Embed Size (px)
Citation preview

Asset Allocation Training Manual
Version 2.0 i
Overview - - - - - - - - - - - - - - - - - - - - - - - - - - - - - - - - - - - - - 1What do I need to do to create a scenario? - - - - - - - - - - - - - - - - - - - - - - 1What do I need to do before beginning? - - - - - - - - - - - - - - - - - - - - - - - 1Creating a client file - - - - - - - - - - - - - - - - - - - - - - - - - - - - - - - - - 2Exercise 1 - - - - - - - - - - - - - - - - - - - - - - - - - - - - - - - - - - - - - - 2Creating an unscheduled portfolio - - - - - - - - - - - - - - - - - - - - - - - - - - 3Exercise 2 - - - - - - - - - - - - - - - - - - - - - - - - - - - - - - - - - - - - - 3
Creating a Scenario Profile . . . . . . . . . . . . . . . . . . . . . . . . . . . . . . . . . . . . . . . . . . . . . . . . . 5
Overview - - - - - - - - - - - - - - - - - - - - - - - - - - - - - - - - - - - - - - 5What basic information is needed for a scenario? - - - - - - - - - - - - - - - - - - -5Exercise 3 - - - - - - - - - - - - - - - - - - - - - - - - - - - - - - - - - - - - - - 5Entering client information - - - - - - - - - - - - - - - - - - - - - - - - - - - - - -6Exercise 4 - - - - - - - - - - - - - - - - - - - - - - - - - - - - - - - - - - - - - - 6Entering Capital Market Assumptions - - - - - - - - - - - - - - - - - - - - - - - - 8Exercise 5 - - - - - - - - - - - - - - - - - - - - - - - - - - - - - - - - - - - - - - 8
Entering Current Portfolios . . . . . . . . . . . . . . . . . . . . . . . . . . . . . . . . . . . . . . . . . . . . . . . . 10
Overview - - - - - - - - - - - - - - - - - - - - - - - - - - - - - - - - - - - - - 10Importing Portfolios - - - - - - - - - - - - - - - - - - - - - - - - - - - - - - - - 10Exercise 6 - - - - - - - - - - - - - - - - - - - - - - - - - - - - - - - - - - - - - 10Adding a portfolio - - - - - - - - - - - - - - - - - - - - - - - - - - - - - - - - - 12Exercise 7 - - - - - - - - - - - - - - - - - - - - - - - - - - - - - - - - - - - - - 12
Optimizing the Asset Allocation . . . . . . . . . . . . . . . . . . . . . . . . . . . . . . . . . . . . . . . . . . . . . 14
Overview - - - - - - - - - - - - - - - - - - - - - - - - - - - - - - - - - - - - - 14Answering the Risk Tolerance Questionnaire - - - - - - - - - - - - - - - - - - - - 14Exercise 8 - - - - - - - - - - - - - - - - - - - - - - - - - - - - - - - - - - - - - 14Reviewing the analysis of the risk tolerance questionnaire - - - - - - - - - - - - - - 15Exercise 9 - - - - - - - - - - - - - - - - - - - - - - - - - - - - - - - - - - - - - 15Choosing asset classes and setting constraints for your target allocation - - - - - - - - - - - - - - - - - - - - - - - - - - - - - - - - - - 16Exercise 10 - - - - - - - - - - - - - - - - - - - - - - - - - - - - - - - - - - - - 16Efficient Frontier - - - - - - - - - - - - - - - - - - - - - - - - - - - - - - - - - - 19Exercise 11 - - - - - - - - - - - - - - - - - - - - - - - - - - - - - - - - - - - - 19Evaluating the Current vs. Target allocations - - - - - - - - - - - - - - - - - - - - 20
Forecasting Wealth . . . . . . . . . . . . . . . . . . . . . . . . . . . . . . . . . . . . . . . . . . . . . . . . . . . . . . 21
Overview - - - - - - - - - - - - - - - - - - - - - - - - - - - - - - - - - - - - - 21Accounting for the client’s retirement - - - - - - - - - - - - - - - - - - - - - - - 21Exercise 12 - - - - - - - - - - - - - - - - - - - - - - - - - - - - - - - - - - - - 21Defining income and Social Security - - - - - - - - - - - - - - - - - - - - - - - - 22Exercise 13 - - - - - - - - - - - - - - - - - - - - - - - - - - - - - - - - - - - - 22Entering a client’s savings - - - - - - - - - - - - - - - - - - - - - - - - - - - - - 24Exercise 14 - - - - - - - - - - - - - - - - - - - - - - - - - - - - - - - - - - - - 24Entering the clients’ withdrawals - - - - - - - - - - - - - - - - - - - - - - - - - - 25Exercise 15 - - - - - - - - - - - - - - - - - - - - - - - - - - - - - - - - - - - - 25Exercise 16 - - - - - - - - - - - - - - - - - - - - - - - - - - - - - - - - - - - - 26Figuring the clients’ Tax Rates - - - - - - - - - - - - - - - - - - - - - - - - - - - 27Exercise 17 - - - - - - - - - - - - - - - - - - - - - - - - - - - - - - - - - - - - 27Forecast - - - - - - - - - - - - - - - - - - - - - - - - - - - - - - - - - - - - - 28Exercise 18 - - - - - - - - - - - - - - - - - - - - - - - - - - - - - - - - - - - - 28

ii Version 2.0
Modifying the Client Scenario . . . . . . . . . . . . . . . . . . . . . . . . . . . . . . . . . . . . . . . . . . . . . . 30
Overview - - - - - - - - - - - - - - - - - - - - - - - - - - - - - - - - - - - - - 30Why changes need to be made to the scenario - - - - - - - - - - - - - - - - - - - 30Entering the changes for the scenario - - - - - - - - - - - - - - - - - - - - - - - 30
Proposing a Portfolio . . . . . . . . . . . . . . . . . . . . . . . . . . . . . . . . . . . . . . . . . . . . . . . . . . . . . 32
Overview - - - - - - - - - - - - - - - - - - - - - - - - - - - - - - - - - - - - - 32Using the Search for Securities screen - - - - - - - - - - - - - - - - - - - - - - - 32Exercise 19 - - - - - - - - - - - - - - - - - - - - - - - - - - - - - - - - - - - - 32Allocating the proposed portfolio - - - - - - - - - - - - - - - - - - - - - - - - - - 34Exercise 20 - - - - - - - - - - - - - - - - - - - - - - - - - - - - - - - - - - - - 34
Creating a Model Portfolio 35
Overview - - - - - - - - - - - - - - - - - - - - - - - - - - - - - - - - - - - - - 35Saving Investment List - - - - - - - - - - - - - - - - - - - - - - - - - - - - - - 35Creating a model portfolio from an investment list - - - - - - - - - - - - - - - - - 37Exercise 21 - - - - - - - - - - - - - - - - - - - - - - - - - - - - - - - - - - - - 37Using a model portfolio for a proposal - - - - - - - - - - - - - - - - - - - - - - - 39Exercise 22 - - - - - - - - - - - - - - - - - - - - - - - - - - - - - - - - - - - - 39Action Plan - - - - - - - - - - - - - - - - - - - - - - - - - - - - - - - - - - - - 40Exercise 23 - - - - - - - - - - - - - - - - - - - - - - - - - - - - - - - - - - - - 40
Generating Reports . . . . . . . . . . . . . . . . . . . . . . . . . . . . . . . . . . . . . . . . . . . . . . . . . . . . . . 41
Overview - - - - - - - - - - - - - - - - - - - - - - - - - - - - - - - - - - - - - 41Adding a company logo to the output reports - - - - - - - - - - - - - - - - - - - - 41Exercise 24 - - - - - - - - - - - - - - - - - - - - - - - - - - - - - - - - - - - - 41Generate Report - - - - - - - - - - - - - - - - - - - - - - - - - - - - - - - - - - 43Exercise 25 - - - - - - - - - - - - - - - - - - - - - - - - - - - - - - - - - - - - 43

Asset A l locat ion Tra in ing Manual
Version 2.0 1
OverviewThis Asset Allocation training manual walks you through the steps necessary to create a scenario in the Asset Allocation software.
What do I need to do to create a scenario?
A scenario is divided into the following sections:•Creating a scenario profile•Optimizing a client’s asset allocation•Forecasting wealth•Reallocating portfolios, and•Generating reports for the scenario.
The asset allocation process is started by entering basic information about the client in the Scenario Profile section.
The optimization section creates a target portfolio on the efficient frontier. It uses risk tolerance, client age, and an optional asset class constraints feature to create a target allocation.
The forecasting wealth section runs a Monte Carlo simulation assessing the potential growth of the target portfolio over the planning horizon.
The portfolio is then reallocated and presented to the client in the Reporting section.
What do I need to do before beginning?
In this training manual, we’ll be working with a fictional client called the Smith Family. Jerry Smith plans to work until he is 65, but Sarah Smith would like to examine the possibility of retiring early, at age 50. They also have two children, and want to account for the cost of sending both of them to college.
The scenario we’ll create includes their existing portfolios. Before starting with the Asset Allocation module, we’ll create this client and a portfolio record in Principia’s Portfolio mode, so we can import it into Asset Allocation later.

Creating a client file
Version 2.0 2
Creating a client fileYou’ll start by creating a client file for the Smith Family. When creating just the client record, all you need to do is save a .cli file named for the client
Exercise 1In the exercise below, you’ll create a client file for the Smith Family. Do the following:1. From the Principia toolbar, click the Portfolio Mode icon.2. From the left-hand navigation pane, right-click on the Practice level and choose New
Client. The Select Client File dialog box appears.
3. In the File Name field, type Smith Family.4. Click Open.
5. Click No when asked to create a portfolio.
Right click here, then select New Client… .
Enter the client name, then click Open.

Creating an unscheduled portfolio
Version 2.0 3
Creating an unscheduled portfolio
The client file has been created. Now you can create an unscheduled portfolio for the funds they own.
Exercise 2In this exercise, create an unscheduled portfolio for the Smith Family. Do the following:1. Right-click on the client name Smith Family in the Advisor Palette.2. Select New Portfolio, and then Unscheduled. The Add Holding dialog box appears.
3. Choose the funds below:•Gabelli ABC•T. Rowe Price US Bond Idx, and•Vanguard 500 Index.
Right-click on the client’s name, then choose this option.
Find the holdings by name, then add them to this area.

Creating an unscheduled portfolio
Version 2.0 4
4. After adding the securities, click OK. The Allocation dialog box appears. 5. Add the following allocations:
•Vanguard 500 Index = 10,000•Gabelli ABC = 5,000, and•T. Rowe Price U.S. Bnd Idx = 10,000.
6. Click OK. Principia defaults to Snapshot View.7. From the toolbar, click the Save icon. The Save As dialog box appears. 8. In the Portfolio Name type, Retirement.
9. Click Save. The portfolio can now be used with the Asset Allocation module.
Make sure the option button forMarket Value is selected when entering 10,000 for each fund.
Enter the portfolio name here.

Creating a Scenario Profile Overview
Version 2.0 5
Creating a Scenario Profile
OverviewThe first action when using the Asset Allocation tool is to create a scenario profile. You will need to do the following
•Give the scenario a name, and define the start date for the scenario. •Enter information about the client, such as gender, name, address and birth date.•Select Style Analysis Methodology•View (and edit, if necessary) capital market assumptions.
What basic information is needed for a scenario?
A scenario needs basic client information like client name, spouse name, and gender information. Also, a client’s birth date is required in order to create the Risk Tolerance questionnaire. Finally, a Notes section is provided for you to review what occurred in the client meeting.
? Notes do not appear on the output report.
Exercise 3In this exercise, you’ll enter the scenario name, style analysis method, and scenario begin year. Space is also provided to type scenario notes. Do the following:
1. From the toolbar in Portfolio mode, click the Asset Allocation icon. The Principia Asset Allocation Module window appears.
2. In the Scenario Name space, type Smith Scenario.3. In the Scenario Begin Year space, type the current year, or scenario start year.4. Select Holdings Based Style Analysis or Returns Based Style Analysis.5. In the Scenario Note space, enter client notes, if you wish.
? You can click the Save icon from the toolbar at any time to save your work.

Creating a Scenario Profile Entering client information
Version 2.0 6
6. When finished, click Client Information, or Next to proceed.
Entering client information
When entering client information, note the following:•The client birth date is mandatory, as it is used in creating the target allocation.•The spouse can be selected or deselected depending on whether they are contributing
salary or investments to the scenario.•Employer, address and Email information is optional.
Exercise 4In this exercise, you will enter client and spouse information. Do the following:1. Enter the following information for both the client and a spouse. Be sure to check the
Include Spouse check box.
? Optionally, enter an address if you wish. Only the Birth Date field is required.
2. Click Capital Mkt Assumptions, or Next to proceed.
Scenario Notes do not appear on the output report.
Client Spouse
Name Jerry Smith Sarah Smith
Gender Male Female
Birth Date 01/25/1972 01/02/1974

Creating a Scenario Profile Entering client information
Version 2.0 7
Birth Date information is required for a scenario.

Entering Capital Market Assumptions Creating a Scenario Profile
8 Version 2.0
Entering Capital Market Assumptions
You can see the following information on the Capital Mkts Assumptions page:•Pretax Returns•Standard Deviation•Yield, and•Asset Class Correlations.
The values displayed here are used to construct the efficient frontier. Capital Market Assumptions are updated in the application once each year. You can do the following at any time:
•Edit the asset class assumptions•Edit the inflation rate•Remove an asset class, or•Create a customized asset class.
? Note that if you create a custom asset class, the correlations you enter to the other asset classes must be accurate.
Exercise 5In this exercise, you will learn how to edit the pre-tax returns, but we will not save the change (in order to not have it adversely affect our Wealth Forecast later). We will use the default Inflation rate of 2.3%.
? If you do not want to edit capital market assumptions, click Current Portfolios, or Next to proceed
Note the inflation rate here.
Creating a Scenario Profile Entering Capital Market Assumptions
Version 2.0 9
Do the following:1. On the Capital Markets Assumptions, page, click the Pre-Tax Return cell for the asset
class Domestic Large Growth.
2. Type 11.48 to change the Pre-Tax Returns for the Domestic Large Growth asset class. 3. Click Reset to change back to the default Pre-Tax Return value for the Domestic Large
Growth asset class.4. Click Yes when the confirmation message appears.5. Click Current Portfolios from the left-hand navigation pane, or Next to proceed.
Click in this cellto change its value.
Overview Entering Current Portfolios
10 Version 2.0
Entering Current Portfolios
OverviewIn this section, you’ll enter client portfolios. Portfolios can be imported from Principia, or you can enter them directly into the Asset Allocation module. The Asset Class Breakdown is displayed in the Current Portfolios page.
? Portfolios created in the Asset Allocation module can be exported back to Principia.
Importing PortfoliosIf you have an existing portfolio in the Advisor Palette, it can be imported directly into the Asset Allocation module. You can import up to 12 portfolios from Principia into the Asset Allocation module.
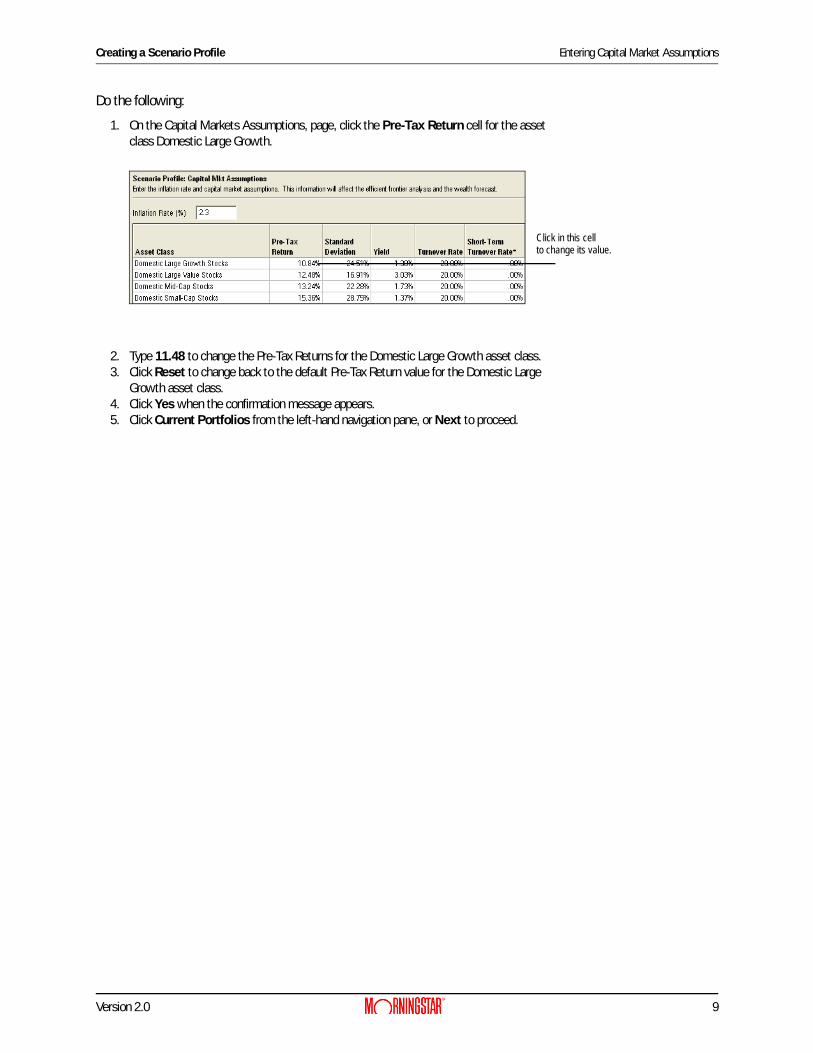
Exercise 6In this exercise, you will import a portfolio from Principia into the Smith Scenario. Do the following:
1. On the Current Portfolios page, click the Import button. The Import dialog box appears, listing all of your current Principia clients.
2. On the Import dialog box, double-click Smith Family. This will expand and display the client’s portfolios.
3. Double-click the Retirement portfolio. It automatically appears in the Portfolio Name field at the bottom of the Import dialog box.
4. From the Owner drop-down field, make sure Client is selected.5. From the Type drop-down field, select Defined Contribution.
Assign an Owner and select a portfolio Type before importing into theCurrent Portfolios page.

Entering Current Portfolios Importing Portfolios
Version 2.0 11
6. Click the Import button. The asset allocation breakdown of the portfolio is displayed in the Current Portfolios page, as shown in the screenshot below.
Note the asset class breakdown here.

Adding a portfolio Entering Current Portfolios
12 Version 2.0
Adding a portfolioIf you have not created a portfolio in Principia, you can create one directly in the Asset Allocation module. You can also edit an existing portfolio within the Asset Allocation module. Note that you will have access to the portfolios you have entered in Principia’s Portfolio mode.
Exercise 7In this exercise, you will add a new portfolio to the Smith Scenario. Do the following from the Current Portfolios page:
1. Click Add. The Add Holdings dialog box appears.
2. In the Find field, type PIMCO All Asset A.3. Click Add.4. To add the next security, click in the Find field and type T. Rowe Price U.S. Bnd Idx.5. Click Add. The Total holdings should be 2.6. Click OK to allocate assets to the portfolio. The Asset Allocation dialog box appears.
Use the From drop-downto access additional Principia databases.

Entering Current Portfolios Adding a portfolio
Version 2.0 13
7. In the $Value cell for PIMCO All Asset A, type 10,000.8. In the $Value cell for T. Rowe Price U.S. Bnd Idx, type 10,000.
? Portfolio values can be entered by dollar amount, share amount, or percent of assets. You can also enter the cost basis for a holding.
9. In the Portfolio Name field, type Brokerage_Sarah.10. Click the Owner drop-down field and select Spouse.11. From the Type drop-down field, make sure Taxable is selected.
12. Click OK. The portfolio is added to Current Portfolios window.
? A portfolio can be edited to update values, add/delete holdings, or to reassign an owner or portfolio type. Click the Edit button to make changes to a portfolio.
13. Click Optimize Asset Allocation from the left-hand navigation panel, or Next to proceed.
Assign an Owner and select a portfolio Type before importing into the Current Portfolios page.
To edit a portfolio, highlight it, thenclick the Edit button.

Overview Optimizing the Asset Allocation
14 Version 2.0
Optimizing the Asset Allocation
OverviewIn the Optimize Asset Allocation section, you will assign a target allocation on the efficient frontier. The target allocation is the result of determining the client’s risk type and asset class constraints placed on the target allocation.
Answering the Risk Tolerance Questionnaire
The Optimization process begins with a 7-question Risk Tolerance Questionnaire. The questionnaire measures time horizon, and both short-term and long-term risk.
? You can print a PDF version of the questionnaire for the client, if you wish.
Exercise 8In this exercise, you will assign a risk type for the client. Do the following:1. In the Risk Tolerance Questionnaire page, select the second answer (from the top) for
each question. Note that the first question’s answer has already been automatically selected based on the information you entered on the Client Information page.
? To generate a PDF version of the questionnaire, click Resources… Risk Tolerance Questionnaire on the toolbar. An electronic copy is created and can be printed and given to your client.
2. After answering the questions, click Analysis in the left-hand navigation panel, or Next in the bottom right corner of the screen to view the Risk Type assigned to the client.
Optimizing the Asset Allocation Reviewing the analysis of the risk tolerance questionnaire
Version 2.0 15
Reviewing the analysis of the risk tolerance questionnaire
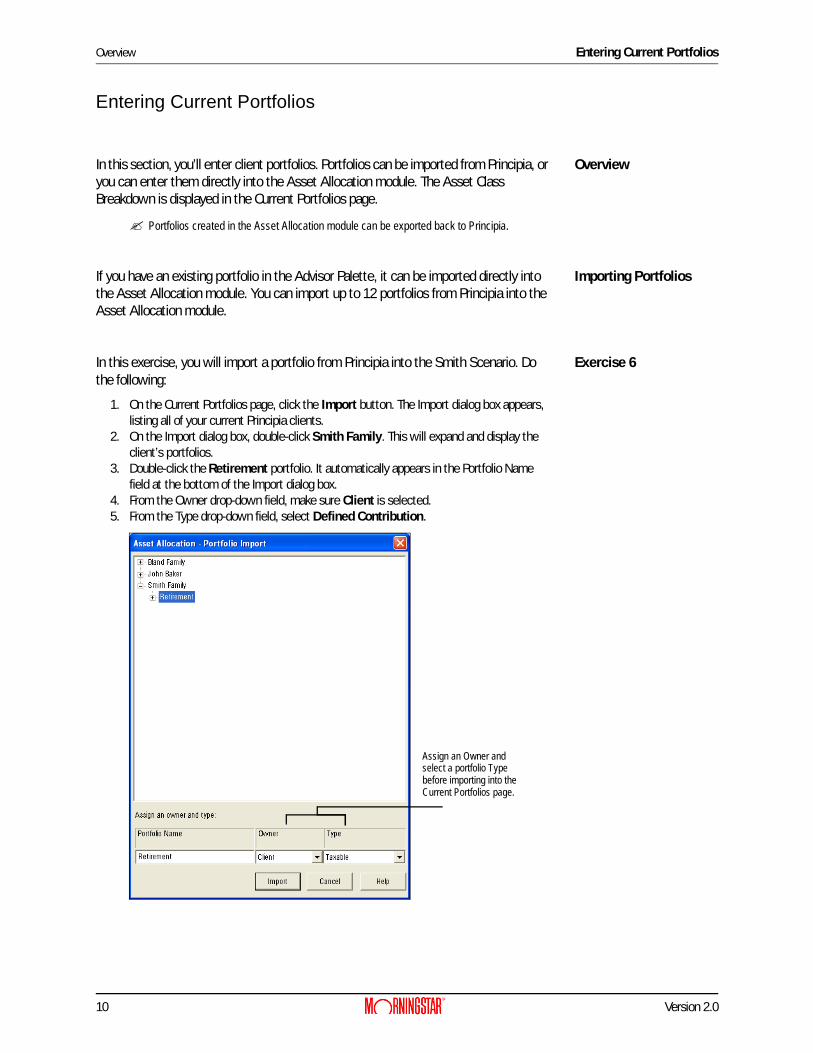
On the Analysis page, a risk type is assigned, summarized in the Description field. You can override the Risk Type, if needed. Alternatively, you can click Previous to return to the risk questionnaire and have the client reconsider some of their answers in light of the risk type they were assigned to.
A Notes area is also available on the Analysis page for commenting on client meetings or reviews.
? Notes do not appear on the output report.
Exercise 9In this exercise, you’ll override the default risk type. If you do not want to override the default risk type, click Constraints, or Next to proceed. Otherwise, do the following:
1. From the Analysis page, click the Override checkbox. The Risk Type field is enabled.2. From the Risk Type drop-down, select Moderate Growth.
? A Notes section is provided if you want to summarize why you chose to overwrite the default risk type.
3. Click Constraints, or Next to proceed to the Constraints page.
To override default risk type,click the Override check box.Then, select a new risk type.

Choosing asset classes and setting constraints for your target allocation Optimizing the Asset Allocation
16 Version 2.0
Choosing asset classes and setting constraints for your target allocation
On the Constraints page, you can select the appropriate asset classes for the target portfolio. Additionally, you can assign minimum and maximum percentages to further customize the target allocation. A constrained portfolio provides a more realistic target allocation compared to an unconstrained portfolio. An unconstrained portfolio might not choose multiple asset classes or, may allocate a large percentage to one asset class.
Exercise 10In this exercise, you will enter constraints for the target allocation You will also save the constraints as a model. Do the following:
1. From the Constraints page, under the Include? column, click to deselect the following Asset Classes:•Domestic Inflation-Protected Bonds•Non-Domestic Bonds•Commodities, and•REITs.
Deselect thesecheck boxes.

Optimizing the Asset Allocation Choosing asset classes and setting constraints for your target allocation
Version 2.0 17
2. To set the constraints for the remaining asset classes, type the minimum and maximum percentages you wish to allocate for each remaining asset classes:
3. To save constraints as a model, click Save Model... and type, Moderate Growth Model.
? To apply a saved model, click the Select Model Constraints dropdown and choose the model appropriate for the scenario.
Asset Class Minimum Maximum
Domestic Large Growth Stocks 10% 20%
Domestic Large Value Stocks 10% 20%
Domestic Mid-Cap Stocks 10% 30%
Domestic Small-Cap Stocks 10% 30%
Non-Domestic Developed Stocks 0% 20%
Developing Markets Stocks 0% 10%
Domestic Investment-Grade Bonds 20% 70%
Domestic High-Yield Bonds 20% 70%
Cash 5% 100%

Choosing asset classes and setting constraints for your target allocation Optimizing the Asset Allocation
18 Version 2.0
4. Click Efficient Frontier, or Next to proceed.

Optimizing the Asset Allocation Efficient Frontier
Version 2.0 19
Efficient FrontierThe Efficient Frontier page displays the efficient frontier graph for the scenario. It uses the constrained asset classes you selected and set up, as well as the clients’ Risk Type.
The efficient frontier is represented by the solid line on the graph. the clients’ current portfolio(s) are represented by a circled dot beneath the Efficient Frontier.
Clicking anywhere on the solid line resets the asset allocation for the Target portfolio.Target allocations defined here can be saved as models and used in future scenarios.
Exercise 11In this exercise, you will assign a target asset allocation to the Smith Scenario. Do the following:
1. From the Efficient Frontier page, click anywhere on the dark blue line to select a Target Portfolio allocation.
2. Click the Set Target button to create the Target Allocation for the Smith Scenario.
? To save this allocation for future scenarios, click the Save Model button. In future scenarios, click the Select Model Allocation dropdown from this page to retrieve a previously saved model.
3. Click Current vs. Target from the left-hand navigation panel, or click Next to proceed.
Note the location of the Current Portfolio on theEfficient Frontier graph.

Evaluating the Current vs. Target allocations Optimizing the Asset Allocation
20 Version 2.0
Evaluating the Current vs. Target allocations
The Current vs. Target page is a graphic depiction comparing the Current and Target allocations. This page cannot be modified or interacted with, but it is included on the PDF output report.
Click Forecast Wealth in the left-hand navigation panel, or Next to continue.
The Current portfolio isless heavily weighted to stocks than the Target portfolio.
Forecasting Wealth Overview
Version 2.0 21
Forecasting Wealth
OverviewWealth forecasting takes into account the following assumptions:•the client’s target asset allocation•the value of their current portfolio(s)•savings, and•withdrawals.
The wealth forecast graph and table are generated using Monte Carlo simulation scenarios.
Accounting for the client’s retirement
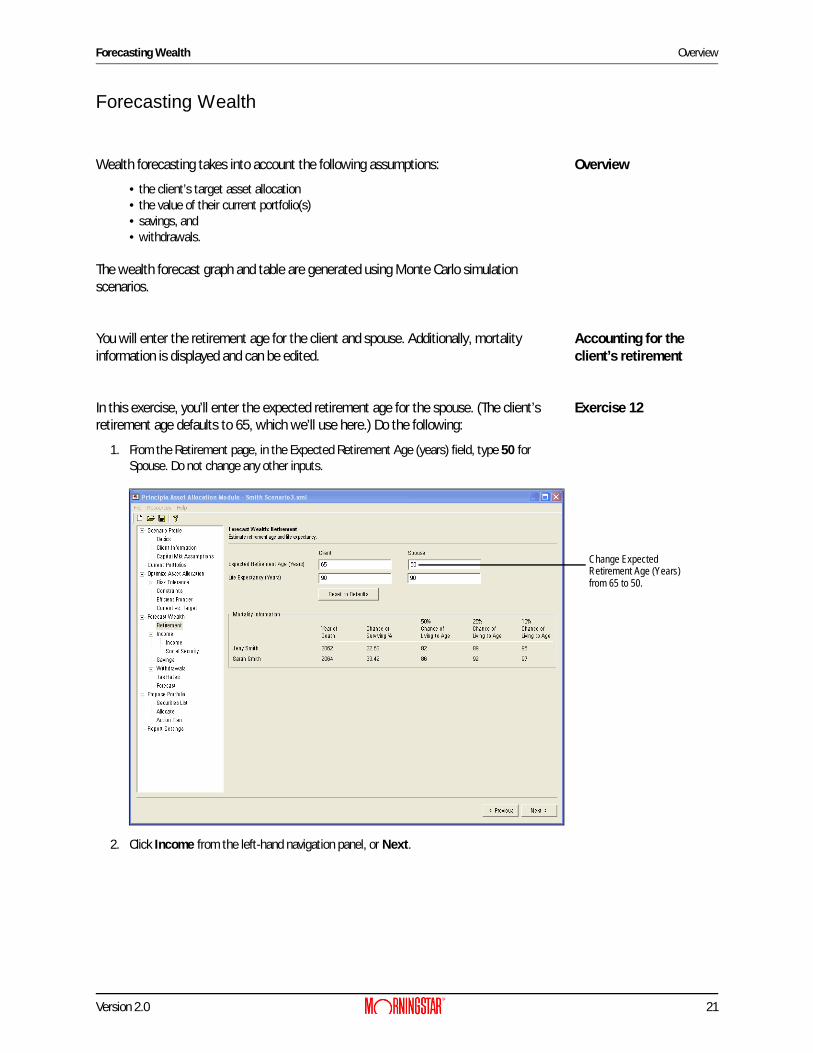
You will enter the retirement age for the client and spouse. Additionally, mortality information is displayed and can be edited.
Exercise 12In this exercise, you’ll enter the expected retirement age for the spouse. (The client’s retirement age defaults to 65, which we’ll use here.) Do the following:
1. From the Retirement page, in the Expected Retirement Age (years) field, type 50 for Spouse. Do not change any other inputs.
2. Click Income from the left-hand navigation panel, or Next.
Change ExpectedRetirement Age (Years)from 65 to 50.

Defining income and Social Security Forecasting Wealth
22 Version 2.0
Defining income and Social Security
In this section, current income and expected income growth are entered. You need to specify if the income is generated by the client or spouse.
Note that the Income Growth Rate field here is calculated based on the Inflation Rate you entered on the Capital Markets Assumptions page, and the value you enter here for Income Growth Rate Above Inflation.
On the Social Security page, estimated social security benefits are entered.
Exercise 13In this exercise, enter current income for the client and spouse. You will also enter the age at which Social Security benefits will be collected. Do the following:
1. From the Income page, click the Add button twice. Two lines should now appear in the income spreadsheet, reflecting two sources of income you will enter for the Smith Scenario.
2. On the income spreadsheet, enter the following amounts for the client and spouse:
? Begin Year should be the current year. End Year is the expected year of retirement.
3. Click Social Security from the left-hand navigation panel, or Next to proceed.
Begin Year
End Year
Begin Year Income Before Tax
Begin Year Income After Tax
Income Growth Rate Above Inflation Owner
2007 2037 $100,000.00 $72,000 2.00% Client
2007 2024 $120,000.00 $86,000 2.00% Spouse

Forecasting Wealth Defining income and Social Security
Version 2.0 23
4. In the Age to Collect (yrs) field for Spouse, type 62.
? The Default Age to Collect (yrs) is 65. This is an estimate and may not match client/spouse Social Security Statement.
5. Click the Calculate Default Benefit button.
6. Click Savings from the left-hand navigation panel or Next to proceed to next page.
Change this field to 62.

Entering a client’s savings Forecasting Wealth
24 Version 2.0
Entering a client’s savings
On the Savings page, taxable and non-taxable savings for the clients and spouse are entered.
Exercise 14In this exercise, you will enter savings accounts for the client and spouse. Do the following:
1. On the Savings page, click the Add button three times, to create three lines of savings for the Smith Scenario.
2. Enter the following values for the client and spouse:
3. Click Withdrawals from the left-hand navigation panel, or Next to proceed.
Click Add three times.
Description Owner Portfolio Begin Year
End Year Value Value based on
401k_Jerry Client Defined Contribution 2007 2037 6,000.00 Current Dollars
Brokerage_Sarah Spouse Taxable 2007 2010 5,000.00 Current Dollars
401k_Sarah Spouse Defined Contribution 2007 2024 5,000.00 Current Dollars

Forecasting Wealth Entering the clients’ withdrawals
Version 2.0 25
Entering the clients’ withdrawals
In the Withdrawals section, you can enter assumptions to cover the following:•retirement•education, and•miscellaneous withdrawals.
Exercise 15In this exercise, you’ll enter expected retirement income as withdrawals. Two stages of withdrawals will be entered: the client will withdraw 80% of his pre-retirement income for the first 14 years of his retirement. Subsequently, the client will withdraw 70% of his income for retirement.
Do the following:
1. From the Retirement Needs page, click the Add button twice.You should have two lines on the spreadsheet.
2. Enter the following values in each line:
? In the example above, a Retirement Need of 80% of Income for retirement was entered. As the client ages, % of Income was reduced to 70%.
3. After entering the Retirement Needs, click Education from the left-hand navigation panel, or Next to proceed.
Click the Add button twice.
Begin Year
End Year Retirement Need Needs Based On Owner
2037 2050 80.00 % of Income Client
2051 2064 70.00 % of Income Spouse

Entering the clients’ withdrawals Forecasting Wealth
26 Version 2.0
Exercise 16In this exercise, you’ll enter expected education expenses using current tuition rates. When entering tuition costs, you can forecast the price of college to increase above the rate of inflation. The inflation rate you entered on the Capital Market Assumptions page is automatically entered here to help calculate the Tuition Growth Rate.
Do the following:1. From the Education page, click the Add button twice. You should have two lines in the
Education spreadsheet.
2. For each student, enter the following expected education expenses:
? Editing Growth Rate Above Inflation automatically calculates the assumption for Tuition Growth Rate.
3. After entering the Education expenses, click Tax Rates from the left-hand navigation panel, or Next twice to proceed. We will not enter anything on the Miscellaneous page.
Click the Add button twice.
Student Name
Birth Year
BeginYear
End Year
School Name
Current Cost(Tuition/Board)
Growth Rate Above Inflation
Jill 2000 2018 2022 State U 22,000.00 3.00%
John 2002 2020 2024 State U 22,000.00 3.00%

Forecasting Wealth Figuring the clients’ Tax Rates
Version 2.0 27
Figuring the clients’ Tax Rates
On the Tax Rates page, current and expected tax rates are entered. Taxes are considered only if a taxable security is sold.
Exercise 17In this exercise, you will enter the current and expected tax rates. Do the following:1. From the Tax Rates page, click the Add button twice. You should have two lines in the
Tax Rates page.
2. Enter the following values:
? In the second line of the spreadsheet, tax assumptions were reduced beginning in 2038, reflecting a lower tax rate during retirement.
3. After you have entered Tax Rates, click Forecast from the left-hand navigation panel or Next to proceed.
Click the Add button twice.
Begin Year
End Year
Federal Income Tax*
Income Tax on Equity Yield
Federal Capital Gains Tax
State Income Tax
State Capital Gains Tax
2007 2037 28.00% 15.00% 15.00% 3.00% 3.00%
2038 2064 20.00% 10.00% 10.00% 3.00% 3.00%

Forecast Forecasting Wealth
28 Version 2.0
ForecastThe Forecast page runs 1,000 separate simulations for each asset class in the target portfolio. The asset class value-weighted returns are calculated for taxable and tax-deferred accounts for the current portfolios entered in the scenario. The returns are then sorted and ranked by probability percentile (95th Percentile, Expected Value, and 5th Percentile) on the wealth table. They are also displayed on the Wealth Forecast graph.
The Wealth Table displays annualized returns for the following periods:•1 Year•3 Year•5 Year•10 Year, and•20 Year.
Exercise 18In this exercise, you’ll view the Wealth Forecast graph and generate the Wealth Forecast table. Do the following:
1. The Wealth Forecast graph should be showing on the screen. If not, click Forecast from the left-hand navigation panel.
The Wealth Forecast graph contains four shades of green. These represent the different chances (5%, 25%, 75% and 95%) of having a certain amount of wealth at a given time. The lightest shade of green is the most conservative expectation, and the darkest green is the most optimistic possible outcome.
You can also see two lines on the graph. The red line represents the median value of the portfolio using the proposed asset allocation. The blue line is the median value of the portfolio with the client’s existing asset allocation.
Click here to see the Wealth Table displayed in a pop-up window.

Forecasting Wealth Forecast
Version 2.0 29
2. Place your mouse over any point on the bar graph. A pop-up appears, displaying the ending wealth value and the probability percentile of achieving that value for the given year.
3. To view the Wealth Forecast table, click the Wealth Table button.
4. After viewing the Wealth Table, click OK to return to the Wealth Forecast graph. In this scenario the Median value of the proposed asset allocation - in conjunction with the client’s current portfolio value, and savings rate - will most likely not be enough to last the client through his retirement. Before proposing a portfolio based on the asset allocation, we should be able to demonstrate that the asset allocation we are proposing will actually work. Let’s return to some previous inputs to update them and see how that affects the Wealth Forecast graph.
Moving your mouse overthe Wealth Forecast graph gives you a pop-up window for that year.
Assumptions can be displayed as Current Dollars or as Future Dollars.

Overview Modifying the Client Scenario
30 Version 2.0
Modifying the Client Scenario
OverviewIn this section, you’ll see a couple of changes that can be made to a client’s scenario, to help them meet their goals.
Why changes need to be made to the scenario
With the current inputs, the Smith family will likely run out of money around the time Jerry retires in 2037.
To give the Smith family a better chance at making their money last, we’ll adjust Sarah’s retirement age, and also increase their savings rate. Once that is done, you can generate the Wealth Forecast again, and note the impact of the changes.
Entering the changes for the scenario
To enter the changes for the scenario, do the following:1. In the left-hand navigation panel, click Retirement.2. In the Spouse field, type 55.(We’ll delay Sarah’s retirement by just five years.)
3. In the left-hand navigation panel, click Savings.4. Make the changes reflected in the table below.
Make the change to the Retirement Age here.
Description Owner Portfolio Begin Year
End Year Value Value based on
401k_Jerry Client Defined Contribution 2007 2037 10.00 % of Pre-Tax Income
Brokerage_Sarah Spouse Taxable 2007 2010 5,000.00 Current Dollars
401k_Sarah Spouse Defined Contribution 2007 2029 10.00 % of Pre-Tax Income

Modifying the Client Scenario Entering the changes for the scenario
Version 2.0 31
5. In the left-hand navigation panel, click Forecast.
With the revised scenario, the median return for the client now seems as if they will have enough money to live on in retirement. Also, the impact of Jill and John Smith going to college will not be nearly as dramatic as it was under the original plan.
6. From the left-hand navigation panel, click Propose Portfolio, or click Next to proceed.
Note the updatedexpected value of the median return with the changes you made.
Overview Proposing a Portfolio
32 Version 2.0
Proposing a Portfolio
OverviewNow that you’ve optimized an allocation and run a wealth forecasting scenario to help meet the clients’ needs, you can propose a portfolio based on the target allocation. You can search for securities and add them to a current portfolio. Alternatively, you can create a model portfolio and replace the existing portfolio.
? Model portfolios can be saved and applied to other scenarios you create.
Using the Search for Securities screen
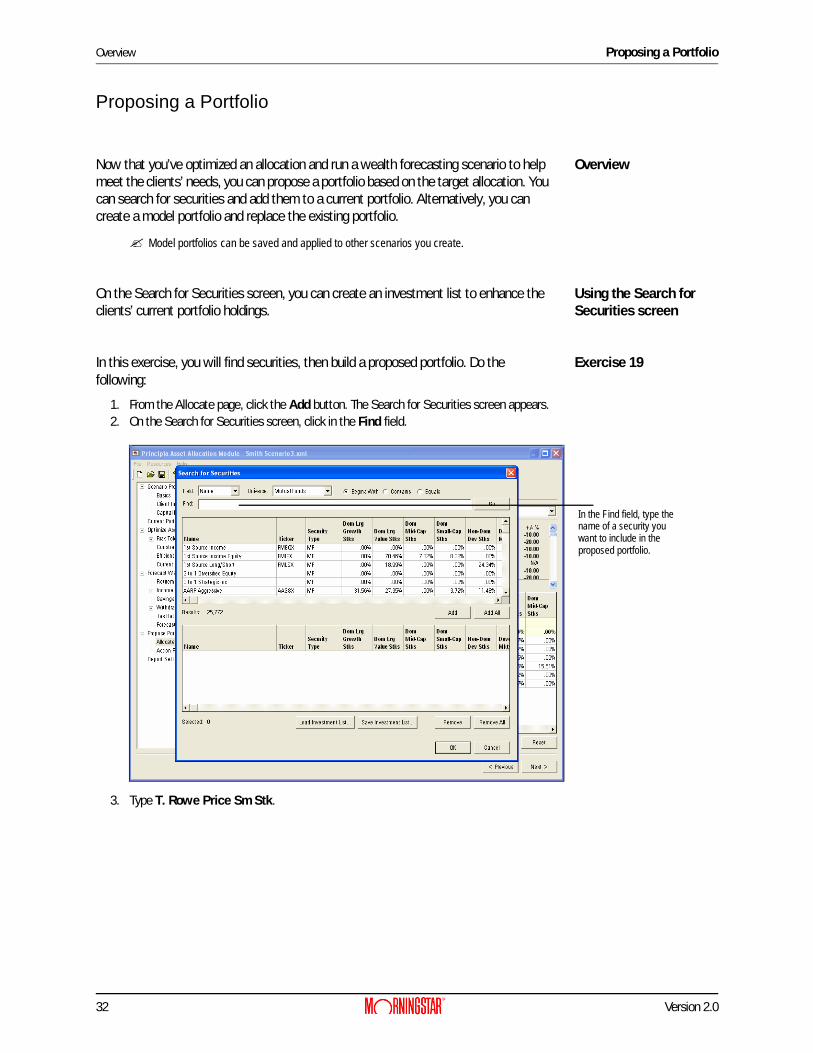
On the Search for Securities screen, you can create an investment list to enhance the clients’ current portfolio holdings.
Exercise 19In this exercise, you will find securities, then build a proposed portfolio. Do the following:
1. From the Allocate page, click the Add button. The Search for Securities screen appears.2. On the Search for Securities screen, click in the Find field.
3. Type T. Rowe Price Sm Stk.
In the Find field, type thename of a security youwant to include in the proposed portfolio.

Proposing a Portfolio Using the Search for Securities screen
Version 2.0 33
4. Click Go. All share classes of the fund appear.
5. Select the Adv share class.6. Click Add. The security is included in the Investment List for the proposed portfolio.
7. Repeat steps 2 through 4 for the following securities:•Amer Funds Bond Fund A•T. Rowe Price Balanced, and•General Electric.
? To find General Electric, you will need to select Stocks from the Universe field.
8. After adding the securities, click OK.
Click Go to find allshare classes of thesecurity.
Security has been added tothe investment list.

Allocating the proposed portfolio Proposing a Portfolio
34 Version 2.0
Allocating the proposed portfolio
The Allocate page displays both the securities selected in the investment list and holdings from the current portfolio. You can manually allocate the proposed portfolio, or use the Auto Allocate button to find the most appropriate securities mix for the proposed portfolio.
Exercise 20In this exercise, you will create a proposed portfolio based on the target allocation you assigned on the Efficient Frontier page. Do the following:
1. On the Allocate page, click the Auto Allocate button. Using the investment list, the Auto Allocate feature selects securities with the lowest tracking error.
2. If you want to maximize alpha, move the Auto Allocate slider to the right.
3. The proposed portfolio has now been allocated. Turn to Exercise 23 on page 40 to see the Action Plan and Generate Reports pages.
You can manually enter a proposed portfolio by typing the Amount $ or Weight% for the selected securities in the proposed portfolio. The Under/Over% helps you monitor the Target and Proposed portfolios allocations.
Alternatively, you can click the Auto Allocate button.
Note: Maximizing Alpha pushes the proposed portfolio’s allocation furtheraway from the Target Allocation.

Creating a Model Portfolio Overview
Version 2.0 35
Creating a Model Portfolio
OverviewUsing a model portfolio allows you to replace an existing portfolio with a model allocation. Model Portfolios are assigned one of the five risk types. These are the same risk types used in the Risk Analysis section of the Asset Allocation work flow. If you plan to use a model portfolio, note that you will have access only to those models that match the Risk Analysis type for the client. That is, you cannot choose an Aggressive model portfolio for a Conservative client. To use a model portfolio, you’ll need to do the following:
•Create a securities list for the model portfolios, or load a saved securities list•Assign a risk type to the model portfolio, and•Assign the model portfolio to the client.
Saving Investment ListWhen creating a model portfolio, you may want to first create an investment list. The list can be saved and used as a model portfolio. To create an investment list, do the following:
1. From the Allocate page click Add. The Search for Securities screen appears. 2. At the bottom of the Search for Securities screen, click Remove All. This removes
securities from the investment list.
Click to removesecurities from anInvestment List.

Saving Investment List Creating a Model Portfolio
36 Version 2.0
3. At the top of the screen, in the Find field, type the name of the security you want to add to your list. Use the following securities:•Amer Funds Bond Fund A•Columbia Grt Ch B•T. Rowe Price Balanced, and•Vanguard Em Mkt Idx.
? Click the Field drop-down to switch between finding securities by Name or Ticker.
4. Highlight a security, then click the Add button. The security is included in the Investment list at the bottom of the screen.
5. Repeat steps 3-4 until you have entered all of the securities for your list.After you’ve found the securities, click Save Investment List at the bottom of the screen.
6. In the File Name field, type Moderate Model and then click Save. The file has been saved.
? To load the list for a future scenario, click the Load Investment List button at the top of the screen.
Type the name of the security you want, then click Find.
Click here after entering a name for the list.

Creating a Model Portfolio Creating a model portfolio from an investment list
Version 2.0 37
Creating a model portfolio from an investment list
After you have saved an investment list, you can allocate assets to is and save it as a model portfolio.
Exercise 21In this exercise, you will create a model portfolio using the saved securities in the Moderate Model portfolio Investment List. Do the following:
1. From the menu bar, select File… New.2. If prompted to Save Changes, click Yes3. If prompted to save the scenario, type Smith Scenario and click Save.4. In the left hand navigation pain, click Allocate.5. From the Allocate page, click the Add button.6. Click Load Investment List.7. Select Moderate Model, then click Open.
8. Click OK. The Allocate page appears. 9. In the Allocation page spreadsheet, enter the allocations in the table below.
Select the investment list you want, then click Open.
Name Allocation Percent
Amer Funds Bond Fund A 30%
Columbia Grt Ch B 40%
T. Rowe Price Balanced 20%
Vanguard Em Mkt Idx 10%

Creating a model portfolio from an investment list Creating a Model Portfolio
38 Version 2.0
10. Click Save As Model.
11. In the Save As Model dialog, type Moderate Model Portfolio.12. From the Risk Type dropdown, select Moderate Growth. The Moderate Model Portfolio
can be used for any scenario with a Moderate Growth target allocation.
? Target allocations for scenarios are assigned in the Optimize Asset Allocation-Analysis section of the Scenario work flow.
Click here to save as a model allocation.
Enter a Model Portfolio name and Risk Type.

Creating a Model Portfolio Using a model portfolio for a proposal
Version 2.0 39
Using a model portfolio for a proposal
Model portfolios can be assigned to a proposed portfolio. In the exercise above, the assigned Risk Type was Moderate Growth. The model can then be assigned to any scenario with a Moderate Growth Risk Type.
Exercise 22In this exercise, you will add a model portfolio to an existing scenario.1. From the menu bar, select File… Open.2. Select the Smith Scenario, then click Open.
3. In the left-hand navigation panel, click Allocate under Propose Portfolio.4. From the Select Model Portfolio dropdown, choose Moderate Model Portfolio.
? Click the Add button if you wish to add additional securities to the model.
5. The Moderate Model Portfolio has been added to the Proposed portfolio. In this example, the client’s original portfolio was replaced by the model portfolio. Click Next to proceed to the Action Plan page.
Select the Smith Scenario, then click Open.
From the Select Model Portfolio
In the Weight column, the Model Allocation percentages
drop-down field, choose the appropriate model portfolio.
can be adjusted, if necessary.

Action Plan Creating a Model Portfolio
40 Version 2.0
Action PlanThe Action Plan displays what items need to be bought or sold to achieve the proposed portfolio. You can also export the proposed portfolio from Asset Allocation into Principia as an unscheduled portfolio.
Exercise 23In this exercise, you will export the proposed portfolio into Principia’s Advisor Palette. 1. From the Action Plan page, click Export to Principia. The Client Information dialog box
appears.
2. In the Client file field, type Jerry Smith.3. In the Portfolio name field, type Proposed.4. Click Save.
5. Click OK when the confirmation message appears, indicating the action plan was successfully exported. Later, you can go to the Advisor Palette, and confirm that the proposed portfolio appears as an unscheduled portfolio.
6. Click Report Settings from the left-hand navigation panel, or Next to proceed.
Click here to duplicate this portfolio in Portfolio Mode.
Enter the information in this dialog box, then click Save.

Generating Reports Overview
Version 2.0 41
Generating Reports
OverviewOn the Reports Settings page, you can generate PDF reports to make presentations to your client. The report includes scenario information, as well as a customized cover page with your company logo.
Adding a company logo to the output reports
Adding your company logo to the cover page is a great way to customize your report. The following file types can be used for company logos:
•.GIF•.JPG•.JPEG•.BMP and•.PNG.
Exercise 24In this exercise, you will include a company logo on the cover page.
? If you do not have a logo file to include, simply complete steps 1-4 below.
1. From the Report Settings page, click the check box next to All Pages. A check mark should appear next to all pages on the reports page.
2. Click the Edit Cover Page button.3. In the Cover Page - Asset Allocation Report dialog box, enter the Prepared For and
Prepared By information.
Check this box to select all pages.
Adding a company logo to the output reports Generating Reports
42 Version 2.0
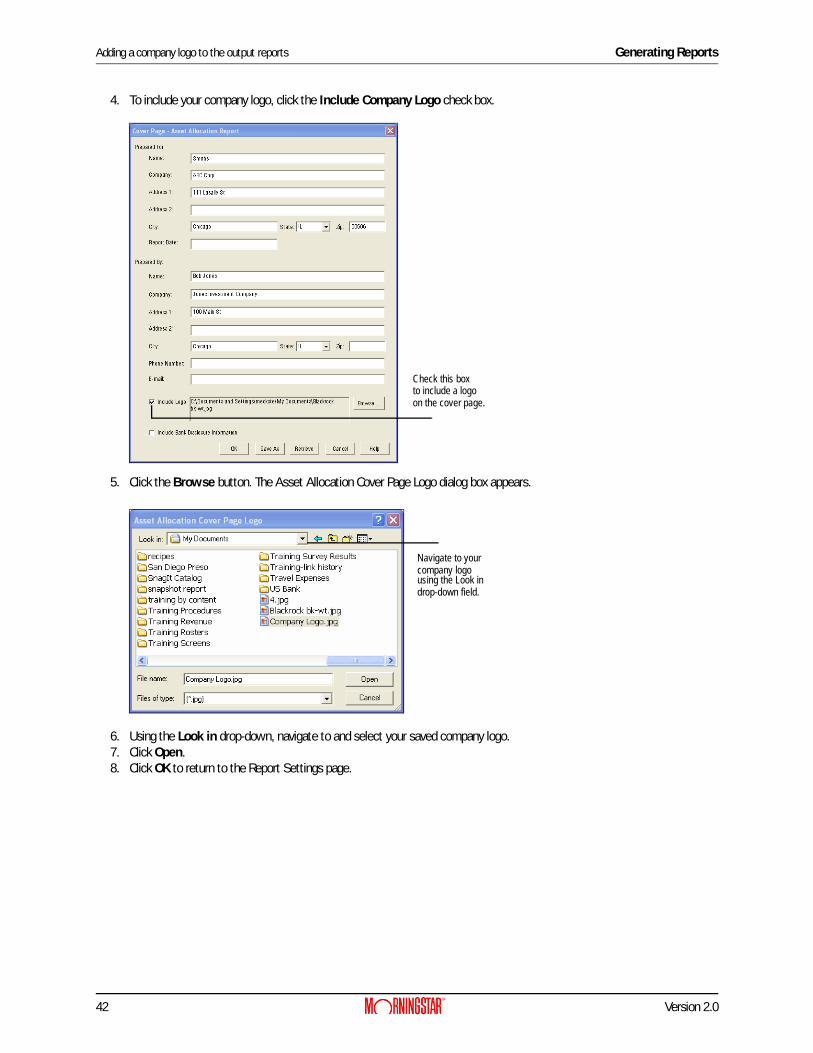
4. To include your company logo, click the Include Company Logo check box.
5. Click the Browse button. The Asset Allocation Cover Page Logo dialog box appears.
6. Using the Look in drop-down, navigate to and select your saved company logo.7. Click Open. 8. Click OK to return to the Report Settings page.
Check this box to include a logo on the cover page.
Navigate to your company logousing the Look in drop-down field.

Generating Reports Generate Report
Version 2.0 43
Generate ReportAfter you have entered the Report Settings, a PDF report can be created. The output on the report reflects assumptions entered in the Scenario Profile, Optimization, Wealth Forecast and Proposed Portfolio sections.
Exercise 25In this exercise, you will generate a PDF report. Do the following:1. On the Report Settings page, click Generate Report. A multi-page PDF report appears
in a new window.
2. You can save or print the PDF file.
Click here to generate the report.