Embed Size (px)
Citation preview

Atomic4Dj Par64 Led SlimRGB cod.61085P
Manuale utente
Atomic4Dj Par64 Led Slim RGB – www.Atomic4Dj.com

Ci complimentiamo per la scelta di un prodotto Atomic4Dj .
Questo Prodotto è costruito con componenti di elevata qualità e risponde a tutte le norme di sicurezza previste. Le raccomandiamo di leggere con attenzione questo manuale e di seguire minuziosamente tutte le indicazione riportate in modo da sfruttare tutte le potenzialità di questo articolo in totale sicurezza.
CONTENUTO DELLA CONFEZIONE
n.1 Par64 Led Slim n.1 Cavo Alimentazionen.1 Staffe Montaggion.1 Manuale Utente
INTRODUZIONE
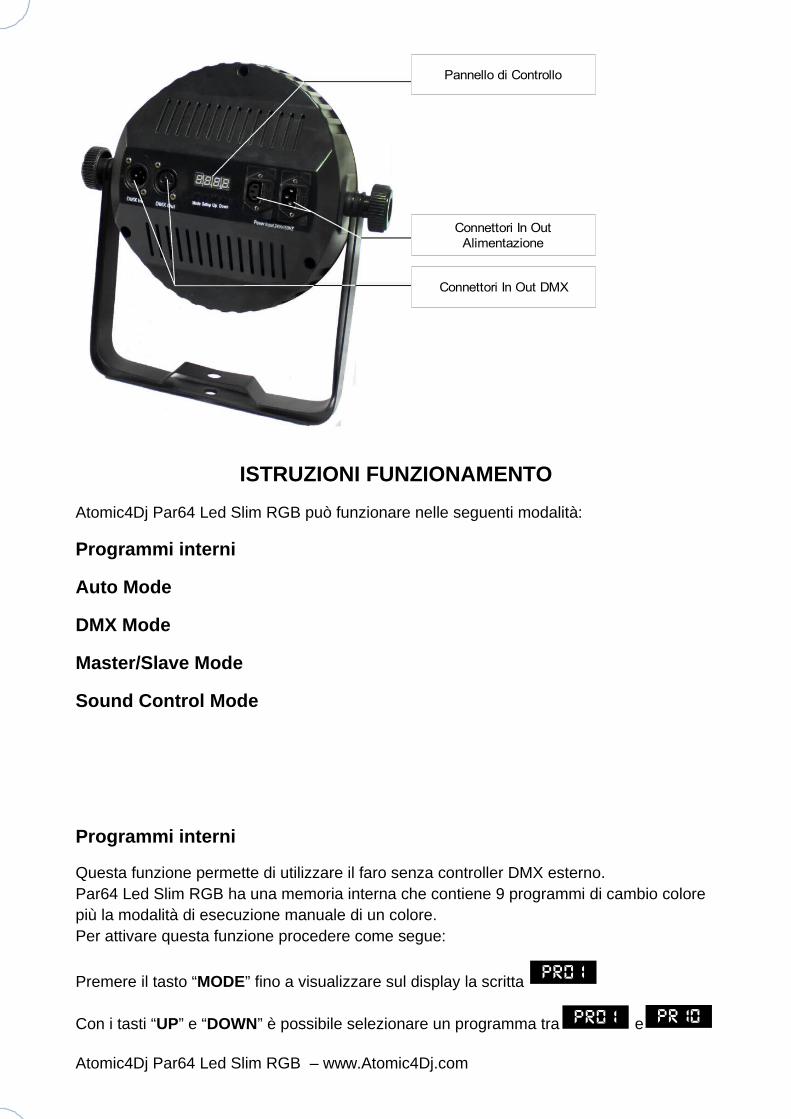
Atomic4Dj Par64 Led Slim RGB è un faro spot a led dalle caratteristiche professionali.Equipaggiato con 177 led da 10mm con tecnologia RGB.Pratico pannello di controllo con display digitale e 4 tasti di selezione. Doppia staffa forata regolabile per facilitare l'istallazione a terra, su traliccio e Stativo.
Per accendere il faro è sufficiente collegare il cavo con la spina alla rete elettrica.Tutte le funzioni del Atomic4Dj Par64 Led Slim RGB possono essere impostate dal pannello di controllo posto sulla parte posteriore del faro.
Atomic4Dj Par64 Led Slim RGB – www.Atomic4Dj.com
Corpo Illuminante
Doppia Staffa Forata
ISTRUZIONI FUNZIONAMENTO
Atomic4Dj Par64 Led Slim RGB può funzionare nelle seguenti modalità:
Programmi interni
Auto Mode
DMX Mode
Master/Slave Mode
Sound Control Mode
Programmi interni
Questa funzione permette di utilizzare il faro senza controller DMX esterno. Par64 Led Slim RGB ha una memoria interna che contiene 9 programmi di cambio colore più la modalità di esecuzione manuale di un colore.Per attivare questa funzione procedere come segue:
Premere il tasto “MODE” fino a visualizzare sul display la scritta
Con i tasti “UP” e “DOWN” è possibile selezionare un programma tra e
Atomic4Dj Par64 Led Slim RGB – www.Atomic4Dj.com
Pannello di Controllo
Connettori In Out DMX
Connettori In Out Alimentazione
pr01
pr01 pr10

. Selezionando con il tasto “SETUP” sarà possibile impostare manualmente: un colore fisso, modificarne l'intensità e assegnargli la funzione strobo.Per le impostazioni manuali del faro potete consultare lo schema seguente.
Selezionando fino a premendo il tasto “SETUP”, sarà possibile modificare la velocità di esecuzione del programma cambia colore utilizzando i tasti “UP” e“DOWN” selezionando un valore compreso tra
Premendo nuovamente “SETUP” è possibile attivare e modificare la funzione strobo selezionando con i tasti “UP” e “DOWN” un valore compreso tra
Atomic4Dj Par64 Led Slim RGB – www.Atomic4Dj.com
pr02 pr10
SP01 Sp99
FS00 FS99
pr01

Auto Mode
La funzione Auto permette di eseguire un programma interno di cambio colore. L'attivazione della funzione Auto non necessita di controller DMX esterno.Per attivare questa funzione procedere come segue:
Premere il tasto “MODE” fino a visualizzare sul display la scritta .Il faro eseguirà in automatico i programmi da a Le modalità di esecuzione come la velocità e la funzione strobo saranno le stesse impostate nella modalità Programmi interni.
DMX Mode
Questa funzione permette di utilizzare il Par64 Led Slim RGB con un controller DMX esterno.Collegare il faro ad un controller DMX utilizzando un cavo DMX 3pin, inserire il connettore maschio nel controller DMX( DMX out) e il connettore femmina nel faro (DMX in ).Impostare una delle quattro modalità di controllo DMX disponibili utilizzando il pannello di controllo del faro; Premere il tasto “MODE” fino a visualizzare sul display la scrittapremere “SETUP” e tramite i tasti “UP”e “DOWN” selezionare una delle quattro modalità DMX seguenti:
1 Canale di controllo
3 Canali di controllo
4 Canali di controllo
. 6 Canali di controllo
Atomic4Dj Par64 Led Slim RGB – www.Atomic4Dj.com
AUTO
pr02 pr10

Impostazione dell'indirizzo DMX:Premere il tasto “MODE” fino a visualizzare sul display la scritta . Selezionare il canale di partenza del controllo DMX utilizzando i tasti “UP” e “DOWN”
compreso tra e premere “SELECT” per confermare.
Una volta impostato il canale di partenza es. , in base alla modalità DMX sceltaprecedentemente, il faro occuperà 1,3,4 o 6 canali del vostro controller DMX.
Qualora più unità avessero lo stesso indirizzo DMX esse eseguiranno esattamente le stesse operazioni. Per controllare in modo indipendente ogni faro è importante che non vi siano sovrapposizioni tra i canali DMX, esempio:Il primo faro o gruppo di fari che ha come indirizzo “d001” in modalità verrà controllato dai canali 1,2 e 3 del mixer luci DMX.Al Secondo faro o gruppo di fari bisognerà dare il primo indirizzo libero disponibile ovvero “d004” che verra quindi controllato dai canali 4,5 e 6.
N.B. E’ possibile collegare molte unità alla stessa Catena DMX, è consigliabile collegare all’uscita dell’ultima unità collegata un Terminatore Dmx (120 Ohm) in modo da assicurare una corretta trasmissione del segnale DMX. Esempio di collegamento DMX di più fari.
Se il faro non risponde ai comandi del vostro controller verificare quanto segue:
1.Il cavo DMX non è collegato all’ingresso dell’unità o all’uscita del controller DMX.2.Il controller DMX è SPENTO3.Il cavo utilizzato è danneggiato o non corretto.
Atomic4Dj Par64 Led Slim RGB – www.Atomic4Dj.com

PROTOCOLLO DMX
Modalità 1 canale
Modalità 3 Canali
Modalità 4 canali
Modalità 6 Canali
Atomic4Dj Par64 Led Slim RGB – www.Atomic4Dj.com
Atomic4dj Par64 Slim RGB
1- Ch Mode 1 Canale
Canale Valore Funzione
Ch1
0 Nessuna Funzione1-22 Rosso23-45 Verde46-68 Blu69-91 Ciano92-114 Giallo115-137 Arancio138-160 Rosa161-183 Porpora184-206 Blu Scuro207-229 Verde Chiaro230-252 Bianco Freddo253-255 Bianco Caldo
Atomic4dj Par64 Slim RGB
3- Ch Mode 3 Canali
Canale Valore FunzioneCh1 0-255 Dimmer Led Rosso 0-100%Ch2 0-255 Dimmer Led Verde 0-100%Ch3 0-255 Dimmer Led Blu 0-100%
Atomic4dj Par64 Slim RGB
4-Ch Mode 4 Canali
Canale Valore FunzioneCh1 0-255 Master Dimmer 0-100%Ch2 0-255 Dimmer Led Rosso 0-100%Ch3 0-255 Dimmer Led Verde 0-100%Ch4 0-255 Dimmer Led Blu 0-100%

Master/Slave Mode
Questa funzione permette di far funzionare due o più fari Atomic4Dj Par64 Led Slim RGB insieme collegati tra loro senza un controller DMX esterno.Per attivare questa funzione procedere come segue:Collegare il cavo DMX al primo faro nel connettore DMX Out e entrare nel connettore DMXIn del secondo.Selezionare una delle modalità Master nel menù del primo faro esempio:
Premere “MODE” fino alla voce nel secondo faro. Eseguire la stessa identica procedura se si hanno più fari collegati con il Master.A questo punto i due o più Atomic4Dj Par64 Led Slim RGB collegati in cascata con il Master si sincronizzeranno eseguendo lo stesso identico programma.
Esempio di collegamento di più fari con la modalità Master/Slave:
Atomic4Dj Par64 Led Slim RGB – www.Atomic4Dj.com
Canale Valore FunzioneCh1 0-255Ch2 0-255
Ch2
0-2550-255 Macro RGB Colori Preimpostati solo se Ch6 1-240-255 Velocità Programmi Interni solo se Ch6 25-2490-255 Regolazione Sensibilità Microfono solo se Ch6 250-255
Ch3 0-255Ch4 0-255
Ch50-9 Nessuna Funzione10-255
Ch6
0 Nessuna Funzione1-24 Macro RGB Colori Preimpostati su Ch225-49 Programma 250-74 Programma 375-99 Programma 4100-124 Programma 5125-149 Programma 6150-174 Programma 7175-199 Programma 8200-224 Programma 9225-249 Programma 10250-255
Atomic4dj Par64 Slim RGB
6-Ch Mode 4 Canali
Master Dimmer 0-100%Dimmer Led Rosso 0-100%Dimmer Led Rosso 0-100% solo se Ch6 Off
Dimmer Led Verde 0-100%Dimmer Led Blu 0-100%
Funzione Strobo regolabile 1-20 flash/sec
Attivazione Sound Control

Sound Control Mode
Questa funzione attiva il Microfono incorporato nel faro che controllerà il cambio colore a tempo di musica (beat-sensitive)Per attivare questa funzione procedere come segue:Premere il tasto “MODE” fino a visualizzare sul display la scritta .A questo punto con i tasti “UP” e “DOWN” sarà possibile modificare la sensibilità del microfono incorporato selezionando un valore compreso tra:
e
Atomic4Dj Par64 Led Slim RGB – www.Atomic4Dj.com

Specifiche Tecniche
NORME DI SICUREZZA
AVVERTENZA: E’ assolutamente vietato rimuovere il coperchio o il pannello posteriore dell’apparecchio , la manomissione del apparecchio può comportare seri rischi di folgorazione, qualunque riparazione deve essere effettuata da personale qualificato . Non esporre questo apparecchio alla pioggia o all’umidità. Conservare le istruzioni, Il presente manuale è parte integrante del prodotto e lo deve accompagnare in caso di eventuali cambi di proprietà. In questo modo il nuovo proprietario potrà conoscere le istruzioni relative a installazione, funzionamento e sicurezza.
Acqua ed umidità: l’apparecchio non deve essere utilizzato in prossimità di acqua o in ambienti particolarmente umidi Ventilazione: L’apparecchio deve essere posto in modo da avere adeguata ventilazione, non deve essere coperto con panni o teli .Calore: L’apparecchio deve essere posto lontano da fonti di calore Alimentazione: L’apparecchio deve essere collegato solo al tipo di alimentazione descritto nelle istruzioni d’uso o segnalato sull’apparecchio. Per evitare il danneggiamento del cavo d’alimentazione dell’apparato, assicurarsi che questo non venga calpestato o schiacciato da oggetti pesanti.Messa a terra: l’apparecchio deve essere collegato ad una presa elettrica munita di
Atomic4Dj Par64 Led Slim RGB – www.Atomic4Dj.com
Alimentazione AC 100V-240V, 60Hz/50Hz Consumo 30W Tipo di Led 10mm ultra Bright RGB Quantità Led 177 Grado di isolamento IP20 Angolo di apertura fascio luminoso 30° Numero di Canali DMX 1,3,4,6 DMX 512 Connettori 3-pin XLR IN/OUT Dimensioni (LxWxH): 290 x 295 x 100mm Peso 1,6kg
Atomic4Dj P a r 6 4 L e d S l i m R G B

messa a terra funzionante , in caso di dubbi contattare un tecnico elettricista.Pulizia: E’ possibile eliminare la polvere utilizzando un getto d’aria compressa o un panno inumidito. Non Utilizzare mai solventi o altri liquidi infiammabili.Spostamento dell’unità: prima di ogni spostamento, verificare che l’apparecchio sia spento .
MALFUNZIONAMENTI
Non tentare di smontare né riparare da soli l’apparecchio. Per qualsiasi problema non risolvibile con l’aiuto del presente manuale, rivolgersi a un tecnico qualificato o consultare inostri centri assistenza . Qualsiasi uso non appropriato può causare incendi o scosse elettriche .Contattare un centro assistenza nei casi in cui :- l’apparato non funziona o funziona in modo anomalo.- il cavo d’alimentazione o la spina sono danneggiati.- Sono penetrati oggetti estranei o è stato versato del liquido nell’apparecchio.- L’apparecchio è stato esposto alla pioggia.- L’apparecchio è caduto, o il corpo è danneggiato.
IMPORTANTI NORME DI SICUREZZA
Non installare, collegare o sconnettere l’alimentazione quando l’apparato è acceso. Se si avverte uno strano odore proveniente dall’apparato, spegnerlo immediatamente e sconnettere il cavo dell’alimentazione. Non ostruire le griglie di ventilazione dell’apparato. Evitare che l’unità lavori in sovraccarico per tempo prolungato.
Per ragioni di sicurezza, non annullare il collegamento a massa della spina. Il collegamento a massa è necessario per salvaguardare la sicurezza dell’operatore In presenza di temporali con fulmini o quando l’apparato non è utilizzato, estrarre la spina d’alimentazione dalla presa.
Per prevenire il rischio di incendi e scosse elettriche, è necessario tenere l’apparato lontano da spruzzi e gocce. PRO-SHOW SNC. declina ogni responsabilità in caso di scorretta installazione dell’unità.
TENERE LONTANTO DALLA PORTATA DI BAMBINI
Questo apparecchio è un effetto luce professionale da usare su palcoscenici , teatri, discoteche etc. Tutte le operazioni di installazione devono essere eseguire da un tecnico competente. Questo apparecchio è progettato per utilizzo al chiuso, l’esposizione ad agenti atmosferici può comportare il danneggiamento dell’apparecchio nonché renderlo insicuro e pericoloso .Nella scelta della posizione di installazione avere cura di seguire le seguenti raccomandazioni :1)non installare l’apparecchio visino a fonti di calore o umidità 2)considerare che la distanza minima fra l’apparecchio e la superficie illuminata più vicina deve essere di almeno 1 metro .
Tutte le operazioni di installazione aerea dell’apparecchio devono essere eseguite da un tecnico competente, applicare sempre all’apparecchio un cavo di sicurezza secondario in acciaio di sezione adeguata ed in grado di prevenire l’accidentale caduta
Atomic4Dj Par64 Led Slim RGB – www.Atomic4Dj.com

dell’apparecchio in caso di cedimento del punto di ancoraggio principale. Non consentire apersone non abilitate e non competenti di utilizzare l’apparecchio .Ogni manomissione o modifica dell’apparecchio può inficiarne gravemente la sicurezza , per ogni operazione di manutenzione affidarsi ad un tecnico competente. Installare l’apparecchio fuori dalla portata di persone e/o animali.
GARANZIE E RESI
Questo apparecchio è provvisto della garanzia di funzionamento e di conformità alle proprie specifiche, come dichiarate dal costruttore. Per i clienti con Partita IVA si applicanole disposizioni del codice civile art. 1490, cioè mesi 12 a partire dalla data di consegna (fa fede la data della prova di acquisto).Per gli utenti finali (consumatori): ovvero coloro che acquistano il prodotto per scopi estranei alla loro attività professionale/imprenditoriale, ai sensi del nuovo Codice del Consumo (Decreto legislativo 6 Settembre 2005, n.206) la garanzia di mesi 24 dalla data di consegna (fa fede la data della prova di acquisto). Qualora si riscontrassero entro la data di garanzia difetti imputabili a materiali difettosi o difetti di costruzione, occorre comunicare tempestivamente il problema al proprio rivenditore o distributore, allegando fattura commerciale o scontrino fiscale e la descrizione del tipo di difetto riscontrato. Sono esclusi dalla garanzia difetti causati da uso improprio o manomissione.
Pro-show s.n.c verificherò la difettosità dichiarata, correlata all’appropriato utilizzo, e l’effettiva validità della garanzia; Pro-show s.n.c provvederà quindi alla sostituzione o riparazione dei prodotti, declinando tuttavia ogni obbligo di risarcimento per danni diretti o indiretti eventualmente derivanti dalla difettosità.
Per ulteriori informazioni :
Atomic4Dj Par64 Led Slim RGB – www.Atomic4Dj.com

www.Atomic4Dj.Com
Atomic4Dj Par64 Led Slim RGB – www.Atomic4Dj.com

Atomic4Dj Par64 Led SlimRGB cod.61085P
User Manual
Congratulations on choosing a product Atomic4Dj.
Atomic4Dj Par64 Led Slim RGB – www.Atomic4Dj.com

This product is built with high quality components and meets all safety regulations. We re-commend that you read this manual carefully and follow carefully all the directions given inorder to exploit the full potential of this article in complete safety.
PACKAGE CONTENTS
n.1 Par64 Led Slim RGBn.1 Power Cablen.1 User Manual
INTRODUCTION
Our DMX LED Flood Panel offers many possibilities to achieve the effects which you want.It is for DJs, bands, nightclubs and other performers who want a complete LED wash light system. Please read the manual before operation.
OPERATION
This series of product with rich effect pro-grams, easier operation, there are five wor-king mode:
Atomic4Dj Par64 Led Slim RGB – www.Atomic4Dj.com
Led Panel
Mounting Bracket
Panel Board
In Out Power Connectors
In Out DMX Connectors

1_Built-in Program
2_Auto Running
3_DMX Mode
4_Master/Slave Mode
5_Sound Control
1_Built-in Program
1) Press “MODE” button, enter built-in select program menu “Pr. ××”2) Press “UP” or “DOWN” button, select effect program ~ When LED display show , Press“SETUP” button enter static state color edit condition, Press “UP” or “DOWN” button selectbuilt in 7 kinds of static state color (1.-r ; 2.-rg; 3.-g; 4.-gb; 5.-b; 6.-rb; 7.rgb), press “SE-TUP” button can adjust the brightness of static color through “UP” or “DOWN” button , Press “SETUP” button can setup the flash of selected color “FSxx” , through “UP” or “DOWN” button, can adjust the flash speed ~.
Atomic4Dj Par64 Led Slim RGB – www.Atomic4Dj.com

3) When the LED display show ~ , the first time press “SETUP” button , will be show “SP.XX”; Now can get through “UP” or “DOWN” button setup program speed ~ (SP100); Press “SETUP” second time, will be show “FSxx”, now can get through “UP” or “DOWN” button setup program flash speed ~.For the manual settings headlight you can consult the diagrams below.
2_Auto Running
Press “MODE” button to enter into auto running mode “AUTO”, the device will get into the built-in programs ~ automatically. The user could set the running speed and strobespeed in the built-in mode, the effect will auto running in order.
Atomic4Dj Par64 Led Slim RGB – www.Atomic4Dj.com

3_DMX Mode
1) Press “MODE” button, enter DMX control program menu 2) Press “UP” or “DOWN” button, setup DMX address value 3) Press “SETUP” button, enter setup DMX mode menu X-ch.4) Press “UP” or “DOWN” button, setup DMX mode: , , .
1) 1 Control channel
2) 3 Control channel
3) 4 Control channel
. 6 Control channel
Example of connecting DMX:
Atomic4Dj Par64 Led Slim RGB – www.Atomic4Dj.com
d001d001 d512

If the light does not respond to commands from your controller check the following:
1.DMX cable is not connected to the unit or the output of the DMX controller. 2.DMX controller is OFF 3.Used cable is damaged or incorrect.
DMX PROTOCOL
CHANNEL VALUE FUNCTION
CH1
0 No use
1-22 Red
23-45 Green
46-68 Blue
69-91 Cyan
92-114 Yellow
115-137 Orange
138-160 Pink
161-183 Purple
184-206 Dark Blue
207-229 Light Green
230-252 White
253-255 Warm White
DMX Mode2 3 Channel
CHANNEL VALUE FUNCTION
CH1 0-255 MASTER DIMMER
CH2 0-255 RED
CH3 0-255 GREEN
CH4 0-255 BLUE
Atomic4Dj Par64 Led Slim RGB – www.Atomic4Dj.com

DMX Mode3 4 Channel
CHANNEL VALUE FUNCTION
CH1 0-255 MASTER DIMMER
CH2 0-255 RED
CH3 0-255 GREEN
CH4 0-255 BLUE
DMX Mode4 6 Channel
CHANNEL VALUE FUNCTION
CH1 0-255 Master dimming
CH2
CH2
red dimming 0-255 red dimming 0-255
Different sta-tic color selec-ted (when the six channel on 0-24)
0-8 R(255)
9-17 R(255) G(50)
18-26 R(255) G(150)
27-35 R(255) G(255)
36-44 R(200) G(255)
45-53 R(100) G(255)
54-62 R(40) G(255)
63-71 G(255)
72-80 G(255) B(50)
81-89 G(255) B(150)
90-98 G(255) B(255)
99-107 G(150) B(255)
108-116 G(50) B(255)
117-125 B(255)
126-134 R(50) B(255)
135-143 R(150) B(250)
144-152 R(255) B(255)
153-161 R(220) B(50)
162-170 R(150) G(50) B(100)
171-179 R(50) G(180) B(220)
180-188 R(50) G(220) B(100)
Atomic4Dj Par64 Led Slim RGB – www.Atomic4Dj.com

189-197 R(150) G(220)
198-206 R(150) B(220)
207-215 G(180) B(220)
216-224 G(220) B(50)
225-233 R(220) G(100) B(50)
234-242 R(220) G(200) B(100)
243-251 R(255) G(200) B(150)
252-255 R(255) G(255) B(255)
Speed Adjust-ment Con-trol CH6{25-249}Selec-ted Pro-grams Speed
0-255 0—255 Fast—Slow
When CH6 on250-255, can
adjust the Sen-sitivity of
sound active
0-255Adjust The Sensitivity of
Sound Active
CH3 0-255 Green color dimming 0-255
CH4 0-255 Blue color dimming 0-255
CH50-9 No Function
10-255 Strobe (slow—fast)
CH6
0-24 Can get through the secondchannel select 29 static sta-
te color
25-49 Pr02(seven color gradualchange)
50-74 Pr03(three color gradualchange)
75-99 Pr04(seven color hopping)
100-124 Pr05(three color hopping)
125-149 Pr06(fantasy 1)
150-174 Pr07(fantasy 2)
175-199 Pr08(red color gradualchange)
200-224 Pr09(green color gradualchange)
225-249 Pr10(blue color gradualchange)
250-255 Sound active mode
Atomic4Dj Par64 Led Slim RGB – www.Atomic4Dj.com

1) On mode 3 condition, when the CH6 on 0-24, CH2 can select built-in static state color, but the function of red color dimming will be temporary failure, CH3/CH4 will be failure in the same time;
2) when CH6 on 25-249 , CH2 can adjust the CH6 selected built-in program running speed, but the function of red color dimming will be temporary failure, CH3/CH4 will be fai-lure in the same time;
3) When CH6 on 250-255, can open the sound active function, now CH2 can adjust the sensitivity of sound active, but the function of red color dimming will be temporary failure, CH3/CH4 will be failure in the same time;
4) CH6 not as 0, the function of CH2, CH3, CH4 dimming on red color/ green color/Blue color will be failure.
4_Master/Slave Mode
Press “MODE” button, enter salve mode “SLAV”The effect of mater light on built-in program, auto run mode or sound active mode, is the same with the salve light which hang over on the master cable.
Example of connecting multiple lights with the Master / Slave mode:
Atomic4Dj Par64 Led Slim RGB – www.Atomic4Dj.com

5_Sound Control
1) Press the “MODE”, enter sound active mode “Soud”.
2) Press the “SETUP”, enter to set the sound active sensitivity.
3) Press the “UP” or DOWN”, the user can set the sound active sensitivity “~”.
Notice:
1) If there is no touch in 4 buttons within 20 seconds ,the LED display will be close, if any button be touch ,the LED display will be recover the before condition .4 button will be reco-ver their function
2) Power supply each time, the LED display will be show the version number of the sy-stem, such as “V1.0”, after 2 seconds, enter the condition of user setting.
Technical Specifications
SAFETY INSTRUCTIONS
This device has left our premises in absolutely perfect condition. In order to maintain this condition and to ensure a safe operation, it is absolutely necessary for the user to follow the safety instructions and warning notes written in this user manual.
Atomic4Dj Par64 Led Slim RGB – www.Atomic4Dj.com
AC 100V-240V, 60Hz/50Hz 30W
Quantità Led 177 IP20 30° 1,3,4,6
DMX 512
1,6Kg
Atomic4Dj P a r 6 4 L e d S l i m R G B Power supply Power Consumption Type Led 10mm ultra Bright RGB
Insulation grade Beam Angle DMX Channel
Cannon 3-pin XLR IN/OUT Dimension (LxWxH): 290 x 295 x 100mm Weight

Important:Damages caused by the disregard of this user manual are not subject to warranty. The dealer will not accept liability for any resulting defects or problems.If the device has been exposed to drastic temperature fluctuation (e.g. after transportation), do not switch it on immediately. The arising condensation water might da-mage your device. Leave the device switched off until it has reached room temperature.
Please make sure that there are no obvious transport damages. Should you notice any da-mages on the A/C connection cable or on the casing, do not take the device into operation and immediately consult your local dealer.
This device falls under protection-class I. The power plug must only be plugged into a pro-tection class I outlet.
The voltage and frequency must exactly be the same as stated on the device. Wrong vol-tages or power outlets can lead to the destruction of the device and to mortal electrical shock.
Always plug in the power plug last. The power plug must always be inserted without force. Make sure that the plug is tightly connected with the outlet.
Never let the power-cord come into contact with other cables! Handle the power-cord and all connections with the mains with particular caution! Never touch them with wet hands, as this could lead to mortal electrical shock.
Never modify, bend, strain mechanically, put pressure on, pull or heat up the power cord. Never operate next to sources of heat or cold. Disregard can lead to power cord damages, fire or mortal electrical shock.
The cable insert or the female part in the device must never be strained. There must al-ways be sufficient cable to the device. Otherwise, the cable may be damaged which may lead to mortal damage.
Make sure that the power-cord is never crimped or damaged by sharp edges. Check the device and the power-cord from time to time.
Atomic4Dj Par64 Led Slim RGB – www.Atomic4Dj.com

If extension cords are used, make sure that the core diameter is sufficient for the required power consumption of the device. All warnings concerning the power cords are also valid for possible extension cords.
Always disconnect from the mains, when the device is not in use or before cleaning it. Only handle the power-cord by the plug. Never pull out the plug by tugging the power-cord.Otherwise, the cable or plug can be damaged leading to mortal electrical shock. If the power plug or the power switch is not accessible, the device must be disconnected via the mains.
If the power plug or the device is dusty, the device must be taken out of operation, discon-nected and then be cleaned with a dry cloth. Dust can reduce the insulation which may lead to mortal electrical shock. More severe dirt in and at the device should only be removed by a specialist.There must never enter any liquid into power outlets, extension cords or any holes in the housing of the device. If you suppose that also a minimal amount of liquid may have ente-red the device, it must immediately be disconnected. This is also valid, if the device was exposed to high humidity. Also if the device is still running, the device must be checked by a specialist if the liquid has reduced any insulation. Reduced insulation can cause mortal electrical shock.
There must never be any objects entering into the device. This is especially valid for metal parts. If any metal parts like staples or coarse metal chips enter into the device, the device must be taken out of operation and disconnected immediately. Malfunction or short-circuitscaused by metal parts may cause mortal injuries.
OPERATING DETERMINATIONS
This device is a lighting effect for creating decorative effects This product is allowed to be operated with an alternating voltage of 100 - 240 V, 50/60 Hz~ and was designed for in-door use only.
This device is designed for professional use, e.g. on stages, in discotheques, theatres etc.
Lighting effects are not designed for permanent operation. Consistent operation breaks willensure that the device will serve you for a long time without defects.
Do not shake the device. Avoid brute force when installing or operating the device.
When choosing the installation-spot, please make sure that the device is not exposed to extreme heat, moisture or dust. There should not be any cables lying around. You endanger your own and the safety of others!
This device must never be operated or stockpiled in sourroundings where splash water, rain, moisture or fog may harm the device. Moisture or very high humidity can reduce the insulation and lead to mortal electrical shocks.
When using smoke machines, make sure that the device is never exposed to the direct smoke jet and is installed in a distance of 0.5 meters between smoke machine and device.
Atomic4Dj Par64 Led Slim RGB – www.Atomic4Dj.com

The room must only be saturated with an amount of smoke that the visibility will always be more than 10 meters.
The ambient temperature must always be between -5° C and +45° C. Keep away from di-rect insulation (particularly in cars) and heaters.
The relative humidity must not exceed 50 % with an ambient temperature of 45° C.
This device must only be operated in an altitude between -20 and 2000 m over NN.
Never use the device during thunderstorms. Over voltage could destroy the device. Alwaysdisconnect the device during thunderstorms.
The symbol - - -m determines the minimum distance from lighted objects. The minimum di-stance between light-output and the illuminated surface must be more than 0.1 meters.
This device is only allowed for an installation via the mounting bracket. In order to safe-guard sufficient ventilation, leave 50 cm of free space around the device.
The housing must never touch surrounding surfaces or objects.
Make sure that the area below the installation place is blocked when rigging, derigging or servicing the fixture.
Always fix the fixture with an appropriate safety bond.
The maximum ambient temperature Ta = 45° C must never be exceeded.
Operate the device only after having become familiarized with its functions. Do not permit operation by persons not qualified for operating the device. Most damages are the result ofunprofessional operation!
Never use solvents or aggressive detergents in order to clean the device! Rather use a soft and damp cloth.
Please use the original packaging if the device is to be transported. Make sure that you pack the device in the original state.
Please consider that unauthorized modifications on the device are forbidden due to safety reasons!
Never remove the serial barcode from the device as this would make the guarantee void.
If this device will be operated in any way different to the one described in this manual, the product may suffer damages and the guarantee becomes void. Furthermore, any other operation may lead to dangers like shortcircuit, burns, electric shock, crash etc.
Atomic4Dj Par64 Led Slim RGB – www.Atomic4Dj.com

Keep away children and amateurs!
Never leave this device running unattended.
www.Atomic4Dj.Com
Atomic4Dj Par64 Led Slim RGB – www.Atomic4Dj.com