Embed Size (px)
Citation preview

Audi A6 MMI Apple TV (or any AV input) Guide 3G MMI (some details noted for 2G MMI)
all for less than $250
Necessary Products *(Different product needed for 2G)
**(Substitute similar product if you want)
1. *AUDI 3G MMI HIGH MULTIMEDIA MOST VIDEO AUDIO INTERFACE a. £149.99 (about $175 shipped (took 4 days to arrive for me)) b. For 2G models I stumbled upon a audio and video (not just video only)
receiver from somewhere in Europe – but I forgot the site – will update this manual when I remember
http://www.xcarlink.co.uk/product.php?productid=181&cat=4&page=1
2. **ViewHD Universal HDMI to Composite / AV Video Converter, Support PAL / NTSC Standard TVs
a. $31.75 + $4.53 shipping (took 1 day to arrive) b. There are other types of these product -‐ but for size and power supply
I highly recommend this guy (this will convert HDMI signal to PAL composite which is needed) (depending on your source if its not HDMI you may just need a NTSC to PAL converter if you are using a composite device already (it is easier if you do it through HDMI (with this product) word of advice
c. You will also need the composite cables
http://www.amazon.com/gp/product/B0080KN18K/ref=oh_details_o05_s00_i00?ie=UTF8&psc=1
3. **BESTEK Dual 110V AC outlets and Dual USB 3.1A 300w power inverter car dc 12v to 110v ac inverter
a. $26.09 + FS b. I chose it for USB outlets, it is completely silent, and its smart power
off functions – (also size)

http://www.amazon.com/gp/product/B004MDXS0U/ref=oh_details_o04_s00_i01?ie=UTF8&psc=1
4. **Littelfuse FHA200BP ATO Add-‐A-‐Circuit Kit a. 7.84 + FS b. Needed for a clean install (taps power from passenger side fuse box)
http://www.amazon.com/gp/product/B0002BGELQ/ref=oh_details_o03_s00_i00?ie=UTF8&psc=1
5. 11mm socket and wrench 6. Automotive wire and wire crimps (for splicing and for ground) and crimping
tool 7. 4 hours (less if your mechanically inclined) 8. Common sense and confidence with wiring
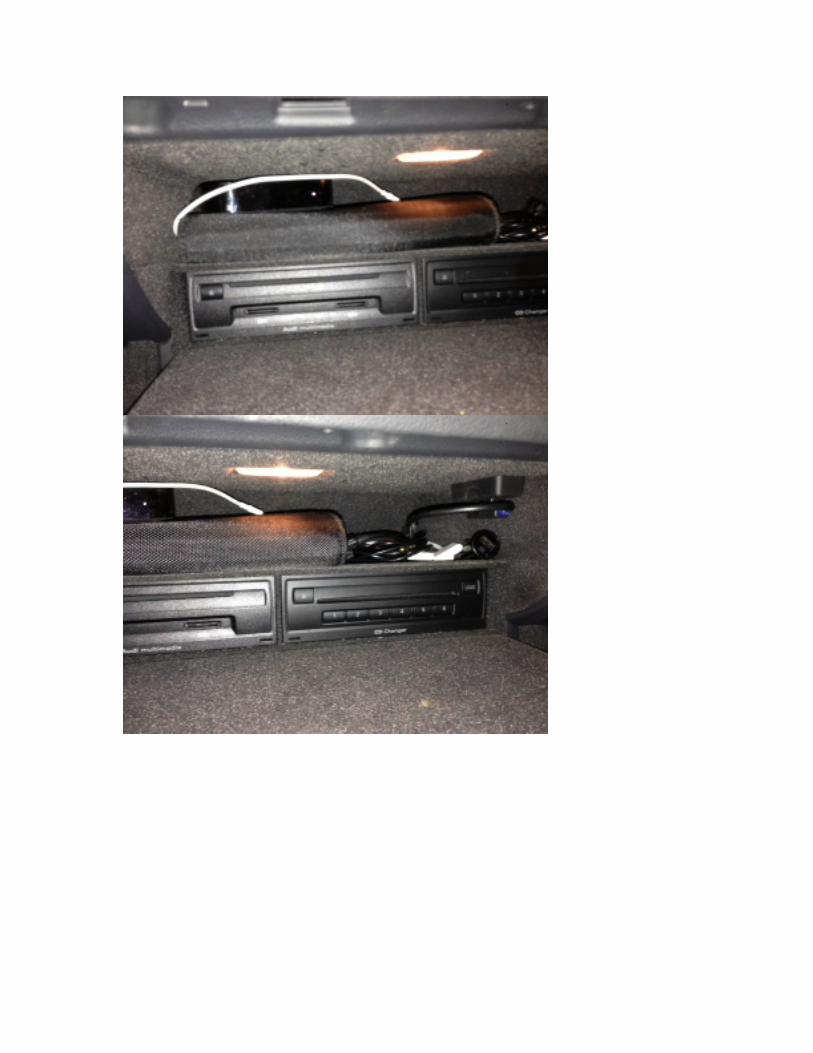
The reason the XCarlinkadapter works like a charm is because the 3G DVD system is put into the glove box – the way it is wired it is by going into an already open slot meant for TV streaming in the UK, and audio pass-‐through using the Audi MOST setup (more on that later) – 2G owners don’t fret as I know that there is another aftermarket system that could be installed in the trunk electronic area that uses MOST interface for audio and a replacement device the adds AV where the TV box installs in the trunk – (good news for you guys with 2G teardown and wiring is easier (wire right to the battery) – bad news – my personal preference is having access to the device in my glovebox) Whatever you have just read through and glean the basic principles and do amazing things with your ideas! From this point on I will be mostly referring to 3G MMI systems as that’s what I am working with – but you can always contact me if you need help on your specific system The first step is to drop your glove box for install – pop out the farthest back plastic piece being careful with the tabs.
Than you will need to remove the two lower 11mm bolts found at the base

– and three 11mm bolts found inside the top of the glovebox – careful as that’s all that holds it together…
You now can begin wiring in your XCARLINK adapter:

Connect the MOST cable to the original MOST connector behind the CD changer:
The Audi MOST Audi system if you are unfamiliar runs an audio line through all its devices and you are tapping into and continuing on the series – by simply grabbing the line and going through the XCARLINK and coming back through with the wire that comes out

Connect the green cable to the video input on the back of the 3G MMI DVD player:
To get my cables and Apple TV (your source) inside the glove box I simple punched out one of the tabs and ran the HDMI and power through the insulation

Take the HDMI cable and send it through the PAL composite convertor
Unfortunately I did not get pictures but I mounted both the XCARLINK and the mini convertor on the open space of the backside on the glove box right next to where the wires came out using zipties:
Next I mounted my power inverter using zip ties to the back of where the dash rests when its installed
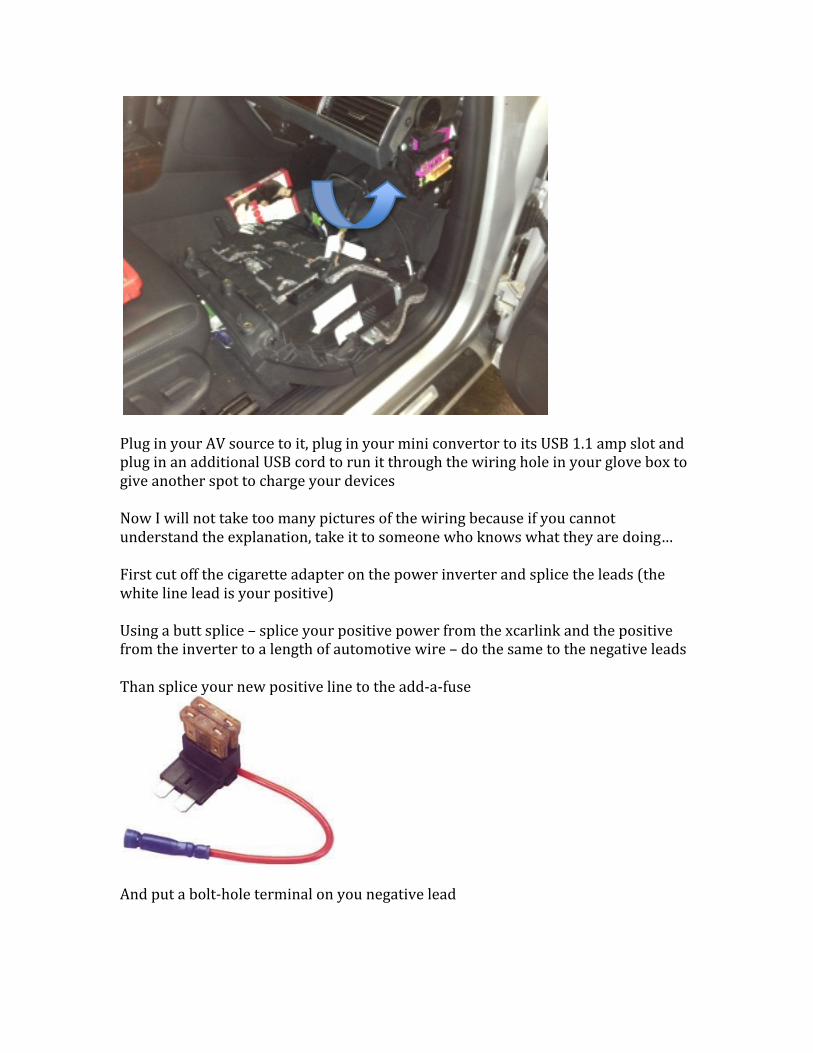
Plug in your AV source to it, plug in your mini convertor to its USB 1.1 amp slot and plug in an additional USB cord to run it through the wiring hole in your glove box to give another spot to charge your devices Now I will not take too many pictures of the wiring because if you cannot understand the explanation, take it to someone who knows what they are doing… First cut off the cigarette adapter on the power inverter and splice the leads (the white line lead is your positive) Using a butt splice – splice your positive power from the xcarlink and the positive from the inverter to a length of automotive wire – do the same to the negative leads Than splice your new positive line to the add-‐a-‐fuse
And put a bolt-‐hole terminal on you negative lead

Open the access to the fuse box and add your new fuse to the following spot:
The brown brick of fuses will turn on and off with ignition where I added it too (remember to pull an existing fuse out and put it at the bottom of your new holder )– while the black brick of fuses are always on (you can go there, but I prefer to not risk a battery drain Take out a bolt and add the ground to the vehicles farm (upper bolt in previous picture) Be sure to run your wiring neatly to maintain OEM look in the fuse box (my positive is neatly run up from behind) Now before putting it together power your system on and on the MMI you should see two new icons – TV (ignore this one) and AV sources –Navigate to external av input and choice the coordinating input where your device went – it should also be powered on and displaying video and audio – make sure the HDMI/ composite inverter is set to PAL


Now that it is confirmed working get some help and reinstall the glove box and enjoy your new AV source

OTHER IDEAS AND NOTES The XCARLINK adapter has to composite video outs on the main cable – Use them to install rear seat monitors – or install a larger screen in your dash for the ambitious I use an Apple TV to mirror my iPad and iPhone – but in order to do this you need an personal hotspot or router in your car-‐ the easiest way is to use your personal hotspot on your iPad and connect the apple tv to it – (I am lucky to have unlimited data). For other DLNA streaming or other options install a small router (like a Airport express) and power it with your power inverter set it up to just be a router without internet – and connect your portable device (use static connection and enter in a manual ip and subnet address (just copy what it assigned you) so you can use your devices cellular connection and still be on the wifi connection (do not enter a router or DNS address), than connect your Roku or similar to the wifi connection as well and enjoy in car DLNA streaming still using your cellular connection For 2G MMI systems install a similar product in the trunk of the car and enjoy the benefits of in dash media! Because Apple devices work so seamlessly together – I recommend trashing any other device and moving to IOS/Mac for the easiest media experience (just kidding all devices have their perks!) BE SAFE BOTH DURING THE INSTALL AND I DO NOT RECOMMEND PLAYING WITH YOUR NEW SYSTEM WHILE DRIVING – I AM NOT LIABLE IF YOU CAUSE YOUR CAR TO RANDOMLY IMPLODE OR ANY OTHER FAULT THAT COULD
HAPPEN


![Multiconn Srl AUDI Systems High MMI 2G – MMI 3G Installation and User Manual ver.1.0 [to integrate with the user manual of DAS M32/M44]](https://img.pdfslide.net/doc/110x75/551b5b2e5503465c7e8b5f94/multiconn-srl-audi-systems-high-mmi-2g-mmi-3g-wwwdasdvbtcom-installation-and-user-manual-ver10-to-integrate-with-the-user-manual-of-das-m32m44.jpg)