Embed Size (px)
Citation preview

User Manual
EVE™
Automatic cell counter

2
All the materials in this user guide are protected by Korean and international copyright laws. They cannot be reproduced, translated, published or distributed without the permission of the copyright owner.
EVE™ User manual
Website : www.nanoentek.com
E-mail : [email protected]
Manufactured by
NanoEnTek Inc. (HQ)
12F, 5, Digital-ro 26-gil, Guro-gu, Seoul, 152-740, Korea
Tel : +82-2-6220-7940
Fax: +82-2-6220-7721
The information in this manual is described as accurately as possible.
Firmware and software changes and updates may change without prior
consent or notification.
Copyright © 2013 by NanoEnTek Inc.
All rights reserved. Published in Korea.
Documentation : NESMU-EVE-001E
Revision history : V.0.0 Date : MAR 2013
: V.0.5 Date : MAY 2013
: V.0.8 Date : OCT 2013

EVETM, Automatic Cell Counter ©2013 NanoEnTek Inc. 3
Table of contents
Product contents Product overviewDescription Installation
OperationSettingsCell mode parameters
Date and time setup
Recommend actionsCell countingTransferring data to a computerUsing the beads mode for counting beadsCalibrating
PC softwareInstallationOpen the dataCell gatingCountingSpread sheetPrepare report
Cleaning and maintenance Troubleshooting Error codesWarranty Safety precautions Product specificationsOrdering informationTechnical support
45-67-8
9
10-2410
10-121314
15-1920
21-22
23-24
25-3225-2627-28
29303132
3334-35
3637
38-40414243

4
Product contents
EVE™ is shipped with the following components.Please check that all items listed below were shipped, receiving the instrument.If any items are missing or damaged, contact your local distributor or [email protected].
Automatic cell counter
1 EA
USB drive 2 GB
1 EA
User manual
1 EA
Power cord with 4 adaptor cords ( 4 pcs/set, for U.S./Canada/
Taiwan/Japan, Europe or UK)
1 SET
Cell counting slides
(with 1.5 mL of Trypan blue (0.4%))
1 BOX (50 slides/box)
Quick manual
1 EA
Cat. No. EVE-MCCat. No. EVS-050

EVETM, Automatic Cell Counter ©2013 NanoEnTek Inc. 5
Product overview
The EVE™ Automatic cell counter uses state-of-the-art optics and image analysis to automatic cell counting. The EVE™ is a benchtop counter designed to measure cell count and viability (live, dead, and total cells) accurately and precisely, using the standard trypan blue technique.
Using the same amount of sample that you currently use with the hemocytometer, the EVE™ takes less than 20 seconds per sample for a typical cell count and is compatible with a wide variety of eukaryotic cells and provides information on cell size.
The EVE™ offers an intuitive user interface, and provides the option to save and print cell count data using the EVE™ Software (download from www.nanoentek.com )and USB drive supplied with the instrument or available separately.
The EVE™ is supplied with disposable EVE™ Cell counting slides that contain two enclosed chambers to hold the sample to allow you to measure two different samples or perform replicates of the same sample. The cell counting occurs in the central location of the counting chamber and the volume counted is 0.4 µL, the same as counting four (1 mm × 1 mm) squares in a standard hemocytometer.

6
Product overview
Features and benefits
—
User-friendly, benchtop design for simple, fast, automated cell count and
viability measurements within 20 seconds.
—
Provides data on cell size and is compatible with a wide variety of eukaryotic cells
without the need for any special changes between large or small sizes.
—
Measures cell concentrations ranging from 1 × 10⁴ to 1 × 10⁷ cells/mL and
cells with sizes ranging from 5 µm to 60 µm.
—
Provide the clumping cell counting function to get more accurate results
(using EVETM PC software).
—
Uses disposable cell counting slides that eliminate washing steps and
cross contamination between samples.
—
Saves and print cell count data including images using the EVE™ software and
EVE™ USB drive.
—
Presents comprehensive data with graphical reports and as a .CSV
(comma separated value) file for sample comparisons.

EVETM, Automatic Cell Counter ©2013 NanoEnTek Inc. 7
Description
Front view The power button is used to turn the instrument
on and off. The red status light indicates that
the instrument is off; the green status light
indicates that the instrument is on.
Located in the front of the instrument contains
buttons for all the functions needed and
displays data from the cell count.
The slide port is used to insert the EVE™
Cell counting slide containing the sample with
trypan blue stain into the counter for analysis.
The USB port allows you to transfer and save
the cell count data and image to your computer
for record keeping and printing purposes. The
USB drive supplied with the instrument or any
other standard USB drive is inserted into the
USB port for data transfer.
Power button
LCD touch screen
Slide port
USB port
[Front view]
Power buttonSlide port
USB port
LCDtouch screen

8
Description
Rear and side view
Connect the counter to an electrical outlet
using the supplied power cord and the
appropriate plug, based on the electrical outlet
configuration in your country.
The image adjustment (focus) knob is used
to adjust the image quality to obtain better
contrast between live (bright centers) and dead
(dark blue centers) cells. This is important
to obtain accurate cell counts and viability
measurements.
The focus lock knob is used to lock the image
adjustment (focus) knob once the image is
optimized. There is no need to use the focus
lock knob , but is available for convenience,
if you are measuring multiple samples of the
same cell type.
Power inlet
Image adjustment
(focus) knob
Focus lock knob
[Rear view] [Side view]
Power inlet Focus lock Focus knob

EVETM, Automatic Cell Counter ©2013 NanoEnTek Inc. 9
1. After unpacking the instrument, place the instrument on a flat, level, dry surface.
3. Plug the power cord into the electrical outlet. Be sure to use only the power cord supplied with your instrument. Powering the instrument with an unapproved power cord may damage the instrument.
5. When the instrument is turned on, the Start Up screen is displayed. Here you can proceed immediately to cell counting, set up the instrument for cell or bead count, or adjust the screen brightness.
Installation
Installing EVE™ Automatic cell counter
2. Plug one end of the supplied power cord into the EVE™. To the other end attach the appropriate plug adaptor, based on the electrical outlet configuration in your country.
4. When you are ready to use, start the EVE™ by pressing the Power button.

10
Operation
Settings
Cell mode parameters
1. Press Settings from the Start-Up screen to display Settings.
The settings menu allows you to set up the following: · Count mode to operate the instrument for cell counting (choose Cells)
or bead counting (choose Beads)
· Parameters (see below and next page for details)
· Calibration to calibrate the instrument (page 23)
· Update to install new firmware versions as they become available
· Date and Time to set up date and time (page 13)
· Use the scroll buttons to adjust the screen brightness.
1. Press Parameters from the settings screen to display Cell mode parameters screen.
The Parameters function allows you to change the image analysis
algorithm for specific or mixed cell types, and the specific parameters
must be determined empirically.

EVETM, Automatic Cell Counter ©2013 NanoEnTek Inc. 11
Operation
Cell mode parameters
2. The cell mode parameters are described below:
∙ Sensitivity (refers to the contrast of the objects from the background).
Adjusting the sensitivity higher makes instrument more sensitive to
objects; useful for cells that do not stain well with trypan blue while
adjusting the sensitivity lower makes the instrument less sensitive and is
useful if there is a lot of background.
∙ Minimum cell size is used to determine the low range of cell size to
include in the measurement. The algorithm first identifies all objects, and
calculates the average size (e.g., 15 µm). From the percent of average
size setting, the algorithm calculates the smallest object size to include in
the final measurement (e.g., 70% of 15 is 10.5 µm; 15–10.5 = 4.5 µm; 4.5
µm would be the smallest particle included in the count). Adjusting the
number up, increases inclusiveness thereby decreasing the lower cell
size range (e.g., 50% of 15 is 7.5 µm; 15–7.5 = 7.5 µm).
∙ Maximum cell size is used to determine the high range of cell size to
include in the measurement. The algorithm first identifies all objects, then
calculates the average size (e.g., 15 µm). From the percent of average
size setting, the algorithm calculates the largest object size to include in
the final measurement (e.g., 200%; 200% of 15 µm = 30 µm; 30 µm is
the largest cell size included in the measurement.
∙ Circularity is used to determine the objects to include in the
measurement based on roundness. Increasing the value from 80%
requires objects to be more round for inclusion in the measurement.
Decreasing the value from 80% allows objects to be less round. Adjusting
this may be useful if the cell type is not particularly circular or perhaps
oddly shaped.
After modifying any parameters,
press Apply button to make the changes.
To restore default parameters, press Default button.
3. Press Save protocol button to create a new protocol.

12
Operation
Cell mode parameters
4. Type protocol name and user name in the appropriate fields, and press Save button again.
5. Once a protocol is saved, it is available for use at any time. Press Load protocol button.
6. The protocol appears in the protocol menu. Use the up and down arrows to find your saved protocol. To use the protocol, select one of protocol and press Apply button. » press Delete button to delete protocol. press Edit button to edit protocol.

EVETM, Automatic Cell Counter ©2013 NanoEnTek Inc. 13
Operation
Date and time setup
1. Turn on the EVE™ by pressing the Power button. The Start up screen is displayed after a few seconds.
2. Press Settings and then press Date and Time.
3. The Date/Time Properties screen is displayed. To select the month and day, scroll to the appropriate month using the arrow keys and then press the day on the calendar.» Use a pointed object, like a stylus or pipette tip, to push the small buttons on the calendar.
4. To select the time, scroll to the appropriate time and select Automatically adjust clock for daylight saving, if necessary. Press Apply or OK button to make the date/time changes. The updated date/time is displayed on the top of the window. Once the date/time is set, there is no need to set it each time the instrument is turned on.
5. Press Close button to exit the screen.

14
Operation
Recommend actions
To obtain the best results, follow these recommendations:
∙ Wear Protective gloves during sample handling.
∙ Do not touch the optical surfaces of the EVE™ Cell counting slides.
Hold the cell counting slides by the edges.
∙ Use the EVE™ at room temperature only (5 - 40 °C).
∙ For accurate viability count results, ensure the counting area is covered
with cell suspension and count cells within 3 minutes of mixing the cells
with trypan blue solution as trypan blue is toxic to cells. For best data
with biological samples, we recommend counting at least two samples
and taking an average.
∙ The EVE™ is supplied pre-calibrated. To recalibrate your instrument,
see page 23.
∙ The EVE™ memory holds one set of data. Save your data to the USB
drive after each reading. You may transfer the data to your PC, using the
USB drive immediately as described in Transferring data to a PC (page
20).
∙ After using EVE™, appropriately dispose slides as biohazardous waste.
Do not reuse the cell counting slides.

EVETM, Automatic Cell Counter ©2013 NanoEnTek Inc. 15
Operation
Cell counting 1. Push the Power button to start the instrument. The Start-up screen is displayed.
2. The EVE™ is preset to Cells mode.
3. Mix well the 10 µL of your sample and the 0.4% trypan blue stain using a pipette.
4. Load 10 µL of the sample mixture on EVE™ Cell counting slide (side A) using a pipette. The two chambers of the slide are labeled “A” and “B” for easy tracking of your samples.

16
Operation
Cell counting 5. Insert the EVE™ Cell counting slide, sample side (side A) first into the slide port on the instrument, you will hear a soft click, if the slide is pushed in correctly. Each chamber is counted separately.
6. Press the Count cells or Next sample button.
7. Adjust the image by pressing the Zoom button. Navigate by pressing the location you like to see on the grid.
8. While viewing cells in the zoom mode, use the Focus knob to adjust the image.
» After you have counted the first sample, you may not have to use the Focus knob again. If measuring multiple samples of the same approximate size, you may lock the Focus knob. You are able to unlock
the knob later, to adjust the image.

EVETM, Automatic Cell Counter ©2013 NanoEnTek Inc. 17
Operation
Cell counting Optimize the image for analysis such that:
∙ Live cells have bright centers and dark edges.
∙ Dead cells have a uniform blue color throughout the cell with no bright centers.
<Correct Image>
<Incorrect Image 1>Dead cells have bright, blue centers
are counted as the live cells.
<Incorrect Image 2>Live cells have dark centers and are
counted as the dead cells.

18
Operation
Cell counting 9. When you are satisfied with the image, press Count Cells.
10. After 20 seconds to count each sample, and the cell count for live, dead, and total cells as well as percentage viability is displayed on the screen. Record the cell count, or insert a USB drive and press Save button (see page 20).
11. To see more details on the data as well as graphical representation of the data, press the More data button.
» Press the Close button to return to the main screen.
67.733 mm

EVETM, Automatic Cell Counter ©2013 NanoEnTek Inc. 19
Operation
Cell counting 12. The Calculator button allows you to quickly calculate adjustments to the cell suspension to obtain a desired concentration.
13. To count the cells in the other side of the slide (side B), remove the EVE™ slide after side A is counted by pushing in the slide slightly and then pulling the slide out. Turn the slide around and reinsert into the slide inlet and repeat the procedure.
14. The EVE™ USB drive holds one set of data. To save your data for future analysis or archiving, you must record the data or save after each reading. See page 20 for Transferring data to a PC.
15. After recording or saving the data, remove and discard the slide appropriately as bio-hazardous waste.
16. At this point, the EVE™ is ready for another sample. If you are not using the instrument, press the Power button to turn off the instrument.
» If the touch screen is not responding, you can turn off the instrument by pressing and holding the Power button for 4 seconds.

20
Operation
Transferring data to a computer
1. To archive your data or generate a printed report, insert EVE™ USB drive into the USB port.
2. Save your data on the USB drive by pressing the Save button on the main screen. The image and the counting data are saved.
3. Enter the file name using the keypad buttons displayed on the Save menu.
» The numerical data is also automatically saved as a .CSV file that can be opened with any spreadsheet program. To delete all data from the .CSV file and start with a
blank file, press Start .CSV file button.
4. Transfer the EVE™ USB drive to the USB port on your PC. You may open the .CSV file using a spreadsheet program. To see the image and generate a report, use the EVE™ PC software (on page 25).
USB port

EVETM, Automatic Cell Counter ©2013 NanoEnTek Inc. 21
Operation
Using the beads mode for counting beads
1. Press Settings and then press Beads to place the instrument into bead counting mode.
2. Put 10 µL of beads to 10 µL of 0.4% trypan blue stain, and mix well. Mix gently by pipetting up and down.
3. Load 10 µL of the sample mixture on EVETM Cell counting slide (side A or B) using pipette. The two chambers of the slide are labeled “A” and “B” for easy tracking of your samples.
4. Insert the EVE™ Cell counting slide with beads into the slide port on the instrument, making sure that the sample side is inserted completely into the instrument.
5. Press Count beads button.
» You can check the result in detail pressing More data button.

22
Operation
Using the beads mode for counting beads
6. Adjust the bead image by pressing the Zoom button. Navigate the fields by pressing the location you like to see on the grid.
7. When you are satisfied with the image, press the Count beads button.
8. The instrument takes approximately 20 seconds to count each sample and the bead count is displayed in the screen. Record the bead count.
9. To count beads in the other side of the slide chamber (side B), remove the slide after side A is counted, turn the slide around, and reinsert into the slide inlet to repeat the counting procedure.
10. After counting beads, place instrument into Cell Count mode for counting cells by pressing Settings button and then pressing the Cells button.

EVETM, Automatic Cell Counter ©2013 NanoEnTek Inc. 23
Operation
Calibrating 1. Press Settings and then press Calibration button.
2. Check the current background level and press Yes button to recalibrate.
3. To recalibrate the EVE™, mix 10 µL trypan blue solution with 10 µL of a standard buffer, such as phosphate buffered saline (PBS). Mix thoroughly.

24
Operation
Calibrating 4. Load 10 µL of the sample mixture to the chamber ports on one side of the EVE™ Cell counting slide. Press Start.
5. After calibration is completed, press the OK button to restart the instrument and proceed to cell counting.
There is no need to recalibrate each time the instrument is turned on.

EVETM, Automatic Cell Counter ©2013 NanoEnTek Inc. 25
PC software
Installation The EVE™ is designed for stand-alone use and does not require the use of an external computer.
If you wish to archive data and generate reports, you must transfer data to your computer, and use the EVE™ software to generate and print reports (see instructions, below).
Alternatively, data stored in the .CSV file may be transferred to your computer by the USB drive and imported into any spreadsheet program, without the need for EVE™ PC software.
Computer requirements (EVE™ is not compatible with Macintosh operating systems)∙ USB port (1.1 or later, 2.0 is recommended)∙ Windows XP/2000/Vista/7
1. Insert the supplied USB drive into the computer. Then open the file “EVE™ PC Software”.
2. The start-up dialogue of the software will appear. Click ‘Next’ to start installation.
3. If you want to change installation folder, click ‘Browse’ and choose the location that you want. And click ‘Install’.
26
PC software
Installation 4. The computer activates the installation of the Software.
5. Click ‘OK’ when Installation is complete.
6. When the software is installed, the PC software icon appears on your desktop.
7. Click on the PC software icon on your PC, Start-up screen will be shown.

EVETM, Automatic Cell Counter ©2013 NanoEnTek Inc. 27
PC software
Open the data
1. Insert the USB to USB port of computer. And Click Open button to load data files transferred from the instrument.
2. Select the file that need to adjust counting result in different condition.
3. Adjust the cell image by pressing the Zoom button. Navigate the fields by clicking the location you like to see on the grid.
4. If it is necessary, you can adjust cell counting result using Right button of mouse interface.
You can change the circle mark recognized by counting algorithm of each cell to live or dead. And also, each cell can be deleted or added from counting result.

28
PC software
Open the data
5. Click Apply changes button to make the changes.
6. You can check cell size graph. Cell size graph will be shown with different color for viable cells, dead cells and total cells.
» Using each button, you can check individual result for viable cells, dead cells and
total cells.
7. If modified image should be saved, then click Save changes button.

EVETM, Automatic Cell Counter ©2013 NanoEnTek Inc. 29
PC software
Cell gating 1. Select the saved file you wish to open and adjust range of cell size using Cell gating button.
2. Determine the value for minimum cell size and maximum cell size using up and down arrow button.
» Minimum cell size is used to determine the low range of cell size to
include in the measurement. The algorithm first identifies all objects, and
calculates the average size. From the percent of average size setting,
the algorithm calculates the smallest object size to include in the final
measurement. Adjusting the number up, increases inclusiveness thereby
decreasing the lower cell size range.
» Maximum cell size is used to determine the high range of cell size to
include in the measurement. The algorithm first identifies all objects, then
calculates the average size. From the percent of average size setting,
the algorithm calculates the largest object size to include in the final
measurement.
3. After modifying cell size, click Apply changes button to make the changes.
4. You can check modified cell size graph will be shown.

30
PC software
Counting 1. If the cells clumping together are existed, these will be counted for one cell by counting algorithm. For this reason, the cell counting result may not be accurate.
In this case, select the saved file you wish to open and click Counting button for re-counting the cells, exception algorithm will solve this problem. User can achieve more accurate result.
2. You can check more accurate counting result. » Before recounting, cells clumping together could be counted one cell. But
after recounting, software algorithm will recognize and count each of them.
<Result before recounting> <Result after recounting>
Clumped cell Recognize individual cell
EVETM, Automatic Cell Counter ©2013 NanoEnTek Inc. 31
PC software
Spread sheet 1. Select the saved file you wish to open and click Spread sheet button.
2. User can check cell distribution according to cell size differences. And also, this information can be exported by Export button.

32
PC software
Prepare report
1. Select the saved file you wish to open and click Prepare report button.
2. You can check preview of report before export to PDF file.
3. Click Export to PDF button to obtain a printable version of the image and data.
4. Type the file name and select location for saving file.
5. You can check the file on the location you selected.

EVETM, Automatic Cell Counter ©2013 NanoEnTek Inc. 33
Cleaning & maintenance
Cleaning and maintenance
Clean the surface of the EVE™ with a damp cloth. To clean the LCD screen, turn off the EVE™, disconnect the power cable, and clean the LCD screen with a soft cloth lightly moistened with LCD cleansing detergent. Cleaning the screen with excessive force can damage the LCD the screen. Wipe the screen dry immediately. Do not reuse the cell counting slides.
The EVE™ does not need regular maintenance. To troubleshoot problems with EVE™, contact technical support (page 43). Do not perform any repairs or service on the EVE™ to avoid damaging the instrument.

34
Troubleshooting
Inaccurate cell count Sample handling
Low and high readings
Poor image quality
Cell clumping
Error codes
∙ Do not insert the EVE™ Cell counting slide upside-down
as this may introduce liquid into the instrument that could
damage it.
∙ Do not reuse the EVE™ Cell counting slides, as leftover
dye from the previous reading may affect the next reading.
∙ Do not use any other counting slides such as a glass
hemocytometer with the EVE™ as it results in inaccurate
cell count and may damage the instrument.
∙ Ensure that the sample covers the entire counting area
and the EVE™ Cell counting slide is inserted completely
into the counter.
∙ The EVE™ is designed to read samples from 1 × 10⁴ cells/
mL to 1 × 10⁷ cells/mL, with the highest accuracy between 1
× 105 cells/mL and 4 × 10⁶ cells/mL.
If your sample is not in this range, you may need to dilute
the sample or add more cells and read the sample again.
∙ While viewing cells in the Zoom mode, use the focus knob
to adjust the image to ensure that live cells have bright
centers, and dead cells have dark/blue centers.
∙ Ensure the cells are not clumped.
∙ To maintain instrument sensitivity, we recommend that you
calibrate the counter each year as described on page 23.
∙ See page 36 for a description of error codes.

EVETM, Automatic Cell Counter ©2013 NanoEnTek Inc. 35
Troubleshooting
Incorrect USB drive
Accidentally removed the USB drive
May be using a corrupted firmware file or a damaged USB drive
Saving and printing problems
Instrument not updating firmware
∙ Use the USB drive supplied with the counter or an USB
2.0 drive as some types of USB drive are not detected or
recorded by the counter.
∙ Do not save too many files in a USB drive as the counter
may slow down to read the USB drive.
∙ Do not remove the USB drive or turn off the counter when
updating.
∙ Do not remove a USB drive when saving or reading data
as it may damage the counter.
∙ Download a new version of the firmware from the website
on a different USB drive and try updating the firmware
on the EVE™. Contact technical support (page 43) if the
problem persists.

36
Error codes
Position
Driver
Preview
Memory
Reason
Camera driver loading fail
Camera driver open fail
Camera driver initializing fail
GPIO driver loading fail
Camera preview fail
Image buffer memory allocation
fail
Camera memory allocation fail
Message
System Error
(E0101)
Reboot the device or refer
to service personnel
Error code
0101
0102
0103
0104
0201
0301
0302
This section describes the error codes displayed by the EVE™ when it encounters a problem. Contact technical support (page 43) for details on error codes and if you need to send the instrument back for servicing.

EVETM, Automatic Cell Counter ©2013 NanoEnTek Inc. 37
Warranty
Nanoentek warrants that EVE™ will be free from defects in material and workmanship for a period of one (1) year from date of purchase. If any defects occur in EVE™ during this warranty period, NanoEnTek will repair or replace the defective parts at its discretion without charge.
The following defects, however, are specifically excluded:
1. Defects caused by improper operation.2. Repair or modification done by anyone other than Nanoentek or an authorized agent.3. Damage caused by substituting alternative parts.4. Use of fittings or spare parts supplied by anyone other than NanoEnTek.5. Damage caused by accident or misuse.6. Damage caused by disaster.7. Corrosion caused by improper solvent or sample.
For your protection, EVE™ being returned must be insured against possible damage or loss. NanoEnTek cannot be responsible for damage incurred during shipment of a defective instrument. It is recommend that you save the original packing material in which the instrument was shipped. This warranty is limited to the replacement of defective products.
For any inquiry or request for repair service, contact [email protected] or your local distributor.

38
Safety precautions
Review and follow the safety instructions below :
· Do not install the instrument in a humid place such as a greenhouse or an incubator to avoid a
danger of electric shock. If water or other material enters the instrument, the adaptor, or power
inlet, disconnect the power cord and contact a service person. For operating environment, refer to
Product Specifications.
· Do not touch the main plug or power cord with wet hands.
· Always ensure that the power supply input voltage matches the voltage available at your location.
· This instrument is air-cooled and its surfaces may become hot during operation. When installing,
leave a space of more than 10 cm (4 inches) around the instrument and do not place any objects
between the instrument and walls.
· Do not install an instrument on a slant or a place prone to vibrations, which induces the risk of
malfunction or damage of the instrument.
· Never insert any objects into the air vents of the instrument as this can result in electric shock,
personal injury, and equipment damage.
· Plug the power cord firmly into the wall outlet and AC adapter.
· To avoid potential shock hazard, make sure that the power cord is properly grounded.
· Be sure to position the instrument such that it is easy to disconnect.
· Turn off an instrument before unplugging the power cord and/or moving the instrument.
· If an instrument is dropped or broken, disconnect the power cord and contact a service person
The warrant will be void in case of disassembly.
· Use only authorized accessories (adaptor, power cord, and USB driver).
WarningClass A equipment is intended for use in an industrial environment. In the documentation for the user, a statement shall be included drawing attention to the fact that there may be potential difficulties in ensuring electromagnetic compatibility in other environments, due to conducted as well as radiated disturbances.

EVETM, Automatic Cell Counter ©2013 NanoEnTek Inc. 39
Consignes de sécurité
Examinez et suivez les consignes de sécurité ci-dessous :
· N'installez pas l'instrument dans un endroit humide comme une serre ou un incubateur pour
éviter un risque de choc électrique. Si de l'eau ou tout autre matériau pénètre dans l'instrument,
l'adaptateur, ou l'entrées d'alimentation, débranchez le cordon d'alimentation et contactez un
technicien de service. Pour l'environnement d'exploitation, reportez-vous aux spécifications du
produit.
· Ne touchez pas la fiche ou le cordon d'alimentation principale avec les mains mouillées.
· Assurez-vous toujours que la tension d'entrée d'alimentation correspond à la tension disponible
dans votre endroit.
· Cet instrument est refroidi à l'air de sorte que ses surfaces peuvent devenir chaudes pendant le
fonctionnement.
Lors de l'installation de l'instrument, laisser un espace de plus de 10 cm (4 pouces) autour de cet
instrument et ne placez aucun objet entre l'appareil et le mur.
· N'installez pas l'instrument sur une pente ou un endroit soumis à des vibrations, ce qui induit le
risque de dysfonctionnement ou d'endommagement de l'instrument.
· N'insérez jamais aucun objet dans les orifices d'aération de l'instrument, car cela pourrait
entraîner un choc électrique, des blessures chez les utilisateurs et des dommages d'équipement.
· Branchez le cordon d'alimentation fermement dans la prise murale et l'adaptateur secteur aussi.
· Pour éviter un risque potentiel de commotion électrique, assurez-vous que le cordon
d'alimentation est correctement mis à la terre.
· Assurez-vous de positionner l'instrument de telle sorte qu'il soit facile de débrancher l'instrument.
· Eteignez l'instrument avant de débrancher le cordon d'alimentation et / ou de déplacer l'instrument.
· Si l'instrument est cassé ou qu'il soit tombé, débranchez le cordon d'alimentation et contactez
un technicien de service. Ne démontez pas l'instrument et la garantie sera annulée en cas de
démontage.
· Utilisez uniquement les accessoires autorisés (l'adaptateur, le cordon d'alimentation, et le lecteur USB).
WarningLe produit de classe A est conçu pour l'utilisation dans un environnement industriel. Dans la documentation de l'utilisateur, la déclaration doit être incluse pour attirer l'attention sur le fait qu'il peut y avoir des difficultés potentielles pour assurer la compatibilité électromagnétique dans d'autres environnements, en raison des perturbations rayonnées et conduites par l'électricité.

40
Safety precautions
Review and follow the safety instructions below :
Symbol
FCC compliance
Meaning
Caution & Warning
Protective earth (Ground)
This instrument and consumables conforms to the Declaration of
Conformity.
This equipment has been tested and found to comply with the limits for a
Class A digital device, pursuant to Part 15 of the FCC Rules.
These limits are designed to provide reasonable protection against
harmful interference when the equipment is operated in a commercial
environment.
This equipment generates, uses, and can radiate radio frequency energy
and, if not installed and used in accordance with the instruction manual,
may cause harmful interference to radio communications.
Operation of this equipment in a residential area is likely to cause
harmful interference in which case the user will be required to correct the
interference at his own expense.
WEEE (Waste Electrical and Electronic Equipment) symbol indicates
that this product should not be disposed of in unsorted municipal waste.
Follow local municipal waste ordinances for proper disposal provisions to
reduce the environmental impact of WEEE.
This product conforms to UL61010-1/CSA C22.2 No. 61010-1 “Safety
Requirements for Electrical Equipment for Measurement, Control, and
Laboratory Use, Part I: General Requirements.” Instruments bearing the
TUV symbol are certified by TUV Product Services to be in conformance
with the applicable safety standards for the US and Canada.

EVETM, Automatic Cell Counter ©2013 NanoEnTek Inc. 41
Product specifications
Operating power
Frequency
Electrical input
Installation site
Operating temperature
Maximum relative Humidity
Altitude
Transient category
Pollution degree
Degree of protection
Instrument type
Counting time
Cell measurement range (cells/mL)
Optimal measurement range (cells/mL)
Cell size range
Dimensions
Weight
Material
Dimensions
Chamber depth
Chamber volume
EVE™ USB drive
AC 100 - 240 VAC, 1.5A
50 / 60 Hz
12 VDC, 1.0 A
Indoor use only
5 - 40 °C
20 - 80 %
≤ 2,000 m
Installation categories II
2
IPX0
Benchtop cell counter
< 20 seconds
1 x 10⁴ - 1 x 10⁷
1 x 10⁵ - 4 x 10⁶
5 - 60 µm
27 cm (W) x 20 cm (D) x 19 cm (H)
2.1 kg
Polymethy methacrylate
75 mm (L) x 25 mm (W) x 1.8 mm (H)
100 µm
10 µL
2 GB
Environmental conditions
EVE™ instrument
EVE™ Cell counting slide

42
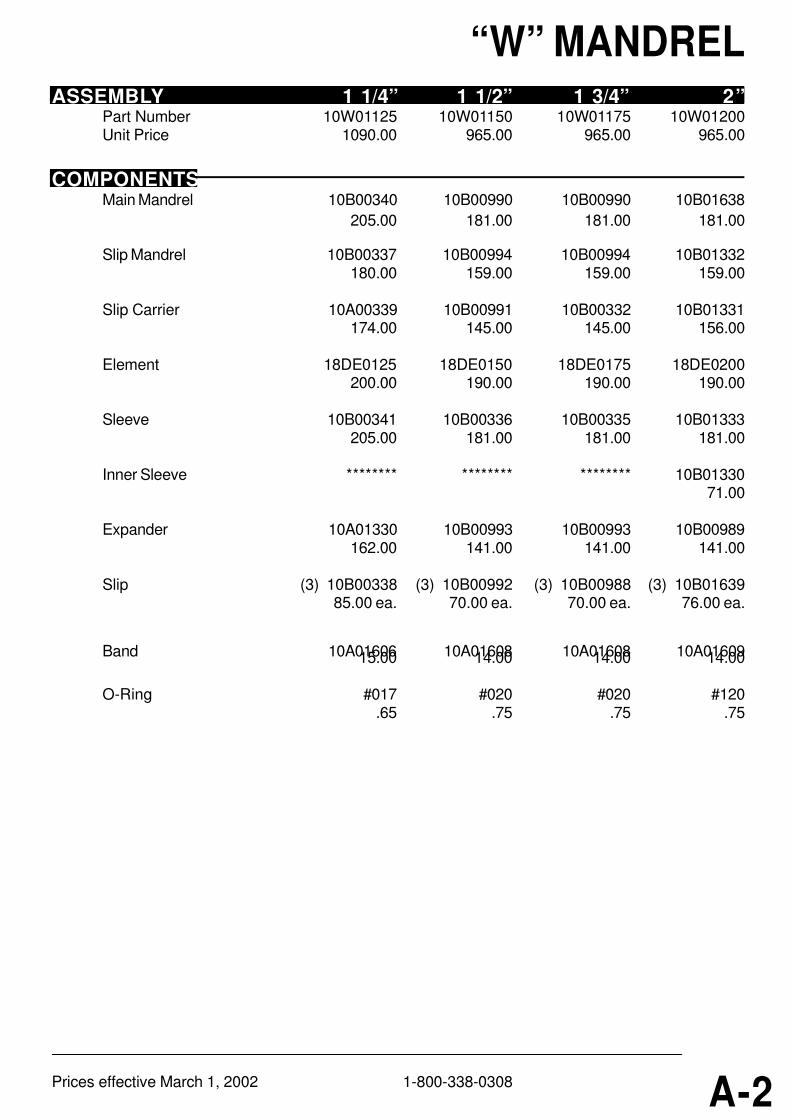
Ordering information
The following products can be used with the EVE™ and are available separately from NanoEnTek.
Cat. No.
EVS-050
EVS-1000
EVS-5000
EBB-001
Contents
50 slides
(100 counts, with 1 ea X 1.5 mL of
trypan blue (0.4%))
1,000 slides
(2,000 counts, with 20 ea X 1.5 mL of
trypan blue (0.4%))
5,000 slides
(10,000 counts, with 100 ea X 1.5 mL of
trypan blue (0.4%))
1 mL
Description
EVETM Cell counting slide
EVETM Cell counting slide
EVETM Cell counting slide
Test beads
Concentration(avg.) 1.0 X 10⁶

EVETM, Automatic Cell Counter ©2013 NanoEnTek Inc. 43
Technical support
Visit the our Website at www.nanoentek.com for :
· Technical resources, including manuals, FAQs, etc.
· Technical support contact information
· Additional product information and special offers.
For more information or technical assistance, please call or email.
NanoEnTek Inc. (HQ)12F, 5, Digital-ro 26-gil, Guro-gu, Seoul, 152-740, KoreaTel : +82-2-6220-7940 Fax : +82-2-6220-7721
NanoEnTek USA Inc. 5627 Stoneridge Drive Suite 304, Pleasanton, CA 94588, USATel : +1-925-225-0108, +1-888-988-0108(Toll free)Fax : +1-925-225-0109
Websitewww.nanoentek.com

EVE™
Automatic cell counter
NanoEnTek Inc. (HQ)12F, 5, Digital-ro 26-gil, Guro-gu, Seoul, 152-740, Korea
Tel. +82-2-6220-7940Fax. +82-2-6220-7721
NanoEnTek USA Inc. 5627 Stoneridge Drive Suite 304, Pleasanton, CA 94588, USATel : +1-925-225-0108, +1-888-988-0108(Toll free)Fax : +1-925-225-0109
Websitewww.nanoentek.com
NESMU-EVE-001E (V.0.8)


![[외부용]eve brochure 20130320 - Witec AGNanoEnTek 1 Demo request 1 demo@nanoentek.com lwebsitel !e-maill sales@nanoentek.com EVE ™ Automatie ce/1 counter NanoEnTek lnc. …](https://img.pdfslide.net/doc/110x75/5e5a462b40ede912617705af/eeve-brochure-20130320-witec-ag-nanoentek-1-demo-request-1-demonanoentekcom.jpg)