Embed Size (px)
Citation preview
32-bit Microcontrollers Application Note
Rev. 32086C-AVR32-04/08
AVR32015: AVR32 Studio getting started
Features • Installing AVR32 Studio • Upgrading from AVR32 Studio 1.0 to 2.x • Creating a AVR32 standalone application • Using examples from the SW framework • Creating a AVR32 Linux application
1 Introduction This application note is a quick start guide for the AVR®32 Studio. It documents on a step by step basis how a simple program can be created as standalone or Linux® application. All these steps and much more, are also described in the AVR32 Studio help system.
2 AVR32015 32086C-AVR32-04/08
2 AVR32 Studio introduction AVR32 Studio is an integrated development environment (IDE) for developing AVR32 applications. AVR32 Studio provides a complete set of features including project management and version control integration (CVS); a C/C++ editor with syntax highlighting and code completion; a debugger supporting run control including source and instruction-level stepping and breakpoints; registers, memory and I/O views; and target configuration and management. AVR32 Studio is Built on Eclipse, enabling easy integration with third party plugins for increased functionality.
AVR32 Studio supports all of Atmel's AVR32 32-bit processors. AVR32 Studio supports development and debugging of both standalone (without an operating system) applications and Linux applications (for the AT32AP7 device family).
All Atmel tools that support the AVR32 architecture, including the JTAGICE mkII, AVR®ONE! and STK®600, are supported by AVR32 Studio.
AVR32 Studio supports also all Atmel Linux boards like the STK1000 and the NGW100. To be able to debug Linux applications on the target system a network connection is necessary.
AVR32 Studio integrates with the GNU Toolchain for AVR32. The GNU C Compiler (GCC) is used for compiling C/C++ programs, while the GNU debugger (GDB) is used for debugging the application on target. Atmel's AVR32 utilities, avr32program and avr32gdbproxy, are used for deployment and debugging of standalone applications as well as target voltage and clock generator adjustments.
2.1 Software requirements In order to run AVR32 Studio following software requirements have to be met:
• Windows 2000 or Windows XP • Fedora Core 4, 5 or 6, Ubuntu Linux 6.06 (Dapper) or SUSE Linux 10.2 • Sun Java 2 Platform version 1.5 or later • Internet Explorer, Mozilla, or Firefox
AVR32 Studio has not been tested on Windows Vista or 64-bit operating systems and is thus not supported on these. AVR32 Studio does not support Windows 98, NT or ME. The Sun Java 2 Platform is installed automatically, if not already installed, on Windows platforms. On a Linux distribution this must be done by the user.
More software may be needed to be able to debug Linux applications on the target system by using AVR32 Studio on the host. In that case the GNU Debugger (GDB) server is needed on the target. The software is installed by default on all Atmel development boards and is included in the Buildroot build system. More information about the Buildroot build system can be found here: http://www.atmel.no/buildroot/
2.2 Hardware requirements¨ Following list shows the minimum requirements that have to be met to run AVR32 Studio:
• Minimum processor Pentium 4, 1GHz • Minimum 512 MB RAM • Minimum 300 MB free disk space
AVR32015
3
32086C-AVR32-04/08
• Minimum screen resolution of 1024x768 AVR32 Studio has not been tested on computers with fewer resources, but may run satisfactorily depending on the number and size of projects and the user's patience.
For the deployment of a standalone AVR32 application a Flash programmer or even better a JTAG device that supports the on-chip debug system is needed. The JTAGICE mkII or the AVR ONE! are such a devices that are supported within the AVR32 studio.
To transfer a Linux application to the target many possibilities are available. Depending on your deployment solution a SD-card, network connection or a Flash programmer may be needed.
AVR32 Studio needs a network connection to be able to debug a Linux application on the target system. If you intend to use a chip without network capabilities in your application use a chip with that interface for development and gain from the debugging capabilities. Because for instance the AP700x series is completely compatible you can switch the devices later in the development cycle.
2.3 Downloading and Installing The software can be found on the AVR32 Technical Library DVD, or on the Atmel website at http://www.atmel.com/products/avr32/ under the "Tools & Software" menu entry.
2.3.1 Windows
Note to users of 1.0: The Development Tools installer is no longer supported. This means that AVR32 Studio and the AVR32 Toolchain must be installed separately.
The AVR32 Studio installer can be downloaded from the website as noted above. After downloading, double-click the AVR32Studio-2.0-Setup.exe file to install. If you wish to specify the location where the AVR32 Studio software is installed, choose "Custom Installation". The installation software will install a Sun Java Runtime Environment on your computer if it is missing.
2.3.2 Linux
On Linux, the AVR32 Studio IDE is distributed separately from the AVR32 GNU Toolchain which can be installed as RPM or Debian packages depending on the distribution. AVR32 Studio is available as a ZIP archive which can be extracted using the unzip utility.
IMPORTANT! The Java runtime environments shipped with many Linux distributions are not compatible with AVR32 Studio. A Java Runtime (or JDK) 1.5 or 1.6 is required. Consult your distribution's documentation for instructions on installing Sun Java, or download it from Sun's website at http://java.sun.com/.
We recommend installing AVR32 Studio into a directory which is writable for the user(s). This simplifies the process of adding or updating the product using the update manager. On a single-user machine, you can typically extract the AVR32 Studio ZIP file into your home directory. This creates an avr32studio directory containing the product files.
To run AVR32 Studio, execute the avr32studio program from the avr32studio directory. If you experience problems, make sure the correct java is being used by running java -version which should give output similarly to this:
java version "1.6.0_03"
4 AVR32015 32086C-AVR32-04/08
Java(TM) SE Runtime Environment (build 1.6.0_03-b05) Java HotSpot(TM) Client VM (build 1.6.0_03-b05, mixed mode, sharing)
Note that you may need to set the environment variable MOZILLA_FIVE_HOME to the folder containing your Firefox install. e.g.
export MOZILLA_FIVE_HOME=/usr/lib/firefox-1.0.4 or, if using a tcsh: setenv MOZILLA_FIVE_HOME /usr/lib/firefox-1.0.4 in order for the welcome page to work.
2.4 Upgrading from version 1.0 to 2.0
2.4.1 AVR32 Studio
AVR32 Studio 1.0 and 2.0 as well as the GNU Toolchain 1.0 and 2.0 can co-exist. Therefore you may wait and uninstall the older versions when you are ready. This upgrade procedure is also described in the help system of the AVR32 Studio installation.
Simply install the AVR32 GNU Toolchain 2.0 first, then install AVR32 Studio 2.0 and start it. Every time AVR32 Studio starts it will test it's environment and report errors if some required applications are missing. If you do not get any error messages you should be ready to go.
2.4.2 Workspace
When upgrading AVR32 Studio from version 1.0 to 2.0 you have two choices with regards to your workspace. You can either upgrade your existing 1.0 workspace or you can create a new workspace and import your 1.0 projects.
If upgrading the workspace you should use a copy of your existing workspace. Changes will be made that causes the upgraded workspace to be incompatible with the 1.0 workspace.
AVR32 Studio 2.0 projects have quite different metadata compared to AVR32 Studio 1.0 projects and must thus be upgraded. Note that only projects that use the internal builder or the managed build system must be upgraded. Standard make projects will be left as they are.
1. Start by a pointing AVR32 Studio to a copy of your old workspace.
2. For each of the managed build projects the following will happen:
a. A dialog named 'Update Managed Build Project' will pop up and ask to update the project from version 3.1.0 to 4.0.0. Answer Yes on this question.
b. A new dialog named Backup File Already Exists pops up indicating that a file named .project_initial already exists and asks whether or not the project should be updated. Answer Yes on this question.
3. If your projects settings also require updates; a dialog will pop up requesting you to select projects that will be upgraded. Select all projects and press OK.
If you later on decide project settings shall be updated you may find the same dialog in the main menu by selecting Help > AVR32 Studio > Update project settings.

AVR32015
3 Creating a new AVR32 project All information in this “getting started guide” is also available in more detail in the AVR32 Studio user guide. The AVR32 user guide is included, among other related documentation, in the AVR32 studio and is available under the menu “Help -> Help Contents”. Use this integrated help system intensively in order to learn about all the available features and tools. The help documents can be updated with the update manager to get the latest versions.
3.1 Creating a workspace When you start AVR32 Studio for the first time following dialog will appear and ask you for a workspace folder. The workspace is the directory where your work will be stored.
Figure 1 Workspace selection/creation
If you already have a workspace that you want to use set the path to it. If not, type the path to a folder where you want your workspace. If the folder doesn’t exist it is created by AVR32 Studio.
3.2 Creating a new project The first thing you need to do is to create a new project. Go to the "File" menu, select "New..." and the type of project you want to make. If the project type is not in the list go to “New -> Project”.
AVR32 Studio offers two build systems. One is known the MBS or Managed Build System. This has two operation modes; internal build and managed make. The managed make mode will automatically create a Makefile for your project using the build settings you specify and execute Make using this Makefile. This requires that the Make utility is in your path. The latter will also use your build settings, but does not require Make. All toolchain commands are executed directly. This is the preferred method and the one offered per default. Creating a project using this method is done through the C Project Wizard or the C ++Project Wizard. All available project types are described in the AVR32 Studio help files in detail.
It is not possible to use a wizard to create a managed make project directly. This has to be done through the project properties dialogue.
5
32086C-AVR32-04/08
6 AVR32015
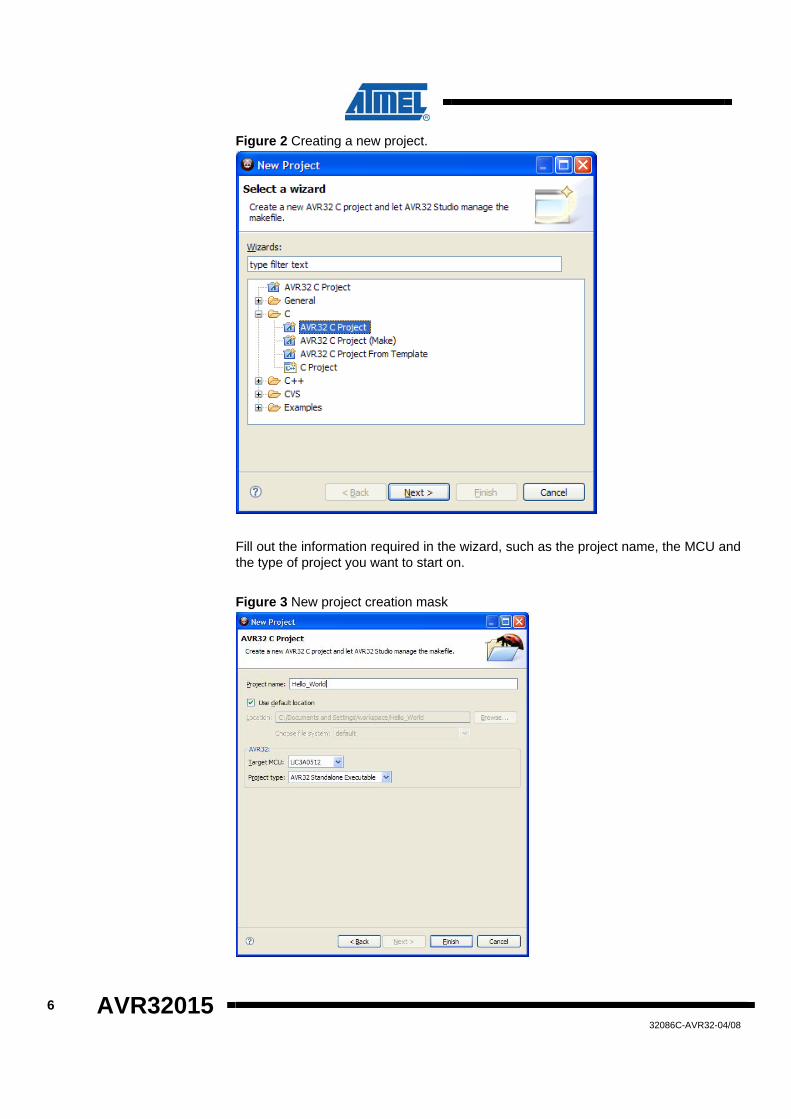
Figure 2 Creating a new project.
Fill out the information required in the wizard, such as the project name, the MCU and the type of project you want to start on.
Figure 3 New project creation mask
32086C-AVR32-04/08
AVR32015
4 Importing AVR32 Studio 1.0 projects AVR32 Studio 1.0 projects imported to a AVR32 Studio 2.0 workspace must be upgraded before they can be used. The managed build system updates will be handled automatically while some AVR32 Studio settings must be done manually. The procedure is as follows:
1. Import of the project is initiated by selecting File > Import from the main menu then selecting the Existing Projects Into Workspace wizard.
2. Select the projects you wish to import and make sure that the Copy projects into workspace option is selected.
3. A dialog named 'Update Managed Build Project' will pop up and ask to update the project from version 3.1.0 to 4.0.0. Answer Yes on this question.
4. A new dialog named Backup File Already Exists pops up indicating that a file named .project_initial already exists and asks whether or not the project should be updated. Answer Yes on this question.
5. Start the AVR32 Studio project update by selecting Help > AVR32 Studio > Update project settings from the main menu and select the project that you've just imported. Press OK to upgrade the project.
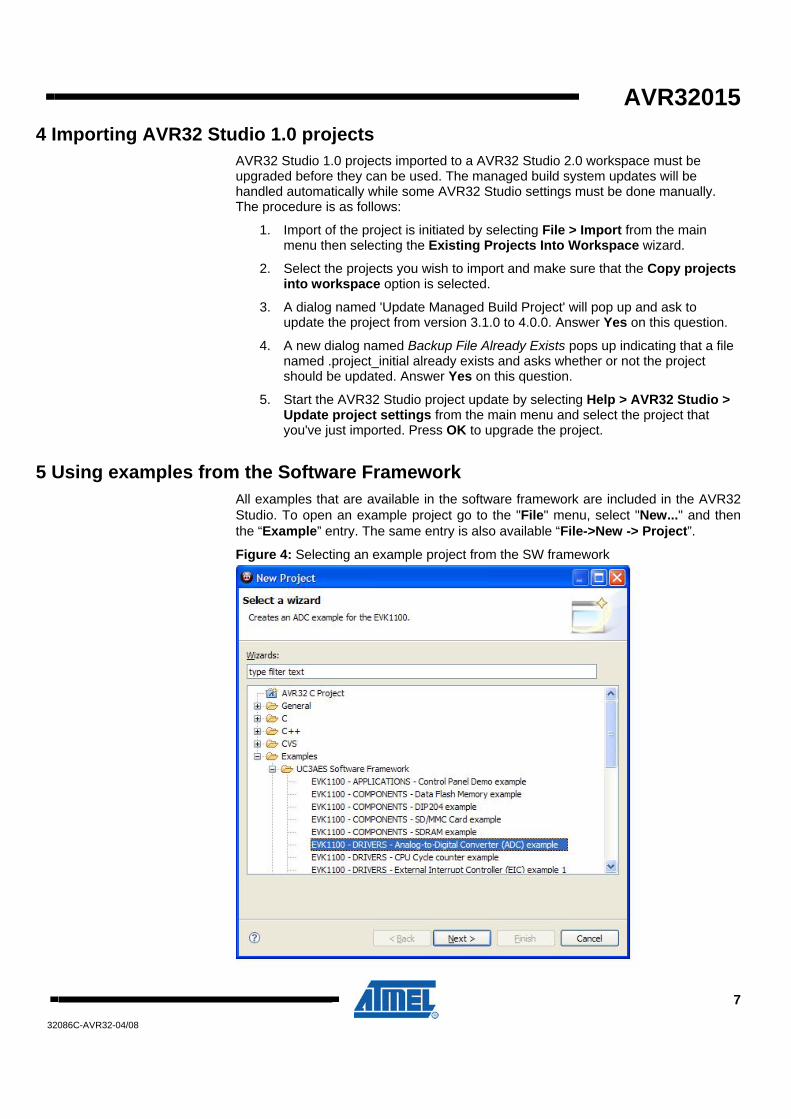
5 Using examples from the Software Framework All examples that are available in the software framework are included in the AVR32 Studio. To open an example project go to the "File" menu, select "New..." and then the “Example” entry. The same entry is also available “File->New -> Project”.
Figure 4: Selecting an example project from the SW framework
7
32086C-AVR32-04/08
8 AVR32015
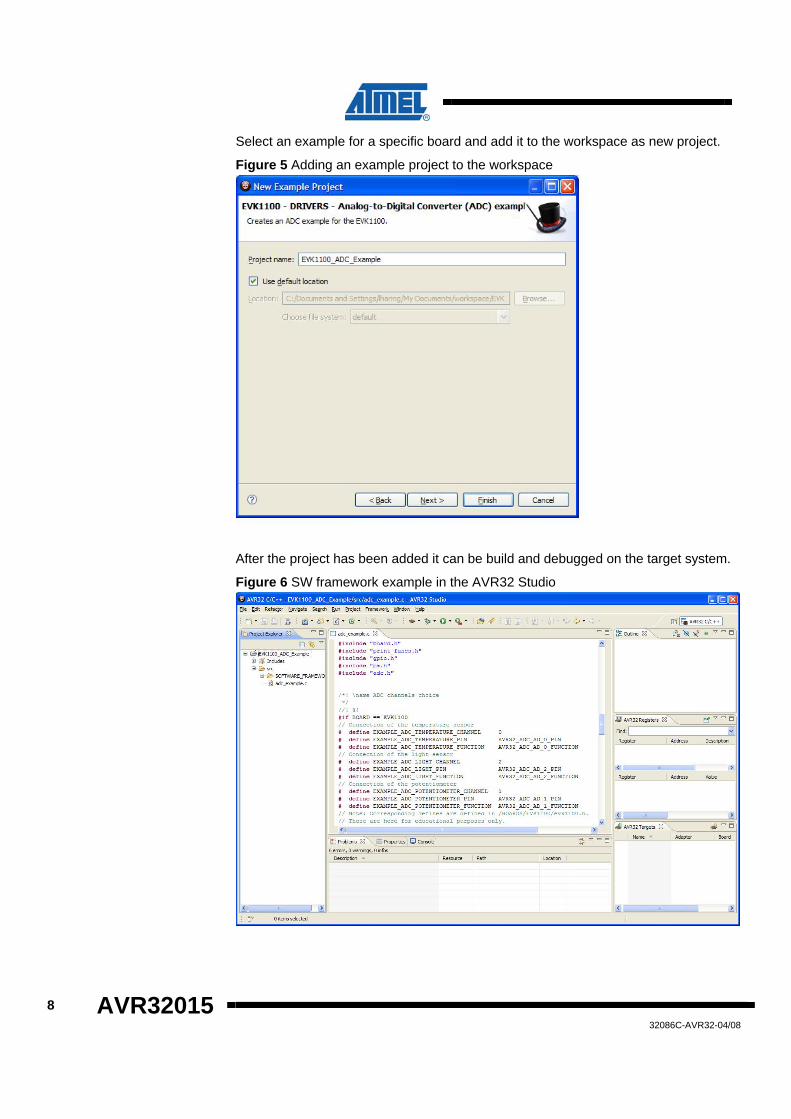
Select an example for a specific board and add it to the workspace as new project.
Figure 5 Adding an example project to the workspace
After the project has been added it can be build and debugged on the target system.
Figure 6 SW framework example in the AVR32 Studio
32086C-AVR32-04/08
AVR32015
6 Adding files to the project
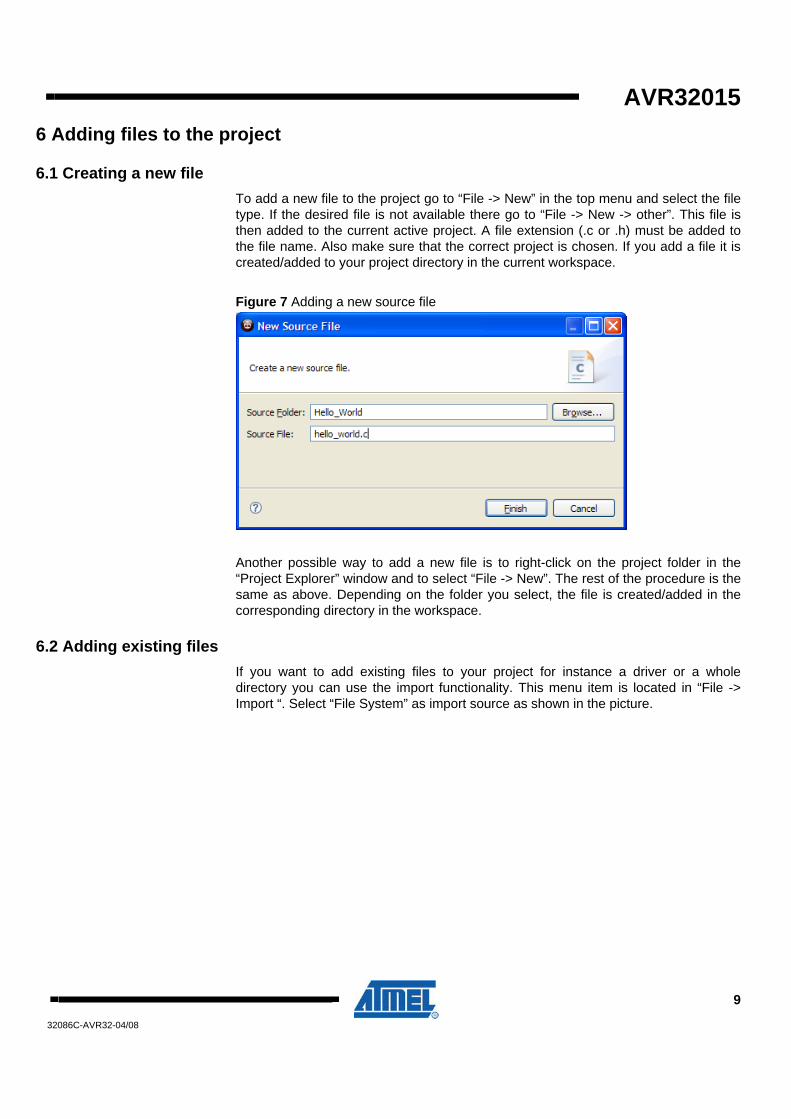
6.1 Creating a new file To add a new file to the project go to “File -> New” in the top menu and select the file type. If the desired file is not available there go to “File -> New -> other”. This file is then added to the current active project. A file extension (.c or .h) must be added to the file name. Also make sure that the correct project is chosen. If you add a file it is created/added to your project directory in the current workspace.
Figure 7 Adding a new source file
Another possible way to add a new file is to right-click on the project folder in the “Project Explorer” window and to select “File -> New”. The rest of the procedure is the same as above. Depending on the folder you select, the file is created/added in the corresponding directory in the workspace.
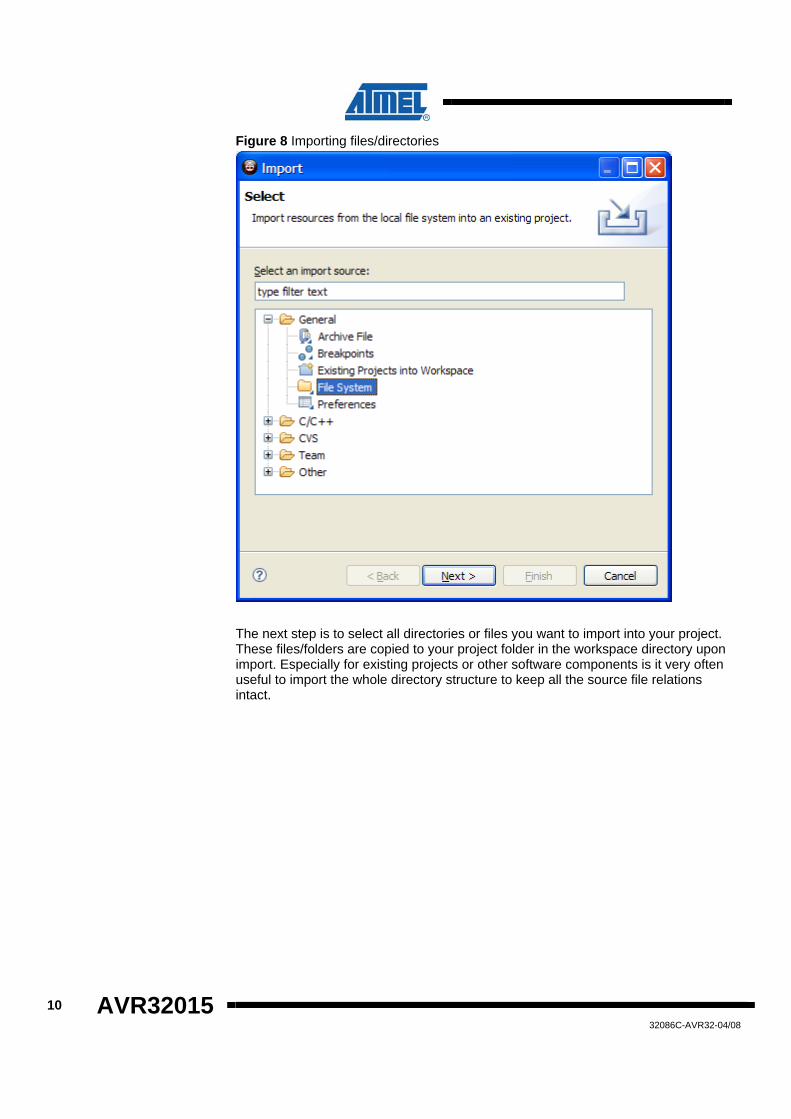
6.2 Adding existing files If you want to add existing files to your project for instance a driver or a whole directory you can use the import functionality. This menu item is located in “File -> Import “. Select “File System” as import source as shown in the picture.
9
32086C-AVR32-04/08
10 AVR32015
Figure 8 Importing files/directories
The next step is to select all directories or files you want to import into your project. These files/folders are copied to your project folder in the workspace directory upon import. Especially for existing projects or other software components is it very often useful to import the whole directory structure to keep all the source file relations intact.
32086C-AVR32-04/08
AVR32015
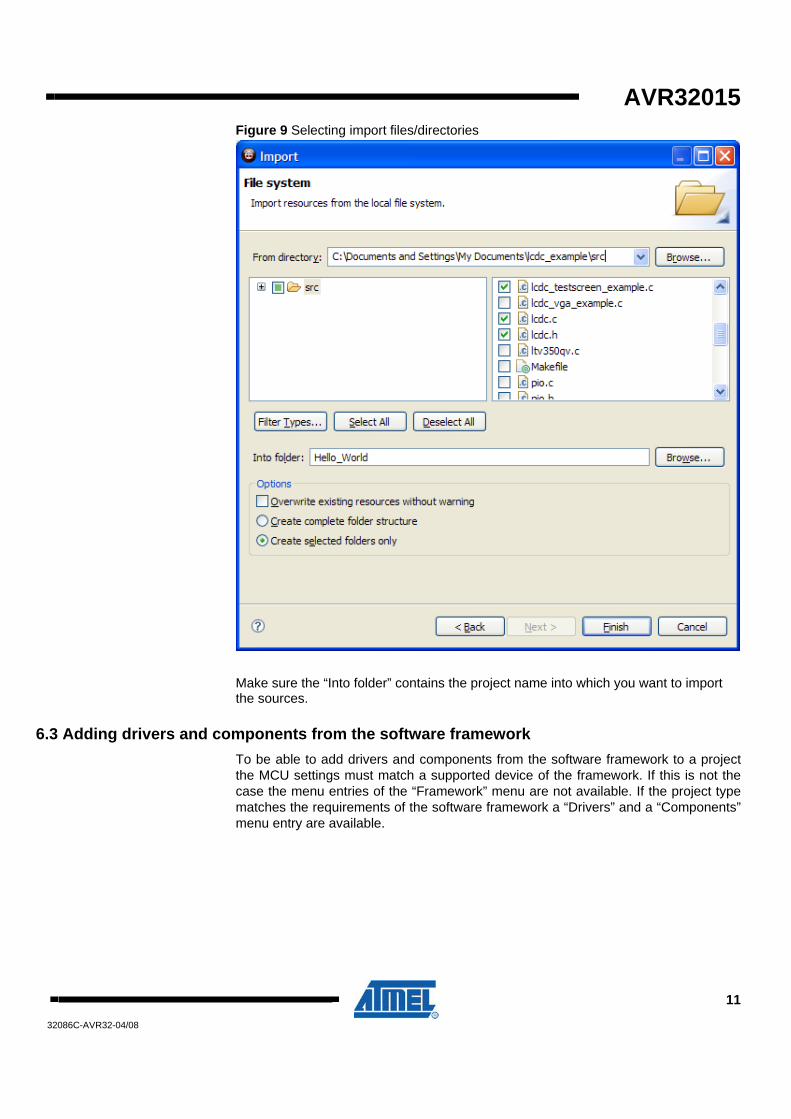
Figure 9 Selecting import files/directories
Make sure the “Into folder” contains the project name into which you want to import the sources.
6.3 Adding drivers and components from the software framework To be able to add drivers and components from the software framework to a project the MCU settings must match a supported device of the framework. If this is not the case the menu entries of the “Framework” menu are not available. If the project type matches the requirements of the software framework a “Drivers” and a “Components” menu entry are available.
11
32086C-AVR32-04/08
12 AVR32015
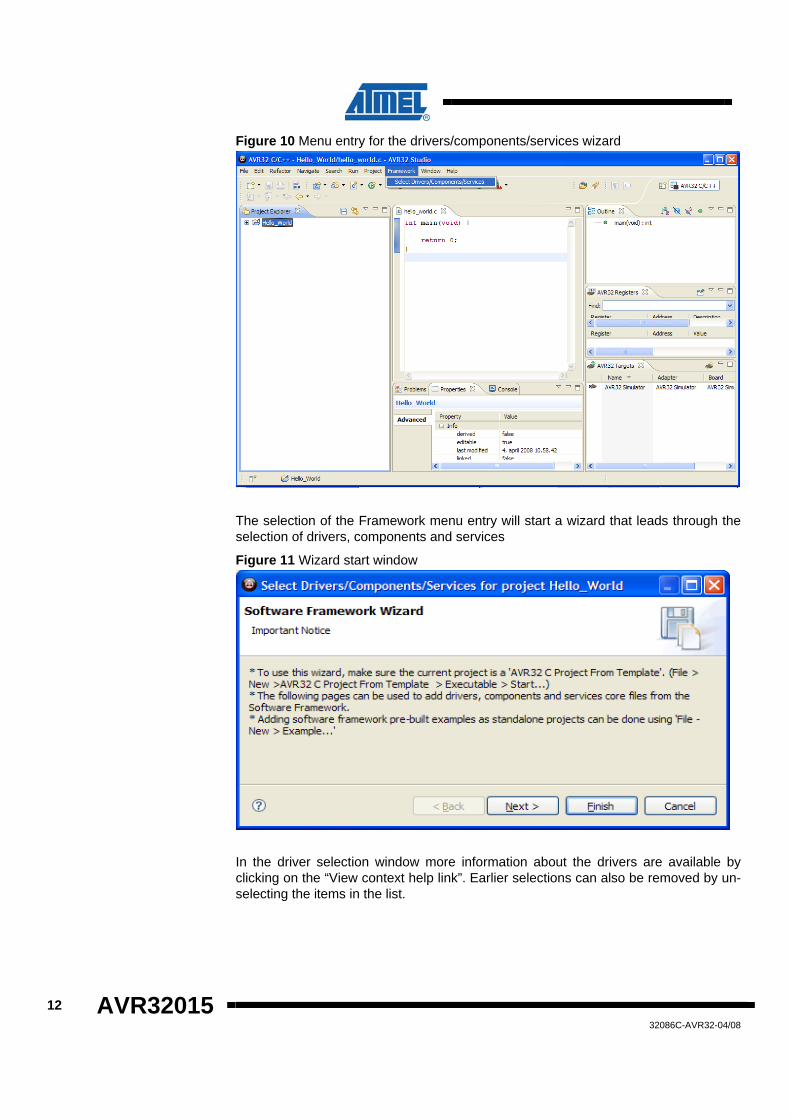
Figure 10 Menu entry for the drivers/components/services wizard
The selection of the Framework menu entry will start a wizard that leads through the selection of drivers, components and services
Figure 11 Wizard start window
In the driver selection window more information about the drivers are available by clicking on the “View context help link”. Earlier selections can also be removed by un-selecting the items in the list.
32086C-AVR32-04/08
AVR32015
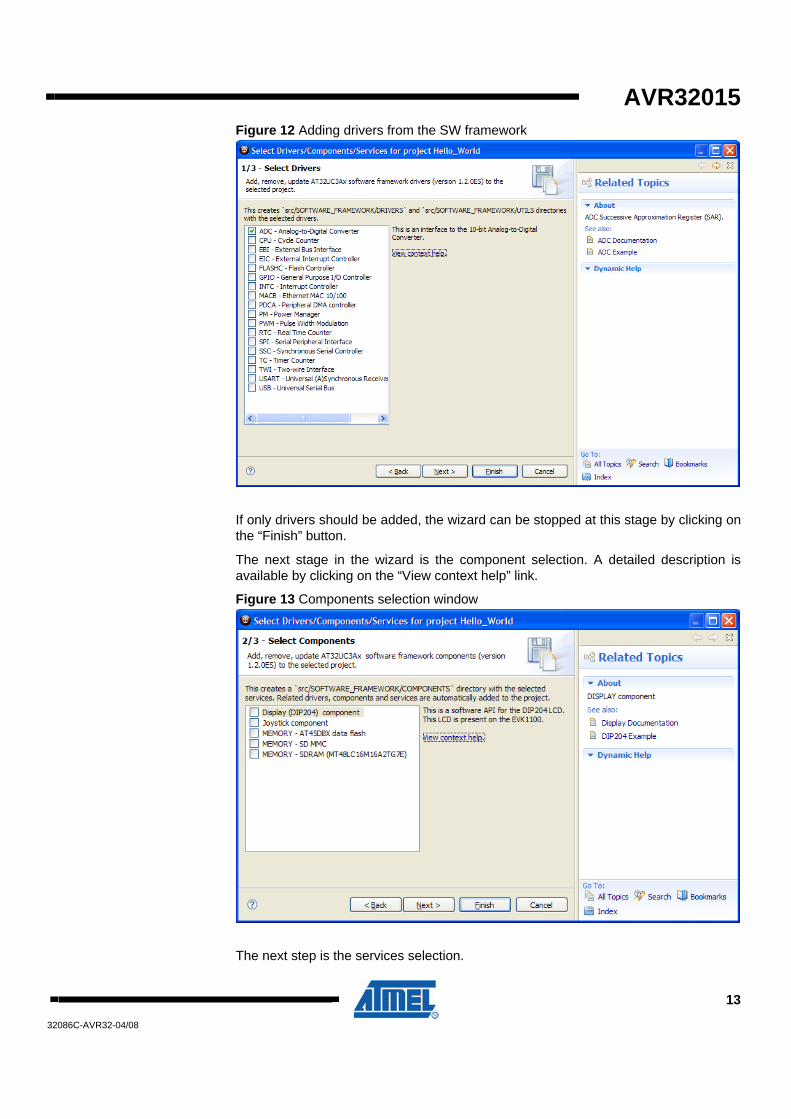
Figure 12 Adding drivers from the SW framework
If only drivers should be added, the wizard can be stopped at this stage by clicking on the “Finish” button.
The next stage in the wizard is the component selection. A detailed description is available by clicking on the “View context help” link.
Figure 13 Components selection window
The next step is the services selection.
13
32086C-AVR32-04/08
14 AVR32015
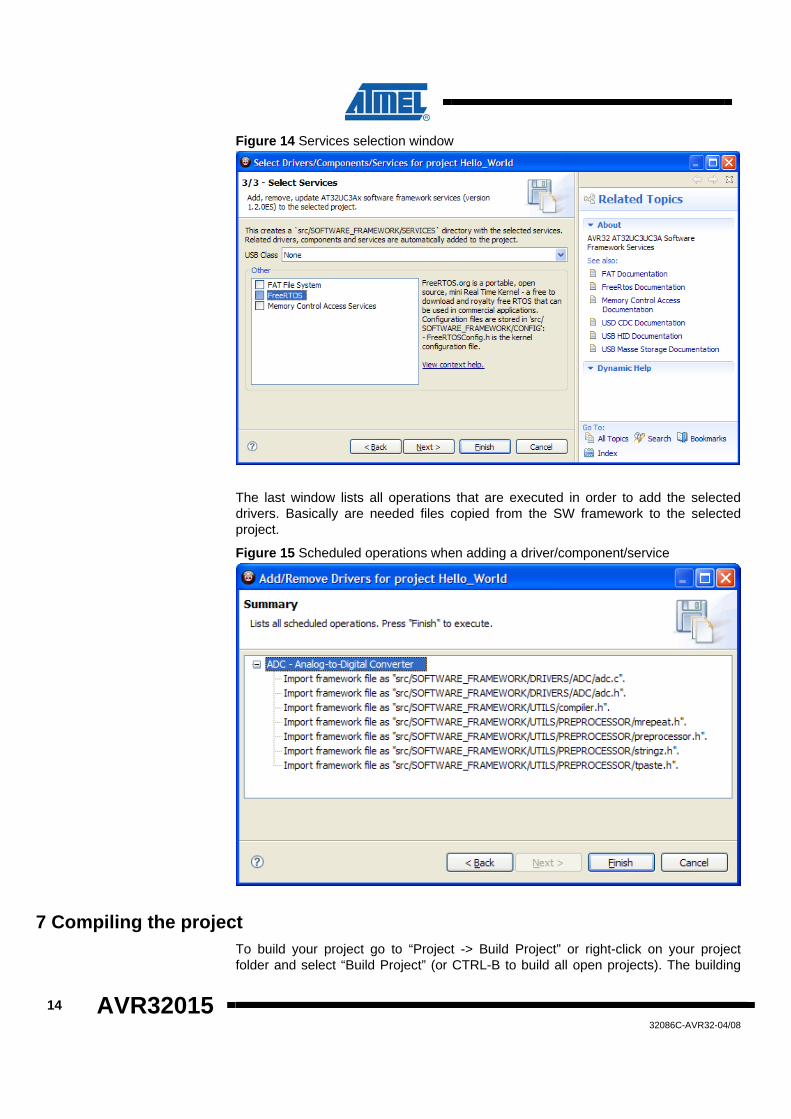
Figure 14 Services selection window
The last window lists all operations that are executed in order to add the selected drivers. Basically are needed files copied from the SW framework to the selected project.
Figure 15 Scheduled operations when adding a driver/component/service
7 Compiling the project To build your project go to “Project -> Build Project” or right-click on your project folder and select “Build Project” (or CTRL-B to build all open projects). The building
32086C-AVR32-04/08
AVR32015
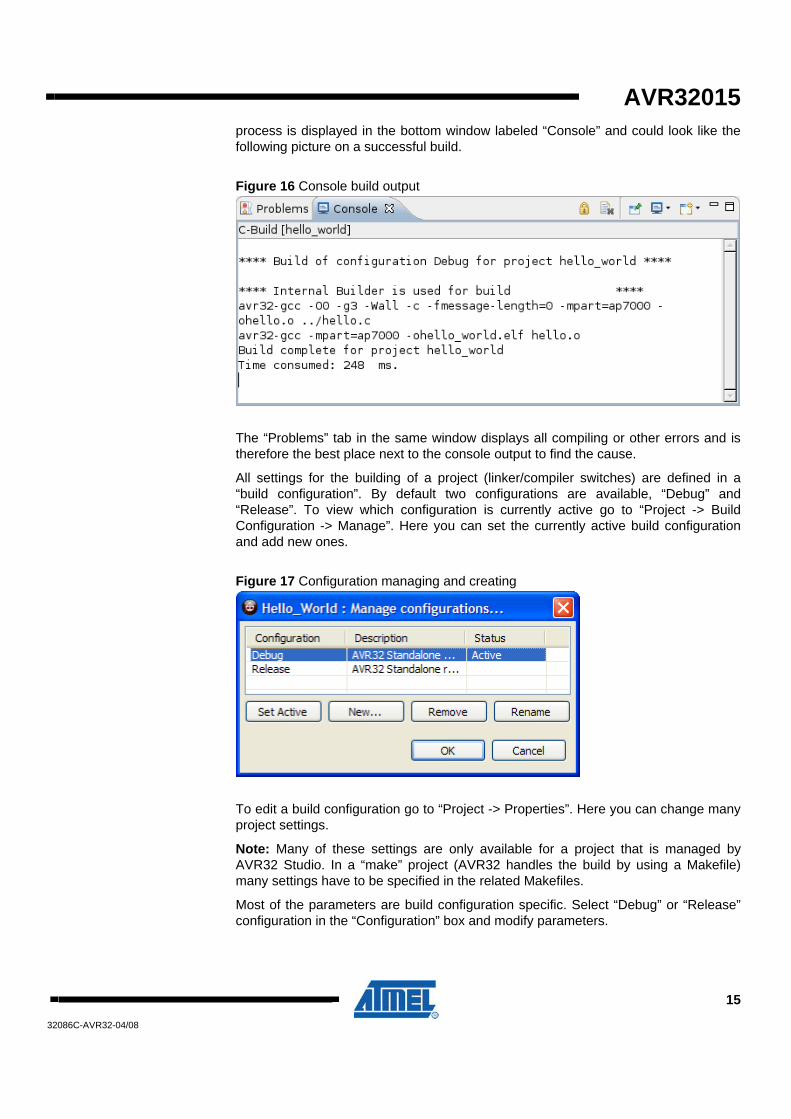
process is displayed in the bottom window labeled “Console” and could look like the following picture on a successful build.
Figure 16 Console build output
The “Problems” tab in the same window displays all compiling or other errors and is therefore the best place next to the console output to find the cause.
All settings for the building of a project (linker/compiler switches) are defined in a “build configuration”. By default two configurations are available, “Debug” and “Release”. To view which configuration is currently active go to “Project -> Build Configuration -> Manage”. Here you can set the currently active build configuration and add new ones.
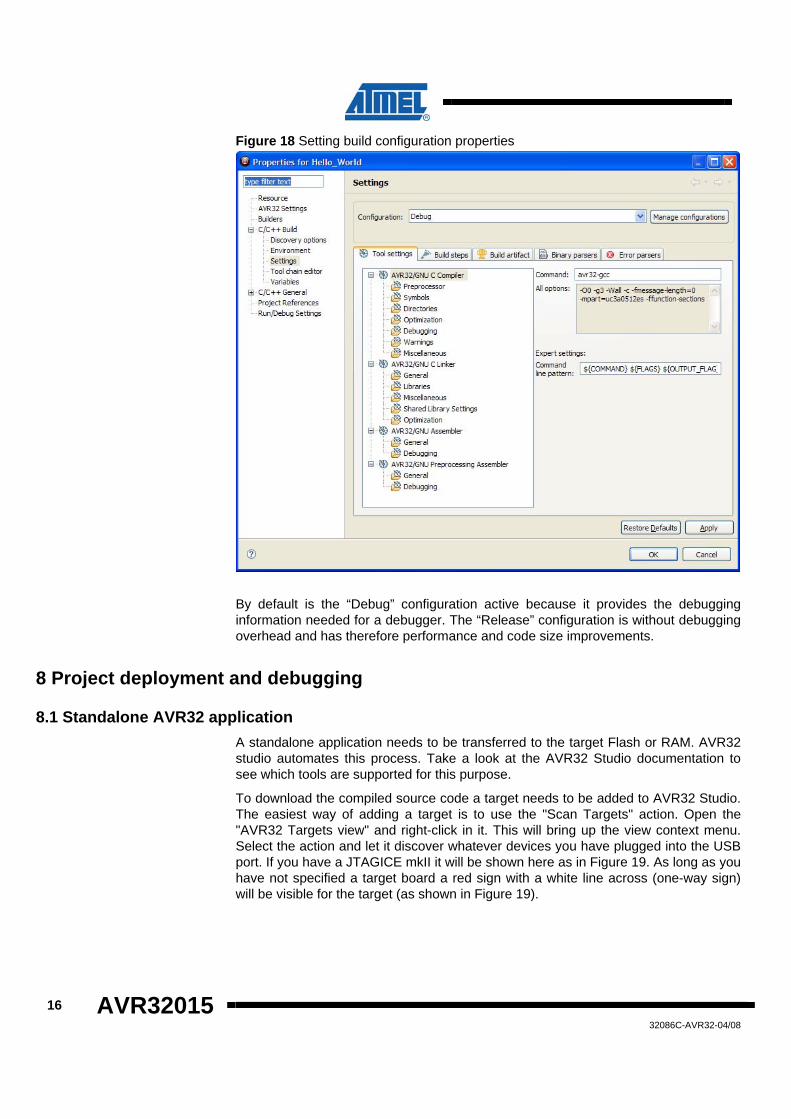
Figure 17 Configuration managing and creating
To edit a build configuration go to “Project -> Properties”. Here you can change many project settings.
Note: Many of these settings are only available for a project that is managed by AVR32 Studio. In a “make” project (AVR32 handles the build by using a Makefile) many settings have to be specified in the related Makefiles.
Most of the parameters are build configuration specific. Select “Debug” or “Release” configuration in the “Configuration” box and modify parameters.
15
32086C-AVR32-04/08
16 AVR32015
Figure 18 Setting build configuration properties
By default is the “Debug” configuration active because it provides the debugging information needed for a debugger. The “Release” configuration is without debugging overhead and has therefore performance and code size improvements.
8 Project deployment and debugging
8.1 Standalone AVR32 application A standalone application needs to be transferred to the target Flash or RAM. AVR32 studio automates this process. Take a look at the AVR32 Studio documentation to see which tools are supported for this purpose.
To download the compiled source code a target needs to be added to AVR32 Studio. The easiest way of adding a target is to use the "Scan Targets" action. Open the "AVR32 Targets view" and right-click in it. This will bring up the view context menu. Select the action and let it discover whatever devices you have plugged into the USB port. If you have a JTAGICE mkII it will be shown here as in Figure 19. As long as you have not specified a target board a red sign with a white line across (one-way sign) will be visible for the target (as shown in Figure 19).
32086C-AVR32-04/08

AVR32015
Figure 19 Creating/Scanning targets
If no target was discovered you can manually add a new one by pressing the "Add target" tool button in the upper right corner in the view.
The Target view contains the list of targets, and allows the user to perform actions on the targets as well as set up the targets. A target consists of three main components: adapter, board and microcontroller unit (MCU). The adapter role, is often performed by a JTAGICE mkII that communicates with the MCU and is responsible for executing the programming and/or debugging commands. The board is the hardware where the MCU is mounted, and may contain external memory which can be used by the MCU.
Now open the "Properties" view (if not visible in the main window by default go to “Window -> Show View -> Properties) and select the target that was just discovered. Because the “Properties view” is shared by other functions or values of AVR32 Studio another click on the target may be needed to display its properties in the pane. If the target was added manually you must select the "Adapter" tab and set the correct adapter. Otherwise the adapter should be correct.
Go to the "Board" tab and select the board you have. The MCU will be automatically selected if there is only one MCU available for that board. Otherwise you must also select the correct MCU.
17
32086C-AVR32-04/08
18 AVR32015
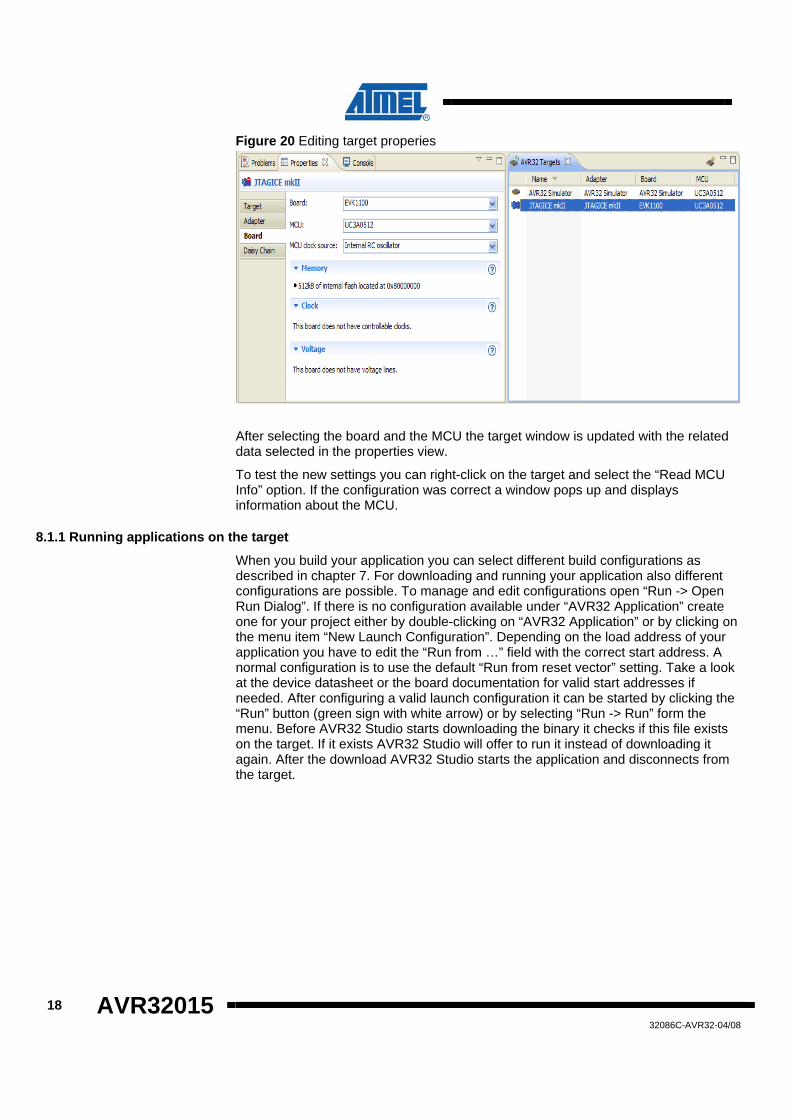
Figure 20 Editing target properies
After selecting the board and the MCU the target window is updated with the related data selected in the properties view.
To test the new settings you can right-click on the target and select the “Read MCU Info” option. If the configuration was correct a window pops up and displays information about the MCU.
8.1.1 Running applications on the target
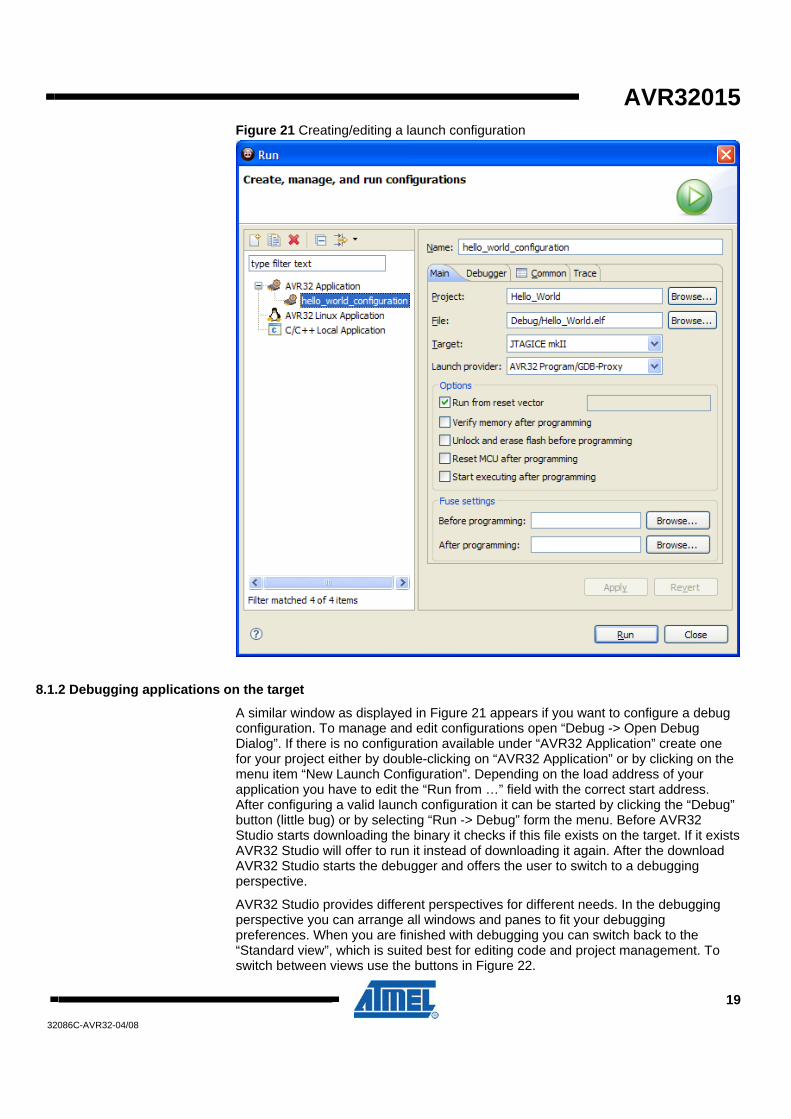
When you build your application you can select different build configurations as described in chapter 7. For downloading and running your application also different configurations are possible. To manage and edit configurations open “Run -> Open Run Dialog”. If there is no configuration available under “AVR32 Application” create one for your project either by double-clicking on “AVR32 Application” or by clicking on the menu item “New Launch Configuration”. Depending on the load address of your application you have to edit the “Run from …” field with the correct start address. A normal configuration is to use the default “Run from reset vector” setting. Take a look at the device datasheet or the board documentation for valid start addresses if needed. After configuring a valid launch configuration it can be started by clicking the “Run” button (green sign with white arrow) or by selecting “Run -> Run” form the menu. Before AVR32 Studio starts downloading the binary it checks if this file exists on the target. If it exists AVR32 Studio will offer to run it instead of downloading it again. After the download AVR32 Studio starts the application and disconnects from the target.
32086C-AVR32-04/08
AVR32015
Figure 21 Creating/editing a launch configuration
8.1.2 Debugging applications on the target
A similar window as displayed in Figure 21 appears if you want to configure a debug configuration. To manage and edit configurations open “Debug -> Open Debug Dialog”. If there is no configuration available under “AVR32 Application” create one for your project either by double-clicking on “AVR32 Application” or by clicking on the menu item “New Launch Configuration”. Depending on the load address of your application you have to edit the “Run from …” field with the correct start address. After configuring a valid launch configuration it can be started by clicking the “Debug” button (little bug) or by selecting “Run -> Debug” form the menu. Before AVR32 Studio starts downloading the binary it checks if this file exists on the target. If it exists AVR32 Studio will offer to run it instead of downloading it again. After the download AVR32 Studio starts the debugger and offers the user to switch to a debugging perspective.
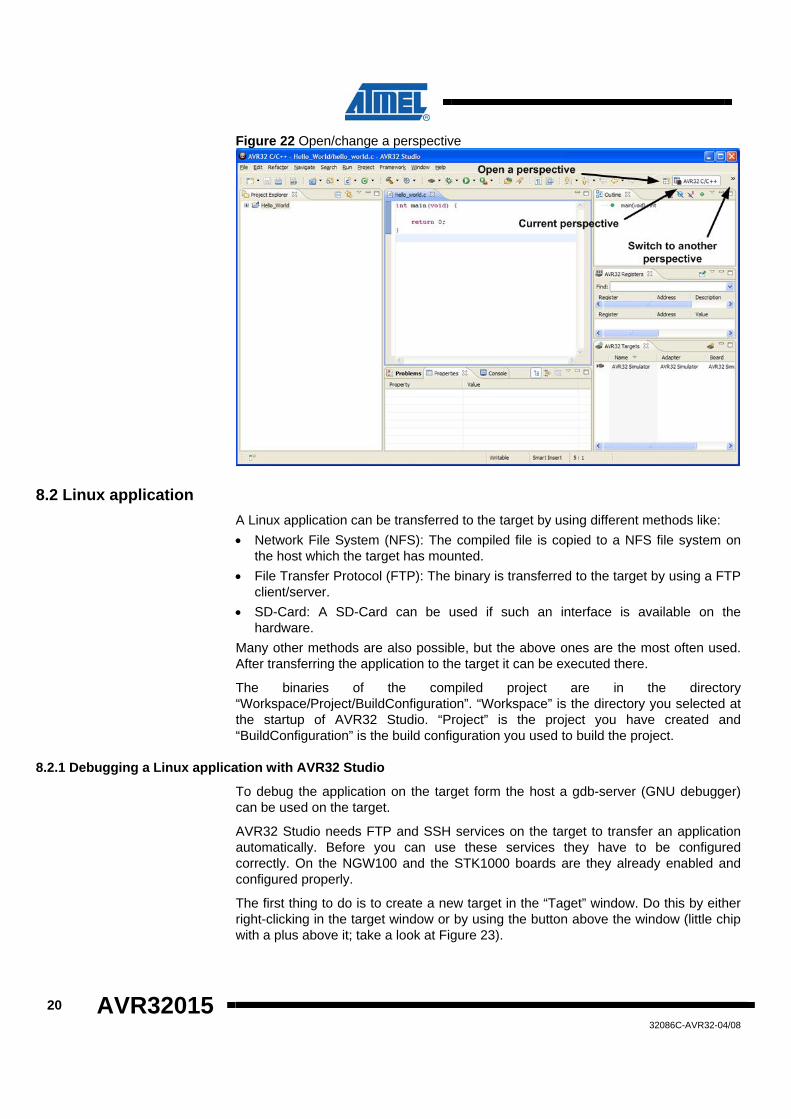
AVR32 Studio provides different perspectives for different needs. In the debugging perspective you can arrange all windows and panes to fit your debugging preferences. When you are finished with debugging you can switch back to the “Standard view”, which is suited best for editing code and project management. To switch between views use the buttons in Figure 22.
19
32086C-AVR32-04/08
20 AVR32015
Figure 22 Open/change a perspective
8.2 Linux application A Linux application can be transferred to the target by using different methods like: • Network File System (NFS): The compiled file is copied to a NFS file system on
the host which the target has mounted. • File Transfer Protocol (FTP): The binary is transferred to the target by using a FTP
client/server. • SD-Card: A SD-Card can be used if such an interface is available on the
hardware. Many other methods are also possible, but the above ones are the most often used. After transferring the application to the target it can be executed there.
The binaries of the compiled project are in the directory “Workspace/Project/BuildConfiguration”. “Workspace” is the directory you selected at the startup of AVR32 Studio. “Project” is the project you have created and “BuildConfiguration” is the build configuration you used to build the project.
8.2.1 Debugging a Linux application with AVR32 Studio
To debug the application on the target form the host a gdb-server (GNU debugger) can be used on the target.
AVR32 Studio needs FTP and SSH services on the target to transfer an application automatically. Before you can use these services they have to be configured correctly. On the NGW100 and the STK1000 boards are they already enabled and configured properly.
The first thing to do is to create a new target in the “Taget” window. Do this by either right-clicking in the target window or by using the button above the window (little chip with a plus above it; take a look at Figure 23).
32086C-AVR32-04/08
AVR32015
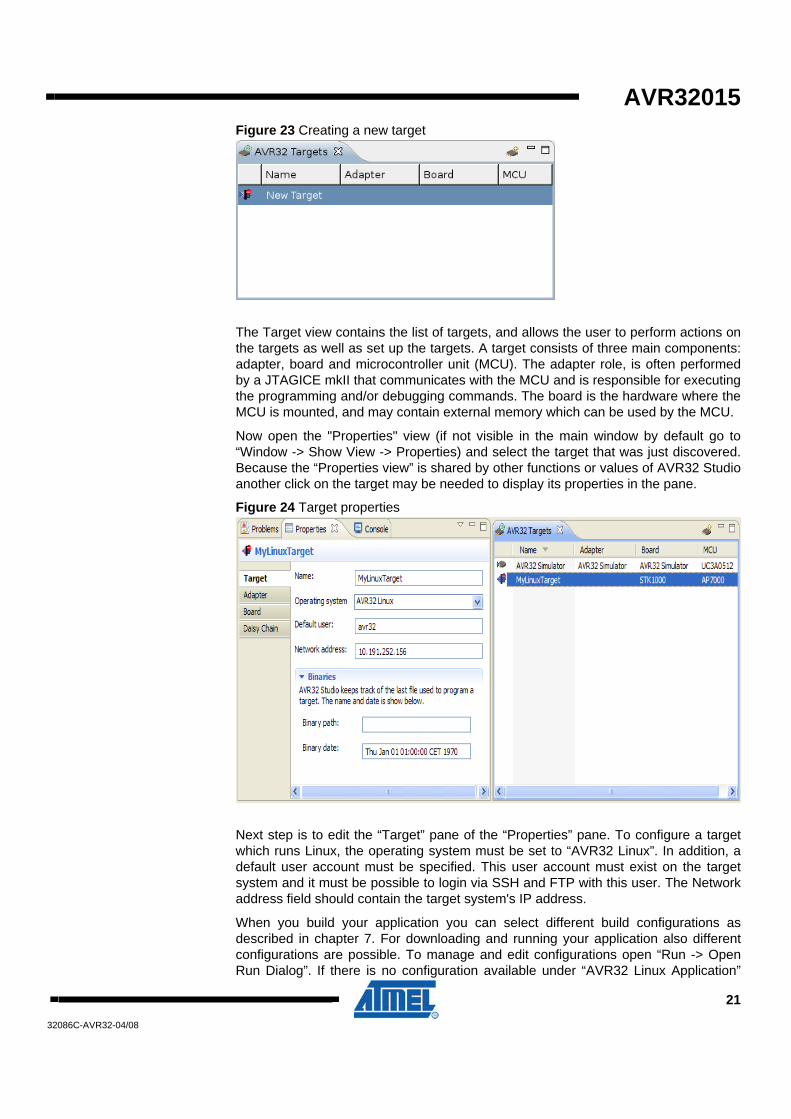
Figure 23 Creating a new target
The Target view contains the list of targets, and allows the user to perform actions on the targets as well as set up the targets. A target consists of three main components: adapter, board and microcontroller unit (MCU). The adapter role, is often performed by a JTAGICE mkII that communicates with the MCU and is responsible for executing the programming and/or debugging commands. The board is the hardware where the MCU is mounted, and may contain external memory which can be used by the MCU.
Now open the "Properties" view (if not visible in the main window by default go to “Window -> Show View -> Properties) and select the target that was just discovered. Because the “Properties view” is shared by other functions or values of AVR32 Studio another click on the target may be needed to display its properties in the pane.
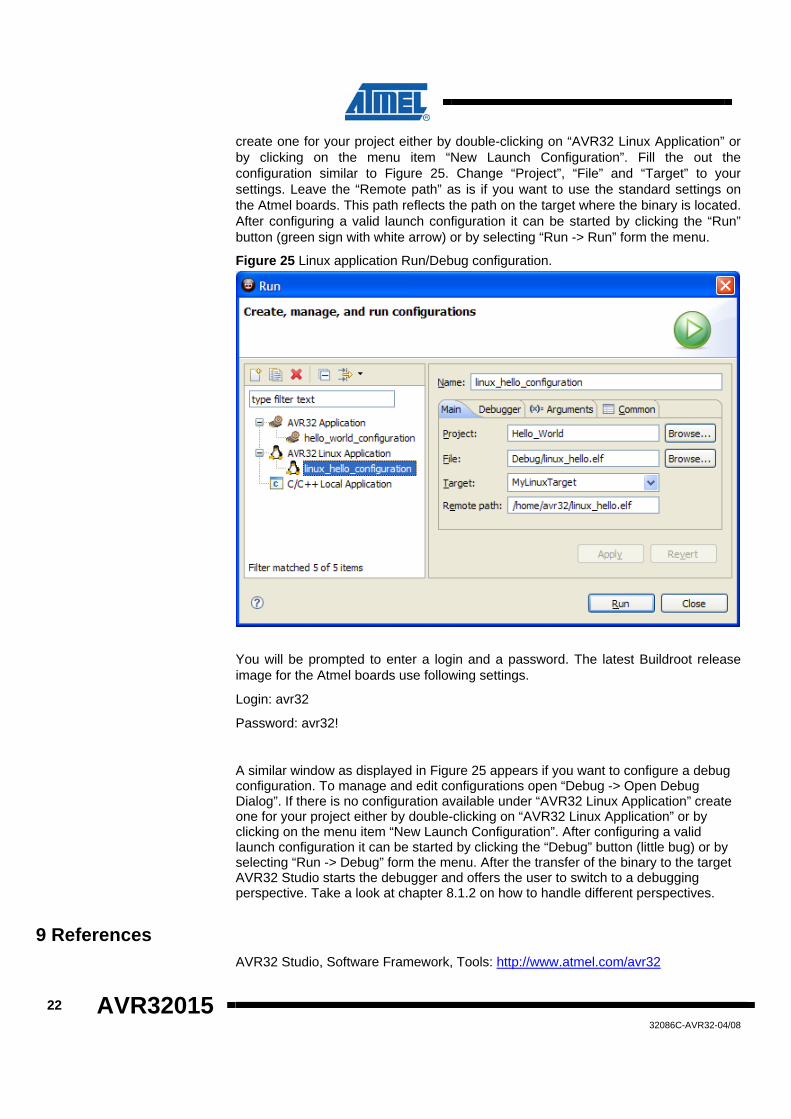
Figure 24 Target properties
Next step is to edit the “Target” pane of the “Properties” pane. To configure a target which runs Linux, the operating system must be set to “AVR32 Linux”. In addition, a default user account must be specified. This user account must exist on the target system and it must be possible to login via SSH and FTP with this user. The Network address field should contain the target system's IP address.
When you build your application you can select different build configurations as described in chapter 7. For downloading and running your application also different configurations are possible. To manage and edit configurations open “Run -> Open Run Dialog”. If there is no configuration available under “AVR32 Linux Application”
21
32086C-AVR32-04/08
22 AVR32015
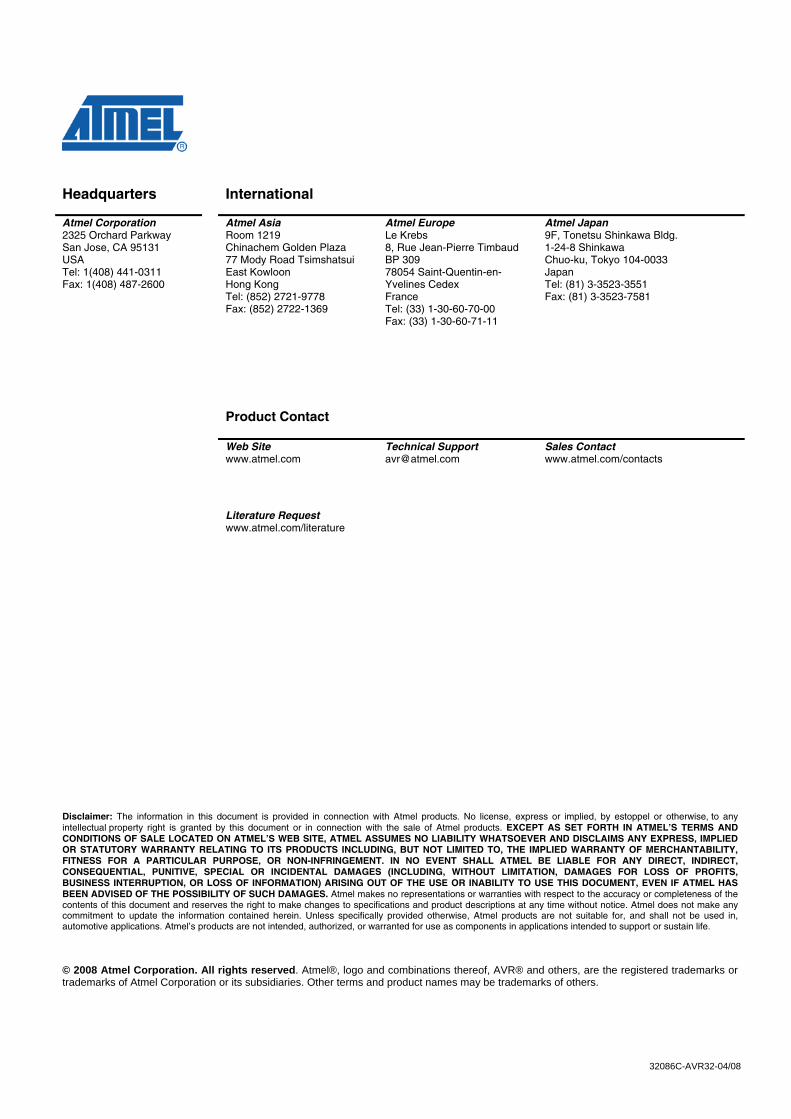
create one for your project either by double-clicking on “AVR32 Linux Application” or by clicking on the menu item “New Launch Configuration”. Fill the out the configuration similar to Figure 25. Change “Project”, “File” and “Target” to your settings. Leave the “Remote path” as is if you want to use the standard settings on the Atmel boards. This path reflects the path on the target where the binary is located. After configuring a valid launch configuration it can be started by clicking the “Run” button (green sign with white arrow) or by selecting “Run -> Run” form the menu.
Figure 25 Linux application Run/Debug configuration.
You will be prompted to enter a login and a password. The latest Buildroot release image for the Atmel boards use following settings.
Login: avr32
Password: avr32!
A similar window as displayed in Figure 25 appears if you want to configure a debug configuration. To manage and edit configurations open “Debug -> Open Debug Dialog”. If there is no configuration available under “AVR32 Linux Application” create one for your project either by double-clicking on “AVR32 Linux Application” or by clicking on the menu item “New Launch Configuration”. After configuring a valid launch configuration it can be started by clicking the “Debug” button (little bug) or by selecting “Run -> Debug” form the menu. After the transfer of the binary to the target AVR32 Studio starts the debugger and offers the user to switch to a debugging perspective. Take a look at chapter 8.1.2 on how to handle different perspectives.
9 References AVR32 Studio, Software Framework, Tools: http://www.atmel.com/avr32
32086C-AVR32-04/08
Disclaimer Headquarters International
Atmel Corporation 2325 Orchard Parkway San Jose, CA 95131 USA Tel: 1(408) 441-0311 Fax: 1(408) 487-2600
Atmel Asia Room 1219 Chinachem Golden Plaza 77 Mody Road Tsimshatsui East Kowloon Hong Kong Tel: (852) 2721-9778 Fax: (852) 2722-1369
Product Contact
Atmel Europe Le Krebs 8, Rue Jean-Pierre Timbaud BP 309 78054 Saint-Quentin-en-Yvelines Cedex France Tel: (33) 1-30-60-70-00 Fax: (33) 1-30-60-71-11
Atmel Japan 9F, Tonetsu Shinkawa Bldg. 1-24-8 Shinkawa Chuo-ku, Tokyo 104-0033 Japan Tel: (81) 3-3523-3551 Fax: (81) 3-3523-7581
Web Site www.atmel.com
Technical Support [email protected]
Sales Contact www.atmel.com/contacts
Literature Request www.atmel.com/literature
Disclaimer: The information in this document is provided in connection with Atmel products. No license, express or implied, by estoppel or otherwise, to any intellectual property right is granted by this document or in connection with the sale of Atmel products. EXCEPT AS SET FORTH IN ATMEL’S TERMS AND CONDITIONS OF SALE LOCATED ON ATMEL’S WEB SITE, ATMEL ASSUMES NO LIABILITY WHATSOEVER AND DISCLAIMS ANY EXPRESS, IMPLIED OR STATUTORY WARRANTY RELATING TO ITS PRODUCTS INCLUDING, BUT NOT LIMITED TO, THE IMPLIED WARRANTY OF MERCHANTABILITY, FITNESS FOR A PARTICULAR PURPOSE, OR NON-INFRINGEMENT. IN NO EVENT SHALL ATMEL BE LIABLE FOR ANY DIRECT, INDIRECT, CONSEQUENTIAL, PUNITIVE, SPECIAL OR INCIDENTAL DAMAGES (INCLUDING, WITHOUT LIMITATION, DAMAGES FOR LOSS OF PROFITS, BUSINESS INTERRUPTION, OR LOSS OF INFORMATION) ARISING OUT OF THE USE OR INABILITY TO USE THIS DOCUMENT, EVEN IF ATMEL HAS BEEN ADVISED OF THE POSSIBILITY OF SUCH DAMAGES. Atmel makes no representations or warranties with respect to the accuracy or completeness of the contents of this document and reserves the right to make changes to specifications and product descriptions at any time without notice. Atmel does not make any commitment to update the information contained herein. Unless specifically provided otherwise, Atmel products are not suitable for, and shall not be used in, automotive applications. Atmel’s products are not intended, authorized, or warranted for use as components in applications intended to support or sustain life. © 2008 Atmel Corporation. All rights reserved. Atmel®, logo and combinations thereof, AVR® and others, are the registered trademarks or trademarks of Atmel Corporation or its subsidiaries. Other terms and product names may be trademarks of others.
32086C-AVR32-04/08