Embed Size (px)
Citation preview

BIG-IP® Application Security Manager™:Attack and Bot Signatures
Version 12.1


Table of Contents
Assigning Attack Signatures to Security Policies...................................................................5
About attack signatures......................................................................................................5
About attack signature staging................................................................................5
Types of attacks that attack signatures detect.........................................................6
Attack signature properties.....................................................................................7
Overview: Creating and assigning attack signature sets....................................................8
About attack signature sets.....................................................................................8
List of attack signature sets.....................................................................................8
Creating a set of attack signatures........................................................................10
Assigning signature sets to a security policy.........................................................11
Viewing the attack signatures in a security policy.................................................12
Enabling or disabling a specific attack signature...................................................12
Enabling or disabling staging for all attack signatures...........................................13
Overriding attack signatures based on content.....................................................14
Assigning Bot Signatures to Security Policies......................................................................15
About bot signatures........................................................................................................15
Using proactive bot defense..................................................................................15
Configuring bot signature checking.......................................................................17
Updating Attack and Bot Signatures......................................................................................19
Overview: Updating the signature pools...........................................................................19
Updating signatures automatically .......................................................................19
Updating signatures manually...............................................................................20
Getting email about signature updates..................................................................20
Viewing attack signature details............................................................................21
Viewing bot signature details.................................................................................21
Writing Custom Attack Signatures..........................................................................................23
About custom attack signatures.......................................................................................23
Creating a custom attack signature..................................................................................23
Attack signature example: Protecting the management interface.........................24
Attack signature example: Protecting against cross-site scripting.........................24
Exporting custom attack signatures.................................................................................25
Importing custom attack signatures.................................................................................25
About attack signatures in XML format.................................................................26
Writing Custom Bot Signatures...............................................................................................27
3
Table of Contents

About custom bot signatures............................................................................................27
Bot signature syntax limitations........................................................................................27
Creating a custom bot signature......................................................................................28
Creating a new bot signature category............................................................................29
Signature Options.....................................................................................................................31
Keyword summary...........................................................................................................31
Modifiers summary...........................................................................................................31
Regular expression scopes..............................................................................................32
Keyword and flag compatibility.........................................................................................32
About normalization.........................................................................................................33
Composite rules...............................................................................................................33
Signature Syntax......................................................................................................................35
The content rule option....................................................................................................35
The uricontent rule option................................................................................................35
The headercontent rule option.........................................................................................35
The valuecontent rule option............................................................................................36
The reference rule option.................................................................................................37
The nocase modifier.........................................................................................................37
The offset modifier...........................................................................................................38
The plaintextonly modifier................................................................................................38
The depth modifier...........................................................................................................39
The distance modifier.......................................................................................................40
The within modifier...........................................................................................................41
The objonly modifier.........................................................................................................42
The norm modifier............................................................................................................42
The escape character (|)..................................................................................................42
The not character.............................................................................................................43
The re2 rule option...........................................................................................................43
The pcre rule option.........................................................................................................44
The ipp rule option...........................................................................................................45
Scope modifiers for re2, pcre, and ipp ............................................................................45
Matching action modifiers for re2 and pcre .....................................................................45
Legal Notices............................................................................................................................47
Legal notices....................................................................................................................47
4
Table of Contents

Assigning Attack Signatures to Security Policies
About attack signatures
Attack signatures are rules or patterns that identify attacks on a web application.When Application SecurityManager™ (ASM) receives a client request (or a server response), the system compares the request orresponse against the attack signatures associated with your security policy. If a matching pattern is detected,ASM™ triggers an Attack signature detected violation, and either alarms or blocks based on theenforcement mode of your security policy.
For example, the SQL injection attack signature looks for certain expressions like ' or 1=1, and if a userenters that string into a field (such as the username field) on your web application, ASM can block therequest based on the SQL injection attempt.
An ideal security policy includes only the attack signatures needed to defend your application. If too manyare included, you waste resources on keeping up with signatures that you do not need. Likewise, if you donot include enough, you might let an attack compromise your application without knowing it. If you are indoubt about a certain signature set, it is a good idea to include it in the policy rather than omitting it.
ASM provides over 2,500 attack signatures that are designed to guard against many different types of attacksand protect networking elements such as operating systems, web servers, databases, frameworks, andapplications. Updates are provided periodically.
You can also create custom signatures, if needed, to secure your application. Additionally, you can createsignatures to protect specific alphanumeric user-input parameters.
All of the attack signatures are organized into sets and are stored in the attack signature pool on ASM. Ifyou know what systems your application is built on (Windows, SQL, IIS, UNIX/Linux, Apache, and soon), you can allow the system to choose the appropriate attack signatures to include in the security policy.
About attack signature staging
When you first activate a security policy, the system puts the attack signatures into staging (if staging isenabled for the security policy). Staging means that the system applies the attack signatures to the webapplication traffic, but does not apply the blocking policy action to requests that trigger those attack signatures.The default staging period is seven days.
Whenever you add or change signatures in assigned sets, those are also put into staging. You also have theoption of putting updated signatures in staging.
Placing new and updated attack signatures in staging helps to reduce the number of violations triggered byfalse-positivematches.When signatures match attack patterns during the staging period, the system generateslearning suggestions. From Manual Traffic Learning, if you see that an attack signature violation hasoccurred, you can view these attack signatures from the Attack Signature Detected screen.
Upon evaluation, if the signature is a false-positive, you can disable the signature, and the system no longerapplies that signature to traffic for the corresponding web application. Alternately, if the detected signaturematch is legitimate, you can enable the corresponding attack signature. Note that enabling the signatureremoves it from staging, and puts the blocking policy into effect.

Types of attacks that attack signatures detect
Attack signatures in a security policy are compared with requests or responses to attempt to identify classesof attacks, for example, SQL injection, command injection, cross-site scripting, and directory traversal.This table describes the types of attacks that attack signatures can detect. You can filter lists of attacksignatures by these attack types.
DescriptionAttack Type
Uses a web site's own features and functionality to consume, defraud,or circumvent the application’s access control mechanisms.
Abuse of Functionality
Targets a web site's method of validating the identity of a user, serviceor application. Authorization attacks target a web site's method of
Authentication/AuthorizationAttacks
determining if a user, service, or application has the necessarypermissions to perform a requested action.
Alters the flow on an application by overwriting parts of memory. Anattacker could trigger a buffer overflow by sending a large amount ofunexpected data to a vulnerable component of the web server.
Buffer Overflow
Occurs when an attacker manipulates the data in a user-input field, bysubmitting commands that could alter the web page content or web
Command Execution
application by running a shell command on a remote server to revealsensitive data-for example, a list of users on a server.
Forces a web site to echo attacker-supplied executable code, whichloads in a user's browser.
Cross-site Scripting (XSS)
Overwhelms system resources to prevent a web site from serving normaluser activity.
Denial of Service
Attempts to disguise or hide an attack to avoid detection by an attacksignature.
Detection Evasion
Involves a web server function that lists all of the files within arequested directory if the normal base file is not present.
Directory Indexing
Pertains to an attempt to deliver a malicious response payload to anapplication user.
HTTP Response Splitting
Occurs when a web site reveals sensitive data, such as developercomments or error messages, which may aid an attacker in exploitingthe system.
Information Leakage
Concerns an attempt to exploit web sites that construct LDAP statementsfrom user-supplied input.
LDAP Injection
Relates to an attempt by automated client access to obtain sensitiveinformation. HTML comments, error messages, source code, oraccessible files may contain sensitive information.
Non-browser Client
Represents attacks that do not fit into the more explicit attackclassifications, including email injection, HTTP header injection,
Other Application Attacks
attempts to access local files, potential worm attacks, CDATA injection,and session fixation.
Forces access to files, directories, and commands that potentially resideoutside the web document root directory.
Path Traversal
Attempts to uncover hidden web site content and functionality.Predictable Resource Location
6
Assigning Attack Signatures to Security Policies

DescriptionAttack Type
Occurs as a result of unclassified application attacks such as whenapplications use parameters to pass URLs between pages.
Remote File Include
Attempts to exploit the server and allow an attacker to send code to aweb application, which the web server runs locally.
Server Side Code Injection
Attempts to exploit web sites that construct SQL statements fromuser-supplied input.
SQL-Injection
Tries to circumvent a web server’s or web application’s built-in securitybymasking the attack within a legitimate communication. For example,
Trojan/Backdoor/Spyware
an attacker may include an attack in an email or Microsoft® Worddocument, and when a user opens the email or document, the attackstarts.
Uses an automated security program to probe a web application forsoftware vulnerabilities.
Vulnerability Scan
Occurs when an attempt is made to inject XPath queries into thevulnerable web application.
XPath Injection
Attack signature properties
This table describes the attack signature properties, listed on the Attack Signature Properties screen, thatyou can view for more information about the signatures in the pool.
DescriptionProperty
Displays the signature name.Name
Specifies the signature number automatically provided by the system.ID
Specifies whether the signatures are for all traffic, for requests only, or for responsesonly.
Signature Type
Indicates whether the rule inspects the client’s request (Request) or the server’sresponse (Response).
Apply To
Forces a web site to echo attacker-supplied executable code, which loads in a user'sbrowser.
Attack Type
Displays which systems (for example, web applications, web server databases, orapplication frameworks) the signature or set protects.
Systems
Indicates the ability of the attack signature to identify the attack includingsusceptibility to false-positive alarms:
Accuracy
• Low: Indicates a high likelihood of false positives.• Medium: Indicates some likelihood of false positives.• High: Indicates a low likelihood of false positives.
Indicates the level of potential damage this attack might cause if it is successful:Risk
• Low: Indicates the attack does not cause direct damage or reveal highly sensitivedata.
• Medium: Indicates the attack may reveal sensitive data or cause moderatedamage.
• High: Indicates the attack may cause a full system compromise.
7
BIG-IP® Application Security Manager™: Attack and Bot Signatures

DescriptionProperty
Indicates whether this signature is a system supplied rule (No) or was defined by auser (Yes).
User-defined
Indicates the version of the attack signature.Revision
Indicates the date when the attack signature was most recently updated.Last Updated
Indicates whether the system provides documentation explaining this attack signature(View) or not (N/A). Click the View link to display the available documentation.
Documentation
Displays a clickable link to an external web site explaining this attack signature, ordisplays (N/A) if no link is available.
References
Overview: Creating and assigning attack signature sets
You can create attack signature sets in two ways: by using a filter or by manually selecting the signaturesto include.
Filter-based signature sets are based solely on criteria you define in the signatures filter. The advantage ofusing filter-based signature sets is that you can focus on the criteria that define the attack signatures youare interested in, rather than trying to manage a specific list of attack signatures. Another advantage tofilter-based sets is that when you update the attack signatures database, the system also updates any signaturesets affected by the update.
When manually creating a signature set, you must select each of the signatures to include from the signaturepool. To simplify using this method, you can still filter the signatures first, then select the individual signaturesfrom the filtered list.
Once you create the attack signature sets that you need, you can assign them to security policies.
About attack signature sets
An attack signature set is a group of attack signatures. The Application Security Manager™ ships withseveral system-supplied signature sets tailored to specific types of systems. Rather than applying severalindividual attack signatures to a security policy, you can apply the most relevant attack signature sets forthe systems running your applications.
Each security policy has a default (generic) set of attack signatures associated with it. When you create asecurity policy, you can use the default signature set alone or assign additional signature sets to the securitypolicy. Certain sets are more applicable to certain types of applications or types of attack.
For example, some signature sets focus on detecting attacks perpetrated on Unix/Linux systems. The setsare named logically so you can tell which ones to choose. Additionally, you can create your own attacksignature sets.
List of attack signature sets
This table lists the attack signature sets included with Application Security Manager™. Note that attacksignature updates may contain new signature sets.
Contains These SignaturesSignature Set
All signatures in the attack signature pool that can review responses.All Response Signatures
8
Assigning Attack Signatures to Security Policies

Contains These SignaturesSignature Set
All attack signatures in the attack signature pool.All Signatures
Signatures that target well-known or common web and applicationattacks.
Generic Detection Signatures
Signatures with a high level of accuracy that produce few false positiveswhen identifying attacks.
High Accuracy Signatures
Signatures that may result in more false positives when identifyingattacks.
Low Accuracy Signatures
Signatures with a medium level of accuracy when identifying attacks.Medium Accuracy Signatures
Signatures that target attacks against theMicrosoft OutlookWeb Access(OWA) application.
OWA Signatures
Signatures that target attacks on many computing platforms that areintegrated using WebSphere including general database, Microsoft
WebSphere Signatures
Windows, IIS, Microsoft SQL Server, Apache, Oracle, Unix/Linux,IBM DB2, PostgreSQL, and XML.
Signatures involving attacks perpetrated by executing commands.Command Execution Signatures
Signatures that target attacks caused by cross-site scripting techniqueswhich force a user to execute unwanted actions in a web applicationwhere the user is currently authenticated.
Cross Site Scripting Signatures
Signatures targeting attacks that browse directory listings.Directory Indexing Signatures
Signatures targeting attacks that take advantage of responses for whichinput values have not been sanitized
HTTP Response SplittingSignatures
Signatures targeting attacks that are looking for system data or debugginginformation that shows where the system is vulnerable to attack.
Information Leakage Signatures
Signatures targeting attacks that attempt to run system level commandsthrough a vulnerable application.
OS Command InjectionSignatures
Signatures targeting miscellaneous attacks including session fixation,local file access, injection attempts, header tampering, and so on thatcould affect many applications.
Other Application AttacksSignatures
Signatures targeting attacks that attempt to access files and directoriesthat are stored outside the web root folder.
Path Traversal Signatures
Signatures targeting attacks that attempt to uncover hidden websitecontent and functionality by forceful browsing, or by directory and fileenumeration.
Predictable Resource LocationSignatures
Signatures targeting attacks that attempt to exploit a remote file includevulnerability that could enable a remote attacker to execute arbitrarycommands on the server hosting the application.
Remote File Include Signatures
Signatures targeting attacks that attempt to insert (inject) a SQL queryusing the input data from a client to an application.
SQL Injection Signatures
Signatures that target code injection attacks on the server side.Server Side Code InjectionSignatures
Signatures targeting attacks that attempt to gain access to data structuresor bypass permissions or access when a web site uses user-suppliedinformation to construct XPath queries for XML data.
XPath Injection Signatures
9
BIG-IP® Application Security Manager™: Attack and Bot Signatures

Contains These SignaturesSignature Set
Signature set that the system creates if you use other than the defaultsignature sets when creating a security policy. It lists the systemsassigned and all the signatures associated with those systems.
Systems...
Creating a set of attack signatures
When you create an attack signature set, you can include the attack signatures that are relevant to yourspecific systems and applications.
1. On the Main tab, click Security > Options > Application Security > Attack Signatures > AttackSignatures Sets.The Attack Signature Sets screen opens and displays the attack signature sets on the system.
2. Click Create.The Create New Signature Set screen opens.
3. In the Name field, type a unique name for the signature set.Do not use system-supplied attack signature names when you create a user-defined attack signature.Although the system does not prohibit duplicate attack signature names, future attack-signature updatesmay fail because of name conflicts.
4. For the Type setting, select the appropriate option:UseOption
To create a signature set by using a filter only.Filter-based
To create a signature set by selecting signatures from the signature pool,and optionally a filter as well.
Manual
5. For the Default Blocking Actions setting, select the blocking actions you want the system to enforcefor the signature set when you associate it with a new security policy.
Note: The Learn, Alarm, and Block actions take effect only when you assign this signature set to anew security policy. If this signature set is already assigned to an existing security policy, these settingshave no affect.
6. If you want the system to automatically include this signature set in any new security policies you create,enable the Assign To Policy By Default setting.
7. In the Signatures Filter area, select the filter options to narrow the scope of the signatures to include inthe new signature set.
What It DoesFilter Option
Manual only. Leave blank unless you want to include a signature with aspecific ID number in the signature set.
Signature ID
Select to include signatures that apply to all traffic, requests only, or responsesonly.
Signature Type
Manual only. Select whether to include in the set all signatures or onlysignatures that apply to alpha-numeric user-input parameters defined in thesecurity policy, XML documents, or JSON data.
Apply To
Select the threat classifications for which to include signatures in the set.Attack Type
Select the systems (for example web applications, web server databases, andapplication frameworks) that you want protected by the set.
Systems
10
Assigning Attack Signatures to Security Policies

What It DoesFilter Option
Select the level of accuracy you want for the signatures in the set. Higheraccuracy results in fewer false positives.
Accuracy
Select the level of potential damage for attacks protected by the signaturesin the set.
Risk
Specify whether to include signatures based on who created them (the user,system, or both).
User-defined
Specify whether to include signatures in the set based on the date thesignature was changed.
Update Date
8. In the Signatures setting,
• If creating the set using the filter only, review the signatures list that the filter settings generate tomake sure it is correct.
• If creating the set manually, move the signatures to include in the set from theAvailable Signatureslist into the Assigned Signatures list.
9. Click Create to create the new signature set.
The new signature set is added to the bottom of the list of attack signature sets that are available on thesystem. You can assign attack signature sets to security policies. The signature set is also available to beapplied when creating new security policies.
If, in the future, you no longer need a user-defined signature set, you can delete it. When you delete asignature set, you are not deleting the attack signatures that make up the set, just the set.
Assigning signature sets to a security policy
Each security policy enforces one or more attack signature sets. When you first create a security policy,you select the attack signature sets to include. Later, you can assign additional attack signature sets to thesecurity policy. For each attack signature set, you can also specify the blocking policy, which is what youwant to happen if an attack signature in the set discovers a potential attack.
1. On the Main tab, click Security > Application Security > Policy Building > Learning and BlockingSettings.The Learning and Blocking Settings screen opens.
2. In the Current edited policy list near the top of the screen, verify that the edited security policy is theone you want to work on.
3. In the Policy Building Settings area, expand Attack Signatures.The attack signature configuration is displayed including the attack signature sets and blocking settingsthat the policy uses.
4. Review the attack signature sets associated with the policy:a) Look over the blocking settings associated with each signature set.b) To view the signature set properties and a list of the signatures that are in each set, click the signature
set name.
5. For each signature set, configure the blocking policy: select or clear theLearn,Alarm, andBlock checkboxes.
Note: You can enable or disable theBlock action only when the enforcement mode of the security policyis set to blocking.
11
BIG-IP® Application Security Manager™: Attack and Bot Signatures

6. To assign different signature sets to the security policy, click Change, select the ones to assign, thenclick Change again.
7. If you want signatures to be put into staging before being enforced, select the Signature Staging checkbox.Staging means that the system compares the assigned attack signatures to the web application traffic,but does not apply the blocking policy action if requests trigger those attack signatures during the stagingperiod. The default staging period is seven days.
8. In theApply Response Signatures for the File Types setting, specify the file types to which to enforceresponse signatures: Type the file type, and click Add.
9. Click Save to save your settings.10. To put the security policy changes into effect immediately, click Apply Policy.
The signature sets are assigned to the security policy, and the blocking policy applies to all of the signaturesin the signature set.
What happens depends on the blocking policy options you selected.
• If you selected Learn, the security policy learns all requests that match enabled signatures included inthe signature set, and displays the request data on the Traffic Learning Attack Signature Detected screen.
• If Alarm is selected, the security policy logs the request data if a request matches a signature in thesignature set.
• If you selected Block, and the enforcement mode is Blocking, the security policy blocks all requeststhat match a signature included in the signature set, and sends the client a support ID number.
Viewing the attack signatures in a security policy
You can review all of the attack signatures in a security policy, including their current blocking policy andtheir state.
1. On the Main tab, click Security > Application Security > Attack Signatures.The Attack Signatures screen opens.
2. In the Current edited policy list near the top of the screen, verify that the edited security policy is theone you want to work on.
3. In the Policy Attack Signatures area, you can review the signatures that are associated with the securitypolicy, the signature ID, the blocking policy actions, and whether or not they are enabled.
4. Click a signature name to view its properties on the Policy Attack Signature Properties screen, and getmore information about the signature.Here you can also enable or disable the signature for the active security policy. Clicking on the signaturename again displays additional properties.
5. Click Cancel (if you made no changes) or Update (if you changed the Enable setting) to return to theAttack Signatures List screen.
Enabling or disabling a specific attack signature
You can enable or disable specific attack signatures in a security policy, one at a time. For example, if oneof the attack signatures in a selected set causes false positives in your environment, you can disable it. Atthe same time, you can enable or disable staging for a particular attack signature. Settings for the specificattack signatures override the general attack signature settings.
1. On the Main tab, click Security > Application Security > Attack Signatures.
12
Assigning Attack Signatures to Security Policies

The Attack Signatures screen opens.2. In the Current edited policy list near the top of the screen, verify that the edited security policy is the
one you want to work on.3. In the Policy Attack Signatures area, you can review the signatures that are associated with the security
policy, the signature ID, the blocking policy actions, and whether or not they are enabled.4. Click the name of the signature you want to enable or disable.
The Policy Attack Signature Properties screen opens.
5. Select or clear the Enable check box to enable or disable the signature for the active policy.6. Select or clear the Perform Staging check box for that attack signature.7. Click Update (if you changed a setting) to return to the Attack Signatures screen.8. To put the security policy changes into effect immediately, click Apply Policy.
If disabled, the signature does not cause a violation even if patterns match the traffic. If enabled, if trafficmatches the pattern in the signature, an Attack Signature Detected violation occurs, and traffic ishandled in accordance with the signature blocking policy. Note that enabling a signature that is in stagingremoves it from staging, and puts the blocking policy into effect.
Enabling or disabling staging for all attack signatures
For each security policy, you can enable or disable staging in general for all attack signatures. By default,attack signature staging is enabled. You can also control whether specific signatures are in staging.
1. On the Main tab, click Security > Application Security > Policy Building > Learning and BlockingSettings.The Learning and Blocking Settings screen opens.
2. In the Current edited policy list near the top of the screen, verify that the edited security policy is theone you want to work on.
3. On the right side of the Learning and Blocking Settings screen, select Advanced.The screen displays the advanced configuration details for policy building.
4. In the Policy Building Settings area, expand Attack Signatures.The attack signature configuration is displayed including the attack signature sets and blocking settingsthat the policy uses.
5. To enable (or disable) staging for all signatures, select (or clear) the Enable Signature Staging checkbox.Staging means that the system compares the assigned attack signatures to the web application traffic,but does not apply the blocking policy action if requests trigger those attack signatures during the stagingperiod. The default staging period is seven days.
6. If you want updated signatures to be placed in staging, select Place updated signatures in staging.7. Click Save to save your settings.8. To put the security policy changes into effect immediately, click Apply Policy.
When signature staging is enabled, the system places new or updated signatures in staging for the numberof days specified in the enforcement readiness period. The system does not enforce signatures that are instaging, even if it detects a violation. Instead, the system records the request information.
If staging is disabled, attack signatures are not put into staging before they are enforced, regardless of thestaging configuration for each individual signature. The system enforces the Learn, Alarm, and Blocksettings for each signature immediately. New signatures are always placed in staging even if the signaturesettings are disabled.
13
BIG-IP® Application Security Manager™: Attack and Bot Signatures

If staging is disabled for a specific signature or group of signatures, those signatures are also enforcedaccording to the blocking settings. (If traffic causes an attack signature violation, it is blocked only if thesecurity policy’s enforcement mode is Blocking.)
Overriding attack signatures based on content
Before you can perform this task, you must have previously created a JSON, XML, or Google Web Toolkit(GWT) content profile.
You can have the system perform attack signature checks based on the content of a request as defined incontent profiles (XML, JSON, or GWT). In addition, you can override the security policy settings so thatthe system avoids checking specific attack signatures in particular content.
1. On theMain tab, point toSecurity >Application Security >Content Profiles and click a content profiletype (XML, JSON, GWT, or Plain Text).
2. In the profiles list, click the name of the content profile for which you want to specify attack signaturechecks.The profile properties screen opens.
3. Click the Attack Signatures tab.4. Make sure that the Check attack signatures check box is selected if you want the system to perform
attack signature checking against the content profile.5. In theGlobal Security Policy Settings list, review the attack signatures that are assigned to the security
policy, and which are enabled and enforced in the content profile.6. From the Global Security Policy Settings list, move any attack signatures that you want to override
for this content profile into the Overridden Security Policy Settings list.
Tip: In the Overridden Security Policy Settings list, click an attack signature link to display detailsabout the attack signature.
7. Click Update to update the content profile.8. To put the security policy changes into effect immediately, click Apply Policy.
Attack signatures in the overridden settings list are set to Disabled. The system does not issue a violationeven when part of a request matches an overridden attack signature.
14
Assigning Attack Signatures to Security Policies

Assigning Bot Signatures to Security Policies
About bot signatures
Bot signatures identify web robots by looking for specific patterns in the headers of incoming HTTP requests.DoS Layer 7 bot detection includes many signatures that identify bots, and you can also write your own forcustomized bot defense.
Bot signatures carefully identify bots and have a low rate of producing false positive results. The signaturesidentify the type of bot for classification and investigative purposes, and can distinguish between benignand malicious bots.
Benign bots can be useful for providing Internet services such as search engine bots, index crawlers, sitemonitors, and those used to establish availability and response time. Some environments may not want toblock benign bot traffic. But attackers use malicious bots for more harmful purposes such as harvestingemail addresses, producing spam, and developing exploitation tools. You may want to block malicious botsbecause they can orchestrate DoS attacks, waste internet resources, and search for vulnerabilities to exploitin your application.
Being able to classify bots allows you to treat them differently. You can report, block, or do nothing whena signature matches a malicious or benign bot. Further, malicious and benign bots fall into more specificbot signature categories that can be handled as needed. You can create new categories if needed for custombot signatures.
Using proactive bot defense
For you to use proactive bot defense, client browsers accessing your web site must be able to acceptJavaScript. Because this defense mechanism uses reverse lookup, you need to configure a DNS Server(System > Configuration > Device > DNS) and a DNS Resolver (Network > DNS Resolvers > DNSResolver List) for it to work.
You can configure Application Security Manager™ (ASM) to protect your web site against attacks by webrobots (called bots, for short) before the attacks occur. Proactive bot defense checks all traffic (exceptwhitelisted URLs) coming to the web site, not simply suspicious traffic. This DoS protection uses a set ofJavaScript evaluations and bot signatures to make sure that browsers visiting your web site are legitimate.
Important: Proactive bot defense has limitations if your web site uses Cross-Origin Resource Sharing(CORS), for example, with AJAX requests.
1. On the Main tab, click Security > DoS Protection > DoS Profiles.The DoS Profiles list screen opens.
2. Click the name of an existing DoS profile (or create a new one).The DoS Profile Properties screen for that profile opens.
3. On the left, under Application Security, click General Settings, and ensure that Application Securityis enabled.If Application Security is disabled, click Enabled.The screen displays additional settings.
4. On the left, click Proactive Bot Defense.
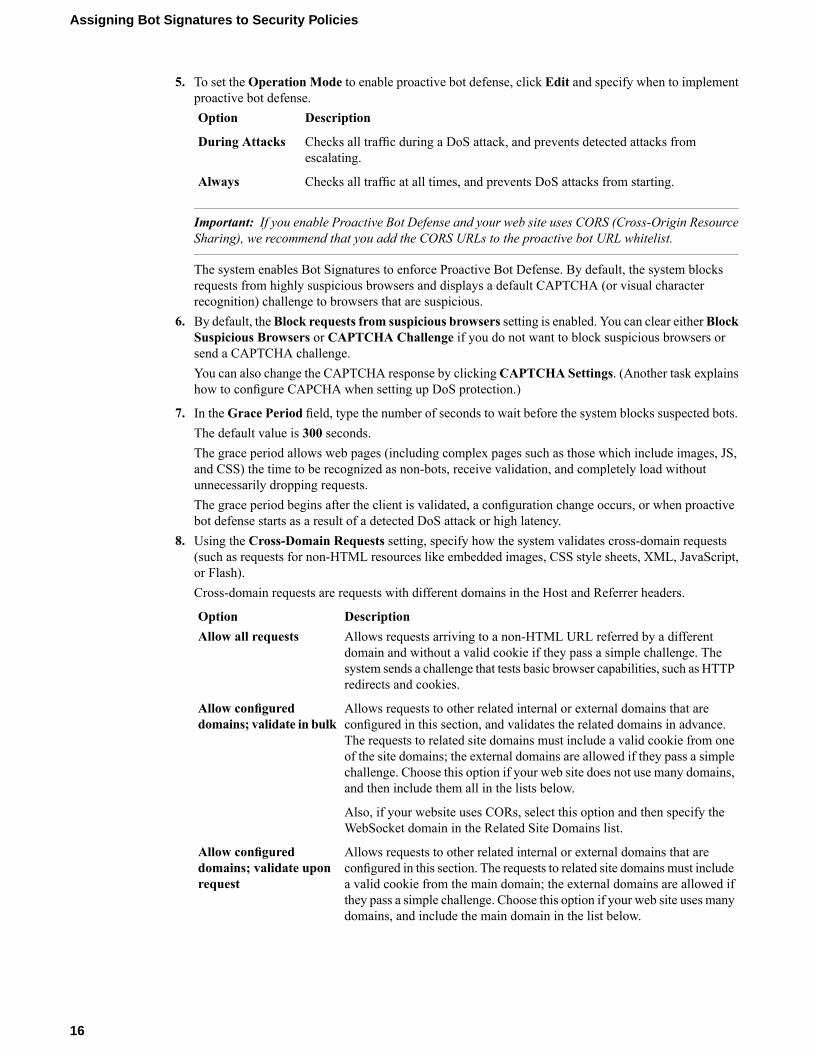
5. To set theOperation Mode to enable proactive bot defense, click Edit and specify when to implementproactive bot defense.
DescriptionOption
Checks all traffic during a DoS attack, and prevents detected attacks fromescalating.
During Attacks
Checks all traffic at all times, and prevents DoS attacks from starting.Always
Important: If you enable Proactive Bot Defense and your web site uses CORS (Cross-Origin ResourceSharing), we recommend that you add the CORS URLs to the proactive bot URL whitelist.
The system enables Bot Signatures to enforce Proactive Bot Defense. By default, the system blocksrequests from highly suspicious browsers and displays a default CAPTCHA (or visual characterrecognition) challenge to browsers that are suspicious.
6. By default, theBlock requests from suspicious browsers setting is enabled. You can clear eitherBlockSuspicious Browsers or CAPTCHA Challenge if you do not want to block suspicious browsers orsend a CAPTCHA challenge.You can also change the CAPTCHA response by clickingCAPTCHA Settings. (Another task explainshow to configure CAPCHA when setting up DoS protection.)
7. In theGrace Period field, type the number of seconds to wait before the system blocks suspected bots.The default value is 300 seconds.The grace period allows web pages (including complex pages such as those which include images, JS,and CSS) the time to be recognized as non-bots, receive validation, and completely load withoutunnecessarily dropping requests.The grace period begins after the client is validated, a configuration change occurs, or when proactivebot defense starts as a result of a detected DoS attack or high latency.
8. Using the Cross-Domain Requests setting, specify how the system validates cross-domain requests(such as requests for non-HTML resources like embedded images, CSS style sheets, XML, JavaScript,or Flash).Cross-domain requests are requests with different domains in the Host and Referrer headers.
DescriptionOptionAllows requests arriving to a non-HTML URL referred by a differentdomain and without a valid cookie if they pass a simple challenge. The
Allow all requests
system sends a challenge that tests basic browser capabilities, such as HTTPredirects and cookies.
Allows requests to other related internal or external domains that areconfigured in this section, and validates the related domains in advance.
Allow configureddomains; validate in bulk
The requests to related site domains must include a valid cookie from oneof the site domains; the external domains are allowed if they pass a simplechallenge. Choose this option if your web site does not use many domains,and then include them all in the lists below.
Also, if your website uses CORs, select this option and then specify theWebSocket domain in the Related Site Domains list.
Allows requests to other related internal or external domains that areconfigured in this section. The requests to related site domains must include
Allow configureddomains; validate uponrequest a valid cookie from the main domain; the external domains are allowed if
they pass a simple challenge. Choose this option if your web site uses manydomains, and include the main domain in the list below.
16
Assigning Bot Signatures to Security Policies

9. If you selected one of the Allow configured domains options in the last step, you need to add RelatedSite Domains that are part of your web site, and Related External Domains that are allowed to link toresources in your web site.
10. In the URLWhitelist setting, add the non-HTML resource URLs for which the web site expects toreceive requests and that you want the system to consider safe.Type URLs in the form /index.html, then click Add.. Wildcards are supported.
Tip: If your web site uses CORS, add the CORS URLs to the whitelist, otherwise, they will be blocked.
The system does not perform proactive bot defense on requests to the URLs in this list.11. Click Update to save the DoS profile.
You have now configured proactive bot defense which protects against DDoS, web scraping, and bruteforce attacks (on the virtual servers that use this DoS profile).
The system sends a JavaScript challenge to traffic accessing the site for the first time. Legitimate trafficanswers the challenge correctly, and resends the request with a valid cookie; then it is allowed to access theserver. The system drops requests sent by browsers that do not answer the system’s initial JavaScriptchallenge (considering those requests to be bots). The system also automatically enables bot signatures andblocks bots known to be malicious.
If proactive bot detection is always running, ASM™ filters out bots before they manage to build up an attackon the system and cause damage. If using proactive bot defense only during attacks, once ASM detects aDoS attack, the system uses proactive bot defense for the duration of the attack.
Proactive bot defense is used together with the active mitigation methods specified in TPS- and stress-baseddetection. Any request that is not blocked by the active mitigation method still has to pass the proactive botdefense mechanism to be able to reach the server (unless it is on the URL whitelist). Proactive bot defenseblocks requests to CORS (Cross-Origin Resource Sharing) URLs not on the URL whitelist.
Configuring bot signature checking
If you need to create custom bot signatures and categories for your application, you should do this beforeconfiguring bot signature checking. Navigate to Security > Options > DoS Protection > Bot Signatures.Otherwise, you can use the system-supplied bot signatures and categories.
Because this defense mechanism uses reverse lookup, you need to configure a DNS Server (System >Configuration > Device > DNS) and a DNS Resolver (Network > DNS Resolvers > DNS Resolver List)for it to work.
Bot signature checking is typically used with proactive bot defense (and is enabled by default when youuse proactive bot defense). The system performs bot signature checking, which identifies known bots aslegitimate or malicious based on their HTTP characteristics. You can specify whether to ignore, report, orblock certain categories of malicious or benign bots. You can also disable specific bot signatures, if needed.
1. On the Main tab, click Security > DoS Protection > DoS Profiles.The DoS Profiles list screen opens.
2. Click the name of an existing DoS profile (or create a new one).The DoS Profile Properties screen for that profile opens.
3. On the left, under Application Security, click General Settings, and ensure that Application Securityis enabled.If Application Security is disabled, click Enabled.The screen displays additional settings.
4. On the left, click Bot Signatures to display the settings.
17
BIG-IP® Application Security Manager™: Attack and Bot Signatures

5. For the Bot Signature Check setting, click Edit and select Enabled if it is not already selected.6. In the Bot Signature Categories field, for each category of bots, both malicious and benign, select the
action to take when a request matches a signature in that category.ActionOption
Ignore requests in this category.None
Log requests in this category.Report
Block and report requests in this category.Block
You can select one action for all malicious or all benign categories, or have different actions for separatecategories.
Note:
These settings override the Proactive Bot Defense settings. For example, requests from bots in anycategory, if set to Block, are always blocked.
7. If certain signatures need to be disabled, in the Bot Signatures List options, move the signatures to theDisabled Signatures list.
8. Click Update to save the DoS profile.
You have specified how to perform bot signature checking on your system. By comparing the bot signatureswith requests, the system can identify those made by different categories of bots and will ignore, report, orblock requests from bots it discovers.
If using bot signature checking, you will want to keep the signatures up to date. You can configure botsignatures (and all other signatures) to be updated automatically or update themmanually using the SecurityUpdates feature. A security update downloads the latest new and updated bot signatures and attack signatures.
18
Assigning Bot Signatures to Security Policies

Updating Attack and Bot Signatures
Overview: Updating the signature pools
The system includes an attack signature pool and a bot signature pool. These pools include the system-suppliedattack signatures and bot signatures, which are shipped with the Application Security Manager™, and anyuser-defined signatures. You can update both pools at once by using the Security Updates feature.
F5 develops new signatures to recognize the latest attacks and web robots, and you can schedule periodicsecurity updates to the signature pool, or perform manual updates. You can also have the system send youan email when a security update is available.
Updating signatures automatically
Before you can update the signature pools (including both attack signatures and bot signatures), you musthave a valid service agreement with F5 Networks, and a service check date within 7 days of the updaterequest. The Application SecurityManager™ (ASM)must also have external network access for the automaticupdate process to work.
For additional information regarding licensing requirements, allowing signature file updates through afirewall, and configuring signature file updates through an HTTPS proxy, refer to Solution 8217 in theAskF5™ knowledge base (https://support.f5.com/).
You can schedule automatic updates to the signature pools so that you always have the current securityupdates. Having an updated set of system-supplied attack signatures and bot signatures provides protectionfrom the latest threats.
1. On the Main tab, click Security > Security Updates > Application Security.The Security Updates: Application Security screen opens.
2. To schedule automatic updates, for Update Mode, click Scheduled.3. From Update Interval, select how often to automatically download the signatures and perform an
update.4. Click the Save Settings button to preserve your changes.
The system connects to the F5 server periodically to see if there are any new signatures or updates to existingattack signatures or bot signatures, and if there are, it downloads and includes them. Any user-definedsignatures remain in the pools untouched.
After the update, the system places newly added and updated signatures in staging if they are specified inone or more security policies (for security policies with the staging feature enabled).
ASM records details about the most recent update activity, and displays this information on the SecurityUpdates: Application Security screen. There you can review the last update time as well as the Readme filethat pertains to the update.

Updating signatures manually
Before you can update the signature pools (including both attack signatures and bot signatures), you musthave a valid service agreement with F5 Networks, and a service check date within 7 days of the updaterequest. If you want the system to get the updates from the F5 server, the Application Security Manager™
(ASM) must have external network access. If the system does not have network access, you have to get thedownload from downloads.f5.com first, and the file must be accessible from your system.
For information regarding licensing requirements, allowing signature file updates through a firewall, andconfiguring signature file updates through an HTTPS proxy, refer to Solution 8217 in the AskF5™ web site(support.f5.com).
You can manually update the signature pools if you want to control when security updates take place.
1. On the Main tab, click Security > Security Updates > Application Security.The Security Updates: Application Security screen opens.
2. To determine whether an update is available, click Check for Updates .A popup screen indicates whether updates are available.
3. Click Close to dismiss the popup screen when you are finished looking at it.4. If no updates are available, you are done. If updates are available, continue with the next steps.5. For the Update Mode setting, selectManual.6. For the Delivery Mode setting, select how to get the update:
• If the system has Internet access and you want to get the update directly from F5, select Automatic.• To specify a previously downloaded security update file from F5, selectManual, then clickChoose
File and browse to the update file.
7. Click the Save Settings button to preserve any changes you made to the configuration.8. Click Install Updates.
The system installs the security update.
If you used the automatic delivery mode, the system connects to the F5 server to retrieve any availableupdates, then installs them. If you downloaded the update file manually, the system installs the updatesfrom the file. The signature pools then include any new attack and bot signatures, and updates to any existingsignatures. Any user-defined signatures remain in the pools untouched.
After the update, the system places newly added and updated signatures in staging if they are specified inone or more security policies (for security policies with the staging feature enabled).
ASM™ records details about the most recent update activity, and displays this information on the SecurityUpdates: Application Security screen. There you can review the last update time as well as the readme filethat pertains to the update.
Getting email about signature updates
If you want to receive notification from F5 Networks about signature updates available for download, youcan sign up for the Security Updates mailing list.
1. From a web browser, open the Search the AskF5™Knowledge Base site, http://support.f5.com/.2. From the SELF-HELP menu, select Subscribe: Mailing Lists
The AskF5 Publication Preference Center page opens.3. Provide the email address to which you want the notifications sent.4. Select the Security Updates list, as well as any others in which you are interested.
20
Updating Attack and Bot Signatures

5. Click Submit.Whenever F5 has signature updates available, or has information related to security, you will receivean email notification at the address you specified.
Viewing attack signature details
The attack signature pool contains all of the attack signatures that are on the system. You can view theattack signature pool contents, and see details about each signature.
1. On the Main tab, click Security > Application Security > Attack Signatures.The Attack Signatures screen opens.
2. If you are looking for specific signatures, use the filter to display the ones you are interested in.You can use one of the predefined filters, or click Show Filter Details to develop a custom filter.
3. In the Signature Name column, click the signature for which you want to view information.The Policy Attack Signature Properties screen opens and shows details about that signature.
4. For the Signature Name setting, click the signature name link.The Attack Signature Properties screen opens and shows additional details about that signature.
5. In the Documentation setting (if available), click View to see additional information that applies to theselected attack signature.The Documentation for Attack Signature screen opens in a new browser window, and displays additionalrelated documentation.
6. On the Attack Signature Properties screen, click the References setting link to an external web site thatdescribes the attack signature.If no additional documentation is available, you see N/A.
7. When you finish reviewing the details, close the additional documentation screens and click Cancel toclose the Attack Signature Properties screens.
Viewing bot signature details
The bot signature pool contains all of the bot signatures that are on the system. You can view the botsignature pool contents, and see details about each signature.
1. On the Main tab, click Security >Options >DoS Protection > Bot Signatures > Bot Signatures List.2. If you are looking for specific signatures, use the filter to display the ones you are interested in.
Click Show Filter Details to develop a custom filter.
3. In the Signature Name column, click the signature for which you want to view information.The Bot Signature Properties screen opens and shows details about that signature including the categoryof bot, the level of risk, and specific domains associated with the bot, if any.
4. When you finish reviewing the details, close the additional documentation screens and click Cancel toclose the Bot Signature Properties screens.
21
BIG-IP® Application Security Manager™: Attack and Bot Signatures

22
Updating Attack and Bot Signatures

Writing Custom Attack Signatures
About custom attack signatures
Custom attack signatures are those that your organization creates and adds to the attack signature pool.Custom attack signatures must adhere to a specific rule syntax. They are never updated by F5 Networks.All user-defined signatures are carried forward as-is when the system is updated to a new software version.
You can develop custom attack signatures, if needed, for specific purposes in your environment. Thesignatures that you define are stored in the attack signatures pool along with the system-supplied signatures.You can also export and import custom signatures to and from other Application SecurityManager™ systems.
Note: Developing custom attack signatures is an advanced feature only needed in specific cases.
Creating a custom attack signature
Custom attack signatures can handle security policy enforcement unique to your networking environment,emergency situations, or analysis of specific activity on the network. If your organization has a need for acustom attack signature, you can create one using the F5 attack signature syntax.
1. On the Main tab, click Security > Options > Application Security > Attack Signatures.The Attack Signature screen opens.
2. Click Create.The Create New Attack Signature screen opens.
3. In the Name field, type a unique name for the attack signature.
Note: If you attempt to create a customized attack signature with the same name as a system-suppliedattack signature, you will receive an error and the attack signature will not be created.
4. In the Description field, type an optional description of the signature.5. For the Signature Type setting, select Request or Response to determine whether the new signature
applies to client requests or server responses.6. For the Systems setting, select from the Available Systems list any systems to which the new signature
applies, and move them to the Assigned Systems list.7. For the Attack Type setting, select the type of threat that the new signature protects against.8. For theRule setting, type a rule according to the syntax guidelines to specify the content of the signature.
The rule is the heart of the attack signature. Refer to the Signature Options and Signature Syntax sectionsfor details. Refer to Bot signature syntax for special limitations when writing bot signatures.
9. For the Accuracy setting, select an accuracy level.The accuracy level indicates the ability of the attack signature to identify the attack, includingsusceptibility to false-positive alarms.
10. For the Risk setting, select a risk level.The risk level indicates the level of potential damage this attack may cause, if it were successful.

11. Click Create to create the new attack signature.
The new attack signature is placed into the attack signature pool and is added to the signature sets for thesystems you specified. The custom signature is put in staging for all policies that have this signature in theirassigned signature sets. It is a good idea to make sure that the new signature was added to the appropriatesecurity policies.
Attack signature example: Protecting the management interface
This example describes an attack signature that blocks attempts to access the management interface, whichis located at http://example.com/manage/. The web server is IIS, and the signature ignores URL case,treating manage the same as MaNAGE.
The following example attack signature examines the URL part (without the query string) and is notcase-sensitive. The signature does not need to use a regular expression, because it needs to match only onepattern (manage):
uricontent:"/manage/"; nocase; objonly;
This signature can detect URLs that contain /manage/ (the nocasemodifier causes it to be not case-sensitiveso that it also catches /mAnage/, for example). The signature catches, for example:http://example.com/portal/manage/panel/index.php.
This signature also catches a request that contains:
http://example.com/manage/admin.php
It does not catch:
http://example.com/admin.php?a=%2Fmanage%2F
In the example, %2f is URL-encoded in place of / because the query string part cannot include an explicitforward slash.
Attack signature example: Protecting against cross-site scripting
This example describes an attack signature that blocks a cross-site scripting attempt that use HTML eventssuch as onmousemove, onmousedown, onmouseup and other similar events within a parameter.
HTML is not case-sensitive, so the signature should not distinguish between upper- and lower-case. Thatway, the browser treats the onMousemOve event the same as onmousemove.
This example signature is not case-sensitive and looks inside a parameter. The signature also uses a regularexpression for these reasons:
• To support several events in a single signature• To ignore special characters such as the space (the browser normalizes several spaces into a single space)• To match a certain pattern: "[event_name] =" (for example, to reduce false positives, so the single
word onmousemove or blablaonmousemove does not match the signature)
The signature has two parts:
• The constant keyword that matches the word onmouse (not case-sensitive)
24
Writing Custom Attack Signatures

• A regular expression that matches several events (separated by a vertical bar |), ignores non-wordcharacters (\W*), and matches a certain pattern (\b for word boundary and = for [event_name] =pattern)
valuecontent:"onmouse"; nocase; norm;re2:"/\bonmouse(?:move|down|up|out|over|enter|leave|wheel) \\W*=/Vsi";
norm;
The example signature would catch:
http://example.com/index.php?a=onmousedown%3D%22alert(document.cookie)%22
After parameter a is URL-decoded, you can see onmousedown="alert(document.cookie)". Thesame signature would also catch requests where this expression is located in the request body, for instance:
POST /index.php HTTP/1.1 Host: example.coma=onmousedown%3D%22alert(document.cookie)%22
The example signature would not catch:
http://example.com/onmousedown%3d/
since it is located in the URI part of the request, and not in the query string part.
Exporting custom attack signatures
You can export all custom attack signatures from one Application Security Manager™ system for use onanother system. Both systems must be running the same software version. This is useful if you need to usethe same user-defined attack signatures on multiple systems, or if you want to use a custom signature todevelop another one on a different system.
1. On the Main tab, click Security > Options > Application Security > Attack Signatures.The Attack Signature screen opens.
2. Click Export.The web browser opens a file download screen.
3. Save the file in a convenient location.Application Security Manager uses a file name with this format:
sigfile_<date>_<time>.xml
The system exports all custom attack signatures to the XML file.
Importing custom attack signatures
Before you can import custom signatures to an Application Security Manager™ (ASM) system, they mustfirst have been exported from a different system in XML file format.
25
BIG-IP® Application Security Manager™: Attack and Bot Signatures

You can import custom attack signatures that you want to use from other ASM™ systems. Both systemsmust be running the same software version.
1. On the Main tab, click Security > Options > Application Security > Attack Signatures.The Attack Signature screen opens.
2. Click Import.The Import Attack Signatures screen opens.
3. In the Choose File field, specify the path to the XML file that contains the exported custom attacksignature.
4. Click Import.
The system imports the custom signature, and issues either a success message or a failure message. If theimport was not successful, make any required changes to the XML file, and then try to import the file again.Successfully imported signatures are placed into the attack signature pool, and added to the signature setsfor the systems you specified.
After the import, the system puts updated signatures into staging for the Enforcement Readiness Period(specified in Policy properties). Custom signatures are put into staging for all policies that have this signaturein their assigned signature sets. It is a good idea to make sure that the new signature was added to theappropriate security policies.
About attack signatures in XML format
The XML file format is the only accepted import format for attack signatures. Following is an example ofthe XML format used when saving user-defined attack signatures for import onto another system.
<?xml version="1.0" encoding="utf-8"?><signatures export_version="11.X.X"><sig id="300000000"><rev num="1"><sig_name>Unique signature name</sig_name><rule>msg:"Signature Name"; content:"soda";</rule><last_update>2011-04-15 13:37:17</last_update><apply_to>Request</apply_to><risk>3</risk><accuracy>2</accuracy><doc>Any additional descriptive text</doc>f<attack_type>Cross Site Scripting (XSS)</attack_type><systems><system_name>IIS</system_name><system_name>Microsoft Windows</system_name>
</systems></rev>
</sig></signatures>
Warning: The sig_name attribute uniquely identifies a user-defined attack signature. Therefore, whenyou import an attack signature XML file, if there are any signatures in the XML file whose sig_nameattribute matches that of any existing user-defined signatures, the system overwrites the existing definitionwith the imported definition.
26
Writing Custom Attack Signatures

Writing Custom Bot Signatures
About custom bot signatures
If your organization has additional needs for bot defense, you can write a custom bot signature to identifyweb robots by looking for specific patterns in the headers of incoming HTTP requests.
Bot signatures are similar to attack signatures; they are written using a limited subset of allowed keywords.You can design custom bot signatures to handle emergency situations, to support security policy enforcementunique to your networking environment, or to provide an analysis of specific activity on the network.
Being able to classify bots into different categories allows you to treat each category differently. You canreport, block, or do nothing when a signature matches a malicious or benign bot. Further, malicious andbenign bots fall into more specific bot signature categories that can be handled as needed. You can createnew categories if they are needed to classify custom bot signatures.
Bot signature syntax limitations
Bot signatures are developed using Snort syntax to search for bots in either the User-Agent field of theheader or the URL, or both. The User-Agent field is examined to identify the browser and operating system.The URL is searched to locate bots that access specific peculiar URLs within a site, regardless of whetherthe site has such a URL (in most cases it does not).
The syntax of bot signatures is similar to that of attack signatures using the general format keyword:"value"; modifier; but bot signatures can include only the following attributes:
• uricontent (objonly flag is not allowed)• headercontent (useragentonly flag is mandatory)• ipp (for regular expressions)• offset
• depth
• nocase
The following are not allowed in bot signatures:
• negation• norm (normalization is predefined)• distance modifiers• within modifiers
Refer to the Signature Options, Signature Syntax, and examples for additional details on the syntax used inbot signatures.

Creating a custom bot signature
You can write custom bot signatures to increase bot protection for your web application.
1. On the Main tab, click Security > Options > DoS Protection > Bot Signatures List.2. Click Create.
The Create New Bot Signature screen opens.3. In the Name field, type a unique name for the bot signature.
Note: If you attempt to create a custom bot signature with the same name as a system-supplied signature,you will receive an error and the signature will not be created.
4. In the Domains field, type the name of one or more domains from which the bot can send its requests,and click Add.This field is mandatory only for benign bots in the Search Engines category to validate their identityusing reverse DNS lookup.
5. From the Category list, select the type of bot this signature will protect against.All bot categories are listed including those provided by the system and any that you have created.
6. In the Rule setting, develop the bot signature.a) If the bot signature will search for patterns in the user-agent string or URL, use Simple Edit Mode.b) If searching the user-agent string, for User-agent, select either contains or regexp match, and then
type the pattern in the text box.c) If searching requests within the normalized URI path (excluding the Query String), for URL, select
either contains or regexp match, and then type the pattern in the text box.
Note: If a bot signature requires multiple search strings, a conditional text match, or a search of boththe URL and User-agent contexts, you cannot use the simple edit mode.
To develop more complex bot signatures, use theAdvanced Edit Mode to type expressions using Snortcontrol. Refer to the Signature Options and Signature Syntax sections for details. Refer to Bot signaturesyntax for special limitations when writing bot signatures.
As an example, this signature searches the header for three terms: SODA, BAR, and for a specifichexadecimal value.
headercontent:\"SODA\"; useragentonly; nocase;headercontent:\"BAR\"; useragentonly; nocase;headercontent:\"0x31303235343830303522\"; useragentonly; nocase;
In this example, the bot signature searches both User-Agent and the URL:
headercontent: "MaliciousBot/0.1"; useragentonly;uricontent: "/settings.php";
7. For the Risk setting, select a risk level.The risk level indicates the level of potential damage an attack containing this text may cause, if it weresuccessful.
8. Click Create to create the new bot signature.
28
Writing Custom Bot Signatures

The new bot signature is added to the bot signature list. If you create a DoS profile, enable Bot SignatureCheck, and associate the DoS profile with a virtual server, the system examines traffic for bots (using thesignature you developed plus others that are enabled) as one of the first checks.
Creating a new bot signature category
You can create customized bot signature categories if the default categories do not include the one you arelooking for. You can create a new malicious or benign bot category.
1. On the Main tab, click Security > Options > DoS Protection > Bot Signature Categories.The Bot Signature Categories screen opens.
2. Depending on whether you want to create a malicious or benign category, in the edit field above theMalicious Categories List or Benign Categories List, type a unique name for the category and clickAdd.
3. Click Save to save the new bot signature category on the system.
The bot signature category is added to the appropriate list. If you create a customized bot signature, youcan assign the category you created to that signature.
29
BIG-IP® Application Security Manager™: Attack and Bot Signatures

30
Writing Custom Bot Signatures

Signature Options
Keyword summary
The keywords, generally referred to as scopes, are used in signatures to search for specific fixed strings indifferent parts of the input. This table summarizes the keywords that you can use in signatures, includingthe reference keyword, which is not a scope.
UseKeyword
Matches the full content.content
Matches the URI, including the query string (unless using the objonlymodifier).
uricontent
Matches the HTTP header.headercontent
Matches an alphanumeric user-input parameter (or an extra-normalizedparameter, if using the normmodifier); used for parameter values, XML objects,
valuecontent
JSON/GWT objects, XML/JSON parameters, and cookies. When a signatureincludes the valuecontent keyword, XML payloads are examined.
Note: The valuecontent parameter replaces the paramcontent parameterthat was used in Application Security Manager™ versions prior to 10.0.
Provides an external link to documentation and other information for the rule.reference
Modifiers summary
The modifiers alter the meaning of keywords used in a signature. This table summarizes the modifiers.
UsageModifier
Makes the preceding keyword not case-sensitive.nocase
Specifies that the preceding keyword is found not less than X bytes into theappropriate scope. This is an absolute modifier.
offset
Specifies that the preceding keyword is found not more than X bytes into theappropriate scope. This is an absolute modifier.
depth
Specifies that the preceding keyword is found not less than X bytes after the priorkeyword. This is a relative modifier.
distance
Specifies that the preceding keyword is found not more than X bytes after theprior keyword. This is a relative modifier.
within
Limits the scope of the preceding uricontent keyword to the URI part only.objonly
Matches the preceding parameter to which additional normalizations have beenapplied.
norm

UsageModifier
Applies the signature if the request contains XML content. Used with thevaluecontent keyword.
xmlonly
Matches on parameters when used with the valuecontent keyword.httponly
Applies the signature if the request contains JSON content. Used with thevaluecontent keyword.
jsononly
Applies the signature if the request contains GoogleWeb Toolkit (GWT) content.Used with the valuecontent keyword.
gwtonly
Enforces signatures on text messages, such as WebSocket messages. Used withthe valuecontent keyword.
plaintextonly
Regular expression scopes
Scopes define the portion of a request or response that the regular expression keyword (pcre, re2, ipp)applies to. This table lists the rule flags to use for different scopes in an attack or bot signature.
ScopeRule flag
Full content of the request or response bodyC
URI, including query stringU
URL only (URI without query string)O
HTTP headersH
HTTP parameters in query string or POST dataV
HTTP parameters with additional normalizationsN
Note:
In signatures, rules for responses can contain only rule options and modifiers that apply to the entire contentof the response. In other words, for response rules, you can use the content and reference keywords,and any applicable modifiers for these keywords. You can also use the pcre, re2, or ipp rule options forresponses, as long as you do not use a scope modifier for them.
Keyword and flag compatibility
These tables describe the compatibility between keyword rule options themselves, and between keywordsand regular expression (regex) flags. You can refer to these tables when developing attack or bot signaturesto understandwhich keywords and flags can be used together. "Valid" means that you can use the combinationtogether in a signature. "Invalid" means you cannot use the two together.
valuecontentparamcontentheadercontenturicontentcontentKeywords/Keywords
InvalidInvalidValidValidValidcontent
InvalidInvalidValidValidValiduricontent
InvalidInvalidValidValidValidheadercontent
32
Signature Options

valuecontentparamcontentheadercontenturicontentcontentKeywords/Keywords
InvalidValidInvalidInvalidInvalidparamcontent
ValidInvalidInvalidInvalidInvalidvaluecontent
VNPHOUNoneKeywords/Flags
InvalidInvalidInvalidValidValidValidValidcontent
InvalidInvalidInvalidValidValidValidValiduricontent
InvalidInvalidInvalidValidValidValidValidheadercontent
InvalidValidValidInvalidInvalidInvalidInvalidparamcontent
ValidInvalidInvalidInvalidInvalidInvalidInvalidvaluecontent
VNPHOUNoneFlags/Flags
InvalidInvalidInvalidValidValidValidValidNone
InvalidInvalidInvalidValidValidValidValidU
InvalidInvalidInvalidValidValidValidValidO
InvalidInvalidInvalidValidValidValidValidH
InvalidValidValidInvalidInvalidInvalidInvalidN
ValidInvalidInvalidInvalidInvalidInvalidInvalidV (See note)
Note: You should use V (with httponly if necessary) instead of the deprecated P regex flag.
About normalization
For the URI and parameter scopes, the system always applies a normalization process before applying therule options to the signature. For parameters, you can include the norm modifier with the valuecontentkeyword to cause the system to perform additional normalizations to make the content more regular. Theadditional parameter normalizations also help mitigate common evasion techniques used in XSS,SQL-Injection, and Command Execution attacks. Therefore, it is a good idea to use additional normalizations,by default.
Composite rules
You can combine rule options together to form composite rules. By using keywords combinedwithmodifiers,the rule options merge to form a single assertion. Rule options are combined using an implied AND operator;this makes it so that all conditions in the rule must be met in order to satisfy the rule as a whole.
Consider the following points when combining rule options:
33
BIG-IP® Application Security Manager™: Attack and Bot Signatures

• You can combine different scopes within one rule as long as you do not use any relative modifiers. Forexample, this rule is invalid because it includes two scopes (content and uricontent), and within,a relative modifier:
content:"ABC"; uricontent:"XYZ"; within:10;
• You cannot combine the valuecontent, pcre P, or re2 P rule options with other scope keywords.The parameter rule options must be the only scope keywords in their respective rules. You can, however,combine the parameter keywords with additional valuecontent, pcre P, or re2 P keywords, includingthose with the norm modifier (or N, for pcre or re2).
34
Signature Options

Signature Syntax
The content rule option
Use the content rule option to match a specified string located anywhere in the full content of the request.
The content rule option matches when the specified string is found anywhere in the full content of therequest or response.
Note: The system does not perform any normalization for the content rule option.
You can use the content keyword for request or response attack signatures. To apply the signature toresponses, note the following:
• Enable the Apply Response Signatures setting for the related file type.• In the rule itself, set the Apply to option to Response.
content:"ABC";
The uricontent rule option
Use the uricontent rule option to match a specified string located anywhere in the URI of the request.
The uricontent rule option matches when the specified string is found anywhere in the normalized URI,including the query string. The string match is case-sensitive, and must be exact.
You can use the uricontent keyword for request attack or bot signatures only. You cannot use the objonlyflag in bot signatures.
uricontent:"ABC";
The headercontent rule option
Use the headercontent rule option to match a specified string located in the HTTP request header.
The headercontent rule option matches a specified string that is found anywhere in the HTTP requestheaders. The string match is case-sensitive, and must be exact.
You can use the headercontent keyword for request attack or bot signatures only. In bot signatures, theuseragentonly flag is mandatory.

Note: The system does not perform any normalizations for the headercontent rule option.
headercontent:"ABC";
headercontent: "MyMaliciousBot"; useragentonly; ipp: "/MyMaliciousBotv0.[0-9]/H";
useragentonly;
The valuecontent rule option
Use the valuecontent rule option to match a specified string located in an alphanumeric user-inputparameter.
The valuecontent rule option matches when a specified string is found anywhere within a alphanumericuser-input parameter, or if found in the complete payload when the Apply Value and Content Signaturescontent profile is selected. The system applies valuecontent rules only to parameters defined in thesecurity policy. The rule matches against each parameter separately, on the full name and value pair.
You can use the valuecontent keyword for request attack signatures only. You cannot combine this scopewith any other scope in a single rule.
Note: Any signature with a rule that contains the valuecontent option is considered a parameter signature,that is, a signature that applies to the user-input, alphanumeric parameters that are defined within a securitypolicy. The system applies parameter signatures to each parameter name and value pair (that is, to thename=value string using the equal sign).
In other words, you cannot use the valuecontent option with other content rule options. You can disablea parameter signature at both the parameter level, and the security policy level.
valuecontent:"ABC";valuecontent:"ABC"; httponly;valuecontent:"ABC"; xmlonly;valuecontent:"url=http"; plaintextonly;
For example, suppose you have the following signature:
valuecontent:"soda";valuecontent:"bar"; distance 0;
The signature matches in the following situations.
• A request goes to a URL in the form data content profile, and its content is a parameter defined asalphanumeric (like the default wildcard *). It matches a request such as the following:
POST /a_form_data_url.html HTTP/1.1Host: beni.core.com
alpha_numeric_parameter=sodabar
36
Signature Syntax
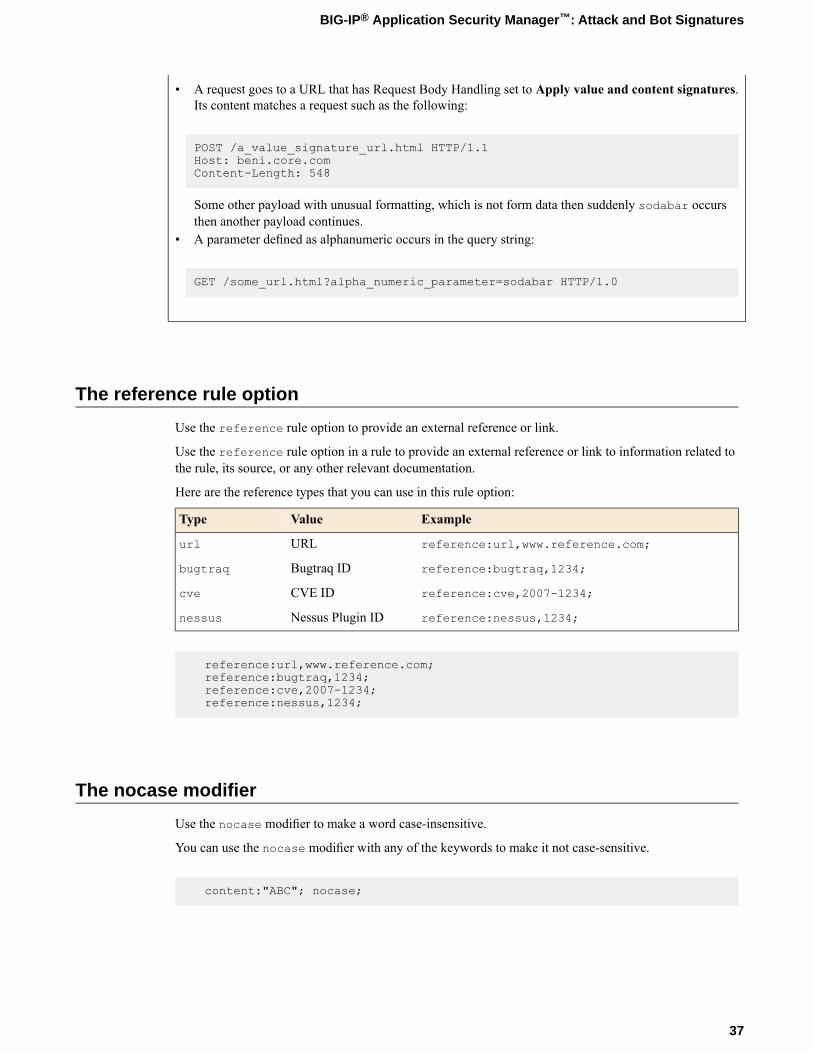
• A request goes to a URL that has Request Body Handling set to Apply value and content signatures.Its content matches a request such as the following:
POST /a_value_signature_url.html HTTP/1.1Host: beni.core.comContent-Length: 548
Some other payload with unusual formatting, which is not form data then suddenly sodabar occursthen another payload continues.
• A parameter defined as alphanumeric occurs in the query string:
GET /some_url.html?alpha_numeric_parameter=sodabar HTTP/1.0
The reference rule option
Use the reference rule option to provide an external reference or link.
Use the reference rule option in a rule to provide an external reference or link to information related tothe rule, its source, or any other relevant documentation.
Here are the reference types that you can use in this rule option:
ExampleValueType
reference:url,www.reference.com;URLurl
reference:bugtraq,1234;Bugtraq IDbugtraq
reference:cve,2007-1234;CVE IDcve
reference:nessus,1234;Nessus Plugin IDnessus
reference:url,www.reference.com;reference:bugtraq,1234;reference:cve,2007-1234;reference:nessus,1234;
The nocase modifier
Use the nocase modifier to make a word case-insensitive.
You can use the nocase modifier with any of the keywords to make it not case-sensitive.
content:"ABC"; nocase;
37
BIG-IP® Application Security Manager™: Attack and Bot Signatures

The offset modifier
Use the offset modifier to specify that the previous keyword matches within its scope starting no lessthan the specified number of bytes from the beginning of the scope.
You can use the offsetmodifier to modify keywords in any scope. The scope determines where the offsetmatching begins. For example, the rule uricontent:"ABC"; offset:10; matches these requests:
xxxx123456789012345GET /234567890ABC ...GET /2345678901ABC ...
but not these requests:
xxxx123456789012345GET /23456789ABC ...GET /2345678ABC ...
Tip: The line of numbers at the top shows the number of bytes.
Here is an example rule with the offset modifier:
content:"ABC"; offset:10;uricontent:"ABC"; offset:10;
The example matches these requests:
12345678901234567890GET /67890ABC ...GET /678901ABC ...
but not these:
12345678901234567890GET /6789ABC ...GET /678ABC ...
The plaintextonly modifier
The plaintextonly modifier is used to explicitly enforce signatures on text messages.
Note: You can use the plaintextonly modifier only in attack signatures, not in bot signatures.
Use the plaintextonly modifier with valuecontent to enforce signatures.
For example:
valuecontent:”url=http”; plaintextonly;
38
Signature Syntax

Without the plaintextonly keyword, this signature would match any parameter named url that startswith http, possibly causing false positives. With the keyword, the signature has to match the entire string(including the equal sign) inside a WebSocket message, making it a more specific signature.
The depth modifier
Use the depth modifier to specify that the previous keyword matches within its scope ending not morethan the specified number of bytes from the beginning of the scope.
You can use the depthmodifier to modify keywords for any scope. The scope determines where the depthmatching begins. For example, the rule uricontent:"ABC"; depth:10; matches these requests:
xxxx123456789012345GET /234567ABC ...GET /23456ABC ...
but not these requests:
xxxx123456789012345GET /2345678ABC ...GET /23456789ABC ...
Tip: The line of numbers at the top shows the number of bytes.
You can combine the offset and depthmodifiers to define both the beginning and end boundaries of thearea in which the keyword can match. For example, the rule content:"ABC"; offset:10; depth:20;matches these requests:
1234567890123456789012345GET /67890ABC ...GET /678901234567ABC ...
but not these requests:
1234567890123456789012345GET /678ABC ...GET /6789ABC ...
Here is an example rule with the depth modifier:
content:"ABC"; depth:10;uricontent:"ABC"; depth:10;
The example matches these requests:
12345678901234567890GET /67ABC ...GET /6ABC ...
39
BIG-IP® Application Security Manager™: Attack and Bot Signatures

but not these:
12345678901234567890GET /678ABC ...GET /6789ABC ...
The distance modifier
The distance modifier specifies that the previous keyword matches no less than the specified number ofbytes from the prior keyword.
Note: You can use the distance modifier only in attack signatures, not in bot signatures.
Use the distancemodifier to specify that the previous keyword matches no less than the specified numberof bytes from the prior keyword. The distancemodifier is similar to the offsetmodifier. The distancemodifier enforces a minimum number of bytes relative to the end of the previously specified keyword,whereas the offset modifier is an absolute value that starts matching from the beginning of thecorresponding keyword scope.
Use the distancemodifier when the rule includes two keywords, and you want to enforce that the secondkeyword appears (anywhere) after the first keyword. Note that without the distancemodifier, no positionalrelationship exists between two keywords in a rule. As such, the rule content:"ABC"; content:"XYZ";,without the distance modifier, matches both of these requests:
GET /ABCXYZ ...GET /XYZABC ...
Example rule with the distance modifier:
content:"ABC"; content:"XYZ"; distance:10;
The example matches these requests:
xxxxxxxx12345678901234567890GET /ABC1234567890XYZ ...GET /ABC12345678901XYZ ...
but not these:
xxxxxxxx12345678901234567890GET /ABC123456789XYZ ...GET /ABC12345678XYZ ...
Tip: The line of numbers at the top shows the number of bytes.
40
Signature Syntax

The within modifier
The within modifier specifies that the previous keyword matches no more than the specified number ofbytes from the prior keyword.
Note: You can use the within modifier only in attack signatures, not in bot signatures.
Use the withinmodifier to specify that the previous keyword matches no more than the specified numberof bytes from the prior keyword. The within modifier is similar to the depth modifier, except that thewithin modifier enforces a maximum number of bytes relative to the end of the previously specifiedkeyword, whereas the depth modifier is an absolute value that starts matching from the beginning of thecorresponding keyword scope.
You can combine the distance and within modifiers to define both the beginning and end boundariesof the area in which the keyword can match, relative to the end of the previous keyword match.
For example, the rule content:"ABC"; content:"XYZ"; distance:10; within:20;matches theserequests:
xxxxxxxx12345678901234567890GET /ABC1234567890XYZ ...GET /ABC12345678901234567XYZ ...
but not these requests:
xxxxxxxx1234567890123456789012345GET /ABC123456789XYZ ...GET /ABC123456789012345678XYZ ...
Tip: The line of numbers at the top shows the number of bytes.
content:"ABC"; content:"XYZ"; within:10;
The example matches these requests:
xxxxxxxx12345678901234567890GET /ABC1234567XYZ ...GET /ABC123456XYZ ...
but not these:
xxxxxxxx12345678901234567890GET /ABC12345678XYZ ...GET /ABC123456789XYZ ...
41
BIG-IP® Application Security Manager™: Attack and Bot Signatures

The objonly modifier
The objonlymodifier works with the uricontent keyword to look for a match that must be found in theURI.
Use the objonly modifier with the uricontent keyword to specify that the match must be found withinthe URI and not the query string. For example, in the URI, GET /index.html?q=1, the object part is/index.html.
uricontent:"ABC"; objonly;
The example matches these requests:
GET /ABC ...GET /ABC?param=123 ...
but not this request:
GET /123?param=ABC ...
The norm modifier
Use the normmodifier to apply additional normalization processes or normalize parameter and value pairs.
Use the norm modifier to specify that the system applies additional normalization processes to parameterand value pairs before applying the rule. The additional normalization processes include transformationsto mitigate evasion techniques commonly used in cross-site scripting (XSS), SQL-Injection, and CommandExecution attacks.
valuecontent:"ABC"; norm;
Note: The norm modifier applies only to the valuecontent rule option. See the valuecontent ruleoption for additional information.
The escape character (|)
Use the escape character (|) to escape special characters and in keywords.
When writing rules in user-defined signatures, you use the pipe symbol (|) to escape special characters inkeywords. You use the ASCII-equivalent hexadecimal values to represent the characters in the argumentand surround them with pipe symbols. The system escapes all of the values that occur between the two pipesymbols in the argument.
You must escape the following characters when using them in a keyword argument:
42
Signature Syntax

• Colon (:)• Semicolon (;)• Double quotation mark (")• Backward slash (\)• Pipe (|)• All binary characters (not ASCII-printable characters), including:
• ASCII 0x00 through 0x1F• ASCII 0x7F through 0xFF
• The space character (ASCII 0x20)
content:"ABC|20|XYZ";content:"ABC|22 22|XYZ";
In the example, where |20| represents the space character, the first rule matches the string ABC XYZ. Inthe second rule in the example, where |22 22| represents two double quotation marks, the rule matchesthe string ABC""XYZ.
Note that there is a different syntax when escaping characters in regular expressions. Refer to the pcre andre2 documentation for details or look online at https://re2.googlecode.com/hg/doc/syntax.html.
The not character
Use the not (!) character to negate a string and make it an exception to the rule.
Note: Do not use negation in bot signatures.
You can place the not (!) character in front of a string to make that string an exception to a rule. However,the negative keyword cannot be the only keyword in a signature, so you cannot use the not character (!)without a positive condition before it. A relationship, such as distance, must exist between the negative andpositive keywords.
You can use the not (!) character in front of a regular expression even without a non-negative keyword.
Here are some examples of using the not (!) character.
content:"ABC"; content:!"CDE"; distance:1;uricontent:"ABC"; uricontent:!"CDE"; distance:0;headercontent:"ABC"; headercontent:!"CDE"; distance:0;valuecontent:"ABC"; valuecontent:!"CDE"; distance:0;content:"ABC"; pcre:!"/<regex>/";re2:!"/<regex>/";
The re2 rule option
Use the re2 rule option to perform a regular expression match on different parts of the input.
The re2 rule option performs a regular expression match on different parts of the input, and accepts theopen-source RE2 regular expression syntax (as of Application Security Manager™ version 11.2). You can
43
BIG-IP® Application Security Manager™: Attack and Bot Signatures

find the full syntax at https://re2.googlecode.com/hg/doc/syntax.html. The re2 syntax issimilar to the pcre regular expression syntax.
The scope of the match depends on the re2 modifiers that you specify.
re2:"/regex/[options]";re2:!"/regex/[options]";
In regular expressions, you must escape the following characters: period (.), caret (^), dollar sign ($), asterisk(*), plus sign (+), question mark (?), parentheses [( )], left square bracket ([), left curly brace ({), backslash(\), and vertical bar (|); and inside character classes you need to escape caret (^), hyphen (-), right squarebracket (]), and backslash (\). Note that when escaping characters in regular expressions using re2, you usere2 escape sequences, and not the pipe symbol, to escape characters.
Note that you do not need to escape semicolons that are not followed by whitespace, such as:
re2: "/soda;bar/";
If an argument requires a semicolon followed by whitespace, you can either escape the semicolon as follows:
re2: "/soda\x3b bar/";
or escape the whitespace (one or more spaces) after the semicolon:
re2: "/soda;\s+bar/";
You can also escape both the semicolon and the whitespace in the same regular expression:
re2: "/soda\x3b\s+bar/";
For the re2 escape sequences, look online at https://re2.googlecode.com/hg/doc/syntax.html.
The pcre rule option
Use the pcre rule option to perform a regular expression match on different parts of the input.
Note: Although Application Security Manager™ supports PCRE, F5 recommends using the re2 rule optioninstead (as of Application Security Manager™ version 11.2). Using re2 provides performance enhancementsfor signature matching processes.
The pcre rule option performs a regular expression match on different parts of the input, and is based onthe Perl-compatible regular expressions (PCRE) syntax.
The scope of the match depends on the PCRE modifiers that you specify. For details about the syntax usedwithin the regular expression itself, refer to the PCRE documentation at pcre.org.
pcre:"/<regex>/";pcre:"/<regex>/<modifiers>";
In regular expressions, you must escape the following characters: period (.), caret (^), dollar sign ($), asterisk(*), plus sign (+), question mark (?), parentheses [( )], left square bracket ([), left curly brace ({), backslash
44
Signature Syntax

(\), and vertical bar (|); and inside character classes you need to escape caret (^), hyphen (-), right squarebracket (]), and backslash (\). Note that pcre has a different syntax (other than the vertical bar) for escapingcharacters (as explained at pcre.org).
The ipp rule option
Use the ipp rule option in a bot signature to perform a regular expression match on different parts of theinput.
The ipp option, used only for bot signatures, performs a regular expression match on the input (instead ofusing pcre or re2). (The ipp option is analogous to the Snort keyword pcre.) The ipp option uses anIntel-based regular expression engine (processor-optimized) that is available on the BIG-IP system. Forexample:
headercontent: "MyMaliciousBot"; useragentonly; ipp: "/MyMaliciousBotv0.[0-9]/H";
useragentonly;
This bot signature searches for MyMaliciousBot in the user-agent, and if found, it runs the regular expression"/MyMaliciousBot v0.[0-9]/H" on the user-agent header. The useragentonly modifier narrowsdown the header scope to the user agent only, and can be used only when the previous modifier washeadercontent, or ipp with the /H modifier. An HTTP request that contains the header User-Agent:MyMaliciousBot v0.8 is considered a bot as a result of using this signature.
Scope modifiers for re2, pcre, and ipp
This table describes the scope modifiers for the re2, pcre, and ipp rule options. You can use only onescope modifier for each rule option.
What it affectsmodifier
Full content of the request or response bodynone (using no modifier)
URI scopeU
URL-only scope (does not apply to ipp)O
HTTP headers scopeH
Parameters scope (does not apply to ipp)P
Parameters with additional normalizations scope (does not apply to ipp)N
Combined parameters and normalization scopeV
Matching action modifiers for re2 and pcre
This table describes the matching action modifiers for the re2, pcre, and ipp rule options. You can useone or more modifier for each rule option.
45
BIG-IP® Application Security Manager™: Attack and Bot Signatures

Applies toEffectMatching actionmodifier
pcre, re2, ippThe match is not case-sensitive.i
pcre, re2, ippThe dot character (.) matches any character, including a new line,which normally it would not match.
s
pcre, re2, ippThe caret (^) and the dollar sign ($) match the start or end of anyline anywhere within the scope (instead of matching the start orend of the scope).
m
pcreThe match is relative to the end of the last keyword match. (Thismodifier is similar to the distance:0; modifier.)
R
46
Signature Syntax

Legal Notices
Legal notices
Publication Date
This document was published on November 4, 2016.
Publication Number
MAN-0578-01
Copyright
Copyright © 2016, F5 Networks, Inc. All rights reserved.
F5 Networks, Inc. (F5) believes the information it furnishes to be accurate and reliable. However, F5 assumesno responsibility for the use of this information, nor any infringement of patents or other rights of thirdparties which may result from its use. No license is granted by implication or otherwise under any patent,copyright, or other intellectual property right of F5 except as specifically described by applicable userlicenses. F5 reserves the right to change specifications at any time without notice.
Trademarks
For a current list of F5 trademarks and service marks, seehttp://www.f5.com/about/guidelines-policies/trademarks/.
All other product and company names herein may be trademarks of their respective owners.
Patents
This product may be protected by one or more patents indicated at: https://f5.com/about-us/policies/patents
Export Regulation Notice
This product may include cryptographic software. Under the Export Administration Act, the United Statesgovernment may consider it a criminal offense to export this product from the United States.
RF Interference Warning
This is a Class A product. In a domestic environment this product may cause radio interference, in whichcase the user may be required to take adequate measures.
FCC Compliance
This equipment has been tested and found to comply with the limits for a Class A digital device pursuantto Part 15 of FCC rules. These limits are designed to provide reasonable protection against harmfulinterference when the equipment is operated in a commercial environment. This unit generates, uses, andcan radiate radio frequency energy and, if not installed and used in accordance with the instruction manual,may cause harmful interference to radio communications. Operation of this equipment in a residential areais likely to cause harmful interference, in which case the user, at his own expense, will be required to takewhatever measures may be required to correct the interference.

Anymodifications to this device, unless expressly approved by themanufacturer, can void the user's authorityto operate this equipment under part 15 of the FCC rules.
Canadian Regulatory Compliance
This Class A digital apparatus complies with Canadian ICES-003.
Standards Compliance
This product conforms to the IEC, European Union, ANSI/UL and Canadian CSA standards applicable toInformation Technology products at the time of manufacture.
48
Legal Notices

Index
A
attack signature examplescreating customized 24for protecting against cross-site scripting 24for protecting management interface 24
attack signature poolgetting update emails 20updating automatically 19updating manually 20viewing details 21
attack signature setsdefined 8listed 8
attack signaturesabout custom 23and staging 5and XML format 26assigning sets to policies 11creating a set of 10creating custom 23enabling or disabling in a policy 12enabling or disabling staging 13exporting custom 25importing custom 25list of attack types 6list of properties 7list of signature sets 8overriding in content profiles 14overview 5overview of creating sets 8specifying blocking policy 11viewing all in a policy 12
B
bot defenseconfiguring proactive 15
bot signature checkconfiguring 17
bot signature syntaxsummary 27
bot signaturesabout 15about custom 27creating custom 28creating user-defined categories 29updating automatically 19updating manually 20viewing details 21
C
categorycreating for bot signatures 29
character escaping 42composite rules
overview 33
content profilesoverriding attack signatures 14
content rule option 35custom attack signatures
about 23creating 23exporting 25importing 25
custom bot signaturescreating 28
customized attack signaturesexample of creating 24
D
depth modifier 39distance modifier 40DoS attacks
configuring bot signature check 17configuring proactive bot defense 15
E
escape character (|) 42
H
headercontent rule option 35
I
ipp optiondescription 45
ipp rule optionand action modifiers 45and scope modifiers 45
K
keyword compatibility 32keywords 31
M
matching action modifiersfor re2, pcre, and ipp 45
modifiersfor matching action 45for scope 45summary 31
N
nocase modifier 37norm modifier 42normalization 33
49
Index

not (!) character 43
O
objonly modifier 42offset modifier 38
P
pcre rule optionand action modifiers 45and scope modifiers 45description 44
plaintextonly modifier 38proactive bot defense
configuring 15
R
re2 rule optionand action modifiers 45and scope modifiers 45description 43
reference rule option 37regex flag compatibility 32regular expression
escaping semicolons 43re2 syntax 43
regular expressionsand scopes 32
rule optionsand scope modifiers 45
S
scope modifiersfor re2, pcre, ipp 45
scopesfor regular expressions 32
security updatedescription 19scheduling automatic 19
security updatesupdating manually 20
signature pooldefined 19
signaturesabout bot 15about custom bot 27and combining rules 33and normalization 33updating automatically 19updating manually 20
stagingenabling or disabling for attack signatures 13
summarized 31
U
uricontent rule option 35
V
valuecontent rule option 36
W
web scraping attacksconfiguring proactive bot defense 15
within modifier 41
50
Index