Embed Size (px)
Citation preview
Page 1 www.jocole.com
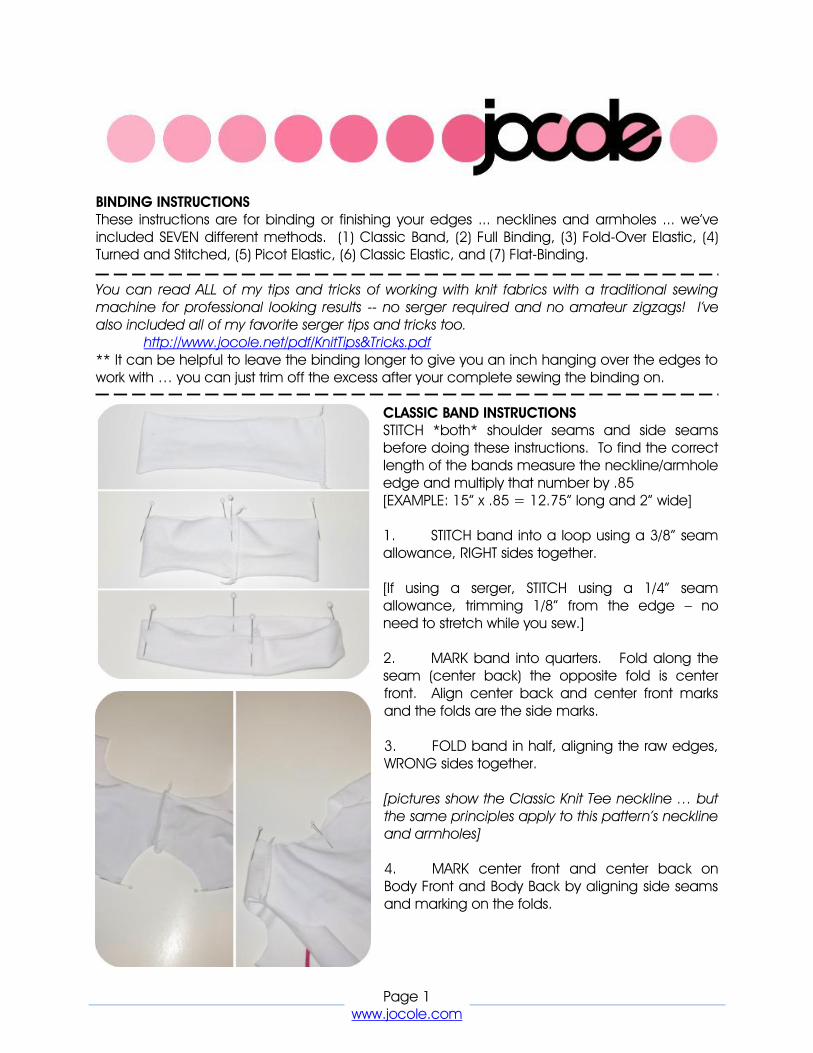
BINDING INSTRUCTIONS These instructions are for binding or finishing your edges ... necklines and armholes ... we’ve included SEVEN different methods. (1) Classic Band, (2) Full Binding, (3) Fold-Over Elastic, (4) Turned and Stitched, (5) Picot Elastic, (6) Classic Elastic, and (7) Flat-Binding. You can read ALL of my tips and tricks of working with knit fabrics with a traditional sewing machine for professional looking results -- no serger required and no amateur zigzags! I’ve also included all of my favorite serger tips and tricks too. http://www.jocole.net/pdf/KnitTips&Tricks.pdf ** It can be helpful to leave the binding longer to give you an inch hanging over the edges to work with … you can just trim off the excess after your complete sewing the binding on.
CLASSIC BAND INSTRUCTIONS STITCH *both* shoulder seams and side seams before doing these instructions. To find the correct length of the bands measure the neckline/armhole edge and multiply that number by .85 [EXAMPLE: 15” x .85 = 12.75” long and 2” wide] 1. STITCH band into a loop using a 3/8” seam allowance, RIGHT sides together. [If using a serger, STITCH using a 1/4” seam allowance, trimming 1/8” from the edge – no need to stretch while you sew.] 2. MARK band into quarters. Fold along the seam (center back) the opposite fold is center front. Align center back and center front marks and the folds are the side marks. 3. FOLD band in half, aligning the raw edges, WRONG sides together. [pictures show the Classic Knit Tee neckline … but the same principles apply to this pattern’s neckline and armholes] 4. MARK center front and center back on Body Front and Body Back by aligning side seams and marking on the folds.
Page 2 www.jocole.com
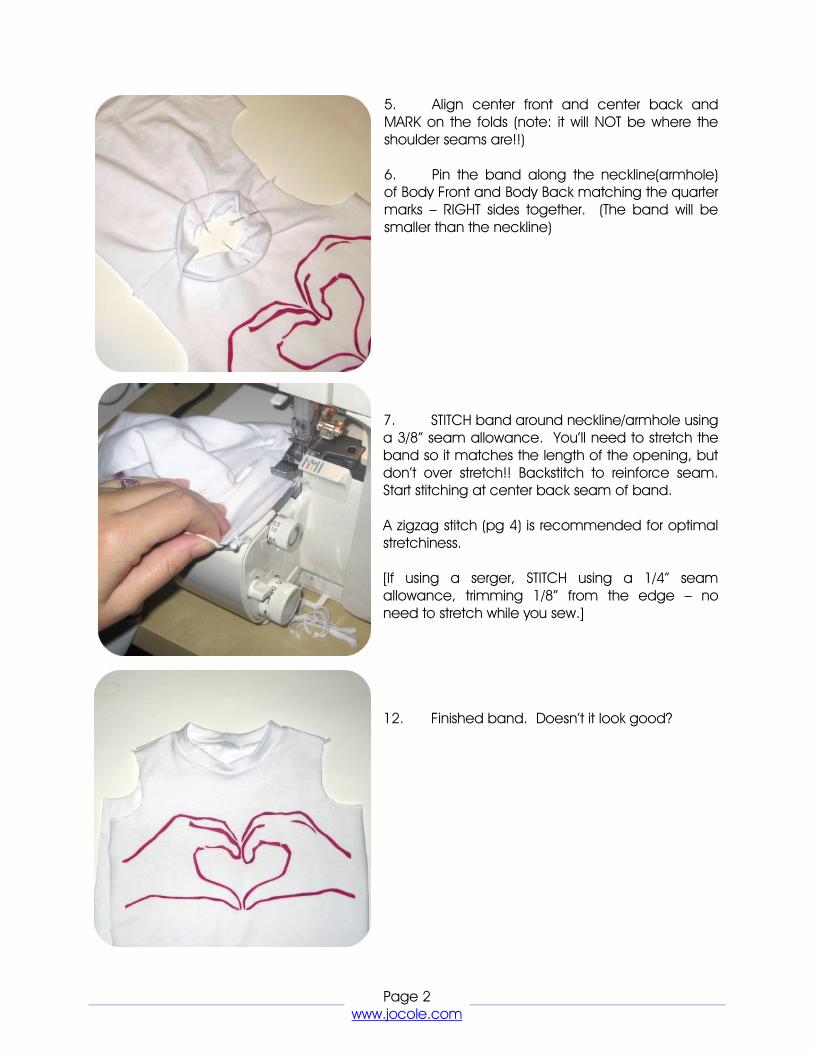
5. Align center front and center back and MARK on the folds (note: it will NOT be where the shoulder seams are!!) 6. Pin the band along the neckline(armhole) of Body Front and Body Back matching the quarter marks – RIGHT sides together. (The band will be smaller than the neckline) 7. STITCH band around neckline/armhole using a 3/8” seam allowance. You’ll need to stretch the band so it matches the length of the opening, but don’t over stretch!! Backstitch to reinforce seam. Start stitching at center back seam of band. A zigzag stitch (pg 4) is recommended for optimal stretchiness. [If using a serger, STITCH using a 1/4” seam allowance, trimming 1/8” from the edge – no need to stretch while you sew.] 12. Finished band. Doesn’t it look good?

Page 3 www.jocole.com
BINDING INSTRUCTIONS For binding you can just use your rotary cutter and cut a 2” strip the whole width of the fabric (perpendicular to the selvages) and then cut the desired lengths from that piece. 2” wide = 1/2" binding 1 1/2" wide = 3/8” binding 1” wide = 1/4" binding 1. Align the raw edges of the binding with the raw edge of the fabric, RIGHT sides down (right side of the binding to the wrong side of the fabric). STITCH together using a 1/2” seam allowance. **A serger is not recommended for this, as the threads will add unnecessary bulk. Gently stretch the binding (but NOT the fabric) while stitching. 2. Flip the binding away from the stitching line, and flip the fabric over (RIGHT side up). Fold the binding raw edges to meet the raw edge of the fabric, and then fold again so the fold line meets the line of stitching.
3. TOPSTITCH 1/8” from the fold line. You can use a single needle, or use a double needle which creates a faux-coverstitch. ** you can also use a zigzag stitch instead for optimal stretchiness
Page 4 www.jocole.com
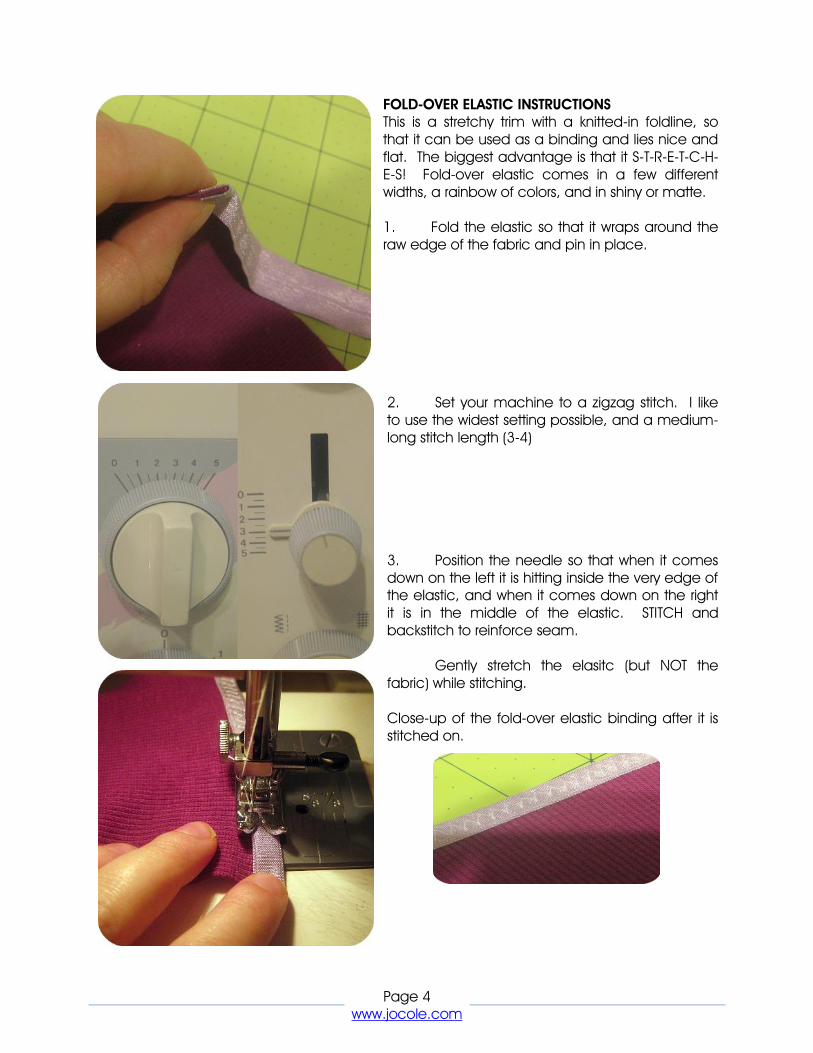
FOLD-OVER ELASTIC INSTRUCTIONS This is a stretchy trim with a knitted-in foldline, so that it can be used as a binding and lies nice and flat. The biggest advantage is that it S-T-R-E-T-C-H-E-S! Fold-over elastic comes in a few different widths, a rainbow of colors, and in shiny or matte. 1. Fold the elastic so that it wraps around the raw edge of the fabric and pin in place. 2. Set your machine to a zigzag stitch. I like to use the widest setting possible, and a medium-long stitch length (3-4) 3. Position the needle so that when it comes down on the left it is hitting inside the very edge of the elastic, and when it comes down on the right it is in the middle of the elastic. STITCH and backstitch to reinforce seam.
Gently stretch the elasitc (but NOT the fabric) while stitching. Close-up of the fold-over elastic binding after it is stitched on.
Page 5 www.jocole.com
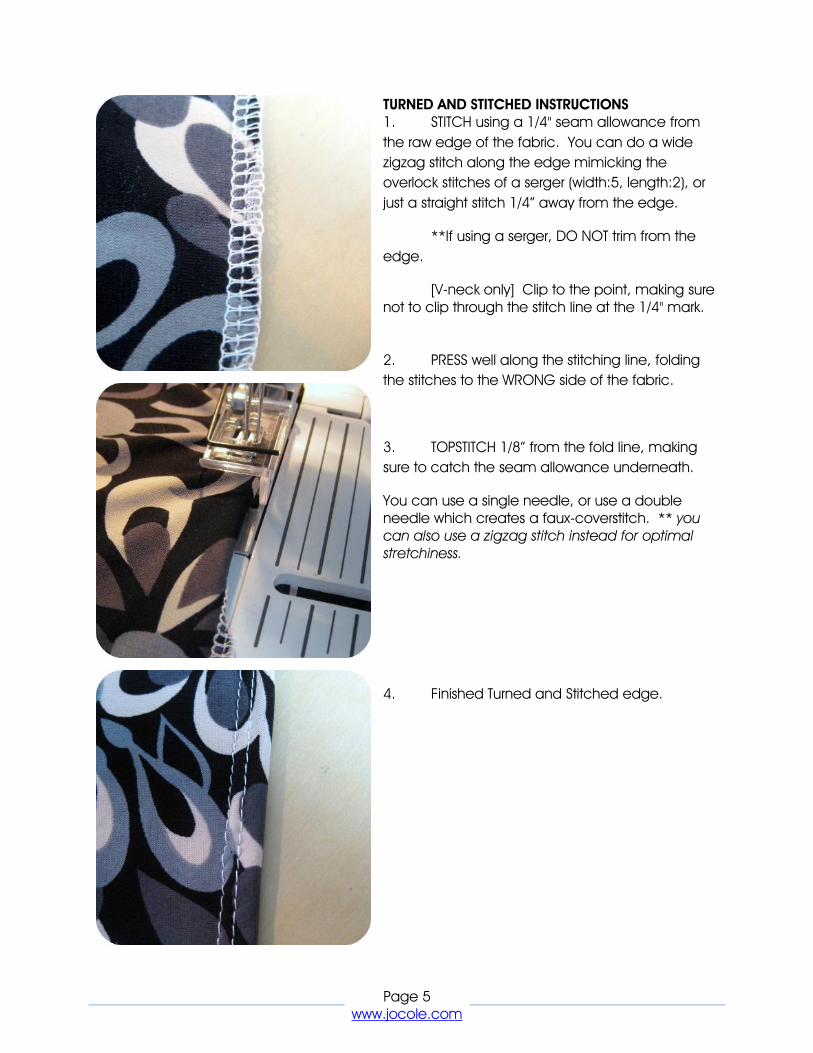
TURNED AND STITCHED INSTRUCTIONS 1. STITCH using a 1/4" seam allowance from
the raw edge of the fabric. You can do a wide
zigzag stitch along the edge mimicking the
overlock stitches of a serger (width:5, length:2), or
just a straight stitch 1/4” away from the edge.
**If using a serger, DO NOT trim from the
edge.
[V-neck only] Clip to the point, making sure not to clip through the stitch line at the 1/4" mark. 2. PRESS well along the stitching line, folding
the stitches to the WRONG side of the fabric.
3. TOPSTITCH 1/8” from the fold line, making
sure to catch the seam allowance underneath.
You can use a single needle, or use a double needle which creates a faux-coverstitch. ** you can also use a zigzag stitch instead for optimal stretchiness. 4. Finished Turned and Stitched edge.
Page 6 www.jocole.com
PICOT ELASTIC INSTRUCTIONS
To find the correct length of the elastic measure
the neckline/armhole edge and multiply that
number by .85
[EXAMPLE: 15” x .85 = 12.75” long and 2” wide] 1. Prepare elastic. Stretch it out a few times
before cutting to the right length
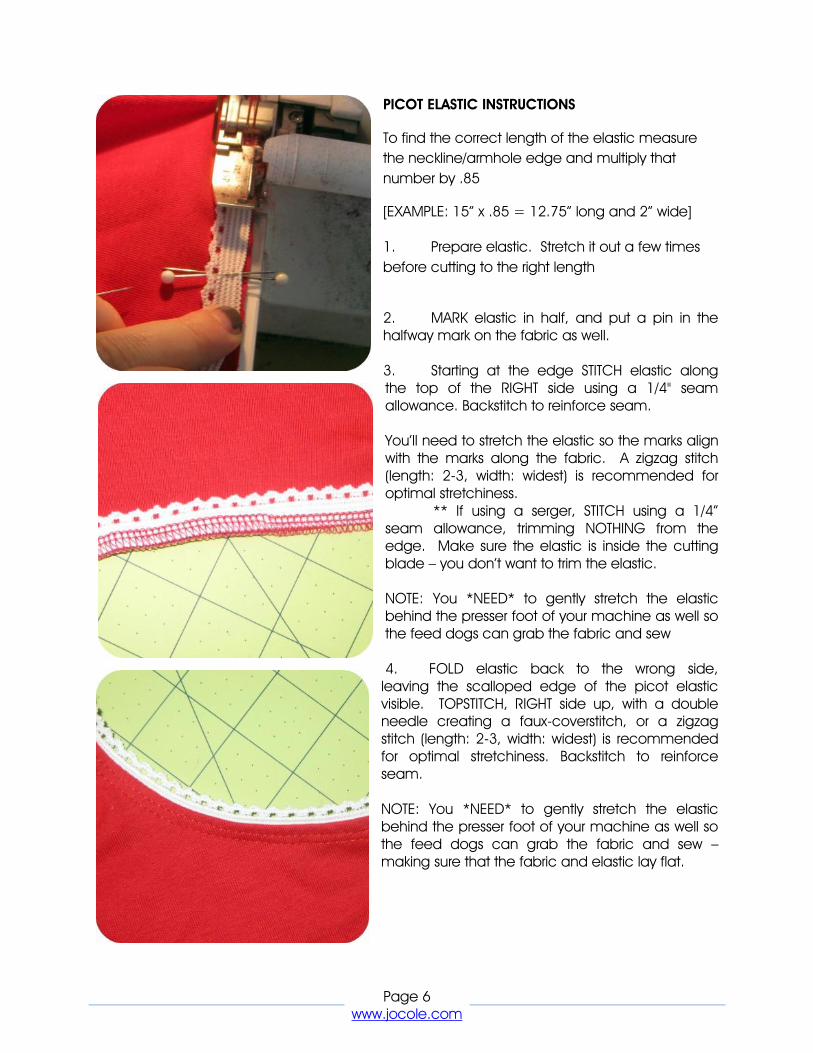
2. MARK elastic in half, and put a pin in the halfway mark on the fabric as well. 3. Starting at the edge STITCH elastic along the top of the RIGHT side using a 1/4" seam allowance. Backstitch to reinforce seam. You’ll need to stretch the elastic so the marks align with the marks along the fabric. A zigzag stitch (length: 2-3, width: widest) is recommended for optimal stretchiness.
** If using a serger, STITCH using a 1/4” seam allowance, trimming NOTHING from the edge. Make sure the elastic is inside the cutting blade – you don’t want to trim the elastic.
NOTE: You *NEED* to gently stretch the elastic behind the presser foot of your machine as well so the feed dogs can grab the fabric and sew 4. FOLD elastic back to the wrong side, leaving the scalloped edge of the picot elastic visible. TOPSTITCH, RIGHT side up, with a double needle creating a faux-coverstitch, or a zigzag stitch (length: 2-3, width: widest) is recommended for optimal stretchiness. Backstitch to reinforce seam. NOTE: You *NEED* to gently stretch the elastic behind the presser foot of your machine as well so the feed dogs can grab the fabric and sew – making sure that the fabric and elastic lay flat.
Page 7 www.jocole.com
CLASSIC ELASTIC INSTRUCTIONS To find the correct length of the elastic measure
the neckline/armhole edge and multiply that
number by .85
[EXAMPLE: 15” x .85 = 12.75” long and 2” wide] 1. Prepare elastic. Stretch it out a few times
before cutting to the right length
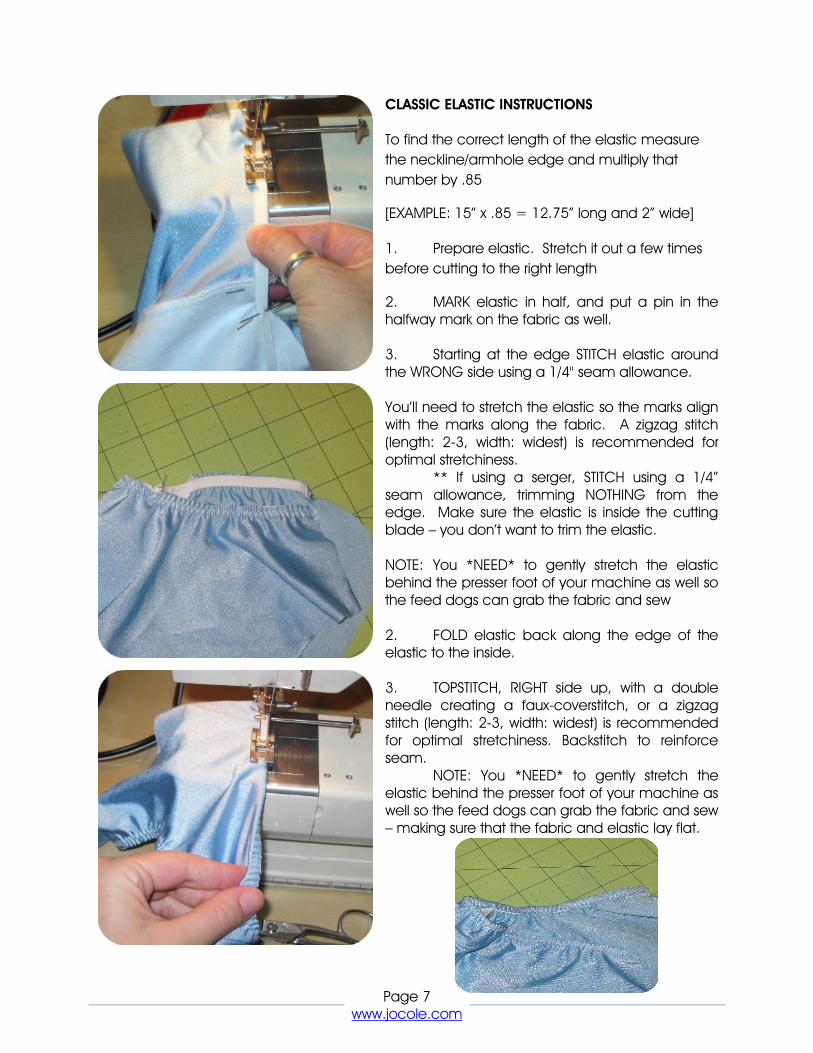
2. MARK elastic in half, and put a pin in the halfway mark on the fabric as well. 3. Starting at the edge STITCH elastic around the WRONG side using a 1/4" seam allowance. You’ll need to stretch the elastic so the marks align with the marks along the fabric. A zigzag stitch (length: 2-3, width: widest) is recommended for optimal stretchiness.
** If using a serger, STITCH using a 1/4” seam allowance, trimming NOTHING from the edge. Make sure the elastic is inside the cutting blade – you don’t want to trim the elastic.
NOTE: You *NEED* to gently stretch the elastic behind the presser foot of your machine as well so the feed dogs can grab the fabric and sew 2. FOLD elastic back along the edge of the elastic to the inside. 3. TOPSTITCH, RIGHT side up, with a double needle creating a faux-coverstitch, or a zigzag stitch (length: 2-3, width: widest) is recommended for optimal stretchiness. Backstitch to reinforce seam.
NOTE: You *NEED* to gently stretch the elastic behind the presser foot of your machine as well so the feed dogs can grab the fabric and sew – making sure that the fabric and elastic lay flat.
Page 8 www.jocole.com
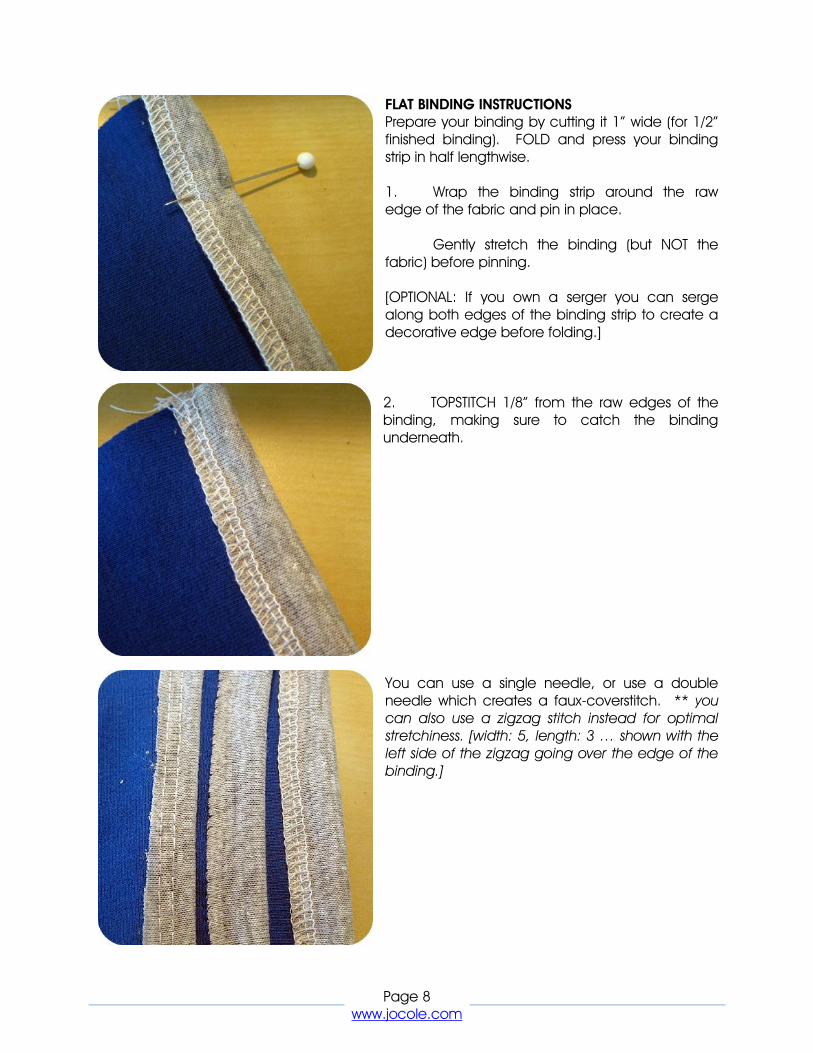
FLAT BINDING INSTRUCTIONS Prepare your binding by cutting it 1” wide (for 1/2” finished binding). FOLD and press your binding strip in half lengthwise. 1. Wrap the binding strip around the raw edge of the fabric and pin in place.
Gently stretch the binding (but NOT the fabric) before pinning. [OPTIONAL: If you own a serger you can serge along both edges of the binding strip to create a decorative edge before folding.] 2. TOPSTITCH 1/8” from the raw edges of the binding, making sure to catch the binding underneath. You can use a single needle, or use a double needle which creates a faux-coverstitch. ** you can also use a zigzag stitch instead for optimal stretchiness. [width: 5, length: 3 … shown with the left side of the zigzag going over the edge of the binding.]

Page 9 www.jocole.com
EMBELLISHMENT IDEAS: You can find a list of all of our FREE tutorials for embellishing you garments HERE: http://jocole.blogspot.com/2011/12/embellishment-ideas.html
Easy Ribbon Tags for identifying what size the item is: http://jocole.blogspot.com/2010/11/easy-ribbon-tags.html Mini-Bows are perfect for sewing on the FRONT to help your little one dress herself, so she can easily tell which is the front and which is the back:
http://jocole.blogspot.com/2010/11/mini-bow-directions.html
SHARE YOUR CREATIONS: This group showcases creations made with the pdf sewing patterns from Jocole. Please share your finished results, fabric choices and discuss you experience with the patterns! We can't wait to see what you create! http://www.flickr.com/groups/jocolepatterns/ JOIN US ON FACEBOOK: http://www.facebook.com/pages/Jocole/120081946489 SIGN UP FOR THE JOCOLE MAILING LIST: You will get notices of new items and super secret sales and discounts! Requests for pattern testing is posted there (try out our patterns for FREE before anyone else!!) http://joccole.blogspot.com


![650W 180mm Tile cutter manual[EN] - Free …Original Instructions_MNL _ MTC650_GB_V01_180102 MTC650 650W Tile Cutter EAN: 3663602797913 WARNING! Read the instructions before …](https://img.pdfslide.net/doc/110x75/5ee27ebaad6a402d666ced7e/650w-180mm-tile-cutter-manualen-free-original-instructionsmnl-mtc650gbv01180102.jpg)