Embed Size (px)
Citation preview

Product Documentation PUBLICSAP Business ByDesign February 2017
Business Partner Data


Table Of Contents
1 Business Background . . . . . . . . . . . . . . . . . . . . . . . . . . . . . . . . . . . . . . . . . . . . . . . . . . . . 51.1 Address Management . . . . . . . . . . . . . . . . . . . . . . . . . . . . . . . . . . . . . . . . . . . . . . . . . . . . . . . . 51.2 Business Partner Duplicate Check . . . . . . . . . . . . . . . . . . . . . . . . . . . . . . . . . . . . . . . . . . . . . . . 7
2 Business Partners View . . . . . . . . . . . . . . . . . . . . . . . . . . . . . . . . . . . . . . . . . . . . . . . . . . 92.1 Business Partners Quick Guide . . . . . . . . . . . . . . . . . . . . . . . . . . . . . . . . . . . . . . . . . . . . . . . . . 92.2 Business Background . . . . . . . . . . . . . . . . . . . . . . . . . . . . . . . . . . . . . . . . . . . . . . . . . . . . . . . . 11
Business Partners . . . . . . . . . . . . . . . . . . . . . . . . . . . . . . . . . . . . . . . . . . . . . . . . . . . . . . . . 11Additional Identifiers for Business Partners . . . . . . . . . . . . . . . . . . . . . . . . . . . . . . . . . . . . . . . 14
3 Accounts View . . . . . . . . . . . . . . . . . . . . . . . . . . . . . . . . . . . . . . . . . . . . . . . . . . . . . . . . . . 163.1 Accounts Quick Guide . . . . . . . . . . . . . . . . . . . . . . . . . . . . . . . . . . . . . . . . . . . . . . . . . . . . . . . . 163.2 Business Background . . . . . . . . . . . . . . . . . . . . . . . . . . . . . . . . . . . . . . . . . . . . . . . . . . . . . . . . 23
Maintenance of Accounts and Contacts . . . . . . . . . . . . . . . . . . . . . . . . . . . . . . . . . . . . . . . . . 23Access Rights and Restrictions for Accounts . . . . . . . . . . . . . . . . . . . . . . . . . . . . . . . . . . . . . . 26Process-Integrated Output Settings . . . . . . . . . . . . . . . . . . . . . . . . . . . . . . . . . . . . . . . . . . . . 29Overviews of Business Partners . . . . . . . . . . . . . . . . . . . . . . . . . . . . . . . . . . . . . . . . . . . . . . . 30
3.3 Tasks . . . . . . . . . . . . . . . . . . . . . . . . . . . . . . . . . . . . . . . . . . . . . . . . . . . . . . . . . . . . . . . . . . . 32Create Accounts Using Microsoft Excel® . . . . . . . . . . . . . . . . . . . . . . . . . . . . . . . . . . . . . . . . . 32Maintain Cross-Account Sales Data . . . . . . . . . . . . . . . . . . . . . . . . . . . . . . . . . . . . . . . . . . . . 34Create a Tax Exemption Certificate (Accounts view) . . . . . . . . . . . . . . . . . . . . . . . . . . . . . . . . 34Create a SEPA Direct Debit Mandate . . . . . . . . . . . . . . . . . . . . . . . . . . . . . . . . . . . . . . . . . . . 35Export Business Data Using Microsoft Excel® . . . . . . . . . . . . . . . . . . . . . . . . . . . . . . . . . . . . . 37Maintain Mass Account Data . . . . . . . . . . . . . . . . . . . . . . . . . . . . . . . . . . . . . . . . . . . . . . . . . 39
4 Suppliers View . . . . . . . . . . . . . . . . . . . . . . . . . . . . . . . . . . . . . . . . . . . . . . . . . . . . . . . . . . 414.1 Suppliers Quick Guide . . . . . . . . . . . . . . . . . . . . . . . . . . . . . . . . . . . . . . . . . . . . . . . . . . . . . . . . 414.2 Business Background . . . . . . . . . . . . . . . . . . . . . . . . . . . . . . . . . . . . . . . . . . . . . . . . . . . . . . . . 46
Maintenance of Suppliers and Service Agents . . . . . . . . . . . . . . . . . . . . . . . . . . . . . . . . . . . . . 46Managing the Product Category Life Cycle . . . . . . . . . . . . . . . . . . . . . . . . . . . . . . . . . . . . . . . 47
4.3 Tasks . . . . . . . . . . . . . . . . . . . . . . . . . . . . . . . . . . . . . . . . . . . . . . . . . . . . . . . . . . . . . . . . . . . 47Create Suppliers Using Microsoft Excel® . . . . . . . . . . . . . . . . . . . . . . . . . . . . . . . . . . . . . . . . . 47
5 Contacts View . . . . . . . . . . . . . . . . . . . . . . . . . . . . . . . . . . . . . . . . . . . . . . . . . . . . . . . . . . 505.1 Quick Guide for Contacts in Business Partner Data . . . . . . . . . . . . . . . . . . . . . . . . . . . . . . . . . . . 505.2 Business Background . . . . . . . . . . . . . . . . . . . . . . . . . . . . . . . . . . . . . . . . . . . . . . . . . . . . . . . . 52
Maintenance of Accounts and Contacts . . . . . . . . . . . . . . . . . . . . . . . . . . . . . . . . . . . . . . . . . 52
SAP Business ByDesign February 2017Table Of Contents P U B L I C • © 2017 SAP SE or an SAP affiliate company. All rights reserved. 3

6 Service Agents View . . . . . . . . . . . . . . . . . . . . . . . . . . . . . . . . . . . . . . . . . . . . . . . . . . . . . 556.1 Service Agents Quick Guide . . . . . . . . . . . . . . . . . . . . . . . . . . . . . . . . . . . . . . . . . . . . . . . . . . . . 556.2 Business Background . . . . . . . . . . . . . . . . . . . . . . . . . . . . . . . . . . . . . . . . . . . . . . . . . . . . . . . . 58
Maintenance of Suppliers and Service Agents . . . . . . . . . . . . . . . . . . . . . . . . . . . . . . . . . . . . . 586.3 Tasks . . . . . . . . . . . . . . . . . . . . . . . . . . . . . . . . . . . . . . . . . . . . . . . . . . . . . . . . . . . . . . . . . . . 59
Edit Time Sheet . . . . . . . . . . . . . . . . . . . . . . . . . . . . . . . . . . . . . . . . . . . . . . . . . . . . . . . . . . 59Record Times from Microsoft Excel® . . . . . . . . . . . . . . . . . . . . . . . . . . . . . . . . . . . . . . . . . . . 62
7 Employees View . . . . . . . . . . . . . . . . . . . . . . . . . . . . . . . . . . . . . . . . . . . . . . . . . . . . . . . . . 657.1 Quick Guide for Employees in Business Partner Data . . . . . . . . . . . . . . . . . . . . . . . . . . . . . . . . . . 657.2 Business Background . . . . . . . . . . . . . . . . . . . . . . . . . . . . . . . . . . . . . . . . . . . . . . . . . . . . . . . . 66
Data Privacy Management in Business ByDesign . . . . . . . . . . . . . . . . . . . . . . . . . . . . . . . . . . . 66
8 Reports View . . . . . . . . . . . . . . . . . . . . . . . . . . . . . . . . . . . . . . . . . . . . . . . . . . . . . . . . . . . 698.1 Account Collaboration Data . . . . . . . . . . . . . . . . . . . . . . . . . . . . . . . . . . . . . . . . . . . . . . . . . . . . 698.2 Account Contact Data . . . . . . . . . . . . . . . . . . . . . . . . . . . . . . . . . . . . . . . . . . . . . . . . . . . . . . . . 708.3 Account Details . . . . . . . . . . . . . . . . . . . . . . . . . . . . . . . . . . . . . . . . . . . . . . . . . . . . . . . . . . . . 718.4 Account Responsibility Data . . . . . . . . . . . . . . . . . . . . . . . . . . . . . . . . . . . . . . . . . . . . . . . . . . . 738.5 Supplier Details . . . . . . . . . . . . . . . . . . . . . . . . . . . . . . . . . . . . . . . . . . . . . . . . . . . . . . . . . . . . 74
4 © 2017 SAP SE or an SAP affiliate company. All rights reserved. • P U B L I CSAP Business ByDesign February 2017
Table Of Contents
1 Business Background
1.1 Address Management
OverviewYou can create, view, and update the details you need to communicate with your business partners. You can maintaindetailed postal and communication data for persons and organizations.
Postal DataYou can maintain general postal address data for a business partner. You have to select the country before theaddress details can be added.The layout of the postal address fields is country-specific.
The country-specific layout is not available for all countries.
You can maintain further postal address details for organizations and persons in the additional fields, such as: ● P.O. box number ● Time zone ● Address lines
We recommend that you create a separate address entry for a P.O. box address that contains P.O. box dataonly.
In human resources, address data is time-dependent, allowing you to maintain accurate address details foremployees. Private address data maintained in human resources is protected in other application areas.
Communication DataYou can maintain communication data for a business partner. The fields available for communication data varydepending on whether you maintain data for persons or organizations.
Maintaining communication data is optional.
You can enter communication details, such as: ● Phone number ● Fax number ● E-mail address ● Web site address (organization only) ● Mobile phone (person only)
You can also specify the business partner’s language and preferred method of contact.
SAP Business ByDesign February 2017Business Background P U B L I C • © 2017 SAP SE or an SAP affiliate company. All rights reserved. 5
Multiple AddressesYou can maintain multiple addresses for a business partner. You must specify the main address when you assignmore than one address to a business partner.If you enter multiple addresses for accounts, you can specify the ship-to, bill-to, dunning-to, and remittance adviceto addresses. For suppliers, you can specify the ship-from, invoicer, payee, and remittance advice to addresses.You can specify business and personal addresses for contacts and service agents. You can add further details to abusiness address, such as the building, floor, room, and further in-house mail details. If you want to select a businessaddress for a contact or service agent, you have to assign the relevant business partner organization first whoseaddress is then used as the business address.Additionally you can also maintain validity period for the address of an account master data.
The time dependent address can be created and maintained through migration or service.
Deletion of AddressesYou can delete the address of a business partner. The deletion of a business partner address will not lead to errorsin business documents, since business documents always refer to a copy of the business partner address that theyuse.
Credit Card Holder Addresses for AccountsIn some countries, the authorization check of a credit card service provider includes an address check. In this case,a credit card holder address is required. The clearing house checks the address of the payer against the address ofthe credit card holder that is stored at the credit card service provider. If the addresses do not match, the credit cardpayment fails.You can maintain a credit card holder address or copy one of the existing addresses of the account to the credit cardholder address.
In the quick activity you can only copy the main address of the account to the credit card holder address.
Additional FeaturesThe features listed below and other features are available if they have been activated in the Mashup Authoring view.For more information, see the Mashup Authoring Quick Guide in the Help Center.
● Map/DirectionsYou can view an address on a map.
● Reverse Phone Look-UpYou can enter the phone number of a supplier, an account, or a contact to display the details of the personor organization to which this number belongs.
6 © 2017 SAP SE or an SAP affiliate company. All rights reserved. • P U B L I CSAP Business ByDesign February 2017
Business Background
1.2 Business Partner Duplicate Check
OverviewThe business partner duplicate check allows you to find business partners that exist more than once in the system,thus avoiding having redundant data in your system and helping you to reduce efforts and save costs when managingyour business partner master data.You can use the duplicate check when performing the following activities:
● When creating a new business partner in a business partner view ● When creating business partners from Microsoft Excel®
For example, the duplicate check is available when creating accounts using Microsoft Excel. For moreinformation, see Create Accounts Using Microsoft Excel® [page 32].
The duplicate check is available in various business processes where business partners, accounts, suppliers, or anyother types of business partners and their respective business partner roles are used.The check is carried out when you create a new business partner. While saving the data the system checks whetherthe business partner already exists. Each check is carried out for business partners with any kind of status.
The check will also list business partner data that you might not be able to access due to missing access rights.The main address is only displayed if you have authorization to access it.
You have the following options when checking for duplicate business partners: ● The duplicate check is carried out automatically when you save the data you entered. ● You can also carry out the duplicate check manually by clicking Check for Duplicates .
The check is always done by comparing existing business partner data with the data of a business partner youare about to create.
Prerequisites
Configuration Settings
Configuration settings are usually performed by an administrator. If you do not have the requiredauthorization, contact your administrator.
To deactivate the duplicate check and to select the type of check you want to use, you have selected the requiredfunctions in your solution configuration. To find this business option, go to the Business Configuration work centerand choose the Implementation Projects view. Select your implementation project and click Edit Project Scope . Inthe Scoping step of the project, ensure that Business Partners is selected within General Business Data.In the Questions step, expand the General Business Data scoping element and select Business Partners. SelectHandling of Business Partners and answer the questions related to the duplicate check for business partners.
SAP Business ByDesign February 2017Business Background P U B L I C • © 2017 SAP SE or an SAP affiliate company. All rights reserved. 7
Features
Searching for Duplicate Business PartnersThe search for duplicate business partners is carried out based on the following search criteria:
● Name of a business partner and related data ○ First name, last name, and date of birth of a person ○ Name and additional name of an organization
● Address data ○ Postal address data such as country, city, postal code, street, and house number
● Communication data ○ Phone, fax, mobile number, and e-mail
The system carries out a fuzzy search that finds business partners even when the data you enter containstypographical errors or is incomplete.
The duplicate check result displays the following information about potential duplicate business partners: ● ID ● Name ● Address ● Status ● Ranking information about the probability of a match with a potential duplicate business partner in percent ● An indication of whether the related role of the current view has already been assigned to the business partner
in questionFor example, when checking for duplicate suppliers in the Suppliers view, the Existing as Supplier check boxis selected if the business partner has been created as a supplier.
You can choose one of the following profiles for the duplicate check during scoping: ● Strong check if you want to search for duplicate business partners with high similarity only
If you select this type of check, business partners will be displayed as duplicates if the similarity is atleast 85 %.
● Medium check if you want to search for duplicate business partners with medium to high similarityIf you select this type of check, business partners will be displayed as duplicates if the similarity is atleast 80 %.
● Weak check if you want to search for duplicate business partners with low to high similarityIf you select this type of check, business partners will be displayed as duplicates if the similarity is atleast 70 %.You can also deactivate the duplicate check.
Handling Duplicate Business PartnersIn the duplicate check result, you can do the following:
● Ignore the duplicate business partners and save your entries ● Create the new business partner based on the data of the duplicate business partner
Depending on whether the existing business partner has already been created with a certain role, you can usethe existing data or create the new business partner with the new role.
8 © 2017 SAP SE or an SAP affiliate company. All rights reserved. • P U B L I CSAP Business ByDesign February 2017
Business Background
2 Business Partners View
2.1 Business Partners Quick Guide
The Business Partners view enables you to easily create and access records of companies and persons who arebusiness partners. You can view and maintain business partner details, such as the current status of the record,address and communication data, and the main contact.In the Business Partners view you can assign multiple business partner roles to an existing business partner, forexample, you can specify that a customer is also a competitor. By assigning business partner roles, you ensure thatinformation already maintained for this organization or person is shared. This information therefore does not haveto be re-entered every time a new business partner role is assigned to that business partner.You can access the Business Partners view from the Business Partner Data work center.
Business Background
Business PartnersA business partner is a person or organization in which your company has a business interest. A wide range of peopleand organizations are considered business partners. For example, business partners are used in human resources(employees) and financials (bank, clearing house).For more information, see Business Partners [page 11].
Address ManagementYou can create, view, and update the details you need to communicate with your business partners. You can maintaindetailed postal and communication data for persons and organizations.For more information, see Address Management [page 5].
Business Partner Duplicate CheckThe business partner duplicate check allows you to find business partners that exist more than once in the system,thus avoiding having redundant data in your system and helping you to reduce efforts and save costs when managingyour business partner master data.For more information, see Business Partner Duplicate Check [page 7].
Tasks
Create and Edit a Business Partner1. In the worklist of the Business Partners view, click New , then choose Business Partner Person or Business
Partner Organization.
You can also create a new business partner by starting the New Business Partner Organization orNew Business Partner Person common task, which belongs to the Business Partner Data work center.
SAP Business ByDesign February 2017Business Partners View P U B L I C • © 2017 SAP SE or an SAP affiliate company. All rights reserved. 9
2. Enter the business partner’s name, address, and communication details and other data, depending onwhether the business partner is a person or an organization.
You can check if a business partner already exists in the system if you have chosen this option duringscoping. When you enter the details of a business partner, click Check For Duplicates . The system alsonotifies you of potential duplicates when you save the details of a new business partner. You can viewthe potential duplicates listed.
3. To enter additional information about the business partner, click View All to open the editor.
You can also add more information to a particular business partner by selecting the business partnerin the worklist and clicking Edit —> General.
4. Click Save to save the new business partner.
Assign a Business Partner Role1. In the worklist of the Business Partners view, select the relevant business partner and click Create As .2. Select the business partner role from the drop-down list to open the quick activity for this particular role.
Business partner roles are disabled on the drop-down list if they have already been assigned to thebusiness partner or if the role cannot be assigned to the business partner. Some roles can be assignedto a business partner person only or a business partner organization only. Under Details in the BusinessPartners view, you can see the roles that have already been assigned to the business partner. You canassign the role of employee to a business partner if human resources is inactive.
3. Any address and communication information already maintained for this business partner is displayed in thequick activity. Enter further information as required.
4. To maintain additional information about the business partner role, click View All to open the editor.
The editor is not available for every business partner role.
5. Click Save to save the new business partner role.You can add one or more business partner roles to an existing business partner.
Assign Multiple Addresses to a Business Partner1. In the editor of the Business Partners view, click Addresses .2. Click Add Row .3. Enter the address details.4. If you require additional address fields, click Additional Fields.
You can also select a different main address.5. Enter one or more addresses, and save the address details.
You can also assign additional addresses to a particular business partner by selecting the businesspartner in the worklist and clicking Edit → Addresses.
Assign a Contact to a Business Partner Organization1. In the editor of the Business Partners view, click Contacts and then Contacts .2. Click Assign Contact if you want to use an existing business partner as the contact for the business partner.
1. In the dialog box, search for a business partner using the value selection.
10 © 2017 SAP SE or an SAP affiliate company. All rights reserved. • P U B L I CSAP Business ByDesign February 2017
Business Partners View
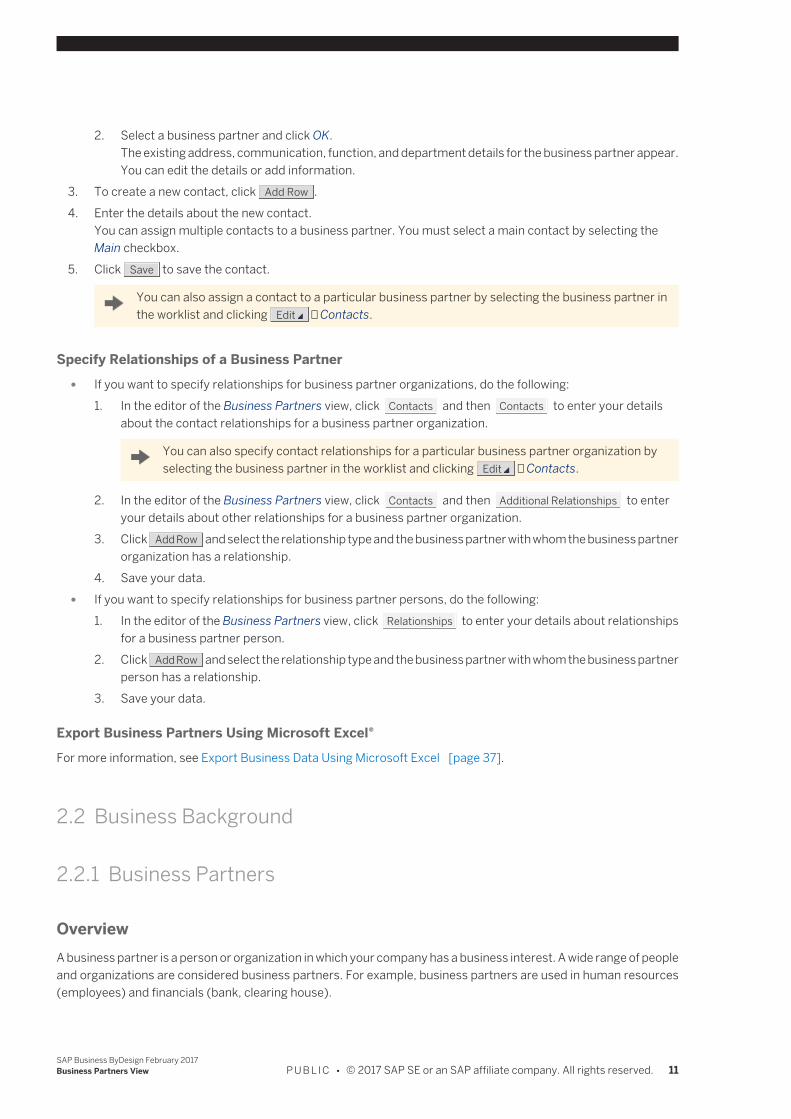
2. Select a business partner and click OK.The existing address, communication, function, and department details for the business partner appear.You can edit the details or add information.
3. To create a new contact, click Add Row .4. Enter the details about the new contact.
You can assign multiple contacts to a business partner. You must select a main contact by selecting theMain checkbox.
5. Click Save to save the contact.
You can also assign a contact to a particular business partner by selecting the business partner inthe worklist and clicking Edit → Contacts.
Specify Relationships of a Business Partner ● If you want to specify relationships for business partner organizations, do the following:
1. In the editor of the Business Partners view, click Contacts and then Contacts to enter your detailsabout the contact relationships for a business partner organization.
You can also specify contact relationships for a particular business partner organization byselecting the business partner in the worklist and clicking Edit → Contacts.
2. In the editor of the Business Partners view, click Contacts and then Additional Relationships to enteryour details about other relationships for a business partner organization.
3. Click Add Row and select the relationship type and the business partner with whom the business partnerorganization has a relationship.
4. Save your data. ● If you want to specify relationships for business partner persons, do the following:
1. In the editor of the Business Partners view, click Relationships to enter your details about relationshipsfor a business partner person.
2. Click Add Row and select the relationship type and the business partner with whom the business partnerperson has a relationship.
3. Save your data.
Export Business Partners Using Microsoft Excel®For more information, see Export Business Data Using Microsoft Excel [page 37].
2.2 Business Background
2.2.1 Business Partners
OverviewA business partner is a person or organization in which your company has a business interest. A wide range of peopleand organizations are considered business partners. For example, business partners are used in human resources(employees) and financials (bank, clearing house).
SAP Business ByDesign February 2017Business Partners View P U B L I C • © 2017 SAP SE or an SAP affiliate company. All rights reserved. 11

The Business Partners view of the Business Partner Data work center provides you with an overview of all the businesspartners that are currently in your system. You can maintain general data of a business partner, such as addressand communication data, the status of the business partner, and business partner roles and relationships.You can maintain all information about a business partner in one place, even when a business partner has multipleroles. For example, if a supplier becomes an account, you can add the new information to the existing informationabout this business partner. It is also possible to create a business partner without assigning a specific role to it. Thisis suitable for a business partner such as a courier company.There are the following types of business partners that are relevant for different business processes:
● AccountsA person (private account) or an organization (corporate account), with which a company has a businessrelationship, that orders, purchases, or receives a product.
● SuppliersA company that provides materials or services.
● Service agentsA person who performs a service on behalf of a company.
● ContactsA contact person in an organization.
● EmployeesA person who contributes or has contributed to the creation of goods and services in the company based ona work agreement.
● PartnersA company with which your enterprise has a mutually contractual agreement, for example, a wholesaler or achannel partner.
● My banksA financial institution that provides banking services such as holding deposits and providing credit and otherfinancial services for your enterprise.
● Clearing housesAn intermediary agency where payment information is processed between suppliers and financialinstitutions. The clearing house authorizes the supplier to accept a payment card transaction.
● Tax authoritiesA government agency authorized to levy taxes.
● CompetitorsAnother company that competes for sales in the same target market.
● Social insurance fundsAn organization that runs a social insurance fund.
There is a distinction between a business partner and a partner. A partner is a company with which you havea mutually beneficial contractual agreement, for example, a wholesaler. A partner is a type of business partner.However, a business partner can also be a competitor and is therefore defined as a stakeholder or interestedparty.
Prerequisites
Configuration Settings
Configuration settings are usually performed by an administrator. If you do not have the requiredauthorization, contact your administrator.
12 © 2017 SAP SE or an SAP affiliate company. All rights reserved. • P U B L I CSAP Business ByDesign February 2017
Business Partners View
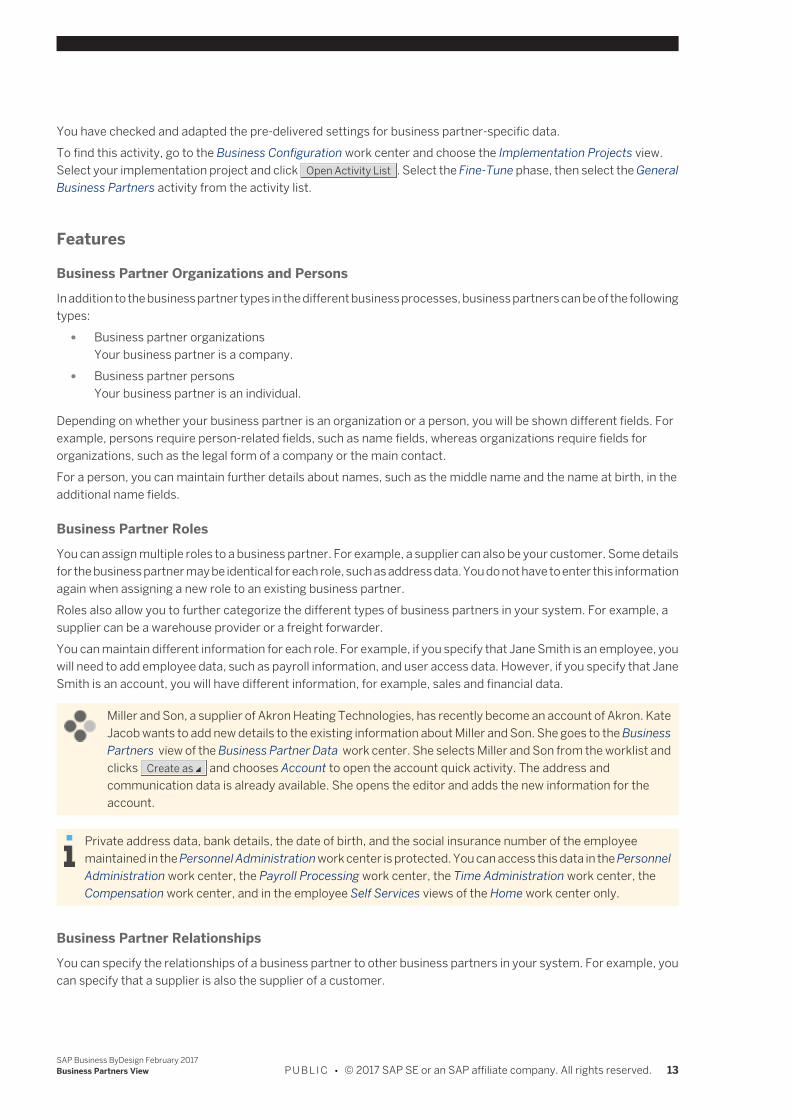
You have checked and adapted the pre-delivered settings for business partner-specific data.To find this activity, go to the Business Configuration work center and choose the Implementation Projects view.Select your implementation project and click Open Activity List . Select the Fine-Tune phase, then select the GeneralBusiness Partners activity from the activity list.
Features
Business Partner Organizations and PersonsIn addition to the business partner types in the different business processes, business partners can be of the followingtypes:
● Business partner organizationsYour business partner is a company.
● Business partner personsYour business partner is an individual.
Depending on whether your business partner is an organization or a person, you will be shown different fields. Forexample, persons require person-related fields, such as name fields, whereas organizations require fields fororganizations, such as the legal form of a company or the main contact.For a person, you can maintain further details about names, such as the middle name and the name at birth, in theadditional name fields.
Business Partner RolesYou can assign multiple roles to a business partner. For example, a supplier can also be your customer. Some detailsfor the business partner may be identical for each role, such as address data. You do not have to enter this informationagain when assigning a new role to an existing business partner.Roles also allow you to further categorize the different types of business partners in your system. For example, asupplier can be a warehouse provider or a freight forwarder.You can maintain different information for each role. For example, if you specify that Jane Smith is an employee, youwill need to add employee data, such as payroll information, and user access data. However, if you specify that JaneSmith is an account, you will have different information, for example, sales and financial data.
Miller and Son, a supplier of Akron Heating Technologies, has recently become an account of Akron. KateJacob wants to add new details to the existing information about Miller and Son. She goes to the BusinessPartners view of the Business Partner Data work center. She selects Miller and Son from the worklist andclicks Create as and chooses Account to open the account quick activity. The address andcommunication data is already available. She opens the editor and adds the new information for theaccount.
Private address data, bank details, the date of birth, and the social insurance number of the employeemaintained in the Personnel Administration work center is protected. You can access this data in the PersonnelAdministration work center, the Payroll Processing work center, the Time Administration work center, theCompensation work center, and in the employee Self Services views of the Home work center only.
Business Partner RelationshipsYou can specify the relationships of a business partner to other business partners in your system. For example, youcan specify that a supplier is also the supplier of a customer.
SAP Business ByDesign February 2017Business Partners View P U B L I C • © 2017 SAP SE or an SAP affiliate company. All rights reserved. 13
General Data for Business PartnersApart from the data mentioned above, you can also maintain a number of additional business partner-specific data.You can maintain the following general data for a business partner:
● Number rangesNumber ranges control how the system creates numbers for new business partners. They define the highestand the lowest number that can be used in a system.
You can maintain the following data for a business partner organization: ● Industries ● Legal forms
You can maintain the following data for a business partner person: ● Name formats
Name formats define the sequence in which the name components of a person's name are displayed.Formatted names are used, for example, in the business partner overview.
● Marital statuses ● Professions ● Academic titles ● Titles
See AlsoAdditional Identifiers for Business Partners [page 14]
2.2.2 Additional Identifiers for Business Partners
Business partners can be identified by their identifiers, such as the account ID, which are unique alphanumeric IDsassigned to a business partner. In addition to the business partner ID, you can maintain various additional identifiers.You can add these IDs to a business partner by clicking General and then Additional Identifiers.Some of the additional IDs are used for business-to-business transactions (B2B). The following IDs are relevant forB2B:
● DUNSThe DUNS (Data Universal Numbering System) is a unique nine-character identification number provided byDun & Bradstreet. The DUNS is internationally recognized and used as a company identifier in electroniccommerce transactions.The DUNS is provided for use in Central Contractor Registration (CCR). A separate number is required foreach physical location of a company entered in CCR.The DUNS is available in the quick activity and the editor of corporate accounts and suppliers.
● Global Location NumberThe global location number is a number that is used to identify physical, legal, or operational units that belongto an enterprise, or part of an enterprise such as a warehouse.The global location number is available in the quick activity and the editor of corporate accounts and suppliers.
● German Customs Number
14 © 2017 SAP SE or an SAP affiliate company. All rights reserved. • P U B L I CSAP Business ByDesign February 2017
Business Partners View
The German customs number is a unique alphanumeric identifier that is used to register a supplier at aGerman customs office. The number is used for identifying the parties involved in electronic communicationwith the German customs authority and consists of a two-character country code and seven numbers.The German customs number is available in the quick activity and the editor of suppliers.
● EU Customs Office IDThe EU customs office ID is a unique alphanumeric identifier of a customs office in the European Union. Itconsists of a two-character country code and six numbers.If you select the Customs Office checkbox, the related business partner is classified as a customs office, andthe ID field will become visible. To enable the electronic exchange of business documents with a customsoffice, you have to maintain the relevant communication arrangement in the Application and UserManagement work center.The EU customs office ID is available in the editor of business partner organizations.
SAP Business ByDesign February 2017Business Partners View P U B L I C • © 2017 SAP SE or an SAP affiliate company. All rights reserved. 15
3 Accounts View
3.1 Accounts Quick Guide
As a sales or service professional, you need complete and easy access to the account information of your customersand potential customers. This enables you to provide quality sales and service solutions.The Accounts view provides you with an overview of all the accounts that are currently in your system. You canmaintain important information about an account, such as address and communication data, status, classification,contact hours, sales data, and financial data.You can access the Accounts view from the following locations:
● Business Partner Data work center ● Account Management work center
Business Background
Accounts and ContactsYou can view, create, and maintain information about your accounts and contacts in more than one work center.The data you create is shared by several work centers. You only need to maintain the information in one work centerfor it to be updated automatically in all relevant work centers.For more information, see Maintenance of Accounts and Contacts [page 23].
Address ManagementYou can create, view, and update the details you need to communicate with your business partners. You can maintaindetailed postal and communication data for persons and organizations.For more information, see Address Management [page 5].
Access Rights and RestrictionsYou can control which account data a user can access in the Accounts view of the Account Management and BusinessPartner Data work centers. Depending on the access rights and restrictions you define for a user, the user can viewand edit only selected accounts. This allows you to manage your users based on your company’s requirements.Thus, you can allow selected users to view more confidential account data while reducing the data that can beaccessed by other users.For more information, see Access Rights and Restrictions for Accounts [page 26] and Overviews of BusinessPartners [page 30].
Business Partner Duplicate CheckThe business partner duplicate check allows you to find business partners that exist more than once in the system,thus avoiding having redundant data in your system and helping you to reduce efforts and save costs when managingyour business partner master data.For more information, see Business Partner Duplicate Check [page 7].
16 © 2017 SAP SE or an SAP affiliate company. All rights reserved. • P U B L I CSAP Business ByDesign February 2017
Accounts View
Tasks
Create and Edit an Account1. In the worklist of the Accounts view, click New , then choose Private Account or Corporate Account.
You can also create a new account by starting the New Corporate Account or New Private Accountcommon task, which belongs to the Business Partner Data or Account Management work center.
2. Enter the account’s name, address, and communication details and other account-specific data, such as theABC classification or the Nielsen ID, depending on whether the account is a private or corporate account.
Although the Name field is the only one that is mandatory, we recommend that you also enter the mainaddress, contact, and communication details. We also recommend that you enter sales data andfinancial data, as this information is required within other processes, such as creating a sales order.To enter sales and financial data, such as bank account or payment card details, click View All and then Sales Data or Financial Data .
If the account details do not include all the information required for the sale, delivery, and invoicing ofproducts and services to the account we recommend you add the required information to the account.The information required for the complete sales process includes:
● General data, for example, account name, main address, and language ● Sales data, for example, sales organization, distribution channel, delivery priority, incoterms,
payment terms, and currency ● Financial data, for example, company ID, and account determination group
You can check if an account already exists in the system if you have chosen this option during scoping.When you enter the details of an account, click Check For Duplicates . The system also notifies you ofpotential duplicates when you save the details of a new account. You can view the potential duplicateslisted.
3. To enter additional information about the account, click View All to open the editor. You can also clickMore to navigate directly to the tab relevant for the data you require.
You can also add more information to a particular account by selecting the account in the worklistand clicking Edit → General.
4. Click Save to save the new account.
Create Accounts Using Microsoft Excel®You can create accounts using a predefined Microsoft Excel template. For more information, see Create AccountsUsing Microsoft Excel [page 32].
Assign Multiple Addresses to an Account1. In the editor of the Accounts view, click Communication and then Addresses .2. Click Add Row .3. Enter the address details.4. If you require additional address fields, click Additional Fields.
SAP Business ByDesign February 2017Accounts View P U B L I C • © 2017 SAP SE or an SAP affiliate company. All rights reserved. 17
You can also select a different main address and indicate how the address should be used, such as the ship-to address.
5. Enter one or more addresses, and save the address details.
You can also assign additional addresses to a particular account by selecting the account in theworklist and clicking Edit → Addresses.
Maintain Output Settings for an Account1. In the editor of the Accounts view, click Communication and then Collaboration .2. You have the following options:
● To specify output settings for a specific document, select a document from the list.a. Select E-Mail, Fax, or Printer from the dropdown list.
If you want to use fax as an output channel, you have to select this option during scoping.For more information, see Configuration: E-Mail and Fax Settings.
b. Enter the e-mail address, fax number, or enter the number of copies required.
You can select a form template for accounts, if available.
By default, the advanced shipping notification is not sent to accounts. If you want to sendadvanced shipping notifications to a particular account, select the checkbox in the Activecolumn, enter an output channel and click Save ..
● To maintain an output channel to be used for all business documents sent to this business partner,select the Use for all Business Documents checkbox.a. Select E-Mail, Fax, or Printer from the dropdown list.
b. Enter the e-mail address, fax number, or enter the number of copies required.c. Press ENTER.
If you use e-mail as an output channel and do not enter an e-mail address, the e-mailaddress of the main address of the business partner will be used.
● To maintain XML settings, click Maintain XML Settings . This brings you to the CommunicationArrangement quick activity.
Business partner-specific output settings overwrite any default output settings that have been maintained in theOutput Channel Selection and Form Template Selection views of the Application and User Management work center.
The business partner-specific settings can also be overwritten if the employee responsible for a documentchanges the output settings by clicking You Can Also and choosing Edit Output Settings.
For more information, see Process-Integrated Output Settings [page 29].
Assign a Contact to a Corporate Account1. In the editor of the Accounts view, click Contacts and then Contacts .2. Click Assign Contact if you want to use an existing business partner as the contact for the account.
18 © 2017 SAP SE or an SAP affiliate company. All rights reserved. • P U B L I CSAP Business ByDesign February 2017
Accounts View

1. In the dialog box, search for a business partner using the value selection.2. Select a business partner and click OK.
The existing address, communication, function, and department details for the business partner appear.You can edit the details or add information.
3. To create a new contact, click Add Row .4. Enter the details about the new contact.
You can assign multiple contacts to an account . You must select a main contact by selecting the Maincheckbox.
5. Click Save to save the contact.
You can also assign a contact to a particular account by selecting the account in the worklist andclicking Edit → Contacts.
Assign Corporate Account to a Target Group1. In the new or existing corporate account editor under Accounts view, click Marketing Data .2. Click Assign Target Group to assign an existing target group.3. In the dialog box, select a target group. You can search for a target group using the value selection.4. You can assign a contact by selecting a contact id if required. You can search for contacts using the value
selection.
The Contact ID value selection will display the contacts which are assigned to the account.
5. Click Save to save the target group assignment to the account.6. You can assign a corporate account to more than one target group. To remove target group assignments,
select a target group assignment and click Remove Target Group Assignment .
Specify Relationships of an Account ● If you want to specify relationships for corporate accounts, do the following:
1. In the editor of the Accounts view, click Contacts and then Contacts to enter your details about thecontact relationships for a corporate account.
You can also specify contact relationships for a particular corporate account by selecting theaccount in the worklist and clicking Edit → Contacts.
2. In the editor of the Accounts view, click Contacts and then Relationships and Responsibilities to enteryour details about other relationships for a corporate account.
3. Click Add Row under Relationships and select the relationship type and the business partner with whomthe corporate account has a relationship.
4. Save your data. ● If you want to specify relationships for private accounts, do the following:
1. In the editor of the Accounts view, click Relationships to enter your details about relationships for aprivate account.
2. Click Add Row under Relationships and select the relationship type and the business partner with whomthe private account has a relationship.
3. Save your data.
SAP Business ByDesign February 2017Accounts View P U B L I C • © 2017 SAP SE or an SAP affiliate company. All rights reserved. 19
Assign Direct Responsibilities to Accounts1. In the editor of the Accounts view, click Contacts and then Responsibilities for corporate accounts or
Relationships and then Responsibilities for private accounts.
You can also maintain the employee directly responsible in the quick activity. If you want to edit thefields under Responsibility in the quick activity, you have to do the following:
1. To make the fields visible, click on Personalize This Screen in the title bar in the quickactivity.
2. Select the Visible checkbox for the Responsibility section and save your changes.
2. Click Add Row under Responsibilities.3. Select an employee.
The Direct Responsible checkbox will automatically be selected.
The value selection where you can select the employee will provide all employees and service agentsin your SAP Business ByDesign system regardless of your user’s access rights.
4. Select Employee Responsible-Sales as the party role.
5. Save your data.
The responsibilities shown in the list for which the Direct Responsible checkbox is not selected are determinedbased on the employee work distribution rule defined for individual party roles and cannot be edited.For more information about employee work distribution, see Employee Work Distribution Quick Guide.
Set Document Blocks for an Account1. In the editor of the Accounts view, click Sales Data .2. To set a block, select a block reason from the dropdown list for the block you require under Document
Blocks.To block an account for sales processes, you can set the following blocks: ● Order block ● Delivery block ● Invoice block
3. Save your data.
You can also set blocks for a particular account by selecting the account in the worklist and clicking Edit →Sales Data.
When you set or remove a delivery or invoice block for an account, this change will only apply to newlycreated orders for that account. For existing sales or service orders, you need to set or remove the blockin the related order itself.
Add Sales Data to an Account1. In the editor of the Accounts view, click Sales Data .
You can also maintain the sales data in the quick activity.2. Click Add Row under Sales Data.
20 © 2017 SAP SE or an SAP affiliate company. All rights reserved. • P U B L I CSAP Business ByDesign February 2017
Accounts View

3. Select your sales data details, such as the Incoterms, for the distribution chains that are used to sell productsor services to an account.If you select complete delivery for an account, this information is automatically transferred to the relatedsales or service orders for that account and results in one delivery of the full quantity. In the quick activity,you have to select a sales organization and a distribution channel for this field to become visible. For moreinformation about complete delivery orders, see Complete Delivery Orders.You have the following options for sales data: ● Create sales data for an individual account ● Use cross-account sales data
If cross-account sales data is available, the relevant checkbox is selected in the sales data.
For more information about cross-account sales data, see here [page 34].4. Save your data.
The sales data that you enter for an account will be used in the related business document for that account.
You can also add sales data to a particular account by selecting the account in the worklist andclicking Edit → Sales Data.
5. Save your data.
Add Payment Data to an Account1. In the editor of the Accounts view, click Financial Data and then Payment Data .
You can also maintain payment data in the quick activity. After you have selected the company ID and theaccount determination group, you can maintain further data depending on the payment method you selected.
2. Under Companies, click Add Row and select the company using the value selection.3. Select the account determination group.
You can select a payment block reason and a payment block expiry date. You can also select a dunning blockreason and a dunning block expiry date.
4. Under Payment Methods, click Add Row and select a payment method from the dropdown list.5. Depending on the payment method you selected, enter other applicable data, such as SEPA mandates and
direct debit, credit card, and bill of exchange information.If required, you can also add instructions to the bank for international payments.
6. If remittance advice is required, select the appropriate checkbox.7. Enter the debtor ID at DATEV in the appropriate field, if you use DATEV.8. Save your data.
Add Bank Data to an Account1. In the editor of the Accounts view, click Financial Data and then Bank Data .2. Select a bank using the value selection.
The country and national bank code are added automatically.
If the relevant bank does not appear in the value selection, click New Bank and enter the bank'sdetails to add the bank to the bank directory.
3. Enter the bank account details.4. Save your data.
SAP Business ByDesign February 2017Accounts View P U B L I C • © 2017 SAP SE or an SAP affiliate company. All rights reserved. 21

Assign and Register Credit Cards for an Account1. In the editor of the Accounts view, click Financial Data and then Bank Data .2. Under Credit Cards, you can do the following:
● To assign an existing credit card to an account, click Assign . ● To create a new credit card, click Register with <Credit Card Service Provider> depending on which credit
card service provider you want to use.
You can only use this function if the respective credit card service has been enabled in your solutionconfiguration.To find this business option, go to the Business Configuration work center and choose theImplementation Projects view. Select your implementation project and click Edit Project Scope .In the Scoping step of the project, ensure that Payment and Liquidity Management is selectedwithin Cash Flow Management.In the Questions step, expand the Cash Flow Management scoping element and select Paymentand Liquidity Management. Select Payment Methods and answer the questions related to creditcard service providers.
Configuration settings are usually performed by an administrator. If you do not have the requiredauthorization, contact your administrator.
This business option is a third party service or functionality and for use by customers inpossession of a valid license or service agreement with the respective third party only. Anyscoping and use of this functionality is subject to a written agreement between the customerand the respective third party.
For more information about payments by credit card and any related prerequisites, see CustomerPayments by Credit Card.
● You can remove a credit card that has been assigned to an account. ● You can maintain a credit card holder address for a selected credit card or copy one of the addresses of
the account to the credit card address by clicking Copy Address.In the quick activity, you can also copy the main address of the account to the credit card address.
3. Save your data.
You can also add credit card data to a particular account by selecting the account in the worklist andclicking Edit → Financial Data.
Add Tax Data to an Account1. In the editor of the Accounts view, click Financial Data and then Tax Data .2. Under Tax Numbers, click Add Row and select the country, tax number type, and tax number from the
dropdown lists.3. Under Tax Exemptions, click Add Row and select the country, state, tax type, and tax exemption reason from
the dropdown lists.4. Save your data.
Edit Customer-Specific Prices and DiscountsIf you want to maintain customer-specific prices or discounts, you need to go to the Pricing view of the Product andService Portfolio work center.You need to create a price or discount list first.
22 © 2017 SAP SE or an SAP affiliate company. All rights reserved. • P U B L I CSAP Business ByDesign February 2017
Accounts View
For more information about price and discount lists and pricing in general, see Quick Guide for Pricing in CustomerRelationship Management.
The information shown under Prices in the editor of the Accounts view is for display purposes only.
Create a Tax Exemption Certificate for an AccountFor more information about this task, see here [page 34].
Create a SEPA Direct Debit Mandate for an AccountFor more information about this task, see here [page 35].
Create a Target Group From an Accounts WorklistYou can use a worklist as a basis to create a target group.For marketing purposes you can create a target group of accounts listed in a worklist. To do this:
1. Call up the required worklist, and modify it to your needs.2. Click Export followed by To Target Group.
The New Target Group screen opens.3. Check the details and save the target group.
Export Accounts Using Microsoft Excel®For more information, see Export Business Data Using Microsoft Excel [page 37].
Maintain Mass Account DataFor more information, see here [page 39].
3.2 Business Background
3.2.1 Maintenance of Accounts and Contacts
OverviewYou can view, create, and maintain information about your accounts and contacts in more than one work center.The data you create is shared by several work centers. You only need to maintain the information in one work centerfor it to be updated automatically in all relevant work centers.You can access the Accounts and the Contacts views from the following locations:
● Account Management work center ● Business Partner Data work center
The Contacts view of the Account Management work center shows the following contacts: ● Contacts for accounts ● Contacts that are not assigned to a business partner
The Contacts view of the Business Partner Data work center shows all types of contacts.The Accounts view shows both existing customers and prospects.
SAP Business ByDesign February 2017Accounts View P U B L I C • © 2017 SAP SE or an SAP affiliate company. All rights reserved. 23

In the Customers view of the Receivables work center you can also view, create, and maintain existingcustomers and prospects.
Accounts and ContactsThe Accounts view provides you with an overview of all the accounts that are currently in your system. You canmaintain important information about an account, such as address and communication data, status, classification,contact hours, sales data, and financial data.The Contacts view provides you with an overview of all the contacts that are currently in your system. You canmaintain essential information about a contact, such as the business address and communication data and status.You can also enter a contact’s personal details, such as the date of birth, marital status, and home address.
Prerequisites
Configuration Settings
Configuration settings are usually performed by an administrator. If you do not have the requiredauthorization, contact your administrator.
You have checked and adapted the pre-delivered settings for account-specific and contact-specific data.To find these activities, go to the Business Configuration work center and choose the Implementation Projects view.Select your implementation project and click Open Activity List . Select the Fine-Tune phase, then select theAccounts or the Contacts activity from the activity list.
Features
Private and Corporate AccountsAccounts can be of the following types:
● Corporate accountsYour account is an organization.
● Private accountsYour account is an individual.
Depending on whether your account is a corporate or a private account, you will be shown different account fields.For example, private accounts require person-related fields, such as name fields, whereas corporate accountsrequire fields for organizations, such as the Nielsen ID or the legal form of a company.
General Data for AccountsYou can maintain the following general data for an account that is specific to accounts:
● ABC classificationsABC classifications are used to rate accounts based on the significance they have for your business.
● Nielsen IDsNielsen IDs indicate the geographic region to which an account belongs. The Nielsen ID can be used to classifyaccounts according to their consumer behavior.
24 © 2017 SAP SE or an SAP affiliate company. All rights reserved. • P U B L I CSAP Business ByDesign February 2017
Accounts View

Sales Data for AccountsYou can maintain sales-specific data, such as Incoterms or customer groups, for an account. The data you maintainfor the account will be transferred to the related sales or service document. You can maintain the following data:
● Document blocks ● Sales data that is dependent on distribution chains
You can maintain the following sales-specific data: ● Document Blocks
○ Order blocksOrder blocks prevent new sales or service documents from being created. If an order block is set in theaccount master data, no new sales or service documents can be created for this account.
○ Delivery blocksDelivery blocks prevent an order from being delivered. If a delivery block is set in the account masterdata, it is copied to any new sales orders. It can also be set, edited, or removed within a sales order.
○ Invoice blocksInvoice blocks prevent an order from being invoiced. If an invoice block is set in the account master data,it is copied to any new sales orders. It can also be set, edited, or removed within a sales order.Return documents receive an invoice block by default in order to provide consistent invoicing.
● Sales Data ○ Customer groups
Customer groups are used for pricing and statistical purposes. You can maintain customer groups inthe account master data record for each organizational assignment.
○ Payment termsPayment terms are used for arrangements made with a customer for financial settlement with respectto goods supplied and services performed. They represent agreed conditions for the payment of theprice charged for products and services, such as the due date and credit terms.A payment term can be maintained as account master data. If a payment term has been maintained foran account, this will then be copied into documents, such as a new sales order or a new sales quote asthe default value.
Financial Data for AccountsThis data is relevant for accounting. It covers the following:
● Bank DataHere you edit the customer’s bank details and payment card (credit card) data.
● Payment-Relevant DataYou can see which dunning and clearing strategy is assigned to the customer.Here you specify the company in your organization that collaborates with this customer, and the accountdetermination group to determine the G/L account. For more information, see Configuration of AccountDetermination for Business Transactions.You can block the customer for the automatic payment process by specifying a payment block reason. Youcan also exclude this customer from the dunning process by using a dunning block and by specifying a dunningblock reason.Furthermore, you specify the payment method to be used to clear customer invoices, the person responsiblefor the payment fees, the payment instruction(s) for the bank for international payments, and the methodrequired to send a payment advice to the customer. You can indicate receivables from a customer as doubtful.The Doubtful Debtor checkbox is only used for information purposes.You edit this data under Financial Data in the Payment Data area.
● Tax Data
SAP Business ByDesign February 2017Accounts View P U B L I C • © 2017 SAP SE or an SAP affiliate company. All rights reserved. 25
Here you define the tax numbers and the data for customer tax exemption. Tax exemption is only permittedin some countries, such as in the United States. For more information, see Tax Determination.
Ensure that the information under Financial Data is complete. You can create a customer without enteringany financial data, for example, if a customer is initially only a prospect. The system does not prevent thecreation of an invoice for this customer in the Customer Invoicing work center. For this reason, it doesnot issue a corresponding message. The customer invoice is not posted, but the system creates a taskfor the accountant in which data can be edited or any missing financial data added.
General Data for ContactsYou can maintain the following general data for a contact that is specific to contacts:
● DepartmentsThe department in which a contact works can be specified.
● FunctionsThe function describes the job of a contact.
● VIP contactsA contact can be classified as a VIP contact according to his or her importance in a company.
See AlsoAdditional Identifiers for Business Partners [page 14]
3.2.2 Access Rights and Restrictions for Accounts
OverviewYou can control which account data a user can access in the Accounts view of the Account Management and BusinessPartner Data work centers. Depending on the access rights and restrictions you define for a user, the user can viewand edit only selected accounts. This allows you to manage your users based on your company’s requirements.Thus, you can allow selected users to view more confidential account data while reducing the data that can beaccessed by other users.You give access rights to a user at the level of work centers and work center views. Access to data in assigned workcenter views can be restricted using various attributes called access contexts, which are dependent on the businessprocess in question. For more information about access rights and restrictions in SAP Business ByDesign and howto assign them, see the documentation about Business Users.Employees can be assigned to accounts for which they are directly responsible. This assignment is used as a basisfor defining access restrictions for viewing and editing accounts. You can define access restrictions for one or moreemployees or for one or more org units. After you have defined access restrictions for an account in the BusinessUsers view, a user can only view or edit the account if the employee directly responsible for that account has alsobeen assigned to that user with the appropriate read or write access.In addition to these access rights and restrictions, you can also restrict the display of data in the account-relatedoverviews. For more information about access rights and restrictions in overviews, see here [page 30].
The access restrictions defined for the Accounts view do not apply to the Customers view of theReceivables work center. For the Customers view, the Company access context is used.
26 © 2017 SAP SE or an SAP affiliate company. All rights reserved. • P U B L I CSAP Business ByDesign February 2017
Accounts View

Prerequisites
Configuration Settings
Configuration settings are usually performed by an administrator. If you do not have the requiredauthorization, contact your administrator.
You have enabled the business areas that you require for your sales and service processes in your solutionconfiguration.
Direct ResponsibilitiesOne or more employees who are directly responsible for an account have been assigned in the Accounts view.
Access Rights and Restrictions for Business UsersYou have assigned access rights to a user for the Accounts view of the Account Management and Business PartnerData work centers.
To do so, you have to go to Application and User Management User and Access Management BusinessUsers , click Edit → Access Rights for a selected business user, and go to Work Center and View Assignment .In the same view, you have restricted the read and write access to the Accounts view under Access Restrictions using the Employee access context.
The list shown under Detailed Restrictions depicts the org structure hierarchy of your company. You defineaccess restrictions by selecting the following from the list:
● One or more employees or service agentsThese employees also have to be assigned as employees directly responsible for an account in theAccounts view.
● One or more org unitsThe employees belonging to these org units also have to be assigned as employees directly responsiblefor an account in the Accounts view.
● The Read Access or Write Access checkboxes next to the selected employee or org unit
Access Rights and Restrictions in Account Worklists and EditorsA user can view and edit only selected corporate or private accounts in editors or worklists of the AccountManagement or Business Partner Data work center, depending on the access rights and restrictions defined for thatuser.The user can view and edit the following data:
● If you define unrestricted read and write access, the user can view all accounts in the worklist and view andedit the data in all accounts.
● If you restrict the read or write access, the user can do the following: ○ View those accounts in the worklist for which the user has been given at least read access and where
one or more selected employees or employees of a specific org unit are directly responsible ○ View or edit those accounts for which the user has been given read or write access and where one or
more selected employees or employees of a specific org unit are directly responsible
SAP Business ByDesign February 2017Accounts View P U B L I C • © 2017 SAP SE or an SAP affiliate company. All rights reserved. 27

○ View the reports assigned to the Account Management or Business Partner Data work center for accountsfor which the user has been given read or write access
If a user’s access is restricted and the employee directly responsible for the account in question has not been selectedfor that user, the user will not be able to access that account.If no employee directly responsible has been assigned to an account, any user can view this account regardless ofthe users' access rights.
You have to make sure that for each account in your SAP Business ByDesign system you have defined at leastone user who has the required access rights.
A user has access to all accounts for whom Kate Jacob is the employee directly responsible. The usersearches for the account Akron Heating Technologies Inc. in the worklist of the Accounts view and selectsthis account. He opens the editor and replaces Kate Jacob with Jack Ingersoll as the employee directlyresponsible for that account. After he has saved the data, he will no longer be able to view and select thisaccount in the worklist.
A user has access to all accounts for which an employee of a specific org unit is the employee directlyresponsible. The user creates a new account and adds an employee as the directly responsible employeewho belongs to a different org unit in his company. After he has saved the data, he will not be able to viewand select this account in the worklist.
Access Rights and Restrictions for Accounts Used in Other Work CentersA user can view and edit only selected corporate or private accounts in work centers other than the AccountManagement or Business Partner Data work center, depending on the access rights and restrictions defined for thatuser.The user can view and edit the following data:
● If you define unrestricted read and write access, the user can view all accounts in the worklist and view andedit the data in all accounts.
● If you restrict the read or write access, the user can do the following: ○ View all accounts in the worklist regardless of the access restrictions for those accounts ○ View or edit those accounts for which the user has been given read or write access and where a selected
employee or employees of a specific org unit are directly responsible
The Enterprise Search and the value selection for accounts will show all accounts regardless of theuser’s access rights for those accounts.
See AlsoAccounts Quick Guide [page 16]
28 © 2017 SAP SE or an SAP affiliate company. All rights reserved. • P U B L I CSAP Business ByDesign February 2017
Accounts View
3.2.3 Process-Integrated Output Settings
OverviewThe output settings used for the process-integrated output of documents can be configured on multiple levels. Thesesettings can be made for each business document type, for a specific business partner, or, individually, for a businessdocument instance. Output settings are used by the system to determine which output channel and form templateto use when a document is output.
Output Channel Rules and Form Template RulesOutput channel and form template rules are used by the system to select the output channel and form template thatshould be used for a specific combination of document and parameters that you define. For example, you can specifythat for department A, all requests for quotes (RFQs) should be sent by fax, whereas for all other departments, RFQsshould be sent by e-mail. You could also define a similar rule for the form template to be used in each case. Thisallows you, for example, to define a default output channel or form template for each business document as well asdefining multiple alternative output channels and form templates for exceptions.Output channel and form template rules can be defined in the Application and User Management work center, underInput and Output Management. For more information, see the Output Channel Selection Quick Guide and the FormTemplate Selection Quick Guide in the Help Center of your solution.
Business Partner-Specific Output SettingsBusiness partner-specific output settings allow you to define how business documents are sent to your accounts orsuppliers. These settings override any output channel and form template rules. You define these settings as follows:
● Navigate to the Account Management work center, Accounts view. Select an account and choose Generalfrom the Edit menu. Navigate to the Collaboration section of the Communication tab.
● Navigate to the Supplier Base work center, Suppliers view. Select a supplier and choose General from theEdit menu. Navigate to the Collaboration section of the Communication tab.
Under Collaboration, you can view all documents that are valid for the selected business partner. You can eitherdefine an output channel that is valid for all business documents belonging to this business partner, or you can specifyan output channel for one or more individual business documents. For accounts, you can also specify a form templatethat should be used for a business document instead of the default form template.For more information, see the Accounts Quick Guide and the Suppliers Quick Guide in the Help Center of yoursolution.
Output Settings for a Business Document InstanceUsers can change the output settings for business documents that they are authorized to edit before the documentis submitted for process-integrated output. These settings are only valid for the next output of the current documentand override any other output settings that have been made for the type of document or the business partner. Userscan edit a document’s output settings by selecting Edit Output Settings from the You Can Also menu. This option istypically available when editing a business document.For example, an employee wants to ensure that a business partner gets a document as soon as possible. Instead ofusing the default output channel, printing, which would require the document to be sent by post, the employeedecides to overwrite the existing output settings and send the document by e-mail.
SAP Business ByDesign February 2017Accounts View P U B L I C • © 2017 SAP SE or an SAP affiliate company. All rights reserved. 29
Output Setting DeterminationWhen the process-integrated output of a business document is triggered, the system determines which outputchannel and form template settings to use based on the following level of prioritization:
1. Output settings for a business document instance2. Business partner-specific output settings3. Output channel rules and form template rules
The system checks whether settings are available at each level in the list. If a setting exists then this is used, otherwisethe next available setting in the order defined in the list is taken.
Form Template Country and Language DeterminationYou do not have to configure any settings for the selection of country and language form template variants. Instead,they are determined automatically based on the following rules:
● Country variants are determined based on the location of the sender’s company. For example, if an employeein a German company creates a sales order, the system searches for a German country variant of the salesorder form template and uses this to generate the document. If a country-specific variant is not available, thegeneric form template is used.
● Language variants are determined by the communication language of the receiving business partner: ○ For private accounts, the communication language is taken from the Account editor, General tab,
Account section, Language field. ○ For corporate accounts and suppliers, the communication language is taken from the Account or
Supplier editor, General tab, Main Communication section, Language field.
For example, if an employee in a German company sends a sales order to a business partner in France forwhom the communication language French has been maintained, the system searches for a French languagevariant of the form template and uses this to generate the document. If a language variant is not available inthe recipient’s communication language, then the form template in the fallback language English is used.
3.2.4 Overviews of Business Partners
OverviewThe overview provides a summary of essential data for a selected business partner.It includes general information, such as address data, relationships, and further business partner details dependingon the type of business partner.The overview also shows all business partner interactions in sales, service, and financial processes. For example,you can display open sales orders and open invoicing documents for an account, and other information for sales,service, and financials. You can also run reports related to the particular business partner.To go to the overview of a business partner, you have to select the business partner in the worklist of the relevantbusiness partner view.You can restrict the display of documents in the overviews of the following views in the Account Management andMarketing work centers:
● Accounts
30 © 2017 SAP SE or an SAP affiliate company. All rights reserved. • P U B L I CSAP Business ByDesign February 2017
Accounts View
● Contacts ● Partners ● Competitors in the Marketing work center
Prerequisites
Configuration Settings
Configuration settings are usually performed by an administrator. If you do not have the requiredauthorization, contact your administrator.
To restrict the display of documents in the overviews of accounts, contacts, partners, and competitors, you haveenabled the restriction of the overviews for account management in your solution configuration. To find this businessoption, go to the Business Configuration work center and choose the Implementation Projects view. Select yourimplementation project and click Edit Project Scope . In the Scoping step of the project, ensure that Account andActivity Management is selected within Sales.In the Questions step, expand the Sales scoping element and select Account and Activity Management. SelectAccount Management and answer the question related to the overviews.
Access Rights and Restrictions in Overviews of Account Management andMarketingA user can view different information in the overviews for corporate and private accounts, contacts, partners, andcompetitors, depending on the access rights assigned to that user and on what you select during scoping.These restrictions apply if the user opens the overview from the respective view in the Account Management,Business Partner Data, or Marketing work center or from any other work center view, such as the Sales Orders view.These restrictions affect the following information:
● Private or corporate account overview: ○ Reports under General
○ All data under Sales , Service , and Financials ● Contact overview:
○ Campaigns and activities ● Partner overview:
○ Activities ● Competitor overview:
○ Related opportunities
The user can view the following data: ● If you do not restrict the data displayed in the overview, all general data and all documents related to a specific
account, contact, partner, or competitor will be displayed in the overview regardless of a user’s access rights.You do not have to assign access rights to the user for the work center views required for these documents.
● If you restrict what is displayed in the overview, the user will see the following: ○ All account, contact, partner, or competitor data if the user has been given at least read access for the
relevant view ○ All documents related to those work center views for which the user has been assigned the corresponding
access rights.
SAP Business ByDesign February 2017Accounts View P U B L I C • © 2017 SAP SE or an SAP affiliate company. All rights reserved. 31
The documents will be displayed according to the access restrictions that have been defined forthe relevant work center view.
3.3 Tasks
3.3.1 Create Accounts Using Microsoft Excel®
OverviewYou can create accounts by entering them in a predefined Microsoft Excel template and uploading them to the SAPBusiness ByDesign system.
You can create corporate or private accounts using Microsoft Excel.
PrerequisitesYou have installed the latest Add-In for Microsoft Excel. Depending on your solution set-up, you can do this from theSelf Services Overview in the Home work center, from the Download Center in the Application and UserManagement work center, or from the Download link that is available directly on the user interface.Also, the settings for your browser must be set correctly. You can check this by clicking Check My ComputerSettings on the logon screen.
StepsIn the SAP Business ByDesign system in the Accounts view of the Business Partner Data or the Account Managementwork center, click New and choose Private Accounts from Microsoft Excel or Corporate Accounts from MicrosoftExcel.Get the Template
1. Select the template.Choose the template in the required language and click Download.
You can choose any language that you have selected during scoping. If you have selected only onelanguage during scoping, you will not get a selection of language versions to choose from.
2. Decide what you want to do with the template. Choose one of the following options: ● If you want to use the template only once, you can open the template without saving it. Click Open. ● If you want to save the template so that you can use it again, choose a location to save the file to, enter
an appropriate file name, and click Save. Then click Open.
If you have previously downloaded and saved this template on your computer, navigate to the location whereyou have saved the template, and open it.
Log on to the solution from Microsoft Excel
32 © 2017 SAP SE or an SAP affiliate company. All rights reserved. • P U B L I CSAP Business ByDesign February 2017
Accounts View

1. In the SAP Add-In ribbon in Microsoft Excel, click Logon.
If the SAP Add-In ribbon is not displayed, check to make sure that the Add-In for Microsoft Excel hasbeen installed correctly (see Prerequisites in this document).
A dialog box opens where you can enter the logon details. The system URL is proposed automatically. Thesystem URL is the URL of the system that you are working with.
2. Enter your user ID and your password, and click Logon.
After initial logon to the system, the ribbon text is changed from SAP Add-In to the name of yoursolution.
Enter Details in the Microsoft Excel Template
Note the following: ● The Microsoft Excel template is presented with a number of rows where you can enter or copy your
data. If you need more, add the number of rows you need before you start entering or copying yourdata.
● Ensure that mandatory fields (those marked with an asterisk) are filled. ● To help you fill in the details:
○ Some fields have dropdown lists. ○ In some fields you can search the system for data, for example, countries. Place the cursor on the
field, and click Lookup in your solution's tool bar or ribbon to search the system. A search field isavailable in the Lookup dialog box that appears. When you start to type text in the search field, therelevant entries are filtered in the ID and Description columns, meaning that you do not have toscroll through the whole list. If the Lookup button is not active in the ribbon or toolbar, then it isnot possible to perform a search.
Enter the account data in the appropriate columns, such as the general account data, the address data, the accountdetails, and the sales data.If you do not select a status, the system will use the In Preparation status.
The system will then carry out a duplicate check for names, addresses, and communication data if this function hasbeen selected during scoping. If there is duplicate data it cannot be saved to the SAP Business ByDesign system,and an error message displays. If you do not want to carry out a duplicate check for selected accounts, select No inthe Duplicate Check column for the relevant accounts.For more information about the duplicate check, see Business Partner Duplicate Check [page 7].Save Your Data
1. After you have finished entering all the data, save the Microsoft Excel file.2. Click Save Data to .
A dialog box opens, informing you that the data is being saved to the solution.After the upload, a message informs you that your data has been saved in the solution.
If you do not provide all the required information, or if you provide incorrect information, somerecords will not be saved. Error messages will highlight the problems so that you can correct themand save the data again.
3. You can then log off by clicking Logoff .
SAP Business ByDesign February 2017Accounts View P U B L I C • © 2017 SAP SE or an SAP affiliate company. All rights reserved. 33
ResultThe new accounts are saved in the SAP Business ByDesign system and added to the list in the Accounts view.If you need to make changes to these accounts, you can change them in the Microsoft Excel template and uploadthem again to the SAP Business ByDesign system.
3.3.2 Maintain Cross-Account Sales Data
OverviewYou can create sales data that can be used as default data for all accounts.
Procedure1. Start the Maintain Cross-Account Sales Data common task, which belongs to the Business Partner Data or
Account Management work center.2. To maintain cross-account sales data, click Add Row .3. Select the sales organization and the distribution channel that you require.4. Select the sales data under Details, such as the delivery priority, the Incoterms, and the payment terms, and
enter an Incoterms location for the Incoterms you selected.If you select complete delivery, this results in one delivery of the full quantity.For more information about complete delivery orders, see Complete Delivery Orders.
5. Click Save and Close to save your data and return to the work center.The data you entered will be proposed as default data in the sales data for each account that you create.
You cannot overwrite the default sales data with account-specific sales data entered in the Accountsview. However, if you add account-specific sales data, the system will give preference to this data overthe default sales data and use it in the related business documents. If you want to change the actualdefault sales data, you have to change the cross-account sales data that you entered earlier.
3.3.3 Create a Tax Exemption Certificate (Accounts view)
OverviewYou can create tax exemption certificates in the SAP Business ByDesign system and assign them to thecorresponding account master in the system.
You can also create tax exemption certificates when you create a new sales/service order or customer invoiceand assign it immediately to the sales/invoicing document. For more information, see:
● Create Tax Exemption Certificate (Service Order Processing view) ● Create Tax Exemption Certificate (Sales Orders Processing view)
34 © 2017 SAP SE or an SAP affiliate company. All rights reserved. • P U B L I CSAP Business ByDesign February 2017
Accounts View
Procedure1. Open An Existing Account
1. Go to the Accounts Management work center and then choose the Accounts view.2. Select All Accounts from the Show field. The system retrieves and displays the status, account ID,
account name, city, and main contact for all the accounts.3. Select an account to create a new tax exemption certificate.4. Click Edit and then choose Financial Data to open the master data for the account.
2. Enter IDs and Dates1. In the master data, select Tax Exemption Certificates .2. Add a row to fill in the tax exemption certificate details.3. Enter the company ID and the tax exemption certificate ID in the respective fields.4. Select the Certificate Type from the drop down menu. The system retrieves and displays the Tax
Type and Country.5. Enter the dates. The start date and end date is the validity period of the certificate.6. Enter the External ID and Maximum Tax Exemption Amount as stated on the certificate. If the
information is not available, leave the respective fields empty.
● For France: The system retrieves and displays the tax exemption reason.
● For US: Go to Tax Exemption Reason and select the tax exemption reason.
3. Save and Activate Tax Exemption Certificate1. Click Save to save the data.2. Click Change Status and then choose Activate to set the status of the tax exemption certificate to
Active.3. Click Close to return to the Accounts view.
ResultYou have an activated tax exemption certificate that is ready for use.
3.3.4 Create a SEPA Direct Debit Mandate
OverviewIf you want to make payments using the SEPA direct debit procedure, you must obtain automatic debit authorization(in the form of a mandate) for each customer. You create and print out the mandate then send it to your customerfor signing. The customer then completes and returns the signed copy of the mandate. You update the data in thesystem and send the information in the mandate with each direct debit to the bank.
PrerequisitesYou have a unique creditor identifier (UCI), which you obtained from the national bank. You have entered the UCI inyour company master data in the Organizational Management work center.
SAP Business ByDesign February 2017Accounts View P U B L I C • © 2017 SAP SE or an SAP affiliate company. All rights reserved. 35
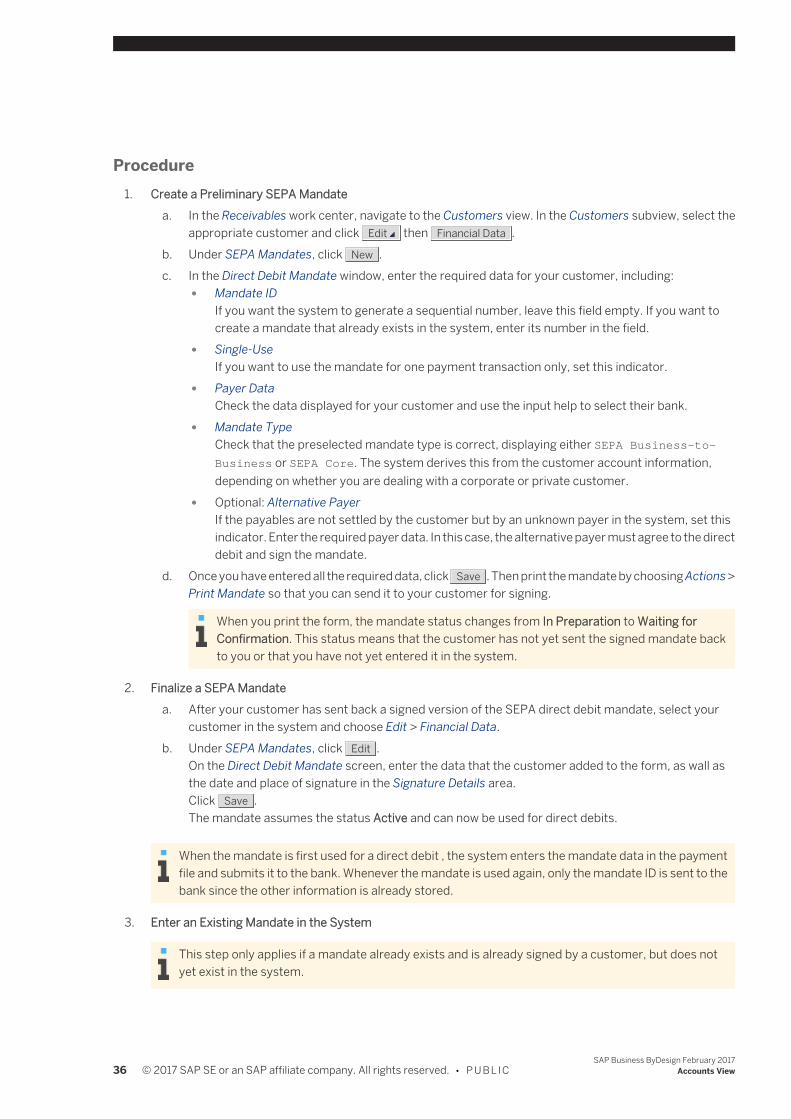
Procedure1. Create a Preliminary SEPA Mandate
a. In the Receivables work center, navigate to the Customers view. In the Customers subview, select theappropriate customer and click Edit then Financial Data .
b. Under SEPA Mandates, click New .c. In the Direct Debit Mandate window, enter the required data for your customer, including:
● Mandate IDIf you want the system to generate a sequential number, leave this field empty. If you want tocreate a mandate that already exists in the system, enter its number in the field.
● Single-UseIf you want to use the mandate for one payment transaction only, set this indicator.
● Payer DataCheck the data displayed for your customer and use the input help to select their bank.
● Mandate TypeCheck that the preselected mandate type is correct, displaying either SEPA Business–to–Business or SEPA Core. The system derives this from the customer account information,depending on whether you are dealing with a corporate or private customer.
● Optional: Alternative PayerIf the payables are not settled by the customer but by an unknown payer in the system, set thisindicator. Enter the required payer data. In this case, the alternative payer must agree to the directdebit and sign the mandate.
d. Once you have entered all the required data, click Save . Then print the mandate by choosing Actions >Print Mandate so that you can send it to your customer for signing.
When you print the form, the mandate status changes from In Preparation to Waiting forConfirmation. This status means that the customer has not yet sent the signed mandate backto you or that you have not yet entered it in the system.
2. Finalize a SEPA Mandatea. After your customer has sent back a signed version of the SEPA direct debit mandate, select your
customer in the system and choose Edit > Financial Data.b. Under SEPA Mandates, click Edit .
On the Direct Debit Mandate screen, enter the data that the customer added to the form, as wall asthe date and place of signature in the Signature Details area.Click Save .The mandate assumes the status Active and can now be used for direct debits.
When the mandate is first used for a direct debit , the system enters the mandate data in the paymentfile and submits it to the bank. Whenever the mandate is used again, only the mandate ID is sent to thebank since the other information is already stored.
3. Enter an Existing Mandate in the System
This step only applies if a mandate already exists and is already signed by a customer, but does notyet exist in the system.
36 © 2017 SAP SE or an SAP affiliate company. All rights reserved. • P U B L I CSAP Business ByDesign February 2017
Accounts View
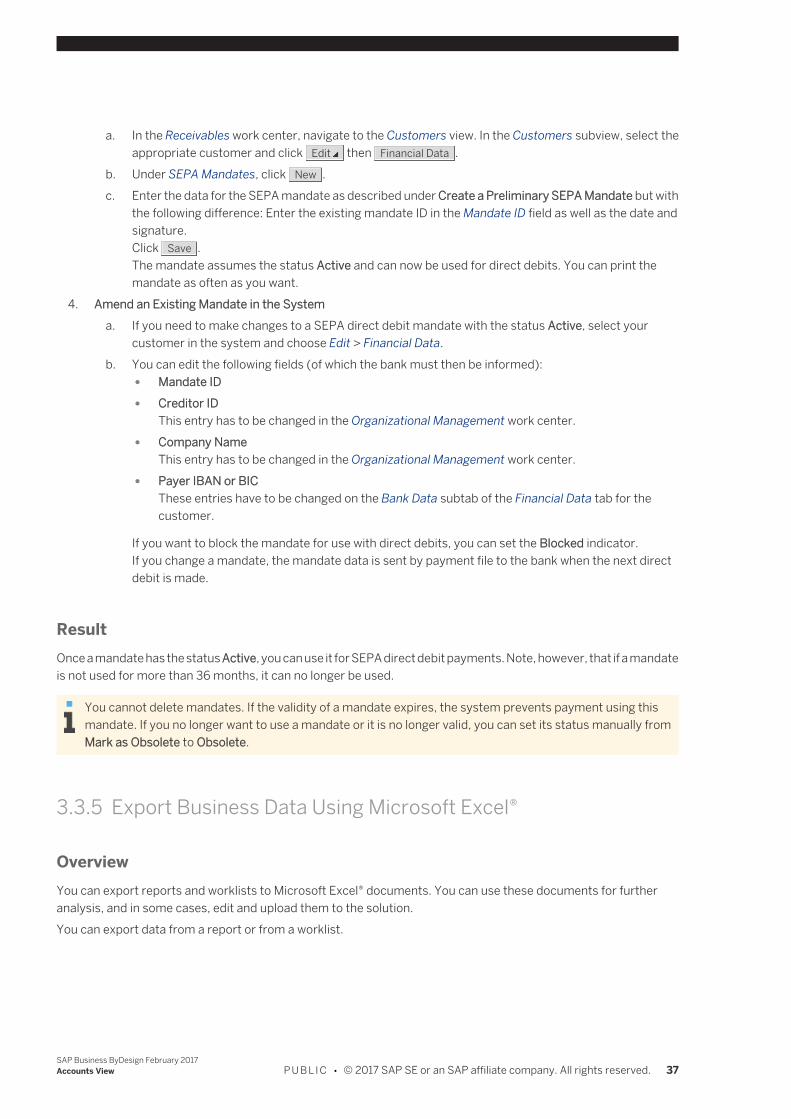
a. In the Receivables work center, navigate to the Customers view. In the Customers subview, select theappropriate customer and click Edit then Financial Data .
b. Under SEPA Mandates, click New .c. Enter the data for the SEPA mandate as described under Create a Preliminary SEPA Mandate but with
the following difference: Enter the existing mandate ID in the Mandate ID field as well as the date andsignature.Click Save .The mandate assumes the status Active and can now be used for direct debits. You can print themandate as often as you want.
4. Amend an Existing Mandate in the Systema. If you need to make changes to a SEPA direct debit mandate with the status Active, select your
customer in the system and choose Edit > Financial Data.b. You can edit the following fields (of which the bank must then be informed):
● Mandate ID ● Creditor ID
This entry has to be changed in the Organizational Management work center. ● Company Name
This entry has to be changed in the Organizational Management work center. ● Payer IBAN or BIC
These entries have to be changed on the Bank Data subtab of the Financial Data tab for thecustomer.
If you want to block the mandate for use with direct debits, you can set the Blocked indicator.If you change a mandate, the mandate data is sent by payment file to the bank when the next directdebit is made.
ResultOnce a mandate has the status Active, you can use it for SEPA direct debit payments. Note, however, that if a mandateis not used for more than 36 months, it can no longer be used.
You cannot delete mandates. If the validity of a mandate expires, the system prevents payment using thismandate. If you no longer want to use a mandate or it is no longer valid, you can set its status manually fromMark as Obsolete to Obsolete.
3.3.5 Export Business Data Using Microsoft Excel®
OverviewYou can export reports and worklists to Microsoft Excel® documents. You can use these documents for furtheranalysis, and in some cases, edit and upload them to the solution.You can export data from a report or from a worklist.
SAP Business ByDesign February 2017Accounts View P U B L I C • © 2017 SAP SE or an SAP affiliate company. All rights reserved. 37
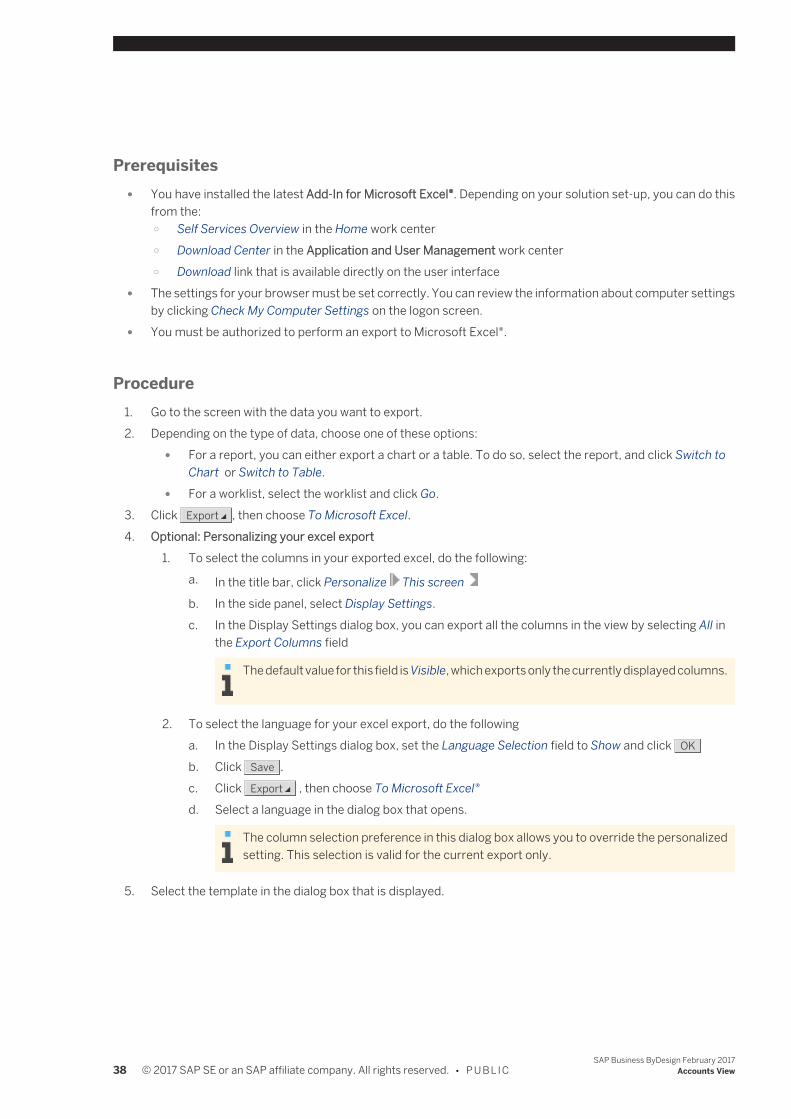
Prerequisites ● You have installed the latest Add-In for Microsoft Excel®. Depending on your solution set-up, you can do this
from the: ○ Self Services Overview in the Home work center ○ Download Center in the Application and User Management work center ○ Download link that is available directly on the user interface
● The settings for your browser must be set correctly. You can review the information about computer settingsby clicking Check My Computer Settings on the logon screen.
● You must be authorized to perform an export to Microsoft Excel®.
Procedure1. Go to the screen with the data you want to export.2. Depending on the type of data, choose one of these options:
● For a report, you can either export a chart or a table. To do so, select the report, and click Switch toChart or Switch to Table.
● For a worklist, select the worklist and click Go.3. Click Export , then choose To Microsoft Excel.4. Optional: Personalizing your excel export
1. To select the columns in your exported excel, do the following:a. In the title bar, click Personalize This screen b. In the side panel, select Display Settings.c. In the Display Settings dialog box, you can export all the columns in the view by selecting All in
the Export Columns field
The default value for this field is Visible, which exports only the currently displayed columns.
2. To select the language for your excel export, do the followinga. In the Display Settings dialog box, set the Language Selection field to Show and click OK
b. Click Save .c. Click Export , then choose To Microsoft Excel®d. Select a language in the dialog box that opens.
The column selection preference in this dialog box allows you to override the personalizedsetting. This selection is valid for the current export only.
5. Select the template in the dialog box that is displayed.
38 © 2017 SAP SE or an SAP affiliate company. All rights reserved. • P U B L I CSAP Business ByDesign February 2017
Accounts View

● If there is only one template that has the logged in language variant, then the export will beperformed in the logged in language, and no user interaction is required.
● If there is only one template in the system for this export scenario, but the logged in languagevariant is not available, then export will be performed in the English language.
● If there is more than one template in the system for this export scenario, the Template List dialogbox is displayed. In this dialog, you can select the Microsoft Excel template that you want to usefor the export. The template will dictate how your exported data will be formatted. The MicrosoftExcel version that is relevant for each template is displayed.
6. Click Download.7. A message shows that you can open or save the file which contains the data that you have just exported from
the solution. Click Open or Save depending on what you want to do with the exported data.Depending on whether you click Open or Save, there are two possible results:
● If you click Open, a worksheet opens with the data in Microsoft Excel. The file has a temporary name,but it is not saved. You can use all the functions of Microsoft Excel to organize the data and to savethat worksheet.
● If you click Save, a Save As dialog box opens. You can specify an appropriate file name and a locationto save the exported Microsoft Excel file to. A message will inform you when the download hascompleted successfully.You can later navigate to the location where you have saved the template and open it .
3.3.6 Maintain Mass Account Data
OverviewThis document describes how to make one or more changes to multiple accounts simultaneously.You can make mass changes to accounts by starting the Mass Change Account Data common task, which belongsto the Account Management and Business Partner Data work centers. You can also access the mass maintenancefrom the Account Details and Account Responsibility Data reports by selecting Mass Change Data of All Accounts.
Procedure1. In the Select Accounts step, select the accounts that you want to change using the Find search.2. Add the accounts that you want to change to a user-specific worklist by clicking Add to Worklist .
● To add all the accounts displayed in the result list, select All Accounts. ● To add only accounts you have previously selected, select Selected Accounts.
You can also remove accounts from your worklist.
The worklist is only a temporary list and will not be available the next time you call up this screen.
If you access the mass maintenance from a report, the result list in the report might contain morelines than the worklist, since one account can have one or more sales organizations or addressesthat will be displayed in individual lines in the report.
SAP Business ByDesign February 2017Accounts View P U B L I C • © 2017 SAP SE or an SAP affiliate company. All rights reserved. 39
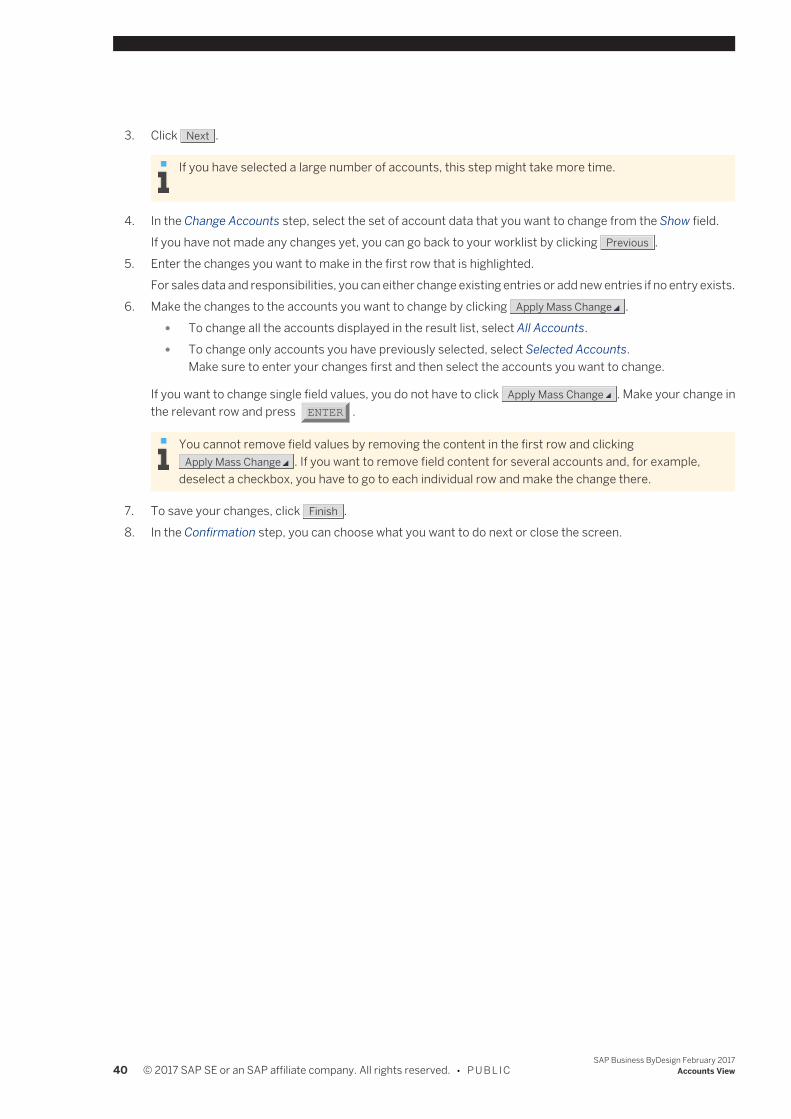
3. Click Next .
If you have selected a large number of accounts, this step might take more time.
4. In the Change Accounts step, select the set of account data that you want to change from the Show field.If you have not made any changes yet, you can go back to your worklist by clicking Previous .
5. Enter the changes you want to make in the first row that is highlighted.For sales data and responsibilities, you can either change existing entries or add new entries if no entry exists.
6. Make the changes to the accounts you want to change by clicking Apply Mass Change . ● To change all the accounts displayed in the result list, select All Accounts. ● To change only accounts you have previously selected, select Selected Accounts.
Make sure to enter your changes first and then select the accounts you want to change.
If you want to change single field values, you do not have to click Apply Mass Change . Make your change inthe relevant row and press ENTER .
You cannot remove field values by removing the content in the first row and clickingApply Mass Change . If you want to remove field content for several accounts and, for example,
deselect a checkbox, you have to go to each individual row and make the change there.
7. To save your changes, click Finish .8. In the Confirmation step, you can choose what you want to do next or close the screen.
40 © 2017 SAP SE or an SAP affiliate company. All rights reserved. • P U B L I CSAP Business ByDesign February 2017
Accounts View
4 Suppliers View
4.1 Suppliers Quick Guide
The Suppliers view provides you with an overview of all the suppliers or bidders that are currently in your system.You can enter and view details about the service agents who work with your suppliers and any relationships suppliersmay have with other suppliers.You can maintain the purchasing data of the suppliers or bidders. You can also maintain the financial data of thesupplier, including their bank and tax details, and the finance details of each site of your company that deals with aspecific supplier.The Suppliers view provides information about the product category life cycle. This can be used in planning yoursourcing strategy.You can access the Suppliers view from the following locations:
● Business Partner Data work center ● Supplier Base work center ● Payables work center
If your company has selected the implementation focus Buy, Sell, and Administrate, there will be slightdifferences between your solution and the standard as outlined below. For more information, see What WorksDifferently for Purchasing in Buy, Sell, and Administrate.
Business Background
Suppliers and Service AgentsYou can view, create, and maintain information about your suppliers and service agents in more than one work center.The data that you create is shared by several work centers. You only need to maintain the information in one workcenter for it to be updated automatically in all relevant work centers.For more information, see Maintenance of Suppliers and Service Agents [page 46].
Address ManagementYou can create, view, and update the details you need to communicate with your business partners. You can maintaindetailed postal and communication data for persons and organizations.For more information, see Address Management [page 5].
Business Partner Duplicate CheckThe business partner duplicate check allows you to find business partners that exist more than once in the system,thus avoiding having redundant data in your system and helping you to reduce efforts and save costs when managingyour business partner master data.For more information, see Business Partner Duplicate Check [page 7].
SAP Business ByDesign February 2017Suppliers View P U B L I C • © 2017 SAP SE or an SAP affiliate company. All rights reserved. 41
Managing the Product Category Life CycleIn the Product Categories view of the supplier editor, you can manage the life cycle of the product categories deliveredby the supplier.For more information, see Managing the Product Category Life Cycle [page 47].
Tasks
Create and Edit a Supplier1. In the worklist of the Suppliers view, click New , then choose Supplier.
You can also create a new supplier by starting the New Supplier common task, which belongs to theBusiness Partner Data, Supplier Base, or Payables work center.
2. Enter the supplier's name, address, and communication details and other supplier-specific data, such as theABC classification.
The certification content for the Certified According To field has to be defined during fine-tuning. Ifcertifications are not defined, then this information cannot be entered.
You can check if a supplier already exists in the system if you have chosen this option during scoping.When you enter the details of a supplier, click Check For Duplicates . The system also notifies you ofpotential duplicates when you save the details of a new supplier. You can view the potential duplicateslisted.
3. Assign one or more supplier roles to the supplier. The Supplier role is pre-selected for you, however, you canalso assign the Bidder or Freight Forwarder role.You can assign the Warehouse Provider role to a business partner running an externally managed warehouse.The connection between the business partner and the externally managed warehouse is established in theLocations view of the Supply Chain Design Master Data work center after a new site has been created for thatpurpose.
4. Enter purchasing data and payment data to enable an end-to-end-process from purchasing to invoicing, andaccounting.The purchasing and payment information you enter will be used as standard data when you create a newpurchasing document.
When you maintain payment data for a new supplier and select the bank transfer payment method,the bank data can be maintained as well.
5. To enter additional information about the supplier, click View All to open the editor.
You can also add more information to a particular supplier by selecting the supplier in the worklistand clicking Edit → General.
6. Click Save to save the new supplier.
Create Suppliers Using Microsoft Excel®You can create suppliers using a predefined Microsoft Excel template. For more information, see Create SuppliersUsing Microsoft Excel [page 47].
42 © 2017 SAP SE or an SAP affiliate company. All rights reserved. • P U B L I CSAP Business ByDesign February 2017
Suppliers View

Assign Multiple Addresses to a Supplier1. In the editor of the Suppliers view, click Communication and then Addresses .2. Click Add Row .3. Enter the address details.4. If you require additional address fields, click Additional Fields.
You can also select a different main address and indicate how the address should be used, such as the ship-from address.
5. Enter one or more addresses, and save the address details.
You can also assign additional addresses to a particular supplier by selecting the supplier in theworklist and clicking Edit → Addresses.
Maintain Output Settings for a Supplier1. In the editor of the Suppliers view, click Communication and then Collaboration .2. You have the following options:
● To specify output settings for a specific document, select a document from the list.a. Select E-Mail, Fax, or Printer from the dropdown list.
If you want to use fax as an output channel, you have to select this option during scoping.For more information, see Configuration: E-Mail and Fax Settings.
b. Enter the e-mail address, fax number, or enter the number of copies required.
You can select a form template for accounts, if available.
By default, the advanced shipping notification is not sent to accounts. If you want to sendadvanced shipping notifications to a particular account, select the checkbox in the Activecolumn, enter an output channel and click Save ..
● To maintain an output channel to be used for all business documents sent to this business partner,select the Use for all Business Documents checkbox.a. Select E-Mail, Fax, or Printer from the dropdown list.
b. Enter the e-mail address, fax number, or enter the number of copies required.c. Press ENTER.
If you use e-mail as an output channel and do not enter an e-mail address, the e-mailaddress of the main address of the business partner will be used.
● To maintain XML settings, click Maintain XML Settings . This brings you to the CommunicationArrangement quick activity.
3. To maintain XML settings, click Maintain XML Settings . This brings you to the Communication Arrangementquick activity.
Business partner-specific output settings overwrite any default output settings that have been maintained in theOutput Channel Selection and Form Template Selection views of the Application and User Management work center.
SAP Business ByDesign February 2017Suppliers View P U B L I C • © 2017 SAP SE or an SAP affiliate company. All rights reserved. 43
The business partner-specific settings can also be overwritten if the employee responsible for a documentchanges the output settings by clicking You Can Also and choosing Edit Output Settings.
For more information, see Process-Integrated Output Settings [page 29].
Assign a Contact to a Supplier1. In the editor of the Suppliers view, click Contacts and then Contacts .2. Click Assign Contact if you want to use an existing business partner as the contact for the supplier.
1. In the dialog box, search for a business partner using the value selection.2. Select a business partner and click OK.
The existing address, communication, function, and department details for the business partner appear.You can edit the details or add information.
3. To create a new contact, click Add Row .4. Enter the details about the new contact.
You can assign multiple contacts to a supplier. You must select a main contact by selecting the Main checkbox.5. Click Save to save the contact.
You can also assign a contact to a particular supplier by selecting the supplier in the worklist andclicking Edit → Contacts.
Assign a Service Agent to a Supplier1. In the editor of the Suppliers view, click Contacts and then Service Agents .2. Click Assign Service Agent if you want to use an existing business partner as the service agent for the supplier.
1. In the dialog box, search for a business partner using the value selection.2. Select a business partner and click OK.
The existing address, communication, function, and department details for the business partner appear.You can edit the details or add information.
3. To create a new service agent, click Add Row .4. Enter the details about the new service agent.
You can assign multiple service agents to a supplier.5. Click Save to save the service agent.
Specify Relationships of a Supplier1. In the editor of the Suppliers view, click Contacts and then Relationships to enter your details about further
relationships for a supplier.2. Click Add Row and select the relationship type and the business partner with whom the supplier has a
relationship.3. Save your data.
Add Purchasing Data to a Supplier1. In the editor of the Suppliers view, click Purchasing .2. Select the purchasing data that you require, such as the payment terms and Incoterms.
If you want to block a supplier from being used in the purchasing process, select the Purchasing Blockedcheckbox.
3. Save your data.
44 © 2017 SAP SE or an SAP affiliate company. All rights reserved. • P U B L I CSAP Business ByDesign February 2017
Suppliers View
Add Payment Data to a Supplier1. In the editor of the Suppliers view, click Financial Data and then Payment Data .2. Under Companies, click Add Row and select the company using the value selection.3. Select the account determination group.
You can select a payment block reason and a payment block expiry date.4. Under Payment Methods, you can click Add Row if you want to select a payment method from the dropdown
list.5. If applicable, you can add instructions to the bank for international payments.6. If remittance advice is required, select the appropriate checkbox.7. Enter the creditor ID at DATEV in the appropriate field, if you use DATEV.8. Save your data.
Add Bank Data to a Supplier1. In the editor of the Suppliers view, click Financial Data and then Bank Data .2. Select a bank using the value selection.
The country and national bank code are added automatically.
If the relevant bank does not appear in the value selection, click New Bank and enter the bank'sdetails to add the bank to the bank directory.
3. Enter the bank account details.4. Save your data.
Add Tax Data to a Supplier1. In the editor of the Suppliers view, click Financial Data and then Tax Data .2. Under Tax Numbers, click Add Row and select the country, tax number type, and tax number from the
dropdown lists.3. Under Withholding Tax Classifications, click Add Row and select the country, tax type, and tax rate type from
the dropdown lists.4. Under Tax Exemptions, click Add Row and select the country, state, tax type, and tax exemption reason from
the dropdown lists.5. Save your data.
Export Suppliers Using Microsoft Excel®For more information, see Export Business Data Using Microsoft Excel [page 37].
SAP Business ByDesign February 2017Suppliers View P U B L I C • © 2017 SAP SE or an SAP affiliate company. All rights reserved. 45

4.2 Business Background
4.2.1 Maintenance of Suppliers and Service Agents
OverviewYou can view, create, and maintain information about your suppliers and service agents in more than one work center.The data that you create is shared by several work centers. You only need to maintain the information in one workcenter for it to be updated automatically in all relevant work centers.You can access the Suppliers view from the following locations:
● Business Partner Data work center ● Supplier Base work center ● Payables work center
You can access the Service Agents view from the following locations: ● Business Partner Data work center ● Supplier Base work center ● Project Management work center
Suppliers and Service AgentsThe Suppliers view provides you with an overview of the suppliers who are currently in your system. You can createand maintain all details about your suppliers or bidders, such as address, communication, and purchasing data.The Service Agents view provides you with an overview of your service agents, including such information as thename and contact details. You can see which supplier each service agent works for and see the relationship theservice agent has with the supplier and other business partners.
Prerequisites
Configuration Settings
Configuration settings are usually performed by an administrator. If you do not have the requiredauthorization, contact your administrator.
You have checked and adapted the predelivered settings for supplier-specific data.To find this activity, go to the Business Configuration work center and choose the Implementation Projects view.Select your implementation project and click Open Activity List . Select the Fine-Tune phase, then select theSuppliers activity from the activity list.
See AlsoSuppliers — Configuration GuideAdditional Identifiers for Business Partners [page 14]
46 © 2017 SAP SE or an SAP affiliate company. All rights reserved. • P U B L I CSAP Business ByDesign February 2017
Suppliers View

4.2.2 Managing the Product Category Life Cycle
OverviewIn the Product Categories view of the supplier editor, you can manage the life cycle of the product categories deliveredby the supplier.You can assess your sourcing strategy for a product category by reviewing factors such as the number of supplierswho can provide items in the product category, your company’s dependency on these suppliers, and the ease ordifficulty in obtaining the products. With this information, you can decide whether or not to change your supplier inorder to reduce the risk of a product not being available when needed, for example. You might also use the informationto help negotiate prices and conditions with your supplier.The engagement status is an indicator of the current standing of a product category and its availability for purchasingfrom a supplier. The statuses range from “In Pre-Evaluation”, “In Introduction”, “Released for Purchasing”, “InRemoval” to “Removed”. With these statuses, you can determine which supplier should be used for a particularproduct category. Based on the status, restrictions on purchasing from a particular supplier are maintained.The engagement statuses are:
● In Pre-Evaluation: A product category is being researched but is not yet available for purchasing from thesupplier. A warning message is raised when a purchase order is created for this product category with thesupplier in question.
● In Introduction: A product category is not available for sourcing activities with the supplier until the appraisalis complete. You cannot create a purchase order for this product category with the supplier in question.
● Released for Purchasing: A product category is fully available for purchasing from the supplier.
● In Removal: A product category is available for limited purchasing to complete unfinished procurementprocesses before the supplier is removed from the product category. A warning message is raised when youfurther create purchase orders using the same supplier for that product category.
● Removed: A product category is not available for purchasing from the supplier.
4.3 Tasks
4.3.1 Create Suppliers Using Microsoft Excel®
OverviewYou can create suppliers by entering them in a predefined Microsoft Excel template and uploading them to the SAPBusiness ByDesign system.
PrerequisitesYou have installed the latest Add-In for Microsoft Excel. Depending on your solution set-up, you can do this from theSelf Services Overview in the Home work center, from the Download Center in the Application and UserManagement work center, or from the Download link that is available directly on the user interface.
SAP Business ByDesign February 2017Suppliers View P U B L I C • © 2017 SAP SE or an SAP affiliate company. All rights reserved. 47

Also, the settings for your browser must be set correctly. You can check this by clicking Check My ComputerSettings on the logon screen.
StepsIn the SAP Business ByDesign system, in the Suppliers view, click New and choose Suppliers from MicrosoftExcel.Get the Template
1. Select the template.Choose the template in the required language and click Download.
You can choose any language that you have selected during scoping. If you have selected only onelanguage during scoping, you will not get a selection of language versions to choose from.
2. Decide what you want to do with the template. Choose one of the following options: ● If you want to use the template only once, you can open the template without saving it. Click Open. ● If you want to save the template so that you can use it again, choose a location to save the file to, enter
an appropriate file name, and click Save. Then click Open.
If you have previously downloaded and saved this template on your computer, navigate to the location whereyou have saved the template, and open it.
Log on to the solution from Microsoft Excel1. In the SAP Add-In ribbon in Microsoft Excel, click Logon.
If the SAP Add-In ribbon is not displayed, check to make sure that the Add-In for Microsoft Excel hasbeen installed correctly (see Prerequisites in this document).
A dialog box opens where you can enter the logon details. The system URL is proposed automatically. Thesystem URL is the URL of the system that you are working with.
2. Enter your user ID and your password, and click Logon.
After initial logon to the system, the ribbon text is changed from SAP Add-In to the name of yoursolution.
Enter Details in the Microsoft Excel Template
48 © 2017 SAP SE or an SAP affiliate company. All rights reserved. • P U B L I CSAP Business ByDesign February 2017
Suppliers View

Note the following: ● The Microsoft Excel template is presented with a number of rows where you can enter or copy your
data. If you need more, add the number of rows you need before you start entering or copying yourdata.
● Ensure that mandatory fields (those marked with an asterisk) are filled. ● To help you fill in the details:
○ Some fields have dropdown lists. ○ In some fields you can search the system for data, for example, countries. Place the cursor on the
field, and click Lookup in your solution's tool bar or ribbon to search the system. A search field isavailable in the Lookup dialog box that appears. When you start to type text in the search field, therelevant entries are filtered in the ID and Description columns, meaning that you do not have toscroll through the whole list. If the Lookup button is not active in the ribbon or toolbar, then it isnot possible to perform a search.
Enter the supplier data in the appropriate columns, such as the general supplier data, the address data, the supplierdetails, and the purchasing data.If you do not select a status, the system will use the In Preparation status.
The system will then carry out a duplicate check for names, addresses, and communication data if this function hasbeen selected during scoping. If there is duplicate data it cannot be saved to the SAP Business ByDesign system,and an error message displays. If you do not want to carry out a duplicate check for selected suppliers, select No inthe Duplicate Check column for the relevant suppliers.For more information about the duplicate check, see Business Partner Duplicate Check [page 7].Save Your Data
1. After you have finished entering all the data, save the Microsoft Excel file.2. Click Save Data to .
A dialog box opens, informing you that the data is being saved to the solution.After the upload, a message informs you that your data has been saved in the solution.
If you do not provide all the required information, or if you provide incorrect information, somerecords will not be saved. Error messages will highlight the problems so that you can correct themand save the data again.
3. You can then log off by clicking Logoff .
ResultThe new suppliers are saved in the SAP Business ByDesign system and added to the list in the Suppliers view.If you need to make changes to these suppliers, you can change them in the Microsoft Excel template and uploadthem again to the SAP Business ByDesign system.
SAP Business ByDesign February 2017Suppliers View P U B L I C • © 2017 SAP SE or an SAP affiliate company. All rights reserved. 49

5 Contacts View
5.1 Quick Guide for Contacts in Business Partner Data
The Contacts view provides you with an overview of all the contacts that are currently in your system. You canmaintain essential information about a contact, such as address, e-mail, telephone number, department, andfunction within the company. You can also enter a contact’s personal details, such as date of birth, marital status,and home address.You can access the Contacts view from the Business Partner Data work center.
Business Background
Accounts and ContactsYou can view, create, and maintain information about your accounts and contacts in more than one work center.The data you create is shared by several work centers. You only need to maintain the information in one work centerfor it to be updated automatically in all relevant work centers.For more information, see Maintenance of Accounts and Contacts [page 23].
Address ManagementYou can create, view, and update the details you need to communicate with your business partners. You can maintaindetailed postal and communication data for persons and organizations.For more information, see Address Management [page 5].
Business Partner Duplicate CheckThe business partner duplicate check allows you to find business partners that exist more than once in the system,thus avoiding having redundant data in your system and helping you to reduce efforts and save costs when managingyour business partner master data.For more information, see Business Partner Duplicate Check [page 7].
Tasks
Create and Edit a Contact1. In the worklist of the Contacts view, click New , then choose Contact.
You can also create a new contact by starting the New Contact common task, which belongs to theBusiness Partner Data work center.
2. Enter the contact's name, addresses, communication details, and other details.If you create a new contact for an existing account, you can enter the account ID of the existing account inthe Business Partner field and enter relevant information under Business Address, Business Details, andBusiness Communication.
50 © 2017 SAP SE or an SAP affiliate company. All rights reserved. • P U B L I CSAP Business ByDesign February 2017
Contacts View
You can check if a contact already exists in the system if you have chosen this option during scoping.When you enter the details of the contact, click Check For Duplicates . The system also notifies you ofpotential duplicates when you save the details of a new contact. You can view the potential duplicateslisted.
3. To enter additional information about the contact, click View All to open the editor.
You can also add more information to a particular contact by selecting the contact in the worklistand clicking Edit → General.
4. Click Save to save the new contact.
Assign Multiple Addresses to a Contact1. In the editor of the Contacts view, click Addresses .2. Click Add Row .3. Select the address type, and enter the address details.4. If you require additional address fields, click Additional Fields.5. Enter one or more addresses, and save the address details.
You can also assign additional addresses to a particular contact by selecting the contact in theworklist and clicking Edit → Addresses.
Specify Relationships of a Contact1. In the editor of the Contacts view, click Relationships to enter your details about relationships for a contact.2. Click Add Row and select the relationship type and the business partner with whom the contact has a
relationship.If your contact is the contact for more than one business partner (relationship type Is Contact PersonFor), select Main under Details for the main relationship for this contact.
The main business partner to which a contact is assigned is also displayed in the worklist.
3. Save your data.
Export Contacts Using Microsoft Excel®For more information, see Export Business Data Using Microsoft Excel® [page 37] .
Maintain Mass Contact DataFor more information, see here.
SAP Business ByDesign February 2017Contacts View P U B L I C • © 2017 SAP SE or an SAP affiliate company. All rights reserved. 51
5.2 Business Background
5.2.1 Maintenance of Accounts and Contacts
OverviewYou can view, create, and maintain information about your accounts and contacts in more than one work center.The data you create is shared by several work centers. You only need to maintain the information in one work centerfor it to be updated automatically in all relevant work centers.You can access the Accounts and the Contacts views from the following locations:
● Account Management work center ● Business Partner Data work center
The Contacts view of the Account Management work center shows the following contacts: ● Contacts for accounts ● Contacts that are not assigned to a business partner
The Contacts view of the Business Partner Data work center shows all types of contacts.The Accounts view shows both existing customers and prospects.
In the Customers view of the Receivables work center you can also view, create, and maintain existingcustomers and prospects.
Accounts and ContactsThe Accounts view provides you with an overview of all the accounts that are currently in your system. You canmaintain important information about an account, such as address and communication data, status, classification,contact hours, sales data, and financial data.The Contacts view provides you with an overview of all the contacts that are currently in your system. You canmaintain essential information about a contact, such as the business address and communication data and status.You can also enter a contact’s personal details, such as the date of birth, marital status, and home address.
Prerequisites
Configuration Settings
Configuration settings are usually performed by an administrator. If you do not have the requiredauthorization, contact your administrator.
You have checked and adapted the pre-delivered settings for account-specific and contact-specific data.To find these activities, go to the Business Configuration work center and choose the Implementation Projects view.Select your implementation project and click Open Activity List . Select the Fine-Tune phase, then select theAccounts or the Contacts activity from the activity list.
52 © 2017 SAP SE or an SAP affiliate company. All rights reserved. • P U B L I CSAP Business ByDesign February 2017
Contacts View

Features
Private and Corporate AccountsAccounts can be of the following types:
● Corporate accountsYour account is an organization.
● Private accountsYour account is an individual.
Depending on whether your account is a corporate or a private account, you will be shown different account fields.For example, private accounts require person-related fields, such as name fields, whereas corporate accountsrequire fields for organizations, such as the Nielsen ID or the legal form of a company.
General Data for AccountsYou can maintain the following general data for an account that is specific to accounts:
● ABC classificationsABC classifications are used to rate accounts based on the significance they have for your business.
● Nielsen IDsNielsen IDs indicate the geographic region to which an account belongs. The Nielsen ID can be used to classifyaccounts according to their consumer behavior.
Sales Data for AccountsYou can maintain sales-specific data, such as Incoterms or customer groups, for an account. The data you maintainfor the account will be transferred to the related sales or service document. You can maintain the following data:
● Document blocks ● Sales data that is dependent on distribution chains
You can maintain the following sales-specific data: ● Document Blocks
○ Order blocksOrder blocks prevent new sales or service documents from being created. If an order block is set in theaccount master data, no new sales or service documents can be created for this account.
○ Delivery blocksDelivery blocks prevent an order from being delivered. If a delivery block is set in the account masterdata, it is copied to any new sales orders. It can also be set, edited, or removed within a sales order.
○ Invoice blocksInvoice blocks prevent an order from being invoiced. If an invoice block is set in the account master data,it is copied to any new sales orders. It can also be set, edited, or removed within a sales order.Return documents receive an invoice block by default in order to provide consistent invoicing.
● Sales Data ○ Customer groups
Customer groups are used for pricing and statistical purposes. You can maintain customer groups inthe account master data record for each organizational assignment.
○ Payment terms
SAP Business ByDesign February 2017Contacts View P U B L I C • © 2017 SAP SE or an SAP affiliate company. All rights reserved. 53
Payment terms are used for arrangements made with a customer for financial settlement with respectto goods supplied and services performed. They represent agreed conditions for the payment of theprice charged for products and services, such as the due date and credit terms.A payment term can be maintained as account master data. If a payment term has been maintained foran account, this will then be copied into documents, such as a new sales order or a new sales quote asthe default value.
Financial Data for AccountsThis data is relevant for accounting. It covers the following:
● Bank DataHere you edit the customer’s bank details and payment card (credit card) data.
● Payment-Relevant DataYou can see which dunning and clearing strategy is assigned to the customer.Here you specify the company in your organization that collaborates with this customer, and the accountdetermination group to determine the G/L account. For more information, see Configuration of AccountDetermination for Business Transactions.You can block the customer for the automatic payment process by specifying a payment block reason. Youcan also exclude this customer from the dunning process by using a dunning block and by specifying a dunningblock reason.Furthermore, you specify the payment method to be used to clear customer invoices, the person responsiblefor the payment fees, the payment instruction(s) for the bank for international payments, and the methodrequired to send a payment advice to the customer. You can indicate receivables from a customer as doubtful.The Doubtful Debtor checkbox is only used for information purposes.You edit this data under Financial Data in the Payment Data area.
● Tax DataHere you define the tax numbers and the data for customer tax exemption. Tax exemption is only permittedin some countries, such as in the United States. For more information, see Tax Determination.
Ensure that the information under Financial Data is complete. You can create a customer without enteringany financial data, for example, if a customer is initially only a prospect. The system does not prevent thecreation of an invoice for this customer in the Customer Invoicing work center. For this reason, it doesnot issue a corresponding message. The customer invoice is not posted, but the system creates a taskfor the accountant in which data can be edited or any missing financial data added.
General Data for ContactsYou can maintain the following general data for a contact that is specific to contacts:
● DepartmentsThe department in which a contact works can be specified.
● FunctionsThe function describes the job of a contact.
● VIP contactsA contact can be classified as a VIP contact according to his or her importance in a company.
See AlsoAdditional Identifiers for Business Partners [page 14]
54 © 2017 SAP SE or an SAP affiliate company. All rights reserved. • P U B L I CSAP Business ByDesign February 2017
Contacts View
6 Service Agents View
6.1 Service Agents Quick Guide
As a buyer or project manager who deals with external employees, it is essential that you have detailed informationabout your suppliers. It is also essential that you have information about the service agents who work for yoursuppliers and provide their services to you.The Service Agents view allows you to view, create, and update the most essential service agent data. It provides anoverview of service agent information, such as name and contact details. You can see for which supplier each serviceagent works, and see the relationships the service agent has with other business partners. You can create a user forthe service agent, so he or she can access your system directly for tasks such as time entry. You can vieworganizational details, such as the organizational unit, the job title, the reporting line unit, and the manager.You can access the Service Agents view from the following locations:
● Business Partner Data work center ● Project Management work center ● Supplier Base work center
Business Background
Suppliers and Service AgentsYou can view, create, and maintain information about your suppliers and service agents in more than one work center.The data that you create is shared by several work centers. You only need to maintain the information in one workcenter for it to be updated automatically in all relevant work centers.For more information, see Maintenance of Suppliers and Service Agents [page 46].
Address ManagementYou can create, view, and update the details you need to communicate with your business partners. You can maintaindetailed postal and communication data for persons and organizations.For more information, see Address Management [page 5].
Business Partner Duplicate CheckThe business partner duplicate check allows you to find business partners that exist more than once in the system,thus avoiding having redundant data in your system and helping you to reduce efforts and save costs when managingyour business partner master data.For more information, see Business Partner Duplicate Check [page 7].
Tasks
Create and Edit a Service Agent1. In the worklist of the Service Agents view, click New , then choose Service Agent.
SAP Business ByDesign February 2017Service Agents View P U B L I C • © 2017 SAP SE or an SAP affiliate company. All rights reserved. 55

You can also create a new service agent by starting the New Service Agent common task, whichbelongs to the Business Partner Data, Project Management, or Supplier Base work center.
2. Enter the service agent's name, address, and communication details and other service agent-specific data,such as the supplier that he works for and the organizational assignment.
You can check if a service agent already exists in the system if you have chosen this option duringscoping. When you enter the details of a service agent, click Check For Duplicates . The system alsonotifies you of potential duplicates when you save the details of a new service agent. You can view thepotential duplicates listed.
3. Enter business information about the new service agent.1. In the Business Details section, enter information about the service agent that is internal to your
company, such as function and department, if applicable. This might be appropriate if the service agentis working on site for you.If the service agent is working on site, enter the in-house address and communication information.
2. In the Business Address and Business Communication sections, enter information about the serviceagent that is external to your company, such as phone, fax, and e-mail at the supplier’s address, or thefunction and department within the supplier’s company.
4. To enter additional information about the service agent, click View All to open the editor.
You can also add more information to a particular service agent by selecting the service agent in theworklist and clicking Edit → General.
If you set the service agent’s status to blocked, the system displays a warning message for the entireservice agent account. This may affect purchasing, sales, and any related business partners, but youcan still use the service agent in your business processes. However, this status automatically locks theuser for that service agent if one has been assigned, and the service agent cannot access your systemuntil you change the status.
5. Click Save to save the new service agent.
Assign Multiple Addresses to a Service Agent1. In the editor of the Service Agents view, click Addresses .2. Click Add Row .3. Select the address type, and enter the address details.4. If you require additional address fields, click Additional Fields.5. Enter one or more addresses, if the service agent works for more than one supplier and has additional
addresses, and save the address details.
You can also assign additional addresses to a particular service agent by selecting the service agentin the worklist and clicking Edit → Addresses.
Specify Relationships of a Service Agent1. In the editor of the Service Agents view, click Relationships to enter your details about the relationships for
a service agent.2. Click Add Row and select the relationship type and the business partner with whom the service agent has a
relationship.
56 © 2017 SAP SE or an SAP affiliate company. All rights reserved. • P U B L I CSAP Business ByDesign February 2017
Service Agents View
If your service agent is the service agent for more than one supplier (relationship type Is ServicePerformer For), select Main under Details for the main relationship for this service agent.
The main supplier to which a service agent is assigned is also displayed in the worklist.
3. Save your data.
Create a User for a Service Agent1. If a service agent requires a user to access your system, click Request User .
The user is automatically created.2. Contact an administrator to maintain the new user account, for example, to maintain the user’s password
and validity period. In the Application and User Management work center, the user for the service agent canalso be locked or unlocked.The service agent can then access your system directly to maintain a time sheet, if required.
Edit the Time Sheet of a Service AgentYou can only click Edit Time Sheet in the worklist of the Service Agents view for a selected service agent if thefollowing applies:
● You have assigned the service agent to a project. ● The service agent is not an internal employee. ● The purchase orders with time sheet recordings for projects are enabled in your solution configuration.
To find this business option, go to the Business Configuration work center and choose the ImplementationProjects view. Select your implementation project and click Edit Project Scope . In the Scoping step of theproject, ensure that Purchase Request and Order Management is selected within Purchasing.In the Questions step, expand the Purchasing scoping element and select Purchase Request and OrderManagement. Select Goods and Services Receipts and answer the question related to the type of purchaseorder for services.
Configuration settings are usually performed by an administrator. If you do not have the requiredauthorization, contact your administrator.
For more information about this task, see here [page 59].
Record Times from Microsoft Excel®For more information, see here [page 62].
Export Service Agents Using Microsoft Excel®For more information, see Export Business Data Using Microsoft Excel [page 37] .
SAP Business ByDesign February 2017Service Agents View P U B L I C • © 2017 SAP SE or an SAP affiliate company. All rights reserved. 57
6.2 Business Background
6.2.1 Maintenance of Suppliers and Service Agents
OverviewYou can view, create, and maintain information about your suppliers and service agents in more than one work center.The data that you create is shared by several work centers. You only need to maintain the information in one workcenter for it to be updated automatically in all relevant work centers.You can access the Suppliers view from the following locations:
● Business Partner Data work center ● Supplier Base work center ● Payables work center
You can access the Service Agents view from the following locations: ● Business Partner Data work center ● Supplier Base work center ● Project Management work center
Suppliers and Service AgentsThe Suppliers view provides you with an overview of the suppliers who are currently in your system. You can createand maintain all details about your suppliers or bidders, such as address, communication, and purchasing data.The Service Agents view provides you with an overview of your service agents, including such information as thename and contact details. You can see which supplier each service agent works for and see the relationship theservice agent has with the supplier and other business partners.
Prerequisites
Configuration Settings
Configuration settings are usually performed by an administrator. If you do not have the requiredauthorization, contact your administrator.
You have checked and adapted the predelivered settings for supplier-specific data.To find this activity, go to the Business Configuration work center and choose the Implementation Projects view.Select your implementation project and click Open Activity List . Select the Fine-Tune phase, then select theSuppliers activity from the activity list.
See AlsoSuppliers — Configuration GuideAdditional Identifiers for Business Partners [page 14]
58 © 2017 SAP SE or an SAP affiliate company. All rights reserved. • P U B L I CSAP Business ByDesign February 2017
Service Agents View
6.3 Tasks
6.3.1 Edit Time Sheet
OverviewIn the Time Sheet, you can record the hours you have worked and leave you have taken, post working time to differentprojects and project tasks, and then submit the time sheet for approval. For detailed information about all of thefunctions available in the time sheet, see The Time Sheet.
Procedure1. You are in the Home work center in the Self-Services Overview view. Under Time, click Edit Time Sheet.2. Select the view best suited to your time recording needs if this has not already been preset.
● Select the Day view to record time on a daily basis, typically if you want to confirm partial-day timesfor the tasks and activities you have worked on each day.
● Select the Week view to record time on a weekly basis, typically at the end of the week when you wantto confirm partial-day times for tasks and activities you worked on during the week.
● Select the Month view to record time on a monthly basis, typically at the end of the month when youwant to confirm partial-day times for tasks and activities you worked on during the month. You mayalso find this view useful when you want to release all times in one go rather than having to releaseevery single entry individually.
● Select the Worklist view when you have worked on several different tasks or activities during therelevant time frame and therefore want to report your times accordingly.
● If you are recording project times for a project that has been flagged as billable in ProjectManagement, the billable hours are displayed in addition. If you are recording project times for a projecttask of a partner company (buying company), the Purchase Order is displayed.
3. Optional: You can add and remove columns to the time sheet by clicking Personalize at the top of the screenand selecting or deselecting fields as required. Save your selections and exit.
4. Record time against projects and project tasks or against time types (non-project time recording) in one ofthe following ways:
SAP Business ByDesign February 2017Service Agents View P U B L I C • © 2017 SAP SE or an SAP affiliate company. All rights reserved. 59
You can use the Manage My Worklist function to control the visibility of work packages (project tasksand services) and time types in both the worklist and the time sheet. Employees can also assignthemselves to work packages to which they are not directly assigned. You access the worklist functionsby clicking Manage My Worklist:
● To show or hide entries in the time sheet, select the relevant row, click Actions and choosethe required Show or Hide action. Alternatively, you can toggle the display by clicking the iconin the Visibility column.
● Work packages or time types that you add to the worklist are displayed in parallel in the timesheet and vice versa.
● To add a task that is not currently displayed, click Add Work Package. The Add Work Packagedialog box opens, where you can select the required task and service. Entry of a service is notmandatory.
● If you need to record work done for a project task to which you are not already specificallyassigned, when you select the work package, the system will automatically find the relevantservice if the following condition is fulfilled: there is one unassigned service in the project taskyou have entered and you are not assigned to any other work packages belonging to the task.
If a service agent has started working on a project task, but is not yet assigned to it, the service agentcan manually enter the ID of the task and record time against it. This task is displayed in the worklist,value help, and time sheet every time the service agents logs on to the system to edit the time sheet.If the service agent deletes the task, it stops displaying in the worklist, value help, and time sheet.
● For project task and sales order confirmation time recording:a. Enter a task for the project or sales order in one of the following ways:
The field Category is hidden and can be personalized.
1. In the Category cell, select Project Task Confirmation or Sales Order Confirmation and enterthe ID of the Task directly or click the value help icon.
The Sales Order Confirmation option in only visible if it is scoped in businessconfiguration.
The Select: Task screen is displayed.The value help displays all tasks on which you are staffed directly, as well as any that youhave added using the Manage My Worklist function. In addition, it displays the header tasksfor projects to which you are indirectly assigned, for example, through your organizationalunit.
2. Select a task from the list.The corresponding project or sales order confirmation is automatically entered in the Taskand Activity columns of the time sheet.
b. Proceed to step 5. ● For intercompany project time recording:
a. In the Task cell, click the value help icon.The Select: Task screen is displayed. Project tasks of the partner (buying) company areautomatically available for selection in addition to other project tasks to which the employee isassigned.
60 © 2017 SAP SE or an SAP affiliate company. All rights reserved. • P U B L I CSAP Business ByDesign February 2017
Service Agents View

b. Select a task from the list.The corresponding project and service are automatically entered in the Project and Activitycolumns respectively of the time sheet.The purchase order item to which the work package belongs is determined by the system anddisplayed in the Details area under Purchase Order when you enter times. The system finds thepurchase order item by searching in the following sequence:1. Employee, service, and project task2. Header task of the project, service3. Cost center, service
The approval process for intercompany project task confirmation is specified differently foremployees and service agents: Project task confirmations by service agents are alwayssubmitted for approval, whereas employees' confirmations are only subject to approval if thisis explicitly specified for the project.
● For non-project time recording, that is, to post time against a time type:a. In the Activity cell, click the value help icon. The Select: Activity screen is displayed listing the time
types against which you can post time.b. Select the required time type and click OK .
If you need to record time against a time type that is not displayed, click Manage My Worklist . Theworklist opens in the Time Type view. Click Add Row and select the required time type.
5. Record your working hours by entering the start and end times or the duration and click Save .
● The time entry options available depend on which view you have selected. In the Days view, youcan enter both start and end times and/or the number of hours. In the Tasks view, you specifyor select the duration. You can overwrite the value help provided with any required number ofhours and minutes, for example, 02:45.You can enter start and end times in addition in the details section below.
● If you specify start and end times, the Hours field updates automatically. You can overwrite thisentry but only if you need to enter a shorter duration. You cannot overwrite the entry with alonger duration. However, if you have already saved a time entry and later overwrite the startand end times, the Hours entry is not automatically updated to reflect the change. It is onlyupdated when you release your time recording.
6. Edit the details of the time record as required. For example, you can set the Work Package Completed indicatorfor tasks that you have finished. This indicator is used for information purposes only in Time Recording. It canbe deselected again if required. This information is passed to project management.
7. If you are recording project times for a customer project, the billable hours displayed below the table aredefaulted from the hours you enter. You can overwrite this entry if you need to specify that the number ofhours billed differs from the number of hours worked. An icon appears beside the field to indicate that differentbillable hours have been recorded. To revert to the default hours, simply clear the field and press Enter .
8. If you are recording time for a sales order, the Service Confirmation Quantity displayed below the table aredefaulted from the hours you enter.
9. If required, enter a work description and/or an internal comment in the fields provided. The work descriptionis available externally, for example, for project invoicing purposes and is displayed, for example, in theMicrosoft Excel® template if you export your project times to Microsoft Excel. Internal comments are forinternal use only and are mainly used in the approval process for communication between project managerand team member.
SAP Business ByDesign February 2017Service Agents View P U B L I C • © 2017 SAP SE or an SAP affiliate company. All rights reserved. 61

10. To release your recorded times, click Release and choose All or Selected Period. The Releasedsuccessfully message is displayed.
Note about unpaid break deduction for employees with a work schedule assigned: Unpaid breaksdefined in the employee's work schedule are only deducted when the employee times are released,and not while they have inactive status. For example, an employee's work schedule specifies an unpaidbreak from 13:00 to 14:00. The employee records working time from 07:00 to 16:00. The time sheetdisplays 9 hours for the inactive record and deducts the one-hour break only when the times arereleased.
Result ● If you have recorded time against a project and if approval is required, an approval task is routed to the project
manager. ● If you have recorded time against a project task for a partner company, the relevant notifications for further
processing are automatically sent to Project Management, Accounting, and Purchasing. ● If you have recorded time against a time type, depending on configuration settings, the time administrator
might receive an approval task, a notification or nothing. In the status column, an icon and text indicate boththe release status and the approval status of the recorded time.
● If you have recorded time against a sales order, a Service Confirmation is created automatically.
Follow-Up ActivitiesIf you have recorded time against a customer project, for example, you can run the activity report for the project,export the details to Microsoft Excel and print the report out for sign-off. To run the report, click
View Activity Report and specify your selection. Note that when you record times for a customer project, only thebillable hours entered are uploaded and displayed in the activity report, and not the recorded hours. For moreinformation, see View Activity Report.
See AlsoThe Time SheetCreate a Leave RequestCancel a Leave RequestApprove Time RecordingsUpload Times Using Microsoft Excel
6.3.2 Record Times from Microsoft Excel®
OverviewYou can record times by entering them in a predefined Microsoft Excel template and uploading them to the SAPBusiness ByDesign system.
62 © 2017 SAP SE or an SAP affiliate company. All rights reserved. • P U B L I CSAP Business ByDesign February 2017
Service Agents View

PrerequisitesYou have installed the latest Add-In for Microsoft Excel. Depending on your solution set-up, you can do this from theSelf Services Overview in the Home work center, from the Download Center in the Application and UserManagement work center, or from the Download link that is available directly on the user interface.Also, the settings for your browser must be set correctly. You can check this by clicking Check My ComputerSettings on the logon screen.
The scope of users' uploading privileges varies depending on the users' authorizations. The followingdescribes which privileges are assigned to which users:
● Project managers can perform an upload for all service agents. ● Line managers can perform an upload for all employees in their department. ● Time administrators can perform an upload for all employees in their company.
StepsIn the SAP Business ByDesign system, go to the Service Agents view, which can be accessed from the followinglocations:
● Business Partner Data work center ● Project Management work center ● Supplier Base work center
Click Actions , then Record Times from Microsoft Excel.Get the Template
1. Select the template.Choose the template in the required language and click Download.
You can choose any language that you have selected during scoping. If you have selected only onelanguage during scoping, you will not get a selection of language versions to choose from.
2. Decide what you want to do with the template. Choose one of the following options: ● If you want to use the template only once, you can open the template without saving it. Click Open. ● If you want to save the template so that you can use it again, choose a location to save the file to, enter
an appropriate file name, and click Save. Then click Open.
If you have previously downloaded and saved this template on your computer, navigate to the location whereyou have saved the template, and open it.
Log on to the solution from Microsoft Excel1. In the SAP Add-In ribbon in Microsoft Excel, click Logon.
If the SAP Add-In ribbon is not displayed, check to make sure that the Add-In for Microsoft Excel hasbeen installed correctly (see Prerequisites in this document).
A dialog box opens where you can enter the logon details. The system URL is proposed automatically. Thesystem URL is the URL of the system that you are working with.
2. Enter your user ID and your password, and click Logon.
SAP Business ByDesign February 2017Service Agents View P U B L I C • © 2017 SAP SE or an SAP affiliate company. All rights reserved. 63

After initial logon to the system, the ribbon text is changed from SAP Add-In to the name of yoursolution.
Enter Details in the Microsoft Excel Template
Note the following: ● The Microsoft Excel template is presented with a number of rows where you can enter or copy your
data. If you need more, add the number of rows you need before you start entering or copying yourdata.
● Ensure that mandatory fields (those marked with an asterisk) are filled. ● To help you fill in the details:
○ Some fields have dropdown lists. ○ In some fields you can search the system for data, for example, countries. Place the cursor on the
field, and click Lookup in your solution's tool bar or ribbon to search the system. A search field isavailable in the Lookup dialog box that appears. When you start to type text in the search field, therelevant entries are filtered in the ID and Description columns, meaning that you do not have toscroll through the whole list. If the Lookup button is not active in the ribbon or toolbar, then it isnot possible to perform a search.
Enter the country code in the field labeled Country. In the appropriate columns, enter the project time data such asthe start and end times, duration, service, project task, purchase order, different billable duration, work description,and internal comment.
The Premium Pay column does not apply to service agents.
Save Your Data1. After you have finished entering all the data, save the Microsoft Excel file.2. Click Save Data to .
A dialog box opens, informing you that the data is being saved to the solution.After the upload, a message informs you that your data has been saved in the solution.
If you do not provide all the required information, or if you provide incorrect information, somerecords will not be saved. Error messages will highlight the problems so that you can correct themand save the data again.
3. You can then log off by clicking Logoff .
ResultThe new times are saved in the SAP Business ByDesign system and added to the list in the Service Agents view.If you need to make changes to these times, you can change them in the Microsoft Excel template and upload themagain to the SAP Business ByDesign system.
If the uploaded record has been changed in the system, for example by a time administrator, you cannotoverwrite this change with a new upload.
64 © 2017 SAP SE or an SAP affiliate company. All rights reserved. • P U B L I CSAP Business ByDesign February 2017
Service Agents View

7 Employees View
7.1 Quick Guide for Employees in Business Partner Data
The Employees view allows you to view, create, and update the most essential employee data. It provides an overviewof an employee’s work details including in-house address and communication data. When you create a newemployee, an inactive user login profile is created. You can view organizational details, such as the organizationalunit, the job title, the reporting line unit, and the manager.You can access the Employees view from the Business Partner Data work center.
You can only access the Employees view in the Business Partner Data work center if human resources has notbeen selected in your solution configuration.
Business Background
Address ManagementYou can create, view, and update the details you need to communicate with your business partners. You can maintaindetailed postal and communication data for persons and organizations.For more information, see Address Management [page 5].
Business Partner Duplicate CheckThe business partner duplicate check allows you to find business partners that exist more than once in the system,thus avoiding having redundant data in your system and helping you to reduce efforts and save costs when managingyour business partner master data.For more information, see Business Partner Duplicate Check [page 7].
Tasks
Create and Edit an Employee1. In the worklist of the Employees view, click New , then choose Employee.
You can also create a new employee by starting the New Employee common task, which belongs tothe Business Partner Data work center.
2. Enter the employee's name, in-house address, communication details and other employee-specific details,such as the employee’s organizational assignments.
You can check if an employee already exists in the system if you have chosen this option during scoping.When you enter the details of the employee, click Check For Duplicates . The system also notifies youof potential duplicates when you save the details of a new employee. You can view the potentialduplicates listed.
SAP Business ByDesign February 2017Employees View P U B L I C • © 2017 SAP SE or an SAP affiliate company. All rights reserved. 65
You can also add more information to a particular employee by selecting the employee in the worklistand clicking Edit .
3. Click Save to save the new employee.
For data protection reasons, personal data of employees can be removed by an administrator responsible fordata privacy, if requested. If the personal data of an employee has been deleted, you can still display thebusiness partner in question, for example, in related business documents or overviews. The ID of the businesspartner will then be shown in an anonymized form.For more information, see Data Privacy Management [page 66].
Delimit the Validity of an EmployeeIf you want to delimit the validity of an employee record, enter the appropriate date in the Valid To field. From thisdate, you can no longer use this employee in new business processes.
The value in the field is set to Unlimited by default.
Export Employees Using Microsoft Excel®For more information, see Export Business Data Using Microsoft Excel® [page 37] .
7.2 Business Background
7.2.1 Data Privacy Management in Business ByDesign
OverviewData processing systems store master data or transactional data used to perform business processes and todocument them. In many cases, personal data of employees is involved. In many countries, the storage, disclosure,and removal of such personal data from data storage systems must be in accordance with statutory data protectionlaws. One requirement in many countries is that employee's personal data can only be stored if a clear businessreason for this data retention exists. Much data protection legislation proscribes fixed retention periods, definingfor how long data can be stored in data systems, after which it must be deleted. Only in certain cases can organizationsmake data anonymous, rather than completely remove it. In addition, legislation in many countries stipulates thatemployers must disclose the personal data stored on an individual, when that employee expressly requests this. TheData Privacy Management work center allows those responsible for data protection issues in an organization torespond to employee requests to disclose personal information and remove it.With the Data Privacy Management work center you can:
● Disclose personal data for employees who request this. ● Remove employee personal data based on complete work agreements that lie outside the retention period
of the country of employment. Complete work agreement refers to all dependent application-relevant datawithin an employee's work agreement, including time, compensation, expense report and payroll-relateddata. However, this deletion process is “all-or-nothing”, meaning that if some parts of an employee's workagreement data cannot be deleted for whatever reason, then nothing is deleted.
66 © 2017 SAP SE or an SAP affiliate company. All rights reserved. • P U B L I CSAP Business ByDesign February 2017
Employees View

● Monitor and manage background data removal processes using an application log. ● Display log data detailing each access made by a Data Protection Officer or other authorized user to the
Disclose Employee Data and Remove Employee Data overview screens of a selected employee.
Obligation to Delete refers generally to the requirement of organizations to delete personal data held on itsemployees that is kept in an identifiable form, and retain this data for no longer than necessary. Wherespecified, organizations must delete all such personal data after the relevant data retention period haselapsed.
RelevanceRelevant if your organization wishes to disclose personal data or remove it, when requested to do so by specificemployees.
PrerequisitesThe required statutory retention periods have been maintained in the Fine-Tune phase of Business Configuration,in the fine-tuning activity: Data Retention Rule relevant for your country. You find this activity under Built-in Servicesand Support —> System Management —> Data Retention. It is not yet possible to define retention rules based onindividual/groups of data (for example, absence data). You can set only one retention period per country, which isindependent of any other characteristic.
Users with authorization to access the Data Privacy Management work center can perform all data privacyfunctions within this work center, including the disclosure and deletion of employee's personal data.Access to this work center is granted in the Application and User Management work center. You mustensure that only employees with authorization to disclose/delete personal data are granted access to theData Privacy Management work center. If your corporate group consists of more then one company, youcan set access to this work center at a company level. For example, you can assign one user with dataprivacy rights for the employees in one company, and assign a different user with these same rights fora separate company in your group.
FeaturesThere are a number of key features of Data Privacy Management in Business ByDesign. These are outlined below:
Employee Data Disclosure — Obligation to DiscloseA key principle in data privacy is the Obligation to Disclose. This is an obligation set in legislation in many countrieswhere data protection regulation has been adopted. An employee can request if personal data is held by his or heremployer and the employer must confirm whether such personal data exists or not. If yes, the employee can requesta description of the personal data held, and in some legal jurisdictions, why the data are being stored or processedand who the recipients of this data are, or have been. This requirement of a organization to supply information onpersonal data held for an employee is termed "Obligation to Disclose".
Employee Data Removal — Deletion on RequestThis second data privacy principle is a narrower form of the “Obligation to Delete” principle discussed above. Anemployee can request if personal data are held by the employing organization. If such data exists, the employee canrequest a description of this data and its removal from storage.
SAP Business ByDesign February 2017Employees View P U B L I C • © 2017 SAP SE or an SAP affiliate company. All rights reserved. 67

Data Protection RolesIn large organizations, employees with the designated role Data Protection Officer (for example) are responsiblethat data privacy principles are followed, and that the organization complies with all data privacy legislation in forcewithin the country (or countries) it operates. However, these tasks can be delegated to other authorized employees,for example, designated Human Resources administrators.
Work Center Data Privacy ManagementThe Data Privacy Management work center allows companies to fulfil the Obligation to Disclose and Deletion onRequest principles, and consists of three parts:
● Work center view: Personal Data DisclosureThis view allows those employees responsible for data protection to administer data disclosure for employeeswho request it.For more information see Personal Data Disclosure Quick Guide.
● Work center view: Personal Data RemovalIn this view, for the Employee role, administrators can remove complete work agreements when employeesrequest deletion of personal data from the ByDesign system.
Where only the Employees and Service Agents business package is included in your scoped solution(only basic employee data are stored in the ByDesign system), this basic data can also be removed/anonymized in this view.
For more information see Personal Data Removal Quick Guide. ● Common Task: Administer Data Removal Runs
Removal of employee work agreement data in the Data Privacy Management work center is performedautomatically in a separate background process. The Administer Data Removal Runs common task providesyou with an overview of planned, current and completed data removal runs, the ability to reschedule failedruns, mark runs as obsolete, and delete runs.For more information, see Working with the Administer Data Removal Runs View.
Authorization IssuesThe Data Privacy Management work center must only be available to authorized employees in your organization. Itis therefore strongly recommended this work center assignment should only be given to those employees directlyresponsible for data privacy issues in your organization.
AuditingThe system logs every access made by a Data Protection Officer or other authorized user to the Disclose EmployeeData and Remove Employee Data overview screens of a selected employee. This logging is provided to supportauditing of data protection actions in the system. For more information, see the respective View Quick Guides linkedabove in this document.
Employees, such as Data Protection Officers with responsibility for data protection have full access rights forthe Data Privacy Management work center. These access rights allow an authorized user to access personaldata for the selected employee in all Business ByDesign work centers where such data exists. Because of theability for an individual user to access large volumes of personal employee data across many work centers,the access log is provided to allow transparency and traceability of user access to personal data. The log doesnot contain detailed personal data, but rather a summary of the types of data accessed, by whom and when.Data Protection Officers (or other authorized users) can only access the employee information for employeesof those companies for which they possess the full access rights. This allows the creation of separate dataprotection officer roles in multiple companies within a corporate group.
68 © 2017 SAP SE or an SAP affiliate company. All rights reserved. • P U B L I CSAP Business ByDesign February 2017
Employees View
8 Reports View
8.1 Account Collaboration Data
OverviewProvides an overview of collaboration data for accounts that can be used by sales managers and representatives fora synopsis of their account master data. It provides business-partner specific output settings, such as the businessdocument name and the output channel, along with information about the related accounts.
PrerequisitesYou have selected the report in your solution configuration. To find this business option, go to the BusinessConfiguration work center and choose the Implementation Projects view. Select your implementation project andclick Edit Project Scope . In the Scoping step of the project, ensure that Business Partners is selected within GeneralBusiness Data.In the Questions step, expand the General Business Data scoping element and select Business Partners. SelectReporting and Analytics for Business Partners and answer the question related to the reports for accounts.
Features
Running the ReportBefore running the report, you can specify the data you want to see by making value selections for variables.The following variables are available for this report:
● Account ● City ● Country ● Status
Analyzing the ReportThe report displays the following data:
● Collaboration data of an account, including the following: ○ Business document name ○ Output channel ○ Number of copies ○ Template ○ Indication of whether output settings are active for a particular business document and account
● Basic data of the related corporate account, including the following: ○ Account name and ID ○ Address data
To further analyze data in this report, you can drag characteristics to rows and columns.
SAP Business ByDesign February 2017Reports View P U B L I C • © 2017 SAP SE or an SAP affiliate company. All rights reserved. 69
See AlsoOverview of Reports in General Business DataOverview of Data Sources in General Business Data
8.2 Account Contact Data
OverviewProvides an overview of contact master data for corporate accounts that can be used by sales managers andrepresentatives for a synopsis of their account master data. It provides basic contact data, such as address data,and other contact-specific information along with information about the related accounts.
PrerequisitesYou have selected the report in your solution configuration. To find this business option, go to the BusinessConfiguration work center and choose the Implementation Projects view. Select your implementation project andclick Edit Project Scope . In the Scoping step of the project, ensure that Business Partners is selected within GeneralBusiness Data.In the Questions step, expand the General Business Data scoping element and select Business Partners. SelectReporting and Analytics for Business Partners and answer the question related to the reports for accounts.
Features
Running the ReportBefore running the report, you can specify the data you want to see by making value selections for variables.The following variables are available for this report:
● Contact ● Account ● City ● Country ● Status
Analyzing the ReportThe report displays the following data:
● Basic data of the contact, including the following: ○ Contact name and ID ○ Address and communication data ○ Indication of whether a contact is the main contact for an account
● Contact-specific business details, including the following ○ Function of the contact ○ Department of the contact
70 © 2017 SAP SE or an SAP affiliate company. All rights reserved. • P U B L I CSAP Business ByDesign February 2017
Reports View
● Basic data of the related corporate account, including the following: ○ Account name and ID ○ Address data
● Data for direct responsibilities, including the following: ○ Contact Responsible party role ○ Employee responsible for a contact ○ Party role
To further analyze data in this report, you can drag characteristics to rows and columns.
See AlsoOverview of Reports in General Business DataOverview of Data Sources in General Business Data
8.3 Account Details
OverviewProvides an overview of account master data that can be used by sales managers and representatives for a synopsisof delivery and payment terms of their accounts. It provides basic account data, such as address data, along withsales-specific and financial information.
The BUPCSDB data source formerly used for this report is being phased out and will be replaced by BPCSDB.We recommend using the new data source when you create or copy reports or when you create combined orjoined data sources.
PrerequisitesYou have selected the report in your solution configuration. To find this business option, go to the BusinessConfiguration work center and choose the Implementation Projects view. Select your implementation project andclick Edit Project Scope . In the Scoping step of the project, ensure that Business Partners is selected within GeneralBusiness Data.In the Questions step, expand the General Business Data scoping element and select Business Partners. SelectReporting and Analytics for Business Partners and answer the question related to the reports for accounts.
ViewsThe following views are available with this report:
● Account DataDisplays all available characteristics for an account.
● Account General DataDisplays selected general data of an account, such as name, address, and communication data along withthe industry, the legal form, and the blocks that have been maintained for this account.
● Account Sales Data
SAP Business ByDesign February 2017Reports View P U B L I C • © 2017 SAP SE or an SAP affiliate company. All rights reserved. 71

Displays selected general data and the data that is related to the sales process, such as the sales organizationname and ID, the delivery priority, the payment terms, the currency, and the Incoterms.This view is also the pre-delivered default view of the report.
● Account Bank Data ● Account Credit Card Data ● Account Tax Data
Features
Running the ReportBefore running the report, you can specify the data you want to see by making value selections for variables.The following variables are available for this report:
● Account ● City ● Country ● Status
Analyzing the ReportThe report displays the following data for an account:
● Basic data of an account, including the following: ○ Account name and ID ○ Address and communication data ○ Additional identifiers, such as the D-U-N-S and the Global Location Number
● Sales data of an account, including the following: ○ Sales organization ○ Distribution channel ○ Delivery priority ○ Payment terms ○ Currency ○ Incoterms ○ Customer group ○ Order, delivery, and invoice blocks
● Financial data of an account ○ Bank data, such as the bank name and the bank account data ○ Credit card data, such as the type, the holder and the expiration date of the credit card ○ Tax data, such as the tax country, the tax jurisdiction code, and the tax number
To further analyze data in this report, you can drag characteristics to rows and columns.
See AlsoOverview of Reports in General Business DataOverview of Data Sources in General Business DataReports View
72 © 2017 SAP SE or an SAP affiliate company. All rights reserved. • P U B L I CSAP Business ByDesign February 2017
Reports View
Maintain Mass Account Data [page 39]
8.4 Account Responsibility Data
OverviewProvides an overview of responsibility data for accounts that can be used by sales managers and representativesfor a synopsis of their account master data. It provides data of employees directly responsible for an account, suchas the employee ID, name, and address, along with information about the related accounts.
PrerequisitesYou have selected the report in your solution configuration. To find this business option, go to the BusinessConfiguration work center and choose the Implementation Projects view. Select your implementation project andclick Edit Project Scope . In the Scoping step of the project, ensure that Business Partners is selected within GeneralBusiness Data.In the Questions step, expand the General Business Data scoping element and select Business Partners. SelectReporting and Analytics for Business Partners and answer the question related to the reports for accounts.
Features
Running the ReportBefore running the report, you can specify the data you want to see by making value selections for variables.The following variables are available for this report:
● Employee ● Account ● City ● Country ● Status
Analyzing the ReportThe report displays the following data:
● Basic data of the employee directly responsible for an account and other specific data, including the following: ○ Employee name and ID ○ Address and communication data ○ Party role
● Basic data of the related account, including the following: ○ Account name and ID ○ Address data
To further analyze data in this report, you can drag characteristics to rows and columns.
See AlsoOverview of Reports in General Business Data
SAP Business ByDesign February 2017Reports View P U B L I C • © 2017 SAP SE or an SAP affiliate company. All rights reserved. 73
Overview of Data Sources in General Business DataReports ViewMaintain Mass Account Data [page 39]
8.5 Supplier Details
OverviewProvides an overview of supplier master data that can be used by purchasing managers and buyers for a synopsisof the purchasing terms of their suppliers. It provides basic supplier data, such as address data, along withpurchasing-specific and financial information.
The BUPSPPB data source formerly used for this report is being phased out and will be replaced by BPSPPB.We recommend using the new data source when you create or copy reports or when you create combined orjoined data sources.
PrerequisitesYou have selected the report in your solution configuration. To find this business option, go to the BusinessConfiguration work center and choose the Implementation Projects view. Select your implementation project andclick Edit Project Scope. In the Scoping step of the project, ensure that Business Partners is selected within GeneralBusiness Data.In the Questions step, expand the General Business Data scoping element and select Business Partners. SelectReporting and Analytics for Business Partners and answer the question related to the report for suppliers.
ViewsThe following views are available with this report:
● Supplier DataDisplays all available characteristics for a supplier.
● Supplier General DataDisplays selected general data of a supplier, such as name, address, and communication data along with theindustry, the legal form, the currency and the minimum purchase order value.
● Supplier Purchasing DataDisplays selected general data and the data that is related to the purchasing process, such as the paymentterms, the purchase order currency, the evaluated receipt settlement, the customer ID at the supplier, andthe Incoterms.This view is also the pre-delivered default view of the report.
● Supplier Bank Data ● Supplier Tax Data
Features
Running the ReportBefore running the report, you can specify the data you want to see by making value selections for variables.
74 © 2017 SAP SE or an SAP affiliate company. All rights reserved. • P U B L I CSAP Business ByDesign February 2017
Reports View
The following variables are available for this report: ● Supplier ● City ● Country ● Status
Analyzing the ReportThe report displays the following data for a supplier:
● Basic data of a supplier, including the following: ○ Supplier name and ID ○ Address and communication data ○ Additional identifiers, such as the D-U-N-S and the Standard Carrier Alpha Code
● Purchasing data of a supplier, including the following: ○ Incoterms ○ Incoterms location ○ Purchase order currency ○ Minimum purchase order value ○ Currency ○ Payment terms ○ Evaluated receipt settlement ○ Purchase order acknowledgement expected ○ Purchasing blocked ○ Customer ID at supplier
● Financial data of a supplier ○ Bank data, such as the bank name and the bank account data ○ Tax data, such as the tax country, the tax jurisdiction code, the tax number, and withholding tax
information
To further analyze data in this report, you can drag characteristics to rows and columns.
See AlsoOverview of Reports in General Business DataOverview of Data Sources in General Business DataReports View
SAP Business ByDesign February 2017Reports View P U B L I C • © 2017 SAP SE or an SAP affiliate company. All rights reserved. 75

www.sap.com/contactsap
© 2017 SAP SE or an SAP affiliate company. All rightsreserved.No part of this publication may be reproduced ortransmitted in any form or for any purpose without theexpress permission of SAP SE or an SAP affiliatecompany.The information contained herein may be changedwithout prior notice. Some software productsmarketed by SAP SE and its distributors containproprietary software components of other softwarevendors. National product specifications may vary.These materials are provided by SAP SE or an SAPaffiliate company for informational purposes only,without representation or warranty of any kind, andSAP or its affiliated companies shall not be liable forerrors or omissions with respect to the materials. Theonly warranties for SAP or SAP affiliate companyproducts and services are those that are set forth inthe express warranty statements accompanying suchproducts and services, if any. Nothing herein should beconstrued as constituting an additional warranty.SAP and other SAP products and services mentionedherein as well as their respective logos are trademarksor registered trademarks of SAP SE (or an SAP affiliatecompany) in Germany and other countries. All otherproduct and service names mentioned are thetrademarks of their respective companies. Please seehttp://www.sap.com/corporate-en/legal/copyright/index.epx for additional trademark information andnotices.
icon courtesy of W3C, see http://creativecommons.org/licenses/by/3.0/ .