Embed Size (px)
Citation preview

Census 2010 Participant Statistical Areas Program MAF/TIGER Partnership Software Version 4.6 User Guide
Version 1 October 2008

Table of Contents 1 Preface......................................................................................................................... 3 2 Overview of the PSAP and PSAP MTPS Installation ................................................ 5
2.1 Participant Statistical Areas Criteria Overview........................................................................... 5 2.2 Installation and Starting the PSAP MTPS................................................................................... 6 2.3 Computer Based Training (CBT) and PSAP Help ...................................................................... 8
3 Introduction to the PSAP MTPS................................................................................. 9 3.1 PSAP Menu ................................................................................................................................. 9 3.2 Selecting a PSAP county........................................................................................................... 10 3.3 PSAP Map Window .................................................................................................................. 11 3.4 Standard toolbox and Map Layers............................................................................................. 12
3.4.1 Standard toolbox................................................................................................................... 12 3.4.2 Standard Dataview Toolbox ................................................................................................. 14 3.4.3 Selection toolbox .................................................................................................................. 15 3.4.4 To Work with Map Layers ................................................................................................... 16
3.5 Tools Toolbox ........................................................................................................................... 19 3.5.1 To move around the map ...................................................................................................... 19 3.5.2 To view attributes ................................................................................................................. 20 3.5.3 To measure distance or size.................................................................................................. 21
3.6 Line Editing Toolbox ................................................................................................................ 22 3.7 Using additional reference information in the PSAP MTPS ..................................................... 24
3.7.1 Using TerraServer-USA imagery in the PSAP MTPS.......................................................... 24 3.7.2 Using GIS, tabular, or other imagery files in the PSAP MTPS ............................................ 25
4 PSAP Toolbox .......................................................................................................... 27 4.1 PSAP Toolbox: Tool Buttons.................................................................................................... 27 4.2 PSAP Toolbox: Drop Down Menus .......................................................................................... 29
4.2.1 Edit Layer ............................................................................................................................. 29 4.2.2 Update................................................................................................................................... 30 4.2.3 Target Area ........................................................................................................................... 33 4.2.4 Action ................................................................................................................................... 33
5 Review and Edit the Statistical Areas....................................................................... 35 5.1 Updates and Actions Used to Edit the Statistical Areas ............................................................ 36 5.2 Steps to Execute Actions to Edit the Statistical Areas............................................................... 39
5.2.1 Census Tracts, Block Groups, Census Designated Places and Census County Divisions .... 39 5.2.2 Census Tracts, Block Groups, and Census County Divisions .............................................. 41 5.2.3 Census Tracts........................................................................................................................ 44 5.2.4 Block Groups........................................................................................................................ 47 5.2.5 Census Designated Places..................................................................................................... 47
5.3 Additional Tools for Reviewing and Editing............................................................................. 49 5.3.1 Discontiguous features.......................................................................................................... 49 5.3.2 Unacceptable boundary features........................................................................................... 50
5.4 Justifications.............................................................................................................................. 51 6 Verify and Report Changes....................................................................................... 55
6.1 Verify Your PSAP Plan Work................................................................................................... 55 6.2 Report Your PSAP Changes...................................................................................................... 56 6.3 Review Your PSAP Changes Using the PSAP MTPS .............................................................. 56 6.4 Submit Your PSAP Changes ZIP File to the Census Bureau .................................................... 57
Appendix A – Regional Census Center (RCC) contact information ................................ 59 Appendix B - Important information about updating streets as part of Census 2010 Geographic Area Programs............................................................................................... 60 Appendix C – Reset a Single County ............................................................................... 62
PSAP MTPS Version 4.6 User Guide 2

1 Preface The Participant Statistical Areas Program (PSAP) MAF/TIGER Partnership Software (PSAP MTPS) is used to review and update census tracts (CTs), census block groups (BGs), census designated places (CDPs)1, and census county2 divisions (CCDs)3 for Census 2010, the American Community Survey (ACS), and other Bureau of the Census (Census Bureau) data tabulation programs. The PSAP MTPS enables participants to review and update the boundaries and attributes of CTs, BGs, CDPs, and CCDs, following Census Bureau criteria and guidelines. It is very important that you read the 2010 Participant Statistical Areas Program - Program Guidelines (PSAP Program Guidelines) and this user guide in their entirety before attempting any updates in the PSAP MTPS. The two documents together provide the information needed to create a successful statistical areas submission. The PSAP Program Guidelines contain an overview of the CT, BG, CDP and CCD concepts and criteria, as well as information about the program, including:
General information about the 2010 PSAP Acceptable boundary features for CTs, BGs, CDPs, and CCDs Separate chapters for CTs, BGs, CDPs, and CCDs, including coverage, criteria,
and review and update information The 2010 PSAP plan submission, review, and approval process
This PSAP MTPS user guide contain information about using the PSAP MTPS to review and update CTs, BGs, CDPs, and CCDs, as well as how to create a final submission, including:
Installation instructions, computer-based training (CBT), and other helpful information
Menu and tool descriptions and usage instructions Instructions on how to successfully review and update Census 2000 statistical
areas to create a complete 2010 statistical area submission Instructions on how to import external GIS files, including imagery Description of the verification and report changes functionalities Installation instructions, computer-based training (CBT), and other helpful
information
1 The term CDP includes communidades and zonas urbanas in Puerto Rico. 2 For the Census Bureau’s purposes, the term “county” includes parishes in Louisiana; boroughs, city and boroughs, municipalities, and census areas in Alaska; independent cities in Maryland, Missouri, Nevada, and Virginia; districts and islands in American Samoa; districts in the U.S. Virgin Islands; municipalities in the Commonwealth of the Northern Mariana Islands; municipios in Puerto Rico; the area constituting the District of Columbia and Guam. This document will refer to all these entities collectively as “counties.” 3 CCDs are only present in: Alabama, Alaska, Arizona, California, Colorado, Delaware, Florida, Georgia, Hawaii , Idaho, Kentucky, Montana, Nevada, New Mexico, Oklahoma, Oregon, South Carolina, Texas, Utah, Washington, and Wyoming. CCDs will only be reviewed and updated as part of the PSAP in these states. In Alaska, census subareas are equivalents of CCDs. For Census 2010 and beyond, Tennessee will have MCDs (following county commissioner districts) instead of CCDs.
PSAP MTPS Version 4.6 User Guide 3

You will find the PSAP MTPS on the MAF/TIGER Partnership Software Version 4.6 Program Disc. It is designed to work with Windows based PCs4 and will run on Windows 98, 2000, ME, NT, XP and Vista5. You also will find one or more CD/DVD data disc(s) with the PSAP data for the county or counties you agreed to cover for the 2010 PSAP in ESRI shapefile6 format. Deadline for submitting PSAP proposals The deadline for submitting all statistical areas plans for CTs, BGs, CDPs, and CCDs is 120 calendar days from the receipt of the materials provided by the Census Bureau. To ensure that related geographic preparations for Census 2010 proceed in a timely manner, the Census Bureau needs to receive all submissions within this time frame. For those PSAP primary participants covering more than one county, the Census Bureau requests that participants review, update, and submit statistical areas for one county within 60 calendar days so that the Census Bureau can review the submission to ensure participants are successful in implementing the PSAP criteria and guidelines, using the PSAP MTPS to review and edit statistical areas, and generating proposed statistical area submissions. The Census Bureau will provide feedback to the participant on their submission, and if necessary provide additional guidance on the criteria and guidelines and/or PSAP MTPS usage. Should you not be able to meet this request contact your Census Bureau Regional Census Center (RCC) staff for your area. Appendix A contains RCC contact information. Contact your RCC if you review your county or counties and determine that no updates are required for one or more of your counties, or no updates are required for one or more of the statistical areas within the county, e.g., CT and BG edits will be submitted to the Census Bureau but there will be no CDP changes/submission (all CDPs in the county should remain for 2010 unchanged). Questions? If there are any questions during the use of the PSAP MTPS version 4.6, please contact your RCC.
4 Windows XP is the ideal operating system for the PSAP MTPS. Additionally, the PC should have 1 GB of RAM to run the PSAP MTPS, and the software will operate better with more RAM and hard disk storage available on the computer. 5 If using Vista, you will need to download an executable to use the Help functionality in the PSAP MTPS. The executable can be downloaded at: http://www.microsoft.com/downloads/details.aspx?familyid=6EBCFAD9-D3F5-4365-8070-334CD175D4BB&displaylang=en 6 The use of brand names does not represent an endorsement of a company or its products by the U.S. government. Due to the wide use of ESRI products by our partners in the GIS community, and the wide use of the shapefile format as a medium for GIS data exchange, the Census Bureau is providing this data in shapefile format.
PSAP MTPS Version 4.6 User Guide 4

PSAP MTPS Version 4.6 User Guide 5
2 Overview of the PSAP and PSAP MTPS Installation
2.1 Participant Statistical Areas Criteria Overview Before working with the PSAP MTPS review the PSAP Program Guidelines. The following is a high level summary of CT, BG, CDP and CCD concepts and criteria:
Primary purpose
Nationwide wall-to-wall
coverage
Geography nests within
Census 2000 population
criteria Other criteria/ information Summary of changes to the criteria for Census 2010
Lower the minimum population threshold for most CTs. Optimum: 4,000 Minimum: 1,200 Maximum: 8,000 Optimum 4,000
Housing unit counts may be used to meet CT thresholds. Minimum: 480 Maximum: 3,200 Optimum: 1,600
Boundary continuity Minimum: 1,500 (1,000 within AIRs) All types of populated CTs must meet the same thresholds.
Wherever possible conform to American Indian reservations (AIRs).
Census Tracts (CTs)
Data comparability
Yes County
Maximum: 8,000
Merge and split CTs to meet thresholds, not change
Special land use CTs may be created for large special land use areas without housing units or population e.g., large public parks, airports). Water CTs
may be created for large water bodies. Population thresholds: Optimum:
1,500 Smallest area for ACS1
sample data Minimum: 600 Maximum: 3,000 Optimum: none Housing unit counts may be used to meet BG thresholds.
Small area characteristics data
Minimum: 240 Maximum: 1,200 Optimum: none Minimum: 600
(300 within AIRs)
Between 1 and 9 BGs nest within a CT
All types of populated BGs must meet the same thresholds. Wherever possible conform to American Indian reservations.
Block Groups (BGs)
Meet minimum thresholds
Yes CT
Maximum: 3,000
CT boundaries are always BG boundaries
Special land use BGs will be created coextensive with special land use CTs. Water BGs will be created coextensive with water CTs. Non-coextensive
water BGs can be created for smaller water bodies.
CCDs and MCDs
together Census County
Divisions (CCDs)
Set of subcounty units that have stable
boundaries and recognizable names CCDs exist in
21 states
County None Usually represents one or
more communities, trading centers, or major land uses
No significant changes.
Named community A CDP cannot have zero population and zero housing units. Place-level statistics for well-known, closely settled
localities
Not part of an incorporated place or other CDP
Part
icip
ant S
tatis
tical
Are
as
Census Designated
Places (CDPs) Mix of residential, commercial, and
retail areas
No, CDPs capture distinct
communities
State None
Nucleus of relatively high residential population density
A CDP must represent a single, distinct community. A CDP that represents multiple, distinct communities, and the hyphenated name typically assigned to represent such CDPs, will not be permitted. Exceptions will be made for
communities whose identities have merged and in which both names commonly are used together.
These statistical areas are for statistical uses only. All comprise relatively compact, contiguous land areas. 1 The American Community Survey (ACS) is conducted in the United States and Puerto Rico. In Puerto Rico the survey is called the Puerto Rico Community Survey (PRCS). Additional information about the PSAP can be found in the PSAP Program Guidelines and also the on PSAP website: http://www.census.gov/geo/www/psap2010/psap2010_main.html

PSAP MTPS Version 4.6 User Guide 6
2.2 Installation and Starting the PSAP MTPS Note: Installing the PSAP MTPS and PSAP MTPS data may take several minutes. For some very large counties the PSAP MTPS data installation may take up to one hour. To install the PSAP MTPS, do the following: 1. Start Windows.
2. Insert the Program CD in your CD-ROM drive. Note: If the “Installation Wizard” automatically starts up, proceed to step 6.
3. Choose the “Run” command from the “Start” menu.
4. Type the location of the CD-ROM drive plus the word “setup” (for example, type d:\setup), or use the “Browse” button to locate the SETUP.EXE file.
5. Click “OK” and the installation program will appear on your screen.
6. On the “Welcome” screen, click “Next”.
7. For “Installation Type”, choose “Single User” and click “Next”.
8. The installation process asks questions and makes suggestions on how to best set up the PSAP MTPS software. It is best to accept the default settings (including the installation of the PSAP MTPS application and data on the C: drive). If there are files in the directory, the setup program will ask if you want to remove these files. If you click “Yes”, the files are removed; if you click “No”, you can choose another directory. Note: Installing the PSAP MTPS data will delete any previous MTPS data installations and any work you have already completed in the PSAP MTPS or for other Census programs (BAS, LUCA, SDRP, RDP, etc.).7
Continue to follow the tutorial steps in the installation process.
9. Once the program has been installed, the setup indicates that “Setup Needs the Census Data” and prompts you to insert the Census PSAP Data CD/DVD. Remove
7 To avoid overwriting data, install the PSAP MTPS on separate computers or in different folders. To install the data into different folders:
1. Before beginning the installation, navigate to the C:\MTPSData folder. 2. Rename the folder using the program initials so you can easily identify it later. (e.g.
C:\MTPSData_LUCA or C:\MTPSData_SDRP) 3. Proceed with the installation. When the installation is complete you will again have a folder titled
C:\MTPSData but it will now contain your PSAP data. 4. If you need to switch back to one of these other programs, first rename the C:\MTPSData folder to
C:\MTPSData_PSAP or another memorable name) 5. Rename the program’s folder that you want to use to C:\MTPSData. 6. Now, launching the software will open that dataset.

the program CD and insert the PSAP Data CD/DVD. Browse to the CD/DVD’s location and click “OK”.
10. After copying the data files, the setup is finished, and it prompts you to run the PSAP
MTPS by selecting it from the “Start” Menu. Click “Finish”.
11. Click the Windows taskbar “Start” button, and from the Programs menu choose the “MAF-TIGER Partnership Software” and then “MAF-TIGER Partnership Software 4.6”.
12. The prompt “Please Log In” with a “User Name” appears. Enter “PSAP” as the
“User Name” (case sensitive) and click “OK”. 13. Please verify and correct your “Participant Information”.
Note: The participant information is provided for the “official” PSAP participant, and therefore not may not be the contact information for the individual using the MTPS to review and edit statistical areas. Please update the contact information for the individual whose contact information is originally provided (i.e., if your contact information is not present in this “Participant Information” section do not update the Participant Information with your contact information in this section).
14. The prompt for two “Startup Choices” gives the choice of:
“Run the MAF/TIGER Partnership Software Computer Based Training” “Go directly to the MAF/TIGER Partnership Software program”
PSAP MTPS Version 4.6 User Guide 7

If this is your first time using the PSAP MTPS, run the Computer Based Training. Additionally, before you begin to review and update your statistical areas for final submission, the Census Bureau strongly recommends that you become familiar with the work flow and functionalities of the PSAP MTPS by making edits to the CT, BG, CDP, and CCD layer. Once comfortable with the PSAP MTPS, reinstall the original data for the county (Refer to section 3.1 for information on the undo all changes tool) so that you can begin working on the final submission.
2.3 Computer Based Training (CBT) and PSAP Help Computer Based Training The Computer Based Training provides an overview of the PSAP MTPS functionality and usage. Even an experienced Geographic Information System (GIS) user should review the CBT to provide you with time-saving information. After completing the CBT, return to the PSAP MTPS software and go to “PSAP: Pick a PSAP County” to begin working on a county.
Help
For further information about the PSAP MTPS review the help section for the PSAP program by choosing “Help: Contents”. For general MTPS guidance select the “Help for MTPS Basic Skills”. For general PSAP MTPS guidance, select the “Help for the MTPS Census Programs” link, and then the “PSAP” link. For help with specific items, either look for the specific item within the index list or search for items by entering the term in the search box. Note: While using the PSAP MTPS you can learn more about a command, dialog box, or toolbox, by opening or highlighting the item and pressing F1 to get the appropriate topic in the help. To review the function of an icon on any toolbox, hover the cursor over the icon and a text box will appear describing the function.
PSAP MTPS Version 4.6 User Guide 8

3 Introduction to the PSAP MTPS
3.1 PSAP Menu The PSAP menu allows you to select and open the county you would like to work on, open the various toolboxes available for use in the statistical area review and update, and execute the verify tool and report changes tool.
PSAP Menu option Does this… PSAP Toolbox Opens the PSAP Toolbox that allows you to review and edit the
boundaries and attributes of CTs, BGs, CDPs, and CCDs. Refer to “4. PSAP Toolbox” for additional information. The PSAP Toolbox is open by default when a county is opened.
Line Editing Toolbox Opens the Line Editing Toolbox that allows you to add, remove, and edit line features and their attributes. You can use this tool to add valid features to use as boundaries for your CTs, BGs, CDPs, and CCDs, i.e., to split a face (or individual polygon). You can use this tool to change the attributes of a line feature. This tool edits the “All lines” layer. Refer to “3.6. Line Editing Toolbox” for additional information.
Area Editing Toolbox Not applicable to the PSAP. Point Editing Toolbox Not applicable to the PSAP. Measuring Toolbox Opens the Measuring Toolbox that allows you to measure distances in
feet (default). This can be used to evaluate potential special land use CT and water CTs.
Pick a County Opens the Pick a County dialog box that allows you to select the county in which you will review and edit the statistical area plans.
Open Opens the county selected in the Pick a County dialog box. Undo All Changes Opens the Undo All Changes Tool that allows you to undo all changes
for the CT, BG, CDP or CCD plans in the county, or all changes [CT, BG, CDP, CCD, and all lines] to all plans within the county. Note: If you select the option to undo changes to the CT layer, the action will also undo all BG changes. Note: You can undo individual edits by selecting Edit: Undo [previous action] provided you are in the same editing session and did not Close the county
Close Closes the county selected in the Pick a County dialog box (i.e., the county you are working on).
Verify Opens the Verify tool that allows you to verify that all criteria/ requirements have been met in your completed plan. The software requires verification for each statistical area type (CTs, BGs, CDPs, and
PSAP MTPS Version 4.6 User Guide 9

CCDs) before it will report changes for a county. Refer to “6.1. Verify Your PSAP Plan Work ” for additional information.
Report Changes Opens the Report Changes tool that reports all changes for the edited statistical area plans for the county (i.e., updated plans for CTs, BGs, CDPs, CCDs, and all lines). The tool will only run after the verify tool has been run for each of the statistical area types. The tool assembles all the reported changes into a ZIP archive that can be opened and reviewed within the PSAP MTPS and submitted to the Census Bureau. Refer to “6.2. Report Your PSAP Changes” for additional information.
Update User Information… Opens the User Information window in which you can review and update your contact information.
3.2 Selecting a PSAP county Before you can open the PSAP map window you must select a county to work on. The PSAP MTPS will then import the data for that county. The PSAP MTPS is designed to work on one county at a time. Each time you open the PSAP map window, it will display the county and the type of statistical area (CT, BG, CDP or CCD) you were editing in the previous session. To work with a different county you must close the PSAP Map window (“PSAP: Close”), pick another county (“PSAP: Pick a County”), and open the PSAP map window again (“PSAP: Open”). 1. Go to “PSAP: Pick a County”. PSAP MTPS displays the MTPS Counties dialog box.
The county or counties you agreed to cover for the 2010 PSAP will be displayed in the MTPS Counties dialog box. If the county or counties you agreed to cover is/are not displayed in the box, contact your RCC.
2. Highlight a county in the scroll list.
3. Click “OK”. If you are opening a county for the first time, the PSAP MTPS displays a message recommending that you disable any anti-virus software to speed the process. When you click “OK”, the PSAP MTPS imports the county, makes it the current county, and displays a message indicating success. Note: When you pick a county for the first time the file indexing may take several minutes. Note: There is no specific save functionality in the PSAP MTPS; your statistical areas plans continuously saves while you are working.
PSAP MTPS Version 4.6 User Guide 10

3.3 PSAP Map Window Once you’ve selected a county to work on the PSAP map window can be opened. 1. Go to “PSAP: Open” to display the PSAP Map window, toolboxes, and open to the
CT plan for that county (or the edit layer most recently worked on). Note: Opening the county for the first time may take several minutes.
2. A reminder that CTs must nest within and cover the entire area of the county pops up.
Press “OK”.
3. PSAP MTPS opens the map window, displaying the selected county, the Standard Toolbox (described in “3.4.1 Standard Toolbox”), the Tools toolbox (described in “3.5 Tools Toolbox”), the PSAP toolbox (described in detail in “4. PSAP Toolbox”), and the map legend.
4. When you have finished working with the county and the PSAP Map window is open, go to “PSAP: Close”. PSAP MTPS closes the PSAP Map window and any toolboxes that are open.
PSAP MTPS Version 4.6 User Guide 11

3.4 Standard toolbox and Map Layers The standard toolbox is docked by default below the menu bar and contains many of the functionalities found within the menus.
3.4.1 Standard toolbox
Note: The layer displayed in the “Working Layer” is the featured layer that will be displayed in the dataview if the dataview is opened, in the attribute table if a feature is selected using the “Info” tool in the Tools toolbox, etc.
To do this… Do this… Open a file Go to File: Open or click the Open File icon on the
Standard toolbar. Refer to “3.6.2 Using GIS, tabular, or other imagery files in the MTPS” for additional information.
Print a map Go to File: Print or click the Print icon on the Standard toolbar.
To view map properties Go to File: Properties or click the Properties icon on the standard toolbar.
To change the working layer Select the Working Layer drop down menu
and navigate to and select the name of the layer that you would like to select as the working layer.
To open the dataview for the working Click the New Dataview icon to open the dataview layer (or data table) for the layer displayed in the Working Layer
drop down menu. Note: When a dataview is open the Standard toolbox contains dataview-specific tools. Refer to
“3.4.2 Standard Dataview Toolbox” for additional information. To edit the map layers Go to Map: Layers, click the Map Layers icon on the
Standard toolbox, or click the right mouse button on the map window and choose Layers to display the Layers dialog box. Refer to “3.4.2 To Work with Map Layers” for additional information.
To show or hide the legend Click the To Show or Hide Legend icon to show the legend (if hidden) or hide the legend (if displayed).
To edit the layer style Click the Layer Style icon to edit the style of the layer displayed in the Working Layer drop down menu.
To display or edit labels Click the Automatic Labels icon to display or edit labels for the layer displayed in the Working Layer drop down menu.
Print Properties Working Layer
New Dataview
Map Layers
Automatic Labels
Layer Style
Set the Map Scale
Add a Bookmark
Manage Bookmarks
Main Toolbox
Selection Toolbox
Show or Hide the Legend
Open File
PSAP MTPS Version 4.6 User Guide 12
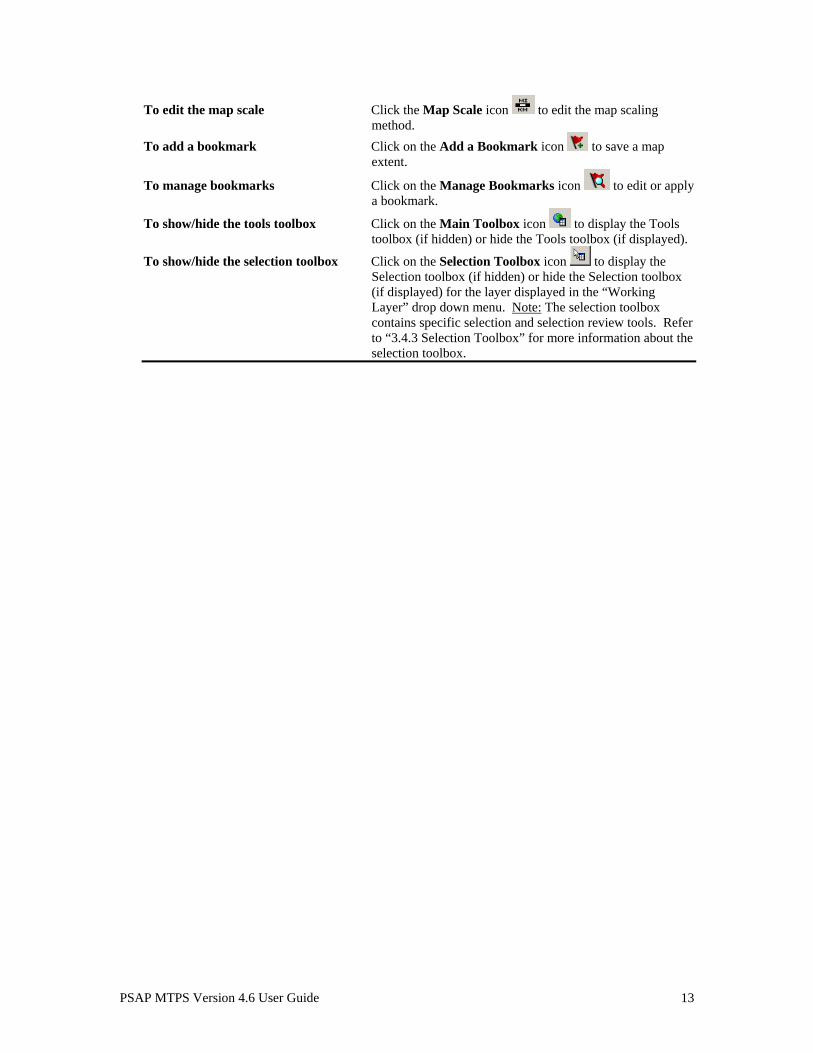
To edit the map scale Click the Map Scale icon to edit the map scaling method.
To add a bookmark Click on the Add a Bookmark icon to save a map extent.
To manage bookmarks Click on the Manage Bookmarks icon to edit or apply a bookmark.
To show/hide the tools toolbox Click on the Main Toolbox icon to display the Tools toolbox (if hidden) or hide the Tools toolbox (if displayed).
To show/hide the selection toolbox Click on the Selection Toolbox icon to display the Selection toolbox (if hidden) or hide the Selection toolbox (if displayed) for the layer displayed in the “Working Layer” drop down menu. Note: The selection toolbox contains specific selection and selection review tools. Refer to “3.4.3 Selection Toolbox” for more information about the selection toolbox.
PSAP MTPS Version 4.6 User Guide 13

3.4.2 Standard Dataview Toolbox When a Dataview is open the Standard toolbox with dataview-specific tools is available.
To do this… Do this… Open a file Go to File: Open or click the Open File icon on the
Standard toolbar. Refer to 3.7.2 “Using GIS, tabular or other imagery files in the MTPS” for additional information.
Print a map Go to File: Print or click the Print icon on the “Standard toolbar”.
View map properties Go to File: Properties or click the Properties icon on the standard toolbar.
View all or a selection set of the Select All Records or a specific selection set in the dataview records Records to Display drop down menu
.
Open the dataview for a different layer Click the Open Dataview icon and select the layer with the dataview you would like to display
Find a specific record in the dataview Click the Find icon to search for a specific record in the open dataview.
Change the display of the dataview Select Dataview: Fields or click the Dataview Fields icon
fields to display the Dataview Fields dialog box, which allows you to edit the fields and the displayed order of the fields in the dataview.
Lock a field in the dataview Select a cell or column heading of the field(s) you want to lock, and select Dataview: Lock Columns or click Lock
Columns icon . Change column settings in the dataview Go to Dataview: Column Settings or click the Column
Settings icon to edit the column formats and settings. To sort the fields in the dataview Select a cell or column heading of the field(s) you want to
sort and click on the Sort Increasing icon or Sort Decreasing icon .
Hide columns in the dataview Select a cell or column heading of the field(s) you want to hide and click on the Hide Columns icon .
Change the column width in the Select a cell or column heading of the field(s) you want to dataview increase or decrease the column width size, and click the
Reduce Width icon or the Increase Width icon .
New Dataview
Sort Decreasing
Hide Columns
Increase Width
Reduce Width Sort Increasing
Column Settings
Lock Columns
Dataview Fields
Find
Open File
Working LayerProperties
PSAP MTPS Version 4.6 User Guide 14

3.4.3 Selection toolbox The PSAP MTPS provides tools to select features by map location or condition, and review the selected features. The selected features are highlighted on the map. Open the selection toolbox by going to “Tools: Selection”, or clicking the “Selection toolbox” icon on the standard toolbox.
Select by Pointing
Select by Circle
Select by Shape
Select by Condition
Clear Selection
Create New Selection
Selection Settings
Show One Set/ All Features
Beginning Previous Record
Next Record
Last Record
Zoom to Record
Use Current Map Scale
Current Selection
Zoom to Selection
Note: Select the layer whose features you are interested in viewing and editing in the “Working Layer” drop down menu in the “Standard Toolbox” before using any of the “Selection Toolbox” tools.
To do this… Do this… Select one or more features directly Use one of the following three tools to select features from the map from the map: (1) Click the “Select by Pointing” icon and click on
a single feature or drag a rectangle to select all features inside the rectangle,
(2) Click the “Select by Circle” icon and drag a circle to select all features inside the circle or click at the center of the circle and type the radius in the Enter Selection Radius dialog box
(3) Click the “Select by Shape” icon and draw and area to select all features located inside the area by clicking on each corner of the area and double-click to close the shape.
Note: By default, when features are selected by drawing a rectangle, circle, or shape, the PSAP MTPS finds the map features that are completely contained within the defined shape. Note: To remove features from the selection set hold the Ctrl key while using the selection tools.
Select one or more features by condition Go to “Selection: Select by Condition”, or click the
“Select by Condition” icon to display the Select by Condition dialog box. In the Select by Condition dialog box, enter a condition or use the condition builder to create a condition, choose or enter a new selection set name, and choose how to store the results.
PSAP MTPS Version 4.6 User Guide 15

Clear a current selection Click the “Clear Selection” icon to clear the selection set.
Create a new selection Go to Selection: Settings: Add Set button, or click the
Create New Selection icon to create a new set, then either select one or more features directly from the map or select one or more features by condition to add to the new set.
To change the settings of the selection Go to Selection: Settings, or click the Selection Settings
icon to add or drop a selection set, to reorder (promote) a selection set, or to change the selection set status, style, labels, or autoscale settings.
Zoom to selection Click the Zoom to Selection icon to zoom to all of the features within the selection set.
Show one set or all features Click the Show One Set/All Features icon if you want to display the set (if all features are displayed) or show all features (if the selection set is displayed)
To change the current selection Click the Current Selection drop down menu
to change the current selection.
To navigate through the selected features Click the Beginning icon to go to the first record of the selection set, the Previous Record icon to go to the previous record in the selection set , the Next Record icon to the next record in the selection set, and the Last Record icon to the last record of the selection set.
To zoom to a feature Click the Zoom to Record icon to zoom to the current feature by entering the PSAP MTPS assigned ID or number of the item within the selection set.
To lock the map scale for viewing Click the Use Current Map Scale icon to lock the current map scale for viewing the selected features
3.4.4 To Work with Map Layers Open the layers dialog box by going to “Map: Layers” or selecting the “Map Layers” icon in the “Standard” toolbar.
Use the Layers dialog box to view and edit the map layers and settings:
PSAP MTPS Version 4.6 User Guide 16
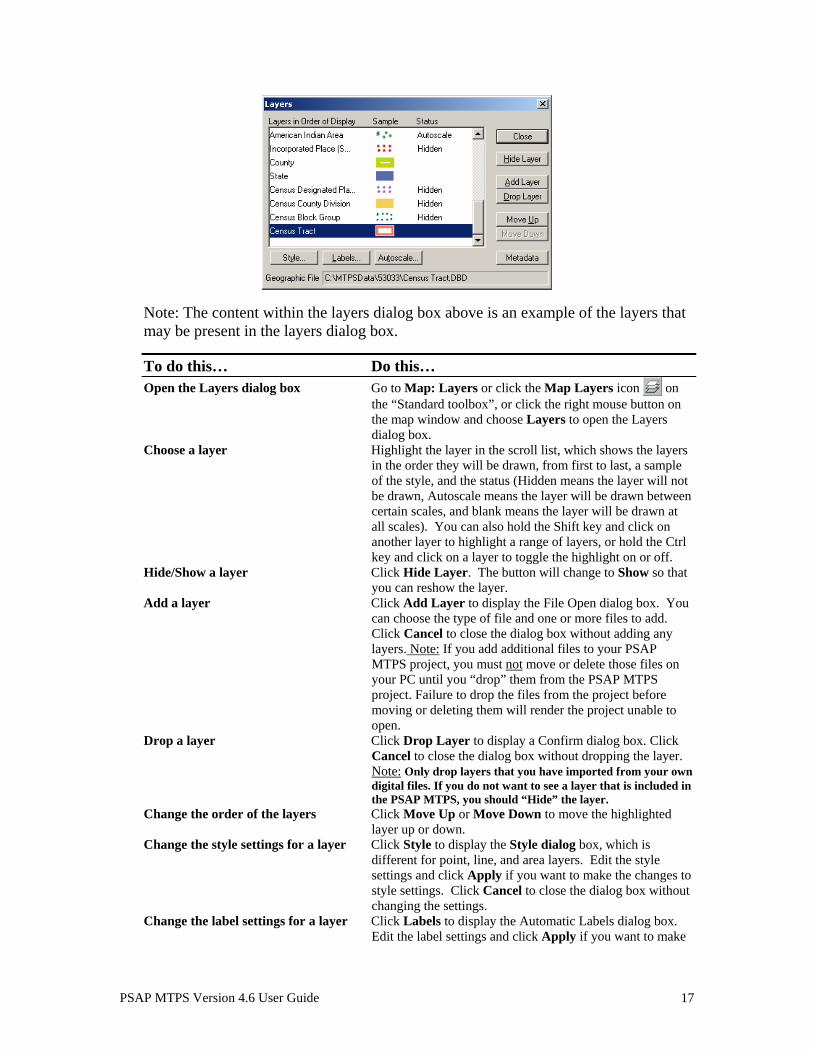
Note: The content within the layers dialog box above is an example of the layers that may be present in the layers dialog box.
To do this… Do this… Open the Layers dialog box Go to Map: Layers or click the Map Layers icon on
the “Standard toolbox”, or click the right mouse button on the map window and choose Layers to open the Layers dialog box.
Choose a layer Highlight the layer in the scroll list, which shows the layers in the order they will be drawn, from first to last, a sample of the style, and the status (Hidden means the layer will not be drawn, Autoscale means the layer will be drawn between certain scales, and blank means the layer will be drawn at all scales). You can also hold the Shift key and click on another layer to highlight a range of layers, or hold the Ctrl key and click on a layer to toggle the highlight on or off.
Hide/Show a layer Click Hide Layer. The button will change to Show so that you can reshow the layer.
Add a layer Click Add Layer to display the File Open dialog box. You can choose the type of file and one or more files to add. Click Cancel to close the dialog box without adding any layers. Note: If you add additional files to your PSAP MTPS project, you must not move or delete those files on your PC until you “drop” them from the PSAP MTPS project. Failure to drop the files from the project before moving or deleting them will render the project unable to open.
Drop a layer Click Drop Layer to display a Confirm dialog box. Click Cancel to close the dialog box without dropping the layer. Note: Only drop layers that you have imported from your own digital files. If you do not want to see a layer that is included in the PSAP MTPS, you should “Hide” the layer.
Change the order of the layers Click Move Up or Move Down to move the highlighted layer up or down.
Change the style settings for a layer Click Style to display the Style dialog box, which is different for point, line, and area layers. Edit the style settings and click Apply if you want to make the changes to style settings. Click Cancel to close the dialog box without changing the settings.
Change the label settings for a layer Click Labels to display the Automatic Labels dialog box. Edit the label settings and click Apply if you want to make
PSAP MTPS Version 4.6 User Guide 17
the changes to label settings. Click Cancel to close the dialog box without changing the settings.
Change the autoscale settings for a Click Autoscale to display the Autoscale dialog box. The layer largest drop down menu, if not blank, shows the “largest”
scale at which the layer is displayed, as you zoom in. The “smallest” drop down menu, if not blank, shows the smallest scale at which the layer is displayed, as you zoom out. Edit the autoscale settings and click Apply if you want to make changes to the autoscale settings. Click Cancel to close the dialog box without changing the settings.
Close the Layers dialog box Click Close.
PSAP MTPS Version 4.6 User Guide 18

3.5 Tools Toolbox
The “Tools” toolbox provides tools to move around the map, display feature attributes, and measure distances and areas. The Tools toolbox is on by default when the PSAP MTPS is first launched.
3.5.1 To move around the map
To do this… Do this… Zoom in to a point or a rectangle Click the Zoom in icon and click on a point or drag a
rectangle to make the scale larger and change the center of the map.
Zoom out from a point or a rectangle Click the Zoom out icon and click on a point or drag a rectangle to make the scale smaller and change the center of the map
Move the map in any direction Click the Pan icon and drag the map to change the center of the map.
Move the map right, left, up, or down Go to Map: Pan and choose one of the commands: Pan Right, Pan Left, Pan Up, or Pan Down.
Return to the previous scale and center Go to Map: Previous scale or click the Previous scale icon to return to the previous scale
Return to the original scale and center Go to Map: Initial Scale or click the Initial scale icon to return to the original scale
Move the map in a cardinal direction Go to Map: Pan: Pan Map Toolbox to display the Pan Map toolbox, then click the appropriate button to move the map half the width or height of the map in that direction.
Also use the “Pan Map” toolbox (go to “Map: Pan: Pan Map Toolbox”) to move around the map:
Pan Previous Scale
Initial Scale
Zoom out
Zoom in
PSAP MTPS Version 4.6 User Guide 19

3.5.2 To view attributes Note: Assure that the “Working Layer” in the standard toolbox is set to the layer for which you are interested in getting information.
To do this… Do this… Change the working layer Choose the layer you for which you want to view information
from the drop down menu on the Standard toolbar.
Get information on a map feature Click the Info icon from the “Tools Toolbox” to activate the
Info tool and click on a feature on the map to mark the feature with an “i” and display the data for the feature in the Info window. Note: The PSAP Toolbox also has a tool button with the same symbol, but it is the “Edit attribute information" tool that allows you to view and edit the attribute information for the statistical area in the PSAP tool box “Edit Layer” window.
Get information on several features Click the Multi-layer information icon or the Multi-layer area information icon to activate the Info tool and click on a point or drag a circle around the map features to mark the features with an “i” and display the data for the features in the Info window.
Close the Info window Click the Close box in the upper right corner or choose Close from the menu in the upper left corner.
Info Multi-layer information
Multi-layer area information
PSAP MTPS Version 4.6 User Guide 20

3.5.3 To measure distance or size
To do this… Do this… Measure distance Click on the Measure distance icon to activate the
measure distance tool. Click the map on the starting point, and the elapsed length of the line (from the starting point to the current cursor location) is displayed in the status bar at the bottom of the screen. Note: If the line is not straight, click on one or more points to shape the line. Double click on the last point to end the line to display the total length of the line.
Measure size of an area Click on the Measure area icon to activate the measure area tool. Click the map on the starting point, and click on two or more points to bound the area. Double click on the last point to end the area by connecting the first and last point automatically, to display the total size of the area and its perimeter.
Measure distance
Measure size
PSAP MTPS Version 4.6 User Guide 21

3.6 Line Editing Toolbox When working on your statistical area plans it will be necessary to digitize lines into the PSAP MTPS for use as CT, BG, CDP, and CCD boundaries. Additionally, you may need to edit the attributes of line features to use as boundaries (for example, if the line feature is classified incorrectly as a not acceptable feature). Edit only those line features that will be used as statistical area boundaries. Refer to the PSAP Program Guidelines and Appendix B “Important information about updating streets as part of Census 2010 Geographic Area Programs” for information about acceptable line feature additions and edits. Should a submission contain many non-boundary line additions, the submission will be returned to the participant to revise and resubmit without the non-boundary line additions. Note: Some acceptable boundary features will not connect to other features and will require the use of feature extensions or lines-of-sight to connect them. The feature under consideration for extension as a line-of-sight must have a specific visible ending point and a clearly locatable starting point. Features extensions should be coded P0004 in the PSAP MTPS, and if possible, should not extend more than 300 feet. Note: If an existing line is within 30 feet of the line that you are adding and the existing line parallels your line, use the existing line rather than creating a new line. Use the Line Editing toolbox to add or edit line features. Open the line editing toolbox by going to “PSAP: Line Editing Toolbox”.
The default snap tolerance in the PSAP MTPS is 50 feet. If you would like to edit the snap tolerance to add specific line features (e.g., to add a centerline in a narrow area water feature) go to “Edit: Preferences” and change the snap tolerance in the “Snap Tolerance” section.
Add line
Delete lineSplit line
Copy and delete line
Replace copied line
Edit line attributes
Display alternatenames
Display alternate addresses
Show right/left direction arrows
Cancel edits
Save edits
PSAP MTPS Version 4.6 User Guide 22

To do this… Do this… Add a line feature Click the Add line icon to add a line feature by clicking at
the beginning of the new line and double clicking to end the line. If the line curves add shape points by clicking along the line while adding the line. Save edits by clicking the Save edits icon
. Note: When a line is added the MTFCC (feature class code) must be documented. As necessary, other feature attribute information may also be documented.
Delete a line feature Click the Delete line icon to delete a line feature by clicking on the line you want to delete. Save edits by clicking the Save edits icon . Note: When a line feature is deleted it is not removed from the map window, but the symbology of the line is changed to a red dash.
Split a line feature Not applicable for PSAP.
Copy and delete line feature Click the Copy and delete line icon as the first step of copying, deleting, and replacing a line feature, by clicking on the line to be copied and deleted and then selecting the Replace copied line icon . Note: This step in copying, deleting, and replacing a line feature copies the IDs and attributes of the existing line feature and then deletes the feature. The line feature added by using the Replace copied line feature icon
will receive the IDs and attributes of this line feature. Note: To reshape a line feature that is a PSAP boundary, use the Copy and delete line and Replace copied line tools. Refer to Appendix B for additional information.
Replace copied line feature Click the Replace copied line icon as the second step of copying, deleting and replacing a line feature, by clicking at the beginning of the new line (the line replacing the line to be deleted) and double clicking to end the line. If the line curves add shape points by clicking along the line while adding the line. Save edits by clicking the Save edits icon . Note: This step in copying, deleting, and replacing a line feature creates the new line feature and assigns the IDs and attributes of the line selected
PSAP MTPS Version 4.6 User Guide 23

by the Copy and delete line feature icon . Note: To reshape a line feature that is a PSAP boundary, use the Copy and delete line and Replace copied line tools. Refer to Appendix B for additional information.
Update the line attributes Click the Edit line attributes icon to update line attributes, including the feature code and feature name, by clicking on the line and editing the feature attribute information. Save edits by clicking the Save edits icon .
Display alternate street names Click the Display alternate names icon to view alternate feature names by clicking on the feature.
Not applicable to the PSAP “Display alternate addresses” Not applicable to the PSAP “Show right/left direction arrows”
Cancel the current edit Click the Cancel edits icon to cancel all edits made since edits were last saved. Note: When edits have not been made successfully the Save Edits and Cancel Edits icons are gray/not available to be selected.
Execute and save the current edit Click the Save edits icon to save all edits made since the edits were last saved. Note: When edits have not been made successfully the Save Edits and Cancel Edits icons are gray/not available to be selected.
3.7 Using additional reference information in the PSAP MTPS The PSAP MTPS accepts a wide-range of GIS files, imagery, and other types of digital information for use as a backdrop reference. Using reference information in the PSAP MTPS will enable participants to review and update statistical areas more accurately and quickly.
3.7.1 Using TerraServer-USA imagery in the PSAP MTPS It is possible to bring imagery and topographic maps into the PSAP MTPS from the TerraServer USA Imagery internet service. These images can function as layers in your maps in almost the same way as any other type of layer, and can be useful for digitizing new lines or for adjudicating boundary placement. There are two technical prerequisites to using this tool; there must be an active broadband internet connection, the Microsoft .NET framework must be installed. The Microsoft .NET framework can be downloaded from Microsoft at: http://www.microsoft.com/downloads/details.aspx?FamilyID=0856eacb-4362-4b0d-
nto the PSAP MTPS from the TerraServer USA Imagery internet service. These images can function as layers in your maps in almost the same way as any other type of layer, and can be useful for digitizing new lines or for adjudicating boundary placement. There are two technical prerequisites to using this tool; there must be an active broadband internet connection, the Microsoft .NET framework must be installed. The Microsoft .NET framework can be downloaded from Microsoft at: http://www.microsoft.com/downloads/details.aspx?FamilyID=0856eacb-4362-4b0d-8edd-aab15c5e04f5&displaylang=en . Moreover, if your system operates behind a firewall, please ensure that you are outside the firewall before using this feature. Follow these steps use a Terra-Server-USA map image:
1. Zoom to the area for which you want the map image
PSAP MTPS Version 4.6 User Guide 24

2. Select “Tools: Imagery: TerraServer-USA toolbox” to open the TerraServer-USA toolbox.
Image Information
Save Image
Drop Image
Get image
3. Choose one of the following options from the “Methods” drop down menu: Aerial image – nationwide black and white digital orthophoto quadrangles
(DOQs) Topographic map – nationwide digitally scanned images of USGS
topographic maps, also called digital raster graphics (DRGs) Urban color maps – color DOQs for the 133 most populated metropolitan
areas of the United States. Refer to the USGS Fact Sheet at: gisdata.usgs.net/IADD/factsheets/fact.html.
4. Choose the image resolution from the “Resolution” drop down menu. If you
choose Autoscale, the PSAP MTPS will choose an appropriate resolution.
5. Click on the “Get image” icon to get the image. The PSAP MTPS requests, receives, and displays the image in the map window.
6. Click on the “Save image” icon to display the Save Image As dialog box. Choose a folder, choose a file type, type a name, and click Save to save the image in JPEG format.
Click on the “Drop image” icon to drop the image layer from the map. The metadata for the image can be displayed by clicking on the “Image information” icon . Click “OK” when you’re done reading the metadata. When finished, click on the close button in the top right-hand corner of the toolbox to close the toolbox. More detailed information about using imagery can be found in the Help.
3.7.2 Using GIS, tabular, or other imagery files in the PSAP MTPS The Census Bureau encourages the use of external reference sources such as GIS files, georeferenced imagery, and other types of reference sources when reviewing and updating your statistical areas. You can import external reference sources into the PSAP MTPS as additional layers in your map window using either the “Add Layer” option in the “Map Layers” toolbox or clicking on “File” from the main menu bar and selecting “Open”. Note: The “Add Layer” option is limited to only a few mainstream GIS data
PSAP MTPS Version 4.6 User Guide 25

formats (i.e., ESRI shapefiles and geodatabases, MapInfo Tables, and others). The “File”/”Open” option allows users to import many other GIS data formats, so check this option if you are unable to locate your data format in the “Add Layer” menu. In addition, to utilize the PSAP MTPS “change projection and transformation on-the-fly” feature, the PSAP MTPS requires that a defined projection file (e.g., .PRJ) accompany all reference layers to ensure correct importation into the PSAP MTPS. The PSAP MTPS still offers its users to manually enter coordinate/projection information in both importation methods if a defined projection file is unavailable, but you must know the coordinate, projection, datum, units of measurement, and other information of your file(s). Note: If you add additional files to your PSAP MTPS project, you must not move or delete those files on your PC until you “drop” them from the PSAP MTPS project. Failure to drop the files from the project before moving or deleting them will render the project unable to open.
Use these steps to import an external reference source using the “Add Layer” option:
1. Open the Layers dialog box by selecting “Map: Layers” or clicking the “Map layers” icon in the Standard toolbox.
2. Click the “Add Layer” button.
3. In the “File Open” window, set the “Files of type” drop down menu to the file type you are adding to the project.
4. After setting the file type navigate to and select the file you want to add. Click the “Open” button.
5. A pop-up box will appear listing information about the file you are adding. Click the “Coordinates” button. This lists the coordinates, as interpreted by the software, from any associated projection files. If the file you are trying to add does not have the associated projection file, then this is where you would manually enter the projection information. Note: Each projection type has its own specific characteristics. In general, the information you need is the projection name, datum, units (if applicable), and zone (if applicable). It is also worth noting that the system of latitude and longitude is often referred to as un-projected. Help with projections is available in the Help section under Basic Skills: Additional Skills: Importing and Exporting Geographic Files: Using Data in Other Coordinate Systems). 6. After verifying or entering the projection information, click the “OK” button, and continue clicking “OK” buttons until you are back at the Layers dialog box. Your file should now be listed in the “Layers” window. Note: If you are using a GIS file, you can change the symbology for your layer here by clicking on “Style” button (refer back to “3.4.4 To Work with Map Layers” section).
7. Click the “Apply” button, the “OK” button, and the “Close” button to have
your newly added file drawn in your map.
PSAP MTPS Version 4.6 User Guide 26

4 PSAP Toolbox
4.1 PSAP Toolbox: Tool Buttons
Use the following buttons in the PSAP toolbox:
To do this… Do this…
Select a target area for editing Click the Target area pointer icon and click on the feature (CT, BG, CDP or CCD) you are interested in editing. Zoom to the target area Click the Zoom to target area icon to show the target area in
the map window. Note: The software does not automatically zoom to the target area once selected in the Target Area drop
down menu, or with the Target area pointer .
Zoom to view the entire map Click the Show entire map icon to show the entire extent of the county you are working on in the map window.
Edit the feature name and code Click the Edit attribute data icon to edit the feature name and code by clicking on the CT, BG, CDP or CCD that you are interested in editing. When the “Edit Layer” is Census Tracts and the “Update” selection is “Special Land Use” this tool allows you to delineate a special land use CT and provide the “name”, “code”, “land use type” and “official name” attributes for the special land use CT.
Show or hide boundary eligibility Click the Show boundary eligibility icon to symbolize the line features as Acceptable, Questionable and Not Acceptable. This tool is discussed in more detail in “5.3 Additional Tools for Reviewing and Editing”8.
Select features or faces for editing Click the Select by pointing from the face area layer icon to select faces in the selected statistical areas (“Target Area”) to execute a split, execute a boundary change, or create a new statistical area, or to merge a statistical area with an adjacent statistical area by clicking on individual faces or clicking and dragging a rectangle around the faces to select them. Click the
Target area pointer
Zoom to target area
Show entire map
Edit attribute data
Show boundary eligibility theme/ Hide boundary eligibility theme
Save edits
Cancel edits
Zoom to previous discontiguous area
Zoom to next discontiguous area
Select by pointing from the face area layer
Select shape from the face area layer
8 Note that in the PSAP MTPS all non-visible boundaries are classified as not acceptable even if they are considered to be acceptable due to an inconsistency in the software. Please verify that the non-visible feature (P0001) used as a statistical area boundary is an acceptable legal or administrative boundary before submitting your statistical area plan.
PSAP MTPS Version 4.6 User Guide 27

Select by shape from the face layer icon to select faces by a shape in the selected statistical area (“Target Area”) to execute a split, execute a boundary change, create a new statistical area, or to merge a statistical area with an adjacent statistical area by clicking on each corner of the area and double-click to close the shape. When merging a statistical area with an adjacent statistical area, the icon description is “Select areas to merge”/ “Select by shape areas to merge”. Note: By default, when features are selected by drawing a rectangle or shape, the PSAP MTPS finds the map features that are completely contained within the defined shape. Note: Holding the Ctrl key while editing with the “Select by pointing from the face area layer” or the “Select by shape from the face layer” tools removes previously selected faces.
To review and edit discontiguous Click the Zoom to the previous discontiguous area icon
areas and the Zoom to the next discontiguous area icon to review and edit all discontiguous areas associated with the edit you are executing. This tool is discussed in more detail in “5.3. Additional Tools for Reviewing and Editing”.
Cancel the current edit Click the Cancel edits icon to cancel all edits made since edits were last saved. Note: When edits have not been made successfully the Save Edits and Cancel Edits icons are gray/not available to be selected.
Execute and save the current edit Click the Save edits icon to save all edits made since the edits were last saved. Note: When edits have not been made successfully the Save Edits and Cancel Edits icons are gray/not available to be selected.
PSAP MTPS Version 4.6 User Guide 28

4.2 PSAP Toolbox: Drop Down Menus
4.2.1 Edit Layer 1. The first time you open the PSAP MTPS for a county the default layer is the “Census
Tract” edit layer. The next time the PSAP MTPS is opened, the last feature layer worked on will be the active layer.
2. The preferred order of reviewing and editing the statistical area plans is (1) CTs, (2)
BGs, (3) CDPs, and (4) CCDs9. This user guide is based on this preferred order of work.
3. To work on the PSAP geography plans for BGs, CDPs and CCDs, or to return to the
CT plan, choose your desired edit layer from the “Edit Layer” drop down menu in the PSAP toolbox. Note: When you switch the “Edit Layer” the PSAP MTPS may process for several minutes.
The Census Bureau requires that you create a set of backup files after you’ve completed the review and update for one statistical area/“Edit Layer” and before switching to a different statistical area/ “Edit Layer” (e.g., after you completed the review and update of census tract Edit Layer and before you switch to the census block group Edit Layer) at a minimum. It is preferred that this set of backup files be made after the “Verify” has been run for the statistical area plan. To create a set of backup files, close the PSAP MTPS and copy and paste the entire MTPSData folder. The Census Bureau suggests renaming the copied and pasted backup folder with MTPSData, the county name or state-county FIPS code (SSCCC) and the statistical area edited, e.g., “MTPSData_24033_CT”, or “MTPSData_Fairfield_CDP”. For example, after you’ve completed your CT review and update for 27053: 1. Run the “Verify” tool and address any specific census tracts that did not pass
verification (re-run the “Verify” tool as necessary) 2. Close the PSAP MTPS 3. Navigate to your MTPSData folder 4. Copy and paste the entire folder 5. Rename the folder “MTPSData_27053_CT”. 6. After you create a set of backup files you may reopen the PSAP MTPS and begin reviewing and updating BGs.
9 Applicable only for the CCD states indicated in footnote 3.
PSAP MTPS Version 4.6 User Guide 29

4.2.2 Update 1. Choose an update selection from the “Update” drop down menu in the PSAP toolbox.
An update selection is a specific universe of areas to work with. Many update selections may select those statistical areas that do not meet criteria (e.g., are above or below thresholds), or indicate areas that may require a special type of designation.
Note: Each statistical area within the “Update” selection (except for statistical areas within the “All” selection) must be edited so that it meets criteria/no longer is within the Update selection, or a justification must be provided as to why it should not be edited/should be maintained for Census 2010. 2. The software will select all those statistical areas within the “Edit Layer” that meet the
“Update” selection chosen. The selected statistical areas will be both shaded within the map window and available on the “Target Area” drop down menu and to be selected by the “Target Area” tool.
3. For each PSAP geography level in the “Edit Layer” there are unique “Update” selections. The sequence items within the “Update” drop down menu is the sequence the participant should follow when updating the statistical areas, starting with the first item, on by default when the “Edit Layer” is first launched, and working through to the last item in the menu. For example, for BGs the “Update” drop down menu sequence is renumbering, below minimum, above maximum, and shape index.
PSAP MTPS Version 4.6 User Guide 30
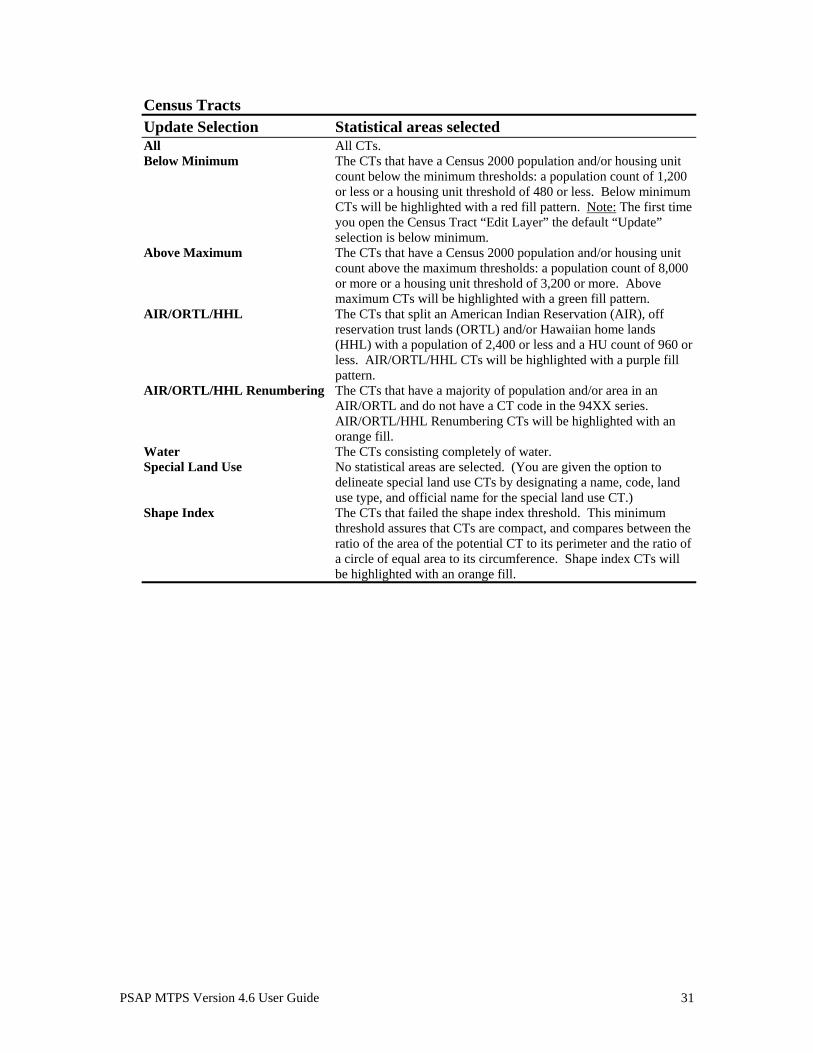
Census Tracts Update Selection Statistical areas selected All All CTs. Below Minimum The CTs that have a Census 2000 population and/or housing unit
count below the minimum thresholds: a population count of 1,200 or less or a housing unit threshold of 480 or less. Below minimum CTs will be highlighted with a red fill pattern. Note: The first time you open the Census Tract “Edit Layer” the default “Update” selection is below minimum.
Above Maximum The CTs that have a Census 2000 population and/or housing unit count above the maximum thresholds: a population count of 8,000 or more or a housing unit threshold of 3,200 or more. Above maximum CTs will be highlighted with a green fill pattern.
AIR/ORTL/HHL The CTs that split an American Indian Reservation (AIR), off reservation trust lands (ORTL) and/or Hawaiian home lands (HHL) with a population of 2,400 or less and a HU count of 960 or less. AIR/ORTL/HHL CTs will be highlighted with a purple fill pattern.
AIR/ORTL/HHL Renumbering The CTs that have a majority of population and/or area in an AIR/ORTL and do not have a CT code in the 94XX series. AIR/ORTL/HHL Renumbering CTs will be highlighted with an orange fill.
Water The CTs consisting completely of water. Special Land Use No statistical areas are selected. (You are given the option to
delineate special land use CTs by designating a name, code, land use type, and official name for the special land use CT.)
Shape Index The CTs that failed the shape index threshold. This minimum threshold assures that CTs are compact, and compares between the ratio of the area of the potential CT to its perimeter and the ratio of a circle of equal area to its circumference. Shape index CTs will be highlighted with an orange fill.
PSAP MTPS Version 4.6 User Guide 31

Census Block Groups Update Selection Statistical Areas Selected All All BGs. Renumbering The BGs that are renumbered by the software so that the BG code
(number) is between 1-9 and is unique within a CT. Renumbered BGs will be highlighted with a light green fill. Note: This update selection only updates those BGs that had duplicate or invalid BG numbers as a result of CT editing. Participants are requested to manually review and renumber BGs sequentially after all BG edits are completed. Note: The first time you open the Census Block Group “Edit Layer” the default “Update” selection is renumbering.
Below Minimum The BGs that have a Census 2000 population and/or housing unit count below the minimum thresholds: a population count of 600 or less or a housing unit threshold of 240 or less. Below minimum BGs will be highlighted with a red fill.
Above Maximum The BGs that have a Census 2000 population and/or housing unit count above the maximum thresholds: a population count of 3,000 or more or a housing unit threshold of 1,200 or more.10 Above maximum BGs will be highlighted with a green fill.
Shape Index The BGs that failed the shape index threshold. This threshold assures BGs are compact, and compares between the ratio of the area of the BG to its perimeter and the ratio of a circle of equal area to its circumference. Shape index BGs will be highlighted with an orange fill.
Census Designated Places Update Selection Statistical Areas Selected All All CDPs. Below Minimum The CDPs that have a housing unit count below the minimum
threshold: a housing unit threshold of 10. Below minimum CDPs will be highlighted with a red fill.11 Note: The first time you open the Census Designated Places “Edit Layer” the default “Update” selection is below minimum.
Census County Divisions Update Selection Statistical Areas Selected All All CCDs. Note: The first time you open the Census County
Divisions “Edit Layer” the default “Update” selection is all.
10 Where a special land use tract meets thresholds the coextensive special land use block group will be “above maximum”. In this case, do not edit the block group; provide the justification “Special land use block group”. 11 The PSAP MTPS may warn the user that a CDP should have a minimum housing unit count of at least 3, and not the actual minimum housing unit count of 10 due to an inconsistency in the software. Should the CDP be defined with fewer than 10 housing units the CDP should be edited or a justification should be provided as to why this CDP should be retained.
PSAP MTPS Version 4.6 User Guide 32

4.2.3 Target Area 1. After selecting the “Edit Layer” and the “Update” selection, choose a specific target
area from the “Target Area” drop down menu or the “Target Area Pointer” button.
2. Make a choice as follows to make the area the target (shaded in gray on the map):
To do this… Do this… Pick the target area in the Choose a target area from the “Target Area” drop down menu toolbox
Pick the target area on the map Click and click in an area on the map
Note: When you set the “Update” selection set to any selection other than “All” (e.g., Above Maximum, Below Minimum, Shape Index), and you select a target area you will be required to either edit the target area so that it meets that specific criteria or provide a justification as to why the target area should remain as it is/should not be edited before reviewing a different statistical area.
3. Click to zoom to the target area that you have selected.
4.2.4 Action 1. After selecting the “Edit Layer”, the “Update” selection, and the specific “Target
Area”, you can choose an action to execute from the “Action” drop down menu.
2. The software allows you to perform the action chosen from the “Action” drop down
menu to the “Target Area” selected, and in most situations adjacent areas.
3. For each statistical area in the “Edit Layer” there are distinct actions in the “Action” drop down menu. Also, for each update selection in the “Update” there is a preferred action that is set as the default for the “Update”.
PSAP MTPS Version 4.6 User Guide 33

Census Tracts
Note: Since BGs by definition nest within (or are completely contained within) CTs, as CTs are edited the underlying BGs are edited so that the BGs automatically nest within and are coded to the updated CTs.
Action Description Boundary Change Edit the “Target Area” CT by adding small areas to the CT. Merge Combine the whole “Target Area” CT with one or more adjacent
CTs to create one new CT. Split Divide the “Target Area” CT into two distinct CTs.
Census Block Groups
Note: Since BGs by definition nest within (or are completely contained within) CTs, as CTs are edited the underlying BGs are edited so that the BGs automatically nest within and are coded to the updated CTs.
Action Description Boundary Change Edit the “Target Area” BG by adding small areas to the BG. Merge Combine the whole “Target Area” BG to one or more adjacent
BGs to create one new BG. Split Divide the “Target Area” BG into two distinct BGs.
Census Designated Places
Action Description Boundary Change - Add Edit the “Target Area” CDP by adding small areas to the CDP. Boundary Change – Remove Edit the “Target Area” CDP by removing small areas from the
CDP. New Entity Create a new CDP by selecting the area that represents the new
CDP to be created and assigning the appropriate attribute information.
Remove Completely remove/delete the “Target Area” CDP by selecting the CDP to be removed.
Census County Divisions
Action Description Boundary Change Edit the “Target Area” CCD by adding small areas to the CCD. Merge Combine the whole “Target Area” CCD to one or more adjacent
CCDs to create one new CCD. Split Divide the “Target Area” CCD into two distinct CCDs.
PSAP MTPS Version 4.6 User Guide 34

5 Review and Edit the Statistical Areas The Census Bureau will only accept one submission for each county containing all of the statistical area edits for the county. Portions of a county’s statistical area submission cannot be merged together. Where more than one technical participant is editing the statistical areas within the county, each individual participant must update the same shapefiles for the county (i.e., one participant may update the statistical area plan for the county, and once their work is completed they must share their updated shapefiles with the other participant conducting the update). The work flow for the PSAP should follow the following order:
1) CTs 2) BGs 3) CDPs 4) CCDs
Additionally the work flow within each statistical area “Edit Layer” should follow the sequence of items within the “Update” drop down menu. When a CT, BG, or CDP within an update selection is not edited (i.e., the update criteria are not met by editing) the PSAP MTPS will require that the participant provide a justification as to why the area should remain as it is/should not be edited.
Once the CT, BG CDP, and CCD plans for a county are complete, you can begin working on the next county in your assigned area (if one is available) to review and update the statistical area plans for that county. Remember, the Census Bureau requires that you periodically back up your work. At a minimum, you must create a set of backup files after you’ve completed the review and update for one statistical area/“Edit Layer” and before switching to a different statistical area/ “Edit Layer”. To create a set of backup files, copy and paste the entire MTPSData folder while outside of the PSAP MTPS editing session (the PSAP MTPS is not open). The Census Bureau suggests renaming the copied and pasted backup folder with MTPSData, the county name or state-county FIPS code (SSCCC) and the statistical area edited, e.g., “MTPSData_24033_CT”, or “MTPSData_Fairfield_CDP”. After you create a set of backup files you may reopen the PSAP MTPS and begin reviewing and updating BGs. Note: For those PSAP primary participants covering more than one county, the Census Bureau requests that participants review, update, and submit statistical areas for one county within 60 calendar days so that the Census Bureau can review the submission to ensure participants are successful in implementing the PSAP criteria and guidelines, using the PSAP MTPS to review and edit statistical areas, and generating proposed statistical area submissions. The Census Bureau will provide feedback to the participant on their submission, and if necessary provide additional guidance on the criteria and
PSAP MTPS Version 4.6 User Guide 35

guidelines and/or PSAP MTPS usage. Should you not be able to meet this request contact your RCC.
5.1 Updates and Actions Used to Edit the Statistical Areas For all statistical areas, splits and merges should be executed before boundary changes are executed. Turn on the “Show Boundary Eligibility Theme” tool before you begin to review and edit any of the statistical areas in an “Edit Layer”. When editing statistical areas be sure to use acceptable features as the statistical area boundaries, wherever possible. Again, the sequence of items within the “Update” drop down menu is the sequence the participant should follow when updating the statistical areas, starting with the first item, on by default when the “Edit Layer” is first launched, and working through to the last item in the menu. For example, for BGs the “Update” drop down menu sequence is renumbering, below minimum, above maximum, and shape index. After the items within “Update” drop down menu are addressed, the participant should update those other items that need to be addressed as indicated in the PSAP Program Guidelines and the Update: “All” sections in the table below, for example editing boundaries so that they follow acceptable boundary features, or in the case of BGs recoding BGs so that they are sequential within a CT. The following are the actions and tools to use for the specific update selections:
Census Tracts
Update: Actions/tools used: Edit to… Below Minimum
Merge, Boundary Change
Increase the population and housing unit counts of the CT so that the CT exceeds the minimum population count (1,200) and housing unit count (480). Note: Merge is the preferred action to use with below minimum CTs so that the outer boundary of the CT is maintained, and therefore data comparability over time is maintained.
Above Maximum
Split, Boundary Change
Decrease the population and housing unit counts of the CT so that the CT population and housing unit counts fall under the thresholds of 8,000 (population) and 3,200 (housing unit). Note: Split is the preferred action to use with above maximum CTs so that the outer boundary of the CT is maintained, and therefore data comparability over time is maintained.
AIR/ORTL/ HHL
All Actions Edit CTs so that AIR/ORTL/HHL are in as few CTs as possible. Delineate a CT that encompasses (does not split) an AIR/ORTL/HHL with a population count under 2,400 and a housing unit count under 960. Use Merge, Boundary Change and/or Split.
AIR/ORTL/ HHL Renumbering
"Edit attribute information" tool
Assign a CT code within the 94XX series to the CT that has the majority of its area or population covered by an AIR/ORTL. Where the PSAP MTPS does not
PSAP MTPS Version 4.6 User Guide 36

automatically assign the 94XX series CT code to these areas, use "Edit attribute information" tool.
Water All Actions, "Edit attribute information" tool
Assign the existing or new delineated water CT (code 0000) to a CT code in the 99XX series. Use "Edit attribute information" tool.
Edit the boundary of the water CT so that it follows a non visible P0002 feature inserted in the water parallel to the shoreline (not the shoreline).
Special Land Use
All Actions, "Edit attribute information" tool
Delineate a Special Land Use CT that encompasses a major airport, business/employment area, college, hospital, jail, military area, or public park or public forest that has zero or low population or housing units, or meets thresholds, using Merge, Boundary Change and/or Split. Then use the "Edit attribute information" tool to assign the name, code, land use type, and official name to the Special Land Use CT.
Use "Edit attribute information" tool to assign the name, code, land use type, and official name to an existing Special Land Use CT.
Shape Index All Actions Delineate a CT that meets the shape index criteria (the ratio of the area of the CT to its perimeter and the ratio of the circle of equal area to its circumference is above 0.15) using Merge, Boundary Change, and/or Split
All All Actions, “Edit attribute information" tool, “Show boundary eligibility theme”
Create two or more CTs from one CT Create one CT by combining two or more CTs Edit CT boundaries Edit CT attribute information Update the boundaries that currently follow not acceptable boundary features by editing the boundary so that it follows an acceptable boundary feature or correcting the classification (MTFCC) of the boundary feature (if it is an acceptable boundary feature coded as a not acceptable boundary feature).
All Actions for census tracts are Boundary Change, Merge, and Split.
PSAP MTPS Version 4.6 User Guide 37

Census Block Groups Update: Actions/tools used: Edit to… Renumbering "Edit attribute
information" tool Renumber BGs that do not have valid BG codes. Note: BG numbers must be unique within a CT and be 0-9 (with 0 reserved for BGs that completely consist of water/no land area). The Renumbering update is automatically executed when the Census Block Group edit layer is selected after CT edits are made, as the resulting BGs may require BG renumbering if there are duplicate BG codes or invalid BG codes. Selecting the Renumbering update after BG edits are made will renumber all BGs with duplicate or invalid codes. Note: After BG editing is completed the participant must review BG coding and recode all BGs that are not coded sequentially through the “Edit attribute information” tool.
Below Minimum
Merge, Boundary Change
Increase the population and housing unit counts of the BG so that the BG exceeds the minimum population count (600) and housing unit count (240). Note: Either Merge or Boundary Change is equally valid to use for BGs as comparability over time is less of a concern for BG data.
Above Maximum
Split, Boundary Change
Decrease the population and housing unit counts of the BG so that the BG population and housing unit counts fall under the thresholds of 3,000 (population) and 1,200 (housing unit). Note: Either Split or Boundary Change is equally valid to use for BGs as comparability over time is less of a concern for BG data.
Shape Index All Actions Delineate a BG that meets the shape index criteria (the ratio of the area of the BG to its perimeter and the ratio of the circle of equal area to its circumference is above 0.15) by Merge, Boundary Change, and/or Split.
All All Actions, "Edit attribute information" tool, “Show boundary eligibility theme”
Create two or more BGs from one BG Create one BG by combining two or more BGs edit BG boundaries
Recode BGs so that they are numbered sequentially within a CT
Create water BGs for smaller water bodies that are not designated as water CTs
Edit BG attribute information Update the boundaries that currently follow not acceptable boundary features by editing the boundary so that it follows an acceptable boundary feature or correcting the classification (MTFCC) of the boundary feature (if it is an acceptable boundary feature coded as a not acceptable boundary feature).
All Actions for census block groups are Boundary Change, Merge, and Split.
PSAP MTPS Version 4.6 User Guide 38

Census Designated Places Update: Actions/tools used: Edit to… Below Minimum
Boundary Change - Add Delineate a CDP that meets the minimum housing unit count of 10.
All All Actions, "Edit attribute information" tool, “Show boundary eligibility theme”
Create a new CDP Remove an existing CDP Edit the boundary or attributes of an existing CDP Edit CDP attribute information (including name) Where it would not significantly overbound or underbound the community (CDP), update the boundaries that currently follow not acceptable boundary features by editing the boundary so that it follows an acceptable boundary feature or correcting the classification (MTFCC) of the boundary feature (if it is an acceptable boundary feature coded as a not acceptable boundary feature).
All Actions for CDPs are Boundary Change-Add, Boundary Change-Remove, New Entity, and Remove.
Census County Divisions Update: Actions/tools used: Edit to… All All Actions,
"Edit attribute information" tool, “Show boundary eligibility theme”
Create two or more CCDs from one CCD (split), Create one CCD by combining two or more CCDs (merge)
Edit CCD boundaries so that CCD boundaries follow CT boundaries (one or more CTs nest within the CCD or one or more CCDs nest within a CT) (boundary change)
Edit CCD attribute information (including name) Update the boundaries that currently follow not acceptable boundary features by editing the boundary so that it follows an acceptable boundary feature or correcting the classification (MTFCC) of the boundary feature (if it is an acceptable boundary feature coded as a not acceptable boundary feature).
All Actions for CCDs are Boundary Change, Merge, and Split.
5.2 Steps to Execute Actions to Edit the Statistical Areas
5.2.1 Census Tracts, Block Groups, Census Designated Places and Census County Divisions The Census Bureau strongly recommends periodically backing up your work. At a minimum, you must create a set of backup files after you’ve completed the review and update for one statistical area/“Edit Layer” and before switching to a different statistical area/ “Edit Layer”. To create a set of backup files, copy and paste the entire MTPSData folder while outside of the PSAP MTPS editing session (the PSAP MTPS is not open). The Census Bureau suggests renaming the copied and pasted backup folder
PSAP MTPS Version 4.6 User Guide 39

with MTPSData, the county name or state-county FIPS code (SSCCC) and the statistical area edited, e.g., “MTPSData_24033_CT”, or “MTPSData_Fairfield_CDP”. After you create a set of backup files you may reopen the PSAP MTPS and begin reviewing and updating BGs. Undo changes If you execute an action and the action did not produce the desired or expected outcome, you can undo your edit by going to “Edit: Undo [previous action]” provided that you are in the same editing session and did not “Close” the county you are working on. Additionally, you can undo all changes for an edit layer by going to “PSAP: Undo All Changes”. Refer to section “3.1 PSAP Menu” for information on the “Undo All Changes” tool. Revert to backed up data or reset a single county In extreme cases where the files become corrupted for a county, it may become necessary to either revert to the work you backed up or to reset that county’s data. If you backed up your work you may revert to your backed up work by deleting the corrupted “MTPSData” folder, copying and pasting the entire backed up folder and renaming the copied and pasted backup folder “MTPSData”. If you did not back up your work, you will need to reset that county’s data. Refer to Appendix C – Reset a Single County for instructions to reset a single county. Edit attribute information tool The “Edit attribute information” tool is available for the Census Tract, Census Block Group, Census Designated Place and Census County Division “Edit Layer”. Use the “Edit attribute information” tool to:
Edit CT codes Designate the codes, land use types, and official names for special land use CTs Edit BG codes Designate or edit CDP names and codes12 Designate or edit CCD names and codes
Edit Not Acceptable Boundary Features The Show Boundary Eligibility Theme/Hide Boundary Eligibility Theme tool is available for the Census Tract, Census Block Group, Census Designated Place and Census County Division “Edit Layer”. Selecting the boundary eligibility theme (“show”) symbolizes the line features as Acceptable, Questionable and Not Acceptable.
12 When editing the name of an existing CDP or creating a new CDP in Puerto Rico, append zona urbana (or “ZA”) to the zona urbana CDP name, and comunidad (or "comun") to the comunidad CDP name.
PSAP MTPS Version 4.6 User Guide 40
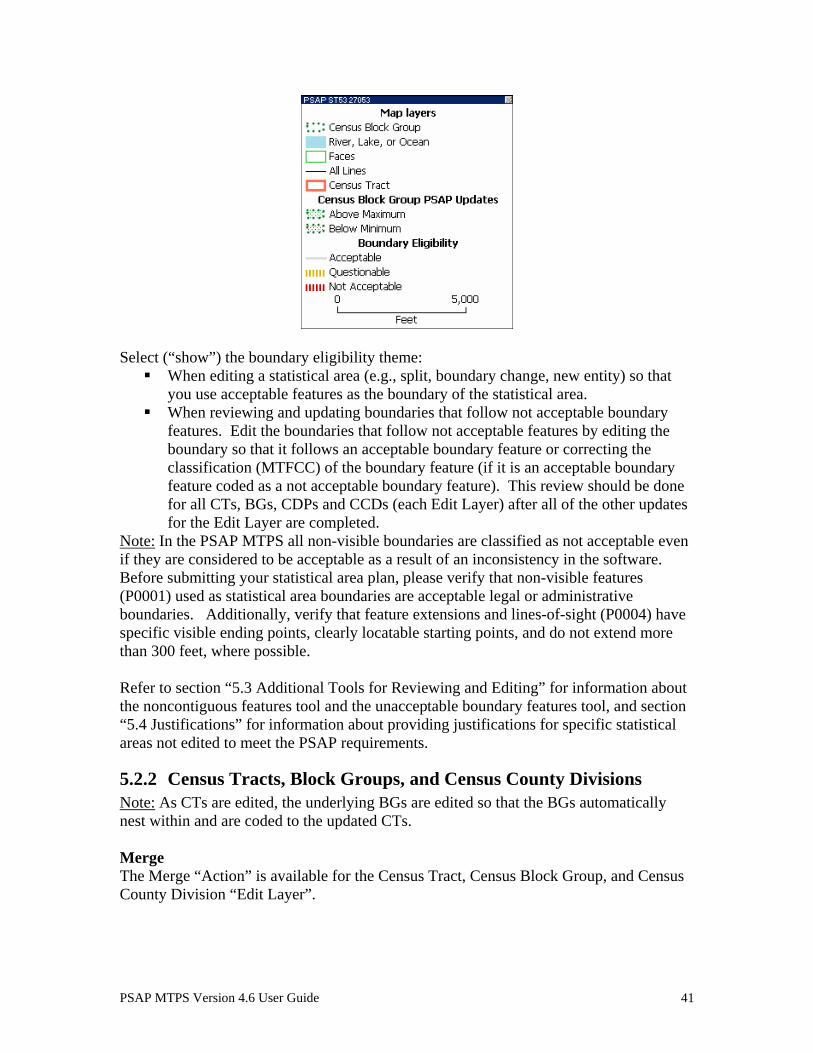
Select (“show”) the boundary eligibility theme:
When editing a statistical area (e.g., split, boundary change, new entity) so that you use acceptable features as the boundary of the statistical area.
When reviewing and updating boundaries that follow not acceptable boundary features. Edit the boundaries that follow not acceptable features by editing the boundary so that it follows an acceptable boundary feature or correcting the classification (MTFCC) of the boundary feature (if it is an acceptable boundary feature coded as a not acceptable boundary feature). This review should be done for all CTs, BGs, CDPs and CCDs (each Edit Layer) after all of the other updates for the Edit Layer are completed.
Note: In the PSAP MTPS all non-visible boundaries are classified as not acceptable even if they are considered to be acceptable as a result of an inconsistency in the software. Before submitting your statistical area plan, please verify that non-visible features (P0001) used as statistical area boundaries are acceptable legal or administrative boundaries. Additionally, verify that feature extensions and lines-of-sight (P0004) have specific visible ending points, clearly locatable starting points, and do not extend more than 300 feet, where possible. Refer to section “5.3 Additional Tools for Reviewing and Editing” for information about the noncontiguous features tool and the unacceptable boundary features tool, and section “5.4 Justifications” for information about providing justifications for specific statistical areas not edited to meet the PSAP requirements.
5.2.2 Census Tracts, Block Groups, and Census County Divisions Note: As CTs are edited, the underlying BGs are edited so that the BGs automatically nest within and are coded to the updated CTs. Merge The Merge “Action” is available for the Census Tract, Census Block Group, and Census County Division “Edit Layer”.
PSAP MTPS Version 4.6 User Guide 41

1. Set the “Update” selection in the PSAP Toolbox, and select the specific “Target Area” in the PSAP Toolbox by using the Target Area drop down or using the “Target Area Pointer” tool.
2. Select Merge from the “Action” drop down menu.
3. To merge the target area with one or more adjacent CTs (when in the Census Tract
“Edit Layer”, BGs (when in the Census Block Group “Edit Layer”), or CCDs (when in the Census County Division “Edit Layer”) select one or more adjacent CTs, BGs, or CCDs using the “Select by pointing from the face area layer” or the “Select by shape from the face layer”.
Note: When the update selection is set to Below Minimum (in the Census Tract or
Census Block Group “Edit Layer”) and one or more adjacent CTs or BGs also fall below the minimum thresholds, a message will appear: “the following adjacent [CTs/BGs] also have values below the minimum [list of the CTs/BGs].” It is recommended that the two or more below minimum CTs/BGs are merged to meet the thresholds.
4. To execute the action and accept the merge edits select “Save edits”. (Note: To
cancel the action and reject the edits select the “Cancel edits”.) Split The Split “Action” is available for the Census Tract , Census Block Group and Census County Division “Edit Layer”. 1. Set the “Update” selection in the PSAP Toolbox, and the specific “Target Area” in the
PSAP Toolbox or using the “Target Area Pointer” tool. 2. Select Split from the “Action” drop down menu.
3. To split the target area select one or more adjacent faces within the target area using
the “Select by pointing from the face area layer” or the “Select by shape from the face layer”.
PSAP MTPS Version 4.6 User Guide 42

4. To execute the action and accept the split edits select “Save edits”. (Note: To cancel the action and reject the edits select the “Cancel edits”.)
5. Enter the CT codes for the new CTs. Note: The software will automatically suggest
the next available CT code.
Note: If a CT is split, each portion should keep the same basic 4-digit identifier, but each portion must be given a new unique suffix. If a CT that was suffixed for Census 2000 is split, each portion must be given a new suffix. The range of acceptable CT suffixes is .01 to .98. Where possible, the Census Bureau recommends that CT suffixes follow a sequential, logical order within a CT. The use the “Edit Attribute Information” tool to change CT suffixes, including for those Census 2000 CTs that were split for 2010, and for which the PSAP MTPS has assigned non-sequential suffixes.
Enter the BG code for the new BG. Note: The software will automatically suggest the next available BG code within the CT.
Enter the census county division name and code for the new census county divisions. Note: The software will automatically suggest the name of the largest (most populous) incorporated place or CDP in the CCD as the CCD name. The software will also automatically suggest the next available default CCD code.
PSAP MTPS Version 4.6 User Guide 43

Boundary Change The Boundary Change “Action” is available for the Census Tract, Census Block Group, and Census County Division “Edit Layer”(Note: Boundary Change – Add and Boundary Change – Remove are available in the Census Designated Place “Edit Layer”). Note: Before executing any boundary changes first execute all needed splits and merges. Note: When editing CT boundaries, remember that comparability is important to the CT program. Editing a questionable or ineligible CT boundary so that it follows a nearby acceptable feature is acceptable if roughly five percent or less of the Census 2000 population/housing units are affected by the change. This requirement excludes redefinition for CTs defined to better encompass AIRs/ORTLs/HHLs, for special land use CTs, and/or for water CTs. Refer to the PSAP Program Guidelines for additional information on CT redefinition. 1. Set the “Update” selection in the PSAP Toolbox, and the specific “Target Area” in the
PSAP Toolbox or using the “Target Area Pointer” tool. 2. Select Boundary Change from the “Action” drop down menu.
3. To change the boundary of the target area, select one or more faces in one or more
adjacent CTs (when in the Census Tract “Edit Layer”), BGs (when in the Census Block Group “Edit Layer”), or CCDs (when in the Census County Division “Edit Layer”) using the “Select by pointing from the face area layer” or the “Select by shape from the face layer”.
4. To execute the action and accept the boundary change edits select “Save edits”.
(Note: To cancel the action and reject the edits select the “Cancel edits”.)
5.2.3 Census Tracts Designate special land use CTs Note: Participants are not required to delineate special land use CTs. 1. Set the “Update” selection to All in the PSAP toolbox. 2. Split the tract that will be designated as the special land use CT, if necessary. 3. Select Special Land Use in the “Update” selection.
PSAP MTPS Version 4.6 User Guide 44
4. Use the “Edit attribute information” tool to select the CT that will be designated as the special land use CT.
5. The Special Land Use Information dialog box opens.
(1) Enter the new special land use CT code. The software automatically suggests the next available CT code in the 98XX series if the special land use CT has zero population/housing units, or the next available code in the standard CT series if the special land use CT meets thresholds. Note: CTs designated as a special land use CTs with no population or housing units must be numbered in the 98XX series.
(2) Specify the appropriate land use type in the “Land Use Type” drop down menu:
A Airport13 B Business/Industrial Park, Central Business District, or other major
place-of-work14 C College, University, Boarding School, or other major educational
institution H Hospital, Nursing Home, or other major health care facility J Jail, Prison, or other major correctional facility M Military P Park (National, State, or other major Tribal or Local Park)
(3) Provide the official name of the special land use CT in the “Official Name” field. (4) Select the OK button.
13 Commercial airports with 10,000 or more enplanements (number of passengers boarding an aircraft) per year should be made an airport special land use CTs. Other commercial airports may be made airport CTs if they have 2,500 or more enplanements per year. Other airports should only be made airport CTs if they are major regional airports and the resulting CT will be as large or larger than the surround standard CTs. 2007 Enplanement data can be found at: <http://www.faa.gov/airports_airtraffic/airports/planning_capacity/passenger_allcargo_stats/passenger/media/cy07_all_enplanements.pdf> . 14 Areas with 1,200 or more employees/ workers at place of work should be defined a Business/Industrial Park, Central Business District, or other major place-of-work type special land use CT.
PSAP MTPS Version 4.6 User Guide 45

Note: Where a special land use CT is designated a special land use BG will be designated coextensive with, or covering the same area as, the special land use CT. Where a populated special land use CT (meets thresholds) is delineated, the coextensive BG will be considered “Above Maximum” by the PSAP MTPS but is acceptable. Designate water CTs Note: Participants are required to delineate water CTs for territorial seas, coastal waters, and the Great Lakes, but are not required to define water CTs for other areas. 1. Set the “Update” selection to All in the PSAP toolbox. 2. Use the Line Editing toolbox to line feature parallel to the shoreline. Code the line feature as a P0002 – Nonvisible Hydrographic Legal/Statistical Boundary. This will be the new water CT boundary. 3. Set the “Update” selection to All in the PSAP toolbox. 4. Split the water CT area from the parent CT (the land/water CT or the Census 2000 former water CT using the shoreline as a boundary) using the new P0002 boundary inserted parallel to the shoreline. Note: A water CT must consist of only water; any islands or other land within a qualifying water body must be designated as its own separate CT (if it meets the population/housing unit thresholds) or included within an adjacent land-based CT. 5. Set the “Update” selection to Water in the PSAP toolbox, and use the “Edit Attribute Information” tool to code the new water CT in the 99XX series. 6. If a Census 2000 water CT existed, merge the portion of the parent CT that is not part of the new water CT (most likely the area between the shoreline and the new P0002 feature) with the adjacent land CT. Note: Where a water CT is designated a water BG will be designated coextensive with, or covering the same area as, the water CT.
PSAP MTPS Version 4.6 User Guide 46

5.2.4 Block Groups Designate water BGs Note: Participants are not required to delineate water BGs . 1. Set the “Update” selection to All in the PSAP toolbox. 2. Split the water BG area from the parent BG (the land/water block group) 3. Code the new water BG “0” and code the other portion of the parent BG the next available and appropriate code within the CT. Recoding BGs The Census Bureau requests that participants review all BG codes after BG editing is completed. If the BG codes within a CT are not sequential, recode the BGs within the tract in a serpentine fashion, starting with one in the northwest portion of the tract and continuing using as many BG codes as needed up to the maximum of nine (e.g., if there are 4 BGs in the CT, the BGs will be coded 1, 2, 3, 4 and not 1, 4, 5, 9). This excludes water BGs that are coextensive with water body CTs and coded as 0. 1. Set the “Update” selection to All in the PSAP toolbox. 2. Use the “Edit Attribute Information” tool to recode BGs so that all BG codes within a CT are sequential.
5.2.5 Census Designated Places Boundary Change – Add The Boundary Change - Add “Action” is available for the CDP “Edit Layer”. 1. Set the “Update” selection in the PSAP Toolbox, and the specific “Target Area” in the
PSAP Toolbox or using the “Target Area Pointer” tool. 2. Select Boundary Change - Add from the “Action” drop down menu.
3. To change the boundary by adding area to the target area, select one or more faces in
one or more adjacent area using the “Select by pointing from the face area layer” or the “Select by shape from the face layer”.
4. To execute the action and accept the boundary change - add edits select “Save
edits”. (Note: To cancel the action and reject the edits select the “Cancel edits”.)
PSAP MTPS Version 4.6 User Guide 47

Boundary Change – Remove The Boundary Change - Remove “Action” is available for the CDP “Edit Layer”. 1. Set the “Update” selection in the PSAP Toolbox, and the specific “Target Area” in the
PSAP Toolbox or using the “Target Area Pointer” tool. 2. Select Boundary Change -Remove from the “Action” drop down menu.
3. To change the boundary by removing area from the target area, select one or more
faces within the target area using the “Select by pointing from the face area layer” or the “Select by shape from the face layer”.
4. To execute the action and accept the boundary change - remove edits select “Save
edits. (Note: To cancel the action and reject the edits select the “Cancel edits”.) New Entity The New Entity “Action” is available for the CDP “Edit Layer”. 1. Set the “Update” selection to All in the PSAP Toolbox. 2. Select New Entity from the “Action” drop down menu.
3. Select faces that are not already covered by an existing CDP or incorporated place
using the “Select by pointing from the face area layer” or the “Select by shape from the face layer” to create a new statistical area.
4. To execute the action and accept the new statistical area edits select “Save edits”.
(Note: To cancel the action and reject the edits select the “Cancel edits”.) 5. Enter the name of the new CDP and check the box if the CDP extends into an adjacent county. Note: When entering the name of the new CDP do not append the term “CDP” at the end of the name. Also note that the software will automatically assign a code to the CDP.
PSAP MTPS Version 4.6 User Guide 48

Note: When editing the name of an existing CDP or creating a new CDP in Puerto Rico, append zona urbana (or “ZA”) to the zona urbana CDP name, and comunidad (or "comun") to the comunidad CDP name. Remove The Remove “Action” is available for the CDP “Edit Layer”. 1. Set the “Update” selection in the PSAP Toolbox, and the specific “Target Area” in the
PSAP Toolbox or using the “Target Area Pointer” tool. 2. Set Remove from the “Action” drop down menu.
3. To execute the action and accept the remove edit select “Save edits”. (Note: To
cancel the action and reject the edits select the “Cancel edits”.)
5.3 Additional Tools for Reviewing and Editing When editing a CT, BG, CDP, or CCD often one or more faces gets mistakenly included or excluded in the selection. After selecting “Save edits” the PSAP MTPS automatically checks for noncontiguous faces created by executing an action, and prompts you to review and fix the noncontiguous faces by adding or removing the face(s) from the selection before the edit is saved. When you are finished reviewing and executing the spatial edits for all statistical areas in the Edit Layer, specifically those that do not meet criteria featured in “Update” selections, review statistical area boundaries to assure they follow acceptable boundary features. If the statistical area boundaries do not follow acceptable features, either edit the boundary so that it follows an acceptable boundary or correct the classification of the boundary feature if it is coded incorrectly. Note that CDP boundaries should be edited so that they follow acceptable boundary features where it would not significantly overbound or underbound the CDP.
5.3.1 Discontiguous features Should noncontiguous areas exist within the edited statistical area: 1. A dialog box will popup warning you that the statistical area contains discontiguous areas that are not islands. 2. The PSAP MTPS will provide the options to (1) cancel the operation for the moment (the selected features will be retained) and run the discontiguous tools to review and edit
PSAP MTPS Version 4.6 User Guide 49

the noncontiguous feature(s) created, or (2) continue, and accept (provide a justification for) the target area as it is delineated with discontiguous areas. Discontiguous tools:
To review and edit the discontiguous features use the following buttons in the PSAP toolbox:
Select this… To do this…
“Zoom to the previous To review and edit the previous discontiguous area in the discontiguous area” target area(s).
“Zoom to the next To review and edit the next discontiguous area in the target discontiguous area” area(s).
Use the Select by pointing from the face area layer tool to select or remove faces that are noncontiguous. When the noncontiguous faces have been edited, select the Save Edits tool. If the noncontiguous areas are intentional (e.g., the noncontiguous areas are islands within a water body CT) provide a justification as to why the area should remain as it is/should not be edited.
5.3.2 Unacceptable boundary features Review all CT, BG and CCD boundaries. Edit the boundaries that follow not acceptable boundary features so that the boundary follows an acceptable boundary feature. Review all CDP boundaries and, where it would not significantly overbound or underbound the community (CDP), edit the boundaries that follow not acceptable boundary features so that the boundary follows an acceptable boundary feature. If the boundary feature is misclassified, correct the classification (MTFCC) of the boundary feature. The “Show Boundary Eligibility Theme/Hide Boundary Eligibility Theme” tool symbolizes the line features as Acceptable, Questionable and Not Acceptable. Show Boundary Eligibility Theme/Hide Boundary Eligibility Theme: To review unacceptable boundary features use the show boundary eligibility theme/hide boundary eligibility theme
PSAP MTPS Version 4.6 User Guide 50

To update unacceptable boundary features, either: 1. Use the Boundary Change Action for CTs, BGs, and CCDs, or the Boundary Change – Add and Boundary Change – Remove for CDPs to edit the boundary so that it follows an acceptable boundary feature, or
2. Use the Line editing tool box Edit Line Attributes tool to correct the MTFCC of the boundary feature (if it is an acceptable boundary feature coded as a not acceptable boundary feature).
5.4 Justifications For all statistical areas selected in the “Update” selections (except the “Update” All selection) you must:
Edit the statistical area through the actions in the “Action” drop down, or through the “Edit attribute information” tool, so that the statistical area meets the requirements, or
Provide a textual justification explaining why this statistical area should remain as it is, addressing why the specific requirement in the “Update” drop down is not being met for this specific statistical area, or the statistical area is noncontiguous.
If you attempt to change the target area within an “Update” selection without editing the boundary and/or attributes, a window will popup soliciting an explanation for retaining the statistical area as it exists (justification). Also, if you edit the statistical area through the actions in the “Action” drop down, or through the “Edit attribute information” tool and the statistical area does not meet the requirements, a window will popup soliciting an explanation for why the edited statistical area(s) do not meet the requirements. Example: “Confirm with Explanation” popup for the Census Tract “Edit Layer”, Above Maximum “Update”:
Additionally, for all noncontiguous features found when executing an action you must:
PSAP MTPS Version 4.6 User Guide 51

Edit the area by adding or removing the noncontiguous faces through the noncontiguous feature tool, or
Provide a textual justification explaining why this statistical area should remain as it is, addressing why the statistical area is noncontguous
Acceptable justifications The following are the acceptable justifications for the statistical areas that do not meet criteria or guidelines. With appropriate justification, the Census Bureau, at its discretion, may grant exceptions on a case-by-case basis. Current (2008 or earlier), locally produced estimates of population and housing units can and should be used when reviewing and updating statistical areas, especially in areas that have experienced considerable growth since Census 2000. Future growth may be considered, but should only be used to meet the optimum (or exceed the minimum) threshold. Future growth projections should extend no more than 5 years from the date of 2010 PSAP review and update (i.e., pre-2015) so that the projections are more likely to be reliable and to best leverage the ACS data. When estimates and projections are used to meet thresholds, supply the estimate/projection as part of the justification required when a statistical area does not meet the criteria. Population estimates and projections do not need to be precise; they just need to show that the 2010 (or 2015) population/housing units of the area will meet the thresholds. Census tracts 1. CT is below the minimum population threshold (<1,200 population)
Includes greater than 480 housing units (meets threshold). County does not include enough population to meet the threshold. New housing units built since 2000 (will meet threshold). Includes area for new planned housing units (pre-2015). Population counts provided are incorrect. Seasonal population.
2. CT is below the minimum housing unit threshold (<480 housing units)
Includes greater than 1,200 population (meets threshold). County does not include enough housing units to meet the threshold. New housing units built since 2000 (will meet threshold). Includes area for new planned housing units (pre-2015). Housing unit counts provided are incorrect.
3. CT is above the maximum population threshold (>8,000 population)
Includes fewer than 3,200 housing units (meets threshold). Population associated with group quarter(s). Large amount of seasonally occupied housing units. Population counts provided are incorrect.
4. CT is above the maximum housing unit threshold (>3,200 housing units)
Includes fewer than 8,000 population (meets threshold).
PSAP MTPS Version 4.6 User Guide 52

Large amount of seasonally occupied housing units. Large amount of housing units uninhabitable. Housing unit counts provided are incorrect.
5. CT is noncontiguous
County is noncontiguous. Includes islands, causeways or other land in a water body
Block Groups 1. BG is below the minimum population threshold (<600 population)
Includes greater than 240 housing units (meets threshold). County does not include enough population to meet the threshold. New housing units built since 2000 (will meet threshold). Includes area for new planned housing units (pre-2015). Population counts provided are incorrect. Seasonal population.
2. BG is below the minimum housing unit threshold (<240 housing units)
Includes greater than 600 population (meets threshold). County does not include enough housing units to meet the threshold. New housing units built since 2000 (will meet threshold). Includes area for new planned housing units (pre-2015). Housing unit counts provided are incorrect.
3. BG is above the maximum population threshold (>3,000 population)
Includes fewer than 1,200 housing units (meets threshold). Population associated with group quarter(s). Large amount of seasonally occupied housing units. Population counts provided are incorrect.
4. BG is above the maximum housing unit threshold (>1,200 housing units)
Includes fewer than 3,000 population (meets threshold). Large amount of seasonally occupied housing units. Large amount of housing units uninhabitable. Housing unit counts provided are incorrect.
5. BG is noncontiguous
County is noncontiguous. Includes islands, causeways, or other land in a water body.
Census Designated Places (CDPs) 1. CDP is below the minimum housing unit guidelines (<10 housing unit)
Includes group quarters. New housing units built since 2000 (will meet threshold). Includes area for new planned housing units (pre-2015). Housing unit counts provided are incorrect.
PSAP MTPS Version 4.6 User Guide 53

2. CDP is noncontiguous
Military installation excluded. CDP has two or more separate populated centers, but is considered one
community. CDP is too large if contiguous.
Census County Divisions (CCDs) 1. CCD is noncontiguous
County is noncontiguous
PSAP MTPS Version 4.6 User Guide 54

6 Verify and Report Changes
6.1 Verify Your PSAP Plan Work The “Verify” tool in the PSAP menu is run individually for each statistical area plan (i.e., CTs, BGs, CDPs and CCDs) within each county. Specifically, when you complete a statistical area plan (when each of the statistical areas selected in the “Update” selections are edited or justified for that “Edit Layer” statistical area type), the “Verify” tool is run for the “Edit Layer” statistical area type (i.e., Census Tract, Census Block Group, and Census Designated Place, Census County Division). 1. Choose “Verify” from the PSAP menu. The dialog box pops up:
Note: The Confirm box is customized for each PSAP geography type.
Click OK, and the PSAP MTPS performs the verification tests. The verification tests check that all statistical areas that required editing were edited successfully and meet the requirements or have a justification provided, specifically all those within the “Update” selection drop down (excluding the All selection), all edits that created noncontiguous features, and all edits that created statistical areas with unacceptable boundary features.
2. If the plan fails any checks in the verification phase, the PSAP MTPS will report the type(s) and number of failures for each type. You must fix/edit or provide a justification for the failed statistical areas as you did in the initial review and update using the functionalities in the PSAP toolbox. Once all of the failures are fixed/edited or justified, run the “Verify” tool again. Continue this verification and fix/edit or justification process until there are no issues identified when the “Verify” tool is run. At this time you are prompted to review the next PSAP geography in the county or move onto PSAP geography plans in the next county if completed and verified all the plans for the current county.
3. If no issues are identified when the “Verify” tool is run you will be notified that the plan passed the verification phase and are prompted to review the next PSAP geography in the county or move onto PSAP geography plans in the next county if completed and verified all the plans for the current county. If all the statistical area type plans for all counties have passed verify with no outstanding issues to address, you can report changes for each of the counties.
PSAP MTPS Version 4.6 User Guide 55

6.2 Report Your PSAP Changes The Census Bureau will only accept one submission for each county containing all of the statistical area edits for the county. Portions of a county’s statistical area submission cannot be merged together. Where more than one technical participant is editing the statistical areas within the county, each individual participant must update the same shapefiles for the county (i.e., one participant may update the statistical area plan for the county, and once their work is completed they must share their updated shapefiles with the other participant conducting the update). 1. Run the “Verify” tool again for each statistical area plan before selecting “Report
Changes” to assure that changes have occurred since you last ran “Verify”.
2. Choose “Report Changes” from the PSAP menu to display a “Confirm” dialog to make sure you want to create a ZIP archive of changes that can be sent to the Census Bureau.
3. Click “Yes”. If there are no changes to report, PSAP MTPS displays a message. Click “OK”.
Otherwise, within the specific county folder (named with the state-county FIPS code) in the MTPSData folder, PSAP MTPS creates a ZIP archive called PSAP_SSCCC__Return.zip where SSCCC is the state (SS) and county (CCC) FIPS code and displays a message with the path to the archive. Click “OK” to close the message.
6.3 Review Your PSAP Changes Using the PSAP MTPS 1. Use Windows Explorer to navigate to the folder c:\MTPSData\[SSCCC] and open
PSAP_SSCCC_Return.zip where SSCCC is the state (SS) and county (CCC) FIPS code.
2. Extract all of the files into a folder, such as c:\Temp.
3. Choose File: Open or click the “Open File” icon on the Standard toolbar, choose ESRI Shapefile from the “Files of Type” drop down list, navigate to the folder where you extracted the Shapefiles, choose the Shapefile(s) you would like to view, and click “Open” to display the ESRI “Shapefile” dialog box.
4. Click “OK” to display a map with the Shapefile. You can return to Step 3 to open another Shapefile, or you can add one or more Shapefiles to the map by doing the following:
(1) Choose “Map: Layers" or click the “Map Layer” icon to display the “Layers” dialog box
(2) Choose ESRI Shapefile from the “Files of Type” drop down list (3) Highlight one or more Shapefiles (4) Click “Open” to display the “ESRI Shapefile” dialog box
PSAP MTPS Version 4.6 User Guide 56

(5) Click “OK” for each Shapefile; PSAP MTPS returns to the “Layers” dialog box (6) Highlight each added Shapefile, clicking “Style”, and choosing a different border
color (7) Click “Close”; PSAP MTPS displays the map with the added layers
6.4 Submit Your PSAP Changes ZIP File to the Census Bureau Contact your RCC if you review your county or counties and determine that no updates are required for one or more of your counties, or no updates are required for one or more of the statistical areas within the county, e.g., CT and BG edits will be submitted to the Census Bureau but there will be no CDP changes/submission (all CDPs in the county should remain for 2010 unchanged). The RCC will then know not to expect a submission for those counties/areas. 1. How to FTP a Completed File (1) Upload your files using the Census Bureau’s Send a File Utility at: http://www2.census.gov/cgi-bin/sendfile. (2) Copy and paste the above URL into the browser address bar or use these following steps to access the utility: (3) Type www.census.gov in your browser address bar; (4) Click on Data Tools in the dark blue column on the left-hand side of the screen; (5) Scroll down to the bottom of the Data Access Tools page; (6) Click on the Public file send utility link. 2. Use the following steps to FTP your completed files: (1) In the Source Information (Local) section, click on the Browse button to navigate to the completed file that is to be submitted. (2) Select the file from the Choose file window by clicking on it. Click Open. The File to Send field now contains the file name. Note: Only one file can be sent at a time. (3) In the Target Information (Remote) section, enter /geo/2010_PSAP_TSAP/Name of RCC/ in the Directory to Receive File, where Name of RCC/ = your appropriate RCC. Choose Name of RCC/ from following list:
Atlanta_RCC/ Detroit_RCC/ Boston_RCC/ KansasCity_RCC/ Charlotte_RCC/ LosAngeles_RCC/ Chicago_RCC/ NewYork_RCC/ Dallas_RCC/ Philadelphia_RCC/ Denver_RCC/ Seattle_RCC/
PSAP MTPS Version 4.6 User Guide 57

If you’re not sure which RCC you should choose, refer to Appendix A – Regional Census Center (RCC) contact information. (4) No entry should be made in the New File Name field. (5) Under Notify by E-mail, type your e-mail address in the Sender’s Email Address field. In the Census Bureau Employee’s E-Mail Address field, enter [email protected]. (6) We are asking you to please send a second e-mail to [email protected] using your regular e-mail account, to notify us when you have submitted files. (7) The last thing you need to do is type in the Verification Code that you see (or hear) in the field below the code. (8) After filling in all the fields correctly, click on the Upload button. If you find an error, click the Clear button and start the process again from the beginning. Important Note!! If you must resubmit a file for any reason, you must rename the file. If not, the utility will produce an error message. Please retain the default naming convention of PSAP_SSCCC_Return.zip when you rename it. Here are examples for re-naming a file: PSAP_42027_Return_revised.zip PSAP_36001_Return_Return_2.zip
PSAP MTPS Version 4.6 User Guide 58

Appendix A – Regional Census Center (RCC) contact information
Atlanta RCC: Geography Detroit RCC: Geography 285 Peachtree Center Avenue NE 300 River Place Drive, Suite 2950 Marquis II Tower, Suite 1000 Detroit, MI 48207 Atlanta, GA 30303-1230 Phone: (313) 396-5002 Phone: (404) 332-2711 Fax: (313) 567-2119 Fax: (404) 332-2787 E-mail: [email protected] E-mail: [email protected] Boston RCC: Geography Kansas City RCC: Geography One Beacon Street, 7th Floor 2001 NE 46th Street, Suite LL100 Boston, MA 02108-3107 Kansas City, MO 64116-2051 Phone: (617) 223-3600 Phone: (816) 994-2020 Fax: (617) 223-3675 Fax: (816) 994-2033 E-mail: [email protected] E-mail: [email protected] Charlotte RCC: Geography Los Angeles RCC: Geography 3701 Arco Corporate Drive, Suite 250 9301 Corbin Avenue, Suite 1000 Charlotte, NC 28273 Northridge, CA 91324-2406 Phone: (704) 936-4200 Phone: (818) 717-6701 Fax: (704) 936-4225 Fax: (818) 717-6778 E-mail: [email protected] E-mail: [email protected] Chicago RCC: Geography New York RCC: Geography 500 West Madison Street, Suite 1600 330 West 34th Street, 13th Floor Chicago, IL 60661-4555 New York, NY 10001-2406 Phone: (312) 454-2705 Phone: (212) 971-8800 Fax: (312) 488-1510 Fax: (212) 971-8990 E-mail: [email protected] E-mail: [email protected] Dallas RCC: Geography Philadelphia RCC: Geography 2777 N Stemmons Freeway, Suite 200 1234 Market Street, Suite 340 Dallas, TX 75207 Philadelphia, PA 19107-3780 Phone: (214) 267-6920 Phone: (215) 717-1000 Fax: (214) 267-6970 Fax: (215) 253-8001 E-mail: [email protected] E-mail: [email protected] Denver RCC: Geography Seattle RCC: Geography 6950 W Jefferson Avenue, Suite 250 19820 North Creek Parkway N, Suite 100 Lakewood, CO 80235-2032 Bothell, WA 98011 Phone: (720) 475-3600 Phone: (425) 908-3010 Fax: (720) 962-4606 Fax: (425) 908-3020 E-mail: [email protected] E-mail: [email protected]
PSAP MTPS Version 4.6 User Guide 59

Appendix B - Important information about updating streets as part of Census 2010 Geographic Area Programs
The Census Bureau has spent the last 6 years improving the spatial accuracy of the roads in our MAF/TIGER system (Master Address File/Topologically Integrated Geographic Encoding and Referencing system). Many of you have heard the Census Bureau staff talk about this work. Many organizations throughout the country who maintain geographic information in digital form have worked with us on this project. This notice is to inform you that at this point, the Census Bureau is moving forward with our Census 2010 field canvassing and collection activities. This means that we are no longer processing widespread spatial corrections to our street network. What is critical for the success of Census 2010 data tabulation is the location of roads relative to the tabulation statistical area boundary. As long as the road is within the correct statistical area, the population and housing will be properly reported. The guidelines below explain what we can accept as part of our geographic area delineation programs (including the Redistricting Data Program-Phase 2, the Participant Statistical Areas Program, and the Tribal Statistical Areas Program.) This document supplements the detailed criteria and guidelines provided for each of these programs. It is critical that participants understand that the programs offered to review and delineate boundaries are not intended for street feature update except where a boundary follows a road (or other visible feature such as a stream) and the road is not reflected in our file. For this reason the Census Bureau can not accept street (or other) feature updates that do not follow the guidelines below. Street Update Do’s:
If a road is missing and it forms the boundary for the area you are defining, add the road and provide the name.
If you can not correctly delineate the boundary for a statistical area you are
updating because the feature you need to follow is incorrectly located, mislabeled or distorted in the Census Bureau’s file, we request that you put the boundary on the problematic feature in our file. This will establish for us what feature you want the boundary to follow. In addition, we request that you report the problem area to the Census Bureau (through your regional office contact) by sending information describing the incorrect feature including the TIGER Line Identifier (TLID) and the specific statistical area boundary affected. This can be done using email with information to describe the problem such as an image file, PDF or other medium showing the appropriate correction.
Street Update Don’ts Do not realign street features by merging your roads into our spatial file and
flagging your roads as adds and our roads as deletes. Do not add streets that are missing for an entire housing development (add only
streets that are needed to form a boundary). We will be adding new or missing streets during our address canvassing operation which will occur in the spring and early summer of 2009. We recommend that you flag these missing streets in your
PSAP MTPS Version 4.6 User Guide 60

geographic information system’s file. The Census Bureau will provide verification materials for each project that will show the results of address canvassing. If these streets are still missing at that time, we will accept these as adds.
Do not delete streets for the same reasons described above.
The Census Bureau staff will contact you if they require more information or have questions about feature updates submitted as part of our 2010 geographic programs.
PSAP MTPS Version 4.6 User Guide 61

PSAP MTPS Version 4.6 User Guide 62
Appendix C – Reset a Single County In extreme cases where the files become corrupted for an individual county, it may become necessary to reset that county's data. The following instructions explain how to perform this operation. 1. Navigate to the main data folder for your state. 2. Identify the corrupted county's sub-folder by the state county FIPS code. 3. Delete the corrupted county's sub-folder. 4. Launch the MAF/TIGER Partnership software (MTPS). 5. Use the PSAP pull down menu and use the Pick a County function to select the county you just deleted. Note: It is extremely important that you use the Pick a County function. If you use the Open function at this stage you will corrupt the data for all counties in your PSAP coverage. 6. Allow the county to import. 7. Once the county has completely imported, use the PSAP pull down to select the Open command. 8. You can now work in your county as needed.