Embed Size (px)
Citation preview
CentricityTM EDI 12 Plug-inInstallation and Setup Guide
September 2015© 2015 General Electric Company—All rights reserved.
GE Healthcare Integrated IT Solutions
540 W. Northwest HighwayBarrington, IL 60010 USA
GE Healthcare
The Centricity EDI 12 plug-in is an auxiliary program that works with Centricity Practice Solution 12, to enable the electronic
Creation and transmission of claims in X12 837P, 837I, and 837WC version 5010 formatted files to the Centricity clearinghouse
Processing of X12 835 version 5010 remittance files received from Centricity
Processing of Centricity’s proprietary reports
This document describes how to install and set up the Centricity EDI 12 plug-in and modify your existing Centricity Practice Solution 12 database for electronic data interchange (EDI) transaction processing.
The procedures you need to perform depend on your reason for installing the plug-in, for example first-time implementation of EDI claim processing versus a simple plug-in upgrade. Refer to the appropriate checklist to determine the required procedures.
Contents...
Checklist for first time installations...... 2
Checklist for upgrading only ................... 2
Checklist for upgrading and adding EDI remittance processing ............................... 3
Enroll for EDI transaction processing.. 3
Enroll for EDI transaction processing.. 3
Order Centricity licenses ........................... 3
Modify the Centricity Practice Solution database for EDI claim processing ...... 4
Collect required information .................18
Install the Centricity EDI 12 plug-in....19
Verify plug-in installation ........................20
Set up the clearinghouse........................22
Edit insurance carrier settings .............26
Set up carrier claim files (professional filing) .............................................................29
Set up carrier claim files (institutional filing) .............................................................40
Set up carrier claim files (Workers’ Compensation Electronic Claims Submission) ...............................................45
Create a case for a Workers’ Compensation claim...............53Associate a Workers’ Compensation case to a visit..............................54
Add optional service: remittance processing......................................................55
The next step ................................................70
Glossary ..........................................................70
Centricity EDI 12 Plug-in Installation and Setup
2
Checklist for first time installations
If your practice is new to EDI transaction processing or if this is a first time installation of the Centricity plug-in, you need to perform the following tasks to install the plug-in and set up Centricity Practice Solution 12 for transaction processing.
“Modify the Centricity Practice Solution database for EDI claim processing” on page 4
“Enroll for EDI transaction processing” on page 3
“Order Centricity licenses” on page 3
“Collect required information” on page 18
“Install the Centricity EDI 12 plug-in” on page 19
“Verify plug-in installation” on page 20
“Set up the clearinghouse” on page 22
“Edit insurance carrier settings” on page 26
“Add optional service: remittance processing” on page 55
Checklist for upgrading only
If you want to upgrade the currently installed plug-in, you need to perform only the following procedures.
If you are changing clearinghouses, you should treat this as a new installation. See the “Checklist for first time installations” on page 2.
If you want to upgrade the plug-in version and add an optional service, see the following procedures:
“Checklist for upgrading and adding EDI remittance processing” on page 3
“Enroll for EDI transaction processing” on page 3
“Install the Centricity EDI 12 plug-in” on page 19
“Verify plug-in installation” on page 20
Some tasks have more than one procedure.
Checklist for upgrading and adding EDI remittance processing
3
Checklist for upgrading and adding EDI remittance processing
If you want to upgrade a currently installed plug-in and add the optional service of remittance processing, you need to perform only the following tasks.
If you are changing the clearinghouse, you need to treat this as a new installation. See the “Checklist for first time installations” on page 2.
“Enroll for EDI transaction processing” on page 3
“Order Centricity licenses” on page 3
“Collect required information” on page 18
“Install the Centricity EDI 12 plug-in” on page 19
“Verify plug-in installation” on page 20
“Set up remittance processing” on page 55
Enroll for EDI transaction processing
Before you can electronically process transactions through the Centricity clearinghouse, you must enroll through GE Healthcare EDI. Separate enrollment is required for claims and remittance processing.
Refer to your GE Centricity Practice Solution 12 Welcome Kit and contact GE Healthcare EDI by phone or e-mail:
1-888-436-8491
Order Centricity licenses
Before you can submit claims to Centricity, you must have an Centricity claims license. If you want to use remittance, you must order a separate Centricity remittance license.
If you are a new customer, your Centricity license is ordered by your VAR or GE Healthcare sales representative when you purchase Centricity Practice Solution 12. License numbers are added to your database when the VAR or sales representative installs Centricity Practice Solution 12 at your site.
If you are adding this plug-in to your current Centricity Practice Solution 12 system, contact your VAR or GE sales representative, and they will contact GE
Some tasks have more than one procedure.
Enrollment normally takes from six to eight weeks to complete.
Centricity EDI 12 Plug-in Installation and Setup
4
to add Centricity to your license. Then Centricity Practice Solution Services will contact you to help you add the license information to your database.
The Centricity licenses are:
Modify the Centricity Practice Solution database for EDI claim processing
Before you can submit claims electronically, you must ensure the Centricity Practice Solution 12 database is set up to handle HIPAA compliant files. For example, the database must contain certain company, facility, and provider information such as federal tax and provider referring IDs, and ID qualifiers.
Procedures for setting up the Centricity Practice Solution 12 database are:
“Add company information” on page 4
“Add facility information” on page 10
“Add provider information” on page 14
Add company information
Company information that is required to successfully process electronic claims and file facility fees includes the ID qualifiers and the facility type.
Procedures for adding company information are:
“Select a company and access the Edit Company window” on page 4
“Add company information (professional filing)” on page 5
“Add company information (facility filing)” on page 8
Select a company and access the Edit Company window
Perform this procedure to select the company and access the Edit Company window. From this window, you enter information that is required to set up the company for EDI claim processing.
Prerequisites
Set up basic company information in the Centricity Practice Solution 12 database. See the Centricity Practice Solution 12 online help.
To select a company and access the Edit Company window
License ID Part number
Claims 411 MBCHBOCSUBMISSION
Remittance 412 MBCHBOCREMITTANCE
You need to add company information for all companies and to perform the appropriate procedures based on the filing method for each.
Modify the Centricity Practice Solution database for EDI claim processing
5
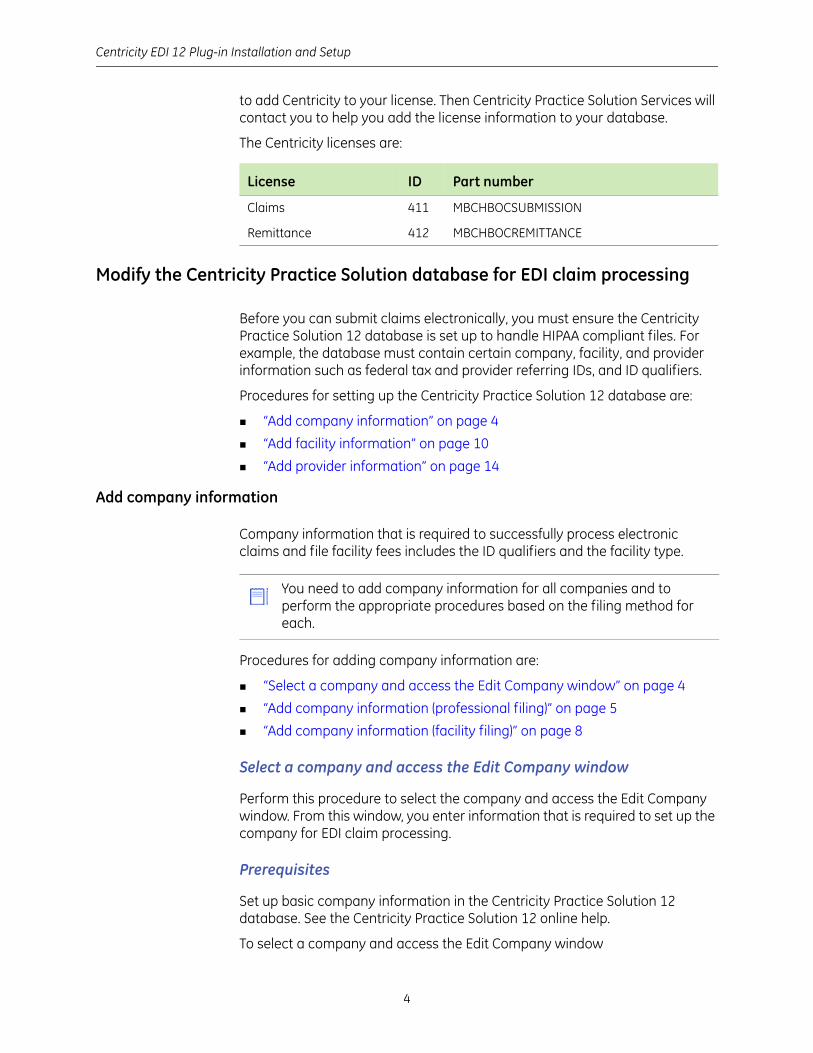
1 From the Centricity Practice Solution 12 main menu, click Administration.
2 Select Edit > Companies.
The Find Company window opens.
3 Click Search.
4 In the search results, select the desired company name, then click Edit .
The Edit Company window opens with the Information tab selected.
Add company information (professional filing)
Perform this procedure to add the company information required for electronic claim processing if your credentials with insurance carriers are for either group or individual filing.
Prerequisites
Set up basic company information in the Centricity Practice Solution 12 database. See the Centricity Practice Solution 12 online help.
“Select a company and access the Edit Company window” on page 4.
To add company information (professional filing)
search results
Centricity EDI 12 Plug-in Installation and Setup
6
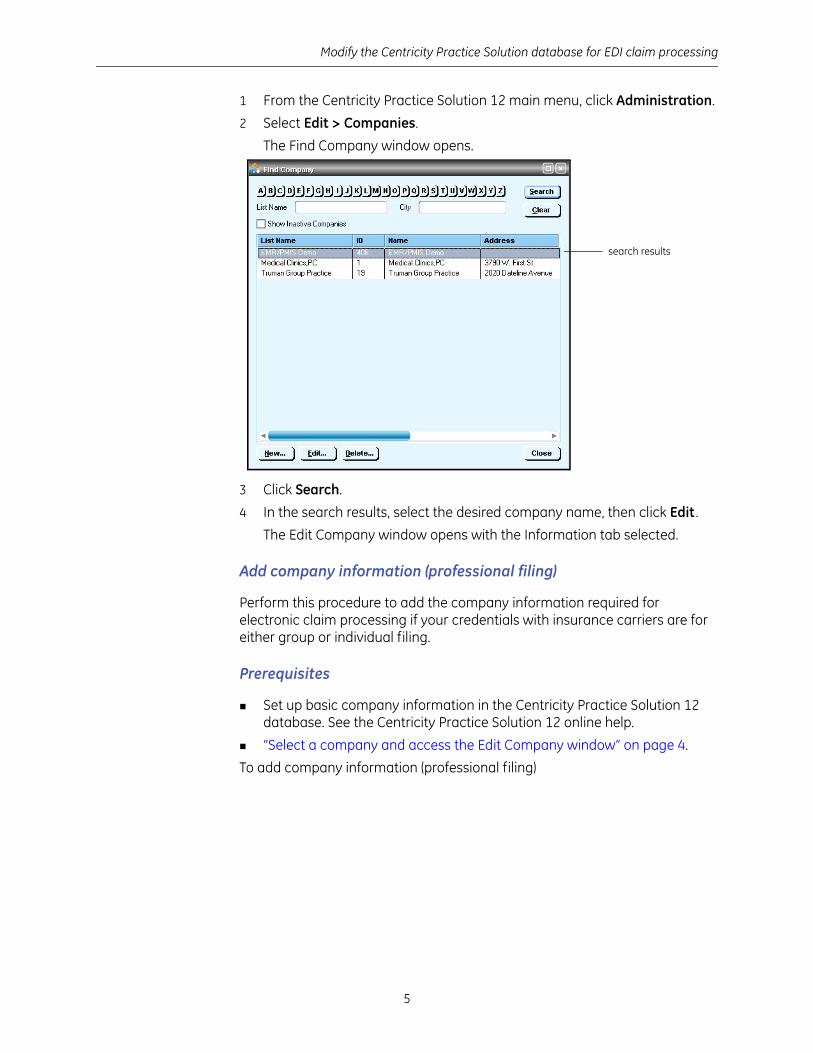
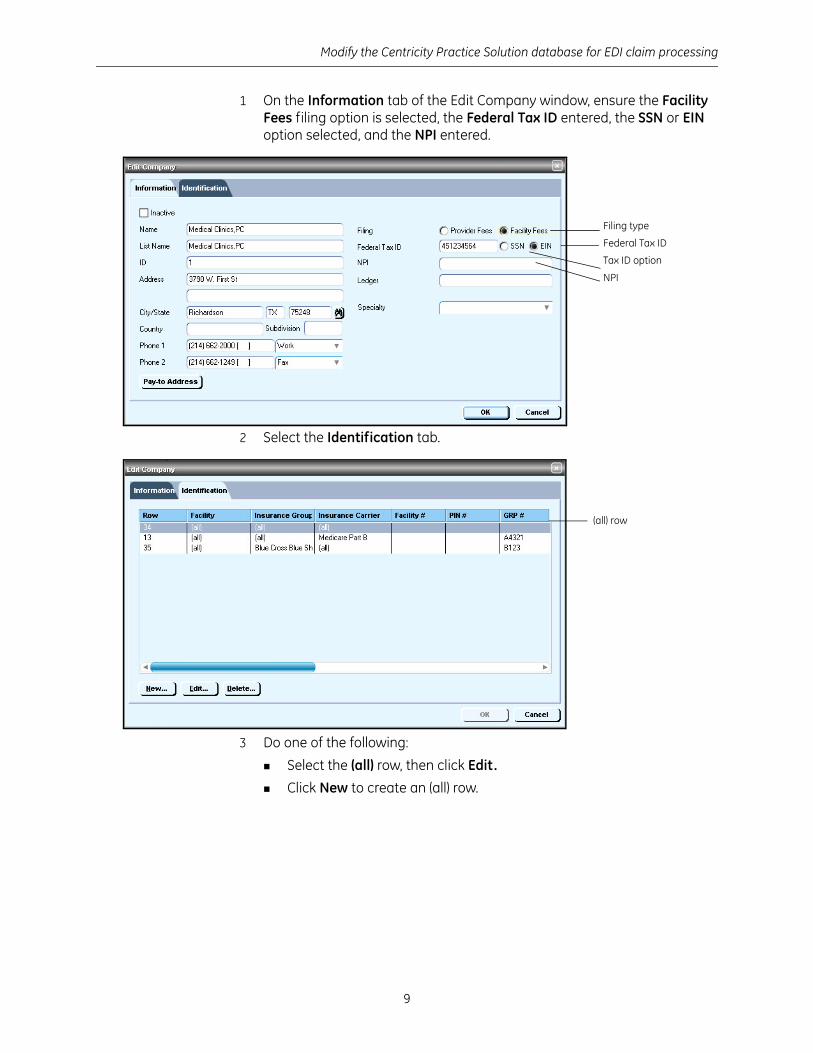
1 On the Information tab of the Edit Company window, ensure the Provider Fees filing option is selected, the Federal Tax ID entered, the SSN or EIN option selected, and the NPI selected.
2 If filing as a group, select the appropriate Specialty.
3 Select the Identification tab.
Filing type
Federal Tax ID
Tax ID option
NPI
Before you can use the Group Taxonomy qualifier, you will need to specify the Taxonomy code associated with the Specialty, which is entered in Administration > Edit > Companies > Edit Company window > Information tab > Specialty.
The Group Taxonomy associated with the Specialty you select will be pulled by Loop 2000A PRV if this option is selected in the Insurance Carrier Settings window. For Professional filing, see “Send Taxonomy in 2000A PRV” on page 30. For Institutional Filing, see “Send Taxonomy in 2000A PRV” on page 41.
(all) row
exception rows
Modify the Centricity Practice Solution database for EDI claim processing
7
4 Do one of the following:
Select the (all) row, then click Edit .
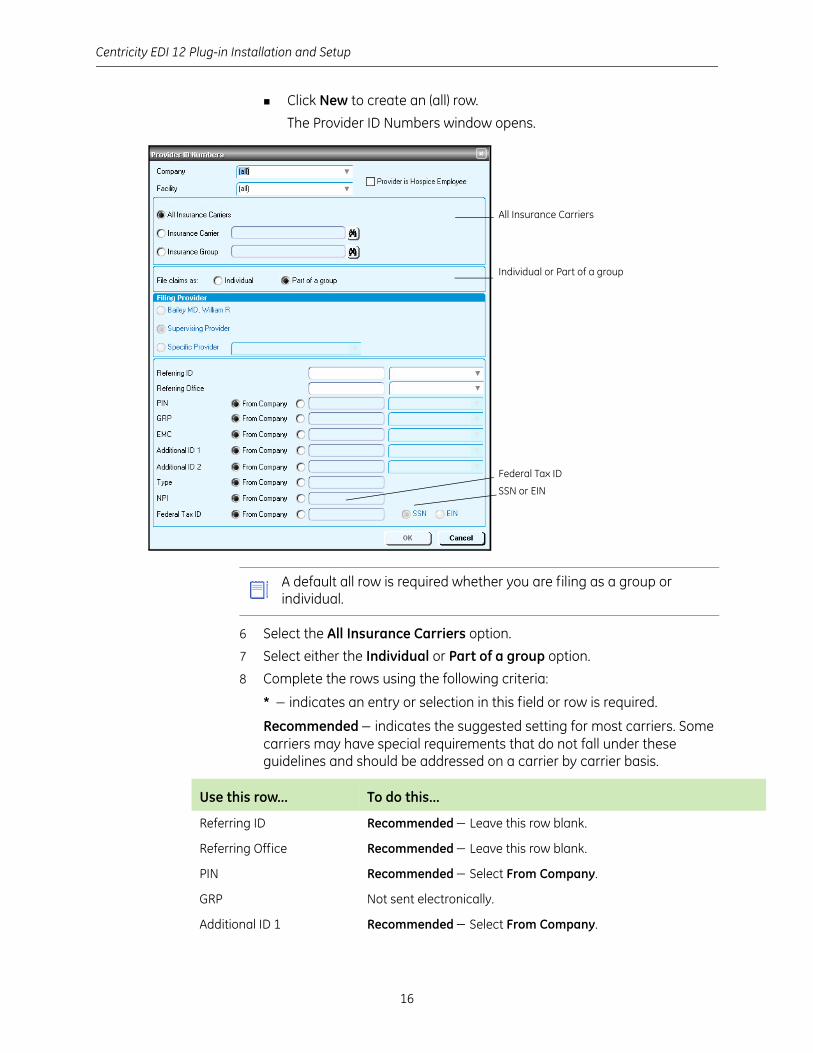
Click New to create an (all) row.
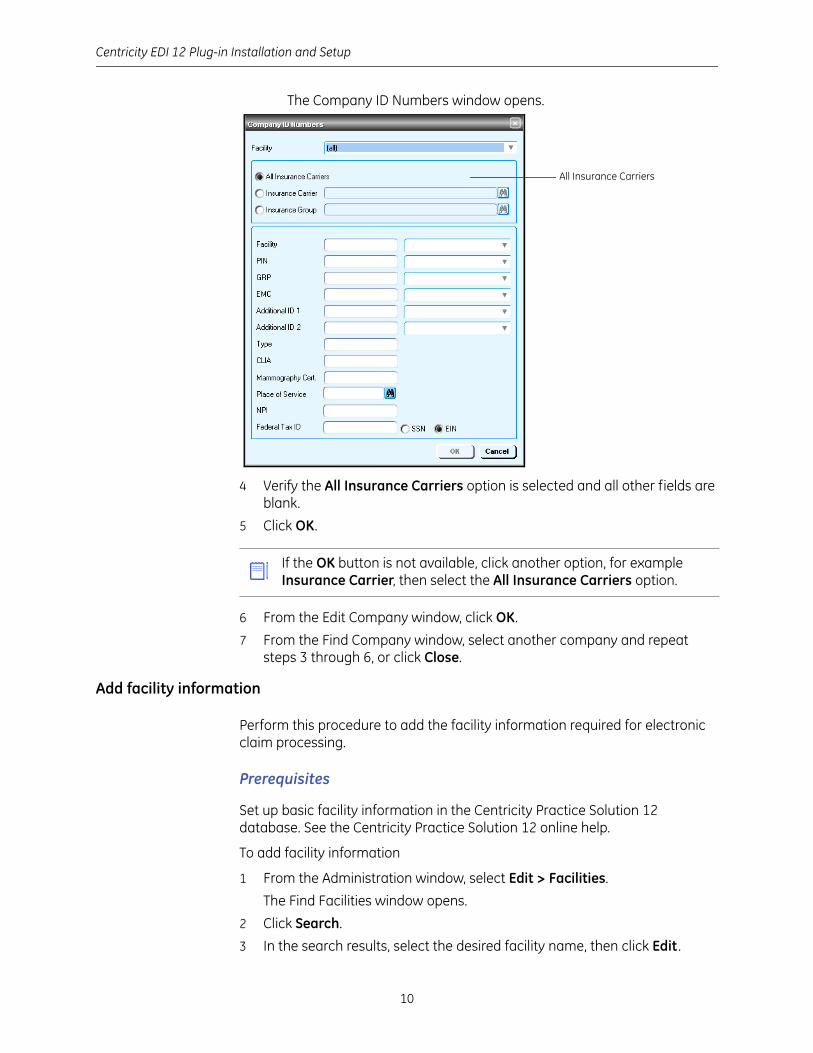
The Company ID Numbers window opens.
5 Verify the All Insurance Carriers option is selected and all other fields are blank.
6 Click OK.
7 Do one of the following if you have or need an exception row:
Select an exception row, then click Edit .
Click New to create an exception row.
The Company ID Numbers window opens.
A default all row is required whether you are filing as a group or individual.
If the OK button is not available, click another option, for example Insurance Carrier, then select the All Insurance Carriers option.
Exception rows are used to enter carrier-specific information required by the carrier to process EDI transactions. If you are licensed with carriers to file as an individual, exception rows at the company level are generally not required.
Centricity EDI 12 Plug-in Installation and Setup
8
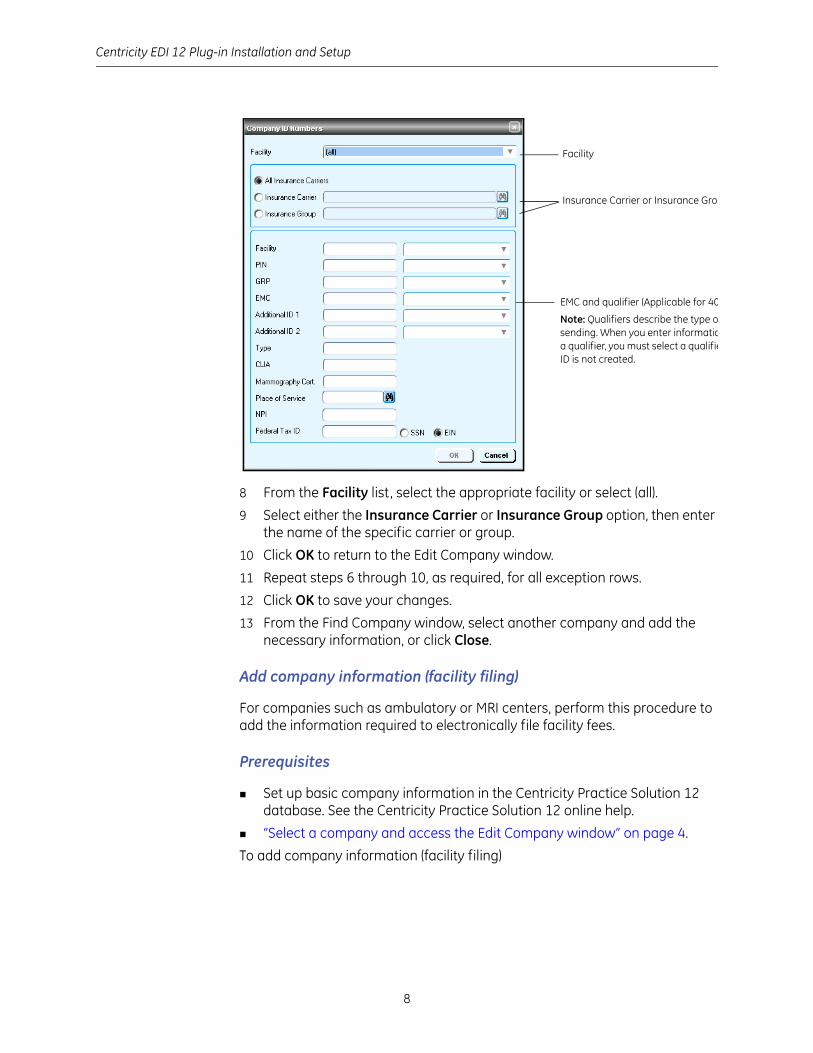
8 From the Facility list, select the appropriate facility or select (all).
9 Select either the Insurance Carrier or Insurance Group option, then enter the name of the specific carrier or group.
10 Click OK to return to the Edit Company window.
11 Repeat steps 6 through 10, as required, for all exception rows.
12 Click OK to save your changes.
13 From the Find Company window, select another company and add the necessary information, or click Close.
Add company information (facility filing)
For companies such as ambulatory or MRI centers, perform this procedure to add the information required to electronically file facility fees.
Prerequisites
Set up basic company information in the Centricity Practice Solution 12 database. See the Centricity Practice Solution 12 online help.
“Select a company and access the Edit Company window” on page 4.
To add company information (facility filing)
EMC and qualifier (Applicable for 40
Note: Qualifiers describe the type osending. When you enter informatioa qualifier, you must select a qualifieID is not created.
Insurance Carrier or Insurance Grou
Facility
Modify the Centricity Practice Solution database for EDI claim processing
9
1 On the Information tab of the Edit Company window, ensure the Facility Fees filing option is selected, the Federal Tax ID entered, the SSN or EIN option selected, and the NPI entered.
2 Select the Identification tab.
3 Do one of the following:
Select the (all) row, then click Edit.
Click New to create an (all) row.
Filing type
Federal Tax ID
Tax ID option
NPI
(all) row
Centricity EDI 12 Plug-in Installation and Setup
10
The Company ID Numbers window opens.
4 Verify the All Insurance Carriers option is selected and all other fields are blank.
5 Click OK.
6 From the Edit Company window, click OK.
7 From the Find Company window, select another company and repeat steps 3 through 6, or click Close.
Add facility information
Perform this procedure to add the facility information required for electronic claim processing.
Prerequisites
Set up basic facility information in the Centricity Practice Solution 12 database. See the Centricity Practice Solution 12 online help.
To add facility information
1 From the Administration window, select Edit > Facilities.
The Find Facilities window opens.
2 Click Search.
3 In the search results, select the desired facility name, then click Edit .
If the OK button is not available, click another option, for example Insurance Carrier, then select the All Insurance Carriers option.
All Insurance Carriers
Modify the Centricity Practice Solution database for EDI claim processing
11
The Edit Facility window opens with the Information tab selected.
4 Select the Identification tab.
5 Do one of the following:
Select the (all) row, then click Edit.
Click New to create an (all) row.
The Facility ID Numbers window opens.
6 From the Company list, select (all).
(all) rowexception row
Company
Facility Addres
Place of Servic
Type
Federal Tax IDSSN or EIN
All Insurance C
Centricity EDI 12 Plug-in Installation and Setup
12
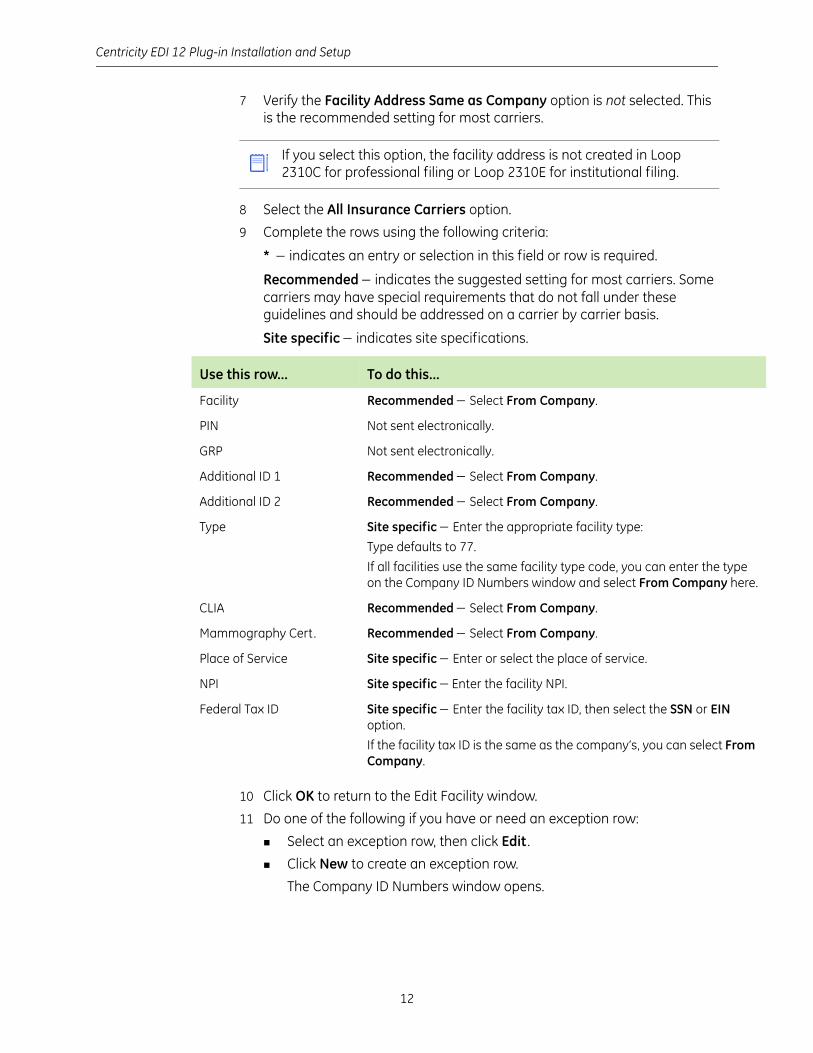
7 Verify the Facility Address Same as Company option is not selected. This is the recommended setting for most carriers.
8 Select the All Insurance Carriers option.
9 Complete the rows using the following criteria:
* indicates an entry or selection in this field or row is required.
Recommended indicates the suggested setting for most carriers. Some carriers may have special requirements that do not fall under these guidelines and should be addressed on a carrier by carrier basis.
Site specific indicates site specifications.
10 Click OK to return to the Edit Facility window.
11 Do one of the following if you have or need an exception row:
Select an exception row, then click Edit .
Click New to create an exception row.
The Company ID Numbers window opens.
If you select this option, the facility address is not created in Loop 2310C for professional filing or Loop 2310E for institutional filing.
Use this row... To do this...
Facility Recommended Select From Company.
PIN Not sent electronically.
GRP Not sent electronically.
Additional ID 1 Recommended Select From Company.
Additional ID 2 Recommended Select From Company.
Type Site specific Enter the appropriate facility type:
Type defaults to 77.
If all facilities use the same facility type code, you can enter the type on the Company ID Numbers window and select From Company here.
CLIA Recommended Select From Company.
Mammography Cert. Recommended Select From Company.
Place of Service Site specific Enter or select the place of service.
NPI Site specific Enter the facility NPI.
Federal Tax ID Site specific Enter the facility tax ID, then select the SSN or EIN option.
If the facility tax ID is the same as the company’s, you can select From Company.
Modify the Centricity Practice Solution database for EDI claim processing
13
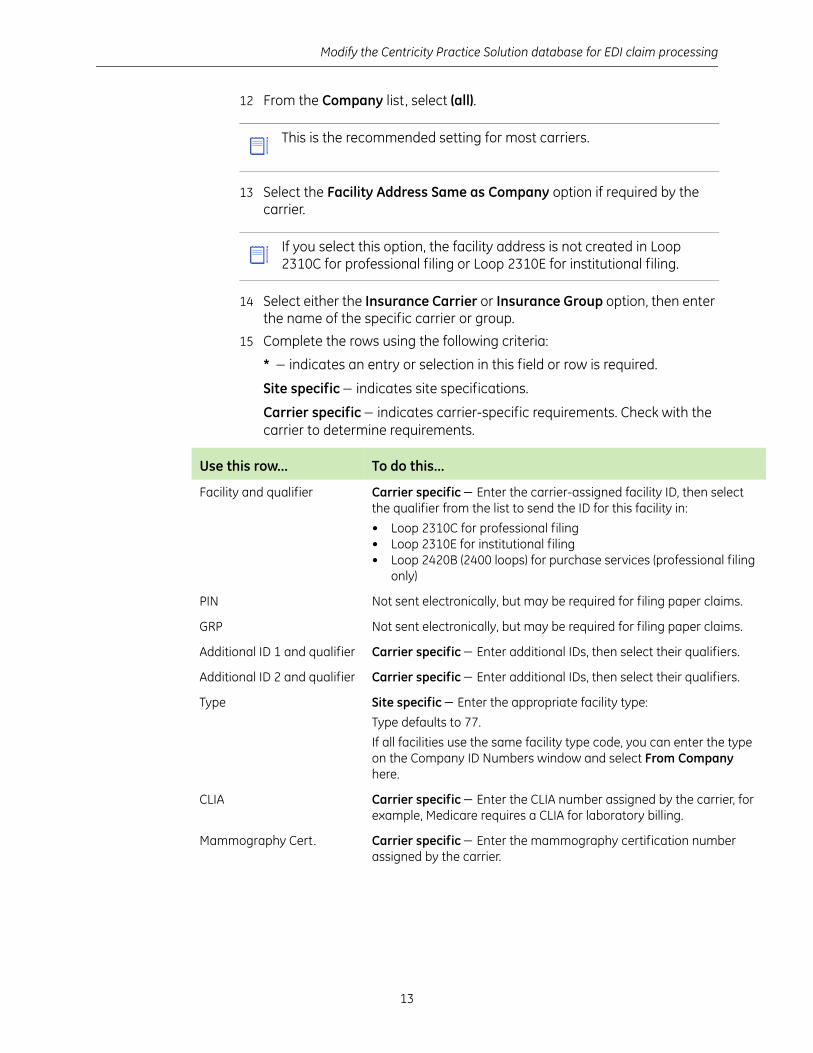
12 From the Company list, select (all).
13 Select the Facility Address Same as Company option if required by the carrier.
14 Select either the Insurance Carrier or Insurance Group option, then enter the name of the specific carrier or group.
15 Complete the rows using the following criteria:
* indicates an entry or selection in this field or row is required.
Site specific indicates site specifications.
Carrier specific indicates carrier-specific requirements. Check with the carrier to determine requirements.
This is the recommended setting for most carriers.
If you select this option, the facility address is not created in Loop 2310C for professional filing or Loop 2310E for institutional filing.
Use this row... To do this...
Facility and qualifier Carrier specific Enter the carrier-assigned facility ID, then select the qualifier from the list to send the ID for this facility in:
• Loop 2310C for professional filing• Loop 2310E for institutional filing• Loop 2420B (2400 loops) for purchase services (professional filing
only)
PIN Not sent electronically, but may be required for filing paper claims.
GRP Not sent electronically, but may be required for filing paper claims.
Additional ID 1 and qualifier Carrier specific Enter additional IDs, then select their qualifiers.
Additional ID 2 and qualifier Carrier specific Enter additional IDs, then select their qualifiers.
Type Site specific Enter the appropriate facility type:
Type defaults to 77.
If all facilities use the same facility type code, you can enter the type on the Company ID Numbers window and select From Company here.
CLIA Carrier specific Enter the CLIA number assigned by the carrier, for example, Medicare requires a CLIA for laboratory billing.
Mammography Cert. Carrier specific Enter the mammography certification number assigned by the carrier.
Centricity EDI 12 Plug-in Installation and Setup
14
16 Repeat steps 11 through 15 for every exception row.
17 Click OK to save your changes.
18 From the Find Facility window, select another facility and add the necessary information, or click Close.
Add provider information
Perform this procedure to add the provider information required for electronic claim processing when filing with a carrier as either a group or individual. For each provider, you need to add appropriate information based on the filing method and carrier requirements. For example:
If filing as a group, the carrier may require a billing and rendering number.
If filing as an individual, the carrier may only require a rendering or billing number.
Prerequisites
Set up basic provider information in the Centricity Practice Solution 12 database. See the Centricity Practice Solution 12 online help.
To add provider information
1 From the Administration window, select Edit > Responsible Provider.
* Place of Service Site specific Enter or select the place of service.
NPI Site specific Enter the facility NPI.
Federal Tax ID Carrier specific Enter the facility tax ID, then select the SSN or EIN option.
If the facility tax ID is the same as the company’s, you can select From Company. See “To add company information (professional filing)” on page 5 or “To add company information (facility filing)” on page 8.
Use this row... To do this...
Modify the Centricity Practice Solution database for EDI claim processing
15
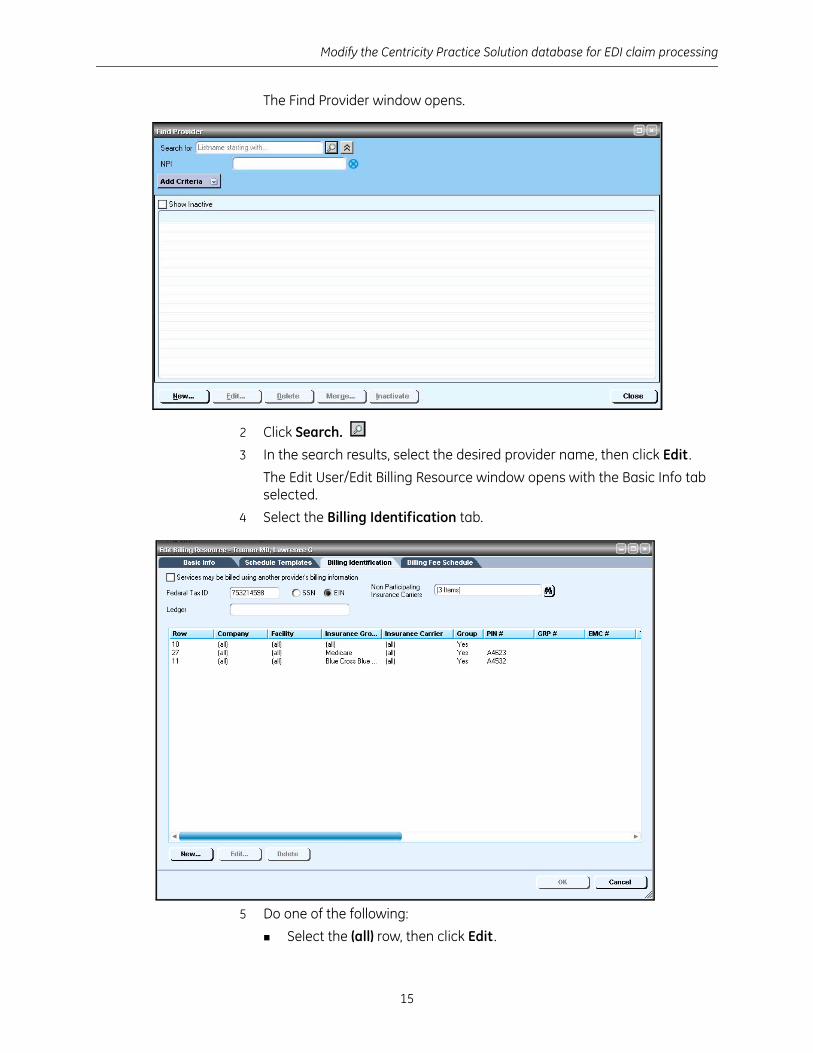
The Find Provider window opens.
2 Click Search.
3 In the search results, select the desired provider name, then click Edit .
The Edit User/Edit Billing Resource window opens with the Basic Info tab selected.
4 Select the Billing Identification tab.
5 Do one of the following:
Select the (all) row, then click Edit .
Centricity EDI 12 Plug-in Installation and Setup
16
Click New to create an (all) row.
The Provider ID Numbers window opens.
6 Select the All Insurance Carriers option.
7 Select either the Individual or Part of a group option.
8 Complete the rows using the following criteria:
* indicates an entry or selection in this field or row is required.
Recommended indicates the suggested setting for most carriers. Some carriers may have special requirements that do not fall under these guidelines and should be addressed on a carrier by carrier basis.
All Insurance Carriers
Individual or Part of a group
Federal Tax ID
SSN or EIN
A default all row is required whether you are filing as a group or individual.
Use this row... To do this...
Referring ID Recommended Leave this row blank.
Referring Office Recommended Leave this row blank.
PIN Recommended Select From Company.
GRP Not sent electronically.
Additional ID 1 Recommended Select From Company.
Modify the Centricity Practice Solution database for EDI claim processing
17
9 Click OK to return to the Edit User/Edit Billing Resource window.
10 Do one of the following if you have or need an exception row:
Select an exception row, then click Edit .
Click New to create an exception row.
The Provider ID Numbers window opens.
11 Select either the Insurance Carrier or Insurance Group option, then enter the name of the specific carrier or group.
12 Select either the Individual or Part of a group option.
13 Select the Filing Provider.
14 Complete the rows using the following criteria:
* indicates an entry or selection in this field or row is required.
Recommended indicates the suggested setting for most carriers. Some carriers may have special requirements that do not fall under these guidelines and should be addressed on a carrier by carrier basis.
Carrier specific indicates carrier-specific requirements. Check with the carrier to determine requirements.
Additional ID 2 Recommended Select From Company.
Type Not sent electronically.
NPI Recommended Enter the provider’s NPI.
Federal Tax ID Recommended Enter the provider’s tax ID, then select the SSN or EIN option.
If the provider’s tax ID is the same as the company’s, you can select From Company.
Use this row... To do this...
Use this row... To do this...
Referring ID and qualifier Carrier specific Enter the provider’s referring ID (for example, Medicare requires a UPIN), then select the qualifier from the list.
Referring Office and qualifier Carrier specific Enter the referring office, then select the qualifier from the list .
PIN and qualifier Carrier specific Enter the provider’s personal identification number (PIN) assigned by the carrier, then select the qualifier from the list.
GRP Not sent electronically, but may be required for filing paper claims.
Additional ID 1 and qualifier Carrier specific Enter additional IDs, then select their qualifiers.
Additional ID 2 and qualifier Carrier specific Enter additional IDs, then select their qualifiers.
Type Not sent electronically.
Centricity EDI 12 Plug-in Installation and Setup
18
15 Click OK to return to the Edit User/Edit Billing Resource window.
16 Repeat steps 11 through 15 for every exception row.
17 Click OK to save your changes.
18 From the Find Provider window, select another provider and add the necessary information, or click Close.
Collect required information
Use the following checklist to ensure you have the information required to set up the Centricity Practice Solution 12 database for EDI transaction processing.
Site information
Server name – name of your SQL server ____________________
User name – SA (system administrator) ____________________
Password – system administrator password ____________________
Database name ____________________
Name of connection device – type of modem ____________________
Dial location – location of the modem (workstation or server) ____________________
Address of the practice or billing service submitting claims – street, city, state, and zip code
_____________________________________________________________________________
Your site’s general guidelines for automatic posting of remittance files
Clearinghouse and carrier information
Carrier-specific requirements https://edi.idxasp.com/XMLFileTransfer
Logon ID and password – contact your EDI Implementation Specialist ___________________
Remittance logon ID and password – contact GE Enrollments ___________________
Payer literals (remittance only) N1 PR segment of the X12 835 remittance file
NPI Recommended Enter the provider’s NPI.
* Federal Tax ID Recommended Enter the provider’s tax ID, then select the SSN or EIN option.
If the provider’s tax ID is the same as the company’s, you can select From Company. See “To add company information (professional filing)” on page 5.
Use this row... To do this...
Install the Centricity EDI 12 plug-in
19
Install the Centricity EDI 12 plug-in
Perform this procedure to install the Centricity EDI 12 plug-in on a workstation (local computer) or a network server.
Prerequisites
“Enroll for EDI transaction processing” on page 3.
Have administrative privileges to the computer or be logged on as the administrator.
Know the server name, database name, and SA password. See “Collect required information” on page 18.
Have Centricity Practice Solution 12 security permissions.
To install the Centricity EDI 12 plug-in
1 From the Centricity Practice Solution 12 main menu, click the Product Updates button.
The Centricity Practice Solution 12: Product Updates Installer page opens.
2 Click the link Visit the GE Website for Product Updates to download updates.
The GE Product Updates page opens.
3 Under Status, select the Download Update or New Download link for the desired plug-in.
The File Download page opens.
4 Select the Back to Product Update page link, when the download is complete.
5 In the Optional section (for a new installation), select the Centricity install link to install the plug-in for the first time.
The InstallShield One-Step Install page opens.
6 Click Install.
The InstallShield Wizard opens.
If you are installing the plug-in on a local computer and using the modem on the server to dial out, contact Centricity Practice Solution Services (1-888-436-8491) for assistance.
If you are installing the plug-in locally, you must install the plug-in on all workstations that are used to batch and transmit claims and process reports and remittance.
Centricity EDI 12 Plug-in Installation and Setup
20
7 Follow the installation instructions to complete the installation.
Verify plug-in installation
Perform this procedure to ensure the Centricity EDI 12 plug-in is successfully installed.
To verify plug-in installation
1 From the Centricity Practice Solution 12 main menu, click Administration.
The Administration window opens.
2 Select Edit > Plug-Ins.
The Plug-ins window opens with the Claim Files Creator tab selected.
3 Select the desired plug-in, then click Verify.
The File Creator window opens.
4 Ensure each item is “available,” then click OK.
5 Select the File Processor tab, then repeat steps 3 and 4.
6 Select the File Transmitters tab, then repeat steps 3 and 4.
7 Click Cancel to close the Plug-in window.
Troubleshoot installation
Plug-in file settings are configured automatically when you install the plug-in. If your installation verification failed, compare your plug-in file settings with the settings in the examples that follow. If you find discrepancies, contact your VAR or Centricity Practice Solution Services.
View Centricity EDI 12 plug-in file settings
Perform this procedure to compare your Centricity EDI 12 plug-in file settings to the settings in the examples.
You must configure the database the first time you install the plug-in and each time you install a new build of the plug-in. On the Setup Type window, select the Yes, configure a new database option. If you subsequently install the plug-in on other computers, select the No, just install the plug-in on this workstation option.The installation is complete when the status bar indicates Done.
Do not alter these settings unless you know how to create your own plug-ins or have specific instructions from your VAR or Centricity Practice Solution Services.
Before using EDI Submission Management, you must log out of Centricity Practice Solution and close the Internet Explorer® start screen to view recently installed plug-ins.
Verify plug-in installation
21
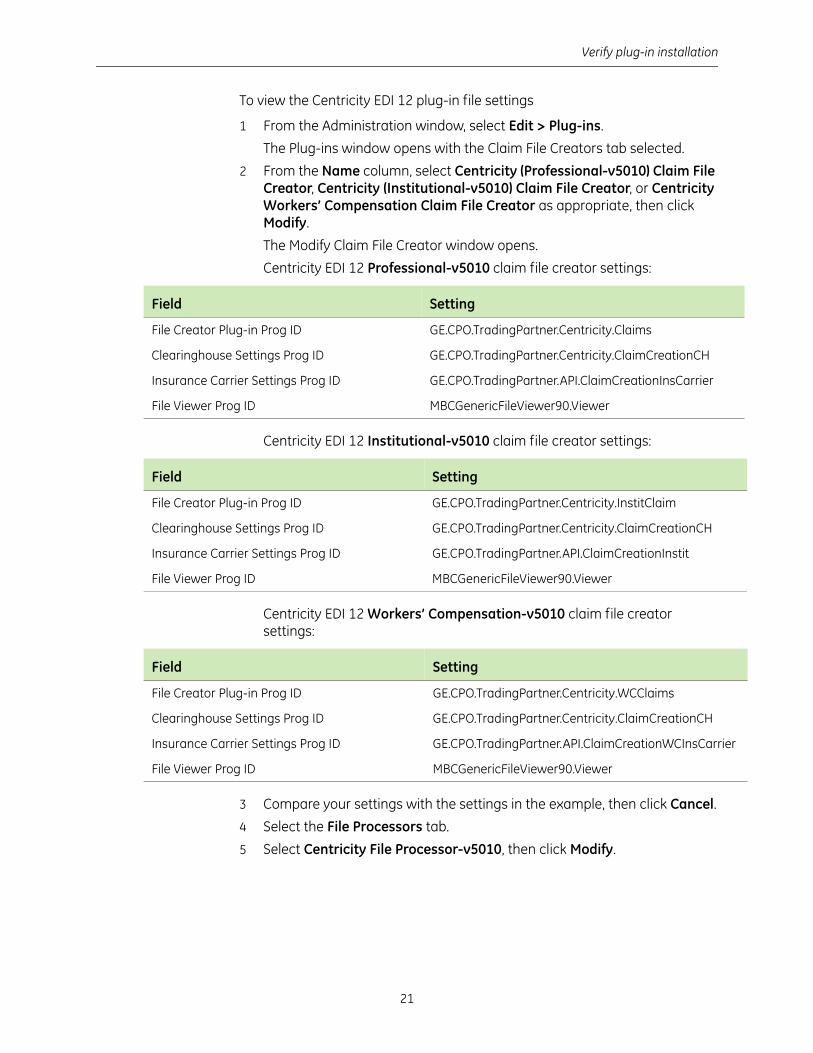
To view the Centricity EDI 12 plug-in file settings
1 From the Administration window, select Edit > Plug-ins.
The Plug-ins window opens with the Claim File Creators tab selected.
2 From the Name column, select Centricity (Professional-v5010) Claim File Creator, Centricity (Institutional-v5010) Claim File Creator, or Centricity Workers’ Compensation Claim File Creator as appropriate, then click Modify.
The Modify Claim File Creator window opens.
Centricity EDI 12 Professional-v5010 claim file creator settings:
Centricity EDI 12 Institutional-v5010 claim file creator settings:
Centricity EDI 12 Workers’ Compensation-v5010 claim file creator settings:
3 Compare your settings with the settings in the example, then click Cancel.
4 Select the File Processors tab.
5 Select Centricity File Processor-v5010, then click Modify.
Field Setting
File Creator Plug-in Prog ID GE.CPO.TradingPartner.Centricity.Claims
Clearinghouse Settings Prog ID GE.CPO.TradingPartner.Centricity.ClaimCreationCH
Insurance Carrier Settings Prog ID GE.CPO.TradingPartner.API.ClaimCreationInsCarrier
File Viewer Prog ID MBCGenericFileViewer90.Viewer
Field Setting
File Creator Plug-in Prog ID GE.CPO.TradingPartner.Centricity.InstitClaim
Clearinghouse Settings Prog ID GE.CPO.TradingPartner.Centricity.ClaimCreationCH
Insurance Carrier Settings Prog ID GE.CPO.TradingPartner.API.ClaimCreationInstit
File Viewer Prog ID MBCGenericFileViewer90.Viewer
Field Setting
File Creator Plug-in Prog ID GE.CPO.TradingPartner.Centricity.WCClaims
Clearinghouse Settings Prog ID GE.CPO.TradingPartner.Centricity.ClaimCreationCH
Insurance Carrier Settings Prog ID GE.CPO.TradingPartner.API.ClaimCreationWCInsCarrier
File Viewer Prog ID MBCGenericFileViewer90.Viewer
Centricity EDI 12 Plug-in Installation and Setup
22
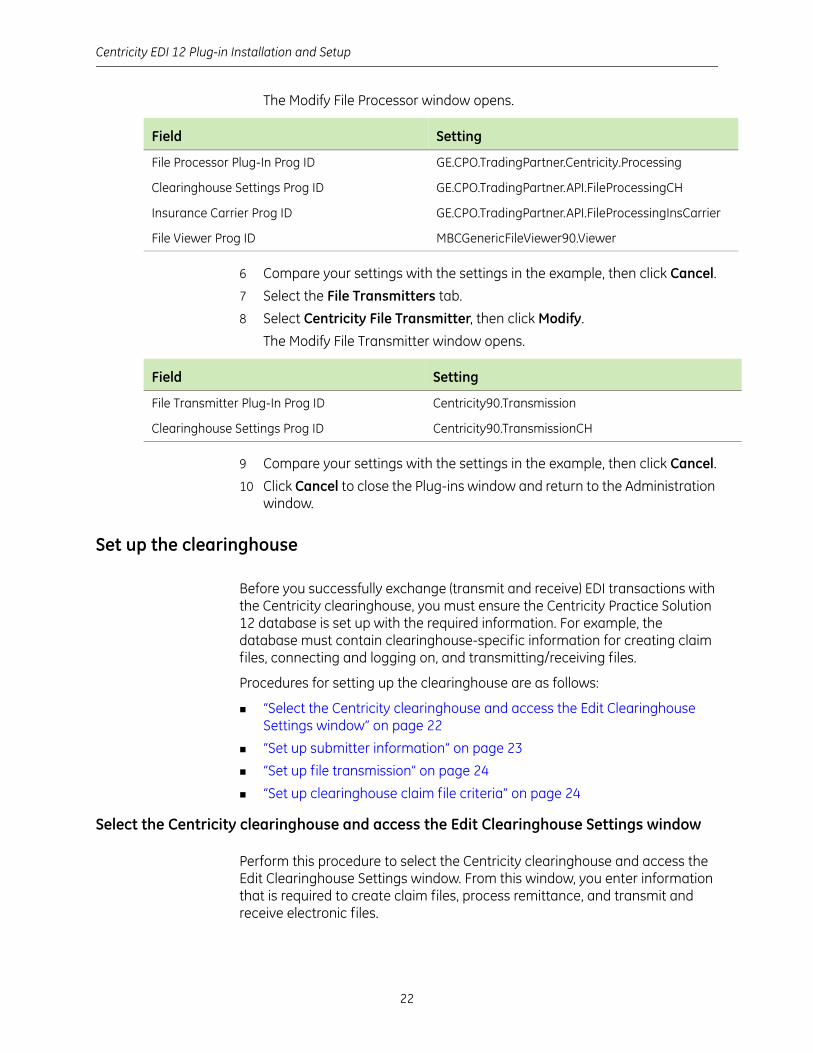
The Modify File Processor window opens.
6 Compare your settings with the settings in the example, then click Cancel.
7 Select the File Transmitters tab.
8 Select Centricity File Transmitter, then click Modify.
The Modify File Transmitter window opens.
9 Compare your settings with the settings in the example, then click Cancel.
10 Click Cancel to close the Plug-ins window and return to the Administration window.
Set up the clearinghouse
Before you successfully exchange (transmit and receive) EDI transactions with the Centricity clearinghouse, you must ensure the Centricity Practice Solution 12 database is set up with the required information. For example, the database must contain clearinghouse-specific information for creating claim files, connecting and logging on, and transmitting/receiving files.
Procedures for setting up the clearinghouse are as follows:
“Select the Centricity clearinghouse and access the Edit Clearinghouse Settings window” on page 22
“Set up submitter information” on page 23
“Set up file transmission” on page 24
“Set up clearinghouse claim file criteria” on page 24
Select the Centricity clearinghouse and access the Edit Clearinghouse Settings window
Perform this procedure to select the Centricity clearinghouse and access the Edit Clearinghouse Settings window. From this window, you enter information that is required to create claim files, process remittance, and transmit and receive electronic files.
Field Setting
File Processor Plug-In Prog ID GE.CPO.TradingPartner.Centricity.Processing
Clearinghouse Settings Prog ID GE.CPO.TradingPartner.API.FileProcessingCH
Insurance Carrier Prog ID GE.CPO.TradingPartner.API.FileProcessingInsCarrier
File Viewer Prog ID MBCGenericFileViewer90.Viewer
Field Setting
File Transmitter Plug-In Prog ID Centricity90.Transmission
Clearinghouse Settings Prog ID Centricity90.TransmissionCH
Set up the clearinghouse
23
To select the Centricity clearinghouse and access the Edit Clearinghouse Settings window
1 From the Administration window, select Edit > Clearinghouses.
The Find Clearinghouse window opens.
2 Click Search.
3 In the search results, select Centricity, then click Edit .
The Edit Clearinghouse Settings window opens with the File Transmission/Processing tab selected.
Set up submitter information
Perform this procedure to enter contact information that enables two-way communication between your site and the Centricity clearinghouse.
Prerequisites
Obtain site contact and Centricity logon information. See “Collect required information” on page 18.
“Select the Centricity clearinghouse and access the Edit Clearinghouse Settings window” on page 22.
To set up submitter information
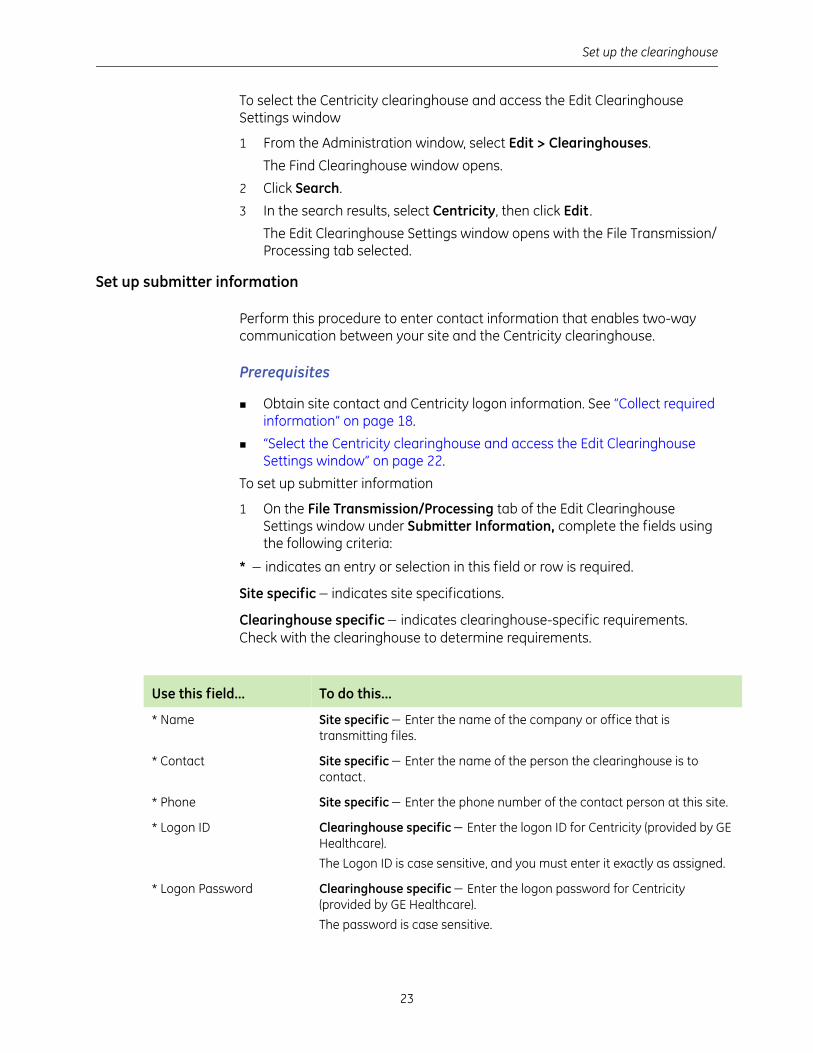
1 On the File Transmission/Processing tab of the Edit Clearinghouse Settings window under Submitter Information, complete the fields using the following criteria:
* indicates an entry or selection in this field or row is required.
Site specific indicates site specifications.
Clearinghouse specific indicates clearinghouse-specific requirements. Check with the clearinghouse to determine requirements.
Use this field... To do this...
* Name Site specific Enter the name of the company or office that is transmitting files.
* Contact Site specific Enter the name of the person the clearinghouse is to contact.
* Phone Site specific Enter the phone number of the contact person at this site.
* Logon ID Clearinghouse specific Enter the logon ID for Centricity (provided by GE Healthcare).
The Logon ID is case sensitive, and you must enter it exactly as assigned.
* Logon Password Clearinghouse specific Enter the logon password for Centricity (provided by GE Healthcare).
The password is case sensitive.
Centricity EDI 12 Plug-in Installation and Setup
24
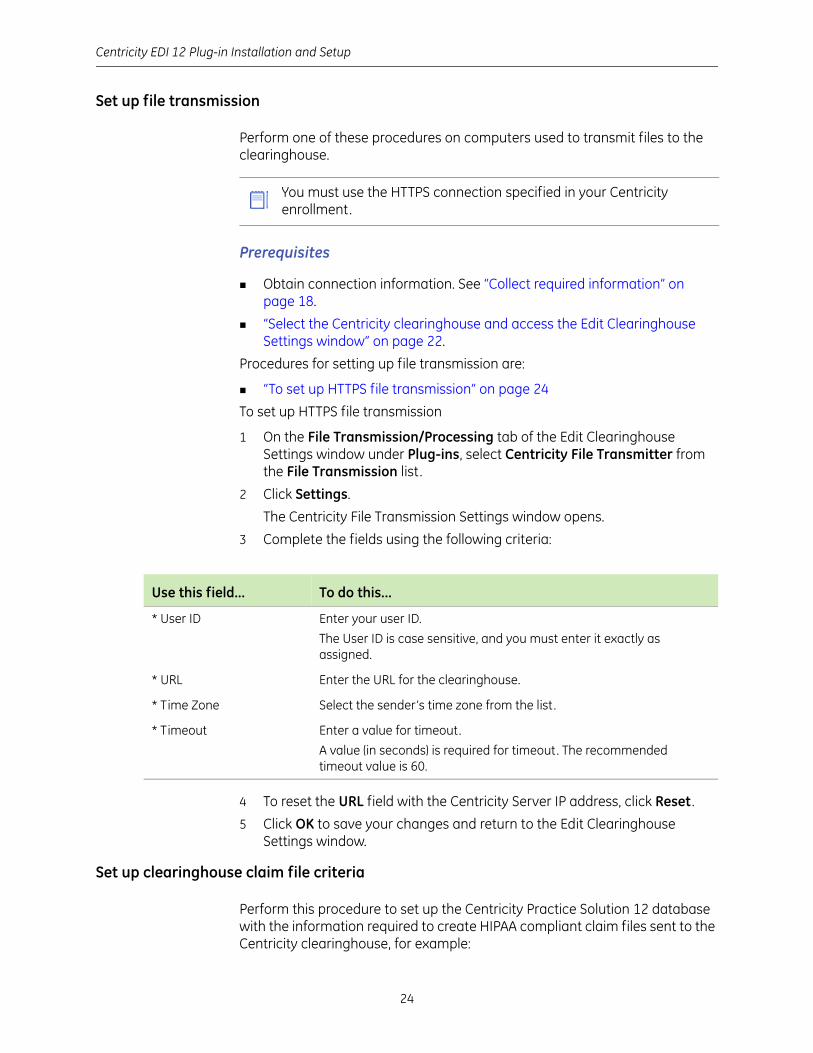
Set up file transmission
Perform one of these procedures on computers used to transmit files to the clearinghouse.
Prerequisites
Obtain connection information. See “Collect required information” on page 18.
“Select the Centricity clearinghouse and access the Edit Clearinghouse Settings window” on page 22.
Procedures for setting up file transmission are:
“To set up HTTPS file transmission” on page 24
To set up HTTPS file transmission
1 On the File Transmission/Processing tab of the Edit Clearinghouse Settings window under Plug-ins, select Centricity File Transmitter from the File Transmission list.
2 Click Settings.
The Centricity File Transmission Settings window opens.
3 Complete the fields using the following criteria:
4 To reset the URL field with the Centricity Server IP address, click Reset .
5 Click OK to save your changes and return to the Edit Clearinghouse Settings window.
Set up clearinghouse claim file criteria
Perform this procedure to set up the Centricity Practice Solution 12 database with the information required to create HIPAA compliant claim files sent to the Centricity clearinghouse, for example:
You must use the HTTPS connection specified in your Centricity enrollment.
Use this field... To do this...
* User ID Enter your user ID.
The User ID is case sensitive, and you must enter it exactly as assigned.
* URL Enter the URL for the clearinghouse.
* Time Zone Select the sender’s time zone from the list .
* Timeout Enter a value for timeout.
A value (in seconds) is required for timeout. The recommended timeout value is 60.
Set up the clearinghouse
25
Submitter information
Claim filing method (production)
Number of allowable claims per file
Prerequisites
“Select the Centricity clearinghouse and access the Edit Clearinghouse Settings window” on page 22.
To set up clearinghouse claim file criteria
1 On the Edit Clearinghouse Settings window, select the File Creator tab.
2 From the FIle Creator Plug-in list, select either Centricity (Professional-v5010) Claim File Creator or Centricity (Institutional-v5010) Claim File Creator.
3 Click Settings.
The Centricity Claims Clearinghouse Settings window opens.
4 Complete the fields using the following criteria:
* indicates an entry or selection in this field or row is required.
Recommended indicates the suggested setting for most carriers. Some carriers may have special requirements that do not fall under these guidelines and should be addressed on a carrier by carrier basis.
Site specific indicates site specifications.
Carrier specific indicates carrier-specific requirements. Check with the carrier to determine requirements.
Use this field... To do this...
* Address Site specific Enter the address of the company responsible for submitting claims to Centricity.
Enter information in the first field only. Information entered in the second field is not sent.
* City Site specific Enter the city where the submitter is located.
* State Site specific Enter the two-letter abbreviation of the state where the submitter is located.
* Zip Site specific Enter the zip code.
Region Recommended Leave blank.
* Production Carrier-specific Select the Production option to submit live claim files to the clearinghouse.
The Test Claim Filing Method is not supported for Centricity.
* Unique Submission Number Identifier
Site specific Select the Include Unique Identifier checkbox and enter the Unique Identifier.
This option applies only to Professional Claims creators.
Centricity EDI 12 Plug-in Installation and Setup
26
5 Click OK to save your changes and return to the Edit Clearinghouse Settings window.
6 On the Edit Clearinghouse Settings window, click OK.
7 On the Find Clearinghouse window, click OK.
Edit insurance carrier settings
Before you successfully exchange (transmit and receive) EDI transactions with insurance carriers, you must ensure the Centricity Practice Solution 12 database is set up with the required information. For example, the database must be set up to match the carrier-specific requirements for creating claim files.
Procedures for modifying insurance carrier settings are:
“Select an insurance carrier and access the Edit Insurance Carrier window” on page 26
“Add carrier information” on page 27
“Set up carrier claim files (professional filing)” on page 29
“Set up carrier claim files (institutional filing)” on page 40
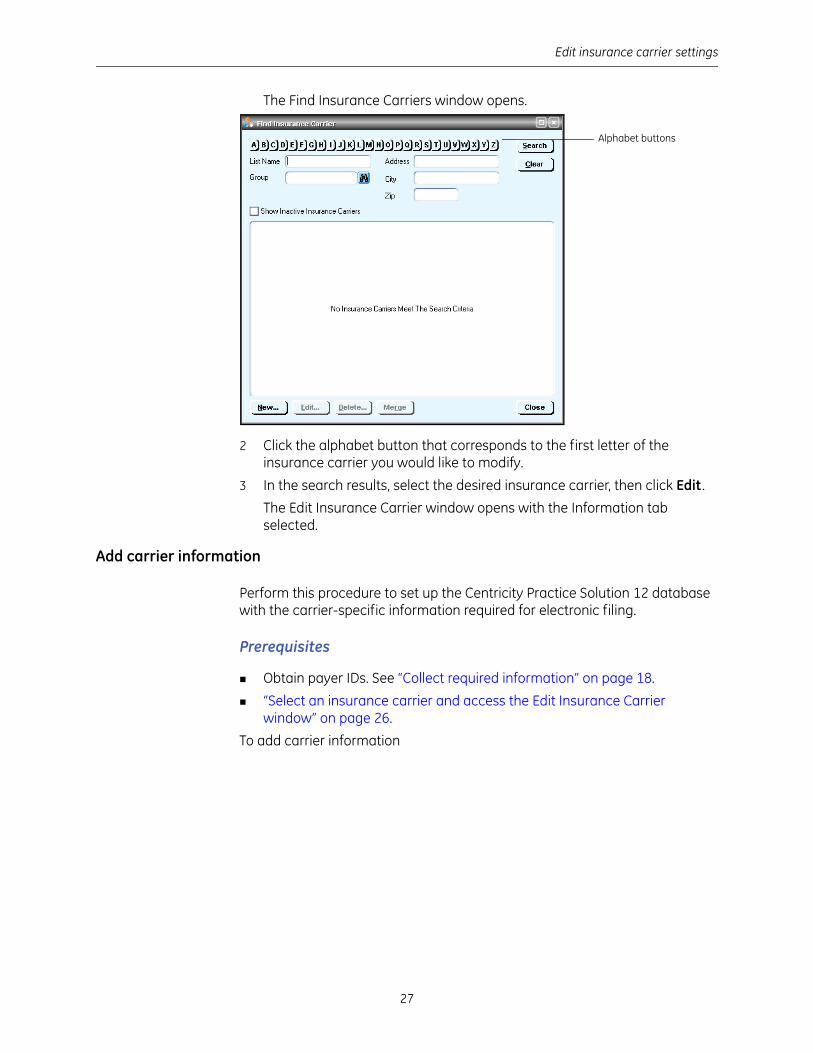
Select an insurance carrier and access the Edit Insurance Carrier window
Perform this procedure to select an insurance carrier and access the Edit Insurance Carrier window. From this window, you enter the carrier-specific information required to electronically process claim files.
Prerequisites
Set up basic carrier information in the Centricity Practice Solution 12 database. See the Centricity Practice Solution 12 online help.
To select an insurance carrier and access the Edit Insurance Carrier window
1 From the Administration window, select Edit > Insurance Carriers.
You need to add insurance carrier information for all carriers and to perform the associated procedures based on the filing method for each.
Edit insurance carrier settings
27
The Find Insurance Carriers window opens.
2 Click the alphabet button that corresponds to the first letter of the insurance carrier you would like to modify.
3 In the search results, select the desired insurance carrier, then click Edit .
The Edit Insurance Carrier window opens with the Information tab selected.
Add carrier information
Perform this procedure to set up the Centricity Practice Solution 12 database with the carrier-specific information required for electronic filing.
Prerequisites
Obtain payer IDs. See “Collect required information” on page 18.
“Select an insurance carrier and access the Edit Insurance Carrier window” on page 26.
To add carrier information
Alphabet buttons
Centricity EDI 12 Plug-in Installation and Setup
28
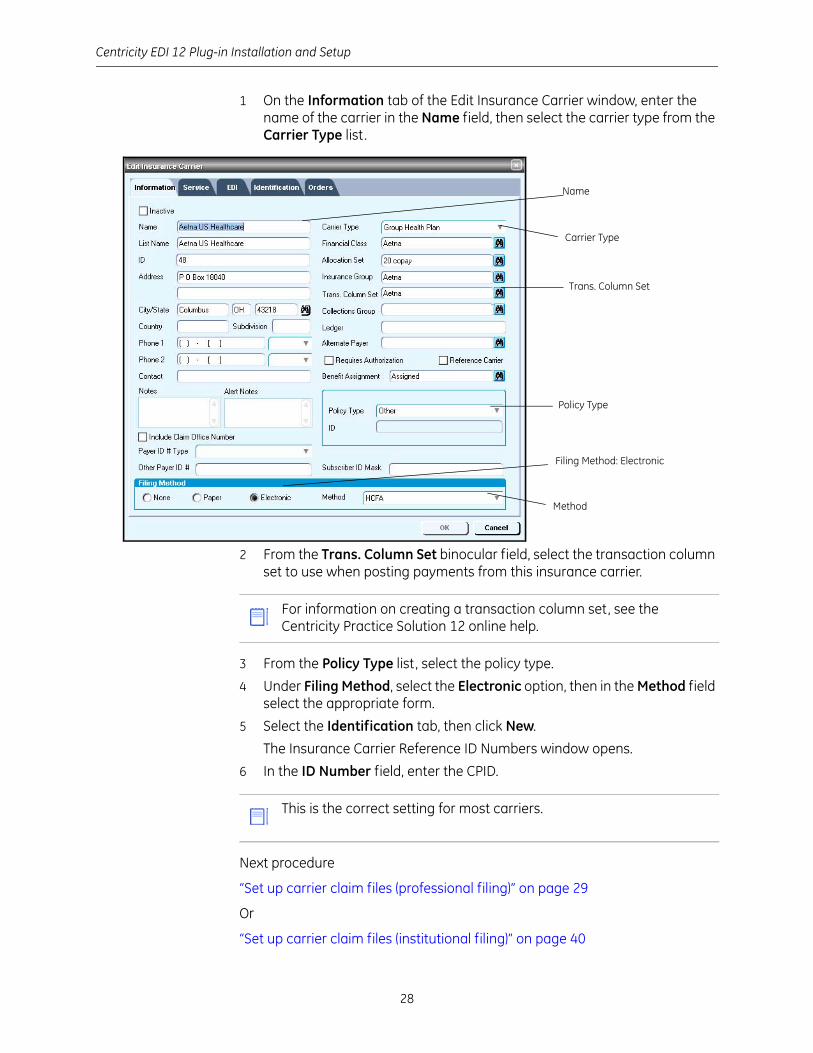
1 On the Information tab of the Edit Insurance Carrier window, enter the name of the carrier in the Name field, then select the carrier type from the Carrier Type list.
2 From the Trans. Column Set binocular field, select the transaction column set to use when posting payments from this insurance carrier.
3 From the Policy Type list, select the policy type.
4 Under Filing Method, select the Electronic option, then in the Method field select the appropriate form.
5 Select the Identification tab, then click New.
The Insurance Carrier Reference ID Numbers window opens.
6 In the ID Number field, enter the CPID.
Next procedure
“Set up carrier claim files (professional filing)” on page 29
Or
“Set up carrier claim files (institutional filing)” on page 40
Policy Type
Name
Filing Method: Electronic
Carrier Type
Trans. Column Set
Method
For information on creating a transaction column set, see the Centricity Practice Solution 12 online help.
This is the correct setting for most carriers.
Edit insurance carrier settings
29
Set up carrier claim files (professional filing)
Perform this procedure to set up the Centricity Practice Solution 12 database with the information required to create carrier-specific, HIPAA compliant claim files for professional (group or individual) filing. Requirements may vary by carrier.
Prerequisites
Determine the carrier’s requirements for electronic filling. See “Collect required information” on page 18.
Obtain payer IDs, see “Collect required information” on page 18.
“Select an insurance carrier and access the Edit Insurance Carrier window” on page 26.
To set up carrier claim files (professional filing)
1 From the Edit Insurance Carrier window, select the EDI tab.
2 Under File Creators, click New.
The Insurance Carrier EDI window opens.
3 Complete the fields using the following criteria:
* indicates an entry or selection in this field or row is required.
Site specific indicates site specifications.
Clearinghouse specific indicates clearinghouse-specific requirements. Check with the clearinghouse to determine requirements.
4 From the Creator Plug-In list, select Centricity (Professional-v5010) Claim File Creator, then click Settings.
The Professional Claims Ins Carrier Settings window opens.
Repeat this procedure for every insurance carrier to which you file electronic claims.
Use this field... To do this...
* Company Site specific Select the appropriate company or select (all) to apply settings to every company.
* Filing Method Site specific Select the appropriate filing method or select (all) to apply settings to all filing methods.
* Clearinghouse Clearinghouse specific Select Centricity.
* Payer ID Clearinghouse specific Enter the appropriate payer ID number.

Centricity EDI 12 Plug-in Installation and Setup
30
5 Check with the carrier to determine the following options to choose. These options are provided to accommodate payer-specific requirements..
Select this option... To do this...
Loop 2000A Settings
Send Taxonomy in 2000A PRV Select to send Taxonomy in Loop 2000 PRV
When this setting is checked and the doctor's billing identification tab is set to file as “individual” then the provider taxonomy is sent.
When this setting is checked and the doctor's billing identification tab is set to file as “part of group” then the company taxonomy is sent.
The Taxonomy ID is pulled from the Taxonomy code associated with the Specialty selected in Administration > Edit > Companies > Edit Company window > Information tab > Specialty. See “Add company information” on page 4.
Loop 2010 Settings
Send Pay-To Provider Information in Loop 2010AB
Select to send company Pay-to Address information in loop 2010AB.
The Pay-to Address is pulled from the Administration > Edit > Companies > Edit Company window > Pay-to Address window.
Send Property and Casualty Claim Number in Loop 2010 REF Segment
Select to send the claim number in the Loop 2010BA REF segment when the patient is the same as the subscriber.
The option to send the claim number in 2010BA REF segment exists for carriers who require the claim number in the 2010BA REF segment instead of what is stated in the 837 Implementation Guide.
If the patient is different from the subscriber, the number is sent in Loop 2010CA REF segment.
The claim number for the case that is attached to the visit is pulled from the Visit window > Charges tab > Case Management window > Claim Number (Property & Casualty Only) field.
Send Qualifier “23” in Loop 2010BA REF Segment
Select to send Qualifier 23 in the Loop 2010BA REF segment.
Qualifier 23 refers to the client number and is only intended to be used in claims submitted to the Indian Health Service/Contract Health Services Fiscal Intermediary for the purpose of reporting the Health Record Number.
If you do not select this option, the policy group is sent in Loop 2000B in SBR03.
Qualifier 23 is pulled from the Patient Information window > Patient tab > Policy Group field.
Edit insurance carrier settings
31
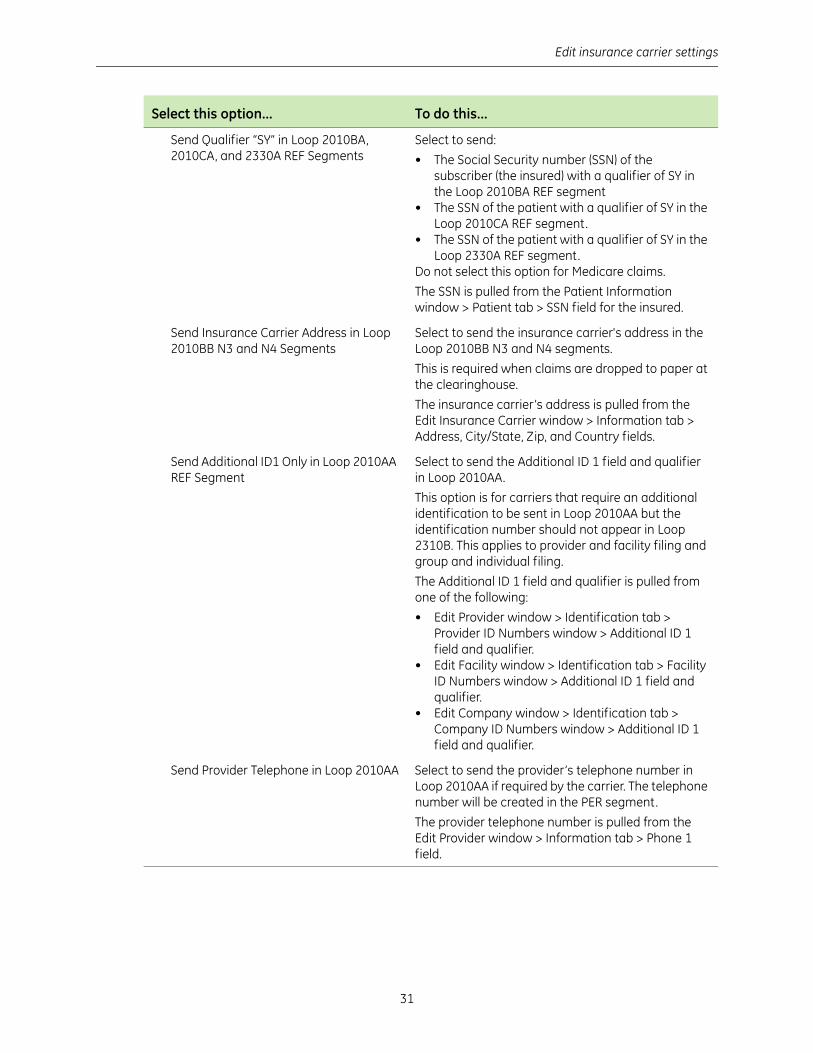
Send Qualifier “SY” in Loop 2010BA, 2010CA, and 2330A REF Segments
Select to send:
• The Social Security number (SSN) of the subscriber (the insured) with a qualifier of SY in the Loop 2010BA REF segment
• The SSN of the patient with a qualifier of SY in the Loop 2010CA REF segment.
• The SSN of the patient with a qualifier of SY in the Loop 2330A REF segment.
Do not select this option for Medicare claims.
The SSN is pulled from the Patient Information window > Patient tab > SSN field for the insured.
Send Insurance Carrier Address in Loop 2010BB N3 and N4 Segments
Select to send the insurance carrier's address in the Loop 2010BB N3 and N4 segments.
This is required when claims are dropped to paper at the clearinghouse.
The insurance carrier’s address is pulled from the Edit Insurance Carrier window > Information tab > Address, City/State, Zip, and Country fields.
Send Additional ID1 Only in Loop 2010AA REF Segment
Select to send the Additional ID 1 field and qualifier in Loop 2010AA.
This option is for carriers that require an additional identification to be sent in Loop 2010AA but the identification number should not appear in Loop 2310B. This applies to provider and facility filing and group and individual filing.
The Additional ID 1 field and qualifier is pulled from one of the following:
• Edit Provider window > Identification tab > Provider ID Numbers window > Additional ID 1 field and qualifier.
• Edit Facility window > Identification tab > Facility ID Numbers window > Additional ID 1 field and qualifier.
• Edit Company window > Identification tab > Company ID Numbers window > Additional ID 1 field and qualifier.
Send Provider Telephone in Loop 2010AA Select to send the provider’s telephone number in Loop 2010AA if required by the carrier. The telephone number will be created in the PER segment.
The provider telephone number is pulled from the Edit Provider window > Information tab > Phone 1 field.
Select this option... To do this...

Centricity EDI 12 Plug-in Installation and Setup
32
Send as Primary REF Segment in Loop 2010AA
Select to send the indicated field in Loop 2010AA in the first REF segment. In the dropdown list, select the field to be created first (PIN, EMC, Additional ID 1, or Additional ID 2).
This setting exists for carriers that require a specific REF segment to be sent first in Loop 2010AA.
If you use this option, please contact Centricity Practice Solution Services at 888-436-8491. Centricity Practice Solution Services will contact the carrier to determine why the carrier requires the REF segments in this order. HIPAA does not regulate the order of the REF segments, so the carrier might have a non-compliant requirement.
The information is pulled from one of the following:
• Edit Provider window > Identification tab > PIN, EMC, Additional ID 1, or Additional ID 2 field.
• Edit Facility window > Identification tab > PIN, EMC, Additional ID 1, or Additional ID 2 field.
• Edit Company window > Identification tab > PIN, EMC, Additional ID 1, or Additional ID 2 field.
Loop 2300 Settings
Send Service Authorization Exception Code in Loop 2300 REF Segment
Select to send the Service Authorization Exception Code in the Loop 2300 REF segment.
This option is used for carriers that are required by state law (for example, NY State Medicaid) to have an authorization on file, but service was delivered without first obtaining the service authorization.
These carriers only accept the following reasons:
The Service Authorization Exception Code is pulled from the Visit window > Filing 1 tab > Authorization Number field.
Select this option... To do this...
1 Immediate/Urgent Care
2 Services rendered in retroactive period
3 Emergency Care
4 Client has temporary Medicaid
5 Request from county for a second opinion to Recipient can work
6 Request for Override pending
7 Special Handling
Edit insurance carrier settings
33
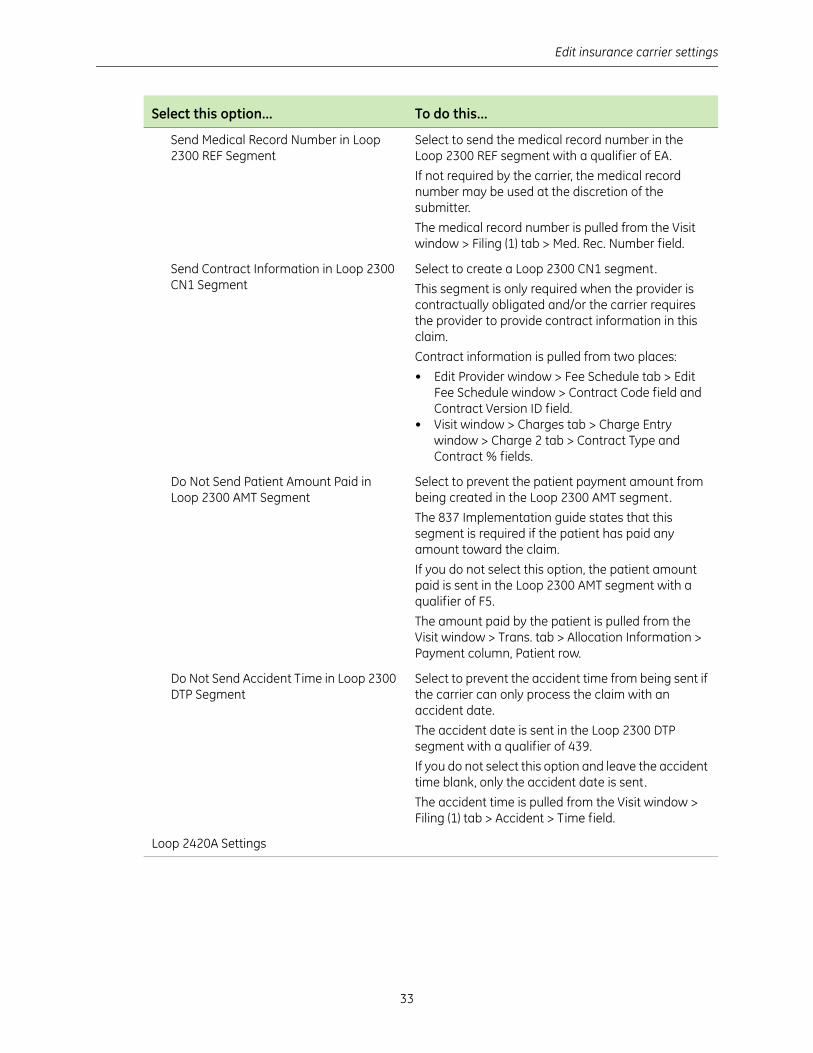
Send Medical Record Number in Loop 2300 REF Segment
Select to send the medical record number in the Loop 2300 REF segment with a qualifier of EA.
If not required by the carrier, the medical record number may be used at the discretion of the submitter.
The medical record number is pulled from the Visit window > Filing (1) tab > Med. Rec. Number field.
Send Contract Information in Loop 2300 CN1 Segment
Select to create a Loop 2300 CN1 segment.
This segment is only required when the provider is contractually obligated and/or the carrier requires the provider to provide contract information in this claim.
Contract information is pulled from two places:
• Edit Provider window > Fee Schedule tab > Edit Fee Schedule window > Contract Code field and Contract Version ID field.
• Visit window > Charges tab > Charge Entry window > Charge 2 tab > Contract Type and Contract % fields.
Do Not Send Patient Amount Paid in Loop 2300 AMT Segment
Select to prevent the patient payment amount from being created in the Loop 2300 AMT segment.
The 837 Implementation guide states that this segment is required if the patient has paid any amount toward the claim.
If you do not select this option, the patient amount paid is sent in the Loop 2300 AMT segment with a qualifier of F5.
The amount paid by the patient is pulled from the Visit window > Trans. tab > Allocation Information > Payment column, Patient row.
Do Not Send Accident Time in Loop 2300 DTP Segment
Select to prevent the accident time from being sent if the carrier can only process the claim with an accident date.
The accident date is sent in the Loop 2300 DTP segment with a qualifier of 439.
If you do not select this option and leave the accident time blank, only the accident date is sent.
The accident time is pulled from the Visit window > Filing (1) tab > Accident > Time field.
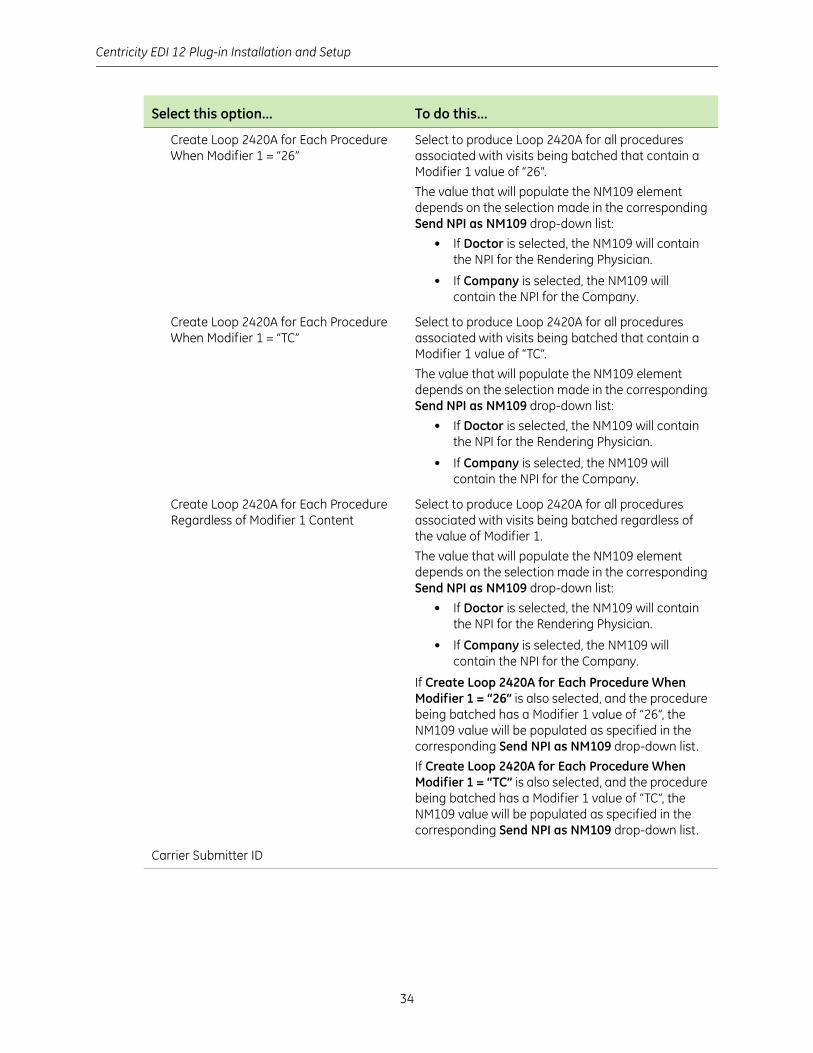
Loop 2420A Settings
Select this option... To do this...
Centricity EDI 12 Plug-in Installation and Setup
34
Create Loop 2420A for Each Procedure When Modifier 1 = “26”
Select to produce Loop 2420A for all procedures associated with visits being batched that contain a Modifier 1 value of “26”.
The value that will populate the NM109 element depends on the selection made in the corresponding Send NPI as NM109 drop-down list:
• If Doctor is selected, the NM109 will contain the NPI for the Rendering Physician.
• If Company is selected, the NM109 will contain the NPI for the Company.
Create Loop 2420A for Each Procedure When Modifier 1 = “TC”
Select to produce Loop 2420A for all procedures associated with visits being batched that contain a Modifier 1 value of “TC”.
The value that will populate the NM109 element depends on the selection made in the corresponding Send NPI as NM109 drop-down list:
• If Doctor is selected, the NM109 will contain the NPI for the Rendering Physician.
• If Company is selected, the NM109 will contain the NPI for the Company.
Create Loop 2420A for Each ProcedureRegardless of Modifier 1 Content
Select to produce Loop 2420A for all procedures associated with visits being batched regardless of the value of Modifier 1.
The value that will populate the NM109 element depends on the selection made in the corresponding Send NPI as NM109 drop-down list:
• If Doctor is selected, the NM109 will contain the NPI for the Rendering Physician.
• If Company is selected, the NM109 will contain the NPI for the Company.
If Create Loop 2420A for Each Procedure When Modifier 1 = “26” is also selected, and the procedure being batched has a Modifier 1 value of “26”, the NM109 value will be populated as specified in the corresponding Send NPI as NM109 drop-down list.
If Create Loop 2420A for Each Procedure When Modifier 1 = “TC” is also selected, and the procedure being batched has a Modifier 1 value of “TC”, the NM109 value will be populated as specified in the corresponding Send NPI as NM109 drop-down list.
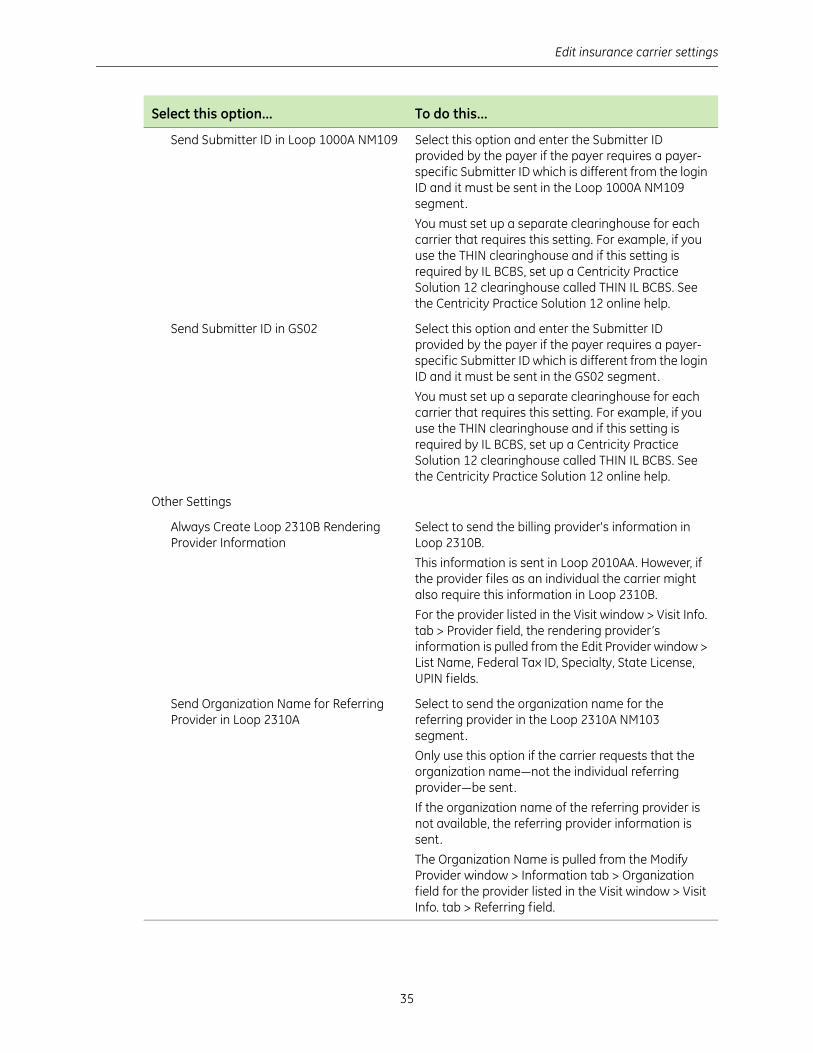
Carrier Submitter ID
Select this option... To do this...
Edit insurance carrier settings
35
Send Submitter ID in Loop 1000A NM109 Select this option and enter the Submitter ID provided by the payer if the payer requires a payer-specific Submitter ID which is different from the login ID and it must be sent in the Loop 1000A NM109 segment.
You must set up a separate clearinghouse for each carrier that requires this setting. For example, if you use the THIN clearinghouse and if this setting is required by IL BCBS, set up a Centricity Practice Solution 12 clearinghouse called THIN IL BCBS. See the Centricity Practice Solution 12 online help.
Send Submitter ID in GS02 Select this option and enter the Submitter ID provided by the payer if the payer requires a payer-specific Submitter ID which is different from the login ID and it must be sent in the GS02 segment.
You must set up a separate clearinghouse for each carrier that requires this setting. For example, if you use the THIN clearinghouse and if this setting is required by IL BCBS, set up a Centricity Practice Solution 12 clearinghouse called THIN IL BCBS. See the Centricity Practice Solution 12 online help.
Other Settings
Always Create Loop 2310B Rendering Provider Information
Select to send the billing provider's information in Loop 2310B.
This information is sent in Loop 2010AA. However, if the provider files as an individual the carrier might also require this information in Loop 2310B.
For the provider listed in the Visit window > Visit Info. tab > Provider field, the rendering provider’s information is pulled from the Edit Provider window > List Name, Federal Tax ID, Specialty, State License, UPIN fields.
Send Organization Name for Referring Provider in Loop 2310A
Select to send the organization name for the referring provider in the Loop 2310A NM103 segment.
Only use this option if the carrier requests that the organization name—not the individual referring provider—be sent.
If the organization name of the referring provider is not available, the referring provider information is sent.
The Organization Name is pulled from the Modify Provider window > Information tab > Organization field for the provider listed in the Visit window > Visit Info. tab > Referring field.
Select this option... To do this...
Centricity EDI 12 Plug-in Installation and Setup
36
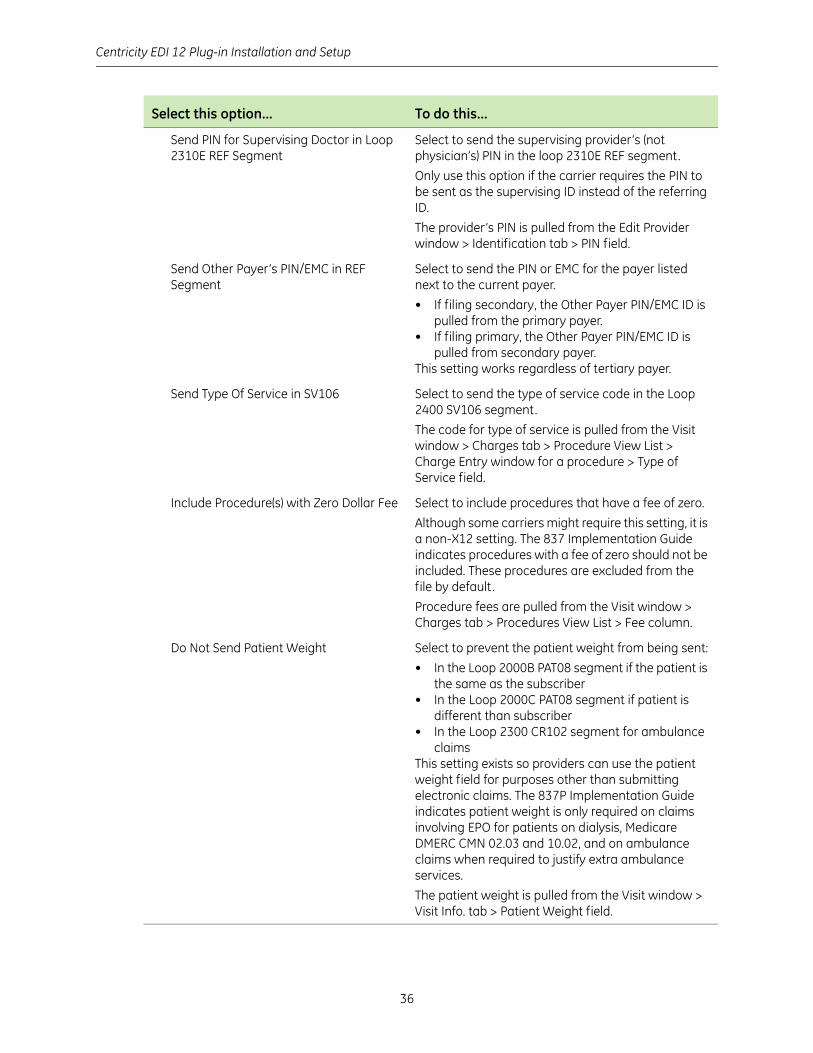
Send PIN for Supervising Doctor in Loop 2310E REF Segment
Select to send the supervising provider’s (not physician’s) PIN in the loop 2310E REF segment.
Only use this option if the carrier requires the PIN to be sent as the supervising ID instead of the referring ID.
The provider’s PIN is pulled from the Edit Provider window > Identification tab > PIN field.
Send Other Payer’s PIN/EMC in REF Segment
Select to send the PIN or EMC for the payer listed next to the current payer.
• If filing secondary, the Other Payer PIN/EMC ID is pulled from the primary payer.
• If filing primary, the Other Payer PIN/EMC ID is pulled from secondary payer.
This setting works regardless of tertiary payer.
Send Type Of Service in SV106 Select to send the type of service code in the Loop 2400 SV106 segment.
The code for type of service is pulled from the Visit window > Charges tab > Procedure View List > Charge Entry window for a procedure > Type of Service field.
Include Procedure(s) with Zero Dollar Fee Select to include procedures that have a fee of zero.
Although some carriers might require this setting, it is a non-X12 setting. The 837 Implementation Guide indicates procedures with a fee of zero should not be included. These procedures are excluded from the file by default.
Procedure fees are pulled from the Visit window > Charges tab > Procedures View List > Fee column.
Do Not Send Patient Weight Select to prevent the patient weight from being sent:
• In the Loop 2000B PAT08 segment if the patient is the same as the subscriber
• In the Loop 2000C PAT08 segment if patient is different than subscriber
• In the Loop 2300 CR102 segment for ambulance claims
This setting exists so providers can use the patient weight field for purposes other than submitting electronic claims. The 837P Implementation Guide indicates patient weight is only required on claims involving EPO for patients on dialysis, Medicare DMERC CMN 02.03 and 10.02, and on ambulance claims when required to justify extra ambulance services.
The patient weight is pulled from the Visit window > Visit Info. tab > Patient Weight field.
Select this option... To do this...
Edit insurance carrier settings
37
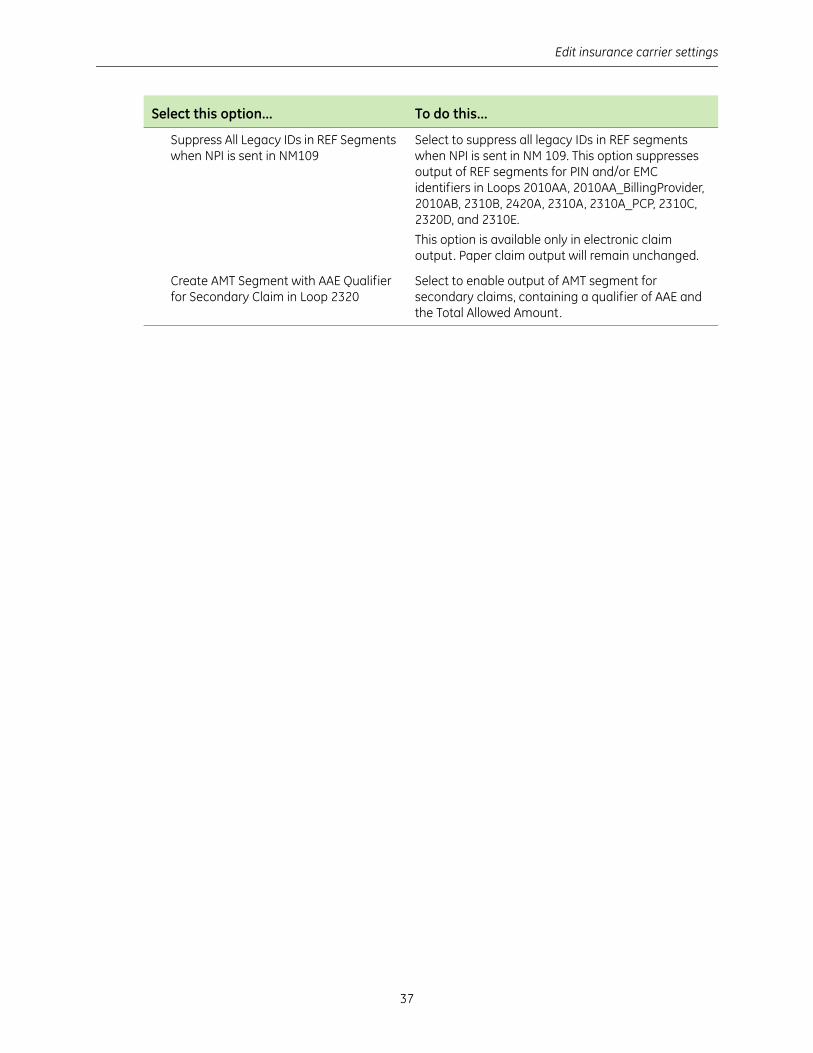
Suppress All Legacy IDs in REF Segments when NPI is sent in NM109
Select to suppress all legacy IDs in REF segments when NPI is sent in NM 109. This option suppresses output of REF segments for PIN and/or EMC identifiers in Loops 2010AA, 2010AA_BillingProvider, 2010AB, 2310B, 2420A, 2310A, 2310A_PCP, 2310C, 2320D, and 2310E.
This option is available only in electronic claim output. Paper claim output will remain unchanged.
Create AMT Segment with AAE Qualifier for Secondary Claim in Loop 2320
Select to enable output of AMT segment for secondary claims, containing a qualifier of AAE and the Total Allowed Amount.
Select this option... To do this...

Centricity EDI 12 Plug-in Installation and Setup
38
Report TPL Information in Loop 2330B When Secondary to TPL Code
Select to report TPL information in Loop 2330B when secondary to TPL Code.
The default value for the TPL Code is 910 (Medicare Part B), but you can change this to match the TPL code needed.
To complete the REF segment (Qualifier = 2U), you will need to submit the value of the TPL Status Code through Transaction Distribution. When supplying the ICN associated with the Insurance Payment, append the TPL Status Code to the ICN, separated by a hyphen (-). TPL Status Codes are as follows:
For example, if the ICN is 1107282903840, and the TPL status indicates “TPL Adjudicated — total payment shown”, the entry would be as follows:
1107282903840-01
When no ICN is available, but TPL coding is required for IL Medicaid secondary to IL Medicare, provide the TPL Code preceded by a hyphen (-). For example,
-01
The plug-in pulls the TPL Code and creates the appropriate REF segment in 2330B. No REF segment is created for the ICN, since it is absent.
Send 2U Qualifier in Loop 2330B REF With ICN When Secondary.
Select to send 2U Qualifier in Loop 2330B REF with ICN when Secondary.
Select this option... To do this...
TPL Status Codes
Meaning
01 TPL Adjudicated — total payment shown
02 TPL Adjudicated — patient not covered
03 TPL Adjudicated — service not covered
04 TPL Adjudicated — spenddown met
05 Patient not covered
06 Services not covered
07 Third Party Adjudication Pending
10 Deductible not met
Edit insurance carrier settings
39
Send Other Payer Address in Loop 2330B N3 and N4 Segments
Select to send the address of the active other payer on the visit in the Loop 2300B N3 and N4 segments when this carrier is the primary carrier.
For the carrier listed on the visit, the Other Payer’s Address is pulled from the Edit Insurance Carrier window > Information tab > Address, City/State, Zip, and Country fields.
Do Not Send Other Payer Payment Information When Filing Primary
Select to not send the other payer’s payment information to CAS and AMT(COB) segments when filing the primary payer.
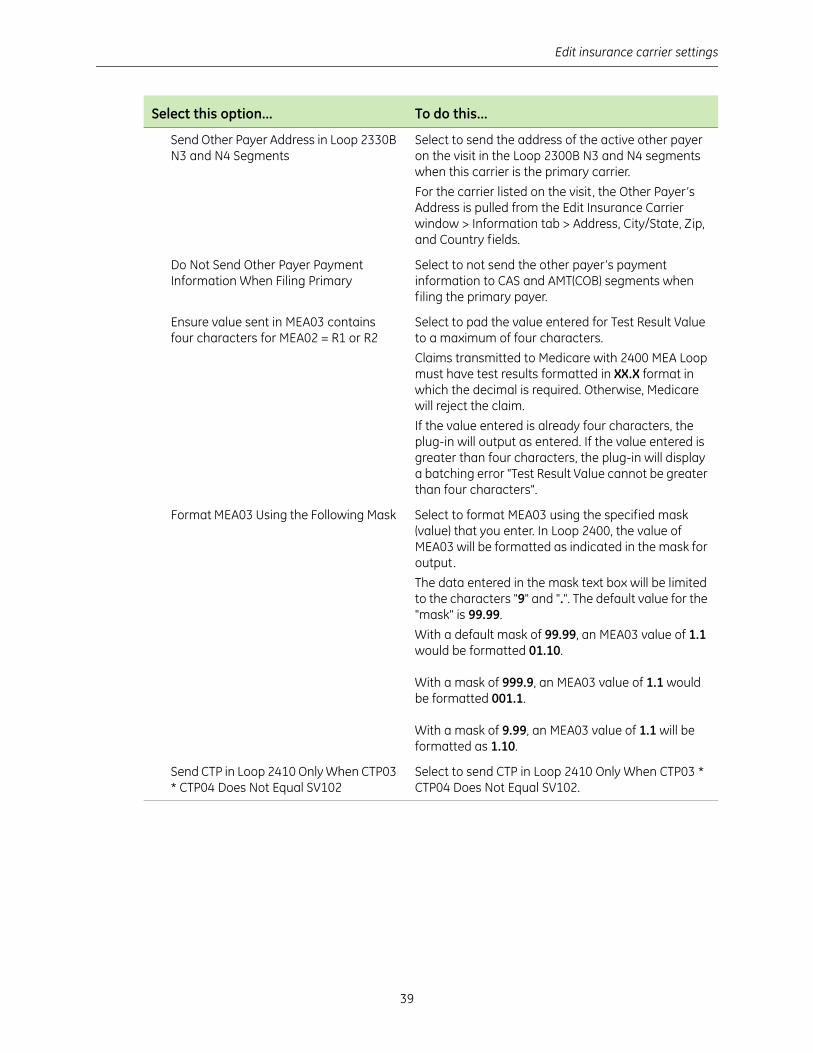
Ensure value sent in MEA03 contains four characters for MEA02 = R1 or R2
Select to pad the value entered for Test Result Value to a maximum of four characters.
Claims transmitted to Medicare with 2400 MEA Loop must have test results formatted in XX.X format in which the decimal is required. Otherwise, Medicare will reject the claim.
If the value entered is already four characters, the plug-in will output as entered. If the value entered is greater than four characters, the plug-in will display a batching error "Test Result Value cannot be greater than four characters".
Format MEA03 Using the Following Mask Select to format MEA03 using the specified mask (value) that you enter. In Loop 2400, the value of MEA03 will be formatted as indicated in the mask for output.
The data entered in the mask text box will be limited to the characters "9" and ".". The default value for the "mask" is 99.99.
With a default mask of 99.99, an MEA03 value of 1.1 would be formatted 01.10.
With a mask of 999.9, an MEA03 value of 1.1 would be formatted 001.1.
With a mask of 9.99, an MEA03 value of 1.1 will be formatted as 1.10.
Send CTP in Loop 2410 Only When CTP03 * CTP04 Does Not Equal SV102
Select to send CTP in Loop 2410 Only When CTP03 * CTP04 Does Not Equal SV102.
Select this option... To do this...

Centricity EDI 12 Plug-in Installation and Setup
40
6 Click OK to save your changes.
7 From the Insurance Carrier EDI window, click OK
8 From the Edit Insurance Carrier window, click OK.
9 From the Find Insurance Carrier window, select another insurance carrier and modify required settings, or click Close.
Set up carrier claim files (institutional filing)
Perform this procedure to set up the Centricity Practice Solution 12 database with the information required to create carrier-specific, HIPAA compliant claim files for institutional (group or individual) filing. Requirements may vary by carrier.
Prerequisites
Determine the carrier’s requirements for electronic filling. See “Collect required information” on page 18.
Obtain payer IDs. See “Collect required information” on page 18.
Send CN1 Segment in Loop 2400 With CN104 = ____
Select to send the CN1 segment in Loop 2400 and indicate the value to include in CN104.
Valid values for CN104 follow:
• NI (Indian Providers billing for non-Indian patients)
• DM (Behavioral Health Facility contracted with DMHSAS)
• A (BH Case Mgmt., Public or Private, Over 21)• C (BH Case Mgmt., Public or Private, Under 21)• DA (BH Case Mgmt., DMHSAS Contracted, Over
21)• DC (BH Case Mgmt., DMHSAS Contracted, Under
21)• G (Group Primary Specialty code 082)• T (Teaching Physician provider type 52)• TS (Teaching Specialist)The value entered will be compared with the values listed above. If the value does not match one of the valid values, you will be asked to ensure the correct value is entered. If you confirm the value, the entered value will be used.
Max Procedures per Claim Use this field only if your carrier restricts the number of procedures per claim. Enter the number, from 1 to 49, of procedures that can be filed. The default is 50.
Select this option... To do this...
Repeat this procedure for every insurance carrier to which you file electronic claims.
Edit insurance carrier settings
41
“Select an insurance carrier and access the Edit Insurance Carrier window” on page 26.
To set up carrier claim files (institutional filing)
1 From the Edit Insurance Carrier window, select the EDI tab.
2 Under File Creators, select New.
The Insurance Carrier EDI window opens.
3 Complete the fields using the following criteria:
* indicates an entry or selection in this field or row is required.
Site specific indicates site specifications.
Clearinghouse specific indicates clearinghouse-specific requirements. Check with the clearinghouse to determine requirements.
4 From the Creator Plug-In list, select Centricity Institutional-v5010 Claim File Creator, then click Settings.
The 837 Institutional Insurance Carrier Settings window opens.
5 Check with the carrier to determine the following options to choose. These options are provided to accommodate payer-specific requirements.
Use this field... To do this...
* Company Site specific Select the appropriate company or select (all) to apply settings to every company.
* Filing Method Site specific Select the appropriate filing method or select (all) to apply settings to all filing methods.
* Clearinghouse Clearinghouse specific Select Centricity.
* Payer ID Clearinghouse specific Enter the appropriate payer ID number.
Use this option... To do this...
Loop 2000A Settings
Send Taxonomy in 2000A PRV Select to send Taxonomy in Loop 2000 PRV
When this setting is checked and the doctor's billing identification tab is set to file as “individual” then the provider taxonomy is sent.
When this setting is checked and the doctor's billing identification tab is set to file as “part of group” then the company taxonomy is sent.
The Group Taxonomy ID is pulled from the Taxonomy code associated with the Specialty selected in Administration > Edit > Companies > Edit Company window > Information tab > Specialty. See “Add company information” on page 4.
Loop 2010 Settings
Centricity EDI 12 Plug-in Installation and Setup
42
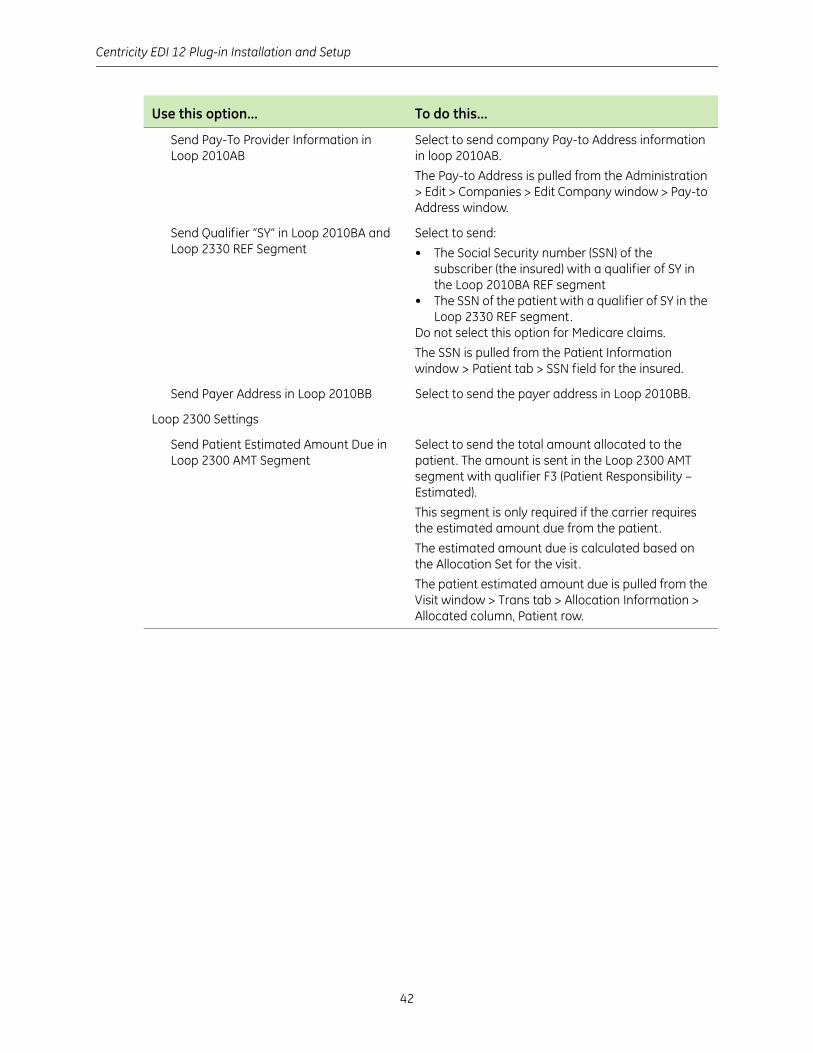
Send Pay-To Provider Information in Loop 2010AB
Select to send company Pay-to Address information in loop 2010AB.
The Pay-to Address is pulled from the Administration > Edit > Companies > Edit Company window > Pay-to Address window.
Send Qualifier “SY” in Loop 2010BA and Loop 2330 REF Segment
Select to send:
• The Social Security number (SSN) of the subscriber (the insured) with a qualifier of SY in the Loop 2010BA REF segment
• The SSN of the patient with a qualifier of SY in the Loop 2330 REF segment.
Do not select this option for Medicare claims.
The SSN is pulled from the Patient Information window > Patient tab > SSN field for the insured.
Send Payer Address in Loop 2010BB Select to send the payer address in Loop 2010BB.
Loop 2300 Settings
Send Patient Estimated Amount Due in Loop 2300 AMT Segment
Select to send the total amount allocated to the patient. The amount is sent in the Loop 2300 AMT segment with qualifier F3 (Patient Responsibility – Estimated).
This segment is only required if the carrier requires the estimated amount due from the patient.
The estimated amount due is calculated based on the Allocation Set for the visit.
The patient estimated amount due is pulled from the Visit window > Trans tab > Allocation Information > Allocated column, Patient row.
Use this option... To do this...
Edit insurance carrier settings
43
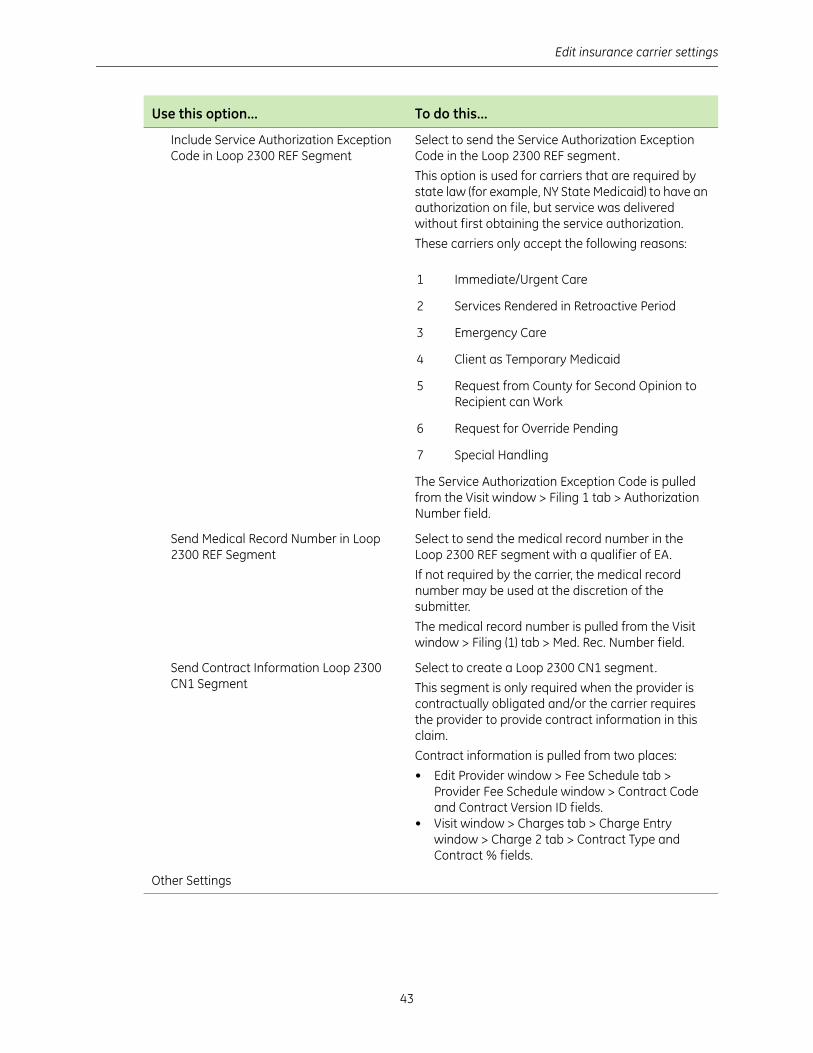
Include Service Authorization Exception Code in Loop 2300 REF Segment
Select to send the Service Authorization Exception Code in the Loop 2300 REF segment.
This option is used for carriers that are required by state law (for example, NY State Medicaid) to have an authorization on file, but service was delivered without first obtaining the service authorization.
These carriers only accept the following reasons:
The Service Authorization Exception Code is pulled from the Visit window > Filing 1 tab > Authorization Number field.
Send Medical Record Number in Loop 2300 REF Segment
Select to send the medical record number in the Loop 2300 REF segment with a qualifier of EA.
If not required by the carrier, the medical record number may be used at the discretion of the submitter.
The medical record number is pulled from the Visit window > Filing (1) tab > Med. Rec. Number field.
Send Contract Information Loop 2300 CN1 Segment
Select to create a Loop 2300 CN1 segment.
This segment is only required when the provider is contractually obligated and/or the carrier requires the provider to provide contract information in this claim.
Contract information is pulled from two places:
• Edit Provider window > Fee Schedule tab > Provider Fee Schedule window > Contract Code and Contract Version ID fields.
• Visit window > Charges tab > Charge Entry window > Charge 2 tab > Contract Type and Contract % fields.
Other Settings
Use this option... To do this...
1 Immediate/Urgent Care
2 Services Rendered in Retroactive Period
3 Emergency Care
4 Client as Temporary Medicaid
5 Request from County for Second Opinion to Recipient can Work
6 Request for Override Pending
7 Special Handling
Centricity EDI 12 Plug-in Installation and Setup
44
6 Click OK to save your changes and return to the Insurance Carrier EDI window.
Send Other Payer Address in Loop 2330B N3 and N4 Segments
Select to send the address of the active other payer on the visit in the Loop 2300B N3 and N4 segments when this carrier is the primary carrier.
For the carrier listed on the visit, the Other Payer’s Address is pulled from the Edit Insurance Carrier window > Information tab > Address, City/State, Zip, and Country fields.
Include Procedure(s) with Zero Dollar Fee Select to include procedures that have a fee of zero.
Although some carriers might require this setting, it is a non-X12 setting. The 837 Implementation Guide indicates procedures with a fee of zero should not be included. These procedures are excluded from the file by default.
Procedure fees are pulled from the Visit window > Charges tab > Procedures View List > Fee column.
Do Not Send Other Payer Payment Information When Filing Primary
Select to not send the other payer’s payment information to CAS and AMT(COB) segments when filing the primary payer.
Send Claim Adjudication Payment Information with Check Date
Select to send claim adjudication information with check date if it is present in the visit.
Use Billing Tax ID and NPI number from Company
Use this setting to send Billing provider Tax ID and NPI from company information.
Max Procedures per claim Use this field only if your carrier restricts the number of procedures per claim. Enter the number, from 1 to 98, of procedures that can be filed. The default is 99.
Do Not Send SV202 in Loop 2400 When Revenue Code Is ___
Use to send only a procedure's revenue code and not the SV202 element. The SV202 element is only required for outpatient claims and contains the CPT code, qualifier, and modifier.
To enter a revenue code(s)
1 In the Revenue Code area, click New.
2 In the Revenue Code field, enter a revenue code.
3 Click OK.
4 Repeat steps 1 through 4 to enter additional revenue codes.
You may also modify existing revenue codes or delete them as needed.
The SV202 element is pulled from the Visit window > Charges tab > Procedures View List > Revenue Code column.
Use this option... To do this...
Edit insurance carrier settings
45
7 From the Insurance Carrier EDI window, click OK
8 From the Edit Insurance Carrier window, click OK.
9 From the Select Insurance Carrier window, select another insurance carrier and modify all required settings, or click Close.
Set up carrier claim files (Workers’ Compensation Electronic Claims Submission)
Perform this procedure to set up the Centricity Practice Solution 12 database with the information required to create carrier-specific claim files for Workers’ Compensation Electronic Claims Submission (ECS) in Texas and Washington. Requirements may vary by carrier.
Prerequisites
Determine the carrier’s requirements for electronic filling. See “Collect required information” on page 18.
Obtain payer IDs. See “Collect required information” on page 18.
“Select an insurance carrier and access the Edit Insurance Carrier window” on page 26.
To set up carrier claim files (Workers’ Compensation)
1 From the Modify Insurance Carrier window, select the EDI tab.
2 Under File Creators, click New.
The Insurance Carrier EDI window displays.
3 Complete the Claims fields using the following criteria:
* indicates an entry or selection in this field or row is required.
Site specific indicates site specifications.
Clearinghouse specific indicates clearinghouse-specific requirements. Check with the clearinghouse to determine requirements.
4 From the Creator Plug-In list, select Centricity 837 (WC) File Creator, then click Settings.
The Workers’ Comp Claims Ins Carrier Settings window displays.
5 From the Use Settings For field, select Texas Department of Insurance Division of Workers Comp or Washington State Department of Labor and Industries as appropriate.
Use this field... To do this...
* Company Site specific Select the appropriate company or select (all) to apply settings to every company.
* Filing Method Site specific Select the appropriate filing method or select (all) to apply settings to all filing methods.
* Clearinghouse Clearinghouse specific Select Centricity.
* Payer ID Clearinghouse specific Enter the appropriate payer ID number.
Centricity EDI 12 Plug-in Installation and Setup
46
The appropriate payer-specific options for 2000B, 2010, and 2300 are selected accordingly. See the following table for a description of these settings: .
2000B/2010/2300 Settings
Select this option... To do this...
Loop 2000A Settings
Send Taxonomy in 2000A PRV Select to send Taxonomy in Loop 2000 PRV
When this setting is checked and the doctor's billing identification tab is set to file as “individual” then the provider taxonomy is sent.
When this setting is checked and the doctor's billing identification tab is set to file as “part of group” then the company taxonomy is sent.
The Group Taxonomy ID is pulled from the Taxonomy code associated with the Specialty selected in Administration > Edit > Companies > Edit Company window > Information tab > Specialty. See “Add company information” on page 4.
Loop 2000B Settings
Send SBR02 Select to send a value of "18" (Self), as required by Washington State Department of Labor and Industries.
Send SBR03 Select to send the Workers’ Compensation Policy Number, as required by Texas Department of Workers’ Compensation, or the Workers Compensation Claim Number, as required by Washington State Department of Labor and Industries.
Send SBR04 Select to send the Employer Name, as required by Texas Department of Workers’ Compensation.
Send PATa Select to send an empty PAT segment, as required by Washington State Department of Labor and Industries.
Send Loop 2000C Select to send the Patient Information loop, as required by Texas Department of Workers’ Compensation.
Loop 2010 Settings
Send Provider Telephone number in Loop 2010AA
Select to send the provider’s telephone number in Loop 2010AA if required by the carrier. The telephone number will be created in the PER segment.
The provider telephone number is pulled from the Clearinghouse Submitter Information.
This setting is required by the Texas Department of Workers’ Compensation.
Edit insurance carrier settings
47
Send Pay-To Provider Information in Loop 2010AB
Select to send company information in loop 2010AB when the providers are filing as a group and are filing provider fees.
This option is for carriers that require provider information (instead of company information) in Loop 2010AA. It ensures the carrier pays the group instead of the individual providers.
The company information is pulled from the Administration > Edit > Companies > Modify Company window.
This setting is required by the Texas Department of Workers’ Compensation.
Send Property and Casualty Claim Number in Loop 2010 REF Segment
Select to send the claim number in the Loop 2010BA REF segment when the patient is the same as the subscriber.
The option to send the claim number in 2010BA REF segment exists for carriers who require the claim number in the 2010BA REF segment instead of what is stated in the 837 Implementation Guide.
If the patient is different from the subscriber, the number is sent in Loop 2010CA REF segment.
The claim number for the case that is attached to the visit is pulled from the Visit window > Charges tab > Case Management window > Claim Number (Property & Casualty Only) field.
Send Qualifier “23” in Loop 2010BA REF Segment
Select to send Qualifier 23 in the Loop 2010BA REF segment.
Qualifier 23 refers to the client number and is only intended to be used in claims submitted to the Indian Health Service/Contract Health Services Fiscal Intermediary for the purpose of reporting the Health Record Number.
If you do not select this option, the policy group is sent in Loop 2000B in SBR03.
Qualifier 23 is pulled from the Patient Information window > Patient tab > Policy Group field.
2000B/2010/2300 Settings
Select this option... To do this...

Centricity EDI 12 Plug-in Installation and Setup
48
Send Qualifier “SY” in Loop 2010BA, 2010CA, and 2330A REF Segments
Select to send:
• The Social Security number (SSN) of the subscriber (the insured) with a qualifier of SY in the Loop 2010BA REF segment
• The SSN of the patient with a qualifier of SY in the Loop 2010CA REF segment.
• The SSN of the patient with a qualifier of SY in the Loop 2330A REF segment.
Do not select this option for Medicare claims.
The SSN is pulled from the Patient Information window > Patient tab > SSN field for the insured.
Send Employer Address in Loop 2010BA N3 and N4 Segments
Select to send the employer's address in the Loop 2010BA N3 and N4 segments.
This setting is unchecked by default for addresses in Texas.
This setting is checked by default for addresses in Washington.
Send Insurance Carrier Address in Loop 2010BB N3 and N4 Segments
Select to send the insurance carrier's address in the Loop 2010BB N3 and N4 segments.
This is required when claims are dropped to paper at the clearinghouse.
The insurance carrier’s address is pulled from the Modify Insurance Carrier window > Information tab > Address, City/State, Zip, and Country fields.
Send Insured in Loop 2010BA To send the Insured information in Loop 2010BA, as required by Washington State Department of Labor and Industries.
Send State Tax ID in Loop 2010BB To send the State Tax ID number in Loop 2010BB, as required by Washington State Department of Labor and Industries.
Do Not Send Other Payer ID in Loop 2010BB
To suppress the output of the REF segment using the SY qualifier containing the Other Payer ID, as required by Washington State Department of Labor and Industries.
Send PER Segment in Loop 2010CA Select to generate 2010CA PER segment.
Send Qualifier “1W” in Loop 2010CA REF Segment
Select to generate the REF1W segment in Loop 2010CA.
Loop 2300 Settings
2000B/2010/2300 Settings
Select this option... To do this...
Edit insurance carrier settings
49
6 Check with the carrier to determine the following options to choose. These options are provided to accommodate payer-specific requirements.
Send Medical Record Number in Loop 2300 REF Segment
Select to send the medical record number in the Loop 2300 REF segment with a qualifier of EA.
If not required by the carrier, the medical record number may be used at the discretion of the submitter.
The medical record number is pulled from the Visit window > Filing (1) tab > Med. Rec. Number field.
This setting is required by the Washington State Department of Labor and Industries.
Send Contract Information in Loop 2300 CN1 Segment
Select to create a Loop 2300 CN1 segment.
This segment is only required when the provider is contractually obligated and/or the carrier requires the provider to provide contract information in this claim.
Contract information is pulled from two places:
• Edit Provider window > Fee Schedule tab > Modify Fee Schedule window > Contract Code field and Contract Version ID field.
• Visit window > Charges tab > Charge Entry window > Charge 2 tab > Contract Type and Contract % fields.
This setting is required by the Texas Department of Workers’ Compensation.
Do Not Send Patient Amount Paid in Loop 2300 AMT Segment
Select to prevent the patient payment amount from being created in the Loop 2300 AMT segment.
The 837 Implementation guide states that this segment is required if the patient has paid any amount toward the claim.
If you do not select this option, the patient amount paid is sent in the Loop 2300 AMT segment with a qualifier of F5.
The amount paid by the patient is pulled from the Visit window > Trans. tab > Allocation Information > Payment column, Patient row.
This setting is required by the Washington State Department of Labor and Industries.
a.These settings are not used for Workers Compensation claims.
2000B/2010/2300 Settings
Select this option... To do this...
2310/2320/2330 Settings
Select this option... To do this...
Loop 2310
Centricity EDI 12 Plug-in Installation and Setup
50
Send Organization Name for Referring Provider in Loop 2310A
Select to send the organization name for the referring provider in the Loop 2310A NM103 segment.
Only use this option if the carrier requests that the organization name—not the individual referring physician—be sent.
If the organization name of the referring provider is not available, the referring provider information is sent.
The Organization Name is pulled from the Modify Physician window > Information tab > Organization field for the physician listed in the Visit window > Visit Info. tab > Referring field.
Always Send Loop 2310B Rendering Provider Information
Select to send the billing provider's information in Loop 2310B.
This information is sent in Loop 2010AA. However, if the provider files as an individual the carrier might also require this information in Loop 2310B.
For the provider listed in the Visit window > Visit Info. tab > Provider field, the rendering provider’s information is pulled from the Edit Provider window > List Name, Federal Tax ID, Specialty, State License, UPIN fields.
Send PIN for Supervising Provider in Loop 2310E REF Segment
Select to send the supervising provider’s (not physician’s) PIN in the loop 2310E REF segment.
Only use this option if the carrier requires the PIN to be sent as the supervising ID instead of the referring ID.
The provider’s PIN is pulled from the Edit Provider window > Identification tab > PIN field.
Loop 2320a
Send AMT Segment with AAE Qualifier for Secondary Claim in Loop 2320*
Select to enable output of AMT segment for secondary claims, containing a qualifier of AAE and the Total Allowed Amount.
Do Not Send Other Payer Payment Information When Filing Primary*
Select to not send the other payer’s payment information to CAS and AMT(COB) segments when filing the primary payer.
Loop 2330a
Send Loop 2330C Select to create Loop 2330C if the carrier requires NM109 in Loop 2330C to be sent. NM109 will contain the insured's ID of the primary payer.
2310/2320/2330 Settings
Select this option... To do this...
Edit insurance carrier settings
51
7 Check with the carrier to determine the following options to choose. These options are provided to accommodate payer-specific requirements.
Send Loop 2330D Select to create Loop 2330D, which is required by Medicare when sending Loop 2330B.
Loop 2330D will output two segments: NM1 and REF. It will output the Referral ID in the REF segment and the NPI in the NM1_09 segment. If the NPI is not entered, it will pull the SSN or Tax ID number.
Other Settings
Suppress All Legacy IDs in REF Segments when NPI is sent in NM109
Select to suppress all legacy IDs in REF segments when NPI is sent in NM 109. This option suppresses output of REF segments for PIN and/or EMC identifiers in Loops 2010AA, 2010AA_BillingProvider, 2010AB, 2310B, 2420A, 2310A, 2310A_PCP, 2310C, 2320D, and 2310E.
This option is available only in electronic claim output. Paper claim output will remain unchanged.
Max Procedures per Claim Enter the number, from 1 to 49, of procedures that can be filed electronically to this carrier. The default is 50.
a.These settings are not used for Workers Compensation claims.
2310/2320/2330 Settings
Select this option... To do this...
Procedures Settings
Select this option... To do this...
Include Procedure(s) with Zero Dollar Fee Select to include procedures that have a fee of zero.
Although some carriers might require this setting, it is a non-X12 setting. The 837 Implementation Guide indicates procedures with a fee of zero should not be included. These procedures are excluded from the file by default.
Procedure fees are pulled from the Visit window > Charges tab > Procedures View List > Fee column.
Loop 2420A
Centricity EDI 12 Plug-in Installation and Setup
52
8 Click OK to save your changes.
9 From the Insurance Carrier EDI window, click OK
10 From the Modify Insurance Carrier window, click OK.
Send Loop 2420A for Each Procedure When Modifier 1 = “26”
Select to produce Loop 2420A for all procedures associated with visits being batched that contain a Modifier 1 value of “26”.
The value that will populate the NM109 element depends on the selection made in the corresponding Send NPI as NM109 drop-down list:
• If Doctor is selected, the NM109 will contain the NPI for the Rendering Physician.
• If Company is selected, the NM109 will contain the NPI for the Company.
Send Loop 2420A for Each Procedure When Modifier 1 = “TC”
Select to produce Loop 2420A for all procedures associated with visits being batched that contain a Modifier 1 value of “TC”.
The value that will populate the NM109 element depends on the selection made in the corresponding Send NPI as NM109 drop-down list:
• If Doctor is selected, the NM109 will contain the NPI for the Rendering Physician.
• If Company is selected, the NM109 will contain the NPI for the Company.
Send Loop 2420A for Each ProcedureRegardless of Modifier 1 Content
Select to produce Loop 2420A for all procedures associated with visits being batched regardless of the value of Modifier 1.
The value that will populate the NM109 element depends on the selection made in the corresponding Send NPI as NM109 drop-down list:
• If Doctor is selected, the NM109 will contain the NPI for the Rendering Physician.
• If Company is selected, the NM109 will contain the NPI for the Company.
If Create Loop 2420A for Each Procedure When Modifier 1 = “26” is also selected, and the procedure being batched has a Modifier 1 value of “26”, the NM109 value will be populated as specified in the corresponding Send NPI as NM109 drop-down list.
If Create Loop 2420A for Each Procedure When Modifier 1 = “TC” is also selected, and the procedure being batched has a Modifier 1 value of “TC”, the NM109 value will be populated as specified in the corresponding Send NPI as NM109 drop-down list.
Procedures Settings
Select this option... To do this...
Edit insurance carrier settings
53
11 From the Select Insurance Carrier window, select another insurance carrier and modify required settings, or click Close.
Create a case for a Workers’ Compensation claim
Perform this procedure to create a case for a Workers’ Compensation Claim.
To create a case for a Workers’ Compensation claim
1 In Registration, open a patient record.
2 Select Edit > Case Management .
The Select Case window opens.
3 Click New to create a new case.
The Case Management: New Case window opens.
4 For Name, enter the case name.
5 Select the Workers’ Compensation checkbox.
6 Click Apply to save your new case for the current patient.
7 Select the Workers’ Compensation tab.
8 In the Claim Number field, enter the Claim Number associated with the case.
9 In the Date of Injury field, enter the initial date of injury in MM/DD/YYYY format, or double-click this field to use the calendar.
10 Review employee, employer, and insurance carrier information, as well as authorized responsible providers, and update the information as needed.
The Workers’ Compensation tab contains information pertaining to Workers’ Compensation cases only. This includes employee and employer information, as well as insurance carriers associated with the case. If this case is not a result of a work-related injury or incident, the Insurance Carrier tab will display instead.
Fields Description
Employee Information This information is read-only and is pulled from the Registration component. If you need to revise any of this information, you will need to do so from the Registration component.
Employer Information Except for the Name, Insurance Carrier, and related fields, this information is read-only and is pulled from the Employer table within the Administration component.
Name This field is automatically populated based on the employer entered in the Registration component. However, you may type and search for an employer to change this information, if needed.
Centricity EDI 12 Plug-in Installation and Setup
54
11 Click Apply to save Workers’ Compensation case information for the patient.
12 From the Select Case window, select another case and add the necessary information, or click Close.
Associate a Workers’ Compensation case to a visit
To associate a Workers’ Compensation case to a visit
1 From the Billing component, create a new visit and click the Charges tab.
Insurance Carrier This field is automatically populated based on the insurance carrier associated with this employer. However, you may type or search for a different insurance carrier, if needed.
Group Number Enter the group number assigned to this employer.
Authorization # Enter the authorization number assigned to this employer.
Expiration Date Enter the expiration date for this employer and insurance carrier.
Insurance Carrier Information This information is pulled from entries in the Employer Information pane.
Authorized Responsible Providers The Authorized Responsible Providers pane contains a list of all active Responsible Providers. Responsible Providers who participate with the case's primary insurance carrier are pre-selected. Selected Responsible Providers who do not participate in the insurance carrier plan are displayed in red. All participating Responsible Providers are selected by default .
Information on insurance carriers that Responsible Providers do not participate with is set up in the Administration component in the Responsible Providers table.
With appropriate security, you can select additional Responsible Providers or deselect others. If special circumstances exist (such as an emergency), you can also select Responsible Providers that do not participate with the carrier.
If you change the primary insurance carrier, the Authorized Responsible Providers list automatically updates to reflect the authorized Responsible Providers for the new primary carrier.
Click the Reset button to reset the list of Responsible Providers and their participation check marks after any other changes are made and before saving any current changes.
Fields Description
Add optional service: remittance processing
55
2 Enter patient charges using individual codes or charge sets.
3 In the Case field, type or search for the Workers’ Compensation case to associate with this visit .
4 Enter additional diagnosis and/or procedure information using the Diagnosis View List or Procedures View List.
5 Click OK to return to the Billing window.
Add optional service: remittance processing
Remittance processing is an optional service available for this plug-in. Before you can implement this service, you must enroll through GE Healthcare. Additionally, you will need to set up your Centricity Practice Solution 12 database to process HIPAA-compliant electronic files.
To add this optional service, see “Set up remittance processing” on page 55.
Set up remittance processing
EDI remittance processing enables your site to receive electronic Explanations of Benefits (EOBs) from carriers in the X12 835 version 5010 format, automatically post payments and adjustments, and transfer balances.
Prior to setting up Centricity Practice Solution 12 and the Centricity EDI 12 plug-in for remittance processing, you must:
Enroll for remittance processing, see “Enroll for EDI transaction processing” on page 3
Be trained by GE Healthcare in remittance processing
File claims through Centricity Practice Solution 12, see the Centricity Practice Solution 12 online help
Procedures for setting up remittance processing are:
“Create a transaction column set for a carrier” on page 55
“Associate a transaction column set with an insurance group” on page 60
“Enter a payer literal” on page 63
“Modify response code actions” on page 64
Create a transaction column set for a carrier
Perform this procedure to create transaction column sets for EDI remittance processing. Transaction column sets:
Are used to define the columns and fields that display on the Transaction Distribution window
For more information on patient visits, see the Centricity Practice Solution online help.
Centricity EDI 12 Plug-in Installation and Setup
56
Determine the outcome of transactions posted by remittance files; for example, transaction column sets can specify when balances are transferred to the guarantor
Are required for every carrier from which you receive remittance
Usually you define a transaction column set to closely follow the layout of the carrier-specific EOB. For more information on transaction column sets, see the Centricity Practice Solution 12 online help.
Procedures for creating a transaction column set for a carrier are:
“Create a transaction column set” on page 56
“Associate a transaction column set with a carrier” on page 59
Create a transaction column set
Perform this procedure to set up the system to automatically post remittance files according to your site’s specific requirements.
Prerequisites
Determine your site’s general guidelines for automatic posting of remittance files, for example, how you want the system to handle co-insurance amounts.
To create a transaction column set
1 From the Administration window, select Edit > Transaction Column Set .
The Find Transaction Column Set window opens.
2 Click New.
The New Transaction Column Set window opens.
3 In the Name field, enter a name for this transaction column set.
4 Clear the Use this set for non-insurance payers option.
5 Click New to create a transaction column.
If you have an existing transaction column set that closely meets the requirements, you can copy and modify it rather than create a new one. See the Centricity Practice Solution 12 online help for more information.

Add optional service: remittance processing
57
The Transaction Column window opens.
6 In the Name field, enter the column name that is to display on the Transaction Distribution window.
7 Click OK.
8 Repeat steps 5 through 7 to create all transaction columns.
9 From the New Transaction Column Set window, select a column, then click Edit.
The Transaction Column window opens.
The following columns are required for remittance processing:
Actual allowed Centricity Practice Solution 12 does not post negative actual allowed values sent by the carrier. For example: A carrier reverses a previously processed claim.
Adjustment
Co-insurance
Deductible
File to insurance
Payment
Line information
Residual
Transfer
Sanction
Additionally, the following columns are recommended:
Allowed
Date of service
Fee
Insurance balance
Patient balance
Split
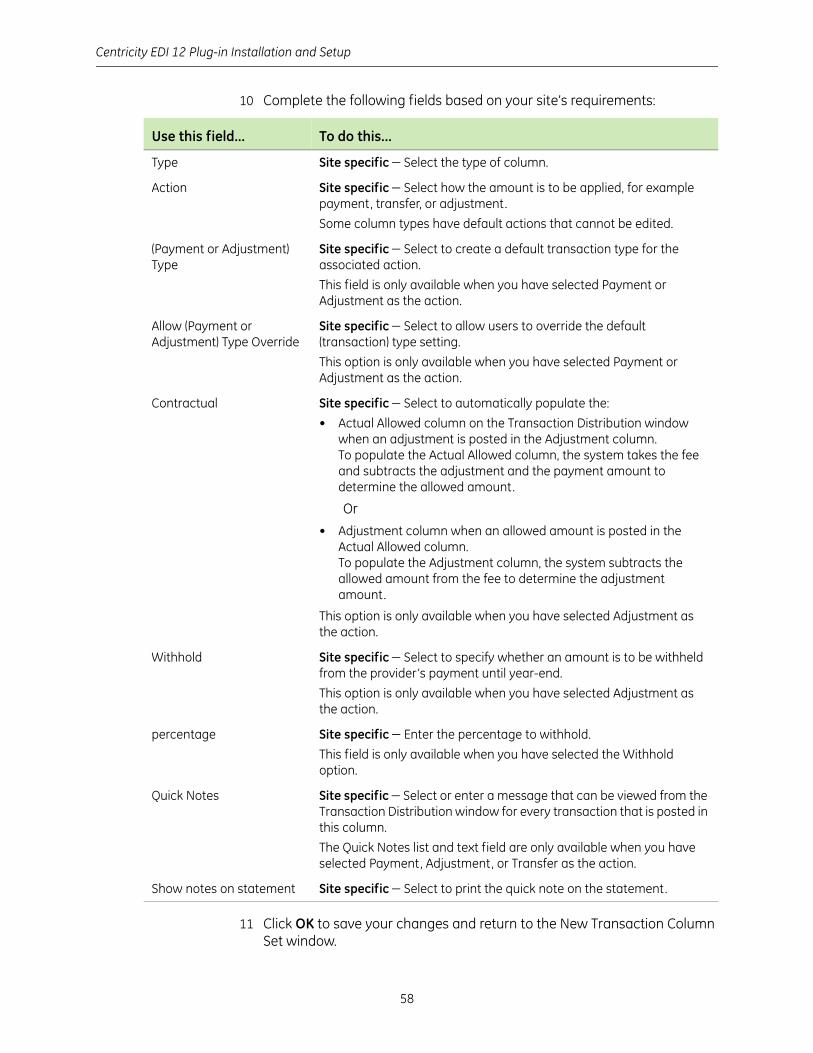
Centricity EDI 12 Plug-in Installation and Setup
58
10 Complete the following fields based on your site’s requirements:
11 Click OK to save your changes and return to the New Transaction Column Set window.
Use this field... To do this...
Type Site specific Select the type of column.
Action Site specific Select how the amount is to be applied, for example payment, transfer, or adjustment.
Some column types have default actions that cannot be edited.
(Payment or Adjustment) Type
Site specific Select to create a default transaction type for the associated action.
This field is only available when you have selected Payment or Adjustment as the action.
Allow (Payment or Adjustment) Type Override
Site specific Select to allow users to override the default (transaction) type setting.
This option is only available when you have selected Payment or Adjustment as the action.
Contractual Site specific Select to automatically populate the:
• Actual Allowed column on the Transaction Distribution window when an adjustment is posted in the Adjustment column.To populate the Actual Allowed column, the system takes the fee and subtracts the adjustment and the payment amount to determine the allowed amount.
Or
• Adjustment column when an allowed amount is posted in the Actual Allowed column.To populate the Adjustment column, the system subtracts the allowed amount from the fee to determine the adjustment amount.
This option is only available when you have selected Adjustment as the action.
Withhold Site specific Select to specify whether an amount is to be withheld from the provider’s payment until year-end.
This option is only available when you have selected Adjustment as the action.
percentage Site specific Enter the percentage to withhold.
This field is only available when you have selected the Withhold option.
Quick Notes Site specific Select or enter a message that can be viewed from the Transaction Distribution window for every transaction that is posted in this column.
The Quick Notes list and text field are only available when you have selected Payment, Adjustment, or Transfer as the action.
Show notes on statement Site specific Select to print the quick note on the statement.
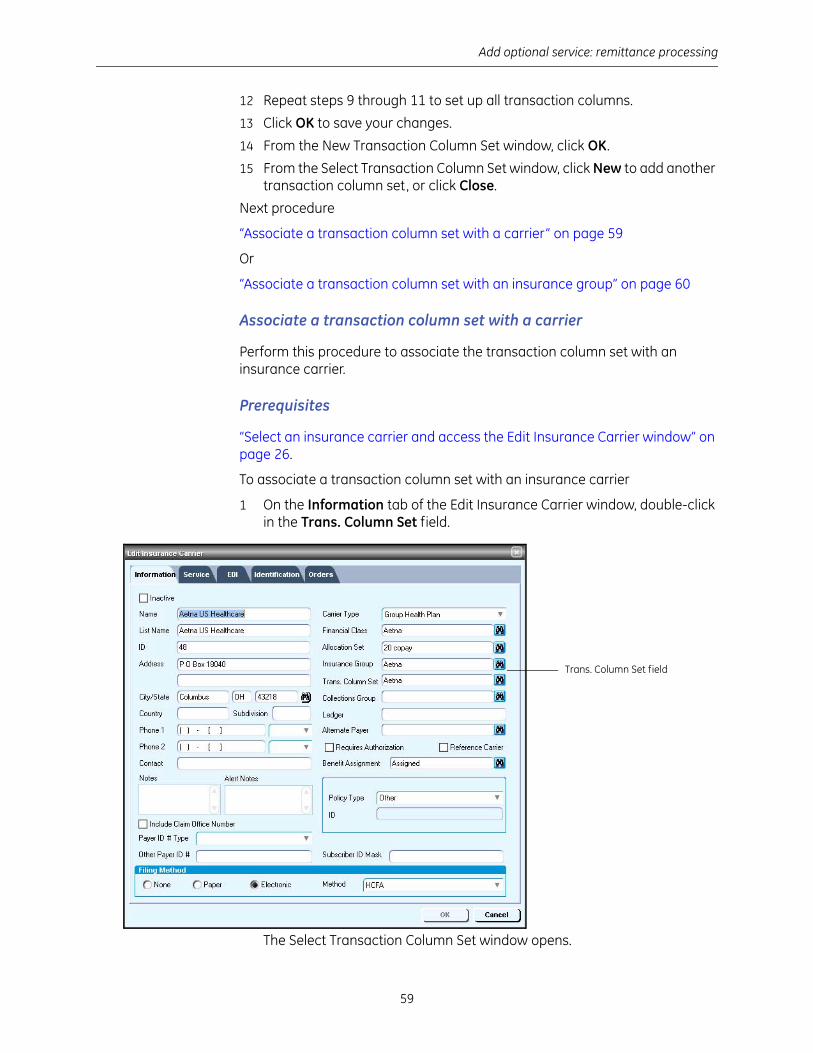
Add optional service: remittance processing
59
12 Repeat steps 9 through 11 to set up all transaction columns.
13 Click OK to save your changes.
14 From the New Transaction Column Set window, click OK.
15 From the Select Transaction Column Set window, click New to add another transaction column set, or click Close.
Next procedure
“Associate a transaction column set with a carrier” on page 59
Or
“Associate a transaction column set with an insurance group” on page 60
Associate a transaction column set with a carrier
Perform this procedure to associate the transaction column set with an insurance carrier.
Prerequisites
“Select an insurance carrier and access the Edit Insurance Carrier window” on page 26.
To associate a transaction column set with an insurance carrier
1 On the Information tab of the Edit Insurance Carrier window, double-click in the Trans. Column Set field.
The Select Transaction Column Set window opens.
Trans. Column Set field
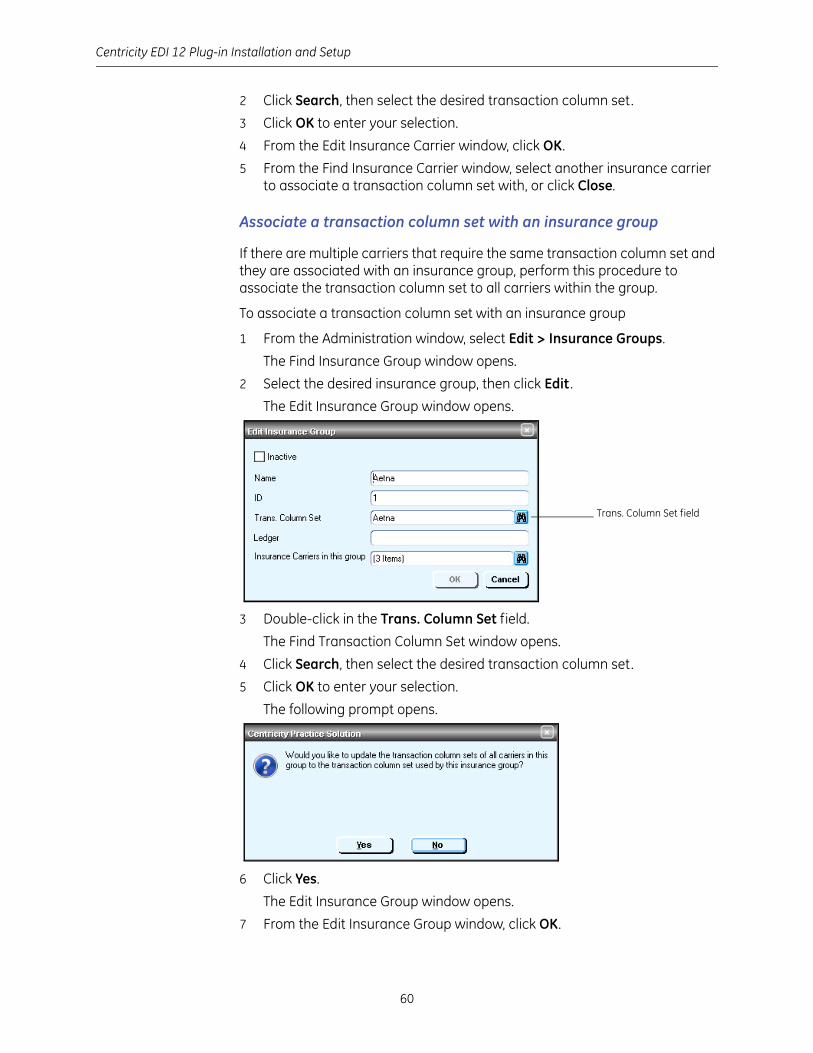
Centricity EDI 12 Plug-in Installation and Setup
60
2 Click Search, then select the desired transaction column set.
3 Click OK to enter your selection.
4 From the Edit Insurance Carrier window, click OK.
5 From the Find Insurance Carrier window, select another insurance carrier to associate a transaction column set with, or click Close.
Associate a transaction column set with an insurance group
If there are multiple carriers that require the same transaction column set and they are associated with an insurance group, perform this procedure to associate the transaction column set to all carriers within the group.
To associate a transaction column set with an insurance group
1 From the Administration window, select Edit > Insurance Groups.
The Find Insurance Group window opens.
2 Select the desired insurance group, then click Edit .
The Edit Insurance Group window opens.
3 Double-click in the Trans. Column Set field.
The Find Transaction Column Set window opens.
4 Click Search, then select the desired transaction column set.
5 Click OK to enter your selection.
The following prompt opens.
6 Click Yes.
The Edit Insurance Group window opens.
7 From the Edit Insurance Group window, click OK.
Trans. Column Set field
Add optional service: remittance processing
61
8 From the Find Insurance Group window, select another insurance group to associate a transaction column set with, or click Close.
Modify clearinghouse remittance settings
Perform this procedure to set up the system to automatically post remittance files that contain codes that effect an entire claim.
Prerequisites
Review the claim level codes and their descriptions:
Claim status codes See Claim Status Codes in the 835 EDI Implementation Guide.
Medicare adjudication remarks Access the WPC website at www.wpc-edi.com/codes/Codes.asp, then select Remittance Advice Remark Codes. The Medicare Adjudication remarks start with MA.
Determine your site’s general guidelines for automatic posting of remittance files, for example how you want the system to handle co-insurance amounts.
“Select the Centricity clearinghouse and access the Edit Clearinghouse Settings window” on page 22.
To modify clearinghouse remittance settings
1 From the File Transmission/Processing tab on the Edit Clearinghouse Settings window under Plug-ins, select Centricity File Processor-v5010 from the File Processor list.
2 Click Settings.
The File Processing Settings window opens.
3 Complete the fields using the following criteria:
* indicates an entry or selection in this field or row is required.
Recommended indicates the suggested setting for most carriers. Some carriers may have special requirements that do not fall under these guidelines and should be addressed on a carrier by carrier basis.
Site specific indicates site specifications.
4 Click Remittance Settings.
Use this field... To do this...
* Enable Remittance Recommended Select this option.
Automatically Process Remittance
Site specific and not recommended Select to automatically process remittance files after download. Otherwise, you must select the files to process from EDI Response Management. Generally, selecting this field is not recommended since you should verify the payement is received from the payer prior to posting the payment into CPS.

Centricity EDI 12 Plug-in Installation and Setup
62
The Clearinghouse Remittance Settings window opens with a default (all) row selected.
5 Complete the fields using the following criteria:
Site specific indicates site specifications.
6 Do one of the following:
Click Modify to make changes to the (all) row.
Click New to create an exception row.
The Claim Status Action window opens.
7 Complete the fields using the following criteria:
* indicates an entry or selection in this field or row is required.
Recommended indicates the suggested setting for most carriers. Some carriers may have special requirements that do not fall under these guidelines and should be addressed on a carrier by carrier basis.
Site specific indicates site specifications.
You cannot delete the (all) row.
Use this field or button...
To do this...
Claim status reason code action list
Site specific View the reason codes set up for your practice.
To create or modify a reason code, go to the next step.
Posting interval (milliseconds)
Site specific Enter a number of milliseconds for the system to wait before posting each remittance file in Centricity Practice Solution 12.
Use this setting only as directed by Centricity Practice Solution Services.
Reset Site specific Click to replace the current Claim Status Reason Codes and actions with the default codes and actions.
Use this field... To do this...
* Claim Status Reason Site specific - Enter a claim status code and/or a Medicare adjudication remark to flag visits for acknowledgment of receipt or to evaluate for further action.
Carriers use a claim status or a Medicare adjudication remark to indicate claim status. Check with the carrier to determine the reason code(s) returned, then determine the codes to process for your site.
To enter multiple claim status codes for one action, separate each code with a comma and no spaces, for example:
2,12,14
You can enter a maximum of 10 comma-separated codes.
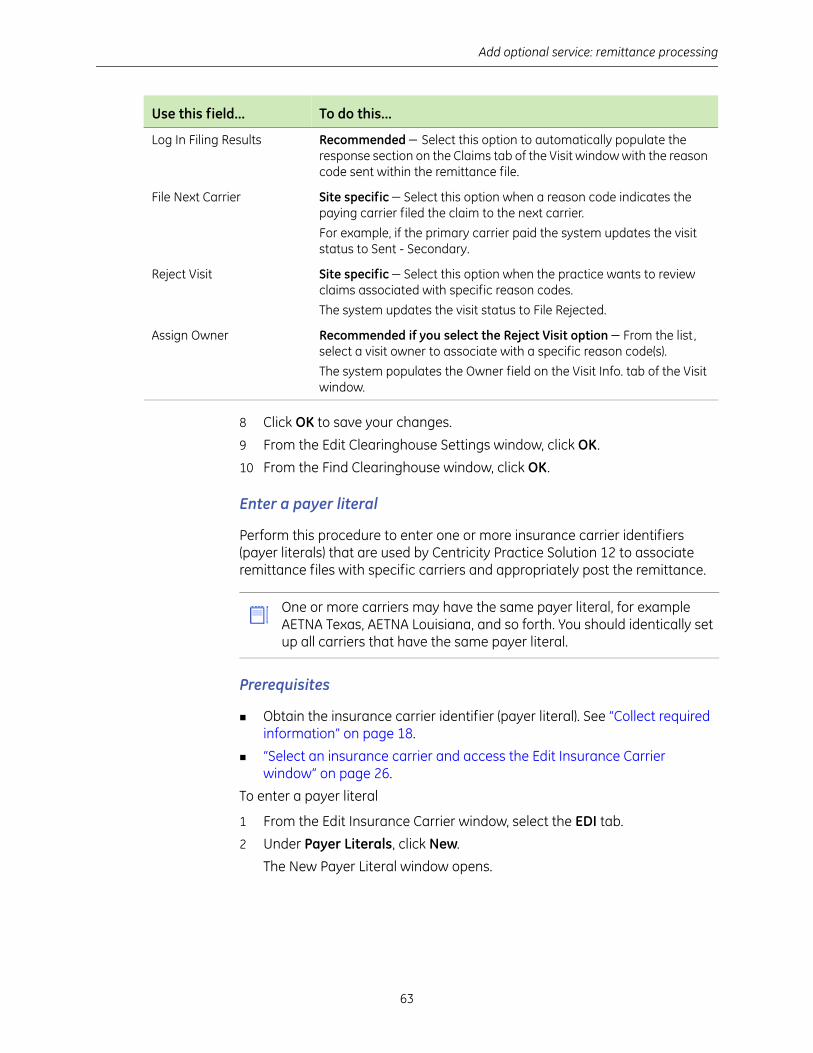
Add optional service: remittance processing
63
8 Click OK to save your changes.
9 From the Edit Clearinghouse Settings window, click OK.
10 From the Find Clearinghouse window, click OK.
Enter a payer literal
Perform this procedure to enter one or more insurance carrier identifiers (payer literals) that are used by Centricity Practice Solution 12 to associate remittance files with specific carriers and appropriately post the remittance.
Prerequisites
Obtain the insurance carrier identifier (payer literal). See “Collect required information” on page 18.
“Select an insurance carrier and access the Edit Insurance Carrier window” on page 26.
To enter a payer literal
1 From the Edit Insurance Carrier window, select the EDI tab.
2 Under Payer Literals, click New.
The New Payer Literal window opens.
Log In Filing Results Recommended Select this option to automatically populate the response section on the Claims tab of the Visit window with the reason code sent within the remittance file.
File Next Carrier Site specific Select this option when a reason code indicates the paying carrier filed the claim to the next carrier.
For example, if the primary carrier paid the system updates the visit status to Sent - Secondary.
Reject Visit Site specific Select this option when the practice wants to review claims associated with specific reason codes.
The system updates the visit status to File Rejected.
Assign Owner Recommended if you select the Reject Visit option From the list , select a visit owner to associate with a specific reason code(s).
The system populates the Owner field on the Visit Info. tab of the Visit window.
Use this field... To do this...
One or more carriers may have the same payer literal, for example AETNA Texas, AETNA Louisiana, and so forth. You should identically set up all carriers that have the same payer literal.
Centricity EDI 12 Plug-in Installation and Setup
64
3 In the Payer Literal field, enter the insurance carrier identifier.
4 Click OK.
5 Repeat steps 2 through 4, as required, to enter additional identifiers for the same carrier.
6 Repeat steps 1 through 5 if the same carrier is listed under a different name.
Modify response code actions
Perform this procedure to establish the criteria the system uses to automatically process reason codes sent by a carrier(s). This criteria effects specific codes on a procedure level.
Prerequisites
Review the codes and their descriptions by accessing the WPC website at www.wpc-edi.com/codes/Codes.asp, then select Claim Adjustment Reason Codes.
Determine acceptable actions based upon your practice’s established billing processes.
“Select an insurance carrier and access the Edit Insurance Carrier window” on page 26.
To modify response code actions:
1 From the Edit Insurance Carrier window, select the EDI tab.
2 Under Response Processors, click New.
The Insurance Carrier Response Processing window opens.
3 From the Company list, select (all) or select the company you want to process the file.
4 From the Clearinghouse list, select Centricity, then click Settings.
The File Processing Insurance Carrier Setting window opens.
5 Under Processing Options, select one of the following to associate the clearinghouse claim level settings to this carrier:
Process Claim Level Codes select if you process claim status codes
Process Medicare Adjudication Remarks select to process Medicare adjudication remarks
You must enter the identifier exactly as provided in the remittance file. Pay particular attention to the use of spaces.
Carriers use a claim status reason or a Medicare adjudication remark to indicate claim status. Check with the carrier to determine the reason code(s) returned, then determine the codes to process for your site.
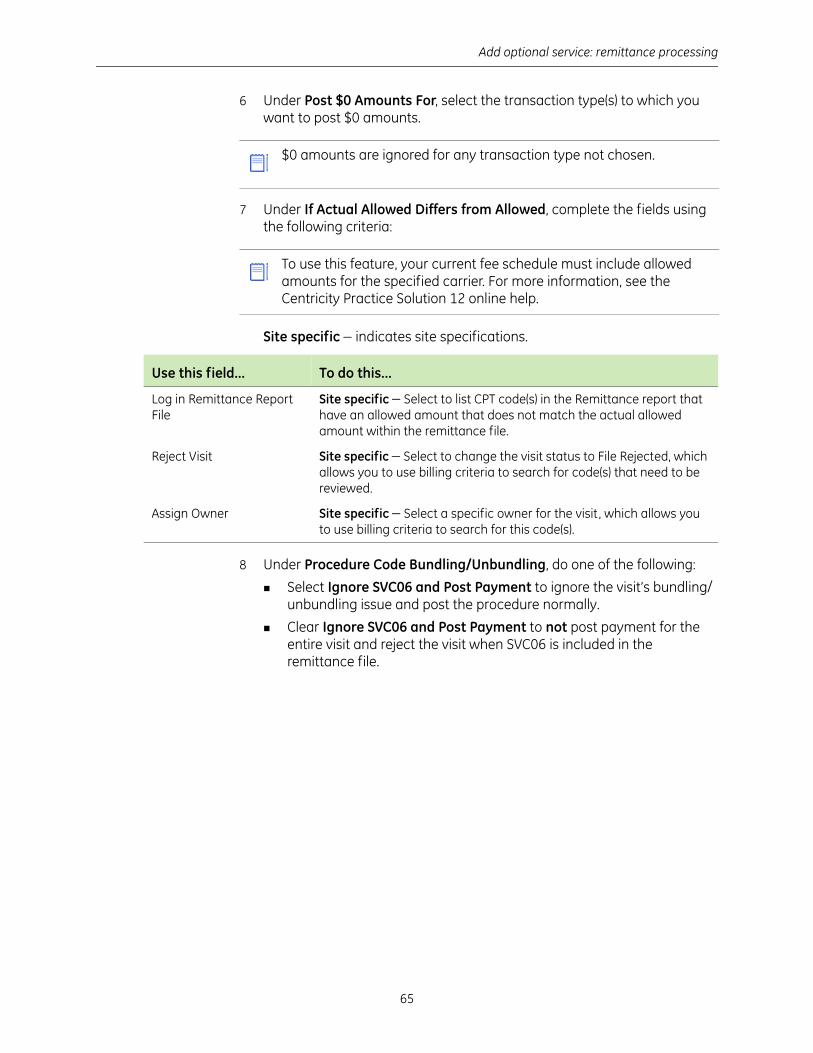
Add optional service: remittance processing
65
6 Under Post $0 Amounts For, select the transaction type(s) to which you want to post $0 amounts.
7 Under If Actual Allowed Differs from Allowed, complete the fields using the following criteria:
Site specific indicates site specifications.
8 Under Procedure Code Bundling/Unbundling, do one of the following:
Select Ignore SVC06 and Post Payment to ignore the visit’s bundling/unbundling issue and post the procedure normally.
Clear Ignore SVC06 and Post Payment to not post payment for the entire visit and reject the visit when SVC06 is included in the remittance file.
$0 amounts are ignored for any transaction type not chosen.
To use this feature, your current fee schedule must include allowed amounts for the specified carrier. For more information, see the Centricity Practice Solution 12 online help.
Use this field... To do this...
Log in Remittance Report File
Site specific Select to list CPT code(s) in the Remittance report that have an allowed amount that does not match the actual allowed amount within the remittance file.
Reject Visit Site specific Select to change the visit status to File Rejected, which allows you to use billing criteria to search for code(s) that need to be reviewed.
Assign Owner Site specific Select a specific owner for the visit, which allows you to use billing criteria to search for this code(s).
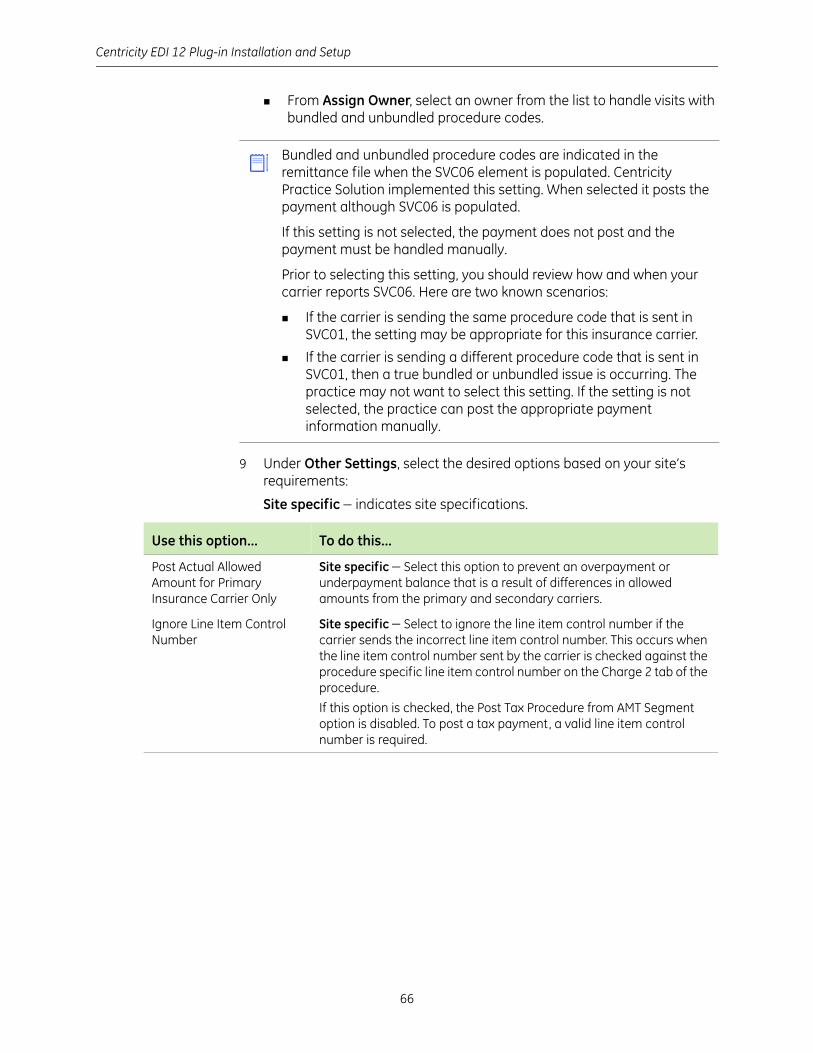
Centricity EDI 12 Plug-in Installation and Setup
66
From Assign Owner, select an owner from the list to handle visits with bundled and unbundled procedure codes.
9 Under Other Settings, select the desired options based on your site’s requirements:
Site specific indicates site specifications.
Bundled and unbundled procedure codes are indicated in the remittance file when the SVC06 element is populated. Centricity Practice Solution implemented this setting. When selected it posts the payment although SVC06 is populated.
If this setting is not selected, the payment does not post and the payment must be handled manually.
Prior to selecting this setting, you should review how and when your carrier reports SVC06. Here are two known scenarios:
If the carrier is sending the same procedure code that is sent in SVC01, the setting may be appropriate for this insurance carrier.
If the carrier is sending a different procedure code that is sent in SVC01, then a true bundled or unbundled issue is occurring. The practice may not want to select this setting. If the setting is not selected, the practice can post the appropriate payment information manually.
Use this option... To do this...
Post Actual Allowed Amount for Primary Insurance Carrier Only
Site specific Select this option to prevent an overpayment or underpayment balance that is a result of differences in allowed amounts from the primary and secondary carriers.
Ignore Line Item Control Number
Site specific Select to ignore the line item control number if the carrier sends the incorrect line item control number. This occurs when the line item control number sent by the carrier is checked against the procedure specific line item control number on the Charge 2 tab of the procedure.
If this option is checked, the Post Tax Procedure from AMT Segment option is disabled. To post a tax payment, a valid line item control number is required.
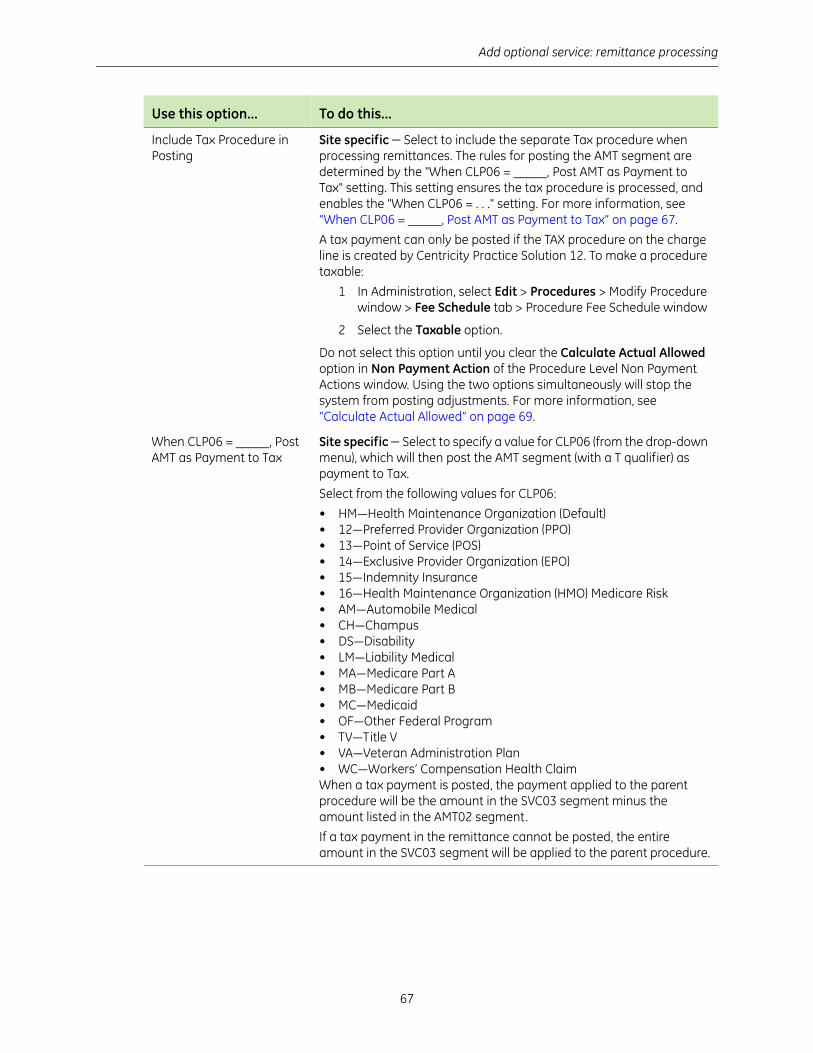
Add optional service: remittance processing
67
Include Tax Procedure in Posting
Site specific Select to include the separate Tax procedure when processing remittances. The rules for posting the AMT segment are determined by the "When CLP06 = _____, Post AMT as Payment to Tax" setting. This setting ensures the tax procedure is processed, and enables the "When CLP06 = . . ." setting. For more information, see “When CLP06 = _____, Post AMT as Payment to Tax” on page 67.
A tax payment can only be posted if the TAX procedure on the charge line is created by Centricity Practice Solution 12. To make a procedure taxable:
1 In Administration, select Edit > Procedures > Modify Procedure window > Fee Schedule tab > Procedure Fee Schedule window
2 Select the Taxable option.
Do not select this option until you clear the Calculate Actual Allowed option in Non Payment Action of the Procedure Level Non Payment Actions window. Using the two options simultaneously will stop the system from posting adjustments. For more information, see “Calculate Actual Allowed” on page 69.
When CLP06 = _____, Post AMT as Payment to Tax
Site specific Select to specify a value for CLP06 (from the drop-down menu), which will then post the AMT segment (with a T qualifier) as payment to Tax.
Select from the following values for CLP06:
• HM—Health Maintenance Organization (Default)• 12—Preferred Provider Organization (PPO)• 13—Point of Service (POS)• 14—Exclusive Provider Organization (EPO)• 15—Indemnity Insurance• 16—Health Maintenance Organization (HMO) Medicare Risk• AM—Automobile Medical• CH—Champus• DS—Disability• LM—Liability Medical• MA—Medicare Part A• MB—Medicare Part B• MC—Medicaid• OF—Other Federal Program• TV—Title V• VA—Veteran Administration Plan• WC—Workers’ Compensation Health ClaimWhen a tax payment is posted, the payment applied to the parent procedure will be the amount in the SVC03 segment minus the amount listed in the AMT02 segment.
If a tax payment in the remittance cannot be posted, the entire amount in the SVC03 segment will be applied to the parent procedure.
Use this option... To do this...
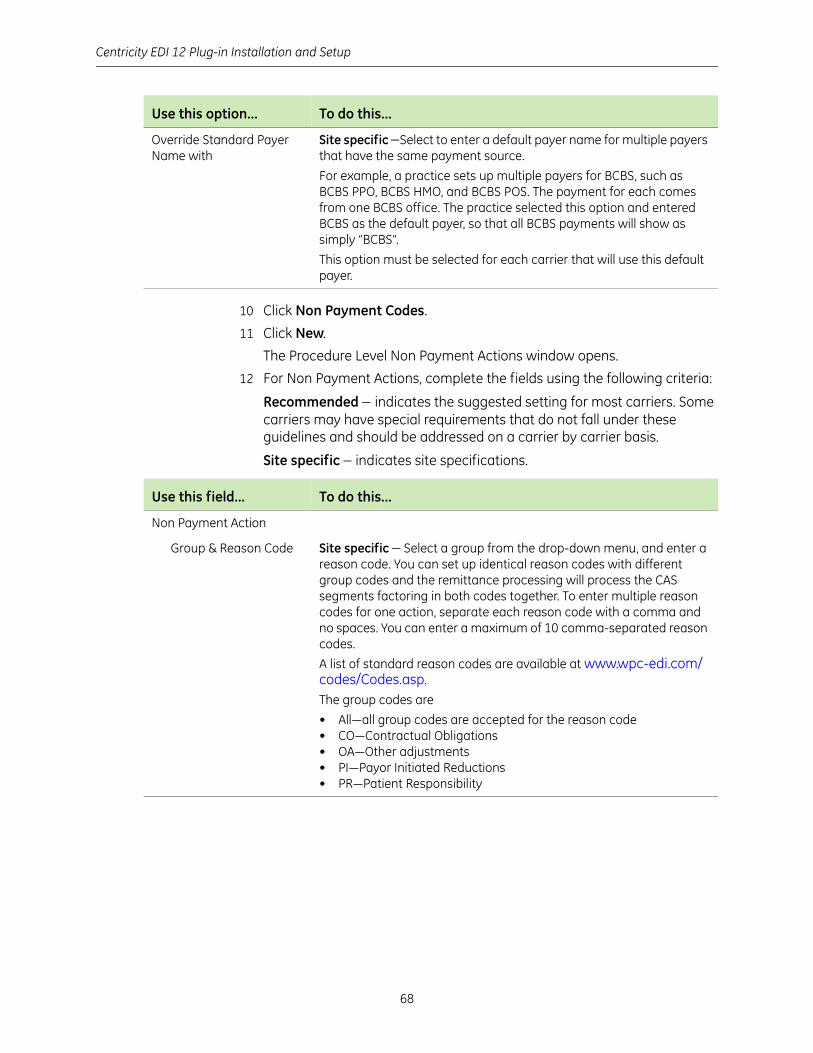
Centricity EDI 12 Plug-in Installation and Setup
68
10 Click Non Payment Codes.
11 Click New.
The Procedure Level Non Payment Actions window opens.
12 For Non Payment Actions, complete the fields using the following criteria:
Recommended indicates the suggested setting for most carriers. Some carriers may have special requirements that do not fall under these guidelines and should be addressed on a carrier by carrier basis.
Site specific indicates site specifications.
Override Standard Payer Name with
Site specific Select to enter a default payer name for multiple payers that have the same payment source.
For example, a practice sets up multiple payers for BCBS, such as BCBS PPO, BCBS HMO, and BCBS POS. The payment for each comes from one BCBS office. The practice selected this option and entered BCBS as the default payer, so that all BCBS payments will show as simply “BCBS”.
This option must be selected for each carrier that will use this default payer.
Use this option... To do this...
Use this field... To do this...
Non Payment Action
Group & Reason Code Site specific Select a group from the drop-down menu, and enter a reason code. You can set up identical reason codes with different group codes and the remittance processing will process the CAS segments factoring in both codes together. To enter multiple reason codes for one action, separate each reason code with a comma and no spaces. You can enter a maximum of 10 comma-separated reason codes.
A list of standard reason codes are available at www.wpc-edi.com/codes/Codes.asp.
The group codes are
• All—all group codes are accepted for the reason code• CO—Contractual Obligations• OA—Other adjustments• PI—Payor Initiated Reductions• PR—Patient Responsibility
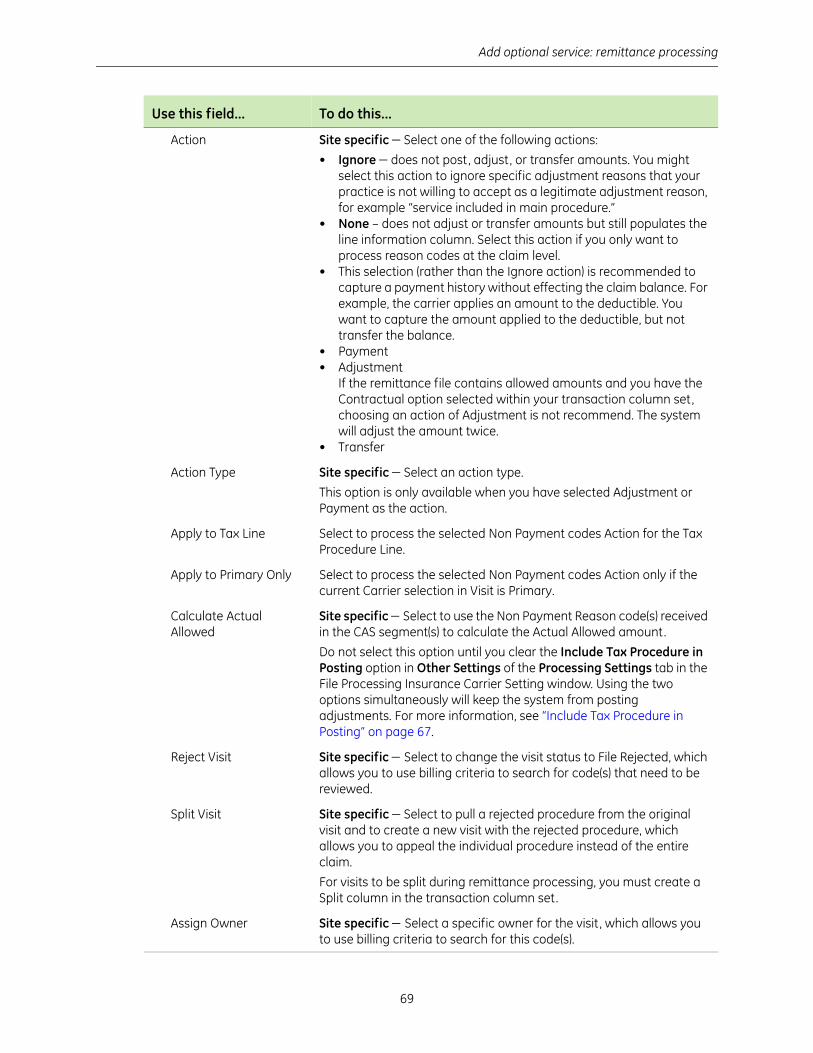
Add optional service: remittance processing
69
Action Site specific Select one of the following actions:
• Ignore does not post, adjust, or transfer amounts. You might select this action to ignore specific adjustment reasons that your practice is not willing to accept as a legitimate adjustment reason, for example “service included in main procedure.”
• None – does not adjust or transfer amounts but still populates the line information column. Select this action if you only want to process reason codes at the claim level.
• This selection (rather than the Ignore action) is recommended to capture a payment history without effecting the claim balance. For example, the carrier applies an amount to the deductible. You want to capture the amount applied to the deductible, but not transfer the balance.
• Payment• Adjustment
If the remittance file contains allowed amounts and you have the Contractual option selected within your transaction column set, choosing an action of Adjustment is not recommend. The system will adjust the amount twice.
• Transfer
Action Type Site specific Select an action type.
This option is only available when you have selected Adjustment or Payment as the action.
Apply to Tax Line Select to process the selected Non Payment codes Action for the Tax Procedure Line.
Apply to Primary Only Select to process the selected Non Payment codes Action only if the current Carrier selection in Visit is Primary.
Calculate Actual Allowed
Site specific Select to use the Non Payment Reason code(s) received in the CAS segment(s) to calculate the Actual Allowed amount.
Do not select this option until you clear the Include Tax Procedure in Posting option in Other Settings of the Processing Settings tab in the File Processing Insurance Carrier Setting window. Using the two options simultaneously will keep the system from posting adjustments. For more information, see “Include Tax Procedure in Posting” on page 67.
Reject Visit Site specific Select to change the visit status to File Rejected, which allows you to use billing criteria to search for code(s) that need to be reviewed.
Split Visit Site specific Select to pull a rejected procedure from the original visit and to create a new visit with the rejected procedure, which allows you to appeal the individual procedure instead of the entire claim.
For visits to be split during remittance processing, you must create a Split column in the transaction column set.
Assign Owner Site specific Select a specific owner for the visit, which allows you to use billing criteria to search for this code(s).
Use this field... To do this...
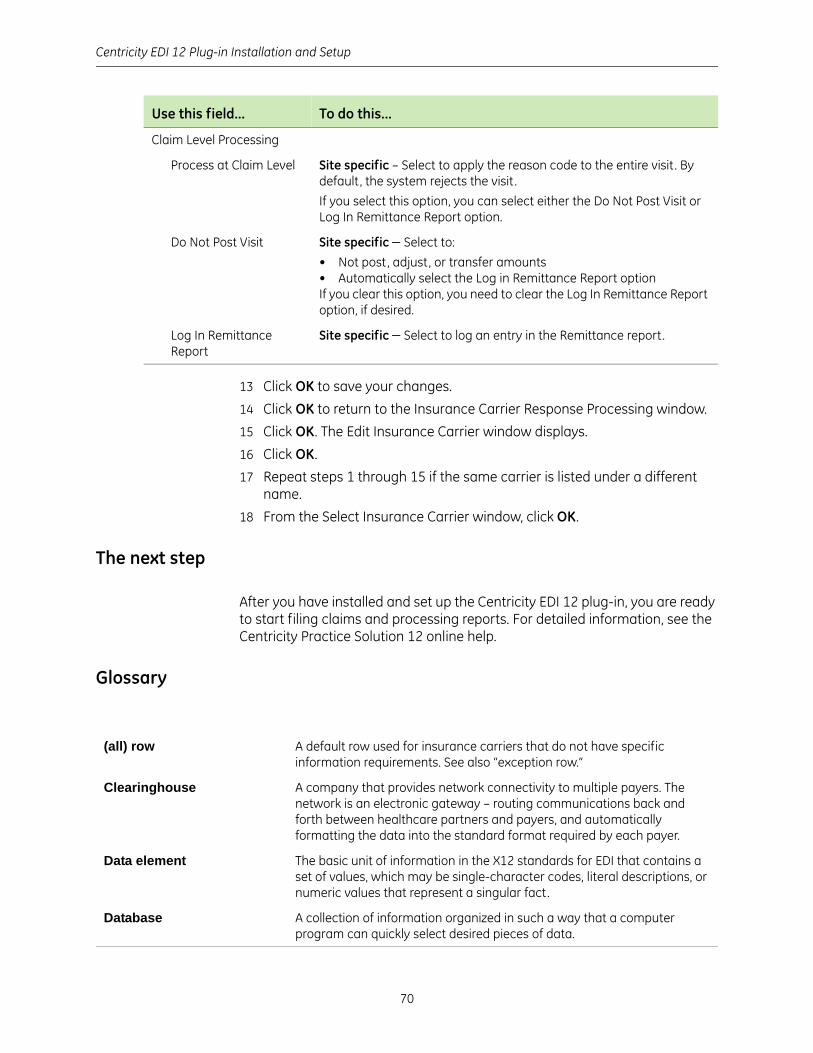
Centricity EDI 12 Plug-in Installation and Setup
70
13 Click OK to save your changes.
14 Click OK to return to the Insurance Carrier Response Processing window.
15 Click OK. The Edit Insurance Carrier window displays.
16 Click OK.
17 Repeat steps 1 through 15 if the same carrier is listed under a different name.
18 From the Select Insurance Carrier window, click OK.
The next step
After you have installed and set up the Centricity EDI 12 plug-in, you are ready to start filing claims and processing reports. For detailed information, see the Centricity Practice Solution 12 online help.
Glossary
Claim Level Processing
Process at Claim Level Site specific – Select to apply the reason code to the entire visit. By default , the system rejects the visit .
If you select this option, you can select either the Do Not Post Visit or Log In Remittance Report option.
Do Not Post Visit Site specific Select to:
• Not post, adjust, or transfer amounts• Automatically select the Log in Remittance Report optionIf you clear this option, you need to clear the Log In Remittance Report option, if desired.
Log In Remittance Report
Site specific Select to log an entry in the Remittance report.
Use this field... To do this...
(all) row A default row used for insurance carriers that do not have specific information requirements. See also “exception row.”
Clearinghouse A company that provides network connectivity to multiple payers. The network is an electronic gateway – routing communications back and forth between healthcare partners and payers, and automatically formatting the data into the standard format required by each payer.
Data element The basic unit of information in the X12 standards for EDI that contains a set of values, which may be single-character codes, literal descriptions, or numeric values that represent a singular fact.
Database A collection of information organized in such a way that a computer program can quickly select desired pieces of data.
Glossary
71
EDI Electronic data interchange; The computer/application to computer/application exchange of transactions between different organizations using a standardized format.
Exception row A row set up with carrier-specific information required by the carrier to process EDI transactions.
HIPAA Health Insurance Portability & Accountability Act; U.S. public law (104-191) enacted to protect employees' health insurance coverage when they change or lose their jobs (Title I), and provide standards for patient health, administrative and financial data interchange (Title II). The latter also governs the privacy and security of health information records and transactions.
Implementation Guide A document explaining the proper use of a standard for a specific business purpose. The X12N HIPAA implementation guides are the primary reference documents used by those implementing the associated transactions and are incorporated into the HIPAA regulations by reference.
Insurance carrier For the purpose of this document, an entity that pays claims, administers the insurance product or benefit , or both.
Loop An organizational data structure specified in the X12 standards for EDI that groups related segments (two or more) for the purpose of repetition within a transaction set. For example, the N1 loop includes segments N1 to PER for name and address information.
Payer agreement A legal contract spelling out the terms and conditions for doing business electronically. These terms and conditions take the place of the terms and conditions that were present when the two companies were exchanging paper documents.
Payer ID A numeric identifier given to each insurance carrier by the clearinghouse.
Payer literal An identifier provided by the insurance carrier (N1 PR segment of the X12 835 remittance file) that is used by Centricity Practice Solution 12 to associate remittance files with the specified carrier(s).
Plug-in An auxiliary application to a software program that is designed to enhance the functionality of the primary program. When installed, the added functionality is automatically integrated into the primary program and as a separate program, the plug-in becomes transparent.
Qualifier A data element that contains an X12 code and a description of the code that is used to indicate the type of information transmitted. For example, the Blue Cross Blue Shield qualifier contains the 1B X12 code.
Segment An organizational data structure specified in the X12 standards for EDI that consists of logically related data elements in a defined sequence. Every segment consists of a segment identifier, one or more data elements each preceded by an element separator, and a segment terminator.

Centricity EDI 12 Plug-in Installation and Setup
72
Transaction column set A set of customized columns that define the fields to display on the Transaction Distribution window. Transaction column sets determine the outcome of transactions and are required for every carrier. Usually you define a transaction column set to closely follow the layout of the carrier-specific EOB.
Transaction Distribution window
The window that opens the fields necessary to process transactions, for example to enter payments, make adjustments, and apply transfers. These fields are set up using transaction column sets.
X12 A group accredited by the American National Standards Institute (ANSI) that defines EDI standards for many American industries, including health care insurance. Most of the electronic transaction standards mandated or proposed under HIPAA are X12 standards.