Embed Size (px)
Citation preview

Owner’s Guide
Concert Master Mark II
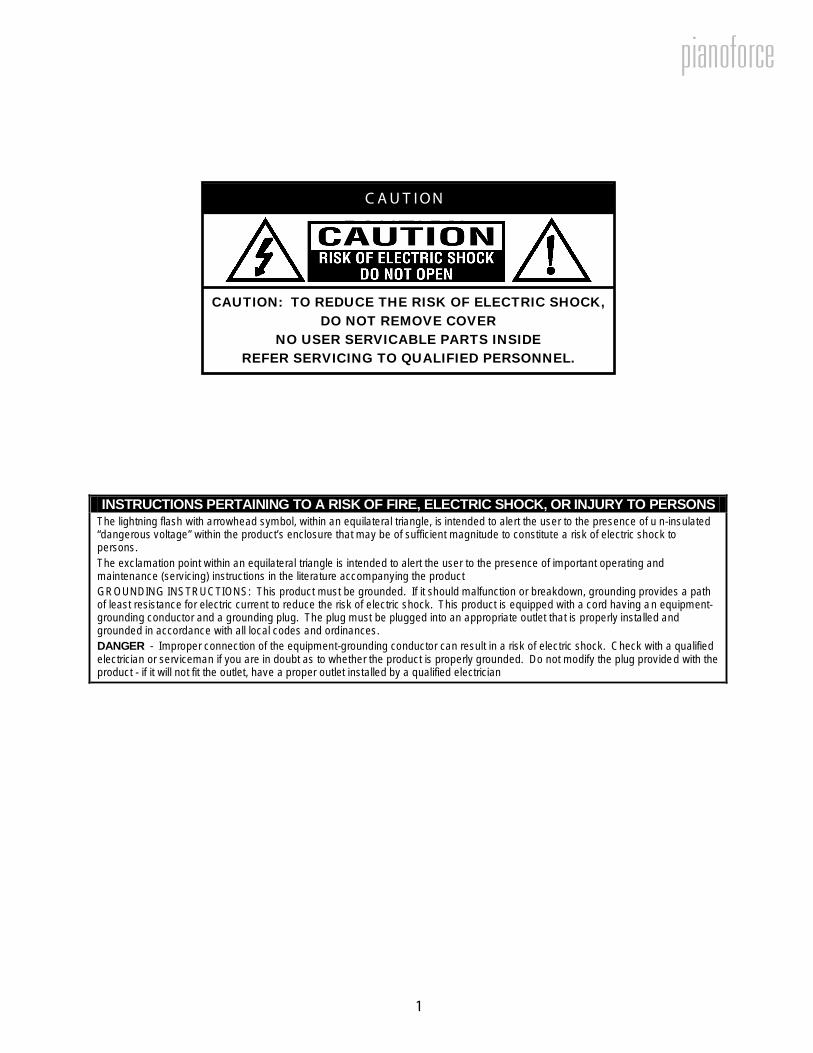
INSTRUCTIONS PERTAINING TO A RISK OF FIRE, ELECTRIC SHOCK, OR INJURY TO PERSONSThe lightning flash with arrowhead symbol, within an equilateral triangle, is intended to alert the user to the presence of u n-insulated“dangerous voltage” within the product’s enclosure that may be of sufficient magnitude to constitute a risk of electric shock topersons.The exclamation point within an equilateral triangle is intended to alert the user to the presence of important operating andmaintenance (servicing) instructions in the literature accompanying the productGROUNDING INSTRUCTIONS: This product must be grounded. If it should malfunction or breakdown, grounding provides a pathof least resistance for electric current to reduce the risk of electric shock. This product is equipped with a cord having a n equipment-grounding conductor and a grounding plug. The plug must be plugged into an appropriate outlet that is properly installed andgrounded in accordance with all local codes and ordinances.DANGER - Improper connection of the equipment-grounding conductor can result in a risk of electric shock. Check with a qualifiedelectrician or serviceman if you are in doubt as to whether the product is properly grounded. Do not modify the plug provide d with theproduct - if it will not fit the outlet, have a proper outlet installed by a qualified electrician
CAUTION: TO REDUCE THE RISK OF ELECTRIC SHOCK,DO NOT REMOVE COVER
NO USER SERVICABLE PARTS INSIDEREFER SERVICING TO QUALIFIED PERSONNEL.
C AU T ION
1
Introduction
WelcomeC ongratu lations on choosing the Baldwin Concert Master p layer p iano system ! A greatadvancem ent over p layer p ianos of yesterday, the Baldwin Concert Master sets severa l newstandards for ease-of-use, versatility, convenience, and m usica l realism . W hether you want softbackground m usic for conversation, the gentle m ood created by an upbeat jazz trio , or a powerfu lsym phonic experience, the Baldwin Concert Master w ill accom m odate you with years of unsurpassedm usica l enjoym ent.
OverviewThe Baldwin Concert Master p layer p iano system is a M ID I equipped m usic p layback and recordsystem (with record option) for acoustic p ianos. M ID I is an acronym for M usica l Instrum ent D ig ita lIn terface. It is a universal language adopted by the m usica l instrum ent m anufacturers sovarious M ID I equipped dev ices can ta lk to each other. M ID I is a form of com m unication.
The Baldwin CM system has two m ain parts, the S tationary Contro ller (the centra l bra in) and thesolenoid ra il (or engine). Notes or keys C1 to A8 on the piano have a corresponding solenoid.
The Performance system perform s the M ID I m essages sent from either the internal CD-R OM, InternalLibrary, or external USB device. A message received by the CM prompts the key solenoid to rise, hitting the tail of the piano key. The associated hammer then precisely strikes the string, exactly duplicating manual playing.
Choosing a Good LocationTo prevent excessive internal heat buildup in the electronic com ponents, p lace the piano in a locationwith suffic ient a ir c ircu lation.
D o not insta ll the piano:
Near heat sources such as radiators or hot air ducts.In direct sun light.In places where excessive dust, mechanical vibration or shocks exist.
2

Introduction/Welcome 2Getting Started 3What media to play 3Source/Library 4, 5Volume and Balance 6Tone Control/Expression/Tempo/Transpose 7Help/Repeat/Random/Menu 8Attention/Additional Features 9Quick Start 10Unlock/Copy 11, 12, 13, 14A-B Repeat 13Internal Library Structure 15, 16Playlist Function 17IR Remote 18, 19, 20Functions - Update - Remote Assistant 21Solenoid Controller Setup 22Split Play - Split Note - Help - Random 23, 24Repeat - Tone - Pan - Tempo - Transpose 25Add/Playlist - All - Delete - Rename - Copy 26The Source Buttons 27USB 28, 29CD 30CD Auto Play 31Accompaniment Volume 32Menu 33, 34, 35, 35
37, 38, 39, 4041, 42
Connections 42Playback Sources 43Index 44, 45Internal Library Song List 46, 47Warranty 48
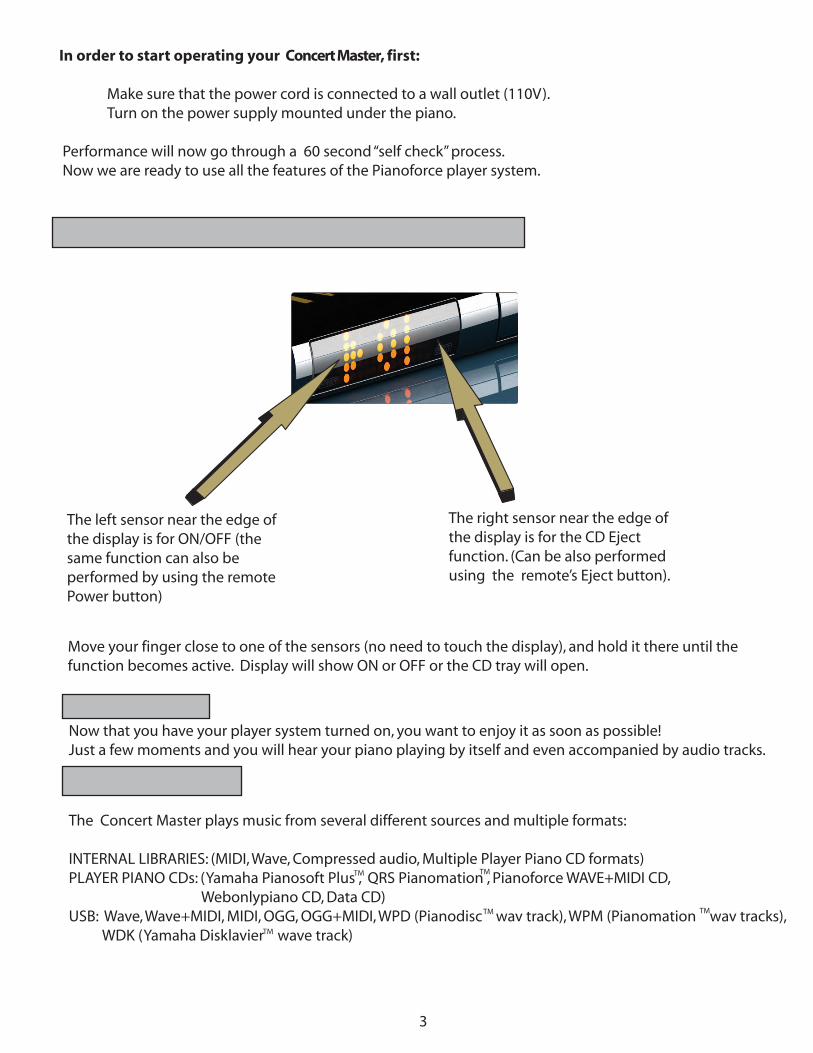
In order to start operating your Concert Master, first:
Make sure that the power cord is connected to a wall outlet (110V). Turn on the power supply mounted under the piano.
Performance will now go through a 60 second “self check” process. Now we are ready to use all the features of the Pianoforce player system.
HOW TO TURN THE CONTROL UNIT (PERFORMANCE) ON and OFF:
The left sensor near the edge of the display is for ON/OFF (the same function can also be performed by using the remote Power button)
The right sensor near the edge of the display is for the CD Eject function. (Can be also performed using the remote’s Eject button).
Move your finger close to one of the sensors (no need to touch the display), and hold it there until the function becomes active. Display will show ON or OFF or the CD tray will open.
GETTING STARTED
Now that you have your player system turned on, you want to enjoy it as soon as possible!Just a few moments and you will hear your piano playing by itself and even accompanied by audio tracks.
WHAT MEDIA TO PLAY?
The Concert Master plays music from several different sources and multiple formats:
INTERNAL LIBRARIES: (MIDI, Wave, Compressed audio, Multiple Player Piano CD formats)PLAYER PIANO CDs: (Yamaha Pianosoft Plus , QRS Pianomation , Pianoforce WAVE+MIDI CD, Webonlypiano CD, Data CD)USB: Wave, Wave+MIDI, MIDI, OGG, OGG+MIDI, WPD (Pianodisc wav track), WPM (Pianomation wav tracks), WDK (Yamaha Disklavier wave track)
3
TM TM
TM
TM TM
LET THE MUSIC (YOUR PIANO) PLAY!
SELECT A SOURCE
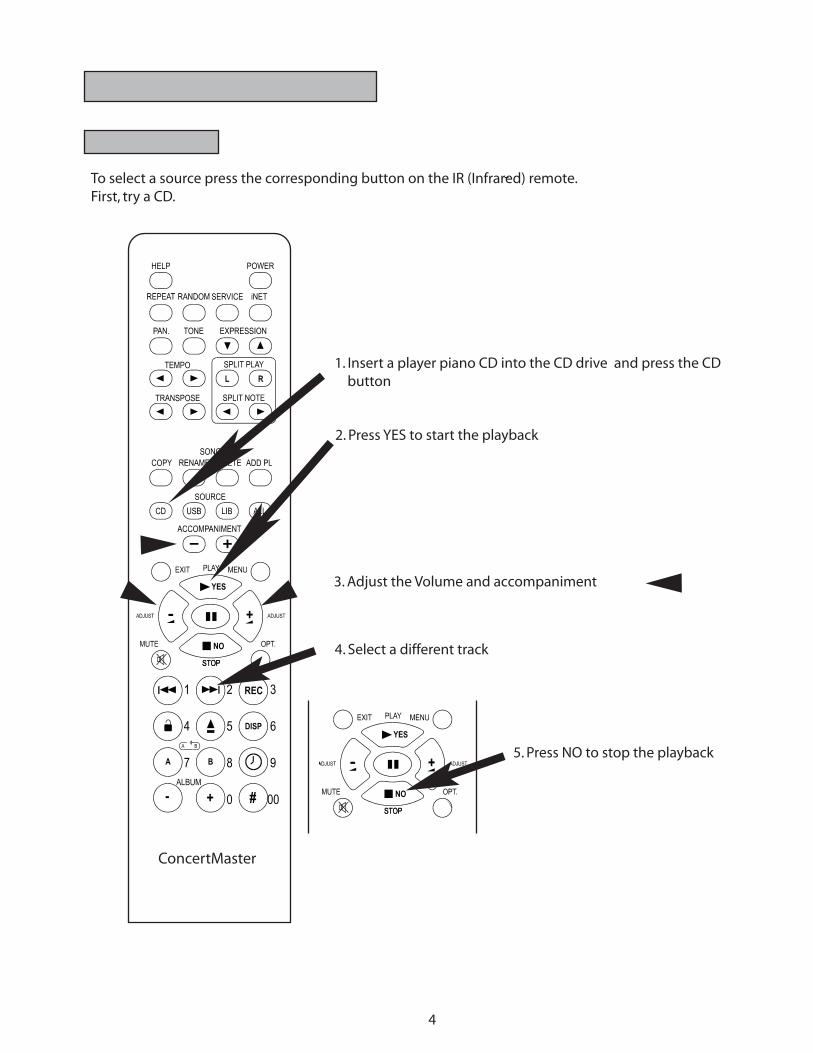
To select a source press the corresponding button on the IR (Infrared) remote. First, try a CD.
1. Insert a player piano CD into the CD drive and press the CD button
2. Press YES to start the playback
3. Adjust the Volume and accompaniment
4. Select a different track
5. Press NO to stop the playback
4
-
ConcertMaster
DISCOVER THE INTERNAL LIBRARIES
To select one of the internal libraries Press the LIB (Library) button
The display shows current album ( ex. CLASSICAL VOL 1)
If you want to listen to music from the CLASSICAL VOL 1 library, press YES
The display shows MIDI Demo
Press YES
The display shows the first song in the Library
Press YES - piano starts to play
To select a different library press the LIB (Library) button again
Press the + and - buttons to scroll through the libraries
Press YES to activate the library
Press the PREVIOUS or NEXT button to select an album
Press YES
Display shows the first song in the album
Press YES - Piano will start to play
To select or play another song press the NEXT or PREVIOUS button
To stop the playback, press the NO button
When an album is selected from the internal library, these buttons can also be used to go to the previous or next album.
5
The Baldwin Concert Master comes with pre-loaded music libraries.
ConcertMaster

DISCOVER THE INTERNAL LIBRARIES
To select one of the internal libraries Press the LIB (Library) button
The display shows current album ( ex. CLASSICAL VOL 1)
If you want to listen to music from the CLASSICAL VOL 1 library, press YES
The display shows MIDI Demo
Press YES
The display shows the first song in the Library
Press YES - piano starts to play
To select a different library press the LIB (Library) button again
Press the + and - buttons to scroll through the libraries
Press YES to activate the library
Press the PREVIOUS or NEXT button to select an album
Press YES
Display shows the first song in the album
Press YES - Piano will start to play
To select or play another song press the NEXT or PREVIOUS button
To stop the playback, press the NO button
When an album is selected from the internal library, these buttons can also be used to go to the previous or next album.
5
The Concert Master comes with pre-loaded music libraries.
Concert Master
HOW TO ADJUST THE VOLUME AND BALANCE
There are two volume controls available: The Master Volume (+ - ADJUST) control the global volume of the piano and orchestral accompaniment while the Accompaniment (+ -) buttons adjust the balance between the piano and background music.
The master volume controls how hard or soft the hammers strike the piano strings (128 levels), while the Accompaniment controls the audio output to the speakers.
Press the Adjust + - buttons to increase or decrease the global volume (piano and accompaniment - if available). The level ranges from 1-30. NOTE: The lowest piano volume level is 1. If you want to turn off the piano (and accompaniment) completely without interrupting the playback, use the MUTE button. interrupting the playback, use the MUTE button.While the Master Volume is set to 1, it is possible to adjust the accompaniment level up or down in relation to the piano volume. Use the accompaniment + - buttons to adjust. Once the master volumeis moved off of “1”, the accompaniment will keep the same “balance’ withthe piano.
MUTE
If the music has orchestral accompaniment and sometimes even vocal, you can adjust the balance between the piano and the audio tracks by pressing the ACCOMPANIMENT + - buttons.The levels are 0 - 25 when the master volume is set to 1, or 0-42 when Master is 2 or higher.
6
Concert Master
CM plays your piano just like a pianist does. As keys are moving,the hammers are striking the strings with variable force (expression). Theorchestral accompaniment is typically amplified by powered speakers under the piano. There are different brands of speakers used and performance and sound will vary accordingly. Recordings also represent a wide spectrum of sound especially in tone (treble, mid-range, and bass). In addition to the Balance control between the piano and the accompani-ment, CM also offers tone control, so you can adjust Treble and Bass to your liking.
When first pressing the TONE button, the display shows Tx (x is the current boost or cut level of the Treble setting). To change the Treble setting use the ADJUST + - buttons.When the TONE button is pressed the second time, the displayshows Bx (x is the current boost or cut level for the Bass level).Use the ADJUST button to change the bass setting.The Treble and Bass corrections of the digital accompaniment range from -18 to +18 dB.
Performance plays multiple CD and other media formats. The piano expression levelvaries from different software manufac-turers.The EXPRESSION buttons allowsselection of SOFT, MEDIUM, or DEEPexpressions. Deep is probably the best forclassical piano music, soft if very quiet playback is desired, and medium for pop,jazz, and easy listening music.
TEMPO buttons can change the playbacktempo by + - 50% of someplayback formats such as MIDI .
It is possible to transpose some playback formats by+ - 2 octaves
TONE CONTROL, EXPRESSION and more
EXPRESSION
TEMPO
TRANSPOSE
7
Concert Master
HELP
The REPEAT button toggles between three repeat options: No Repeat Single Song Repeat All Song Repeat
REPEAT
Pressing the HELP button followed by another functionbutton will display information, instruction, and help.
RANDOM
The RANDOM button toggles between normal and RANDOM. In this mode, Performer automatically selects songs in no particular order from the current source.
MENU
The MENU opens up the list of all available features.
The main MENU items are:
SOURCE, AUDIO, PIANO, PLAYBACK OPTIONS, OPTIONS, SETUP, INET, ABOUT
You may want to discover the DISPLAY MENU first.
Using the MENU button followed by the ADJUST + - buttons you can select and adjust the:DISPLAY SCROLL SPEEDLIGHT LEVELFADE LEVELFADE DELAYYou can also turn the touchless sensors ON and OFF
Push MENU, use the ADJUST + - buttons toselect SETUP. Then press YES, use the ADJUST + - buttons to select DISPLAY SETUP.Press YES and adjust the parameters.
The dot matrix display will show the new setting.
8
For the complete MENU guide and all available Performance features, please refer to the owners manual or use the built in Help function.
HOW TO COPY PLAYER PIANO CDs or MIDI FILES to a USB
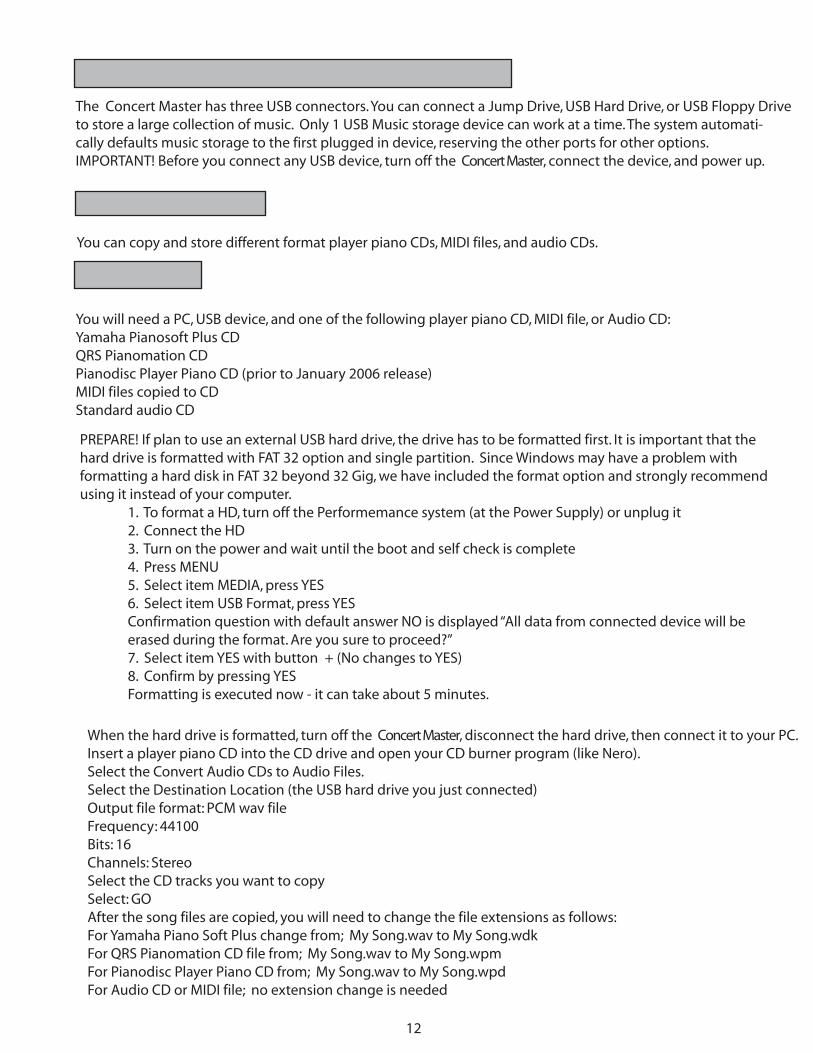
The Concert Master has three USB connectors. You can connect a Jump Drive, USB Hard Drive, or USB Floppy Drive to store a large collection of music. Only 1 USB Music storage device can work at a time. The system automati-cally defaults music storage to the first plugged in device, reserving the other ports for other options.IMPORTANT! Before you connect any USB device, turn off the Concert Master, connect the device, and power up.
WHAT CAN YOU STORE?
You can copy and store different format player piano CDs, MIDI files, and audio CDs.
HOW TO COPY
You will need a PC, USB device, and one of the following player piano CD, MIDI file, or Audio CD:Yamaha Pianosoft Plus CDQRS Pianomation CDPianodisc Player Piano CD (prior to January 2006 release)MIDI files copied to CDStandard audio CD
PREPARE! If plan to use an external USB hard drive, the drive has to be formatted first. It is important that the hard drive is formatted with FAT 32 option and single partition. Since Windows may have a problem with formatting a hard disk in FAT 32 beyond 32 Gig, we have included the format option and strongly recommend using it instead of your computer. 1. To format a HD, turn off the Performemance system (at the Power Supply) or unplug it 2. Connect the HD 3. Turn on the power and wait until the boot and self check is complete 4. Press MENU 5. Select item MEDIA, press YES 6. Select item USB Format, press YES Confirmation question with default answer NO is displayed “All data from connected device will be erased during the format. Are you sure to proceed?” 7. Select item YES with button + (No changes to YES) 8. Confirm by pressing YES Formatting is executed now - it can take about 5 minutes.
When the hard drive is formatted, turn off the Concert Master, disconnect the hard drive, then connect it to your PC. Insert a player piano CD into the CD drive and open your CD burner program (like Nero). Select the Convert Audio CDs to Audio Files.Select the Destination Location (the USB hard drive you just connected)Output file format: PCM wav fileFrequency: 44100Bits: 16Channels: StereoSelect the CD tracks you want to copySelect: GOAfter the song files are copied, you will need to change the file extensions as follows:For Yamaha Piano Soft Plus change from; My Song.wav to My Song.wdkFor QRS Pianomation CD file from; My Song.wav to My Song.wpmFor Pianodisc Player Piano CD from; My Song.wav to My Song.wpdFor Audio CD or MIDI file; no extension change is needed
12
1
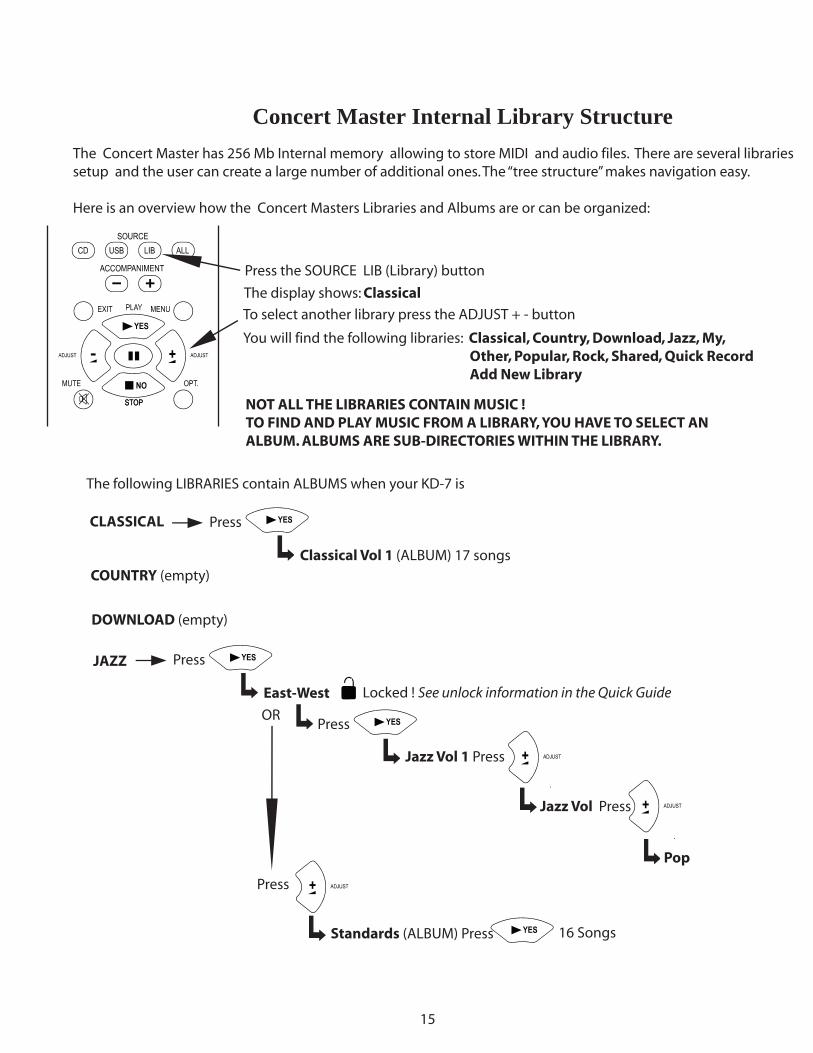
Concert Master Internal Library Structure
4The Concert Master has 256 Mb Internal memory allowing to store MIDI and audio files. There are several libraries setup and the user can create a large number of additional ones. The “tree structure” makes navigation easy.
Here is an overview how the Concert Masters Libraries and Albums are or can be organized:
Press the SOURCE LIB (Library) button
The display shows: Classical
To select another library press the ADJUST + - button
You will find the following libraries: Classical, Country, Download, Jazz, My, Other, Popular, Rock, Shared, Quick Record Add New Library
NOT ALL THE LIBRARIES CONTAIN MUSIC ! TO FIND AND PLAY MUSIC FROM A LIBRARY, YOU HAVE TO SELECT ANALBUM. ALBUMS ARE SUB-DIRECTORIES WITHIN THE LIBRARY.
The following LIBRARIES contain ALBUMS when your KD-7 is
CLASSICAL Press
Classical Vol 1 (ALBUM) 17 songsCOUNTRY (empty)
DOWNLOAD (empty)
JAZZ Press
East-West Locked ! See unlock information in the Quick Guide
Press
Jazz Vol 1 Press
Jazz Vol Press
Pop
Press
Standards (ALBUM) Press 16 Songs
OR
15
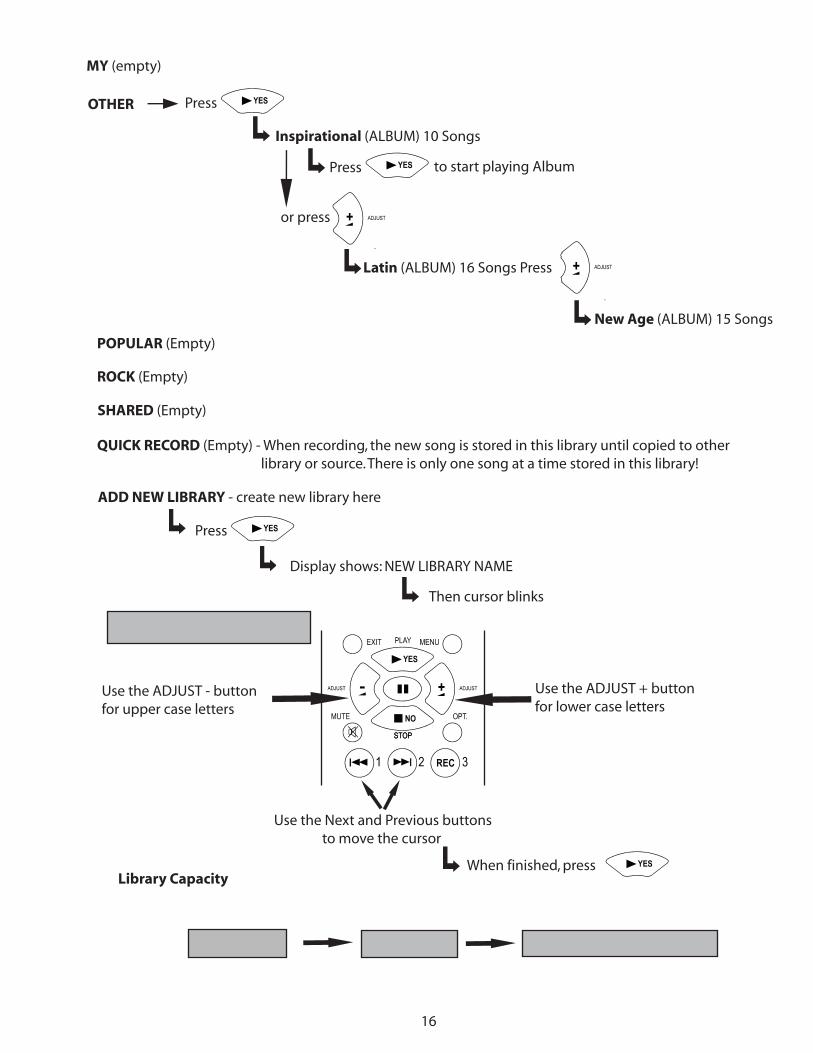
MY (empty)
Press
Inspirational (ALBUM) 10 Songs
Press
Latin (ALBUM) 16 Songs Press
New Age (ALBUM) 15 Songs
OTHER
to start playing Album
or press
POPULAR (Empty)
ROCK (Empty)
SHARED (Empty)
QUICK RECORD (Empty) - When recording, the new song is stored in this library until copied to other library or source. There is only one song at a time stored in this library!
ADD NEW LIBRARY - create new library here
Press
Display shows: NEW LIBRARY NAME
Then cursor blinks
To enter the new library name:
Use the ADJUST - buttonfor upper case letters
Use the ADJUST + button for lower case letters
Use the Next and Previous buttons to move the cursor
Library Capacity
99 LIBRARIES 999 ALBUMS 999 SONGS IN EACH ALBUM
When finished, press
16
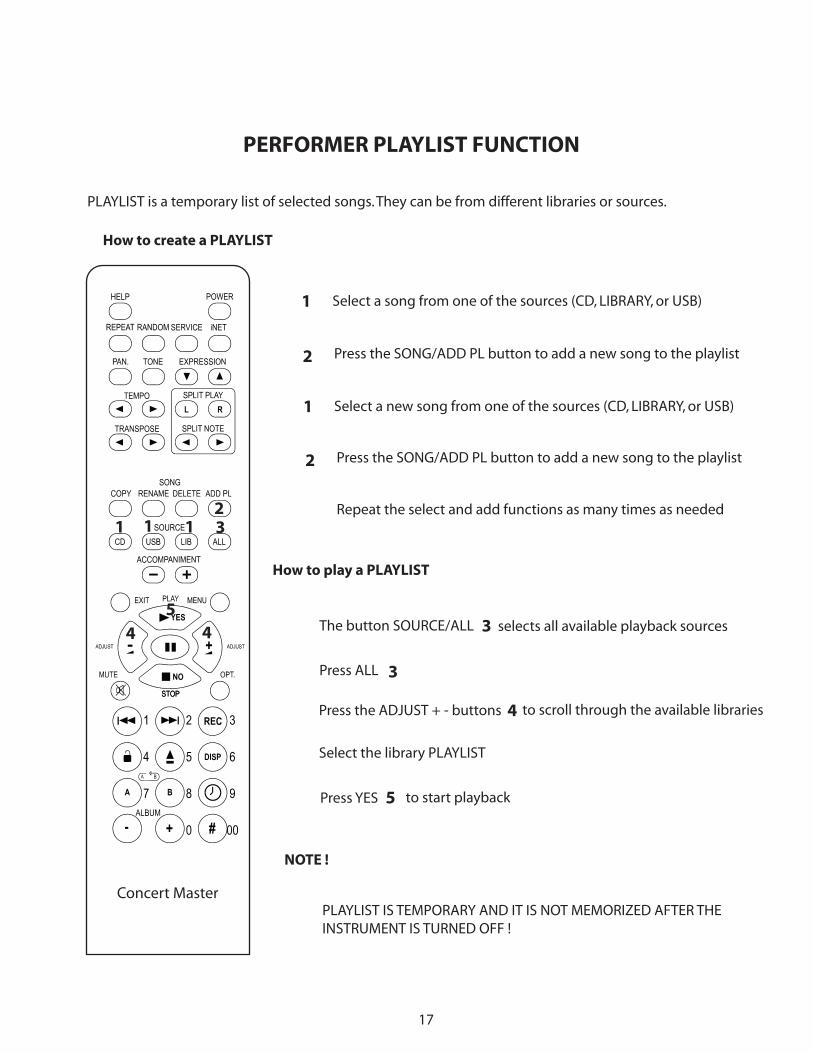
PERFORMER PLAYLIST FUNCTION
PLAYLIST is a temporary list of selected songs. They can be from different libraries or sources.
How to create a PLAYLIST
1 3
4
1 12
1 Select a song from one of the sources (CD, LIBRARY, or USB)
2 Press the SONG/ADD PL button to add a new song to the playlist
1 Select a new song from one of the sources (CD, LIBRARY, or USB)
2 Press the SONG/ADD PL button to add a new song to the playlist
Repeat the select and add functions as many times as needed
How to play a PLAYLIST
The button SOURCE/ALL 3 selects all available playback sources
Press ALL 3
4
Press the ADJUST + - buttons 4 to scroll through the available libraries
Select the library PLAYLIST
5
Press YES 5 to start playback
NOTE !
PLAYLIST IS TEMPORARY AND IT IS NOT MEMORIZED AFTER THEINSTRUMENT IS TURNED OFF !
17
Concert Master
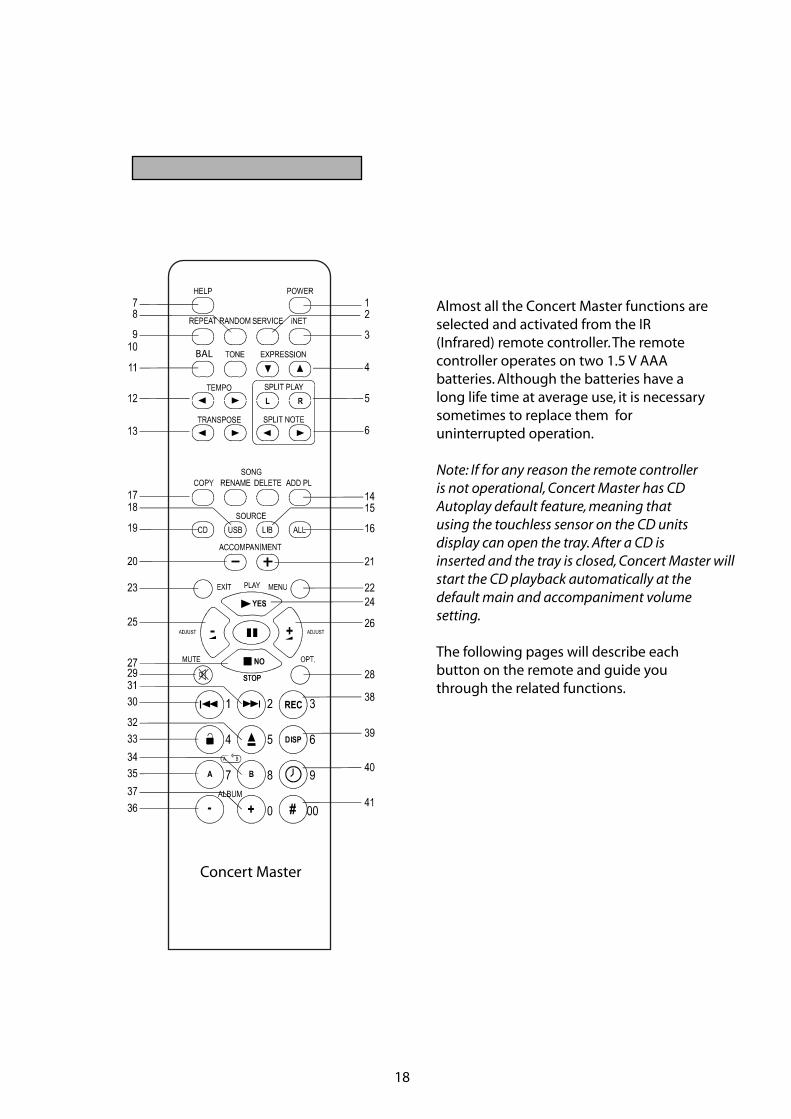
Concert Master IR Remote
Almost all the Concert Master functions are selected and activated from the IR(Infrared) remote controller. The remotecontroller operates on two 1.5 V AAAbatteries. Although the batteries have a long life time at average use, it is necessary sometimes to replace them for uninterrupted operation.
Note: If for any reason the remote controller is not operational, Concert Master has CD Autoplay default feature, meaning that using the touchless sensor on the CD units display can open the tray. After a CD is inserted and the tray is closed, Concert Master will start the CD playback automatically at thedefault main and accompaniment volumesetting.
The following pages will describe eachbutton on the remote and guide you through the related functions.
18
BAL
Concert Master
Description of the remote controller buttons
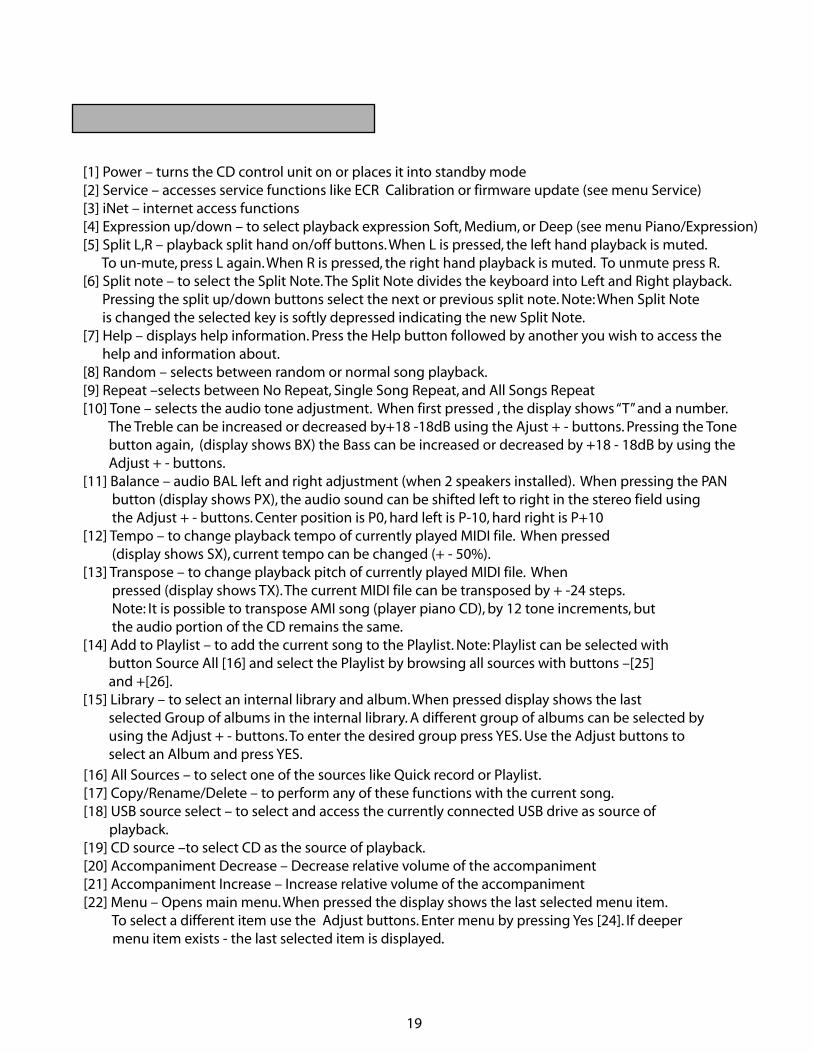
[1] Power – turns the CD control unit on or places it into standby mode[2] Service – accesses service functions like ECR Calibration or firmware update (see menu Service)[3] iNet – internet access functions[4] Expression up/down – to select playback expression Soft, Medium, or Deep (see menu Piano/Expression)[5] Split L,R – playback split hand on/off buttons. When L is pressed, the left hand playback is muted. To un-mute, press L again. When R is pressed, the right hand playback is muted. To unmute press R.[6] Split note – to select the Split Note. The Split Note divides the keyboard into Left and Right playback. Pressing the split up/down buttons select the next or previous split note. Note: When Split Note is changed the selected key is softly depressed indicating the new Split Note.[7] Help – displays help information. Press the Help button followed by another you wish to access the help and information about.[8] Random – selects between random or normal song playback.[9] Repeat –selects between No Repeat, Single Song Repeat, and All Songs Repeat[10] Tone – selects the audio tone adjustment. When first pressed , the display shows “T” and a number. The Treble can be increased or decreased by+18 -18dB using the Ajust + - buttons. Pressing the Tone button again, (display shows BX) the Bass can be increased or decreased by +18 - 18dB by using the Adjust + - buttons.[11] Balance – audio BAL left and right adjustment (when 2 speakers installed). When pressing the PAN button (display shows PX), the audio sound can be shifted left to right in the stereo field using the Adjust + - buttons. Center position is P0, hard left is P-10, hard right is P+10[12] Tempo – to change playback tempo of currently played MIDI file. When pressed (display shows SX), current tempo can be changed (+ - 50%).[13] Transpose – to change playback pitch of currently played MIDI file. When pressed (display shows TX). The current MIDI file can be transposed by + -24 steps. Note: It is possible to transpose AMI song (player piano CD), by 12 tone increments, but the audio portion of the CD remains the same.[14] Add to Playlist – to add the current song to the Playlist. Note: Playlist can be selected with button Source All [16] and select the Playlist by browsing all sources with buttons –[25] and +[26].[15] Library – to select an internal library and album. When pressed display shows the last selected Group of albums in the internal library. A different group of albums can be selected by using the Adjust + - buttons. To enter the desired group press YES. Use the Adjust buttons to select an Album and press YES.
[16] All Sources – to select one of the sources like Quick record or Playlist.[17] Copy/Rename/Delete – to perform any of these functions with the current song.[18] USB source select – to select and access the currently connected USB drive as source of playback.[19] CD source –to select CD as the source of playback.[20] Accompaniment Decrease – Decrease relative volume of the accompaniment[21] Accompaniment Increase – Increase relative volume of the accompaniment[22] Menu – Opens main menu. When pressed the display shows the last selected menu item. To select a different item use the Adjust buttons. Enter menu by pressing Yes [24]. If deeper menu item exists - the last selected item is displayed.
19
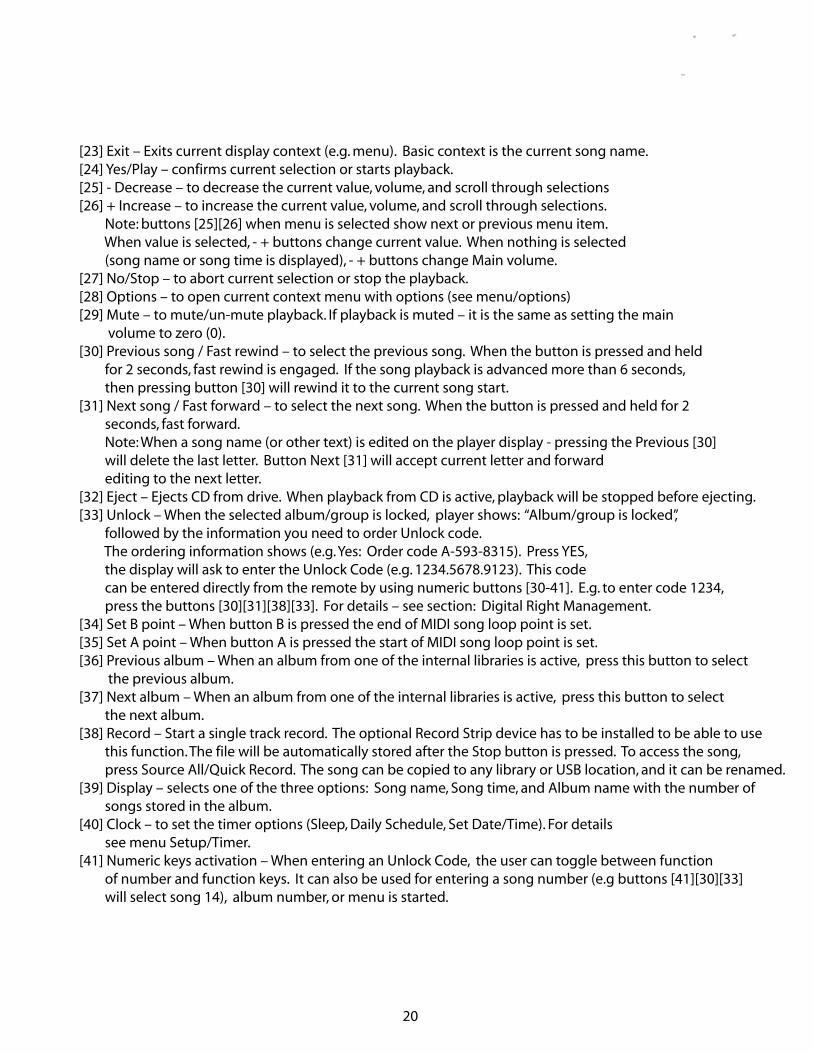
[23] Exit – Exits current display context (e.g. menu). Basic context is the current song name.[24] Yes/Play – confirms current selection or starts playback.[25] - Decrease – to decrease the current value, volume, and scroll through selections[26] + Increase – to increase the current value, volume, and scroll through selections. Note: buttons [25][26] when menu is selected show next or previous menu item. When value is selected, - + buttons change current value. When nothing is selected (song name or song time is displayed), - + buttons change Main volume.[27] No/Stop – to abort current selection or stop the playback.[28] Options – to open current context menu with options (see menu/options)[29] Mute – to mute/un-mute playback. If playback is muted – it is the same as setting the main volume to zero (0).[30] Previous song / Fast rewind – to select the previous song. When the button is pressed and held for 2 seconds, fast rewind is engaged. If the song playback is advanced more than 6 seconds, then pressing button [30] will rewind it to the current song start.[31] Next song / Fast forward – to select the next song. When the button is pressed and held for 2 seconds, fast forward. Note: When a song name (or other text) is edited on the player display - pressing the Previous [30] will delete the last letter. Button Next [31] will accept current letter and forward editing to the next letter.[32] Eject – Ejects CD from drive. When playback from CD is active, playback will be stopped before ejecting.[33] Unlock – When the selected album/group is locked, player shows: “Album/group is locked”, followed by the information you need to order Unlock code. The ordering information shows (e.g. Yes: Order code A-593-8315). Press YES, the display will ask to enter the Unlock Code (e.g. 1234.5678.9123). This code can be entered directly from the remote by using numeric buttons [30-41]. E.g. to enter code 1234, press the buttons [30][31][38][33]. For details – see section: Digital Right Management.[34] Set B point – When button B is pressed the end of MIDI song loop point is set.[35] Set A point – When button A is pressed the start of MIDI song loop point is set.[36] Previous album – When an album from one of the internal libraries is active, press this button to select the previous album.[37] Next album – When an album from one of the internal libraries is active, press this button to select the next album.[38] Record – Start a single track record. The optional Record Strip device has to be installed to be able to use this function. The file will be automatically stored after the Stop button is pressed. To access the song, press Source All/Quick Record. The song can be copied to any library or USB location, and it can be renamed.[39] Display – selects one of the three options: Song name, Song time, and Album name with the number of songs stored in the album.[40] Clock – to set the timer options (Sleep, Daily Schedule, Set Date/Time). For details see menu Setup/Timer.[41] Numeric keys activation – When entering an Unlock Code, the user can toggle between function of number and function keys. It can also be used for entering a song number (e.g buttons [41][30][33] will select song 14), album number, or menu is started.
20
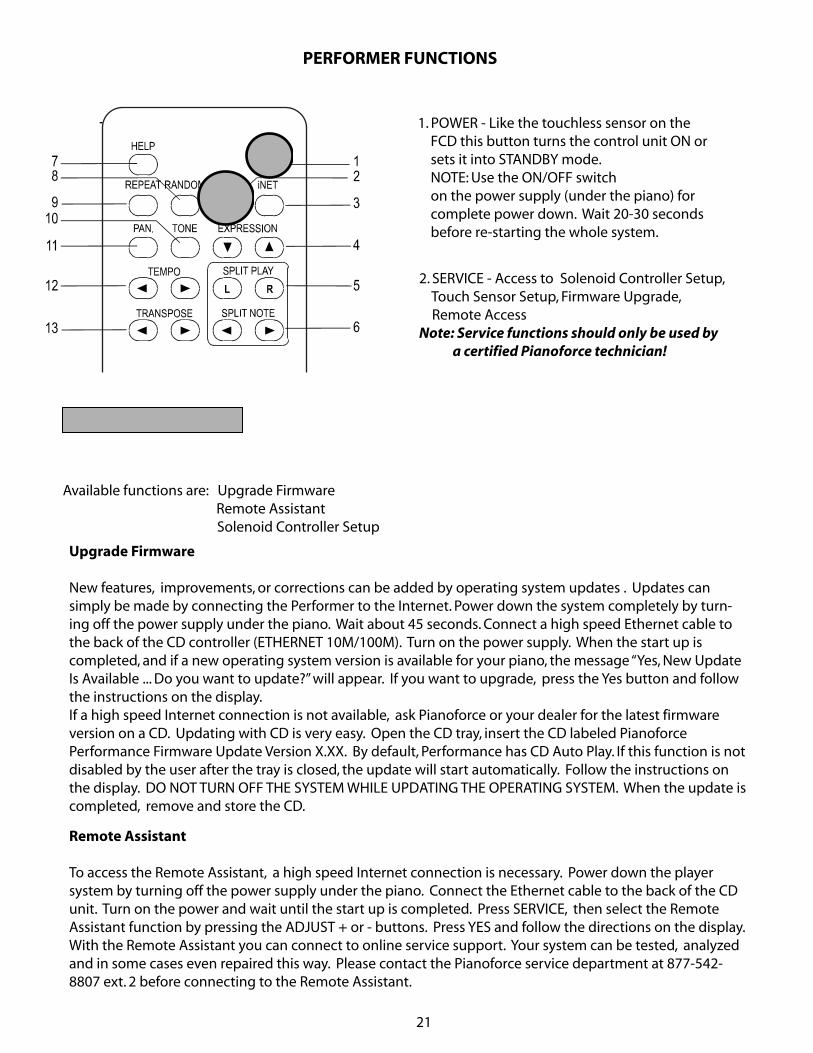
1. POWER - Like the touchless sensor on the FCD this button turns the control unit ON or sets it into STANDBY mode. NOTE: Use the ON/OFF switch on the power supply (under the piano) for complete power down. Wait 20-30 seconds before re-starting the whole system.
2. SERVICE - Access to Solenoid Controller Setup, Touch Sensor Setup, Firmware Upgrade, Remote AccessNote: Service functions should only be used by a certified Pianoforce technician!
THE SERVICE FUNCTIONS
Press SERVICE
Available functions are: Upgrade Firmware Remote Assistant Solenoid Controller Setup
Upgrade Firmware
New features, improvements, or corrections can be added by operating system updates . Updates can simply be made by connecting the Performer to the Internet. Power down the system completely by turn-ing off the power supply under the piano. Wait about 45 seconds. Connect a high speed Ethernet cable to the back of the CD controller (ETHERNET 10M/100M). Turn on the power supply. When the start up is completed, and if a new operating system version is available for your piano, the message “Yes, New Update Is Available ... Do you want to update?” will appear. If you want to upgrade, press the Yes button and follow the instructions on the display. If a high speed Internet connection is not available, ask Pianoforce or your dealer for the latest firmware version on a CD. Updating with CD is very easy. Open the CD tray, insert the CD labeled Pianoforce Performance Firmware Update Version X.XX. By default, Performance has CD Auto Play. If this function is not disabled by the user after the tray is closed, the update will start automatically. Follow the instructions on the display. DO NOT TURN OFF THE SYSTEM WHILE UPDATING THE OPERATING SYSTEM. When the update is completed, remove and store the CD.
Remote Assistant
To access the Remote Assistant, a high speed Internet connection is necessary. Power down the player system by turning off the power supply under the piano. Connect the Ethernet cable to the back of the CD unit. Turn on the power and wait until the start up is completed. Press SERVICE, then select the Remote Assistant function by pressing the ADJUST + or - buttons. Press YES and follow the directions on the display. With the Remote Assistant you can connect to online service support. Your system can be tested, analyzed and in some cases even repaired this way. Please contact the Pianoforce service department at 877-542-8807 ext. 2 before connecting to the Remote Assistant.
PERFORMER FUNCTIONS
21
Solenoid Controller Setup
The Solenoid Controller Setup functions are intended to be used by a qualified installer technician only. Here is a description of the functions:
Ca: Calibration advanced - this function is very important to achieve the best possible playback and has to be performed by the installer technician!
Ca will adjust the expression levels for each key solenoid, tests if each solenoid is performing correctly and performs an analysis before auto- matically storing the information. Ca is the highest calibration level and depending on the firmware version it can take 45-90 minutes. During calibration the lid of the piano should be open and a quiet enviroment is necessary. To start the advanced calibration press the YES button while the display shows: Ca:Calibration advanced Cq: Calibration quick - this is a faster but less detailed calibration.
An: Analysis of calibration - this function can be used to review the calibration result. By pressing YES the system performs a calibration test and displays the results.
Ck: Key Calibration - allowing single key calibration. When pressing YES Kxx will be displayed ((xx) indicating the key number). Pressing the Forward or Rewind buttons any of the keys between K05-K84 can be selected. Once the key is selected, pressing the YES button will start calibrating the selected key.
HC: Key Hold Force - sets the optimal key solenoid hold force. Piano actions, and key weights are different on each piano. It is important to select the best Key Hold Force value for the particular piano. Available value ranges from 0-99. Pressing the ADJUST + and - buttons will increase or lower the force. If the hold force is too low, the piano will play short (staccato) notes even if it was recorded as a long (legato) one. Adjust the hold force level and listen, carefully triggering several keys accross the keyboard. Keys can be selected by pressing the Forward or Rewind buttons. The default value is set to 6. By our experience Key Hold Force level 6 is optimal for most small to grand pianos.
RC: Key Release Force - controls how fast the plunger returns to the rest position. This is another very important parameter to set to the optimal value. Available value ranges from 0-99. The lower the value, the faster the plunger returns to its rest position. This will allow the solenoid to “fire” faster resulting, better note repetition. Higher value slows down the plunger return, resulting quieter plunger movement but decreasing repetition rate. Select different values testing several keys accross the keyboard. Listen to a piano piece you know very well, especially with fast repeating notes. Select the optimal release value. Factory setting is 13.
SC: Sustain Force - adjusts the force of the pedal solenoid. The Sustain Force is not calibrated automatically. It is important to select a value that will lift the damper rail without delay and at the minimum mechanical noise. Pressing YES will display the current force level. Pressing the ADJUST + and - buttons will increase or decrease the solenoid force. It is important that all trapwork related mechanical adjustments are correct (loss motion, solenoid travel, susutain lever) before the SC value is selected. The default setting is 23. Once the optimal value is established, it is recomended adding +2 digits. During extended playback the solenoid heats up and needs additional power to perform correctly.
WARNING! These functions should only be used by a certified Concert Master technician !
22
SR: Susutain Release - controls the return of the solenoid and the damper rail. Lower value allows the dampers to return faster, higher value helps reduce mechanical noise. Default setting is 32. The ADJUST + and - buttons change the value and the Forward and Rewind buttons activate the solenoid to monitor and adjust the damper rail, returning to the optimal setting.
SD: Sustain Release Delay - adjusts the time delay before force is applied to the pedal solenoid. This setting has significant effect on lowering the sustain pedal noise. Default and typical setting is 32.
It is very important that the SC, SR, and SD are working in conjunction with each other and set to the correct values.
ST: Store Parameters - after the Key Solenoid Hold, Release, Sustain Force, Sustain Release and Susutain Release Delay values are set, the new information has to be stored in the internal memory. When the display shows St: Store Parameters, press the YES button. The display shows “Ok: Stored” Once the new values are stored, they will remain in the internal memory until new values are selected and stored again. After the Store function is completed press the NO button to return to the CD mode.
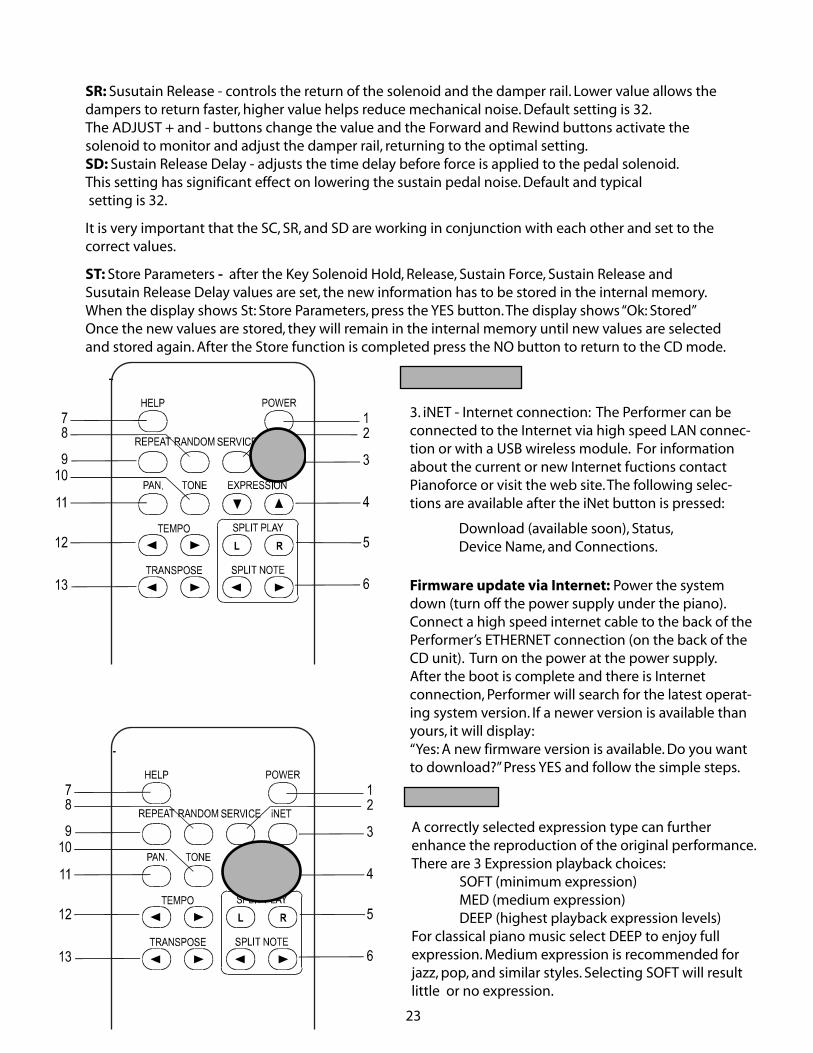
3. iNET - Internet connection: The Performer can be connected to the Internet via high speed LAN connec-tion or with a USB wireless module. For information about the current or new Internet fuctions contact Pianoforce or visit the web site. The following selec-tions are available after the iNet button is pressed:
Download (available soon), Status,Device Name, and Connections.
Firmware update via Internet: Power the system down (turn off the power supply under the piano). Connect a high speed internet cable to the back of the Performer’s ETHERNET connection (on the back of the CD unit). Turn on the power at the power supply. After the boot is complete and there is Internet connection, Performer will search for the latest operat-ing system version. If a newer version is available than yours, it will display:“Yes: A new firmware version is available. Do you want to download?” Press YES and follow the simple steps.
iNET FUNCTIONS
EXPRESSION
A correctly selected expression type can further enhance the reproduction of the original performance. There are 3 Expression playback choices: SOFT (minimum expression) MED (medium expression) DEEP (highest playback expression levels)For classical piano music select DEEP to enjoy full expression. Medium expression is recommended for jazz, pop, and similar styles. Selecting SOFT will result little or no expression.
23
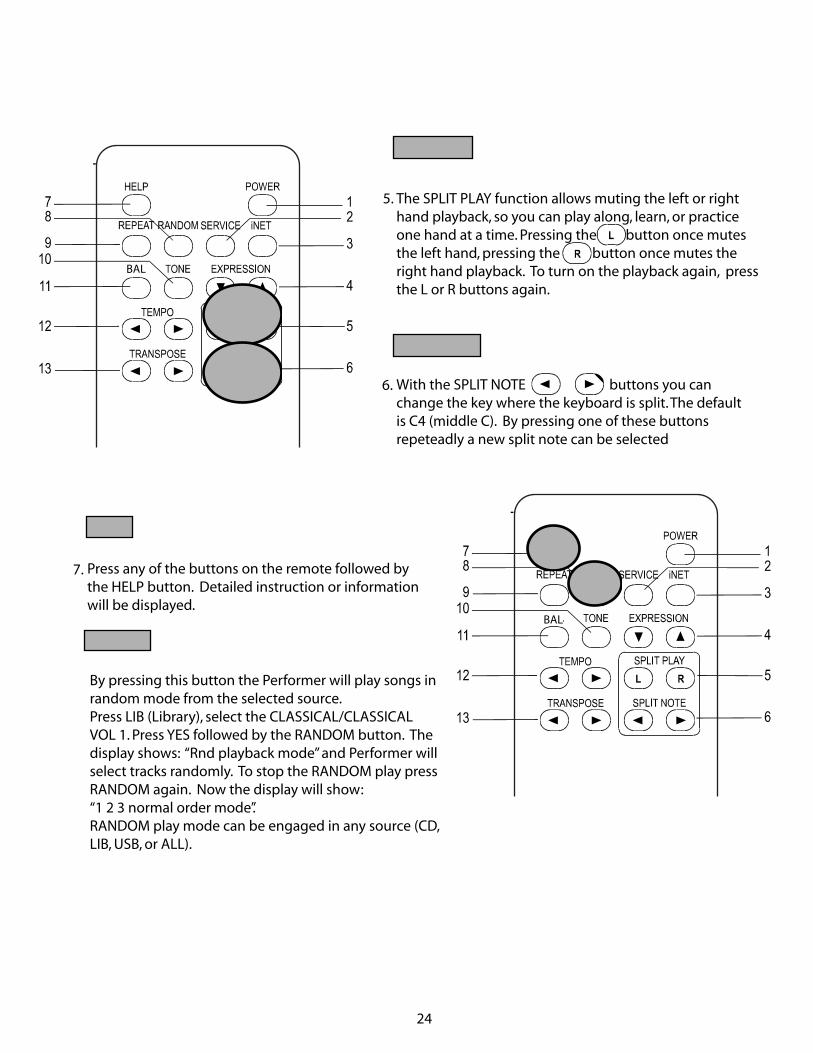
SPLIT PLAY
The SPLIT PLAY function allows muting the left or right hand playback, so you can play along, learn, or practice one hand at a time. Pressing the button once mutes the left hand, pressing the button once mutes the right hand playback. To turn on the playback again, press the L or R buttons again.
5.
SPLIT NOTE
With the SPLIT NOTE buttons you can change the key where the keyboard is split. The default is C4 (middle C). By pressing one of these buttons repeteadly a new split note can be selected
6.
HELP
Press any of the buttons on the remote followed by the HELP button. Detailed instruction or information will be displayed.
7.
RANDOM
By pressing this button the Performer will play songs in random mode from the selected source. Press LIB (Library), select the CLASSICAL/CLASSICAL VOL 1. Press YES followed by the RANDOM button. Thedisplay shows: “Rnd playback mode” and Performer will select tracks randomly. To stop the RANDOM play press RANDOM again. Now the display will show: “1 2 3 normal order mode”.RANDOM play mode can be engaged in any source (CD, LIB, USB, or ALL).
24
BAL
BAL
REPEAT
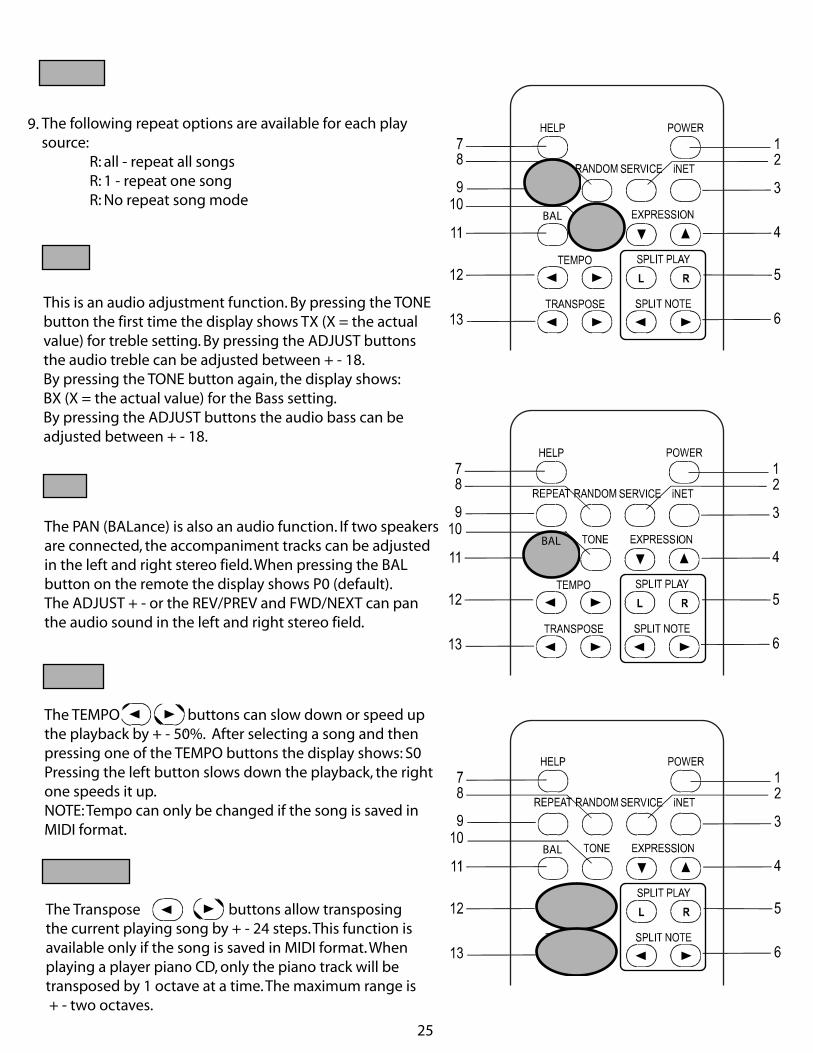
The following repeat options are available for each play source: R: all - repeat all songs R: 1 - repeat one song R: No repeat song mode
9.
TONE
This is an audio adjustment function. By pressing the TONE button the first time the display shows TX (X = the actual value) for treble setting. By pressing the ADJUST buttons the audio treble can be adjusted between + - 18.By pressing the TONE button again, the display shows:BX (X = the actual value) for the Bass setting.By pressing the ADJUST buttons the audio bass can be adjusted between + - 18.
BAL
The PAN (BALance) is also an audio function. If two speakers are connected, the accompaniment tracks can be adjustedin the left and right stereo field. When pressing the BALbutton on the remote the display shows P0 (default). The ADJUST + - or the REV/PREV and FWD/NEXT can panthe audio sound in the left and right stereo field.
TEMPO
The TEMPO buttons can slow down or speed up the playback by + - 50%. After selecting a song and then pressing one of the TEMPO buttons the display shows: S0Pressing the left button slows down the playback, the right one speeds it up. NOTE: Tempo can only be changed if the song is saved inMIDI format.
TRANSPOSE
The Transpose buttons allow transposing the current playing song by + - 24 steps. This function is available only if the song is saved in MIDI format. When playing a player piano CD, only the piano track will be transposed by 1 octave at a time. The maximum range is + - two octaves.
25
BAL
BAL
BAL
THE SONG FUNCTION BUTTONS
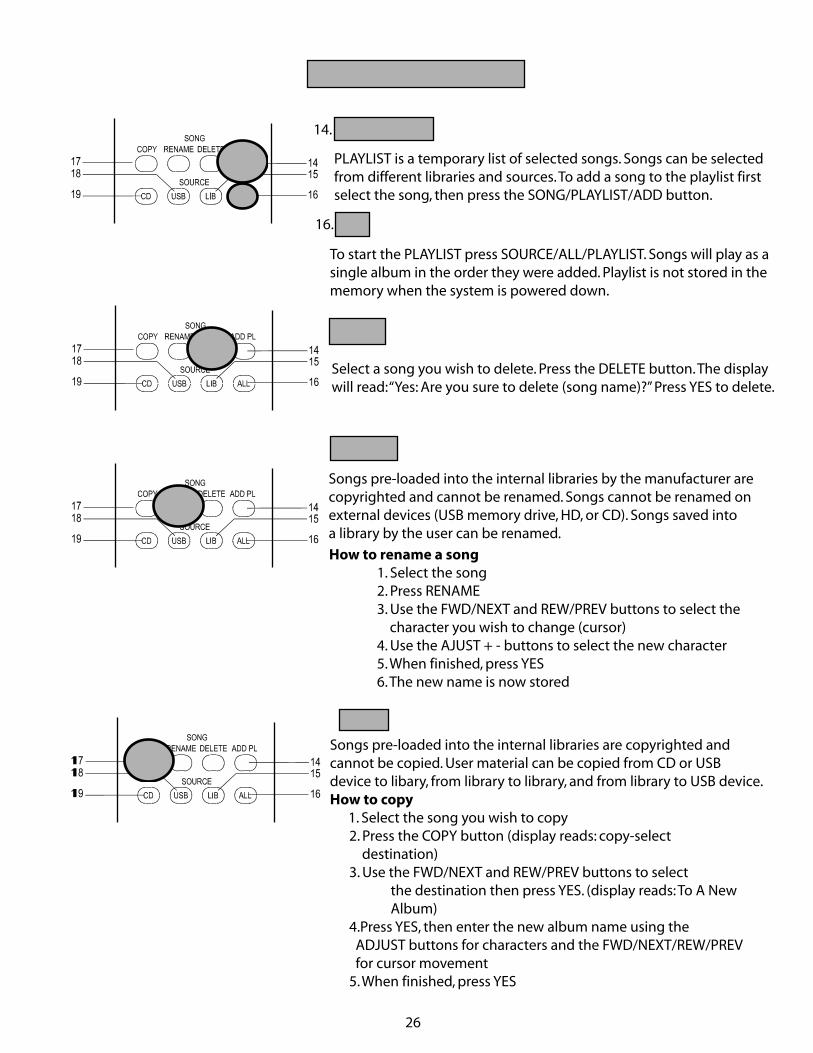
14. ADD/PLAYLIST
PLAYLIST is a temporary list of selected songs. Songs can be selected from different libraries and sources. To add a song to the playlist first select the song, then press the SONG/PLAYLIST/ADD button.
16. ALL
To start the PLAYLIST press SOURCE/ALL/PLAYLIST. Songs will play as a single album in the order they were added. Playlist is not stored in the memory when the system is powered down.
DELETE
Select a song you wish to delete. Press the DELETE button. The display will read: “Yes: Are you sure to delete (song name)?” Press YES to delete.
RENAME
Songs pre-loaded into the internal libraries by the manufacturer are copyrighted and cannot be renamed. Songs cannot be renamed on external devices (USB memory drive, HD, or CD). Songs saved intoa library by the user can be renamed.
How to rename a song 1. Select the song 2. Press RENAME 3. Use the FWD/NEXT and REW/PREV buttons to select the character you wish to change (cursor) 4. Use the AJUST + - buttons to select the new character 5. When finished, press YES 6. The new name is now stored
COPY
Songs pre-loaded into the internal libraries are copyrighted and cannot be copied. User material can be copied from CD or USB device to libary, from library to library, and from library to USB device. How to copy
1. Select the song you wish to copy 2. Press the COPY button (display reads: copy-select destination) 3. Use the FWD/NEXT and REW/PREV buttons to select the destination then press YES. (display reads: To A New Album) 4.Press YES, then enter the new album name using the ADJUST buttons for characters and the FWD/NEXT/REW/PREV for cursor movement 5. When finished, press YES
26
After the hard drive is formatted, turn off the Performer, disconnect it, then connect it to your PC. Insert a player piano CD into the CD drive, and open your CD burner program (like Nero). Select the Convert Audio CDs to Audio Files.Select the Destination Location (the USB hard drive you just connected)Output file format: PCM wav fileFrequency: 44100Bits: 16Channels: StereoSelect the CD tracks you want to copySelect: GO
After the song files are copied, you will need to change the file extensions as follow:For Yamaha Piano Soft Plus change from; My Song.wav to My Song.wdkFor QRS Pianomation CD file from; My Song.wav to My Song.wpmFor Pianodisc Player Piano CD from; My Song.wav to My Song.wpdFor Audio CD or MIDI file; no extension change is needed
Windows has Auto-Hiding of a known file extension. TO RENAME THE FILE CORRECTLY YOU SHOULD FIRST TURN OFF THE AUTO-HIDING EXTENSION FEATURE IN WINDOWS: 1. Open the Windows menu 2. Select Tools 3. Choose Folder Options 4. Select View 5. Uncheck Hide extensions for known file types 6. Select OK/Apply
SONG FILES CAN BE STORED IN ROOT POSITION OR IN FOLDERS. NOTE: ROOT POSITION HAS PRIORITY! IT IS RECOMENDED TO ORGANIZE YOUR SONGS IN FOLDERS. IF LONG UNINTERRUPTED PLAYBACK IS REQUIRED, CONSIDER CREATING A FOLDER AND COPY LARGE NUMBER OF SONGS INTO IT.AFTER THE SONG FILES ARE COPIED AND RENAMED, BE SURE THAT THE HDD OR ANY USB DEVICE IS DISCONNECTED FROM THE PC CORRECTLY. USE “UNPLUG USB DEVICE” (green icon near the clock), BEFORE HDD IS PHYSICALLY DISCONNECTED. When this function is used - the system stores all unstored sectors onto disk.When the data is not stored, disk content can be corrupted.
IMPORTANT !
29
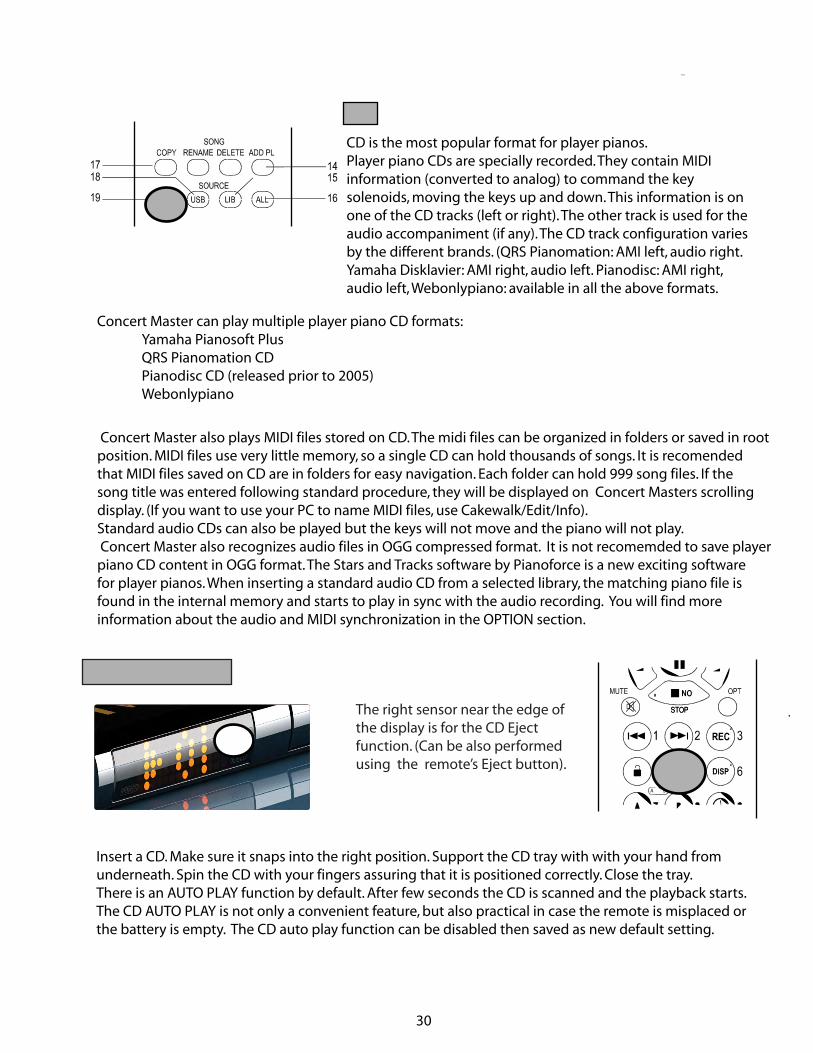
CD
CD is the most popular format for player pianos. Player piano CDs are specially recorded. They contain MIDI information (converted to analog) to command the key solenoids, moving the keys up and down. This information is on one of the CD tracks (left or right). The other track is used for the audio accompaniment (if any). The CD track configuration varies by the different brands. (QRS Pianomation: AMI left, audio right. Yamaha Disklavier: AMI right, audio left. Pianodisc: AMI right,audio left, Webonlypiano: available in all the above formats.
Concert Master can play multiple player piano CD formats: Yamaha Pianosoft Plus QRS Pianomation CD Pianodisc CD (released prior to 2005) Webonlypiano
Concert Master also plays MIDI files stored on CD. The midi files can be organized in folders or saved in root position. MIDI files use very little memory, so a single CD can hold thousands of songs. It is recomended that MIDI files saved on CD are in folders for easy navigation. Each folder can hold 999 song files. If the song title was entered following standard procedure, they will be displayed on Concert Masters scrolling display. (If you want to use your PC to name MIDI files, use Cakewalk/Edit/Info). Standard audio CDs can also be played but the keys will not move and the piano will not play. Concert Master also recognizes audio files in OGG compressed format. It is not recomemded to save player piano CD content in OGG format. The Stars and Tracks software by Pianoforce is a new exciting software for player pianos. When inserting a standard audio CD from a selected library, the matching piano file is found in the internal memory and starts to play in sync with the audio recording. You will find more information about the audio and MIDI synchronization in the OPTION section.
HOW TO PLAY A CD ?
The right sensor near the edge of the display is for the CD Eject function. (Can be also performed using the remote’s Eject button).
Insert a CD. Make sure it snaps into the right position. Support the CD tray with with your hand from underneath. Spin the CD with your fingers assuring that it is positioned correctly. Close the tray.There is an AUTO PLAY function by default. After few seconds the CD is scanned and the playback starts.The CD AUTO PLAY is not only a convenient feature, but also practical in case the remote is misplaced or the battery is empty. The CD auto play function can be disabled then saved as new default setting.
30
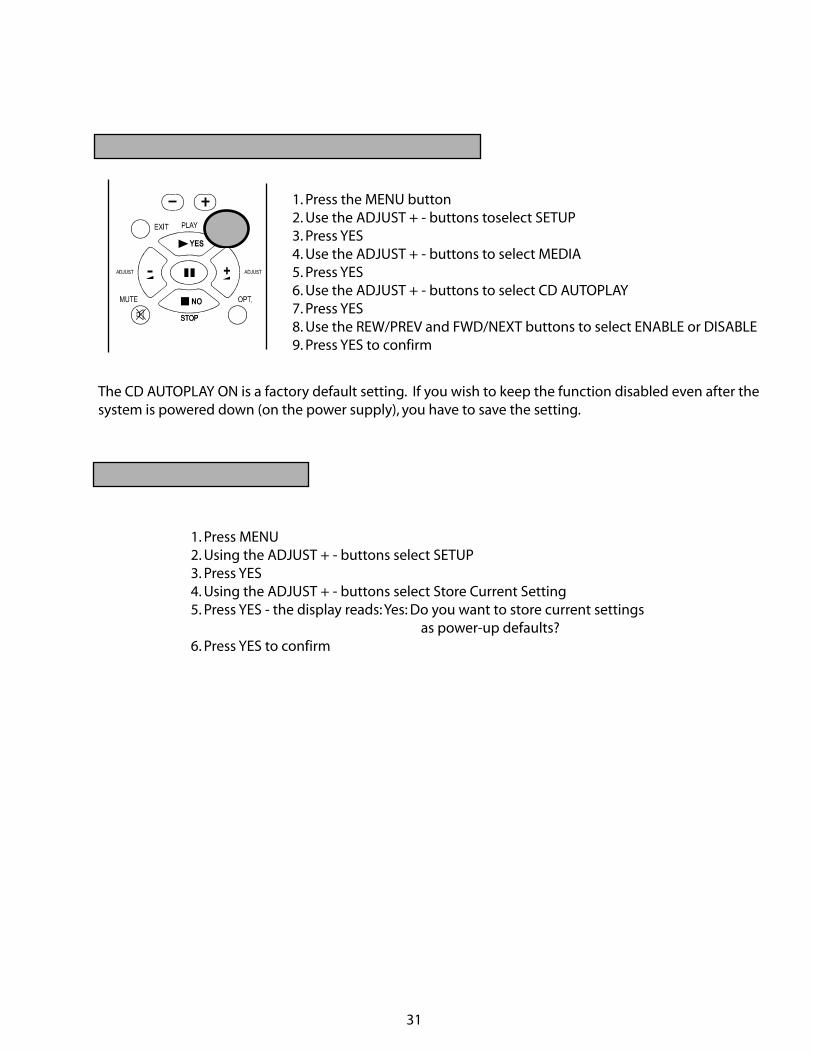
HOW TO DISABLE/ENABLE THE CD AUTO PLAY FUNCTION ?
1. Press the MENU button2. Use the ADJUST + - buttons toselect SETUP3. Press YES4. Use the ADJUST + - buttons to select MEDIA5. Press YES6. Use the ADJUST + - buttons to select CD AUTOPLAY7. Press YES8. Use the REW/PREV and FWD/NEXT buttons to select ENABLE or DISABLE9. Press YES to confirm
The CD AUTOPLAY ON is a factory default setting. If you wish to keep the function disabled even after the system is powered down (on the power supply), you have to save the setting.
1. Press MENU2. Using the ADJUST + - buttons select SETUP3. Press YES4. Using the ADJUST + - buttons select Store Current Setting5. Press YES - the display reads: Yes: Do you want to store current settings as power-up defaults?6. Press YES to confirm
31
TO SAVE CURRENT SETTINGS
ACCOMPANIMENT VOLUME
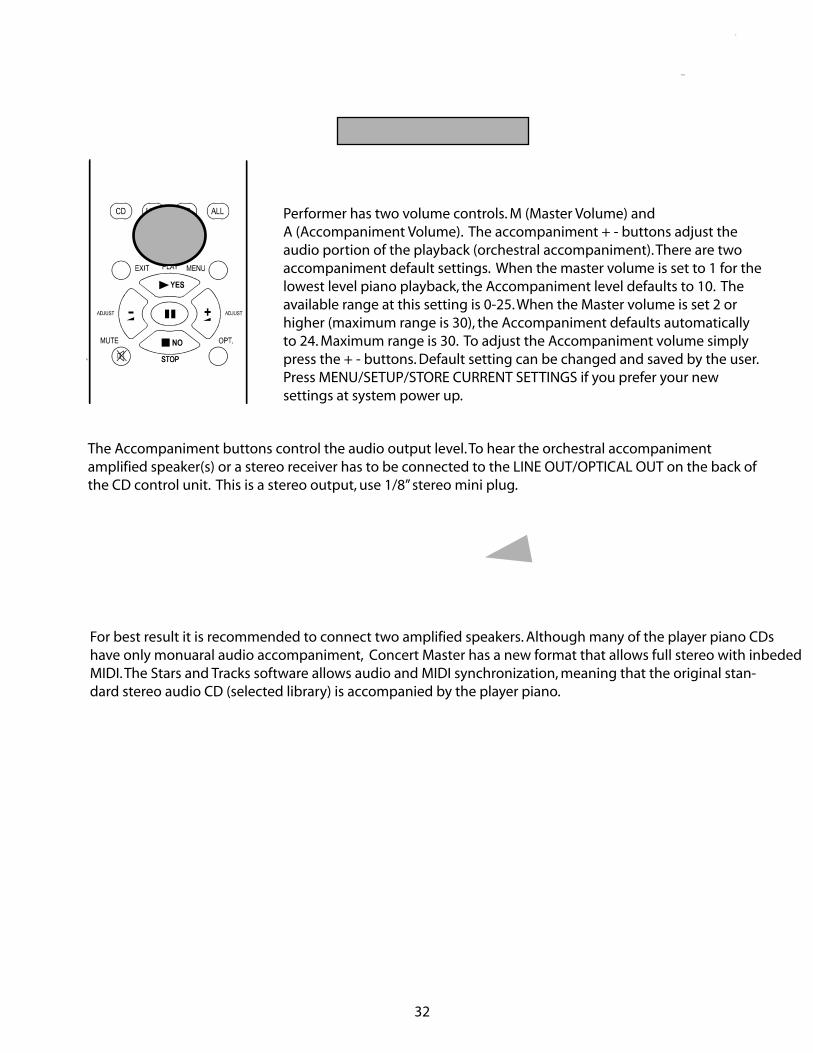
Performer has two volume controls. M (Master Volume) and A (Accompaniment Volume). The accompaniment + - buttons adjust the audio portion of the playback (orchestral accompaniment). There are two accompaniment default settings. When the master volume is set to 1 for the lowest level piano playback, the Accompaniment level defaults to 10. The available range at this setting is 0-25. When the Master volume is set 2 or higher (maximum range is 30), the Accompaniment defaults automatically to 24. Maximum range is 30. To adjust the Accompaniment volume simply press the + - buttons. Default setting can be changed and saved by the user. Press MENU/SETUP/STORE CURRENT SETTINGS if you prefer your new settings at system power up.
The Accompaniment buttons control the audio output level. To hear the orchestral accompaniment amplified speaker(s) or a stereo receiver has to be connected to the LINE OUT/OPTICAL OUT on the back of the CD control unit. This is a stereo output, use 1/8” stereo mini plug.
For best result it is recommended to connect two amplified speakers. Although many of the player piano CDs have only monuaral audio accompaniment, Concert Master has a new format that allows full stereo with inbeded MIDI. The Stars and Tracks software allows audio and MIDI synchronization, meaning that the original stan-dard stereo audio CD (selected library) is accompanied by the player piano.
32
MENU BUTTON
Source
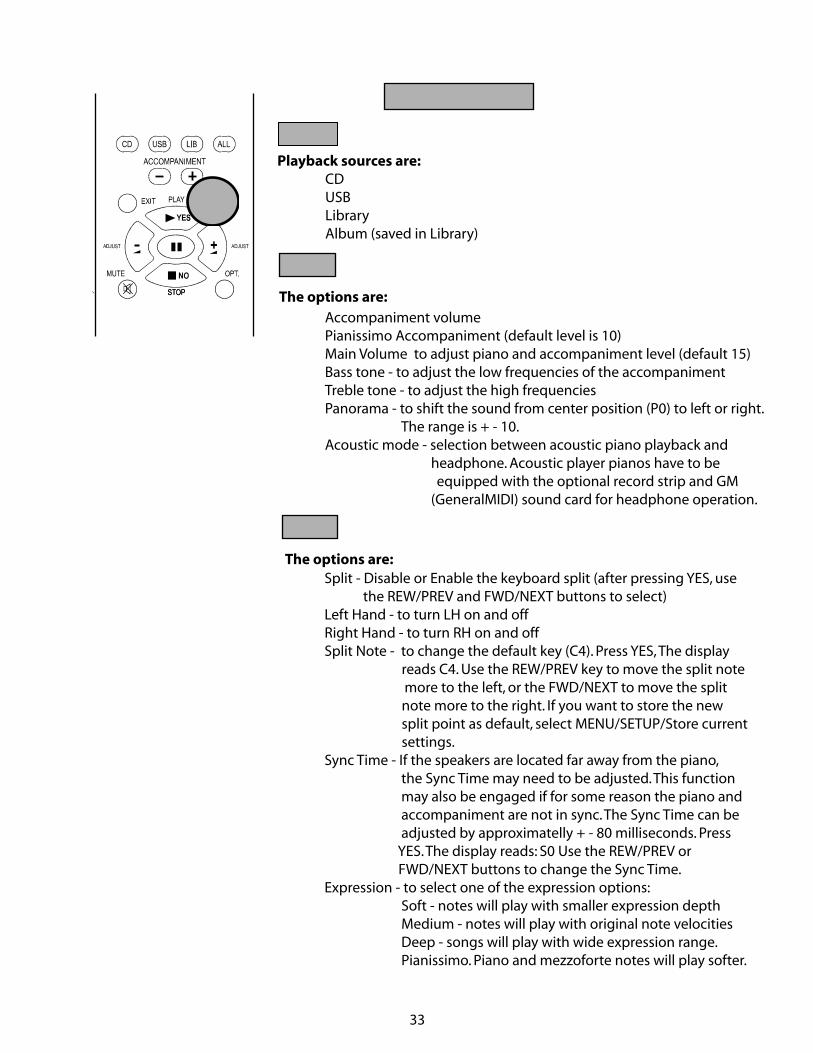
Playback sources are: CD USB Library Album (saved in Library)
Audio
The options are:Accompaniment volumePianissimo Accompaniment (default level is 10)Main Volume to adjust piano and accompaniment level (default 15)Bass tone - to adjust the low frequencies of the accompanimentTreble tone - to adjust the high frequenciesPanorama - to shift the sound from center position (P0) to left or right. The range is + - 10.Acoustic mode - selection between acoustic piano playback and headphone. Acoustic player pianos have to be equipped with the optional record strip and GM (GeneralMIDI) sound card for headphone operation.
PIANO
The options are:Split - Disable or Enable the keyboard split (after pressing YES, use the REW/PREV and FWD/NEXT buttons to select)Left Hand - to turn LH on and offRight Hand - to turn RH on and offSplit Note - to change the default key (C4). Press YES, The display reads C4. Use the REW/PREV key to move the split note more to the left, or the FWD/NEXT to move the split note more to the right. If you want to store the new split point as default, select MENU/SETUP/Store current settings.Sync Time - If the speakers are located far away from the piano, the Sync Time may need to be adjusted. This function may also be engaged if for some reason the piano and accompaniment are not in sync. The Sync Time can be adjusted by approximatelly + - 80 milliseconds. Press YES. The display reads: S0 Use the REW/PREV or FWD/NEXT buttons to change the Sync Time.Expression - to select one of the expression options: Soft - notes will play with smaller expression depth Medium - notes will play with original note velocities Deep - songs will play with wide expression range. Pianissimo. Piano and mezzoforte notes will play softer.
33
Playback Modes
The options are:
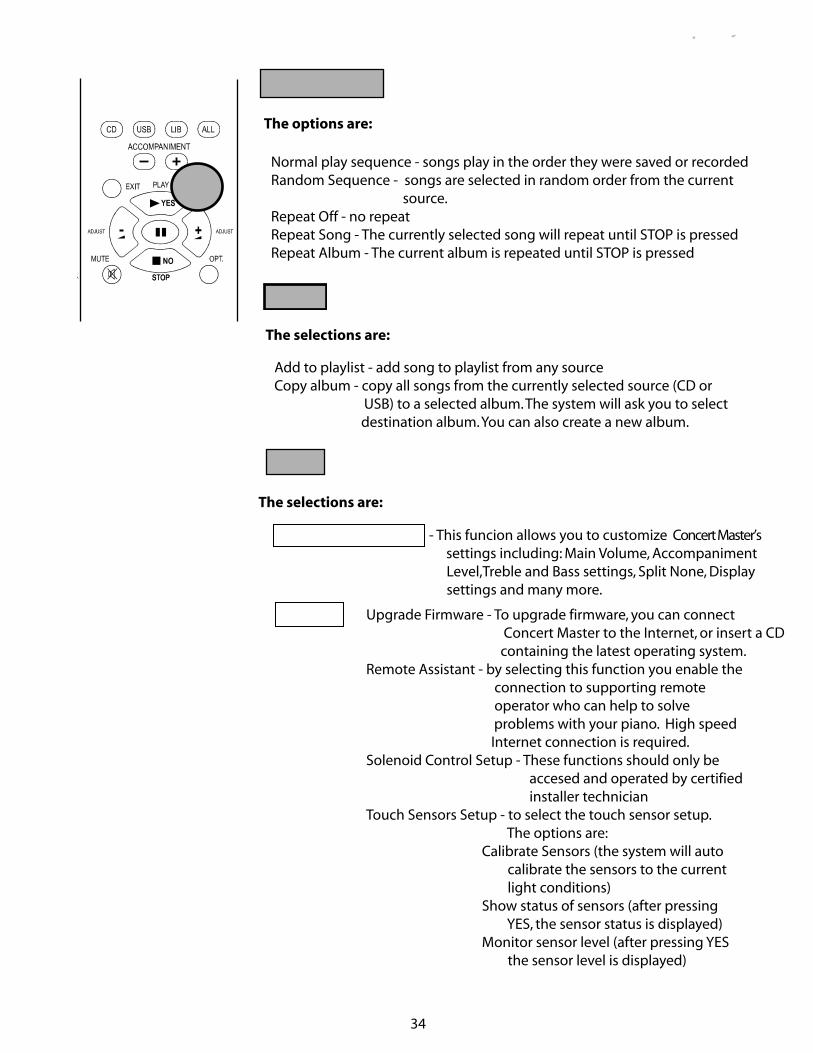
Normal play sequence - songs play in the order they were saved or recordedRandom Sequence - songs are selected in random order from the current source.Repeat Off - no repeatRepeat Song - The currently selected song will repeat until STOP is pressedRepeat Album - The current album is repeated until STOP is pressed
Options
The selections are:
Add to playlist - add song to playlist from any sourceCopy album - copy all songs from the currently selected source (CD or USB) to a selected album. The system will ask you to select destination album. You can also create a new album.
SETUP
The selections are:
Store Current Setting - This funcion allows you to customize Concert Master’s settings including: Main Volume, Accompaniment Level,Treble and Bass settings, Split None, Display settings and many more.
SERVICE Upgrade Firmware - To upgrade firmware, you can connect Concert Master to the Internet, or insert a CD containing the latest operating system.Remote Assistant - by selecting this function you enable the connection to supporting remote operator who can help to solve problems with your piano. High speed Internet connection is required.Solenoid Control Setup - These functions should only be accesed and operated by certified installer technicianTouch Sensors Setup - to select the touch sensor setup. The options are: Calibrate Sensors (the system will auto calibrate the sensors to the current light conditions) Show status of sensors (after pressing YES, the sensor status is displayed) Monitor sensor level (after pressing YES the sensor level is displayed)
34
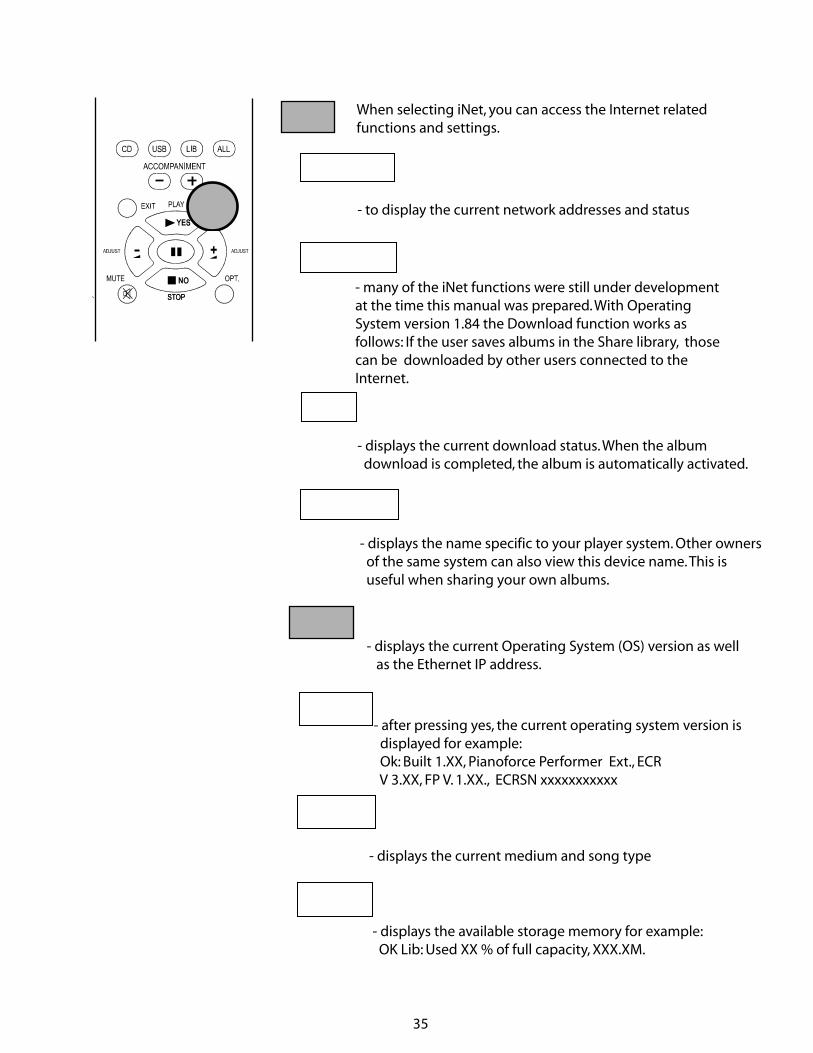
iNet When selecting iNet, you can access the Internet relatedfunctions and settings.
Connections
- to display the current network addresses and status
Download
- many of the iNet functions were still under development at the time this manual was prepared. With Operating System version 1.84 the Download function works as follows: If the user saves albums in the Share library, those can be downloaded by other users connected to the Internet.
Status
- displays the current download status. When the album download is completed, the album is automatically activated.
Device name
- displays the name specific to your player system. Other owners of the same system can also view this device name. This is useful when sharing your own albums.
ABOUT
- displays the current Operating System (OS) version as well as the Ethernet IP address.
Version- after pressing yes, the current operating system version is displayed for example: Ok: Built 1.XX, Pianoforce Performer Ext., ECR V 3.XX, FP V. 1.XX., ECRSN xxxxxxxxxxx
Medium
- displays the current medium and song type
Storage
- displays the available storage memory for example: OK Lib: Used XX % of full capacity, XXX.XM.
35
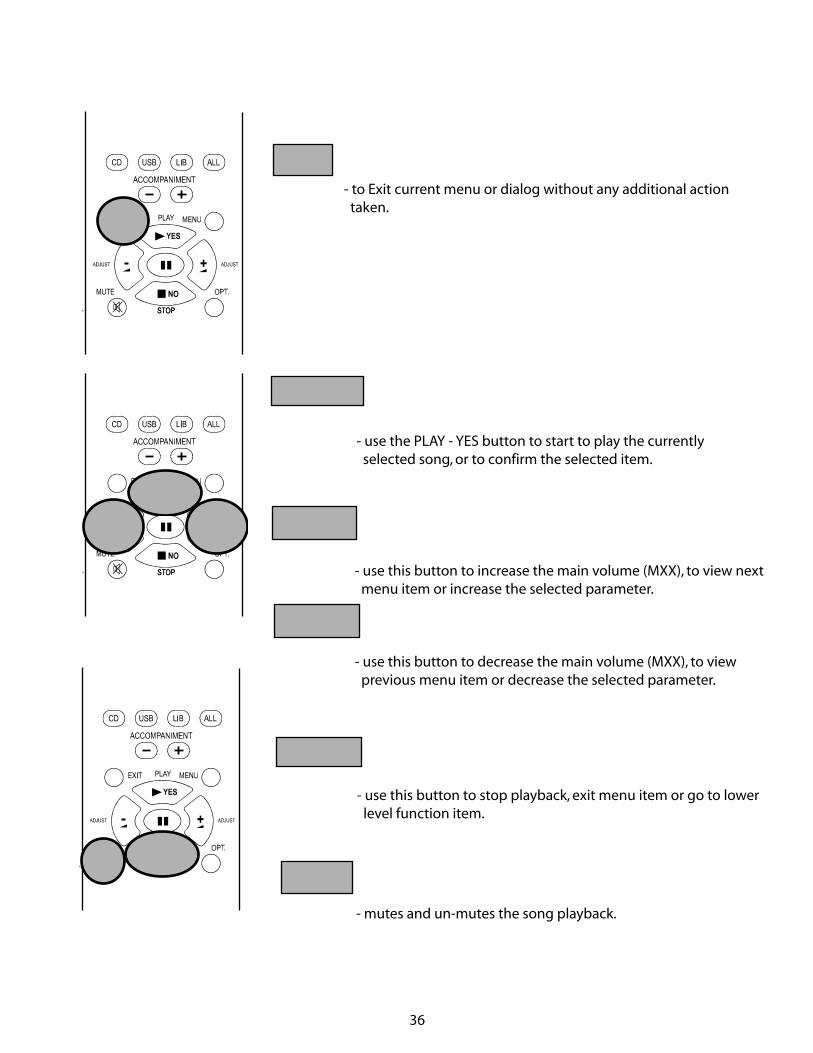
EXIT
- to Exit current menu or dialog without any additional action taken.
PLAY - YES
- use the PLAY - YES button to start to play the currently selected song, or to confirm the selected item.
ADJUST +
- use this button to increase the main volume (MXX), to view next menu item or increase the selected parameter.
ADJUST -
- use this button to decrease the main volume (MXX), to view previous menu item or decrease the selected parameter.
STOP - NO
- use this button to stop playback, exit menu item or go to lower level function item.
MUTE
- mutes and un-mutes the song playback.
36
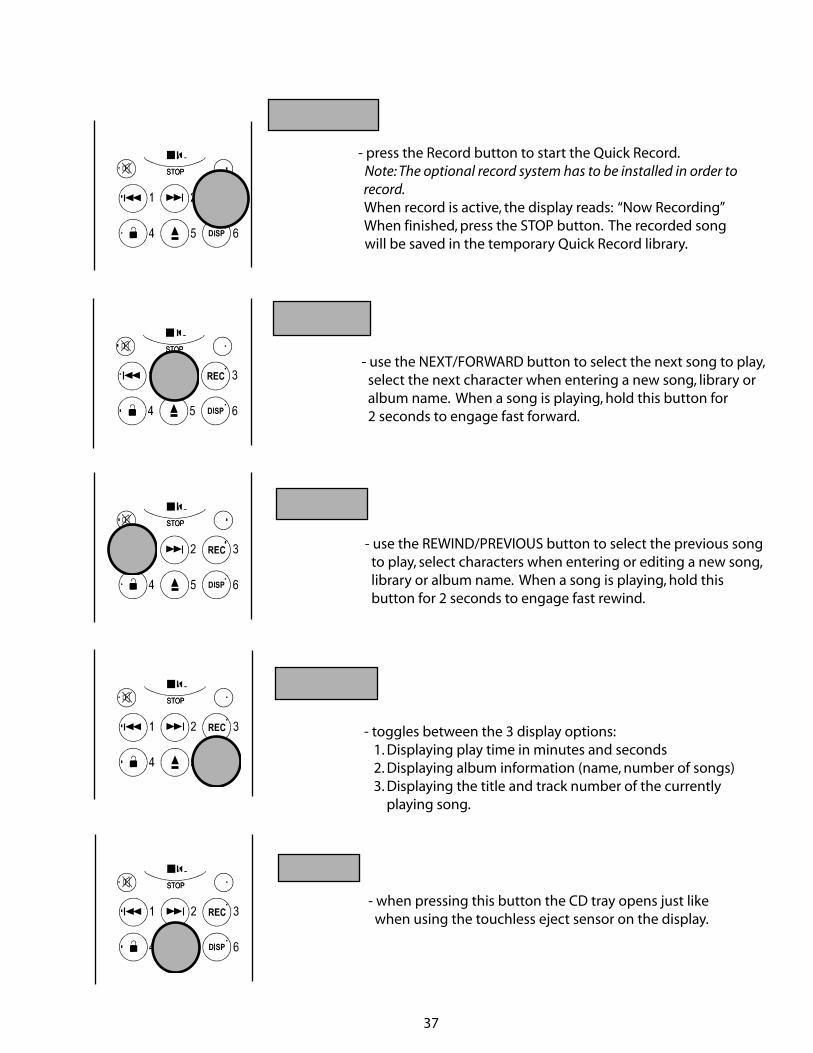
REC - RECORD
- press the Record button to start the Quick Record. Note: The optional record system has to be installed in order to
record. When record is active, the display reads: “Now Recording” When finished, press the STOP button. The recorded song will be saved in the temporary Quick Record library.
FWD/NEXT
- use the NEXT/FORWARD button to select the next song to play, select the next character when entering a new song, library or album name. When a song is playing, hold this button for 2 seconds to engage fast forward.
REW/PREV
- use the REWIND/PREVIOUS button to select the previous song to play, select characters when entering or editing a new song, library or album name. When a song is playing, hold this button for 2 seconds to engage fast rewind.
DISP - DISPLAY
- toggles between the 3 display options: 1. Displaying play time in minutes and seconds 2. Displaying album information (name, number of songs) 3. Displaying the title and track number of the currently playing song.
EJECT
- when pressing this button the CD tray opens just like when using the touchless eject sensor on the display.
37
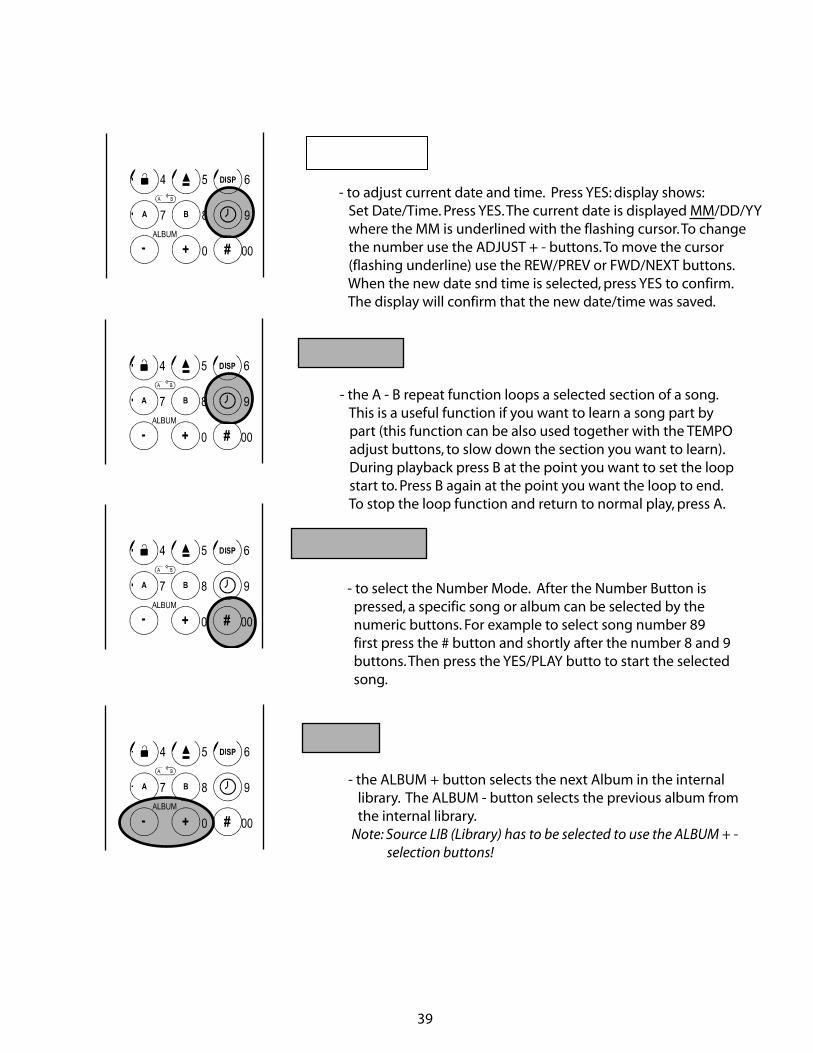
Set Date/Time
- to adjust current date and time. Press YES: display shows: Set Date/Time. Press YES. The current date is displayed MM/DD/YY where the MM is underlined with the flashing cursor. To change the number use the ADJUST + - buttons. To move the cursor (flashing underline) use the REW/PREV or FWD/NEXT buttons. When the new date snd time is selected, press YES to confirm. The display will confirm that the new date/time was saved.
A - B REPEAT
- the A - B repeat function loops a selected section of a song. This is a useful function if you want to learn a song part by part (this function can be also used together with the TEMPO adjust buttons, to slow down the section you want to learn). During playback press B at the point you want to set the loop start to. Press B again at the point you want the loop to end. To stop the loop function and return to normal play, press A.
NUMBER BUTTON
- to select the Number Mode. After the Number Button is pressed, a specific song or album can be selected by the numeric buttons. For example to select song number 89 first press the # button and shortly after the number 8 and 9 buttons. Then press the YES/PLAY butto to start the selected song.
ALBUM
- the ALBUM + button selects the next Album in the internal library. The ALBUM - button selects the previous album from the internal library. Note: Source LIB (Library) has to be selected to use the ALBUM + -
selection buttons!
39
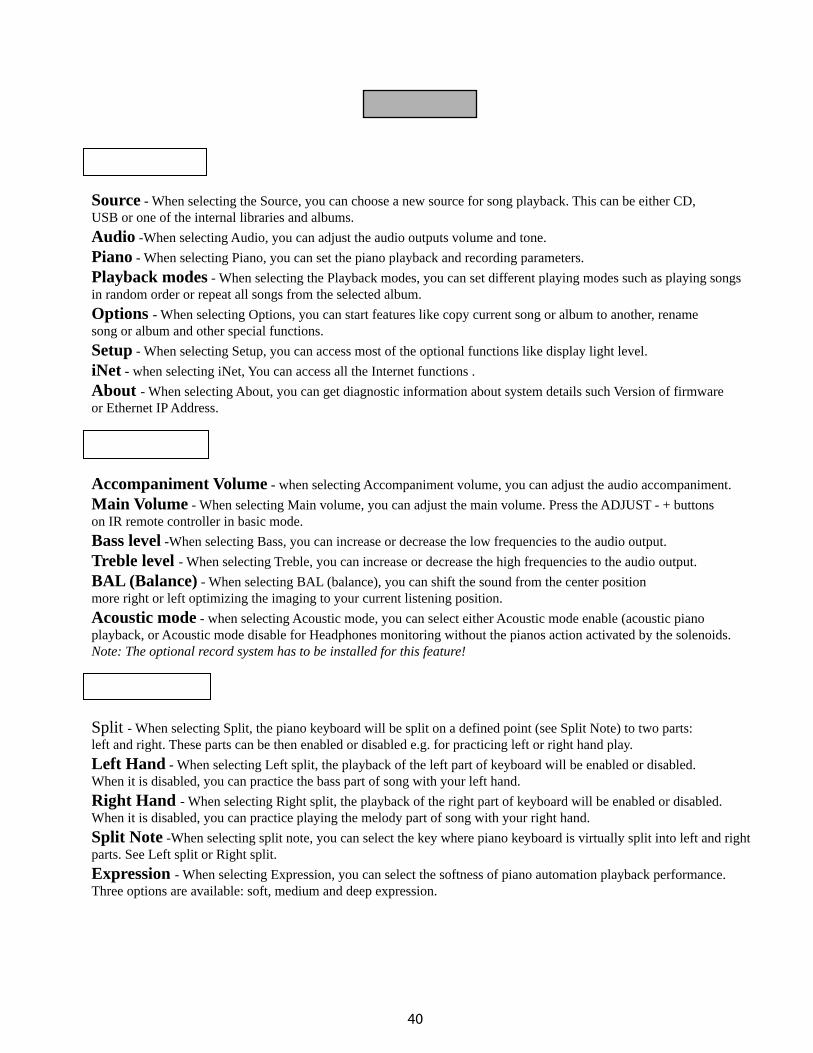
MENU-MENU
Source - When selecting the Source, you can choose a new source for song playback. This can be either CD, USB or one of the internal libraries and albums.Audio -When selecting Audio, you can adjust the audio outputs volume and tone.Piano - When selecting Piano, you can set the piano playback and recording parameters.Playback modes - When selecting the Playback modes, you can set different playing modes such as playing songsin random order or repeat all songs from the selected album.Options - When selecting Options, you can start features like copy current song or album to another, renamesong or album and other special functions.Setup - When selecting Setup, you can access most of the optional functions like display light level.iNet - when selecting iNet, You can access all the Internet functions .About - When selecting About, you can get diagnostic information about system details such Version of firmware or Ethernet IP Address.
MENU-AUDIO
Accompaniment Volume - when selecting Accompaniment volume, you can adjust the audio accompaniment.Main Volume - When selecting Main volume, you can adjust the main volume. Press the ADJUST - + buttons on IR remote controller in basic mode.Bass level -When selecting Bass, you can increase or decrease the low frequencies to the audio output.Treble level - When selecting Treble, you can increase or decrease the high frequencies to the audio output.BAL (Balance) - When selecting BAL (balance), you can shift the sound from the center position more right or left optimizing the imaging to your current listening position.Acoustic mode - when selecting Acoustic mode, you can select either Acoustic mode enable (acoustic piano playback, or Acoustic mode disable for Headphones monitoring without the pianos action activated by the solenoids.Note: The optional record system has to be installed for this feature!
MENU-PIANO
Split - When selecting Split, the piano keyboard will be split on a defined point (see Split Note) to two parts: left and right. These parts can be then enabled or disabled e.g. for practicing left or right hand play.Left Hand - When selecting Left split, the playback of the left part of keyboard will be enabled or disabled. When it is disabled, you can practice the bass part of song with your left hand.Right Hand - When selecting Right split, the playback of the right part of keyboard will be enabled or disabled. When it is disabled, you can practice playing the melody part of song with your right hand.Split Note -When selecting split note, you can select the key where piano keyboard is virtually split into left and rightparts. See Left split or Right split.Expression - When selecting Expression, you can select the softness of piano automation playback performance. Three options are available: soft, medium and deep expression.
MENU ITEMS
40
MENU-PIANO-EXPRESSION
Soft - when selecting Soft piano playback Expression, piano automation will play most of notes with smallerexpression levels.
Medium - when selecting Medium piano playback Expression, piano automation will be playing the songs with original note velocities.
Deep - When selecting Deep piano playback Expression, piano automation will play the songs with increasednotes velocity levels. Piano and mezzoforte notes will be played quieter.
MENU-PLAYBACK-MODES
Normal Sequence - When selecting Normal Sequence, songs will be played in normal order from track 1 to 999.
Random Sequence - When selecting Random Sequence, songs will be played in random order.
Repeat Off - When selecting Repeat Off, no song will be repeated.
Repeat Song - When selecting Repeat Song, current song will be repeated.
Repeat Album - When selecting Repeat Album, all songs within current album will be repeated.
MENU-OPTIONS
Copy song - When selecting Copy song function, you can copy the currently selected song to other selected album.System will ask you for target album. While selecting of target album, you can also create a new one.
Rename song - When selecting Rename song function, you can change the name of the selected song.
Delete song - When selecting Delete song function, you can delete the current song. You will be asked to confirmthis operation because after the song is deleted, there is no way to recover it or undo the delete.
Add to Playlist - Add song to user created playlist. You can play your playlist after selecting Playlist source from theSource menu.
Copy album - When selecting Copy album function, you can copy all songs from the selected album to any other selected album. The system will ask You for a target. The system will create a new one.
Rename album - when selecting Rename album function, you can change the name of the selected album.
Delete album - When selecting Delete album function, you can delete the selected album together with all thesongs stored in it. You will be asked to confirm this operation because after the album is deleted, there is no way to recover any of ther songs from the deleted album.
Add to library - When selecting Add to library function, you can add the current album to a destination group.
Change position - Change Song position (order) in the current album.
Sync with - when selecting Sync with function, you can synchronize current selected MIDI song with the selected CD Audio track. Note: Song, to be synchronized to CD has to be MIDI format.
Remove Sync - When selecting Remove Sync function, you can remove the synchronization of the currently selected song with synchronized MIDI file.
Unlock album - When selecting Unlock album, you can enter unlock key for this album.
MENU-SETUP
Store Current Settings - When selecting Store Current Settings, you can store all current settings like defaults. After device power-up the system will have the current audio volumes, current selected album will be set, current playback mode will be set and some others.
Service - When selecting Service, you can access the service functions such as Setup of ECR.
Display Setup - When selecting Display Setup, you can enter all the display setup functions.
Network Setup - When selecting Network Setup, you can setup WiFi networks if WiFi access device is connected.
41
Status - When selecting Status, you can get information of the current album download status. When download is finished ,while status is displayed, the downloaded album will be automatically activated for playback.Device Name - When selecting Device Name, you can see the name of your player system. Other player system owners online will also see your system name. This is useful when you want to share some our albums with friends, who have the same player system. They will see your player’s name in iNet/Download.
MENU-ABOUT
Version - When selecting Version, the system displays the current firmware version number.
Medium - By selecting Medium, the player shows information about the current medium and song type.
Storage - When selecting Storage, the player displays the remaining capacity of the internal library and the connected USB storage device.
Network - When selecting Network, the player shows the current network interface addresses.
MENU-SERVICE
Solenoid Controller Setup - When selecting Calibration Solenoid Controller, you can enter all the setup functions of the playback engine. Note: These functions are intended to be used by certified installers.
Touch Sensors Setup - When selecting Touch Sensors Setup, you can check touch sensors or turn themon and off.
Upgrade Firmware - When selecting Upgrade software, you can start upgrading the operating system software.
Service - When selecting Service, you can access the system’s service functions such Setup of ECR.
MENU-SERVICE-SENSORS
Calibrate Sensors - Wen selecting Sensors Calibrate, you can recalibrate the display touch sensors to adapt to the new conditions.
Show status of Sensors - When selecting Sensors Status, you can check touch sensors status.
Touch Sensors Setup - When selecting Touch Sensors Setup, you can test the touch sensors, or turn them on and off.
CONNECTIONSGear - ECR 1 (Compatible with Ensemble CD)Record Strip (optional)MIDI I/OHeadphones (on the left front side)Line Out L/RLine In L/RMicrophone InputSPDIF Optical (Integrated with Line Out Connector)Ethernet - Connection to Internet or LAN for controlling with PC or home automationUSB - storage class media (Flash Drive, Hard Disc, USB Floppy Drive, WIFI wireless Internet connection
42
AA/B loop 9, 39About 35Accompaniment volume 32Adjust 36Album 39All 26, 27AMI CD playback format 43AMI to Midi conversion 9Audio 33BBalance 6CCD 30CD auto play 30Choosing a location 2Clock 38Connections 35, 42Copy 9, 11, 12, 14, 26, 28, 29Copy midi files 9DDaily scheduler 38Date/Time 39Delete 26Device name 35Display 9, 37Download 35EEject 37Exit 36Expression 7, 23, 33FFast forward 9Features 9Firmware update 9, 21Forward/Next 37GGetting Started 3HHelp 8, 9, 24IiNet 23, 35Internal libraries 5, 9LLibraries 3, 27Library structure 15, 16Line out 32
MMedium 35Menu 40, 42Menu about 42Menu audio 40Menu options 41Menu piano 40Menu piano expression 41Menu playback modes 41Menu service 42Menu service sensors 42Menu setup 41Mute 36NNaming 9New features 44, 45Numeric song selection 9, 39OOGG file 9On/Off 3Options 34Overview 2PPan 25Piano 33Play CD 30Play/Yes 36Playback 5Playback modes 34Playback services 43Player piano CD 3Playlist 17, 26QQuick start 10RRandom play 8, 24Record 37Remote 18, 19, 20Remote assistant 21, 34Rename 26Repeat 8, 25Rew/Prev 37
INDEX
44
SSelect a source 4Select a track 4Sensors 3Service 34Service functions 21Setup 34Share folder 9Sleep mode 38Solenoid control setup 22, 23Source 27, 33Split play 24, 33Start playback 4Stop/No 36Storage 35Store current setup 34Sync time 33Synchronization 9TTempo adjustment 7, 25Timer 9Tone control 7, 25Touch sensor setup 34Transpose 7, 25Tree structure 9UUnlock 10, 38USB 3, 28VVersion 35Volume 6WWarranty 46Welcome 2What can you store 12, 28
45
Pianoforce LLC. warrants Concert Masterproducts to be free of manufacturing defects in material or workmanship as described below:
If your Concert Master product should prove defective in material or workmanship
Pianoforce LLC. will provide, or arrange for, service (labor) to correct defects in workmanship for a period of one (1) year at no cost.
case parts or units damaged by excessive heat or humidity.
of normal use and wear or damage caused by any repair or service by anyone other than a Concert Masterdealer.
-der, are subject to the following conditions and limitations:
and shall be valid only if the product is purchased from an authorized Concert Master dealerand remains in the possession of the original owner. It is the owner’s responsibility to estab-lish the date and place of purchase.
serviced by anyone other than an authorised service center or if the product is damagedbecause of improper operation and/or maintenance in accordance with the owner’s manual.
Manufacturer reserves the right to make changes in design and/or improvementsupon it’s products without obligation to include these changes in any products previouslymanufactured.
Except to the extent prohibited by applicable law, all implied warranties made byPianoforce LLC. in connection with this product are limited in duration to the applicablewarranty period set forth before, and no warranties, whether expressed or implied, includ-
of defective parts as is expressly provided above; and under no circumstances shall manu-facturer be liable for any special, incidental, or consequential loss or damage. Some states do not allow limitations on how long an implied warranty lasts or the exclusion of limitation ofincidental or consequential damages, so the above limitations or exclusions may not apply to
vary from state to state.
you. Manufacturer does not authorize any person to modify, either orally or in writing, theterms of this warranty.
To obtain warranty service for your ConcertMaster product 1. Contact the Concert Masterdealer from whom you purchased the product, or the nearestauthorized dealer.2. If no dealer is near you, call PianoForce LLC. at 877-542-88073. Do not attempt to service the product beyond that described in the user maintenance
Concert Masterproducts. Open -ing enclosures or attempting to service may compromise the device safety and will void thewarranty. Removing or tampering with Warranty labels will void the warranty. Do not ship theproduct without prior written authorization from Pianoforce LLC.
these instructions should be helpful in enabling you to obtain proper service.
User’s Guide Concert Master
Baldwin Concert Master LImited Warranty
46
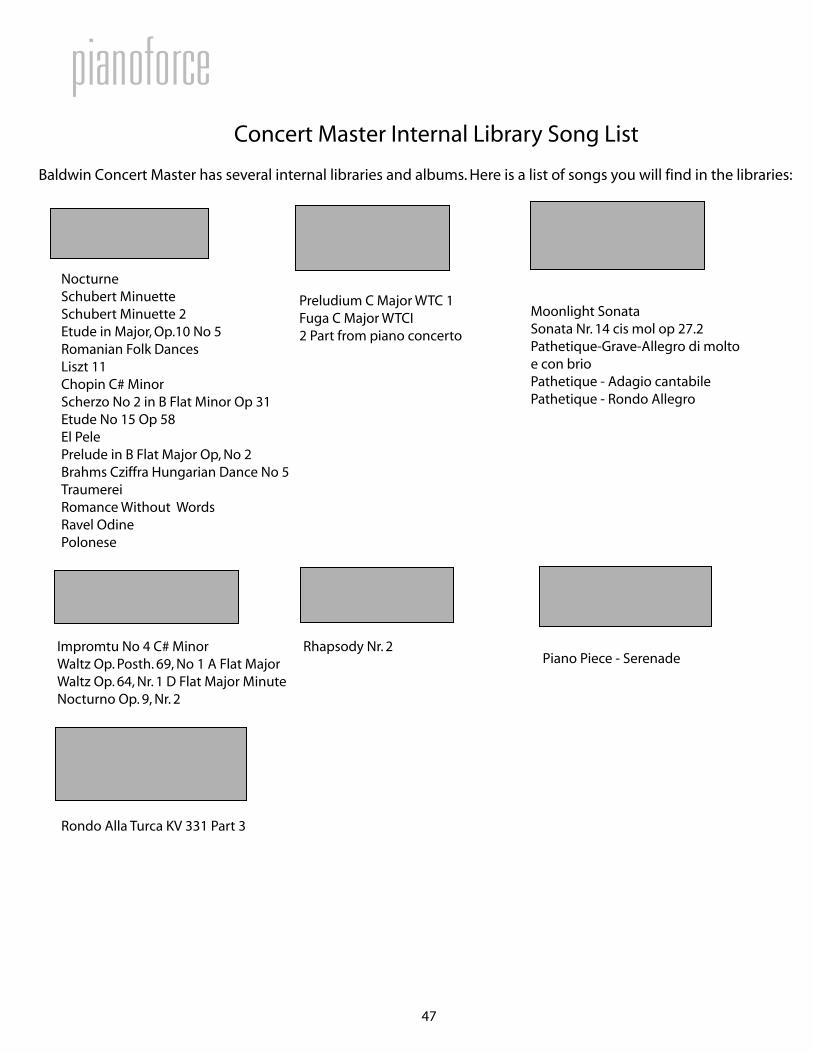
Concert Master Internal Library Song List
Baldwin Concert Master has several internal libraries and albums. Here is a list of songs you will find in the libraries:
LIBRARY: CLASSICALAlbum: Classical 1
NocturneSchubert MinuetteSchubert Minuette 2Etude in Major, Op.10 No 5Romanian Folk DancesLiszt 11Chopin C# MinorScherzo No 2 in B Flat Minor Op 31Etude No 15 Op 58El PelePrelude in B Flat Major Op, No 2Brahms Cziffra Hungarian Dance No 5TraumereiRomance Without WordsRavel OdinePolonese
LIBRARY: CLASSICALAlbum: Bach, Johann Sebastian
Preludium C Major WTC 1Fuga C Major WTCI2 Part from piano concerto
LIBRARY: CLASSICALAlbum: BeethovenLudwig van
Moonlight SonataSonata Nr. 14 cis mol op 27.2Pathetique-Grave-Allegro di molto e con brioPathetique - Adagio cantabilePathetique - Rondo Allegro
LIBRARY: CLASSICALAlbum: Chopin, Frederic
Impromtu No 4 C# MinorWaltz Op. Posth. 69, No 1 A Flat MajorWaltz Op. 64, Nr. 1 D Flat Major MinuteNocturno Op. 9, Nr. 2
LIBRARY: CLASSICALAlbum: Liszt, Franz
Rhapsody Nr. 2
LIBRARY: CLASSICALAlbum: Schubert, Franz
Piano Piece - Serenade
LIBRARY: CLASSICALAlbum: Mozart, WolfgangAmadeus
Rondo Alla Turca KV 331 Part 3
47

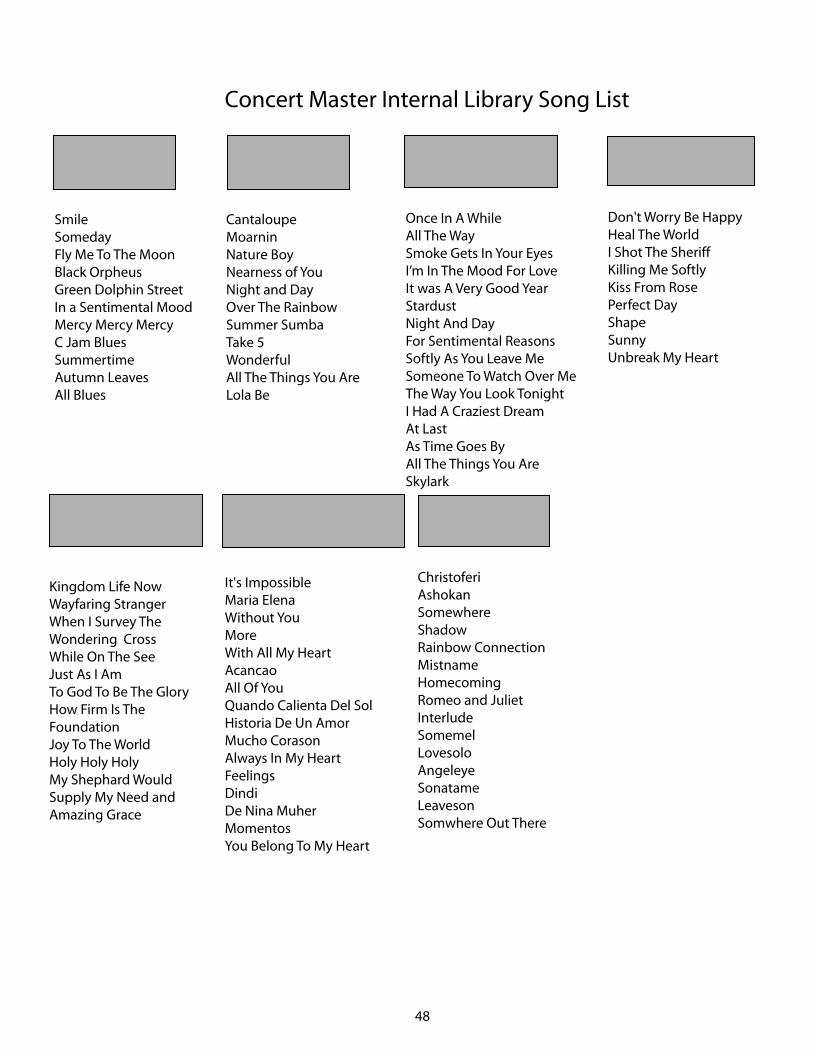
Concert Master Internal Library Song List
LIBRARY: JAZZAlbum: Jazz 1
SmileSomedayFly Me To The MoonBlack OrpheusGreen Dolphin StreetIn a Sentimental MoodMercy Mercy MercyC Jam BluesSummertimeAutumn LeavesAll Blues
LIBRARY: JAZZAlbum: Jazz 2
CantaloupeMoarninNature BoyNearness of YouNight and DayOver The RainbowSummer SumbaTake 5WonderfulAll The Things You AreLola Be
LIBRARY: JAZZAlbum: Standards
Once In A WhileAll The WaySmoke Gets In Your EyesI’m In The Mood For LoveIt was A Very Good YearStardustNight And DayFor Sentimental ReasonsSoftly As You Leave MeSomeone To Watch Over MeThe Way You Look TonightI Had A Craziest DreamAt LastAs Time Goes ByAll The Things You AreSkylark
LIBRARY: POPULARAlbum: Pop
Don't Worry Be HappyHeal The WorldI Shot The SheriffKilling Me SoftlyKiss From RosePerfect DayShapeSunnyUnbreak My Heart
LIBRARY: OTHERAlbum: Inspirational
Kingdom Life NowWayfaring StrangerWhen I Survey The Wondering CrossWhile On The SeeJust As I AmTo God To Be The GloryHow Firm Is The FoundationJoy To The WorldHoly Holy HolyMy Shephard Would Supply My Need and Amazing Grace
LIBRARY: OTHERAlbum: Latin Love Songs
It's ImpossibleMaria ElenaWithout YouMoreWith All My HeartAcancaoAll Of YouQuando Calienta Del SolHistoria De Un AmorMucho CorasonAlways In My HeartFeelingsDindiDe Nina MuherMomentosYou Belong To My Heart
LIBRARY: OTHERAlbum: New Age
ChristoferiAshokanSomewhereShadowRainbow ConnectionMistnameHomecomingRomeo and JulietInterludeSomemelLovesoloAngeleyeSonatameLeavesonSomwhere Out There
48