Embed Size (px)
Citation preview
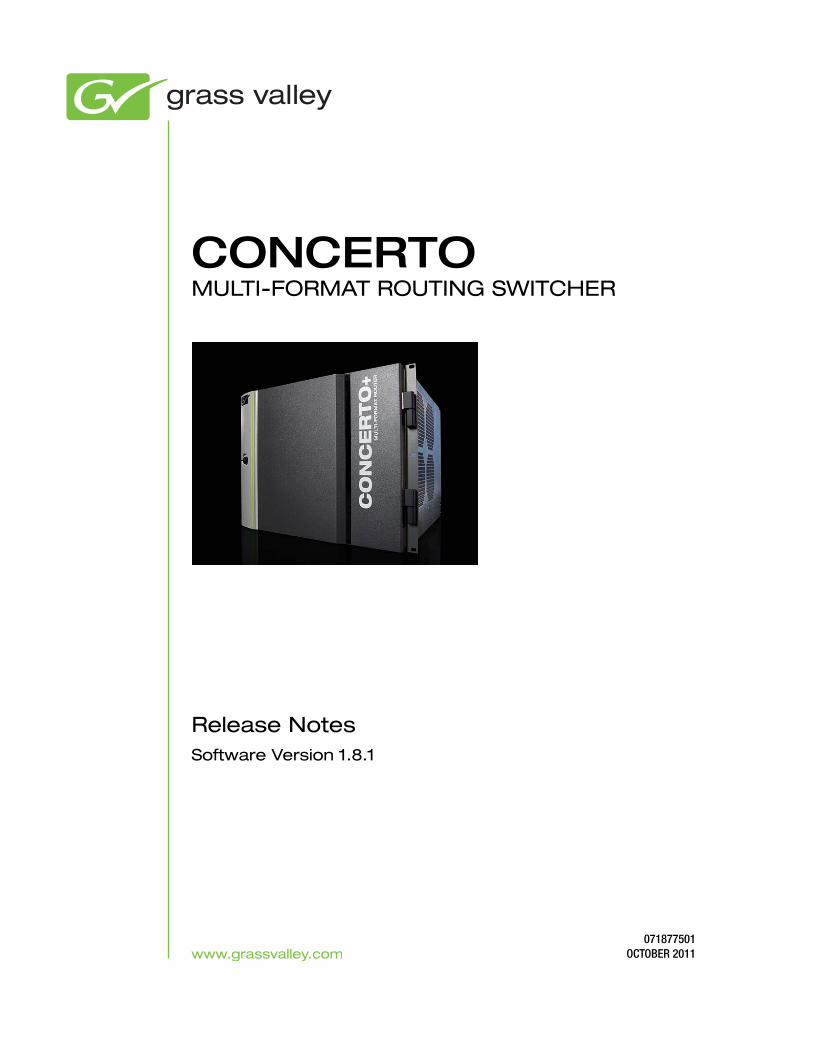
CONCERTOMULTI-FORMAT ROUTING SWITCHER
Release NotesSoftware Version 1.8.1
071877501OCTOBER 2011

CERTIFICATE
Certificate Number: 510040.001
The Quality System of:
Grass Valley USA, LLC and its Grass Valley Affiliates Headquarters: 400 Providence Mine Road Nevada City, CA 95945 United States
15655 SW Greystone Ct. Beaverton, OR 97006 United States
Brunnenweg 9 D-64331 Weiterstadt Germany
Kapittelweg 10 4827 HG Breda The Nederlands
2300 So. Decker Lake Blvd. Salt Lake City, UT 84119 United States
Including its implementation, meets the requirements of the standard:
ISO 9001:2008 Scope:The design, manufacture and support of video and audio hardware and software products and related systems.
This Certificate is valid until: June 14, 2012 This Certificate is valid as of: December 23, 2010 Certified for the first time: June 14, 2000
H. Pierre Sallé President KEMA-Registered Quality
The method of operation for quality certification is defined in the KEMA General Terms And Conditions For Quality And Environmental Management Systems Certifications. Integral publication of this certificate is allowed.
KEMA-Registered Quality, Inc.4377 County Line Road Chalfont, PA 18914 Ph: (215)997-4519 Fax: (215)997-3809 CRT 001 042108
Accredited By: ANAB
CONCERTOMULTI-FORMAT ROUTING SWITCHER
Release NotesSoftware Version 1.8.1
071877501OCTOBER 2011
4 CONCERTO — Release Notes
Contacting Grass Valley
Copyright © Grass Valley USA, LLC. All rights reserved.This product may be covered by one or more U.S. and foreign patents.
Grass Valley Web Site
The www.grassvalley.com web site offers the following:
Online User Documentation — Current versions of product catalogs, brochures, data sheets, ordering guides, planning guides, manuals, and release notes in .pdf format can be downloaded.
FAQ Database — Solutions to problems and troubleshooting efforts can be found by searching our Frequently Asked Questions (FAQ) database.
Software Downloads — Download software updates, drivers, and patches.
InternationalSupport Centers
France24 x 7 +800 8080 2020 or +33 1 48 25 20 20 United States/Canada
24 x 7 +1 800 547 8949 or +1 530 478 4148
Local Support Centers
(available during normal
business hours)
AsiaHong Kong, Taiwan, Korea, Macau: +852 2531 3058 Indian Subcontinent: +91 22 24933476Southeast Asia/Malaysia: +603 7805 3884 Southeast Asia/Singapore: +65 6379 1313China: +861 0660 159 450 Japan: +81 3 5484 6868
Australia and New Zealand: +61 1300 721 495 Central/South America: +55 11 5509 3443
Middle East: +971 4 299 64 40 Near East and Africa: +800 8080 2020 or +33 1 48 25 20 20
Europe
Belarus, Russia, Tadzikistan, Ukraine, Uzbekistan: +7 095 2580924 225 Switzerland: +41 1 487 80 02S. Europe/Italy-Roma: +39 06 87 20 35 28 -Milan: +39 02 48 41 46 58 S. Europe/Spain: +34 91 512 03 50Benelux/Belgium: +32 (0) 2 334 90 30 Benelux/Netherlands: +31 (0) 35 62 38 42 1 N. Europe: +45 45 96 88 70Germany, Austria, Eastern Europe: +49 6150 104 444 UK, Ireland, Israel: +44 118 923 0499
ContentsPurpose . . . . . . . . . . . . . . . . . . . . . . . . . . . . . . . . . . . . . . . . . . . . . . . . . . . . . . . . . . . . . . . 7New Features . . . . . . . . . . . . . . . . . . . . . . . . . . . . . . . . . . . . . . . . . . . . . . . . . . . . . . . . . . 7
Related Documents . . . . . . . . . . . . . . . . . . . . . . . . . . . . . . . . . . . . . . . . . . . . . . . . . 7Module Installation. . . . . . . . . . . . . . . . . . . . . . . . . . . . . . . . . . . . . . . . . . . . . . . . . . . . . 8Configuration. . . . . . . . . . . . . . . . . . . . . . . . . . . . . . . . . . . . . . . . . . . . . . . . . . . . . . . . . . 9
Controllers . . . . . . . . . . . . . . . . . . . . . . . . . . . . . . . . . . . . . . . . . . . . . . . . . . . . . . . . . . 9Control Mode/In Sel Setting . . . . . . . . . . . . . . . . . . . . . . . . . . . . . . . . . . . . . . . . 10
Ethernet Interface Configuration . . . . . . . . . . . . . . . . . . . . . . . . . . . . . . . . . . . . . . . . 10Preparation . . . . . . . . . . . . . . . . . . . . . . . . . . . . . . . . . . . . . . . . . . . . . . . . . . . . . . . . . 11IP Address Setting Using NetConfig . . . . . . . . . . . . . . . . . . . . . . . . . . . . . . . . . . . 11IP Address Setting Using Concerto Web Pages . . . . . . . . . . . . . . . . . . . . . . . . . . 13Software Updates . . . . . . . . . . . . . . . . . . . . . . . . . . . . . . . . . . . . . . . . . . . . . . . . . . . 14
Concerto Web Pages . . . . . . . . . . . . . . . . . . . . . . . . . . . . . . . . . . . . . . . . . . . . . . . . . . . 15Matrix Controller System Configuration . . . . . . . . . . . . . . . . . . . . . . . . . . . . . . . . 16Matrix Reference Configuration . . . . . . . . . . . . . . . . . . . . . . . . . . . . . . . . . . . . . . . 17Matrix Controller Factory Defaults. . . . . . . . . . . . . . . . . . . . . . . . . . . . . . . . . . . . . 18Concerto Matrix Local Configuration . . . . . . . . . . . . . . . . . . . . . . . . . . . . . . . . . . 19Concerto Matrix Applications . . . . . . . . . . . . . . . . . . . . . . . . . . . . . . . . . . . . . . . . . 19System Maintenance . . . . . . . . . . . . . . . . . . . . . . . . . . . . . . . . . . . . . . . . . . . . . . . . . 20
Specific Control System Configurations. . . . . . . . . . . . . . . . . . . . . . . . . . . . . . . 20Verifying the FPGA Version . . . . . . . . . . . . . . . . . . . . . . . . . . . . . . . . . . . . . . . . . . . . 20
CONCERTO — Release Notes 5

Contents
6 CONCERTO — Release Notes
Version 1.8.1OCTOBER 2011
Concerto Release Notes
PurposeThis document provides information about the new features for the 1.8.1 software release of the Concerto Routing Matrix System.
New Features The 1.8.1 software release of the Concerto Routing Matrix System includes support for the Concerto 3Gb/s module.
Related Documents
Concerto Installation and Service manual.
CONCERTO — Release Notes 7
Version 1.8.1
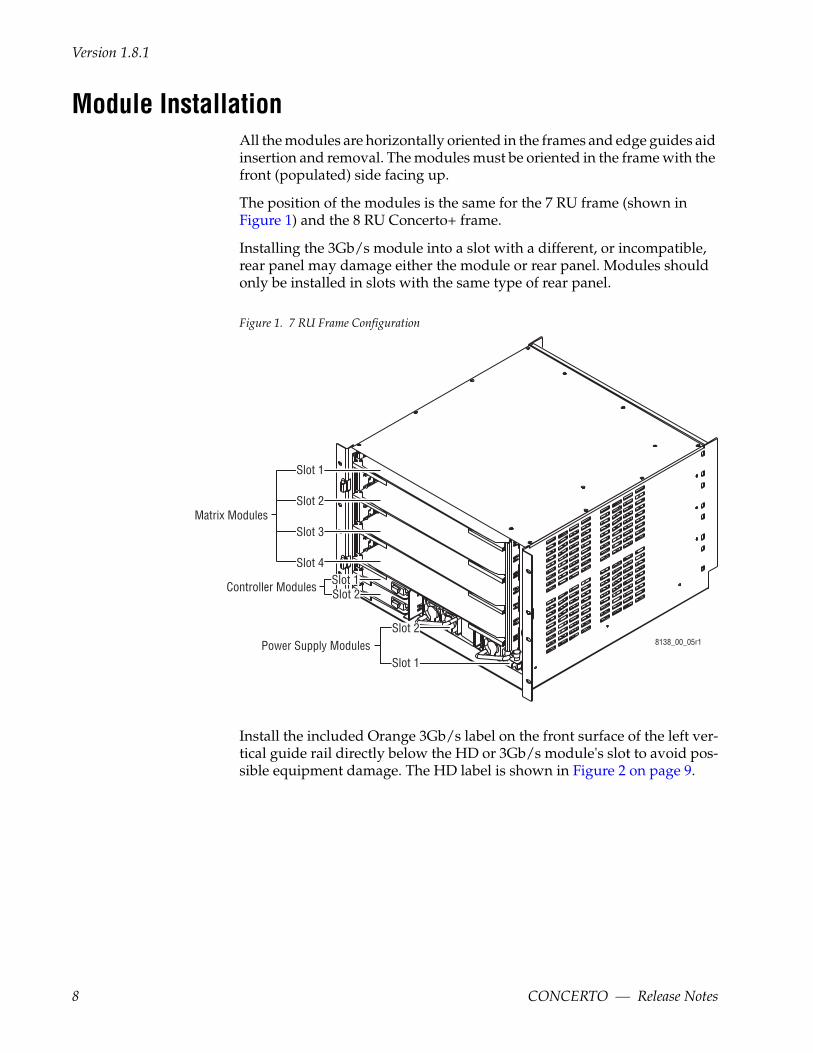
Module InstallationAll the modules are horizontally oriented in the frames and edge guides aid insertion and removal. The modules must be oriented in the frame with the front (populated) side facing up.
The position of the modules is the same for the 7 RU frame (shown in Figure 1) and the 8 RU Concerto+ frame.
Installing the 3Gb/s module into a slot with a different, or incompatible, rear panel may damage either the module or rear panel. Modules should only be installed in slots with the same type of rear panel.
Figure 1. 7 RU Frame Configuration
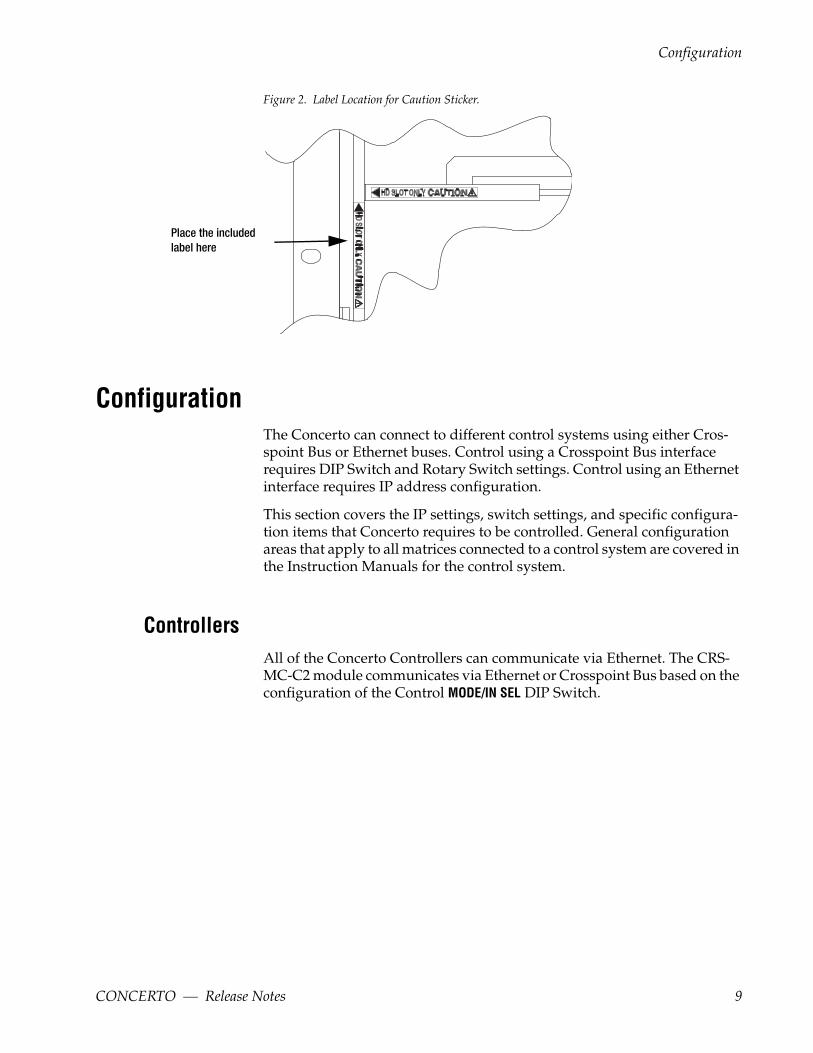
Install the included Orange 3Gb/s label on the front surface of the left ver-tical guide rail directly below the HD or 3Gb/s module's slot to avoid pos-sible equipment damage. The HD label is shown in Figure 2 on page 9.
8138_00_05r1
Matrix Modules
Controller Modules
Power Supply Modules
Slot 1
Slot 4
Slot 3
Slot 2
Slot 1Slot 2
Slot 1
Slot 2
8 CONCERTO — Release Notes
Configuration
Figure 2. Label Location for Caution Sticker.
ConfigurationThe Concerto can connect to different control systems using either Cros-spoint Bus or Ethernet buses. Control using a Crosspoint Bus interface requires DIP Switch and Rotary Switch settings. Control using an Ethernet interface requires IP address configuration.
This section covers the IP settings, switch settings, and specific configura-tion items that Concerto requires to be controlled. General configuration areas that apply to all matrices connected to a control system are covered in the Instruction Manuals for the control system.
ControllersAll of the Concerto Controllers can communicate via Ethernet. The CRS-MC-C2 module communicates via Ethernet or Crosspoint Bus based on the configuration of the Control MODE/IN SEL DIP Switch.
Place the included label here
CONCERTO — Release Notes 9
Version 1.8.1
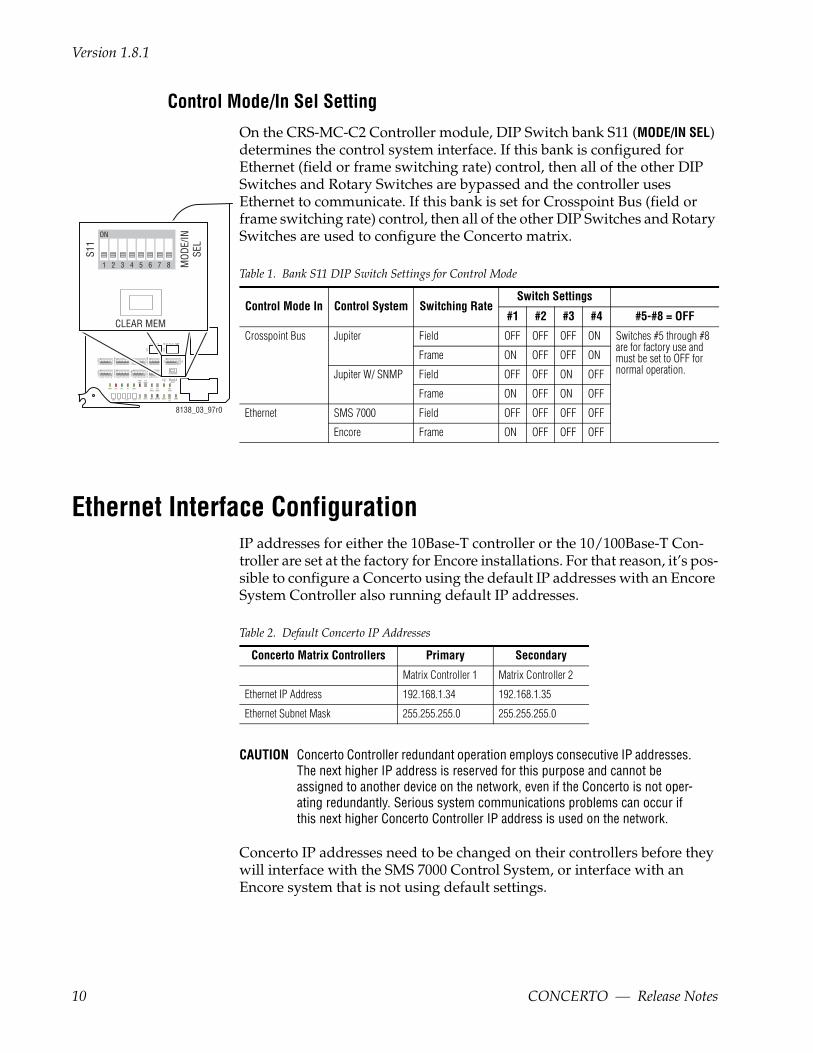
Control Mode/In Sel Setting
8138_03_97r0
1 8765432
ON
1 8765432
ON
1 8765432
ON
1 8765432
ON
1 8765432
ON
1 8765432
ON
1 8765432
ON
1 8765432
ON
1 8765432
ON
PWROK
DONEACTGND +5V ERROR
TC2
PRES
BUSY
48KPRES
LINK
SYNCERR
RECV
VI 2PRES
XMIT
VI 1PRES
CLEAR MEM
RESET
TXRXFAST COL TC1PRES
+2.5V+3.3V
A_LE
VEL
B_LE
VEL
A_OP
TION
S
C_LE
VEL
D_LE
VEL
B_OP
TION
S
C_OP
TION
S
D_OP
TION
S
MOD
E/IN
SEL
S11
S12
S13
A B C D E F G H A B C D E F G H A B C D E F G H A B C D E F G H
M A T R I X MAPC O N F I G
1 8765432
ON
CLEAR MEM
MOD
E/IN
SEL
S11
On the CRS-MC-C2 Controller module, DIP Switch bank S11 (MODE/IN SEL) determines the control system interface. If this bank is configured for Ethernet (field or frame switching rate) control, then all of the other DIP Switches and Rotary Switches are bypassed and the controller uses Ethernet to communicate. If this bank is set for Crosspoint Bus (field or frame switching rate) control, then all of the other DIP Switches and Rotary Switches are used to configure the Concerto matrix.
Ethernet Interface ConfigurationIP addresses for either the 10Base-T controller or the 10/100Base-T Con-troller are set at the factory for Encore installations. For that reason, it’s pos-sible to configure a Concerto using the default IP addresses with an Encore System Controller also running default IP addresses.
CAUTION Concerto Controller redundant operation employs consecutive IP addresses. The next higher IP address is reserved for this purpose and cannot be assigned to another device on the network, even if the Concerto is not oper-ating redundantly. Serious system communications problems can occur if this next higher Concerto Controller IP address is used on the network.
Concerto IP addresses need to be changed on their controllers before they will interface with the SMS 7000 Control System, or interface with an Encore system that is not using default settings.
Table 1. Bank S11 DIP Switch Settings for Control Mode
Control Mode In Control System Switching RateSwitch Settings
#1 #2 #3 #4 #5-#8 = OFF
Crosspoint Bus Jupiter Field OFF OFF OFF ON Switches #5 through #8 are for factory use and must be set to OFF for normal operation.
Frame ON OFF OFF ON
Jupiter W/ SNMP Field OFF OFF ON OFF
Frame ON OFF ON OFF
Ethernet SMS 7000 Field OFF OFF OFF OFF
Encore Frame ON OFF OFF OFF
Table 2. Default Concerto IP Addresses
Concerto Matrix Controllers Primary Secondary
Matrix Controller 1 Matrix Controller 2
Ethernet IP Address 192.168.1.34 192.168.1.35
Ethernet Subnet Mask 255.255.255.0 255.255.255.0
10 CONCERTO — Release Notes
Ethernet Interface Configuration
Note IP addresses set on a Concerto Matrix Controller with the Factory Defaults button on the Concerto Matrix Network Configuration web page (192.168.1.134 primary, 192.168.1.135 secondary) are different from the IP addresses manually set on a Concerto at the factory before shipment.
PreparationBefore you change the IP addresses on Concerto, you should complete any software updates that are available for the control system you will be using to configure Concerto. You can update Concerto’s software using Net-Config after the settings on Concerto are complete.
Consult with your Network or System administrator for the IP address for the Concerto hardware.
The following is required:
• The IP address that you want for each Matrix Controller (and backup if you have one) so that they can be uniquely addressed on your network,
• The IP address of your gateway (if you have one),
• The IP address of the Control System, (MCPU and backup MCPU for SMS 7000 or the System Control Processor for Encore).
• NetConfig installed on the PC being used for configuration, and
• The Concerto Software loaded onto the PC, which will be installed onto the Concerto Matrix controller after network communication is estab-lished.
The NetConfig application can be used to change IP addresses and load software to devices on a network.
CAUTION If you are using a CRS-MC-C2 Controller module, the mode setting on DIP Switch bank S11 must be set correctly before it will communicate using Ethernet. See Control Mode/In Sel Setting on page 10.
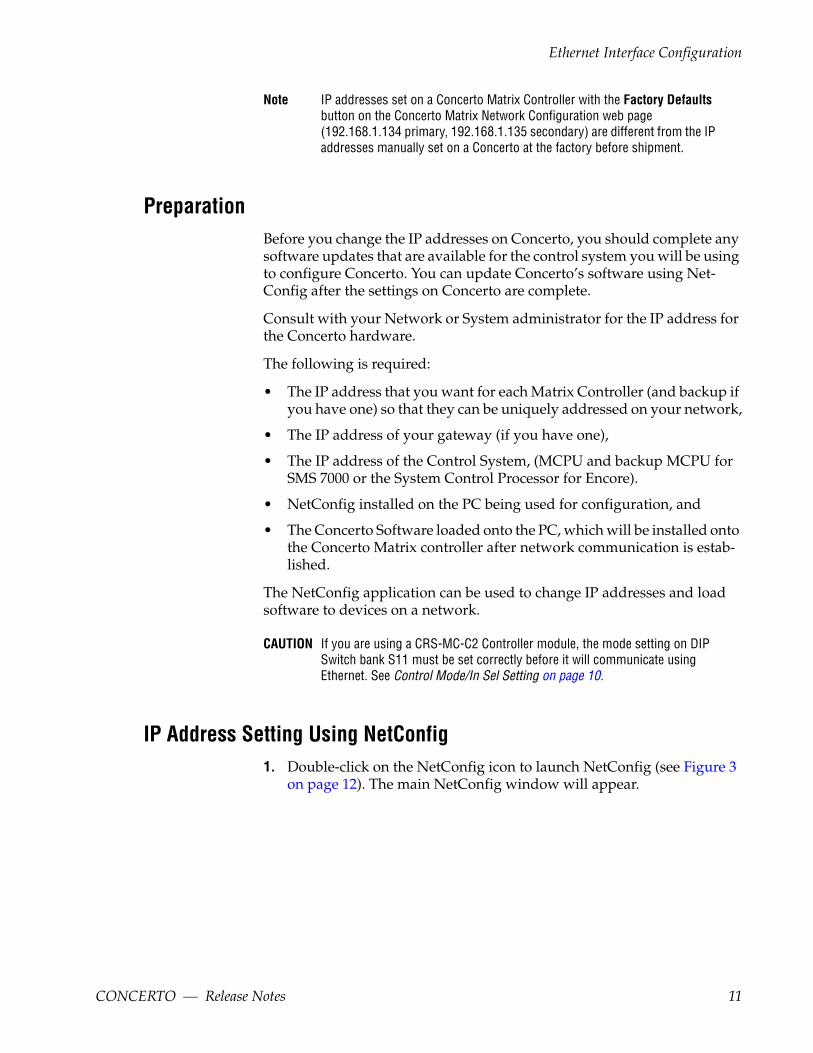
IP Address Setting Using NetConfig1. Double-click on the NetConfig icon to launch NetConfig (see Figure 3
on page 12). The main NetConfig window will appear.
CONCERTO — Release Notes 11
Version 1.8.1
Figure 3. Matrix Controller Invalid IP Address
2. Select Device IP Addresses on the Configure menu to access the Change IP Addresses window.
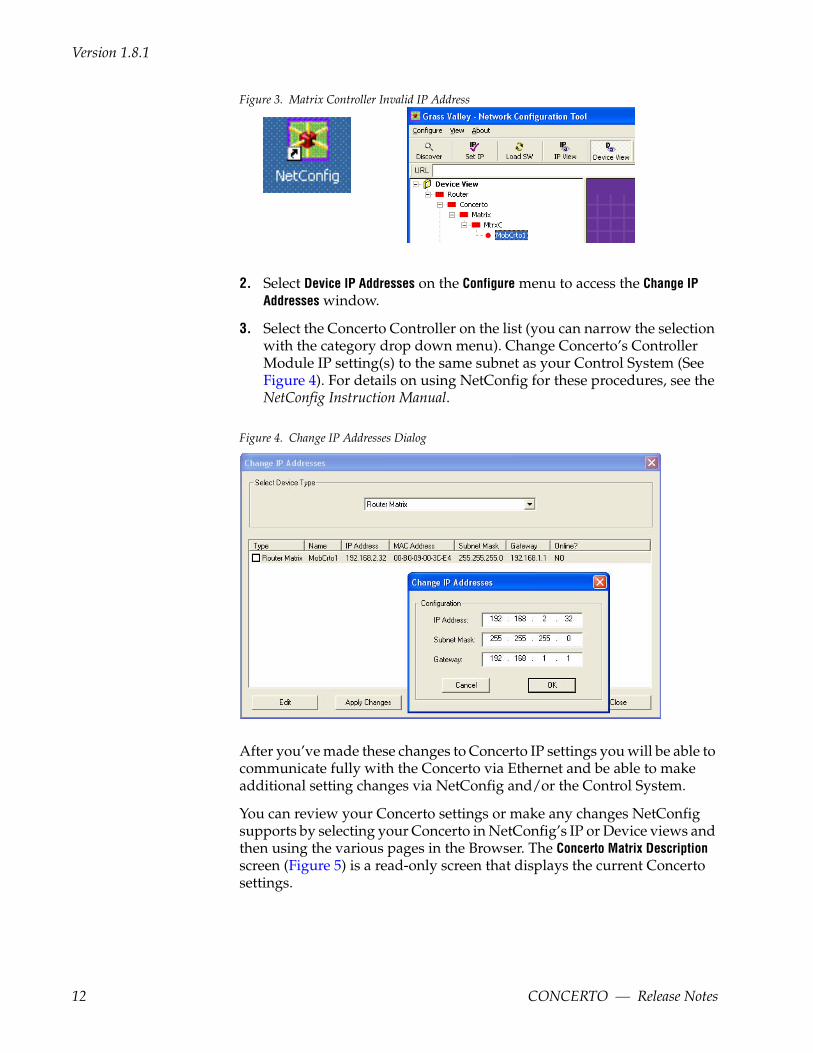
3. Select the Concerto Controller on the list (you can narrow the selection with the category drop down menu). Change Concerto’s Controller Module IP setting(s) to the same subnet as your Control System (See Figure 4). For details on using NetConfig for these procedures, see the NetConfig Instruction Manual.
Figure 4. Change IP Addresses Dialog
After you’ve made these changes to Concerto IP settings you will be able to communicate fully with the Concerto via Ethernet and be able to make additional setting changes via NetConfig and/or the Control System.
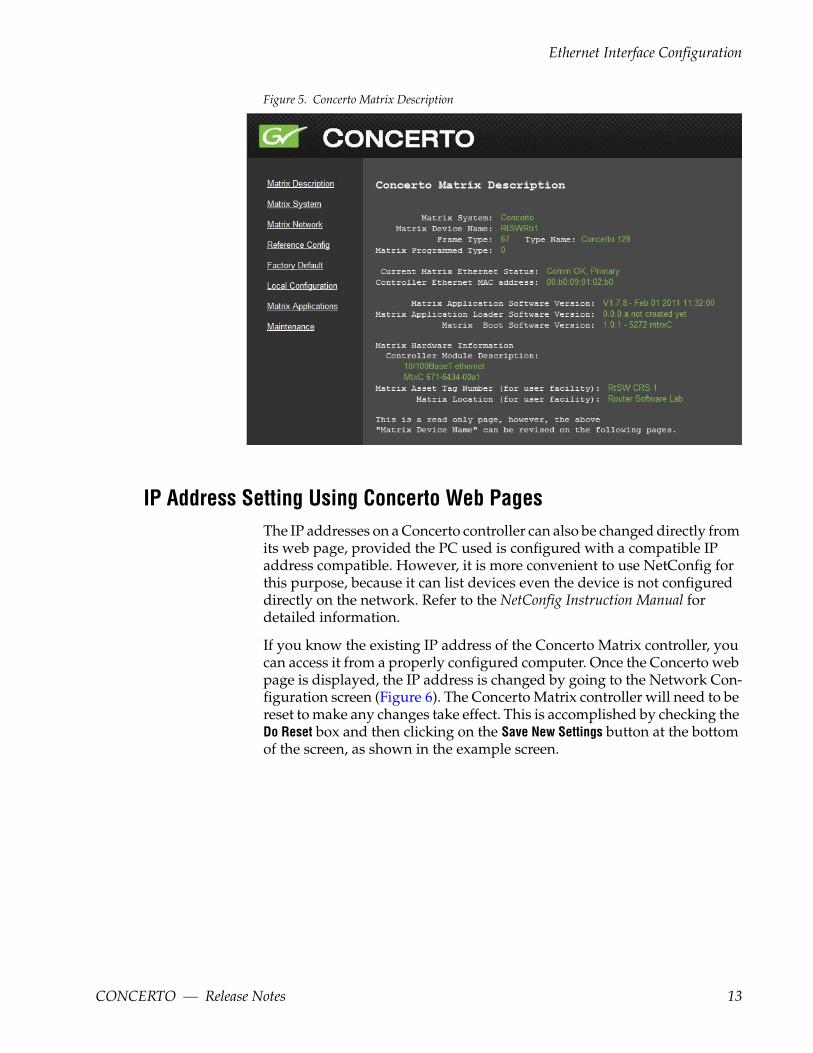
You can review your Concerto settings or make any changes NetConfig supports by selecting your Concerto in NetConfig’s IP or Device views and then using the various pages in the Browser. The Concerto Matrix Description screen (Figure 5) is a read-only screen that displays the current Concerto settings.
12 CONCERTO — Release Notes
Ethernet Interface Configuration
Figure 5. Concerto Matrix Description
IP Address Setting Using Concerto Web PagesThe IP addresses on a Concerto controller can also be changed directly from its web page, provided the PC used is configured with a compatible IP address compatible. However, it is more convenient to use NetConfig for this purpose, because it can list devices even the device is not configured directly on the network. Refer to the NetConfig Instruction Manual for detailed information.
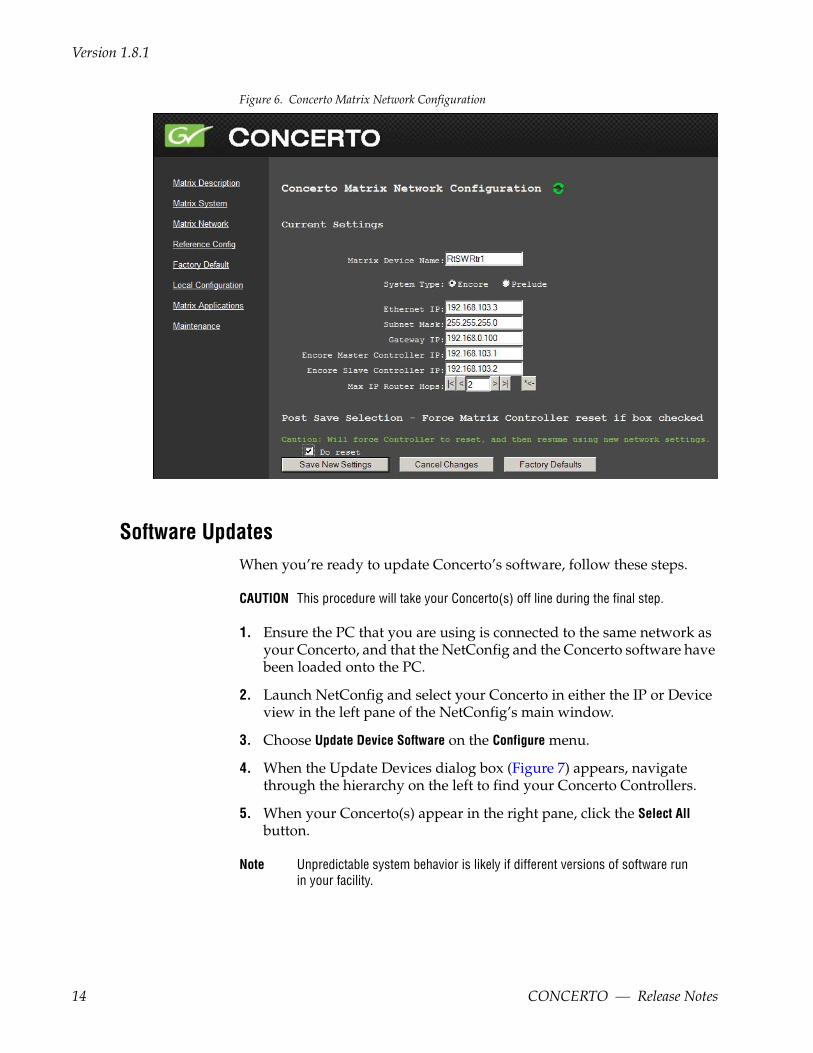
If you know the existing IP address of the Concerto Matrix controller, you can access it from a properly configured computer. Once the Concerto web page is displayed, the IP address is changed by going to the Network Con-figuration screen (Figure 6). The Concerto Matrix controller will need to be reset to make any changes take effect. This is accomplished by checking the Do Reset box and then clicking on the Save New Settings button at the bottom of the screen, as shown in the example screen.
CONCERTO — Release Notes 13
Version 1.8.1
Figure 6. Concerto Matrix Network Configuration
Software UpdatesWhen you’re ready to update Concerto’s software, follow these steps.
CAUTION This procedure will take your Concerto(s) off line during the final step.
1. Ensure the PC that you are using is connected to the same network as your Concerto, and that the NetConfig and the Concerto software have been loaded onto the PC.
2. Launch NetConfig and select your Concerto in either the IP or Device view in the left pane of the NetConfig’s main window.
3. Choose Update Device Software on the Configure menu.
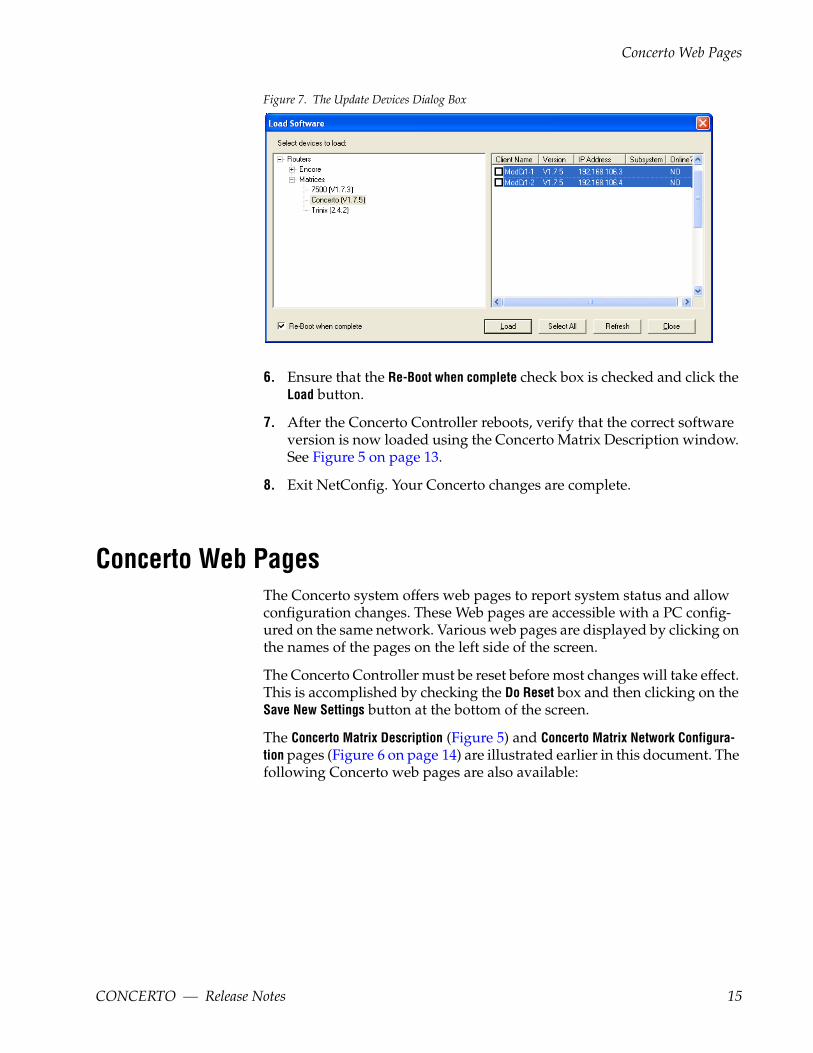
4. When the Update Devices dialog box (Figure 7) appears, navigate through the hierarchy on the left to find your Concerto Controllers.
5. When your Concerto(s) appear in the right pane, click the Select All button.
Note Unpredictable system behavior is likely if different versions of software run in your facility.
14 CONCERTO — Release Notes
Concerto Web Pages
Figure 7. The Update Devices Dialog Box
6. Ensure that the Re-Boot when complete check box is checked and click the Load button.
7. After the Concerto Controller reboots, verify that the correct software version is now loaded using the Concerto Matrix Description window. See Figure 5 on page 13.
8. Exit NetConfig. Your Concerto changes are complete.
Concerto Web PagesThe Concerto system offers web pages to report system status and allow configuration changes. These Web pages are accessible with a PC config-ured on the same network. Various web pages are displayed by clicking on the names of the pages on the left side of the screen.
The Concerto Controller must be reset before most changes will take effect. This is accomplished by checking the Do Reset box and then clicking on the Save New Settings button at the bottom of the screen.
The Concerto Matrix Description (Figure 5) and Concerto Matrix Network Configura-tion pages (Figure 6 on page 14) are illustrated earlier in this document. The following Concerto web pages are also available:
CONCERTO — Release Notes 15
Version 1.8.1
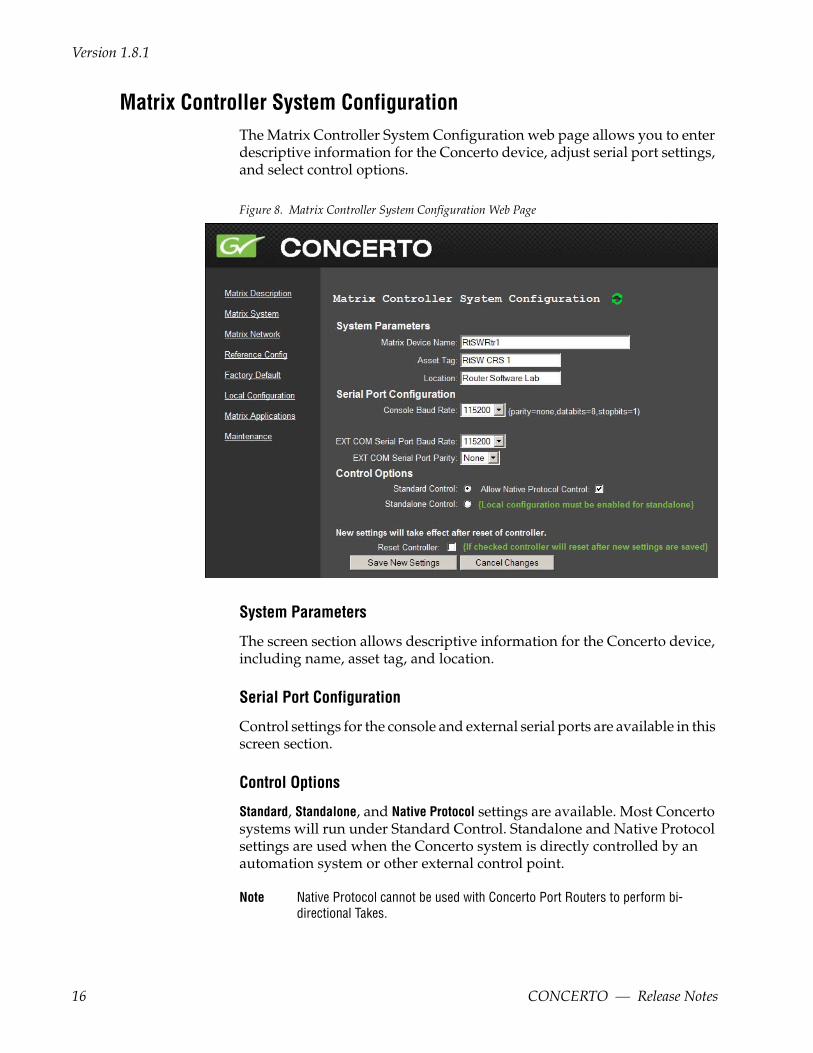
Matrix Controller System ConfigurationThe Matrix Controller System Configuration web page allows you to enter descriptive information for the Concerto device, adjust serial port settings, and select control options.
Figure 8. Matrix Controller System Configuration Web Page
System Parameters
The screen section allows descriptive information for the Concerto device, including name, asset tag, and location.
Serial Port Configuration
Control settings for the console and external serial ports are available in this screen section.
Control Options
Standard, Standalone, and Native Protocol settings are available. Most Concerto systems will run under Standard Control. Standalone and Native Protocol settings are used when the Concerto system is directly controlled by an automation system or other external control point.
Note Native Protocol cannot be used with Concerto Port Routers to perform bi-directional Takes.
16 CONCERTO — Release Notes
Concerto Web Pages
If Standalone is selected, additional settings become available on the Local Control web page.
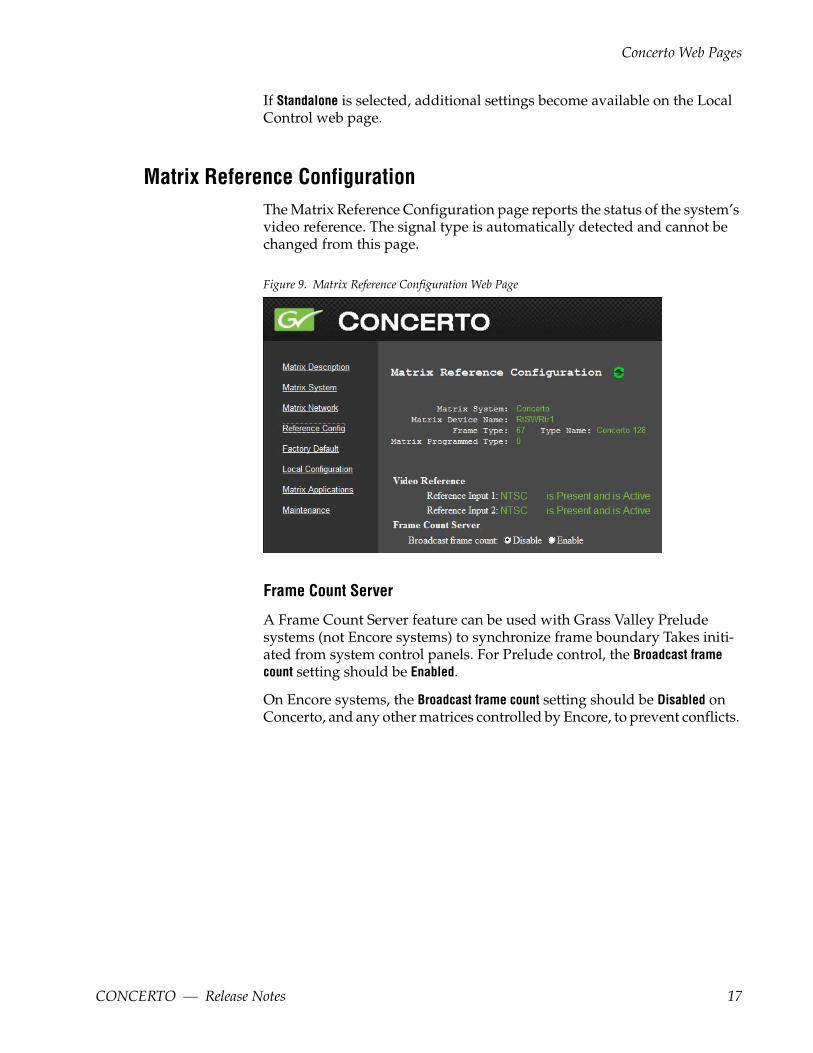
Matrix Reference ConfigurationThe Matrix Reference Configuration page reports the status of the system’s video reference. The signal type is automatically detected and cannot be changed from this page.
Figure 9. Matrix Reference Configuration Web Page
Frame Count Server
A Frame Count Server feature can be used with Grass Valley Prelude systems (not Encore systems) to synchronize frame boundary Takes initi-ated from system control panels. For Prelude control, the Broadcast frame count setting should be Enabled.
On Encore systems, the Broadcast frame count setting should be Disabled on Concerto, and any other matrices controlled by Encore, to prevent conflicts.
CONCERTO — Release Notes 17
Version 1.8.1
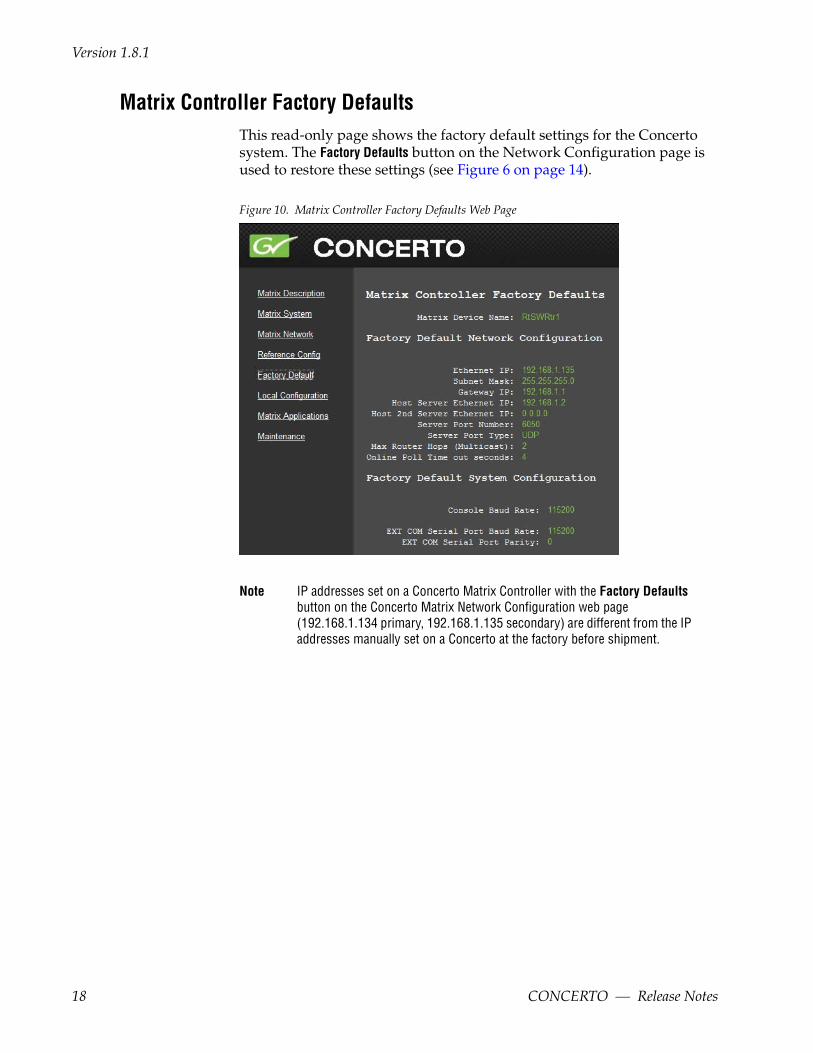
Matrix Controller Factory DefaultsThis read-only page shows the factory default settings for the Concerto system. The Factory Defaults button on the Network Configuration page is used to restore these settings (see Figure 6 on page 14).
Figure 10. Matrix Controller Factory Defaults Web Page
Note IP addresses set on a Concerto Matrix Controller with the Factory Defaults button on the Concerto Matrix Network Configuration web page (192.168.1.134 primary, 192.168.1.135 secondary) are different from the IP addresses manually set on a Concerto at the factory before shipment.
18 CONCERTO — Release Notes
Concerto Web Pages
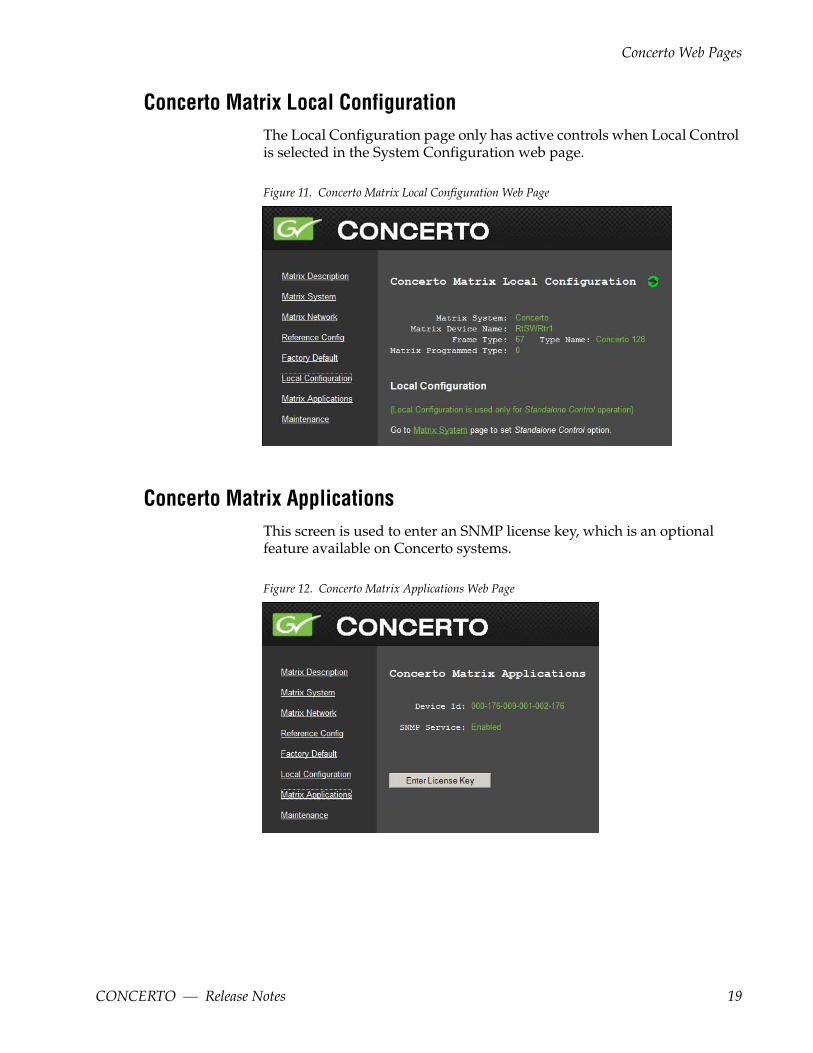
Concerto Matrix Local ConfigurationThe Local Configuration page only has active controls when Local Control is selected in the System Configuration web page.
Figure 11. Concerto Matrix Local Configuration Web Page
Concerto Matrix ApplicationsThis screen is used to enter an SNMP license key, which is an optional feature available on Concerto systems.
Figure 12. Concerto Matrix Applications Web Page
CONCERTO — Release Notes 19
Version 1.8.1
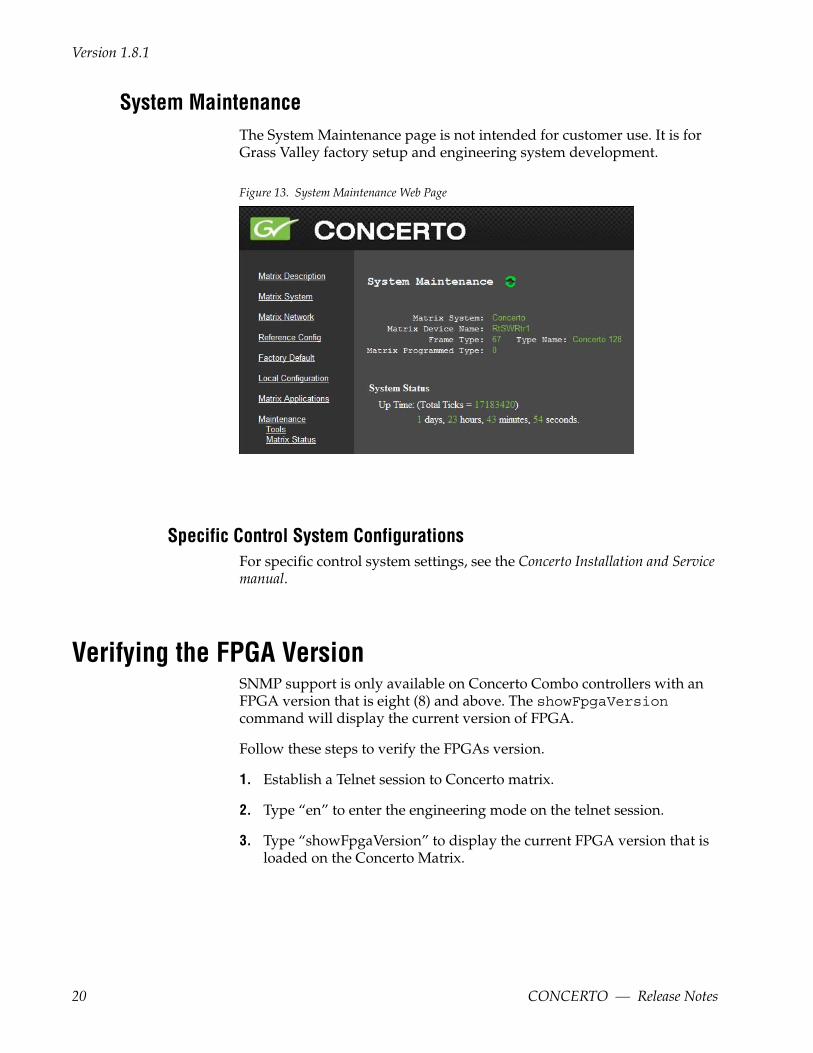
System MaintenanceThe System Maintenance page is not intended for customer use. It is for Grass Valley factory setup and engineering system development.
Figure 13. System Maintenance Web Page
Specific Control System ConfigurationsFor specific control system settings, see the Concerto Installation and Service manual.
Verifying the FPGA VersionSNMP support is only available on Concerto Combo controllers with an FPGA version that is eight (8) and above. The showFpgaVersion command will display the current version of FPGA.
Follow these steps to verify the FPGAs version.
1. Establish a Telnet session to Concerto matrix.
2. Type “en” to enter the engineering mode on the telnet session.
3. Type “showFpgaVersion” to display the current FPGA version that is loaded on the Concerto Matrix.
20 CONCERTO — Release Notes