Embed Size (px)
Citation preview

EN
Owner's Manual

SPECIAL MESSAGE SECTION
This product utilizes batteries or an external power sup-ply (adapter). DO NOT connect this product to any power supply or adapter other than one described in the manual, on the name plate, or specifically recom-mended by Yamaha.WARNING: Do not place this product in a position where anyone could walk on, trip over, or roll anything over power or connecting cords of any kind. The use of an extension cord is not recommended! If you must use an extension cord, the minimum wire size for a 25’ cord (or less) is 18 AWG. NOTE: The smaller the AWG num-ber, the larger the current handling capacity. For longer extension cords, consult a local electrician.
This product should be used only with the components supplied or; a cart, rack, or stand that is recommended by Yamaha. If a cart, etc., is used, please observe all safety markings and instructions that accompany the accessory product.
SPECIFICATIONS SUBJECT TO CHANGE: The information contained in this manual is believed to be correct at the time of printing. However, Yamaha reserves the right to change or modify any of the specifi-cations without notice or obligation to update existing units.
This product, either alone or in combination with an amplifier and headphones or speaker/s, may be capable of producing sound levels that could cause permanent hearing loss. DO NOT operate for long periods of time at a high volume level or at a level that is uncomfortable. If you experience any hearing loss or ringing in the ears, you should consult an audiologist. IMPORTANT: The louder the sound, the shorter the time period before damage occurs.
Some Yamaha products may have benches and / or accessory mounting fixtures that are either supplied with the product or as optional accessories. Some of these items are designed to be dealer assembled or installed. Please make sure that benches are stable and any optional fixtures (where applicable) are well secured BEFORE using.Benches supplied by Yamaha are designed for seating only. No other uses are recommended.
NOTICE: Service charges incurred due to a lack of knowledge relating to how a function or effect works (when the unit is operating as designed) are not covered by the manu-facturer’s warranty, and are therefore the owners responsibility. Please study this manual carefully and consult your dealer before requesting service.
ENVIRONMENTAL ISSUES: Yamaha strives to produce products that are both user safe and environmentally friendly. We sincerely believe that our products and the production methods used to produce them, meet these goals. In keeping with both the letter and the spirit of the law, we want you to be aware of the following:
Battery Notice: This product MAY contain a small non-rechargeable battery which (if applicable) is soldered in place. The average life span of this type of battery is approximately five years. When replacement becomes necessary, con-tact a qualified service representative to perform the replacement.
This product may also use “household” type batteries. Some of these may be rechargeable. Make sure that the battery being charged is a rechargeable type and that the charger is intended for the battery being charged.
When installing batteries, do not mix batteries with new, or with batteries of a different type. Batteries MUST be installed correctly. Mismatches or incorrect installation may result in overheating and battery case rupture.
Warning: Do not attempt to disassemble, or incinerate any bat-tery. Keep all batteries away from children. Dispose of used batteries promptly and as regulated by the laws in your area. Note: Check with any retailer of household type batteries in your area for battery disposal informa-tion.
Disposal Notice: Should this product become damaged beyond repair, or for some reason its useful life is considered to be at an end, please observe all local, state, and federal regula-tions that relate to the disposal of products that contain lead, batteries, plastics, etc. If your dealer is unable to assist you, please contact Yamaha directly.
NAME PLATE LOCATION: The name plate is located on the bottom of the product. The model number, serial number, power requirements, etc., are located on this plate. You should record the model number, serial number, and the date of purchase in the spaces provided below and retain this manual as a permanent record of your purchase.
Model
Serial No.
Purchase Date
PLEASE KEEP THIS MANUAL92-BP (bottom)

1. IMPORTANT NOTICE: DO NOT MODIFY does not guarantee that interference will not occur
FCC INFORMATION (U.S.A.)
THIS UNIT!This product, when installed as indicated in the instructions contained in this manual, meets FCC requirements. Modifications not expressly approved by Yamaha may void your authority, granted by the FCC, to use the product.
2. IMPORTANT: When connecting this product to accessories and/or another product use only high quality shielded cables. Cable/s supplied with this product MUST be used. Follow all installation instructions. Failure to follow instructions could void your FCC authorization to use this product in the USA.
3. NOTE: This product has been tested and found to comply with the requirements listed in FCC Regula-tions, Part 15 for Class “B” digital devices. Compli-ance with these requirements provides a reasonable level of assurance that your use of this product in a residential environment will not result in harmful interference with other electronic devices. This equipment generates/uses radio frequencies and, if not installed and used according to the instructions found in the users manual, may cause interference harmful to the operation of other elec-tronic devices. Compliance with FCC regulations
in all installations. If this product is found to be the source of interference, which can be determined by turning the unit “OFF” and “ON”, please try to elimi-nate the problem by using one of the following mea-sures:Relocate either this product or the device that is being affected by the interference. Utilize power outlets that are on different branch (circuit breaker or fuse) circuits or install AC line fil-ter/s.In the case of radio or TV interference, relocate/reorient the antenna. If the antenna lead-in is 300 ohm ribbon lead, change the lead-in to co-axial type cable.If these corrective measures do not produce satis-factory results, please contact the local retailer authorized to distribute this type of product. If you can not locate the appropriate retailer, please con-tact Yamaha Corporation of America, Electronic Service Division, 6600 Orangethorpe Ave, Buena Park, CA90620The above statements apply ONLY to those prod-ucts distributed by Yamaha Corporation of America or its subsidiaries.
* This applies only to products distributed by YAMAHA CORPORATION OF AMERICA. (class B)
OBSERVERA!Apparaten kopplas inte ur växelströmskällan (nätet) så länge som den ar ansluten till väg-guttaget, även om själva apparaten har stängts av.
ADVARSEL: Netspæendingen til dette apparat er IKKE afbrudt, sålæenge netledningen siddr i en stikkontakt, som er t endt — også selvom der or slukket på apparatets afbryder.
VAROITUS: Laitteen toisiopiiriin kytketty käyttökytkin ei irroita koko laitetta verkosta.
(standby)
COMPLIANCE INFORMATION STATEMENT(DECLARATION OF CONFORMITY PROCEDURE)
Responsible Party : Yamaha Corporation of AmericaAddress : 6600 Orangethorpe Ave., Buena Park, Calif. 90620
Telephone : 714-522-9011Type of Equipment : USB KEYBOARD STUDIO
Model Name : KX25 / KX49 / KX61 / KX8
This device complies with Part 15 of the FCC Rules.Operation is subject to the following two conditions:1) this device may not cause harmful interference, and2) this device must accept any interference received including interference
that may cause undesired operation.See user manual instructions if interference to radio reception is suspected.
* This applies only to products distributed by YAMAHA CORPORATION OF AMERICA.
(FCC DoC)

4
(3)-11
PRECAUTIONSPLEASE READ CAREFULLY BEFORE PROCEEDING
* Please keep this manual in a safe place for future reference.
WARNINGAlways follow the basic precautions listed below to avoid the possibility of serious injury or even death from electrical shock, short-circuiting, damages, fire or other hazards. These precautions include, but are not limited to, the following:
• Only use the voltage specified as correct for the instrument. The required voltage is printed on the name plate of the instrument.
• Use the specified adaptor (PA-3C, PA-130 or an equivalent recommended by Yamaha) only. Using the wrong adaptor can result in damage to the instrument or overheating.
• Check the electric plug periodically and remove any dirt or dust which may have accumulated on it.
• Do not place the AC adaptor cord near heat sources such as heaters or radiators, and do not excessively bend or otherwise damage the cord, place heavy objects on it, or place it in a position where anyone could walk on, trip over, or roll anything over it.
• Do not open the instrument or attempt to disassemble the internal parts or modify them in any way. The instrument contains no user-serviceable parts. If it should appear to be malfunctioning, discontinue use immediately and have it inspected by qualified Yamaha service personnel.
• Do not expose the instrument to rain, use it near water or in damp or wet conditions, or place containers on it containing liquids which might spill into any openings. If any liquid such as water seeps into the instrument, turn off the power immediately and unplug the power cord from the AC outlet. Then have the instrument inspected by qualified Yamaha service personnel.
• Never insert or remove an electric plug with wet hands.
• Do not put burning items, such as candles, on the unit. A burning item may fall over and cause a fire.
• If the AC adaptor cord, plug or USB cable becomes frayed or damaged, or if there is a sudden loss of sound during use of the instrument, or if any unusual smells or smoke should appear to be caused by it, immediately turn off the power switch, disconnect the adaptor plug from the outlet, disconnect the USB cable and have the instrument inspected by qualified Yamaha service personnel.
CAUTIONAlways follow the basic precautions listed below to avoid the possibility of physical injury to you or others, or damage to the instrument or other property. These precautions include, but are not limited to, the following:
• When removing the electric plug from the instrument or an outlet, always hold the plug itself and not the cord.
• Unplug the AC power adaptor when not using the instrument, or during electrical storms.
• Do not connect the instrument to an electrical outlet using a multiple-connector. Doing so can result in lower sound quality, or possibly cause overheating in the outlet.
• Do not expose the instrument to excessive dust or vibrations, or extreme cold or heat (such as in direct sunlight, near a heater, or in a car during the day) to prevent the possibility of panel disfiguration or damage to the internal components.
• Do not use the instrument in the vicinity of a TV, radio, stereo equipment, mobile phone, or other electric devices. Otherwise, the instrument, TV, or radio may generate noise.
• Do not place the instrument in an unstable position where it might accidentally fall over.
• Before moving the instrument, remove all connected adaptor and other cables.
Power supply/AC power adaptor
Do not open
Water warning
Fire warning
If you notice any abnormality
Power supply/AC power adaptor Location
Owner’s Manual

(3)-11
• When setting up the product, make sure that the AC outlet you are using is easily accessible. If some trouble or malfunction occurs, immediately turn off the power switch and disconnect the plug from the outlet. Even when the power switch is turned off, electricity is still flowing to the product at the minimum level. When you are not using the product for a long time, make sure to unplug the power cord from the wall AC outlet.
• Before connecting the instrument to other electronic components, turn off the power for all components. Before turning the power on or off for all components, set all volume levels to minimum. Also, be sure to set the volumes of all components at their minimum levels and gradually raise the volume controls while playing the instrument to set the desired listening level.
• When cleaning the instrument, use a soft, dry cloth. Do not use paint thinners, solvents, cleaning fluids, or chemical-impregnated wiping cloths.
• Do not insert a finger or hand in any gaps on the instrument.
• Never insert or drop paper, metallic, or other objects into the gaps on the panel or keyboard. If this happens, turn off the power immediately and unplug the power cord from the AC outlet. Then have the instrument inspected by qualified Yamaha service personnel.
• Do not place vinyl, plastic or rubber objects on the instrument, since this might discolor the panel or keyboard.
• Do not rest your weight on, or place heavy objects on the instrument, and do not use excessive force on the buttons, switches or connectors.
• Do not use the instrument/device or headphones for a long period of time at a high or uncomfortable volume level, since this can cause permanent hearing loss. If you experience any hearing loss or ringing in the ears, consult a physician.
Saving and backing up the created Control Template• The Control Template created by using a computer or via the panel
operation of the KX will be stored on internal memory of the KX. Stored data may be lost due to malfunction or incorrect operation. Save important data to a computer by using the special KX Editor software (page 6).
Always turn the power off when the instrument is not in use.
Even when the power switch is in the “STANDBY” position, electricity is still flowing to the instrument at the minimum level. When you are not using the instrument for a long time, make sure you unplug the AC power adaptor from the wall AC outlet.
SPECIAL NOTICES• The contents of this Owner’s Manual and the copyrights thereof are under exclusive ownership by Yamaha Corporation.• The screen displays as illustrated in this manual are for instructional purposes, and may appear somewhat different from the screens which appear on your
computer. • This product incorporates and bundles computer programs and contents in which Yamaha owns copyrights or with respect to which it has license to use
others’ copyrights. Such copyrighted materials include, without limitation, all computer software, style files, MIDI files, WAVE data, musical scores and sound recordings. Any unauthorized use of such programs and contents outside of personal use is not permitted under relevant laws. Any violation of copyright has legal consequences. DON’T MAKE, DISTRIBUTE OR USE ILLEGAL COPIES.
• Copying of the commercially available musical data including but not limited to MIDI data and/or audio data is strictly prohibited except for your personal use.
• Steinberg and Cubase are the registered trademarks of Steinberg Media Technologies GmbH.• Windows is a registered trademark of Microsoft® Corporation in the United States and other countries.• Apple, Mac and Macintosh are trademarks of Apple Inc., registered in the U.S. and other countries.
The company names and product names in this manual are the trademarks or registered trademarks of their respective companies.
Connections
Maintenance
Handling caution
Saving data
Yamaha cannot be held responsible for damage caused by improper use or modifications to the instrument, or data that is lost or destroyed.
About the latest Firmware VersionYamaha may from time to time update firmware of the KX without notice for improvement. Likewise, the DAW software used together with the KX may be updated from time to time. As a result, the link functions between the KX and the DAW software may not work properly depending on the firmware version of the KX and the software version of the DAW. If such a situation occurs, refer to the website below to find the latest information.http://www.yamahasynth.com/Note that the explanations in this Owner’s Manual apply to the version of firmware when this Owner’s Manual was produced. For details about the additional functions due to later releases, refer to the above website.
Owner’s Manual 5
Introduction
6
Thank you for purchasing the Yamaha KX25 / KX49 / KX61 / KX8 USB KEYBOARD STUDIO.Included in the package are the KX MIDI keyboard for controlling a computer via USB as well as the DAW application software, Cubase AI4. Simply connect the KX to a computer via USB, and you’ve got a comprehensive control center and seamless environment for complete music production.In order to take full advantage of the KX’s superior functionality and enjoy years of trouble-free use, please read this manual before you begin using the product. Also, keep this book in a safe place for future reference.
Link with CubaseThe KX keyboard is equipped with link functions specifically designed for Cubase software (Cubase 4, Studio 4, Essential 4 and AI4), providing tremendous efficiency and speed in your workflow.
Track operations on VST plug-in instruments (VSTi)The KX has no built-in tone generator; it is a keyboard controller designed to play the sounds of VST plug-in instruments (VSTi) on your connected computer. The KX lets you conveniently perform certain VSTi operations in your DAW directly from the KX panel, including creating tracks and selecting programs (instrument voices).
Four knobs for real-time control of various parametersThese versatile knobs give you real-time control over parameters in your VSTi software. Simply select the Control Template for the VSTi you wish to control (30 pre-programmed templates are built in), and you can use the four knobs to control the sound of your VSTi remotely. Many popular VSTi are covered by the templates; however, you can also create/customize your own to use with your favorite VSTi.
Powerful Arpeggio featureThe KX also has a built-in Arpeggio feature that lets you easily play various rhythmic patterns and ‘sequenced’ phrases, depending on the notes you press. These include a wide variety of vintage analog synthesizer-like arpeggios, guitar/bass riffs, and drum/percussion rhythm patterns—all of which can be triggered instantly and held automatically to provide dynamic, realistic backing for your performance.
USB bus-poweredThe KX can be powered by the USB connection to your computer. This means you can simply connect the KX to a USB terminal on your computer, get full power, and not have to worry about setting up an AC adaptor.
• AC power adaptor (PA-3C, PA-130, or equivalent)*• Owner’s Manual (this book)• USB cable• Cubase AI4 DVD-ROM• TOOLS for KX DVD-ROM
* May not be included depending on your particular area. Please check with your Yamaha dealer.
Introduction
Features
Included Accessories
KX EditorKX Editor is a special software that gives you convenient editing tools for the KX and its settings. You can download this software from the following Yamaha website.http://www.yamahasynth.com/
Owner’s Manual

About the Included Software
Special Notices about the Accessory Disks
CAUTION• This disk containing the software is not meant for use with an audio/visual system (CD player, DVD player, etc.). Do
not attempt to use the disk on equipment other than a computer.
Special Notice• The copyrights of the USB-MIDI Driver and Extensions for Steinberg DAW (contained in the TOOLS for KX DVD-ROM) are under
exclusive ownership by Yamaha Corporation. • The software included in the Cubase AI4 DVD-ROM and the copyrights thereof are under exclusive ownership by Steinberg Media
Technologies GmbH. Note that Yamaha does not offer technical support for Cubase AI4 in the DVD-ROM.• The VSTi tools included in the “VSTis” folder of the TOOLS for KX DVD-ROM and the copyrights thereof are under exclusive
ownership by the respective companies. Note that Yamaha does not offer technical support for the DAW software in the DVD-ROM.• Use of the software and this manual is governed by the license agreement which the purchaser fully agrees to upon breaking the
seal of the software packaging. (Please read carefully the Software Licensing Agreement at the end of this manual before installing the application.)
• Copying of the software in whole or in part by any means is expressly forbidden without the written consent of the manufacturer.• Yamaha makes no representations or warranties with regard to the use of the software and cannot be held responsible for the
results of the use of the software. • Future upgrades of application and system software and any changes in specifications and functions will be announced separately
on Yamaha site.
System Requirements for Software
The system requirements below are necessary for installing and using the software contained in the accessory disk (Cubase AI4 and TOOLS for KX).
Windows Macintosh
Important• A DVD drive is required for installation.• To activate your software license, install Cubase AI4 while the computer is connected to the Internet.
About the Included Software
About support for CubaseSupport for Cubase in the accessory disk is provided by Steinberg on its website at the following address.
http://www.steinberg.netYou can visit the Steinberg site also via the Help menu of Cubase. (The Help menu also includes the PDF manual and other information on the software.)
NOTE To view PDF files on Windows, you must install Adobe Reader on your computer. If you do not have Adobe Reader, you can download the application from the Adobe website at the following URL:http://www.adobe.com
OS: Windows XP Professional/XP Home Edition/Vista 32-bit version
Computer: Intel Pentium 1.4 GHz or higherMemory: 512MBDisplay Resolution: 1280 x 800 pixelsInterface: Equipped with the USB connectorHard Disk: Free disk space of 1GB or more; high-speed
hard disk
OS: Mac OSX 10.4.x or 10.5.xComputer: Power Mac G4 1GHz or Core Solo 1.5GHz or
higherMemory: 512MBDisplay Resolution: 1280 x 800 pixelsInterface: Equipped with the USB connectorHard Disk: Free disk space of 1GB or more; high-speed
hard disk
NOTE · Regarding the USB-MIDI Driver contained in the TOOLS for KX DVD-ROM, you can download the latest version from the following URL. Information on system requirements is also available at the following URL.
http://www.global.yamaha.com/download/usb_midi/· Regarding the Extensions for Steinberg DAW contained in the TOOLS for KX DVD-ROM, you can download the latest
version from the following URL. Information on system requirements is also available at the following URL.http://www.yamahasynth.com/
· For details on system requirements of Cubase AI4, refer to the following URL:http://www.yamahasynth.com/
· For details on system requirements of the DAW software other than Cubase AI4, refer to the corresponding manual or the web site.
· For details on system requirements of the VSTi software synthesizers (contained in the TOOLS for KX DVD-ROM), refer to the corresponding manual in the folder on which the VSTi resides.
Owner’s Manual 7

Owner’s Manual
8
Introduction ...........................................6
Features.................................................6
Included Accessories ............................6
About the Included Software ................7
Special Notices about the Accessory Disks .............7
System Requirements for Software .........................7Windows.............................................................7Macintosh...........................................................7
Turning the Power On and Off...............9
Power Supply ...........................................................9Connecting the AC power adaptor .....................9Using the KX as a USB bus-powered device.....9
Turning the Power On and Off .................................9
Front and Rear Panels .........................10
What You Can Do With the KX.............12
Keyboard Performance ..........................................12
Transport/Track Operations on the DAW Software
....12
Window Operations on the VSTi ............................12
Real-time Parameter Control .................................12
Phrase/Rhythm Performance with Arpeggio Feature...................................................................12
Setting Up ............................................13
Installation Using the Cubase AI4 DVD-ROM........13For Windows: ...................................................13For Macintosh: .................................................13
Installation Using the TOOLS for KX DVD-ROM ...13For Windows: ...................................................14For Macintosh: .................................................15
Connection .............................................................16
Using the KX with Cubase...................17
Setting up on the KX ..............................................17
Setting up on Cubase.............................................17MIDI ports on the KX........................................18
Setting up the VSTi ................................................19Creating a track for the VSTi............................19Opening the VSTi window and selecting an instrument ........................................................19
Playing the Keyboard .............................................20
Playing an Arpeggio ...............................................20Trigger the Arpeggio with one finger ................20Holding Arpeggio playback ..............................21Trying out other notes on the keyboard ...........21
Using the CUBASE FUNCTION Buttons ...............23Default functions ..............................................23Assigning different functions to the buttons .....23
Controlling the VSTi by Using the CONTROL Knobs .................................................................... 24
Controlling the Transport and Tracks .................... 25
Basic Operation on the KX ..................26
Display Indications................................................. 26Top display ...................................................... 26Arpeggio Edit display ....................................... 26Control Template display ................................. 26Utility display.................................................... 26
Changing the Octave Range ................................. 27
Selecting the Velocity Curve.................................. 27
Control Templates ...............................28
Selecting a Control Template ................................ 28
Editing a Control Template .................................... 29Changing the message type generated by using the CONTROL knobs ...................................... 29Changing the Control Change number generated by using the CONTROL knob .......................... 30
Arpeggio...............................................31
Selecting an Arpeggio Type .................................. 31Using MIDI Clock to control Arpeggio tempo... 32
Editing an Arpeggio ............................................... 33
Arpeggio Parameters............................................. 33
Using the KX with a DAW Other than Cubase .................................................34
When using Digital Performer (Macintosh): ..... 35
Utility Settings.....................................36
Basic Operation ..................................................... 36
Utility Parameters .................................................. 36
Restoring the Factory-programmed System Settings (Factory Set) .......................................................... 37
Setting the MIDI Thru Parameter........................... 38
Troubleshooting...................................39
Message List ........................................40
TOOLS for KX LICENSE AGREEMENT ..41
Cubase AI4 LICENSE AGREEMENT......42
Appendix ..............................................44
Specifications ........................................................ 44
Control Template List ............................................ 45
Arpeggio Type List................................................. 46
MIDI Implementation Chart .................50
Index ....................................................52
Table of Contents

Turning the Power On and Off
Power Supply
The KX can be powered from one of the following two sources.• Power supply from the AC power adaptor• Power supply from the connected host computer
(USB bus-power)
Connecting the AC power adaptor1. Make sure that the STANDBY/ON switch of
the KX is in the STANDBY position.
2. Connect the plug of the power adaptor to the DC IN connector on the rear panel.
3. Plug the power adaptor into a standard household power outlet.
WARNING• Use only the included power adaptor (PA-3C or PA-
130) or an equivalent recommended by Yamaha). Use of a different adaptor may result in equipment damage, overheating, or fire. Doing so will also immediately void the product warranty, even if the effective warranty period has not expired.
CAUTION• Wrap the DC output cable of the adaptor around the
cable clip (as shown below) to prevent accidental unplugging of the cable during operation. Avoid tightening the cord more than necessary or pulling on the cord strongly while it is wrapped around the cable clip to prevent wear on the cord or possible breakage of the clip.
Using the KX as a USB bus-powered deviceThe KX is a bus-powered type device which can be powered by the host computer connected via a USB cable. In this case, the AC power adaptor is not necessary.
1. Make sure that the STANDBY/ON switch of the KX is in the STANDBY position.
2. Connect a computer to the USB TO HOST connector of the KX by using a USB cable.
Turning the Power On and Off
1. Turn the power ON by pressing the [STANDBY/ON] switch to set it to the ON position.
2. Turn the power off by pressing the [STANDBY/ON] switch again to set it to the STANDBY position.
CAUTION• Note that a small amount of current continues to flow
while the switch is in the STANDBY position. If you do not plan to use the KX again for a long while, be sure to unplug the adaptor from the wall outlet and unplug the USB cable from the KX.
Turning the Power On and Off
KX61 KX8DC IN
NOTE · While the KX is turned ON, the Macintosh computer connected to the KX via USB cannot enter the power-saving mode (such as sleep and suspended) even if you do not operate the computer for a long time. When connected in this condition, the KX continues to draw power from the computer, even if you are not using it. Particularly when the computer is under battery power, you should make sure to set the STANDBY/ON switch of the KX to STANDBY in order to save power and avoid draining the computer’s battery.
· The USB bus-power function can be used only when connecting the KX to a computer directly without using a hub or connecting the KX to a computer via a self-powered USB hub. This function cannot be used when connecting the KX to a computer via a bus-powered USB hub.
· The USB bus-power function will not work when using the AC adaptor.
Owner’s Manual 9

Front and Rear Panels
10
1 CONTROL knobs .............................Page 24Use these knobs to adjust the parameter values of the VSTi in your computer.
2 Knob Functions Select button .......Page 24Use this button to select one of the two functions assigned to each knob.
3 VELOCITY CURVE [DEC] and [INC] buttons .............................................Page 27Use these buttons to select one of the velocity curves of the keyboard.
4 OCTAVE buttons .............................Page 27Use these buttons to change the note range of the keyboard by octave.
5 [EXIT] button....................................Page 26Press this button to return to the original display.
6 [UTILITY] button ..............................Page 36Press this button to call up the display for setting the system related parameters.
7 [ARP EDIT] button ...........................Page 31Press this button to call up the display for selecting the Arpeggio type and setting the related parameters.
8 [CONTROL TEMPLATE] button......Page 28Use this button to select a template assigned to CONTROL knobs.
9 [ARP ON/OFF] button .....................Page 20Press this button to enable or disable Arpeggio playback. Turning on the button lights up the LED lamp.
) [HOLD] button .................................Page 21This button turns the Arpeggio Hold function on and off.
! TEMPO LED ....................................Page 32This LED lamp flashes in time with the tempo of the Arpeggio.
@ Display .............................................Page 26Shows the related information according to your panel operations.
# SELECT buttons..............................Page 26Use these buttons to select the parameter to be edited.
$ DATA [DEC] and [INC] buttons..................................................Pages 17, 31Use each of these buttons to increase or decrease the value of the selected parameter.
% [VSTi WINDOW] button...................Page 19Press this button to switch between displaying and hiding the VSTi window in Cubase.
^ [ADD INSTRUMENT TRACK] button..........................................................Page 19Press this button to create a VSTi track in Cubase.
Front and Rear Panels
1
2 9 )
7 8
5 6 !
@
3 4 # $
¢ ∞
Owner’s Manual

Front and Rear Panels
& CUBASE FUNCTION [A] and [B] buttons..........................................................Page 23These buttons let you control certain assignable functions within Cubase.
* PROGRAM [DEC] and [INC] buttons..........................................................Page 19Use these buttons to select the particular instrument of the VSTi assigned to the selected track.
( Cursor buttons ................................Page 25These buttons function the same as the cursor keys on your computer.
º [ESC] button ....................................Page 25This button functions the same as the ESC key on your computer.
¡ [ENTER] button................................Page 25This button functions the same as the ENTER key on your computer.
™ Track Control buttons.....................Page 25These buttons let you control the Mute and Solo functions on the selected track within Cubase.
£ Transport Control buttons..............Page 25These buttons let you control transport functions, including record and play, within Cubase.
¢ Pitch Bend wheel ....................Pages 12, 17Controls the pitch bend effect, making continuous pitch change.
∞ Modulation wheel....................Pages 12, 17Controls the modulation effect.
§ [STANDBY/ON] switch......................Page 9Press this switch to turn the power on or off (STANDBY).
¶ DC IN connector................................Page 9Connect an AC adaptor to this jack.
• MIDI IN connector ...........................Page 16This connector is used to receive MIDI messages transmitted from an external MIDI device.
ª MIDI OUT connector .......................Page 16This connector is used to transmit MIDI messages to an external MIDI device.
‚ SUSTAIN jack ..................................Page 16Connect an optional footswitch (such as Yamaha FC4 and FC5) to this jack.
⁄ USB TO HOST connector ...............Page 16This connector is used to connect the keyboard and the computer by using a USB cable. Since the KX is bus-powered, the power can be supplied from the computer to the KX via this connector.
º ¡
™
£
*
&
% ^
(
§ ¶ • ª ‚ ⁄
Owner’s Manual 11

What You Can Do With the KX
12
The KX is, of course, a MIDI keyboard—however, it also provides a wealth of other convenient and powerful features for use with your computer and DAW software. Here’s a short introduction to what you can do with your KX.
Keyboard Performance
Play the keyboard and use the various controllers (including the Pitch Bend and Modulation wheels) to play/change the sounds of the VSTi on the computer (via USB) or a connected MIDI tone generator (via MIDI).
Transport/Track Operations on the DAW Software
Use the KX to control transport functions (such as Play, Record and Stop), as well as mute and solo selected tracks within Cubase.
Window Operations on the VSTi
When using Cubase, you can instantly open or close the VSTi related window and create a track for the VSTi from the KX.
Real-time Parameter Control
Use the CONTROL knobs on the KX to control various sound-shaping parameters on the VSTi or a connected tone generator.
Phrase/Rhythm Performance with Arpeggio Feature
This powerful feature lets you easily play various rhythmic patterns and ‘sequenced’ phrases. These include a wide variety of vintage analog synthesizer-like arpeggios, guitar/bass riffs, and drum/percussion rhythm patterns—all of which can be triggered instantly and held automatically to provide dynamic, realistic backing for your performance.
What You Can Do With the KX
NOTE Track operations such as Mute and Solo are available only for Cubase.
KX
Keyboard
MIDI Select = MIDI
MIDI tone generator
VSTi
MIDI Select = USB
DAW software
KXRec/Play/
Stop
DAW software
Mute/Solo
KXButton
operation
Opening/Closing the VSTi window
Creating a Track
KX
VSTiCubase
KXArpeggio
Playback data
DAW software
VSTi
Owner’s Manual

Setting Up
Installation Using the Cubase AI4 DVD-ROM
Important!Since the End-User Software License Agreement (EUSLA) shown on your computer display when you install the “DAW” software is replaced by the agreement on page 42, you should disregard the EUSLA. Read the Cubase AI4 License Agreement on page 42 carefully, and install the software if you agree to it.
For Windows:1. Start the computer and log on to the
Administrator account.
2. Insert the Cubase AI4 DVD-ROM into the DVD-ROM drive.
3. Open the DVD-ROM, then double-click the file “CubaseAI4.msi.”Follow the on-screen instructions to install Cubase AI4.
For Macintosh:1. Start the computer and log on to the
Administrator account.
2. Insert the Cubase AI4 DVD-ROM into the DVD-ROM drive.
3. Open the DVD-ROM, then double-click the file “CubaseAI4.mpkg.”Follow the on-screen instructions to install Cubase AI4.
Installation Using the TOOLS for KX DVD-ROM
The TOOLS for KX DVD-ROM includes the following application software tools.■ Installer of Extensions for Steinberg DAW■ USB-MIDI driver■ VSTi installers developed by other companiesIn particular, you should install Extensions for Steinberg DAW to ensure optimum control over Cubase. You should also install the USB-MIDI Driver to enable proper communication between the KX and your computer. Other VSTi software can be installed as desired.
By installing Extensions for Steinberg DAW, the following functions are available when using the KX and Cubase on your computer.■ Cubase can recognize the KX as a remote controller when connecting the KX to the computer.■ Performing panel operations on the KX (such as with the knobs and buttons) automatically edits the relevant
parameters on the VSTi software.■ Changing the VSTi on the computer will select the appropriate Control Template (page 28) on the KX
automatically.
Setting Up
NOTE If you have already installed Cubase, the instructions below are not necessary. Jump to the next section “Installation using the TOOLS for KX DVD-ROM.”
NOTE · In order to have continuous use of Cubase AI 4, including support and other benefits, you will need to register the software and activate your software license by starting it while the computer is connected to the Internet. Click the “Register Now” button shown when the software is started, then fill in all required fields for registration. If you do not register the software, you will be unable to use it after a limited period of time expires.
· If you are using Cubase 4, Cubase Studio 4 or Cubase Essential 4, install either application before you install Extensions for Steinberg DAW.
NOTE · If you want to install VSTi software developed by other companies, follow the Installation Guide for each VSTi located in the “VSTis” folder.
· For information on how to uninstall each software, refer to the Installation Guide located in the respective folder of each software.
Owner’s Manual 13

Setting Up
14
For Windows:
1. Make sure that the power to the KX is turned off.
2. Disconnect all MIDI cables that connect MIDI devices to MIDI IN/OUT connectors on the KX.
3. Start the computer and log on to the Administrator account.
4. Insert the TOOLS for KX DVD-ROM into the DVD-ROM drive.
5. Open the “Extensions for Steinberg DAW” folder in the DVD-ROM, then double-click the file “setup.exe”The first display for installing Extensions for Steinberg DAW appears.
6. Click [Next] to call up the InstallShield Wizard for Yamaha Extensions for Steinberg DAW.
7. Click [Next] to start the installation.To cancel the installation procedure, click [Cancel].
8. When the installation is complete, a message indicating so appears. Click [Finish].
9. After disconnecting all other USB devices from the computer, connect the KX directly to the computer (without using a hub) by using a USB cable.
10. Turn the power on of the KX by pressing the [STANDBY/ON] switch.The KX will be recognized by the connected computer.
11. Install the USB-MIDI driver.
The installation is now complete.
Important!Make sure to use the same USB connector as the one used in the installation procedure when you connect the KX and the Windows computer again. If you connect the USB cable to a different connector, you will have to install the USB-MIDI driver again.
NOTE Make sure to install Cubase before installing Extensions for Steinberg DAW described in step 5 below.
NOTE · If the same version of Extensions for Steinberg DAW has already been installed in your computer, a window appears indicating completion. In this case, click [Finish].
· If a newer version of Extensions for Steinberg DAW has already been installed in your computer, a dialog box appears indicating that the newer software has already been installed. In this case, you do not need to install the software. Click [OK] in the dialog box.
· If an older version of Extensions for Steinberg DAW has been installed in your computer, the software should be updated. (The procedure is the same as for installing it from scratch.)
NOTE During the installation procedure, you can select the type of Extensions for Steinberg DAW by selecting “Custom” in the Setup Type dialog.
NOTE Installation of the USB MIDI driver is described in “installationguide_en.pdf” stored in the “USB-MIDI_Driver” folder.
USB connector USB cable
KX rear panel
Owner’s Manual

Setting Up
For Macintosh:
1. Make sure that the power to the KX is turned off.
2. Disconnect all MIDI cables that connect MIDI devices to MIDI IN/OUT connectors on the KX.
3. Start the computer and log on to the Administrator account.
4. Insert the TOOLS for KX DVD-ROM into the DVD-ROM drive.
5. Open the “Extensions for Steinberg DAW” folder in the DVD-ROM, then double-click the file “Yamaha Extensions for Steinberg DAW.mpkg.”This calls up the InstallShield Wizard for Yamaha Extensions for Steinberg DAW.
6. Click [Continue].
7. Execute the installation by following the on-screen directions.
8. When the installation is complete, a message indicating so appears. Click [Close].
9. Install the USB-MIDI driver.
10. After disconnecting all other USB devices from the computer, connect the KX directly to the computer (without using a hub) by using a USB cable.
11. Turn the power on of the KX by pressing the [STANDBY/ON] switch.The KX will be recognized by the connected Macintosh computer.
The installation is now complete.
NOTE Make sure to install Cubase before installing Extensions for Steinberg DAW described in step 5 below.
NOTE · If a dialog box appears asking if you want to install the software, click [Continue].
· If Extensions for Steinberg DAW has been installed, it will be overwritten by the new installed version.
NOTE · You can select only the startup disk as installation destination.
· During the installation procedure, you can select the type of Extensions for Steinberg DAW by selecting “Customize” in the “Installation Type” dialog.
NOTE · Installation of the USB MIDI driver is described in “installationguide_en.pdf” stored in the “USB-MIDI_Driver” folder.
· The “Keyboard Setup Assistant” window appears when connecting the KX to a computer via USB. In this case, click the red circle at the top left corner to close this window.
Precautions when using the USB TO HOST connectorWhen connecting the computer to the USB TO HOST connector, make sure to observe the following points. Failing to do so risks freezing the computer and corrupting or even losing the data. If the computer or the instrument freezes, restart the application software or the computer OS, or turn the power to the instrument off then on again.
CAUTION• Use an AB type USB cable of less than about 3
meters. • Before connecting the computer to the USB TO
HOST connector, exit from any power-saving mode (such as suspended, sleep, standby) of the computer.
• Before turning on the power to the instrument, connect the computer to the USB TO HOST connector.
• Execute the following before turning the power to the instrument on/off or plugging/unplugging the USB cable to/from the USB TO HOST connector.- Quit any open applications. - Make sure that data is not being transmitted
from the instrument. (Data is transmitted only by playing notes on the keyboard or playing back an Arpeggio.)
• While a USB device is connected to the instrument, you should wait for six seconds or more between these operations: (1) when turning the power of the instrument off then on again, or (2) when alternately connecting/disconnecting the USB cable.
USB connector
USB cable
KX rear panel
Owner’s Manual 15

Setting Up
16
Connection
If you’ve followed the instructions on pages 13–15, you’ve connected your KX and computer as shown below. (Additional devices shown below have been included to cover other possible setups.) Keep in mind that all further instructions in this manual assume the connection has been made properly. Also remember that you’ll need a set of headphones or a speaker system to hear the sounds from your computer.
NOTE As necessary, connect the MIDI devices such as synthesizer, tone generator and sequencer to the KX.
NOTE · Once all software and drivers have been properly installed (pages 13–15), and with the initial default settings (MIDI Select = USB, on page 37; MIDI Thru = MIDI → USB, on page 38), the KX can control the DAW software on your computer via a USB cable. This allows you to play the voices of plug-in instruments (including VSTi) on your computer from the keyboard of the KX. Also, MIDI messages generated on a connected MIDI device (such as the synthesizer shown above) can be transmitted through the KX to the computer. This allows you to play back songs on a MIDI device and have the voices of your plug-in software sound.
· When the MIDI Select parameter (page 37) is set to “MIDI,” the USB connector will be inactive. This means that MIDI communication is only possible via the MIDI connectors (and not via USB). In the example illustration above, this setting lets you play the sound of the tone generator from the KX keyboard.
FootswitchWhile holding an optional footswitch (Yamaha FC4 or FC5) connected to the SUSTAIN jack, the note you pressed then released works as if you held it. For organ sounds that have no natural decay, holding down the footswitch will maintain the sound at the same level even if you release the note. For piano sounds that have a natural decay, holding down the footswitch will decay the sound naturally even if you release the note. For the Arpeggio function (page 31), holding down the footswitch will maintain playback of the Arpeggio. Keep in mind that such operations are available only when devices (such as a connected MIDI tone generator or a VSTi on the connected computer) that can recognize Control Change #64 are active.
NOTE Be sure to connect or disconnect the footswitch to the SUSTAIN jack while the power of the KX is turned off. If you disconnect the footswitch while the power is turned on, the footswitch function becomes “stuck”—in other words, the sound will continue to sustain, or Arpeggio playback will continue indefinitely.
1
2
Computer
USB connector USB cableAudio interface
MIDI OUT connector
MIDI IN connector
Footswitch (optional)
Synthesizer, tone generator, sequencer, etc.
Headphone
KX rear panel
MID
I cab
le
MID
I cab
le
Owner’s Manual

Using the KX with Cubase
The KX features a special Link feature that allows you seamless control over various functions in Cubase and provides enormous efficiency and speed in your music production workflow. Make sure you’ve connected all devices and properly set up your system (as described on pages 13–16), then try using the KX with Cubase according to the instructions here.
Setting up on the KX
To use the Link function with Cubase, it is necessary to change the settings of the KX according to the DAW on your computer.
1. Turn the power ON by pressing the [STANDBY/ON] switch to set it to the ON position.The top display (page 26) appears.
2. Press the [UTILITY] button to call up the Utility display.
3. Use the SELECT buttons to call up “DAW Select.”In this state, you can select the DAW software controlled from the KX.
4. Use the DATA [DEC] and [INC] buttons to select the desired DAW software.
■ When using Cubase 4/Cubase Studio 4/Cubase Essential 4:
Select “Cubase4.”
■ When using Cubase AI4:Select “CubaseAI.”
5. Press the [EXIT] button to return to the original display.
Setting up on Cubase
The MIDI messages generated on the KX (by playing the keyboard, controlling the Pitch Bend Wheel and the Modulation Wheel, and so on) are transmitted via USB-MIDI Port 1 from the KX to Cubase. Keep in mind that MIDI data transmitted via the USB-MIDI Ports 2 and 3 are not related to music performance (including the instrument change). This means that any messages received over these ports may be recognized as instrument change and hence may result in unexpected sounds. To avoid this, you should remove the checkmark of “All MIDI Input” for USB-MIDI Port 2 and Port 3.
1. Start Cubase on your computer.
Important!Cubase cannot recognize the KX if you turn the power of the KX on after starting Cubase. Make sure to start Cubase after turning on the power of the KX.
2. Select “Device Setup” from the “Device” menu of Cubase.The Device dialog appears.
3. Click “MIDI Port Setup” in the Devices column.The MIDI ports of Cubase appear at right of the dialog.
Using the KX with Cubase
NOTE · The explanations here use screen examples taken from Windows. The instructions for using Macintosh are the same.
· For further details about the USB-MIDI Ports 1–3, refer to page 18.
Owner’s Manual 17

Using the KX with Cubase
18
4. Remove the checkmarks by clicking the check boxes of “All MIDI Inputs” corresponding to the KX MIDI Ports 2 and 3 respectively.“Yamaha KX-2” and “Yamaha KX-3” on Windows and “YAMAHA KX Port 2” and “YAMAHA KX Port 3” on Macintosh correspond to MIDI Port 2 and MIDI Port 3 respectively. MIDI Ports 2 and 3 of the KX handle the messages generated via the operations other than keyboard performance such as operations via the CONTROL knobs and operations on the KX Editor of the computer. Removing the checkmarks corresponding to these MIDI ports will avoid accidentally recording non-keyboard data to a track in Cubase.
5. Click [OK] to close the dialog.
NOTE The checkmark of “All MIDI Inputs” corresponding to the KX MIDI Port 2 should be removed since “Extensions for Steinberg DAW” is included normally in “TOOLS for KX.” Remove the checkmark of “All MIDI Inputs” corresponding to the KX MIDI Port 2 only if the checkmark is checked for some reasons.
This is an example screen when using Windows. The corresponding Macintosh indications are “YAMAHA KX Port 2” and “YAMAHA KX Port 3.”
Remove the checkmark.
Click “MIDI Port Setup.”
MIDI ports on the KXFor data transfer via a USB cable between the KX and the computer, you can use three MIDI ports by installing the USB-MIDI driver. Each of three MIDI ports can handle the different MIDI messages as described below.
MIDI Port 1: This port is indicated as “Yamaha KX-1” on Windows and “YAMAHA KX Port 1” on Macintosh. This port is used for data transfer of the musical performance such as keyboard performance (note on/off), Modulation wheel operation (Control Change) and Pitch Bend wheel operation.
MIDI Port 2:This port is indicated as “Yamaha KX-2” on Windows and “YAMAHA KX Port 2” on Macintosh. This port is used for data transfer generated by using the DAW REMOTE buttons (with the exception of the Cursor buttons, [ESC] button and [ENTER] button) and CONTROL knobs.
MIDI Port 3:This port is indicated as “Yamaha KX-3” on Windows and “YAMAHA KX Port 3” on Macintosh. This port is used for data transfer generated by operating the KX Editor on the computer.
NOTE · When the MIDI Select parameter is set to “MIDI” (page 37) and the USB TO HOST connector becomes inactive, the data communication described above cannot be performed.
· When using DAW software other than Cubase, perform the MIDI setup manually on the DAW software so that MIDI Port 1 can handle performance data (such as note on/off) and MIDI Port 2 can handle data generated by controlling the Transport function.
· When using DAW software other than Cubase, the MIDI messages generated by using the CONTROL knob will be transmitted via USB-MIDI Port 1. Also when using Cubase, the MIDI messages generated by using the CONTROL knob will be transmitted via USB-MIDI Port 1 only when the KnobOutSel parameter is set to “CC.”
· On Windows XP, “USB 0-1” (different from the above port name) may be shown as the port name. If this happens, select [Start] ➝ [Control Panel], double-click [Yamaha USB-MIDI Driver], enter the checkmark to the check box of “Use Device Name As Port Name (Valid after system restart.),” then restart the computer.
Owner’s Manual

Using the KX with Cubase
Setting up the VSTi
You can create a track for the VSTi and open/close the VSTi window from the KX panel operation remotely. Performing such operations (normally performed on Cubase) from the KX panel is a great convenience and significantly speeds up your workflow.
Creating a track for the VSTiThis lets you easily create a VSTi track remotely by using the KX panel controls.
1. On Cubase, open an already-created Project or open a new Project.
2. Press the [ADD INSTRUMENT TRACK] button of the KX.The [Add Instrument Track] dialog appears.
3. Move the focus to the desired VSTi by using the Cursor buttons on the KX, then press the [ENTER] button on the KX. In this case, select “HALionOne.”
4. Press the [ENTER] button on the KX again to close the [Add Instrument Track] dialog, then create a new Instrument Track. To create a new Instrument Track, you can click [OK] in the [Add Instrument Track] dialog.
Opening the VSTi window and selecting an instrumentWhen the Instrument Track or the MIDI track for which the destination is set to VSTi is selected on the Project window or the other window, you can open the VSTi window quickly at the touch of a button on the KX’s panel.
1. On the KX, use the Cursor buttons to select the track corresponding to the desired VSTi.
2. On the KX, press the [VSTi WINDOW] button to open the VSTi window.The VSTi window of the track selected in step 1 will appear.
3. On the KX, press the CUBASE FUNCTION [A] button twice to call up the window (Preset Browser) shown below.
4. On the KX, use the cursor button and CUBASE FUNCTION [B] button to select a category of instruments. Move the focus to “Drum&Perc” in the Category field then press the CUBASE FUNCTION [B] button to actually select “Drum&Perc.” Move the focus to the Sub Category by using the Cursor [ ] button, move the focus to “DrumSet GM” in the Sub Category field by using the Cursor [▲] and [▼] buttons, then press the CUBASE FUNCTION [B] button to actually select “DrumSet GM.”
5. On the KX, use the PROGRAM [DEC] or [INC] button to select the desired instrument. In this case, select “RockSt2” in the Search & Viewer.
NOTE For Cubase 4 / Cubase Studio 4 / Cubase Essential 4, pressing the [ADD INSTRUMENT TRACK] button while the [Add Instrument Track] dialog is shown will switch between calling up and hiding the “Browse Presets” section.
Instrument Select box
Owner’s Manual 19

Using the KX with Cubase
20
Playing the Keyboard
Try playing the keyboard on the KX to hear the sound of “RockSt2” selected in step 4 on the previous page. Depending on the pressed note, a different instrument’s sound will be played back, allowing you to play your own rhythm pattern in real time by pressing various notes rhythmically.
Playing an Arpeggio
The Arpeggio feature is a powerful tool for both real-time performance and recording. It lets you easily play (in many cases, with just a single finger) a wide variety of specially programmed rhythm patterns, riffs and phrases using the currently selected instrument on the computer.This section shows you how to play Arpeggios by using “RockSt2” selected in step 4 on the previous page. You can hear the rhythm pattern play back automatically.
Trigger the Arpeggio with one finger1. Press the [ARP ON/OFF] button (the lamp
lights).
2. Press a single note on the keyboard. The Arpeggio (rhythm pattern) starts just by playing a single note with one finger.
3. Release the note to stop the Arpeggio.
NOTE By pressing the [OCTAVE] button and playing in the same octave area as before, you can call up a completely different set of drum sounds. Try shifting the octave setting and call up your favorite drum instruments and percussion sounds. To reset the octave to the default status, press both [OCTAVE] buttons simultaneously. For details about the [OCTAVE] buttons, see page 27.
NOTE The Arpeggio plays back according to the internal tempo set in the Utility display (page 36) or the external tempo set on the DAW software depending on the current status. For details, see page 32.
On
Owner’s Manual

Using the KX with Cubase
Holding Arpeggio playback4. Press the [HOLD] button (the lamp lights).
5. Press a single note on the keyboard.The Arpeggio (rhythm pattern) starts just by playing a single note. While the [HOLD] lamp is turned on, Arpeggio playback will not stop even if you release the note meaning that you can perform another operation during playback.
6. Press the [HOLD] button again (the lamp goes out). To stop Arpeggio playback.
Trying out other notes on the keyboard7. Press the lowest C (leftmost note).
A rhythm pattern starts playing.
8. Next, press the G located a fifth above the C pressed in step 7.A different rhythm pattern starts.
9. Next, press the C located a fourth above the G pressed in step 8. A rhythm pattern different from the previous two patterns starts.
10. Next, press the G located a fifth above the C pressed in step 9. A rhythm pattern different from the previous three patterns starts.
11. Finally, press the C located a fourth above the G pressed in step 10 (the highest C of the KX25). The rhythm pattern same as that played in step 7 starts.
NOTE By pressing a footswitch connected to the SUSTAIN jack (page 16), the Arpeggio continues to play, even if you release the note. In this case, you can stop Arpeggio playback by releasing the footswitch.
On
Off
NOTE If you are using the KX8, press the lowest C key on the keyboard (the C a third above the lowest key).
Owner’s Manual 21

Using the KX with Cubase
22
In this way you can play different rhythms from the same Arpeggio type simply by playing just a few notes. In fact, you can create the rhythmic basis for a complete song by letting each rhythm repeat for several measures and changing patterns as desired. Each of the Arpeggio types in the Category “DrPc” (selected with the default initial setting) features four different rhythm patterns recorded respectively to four different tracks. Each of these patterns is assigned to a specific area of the keyboard. You can call up the desired pattern by pressing any note in a specific area, as shown below.
For these “DrPc” (Drum/Percussion) Arpeggio types, the keyboard of the KX is divided into four six-note groups, each group having a different rhythm pattern. The note ranges of these four groups are: C – F, F# – B, C – F, F# – B…and so on, repeating up the keyboard. Playing any note in the group will trigger the assigned Arpeggio/rhythm pattern.
On the KX61, for example, the rhythm patterns are assigned to note groups like this:
C1 – F1 : Track 1 rhythm patternF#1 – B1 : Track 2 rhythm patternC2 – F2 : Track 3 rhythm patternF#2 – B2 : Track 4 rhythm patternC3 – F3 : Track 1 rhythm pattern (…and so on up the keyboard.)
NOTE Each note on the keyboard has a note name like C3, D3, and E3 according to the octave. This octave setting can be shifted by using the [OCTAVE] buttons. For details, see page 27.
Owner’s Manual

Using the KX with Cubase
Using the CUBASE FUNCTION Buttons
Default functionsWhen using Cubase, the functions related to the operations of the Preset Browser are assigned to the CUBASE FUNCTION [A] and [B] buttons.
■ CUBASE FUNCTION [A]: Pressing this button calls up the Preset Browser. Pressing this button while the Preset Browser is shown switches between calling up and hiding the Filter section at left half of the Preset Browser.
■ CUBASE FUNCTION [B]: Pressing this button while the Preset Browser is shown enables or removes a selection of the item to which you have already moved the focus. Move the focus to the item which is not selected currently then press this button to actually select the item. To remove the selection of the item, move the focus to the item which is currently selected, then press this button.
■ CUBASE FUNCTION [A] + [B]: Pressing these two buttons simultaneously resets the Filter settings. In other words, selection of all the items in the Filter section will be removed.
You can assign the different functions from the above to the CUBASE FUNCTION [A] and [B] buttons as desired. For details, refer to the next section.
Assigning different functions to the buttonsThe buttons for controlling Cubase can be changed as desired. To do this, follow the instructions below:
1. Select “Device Setup” from the Device menu.The “Device Setup” dialog appears.
2. Click “Yamaha KX” in the Device column.
The following buttons are assignable.• [ADD INSTRUMENT TRACK] button• [VSTi WINDOW] button• CUBASE FUNCTION[A] and [B] buttons• PROGRAM[DEC] and [INC] buttons• [ASSIGN 1] and [ASSIGN 2] buttons• [MUTE] button• [SOLO] button
3. Click the Category column of the desired button, then select the desired Category from the pop-up menu.When selecting a Category that includes multiple commands, click the Command column, then select the desired function from the pop-up menu.The commands available for assignment depend on the selected category. For example, selecting the “MIDI” category allows you to call up various MIDI-related commands, such as Quantize, Velocity, etc.
4. Click [OK] after completing the setup.The “Device Setup” dialog closes.
HINTThere are many Categories and many Commands within each Category. You may want to spend some time and check them out at your leisure. That way you can find the commands you need to use the most in your music production, and find the ones that best suit your personal preferences and your own workflow.
NOTE For information on the assigned functions of these buttons when using DAW software other than Cubase, see page 34.
Category Command
Click “Yamaha KX.”
Owner’s Manual 23

Using the KX with Cubase
24
Controlling the VSTi by Using the CONTROL Knobs
Operating the CONTROL knobs on the KX panel edits or controls various parameters of the VSTi used on the computer. The KX provides 30 Control Templates which can be used for various VSTi plug-ins. By selecting the desired one from 30 Control Templates, you can assign the functions appropriate for the current VSTi to the CONTROL knobs.When using Cubase, any time you select an Instrument track or select a MIDI track for which the destination is set to VSTi, or change the VSTi assigned to the current track, the Control Template on the KX will automatically change. This means that you need not select the Control Template manually when using Cubase.
When the Top display is shown, the names of the parameters to be adjusted via the CONTROL knobs are shown normally. When controlling the knob, the values of the parameters are shown for a while, then the original display appears again. You can scroll the display to confirm the entire parameter name by pressing the [EXIT] button.Using the Automation function of Cubase lets you record your knob operations to an Instrument track. For details about the Automation function, refer to the Cubase owner’s manual.
NOTE · For details about the available Control Template, refer to the Control Template List on page 45.· The time that the value remains displayed can be changed. For details, refer to “Utility Settings” on
page 36.· When using a DAW other than Cubase, you need to change the Control Template manually on the KX.
Changing the functions assigned to the CONTROL knobsWhen using the VSTi compatible with VST3 in Cubase, you can change the functions assigned to the CONTROL knobs via the following operation.
1. On the computer, move the mouse cursor to the VSTi controller whose function you want to assign to one of the CONTROL knobs.
2. On the KX, hold the Knob Functions Select button then rotate one of the CONTROL knobs to which the function of the VSTi controller selected in step 1 is assigned. “(Learning knob.)” is shown on the display.
3. On the KX, release the Knob Functions Select button. The function of the VSTi controller selected in step 1 is assigned to the knob rotated in step 2.
When using the VSTi which is not compatible with VST3, you can assign the desired function to the CONTROL knobs by using the KX Editor (even though you cannot do this from the KX panel).
Use these knobs to adjust the values of the VSTi parameters.A total of eight different parameters can be controlled. Pressing the Function Select button switches between the two groups of parameter assignments.
Use this button to switch the parameters to be adjusted via the CONTROL knobs (between parameters 1–4 and 5–8).
These lamps indicate which parameter set (1–4 or 5–8) is assigned to the CONTROL knobs.
NOTE
Owner’s Manual

Using the KX with Cubase
Controlling the Transport and Tracks
You can use the panel controls on the KX to control transport functions (such as Play, Record and Stop) within Cubase, and perform other operations, such as muting and soloing of selected tracks.
Cursor buttonsThese buttons function the same as the cursor keys on your computer.
[ENTER] buttonThis button functions the same as the ENTER key on your computer.
[ESC] buttonThis button functions the same as the ESC key on your computer, letting you cancel operations and close windows.
Track Control buttonsSelect the desired track in Cubase and use these buttons to perform the desired function.[ASSIGN 1] button .....Executes the MIDI Quantize
command.[ASSIGN 2] button .....Executes the Delete
command.[MUTE] button............Switches Mute of the
selected track On or Off.[SOLO] button............Switches Solo of the selected
track On or Off.
Transport Control buttonsUse these buttons to control the transport functions.[ ] button.............Rewind[ ] button.............Fast forward[ ] button................Repeat on/off[■] button...................Stop[ ] button.................Play[REC] button ..............Record
Cursor buttons Track Control buttons
Transport Control buttons[ESC] button [ENTER] button
NOTE · The functions assigned to the Track Control buttons can be changed as desired. For details, see page 23.
· If you are using a DAW software other than Cubase, make the appropriate setting in the DAW Select parameter (page 34).
Owner’s Manual 25

Basic Operation on the KX
26
This section describes the basic operations of the KX, such as how to shift the octave range of the keyboard and use the display interface.
Display Indications
The display shows various parameters depending on your panel operation.
Top displayThis display appears when turning the power ON. Parameters edited via the CONTROL knobs are shown on the display.
Operating any of the CONTROL knobs calls up the values on the display. After a while, the display returns to the original indication.
Arpeggio Edit displayCall up this display by pressing the [ARP EDIT] button (the lamp lights). This display lets you select the Arpeggio type and set the related parameters. Press the [EXIT] button to return to the original Top display.
Control Template displayCall up this display by pressing the [CONTROL TEMPLATE] button (the lamp lights). This display lets you select a template of CONTROL knob assignments. Press the [EXIT] button to return to the original Top display.
Utility displayCall up this display by pressing the [UTILITY] button (the lamp lights). This display lets you set the system related parameters. Press the [EXIT] button to return to the original Top display.
From these displays, you can call up the desired parameters by using the SELECT [▲] and [▼] buttons. The arrow indication at the current parameter flashes, indicating the parameter can be edited.
Basic Operation on the KX
NOTE The display illustrated below may appear when turning the power ON. This indicates that Cubase and VSTi have not been started on the computer connected to the KX via USB. If you intend to use Cubase, start Cubase then set the VSTi (the indication below disappears and the Top display shown above appears). If you intend to use a DAW other than Cubase, change the DAW Select parameter (page 37) to the appropriate setting (other than “Cubase4” or “CubaseAI”).
NOTE You can set the desired amount of time that the values remain in the display. For instructions, see page 36.
Lights
Lights
Lights
FlashesParameter
Value
Owner’s Manual

Basic Operation on the KX
Changing the Octave Range
Use these buttons to shift the note range of the keyboard by octave (three octaves, up or down). The initial default setting (no shift) is recalled by pressing both the buttons simultaneously.
The current octave range can be confirmed via the status of the LED lamp above the button.
Selecting the Velocity Curve
You can select the desired Velocity Curve which determines how velocities are applied according to your playing strength. Use the VELOCITY CURVE [DEC] and [INC] buttons to select the desired Velocity Curve.
The following Velocity Curves are available:
Press the VELOCITY CURVE [DEC] and [INC] buttons simultaneously to select “Fix.” The Fix setting lets you play the notes with a fixed velocity no matter how hard or soft you play the notes.
You can set the fixed velocity by pressing one of the VELOCITY CURVE [DEC] and [INC] buttons. Pressing both the buttons simultaneously exits from this status (Fix setting) to the last selected Velocity Curve.
(Flashes) Three octaves lower
Two octaves lower
One octave lower
Initial default setting
One octave higher
Two octaves higher
(Flashes)Three octaves higher
NOTE You can reverse the LED status (on or off) of the OCTAVE buttons. For information about how to reverse the LED status (on or off), refer to “Utility Settings” on page 36.
Note names of the keyboardThe range of the keyboard is indicated by note name, as described below.
Model Range
KX25 C2 .. C4
KX49 C2 .. C6
KX61 C1 .. C6
KX8 A-1 .. C7
The note name assignment above depends on the initial default setting of the KX. This assignment can be shifted by using the [OCTAVE] buttons.
Press this to shift the octave range down.
Press this to shift the octave range up.
Restores the default octave setting.
Soft2
This curve produces high velocity values even for low playing strength. Select this if you want a high volume even when you play softly.
Soft1This curve produces relatively high velocity values even for low playing strength. It is a more moderate curve than Soft 2 above.
NormalThis is a normal, linear curve that has a one-to-one correspondence between your playing strength and the resulting velocity.
Hard1
This curve produces relatively low velocity values even for high playing strength. Select this if you don’t want the volume to change much when you play strongly.
Hard2
This curve produces low velocity values even for high playing strength. It is a more extreme curve than Hard 1 above. This curve is also the optimum Velocity Curve for use with the HALionOne VSTi.
NOTE From the Utility display (page 26), you can select a Velocity Curve and specify a specific velocity value to be used when Fix is selected. For details, refer to “Utility Settings” on page 36.
Velocity value
Owner’s Manual 27

Control Templates
28
The KX provides 30 Control Templates which can be used for VSTi plug-in software. By selecting the desired Control Template, you can automatically call up the appropriate function assignments for controlling the currently selected VSTi with the CONTROL knobs.When using Cubase, selecting an Instrument track or changing the VSTi assigned to the current track will automatically change the Control Template for the VSTi on the KX, meaning that you don’t have select the template manually.On the other hand, if you are using a DAW other than Cubase, you will need to manually select the appropriate Control Template on the KX.
Selecting a Control Template
1. Press the [CONTROL TEMPLATE] button.The LED lamp lights and the Control Template selection display appears.
In this state, you can select the Control Template.
2. Use the DATA [DEC] and [INC] buttons to select the desired Control Template.
3. Press the [EXIT] button to return to the Top display which appears when turning the power on.
Control Templates
NOTE A special KX Editor (page 6), available as a free download from the Yamaha website, provides tools for editing all KX Control Templates.
NOTE If a different, unrelated display appears even when you press the [CONTROL TEMPLATE] button, press the [CONTROL TEMPLATE] button again or press the SELECT [▲] button once or twice to call up the Control Template selection display.
LightsNOTE You can increase the value by 10 by
simultaneously holding down the [DEC] button and pressing the [INC] button, or decrease the value by 10 by simultaneously holding down the [INC] button and pressing the [DEC] button.
Owner’s Manual

Control Templates
Editing a Control Template
Changing the message type generated by using the CONTROL knobsThe MIDI messages generated by operating the CONTROL knobs are divided into two types: Remote and CC (Control Change). Only one of these two types can be active, and the type is set with the KnobOutSel parameter.
Remote (Remote Control message dedicated to Cubase)When this is selected, Remote Control messages dedicated to Cubase will be generated by operating the CONTROL knobs and transmitted to Cubase via USB-MIDI Port 2. This type of data is transmitted via USB-MIDI Port 2, while keyboard performance data is transmitted via USB-MIDI Port 1, meaning that the messages generated by operating the CONTROL knobs do not affect the keyboard performance but only the VSTi parameters.
CC (Control Change)When this is selected, Control Change messages will be generated by operating the CONTROL knobs and transmitted to the computer via USB-MIDI Port 1. When using a DAW other than Cubase, only this setting is available.
1. Press the [CONTROL TEMPLATE] button.The LED lamp lights and the Control Template selection display appears.
2. Use the DATA [DEC] and [INC] buttons to select the desired Control Template.
3. Use the SELECT [▲] and [▼] buttons to call up “KnobOutSelect.”
4. Use the DATA [DEC] and [INC] buttons to select the desired type of message.CC ...................... Control changeRemote ............... Remote Control exclusive for
Cubase
5. Press the [EXIT] button to return to the original display.
NOTE · When using Cubase, you generally won’t need to change this parameter from the initial default setting (Remote), although there may be times that you should set this parameter to “CC” depending on the VSTi you’re using.
· Setting the DAW Select parameter to a value other than “Cubase4” or “CubaseAI” will change the KnobOutSel parameter to “CC” automatically even when it is set to “Remote.”
NOTE If a different, unrelated display appears even when you press the [CONTROL TEMPLATE] button, press the [CONTROL TEMPLATE] button again or press the SELECT [▲] button once or twice to call up the Control Template selection display.
Owner’s Manual 29

Control Templates
30
Changing the Control Change number generated by using the CONTROL knobYou can change the Control Change number assigned to the CONTROL knob from the default setting as desired.
1. Press the [CONTROL TEMPLATE] button.The LED lamp lights and the Control Template selection display appears.
2. Use the DATA [DEC] and [INC] buttons to select the desired Control Template.
3. Use the SELECT [▲] and [▼] buttons to select the desired CONTROL knob.
4. Use the DATA [DEC] and [INC] buttons to change the Control Change number of the selected CONTROL knob.
5. Press the [EXIT] button to return to the original display.
NOTE The setting here is automatically stored to the internal memory of the KX. If you want to back up the setting here, use the KX Editor (page 6) to store the setting to a computer.
NOTE If a different, unrelated display appears even when you press the [CONTROL TEMPLATE] button, press the [CONTROL TEMPLATE] button again or press the SELECT [▲] button once or twice to call up the Control Template selection display.
NOTE The Control Change numbers available for adjusting the parameters may differ depending on the particular VSTi. For details, refer to the relevant owner’s manual of your VSTi.
NOTE The display of the KX shows the Control Change number in decimal. Keep in mind that the Control Change number may be described in hexadecimal depending on the manual of the VSTi.
Owner’s Manual

Arpeggio
The KX features a powerful Arpeggio function, that lets you play various phrases or rhythm pattern depending on the notes you press. Among the preset 342 Arpeggio types provided in the KX, each of 66 types for drum/percussion sounds consists of four phrases (rhythm patterns) which can be called up according to the area of the pressed note—giving you a total of 540 phrases/rhythm patterns (66 types with 4 phrases each, plus 276), which can be played simply by pressing a note on the keyboard. The basic instructions for using the Arpeggio feature are given on page 20. This section shows you how to select an Arpeggio type and edit the related parameters.
Selecting an Arpeggio Type
The KX features 342 different Arpeggio types. You can select an Arpeggio type as desired then start playback simply by pressing any note on the keyboard.
1. Press the [ARP EDIT] button.The LED lamp of the [ARP EDIT] button lights and the Arpeggio Edit display appears.
2. Use the SELECT buttons to select “Cat” (Category).
The KX provides a wide variety of Arpeggio types (page 46) divided into Categories. Since there are so many Arpeggio types, it is quicker and more convenient to select a general Category first, then the specific type.
3. Use the DATA [DEC] and [INC] buttons to select the category of the desired Arpeggio type.
4. Use the SELECT buttons so that the “Typ:” indication flashes, then use the DATA [INC] or [DEC] button to select the Arpeggio type.
5. Select the Arpeggio type by using the DATA [DEC] and [INC] buttons.
6. Press the [EXIT] button to return to the Top display.
Arpeggio
NOTE · The Arpeggio plays back according to the internal tempo value set in the Utility display or in synchronization with the tempo of the external DAW software, depending on the setup of the related parameter. For details, see page 32.
· Each of the Arpeggio types is created assuming that a specific instrument sound is used. The type of the specific instrument (appropriate for each type) is indicated in the Arpeggio Type List on page 46 as “Instrument Type.” Refer to this Instrument Type when selecting an Arpeggio Type.
Category
Arpeggio types
NOTE · If you change the Arpeggio type during playback, the new Arpeggio type may not start immediately.
· You can operate the CONTROL knobs, Pitch Bend wheel and Modulation Wheel and change the sound in real time while selecting an Arpeggio type.
· Hold the [DEC] or [INC] button to continuously change the value.
· You can increase the value by 10 by simultaneously holding down the [INC] button and pressing the [DEC] button, or decrease the value by 10 by simultaneously holding down the [DEC] button and pressing the [INC] button.
Arpeggio CategoryThe Arpeggio types provided in the KX are divided into various categories as listed below.
DrPc Drum / Percussion
CPrc Chromatic Percussion
Bass Bass
Seq Synth Sequence
ChSq Chord Sequence
HySq Hybrid Sequence
ApKb Acoustic Piano / Keyboard
Orgn Organ
GtPl Guitar / Plucked
Strn Strings
Bras Brass
RdPp Reed / Pipe
Lead Synth Lead
Owner’s Manual 31

Arpeggio
32
Using MIDI Clock to control Arpeggio tempoWith the initial default setting (Sync = Auto on page 36), the Arpeggio is played back according to the tempo determined by the internal or external clock as described below.
When MIDI clock is received from an external MIDI device:The Arpeggio will play back according to the tempo of the received MIDI clock.
When MIDI clock is not received:The Arpeggio will play back according to the internal tempo set on the KX.
When using Cubase, you can transmit MIDI clock from the computer to the KX by following the procedure below.
1. Select “Project Synchronization Setup” from the “Transport” menu on Cubase to call up the “Project Synchronization Setup” dialog.
2. Enter checkmarks to the “Yamaha KX-1” (when using Windows) and “MIDI Clock Follows Project Position” of the “MIDI Clock Destination” at the lower right of the dialog.When using Mac OS, enter a checkmark to “YAMAHA KX Port 1.”
3. Click [OK] to close the “Project Synchronization Setup” dialog.
KX
TEMPO=120
KX
When MIDI clock is received from an external MIDI device:
Arpeggio
Tempo: Determined by the speed with which MIDI clock is received from the external device.
Playback data
DAW software, etc.
MIDI clock
Arpeggio
Playback data
DAW software, etc.
When MIDI clock is not received:
Tempo:Set in the Utility display (page 36).
NOTE The KX provides three USB MIDI Ports each of which has a different, specific use. For details, see page 18.
NOTE · Without checkmark to the “Send MIDI Clock in Stop Mode” of the “MIDI Clock Destination”, MIDI clock is transmitted from Cubase (on the computer) only when recording or playback is performed on Cubase. If entering checkmark, MIDI clock is always transmitted.
· For information about DAW software other than Cubase and how to transmit clock data from the MIDI device, refer to the owner’s manual of the DAW software/MIDI device.
· You can select the setting which lets you always use the internal MIDI clock of the KX to play the Arpeggio even if an external clock are received from the external MIDI device. For details, refer to “Utility Settings” on page 36.
Owner’s Manual

Arpeggio
Editing an Arpeggio
The Arpeggio can be edited as desired. For example, you can alter the rhythmic feel of the Arpeggio by changing the amount of Swing, adjust the gate time (length) of the notes, or even select a different variation to completely change the Arpeggio pattern.
1. Press the [ARP EDIT] button.The LED lamp above the button lights and the Arpeggio Edit display will appear.
2. Use the SELECT buttons to call up the desired parameter.For details about the Arpeggio parameters, see the chart below.
3. Use the DATA [DEC] and [INC] buttons to change the value.
4. When you are satisfied with the result, press the [EXIT] button to return to the Control Top display.The settings made here are stored automatically. The settings here will be maintained even if you turn the power off or change the Arpeggio type.
Arpeggio Parameters
NOTE Editing of an Arpeggio can be done even during playback. Any changes made here are immediately applied to playback, meaning that you can check the results of your edits in real time. Keep in mind that editing a parameter during playback may cause glitches in playback. If such a situation occurs, stop Arpeggio playback then press the note to trigger the Arpeggio again.
NOTE If you want to initialize the settings, use the Factory Set operation (page 37).
Display Settings Description
CatDrPc, CPrc, Bass, Seq, ChSq, HySq, ApKb, Orgn, GtPl, Strn, Bras, RdPp, Lead
Determines the Category of the Arpeggio type you want to call up. For details, see pages 31 and 46.
Typ 1–342 Determines the Arpeggio type you want to call up. For details, see page 46.
Variation Orig, Up, Down, Alt1, Alt2, Rnd
Determines the playback variation of the Arpeggio. When any value other than “Orig” is selected, you can shift the pitch up and down in octave for Arpeggio playback by adjusting the “OctRange” parameter.
Orig ......... The original data preprogrammed in the KX will play back.Up ........... An Arpeggio of ascending notes will play.Down....... An Arpeggio of descending notes will play.Alt1 .......... Alternates Up and Down arpeggios. The turnaround note is played
once.Alt2 .......... Alternates Up and Down arpeggios. The turnaround note is played
twice.Rnd.......... The Arpeggio will play randomly according to the pressed notes.
OctRange -3 – 0 – +3Determines the octave setting of Arpeggio playback. When the Variation parameter is set to “Orig,” this parameter is indicated as “—,” meaning that it cannot be edited.
GateTime 0%–200% Determines the gate time of Arpeggio notes.
BeatStretch 50, 66, 75, 100, 133, 150, 200%
Adjusts the tempo of Arpeggio playback based on the current original tempo. When “50%” is selected, for example, the playback time will be halved (tempo is doubled). When “200%” is selected, on the other hand, the playback time will be doubled (tempo is halved).
Swing -120% – 0% – +120%Adjusts the timing of the even-numbered back-beat notes (according to the note type specified in the SwingValue parameter below) to produce a swing feel.
SwingValue
1/32 (32nd note), 3/16 (16th note triplet), 1/16 (16th note), 3/8 (8th note triplet), 1/8 (8th note), 3/4 (1/4 note triplet), 1/4 (1/4 note)
Determines the type of note that serves as the basis for the Swing parameter.
VelMode Orig, Thru
Determines how the velocities are applied to playback notes of the selected Arpeggio type.
Orig ......... The Arpeggio type is played back with the velocity values preprogrammed in the Arpeggio sequence data.
Thru ......... The Arpeggio type is played back with the velocity value determined by how strongly you play the keys.
Owner’s Manual 33

Using the KX with a DAW Other than Cubase
34
This section shows you how to set up the KX for controlling DAW software other than Cubase. For more information on setting up on your particular DAW, refer to the manual of the DAW software.
1. Press the [UTILITY] button.The LED lamp above the button lights and the Utility display appears.
2. Use the SELECT buttons to call up “DAW Select.”
3. Use the DATA [DEC] and [INC] buttons to select one of the following DAW software tools.
4. Press the [EXIT] button to return to the Top display.The setup has been completed.The following operations are available for the selected DAW software.
* Mackie Control is a hardware DAW controller. Mackie Control is the trade mark of the Mackie Designs Inc.
Using the KX with a DAW Other than Cubase
Settings DAW
LogicPro Apple Logic Pro 7.2
DigiPerf MOTU Digital Performer 5.1
SONAR Cakewalk Sonar 6
Button on the KX Operation
[ ] Rewind
[ ] Fast Forward
[ ] Repeat On/off
[■] Stop
[ ] Play
REC Record
CUBASE FUNCTION [A] This button functions the same as the F1 key on the Mackie Control. *
CUBASE FUNCTION [B] This button functions the same as the F2 key on the Mackie Control. *
[ASSIGN 1] This button functions the same as the F3 key on the Mackie Control. *
[ASSIGN 2] This button functions the same as the F4 key on the Mackie Control. *
[MUTE] This button functions the same as the F5 key on the Mackie Control. *
[SOLO] This button functions the same as the F6 key on the Mackie Control. *
[VSTi WINDOW] This button functions the same as the F7 key on the Mackie Control. *
[ADD INSTRUMENT TRACK] This button functions the same as the F8 key on the Mackie Control. *
Program [DEC] Transmits the Program Change number decreased by 1 from the current number.
Program [INC] Transmits the Program Change number increased by 1 from the current number.
Cursor buttons These buttons function the same as the cursor keys on your computer.
[ENTER] This button functions the same as the ENTER key on your computer.
[ESC] This button functions the same as the ESC key on your computer.
NOTE If you perform the Remote Control setup for the Remote Control on the DAW software, you can assign various functions to the Cubase buttons such as the CUBASE FUNCTION [A] button and [ADD INSTRUMENT TRACK] button. For instructions on assigning the function to the button, refer to the manual of the DAW software.
Owner’s Manual

Using the KX with a DAW Other than Cubase
When using Digital Performer (Macintosh):In each of these cases, you need to set the MIDI Port in the “Audio MIDI setup.”
1. In the start up disk of Mac OS X (normally named “Macintosh HD”), open “Application” then “Utilities” and double click “Audio MIDI Setup”.
2. Click [MIDI Devices] if the [Audio Device] window is indicated.The YAMAHA KX icon appears if the KX is recognized by the Macintosh computer.
3. Add two new external devices by clicking the [Add Device] icon twice.Each new external device corresponds to each of the MIDI Ports in the KX. It is a good idea to input your desired device name in the Properties of the new external device in order to easily recognize the MIDI port later.
4. Connect the MIDI input/output plugs of the KX icon to the MIDI input/output plugs of the new external device.Assign the names as listed below to the newly added devices respectively.• USB-MIDI Port 1 (left plug) : YAMAHA KX YAMAHA KX Port 1• USB-MIDI Port 2 (right plug) : YAMAHA KX YAMAHA KX Port 2
Connect the virtual plugs so that each port can handle MIDI messages.
NOTE YAMAHA KX YAMAHA KX Port 3 (rightmost plug) used for data communication of the KX Editor does not need to be set.
Owner’s Manual 35

Utility Settings
36
In the Utility display, you can make various settings such as the Arpeggio tempo, MIDI transmit/receive settings, and display related settings.
Basic Operation
1. Press the [UTILITY] button.The LED lamp above the button lights and the Utility display appears.
2. Use the SELECT buttons to select the parameter to be edited.For details on the parameters, refer to “Utility Parameters” listed below.
3. Use the DATA [INC] and [DEC] buttons to change the value.
4. After making the desired settings, press the [ENTER] button to return to the Utility Top display.The settings you made here will be stored automatically without the special operation. The settings will be maintained until executing the Factory Set operation.
Utility Parameters
Utility Settings
NOTE For the Bulk Transmit and Factory Set parameters, you can execute these operations by simply pressing the DATA [INC] button.
Display RangeInitial Value
Description
Tempo 10–300 120
Determines the tempo (BPM) of Arpeggio playback. The Arpeggio will play according to the speed of the MIDI clock transmitted from an external device or computer when the Sync parameter is set to “Auto” (only when MIDI clock is transmitted continuously) or “External.”
Sync Auto, Internal, External Auto
Determines the tempo source transmitting the MIDI clock to which Arpeggio playback is synchronized.
Auto......... When MIDI clock is transmitted continuously from an external MIDI device or computer, the internal clock of the KX is not effective and Arpeggio playback is synchronized with the external clock. When MIDI clock is not transmitted from the external MIDI device or computer, the internal clock of the KX is effective meaning that the Tempo value set on the KX is available.
Internal .... The Arpeggio will play with the Tempo value set on the KX.
External ... The Arpeggio will play according to the speed of the MIDI clock transmitted from an external device or computer. When the KX does not receive MIDI clock, the Arpeggio does not play.
Clock Off, On On
Determines whether the tempo clock of Arpeggio playback is output as a MIDI message.
On ........... When this is selected, MIDI clock will be transmitted while an Arpeggio plays back with the tempo specified on the Tempo parameter above.
Off ........... When this is selected, MIDI clock will not be transmitted.
VeloCurve Soft2, Soft1, Normal, Hard1, Hard2, Fix Normal Determines the Velocity Curve. For information about each value,
see page 27.
VeloFix 1–127 100 Determines the velocity value when the VelCurve is set to “Fix.”
Owner’s Manual

Utility Settings
Restoring the Factory-programmed System Settings (Factory Set)
You can restore the factory default settings of the KX. Follow the instructions below to execute Factory Set.
CAUTION• The edited Arpeggio types and Control Templates will be lost by executing Factory Set. Important data should be
saved to the computer by using the KX Editor (page 6).
1. From the Top display, press the [UTILITY] button (the lamp lights).
2. Use the SELECT buttons to call up “FactorySet.”
3. Press the DATA [INC] button.“Are you sure?” appears on the display.
4. Press the DATA [INC] button again to execute Factory Set.After Factory Set has been completed, the display called up in step 2 appears.
DAW SelectCubaseAI, Cubase4, LogicPro, DigiPerf, SONAR
CubaseAI Determines the DAW software you use on the computer with the KX.
ProgChgMode PC+Remot, ProgChg, Remote PC+Remot
Determines the type of the MIDI message generated by pressing the PROGRAM [INC] and [DEC] buttons.
PC+Remot . When this is selected, the Program Change message is transmitted via USB-MIDI Port 1 and the Remote Control message dedicated to Cubase is transmitted via USB-MIDI Port 2.
ProgChg.. When this is selected, only the Program Change message is transmitted via USB-MIDI Port 1.
Remote.... When this is selected, only the Remote Control message dedicated to Cubase is transmitted via USB-MIDI Port 2.
MIDI Select USB, MIDI USB
Determines which connector is used for MIDI transmit/receive: USB TO HOST or MIDI IN/OUT.
USB......... The USB TO HOST connector is used for MIDI communication between the computer and the KX. When the MIDI Thru parameter below is set to “MIDI → MIDI” or “MIDI → USB” or “USB → MIDI,” MIDI can also be transmitted via the MIDI OUT connector (MIDI Thru only), even if “USB” is selected here.
MIDI......... Only the MIDI connectors are available for MIDI communication.
MIDI Transmit Ch 1–16 1 Determines the MIDI channel over which the KX transmits MIDI messages (generated via your keyboard performance).
MIDI In Thru Off, MIDI→MIDI, MIDI→USB, USB→MIDI MIDI→USB
Determines whether the MIDI messages received via the MIDI IN connector will be transmitted via the MIDI OUT connector or USB connector.
Device Number Off, 1–16, All All Determines the MIDI Device Number of the KX.
Display TimeOff, 1.0sec, 1.5sec, 2.0sec, 3.0sec, 4.0sec, 5.0sec, Hold
1.5secDetermines the duration (time) for which the value (like the one called up by operating the CONTROL knob) is shown temporarily on the display.
Octave LED Normal, Reverse Normal
Determines the status of OCTAVE LED lamps. When “Normal” is selected, the LED lamps work as described on page 27. When “Reverse” is selected, the right and left of the LED status are reversed.
BulkTransmit — —Transmits all the settings of the KX to the DAW software or external MIDI device as bulk data. Press the DATA [INC] button to start transmission.
FactorySet — — Restores the factory-programmed system settings of the KX.
Display RangeInitial Value
Description
Owner’s Manual 37

Utility Settings
38
Setting the MIDI Thru Parameter
With the initial default settings (MIDI Select = USB, MIDI Thru = MIDI → USB), MIDI messages received via the MIDI IN connector of the KX will be transmitted through the USB TO HOST connector (USB MIDI Port 1). As necessary, you can change the MIDI Thru setting so that MIDI messages received via the MIDI IN connector can be transmitted through the MIDI OUT connector, or the MIDI messages received via the USB TO HOST connector (USB MIDI Port 1) can be transmitted through the MIDI OUT connector.
1. Press the [UTILITY] button.The LED lamp above the button lights and the Utility display appears.
2. Use the SELECT [▲] and [▼] buttons to call up the “MIDI Thru” parameter.
3. Use the DATA [DEC] and [INC] buttons to select the desired setting (from the available ones described below).
4. After selecting, press the [EXIT] button to return to the Top display.
OffWhen this is selected, the MIDI Thru function is not available.
MIDI → MIDI
When this is selected, MIDI messages received via the MIDI IN connector will be transmitted through the MIDI OUT connector. This setting is available even when the MIDI Select parameter is set to “USB.”
MIDI → USB
When this is selected, MIDI messages received via the MIDI IN connector will be transmitted through the USB TO HOST connector (USB MIDI Port 1).
USB → MIDI
When this is selected, MIDI messages of USB MIDI Port 1 received via the USB TO HOST connector will be transmitted through the MIDI OUT connector.
NOTE “MIDI → USB” and “USB → MIDI” can be selected only when the MIDI Select parameter is set to “USB” (page 37).
NOTE Keep in mind that the KX cannot be used as a MIDI interface for the computer and another MIDI device. Although MIDI messages are transferred from the computer to the MIDI device when the MIDI Thru parameter is set to “USB→MIDI” and vice versa when the MIDI Thru parameter is set to “MIDI→USB,” two-way communication between the computer and the MIDI device are not possible.
Owner’s Manual
Troubleshooting
The power of the instrument does not turn on.• If the KX is not connected to a computer, confirm
whether or not the AC power adaptor is properly plugged into the KX.
• If you are not using an AC power adaptor, confirm whether or not a USB cable is properly plugged into the KX and computer.
• Confirm whether or not a proper USB cable is used. If the USB cable is broken or damaged, have the USB cable replaced with a known working one.
• Confirm whether not the USB hub with the bus-powered type is used for connecting the KX and computer. If you must use USB hub, use the self-powered type or use the AC power adaptor of the KX.
Communication problem between the computer and the KX.• Confirm whether or not a USB cable is properly
plugged into the KX and computer.• Confirm whether or not the USB-MIDI driver is
installed properly.• Confirm whether or not the MIDI Select parameter
is set to “MIDI.” When using the KX and a computer, set MIDI Select parameter to “USB.”
DAW software on a computer cannot be remotely controlled.• Confirm whether or not the DAW software
specified in the DAW Select parameter on the Utility display matches the DAW software you actually use on your computer.
• Confirm whether or not the Remote Control setting of the DAW software is proper. Refer to the Owner’s Manual of your particular DAW software.
No sound of a software synthesizer such as VSTi on the computer is produced even when playing the KX keyboard.• Confirm whether or not a USB cable is properly
plugged into the KX and computer.• Confirm whether or not the volume settings are
set properly, such as the volume/mute/solo setup for each track on the DAW, volume setup on the computer, and the related setup on the audio interface (when used).
• Confirm whether or not the MIDI Select parameter is set to “MIDI.” When using the KX and computer, set the MIDI Select parameter to “USB.”
• Confirm whether or not the Control Template corresponding to the VSTi used on the computer is currently selected on the KX. If not, call up the corresponding Control Template. If the corresponding Control Template is not provided
on the KX by default, create an appropriate Control Template by using the KX Editor.
A MIDI tone generator (connected via MIDI cable to the KX) does not sound, even when playing the KX keyboard.• Confirm whether or not the MIDI cable is
connected properly.• Confirm whether or not the MIDI Select parameter
is set to “USB.” When using the KX and MIDI device, set the MIDI Select parameter to “MIDI.”
The Arpeggio does not play back.• Confirm whether or not the [ARP ON/OFF] button
is turned on. • Confirm whether or not the Sync parameter of the
Utility display is set to “External.” If so, start playback or recording on the DAW to transmit MIDI clock from the computer to the KX, or set the Sync parameter to “Auto” or “Internal.”
Releasing the notes does not stop Arpeggio playback even though the [HOLD] button is turned off.• Confirm whether or not you disconnected the
footswitch from the SUSTAIN jack while the power of the KX was turned ON. Keep in mind that the arpeggio may be “stuck” if you disconnect the footswitch from the SUSTAIN jack.
The sound continues even when notes are released.• Confirm whether or not you disconnected the
footswitch from the SUSTAIN jack while the power of the KX was turned ON. Keep in mind that the sustain effect may be “stuck” if you disconnect the footswitch from the SUSTAIN jack.
Cubase does not recognize the KX.• Confirm whether or not the “USB-MIDI Driver” and
“Extensions for Steinberg DAW” have been installed. If not, install them.
• Confirm whether or not the KX is turned on before starting Cubase. If not, do so.
Troubleshooting
NOTE For other problems regarding no sound or noise, refer to the troubleshooting section in the manual of your particular DAW software.
Owner’s Manual 39

Message List
40
Message List
LCD Indication Description
MIDI buffer full. Failed to process the MIDI data because too much data was received at one time.
MIDI checksum error. The check sum for the data received is incorrect.
MIDI data error. An error occurred when receiving MIDI data.
USB error. An error related to the USB TO HOST connector occurred.
Keyboard error. An error related to the keyboard occurred.
Memory error. An error related to data storage memory occurred.
Device number is off. The device number is set to “off.”
Device number mismatch. The device numbers do not match.
Executing... Displayed while the operation is being performed. Please wait.
Completed Displayed when the operation has been completed.
Template No.xx <xxxxxxx> Displayed when the Control Template is selected automatically.
Are you sure? No→Dec/Yes→IncPrompts you to confirm whether or not you want to perform the operation. Pressing the [INC] button performs the operation while pressing the [DEC] button cancels the operation.
Receiving MIDI bulk. The KX is receiving MIDI bulk data.
Owner’s Manual

TOOLS for KX LICENSE AGREEMENT
ATTENTION
PLEASE READ THIS SOFTWARE LICENSE AGREEMENT (“AGREEMENT”) CAREFULLY BEFORE USING THIS SOFTWARE. YOU ARE ONLY PERMITTED TO USE THIS SOFTWARE PURSUANT TO THE TERMS AND CONDITIONS OF THIS AGREEMENT. THIS AGREEMENT IS BETWEEN YOU (AS AN INDIVIDUAL OR LEGAL ENTITY) AND YAMAHA CORPORATION (“YAMAHA”).
BY BREAKING THE SEAL OF THIS PACKAGE YOU ARE AGREEING TO BE BOUND BY THE TERMS OF THIS LICENSE. IF YOU DO NOT AGREE WITH THE TERMS, DO NOT INSTALL, COPY, OR OTHERWISE USE THIS SOFTWARE.
1. GRANT OF LICENSE AND COPYRIGHTYamaha hereby grants you the right to use one copy of the software program(s) and data (“SOFTWARE”) accompanying this Agreement. The term SOFTWARE shall encompass any updates to the accompanying software and data. The SOFTWARE is owned by Yamaha and/or Yamaha’s licensor(s), and is protected by relevant copyright laws and all applicable treaty provisions. While you are entitled to claim ownership of the data created with the use of SOFTWARE, the SOFTWARE will continue to be protected under relevant copyrights.• You may use the SOFTWARE on a single computer.• You may make one copy of the SOFTWARE in machine-
readable form for backup purposes only, if the SOFTWARE is on media where such backup copy is permitted. On the backup copy, you must reproduce Yamaha's copyright notice and any other proprietary legends that were on the original copy of the SOFTWARE.
• You may permanently transfer to a third party all your rights in the SOFTWARE, provided that you do not retain any copies and the recipient reads and agrees to the terms of this Agreement.
2. RESTRICTIONS• You may not engage in reverse engineering,
disassembly, decompilation or otherwise deriving a source code form of the SOFTWARE by any method whatsoever.
• You may not reproduce, modify, change, rent, lease, or distribute the SOFTWARE in whole or in part, or create derivative works of the SOFTWARE.
• You may not electronically transmit the SOFTWARE from one computer to another or share the SOFTWARE in a network with other computers.
• You may not use the SOFTWARE to distribute illegal data or data that violates public policy.
• You may not initiate services based on the use of the SOFTWARE without permission by Yamaha Corporation.
Copyrighted data, including but not limited to MIDI data for songs, obtained by means of the SOFTWARE, are subject to the following restrictions which you must observe. • Data received by means of the SOFTWARE may not be
used for any commercial purposes without permission of the copyright owner.
• Data received by means of the SOFTWARE may not be duplicated, transferred, or distributed, or played back or performed for listeners in public without permission of the copyright owner.
• The encryption of data received by means of the SOFTWARE may not be removed nor may the electronic watermark be modified without permission of the copyright owner.
3. TERMINATIONThis Agreement becomes effective on the day that you receive the SOFTWARE and remains effective until terminated. If any copyright law or provisions of this Agreement is violated, the Agreement shall terminate automatically and immediately without notice from Yamaha. Upon such termination, you must immediately destroy the licensed SOFTWARE, any accompanying written documents and all copies thereof.
4. LIMITED WARRANTY ON MEDIAAs to SOFTWARE sold on tangible media, Yamaha warrants that the tangible media on which the SOFTWARE is recorded will be free from defects in materials and workmanship under normal use for a period of fourteen (14) days from the date of receipt, as evidenced by a copy of the receipt. Yamaha's entire liability and your exclusive remedy will be replacement of the defective media if it is returned to Yamaha or an authorized Yamaha dealer within fourteen days with a copy of the receipt. Yamaha is not responsible for replacing media damaged by accident, abuse or misapplication. TO THE FULLEST EXTENT PERMITTED BY LAW, YAMAHA EXPRESSLY DISCLAIMS ANY IMPLIED WARRANTIES ON THE TANGIBLE MEDIA, INCLUDING THE IMPLIED WARRANTIES OF MERCHANTABILITY AND FITNESS FOR A PARTICULAR PURPOSE.
5. DISCLAIMER OF WARRANTY ON SOFTWARE You expressly acknowledge and agree that use of the SOFTWARE is at your sole risk. The SOFTWARE and related documentation are provided “AS IS” and without warranty of any kind. NOTWITHSTANDING ANY OTHER PROVISION OF THIS AGREEMENT, YAMAHA EXPRESSLY DISCLAIMS ALL WARRANTIES AS TO THE SOFTWARE, EXPRESS, AND IMPLIED, INCLUDING BUT NOT LIMITED TO THE IMPLIED WARRANTIES OF MERCHANTABILITY, FITNESS FOR A PARTICULAR PURPOSE AND NON-INFRINGEMENT OF THIRD PARTY RIGHTS. SPECIFICALLY, BUT WITHOUT LIMITING THE FOREGOING, YAMAHA DOES NOT WARRANT THAT THE SOFTWARE WILL MEET YOUR REQUIREMENTS, THAT THE OPERATION OF THE SOFTWARE WILL BE UNINTERRUPTED OR ERROR-FREE, OR THAT DEFECTS IN THE SOFTWARE WILL BE CORRECTED.
6. LIMITATION OF LIABILITYYAMAHA’S ENTIRE OBLIGATION HEREUNDER SHALL BE TO PERMIT USE OF THE SOFTWARE UNDER THE TERMS HEREOF. IN NO EVENT SHALL YAMAHA BE LIABLE TO YOU OR ANY OTHER PERSON FOR ANY DAMAGES, INCLUDING, WITHOUT LIMITATION, ANY DIRECT, INDIRECT, INCIDENTAL OR CONSEQUENTIAL DAMAGES, EXPENSES, LOST PROFITS, LOST DATA OR
TOOLS for KX LICENSE AGREEMENT
Owner’s Manual 41

Cubase AI4 LICENSE AGREEMENT
42
OTHER DAMAGES ARISING OUT OF THE USE, MISUSE OR INABILITY TO USE THE SOFTWARE, EVEN IF YAMAHA OR AN AUTHORIZED DEALER HAS BEEN ADVISED OF THE POSSIBILITY OF SUCH DAMAGES. In no event shall Yamaha's total liability to you for all damages, losses and causes of action (whether in contract, tort or otherwise) exceed the amount paid for the SOFTWARE.
7. THIRD PARTY SOFTWAREThird party software and data (“THIRD PARTY SOFTWARE”) may be attached to the SOFTWARE. If, in the written materials or the electronic data accompanying the Software, Yamaha identifies any software and data as THIRD PARTY SOFTWARE, you acknowledge and agree that you must abide by the provisions of any Agreement provided with the THIRD PARTY SOFTWARE and that the party providing the THIRD PARTY SOFTWARE is responsible for any warranty or liability related to or arising from the THIRD PARTY SOFTWARE. Yamaha is not responsible in any way for the THIRD PARTY SOFTWARE or your use thereof.• Yamaha provides no express warranties as to the THIRD
PARTY SOFTWARE. IN ADDITION, YAMAHA EXPRESSLY DISCLAIMS ALL IMPLIED WARRANTIES, INCLUDING BUT NOT LIMITED TO THE IMPLIED WARRANTIES OF MERCHANTABILITY AND FITNESS
FOR A PARTICULAR PURPOSE, as to the THIRD PARTY SOFTWARE.
• Yamaha shall not provide you with any service or maintenance as to the THIRD PARTY SOFTWARE.
• Yamaha is not liable to you or any other person for any damages, including, without limitation, any direct, indirect, incidental or consequential damages, expenses, lost profits, lost data or other damages arising out of the use, misuse or inability to use the THIRD PARTY SOFTWARE.
8. GENERALThis Agreement shall be interpreted according to and governed by Japanese law without reference to principles of conflict of laws. Any dispute or procedure shall be heard before the Tokyo District Court in Japan. If for any reason a court of competent jurisdiction finds any portion of this Agreement to be unenforceable, the remainder of this Agreement shall continue in full force and effect.
9. COMPLETE AGREEMENTThis Agreement constitutes the entire agreement between the parties with respect to use of the SOFTWARE and any accompanying written materials and supersedes all prior or contemporaneous understandings or agreements, written or oral, regarding the subject matter of this Agreement. No amendment or revision of this Agreement will be binding unless in writing and signed by a fully authorized representative of Yamaha.
ATTENTION
PLEASE READ THIS SOFTWARE LICENSE AGREEMENT (“AGREEMENT”) CAREFULLY BEFORE USING THIS SOFTWARE. YOU ARE ONLY PERMITTED TO USE THIS SOFTWARE PURSUANT TO THE TERMS AND CONDITIONS OF THIS AGREEMENT. THIS AGREEMENT IS BETWEEN YOU (AS AN INDIVIDUAL OR LEGAL ENTITY) AND YAMAHA CORPORATION (“YAMAHA”).
BY BREAKING THE SEAL OF THIS PACKAGE YOU ARE AGREEING TO BE BOUND BY THE TERMS OF THIS LICENSE. IF YOU DO NOT AGREE WITH THE TERMS, DO NOT INSTALL, COPY, OR OTHERWISE USE THIS SOFTWARE.
THIS AGREEMENT PROVIDES YOUR USE-CONDITIONS ABOUT THE “DAW” SOFTWARE OF STEINBERG MEDIA TECHNOLOGIES GMBH(“STEINBERG”) WHICH IS BUNDLED WITH THIS PRODUCT. SINCE THE END-USER SOFTWARE LICENSE AGREEMENT (EUSLA) SHOWN ON YOUR PC-DISPLAY IN YOUR INSTALLING THE “DAW” SOFTWARE IS REPLACED BY THIS AGREEMENT, YOU SHOULD DISREGARD THE EUSLA. THAT IS, IN THE INSTALLING PROCESS, YOU SHOULD SELECT “AGREE” WITH THE EUSLA, WITHOUT YOUR JUDGMENT THERETO, SO AS TO PROCEED TO THE NEXT PAGE.
1. GRANT OF LICENSE AND COPYRIGHTYamaha hereby grants you the right to use one copy of the software program(s) and data (“SOFTWARE”) accompanying this Agreement. The term SOFTWARE shall encompass any updates to the accompanying software and data. The SOFTWARE is owned by STEINBERG, and is protected by relevant copyright laws and all applicable treaty provisions. Yamaha has acquired the sublicense right to license you to use the SOFTWARE. While you are entitled to claim ownership of the data created with the use of SOFTWARE, the SOFTWARE will continue to be protected under relevant copyrights.You may use the SOFTWARE on a single computer.You may make one copy of the SOFTWARE in machine-readable form for backup purposes only, if the SOFTWARE is on media where such backup copy is permitted. On the
backup copy, you must reproduce Yamaha’s copyright notice and any other proprietary legends that were on the original copy of the SOFTWARE.You may permanently transfer to a third party all your rights in the SOFTWARE only when you transfer this product together, provided that you do not retain any copies and the recipient reads and agrees to the terms of this Agreement.
2. RESTRICTIONSYou may not engage in reverse engineering, disassembly, decompilation or otherwise deriving a source code form of the SOFTWARE by any method whatsoever.You may not reproduce, modify, change, rent, lease, or distribute the SOFTWARE in whole or in part, or create derivative works of the SOFTWARE.
Cubase AI4 LICENSE AGREEMENT
Owner’s Manual

Cubase AI4 LICENSE AGREEMENT
You may not electronically transmit the SOFTWARE from one computer to another or share the SOFTWARE in a network with other computers.You may not use the SOFTWARE to distribute illegal data or data that violates public policy.You may not initiate services based on the use of the SOFTWARE without permission by Yamaha Corporation.Copyrighted data, including but not limited to MIDI data for songs, obtained by means of the SOFTWARE, are subject to the following restrictions which you must observe. Data received by means of the SOFTWARE may not be used for any commercial purposes without permission of the copyright owner. Data received by means of the SOFTWARE may not be duplicated, transferred, or distributed, or played back or performed for listeners in public without permission of the copyright owner.The encryption of data received by means of the SOFTWARE may not be removed nor may the electronic watermark be modified without permission of the copyright owner.
3. TERMINATIONThis Agreement becomes effective on the day that you receive the SOFTWARE and remains effective until terminated. If any copyright law or provisions of this Agreement is violated, the Agreement shall terminate automatically and immediately without notice from Yamaha. Upon such termination, you must immediately destroy the licensed SOFTWARE, any accompanying written documents and all copies thereof.
4. LIMITED WARRANTY ON MEDIAAs to SOFTWARE sold on tangible media, Yamaha warrants that the tangible media on which the SOFTWARE is recorded will be free from defects in materials and workmanship under normal use for a period of fourteen (14) days from the date of receipt, as evidenced by a copy of the receipt. Yamaha’s entire liability and your exclusive remedy will be replacement of the defective media if it is returned to Yamaha or an authorized Yamaha dealer within fourteen days with a copy of the receipt. Yamaha is not responsible for replacing media damaged by accident, abuse or misapplication. TO THE FULLEST EXTENT PERMITTED BY LAW, YAMAHA EXPRESSLY DISCLAIMS ANY IMPLIED WARRANTIES ON THE TANGIBLE MEDIA, INCLUDING THE IMPLIED WARRANTIES OF MERCHANTABILITY AND FITNESS FOR A PARTICULAR PURPOSE.
5. DISCLAIMER OF WARRANTY ON SOFTWAREYou expressly acknowledge and agree that use of the SOFTWARE is at your sole risk. The SOFTWARE and related documentation are provided “AS IS” and without warranty of any kind. NOTWITHSTANDING ANY OTHER PROVISION OF THIS AGREEMENT, YAMAHA EXPRESSLY DISCLAIMS ALL WARRANTIES AS TO THE SOFTWARE, EXPRESS, AND IMPLIED, INCLUDING BUT NOT LIMITED TO THE IMPLIED WARRANTIES OF MERCHANTABILITY, FITNESS FOR A PARTICULAR PURPOSE AND NON-INFRINGEMENT OF THIRD PARTY RIGHTS. SPECIFICALLY, BUT WITHOUT LIMITING THE FOREGOING, YAMAHA DOES NOT WARRANT THAT THE SOFTWARE WILL MEET YOUR REQUIREMENTS, THAT THE OPERATION OF THE SOFTWARE WILL BE UNINTERRUPTED OR ERROR-FREE, OR THAT DEFECTS IN THE SOFTWARE WILL BE CORRECTED.
6. LIMITATION OF LIABILITYYAMAHA’S ENTIRE OBLIGATION HEREUNDER SHALL BE TO PERMIT USE OF THE SOFTWARE UNDER THE TERMS HEREOF. IN NO EVENT SHALL YAMAHA BE LIABLE TO YOU OR ANY OTHER PERSON FOR ANY DAMAGES, INCLUDING, WITHOUT LIMITATION, ANY DIRECT, INDIRECT, INCIDENTAL OR CONSEQUENTIAL DAMAGES, EXPENSES, LOST PROFITS, LOST DATA OR OTHER DAMAGES ARISING OUT OF THE USE, MISUSE OR INABILITY TO USE THE SOFTWARE, EVEN IF YAMAHA OR AN AUTHORIZED DEALER HAS BEEN ADVISED OF THE POSSIBILITY OF SUCH DAMAGES. In no event shall Yamaha’s total liability to you for all damages, losses and causes of action (whether in contract, tort or otherwise) exceed the amount paid for the SOFTWARE.
7. GENERALThis Agreement shall be interpreted according to and governed by Japanese law without reference to principles of conflict of laws. Any dispute or procedure shall be heard before the Tokyo District Court in Japan. If for any reason a court of competent jurisdiction finds any portion of this Agreement to be unenforceable, the remainder of this Agreement shall continue in full force and effect.
8. COMPLETE AGREEMENTThis Agreement constitutes the entire agreement between the parties with respect to use of the SOFTWARE and any accompanying written materials and supersedes all prior or contemporaneous understandings or agreements, written or oral, regarding the subject matter of this Agreement. No amendment or revision of this Agreement will be binding unless in writing and signed by a fully authorized representative of Yamaha.
Owner’s Manual 43

Appendix
44
Specifications
* Specifications and descriptions in this owner’s manual are for information purposes only. Yamaha Corp. reserves the right to change or modify products or specifications at any time without prior notice. Since specifications, equipment or options may not be the same in every locale, please check with your Yamaha dealer.
Appendix
Keyboard
KX25 25 keys (Initial Touch)
KX49 49 keys (Initial Touch)
KX61 61 keys (Initial Touch)
KX8 88 keys (Initial Touch)
Sequencer block Arpeggio342 types540 phrases (DrPc: 66 x 4; plus 276)
Remote Control block DAW
For Windows: Cubase 4, Cubase Studio 4, Cubase AI4, SONAR 6For Macintosh: Cubase 4, Cubase Studio 4, Cubase AI4, Logic7.2, Digital
Performer 5.1* Functions to be controlled differ depending on the software.
ControllerPitch Bend Wheel x 1Modulation Wheel x 1CONTROL knobs x 4 (assignable)
Display 16 characters x 2 lines LED lamp (backlit)
Connectors
USB (TO HOST)MIDI IN/OUTDC-INFOOT SWITCH (SUSTAIN)
Power Consumption1.9 W (when using the AC power adaptor)0.6 W (when using this product as a bus-powered device)
Dimensions, weight
KX25: 508(W) x 286.6(D) x 92(H) mm, 2kg
KX49: 830(W) x 286.6(D) x 92(H) mm, 3kg
KX61: 937(W) x 343.9(D) x 114.6(H) mm, 4.3kg
KX8: 1340(W) x 445(D) x 157(H) mm, 15.1kg
AccessoriesAC power adaptor (PA-3C, PA-130, or an equivalent)USB cable, Disks x 2, Owner’s Manual (this book)
Owner’s Manual

Appendix
Control Template List
For details about what function is assigned to each knob when each Template is selected, refer to the following page:http://www.yamahasynth.com/
No. Manufacturer Product name Indication on the KX display
1 Steinberg HALion One HALionOne
2 Mystic Mystic
3 Prologue Prologue
4 Spector Spector
5 Embracer Embracer
6 Monologue Monologue
7 Hypersonic2 Hypersonic
8 HALion3 HALion
9 Native Instruments PRO-53 Pro-53
10 FM8 FM8
11 MASSIVE Massive
12 KORG Polysix Polysix
13 WAVESTATION Wavestation
14 Mono/Poly MonoPoly
15 M1 M1
16 MS-20 MS-20
17 M-AUDIO / GForce impOSCar impOSCar
18 Minimonsta Minimonsta
19 Oddity Oddity
20 Arturia Analog Factory AnalogFactory
21 CS-80V CS-80V
22 Jupiter-8V Jupiter-8V
23 Minimoog V Minimoog V
24 Novation Music V-Station V-Station
25 Bass Station BassStation
26 reFX VANGUARD Vanguard
27 IK Multimedia SampleTank2 SampleTank
28 Spectrasonics ATMOSPHERE Atmosphere
29 TRILOGY Trilogy
30 -- -- Generic
Owner’s Manual 45

Appendix
46
Arpeggio Type List
General Instrument types which can be selected on HALionOne and are most suitable for the respective Arpeggio Types are listed in the “Instrument Type” column.
Category Arp. No.
Arp. Name
Time Signature Length Original
TempoInstrument
Type
DrPc 1 ContmpRk 4 / 4 4 126 Stereo GM
DrPc 2 StndRock 4 / 4 4 131 :
DrPc 3 PowerRck 4 / 4 4 120 :
DrPc 4 AlternRk 4 / 4 4 100 RockSt2
DrPc 5 MondoRck 4 / 4 4 94 :
DrPc 6 XoverRk 4 / 4 2 100 :
DrPc 7 Rck&Roll 4 / 4 4 172 Stereo GM
DrPc 8 GuitrPp1 4 / 4 2 90 :
DrPc 9 GuitrPp2 4 / 4 4 100 :
DrPc 10 Unpluggd 4 / 4 4 120 :
DrPc 11 FingrPck 4 / 4 4 94 :
DrPc 12 Brit Pop 4 / 4 2 86 :
DrPc 13 EP Balld 4 / 4 2 60 :
DrPc 14 8BtBasic 4 / 4 4 120 :
DrPc 15 8Bt Soft 4 / 4 4 100 :
DrPc 16 16BtBld1 4 / 4 4 75 :
DrPc 17 16BtBld2 4 / 4 2 64 :
DrPc 18 16Bt Pop 4 / 4 4 103 :
DrPc 19 6/8 Pop 4 / 4 4 100 :
DrPc 20 6/8Balld 4 / 4 2 58 :
DrPc 21 Funk 4 / 4 4 107 :
DrPc 22 FunkRock 4 / 4 4 95 :
DrPc 23 JazzFunk 4 / 4 4 120 :
DrPc 24 SlowEasy 4 / 4 4 72 :
DrPc 25 ClubJazz 4 / 4 4 125 :
DrPc 26 PopShuff 4 / 4 4 94 :
DrPc 27 GosplFnk 4 / 4 4 106 :
DrPc 28 StdDisco 4 / 4 4 120 :
DrPc 29 PhilyDsc 4 / 4 2 100 :
DrPc 30 ChartPop 4 / 4 4 92 Hip Hop 1
DrPc 31 New R&B 4 / 4 1 97 :
DrPc 32 Smooth 4 / 4 4 64 :
DrPc 33 HipHop1 4 / 4 2 94 :
DrPc 34 HipHop2 4 / 4 2 105 :
DrPc 35 HipHop3 4 / 4 2 104 R&B Kit 1
DrPc 36 Hip Rock 4 / 4 4 132 :
DrPc 37 Regeton 4 / 4 4 98 Hip Hop 1
DrPc 38 RegetnPc 4 / 4 4 98 Perccussion
DrPc 39 SoulBeat 4 / 4 4 124 Stereo GM
DrPc 40 SoulShuf 4 / 4 4 98 :
DrPc 41 Big Beat 4 / 4 4 115 RockSt2
DrPc 42 Breakbt 4 / 4 4 115 Tekno Kit
DrPc 43 Lo Beat 4 / 4 2 140 R&B Kit 1
DrPc 44 DrumnBas 4 / 4 2 154 :
DrPc 45 Techno 4 / 4 8 135 Tekno Kit
DrPc 46 Trance 4 / 4 4 140 :
DrPc 47 DreamDnc 4 / 4 4 136 :
DrPc 48 Ibiza 4 / 4 2 135 R&B Kit 1
DrPc 49 EuroTeck 4 / 4 2 140 Tekno Kit
DrPc 50 Club Hus 4 / 4 2 128 R&B Kit 1
DrPc 51 House 4 / 4 2 123 :
DrPc 52 Garage 4 / 4 2 127 Tekno Kit
DrPc 53 AcoJazz 4 / 4 4 204 Jazz Kit
DrPc 54 ModernJz 4 / 4 16 218 :
DrPc 55 ShfBlues 4 / 4 4 115 Stereo GM
DrPc 56 SlwBlues 4 / 4 2 49 :
DrPc 57 PnBoogie 4 / 4 8 160 :
DrPc 58 Reggae 4 / 4 4 102 :
DrPc 59 ReggeShf 4 / 4 4 90 :
DrPc 60 Salsa 4 / 4 2 123 :
DrPc 61 SalsaPc 4 / 4 4 123 :
DrPc 62 Samba 4 / 4 4 120 :
DrPc 63 SambaPc 4 / 4 4 120 :
DrPc 64 Bossa 4 / 4 4 124 :
DrPc 65 BossaPc 4 / 4 4 124 :
DrPc 66 Spanish 4 / 4 2 120 :
CPrc 67 R&B Dsc 4 / 4 2 110 Vibes
CPrc 68 Trance 4 / 4 4 140 Marimba
CPrc 69 Ethnic1 6 / 4 5 118 Celeste
CPrc 70 Ethnic2 7 / 4 3 120 Music Box
CPrc 71 MOD 4 / 4 2 120 Glocken
CPrc 72 Trill 4 / 4 1 120 Marimba
Bass 73 CntmpRk1 4 / 4 4 126 Pick Bass
Bass 74 CntmpRk2 4 / 4 4 126 :
Bass 75 StndRck1 4 / 4 4 131 FingerBass
Bass 76 StndRck2 4 / 4 4 131 :
Bass 77 PowerRk1 4 / 4 4 120 Pick Bass
Bass 78 PowerRk2 4 / 4 4 120 :
Bass 79 AlternRk 4 / 4 4 100 FingerBass
Bass 80 XoverRk 4 / 4 1 100 :
Bass 81 Rck&Roll 4 / 4 4 172 Pick Bass
Bass 82 GuitrPp1 4 / 4 2 90 FingerBass
Bass 83 GuitrPp2 4 / 4 4 100 Pick Bass
Bass 84 Unpluggd 4 / 4 4 113 Acoustic
Bass 85 FingrPck 4 / 4 1 120 FingerBass
Bass 86 Brit Pop 4 / 4 2 86 :
Bass 87 EP Balld 4 / 4 2 60 :
Bass 88 8BtBasic 4 / 4 4 120 :
Bass 89 8BtSoft 4 / 4 4 100 :
Bass 90 16BtBlld 4 / 4 4 75 :
Bass 91 16Bt Pop 4 / 4 4 103 SimpleSlap
Bass 92 6/8 Pop 4 / 4 4 100 FingerBass
Bass 93 6/8Balld 4 / 4 2 58 :
Bass 94 FingrBs1 4 / 4 1 115 :
Bass 95 FingrBs2 4 / 4 3 115 :
Bass 96 FingrBs3 4 / 4 2 150 :
Bass 97 FingrBs4 4 / 4 2 89 :
Bass 98 FingrBs5 4 / 4 1 115 :
Bass 99 SlapBass 4 / 4 3 120 SimpleSlap
Bass 100 FunkRock 4 / 4 4 95 FingerBass
Category Arp. No.
Arp. Name
Time Signature Length Original
TempoInstrument
Type
Owner’s Manual
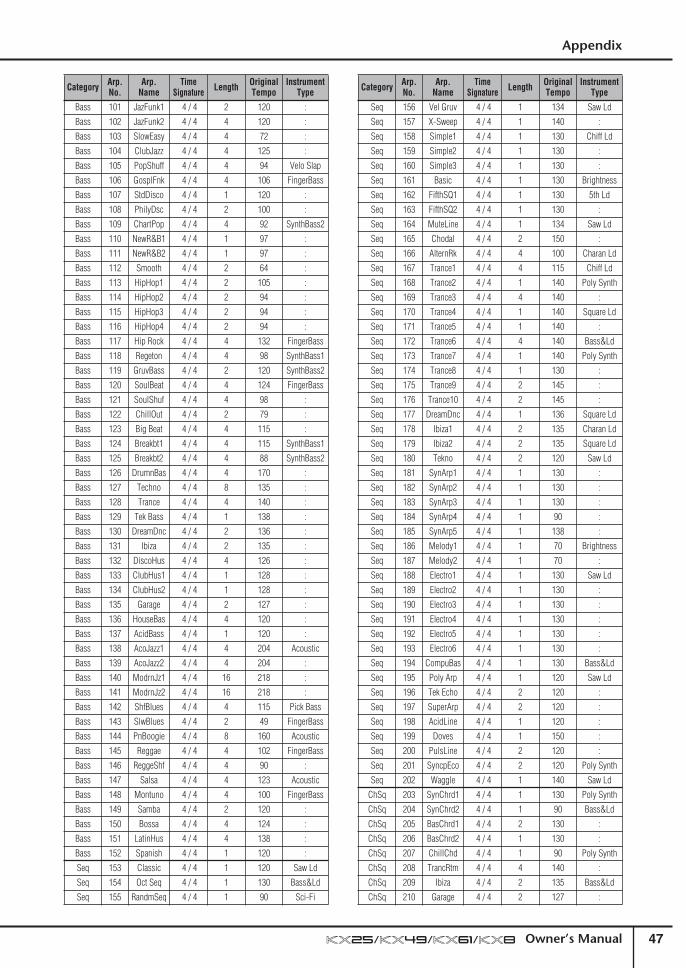
Appendix
Bass 101 JazFunk1 4 / 4 2 120 :
Bass 102 JazFunk2 4 / 4 4 120 :
Bass 103 SlowEasy 4 / 4 4 72 :
Bass 104 ClubJazz 4 / 4 4 125 :
Bass 105 PopShuff 4 / 4 4 94 Velo Slap
Bass 106 GosplFnk 4 / 4 4 106 FingerBass
Bass 107 StdDisco 4 / 4 1 120 :
Bass 108 PhilyDsc 4 / 4 2 100 :
Bass 109 ChartPop 4 / 4 4 92 SynthBass2
Bass 110 NewR&B1 4 / 4 1 97 :
Bass 111 NewR&B2 4 / 4 1 97 :
Bass 112 Smooth 4 / 4 2 64 :
Bass 113 HipHop1 4 / 4 2 105 :
Bass 114 HipHop2 4 / 4 2 94 :
Bass 115 HipHop3 4 / 4 2 94 :
Bass 116 HipHop4 4 / 4 2 94 :
Bass 117 Hip Rock 4 / 4 4 132 FingerBass
Bass 118 Regeton 4 / 4 4 98 SynthBass1
Bass 119 GruvBass 4 / 4 2 120 SynthBass2
Bass 120 SoulBeat 4 / 4 4 124 FingerBass
Bass 121 SoulShuf 4 / 4 4 98 :
Bass 122 ChillOut 4 / 4 2 79 :
Bass 123 Big Beat 4 / 4 4 115 :
Bass 124 Breakbt1 4 / 4 4 115 SynthBass1
Bass 125 Breakbt2 4 / 4 4 88 SynthBass2
Bass 126 DrumnBas 4 / 4 4 170 :
Bass 127 Techno 4 / 4 8 135 :
Bass 128 Trance 4 / 4 4 140 :
Bass 129 Tek Bass 4 / 4 1 138 :
Bass 130 DreamDnc 4 / 4 2 136 :
Bass 131 Ibiza 4 / 4 2 135 :
Bass 132 DiscoHus 4 / 4 4 126 :
Bass 133 ClubHus1 4 / 4 1 128 :
Bass 134 ClubHus2 4 / 4 1 128 :
Bass 135 Garage 4 / 4 2 127 :
Bass 136 HouseBas 4 / 4 4 120 :
Bass 137 AcidBass 4 / 4 1 120 :
Bass 138 AcoJazz1 4 / 4 4 204 Acoustic
Bass 139 AcoJazz2 4 / 4 4 204 :
Bass 140 ModrnJz1 4 / 4 16 218 :
Bass 141 ModrnJz2 4 / 4 16 218 :
Bass 142 ShfBlues 4 / 4 4 115 Pick Bass
Bass 143 SlwBlues 4 / 4 2 49 FingerBass
Bass 144 PnBoogie 4 / 4 8 160 Acoustic
Bass 145 Reggae 4 / 4 4 102 FingerBass
Bass 146 ReggeShf 4 / 4 4 90 :
Bass 147 Salsa 4 / 4 4 123 Acoustic
Bass 148 Montuno 4 / 4 4 100 FingerBass
Bass 149 Samba 4 / 4 2 120 :
Bass 150 Bossa 4 / 4 4 124 :
Bass 151 LatinHus 4 / 4 4 138 :
Bass 152 Spanish 4 / 4 1 120 :
Seq 153 Classic 4 / 4 1 120 Saw Ld
Seq 154 Oct Seq 4 / 4 1 130 Bass&Ld
Seq 155 RandmSeq 4 / 4 1 90 Sci-Fi
Category Arp. No.
Arp. Name
Time Signature Length Original
TempoInstrument
Type
Seq 156 Vel Gruv 4 / 4 1 134 Saw Ld
Seq 157 X-Sweep 4 / 4 1 140 :
Seq 158 Simple1 4 / 4 1 130 Chiff Ld
Seq 159 Simple2 4 / 4 1 130 :
Seq 160 Simple3 4 / 4 1 130 :
Seq 161 Basic 4 / 4 1 130 Brightness
Seq 162 FifthSQ1 4 / 4 1 130 5th Ld
Seq 163 FifthSQ2 4 / 4 1 130 :
Seq 164 MuteLine 4 / 4 1 134 Saw Ld
Seq 165 Chodal 4 / 4 2 150 :
Seq 166 AlternRk 4 / 4 4 100 Charan Ld
Seq 167 Trance1 4 / 4 4 115 Chiff Ld
Seq 168 Trance2 4 / 4 1 140 Poly Synth
Seq 169 Trance3 4 / 4 4 140 :
Seq 170 Trance4 4 / 4 1 140 Square Ld
Seq 171 Trance5 4 / 4 1 140 :
Seq 172 Trance6 4 / 4 4 140 Bass&Ld
Seq 173 Trance7 4 / 4 1 140 Poly Synth
Seq 174 Trance8 4 / 4 1 130 :
Seq 175 Trance9 4 / 4 2 145 :
Seq 176 Trance10 4 / 4 2 145 :
Seq 177 DreamDnc 4 / 4 1 136 Square Ld
Seq 178 Ibiza1 4 / 4 2 135 Charan Ld
Seq 179 Ibiza2 4 / 4 2 135 Square Ld
Seq 180 Tekno 4 / 4 2 120 Saw Ld
Seq 181 SynArp1 4 / 4 1 130 :
Seq 182 SynArp2 4 / 4 1 130 :
Seq 183 SynArp3 4 / 4 1 130 :
Seq 184 SynArp4 4 / 4 1 90 :
Seq 185 SynArp5 4 / 4 1 138 :
Seq 186 Melody1 4 / 4 1 70 Brightness
Seq 187 Melody2 4 / 4 1 70 :
Seq 188 Electro1 4 / 4 1 130 Saw Ld
Seq 189 Electro2 4 / 4 1 130 :
Seq 190 Electro3 4 / 4 1 130 :
Seq 191 Electro4 4 / 4 1 130 :
Seq 192 Electro5 4 / 4 1 130 :
Seq 193 Electro6 4 / 4 1 130 :
Seq 194 CompuBas 4 / 4 1 130 Bass&Ld
Seq 195 Poly Arp 4 / 4 1 120 Saw Ld
Seq 196 Tek Echo 4 / 4 2 120 :
Seq 197 SuperArp 4 / 4 2 120 :
Seq 198 AcidLine 4 / 4 1 120 :
Seq 199 Doves 4 / 4 1 150 :
Seq 200 PulsLine 4 / 4 2 120 :
Seq 201 SyncpEco 4 / 4 2 120 Poly Synth
Seq 202 Waggle 4 / 4 1 140 Saw Ld
ChSq 203 SynChrd1 4 / 4 1 130 Poly Synth
ChSq 204 SynChrd2 4 / 4 1 90 Bass&Ld
ChSq 205 BasChrd1 4 / 4 2 130 :
ChSq 206 BasChrd2 4 / 4 1 130 :
ChSq 207 ChillChd 4 / 4 1 90 Poly Synth
ChSq 208 TrancRtm 4 / 4 4 140 :
ChSq 209 Ibiza 4 / 4 2 135 Bass&Ld
ChSq 210 Garage 4 / 4 2 127 :
Category Arp. No.
Arp. Name
Time Signature Length Original
TempoInstrument
Type
Owner’s Manual 47

Appendix
48
ChSq 211 Syncopat 4 / 4 2 120 Saw Ld
HySq 212 Hybrid1 4 / 4 1 130 :
HySq 213 Hybrid2 4 / 4 1 95 :
HySq 214 Hybrid3 4 / 4 1 130 :
HySq 215 Hybrid4 4 / 4 1 130 Bass&Ld
HySq 216 Hybrid5 4 / 4 1 106 :
ApKb 217 Pf Arp1 4 / 4 2 64 Acoustic Piano
ApKb 218 Pf Arp2 4 / 4 2 74 :
ApKb 219 Pf Arp3 4 / 4 2 130 :
ApKb 220 Pf Arp4 4 / 4 1 116 :
ApKb 221 Pf Arp5 4 / 4 1 82 :
ApKb 222 Pf Arp6 4 / 4 2 130 :
ApKb 223 Pf Arp7 4 / 4 2 130 :
ApKb 224 Pf Arp8 4 / 4 1 74 :
ApKb 225 70sRock1 4 / 4 2 130 :
ApKb 226 70sRock2 4 / 4 4 130 :
ApKb 227 EP Balld 4 / 4 2 60 E_Piano 1
ApKb 228 Slowfeel 4 / 4 1 74 :
ApKb 229 16Bt Pop 4 / 4 4 103 :
ApKb 230 AnalgPop 4 / 4 2 93 :
ApKb 231 ClubJazz 4 / 4 4 125 Acoustic Piano
ApKb 232 ChartPop 4 / 4 1 92 E_Piano 1
ApKb 233 Swing EP 4 / 4 1 101 :
ApKb 234 6/8 R&B 4 / 4 2 61 :
ApKb 235 HipHop1 4 / 4 2 105 :
ApKb 236 HipHop2 4 / 4 2 105 :
ApKb 237 HipHop3 4 / 4 2 105 Harpsichord
ApKb 238 Clavi1 4 / 4 1 110 Brite Clav
ApKb 239 Clavi2 4 / 4 1 110 :
ApKb 240 Clavi3 4 / 4 1 124 :
ApKb 241 DrumnBas 4 / 4 4 170 E_Piano 1
ApKb 242 ClubHus 4 / 4 2 128 :
ApKb 243 HousePf 4 / 4 2 130 Rock Piano
ApKb 244 Reggae 4 / 4 2 92 Brite Clav
ApKb 245 Salsa 4 / 4 1 123 Rock Piano
ApKb 246 Montuno 4 / 4 2 100 :
ApKb 247 PnoLatin 4 / 4 2 120 :
Orgn 248 HouseOrg 4 / 4 1 130 Perc Organ
Orgn 249 Reggae 4 / 4 1 92 Draw Organ
Orgn 250 LatinOrg 4 / 4 1 110 Rock Organ
GtPl 251 Strum1 4 / 4 2 120 Steel
GtPl 252 Strum2 4 / 4 2 120 :
GtPl 253 Strum3 4 / 4 2 120 :
GtPl 254 SteelGtr 4 / 4 4 120 :
GtPl 255 GtrArp1 4 / 4 1 120 :
GtPl 256 GtrArp2 4 / 4 1 120 :
GtPl 257 OvdrGtr1 4 / 4 4 120 Overdrive
GtPl 258 OvdrGtr2 4 / 4 4 120 :
GtPl 259 OvdrGtr3 4 / 4 4 120 :
GtPl 260 OvdrGtr4 4 / 4 4 120 :
GtPl 261 ContmpRk 4 / 4 4 126 :
GtPl 262 StndRck1 4 / 4 4 131 :
GtPl 263 StndRck2 4 / 4 4 131 :
GtPl 264 PowerRk1 4 / 4 4 120 Distortion
GtPl 265 PowerRk2 4 / 4 4 120 :
Category Arp. No.
Arp. Name
Time Signature Length Original
TempoInstrument
Type
GtPl 266 PowerRk3 4 / 4 4 120 :
GtPl 267 AlterRk1 4 / 4 4 97 Overdrive
GtPl 268 AlterRk2 4 / 4 4 97 :
GtPl 269 XoverRk1 4 / 4 2 100 :
GtPl 270 XoverRk2 4 / 4 2 100 Distortion
GtPl 271 Rck&Roll 4 / 4 4 172 Clean
GtPl 272 GuitrPp1 4 / 4 2 90 Nylon
GtPl 273 GuitrPp2 4 / 4 1 90 :
GtPl 274 GuitrPp3 4 / 4 4 100 Steel
GtPl 275 GuitrPp4 4 / 4 4 100 Clean
GtPl 276 GuitrPp5 4 / 4 1 90 Nylon
GtPl 277 Unplug1 4 / 4 4 120 Steel
GtPl 278 Unplug2 4 / 4 2 120 :
GtPl 279 Unplug3 4 / 4 2 120 :
GtPl 280 FingrPk1 4 / 4 2 120 :
GtPl 281 FingrPk2 4 / 4 2 120 :
GtPl 282 BritPop1 4 / 4 2 86 :
GtPl 283 BritPop2 4 / 4 2 86 Clean
GtPl 284 EP Balld 4 / 4 2 60 :
GtPl 285 8BtBasic 4 / 4 4 120 :
GtPl 286 8BtSoft 4 / 4 4 100 Steel
GtPl 287 16BtBlld 4 / 4 4 75 Clean
GtPl 288 6/8 Pop 4 / 4 4 100 :
GtPl 289 6/8Balld 4 / 4 2 58 :
GtPl 290 Funky1 4 / 4 2 120 :
GtPl 291 Funky2 4 / 4 2 120 :
GtPl 292 Funky3 4 / 4 1 120 :
GtPl 293 CleanGt1 4 / 4 4 107 :
GtPl 294 CleanGt2 4 / 4 2 120 :
GtPl 295 CleanGt3 4 / 4 2 120 :
GtPl 296 CleanGt4 4 / 4 4 127 :
GtPl 297 CleanGt5 4 / 4 4 107 :
GtPl 298 Spanky 4 / 4 2 105 :
GtPl 299 FunkRock 4 / 4 4 94 :
GtPl 300 JazzFunk 4 / 4 4 120 :
GtPl 301 SlowEasy 4 / 4 4 72 :
GtPl 302 GosplFnk 4 / 4 4 106 :
GtPl 303 PopShuff 4 / 4 4 94 :
GtPl 304 StdDisco 4 / 4 4 120 :
GtPl 305 PhilyDsc 4 / 4 2 100 :
GtPl 306 New R&B 4 / 4 1 97 Steel
GtPl 307 Smooth 4 / 4 2 64 Nylon
GtPl 308 HipHop1 4 / 4 2 94 Mute
GtPl 309 HipHop2 4 / 4 2 94 :
GtPl 310 HipRock1 4 / 4 4 90 Overdrive
GtPl 311 HipRock2 4 / 4 4 132 :
GtPl 312 SoulBeat 4 / 4 4 124 Clean
GtPl 313 SoulShuf 4 / 4 4 98 :
GtPl 314 Big Beat 4 / 4 4 115 Overdrive
GtPl 315 AcoJazz 4 / 4 4 204 ModernJazz
GtPl 316 ModernJz 4 / 4 16 218 :
GtPl 317 ShfBlues 4 / 4 4 115 Mute
GtPl 318 SlwBlues 4 / 4 2 49 Overdrive
GtPl 319 PnBoogie 4 / 4 4 160 Clean
GtPl 320 Reggae 4 / 4 2 102 :
Category Arp. No.
Arp. Name
Time Signature Length Original
TempoInstrument
Type
Owner’s Manual

Appendix
GtPl 321 ReggeShf 4 / 4 4 90 :
GtPl 322 Samba 4 / 4 4 120 Nylon
GtPl 323 Bossa 4 / 4 4 124 :
GtPl 324 Spanish1 4 / 4 2 120 :
GtPl 325 Spanish2 4 / 4 2 120 Steel
GtPl 326 Lick1 4 / 4 4 120 Distortion
GtPl 327 Lick2 4 / 4 4 120 :
GtPl 328 Lick3 4 / 4 2 120 :
GtPl 329 Lick4 4 / 4 4 120 :
GtPl 330 Lick5 4 / 4 1 120 :
Strn 331 Strings 4 / 4 1 101 StereoSt1
Strn 332 New R&B 4 / 4 2 90 :
Strn 333 Pizz 4 / 4 1 120 Pizz
Bras 334 Funk1 4 / 4 4 132 Brass Sect
Bras 335 Funk2 4 / 4 1 132 :
Bras 336 Samba 4 / 4 2 120 :
RdPp 337 Hip Hop 4 / 4 2 105 TenorSax 2
RdPp 338 Soul 4 / 4 4 120 :
RdPp 339 Flutter 4 / 4 1 120 :
Lead 340 R&B Dsc1 4 / 4 1 110 Bass&Ld
Lead 341 R&B Dsc2 4 / 4 2 110 :
Lead 342 Regeton 4 / 4 4 98 Caliop Ld
Category Arp. No.
Arp. Name
Time Signature Length Original
TempoInstrument
Type
Owner’s Manual 49

MIDI Implementation Chart
50
MIDI Implementation Chart
Note
Number
: True voice
**************
0 - 127
x x
Memorized
YAMAHA
[ USB KEYBOARD STUDIO ]
Date :10-JAN-2008
Model KX25/KX49/KX61/KX8 MIDI Implementation Chart
Version : 1.0
Function...
Transmitted
Recognized
Remarks
Basic
Default
Channel
Changed
1 - 16
x x1 - 16
Default
Mode
Messages
Altered
3 x **************
x x x
Velocity
Note ON
Note OFF
o 9nH,v=1-127
o 8nH,v=0
x
x
After
Touch
Key's
Ch's
x
x
x x
Pitch Bend
ox
Control
Change
0,32
1,7,10,11
6,38646566
71-75
91,93
96-97
100-101
0-127
o o o o o o o o o o o
x x x x x x x x x x x
Bank Select
Data Entry
Sustain Sw
Portamento Sw
Sostenuto
Sound Controller
Effect Depth
RPN Inc,Dec
RPN LSB,MSB
Assignable Cntrl
Owner’s Manual

MIDI Implementation Chart
Prog
Change
: True #
o 0 - 127
x
**************
System Exclusive
oo
Common
: Song Pos.
: Song Sel.
: Tune
x x x
x x x
System
Real Time
: Clock
: Commands
o x
o x
: Reset All Cntrls
: All Sound Off
x xx x
Mode 1 : OMNI ON, POLY
Mode 2 : OMNI ON, MONO
o : Yes
Mode 3 : OMNI OFF, POLY
Mode 4 : OMNI OFF, MONO
x : No
Aux
Messages
: Local ON/OFF
: All Notes OFF
: Active Sense
: Reset
x x o x
x x x x
Owner’s Manual 51

Index
52
AAC power adaptor .....................................................9ADD INSTRUMENT TRACK................................10, 19ARP EDIT ..........................................................10, 33ARP ON/OFF .....................................................10, 20Arpeggio .................................................................31Arpeggio type .........................................................46ASSIGN 1..........................................................25, 34ASSIGN 2..........................................................25, 34Auto ........................................................................36
BBeatStretch .............................................................33BulkTransmit ...........................................................37
CClock ......................................................................36Control Change .......................................................29CONTROL knobs...............................................10, 24CONTROL TEMPLATE.......................................10, 28Control Template .....................................................28Cubase ...................................................................17Cubase AI4 .............................................................13CUBASE FUNCTION .........................................11, 23Cursor ...............................................................11, 25
DDATA ..........................................................10, 17, 31DAW Select .......................................................34, 37DC IN connector..................................................9, 11Device Number .......................................................37Display..............................................................10, 26Display Time ...........................................................37
EENTER ........................................................11, 25, 34ESC.............................................................11, 25, 34EXIT ........................................................................10Extensions for Steinberg DAW .................................13External...................................................................36
FFactory Set ..............................................................37Fast forward ......................................................25, 34Fix.....................................................................27, 36Footswitch...............................................................16
GGateTime................................................................ 33
HHard1 ............................................................... 27, 36Hard2 ............................................................... 27, 36HOLD ............................................................... 10, 21
IInstallation .............................................................. 13Internal ................................................................... 36
KKnob....................................................................... 24Knob Functions Select button.................................. 10KX Editor................................................................... 6
MMIDI........................................................................ 37MIDI IN ................................................................... 11MIDI OUT................................................................ 11MIDI port................................................................. 18MIDI Select ............................................................. 37MIDI Thru.......................................................... 37, 38MIDI Transmit Ch .................................................... 37Modulation wheel .................................................... 11MUTE ..................................................................... 25
NNormal.............................................................. 27, 36
OOCTAVE ........................................................... 10, 27Octave LED ............................................................ 37OctRange ............................................................... 33
PPC+Remot .............................................................. 37Pitch Bend wheel .................................................... 11Play .................................................................. 25, 34Power Supply............................................................ 9ProgChg ................................................................. 37ProgChgMode ........................................................ 37PROGRAM........................................................ 11, 34
Index
Owner’s Manual

Index
RREC ..................................................................25, 34Record ..............................................................25, 34Remote ...................................................................37Repeat on/off.....................................................25, 34Rewind..............................................................25, 34
SSELECT.............................................................10, 26Soft1 .................................................................27, 36Soft2 .................................................................27, 36SOLO................................................................25, 34STANDBY/ON......................................................9, 11Stop ..................................................................25, 34SUSTAIN...........................................................11, 16Swing......................................................................33SwingValue .............................................................33Sync........................................................................36
TTEMPO....................................................................10Tempo...............................................................32, 36TOOLS for KX..........................................................13Top display .............................................................26TRACK (Track Control buttons) ..........................11, 25TRANSPORT (Trasnport Control buttons) ...........11, 25
UUSB ........................................................................37USB bus-powered device..........................................9USB MIDI port .........................................................18USB TO HOST.........................................................11USB-MIDI Driver ......................................................13UTILITY .............................................................10, 36
VVELOCITY CURVE.............................................10, 27Velocity Curve .........................................................27VeloCurve ...............................................................36VeloFix ....................................................................36VSTi ........................................................................19VSTi Remote............................................................29VSTi WINDOW...................................................10, 34
Owner’s Manual 53
54
MEMO
Owner’s Manual

For details of products, please contact your nearest Yamaha representative or the authorized distributor listed below.
CANADAYamaha Canada Music Ltd.135 Milner Avenue, Scarborough, Ontario,M1S 3R1, CanadaTel: 416-298-1311
U.S.A.Yamaha Corporation of America 6600 Orangethorpe Ave., Buena Park, Calif. 90620, U.S.A.Tel: 714-522-9011
MEXICOYamaha de México S.A. de C.V.Calz. Javier Rojo Gómez #1149,Col. Guadalupe del MoralC.P. 09300, México, D.F., MéxicoTel: 55-5804-0600
BRAZILYamaha Musical do Brasil Ltda.Rua Joaquim Floriano, 913 - 4' andar, Itaim Bibi, CEP 04534-013 Sao Paulo, SP. BRAZILTel: 011-3704-1377
ARGENTINAYamaha Music Latin America, S.A. Sucursal de ArgentinaOlga Cossettini 1553, Piso 4 NorteMadero Este-C1107CEKBuenos Aires, ArgentinaTel: 011-4119-7000
PANAMA AND OTHER LATIN AMERICAN COUNTRIES/CARIBBEAN COUNTRIES
Yamaha Music Latin America, S.A.Torre Banco General, Piso 7, Urbanización Marbella, Calle 47 y Aquilino de la Guardia, Ciudad de Panamá, Panamá Tel: +507-269-5311
THE UNITED KINGDOMYamaha Music U.K. Ltd.Sherbourne Drive, Tilbrook, Milton Keynes, MK7 8BL, EnglandTel: 01908-366700
IRELANDDanfay Ltd.61D, Sallynoggin Road, Dun Laoghaire, Co. DublinTel: 01-2859177
GERMANYYamaha Music Central Europe GmbHSiemensstraße 22-34, 25462 Rellingen, GermanyTel: 04101-3030
SWITZERLAND/LIECHTENSTEINYamaha Music Central Europe GmbH, Branch SwitzerlandSeefeldstrasse 94, 8008 Zürich, SwitzerlandTel: 01-383 3990
AUSTRIAYamaha Music Central Europe GmbH, Branch AustriaSchleiergasse 20, A-1100 Wien, AustriaTel: 01-60203900
CZECH REPUBLIC/SLOVAKIA/HUNGARY/SLOVENIA
Yamaha Music Central Europe GmbH, Branch Austria, CEE DepartmentSchleiergasse 20, A-1100 Wien, Austria Tel: 01-602039025
POLANDYamaha Music Central Europe GmbH Sp.z. o.o. Oddzial w Polsceul. 17 Stycznia 56, PL-02-146 Warszawa, PolandTel: 022-868-07-57
THE NETHERLANDS/BELGIUM/LUXEMBOURG
Yamaha Music Central Europe GmbH, Branch Benelux Clarissenhof 5-b, 4133 AB Vianen, The Netherlands Tel: 0347-358 040
FRANCEYamaha Musique France BP 70-77312 Marne-la-Vallée Cedex 2, FranceTel: 01-64-61-4000
ITALYYamaha Musica Italia S.P.A. Combo DivisionViale Italia 88, 20020 Lainate (Milano), Italy Tel: 02-935-771
SPAIN/PORTUGALYamaha Música Ibérica, S.A.Ctra. de la Coruna km. 17, 200, 28230 Las Rozas (Madrid), SpainTel: 91-639-8888
GREECEPhilippos Nakas S.A. The Music House147 Skiathou Street, 112-55 Athens, GreeceTel: 01-228 2160
SWEDENYamaha Scandinavia ABJ. A. Wettergrens Gata 1, Box 30053S-400 43 Göteborg, SwedenTel: 031 89 34 00
DENMARKYS Copenhagen Liaison OfficeGeneratorvej 6A, DK-2730 Herlev, DenmarkTel: 44 92 49 00
FINLANDF-Musiikki OyKluuvikatu 6, P.O. Box 260, SF-00101 Helsinki, FinlandTel: 09 618511
NORWAYNorsk filial av Yamaha Scandinavia AB Grini Næringspark 1, N-1345 Østerås, Norway Tel: 67 16 77 70
ICELANDSkifan HFSkeifan 17 P.O. Box 8120, IS-128 Reykjavik, Ice-landTel: 525 5000
RUSSIAYamaha Music (Russia)Office 4015, entrance 2, 21/5 Kuznetskii Most street, Moscow, 107996, RussiaTel: 495 626 0660
OTHER EUROPEAN COUNTRIESYamaha Music Central Europe GmbHSiemensstraße 22-34, 25462 Rellingen, GermanyTel: +49-4101-3030
Yamaha Corporation, Asia-Pacific Music Marketing GroupNakazawa-cho 10-1, Naka-ku, Hamamatsu, Japan 430-8650Tel: +81-53-460-2312
TURKEY/CYPRUSYamaha Music Central Europe GmbHSiemensstraße 22-34, 25462 Rellingen, GermanyTel: 04101-3030
OTHER COUNTRIESYamaha Music Gulf FZELOB 16-513, P.O.Box 17328, Jubel Ali, Dubai, United Arab EmiratesTel: +971-4-881-5868
THE PEOPLE’S REPUBLIC OF CHINAYamaha Music & Electronics (China) Co.,Ltd.25/F., United Plaza, 1468 Nanjing Road (West),Jingan, Shanghai, ChinaTel: 021-6247-2211
HONG KONGTom Lee Music Co., Ltd.11/F., Silvercord Tower 1, 30 Canton Road,Tsimshatsui, Kowloon, Hong KongTel: 2737-7688
INDIAYamaha Music India Pvt. Ltd.5F Ambience Corporate Tower Ambience Mall ComplexAmbience Island, NH-8, Gurgaon-122001, Haryana, IndiaTel: 0124-466-5551
INDONESIAPT. Yamaha Music Indonesia (Distributor)PT. NusantikGedung Yamaha Music Center, Jalan Jend. Gatot Subroto Kav. 4, Jakarta 12930, IndonesiaTel: 21-520-2577
KOREAYamaha Music Korea Ltd.8F, 9F, Dongsung Bldg. 158-9 Samsung-Dong, Kangnam-Gu, Seoul, KoreaTel: 080-004-0022
MALAYSIAYamaha Music Malaysia, Sdn., Bhd.Lot 8, Jalan Perbandaran, 47301 Kelana Jaya, Petaling Jaya, Selangor, MalaysiaTel: 3-78030900
PHILIPPINESYupangco Music Corporation339 Gil J. Puyat Avenue, P.O. Box 885 MCPO, Makati, Metro Manila, PhilippinesTel: 819-7551
SINGAPOREYamaha Music Asia Pte., Ltd.#03-11 A-Z Building140 Paya Lebor Road, Singapore 409015Tel: 747-4374
TAIWANYamaha KHS Music Co., Ltd. 3F, #6, Sec.2, Nan Jing E. Rd. Taipei.Taiwan 104, R.O.C.Tel: 02-2511-8688
THAILANDSiam Music Yamaha Co., Ltd.4, 6, 15 and 16th floor, Siam Motors Building, 891/1 Rama 1 Road, Wangmai, Pathumwan, Bangkok 10330, ThailandTel: 02-215-2626
OTHER ASIAN COUNTRIES Yamaha Corporation,Asia-Pacific Music Marketing GroupNakazawa-cho 10-1, Naka-ku, Hamamatsu, Japan 430-8650Tel: +81-53-460-2317
AUSTRALIAYamaha Music Australia Pty. Ltd.Level 1, 99 Queensbridge Street, Southbank, Victoria 3006, AustraliaTel: 3-9693-5111
NEW ZEALANDMusic Works LTDP.O.BOX 6246 Wellesley, Auckland 4680, New ZealandTel: 9-634-0099
COUNTRIES AND TRUST TERRITORIES IN PACIFIC OCEAN
Yamaha Corporation,Asia-Pacific Music Marketing GroupNakazawa-cho 10-1, Naka-ku, Hamamatsu, Japan 430-8650Tel: +81-53-460-2312
NORTH AMERICA
CENTRAL & SOUTH AMERICA
EUROPE
AFRICA
MIDDLE EAST
ASIA
OCEANIA
HEAD OFFICE Yamaha Corporation, Pro Audio & Digital Musical Instrument DivisionNakazawa-cho 10-1, Naka-ku, Hamamatsu, Japan 430-8650Tel: +81-53-460-2445
SY46

Yamaha Web Site (English only)http://www.yamahasynth.com/
Yamaha Manual Libraryhttp://www.yamaha.co.jp/manual/
U.R.G., Pro Audio & Digital Musical Instrument Division, Yamaha Corporation© 2008 Yamaha Corporation
8??APTY?.?-??C0Printed in China
WQ82380