Embed Size (px)
Citation preview
3
SET 4
1
5
2
Using the app
Using the unit
Appendix
Cover, Introduction
C A T E Y E PADRONE D I G I TA L
CYCLOCOMPUTERCC-PA400B
The Bluetooth® word mark and logos are registered trademarks owned by Bluetooth SIG, Inc. and any use of such marks by CATEYE Co., Ltd. is under license. Other trademarks and trade names are those of their respective owners.
1
• This instruction manual is subject to change without notice.
• Please visit our website, where a detailed Quick Start manual containing videos can be downloaded.
https://www.cateye.com/instruction/?id=CC-PA400B
Setting up the PADRONE DIGITAL
Smartphone
PADRONE DIGITAL
Mounting the PADRONE DIGITAL
Introduction
Starting measurement
Changing settings
Capabilities with a smart-phone (Cateye Cycling™)
Warning / CautionProduct Warranty, etc.

3
SET 4
1
5
2
Using the app
Using the unit
Appendix
Cover, Introduction
2
The PADRONE DIGITAL is a cyclocomputer that uses Bluetooth® SMART sensors. In addition to the included sensors, optional or commercial sensors can also be connected for use.
Mounting the PADRONE DIGITAL
• Mount the bracket (Page 3)
• Mounting the speed/cadence sensor (ISC-12) (Page 5)
• Wearing the heart rate sensor (HR-12) Optional (Page 9)
* For detailed explanations on how to use CATEYE sensors such as mounting, or pairing, see the sensor’s Online Manual (on our website) or the Quick Start Manual (PDF/smart-phone app).
Setting up the PADRONE DIGITAL
The first time that you use this product, perform the initial setup from the PADRONE DIGITAL or from a smartphone (Cateye Cycling™).
Use the method corresponding to your device to set up the PADRONE DIGITAL. You can change the display of its measurement screen and its total distance value as necessary.
* If you have a smartphone, you can use the “Cateye Cycling™” smartphone app (free of charge) to easily set up the PADRONE DIGITAL.
• If you do not have a smartphone1. Setup with the PADRONE DIGITAL (Page 11)2. Changing settings (Page 22)
• If you have a smartphone1. Setup with a smartphone (Cateye Cycling™) (Page 15)2. Capabilities with a smartphone (Page 31)
Introduction

Cover, Introduction
3
SET 4
5
2
Using the app
Using the unit
Appendix
1/81
3
• When mounting on handlebar
Mount the bracket
The bracket can be mounted on either the stem or the handlebar.
1 Mount the bracket• When mounting on stem
Mounting the PADRONE DIGITAL
Cut
Cutting band after mounting
Caution!:
Cut the bracket band so that cut end will not cause injury.
Dial
HandlebarBracket band
Bracket
Bracket rubber pad
StemBracket band
Bracket
Bracket rubber pad
Bracket band Bracket DialBracket rubber pad

Cover, Introduction
3
SET 4
5
2
Using the app
Using the unit
Appendix
2/81
4
2 Attach/detach PADRONE DIGITAL
Mounting the PADRONE DIGITAL
Mount the bracket
Hold PADRONE DIGITAL.
Push out so that front lifts up.
Click
Cover, Introduction
3
SET 4
5
2
Using the app
Using the unit
Appendix
3/81
5
• Mounting on top of chain stay
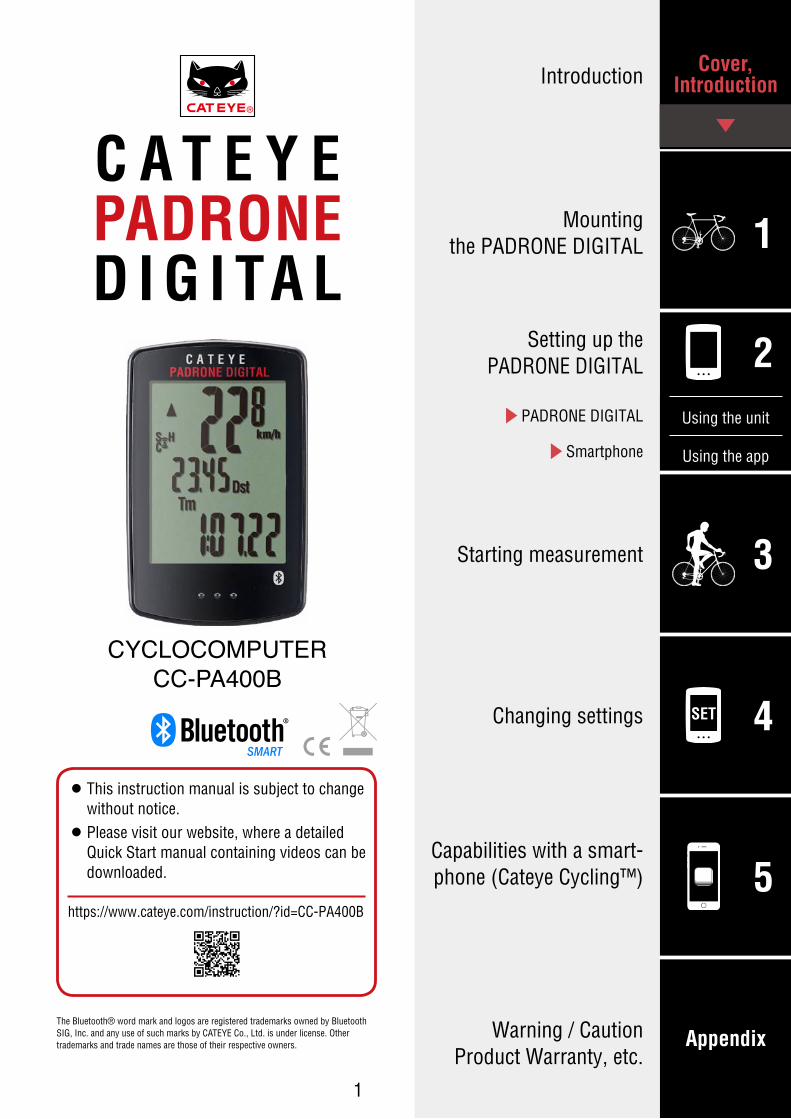
Mounting the speed/cadence sensor (ISC-12)
The speed (cadence) sensor can be mounted either on the top or bottom of the chain stay.
• Mounting on bottom of chain stay
Caution!:If the speed (cadence) sensor is mounted on the bottom of the chain stay rather than on the top, the adjustment range between the sensor and the magnet will be narrower.
* If using pedals with steel axles, the cadence magnet can be attached magnetically to the pedal axle.
* For detailed explanations on how to use CATEYE sensors such as mounting, or pair-ing, see the sensor’s Online Manual (on our website) or the Quick Start Manual (PDF/smartphone app).
* The following mounting procedure gives instructions for mounting on the top of the chain stay.
Mounting the PADRONE DIGITAL
Cadence magnet
Cadence magnet
Speed (cadence) sensor
Speed (cadence) sensor
Wheel magnet
Wheel magnet
Wheel magnet
Cadence magnetNylon tie (x5)Sensor rubber pad
Speed/Cadence sensor (ISC-12)
Cover, Introduction
3
SET 4
5
2
Using the app
Using the unit
Appendix
4/81
6
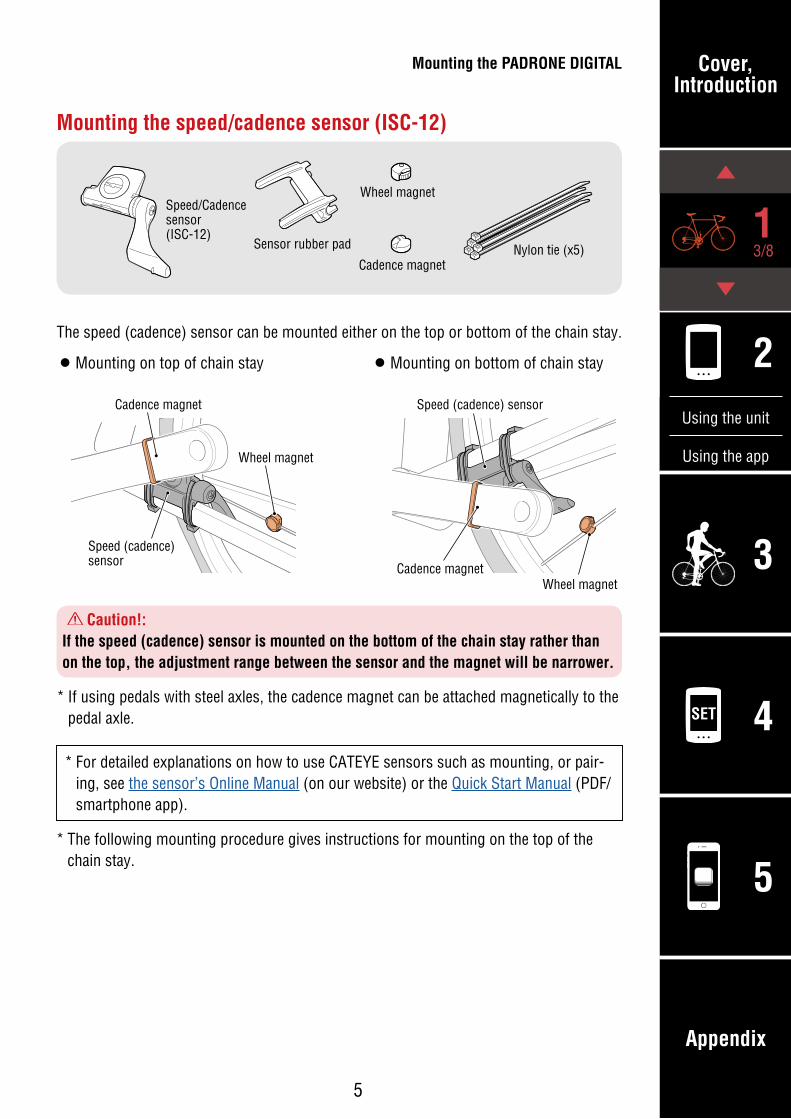
1 Temporarily attach the sensor to the left chain stay.(1) Loosen the sensor screw using a Phillips screwdriver and check that the sen-
sor arm moves.
(2) Attach the sensor rubber pad to the sensor.
Sensor rubber pad
(3) Refer to the illustration and temporarily attach the sensor to the left chain stay with nylon ties.
Caution!:Do not fully tighten the nylon ties.Once the nylon ties are fully tightened they cannot be removed.
Nylon tie
Sensor arm
Sensor screw
Left chain stay
Mounting the PADRONE DIGITAL
Mounting the speed/cadence sensor (ISC-12)

Cover, Introduction
3
SET 4
5
2
Using the app
Using the unit
Appendix
5/81
7
2 Temporarily attach the magnet.
Nylon tie
Sensor zone (CADENCE) side Sensor zone (SPEED) side
Cadence magnet Spoke
Wheel magnetSensor zone (CADENCE)
Sensor zone (SPEED)
(1) Using a nylon tie, temporarily attach the cadence magnet to the inside of the left crank arm so that it faces the cadence sensor zone.
* If using pedals with steel axles, the cadence magnet can be attached mag-netically to the pedal axle. In this case, remove the adhesive tape from the magnet and do not use the nylon tie.
(2) Rotate the sensor arm and temporarily attach the wheel magnet to a spoke facing the speed sensor zone.
* Reposition the sensor and the magnets if both magnets (speed and cadence) cannot pass through their respective sensor zones.
Mounting the PADRONE DIGITAL
Mounting the speed/cadence sensor (ISC-12)
Cover, Introduction
3
SET 4
5
2
Using the app
Using the unit
Appendix
6/81
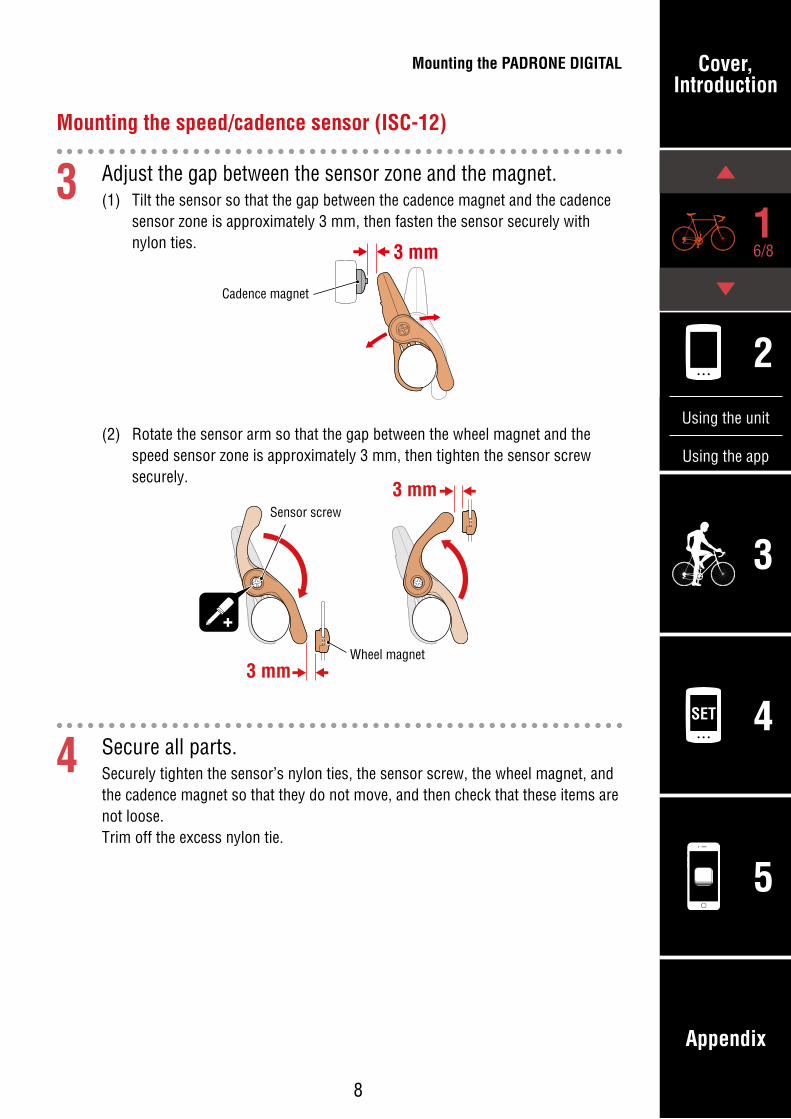
8
3 Adjust the gap between the sensor zone and the magnet.(1) Tilt the sensor so that the gap between the cadence magnet and the cadence
sensor zone is approximately 3 mm, then fasten the sensor securely with nylon ties. 3 mm
Cadence magnet
(2) Rotate the sensor arm so that the gap between the wheel magnet and the speed sensor zone is approximately 3 mm, then tighten the sensor screw securely.
3 mm
3 mm
Sensor screw
Wheel magnet
4 Secure all parts.Securely tighten the sensor’s nylon ties, the sensor screw, the wheel magnet, and the cadence magnet so that they do not move, and then check that these items are not loose.Trim off the excess nylon tie.
Mounting the PADRONE DIGITAL
Mounting the speed/cadence sensor (ISC-12)

Cover, Introduction
3
SET 4
5
2
Using the app
Using the unit
Appendix
7/81
9
Wearing the heart rate sensor (HR-12) OptionalHeart rate is measured by wearing a heart rate sensor around the chest.
Before wearing the heart rate sensor
Warning!!!: Never use this device if you use a pacemaker.
• To eliminate measurement errors, it is recommended to moisten the electrode pads with water or apply electrolyte cream to the pads.
• If you have sensitive skin, moisten the electrode pads with water and wear it over a thin shirt.
• Chest hair may interfere with measurement in some cases.
* For detailed explanations on how to use CATEYE sensors such as mounting, or pair-ing, see the sensor’s Online Manual (on our website) or the Quick Start Manual (PDF/smartphone app).
1 Attach the sensor to the HR strap.Press until you hear a clicking sound.
Heart rate sensor
HR strap
Heart rate sensor (HR-12) HR strap
Cover, Introduction
3
SET 4
5
2
Using the app
Using the unit
Appendix
8/81
10
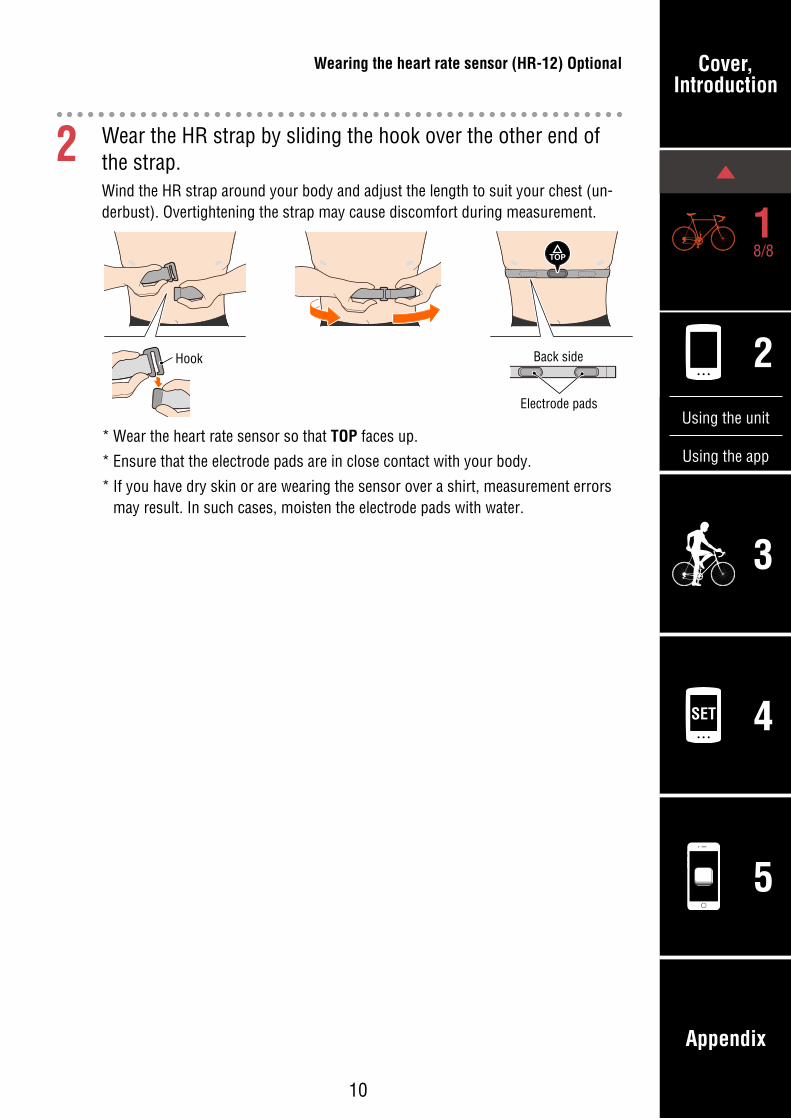
2 Wear the HR strap by sliding the hook over the other end of the strap.Wind the HR strap around your body and adjust the length to suit your chest (un-derbust). Overtightening the strap may cause discomfort during measurement.
Hook Back side
Electrode pads
* Wear the heart rate sensor so that TOP faces up.
* Ensure that the electrode pads are in close contact with your body.
* If you have dry skin or are wearing the sensor over a shirt, measurement errors may result. In such cases, moisten the electrode pads with water.
Wearing the heart rate sensor (HR-12) Optional

Cover, Introduction
3
SET 4
1
5
Appendix
Unit
1/4
2
11
Setting up the PADRONE DIGITALSetup with the PADRONE DIGITAL* Check the locations of the buttons on the PADRONE DIGITAL before starting setup.
AC
MODE
MENU
Battery case cover
Dot section
Short press
Long press (2 sec.)
MODE
MODE
Pull free the PADRONE DIGITAL insulation sheet.After you pull free the insulation sheet, return the battery cover to its previous location.
Insulation sheet
COIN
Open
Close
1 Format (initialize) the unit.While holding down MENU on the back of the PADRONE DIGITAL, press and release the AC button.
ACAC MENUMENU ACAC MENUMENUMENUMENU MENUMENU
1 2 3
The whole display turns on, and then the smartphone search screen is displayed.
* All data is deleted and the unit is reset to the factory de-fault settings.
* If the smartphone search screen is not displayed, the unit could not be formatted. Try to perform the operation again.
2 Select the measurement unit.Press MODE to select “km/h” or “mph”.After selecting a value, press MENU to proceed to the next step.
MENU
MODE
km/h ↔ mph
Confirm
MENU
Cover, Introduction
3
SET 4
1
5
Appendix
Unit
2/4
2
12
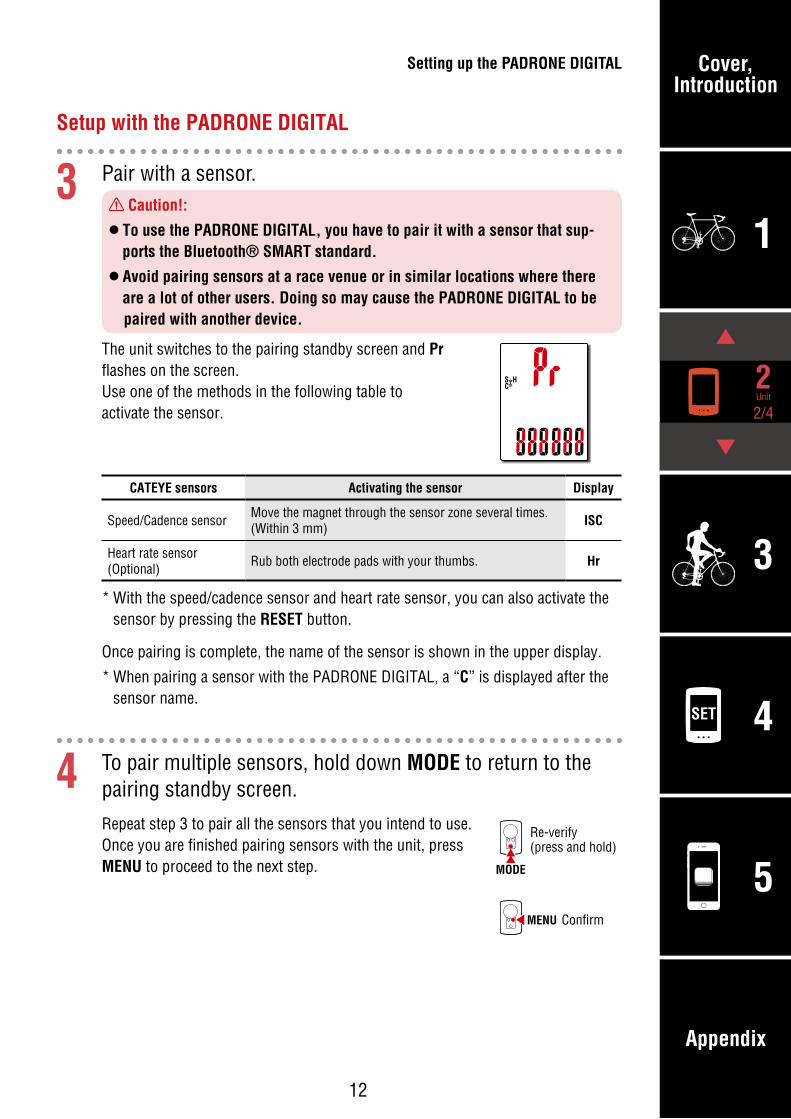
3 Pair with a sensor. Caution!:
• To use the PADRONE DIGITAL, you have to pair it with a sensor that sup-ports the Bluetooth® SMART standard.
• Avoid pairing sensors at a race venue or in similar locations where there are a lot of other users. Doing so may cause the PADRONE DIGITAL to be paired with another device.
The unit switches to the pairing standby screen and Pr flashes on the screen. Use one of the methods in the following table to activate the sensor.
CATEYE sensors Activating the sensor Display
Speed/Cadence sensor Move the magnet through the sensor zone several times. (Within 3 mm) ISC
Heart rate sensor (Optional) Rub both electrode pads with your thumbs. Hr
* With the speed/cadence sensor and heart rate sensor, you can also activate the sensor by pressing the RESET button.
Once pairing is complete, the name of the sensor is shown in the upper display.
* When pairing a sensor with the PADRONE DIGITAL, a “C” is displayed after the sensor name.
4 To pair multiple sensors, hold down MODE to return to the pairing standby screen.
Repeat step 3 to pair all the sensors that you intend to use.Once you are finished pairing sensors with the unit, press MENU to proceed to the next step.
Setting up the PADRONE DIGITAL
Setup with the PADRONE DIGITAL
MODE
MENU
Re-verify (press and hold)
Confirm
Cover, Introduction
3
SET 4
1
5
Appendix
Unit
3/4
2
13
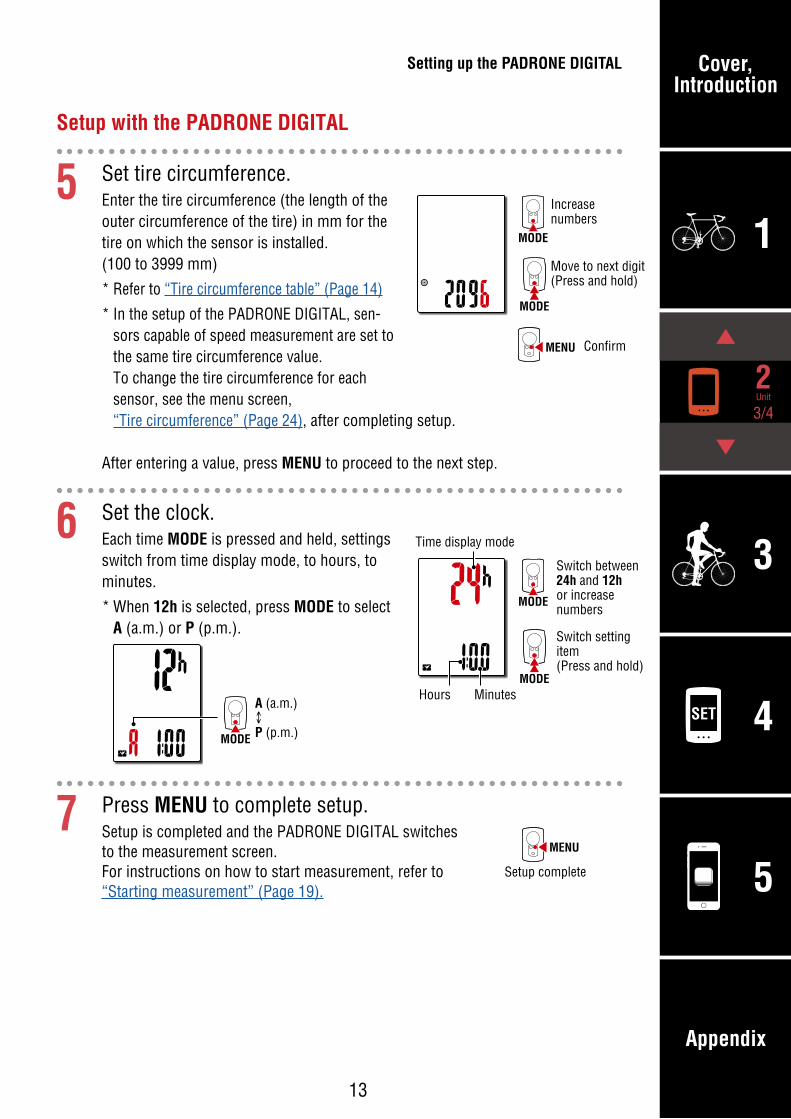
5 Set tire circumference.Enter the tire circumference (the length of the outer circumference of the tire) in mm for the tire on which the sensor is installed. (100 to 3999 mm)
* Refer to “Tire circumference table” (Page 14)
* In the setup of the PADRONE DIGITAL, sen-sors capable of speed measurement are set to the same tire circumference value. To change the tire circumference for each sensor, see the menu screen, “Tire circumference” (Page 24), after completing setup.
After entering a value, press MENU to proceed to the next step.
6 Set the clock.Each time MODE is pressed and held, settings switch from time display mode, to hours, to minutes.
* When 12h is selected, press MODE to select A (a.m.) or P (p.m.).
MODE
A (a.m.)
↔
P (p.m.)
7 Press MENU to complete setup.Setup is completed and the PADRONE DIGITAL switches to the measurement screen.For instructions on how to start measurement, refer to “Starting measurement” (Page 19).
Setting up the PADRONE DIGITAL
Setup with the PADRONE DIGITAL
MODE
MENU
MODE
Increase numbers
Move to next digit (Press and hold)
Confirm
MODE
MODE
Switch between 24h and 12h or increase numbers
Switch setting item (Press and hold)
Time display mode
MinutesHours
MENU
Setup complete
Cover, Introduction
3
SET 4
1
5
Appendix
Unit
4/4
2
14
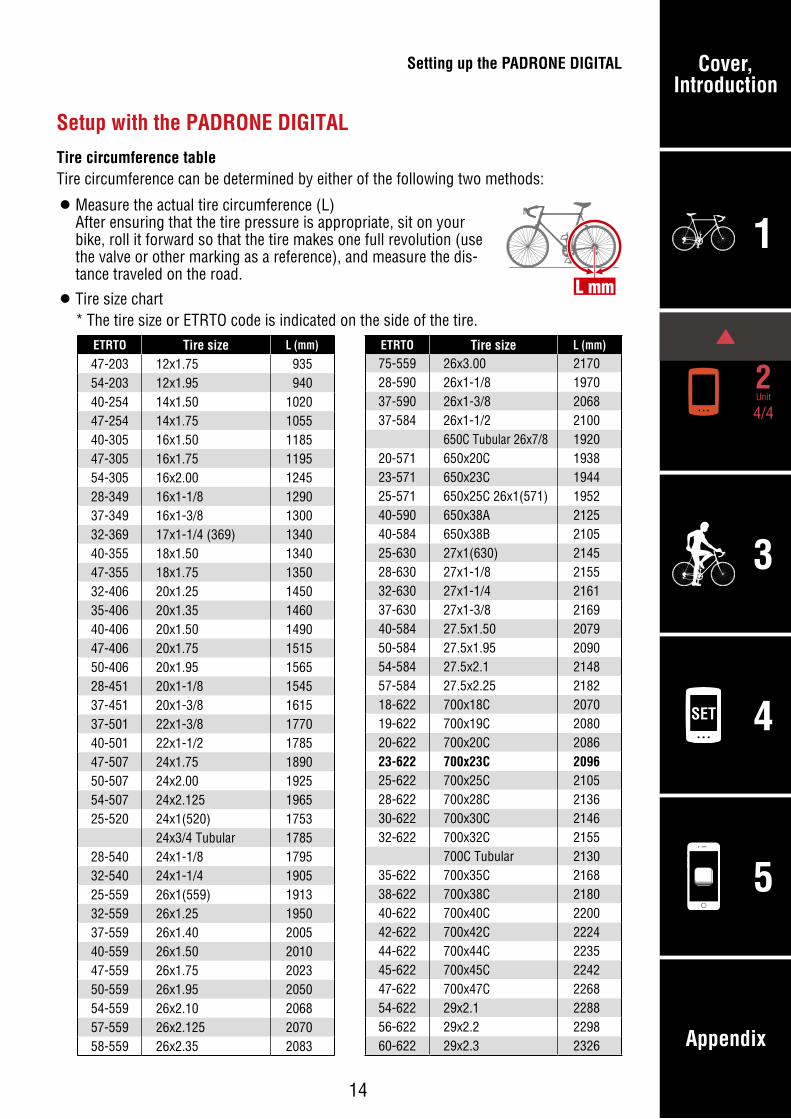
Tire circumference tableTire circumference can be determined by either of the following two methods:
• Measure the actual tire circumference (L)After ensuring that the tire pressure is appropriate, sit on your bike, roll it forward so that the tire makes one full revolution (use the valve or other marking as a reference), and measure the dis-tance traveled on the road.
• Tire size chart* The tire size or ETRTO code is indicated on the side of the tire.
ETRTO Tire size L (mm)
47-203 12x1.75 93554-203 12x1.95 94040-254 14x1.50 102047-254 14x1.75 105540-305 16x1.50 118547-305 16x1.75 119554-305 16x2.00 124528-349 16x1-1/8 129037-349 16x1-3/8 130032-369 17x1-1/4 (369) 134040-355 18x1.50 134047-355 18x1.75 135032-406 20x1.25 145035-406 20x1.35 146040-406 20x1.50 149047-406 20x1.75 151550-406 20x1.95 156528-451 20x1-1/8 154537-451 20x1-3/8 161537-501 22x1-3/8 177040-501 22x1-1/2 178547-507 24x1.75 189050-507 24x2.00 192554-507 24x2.125 196525-520 24x1(520) 1753
24x3/4 Tubular 178528-540 24x1-1/8 179532-540 24x1-1/4 190525-559 26x1(559) 191332-559 26x1.25 195037-559 26x1.40 200540-559 26x1.50 201047-559 26x1.75 202350-559 26x1.95 205054-559 26x2.10 206857-559 26x2.125 207058-559 26x2.35 2083
ETRTO Tire size L (mm)
75-559 26x3.00 217028-590 26x1-1/8 197037-590 26x1-3/8 206837-584 26x1-1/2 2100
650C Tubular 26x7/8 192020-571 650x20C 193823-571 650x23C 194425-571 650x25C 26x1(571) 195240-590 650x38A 212540-584 650x38B 210525-630 27x1(630) 214528-630 27x1-1/8 215532-630 27x1-1/4 216137-630 27x1-3/8 216940-584 27.5x1.50 207950-584 27.5x1.95 209054-584 27.5x2.1 214857-584 27.5x2.25 218218-622 700x18C 207019-622 700x19C 208020-622 700x20C 208623-622 700x23C 209625-622 700x25C 210528-622 700x28C 213630-622 700x30C 214632-622 700x32C 2155
700C Tubular 213035-622 700x35C 216838-622 700x38C 218040-622 700x40C 220042-622 700x42C 222444-622 700x44C 223545-622 700x45C 224247-622 700x47C 226854-622 29x2.1 228856-622 29x2.2 229860-622 29x2.3 2326
Setting up the PADRONE DIGITAL
Setup with the PADRONE DIGITAL
L mm
Cover, Introduction
3
SET 4
1
5
Appendix
App
1/4
2
15
Setup with a smartphone (Cateye Cycling™)You can use the smartphone app “Cateye Cycling™” (free of charge) for setup.
* See Cateye Cycling Recommended Devices for the latest information about smartphones recommended for use with Cateye Cycling™.
* Check the locations of the buttons on the PADRONE DIGITAL before starting setup.
AC
MODE
MENU
Battery case cover
Dot section
Short press
Long press (2 sec.)
MODE
MODE
PADRONE DIGITAL
Pull free the PADRONE DIGITAL insulation sheet.After you pull free the insulation sheet, return the battery cover to its previous location.
Insulation sheet
COIN
Open
Close
Smartphone
1 Install Cateye Cycling™ on your smartphone.
If using an iPhone If using an Android smartphone
2 Launch Cateye Cycling™.Follow the on-screen instructions and allow the use of GPS and Bluetooth® devices.
* At the moment you turn on the Bluetooth® in the smartphone setting, the smart-phone OS will search for devices, but do not configure settings there. Switch to Cateye Cycling™ and follow the procedure below.
Setting up the PADRONE DIGITAL
Cover, Introduction
3
SET 4
1
5
Appendix
App
2/4
2
16
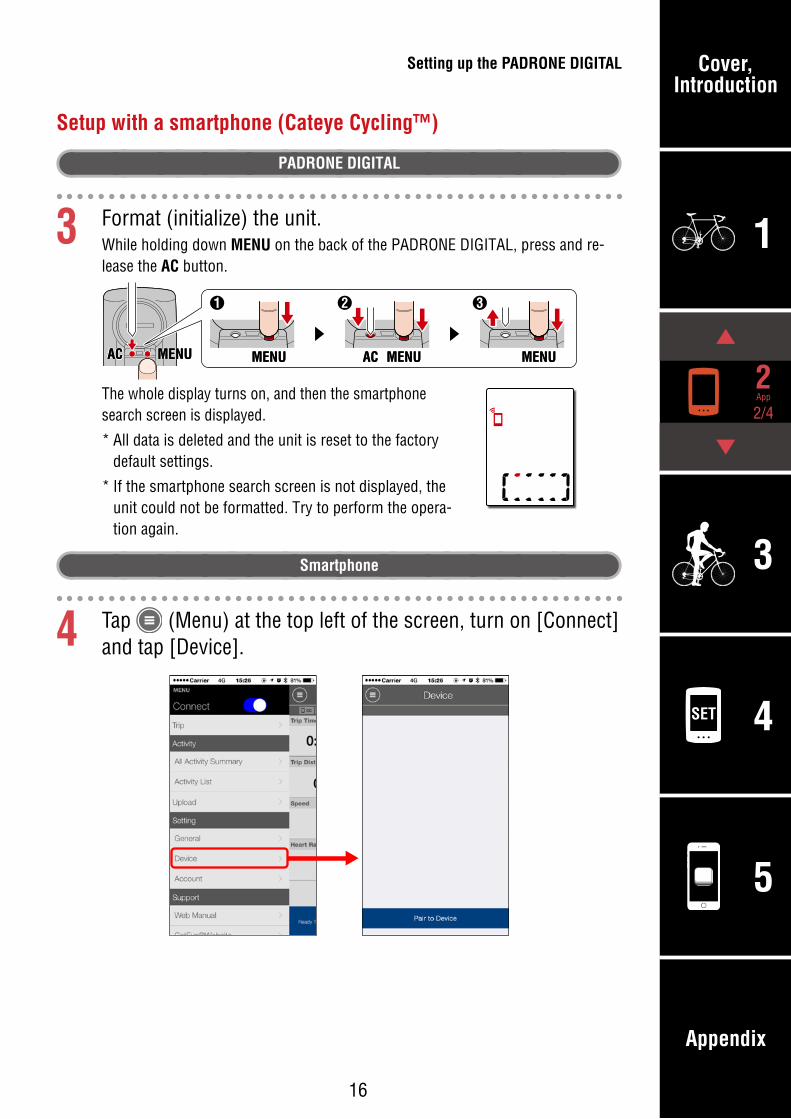
PADRONE DIGITAL
3 Format (initialize) the unit.While holding down MENU on the back of the PADRONE DIGITAL, press and re-lease the AC button.
ACAC MENUMENU ACAC MENUMENUMENUMENU MENUMENU
1 2 3
The whole display turns on, and then the smartphone search screen is displayed.
* All data is deleted and the unit is reset to the factory default settings.
* If the smartphone search screen is not displayed, the unit could not be formatted. Try to perform the opera-tion again.
Smartphone
4 Tap (Menu) at the top left of the screen, turn on [Connect] and tap [Device].
Setting up the PADRONE DIGITAL
Setup with a smartphone (Cateye Cycling™)
Cover, Introduction
3
SET 4
1
5
Appendix
App
3/4
2
17
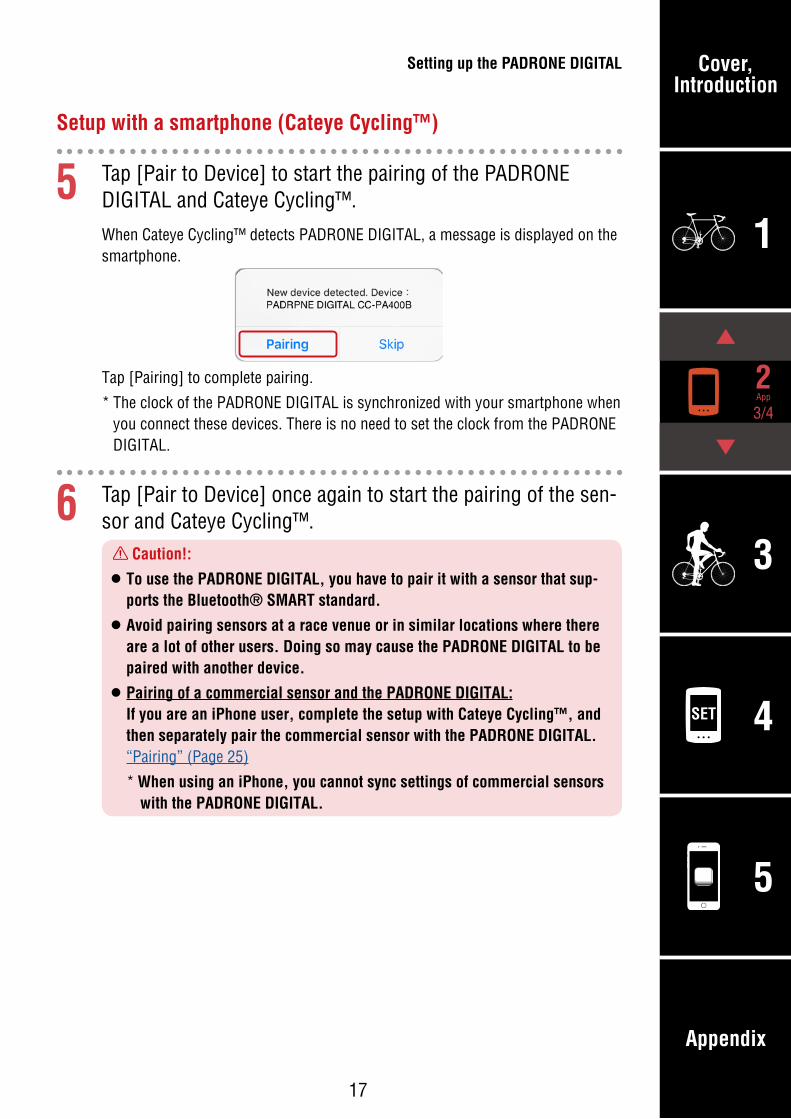
5 Tap [Pair to Device] to start the pairing of the PADRONE DIGITAL and Cateye Cycling™.
When Cateye Cycling™ detects PADRONE DIGITAL, a message is displayed on the smartphone.
Tap [Pairing] to complete pairing.
* The clock of the PADRONE DIGITAL is synchronized with your smartphone when you connect these devices. There is no need to set the clock from the PADRONE DIGITAL.
6 Tap [Pair to Device] once again to start the pairing of the sen-sor and Cateye Cycling™.
Caution!:
• To use the PADRONE DIGITAL, you have to pair it with a sensor that sup-ports the Bluetooth® SMART standard.
• Avoid pairing sensors at a race venue or in similar locations where there are a lot of other users. Doing so may cause the PADRONE DIGITAL to be paired with another device.
• Pairing of a commercial sensor and the PADRONE DIGITAL: If you are an iPhone user, complete the setup with Cateye Cycling™, and then separately pair the commercial sensor with the PADRONE DIGITAL. “Pairing” (Page 25)
* When using an iPhone, you cannot sync settings of commercial sensors with the PADRONE DIGITAL.
Setting up the PADRONE DIGITAL
Setup with a smartphone (Cateye Cycling™)
Cover, Introduction
3
SET 4
1
5
Appendix
App
4/4
2
18
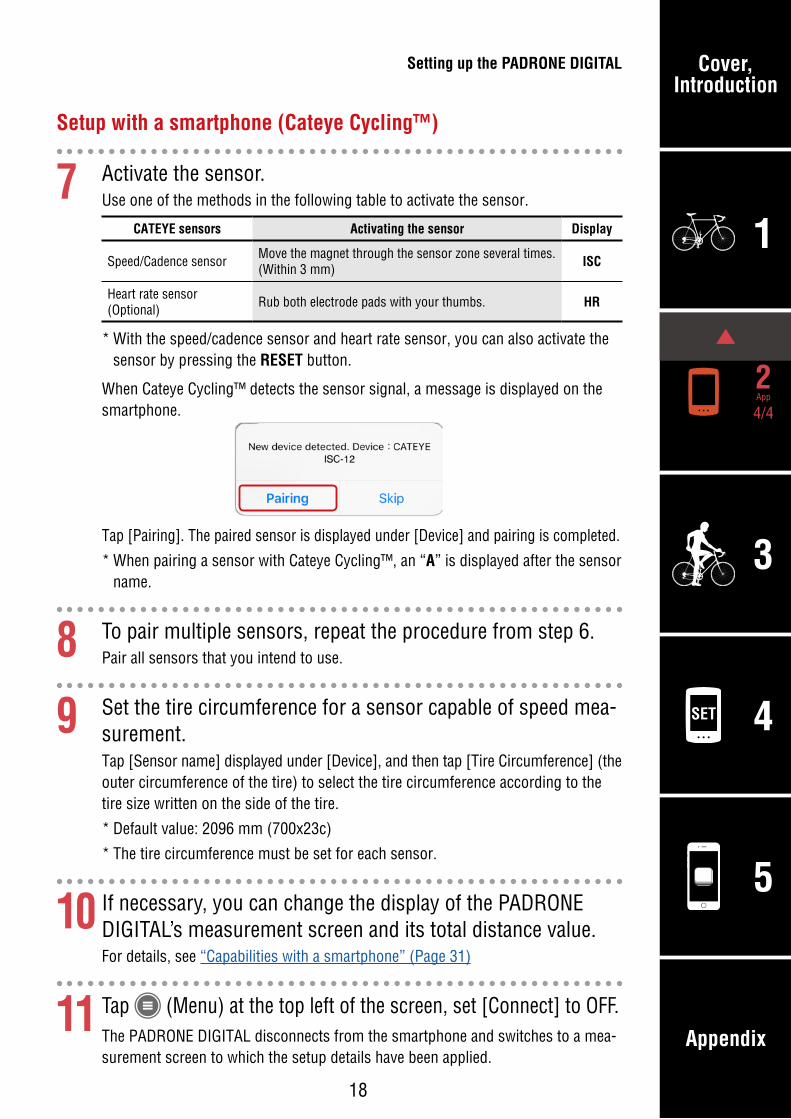
7 Activate the sensor.Use one of the methods in the following table to activate the sensor.
CATEYE sensors Activating the sensor Display
Speed/Cadence sensor Move the magnet through the sensor zone several times. (Within 3 mm) ISC
Heart rate sensor (Optional) Rub both electrode pads with your thumbs. HR
* With the speed/cadence sensor and heart rate sensor, you can also activate the sensor by pressing the RESET button.
When Cateye Cycling™ detects the sensor signal, a message is displayed on the smartphone.
Tap [Pairing]. The paired sensor is displayed under [Device] and pairing is completed.
* When pairing a sensor with Cateye Cycling™, an “A” is displayed after the sensor name.
8 To pair multiple sensors, repeat the procedure from step 6.Pair all sensors that you intend to use.
9 Set the tire circumference for a sensor capable of speed mea-surement.Tap [Sensor name] displayed under [Device], and then tap [Tire Circumference] (the outer circumference of the tire) to select the tire circumference according to the tire size written on the side of the tire.
* Default value: 2096 mm (700x23c)
* The tire circumference must be set for each sensor.
10 If necessary, you can change the display of the PADRONE DIGITAL’s measurement screen and its total distance value. For details, see “Capabilities with a smartphone” (Page 31)
11 Tap (Menu) at the top left of the screen, set [Connect] to OFF.The PADRONE DIGITAL disconnects from the smartphone and switches to a mea-surement screen to which the setup details have been applied.
Setting up the PADRONE DIGITAL
Setup with a smartphone (Cateye Cycling™)
Cover, Introduction
SET 4
1
5
2
Using the app
Using the unit
Appendix
1/33
19
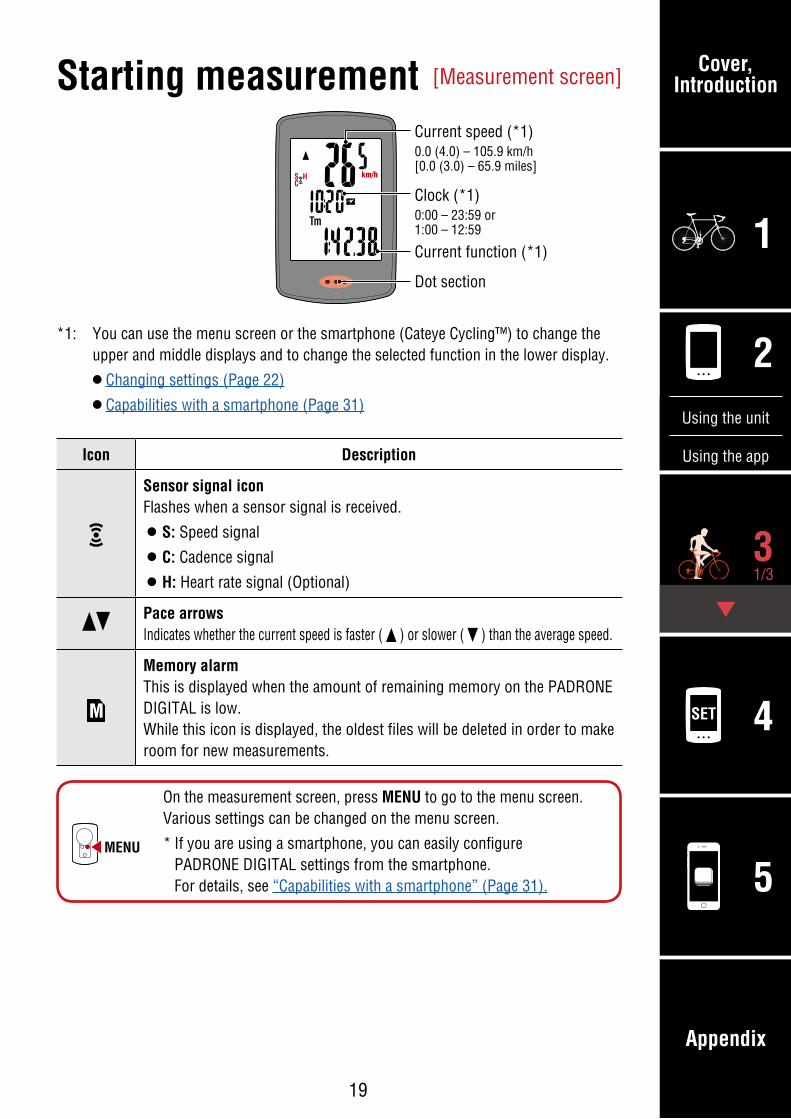
Starting measurement
On the measurement screen, press MENU to go to the menu screen. Various settings can be changed on the menu screen.
* If you are using a smartphone, you can easily configure PADRONE DIGITAL settings from the smartphone. For details, see “Capabilities with a smartphone” (Page 31).
[Measurement screen]
Current speed (*1)0.0 (4.0) – 105.9 km/h[0.0 (3.0) – 65.9 miles]
Clock (*1)0:00 – 23:59 or 1:00 – 12:59
Current function (*1)
Dot section
MENU
Icon Description
Sensor signal iconFlashes when a sensor signal is received.
• S: Speed signal
• C: Cadence signal
• H: Heart rate signal (Optional)
Pace arrowsIndicates whether the current speed is faster ( ) or slower ( ) than the average speed.
Memory alarmThis is displayed when the amount of remaining memory on the PADRONE DIGITAL is low.While this icon is displayed, the oldest files will be deleted in order to make room for new measurements.
*1: You can use the menu screen or the smartphone (Cateye Cycling™) to change the upper and middle displays and to change the selected function in the lower display.
• Changing settings (Page 22)
• Capabilities with a smartphone (Page 31)
Cover, Introduction
SET 4
1
5
2
Using the app
Using the unit
Appendix
2/33
20
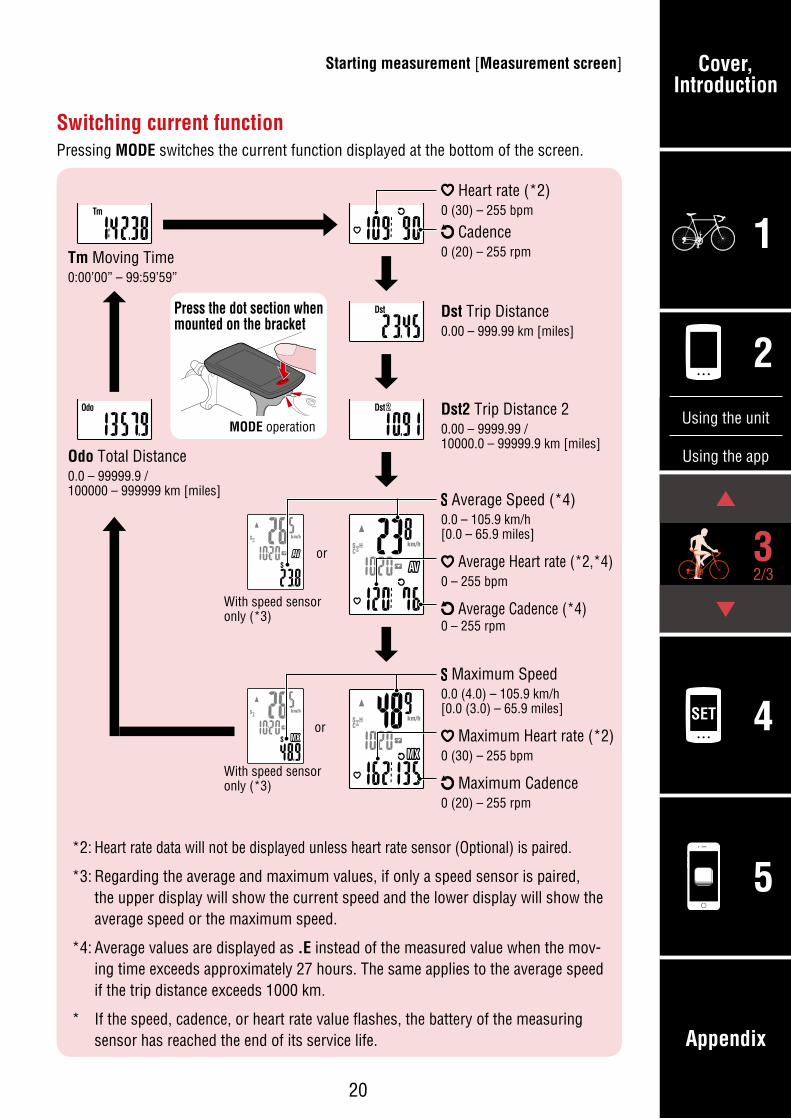
*2: Heart rate data will not be displayed unless heart rate sensor (Optional) is paired.
*3: Regarding the average and maximum values, if only a speed sensor is paired, the upper display will show the current speed and the lower display will show the average speed or the maximum speed.
*4: Average values are displayed as .E instead of the measured value when the mov-ing time exceeds approximately 27 hours. The same applies to the average speed if the trip distance exceeds 1000 km.
* If the speed, cadence, or heart rate value flashes, the battery of the measuring sensor has reached the end of its service life.
Switching current functionPressing MODE switches the current function displayed at the bottom of the screen.
Starting measurement [Measurement screen]
Press the dot section when mounted on the bracket
Tm Moving Time0:00’00” – 99:59’59”
With speed sensor only (*3)
With speed sensor only (*3)
or
or
MODE operation
Heart rate (*2)0 (30) – 255 bpm
Cadence0 (20) – 255 rpm
Dst Trip Distance0.00 – 999.99 km [miles]
Dst2 Trip Distance 20.00 – 9999.99 / 10000.0 – 99999.9 km [miles]
Average Speed (*4)0.0 – 105.9 km/h [0.0 – 65.9 miles]
Average Heart rate (*2,*4)0 – 255 bpm
Average Cadence (*4)0 – 255 rpm
Maximum Speed0.0 (4.0) – 105.9 km/h [0.0 (3.0) – 65.9 miles]
Maximum Heart rate (*2)0 (30) – 255 bpm
Maximum Cadence0 (20) – 255 rpm
Odo Total Distance0.0 – 99999.9 /100000 – 999999 km [miles]
Cover, Introduction
SET 4
1
5
2
Using the app
Using the unit
Appendix
3/33
21
(2 seconds)MODE
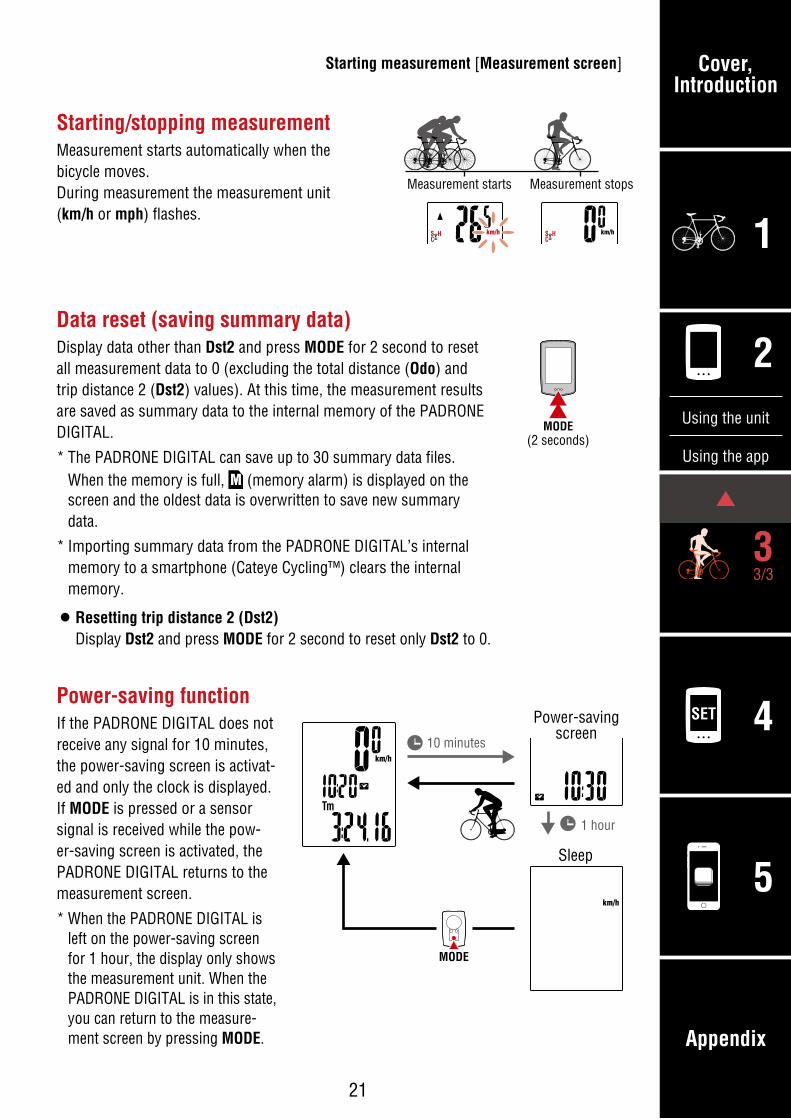
Starting/stopping measurementMeasurement starts automatically when the bicycle moves. During measurement the measurement unit (km/h or mph) flashes.
Data reset (saving summary data)Display data other than Dst2 and press MODE for 2 second to reset all measurement data to 0 (excluding the total distance (Odo) and trip distance 2 (Dst2) values). At this time, the measurement results are saved as summary data to the internal memory of the PADRONE DIGITAL.
* The PADRONE DIGITAL can save up to 30 summary data files. When the memory is full, (memory alarm) is displayed on the screen and the oldest data is overwritten to save new summary data.
* Importing summary data from the PADRONE DIGITAL’s internal memory to a smartphone (Cateye Cycling™) clears the internal memory.
• Resetting trip distance 2 (Dst2)Display Dst2 and press MODE for 2 second to reset only Dst2 to 0.
MODE
Power-saving functionIf the PADRONE DIGITAL does not receive any signal for 10 minutes, the power-saving screen is activat-ed and only the clock is displayed. If MODE is pressed or a sensor signal is received while the pow-er-saving screen is activated, the PADRONE DIGITAL returns to the measurement screen.
* When the PADRONE DIGITAL is left on the power-saving screen for 1 hour, the display only shows the measurement unit. When the PADRONE DIGITAL is in this state, you can return to the measure-ment screen by pressing MODE.
Starting measurement [Measurement screen]
Measurement starts Measurement stops
1 hour
10 minutes
Sleep
Power-saving screen

Cover, Introduction
3
1
5
2
Using the app
Using the unit
Appendix
SET
1/94
22
Smartphone searchOperate the smartphone (Cateye Cycling™) on this screen to connect the PADRONE DIGITAL to the smartphone.
* For details on how to operate and use the smartphone (Cateye Cycling™), see “Capabili-ties with a smartphone” (Page 31).
Total distance
Clock
Tire circum-ference
Pairing
Upper display
Middle display
Function
Measurement unit
Measurement screen Menu screen Description
On the measurement screen, press MENU to go to the menu screen. Various settings can be changed on the menu screen.
* After changing settings, always press MENU to confirm changes.* When the menu screen is left on for 1 minute, the PADRONE DIGITAL returns to the
measurement screen.
Changing settings [Menu screen]
MENU
MODEMODE
MODE
MODE
MODE
MODE
MODE
MODE
MODE
MENU
Cover, Introduction
3
1
5
2
Using the app
Using the unit
Appendix
SET
2/94
23
MODE
MODE
MODE
MODE
MODE
MODE
MODE
MODE
Smartphone search
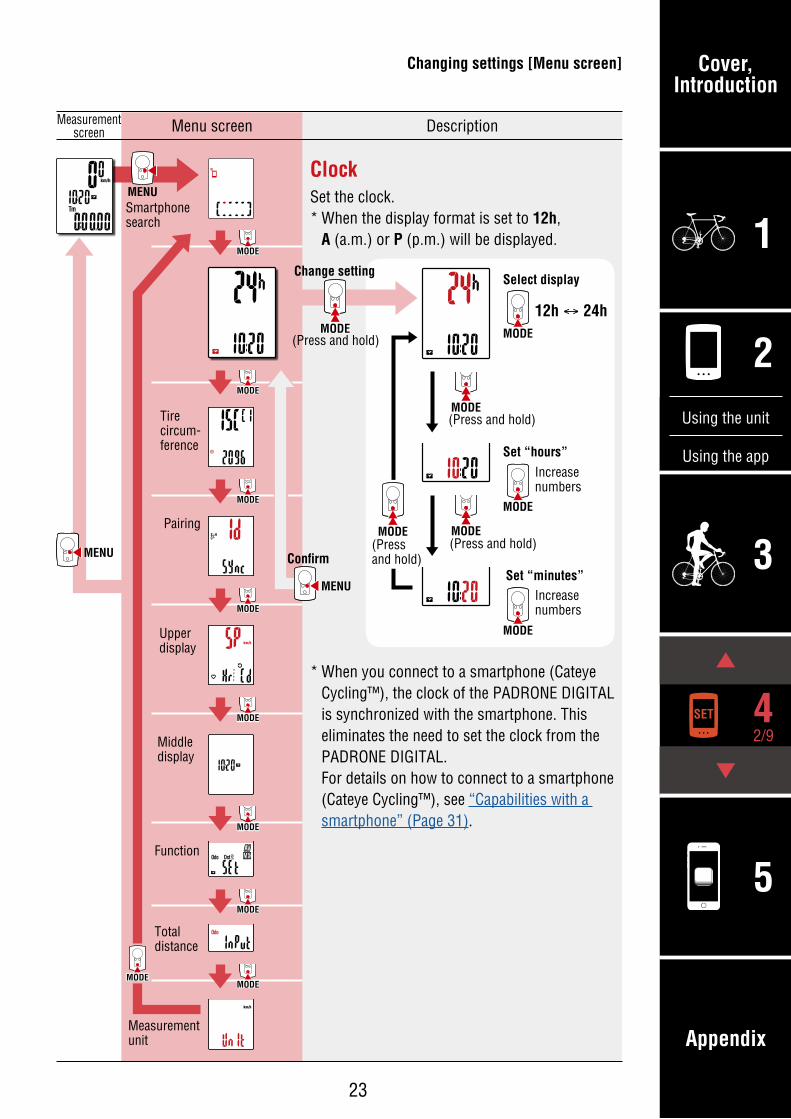
ClockSet the clock.* When the display format is set to 12h,
A (a.m.) or P (p.m.) will be displayed.
* When you connect to a smartphone (Cateye Cycling™), the clock of the PADRONE DIGITAL is synchronized with the smartphone. This eliminates the need to set the clock from the PADRONE DIGITAL. For details on how to connect to a smartphone (Cateye Cycling™), see “Capabilities with a smartphone” (Page 31).
Measurement screen Menu screen Description
Total distance
Tire circum-ference
Pairing
Upper display
Middle display
Function
Measurement unit
Changing settings [Menu screen]
MENU
MODE
MODE MODE
MODE
12h ↔ 24h
Select display
MODE
Increase numbers
Increase numbers
Set “hours”
MODE
Set “minutes”
MODE(Press and hold)
(Press and hold)
(Press and hold)(Press and hold)
Change setting
MODE
MENU
Confirm
MENU
Cover, Introduction
3
1
5
2
Using the app
Using the unit
Appendix
SET
3/94
24
MODE
MODE
MODE
MODE
MODE
MODE
MODE
MODE
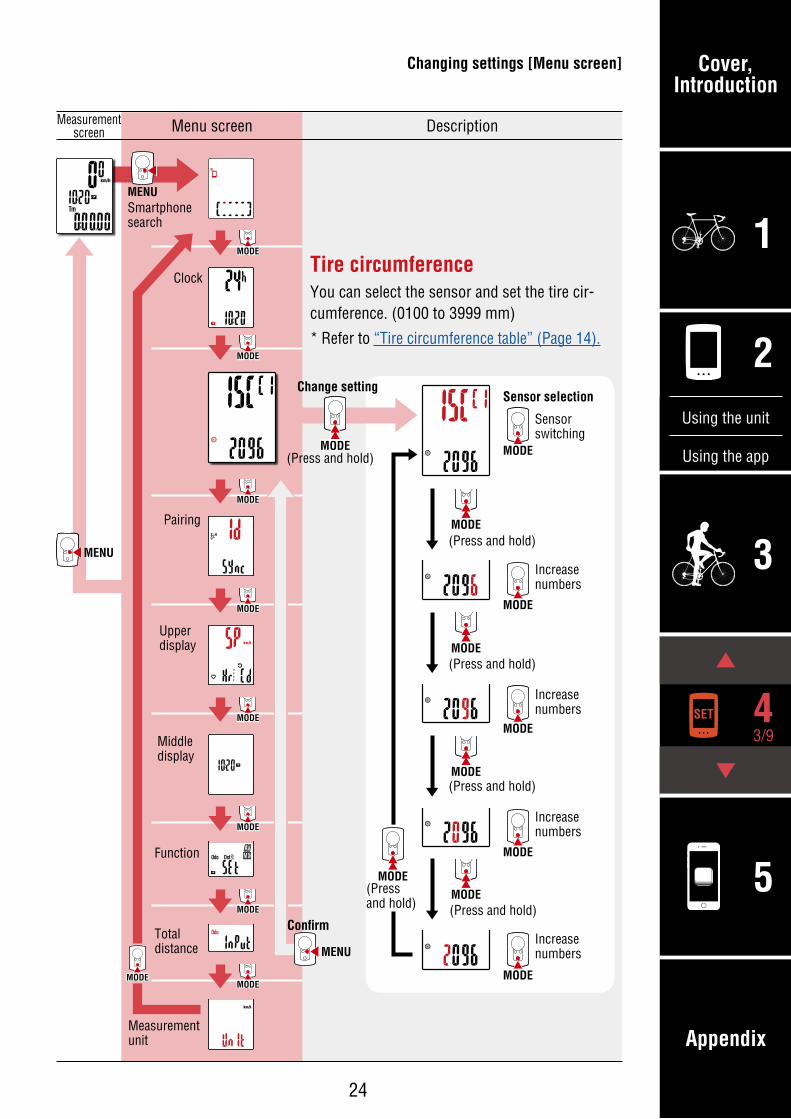
Tire circumferenceYou can select the sensor and set the tire cir-cumference. (0100 to 3999 mm)
* Refer to “Tire circumference table” (Page 14).
Menu screen Description
Total distance
Pairing
Upper display
Middle display
Function
Measurement unit
Clock
Smartphone search
Measurement screen
Changing settings [Menu screen]
MODE
MODE
MODE
MODE
MODE
MODE
Sensor selection
Sensor switching
MODE(Press and hold)
(Press and hold)
(Press and hold)
(Press and hold)
(Press and hold)
(Press and hold)
Change setting
MODE
MENU
MENU
MENU
MODE
Increase numbers
MODE
Increase numbers
MODE
Increase numbers
MODE
Increase numbers
Confirm
Cover, Introduction
3
1
5
2
Using the app
Using the unit
Appendix
SET
4/94
25
MODE
MODE
MODE
MODE
MODE
MODE
MODE
MODE
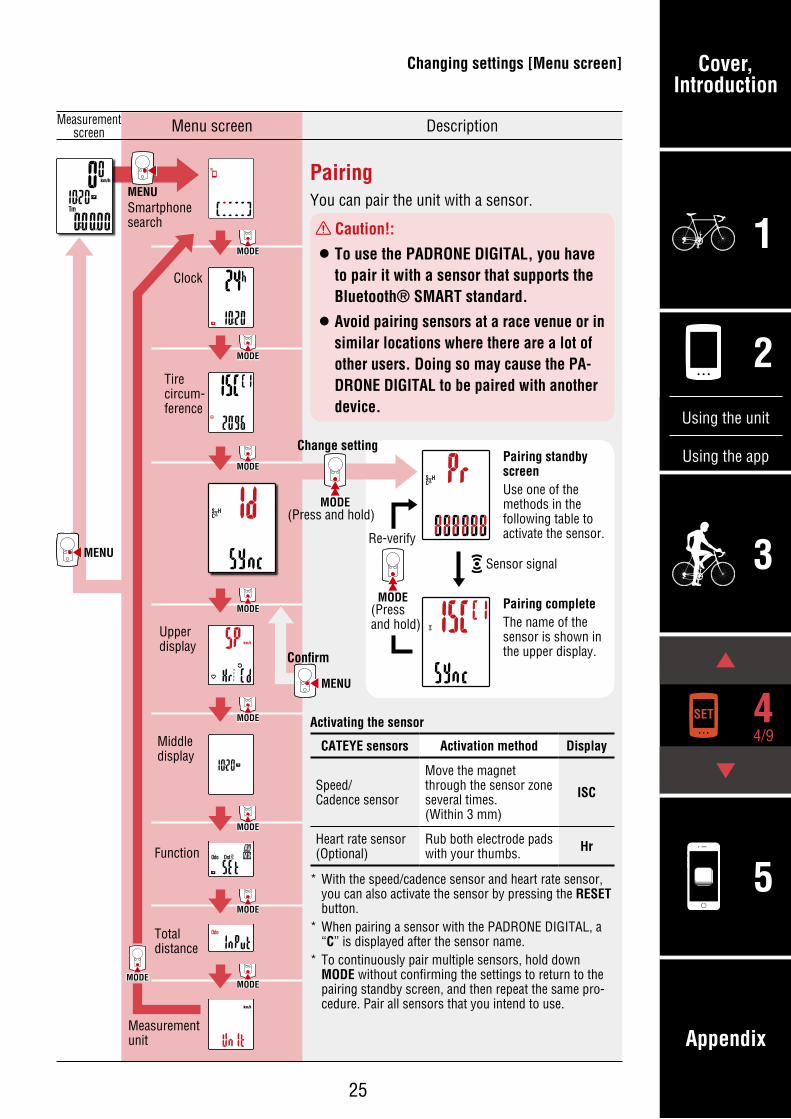
PairingYou can pair the unit with a sensor.
Caution!:
• To use the PADRONE DIGITAL, you have to pair it with a sensor that supports the Bluetooth® SMART standard.
• Avoid pairing sensors at a race venue or in similar locations where there are a lot of other users. Doing so may cause the PA-DRONE DIGITAL to be paired with another device.
Activating the sensor
CATEYE sensors Activation method Display
Speed/ Cadence sensor
Move the magnet through the sensor zone several times. (Within 3 mm)
ISC
Heart rate sensor (Optional)
Rub both electrode pads with your thumbs. Hr
* With the speed/cadence sensor and heart rate sensor, you can also activate the sensor by pressing the RESET button.
* When pairing a sensor with the PADRONE DIGITAL, a “C” is displayed after the sensor name.
* To continuously pair multiple sensors, hold down MODE without confirming the settings to return to the pairing standby screen, and then repeat the same pro-cedure. Pair all sensors that you intend to use.
Menu screen Description
Smartphone search
Total distance
Upper display
Middle display
Function
Measurement unit
Clock
Tire circum-ference
Measurement screen
Changing settings [Menu screen]
Pairing standby screenUse one of the methods in the following table to activate the sensor.
Pairing completeThe name of the sensor is shown in the upper display.
Sensor signal
MODE
MODE
MENU
MENU
MODE
Re-verify
MENU
(Press and hold)
(Press and hold)
Change setting
Confirm
Cover, Introduction
3
1
5
2
Using the app
Using the unit
Appendix
SET
5/94
26
MODE
MODE
MODE
MODE
MODE
MODE
MODE
MODE
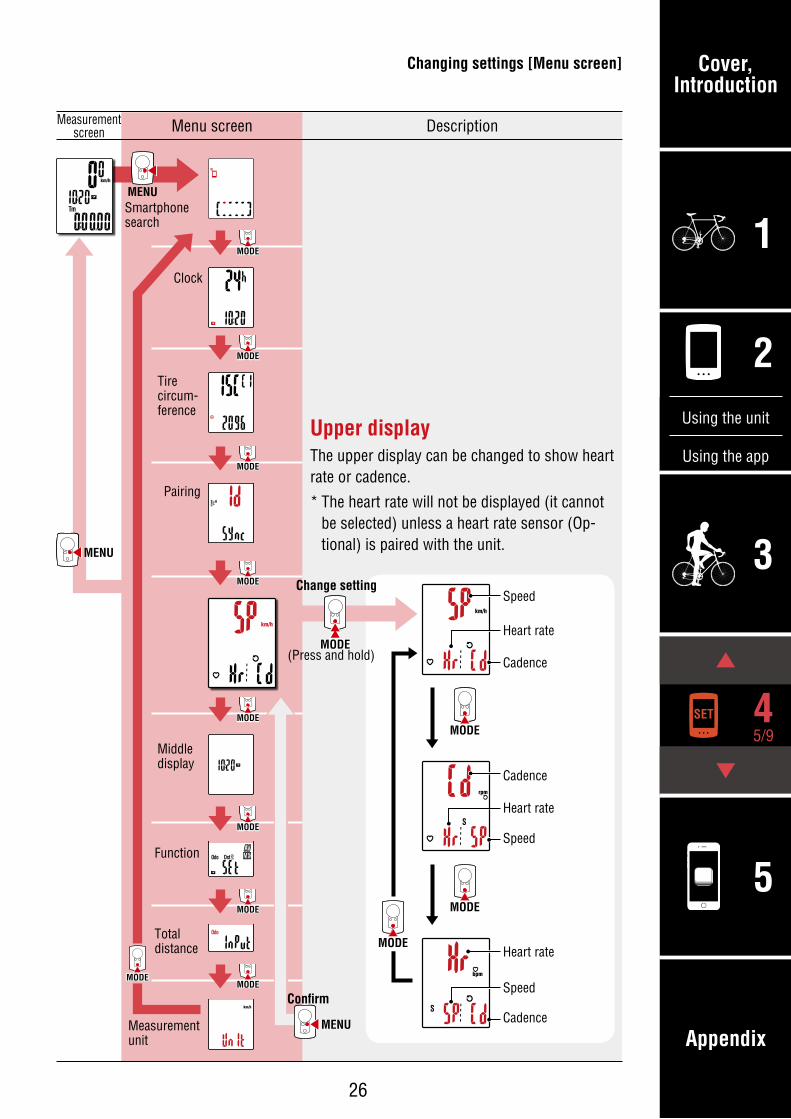
Upper displayThe upper display can be changed to show heart rate or cadence.
* The heart rate will not be displayed (it cannot be selected) unless a heart rate sensor (Op-tional) is paired with the unit.
Total distance
Pairing
Middle display
Function
Measurement unit
Clock
Smartphone search
Tire circum-ference
Menu screen DescriptionMeasurement screen
Changing settings [Menu screen]
MODE
MENU
MENU
Speed
Speed
Speed
Heart rate
Heart rate
Heart rate
Cadence
Cadence
Cadence
MODE
MENU
(Press and hold)
Change setting
Confirm
MODE
MODE
MODE
Cover, Introduction
3
1
5
2
Using the app
Using the unit
Appendix
SET
6/94
27
MODE
MODE
MODE
MODE
MODE
MODE
MODE
MODE
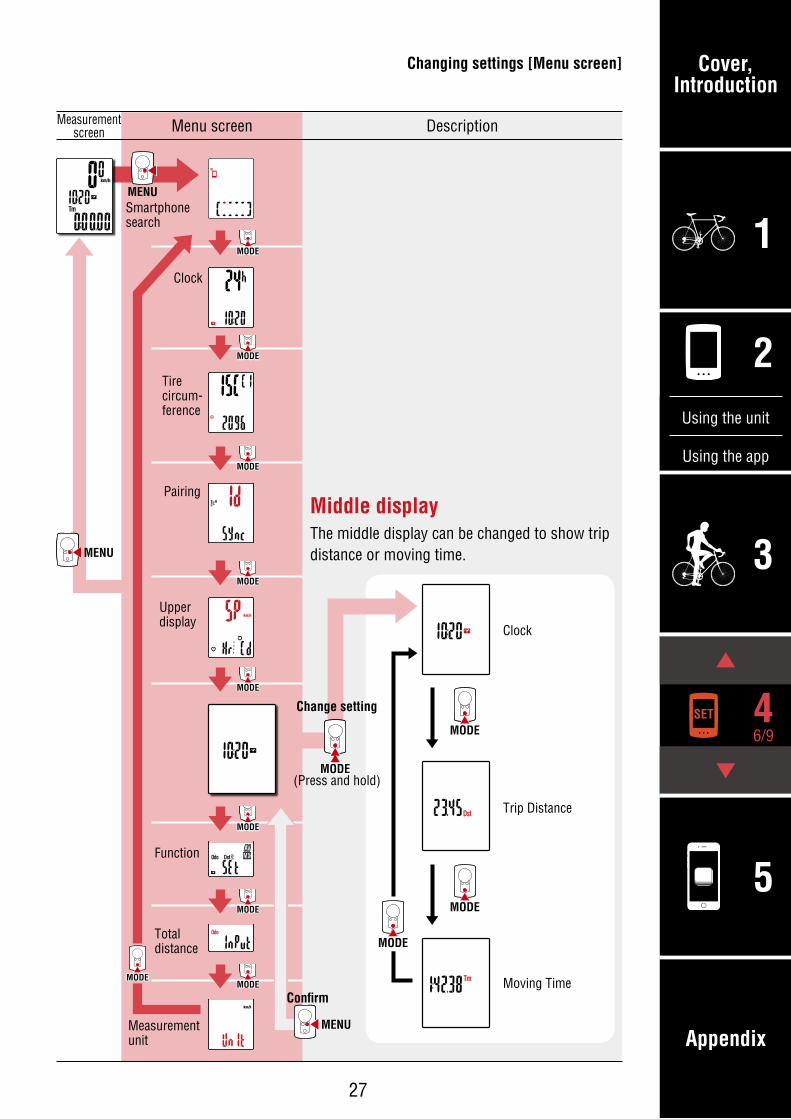
Middle displayThe middle display can be changed to show trip distance or moving time.
Menu screen Description
Total distance
Pairing
Function
Measurement unit
Clock
Smartphone search
Tire circum-ference
Confirm
Upper display
Measurement screen
Changing settings [Menu screen]
MODE
MENU
MENU
Moving Time
Clock
Trip Distance
MODE
MENU
(Press and hold)
Change setting
MODE
MODE
MODE

Cover, Introduction
3
1
5
2
Using the app
Using the unit
Appendix
SET
7/94ON (displayed)/
OFF (hidden) switching
ON (displayed)/OFF (hidden) switching
ON (displayed)/OFF (hidden) switching
28
MODE
MODE
MODE
MODE
MODE
MODE
MODE
MODE
FunctionYou can select certain functions to display or hide.
Menu screen Description
Total distance
Pairing
Measurement unit
Clock
Smartphone search
Tire circum-ference
Upper display
Middle display
Measurement screen
Changing settings [Menu screen]
MODE
MENU
MENU
MODE
MODE
MODE
MODE
MODE
MODE
Average
Total Distance
Clock
Trip Distance
Trip Distance 2
Maximum
MODE
MODE
MODE
MODE
MODE
MODE
MODE
ON (displayed)/OFF (hidden) switching
MENU
ON (displayed)/OFF (hidden) switching
ON (displayed)/OFF (hidden) switching
(Press and hold)
(Press and hold)
(Press and hold)
(Press and hold)
(Press and hold)
(Press and hold)
(Press and hold)
Confirm
Change setting
Cover, Introduction
3
1
5
2
Using the app
Using the unit
Appendix
SET
8/94
29
MODE
MODE
MODE
MODE
MODE
MODE
MODE
MODE
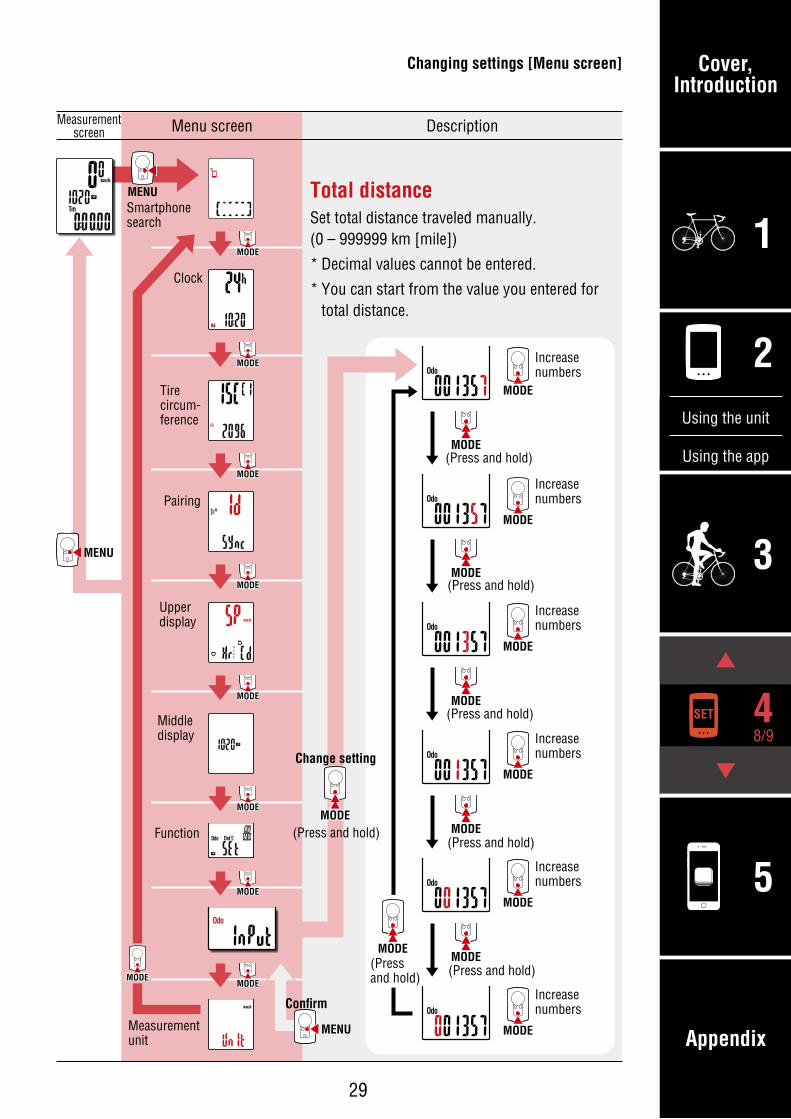
Total distanceSet total distance traveled manually. (0 – 999999 km [mile])
* Decimal values cannot be entered.
* You can start from the value you entered for total distance.
Pairing
Measurement unit
Clock
Smartphone search
Tire circum-ference
Upper display
Middle display
Function
Menu screen DescriptionMeasurement screen
Changing settings [Menu screen]
MODE
MENU
MENU
MODEMODE
MODE
MODE
MODE
MODE
MODE
MODE
MODE
MODE
MODE
MODE
MODE
MENU
Increase numbers
Increase numbers
Increase numbers
Increase numbers
Increase numbers
Increase numbers
(Press and hold)
(Press and hold)
(Press and hold)
(Press and hold)
(Press and hold)
(Press and hold)
(Press and hold)
Confirm
Change setting
Cover, Introduction
3
1
5
2
Using the app
Using the unit
Appendix
SET
9/94
30
MODE
MODE
MODE
MODE
MODE
MODE
MODE
MODE
Measurement unitSelect the measurement unit (km/h or mph)
Menu screen Description
Pairing
Clock
Smartphone search
Tire circum-ference
Upper display
Middle display
Function
Measurement screen
Total distance
Changing settings [Menu screen]
MODE
MENU
MENU
km/h↔mphMODE
MENU
Confirm
MODE(Press and hold)
Change setting
Cover, Introduction
3
SET 4
1
2
Using the app
Using the unit
Appendix
1/105
31
By connecting the PADRONE DIGITAL to a smartphone (Cateye Cycling™), the measure-ment data can be managed and PADRONE DIGITAL settings changed from the smart-phone.
To connect to a smartphone, install Cateye Cycling™ and perform pairing with PADRONE DIGITAL.For instructions on installing/pairing with Cateye Cycling™, refer to procedures 1 to 5 in “Setup with a smartphone (Cateye Cycling™)” (Page 15).
The following can be performed on a smartphone (Cateye Cycling™).Please select the desired item.
• Importing measurement results to a smartphone (Page 32)
• Check/upload the imported measurement results. (Page 33)
• Account settings (Page 34)
• Changing the measurement unit (km/h or mph) (Page 35)
• Measurement screen customization (Page 36)
• Input the initial settings for total distance (Page 37)
• Adding a new sensor (Page 38)
• Changing sensor tire circumference values (Page 40)
* Restart Cateye Cycling™ if a connection between a paired PADRONE DIGITAL cannot connect with the smartphone (Cateye Cycling™). If this does not resolve the issue, restart your smartphone.
Capabilities with a smartphone
Cover, Introduction
3
SET 4
1
2
Using the app
Using the unit
Appendix
2/105
32
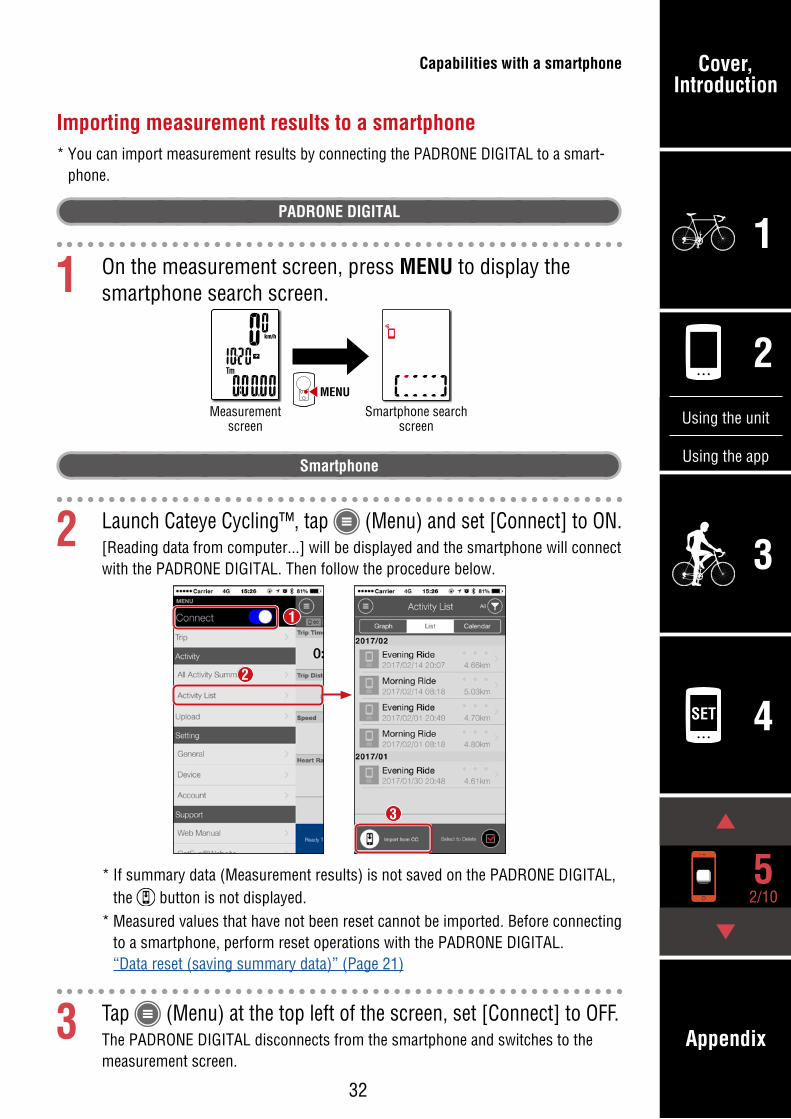
Importing measurement results to a smartphone* You can import measurement results by connecting the PADRONE DIGITAL to a smart-
phone.
PADRONE DIGITAL
1 On the measurement screen, press MENU to display the smartphone search screen.
MENU
Measurement screen
Smartphone search screen
Smartphone
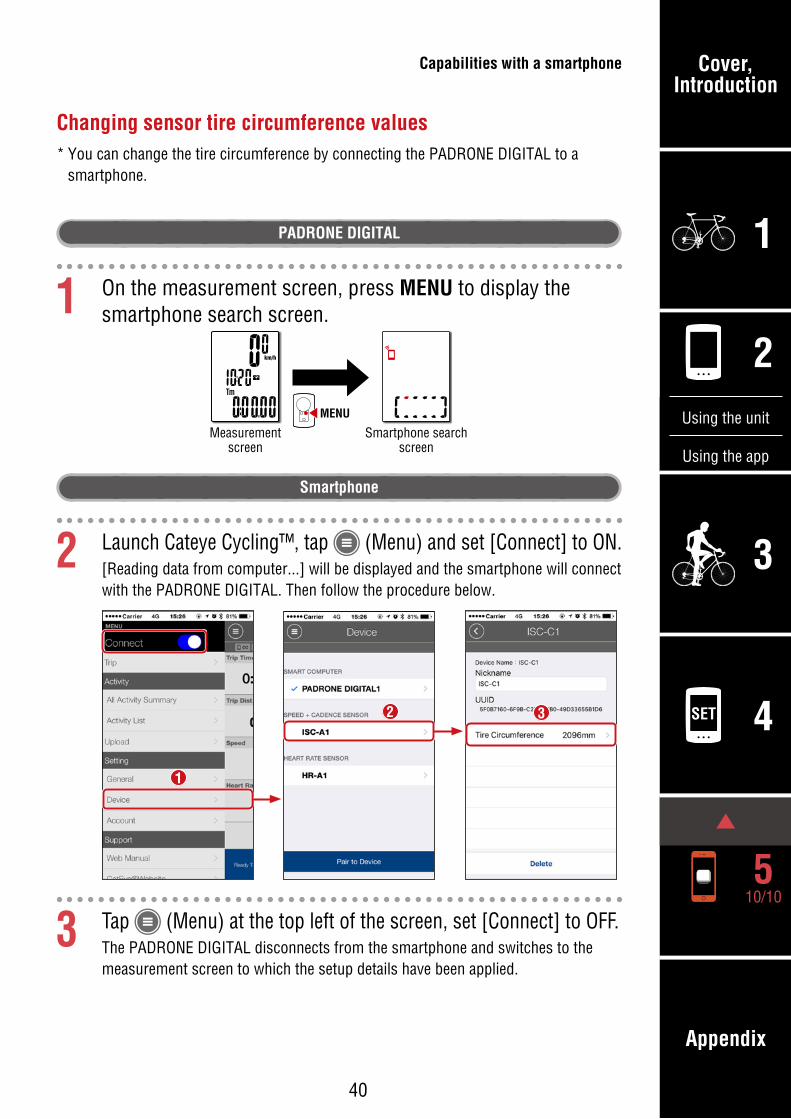
2 Launch Cateye Cycling™, tap (Menu) and set [Connect] to ON.[Reading data from computer...] will be displayed and the smartphone will connect with the PADRONE DIGITAL. Then follow the procedure below.
2
3
1
* If summary data (Measurement results) is not saved on the PADRONE DIGITAL, the button is not displayed.
* Measured values that have not been reset cannot be imported. Before connecting to a smartphone, perform reset operations with the PADRONE DIGITAL. “Data reset (saving summary data)” (Page 21)
3 Tap (Menu) at the top left of the screen, set [Connect] to OFF.The PADRONE DIGITAL disconnects from the smartphone and switches to the measurement screen.
Capabilities with a smartphone
Cover, Introduction
3
SET 4
1
2
Using the app
Using the unit
Appendix
3/105
33
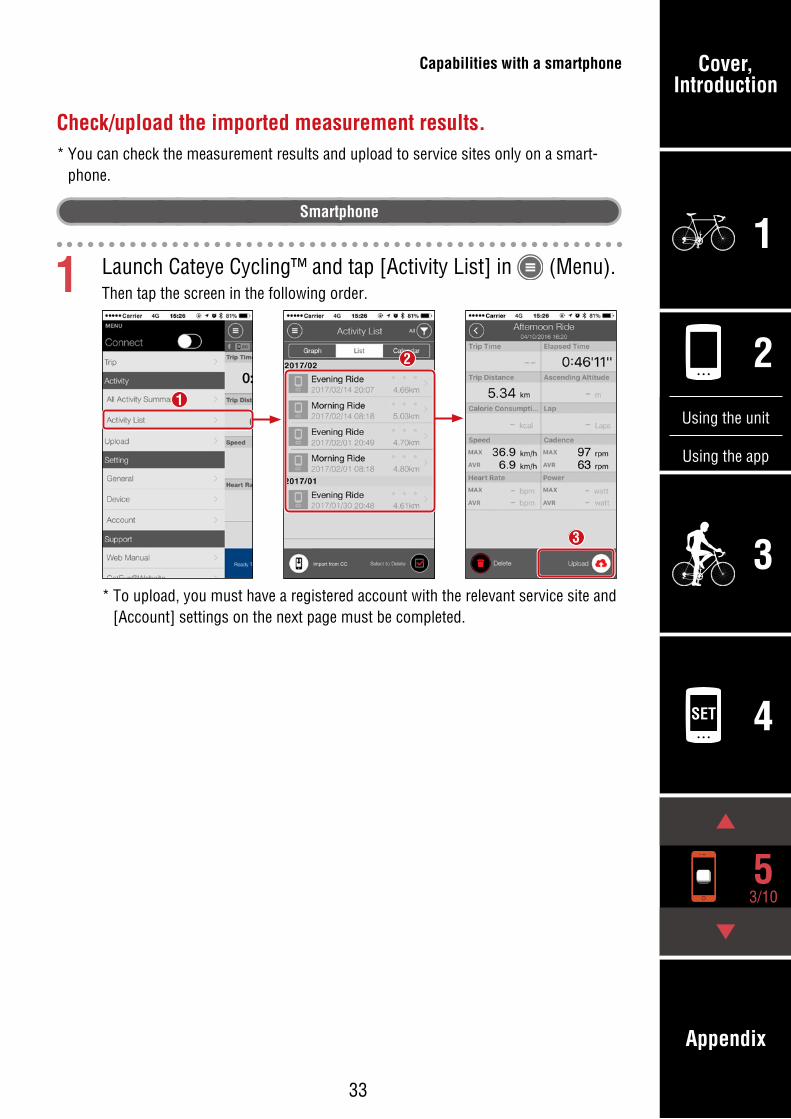
Check/upload the imported measurement results.* You can check the measurement results and upload to service sites only on a smart-
phone.
Smartphone
1 Launch Cateye Cycling™ and tap [Activity List] in (Menu).Then tap the screen in the following order.
1
2
3
* To upload, you must have a registered account with the relevant service site and [Account] settings on the next page must be completed.
Capabilities with a smartphone
Cover, Introduction
3
SET 4
1
2
Using the app
Using the unit
Appendix
4/105
34
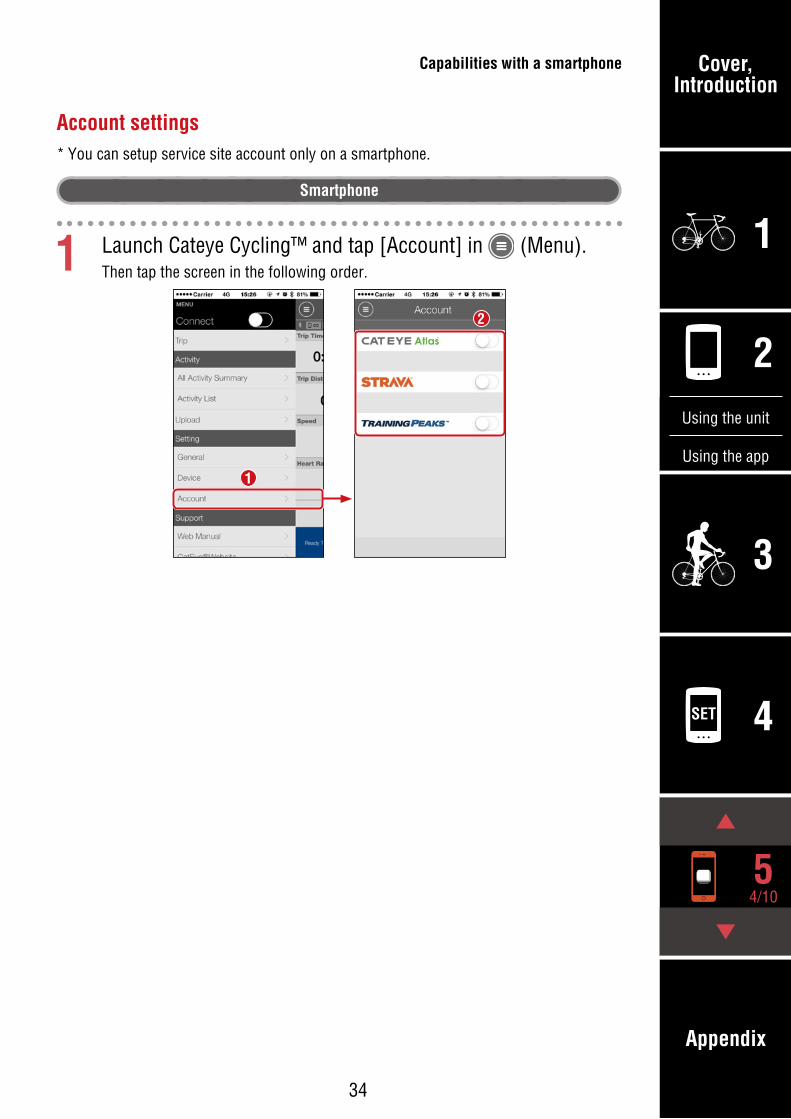
Account settings* You can setup service site account only on a smartphone.
Smartphone
1 Launch Cateye Cycling™ and tap [Account] in (Menu).Then tap the screen in the following order.
1
2
Capabilities with a smartphone
Cover, Introduction
3
SET 4
1
2
Using the app
Using the unit
Appendix
5/105
35
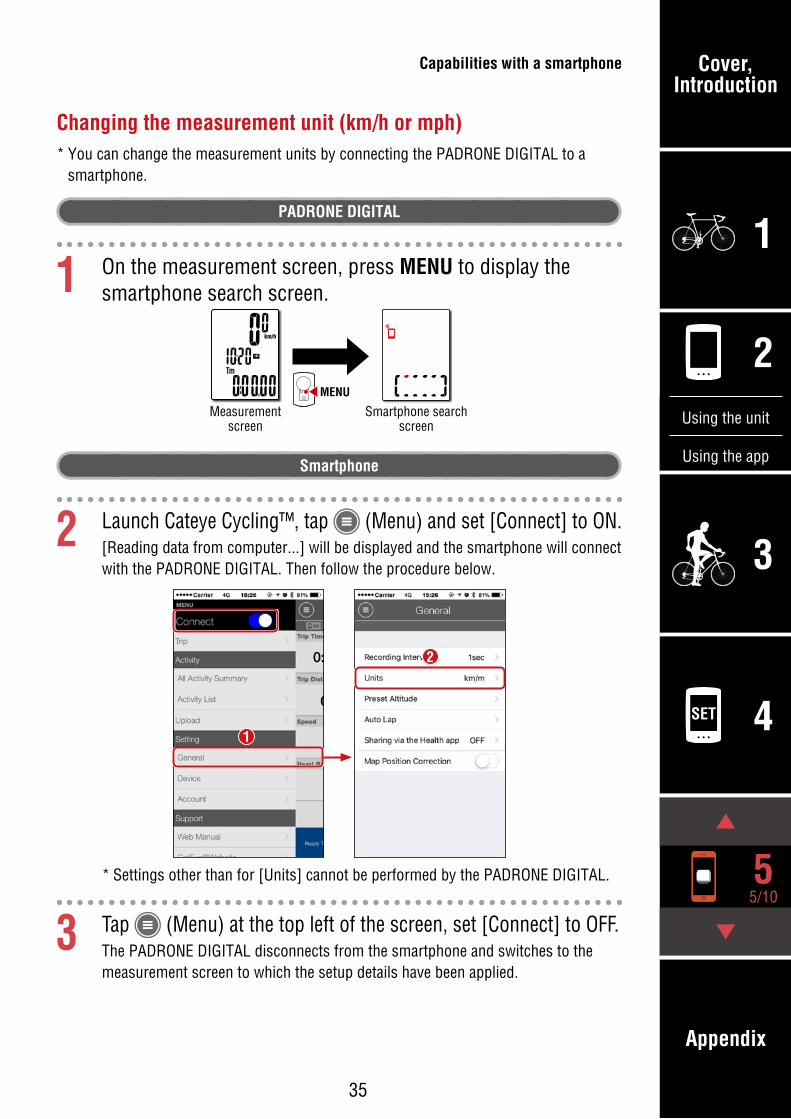
Changing the measurement unit (km/h or mph)* You can change the measurement units by connecting the PADRONE DIGITAL to a
smartphone.
PADRONE DIGITAL
1 On the measurement screen, press MENU to display the smartphone search screen.
MENU
Measurement screen
Smartphone search screen
Smartphone
2 Launch Cateye Cycling™, tap (Menu) and set [Connect] to ON.[Reading data from computer...] will be displayed and the smartphone will connect with the PADRONE DIGITAL. Then follow the procedure below.
1
2
* Settings other than for [Units] cannot be performed by the PADRONE DIGITAL.
3 Tap (Menu) at the top left of the screen, set [Connect] to OFF.The PADRONE DIGITAL disconnects from the smartphone and switches to the measurement screen to which the setup details have been applied.
Capabilities with a smartphone
Cover, Introduction
3
SET 4
1
2
Using the app
Using the unit
Appendix
6/105
36
Measurement screen customization* You can customize the measurement screen by connecting the PADRONE DIGITAL to a
smartphone.
PADRONE DIGITAL
1 On the measurement screen, press MENU to display the smartphone search screen.
MENU
Measurement screen
Smartphone search screen
Smartphone
2 Launch Cateye Cycling™, tap (Menu) and set [Connect] to ON.[Reading data from computer...] will be displayed and the smartphone will connect with the PADRONE DIGITAL. Then follow the procedure below.
1
2
3
3 Tap (Menu) at the top left of the screen, set [Connect] to OFF.The PADRONE DIGITAL disconnects from the smartphone and switches to the measurement screen to which the setup details have been applied.
Capabilities with a smartphone
Cover, Introduction
3
SET 4
1
2
Using the app
Using the unit
Appendix
7/105
37
Input the initial settings for total distance* You can input the total distance by connecting the PADRONE DIGITAL to a smartphone.
PADRONE DIGITAL
1 On the measurement screen, press MENU to display the smartphone search screen.
MENU
Measurement screen
Smartphone search screen
Smartphone
2 Launch Cateye Cycling™, tap (Menu) and set [Connect] to ON.[Reading data from computer...] will be displayed and the smartphone will connect with the PADRONE DIGITAL. Then follow the procedure below.
1
2
3
3 Tap (Menu) at the top left of the screen, set [Connect] to OFF.The PADRONE DIGITAL disconnects from the smartphone and switches to the measurement screen to which the setup details have been applied.
Capabilities with a smartphone
Cover, Introduction
3
SET 4
1
2
Using the app
Using the unit
Appendix
8/105
38
Adding a new sensor Caution!:
• To use the PADRONE DIGITAL, you have to pair it with a sensor that supports the Bluetooth® SMART standard.
• Avoid pairing sensors at a race venue or in similar locations where there are a lot of other users. Doing so may cause the PADRONE DIGITAL to be paired with an-other device.
• Pairing of a commercial sensor and the PADRONE DIGITAL: If using a commercial sensor with an iPhone, go back to (Menu), set [Connect] to OFF and perform pairing with the PADRONE DIGITAL. “Pairing” (Page 25)
* When using an iPhone, you cannot sync settings of commercial sensors with the PADRONE DIGITAL.
* The sensor can be paired even when the PADRONE DIGITAL is not connected to a smartphone. In this case, sensor information will be synchronized with the PADRONE DIGITAL when connected to a smartphone.
PADRONE DIGITAL
1 On the measurement screen, press MENU to display the smartphone search screen.
MENU
Measurement screen
Smartphone search screen
Smartphone
2 Launch Cateye Cycling™, tap (Menu) and set [Connect] to ON.[Reading data from computer...] will be displayed and the smartphone will connect with the PADRONE DIGITAL. Then follow the procedure on the next page.
Capabilities with a smartphone
Cover, Introduction
3
SET 4
1
2
Using the app
Using the unit
Appendix
9/105
39
1
2
After tapping [Pair to Device], activate the added sensor using the procedure in the following table.
CATEYE sensors Activating the sensor Display
Speed/Cadence sensor Move the magnet through the sensor zone several times. (Within 3 mm) ISC
Heart rate sensor (Optional) Rub both electrode pads with your thumbs. HR
* With the speed/cadence sensor and heart rate sensor, you can also activate the sensor by pressing the RESET button.
When Cateye Cycling™ detects the sensor signal, a message is displayed on the smartphone.
When [Pairing] is tapped, the name of the synchronized sensor is displayed and pairing is completed.
* When pairing a sensor with Cateye Cycling™, an “A” is displayed after the sensor name.
3 Tap (Menu) at the top left of the screen, set [Connect] to OFF.The PADRONE DIGITAL disconnects from the smartphone and the new sensor will be ready to use.
Capabilities with a smartphone
Adding a new sensor
Cover, Introduction
3
SET 4
1
2
Using the app
Using the unit
Appendix
10/105
40
Changing sensor tire circumference values* You can change the tire circumference by connecting the PADRONE DIGITAL to a
smartphone.
PADRONE DIGITAL
1 On the measurement screen, press MENU to display the smartphone search screen.
MENU
Measurement screen
Smartphone search screen
Smartphone
2 Launch Cateye Cycling™, tap (Menu) and set [Connect] to ON.[Reading data from computer...] will be displayed and the smartphone will connect with the PADRONE DIGITAL. Then follow the procedure below.
1
2 3
3 Tap (Menu) at the top left of the screen, set [Connect] to OFF.The PADRONE DIGITAL disconnects from the smartphone and switches to the measurement screen to which the setup details have been applied.
Capabilities with a smartphone

Cover, Introduction
3
SET 4
1
5
2
Using the app
Using the unit
Appendix 1/8
41
Appendix Warning!!! / Caution!
Warning!!!:
• Do not concentrate on the PADRONE DIGITAL while riding. Always ride safely.
• Mount the magnet, sensor, and bracket securely, and check them periodically to en-sure that they are not loose.
• If a battery is swallowed accidentally, consult a doctor immediately.
Caution!:
• Do not leave the PADRONE DIGITAL in direct sunlight for a long period of time.
• Do not disassemble the PADRONE DIGITAL.
• Do not drop the PADRONE DIGITAL. Doing so may result in malfunction or damage.
• When pressing the MODE button with the PADRONE DIGITAL installed on the bracket, press the area around the dot section on the front of the PADRONE DIGITAL. Pressing other areas strongly may result in malfunction or damage.
• Always tighten the bracket band dial by hand. Using a tool or other object to tighten the dial may crush the screw thread.
• When cleaning the PADRONE DIGITAL and accessories, do not use thinners, benzine, or alcohol.
• Risk of explosion if battery is replaced by an incorrect type. Dispose of used batteries according to local regulations.
• The LCD screen may be distorted when viewed through polarized sunglass lenses.
Bluetooth® SmartInterference occurs in the following places and/or environments, which may result in an incorrect measurement.
• Near TVs, PCs, radios, or motors or in cars or trains.
• Near railroad crossings, along railway tracks, around television transmitting stations and radar bases, etc.
• When used together with other wireless devices (including other Bluetooth® products) or some particular battery lights.
CC-PA400B Frequency Band: 2.4 GHz Radiated Power: -5.7 dBm (0.269 mW) at EIPRISC-12 Frequency Band: 2.4 GHz Radiated Power: -9.24 dBmHR-12 Frequency Band: 2.4 GHz Radiated Power: -0.09 dBmHereby, CATEYE Co., Ltd. declares that the radio equipment type CC-PA400B / ISC-12 / HR-12 is in compliance with Directive 2014/53/EU. The full text of the EU declaration of conformity is available at the following internet address: cateye.com/doc
This device complies with Part 15 of the FCC Rules and Industry Canada licence-exempt RSS standard(s). Operation is subject to the following two conditions: (1) this device may not cause harmful interference, and (2) this device must accept any interference received, including interference that may cause undesired operation.Modifications The FCC requires the user to be notified that any changes or modifications made to this device that are not expressly approved by CatEye Co., Ltd. may void the user’s authority to operate the equipment.NOTE: This equipment has been tested and found to comply with the limits for a Class B digital device, pursuant to Part 15 of the FCC Rules. These limits are designed to provide reasonable protection against harmful interference in a residential installation. This equipment generates, uses and can radiate radio frequency energy and, if not installed and used in accordance with the instructions, may cause harmful interference to radio communications. However, there is no guarantee that interference will not occur in a particular installation. If this equipment does cause harmful interference to radio or television reception, which can be determined by turning the equipment off and on, the user is encouraged to try to correct the interference by one or more of the following measures: Reorient or relocate the receiving antenna. Increase the separation between the equipment and receiver. Connect the equipment into an outlet on a circuit different from that to which the receiver is connected. Consult the dealer or an experienced radio/TV technician for help.This Class B digital apparatus complies with Canadian ICES-003.

Cover, Introduction
3
SET 4
1
5
2
Using the app
Using the unit
Appendix 2/8
42
Differences between formatting and restartingAction Description
Formatting Perform this action when you use the unit for the first time and when you delete all the measured data and return the settings to their default values.
Operation
ACAC MENUMENU ACAC MENUMENUMENUMENU MENUMENU
1 2 3
Restarting Perform this action when you replace the battery of the PADRONE DIGITAL or when its display is abnormal. Restarting maintains the data shown below.
• Measurement unit
• Clock
• Sensor pairing information and tire circumference
• Upper and middle displays
• Function
• Total distance
• Summary data that has been reset and saved
Operation
ACAC
MaintenanceIf the PADRONE DIGITAL or accessories become dirty, clean with a soft cloth which is moistened with mild soap.
Appendix
Cover, Introduction
3
SET 4
1
5
2
Using the app
Using the unit
Appendix 3/8
43
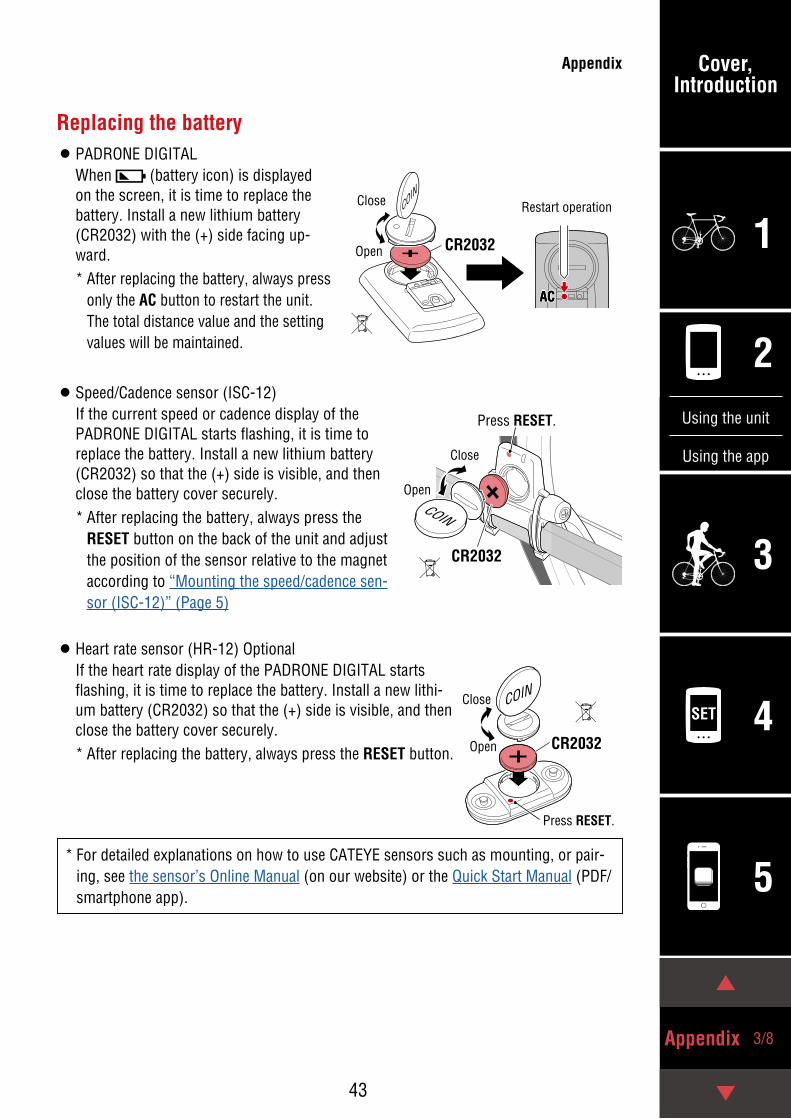
Replacing the battery
• PADRONE DIGITALWhen (battery icon) is displayed on the screen, it is time to replace the battery. Install a new lithium battery (CR2032) with the (+) side facing up-ward.* After replacing the battery, always press
only the AC button to restart the unit. The total distance value and the setting values will be maintained.
• Speed/Cadence sensor (ISC-12)If the current speed or cadence display of the PADRONE DIGITAL starts flashing, it is time to replace the battery. Install a new lithium battery (CR2032) so that the (+) side is visible, and then close the battery cover securely.* After replacing the battery, always press the
RESET button on the back of the unit and adjust the position of the sensor relative to the magnet according to “Mounting the speed/cadence sen-sor (ISC-12)” (Page 5)
• Heart rate sensor (HR-12) OptionalIf the heart rate display of the PADRONE DIGITAL starts flashing, it is time to replace the battery. Install a new lithi-um battery (CR2032) so that the (+) side is visible, and then close the battery cover securely.* After replacing the battery, always press the RESET button.
* For detailed explanations on how to use CATEYE sensors such as mounting, or pair-ing, see the sensor’s Online Manual (on our website) or the Quick Start Manual (PDF/smartphone app).
CR2032
COIN
Press RESET.
Press RESET.
ACAC
COIN
CR2032
Restart operation
CR2032
COIN
Appendix
Open
Open
Open
Close
Close
Close
Cover, Introduction
3
SET 4
1
5
2
Using the app
Using the unit
Appendix 4/8
44
Troubleshooting
Measurement does not work
The PADRONE DIGITAL does not switch to the measurement screen. What should I do?
• Is flashing on the PADRONE DIGITAL?
The PADRONE DIGITAL is connected to a smartphone.Set [Connect] to [OFF] in the (Menu) of the smartphone (Cateye Cycling™) or close Cateye Cycling™.
Why is the sensor signal not being received?
• If using a smartphone (Cateye Cycling™), is [Connect] set to [ON] in the (Menu)?
Set [Connect] to [OFF] or close Cateye Cycling™.
• Are you using another smartphone application that is connecting to the Bluetooth® sensor?
The Bluetooth® sensor may be connected to the smartphone.Bluetooth® sensors are only able to connect with a single device at a time. Stop using all other apps or change the app settings so that it does not connect to Bluetooth® sensors.
• Turn off Bluetooth® on your smartphone, as the sensor may be connected to the smartphone.
Confirm that the sensor gets connected with the PADRONE DIGITAL.It is recommended that Bluetooth® is turned off on your smartphone when the sensor disconnects easily.
• Are you also using other wireless devices simultaneously (including other Blue-tooth® products)?
Stop using the devices simultaneously and confirm that the connection is re-stored.
• Press the RESET button on the sensor that cannot connect.
Confirm that the sensor gets connected with the PADRONE DIGITAL.
Appendix
Cover, Introduction
3
SET 4
1
5
2
Using the app
Using the unit
Appendix 5/8
45
Measurement does not work
Why is the sensor signal not being received? (Continued)
• Is the sensor paired with the unit?
The sensor must be paired with the PADRONE DIGITAL. Perform the pairing with the PADRONE DIGITAL or with a smartphone (Cateye Cycling™).
• PADRONE DIGITAL: “Pairing” (Page 25)
• Smartphone: “Adding a new sensor” (Page 38)
Caution!: Pairing of a commercial sensor and the PADRONE DIGITALIf using a commercial sensor with an iPhone, go back to (Menu), set [Connect] to OFF and perform pairing with the PADRONE DIGITAL. “Pairing” (Page 25)
* When using an iPhone, you cannot sync settings of commercial sensors with the PADRONE DIGITAL.
• Is the PADRONE DIGITAL or sensor battery flat?* Battery performance diminishes in winter.
Replace the batteries with new ones as described in “Replacing the battery” (Page 43).
If speed sensor signals or cadence sensor signals are not received
• Is the clearance between the sensor zone of the sensor and the magnet too large? (The clearance must be within 3 mm.)
• Does the magnet pass through the sensor zone correctly?
Adjust the position of the magnet and/or the speed sensor.
If heart rate signals are not received (Optinal)
• The electrode pad may have slipped out of position.
Check that the electrode pad is still in close contact with your body.
• Your skin may be dry.
Wet the electrode pad a little.
• The electrode pad may have deteriorated or become damaged due to prolonged usage.
If this is the case, replace the attachment belt with a new one.
Appendix
Troubleshooting
Cover, Introduction
3
SET 4
1
5
2
Using the app
Using the unit
Appendix 6/8
46
Appendix
Abnormal display
The display remains blank when the button is pressed.
Replace the PADRONE DIGITAL battery as described in “Replacing the battery” (Page 43).
Incorrect data appear.
Press only the AC button on the back of the PADRONE DIGITAL to restart it.The setting values will be maintained.
Why are measurement values flashing?
If using a Cateye sensor, measured values start flashing to indicate that there is little remaining battery life in the relevant sensor.Refer to “Replacing the battery” (Page 43) to replace the battery for the relevant sensor.
Errors when using Cateye Cycling™ (Smartphone)
Cannot connect a paired PADRONE DIGITAL with a smartphone (Cateye Cycling™)
Restart Cateye Cycling™. If this does not resolve the issue, restart your smartphone.
(import button) to import summary data is not displayed in the Activity List
• Have you reset the PADRONE DIGITAL?
To import summary data using Cateye Cycling™, the PADRONE DIGITAL must be reset (MODE pressed for longer than 2 seconds on any display other than Dst2).
• If the PADRONE DIGITAL was reset but (import button) is not displayed:
Measurements for trips of 0.1 km or less are not recorded as summary data.
Cannot upload data
• Have you setup the account for each service site?
From (Menu) in the smartphone app (Cateye Cycling™), tap [Account] and enter the account information for each site.
Troubleshooting

Cover, Introduction
3
SET 4
1
5
2
Using the app
Using the unit
Appendix 7/8
47
Appendix
Standard accessories
Optional accessories
Main specifications
Batteries usedBattery life
PADRONE DIGITAL Lithium battery (CR2032) x1 / Approx. 4 months
Speed/cadence sensor (ISC-12) Lithium battery (CR2032) x1 / Approx. 5 months
Heart rate sensor (HR-12) Optional Lithium battery (CR2032) x1 / Approx. 5 months
* Life of pre-installed battery may be shorter than indicated above.* Battery life may be reduced depending on the number of paired sensors and usage conditions.
Controller 4 bit, 1-chip microcomputer (Crystal controlled oscillator)
Display Liquid crystal
Sensor Non-contact magnetic sensor
Signal transmission Bluetooth® SMART
Transmission distance Approx. 30 m (The range will vary depending on weather and surroundings.)
Tire circumference range 0100 mm – 3999 mm (Initial value: 2096 mm)
Operating temperature range
32°F – 104°F (0°C – 40°C)(Guaranteed operating temperature range: Display visibility may deteriorate outside this range.)
Dimensions/weight
PADRONE DIGITAL 2-21/32” x 1-11/16” x 39/64” (67.5 x 43 x 15.6 mm) / 1.06 oz (30 g)
Speed/cadence sensor (ISC-12)
2-49/64” x 3-25/64” x 59/64” (70.4 x 86.3 x 23.5 mm) (With arm pointing down, not including rubber pads) / 0.68 oz (19.2 g)
Heart rate sensor (HR-12) Optional
1-7/32” x 2-29/64” x 15/32” (31 x 62.5 x 11.8 mm) (Not including HR strap) / 0.61 oz (17.3 g)
* Specifications and design are subject to change without notice.
1600280NBracket band
1602193Bracket
1665150Lithium battery (CR2032)
1603892Slim bracket kit
1603970Speed/Cadence sensor (ISC-12)
1699691NWheel magnet
1699766Cadence magnet
1603980Heart rate sensor (HR-12)
1603595HR strap
1604100Out-front bracket (OF-100)
1604110Out-front bracket 2 (OF-200)
Cover, Introduction
3
SET 4
1
5
2
Using the app
Using the unit
Appendix 8/8
48
2-8-25, Kuwazu, Higashi Sumiyoshi-ku, Osaka 546-0041 JapanAttn: CATEYE Customer ServicePhone : (06)6719-6863 Fax : (06)6719-6033E-mail : [email protected] URL : http://www.cateye.com[For US Customers]CATEYE AMERICA, INC.2825 Wilderness Place Suite 1200, Boulder CO 80301-5494 USAPhone : 303.443.4595 Toll Free : 800.5.CATEYEFax : 303.473.0006 E-mail : [email protected]
Limited warranty2-year guarantee : PADRONE DIGITAL unit and included sensors (ISC-12)
(Accessories and battery consumption excluded)CatEye cycle computers are warranted to be free of defects from materials and workman-ship for a period of two years from original purchase. If the product fails to work due to normal use, CatEye will repair or replace the defect at no charge. Service must be per-formed by CatEye or an authorized retailer. To return the product, pack it carefully and en-close the warranty certificate (proof of purchase) with instruction for repair. Please write or type your name and address clearly on the warranty certificate. Insurance, handling and transportation charges to CatEye shall be borne by person desiring service.For UK and REPUBLIC OF IRELAND consumers, please return to the place of purchase. This does not affect your statutory rights.
Appendix