Embed Size (px)
Citation preview

CYPRESS 20
FEATURES:Murphy Bed • Great Room
Kitchen • Bathroom Sleeping Loft
144 square feet

Front View Rear View
Left Side Right Side
1st Floor Loft
www.tumbleweedhouses .com • ©Tumbleweed Tiny House Company 2013
Cypress 20FLOOR PLANSThis study plan is not for construction.
Estimated Material Costs: $25,000144 Square Feet
Ceiling Height: 6'6"Loft Height: 3'8"Note: All dimensions are approximate
Trailer Size: 8' x 20'Dry Weight: ~6,600lbs.*
*Includes trailer weight
1' 1
0"
11' 6
"
13' 4
"
Kitchen4' x 6'
Loft6' 8" x 9'
Open to Below
Bath6' x 2'
Optional Murphy Bed
Great Room6' x 9'
20'
2' 8
"17
' 4"
7' 4"

www.tumbleweedhouses .com • ©Tumbleweed Tiny House Company 2013
The year was 2001 when the first tiny home was mounted to a trailer. The little home was
named Tumbleweed because it had roots and was mobile all at the same time. And in that moment, the seeds for a housing revolution were planted.
For more than a decade, Tumbleweed Tiny House Company has been a leader in designing tiny homes that fit neatly on a standard trailer. Countless people have built homes from our plans. We invest hundreds of hours into each set of plans to ensure both beauty and utility. Our years of knowledge and expertise are evident with each set of plans. Working with an architect to produce a similar house from scratch typically costs $5,000–$10,000. Our goal is to offer you an amazing home at an affordable price.
Floor PlansDetailed floor plans for both the downstairs and loft in-clude pertinent dimensions, for walls, windows, rooms and door openings. You’ll also find the location of all appliances on these plans as well.
Exterior ElevationsThese plans include 4 eleva-tion drawings showing the front, back and both sides. Siding and facia boards are called out.
Electric PlansThese pages include both the main floor and loft and show locations for outlets, light switches and lights.
Roof PlanShowing the birds-eye view of the house, you see the slopes and pitches clearly called out, as well as the amount of overhang, and in-dividual rafter locations from above for both the roof and porch.
Kitchen & Cabinet DetailUnlike many other plans on the market, we include 3D plans for all the cabinetry and shelving in the house.
Material ListIncludes windows, doors, water heater, bath tub/shower, kitchen sink, dishwasher, range, washer/dryer, insulation, lumber and more with quantities.
Foundation PlanBuilt on a trailer, the plans describe which trailer to buy, and how to attach to the house. Also included is the floor framing, showing the exact location of each joist and calling out pressure treated joists as needed.
Framing PlansThese plans show the framing for all 4 walls, both gables and lay out the exact location of each stud.
Door DetailThe front door to this home is custom made from standard materials. We include plans to build the door.
Transverse SectionPerhaps one of the most important pages on any set of plans, the transverse sec-tion cuts the house in half and shows details such as wall thickness, roofing material details, flooring details, roof pitch, ceiling heights, and insu-lation.
6' x 6' ½”
4' x 4' ½”4' x 2'
2013 TUMBLEWEED TINY HOUSE COMPANY
www.tumbleweedhouses.com
03/25/13
CYPRESS 20MILLWORK
MW9
©
SHEET Tumbleweed Tiny House CompanyP.O. Box 1907Boyes Hot Springs, CA 95416 (877) 331-8469
COPYRIGHT
- SHEATHE THE OTHER INTERIOR WALLS WITH 5/16” T&G PINE
- INSTALL SHELVES BY DRILLING DOWEL HOLES INTO T&G PINE, INSERTING DOWELS, AND LAYING SHELF ON TOP
18
17
Altering PlansIf you’re interested in making alterations, please contact us so we can discuss your changes. We are happy to assist you. Additionally, we have made the CAD files available online so you can work with your own architect (or engineer). They can simply open the computer file and start making the adjustments you want.

www.tumbleweedhouses .com • ©Tumbleweed Tiny House Company 2013
Glue
Glue
Glue
Glue
Cut

www.tumbleweedhouses .com • ©Tumbleweed Tiny House Company 2013
Glue
Glue Glue
Glue
GlueGlue
Glue
Glue

www.tumbleweedhouses .com • ©Tumbleweed Tiny House Company 2013
Tools you will need for the model.
Cut along the outside of the house. Make sure to have something safe under the cutting area.
Repeat the same process for the roof.
These two pieces will make your tiny house.
What the cut out should look like.
And the back portion.

www.tumbleweedhouses .com • ©Tumbleweed Tiny House Company 2013
Cut out the black rectangle next to the porch.
Close up view.
Cut past the door and first window.
Carefully cut along just the tires.
Fold along the bottom of the house to have the wheels pointing up.
Another shot to show where to cut to.
www.tumbleweedhouses .com • ©Tumbleweed Tiny House Company 2013
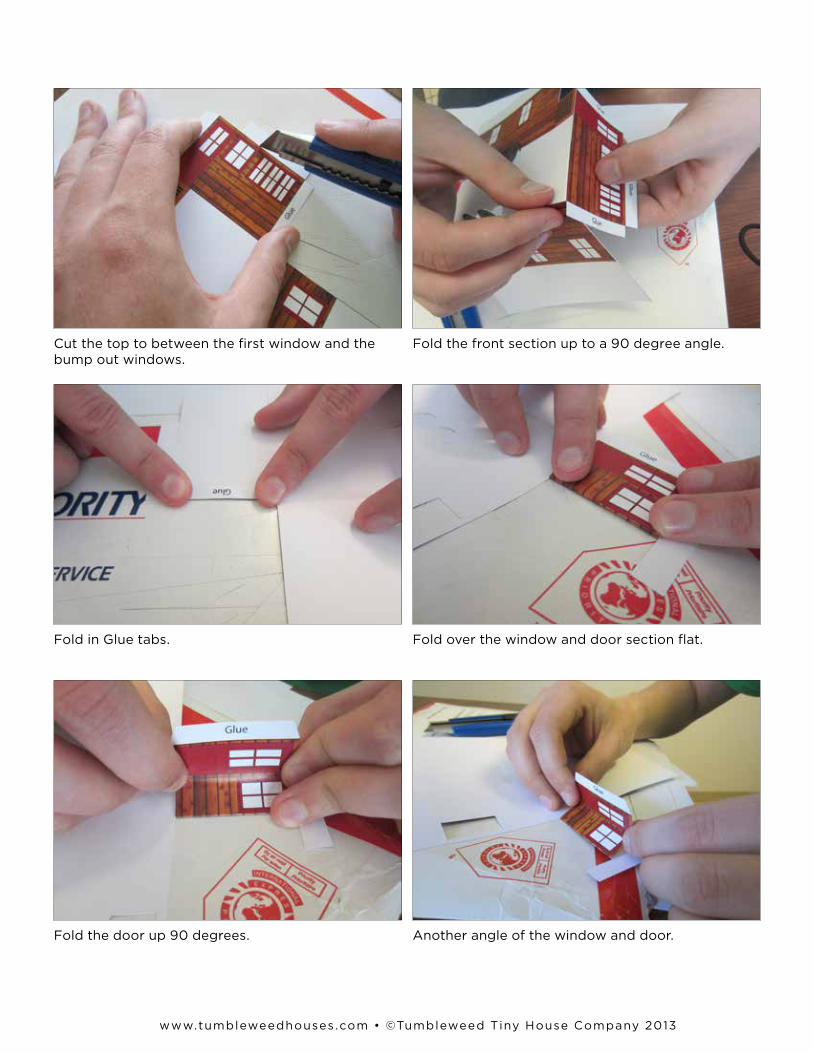
Cut the top to between the first window and the bump out windows.
Fold in Glue tabs.
Fold the door up 90 degrees.
Fold the front section up to a 90 degree angle.
Fold over the window and door section flat.
Another angle of the window and door.

www.tumbleweedhouses .com • ©Tumbleweed Tiny House Company 2013
Fold over the Glue tabs.
Fold each side of the house.
Glue the tab near the door.
What the bump out should look like.
Fold the top roof section over.
Hold the Glued tab here to ensure it stays put.

www.tumbleweedhouses .com • ©Tumbleweed Tiny House Company 2013
Glue the top of the porch tab to the right side tab.
Hold the glued roof down while it dries.
Now the roof. Fold over the section with the sky-lights.
Glue the outside sections around the roof.
What the model should look like at this point.
Fold the back section of the roof with the wooden texture.

www.tumbleweedhouses .com • ©Tumbleweed Tiny House Company 2013
Fold the other side of the roof.
Fold each of those tabs.
Glue along the roof tab.
The front section needs to be folded back.
Glue the tabs next to the wood texture.
Hold one side till you can move to the other.

www.tumbleweedhouses .com • ©Tumbleweed Tiny House Company 2013
Hold each of the roof sections until fully dried.
A front view of the roof.
Fold all the Glue tabs on the back section of the tiny house.
Hold the top of the roof till it is glued together.
Fold over the dormer.
Glue each of the Glue tabs.

www.tumbleweedhouses .com • ©Tumbleweed Tiny House Company 2013
Place the back section into the tiny house and hold until dried.
From the front. You may need to adjust the dormer fold again like in this example.
Place your tiny house in its new home!
Place the roof onto the top to see how it will look.
Glue the roof onto the top of the tiny house.