Embed Size (px)
Citation preview
1
Directions for Assembling your Outdoor Screen Kit(Excerpts from Digital Dummies Instructions)
This Section Comes From: http://www.digitaldummies.com/projects/outdoor2.asp
Enjoying the Great Outdoors
OK, so here we get down into the details of one way to create your easy-to-set-up, low cost, high impact outdoor hometheater in a box. You certainly can do things differently, but Danny can say this one works, and has been optimized overmany showings.
So, where do you start? Here's what you need:
A projector: Unless you’re going to bring a direct-view big screen TV (like your plasma or rear projection TV)outside (we think you won’t — and shouldn’t — do this), you’ll want to use a front projection video system for youroutdoor theater. An LCD or DLP projector (see Chapter 13 of Home Theater for Dummies for more details) worksbest in the outdoors, because these projectors are capable of putting out much brighter pictures than CRTprojectors. Danny recommends his Toshiba TLP-S70U ($1399, www.insight.com) in both his indoor and outdoortheaters — it’s really portable (very light) and easy to set up quickly in both environments. The screen quality andfeatures are great. And the price point is about the lowest you can get for such a high quality device.
An outdoor frame: You’re going to need to mount your screen to something. Danny called a party tent companyand asked them to create a special outdoor home theater product based on the same principles of a party tent —lots of strong rods bundled together with special joints. The result: An outdoor home theater framing system thatyou can put up anywhere. The joints with shipping should run around $200; you can get the rods (1-inch EMT pipe)at any Home Depot or Lowes — these will run about another $100-$150. We'll give you a detailed list of what youneed at the end of this article, and instructions how to put Danny puts his together.
Tip: Danny made his screen 10 feet by 20 feet for a reason — EMT pipe comes in 10 foot lengths, and that makes iteasier to avoid a lot of custom cutting of the pipe to meet a certain size.
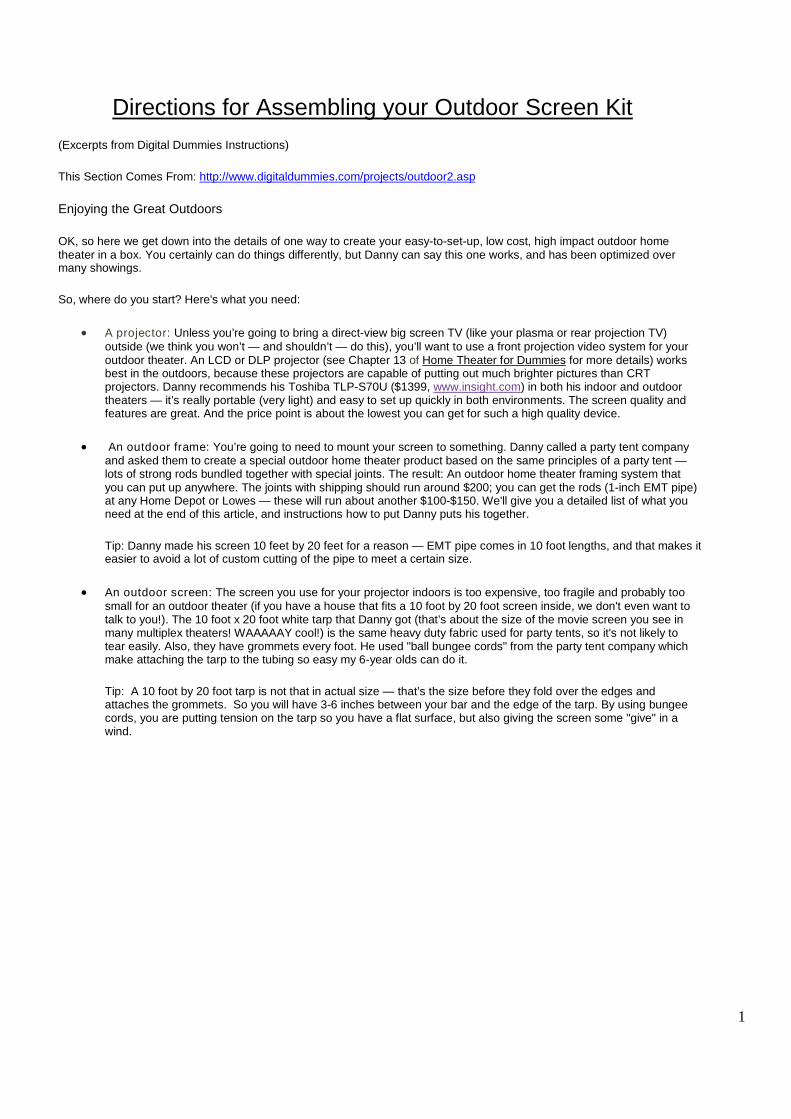
An outdoor screen: The screen you use for your projector indoors is too expensive, too fragile and probably toosmall for an outdoor theater (if you have a house that fits a 10 foot by 20 foot screen inside, we don't even want totalk to you!). The 10 foot x 20 foot white tarp that Danny got (that’s about the size of the movie screen you see inmany multiplex theaters! WAAAAAY cool!) is the same heavy duty fabric used for party tents, so it's not likely totear easily. Also, they have grommets every foot. He used "ball bungee cords" from the party tent company whichmake attaching the tarp to the tubing so easy my 6-year olds can do it.
Tip: A 10 foot by 20 foot tarp is not that in actual size — that’s the size before they fold over the edges andattaches the grommets. So you will have 3-6 inches between your bar and the edge of the tarp. By using bungeecords, you are putting tension on the tarp so you have a flat surface, but also giving the screen some "give" in awind.
2
Tip: If you have problems with wrinkles, consider ironing the plastic tarp by placing a cloth sheet over the plasticand ironing it on low heat. Go slow so you don’t melt the plastic. This will get the wrinkles out. (Not recommendedby Creative Shelters.)
Tip: They sell silver colored tarps too. Get the white — we've had no problems with that.
Warning: The tarp fabric typically is not wide enough to do the tarp in one piece. As a result, you are very very likelyto have a seam across your tarp. This will be apparent to your viewers, especially and most particularly if you areprojecting this from the rear (because the light has to pass through the fabric). You can see the seam in ourslideshow at the end of this article. Personally, and in the eyes of those who have viewed our movies, it's just not abig deal. However, it might be for you. Recognize this is a $30 solution -- there are certainly much more elegant andexpensive solutions too. We're investigating one option now.
3
The following section comes from http://www.digitaldummies.com/projects/outdoor3.asp
If you have questions, please go to the above website and contact the authors regarding this project.
What You Need
So, this will take you about 2 hours to put together the first time, and about a half hour thereafter. Two people can do it, morepeople makes it more fun and go faster. An unleashed Old English Sheepdog puppy slows things up. Beer makes itlopsided.
Disclaimer: We're not responsible for any errors in this following list; you should confirm this with your supplier beforeordering. If we messed up, it was the beer or the dog.
Here's what you need to put this together:
Tools
1 hammer 1 screwdriver (does not really matter what type) 1 circular saw (required if you don't get pipes cut at store) 1 circular saw blade for cutting EMT pipe (required if you don't get pipes cut at store) 1 drill with 3/8 inch metal drill bit Several extension cords 1 right angle/square 1 25' measuring tape 1 pocket knife 1 permanent black marker (for labeling everything so it is easy to put together the second time) 4 kids Enough money for ice cream to bribe 4 kids
Carrying Materials
1 LL Bean canvas carrying case 1 set of cinch straps to help in carrying pipes
Electronics
1 Toshiba TLP-S70U (or equivalent projector) 1 DVD player source (laptop, desktop PC, portable DVD player, etc) 1 set of speakers compatible with the source 1 set of cables (you'll have to figure this out on your own depending on your source and speakers. Danny has a 50ft
SVGA cable from sFC-Bble.com, power extension cords, and cabling that came with his speakers. that's all heneeded)
Frame/Screen Materials
30 1-inch diameter 10 foot long EMT pipe segments, with some cut as follows (keep all scrap):o 2 117-inch lengthso 3 60-inch lengthso 3 57-inch lengthso 3 44-inch lengthso 3 29.5-inch lengths
Tip: If you buy these at Home Depot or Lowes or some place like that, get them to cut these lengths foryou, it will save a LOT of time
1 10' x 20' White Tarp
4
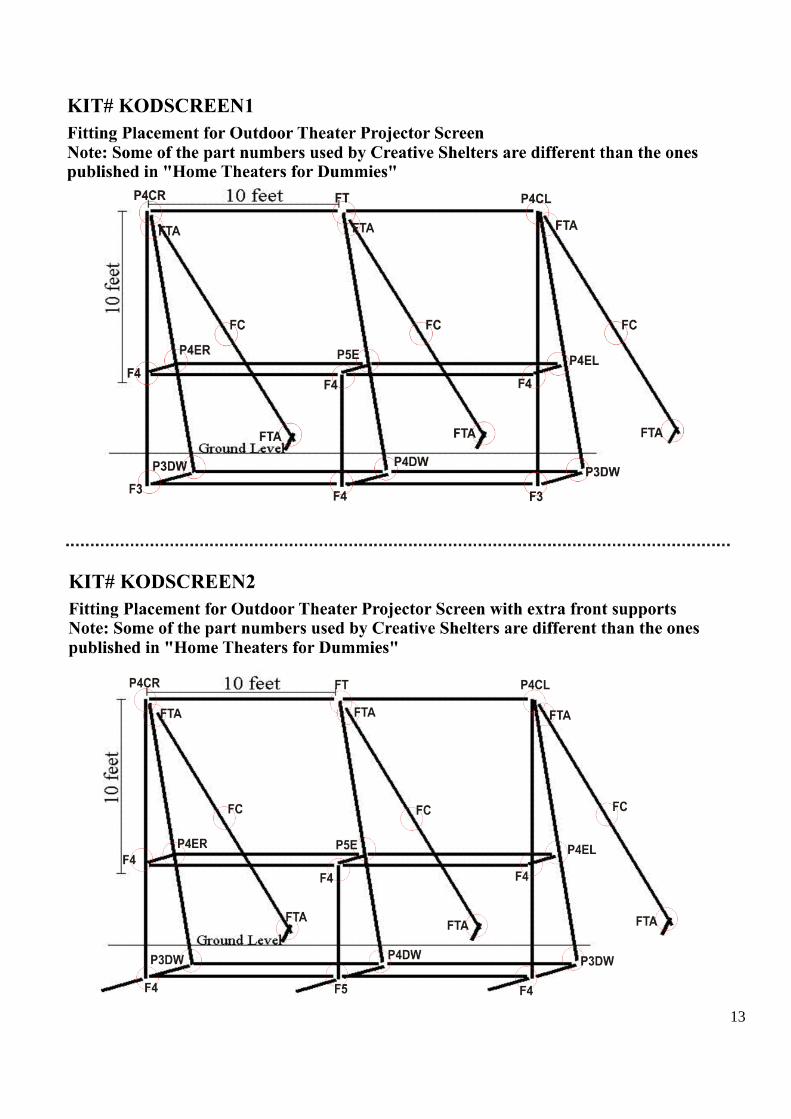
24 Fittings (12 Different Models)o 2 F3-Bo 2 P3DW-Bo 4 F4-Bo 1 P4EL-Bo 1 P4ER-Bo 1 P4CL-Bo 1 P4CR-Bo 1 P4DW-Bo 1 P5E-Bo 1 FT-Bo 3 FC-Bo 6 FTA-B Adjustable tee connectors
30 6" Ball Bungees 20 12" Ball Bungees
By the way, we said 30 and 20 for the numbers of 6- and 12-inch bungees you need, but they come in packs of 25, just soyou know. You might find vendors that don't want to split up the packs of 25 and may charge you less for a whole pack.
Note that you can have an alternative configuration that provides for three front support legs, as we'll describe in the step bystep. This would entail:
o 2 F4-B (instead of 2 F3-B)o 1 F5-B (instead of 1 F4-B )
(Part Number: KODSCREEN2) - $238 for all parts
These would replace the three front foundation fittings, and allow you to have any length of EMT piping that provides bettersupport against the screen going forward — Danny is experimenting with that now. Theoretically, if the rear braces areanchored well, you would not need this. We're also checking into a framed version without the anchors in the ground, forasphalt applications. Check back here for more details as we flesh that out.
Warning
If there is one thing that has concerned us about the fittings is that quality varies substantially. Danny is trying to ascertainwhich vendors sell the best ones, but even that can vary from month to month. The screw eyes will sheer off occasionally, soyou should ask for extra screw eyes when you order. The eyebolts will vary by source manufacturer on size. Some will comewith smaller eyebolts and some with larger eyebolts. You can't specify which you get and right now they are a mixed lot-some are 1/4 inch and some are 5/16 inch (best). What we are seeing is a transitional move to the larger eyebolts which willtake time to complete due to restocking. So you can't always request the larger and be assured of getting them at this time.They can't be sure of what will come in on the ship themselves! (Thanks to Donna at Shelters-to-go.com for thisbackground). NOTE: (Creative Shelters buys top quality fittings which typically have the large 5/16” eye screws.)
Putting it Together, Step-by-Step
1. The first step is an inventory to make sure you have all the right pieces. Lay out all your fittings by group, make sureyou have the right number in each group, and you have the bungees and of course the screen tarp. Two alternativeplans that we are experimenting with include a version with front supports and an alternate rear leg supportsystem..
2. If you bought the piping at a place the cut the pipes for you, that's great. If not, you have to cut them yourself. Youcan use a hacksaw, but the lazier of us (Danny) would buy a $1.49 blade for your circular saw that will cut the pipe.These blades are made up of some sort of abrasive that is not only on the tips, but on the sides too. So, after youcut the pipe, you can also use the sides of the blades (while spinning) to 'sand' down the rough edges of the cut.(Naturally, your manual probably says to do nothing of the sort, and you do so at your own risk (<-disclaimer again),but it works. And the kids love the neat sparks. Even if you get the pipes cut at the store, you might want to get theblade anyway just for this purpose so you can have a nice rounded edge that no one cuts their finger on. This stuffcan be sharp. Watch out! Warning: Wear some glasses, even if only sunglasses, as shards do pop off of thesepipes while cutting them.
3. NOTE: The instructions from here on depend on which of the three framing formats you have chosen to do. Theinstructions here will be for the first and most common format — the anchored format — but you following the samegeneral process and path for the others as well.
4. Lay out the pipes for the side trusses. Here are the pieces you need to make each end truss are the following:
5
1. Fittings: 2-F3-B, 2-P3DW-B, 2-F4-B, 1-P4EL-B, 1-P4ER-B, P4CL-B, P4CR-B2. Frames: 2 120-inch (10-foot) lengths, 2 117-inch lengths, 2 60-inch lengths, 2 57-inch lengths, 2 44-inch
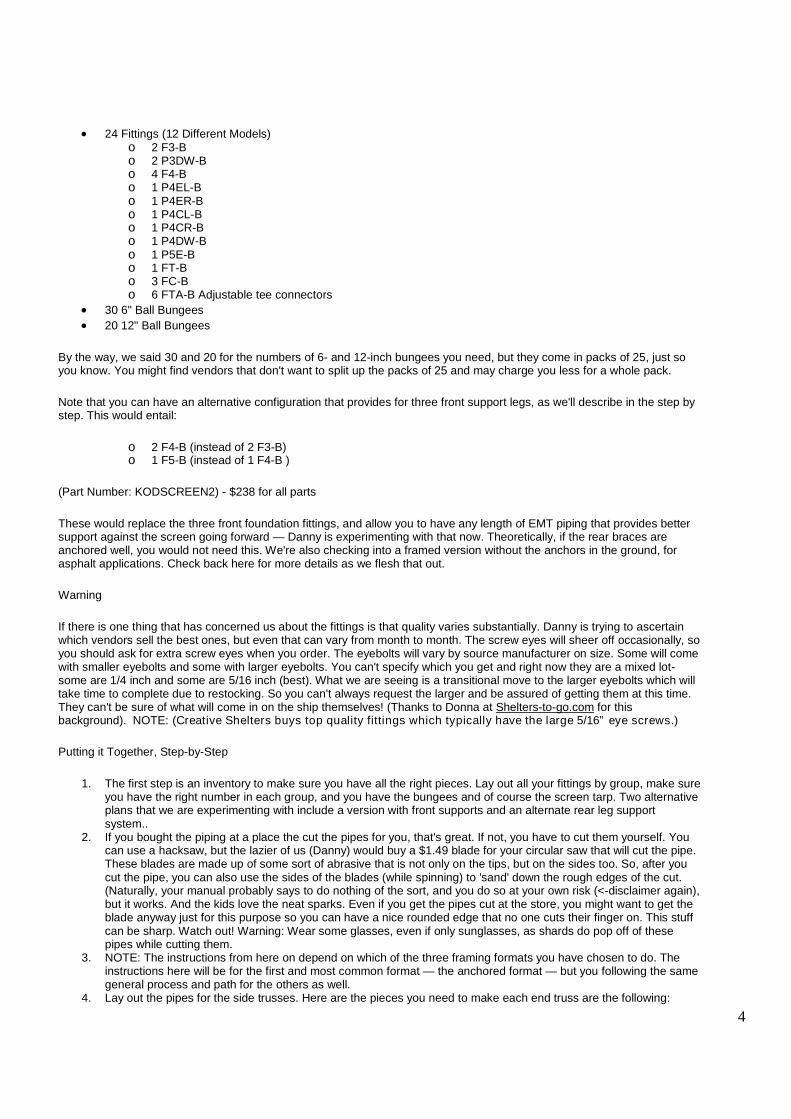
lengths, 2 29.5-inch lengths5. Start with the end trusses by grabbing the top fitting in each, the two P4CL-B/R fittings. This is probably the most
distinctive piece of the frame because of the low angle of the triangle — it's obviously the top piece for each end.
Remember: there is no piece like that in the middle. Why? You don't want a middle brace because, in a slight wind,the vertical middle brace would be visible in a wind-blown screen. So the middle top bar piece is merely a T-bar likefitting, the FT-B fitting, to provide the need support from the back. But we digress.
6. Orient the top truss fitting in your mind. Looking at it in your hand, you'll see part of the fitting that goes out to theright (or left depending on the piece) — this goes towards the audience. There are two downward fitting socketsthat go towards the ground. The vertical piece that will be exactly perpendicular to the ground is the fitting that willactually hold the screen. The socket that goes off at an angle is the socket that houses one of the back supports.And the socket pointed towards or away from you, houses the horizontal cross bar that also holds up the screen.Insert a 120-inch (10-foot) length of EMT into the socket for the back support, and insert a 117-inch length pipe intothe vertical front brace for the screen. You should see two sides of a triangle. Tighten the screw eyes enough tohold the pieces in place. Do this for both trusses.
7. Important: Slide onto each angled, 120-inch bar, an adjustable tee fitting (FTA-B). The nut/bolt connector should beon the top, so that the socket is facing towards the bottom of the frame. Hand tighten the AT into place up againstthe top fitting. This is one of those "Oh Crap, I forgot the..." that you will want to make sure is on there now.
8. Grab your next two pairs of fittings for the trusses: P4EL-B (or ER, whichever side you are working on) and F4-B.Orient yourself again. These fittings have no audience side socket, just a socket for vertical support bar and twohorizontal support bars. Take your 29.5 inch EMT bar into the two sockets that play the role of the bottom of thetriangle for the truss thus far. Orient this so that the screen vertical support bar so that it is perpendicular to the frontscreen supporting vertical braces. Do this for each truss and hand tighten.
9. Grab a 57-inch length, a 60-inch length, and a 44-inch lengths of EMT pipe. These represent the front vertical, rearsupport, and bottom foundation bars. Grab fittings P3DW-B and F3-B, and orient them the same way you did themiddle fittings on the truss. (Again, note that if you have chosen to get the fittings with front supports, you would begrabbing fittings F4-B instead of F3-B here. And if you have the full frame version, well that's something else wedon't know yet, but there'd be some differences the presumably you've figured out since we didn't.) Slide thefittings/bar onto the base of the trust. Once on, the bottom horizontal bar should be parallel to the middle supportbar of the truss, and the bottom should be perpendicular to the front vertical screen support. Hand tighten thefittings.
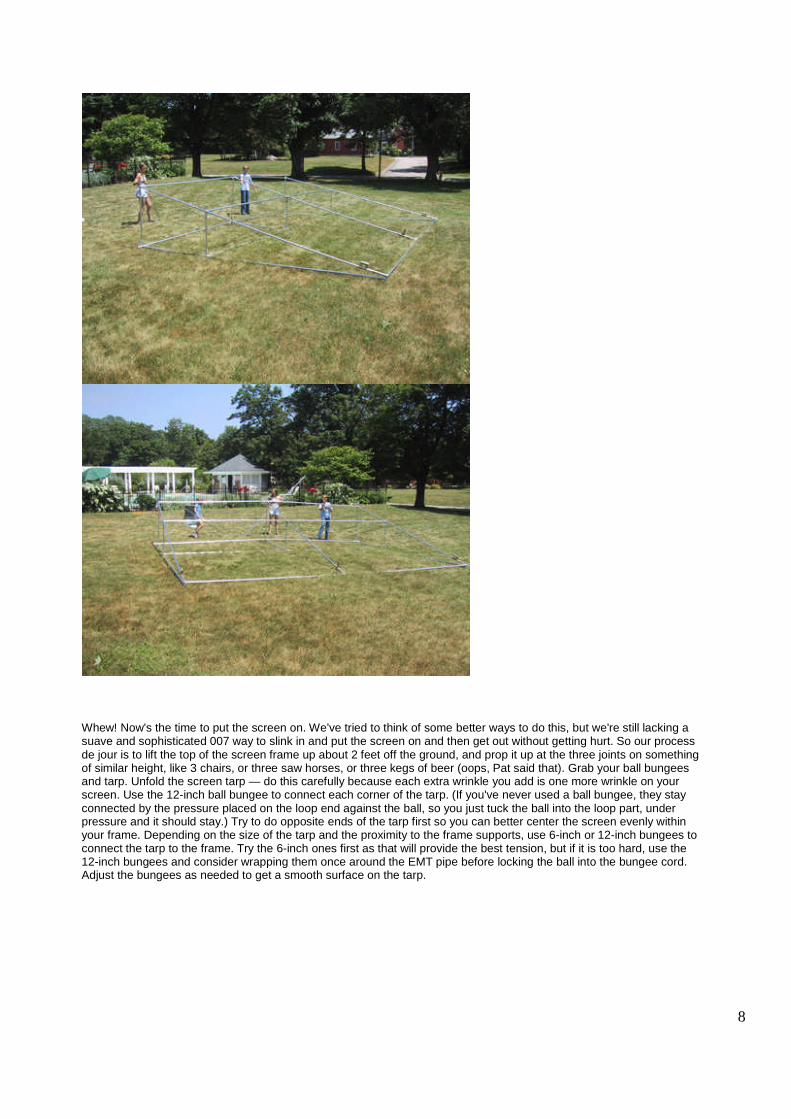
10. OK, now you should have two completed side trusses.
6
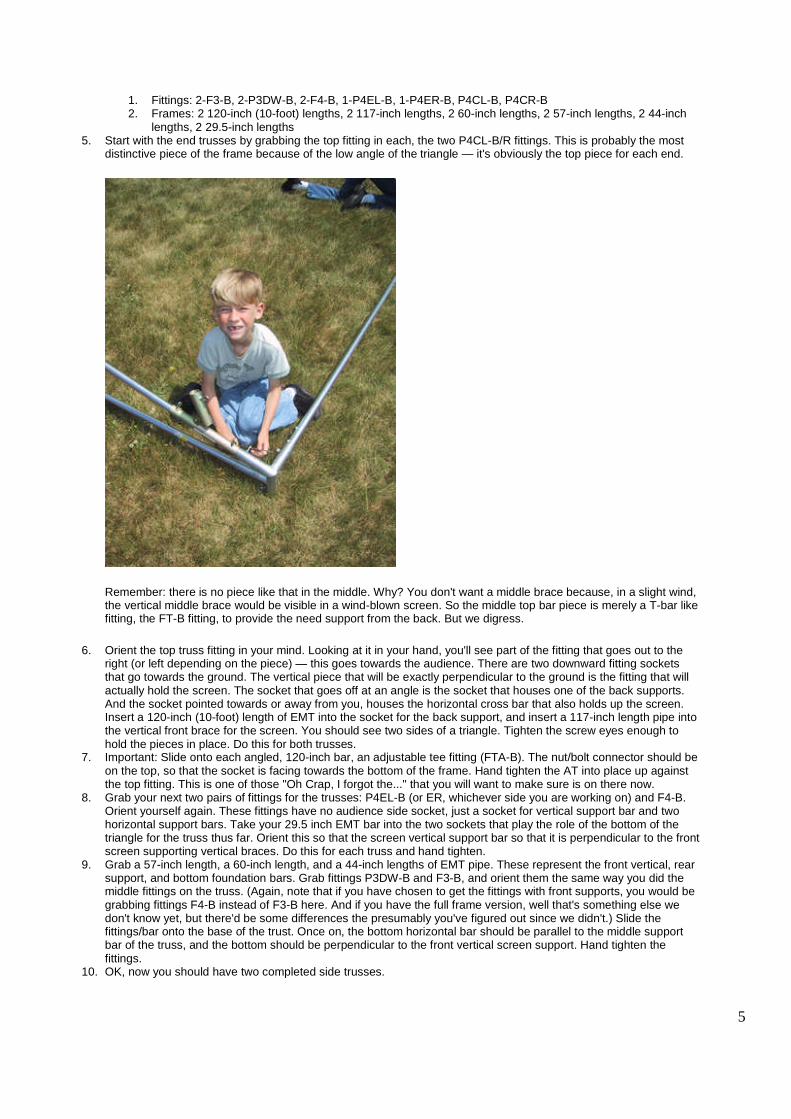
Run your eye along the pipes and fittings and make sure that everything seems pretty square and lined up.Measure the distance from fitting to fitting and compare with the other truss. Even them up — you want thisbalanced. Once you are satisfied with the appearance, use your screwdriver as a level on the screw eyes to tightenthem a little more. Caution: Don't over tighten. These screw eyes can sheer off. We're hunting for higher qualityfittings but until we find them, this warning stands. Ask for extra screw eyes when ordering, or have some onhand...you'll need them every once and a while.
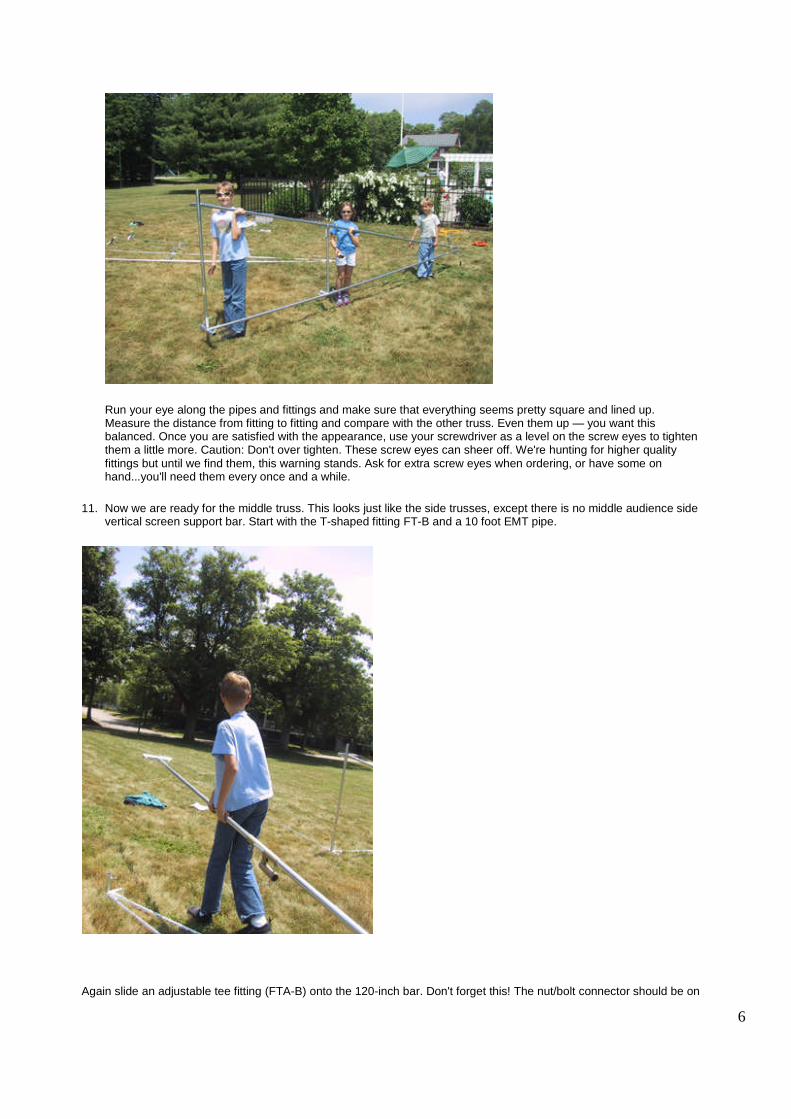
11. Now we are ready for the middle truss. This looks just like the side trusses, except there is no middle audience sidevertical screen support bar. Start with the T-shaped fitting FT-B and a 10 foot EMT pipe.
Again slide an adjustable tee fitting (FTA-B) onto the 120-inch bar. Don't forget this! The nut/bolt connector should be on
7
the top, so that the socket is facing towards the bottom of the frame. Hand tighten the FTA-B into place up againstthe top fitting. Connect this bar into the same basic middle and bottom supports as with the above side trusses.You'll need fittings 2-F4-B, 1-P5E-B, and 1-P4DW-B, as well as a 29.5-inch pipe and a 44-inch pipe. When done,the middle truss should be as square, lined up, and proportioned as the side trusses. Use your square andmeasuring tape again to make sure this is just like the side trusses. Tip: The measuring tape is a good indicator ofpipes that are not seated all the way in, or of a fitting that cuts off prematurely due to some weld spots in the pipe.So make use of it.
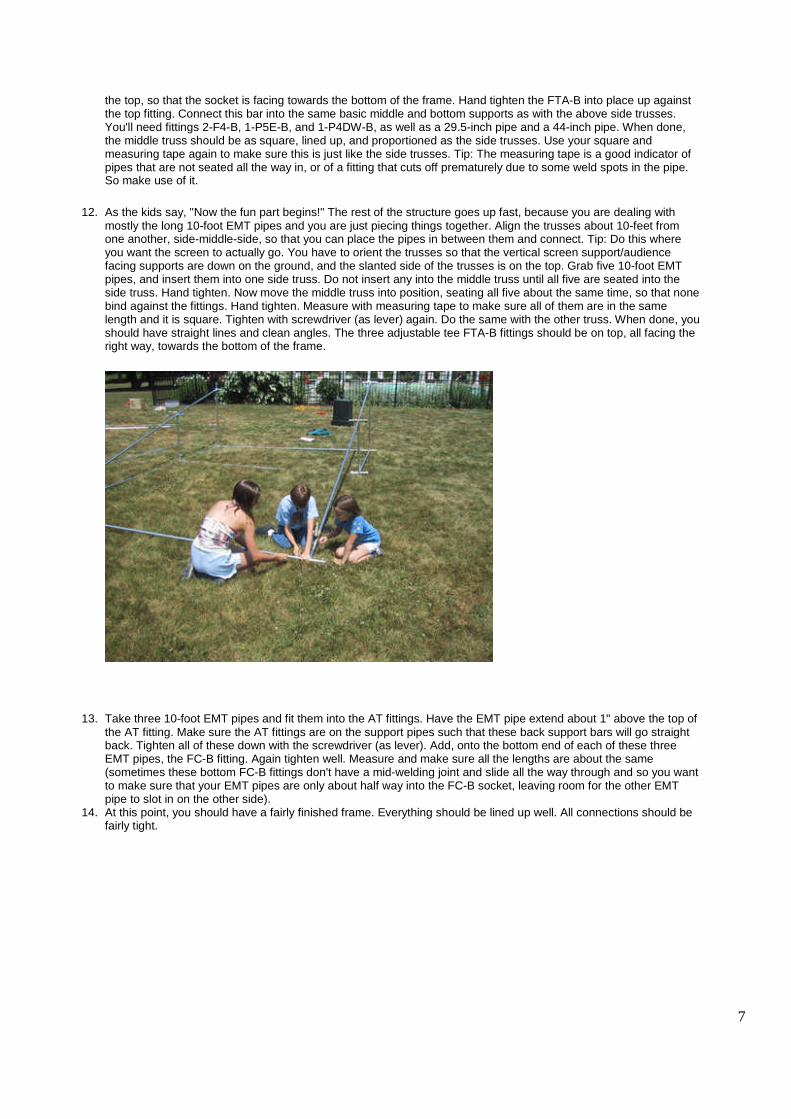
12. As the kids say, "Now the fun part begins!" The rest of the structure goes up fast, because you are dealing withmostly the long 10-foot EMT pipes and you are just piecing things together. Align the trusses about 10-feet fromone another, side-middle-side, so that you can place the pipes in between them and connect. Tip: Do this whereyou want the screen to actually go. You have to orient the trusses so that the vertical screen support/audiencefacing supports are down on the ground, and the slanted side of the trusses is on the top. Grab five 10-foot EMTpipes, and insert them into one side truss. Do not insert any into the middle truss until all five are seated into theside truss. Hand tighten. Now move the middle truss into position, seating all five about the same time, so that nonebind against the fittings. Hand tighten. Measure with measuring tape to make sure all of them are in the samelength and it is square. Tighten with screwdriver (as lever) again. Do the same with the other truss. When done, youshould have straight lines and clean angles. The three adjustable tee FTA-B fittings should be on top, all facing theright way, towards the bottom of the frame.
13. Take three 10-foot EMT pipes and fit them into the AT fittings. Have the EMT pipe extend about 1" above the top ofthe AT fitting. Make sure the AT fittings are on the support pipes such that these back support bars will go straightback. Tighten all of these down with the screwdriver (as lever). Add, onto the bottom end of each of these threeEMT pipes, the FC-B fitting. Again tighten well. Measure and make sure all the lengths are about the same(sometimes these bottom FC-B fittings don't have a mid-welding joint and slide all the way through and so you wantto make sure that your EMT pipes are only about half way into the FC-B socket, leaving room for the other EMTpipe to slot in on the other side).
14. At this point, you should have a fairly finished frame. Everything should be lined up well. All connections should befairly tight.
8
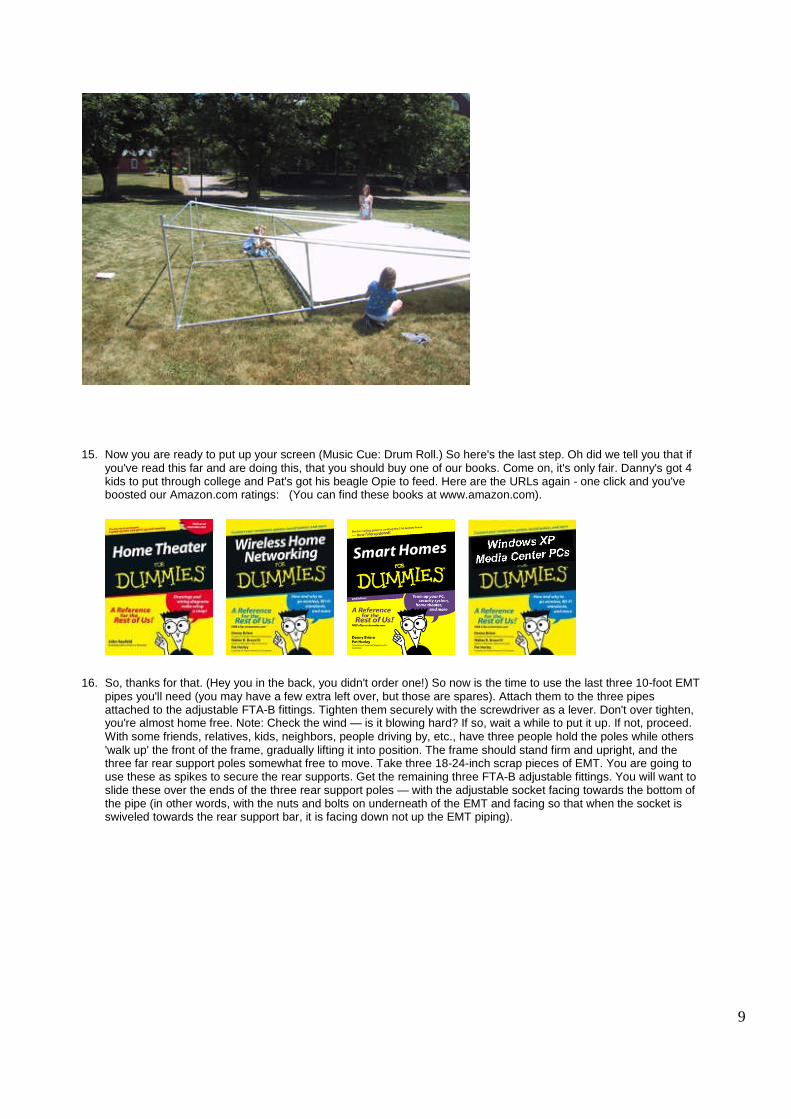
Whew! Now's the time to put the screen on. We've tried to think of some better ways to do this, but we're still lacking asuave and sophisticated 007 way to slink in and put the screen on and then get out without getting hurt. So our processde jour is to lift the top of the screen frame up about 2 feet off the ground, and prop it up at the three joints on somethingof similar height, like 3 chairs, or three saw horses, or three kegs of beer (oops, Pat said that). Grab your ball bungeesand tarp. Unfold the screen tarp — do this carefully because each extra wrinkle you add is one more wrinkle on yourscreen. Use the 12-inch ball bungee to connect each corner of the tarp. (If you've never used a ball bungee, they stayconnected by the pressure placed on the loop end against the ball, so you just tuck the ball into the loop part, underpressure and it should stay.) Try to do opposite ends of the tarp first so you can better center the screen evenly withinyour frame. Depending on the size of the tarp and the proximity to the frame supports, use 6-inch or 12-inch bungees toconnect the tarp to the frame. Try the 6-inch ones first as that will provide the best tension, but if it is too hard, use the12-inch bungees and consider wrapping them once around the EMT pipe before locking the ball into the bungee cord.Adjust the bungees as needed to get a smooth surface on the tarp.
9
15. Now you are ready to put up your screen (Music Cue: Drum Roll.) So here's the last step. Oh did we tell you that ifyou've read this far and are doing this, that you should buy one of our books. Come on, it's only fair. Danny's got 4kids to put through college and Pat's got his beagle Opie to feed. Here are the URLs again - one click and you'veboosted our Amazon.com ratings: (You can find these books at www.amazon.com).
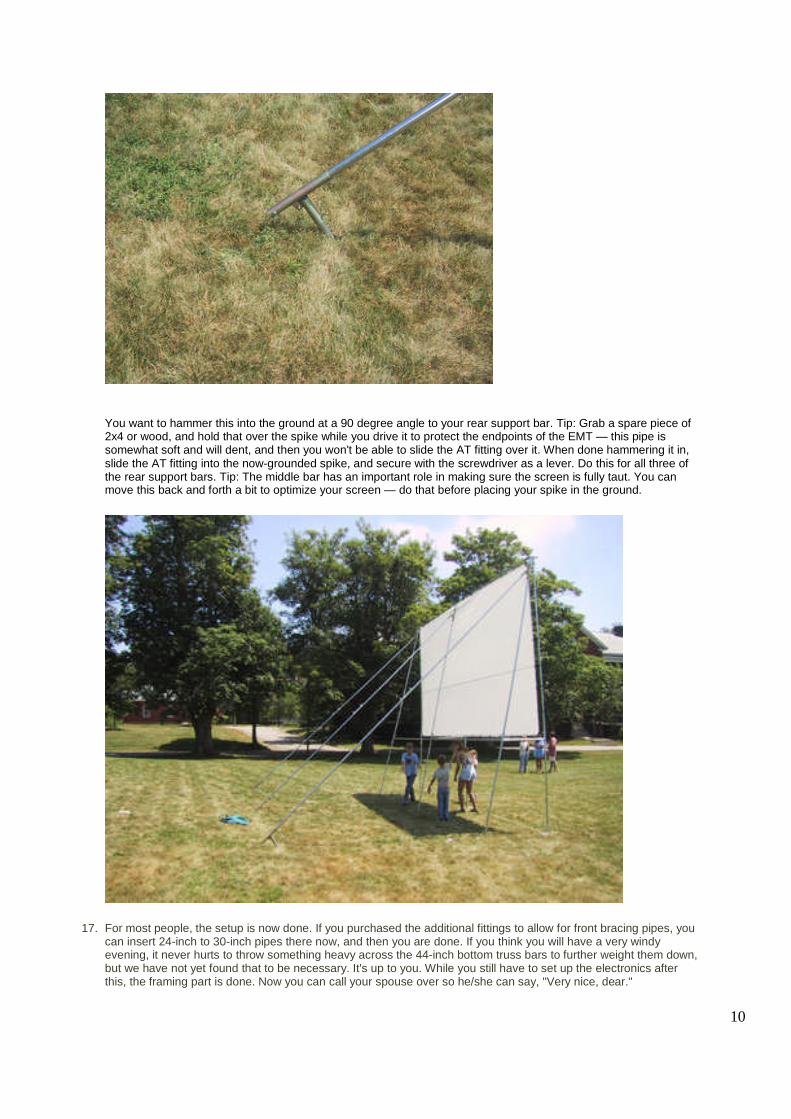
16. So, thanks for that. (Hey you in the back, you didn't order one!) So now is the time to use the last three 10-foot EMTpipes you'll need (you may have a few extra left over, but those are spares). Attach them to the three pipesattached to the adjustable FTA-B fittings. Tighten them securely with the screwdriver as a lever. Don't over tighten,you're almost home free. Note: Check the wind — is it blowing hard? If so, wait a while to put it up. If not, proceed.With some friends, relatives, kids, neighbors, people driving by, etc., have three people hold the poles while others'walk up' the front of the frame, gradually lifting it into position. The frame should stand firm and upright, and thethree far rear support poles somewhat free to move. Take three 18-24-inch scrap pieces of EMT. You are going touse these as spikes to secure the rear supports. Get the remaining three FTA-B adjustable fittings. You will want toslide these over the ends of the three rear support poles — with the adjustable socket facing towards the bottom ofthe pipe (in other words, with the nuts and bolts on underneath of the EMT and facing so that when the socket isswiveled towards the rear support bar, it is facing down not up the EMT piping).
10
You want to hammer this into the ground at a 90 degree angle to your rear support bar. Tip: Grab a spare piece of2x4 or wood, and hold that over the spike while you drive it to protect the endpoints of the EMT — this pipe issomewhat soft and will dent, and then you won't be able to slide the AT fitting over it. When done hammering it in,slide the AT fitting into the now-grounded spike, and secure with the screwdriver as a lever. Do this for all three ofthe rear support bars. Tip: The middle bar has an important role in making sure the screen is fully taut. You canmove this back and forth a bit to optimize your screen — do that before placing your spike in the ground.
17. For most people, the setup is now done. If you purchased the additional fittings to allow for front bracing pipes, youcan insert 24-inch to 30-inch pipes there now, and then you are done. If you think you will have a very windyevening, it never hurts to throw something heavy across the 44-inch bottom truss bars to further weight them down,but we have not yet found that to be necessary. It's up to you. While you still have to set up the electronics afterthis, the framing part is done. Now you can call your spouse over so he/she can say, "Very nice, dear."
11
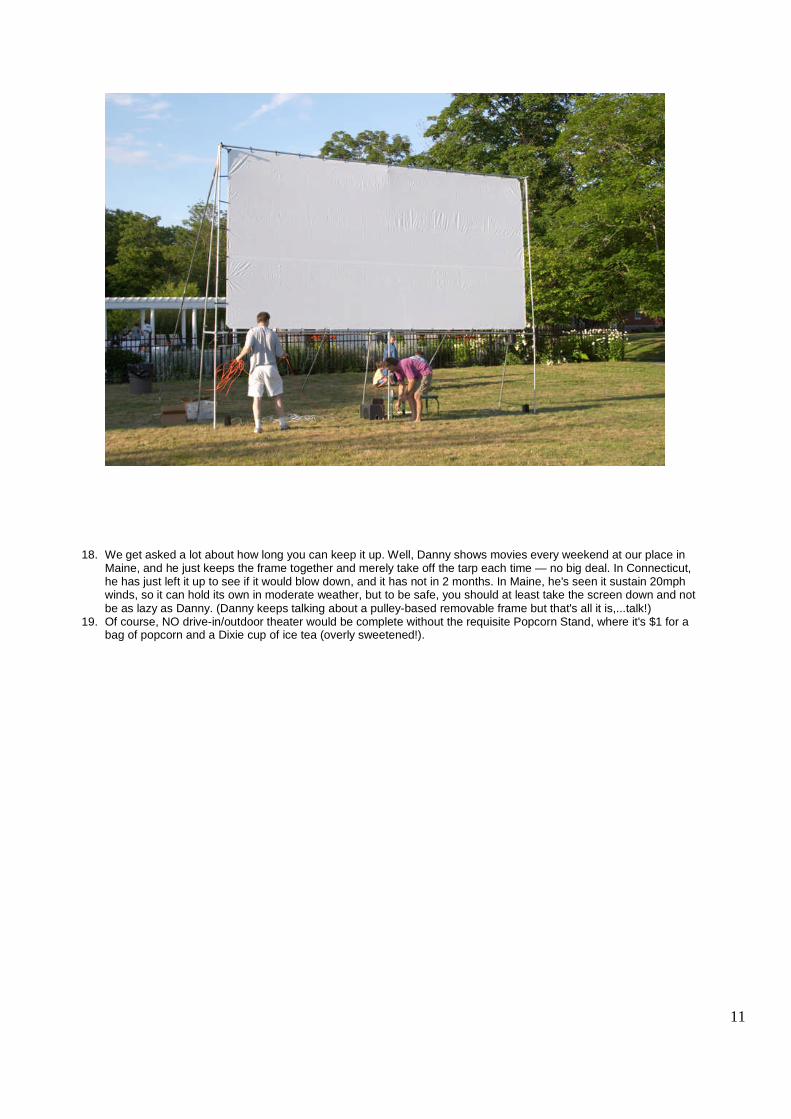
18. We get asked a lot about how long you can keep it up. Well, Danny shows movies every weekend at our place inMaine, and he just keeps the frame together and merely take off the tarp each time — no big deal. In Connecticut,he has just left it up to see if it would blow down, and it has not in 2 months. In Maine, he's seen it sustain 20mphwinds, so it can hold its own in moderate weather, but to be safe, you should at least take the screen down and notbe as lazy as Danny. (Danny keeps talking about a pulley-based removable frame but that's all it is,...talk!)
19. Of course, NO drive-in/outdoor theater would be complete without the requisite Popcorn Stand, where it's $1 for abag of popcorn and a Dixie cup of ice tea (overly sweetened!).

12
20. Taking the screen apart goes very fast. But before you go to take it down, you have a decision to make. We don'thave enough experience with this yet — and enough feedback from people (please write) — to say whether whatwe are now going to propose makes sense or not — Danny intends to do it. As you disassemble the frame you candrill holes where each screw eye hit the pipe. This will make for a stronger and more rigid frame, and less likelihoodthat the screw eyes will sheer off when you are putting them in. It also means, however, that you need to mark, withthe permanent marker, all your joints, so you can easily put it back together again — see, the fittings are notconsistent with where they put the screw eye holes, so you really do need to match the EMT pipes with theirappropriate fitting sockets if you drill holes. If you don't drill holes, you can put any 10 foot pipe where 10 foot pipesneed to go. In any case, do make use of the permanent black pen to mark things in your own way, so it will gotogether faster next time.
21. Store the fittings in a canvas bag like this one. To make storing all the pipes easier, consider getting some Velcrostraps like these.
22. If you really enjoyed this discourse, repeat Step 15 above.23. Send us some pictures of your installation!24. Slide show of putting it up: /images/index.htm
Copyright © 2004 TeleChoice, Inc. For Dummies images Copyright© 2004 Wiley Publishing, Inc. All rights reserved.Content reproduced here by permission of publisher. For Dummies is a registered trademark of Wiley Publishing, Inc.
These instructions are compliments of:
www.creativeshelters.com
13