Embed Size (px)
Citation preview
U S E R M A N U A L
DISPLAY, CENTER LCD W/THROTTLE
Pro-Movec A/SBrunbjergvej 2DK-8240 Risskov
Tel. +45 7027 2623 Fax. +45 7027 2429 [email protected]

User manual - Display, center w/thrott le
TABLE OF CONTENTS
Getting started
Functions
Operating of the display and throttle
Wheel size function
Troubleshooting
Error codes
Charging instructions
Maintenance
Contact Pro-Movec A/S
3
3
4
6
7
7
8
11
12
3 of 12User manual - Display, center w/thrott le
Getting started
After the battery is installed, you can switch on the display, using the on/off button. When pedaling, the motor starts to help you, depend-ing on the selected assist level.See further details about “assist level” under the heading “operating of the display and throttle”.
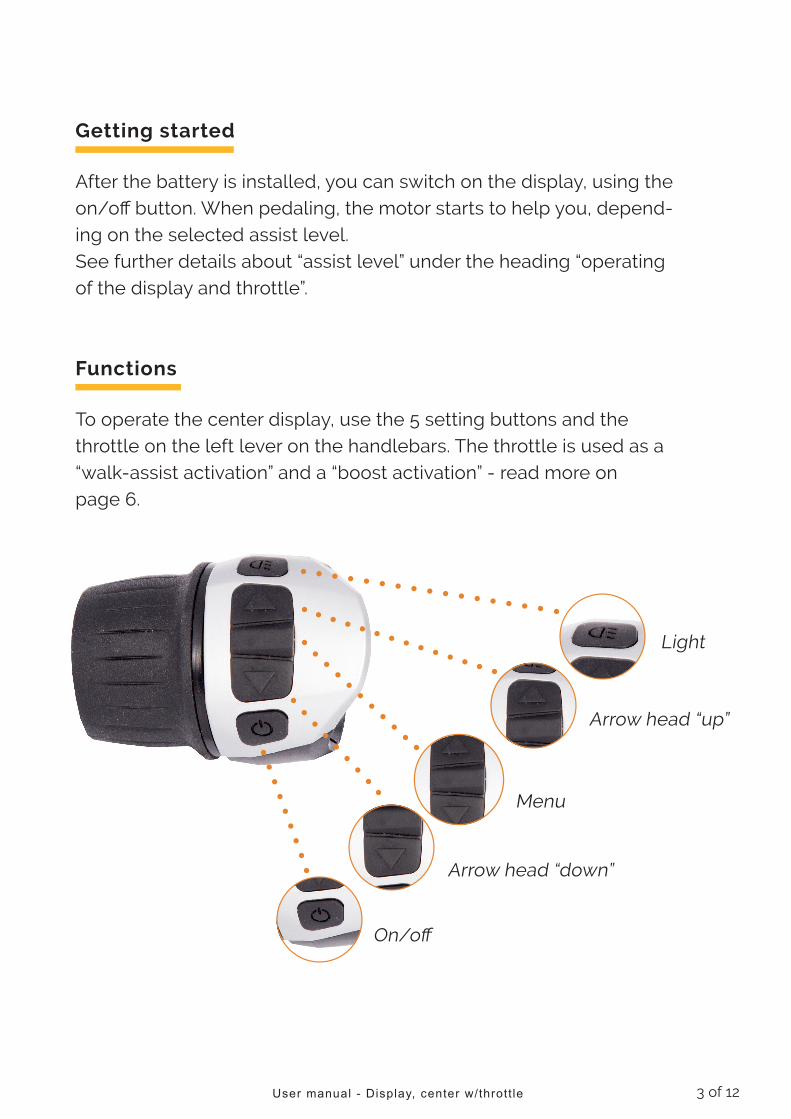
Functions
To operate the center display, use the 5 setting buttons and the throttle on the left lever on the handlebars. The throttle is used as a “walk-assist activation” and a “boost activation” - read more on page 6.
Light
Arrow head “up”
Menu
Arrow head “down”
On/off

4 of 12 User manual - Display, center w/thrott le
Operating of the display and throttle
This is how you operate the 5 functions shown on the previous page. The error-indicator is integrated in the display. Read more about “error codes” at page 9.
On/offThe display is turned on and off by pressing the “on/off” button.
Front lightTurn on the front light (if mounted) by pressing the “light” button. Adjust the brightness of the display by pressing the light button per-sisantly. When the front light is on, the light indicator is shown in the display.
Driving speedThe current driving speed is shown in the display center area.
Battery indicatorThe battery indicator is shown in the left side of the display. It indicates the approximate battery level.
Assist levelThe selected assist level is shown in the right side of the display.
Driving speed Lights on
Battery indicator Assist level 3
5 of 12User manual - Display, center w/thrott le
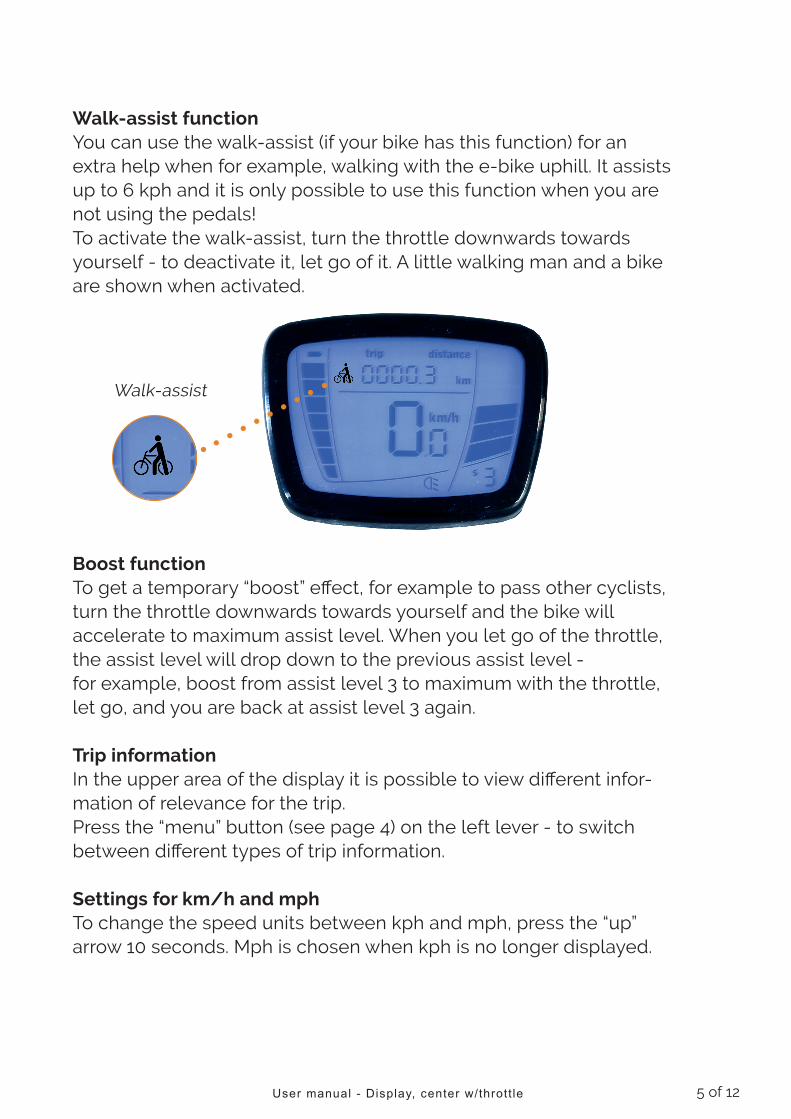
Walk-assist functionYou can use the walk-assist (if your bike has this function) for an extra help when for example, walking with the e-bike uphill. It assists up to 6 kph and it is only possible to use this function when you are not using the pedals! To activate the walk-assist, turn the throttle downwards towards yourself - to deactivate it, let go of it. A little walking man and a bike are shown when activated.
Boost functionTo get a temporary “boost” effect, for example to pass other cyclists, turn the throttle downwards towards yourself and the bike will accelerate to maximum assist level. When you let go of the throttle, the assist level will drop down to the previous assist level - for example, boost from assist level 3 to maximum with the throttle, let go, and you are back at assist level 3 again.
Trip informationIn the upper area of the display it is possible to view different infor-mation of relevance for the trip.Press the “menu” button (see page 4) on the left lever - to switch between different types of trip information.
Settings for km/h and mphTo change the speed units between kph and mph, press the “up”arrow 10 seconds. Mph is chosen when kph is no longer displayed.
Walk-assist
6 of 12 User manual - Display, center w/thrott le
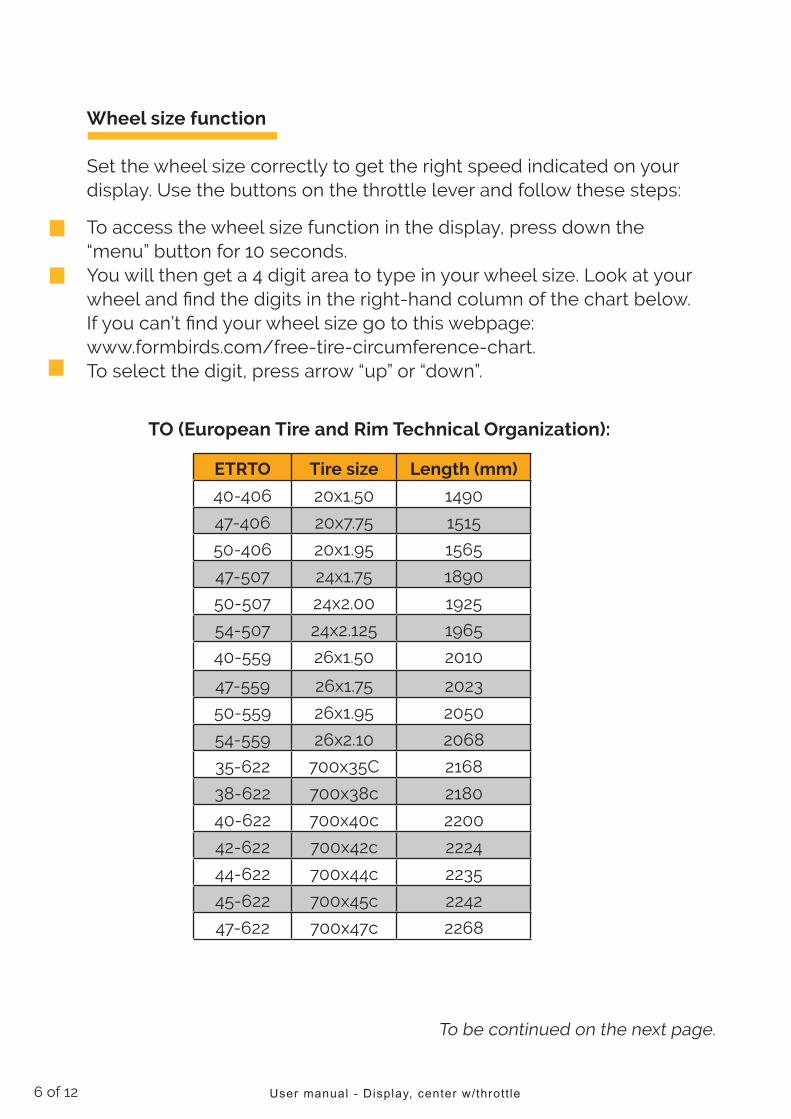
Wheel size function
Set the wheel size correctly to get the right speed indicated on your display. Use the buttons on the throttle lever and follow these steps:
To access the wheel size function in the display, press down the “menu” button for 10 seconds.You will then get a 4 digit area to type in your wheel size. Look at your wheel and find the digits in the right-hand column of the chart below. If you can’t find your wheel size go to this webpage: www.formbirds.com/free-tire-circumference-chart.To select the digit, press arrow “up” or “down”.
ETRTO Tire size Length (mm)
40-406 20x1.50 1490
47-406 20x7.75 1515
50-406 20x1.95 1565
47-507 24x1.75 1890
50-507 24x2.00 1925
54-507 24x2.125 1965
40-559 26x1.50 2010
47-559 26x1.75 2023
50-559 26x1.95 2050
54-559 26x2.10 2068
35-622 700x35C 2168
38-622 700x38c 2180
40-622 700x40c 2200
42-622 700x42c 2224
44-622 700x44c 2235
45-622 700x45c 2242
47-622 700x47c 2268
To be continued on the next page.
TO (European Tire and Rim Technical Organization):
7 of 12User manual - Display, center w/thrott le
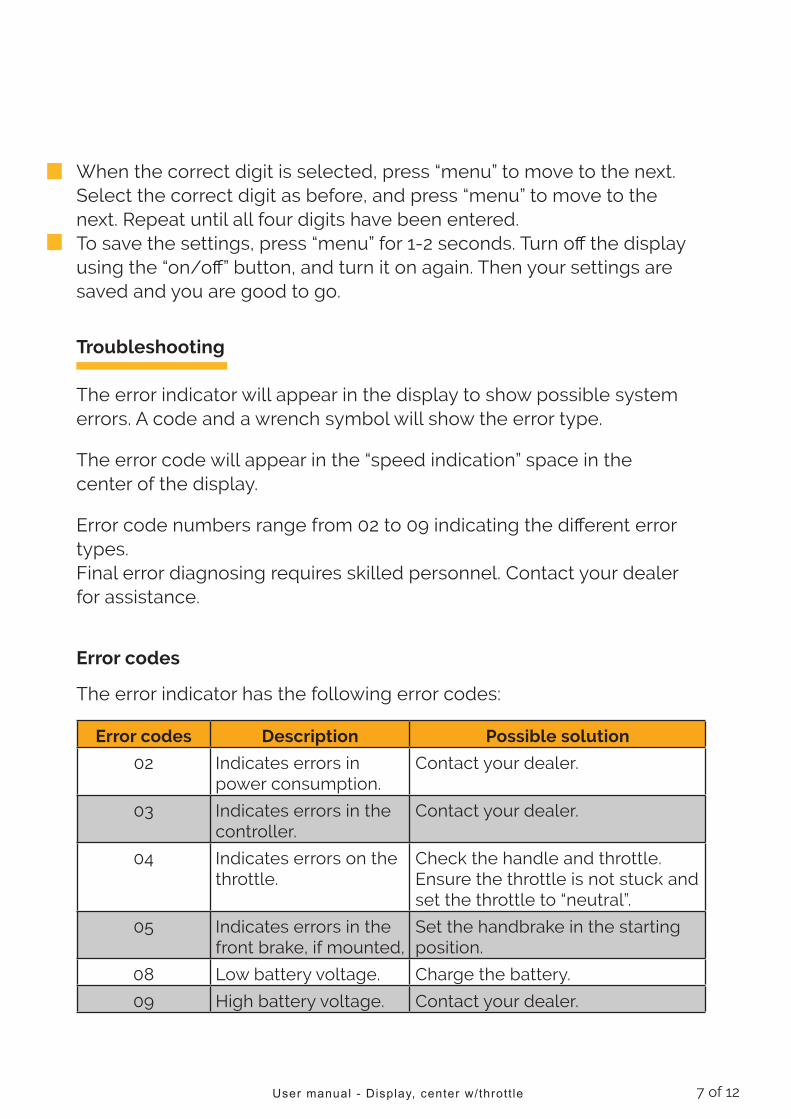
Error codes Description Possible solution
02 Indicates errors in power consumption.
Contact your dealer.
03 Indicates errors in the controller.
Contact your dealer.
04 Indicates errors on the throttle.
Check the handle and throttle. Ensure the throttle is not stuck and set the throttle to “neutral”.
05 Indicates errors in the front brake, if mounted,
Set the handbrake in the starting position.
08 Low battery voltage. Charge the battery.
09 High battery voltage. Contact your dealer.
When the correct digit is selected, press “menu” to move to the next. Select the correct digit as before, and press “menu” to move to the next. Repeat until all four digits have been entered. To save the settings, press “menu” for 1-2 seconds. Turn off the display using the “on/off” button, and turn it on again. Then your settings are saved and you are good to go.
Troubleshooting
The error indicator will appear in the display to show possible system errors. A code and a wrench symbol will show the error type.
The error code will appear in the “speed indication” space in the center of the display.
Error code numbers range from 02 to 09 indicating the different error types. Final error diagnosing requires skilled personnel. Contact your dealer for assistance.
Error codes
The error indicator has the following error codes:
8 of 12 User manual - Display, center w/thrott le
Charging instructions
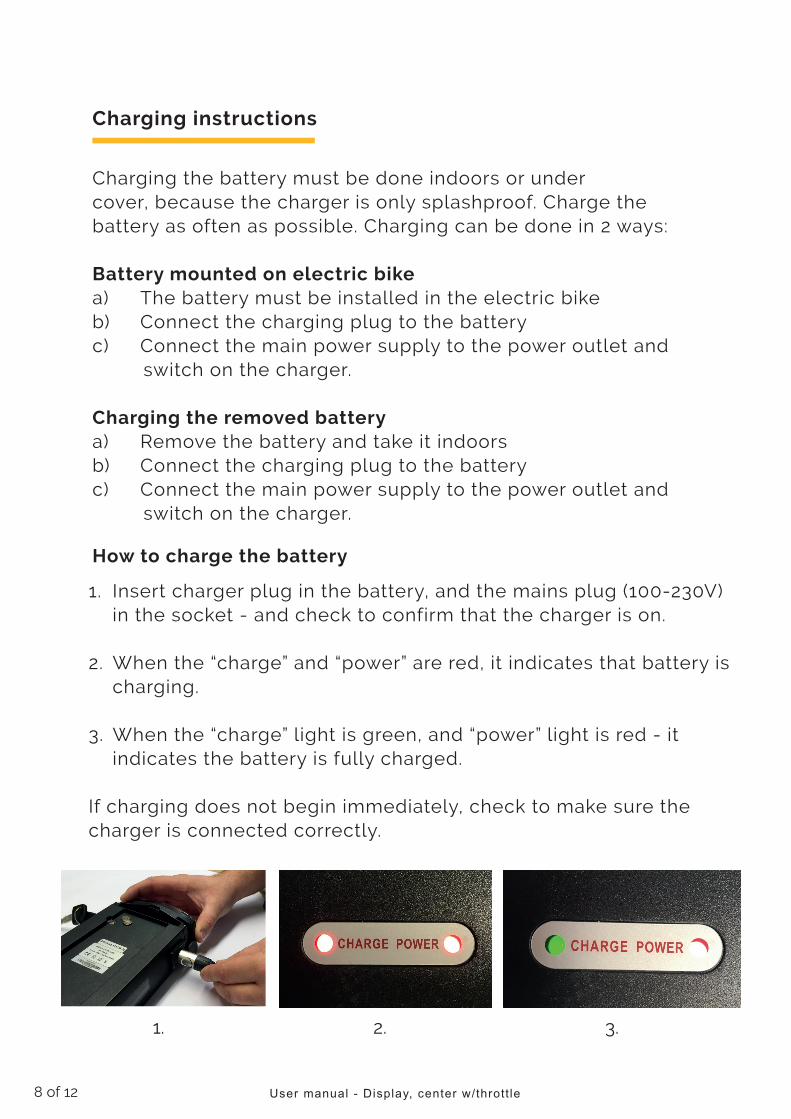
1. Insert charger plug in the battery, and the mains plug (100-230V) in the socket - and check to confirm that the charger is on.
2. When the “charge” and “power” are red, it indicates that battery is charging.
3. When the “charge” light is green, and “power” light is red - it indicates the battery is fully charged.
If charging does not begin immediately, check to make sure the charger is connected correctly.
Charging the battery must be done indoors or under cover, because the charger is only splashproof. Charge the battery as often as possible. Charging can be done in 2 ways:
Battery mounted on electric bikea) The battery must be installed in the electric bikeb) Connect the charging plug to the batteryc) Connect the main power supply to the power outlet and switch on the charger.
Charging the removed batterya) Remove the battery and take it indoorsb) Connect the charging plug to the batteryc) Connect the main power supply to the power outlet and switch on the charger.
How to charge the battery
2. 3. 1.

9 of 12User manual - Display, center w/thrott le
Daily use of electric bike/battery
The electric bike uses maintenance-free Li-ION battery. Note that the battery can be removed.
Before using the battery pack fully charge the battery with the supplied charger.
The best charge of the battery is obtained at 20 °C. (68 °F)Many frequent recharges on the Li-Ion battery can extend battery life. Pay special attention to the battery capacity as it, decreases over time and at lower temperatures.
Things that reduce bike range
• Wrong tire pressure• Wind• Road conditions, uphill• User weight • Biker’s own efforts
In normal use batteries have a lifetime of up to 1000 charge and discharge cycles.
10 of 12 User manual - Display, center w/thrott le
Warning
• Do not heat, short circuit, puncture, or otherwise mistreate the battery.
• The battery must not be dismantled or destroyed.• Do not throw the battery into fire.• Do not immerse the battery in water or any other liquid.• The battery can only be charged with the included charger.• Never charge the battery at temperatures below 0ºC or above
45ºC (below 32°F or above 113°F)
Disposal of battery
Batteries contain substances that may be harmful to human health and the environment if not handled properly.
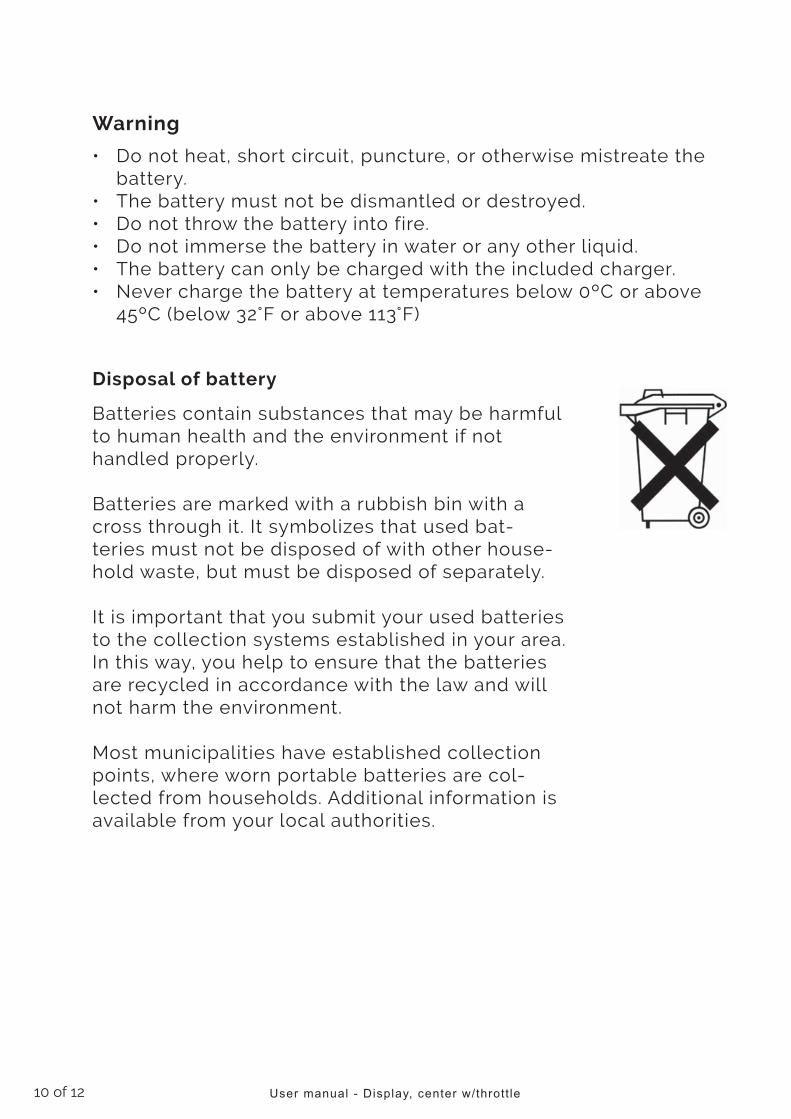
Batteries are marked with a rubbish bin with a cross through it. It symbolizes that used bat-teries must not be disposed of with other house-hold waste, but must be disposed of separately.
It is important that you submit your used batteries to the collection systems established in your area. In this way, you help to ensure that the batteries are recycled in accordance with the law and will not harm the environment.
Most municipalities have established collection points, where worn portable batteries are col-lected from households. Additional information is available from your local authorities.
11 of 12User manual - Display, center w/thrott le
Maintenance
The bike and the electrical system require no special mainte-nance.
It is recommended to clean the bike and lubricate moving parts at regular intervals.
Be aware, however, that the wearing parts must be replaced as needed. Parts should be replaced in a timely manner, so repairs are minimized.
If these guidelines are not followed, there is a risk of damage to the bike and riders, and the warenty on the bike will be avoided.
In order to maintain and preserve the electric bike’s condition, we recommend an inspection two times a year, but not less than once a year by a professional bike workshop.
Winter storage
If the electric bike is set aside for storage (more than one month), it will be sufficient to recharge one time per month.For storage, the batteries must be fully charged, because they cannot tolerate being left discharged for a long time.

Pro-Movec A/SBrunbjergvej 2DK-8240 Risskov
Tel. +45 7027 2623 Fax. +45 7027 2429 [email protected]
Contact Pro-Movec A/S, Denmark
When contacting Pro-Movec by e-mail please inform following:
• Brand of bicycle• Year of manufacture• Date of purchase• Attach a copy of the purchase receipt• Describe the problem in as detailed
way as possible
[email protected]+45 88444411