Embed Size (px)
Citation preview

DiViS DVR Viewer (Android App)
Installation and User Manual
Digital Video Security System Digital Video Recorder
www.DiViSDVR.com
*All contents of this document may change without prior notice
DiViS DVR.com

www.DiViSdvr.com
1 DiViS
Table of Contents
1.
Thank you! ………………………………………………………………………………………………………………………………………………
2
2. DiViS DVR Viewer Feature ………………………………………………………………………………………………………………… 3
3. Note …………………………………………………………………………………………………………………………………………………………… 4
4. Getting Started ……………………………………………………………………………………………………………………………………… 5
5. Settings …………………………………………………………………………………………………………………………………………………… 6
Login ………………………………………………………………………………………………………………………………………………………… 6
Display Setup ………………………………………………………………………………………………………………………………………… 6
Site Connection Mode ………………………………………………………………………………………………………………………… 7
Add Site …………………………………………………………………………………………………………………………………………………… 7
Modify or Delete Existing Sites ………………………………………………………………………………………………………… 8
About ………………………………………………………………………………………………………………………………………………………… 8
6. Live View …………………………………………………………………………………………………………………………………………………… 9
View …………………………………………………………………………………………………………………………………………………………… 9
PTZ …………………………………………………………………………………………………………………………………………………………… 9
Capture …………………………………………………………………………………………………………………………………………………… 10
Settings …………………………………………………………………………………………………………………………………………………… 10
7. Appendix ………………………………………………………………………………………………………………………………………………… 11
Error Images …………………………………………………………………………………………………………………………………………… 11
Error Messages ……………………………………………………………………………………………………………………………………… 11

www.DiViSdvr.com
2 DiViS
1. Thank You! We thank you for your continued support of DiViS products. We always strive to provide you services of the highest quality. For more information on any of our products, please visit our website, www.divisdvr.com.
For any questions or concerns you have, please contact us through the LiveChat service.
Once again, thank you.
Sincerely,
DiViS DVR

www.DiViSdvr.com
3 DiViS
2. DiViS DVR Viewer Feature
• DiViS DVR Viewer is a mobile application for Android devices.
• The application allows easy remote connection on the go.
• Live View Features
1) 1, 6, 12 multi channel view
2) PTZ Camera control interface
3) Screen capture function

www.DiViSdvr.com
4 DiViS
3. Note
• DiViS DVR Viewer is a mobile application for Android devices.
• Compatible with OS version 2.x (Not compatible with version 3.x).
• Available for download in Google Android Market.
• Although the details may vary depending on devices, instructions are generally similar.
• DiViS DVR Software Version 12.11.0 or higher recommended. DiViS DVR Main software version
12.11.0 or higher.
o Download numbers 1 and 2 on the list (the latest driver and DiViS main software) and
install the DiViS DVR main software on the server system. The guide for installation and
use can be found on our website.
o Previous versions of DiViS DVR Main software require the installation of the Android
patch, which can also be found on our website. Keep in mind that there are different
patches for different versions of DiViS DVR Main software.
• WiFi or 4G support needed.
• Though very unlikely, it is possible to be disconnected from the server or experience low
performance when connected via wireless internet or 4G due to heavy traffic on the network.
• After following all the necessary steps in this guide, if the application doesn’t operate properly, try
the following:
1. Access our Demo system via your Android device to verify that a stable connection is
established and that all the configurations are set up correctly on the device. Refer to
Add Site on page 7 for necessary information on our demo site.
2. Check the connection on your DVR server system. Though very rare, there are
situations where the network isn’t stable or strong enough to transfer the data to your
Android device.
3. Please check to make sure that the port you’ve entered in site registration is open on
the DVR server system. The specified port must be open for the data to be transferred.

www.DiViSdvr.com
5 DiViS
4. Getting Started
: Tap the application icon to launch the program.
When starting for the very first time after installation, the application will return a “Connection Mode Check”
message. This is because you have yet to set up a site for the application to connect to. Simply tap “Done”
and it will automatically load into the settings page. To learn how to register a new site, refer to Add Site on
page 7.
If you have enabled the login feature or already have a site registered, the application will either prompt for
password, or automatically connect and display the Live View page, accordingly.

www.DiViSdvr.com
6 DiViS
5. Settings
In settings, you can change your login credentials, choose what to display on the screen, toggle between
single and multiple site connection, register new sites, modify or delete existing sites, and view basic
information of the application.
Login
Prompt for Login
To prompt for login each time DiViS DVR Viewer runs, tap the
checkbox next to “Login”. Change the Password
To change the password required when prompted for login, simply
type in the new password in the provided input space.
Display Setup
Display Site Name
When you register a new site, you are prompted to enter a site
name, used for personal use. To display the site name in Live View
or Search View, highlight the “SiteName” checkbox. Display Camera Number
Each camera is associated with a channel number in the DVR
server system. To display this number, highlight the “Camera
Number” checkbox. Display Camera Name
Similar to the camera number, each camera is given a name in the
DVR server system. To display camera name in Live View or
Search View, highlight the “Camera Name” checkbox. Display Date & Time
To display the current date and time of the DVR server system, highlight the “Date & Time” checkbox.

www.DiViSdvr.com
7 DiViS
Site List
Site Connection Mode Single
Connect to a single DVR server system by selecting from the list of
already registered sites. Once finished, exit out of the settings to Live View page. Note that you cannot setup the site connection mode without registering
a site first. If you have not registered a site yet, go to Add Site below to
learn how.
Add Site If you have not registered a site yet, there should only be “Add Site”
button under Site List. Otherwise, you should see a list of registered sites
below the “Add Site” button in chronological order.
1. Tap “Add Site” under Site List. You should now come to a page
similar to the one to the right.
2. Enter a Site Name – a sort of nickname you give to the new site
for identification..
3. Enter the IP Address of the DVR server system – you can find
this information by going to whatismyip.com on your DVR server
system.
4. Enter the number of channels you want to access. (If you want channels, 1 to 4, simply enter 4)
5. Enter the default port number. (Default port numbers are explained on our website. They are the
ports used by the server system for transferring various data types. By default, the value you
need to enter is set to be 3000.)
6. Enter the username and password required for login on the DVR server system.
7. Tap Settings to save and return to Settings.
You MUST set up the site connection mode before you can view registered sites in Live View
display. Refer to section Site Connection Mode on the page 7 to learn how to set up site connection
mode.

www.DiViSdvr.com
8 DiViS
Site Name Demo
Address 206.40.195.71
Channel 4
Port 3000
User Name 1
Password 1
Table to the right contains configuration to our demo system. Feel free to
use the following settings as a hands-on learning experience before
entering information for your system.
Modify or Delete Existing Sites
Once you register one or more sites on the application, there should be a
list of registered sites below “Add Site”.
1. Tap on the site you want to modify or delete. You should now be
at a page similar to the one on the right.
To modify:
2. Simply change any of the fields in the appropriate space. For
detailed information on each field, refer to Add Site on page 7.
3. Press Save.
To delete:
2. Tap the Delete button on the bottom right.
About
In order to view the version information of DiViS DVR Viewer, simply tap
About in Settings.

www.DiViSdvr.com
9 DiViS
6. Live View
In Live View, you can browse through multiple channels, change how many channels you want to view,
control registered PTZ cameras directly, take a screen capture, and access Settings. View
Change Channels
Browsing through the available channels is very simple.
1. Firstly, look at the center of screen just above the
OSD (on-screen display) menu. You should see one
or more “dots”. These dots indicate the number of
channels or groups of channels available for
browsing.
2. After confirming that there is more than one dot,
simply slide your finger from one side of the screen to
the other just as you would when browsing through
home screen or safari browser.
If there is only a single dot, it indicates that you are viewing
the only registered channel or group of channels. Change the View Mode
You have the option of choosing how many channels you want to view in one screen. You can choose from
1, 6, or 12 channel view modes.
1. Tap the View button.
2. Select the desired view mode. You can browse through the available groups of channels just as
you would single channels. PTZ
Control Pan/Tilt/Zoom (PTZ) Cameras
DiViS DVR Viewer, among many other incredible features, comes with a built in PTZ control interface. If
one of the cameras you registered has pan/tilt functions, you can control the camera by accessing our PTZ
control interface. Note that you may only use the PTZ control interface in 1 channel display mode.

www.DiViSdvr.com
10 DiViS
1. Tap PTZ. You should see that the display is now divided into 9 different squares and that
you also have a zoom control interface on the bottom right hand corner.
2. You can pan the camera by tapping and holding any of the outer squares in the desired direction
and zoom by tapping and holding the magnifying glasses in the zoom control interface.
Re-tap the PTZ button to close PTZ control interface.
Capture Take a Screenshot and Access Saved Images
1. Tap the Capture button. 2. It will return a “Saved Photo” message. Tap Done.
3. Return to home screen on the device.
4. Click “Photos” to access pictures saved on your device. The saved images should be in the default
folder. Settings
Access Settings
Settings allows you to configure your device in order to remotely access a DVR server system.
Simply tap the gear icon on the top right corner to access Settings.
www.DiViSdvr.com
11 DiViS
7. Appendix
Here, you will find information on generic error messages and what they mean.
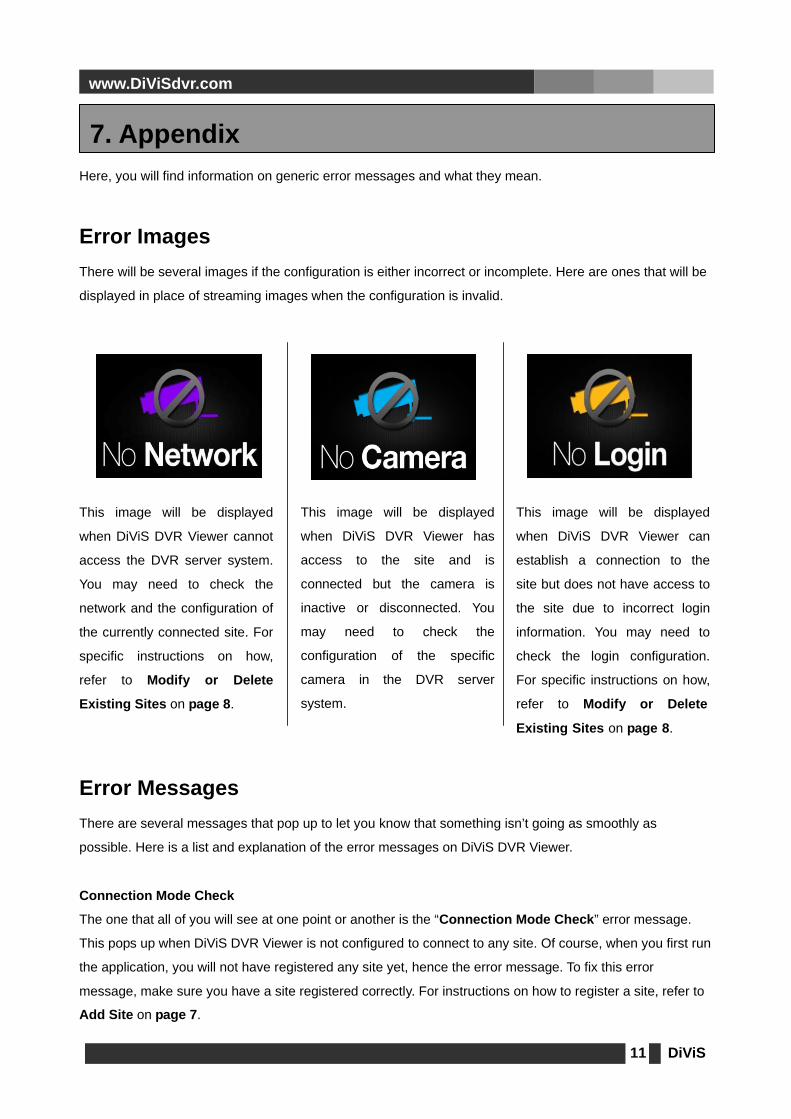
Error Images
There will be several images if the configuration is either incorrect or incomplete. Here are ones that will be
displayed in place of streaming images when the configuration is invalid.
This image will be displayed
when DiViS DVR Viewer cannot
access the DVR server system.
You may need to check the
network and the configuration of
the currently connected site. For
specific instructions on how,
refer to Modify or Delete
Existing Sites on page 8.
This image will be displayed
when DiViS DVR Viewer has
access to the site and is
connected but the camera is
inactive or disconnected. You
may need to check the
configuration of the specific
camera in the DVR server
system.
This image will be displayed
when DiViS DVR Viewer can
establish a connection to the
site but does not have access to
the site due to incorrect login
information. You may need to
check the login configuration.
For specific instructions on how,
refer to Modify or Delete
Existing Sites on page 8.
Error Messages
There are several messages that pop up to let you know that something isn’t going as smoothly as
possible. Here is a list and explanation of the error messages on DiViS DVR Viewer.
Connection Mode Check
The one that all of you will see at one point or another is the “Connection Mode Check” error message.
This pops up when DiViS DVR Viewer is not configured to connect to any site. Of course, when you first run
the application, you will not have registered any site yet, hence the error message. To fix this error
message, make sure you have a site registered correctly. For instructions on how to register a site, refer to
Add Site on page 7.

www.DiViSdvr.com
12 DiViS
Site Name is a Duplicate
While registering a new site, if the name you’ve chosen for the site already exists, DiViS DVR Viewer will
return a “Site Name is a Duplicate” error message. Simply choose a different name for the new site or
change the name of the existing site with the conflicting name. For instructions on how to modify site
configuration, refer to Modify or Delete Existing Sites on page 8.
Check Blank
When you try to enter an incomplete configuration, DiViS DVR Viewer will return a “Check Blank” error
message. This just means that you haven’t completely filled out the necessary information to complete the
process. Look through and make sure to fill out whatever blanks you have.
Check Password
The “Check Password” error message will pop up when you enter the incorrect password at the login
prompt or if you try to enable the prompt for login feature without a password. For the first situation,
make sure you know what your password is and try again. For the latter, simply type in a new password or
disable the prompt for login feature. For instructions on how to toggle the prompt for login feature and
change the password, refer to Prompt for Login and Change the Password on page 6.