Embed Size (px)
Citation preview

061303
2003 Blackbaud, Inc. This publication, or any part thereof, may not be reproduced or transmitted in any form or by any means, electronic, or mechanical, including photocopying, recording, storage in an information retrieval system, or otherwise, without the prior written permission of Blackbaud, Inc.
The information in this manual has been carefully checked and is believed to be accurate. Blackbaud, Inc., assumes no responsibility for any inaccuracies, errors, or omissions in this manual. In no event will Blackbaud, Inc., be liable for direct, indirect, special, incidental, or consequential damages resulting from any defect or omission in this manual, even if advised of the possibility of damages.
In the interest of continuing product development, Blackbaud, Inc., reserves the right to make improvements in this manual and the products it describes at any time, without notice or obligation.
The Raiser’s Edge, MatchFinder, ParaGon, RE:Alum, RE:Event, RE:Member, RE:Queue, RE:Tribute, RE:Volunteer, RE:Zip, and Blackbaud are registered trademarks of Blackbaud, Inc.
All other products and company names mentioned herein are trademarks of their respective holder.
EA6-EducationAdministrationCrystalReportsGuide-061303


Education Administration
Crystal Reports GuideINTRODUCTION TO CRYSTAL REPORTS FOR BLACKBAUD . . . . . 1
Crystal Reports for Blackbaud . . . . . . . . . . . . . . . . . . . . . . . . . . . . . . . . . . . . . . . . . . . 2Using the Crystal Reports Tutorials . . . . . . . . . . . . . . . . . . . . . . . . . . . . . . . . . . . . . . . 2
The Four Tutorials . . . . . . . . . . . . . . . . . . . . . . . . . . . . . . . . . . . . . . . . . . . . . . . . . . . . 2Planning and Organizing Your Custom Report . . . . . . . . . . . . . . . . . . . . . . . . . . . . . . 3Frequently Used Terms . . . . . . . . . . . . . . . . . . . . . . . . . . . . . . . . . . . . . . . . . . . . . . . . . . 3
CUSTOM REPORT TUTORIAL. . . . . . . . . . . . . . . . . . . . . . . . . . . . 5
Exporting Data for a Custom Report . . . . . . . . . . . . . . . . . . . . . . . . . . . . . . . . . . . . . . 9Creating a Custom Report in Crystal Reports . . . . . . . . . . . . . . . . . . . . . . . . . . . . . . 15
Importing Data into Crystal Reports . . . . . . . . . . . . . . . . . . . . . . . . . . . . . . . . . . . . . 15Designing the Report . . . . . . . . . . . . . . . . . . . . . . . . . . . . . . . . . . . . . . . . . . . . . . . . . 18Placing Data in the Report . . . . . . . . . . . . . . . . . . . . . . . . . . . . . . . . . . . . . . . . . . . . 22Grouping the Report by Department . . . . . . . . . . . . . . . . . . . . . . . . . . . . . . . . . . . . . 35Adding Titles, Dates, and Page Numbers . . . . . . . . . . . . . . . . . . . . . . . . . . . . . . . . . 37Saving and Printing the Report . . . . . . . . . . . . . . . . . . . . . . . . . . . . . . . . . . . . . . . . . 40Polishing the Report . . . . . . . . . . . . . . . . . . . . . . . . . . . . . . . . . . . . . . . . . . . . . . . . . 42
CUSTOM REPORT CARD TUTORIAL . . . . . . . . . . . . . . . . . . . . . 45
Exporting from Report Cards and Transcripts . . . . . . . . . . . . . . . . . . . . . . . . . . . . . 46Importing Data into Crystal Reports . . . . . . . . . . . . . . . . . . . . . . . . . . . . . . . . . . . . . 53Designing a Crystal Report . . . . . . . . . . . . . . . . . . . . . . . . . . . . . . . . . . . . . . . . . . . . . 57Designing the Custom Report Card . . . . . . . . . . . . . . . . . . . . . . . . . . . . . . . . . . . . . . 58
Placing Data on the Report Card . . . . . . . . . . . . . . . . . . . . . . . . . . . . . . . . . . . . . . . . 65Previewing, Saving, and Printing the Report Card . . . . . . . . . . . . . . . . . . . . . . . . . . 67
Previewing the Report Card . . . . . . . . . . . . . . . . . . . . . . . . . . . . . . . . . . . . . . . . . . . 68Saving the Report Card . . . . . . . . . . . . . . . . . . . . . . . . . . . . . . . . . . . . . . . . . . . . . . . 69Printing the Report Card . . . . . . . . . . . . . . . . . . . . . . . . . . . . . . . . . . . . . . . . . . . . . . 70
Refreshing and Updating the Custom Report Card . . . . . . . . . . . . . . . . . . . . . . . . . 70Polishing the Report . . . . . . . . . . . . . . . . . . . . . . . . . . . . . . . . . . . . . . . . . . . . . . . . . . . 72
CUSTOM TRANSCRIPT TUTORIAL . . . . . . . . . . . . . . . . . . . . . . . 75
Exporting from Report Cards and Transcripts . . . . . . . . . . . . . . . . . . . . . . . . . . . . . 76Importing Data into Crystal Reports . . . . . . . . . . . . . . . . . . . . . . . . . . . . . . . . . . . . . 83

Designing a Crystal Report . . . . . . . . . . . . . . . . . . . . . . . . . . . . . . . . . . . . . . . . . . . . . . 87Designing the Custom Transcript . . . . . . . . . . . . . . . . . . . . . . . . . . . . . . . . . . . . . . . . 88
Placing Data on the Transcript . . . . . . . . . . . . . . . . . . . . . . . . . . . . . . . . . . . . . . . . . . 93Previewing, Saving, and Printing the Transcript . . . . . . . . . . . . . . . . . . . . . . . . . . . . 97
Previewing the Transcript . . . . . . . . . . . . . . . . . . . . . . . . . . . . . . . . . . . . . . . . . . . . . 97Saving the Transcript . . . . . . . . . . . . . . . . . . . . . . . . . . . . . . . . . . . . . . . . . . . . . . . . . 99Printing the Transcript . . . . . . . . . . . . . . . . . . . . . . . . . . . . . . . . . . . . . . . . . . . . . . . . 99
Refreshing and Updating the Custom Transcript . . . . . . . . . . . . . . . . . . . . . . . . . . 100Polishing the Report . . . . . . . . . . . . . . . . . . . . . . . . . . . . . . . . . . . . . . . . . . . . . . . . . . 102
FINISHING TOUCHES TUTORIAL . . . . . . . . . . . . . . . . . . . . . . . 103
Labels . . . . . . . . . . . . . . . . . . . . . . . . . . . . . . . . . . . . . . . . . . . . . . . . . . . . . . . . . . . . . . 104Lines . . . . . . . . . . . . . . . . . . . . . . . . . . . . . . . . . . . . . . . . . . . . . . . . . . . . . . . . . . . . . . . 105Borders . . . . . . . . . . . . . . . . . . . . . . . . . . . . . . . . . . . . . . . . . . . . . . . . . . . . . . . . . . . . . 105Page Numbers . . . . . . . . . . . . . . . . . . . . . . . . . . . . . . . . . . . . . . . . . . . . . . . . . . . . . . . 108Hiding Sections . . . . . . . . . . . . . . . . . . . . . . . . . . . . . . . . . . . . . . . . . . . . . . . . . . . . . . 109Combining Fields and Text . . . . . . . . . . . . . . . . . . . . . . . . . . . . . . . . . . . . . . . . . . . . . 109Adding Space Between Fields . . . . . . . . . . . . . . . . . . . . . . . . . . . . . . . . . . . . . . . . . . . 110Watermarks . . . . . . . . . . . . . . . . . . . . . . . . . . . . . . . . . . . . . . . . . . . . . . . . . . . . . . . . . 111

Introduction to Crystal Reports for Blackbaud
Contents
Crystal Reports for Blackbaud . . . . . . . . . . . . . . . . . . . . . . . . . . . . . . . . . . . . . 2Using the Crystal Reports Tutorials . . . . . . . . . . . . . . . . . . . . . . . . . . . . . . . . . 2The Four Tutorials . . . . . . . . . . . . . . . . . . . . . . . . . . . . . . . . . . . . . . . . . . . . . . . . 2Planning and Organizing Your Custom Report . . . . . . . . . . . . . . . . . . . . . . . 3Frequently Used Terms . . . . . . . . . . . . . . . . . . . . . . . . . . . . . . . . . . . . . . . . . . . 3

CH A PT E R 12
Crystal Reports for BlackbaudCrystal Reports for Blackbaud is a powerful and flexible report writing tool included with your Blackbaud software. Crystal Reports gives you the flexibility to create custom reports using data from Admissions Office, Registrar’s Office, or Admissions and Registrar’s Office. You select the data to include in your custom report in Export or Report Cards and Transcripts. You create a data file in the data format MS Access Report Writer Database (*.mdb) and export it to Crystal Reports. Using this data, you design a custom report. Your custom report can include headers, footers, free-form text, borders, page numbers, and your own watermarks or logos.In Crystal Reports, you can preview the design with your data, changing the format as you go. The reports you create are dynamic. You can use reports over and over by updating the exported data file used with the report.While your Education Administration software includes many standard reports, use Crystal Reports to tailor reports for the unique needs of your organization. In addition to creating custom reports, you can design custom report cards and transcripts for use with Registrar’s Office.
Using the Crystal Reports TutorialsThe following four chapters contain tutorials. Use these tutorials to familiarize yourself with creating custom reports, custom report cards, custom transcripts, and adding finishing touches to your custom Crystal reports.
The Four TutorialsThere are four Crystal Reports tutorials.Custom Report Tutorial. Follow the Custom Report Tutorial for information
about the specific steps to create a custom report: (a) create a data file in Export, (b) import the data into Crystal Reports, and (c) design a custom report format. Use this tutorial to create reports for Admissions Office, Registrar’s Office, or Admissions and Registrar’s Office.
Custom Report Card Tutorial. In Report Cards and Transcripts, you can create and modify a standard report card format by selecting among specific parameters. To create a custom report card, follow the Custom Report Card Tutorial. In this tutorial, you (a) define data parameters in Report Cards and Transcripts, (b) create an export file, (c) import the data into Crystal Reports, and (d) design a custom report card format.
Custom Transcript Tutorial. In Report Cards and Transcripts, you can create and modify a standard transcript form by selecting among specific parameters. To create a custom transcript, follow the Custom Transcript Tutorial. In this tutorial, you (a) define data parameters in Report Cards and Transcripts, (b) create an export file, (c) import the data into Crystal Reports, and (d) design a custom transcript format.
Finishing Touches Tutorial. Review the Finishing Touches Tutorial for information about adding special elements to your custom reports, such as headers and footers, lines and borders, and watermarks.
IN T R O D U C T I O N T O CR Y S T A L RE P O R T S FO R BL A C K B A U D 3
Each tutorial provides step-by-step instructions about extracting/exporting information from your database, importing the data into Crystal Reports, and creating a custom report. You learn how to preview the design, save and print the report, and refresh the report with newly-exported data.There are many ways to design and format the final report in Crystal Reports. Because you are using the information in your database for each tutorial, your results will differ from the displayed results. However, the structure of the report remains the same.
Planning and Organizing Your Custom ReportAfter you complete the tutorials and learn the basics, you can use the skills to design your own custom reports. Before you create a custom report, identify the data to include in the report in Export or Report Cards and Transcripts.• Think carefully about the report design before using Crystal Reports. Which
records will appear in the report? What fields are needed? How is the information formatted?
• Draw a picture on paper to help you with the planning and design process.• Consider the report steps from the beginning so you can anticipate and prepare
for each step in the process.For detailed information about screens, options, fields, and other topics in Export, see the Admissions Office Mail, Query, and Export Guide or Registrar’s Office Mail, Query, and Export Guide.For detailed information about screens, options, fields, and other topics in Report Cards and Transcripts, see the Registrar’s Office Grades, Report Cards, and Transcripts Guide.For additional information about Crystal Reports, see the Crystal Reports 6.0 User’s Guide.
Frequently Used TermsFollowing are definitions of terms used to identify the sections of a report template in Crystal Reports.Report Header. The report header is the first section in the design window.
Define any data to appear only on the first page of the report, such as a report title, in the report header.
Page Header. A page header is a text section appearing at the top of each report page, above the body of the report. The page header often contains information such as the report title, academic year and term, applicant or student data, and marking column titles.
Details. The details section is the core section of the report. Structure the report in this section by inserting data fields, formulas and other report elements. Fields such as names, grades, courses, and GPAs appear in this section.

CH A PT E R 14
Page Footer. The page footer is a text section appearing at the bottom of each report page. The page footer often includes page numbers and other information to describe or identify the report.
Report Footer. The report footer is the last section of the report in the design window. You can design a report so the summary appears only on the last page of the report.

Custom Report Tutorial
Contents
Exporting Data for a Custom Report . . . . . . . . . . . . . . . . . . . . . . . . . . . . . . . . 9Creating a Custom Report in Crystal Reports . . . . . . . . . . . . . . . . . . . . . . . 15Importing Data into Crystal Reports. . . . . . . . . . . . . . . . . . . . . . . . . . . . . . . . . . 15Designing the Report . . . . . . . . . . . . . . . . . . . . . . . . . . . . . . . . . . . . . . . . . . . . . 18Placing Data in the Report . . . . . . . . . . . . . . . . . . . . . . . . . . . . . . . . . . . . . . . . . 22Grouping the Report by Department . . . . . . . . . . . . . . . . . . . . . . . . . . . . . . . . . 35Adding Titles, Dates, and Page Numbers . . . . . . . . . . . . . . . . . . . . . . . . . . . . . . 37Saving and Printing the Report. . . . . . . . . . . . . . . . . . . . . . . . . . . . . . . . . . . . . . 40Polishing the Report . . . . . . . . . . . . . . . . . . . . . . . . . . . . . . . . . . . . . . . . . . . . . . 42
Procedures
Decide which records to include in the report . . . . . . . . . . . . . . . . . . . . . . . . . . . 9Decide which fields to include in the report . . . . . . . . . . . . . . . . . . . . . . . . . . . . 10Exporting data. . . . . . . . . . . . . . . . . . . . . . . . . . . . . . . . . . . . . . . . . . . . . . . . . . . 13Importing the report data . . . . . . . . . . . . . . . . . . . . . . . . . . . . . . . . . . . . . . . . . . 15Designing the layout . . . . . . . . . . . . . . . . . . . . . . . . . . . . . . . . . . . . . . . . . . . . . . 19Inserting database fields . . . . . . . . . . . . . . . . . . . . . . . . . . . . . . . . . . . . . . . . . . . 22Creating a Spouse Name formula . . . . . . . . . . . . . . . . . . . . . . . . . . . . . . . . . . . . .26Modifying the Spouse Name formula. . . . . . . . . . . . . . . . . . . . . . . . . . . . . . . . . 29Creating an Address Lines formula . . . . . . . . . . . . . . . . . . . . . . . . . . . . . . . . . . 31Creating a City/State/ZIP formula . . . . . . . . . . . . . . . . . . . . . . . . . . . . . . . . . . . 33Inserting the Phone Number field. . . . . . . . . . . . . . . . . . . . . . . . . . . . . . . . . . . . 34Grouping by Department . . . . . . . . . . . . . . . . . . . . . . . . . . . . . . . . . . . . . . . . . . 35Adding lines to separate groups . . . . . . . . . . . . . . . . . . . . . . . . . . . . . . . . . . . . . 37Adding a title in the Report Header section . . . . . . . . . . . . . . . . . . . . . . . . . . . . 37Changing the appearance of the report header title . . . . . . . . . . . . . . . . . . . . . . 37Centering the title . . . . . . . . . . . . . . . . . . . . . . . . . . . . . . . . . . . . . . . . . . . . . . . . 38Resizing and adjusting the Page Header section . . . . . . . . . . . . . . . . . . . . . . . . 38Adding a title in the Page Header section. . . . . . . . . . . . . . . . . . . . . . . . . . . . . . 38Changing the appearance of the Page Header title . . . . . . . . . . . . . . . . . . . . . . . 38

CH A PT E R 26
Centering the Page Header title. . . . . . . . . . . . . . . . . . . . . . . . . . . . . . . . . . . . . . 39Adding a date to the Page Header . . . . . . . . . . . . . . . . . . . . . . . . . . . . . . . . . . . . 39Adding page numbers to the Page Header . . . . . . . . . . . . . . . . . . . . . . . . . . . . . 39Saving the report . . . . . . . . . . . . . . . . . . . . . . . . . . . . . . . . . . . . . . . . . . . . . . . . . 40Printing the report . . . . . . . . . . . . . . . . . . . . . . . . . . . . . . . . . . . . . . . . . . . . . . . . 41

CU S T O M RE PO R T TU T O R I A L 7
Education Administration programs contain many standard reports you can modify based on parameters you select. You can also export data from Admissions Office, Registrar’s Office, or Admissions and Registrar’s Office to create customize reports using Crystal Reports for Blackbaud.Following is a list of some options available in Crystal Reports:• Changing the location, size, and style of most report sections.• Grouping data according to specific criteria.• Adding unlimited text or descriptions.• Including more fields.• Using formulas to provide counts, subtotals, totals, and averages.• Placing and formatting your logo on the report.
In the Custom Report Tutorial, you:• Define data parameters in Export.• Create an export file in the data format MS Access Report Writer Database
(*.mdb).• Import the data into Crystal Reports.• Use the data to create a custom report format in Crystal Reports.

CH A PT E R 28
This tutorial provides step by step directions to create a custom report containing information about your faculty/staff. The finished report looks similar to the report below.
In this tutorial, you define your data parameters in Report Cards and Transcripts, create an export file, import the data file into Crystal Reports, and create a custom report.Before you create a custom report, identify the Registrar’s Office data to export. This helps you set the parameters of your report.• Think carefully about the report you want to design before entering Crystal
Reports. Which records appear in the report? Which fields from the selected records appear in the report? How is the information formatted?
• Draw a picture on paper to help you plan and design the report.

CU S T O M RE PO R T TU T O R I A L 9
• Evaluate the report steps from beginning to end so you can anticipate and prepare for each step in the process
Exporting Data for a Custom Report
Decide which records to include in the report
1. Open Export.2. Select File, New to create a new export. The New Export screen appears.
3. In the Type frame, mark Faculty/Staff.4. In the Records to Include frame, you can mark All Records or Selected
Records.If you mark Selected Records, the From Group field appears. Select a faculty/staff query on the Available Queries screen. You must create a faculty/staff query in Query to select the group on the Available Queries screen.In you mark One Record, the Name field appears. Search for and select a faculty/staff name on the Search screen.

CH A PT E R 210
5. Click OK on the New Export screen. The Export 1 – Faculty/Staff screen appears.
Decide which fields to include in the report
1. In the Categories box, click the plus sign to the left of the category Biographical. The category expands to display all biographical fields.
2. Select the field Faculty/Staff Name.3. Click Add Field. Faculty/Staff Name appears in the Fields to Extract
box.4. In the Categories box, under the category Biographical, select the field
Social Security No.5. Click Add Field. Social Security No. appears in the Fields to Extract
box.6. In the Categories box, under the category Biographical, click the plus
sign to the left of the subcategory Department.7. Select the field Department.

CU S T O M RE PO R T TU T O R I A L 11
8. Click Add Field. The Parameter Type screen appears.
9. In the Department Field Parameters frame, mark A Single Set of Parameters for All Department Fields.
10. Click OK. Department appears in the Fields to Extract box.For more information about the Parameter Type screen, see the Parameter Type section in the Export chapter of the Admissions Office Mail, Query, and Export Guide or Registrar’s Office Mail, Query, and Export Guide.
11. In the Categories box, under the category Biographical, click the plus sign to the left of the subcategory Spouse.
12. Select the field First Name.13. Click Add Field. Spouse First Name appears in the Fields to Extract
box.14. Repeat the above steps to add Middle Name and Last Name to the Fields
to Extract box.15. Use the scroll bar to scroll to the top of the Categories box. Click the
minus sign to the left of the category Biographical. The category closes. A plus sign appears to the left of the category Biographical.
16. Click the plus sign to the left of the category Address. The category expands to display all address fields.
17. Select the field 1st Address Line and click Add Field (or double-click). The Parameter Type screen appears.

CH A PT E R 212
18. In the Faculty/Staff Field Parameters frame, mark A Single Set of Parameters for All Faculty/Staff Address Fields.
19. Click OK. Address 1st Address Line appears in the Fields to Extract box.
20. Select the field 2nd Address Line and double-click. Address 2nd Address Line appears in the Fields to Extract box.
21. Select the field City and double-click. Address City appears in the Fields to Extract box.
22. Select the field Phone Number and double-click. Address Phone Number appears in the Fields to Extract box.
23. Select the field State and double-click. The State Field screen appears.
24. Mark State Abbreviation.25. Click OK. Address State appears in the Fields to Extract box.26. Select the field ZIP and double-click. Address ZIP appears in the Fields
to Extract box.Your export design screen appears as follows.

CU S T O M RE PO R T TU T O R I A L 13
Exporting data
1. Select File, Export. The Export Format screen appears.
2. In the Data Format box, use the scroll bar to scroll to the bottom of the list. Select MS Access Report Writer Database.
3. Mark the Print Control Report checkbox to print a report of the export file name, the location of the saved file, and a list of the fields exported, in the order in which you selected them.
4. Click OK. The Address Criteria screen appears.
5. In the Address to Print frame, mark Faculty/Staff Address.6. In the Phone Type field, select Home.7. In the If No Address Found field, select Print with no Address.8. Click OK. The following screen appears.
CH A PT E R 214
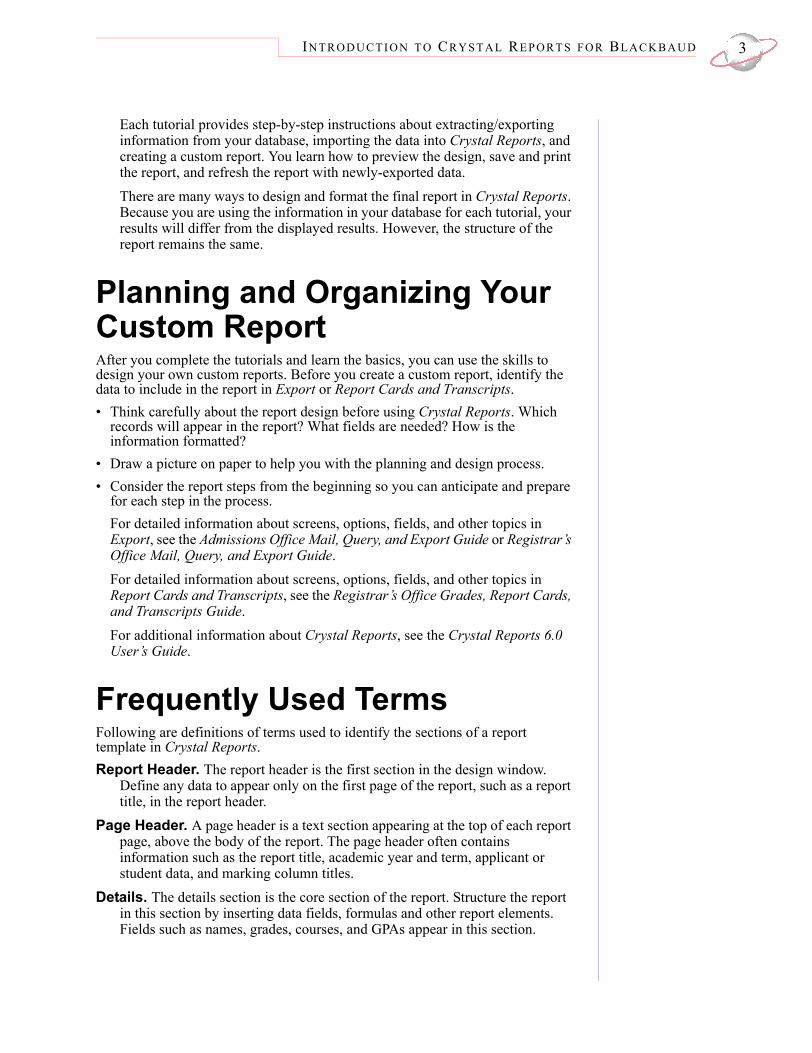
9. Click Yes. The Save Export screen appears.
10. You must enter the Export Name (maximum of 50 alphanumeric characters).
11. In Description (maximum of 255 alphanumeric characters), you can enter a meaningful description for future reference.
12. To let other users run the export, mark the Other Users May Execute This Export checkbox.
13. To let other users edit the export, mark the Other Users May Modify This Export checkbox.
14. Click OK. The Enter Export File Name screen appears.
15. Select a drive in Drives.16. In the Folders box, select a location for the export file.17. Enter a File name (maximum of 8 alphanumeric characters before the
*.mdb extension).18. Click OK to create the export file.
If you marked the Print Control Report checkbox, the Custom Export Control Report appears. Click the printer button on the preview screen to print the report. After printing the report, close the preview screen.
19. To close Export, select File, Exit.

CU S T O M RE PO R T TU T O R I A L 15
Creating a Custom Report in Crystal ReportsThis section explains the basics for creating a custom report, including:• Importing data.• Grouping and sorting data.• Inserting, moving, and resizing database fields.• Inserting, moving, and resizing text objects.• Saving and printing your report.
Importing Data into Crystal ReportsBefore you create a custom report format, you must import the data file created in Export. You use the imported data fields to design your custom report.
Importing the report data
1. Open Crystal Reports for Blackbaud.If the Welcome screen appears, click New Report.
2. Select File, New. The Report Gallery screen appears.

CH A PT E R 216
3. Click Custom. The Choose Report Type and Data Type frame appears.
4. In the Choose Report Type and Data Type frame, click Data File. The Choose Database File screen appears.
5. If the program does not default to the drive and folder in which the export file is located, select a drive in Drives and a folder in the Directories box.
6. In the File Name box, select the name of the exported file (*.mdb). 7. Click OK.

CU S T O M RE PO R T TU T O R I A L 17
On the Select Tables screen, click Select All, then OK.
A Visual Linking Expert screen appears. Click Smart Linking, then OK.
For more information about adding and linking multiple tables, see the Reporting 101 chapter of the Crystal Reports 6.0 User’s Guide.

CH A PT E R 218
8. The Crystal Reports for Blackbaud screen and the Insert Fields screen appear.
Designing the ReportWhen designing a custom report, you place the elements of the report on the Design screen, positioning them in the format they are to appear.The Design screen is divided into five sections: (1) Report Header, (2) Page Header, (3) Details, (4) Report Footer, and (5) Page Footer.The Insert Fields screen appears automatically and lists the fields selected in the export.

CU S T O M RE PO R T TU T O R I A L 19
Designing the layout
Design the layout by selecting options to determine the appearance of the finished report.1. Select File, Options. The File Options screen appears, with the Layout
tab displayed first.
2. On the Layout tab, in the View Options frame, mark the following
checkboxes:• Show Rulers in Design• Show Rulers in Preview• Show Guidelines in Design• Show Section Names in Preview• Show Formatting Toolbar At Top in the View Options frame.
3. In the Grid Options frame, mark the Snap To Grid checkbox.4. In Grid, enter “0.042”.5. In the Preview Pages frame, mark Fit Width 6. Mark the Create Group Tree checkbox.7. In the Field Options frame, mark the Show Field Names and Insert
Detail Field Titles checkboxes.8. Mark the Free-Form Placement checkbox.

CH A PT E R 220
9. Select the Fonts tab. In the Default Fonts frame, you set the font, style, and size for field names, summary fields, group name fields, text objects, and field titles.
10. On the Fonts tab, click Fields. The Font screen appears. On the Font screen for Fields, you set the font for all fields in the report.
11. In Font, select Times New Roman.12. In Font style, select Regular.13. In Size, select 10.14. To return to the Fonts tab, click OK.15. On the Fonts tab, click Summary Fields. The Font screen appears. On
the Font screen for Summary Fields, you set the font for all summary fields in the report.

CU S T O M RE PO R T TU T O R I A L 21
16. In Font, select Times New Roman.17. In Font style, select Bold.18. In Size, select 10.19. To return to the Fonts tab, click OK.20. On the Fonts tab, click Group Name Fields. The Font screen appears. On
the Font screen for Group Name Fields, you set the font for all group name fields in the report.
21. In Font, select Times New Roman.22. In Font style, select Italic.23. In Size, select 11.24. To return to the Fonts tab, click OK.25. On the Fonts tab, click Text Objects. The Font screen appears. On the
Font screen for Text Objects, set the font for all text objects in the report.26. In Font, select Times New Roman.27. In Font style, select Regular.28. In Size, select 10.29. To return to the Fonts tab, click OK.30. On the Fonts tab, click Field Titles. The Font screen appears. On the Font
screen for Field Titles, set the font for all field titles in the report.31. In Font, select Times New Roman.32. In Font style, select Regular.33. In Size, select 12.34. In the Effects frame, mark the Underline checkbox.35. To return to the Fonts tab, click OK.
You can change font styles and sizes on the Preview or Design screens while creating your report. Select the field or field title to edit and select Format, Font. Select a font type and size.

CH A PT E R 222
36. When you finish setting individual default fonts, click OK on the File Options screen. The Crystal Reports for Blackbaud screen and the Insert Fields screen reappear.
You can move the Insert Fields screen in the Design window by clicking on the Insert Fields title bar and dragging it with the mouse.
Placing Data in the ReportNow you are ready to begin adding database fields to the custom report format. In your report, each faculty/staff member’s name displays with the department, Social Security Number, spouse name, address, and home phone number.
Inserting database fields
1. On the Insert Fields screen, select the Database tab. Double-click Department to open the category, if it is not already open.
2. Under _DepartmentLink_ID, select the Department field.

CU S T O M RE PO R T TU T O R I A L 23
3. Click Insert. A circular cursor appears.4. With your mouse, drag the cursor into the far left corner of the Details
section in the Design window. The circular cursor changes to an arrow and an outlined box. Click once to place the box in the Details section. Department appears in the outlined box and in the Page Header section.
5. To shorten the Department header and field to 1.2 inches long, in the Details section, click Department.
6. Click and hold SHIFT and click Department in the Page Header section. Both boxes are outlined.
7. Move your cursor to the center point of the right end of an outlined box. Your cursor changes to a double-ended arrow.
8. Click and drag the arrow to the left until you reach the 1.2 mark on the ruler. Both outlined boxes shrink to 1.2 inches long.
9. Click the print preview button on the toolbar (or select File, Print Preview). The Preview tab appears. Your report will look similar, but may have different departments.
10. To continue designing the report, select the Design tab.11. On the Insert Fields screen, double-click Fac/Staff to open the category if
it is not already open.12. Under _DepartmentLink_ID, select the Faculty/Staff Name field.13. With your mouse, drag the Faculty/Staff Name field to the right of
Department (at approximately the 1.5” marking) in the Details section. Click once to place the box in the Details section. Faculty/Staff Name appears in the outlined box and in the Page Header section.
14. To shorten the Faculty/Staff Name header and field to 1.3 inches long, in the Details section, click Faculty/Staff Name.

CH A PT E R 224
15. Click and hold SHIFT and click Faculty/Staff Name in the Page Header section. Both boxes are outlined.
16. Move your cursor to the center point of the right end of an outlined box. Your cursor changes to a double-ended arrow.
17. Click and drag the arrow to the left until you reach the 2.8 mark on the ruler. Both outlined boxes shrink to 1.3 inches long.
18. To enlarge the Details section to include more lines of data, place your cursor over the dividing line below the Details section.
19. Click and drag the line down until you see three lines in the ruler section between the Details title and the Report Footer section.
20. On the Insert Fields screen, on the Database tab, select Social Security No in the Fac/Staff category.
21. Click and drag the Social Security No field directly under the Faculty/Staff Name field in the Details section. Click once to place the Social Security No in the Details section. The field also appears in the Page Header section, over the Faculty/Staff Name header.
22. To delete the Social Security No header from the Page Header section, click the header and press DELETE.
23. To shorten the Social Security No field to 1.3 inches long, in the Details section, click Social Security No.
CU S T O M RE PO R T TU T O R I A L 25
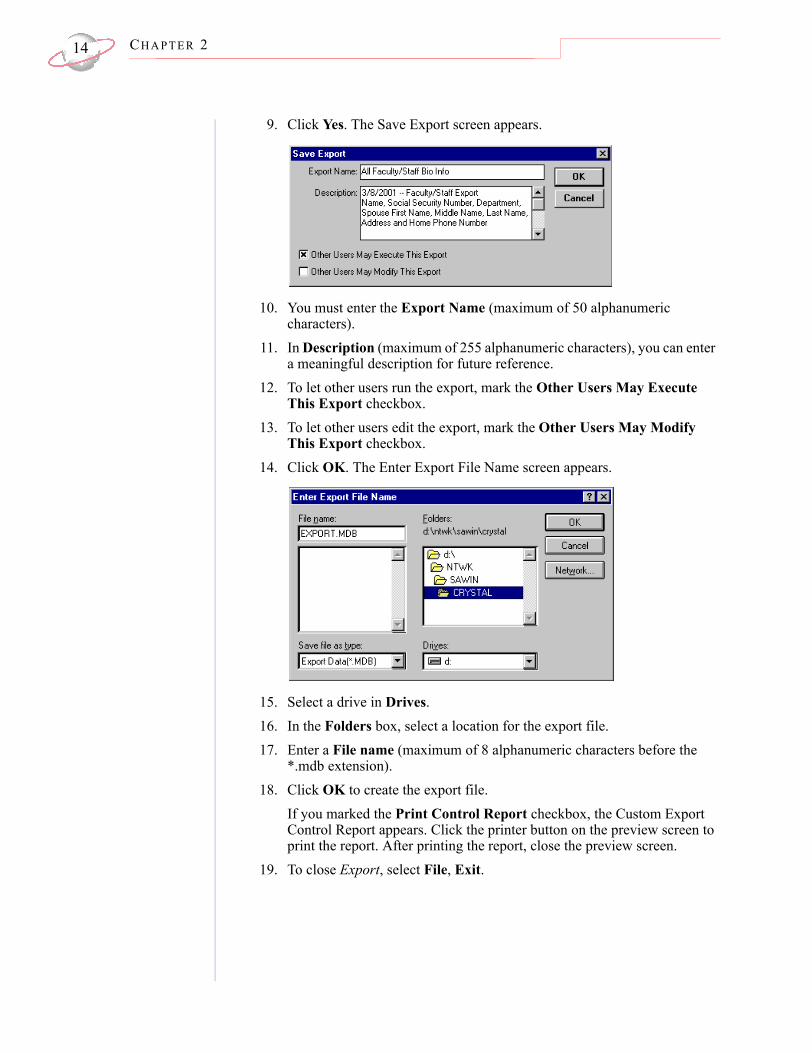
24. Move your cursor to the center point of the right end of the outlined box. Your cursor changes to a double-ended arrow.
25. Click and drag the arrow to the left until you reach the 2.8 mark on the ruler.
26. To change the Faculty/Staff Name header to include SSN, in the Page Header section, click Faculty/Staff Name.
27. Right-click to view the shortcut menu.28. From the shortcut menu, select Edit Text Object.29. Place the cursor after Name and press ENTER to create a new line.30. Enter “SSN”. Click outside the outlined box.31. To enlarge the Faculty/Staff Name header box to view the entire title,
move your cursor to the center point of the top end of the outlined box. Your cursor changes to a double-ended arrow.
32. Click and drag the arrow up until you can see all of the title.33. Select the Preview tab.
34. To continue designing the report, click the Design tab.

CH A PT E R 226
Creating a Spouse Name formula
The spouse name consists of three separate fields — First Name, Middle Name, and Last Name. You can create a formula to group the fields together, eliminate extra spaces, and truncate the middle name to an initial.1. On the Insert Fields screen, select the Formula tab.
2. Click New. The Formula Name screen appears.
3. Enter “Spouse Name”.4. Click OK. The Formula Editor:@Spouse Name screen appears.
CU S T O M RE PO R T TU T O R I A L 27
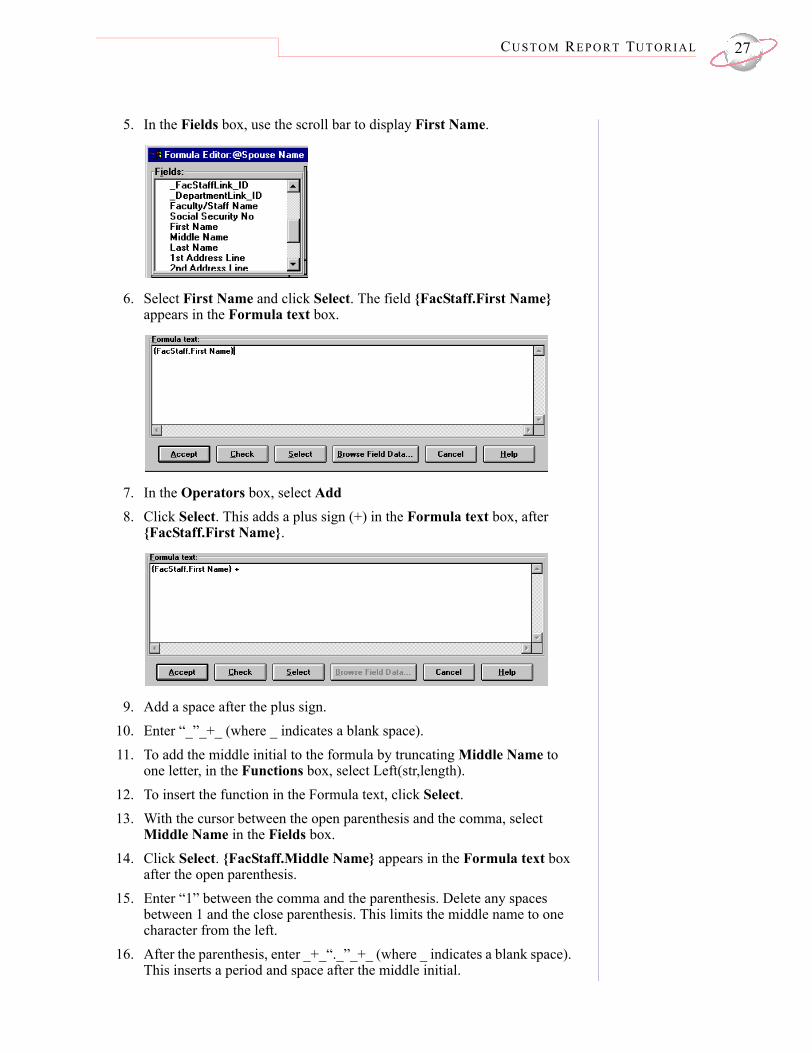
5. In the Fields box, use the scroll bar to display First Name.
6. Select First Name and click Select. The field {FacStaff.First Name} appears in the Formula text box.
7. In the Operators box, select Add8. Click Select. This adds a plus sign (+) in the Formula text box, after
{FacStaff.First Name}.
9. Add a space after the plus sign.10. Enter “_”_+_ (where _ indicates a blank space).11. To add the middle initial to the formula by truncating Middle Name to
one letter, in the Functions box, select Left(str,length).12. To insert the function in the Formula text, click Select.13. With the cursor between the open parenthesis and the comma, select
Middle Name in the Fields box.14. Click Select. {FacStaff.Middle Name} appears in the Formula text box
after the open parenthesis.15. Enter “1” between the comma and the parenthesis. Delete any spaces
between 1 and the close parenthesis. This limits the middle name to one character from the left.
16. After the parenthesis, enter _+_“._”_+_ (where _ indicates a blank space). This inserts a period and space after the middle initial.

CH A PT E R 228
17. In the Fields box, select Last Name and click Select. The field {FacStaff.Last Name} appears in the Formula text box.
18. The formula reads: {FacStaff.First Name} + “ ” + Left({FacStaff.Middle Name},1) + “. ” + {FacStaff.Last Name}.
Using this formula, a spouse with the name Toni Jennifer Foster displays as Toni J. Foster.
19. To check the formula for syntax errors, click Check. If no errors are found, click Accept. If there are errors, make corrections, then click Check and Accept.
20. The Crystal Reports for Blackbaud screen and the Insert Fields screen reappear.
21. With the Spouse Name formula selected, click Insert.22. With your mouse, drag the circular cursor to the Details section, to the
right of Faculty/Staff Name in the Design window. The circular cursor changes to a regular cursor and an outlined box. Click once and @Spouse Name appears in the outlined box. The text field also appears in the Page Header section.
23. Size the Spouse Name fields from the 3” to the 4” mark on the ruler.

CU S T O M RE PO R T TU T O R I A L 29
24. Your report looks as follows in the Design window.
25. Your report looks as follows in the Preview window.
Modifying the Spouse Name formula
You can modify the Spouse Name formula so the word None appears if there is no spouse on the faculty/staff record in Records Management.1. Select the Formula tab on the Insert Fields screen.2. Select Spouse Name and click Edit.3. The Formula Editor:@Spouse Name screen appears.

CH A PT E R 230
4. Place the cursor in the Formula text box before {FacStaff.First Name}. Place a beginning parenthesis before {FacStaff.First Name} and an ending parenthesis after {FacStaff.Last Name}.
5. Place the cursor before the beginning parenthesis. Enter “If not IsNull ({FacStaff.First Name}) then”. This is the beginning of an “If Then Else” statement. It instructs the program as follows: If the First Name field is not blank, display the First Name, Middle Initial, and Last Name.
6. Place the cursor after {FacStaff.Last Name}). Enter “else (“None”)”.This is the end of the “If Then Else” statement. It instructs the program as follows: If the First Name field is blank, display None.
7. The formula now reads: If not IsNull ({FacStaff.First Name}) then ({FacStaff.First Name} + " " + Left ({FacStaff.Middle Name},1) + ". " + {FacStaff.Last Name}) else ("None").This formula assumes all spouse names contain a first name, middle name, and last name. However, a spouse might not have a middle name. Using this formula, if there is no middle name, nothing will print for that spouse. Therefore, we must further modify the formula to print just the first and last names if no middle name is found. We will insert another “If Then Else” statement for the Middle Name field.
8. Place the cursor before Left ({FacStaff.Middle Name},1). Enter “(if not IsNull ({FacStaff.Middle Name}) then”. Place the cursor after the last set of quotes before {FacStaff.Last Name} and enter an ending parenthesis.
9. The formula now reads: If not IsNull ({FacStaff.First Name}) then ({FacStaff.First Name} + “ ” + (if not IsNull ({FacStaff.Middle Name}) then Left ({FacStaff.Middle Name},1) + “. ”) + {FacStaff.Last Name}) else (“None”). The Formula screen looks similar to the following.
Because of the length, the full formula does not appear on the screen above.

CU S T O M RE PO R T TU T O R I A L 31
10. To check the formula for syntax errors, click Check. If no errors are found, click Accept. If there are errors, make corrections, then click Check and Accept.You do not need to reinsert the formula in the Design screen. After you place a formula field on a report, any changes you make to that formula are automatically updated in the report.
Creating an Address Lines formula
During the export process, we exported two address lines for each faculty/staff member. There can be address information on one, both, or neither of the lines. First, we will create two formulas that check for information on each line. The third formula combines the address lines into one field.1. Select the Design tab in the Design window.2. Select the Formula tab in the Insert Fields screen.3. Click New. The Formula Name screen appears.4. Enter “FacLine1”. This formula checks the first address line for
information.5. Click OK. The Formula Editor: @FacLine1 screen appears.6. In the Formula text box, enter “If not ”. Be sure to include a space after
the word not.7. In the Functions box under Other, select IsNull(fld).8. Click Select. The words IsNull appear in the Formula text box with the
cursor blinking between the parentheses.9. In the Fields box, select 1st Address Line and double-click.
10. {FacStaff.1st Address Line} appears in the Formula text box between the parentheses.
11. Add a space after the close parenthesis.12. Enter the following: “then ({FacStaff.1st Address Line})”.

CH A PT E R 232
13. The formula appears as follows.
14. Click Check.15. If there are no errors, click Accept. If there are errors, make corrections,
then click Check and Accept. The Crystal Reports for Blackbaud screen and the Insert Fields screen reappear.
16. Click New. The Formula Name screen appears.17. Enter “FacLine2”. This formula checks the second address line for
information.18. Click OK. The Formula Editor: @FacLine2 screen appears.19. Follow the above instructions to create a second formula using the field
2nd Address Line. Click Check. If there are no errors, click Accept. If there are errors, make corrections, then click Check and Accept. The Crystal Reports for Blackbaud screen and the Insert Fields screen reappear.
20. To create a formula to put the address lines together, click New. The Formula Name screen appears.
21. Enter “Address Lines” and click OK. The Formula Editor: @Address Lines screen appears.
22. In the Fields box, select and double-click @FacLine1.23. Enter _+_”_”_+_ (where _ indicates a blank space).24. In the Fields box, select and double-click @FacLine2.

CU S T O M RE PO R T TU T O R I A L 33
25. The formula appears as follows.
26. Click Check.27. If there are no errors, click Accept. If there are errors, make corrections,
then click Check and Accept. The Crystal Reports for Blackbaud screen and the Insert Fields screen reappear.
28. Click Insert.29. With your mouse, drag the circular cursor to the Details section, to the
right of @Spouse Name in the Design window. The circular cursor changes to an arrow and an outlined box. Click once and @Address Lines appears in the outlined box. The text field also appears in the Page Header section.
30. Stretch both fields from the 4.1” mark to the 5.6” mark on the ruler.
Creating a City/State/ZIP formula
You can create a formula to combine the City, State, and ZIP fields into one field.1. Select the Design tab in the Design window.2. Select the Formula tab in the Insert Fields screen.3. Click New. The Formula Name screen appears.4. Enter “CitySZ”.5. Click OK. The Formula Editor: @CitySZ screen appears.6. In the Fields box, select and double-click City to add it to the Formula
text box.7. After {FacStaff.City}, enter _+_”,_”_+_ (where _ indicates a blank
space).8. In the Fields box, select and double-click State to add it to the Formula
text box.

CH A PT E R 234
9. After {FacStaff.State}, enter _+_”_”_+_ (where _ indicates a blank space).
10. In the Fields box, select and double-click ZIP to add it to the Formula text box.
11. The formula appears as {FacStaff.City}+“,_ “+ {FacStaff.State}+“_“+ {FacStaff.ZIP} (where _ indicates a blank space).
12. Click Check.13. If there are no errors, click Accept. If there are errors, make corrections,
then click Check and Accept. The Crystal Reports for Blackbaud screen and the Insert Fields screen reappear.
14. Click Insert.15. With your mouse, drag the circular cursor to the Details section below
@Address Lines. The circular cursor changes to an arrow and an outlined box. Click once and @CitySZ appears in the outlined box. The text field also appears in the Page Header section.
16. Click the @CitySZ field in the Page Header section and delete.17. Stretch the field in the Details section from the 4.1” mark to the 5.6” mark
on the ruler.18. The Design screen appears as follows.
Inserting the Phone Number field
1. To add the Phone Number field to the Design screen, select the Fields tab on the Insert Fields screen.
2. With your mouse, drag the Phone Number field to the right of @Address Lines (at approximately the 5.6” mark) in the Details section. Click once to place the box in the Details section. Phone Number appears in the outlined box and in the Page Header section.
3. To shorten the Phone Number header and field to 1” long, in the Details section, click Phone Number.
4. Press and hold SHIFT and click Phone Number in the Page Header section. Both boxes are outlined.
5. Move your cursor to the center point of the right end of an outlined box. Your cursor changes to a double-ended arrow.
6. Click and drag the arrow to the left until you reach the 6.6” mark on the ruler. Both outlined boxes shrink to 1” long.

CU S T O M RE PO R T TU T O R I A L 35
The Design screen appears as follows:
Grouping the Report by DepartmentA group is a set of records that are related to each other in some way. Breaking data into groups makes a report more effective. Use groups for the ability to place all records into groups according to a selected field. In the next tutorial, you group faculty/staff members by department (for example, English, Computer, Mathematics, and Foreign Language). To group the faculty/staff members by department, you must create a group.
Grouping by Department
1. Select the Design tab.2. Select Insert, Group. The Insert Group screen appears.

CH A PT E R 236
3. In the first field, click the arrow button and scroll down the list to select the Department field. The second field should read “in ascending order.” Mark the Keep group together checkbox.The department name prints each time the department changes, not with each faculty/staff member’s information.
4. Click OK. There are now two new sections in the report. The new section appearing above the Details section is Group Header #1 and the new section appearing below the Details section is Group Footer #1.
5. To change the appearance of the Department text in Group Header #1, click Department in Group Header #1.
6. Select Format, Font. The Format Editor screen appears.7. In Style, select Italics.8. In Size, select 11 pt.
You can adjust the margins for Group Header #1 by dragging the bottom bar of the section down and enlarging the Department box. You can also adjust spacing between faculty/staff records by dragging the bottom bar of the Details section down until you see four lines. This will increase the space between records.
9. The Design screen appears as follows:
10. The Preview screen appears as follows:
CU S T O M RE PO R T TU T O R I A L 37
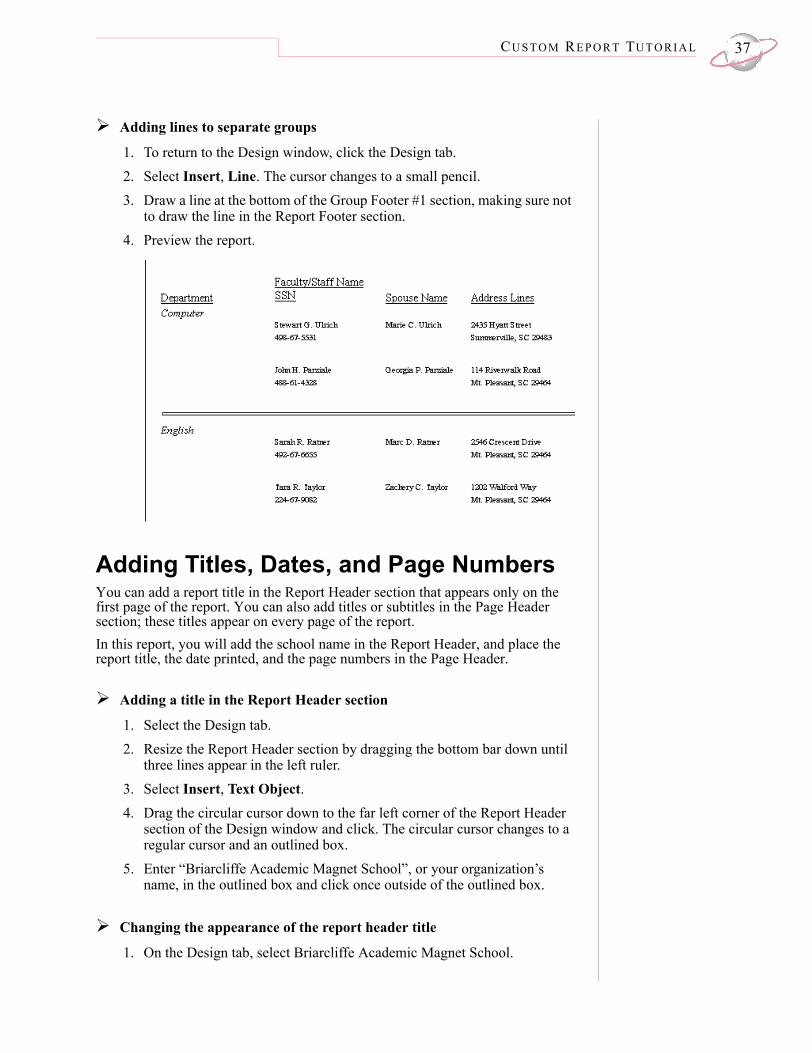
Adding lines to separate groups
1. To return to the Design window, click the Design tab.2. Select Insert, Line. The cursor changes to a small pencil.3. Draw a line at the bottom of the Group Footer #1 section, making sure not
to draw the line in the Report Footer section.4. Preview the report.
Adding Titles, Dates, and Page NumbersYou can add a report title in the Report Header section that appears only on the first page of the report. You can also add titles or subtitles in the Page Header section; these titles appear on every page of the report.In this report, you will add the school name in the Report Header, and place the report title, the date printed, and the page numbers in the Page Header.
Adding a title in the Report Header section
1. Select the Design tab.2. Resize the Report Header section by dragging the bottom bar down until
three lines appear in the left ruler.3. Select Insert, Text Object.4. Drag the circular cursor down to the far left corner of the Report Header
section of the Design window and click. The circular cursor changes to a regular cursor and an outlined box.
5. Enter “Briarcliffe Academic Magnet School”, or your organization’s name, in the outlined box and click once outside of the outlined box.
Changing the appearance of the report header title
1. On the Design tab, select Briarcliffe Academic Magnet School.

CH A PT E R 238
2. Select Format, Font. The Format Editor screen appears.3. In Font, select Arial Black.4. In Style, select Bold.5. In Size, select 18.6. Click OK.
Centering the title
1. On the Design tab, select Briarcliffe Academic Magnet School.2. Stretch the outlined Title box to the width of the report.3. Select Format, Paragraph. On the Paragraph tab, in Alignment, select
Centered.4. Move the cursor over the top black dot in the center of the outlined Title
box. A vertical double-ended arrow appears.5. Click and drag the double-ended arrow down until the title of your report
is clearly seen and not cut off.
Resizing and adjusting the Page Header section
1. Select the Design tab.2. Resize the Page Header section by dragging the bottom bar down until
seven lines appear in the left ruler.3. Press and hold SHIFT and click the following fields in the Page Header
section: Department, Faculty/Staff Name/SSN, Address Lines, and Phone Number.
4. Using the mouse, drag these header fields down to the bottom of the expanded Page Header section.
Adding a title in the Page Header section
1. Select File, Insert Text Object.2. Drag the circular cursor down to the far left corner of the Page Header
section of the Design window and click. The circular cursor changes to a regular cursor and an outlined box.
3. Enter “Faculty/Staff List by Department” in the outlined box and click once outside of the outlined box.
Changing the appearance of the Page Header title
1. On the Design tab, select Faculty/Staff List by Department.2. Select Format, Font. The Format Editor screen appears.3. In Font, select Arial.4. In Style, select Bold.5. In Size, select 16.

CU S T O M RE PO R T TU T O R I A L 39
6. Click OK.
Centering the Page Header title
1. On the Design tab, select Faculty/Staff List by Department.2. Stretch the outlined Title box to the width of the report.3. Select Format, Paragraph. On the Paragraph tab, in Alignment, select
Centered.4. Move the cursor over the top black dot in the center of the outlined Title
box. A vertical double-ended arrow appears.5. Click and drag the double-ended arrow down until the title of your report
is clearly seen and not cut off.
Adding a date to the Page Header
1. On the Design tab, select Insert, Special Field. Select Print Date Field.2. Drag the cursor to left of the title in the Page Header section.3. Click to place the date, and resize the field, if necessary.
Adding page numbers to the Page Header
1. On the Design tab, select Insert, Special Field, Page Number Field.2. Drag the cursor to right of the title in the Page Header section.3. Click to place the page number, and reduce the size of the field, if
necessary.4. To insert the word Page before the number, select Insert, Text Object.5. Drag the circular cursor down to the right of the page number field in the
Page Header section. Click to place the text box.6. Enter “Page” in the outlined box and click once outside of the outlined
box.7. Reduce the size of the box, if necessary.

CH A PT E R 240
8. The Design window appears as follows.
9. The Preview window appears as follows.
Saving and Printing the Report
Saving the report
1. Select File, Save As. The File Save As screen appears.

CU S T O M RE PO R T TU T O R I A L 41
2. Enter the name of your report in the File name field and indicate the drive and folder in which the report should be saved.
3. Click OK.
Printing the report
1. Select File, Print or click the printer button on the toolbar.2. The Print screen appears.
3. In the Print Range frame, mark All.4. Click OK.

CH A PT E R 242
Congratulations!You have successfully created a custom report. Select the Preview tab to view the finished report. Your report appears as follows.
Polishing the ReportAfter you have added all the necessary information to the custom report, you can customize by adding text, lines, borders, and special fields. There are many ways to enhance the appearance and organization of your report, such as:• Adding additional text.• Drawing lines to separate sections.• Adding a header with a border.• Adding page numbers.• Hiding sections.• Combining fields and text.

CU S T O M RE PO R T TU T O R I A L 43
• Changing spacing.• Adding watermark or logo.For more information about enhancing the appearance of your custom reports, see the Finishing Touches Tutorial, or the Crystal Reports 6.0 User’s Guide.

CH A PT E R 244

Custom Report Card Tutorial
Contents
Exporting from Report Cards and Transcripts. . . . . . . . . . . . . . . . . . . . . . . 46Importing Data into Crystal Reports . . . . . . . . . . . . . . . . . . . . . . . . . . . . . . . 53Designing a Crystal Report . . . . . . . . . . . . . . . . . . . . . . . . . . . . . . . . . . . . . . . 57Designing the Custom Report Card . . . . . . . . . . . . . . . . . . . . . . . . . . . . . . . . 58Placing Data on the Report Card . . . . . . . . . . . . . . . . . . . . . . . . . . . . . . . . . . . . 65Previewing, Saving, and Printing the Report Card. . . . . . . . . . . . . . . . . . . . 67Previewing the Report Card . . . . . . . . . . . . . . . . . . . . . . . . . . . . . . . . . . . . . . . . 68Saving the Report Card. . . . . . . . . . . . . . . . . . . . . . . . . . . . . . . . . . . . . . . . . . . . 69Printing the Report Card. . . . . . . . . . . . . . . . . . . . . . . . . . . . . . . . . . . . . . . . . . . 70Refreshing and Updating the Custom Report Card . . . . . . . . . . . . . . . . . . . 70Polishing the Report . . . . . . . . . . . . . . . . . . . . . . . . . . . . . . . . . . . . . . . . . . . . . 72
Procedures
Preparing the custom report card . . . . . . . . . . . . . . . . . . . . . . . . . . . . . . . . . . . . 46Exporting the custom report card . . . . . . . . . . . . . . . . . . . . . . . . . . . . . . . . . . . . 52Importing the report card data . . . . . . . . . . . . . . . . . . . . . . . . . . . . . . . . . . . . . . 54Designing the layout . . . . . . . . . . . . . . . . . . . . . . . . . . . . . . . . . . . . . . . . . . . . . . 59Organizing the custom report card . . . . . . . . . . . . . . . . . . . . . . . . . . . . . . . . . . . 62Inserting database fields . . . . . . . . . . . . . . . . . . . . . . . . . . . . . . . . . . . . . . . . . . . 65Adding subtotals and grand totals. . . . . . . . . . . . . . . . . . . . . . . . . . . . . . . . . . . . 67Previewing the design. . . . . . . . . . . . . . . . . . . . . . . . . . . . . . . . . . . . . . . . . . . . . 68Previewing each page . . . . . . . . . . . . . . . . . . . . . . . . . . . . . . . . . . . . . . . . . . . . . 68Saving the custom report card . . . . . . . . . . . . . . . . . . . . . . . . . . . . . . . . . . . . . . 69Printing the custom report card. . . . . . . . . . . . . . . . . . . . . . . . . . . . . . . . . . . . . . 70Refreshing and updating the report card data . . . . . . . . . . . . . . . . . . . . . . . . . . . 70

CH A PT E R 346
Registrar’s Office contains a standard report card format you can modify based on parameters you select. You can also create a custom report card by exporting data from Report Cards and Transcripts and importing the data into Crystal Reports for Blackbaud. To design a custom report card in Crystal Reports, you export data in the data format MS Access Report Writer Database.In Crystal Reports, you can select from many options to customize report cards. A partial list follows:• Change the location, size, and style of most report card sections.• Add percentile markings.• Include more marking columns.• Place and format your logo on the report card.If you include skill ratings which are check marks in your export from Report Cards and Transcripts, you can display the check marks in Crystal Reports by selecting the Blackbaud Report font for those fields. To list a skill ratings table as a legend on a custom report card, enter the information in a text box in Crystal Reports.In this tutorial, you define your data parameters in Report Cards and Transcripts, create an export file, import the data file into Crystal Reports, and create a custom report card format.Before you create a report card, identify the Registrar’s Office data to export. This helps you set the parameters of your report.• Think carefully about the report you want to design before entering Crystal
Reports. Which records appear in the report? Which fields from the selected records appear in the report? How is the information formatted?
• Draw a picture on paper to help you plan and design the report.• Evaluate the report steps from beginning to end so you can anticipate and
prepare for each step in the process.For detailed information about screens, options, fields, and other topics in Report Cards and Transcripts, see the Registrar’s Office Grades, Report Cards, and Transcripts Guide. For additional information about Crystal Reports, see Crystal Reports 6.0 User’s Guide.
Exporting from Report Cards and Transcripts
Preparing the custom report card
1. Open Report Card Cards and Transcripts.

CU S T O M RE P O R T CA R D TU T O R I A L 47
2. Select File, New, Report Card. The New Report Card screen appears.
3. On the General tab, select Custom in Report Card Type. This instructs the program to export the information in the data format MS Access Report Writer Database (*.mdb). You must export data in *.mdb format for import into Crystal Reports.Select all fields if you are unsure which information to include. You can filter the data to appear in the custom report card in Crystal Reports. You cannot add new data in the custom report card in Crystal Reports unless you create a new export file.
4. In the Student Addressee/Salutation and Relation Addressee/Salutation frames, mark Use Key Name.
5. In the Optional Fields frame, mark all the checkboxes:• Student ID• SSN• Grade Level• Homeroom• Advisor

CH A PT E R 348
6. Select the Address Tab.
7. In the Report Card Address field, mark Relation.8. In the Address to Print frame, mark Primary Address. The program
exports the relation’s primary address as defined in the student’s record (Records Management).
9. In the If No Address is Found field, select Print with no Address.10. Select the Courses tab. On this tab, you select the credit and course
information to include in the export
11. In the Marking Columns to Include frame, mark the checkboxes for all marking columns.We recommend marking all checkboxes in the Credit Attempt and Credit Earned columns. You can filter the data to appear on the report card in Crystal Reports.

CU S T O M RE P O R T CA R D TU T O R I A L 49
12. To include skills ratings on report cards, mark the Include Skills checkbox.
13. In the Skills Sort Order field, you can select Display Name, Alphabetical, or Course Order.
14. Move all the selections from the list in the Course Information box to the Information to Include box.
15. Mark the Print Grade Comments for checkbox and select Final.16. Mark the Show Historic Grades checkbox.17. Select the Attendance tab.
18. In the Attendance Categories frame, mark All Categories.19. Mark the Breakdown by Term checkbox.20. Select the Conduct tab.
21. In the Conduct Categories frame, mark All Categories.
CH A PT E R 350
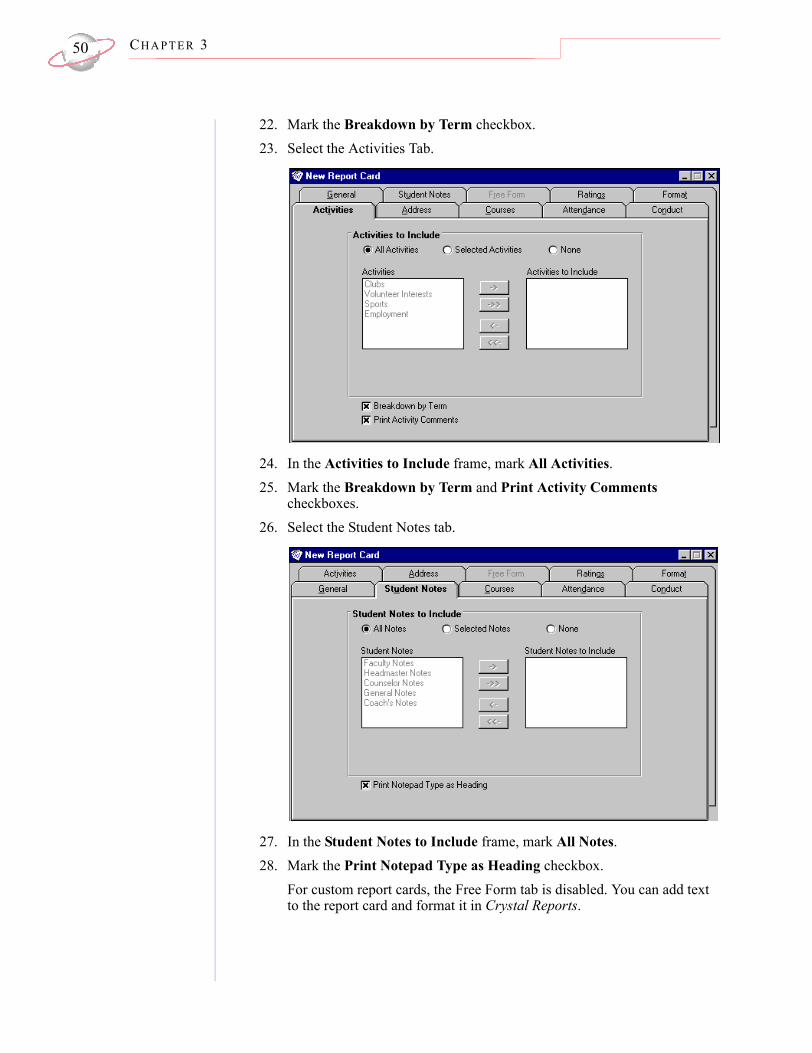
22. Mark the Breakdown by Term checkbox.23. Select the Activities Tab.
24. In the Activities to Include frame, mark All Activities.25. Mark the Breakdown by Term and Print Activity Comments
checkboxes.26. Select the Student Notes tab.
27. In the Student Notes to Include frame, mark All Notes.28. Mark the Print Notepad Type as Heading checkbox.
For custom report cards, the Free Form tab is disabled. You can add text to the report card and format it in Crystal Reports.

CU S T O M RE P O R T CA R D TU T O R I A L 51
29. Select the Ratings tab.
30. In the Ratings to Include frame, mark all checkboxes in the Ratings column.
31. Mark the PTD (Period to Date), YTD (Year to Date), and the Cum (Cumulative) checkboxes in the Overall GPA row.
32. Mark the Suppress Rating Line if Rating Does Not Exist checkbox.33. Select the Format tab.
34. Mark all checkboxes in the Print Credits frame.If you did not mark the Credits Attempted or Credits Earned checkbox on the Courses tab, these options are disabled.
35. In the Student Sequence frame, mark Alphabetically.36. In the Course/Class Sequence frame, mark Course ID.37. Mark the Print Students without Grades checkbox.

CH A PT E R 352
38. Select File, Save to save your custom report card parameters. The Save Report Card screen appears.
39. You must enter the report card Name (maximum of 50 alphanumeric characters).
40. In Description (maximum of 254 alphanumeric characters), you can enter a meaningful description for future reference.
41. To save the report card, click OK.
Exporting the custom report card
Now that you have defined the parameters for your custom report card, export the data included in these parameters. You use the exported data file in Crystal Reports to create your custom report card.1. With the custom report card open, select File, Export.2. The Print Report Card Options screen appears.
In general, you export a group of students and select the grade levels, academic year, and terms to include. This demonstration uses one record, Caroline Aaron, and the Grade Levels to Include frame is unavailable.
3. You can select to mark the Print Extra Copy for File checkbox.
CU S T O M RE P O R T CA R D TU T O R I A L 53
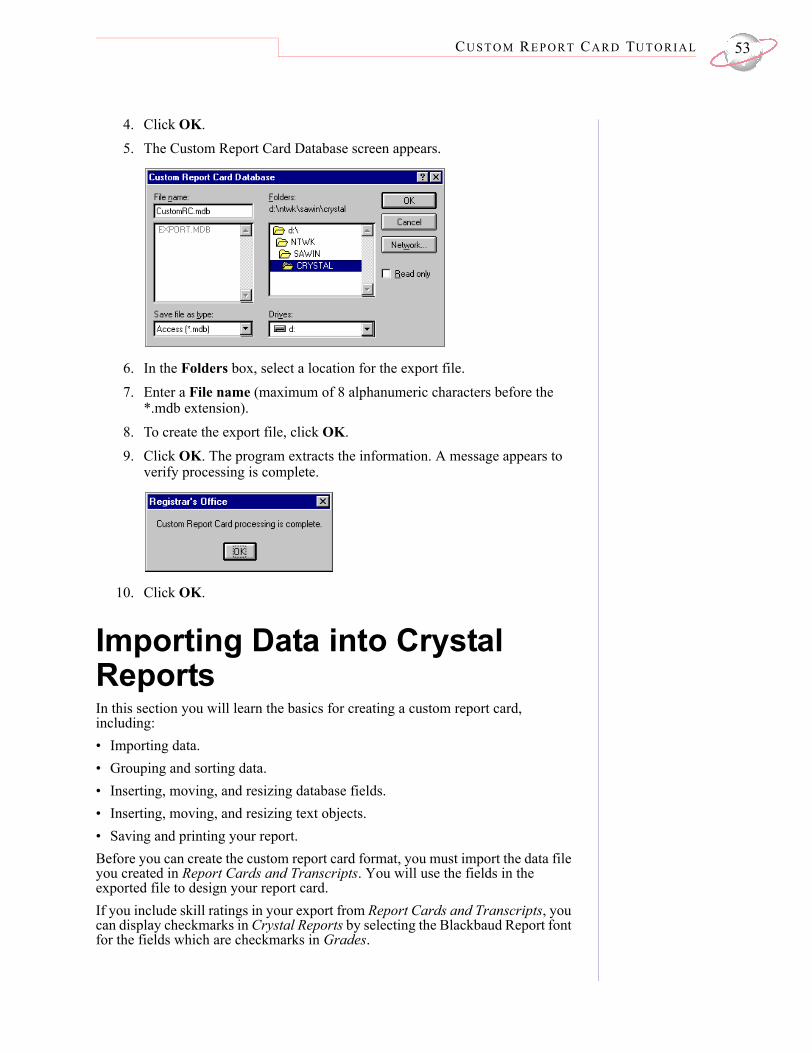
4. Click OK.5. The Custom Report Card Database screen appears.
6. In the Folders box, select a location for the export file.7. Enter a File name (maximum of 8 alphanumeric characters before the
*.mdb extension).8. To create the export file, click OK.9. Click OK. The program extracts the information. A message appears to
verify processing is complete.
10. Click OK.
Importing Data into Crystal ReportsIn this section you will learn the basics for creating a custom report card, including:• Importing data.• Grouping and sorting data.• Inserting, moving, and resizing database fields.• Inserting, moving, and resizing text objects.• Saving and printing your report.Before you can create the custom report card format, you must import the data file you created in Report Cards and Transcripts. You will use the fields in the exported file to design your report card.If you include skill ratings in your export from Report Cards and Transcripts, you can display checkmarks in Crystal Reports by selecting the Blackbaud Report font for the fields which are checkmarks in Grades.

CH A PT E R 354
Importing the report card data
1. Open Crystal Reports for Blackbaud.If the Welcome screen appears, click New Report.
2. Select File, New. The Report Gallery screen appears.
3. Click Custom. The Choose Report Type and Data Type frame appears.
4. In the Choose Report Type and Data Type frame, click Data File. The Choose Database File screen appears.
5. If the program does not default to the drive and folder in which the export file is located, select a drive in Drives and a folder in the Directories box.

CU S T O M RE P O R T CA R D TU T O R I A L 55
6. In the File Name box, select the name of the exported report card file (*.mdb).
7. Click OK. The Select Tables screen appears.
8. On the Select Tables screen appears, click Select All, then OK.We recommend you select all tables because it is difficult to add tables after this step.
9. The Visual Linking Expert screen appears.

CH A PT E R 356
10. Click OK.
11. Maximize the Visual Linking Expert screen. You must reverse the links to instruct Crystal Reports to keep each student’s information together. By reversing the links, the student table points to each other table. In this way, Crystal Reports “knows” which values to associate with each student.
12. Link the ID in the Student table to the Student ID in all other tables, except Group Key and Transcripts.
13. Link Group ID in the Details table to ID in the GroupKey table.

CU S T O M RE P O R T CA R D TU T O R I A L 57
14. To close the Visual Linking Expert screen, click OK. The Crystal Reports for Blackbaud screen and the Insert Fields screen appear.
15. The Insert Fields screen displays the tables and fields selected for your export. Double-click a table to view the fields in the table. Double-click again to retract the list of available fields for a table.
Designing a Crystal ReportWhen designing a custom report in Crystal Reports, you place the elements of the report on the Design screen, positioning them in the format they are to appear.The Design screen is divided into five sections: (1) Report Header, (2) Page Header, (3) Details, (4) Report Footer, and (5) Page Footer.

CH A PT E R 358
The Insert Fields screen appears automatically and lists the fields selected in the export. You design the layout by selecting options to determine the appearance of the finished report. When you select File, Options, the File Options screen appears.
The Layout tab displays first.
Designing the Custom Report CardYou place the elements of the report card on the Design screen in the format they are to appear. The Design screen is divided into five sections: (1) Report Header, (2) Page Header, (3) Details, (4) Report Footer, and (5) Page Footer. The Insert Fields screen appears automatically and lists the fields selected in the report card export. If you close the Insert Fields screen, to re-open it, select Insert, Database.

CU S T O M RE P O R T CA R D TU T O R I A L 59
Designing the layout
Design the layout by selecting options to determine the appearance of the finished report.1. Select File, Options. The File Options screen appears, with the Layout
tab displayed first.
2. On the Layout tab, in the View Options frame, mark the Show Rulers in
Design and Show Rulers in Preview checkboxes.3. In the Grid Options frame, mark the Snap To Grid checkbox.4. In Grid, enter “0.083”.5. In the Preview Pages frame, mark Full Size.6. Mark the Create Group Tree checkbox.7. In the Field Options frame, mark the Show Field Names, Insert Details
Fields Titles, and Insert Group Name with Group checkboxes.8. Mark the Free-Form Placement checkbox.

CH A PT E R 360
9. Select the Fonts tab. In the Default Fonts frame, you set the font, style, and size for field names, summary fields, group name fields, text objects, and field titles.
10. On the Fonts tab, click Fields. The Font screen appears. On the Font screen for Fields, you set the font for all fields in the report.
11. In Font, select Times New Roman.12. In Font Style, select Regular.13. In Size, select 10.14. Click OK to return to the Fonts tab.

CU S T O M RE P O R T CA R D TU T O R I A L 61
15. On the Fonts tab, click Summary Fields. The Font screen appears. On the Font screen for Summary Fields, you set the font for all summary fields in the report.
16. In Font, select Times New Roman.17. In Font style, select Bold.18. In Size, select 10.19. To return to the Fonts tab, click OK.20. On the Fonts tab, click Group Name Fields. The Font screen appears. On
the Font screen for Group Name Fields, you set the font for all group name fields in the report.
21. In Font, select Times New Roman.22. In Font style, select Bold.23. In Size, select 12.24. To return to the Fonts tab, click OK.25. On the Fonts tab, click Text Objects. The Font screen appears. On the
Font screen for Text Objects, set the font for all text objects in the report.26. In Font, select Arial.27. In Font style, select Regular.28. In Size, select 9.29. Click OK to return to the Fonts tab.30. On the Fonts tab, click Field Titles. The Font screen appears. On the Font
screen for Field Titles, set the font for all field titles in the report.31. In Font, select Times New Roman.32. In Font style, select Regular.33. In Size, select 12.34. In the Effects frame, mark the Underline checkbox.35. To return to the Fonts tab, click OK.
You can change font styles and sizes on the Preview or Design screens while creating your report. Select the field or field title to edit and select Format, Font. Select a font type and size.

CH A PT E R 362
36. When you finish setting individual default fonts, click OK on the File Options screen. The Crystal Reports for Blackbaud screen and the Insert Fields screen reappear.
You can move the Insert Fields screen in the Design window by clicking on the Insert Fields title bar and dragging it with the mouse.
This procedure just sets the defaults. You can change the font or font size of any field at anytime during the creation of the report.
Organizing the custom report card
This section explains data grouping.1. Close the Insert Fields screen to view the entire Design window.2. Select Insert, Group. The Insert Group screen appears.

CU S T O M RE P O R T CA R D TU T O R I A L 63
3. Under the Student table, click Name in the list of displayed fields. The list closes, and another empty field appears directly below Name.
4. Click the down arrow to see the list:5. Select in ascending order.
6. Mark the Keep group together and Repeat group header on each new page checkboxes.
7. Click OK. 8. The Crystal Reports for Blackbaud screen reappears. The Group #1 Name
field is inserted in the Group Header #1 section of the Design Window.
CH A PT E R 364
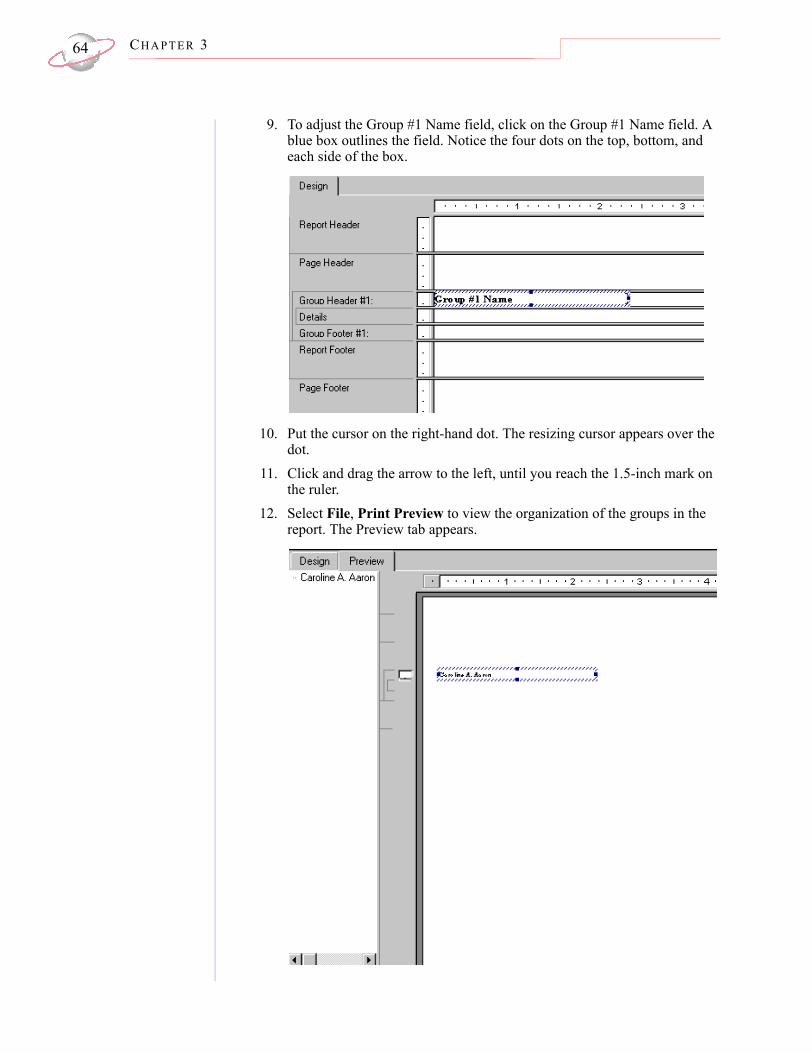
9. To adjust the Group #1 Name field, click on the Group #1 Name field. A blue box outlines the field. Notice the four dots on the top, bottom, and each side of the box.
10. Put the cursor on the right-hand dot. The resizing cursor appears over the dot.
11. Click and drag the arrow to the left, until you reach the 1.5-inch mark on the ruler.
12. Select File, Print Preview to view the organization of the groups in the report. The Preview tab appears.

CU S T O M RE P O R T CA R D TU T O R I A L 65
The Preview window allows you to view the report card as it will print. You can switch between the Preview and Design tabs at any time during the report writing process.
Placing Data on the Report Card
Inserting database fields
1. On the Design tab, select Insert, Database Field. The Insert Field screen appears.
2. Click the Insert Fields title bar and drag the screen to the bottom right corner.
3. Double-click CourseName in the Grades table in the Insert Fields screen. The stop cursor appears.
4. Move your cursor to the Details section in the Design window. An outline of the field appears connected to the cursor.
5. Place the cursor at the 1.5-inch mark. Use the ruler at the top as a guide.6. Click in the Details section and CourseName appears. CourseName
appears in the Page Header section of the report.

CH A PT E R 366
7. To adjust the CourseName field in both the Details and Page Header sections, click the CourseName field in the Page Header. A blue box outlines the field.
8. Press and hold SHIFT and click CourseName in the Details section. Both fields are selected.
9. Move the cursor over the dot on the right side of one of the boxes. The resizing cursor appears over the dot.
10. Click and drag the arrow to the left, using the ruler at the top as a guide. Both boxes are shortened to 1 inch.
11. To view the report, select the Preview tab. It looks similar to the one below.
12. To place additional fields, select the Design tab.13. Repeat steps 1-10 to create and place additional fields, including:
Sem1_G at 3 inches, Sem2_G at 4 inches, Exam_G at 5 inches, Final_G at 6 inches, and Final_CE at 7 inches.Once the database fields are inserted, the Design window looks similar to this.
14. Select the Preview tab. Your report looks similar to this.

CU S T O M RE P O R T CA R D TU T O R I A L 67
Adding subtotals and grand totals
1. From the Design tab, click the Final_CE field in the Details section. A blue box outlines the field.
2. Select Insert, SubTotal. The Insert Subtotal screen appears.
3. Select sum and click OK.4. A Sum of Final_CE field appears in the Group Footer section of the
Design window.
To add a Grand Total, follow the above procedure but substitute “Grand Total” for “Subtotal”.
Previewing, Saving, and Printing the Report CardPreview each page to ensure the report fits your design plan. Make any changes, then save and print.The steps to preview, save, and print the report are as follows:• Preview the design (Preview tab).• Preview each page (Preview tab).• Save (File, Save).• Print (File, Print).

CH A PT E R 368
Previewing the Report Card
Previewing the design
1. Click the Design tab to view the Design screen.Fields on the Design screen may extend on top of others. This is normal.
2. Make sure each field is placed in the correct section of the Design screen.3. If necessary, move or resize the fields.
To move a field:• Click inside the field. A box outlines the field.• Move the cursor inside the box. The move cursor appears.• Click and drag the box to the correct position.To resize a field:• Move the cursor over the dot on the either side of the box. The resizing
arrow appears.• Click and drag the box, using the ruler at the top as a guide.• Resize the box to the proper dimensions.
Previewing each page
1. Select the Preview tab.2. Make sure all fields are organized the way you want them.3. To get a full view of the report, select View, Zoom.
4. Mark Fit Whole Page and click OK.

CU S T O M RE P O R T CA R D TU T O R I A L 69
5. To expand the viewing space by hiding the Standard toolbar, Formatting toolbar, or Status bar, select View. Unmark the check next to an option.
6. On the preview screen, use the arrow buttons to move through the report.7. View each page carefully.8. Make any changes in the Design window of the report.
The data in the report groups and fields of the report cannot be changed in Crystal Reports. You must make these changes in Registrar’s Office, re-run the export and re-export the data file.
Saving the Report Card
Saving the custom report card
1. Select File, Save. The File Save As screen appears.
2. You must save the file in the data format Crystal Reports (*.rpt).3. Select a drive in Drives.4. In the Folders box, select a location for the report.5. Enter a File name (maximum of 8 alphanumeric characters before the
*.rpt extension).6. To save the report, click OK.
CH A PT E R 370
Printing the Report Card
Printing the custom report card
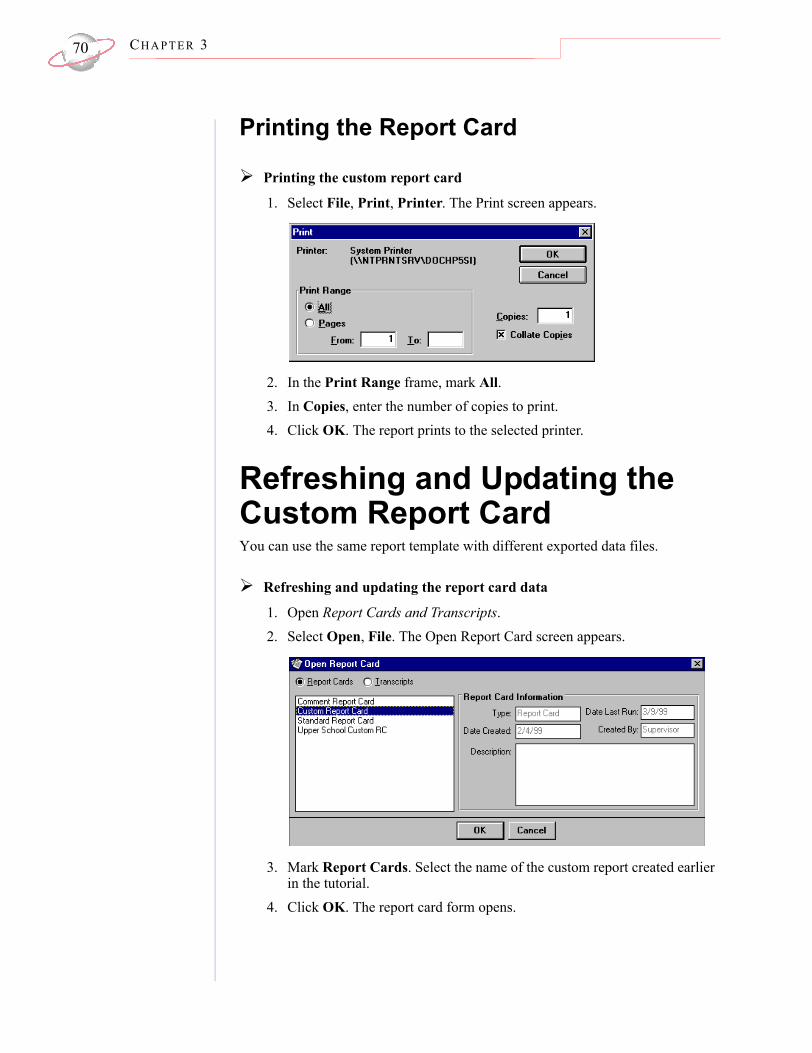
1. Select File, Print, Printer. The Print screen appears.
2. In the Print Range frame, mark All.3. In Copies, enter the number of copies to print.4. Click OK. The report prints to the selected printer.
Refreshing and Updating the Custom Report CardYou can use the same report template with different exported data files.
Refreshing and updating the report card data
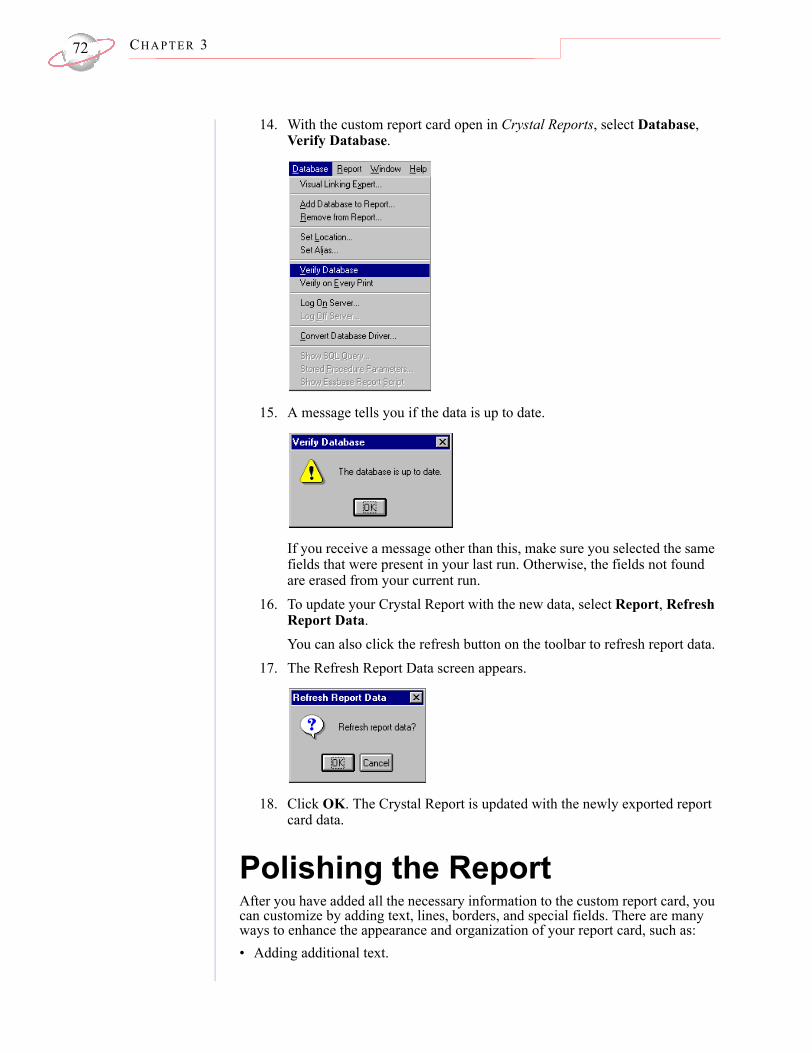
1. Open Report Cards and Transcripts.2. Select Open, File. The Open Report Card screen appears.
3. Mark Report Cards. Select the name of the custom report created earlier in the tutorial.
4. Click OK. The report card form opens.

CU S T O M RE P O R T CA R D TU T O R I A L 71
5. Select File, Export. The Print Report Card Options screen appears.
6. Select new parameters for the data. For example, you might print for a different group of students or grade level.
7. Click OK. The Custom Report Card Database screen appears.
8. Locate and select the *.mdb file you saved previously in this tutorial.9. Click OK. A message appears, stating that the file already exists and
asking if you want to replace it.10. To overwrite the file with the new information, click OK.
11. The export processes. A screen appears telling you the process is complete. Click OK to close.
12. Open Crystal Reports for Blackbaud.13. If the custom report card you created is not already open, select File,
Open. Locate and open the custom report card you created earlier in the tutorial.
CH A PT E R 372
14. With the custom report card open in Crystal Reports, select Database, Verify Database.
15. A message tells you if the data is up to date.
If you receive a message other than this, make sure you selected the same fields that were present in your last run. Otherwise, the fields not found are erased from your current run.
16. To update your Crystal Report with the new data, select Report, Refresh Report Data.You can also click the refresh button on the toolbar to refresh report data.
17. The Refresh Report Data screen appears.
18. Click OK. The Crystal Report is updated with the newly exported report card data.
Polishing the ReportAfter you have added all the necessary information to the custom report card, you can customize by adding text, lines, borders, and special fields. There are many ways to enhance the appearance and organization of your report card, such as:• Adding additional text.

CU S T O M RE P O R T CA R D TU T O R I A L 73
• Drawing lines to separate sections.• Adding a header with a border.• Adding page numbers.• Hiding sections.• Combining fields and text.• Changing spacing.• Adding watermark or logo.For more information about enhancing the appearance of your custom reports, see the Finishing Touches Tutorial, or the Crystal Reports 6.0 User’s Guide.

CH A PT E R 374

Custom Transcript Tutorial
Contents
Exporting from Report Cards and Transcripts. . . . . . . . . . . . . . . . . . . . . . . 76Importing Data into Crystal Reports . . . . . . . . . . . . . . . . . . . . . . . . . . . . . . . 83Designing a Crystal Report . . . . . . . . . . . . . . . . . . . . . . . . . . . . . . . . . . . . . . . 87Designing the Custom Transcript . . . . . . . . . . . . . . . . . . . . . . . . . . . . . . . . . . 88Placing Data on the Transcript . . . . . . . . . . . . . . . . . . . . . . . . . . . . . . . . . . . . . . 93Previewing, Saving, and Printing the Transcript . . . . . . . . . . . . . . . . . . . . . 97Previewing the Transcript . . . . . . . . . . . . . . . . . . . . . . . . . . . . . . . . . . . . . . . . . . 97Saving the Transcript . . . . . . . . . . . . . . . . . . . . . . . . . . . . . . . . . . . . . . . . . . . . . 99Printing the Transcript . . . . . . . . . . . . . . . . . . . . . . . . . . . . . . . . . . . . . . . . . . . . 99Refreshing and Updating the Custom Transcript . . . . . . . . . . . . . . . . . . . . 100Polishing the Report . . . . . . . . . . . . . . . . . . . . . . . . . . . . . . . . . . . . . . . . . . . . 102
Procedures
Preparing the custom transcript . . . . . . . . . . . . . . . . . . . . . . . . . . . . . . . . . . . . . 76Exporting the custom transcript . . . . . . . . . . . . . . . . . . . . . . . . . . . . . . . . . . . . . 82Importing the transcript data. . . . . . . . . . . . . . . . . . . . . . . . . . . . . . . . . . . . . . . . 83Designing the layout . . . . . . . . . . . . . . . . . . . . . . . . . . . . . . . . . . . . . . . . . . . . . . 88Organizing the transcript . . . . . . . . . . . . . . . . . . . . . . . . . . . . . . . . . . . . . . . . . . 91Inserting database fields . . . . . . . . . . . . . . . . . . . . . . . . . . . . . . . . . . . . . . . . . . . 93Adding subtotals, grand totals, and summaries . . . . . . . . . . . . . . . . . . . . . . . . . 95Previewing the design. . . . . . . . . . . . . . . . . . . . . . . . . . . . . . . . . . . . . . . . . . . . . 97Previewing each page . . . . . . . . . . . . . . . . . . . . . . . . . . . . . . . . . . . . . . . . . . . . . 98Saving the custom transcript. . . . . . . . . . . . . . . . . . . . . . . . . . . . . . . . . . . . . . . . 99Printing the custom transcript. . . . . . . . . . . . . . . . . . . . . . . . . . . . . . . . . . . . . . . 99Refreshing and updating the transcript data . . . . . . . . . . . . . . . . . . . . . . . . . . . 100

CH A PT E R 476
Registrar’s Office contains a standard transcript format you can modify based on parameters you select. You can also create a custom transcript by exporting data from Report Cards and Transcripts and importing the data into Crystal Reports for Blackbaud. To design a custom transcript in Crystal Reports, you export data in the data format MS Access Report Writer Database.In Crystal Reports, you can select from many options to customize report cards. A partial list follows:• Changing the location, size, and style of most transcript sections.• Allowing grouped subject matter.• Including your organization’s address and phone number on the transcript.• Placing and formatting your logo on the transcript.In this tutorial, you define your data parameters in Report Cards and Transcripts, create an export file, import the data file into Crystal Reports, and create a custom transcript.Before you create a custom transcript, identify the Registrar’s Office data to export. This helps you set the parameters of your report.• Think carefully about the report you want to design before entering Crystal
Reports. Which records appear in the report? Which fields from the selected records appear in the report? How is the information formatted?
• Draw a picture on paper to help you plan and design the report.• Evaluate the report steps from beginning to end so you can anticipate and
prepare for each step in the process.For detailed information about screens, options, fields, and other topics in Report Cards and Transcripts, see the Report Cards and Transcripts chapter of the Registrar’s Office Grades, Report Cards, and Transcripts Guide. For additional information about Crystal Reports, see the Crystal Reports 6.0 User’s Guide.
Exporting from Report Cards and Transcripts
Preparing the custom transcript
1. Open Report Cards and Transcripts.2. Select File, New, Transcript.

CU S T O M TR A N S C R I P T TU T O R I A L 77
3. The New Transcript screen appears.
4. On the General tab, mark Custom. This instructs the program to export the information in the data format MS Access Report Writer Database (*.mdb). You must export data in *.mdb format for import into Crystal Reports.
5. In the Print By frame, mark Academic Year or Grade Level.6. Select the range of academic years or grade levels in From and to.7. In Order, you can select Ascending or Descending.
You can change the sort order in Crystal Reports.8. Select the Address tab.
9. In the Transcript Address field, mark Relation.

CH A PT E R 478
10. In the Address to Print frame, mark Primary Address. For each student, the program exports the primary address of the relation with the Print Relation on Transcript checkbox marked on the Address/More tab of the relation record in Records Management.
11. In the If No Address is Found field, select Print with no Address.12. Select the Addr/Sal tab.
13. In the Student Addressee/Salutation frame, mark Use Key Name.14. In the Relation Addressee/Salutation frame, mark Use Key Name.15. Select the Demographics tab.
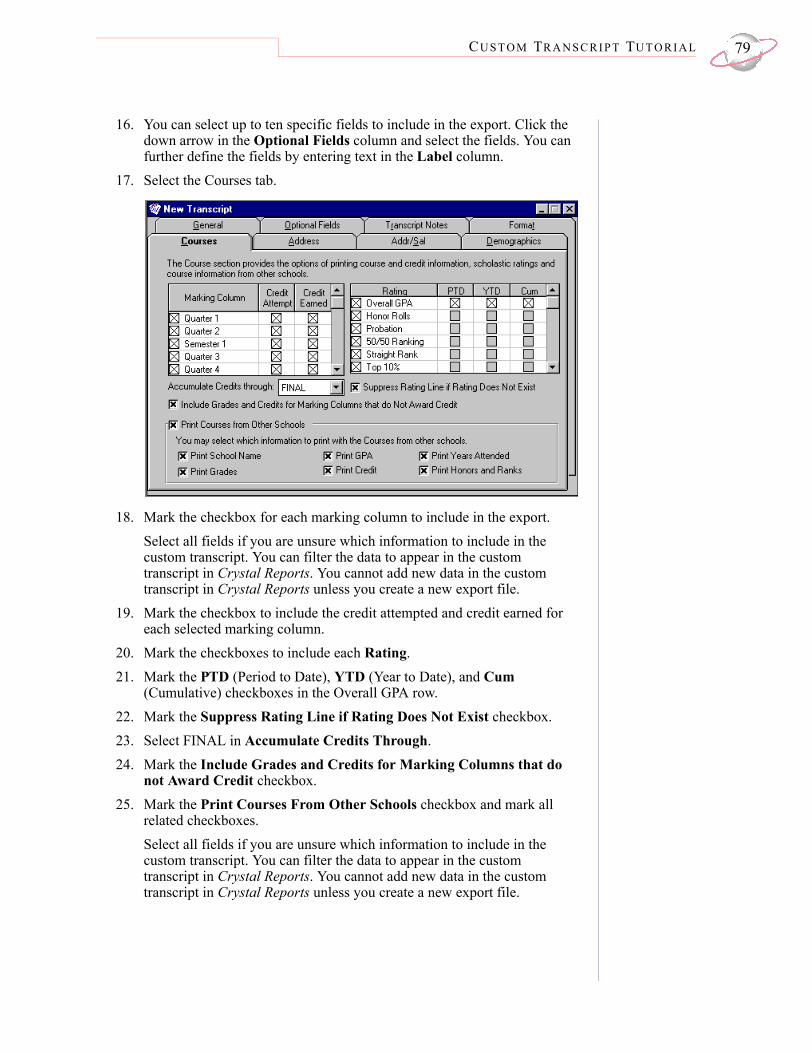
CU S T O M TR A N S C R I P T TU T O R I A L 79
16. You can select up to ten specific fields to include in the export. Click the down arrow in the Optional Fields column and select the fields. You can further define the fields by entering text in the Label column.
17. Select the Courses tab.
18. Mark the checkbox for each marking column to include in the export.Select all fields if you are unsure which information to include in the custom transcript. You can filter the data to appear in the custom transcript in Crystal Reports. You cannot add new data in the custom transcript in Crystal Reports unless you create a new export file.
19. Mark the checkbox to include the credit attempted and credit earned for each selected marking column.
20. Mark the checkboxes to include each Rating. 21. Mark the PTD (Period to Date), YTD (Year to Date), and Cum
(Cumulative) checkboxes in the Overall GPA row.22. Mark the Suppress Rating Line if Rating Does Not Exist checkbox. 23. Select FINAL in Accumulate Credits Through.24. Mark the Include Grades and Credits for Marking Columns that do
not Award Credit checkbox.25. Mark the Print Courses From Other Schools checkbox and mark all
related checkboxes.Select all fields if you are unsure which information to include in the custom transcript. You can filter the data to appear in the custom transcript in Crystal Reports. You cannot add new data in the custom transcript in Crystal Reports unless you create a new export file.

CH A PT E R 480
26. Select the Optional Fields tab.
27. Use the arrow buttons to move all selections from the Available Information box to the Information to Include box.
28. To define the information to include in the categories, click Criteria. The Optional Fields screen appears with a list of fields to include in the optional categories.
29. Using Test Scores as an example, mark Courses or Transcript Notes.30. In the Test Scores frame, mark All Test Scores or Selected Test Scores.
If you mark Selected Test Scores, use the arrow buttons to move fields from the Test Scores box to Test Scores to Include box.
31. Enter a Heading and click OK.32. Because this is a custom transcript, skip the Transcript Notes tab.33.

CU S T O M TR A N S C R I P T TU T O R I A L 81
34. Select the Format tab.
35. In the Student Sequence frame, mark Alphabetically.36. In the Print Total Credits frame, mark Each Year. 37. Mark the Include Cumulative Credits After Each Year checkbox. 38. Do not mark the Show Grades Entered as NG checkbox.39. In the Course Sequence frame, mark Course.40. Select a Course Name Format.41. To save your custom transcript parameters, select File, Save. The Save
Transcript screen appears.
42. You must enter the transcript Name (maximum of 50 alphanumeric characters).
43. In Description (maximum of 255 alphanumeric characters), you can enter a meaningful description for future reference.

CH A PT E R 482
Exporting the custom transcript
Now that you have defined the parameters for your custom transcript, export the data included in these parameters. You use the exported data file in Crystal Reports to create your custom transcript.1. With the custom transcript open, select File, Export.2. The Transcript Options screen appears.
In general, you export a group of students and select the grade levels to include. This tutorial uses one record, Caroline Aaron, and the Grade Levels to Include frame is unavailable.
3. Click OK.4. The Custom Transcript Database screen appears.
5. Select a drive in Drives.6. In the Folders box, select a location for the export file.7. Enter a File name (maximum of 8 alphanumeric characters before the
*.mdb extension).

CU S T O M TR A N S C R I P T TU T O R I A L 83
8. Click OK to create the export file.The program extracts the information. A message appears to verify processing is complete.
9. Click OK.You have successfully completed the process of exporting records for custom transcripts. Now you will use this data in Crystal Reports and create your own custom transcript format.
Importing Data into Crystal ReportsIn this section you will learn the basics for creating a custom transcript, including:• Importing data.• Grouping and sorting data.• Inserting, moving, and resizing database fields.• Inserting, moving, and resizing text objects.• Saving and printing your report.
Importing the transcript data
1. Open Crystal Reports for Blackbaud.If the Welcome screen appears, click New Report.
2. Select File, New. The Report Gallery Screen appears.

CH A PT E R 484
3. Click Custom. The Choose Report Type and Data Type frame appears.
4. In the Choose Report Type and Data Type frame, click Data File. The Choose Database File screen appears.
5. If the program does not default to the drive and folder in which the export file is located, select a drive in Drives and a folder in the Directories box.
6. In the File Name box, select the name of the exported report card file (*.mdb).

CU S T O M TR A N S C R I P T TU T O R I A L 85
7. Click OK. The Select Tables screen appears.
8. On the Select Tables screen appears, click Select All, then OK.We recommend you select all tables because it is difficult to add tables after this step.
9. The Visual Linking Expert screen appears.
10. Click OK.

CH A PT E R 486
11. Maximize the Visual Linking Expert screen. You must reverse the links to instruct Crystal Reports to keep each student’s information together. By reversing the links, the student table points to each other table. In this way, Crystal “knows” which values to associate with each student.
12. Link the ID in the Student table to the Student ID in all other tables, except Group Key and Transcript.
13. Link Group ID in the Details table to ID in the GroupKey table.14. To close the Visual Linking Expert screen, click OK. The Crystal Reports
for Blackbaud screen and the Insert Fields screen appear.

CU S T O M TR A N S C R I P T TU T O R I A L 87
15. The Insert Fields screen displays the tables and fields selected for your export. Double-click a table to view the fields in the table. Double-click again to retract the list of available fields for a table.
Designing a Crystal ReportWhen designing a custom report in Crystal Reports, you place the elements of the report on the Design screen, positioning them in the format they are to appear.The Design screen is divided into five sections: (1) Report Header, (2) Page Header, (3) Details, (4) Report Footer, and (5) Page Footer.The Insert Fields screen appears automatically and lists the fields selected in the export. You design the layout by selecting options to determine the appearance of the finished report. When you select File, Options, the File Options screen appears.
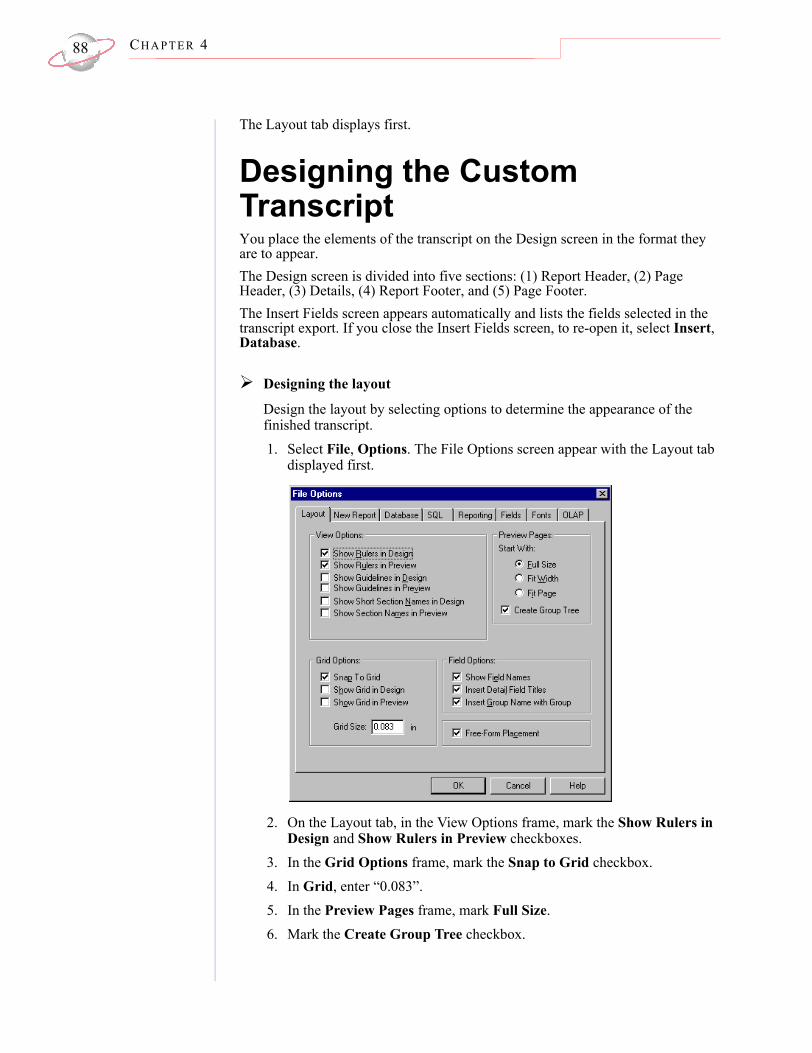
CH A PT E R 488
The Layout tab displays first.
Designing the Custom TranscriptYou place the elements of the transcript on the Design screen in the format they are to appear.The Design screen is divided into five sections: (1) Report Header, (2) Page Header, (3) Details, (4) Report Footer, and (5) Page Footer. The Insert Fields screen appears automatically and lists the fields selected in the transcript export. If you close the Insert Fields screen, to re-open it, select Insert, Database.
Designing the layout
Design the layout by selecting options to determine the appearance of the finished transcript.1. Select File, Options. The File Options screen appear with the Layout tab
displayed first.
2. On the Layout tab, in the View Options frame, mark the Show Rulers in Design and Show Rulers in Preview checkboxes.
3. In the Grid Options frame, mark the Snap to Grid checkbox.4. In Grid, enter “0.083”.5. In the Preview Pages frame, mark Full Size.6. Mark the Create Group Tree checkbox.

CU S T O M TR A N S C R I P T TU T O R I A L 89
7. In the Field Options frame, mark the Show Field Names, Insert Detail Field Titles, and Insert Group Name with Group checkboxes.
8. Mark the Free-Form Placement checkbox.9. Select the Fonts tab. In the Default Fonts frame, you set the font, style,
and size for field names, summary fields, group name fields, text objects, and field titles.
10. On the Fonts tab, click Fields. The Font screen appears. On the Font screen for Fields, you set the font for all fields in the report.
11. In Font, select Times New Roman.12. In Font Style, select Regular.13. In Size, select 10.

CH A PT E R 490
14. To return to the Fonts tab, click OK.15. On the Fonts tab, click Summary Fields. The Font screen appears. On
the Font screen for Summary Fields, you set the font for all summary fields in the report.
16. In Font, select Times New Roman.17. In Font style, select Bold.18. In Size, select 10.19. To return to the Fonts tab, click OK.20. On the Fonts tab, click Group Name Fields. The Font screen appears. On
the Font screen for Group Name Fields, you set the font for all group name fields in the report.
21. In Font, select Times New Roman.22. In Font style, select Bold.23. In Size, select 12.24. To return to the Fonts tab, click OK.25. On the Fonts tab, click Text Objects. The Font screen appears. On the
Font screen for Text Objects, set the font for all text objects in the report.26. In Font, select Arial.27. In Font style, select Regular.28. In Size, select 9.29. Click OK to return to the Fonts tab.30. On the Fonts tab, click Field Titles. The Font screen appears. On the Font
screen for Field Titles, set the font for all field titles in the report.31. In Font, select Times New Roman.32. In Font style, select Regular.33. In Size, select 12.34. In the Effects frame, mark the Underline checkbox.35. To return to the Fonts tab, click OK.
You can change font styles and sizes on the Preview or Design screens while creating your report. Select the field or field title to edit and select Format, Font. Select a font type and size.

CU S T O M TR A N S C R I P T TU T O R I A L 91
36. When you finish setting individual default fonts, click OK on the File Options screen. The Crystal Reports for Blackbaud screen and the Insert Fields screen reappear.
You can move the Insert Fields screen in the Design window by clicking on the Insert Fields title bar and dragging it with the mouse.
Organizing the transcript
This section explains data grouping.1. Close the Insert Fields screen to view the entire Design screen.2. Select Insert, Group. The Insert Group screen appears.3. Under the Student table, click Sort Name in the list of displayed fields.
The list closes, and another empty field appears directly below Name.4. Click the down arrow to see the list.5. Select in ascending order.6. Mark the Keep group together or Repeat group header on each new
page checkboxes.7. Click OK.

CH A PT E R 492
8. The Crystal Reports for Blackbaud screen reappears. Delete the Group #1 Name field from the Group Header #1 section of the Design screen. Insert the Student Name field.
9. To adjust the Group #1 Name field, click the Group #1 Name field. A blue box outlines the field. Notice the four dots on the top, bottom, and each side of the box.
10. Put the cursor on the right-hand dot. The resizing cursor appears over the dot.
11. Click and drag the arrow to the left until you reach the 1.5-inch mark on the ruler.
12. Repeat steps 1-11 to create additional group headings for GroupSDescription, under the Grades table.GroupSDescription is the field name for Academic Year or Grade Level.
13. Put the cursor on the left-hand dot and drag the arrow to the right until you reach the 0.5-inch mark.

CU S T O M TR A N S C R I P T TU T O R I A L 93
14. To view the organization of the groups in the report, select File, Print Preview. The Preview tab appears.
Use the Preview window to view the transcript as it will print. You can switch between the Preview and Design tabs at any time.
Placing Data on the Transcript
Inserting database fields
1. On the Design tab, select Insert, Database Field. The Insert Field screen appears.
2. Click the Insert Fields title bar and drag the screen to the bottom right corner.

CH A PT E R 494
3. Double-click CourseName under the Grades table in the Insert Fields screen. The stop cursor appears.
4. Move your cursor to the Details section in the Design screen. An outline of the field appears connected to the cursor.
5. Place the cursor at the 1.5-inch mark. Use the ruler at the top as a guide.6. Click in the Details section and CourseName appears. CourseName also
appears in the Page Header section of the report.
7. To adjust the CourseName field in both Details and Page Header sections, click the CourseName field in the Page Header. A blue box outlines the field.
8. Press and hold SHIFT and click the Full Name field in Details. Both fields are selected.
9. Move the cursor over the dot on the right side of one of the boxes. The resizing cursor appears over the dot.
10. Click and drag the arrow to the left, using the ruler at the top as a guide. Both boxes are shortened to 1 inch.
11. Select the Preview tab to view your report.

CU S T O M TR A N S C R I P T TU T O R I A L 95
12. Select the Design tab to place additional fields.13. Repeat steps 1-10 to create and place additional fields, including:
Sem1_G at 2.5 inches, Sem2_G at 3 inches, Final_G at 3.5 inches, Final_CA at 4 inches, and Final_CE at 4.5 inches.
14. Select the Preview tab. Your report looks similar to this.
Adding subtotals, grand totals, and summaries
1. On the Design tab, click the Final_CE field in the Details section. A blue box outlines the field.

CH A PT E R 496
2. Select Insert, Grand Total. The Insert Grand Total screen appears
3. Select sum and click OK.4. A Sum of Final_CE field appears in the Report Footer section of the
Design screen.
5. Click the Final_CA field in the Details section and select Insert, Subtotal. The Insert Subtotal screen appears.
6. Click the down arrow and select Group #2: Grades.Department – A in the lower box. This will create a subtotal for Group #2 in the Credit_CA column.
7. Click OK.

CU S T O M TR A N S C R I P T TU T O R I A L 97
8. A Sum of Final_CA field appears in the Group Footer #2 section of the Design tab.
9. To see how the totals and subtotals appear on your report, click the Preview tab.
A summary gives you a specific count, regardless of number or letter. To create one, follow the procedure for subtotals and substitute it with summary.
Previewing, Saving, and Printing the TranscriptPreview each page to ensure the report is exactly what you want. Make any necessary changes, then save and print.The steps to preview, save, and print the report are as follows:• Preview the design (Preview tab)• Preview each page (Preview tab)• Save (File, Save)• Print (File, Print)
Previewing the Transcript
Previewing the design
1. Click the Design tab to view the Design screen.Fields on the Design screen may extend on top of others. This is normal.

CH A PT E R 498
2. Make sure each field is placed in the correct section of the Design screen.3. If necessary, move or resize the fields.
To move a field:• Click inside the field. A box outlines the field.• Move the cursor inside the box. The move cursor appears.• Click and drag the box to the correct position.To resize a field:• Move the cursor over the dot on the either side of the box. The resizing
arrow appears.• Click and drag the box, using the ruler at the top as a guide.• Resize the box to the proper dimensions.
Previewing each page
1. Select the Preview tab.2. Make sure all fields are organized correctly.3. To get a full view of the report, select View, Zoom.4. Mark Fit Whole Page and click OK.5. To expand the viewing space by hiding the Standard toolbar, Formatting
toolbar, or Status bar, select View. Unmark the check next to an option.6. On the preview screen, use the arrow buttons to move through the report.7. View each page carefully.8. Make any changes in the Design window of the report.
You cannot change the data in the report groups and fields in Crystal Reports. You must make these changes in Registrar’s Office, re-run the export, and re-export the data file.

CU S T O M TR A N S C R I P T TU T O R I A L 99
Saving the Transcript
Saving the custom transcript
1. Select File, Save. The File Save As screen appears.
2. You must save the file in the data format Crystal Reports (*.rpt).3. Select a drive in Drives.4. In the Folders box, select a location for the report.5. Enter a File name (maximum of 8 alphanumeric characters before the
*.rpt extension).6. To save the report, click OK.
Printing the Transcript
Printing the custom transcript
1. Select File, Print, Printer. The Print screen appears.
2. Mark All in the Print Range frame.3. In Copies, enter the number of copies to print.4. Click OK. The report prints to the selected printer.

CH A PT E R 4100
Refreshing and Updating the Custom TranscriptYou can use the same report template with different exported data files.
Refreshing and updating the transcript data
1. Open Report Cards and Transcripts.2. Select Open, File.3. Mark Transcripts. Select the custom transcript you created earlier in the
tutorial.4. Click OK. The transcript form opens.5. Click the export button to export. The Transcript Options screen appears.
6. Select the new parameters for the data. For example, you might print for a different group of students or grade level.

CU S T O M TR A N S C R I P T TU T O R I A L 101
7. Click OK. The Custom Transcript Database screen appears.
8. Locate and select the *.mdb file you saved previously in this tutorial.9. Click OK. A message appears, stating that the file already exists and
asking if you want to replace it.10. To overwrite the file with the new information, click OK.11. The export processes. A screen appears telling you the process is
complete. Click OK to close.12. Open Crystal Reports.13. If the custom transcript you created is not already open, select File, Open.
Locate and open the custom transcript you created earlier in the tutorial.14. With the custom transcript open in Crystal Reports, select Database,
Verify Database.
15. A message tells you if the data is up to date.

CH A PT E R 4102
If you receive a message other than this, make sure you selected the same fields that were present in your last run. Otherwise, the fields not found will be erased from your current run.
16. Select Report, Refresh Report Data to update your Crystal report with the new data.
17. The Refresh Report Data screen appears.
18. Click OK.The Crystal report is now updated with the revised transcript data.
Polishing the ReportAfter you have added all the necessary information to the custom transcript, you can customize by adding text, lines, borders, and special fields. There are many ways to enhance the appearance and organization of your transcript, such as:• Adding additional text.• Drawing lines to separate sections.• Adding a header with a border.• Adding page numbers.• Hiding sections.• Combining fields and text.• Changing spacing.• Adding watermark or logo.For more information about enhancing the appearance of your custom reports, see the Finishing Touches Tutorial, or the Crystal Reports 6.0 User’s Guide.

Finishing Touches Tutorial
Contents
Labels . . . . . . . . . . . . . . . . . . . . . . . . . . . . . . . . . . . . . . . . . . . . . . . . . . . . . . . . 104Lines . . . . . . . . . . . . . . . . . . . . . . . . . . . . . . . . . . . . . . . . . . . . . . . . . . . . . . . . . 105Borders. . . . . . . . . . . . . . . . . . . . . . . . . . . . . . . . . . . . . . . . . . . . . . . . . . . . . . . 105Page Numbers . . . . . . . . . . . . . . . . . . . . . . . . . . . . . . . . . . . . . . . . . . . . . . . . . 108Hiding Sections . . . . . . . . . . . . . . . . . . . . . . . . . . . . . . . . . . . . . . . . . . . . . . . . 109Combining Fields and Text . . . . . . . . . . . . . . . . . . . . . . . . . . . . . . . . . . . . . . 109Adding Space Between Fields . . . . . . . . . . . . . . . . . . . . . . . . . . . . . . . . . . . . 110Watermarks. . . . . . . . . . . . . . . . . . . . . . . . . . . . . . . . . . . . . . . . . . . . . . . . . . . 111
Procedures
Adding labels . . . . . . . . . . . . . . . . . . . . . . . . . . . . . . . . . . . . . . . . . . . . . . . . . . 104Drawing lines to separate sections . . . . . . . . . . . . . . . . . . . . . . . . . . . . . . . . . . 105Adding a header with a border . . . . . . . . . . . . . . . . . . . . . . . . . . . . . . . . . . . . . 105Adding page numbers to the report . . . . . . . . . . . . . . . . . . . . . . . . . . . . . . . . . 108Hiding sections . . . . . . . . . . . . . . . . . . . . . . . . . . . . . . . . . . . . . . . . . . . . . . . . . 109Combining fields and text. . . . . . . . . . . . . . . . . . . . . . . . . . . . . . . . . . . . . . . . . 109Changing spacing . . . . . . . . . . . . . . . . . . . . . . . . . . . . . . . . . . . . . . . . . . . . . . . 110Adding a watermark . . . . . . . . . . . . . . . . . . . . . . . . . . . . . . . . . . . . . . . . . . . . . .111

CH A PT E R 5104
Once you have added all the necessary information to your custom report, custom report card or custom transcript, you can polish the report by adding text, lines, borders, and special fields.Steps for enhancing the appearance and organization of your report include:• Adding additional text to label information.• Drawing lines to separate sections.• Adding a header with a border.• Adding page numbers.• Hiding sections.• Combining fields and text.• Changing spacing.• Adding a watermark or logo.A custom transcript is used as an example in this chapter. However, all Crystal Reports consist of the same basic sections, and these techniques apply to all types of Crystal Reports.
LabelsAdding labels
Add additional text to label information in your report.1. On the Design tab, to add a text box to label the Group Footer #1, select
Insert, Text Object. The stop cursor appears.2. Move your cursor to the Group Footer #1 section.3. Position the left-hand side of the box at the 3.5-inch mark.4. Click the box in the Group #1 Footer section.5. Select the Align Right button to shift the text to the right.6. To align the text box to the 3.5-inch mark, click outside then inside the
text box. Four dots will appear, one on each side of the box.7. Put your cursor on the right hand dot. The resizing arrow appears.8. Click and drag this arrow until the box is 1 inch in length.9. Click and drag the entire box to the 4-inch mark.
The text box extends over the Final CE field. This is normal.10. Add text inside the text box.11. Double-click the text box. Your cursor appears inside the text box.12. Enter “Total Credits”.13. To see the results, click the Preview tab.

FI N I S H I N G TO U C H E S TU T O R I A L 105
LinesYou can draw lines in the report to separate grouped information.
Drawing lines to separate sections
1. Draw a line extending the width of the report to separate subtotals from totals:
2. Select Insert, Line. The pencil cursor appears.3. Move your cursor to the left side edge of the report in the Design screen.
Click the cursor, hold down the mouse button, and drag it to the right. Stop at the 5-inch mark on the ruler.
4. To see how the lines appear on the report, click the Preview tab. Your report looks similar to this.
BordersAdding a report header inserts a title at the top of the first page of the report.
Adding a header with a border
1. Select Insert, Text Object. The stop cursor appears.2. Move the text box to the left side of the Report Header.3. Click in the Report Header section.4. To lengthen the text box to the 5.5-inch mark on the ruler, click the border
of the text box.5. Put your cursor on the right-hand dot.

CH A PT E R 5106
6. The resizing arrow appears.7. Click and drag this arrow to the 6.5-inch mark.8. To align the text, select the Center button.9. To increase the height of the text box to the top of the Report Header
section to accommodate a larger font size for the text, put your cursor on the top dot. The resizing arrow appears.
10. Click and drag the arrow up to the top of the Report Header section.11. Double-click the text box. The cursor appears inside the text box.12. Select Format, Font. The Text Format screen appears.
13. In Font, select Arial.14. In Style, select Bold.15. In Size, select 14.16. In Color, select Black.

FI N I S H I N G TO U C H E S TU T O R I A L 107
17. Select the Paragraph tab.
18. In Alignment, select Centered.19. Click OK.20. The cursor appears in the center of the box.21. Enter “Oak Hill Academy”.22. Press ENTER. The cursor moves to the next line.23. Using the Formatting Toolbar, change the Font size to 9 and change the
style to Regular by clicking the bold button to deselect it.
24. In the text box, enter “Transcript”.25. To add a border to the Report Header, click the border of the text box in
the Report Header section. A box outlines the field.

CH A PT E R 5108
26. Select Format, Border and Colors. The Format Editor screen appears.
27. Mark the Drop Shadow checkbox.28. Click OK.29. To view the results, select the Preview tab.
Page NumbersYou can number the pages of the report.
Adding page numbers to the report
1. Select Insert, Special Field. Choose Page Number Field. The stop cursor appears until you move the cursor over the design field.

FI N I S H I N G TO U C H E S TU T O R I A L 109
2. Place the field in the lower right corner of the Page Footer.
Hiding SectionsYou can hide sections in the report.
Hiding sections
Move the student name closer to the Report Header and condense the space between the data and the Page Header.1. On the Design tab, click the Group #1 Name. A box outlines the field.2. Press DELETE.3. Move your cursor over Group Header #1 in the gray area and right-click.4. Select Hide. The Group Header # 1 disappears.5. To view the results, select the Preview tab.
Combining Fields and TextYou can combine fields and text boxes.
Combining fields and text
1. On the Design screen, select Insert, Database Fields. Double-click the Name field in the Student table. The stop cursor appears.
2. Move the field to the upper left corner of the Page Header section.3. Click the left side of the box on the 1-inch mark. Adjust the size to 1 inch
in length.4. Select Insert, Text Object.5. Place the text box at the zero mark in the upper left corner of the Page
Header.6. Enter “Student Name: ”.7. Click once on the field box.8. Move the box to the left until it disappears and combines with the text
box.

CH A PT E R 5110
9. Click once on the outer blue edge of this new field.10. Drag the right dot to the 2-inch mark.11. Drag the entire box down 1/8 of an inch.
You have created a field with text in it. Student Name: will be generated for each new student.
12. Select [Name] and change the font to Arial Bold.13. To view the results, select the Preview tab.
Adding Space Between FieldsYou can change the spacing of fields on the report.
Changing spacing
To create more space between course names:1. From the Design screen move your cursor to the bar below Course Name
in the Details field.You will be able to adjust the size when the cursor looks like an arrow going through the bar.

FI N I S H I N G TO U C H E S TU T O R I A L 111
2. Click and drag the bar down. This will create space between each course name.
3. To view the results, select the Preview tab. Your transcript looks similar to this one.You can also make the columns larger. Click and drag the marker aligned with the left side of the column to the desired length and location.
WatermarksYou can add your organization’s watermark or logo to the report.
Adding a watermark
1. On the Design tab, right-click on the gray area where the Group Header #1 section used to be.

CH A PT E R 5112
2. Select Show.
3. Right-click in the Group Header #1 section.4. Select Format Section. The Section Expert screen appears.
5. On the Common tab, mark the Underlay Following Sections checkbox.Make sure Group Header #1: Student.Name – A is selected in the sections box.
6. Click OK.

FI N I S H I N G TO U C H E S TU T O R I A L 113
7. Select Insert, OLE Object.
8. The Insert Object frame appears.9. Select the location of the image. For this example, mark Create From
File option and click Browse.10. Locate and select the path to your image. Click OK.11. Verify the path is correct. Click OK.12. Move your cursor to the Group Header #1 section.
Attached by the upper left side is an outline of the image.13. Place your cursor at the 1-inch mark in the Page Header #1 section. Click
once.

CH A PT E R 5114
14. To view your results, select the Preview screen. To adjust the position, return to the Design screen.