Embed Size (px)
Citation preview

EFT™ WEB ADMIN v3.9 INSTALLATION, ADMINISTRATION, & USER GUIDE
GlobalSCAPE, Inc. (GSB)
Corporate Headquarters
Address: 4500 Lockhill-Selma Road, Suite 150, San Antonio, TX (USA) 78249
Sales: (210) 308-8267
Sales (Toll Free): (800) 290-5054
Technical Support: (210) 366-3993
Web Support: http://www.globalscape.com/support/
© 2008-2017 GlobalSCAPE, Inc. All Rights Reserved
April 4, 2017

iii
Table of Contents Welcome to the EFT™ Web Administration Interface .................................................................................. 7
Installing EFT Web Admin ............................................................................................................................. 7
Requirements ......................................................................................................................................... 7 Installation ............................................................................................................................................... 8
Upgrading ............................................................................................................................................. 16 Silent Command-Line Installation ......................................................................................................... 18
Installing ......................................................................................................................................... 18
Uninstalling ..................................................................................................................................... 18
Upgrading ....................................................................................................................................... 18
Properties Reference ..................................................................................................................... 19
Using EFT Web Admin ................................................................................................................................ 28
Initial Configuration ............................................................................................................................... 28 Login ..................................................................................................................................................... 34
Site Connections................................................................................................................................... 34
Roles ..................................................................................................................................................... 34
EFT Web Admin Users ......................................................................................................................... 36
Create or Edit EFT Web Admin Users ........................................................................................... 36 Reset User Password .................................................................................................................... 39
User Role Membership .................................................................................................................. 40
Delete User .................................................................................................................................... 41
Password Recovery ....................................................................................................................... 42
Authorization ......................................................................................................................................... 45 Access Control (Containers) ................................................................................................................. 47
Containers ...................................................................................................................................... 48
Link or Unlink Resources ............................................................................................................... 49
Managing Containers ..................................................................................................................... 51
Logs ...................................................................................................................................................... 52
Configure Application Settings ............................................................................................................. 53 Application Status .......................................................................................................................... 54
Application Settings ........................................................................................................................ 54
EFT™ Web Admin Guide
iv
Admin Changes Approval ..................................................................................................................... 55
Web.Config Settings ............................................................................................................................. 60
EFT Account Self-Provisioning ............................................................................................................. 61 Requesting/Approving an Account ....................................................................................................... 64
Email Templates Customization ........................................................................................................... 67
FAQ ...................................................................................................................................................... 68
Replacing Logo on Login Page ............................................................................................................ 69
Alternative Authentication Sources....................................................................................................... 70
EFT Web Admin Permissions ............................................................................................................... 70 Tools ............................................................................................................................................................ 77
Link New Accounts Tool ....................................................................................................................... 77 Link New Accounts in EFT Web Admin ......................................................................................... 77
Schedule Automatic Links Using EFT ............................................................................................ 77
Schedule Automatic Links Using Windows Task Scheduler .......................................................... 81
EFT Web Admin Report Tool ............................................................................................................... 88 Error Codes .................................................................................................................................... 88
Configuring the Report Tool ........................................................................................................... 88
Command-Line Usage ................................................................................................................... 88
Audit Report ................................................................................................................................... 90
Permissions Report ........................................................................................................................ 91
Viewing Reports in Excel ............................................................................................................... 91 ContainerLinks Report ................................................................................................................... 92
Managing EFT ............................................................................................................................................. 93
EFT Accounts ....................................................................................................................................... 93 Reset EFT Account Password .............................................................................................................. 95
Unlock EFT Account ............................................................................................................................. 97 Delete EFT Account ............................................................................................................................. 98
Settings Templates ............................................................................................................................... 99
Groups ................................................................................................................................................ 102
Folders ................................................................................................................................................ 103
Permissions ........................................................................................................................................ 106
SSH Keys ........................................................................................................................................... 112 OpenPGP Keys .................................................................................................................................. 115
Reports ............................................................................................................................................... 118
EFT Physical and Virtual Folders ....................................................................................................... 119
Event Rules ........................................................................................................................................ 120
Creating Event Rules ................................................................................................................... 120

Table of Contents
v
Viewing Event Rules .................................................................................................................... 123
Cloning Event Rules ..................................................................................................................... 125
Editing Event Rules ...................................................................................................................... 126 Delete an Event Rule ................................................................................................................... 128
Enable or Disable an Event Rule ................................................................................................. 129
Execution History ......................................................................................................................... 130
Change Log .................................................................................................................................. 132
Executing Event Rules ................................................................................................................. 134
Searching Event Rules................................................................................................................. 134
EFT™ Web Admin Guide
vi
7
Welcome to the EFT™ Web Administration Interface The EFT Web Administration interface is your web portal to manage the EFT platform. This user guide is intended to help you understand how to manage connections and account access to EFT, in addition to monitoring and creating Event Rules to automate your file management.
For details of EFT and terminology, please refer to the EFT user guides available at http://help.globalscape.com/help/index.html.
Installing EFT Web Admin This section provides procedures for installing, upgrading, and initial configuration of EFT Web Admin.
Requirements The following are the minimum computer requirements to run EFT Web Administration. These requirements are only what is required to run this software. For the full EFT requirements, please refer to the System Requirements for your version of EFT. (An index of help documentation is available at http://help.globalscape.com/help/index.html.)
Hardware Requirements • CPU: Dual Core or more• Memory: Minimum of 4GB or more• Hard drive: 50MB
Software Requirements • Windows 2008 R2 Server, Windows 2012 Server, or Windows 2012 R2 Server• Microsoft IIS version 7 or later with the following roles and features enabled:
Server Roleso Web Server (IIS)o Application Server
Feature o ASP.NET or ASP.NET 4.5
Role service o Default Document, HTTP Errors, Static Content, HTTP Redirectiono HTTP Logging, Static Content Compressiono Windows Authentication role service, Request Filteringo Application Development
ASP.NET or ASP.NET 4.5, ISAPI Extension, ISAPI Filters, .NET Extensibility 4.5 Request Filtering
o IIS Management ConsoleApplication Server
o Roles Services Web Server (IIS) Support
• Microsoft.NET framework 4.0 or later (Full)• EFT v6.4 or later• Microsoft SQL Server 2008, 2012, and 2014 (Standard, Web, Express or Enterprise)
EFT™ Web Admin Guide
8
Installation The EFT Web Administration installer installs and the application and configures Microsoft IIS, the database connection, and the SMTP server connection.
If the password does not meet the Microsoft SQL Server Strong Password requirements, such as described below, the installation will fail.
• Does not contain all or part of the user's account name
• Is more than eight characters in length
• Contains characters from at least three of the following categories:
o English uppercase characters (A through Z)
o English lowercase characters (a through z)
o Base 10 digits (0 through 9)
o Non-alphanumeric characters (for example: !, $, #, %)
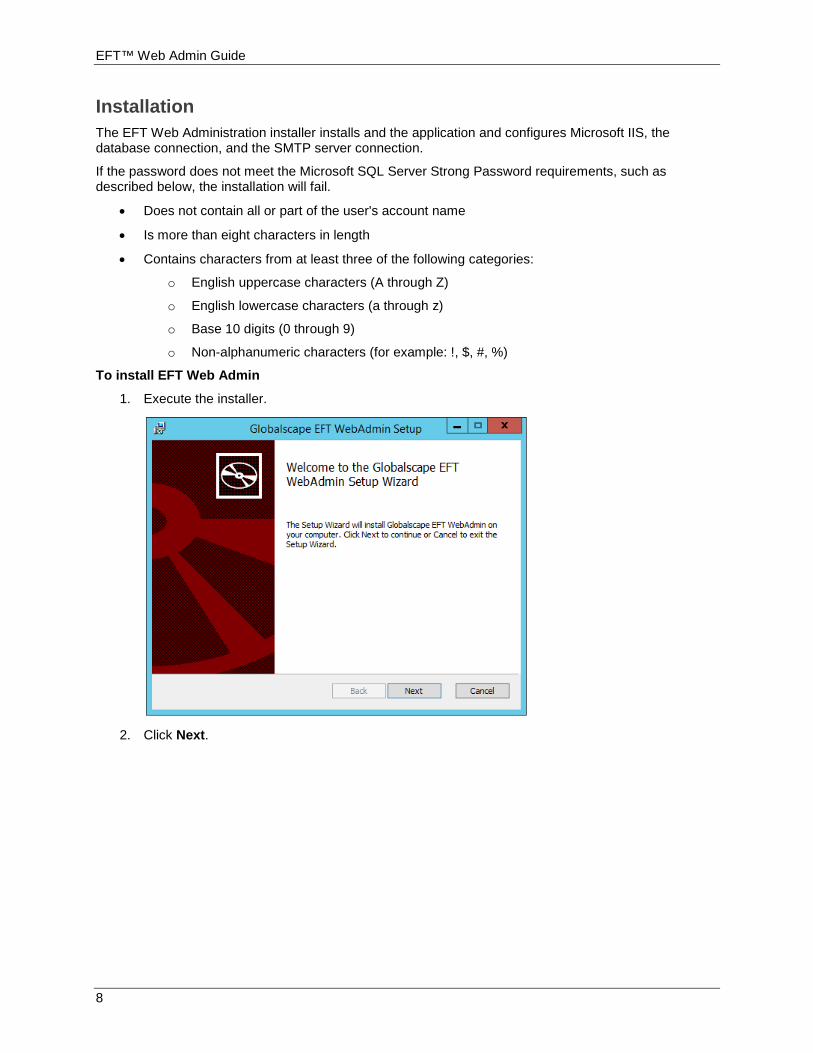
To install EFT Web Admin
1. Execute the installer.
2. Click Next.
Managing EFT
9
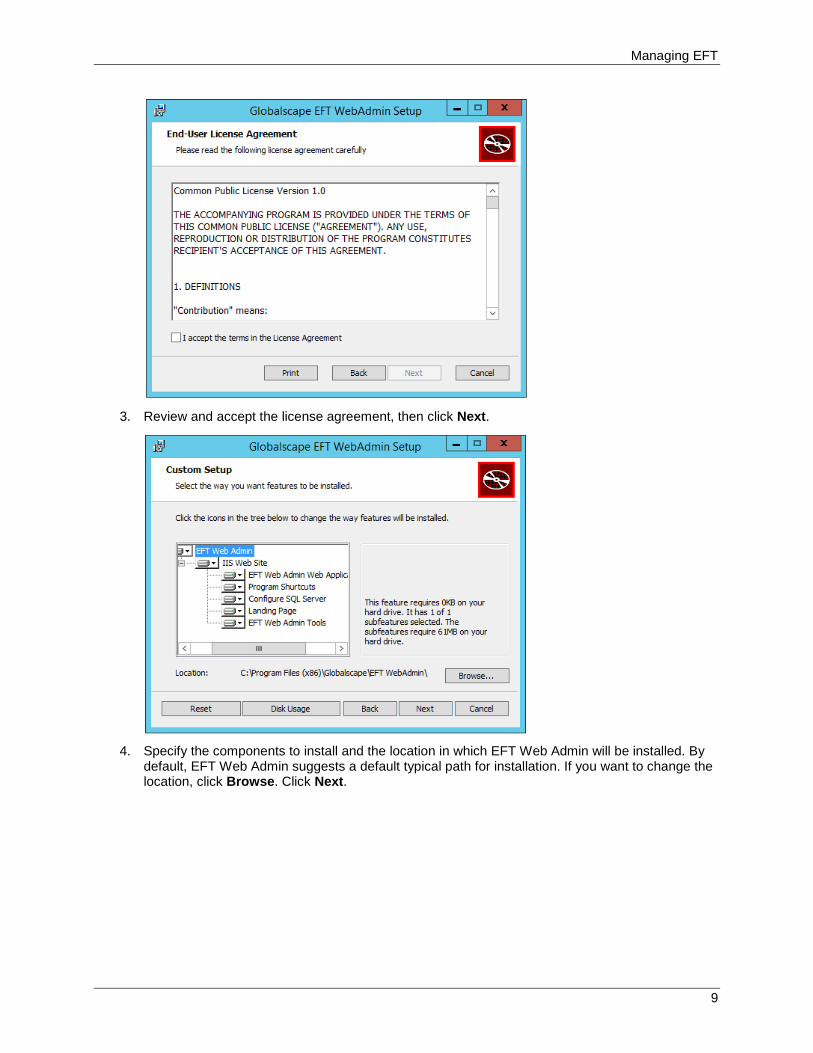
3. Review and accept the license agreement, then click Next.
4. Specify the components to install and the location in which EFT Web Admin will be installed. Bydefault, EFT Web Admin suggests a default typical path for installation. If you want to change thelocation, click Browse. Click Next.
EFT™ Web Admin Guide
10
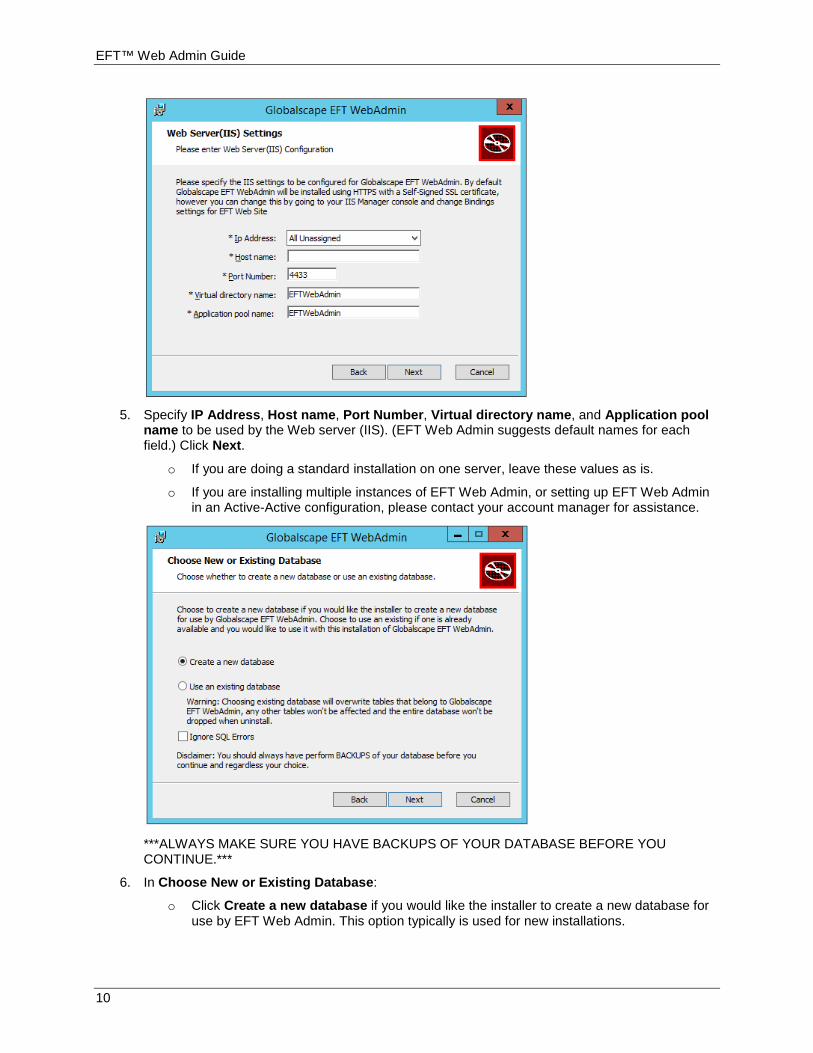
5. Specify IP Address, Host name, Port Number, Virtual directory name, and Application pool
name to be used by the Web server (IIS). (EFT Web Admin suggests default names for each field.) Click Next.
o If you are doing a standard installation on one server, leave these values as is.
o If you are installing multiple instances of EFT Web Admin, or setting up EFT Web Admin in an Active-Active configuration, please contact your account manager for assistance.
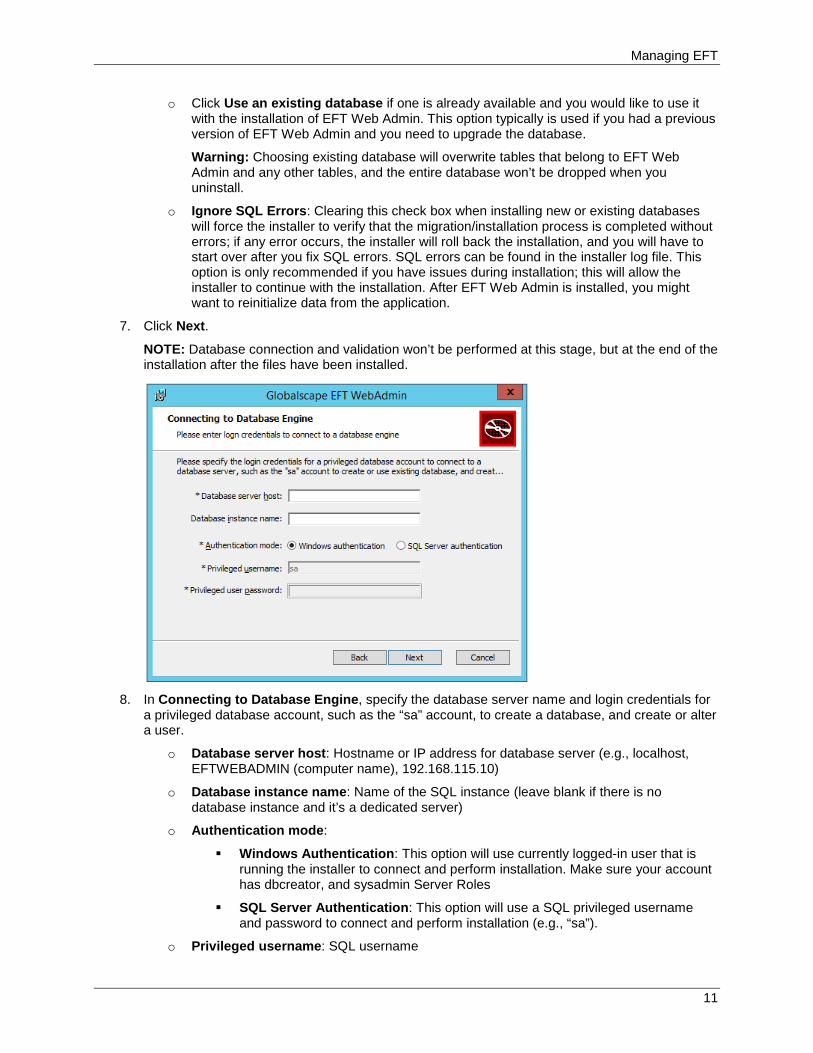
***ALWAYS MAKE SURE YOU HAVE BACKUPS OF YOUR DATABASE BEFORE YOU CONTINUE.***
6. In Choose New or Existing Database:
o Click Create a new database if you would like the installer to create a new database for use by EFT Web Admin. This option typically is used for new installations.
Managing EFT
11
o Click Use an existing database if one is already available and you would like to use it with the installation of EFT Web Admin. This option typically is used if you had a previous version of EFT Web Admin and you need to upgrade the database.
Warning: Choosing existing database will overwrite tables that belong to EFT Web Admin and any other tables, and the entire database won’t be dropped when you uninstall.
o Ignore SQL Errors: Clearing this check box when installing new or existing databases will force the installer to verify that the migration/installation process is completed without errors; if any error occurs, the installer will roll back the installation, and you will have to start over after you fix SQL errors. SQL errors can be found in the installer log file. This option is only recommended if you have issues during installation; this will allow the installer to continue with the installation. After EFT Web Admin is installed, you might want to reinitialize data from the application.
7. Click Next.
NOTE: Database connection and validation won’t be performed at this stage, but at the end of the installation after the files have been installed.
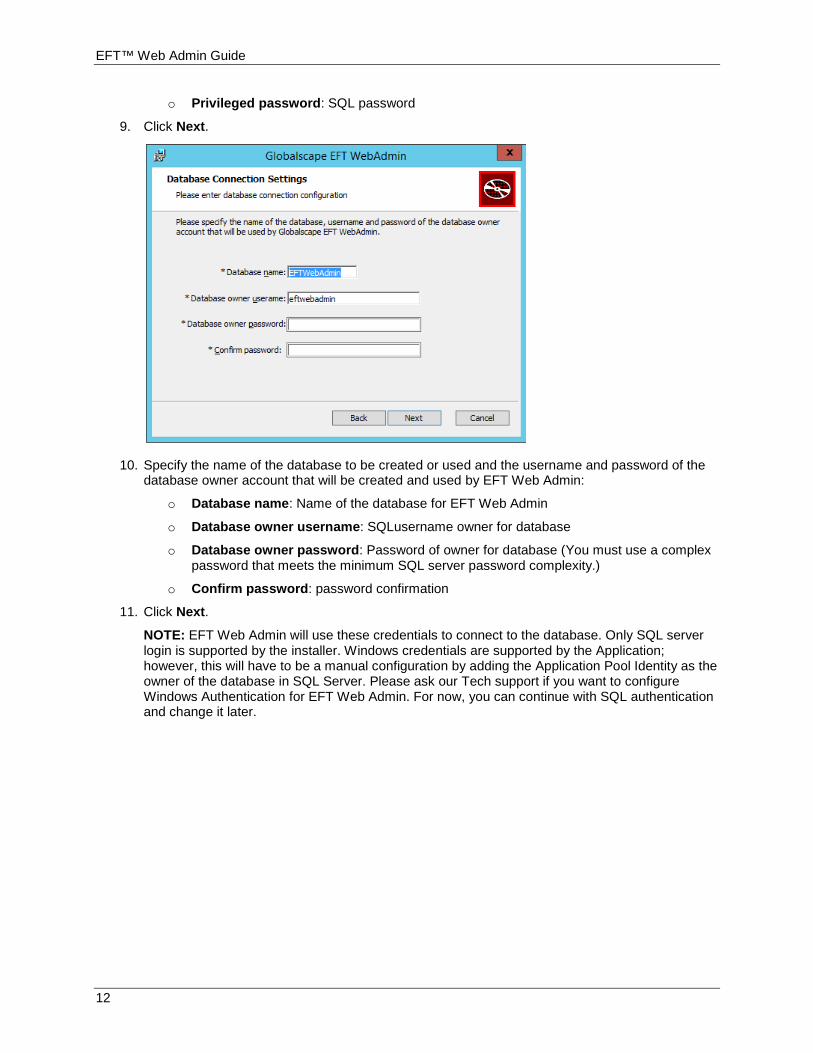
8. In Connecting to Database Engine, specify the database server name and login credentials for
a privileged database account, such as the “sa” account, to create a database, and create or alter a user.
o Database server host: Hostname or IP address for database server (e.g., localhost, EFTWEBADMIN (computer name), 192.168.115.10)
o Database instance name: Name of the SQL instance (leave blank if there is no database instance and it’s a dedicated server)
o Authentication mode:
Windows Authentication: This option will use currently logged-in user that is running the installer to connect and perform installation. Make sure your account has dbcreator, and sysadmin Server Roles
SQL Server Authentication: This option will use a SQL privileged username and password to connect and perform installation (e.g., “sa”).
o Privileged username: SQL username
EFT™ Web Admin Guide
12
o Privileged password: SQL password
9. Click Next.
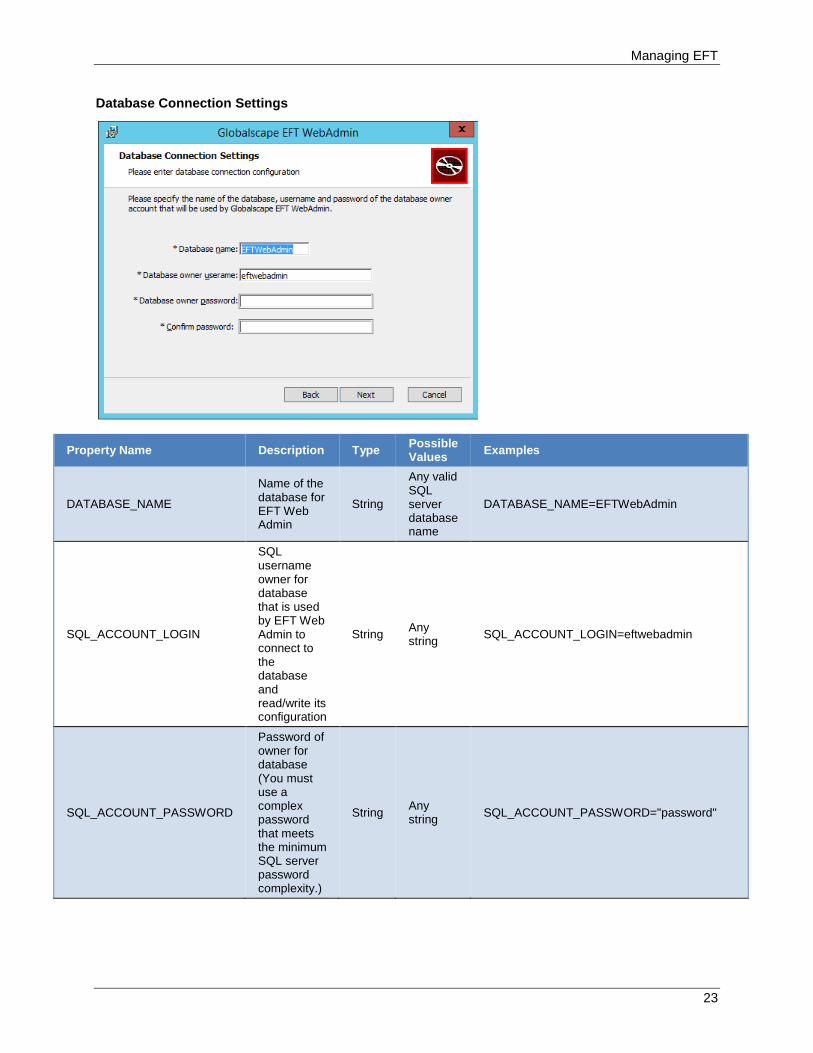
10. Specify the name of the database to be created or used and the username and password of the
database owner account that will be created and used by EFT Web Admin:
o Database name: Name of the database for EFT Web Admin
o Database owner username: SQLusername owner for database
o Database owner password: Password of owner for database (You must use a complex password that meets the minimum SQL server password complexity.)
o Confirm password: password confirmation
11. Click Next.
NOTE: EFT Web Admin will use these credentials to connect to the database. Only SQL server login is supported by the installer. Windows credentials are supported by the Application; however, this will have to be a manual configuration by adding the Application Pool Identity as the owner of the database in SQL Server. Please ask our Tech support if you want to configure Windows Authentication for EFT Web Admin. For now, you can continue with SQL authentication and change it later.
Managing EFT
13
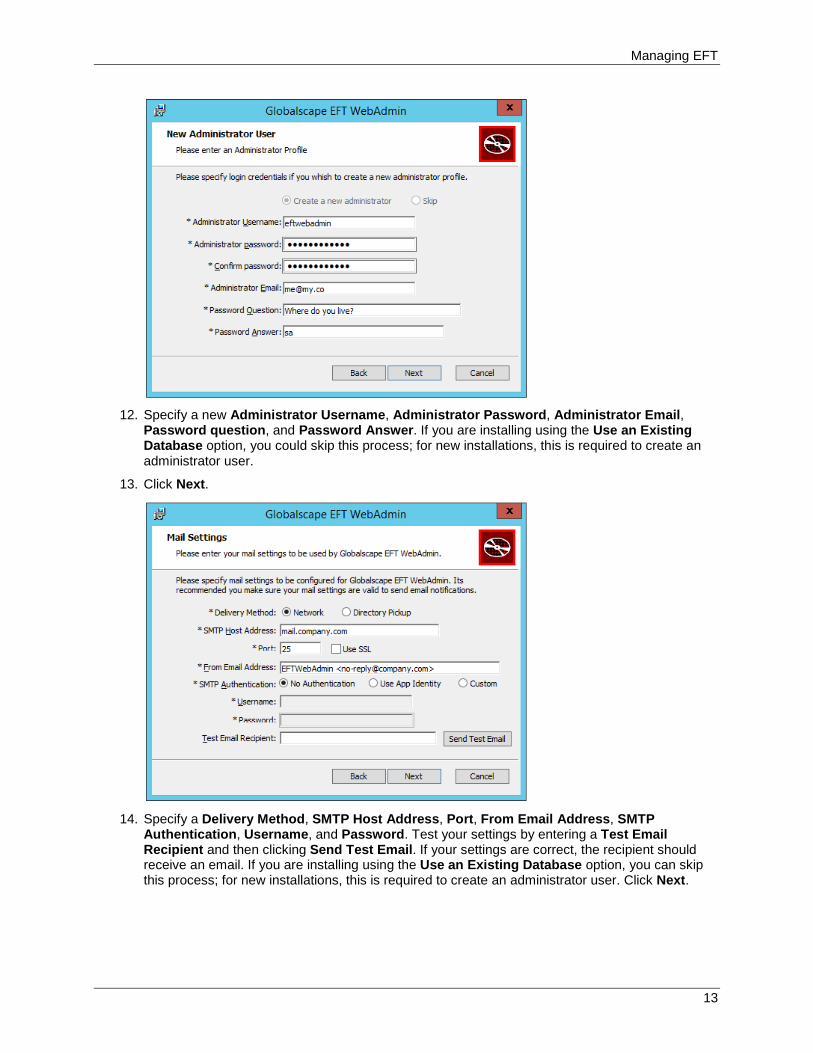
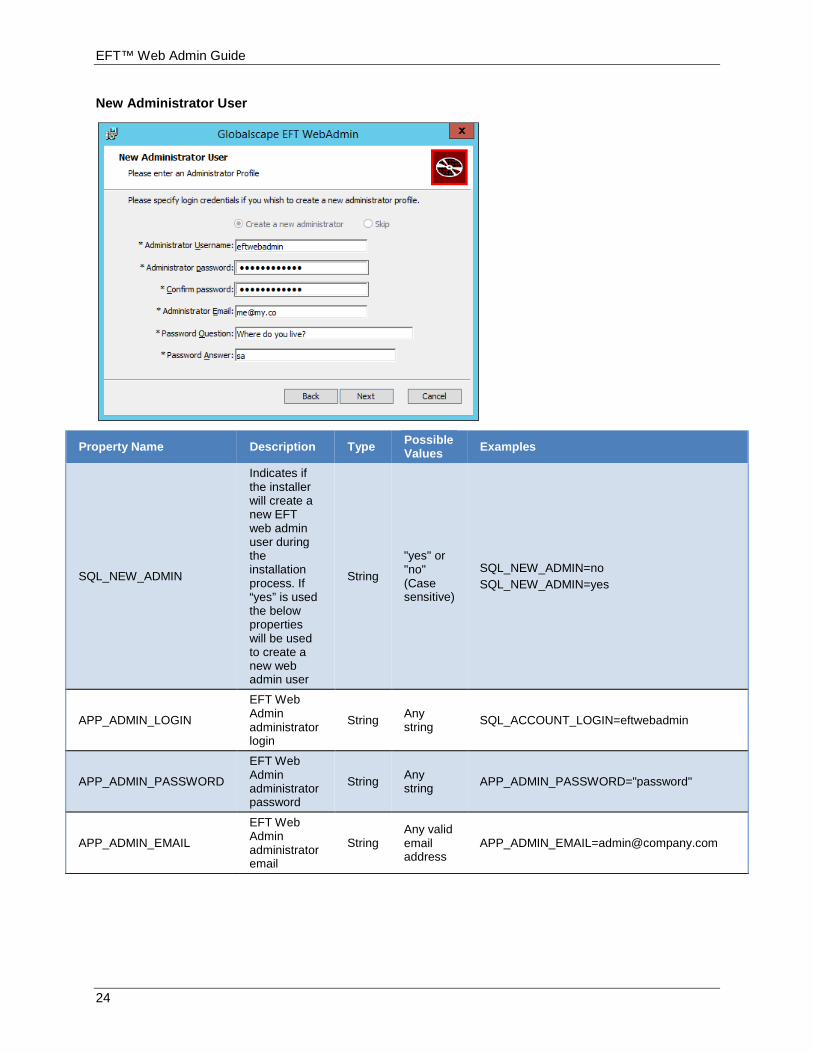
12. Specify a new Administrator Username, Administrator Password, Administrator Email,
Password question, and Password Answer. If you are installing using the Use an Existing Database option, you could skip this process; for new installations, this is required to create an administrator user.
13. Click Next.
14. Specify a Delivery Method, SMTP Host Address, Port, From Email Address, SMTP
Authentication, Username, and Password. Test your settings by entering a Test Email Recipient and then clicking Send Test Email. If your settings are correct, the recipient should receive an email. If you are installing using the Use an Existing Database option, you can skip this process; for new installations, this is required to create an administrator user. Click Next.
EFT™ Web Admin Guide
14
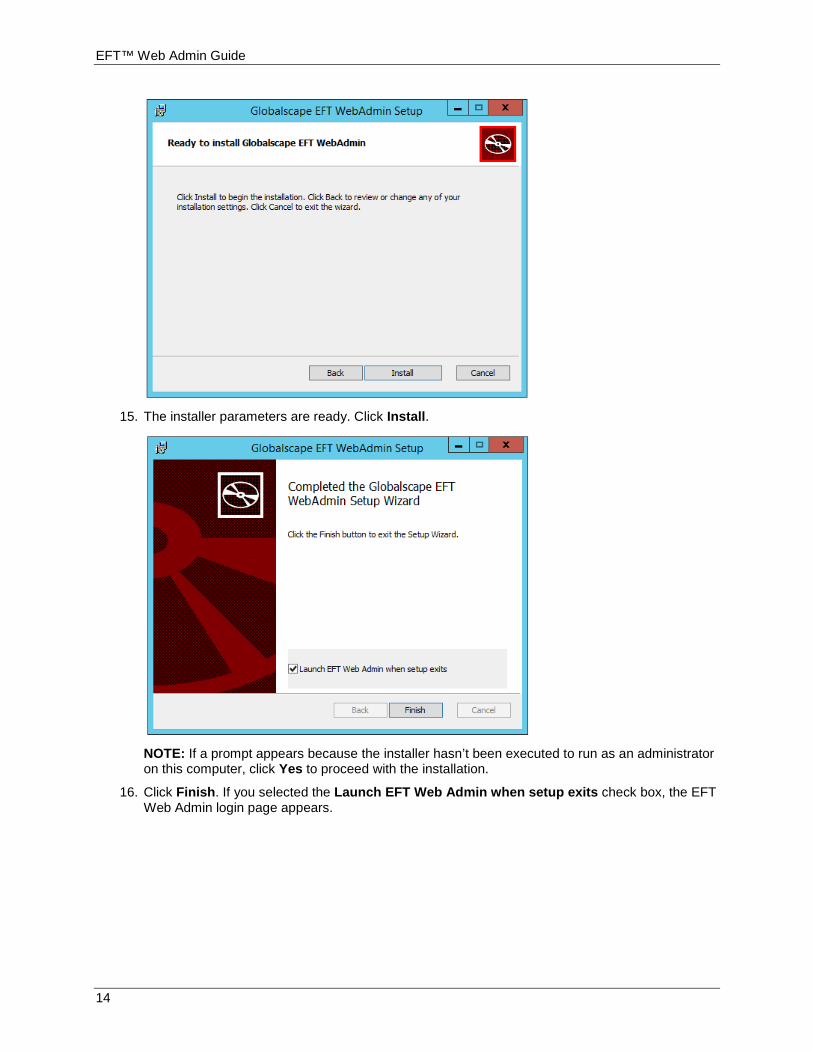
15. The installer parameters are ready. Click Install.
NOTE: If a prompt appears because the installer hasn’t been executed to run as an administrator on this computer, click Yes to proceed with the installation.
16. Click Finish. If you selected the Launch EFT Web Admin when setup exits check box, the EFT Web Admin login page appears.

Managing EFT
15
17. Log in using the administrator username and password that you created during installation.

EFT™ Web Admin Guide
16
18. Continue with Initial Configuration.
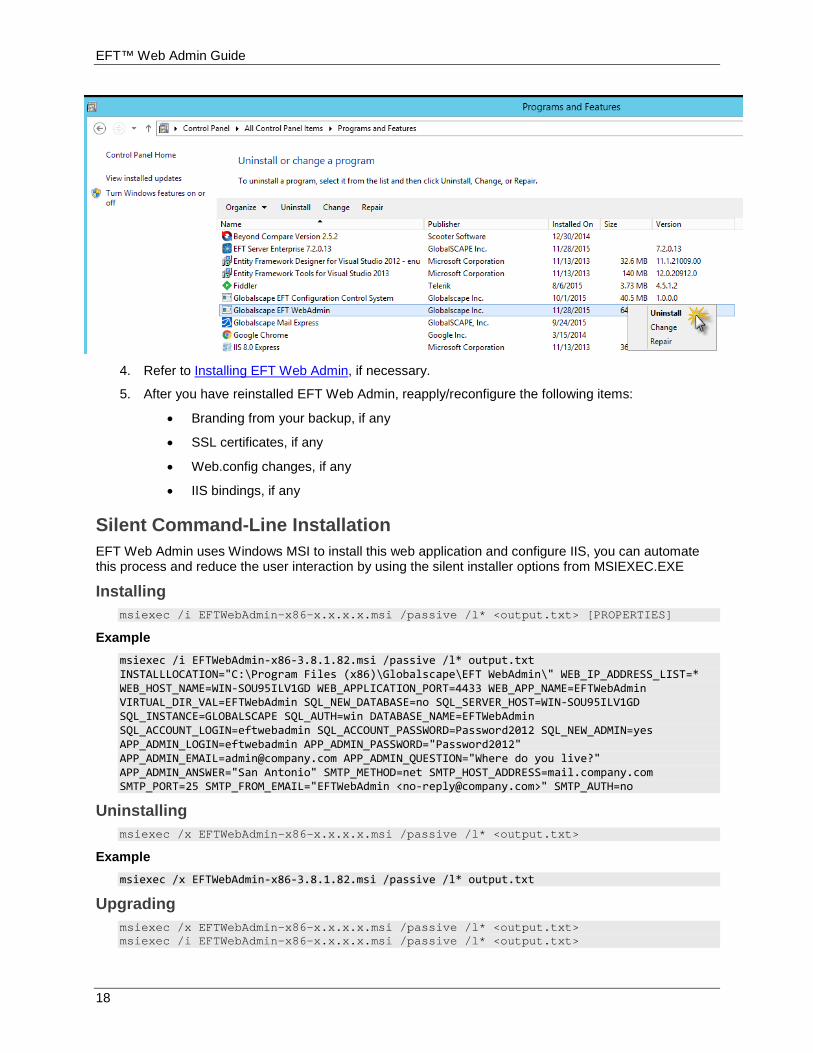
Upgrading Before upgrading EFT Web Admin, as a best practice, you should make a backup of your current database and application files in case you need to roll back.
1. Backup Database: Using SQL Server Studio Management Studio or a similar tool, make a full backup of your EFT Web Admin database.

Managing EFT
17
2. Backup Web Application files: Using Windows explorer or File Explorer, make a ZIP file of your
EFT Web Admin application folder. e.g. C:\Program Files (x86)\Globalscape\EFT WebAdmin\ .
3. After you have backed up your database and web application files, uninstall the previous version,
then install the new version using the Use Existing Database option.
EFT™ Web Admin Guide
18
4. Refer to Installing EFT Web Admin, if necessary.
5. After you have reinstalled EFT Web Admin, reapply/reconfigure the following items:
• Branding from your backup, if any
• SSL certificates, if any
• Web.config changes, if any
• IIS bindings, if any
Silent Command-Line Installation EFT Web Admin uses Windows MSI to install this web application and configure IIS, you can automate this process and reduce the user interaction by using the silent installer options from MSIEXEC.EXE
Installing msiexec /i EFTWebAdmin-x86-x.x.x.x.msi /passive /l* <output.txt> [PROPERTIES]
Example msiexec /i EFTWebAdmin-x86-3.8.1.82.msi /passive /l* output.txt INSTALLLOCATION="C:\Program Files (x86)\Globalscape\EFT WebAdmin\" WEB_IP_ADDRESS_LIST=* WEB_HOST_NAME=WIN-SOU95ILV1GD WEB_APPLICATION_PORT=4433 WEB_APP_NAME=EFTWebAdmin VIRTUAL_DIR_VAL=EFTWebAdmin SQL_NEW_DATABASE=no SQL_SERVER_HOST=WIN-SOU95ILV1GD SQL_INSTANCE=GLOBALSCAPE SQL_AUTH=win DATABASE_NAME=EFTWebAdmin SQL_ACCOUNT_LOGIN=eftwebadmin SQL_ACCOUNT_PASSWORD=Password2012 SQL_NEW_ADMIN=yes APP_ADMIN_LOGIN=eftwebadmin APP_ADMIN_PASSWORD="Password2012" [email protected] APP_ADMIN_QUESTION="Where do you live?" APP_ADMIN_ANSWER="San Antonio" SMTP_METHOD=net SMTP_HOST_ADDRESS=mail.company.com SMTP_PORT=25 SMTP_FROM_EMAIL="EFTWebAdmin <[email protected]>" SMTP_AUTH=no
Uninstalling msiexec /x EFTWebAdmin-x86-x.x.x.x.msi /passive /l* <output.txt>
Example msiexec /x EFTWebAdmin-x86-3.8.1.82.msi /passive /l* output.txt
Upgrading msiexec /x EFTWebAdmin-x86-x.x.x.x.msi /passive /l* <output.txt> msiexec /i EFTWebAdmin-x86-x.x.x.x.msi /passive /l* <output.txt>
Managing EFT
19
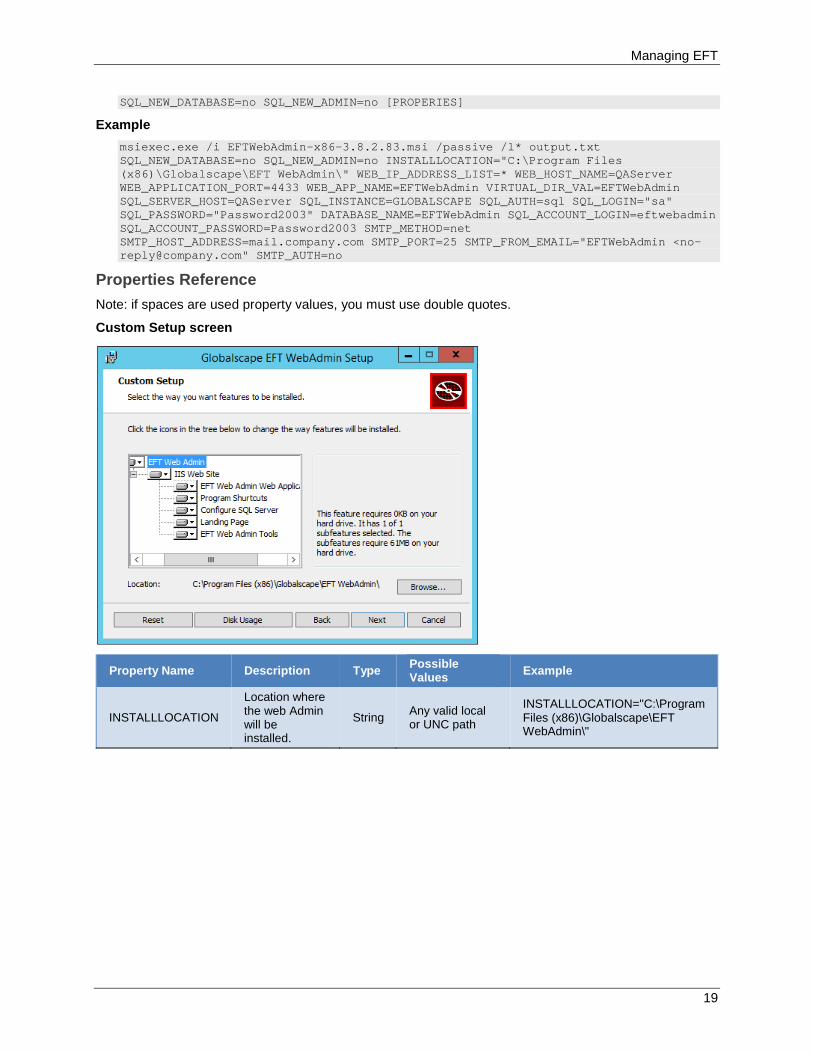
SQL_NEW_DATABASE=no SQL_NEW_ADMIN=no [PROPERIES]
Example msiexec.exe /i EFTWebAdmin-x86-3.8.2.83.msi /passive /l* output.txt SQL_NEW_DATABASE=no SQL_NEW_ADMIN=no INSTALLLOCATION="C:\Program Files (x86)\Globalscape\EFT WebAdmin\" WEB_IP_ADDRESS_LIST=* WEB_HOST_NAME=QAServer WEB_APPLICATION_PORT=4433 WEB_APP_NAME=EFTWebAdmin VIRTUAL_DIR_VAL=EFTWebAdmin SQL_SERVER_HOST=QAServer SQL_INSTANCE=GLOBALSCAPE SQL_AUTH=sql SQL_LOGIN="sa" SQL_PASSWORD="Password2003" DATABASE_NAME=EFTWebAdmin SQL_ACCOUNT_LOGIN=eftwebadmin SQL_ACCOUNT_PASSWORD=Password2003 SMTP_METHOD=net SMTP_HOST_ADDRESS=mail.company.com SMTP_PORT=25 SMTP_FROM_EMAIL="EFTWebAdmin <[email protected]" SMTP_AUTH=no
Properties Reference Note: if spaces are used property values, you must use double quotes.
Custom Setup screen
Property Name Description Type Possible Values Example
INSTALLLOCATION
Location where the web Admin will be installed.
String Any valid local or UNC path
INSTALLLOCATION="C:\Program Files (x86)\Globalscape\EFT WebAdmin\"
EFT™ Web Admin Guide
20
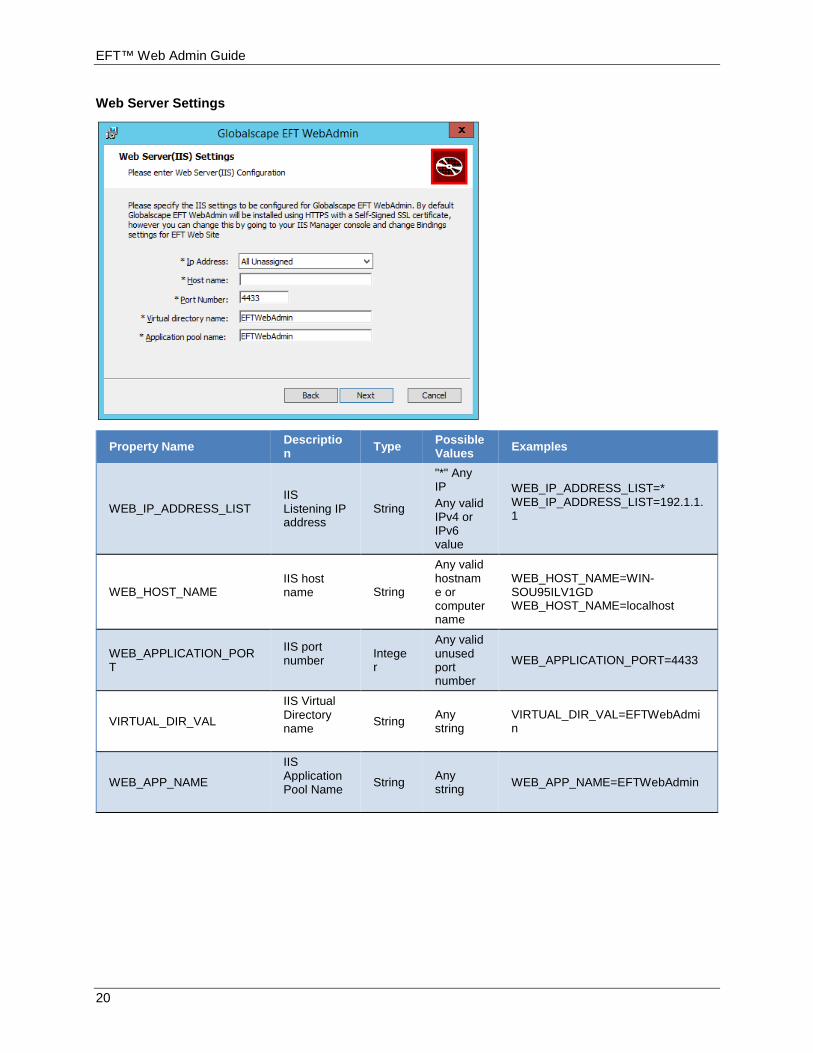
Web Server Settings
Property Name Description Type Possible
Values Examples
WEB_IP_ADDRESS_LIST IIS Listening IP address
String
"*" Any IP Any valid IPv4 or IPv6 value
WEB_IP_ADDRESS_LIST=* WEB_IP_ADDRESS_LIST=192.1.1.1
WEB_HOST_NAME IIS host name String
Any valid hostname or computer name
WEB_HOST_NAME=WIN-SOU95ILV1GD WEB_HOST_NAME=localhost
WEB_APPLICATION_PORT
IIS port number Intege
r
Any valid unused port number
WEB_APPLICATION_PORT=4433
VIRTUAL_DIR_VAL
IIS Virtual Directory name String Any
string VIRTUAL_DIR_VAL=EFTWebAdmin
WEB_APP_NAME
IIS Application Pool Name String Any
string WEB_APP_NAME=EFTWebAdmin

Managing EFT
21
New or Existing Database
Property Name Description Type Possible Values Examples
SQL_NEW_DATABASE
Specify if installer will create a new database or use an existing database
String
"yes" or "no" (Case sensitive)
SQL_NEW_DATABASE=no SQL_NEW_DATABASE=yes
Connecting to Database Engine
EFT™ Web Admin Guide
22
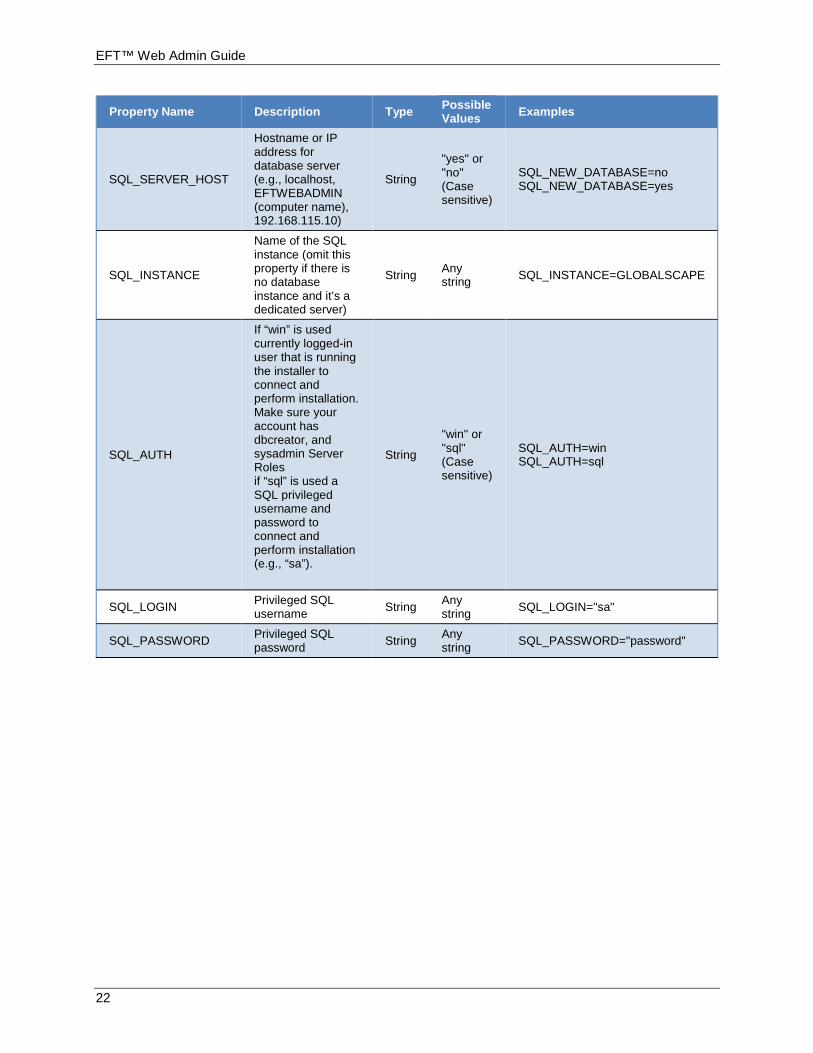
Property Name Description Type Possible Values Examples
SQL_SERVER_HOST
Hostname or IP address for database server (e.g., localhost, EFTWEBADMIN (computer name), 192.168.115.10)
String
"yes" or "no" (Case sensitive)
SQL_NEW_DATABASE=no SQL_NEW_DATABASE=yes
SQL_INSTANCE
Name of the SQL instance (omit this property if there is no database instance and it’s a dedicated server)
String Any string SQL_INSTANCE=GLOBALSCAPE
SQL_AUTH
If “win” is used currently logged-in user that is running the installer to connect and perform installation. Make sure your account has dbcreator, and sysadmin Server Roles if “sql” is used a SQL privileged username and password to connect and perform installation (e.g., “sa”).
String
"win" or "sql" (Case sensitive)
SQL_AUTH=win SQL_AUTH=sql
SQL_LOGIN Privileged SQL username String Any
string SQL_LOGIN="sa"
SQL_PASSWORD Privileged SQL password String Any
string SQL_PASSWORD="password"
Managing EFT
23
Database Connection Settings
Property Name Description Type Possible Values Examples
DATABASE_NAME
Name of the database for EFT Web Admin
String
Any valid SQL server database name
DATABASE_NAME=EFTWebAdmin
SQL_ACCOUNT_LOGIN
SQL username owner for database that is used by EFT Web Admin to connect to the database and read/write its configuration
String Any string SQL_ACCOUNT_LOGIN=eftwebadmin
SQL_ACCOUNT_PASSWORD
Password of owner for database (You must use a complex password that meets the minimum SQL server password complexity.)
String Any string SQL_ACCOUNT_PASSWORD="password"
EFT™ Web Admin Guide
24
New Administrator User
Property Name Description Type Possible Values Examples
SQL_NEW_ADMIN
Indicates if the installer will create a new EFT web admin user during the installation process. If “yes” is used the below properties will be used to create a new web admin user
String
"yes" or "no" (Case sensitive)
SQL_NEW_ADMIN=no SQL_NEW_ADMIN=yes
APP_ADMIN_LOGIN
EFT Web Admin administrator login
String Any string SQL_ACCOUNT_LOGIN=eftwebadmin
APP_ADMIN_PASSWORD
EFT Web Admin administrator password
String Any string APP_ADMIN_PASSWORD="password"
APP_ADMIN_EMAIL
EFT Web Admin administrator email
String Any valid email address

Managing EFT
25
Property Name Description Type Possible Values Examples
APP_ADMIN_QUESTION
Security question presented to EFT Web Admin administrator request reset its password.
String Any string
APP_ADMIN_QUESTION="Where do you live?"
APP_ADMIN_ANSWER
Security question answer used to validate reset password request from the EFT Web Admin administrator.
String Any string APP_ADMIN_ANSWER="San Antonio"
Email Settings
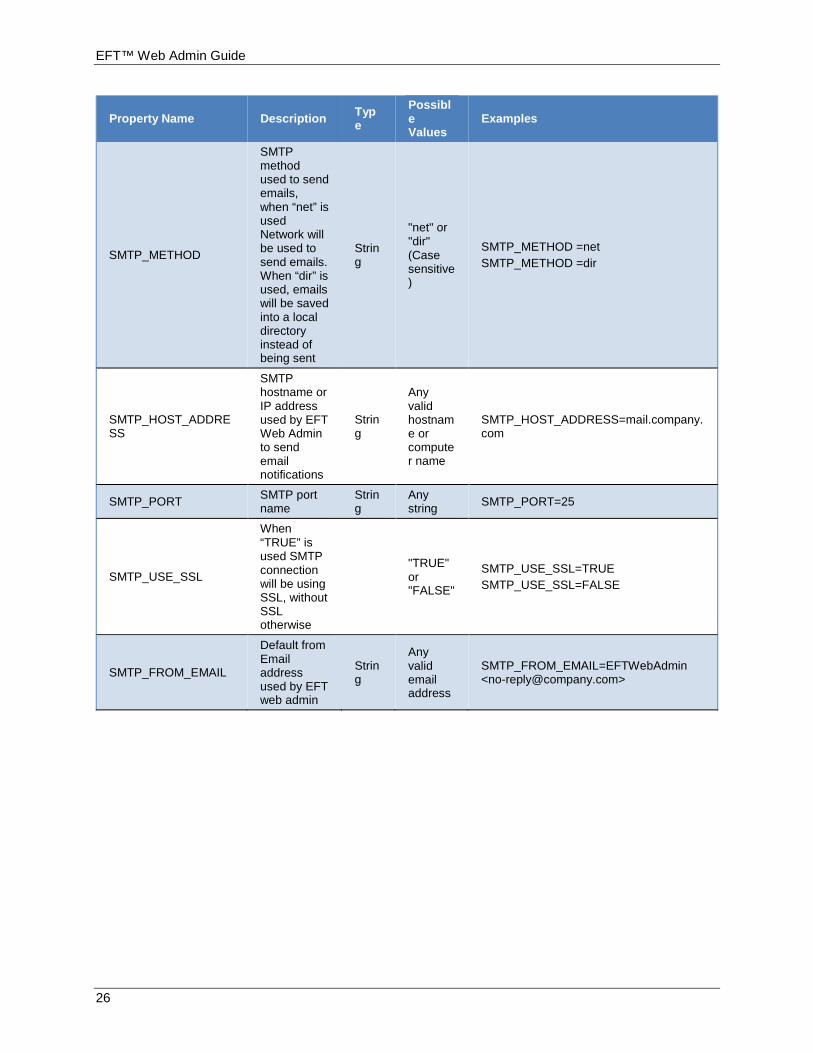
EFT™ Web Admin Guide
26
Property Name Description Type
Possible Values
Examples
SMTP_METHOD
SMTP method used to send emails, when “net” is used Network will be used to send emails. When “dir” is used, emails will be saved into a local directory instead of being sent
String
"net" or "dir" (Case sensitive)
SMTP_METHOD =net SMTP_METHOD =dir
SMTP_HOST_ADDRESS
SMTP hostname or IP address used by EFT Web Admin to send email notifications
String
Any valid hostname or computer name
SMTP_HOST_ADDRESS=mail.company.com
SMTP_PORT SMTP port name
String
Any string SMTP_PORT=25
SMTP_USE_SSL
When “TRUE” is used SMTP connection will be using SSL, without SSL otherwise
"TRUE" or "FALSE"
SMTP_USE_SSL=TRUE SMTP_USE_SSL=FALSE
SMTP_FROM_EMAIL
Default from Email address used by EFT web admin
String
Any valid email address
SMTP_FROM_EMAIL=EFTWebAdmin <[email protected]>
Managing EFT
27
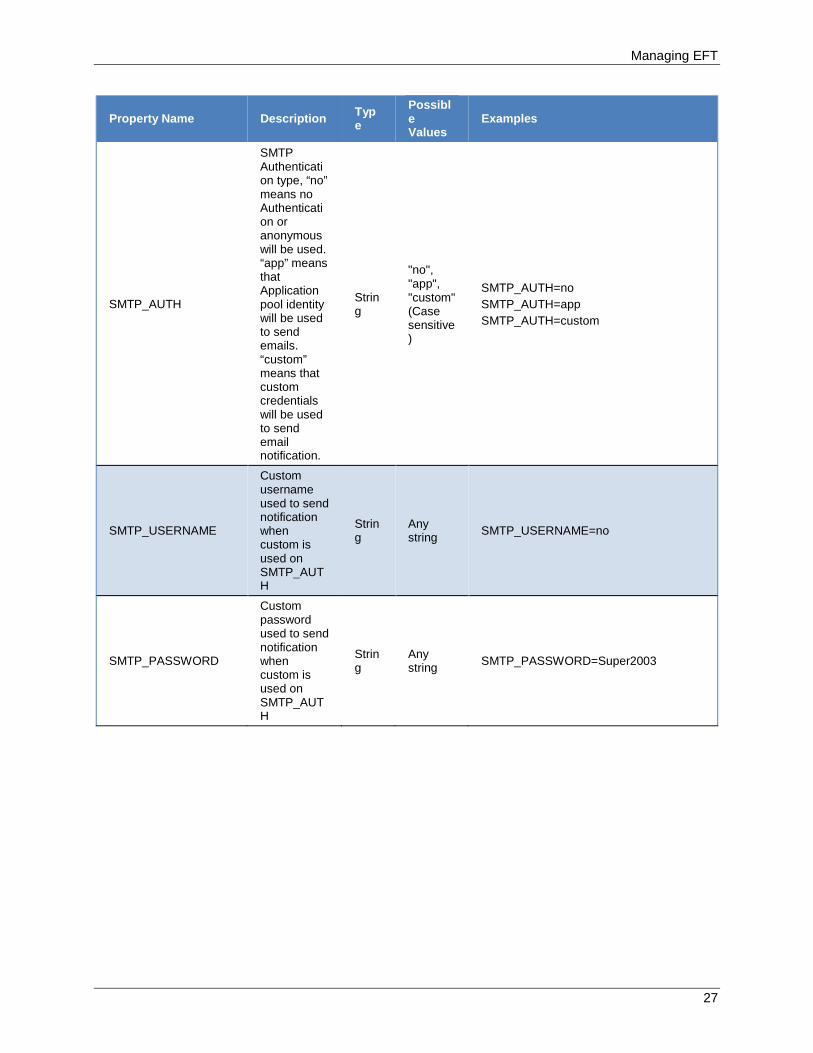
Property Name Description Type
Possible Values
Examples
SMTP_AUTH
SMTP Authentication type, “no” means no Authentication or anonymous will be used. “app” means that Application pool identity will be used to send emails. “custom” means that custom credentials will be used to send email notification.
String
"no", "app", "custom" (Case sensitive)
SMTP_AUTH=no SMTP_AUTH=app SMTP_AUTH=custom
SMTP_USERNAME
Custom username used to send notification when custom is used on SMTP_AUTH
String
Any string SMTP_USERNAME=no
SMTP_PASSWORD
Custom password used to send notification when custom is used on SMTP_AUTH
String
Any string SMTP_PASSWORD=Super2003
EFT™ Web Admin Guide
28
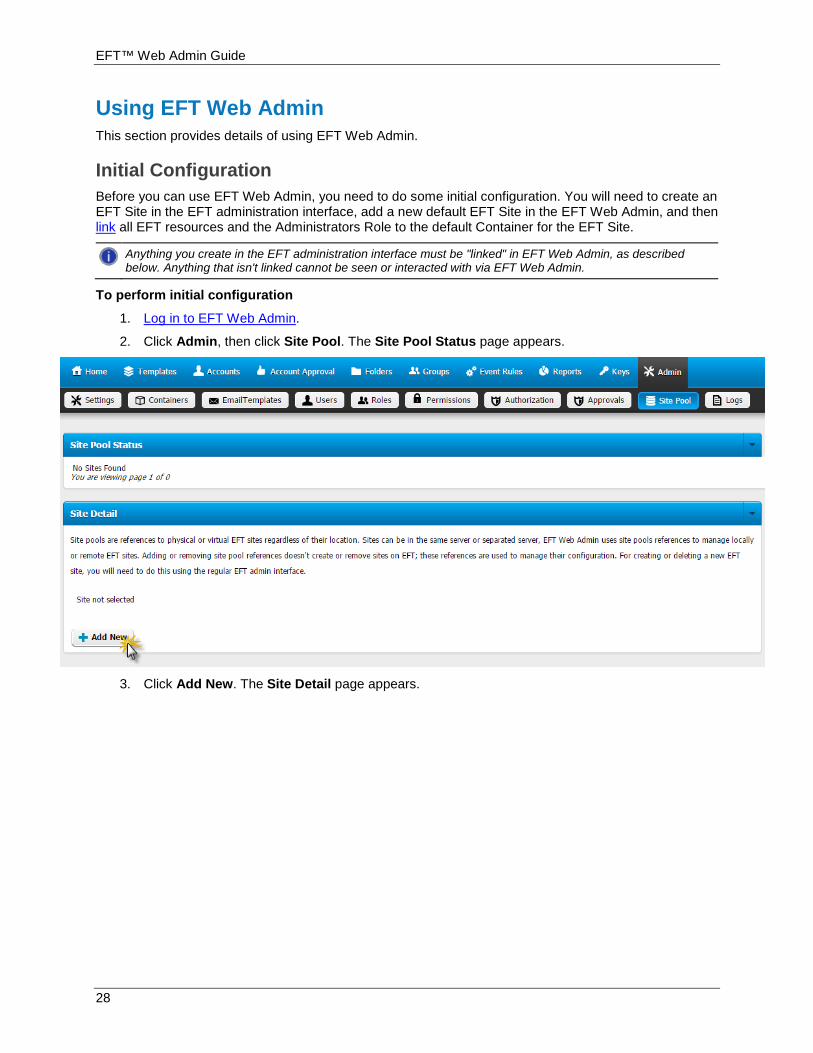
Using EFT Web Admin This section provides details of using EFT Web Admin.
Initial Configuration Before you can use EFT Web Admin, you need to do some initial configuration. You will need to create an EFT Site in the EFT administration interface, add a new default EFT Site in the EFT Web Admin, and then link all EFT resources and the Administrators Role to the default Container for the EFT Site.
Anything you create in the EFT administration interface must be "linked" in EFT Web Admin, as described below. Anything that isn't linked cannot be seen or interacted with via EFT Web Admin.
To perform initial configuration
1. Log in to EFT Web Admin.
2. Click Admin, then click Site Pool. The Site Pool Status page appears.
3. Click Add New. The Site Detail page appears.
Managing EFT
29
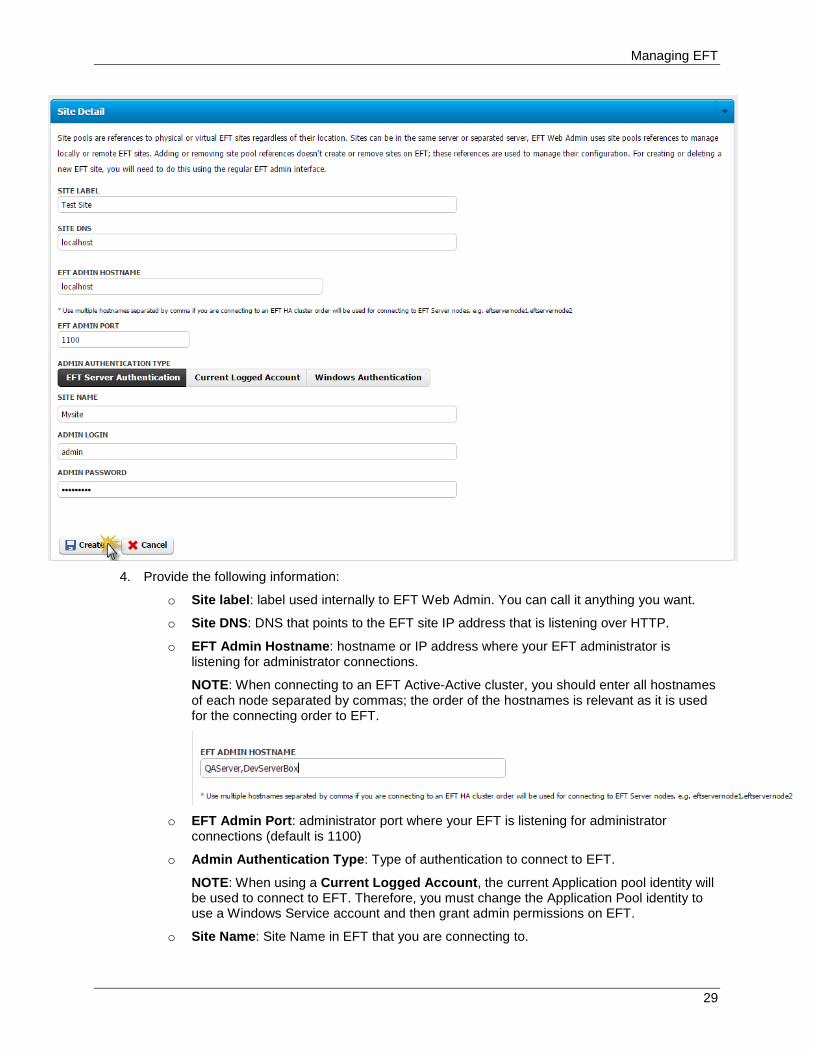
4. Provide the following information:
o Site label: label used internally to EFT Web Admin. You can call it anything you want.
o Site DNS: DNS that points to the EFT site IP address that is listening over HTTP.
o EFT Admin Hostname: hostname or IP address where your EFT administrator is listening for administrator connections.
NOTE: When connecting to an EFT Active-Active cluster, you should enter all hostnames of each node separated by commas; the order of the hostnames is relevant as it is used for the connecting order to EFT.
o EFT Admin Port: administrator port where your EFT is listening for administrator
connections (default is 1100)
o Admin Authentication Type: Type of authentication to connect to EFT.
NOTE: When using a Current Logged Account, the current Application pool identity will be used to connect to EFT. Therefore, you must change the Application Pool identity to use a Windows Service account and then grant admin permissions on EFT.
o Site Name: Site Name in EFT that you are connecting to.
EFT™ Web Admin Guide
30
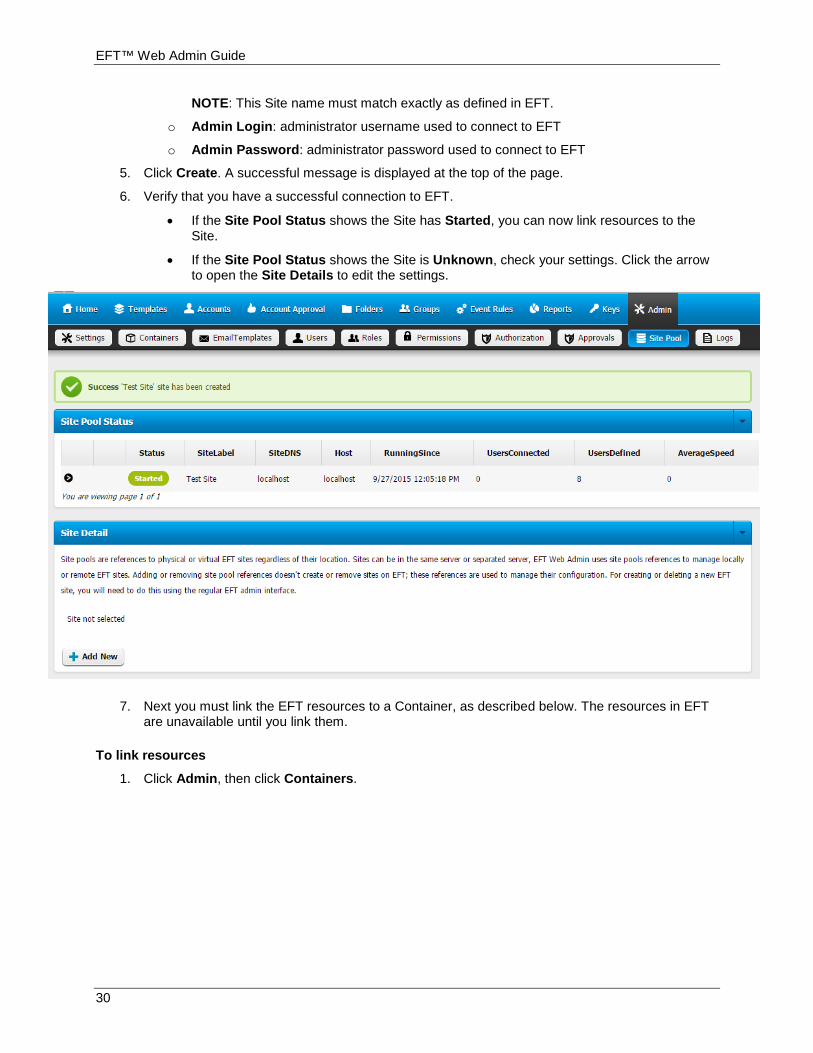
NOTE: This Site name must match exactly as defined in EFT.
o Admin Login: administrator username used to connect to EFT
o Admin Password: administrator password used to connect to EFT
5. Click Create. A successful message is displayed at the top of the page.
6. Verify that you have a successful connection to EFT.
• If the Site Pool Status shows the Site has Started, you can now link resources to the Site.
• If the Site Pool Status shows the Site is Unknown, check your settings. Click the arrow to open the Site Details to edit the settings.
7. Next you must link the EFT resources to a Container, as described below. The resources in EFT are unavailable until you link them.
To link resources
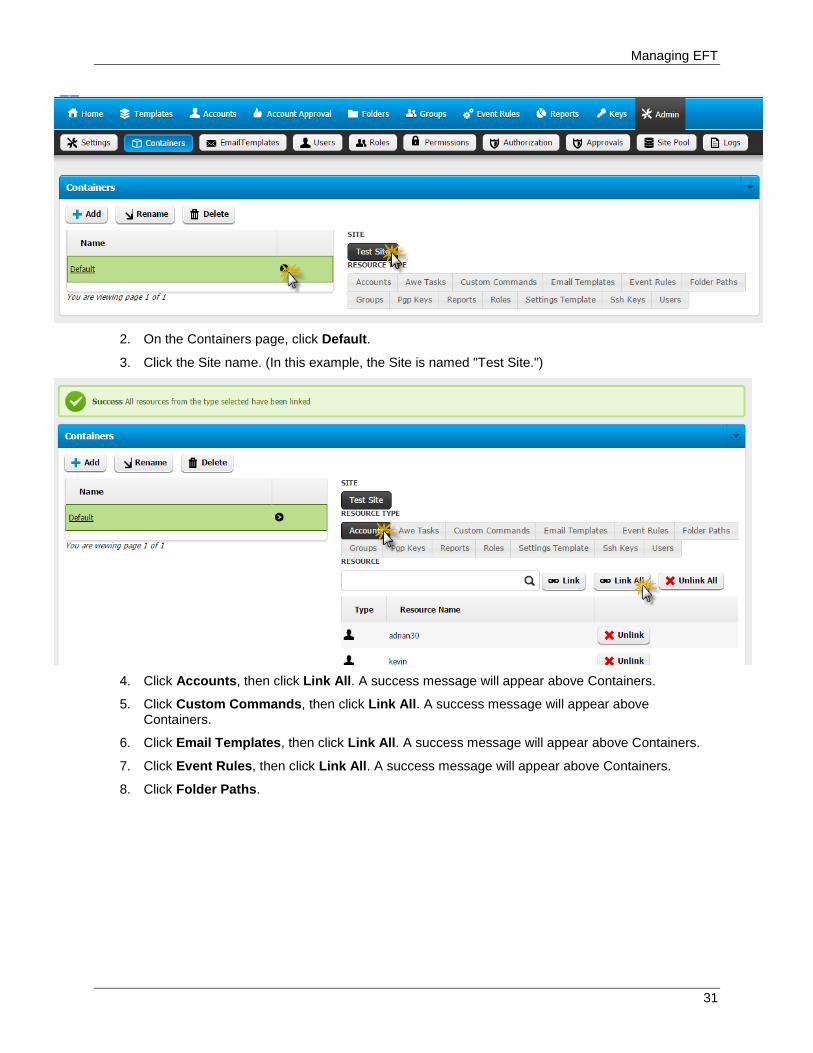
1. Click Admin, then click Containers.
Managing EFT
31
2. On the Containers page, click Default.
3. Click the Site name. (In this example, the Site is named "Test Site.")
4. Click Accounts, then click Link All. A success message will appear above Containers.
5. Click Custom Commands, then click Link All. A success message will appear above Containers.
6. Click Email Templates, then click Link All. A success message will appear above Containers.
7. Click Event Rules, then click Link All. A success message will appear above Containers.
8. Click Folder Paths.
EFT™ Web Admin Guide
32
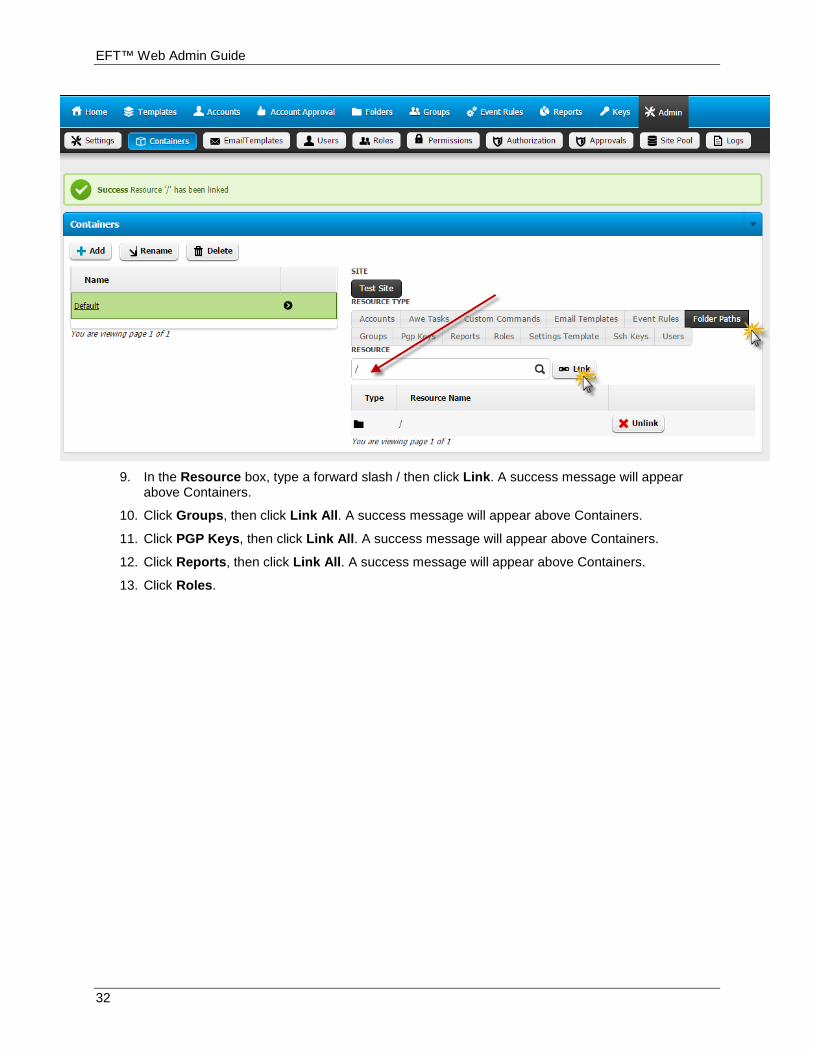
9. In the Resource box, type a forward slash / then click Link. A success message will appear
above Containers.
10. Click Groups, then click Link All. A success message will appear above Containers.
11. Click PGP Keys, then click Link All. A success message will appear above Containers.
12. Click Reports, then click Link All. A success message will appear above Containers.
13. Click Roles.
Managing EFT
33
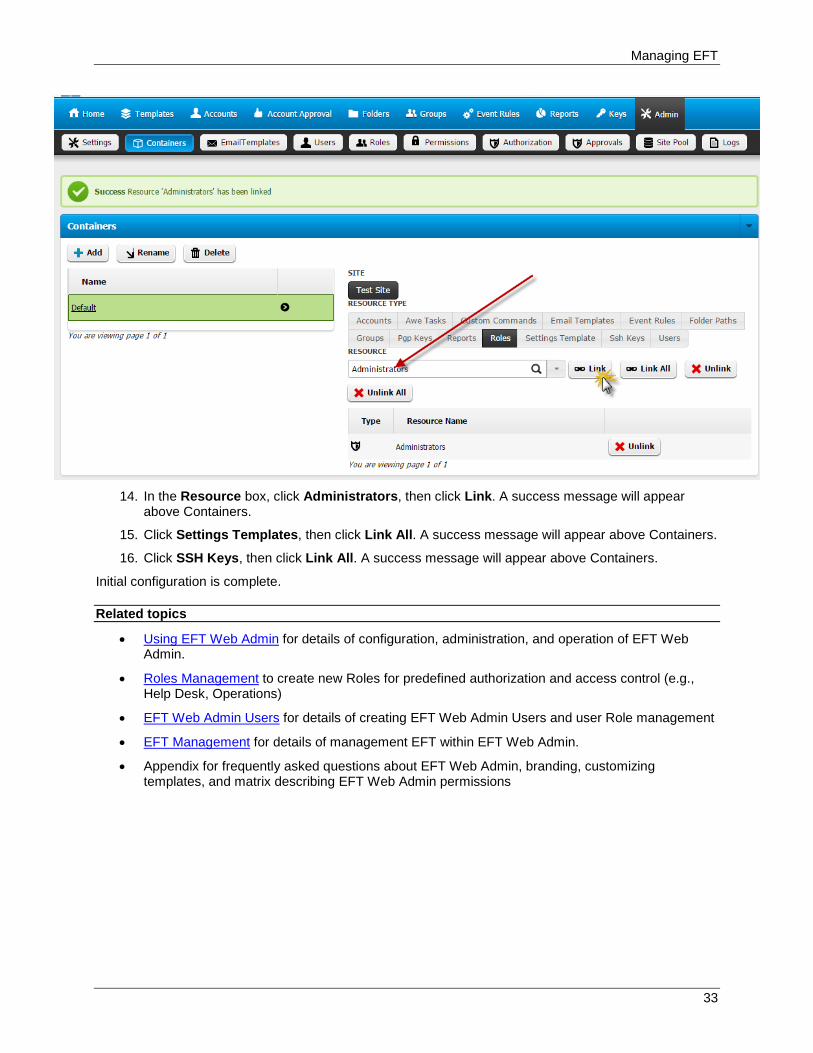
14. In the Resource box, click Administrators, then click Link. A success message will appear
above Containers.
15. Click Settings Templates, then click Link All. A success message will appear above Containers.
16. Click SSH Keys, then click Link All. A success message will appear above Containers.
Initial configuration is complete.
Related topics
• Using EFT Web Admin for details of configuration, administration, and operation of EFT Web Admin.
• Roles Management to create new Roles for predefined authorization and access control (e.g., Help Desk, Operations)
• EFT Web Admin Users for details of creating EFT Web Admin Users and user Role management
• EFT Management for details of management EFT within EFT Web Admin.
• Appendix for frequently asked questions about EFT Web Admin, branding, customizing templates, and matrix describing EFT Web Admin permissions
EFT™ Web Admin Guide
34
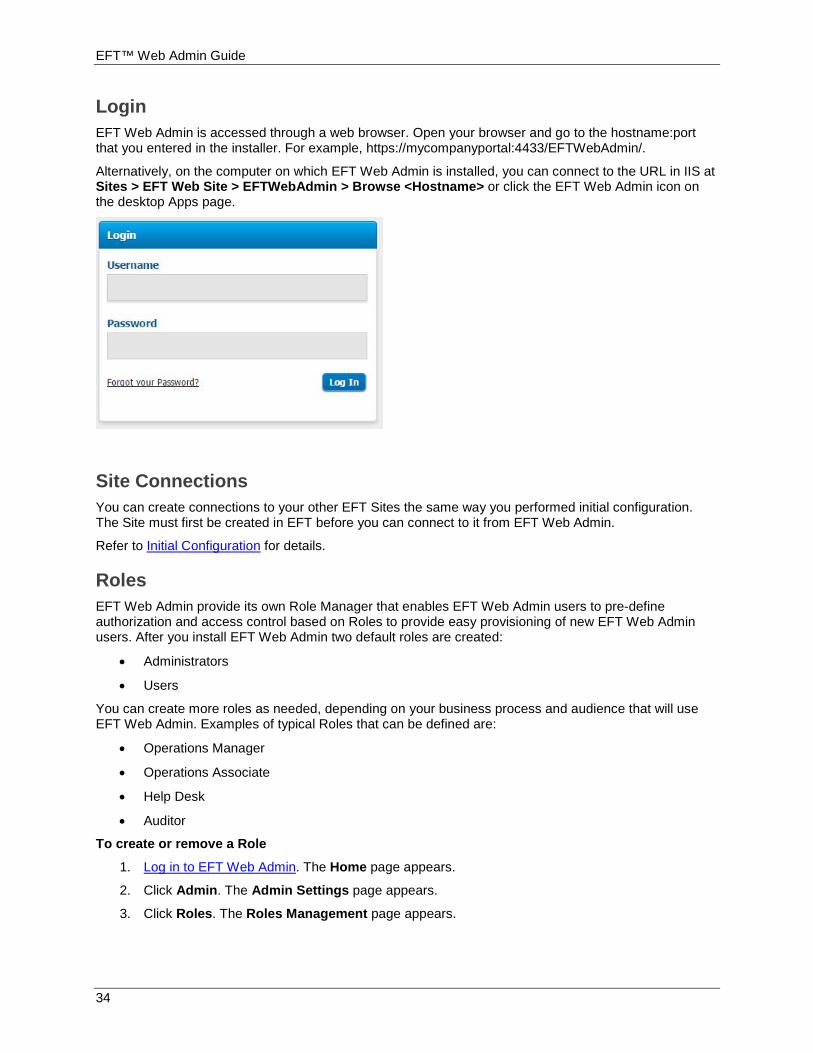
Login EFT Web Admin is accessed through a web browser. Open your browser and go to the hostname:port that you entered in the installer. For example, https://mycompanyportal:4433/EFTWebAdmin/.
Alternatively, on the computer on which EFT Web Admin is installed, you can connect to the URL in IIS at Sites > EFT Web Site > EFTWebAdmin > Browse <Hostname> or click the EFT Web Admin icon on the desktop Apps page.
Site Connections You can create connections to your other EFT Sites the same way you performed initial configuration. The Site must first be created in EFT before you can connect to it from EFT Web Admin.
Refer to Initial Configuration for details.
Roles EFT Web Admin provide its own Role Manager that enables EFT Web Admin users to pre-define authorization and access control based on Roles to provide easy provisioning of new EFT Web Admin users. After you install EFT Web Admin two default roles are created:
• Administrators
• Users
You can create more roles as needed, depending on your business process and audience that will use EFT Web Admin. Examples of typical Roles that can be defined are:
• Operations Manager
• Operations Associate
• Help Desk
• Auditor
To create or remove a Role
1. Log in to EFT Web Admin. The Home page appears.
2. Click Admin. The Admin Settings page appears.
3. Click Roles. The Roles Management page appears.

Managing EFT
35
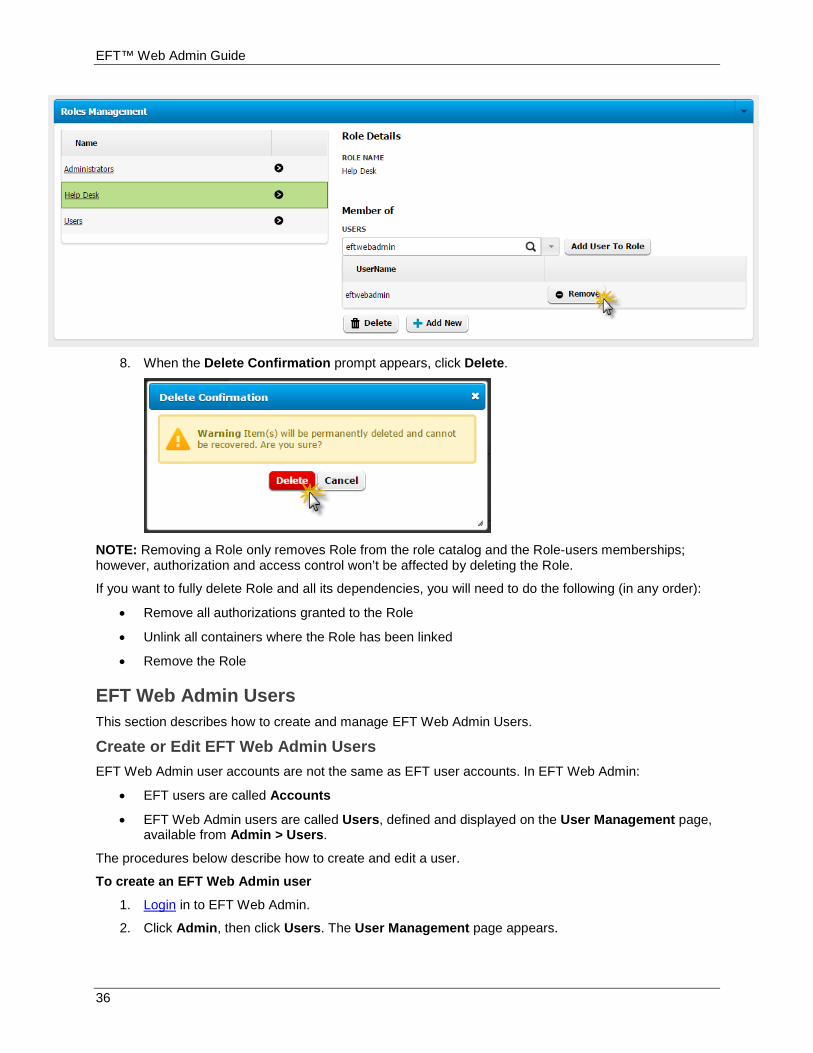
4. Click Add New.
5. Provide the Role Name and then click Create. A successful confirmation message appears.
6. Click the arrow to the right of the new Role that you just created. Select a user from the Users
drop-down list, then click Add User to Role. A successful confirmation message appears.
7. You can also remove users from a Role on this page by clicking the user, then clicking Remove.
EFT™ Web Admin Guide
36
8. When the Delete Confirmation prompt appears, click Delete.
NOTE: Removing a Role only removes Role from the role catalog and the Role-users memberships; however, authorization and access control won’t be affected by deleting the Role.
If you want to fully delete Role and all its dependencies, you will need to do the following (in any order):
• Remove all authorizations granted to the Role
• Unlink all containers where the Role has been linked
• Remove the Role
EFT Web Admin Users This section describes how to create and manage EFT Web Admin Users.
Create or Edit EFT Web Admin Users EFT Web Admin user accounts are not the same as EFT user accounts. In EFT Web Admin:
• EFT users are called Accounts
• EFT Web Admin users are called Users, defined and displayed on the User Management page, available from Admin > Users.
The procedures below describe how to create and edit a user.
To create an EFT Web Admin user
1. Login in to EFT Web Admin.
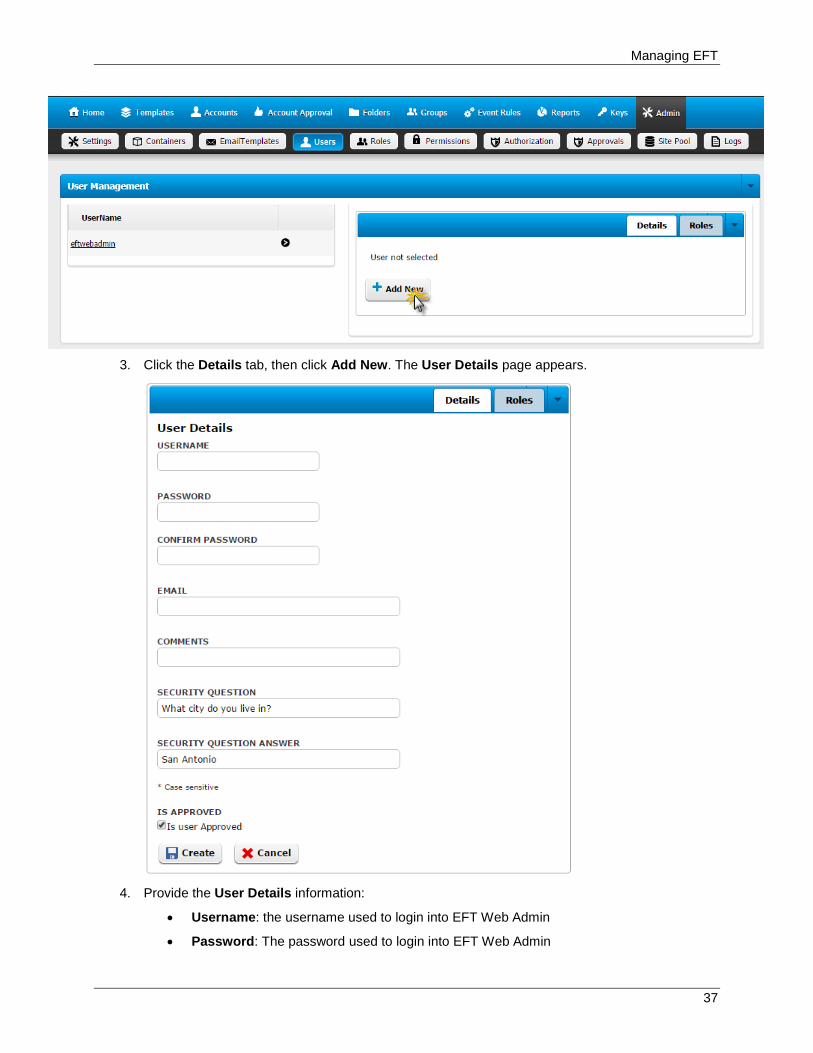
2. Click Admin, then click Users. The User Management page appears.
Managing EFT
37
3. Click the Details tab, then click Add New. The User Details page appears.
4. Provide the User Details information:
• Username: the username used to login into EFT Web Admin
• Password: The password used to login into EFT Web Admin
EFT™ Web Admin Guide
38
• Email: Email associated with the user; this is needed for the Forget Password process
• Comments: Any comments pertaining to the user, such as department name
• Security question: Question asked when user initiates the Forget Password process
• Security question answer: Answer to the security question; user must present to validate and finish the Forget Password process. The answer is case sensitive.
• Is Approved: This check box must be selected. Approved users are allowed to access EFT Web Admin, You can clear this check box if you want to disable the account without removing it.
5. Click Create. A successful message is displayed at the top of the page.
To edit a user
1. Login in to EFT Web Admin.
2. Click Admin, then click Users. The User Management page appears.
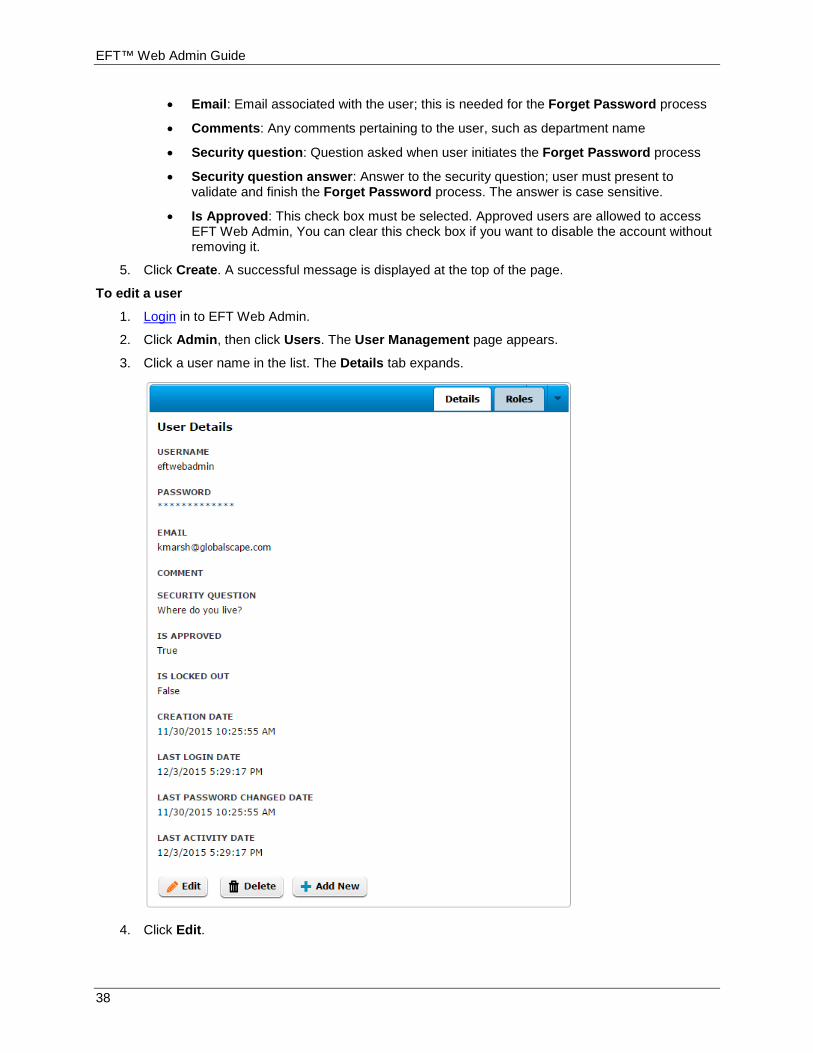
3. Click a user name in the list. The Details tab expands.
4. Click Edit.
Managing EFT
39
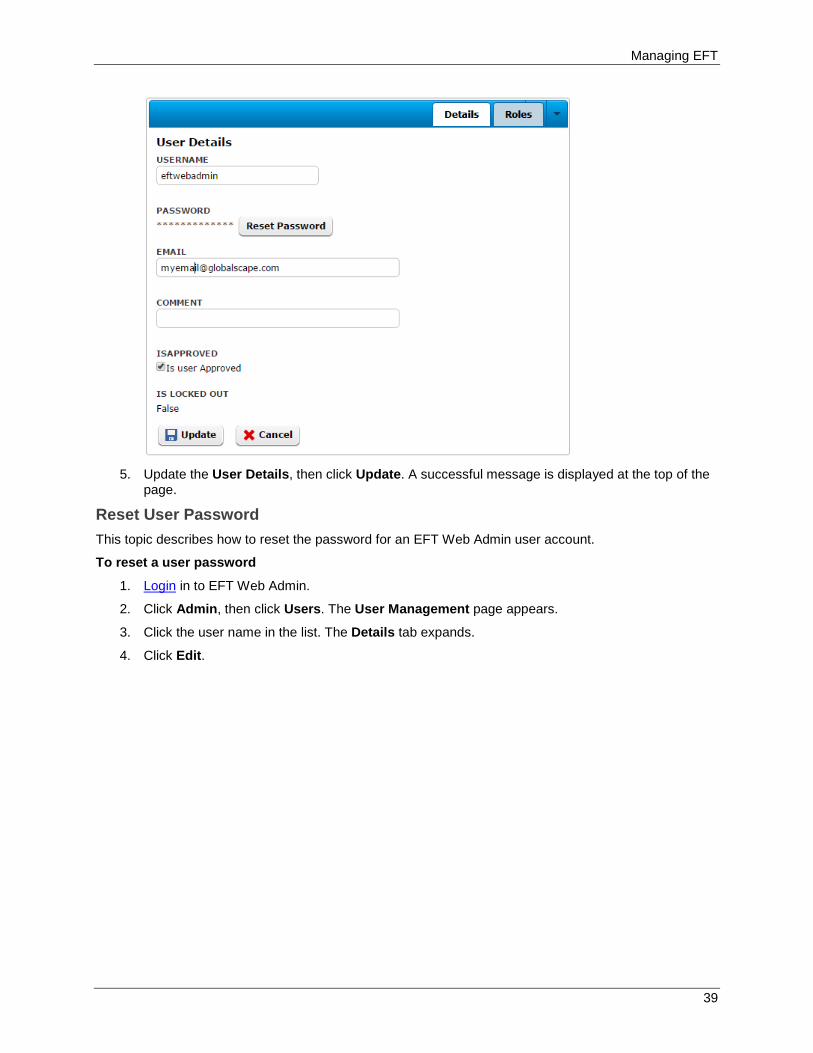
5. Update the User Details, then click Update. A successful message is displayed at the top of the
page.
Reset User Password This topic describes how to reset the password for an EFT Web Admin user account.
To reset a user password
1. Login in to EFT Web Admin.
2. Click Admin, then click Users. The User Management page appears.
3. Click the user name in the list. The Details tab expands.
4. Click Edit.

EFT™ Web Admin Guide
40
5. Click Reset Password. The Change Password dialog box appears.
6. Click Update. A successful message is displayed at the top of the page.
User Role Membership Role Manager that enables EFT Web Admin users to pre-define authorization and access control based on Roles to provide easy provisioning of new EFT Web Admin users. This topic describes how to make an EFT Web Admin user a member of a Role (also known as adding a Role to a user), and remove a Role from a user. Refer to Roles for more information about Roles.
To add a Role to a User
1. Login in to EFT Web Admin.
2. Click Admin, then click Users. The User Management page appears.
3. Click the username in the list, then click the Role tab.
4. Click the list of Roles, then click a Role.
5. Click Add Rule To User. A successful message is displayed at the top of the page.
To remove a Role from a user
1. Login in to EFT Web Admin.
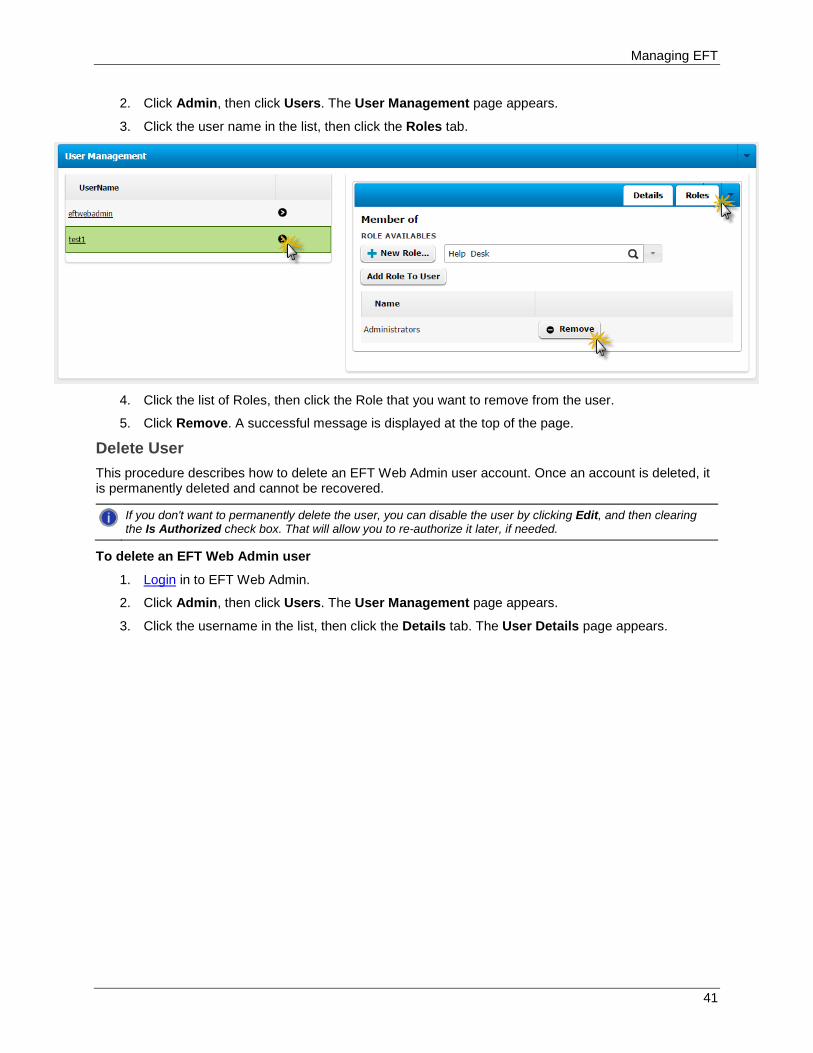
Managing EFT
41
2. Click Admin, then click Users. The User Management page appears.
3. Click the user name in the list, then click the Roles tab.
4. Click the list of Roles, then click the Role that you want to remove from the user.
5. Click Remove. A successful message is displayed at the top of the page.
Delete User This procedure describes how to delete an EFT Web Admin user account. Once an account is deleted, it is permanently deleted and cannot be recovered.
If you don't want to permanently delete the user, you can disable the user by clicking Edit, and then clearing the Is Authorized check box. That will allow you to re-authorize it later, if needed.
To delete an EFT Web Admin user
1. Login in to EFT Web Admin.
2. Click Admin, then click Users. The User Management page appears.
3. Click the username in the list, then click the Details tab. The User Details page appears.

EFT™ Web Admin Guide
42
4. Click Delete. A confirmation message appears.
5. Click Delete.
Password Recovery If EFT Web Admin users have forgotten their password, then they request to have it reset.
To recover a password
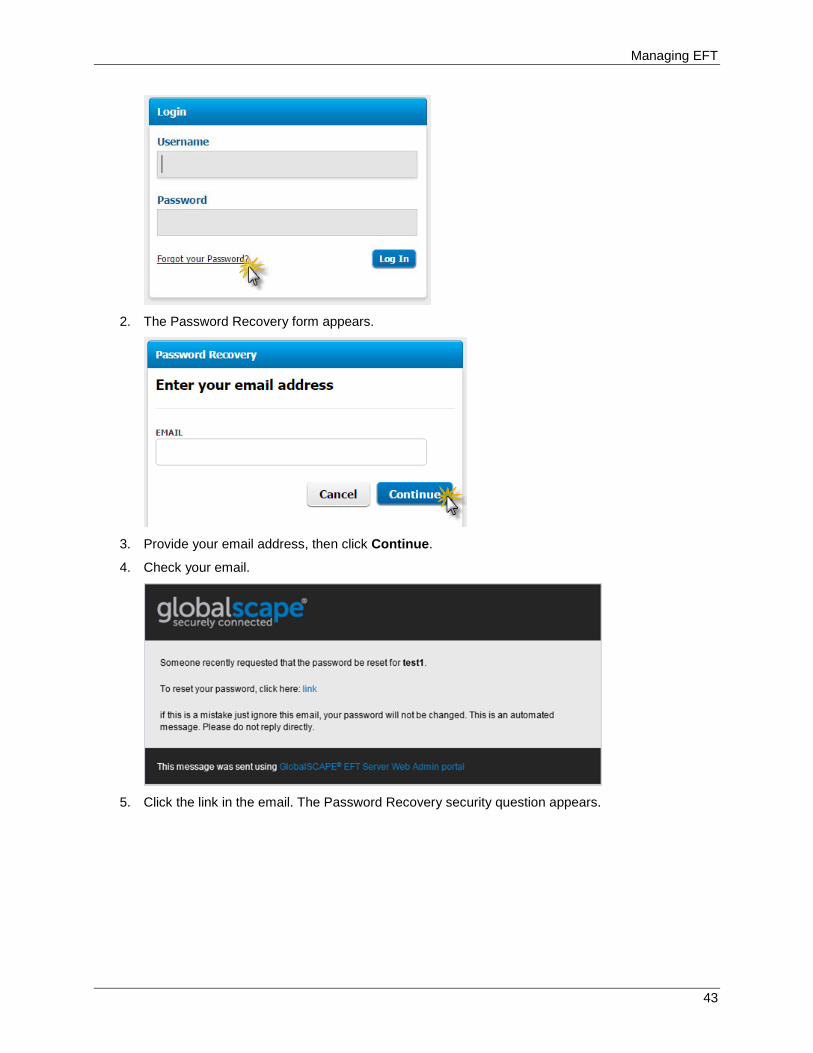
1. On the Login page, click Forgot your Password?
Managing EFT
43
2. The Password Recovery form appears.
3. Provide your email address, then click Continue.
4. Check your email.
5. Click the link in the email. The Password Recovery security question appears.
EFT™ Web Admin Guide
44
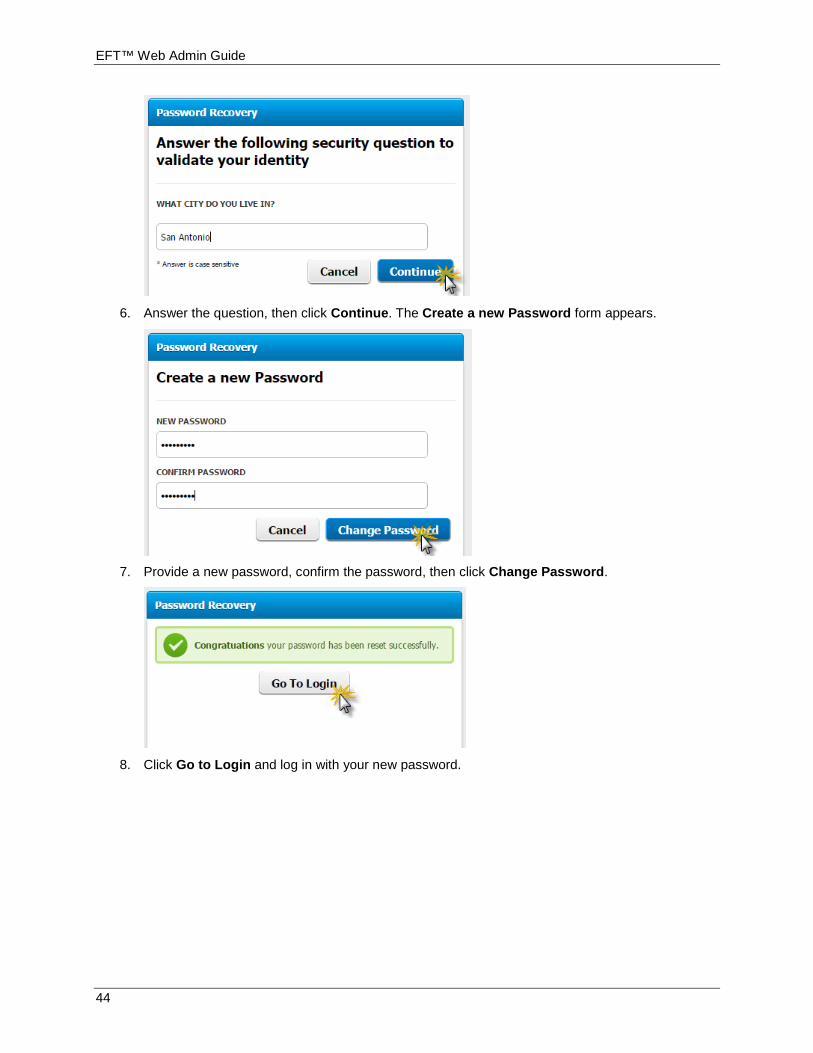
6. Answer the question, then click Continue. The Create a new Password form appears.
7. Provide a new password, confirm the password, then click Change Password.
8. Click Go to Login and log in with your new password.

Managing EFT
45
Authorization You can configure Authorization in EFT Web Admin from two different views: Authorization and Permission.
Both pages allow you to grant or revoke permissions to EFT Web Admin users and Roles:
• The Authorization view manages permissions for a specific EFT Web Admin users and Role
• the Permissions view manages permissions from a specific permissions.
For example, you could define the following Authorization by Roles:
Action
Roles
Administrators Operations Manager
Operations Associate
Help Desk
Accounts: Create, Delete, Display, Remove, Unlock, Change Password
ALL ALL ALL, except Remove
ALL, except Remove
Event Rule Management: Create, Edit, Delete, View, Edit Flow
ALL ALL, except Delete
Display NONE
Event Rule Operations: View History Invoke, Clone, Search, Edit State, Edit General Settings.
ALL ALL ALL, except Change state
NONE
Edit Triggers (Scheduler, Folder Monitor, File System, User, Connections, Server, Site, AS2)
ALL Timer Scheduler, Folder Monitor, File System, User, Connections
Users, Connections
NONE
Event Actions: Email, Download, Upload, Encrypt, AWE, Custom Commands, Backups Configuration, Clean Up, Reports, Stop Action
ALL ALL, except Backup
Add: Email, Reports
Edit: Email, Upload, Download, Encrypt
Remove: NONE
NONE
Event Conditions: Account, Groups, Templates, Virtual Paths, Generic
ALL Add: ALL
Edit: ALL
Remove: NONE
NONE
NONE
EFT™ Web Admin Guide
46
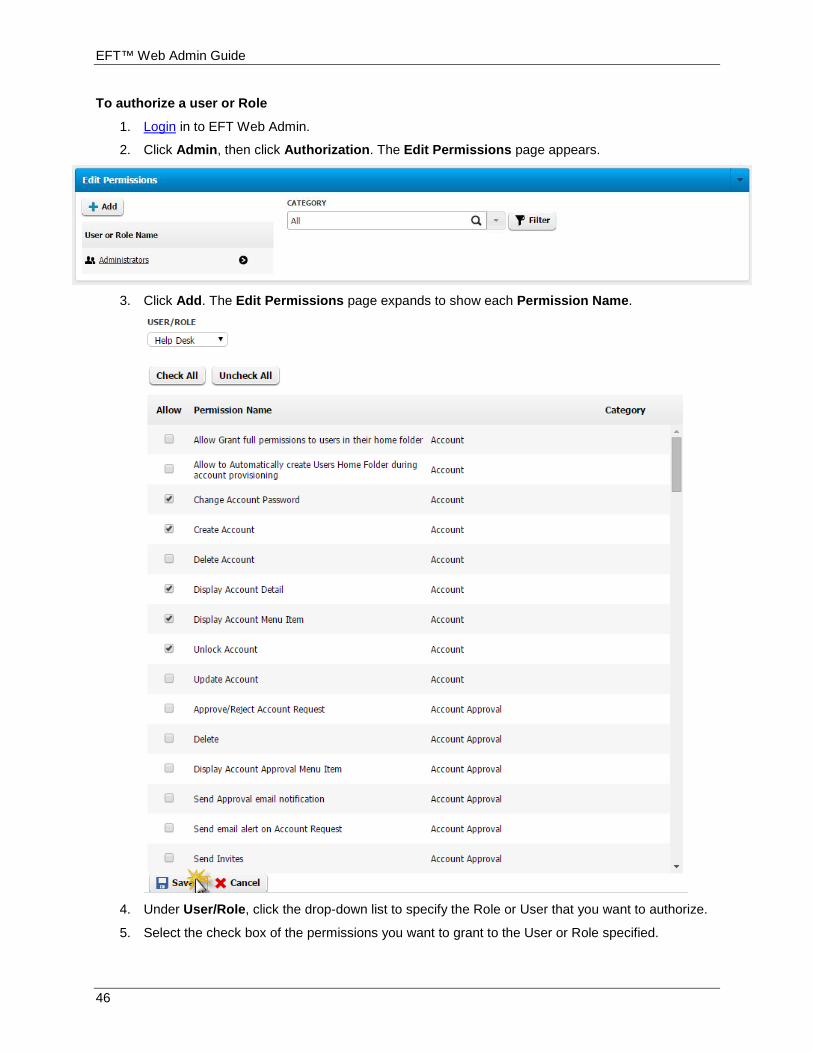
To authorize a user or Role
1. Login in to EFT Web Admin.
2. Click Admin, then click Authorization. The Edit Permissions page appears.
3. Click Add. The Edit Permissions page expands to show each Permission Name.
4. Under User/Role, click the drop-down list to specify the Role or User that you want to authorize.
5. Select the check box of the permissions you want to grant to the User or Role specified.

Managing EFT
47
6. Click Save. A successful message is displayed at the top of the page.
To edit permissions for a User or Role
1. Login in to EFT Web Admin.
2. Click Admin, then click Authorization. The Edit Permissions page appears.
3. Click the User or Role Name that you want to edit. If the User or Role name does not appear in
the list, click Add. the User/Role drop-down list appears.
4. Click the User or Role Name that you want to edit. The Permissions page appears showing all
of the available permissions.
• You can display a specific category of permissions by selecting the category from the drop-down list, and then clicking Filter.
5. Select or clear permissions that you want to grant to or revoke from the selected User or Role.
6. Click Save.
Access Control (Containers) This topic describes how to manage Containers for access control.

EFT™ Web Admin Guide
48
Containers When EFT Web Admin is first installed, a new Container is created called Default Container, along with an EFT Web Admin user (i.e., the administrator). This EFT Web Admin user is authorized to perform all permissions; however, after installation, this Default Container is empty and there are no resources linked to the Default Container. Before you begin to manage the system, the EFT Web Admin administrator user will need to define which resources are linked to the Default Container and which EFT Web Admin Users/Roles are linked to the Container.
The name of the Container button can be changed to whatever you want, such as Departments. The rename procedure is described below.
• A Container is a logical structure that allows you to link related resources
o Containers can link resources from one or many Sites
• A Resource defines custom access controls for EFT resources and Roles/Users
o Resource types include: EFT Accounts, Settings Template, EFT Groups, Folders Reports, PGP Keys, SSH Keys, Event Rules, Customer Commands, AWE Tasks
o Resources can be linked directly or indirectly:
Directly: A link explicitly between the resource and the container
Indirectly: A link from a resource that other resources can be part of. For example, a User can be member of a Role, and by linking the Role to a Container, the user gets linked indirectly to that Container.
This table below shows how you could organize your Users/Roles Access Control in Containers:
User (Role) Containers
Government Services Accounting Legal Insurance Mike (Administrators) X X X X Jason (Operations Manager) X X

Managing EFT
49
Denise (Operations Manager) X X Robert (Operations Associate) X X Chris (Operations Associate) X X Kelly (Help Desk) X X X X X Bobby (Help Desk) X X X X X
"Containers" is the label on the button by default; however, you can rename this menu item to something else, such as Departments, Business Units, Locations, etc. Only the button label itself is changed; everywhere else the Container is referenced, it still says Container. For example, if you change the button label to Departments, on the Application Settings page, it will still say Container Name.
To rename the Containers button
1. Login in to EFT Web Admin.
2. Click Admin, then click Settings. The Application Settings page appears.
3. In the Name list, click Container Name, then click Edit. That page expands to show the Value
box and an Update button.
4. In the Value box, type the new name, then click Update. For example, type Departments. The name on the button changes.
Related Topics
• Link or Unlink Resources
• Managing Containers
Link or Unlink Resources After you create a Container, you need to link EFT resources to it (EFT Accounts, Settings Template, EFT Groups, Folders Reports, OpenPGP Keys, SSH Keys, Event Rules, Customer Commands, AWE Tasks). The procedures below describe how to link a resource to and unlink a resource from a Container.
For the procedures for creating, editing, or deleting Containers, refer to Managing Containers.
To link resources to the Container
1. Login in to EFT Web Admin.
2. Click Admin, then click Containers. The Containers page appears.
EFT™ Web Admin Guide
50
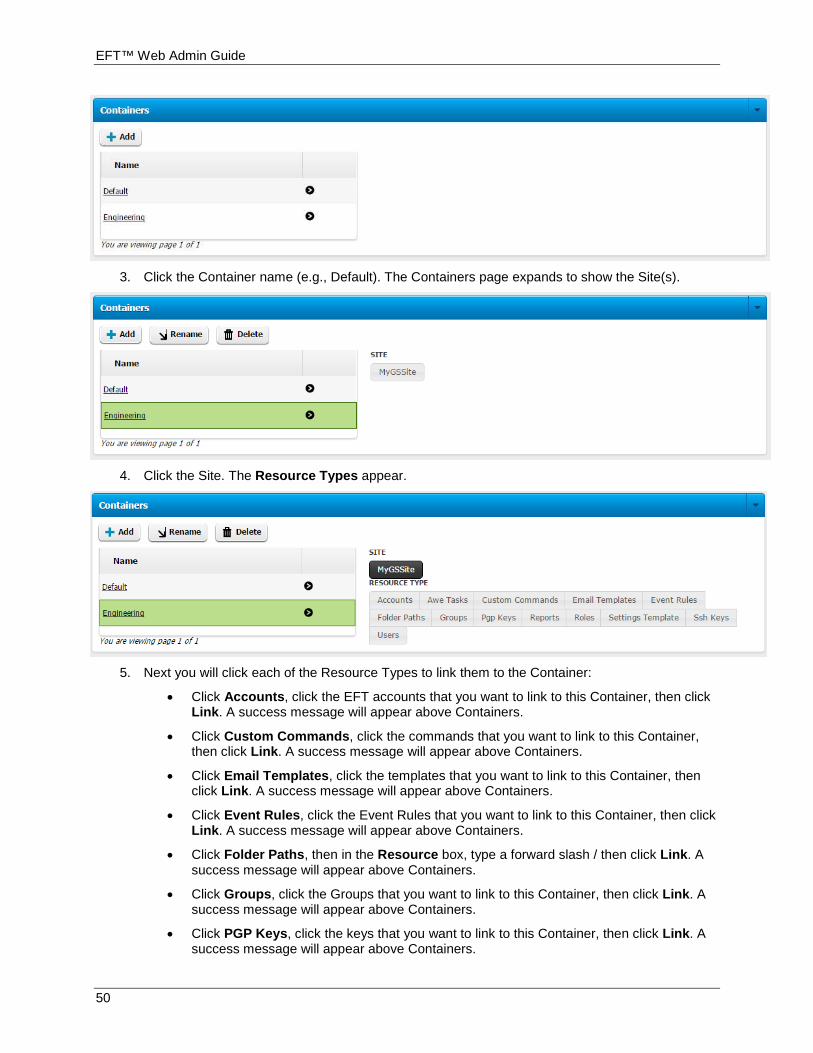
3. Click the Container name (e.g., Default). The Containers page expands to show the Site(s).
4. Click the Site. The Resource Types appear.
5. Next you will click each of the Resource Types to link them to the Container:
• Click Accounts, click the EFT accounts that you want to link to this Container, then click Link. A success message will appear above Containers.
• Click Custom Commands, click the commands that you want to link to this Container, then click Link. A success message will appear above Containers.
• Click Email Templates, click the templates that you want to link to this Container, then click Link. A success message will appear above Containers.
• Click Event Rules, click the Event Rules that you want to link to this Container, then click Link. A success message will appear above Containers.
• Click Folder Paths, then in the Resource box, type a forward slash / then click Link. A success message will appear above Containers.
• Click Groups, click the Groups that you want to link to this Container, then click Link. A success message will appear above Containers.
• Click PGP Keys, click the keys that you want to link to this Container, then click Link. A success message will appear above Containers.

Managing EFT
51
• Click Reports, click the Reports that you want to link to this Container, then click Link. A success message will appear above Containers.
• Click Roles, then in the Resource box, click the drop-down list to specify a permission group, then click Link. A success message will appear above Containers.
• Click Settings Templates, click the Settings Templates that you want to link to this Container, then click Link. A success message will appear above Containers.
• Click SSH Keys, click the SSH keys in the list that you want to link to this Container, then click Link. A success message will appear above Containers.
All of the resources in EFT on that Site that you want available in that Container are now linked to the selected Container.
To unlink resources from a Container
Follow the link resources procedure above, but click Unlink for those things you want to remove from the Container.
Managing Containers The Default Container is created during installation. The procedures below describe how to create, rename, and delete Containers. To link or unlink resources from Containers, refer to Link or Unlink Resources.
To create a Container
1. Login in to EFT Web Admin.
2. Click Admin, then click Containers. The Containers page appears.
3. Click Add. The Add New Container dialog box appears.
.
4. Provide a name for the Container, then click Add.
5. The new Container name appears in the list of Containers, and a success message appears at the top.
To delete a Container
1. Login in to EFT Web Admin.
EFT™ Web Admin Guide
52
2. Click Admin, then click Containers. The Containers page appears.
3. Click an Container in the list, then click Delete. A warning message appears.
4. Click Yes to delete the Container. The Container is removed from the list.
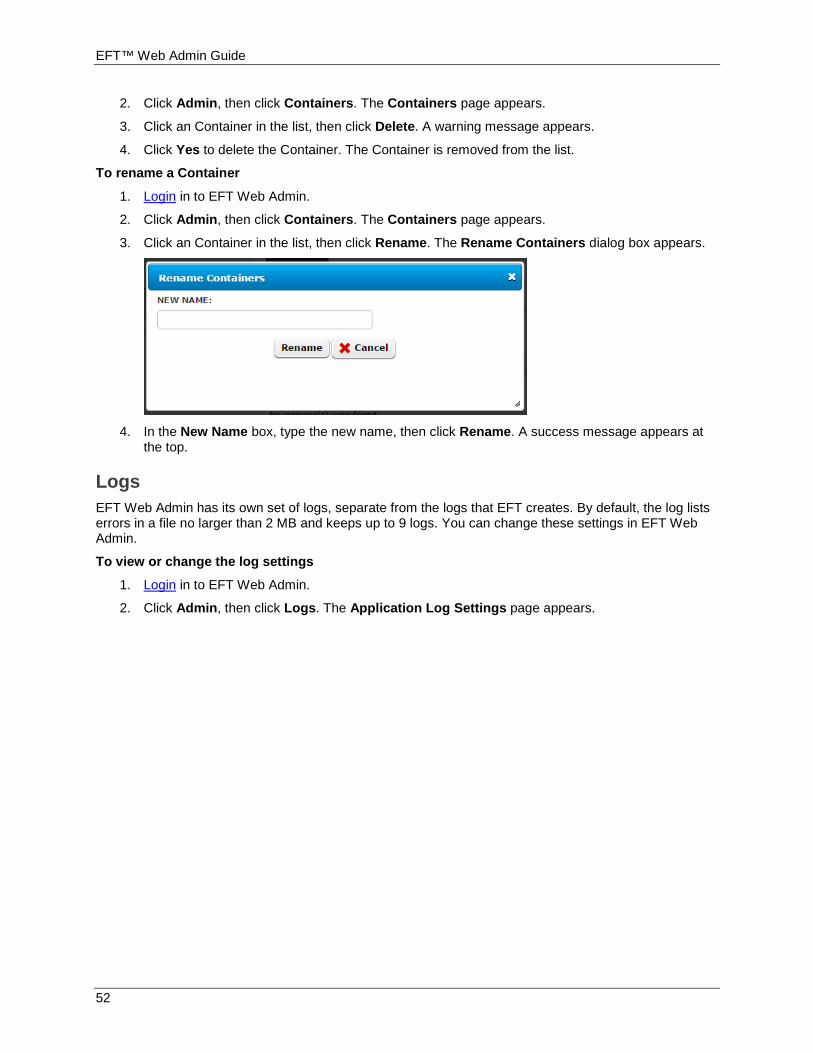
To rename a Container
1. Login in to EFT Web Admin.
2. Click Admin, then click Containers. The Containers page appears.
3. Click an Container in the list, then click Rename. The Rename Containers dialog box appears.
4. In the New Name box, type the new name, then click Rename. A success message appears at
the top.
Logs EFT Web Admin has its own set of logs, separate from the logs that EFT creates. By default, the log lists errors in a file no larger than 2 MB and keeps up to 9 logs. You can change these settings in EFT Web Admin.
To view or change the log settings
1. Login in to EFT Web Admin.
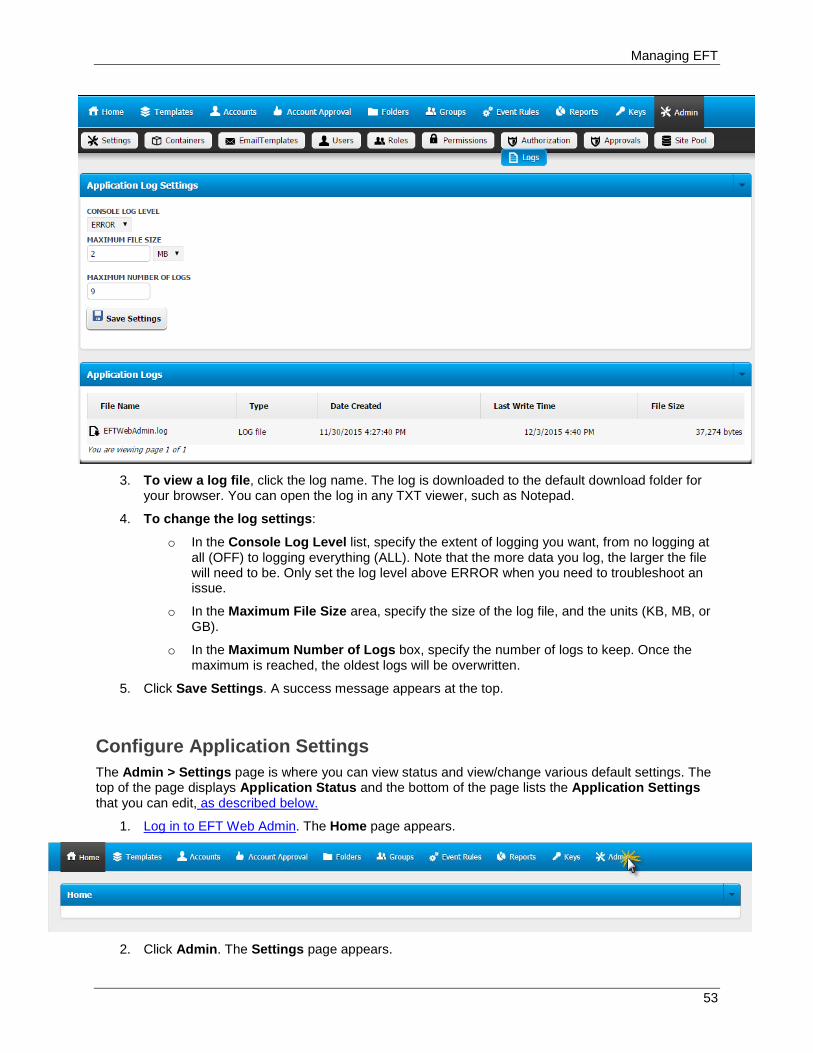
2. Click Admin, then click Logs. The Application Log Settings page appears.
Managing EFT
53
3. To view a log file, click the log name. The log is downloaded to the default download folder for
your browser. You can open the log in any TXT viewer, such as Notepad.
4. To change the log settings:
o In the Console Log Level list, specify the extent of logging you want, from no logging at all (OFF) to logging everything (ALL). Note that the more data you log, the larger the file will need to be. Only set the log level above ERROR when you need to troubleshoot an issue.
o In the Maximum File Size area, specify the size of the log file, and the units (KB, MB, or GB).
o In the Maximum Number of Logs box, specify the number of logs to keep. Once the maximum is reached, the oldest logs will be overwritten.
5. Click Save Settings. A success message appears at the top.
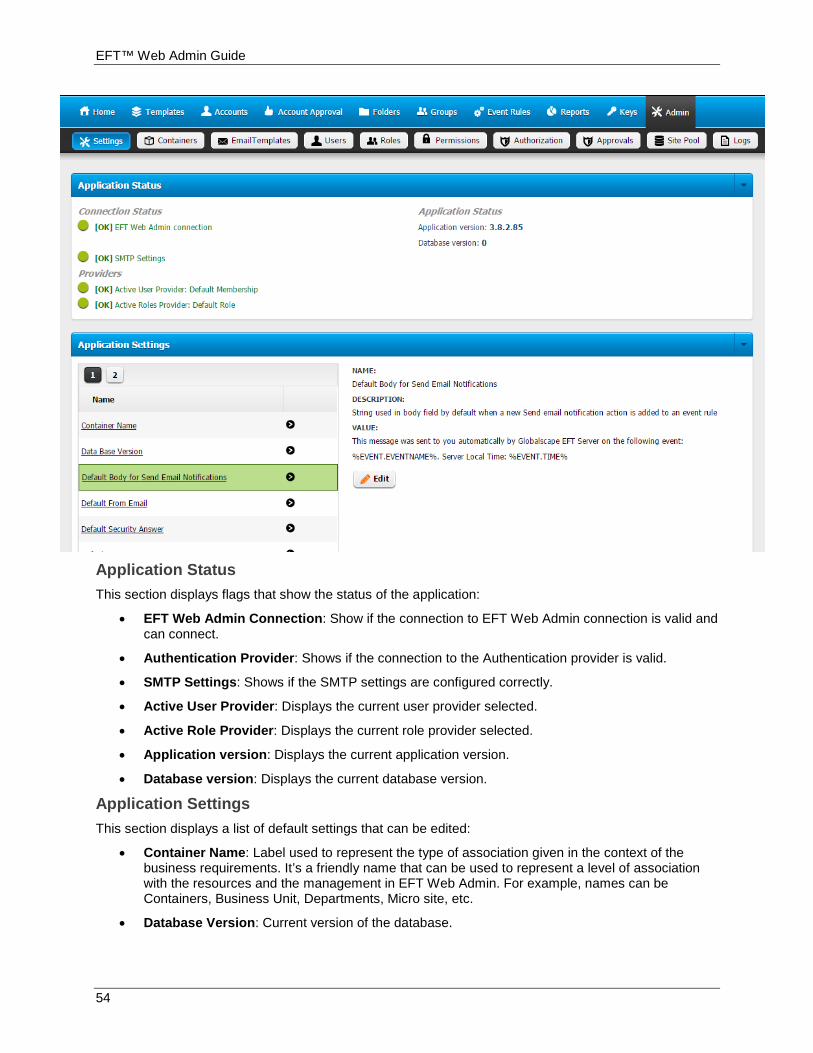
Configure Application Settings The Admin > Settings page is where you can view status and view/change various default settings. The top of the page displays Application Status and the bottom of the page lists the Application Settings that you can edit, as described below.
1. Log in to EFT Web Admin. The Home page appears.
2. Click Admin. The Settings page appears.
EFT™ Web Admin Guide
54
Application Status This section displays flags that show the status of the application:
• EFT Web Admin Connection: Show if the connection to EFT Web Admin connection is valid and can connect.
• Authentication Provider: Shows if the connection to the Authentication provider is valid.
• SMTP Settings: Shows if the SMTP settings are configured correctly.
• Active User Provider: Displays the current user provider selected.
• Active Role Provider: Displays the current role provider selected.
• Application version: Displays the current application version.
• Database version: Displays the current database version.
Application Settings This section displays a list of default settings that can be edited:
• Container Name: Label used to represent the type of association given in the context of the business requirements. It’s a friendly name that can be used to represent a level of association with the resources and the management in EFT Web Admin. For example, names can be Containers, Business Unit, Departments, Micro site, etc.
• Database Version: Current version of the database.
Managing EFT
55
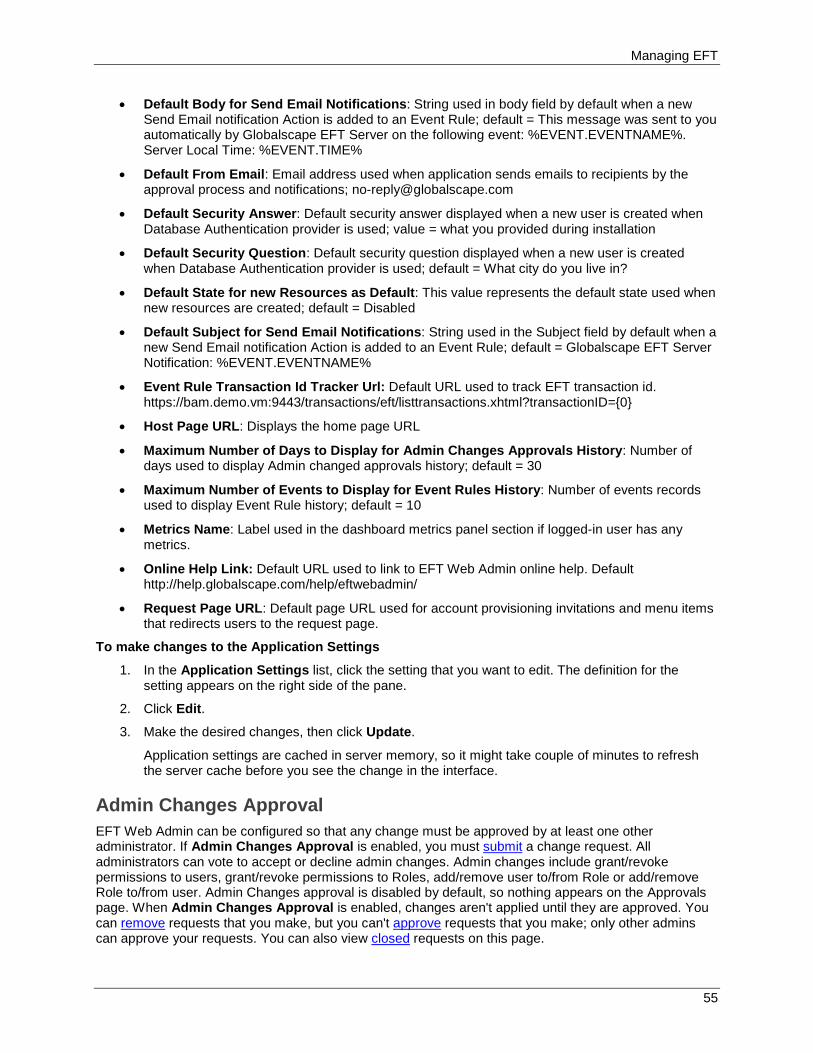
• Default Body for Send Email Notifications: String used in body field by default when a new Send Email notification Action is added to an Event Rule; default = This message was sent to you automatically by Globalscape EFT Server on the following event: %EVENT.EVENTNAME%. Server Local Time: %EVENT.TIME%
• Default From Email: Email address used when application sends emails to recipients by the approval process and notifications; [email protected]
• Default Security Answer: Default security answer displayed when a new user is created when Database Authentication provider is used; value = what you provided during installation
• Default Security Question: Default security question displayed when a new user is created when Database Authentication provider is used; default = What city do you live in?
• Default State for new Resources as Default: This value represents the default state used when new resources are created; default = Disabled
• Default Subject for Send Email Notifications: String used in the Subject field by default when a new Send Email notification Action is added to an Event Rule; default = Globalscape EFT Server Notification: %EVENT.EVENTNAME%
• Event Rule Transaction Id Tracker Url: Default URL used to track EFT transaction id. https://bam.demo.vm:9443/transactions/eft/listtransactions.xhtml?transactionID={0}
• Host Page URL: Displays the home page URL
• Maximum Number of Days to Display for Admin Changes Approvals History: Number of days used to display Admin changed approvals history; default = 30
• Maximum Number of Events to Display for Event Rules History: Number of events records used to display Event Rule history; default = 10
• Metrics Name: Label used in the dashboard metrics panel section if logged-in user has any metrics.
• Online Help Link: Default URL used to link to EFT Web Admin online help. Default http://help.globalscape.com/help/eftwebadmin/
• Request Page URL: Default page URL used for account provisioning invitations and menu items that redirects users to the request page.
To make changes to the Application Settings
1. In the Application Settings list, click the setting that you want to edit. The definition for the setting appears on the right side of the pane.
2. Click Edit.
3. Make the desired changes, then click Update.
Application settings are cached in server memory, so it might take couple of minutes to refresh the server cache before you see the change in the interface.
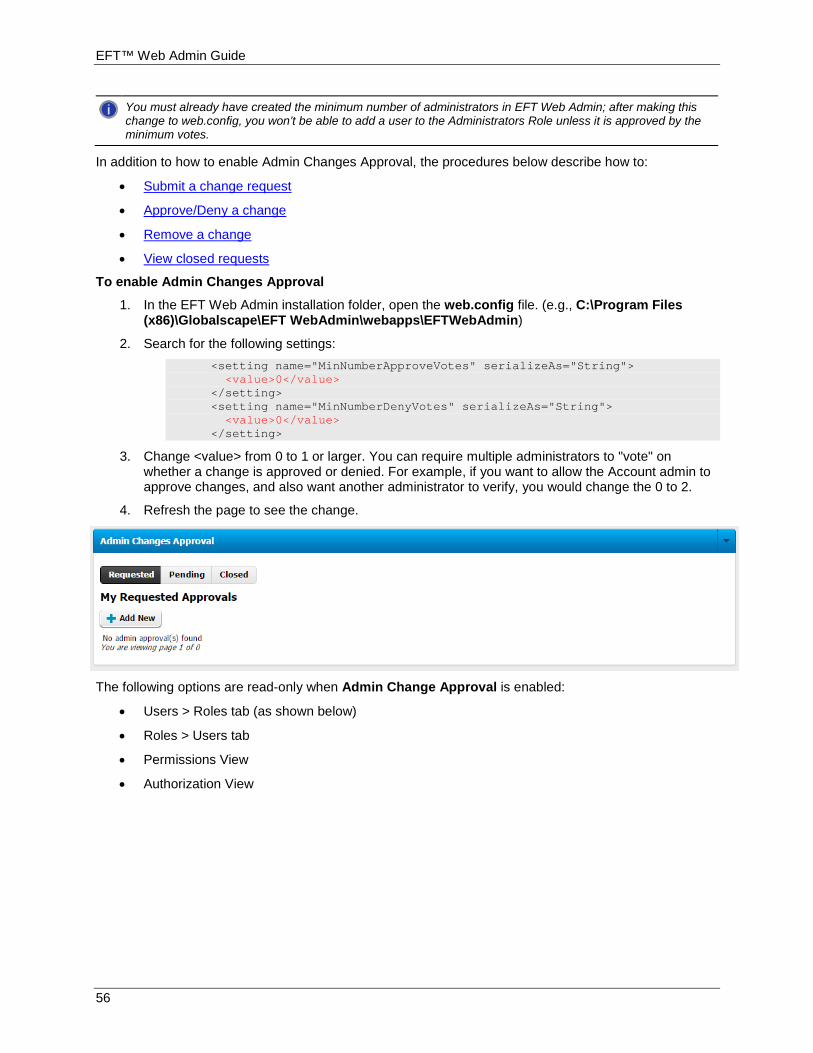
Admin Changes Approval EFT Web Admin can be configured so that any change must be approved by at least one other administrator. If Admin Changes Approval is enabled, you must submit a change request. All administrators can vote to accept or decline admin changes. Admin changes include grant/revoke permissions to users, grant/revoke permissions to Roles, add/remove user to/from Role or add/remove Role to/from user. Admin Changes approval is disabled by default, so nothing appears on the Approvals page. When Admin Changes Approval is enabled, changes aren't applied until they are approved. You can remove requests that you make, but you can't approve requests that you make; only other admins can approve your requests. You can also view closed requests on this page.
EFT™ Web Admin Guide
56
You must already have created the minimum number of administrators in EFT Web Admin; after making this change to web.config, you won’t be able to add a user to the Administrators Role unless it is approved by the minimum votes.
In addition to how to enable Admin Changes Approval, the procedures below describe how to:
• Submit a change request
• Approve/Deny a change
• Remove a change
• View closed requests
To enable Admin Changes Approval
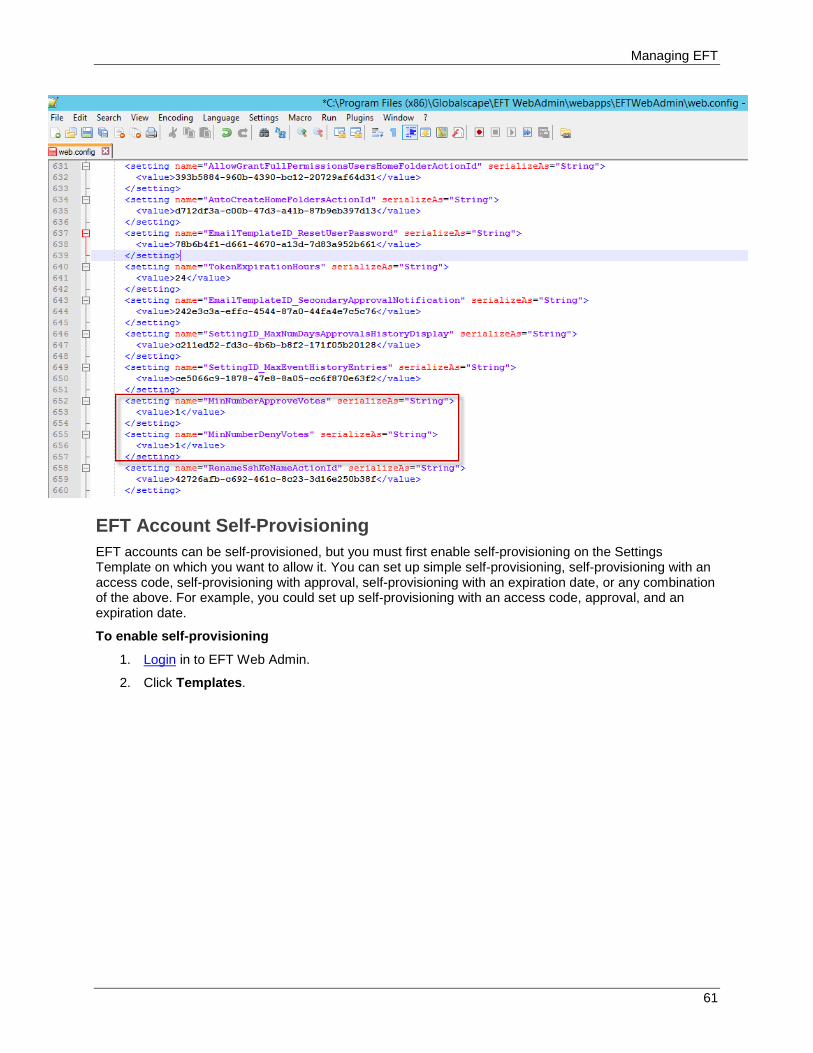
1. In the EFT Web Admin installation folder, open the web.config file. (e.g., C:\Program Files (x86)\Globalscape\EFT WebAdmin\webapps\EFTWebAdmin)
2. Search for the following settings: <setting name="MinNumberApproveVotes" serializeAs="String"> <value>0</value> </setting> <setting name="MinNumberDenyVotes" serializeAs="String"> <value>0</value> </setting>
3. Change <value> from 0 to 1 or larger. You can require multiple administrators to "vote" on whether a change is approved or denied. For example, if you want to allow the Account admin to approve changes, and also want another administrator to verify, you would change the 0 to 2.
4. Refresh the page to see the change.
The following options are read-only when Admin Change Approval is enabled:
• Users > Roles tab (as shown below)
• Roles > Users tab
• Permissions View
• Authorization View

Managing EFT
57
To submit an Admin Change Request
1. Login as an admin user.
2. Click Admin, then click Approvals.
3. Click Requested.
4. Click Add New. The Request New Admin Change Approval options appear.
5. Specify the Resource Type:

EFT™ Web Admin Guide
58
• User Permissions
• Role Permissions
• Role Member
6. Specify an Operation:
• Add
• Remove
7. Specify the Permission or Role that you want to add or remove to Roles or Users. (The options change depending on which Resource Type you specify.)
8. Click Submit Request.
Your request appears on the My Requested Approvals page.
To remove a request
When an Admin Change is requested, it appears on the My Requested Approvals page. You can remove requests that you have made.
1. Click Admin, then click Approvals.
2. Click Requested.
3. Click Remove for each request that you want to remove.
To approve or deny Admin Changes
1. Click Admin, then click Approvals.
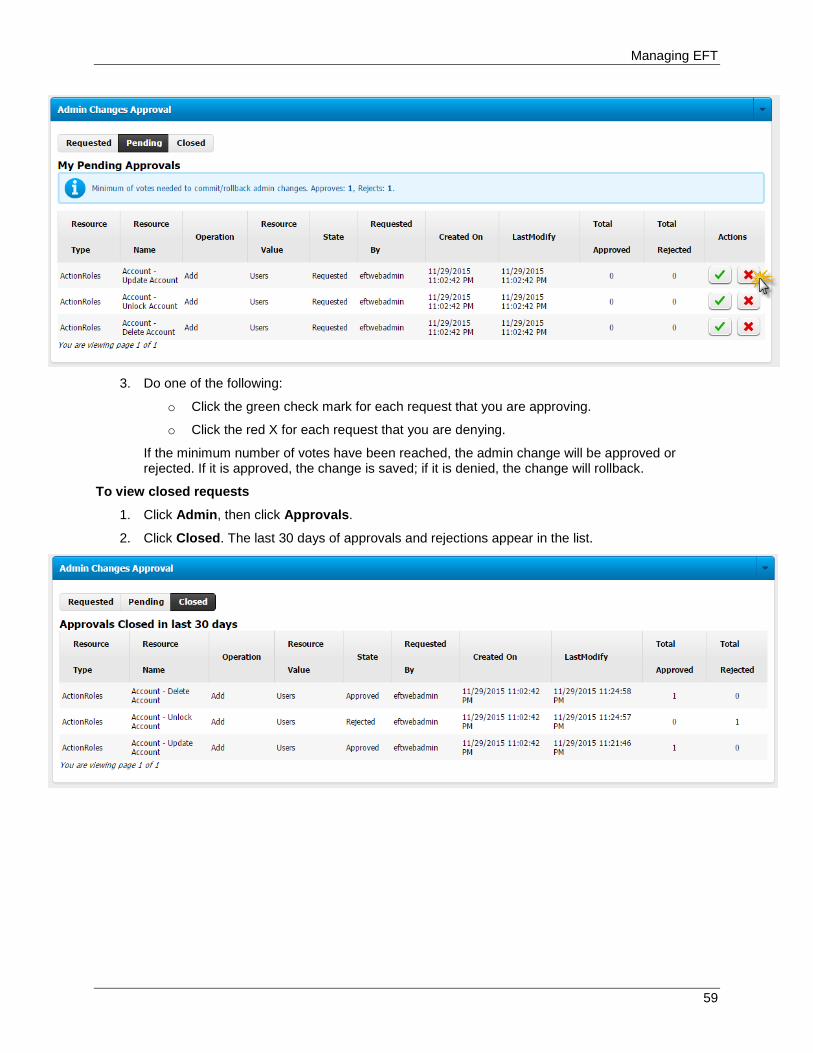
2. Click Pending. Changes pending approval appear.
Managing EFT
59
3. Do one of the following:
o Click the green check mark for each request that you are approving.
o Click the red X for each request that you are denying.
If the minimum number of votes have been reached, the admin change will be approved or rejected. If it is approved, the change is saved; if it is denied, the change will rollback.
To view closed requests
1. Click Admin, then click Approvals.
2. Click Closed. The last 30 days of approvals and rejections appear in the list.
EFT™ Web Admin Guide
60
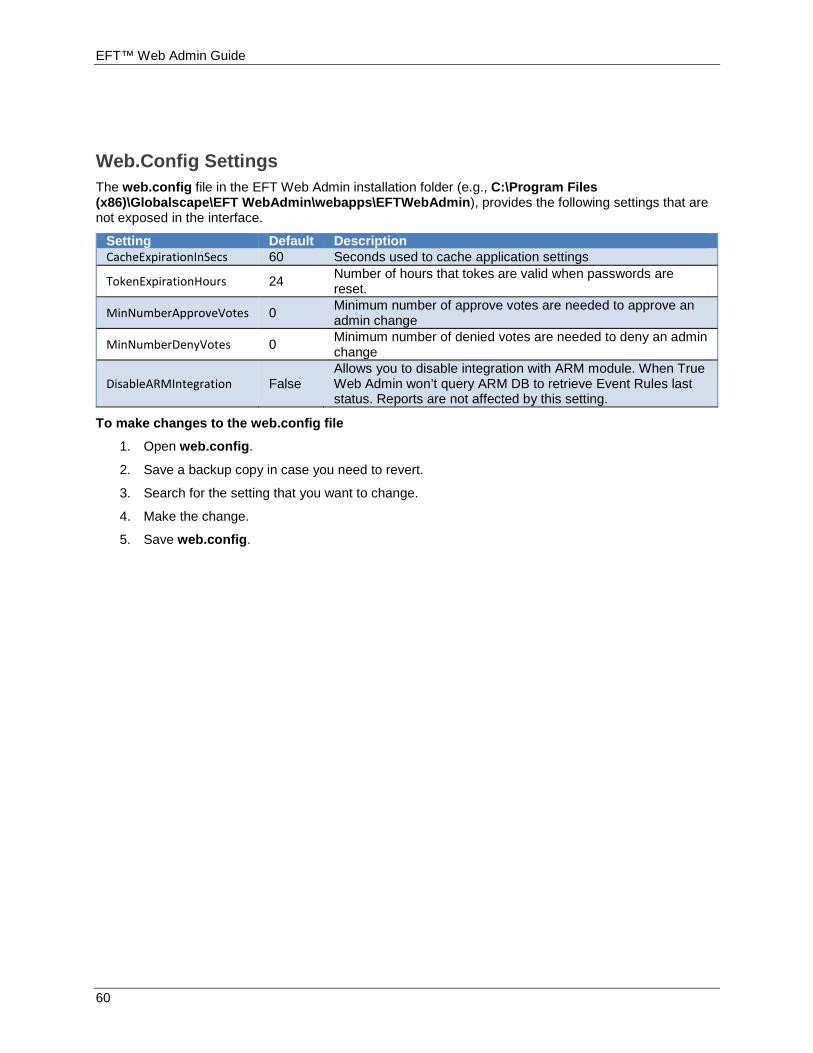
Web.Config Settings The web.config file in the EFT Web Admin installation folder (e.g., C:\Program Files (x86)\Globalscape\EFT WebAdmin\webapps\EFTWebAdmin), provides the following settings that are not exposed in the interface.
Setting Default Description CacheExpirationInSecs 60 Seconds used to cache application settings
TokenExpirationHours 24 Number of hours that tokes are valid when passwords are reset.
MinNumberApproveVotes 0 Minimum number of approve votes are needed to approve an admin change
MinNumberDenyVotes 0 Minimum number of denied votes are needed to deny an admin change
DisableARMIntegration False Allows you to disable integration with ARM module. When True Web Admin won’t query ARM DB to retrieve Event Rules last status. Reports are not affected by this setting.
To make changes to the web.config file
1. Open web.config.
2. Save a backup copy in case you need to revert.
3. Search for the setting that you want to change.
4. Make the change.
5. Save web.config.
Managing EFT
61
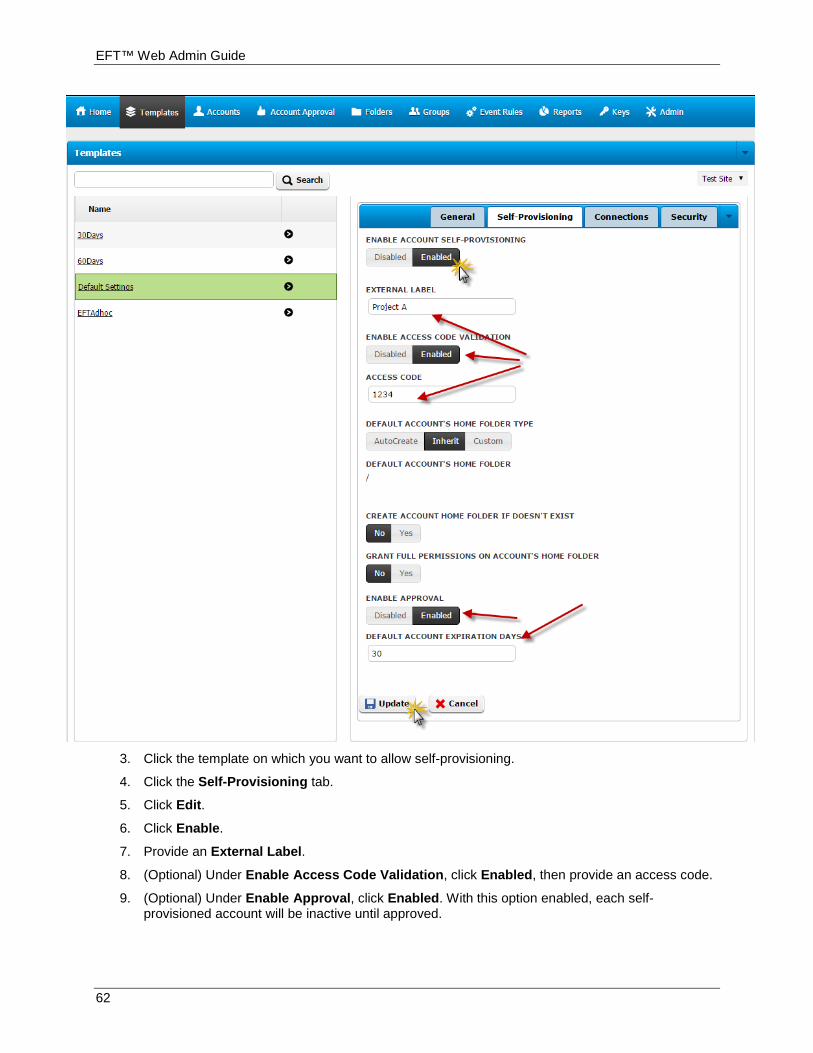
EFT Account Self-Provisioning EFT accounts can be self-provisioned, but you must first enable self-provisioning on the Settings Template on which you want to allow it. You can set up simple self-provisioning, self-provisioning with an access code, self-provisioning with approval, self-provisioning with an expiration date, or any combination of the above. For example, you could set up self-provisioning with an access code, approval, and an expiration date.
To enable self-provisioning
1. Login in to EFT Web Admin.
2. Click Templates.
EFT™ Web Admin Guide
62
3. Click the template on which you want to allow self-provisioning.
4. Click the Self-Provisioning tab.
5. Click Edit.
6. Click Enable.
7. Provide an External Label.
8. (Optional) Under Enable Access Code Validation, click Enabled, then provide an access code.
9. (Optional) Under Enable Approval, click Enabled. With this option enabled, each self-provisioned account will be inactive until approved.

Managing EFT
63
10. (Optional) Under Default Account Expiration Days, provide the number of days after which to expire the account. (0 = never expire.)
11. Click Update.
12. Open a new browser window and enter the URL of EFT Web Admin, and then add /request/ to the end of it (e.g., https://mycompanyportal:4433/EFTWebAdmin/request/). The Request New EFT Account page appears.
13. In the Access To list, click the name of the Template on which you want to request a new
account, then click Next. The Request New EFT Account form appears.
14. Complete the form, then click Submit Request. A success message appears. An email is sent to
the requestor as a confirmation of the submission, and an email is sent to the user who can approve Account requests.
EFT™ Web Admin Guide
64
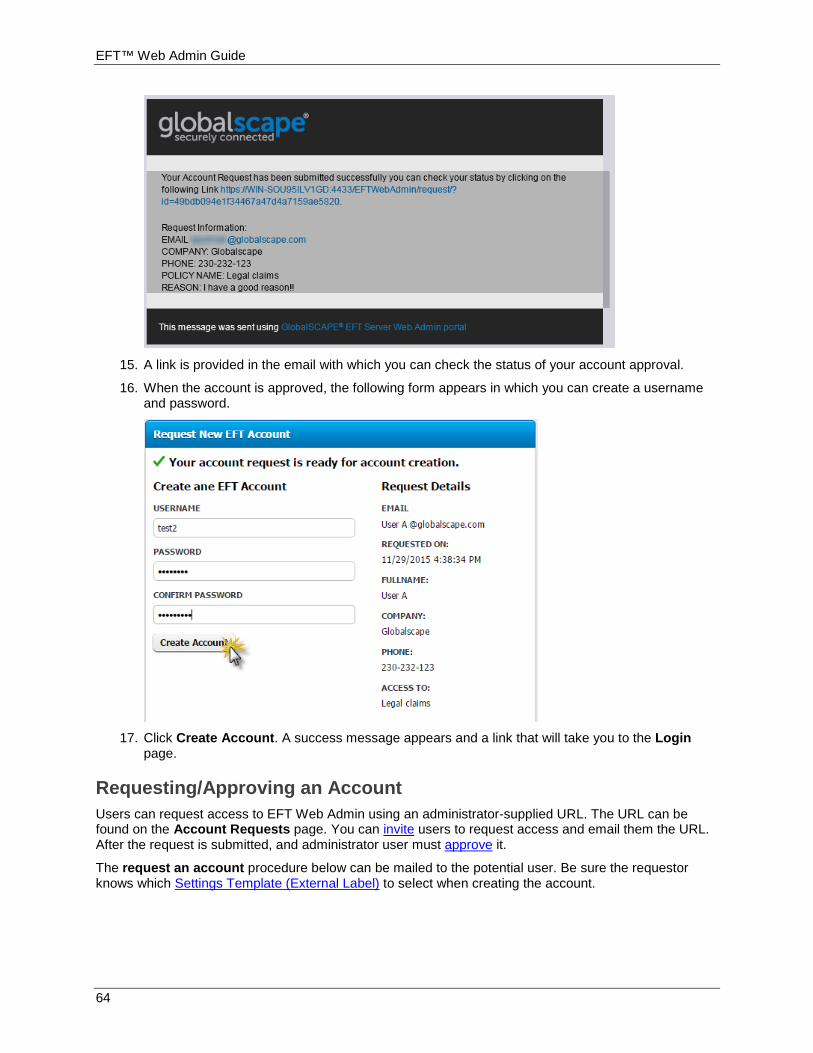
15. A link is provided in the email with which you can check the status of your account approval.
16. When the account is approved, the following form appears in which you can create a username and password.
17. Click Create Account. A success message appears and a link that will take you to the Login
page.
Requesting/Approving an Account Users can request access to EFT Web Admin using an administrator-supplied URL. The URL can be found on the Account Requests page. You can invite users to request access and email them the URL. After the request is submitted, and administrator user must approve it.
The request an account procedure below can be mailed to the potential user. Be sure the requestor knows which Settings Template (External Label) to select when creating the account.
Managing EFT
65
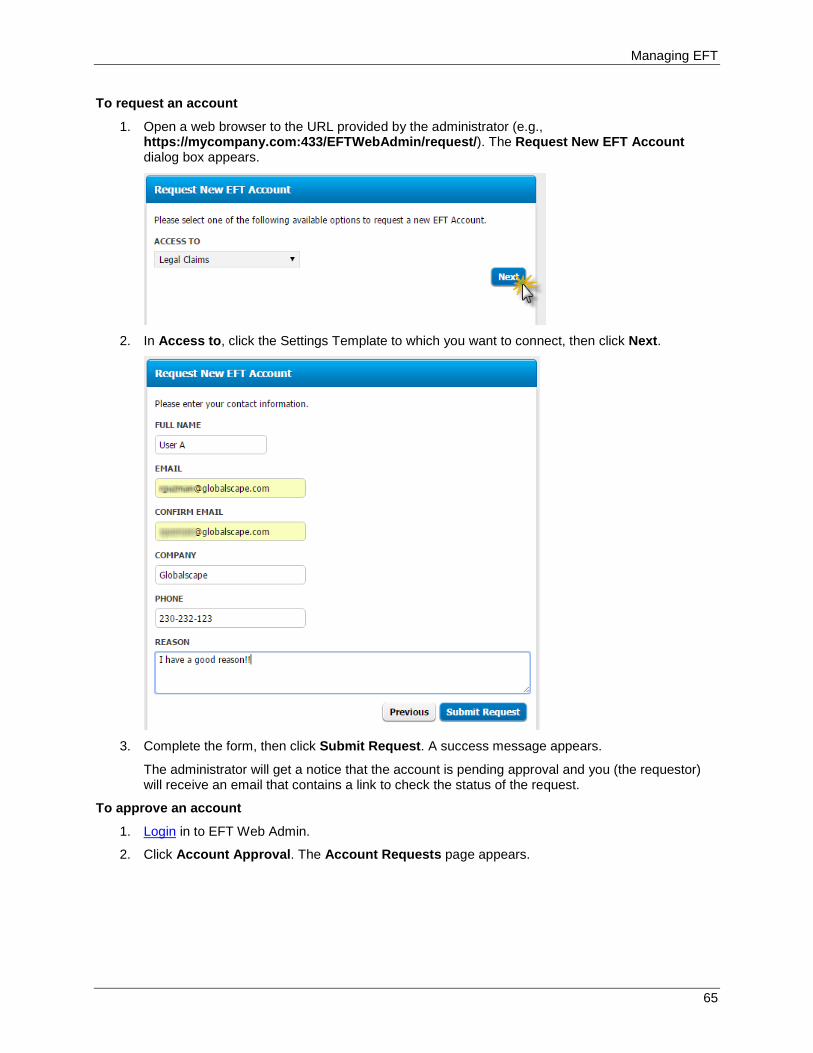
To request an account
1. Open a web browser to the URL provided by the administrator (e.g., https://mycompany.com:433/EFTWebAdmin/request/). The Request New EFT Account dialog box appears.
2. In Access to, click the Settings Template to which you want to connect, then click Next.
3. Complete the form, then click Submit Request. A success message appears.
The administrator will get a notice that the account is pending approval and you (the requestor) will receive an email that contains a link to check the status of the request.
To approve an account
1. Login in to EFT Web Admin.
2. Click Account Approval. The Account Requests page appears.
EFT™ Web Admin Guide
66
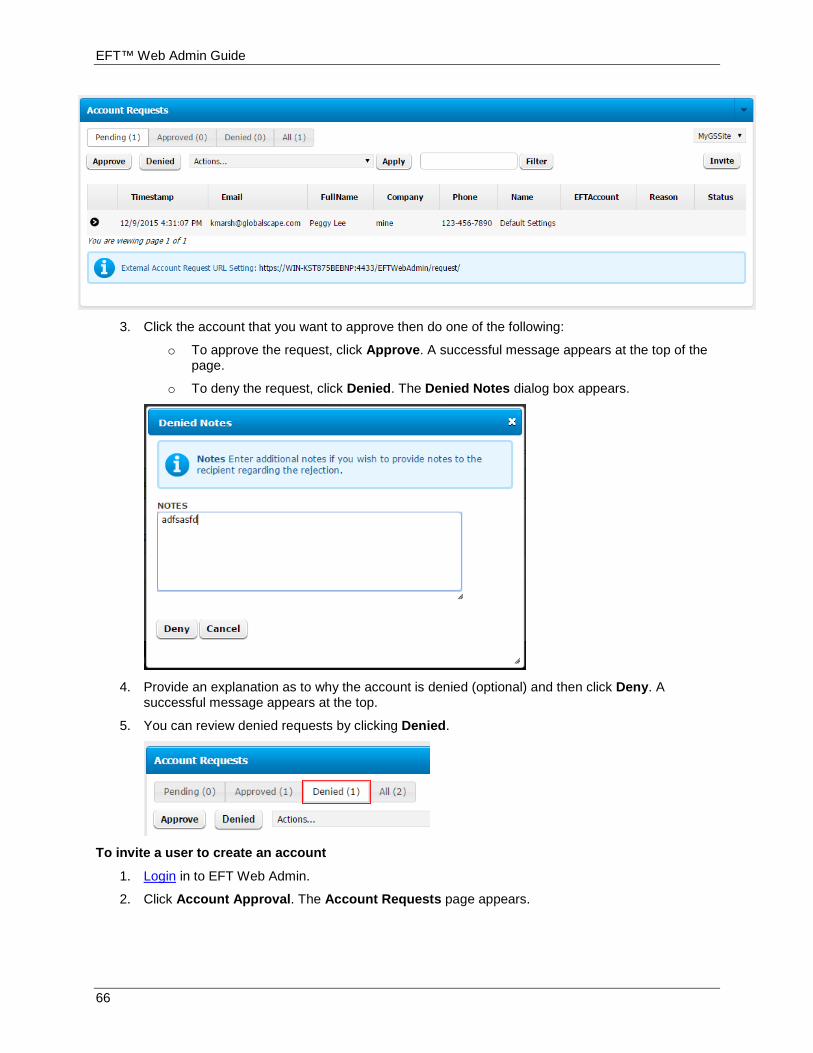
3. Click the account that you want to approve then do one of the following:
o To approve the request, click Approve. A successful message appears at the top of the page.
o To deny the request, click Denied. The Denied Notes dialog box appears.
4. Provide an explanation as to why the account is denied (optional) and then click Deny. A
successful message appears at the top.
5. You can review denied requests by clicking Denied.
To invite a user to create an account
1. Login in to EFT Web Admin.
2. Click Account Approval. The Account Requests page appears.

Managing EFT
67
3. Click Invite. The Send Invite to Create an Account dialog box appears.
4. Provide the name and email of the invitee, then click Send Invite. An invite is sent to the email
address with a link to create an account.
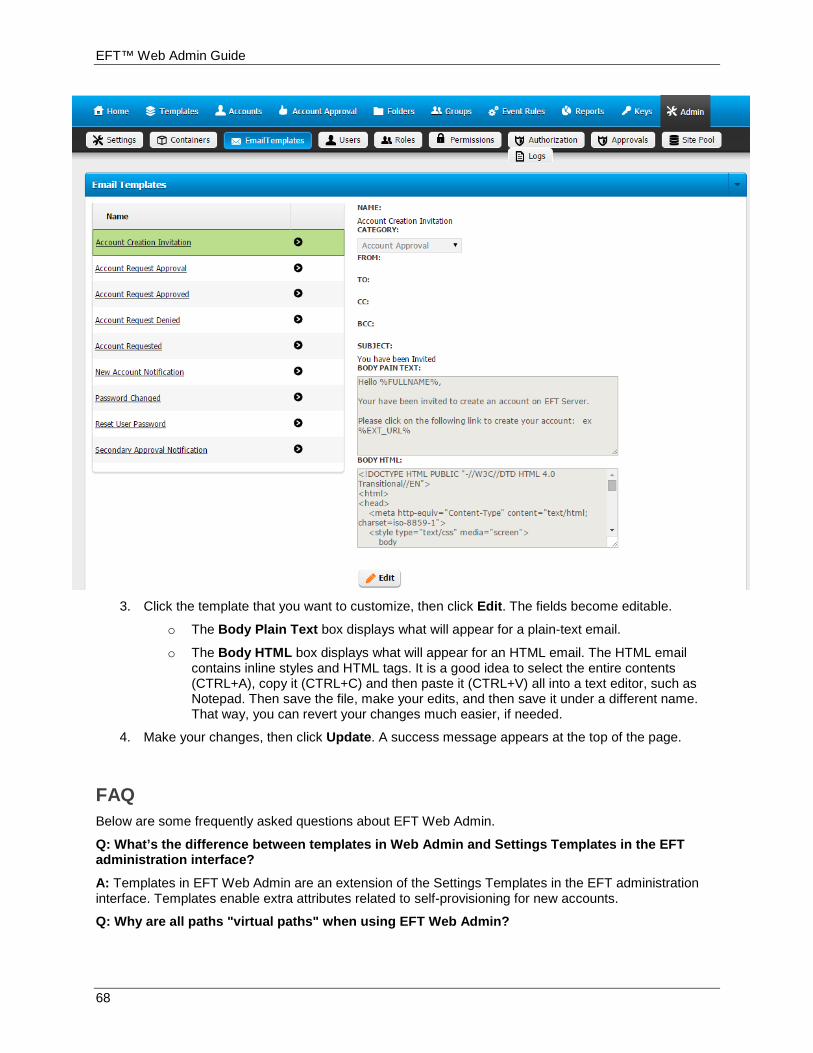
Email Templates Customization When EFT Web Admin sends emails, it references its Email Templates page, which contains several templates containing default settings. You can keep the templates as is or edit the templates to suit your needs.
To edit the email templates
1. Log in to EFT Web Admin. The Home page appears.
2. Click Admin, then click Email Templates. The Email Templates page appears.
EFT™ Web Admin Guide
68
3. Click the template that you want to customize, then click Edit. The fields become editable.
o The Body Plain Text box displays what will appear for a plain-text email.
o The Body HTML box displays what will appear for an HTML email. The HTML email contains inline styles and HTML tags. It is a good idea to select the entire contents (CTRL+A), copy it (CTRL+C) and then paste it (CTRL+V) all into a text editor, such as Notepad. Then save the file, make your edits, and then save it under a different name. That way, you can revert your changes much easier, if needed.
4. Make your changes, then click Update. A success message appears at the top of the page.
FAQ Below are some frequently asked questions about EFT Web Admin.
Q: What’s the difference between templates in Web Admin and Settings Templates in the EFT administration interface?
A: Templates in EFT Web Admin are an extension of the Settings Templates in the EFT administration interface. Templates enable extra attributes related to self-provisioning for new accounts.
Q: Why are all paths "virtual paths" when using EFT Web Admin?
Managing EFT
69
A: For security reasons, Web Admin isolates Physical File System access by providing access to only the Virtual File System by default. If a physical access such as another folder outside of the Site root path or access to an NAS or other share is needed, then the EFT administrator needs to create a virtual folder that points to the location they want to use as a mounting point for users using Web Admin.
Q: Can I create Virtual Folders using Web Admin?
A: No. Virtual Folders are strictly prohibited from Web Admin; however, virtual folders within the same folder Site root are allowed by using the "Share" option, which allows you to create a virtual folder under a user’s home folder that points to the folder selected.
Q: I just created a new EFT user in the EFT administration interface, but I'm not seeing it in Web Admin. Why not?
A: Before you can see EFT users in Web Admin, you must link it to the Container that they are a member of. Click Admin, click Containers, click a Container –Site, and then click Accounts. Find the account and link it to the Container.
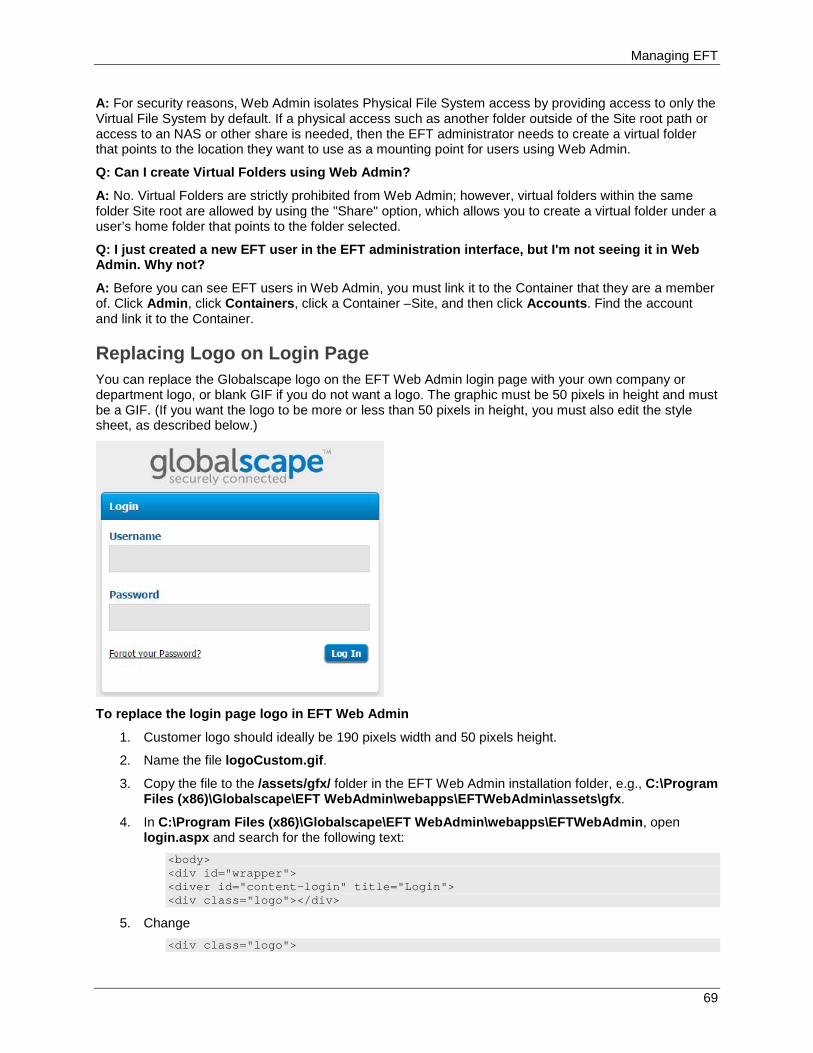
Replacing Logo on Login Page You can replace the Globalscape logo on the EFT Web Admin login page with your own company or department logo, or blank GIF if you do not want a logo. The graphic must be 50 pixels in height and must be a GIF. (If you want the logo to be more or less than 50 pixels in height, you must also edit the style sheet, as described below.)
To replace the login page logo in EFT Web Admin
1. Customer logo should ideally be 190 pixels width and 50 pixels height.
2. Name the file logoCustom.gif.
3. Copy the file to the /assets/gfx/ folder in the EFT Web Admin installation folder, e.g., C:\Program Files (x86)\Globalscape\EFT WebAdmin\webapps\EFTWebAdmin\assets\gfx.
4. In C:\Program Files (x86)\Globalscape\EFT WebAdmin\webapps\EFTWebAdmin, open login.aspx and search for the following text:
<body> <div id="wrapper"> <diver id="content-login" title="Login"> <div class="logo"></div>
5. Change <div class="logo">
EFT™ Web Admin Guide
70
to <div class="LogoCustom">
6. Repeat steps 4-6 in C:\Program Files (x86)\Globalscape\EFT WebAdmin\webapps\EFTWebAdmin\Request\: open Default.aspx and search for the following text:
<body> <div id="wrapper"> <diver id="content-login" title="Login"> <div class="logo"></div>
7. Change <div class="logo">
to <div class="LogoCustom">
8. If you made the logo to 190x50, then the logo is updated. If you were not able to make the logo 190x50, then adjust the style sheet as follows:
9. Open C:\Program Files (x86)\Globalscape\EFT WebAdmin\webapps\EFTWebAdmin\assets\css\style.css and look for the following text:
#content-login .logoCustom { height: 50px background:url("../gfx/logoCustom.gif") no-repeat left top; margin-bottom:10px; }
10. Edit the size as needed, then save the files.
Alternative Authentication Sources The PDFs linked below provide instructions for alternative authentication sources in EFT Web Admin.
• How to use Active Directory as Authentication Source and Role Provider on EFT Web Admin
• How to use EFT Admins as Authentication Source on EFT Web Admin
• How to use EFT Admins as Authentication Source and SQL Roles on EFT Web Admin
Be sure to make a backup of the EFT Web Admin application files, e.g., C:\Program Files (x86)\Globalscape\EFT WebAdmin\webapps\.
EFT Web Admin Permissions The table below explains each of the EFT Web Admin permissions.
Permission Name Description
Account - Allow Grant full permissions to users in their home folder
Allows account to enable/disable grant full permission option when a user is created
Account - Allow to Automatically create Users Home Folder during account provisioning
Allows account to users to automatically create users home folders while EFT account provisioning
Account - Change Account Password Allows account to reset or change passwords for EFT accounts

Managing EFT
71
Permission Name Description
Account - Create Account Allows account to create or add new EFT accounts
Account - Delete Account Allows account to delete EFT accounts
Account - Display Account Detail Allows account to display EFT accounts details
Account - Display Account Menu Item Displays the account menu item at the top menu
Account - Unlock Account Allows account to unlock locked EFT accounts
Account - Update Account Allows account to update EFT accounts
Account Approval - Approve/Reject Account Request
Allows account to approve or reject access requests
Account Approval - Delete Allows account to delete an account requests
Account Approval - Display Account Approval Menu Item
Displays the account approval menu item at the top menu
Account Approval - Send Approval email notification
Sends an email when an account request needs approval
Account Approval - Send email alert on Account Request
Sends and email alert for approval when a new account request is submitted
Account Approval - Send Invites Allows account to send invites to create EFT accounts via email
Admin Settings - Display Admin Menu Item Displays admin settings menu item at the top menu
Event Rule - Add Event Rule Action (Advanced Workflow)
Allows account to add a new advanced workflow action to an event rule step
Event Rule - Add Event Rule Action (Backup Configuration)
Add a new backup configuration action to an event rule step
Event Rule - Add Event Rule Action (Clean up Folder)
Allows account to add a new clean up folder action to an event rule step
Event Rule - Add Event Rule Action (Custom Command)
Allows account to add a new custom command action to an event rule step
Event Rule - Add Event Rule Action (Download) Allows account to add a new download action to an event rule step
Event Rule - Add Event Rule Action (Encrypt/Decrypt PGP)
Allows account to add a new encrypt/decrypt PGP action to an event rule step
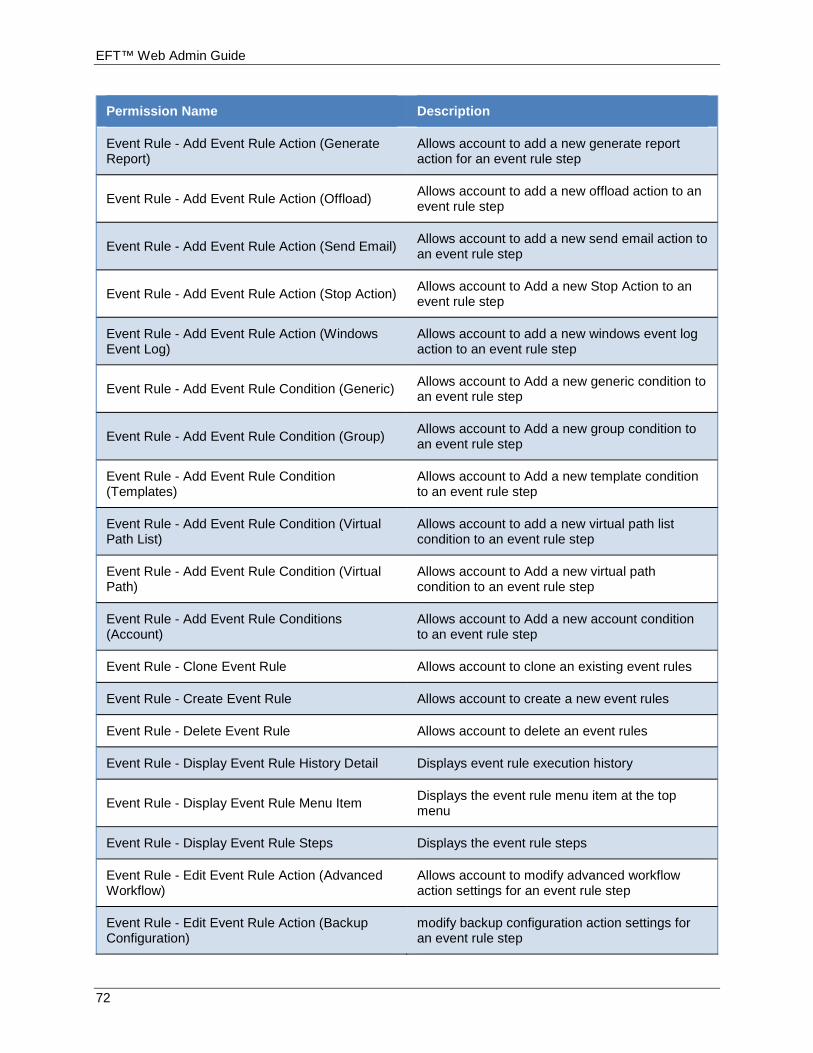
EFT™ Web Admin Guide
72
Permission Name Description
Event Rule - Add Event Rule Action (Generate Report)
Allows account to add a new generate report action for an event rule step
Event Rule - Add Event Rule Action (Offload) Allows account to add a new offload action to an event rule step
Event Rule - Add Event Rule Action (Send Email) Allows account to add a new send email action to an event rule step
Event Rule - Add Event Rule Action (Stop Action) Allows account to Add a new Stop Action to an event rule step
Event Rule - Add Event Rule Action (Windows Event Log)
Allows account to add a new windows event log action to an event rule step
Event Rule - Add Event Rule Condition (Generic) Allows account to Add a new generic condition to an event rule step
Event Rule - Add Event Rule Condition (Group) Allows account to Add a new group condition to an event rule step
Event Rule - Add Event Rule Condition (Templates)
Allows account to Add a new template condition to an event rule step
Event Rule - Add Event Rule Condition (Virtual Path List)
Allows account to add a new virtual path list condition to an event rule step
Event Rule - Add Event Rule Condition (Virtual Path)
Allows account to Add a new virtual path condition to an event rule step
Event Rule - Add Event Rule Conditions (Account)
Allows account to Add a new account condition to an event rule step
Event Rule - Clone Event Rule Allows account to clone an existing event rules
Event Rule - Create Event Rule Allows account to create a new event rules
Event Rule - Delete Event Rule Allows account to delete an event rules
Event Rule - Display Event Rule History Detail Displays event rule execution history
Event Rule - Display Event Rule Menu Item Displays the event rule menu item at the top menu
Event Rule - Display Event Rule Steps Displays the event rule steps
Event Rule - Edit Event Rule Action (Advanced Workflow)
Allows account to modify advanced workflow action settings for an event rule step
Event Rule - Edit Event Rule Action (Backup Configuration)
modify backup configuration action settings for an event rule step
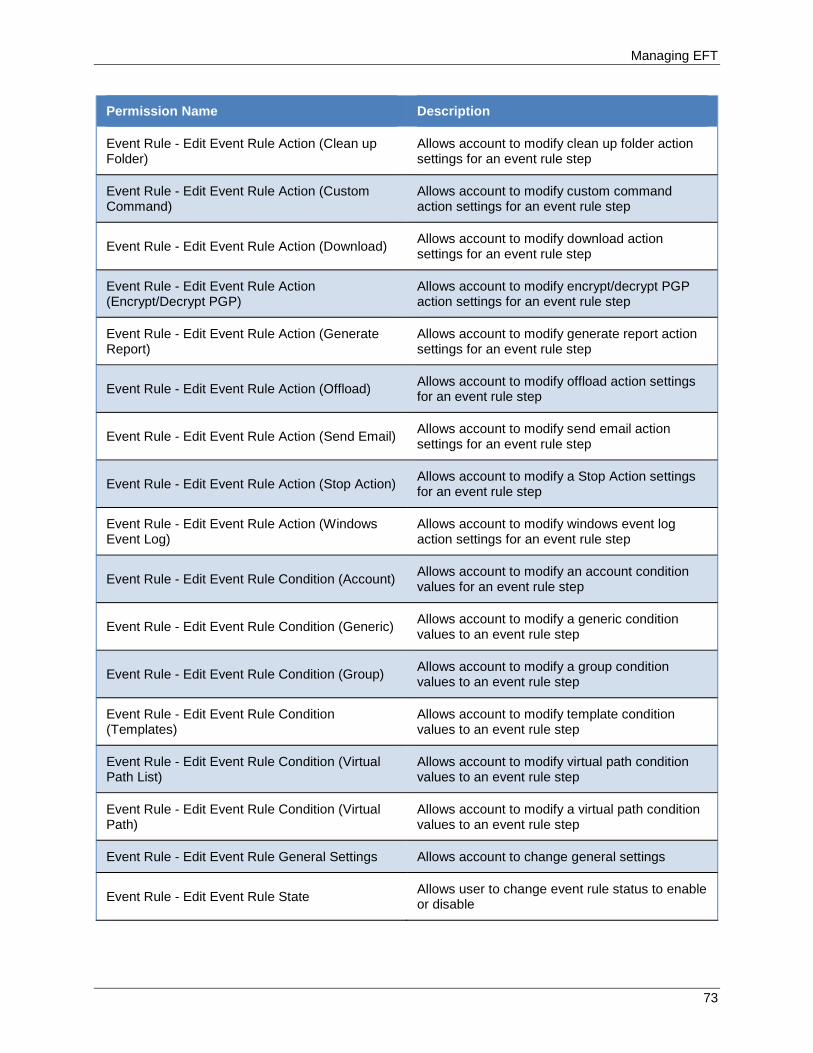
Managing EFT
73
Permission Name Description
Event Rule - Edit Event Rule Action (Clean up Folder)
Allows account to modify clean up folder action settings for an event rule step
Event Rule - Edit Event Rule Action (Custom Command)
Allows account to modify custom command action settings for an event rule step
Event Rule - Edit Event Rule Action (Download) Allows account to modify download action settings for an event rule step
Event Rule - Edit Event Rule Action (Encrypt/Decrypt PGP)
Allows account to modify encrypt/decrypt PGP action settings for an event rule step
Event Rule - Edit Event Rule Action (Generate Report)
Allows account to modify generate report action settings for an event rule step
Event Rule - Edit Event Rule Action (Offload) Allows account to modify offload action settings for an event rule step
Event Rule - Edit Event Rule Action (Send Email) Allows account to modify send email action settings for an event rule step
Event Rule - Edit Event Rule Action (Stop Action) Allows account to modify a Stop Action settings for an event rule step
Event Rule - Edit Event Rule Action (Windows Event Log)
Allows account to modify windows event log action settings for an event rule step
Event Rule - Edit Event Rule Condition (Account) Allows account to modify an account condition values for an event rule step
Event Rule - Edit Event Rule Condition (Generic) Allows account to modify a generic condition values to an event rule step
Event Rule - Edit Event Rule Condition (Group) Allows account to modify a group condition values to an event rule step
Event Rule - Edit Event Rule Condition (Templates)
Allows account to modify template condition values to an event rule step
Event Rule - Edit Event Rule Condition (Virtual Path List)
Allows account to modify virtual path condition values to an event rule step
Event Rule - Edit Event Rule Condition (Virtual Path)
Allows account to modify a virtual path condition values to an event rule step
Event Rule - Edit Event Rule General Settings Allows account to change general settings
Event Rule - Edit Event Rule State Allows user to change event rule status to enable or disable
EFT™ Web Admin Guide
74
Permission Name Description
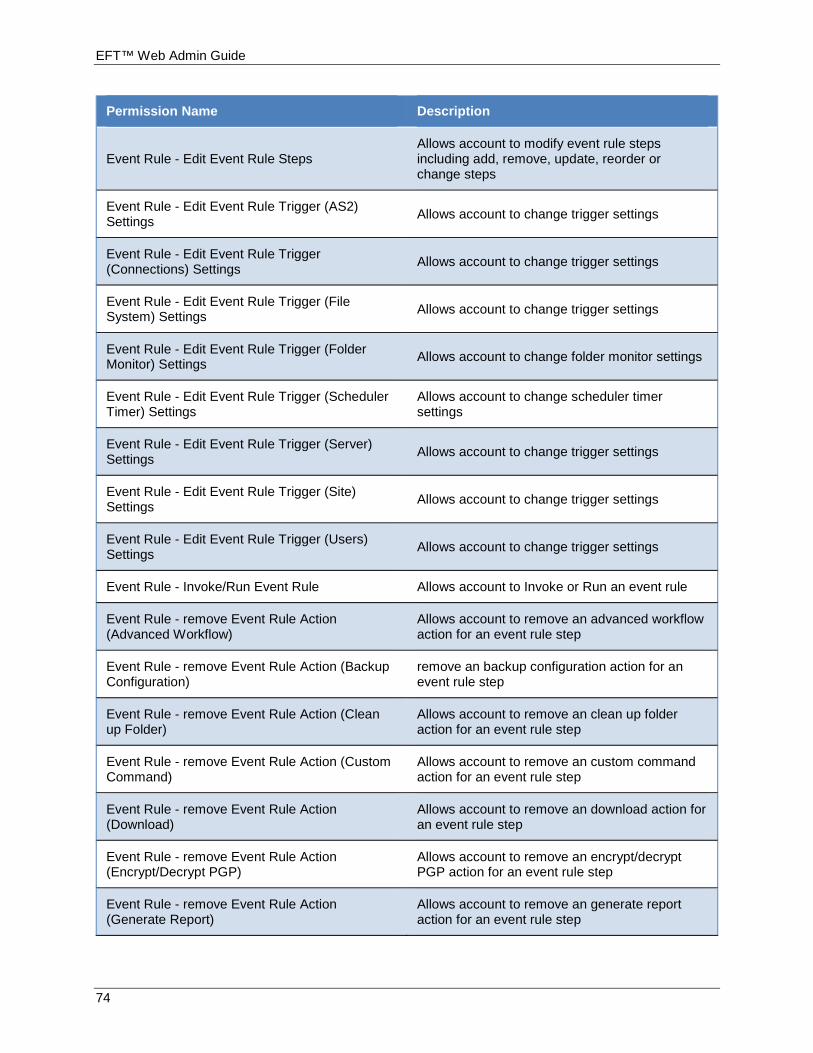
Event Rule - Edit Event Rule Steps Allows account to modify event rule steps including add, remove, update, reorder or change steps
Event Rule - Edit Event Rule Trigger (AS2) Settings Allows account to change trigger settings
Event Rule - Edit Event Rule Trigger (Connections) Settings Allows account to change trigger settings
Event Rule - Edit Event Rule Trigger (File System) Settings Allows account to change trigger settings
Event Rule - Edit Event Rule Trigger (Folder Monitor) Settings Allows account to change folder monitor settings
Event Rule - Edit Event Rule Trigger (Scheduler Timer) Settings
Allows account to change scheduler timer settings
Event Rule - Edit Event Rule Trigger (Server) Settings Allows account to change trigger settings
Event Rule - Edit Event Rule Trigger (Site) Settings Allows account to change trigger settings
Event Rule - Edit Event Rule Trigger (Users) Settings Allows account to change trigger settings
Event Rule - Invoke/Run Event Rule Allows account to Invoke or Run an event rule
Event Rule - remove Event Rule Action (Advanced Workflow)
Allows account to remove an advanced workflow action for an event rule step
Event Rule - remove Event Rule Action (Backup Configuration)
remove an backup configuration action for an event rule step
Event Rule - remove Event Rule Action (Clean up Folder)
Allows account to remove an clean up folder action for an event rule step
Event Rule - remove Event Rule Action (Custom Command)
Allows account to remove an custom command action for an event rule step
Event Rule - remove Event Rule Action (Download)
Allows account to remove an download action for an event rule step
Event Rule - remove Event Rule Action (Encrypt/Decrypt PGP)
Allows account to remove an encrypt/decrypt PGP action for an event rule step
Event Rule - remove Event Rule Action (Generate Report)
Allows account to remove an generate report action for an event rule step
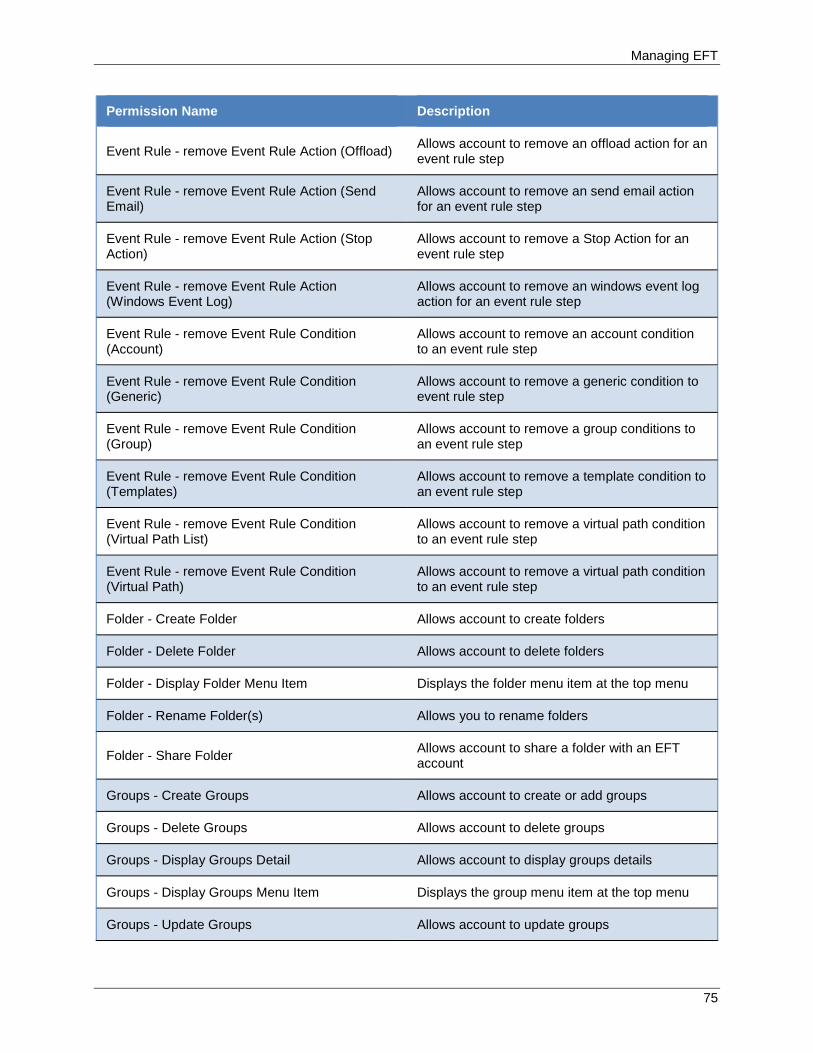
Managing EFT
75
Permission Name Description
Event Rule - remove Event Rule Action (Offload) Allows account to remove an offload action for an event rule step
Event Rule - remove Event Rule Action (Send Email)
Allows account to remove an send email action for an event rule step
Event Rule - remove Event Rule Action (Stop Action)
Allows account to remove a Stop Action for an event rule step
Event Rule - remove Event Rule Action (Windows Event Log)
Allows account to remove an windows event log action for an event rule step
Event Rule - remove Event Rule Condition (Account)
Allows account to remove an account condition to an event rule step
Event Rule - remove Event Rule Condition (Generic)
Allows account to remove a generic condition to event rule step
Event Rule - remove Event Rule Condition (Group)
Allows account to remove a group conditions to an event rule step
Event Rule - remove Event Rule Condition (Templates)
Allows account to remove a template condition to an event rule step
Event Rule - remove Event Rule Condition (Virtual Path List)
Allows account to remove a virtual path condition to an event rule step
Event Rule - remove Event Rule Condition (Virtual Path)
Allows account to remove a virtual path condition to an event rule step
Folder - Create Folder Allows account to create folders
Folder - Delete Folder Allows account to delete folders
Folder - Display Folder Menu Item Displays the folder menu item at the top menu
Folder - Rename Folder(s) Allows you to rename folders
Folder - Share Folder Allows account to share a folder with an EFT account
Groups - Create Groups Allows account to create or add groups
Groups - Delete Groups Allows account to delete groups
Groups - Display Groups Detail Allows account to display groups details
Groups - Display Groups Menu Item Displays the group menu item at the top menu
Groups - Update Groups Allows account to update groups
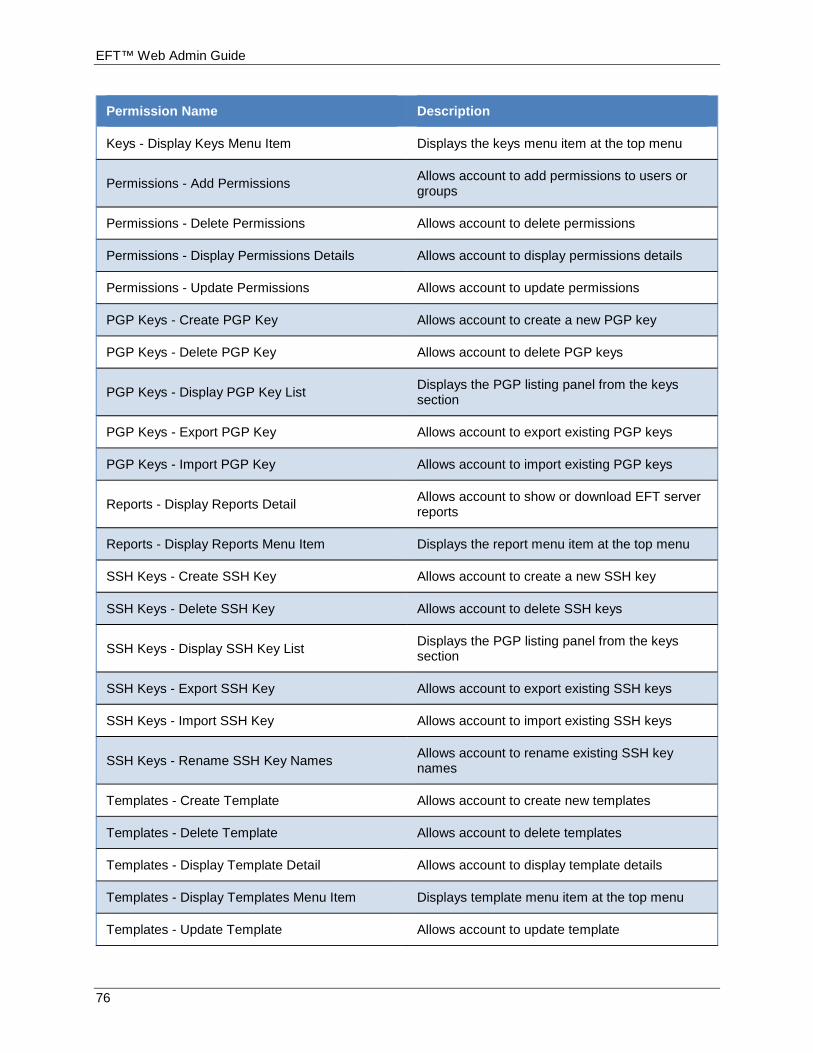
EFT™ Web Admin Guide
76
Permission Name Description
Keys - Display Keys Menu Item Displays the keys menu item at the top menu
Permissions - Add Permissions Allows account to add permissions to users or groups
Permissions - Delete Permissions Allows account to delete permissions
Permissions - Display Permissions Details Allows account to display permissions details
Permissions - Update Permissions Allows account to update permissions
PGP Keys - Create PGP Key Allows account to create a new PGP key
PGP Keys - Delete PGP Key Allows account to delete PGP keys
PGP Keys - Display PGP Key List Displays the PGP listing panel from the keys section
PGP Keys - Export PGP Key Allows account to export existing PGP keys
PGP Keys - Import PGP Key Allows account to import existing PGP keys
Reports - Display Reports Detail Allows account to show or download EFT server reports
Reports - Display Reports Menu Item Displays the report menu item at the top menu
SSH Keys - Create SSH Key Allows account to create a new SSH key
SSH Keys - Delete SSH Key Allows account to delete SSH keys
SSH Keys - Display SSH Key List Displays the PGP listing panel from the keys section
SSH Keys - Export SSH Key Allows account to export existing SSH keys
SSH Keys - Import SSH Key Allows account to import existing SSH keys
SSH Keys - Rename SSH Key Names Allows account to rename existing SSH key names
Templates - Create Template Allows account to create new templates
Templates - Delete Template Allows account to delete templates
Templates - Display Template Detail Allows account to display template details
Templates - Display Templates Menu Item Displays template menu item at the top menu
Templates - Update Template Allows account to update template
Managing EFT
77
Tools The topics below describe and provide procedures for using the EFT Web Admin tools.
• Link New Accounts Tool
• EFT Web Admin Report Tool
Link New Accounts Tool This section provides procedures for linking accounts.
Link New Accounts in EFT Web Admin EFTLinkNewAccounts.exe is a command-line program that links EFT accounts with EFT Web Admin containers. A typical use case for this tool is when EFT accounts are provisioned outside from EFT Web Admin, by executing this tool you can specify a default container where these EFT accounts will be linked and available.
You can run the command manually or create a Custom Command and run the tool in an Event Rule.
Configuration
1. Open the config file: <installed_path>\EFT WebAdmin\Tools\EFTLinkNewAccounts\EFTLinkNewAccounts.exe.config.
2. In the file, change SQLConnectionString and ContainerName settings <add key="SQLConnectionString" value="Data Source=.\SQLEXPRESS;Initial Catalog=EFTWebadmin;Integrated Security=True" /> <add key="ContainerName" value="Default" />
3. Save the file.
Test Configuration
At a command prompt, execute the following: C:\Program Files (x86)\Globalscape\EFT WebAdmin\Tools\EFTLinkNewAccounts>EFTLinkNewAccounts.exe
You should see a summary of new accounts being linked to your container.
Schedule Automatic Links Using EFT To schedule automatic links using EFT
1. Create a new custom command.

EFT™ Web Admin Guide
78
2. Give the Command a name. For example, type EFTLinkNewAccounts.
3. Click Next. Enter the Exe path (e.g., C:\Program Files (x86)\Globalscape\EFT
WebAdmin\Tools\EFTLinkNewAccounts\EFTLinkNewAccounts.exe), then click Next.
4. You don't need to enter any parameters. Click Finish.
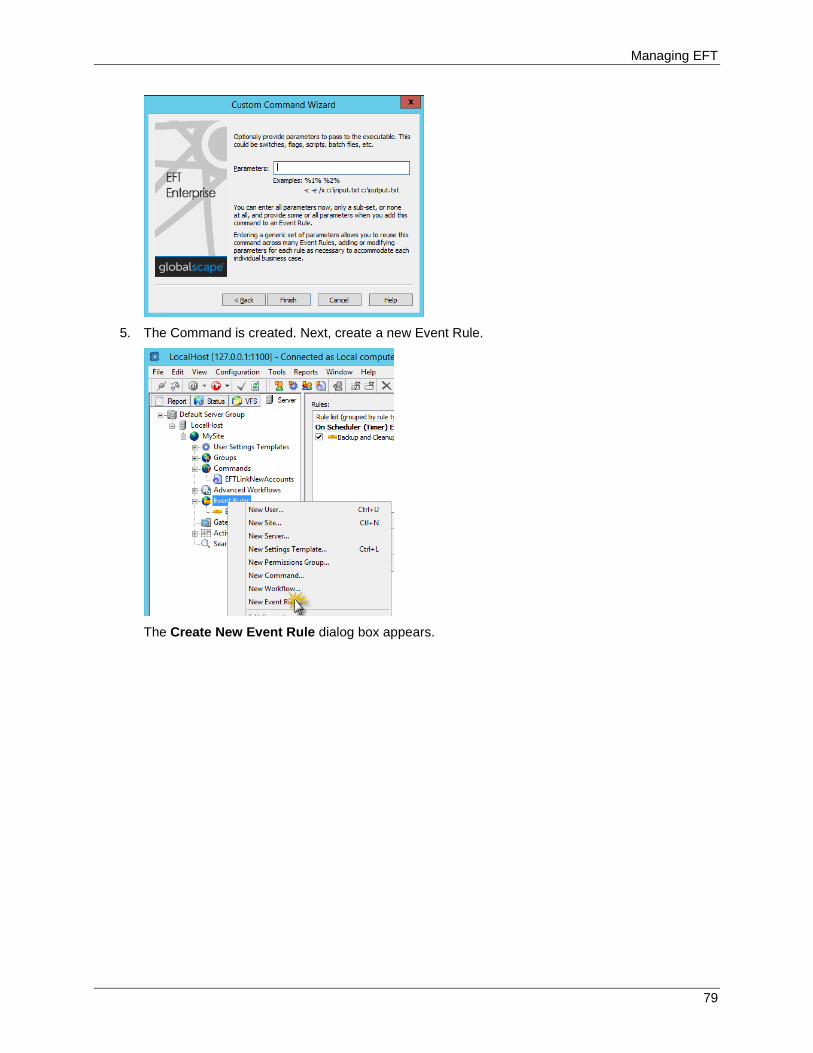
Managing EFT
79
5. The Command is created. Next, create a new Event Rule.
The Create New Event Rule dialog box appears.

EFT™ Web Admin Guide
80
6. Specify the Event Rule Type, then click Create.
• Event Rule name: app-eftwebadmin-link-new-accounts
• Description: Link new EFT accounts into a default container
• Event trigger: Scheduler (Timer) Event
7. Add the Execute command in folder Action to the Rule.
8. In the Execute command line, click the select link. The Execute Command dialog box appears.
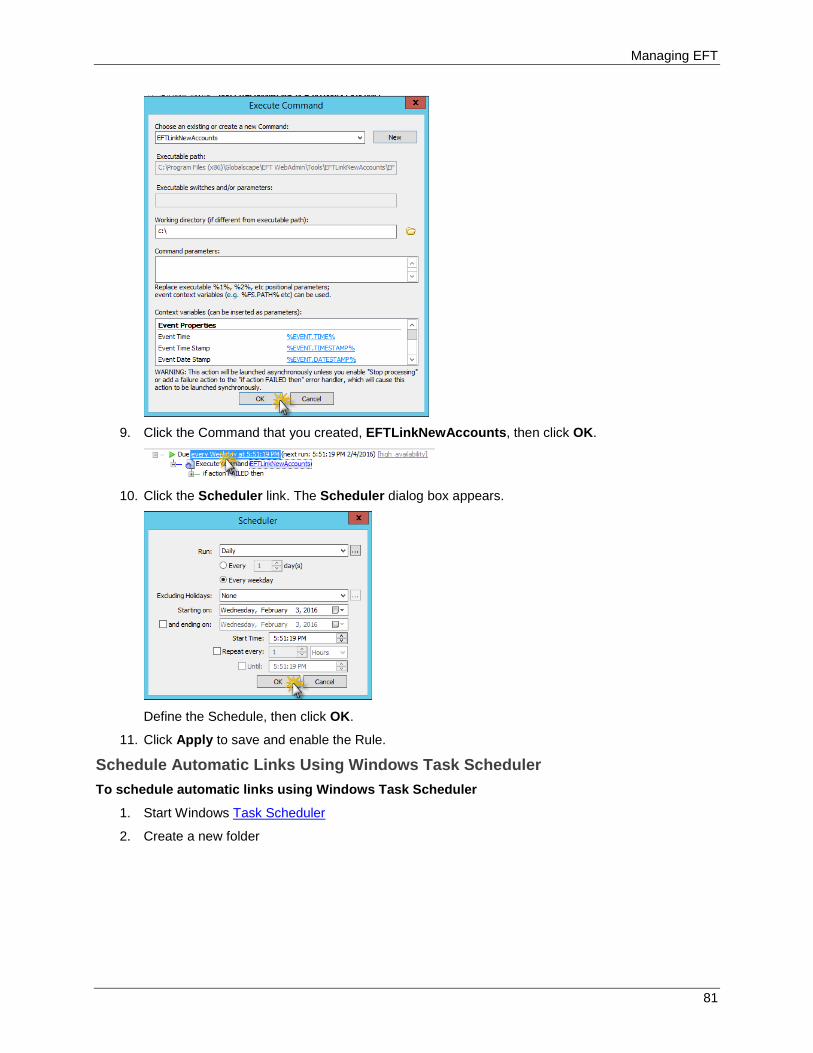
Managing EFT
81
9. Click the Command that you created, EFTLinkNewAccounts, then click OK.
10. Click the Scheduler link. The Scheduler dialog box appears.
Define the Schedule, then click OK.
11. Click Apply to save and enable the Rule.
Schedule Automatic Links Using Windows Task Scheduler To schedule automatic links using Windows Task Scheduler
1. Start Windows Task Scheduler
2. Create a new folder

EFT™ Web Admin Guide
82
3. Enter folder name, Globalscape, then click OK.
4. Click on Create a new Basic Task option.
5. Provide the task details:
Name: EFTLinkNewAccounts Description: EFTLinkNewAccounts.exe is a command-line program that links EFT accounts with EFT Web Admin containers. A typical use case for this tool is when EFT accounts are provisioned outside from EFT Web Admin, by executing this tool you can specify a default container where these EFT accounts will be linked and available.
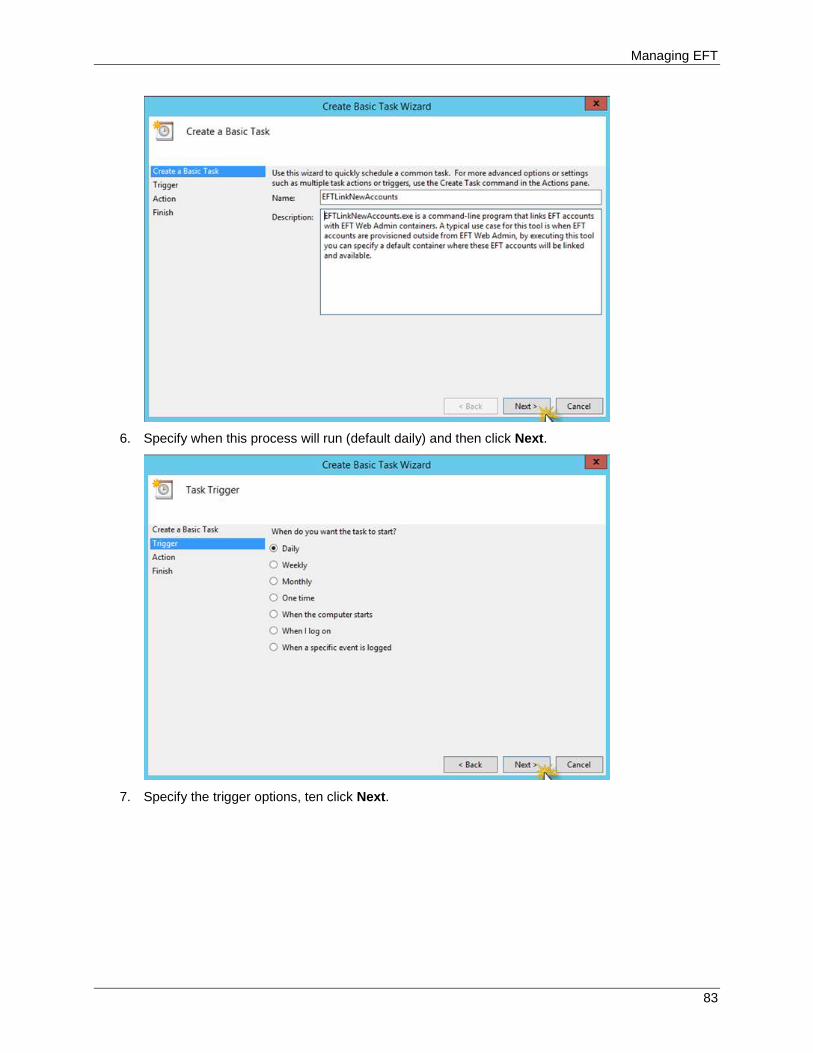
Managing EFT
83
6. Specify when this process will run (default daily) and then click Next.
7. Specify the trigger options, ten click Next.
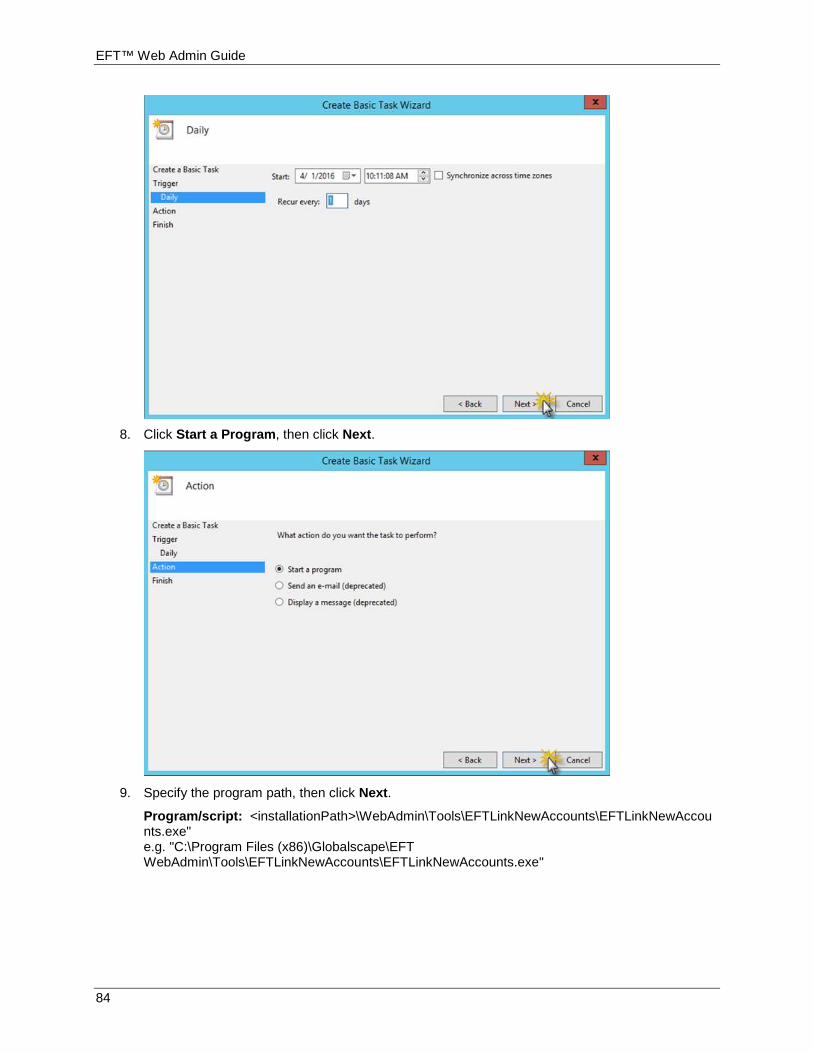
EFT™ Web Admin Guide
84
8. Click Start a Program, then click Next.
9. Specify the program path, then click Next.
Program/script: <installationPath>\WebAdmin\Tools\EFTLinkNewAccounts\EFTLinkNewAccounts.exe" e.g. "C:\Program Files (x86)\Globalscape\EFT WebAdmin\Tools\EFTLinkNewAccounts\EFTLinkNewAccounts.exe"
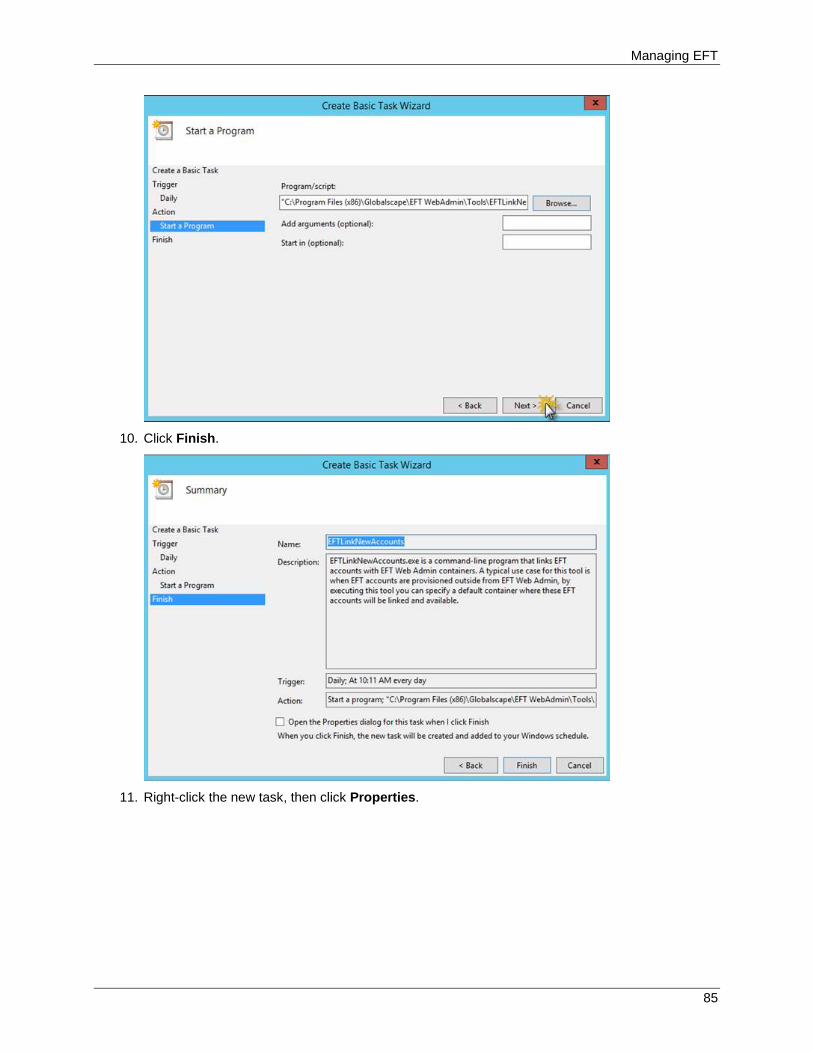
Managing EFT
85
10. Click Finish.
11. Right-click the new task, then click Properties.
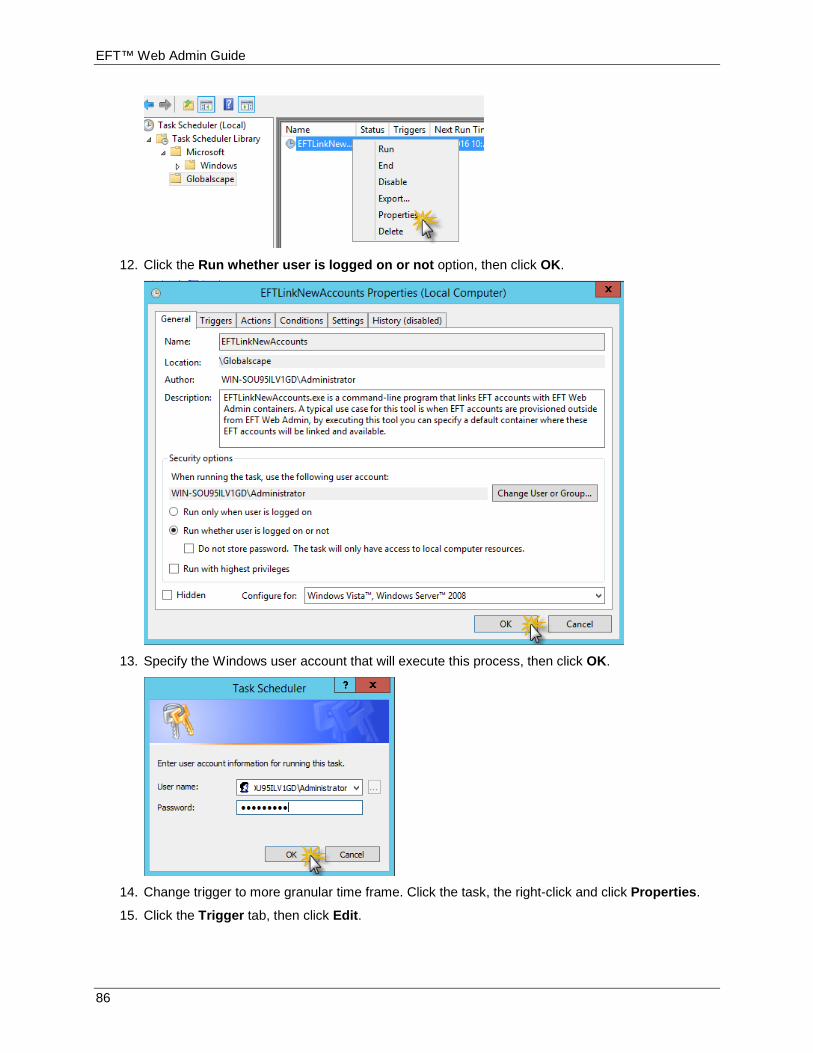
EFT™ Web Admin Guide
86
12. Click the Run whether user is logged on or not option, then click OK.
13. Specify the Windows user account that will execute this process, then click OK.
14. Change trigger to more granular time frame. Click the task, the right-click and click Properties.
15. Click the Trigger tab, then click Edit.
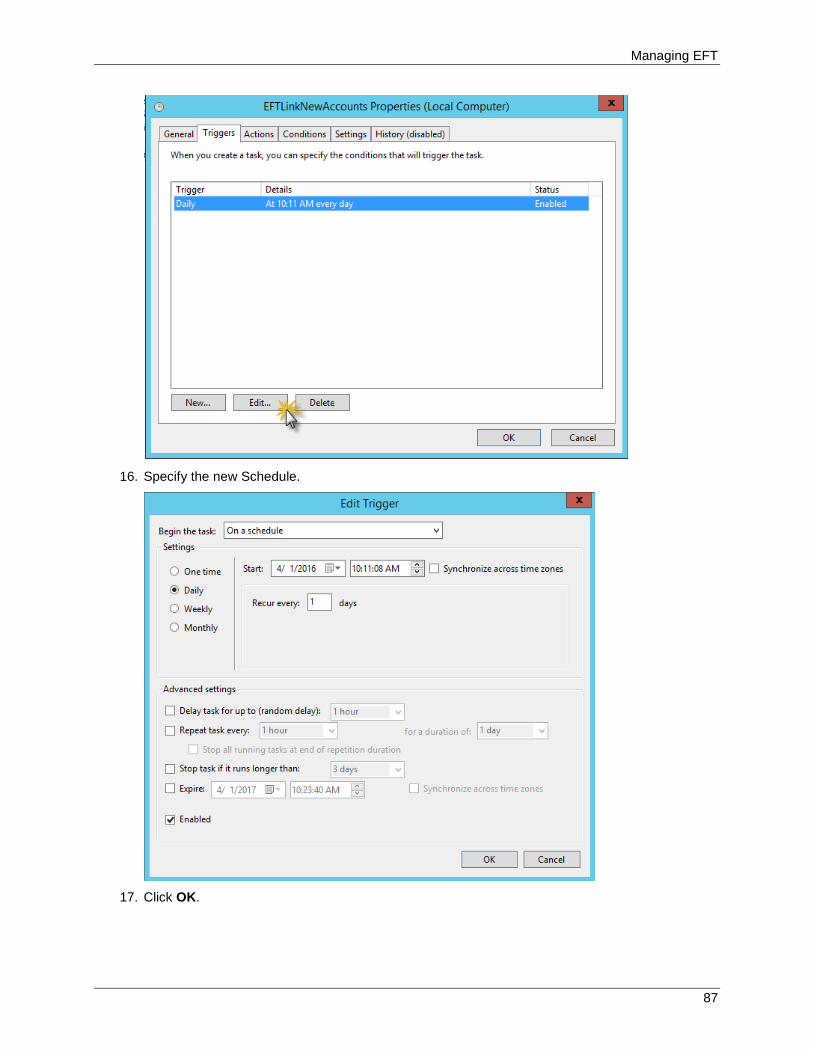
Managing EFT
87
16. Specify the new Schedule.
17. Click OK.

EFT™ Web Admin Guide
88
EFT Web Admin Report Tool The EFT Web Admin Report generates reports in XML file that can be opened with any text editor or in Microsoft Excel. EFTWebAdminReport.exe is a command-line program that produces reports, which include information about Auditing, ContainerLinks, and Permissions. A typical use of this tool is auditors requesting a report that shows all access for all different types of access for all users from EFT Web Admin. You can run the command manually or create a custom command and run the tool in an Event Rule
Error Codes The error codes produced by the report tool and a description of each are shown below.
Error Code Description
0 Ok. The tool has run correctly.
-1 FailCommandLineParse. The tool failed to run because the parameters passed are invalid.
-2 FailQueryingDatabase. The tool failed to run because the database couldn’t be queried.
-3 FailCreatingXmlFile. The tool failed to run because it couldn’t create the report output file.
Configuring the Report Tool Before generating reports with the tool, you have to edit the configuration file.
To configure the report tool
1. Open the configuration file: <installed_path>EFT WebAdmin\Tools\EFTWebAdminReport> EFTWebAdminReport.exe.config
2. In the file, edit the SQLConnectionString setting: <add name="EFTWebAdminDatabaseEntities" connectionString="metadata=res://*/data.EfWebAdminContext.csdl|res://*/data.EfWebAdminContext.ssdl|res://*/data.EfWebAdminContext.msl;provider=System.Data.SqlClient;provider connection string="data source=.\SQLEXPRESS;initial catalog=EFTWebadmin;integrated security=True;MultipleActiveResultSets=True;App=EntityFramework"" providerName="System.Data.EntityClient" />
3. Save the file.
Command-Line Usage To use EFTWebPermissions.exe, type the executable name followed by the parameters:
C:\> EFTWebAdminReport.exe [options]
for example: <installed_path>\EFT WebAdmin\Tools\EFTWebAdminReport> EFTWebAdminReport.exe –r <reportName> –f <reportfilename>
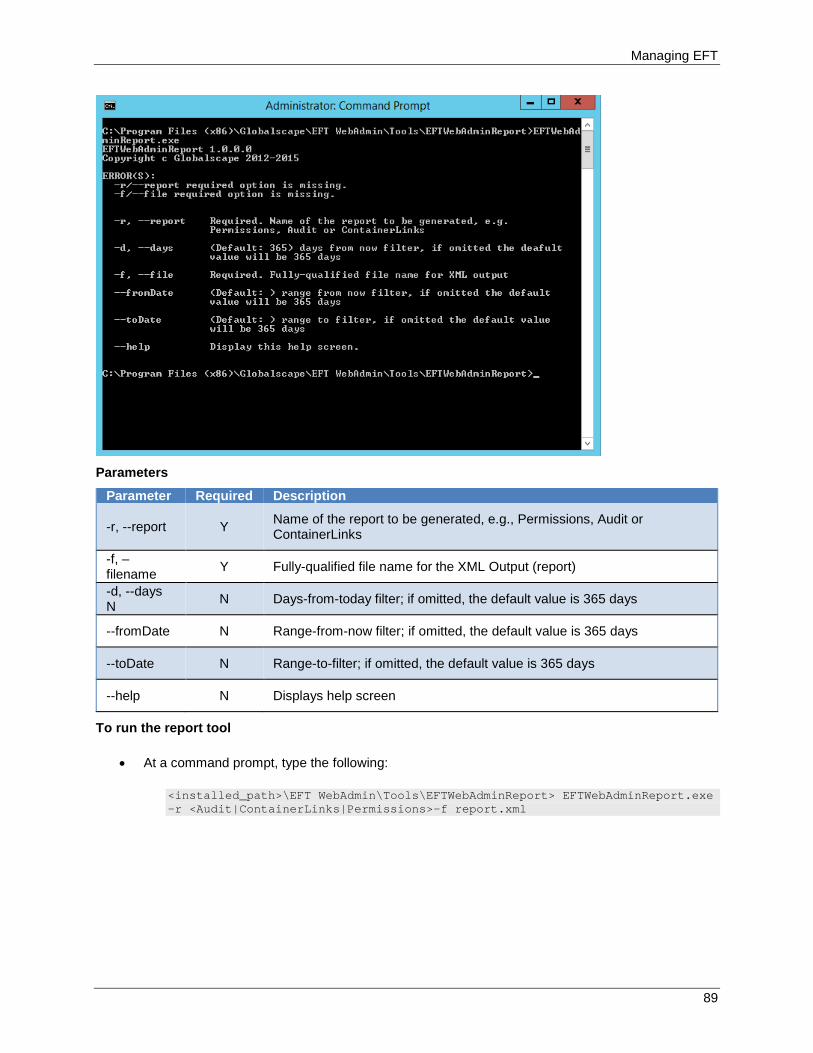
Managing EFT
89
Parameters
Parameter Required Description
-r, --report Y Name of the report to be generated, e.g., Permissions, Audit or ContainerLinks
-f, –filename Y Fully-qualified file name for the XML Output (report)
-d, --days N N Days-from-today filter; if omitted, the default value is 365 days
--fromDate N Range-from-now filter; if omitted, the default value is 365 days
--toDate N Range-to-filter; if omitted, the default value is 365 days
--help N Displays help screen
To run the report tool
• At a command prompt, type the following:
<installed_path>\EFT WebAdmin\Tools\EFTWebAdminReport> EFTWebAdminReport.exe –r <Audit|ContainerLinks|Permissions>–f report.xml
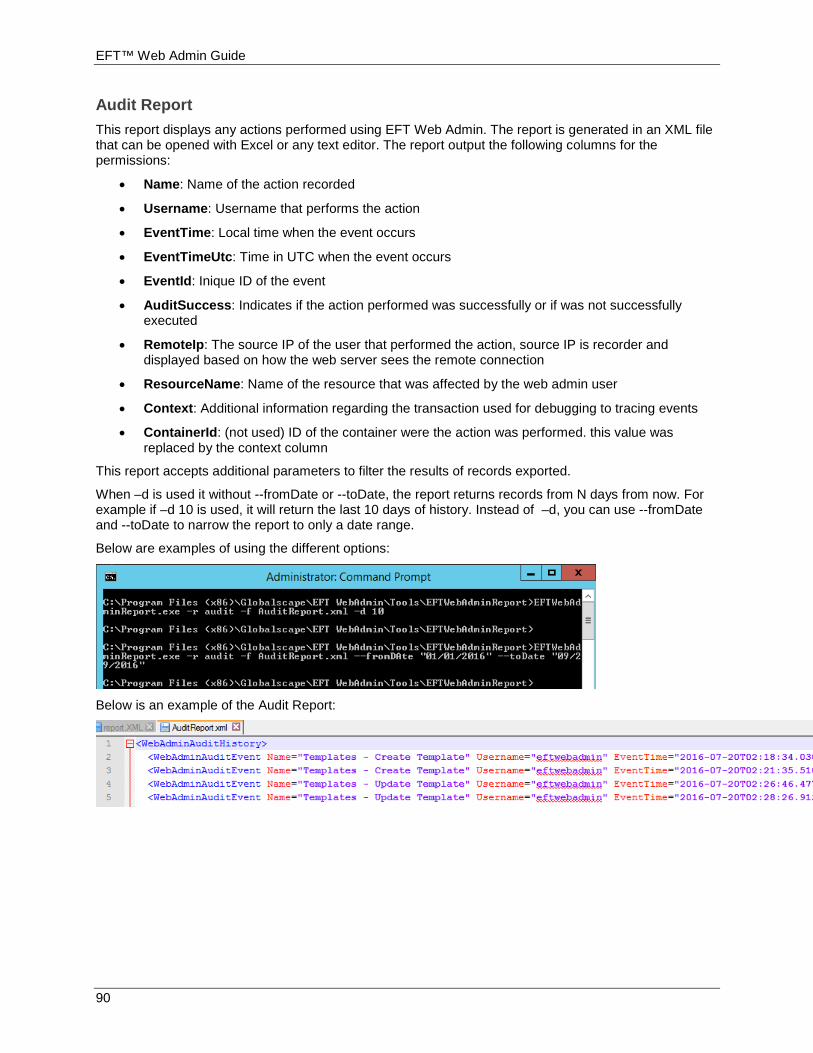
EFT™ Web Admin Guide
90
Audit Report This report displays any actions performed using EFT Web Admin. The report is generated in an XML file that can be opened with Excel or any text editor. The report output the following columns for the permissions:
• Name: Name of the action recorded
• Username: Username that performs the action
• EventTime: Local time when the event occurs
• EventTimeUtc: Time in UTC when the event occurs
• EventId: Inique ID of the event
• AuditSuccess: Indicates if the action performed was successfully or if was not successfully executed
• RemoteIp: The source IP of the user that performed the action, source IP is recorder and displayed based on how the web server sees the remote connection
• ResourceName: Name of the resource that was affected by the web admin user
• Context: Additional information regarding the transaction used for debugging to tracing events
• ContainerId: (not used) ID of the container were the action was performed. this value was replaced by the context column
This report accepts additional parameters to filter the results of records exported.
When –d is used it without --fromDate or --toDate, the report returns records from N days from now. For example if –d 10 is used, it will return the last 10 days of history. Instead of –d, you can use --fromDate and --toDate to narrow the report to only a date range.
Below are examples of using the different options:
Below is an example of the Audit Report:

Managing EFT
91
Permissions Report Tis report displays all permissions associated with all EFT Web Admin users. The report is generated in an XML file that can be opened with Excel or any text editor. The report output the following columns for the permissions:
The report contains the following data:
• AccountType: Defines if the permission is related to a Role or a Username
• RoleName: name of the role name for a permission if any
• UserName name of the username for a permission if any, when there is a value for role name and username exist for the Account type username, means that the permission is associated to the user indirectly by the role.
• Action: specific action of the permission
• Container: container of the permission
• SiteName: site name of the permission
Viewing Reports in Excel Opening EFT Web Permissions Report using Excel
1. In Excel, browse for and select the report file, then click Open. The Open XML dialog box appears.
2. Click As an XML Table, then click OK.
3. Excel displays the report.
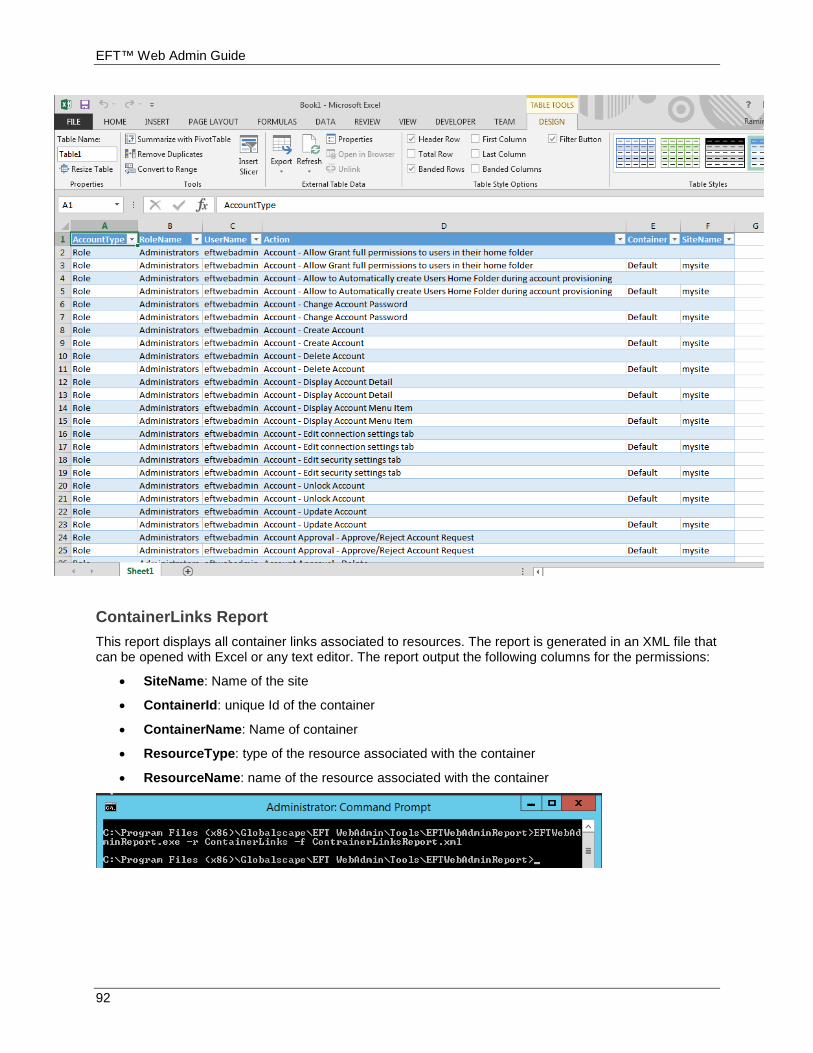
EFT™ Web Admin Guide
92
ContainerLinks Report This report displays all container links associated to resources. The report is generated in an XML file that can be opened with Excel or any text editor. The report output the following columns for the permissions:
• SiteName: Name of the site
• ContainerId: unique Id of the container
• ContainerName: Name of container
• ResourceType: type of the resource associated with the container
• ResourceName: name of the resource associated with the container
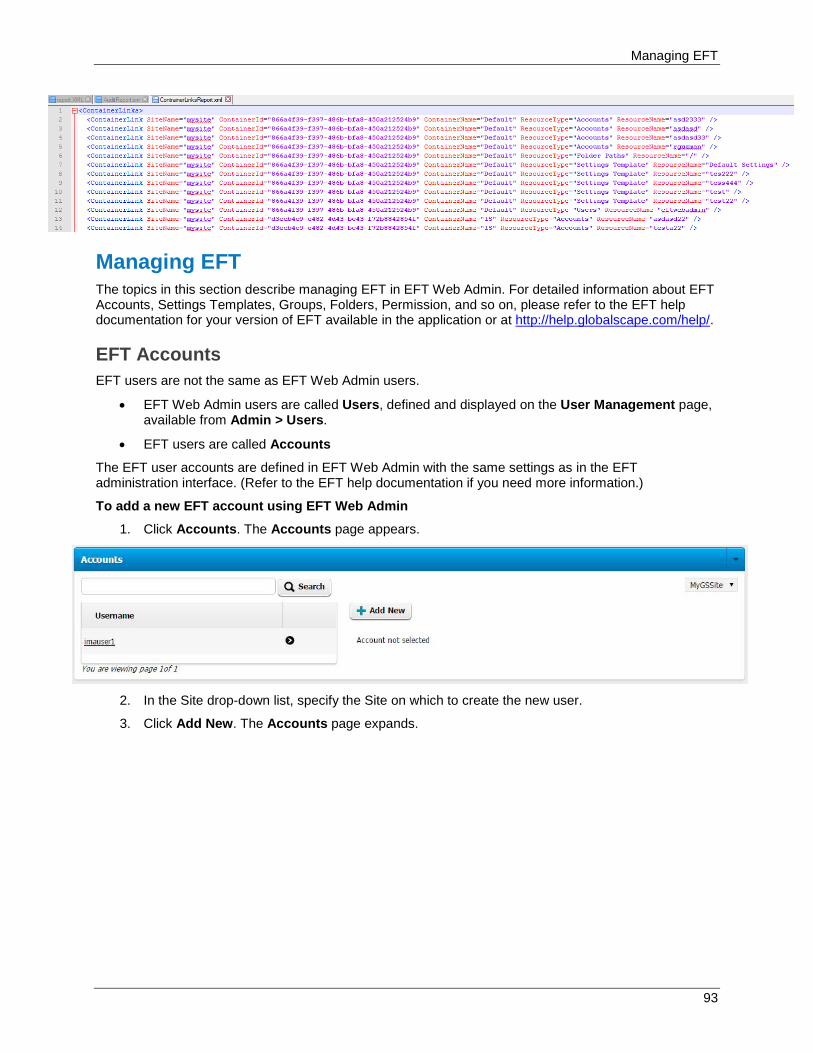
Managing EFT
93
Managing EFT The topics in this section describe managing EFT in EFT Web Admin. For detailed information about EFT Accounts, Settings Templates, Groups, Folders, Permission, and so on, please refer to the EFT help documentation for your version of EFT available in the application or at http://help.globalscape.com/help/.
EFT Accounts EFT users are not the same as EFT Web Admin users.
• EFT Web Admin users are called Users, defined and displayed on the User Management page, available from Admin > Users.
• EFT users are called Accounts
The EFT user accounts are defined in EFT Web Admin with the same settings as in the EFT administration interface. (Refer to the EFT help documentation if you need more information.)
To add a new EFT account using EFT Web Admin
1. Click Accounts. The Accounts page appears.
2. In the Site drop-down list, specify the Site on which to create the new user.
3. Click Add New. The Accounts page expands.

EFT™ Web Admin Guide
94
4. Click the General tab, and then specify the user's Settings Template, username, address,
password, and so on.
5. Click the Details tab, and then specify the details of the user account (full name, phone, etc.).
6. Click the Connections tab, and then specify the protocols this user is allowed to use. The default is to inherit these settings from the Settings Template.
Managing EFT
95
7. Click the Security tab, and then specify invalid login options, account security, and password security.
8. Click Create. A successful confirmation message appears.
Related Topics
• Link New Accounts in EFT Web Admin
• Schedule Automatic Links Using EFT
• Schedule Automatic Links Using Windows Task Scheduler
Reset EFT Account Password You can change the password of an EFT account in EFT Web Admin.
To reset/change an EFT account password
1. Log in to EFT Web Admin.
2. Click Accounts. The Accounts page appears.
3. Click the username. The details of the account appear.

EFT™ Web Admin Guide
96
4. Click the General tab, then click Change Password. The password form appears.
5. Provide and confirm the new password, or click Generate to create a strong password.
6. Provide an email address to send an email with the new credentials, and select the Email login credentials to the user check box.
7. Click Change Password. A successful message is displayed at the top of the page and the email is sent to user (if specified).
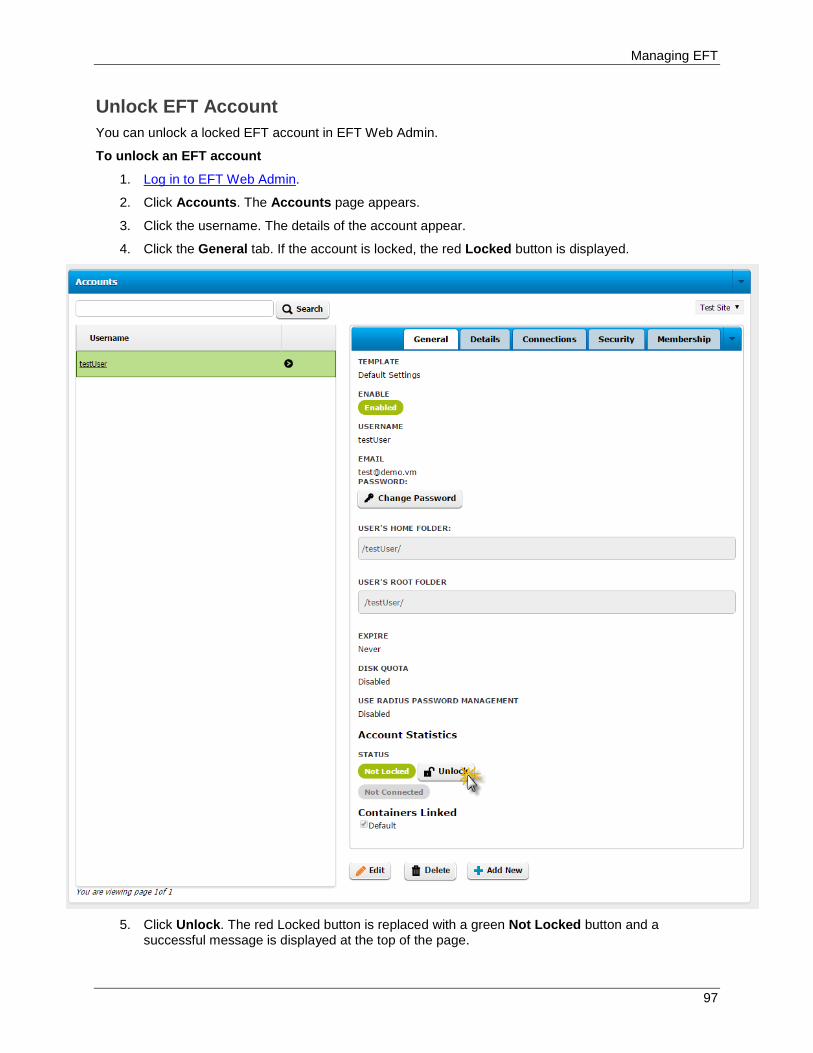
Managing EFT
97
Unlock EFT Account You can unlock a locked EFT account in EFT Web Admin.
To unlock an EFT account
1. Log in to EFT Web Admin.
2. Click Accounts. The Accounts page appears.
3. Click the username. The details of the account appear.
4. Click the General tab. If the account is locked, the red Locked button is displayed.
5. Click Unlock. The red Locked button is replaced with a green Not Locked button and a
successful message is displayed at the top of the page.
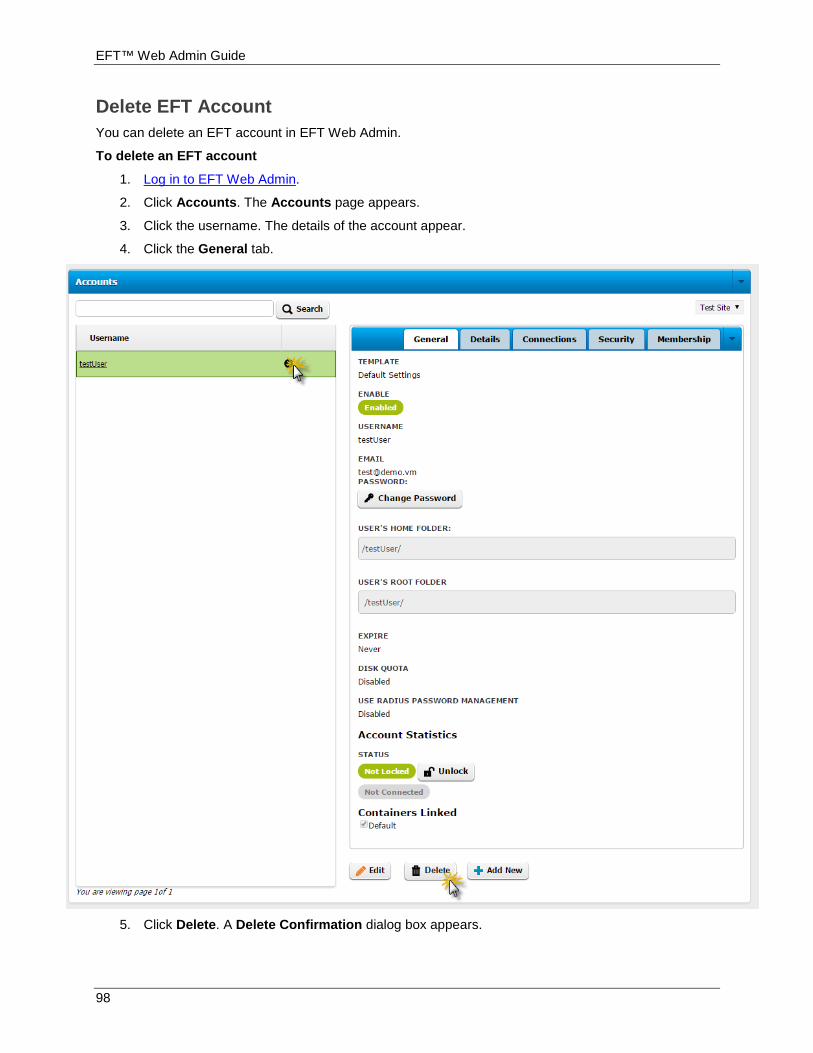
EFT™ Web Admin Guide
98
Delete EFT Account You can delete an EFT account in EFT Web Admin.
To delete an EFT account
1. Log in to EFT Web Admin.
2. Click Accounts. The Accounts page appears.
3. Click the username. The details of the account appear.
4. Click the General tab.
5. Click Delete. A Delete Confirmation dialog box appears.

Managing EFT
99
6. Do one of the following:
o To delete only the account without deleting the account's home folder and files, click Account Only.
o To delete the account and the account's home folder, subfolders, and files, click Account & Data.
A successful message appears at the top of the page.
Settings Templates During initial configuration of EFT Web Admin, you link the Settings Templates defined in EFT to a Container in EFT Web Admin. You can create additional Settings Templates and edit/delete Settings Templates in EFT Web Admin.
To create a Settings Template
1. Log in to EFT Web Admin.
2. Click Templates. The Templates page appears.
3. Click Add New. The settings tabs appear.
EFT™ Web Admin Guide
100
4. If you have more than one Site in EFT, click the Site list to specify under which Site you want to
create the Template.
5. On the General tab, provide the Template details:
o Under Enable, be sure Enabled is specified.
o Provide a Name for the Template.
o Provide a Description for the Template.
o Specify whether the Home Folder is enabled.
o Provide the path to the Home Folder or type a forward slash to the default.
o If you want to set a disk quota, click Enabled.
o To use Radius for two-factor authentication, click Enabled.
o Specify which Container to link the Template to.
6. Click Create. A successful message is displayed at the top of the page

Managing EFT
101
To edit or delete a Settings Template
1. Log in to EFT Web Admin.
2. Click Templates. The Templates page appears.
3. Click the Template that you want to edit or delete. The Template settings appear.
4. Do one of the following:
To make changes to the Template
1. Click Edit.
2. Make changes as needed, then click Update.
To delete the Template:
3. Click Delete. A warning message appears.
4. Click Delete.
A successful message appears at the top of the page.

EFT™ Web Admin Guide
102
Groups EFT Groups can be managed in EFT Web Admin. The procedures below describe how to create and delete Groups and how to add or remove EFT Accounts from a Group.
To create a Group
1. Log in to EFT Web Admin.
2. Click Groups. The Groups page appears.
3. Click Add New. The settings tabs appear.
4. Click the Site list to specify the Site on which to create the Group.
5. Provide a Name for the new Group.
6. Specify in which Container to create the new Group.
7. Click Create. A successful message appears at the top of the page.
To delete a Group
1. Log in to EFT Web Admin.
2. Click Groups. The Groups page appears.
3. Click a Group in the list. The Group's settings appears.
4. Click Delete. The Delete Confirmation message appears.

Managing EFT
103
5. Click Delete. The Group is deleted and a successful message appears.
To add or remove an EFT Account to/from a Group
1. Log in to EFT Web Admin.
2. Click Groups. The Groups page appears.
3. Click the Group to which you want to add an EFT Account.
4. Click the Membership tab. The list of Accounts in this Group appears.
5. In the search box, search for an Account. Searching begins with the first letter typed.
6. Click the Account name that you want to add or remove from the Group.
7. Click Add User or Remove User as needed. A successful message appears at the top.
8. Repeat for other Accounts that you want to add or remove from the Group.
Folders EFT folders can be managed in EFT Web Admin. The procedures below describe how to create, delete, and share folders.
To create a folder
1. Log in to EFT Web Admin.
2. Click Folders. The Folders page appears.
3. In the Site list, click the Site name on which you want to create a Folder.
4. In the Folders list, click the forward slash (the Site root folder). The Folder System page appears.
EFT™ Web Admin Guide
104
5. Click New Folder. The Create a Folder dialog box appears.
6. Provide a name for the Folder, then click Create. The new Folder is displayed in the list and a
successful message appears at the top of the page.
To delete a folder
Deleting the folder permanently removes the folder from EFT storage, including all of the folder's subfolders and files.
1. Log in to EFT Web Admin.
2. Click Folders. The Folders page appears.
3. In the Site list, click the Site name on which you want to create a Folder.
4. In the Folders list, click the forward slash (the Site root folder). The Folder System page appears.
5. Click the selection icon to the right of the Folder name that you want to delete, and then click Delete. The Delete Folder Confirmation message box appears.
6. Verify that the folder you want to delete is the correct path, then click Delete Folder with Subfolders. The folder and all files and subfolders are permanently deleted from your storage.
Managing EFT
105
To share a folder
1. Log in to EFT Web Admin.
2. Click Folders. The Folders page appears.
3. In the Site list, click the Site name on which you want to create a Folder.
4. In the Folders list, click the forward slash (the Site root folder). The Folder System page appears.
5. Click the selection icon to the right of the Folder name that you want to share, and then click Share. The Share Folder with an Account dialog box appears.
6. Search for or type an EFT Account name that you want to share the folder with, then click Share.
A new virtual folder is created under the account's Home folder that will point to the shared folder.

EFT™ Web Admin Guide
106
In this example, the /New Folder/ folder was shared with EFT Account accountB, and accountB's home folder is /accountB/. After sharing, a new virtual folder is created, /accountB/New Folder/, that points to /New Folder/. After sharing folders with accounts, each access point has its own permissions. You can apply permissions to /New Folder/ or to /accountB/New Folder/; both have the same files, but each path can have different permissions for each user.
Permissions Suppose the /New Folder/ folder was shared with EFT Account accountB, and accountB's home folder is /accountB/. After sharing, a new virtual folder is created, /accountB/New Folder/, that points to /New Folder/. After sharing Folders with EFT Accounts, each access point has its own permissions. You can apply permissions to /New Folder/ or to /accountB/New Folder/; both have the same files, but each path can have different permissions for each user. For example, you can apply permissions to /New Folder/ or to /accountB/New Folder/; both have the same files, but each path can have different permissions for each user.
The procedures below describe how to set, modify or remove permissions on Folders. You can also reset inheritance on the folder as described below.
To set permissions on a Folder
1. Log in to EFT Web Admin.
2. Click Folders. The Folders page appears.
3. In the Site list, click the Site name on which you want to create a Folder.
4. In the Folders list, click the forward slash (the Site root folder). The Folder System page appears.
Managing EFT
107
5. Click the Folder's selection icon. The Accounts and Groups details appear.
6. Click Add. The Add Account or Group Permissions dialog box appears.

EFT™ Web Admin Guide
108
7. Type the EFT Account name or Group to which you want to add permission.
8. Click the Permission type: None, Read, or Full, then click Add next to the search box.
To modify or remove permissions on a Folder
1. Log in to EFT Web Admin.
2. Click Folders. The Folders page appears.
3. In the Site list, click the Site name on which you want to modify permissions.
4. In the Folders list, click the forward slash (the Site root folder). The Folder System page appears.
5. Click the Folder's selection icon. The Accounts and Groups details appear.
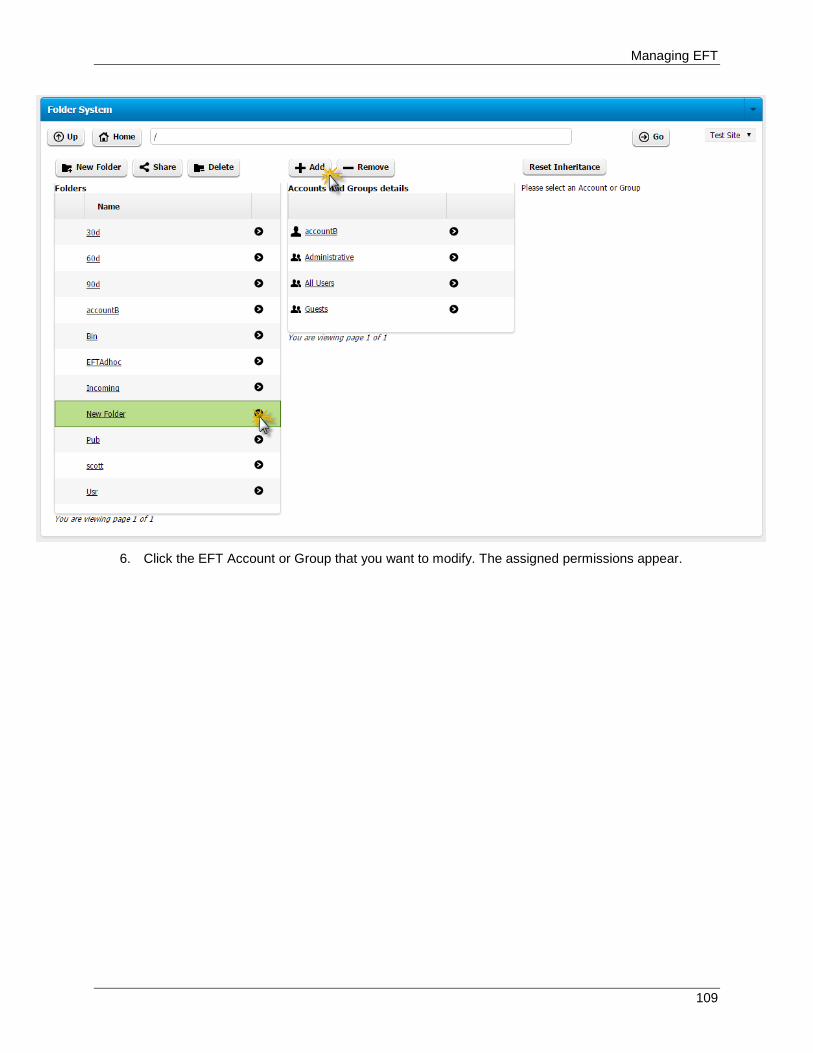
Managing EFT
109
6. Click the EFT Account or Group that you want to modify. The assigned permissions appear.
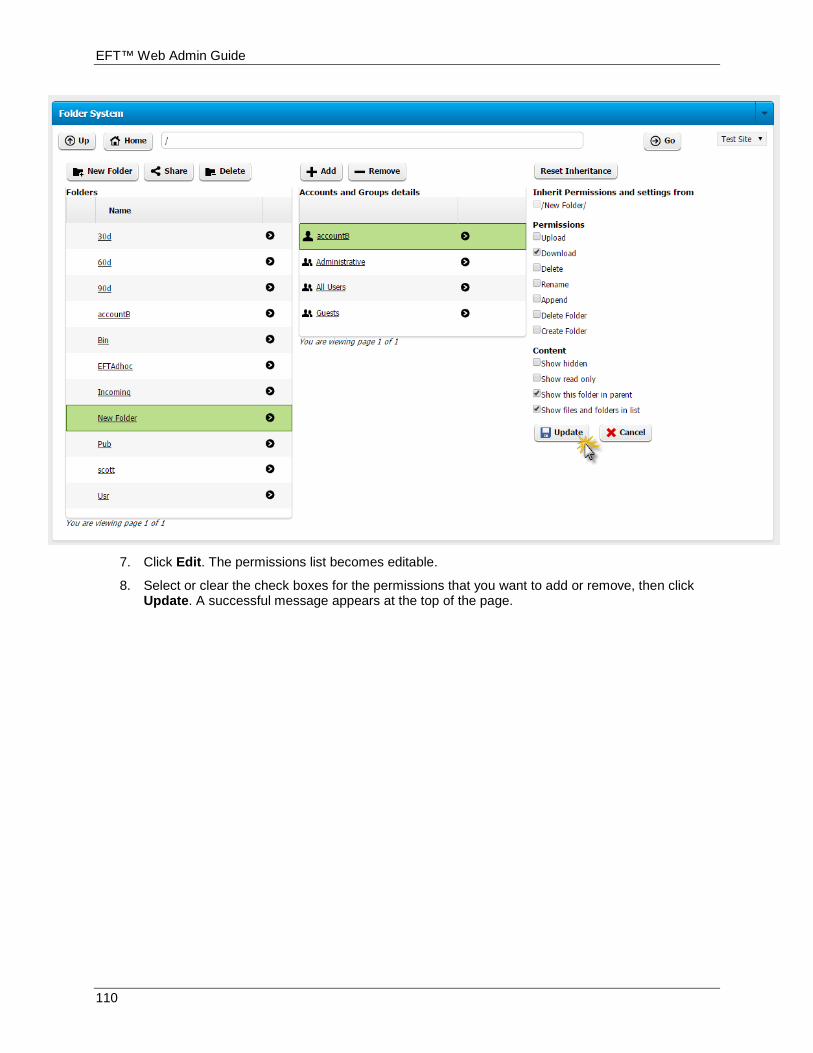
EFT™ Web Admin Guide
110
7. Click Edit. The permissions list becomes editable.
8. Select or clear the check boxes for the permissions that you want to add or remove, then click Update. A successful message appears at the top of the page.
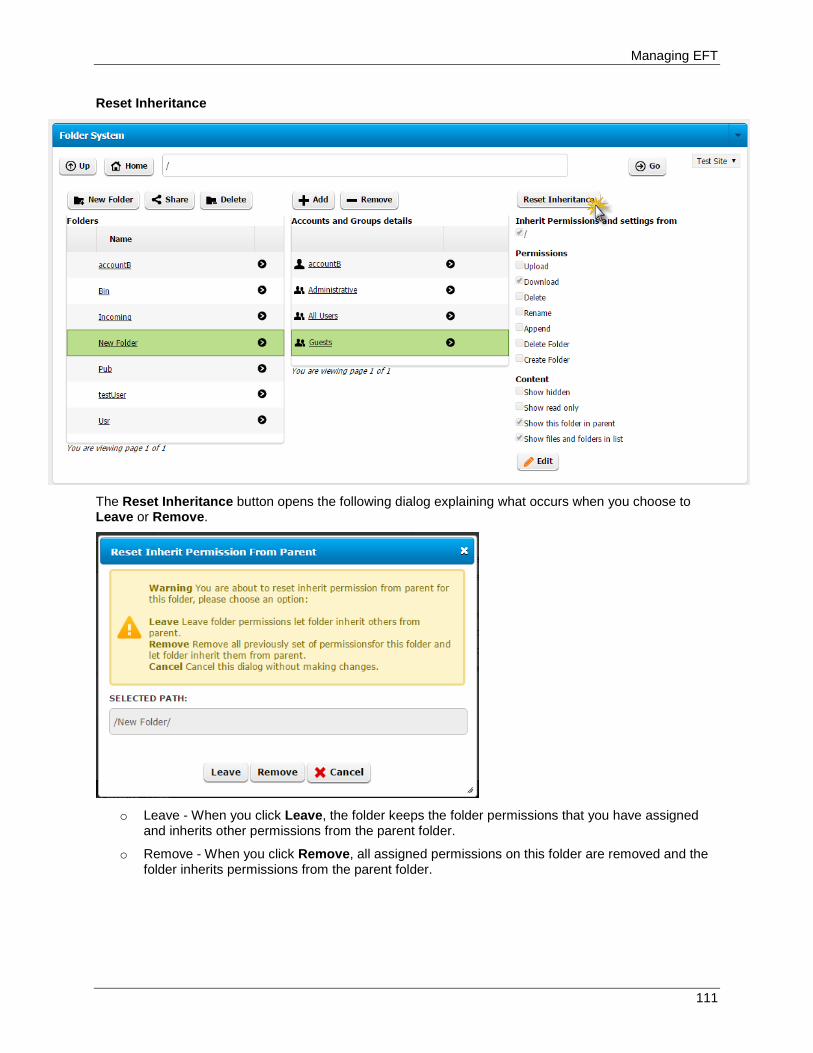
Managing EFT
111
Reset Inheritance
The Reset Inheritance button opens the following dialog explaining what occurs when you choose to Leave or Remove.
o Leave - When you click Leave, the folder keeps the folder permissions that you have assigned
and inherits other permissions from the parent folder.
o Remove - When you click Remove, all assigned permissions on this folder are removed and the folder inherits permissions from the parent folder.
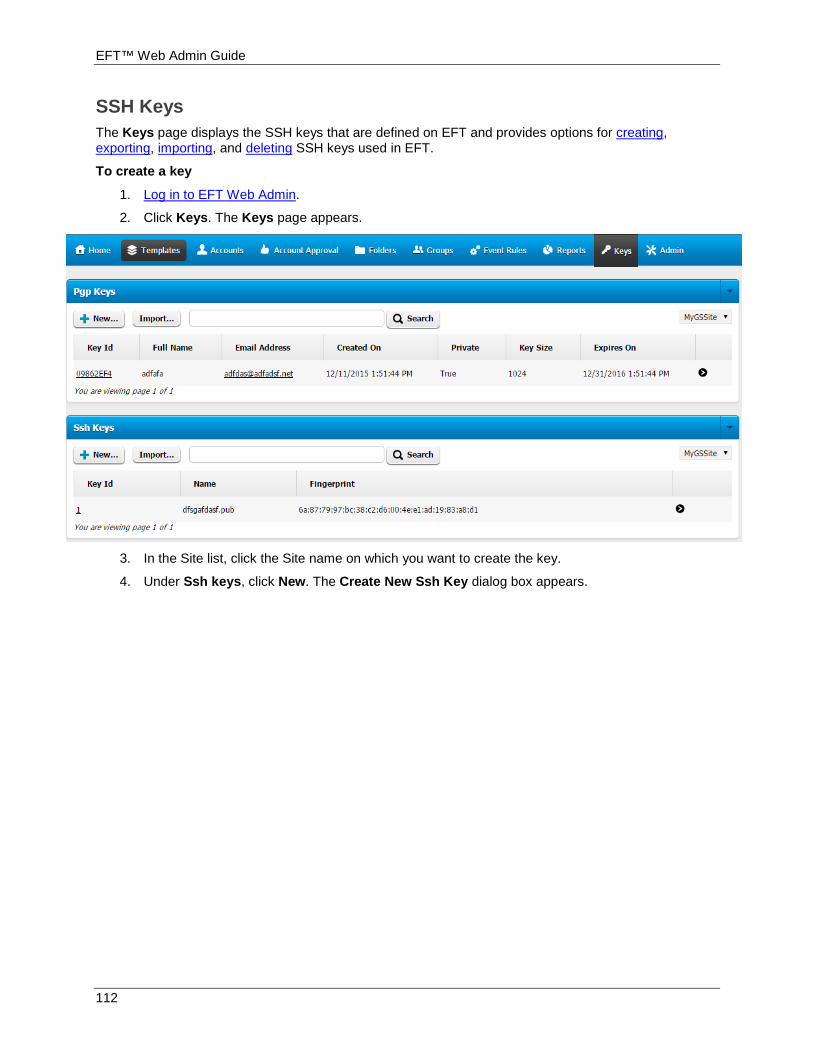
EFT™ Web Admin Guide
112
SSH Keys The Keys page displays the SSH keys that are defined on EFT and provides options for creating, exporting, importing, and deleting SSH keys used in EFT.
To create a key
1. Log in to EFT Web Admin.
2. Click Keys. The Keys page appears.
3. In the Site list, click the Site name on which you want to create the key.
4. Under Ssh keys, click New. The Create New Ssh Key dialog box appears.
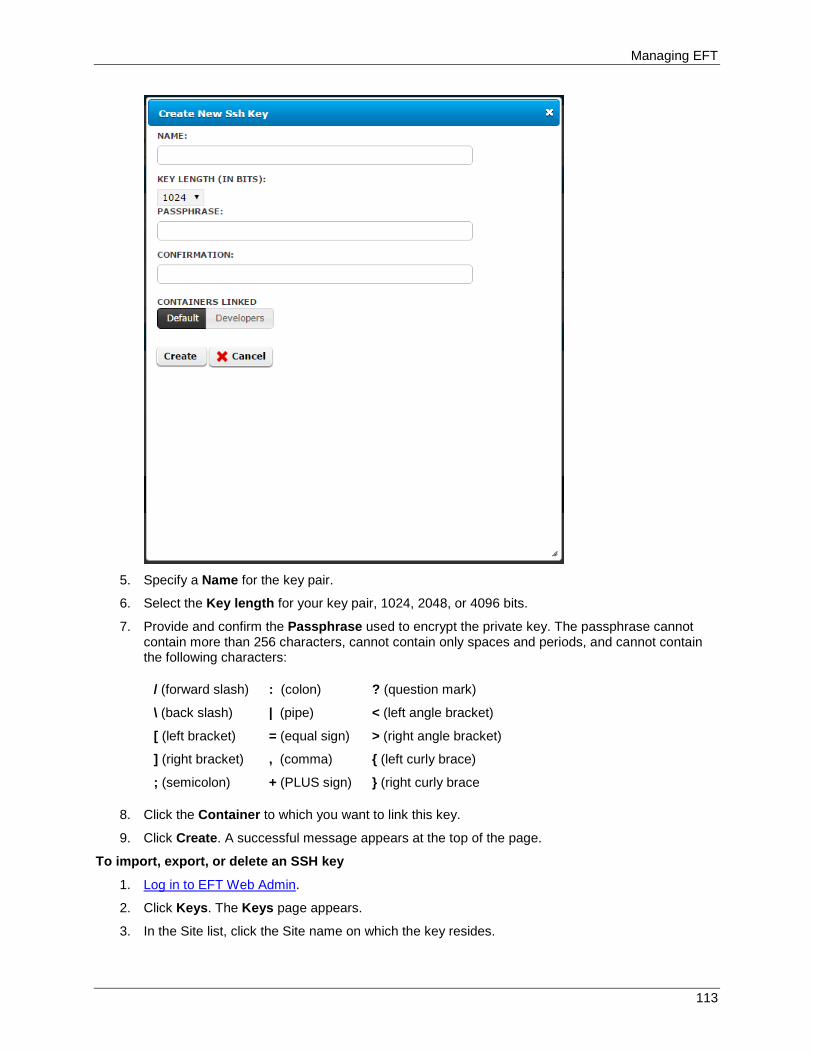
Managing EFT
113
5. Specify a Name for the key pair.
6. Select the Key length for your key pair, 1024, 2048, or 4096 bits.
7. Provide and confirm the Passphrase used to encrypt the private key. The passphrase cannot contain more than 256 characters, cannot contain only spaces and periods, and cannot contain the following characters:
/ (forward slash)
\ (back slash)
[ (left bracket)
] (right bracket)
; (semicolon)
: (colon)
| (pipe)
= (equal sign)
, (comma)
+ (PLUS sign)
? (question mark)
< (left angle bracket)
> (right angle bracket)
{ (left curly brace)
} (right curly brace
8. Click the Container to which you want to link this key.
9. Click Create. A successful message appears at the top of the page.
To import, export, or delete an SSH key
1. Log in to EFT Web Admin.
2. Click Keys. The Keys page appears.
3. In the Site list, click the Site name on which the key resides.

EFT™ Web Admin Guide
114
4. Under Ssh keys, click the key that you want to import, export, or delete. The key is highlighted and additional buttons appear.
To export the key
a. Click Export. The Export Ssh Key dialog box appears.
b. Provide a new name for the file (optional) and then click Export. The key is downloaded
to the Downloads folder for your browser.
To import the key
c. Click Import. The Import Ssh Key dialog box appears.
d. Click Choose File. The Open dialog box appears.
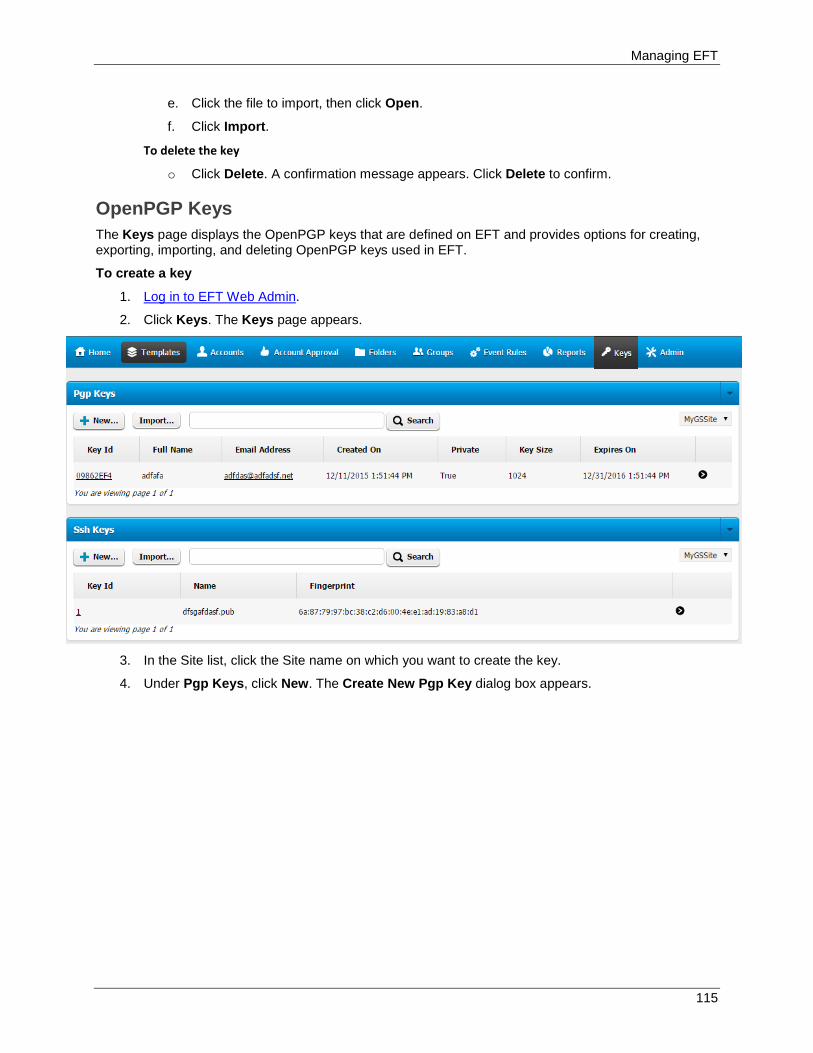
Managing EFT
115
e. Click the file to import, then click Open.
f. Click Import.
To delete the key
o Click Delete. A confirmation message appears. Click Delete to confirm.
OpenPGP Keys The Keys page displays the OpenPGP keys that are defined on EFT and provides options for creating, exporting, importing, and deleting OpenPGP keys used in EFT.
To create a key
1. Log in to EFT Web Admin.
2. Click Keys. The Keys page appears.
3. In the Site list, click the Site name on which you want to create the key.
4. Under Pgp Keys, click New. The Create New Pgp Key dialog box appears.

EFT™ Web Admin Guide
116
5. In the Full name box, provide your name or another contact's name.
6. In the Email address box, provide your email address or another contact's email address.
7. In the Full key cipher box, click the list to specify a cipher to use: IDEA, 3-DES (the default), CAST5, AES128, AES192, AES256, or TWOFISH.
8. In the Key type box, click Diffie-Hellman/DSS, RSA, or RSA legacy.
9. Specify the Key length (1024, 2048, 3072, or 4096). Larger bit sizes increase security, but increase encryption time.
10. Specify the Key expiration date.
11. Provide a passphrase in the Passphrase and Confirmation boxes. The passphrase is case sensitive and must contain a minimum of 8 characters. For better security, the passphrase should contain a mix of alphanumeric (both upper and lower case) and non-alphanumeric characters.
12. Click the Container to which you want to link this key.
13. Click Create. A successful message appears at the top of the page.
To import, export, or delete an OpenPGP key
1. Log in to EFT Web Admin.
2. Click Keys. The Keys page appears.
3. In the Site list, click the Site name on which the key resides.
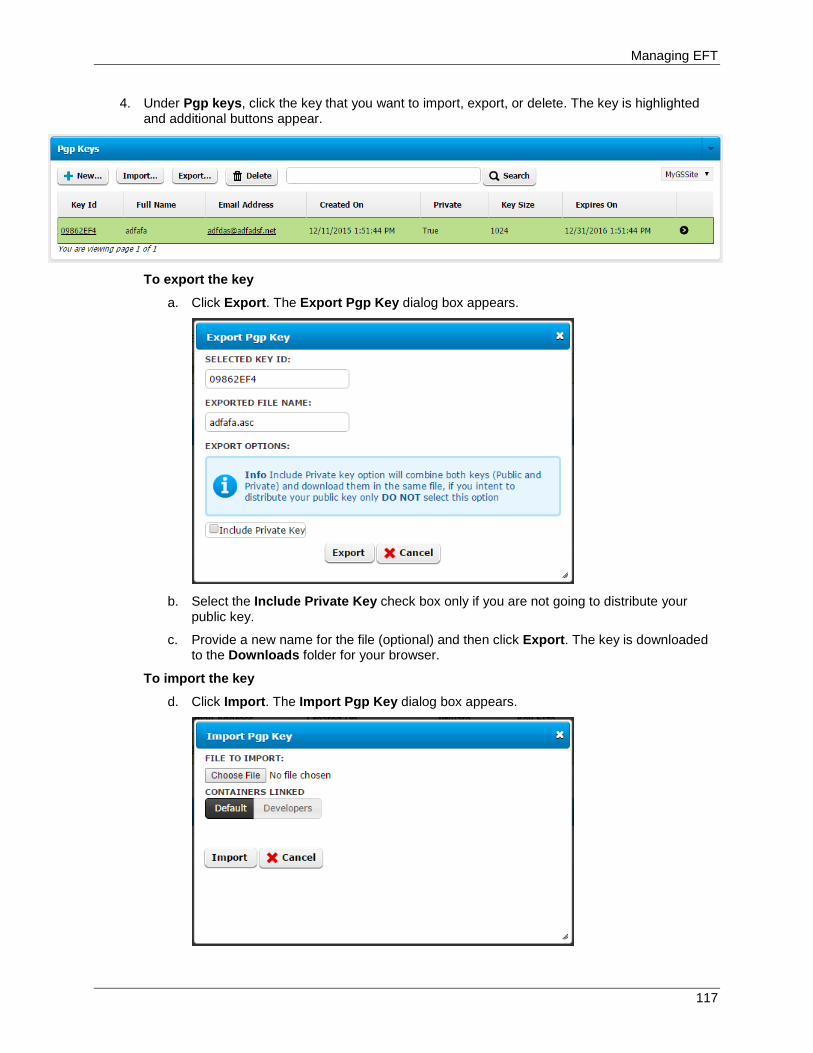
Managing EFT
117
4. Under Pgp keys, click the key that you want to import, export, or delete. The key is highlighted and additional buttons appear.
To export the key
a. Click Export. The Export Pgp Key dialog box appears.
b. Select the Include Private Key check box only if you are not going to distribute your
public key.
c. Provide a new name for the file (optional) and then click Export. The key is downloaded to the Downloads folder for your browser.
To import the key
d. Click Import. The Import Pgp Key dialog box appears.

EFT™ Web Admin Guide
118
e. Click Choose File. The Open dialog box appears.
f. Click the Containers that you want to link to this key.
g. Click the file to import, then click Open.
h. Click Import.
To delete the key
o Click Delete. A confirmation message appears. Click Delete to confirm.
Reports You can execute and export PDFs of EFT reports in EFT Web Admin.
To execute and export a report
1. Log in to EFT Web Admin.
2. Click Reports. The Reports page appears.
3. In the Site list, click the Site name on which you want to view the report.
4. Click the name of the report that you want to view.
5. Specify a date range for the report in the From and To boxes, the click Show. The report appears in the right pane.
6. To save the report as a PDF, click Export PDF. The PDF is saved in the Downloads folder of your browser.
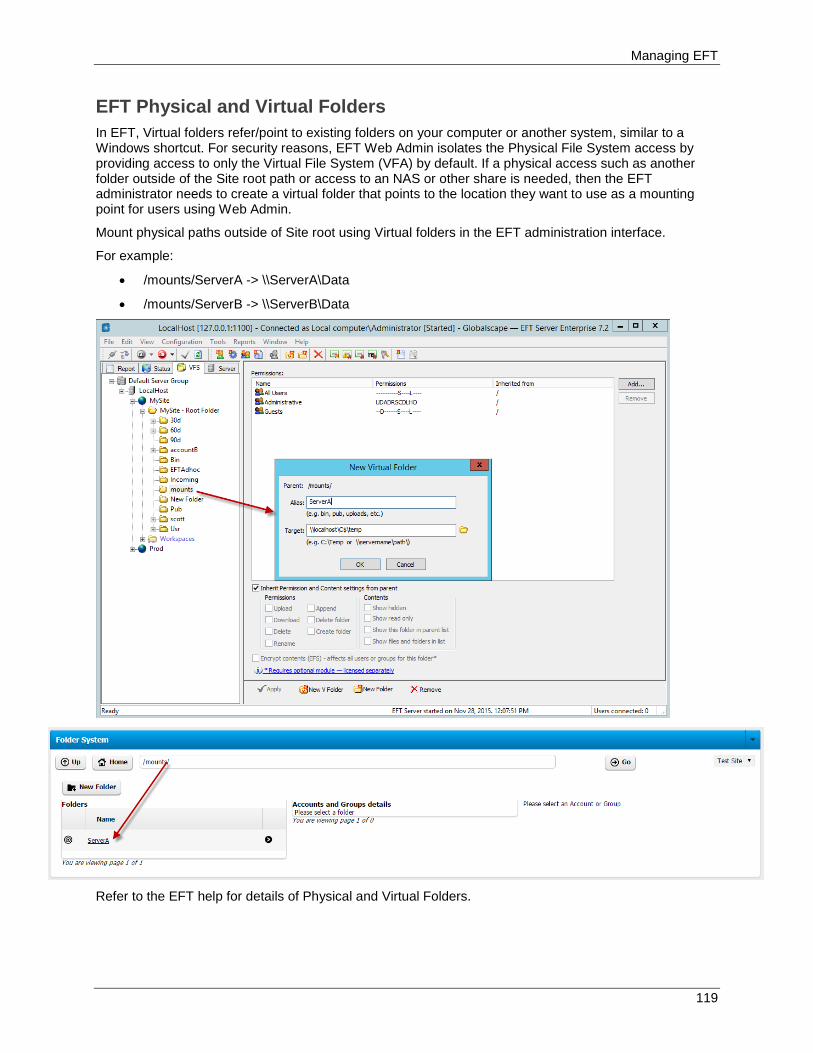
Managing EFT
119
EFT Physical and Virtual Folders In EFT, Virtual folders refer/point to existing folders on your computer or another system, similar to a Windows shortcut. For security reasons, EFT Web Admin isolates the Physical File System access by providing access to only the Virtual File System (VFA) by default. If a physical access such as another folder outside of the Site root path or access to an NAS or other share is needed, then the EFT administrator needs to create a virtual folder that points to the location they want to use as a mounting point for users using Web Admin.
Mount physical paths outside of Site root using Virtual folders in the EFT administration interface.
For example:
• /mounts/ServerA -> \\ServerA\Data
• /mounts/ServerB -> \\ServerB\Data
Refer to the EFT help for details of Physical and Virtual Folders.
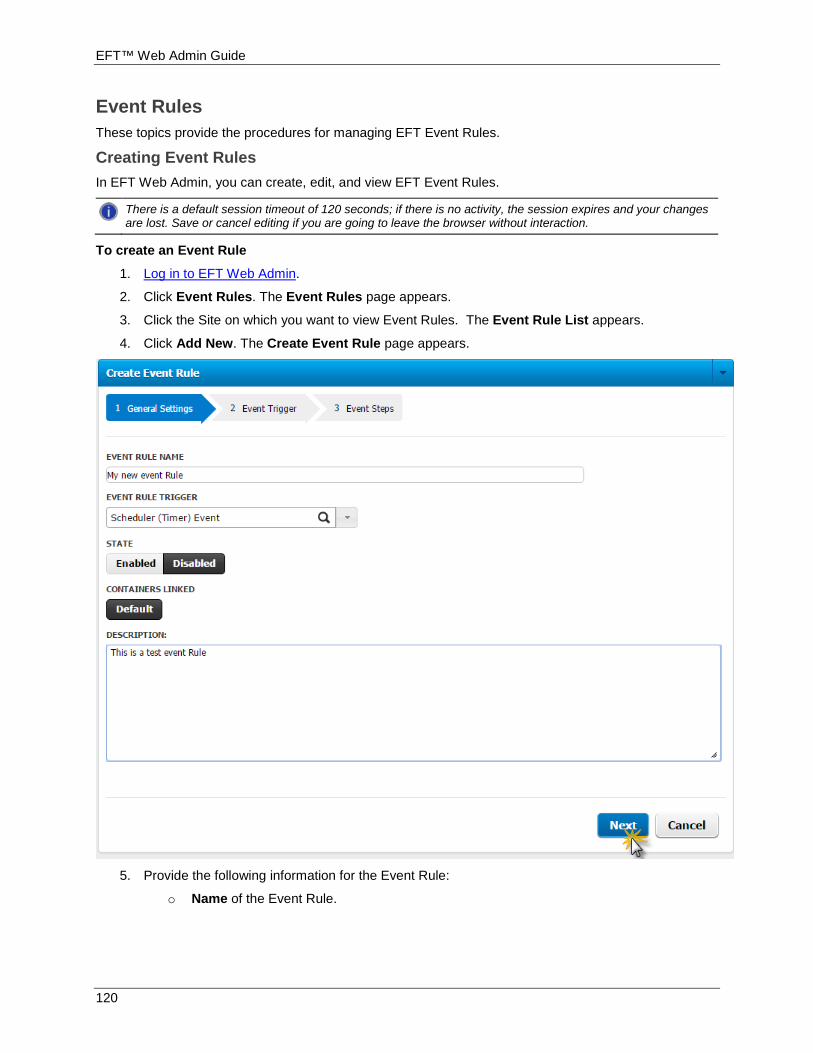
EFT™ Web Admin Guide
120
Event Rules These topics provide the procedures for managing EFT Event Rules.
Creating Event Rules In EFT Web Admin, you can create, edit, and view EFT Event Rules.
There is a default session timeout of 120 seconds; if there is no activity, the session expires and your changes are lost. Save or cancel editing if you are going to leave the browser without interaction.
To create an Event Rule
1. Log in to EFT Web Admin.
2. Click Event Rules. The Event Rules page appears.
3. Click the Site on which you want to view Event Rules. The Event Rule List appears.
4. Click Add New. The Create Event Rule page appears.
5. Provide the following information for the Event Rule:
o Name of the Event Rule.

Managing EFT
121
o Event Rule Type: Type of your event rule. Event Rule types can be restricted as part of the authorization permissions; therefore, some Event Rule Types can be hidden to some EFT Web Admin users.
o State: The state of the Event rule. The default state is enabled; however, you can change the default on the Application Settings page.
o Containers Linked: The Container to which this event will be linked. Only Containers to which this EFT Web Admin user is linked to are displayed and can be linked to the Event Rule
o Description: Description of the Event Rule (optional)
6. Click Next. The Event Trigger page appears.
7. If you are creating a Timer rule, specify when you want the rule to trigger. (Refer to the EFT help for details of Timer rules.)
8. If you are creating a Folder Monitor rule, specify the Folder Monitor settings. (Refer to the EFT
help for details of Folder Monitor rules.)

EFT™ Web Admin Guide
122
9. Click Next. The Create Event Rule page appears.
10. (Optional) Click Condition. The Add Condition dialog box appears.
11. Click a Condition in the list, then click Add. The Conditions available depends on the Event
Trigger specified and the EFT Admin User.
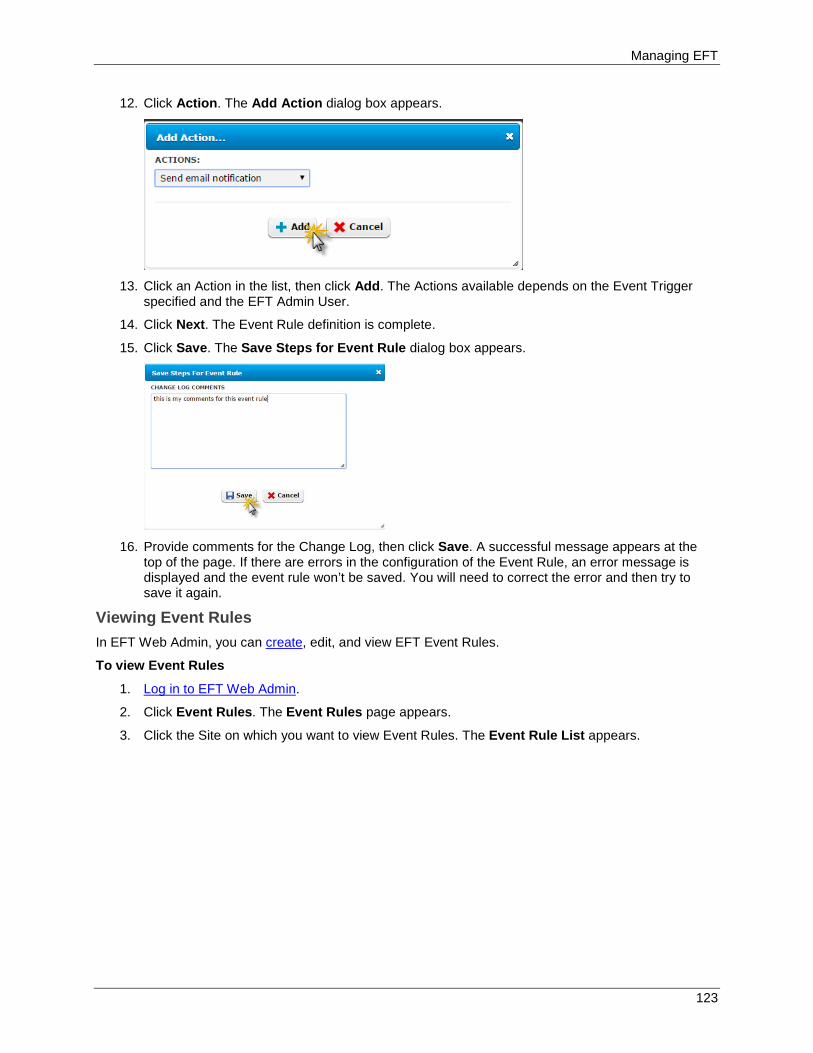
Managing EFT
123
12. Click Action. The Add Action dialog box appears.
13. Click an Action in the list, then click Add. The Actions available depends on the Event Trigger
specified and the EFT Admin User.
14. Click Next. The Event Rule definition is complete.
15. Click Save. The Save Steps for Event Rule dialog box appears.
16. Provide comments for the Change Log, then click Save. A successful message appears at the
top of the page. If there are errors in the configuration of the Event Rule, an error message is displayed and the event rule won’t be saved. You will need to correct the error and then try to save it again.
Viewing Event Rules In EFT Web Admin, you can create, edit, and view EFT Event Rules.
To view Event Rules
1. Log in to EFT Web Admin.
2. Click Event Rules. The Event Rules page appears.
3. Click the Site on which you want to view Event Rules. The Event Rule List appears.
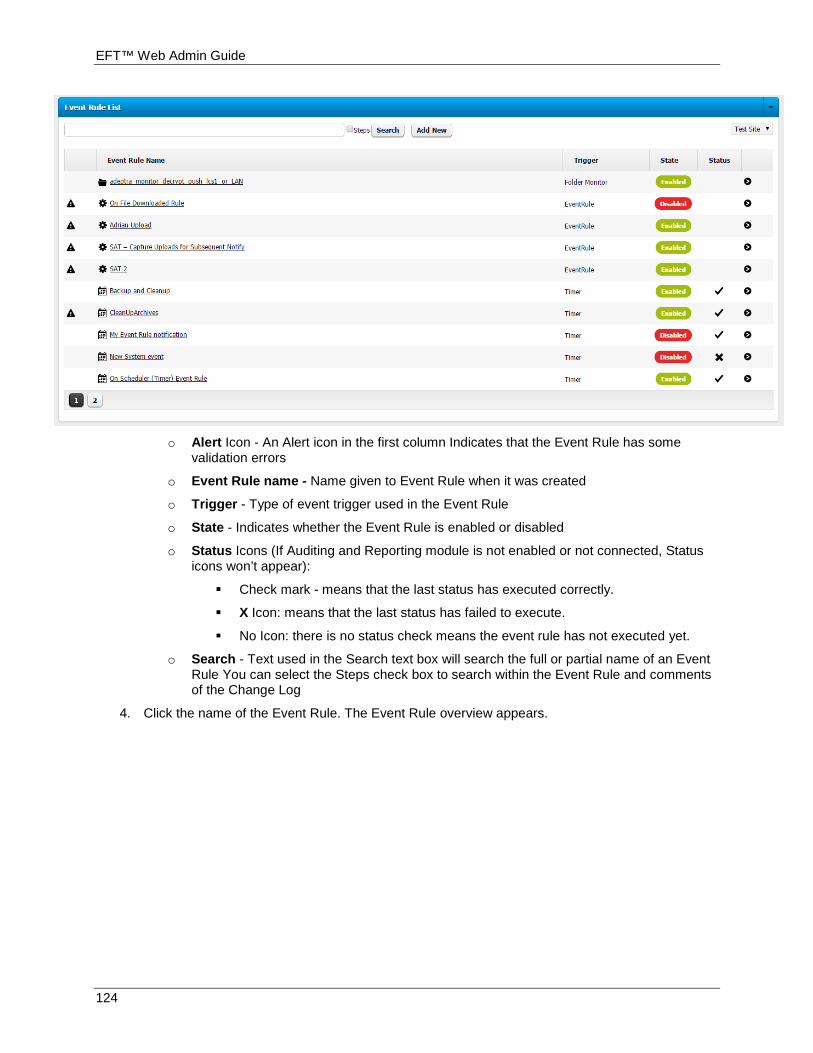
EFT™ Web Admin Guide
124
o Alert Icon - An Alert icon in the first column Indicates that the Event Rule has some
validation errors
o Event Rule name - Name given to Event Rule when it was created
o Trigger - Type of event trigger used in the Event Rule
o State - Indicates whether the Event Rule is enabled or disabled
o Status Icons (If Auditing and Reporting module is not enabled or not connected, Status icons won’t appear):
Check mark - means that the last status has executed correctly.
X Icon: means that the last status has failed to execute.
No Icon: there is no status check means the event rule has not executed yet.
o Search - Text used in the Search text box will search the full or partial name of an Event Rule You can select the Steps check box to search within the Event Rule and comments of the Change Log
4. Click the name of the Event Rule. The Event Rule overview appears.

Managing EFT
125
5. To view the steps in the Event Rule, click Edit Event Rule Settings. Continue to Editing Event
Rules.
Cloning Event Rules Cloning an Event Rule creates a copy of the Rule, and then you can modify it to your needs and the Rule.
To clone an Event Rule
1. Log in to EFT Web Admin.
2. Click Event Rules. The Event Rules page appears.
3. Click the Site on which you want to clone an Event Rule. The Event Rule List appears.
4. Click the selector icon in the far right column of the Event Rule that you want to clone, then click Clone. The Clone Event Rule Confirmation dialog box appears.
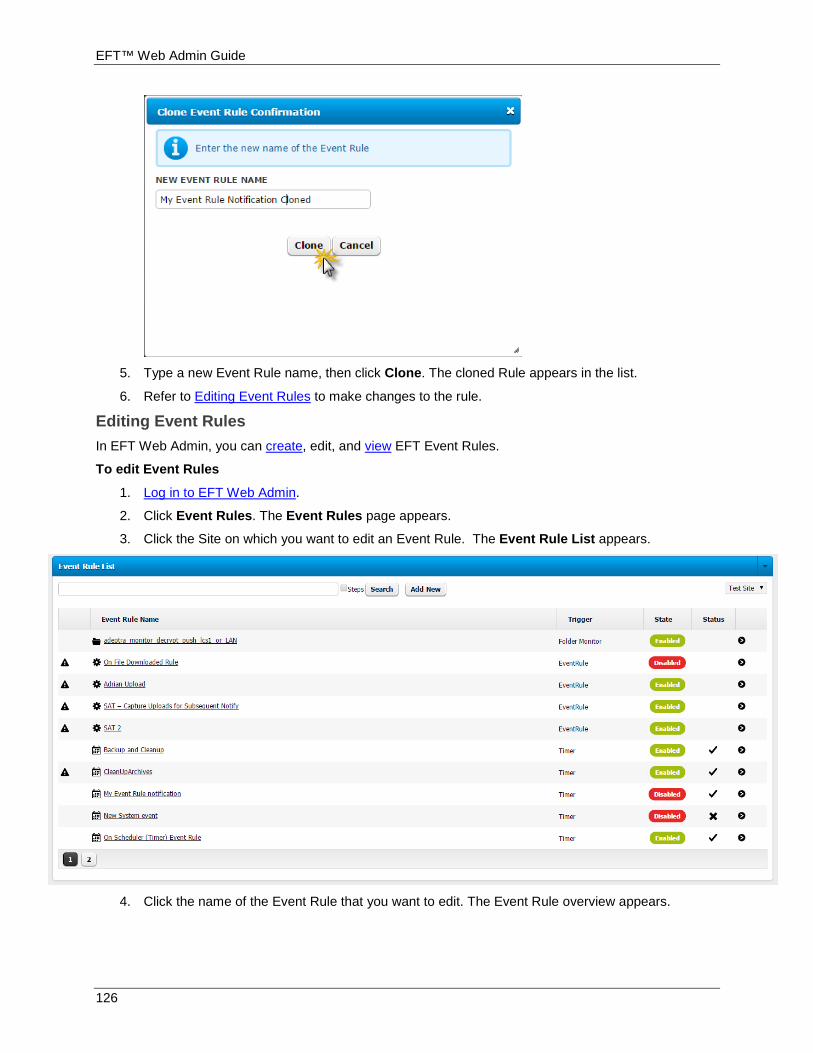
EFT™ Web Admin Guide
126
5. Type a new Event Rule name, then click Clone. The cloned Rule appears in the list.
6. Refer to Editing Event Rules to make changes to the rule.
Editing Event Rules In EFT Web Admin, you can create, edit, and view EFT Event Rules.
To edit Event Rules
1. Log in to EFT Web Admin.
2. Click Event Rules. The Event Rules page appears.
3. Click the Site on which you want to edit an Event Rule. The Event Rule List appears.
4. Click the name of the Event Rule that you want to edit. The Event Rule overview appears.
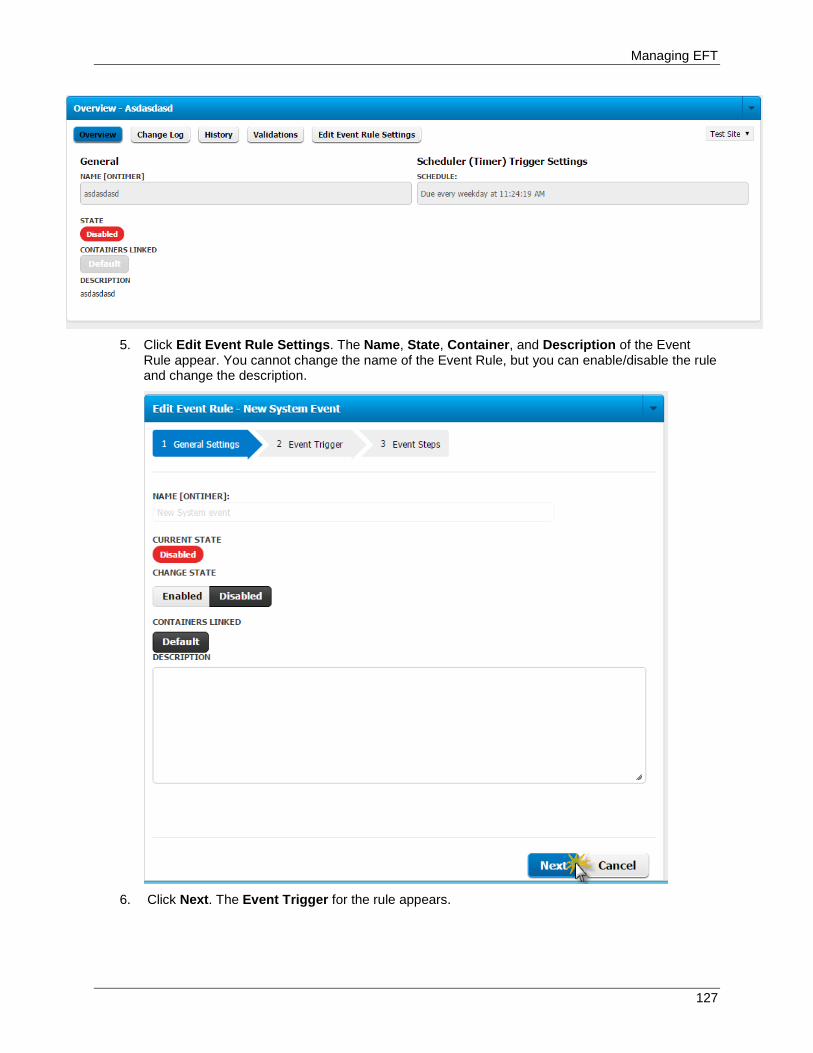
Managing EFT
127
5. Click Edit Event Rule Settings. The Name, State, Container, and Description of the Event
Rule appear. You cannot change the name of the Event Rule, but you can enable/disable the rule and change the description.
6. Click Next. The Event Trigger for the rule appears.
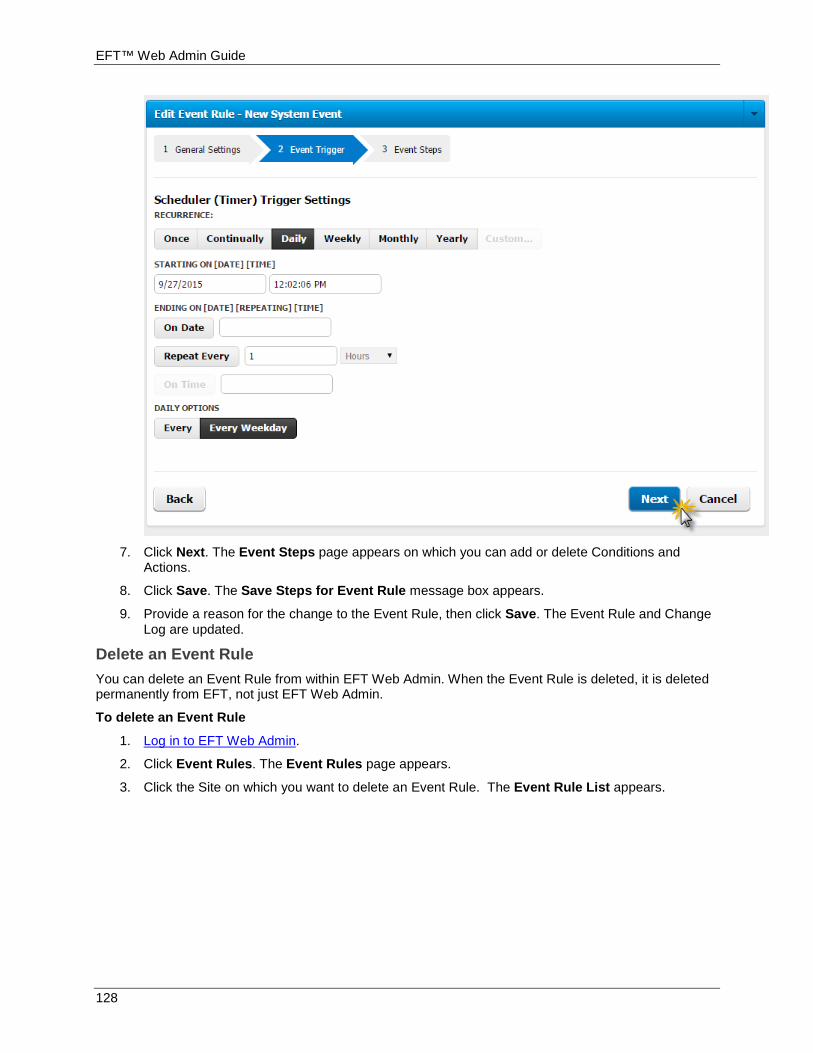
EFT™ Web Admin Guide
128
7. Click Next. The Event Steps page appears on which you can add or delete Conditions and
Actions.
8. Click Save. The Save Steps for Event Rule message box appears.
9. Provide a reason for the change to the Event Rule, then click Save. The Event Rule and Change Log are updated.
Delete an Event Rule You can delete an Event Rule from within EFT Web Admin. When the Event Rule is deleted, it is deleted permanently from EFT, not just EFT Web Admin.
To delete an Event Rule
1. Log in to EFT Web Admin.
2. Click Event Rules. The Event Rules page appears.
3. Click the Site on which you want to delete an Event Rule. The Event Rule List appears.
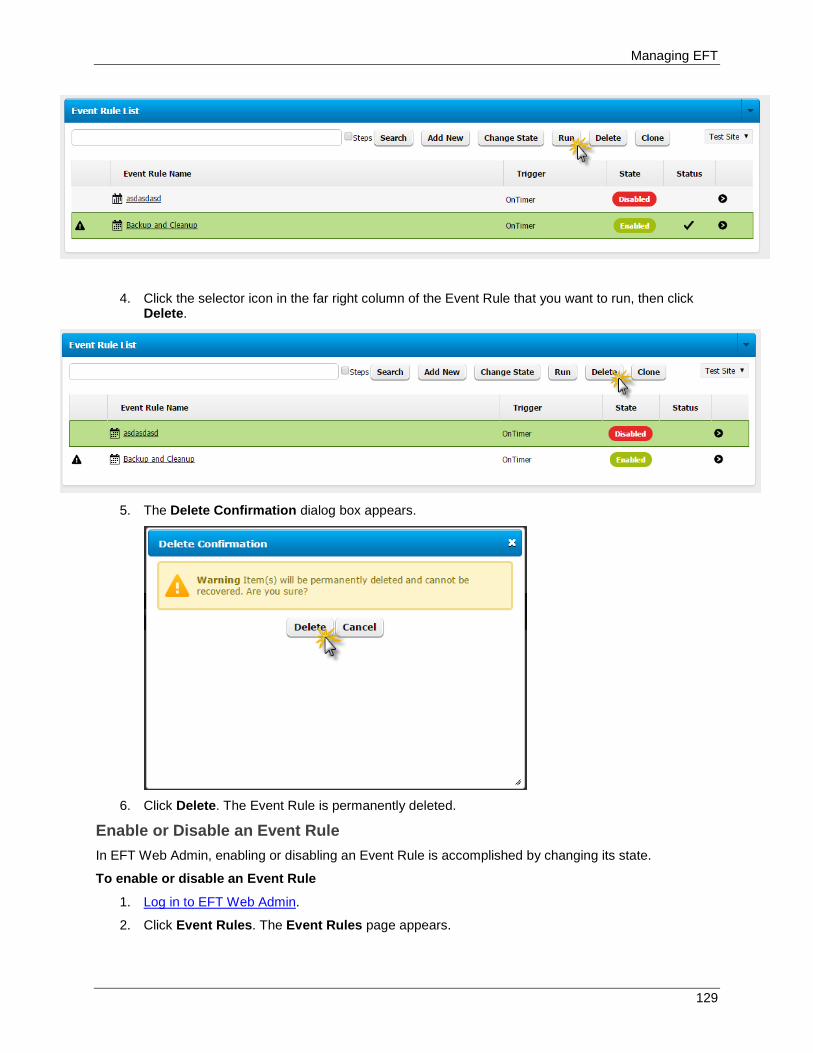
Managing EFT
129
4. Click the selector icon in the far right column of the Event Rule that you want to run, then click Delete.
5. The Delete Confirmation dialog box appears.
6. Click Delete. The Event Rule is permanently deleted.
Enable or Disable an Event Rule In EFT Web Admin, enabling or disabling an Event Rule is accomplished by changing its state.
To enable or disable an Event Rule
1. Log in to EFT Web Admin.
2. Click Event Rules. The Event Rules page appears.
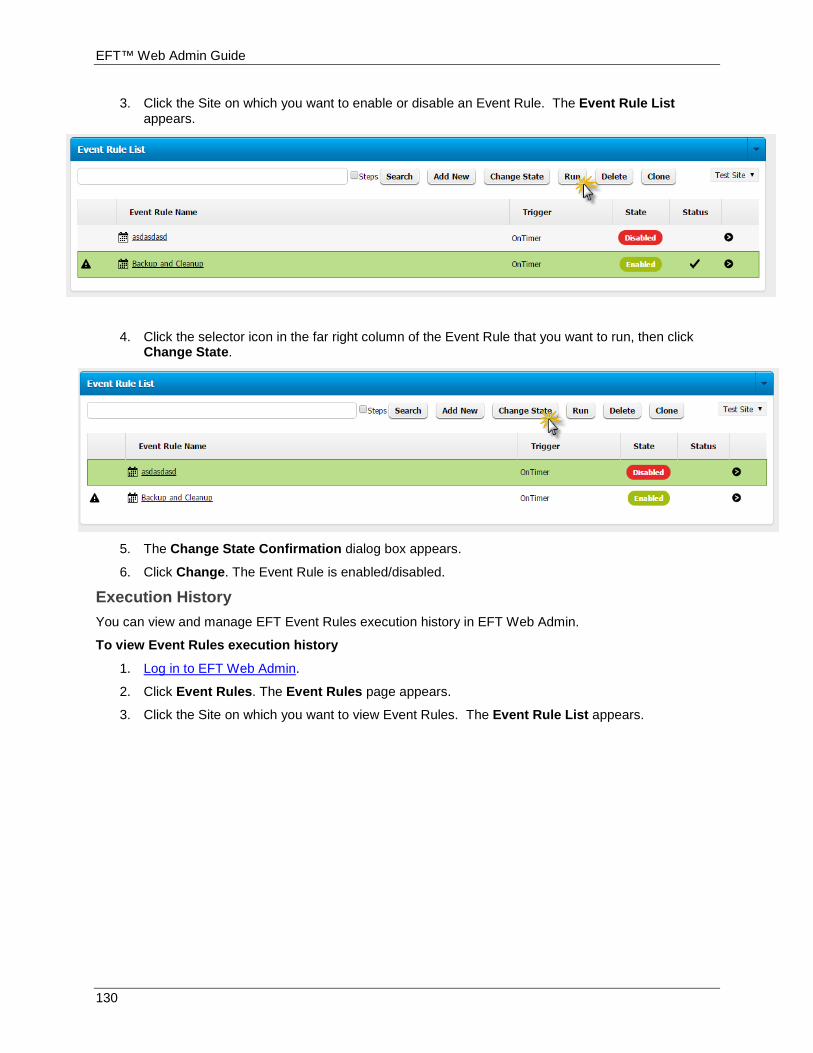
EFT™ Web Admin Guide
130
3. Click the Site on which you want to enable or disable an Event Rule. The Event Rule List appears.
4. Click the selector icon in the far right column of the Event Rule that you want to run, then click Change State.
5. The Change State Confirmation dialog box appears.
6. Click Change. The Event Rule is enabled/disabled.
Execution History You can view and manage EFT Event Rules execution history in EFT Web Admin.
To view Event Rules execution history
1. Log in to EFT Web Admin.
2. Click Event Rules. The Event Rules page appears.
3. Click the Site on which you want to view Event Rules. The Event Rule List appears.
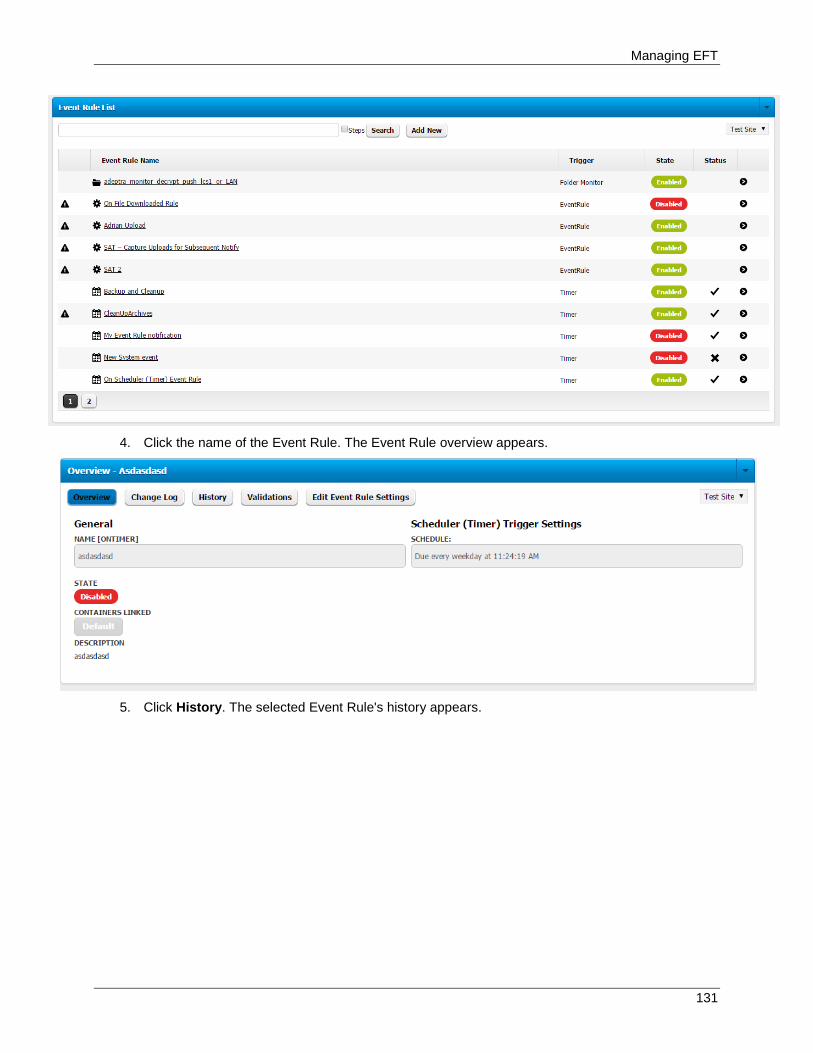
Managing EFT
131
4. Click the name of the Event Rule. The Event Rule overview appears.
5. Click History. The selected Event Rule's history appears.

EFT™ Web Admin Guide
132
6. Click Details to display more information about the rule, then click More Details. The More
Details message box appears.
7. The More Details provides more information, including Custom Commands, parameters,
templates, paths, and working folders.
8. Click Close to dismiss the message.
Change Log When an Event Rule is created or edited, you are asked to note the reason. You can view the Change Log to view the comments that were added to the log. Ideally, the comments would show why a rule was created or edited. The Time Stamp shows when the log was created and the username of who created it.
To view Event Rules change log
1. Log in to EFT Web Admin.
2. Click Event Rules. The Event Rules page appears.
3. Click the Site on which you want to view Event Rules. The Event Rule List appears.
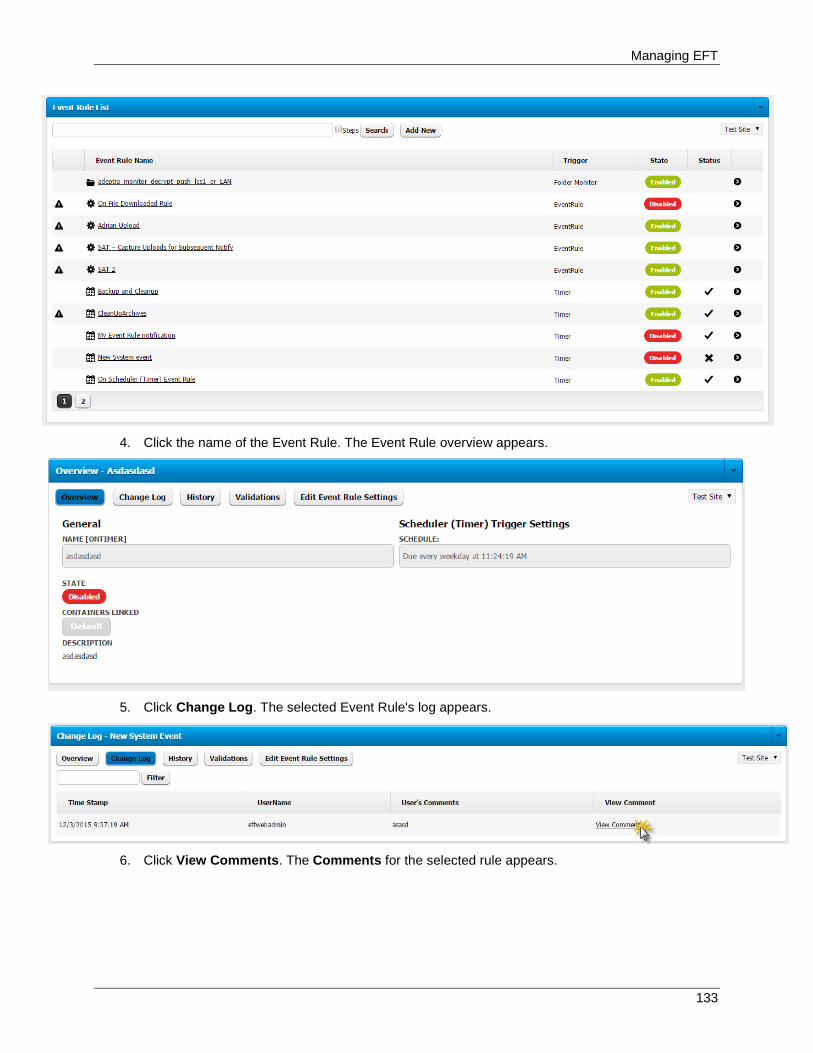
Managing EFT
133
4. Click the name of the Event Rule. The Event Rule overview appears.
5. Click Change Log. The selected Event Rule's log appears.
6. Click View Comments. The Comments for the selected rule appears.

EFT™ Web Admin Guide
134
7. Click the X in the upper-right corner to dismiss the box.
Executing Event Rules You can manually run an Event Rule from within EFT Web Admin.
To execute an Event Rule
1. Log in to EFT Web Admin.
2. Click Event Rules. The Event Rules page appears.
3. Click the Site on which you want to run an Event Rule. The Event Rule List appears.
4. Click the selector icon in the far right column of the Event Rule that you want to run, then click Run. The Run Confirmation dialog box appears.
5. Click Run. The Event Rule executes.
Searching Event Rules When you have a lot of Event Rules, you may need to use the search functionality to find a rule or a specific step in an Event Rule that you want to edit or clone.
To search Event Rules
1. Log in to EFT Web Admin.
2. Click Event Rules. The Event Rules page appears.
3. Click the Site on which you want to search for an Event Rule. The Event Rule List appears.
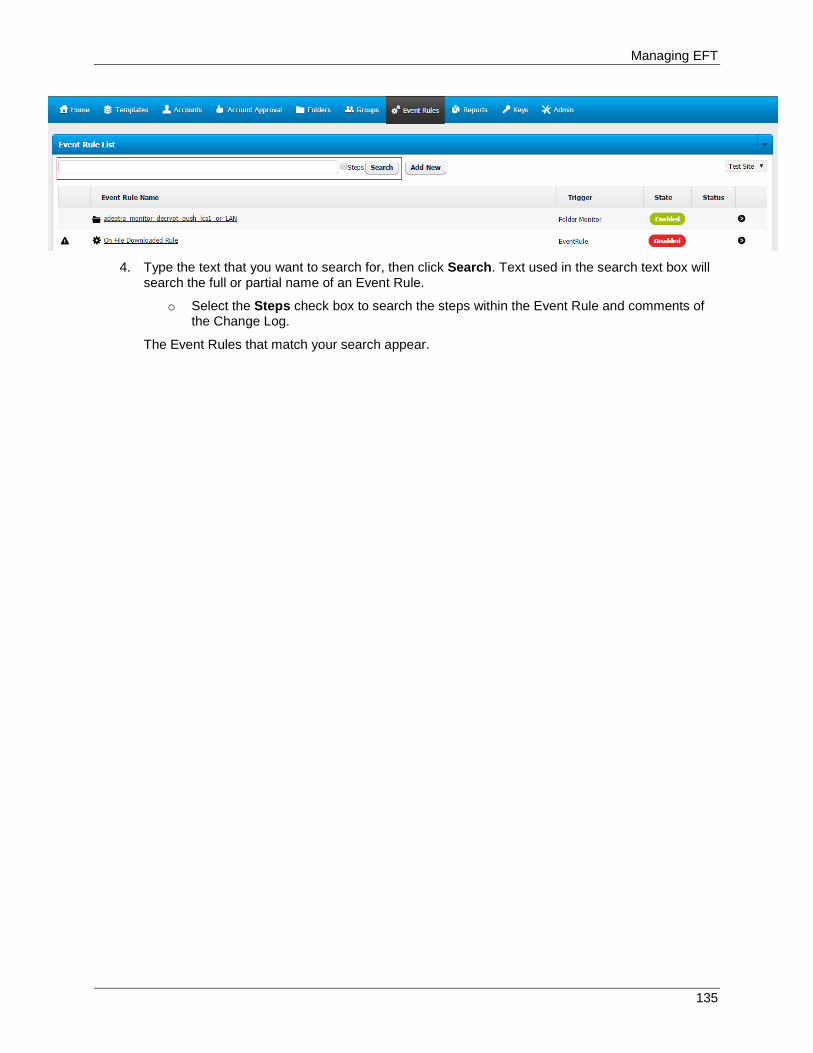
Managing EFT
135
4. Type the text that you want to search for, then click Search. Text used in the search text box will
search the full or partial name of an Event Rule.
o Select the Steps check box to search the steps within the Event Rule and comments of the Change Log.
The Event Rules that match your search appear.