Embed Size (px)
Citation preview
2016-2017 eSchool TAC/GRADEBOOK Training Connect to following URL: https://eschoolplus31.k12.ar.us/TAC31
Or connect using the link on the fordyceschools.org homepage
My Login:
My Password: *SunGard, the makers of eSchool recommend the following web browsers for TAC
--- Internet Explorer 9 or higher --- Safari
Please note that while Chrome and Firefox may work with eSchool TAC, they are not preferred. The use of Chrome or Firefox may cause issues with TAC and its add-ons.
When logging in please remember your login will have apscn\ in front of it….for example apscn\2002jdoe
Once you have entered your login, you can enter your password.
Use the drop down menu to select FORDYCE SCHOOL DISTRICT Click OK
You should now be at your home page with the list of your Classes, Messages, and Reports.
If you need to return to your home page Click the Home button on the top right or: On the Menu on the left, click View Student List then click My Classes.
SPECIAL REQUIREMENTS You MUST be on a school internet connection. State security will not allow you in from home.
You SHOULD BE using Internet Explorer (may have to be in compatibility mode). MAC users SHOULD BE using Safari.
When you are finished working in eSchool, please remember to LOGOUT by clicking the word logout at the top right of the screen.
Class Rosters
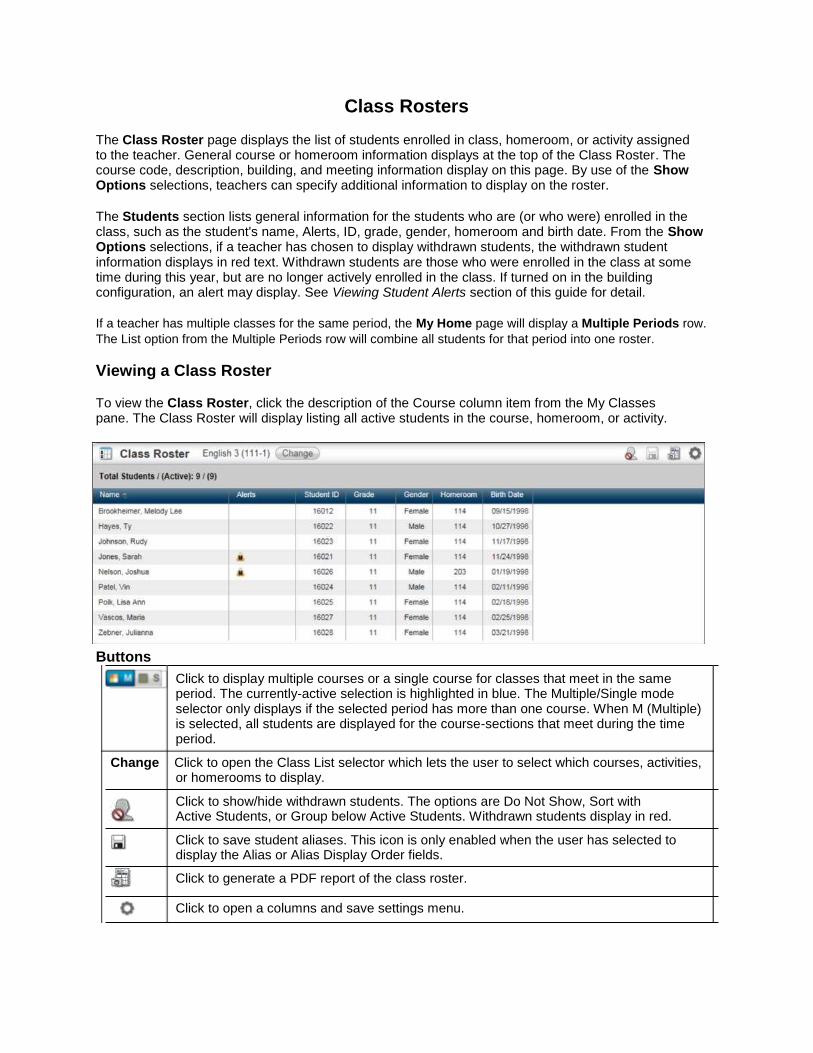
The Class Roster page displays the list of students enrolled in class, homeroom, or activity assigned to the teacher. General course or homeroom information displays at the top of the Class Roster. The course code, description, building, and meeting information display on this page. By use of the Show Options selections, teachers can specify additional information to display on the roster.
The Students section lists general information for the students who are (or who were) enrolled in the class, such as the student's name, Alerts, ID, grade, gender, homeroom and birth date. From the Show Options selections, if a teacher has chosen to display withdrawn students, the withdrawn student information displays in red text. Withdrawn students are those who were enrolled in the class at some time during this year, but are no longer actively enrolled in the class. If turned on in the building configuration, an alert may display. See Viewing Student Alerts section of this guide for detail.
If a teacher has multiple classes for the same period, the My Home page will display a Multiple Periods row.
The List option from the Multiple Periods row will combine all students for that period into one roster.
Viewing a Class Roster To view the Class Roster, click the description of the Course column item from the My Classes pane. The Class Roster will display listing all active students in the course, homeroom, or activity.
Buttons
Click to display multiple courses or a single course for classes that meet in the same period. The currently-active selection is highlighted in blue. The Multiple/Single mode selector only displays if the selected period has more than one course. When M (Multiple) is selected, all students are displayed for the course-sections that meet during the time period.
Change Click to open the Class List selector which lets the user to select which courses, activities,
or homerooms to display.
Click to show/hide withdrawn students. The options are Do Not Show, Sort with Active Students, or Group below Active Students. Withdrawn students display in red.
Click to save student aliases. This icon is only enabled when the user has selected to display the Alias or Alias Display Order fields.
Click to generate a PDF report of the class roster.
Click to open a columns and save settings menu.
Show/Hide Columns - Click to add or remove columns from the page. Refer to the screen example below for a complete list of all columns that can be displayed on this page. Add Empty Columns - Click to add blank columns to the display. This tool allows to print a student list with blank columns so the user can quickly check off who turned in assignments or to take on field trips so the teacher can check that all students are present and accounted for. Empty columns are temporary and are not saved when selecting ‘Save Current Settings’. Save Current Settings - Click to save the current display settings. Once saved, these settings will remain in effect if the user leaves and returns to the Gradebook Entry page.
Restore Default Settings - Click to restore settings to their TAC default.
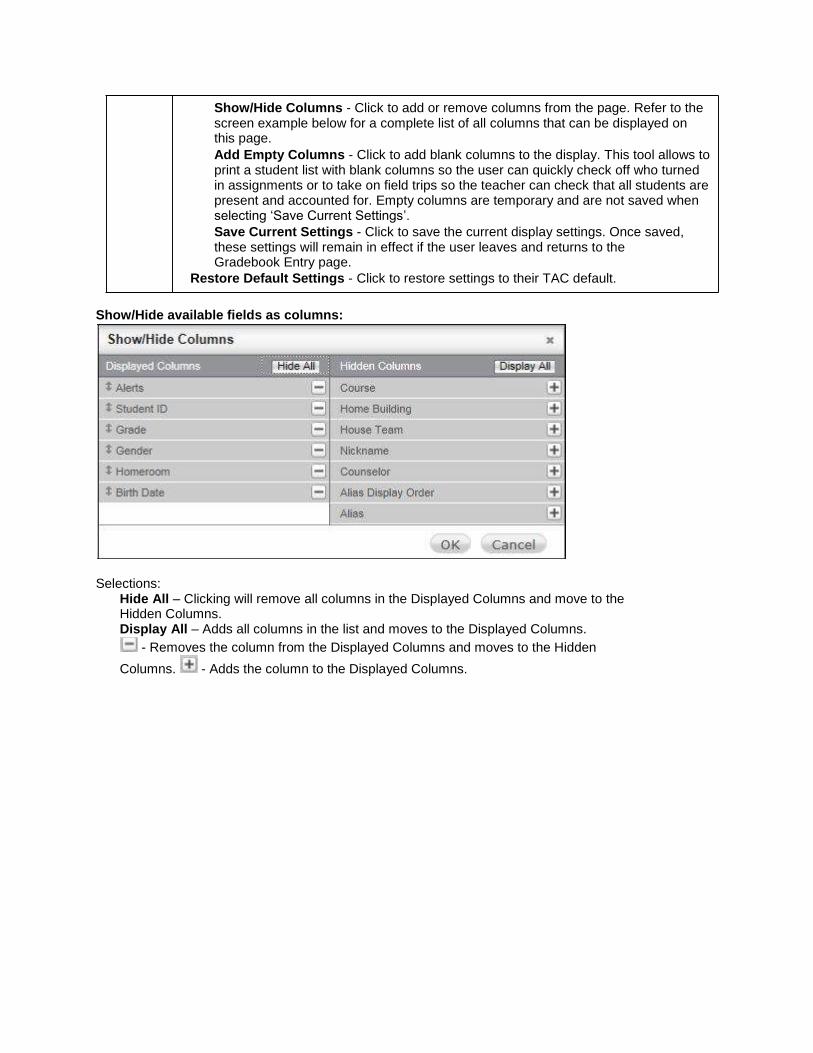
Show/Hide available fields as columns:
Selections: Hide All – Clicking will remove all columns in the Displayed Columns and move to the Hidden Columns. Display All – Adds all columns in the list and moves to the Displayed Columns.
- Removes the column from the Displayed Columns and moves to the Hidden
Columns. - Adds the column to the Displayed Columns.
Creating a Customized Seating Chart
Navigation: Class Management > Seating Chart Use this page to create a class seating arrangement using an interactive set of student pictures. The pictures
can be arranged as a grid or into any design desired. To take attendance using the seating chart, click to display the Attendance By Photo page. Note: The Seating Chart may be used without
student photos.
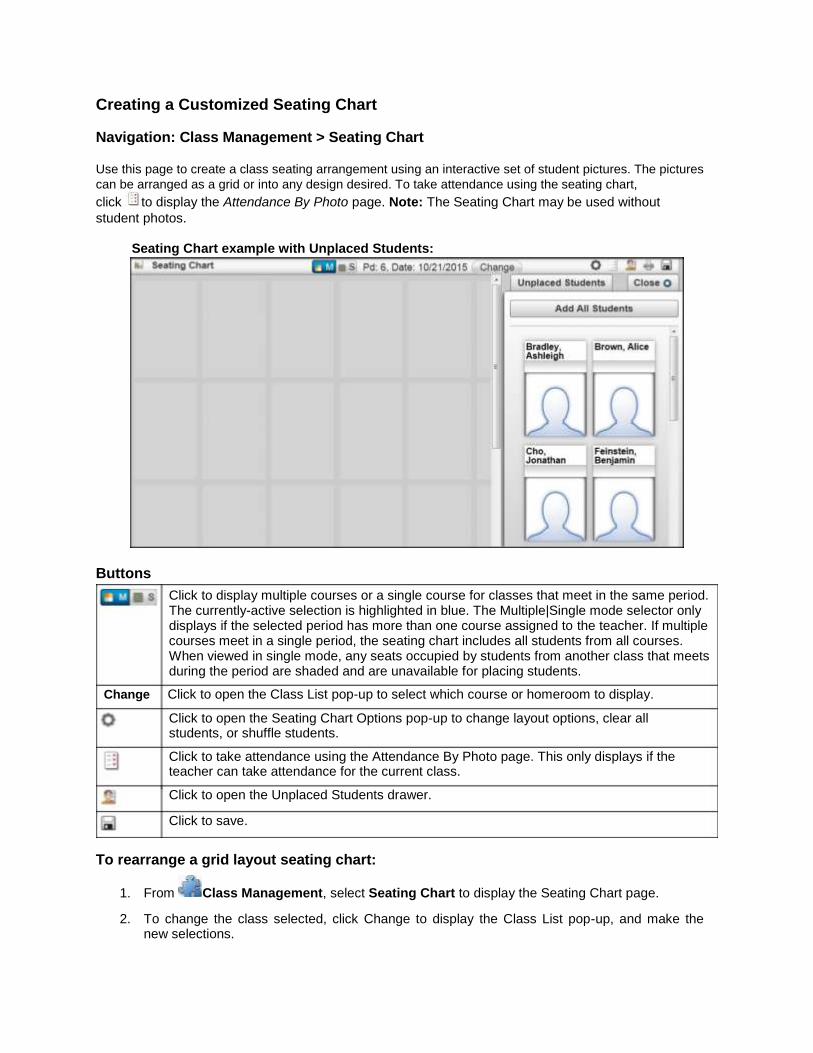
Seating Chart example with Unplaced Students:
Buttons
Click to display multiple courses or a single course for classes that meet in the same period. The currently-active selection is highlighted in blue. The Multiple|Single mode selector only displays if the selected period has more than one course assigned to the teacher. If multiple courses meet in a single period, the seating chart includes all students from all courses. When viewed in single mode, any seats occupied by students from another class that meets during the period are shaded and are unavailable for placing students.
Change Click to open the Class List pop-up to select which course or homeroom to display.
Click to open the Seating Chart Options pop-up to change layout options, clear all students, or shuffle students.
Click to take attendance using the Attendance By Photo page. This only displays if the teacher can take attendance for the current class.
Click to open the Unplaced Students drawer.
Click to save.
To rearrange a grid layout seating chart:
1. From Class Management, select Seating Chart to display the Seating Chart page.
2. To change the class selected, click Change to display the Class List pop-up, and make the new selections.
3. If reducing the number of rows or columns, be sure that there are no students placed in rows or
columns being deleted.
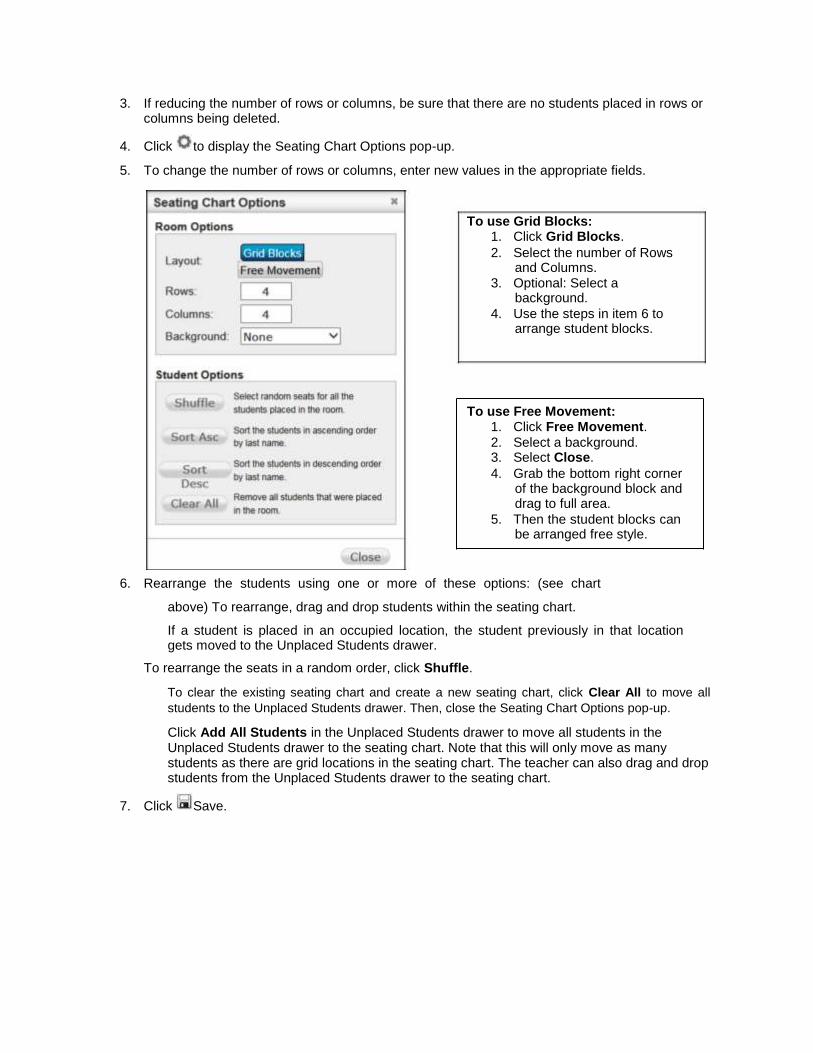
4. Click to display the Seating Chart Options pop-up. 5. To change the number of rows or columns, enter new values in the appropriate fields.
To use Grid Blocks: 1. Click Grid Blocks. 2. Select the number of Rows
and Columns. 3. Optional: Select a
background. 4. Use the steps in item 6 to
arrange student blocks.
To use Free Movement: 1. Click Free Movement. 2. Select a background. 3. Select Close. 4. Grab the bottom right corner
of the background block and drag to full area.
5. Then the student blocks can be arranged free style.
6. Rearrange the students using one or more of these options: (see chart
above) To rearrange, drag and drop students within the seating chart.
If a student is placed in an occupied location, the student previously in that location gets moved to the Unplaced Students drawer.
To rearrange the seats in a random order, click Shuffle.
To clear the existing seating chart and create a new seating chart, click Clear All to move all
students to the Unplaced Students drawer. Then, close the Seating Chart Options pop-up.
Click Add All Students in the Unplaced Students drawer to move all students in the Unplaced Students drawer to the seating chart. Note that this will only move as many students as there are grid locations in the seating chart. The teacher can also drag and drop students from the Unplaced Students drawer to the seating chart.
7. Click Save.
Calendar Use the Calendar page to view all course and assignments. The teacher can also create calendar events for
their homerooms, activities, or courses. Calendar events can be edited or deleted using the Event Detail pop-
up. However, assignments are read-only on the Calendar page; use the Gradebook Entry or Gradebook
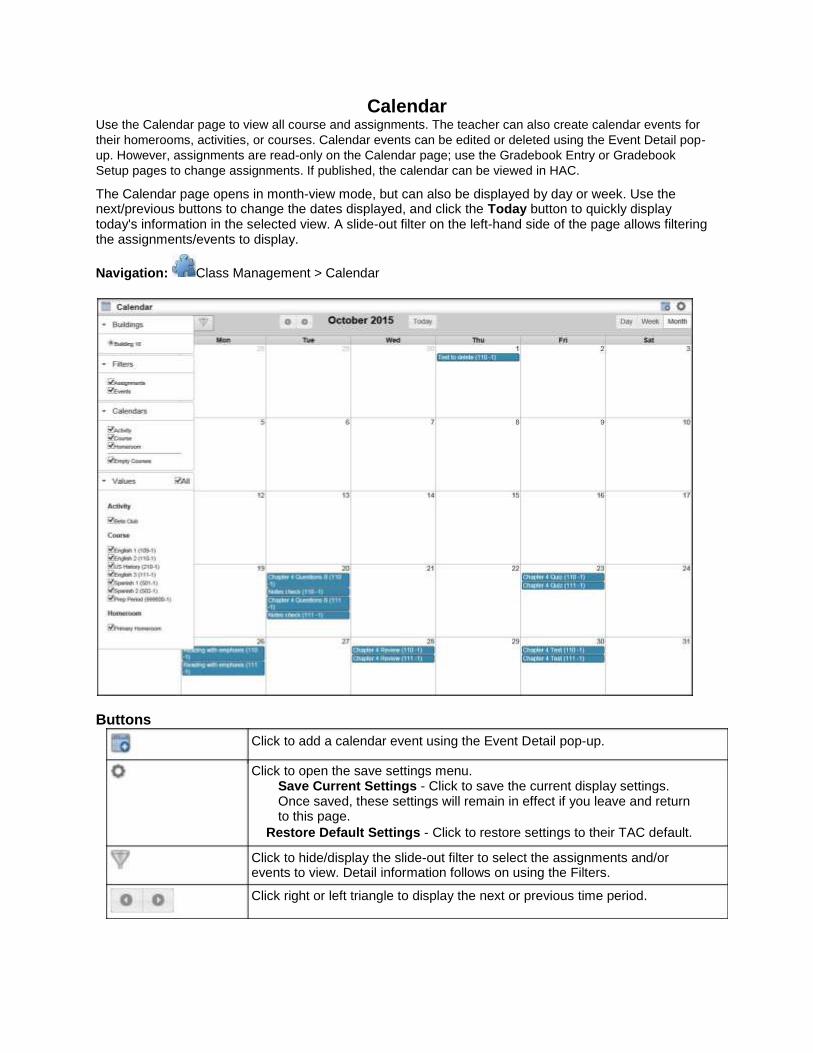
Setup pages to change assignments. If published, the calendar can be viewed in HAC. The Calendar page opens in month-view mode, but can also be displayed by day or week. Use the next/previous buttons to change the dates displayed, and click the Today button to quickly display today's information in the selected view. A slide-out filter on the left-hand side of the page allows filtering the assignments/events to display.
Navigation: Class Management > Calendar
Buttons
Click to add a calendar event using the Event Detail pop-up.
Click to open the save settings menu. Save Current Settings - Click to save the current display settings. Once saved, these settings will remain in effect if you leave and return to this page.
Restore Default Settings - Click to restore settings to their TAC default.
Click to hide/display the slide-out filter to select the assignments and/or events to view. Detail information follows on using the Filters.
Click right or left triangle to display the next or previous time period.
Field Descriptions
Calendar Filter - Click to hide/display the slide-out filter. Use the fields in this filter to choose which
events and assignments to display on the calendar. The filter has expanding sections that enable filtering at the building level and then narrow the selection down to assignments or events attached to specific courses, activities, or homerooms.
Buildings - Select the buildings to display.
Filters - Check to display Assignments, Events, or both.
Calendars - Select to display one or more from: Activity, Course, or Homeroom. If a selection has calendar assignments or events associated with classes in the selection, the classes will display in the Values field.
Values - Select the classes for which events or assignments will display. Check All to display options listed in the Values section. Subsequent checks will display all or none of the classes listed in this section.
Adding, Editing, or Deleting Calendar Events
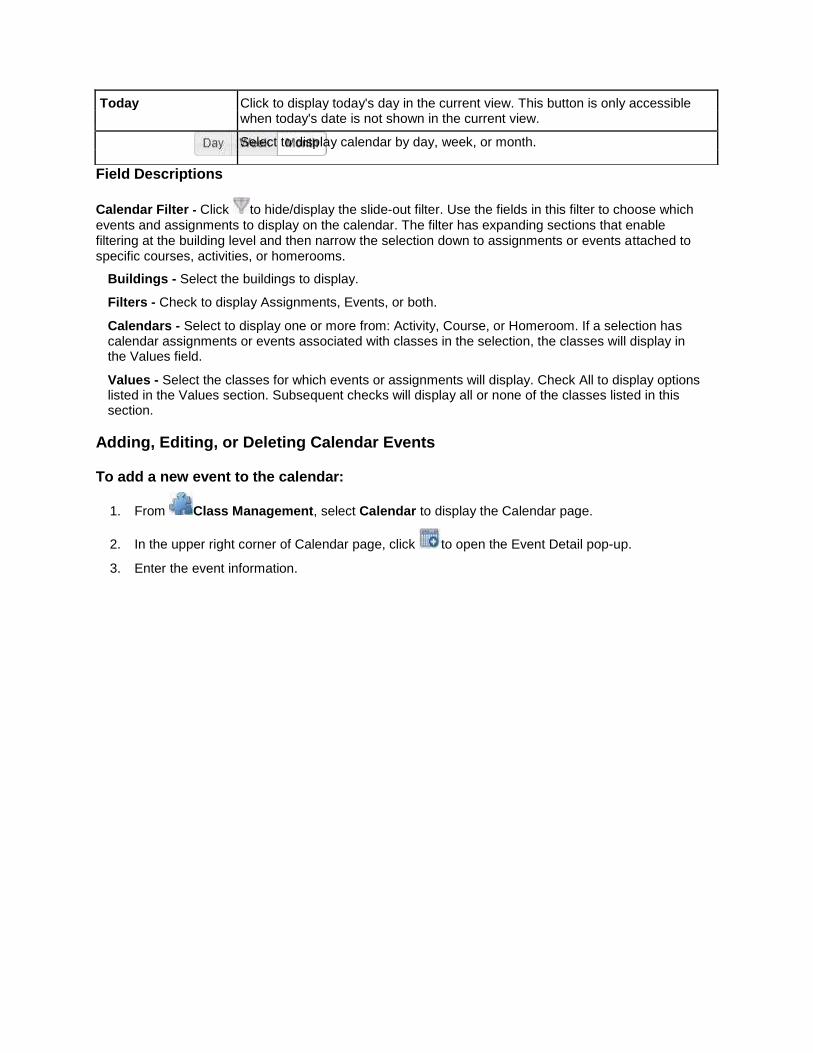
To add a new event to the calendar:
1. From Class Management, select Calendar to display the Calendar page.
2. In the upper right corner of Calendar page, click to open the Event Detail pop-up.
3. Enter the event information.
Today Click to display today's day in the current view. This button is only accessible when today's date is not shown in the current view.
Select to display calendar by day, week, or month.
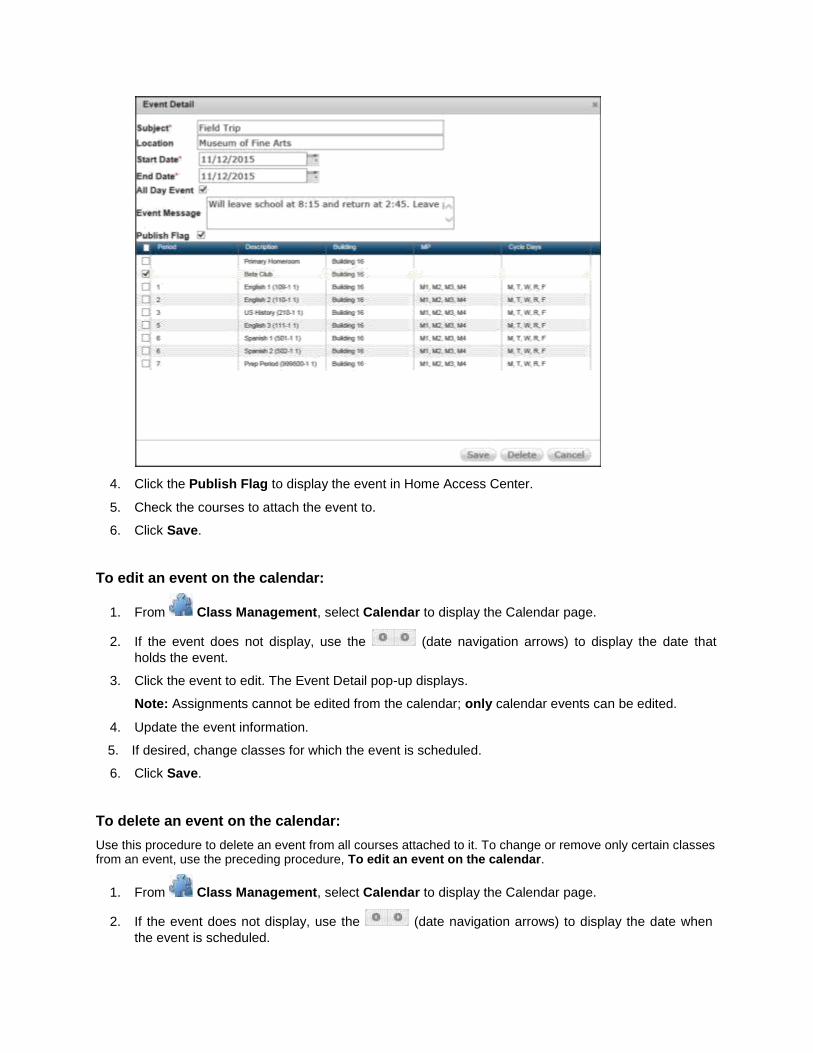
4. Click the Publish Flag to display the event in Home Access Center.
5. Check the courses to attach the event to.
6. Click Save.
To edit an event on the calendar:
1. From Class Management, select Calendar to display the Calendar page.
2. If the event does not display, use the (date navigation arrows) to display the date that
holds the event.
3. Click the event to edit. The Event Detail pop-up displays.
Note: Assignments cannot be edited from the calendar; only calendar events can be edited.
4. Update the event information.
5. If desired, change classes for which the event is scheduled.
6. Click Save.
To delete an event on the calendar: Use this procedure to delete an event from all courses attached to it. To change or remove only certain classes from an event, use the preceding procedure, To edit an event on the calendar.
1. From Class Management, select Calendar to display the Calendar page.
2. If the event does not display, use the (date navigation arrows) to display the date when
the event is scheduled.

3. Click the event to delete. The Event Detail pop-up displays. 4. Click Delete to delete the event from all courses attached to it.
Attendance Attendance Entry by List
The following process is for a teacher to take attendance in Teacher Access Center (TAC) for students in either their homerooms or scheduled courses. If taking homeroom attendance teachers will see an attendance link next to a line titled “homeroom” and if taking class attendance the attendance link is next to the course.
The following items will prevent a teacher from taking a student’s attendance: Future attendance cannot be taken in TAC.
If the student is not enrolled in the class for the date.
If the course section is set to not take attendance. Calendar has ‘No’ to take attendance. An example of this is if the building has an A/B calendar and the selected date is not the appropriate ‘A or B Day’.
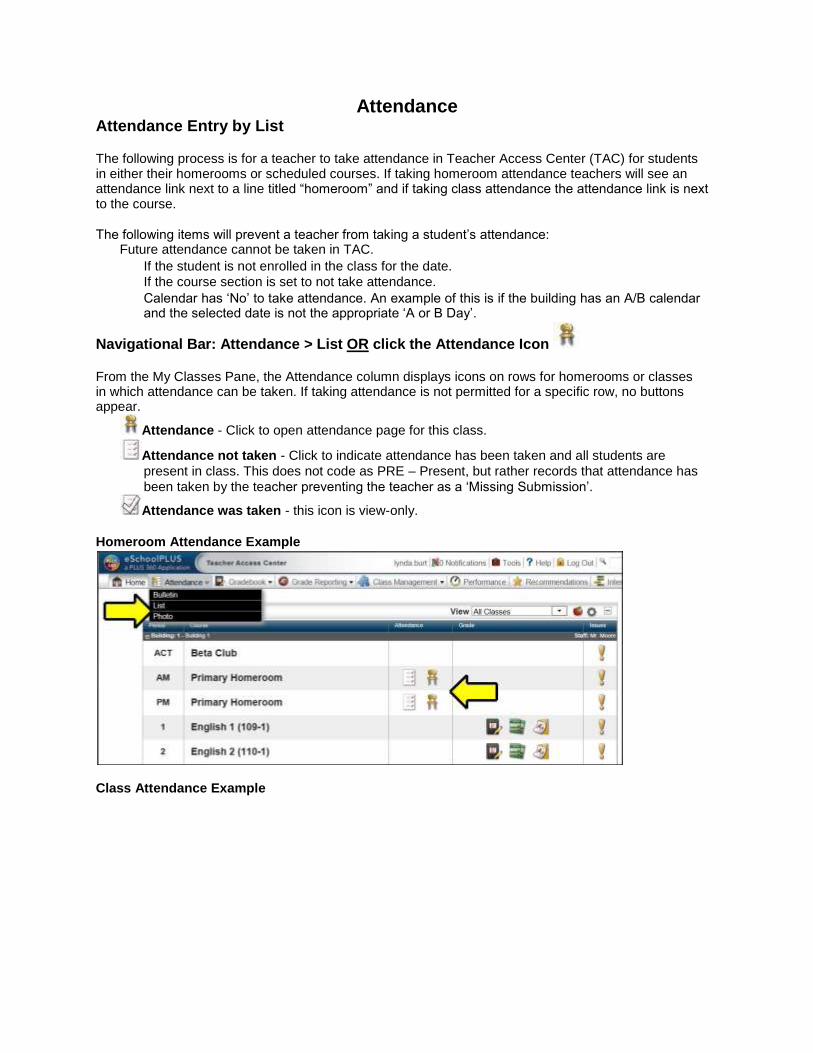
Navigational Bar: Attendance > List OR click the Attendance Icon
From the My Classes Pane, the Attendance column displays icons on rows for homerooms or classes in which attendance can be taken. If taking attendance is not permitted for a specific row, no buttons appear.
Attendance - Click to open attendance page for this class.
Attendance not taken - Click to indicate attendance has been taken and all students are
present in class. This does not code as PRE – Present, but rather records that attendance has
been taken by the teacher preventing the teacher as a ‘Missing Submission’.
Attendance was taken - this icon is view-only.
Homeroom Attendance Example
Class Attendance Example
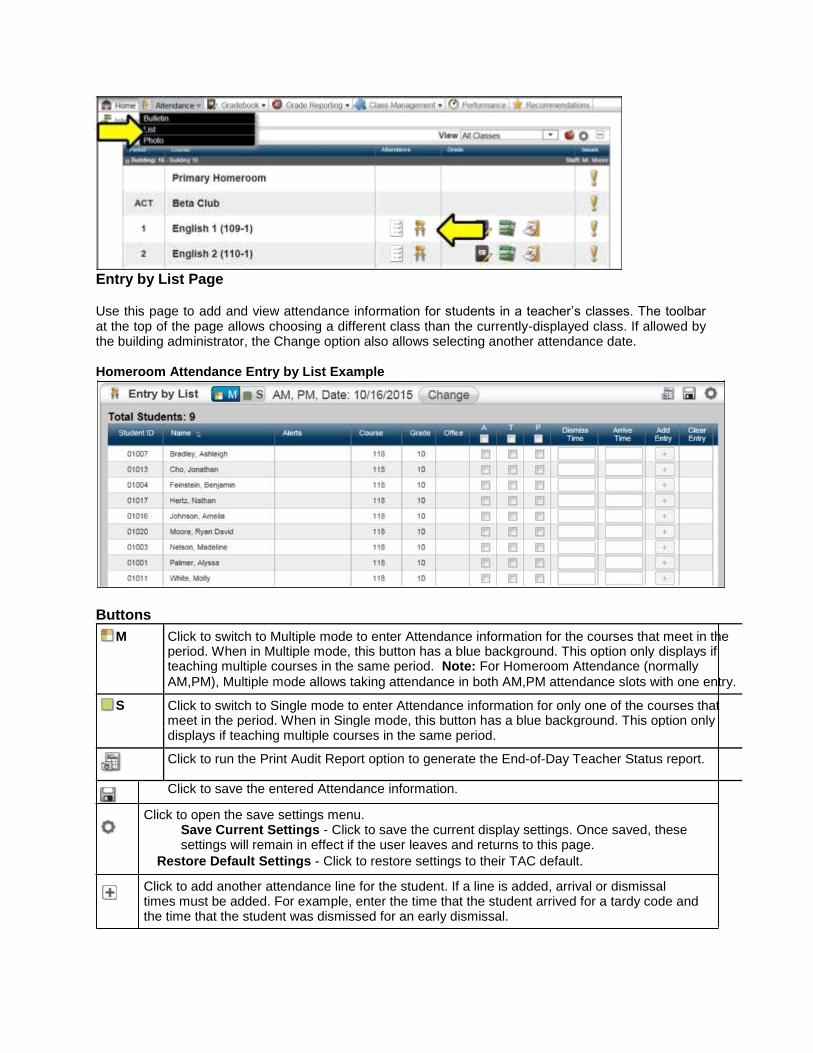
Entry by List Page
Use this page to add and view attendance information for students in a teacher’s classes. The toolbar at the top of the page allows choosing a different class than the currently-displayed class. If allowed by the building administrator, the Change option also allows selecting another attendance date.
Homeroom Attendance Entry by List Example
Buttons
M Click to switch to Multiple mode to enter Attendance information for the courses that meet in the period. When in Multiple mode, this button has a blue background. This option only displays if teaching multiple courses in the same period. Note: For Homeroom Attendance (normally AM,PM), Multiple mode allows taking attendance in both AM,PM attendance slots with one entry.
S Click to switch to Single mode to enter Attendance information for only one of the courses that meet in the period. When in Single mode, this button has a blue background. This option only displays if teaching multiple courses in the same period.
Click to run the Print Audit Report option to generate the End-of-Day Teacher Status report.
Click to save the entered Attendance information.
Click to open the save settings menu. Save Current Settings - Click to save the current display settings. Once saved, these settings will remain in effect if the user leaves and returns to this page.
Restore Default Settings - Click to restore settings to their TAC default.
Click to add another attendance line for the student. If a line is added, arrival or dismissal times must be added. For example, enter the time that the student arrived for a tardy code and the time that the student was dismissed for an early dismissal.

Click to remove the attendance line for the student.
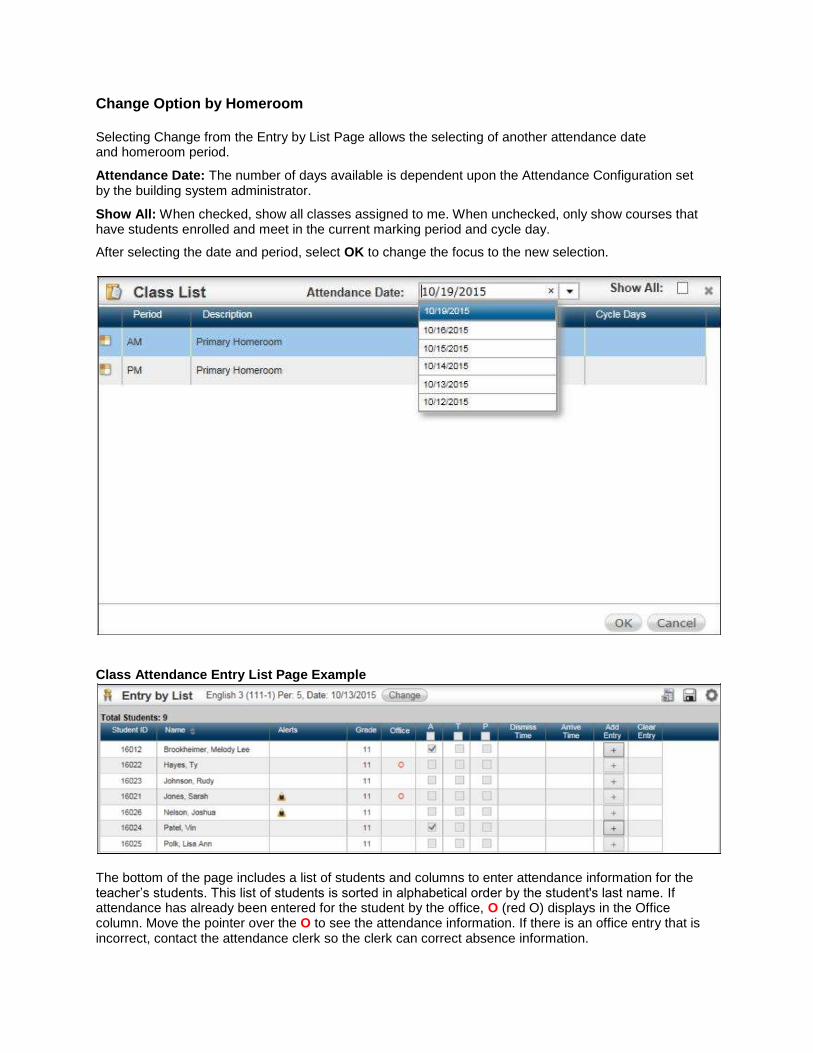
Change Option by Homeroom
Selecting Change from the Entry by List Page allows the selecting of another attendance date and homeroom period. Attendance Date: The number of days available is dependent upon the Attendance Configuration set by the building system administrator. Show All: When checked, show all classes assigned to me. When unchecked, only show courses that have students enrolled and meet in the current marking period and cycle day. After selecting the date and period, select OK to change the focus to the new selection.
Class Attendance Entry List Page Example
The bottom of the page includes a list of students and columns to enter attendance information for the teacher’s students. This list of students is sorted in alphabetical order by the student's last name. If attendance has already been entered for the student by the office, O (red O) displays in the Office column. Move the pointer over the O to see the attendance information. If there is an office entry that is incorrect, contact the attendance clerk so the clerk can correct absence information.

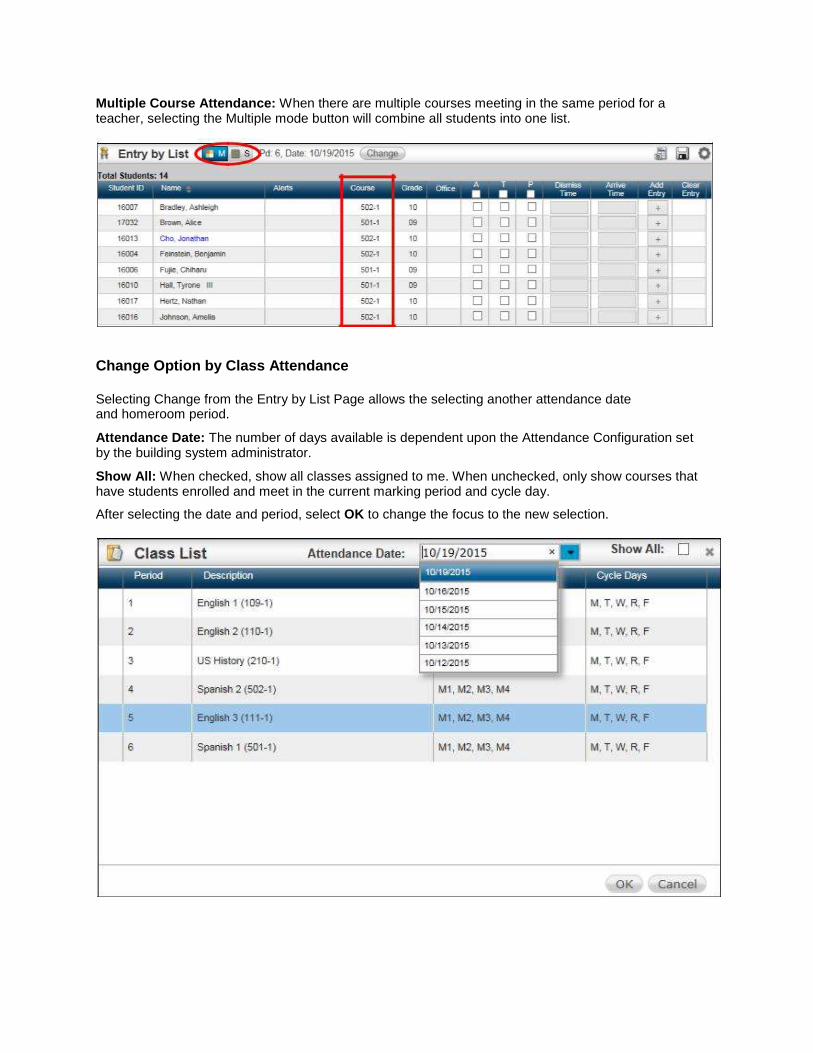
Multiple Course Attendance: When there are multiple courses meeting in the same period for a teacher, selecting the Multiple mode button will combine all students into one list.
Change Option by Class Attendance
Selecting Change from the Entry by List Page allows the selecting another attendance date and homeroom period. Attendance Date: The number of days available is dependent upon the Attendance Configuration set by the building system administrator. Show All: When checked, show all classes assigned to me. When unchecked, only show courses that have students enrolled and meet in the current marking period and cycle day. After selecting the date and period, select OK to change the focus to the new selection.
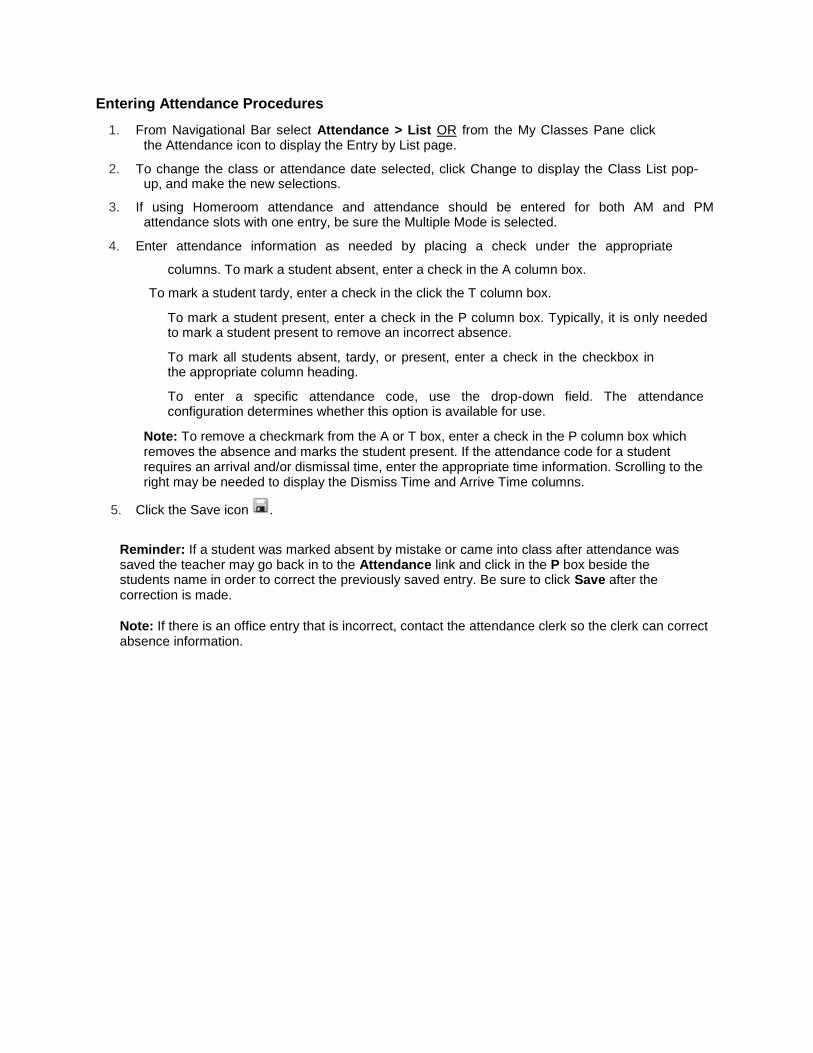
Entering Attendance Procedures
1. From Navigational Bar select Attendance > List OR from the My Classes Pane click the Attendance icon to display the Entry by List page.
2. To change the class or attendance date selected, click Change to display the Class List pop-
up, and make the new selections.
3. If using Homeroom attendance and attendance should be entered for both AM and PM attendance slots with one entry, be sure the Multiple Mode is selected.
4. Enter attendance information as needed by placing a check under the appropriate
columns. To mark a student absent, enter a check in the A column box.
To mark a student tardy, enter a check in the click the T column box.
To mark a student present, enter a check in the P column box. Typically, it is only needed to mark a student present to remove an incorrect absence.
To mark all students absent, tardy, or present, enter a check in the checkbox in the appropriate column heading.
To enter a specific attendance code, use the drop-down field. The attendance configuration determines whether this option is available for use.
Note: To remove a checkmark from the A or T box, enter a check in the P column box which removes the absence and marks the student present. If the attendance code for a student requires an arrival and/or dismissal time, enter the appropriate time information. Scrolling to the right may be needed to display the Dismiss Time and Arrive Time columns.
5. Click the Save icon .
Reminder: If a student was marked absent by mistake or came into class after attendance was saved the teacher may go back in to the Attendance link and click in the P box beside the students name in order to correct the previously saved entry. Be sure to click Save after the correction is made.
Note: If there is an office entry that is incorrect, contact the attendance clerk so the clerk can correct absence information.
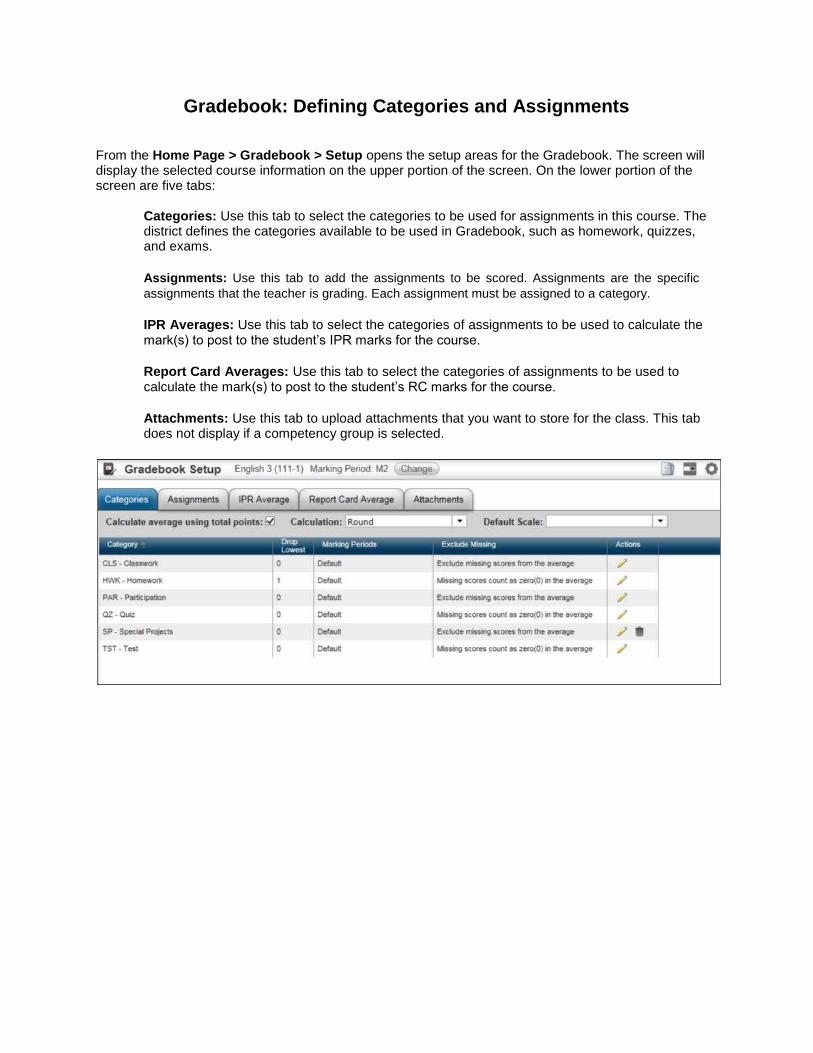
Gradebook: Defining Categories and Assignments
From the Home Page > Gradebook > Setup opens the setup areas for the Gradebook. The screen will display the selected course information on the upper portion of the screen. On the lower portion of the screen are five tabs:
Categories: Use this tab to select the categories to be used for assignments in this course. The district defines the categories available to be used in Gradebook, such as homework, quizzes, and exams.
Assignments: Use this tab to add the assignments to be scored. Assignments are the specific
assignments that the teacher is grading. Each assignment must be assigned to a category.
IPR Averages: Use this tab to select the categories of assignments to be used to calculate the mark(s) to post to the student’s IPR marks for the course.
Report Card Averages: Use this tab to select the categories of assignments to be used to calculate the mark(s) to post to the student’s RC marks for the course.
Attachments: Use this tab to upload attachments that you want to store for the class. This tab does not display if a competency group is selected.
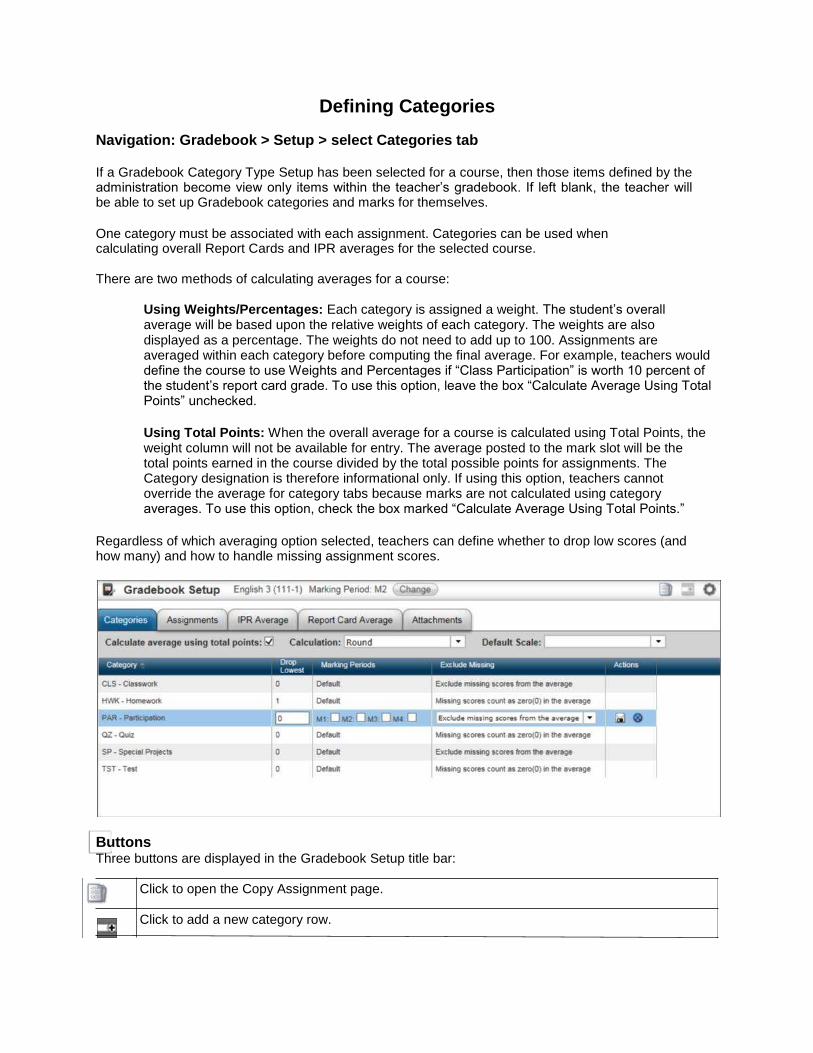
Defining Categories
Navigation: Gradebook > Setup > select Categories tab
If a Gradebook Category Type Setup has been selected for a course, then those items defined by the administration become view only items within the teacher’s gradebook. If left blank, the teacher will be able to set up Gradebook categories and marks for themselves.
One category must be associated with each assignment. Categories can be used when calculating overall Report Cards and IPR averages for the selected course.
There are two methods of calculating averages for a course:
Using Weights/Percentages: Each category is assigned a weight. The student’s overall average will be based upon the relative weights of each category. The weights are also displayed as a percentage. The weights do not need to add up to 100. Assignments are averaged within each category before computing the final average. For example, teachers would define the course to use Weights and Percentages if “Class Participation” is worth 10 percent of the student’s report card grade. To use this option, leave the box “Calculate Average Using Total Points” unchecked.
Using Total Points: When the overall average for a course is calculated using Total Points, the weight column will not be available for entry. The average posted to the mark slot will be the total points earned in the course divided by the total possible points for assignments. The Category designation is therefore informational only. If using this option, teachers cannot override the average for category tabs because marks are not calculated using category averages. To use this option, check the box marked “Calculate Average Using Total Points.”
Regardless of which averaging option selected, teachers can define whether to drop low scores (and how many) and how to handle missing assignment scores.
Buttons Three buttons are displayed in the Gradebook Setup title bar:
Click to open the Copy Assignment page.
Click to add a new category row.

Save Current Settings - Click to save the current display settings. Restore Default Settings - Click to restore settings to their TAC default.
Defining Categories
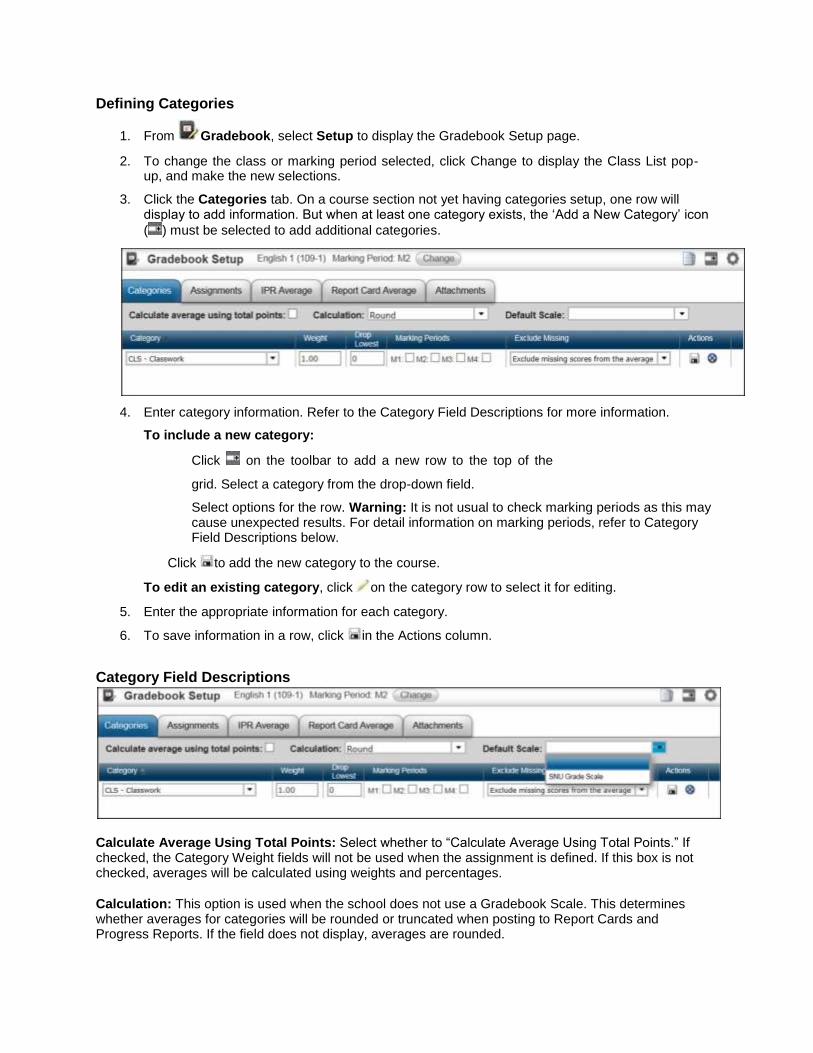
1. From Gradebook, select Setup to display the Gradebook Setup page.
2. To change the class or marking period selected, click Change to display the Class List pop-up, and make the new selections.
3. Click the Categories tab. On a course section not yet having categories setup, one row will
display to add information. But when at least one category exists, the ‘Add a New Category’ icon ( ) must be selected to add additional categories.
4. Enter category information. Refer to the Category Field Descriptions for more information.
To include a new category:
Click on the toolbar to add a new row to the top of the
grid. Select a category from the drop-down field.
Select options for the row. Warning: It is not usual to check marking periods as this may cause unexpected results. For detail information on marking periods, refer to Category Field Descriptions below.
Click to add the new category to the course.
To edit an existing category, click on the category row to select it for editing.
5. Enter the appropriate information for each category.
6. To save information in a row, click in the Actions column.
Category Field Descriptions
Calculate Average Using Total Points: Select whether to “Calculate Average Using Total Points.” If checked, the Category Weight fields will not be used when the assignment is defined. If this box is not checked, averages will be calculated using weights and percentages.
Calculation: This option is used when the school does not use a Gradebook Scale. This determines whether averages for categories will be rounded or truncated when posting to Report Cards and Progress Reports. If the field does not display, averages are rounded.
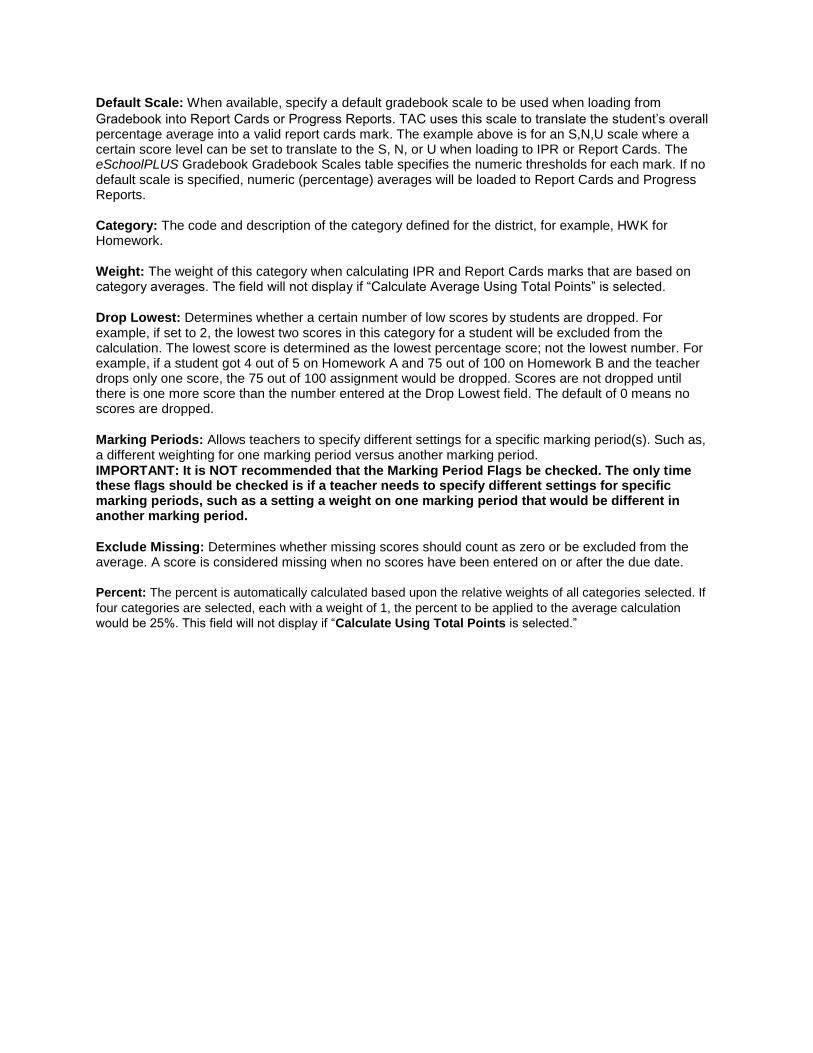
Default Scale: When available, specify a default gradebook scale to be used when loading from Gradebook into Report Cards or Progress Reports. TAC uses this scale to translate the student’s overall percentage average into a valid report cards mark. The example above is for an S,N,U scale where a certain score level can be set to translate to the S, N, or U when loading to IPR or Report Cards. The eSchoolPLUS Gradebook Gradebook Scales table specifies the numeric thresholds for each mark. If no default scale is specified, numeric (percentage) averages will be loaded to Report Cards and Progress Reports.
Category: The code and description of the category defined for the district, for example, HWK for Homework.
Weight: The weight of this category when calculating IPR and Report Cards marks that are based on category averages. The field will not display if “Calculate Average Using Total Points” is selected.
Drop Lowest: Determines whether a certain number of low scores by students are dropped. For example, if set to 2, the lowest two scores in this category for a student will be excluded from the calculation. The lowest score is determined as the lowest percentage score; not the lowest number. For example, if a student got 4 out of 5 on Homework A and 75 out of 100 on Homework B and the teacher drops only one score, the 75 out of 100 assignment would be dropped. Scores are not dropped until there is one more score than the number entered at the Drop Lowest field. The default of 0 means no scores are dropped.
Marking Periods: Allows teachers to specify different settings for a specific marking period(s). Such as, a different weighting for one marking period versus another marking period. IMPORTANT: It is NOT recommended that the Marking Period Flags be checked. The only time these flags should be checked is if a teacher needs to specify different settings for specific marking periods, such as a setting a weight on one marking period that would be different in another marking period.
Exclude Missing: Determines whether missing scores should count as zero or be excluded from the average. A score is considered missing when no scores have been entered on or after the due date. Percent: The percent is automatically calculated based upon the relative weights of all categories selected. If
four categories are selected, each with a weight of 1, the percent to be applied to the average calculation
would be 25%. This field will not display if “Calculate Using Total Points is selected.”

Defining Assignments
Navigation: Gradebook > Setup > select Assignments tab
The Assignments tab is used to define the individual assignments to be scored in the selected course. Each assignment must have a due date and a category. Due dates must fall within the start and end date for the Marking Period selected at the top of the page. When the course is not averaged using Total Points, the category determines how the assignment score computes in the students’ calculated averages for Report Cards and Interim Progress marks.
After defining categories and assignments for a course, teachers can copy defined assignments to other courses they teach.
Buttons
Click to exit edit mode without saving changes.
Click to save changes and exit edit mode.
Click to edit all assignments.
Click to display the Copy Assignment page. Refer to Copy Categories and Assignments for more details.
Click to add a new assignment row. If this button is inactive, click or to exit edit mode.
Creating a new assignment from the Gradebook Setup page
1. From Gradebook, select Setup to display the Gradebook Setup page.
2. To update the class or marking period, click Change to display the Class List pop-up, and make the selections.
3. Click the Assignments tab to open the Assignments grid.
4. Click the on the toolbar to add a new row to the top of the grid.
5. Enter the details of the assignment. Note that all fields marked with an asterisk (*) are
required fields and must be populated prior to saving the assignment.
a. In the Date Assigned field, enter the date the assignment will be assigned to students
(optional). The Date Assigned must be a date within the marking period selected at the top of the page.
b. In the Date Due field, enter the date the assignment is due.
The Date Due must be within the marking period date range. The Date Due is used to determine if scores should be included in averages.
If the Date Due is after the current date, the assignment is not included in the student’s current averages.
If the Date Due is after the IPR date, that assignment is not included in the average for that IPR.
If the Date Due is before the current date and no score is entered for the student, the assignment is considered missing.
On the Category tab, teachers can specify whether averages for categories should exclude a missing assignment or should use a score of 0 (zero) for a missing assignment.
c. In the Category field, select the category for this assignment. Only those categories that
have been selected on the Category tab will be available.
d. Type the title of the assignment. The Title displays in the assignment header for the assignment on
the Gradebook Scores page.
When an assignment is being edited, a button displays next to the topic's title. Click to add a more detailed description of the assignment. The Description displays in the Assignment Details drawer for the assignment on the Gradebook page. The description will also display in the Home Access Center if the teacher publishes the item.
e. In the Extra Credit field, select whether this entire assignment applies as extra credit
towards the student’s average. Teachers can designate possible points for an extra credit assignment, but this value will not be used for averaging and is informational only.
Three options are available for extra credit assignments:
Add to Total Points: The points earned for this assignment will be added to the numerator before averaging. Thus if a student had 180 points out of 200 possible points, plus 5 extra credit points, the average would be 185/200 or a 92.5 percent.
Add to Average: The extra points will be added after the average is calculated. Thus if a student had 180 points out of 200 possible points, plus 5 extra credit points, the average without the extra credit would be 180/200 or 90 percent. With the 5 extra credit points, the average would be 95 percent.
Not Extra Credit: The regular calculations apply. Teachers may award extra points for an assignment that is not an Extra Credit assignment when entering student scores.
Extra Credit Notes:
Do not define a category to store only extra credit assignments if using category weights to calculate averages. Teachers must have at least one regular assignment included in a category that includes extra credit assignments.
If an assignment allows a student to earn extra credit in addition to the possible score, select Not Extra Credit. For example, if a 10 point quiz has a 2 point extra credit question, then the assignment is not an extra credit assignment. When entering student scores, teachers can enter more points than the possible points for the assignment to indicate that extra credit points were earned.
Extra credit scores are only included in the student’s average if they are not blank.
The possible points are not included in the denominator before averaging for a category or a mark.
Extra credit is never dropped as part of a Drop lowest score.
f. Use the Rubrics indicator icon if applicable, and set up a Simple or Full Rubric. See the on- line Help for detail.
g. In the Points field, enter the total possible points for this assignment. This does not limit the points that can be entered as a score, so bonus points should not be included here. Because points are used in the formula for calculating averages, this should not be set to zero.
If the assignment is extra credit, points will not be included in possible total points.
Category averages are calculated based on points and weights. For example, if a student gets 7 points out of 10 on assignment 1 and 20 points out of 20 on assignment 2 and neither assignment is weighted, the student’s average would be calculated as 7 + 20 / 10 + 20 = 27/30 which is 90%.
To calculate averages based on percentages for assignments, enter possible points and scores as percentages. For example, to indicate that a student got 75% for an assignment, teachers would define the assignment with possible points of 100 and a score of 75.
h. In the Weight field, enter the relative weight of this assignment when calculating the average. When averages are determined, the weight is multiplied against both the score and the total number of points. The average for a category is calculated as the [sum of (each score X weight)] / [sum of (each total points X weight)]
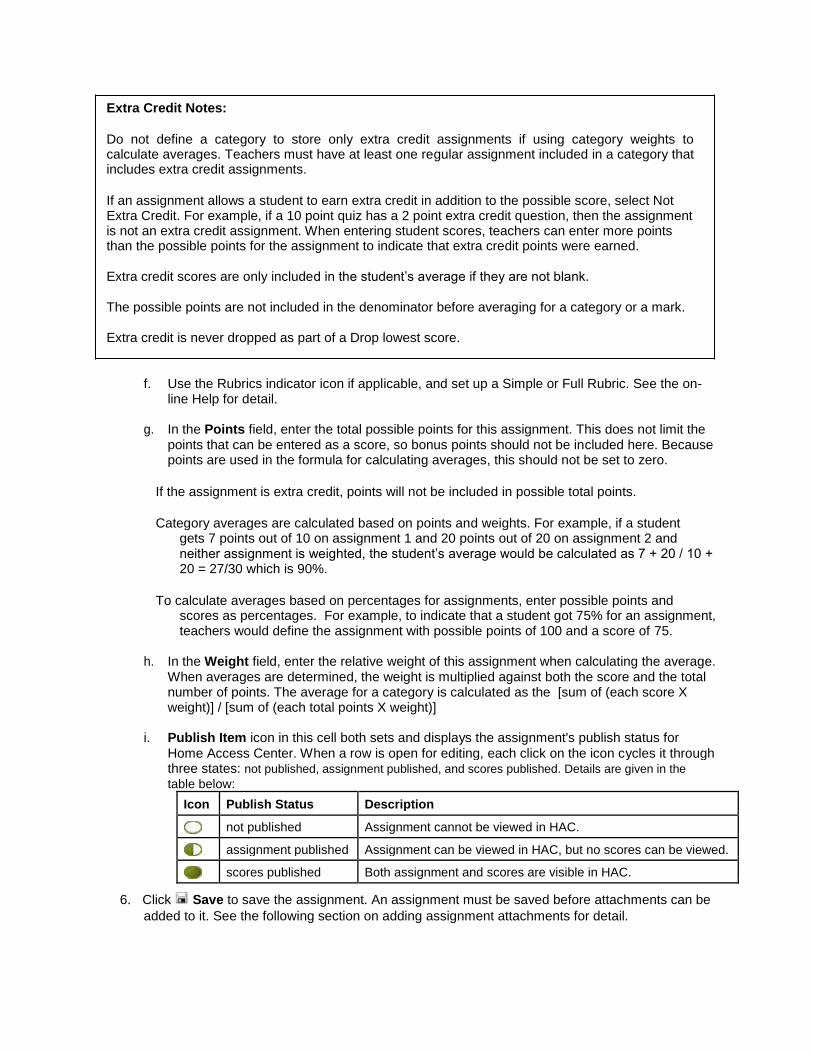
i. Publish Item icon in this cell both sets and displays the assignment's publish status for Home Access Center. When a row is open for editing, each click on the icon cycles it through three states: not published, assignment published, and scores published. Details are given in the
table below:
Icon Publish Status Description
not published Assignment cannot be viewed in HAC.
assignment published Assignment can be viewed in HAC, but no scores can be viewed.
scores published Both assignment and scores are visible in HAC.
6. Click Save to save the assignment. An assignment must be saved before attachments can be
added to it. See the following section on adding assignment attachments for detail.
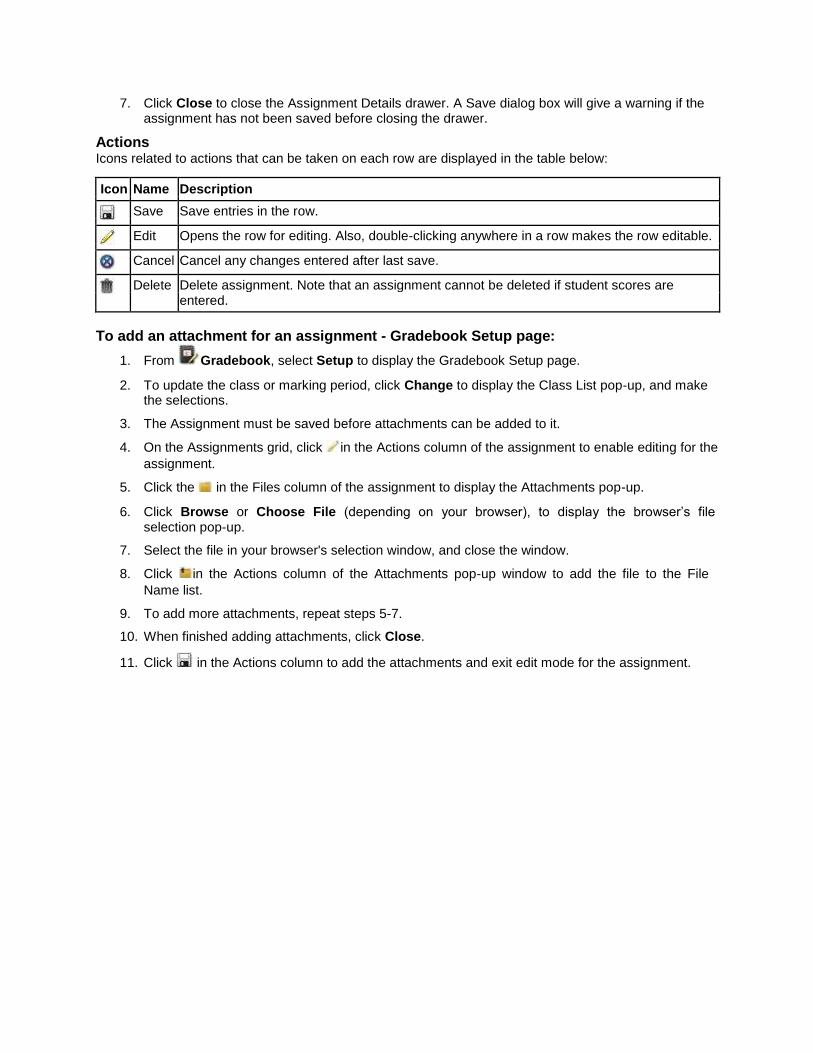
7. Click Close to close the Assignment Details drawer. A Save dialog box will give a warning if the
assignment has not been saved before closing the drawer. Actions Icons related to actions that can be taken on each row are displayed in the table below:
Icon Name Description
Save Save entries in the row.
Edit Opens the row for editing. Also, double-clicking anywhere in a row makes the row editable.
Cancel Cancel any changes entered after last save.
Delete Delete assignment. Note that an assignment cannot be deleted if student scores are entered.
To add an attachment for an assignment - Gradebook Setup page:
1. From Gradebook, select Setup to display the Gradebook Setup page.
2. To update the class or marking period, click Change to display the Class List pop-up, and make the selections.
3. The Assignment must be saved before attachments can be added to it.
4. On the Assignments grid, click in the Actions column of the assignment to enable editing for the
assignment.
5. Click the in the Files column of the assignment to display the Attachments pop-up.
6. Click Browse or Choose File (depending on your browser), to display the browser’s file selection pop-up.
7. Select the file in your browser's selection window, and close the window.
8. Click in the Actions column of the Attachments pop-up window to add the file to the File
Name list.
9. To add more attachments, repeat steps 5-7.
10. When finished adding attachments, click Close.
11. Click in the Actions column to add the attachments and exit edit mode for the assignment.
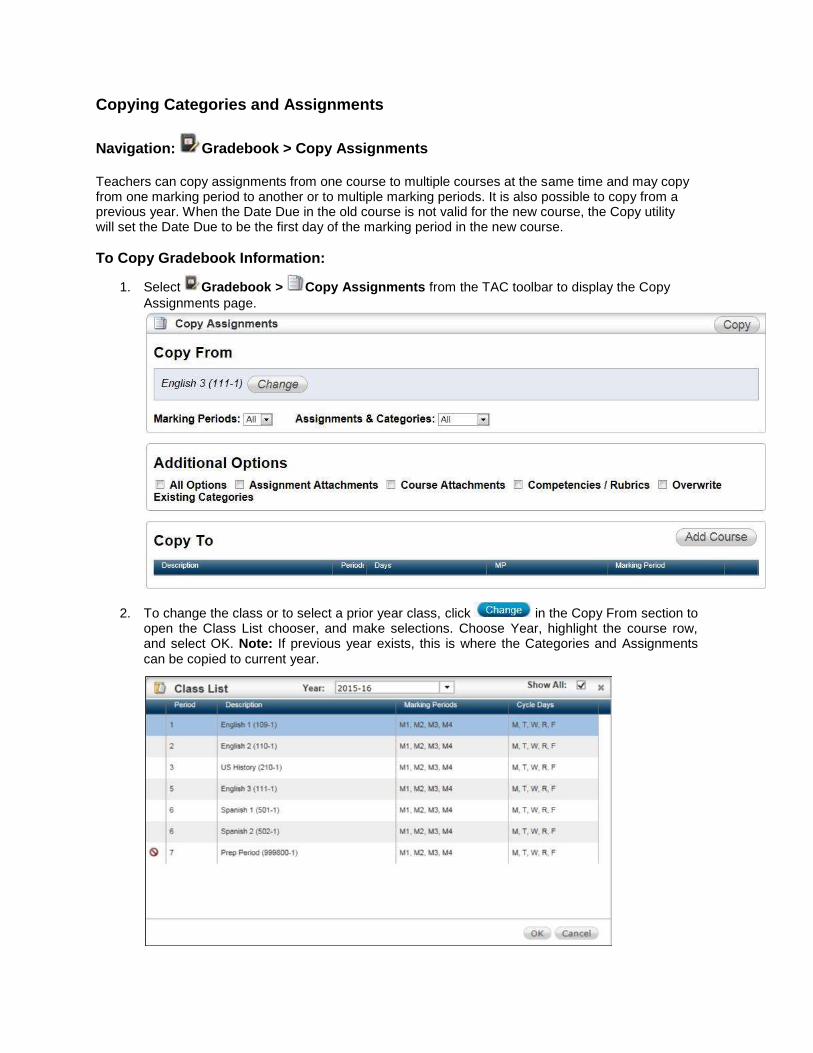
Copying Categories and Assignments
Navigation: Gradebook > Copy Assignments
Teachers can copy assignments from one course to multiple courses at the same time and may copy from one marking period to another or to multiple marking periods. It is also possible to copy from a previous year. When the Date Due in the old course is not valid for the new course, the Copy utility will set the Date Due to be the first day of the marking period in the new course.
To Copy Gradebook Information:
1. Select Gradebook > Copy Assignments from the TAC toolbar to display the Copy
Assignments page.
2. To change the class or to select a prior year class, click in the Copy From section to open the Class List chooser, and make selections. Choose Year, highlight the course row, and select OK. Note: If previous year exists, this is where the Categories and Assignments can be copied to current year.

3. To copy from specific marking period, select the marking period from the Marking Periods drop-
down list. If copying all marking periods, select All. 4. In the Assignments and Categories field, select to copy all or selected categories
and assignments.
To copy all categories and assignments, select All. Skip to Step 6.
To copy specific categories or assignments, select Selected. Continue to the next step. 5. Use the Grid to select the categories and assignments to copy.
To copy all categories without copying assignments, check the box on the header row of the grid of categories and assignments.
To display a category's assignments, click the category's row which opens the area to display each individual assignment.
To copy all assignments for a category, check the box next to the Assignment Date column header.
To copy specific assignments, check the boxes for the assignments. When an assignment is selected, the category is also selected.
6. Make selections in the Additional Options section. Check Overwrite Categories if needing to overwrite existing category information for the course.
7. In the Copy To section, click to open the Course Chooser. 8. Click the row of the destination course to select it.
Select a single marking period in the Copy From section to potentially display more courses.

9. Click Add to add the course to the Copy To list. 10. To add more courses, repeat steps 7-9. 11. If a single marking period is selected in the Copy From section a different destination
marking period can be chosen on the selector in the Copy To section's Marking Period field.
If All marking periods is selected in the Copy From section, the display shows the marking periods are copied to the corresponding marking period.
12. Verify all settings and click . 13. When the copy is complete, a pop-up window displays. Click Close to close the window. 14. If copying assignments from one marking period to another, the Date Due for the assignments
must be edited. The Copy Assignments page sets the due date for these assignments to the first day of the marking period copied to.
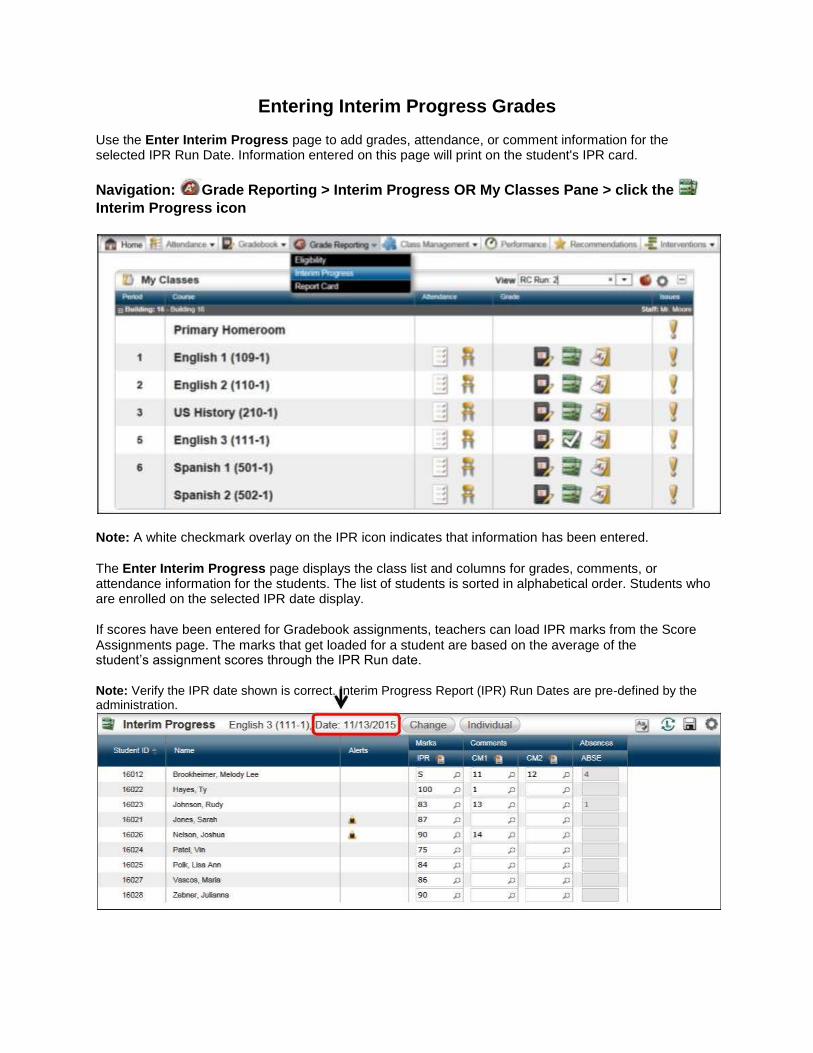
Entering Interim Progress Grades
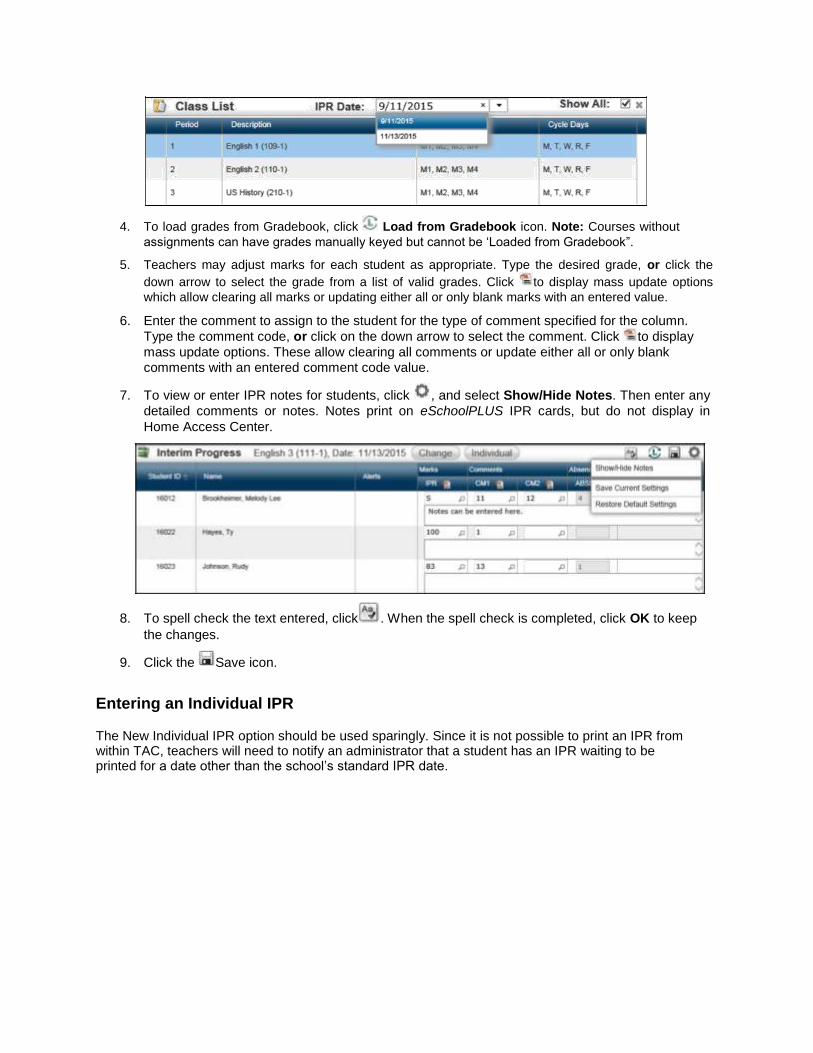
Use the Enter Interim Progress page to add grades, attendance, or comment information for the selected IPR Run Date. Information entered on this page will print on the student's IPR card.
Navigation: Grade Reporting > Interim Progress OR My Classes Pane > click the
Interim Progress icon
Note: A white checkmark overlay on the IPR icon indicates that information has been entered.
The Enter Interim Progress page displays the class list and columns for grades, comments, or attendance information for the students. The list of students is sorted in alphabetical order. Students who are enrolled on the selected IPR date display.
If scores have been entered for Gradebook assignments, teachers can load IPR marks from the Score Assignments page. The marks that get loaded for a student are based on the average of the student’s assignment scores through the IPR Run date.
Note: Verify the IPR date shown is correct. Interim Progress Report (IPR) Run Dates are pre-defined by the administration.
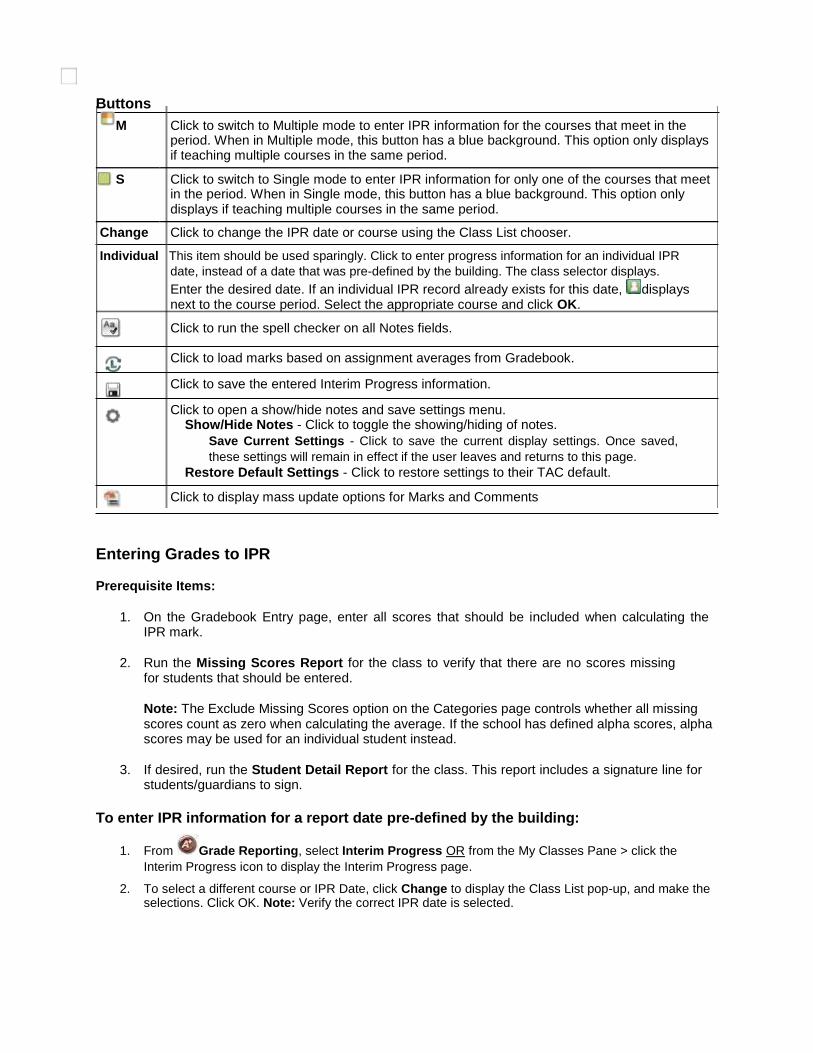
Buttons
M Click to switch to Multiple mode to enter IPR information for the courses that meet in the period. When in Multiple mode, this button has a blue background. This option only displays if teaching multiple courses in the same period.
S Click to switch to Single mode to enter IPR information for only one of the courses that meet in the period. When in Single mode, this button has a blue background. This option only displays if teaching multiple courses in the same period.
Change Click to change the IPR date or course using the Class List chooser. Individual This item should be used sparingly. Click to enter progress information for an individual IPR
date, instead of a date that was pre-defined by the building. The class selector displays. Enter the desired date. If an individual IPR record already exists for this date, displays next to the course period. Select the appropriate course and click OK.
Click to run the spell checker on all Notes fields.
Click to load marks based on assignment averages from Gradebook.
Click to save the entered Interim Progress information.
Click to open a show/hide notes and save settings menu. Show/Hide Notes - Click to toggle the showing/hiding of notes.
Save Current Settings - Click to save the current display settings. Once saved,
these settings will remain in effect if the user leaves and returns to this page. Restore Default Settings - Click to restore settings to their TAC default.
Click to display mass update options for Marks and Comments
Entering Grades to IPR
Prerequisite Items:
1. On the Gradebook Entry page, enter all scores that should be included when calculating the IPR mark.
2. Run the Missing Scores Report for the class to verify that there are no scores missing
for students that should be entered.
Note: The Exclude Missing Scores option on the Categories page controls whether all missing scores count as zero when calculating the average. If the school has defined alpha scores, alpha scores may be used for an individual student instead.
3. If desired, run the Student Detail Report for the class. This report includes a signature line for
students/guardians to sign.
To enter IPR information for a report date pre-defined by the building:
1. From Grade Reporting, select Interim Progress OR from the My Classes Pane > click the
Interim Progress icon to display the Interim Progress page.
2. To select a different course or IPR Date, click Change to display the Class List pop-up, and make the selections. Click OK. Note: Verify the correct IPR date is selected.
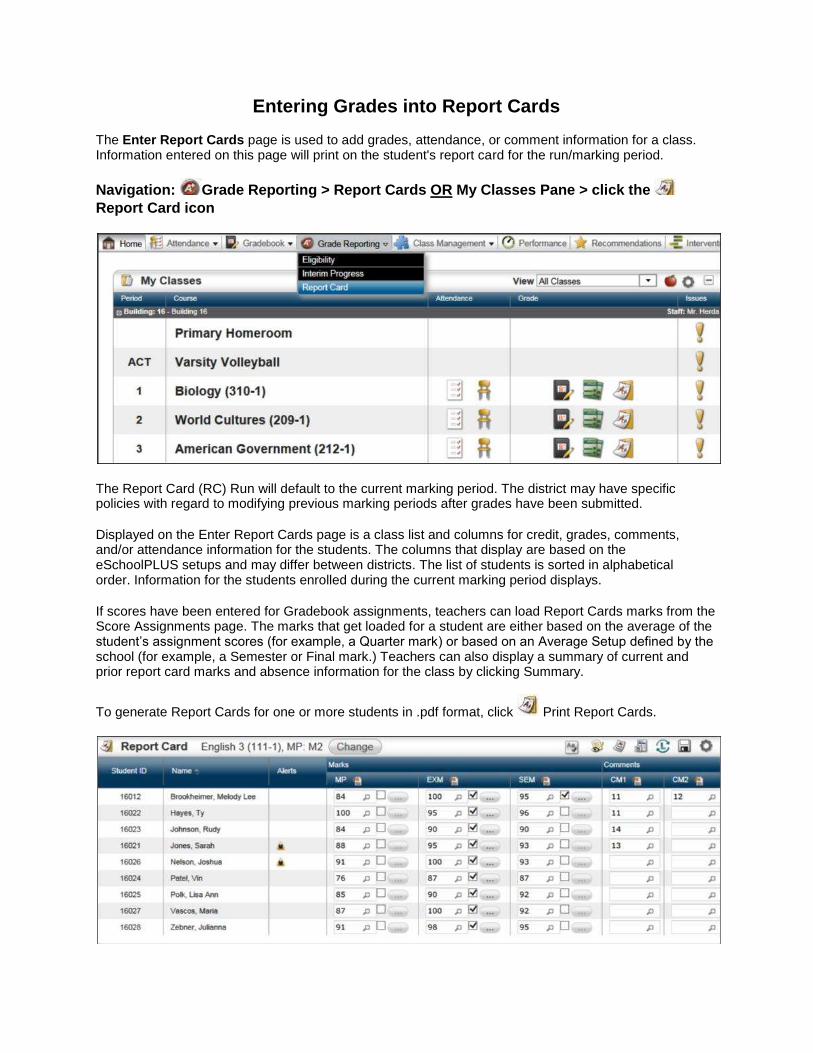
4. To load grades from Gradebook, click Load from Gradebook icon. Note: Courses without
assignments can have grades manually keyed but cannot be ‘Loaded from Gradebook”.
5. Teachers may adjust marks for each student as appropriate. Type the desired grade, or click the
down arrow to select the grade from a list of valid grades. Click to display mass update options
which allow clearing all marks or updating either all or only blank marks with an entered value.
6. Enter the comment to assign to the student for the type of comment specified for the column.
Type the comment code, or click on the down arrow to select the comment. Click to display
mass update options. These allow clearing all comments or update either all or only blank comments with an entered comment code value.
7. To view or enter IPR notes for students, click , and select Show/Hide Notes. Then enter any
detailed comments or notes. Notes print on eSchoolPLUS IPR cards, but do not display in
Home Access Center.
8. To spell check the text entered, click . When the spell check is completed, click OK to keep
the changes.
9. Click the Save icon.
Entering an Individual IPR
The New Individual IPR option should be used sparingly. Since it is not possible to print an IPR from within TAC, teachers will need to notify an administrator that a student has an IPR waiting to be printed for a date other than the school’s standard IPR date.
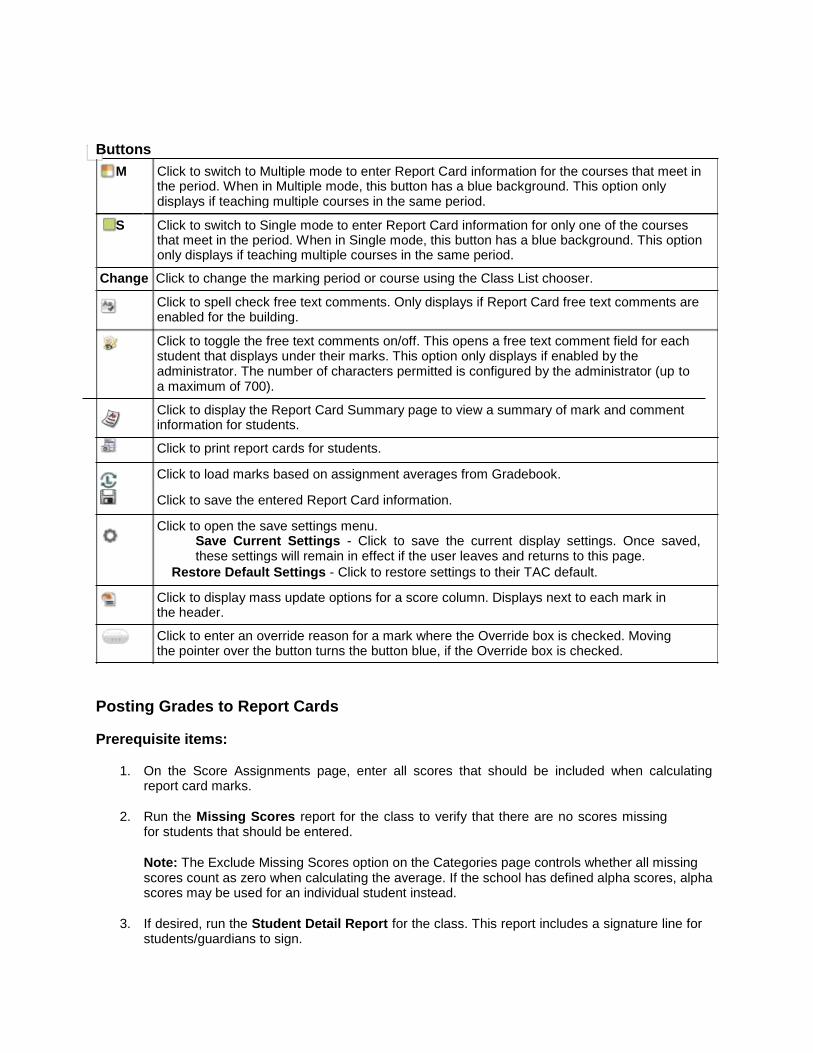
Entering Grades into Report Cards
The Enter Report Cards page is used to add grades, attendance, or comment information for a class. Information entered on this page will print on the student's report card for the run/marking period.
Navigation: Grade Reporting > Report Cards OR My Classes Pane > click the
Report Card icon
The Report Card (RC) Run will default to the current marking period. The district may have specific policies with regard to modifying previous marking periods after grades have been submitted.
Displayed on the Enter Report Cards page is a class list and columns for credit, grades, comments, and/or attendance information for the students. The columns that display are based on the eSchoolPLUS setups and may differ between districts. The list of students is sorted in alphabetical order. Information for the students enrolled during the current marking period displays.
If scores have been entered for Gradebook assignments, teachers can load Report Cards marks from the Score Assignments page. The marks that get loaded for a student are either based on the average of the student’s assignment scores (for example, a Quarter mark) or based on an Average Setup defined by the school (for example, a Semester or Final mark.) Teachers can also display a summary of current and prior report card marks and absence information for the class by clicking Summary.
To generate Report Cards for one or more students in .pdf format, click Print Report Cards.
Buttons
M Click to switch to Multiple mode to enter Report Card information for the courses that meet in the period. When in Multiple mode, this button has a blue background. This option only displays if teaching multiple courses in the same period.
S Click to switch to Single mode to enter Report Card information for only one of the courses that meet in the period. When in Single mode, this button has a blue background. This option only displays if teaching multiple courses in the same period. Change Click to change the marking period or course using the Class List chooser.
Click to spell check free text comments. Only displays if Report Card free text comments are enabled for the building.
Click to toggle the free text comments on/off. This opens a free text comment field for each student that displays under their marks. This option only displays if enabled by the administrator. The number of characters permitted is configured by the administrator (up to a maximum of 700).
Click to display the Report Card Summary page to view a summary of mark and comment information for students.
Click to print report cards for students.
Click to load marks based on assignment averages from Gradebook.
Click to save the entered Report Card information.
Click to open the save settings menu.
Save Current Settings - Click to save the current display settings. Once saved, these settings will remain in effect if the user leaves and returns to this page.
Restore Default Settings - Click to restore settings to their TAC default.
Click to display mass update options for a score column. Displays next to each mark in the header.
Click to enter an override reason for a mark where the Override box is checked. Moving the pointer over the button turns the button blue, if the Override box is checked.
Posting Grades to Report Cards
Prerequisite items:
1. On the Score Assignments page, enter all scores that should be included when calculating report card marks.
2. Run the Missing Scores report for the class to verify that there are no scores missing
for students that should be entered.
Note: The Exclude Missing Scores option on the Categories page controls whether all missing scores count as zero when calculating the average. If the school has defined alpha scores, alpha scores may be used for an individual student instead.
3. If desired, run the Student Detail Report for the class. This report includes a signature line for
students/guardians to sign.
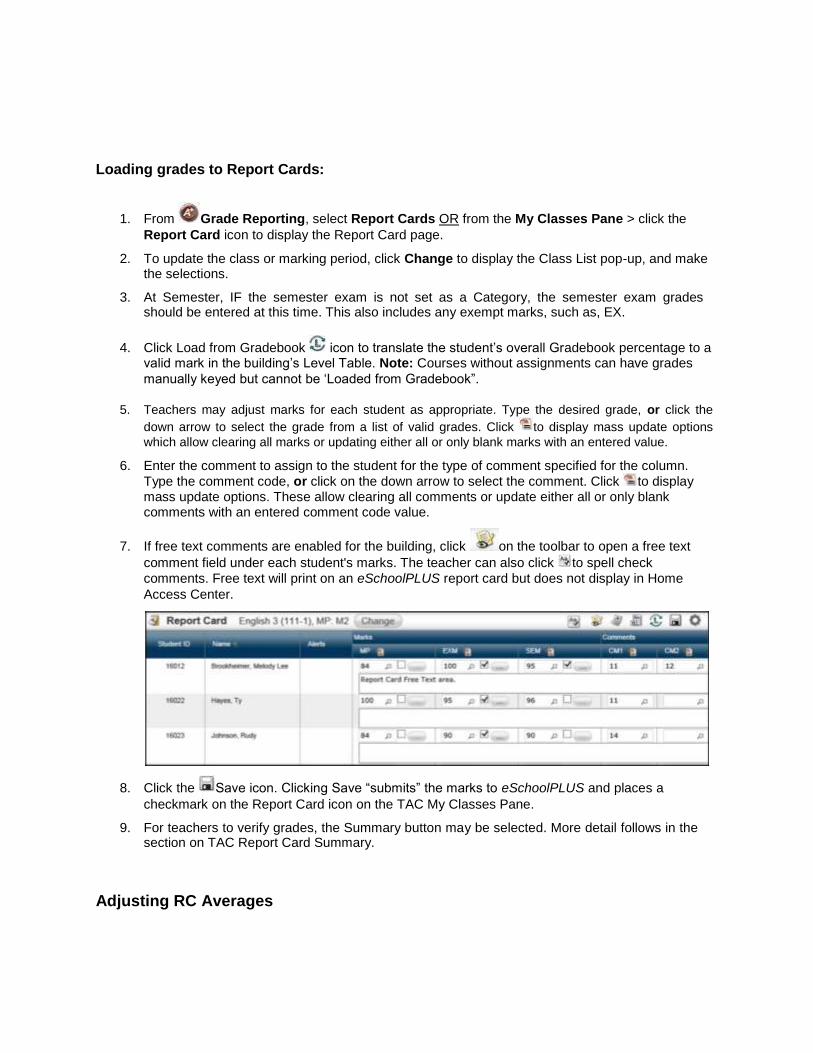
Loading grades to Report Cards:
1. From Grade Reporting, select Report Cards OR from the My Classes Pane > click the Report Card icon to display the Report Card page.
2. To update the class or marking period, click Change to display the Class List pop-up, and make
the selections.
3. At Semester, IF the semester exam is not set as a Category, the semester exam grades should be entered at this time. This also includes any exempt marks, such as, EX.
4. Click Load from Gradebook icon to translate the student’s overall Gradebook percentage to a valid mark in the building’s Level Table. Note: Courses without assignments can have grades
manually keyed but cannot be ‘Loaded from Gradebook”.
5. Teachers may adjust marks for each student as appropriate. Type the desired grade, or click the
down arrow to select the grade from a list of valid grades. Click to display mass update options
which allow clearing all marks or updating either all or only blank marks with an entered value.
6. Enter the comment to assign to the student for the type of comment specified for the column.
Type the comment code, or click on the down arrow to select the comment. Click to display mass update options. These allow clearing all comments or update either all or only blank comments with an entered comment code value.
7. If free text comments are enabled for the building, click on the toolbar to open a free text
comment field under each student's marks. The teacher can also click to spell check
comments. Free text will print on an eSchoolPLUS report card but does not display in Home
Access Center.
8. Click the Save icon. Clicking Save “submits” the marks to eSchoolPLUS and places a
checkmark on the Report Card icon on the TAC My Classes Pane.
9. For teachers to verify grades, the Summary button may be selected. More detail follows in the section on TAC Report Card Summary.
Adjusting RC Averages
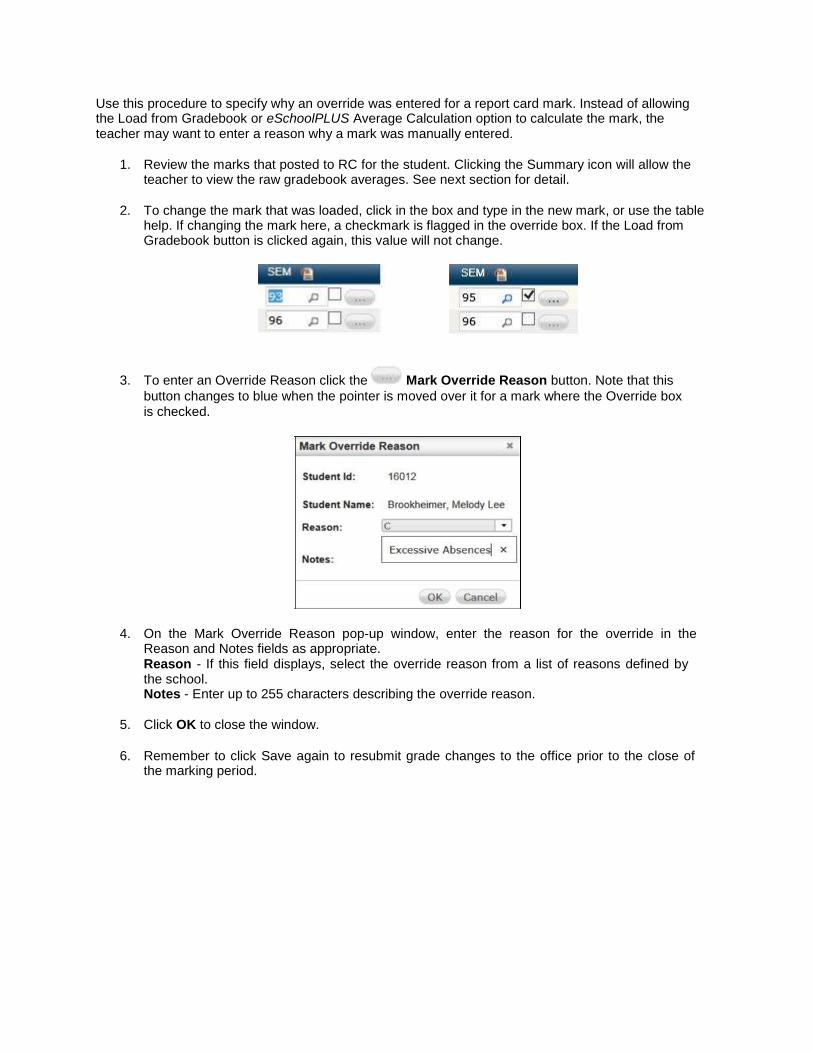
Use this procedure to specify why an override was entered for a report card mark. Instead of allowing the Load from Gradebook or eSchoolPLUS Average Calculation option to calculate the mark, the teacher may want to enter a reason why a mark was manually entered.
1. Review the marks that posted to RC for the student. Clicking the Summary icon will allow the teacher to view the raw gradebook averages. See next section for detail.
2. To change the mark that was loaded, click in the box and type in the new mark, or use the table
help. If changing the mark here, a checkmark is flagged in the override box. If the Load from Gradebook button is clicked again, this value will not change.
3. To enter an Override Reason click the Mark Override Reason button. Note that this
button changes to blue when the pointer is moved over it for a mark where the Override box is checked.
4. On the Mark Override Reason pop-up window, enter the reason for the override in the Reason and Notes fields as appropriate. Reason - If this field displays, select the override reason from a list of reasons defined by the school. Notes - Enter up to 255 characters describing the override reason.
5. Click OK to close the window.
6. Remember to click Save again to resubmit grade changes to the office prior to the close of
the marking period.
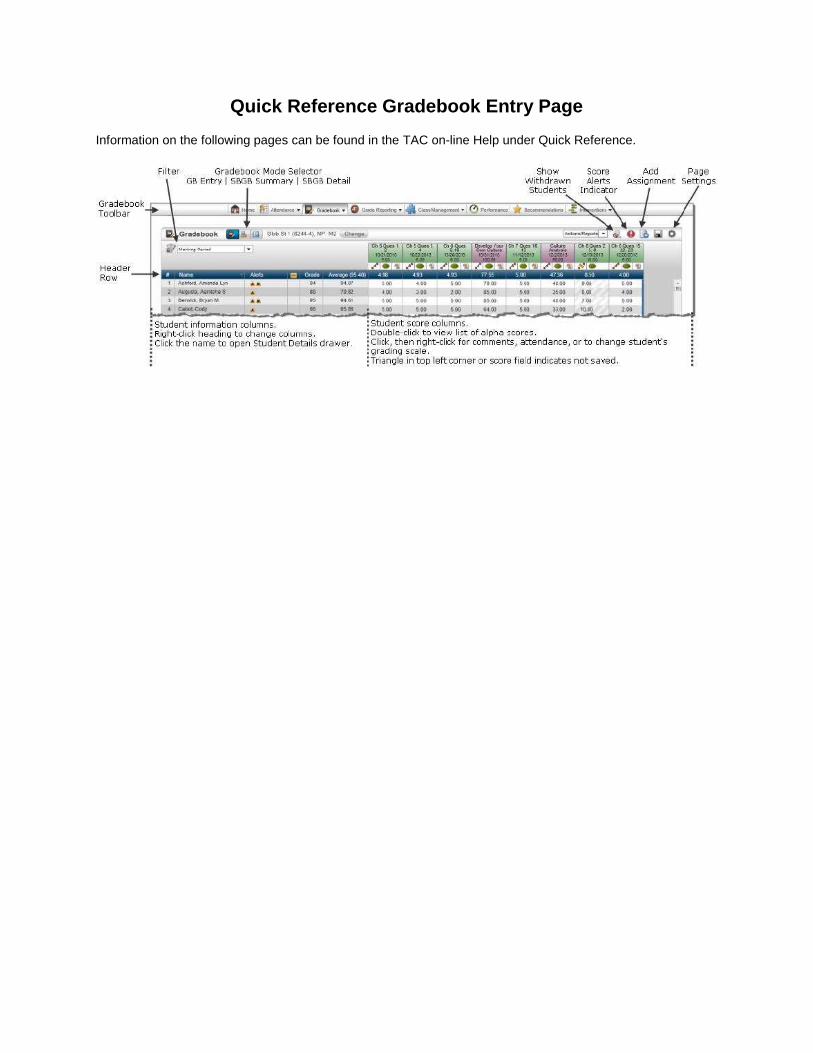
Quick Reference Gradebook Entry Page Information on the following pages can be found in the TAC on-line Help under Quick Reference.
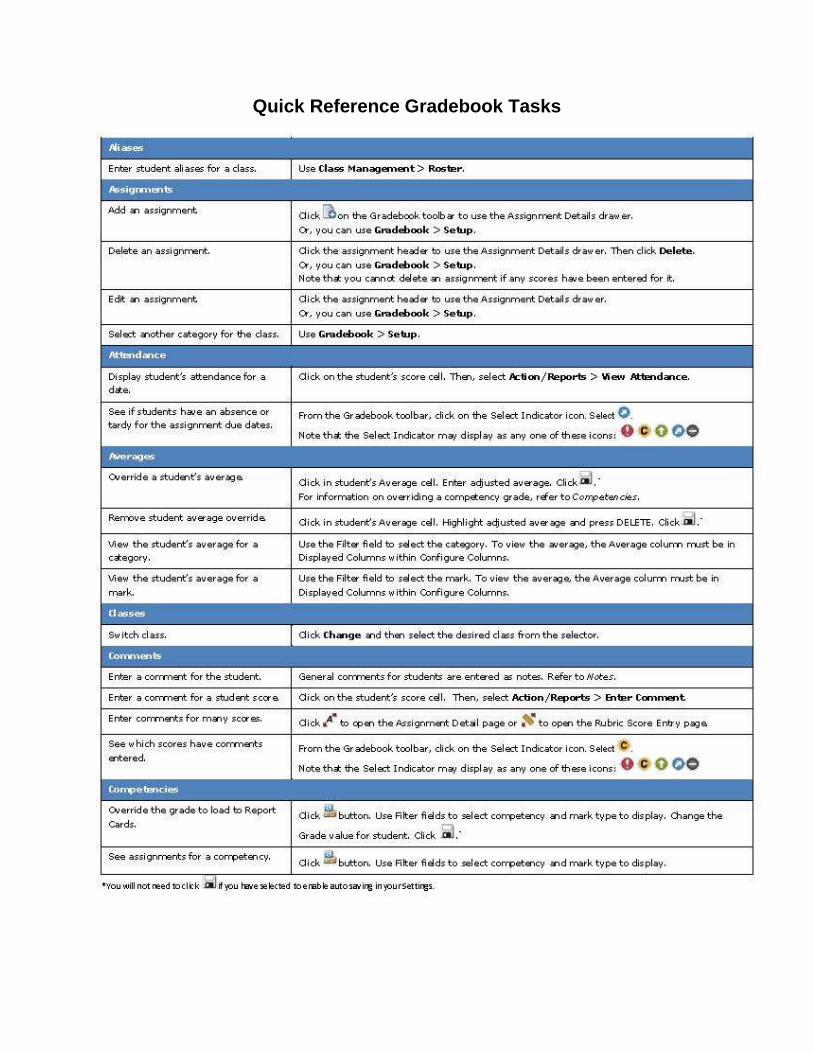
Quick Reference Gradebook Tasks
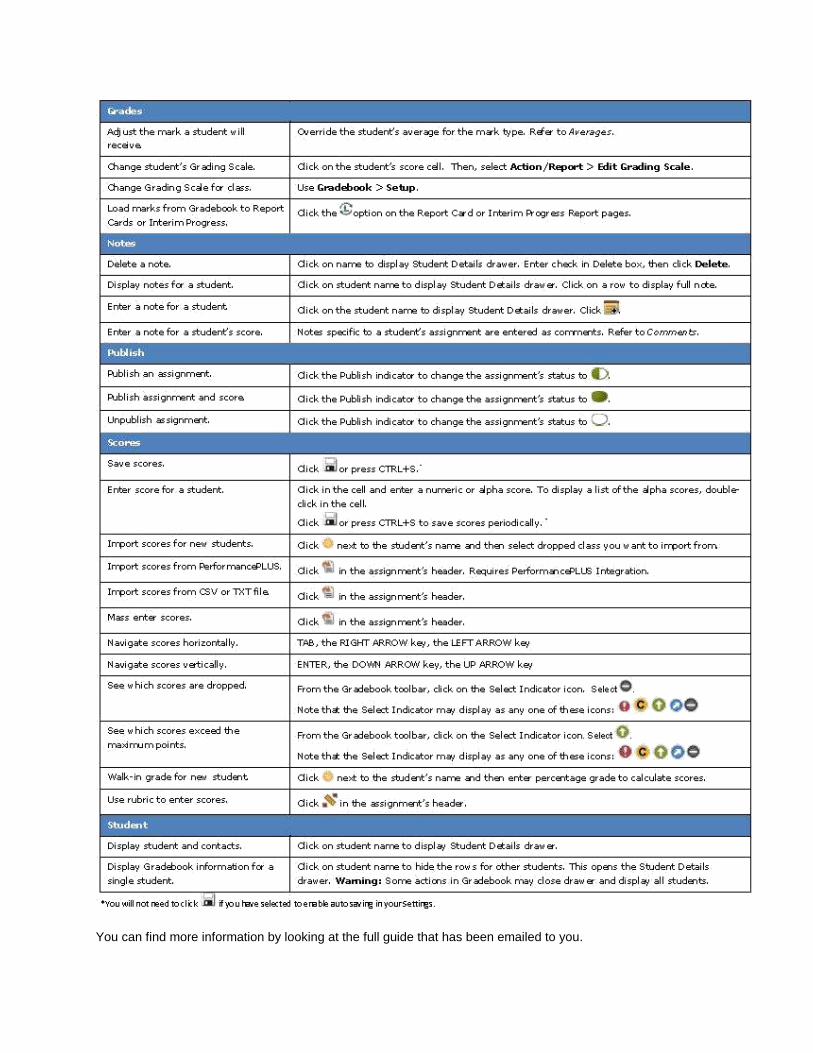
You can find more information by looking at the full guide that has been emailed to you.