Embed Size (px)
Citation preview
Face-Bow with Quick Lock
Toggle AssemblyInstructions
Whip Mix Corporation • 361 Farmington Ave. • P.O. Box 17183 • Louisville, KY 40217-0183 USA 502-637-1451 • 800-626-5651 • Fax 502-634-4512 • www.whipmix.com
Face-Bow with Quick Lock Toggle Assembly Instructions
2
Features and BenefitsThe Whip Mix Quick Lock Toggle Assembly has a variety of customer-
oriented features including a Stainless Steel Universal Joint and wide
range of movement. Registration can be obtained more quickly and
precisely with the single toggle action of the Toggle Assembly.
Additional features include:
• Needonlytocleanandsterilizedetachablebitefork
• Ensurespatientcomfortduringregistrationprocedure
• Extremelycustomerfriendlyforbothpatientanddoctor
• Easytoplacebiteforkadaptor,preventsrotationofbitefork
• ReduceschanceoftorquingFace-Bowtoanabsoluteminimum
• AdaptstoWhipMixDirectandIndirectMountingtypeFace-Bows
• Increasesdoctor’sconfidenceduringface-bowregistrationprocedures
Face-Bow with Quick Lock Toggle Assembly Instructions
3
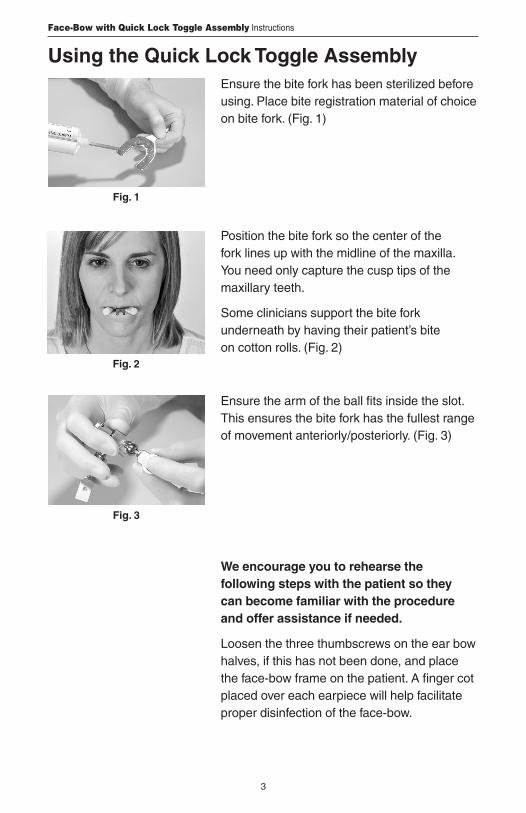
Using the Quick Lock Toggle AssemblyEnsurethebiteforkhasbeensterilizedbeforeusing. Place bite registration material of choice onbitefork.(Fig.1)
Position the bite fork so the center of the fork lines up with the midline of the maxilla. You need only capture the cusp tips of the maxillary teeth.
Some clinicians support the bite fork underneathbyhavingtheirpatient’sbite oncottonrolls.(Fig.2)
Ensurethearmoftheballfitsinsidetheslot. This ensures the bite fork has the fullest range ofmovementanteriorly/posteriorly.(Fig.3)
We encourage you to rehearse the follow ing steps with the patient so they can become familiar with the procedure and offer assistance if needed.
Loosen the three thumbscrews on the ear bow halves,ifthishasnotbeendone,andplacetheface-bowframeonthepatient.Afingercotplaced over each earpiece will help facilitate proper disinfection of the face-bow.
Fig. 1
Fig. 2
Fig. 3

Face-Bow with Quick Lock Toggle Assembly Instructions
4
Placing the Face-BowWiththebiteforkpositionedinthepatient’smouth,havethepatientgraspbotharmsof the face-bow and bring them backwards to a positionjustforwardofthepatient’sears.Havethe patient place each earpiece in the external auditorymeatusandholdinplacewithafirmforwardpressure.(Fig.4)
Firmlytightenthethreethumbscrewsonthe earbowhalves.(Fig.5)
Centerthenosepieceonthepatient’snasion. (Fig.6)
Fig. 6
Fig. 7
Fig. 5
Fig. 4
Exertfirmpressureonthenosepieceshaftwhile tightening the thumb screw of the nasion relatorassemblytolockinplace.(Fig.7)

Face-Bow with Quick Lock Toggle Assembly Instructions
5
Attach the Quick Lock Toggle Assembly to the biteforkusingthumbscrew#1.(Fig.8)
Note:Youmayfinditeasiertolockthetoggleassembly to the bite fork by rotating the screw to underneath the bite fork. This allows for easieraccesstothescrew.(Fig.9)
The patient with a completed face-bow registration.(Fig.12)
Lock the Quick Lock Toggle Assembly by turning the single thumbscrew #2 located at thecenterofthetoggleassembly.EnsuretheQuickLockToggleAssemblyisfirmlylocked inplaced.(Fig.11)
Fig. 11
Fig. 8
Fig. 10
Fig. 9
Lockintoplaceusingthethumbscrew.(Fig.10)
Fig. 12
Face-Bow with Quick Lock Toggle Assembly Instructions
6
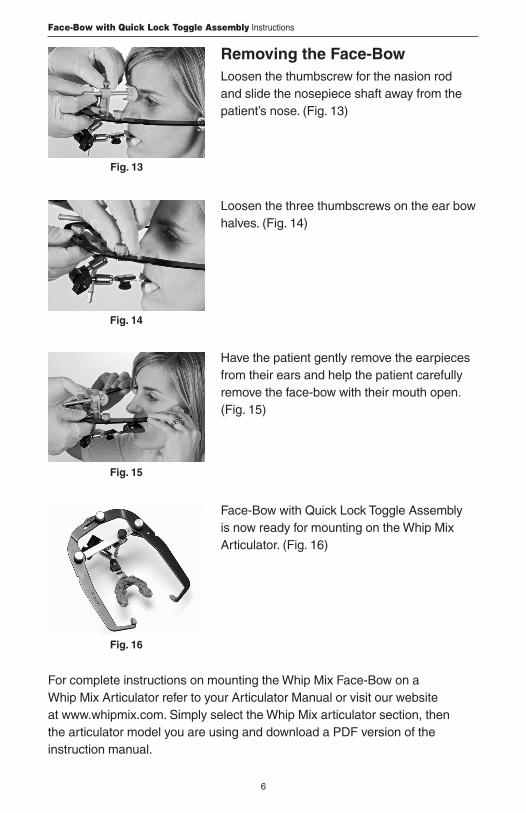
Removing the Face-BowLoosen the thumbscrew for the nasion rod and slide the nosepiece shaft away from the patient’snose.(Fig.13)
Fig. 13
Loosen the three thumbscrews on the ear bow halves.(Fig.14)
Face-BowwithQuickLockToggleAssembly is now ready for mounting on the Whip Mix Articulator.(Fig.16)
Fig. 14
Fig. 15
Havethepatientgentlyremovetheearpiecesfrom their ears and help the patient carefully remove the face-bow with their mouth open. (Fig.15)
Fig. 16
ForcompleteinstructionsonmountingtheWhipMixFace-Bowona Whip Mix Articulator refer to your Articulator Manual or visit our website atwww.whipmix.com.SimplyselecttheWhipMixarticulatorsection,thenthearticulatormodelyouareusinganddownloadaPDFversionoftheinstruction manual.
Face-Bow with Quick Lock Toggle Assembly Instructions
7
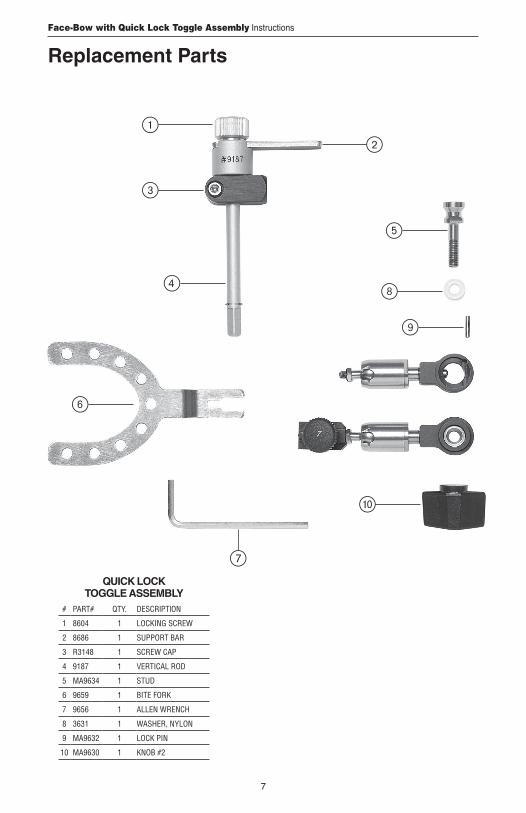
Replacement Parts
QUick Lock ToggLe AssemBLy
# PART# QTY. DESCRlPTlON
1 8604 1 LOCKING SCREW
2 8686 1 SUPPORT BAR
3 R3148 1 SCREW CAP
4 9187 1 VERTICAL ROD
5 MA9634 1 STUD
6 9659 1 BITE FORK
7 9656 1 ALLEN WRENCH
8 3631 1 WASHER, NYLON
9 MA9632 1 LOCK PIN
10 MA9630 1 KNOB #2
1
3
4
6
5
8
9
0
2
7

MPL30300 06/09