Embed Size (px)
Citation preview
www.InsightSoftware.com
Version: 1.7 Last Updated: August 9, 2011
for Oracle E-Business Suite
for Oracle E-Business Suite

InsightSoftware.com Configurator User Guide
Page 2 of 33
Contents
1. Introduction .......................................................................... 3
Welcome ................................................................................................................................3 Using this guide ....................................................................................................................3 Who should use this guide? ................................................................................................4
2. Configurator Features ......................................................... 5
Introduction ...........................................................................................................................5 Create a new template ..........................................................................................................6 Adding Columns through ‘More Columns’ ........................................................................9 Selecting Filters for Filter Layout ..................................................................................... 13 Activating filters ................................................................................................................. 19 Managing Templates: Saving ........................................................................................... 20 Managing Templates: Permissions .................................................................................. 22 Reusable Inquiry Objects .................................................................................................. 28
3. Further Information ........................................................... 33
Contacts .............................................................................................................................. 33 Technical Support .............................................................................................................. 33 Notices and Disclaimer ..................................................................................................... 33
InsightSoftware.com Configurator User Guide
Page 3 of 33
Welcome
Welcome to the Insight® ConfiguratorUser guide, incorporating General
Ledger, Accounts Payable, Accounts Receivable, Advanced Cost Accounting, Contract Service Billing, Fixed Assets, Homebuilder, Human Resources, Inventory, Job Cost, Manufacturing, Master Data, Payroll, Purchase Order Processing, Sales Order Processing, Tax, Time Sheet, Budgeting, Budgeting Contributor, The Console and Currency Restatement.
InsightSoftware.com products provide true real time access to Oracle E-Business Suite systems, delivering enhanced inquiry and aggregation solutions with unparalleled performance.
Using this guide
In order to get the most out of this guide we have used the following symbol to denote areas of special interest, supporting information on a topic and other important points.
NB IMPORTANT INFORMATION
InsightSoftware.com Configurator User Guide
Page 4 of 33
Who should use this guide?
Configurators Users
These are users who require increasingly advanced levels of feature functionality in order to solve ever more sophisticated inquiry and reporting problems. Configurators have the ability to completely control the user interface and the templates made available to Power Users. Configurators Users are normally highly experienced users of Oracle E-Business Suite.
Novice and experienced Configurators Users alike will find this guide useful in introducing all the new features and functionality of the product.

InsightSoftware.com Configurator User Guide
Page 5 of 33
Introduction
The Configurator User License provides enhanced functionality that is not accessible by a Power User.
A summarized list of the functionality provided to a Configurator User is shown below:
Create and define new standard templates for Power Users
‘More Columns’ is available within the ‘Columns Sorting & Grouping’ dialog, allowing a Configurator User to add new columns to an inquiry or template
Filter Layout functionality is active, allowing the Configurator User to customize the filters provided in an inquiry
Access to De/Activate Fields, allowing the Configurator User to add or remove Columns from inquiries and templates
Access to ‘Save as Template’, allowing the Configurator User to create additional templates from inquiries and templates
Full control over the powerful Reusable Inquiry Objects functionality. Power Users can normally only use the objects provided by Configurators Users; they cannot add or modify the objects
Ability to customize the file links in the ‘Alternate Joins’ window (these govern the underlying joins between the Oracle E-Business tables)

InsightSoftware.com Configurator User Guide
Page 6 of 33
Create a new template Configurators Users create a new template file by selecting New from the IS Button or ‘clicking’ on the New icon within the Design Ribbon Tab. This displays the New Inquiry window as per Figure 2-1.
Figure 2-1:New Inquiry Window

InsightSoftware.com Configurator User Guide
Page 7 of 33
You should select the appropriate module, as this will define which Attributes the new template can use, and then ‘double click’ on the New Template icon. The template wizard is then displayed (see Figure 2-2). ‘Click’ on the Next button to continue.
Figure 2-2: New Inquiry Template Wizard
InsightSoftware.com Configurator User Guide
Page 8 of 33
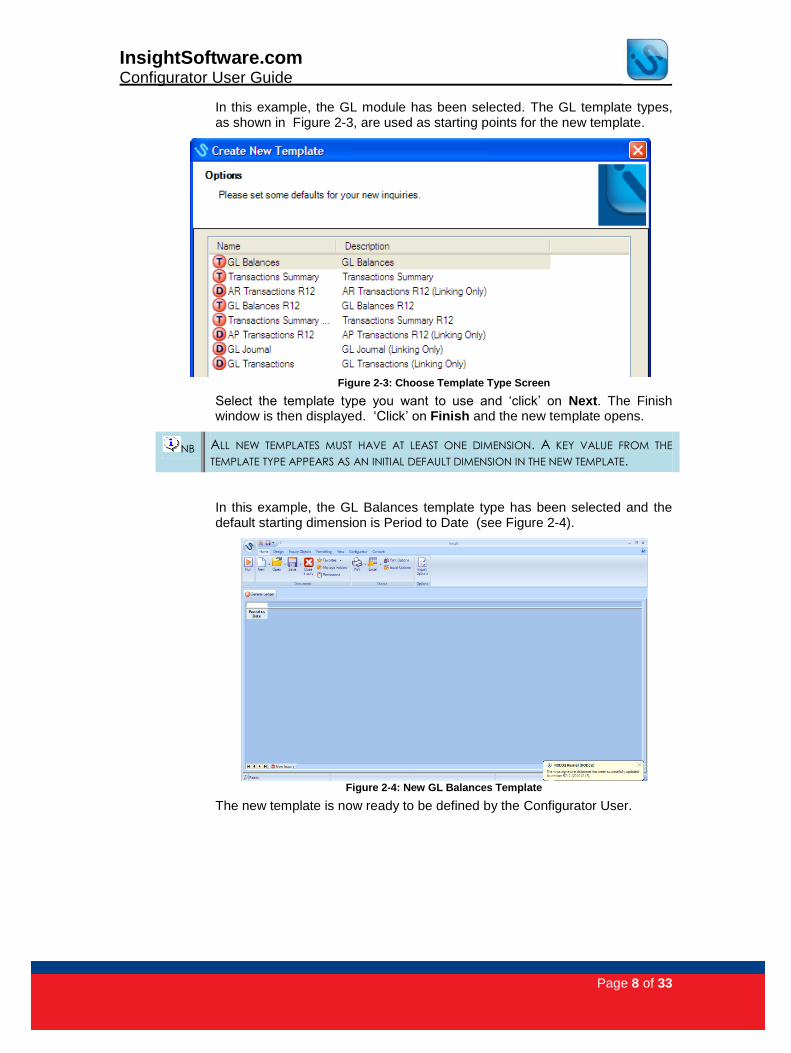
In this example, the GL module has been selected. The GL template types, as shown in Figure 2-3, are used as starting points for the new template.
Figure 2-3: Choose Template Type Screen
Select the template type you want to use and ‘click’ on Next. The Finish window is then displayed. ‘Click’ on Finish and the new template opens.
NB ALL NEW TEMPLATES MUST HAVE AT LEAST ONE DIMENSION. A KEY VALUE FROM THE
TEMPLATE TYPE APPEARS AS AN INITIAL DEFAULT DIMENSION IN THE NEW TEMPLATE.
In this example, the GL Balances template type has been selected and the default starting dimension is Period to Date (see Figure 2-4).
Figure 2-4: New GL Balances Template
The new template is now ready to be defined by the Configurator User.
InsightSoftware.com Configurator User Guide
Page 9 of 33
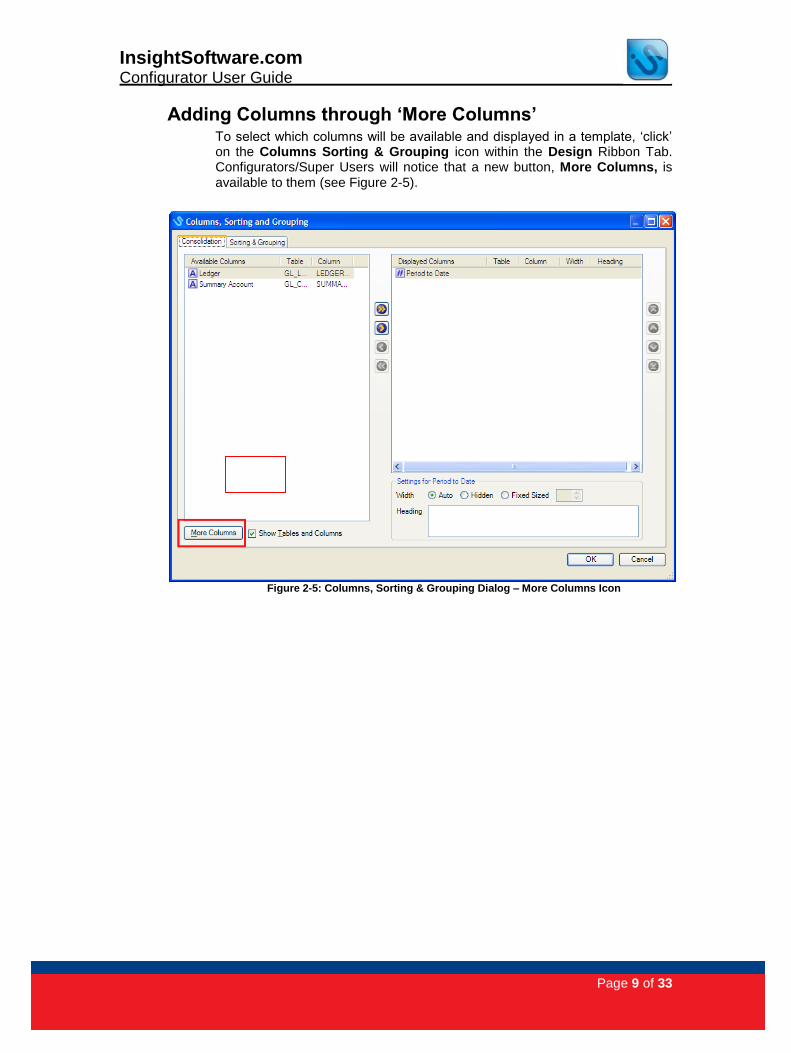
Adding Columns through ‘More Columns’ To select which columns will be available and displayed in a template, ‘click’ on the Columns Sorting & Grouping icon within the Design Ribbon Tab. Configurators/Super Users will notice that a new button, More Columns, is available to them (see Figure 2-5).
Figure 2-5: Columns, Sorting & Grouping Dialog – More Columns Icon

InsightSoftware.com Configurator User Guide
Page 10 of 33
‘Click’ on the More Columns icon to launch the Add Columns dialog (Figure 2-6Error! Reference source not found.).
Figure 2-6: Add Columns Dialog for GL Balances
InsightSoftware.com Configurator User Guide
Page 11 of 33
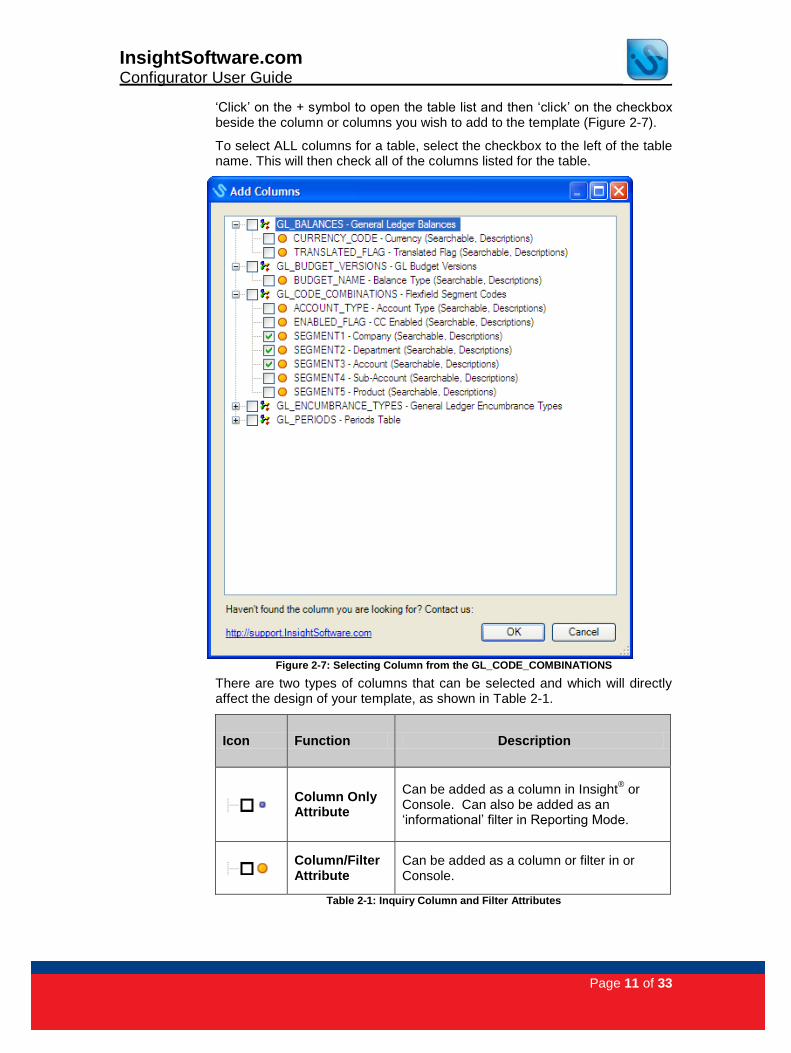
‘Click’ on the + symbol to open the table list and then ‘click’ on the checkbox beside the column or columns you wish to add to the template (Figure 2-7).
To select ALL columns for a table, select the checkbox to the left of the table name. This will then check all of the columns listed for the table.
Figure 2-7: Selecting Column from the GL_CODE_COMBINATIONS
There are two types of columns that can be selected and which will directly affect the design of your template, as shown in Table 2-1.
Icon Function Description
Column Only Attribute
Can be added as a column in Insight® or
Console. Can also be added as an ‘informational’ filter in Reporting Mode.
Column/Filter Attribute
Can be added as a column or filter in or Console.
Table 2-1: Inquiry Column and Filter Attributes
InsightSoftware.com Configurator User Guide
Page 12 of 33
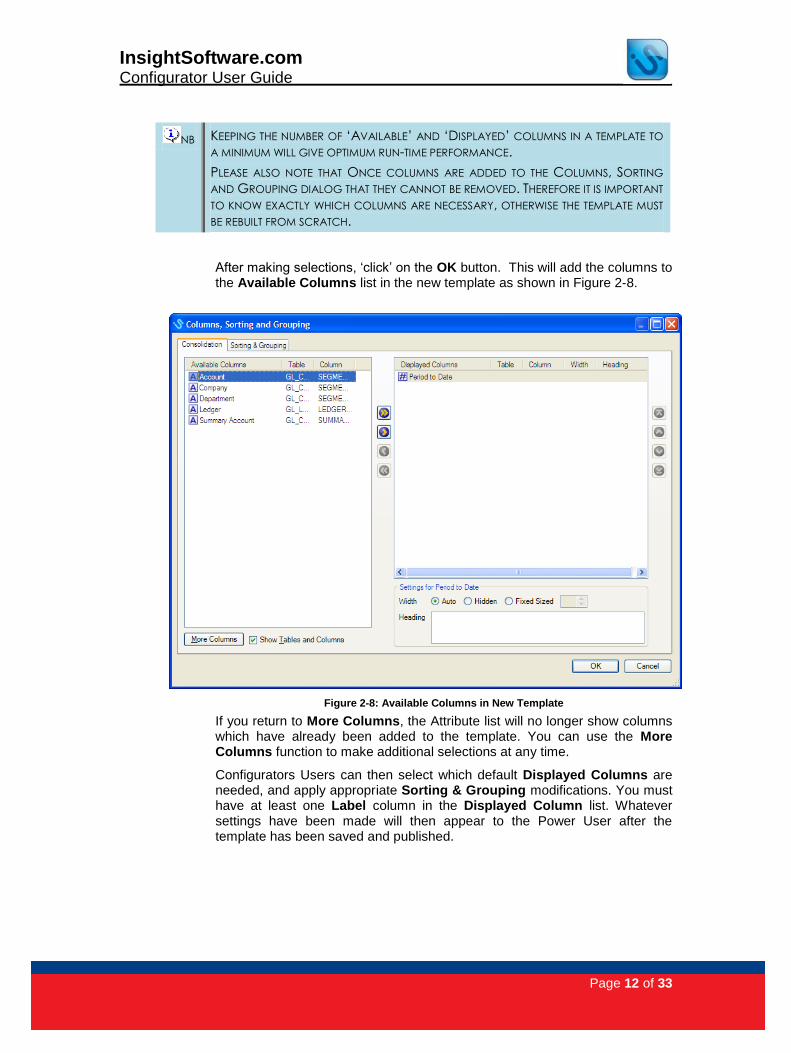
NB KEEPING THE NUMBER OF ‘AVAILABLE’ AND ‘DISPLAYED’ COLUMNS IN A TEMPLATE TO
A MINIMUM WILL GIVE OPTIMUM RUN-TIME PERFORMANCE.
PLEASE ALSO NOTE THAT ONCE COLUMNS ARE ADDED TO THE COLUMNS, SORTING
AND GROUPING DIALOG THAT THEY CANNOT BE REMOVED. THEREFORE IT IS IMPORTANT
TO KNOW EXACTLY WHICH COLUMNS ARE NECESSARY, OTHERWISE THE TEMPLATE MUST
BE REBUILT FROM SCRATCH.
After making selections, ‘click’ on the OK button. This will add the columns to the Available Columns list in the new template as shown in Figure 2-8.
Figure 2-8: Available Columns in New Template
If you return to More Columns, the Attribute list will no longer show columns which have already been added to the template. You can use the More Columns function to make additional selections at any time.
Configurators Users can then select which default Displayed Columns are needed, and apply appropriate Sorting & Grouping modifications. You must have at least one Label column in the Displayed Column list. Whatever settings have been made will then appear to the Power User after the template has been saved and published.

InsightSoftware.com Configurator User Guide
Page 13 of 33
Selecting Filters for Filter Layout To select which filters will be available on a template and which will appear as defaults in the Filter Layout Workspace, ‘click’ on the Filter Layout icon within the Configurator Ribbon Tab. The Filter Layout dialog will be displayed.
Notice that the Column/Filter Attributes added through More Columns have been added as Main Filters automatically. Column Only Attributes will be added as a subset under Object.
Configurators Users will notice that a new button, More Filters, is available to them within the Filter Layout and Console Filter Layout dialogs, shown in Figure 2-9.
Figure 2-9: Filter Layout: Available Filters and Controls
NB CONFIGURATORS USERS HAVE ACCESS TO FILTER LAYOUT AND CONSOLE FILTER LAYOUT
DIALOG’S. POWER USERS CAN ONLY ACCESS THE CONSOLE FILTER LAYOUT.

InsightSoftware.com Configurator User Guide
Page 14 of 33
‘Click’ on the More Filters button and the Add New Filters dialog is displayed (see Figure 2-10).
Figure 2-10: Add New Filters Dialog
‘Click’ on the + symbol to open the list and then ‘click’ on the appropriate checkbox beside the filter or filters you wish to add to the template (see Figure 2-11).
InsightSoftware.com Configurator User Guide
Page 15 of 33
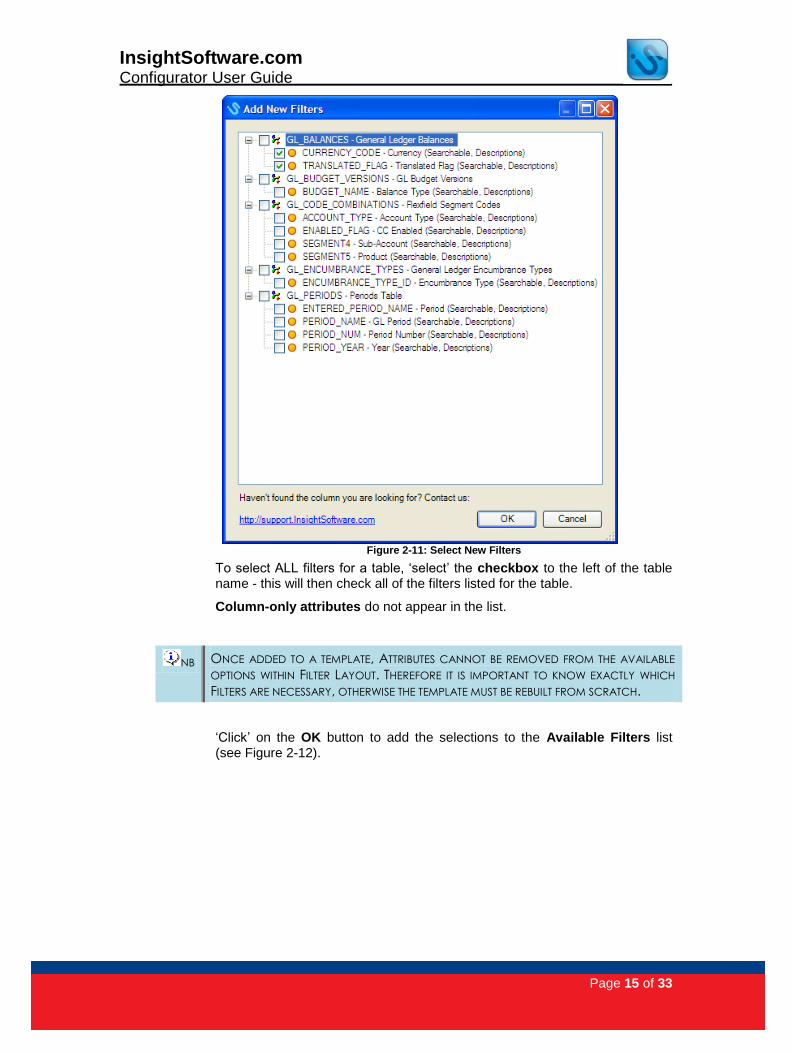
Figure 2-11: Select New Filters
To select ALL filters for a table, ‘select’ the checkbox to the left of the table name - this will then check all of the filters listed for the table.
Column-only attributes do not appear in the list.
NB ONCE ADDED TO A TEMPLATE, ATTRIBUTES CANNOT BE REMOVED FROM THE AVAILABLE
OPTIONS WITHIN FILTER LAYOUT. THEREFORE IT IS IMPORTANT TO KNOW EXACTLY WHICH
FILTERS ARE NECESSARY, OTHERWISE THE TEMPLATE MUST BE REBUILT FROM SCRATCH.
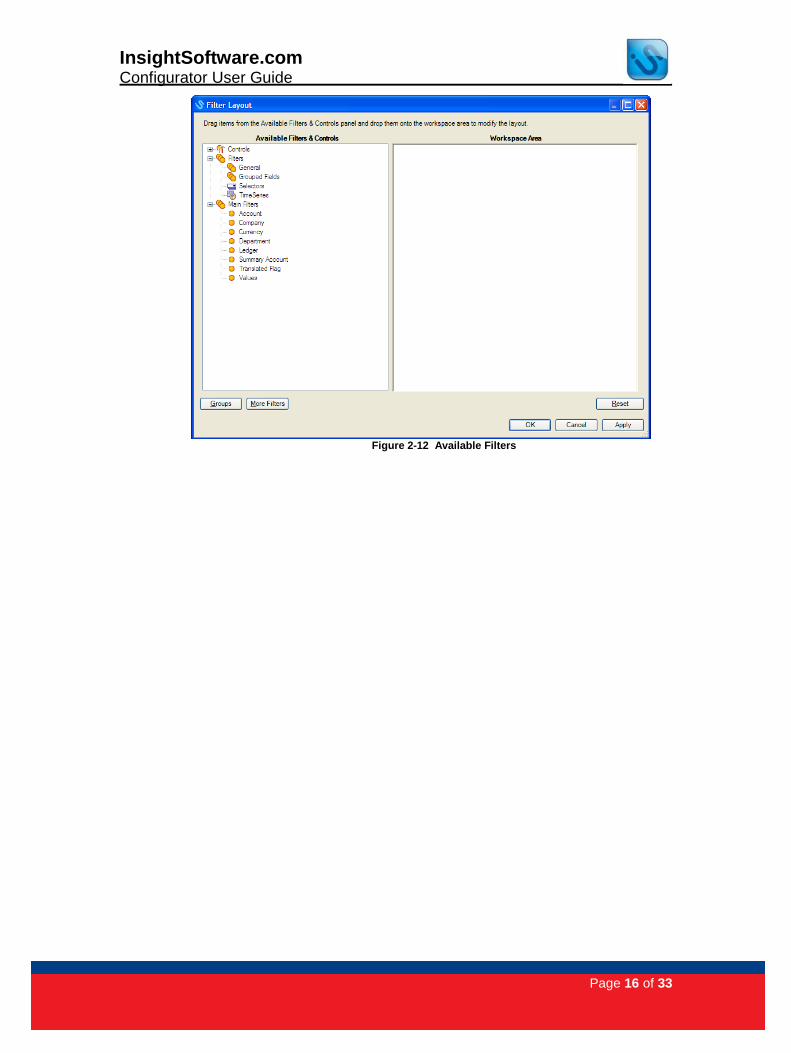
‘Click’ on the OK button to add the selections to the Available Filters list (see Figure 2-12).
InsightSoftware.com Configurator User Guide
Page 16 of 33
Figure 2-12 Available Filters

InsightSoftware.com Configurator User Guide
Page 17 of 33
You can now add filters to the Workspace Area or use the Controls functions if Drop Down Filter, Information or Hierarchy options are needed in the inquiry (Figure 2-13).
Figure 2-13: Filters Added within Filter Layout
Please note that filters are not automatically added as columns. These will need to be added independently through Columns, Sorting and Grouping.
InsightSoftware.com Configurator User Guide
Page 18 of 33
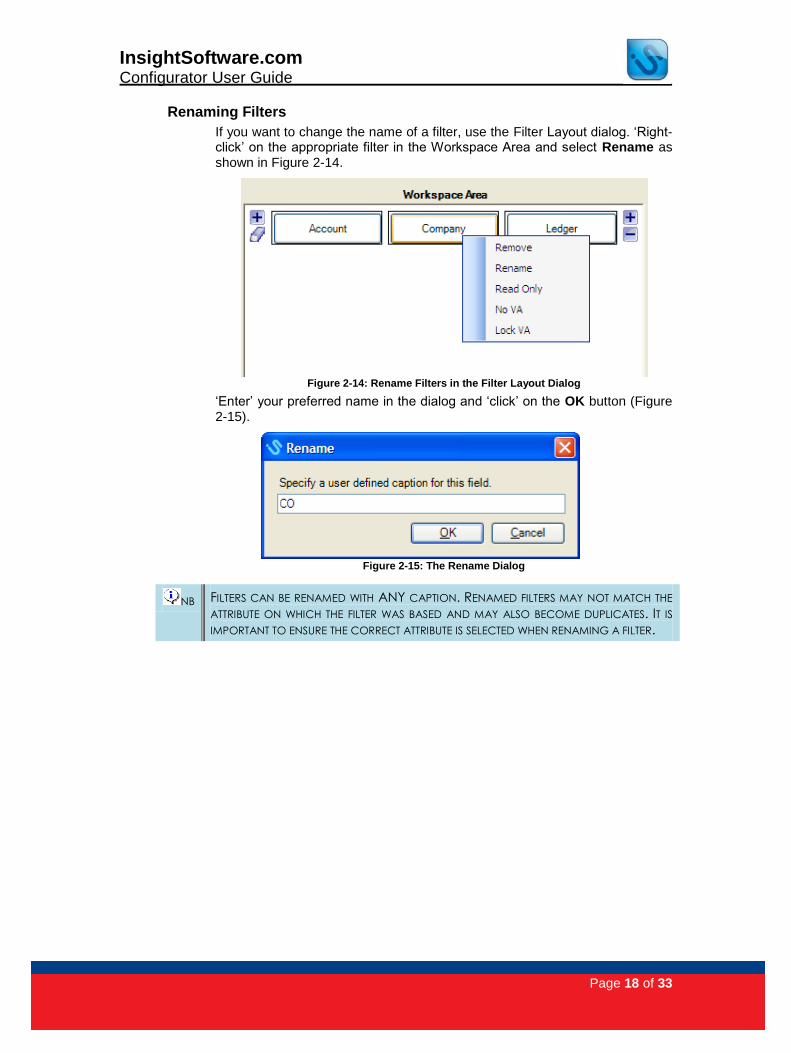
Renaming Filters
If you want to change the name of a filter, use the Filter Layout dialog. ‘Right-click’ on the appropriate filter in the Workspace Area and select Rename as shown in Figure 2-14.
Figure 2-14: Rename Filters in the Filter Layout Dialog
‘Enter’ your preferred name in the dialog and ‘click’ on the OK button (Figure 2-15).
Figure 2-15: The Rename Dialog
NB FILTERS CAN BE RENAMED WITH ANY CAPTION. RENAMED FILTERS MAY NOT MATCH THE
ATTRIBUTE ON WHICH THE FILTER WAS BASED AND MAY ALSO BECOME DUPLICATES. IT IS
IMPORTANT TO ENSURE THE CORRECT ATTRIBUTE IS SELECTED WHEN RENAMING A FILTER.
InsightSoftware.com Configurator User Guide
Page 19 of 33
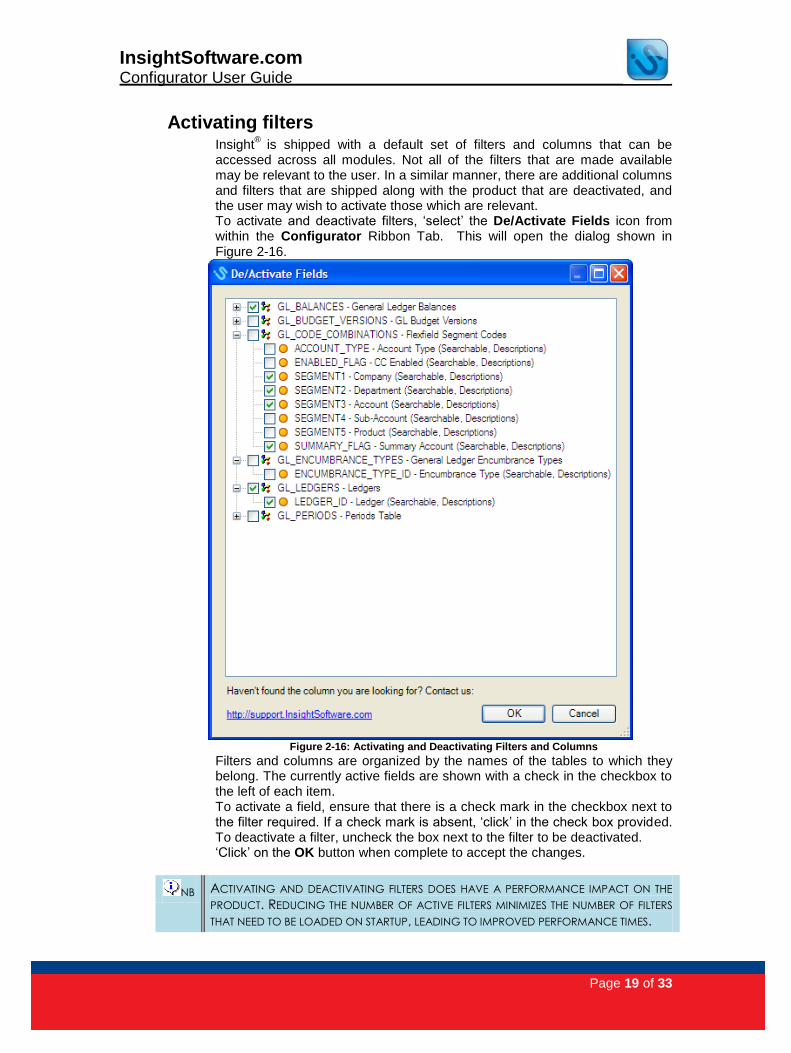
Activating filters Insight
® is shipped with a default set of filters and columns that can be
accessed across all modules. Not all of the filters that are made available may be relevant to the user. In a similar manner, there are additional columns and filters that are shipped along with the product that are deactivated, and the user may wish to activate those which are relevant. To activate and deactivate filters, ‘select’ the De/Activate Fields icon from within the Configurator Ribbon Tab. This will open the dialog shown in Figure 2-16.
Figure 2-16: Activating and Deactivating Filters and Columns
Filters and columns are organized by the names of the tables to which they belong. The currently active fields are shown with a check in the checkbox to the left of each item. To activate a field, ensure that there is a check mark in the checkbox next to the filter required. If a check mark is absent, ‘click’ in the check box provided. To deactivate a filter, uncheck the box next to the filter to be deactivated. ‘Click’ on the OK button when complete to accept the changes.
NB ACTIVATING AND DEACTIVATING FILTERS DOES HAVE A PERFORMANCE IMPACT ON THE
PRODUCT. REDUCING THE NUMBER OF ACTIVE FILTERS MINIMIZES THE NUMBER OF FILTERS
THAT NEED TO BE LOADED ON STARTUP, LEADING TO IMPROVED PERFORMANCE TIMES.
InsightSoftware.com Configurator User Guide
Page 20 of 33
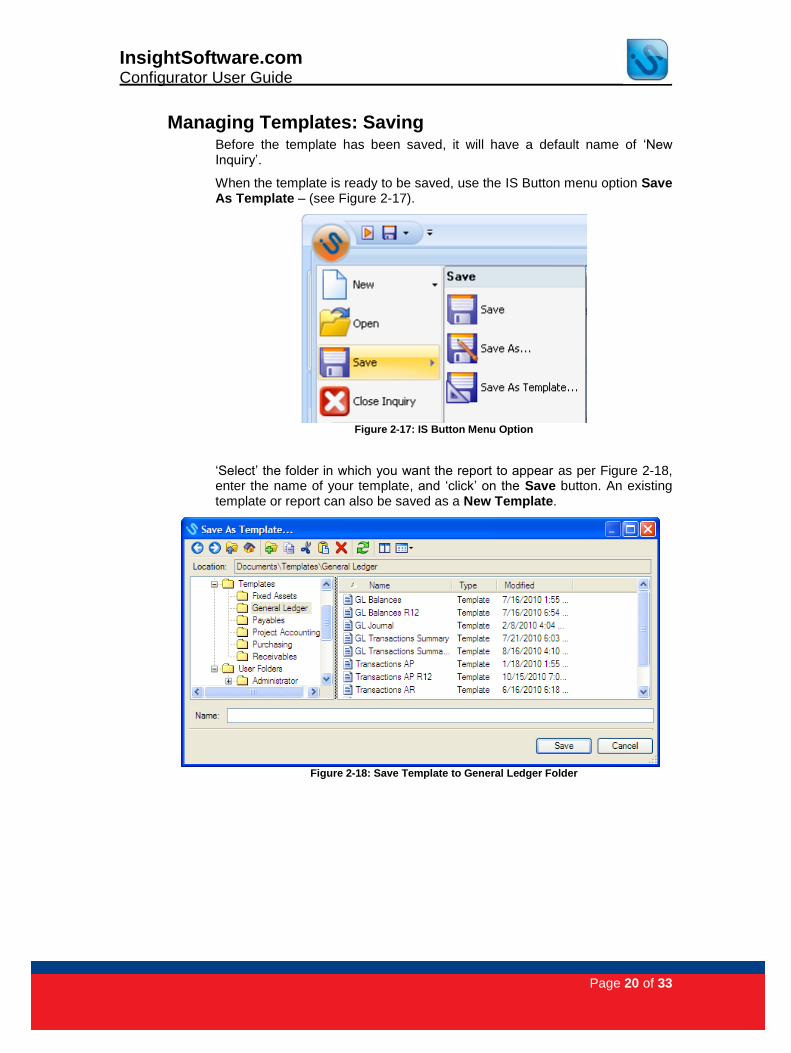
Managing Templates: Saving Before the template has been saved, it will have a default name of ‘New Inquiry’.
When the template is ready to be saved, use the IS Button menu option Save As Template – (see Figure 2-17).
Figure 2-17: IS Button Menu Option
‘Select’ the folder in which you want the report to appear as per Figure 2-18, enter the name of your template, and ‘click’ on the Save button. An existing template or report can also be saved as a New Template.
Figure 2-18: Save Template to General Ledger Folder
InsightSoftware.com Configurator User Guide
Page 21 of 33
Naming Conventions
The Insight® standard templates may be updated in future releases and
upgrades. If you customize the standard templates provided with Insight®, when you upgrade to a new version they will not be updated (your changes will be retained) unless they have been renamed. This means you will not be up to date with the latest templates.
Accordingly, it is recommended that you use different template names for your customized templates, for example, ‘<Company Name> Balances’ or ‘<Company Name> Period Summary’, so that they will be retained upon upgrading.
Creating ‘Linking Only’ templates
The standard template ‘GL Transactions Summary’ is only editable as a template by Configurators Users. Power Users are only able to access this template by drilling down on a link.
Configurators Users can create alternative ‘Linking Only’ templates by selecting ‘GL Transactions Summary’ as the template type when defining the new template. This new template will only be visible as a template to Configurators Users.
Configurator Users can then define additional templates with links to this template. The ‘Linking Only’ template will then only appear as an inquiry when the link is activated.

InsightSoftware.com Configurator User Guide
Page 22 of 33
Managing Templates: Permissions To provide permissions on a new template to Power Users, ‘click’ on the Manage Folders icon within the Home Ribbon Tab as shown in Figure 2-19.
Figure 2-19: Manage Folders Icon
NB PERMISSIONS CAN ALSO BE GRANTED THROUGH THE IS BUTTON MENU. THE LIMITATION OF
THIS APPROACH IS THAT PERMISSIONS CAN ONLY BE GRANTED TO ONE INQUIRY/TEMPLATE
AT A TIME. MANAGE FOLDERS IS RECOMMENDED AS MULTIPLE INQUIRY/TEMPLATES CAN
BE SELECTED FOR PROVIDING PERMISSIONS
The Manage Folders dialog appears. Navigate to the template for which you wish to provide permissions (see Figure 2-20).
Figure 2-20: Manage Folders

InsightSoftware.com Configurator User Guide
Page 23 of 33
‘Right-click’ on the template and select Permissions, as shown in Figure 2-21
Figure 2-21: Permissions
The Permissions for Inquiry dialog displays all of the users and groups that you have permissions to see. The permissions to see other users/groups are granted to you by the Insight
® Administrator.
Figure 2-22: Permissions Dialog
When working with Permissions, there are several different types of permissions that can be assigned. These are shown in the right pane of the dialog (Figure 2-22).
InsightSoftware.com Configurator User Guide
Page 24 of 33
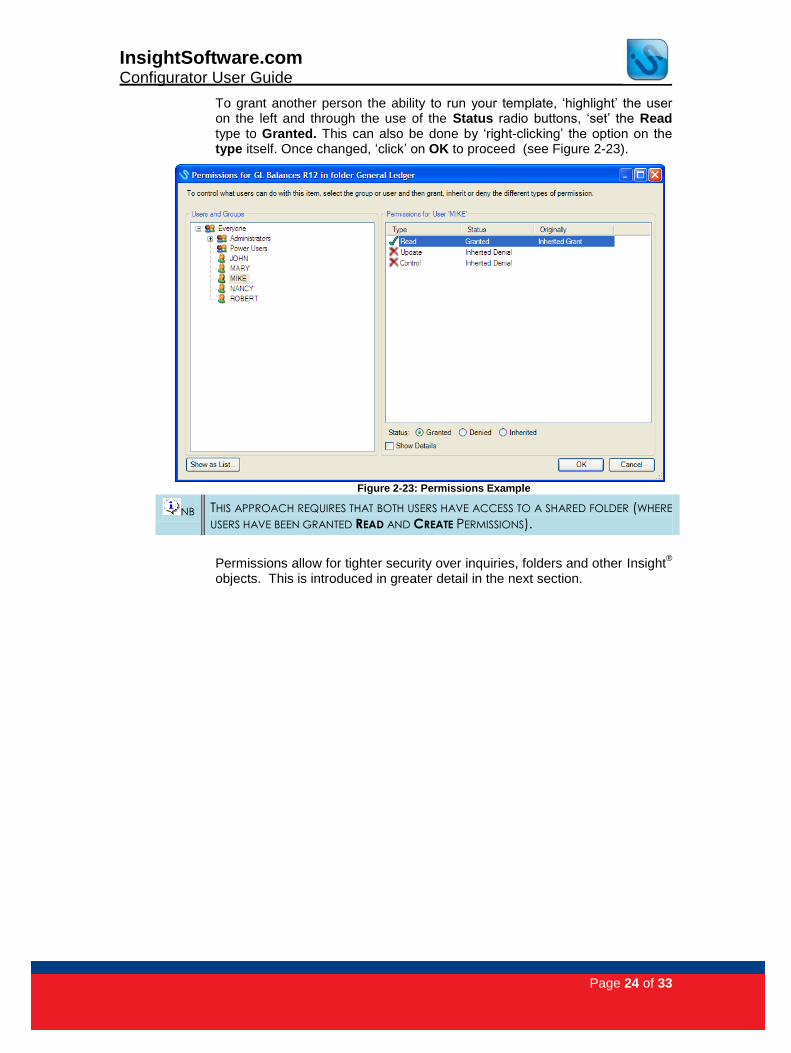
To grant another person the ability to run your template, ‘highlight’ the user on the left and through the use of the Status radio buttons, ‘set’ the Read type to Granted. This can also be done by ‘right-clicking’ the option on the type itself. Once changed, ‘click’ on OK to proceed (see Figure 2-23).
Figure 2-23: Permissions Example
NB THIS APPROACH REQUIRES THAT BOTH USERS HAVE ACCESS TO A SHARED FOLDER (WHERE
USERS HAVE BEEN GRANTED READ AND CREATE PERMISSIONS).
Permissions allow for tighter security over inquiries, folders and other Insight®
objects. This is introduced in greater detail in the next section.

InsightSoftware.com Configurator User Guide
Page 25 of 33
Permission Definition: Options
Read type permissions are only a small subset of the permissions engine. Below is a table showing the Permission Types that can be assigned.
NB A PERMISSION TYPE CAN CONSIST OF SEVERAL INDIVIDUAL SUB TYPES. FOR EXAMPLE, THE
UPDATE PERMISSION GIVES THE RIGHTS TO WRITE AND LOCK ON THE ASSOCIATED OBJECT
OR DOCUMENT.
select and assign individual ‘sub’ types, you can enable the Show Details box within the Permissions dialog (see Figure 2-24).
Figure 2-24 -Permissions Show Details Checkbox
Type Consists of Description
Read Read
The ability to view or open the folder or
document
Update Write The ability to save changes to the folder
or document
Lock The ability to lock and unlock a folder or
document
Create New Document The ability to save a new document within
a folder
New Folder The ability to create a new sub-folder
within a folder
Control Rename The ability to change the name of a
folder or document
Move The ability to move a folder or document
into another folder
Delete The ability to delete a folder or document
Read
Permissions
The ability to view the permissions of
another user or group for a folder or
document
Write Permissions The ability to change the permissions of
any user or group for a folder or
document

InsightSoftware.com Configurator User Guide
Page 26 of 33
The Permission Rights that you select include:
Grant Permission will be given
Deny Permission will be denied
Inherited The right has been taken from the parent group within the
folder tree
Mixed The selected objects have been assigned a variety of
rights
Permission Definition: Users
Users within Insight®
can belong to Groups or have Roles (within Permissions we refer to groups of users but this is interchangeable with roles), the default and largest of which is called Everyone.
When assigning access rights within Permissions, you can give rights to individual users OR to group(s). Users will inherit rights from the group they belong to, unless those rights are then expressly denied to the individual user.
If a user is within multiple groups and has been assigned contradictory rights, Insight
® will allow any assigned right that has been granted.
If a user has been assigned more rights than a group they belong to, rights will not automatically transfer to the group.
Permissions Applied
Once Permissions are applied, the new template will then be available to the selected Power Users in the New Inquiry dialog as per Figure 2-25.
Figure 2-25: New Inquiry Dialog Displaying New Template
InsightSoftware.com Configurator User Guide
Page 27 of 33
Removing Templates from Publication
Only Administrators (or users with explicit Permissions) are able to delete templates.
Instead of deletion, it is recommended that Permissions are removed on templates. This approach means that the template will be retained (in the case of future use) but that no one will be able to access it.
Within the Permissions dialog, change the Read status to Inherited (by default, this will normally deny) to deselect the users who should no longer be able to access the template (or inquiry).
Editing templates
‘Open’ the template you wish to edit, make the changes required and then use the Save As Template function to overwrite and update the existing template.
InsightSoftware.com Configurator User Guide
Page 28 of 33
Reusable Inquiry Objects Reusable Inquiry Objects (RIO) is a repository within Insight
® that allows
you to share a range of common components between inquiries:
Hierarchies
Calculations
Custom Columns
Formats
Time Series
Selectors
User Defined Captions
Inquiries can be ‘subscribed to’ (or linked to) stored objects within Reusable Inquiry Objects. These objects can then be modified and all changes will be reflected the next time an inquiry is run. This feature is designed to save you valuable time and make it easier for you to enhance your reports. For example, you might want to add a particular calculation to all of your inquiries. Rather than creating this calculation separately in each individual report, you can create it once, add it to RIO, and it will be available to add to any other inquiry. RIO objects can also be grouped into folders. The benefit of this is that if the folder is enabled, all of the contents of the folder are subscribed to in one easy step. There are two levels of RIO – ‘Global RIOs’ and ‘Connection RIOs’. Global RIOs objects are available for all connections; Connection RIOs are limited to that one connection. The ability to add and modify items within the RIO libraries is confined to Configurators/Super Users.
InsightSoftware.com Configurator User Guide
Page 29 of 33
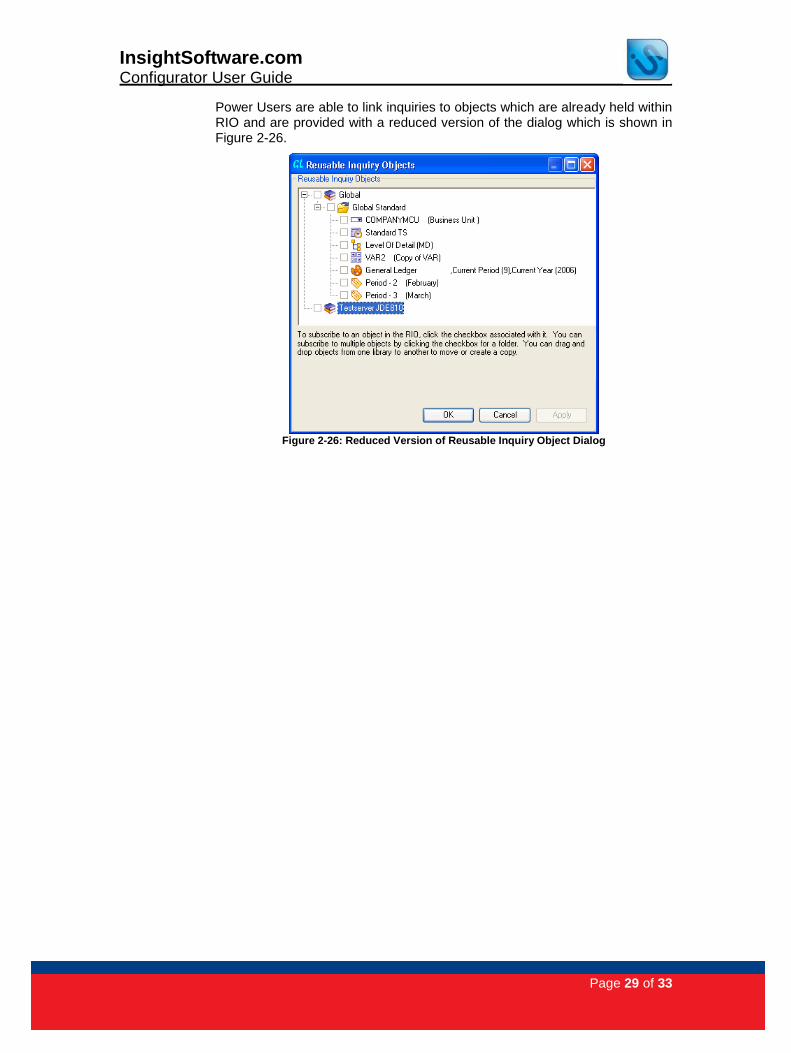
Power Users are able to link inquiries to objects which are already held within RIO and are provided with a reduced version of the dialog which is shown in Figure 2-26.
Figure 2-26: Reduced Version of Reusable Inquiry Object Dialog
InsightSoftware.com Configurator User Guide
Page 30 of 33
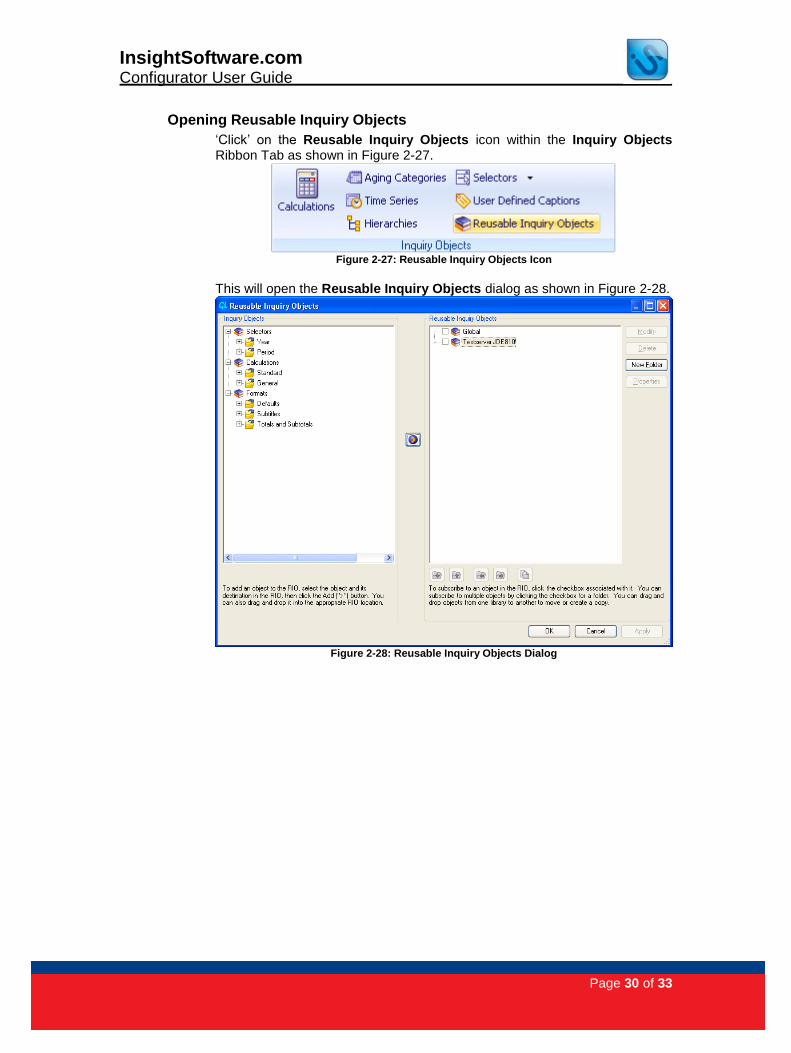
Opening Reusable Inquiry Objects
‘Click’ on the Reusable Inquiry Objects icon within the Inquiry Objects Ribbon Tab as shown in Figure 2-27.
Figure 2-27: Reusable Inquiry Objects Icon
This will open the Reusable Inquiry Objects dialog as shown in Figure 2-28.
Figure 2-28: Reusable Inquiry Objects Dialog

InsightSoftware.com Configurator User Guide
Page 31 of 33
Adding items to Reusable Inquiry Objects
For Power Users to be able to subscribe to objects in RIO, it is necessary for a ConfiguratorUser to add in the necessary objects.
1. Open the inquiry that contains the object to be added to the folder structure.
2. Open the Reusable Inquiry Objects dialog by selecting this option from the ribbon.
3. Select the object that you wish to add to the library in the Reusable Inquiry Objects panel and either drag and drop it into the appropriate folder, or select the destination folder and ‘click’ the blue right-arrow button to move it across (see Figure 2-29).
Figure 2-29: Adding/Modifying Objects Stored in RIO

InsightSoftware.com Configurator User Guide
Page 32 of 33
Modifying objects stored in RIO
Library objects can be modified from within Reusable Inquiry Objects: 1. ‘Click’ on the object you need to modify.
2. ‘Click’ on the Modify button.
3. The associated dialog will open, allowing you to make changes to the selected RIO Object. ‘Click’ on OK to accept the change
4. ‘Click’ OK in the RIO dialog.
Any inquiries which have already subscribed to the object will reflect the changes the next time they are run.
Subscribing
Inquiries need to be subscribed to a library object in order to make use of it. To subscribe an inquiry to a Reusable Inquiry Objects item, do the following:
1. Open the inquiry.
2. Open Reusable Inquiry Objects.
3. If the object is not yet listed in the library, add in the object in as in the previous section ‘Adding items to Reusable Inquiry Objects’.
4. Make sure that the checkbox next to the appropriate item is checked.
5. ‘Click’ on OK.
Changes will be reflected the next time the inquiry is run.
Objects stored in Global RIOs will be available to all database connections. Objects stored in Connection RIOs will only be available for that particular connection.
Library Precedence
The same inquiry object can be added both to Connection RIOs and to Global Rios. In these circumstances the two library objects can be modified independently and changes to one will not impact the other.
If an inquiry subscribes to both library objects, the object in Connection RIOs will take precedence over the object in Global RIOs. This allows the user to subscribe to a company standard at the global level but then override it with a connection level setting.
InsightSoftware.com Configurator User Guide
Page 33 of 33
Contacts For more information regarding our products, please contact us at:
Web www.InsightSoftware.com
Technical Support For Technical Support, Please complete the web form at:
Web Link
http://supportform.InsightSoftware.com
Notices and Disclaimer Insight, Console and GL Reporting are trademarks of InsightSoftware.com Limited. InsightSoftware.com is a registered trademark of InsightSoftware.com Limited. Oracle, JD Edwards, JD Edwards EnterpriseOne, JD Edwards World and Oracle E-Business are registered trademarks of Oracle Corporation. Other product and company names mentioned herein may be the trademarks of their respective owners. The information contained in this document represents the current view of InsightSoftware.com on the issues discussed as of the date of publication. InsightSoftware.com cannot guarantee the accuracy of any information presented after the date of publication. This document is for informational purposes only. InsightSoftware.com makes no warranties, expressed or implied, in this document. © 2000-2011 InsightSoftware.com Limited. All rights reserved.