Embed Size (px)
Citation preview
Informatica® PowerExchange10.2 HotFix 2
Installation and Upgrade Guide
Informatica PowerExchange Installation and Upgrade Guide10.2 HotFix 2May 2019
© Copyright Informatica LLC 2005, 2019
This software and documentation are provided only under a separate license agreement containing restrictions on use and disclosure. No part of this document may be reproduced or transmitted in any form, by any means (electronic, photocopying, recording or otherwise) without prior consent of Informatica LLC.
U.S. GOVERNMENT RIGHTS Programs, software, databases, and related documentation and technical data delivered to U.S. Government customers are "commercial computer software" or "commercial technical data" pursuant to the applicable Federal Acquisition Regulation and agency-specific supplemental regulations. As such, the use, duplication, disclosure, modification, and adaptation is subject to the restrictions and license terms set forth in the applicable Government contract, and, to the extent applicable by the terms of the Government contract, the additional rights set forth in FAR 52.227-19, Commercial Computer Software License.
Informatica, the Informatica logo, PowerCenter, and PowerExchange are trademarks or registered trademarks of Informatica LLC in the United States and many jurisdictions throughout the world. A current list of Informatica trademarks is available on the web at https://www.informatica.com/trademarks.html. Other company and product names may be trade names or trademarks of their respective owners.
Portions of this software and/or documentation are subject to copyright held by third parties. Required third party notices are included with the product.
The information in this documentation is subject to change without notice. If you find any problems in this documentation, report them to us at [email protected].
Informatica products are warranted according to the terms and conditions of the agreements under which they are provided. INFORMATICA PROVIDES THE INFORMATION IN THIS DOCUMENT "AS IS" WITHOUT WARRANTY OF ANY KIND, EXPRESS OR IMPLIED, INCLUDING WITHOUT ANY WARRANTIES OF MERCHANTABILITY, FITNESS FOR A PARTICULAR PURPOSE AND ANY WARRANTY OR CONDITION OF NON-INFRINGEMENT.
Publication Date: 2019-05-15
Table of Contents
Preface . . . . . . . . . . . . . . . . . . . . . . . . . . . . . . . . . . . . . . . . . . . . . . . . . . . . . . . . . . . . . . . . . . . . . . 9Informatica Resources. . . . . . . . . . . . . . . . . . . . . . . . . . . . . . . . . . . . . . . . . . . . . . . . . . . 9
Informatica Network. . . . . . . . . . . . . . . . . . . . . . . . . . . . . . . . . . . . . . . . . . . . . . . . . 10
Informatica Knowledge Base. . . . . . . . . . . . . . . . . . . . . . . . . . . . . . . . . . . . . . . . . . . 10
Informatica Documentation. . . . . . . . . . . . . . . . . . . . . . . . . . . . . . . . . . . . . . . . . . . . 10
Informatica Product Availability Matrices. . . . . . . . . . . . . . . . . . . . . . . . . . . . . . . . . . . 10
Informatica Velocity. . . . . . . . . . . . . . . . . . . . . . . . . . . . . . . . . . . . . . . . . . . . . . . . . 10
Informatica Marketplace. . . . . . . . . . . . . . . . . . . . . . . . . . . . . . . . . . . . . . . . . . . . . . 11
Informatica Global Customer Support. . . . . . . . . . . . . . . . . . . . . . . . . . . . . . . . . . . . . . 11
Chapter 1: PowerExchange Installation and Upgrade Overview. . . . . . . . . . . . . . . 12Installation and Upgrade Guide Scope. . . . . . . . . . . . . . . . . . . . . . . . . . . . . . . . . . . . . . . . 12
PowerExchange Overview. . . . . . . . . . . . . . . . . . . . . . . . . . . . . . . . . . . . . . . . . . . . . . . . 13
PowerExchange Components. . . . . . . . . . . . . . . . . . . . . . . . . . . . . . . . . . . . . . . . . . . . . . 13
PowerExchange Agent. . . . . . . . . . . . . . . . . . . . . . . . . . . . . . . . . . . . . . . . . . . . . . . 13
PowerExchange Condense. . . . . . . . . . . . . . . . . . . . . . . . . . . . . . . . . . . . . . . . . . . . . 14
PowerExchange Environmental Change Capture Routine (ECCR) . . . . . . . . . . . . . . . . . . . . 14
PowerExchange Listener. . . . . . . . . . . . . . . . . . . . . . . . . . . . . . . . . . . . . . . . . . . . . . 14
PowerExchange Logger for Linux, UNIX, and Windows. . . . . . . . . . . . . . . . . . . . . . . . . . . 15
PowerExchange Logger for z/OS. . . . . . . . . . . . . . . . . . . . . . . . . . . . . . . . . . . . . . . . . 15
PowerExchange Navigator. . . . . . . . . . . . . . . . . . . . . . . . . . . . . . . . . . . . . . . . . . . . . 15
Installing PowerExchange Components. . . . . . . . . . . . . . . . . . . . . . . . . . . . . . . . . . . . 15
Chapter 2: Installation Planning. . . . . . . . . . . . . . . . . . . . . . . . . . . . . . . . . . . . . . . . . . . . . 17Installation Planning Overview. . . . . . . . . . . . . . . . . . . . . . . . . . . . . . . . . . . . . . . . . . . . . 17
Where to Install PowerExchange. . . . . . . . . . . . . . . . . . . . . . . . . . . . . . . . . . . . . . . . . . . . 18
Software Requirements for PowerExchange. . . . . . . . . . . . . . . . . . . . . . . . . . . . . . . . . . . . . 18
Software Requirements for i5/OS. . . . . . . . . . . . . . . . . . . . . . . . . . . . . . . . . . . . . . . . 18
Software Requirements for Linux, UNIX, and Windows. . . . . . . . . . . . . . . . . . . . . . . . . . . 19
Software Requirements for z/OS. . . . . . . . . . . . . . . . . . . . . . . . . . . . . . . . . . . . . . . . . 24
Supported Data Sources in an Amazon RDS Environment. . . . . . . . . . . . . . . . . . . . . . . . . 28
Supported PowerExchange Sources and Targets for Other Informatica Products . . . . . . . . . . 28
PowerExchange 32-Bit and 64-Bit Executables on Windows. . . . . . . . . . . . . . . . . . . . . . . . . . . 31
PowerExchange License Keys. . . . . . . . . . . . . . . . . . . . . . . . . . . . . . . . . . . . . . . . . . . . . . 31
How to Get the PowerExchange License Keys. . . . . . . . . . . . . . . . . . . . . . . . . . . . . . . . 32
Entering PowerExchange License Keys. . . . . . . . . . . . . . . . . . . . . . . . . . . . . . . . . . . . . 32
PowerExchange Interoperability with PowerCenter. . . . . . . . . . . . . . . . . . . . . . . . . . . . . . . . 32
PowerExchange Interoperability with Informatica Services . . . . . . . . . . . . . . . . . . . . . . . . . . . 33
PowerExchange Interoperability with Informatica Data Archive. . . . . . . . . . . . . . . . . . . . . . . . 34
PowerExchange to PowerExchange Interoperability. . . . . . . . . . . . . . . . . . . . . . . . . . . . . . . . 34
Table of Contents 3
Organization of the PowerExchange Installation CD Image. . . . . . . . . . . . . . . . . . . . . . . . . . . 34
Chapter 3: Upgrade Planning. . . . . . . . . . . . . . . . . . . . . . . . . . . . . . . . . . . . . . . . . . . . . . . . 36Upgrade Planning Overview. . . . . . . . . . . . . . . . . . . . . . . . . . . . . . . . . . . . . . . . . . . . . . . 36
Strategies for Maintaining PowerExchange Data. . . . . . . . . . . . . . . . . . . . . . . . . . . . . . . . . . 36
Upgrade Scenarios. . . . . . . . . . . . . . . . . . . . . . . . . . . . . . . . . . . . . . . . . . . . . . . . . . . . . 37
Existing Install and Data Location Scenario. . . . . . . . . . . . . . . . . . . . . . . . . . . . . . . . . . 38
New Install Location with Existing Data Location Scenario. . . . . . . . . . . . . . . . . . . . . . . . 38
New Install and Data Location Scenario. . . . . . . . . . . . . . . . . . . . . . . . . . . . . . . . . . . . 38
Migrating Data Maps, Capture Registrations, and Extraction Maps. . . . . . . . . . . . . . . . . . . . . . 39
Migrating Resources Across PowerExchange Systems at the Same Version Level. . . . . . . . . 40
Migrating Data Maps to a New Version Level on i5/OS. . . . . . . . . . . . . . . . . . . . . . . . . . . 40
Migrating Capture Registrations and Extraction Maps to a New Version Level on i5/OS. . . . . . 40
Migrating Data Maps to a New Version Level on Linux, UNIX, and Windows. . . . . . . . . . . . . . 40
Migrating Capture Registrations and Extraction Maps to a New Version Level on Linux UNIX and Windows. . . . . . . . . . . . . . . . . . . . . . . . . . . . . . . . . . . . . . . . . . . . . . . . . . . . . 41
Migrating Data Maps to a New Version Level on z/OS. . . . . . . . . . . . . . . . . . . . . . . . . . . 41
Migrating Capture Registrations and Extraction Maps to a New Version Level on z/OS. . . . . . 42
Chapter 4: Installing and Upgrading PowerExchange on i5/OS. . . . . . . . . . . . . . . . 44i5/OS Installation Overview. . . . . . . . . . . . . . . . . . . . . . . . . . . . . . . . . . . . . . . . . . . . . . . 44
Performing a Full Installation on i5/OS. . . . . . . . . . . . . . . . . . . . . . . . . . . . . . . . . . . . . . . . 44
Before You Install PowerExchange on i5/OS. . . . . . . . . . . . . . . . . . . . . . . . . . . . . . . . . 44
Task Flow for a Full Installation on i5/OS. . . . . . . . . . . . . . . . . . . . . . . . . . . . . . . . . . . 46
Installing PowerExchange on i5/OS. . . . . . . . . . . . . . . . . . . . . . . . . . . . . . . . . . . . . . . 46
After You Install PowerExchange on i5/OS. . . . . . . . . . . . . . . . . . . . . . . . . . . . . . . . . . . 53
Upgrading PowerExchange to a New Release on i5/OS. . . . . . . . . . . . . . . . . . . . . . . . . . . . . . 53
Before You Upgrade PowerExchange on i5/OS. . . . . . . . . . . . . . . . . . . . . . . . . . . . . . . . 53
Upgrading PowerExchange on i5/OS. . . . . . . . . . . . . . . . . . . . . . . . . . . . . . . . . . . . . . 54
After You Upgrade PowerExchange on i5/OS. . . . . . . . . . . . . . . . . . . . . . . . . . . . . . . . . 54
Installing a HotFix on i5/OS. . . . . . . . . . . . . . . . . . . . . . . . . . . . . . . . . . . . . . . . . . . . . . . 55
Before You Install a HotFix on i5/OS. . . . . . . . . . . . . . . . . . . . . . . . . . . . . . . . . . . . . . 56
Task Flow for Installing a HotFix on i5/OS. . . . . . . . . . . . . . . . . . . . . . . . . . . . . . . . . . . 56
Installing a HotFix on i5/OS. . . . . . . . . . . . . . . . . . . . . . . . . . . . . . . . . . . . . . . . . . . . 57
Uninstalling PowerExchange on i5/OS. . . . . . . . . . . . . . . . . . . . . . . . . . . . . . . . . . . . . . . . 59
Chapter 5: Installing and Upgrading PowerExchange on Linux and UNIX. . . . . . 60Linux and UNIX Installation Overview. . . . . . . . . . . . . . . . . . . . . . . . . . . . . . . . . . . . . . . . . 60
Performing a Full Installation on Linux or UNIX. . . . . . . . . . . . . . . . . . . . . . . . . . . . . . . . . . . 60
Before You Install PowerExchange on Linux or UNIX. . . . . . . . . . . . . . . . . . . . . . . . . . . . 60
Task Flow for a Full Installation. . . . . . . . . . . . . . . . . . . . . . . . . . . . . . . . . . . . . . . . . . 62
Installing PowerExchange on Linux or UNIX. . . . . . . . . . . . . . . . . . . . . . . . . . . . . . . . . . 63
After You Install PowerExchange on Linux or UNIX. . . . . . . . . . . . . . . . . . . . . . . . . . . . . 68
4 Table of Contents
Performing an Upgrade Installation on Linux or UNIX. . . . . . . . . . . . . . . . . . . . . . . . . . . . . . . 69
Before You Upgrade PowerExchange on Linux or UNIX. . . . . . . . . . . . . . . . . . . . . . . . . . . 69
Task Flow for an Upgrade Installation on Linux or UNIX. . . . . . . . . . . . . . . . . . . . . . . . . . 70
After You Upgrade PowerExchange on Linux or UNIX. . . . . . . . . . . . . . . . . . . . . . . . . . . . 70
Installing a HotFix on Linux or UNIX. . . . . . . . . . . . . . . . . . . . . . . . . . . . . . . . . . . . . . . . . . 71
Before You Install a HotFix on Linux or UNIX. . . . . . . . . . . . . . . . . . . . . . . . . . . . . . . . . 71
Task Flow for Installing a HotFix on Linux or UNIX. . . . . . . . . . . . . . . . . . . . . . . . . . . . . . 72
Installing the HotFix on Linux or UNIX. . . . . . . . . . . . . . . . . . . . . . . . . . . . . . . . . . . . . . 72
PowerExchange Configuration Files for Localized Environments. . . . . . . . . . . . . . . . . . . . 74
Chapter 6: Installing and Upgrading PowerExchange on Windows. . . . . . . . . . . . 75Windows Installation Overview. . . . . . . . . . . . . . . . . . . . . . . . . . . . . . . . . . . . . . . . . . . . . 75
Performing a Full Installation on Windows. . . . . . . . . . . . . . . . . . . . . . . . . . . . . . . . . . . . . . 76
Before You Install PowerExchange on Windows. . . . . . . . . . . . . . . . . . . . . . . . . . . . . . . 76
Task Flow for a Full Installation. . . . . . . . . . . . . . . . . . . . . . . . . . . . . . . . . . . . . . . . . . 78
Installing PowerExchange. . . . . . . . . . . . . . . . . . . . . . . . . . . . . . . . . . . . . . . . . . . . . 78
After You Install PowerExchange on Windows. . . . . . . . . . . . . . . . . . . . . . . . . . . . . . . . 80
Performing an Upgrade Installation on Windows. . . . . . . . . . . . . . . . . . . . . . . . . . . . . . . . . . 81
Before You Upgrade PowerExchange on Windows. . . . . . . . . . . . . . . . . . . . . . . . . . . . . . 81
Upgrading PowerExchange on Windows. . . . . . . . . . . . . . . . . . . . . . . . . . . . . . . . . . . . 82
After You Upgrade PowerExchange on Windows. . . . . . . . . . . . . . . . . . . . . . . . . . . . . . . 82
Installing a PowerExchange HotFix on Windows. . . . . . . . . . . . . . . . . . . . . . . . . . . . . . . . . . 82
Before You Install a HotFix on Windows. . . . . . . . . . . . . . . . . . . . . . . . . . . . . . . . . . . . 83
Task Flow for Installing a HotFix on Windows. . . . . . . . . . . . . . . . . . . . . . . . . . . . . . . . . 83
Installing the HotFix on Windows. . . . . . . . . . . . . . . . . . . . . . . . . . . . . . . . . . . . . . . . . 83
PowerExchange Configuration Files for Localized Environments. . . . . . . . . . . . . . . . . . . . 84
Uninstalling PowerExchange on Windows. . . . . . . . . . . . . . . . . . . . . . . . . . . . . . . . . . . . . . 85
Chapter 7: Installing and Upgrading PowerExchange on z/OS. . . . . . . . . . . . . . . . 87z/OS Installation Overview. . . . . . . . . . . . . . . . . . . . . . . . . . . . . . . . . . . . . . . . . . . . . . . . 87
z/OS Security. . . . . . . . . . . . . . . . . . . . . . . . . . . . . . . . . . . . . . . . . . . . . . . . . . . . . 87
Installation and Startup Errors. . . . . . . . . . . . . . . . . . . . . . . . . . . . . . . . . . . . . . . . . . 88
Performing a Full Installation on z/OS. . . . . . . . . . . . . . . . . . . . . . . . . . . . . . . . . . . . . . . . 88
Before You Perform a Full Installation on z/OS. . . . . . . . . . . . . . . . . . . . . . . . . . . . . . . . 88
Task Flow for a Full Installation on z/OS. . . . . . . . . . . . . . . . . . . . . . . . . . . . . . . . . . . . 89
Space Requirements for PowerExchange Data Sets. . . . . . . . . . . . . . . . . . . . . . . . . . . . . 90
Phase I. Install the PowerExchange Base Software. . . . . . . . . . . . . . . . . . . . . . . . . . . . . 93
Phase II. Install the PowerExchange CDC Software. . . . . . . . . . . . . . . . . . . . . . . . . . . . 103
Phase III. Install the PowerExchange Software for Specific Data Sources. . . . . . . . . . . . . . 106
Phase IV. Delete Previously Copied RUNLIB Members. . . . . . . . . . . . . . . . . . . . . . . . . . 107
After You Install PowerExchange on z/OS. . . . . . . . . . . . . . . . . . . . . . . . . . . . . . . . . . 107
Performing an Upgrade on z/OS. . . . . . . . . . . . . . . . . . . . . . . . . . . . . . . . . . . . . . . . . . . 108
Before You Upgrade on z/OS. . . . . . . . . . . . . . . . . . . . . . . . . . . . . . . . . . . . . . . . . . 108
Table of Contents 5
Task Flow for an Upgrade on z/OS. . . . . . . . . . . . . . . . . . . . . . . . . . . . . . . . . . . . . . . 109
Phase I. Upgrade the PowerExchange Base Software. . . . . . . . . . . . . . . . . . . . . . . . . . . 110
Phase II. Upgrade the PowerExchange CDC Software. . . . . . . . . . . . . . . . . . . . . . . . . . . 121
Phase III. Upgrade the PowerExchange Software for Specific Data Sources. . . . . . . . . . . . . 122
Phase IV. Post-Upgrade Activities. . . . . . . . . . . . . . . . . . . . . . . . . . . . . . . . . . . . . . . 125
After You Upgrade on z/OS. . . . . . . . . . . . . . . . . . . . . . . . . . . . . . . . . . . . . . . . . . . . 126
Installing a HotFix on z/OS. . . . . . . . . . . . . . . . . . . . . . . . . . . . . . . . . . . . . . . . . . . . . . . 127
Before You Install a HotFix on z/OS. . . . . . . . . . . . . . . . . . . . . . . . . . . . . . . . . . . . . . 127
Task Flow for a HotFix Installation on z/OS. . . . . . . . . . . . . . . . . . . . . . . . . . . . . . . . . 127
Phase I. Install the HotFix on z/OS. . . . . . . . . . . . . . . . . . . . . . . . . . . . . . . . . . . . . . . 128
Phase II. Update the PowerExchange Software for Specific Data Sources. . . . . . . . . . . . . . 132
Phase III. Post-HotFix Installation Activities. . . . . . . . . . . . . . . . . . . . . . . . . . . . . . . . . 133
z/OS Installation Assistant Reference. . . . . . . . . . . . . . . . . . . . . . . . . . . . . . . . . . . . . . . . 134
Welcome to the PowerExchange z/OS Installation Assistant Page. . . . . . . . . . . . . . . . . . . 134
Full Install Page. . . . . . . . . . . . . . . . . . . . . . . . . . . . . . . . . . . . . . . . . . . . . . . . . . . 134
Select Global Parameters Page (Full Installation). . . . . . . . . . . . . . . . . . . . . . . . . . . . . 134
Select Data Set Group Details Page. . . . . . . . . . . . . . . . . . . . . . . . . . . . . . . . . . . . . . 136
General Parameters Page. . . . . . . . . . . . . . . . . . . . . . . . . . . . . . . . . . . . . . . . . . . . 139
Data Sources Page. . . . . . . . . . . . . . . . . . . . . . . . . . . . . . . . . . . . . . . . . . . . . . . . . 142
CDC Common Parameters Page. . . . . . . . . . . . . . . . . . . . . . . . . . . . . . . . . . . . . . . . 143
Adabas Parameters Page. . . . . . . . . . . . . . . . . . . . . . . . . . . . . . . . . . . . . . . . . . . . . 145
Datacom Parameters Page. . . . . . . . . . . . . . . . . . . . . . . . . . . . . . . . . . . . . . . . . . . . 147
DB2 Parameters Page. . . . . . . . . . . . . . . . . . . . . . . . . . . . . . . . . . . . . . . . . . . . . . . 148
DB2 CDC Parameters Page. . . . . . . . . . . . . . . . . . . . . . . . . . . . . . . . . . . . . . . . . . . . 150
IDMS Parameters Page. . . . . . . . . . . . . . . . . . . . . . . . . . . . . . . . . . . . . . . . . . . . . . 152
IDMS CDC Parameters Page. . . . . . . . . . . . . . . . . . . . . . . . . . . . . . . . . . . . . . . . . . . 153
IMS Parameters Page. . . . . . . . . . . . . . . . . . . . . . . . . . . . . . . . . . . . . . . . . . . . . . . 154
IMS CDC Parameters Page. . . . . . . . . . . . . . . . . . . . . . . . . . . . . . . . . . . . . . . . . . . . 155
MQ Series Parameters Page. . . . . . . . . . . . . . . . . . . . . . . . . . . . . . . . . . . . . . . . . . . 156
VSAM Parameters Page. . . . . . . . . . . . . . . . . . . . . . . . . . . . . . . . . . . . . . . . . . . . . . 157
Create Runlib JCL Page. . . . . . . . . . . . . . . . . . . . . . . . . . . . . . . . . . . . . . . . . . . . . . 157
Transfer Files to Mainframe Page. . . . . . . . . . . . . . . . . . . . . . . . . . . . . . . . . . . . . . . 158
View File Transfer Status Page. . . . . . . . . . . . . . . . . . . . . . . . . . . . . . . . . . . . . . . . . 160
Upgrade to a New Release Page. . . . . . . . . . . . . . . . . . . . . . . . . . . . . . . . . . . . . . . . 160
Import Existing Parameters Page. . . . . . . . . . . . . . . . . . . . . . . . . . . . . . . . . . . . . . . . 161
Review Parameters Page. . . . . . . . . . . . . . . . . . . . . . . . . . . . . . . . . . . . . . . . . . . . . 161
Review Global Parameters Page (Upgrade with Existing Data Set Names) . . . . . . . . . . . . . 162
Review Global Parameters Page (Upgrade with New Data Set Names). . . . . . . . . . . . . . . . 163
Select Data Set Group Details Page (Upgrade with Existing Data Set Names). . . . . . . . . . . . 164
Select Data Set Group Details Page (Upgrade with New Data Set Names). . . . . . . . . . . . . . 166
Backup Data Sets Page. . . . . . . . . . . . . . . . . . . . . . . . . . . . . . . . . . . . . . . . . . . . . . 168
HotFix Install Page. . . . . . . . . . . . . . . . . . . . . . . . . . . . . . . . . . . . . . . . . . . . . . . . . 168
6 Table of Contents
Global Parameters Page (HotFix). . . . . . . . . . . . . . . . . . . . . . . . . . . . . . . . . . . . . . . . 169
Data Set Group Details Page (HotFix). . . . . . . . . . . . . . . . . . . . . . . . . . . . . . . . . . . . . 170
Appendix A: Upgrade Considerations. . . . . . . . . . . . . . . . . . . . . . . . . . . . . . . . . . . . . . . 171Upgrade Considerations Overview. . . . . . . . . . . . . . . . . . . . . . . . . . . . . . . . . . . . . . . . . . 171
Coordination of PowerExchange and PowerCenter Upgrades. . . . . . . . . . . . . . . . . . . . . . . . . 172
Considerations for Restarting CDC Sessions. . . . . . . . . . . . . . . . . . . . . . . . . . . . . . . . 172
Upgrade Considerations for PowerExchange 10.2 HotFix 2. . . . . . . . . . . . . . . . . . . . . . . . . . 174
New SAMPLIB Member for ECCR Programs That Support CICS/VSAM 5.5. . . . . . . . . . . . . 174
Checksums Added to PowerExchange Logger CDCT File. . . . . . . . . . . . . . . . . . . . . . . . . 174
Upgrade Considerations for PowerExchange 10.2 HotFix 1. . . . . . . . . . . . . . . . . . . . . . . . . . 174
Updated Components in the PowerExchange ECCR CRG.LOAD Library for IMS Synchronous CDC. . . . . . . . . . . . . . . . . . . . . . . . . . . . . . . . . . . . . . . . . . . . . . . . . . . . . . . . . . 174
New SAMPLIB Member for ECCR Programs That Support CICS/VSAM 5.4. . . . . . . . . . . . . 175
Upgrade Considerations for PowerExchange 10.2. . . . . . . . . . . . . . . . . . . . . . . . . . . . . . . . 175
Consideration for Upgrading to PowerExchange on i5/OS. . . . . . . . . . . . . . . . . . . . . . . . 175
Updated Components in the PowerExchange ECCR CRG.LOAD Library for IMS Synchronous CDC. . . . . . . . . . . . . . . . . . . . . . . . . . . . . . . . . . . . . . . . . . . . . . . . . . . . . . . . . . 175
Upgrade Considerations for PowerExchange 10.1. . . . . . . . . . . . . . . . . . . . . . . . . . . . . . . . 176
Updated Components in the PowerExchange 10.1 ECCR CRG.LOAD Library for IMS Synchronous CDC. . . . . . . . . . . . . . . . . . . . . . . . . . . . . . . . . . . . . . . . . . . . . . . . . 176
Upgrade Considerations for PowerExchange 10.0. . . . . . . . . . . . . . . . . . . . . . . . . . . . . . . . 176
Considerations for Upgrading PowerExchange on Windows. . . . . . . . . . . . . . . . . . . . . . . 176
Preparing an i5/OS Environment to Accept pwxcmd displaystats Commands. . . . . . . . . . . 177
Updated Components in the PowerExchange 10.0 ECCR CRG.LOAD Library for IMS Synchronous CDC. . . . . . . . . . . . . . . . . . . . . . . . . . . . . . . . . . . . . . . . . . . . . . . . . 177
Requirements for Upgrading the DB2 for z/OS ECCR to PowerExchange 10.0. . . . . . . . . . . . 177
Removing an Obsolete Capture Directory Table for the DB2 for z/OS ECCR. . . . . . . . . . . . . 178
Shutting Down the PowerExchange Agent Before Upgrading to PowerExchange 10.0 on z/OS 178
Upgrade Considerations for PowerExchange 9.6.1. . . . . . . . . . . . . . . . . . . . . . . . . . . . . . . . 179
Updated Components in the PowerExchange 9.6.1 HotFix 4 ECCR CRG.LOAD Library for IMS Synchronous CDC. . . . . . . . . . . . . . . . . . . . . . . . . . . . . . . . . . . . . . . . . . . . . . . . . 179
Removing an Obsolete Capture Directory Table for the DB2 for z/OS ECCR. . . . . . . . . . . . . 179
Requirements for Upgrading the DB2 for z/OS ECCR to 9.6.1 HotFix 3. . . . . . . . . . . . . . . . 180
Updated Components in the PowerExchange 9.6.1 HotFix 2 ECCR CRG.LOAD Library for IMS Synchronous CDC. . . . . . . . . . . . . . . . . . . . . . . . . . . . . . . . . . . . . . . . . . . . . . . . . 180
Change to the Format of PowerExchange Logger CDCT Backup Files. . . . . . . . . . . . . . . . . 181
Additional Privileges Required for the PowerExchange Express CDC for Oracle User. . . . . . . 181
Preparing an i5/OS Environment to Accept pwxcmd displaystats Commands. . . . . . . . . . . 181
Shut Down the PowerExchange Agent Before Upgrading to PowerExchange 9.6.1 HotFix 1 on z/OS. . . . . . . . . . . . . . . . . . . . . . . . . . . . . . . . . . . . . . . . . . . . . . . . . . . . . . . . 182
Expanded PowerExchange Agent Buffer Size for DB2 for z/OS ECCR Processing. . . . . . . . . 182
Updated Components in the PowerExchange 9.6.1 ECCR CRG.LOAD Library for IMS Synchronous CDC. . . . . . . . . . . . . . . . . . . . . . . . . . . . . . . . . . . . . . . . . . . . . . . . . 182
Upgrade Considerations for PowerExchange 9.6.0. . . . . . . . . . . . . . . . . . . . . . . . . . . . . . . . 183
Table of Contents 7
DB2 for z/OS CDC Configuration Tasks Related to Upgrading to PowerExchange 9.6.0 from an Earlier Version. . . . . . . . . . . . . . . . . . . . . . . . . . . . . . . . . . . . . . . . . . . . . . . . . . 183
Change in Default Character Conversion in Single-Byte Static Code Pages. . . . . . . . . . . . . 184
Connection Sharing for DB2 Lookups. . . . . . . . . . . . . . . . . . . . . . . . . . . . . . . . . . . . . 184
PowerExchange Passphrases and Related Network Layer Changes. . . . . . . . . . . . . . . . . . 184
Updated Components in the IMS Synchronous ECCR CRG.LOAD Library. . . . . . . . . . . . . . . 185
Bind the DBRM Package for the DB2 for z/OS Plan. . . . . . . . . . . . . . . . . . . . . . . . . . . . . 185
Avoid PowerExchange Listener Hangs on z/OS. . . . . . . . . . . . . . . . . . . . . . . . . . . . . . . 185
Appendix B: PowerExchange Environment. . . . . . . . . . . . . . . . . . . . . . . . . . . . . . . . . . 186PowerExchange Environment Overview. . . . . . . . . . . . . . . . . . . . . . . . . . . . . . . . . . . . . . . 186
PowerExchange Environment on i5/OS. . . . . . . . . . . . . . . . . . . . . . . . . . . . . . . . . . . . . . . 186
PowerExchange Data Libraries and Data Files on i5/OS. . . . . . . . . . . . . . . . . . . . . . . . . 187
Configuration Parameters That Point to PowerExchange Data on i5/OS. . . . . . . . . . . . . . . 188
File Parameters in PowerExchange Start Commands on i5/OS. . . . . . . . . . . . . . . . . . . . . 189
PowerExchange Environment on Linux, UNIX, and Windows. . . . . . . . . . . . . . . . . . . . . . . . . . 189
PowerExchange Data Files and Directories on Linux, UNIX, and Windows. . . . . . . . . . . . . . 189
Configuration Parameters That Point to PowerExchange Files on Linux, UNIX, and Windows. . 190
Environment Variables That Point to PowerExchange License, Configuration, and Message Log Files on Linux, UNIX, and Windows. . . . . . . . . . . . . . . . . . . . . . . . . . . . . . . . . . . . 191
Start Command Parameters That Point to Data Files on Linux, UNIX, and Windows. . . . . . . . 191
PowerExchange Environment on z/OS. . . . . . . . . . . . . . . . . . . . . . . . . . . . . . . . . . . . . . . . 192
PowerExchange Data Sets on z/OS. . . . . . . . . . . . . . . . . . . . . . . . . . . . . . . . . . . . . . 192
DD Statements That Point to PowerExchange Data on z/OS. . . . . . . . . . . . . . . . . . . . . . . 194
Index. . . . . . . . . . . . . . . . . . . . . . . . . . . . . . . . . . . . . . . . . . . . . . . . . . . . . . . . . . . 196
8 Table of Contents
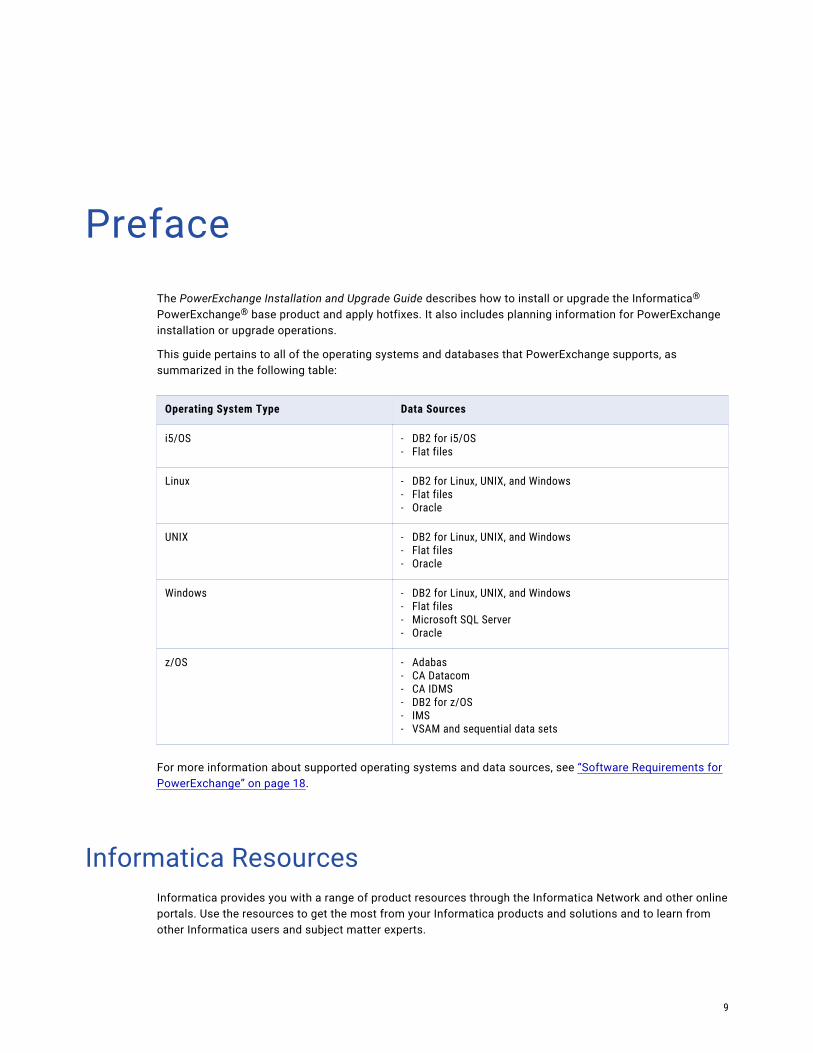
PrefaceThe PowerExchange Installation and Upgrade Guide describes how to install or upgrade the Informatica®
PowerExchange® base product and apply hotfixes. It also includes planning information for PowerExchange installation or upgrade operations.
This guide pertains to all of the operating systems and databases that PowerExchange supports, as summarized in the following table:
Operating System Type Data Sources
i5/OS - DB2 for i5/OS- Flat files
Linux - DB2 for Linux, UNIX, and Windows- Flat files- Oracle
UNIX - DB2 for Linux, UNIX, and Windows- Flat files- Oracle
Windows - DB2 for Linux, UNIX, and Windows- Flat files- Microsoft SQL Server- Oracle
z/OS - Adabas- CA Datacom- CA IDMS- DB2 for z/OS- IMS- VSAM and sequential data sets
For more information about supported operating systems and data sources, see “Software Requirements for PowerExchange” on page 18.
Informatica ResourcesInformatica provides you with a range of product resources through the Informatica Network and other online portals. Use the resources to get the most from your Informatica products and solutions and to learn from other Informatica users and subject matter experts.
9
Informatica NetworkThe Informatica Network is the gateway to many resources, including the Informatica Knowledge Base and Informatica Global Customer Support. To enter the Informatica Network, visit https://network.informatica.com.
As an Informatica Network member, you have the following options:
• Search the Knowledge Base for product resources.
• View product availability information.
• Create and review your support cases.
• Find your local Informatica User Group Network and collaborate with your peers.
Informatica Knowledge BaseUse the Informatica Knowledge Base to find product resources such as how-to articles, best practices, video tutorials, and answers to frequently asked questions.
To search the Knowledge Base, visit https://search.informatica.com. If you have questions, comments, or ideas about the Knowledge Base, contact the Informatica Knowledge Base team at [email protected].
Informatica DocumentationUse the Informatica Documentation Portal to explore an extensive library of documentation for current and recent product releases. To explore the Documentation Portal, visit https://docs.informatica.com.
Informatica maintains documentation for many products on the Informatica Knowledge Base in addition to the Documentation Portal. If you cannot find documentation for your product or product version on the Documentation Portal, search the Knowledge Base at https://search.informatica.com.
If you have questions, comments, or ideas about the product documentation, contact the Informatica Documentation team at [email protected].
Informatica Product Availability MatricesProduct Availability Matrices (PAMs) indicate the versions of the operating systems, databases, and types of data sources and targets that a product release supports. You can browse the Informatica PAMs at https://network.informatica.com/community/informatica-network/product-availability-matrices.
Informatica VelocityInformatica Velocity is a collection of tips and best practices developed by Informatica Professional Services and based on real-world experiences from hundreds of data management projects. Informatica Velocity represents the collective knowledge of Informatica consultants who work with organizations around the world to plan, develop, deploy, and maintain successful data management solutions.
You can find Informatica Velocity resources at http://velocity.informatica.com. If you have questions, comments, or ideas about Informatica Velocity, contact Informatica Professional Services at [email protected].
10 Preface
Informatica MarketplaceThe Informatica Marketplace is a forum where you can find solutions that extend and enhance your Informatica implementations. Leverage any of the hundreds of solutions from Informatica developers and partners on the Marketplace to improve your productivity and speed up time to implementation on your projects. You can find the Informatica Marketplace at https://marketplace.informatica.com.
Informatica Global Customer SupportYou can contact a Global Support Center by telephone or through the Informatica Network.
To find your local Informatica Global Customer Support telephone number, visit the Informatica website at the following link: https://www.informatica.com/services-and-training/customer-success-services/contact-us.html.
To find online support resources on the Informatica Network, visit https://network.informatica.com and select the eSupport option.
Preface 11
C h a p t e r 1
PowerExchange Installation and Upgrade Overview
This chapter includes the following topics:
• Installation and Upgrade Guide Scope, 12
• PowerExchange Overview, 13
• PowerExchange Components, 13
Installation and Upgrade Guide ScopeThis guide provides PowerExchange installation and upgrade instructions. It also covers prerequisites and planning information.
The guide provides step-by-step instructions for performing the following types of installation:
• Full installation. Installs all PowerExchange software. Perform a full installation to install PowerExchange for the first time or in a new location.
• Upgrade installation. Installs a new release of PowerExchange over an existing installation.
• Hotfix installation. Installs a hotfix for a PowerExchange release over an existing installation at the same release level.
Instructions are provided for the following types of operating systems:
• i5/OS
• Linux and UNIX
• Windows
• z/OS
This guide also covers the following planning topics for consideration before performing an installation or upgrade:
• PowerExchange components. This topic applies to new PowerExchange users.
• Software requirements for each supported database and operating system. This topic applies to all PowerExchange users.
• License keys. This topic applies to all PowerExchange users.
12
• PowerExchange interoperability with PowerCenter® and with earlier releases of PowerExchange. This topic applies to all users who are installing PowerExchange for the first time or upgrading to a new release.
• PowerExchange environment. Describes the PowerExchange data files and directories, configuration parameters, environment variables, and other elements that comprise the PowerExchange environment on each operating system.
• Upgrade planning. Discusses strategies and steps for preserving PowerExchange data under different upgrade scenarios. This topic applies to all PowerExchange users, especially those who are upgrading to a new PowerExchange release. Users who are installing PowerExchange for the first time can also use this information to plan their environment so that future upgrades are as easy as possible.
• Upgrade considerations. Discusses considerations for upgrading to specific PowerExchange releases and coordination with PowerCenter upgrades. This topic applies to PowerExchange users who are upgrading to a new PowerExchange release.
Caution: Perform only one type of installation on a system at a time. If you install the software in both the software and patches folders, the installation does not work properly.
PowerExchange OverviewPowerExchange can help you synchronize a data source with a data target. PowerExchange performs the following basic functions:
• Bulk data movement. Use this function to materialize or entirely refresh a data target. This function can move large amounts of data between different platforms efficiently. However, frequent bulk data movement operations can be costly in terms of space, time, and staff resources.
• Change data capture (CDC). Use this function to capture changes to a data source and apply them to a target in near real time or asynchronously. PowerExchange CDC can capture insert, update, and delete changes that are made to a data source. PowerExchange CDC has minimal impact on the performance and availability of the source database, tables, and files.
PowerExchange provides two types of CDC:
- Synchronous CDC. Occurs in real time by integrating into the transaction performing the change.
- Asynchronous CDC. Captures the changes from database log files.
PowerExchange works with PowerCenter to enable you move bulk data and change data to a variety of data targets.
PowerExchange ComponentsPowerExchange uses some or most of following components, depending on your operating system and whether you are performing CDC, bulk data movement, or both.
PowerExchange AgentOn a z/OS system, the PowerExchange Agent verifies capture registration information, provides registration information to some types of ECCRs, and manages global queues and data flow among CDC components.
PowerExchange Overview 13
The PowerExchange Agent provides capture registrations to the following ECCRs:
• DB2 for z/OS
• IMS synchronous
• Batch VSAM
• CICS/VSAM
Other ECCRs read capture registration information directly from the CCT data set. For all of the ECCRs, the PowerExchange Agent verifies the capture registration information.
The PowerExchange Agent also manages global queues and data flow among various PowerExchange CDC components.
Use of the PowerExchange Agent is required for CDC on z/OS.
PowerExchange CondenseOn an i5/OS or z/OS system, PowerExchange Condense stores change data in condense files and optionally condenses it. The condense files store only the successfully completed units of work (UOWs), in chronological order by end time. When an extraction session runs, change data is extracted from the condense files rather than from the change stream. You can run multiple Condense jobs at a time.
Use of PowerExchange Condense is optional on i5/OS and z/OS. On Linux, UNIX, or Windows, use the PowerExchange Logger.
PowerExchange Environmental Change Capture Routine (ECCR)On a z/OS system, an ECCR captures change data from a data source and passes the captured changes to the PowerExchange Logger for recording. PowerExchange provides an ECCR for each type of data source on z/OS. Depending on the source type, the ECCR captures changes synchronously as they are made or asynchronously from database logs.
Use of an ECCR for the data source is required for CDC on z/OS.
PowerExchange ListenerThe PowerExchange Listener coordinates activities across platforms, initiates requests, or processes requests from third-party applications.
More specifically, the PowerExchange Listener performs the following functions:
• Manages data maps for bulk data movement jobs and CDC for nonrelational sources and optionally for DB2 tables.
• Manages capture registrations and extractions maps for CDC data sources.
• Makes bulk data and change data available to the PowerExchange Navigator for database row tests.
• Makes bulk data and change data available to PowerCenter when you run a PowerCenter session.
• Interacts with other PowerExchange Listeners on other nodes to facilitate communication among the PowerExchange Navigator, PowerCenter Integration Service, data sources, and any system to which PowerExchange processing is offloaded.
If a data source or data target is remote from the system on which you are using PowerExchange, you must also run a PowerExchange Listener that has access to the data.
Use of the PowerExchange Listener is required for bulk data movement and CDC.
14 Chapter 1: PowerExchange Installation and Upgrade Overview
PowerExchange Logger for Linux, UNIX, and WindowsThe PowerExchange Logger for Linux, UNIX, and Windows captures and stores change data in PowerExchange Logger log files. The log files store only the successfully committed UOWs, in chronological order by end time. When an extraction session runs, the change data is extracted from the PowerExchange Logger log files rather than from the database logs.
Use of the PowerExchange Logger is optional on Linux, UNIX, or Windows. On i5/OS or z/OS, use PowerExchange Condense.
PowerExchange Logger for z/OSThe PowerExchange Logger for z/OS receives captured change data from the ECCRs that are connected to it and stores the change data in log data sets. The change data is then available for real-time extractions or PowerExchange Condense jobs.
Use of the PowerExchange Logger is required for CDC on z/OS.
PowerExchange NavigatorThe PowerExchange Navigator is the graphical user interface (GUI) from which you define and manage data maps, capture registrations, and extraction maps for the data sources from which you want to extract bulk data or capture change data.
PowerExchange uses these definitions to determine the data sources to process. Capture registrations and extraction maps pertain to CDC only. Data maps are required to perform bulk data movement operations and to provide metadata for capture registrations.
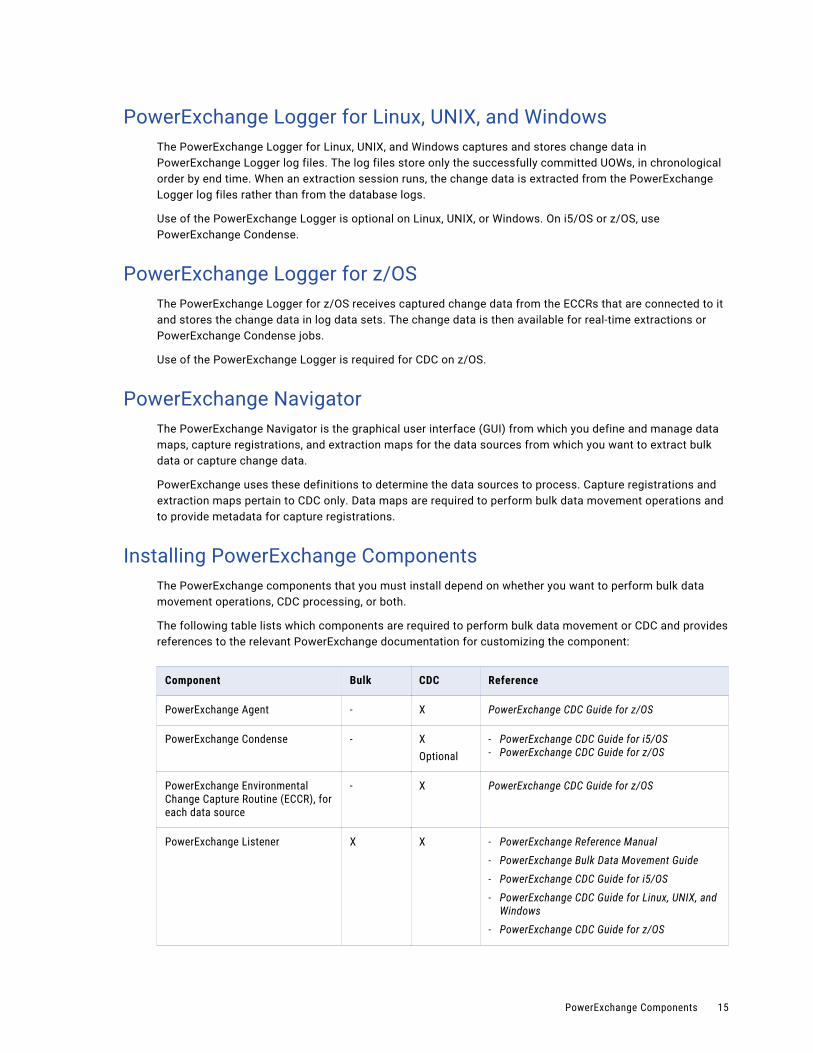
Installing PowerExchange ComponentsThe PowerExchange components that you must install depend on whether you want to perform bulk data movement operations, CDC processing, or both.
The following table lists which components are required to perform bulk data movement or CDC and provides references to the relevant PowerExchange documentation for customizing the component:
Component Bulk CDC Reference
PowerExchange Agent - X PowerExchange CDC Guide for z/OS
PowerExchange Condense - XOptional
- PowerExchange CDC Guide for i5/OS- PowerExchange CDC Guide for z/OS
PowerExchange Environmental Change Capture Routine (ECCR), for each data source
- X PowerExchange CDC Guide for z/OS
PowerExchange Listener X X - PowerExchange Reference Manual- PowerExchange Bulk Data Movement Guide- PowerExchange CDC Guide for i5/OS- PowerExchange CDC Guide for Linux, UNIX, and
Windows- PowerExchange CDC Guide for z/OS
PowerExchange Components 15
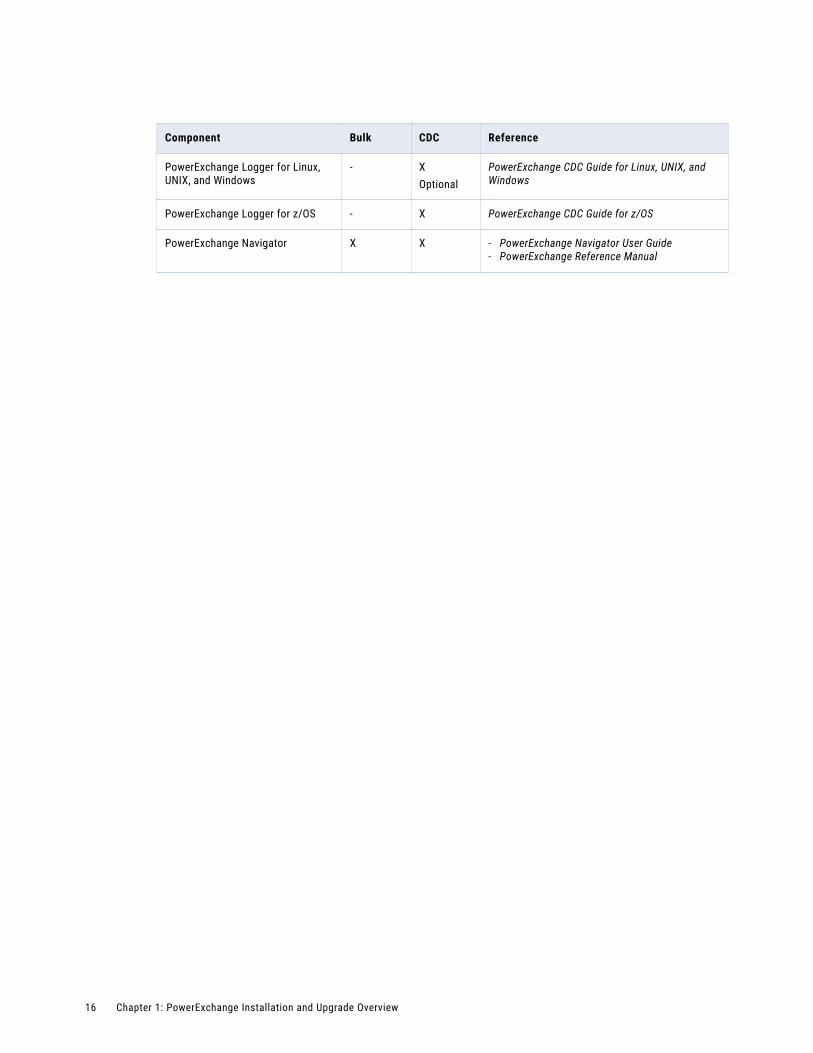
Component Bulk CDC Reference
PowerExchange Logger for Linux, UNIX, and Windows
- XOptional
PowerExchange CDC Guide for Linux, UNIX, and Windows
PowerExchange Logger for z/OS - X PowerExchange CDC Guide for z/OS
PowerExchange Navigator X X - PowerExchange Navigator User Guide- PowerExchange Reference Manual
16 Chapter 1: PowerExchange Installation and Upgrade Overview
C h a p t e r 2
Installation PlanningThis chapter includes the following topics:
• Installation Planning Overview, 17
• Where to Install PowerExchange, 18
• Software Requirements for PowerExchange, 18
• PowerExchange 32-Bit and 64-Bit Executables on Windows, 31
• PowerExchange License Keys, 31
• PowerExchange Interoperability with PowerCenter, 32
• PowerExchange Interoperability with Informatica Services , 33
• PowerExchange Interoperability with Informatica Data Archive, 34
• PowerExchange to PowerExchange Interoperability, 34
• Organization of the PowerExchange Installation CD Image, 34
Installation Planning OverviewBefore you install PowerExchange for the first time or upgrade to a new release, review the installation planning information to ensure that you can successfully install and use the product.
Perform the following planning tasks:
• Verify that your operating systems and data sources and targets meet the version and maintenance requirements that are specified for the PowerExchange release and functions that you want to use.
Note: The term data source refers generically to the relational databases and nonrelational sources from which PowerExchange reads data. The term data targets refers generically to the relational databases and nonrelational targets to which PowerExchange writes data.
• Obtain a license key.
• To use a PowerExchange installation with an earlier version of PowerExchange or PowerCenter, review the PowerExchange and PowerCenter interoperability information.
• Plan your PowerExchange environment to make current and future migrations as easy as possible.
• If you are upgrading from a previous PowerExchange release, review the upgrade planning and upgrade consideration information. See Appendix A, “Upgrade Considerations” on page 171.
17
Where to Install PowerExchangeInstall PowerExchange on each of the following systems:
• Each PowerExchange data source or target system
• Windows system on which you will run the PowerExchange Navigator
• PowerCenter Client or Informatica Developer client system
• PowerCenter Integration Service or Data Integration Service system
Software Requirements for PowerExchangeReview the topics for your operating systems to ensure that your operating systems and data sources are supported for the functions that you want to perform.
For more information about product requirements and supported platforms, see the Product Availability Matrix on Informatica Network: https://network.informatica.com/community/informatica-network/product-availability-matrices
Software Requirements for i5/OSPowerExchange supports the following 64-bit versions of the i5/OS operating system for bulk data movement and CDC:
• 7.3
• 7.2
• 7.1
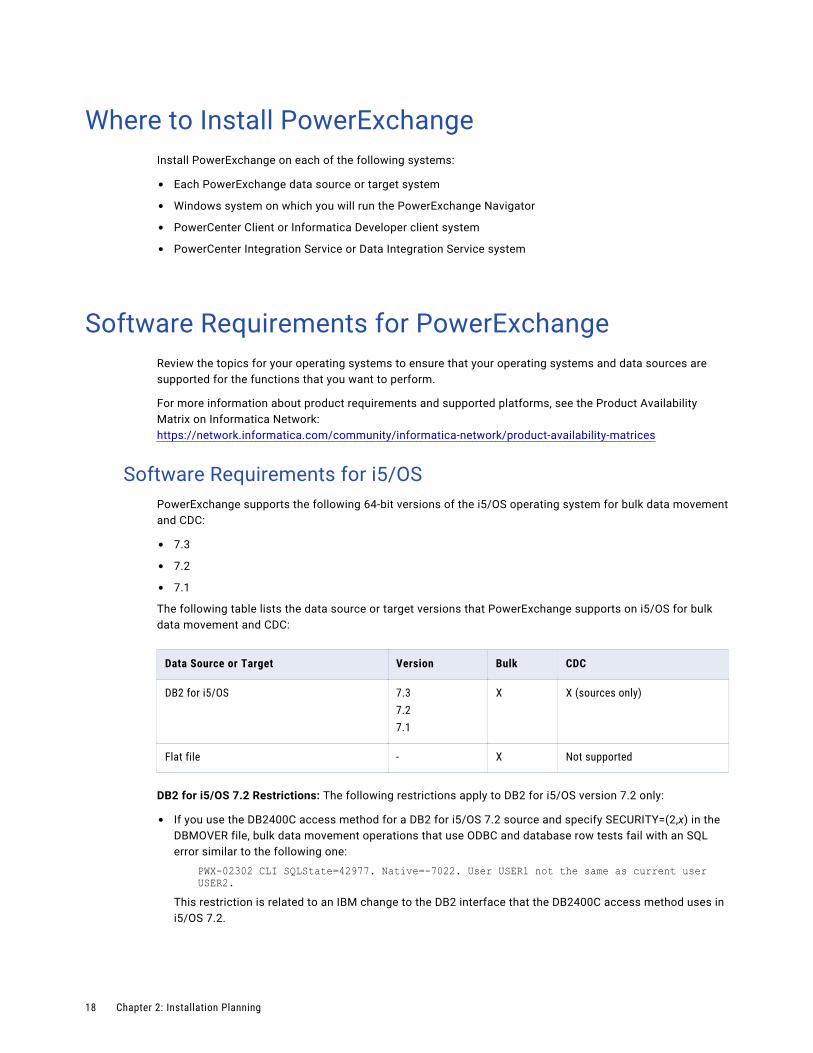
The following table lists the data source or target versions that PowerExchange supports on i5/OS for bulk data movement and CDC:
Data Source or Target Version Bulk CDC
DB2 for i5/OS 7.37.27.1
X X (sources only)
Flat file - X Not supported
DB2 for i5/OS 7.2 Restrictions: The following restrictions apply to DB2 for i5/OS version 7.2 only:
• If you use the DB2400C access method for a DB2 for i5/OS 7.2 source and specify SECURITY=(2,x) in the DBMOVER file, bulk data movement operations that use ODBC and database row tests fail with an SQL error similar to the following one:
PWX-02302 CLI SQLState=42977. Native=-7022. User USER1 not the same as current user USER2.
This restriction is related to an IBM change to the DB2 interface that the DB2400C access method uses in i5/OS 7.2.
18 Chapter 2: Installation Planning
• PowerExchange CDC does not honor Row and Column Access Control (RCAC) rules because of a DB2 limitation. When PowerExchange tries to process journal entries for tables that have RCAC rules applied, the columns or rows are not masked or filtered based on the rules. RCAC rules were introduced in DB2 for i5/OS 7.2.
Software Requirements for Linux, UNIX, and WindowsVerify that your Linux, UNIX, or Windows system meets the operating system and data source requirements for the PowerExchange functions that you plan to perform. Additionally, apply the required maintenance to your operating system and data sources.
Supported AIX Versions and Data Sources and TargetsPowerExchange supports the following versions of the AIX operating system on 64-bit IBM Power systems for bulk data movement and CDC:
• 7.2
• 7.1 TL2 (minimum certified)
For CDC, you must Install the bos.adt.debug package to get the libptools_ptr.a library. This library is required to create PowerExchange registration groups and capture registrations. Download the package from the IBM Web site.
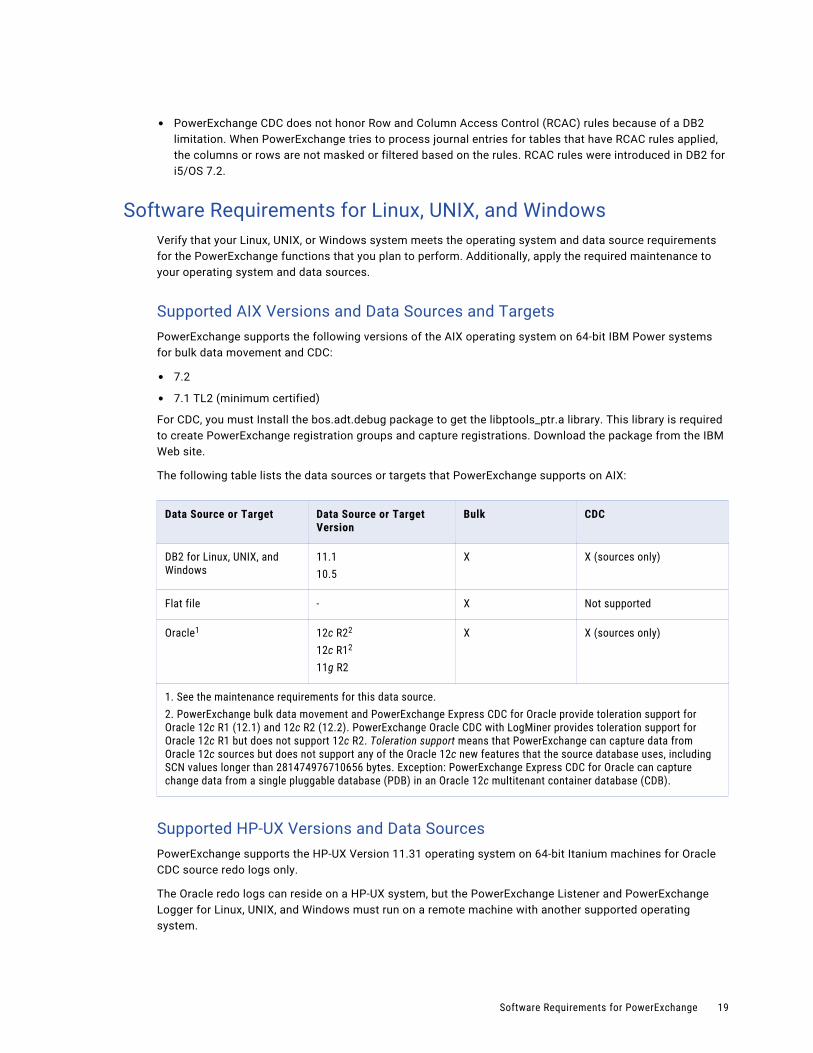
The following table lists the data sources or targets that PowerExchange supports on AIX:
Data Source or Target Data Source or Target Version
Bulk CDC
DB2 for Linux, UNIX, and Windows
11.110.5
X X (sources only)
Flat file - X Not supported
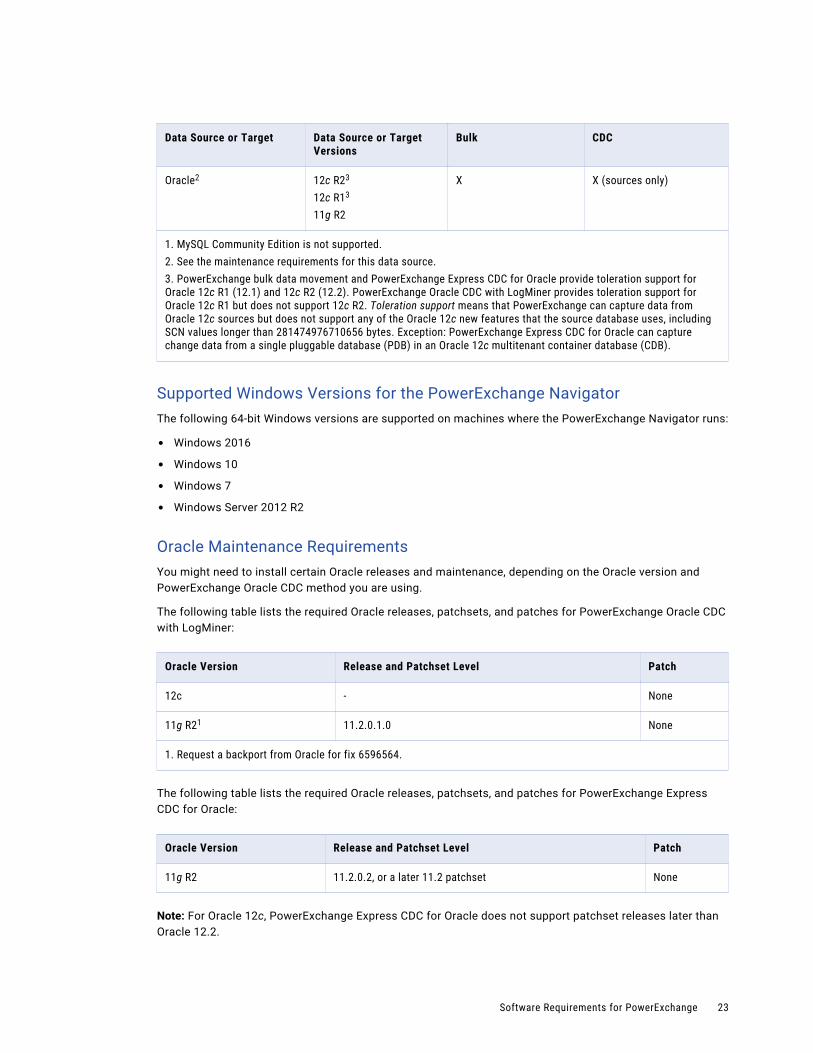
Oracle1 12c R22
12c R12
11g R2
X X (sources only)
1. See the maintenance requirements for this data source.2. PowerExchange bulk data movement and PowerExchange Express CDC for Oracle provide toleration support for Oracle 12c R1 (12.1) and 12c R2 (12.2). PowerExchange Oracle CDC with LogMiner provides toleration support for Oracle 12c R1 but does not support 12c R2. Toleration support means that PowerExchange can capture data from Oracle 12c sources but does not support any of the Oracle 12c new features that the source database uses, including SCN values longer than 281474976710656 bytes. Exception: PowerExchange Express CDC for Oracle can capture change data from a single pluggable database (PDB) in an Oracle 12c multitenant container database (CDB).
Supported HP-UX Versions and Data SourcesPowerExchange supports the HP-UX Version 11.31 operating system on 64-bit Itanium machines for Oracle CDC source redo logs only.
The Oracle redo logs can reside on a HP-UX system, but the PowerExchange Listener and PowerExchange Logger for Linux, UNIX, and Windows must run on a remote machine with another supported operating system.
Software Requirements for PowerExchange 19
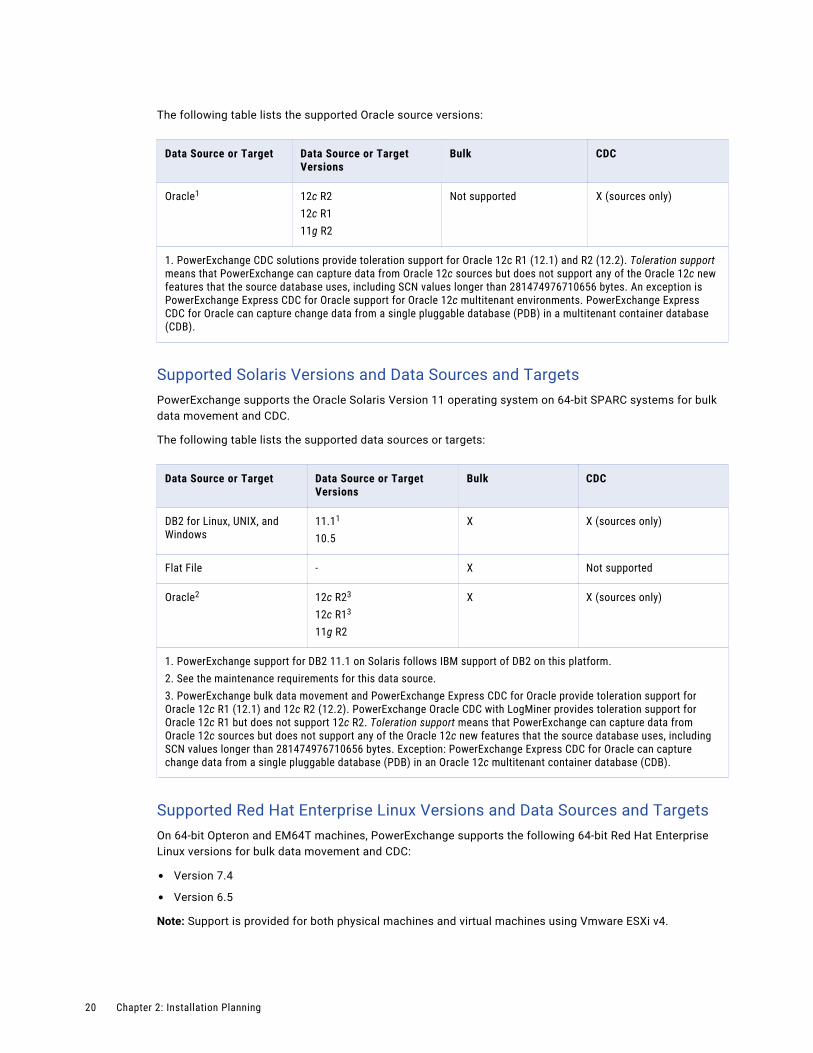
The following table lists the supported Oracle source versions:
Data Source or Target Data Source or Target Versions
Bulk CDC
Oracle1 12c R212c R111g R2
Not supported X (sources only)
1. PowerExchange CDC solutions provide toleration support for Oracle 12c R1 (12.1) and R2 (12.2). Toleration support means that PowerExchange can capture data from Oracle 12c sources but does not support any of the Oracle 12c new features that the source database uses, including SCN values longer than 281474976710656 bytes. An exception is PowerExchange Express CDC for Oracle support for Oracle 12c multitenant environments. PowerExchange Express CDC for Oracle can capture change data from a single pluggable database (PDB) in a multitenant container database (CDB).
Supported Solaris Versions and Data Sources and TargetsPowerExchange supports the Oracle Solaris Version 11 operating system on 64-bit SPARC systems for bulk data movement and CDC.
The following table lists the supported data sources or targets:
Data Source or Target Data Source or Target Versions
Bulk CDC
DB2 for Linux, UNIX, and Windows
11.11
10.5X X (sources only)
Flat File - X Not supported
Oracle2 12c R23
12c R13
11g R2
X X (sources only)
1. PowerExchange support for DB2 11.1 on Solaris follows IBM support of DB2 on this platform.2. See the maintenance requirements for this data source.3. PowerExchange bulk data movement and PowerExchange Express CDC for Oracle provide toleration support for Oracle 12c R1 (12.1) and 12c R2 (12.2). PowerExchange Oracle CDC with LogMiner provides toleration support for Oracle 12c R1 but does not support 12c R2. Toleration support means that PowerExchange can capture data from Oracle 12c sources but does not support any of the Oracle 12c new features that the source database uses, including SCN values longer than 281474976710656 bytes. Exception: PowerExchange Express CDC for Oracle can capture change data from a single pluggable database (PDB) in an Oracle 12c multitenant container database (CDB).
Supported Red Hat Enterprise Linux Versions and Data Sources and TargetsOn 64-bit Opteron and EM64T machines, PowerExchange supports the following 64-bit Red Hat Enterprise Linux versions for bulk data movement and CDC:
• Version 7.4
• Version 6.5
Note: Support is provided for both physical machines and virtual machines using Vmware ESXi v4.
20 Chapter 2: Installation Planning
On IBM z/Series machines, PowerExchange supports the following 64-bit Red Hat Enterprise Linux versions for bulk data movement and CDC processing of Oracle sources only:
• Version 7.5
• Version 6.9
The following table lists the supported data sources or targets on Red Hat Enterprise Linux:
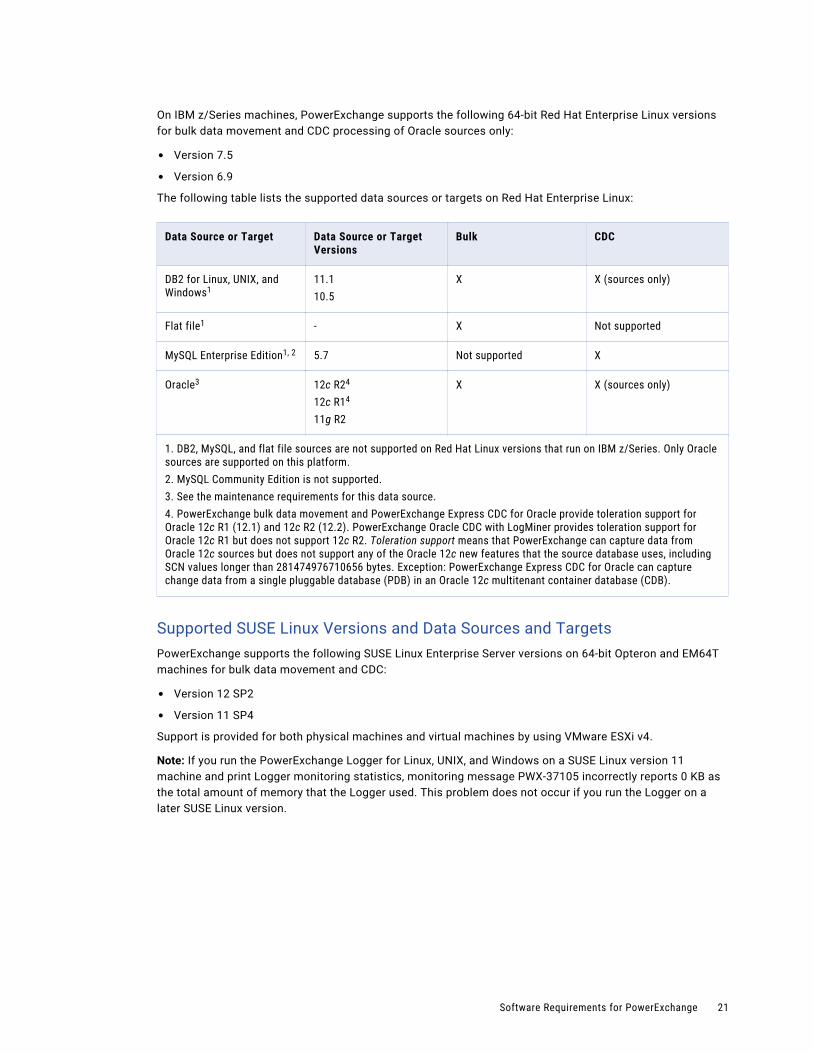
Data Source or Target Data Source or Target Versions
Bulk CDC
DB2 for Linux, UNIX, and Windows1
11.110.5
X X (sources only)
Flat file1 - X Not supported
MySQL Enterprise Edition1, 2 5.7 Not supported X
Oracle3 12c R24
12c R14
11g R2
X X (sources only)
1. DB2, MySQL, and flat file sources are not supported on Red Hat Linux versions that run on IBM z/Series. Only Oracle sources are supported on this platform.2. MySQL Community Edition is not supported.3. See the maintenance requirements for this data source.4. PowerExchange bulk data movement and PowerExchange Express CDC for Oracle provide toleration support for Oracle 12c R1 (12.1) and 12c R2 (12.2). PowerExchange Oracle CDC with LogMiner provides toleration support for Oracle 12c R1 but does not support 12c R2. Toleration support means that PowerExchange can capture data from Oracle 12c sources but does not support any of the Oracle 12c new features that the source database uses, including SCN values longer than 281474976710656 bytes. Exception: PowerExchange Express CDC for Oracle can capture change data from a single pluggable database (PDB) in an Oracle 12c multitenant container database (CDB).
Supported SUSE Linux Versions and Data Sources and TargetsPowerExchange supports the following SUSE Linux Enterprise Server versions on 64-bit Opteron and EM64T machines for bulk data movement and CDC:
• Version 12 SP2
• Version 11 SP4
Support is provided for both physical machines and virtual machines by using VMware ESXi v4.
Note: If you run the PowerExchange Logger for Linux, UNIX, and Windows on a SUSE Linux version 11 machine and print Logger monitoring statistics, monitoring message PWX-37105 incorrectly reports 0 KB as the total amount of memory that the Logger used. This problem does not occur if you run the Logger on a later SUSE Linux version.
Software Requirements for PowerExchange 21
The following table lists the supported data sources or targets on SUSE Linux:
Data Source or Target Data Source or Target Versions
Bulk CDC
DB2 for Linux, UNIX, and Windows
11.110.5
X X (sources only)
Flat file - X Not supported
Oracle1 12c R22
12c R12
11g R2
X X (sources only)
1. See the maintenance requirements for this data source.2. PowerExchange bulk data movement and PowerExchange Express CDC for Oracle provide toleration support for Oracle 12c R1 (12.1) and 12c R2 (12.2). PowerExchange Oracle CDC with LogMiner provides toleration support for Oracle 12c R1 but does not support 12c R2. Toleration support means that PowerExchange can capture data from Oracle 12c sources but does not support any of the Oracle 12c new features that the source database uses, including SCN values longer than 281474976710656 bytes. Exception: PowerExchange Express CDC for Oracle can capture change data from a single pluggable database (PDB) in an Oracle 12c multitenant container database (CDB).
Supported Windows Versions and Data Sources and TargetsPowerExchange supports the following Windows versions on 64-bit Opteron and EM64T Windows machines for bulk data movement and CDC:
• Windows Server 2012 R2
• Windows 2016
Support is provided for physical machines and for virtual machines by using VMware ESXi v4.
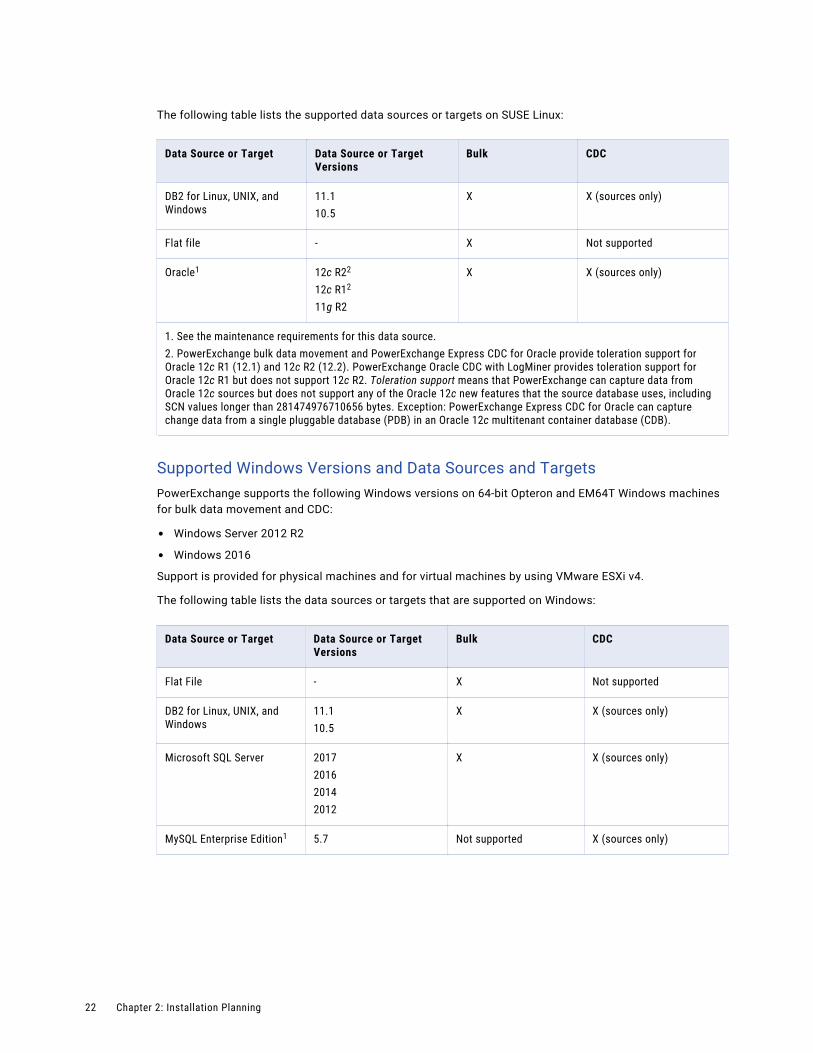
The following table lists the data sources or targets that are supported on Windows:
Data Source or Target Data Source or Target Versions
Bulk CDC
Flat File - X Not supported
DB2 for Linux, UNIX, and Windows
11.110.5
X X (sources only)
Microsoft SQL Server 2017201620142012
X X (sources only)
MySQL Enterprise Edition1 5.7 Not supported X (sources only)
22 Chapter 2: Installation Planning
Data Source or Target Data Source or Target Versions
Bulk CDC
Oracle2 12c R23
12c R13
11g R2
X X (sources only)
1. MySQL Community Edition is not supported.2. See the maintenance requirements for this data source.3. PowerExchange bulk data movement and PowerExchange Express CDC for Oracle provide toleration support for Oracle 12c R1 (12.1) and 12c R2 (12.2). PowerExchange Oracle CDC with LogMiner provides toleration support for Oracle 12c R1 but does not support 12c R2. Toleration support means that PowerExchange can capture data from Oracle 12c sources but does not support any of the Oracle 12c new features that the source database uses, including SCN values longer than 281474976710656 bytes. Exception: PowerExchange Express CDC for Oracle can capture change data from a single pluggable database (PDB) in an Oracle 12c multitenant container database (CDB).
Supported Windows Versions for the PowerExchange NavigatorThe following 64-bit Windows versions are supported on machines where the PowerExchange Navigator runs:
• Windows 2016
• Windows 10
• Windows 7
• Windows Server 2012 R2
Oracle Maintenance RequirementsYou might need to install certain Oracle releases and maintenance, depending on the Oracle version and PowerExchange Oracle CDC method you are using.
The following table lists the required Oracle releases, patchsets, and patches for PowerExchange Oracle CDC with LogMiner:
Oracle Version Release and Patchset Level Patch
12c - None
11g R21 11.2.0.1.0 None
1. Request a backport from Oracle for fix 6596564.
The following table lists the required Oracle releases, patchsets, and patches for PowerExchange Express CDC for Oracle:
Oracle Version Release and Patchset Level Patch
11g R2 11.2.0.2, or a later 11.2 patchset None
Note: For Oracle 12c, PowerExchange Express CDC for Oracle does not support patchset releases later than Oracle 12.2.
Software Requirements for PowerExchange 23
Software Requirements for z/OSFor bulk data movement operations or CDC processing on z/OS, review the list of supported z/OS versions and data sources. Additionally, apply the required maintenance to your operating system and data sources.
Supported z/OS Versions and Data Sources and TargetsPowerExchange supports the following versions of the z/OS operating system for bulk data movement and CDC:
• 2.3
• 2.2
• 2.1
• 1.13
• 1.12
• 1.11
Note: z/OS 1.12 requires IBM APAR OA34369 for the PowerExchange Logger for z/OS to function properly.
The following table lists the data sources and targets on z/OS that are supported for bulk data movement and CDC:
Data Source or Target Data Source or Target Versions
Bulk CDC
Adabas1, 3 8.4.x8.3.x8.2.x8.17.4
X X (sources only)
CA Datacom1 (source only) 15.1151412
X (sources only) X (sources only)
CA IDMS (source only) 1918.51817
X (sources only) X (sources only)
DB2 for z/OS1 1211109.14
X X (sources only)
24 Chapter 2: Installation Planning
Data Source or Target Data Source or Target Versions
Bulk CDC
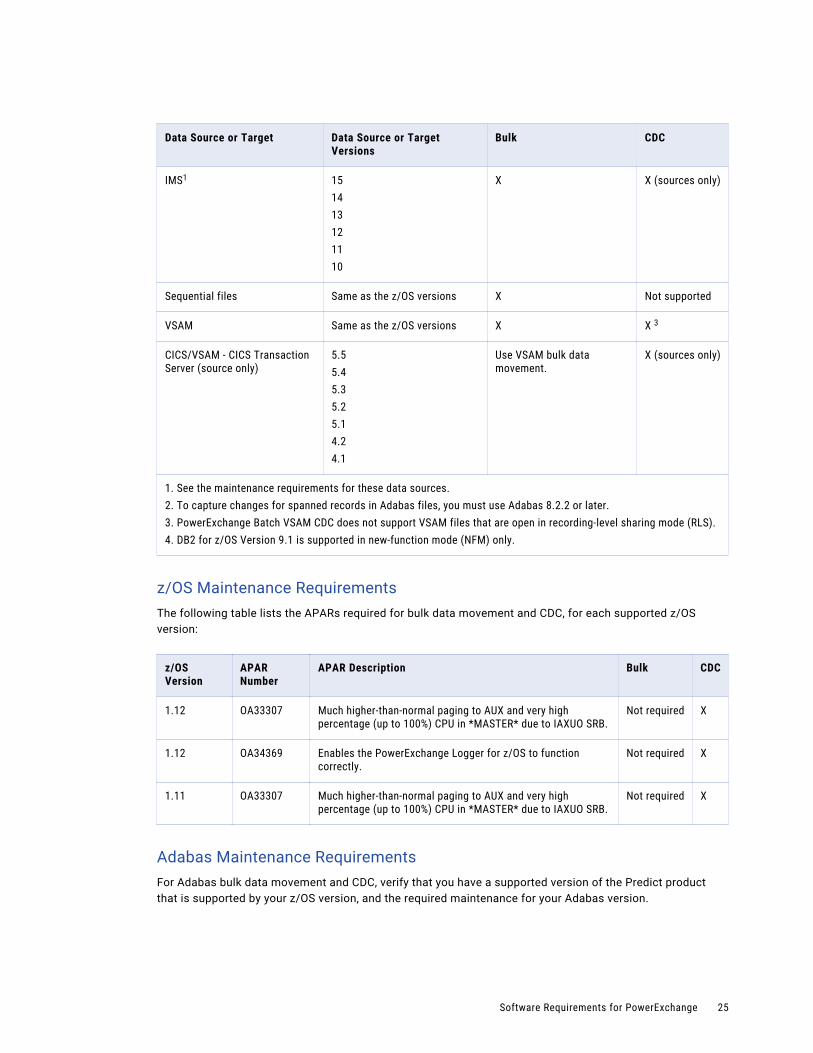
IMS1 151413121110
X X (sources only)
Sequential files Same as the z/OS versions X Not supported
VSAM Same as the z/OS versions X X 3
CICS/VSAM - CICS Transaction Server (source only)
5.55.45.35.25.14.24.1
Use VSAM bulk data movement.
X (sources only)
1. See the maintenance requirements for these data sources.2. To capture changes for spanned records in Adabas files, you must use Adabas 8.2.2 or later.3. PowerExchange Batch VSAM CDC does not support VSAM files that are open in recording-level sharing mode (RLS).4. DB2 for z/OS Version 9.1 is supported in new-function mode (NFM) only.
z/OS Maintenance RequirementsThe following table lists the APARs required for bulk data movement and CDC, for each supported z/OS version:
z/OS Version
APAR Number
APAR Description Bulk CDC
1.12 OA33307 Much higher-than-normal paging to AUX and very high percentage (up to 100%) CPU in *MASTER* due to IAXUO SRB.
Not required X
1.12 OA34369 Enables the PowerExchange Logger for z/OS to function correctly.
Not required X
1.11 OA33307 Much higher-than-normal paging to AUX and very high percentage (up to 100%) CPU in *MASTER* due to IAXUO SRB.
Not required X
Adabas Maintenance RequirementsFor Adabas bulk data movement and CDC, verify that you have a supported version of the Predict product that is supported by your z/OS version, and the required maintenance for your Adabas version.
Software Requirements for PowerExchange 25
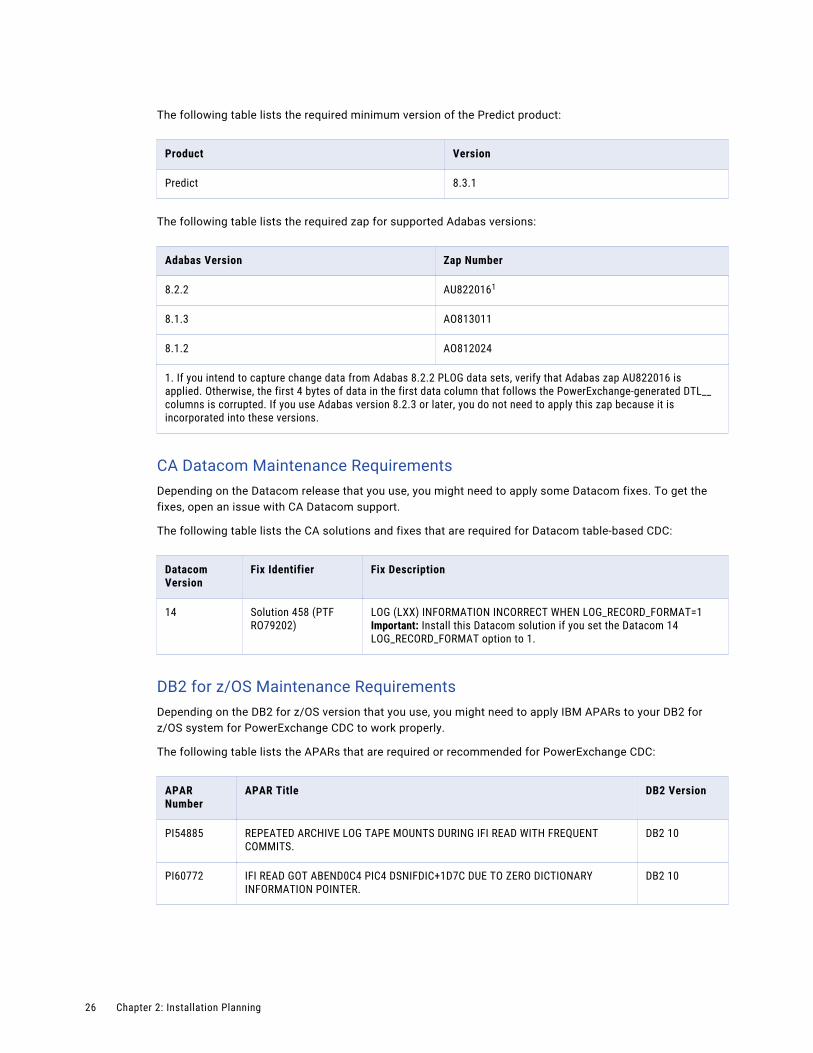
The following table lists the required minimum version of the Predict product:
Product Version
Predict 8.3.1
The following table lists the required zap for supported Adabas versions:
Adabas Version Zap Number
8.2.2 AU8220161
8.1.3 AO813011
8.1.2 AO812024
1. If you intend to capture change data from Adabas 8.2.2 PLOG data sets, verify that Adabas zap AU822016 is applied. Otherwise, the first 4 bytes of data in the first data column that follows the PowerExchange-generated DTL__ columns is corrupted. If you use Adabas version 8.2.3 or later, you do not need to apply this zap because it is incorporated into these versions.
CA Datacom Maintenance RequirementsDepending on the Datacom release that you use, you might need to apply some Datacom fixes. To get the fixes, open an issue with CA Datacom support.
The following table lists the CA solutions and fixes that are required for Datacom table-based CDC:
Datacom Version
Fix Identifier Fix Description
14 Solution 458 (PTF RO79202)
LOG (LXX) INFORMATION INCORRECT WHEN LOG_RECORD_FORMAT=1Important: Install this Datacom solution if you set the Datacom 14 LOG_RECORD_FORMAT option to 1.
DB2 for z/OS Maintenance RequirementsDepending on the DB2 for z/OS version that you use, you might need to apply IBM APARs to your DB2 for z/OS system for PowerExchange CDC to work properly.
The following table lists the APARs that are required or recommended for PowerExchange CDC:
APAR Number
APAR Title DB2 Version
PI54885 REPEATED ARCHIVE LOG TAPE MOUNTS DURING IFI READ WITH FREQUENT COMMITS.
DB2 10
PI60772 IFI READ GOT ABEND0C4 PIC4 DSNIFDIC+1D7C DUE TO ZERO DICTIONARY INFORMATION POINTER.
DB2 10
26 Chapter 2: Installation Planning

APAR Number
APAR Title DB2 Version
PI67145 AN IFI 306 READS REQUEST BECOMES DEADLOCKED READING A COMPRESSED LOG RECORD FROM AN ARCHIVE LOG TAPENote: Occurs when the compression dictionary needed to expand that LOG record is on the same tape volume.
DB2 11
PM84864 IFI306 READS RETURNS THE WRONG LOG RANGENote: Applies to DB2 data sharing environments.
DB2 9.1, DB2 10
PM90594 THE LOG RECORD LRSN RETURNED BY IFCID306 CAN BE OUT OF SEQUENCENote: Applies to DB2 data sharing environments.
DB2 10
PM93957 LOG RECORD LRSN RETURNED BY IFCID306 CAN BE OUT OF SEQUENCE ON THE HOST MEMBER OF A DATA SHARING GROUPNote: Applies to DB2 data sharing environments.
DB2 10, DB2 11
Tip: Informatica recommends that you check the IBM APARs related to IFCID 0306 that are available for your DB2 version on the IBM Support web site to get any additional maintenance that is relevant to your CDC environment.
IMS Maintenance RequirementsIf you perform IMS synchronous CDC with an IMS source, apply the fixes for the listed APARs to the IMS subsystem.
The following table identifies the APAR requirements by IMS version:
IMS Version APAR Number
APAR Description
14 PI56632 AJ status code received when a DL/I SSA contains command code A and a non keyed field.
13 PI49955 AJ status code received when a DL/I SSA contains command code A and a non keyed field.
13 PI26816 Command Code A not resetting to the beginning of the database after a status GE is received on a prior call.
12 PI49632 AJ status code received when a DL/I SSA contains command code A and a non keyed field.
12 PI19691 ABEND0C4 when using command code "A" in a DLI or DBB batch job running DLT0 or REXX.
10 PK36848 ABEND0C1 in DFSDLDD0 during cascade delete due to old PSTCURWA value.
Software Requirements for PowerExchange 27
Supported Data Sources in an Amazon RDS EnvironmentPowerExchange Express CDC for Oracle data sources can reside in a cloud-based Amazon RDS for Oracle environment.
The following Oracle versions in Amazon RDS are supported:
• 11.2.0.4.V14+
• 12.1.0.2.V14+
Supported PowerExchange Sources and Targets for Other Informatica Products
PowerExchange can provide data to the following Informatica products for processing:
Big Data Management
This product can access the following types of PowerExchange bulk data sources and targets:
• Adabas
• DB2 for i5/OS
• DB2 for z/OS
• Flat file
• IMS
Data Quality
This product can access the following types of PowerExchange bulk data sources:
• Adabas
• DB2 for i5/OS
• DB2 for z/OS
• Flat file
• IMS
PowerCenter
This product can access the following types of PowerExchange sources and targets:
• Adabas
• Datacom
• DB2 for i5/OS
• DB2 for z/OS
• DB2 LUW
• Flat file (batch only)
• IDMS
• IMS
• Microsoft SQL Server
• MySQL
• Oracle
• VSAM
28 Chapter 2: Installation Planning
Note: PowerCenter can access both sources and targets for bulk data and only sources for CDC.
Data Integration Hub
This product can access the following types of PowerExchange sources and targets:
• Adabas
• Datacom
• DB2 for i5/OS
• DB2 for z/OS
• DB2 LUW
• Flat file (batch only)
• IDMS
• IMS
• Microsoft SQL Server
• Oracle
• VSAM
Note: Data Integration Hub can access both sources and targets for bulk data and only sources for CDC.
PowerExchange CDC Publisher
This product can access the following types of PowerExchange CDC sources:
• Adabas
• Datacom
• DB2 for i5/OS
• DB2 for z/OS
• DB2 LUW
• IDMS
• IMS
• Microsoft SQL Server
• Oracle
• Batch VSAM and CICS/VSAM
Informatica Intelligent Cloud Services - PowerExchange CDC Connectors
The following Data Integration PowerExchange CDC connectors provide access to change data that PowerExchange captures:
• Oracle CDC Connector provides access to change data from PowerExchange Express CDC for Oracle sources.
Data Archive
This product can access the following types of PowerExchange bulk data sources:
• Adabas
• Datacom
• Flat file
• IDMS
Software Requirements for PowerExchange 29
• IMS
• VSAM
Note: Data Archive uses PowerExchange ODBC to access sources.
Data Masking - Data Centric Security
This security solution can access the following types of PowerExchange bulk data sources and targets:
• Adabas
• DB2 for i5/OS
• DB2 for z/OS
• Flat file
• IMS
Test Data Management
This product can access the following types of PowerExchange bulk data sources and targets:
• Adabas
• DB2 for i5/OS
• DB2 for z/OS
• Flat file
• IMS
• VSAM
Note: Test Data Management accesses sources and targets through PowerCenter.
The Data Generation solution can access the following types of PowerExchange bulk data targets:
• DB2 for i5/OS
• DB2 for z/OS
The Test Data Warehouse solution can access the following types of PowerExchange bulk data sources:
• DB2 for i5/OS
• DB2 for z/OS
30 Chapter 2: Installation Planning
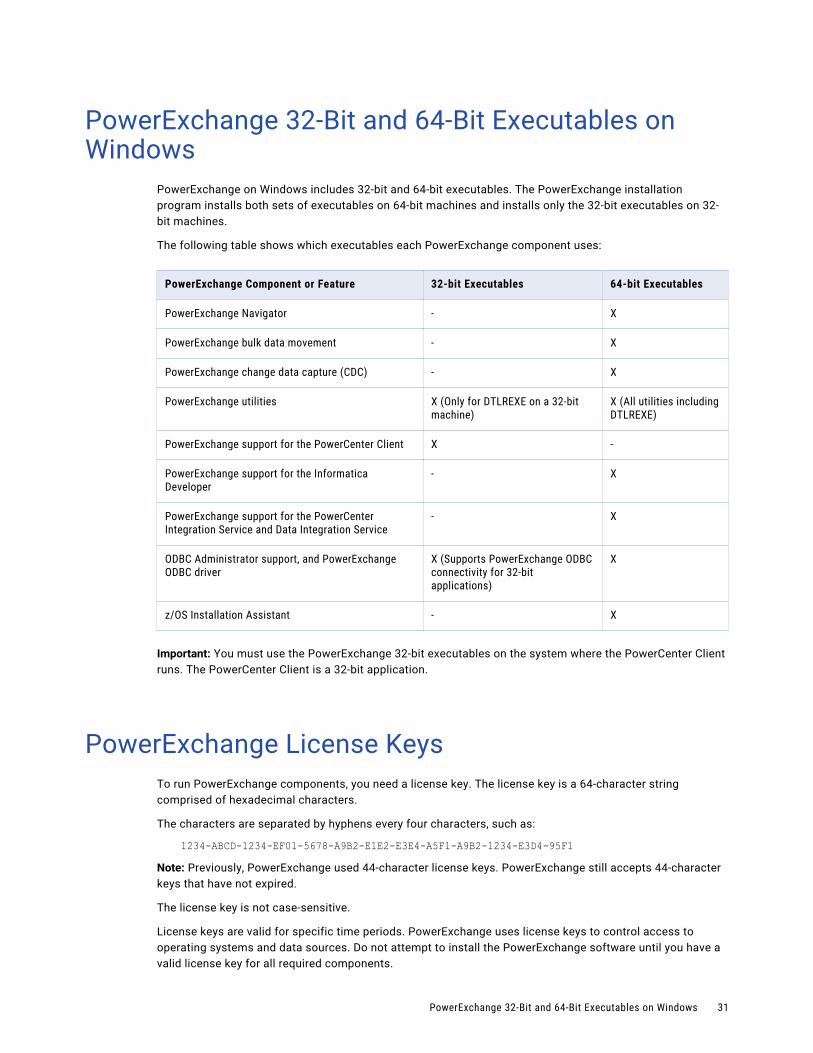
PowerExchange 32-Bit and 64-Bit Executables on Windows
PowerExchange on Windows includes 32-bit and 64-bit executables. The PowerExchange installation program installs both sets of executables on 64-bit machines and installs only the 32-bit executables on 32-bit machines.
The following table shows which executables each PowerExchange component uses:
PowerExchange Component or Feature 32-bit Executables 64-bit Executables
PowerExchange Navigator - X
PowerExchange bulk data movement - X
PowerExchange change data capture (CDC) - X
PowerExchange utilities X (Only for DTLREXE on a 32-bit machine)
X (All utilities including DTLREXE)
PowerExchange support for the PowerCenter Client X -
PowerExchange support for the Informatica Developer
- X
PowerExchange support for the PowerCenter Integration Service and Data Integration Service
- X
ODBC Administrator support, and PowerExchange ODBC driver
X (Supports PowerExchange ODBC connectivity for 32-bit applications)
X
z/OS Installation Assistant - X
Important: You must use the PowerExchange 32-bit executables on the system where the PowerCenter Client runs. The PowerCenter Client is a 32-bit application.
PowerExchange License KeysTo run PowerExchange components, you need a license key. The license key is a 64‑character string comprised of hexadecimal characters.
The characters are separated by hyphens every four characters, such as:
1234-ABCD-1234-EF01-5678-A9B2-E1E2-E3E4-A5F1-A9B2-1234-E3D4-95F1Note: Previously, PowerExchange used 44‑character license keys. PowerExchange still accepts 44-character keys that have not expired.
The license key is not case-sensitive.
License keys are valid for specific time periods. PowerExchange uses license keys to control access to operating systems and data sources. Do not attempt to install the PowerExchange software until you have a valid license key for all required components.
PowerExchange 32-Bit and 64-Bit Executables on Windows 31
How to Get the PowerExchange License KeysIf you download the installation files from the Informatica Electronic Software Download (ESD) site, the license key is delivered in an email message from Informatica.
Entering PowerExchange License KeysEnter PowerExchange license keys at installation or when you get new license keys. Enter the keys in following situations:
• When you initially install PowerExchange, you must enter the license keys to complete the installation. The installation program creates license key files on the systems where the product is installed.
• If you get new license keys for an existing PowerExchange installation, update the license key files on your systems with the new keys.
• If you upgrade the PowerExchange software, update the license key files on your systems with the new keys when you install that new version.
• If you purchase additional product options for an existing PowerExchange installation, update the license key files on your systems with the new keys that are supplied for the added options.
If you do not have a license key or have problems with an existing license key, contact Informatica Global Customer Support.
If you have a Proof of Concept (POC) temporary license that has expired, you can purchase a full license. The expiration date for the temporary license is listed in the POC agreement. If you got the PowerExchange installation files from an FTP download, the expiration date is also listed in the email message.
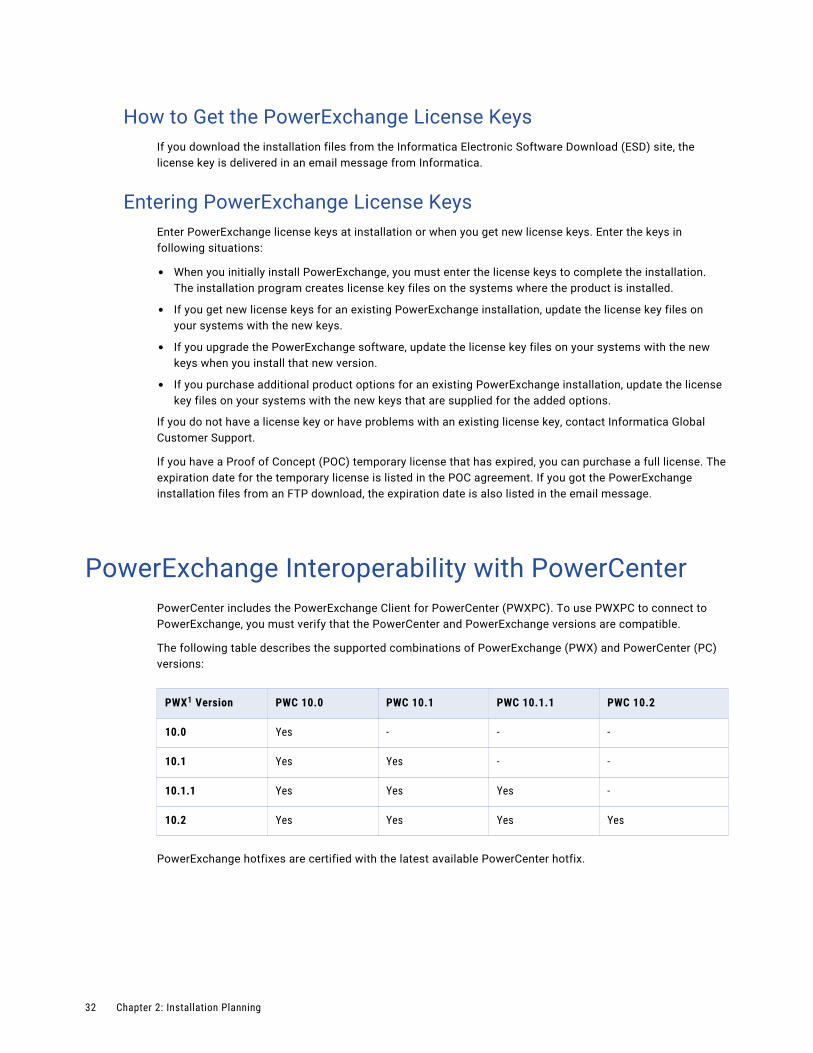
PowerExchange Interoperability with PowerCenterPowerCenter includes the PowerExchange Client for PowerCenter (PWXPC). To use PWXPC to connect to PowerExchange, you must verify that the PowerCenter and PowerExchange versions are compatible.
The following table describes the supported combinations of PowerExchange (PWX) and PowerCenter (PC) versions:
PWX1 Version PWC 10.0 PWC 10.1 PWC 10.1.1 PWC 10.2
10.0 Yes - - -
10.1 Yes Yes - -
10.1.1 Yes Yes Yes -
10.2 Yes Yes Yes Yes
PowerExchange hotfixes are certified with the latest available PowerCenter hotfix.
32 Chapter 2: Installation Planning
Restrictions:
• If you run the PowerExchange Listener Service or PowerExchange Logger Service in the Informatica domain, the Informatica domain must be at the same version, release, and modification (v.r.m) level as PowerExchange.
To run different versions of the Informatica domain and PowerExchange, you must start the PowerExchange Listener or PowerExchange Logger for Linux, UNIX, and Windows by running the dtllst or pwxccl command-line program, respectively.
• If you are using PowerCenter 10.0 with PowerExchange 10.1, local mode is not supported for bulk data movement sessions. That is, do not specify local in the Location property in PWXPC connections for bulk data movement sessions. Instead, configure the PowerCenter Integration Server to connect to the PowerExchange Listener on the machine. To do so, define a NODE statement for the machine in the DBMOVER configuration file, and enter this node name in the Location property for the connection.
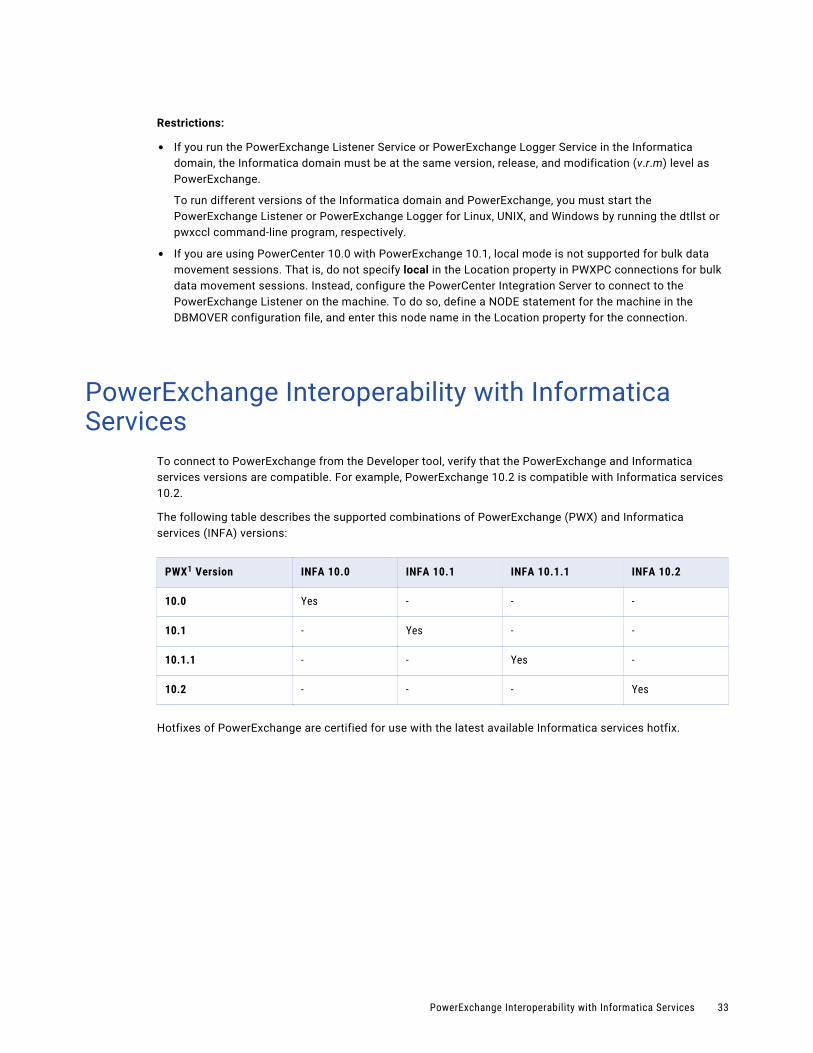
PowerExchange Interoperability with Informatica Services
To connect to PowerExchange from the Developer tool, verify that the PowerExchange and Informatica services versions are compatible. For example, PowerExchange 10.2 is compatible with Informatica services 10.2.
The following table describes the supported combinations of PowerExchange (PWX) and Informatica services (INFA) versions:
PWX1 Version INFA 10.0 INFA 10.1 INFA 10.1.1 INFA 10.2
10.0 Yes - - -
10.1 - Yes - -
10.1.1 - - Yes -
10.2 - - - Yes
Hotfixes of PowerExchange are certified for use with the latest available Informatica services hotfix.
PowerExchange Interoperability with Informatica Services 33
PowerExchange Interoperability with Informatica Data Archive
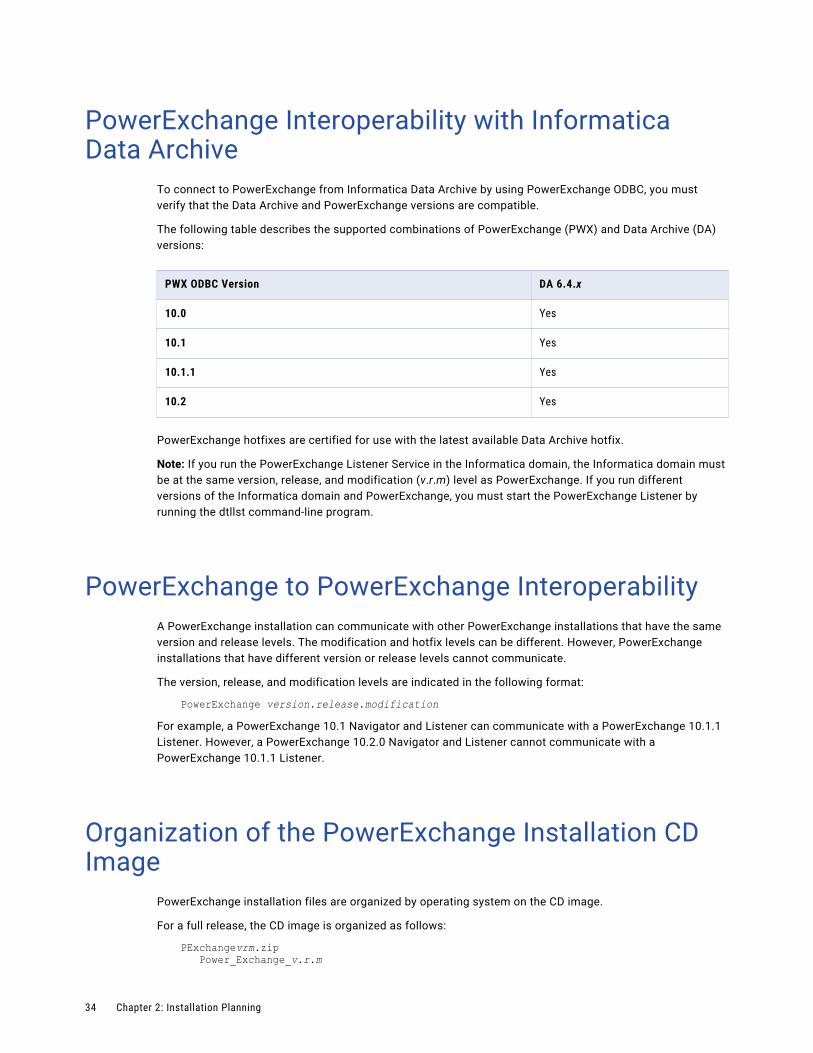
To connect to PowerExchange from Informatica Data Archive by using PowerExchange ODBC, you must verify that the Data Archive and PowerExchange versions are compatible.
The following table describes the supported combinations of PowerExchange (PWX) and Data Archive (DA) versions:
PWX ODBC Version DA 6.4.x
10.0 Yes
10.1 Yes
10.1.1 Yes
10.2 Yes
PowerExchange hotfixes are certified for use with the latest available Data Archive hotfix.
Note: If you run the PowerExchange Listener Service in the Informatica domain, the Informatica domain must be at the same version, release, and modification (v.r.m) level as PowerExchange. If you run different versions of the Informatica domain and PowerExchange, you must start the PowerExchange Listener by running the dtllst command-line program.
PowerExchange to PowerExchange InteroperabilityA PowerExchange installation can communicate with other PowerExchange installations that have the same version and release levels. The modification and hotfix levels can be different. However, PowerExchange installations that have different version or release levels cannot communicate.
The version, release, and modification levels are indicated in the following format:
PowerExchange version.release.modificationFor example, a PowerExchange 10.1 Navigator and Listener can communicate with a PowerExchange 10.1.1 Listener. However, a PowerExchange 10.2.0 Navigator and Listener cannot communicate with a PowerExchange 10.1.1 Listener.
Organization of the PowerExchange Installation CD Image
PowerExchange installation files are organized by operating system on the CD image.
For a full release, the CD image is organized as follows:
PExchangevrm.zip Power_Exchange_v.r.m
34 Chapter 2: Installation Planning
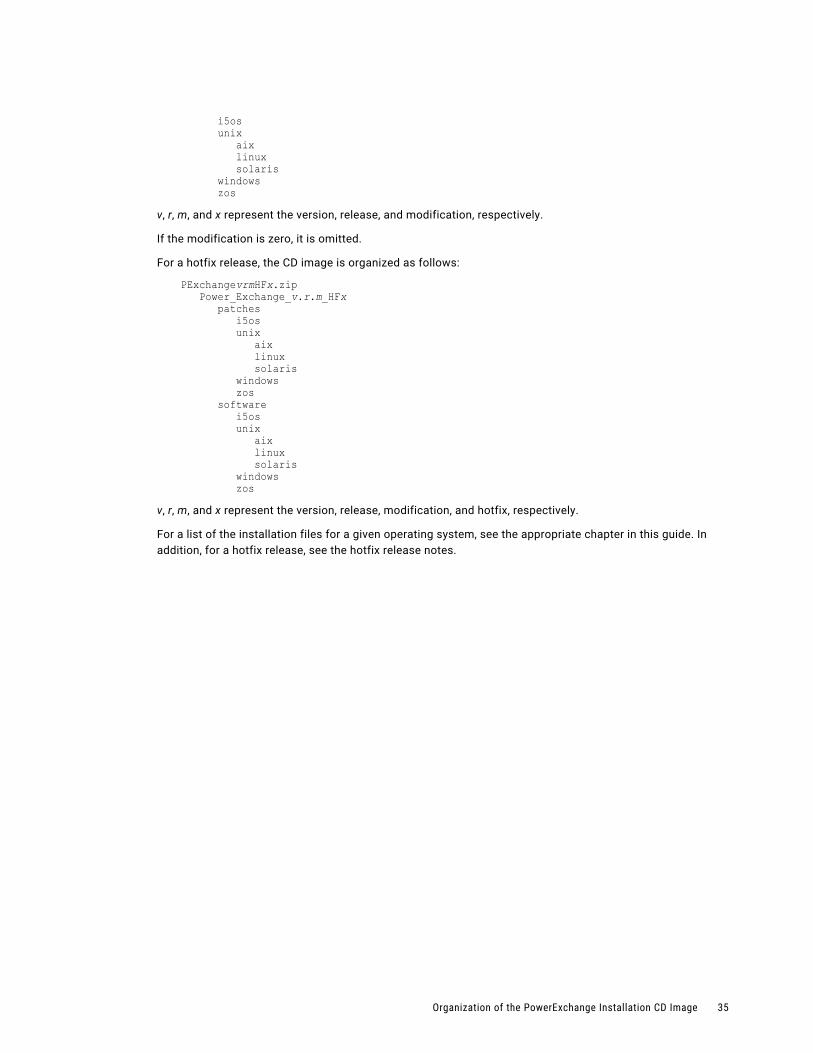
i5os unix aix linux solaris windows zos
v, r, m, and x represent the version, release, and modification, respectively.
If the modification is zero, it is omitted.
For a hotfix release, the CD image is organized as follows:
PExchangevrmHFx.zip Power_Exchange_v.r.m_HFx patches i5os unix aix linux solaris windows zos software i5os unix aix linux solaris windows zos
v, r, m, and x represent the version, release, modification, and hotfix, respectively.
For a list of the installation files for a given operating system, see the appropriate chapter in this guide. In addition, for a hotfix release, see the hotfix release notes.
Organization of the PowerExchange Installation CD Image 35
C h a p t e r 3
Upgrade PlanningThis chapter includes the following topics:
• Upgrade Planning Overview, 36
• Strategies for Maintaining PowerExchange Data, 36
• Upgrade Scenarios, 37
• Migrating Data Maps, Capture Registrations, and Extraction Maps, 39
Upgrade Planning OverviewWhen you upgrade PowerExchange, you must perform an upgrade installation on each of the following systems:
• Each PowerExchange data source or target system
• Windows system on which you will run the PowerExchange Navigator
• PowerCenter Client or Informatica Developer client system
• PowerCenter Integration Service or Data Integration Service system
To help you plan your upgrade, this chapter provides strategies for preserving existing PowerExchange data files. The chapter also describes several migration scenarios and lists the basic steps to follow for each scenario.
In addition to reviewing this chapter, see the upgrade considerations that are described in Appendix A, “Upgrade Considerations” on page 171. For detailed descriptions of the PowerExchange environment for each operating system, see Appendix B, “PowerExchange Environment” on page 186.
Strategies for Maintaining PowerExchange DataPowerExchange lets you configure the locations of many of the PowerExchange data files and libraries. When you install and configure PowerExchange, Informatica recommends that you set up your environment to separate your data files and libraries from the PowerExchange software.
This approach to maintaining your PowerExchange data offers the following benefits:
• Upgrading to a new PowerExchange version is easier.
• Customized files do not get lost or overwritten during the upgrade.
36
• Backing up PowerExchange data is easier.
Consider the following approaches when you set up your PowerExchange environment:
• Create libraries for PowerExchange data that are separate from the PowerExchange software. Depending on the operating system and the data files, you might create the libraries yourself or specify their locations to the installation program.
For example, on Linux, UNIX, or Windows, you can store configuration files in the parent directory of the installation directory, or in a separate directory.
• Rename or copy configuration files and other files that you customize. For example, you can append the version number to the file name. In this way, you can easily identify the configuration files for a particular release. In addition, on some operating systems, this practice ensures that the installation program does not overwrite the configuration files.
After you set up your data, update the following items to point to the customized files:
• Configuration parameters
• Environment variables on Linux, UNIX, and Windows
• DD statements in JCL for PowerExchange jobs and started tasks on z/OS
• PowerExchange start commands in scripts or automation
The extent to which you can separate PowerExchange code and data, and the items that point to the data, varies by operating system.
Upgrade ScenariosWhen you upgrade PowerExchange, depending on your requirements and environment, you can take one of the following approaches:
• Existing install and data location. Install a new release of PowerExchange in the same location as an existing installation on the same machine. PowerExchange uses the existing data files from their current location.
You can use this option on platforms other than i5/OS, if you run only one version of the product.
• New install location with existing data location. Install a new release of PowerExchange in a new location on the same machine as an existing installation. PowerExchange uses the existing data files from their current location.
You can use this option when you upgrade PowerExchange on Linux, UNIX, Windows, or z/OS, provided you are running only one version of the product. If you use this option on Windows, you must first remove the existing PowerExchange release.
• New install and data location. Install a new release of PowerExchange in a new location on the same machine as the existing release. The new installation uses data files from the new location.
You can use this option on any operating system. You must use this option if you are running multiple versions of PowerExchange or if you are upgrading PowerExchange on i5/OS. If you use this option on Windows, you must first remove the existing PowerExchange release.
For each scenario, the following topics describe the basic flow for installing software, copying data files, and editing configuration parameters and other variables.
Upgrade Scenarios 37
Existing Install and Data Location ScenarioIn this scenario, you install the PowerExchange software into the same location as the previous installation, and you use the existing location for your PowerExchange data files.
After installation, verify that your configuration parameters and other variables to point to the correct locations of the data.
Use the following process:
1. Back up PowerExchange data files and libraries for safekeeping.
2. Follow the instructions in this guide for upgrading to a new release. These instructions install the software into the same location as the previous installation.
If you are installing a new PowerExchange release on z/OS, select the Upgrade by Using Existing Data Set Names option in the z/OS Installation Assistant.
3. Verify that configuration parameters, environment variables, and DD statements point to the existing data environment. Because you are using the existing data location, these values should already be correct.
New Install Location with Existing Data Location ScenarioIn this scenario, you install the PowerExchange software into a different location from the previous installation, but you use the same location for your PowerExchange data files.
After installation, verify that configuration parameters and other variables point to the correct locations of the data.
Use the following process:
1. Back up PowerExchange data files and libraries.
2. Follow the instructions in this guide for performing a full installation. Specify an installation location that is different from the location of the previous installation.
If you are installing a new PowerExchange release on z/OS, select Upgrade by Using New Data Set Names in the z/OS Installation Assistant. This approach results in a whole new set of data libraries being allocated.
On i5/OS, this approach results in the entire PowerExchange environment being re-created.
Verify that configuration parameters, environment variables, and DD statements point to the existing data environment.
New Install and Data Location ScenarioIn this scenario, you install the PowerExchange software into a different location from the previous installation, and you create a new location for your PowerExchange data files.
Where possible, you then copy the PowerExchange data files from the previous release that you intend to use with the new release to the new data location. You also update configuration parameters and other variables to point to the new location of the data.
This approach does not work for all PowerExchange data. For example, you cannot use new data set names for the PowerExchange Logger for z/OS active and archive logs and then copy the existing data. For the PowerExchange Logger for z/OS, you must either keep the existing names or lose all existing captured data.
38 Chapter 3: Upgrade Planning
Use the following process:
1. Follow the instructions in this guide for performing a full installation, rather than an upgrade installation. Specify an installation directory that is different from the location of the old installation.
If you are installing a new PowerExchange release on z/OS, use the full installation option in the z/OS Installation Assistant. On z/OS, this option does not allow you to keep previously captured change data. If you need to keep previously captured change data on z/OS, you must follow the steps in “New Install Location with Existing Data Location Scenario” on page 38.
2. Copy the PowerExchange data files and libraries from the previous installation to the new environment. However, you cannot use this approach for CDC on z/OS.
3. Set configuration parameters, environment variables, automation and scripts, and DD statements to point to the new data environment.
Migrating Data Maps, Capture Registrations, and Extraction Maps
After you upgrade to a new version of PowerExchange, migrate your data maps, extraction maps, and capture registrations as needed.
Informatica recommends that you use the DTLURDMO utility to copy these resources. Using DTLURDMO ensures that the resources are copied in a format that the upgraded version of PowerExchange requires. Also, DTLURDMO updates the header information in these resources that identifies their version.
The procedures for migrating resources vary by operating system. The procedures also vary, depending on whether the source and target systems are at the same version level. A PowerExchange version, release, and modification level is represented as v.r.m, where v represents the version level.
Consider the following scenarios:
• Migrating resources after upgrading within the same version level. For example, upgrading from PowerExchange 10.1 to PowerExchange 10.2.
In this scenario, you can use DTLURDMO to copy the resources from the old PowerExchange Listener environment to the new environment. You do not need to first use operating system commands to copy the resources to the new location.
• Migrating resources after upgrading to a new version level. For example, upgrading from PowerExchange 9.6.1 to PowerExchange 10.0.0
DTLURDMO cannot copy resources across PowerExchange Listener environments at different version levels. The utility uses the SOURCE and TARGET statements to point to NODE statements of the two listeners. If the listeners are at different release levels, the system returns an error message indicating a version mismatch. Instead use DTLURDMO where the source is local and the target is the higher version PowerExchange Listener. To copy resources from one environment to a target environment at a higher version, use a copy utility to copy the resources to staging files on the target system, and then use DTLURDMO to upgrade the resources on the target system. DTLURDMO must always be run from the higher version environment.
Note: On z/OS you can submit JCL to accomplish both tasks in the same job.
Migrating Data Maps, Capture Registrations, and Extraction Maps 39

Migrating Resources Across PowerExchange Systems at the Same Version Level
To migrate data maps, capture registrations, and extraction maps from one PowerExchange system to another PowerExchange system as the same version level, follow the procedures in the "DTLURDMO Utility" chapter of the PowerExchange Utilities Guide.
Migrating Data Maps to a New Version Level on i5/OSTo migrate data maps after upgrading to a new PowerExchange version level on i5/OS, use the following procedure:
1. Copy the data map files from the STDATAMAPS directory for the old version to the STDATAMAPS directory for the new version.
2. To upgrade the data maps in place, run DTLURDMO for the new version using dtlurdmo.ini input statements such as the following ones:
USER user_id;EPWD epwd;SOURCE LOCAL;TARGET LOCAL;DETAIL;REPLACE;DM_COPY;
Migrating Capture Registrations and Extraction Maps to a New Version Level on i5/OS
To migrate capture registrations and extraction maps after upgrading to a new PowerExchange version level on i5/OS, use the following procedure:
1. Copy the CCT file of the datalib library for the old version to the datalib library for the new version.
2. To upgrade the capture registrations and extraction maps in place, run DTLURDMO for the new version using the following dtlurdmo.ini input statements:
USER user_id;EPWD epwd;SOURCE LOCAL;TARGET LOCAL;DETAIL;REPLACE;REG_COPY;CREATEXMAPS;KEEPREGTAG;
Migrating Data Maps to a New Version Level on Linux, UNIX, and Windows
To migrate data maps after upgrading to a new PowerExchange version level on Linux, UNIX, or Windows, use the following procedure:
1. Copy the data map files from the directory defined in the DMX_DIR statement in the DBMOVER file for the old version to the directory defined in the DMX_DIR statement in the DBMOVER file for the new version.
40 Chapter 3: Upgrade Planning
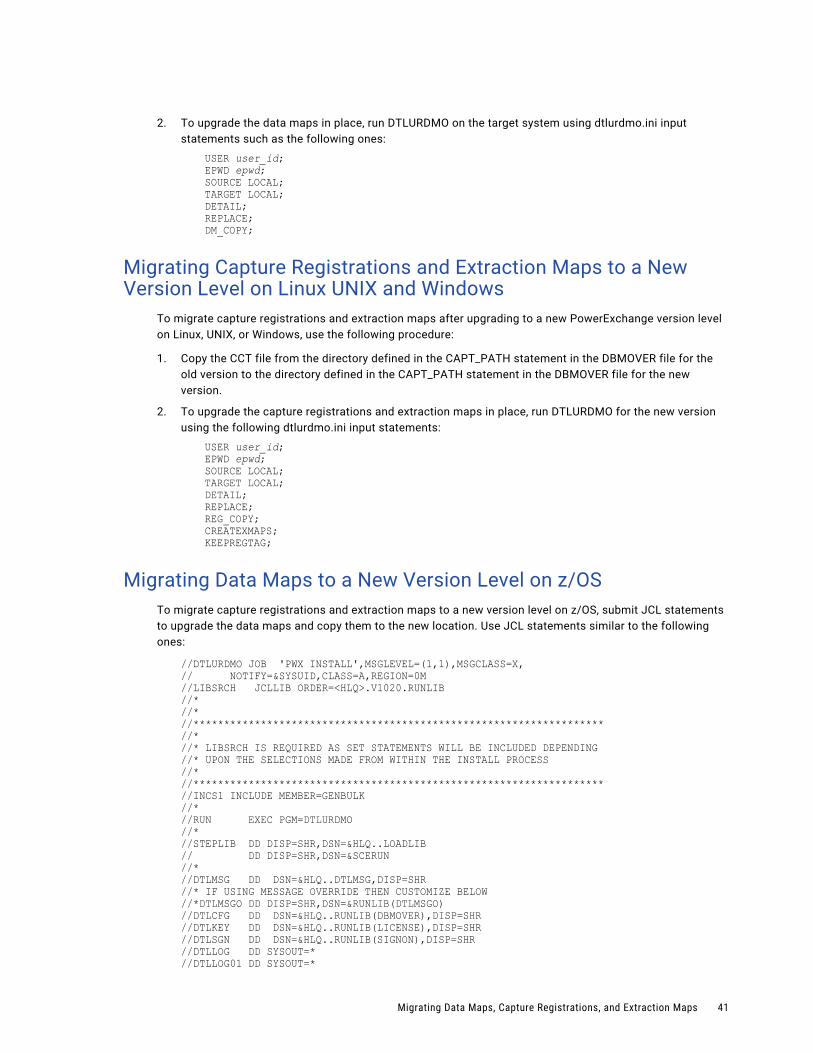
2. To upgrade the data maps in place, run DTLURDMO on the target system using dtlurdmo.ini input statements such as the following ones:
USER user_id;EPWD epwd;SOURCE LOCAL;TARGET LOCAL;DETAIL;REPLACE;DM_COPY;
Migrating Capture Registrations and Extraction Maps to a New Version Level on Linux UNIX and Windows
To migrate capture registrations and extraction maps after upgrading to a new PowerExchange version level on Linux, UNIX, or Windows, use the following procedure:
1. Copy the CCT file from the directory defined in the CAPT_PATH statement in the DBMOVER file for the old version to the directory defined in the CAPT_PATH statement in the DBMOVER file for the new version.
2. To upgrade the capture registrations and extraction maps in place, run DTLURDMO for the new version using the following dtlurdmo.ini input statements:
USER user_id;EPWD epwd;SOURCE LOCAL;TARGET LOCAL;DETAIL;REPLACE;REG_COPY;CREATEXMAPS;KEEPREGTAG;
Migrating Data Maps to a New Version Level on z/OSTo migrate capture registrations and extraction maps to a new version level on z/OS, submit JCL statements to upgrade the data maps and copy them to the new location. Use JCL statements similar to the following ones:
//DTLURDMO JOB 'PWX INSTALL',MSGLEVEL=(1,1),MSGCLASS=X,// NOTIFY=&SYSUID,CLASS=A,REGION=0M//LIBSRCH JCLLIB ORDER=<HLQ>.V1020.RUNLIB//*//*//*******************************************************************//*//* LIBSRCH IS REQUIRED AS SET STATEMENTS WILL BE INCLUDED DEPENDING//* UPON THE SELECTIONS MADE FROM WITHIN THE INSTALL PROCESS//*//*******************************************************************//INCS1 INCLUDE MEMBER=GENBULK//*//RUN EXEC PGM=DTLURDMO//*//STEPLIB DD DISP=SHR,DSN=&HLQ..LOADLIB// DD DISP=SHR,DSN=&SCERUN//*//DTLMSG DD DSN=&HLQ..DTLMSG,DISP=SHR//* IF USING MESSAGE OVERRIDE THEN CUSTOMIZE BELOW//*DTLMSGO DD DISP=SHR,DSN=&RUNLIB(DTLMSGO)//DTLCFG DD DSN=&HLQ..RUNLIB(DBMOVER),DISP=SHR//DTLKEY DD DSN=&HLQ..RUNLIB(LICENSE),DISP=SHR//DTLSGN DD DSN=&HLQ..RUNLIB(SIGNON),DISP=SHR//DTLLOG DD SYSOUT=*//DTLLOG01 DD SYSOUT=*
Migrating Data Maps, Capture Registrations, and Extraction Maps 41
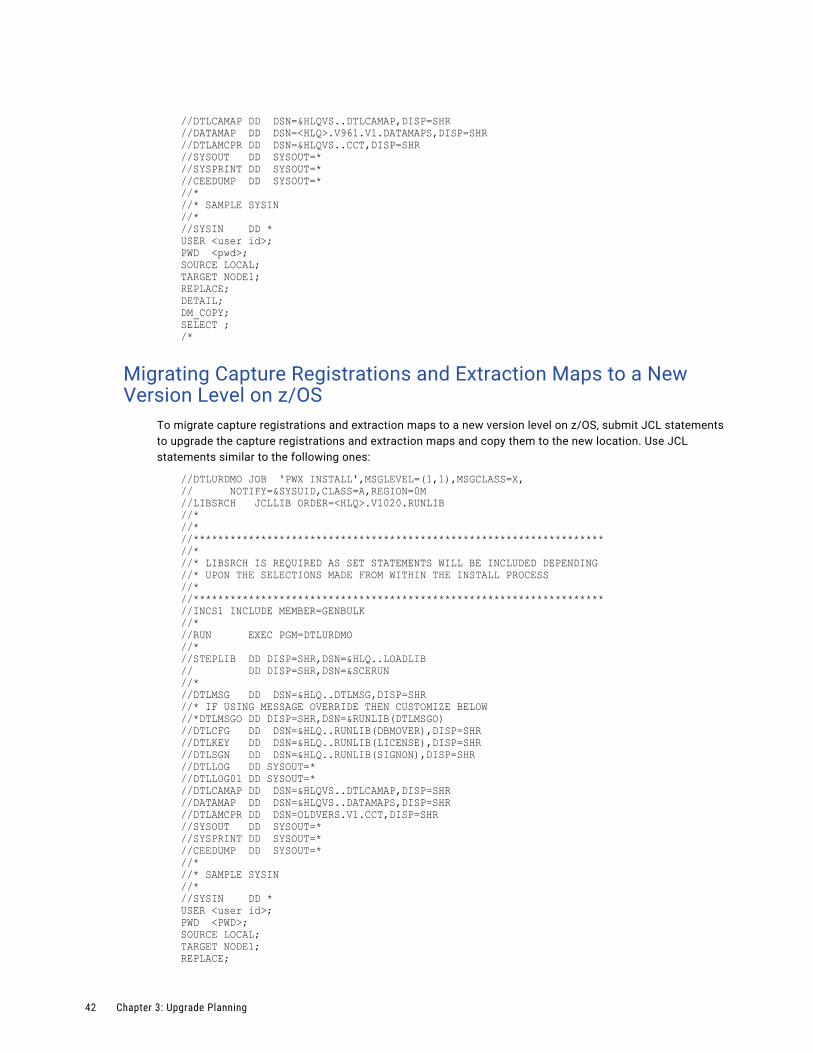
//DTLCAMAP DD DSN=&HLQVS..DTLCAMAP,DISP=SHR//DATAMAP DD DSN=<HLQ>.V961.V1.DATAMAPS,DISP=SHR//DTLAMCPR DD DSN=&HLQVS..CCT,DISP=SHR//SYSOUT DD SYSOUT=*//SYSPRINT DD SYSOUT=*//CEEDUMP DD SYSOUT=*//*//* SAMPLE SYSIN//*//SYSIN DD *USER <user id>;PWD <pwd>;SOURCE LOCAL;TARGET NODE1;REPLACE;DETAIL;DM_COPY;SELECT ;/*
Migrating Capture Registrations and Extraction Maps to a New Version Level on z/OS
To migrate capture registrations and extraction maps to a new version level on z/OS, submit JCL statements to upgrade the capture registrations and extraction maps and copy them to the new location. Use JCL statements similar to the following ones:
//DTLURDMO JOB 'PWX INSTALL',MSGLEVEL=(1,1),MSGCLASS=X,// NOTIFY=&SYSUID,CLASS=A,REGION=0M//LIBSRCH JCLLIB ORDER=<HLQ>.V1020.RUNLIB //*//*//*******************************************************************//*//* LIBSRCH IS REQUIRED AS SET STATEMENTS WILL BE INCLUDED DEPENDING//* UPON THE SELECTIONS MADE FROM WITHIN THE INSTALL PROCESS//*//*******************************************************************//INCS1 INCLUDE MEMBER=GENBULK//*//RUN EXEC PGM=DTLURDMO//*//STEPLIB DD DISP=SHR,DSN=&HLQ..LOADLIB// DD DISP=SHR,DSN=&SCERUN//*//DTLMSG DD DSN=&HLQ..DTLMSG,DISP=SHR//* IF USING MESSAGE OVERRIDE THEN CUSTOMIZE BELOW//*DTLMSGO DD DISP=SHR,DSN=&RUNLIB(DTLMSGO)//DTLCFG DD DSN=&HLQ..RUNLIB(DBMOVER),DISP=SHR//DTLKEY DD DSN=&HLQ..RUNLIB(LICENSE),DISP=SHR//DTLSGN DD DSN=&HLQ..RUNLIB(SIGNON),DISP=SHR//DTLLOG DD SYSOUT=*//DTLLOG01 DD SYSOUT=*//DTLCAMAP DD DSN=&HLQVS..DTLCAMAP,DISP=SHR//DATAMAP DD DSN=&HLQVS..DATAMAPS,DISP=SHR//DTLAMCPR DD DSN=OLDVERS.V1.CCT,DISP=SHR//SYSOUT DD SYSOUT=*//SYSPRINT DD SYSOUT=*//CEEDUMP DD SYSOUT=*//*//* SAMPLE SYSIN//*//SYSIN DD *USER <user id>;PWD <PWD>;SOURCE LOCAL;TARGET NODE1;REPLACE;
42 Chapter 3: Upgrade Planning
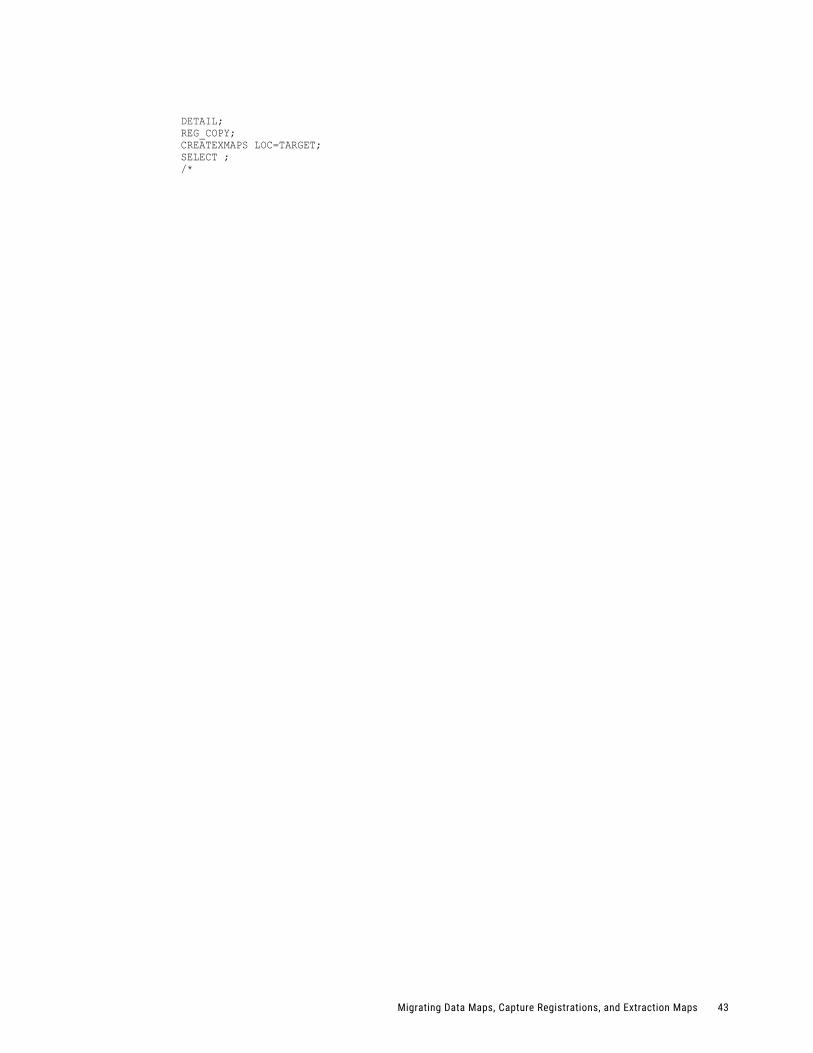
DETAIL;REG_COPY;CREATEXMAPS LOC=TARGET;SELECT ;/*
Migrating Data Maps, Capture Registrations, and Extraction Maps 43
C h a p t e r 4
Installing and Upgrading PowerExchange on i5/OS
This chapter includes the following topics:
• i5/OS Installation Overview, 44
• Performing a Full Installation on i5/OS, 44
• Upgrading PowerExchange to a New Release on i5/OS, 53
• Installing a HotFix on i5/OS, 55
• Uninstalling PowerExchange on i5/OS, 59
i5/OS Installation OverviewThis chapter provides instructions for the installing PowerExchange on i5/OS, including instructions for a full installation, an upgrade, and a hotfix installation.
Performing a Full Installation on i5/OSPerform a full installation if you are installing PowerExchange for the first time or to a new location.
Before You Install PowerExchange on i5/OSBefore installing PowerExchange, make sure that pre-installation requirements are met and that you have performed the specified prerequisite tasks.
General Pre-Installation RequirementsReview the information in this guide to perform the following tasks:
• Verify that PowerExchange supports the versions and release levels of your operating system and data sources.
• Obtain a valid license key.
• Verify that the new PowerExchange release can operate with your PowerCenter installation.
44
• If you are upgrading from a previous release and plan to run multiple releases of PowerExchange, verify that the new PowerExchange release can operate with your existing PowerExchange installation.
• If you are upgrading from a previous release, perform any required pre-installation upgrade tasks.
User ID RequirementsOptionally, create a user ID for the owner or administrator of the PowerExchange installation. Make sure that the user ID has the sufficient rights and privileges to access source and target data from different locations on the i5/OS platform.
To install the product, you must be logged in with a user profile that has the required authorities. Use one of the following user profiles:
• The IBM supplied user profile of QSECOFR
• A user profile defined with USRCLS of *SECOFR and SPCAUT of *USRCLS
• A user profile defined with at least the following SPCAUT values: *SECADM, *ALLOBJ and *JOBCTL
Disk Space RequirementsVerify that you have sufficient disk space. PowerExchange requires about 140 MB of disk space. Additional disk space might be needed depending on the files and databases being sent and received.
Threadsafe Processing RequirementPowerExchange uses asynchronous network communication for all send and receive data operations between a PowerExchange client and a PowerExchange Listener. With asynchronous communication, PowerExchange uses separate threads for network processing and data processing, so that network processing overlaps with data processing.
Because the PowerExchange Listener and any jobs that it spawns are multithreaded, the PowerExchange Listener must not be used to invoke I5/OS commands or APIs that are not threadsafe, such as RCLRSC.
i5/OS System Value RequirementsPowerExchange for i5/OS requires that certain system values be set correctly. Failure to set these values correctly might result in unexpected errors or run-time failures.
QCCSID - Coded Character Set Identifier
For PowerExchange for i5/OS to process metadata information correctly, the QCCSID system value must be set according to IBM guidelines.
QCCSID must be set based on the language installed on the system. On a double-byte character set (DBCS) system, set QCCSID to a mixed CCSID. On a non-DBCS system, set QCCSID to a single-byte character set (SBCS) CCSID. For more information, see the IBM Knowledge Center website.
If QCCSID is not set correctly and instead has the shipped default value of 65535, PowerExchange metadata requests fail with the following message when attempting to access the DB2 tables:
SQL0332 - Character conversion between CCSID 1200 and CCSID 65535 not valid. This error is due to the columns being defined as GRAPHIC to enable multibyte values to be stored.
QSHRMEMCTL - Shared Memory Control
PowerExchange for i5/OS uses memory mapping functions to pass information between running tasks. For this to function as expected, set QSHRMEMCTL to 1.
Performing a Full Installation on i5/OS 45
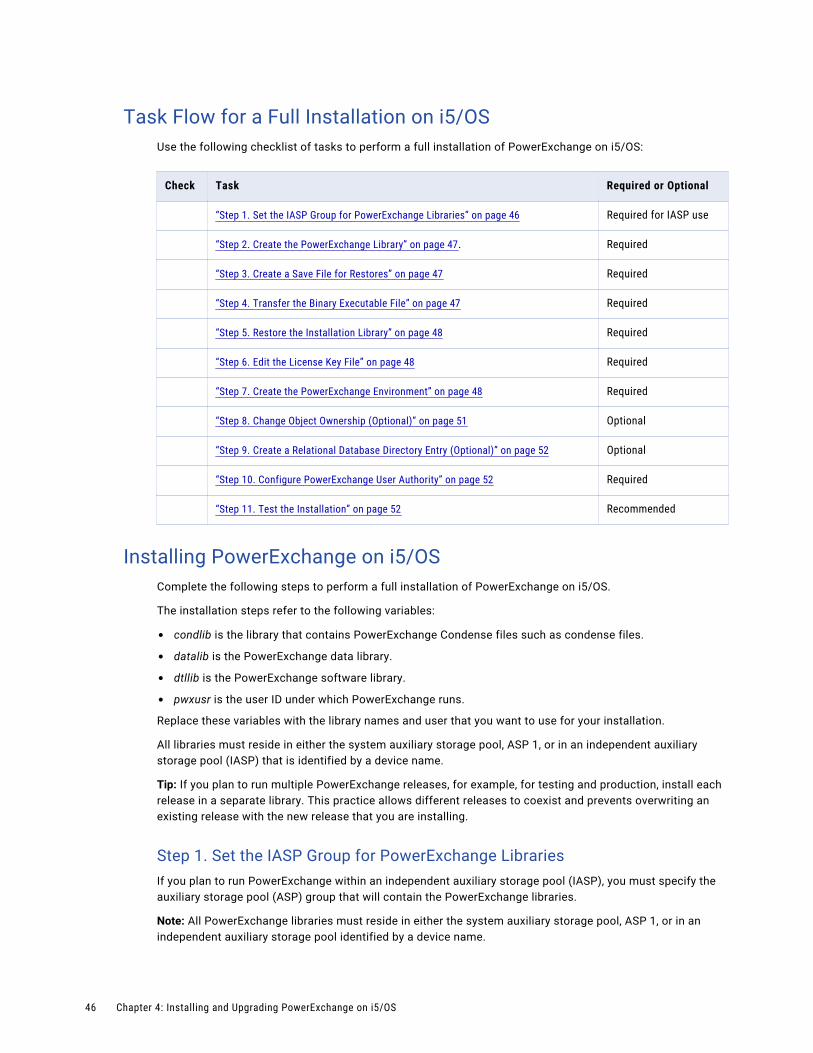
Task Flow for a Full Installation on i5/OSUse the following checklist of tasks to perform a full installation of PowerExchange on i5/OS:
Check Task Required or Optional
“Step 1. Set the IASP Group for PowerExchange Libraries” on page 46 Required for IASP use
“Step 2. Create the PowerExchange Library” on page 47. Required
“Step 3. Create a Save File for Restores” on page 47 Required
“Step 4. Transfer the Binary Executable File” on page 47 Required
“Step 5. Restore the Installation Library” on page 48 Required
“Step 6. Edit the License Key File” on page 48 Required
“Step 7. Create the PowerExchange Environment” on page 48 Required
“Step 8. Change Object Ownership (Optional)” on page 51 Optional
“Step 9. Create a Relational Database Directory Entry (Optional)” on page 52 Optional
“Step 10. Configure PowerExchange User Authority” on page 52 Required
“Step 11. Test the Installation” on page 52 Recommended
Installing PowerExchange on i5/OSComplete the following steps to perform a full installation of PowerExchange on i5/OS.
The installation steps refer to the following variables:
• condlib is the library that contains PowerExchange Condense files such as condense files.
• datalib is the PowerExchange data library.
• dtllib is the PowerExchange software library.
• pwxusr is the user ID under which PowerExchange runs.
Replace these variables with the library names and user that you want to use for your installation.
All libraries must reside in either the system auxiliary storage pool, ASP 1, or in an independent auxiliary storage pool (IASP) that is identified by a device name.
Tip: If you plan to run multiple PowerExchange releases, for example, for testing and production, install each release in a separate library. This practice allows different releases to coexist and prevents overwriting an existing release with the new release that you are installing.
Step 1. Set the IASP Group for PowerExchange LibrariesIf you plan to run PowerExchange within an independent auxiliary storage pool (IASP), you must specify the auxiliary storage pool (ASP) group that will contain the PowerExchange libraries.
Note: All PowerExchange libraries must reside in either the system auxiliary storage pool, ASP 1, or in an independent auxiliary storage pool identified by a device name.
46 Chapter 4: Installing and Upgrading PowerExchange on i5/OS
Issue the following command:
SETASPGRP ASPGRP(asp_device)
Step 2. Create the PowerExchange LibraryIn this step, you create the dtllib library for PowerExchange software.
To create the dtllib library, issue the following command:
CRTLIB LIB(dtllib) CRTAUT(*CHANGE)Include CRTAUT(*CHANGE) if it is not the default.
If you plan to use flat or sequential files on the i5/OS system as data sources or targets, enter the following command to create a data maps library:
CRTLIB stdatamapsNote: If you specify a different name for your data maps library, you must specify that name in the DMX_DIR parameter of the DBMOVER configuration file in the datalib library.
If you plan to run PowerExchange within an independent auxiliary storage pool (IASP), issue the following command instead:
CRTLIB LIB(dtllib) CRTAUT(*CHANGE) ASP(*ASPDEV) ASPDEV(asp_device)
Step 3. Create a Save File for RestoresIn this step, you create a save file to store the PowerExchange-distributed save file.
To create the save file, issue the following command:
CRTSAVF FILE(library/save_file_name) This file can be created in any library, such as QGPL/libres.
Note: In previous releases, PowerExchange distributed a separate save file that contained the necessary ICU objects for code page support. PowerExchange now includes these ICU objects in the same save file as the PowerExchange software. For more information about code page support in PowerExchange, see the PowerExchange Reference Manual .
Step 4. Transfer the Binary Executable FileIn this step, you transfer the i5/OS save file from the target directory on the Windows machine to the save file on i5/OS that you created in the previous step.
PowerExchange provides the following self-extracting zip file for the PowerExchange for i5/OS installation:
pwxvrm_i5os.exeThe vrm variable represents the PowerExchange version and release number.
When you extract the zip file, you must specify a target directory on the Windows machine that will be used to unzip the file. After you extract the zip file on Windows, the following object is created in the target directory:
pwxvrm_i5osThis object is an i5/OS save file that contains the PowerExchange software.
Using binary mode in FTP, transfer the i5/OS save file from the target directory on the Windows machine to the save file on i5/OS that you created in the previous step.
Performing a Full Installation on i5/OS 47
Step 5. Restore the Installation LibraryIn this step, you restore the save file that you transferred to i5/OS with FTP in the previous step.
After you transfer the binary save data, use the following command to display the save file that was updated by the FTP process:
DSPSAVF FILE(library/save_file_name)Use the displayed Library saved value in the SAVLIB parameter of the following command to restore the save file that you transferred to i5/OS in the previous step:
RSTLIB SAVLIB(DTLvrm) DEV(*SAVF) SAVF(library/save_file_name) RSTLIB(dtllib) MBROPT(*ALL) ALWOBJDIF(*ALL) FRCOBJCVN(*YES)
DTLvrm is the library that contains the save file. vrm is the version, release, and modification level of that library. The modification level can include a release type, such as GA for general availability or HFn for a hotfix. You must include the entire name in the SAVLIB parameter, including the release type.
You can install and run PowerExchange by using an IASP. To do so, you must specify the details for the IASP into which you will restore the objects by using the RSTASPDEV parameter. The following example shows the RSTLIB syntax with the RSTASPDEV parameter:
RSTLIB SAVLIB(DTLvrm) DEV(*SAVF) SAVF(library/save_file_name) RSTLIB(dtllib) MBROPT(*ALL) ALWOBJDIF(*ALL) FRCOBJCVN(*YES) RSTASPDEV(asp_device)
After the RSTLIB command completes, you can delete the save file by using the following command:
DLTF File(library/save_file)
Step 6. Edit the License Key FileEdit the license key file to add the key for the newly installed PowerExchange software. PowerExchange requires a license key to run.
Eenter the license key in the dtllib/LICENSE(KEY) file. This file must be in the same library as the PowerExchange Listener program dtllst. In the file, update the single record member with your 64-byte license key, including a hyphen every four bytes, such as:
1234-ABCD-1234-EF01-5678-A9B2-E1E2-E3E4-A5F1-A9B2-1234-E3D4-95F1
Step 7. Create the PowerExchange EnvironmentIn this step, you use the CRTPWXENV command to create a PowerExchange environment.
A PowerExchange environment includes the following libraries:
• dtllib. PowerExchange software library.
• datalib. Library that contains data files such as the CCT file for capture registrations, PowerExchange configuration parameters, and the LISTENER and DTLOS_MSQG message queues.
• condlib. Library that is used only for CDC with PowerExchange Condense. This library contains PowerExchange Condense condense files; lock files; the CFGCOND(CAPTPARM) configuration member; and the CHECKPOINT, CMDHANDLER, COLLECTOR, CONDENSE, CONTROLLER and DUMP message queues. PowerExchange deletes files in this library during normal operation. Do not place your own files in this library without first contacting Informatica Global Customer Support.
• cpxlib. Library that contains extraction maps. This library is required only for CDC processing.
48 Chapter 4: Installing and Upgrading PowerExchange on i5/OS
Ensure that the CRTPWXENV command runs under a user profile that has the required authority. For more information ,see “User ID Requirements” on page 45. If you plan to use remote journals for CDC, ensure that the user profile has the required authority on both the local and remote systems.
1. Issue the following command:
ADDLIBLE LIB(dtllib) POSITION(*FIRST)2. Issue the CRTPWXENV command to create the PowerExchange environment. The parameters that you
specify on the CRTPWXENV command depend on whether you use CDC processing or only the bulk data movement function and whether you restored dtllib to an IASP.
If you capture change data from journal receivers on the same system as the DB2 database, use the following command syntax:
CRTPWXENV DESC('user_description') DATALIB(datalib) CONDLIB(condlib) ASPDEV(*NONE) CRTSYSOBJ(*YES) CPXLIB(cpxlib) JRNEXTSEQ(nnnn) RMTOSLEVEL(*LOCAL)
If you capture change data from remote journal receivers, use the following command syntax:
CRTPWXENV DESC('user_description') DATALIB(datalib) CONDLIB(condlib) ASPDEV(*NONE) CRTSYSOBJ(*YES) CPXLIB(cpxlib) JRNEXTSEQ(nnnn) RMTASPDEV(*NONE) RMTRDBDIRE(database_name) RMTSYSNAME(host_name) RMTOSLEVEL(os_level)
If you complete bulk data movement operations only, use the following command syntax:
CRTPWXENV DESC('user_description') DATALIB(datalib) CONDLIB(*NONE) ASPDEV(*NONE) CRTSYSOBJ(*YES)
If you restored dtllib into an IASP, specify the name of the ASP device in the ASPDEV parameter of the CRTPWXENV command. For example:
CRTPWXENV DESC('user_description') DATALIB(datalib) CONDLIB(condlib) ASPDEV(asp_device) CRTSYSOBJ(*YES)CPXLIB(cpxlib) JRNEXTSEQ(nnnn) RMTOSLEVEL(*LOCAL) EXTPGMLIB(exitlib)
The following table describes the parameters of the CRTPWXENV command:
Parameter Valid Values Description
ASPDEV 1 to 10 characters
Name of the ASP device where dtllib resides. All PowerExchange libraries must reside on the same ASP device.Default is *NONE.
CONDLIB 1 to 10 characters
PowerExchange Condense library that contains objects such as a configuration source file, data files for checkpoints and condense files, message queues, and the PowerExchange Delete Journal Receiver exit program and its journal.
CPXLIB 1 to 10 characters
PowerExchange capture library that contains the extraction map files.Default is *NONE.
CRTSYSOBJ See next table. -
DATALIB 1 to 10 characters
PowerExchange data library that contains objects such as a configuration source file, data files for capture registrations and condense files, the message log file, message queues, and PowerExchange job description.
Performing a Full Installation on i5/OS 49
Parameter Valid Values Description
DESC 1 to 25 characters
A brief text description that PowerExchange uses when creating the datalib, condlib, and cpxlib libraries.
EXTPGMLIB 1 to 10 characters
Specifies a PowerExchange Delete Journal exit program library.Default is *NONE. Use the default unless you also specified the ASPDEV parameter.
JRNEXTSEQ 1000 through 9999
A unique four-digit number that is used to register the PowerExchange Delete Journal Receiver exit program for the exit point QIBM_QJO_DLT_JRNRCV.Specify a value that is not used on your system. To determine the numbers that are currently registered against the exit point, use the WRKREGINF command and then choose option 8.Default is 1000.
RMTASPDEV Maximum length of 10 characters
In a remote journaling environment, the name of an ASP device on which the CRTPWXENV command creates only dtllib and datalib libraries that contain a SQL package and SQL views for accessing source table metadata. This ASP device is remote from where you run the CRTPWXENV command and create the primary PowerExchange environment.Include this parameter only if you plan to use remote journal receivers for CDC and want to use an ASP on the local system to store the files that the remote PowerExchange Listener requires to access the table metadata.Default is *.
RMTOSLEVEL *LOCALV7R1M0V7R2M0V7R3M0
Specifies the i5/OS version that runs on a remote machine. Include this parameter only if the metadata being retrieved is for tables that are stored in libraries on a remote machine. If the metadata is on the machine where this command is executed, the software determines the operating system release level.This parameter controls the views that the software builds over the system metadata tables.
RMTRDBDIRE Maximum length of 18 characters
In a remote journaling environment, the name of DB2 database on the local system that contains the DB2 source tables for CDC. This value must have been defined to i5/OS with the “Work with Relational Database Directory Entries” function (WRKRDBDIRE).Include this parameter only if you plan to use remote journal receivers for CDC.Default is *LOCAL.
RMTSYSNAME Maximum length of 68 characters
In a remote journaling environment, the name of the i5/OS host that contains the DB2 source tables for CDC and the local journals and journal receivers. Also called the local system. This value must have been defined to i5/OS with the “Work with TCP/IP Host Table Entries” function.Include this parameter only if you plan to use remote journal receivers for CDC.Default is *NONE.
50 Chapter 4: Installing and Upgrading PowerExchange on i5/OS
The following table describes the objects that the CRTSYSOBJ parameter creates so that PowerExchange can run in its own subsystem:
Object Type
Description Object Name Library
*CLS Class that defines the run-time attributes of PowerExchange jobs. DTLLIST datalib
*OUTQ Output queue that stores all spooled file outputs from PowerExchange jobs.
datalib QGPL
*SBSD Subsystem description that is used to run all the PowerExchange jobs for this environment.
datalib QGPL
*JOBQ Job queue that is associated with the subsystem description. datalib QGPL
*JOBD Job description that describes a job that uses all the system objects and libraries created for this environment.
DTLLIST datalib
3. If you want to move the objects that are created by default in the QGPL library to other libraries, use the appropriate commands.
You might not be able to move objects to an alternative library in an IASP. i5/OS does not permit certain object types, such as output queues and job queues, to reside in libraries within an IASP.
The following example shows the commands that you can use to move objects to an alternative library newlib:
ENDSBS SBS(datalib) MOVOBJ OBJ(save_file_library/datalib) OBJTYPE(*OUTQ) TOLIB(newlib) MOVOBJ OBJ(save_file_library/datalib) OBJTYPE(*JOBQ) TOLIB(newlib) MOVOBJ OBJ(save_file_library/datalib) OBJTYPE(*SBSD) TOLIB(newlib) CHGJOBD JOBD(datalib/DTLLIST) JOBQ(newlib/datalib) OUTQ(newlib/datalib) RMVJOBQE SBSD(newlib/datalib) JOBQ(save_file_library/datalib)ADDJOBQE SBSD(newlib/datalib) JOBQ(newlib/datalib) MAXACT(*NOMAX) SEQNBR(1) MAXPTY1(*NOMAX) MAXPTY2(*NOMAX) MAXPTY3(*NOMAX) MAXPTY4(*NOMAX) MAXPTY5(*NOMAX) MAXPTY6(*NOMAX) MAXPTY7(*NOMAX) MAXPTY8(*NOMAX) MAXPTY9(*NOMAX) STRSBS SBSD(newlib/datalib)
Note: If you specify CRTSYSOBJ(*NO) on the CRTPWXENV command, make sure the subsystem and job queue where you intend to run the PowerExchange Listener can support multiple concurrent jobs. If you are using CDC, the subsystem and job queue should support a minimum of six concurrent jobs.
Step 8. Change Object Ownership (Optional)You can the change the ownership of the objects that were created from the shipped library and are owned by the user ID under which PowerExchange software and libraries were installed. Perform this step if you use a user ID for installation that is different from the one under which you want to run PowerExchange.
To change this user ID for the dtllib and datalib libraries, enter the following commands:
call pgm(dtllib/chgallobj) parm('dtllib' 'pwxusr')call pgm(dtllib/chgallobj) parm('datalib' 'pwxusr')
To change the user ID for the condlib and cpxlib libraries, which are used for PowerExchange CDC, enter the following commands:
call pgm(dtllib/chgallobj) parm('condlib' 'pwxusr')call pgm(dtllib/chgallobj) parm('cpxlib' 'pwxusr')
Performing a Full Installation on i5/OS 51
Step 9. Create a Relational Database Directory Entry (Optional)Perform this step only if you want to use the DB2400C DB2 Call Level Interface (CLI) access method.
Use the following command to specify that the Relational Database Directory entry or entries with which you want to work:
WRKRDBDIREA Relational Database Directory entry can be a local database or a remote database on an i5/OS system on which the PowerExchange Listener running. This command specifies all local and remote entries on the i5/OS system, including *LOCAL.
If a Relational Database Directory entry does not exist, you must create one. The CLI access method requires a Relational Database Directory entry to obtain the name of the database to access.
Step 10. Configure PowerExchange User AuthorityConfigure security options for the PowerExchange Listener and user.
If you want to run the PowerExchange Listener interactively, ensure that the library list for the current job includes the dtllib and datalib libraries before running the commands shown.
If you want the PowerExchange Listener to use the user ID and passwords supplied from the remote platform for security, change the first SECURITY parameter in the DBMOVER configuration file to a nonzero value.
Before running jobs, ensure the pwxusr user ID has *EXECUTE authority for the following objects:
• QSYGETPH
• QSYRLSPH
• QWTSETP
• QCLRPGMI
You can grant EXECUTE authority on these objects by entering the following commands:
GRTOBJAUT OBJ(QSYGETPH) OBJTYPE(*PGM) AUT(*EXECUTE) USER(pwxusr)GRTOBJAUT OBJ(QSYRLSPH) OBJTYPE(*PGM) AUT(*EXECUTE) USER(pwxusr)GRTOBJAUT OBJ(QWTSETP) OBJTYPE(*PGM) AUT(*EXECUTE) USER(pwxusr)GRTOBJAUT OBJ(QCLRPGMI) OBJTYPE(*PGM) AUT(*EXECUTE *READ) USER(pwxusr)
Also, to run the PowerExchange Listener, the pwxusr user ID must have *READ authority for all of the user profiles. The following command grants *READ authority:
GRTOBJAUT OBJ(remote_id) OBJTYPE(*USRPRF) AUT(*READ) USER(pwxusr)
Step 11. Test the InstallationTo test the installation, use the PowerExchange DTLINFO utility, which is located in the dtllib library.
To run the DTLINFO utility, enter the following command:
CALL DTLINFOThe following information is displayed for the current PowerExchange installation:
• Version
• Release and release level
• Build date and time
For more information about DTLINFO, see the PowerExchange Utilities Guide.
52 Chapter 4: Installing and Upgrading PowerExchange on i5/OS
After You Install PowerExchange on i5/OSAfter you install PowerExchange, perform the following post-installation tasks:
• If you are upgrading from a previous release, review the PowerExchange Release Guide for new features and changes.
• Optionally, copy PowerExchange data and configuration files from a previous release.
• Configure PowerExchange prior to performing bulk data movement or change data capture (CDC).
For more information about configuring PowerExchange, see the following documents:
- For bulk data movement configuration, see the PowerExchange Bulk Data Movement Guide.
- For CDC configuration, see the PowerExchange CDC Guide for i5/OS.
- For DBMOVER configuration file parameters, see the PowerExchange Reference Manual.
After you have configured PowerExchange and optionally copied PowerExchange data, you can start the PowerExchange Listener and, if required, PowerExchange Condense. For more information about starting and stopping PowerExchange tasks, see the PowerExchange Command Reference.
Related Topics:• “Copying Data and Configuration Files from a Previous Release on i5/OS” on page 55
• “Migrating Data Maps, Capture Registrations, and Extraction Maps” on page 39
Upgrading PowerExchange to a New Release on i5/OS
This section discusses upgrading PowerExchange to a new release on i5/OS. To upgrade to a new release on i5/OS, you must perform a full installation.
Related Topics:• “Installing a HotFix on i5/OS” on page 55
Before You Upgrade PowerExchange on i5/OSBefore you upgrade PowerExchange on i5/OS, perform pre-requisite tasks.
Complete the following tasks:
1. Stop all PowerExchange tasks.
2. Back up the PowerExchange installation library, dtllib. This library contains the PowerExchange programs, messages, and license key. If you specify the DMX_DIR parameter in the DBMOVER member of the CFG file, back up the library to which it points.
3. If you use CDC, back up the following libraries:
• datalib. PowerExchange created this library when you ran the CRTPWXENV command as a part of the installation process. In addition to the CFG file, this library contains the CCT file that holds the capture registrations as well as files for the PowerExchange Condense.
• cpxlib. This library contains the extraction maps, and is pointed to by the CPX_DIR parameter in the DBMOVER member of the CFG file.
Upgrading PowerExchange to a New Release on i5/OS 53
4. If you use PowerExchange Condense, back up the directories you specified in the following parameters in the CAPTPARM member of the CFG file:
• CHKPT_BASENAME. The library that this parameter points to contains the checkpoint files for PowerExchange Condense.
• COND_DIR. The library that this parameter points to contains the condense files created by PowerExchange Condense.
Note: If you plan to cold start PowerExchange Condense, you do not need to backup the libraries specified by the CHKPT_BASENAME and COND_DIR parameters.
Upgrading PowerExchange on i5/OSPowerExchange does not provide an upgrade installation option for i5/OS. You must perform a full installation. When you perform the full installation, create a new PowerExchange environment that includes new copies of the following libraries:
• STDATAMAPS. The default PowerExchange library name for data maps. You can override the name for the data map library by using the DMX_DIR parameter in the DBMOVER configuration file.
• dtllib. The default PowerExchange installation library name. You must manually create this library prior to installing PowerExchange.
• datalib. The default PowerExchange data library name. PowerExchange creates this library when you run the CRTPWXENV command during the installation process. In addition to the CFG file, this library contains the CCT file that holds the capture registrations as well as files for the PowerExchange Condense.
• cpxlib. The default PowerExchange library name for CDC extraction maps. PowerExchange creates this library when you run the CRTPWXENV command during the installation process. You can override the name for the CPX library by using the CPX_DIR parameter in the DBMOVER member of the CFG file.
• condlib. The default PowerExchange Condense library name. PowerExchange creates this library when you run the CRTPWXENV command during the installation process. You can override the name for the PowerExchange Condense library by using the COND_DIR parameter in the CAPTPARM member of the CFG file. PowerExchange Condense writes the condense data into condense files in this library.
• Checkpoint files. The checkpoint files for PowerExchange Condense. Specify the library and file name prefix for these files in the CHKPT_BASENAME parameter in the CAPTPARM member of the CFG file.
Related Topics:• “Performing a Full Installation on i5/OS” on page 44
After You Upgrade PowerExchange on i5/OSAfter you upgrade PowerExchange, perform the following post-installation tasks:
• Review the PowerExchange Release Guide for new features and changes.
• Optionally, copy PowerExchange data and configuration files from a previous release.
• If necessary, configure PowerExchange prior to performing bulk data movement or change data capture (CDC).
Related Topics:• “Copying Data and Configuration Files from a Previous Release on i5/OS” on page 55
• “Migrating Data Maps, Capture Registrations, and Extraction Maps” on page 39
54 Chapter 4: Installing and Upgrading PowerExchange on i5/OS
Copying Data and Configuration Files from a Previous Release on i5/OSAfter you have completed the PowerExchange installation, you can copy or migrate the data maps, capture registrations, extraction maps, configuration files, and PowerExchange Condense checkpoints and condense files from the previous release to the libraries for the new PowerExchange environment. Copying this information enables you to maintain all existing bulk and CDC map definitions as well as condensed change data.
For bulk data movement, copy the DBMOVER member of the datalib/CFG file from the previous release installation to the new installation.
For CDC, if you plan to cold start PowerExchange Condense in the new environment, you do not need to copy any additional files.
If you plan to warm start PowerExchange Condense, copy the following additional libraries, files, and members from the previous release installation to the new installation:
• DBMOVER member of the datalib/CFG file
• All files that begin with FULL and PART in the condlib library. These files are the condense files and contains the change data.
• The PowerExchange Condense checkpoint files, which are pointed to by the CHKPT_BASENAME parameter in the CAPTPARM member of the CFG file.
Also, use the DTLURDMO utility to migrate data maps, capture registrations. For more information, see “Migrating Data Maps, Capture Registrations, and Extraction Maps” on page 39.
PowerExchange ConfigurationIf necessary, configure PowerExchange prior to performing bulk data movement or change data capture (CDC).
For configuration information, see the following documents:
• For bulk data movement configuration, see the PowerExchange Bulk Data Movement Guide.
• For CDC configuration, see the PowerExchange CDC Guide for i5/OS.
• For DBMOVER configuration file parameters, see the PowerExchange Reference Manual.
After you have configured PowerExchange, you can restart the PowerExchange Listener and, if required, PowerExchange Condense. For more information about starting and stopping PowerExchange tasks, see the PowerExchange Command Reference.
Installing a HotFix on i5/OSThis section describes how to install a hotfix to an existing PowerExchange environment. To install a hotfix, the hotfix version and the existing PowerExchange version must be the same.
Hotfixes provide a subset of the standard PowerExchange software that you apply to an existing PowerExchange environment. When you install a hotfix, PowerExchange does not create new data libraries, such as those for data maps, capture registrations, and extraction maps. As a result, you do not need to migrate the contents of these data sets, which simplifies the hotfix installation process.
Because PowerExchange hotfixes are cumulative, you need to install only the latest available hotfix.
Installing a HotFix on i5/OS 55
Related Topics:• “Upgrading PowerExchange to a New Release on i5/OS” on page 53
Before You Install a HotFix on i5/OSBefore you install the hotfix, perform prerequisite tasks.
Complete the following tasks:
1. Stop all PowerExchange tasks.
2. Back up the PowerExchange installation library, dtllib. This library contains the PowerExchange programs, messages, and license key.
3. If you specify the DMX_DIR parameter in the DBMOVER member of the CFG file, back up the library to which it points.
4. If you use CDC, back up the following libraries:
• datalib. PowerExchange created this library when you ran the CRTPWXENV command as a part of the installation process. In addition to the CFG file, this library contains the CCT file that holds the capture registrations as well as files for the PowerExchange Condense.
• cpxlib. This library contains the extraction maps, and is pointed to by the CPX_DIR parameter in the DBMOVER member of the CFG file.
5. If you use the PowerExchange Condense, back up the directories you specified in the following pwxccl.cfg or dtlca.cfg parameters:
• CHKPT_BASENAME. The library that this parameter points to contains the checkpoint files for PowerExchange Condense.
• COND_DIR. The library that this parameter points to contains the condense files created by PowerExchange Condense.
Note: You do not need to back up the libraries for CHKPT_BASENAME and COND_DIR if you plan to cold start the PowerExchange Condense.
Task Flow for Installing a HotFix on i5/OSUse the following checklist of tasks to install a PowerExchange hotfix on i5/OS:
Check Task Required or Optional
“Step 1. Extract the Save File on Windows” on page 57 Required
“Step 2. Transfer the Save File to the i5/OS System” on page 57 Required
“Step 3. Restore the Save File ” on page 57 Required
“Step 4. Verify the License Key File” on page 58 Required
“Step 5. Update the Signature of Installed Programs” on page 58 Required only if indicated by the Release Notes for the hotfix
“Step 6. Update the DB2 Package for Remote Journals” on page 58 Required if you configured i5/OS to access DB2 for i5/OS metadata on a remote system for CDC
56 Chapter 4: Installing and Upgrading PowerExchange on i5/OS

Check Task Required or Optional
“Step 7. Change Object Ownership (Optional)” on page 58 Optional
“Step 8. Verify That the HotFix Is Installed” on page 59 Recommended
“Step 9. Restart PowerExchange Tasks” on page 59 Required
Installing a HotFix on i5/OSUse the following steps to install a hotfix to PowerExchange on i5/OS:
Step 1. Extract the Save File on WindowsPowerExchange provides a single self-extracting executable zip file that contains the save file for the hotfix. The zip file is located in the patches/i5os directory of the CD image. The zip file name has the following format:
pwxvrm_hotfixn_i5os.exe The variable vrm is the version, release, and modification level, and the variable n is the hotfix number. For more information about the specific file name, see the PowerExchange Release Notes for the PowerExchange hotfix.
Unzip the self‑extracting zip file into a temporary directory on your Windows machine.
Step 2. Transfer the Save File to the i5/OS SystemOn the i5/OS system, enter the following i5/OS command to create a save file in which to store the hotfix installation file:
CRTSAVF library/save_fileThen, use FTP to transfer the hotfix installation file in BINARY mode to the save file on the i5/OS system.
Step 3. Restore the Save FileEnter the following i5/OS command to restore the save file to the PowerExchange installation library, dtllib:
RSTOBJ OBJ(*ALL) SAVLIB(DTLvrm) DEV(*SAVF) SAVF(library/save_file) RSTLIB(dtllib) MBROPT(*ALL) ALWOBJDIF(*ALL) FRCOBJCVN(*YES)
The following table describes the variables that you need to enter in some of the parameters in the RSTOBJ command:
Parameter Description
DTLvrm The name of the library saved.PowerExchange uses "DTL" followed by the PowerExchange version.release.modification number. Use the DSPSAVF command to display the name of the library.
library/save_file The name of the library and save file to which you stored the hotfix installation file.
dtllib The name of the PowerExchange installation library.
Installing a HotFix on i5/OS 57
Step 4. Verify the License Key FileIf you store the license key in the PowerExchange installation directory, verify that it is still correct and has not been affected by the hotfix installation. If necessary, copy the KEY member of the LICENSE file from the backup.
To make migration to a new release simpler, store the license key in a library other than the PowerExchange installation library. You can use options on the start commands to point to locations of the license key and DBMOVER files. For more information about options for start commands for PowerExchange tasks, see “File Parameters in PowerExchange Start Commands on i5/OS” on page 189.
Step 5. Update the Signature of Installed ProgramsThe UPDPWXENV command updates the i5/OS signatures of the PowerExchange programs so that these signatures match the signatures of the service programs. The PowerExchange Release Notes for the hotfix indicates if you need to run the command.
u To update the signatures of PowerExchange programs, issue the following command:
UPDPWXENV PWXLIB(dtllib) DATALIB(datalib) SAVF(library/save_file)The following table describes the variables that you need to enter in the parameters in the UPDPWXENV command:
Variable Variable Description
dtllib The name of the PowerExchange installation library.
datalib The name of the PowerExchange dat library.
library/save_file The name of the library and save file in which you stored the hotfix installation file.
Step 6. Update the DB2 Package for Remote JournalsIf you configured the i5/OS system to access DB2 for i5/OS metadata on a remote system for CDC, update the DB2 package for the remote journals.
u To update the package, issue the CRTPWXPKG command from the i5/OS console.
Use the following syntax:
CRTPWXPKG DTLLIB(dtllib) DATALIB(datalib) RMTRDBDIRE(database_name)
Step 7. Change Object Ownership (Optional)If you previously changed the ownership of objects when you performed the full installation, you must run the same commands from Step 7 of the full installation again to change the ownership of the objects that the hotfix supplies.
To change user ID for the dtllib and datalib libraries, run the following commands:
call pgm(dtllib/chgallobj) parm('dtllib' 'pwxusr')call pgm(dtllib/chgallobj) parm('datalib' 'pwxusr')
To change the user ID for the condlib and cpxlib libraries, run the following commands:
call pgm(dtllib/chgallobj) parm('condlib' 'pwxusr')call pgm(dtllib/chgallobj) parm('cpxlib' 'pwxusr')
58 Chapter 4: Installing and Upgrading PowerExchange on i5/OS
Step 8. Verify That the HotFix Is InstalledRun the DTLINFO utility to confirm that the current PowerExchange version matches the hotfix level.
For more information about the DTLINFO utility, see the PowerExchange Utilities Guide.
Step 9. Restart PowerExchange TasksRestart the PowerExchange tasks that you stopped just prior to installing the hotfix.
These tasks include the PowerExchange Listener and PowerExchange Condense tasks.For more information, see the PowerExchange Command Reference.
Uninstalling PowerExchange on i5/OSUse this procedure to uninstall PowerExchange on i5/OS. If you added remote capture registrations, perform the applicable steps on both the local and remote machines.
1. Stop all PowerExchange tasks.
2. Clear all spooled files from the PowerExchange output queue. The name of the output queue is the value that you specified for the DATALIB parameter of the CRTPWXENV command. The output queue resides in either QGPL or the data library itself, depending on the PowerExchange version.
3. Issue the ENDSBS command to end the PowerExchange subsystem. The name of the subsystem is the value that you specified for the DATALIB parameter of the CRTPWXENV command.
4. Delete all libraries that were created during the installation process, including the data maps library.
5. Delete any objects in QGPL that have the name that you specified for the DATALIB parameter of the CRTPWXENV command.
6. Delete any user profiles that were created during the installation process.
Uninstalling PowerExchange on i5/OS 59
C h a p t e r 5
Installing and Upgrading PowerExchange on Linux and UNIX
This chapter includes the following topics:
• Linux and UNIX Installation Overview, 60
• Performing a Full Installation on Linux or UNIX, 60
• Performing an Upgrade Installation on Linux or UNIX, 69
• Installing a HotFix on Linux or UNIX, 71
Linux and UNIX Installation OverviewThis chapter provides instructions for the installing PowerExchange on Linux or UNIX, including instructions for a full installation, an upgrade, and a hotfix installation.
Note: The PowerExchange installation instructions apply to both Linux and UNIX unless otherwise noted.
Performing a Full Installation on Linux or UNIXPerform a full installation if you are installing PowerExchange for the first time or to a new location.
Before You Install PowerExchange on Linux or UNIXBefore installing PowerExchange, make sure that pre-installation requirements are met and that you have performed the specified prerequisite tasks.
General Pre-Installation RequirementsReview the information in this guide to perform general pre-installation requirements.
60
Use the guide to complete the following tasks:
• Verify that PowerExchange supports the versions and release levels of your operating system and data sources.
• Obtain a valid license key.
• Verify that the new PowerExchange release can operate with your PowerCenter installation.
• If you are upgrading from a previous release and plan to run multiple releases of PowerExchange, verify that the new PowerExchange release can operate with your existing PowerExchange installation.
• If you are upgrading from a previous release, perform required upgrade tasks.
Create User ID and Grant PrivilegesCreate a Linux or UNIX user ID for the installation.
Complete the following steps to create the user ID:
1. Create a new user ID for the installation to become the owner or administrator of the software. In the installation instructions, this user ID is called pwxuser. Using the correct System Administration tool, create the pwxuser user ID.
2. Define a home disk.
3. Grant rights and privileges to pwxuser that are sufficient to access data from different locations on the Linux or UNIX platform.
Disk Space RequirementsMake sure that sufficient disk space is available for the installation.
The following disk space is required:
• The PowerExchange installation requires about 150 MB of disk space. Other disk space requirements depend on the files and database records being sent and received.
• The PowerExchange installation also requires 200 MB of disk space for temporary files. On UNIX, the installation script writes temporary files to the /tmp directory. To specify the location of these files, you can set the TMP or InstallAnywhere IATEMPDIR environment variable.
Java RequirementsBefore you install PowerExchange on Linux or UNIX, verify that the Java Development Kit (JDK) is installed and set the INFA_JDK_HOME environment variable.
The following table shows the Java version that PowerExchange requires for each platform:
Platform Java Major Version Java Minor Version
AIX 1.8.0 pap64
Linux 1.8.0_77 -
Solaris 1.7.0_45 -
In the login shell (for example, the .bashrc or .cshrc startup file), set the INFA_JDK_HOME environment variable to the directory that contains the Java Development Kit (JDK). Verify that the login shell can access this environment variable.
Performing a Full Installation on Linux or UNIX 61
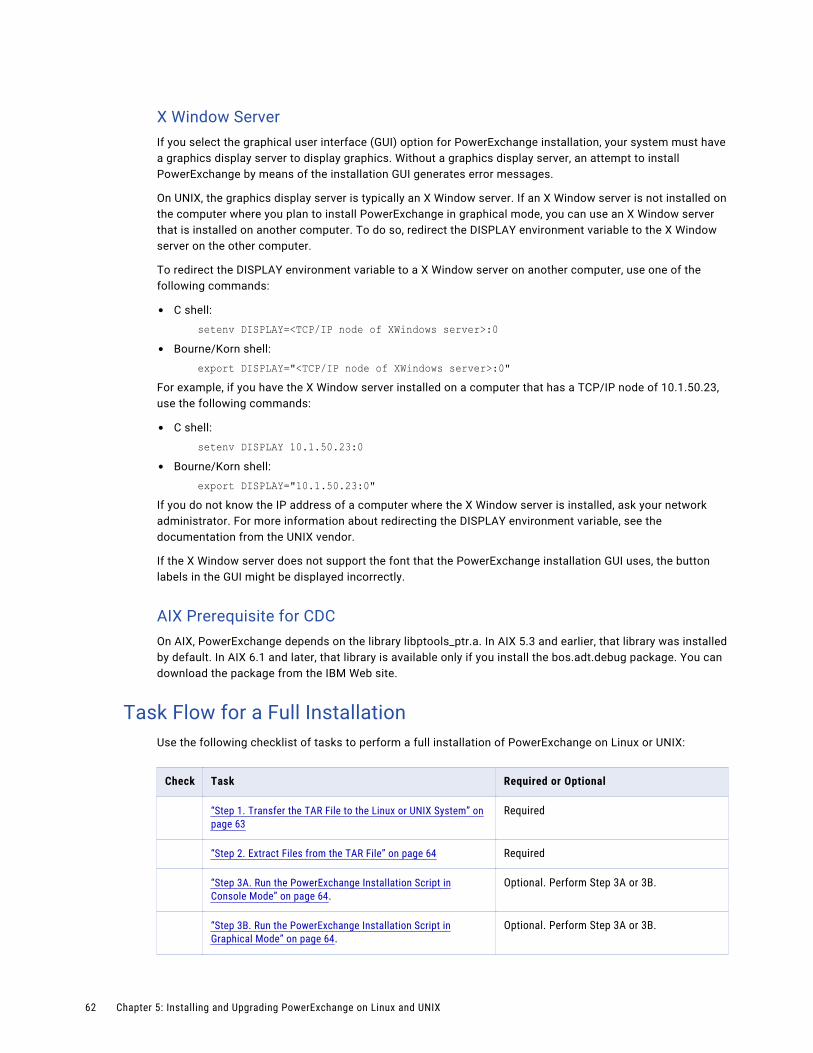
X Window ServerIf you select the graphical user interface (GUI) option for PowerExchange installation, your system must have a graphics display server to display graphics. Without a graphics display server, an attempt to install PowerExchange by means of the installation GUI generates error messages.
On UNIX, the graphics display server is typically an X Window server. If an X Window server is not installed on the computer where you plan to install PowerExchange in graphical mode, you can use an X Window server that is installed on another computer. To do so, redirect the DISPLAY environment variable to the X Window server on the other computer.
To redirect the DISPLAY environment variable to a X Window server on another computer, use one of the following commands:
• C shell:
setenv DISPLAY=<TCP/IP node of XWindows server>:0 • Bourne/Korn shell:
export DISPLAY="<TCP/IP node of XWindows server>:0" For example, if you have the X Window server installed on a computer that has a TCP/IP node of 10.1.50.23, use the following commands:
• C shell:
setenv DISPLAY 10.1.50.23:0 • Bourne/Korn shell:
export DISPLAY="10.1.50.23:0" If you do not know the IP address of a computer where the X Window server is installed, ask your network administrator. For more information about redirecting the DISPLAY environment variable, see the documentation from the UNIX vendor.
If the X Window server does not support the font that the PowerExchange installation GUI uses, the button labels in the GUI might be displayed incorrectly.
AIX Prerequisite for CDCOn AIX, PowerExchange depends on the library libptools_ptr.a. In AIX 5.3 and earlier, that library was installed by default. In AIX 6.1 and later, that library is available only if you install the bos.adt.debug package. You can download the package from the IBM Web site.
Task Flow for a Full InstallationUse the following checklist of tasks to perform a full installation of PowerExchange on Linux or UNIX:
Check Task Required or Optional
“Step 1. Transfer the TAR File to the Linux or UNIX System” on page 63
Required
“Step 2. Extract Files from the TAR File” on page 64 Required
“Step 3A. Run the PowerExchange Installation Script in Console Mode” on page 64.
Optional. Perform Step 3A or 3B.
“Step 3B. Run the PowerExchange Installation Script in Graphical Mode” on page 64.
Optional. Perform Step 3A or 3B.
62 Chapter 5: Installing and Upgrading PowerExchange on Linux and UNIX
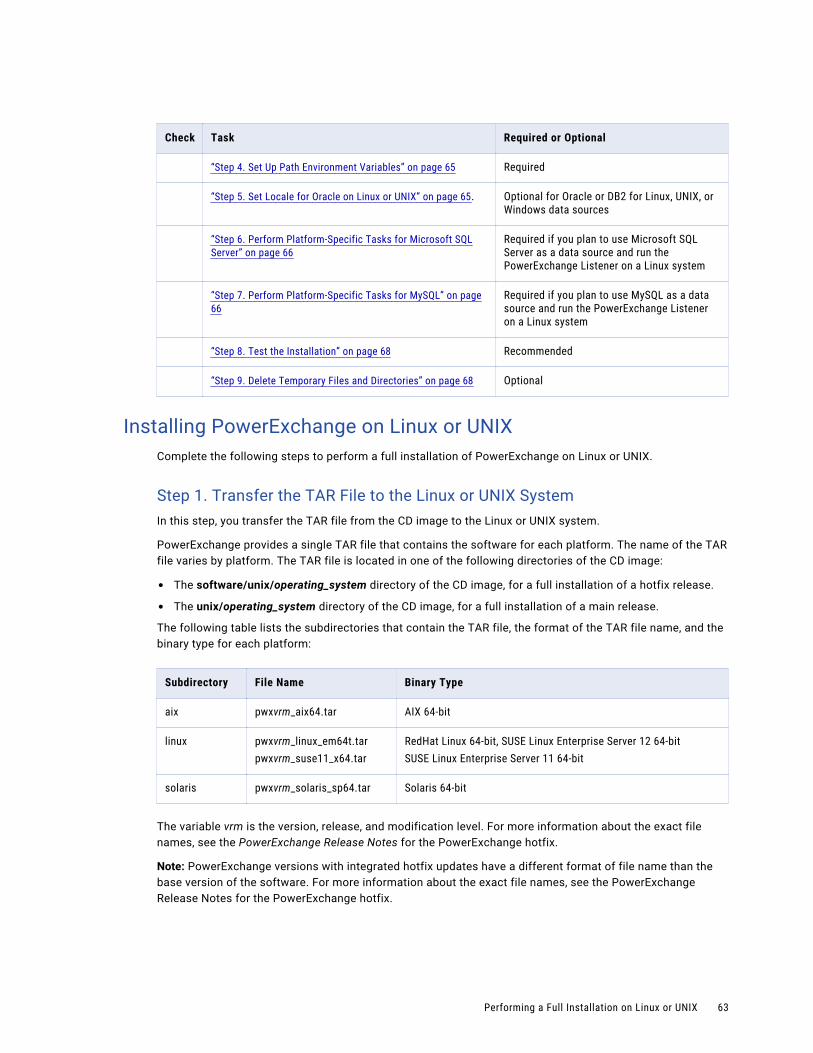
Check Task Required or Optional
“Step 4. Set Up Path Environment Variables” on page 65 Required
“Step 5. Set Locale for Oracle on Linux or UNIX” on page 65. Optional for Oracle or DB2 for Linux, UNIX, or Windows data sources
“Step 6. Perform Platform-Specific Tasks for Microsoft SQL Server” on page 66
Required if you plan to use Microsoft SQL Server as a data source and run the PowerExchange Listener on a Linux system
“Step 7. Perform Platform-Specific Tasks for MySQL” on page 66
Required if you plan to use MySQL as a data source and run the PowerExchange Listener on a Linux system
“Step 8. Test the Installation” on page 68 Recommended
“Step 9. Delete Temporary Files and Directories” on page 68 Optional
Installing PowerExchange on Linux or UNIXComplete the following steps to perform a full installation of PowerExchange on Linux or UNIX.
Step 1. Transfer the TAR File to the Linux or UNIX SystemIn this step, you transfer the TAR file from the CD image to the Linux or UNIX system.
PowerExchange provides a single TAR file that contains the software for each platform. The name of the TAR file varies by platform. The TAR file is located in one of the following directories of the CD image:
• The software/unix/operating_system directory of the CD image, for a full installation of a hotfix release.
• The unix/operating_system directory of the CD image, for a full installation of a main release.
The following table lists the subdirectories that contain the TAR file, the format of the TAR file name, and the binary type for each platform:
Subdirectory File Name Binary Type
aix pwxvrm_aix64.tar AIX 64-bit
linux pwxvrm_linux_em64t.tarpwxvrm_suse11_x64.tar
RedHat Linux 64-bit, SUSE Linux Enterprise Server 12 64-bitSUSE Linux Enterprise Server 11 64-bit
solaris pwxvrm_solaris_sp64.tar Solaris 64-bit
The variable vrm is the version, release, and modification level. For more information about the exact file names, see the PowerExchange Release Notes for the PowerExchange hotfix.
Note: PowerExchange versions with integrated hotfix updates have a different format of file name than the base version of the software. For more information about the exact file names, see the PowerExchange Release Notes for the PowerExchange hotfix.
Performing a Full Installation on Linux or UNIX 63

To transfer the TAR file to a UNIX or Linux system:
1. Log in as pwxuser and edit the .profile, as needed, to support the files and databases that will be accessed.
2. Create a temporary directory for this PowerExchange installation, for example:
mkdir pwx_install3. Make this directory the current working directory:
cd pwx_install4. Use FTP in BINARY mode to transfer the TAR file to the current working directory.
Step 2. Extract Files from the TAR FileUse the tar command to extract all of the files in the tar file to the directory that you created in Step 1.
The exact syntax might vary by type of Linux or UNIX platform. However, the following general syntax applies to most platforms:
tar -xvf file_name.tar
Step 3A. Run the PowerExchange Installation Script in Console ModeYou can install PowerExchange in console mode from a command prompt or in graphical mode. In this step, you install PowerExchange in console mode.
To install PowerExchange in console mode:
1. Locate the install.sh file.
2. At the command prompt, enter the following command:
sh install.sh3. Follow the instructions in the installation wizard.
Step 3B. Run the PowerExchange Installation Script in Graphical ModeIn this step, you install PowerExchange in graphical mode.
You can install PowerExchange in console mode from a command prompt or in graphical mode using the PowerExchange installation graphical user interface (GUI). To install PowerExchange in graphical mode, an X Window server must be configured and running. For more information about the X Window System, see the X Window documentation.
To install PowerExchange in graphical mode:
1. Ensure that the X Window System is running.
2. Locate the install.sh file.
3. At the command prompt, enter the following command:
sh install.sh -i gui4. Follow the instructions in the installation wizard.
64 Chapter 5: Installing and Upgrading PowerExchange on Linux and UNIX
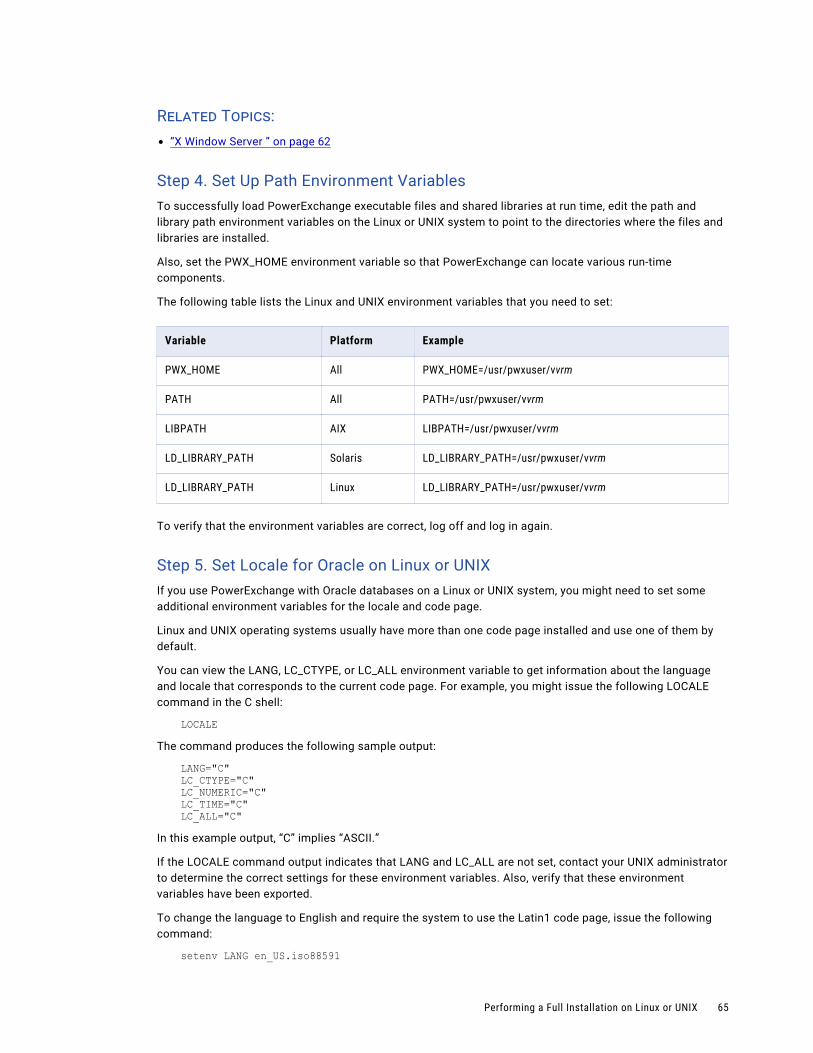
Related Topics:• “X Window Server ” on page 62
Step 4. Set Up Path Environment VariablesTo successfully load PowerExchange executable files and shared libraries at run time, edit the path and library path environment variables on the Linux or UNIX system to point to the directories where the files and libraries are installed.
Also, set the PWX_HOME environment variable so that PowerExchange can locate various run-time components.
The following table lists the Linux and UNIX environment variables that you need to set:
Variable Platform Example
PWX_HOME All PWX_HOME=/usr/pwxuser/vvrm
PATH All PATH=/usr/pwxuser/vvrm
LIBPATH AIX LIBPATH=/usr/pwxuser/vvrm
LD_LIBRARY_PATH Solaris LD_LIBRARY_PATH=/usr/pwxuser/vvrm
LD_LIBRARY_PATH Linux LD_LIBRARY_PATH=/usr/pwxuser/vvrm
To verify that the environment variables are correct, log off and log in again.
Step 5. Set Locale for Oracle on Linux or UNIXIf you use PowerExchange with Oracle databases on a Linux or UNIX system, you might need to set some additional environment variables for the locale and code page.
Linux and UNIX operating systems usually have more than one code page installed and use one of them by default.
You can view the LANG, LC_CTYPE, or LC_ALL environment variable to get information about the language and locale that corresponds to the current code page. For example, you might issue the following LOCALE command in the C shell:
LOCALEThe command produces the following sample output:
LANG="C"LC_CTYPE="C"LC_NUMERIC="C"LC_TIME="C"LC_ALL="C"
In this example output, “C” implies “ASCII.”
If the LOCALE command output indicates that LANG and LC_ALL are not set, contact your UNIX administrator to determine the correct settings for these environment variables. Also, verify that these environment variables have been exported.
To change the language to English and require the system to use the Latin1 code page, issue the following command:
setenv LANG en_US.iso88591
Performing a Full Installation on Linux or UNIX 65
In this case, the locale changes to Latin1 (ISO 8859‑1), as shown in the following sample output:
LANG="en_US.iso88591"LC_CTYPE="en_US.iso88591"LC_NUMERIC="en_US.iso88591"LC_TIME="en_US.iso88591"LC_ALL="en_US.iso88591"
For more information about changing the locale or code page of your UNIX system, see the documentation for your UNIX system.
Step 7. Perform Platform-Specific Tasks for OracleIf you run Oracle on a zLinux system, preload the libnnz10.so and libclntsh.so libraries by issuing the following export command:
export LD_PRELOAD=$ORACLE_HOME/lib/libnnz10.so:$ORACLE_HOME/lib/libclntsh.so
Step 6. Perform Platform-Specific Tasks for Microsoft SQL ServerIf you plan to use Microsoft SQL Server as a data source and run the PowerExchange Listener on a Linux system, you must configure the DataDirect ODBC driver on Linux that PowerExchange supplies to connect to the SQL Server system.
1. Set the ODBCINI and ODBCINST environment variables to the DataDirect ODBC installation directory.
If the installation directory is pwx_base_installation/ODBCversion, set the values as follows:
$ ODBCINI=pwx_base_installation/ODBCversion/odbc.ini; export ODBCINI$ ODBCINST=pwx_base_installation/ODBCversion/odbc.ini; export ODBCINST
2. Set the shared library environment variable. Use the following syntax:
$ LD_LIBRARY_PATH=${LD_LIBRARY_PATH}:pwx_base_installation/ODBCversion/lib;export LD_LIBRARY_PATH
3. Edit the existing odbcinst.ini file.
Verify that the "'Driver'" path in the "[DataDirect 8.0 New SQL Server Wire Protocol]" section is correct.
The entry should appear as follows:
Driver=pwx_base_installation/ODBCversion/lib/DWsqls28.so
Step 7. Perform Platform-Specific Tasks for MySQLIf you plan to use MySQL as a data source and run the PowerExchange Listener on a Linux system, you must perform several steps to configure the source system.
1. Verify that the MySQL mysqlbinlog utility is installed on the system where change capture processing will occur. This location can be local to or remote from the source database.
The following configurations meet this requirement:
• Run PowerExchange and the mysqlbinlog utility on the MySQL source database server.
• Run PowerExchange and the mysqlbinlog utility on a machine that is remote from the MySQL source database server. Either specify the mysqlbinlog path in the Path environment variable or specify the mysqlbinlog full path and file name in the MYSQLBINLOG parameter in the MYSQL CAPI_CONNECTION statement in the dbmover configuration file.
66 Chapter 5: Installing and Upgrading PowerExchange on Linux and UNIX
2. If PowerExchange capture will run on a Linux system, configure ODBC on that system so that PowerExchange will be able to use the ODBC driver to connect to the MySQL server. Perform the following steps:
a. Set the ODBCINI and ODBCINST environment variables.
Use the following export statements:
export ODBCINI=$PWX_HOME/ODBC7.1/odbc.iniexport ODBCINST=$PWX_HOME/ODBC7.1/odbcinst.ini
b. Set the shared LD_LIBRARY_PATH environment variable.
Use the following statements:
LD_LIBRARY_PATH=${LD_LIBRARY_PATH}:$PWX_HOME/ODBC7.1/lib; export LD_LIBRARY_PATH
c. Update the ODBC driver information in the odbc.ini and odbcinst.ini files.
For example, add the following statement:
Driver=pwx_home/ODBC7.1/lib/DWmysql27.soThe pwx_home variable represents the local path to the DataDirect installation that PowerExchange uses.
3. Enable binary logging with the options that PowerExchange requires on the MySQL source database by using one of the following methods:
• If you start the MySQL database server from the command line, enter the following command:
mysqld --server-id[=server_id] --log-bin[=base_name] --binlog-format[=row] --binlog-row-image[=full]
• If you start the MySQL database server as a service on Windows or as a daemon on Linux, you can specify database configuration settings in an .ini or .cnf configuration file. The default file, my.ini, is located in the MySQL installation directory. To enable binary logging, add the following lines to your MySQL configuration file:
[mysqld]server-id=server_idlog-bin=base_namebinlog-format=rowbinlog-row-image=full
Notes:
• For MySQL 5.7.x, you must use a number greater than 0 for the server-id value.
• Informatica recommends that you include the optional log-bin parameter to specify the base name for the sequence of binary log files. To create the binary log file names, MySQL adds a numeric suffix to the base name, which is incremented each time a new binary log is created. If you do not specify a base name, MySQL uses the default base name of host_name-bin.
• PowerExchange requires row-based binary logging with the row image type of full. Verify that the binlog-format parameter is set to row and that the binlog-row-image parameter is set to full. These values are the default values.
4. Create a MySQL user that PowerExchange can use to connect to the MySQL database. Use the following SQL statement:
CREATE USER 'pwx_user'@'%' IDENTIFIED BY 'password';5. Grant the following privileges that are required for CDC to the PowerExchange user:
GRANT SELECT ON database_name.* TO 'pwx_user'@'%';GRANT REPLICATION CLIENT ON *.* TO 'pwx_user'@'%';
If the user needs to access binary logs on a remote MySQL server, grant the following additional privilege:
GRANT REPLICATION SLAVE ON database_name.* TO 'pwx_user'@'%';
Performing a Full Installation on Linux or UNIX 67
Step 8. Test the InstallationTo test the installation, use the PowerExchange DTLINFO utility.
To run the DTLINFO utility, enter the following command:
dtlinfoThe following information is displayed for the current PowerExchange installation:
• Version
• Release and release level
• Build date and time
For more information about DTLINFO, see the PowerExchange Utilities Guide.
Step 9. Delete Temporary Files and DirectoriesAfter you complete the installation, you can delete the temporary directory that you created in Step 1 and its contents.
After You Install PowerExchange on Linux or UNIXAfter you install PowerExchange, perform the following post-installation tasks:
• Review the PowerExchange Release Guide for new features and changes.
• Optionally, migrate PowerExchange data and configuration files from a previous release.
• If necessary, configure PowerExchange prior to performing bulk data movement or change data capture (CDC).
Related Topics:• “Copying PowerExchange Data from a Previous Release on Linux or UNIX” on page 68
• “Migrating Data Maps, Capture Registrations, and Extraction Maps” on page 39
Copying PowerExchange Data from a Previous Release on Linux or UNIXIf you are upgrading to a new PowerExchange release on the machine and creating a new PowerExchange environment, you can copy PowerExchange data from the previous release to the new location.
Copy the following PowerExchange data:
• Copy the DBMOVER configuration file.
• If you use the PowerExchange Logger for Linux, UNIX, and Windows, copy the directory that is specified in the EXT_CAPT_MASK parameter of the pwxccl or dtlca configuration file. This directory contains the PowerExchange Logger log files. If you use a group definitions file, back up the directories that are specified in the external_capture_mask positional parameter of each GROUP statement.
Note: You do not need to back up these directories if you plan to cold start the PowerExchange Logger for Linux, UNIX, and Windows.
Related Topics:• “Migrating Data Maps, Capture Registrations, and Extraction Maps” on page 39
PowerExchange ConfigurationConfigure PowerExchange prior to performing bulk data movement or change data capture (CDC).
68 Chapter 5: Installing and Upgrading PowerExchange on Linux and UNIX
For configuration information, see the following documents:
• For bulk data movement configuration, see the PowerExchange Bulk Data Movement Guide.
• For CDC configuration, see the PowerExchange CDC Guide for Linux, UNIX, and Windows.
• For dbmover.cfg configuration parameters, see the PowerExchange Reference Manual.
After you have configured PowerExchange, you can start the PowerExchange Listener and, if required, PowerExchange Logger for Linux, UNIX, and Windows. For more information about starting and stopping PowerExchange tasks, see the PowerExchange Command Reference.
PowerExchange Configuration Files for Localized EnvironmentsThe PowerExchange installation program installs sample configuration files for use in English and localized environments. The sample configuration files for localized environments include statements that specify the code page and messages file required for the environment.
PowerExchange provides the following sample configuration files:
File Name Environment
dbmover.cfg English
dbmover_bz.cfg Brazilian Portuguese
dbmover_ja.cfg Japanese
dbmover_ko.cfg Korean
dbmover_sc.cfg Simplified Chinese
Performing an Upgrade Installation on Linux or UNIXThis section describes how to perform an upgrade installation on Linux or UNIX. If you plan to install the new version of PowerExchange in the same directory as the previous version, follow the instructions in this topic.
Related Topics:• “Performing a Full Installation on Linux or UNIX” on page 60
• “Installing a HotFix on Linux or UNIX” on page 71
Before You Upgrade PowerExchange on Linux or UNIXBefore you upgrade the PowerExchange software, complete the following tasks:
1. Stop all PowerExchange tasks.
2. Back up the current PowerExchange installation directory to provide fallback, if necessary.
3. If you specify the DMX_DIR parameter in the dbmover configuration file, back up the directory to which it points.
Performing an Upgrade Installation on Linux or UNIX 69

4. If you use CDC, back up the directories that you specified in the following dbmover.cfg parameters:
• CAPT_PATH. Specifies the directory that contains the CCT files that hold the capture registrations as well as files for the PowerExchange Logger for Linux, UNIX, and Windows.
• CAPT_XTRA. Specifies the directory that contains the extraction maps.
5. If you use the PowerExchange Logger for Linux, UNIX, and Windows, back up the directory that is specified in the EXT_CAPT_MASK parameter of the pwxccl or dtlca configuration file. This directory contains the PowerExchange Logger log files. If you use a group definitions file, back up the directories that are specified in the external_capture_mask positional parameter of each GROUP statement.
Note: You do not need to back up these directories if you plan to cold start the PowerExchange Logger for Linux, UNIX, and Windows.
6. Review the prerequisites.
Related Topics:• “Before You Install PowerExchange on Linux or UNIX” on page 60
Task Flow for an Upgrade Installation on Linux or UNIXThese tasks for upgrading PowerExchange on Linux or UNIX are a subset of the tasks for a full installation.
Use the following checklist of tasks to upgrade PowerExchange on Linux or UNIX when using the same installation directory as the previous version:
Check Task Required or Optional
“Step 1. Transfer the TAR File to the Linux or UNIX System” on page 63
Required
“Step 2. Extract Files from the TAR File” on page 64 Required
“Step 3A. Run the PowerExchange Installation Script in Console Mode” on page 64
Optional. Perform Step 3A or 3B.
“Step 3B. Run the PowerExchange Installation Script in Graphical Mode” on page 64
Optional. Perform Step 3A or 3B.
“Step 6. Perform Platform-Specific Tasks for Microsoft SQL Server” on page 66
Required if you plan to use Microsoft SQL Server as a data source and run the PowerExchange Listener on a Linux system
“Step 7. Perform Platform-Specific Tasks for MySQL” on page 66
Required if you plan to use MySQL as a data source and run the PowerExchange Listener on a Linux system
“Step 8. Test the Installation” on page 68 Recommended
“Step 9. Delete Temporary Files and Directories” on page 68 Optional
After You Upgrade PowerExchange on Linux or UNIXReview the PowerExchange Release Guide for new features and changes.
70 Chapter 5: Installing and Upgrading PowerExchange on Linux and UNIX
If necessary, configure PowerExchange prior to performing bulk data movement operations or CDC processing. For configuration information, see the following documents:
• For bulk data movement configuration, see the PowerExchange Bulk Data Movement Guide.
• For CDC configuration, see the PowerExchange CDC Guide for Linux, UNIX, and Windows.
• For dbmover.cfg configuration parameters, see the PowerExchange Reference Manual.
After you have configured PowerExchange, you can restart the PowerExchange Listener and, if required, PowerExchange Logger for Linux, UNIX, and Windows. For more information about starting and stopping PowerExchange tasks, see the PowerExchange Command Reference.
PowerExchange Configuration Files for Localized EnvironmentsThe PowerExchange installation program installs sample configuration files for use in English and localized environments. The sample configuration files for localized environments include statements that specify the code page and messages file required for the environment.
PowerExchange provides the following sample configuration files:
File Name Environment
dbmover.cfg English
dbmover_bz.cfg Brazilian Portuguese
dbmover_ja.cfg Japanese
dbmover_ko.cfg Korean
dbmover_sc.cfg Simplified Chinese
Installing a HotFix on Linux or UNIXThis section describes how to install a hotfix to an existing PowerExchange environment. The hotfix version and the existing PowerExchange version must be the same.
Hotfixes provide a subset of the PowerExchange software. You install on top of an existing PowerExchange environment. When you install a hotfix, PowerExchange does not create new data files, such as those containing data maps, capture registrations, and extraction maps. As a result, you do not need to migrate the contents of these files, which simplifies the hotfix installation process.
Because PowerExchange hotfixes are cumulative, you need to install only the latest available hotfix.
Related Topics:• “Performing an Upgrade Installation on Linux or UNIX” on page 69
Before You Install a HotFix on Linux or UNIXBefore you install the hotfix, complete the following tasks:
1. Stop all PowerExchange tasks.
2. Back up the PowerExchange installation directory.
Installing a HotFix on Linux or UNIX 71
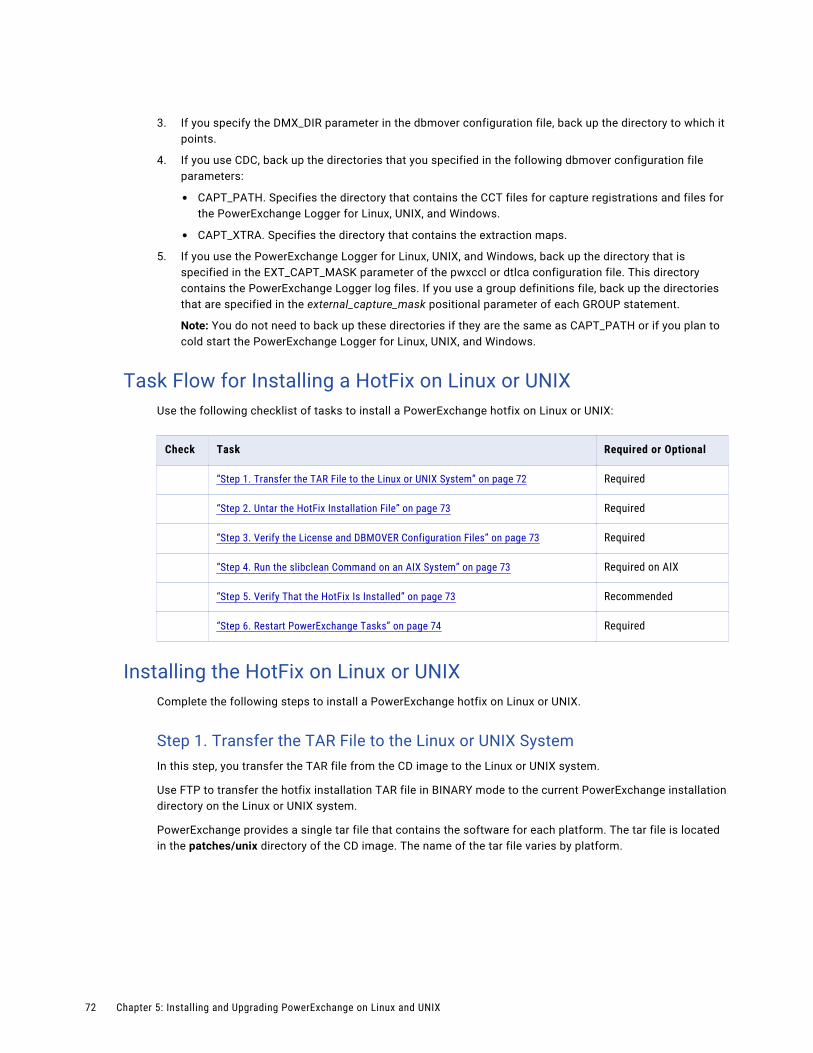
3. If you specify the DMX_DIR parameter in the dbmover configuration file, back up the directory to which it points.
4. If you use CDC, back up the directories that you specified in the following dbmover configuration file parameters:
• CAPT_PATH. Specifies the directory that contains the CCT files for capture registrations and files for the PowerExchange Logger for Linux, UNIX, and Windows.
• CAPT_XTRA. Specifies the directory that contains the extraction maps.
5. If you use the PowerExchange Logger for Linux, UNIX, and Windows, back up the directory that is specified in the EXT_CAPT_MASK parameter of the pwxccl or dtlca configuration file. This directory contains the PowerExchange Logger log files. If you use a group definitions file, back up the directories that are specified in the external_capture_mask positional parameter of each GROUP statement.
Note: You do not need to back up these directories if they are the same as CAPT_PATH or if you plan to cold start the PowerExchange Logger for Linux, UNIX, and Windows.
Task Flow for Installing a HotFix on Linux or UNIXUse the following checklist of tasks to install a PowerExchange hotfix on Linux or UNIX:
Check Task Required or Optional
“Step 1. Transfer the TAR File to the Linux or UNIX System” on page 72 Required
“Step 2. Untar the HotFix Installation File” on page 73 Required
“Step 3. Verify the License and DBMOVER Configuration Files” on page 73 Required
“Step 4. Run the slibclean Command on an AIX System” on page 73 Required on AIX
“Step 5. Verify That the HotFix Is Installed” on page 73 Recommended
“Step 6. Restart PowerExchange Tasks” on page 74 Required
Installing the HotFix on Linux or UNIXComplete the following steps to install a PowerExchange hotfix on Linux or UNIX.
Step 1. Transfer the TAR File to the Linux or UNIX SystemIn this step, you transfer the TAR file from the CD image to the Linux or UNIX system.
Use FTP to transfer the hotfix installation TAR file in BINARY mode to the current PowerExchange installation directory on the Linux or UNIX system.
PowerExchange provides a single tar file that contains the software for each platform. The tar file is located in the patches/unix directory of the CD image. The name of the tar file varies by platform.
72 Chapter 5: Installing and Upgrading PowerExchange on Linux and UNIX

The following table lists the subdirectories that contain the tar file, the format of the tar file name, and the binary type for each platform:
Subdirectory File Name Binary Type
aix pwxvrm_hotfixn_aix64.tar AIX 64-bit
linux pwxvrm_hotfixn_linux_em64t.tarpwxvrm_hotfixn_suse11_x64.tar
RedHat Linux 64-bit, SUSE Linux Enterprise Server 12 64-bitSUSE Linux Enterprise Server 11 64-bit
solaris pwxvrm_hotfixn_solaris_sp64.tar Solaris 64-bit
The variable vrm is the version, release, and modification level, and the variable n is the hotfix number. For more information about the exact file names, see the PowerExchange Release Notes for the PowerExchange hotfix.
Step 2. Untar the HotFix Installation FileUse the tar command to extract all of the files in the TAR file to the installation directory.
The exact syntax might vary by type of Linux or UNIX platform. However, the following general syntax applies to most platforms:
tar -xvf file_name.tar
Step 3. Verify the License and DBMOVER Configuration FilesIf you store the license.key and dbmover.cfg files in the PowerExchange installation directory, verify that they are accurate and have not been affected by the hotfix installation. If necessary, copy these files from the backup.
Tip: To make upgrading to a new release simpler, store the license.key and dbmover.cfg files in a directory other than the PowerExchange installation directory. You can use environment variables or options on the start commands to point to locations of the license.key and dbmover.cfg files. For more information about environment variable and options for start commands for PowerExchange tasks, see “PowerExchange Environment on Linux, UNIX, and Windows” on page 189.
Step 4. (zLinux only) Run the mkliblinks.sh ScriptOn zLinux, to reinstate required links for some modules, run the mkliblinks.sh script. This script is located in the PowerExchange installation directory.
Step 4. Run the slibclean Command on an AIX SystemTo ensure that the DTLINFO utility and the PowerExchange Listener report the correct hotfix number, run the slibclean command if you are installing on an AIX system. To run this command, you must have root or sudo authority.
Step 5. Verify That the HotFix Is InstalledRun the DTLINFO utility to verify that the current PowerExchange version matches the hotfix level.
For more information about the DTLINFO utility, see the PowerExchange Utilities Guide.
Installing a HotFix on Linux or UNIX 73
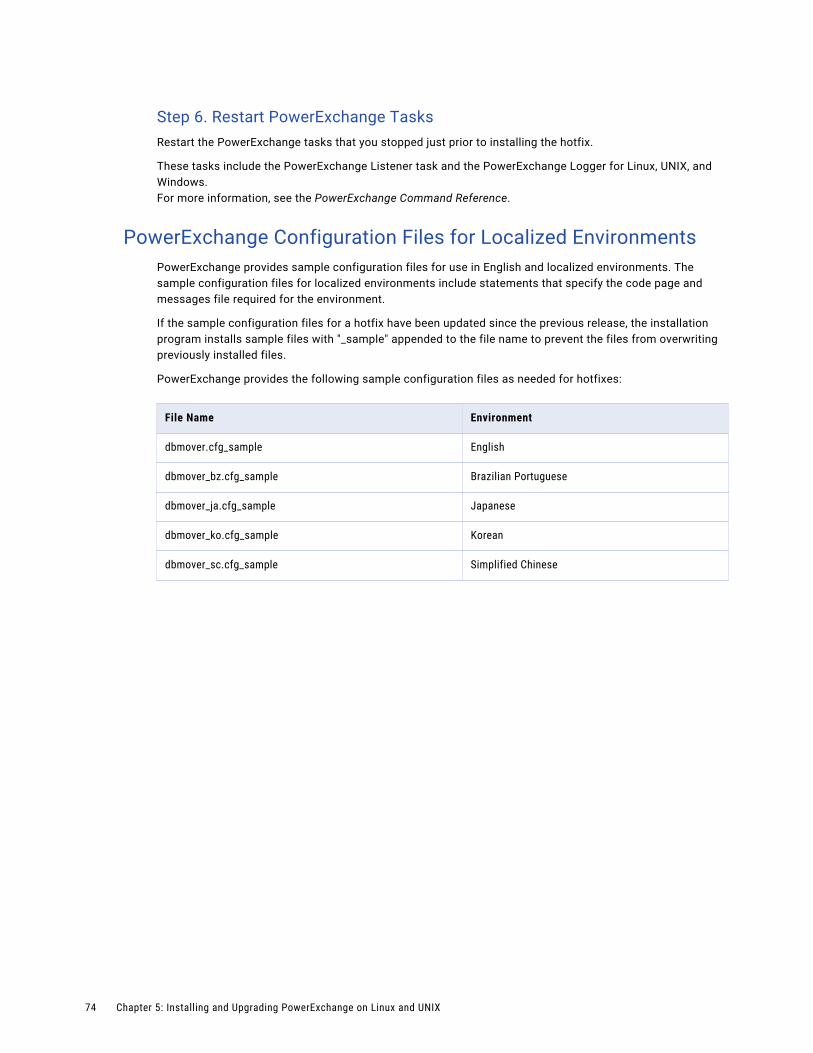
Step 6. Restart PowerExchange TasksRestart the PowerExchange tasks that you stopped just prior to installing the hotfix.
These tasks include the PowerExchange Listener task and the PowerExchange Logger for Linux, UNIX, and Windows.For more information, see the PowerExchange Command Reference.
PowerExchange Configuration Files for Localized EnvironmentsPowerExchange provides sample configuration files for use in English and localized environments. The sample configuration files for localized environments include statements that specify the code page and messages file required for the environment.
If the sample configuration files for a hotfix have been updated since the previous release, the installation program installs sample files with "_sample" appended to the file name to prevent the files from overwriting previously installed files.
PowerExchange provides the following sample configuration files as needed for hotfixes:
File Name Environment
dbmover.cfg_sample English
dbmover_bz.cfg_sample Brazilian Portuguese
dbmover_ja.cfg_sample Japanese
dbmover_ko.cfg_sample Korean
dbmover_sc.cfg_sample Simplified Chinese
74 Chapter 5: Installing and Upgrading PowerExchange on Linux and UNIX
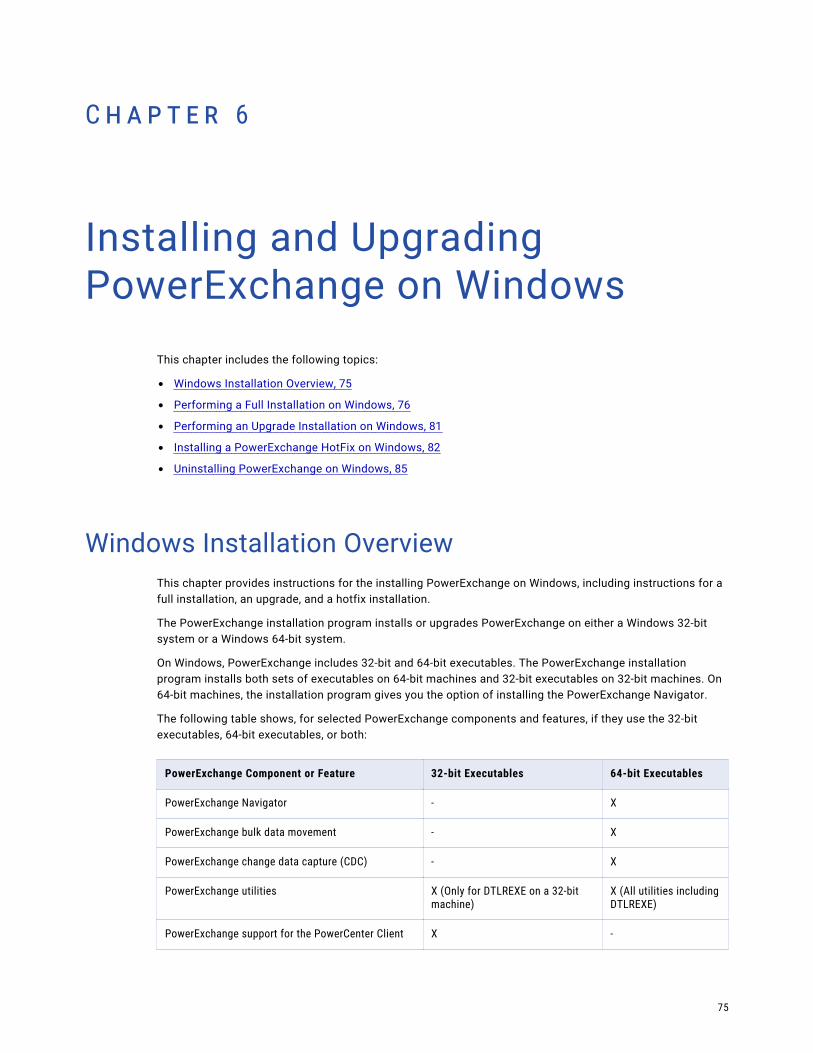
C h a p t e r 6
Installing and Upgrading PowerExchange on Windows
This chapter includes the following topics:
• Windows Installation Overview, 75
• Performing a Full Installation on Windows, 76
• Performing an Upgrade Installation on Windows, 81
• Installing a PowerExchange HotFix on Windows, 82
• Uninstalling PowerExchange on Windows, 85
Windows Installation OverviewThis chapter provides instructions for the installing PowerExchange on Windows, including instructions for a full installation, an upgrade, and a hotfix installation.
The PowerExchange installation program installs or upgrades PowerExchange on either a Windows 32-bit system or a Windows 64-bit system.
On Windows, PowerExchange includes 32-bit and 64-bit executables. The PowerExchange installation program installs both sets of executables on 64-bit machines and 32-bit executables on 32-bit machines. On 64-bit machines, the installation program gives you the option of installing the PowerExchange Navigator.
The following table shows, for selected PowerExchange components and features, if they use the 32-bit executables, 64-bit executables, or both:
PowerExchange Component or Feature 32-bit Executables 64-bit Executables
PowerExchange Navigator - X
PowerExchange bulk data movement - X
PowerExchange change data capture (CDC) - X
PowerExchange utilities X (Only for DTLREXE on a 32-bit machine)
X (All utilities including DTLREXE)
PowerExchange support for the PowerCenter Client X -
75
PowerExchange Component or Feature 32-bit Executables 64-bit Executables
PowerExchange support for the Informatica Developer
- X
PowerExchange support for the PowerCenter Integration Service and Data Integration Service
- X
ODBC Administrator support, and PowerExchange ODBC driver
X (Supports PowerExchange ODBC connectivity for 32-bit applications)
X
z/OS Installation Assistant - X
Performing a Full Installation on WindowsPerform a full installation if you are installing PowerExchange for the first time or to a new location or if you are upgrading PowerExchange.
Before You Install PowerExchange on WindowsBefore installing PowerExchange, make sure that pre-installation requirements are met and that you have performed the specified prerequisite tasks.
General Installation RequirementsBefore you install PowerExchange, perform the following tasks:
• Verify that PowerExchange supports the versions and release levels of your operating system and data sources.
• Obtain a valid license key.
• Verify that the new PowerExchange release can operate with your PowerCenter installation.
• If you are upgrading from a previous release and plan to run different release levels of PowerExchange on different systems, verify that the new PowerExchange release can operate with existing PowerExchange installations. For more information, see “PowerExchange to PowerExchange Interoperability” on page 34.
• If you are upgrading from a previous release, perform required migration tasks. For more information, see “Before You Upgrade PowerExchange on Windows” on page 81.
• Optionally, if you are upgrading from a previous release, uninstall the previous release from the Windows system.
For more information about uninstalling PowerExchange on Windows, see “Uninstalling PowerExchange on Windows” on page 85.
• Make a backup of the system PATH environment variable. The installation program prepends the PowerExchange path to the system PATH variable. If the maximum length of the PATH variable is exceeded, the variable may be truncated.
Disk Space RequirementsA PowerExchange installation on Windows requires 360 MB of disk space.
76 Chapter 6: Installing and Upgrading PowerExchange on Windows

ODBC ConsiderationsDetermine whether you need to install PowerExchange Open Database Connectivity (ODBC) drivers. You must install these drivers after you install PowerExchange if you plan to use ODBC to access PowerExchange from another Informatica product, such as PowerCenter or Data Archive.
Tip: To integrate PowerCenter with PowerExchange, Informatica recommends that you use the PowerExchange Client for PowerCenter (PWXPC) instead of PowerExchange ODBC. PWXPC offers additional functionality. For more information, see PowerExchange Interfaces for PowerCenter.
The PowerExchange installation delivers 32-bit and 64-bit versions of the following thin ODBC drivers:
• Informatica PowerExchange Unicode driver. Use this driver to retrieve metadata that contains multibyte characters.
• Informatica PowerExchange driver. Use this driver to access data sources.
Install PowerExchange ODBC drivers on the following machines:
• If you use ODBC to import metadata into the PowerCenter Designer (a 32-bit application) or preview data in PowerCenter, install the 32-bit PowerExchange ODBC drivers on the PowerCenter Client machine.
• If you run workflows that use ODBC, install the 64-bit PowerExchange ODBC drivers on the PowerCenter Integration Service or Data Integration Service machine.
Considerations for PowerExchange Environment VariablesYou can define PowerExchange environment variables to specify the location of PowerExchange message log, configuration, and license files. By moving these files from their default locations and using environment variables to point to the new locations, you can make upgrading easier and locating the files easier.
The following table lists the environment variables and the files to which they point:
Environment Variable Points to
DETAIL_LOGPATH PowerExchange message log file
PWX_CONFIG PowerExchange DBMOVER configuration file
PWX_LICENSE PowerExchange license key
The following table shows the default locations of the PowerExchange message log file, DBMOVER configuration file, and license key file in 32-bit and 64-bit PowerExchange environments:
PowerExchange File Default Location in 32-bit PowerExchange Default Location in 64-bit PowerExchange
Message log file Current working directory Current working directory
DBMOVER configuration file bin32 subdirectory of the installation directory Installation directory
License key file bin32 subdirectory of the installation directory Installation directory
In some cases you might run 32-bit and 64-bit Windows versions of PowerExchange on the same machine. For example, you might run the PowerCenter Developer and the PowerCenter Integration Server on the same machine. In this case, the Developer client invokes 32-bit PowerExchange executables to access metadata,
Performing a Full Installation on Windows 77
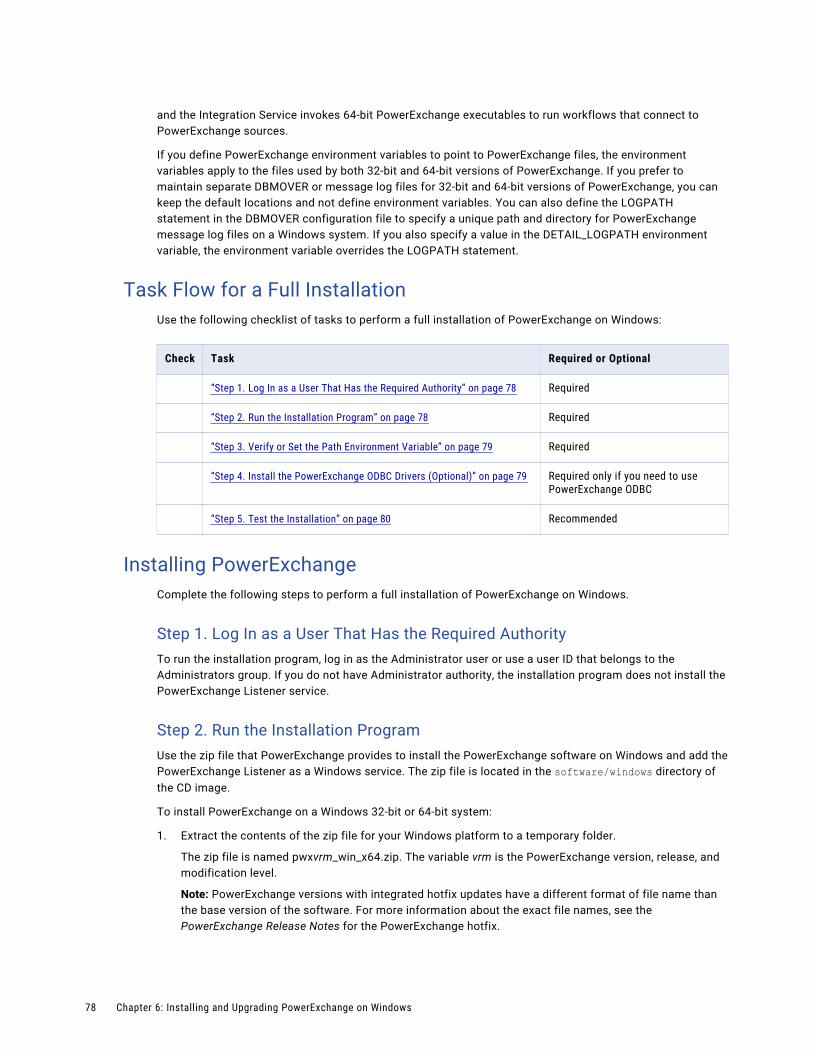
and the Integration Service invokes 64-bit PowerExchange executables to run workflows that connect to PowerExchange sources.
If you define PowerExchange environment variables to point to PowerExchange files, the environment variables apply to the files used by both 32-bit and 64-bit versions of PowerExchange. If you prefer to maintain separate DBMOVER or message log files for 32-bit and 64-bit versions of PowerExchange, you can keep the default locations and not define environment variables. You can also define the LOGPATH statement in the DBMOVER configuration file to specify a unique path and directory for PowerExchange message log files on a Windows system. If you also specify a value in the DETAIL_LOGPATH environment variable, the environment variable overrides the LOGPATH statement.
Task Flow for a Full InstallationUse the following checklist of tasks to perform a full installation of PowerExchange on Windows:
Check Task Required or Optional
“Step 1. Log In as a User That Has the Required Authority” on page 78 Required
“Step 2. Run the Installation Program” on page 78 Required
“Step 3. Verify or Set the Path Environment Variable” on page 79 Required
“Step 4. Install the PowerExchange ODBC Drivers (Optional)” on page 79 Required only if you need to use PowerExchange ODBC
“Step 5. Test the Installation” on page 80 Recommended
Installing PowerExchangeComplete the following steps to perform a full installation of PowerExchange on Windows.
Step 1. Log In as a User That Has the Required AuthorityTo run the installation program, log in as the Administrator user or use a user ID that belongs to the Administrators group. If you do not have Administrator authority, the installation program does not install the PowerExchange Listener service.
Step 2. Run the Installation ProgramUse the zip file that PowerExchange provides to install the PowerExchange software on Windows and add the PowerExchange Listener as a Windows service. The zip file is located in the software/windows directory of the CD image.
To install PowerExchange on a Windows 32-bit or 64-bit system:
1. Extract the contents of the zip file for your Windows platform to a temporary folder.
The zip file is named pwxvrm_win_x64.zip. The variable vrm is the PowerExchange version, release, and modification level.
Note: PowerExchange versions with integrated hotfix updates have a different format of file name than the base version of the software. For more information about the exact file names, see the PowerExchange Release Notes for the PowerExchange hotfix.
78 Chapter 6: Installing and Upgrading PowerExchange on Windows
When you extract the contents of the zip file, preserve its structure, so that the destination folder includes the following folders and files:
• properties folder
• Server folder
• source folder
• install.bat file
2. Run install.bat.
The installation interface starts.
3. If you are prompted to select a language, select a language and click OK.
4. On the Introduction page, click Next.
5. On the Enter License Key page, enter the license key and click Next.
If you do not know your license key, see “PowerExchange License Keys” on page 31.
6. On the Installation Directory page, accept the default installation directory, or click Choose to browse to an installation directory.
If you do not want to install the PowerExchange Navigator, clear the check box.
Then click Next.
7. On the Pre-Installation Summary page, review the installation information. If the information is correct, click Install.
8. On the Post-Installation Summary page, click Done.
Step 3. Verify or Set the Path Environment VariableVerify or set the Path environment variable. The installation program updates the Path environment variable to include the PowerExchange installation directory. If the PowerExchange installation directory is not included, PowerExchange features, such as the PowerExchange Navigator help, might not work.
1. Click Start > Control Plan > System > Advanced System Settings.
2. Click Environment Variables.
3. To verify or change the Path environment variable, perform the following steps:
• In the System variables box, select Path and click Edit.
• In the Variable value box, verify that the Path environment variable contains the correct path to the PowerExchange installation directory. If it does not, add the PowerExchange installation directory to the semicolon‑separated list of paths. If you accepted the default installation location, use the following default path:
C:\Informatica\PowerExchangev.r.m4. Click OK.
5. Click OK.
Step 4. Install the PowerExchange ODBC Drivers (Optional)If you plan to use ODBC to access PowerExchange from PowerCenter or another Informatica product that integrates with PowerExchange, install the PowerExchange Open Database Connectivity (ODBC) drivers.
1. To run the command prompt with administrator privileges, perform these actions:
• Select Start > All Programs > Accessories.
Performing a Full Installation on Windows 79
• Right-click Command Prompt and select Run as administrator.
2. Navigate to one of the following directories:
• To install 64-bit ODBC drivers, navigate to the base PowerExchange installation directory.
• To install 32-bit ODBC drivers, navigate to the bin32 subdirectory of the PowerExchange installation directory.
For more information about the 32-bit and 64-bit ODBC drivers, see “ODBC Considerations” on page 77.
3. At a command prompt, enter the following command:
dtlodbci addThis command installs both ODBC drivers and issues the following messages:
PWX‑00607 DTLODBCI VRM x.x.x Build Vxxx started.PWX‑02322 ODBC driver “Informatica PowerExchange” added.PWX‑02322 ODBC driver “Informatica PowerExchange Unicode” added.
4. Use the Windows ODBC Data Source Administrator to define PowerExchange ODBC data sources.For more information, see the PowerExchange Reference Manual.
Notes:
• If you run the dtlodbci program without administrator privileges, the program might appear to add or remove entries successfully without actually adding or removing them.
• As an alternative to running the command prompt with administrator privileges, you can configure Windows to always run the dtlodbci program with administrator privileges. Follow these steps:
1. Navigate to the directory that contains the appropriate dtlodbci.exe file.
2. Right-click dtlodbci.exe and select Properties.
3. On the Compatibility tab, select Run this program as an administrator.
Step 5. Test the InstallationUse the DTLINFO utility to test the PowerExchange installation. To run the utility, enter the following command at the command prompt:
dtlinfoThis command displays the following information for the current installation of PowerExchange: version, release, modification level, and the build date and time. For more information about DTLINFO, see the PowerExchange Utilities Guide.
After You Install PowerExchange on WindowsAfter you install PowerExchange, perform the following post-installation tasks:
• Review the PowerExchange Release Guide for new features and changes.
• Optionally, migrate PowerExchange data and configuration files from a previous release.
For more information about migrating data maps, capture registrations, and extraction maps, see “Migrating Data Maps, Capture Registrations, and Extraction Maps” on page 39.
• Configure PowerExchange prior to performing bulk data movement or CDC. For configuration information, see the following documents:
- For bulk data movement configuration, see the PowerExchange Bulk Data Movement Guide.
- For CDC configuration, see the PowerExchange CDC Guide for z/OS, PowerExchange CDC Guide for i5/OS, or PowerExchange CDC Guide for Linux, UNIX, and Windows.
80 Chapter 6: Installing and Upgrading PowerExchange on Windows
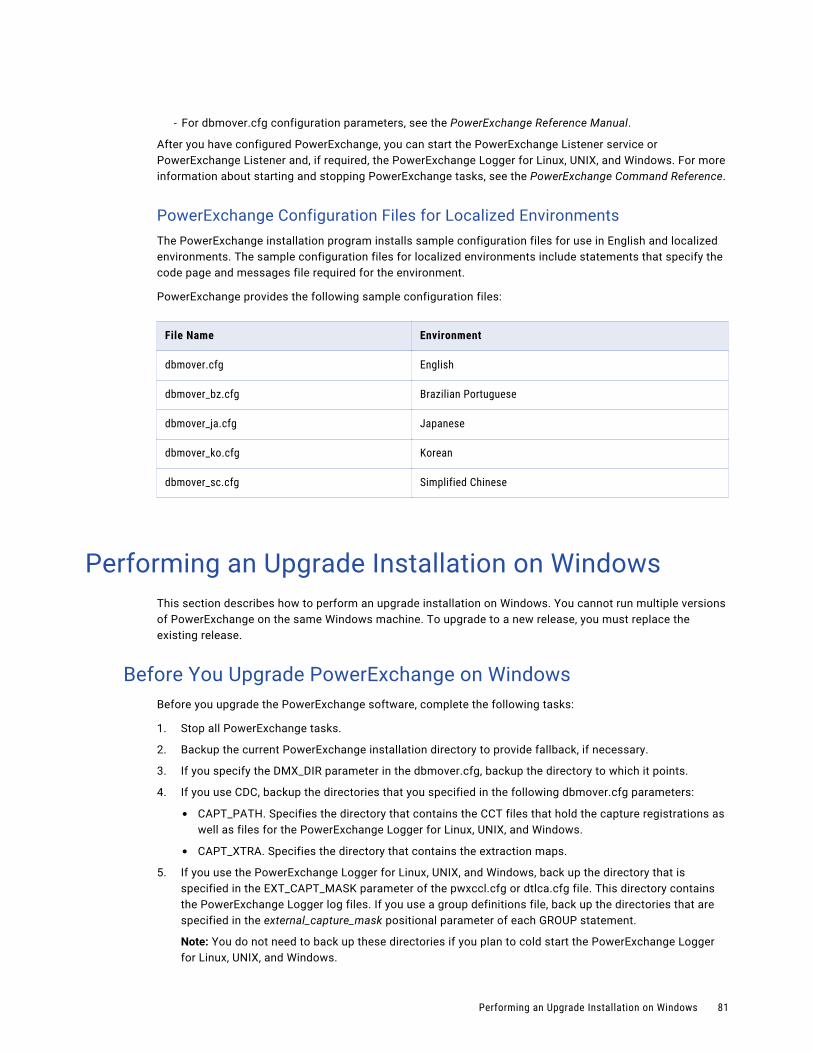
- For dbmover.cfg configuration parameters, see the PowerExchange Reference Manual.
After you have configured PowerExchange, you can start the PowerExchange Listener service or PowerExchange Listener and, if required, the PowerExchange Logger for Linux, UNIX, and Windows. For more information about starting and stopping PowerExchange tasks, see the PowerExchange Command Reference.
PowerExchange Configuration Files for Localized EnvironmentsThe PowerExchange installation program installs sample configuration files for use in English and localized environments. The sample configuration files for localized environments include statements that specify the code page and messages file required for the environment.
PowerExchange provides the following sample configuration files:
File Name Environment
dbmover.cfg English
dbmover_bz.cfg Brazilian Portuguese
dbmover_ja.cfg Japanese
dbmover_ko.cfg Korean
dbmover_sc.cfg Simplified Chinese
Performing an Upgrade Installation on WindowsThis section describes how to perform an upgrade installation on Windows. You cannot run multiple versions of PowerExchange on the same Windows machine. To upgrade to a new release, you must replace the existing release.
Before You Upgrade PowerExchange on WindowsBefore you upgrade the PowerExchange software, complete the following tasks:
1. Stop all PowerExchange tasks.
2. Backup the current PowerExchange installation directory to provide fallback, if necessary.
3. If you specify the DMX_DIR parameter in the dbmover.cfg, backup the directory to which it points.
4. If you use CDC, backup the directories that you specified in the following dbmover.cfg parameters:
• CAPT_PATH. Specifies the directory that contains the CCT files that hold the capture registrations as well as files for the PowerExchange Logger for Linux, UNIX, and Windows.
• CAPT_XTRA. Specifies the directory that contains the extraction maps.
5. If you use the PowerExchange Logger for Linux, UNIX, and Windows, back up the directory that is specified in the EXT_CAPT_MASK parameter of the pwxccl.cfg or dtlca.cfg file. This directory contains the PowerExchange Logger log files. If you use a group definitions file, back up the directories that are specified in the external_capture_mask positional parameter of each GROUP statement.
Note: You do not need to back up these directories if you plan to cold start the PowerExchange Logger for Linux, UNIX, and Windows.
Performing an Upgrade Installation on Windows 81
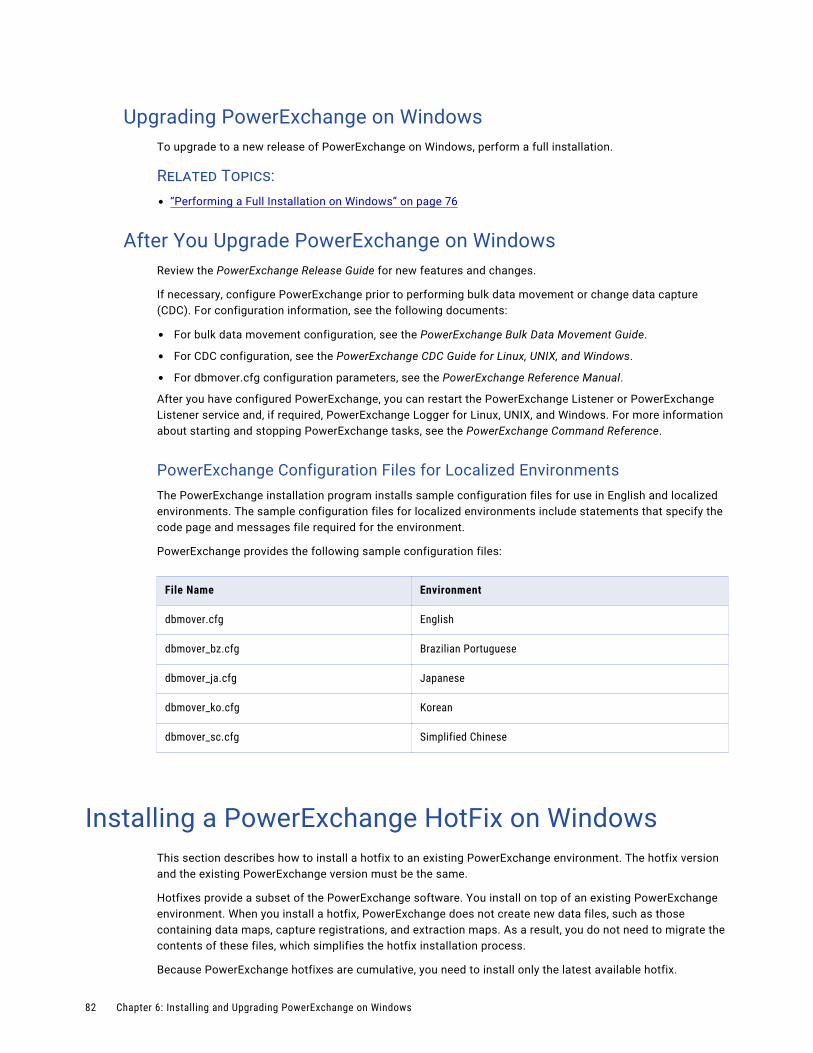
Upgrading PowerExchange on WindowsTo upgrade to a new release of PowerExchange on Windows, perform a full installation.
Related Topics:• “Performing a Full Installation on Windows” on page 76
After You Upgrade PowerExchange on WindowsReview the PowerExchange Release Guide for new features and changes.
If necessary, configure PowerExchange prior to performing bulk data movement or change data capture (CDC). For configuration information, see the following documents:
• For bulk data movement configuration, see the PowerExchange Bulk Data Movement Guide.
• For CDC configuration, see the PowerExchange CDC Guide for Linux, UNIX, and Windows.
• For dbmover.cfg configuration parameters, see the PowerExchange Reference Manual.
After you have configured PowerExchange, you can restart the PowerExchange Listener or PowerExchange Listener service and, if required, PowerExchange Logger for Linux, UNIX, and Windows. For more information about starting and stopping PowerExchange tasks, see the PowerExchange Command Reference.
PowerExchange Configuration Files for Localized EnvironmentsThe PowerExchange installation program installs sample configuration files for use in English and localized environments. The sample configuration files for localized environments include statements that specify the code page and messages file required for the environment.
PowerExchange provides the following sample configuration files:
File Name Environment
dbmover.cfg English
dbmover_bz.cfg Brazilian Portuguese
dbmover_ja.cfg Japanese
dbmover_ko.cfg Korean
dbmover_sc.cfg Simplified Chinese
Installing a PowerExchange HotFix on WindowsThis section describes how to install a hotfix to an existing PowerExchange environment. The hotfix version and the existing PowerExchange version must be the same.
Hotfixes provide a subset of the PowerExchange software. You install on top of an existing PowerExchange environment. When you install a hotfix, PowerExchange does not create new data files, such as those containing data maps, capture registrations, and extraction maps. As a result, you do not need to migrate the contents of these files, which simplifies the hotfix installation process.
Because PowerExchange hotfixes are cumulative, you need to install only the latest available hotfix.
82 Chapter 6: Installing and Upgrading PowerExchange on Windows
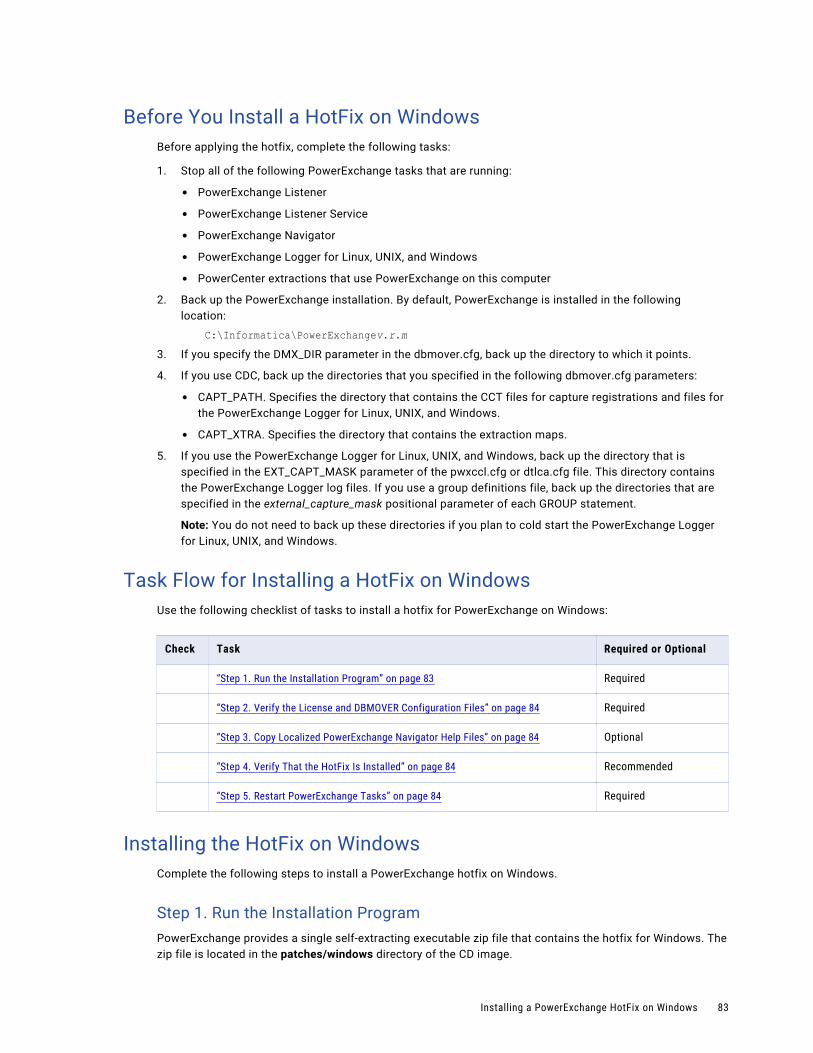
Before You Install a HotFix on WindowsBefore applying the hotfix, complete the following tasks:
1. Stop all of the following PowerExchange tasks that are running:
• PowerExchange Listener
• PowerExchange Listener Service
• PowerExchange Navigator
• PowerExchange Logger for Linux, UNIX, and Windows
• PowerCenter extractions that use PowerExchange on this computer
2. Back up the PowerExchange installation. By default, PowerExchange is installed in the following location:
C:\Informatica\PowerExchangev.r.m3. If you specify the DMX_DIR parameter in the dbmover.cfg, back up the directory to which it points.
4. If you use CDC, back up the directories that you specified in the following dbmover.cfg parameters:
• CAPT_PATH. Specifies the directory that contains the CCT files for capture registrations and files for the PowerExchange Logger for Linux, UNIX, and Windows.
• CAPT_XTRA. Specifies the directory that contains the extraction maps.
5. If you use the PowerExchange Logger for Linux, UNIX, and Windows, back up the directory that is specified in the EXT_CAPT_MASK parameter of the pwxccl.cfg or dtlca.cfg file. This directory contains the PowerExchange Logger log files. If you use a group definitions file, back up the directories that are specified in the external_capture_mask positional parameter of each GROUP statement.
Note: You do not need to back up these directories if you plan to cold start the PowerExchange Logger for Linux, UNIX, and Windows.
Task Flow for Installing a HotFix on WindowsUse the following checklist of tasks to install a hotfix for PowerExchange on Windows:
Check Task Required or Optional
“Step 1. Run the Installation Program” on page 83 Required
“Step 2. Verify the License and DBMOVER Configuration Files” on page 84 Required
“Step 3. Copy Localized PowerExchange Navigator Help Files” on page 84 Optional
“Step 4. Verify That the HotFix Is Installed” on page 84 Recommended
“Step 5. Restart PowerExchange Tasks” on page 84 Required
Installing the HotFix on WindowsComplete the following steps to install a PowerExchange hotfix on Windows.
Step 1. Run the Installation ProgramPowerExchange provides a single self-extracting executable zip file that contains the hotfix for Windows. The zip file is located in the patches/windows directory of the CD image.
Installing a PowerExchange HotFix on Windows 83
Unzip the self-extracting installation file into the PowerExchange installation directory. The installation file is named pwxvrm_hotfixn_win_x64.exe.
The variable vrm is the version, release, and modification level, and the variable n is the hotfix number. For more information about the exact file names, see the PowerExchange Release Notes for the PowerExchange hotfix.
Step 2. Verify the License and DBMOVER Configuration FilesIf you store the license.key and dbmover.cfg files in the PowerExchange installation directory, verify that they are accurate and have not been affected by the hotfix installation. If necessary, copy these files from the backup.
Tip: To make migration to a new release simpler, store the license.key and dbmover.cfg files in a directory other than the PowerExchange installation directory. You can use environment variables or options on the start commands to point to locations of the license.key and dbmover.cfg files. For more information about environment variable and options for start commands for PowerExchange tasks, see “PowerExchange Environment on Linux, UNIX, and Windows” on page 189.
Step 3. Copy Localized PowerExchange Navigator Help FilesIf you installed the hotfix on the PowerExchange Navigator machine, localized PowerExchange help files reside in separate helpdoc_language folders, such as the helpdoc_en folder for English help and the helpdoc_bz folder for Brazilian Portuguese help. For the PowerExchange Navigator to display help in the correct language on your system, copy all of the help files to the generic helpdoc folder.
Step 4. Verify That the HotFix Is InstalledRun the DTLINFO utility, dtlinfo.exe, to verify that the current PowerExchange version matches the hotfix level.
For more information about the DTLINFO utility, see the PowerExchange Utilities Guide.
Step 5. Restart PowerExchange TasksRestart the PowerExchange tasks that you stopped just prior to installing the hotfix.
These tasks include the PowerExchange Listener, PowerCenter extraction workflows, and PowerExchange Logger for Linux, UNIX, and Windows.
For more information, see the PowerExchange Command Reference.
PowerExchange Configuration Files for Localized EnvironmentsPowerExchange provides sample configuration files for English and localized environments. The sample configuration files for localized environments include statements that specify the code page and messages file required for the environment.
If the sample configuration files for a hotfix have been updated since the previous release, the installation program installs sample files with "_sample" appended to the file name to prevent the files from overwriting previously installed files.
84 Chapter 6: Installing and Upgrading PowerExchange on Windows
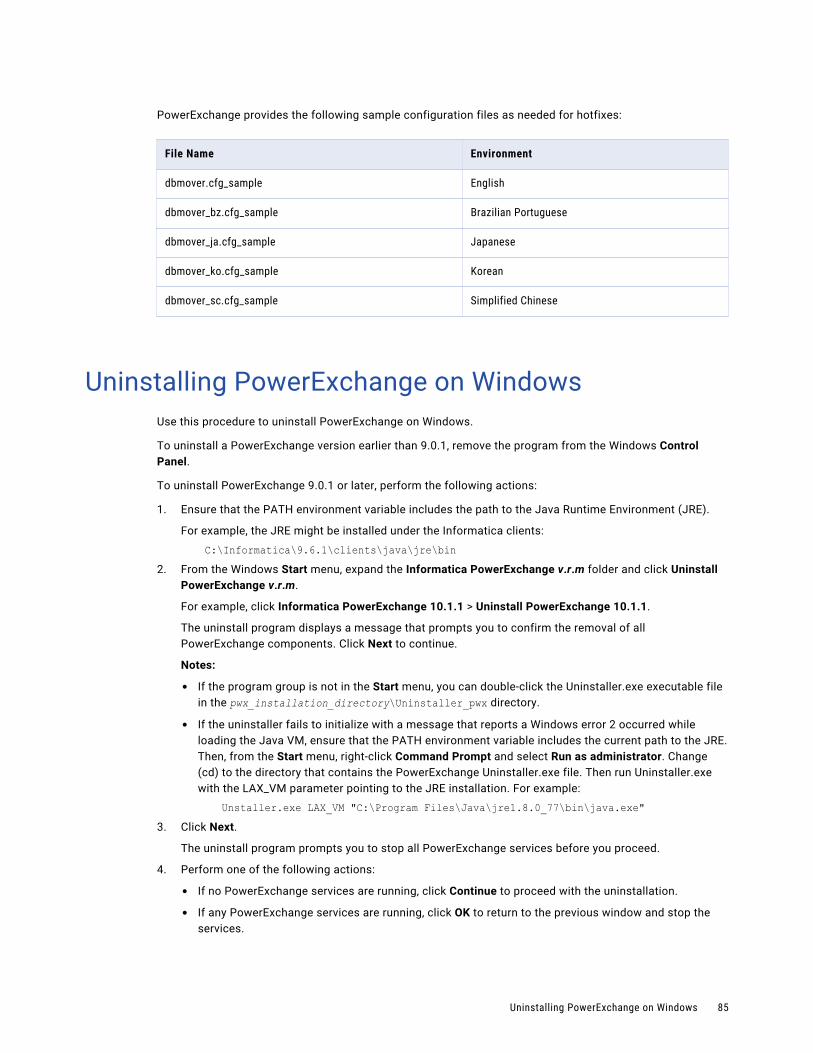
PowerExchange provides the following sample configuration files as needed for hotfixes:
File Name Environment
dbmover.cfg_sample English
dbmover_bz.cfg_sample Brazilian Portuguese
dbmover_ja.cfg_sample Japanese
dbmover_ko.cfg_sample Korean
dbmover_sc.cfg_sample Simplified Chinese
Uninstalling PowerExchange on WindowsUse this procedure to uninstall PowerExchange on Windows.
To uninstall a PowerExchange version earlier than 9.0.1, remove the program from the Windows Control Panel.
To uninstall PowerExchange 9.0.1 or later, perform the following actions:
1. Ensure that the PATH environment variable includes the path to the Java Runtime Environment (JRE).
For example, the JRE might be installed under the Informatica clients:
C:\Informatica\9.6.1\clients\java\jre\bin 2. From the Windows Start menu, expand the Informatica PowerExchange v.r.m folder and click Uninstall
PowerExchange v.r.m.
For example, click Informatica PowerExchange 10.1.1 > Uninstall PowerExchange 10.1.1.
The uninstall program displays a message that prompts you to confirm the removal of all PowerExchange components. Click Next to continue.
Notes:
• If the program group is not in the Start menu, you can double-click the Uninstaller.exe executable file in the pwx_installation_directory\Uninstaller_pwx directory.
• If the uninstaller fails to initialize with a message that reports a Windows error 2 occurred while loading the Java VM, ensure that the PATH environment variable includes the current path to the JRE. Then, from the Start menu, right-click Command Prompt and select Run as administrator. Change (cd) to the directory that contains the PowerExchange Uninstaller.exe file. Then run Uninstaller.exe with the LAX_VM parameter pointing to the JRE installation. For example:
Unstaller.exe LAX_VM "C:\Program Files\Java\jre1.8.0_77\bin\java.exe"3. Click Next.
The uninstall program prompts you to stop all PowerExchange services before you proceed.
4. Perform one of the following actions:
• If no PowerExchange services are running, click Continue to proceed with the uninstallation.
• If any PowerExchange services are running, click OK to return to the previous window and stop the services.
Uninstalling PowerExchange on Windows 85
5. At the prompt, select whether to uninstall the binary files only or completely remove PowerExchange from the system.
If you select to uninstall the binary files only, PowerExchange removes the following items:
• PowerExchange binaries
• Path to the PowerExchange binaries from the PATH environment variable
• PowerExchange Listener service
If you select to completely remove PowerExchange from the system, PowerExchange removes the preceding items and also removes registry entries that the PowerExchange Navigator created.
86 Chapter 6: Installing and Upgrading PowerExchange on Windows
C h a p t e r 7
Installing and Upgrading PowerExchange on z/OS
This chapter includes the following topics:
• z/OS Installation Overview, 87
• Performing a Full Installation on z/OS, 88
• Performing an Upgrade on z/OS, 108
• Installing a HotFix on z/OS, 127
• z/OS Installation Assistant Reference, 134
z/OS Installation OverviewWhen you install PowerExchange on z/OS, you can perform a full installation, an upgrade, or a hotfix installation by running the z/OS Installation Assistant.
The z/OS Installation Assistant can perform the following tasks:
• Set variables and change PowerExchange parameters and data set names for the z/OS installation in a single process.
• Move the software library binary files to the BINLIB library on the z/OS system.
• Move customized run-time library members to the RUNLIB library on the z/OS system.
After you run the z/OS Installation Assistant, you must submit a series of jobs that the z/OS Installation Assistant created on the z/OS system to complete the installation.
Important: The z/OS Installation Assistant only runs on 64-bit Windows systems. If you attempt to run the z/OS Installation Assistant on a 32-bit system, the installation will fail.
z/OS SecurityPowerExchange requires access to z/OS databases and files that are typically protected by security products such as the IBM Resource Access Control Facility (RACF), CA ACF2, and CA Top Secret.
When you run the z/OS Installation Assistant, enter the user ID for the PowerExchange administrator. The PowerExchange administrator defines libraries, runs installation jobs, customizes data sources, and authorizes libraries.
87
After installation, you can set additional security options. For more information about PowerExchange security options and the SECURITY statement in the DBMOVER configuration member, see the PowerExchange Reference Manual.
Installation and Startup ErrorsPowerExchange issues error messages that contain information about the causes of z/OS installation and startup errors.
The most common cause of a PowerExchange startup error is an incorrect IP address or port number in the NODE and LISTENER statements in the DBMOVER configuration member.
Performing a Full Installation on z/OSPerform a full installation if you are installing PowerExchange on z/OS for the first time or to a different location or if you are updating an existing installation to add the CDC software. Use the z/OS Installation Assistant wizard.
The z/OS Installation Assistant uses your input to customize JCL and parameters in some files on the Windows system. From the z/OS Installation Assistant, you can transfer the files to the BINLIB and RUNLIB libraries on the z/OS system.
On the z/OS system, you must submit at least the SETUPBLK job. The SETUPBLK job performs the following tasks:
• Allocates the following PowerExchange partitioned data sets (PDSs) and data sets: DBRMLIB, DTLDATA, DTLDEMO, DTLEXPL, DTLLOG, DTLMSG, LOADLIB, PROCLIB, and SRCLIB.
• Uses TSO/E RECEIVE to expand the following distributed PDSs and data sets: DBRMLIB, DTLDATA, DTLMSG, LOADLIB, and SRCLIB.
• Optionally submits additional installation jobs. If you select the Auto Submit option on the General Parameters page, the SETUPBLK job submits these jobs based on the options that you select in the z/OS Installation Assistant. Otherwise, you must manually submit all of the jobs.
• Adds the JOB card in the JOBCARD member of the RUNLIB library to the additional installation jobs.
If you want to perform CDC, you must submit some additional jobs.
Before You Perform a Full Installation on z/OSBefore you perform a full installation on z/OS, you must complete the following tasks:
• Verify that PowerExchange supports the versions and release levels of your operating system and data sources. For more information, see “Supported z/OS Versions and Data Sources and Targets” on page 24.
• Verify that the z/OS Installation Assistant is installed on a 64-bit Windows system. The installation will fail if you attempt to run the z/OS Installation Assistant from a 32-bit system.
• Get a valid license key.
• If the Microsoft .NET Framework is not installed on your Windows machine, double-click dotnetfx35.exe in the PowerExchange installation directory to install it.
• Verify that the new PowerExchange release is compatible with your PowerCenter release on Linux, UNIX, or Windows. For more information, see “PowerExchange Interoperability with PowerCenter” on page 32.
88 Chapter 7: Installing and Upgrading PowerExchange on z/OS
• If you plan to run the new PowerExchange instance with other existing PowerExchange instances in your environment, verify that all of the PowerExchange instances have version.release.modification levels that are compatible. For more information, see “PowerExchange to PowerExchange Interoperability” on page 34.
• If you are upgrading from a previous release, verify that you have addressed all applicable upgrade issues.
Task Flow for a Full Installation on z/OSTo install PowerExchange on z/OS, install the PowerExchange base software. Also, install the PowerExchange Change Data Capture (CDC) software and the PowerExchange software for selected data sources if applicable.
Use the following checklist of tasks to complete a full installation of PowerExchange:
Check Task Required or Optional
Phase I. Install the PowerExchange Base Software Required
“Step 1. Allocate the BINLIB and RUNLIB Libraries” on page 93 Required
“Step 2. Extract the z/OS Installation Files to a Windows System” on page 94
Required
“Step 3. Run the z/OS Installation Assistant for a Full Installation” on page 94
Required
“Step 4. Edit the JOBCARD Member in the RUNLIB Library” on page 102 Required
“Step 5. Review the XJOBS Member in the RUNLIB Library” on page 102 Required
“Step 6. Submit PowerExchange Base Software Jobs” on page 102 Required
“Step 7. Add the Library that Contains the CSNBSYD and CSNBSYE Programs to the System Link List (Optional)” on page 102
Optional. Perform this step if you want PowerExchange to use the z/OS Cryptographic Services ICSF to perform AES-128 encryption of user names and passwords.
“Step 8. Add the Required Libraries to the APF List” on page 103 Required
“Step 9. Add an OMVS Segment to the PowerExchange Listener User ID (RACF Users)” on page 103
Required if you use RACF
Phase II. Install the PowerExchange CDC Software Required if you use CDC
“Step 10. Submit the CDC Jobs” on page 104 Required if you use CDC
“Step 11. Submit the XIZZZ998 Job” on page 104 Required if you use CDC
“Step 12. Copy the PowerExchange Agent Procedure to the PROCLIB Library ” on page 105
Required if you use CDC
“Step 13. Add the PowerExchange Load Libraries to the APF List” on page 105
Required if you use CDC
Performing a Full Installation on z/OS 89
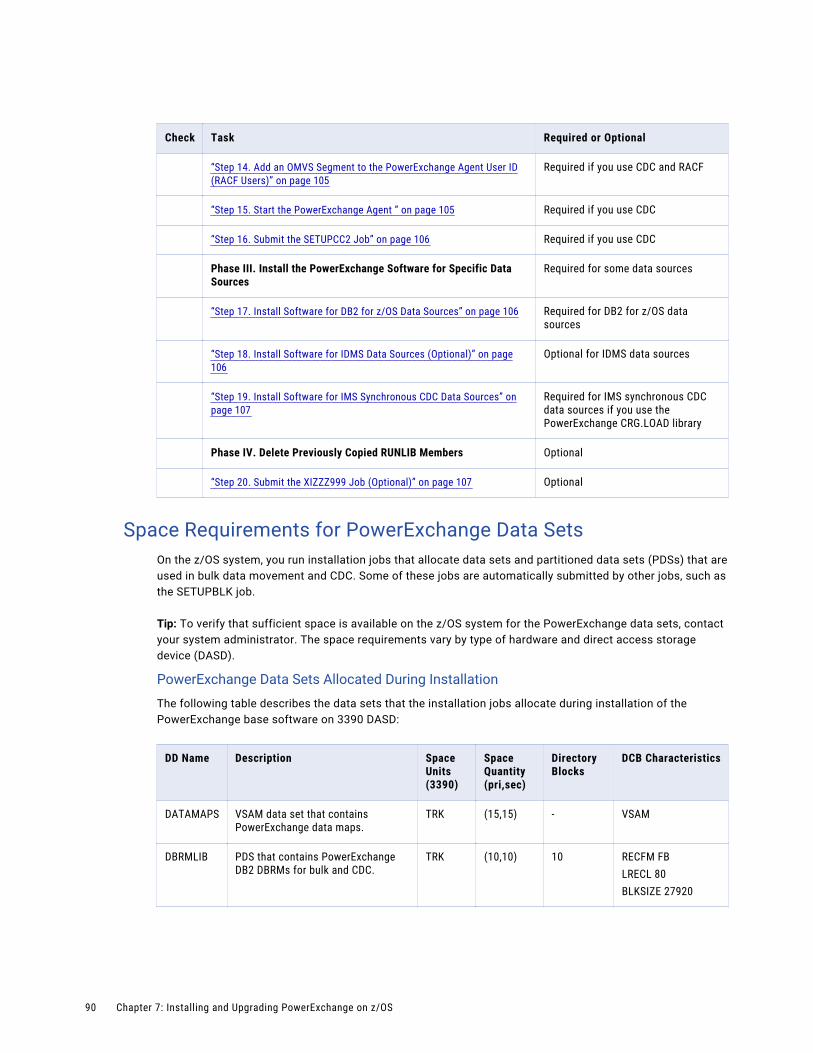
Check Task Required or Optional
“Step 14. Add an OMVS Segment to the PowerExchange Agent User ID (RACF Users)” on page 105
Required if you use CDC and RACF
“Step 15. Start the PowerExchange Agent ” on page 105 Required if you use CDC
“Step 16. Submit the SETUPCC2 Job” on page 106 Required if you use CDC
Phase III. Install the PowerExchange Software for Specific Data Sources
Required for some data sources
“Step 17. Install Software for DB2 for z/OS Data Sources” on page 106 Required for DB2 for z/OS data sources
“Step 18. Install Software for IDMS Data Sources (Optional)” on page 106
Optional for IDMS data sources
“Step 19. Install Software for IMS Synchronous CDC Data Sources” on page 107
Required for IMS synchronous CDC data sources if you use the PowerExchange CRG.LOAD library
Phase IV. Delete Previously Copied RUNLIB Members Optional
“Step 20. Submit the XIZZZ999 Job (Optional)” on page 107 Optional
Space Requirements for PowerExchange Data SetsOn the z/OS system, you run installation jobs that allocate data sets and partitioned data sets (PDSs) that are used in bulk data movement and CDC. Some of these jobs are automatically submitted by other jobs, such as the SETUPBLK job.
Tip: To verify that sufficient space is available on the z/OS system for the PowerExchange data sets, contact your system administrator. The space requirements vary by type of hardware and direct access storage device (DASD).
PowerExchange Data Sets Allocated During Installation
The following table describes the data sets that the installation jobs allocate during installation of the PowerExchange base software on 3390 DASD:
DD Name Description Space Units (3390)
Space Quantity (pri,sec)
Directory Blocks
DCB Characteristics
DATAMAPS VSAM data set that contains PowerExchange data maps.
TRK (15,15) - VSAM
DBRMLIB PDS that contains PowerExchange DB2 DBRMs for bulk and CDC.
TRK (10,10) 10 RECFM FBLRECL 80BLKSIZE 27920
90 Chapter 7: Installing and Upgrading PowerExchange on z/OS
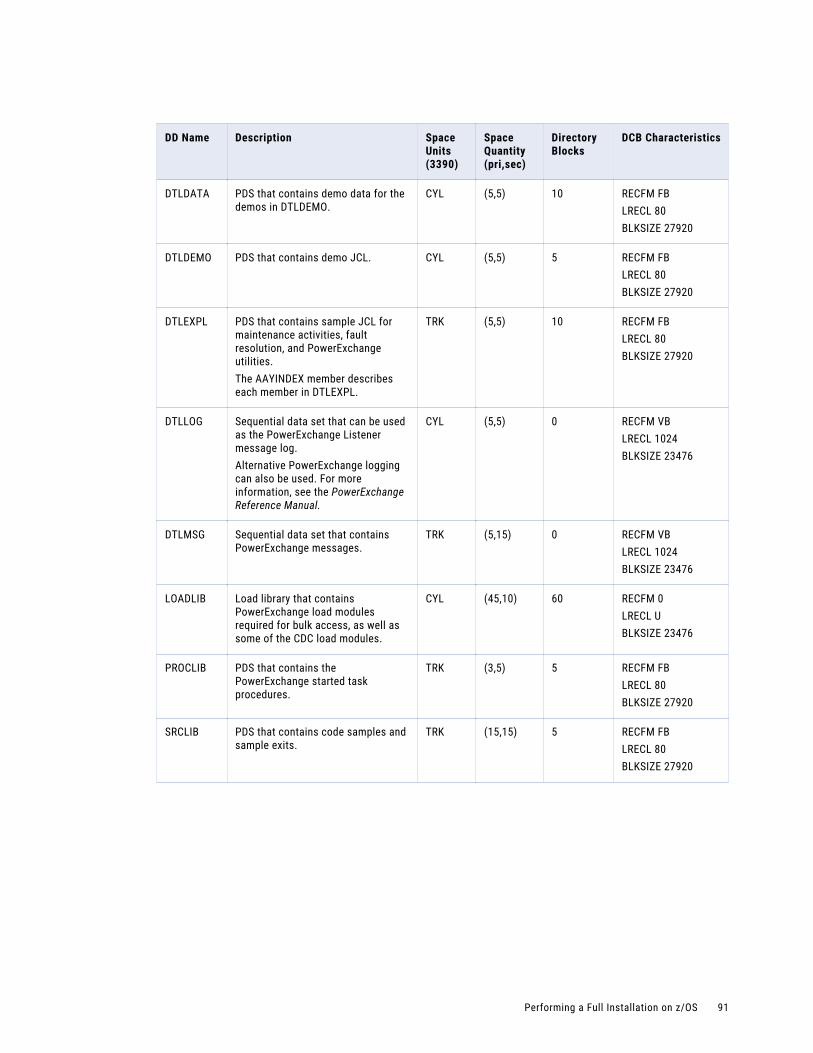
DD Name Description Space Units (3390)
Space Quantity (pri,sec)
Directory Blocks
DCB Characteristics
DTLDATA PDS that contains demo data for the demos in DTLDEMO.
CYL (5,5) 10 RECFM FBLRECL 80BLKSIZE 27920
DTLDEMO PDS that contains demo JCL. CYL (5,5) 5 RECFM FBLRECL 80BLKSIZE 27920
DTLEXPL PDS that contains sample JCL for maintenance activities, fault resolution, and PowerExchange utilities.The AAYINDEX member describes each member in DTLEXPL.
TRK (5,5) 10 RECFM FBLRECL 80BLKSIZE 27920
DTLLOG Sequential data set that can be used as the PowerExchange Listener message log.Alternative PowerExchange logging can also be used. For more information, see the PowerExchange Reference Manual.
CYL (5,5) 0 RECFM VBLRECL 1024BLKSIZE 23476
DTLMSG Sequential data set that contains PowerExchange messages.
TRK (5,15) 0 RECFM VBLRECL 1024BLKSIZE 23476
LOADLIB Load library that contains PowerExchange load modules required for bulk access, as well as some of the CDC load modules.
CYL (45,10) 60 RECFM 0LRECL UBLKSIZE 23476
PROCLIB PDS that contains the PowerExchange started task procedures.
TRK (3,5) 5 RECFM FBLRECL 80BLKSIZE 27920
SRCLIB PDS that contains code samples and sample exits.
TRK (15,15) 5 RECFM FBLRECL 80BLKSIZE 27920
Performing a Full Installation on z/OS 91
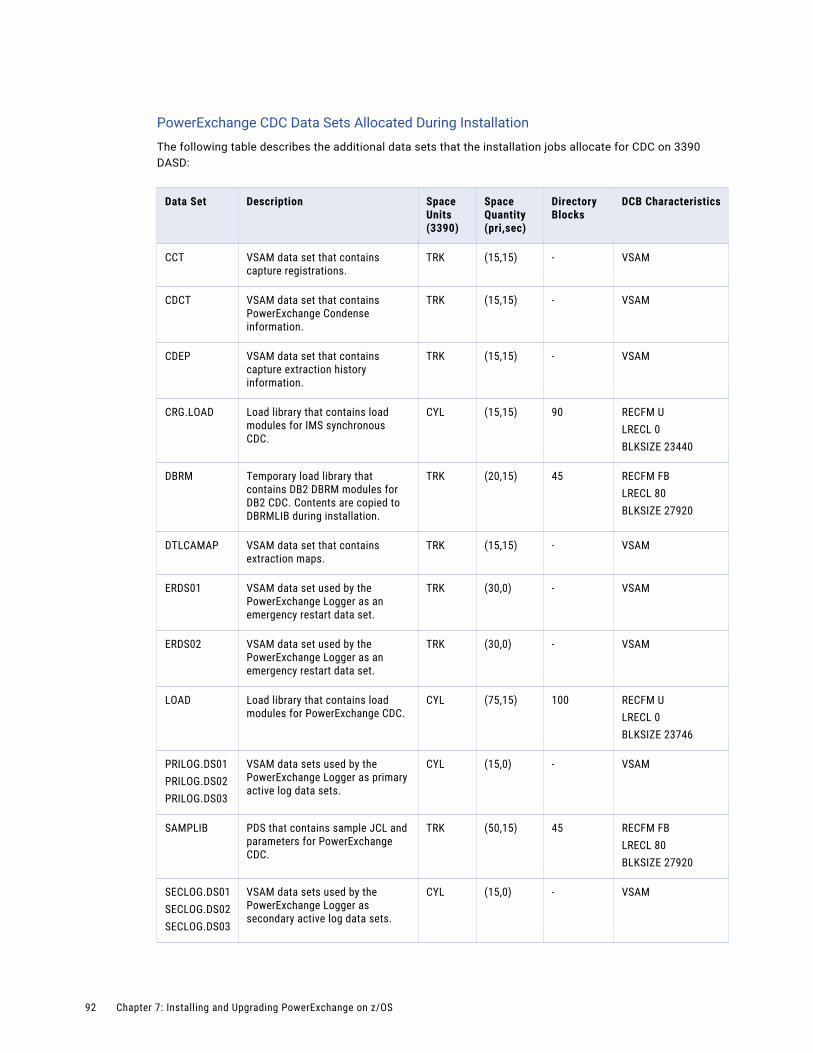
PowerExchange CDC Data Sets Allocated During Installation
The following table describes the additional data sets that the installation jobs allocate for CDC on 3390 DASD:
Data Set Description Space Units (3390)
Space Quantity (pri,sec)
Directory Blocks
DCB Characteristics
CCT VSAM data set that contains capture registrations.
TRK (15,15) - VSAM
CDCT VSAM data set that contains PowerExchange Condense information.
TRK (15,15) - VSAM
CDEP VSAM data set that contains capture extraction history information.
TRK (15,15) - VSAM
CRG.LOAD Load library that contains load modules for IMS synchronous CDC.
CYL (15,15) 90 RECFM ULRECL 0BLKSIZE 23440
DBRM Temporary load library that contains DB2 DBRM modules for DB2 CDC. Contents are copied to DBRMLIB during installation.
TRK (20,15) 45 RECFM FBLRECL 80BLKSIZE 27920
DTLCAMAP VSAM data set that contains extraction maps.
TRK (15,15) - VSAM
ERDS01 VSAM data set used by the PowerExchange Logger as an emergency restart data set.
TRK (30,0) - VSAM
ERDS02 VSAM data set used by the PowerExchange Logger as an emergency restart data set.
TRK (30,0) - VSAM
LOAD Load library that contains load modules for PowerExchange CDC.
CYL (75,15) 100 RECFM ULRECL 0BLKSIZE 23746
PRILOG.DS01PRILOG.DS02PRILOG.DS03
VSAM data sets used by the PowerExchange Logger as primary active log data sets.
CYL (15,0) - VSAM
SAMPLIB PDS that contains sample JCL and parameters for PowerExchange CDC.
TRK (50,15) 45 RECFM FBLRECL 80BLKSIZE 27920
SECLOG.DS01SECLOG.DS02SECLOG.DS03
VSAM data sets used by the PowerExchange Logger as secondary active log data sets.
CYL (15,0) - VSAM
92 Chapter 7: Installing and Upgrading PowerExchange on z/OS
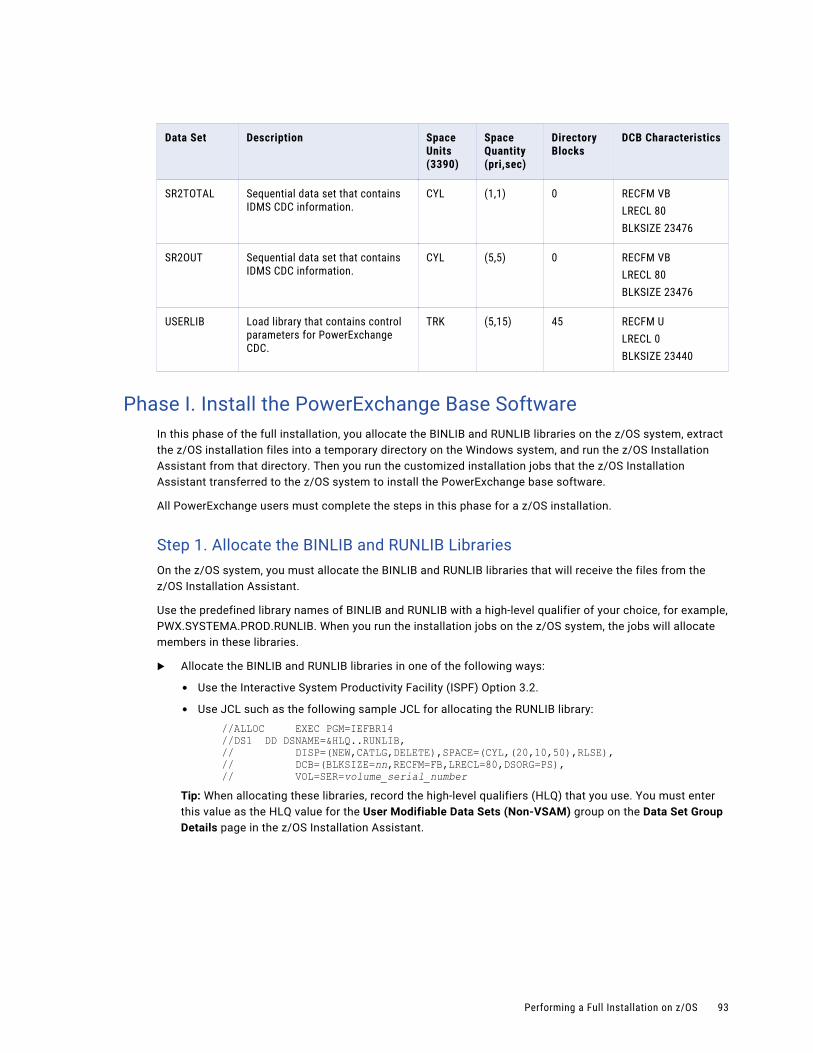
Data Set Description Space Units (3390)
Space Quantity (pri,sec)
Directory Blocks
DCB Characteristics
SR2TOTAL Sequential data set that contains IDMS CDC information.
CYL (1,1) 0 RECFM VBLRECL 80BLKSIZE 23476
SR2OUT Sequential data set that contains IDMS CDC information.
CYL (5,5) 0 RECFM VBLRECL 80BLKSIZE 23476
USERLIB Load library that contains control parameters for PowerExchange CDC.
TRK (5,15) 45 RECFM ULRECL 0BLKSIZE 23440
Phase I. Install the PowerExchange Base SoftwareIn this phase of the full installation, you allocate the BINLIB and RUNLIB libraries on the z/OS system, extract the z/OS installation files into a temporary directory on the Windows system, and run the z/OS Installation Assistant from that directory. Then you run the customized installation jobs that the z/OS Installation Assistant transferred to the z/OS system to install the PowerExchange base software.
All PowerExchange users must complete the steps in this phase for a z/OS installation.
Step 1. Allocate the BINLIB and RUNLIB LibrariesOn the z/OS system, you must allocate the BINLIB and RUNLIB libraries that will receive the files from the z/OS Installation Assistant.
Use the predefined library names of BINLIB and RUNLIB with a high-level qualifier of your choice, for example, PWX.SYSTEMA.PROD.RUNLIB. When you run the installation jobs on the z/OS system, the jobs will allocate members in these libraries.
u Allocate the BINLIB and RUNLIB libraries in one of the following ways:
• Use the Interactive System Productivity Facility (ISPF) Option 3.2.
• Use JCL such as the following sample JCL for allocating the RUNLIB library:
//ALLOC EXEC PGM=IEFBR14//DS1 DD DSNAME=&HLQ..RUNLIB,// DISP=(NEW,CATLG,DELETE),SPACE=(CYL,(20,10,50),RLSE),// DCB=(BLKSIZE=nn,RECFM=FB,LRECL=80,DSORG=PS),// VOL=SER=volume_serial_number
Tip: When allocating these libraries, record the high-level qualifiers (HLQ) that you use. You must enter this value as the HLQ value for the User Modifiable Data Sets (Non-VSAM) group on the Data Set Group Details page in the z/OS Installation Assistant.
Performing a Full Installation on z/OS 93
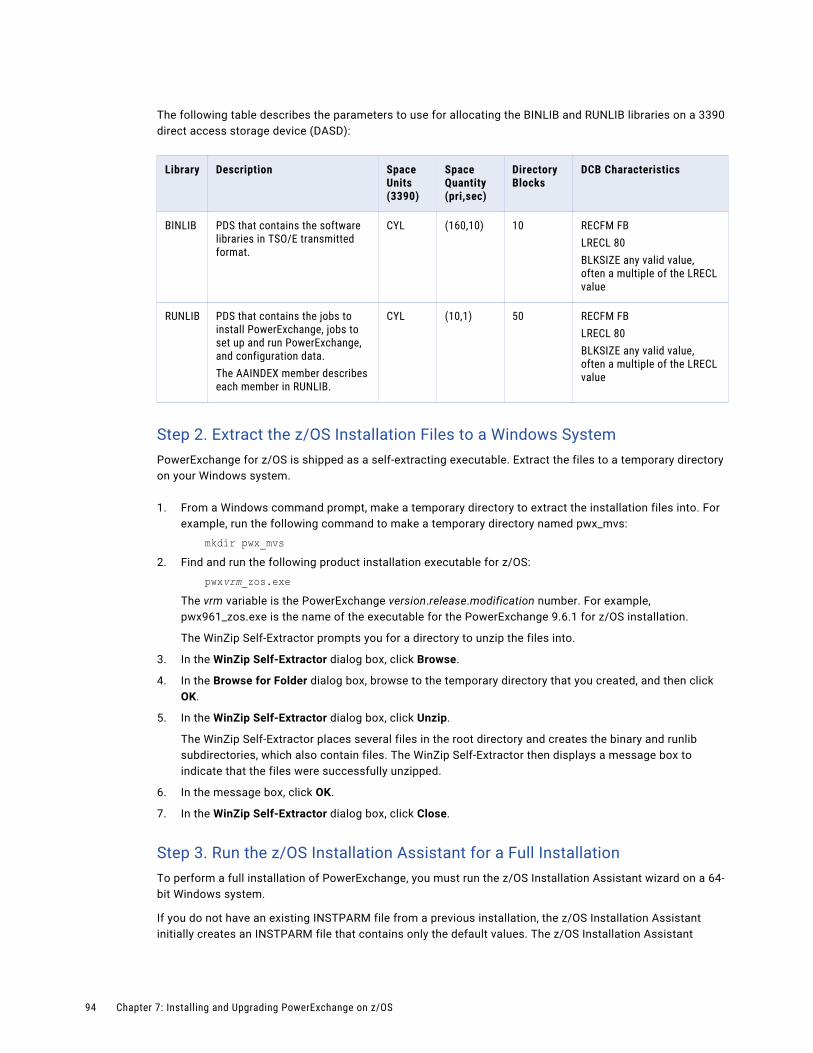
The following table describes the parameters to use for allocating the BINLIB and RUNLIB libraries on a 3390 direct access storage device (DASD):
Library Description Space Units (3390)
Space Quantity (pri,sec)
Directory Blocks
DCB Characteristics
BINLIB PDS that contains the software libraries in TSO/E transmitted format.
CYL (160,10) 10 RECFM FBLRECL 80BLKSIZE any valid value, often a multiple of the LRECL value
RUNLIB PDS that contains the jobs to install PowerExchange, jobs to set up and run PowerExchange, and configuration data.The AAINDEX member describes each member in RUNLIB.
CYL (10,1) 50 RECFM FBLRECL 80BLKSIZE any valid value, often a multiple of the LRECL value
Step 2. Extract the z/OS Installation Files to a Windows SystemPowerExchange for z/OS is shipped as a self-extracting executable. Extract the files to a temporary directory on your Windows system.
1. From a Windows command prompt, make a temporary directory to extract the installation files into. For example, run the following command to make a temporary directory named pwx_mvs:
mkdir pwx_mvs2. Find and run the following product installation executable for z/OS:
pwxvrm_zos.exe The vrm variable is the PowerExchange version.release.modification number. For example, pwx961_zos.exe is the name of the executable for the PowerExchange 9.6.1 for z/OS installation.
The WinZip Self-Extractor prompts you for a directory to unzip the files into.
3. In the WinZip Self-Extractor dialog box, click Browse.
4. In the Browse for Folder dialog box, browse to the temporary directory that you created, and then click OK.
5. In the WinZip Self-Extractor dialog box, click Unzip.
The WinZip Self-Extractor places several files in the root directory and creates the binary and runlib subdirectories, which also contain files. The WinZip Self-Extractor then displays a message box to indicate that the files were successfully unzipped.
6. In the message box, click OK.
7. In the WinZip Self-Extractor dialog box, click Close.
Step 3. Run the z/OS Installation Assistant for a Full InstallationTo perform a full installation of PowerExchange, you must run the z/OS Installation Assistant wizard on a 64-bit Windows system.
If you do not have an existing INSTPARM file from a previous installation, the z/OS Installation Assistant initially creates an INSTPARM file that contains only the default values. The z/OS Installation Assistant
94 Chapter 7: Installing and Upgrading PowerExchange on z/OS
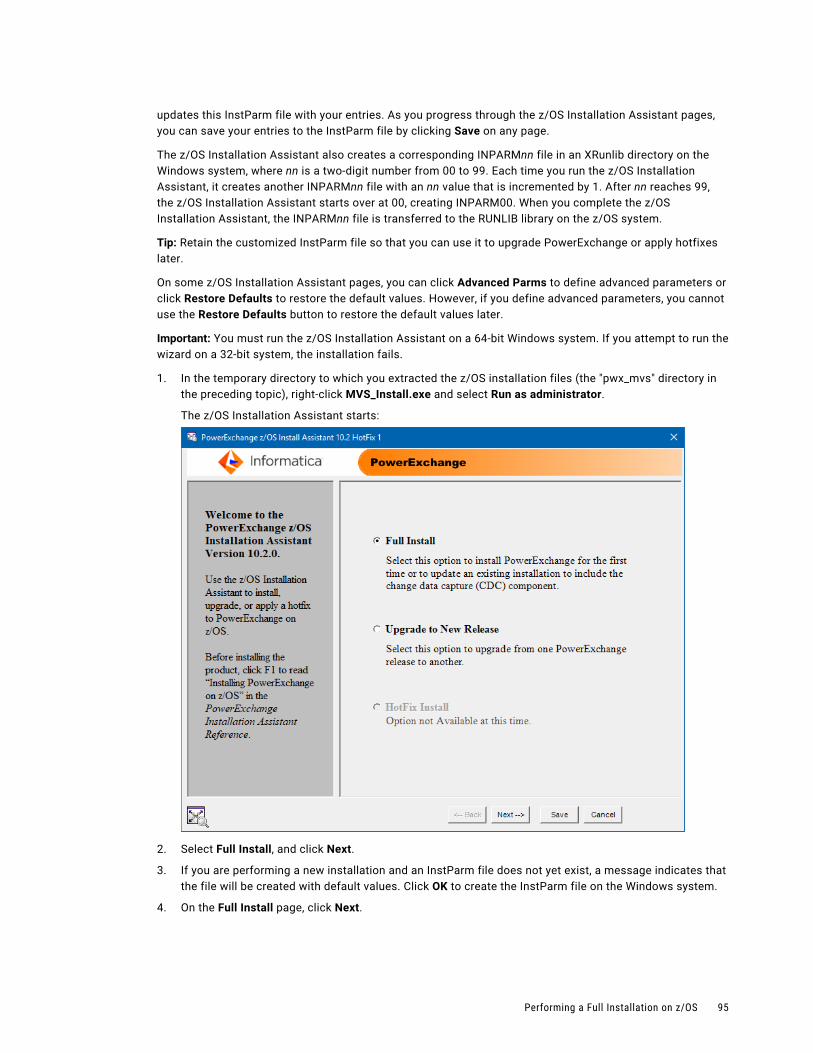
updates this InstParm file with your entries. As you progress through the z/OS Installation Assistant pages, you can save your entries to the InstParm file by clicking Save on any page.
The z/OS Installation Assistant also creates a corresponding INPARMnn file in an XRunlib directory on the Windows system, where nn is a two-digit number from 00 to 99. Each time you run the z/OS Installation Assistant, it creates another INPARMnn file with an nn value that is incremented by 1. After nn reaches 99, the z/OS Installation Assistant starts over at 00, creating INPARM00. When you complete the z/OS Installation Assistant, the INPARMnn file is transferred to the RUNLIB library on the z/OS system.
Tip: Retain the customized InstParm file so that you can use it to upgrade PowerExchange or apply hotfixes later.
On some z/OS Installation Assistant pages, you can click Advanced Parms to define advanced parameters or click Restore Defaults to restore the default values. However, if you define advanced parameters, you cannot use the Restore Defaults button to restore the default values later.
Important: You must run the z/OS Installation Assistant on a 64-bit Windows system. If you attempt to run the wizard on a 32-bit system, the installation fails.
1. In the temporary directory to which you extracted the z/OS installation files (the "pwx_mvs" directory in the preceding topic), right-click MVS_Install.exe and select Run as administrator.
The z/OS Installation Assistant starts:
2. Select Full Install, and click Next.
3. If you are performing a new installation and an InstParm file does not yet exist, a message indicates that the file will be created with default values. Click OK to create the InstParm file on the Windows system.
4. On the Full Install page, click Next.
Performing a Full Installation on z/OS 95
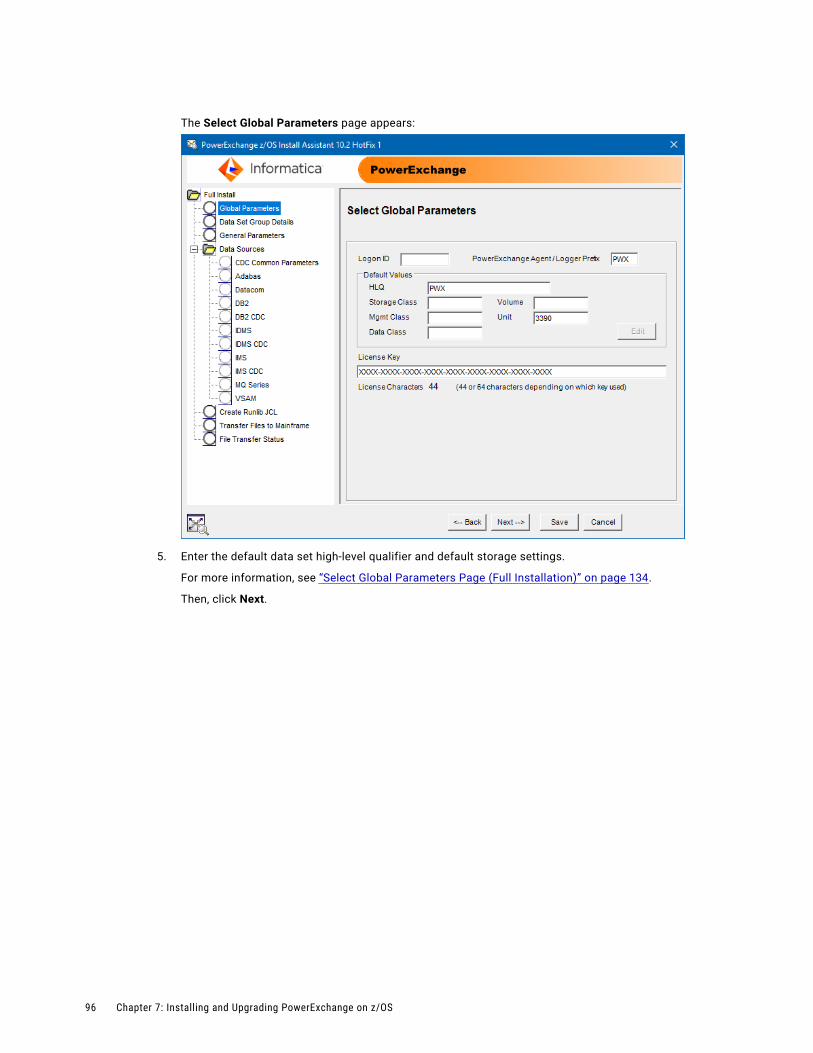
The Select Global Parameters page appears:
5. Enter the default data set high-level qualifier and default storage settings.
For more information, see “Select Global Parameters Page (Full Installation)” on page 134.
Then, click Next.
96 Chapter 7: Installing and Upgrading PowerExchange on z/OS
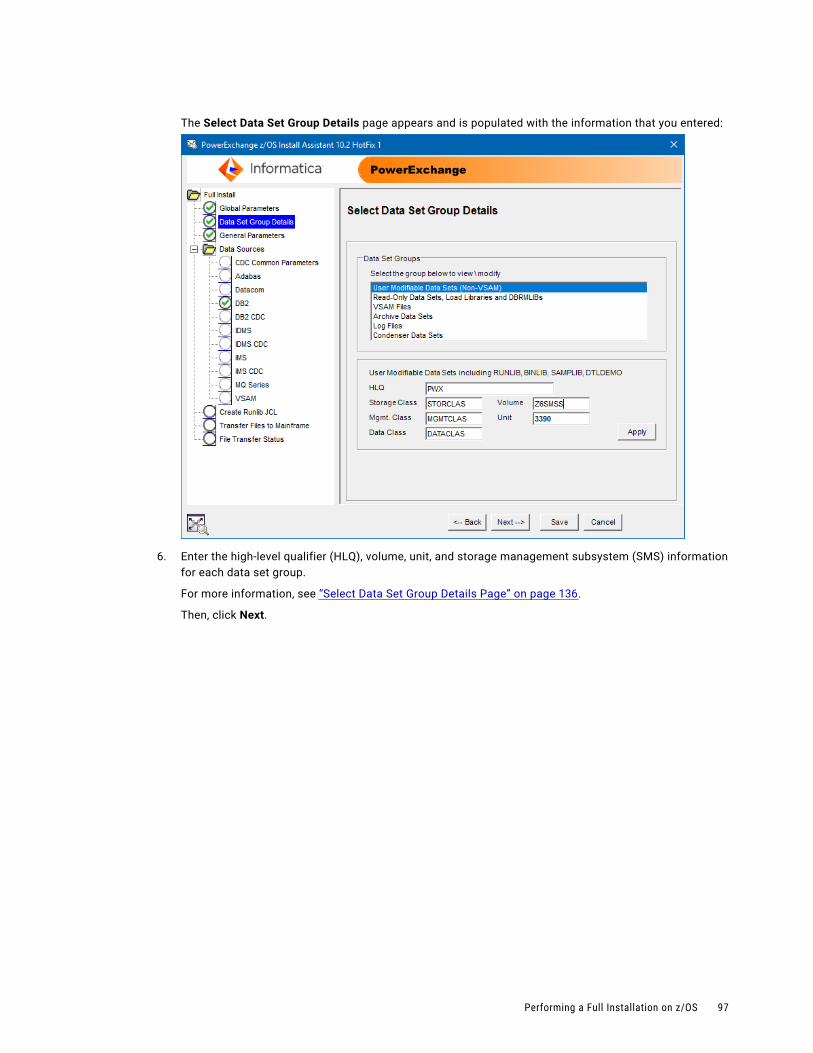
The Select Data Set Group Details page appears and is populated with the information that you entered:
6. Enter the high-level qualifier (HLQ), volume, unit, and storage management subsystem (SMS) information for each data set group.
For more information, see “Select Data Set Group Details Page” on page 136.
Then, click Next.
Performing a Full Installation on z/OS 97
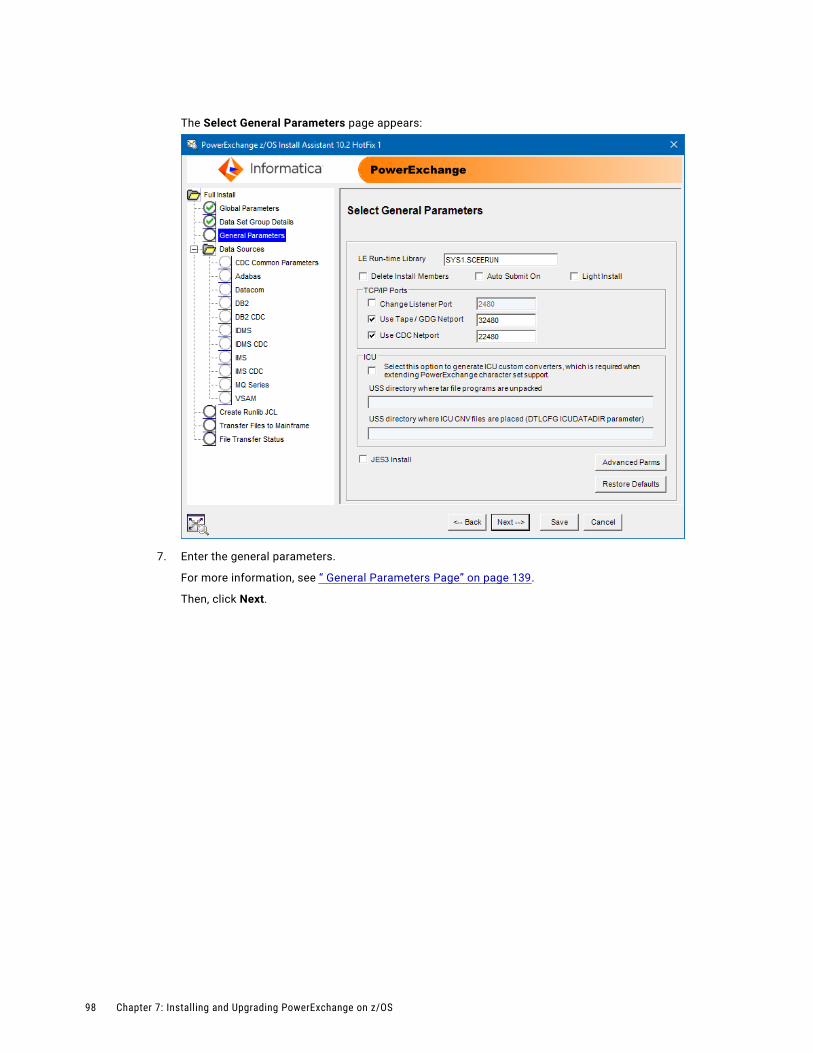
The Select General Parameters page appears:
7. Enter the general parameters.
For more information, see “ General Parameters Page” on page 139.
Then, click Next.
98 Chapter 7: Installing and Upgrading PowerExchange on z/OS
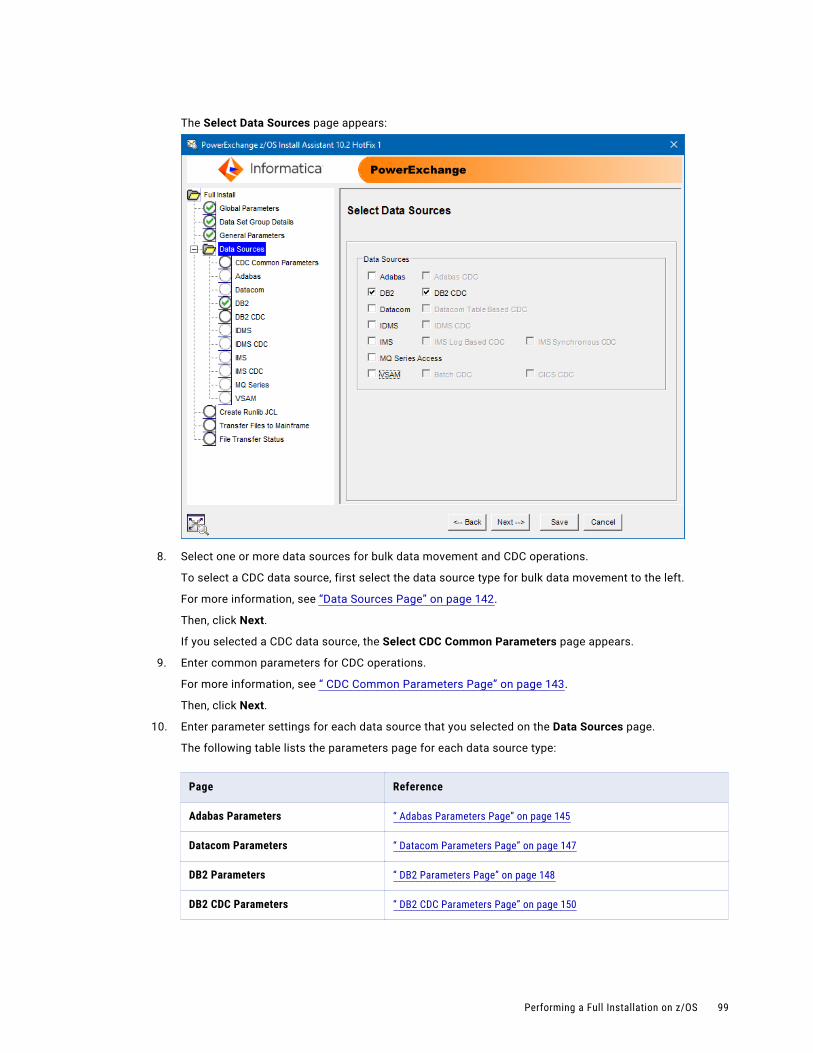
The Select Data Sources page appears:
8. Select one or more data sources for bulk data movement and CDC operations.
To select a CDC data source, first select the data source type for bulk data movement to the left.
For more information, see “Data Sources Page” on page 142.
Then, click Next.
If you selected a CDC data source, the Select CDC Common Parameters page appears.
9. Enter common parameters for CDC operations.
For more information, see “ CDC Common Parameters Page” on page 143.
Then, click Next.
10. Enter parameter settings for each data source that you selected on the Data Sources page.
The following table lists the parameters page for each data source type:
Page Reference
Adabas Parameters “ Adabas Parameters Page” on page 145
Datacom Parameters “ Datacom Parameters Page” on page 147
DB2 Parameters “ DB2 Parameters Page” on page 148
DB2 CDC Parameters “ DB2 CDC Parameters Page” on page 150
Performing a Full Installation on z/OS 99
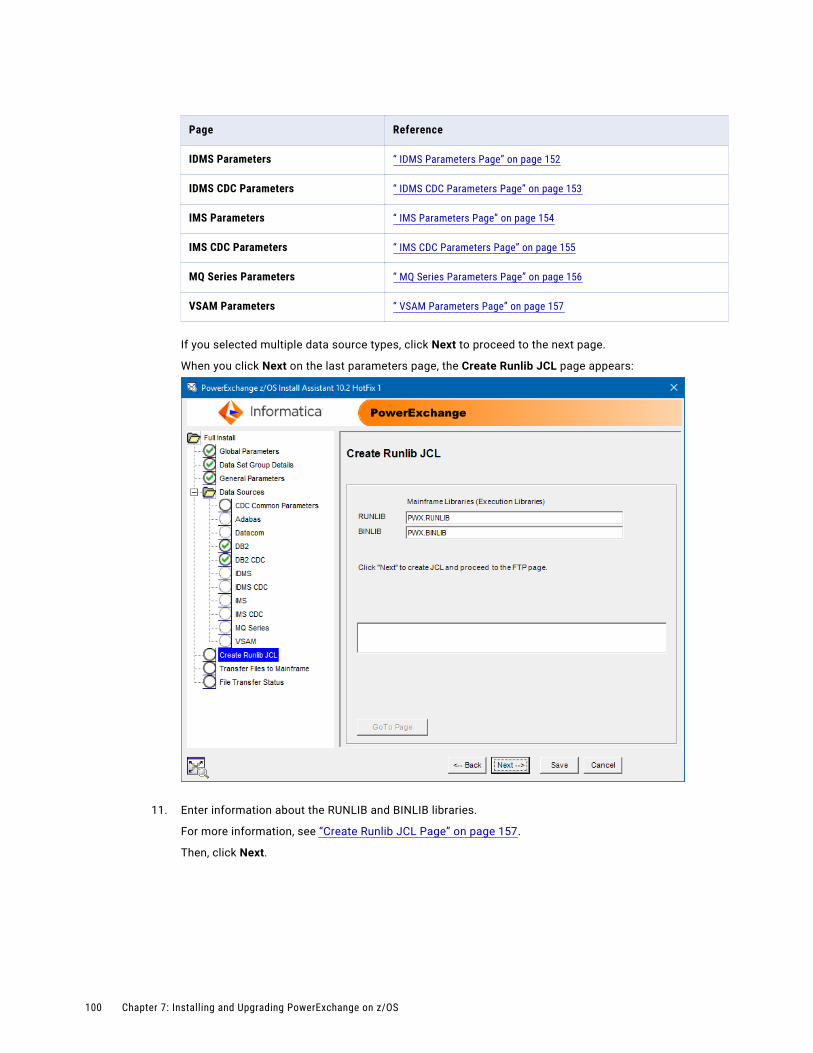
Page Reference
IDMS Parameters “ IDMS Parameters Page” on page 152
IDMS CDC Parameters “ IDMS CDC Parameters Page” on page 153
IMS Parameters “ IMS Parameters Page” on page 154
IMS CDC Parameters “ IMS CDC Parameters Page” on page 155
MQ Series Parameters “ MQ Series Parameters Page” on page 156
VSAM Parameters “ VSAM Parameters Page” on page 157
If you selected multiple data source types, click Next to proceed to the next page.
When you click Next on the last parameters page, the Create Runlib JCL page appears:
11. Enter information about the RUNLIB and BINLIB libraries.
For more information, see “Create Runlib JCL Page” on page 157.
Then, click Next.
100 Chapter 7: Installing and Upgrading PowerExchange on z/OS
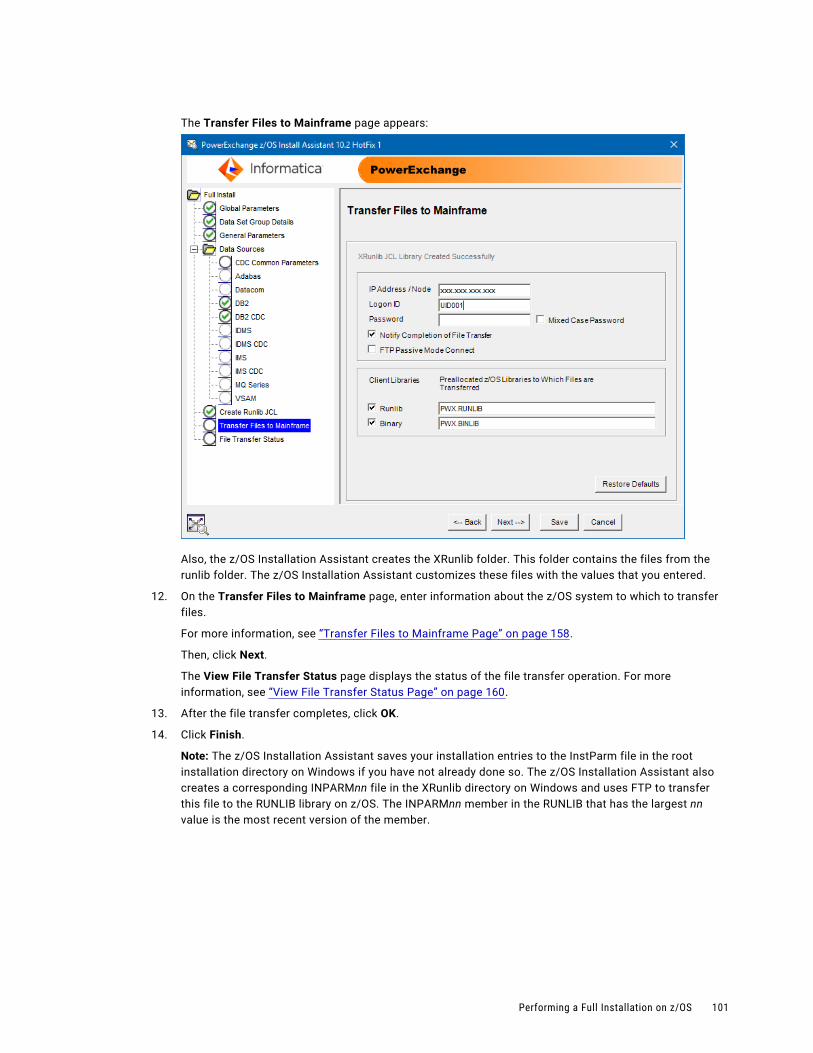
The Transfer Files to Mainframe page appears:
Also, the z/OS Installation Assistant creates the XRunlib folder. This folder contains the files from the runlib folder. The z/OS Installation Assistant customizes these files with the values that you entered.
12. On the Transfer Files to Mainframe page, enter information about the z/OS system to which to transfer files.
For more information, see “Transfer Files to Mainframe Page” on page 158.
Then, click Next.
The View File Transfer Status page displays the status of the file transfer operation. For more information, see “View File Transfer Status Page” on page 160.
13. After the file transfer completes, click OK.
14. Click Finish.
Note: The z/OS Installation Assistant saves your installation entries to the InstParm file in the root installation directory on Windows if you have not already done so. The z/OS Installation Assistant also creates a corresponding INPARMnn file in the XRunlib directory on Windows and uses FTP to transfer this file to the RUNLIB library on z/OS. The INPARMnn member in the RUNLIB that has the largest nn value is the most recent version of the member.
Performing a Full Installation on z/OS 101
Step 4. Edit the JOBCARD Member in the RUNLIB LibraryOn the z/OS system, edit the JOBCARD member in the RUNLIB library according to your site standards. You might need to add parameters such as CLASS and MSGCLASS.
To see a list of the jobs in the RUNLIB library that will use the updated JOBCARD, view the XJOBSU member in the upgrade RUNLIB library.
1. In the RUNLIB library, edit the JOBCARD member.
2. If you selected the Auto Submit On option on the General Parameters page of the z/OS Installation Assistant, add the TYPRUN=HOLD statement to control how the jobs run.
With this parameter setting, when the jobs run, you must release each job manually.
Step 5. Review the XJOBS Member in the RUNLIB LibraryThe XJOBS member lists the installation jobs that you must submit from the RUNLIB, in the order that they must be submitted. It also includes some of the installation options that you set in the z/OS Installation Assistant.
u Review the XJOBS member in the RUNLIB library to determine which job to run next.
Step 6. Submit PowerExchange Base Software JobsYou must submit the SETUPBLK job. If you did not select Auto Submit On and the option to install CDC software, also submit the SETUPVSM and XIZZZ998 jobs.
1. In the RUNLIB library, add the JOB card that is in the JOBCARD member of the RUNLIB to the SETUPBLK job.
2. Submit the SETUPBLK job.
The SETUPBLK job allocates sequential data sets, copies procedures to the PROCLIB library, and adds the JOB card that is in JOBCARD member of the RUNLIB to the other installation jobs.
If you selected the Auto Submit On option in the z/OS Installation Assistant, the SETUPBLK job also submits additional jobs based on the options that you selected.
3. If you did not select the Auto Submit On option and the option to install the CDC software, manually submit the following jobs:
• SETUPVSM. This job allocates the DATAMAPS data set.
• XIZZZ998. This job populates several data sets by using the corresponding members from RUNLIB.
Note: If you selected Auto Submit On and the option to install CDC software, you will submit the SETUPVSM and XIZZZ998 jobs later:
• Submit the SETUPVSM job after you submit the SETUPCC1 job. For more information, see “Step 10. Submit the CDC Jobs” on page 104.
• Submit the XIZZZ998 job after you submit CDC jobs. For more information, see “Step 11. Submit the XIZZZ998 Job” on page 104.
Step 7. Add the Library that Contains the CSNBSYD and CSNBSYE Programs to the System Link List (Optional)If you want PowerExchange to use the z/OS Cryptographic Services Integrated Cryptographic Service Facility (ICSF) to perform AES-128 encryption of user names and passwords, verify that the ICSF is enabled. Also,
102 Chapter 7: Installing and Upgrading PowerExchange on z/OS
work with your z/OS system programmer to verify that the library that contains the CSNBSYD and CSNBSYE modules is included in the system link list.
By default, the CSNBSYD and CSNBSYE modules reside in CSF.SCSFMOD0. If the library that contains the CSNBSYD and CSNBSYE modules is not in the system link list, work with your z/OS system programmer to add the library to the list.
PowerExchange uses ICSF, when it is enabled, to encrypt user names and passwords. Otherwise, PowerExchange uses AES-128 encryption and decryption routines that are compatible with those in the OpenSSL Toolkit. Because ICSF uses hardware assists, its encryption and decryption routines are much faster than the alternative routines.
Step 8. Add the Required Libraries to the APF ListAdd the PowerExchange LOADLIB library and other required libraries to the authorized program facility (APF) list.
For more information about updating the APF list, consult with your z/OS systems programming team.
1. Add the LOADLIB library to the APF list.
After you APF-authorize the LOADLIB library, PowerExchange can complete the following tasks:
• Issue RACROUTE security calls to check permissions.
• Wait for tape mounts when no tape drives are available.
• Wait for data sets currently in use by other users.
• Get IDMS schema and subschema information.
2. Verify that the library that contains the CSNBSYD and CSNBSYE modules is APF-authorized. If this library is included in the system link list, also verify that all of the libraries that are accessed through the system link list are APF-authorized.
3. Review the STEPLIB DD statement in any PowerExchange JCL, especially the PowerExchange Listener JCL in the STARTLST and PWXLSTNR members of the RUNLIB library.
APF-authorize all libraries that are concatenated in the STEPLIB DD statement. Otherwise, failures occur.
Step 9. Add an OMVS Segment to the PowerExchange Listener User ID (RACF Users)The PowerExchange Listener uses Transmission Control Protocol/Internet Protocol (TCP/IP) sockets for communication. If you use RACF, complete this step to configure the RACF user or profile under which the PowerExchange Listener runs.
Note: If you do not use RACF, consult the documentation for your security product.
u Define an OMVS segment for the RACF user ID under which the PowerExchange Listener runs.
Alternatively, set up a default OMVS segment by using the FACILITY class profile BPX.DEFAULT.USER.
Phase II. Install the PowerExchange CDC SoftwareIf you purchased the CDC option and you selected CDC data sources in the z/OS Installation Assistant, install the PowerExchange CDC software in this phase of the installation.
Otherwise, proceed to “Phase III. Install the PowerExchange Software for Specific Data Sources” on page 106.
Performing a Full Installation on z/OS 103
For any change capture environment on z/OS, the following components are required:
• A PowerExchange Listener. The z/OS Installation Assistant installs the PowerExchange Listener.
• A PowerExchange Agent. You must install and start the PowerExchange Agent.
• A PowerExchange Logger for z/OS. When you start the PowerExchange Agent, it runs the final setup job for the PowerExchange Logger.
• Environmental Change Capture Routines (ECCRs). You must install at least one ECCR.
Step 10. Submit the CDC JobsYou must submit some CDC jobs in the RUNLIB library on the z/OS system.
1. Submit the following CDC jobs in the RUNLIB library:
SETUPCC1
Allocates and populates the common CDC component data sets.
SETUPVSM
Allocates the following VSAM data sets:
• CCT data set for capture registrations
• CDCT data set for PowerExchange Condense information
• CDEP data set for tracking CDC extraction information
• DATAMAPS data set for data maps
• DTLCAMAP data set for extraction maps
• PowerExchange Log Catalog (LOGSCAT) VSAM data set, which the PowerExchange IDMS log-based ECCR uses
• PowerExchange Logger active log and emergency restart data sets
• PowerExchange PLOG Catalog (PCAT) VSAM data set, which the Adabas ECCR uses
The SETUPVSM job creates VSAM data sets for capture processing by using the data set specifications in “Space Requirements for PowerExchange Data Sets” on page 90. The data set sizes are adequate to build a test PowerExchange environment on a single z/OS logical partition (LPAR).
SETUPAGT
Assembles the EDMSDIR options module and writes it to the USERLIB library.
2. To create an efficient CDC implementation in a production environment, consider the number and size of the PowerExchange Logger active log and archive log data sets. Review data set sizes and parameters for the all CDC components after the installation is complete.
For more information about configuring the CDC components, see the PowerExchange CDC Guide for z/OS.
Step 11. Submit the XIZZZ998 JobThe XIZZZ998 job populates the DTLDATA, DTLDEMO, DTLEXPL, and PROCLIB data sets with the appropriate members from RUNLIB.
u On the z/OS system, submit the XIZZZ998 job.
104 Chapter 7: Installing and Upgrading PowerExchange on z/OS
Step 12. Copy the PowerExchange Agent Procedure to the PROCLIB LibraryThe z/OS Installation Assistant customized the sample procedure, AGENTSTP, for the PowerExchange Agent based on your input.
The XIZZZ998 job copied this procedure to the PowerExchange installation PROCLIB library and renamed it based on the Agent Started Task ID field that you specified on the CDC Common Parameters page of the z/OS Installation Assistant.
u Copy the customized PowerExchange Agent procedure from the PowerExchange installation PROCLIB to the system PROCLIB library for started tasks.
Step 13. Add the PowerExchange Load Libraries to the APF ListFor CDC, you must add PowerExchanage load libraries to the APF list.
1. Add the following load libraries to the APF list:
• hlq.LOAD
• hlq.LOADLIB, if you have not already added it
• hlq.CRG.LOAD, if you use IMS synchronous capture
The hlq variable is the value that you entered in the Seq \ Install Library field on the Data Set Names page of the z/OS Installation Assistant.
For information about updating the APF list, contact your z/OS systems programming team.
2. Review the STEPLIB DD statement in PowerExchange JCL, including the JCL for the PowerExchange Listener. Authorize all of the libraries that are concatenated in the STEPLIB DD statement. Otherwise, authorization is not in effect and failures might occur.
Step 14. Add an OMVS Segment to the PowerExchange Agent User ID (RACF Users)The PowerExchange Agent uses TCP/IP sockets for communication with the PowerExchange Listener. If you use RACF, complete this step to configure the RACF user or profile under which the PowerExchange Listener runs.
Note: If you do not use RACF, consult the documentation for your security product.
u Define an OMVS segment for the RACF user ID under which the PowerExchange Agent runs.
Alternatively, you can set up a default OMVS segment by using the FACILITY class profile BPX.DEFAULT.USER.
Step 15. Start the PowerExchange AgentTo start the PowerExchange Agent, run the MVS START command.
u Run one of the following commands:
S agent_nameSTART agent_name
The agent_name variable is the member name of the PowerExchange Agent procedure in the started task PROCLIB library.
The PowerExchange Agent started task name can be up to eight characters in length and can be different from the AgentID parameter defined in the AGENTCTL member of RUNLIB library.
Performing a Full Installation on z/OS 105
Step 16. Submit the SETUPCC2 JobThe SETUPCC2 job creates the PowerExchange Logger EDMUPARM module and defines the active log data sets in the PowerExchange Logger emergency restart data sets. The job has been customized based on your entries in the z/OS Installation Assistant.
1. From the RUNLIB library on z/OS, add the JOB card that is in the JOBCARD member to the JCL in the SETUPCC2 member.
Note: You can change the job name.
2. Submit the SETUPCC2 job.
Phase III. Install the PowerExchange Software for Specific Data Sources
If you use Adabas, DB2 for z/OS, or IDMS data sources, install the PowerExchange software for these data sources.
Otherwise, proceed to “After You Install PowerExchange on z/OS” on page 107.
Step 17. Install Software for DB2 for z/OS Data SourcesThe SETUPDB2 job submits jobs that install PowerExchange for DB2.
1. In the RUNLIB library, add the JOB card that is in the JOBCARD member to the SETUPDB2 JCL.
Note: You can change the job name.
2. Submit the SETUPDB2 job.
This job submits the XIDDB210 job. The XIDDB210 job runs the DB2 bind for PowerExchange bulk data processing. You must have DB2 BINDADD authority to run this job.
If you selected the DB2 CDC option on the Data Sources page, the SETUPDB2 job also submits the XIDDB220 job.
The XIDDB220 job performs the following tasks:
• Creates the capture directory database, table spaces, tables, and indexes for PowerExchange CDC.
• Submits the XIDDB225 job, which completes the DB2 binds for the DB2 ECCR. You must have SYSCTRL authority to run this job.
3. Authorize the appropriate users to access the DB2 plans. The following PowerExchange address spaces require access to the DB2 plans:
• The PowerExchange Listener requires access to the plan that is specified in the XIDDB210 job.
• The PowerExchange DB2 for z/OS ECCR requires access to the plan that is specified in the XIDDB225 job.
Step 18. Install Software for IDMS Data Sources (Optional)If you selected IDMS as a data source, optionally submit the XIDIDM10 job. This job copies the system IDMS load libraries to the PowerExchange copies of these libraries, called hlq.IDMS.LOADLIB and hlq.IDMS.DBA.LOADLIB.
1. In the RUNLIB library, add the JOB card that is in the JOBCARD member to the SETUPIDM JCL.
2. Submit the XIDIDM10 job.
106 Chapter 7: Installing and Upgrading PowerExchange on z/OS
If you set the first parameter of the SECURITY statement in the DBMOVER configuration file to 1 or 2, the PowerExchange Listener must run APF-authorized. However, the IDMS load libraries are usually not APF-authorized. To handle this situation, use one of the following methods:
• Set the PC_AUTH statement to Y in the DBMOVER configuration member on the z/OS system. This setting causes PowerExchange to use a z/OS Program Call (PC) services routine to get the APF-authorization that the PowerExchange Listener requires. Use this method if you do not want to maintain and APF-authorize copies of the IDMS load libraries. This method is recommended when security is enabled.
• After you run the XIDIDM10 job to copy the IDMS load libraries, APF-authorize the copies. Then verify that these libraries are specified in the PowerExchange Listener STEPLIB DD statement.
For more information, see the PowerExchange Bulk Data Movement Guide.
Related Topics:• “ IDMS CDC Parameters Page” on page 153
Step 19. Install Software for IMS Synchronous CDC Data SourcesFor IMS synchronous CDC data sources, the PowerExchange-provided CRG.LOAD library is installed if you selected the IMS Synchronous CDC option. You can use this software or one of the following BMC Software products, if available: CHANGE RECORDING FACILITY, DATABASE INTEGRITY PLUS, or Fast Path Online Restructure/EP. With any of these software choices, you must perform some configuration tasks.
u Complete the following tasks:
• If you currently use IMS synchronous CDC and the PowerExchange-provided CRG.LOAD library, redo the IMS Database Recovery Control (DBRC) configuration for the IMS synchronous ECCR when you complete the full installation. For information about configuring DBRC, see the PowerExchange CDC Guide for z/OS.
• If you are a new user of IMS synchronous CDC, complete the customization tasks described in the PowerExchange CDC Guide for z/OS.
Phase IV. Delete Previously Copied RUNLIB MembersOptionally, delete the RUNLIB members that the XIZZZ998 job previously copied to other libraries.
Step 20. Submit the XIZZZ999 Job (Optional)u Optionally, submit the XIZZZ999 job to delete the RUNLIB members that were previously copied.
After You Install PowerExchange on z/OSAfter you install PowerExchange on z/OS, you must configure PowerExchange.
For more information, see the following documents:
• For bulk data movement configuration, see the PowerExchange Bulk Data Movement Guide.
• For CDC configuration, see the PowerExchange CDC Guide for z/OS.
• For DBMOVER configuration file statements, see the PowerExchange Reference Manual.
After you configure PowerExchange, start the PowerExchange Listener and, if required, the PowerExchange Agent, PowerExchange Logger for z/OS, PowerExchange ECCRs, and PowerExchange Condense. For more information about starting and stopping PowerExchange tasks, see the PowerExchange Command Reference.
Performing a Full Installation on z/OS 107
Performing an Upgrade on z/OSTo upgrade PowerExchange for z/OS, run the z/OS Installation Assistant.
The z/OS Installation Assistant upgrades the message, sample, and load libraries. The z/OS Installation Assistant does not create new operational data libraries, such as those containing data maps, capture registrations, extraction maps, and captured change data. As a result, you do not need to migrate the contents of these data sets to the newly allocated data sets, which simplifies the upgrade process.
When you upgrade, you have the option to use new data set names or existing data set names, as follows:
• To add new data sources to an existing PowerExchange environment and use new data set names for the message, sample, and load libraries, select the Upgrade by Using New Data Set Names option on the Upgrade to a New Release page.
• To use the same data set names as the existing installation for the message, sample, and load libraries, select the Upgrade by Using Existing Data Set Names option on the Upgrade to a New Release page.
When you run the z/OS Installation Assistant, it creates several jobs on the z/OS system. To complete the upgrade, submit these jobs.
Note: An upgrade does not create a complete PowerExchange environment. To run the new PowerExchange release concurrently with an existing PowerExchange release, you must complete a full installation.
For a PowerExchange CDC environment, Informatica recommends that you upgrade to prevent potential loss of captured change data.
Related Topics:• “Performing a Full Installation on z/OS” on page 88
Before You Upgrade on z/OSBefore you upgrade on z/OS, complete the following tasks:
• Verify that PowerExchange supports the versions and release levels of the operating system and data sources.
• Verify that the license key is valid. If you have an existing InstParm file, it contains the license key. As part of the upgrade, you import the InstParm file. If you are adding new features, you might need a new license key.
• Verify that the new PowerExchange release is compatible with your PowerCenter installation.
• Verify that the z/OS Installation Assistant is installed on a 64-bit Windows system. The installation will fail if you attempt to run the z/OS Installation Assistant from a 32-bit system.
108 Chapter 7: Installing and Upgrading PowerExchange on z/OS
Task Flow for an Upgrade on z/OSTo upgrade PowerExchange on z/OS, upgrade the PowerExchange base software. Also, upgrade the PowerExchange CDC software and the PowerExchange software for certain data sources if applicable.
Use the following checklist of tasks to perform a PowerExchange upgrade:
Check Task Required or Optional
Phase I. Upgrade the PowerExchange Base Software Required
“Step 1. Stop Access to PowerExchange” on page 110 Required
“Step 2. Allocate the BINLIB and RUNLIB Libraries for an Upgrade” on page 111
Required
“Step 3. Prepare the z/OS Components on Windows for an Upgrade” on page 112
Required
“Step 4. Run the z/OS Installation Assistant to Upgrade” on page 112 Required
“Step 5A. Upgrade by Using Existing Data Set Names (Optional)” on page 115
Optional. Perform Step 5A or 5B.
“Step 5B. Upgrade by Using New Data Set Names (Optional)” on page 118
Optional. Perform Step 5A or 5B.
“Step 6. Edit the JOBCARD Member in the RUNLIB Library” on page 120 Required
“Step 7. Review the XJOBSU Member in the RUNLIB Library” on page 120
Required
“Step 8. Submit PowerExchange Base Software Jobs” on page 120 Required
“Step 9. Add the PowerExchange Load Library to the APF List” on page 121
Required if you use new data set names
Phase II. Upgrade the PowerExchange CDC Software Required if you use CDC
“Step 10. Submit CDC Jobs” on page 121 Required if you use CDC
“Step 11. Add the PowerExchange Load Libraries to the APF List” on page 122
Required if you use CDC and new data set names
Phase III. Upgrade the PowerExchange Software for Specific Data Sources
Required for some data sources
“Step 12A. Run the SETUDB2U or SETDB2UE Job to Upgrade Software for DB2 Data Sources” on page 123
Required if you used DB2 for z/OS data sources before the upgrade
“Step 12B. Run the SETUPDB2 Job to Upgrade Software for DB2 Data Sources” on page 124
Required if you add a DB2 for z/OS data source during the upgrade
“Step 13. Upgrade Software for IDMS Data Sources (Optional)” on page 124
Optional for IDMS data sources
Performing an Upgrade on z/OS 109
Check Task Required or Optional
“Step 14. Upgrade Software for IMS Synchronous CDC Data Sources” on page 125
Required for IMS synchronous CDC sources if you use the PowerExchange CRG.LOAD library
Phase IV. Complete Post-Upgrade Activities Required
“Step 15. Copy Started Task Procedures and Update RUNLIB Members” on page 125
Required if you use new data set names
“Step 16. Resume Access to PowerExchange” on page 125 Required
Phase I. Upgrade the PowerExchange Base SoftwareIn this phase of the upgrade, you allocate libraries on the z/OS system, extract the z/OS installation files to the Windows system, and use the z/OS Installation Assistant to upgrade the PowerExchange base software on the z/OS system.
After you run the z/OS Installation Assistant, you must complete additional tasks on the z/OS system.
All PowerExchange users must complete the steps in this phase.
Step 1. Stop Access to PowerExchangeBefore you upgrade, you must stop some PowerExchange and PowerCenter tasks.
1. If you use PowerExchange bulk data movement only, stop the following tasks:
• All PowerCenter workflows that extract data from or write data to PowerExchange
• All PowerExchange Listener address spaces
2. If you use PowerExchange CDC, stop the following tasks:
• All PowerCenter workflows that extract data from or write data to PowerExchange
• All PowerExchange Listener address spaces
• All ECCR address spaces
• All PowerExchange Condense address spaces
• All PowerExchange Logger for z/OS address spaces
• All PowerExchange Agent address spaces
Note: To stop the DB2 for z/OS ECCR, use the ECCR QUIESCE command. This command stops the ECCR after it reaches a point in the DB2 log where no in-flight UOWs exist.
Use the following syntax to issue the QUIESCE command:
F job_name,QUIESCEThe job_name variable is the name of the ECCR job or the started task.
The resulting output includes the PWXEDM177268I and PWXEDM177012I messages, as shown in the following example:
PWXEDM177268I LAST READ DB2 LOG LOCATION=rba_or_lrsn.data_sharing_member_id.sequence_numberPWXEDM177012I ECCR STATUS: LAST DB2 READ LOC rba_or_lrsn.data_sharing_member_id.sequence_numberOLDEST OPEN UOW urid.data_sharing_member_id
110 Chapter 7: Installing and Upgrading PowerExchange on z/OS
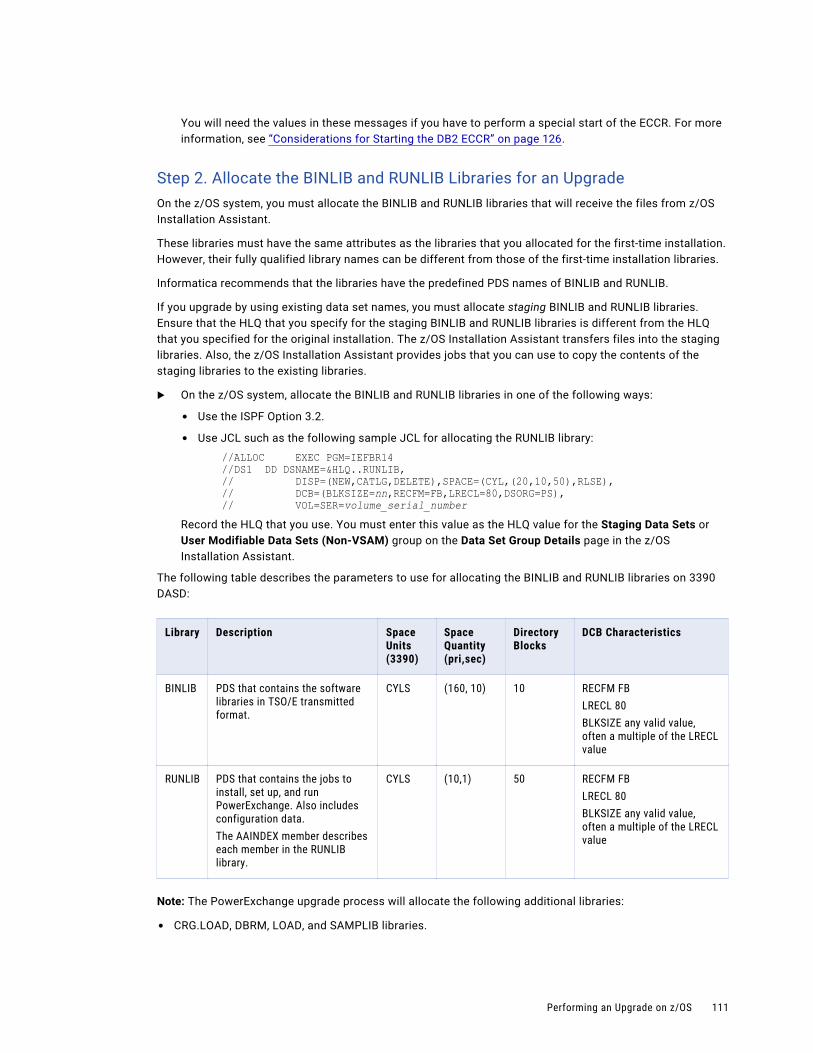
You will need the values in these messages if you have to perform a special start of the ECCR. For more information, see “Considerations for Starting the DB2 ECCR” on page 126.
Step 2. Allocate the BINLIB and RUNLIB Libraries for an UpgradeOn the z/OS system, you must allocate the BINLIB and RUNLIB libraries that will receive the files from z/OS Installation Assistant.
These libraries must have the same attributes as the libraries that you allocated for the first-time installation. However, their fully qualified library names can be different from those of the first-time installation libraries.
Informatica recommends that the libraries have the predefined PDS names of BINLIB and RUNLIB.
If you upgrade by using existing data set names, you must allocate staging BINLIB and RUNLIB libraries. Ensure that the HLQ that you specify for the staging BINLIB and RUNLIB libraries is different from the HLQ that you specified for the original installation. The z/OS Installation Assistant transfers files into the staging libraries. Also, the z/OS Installation Assistant provides jobs that you can use to copy the contents of the staging libraries to the existing libraries.
u On the z/OS system, allocate the BINLIB and RUNLIB libraries in one of the following ways:
• Use the ISPF Option 3.2.
• Use JCL such as the following sample JCL for allocating the RUNLIB library:
//ALLOC EXEC PGM=IEFBR14//DS1 DD DSNAME=&HLQ..RUNLIB,// DISP=(NEW,CATLG,DELETE),SPACE=(CYL,(20,10,50),RLSE),// DCB=(BLKSIZE=nn,RECFM=FB,LRECL=80,DSORG=PS),// VOL=SER=volume_serial_number
Record the HLQ that you use. You must enter this value as the HLQ value for the Staging Data Sets or User Modifiable Data Sets (Non-VSAM) group on the Data Set Group Details page in the z/OS Installation Assistant.
The following table describes the parameters to use for allocating the BINLIB and RUNLIB libraries on 3390 DASD:
Library Description Space Units (3390)
Space Quantity (pri,sec)
Directory Blocks
DCB Characteristics
BINLIB PDS that contains the software libraries in TSO/E transmitted format.
CYLS (160, 10) 10 RECFM FBLRECL 80BLKSIZE any valid value, often a multiple of the LRECL value
RUNLIB PDS that contains the jobs to install, set up, and run PowerExchange. Also includes configuration data.The AAINDEX member describes each member in the RUNLIB library.
CYLS (10,1) 50 RECFM FBLRECL 80BLKSIZE any valid value, often a multiple of the LRECL value
Note: The PowerExchange upgrade process will allocate the following additional libraries:
• CRG.LOAD, DBRM, LOAD, and SAMPLIB libraries.
Performing an Upgrade on z/OS 111
• All of the libraries described in “Space Requirements for PowerExchange Data Sets” on page 90 except DATAMAPS, if you chose to upgrade by using new data set names.
• DBRMLIB, DTLEXPL, DTLMSG, LOADLIB, and SRCLIB libraries, if you chose to upgrade by using existing data set names.
Step 3. Prepare the z/OS Components on Windows for an UpgradePowerExchange for z/OS is shipped as a self-extracting executable. Extract the upgrade files into a temporary directory on your Windows system.
1. From a Windows command prompt, make a temporary directory to extract the upgrade files into. For example, you might run the following command to make a temporary directory named pwx_mvs_vvrm:
mkdir pwx_mvs_vvrmThe vrm variable is the PowerExchange version.release.modification number.
2. Find and run the product upgrade executable.
The executable has a name such as:
pwxos26_Vvrm.exe The vrm is the PowerExchange version.release.modification number. For example, pwxos26_v961.exe is the name of the executable for the PowerExchange version 9.6.1 installation on z/OS.
3. In the WinZip Self-Extractor dialog box, click Browse.
4. In the Browse for Folder dialog box, browse to the temporary directory that you created. Then, click OK.
5. In the WinZip Self-Extractor dialog box, click Unzip.
The WinZip Self-Extractor places several files in the root directory and creates the binary and runlib subdirectories, which also contain files. The WinZip Self-Extractor then displays a message box to indicate that the files were unzipped successfully.
6. In the message box, click OK.
7. In the WinZip Self-Extractor dialog box, click Close.
Step 4. Run the z/OS Installation Assistant to UpgradeTo perform a PowerExchange upgrade, you must run the z/OS Installation Assistant wizard on the Windows system.
Also, copy the existing InstParm file from the last full installation of the current PowerExchange version to your working directory on Windows. You can either manually copy the file before you start the z/OS Installation Assistant or you can import the file from a subsequent z/OS Installation Assistant page. As you progress through the z/OS Installation Assistant pages, you can save your entries to the InstParm file by clicking Save on any page.
Tip: Retain the InstParm file on Windows so that you can use it to upgrade or apply hotfixes to PowerExchange later.
On some pages, you can click Advanced Parms to define advanced parameters or click Restore Defaults to restore the default values. However, if you define advanced parameters, you cannot restore the default values later by using the Restore Defaults button.
112 Chapter 7: Installing and Upgrading PowerExchange on z/OS
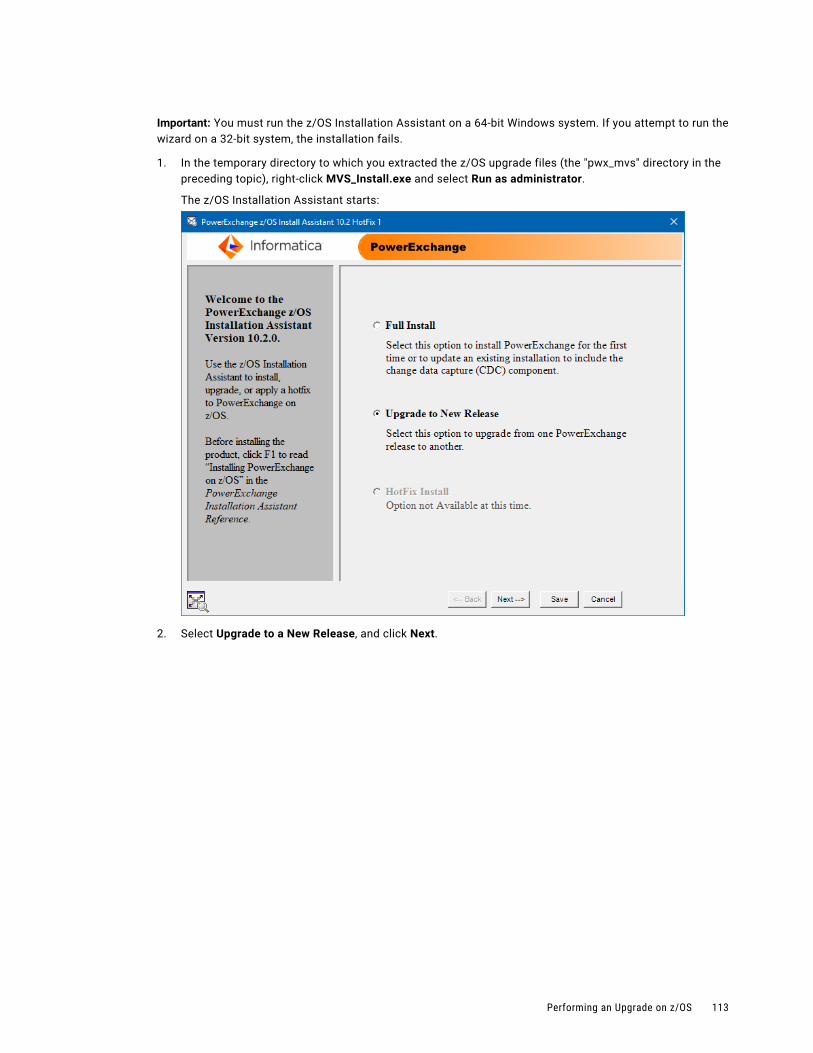
Important: You must run the z/OS Installation Assistant on a 64-bit Windows system. If you attempt to run the wizard on a 32-bit system, the installation fails.
1. In the temporary directory to which you extracted the z/OS upgrade files (the "pwx_mvs" directory in the preceding topic), right-click MVS_Install.exe and select Run as administrator.
The z/OS Installation Assistant starts:
2. Select Upgrade to a New Release, and click Next.
Performing an Upgrade on z/OS 113
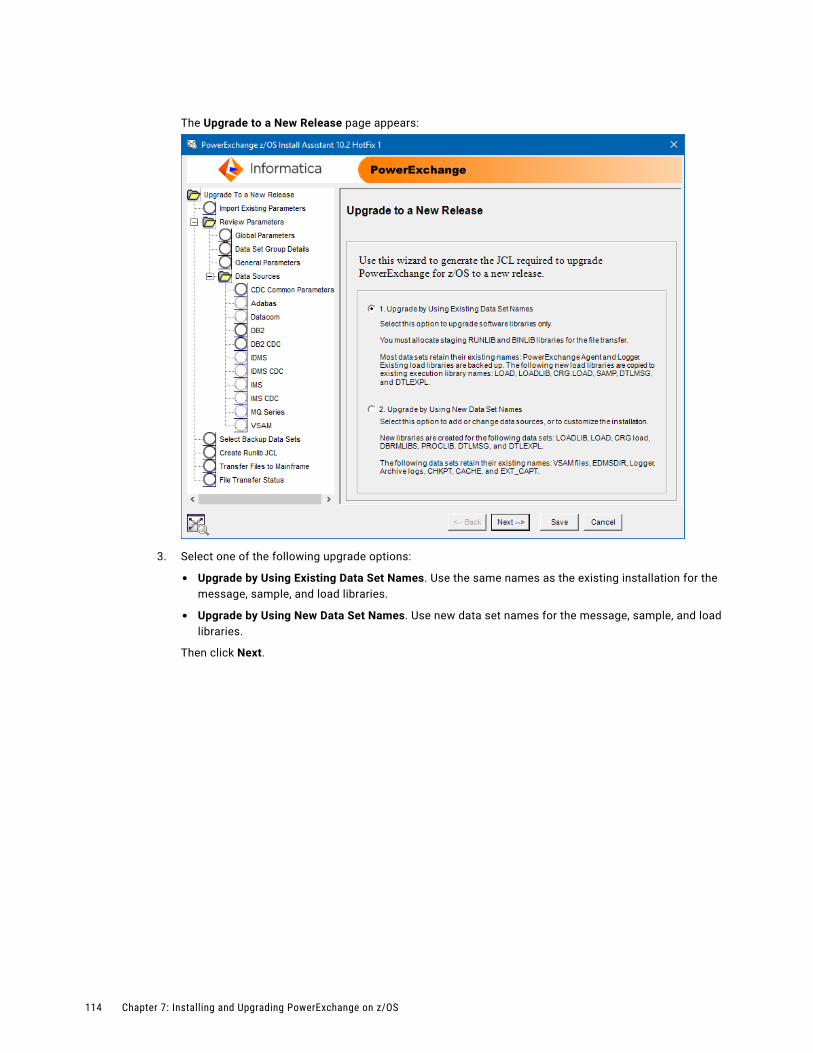
The Upgrade to a New Release page appears:
3. Select one of the following upgrade options:
• Upgrade by Using Existing Data Set Names. Use the same names as the existing installation for the message, sample, and load libraries.
• Upgrade by Using New Data Set Names. Use new data set names for the message, sample, and load libraries.
Then click Next.
114 Chapter 7: Installing and Upgrading PowerExchange on z/OS
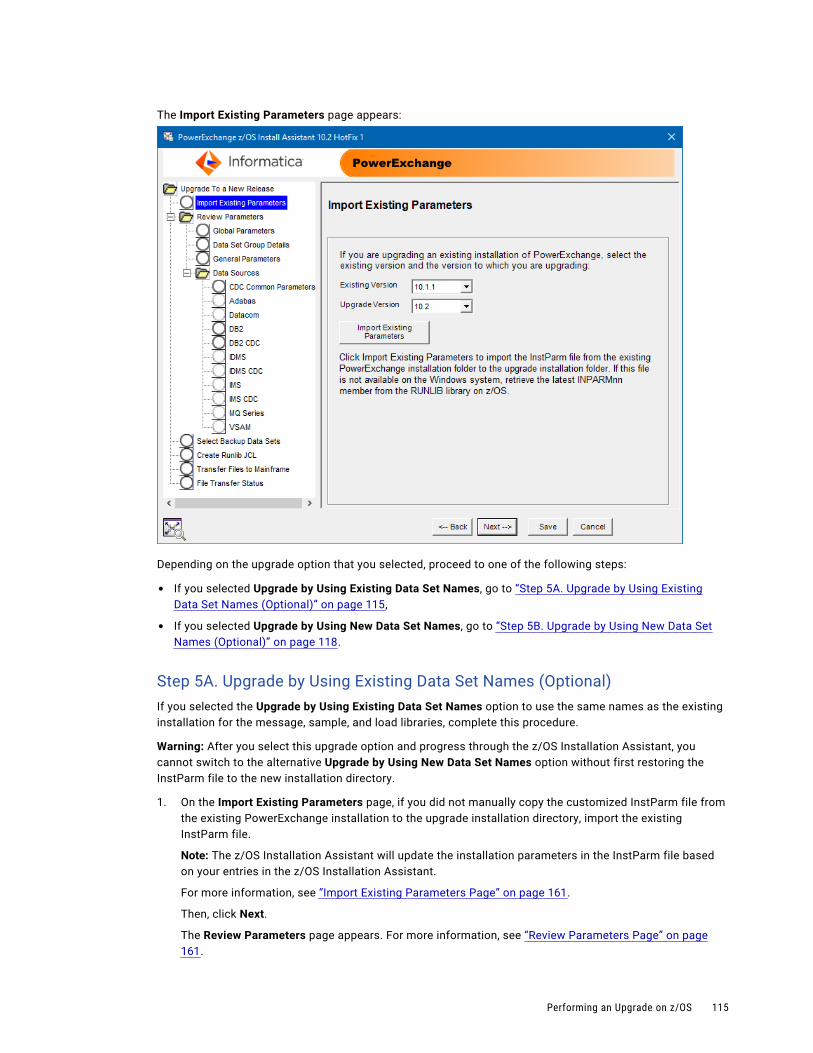
The Import Existing Parameters page appears:
Depending on the upgrade option that you selected, proceed to one of the following steps:
• If you selected Upgrade by Using Existing Data Set Names, go to “Step 5A. Upgrade by Using Existing Data Set Names (Optional)” on page 115,
• If you selected Upgrade by Using New Data Set Names, go to “Step 5B. Upgrade by Using New Data Set Names (Optional)” on page 118.
Step 5A. Upgrade by Using Existing Data Set Names (Optional)If you selected the Upgrade by Using Existing Data Set Names option to use the same names as the existing installation for the message, sample, and load libraries, complete this procedure.
Warning: After you select this upgrade option and progress through the z/OS Installation Assistant, you cannot switch to the alternative Upgrade by Using New Data Set Names option without first restoring the InstParm file to the new installation directory.
1. On the Import Existing Parameters page, if you did not manually copy the customized InstParm file from the existing PowerExchange installation to the upgrade installation directory, import the existing InstParm file.
Note: The z/OS Installation Assistant will update the installation parameters in the InstParm file based on your entries in the z/OS Installation Assistant.
For more information, see “Import Existing Parameters Page” on page 161.
Then, click Next.
The Review Parameters page appears. For more information, see “Review Parameters Page” on page 161.
Performing an Upgrade on z/OS 115
2. Click Next.
The Review Global Parameters page appears.
3. Review the information on this page.
Optionally, change the Logon ID or License Key. You cannot change the other values on this page.
For more information, see “Review Global Parameters Page (Upgrade with Existing Data Set Names) ” on page 162.
Then, click Next.
The Select Data Set Group Details page appears.
4. Review the information for the staging and backup data sets. Provide data set group details as required.
For more information, see “Select Data Set Group Details Page (Upgrade with Existing Data Set Names)” on page 164.
Then, click Next.
The Review General Parameters page appears.
5. Review the general parameters.
For more information, see “ General Parameters Page” on page 139.
Then, click Next.
The Review Data Sources page appears.
6. Review the data sources selected for bulk data movement and CDC operations.
For more information, see “Data Sources Page” on page 142.
Then, click Next.
Note: For an upgrade that uses existing data set names, you cannot add or remove data sources. To add or remove data sources, you must perform a full installation.
If any CDC data source was selected, the Review CDC Common Parameters page appears.
7. Review the common parameters for CDC operations.
For more information, see “ CDC Common Parameters Page” on page 143.
Then, click Next.
8. Enter parameter settings for each data source that you selected on the Data Sources page.
The following table lists the parameters page for each data source type:
Page Reference
Adabas Parameters “ Adabas Parameters Page” on page 145
Datacom Parameters “ Datacom Parameters Page” on page 147
DB2 Parameters “ DB2 Parameters Page” on page 148
DB2 CDC Parameters “ DB2 CDC Parameters Page” on page 150
IDMS Parameters “ IDMS Parameters Page” on page 152
IDMS CDC Parameters “ IDMS CDC Parameters Page” on page 153
IMS Parameters “ IMS Parameters Page” on page 154
116 Chapter 7: Installing and Upgrading PowerExchange on z/OS
Page Reference
IMS CDC Parameters “ IMS CDC Parameters Page” on page 155
MQ Series Parameters “ MQ Series Parameters Page” on page 156
VSAM Parameters “ VSAM Parameters Page” on page 157
If you selected multiple source types, click Next to proceed to the next page.
Note: You cannot change data source information on these pages. To change data source information, you must upgrade by using new data set names or perform a full installation.
After you click Next on the last parameters page, the Backup Data Sets page appears.
9. Select the data sets that you want to back up.
For more information, see “Backup Data Sets Page” on page 168.
Then, click Next.
The Create Runlib JCL page appears.
10. Enter information about the RUNLIB and BINLIB libraries.
For an upgrade that uses existing data set names, these libraries must be the BINLIB and RUNLIB libraries in the current PowerExchange environment.
For more information, see “Create Runlib JCL Page” on page 157.
Then, click Next.
The Transfer Files to Mainframe page appears. Also, the z/OS Installation Assistant creates the XRunlib folder. The XRunlib folder contains the files from the runlib folder, which are customized with the values that you entered in the z/OS Installation Assistant.
11. On the Transfer Files to Mainframe page, enter information about the z/OS system to which to transfer files.
Note: For an upgrade using existing data set names, the RUNLIB and BINLIB libraries are temporary staging libraries. You entered the HLQ for these libraries in the Staging Library HLQ field on the Data Set Names page.
For more information, see “Transfer Files to Mainframe Page” on page 158.
Then, click Next.
The File Transfer Status page displays the status of the file transfer operation. For more information, see “View File Transfer Status Page” on page 160.
12. After the file transfer completes, click OK.
13. Click Finish.
The z/OS Installation Assistant saves your installation entries to the InstParm file in the root installation directory on Windows if you have not already done so. The z/OS Installation Assistant also creates a corresponding INPARMnn file in the XRunlib directory on Windows and uses FTP to transfer this file to the RUNLIB library on z/OS. The INPARMnn member in the RUNLIB that has the largest nn value is the most recent version of the member.
Proceed to “Step 6. Edit the JOBCARD Member in the RUNLIB Library” on page 120.
Performing an Upgrade on z/OS 117
Step 5B. Upgrade by Using New Data Set Names (Optional)If you selected the Upgrade by Using New Data Set Names option to use new data set names for the message, sample, and load libraries, complete this procedure.
Warning: After you select this upgrade option and progress through the z/OS Installation Assistant, you cannot switch to the alternative Upgrade by Using Existing Data Set Names option without first restoring the InstParm file to the new installation directory.
1. On the Import Existing Parameters page, if you did not manually copy the customized InstParm file from the existing PowerExchange installation to the upgrade installation directory, import the existing InstParm file.
Note: The z/OS Installation Assistant will update the installation parameters in the InstParm file based on your entries in the z/OS Installation Assistant.
For more information, see “Import Existing Parameters Page” on page 161.
Then, click Next.
The Review Parameters page appears. For more information, see “Review Parameters Page” on page 161.
2. Click Next.
The Review Global Parameters page appears.
3. Enter the high-level qualifier (HLQ) for the new data set names and review the other information.
For more information, see “Review Global Parameters Page (Upgrade with New Data Set Names)” on page 163.
Then, click Next.
The Select Data Set Group Details page appears.
4. Review the volume and unit values for data sets.
If necessary, you can change the volume and unit values for new data sets. For more information, see “Select Data Set Group Details Page (Upgrade with New Data Set Names)” on page 166.
Then, click Next.
The Review General Parameters page appears.
5. Review the general parameters.
For more information, see “ General Parameters Page” on page 139.
Then, click Next.
The Review Data Sources page appears.
6. Review the data sources selected for bulk data movement and CDC operations. Optionally, add data source types.
For more information, see “Data Sources Page” on page 142.
Then, click Next.
Note: For an upgrade that uses new data set names, you cannot remove data sources. To remove data sources, you must perform a full installation.
If any CDC data source was selected, the CDC Common Parameters page appears.
7. On the Review CDC Common Parameters page, review the common parameters for CDC operations.
For more information, see “ CDC Common Parameters Page” on page 143.
Then, click Next.
8. Enter parameter settings for each data source that you selected on the Data Sources page.
118 Chapter 7: Installing and Upgrading PowerExchange on z/OS
The following table lists the parameters page for each data source type:
Page Reference
Adabas Parameters “ Adabas Parameters Page” on page 145
Datacom Parameters “ Datacom Parameters Page” on page 147
DB2 Parameters “ DB2 Parameters Page” on page 148
DB2 CDC Parameters “ DB2 CDC Parameters Page” on page 150
IDMS Parameters “ IDMS Parameters Page” on page 152
IDMS CDC Parameters “ IDMS CDC Parameters Page” on page 153
IMS Parameters “ IMS Parameters Page” on page 154
IMS CDC Parameters “ IMS CDC Parameters Page” on page 155
MQ Series Parameters “ MQ Series Parameters Page” on page 156
VSAM Parameters “ VSAM Parameters Page” on page 157
If you selected multiple source types, click Next to proceed to the next page.
After you click Next on the last parameters page, the Backup Data Sets page appears.
9. Select the data sets that you want to back up.
For more information, see “Backup Data Sets Page” on page 168.
Then, click Next.
The Create Runlib JCL page appears.
10. Enter information about the RUNLIB and BINLIB libraries.
For more information, see “Create Runlib JCL Page” on page 157.
Then, click Next.
The Transfer Files to Mainframe page appears. Also, the z/OS Installation Assistant creates the XRunlib folder. The XRunlib folder contains the files from the runlib folder, which are customized with the values that you entered in the z/OS Installation Assistant.
11. On the Transfer Files to Mainframe page, enter information about the z/OS system to which to transfer files.
Note: For an upgrade that uses new data set names, the RUNLIB and BINLIB libraries are new libraries. These libraries are also the libraries to which the z/OS Installation Assistant transfers the RUNLIB and BINLIB data sets. You entered the HLQ for these libraries on the Data Set Group Details page.
For more information, see “Transfer Files to Mainframe Page” on page 158.
Then, click Next.
The File Transfer Status page displays the status of the file transfer operation. For more information, see “View File Transfer Status Page” on page 160.
12. After the file transfer completes, click OK.
Performing an Upgrade on z/OS 119
13. Click Finish.
Note: The z/OS Installation Assistant saves your installation entries to the InstParm file in the root installation directory on Windows if you have not already done so. The z/OS Installation Assistant also creates a corresponding INPARMnn file in the XRunlib directory on Windows and uses FTP to transfer this file to the RUNLIB library on z/OS. The INPARMnn member in the RUNLIB that has the largest nn value is the most recent version of the member.
Proceed to “Step 6. Edit the JOBCARD Member in the RUNLIB Library” on page 120.
Step 6. Edit the JOBCARD Member in the RUNLIB LibraryOn the z/OS system, edit the JOBCARD member in the upgrade RUNLIB library according to your site standards. You might want to add parameters such as CLASS and MSGCLASS.
To see a list of the jobs in the RUNLIB library that will use the updated JOBCARD, view the XJOBSU member in the upgrade RUNLIB library.
1. In the upgrade RUNLIB library, edit the JOBCARD member.
2. If you selected the Auto Submit On option on the General Parameters page, add the TYPRUN=HOLD statement to control how the jobs run.
With this parameter setting, when the jobs run, you must release each job manually.
Step 7. Review the XJOBSU Member in the RUNLIB LibraryThe XJOBS member lists the installation jobs that you must submit from the RUNLIB, in the order that they must be submitted.
u Review the XJOBSU member in the RUNLIB library to determine which job to run next.
Step 8. Submit PowerExchange Base Software JobsTo add the libraries that are required for bulk data movement, submit either the SETUBL1E or SETUBL1N job in the upgrade RUNLIB library. These jobs add libraries for bulk data movement and add the JOB card to other jobs.
The job that you use depends on the upgrade option that you selected:
• If you selected Upgrade by Using Existing Data Set Names, use SETUBL1E.
• If you selected Upgrade by Using New Data Set Names, use SETUBL1N,
Also, submit additional jobs as listed in the XJOBSU member.
1. If you are upgrading by using new data set names, submit the BKUPDSUN job.
This job makes backup copies of the data sets that you selected on the Backup Data Sets page.
2. Based on the upgrade option that you selected, add the JOB card in the JOBCARD member to the SETUBL1E or SETUBL1N job in the upgrade RUNLIB library.
3. Perform one of the following actions:
• If you selected Upgrade by Using Existing Data Set Names, verify that the HLQ value in the GENBULK member in the existing RUNLIB library is the same as the HLQ value in the GENBULK member in the upgrade RUNLIB library.
• If you selected Upgrade by Using New Data Set Names, verify that the HLQ value in the GENBULK member in the existing RUNLIB library differs from the HLQ value in the GENBULK member in the upgrade RUNLIB library.
120 Chapter 7: Installing and Upgrading PowerExchange on z/OS
4. Submit the SETUBL1E job or SETUBL1N job.
5. If you are upgrading by using existing data set names, submit the BKUPDSUE job.
This job backs up selected current installed data sets.
6. If you are upgrading by using existing data set names, submit the INSPWXUE job.
This job copies the newly created libraries to previously existing names.
If you chose to upgrade by using new data set names, proceed to “Step 9. Add the PowerExchange Load Library to the APF List” on page 121.
If you chose to upgrade by using existing data set names, proceed to “Phase II. Upgrade the PowerExchange CDC Software” on page 121.
Related Topics:• “Backup Data Sets Page” on page 168
Step 9. Add the PowerExchange Load Library to the APF ListIf you chose to upgrade by using new data set names and you previously APF-authorized the LOADLIB library, add the new LOADLIB library to the APF list.
For information about updating the APF list, consult with your z/OS systems programming team.
After you APF-authorize the LOADLIB library, PowerExchange can complete the following tasks:
• Issue RACROUTE security calls to check permissions.
• Wait for tape mounts when no tape drives are available.
• Wait for data sets currently in use by other users.
• Get IDMS schema and subschema information.
Phase II. Upgrade the PowerExchange CDC SoftwareIf you purchased the CDC option and you selected CDC data sources in the z/OS Installation Assistant, you must upgrade the PowerExchange CDC software in this phase of the upgrade.
Otherwise, proceed to “Phase III. Upgrade the PowerExchange Software for Specific Data Sources” on page 122.
Step 10. Submit CDC JobsTo allocate the data sets required for CDC operations, submit the CDC jobs in the upgrade RUNLIB library based on the upgrade option that you selected.
1. Submit the SETUCC1E or SETUCC1N job to allocate the required data sets.
• If you selected the Upgrade by Using Existing Data Set Names option, submit SETUCC1E.
• If you selected the Upgrade by Using New Data Set Names option, submit SETUCC1N.
Performing an Upgrade on z/OS 121
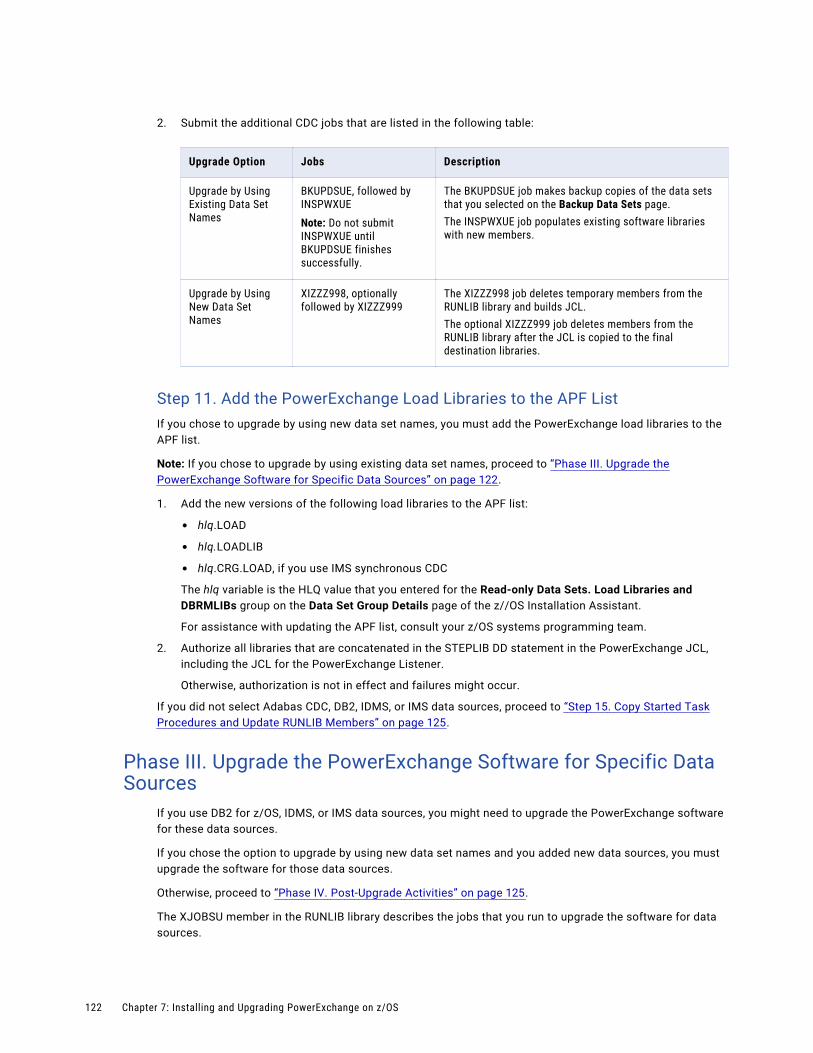
2. Submit the additional CDC jobs that are listed in the following table:
Upgrade Option Jobs Description
Upgrade by Using Existing Data Set Names
BKUPDSUE, followed by INSPWXUENote: Do not submit INSPWXUE until BKUPDSUE finishes successfully.
The BKUPDSUE job makes backup copies of the data sets that you selected on the Backup Data Sets page.The INSPWXUE job populates existing software libraries with new members.
Upgrade by Using New Data Set Names
XIZZZ998, optionally followed by XIZZZ999
The XIZZZ998 job deletes temporary members from the RUNLIB library and builds JCL.The optional XIZZZ999 job deletes members from the RUNLIB library after the JCL is copied to the final destination libraries.
Step 11. Add the PowerExchange Load Libraries to the APF ListIf you chose to upgrade by using new data set names, you must add the PowerExchange load libraries to the APF list.
Note: If you chose to upgrade by using existing data set names, proceed to “Phase III. Upgrade the PowerExchange Software for Specific Data Sources” on page 122.
1. Add the new versions of the following load libraries to the APF list:
• hlq.LOAD
• hlq.LOADLIB
• hlq.CRG.LOAD, if you use IMS synchronous CDC
The hlq variable is the HLQ value that you entered for the Read-only Data Sets. Load Libraries and DBRMLIBs group on the Data Set Group Details page of the z//OS Installation Assistant.
For assistance with updating the APF list, consult your z/OS systems programming team.
2. Authorize all libraries that are concatenated in the STEPLIB DD statement in the PowerExchange JCL, including the JCL for the PowerExchange Listener.
Otherwise, authorization is not in effect and failures might occur.
If you did not select Adabas CDC, DB2, IDMS, or IMS data sources, proceed to “Step 15. Copy Started Task Procedures and Update RUNLIB Members” on page 125.
Phase III. Upgrade the PowerExchange Software for Specific Data Sources
If you use DB2 for z/OS, IDMS, or IMS data sources, you might need to upgrade the PowerExchange software for these data sources.
If you chose the option to upgrade by using new data set names and you added new data sources, you must upgrade the software for those data sources.
Otherwise, proceed to “Phase IV. Post-Upgrade Activities” on page 125.
The XJOBSU member in the RUNLIB library describes the jobs that you run to upgrade the software for data sources.
122 Chapter 7: Installing and Upgrading PowerExchange on z/OS
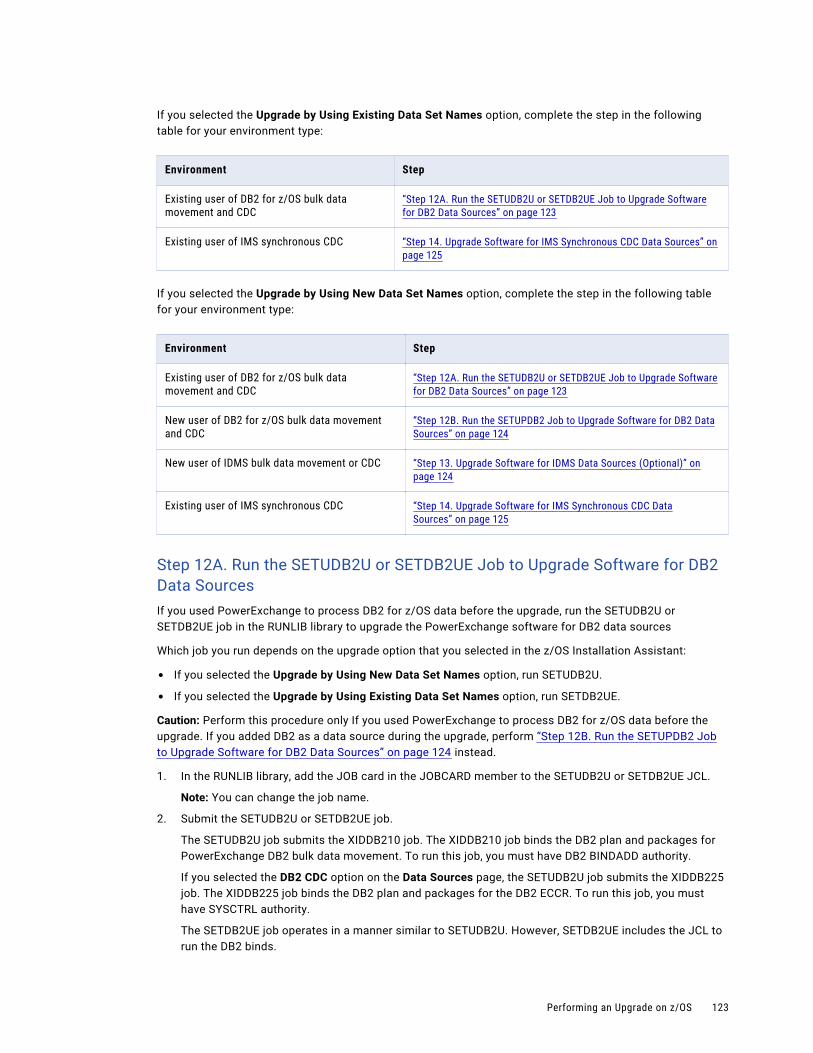
If you selected the Upgrade by Using Existing Data Set Names option, complete the step in the following table for your environment type:
Environment Step
Existing user of DB2 for z/OS bulk data movement and CDC
“Step 12A. Run the SETUDB2U or SETDB2UE Job to Upgrade Software for DB2 Data Sources” on page 123
Existing user of IMS synchronous CDC “Step 14. Upgrade Software for IMS Synchronous CDC Data Sources” on page 125
If you selected the Upgrade by Using New Data Set Names option, complete the step in the following table for your environment type:
Environment Step
Existing user of DB2 for z/OS bulk data movement and CDC
“Step 12A. Run the SETUDB2U or SETDB2UE Job to Upgrade Software for DB2 Data Sources” on page 123
New user of DB2 for z/OS bulk data movement and CDC
“Step 12B. Run the SETUPDB2 Job to Upgrade Software for DB2 Data Sources” on page 124
New user of IDMS bulk data movement or CDC “Step 13. Upgrade Software for IDMS Data Sources (Optional)” on page 124
Existing user of IMS synchronous CDC “Step 14. Upgrade Software for IMS Synchronous CDC Data Sources” on page 125
Step 12A. Run the SETUDB2U or SETDB2UE Job to Upgrade Software for DB2 Data SourcesIf you used PowerExchange to process DB2 for z/OS data before the upgrade, run the SETUDB2U or SETDB2UE job in the RUNLIB library to upgrade the PowerExchange software for DB2 data sources
Which job you run depends on the upgrade option that you selected in the z/OS Installation Assistant:
• If you selected the Upgrade by Using New Data Set Names option, run SETUDB2U.
• If you selected the Upgrade by Using Existing Data Set Names option, run SETDB2UE.
Caution: Perform this procedure only If you used PowerExchange to process DB2 for z/OS data before the upgrade. If you added DB2 as a data source during the upgrade, perform “Step 12B. Run the SETUPDB2 Job to Upgrade Software for DB2 Data Sources” on page 124 instead.
1. In the RUNLIB library, add the JOB card in the JOBCARD member to the SETUDB2U or SETDB2UE JCL.
Note: You can change the job name.
2. Submit the SETUDB2U or SETDB2UE job.
The SETUDB2U job submits the XIDDB210 job. The XIDDB210 job binds the DB2 plan and packages for PowerExchange DB2 bulk data movement. To run this job, you must have DB2 BINDADD authority.
If you selected the DB2 CDC option on the Data Sources page, the SETUDB2U job submits the XIDDB225 job. The XIDDB225 job binds the DB2 plan and packages for the DB2 ECCR. To run this job, you must have SYSCTRL authority.
The SETDB2UE job operates in a manner similar to SETUDB2U. However, SETDB2UE includes the JCL to run the DB2 binds.
Performing an Upgrade on z/OS 123
3. If you changed the DB2 plan names during the upgrade, authorize the appropriate PowerExchange users to access the DB2 plans.
The following PowerExchange user address spaces require access to the DB2 plans:
• For bulk data movement, the PowerExchange Listener requires access to the plan that is specified in the XIDDB210 job.
• For CDC, the PowerExchange DB2 ECCR requires access to the plan that is specified in the XIDDB225 job.
Step 12B. Run the SETUPDB2 Job to Upgrade Software for DB2 Data SourcesIf you added DB2 for z/OS as a data source during the upgrade, run the SETUPDB2 job to upgrade software for DB2 data sources.
Caution: Perform this procedure only if you added DB2 as a data source during the upgrade. If you used PowerExchange to process DB2 for z/OS data before the upgrade, perform “Step 12A. Run the SETUDB2U or SETDB2UE Job to Upgrade Software for DB2 Data Sources” on page 123 instead.
1. In the RUNLIB library, add the JOB card in the JOBCARD member to the SETUPDB2 JCL.
Note: You can change the job name.
2. Submit the SETUPDB2 job.
This job submits the XIDDB210 job. The XIDDB210 job runs the DB2 bind for DB2 bulk data processing. You must have DB2 BINDADD authority to run this job.
If you selected the DB2 CDC option on the Data Sources page, SETUPDB2 also submits the XIDDB220 job. The XIDDB220 job completes the following tasks:
• Creates the capture directory database, table spaces, tables, and indexes for PowerExchange for DB2 CDC.
• Submits the XIDDB225 job, which runs the DB2 binds for the DB2 ECCR. You must have SYSCTRL authority to run this job.
3. Authorize the appropriate users to access the DB2 plans.
The following PowerExchange address spaces require access to the PowerExchange for DB2 plans:
• The PowerExchange Listener requires access to the plan that is specified in the XIDDB210 job.
• The PowerExchange DB2 ECCR requires access to the plan that is specified in the XIDDB225 job.
Step 13. Upgrade Software for IDMS Data Sources (Optional)If you selected IDMS as a new data source during the upgrade, optionally submit the XIDIDM10 job. This job copies the system IDMS load libraries to the PowerExchange copies of these libraries, called hlq.IDMS.LOADLIB and hlq.IDMS.DBA.LOADLIB.
If you set the first parameter of the SECURITY statement in the DBMOVER configuration file to 1 or 2, the PowerExchange Listener must run APF-authorized. However, IDMS load libraries are usually not APF-authorized. To handle this situation, you can use one of the following methods:
• Run the XIDIDM10 job to copy the IDMS load libraries and APF-authorize the copies. Then verify that these libraries are specified in the PowerExchange Listener STEPLIB DD statement.
• In the DBMOVER configuration member on the z/OS system, set the PC_AUTH statement to Y. This setting causes PowerExchange to use an z/OS Program Call (PC) services routine to get the APF-authorization that the PowerExchange Listener requires. Use this method if you do not want to maintain and APF-authorize copies of the IDMS load libraries. This method is recommended when security is enabled.
1. In the RUNLIB library, add the JOB card in the JOBCARD member to the XIDIDM10 JCL.
124 Chapter 7: Installing and Upgrading PowerExchange on z/OS

2. Submit the XIDIDM10 job.
For more information, see the PowerExchange Bulk Data Movement Guide.
Step 14. Upgrade Software for IMS Synchronous CDC Data SourcesIf you currently use IMS synchronous CDC and the PowerExchange-provided CRG.LOAD library, you must redo the DBRC configuration for the IMS synchronous ECCR.
For information about how to configure DRBC for IMS synchronous CDC, see the PowerExchange CDC Guide for z/OS.
Phase IV. Post-Upgrade ActivitiesAfter you upgrade PowerExchange, copy started task procedures and update the RUNLIB members. Then, resume access to PowerExchange.
Step 15. Copy Started Task Procedures and Update RUNLIB MembersIf you upgraded by using new data set names, you must copy new or changed procedures for started tasks from the PowerExchange upgrade PROCLIB library to a system started task PROCLIB library.
Additionally, because some DD statements in the procedure JCL in the upgrade PROCLIB library refer to upgrade RUNLIB members such as DBMOVER and CAPTDB2, complete the following steps:
1. Review the RUNLIB members in the earlier release to determine if they contain customizations.
2. To ensure that the upgrade RUNLIB members contain the customizations from the earlier release, perform one of the following actions:
• Edit the upgrade RUNLIB members to incorporate any customization from the earlier release.
• Replace the upgrade RUNLIB members with the customized members from the earlier release. To add new parameters and remove deprecated parameters from the RUNLIB members, review the PowerExchange Release Guide.
Step 16. Resume Access to PowerExchangeTo resume access to PowerExchange, you must start the tasks for bulk data movement and CDC in the upgraded PowerExchange environment.
1. If you use PowerExchange bulk data movement, start the following tasks:
• All PowerExchange Listener address spaces
• All PowerCenter workflows that extract data from or write data to PowerExchange
2. If you use PowerExchange CDC, start the following tasks:
• All PowerExchange Listener address spaces
• All PowerExchange Agent address spaces
• All PowerExchange Logger for z/OS address spaces
• All ECCR address spaces
• All PowerExchange Condense address spaces
• All PowerCenter workflows that extract data from or write data to PowerExchange
Performing an Upgrade on z/OS 125
Considerations for Starting the DB2 ECCRPerform a warm start, cold start, or special start of the DB2 ECCR.
Use the following criteria to determine which start type to use:
• If you performed “Step 12A. Run the SETUDB2U or SETDB2UE Job to Upgrade Software for DB2 Data Sources” on page 123, warm start the DB2 ECCR.
• If you performed “Step 12B. Run the SETUPDB2 Job to Upgrade Software for DB2 Data Sources” on page 124, cold start the DB2 ECCR.
• In the following situations, perform a special start of the DB2 ECCR:
- You upgraded from a release earlier than PowerExchange 8.6.1 HotFix 14, and you used PowerExchange to process DB2 for z/OS data before the upgrade.
- You inadvertently deleted the DB2 ECCR capture directory tables (TCAP*), thereby preventing a warm start of the DB2 ECCR. Note that “Step 12B. Run the SETUPDB2 Job to Upgrade Software for DB2 Data Sources” on page 124 deletes these tables if they exist.
To perform a special start of the DB2 ECCR, edit the REPLOPT data set to specify the STARTLOC parameter and the log location and RBA values from messages PWXEDM177268I and PWXEDM177021I, which you saved in “Step 1. Stop Access to PowerExchange” on page 110. For example:
*START WARM *START COLD START STARTLOC=00000000047F56A7B2DB USEDIR,USESTAT
After you perform a special start of the ECCR, reset the control cards for a warm start:
START WARM *START COLD *START STARTLOC=00000000047F56A7B2DB USEDIR,USESTAT
For more information about performing a special start of the DB2 ECCR, see the PowerExchange CDC Guide for z/OS.
After You Upgrade on z/OSAfter you upgrade on z/OS, review the latest PowerExchange documentation for information about new features and changes.
See the following documentation:
• For an overview of new features and changes, see the PowerExchange Release Guide.
• For information about post-upgrade tasks and considerations, see Appendix A, “Upgrade Considerations” on page 171.
• For more information about migrating data maps, capture registrations, and extraction maps from a previous release, see “Migrating Data Maps, Capture Registrations, and Extraction Maps” on page 39.
• If you selected the Upgrade by Using New Data Set Names option and you configured additional data sources, you must configure PowerExchange before you can use those data sources for bulk data movement or CDC.
To configure bulk data movement, see the PowerExchange Bulk Data Movement Guide.
To configure CDC, see the PowerExchange CDC Guide for z/OS.
For information about DBMOVER configuration statements, see the PowerExchange Reference Manual.
126 Chapter 7: Installing and Upgrading PowerExchange on z/OS
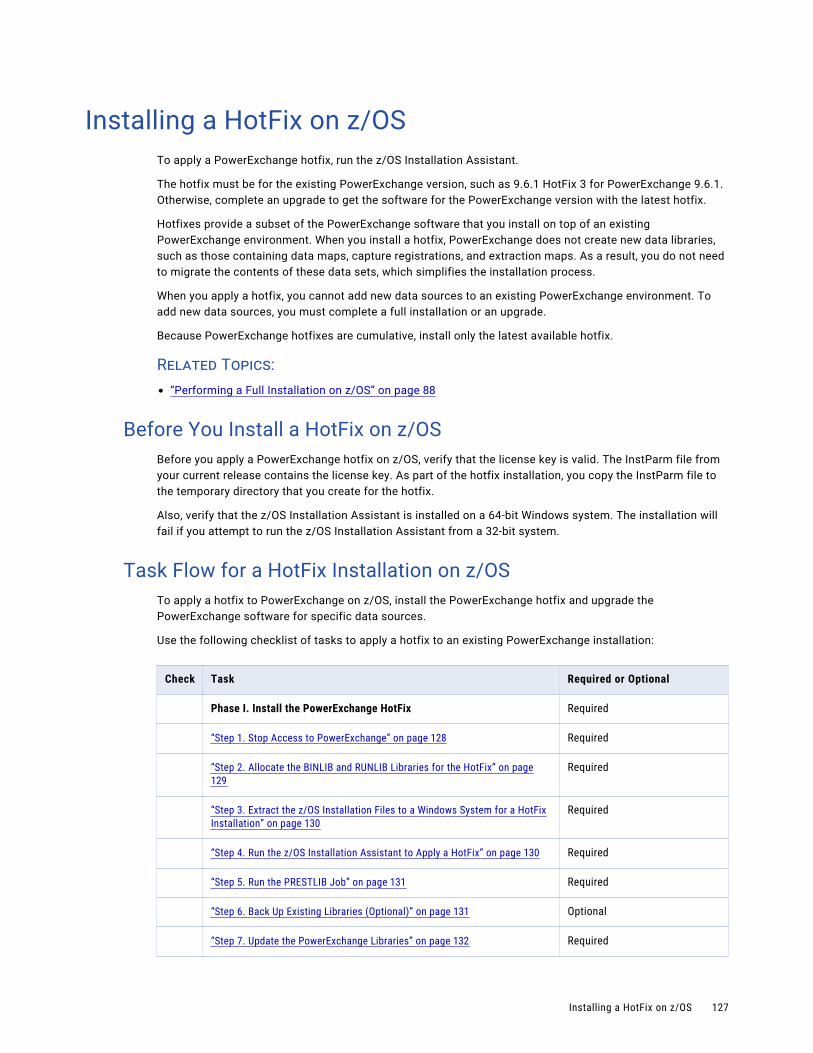
Installing a HotFix on z/OSTo apply a PowerExchange hotfix, run the z/OS Installation Assistant.
The hotfix must be for the existing PowerExchange version, such as 9.6.1 HotFix 3 for PowerExchange 9.6.1. Otherwise, complete an upgrade to get the software for the PowerExchange version with the latest hotfix.
Hotfixes provide a subset of the PowerExchange software that you install on top of an existing PowerExchange environment. When you install a hotfix, PowerExchange does not create new data libraries, such as those containing data maps, capture registrations, and extraction maps. As a result, you do not need to migrate the contents of these data sets, which simplifies the installation process.
When you apply a hotfix, you cannot add new data sources to an existing PowerExchange environment. To add new data sources, you must complete a full installation or an upgrade.
Because PowerExchange hotfixes are cumulative, install only the latest available hotfix.
Related Topics:• “Performing a Full Installation on z/OS” on page 88
Before You Install a HotFix on z/OSBefore you apply a PowerExchange hotfix on z/OS, verify that the license key is valid. The InstParm file from your current release contains the license key. As part of the hotfix installation, you copy the InstParm file to the temporary directory that you create for the hotfix.
Also, verify that the z/OS Installation Assistant is installed on a 64-bit Windows system. The installation will fail if you attempt to run the z/OS Installation Assistant from a 32-bit system.
Task Flow for a HotFix Installation on z/OSTo apply a hotfix to PowerExchange on z/OS, install the PowerExchange hotfix and upgrade the PowerExchange software for specific data sources.
Use the following checklist of tasks to apply a hotfix to an existing PowerExchange installation:
Check Task Required or Optional
Phase I. Install the PowerExchange HotFix Required
“Step 1. Stop Access to PowerExchange” on page 128 Required
“Step 2. Allocate the BINLIB and RUNLIB Libraries for the HotFix” on page 129
Required
“Step 3. Extract the z/OS Installation Files to a Windows System for a HotFix Installation” on page 130
Required
“Step 4. Run the z/OS Installation Assistant to Apply a HotFix” on page 130 Required
“Step 5. Run the PRESTLIB Job” on page 131 Required
“Step 6. Back Up Existing Libraries (Optional)” on page 131 Optional
“Step 7. Update the PowerExchange Libraries” on page 132 Required
Installing a HotFix on z/OS 127
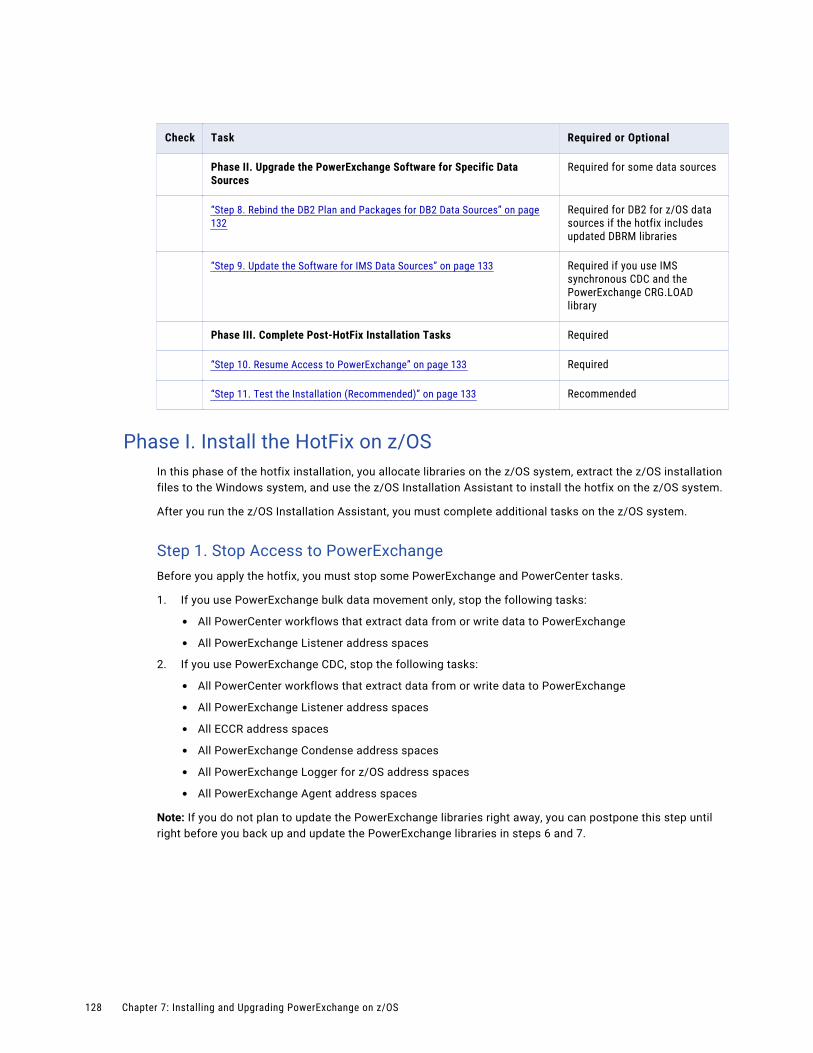
Check Task Required or Optional
Phase II. Upgrade the PowerExchange Software for Specific Data Sources
Required for some data sources
“Step 8. Rebind the DB2 Plan and Packages for DB2 Data Sources” on page 132
Required for DB2 for z/OS data sources if the hotfix includes updated DBRM libraries
“Step 9. Update the Software for IMS Data Sources” on page 133 Required if you use IMS synchronous CDC and the PowerExchange CRG.LOAD library
Phase III. Complete Post-HotFix Installation Tasks Required
“Step 10. Resume Access to PowerExchange” on page 133 Required
“Step 11. Test the Installation (Recommended)” on page 133 Recommended
Phase I. Install the HotFix on z/OSIn this phase of the hotfix installation, you allocate libraries on the z/OS system, extract the z/OS installation files to the Windows system, and use the z/OS Installation Assistant to install the hotfix on the z/OS system.
After you run the z/OS Installation Assistant, you must complete additional tasks on the z/OS system.
Step 1. Stop Access to PowerExchangeBefore you apply the hotfix, you must stop some PowerExchange and PowerCenter tasks.
1. If you use PowerExchange bulk data movement only, stop the following tasks:
• All PowerCenter workflows that extract data from or write data to PowerExchange
• All PowerExchange Listener address spaces
2. If you use PowerExchange CDC, stop the following tasks:
• All PowerCenter workflows that extract data from or write data to PowerExchange
• All PowerExchange Listener address spaces
• All ECCR address spaces
• All PowerExchange Condense address spaces
• All PowerExchange Logger for z/OS address spaces
• All PowerExchange Agent address spaces
Note: If you do not plan to update the PowerExchange libraries right away, you can postpone this step until right before you back up and update the PowerExchange libraries in steps 6 and 7.
128 Chapter 7: Installing and Upgrading PowerExchange on z/OS
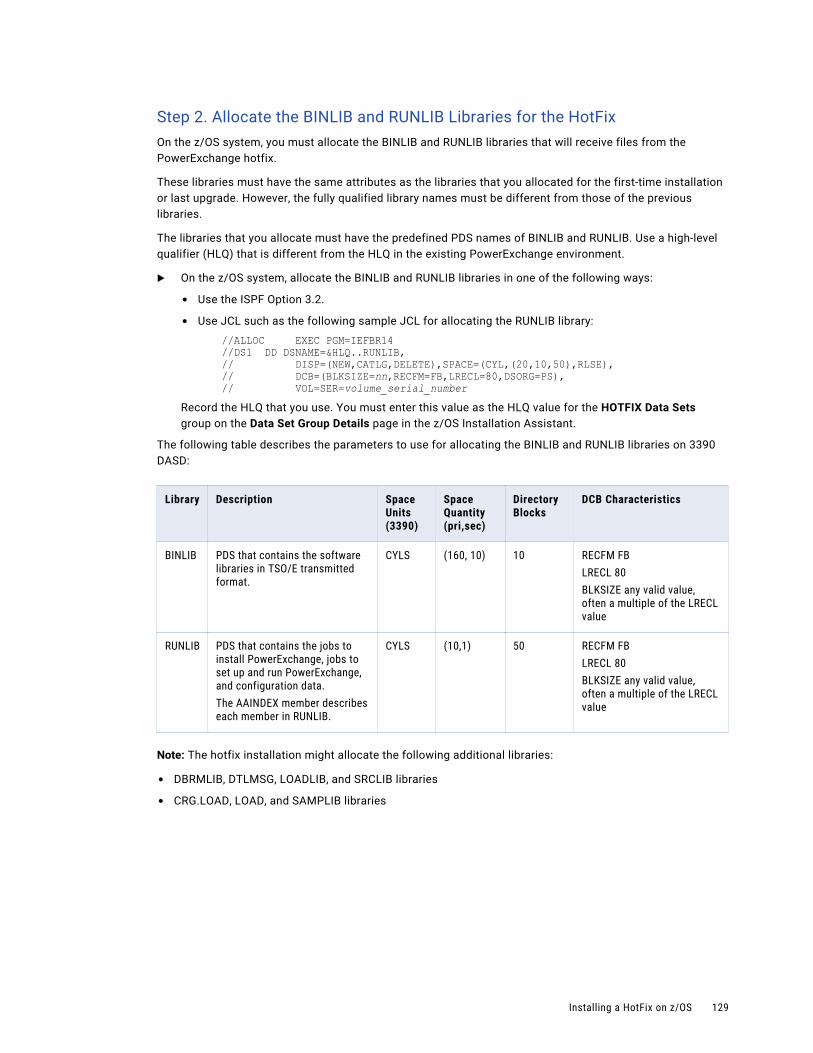
Step 2. Allocate the BINLIB and RUNLIB Libraries for the HotFixOn the z/OS system, you must allocate the BINLIB and RUNLIB libraries that will receive files from the PowerExchange hotfix.
These libraries must have the same attributes as the libraries that you allocated for the first-time installation or last upgrade. However, the fully qualified library names must be different from those of the previous libraries.
The libraries that you allocate must have the predefined PDS names of BINLIB and RUNLIB. Use a high-level qualifier (HLQ) that is different from the HLQ in the existing PowerExchange environment.
u On the z/OS system, allocate the BINLIB and RUNLIB libraries in one of the following ways:
• Use the ISPF Option 3.2.
• Use JCL such as the following sample JCL for allocating the RUNLIB library:
//ALLOC EXEC PGM=IEFBR14//DS1 DD DSNAME=&HLQ..RUNLIB,// DISP=(NEW,CATLG,DELETE),SPACE=(CYL,(20,10,50),RLSE),// DCB=(BLKSIZE=nn,RECFM=FB,LRECL=80,DSORG=PS),// VOL=SER=volume_serial_number
Record the HLQ that you use. You must enter this value as the HLQ value for the HOTFIX Data Sets group on the Data Set Group Details page in the z/OS Installation Assistant.
The following table describes the parameters to use for allocating the BINLIB and RUNLIB libraries on 3390 DASD:
Library Description Space Units (3390)
Space Quantity (pri,sec)
Directory Blocks
DCB Characteristics
BINLIB PDS that contains the software libraries in TSO/E transmitted format.
CYLS (160, 10) 10 RECFM FBLRECL 80BLKSIZE any valid value, often a multiple of the LRECL value
RUNLIB PDS that contains the jobs to install PowerExchange, jobs to set up and run PowerExchange, and configuration data.The AAINDEX member describes each member in RUNLIB.
CYLS (10,1) 50 RECFM FBLRECL 80BLKSIZE any valid value, often a multiple of the LRECL value
Note: The hotfix installation might allocate the following additional libraries:
• DBRMLIB, DTLMSG, LOADLIB, and SRCLIB libraries
• CRG.LOAD, LOAD, and SAMPLIB libraries
Installing a HotFix on z/OS 129
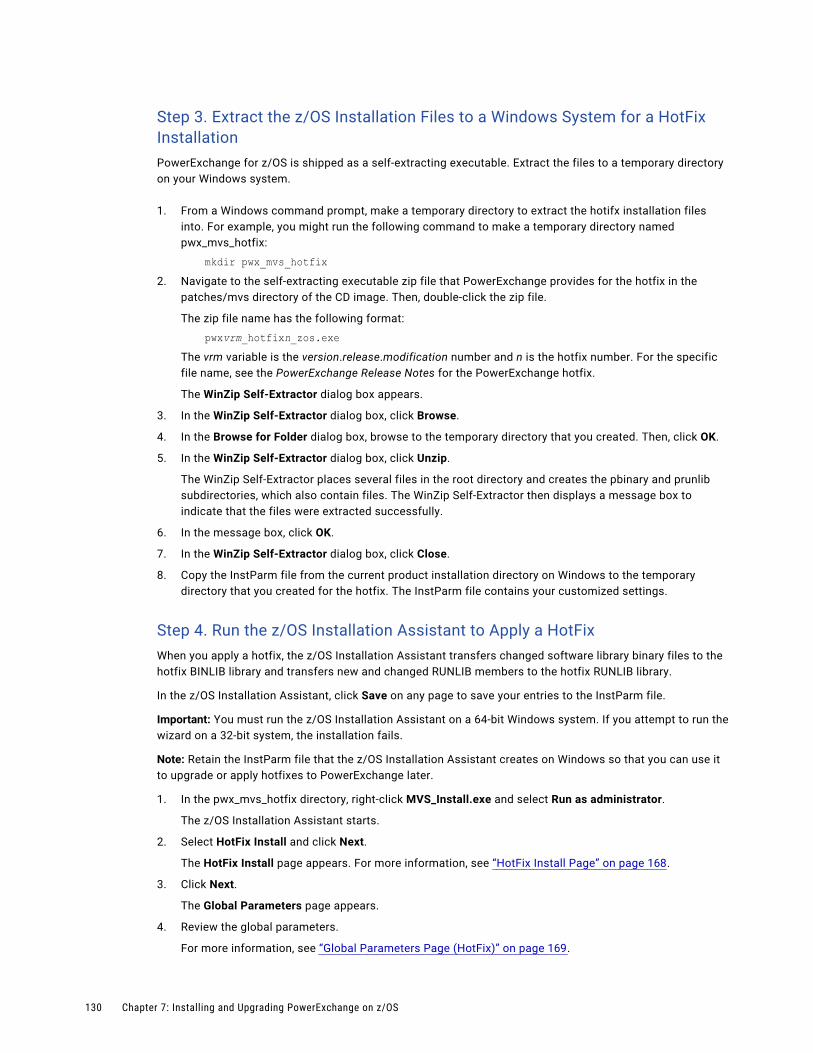
Step 3. Extract the z/OS Installation Files to a Windows System for a HotFix InstallationPowerExchange for z/OS is shipped as a self-extracting executable. Extract the files to a temporary directory on your Windows system.
1. From a Windows command prompt, make a temporary directory to extract the hotifx installation files into. For example, you might run the following command to make a temporary directory named pwx_mvs_hotfix:
mkdir pwx_mvs_hotfix2. Navigate to the self-extracting executable zip file that PowerExchange provides for the hotfix in the
patches/mvs directory of the CD image. Then, double-click the zip file.
The zip file name has the following format:
pwxvrm_hotfixn_zos.exe The vrm variable is the version.release.modification number and n is the hotfix number. For the specific file name, see the PowerExchange Release Notes for the PowerExchange hotfix.
The WinZip Self-Extractor dialog box appears.
3. In the WinZip Self-Extractor dialog box, click Browse.
4. In the Browse for Folder dialog box, browse to the temporary directory that you created. Then, click OK.
5. In the WinZip Self-Extractor dialog box, click Unzip.
The WinZip Self-Extractor places several files in the root directory and creates the pbinary and prunlib subdirectories, which also contain files. The WinZip Self-Extractor then displays a message box to indicate that the files were extracted successfully.
6. In the message box, click OK.
7. In the WinZip Self-Extractor dialog box, click Close.
8. Copy the InstParm file from the current product installation directory on Windows to the temporary directory that you created for the hotfix. The InstParm file contains your customized settings.
Step 4. Run the z/OS Installation Assistant to Apply a HotFixWhen you apply a hotfix, the z/OS Installation Assistant transfers changed software library binary files to the hotfix BINLIB library and transfers new and changed RUNLIB members to the hotfix RUNLIB library.
In the z/OS Installation Assistant, click Save on any page to save your entries to the InstParm file.
Important: You must run the z/OS Installation Assistant on a 64-bit Windows system. If you attempt to run the wizard on a 32-bit system, the installation fails.
Note: Retain the InstParm file that the z/OS Installation Assistant creates on Windows so that you can use it to upgrade or apply hotfixes to PowerExchange later.
1. In the pwx_mvs_hotfix directory, right-click MVS_Install.exe and select Run as administrator.
The z/OS Installation Assistant starts.
2. Select HotFix Install and click Next.
The HotFix Install page appears. For more information, see “HotFix Install Page” on page 168.
3. Click Next.
The Global Parameters page appears.
4. Review the global parameters.
For more information, see “Global Parameters Page (HotFix)” on page 169.
130 Chapter 7: Installing and Upgrading PowerExchange on z/OS
The Data Set Group Details page appears.
5. Enter the high-level qualifier (HLQ) for the hotfix.
For more information, see “Data Set Group Details Page (HotFix)” on page 170.
The Create Runlib JCL page appears.
6. Enter information about the RUNLIB and BINLIB libraries for the hotfix. Verify that these data set names do not match the data set names in the current PowerExchange environment. For more information, see “Create Runlib JCL Page” on page 157.
Then, click Next.
The Transfer Files to Mainframe page appears. Also, the z/OS Installation Assistant creates the PXRunlib folder. This folder contains the files from the prunlib folder, which are customized with the values that you entered in the z/OS Installation Assistant.
7. On the Transfer Files to Mainframe page, enter information about the z/OS system to which to transfer files.
For more information, see “Transfer Files to Mainframe Page” on page 158.
Then, click Next.
The View File Transfer Status page displays the status of the file transfer operation.
8. After the file transfer completes, click OK.
9. Click Finish.
Note: The z/OS Installation Assistant saves your installation entries to the InstParm file in the root installation directory on Windows if you have not already done so. The z/OS Installation Assistant also creates a corresponding INPARMnn file in the XRunlib directory on Windows and uses FTP to transfer this file to the RUNLIB library on z/OS. The INPARMnn member in the RUNLIB that has the largest nn value is the most recent version of the member.
After running the z/OS Installation Assistant, you must manually submit at least the PRESTLIB job on the z/OS system.
Step 5. Run the PRESTLIB JobOn the z/OS system, submit the PRESTLIB job to install the hotfix from the hotfix RUNLIB library into the hotfix libraries.
1. Add a JOB card to the PRESTLIB member in the hotfix RUNLIB library.
2. Make any required changes to the PRESTLIB job. Review the space allocation parameters to determine if they are sufficient.
3. Submit the PRESTLIB job.
Step 6. Back Up Existing Libraries (Optional)Optionally, back up existing libraries in the current PowerExchange environment.
u Back up the following libraries:
• CRG.LOAD
• DBRMLIB
• DTLMSG
• LOAD
• LOADLIB
Installing a HotFix on z/OS 131
• RUNLIB
• SAMPLIB
• SRCLIB
Step 7. Update the PowerExchange LibrariesTo implement the hotfix changes, you must copy the contents of the hotfix libraries to the current PowerExchange environment libraries.
The hotfix libraries might contain only new or changed members or all members.
All hotfix libraries are partitioned data sets (PDSs) except for DTLMSG, which is a sequential data set.
You can also concatenate the libraries in the JCL for the PowerExchange Agent, PowerExchange Logger for z/OS, and ECCRs.
u Use any of the following methods to copy the PDSs and sequential data sets:
• To copy PDSs and sequential data sets, use ISPF Option 3.3.
• To copy PDSs, use the IBM IEBCOPY utility.The following example JCL statements execute the IEBCOPY utility to copy one library to another library:
//COPY EXEC PGM=IEBCOPY//SYSPRINT DD SYSOUT=*//INDD1 DD DISP=SHR,DSN=hlq_hf.LOAD HotFix LOAD//OUTDD1 DD DISP=SHR,DSN=hlq.LOAD Current Execution LOAD//SYSIN DD * COPY INDD=((INDD1,R)),OUTDD=OUTDD1/*
In this example, the hlq_hf variable is the HLQ that you specified for the hotfix libraries and the hlq variable is the HLQ of the current PowerExchange environment.
• To copy sequential data sets, use the IBM IEBGENER utility.The following example JCL statements execute the IEBGENER utility to copy one sequential data set to another library:
//IEBGENER EXEC PGM=IEBGENER//SYSPRINT DD SYSOUT=*//SYSUT1 DD DISP=OLD,DSN=hlq_hf.DTLMSG HotFix DTLMSG//SYSUT2 DD disp=OLD,DSN=hlq.DTLMSG Current Execution DTLMSG//SYSIN DD DUMMY/*
Phase II. Update the PowerExchange Software for Specific Data Sources
If you selected DB2 for z/OS or IMS synchronous CDC data sources, you must upgrade the PowerExchange software in this phase of the hotfix installation.
Otherwise, proceed to “Phase III. Post-HotFix Installation Activities” on page 133.
Step 8. Rebind the DB2 Plan and Packages for DB2 Data SourcesIf the hotfix includes updated DBRM libraries, you must rebind some or all of the DB2 plan and packages for PowerExchange functions.
If the hotfix includes a DBRMXMIT file, use the XIDDB210 job to rebind the DB2 plan and packages for bulk data movement. If the hotfix includes a DBRM file and you selected the DB2 CDC option on the Data Sources
132 Chapter 7: Installing and Upgrading PowerExchange on z/OS
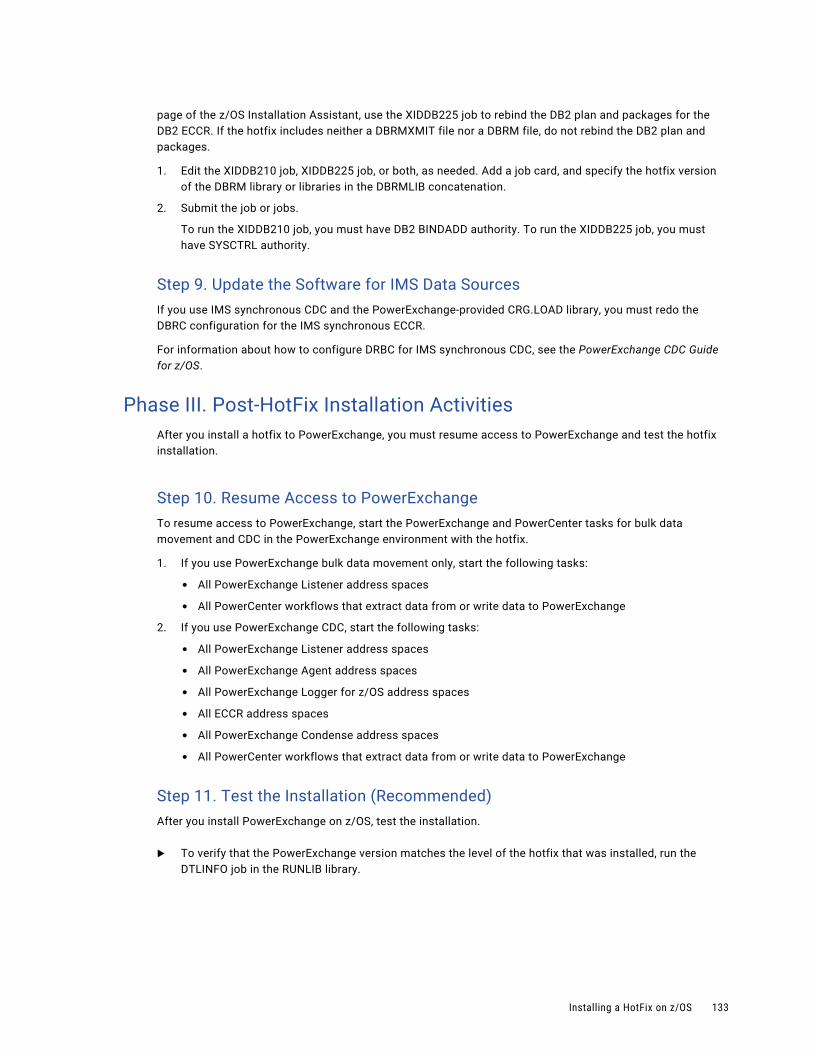
page of the z/OS Installation Assistant, use the XIDDB225 job to rebind the DB2 plan and packages for the DB2 ECCR. If the hotfix includes neither a DBRMXMIT file nor a DBRM file, do not rebind the DB2 plan and packages.
1. Edit the XIDDB210 job, XIDDB225 job, or both, as needed. Add a job card, and specify the hotfix version of the DBRM library or libraries in the DBRMLIB concatenation.
2. Submit the job or jobs.
To run the XIDDB210 job, you must have DB2 BINDADD authority. To run the XIDDB225 job, you must have SYSCTRL authority.
Step 9. Update the Software for IMS Data SourcesIf you use IMS synchronous CDC and the PowerExchange-provided CRG.LOAD library, you must redo the DBRC configuration for the IMS synchronous ECCR.
For information about how to configure DRBC for IMS synchronous CDC, see the PowerExchange CDC Guide for z/OS.
Phase III. Post-HotFix Installation ActivitiesAfter you install a hotfix to PowerExchange, you must resume access to PowerExchange and test the hotfix installation.
Step 10. Resume Access to PowerExchangeTo resume access to PowerExchange, start the PowerExchange and PowerCenter tasks for bulk data movement and CDC in the PowerExchange environment with the hotfix.
1. If you use PowerExchange bulk data movement only, start the following tasks:
• All PowerExchange Listener address spaces
• All PowerCenter workflows that extract data from or write data to PowerExchange
2. If you use PowerExchange CDC, start the following tasks:
• All PowerExchange Listener address spaces
• All PowerExchange Agent address spaces
• All PowerExchange Logger for z/OS address spaces
• All ECCR address spaces
• All PowerExchange Condense address spaces
• All PowerCenter workflows that extract data from or write data to PowerExchange
Step 11. Test the Installation (Recommended)After you install PowerExchange on z/OS, test the installation.
u To verify that the PowerExchange version matches the level of the hotfix that was installed, run the DTLINFO job in the RUNLIB library.
Installing a HotFix on z/OS 133
z/OS Installation Assistant ReferenceUse the z/OS Installation Assistant wizard to complete a full installation, an upgrade, or a hotfix installation of PowerExchange on z/OS. This reference describes each wizard page.
When you run the z/OS Installation Assistant, the wizard pages that are displayed and the fields that are available on these pages depend on the installation type, the source type, and whether you are using CDC.
Based on your entries, the z/OS Installation Assistant updates the InstParm file in the installation directory on the z/OS system and creates a corresponding INPARMnn file in an XRunlib directory on the Windows system. This reference identifies the variables in the INSTPARM file that correspond to the entry fields in the wizard, where applicable.
Note: To reduce the risk of errors, Informatica recommends changing installation settings in the z/OS Installation Assistant rather than editing the INSTPARM file directly. The z/OS Installation Assistant validates most entries and generates some INSTPARM variable values based on your entries.
Welcome to the PowerExchange z/OS Installation Assistant PageSelect the type of installation to perform. You can perform a full installation, an upgrade, or a hotfix installation.
Click one of the following options:
• Full Install. If PowerExchange is not currently installed, select this option to perform a full installation.
• Upgrade to New Release. If an earlier PowerExchange version is currently installed, select this option to perform an upgrade installation.
• Hotfix Install. If the current PowerExchange version.release.modification level is installed and you want to get the latest fixes for it, select this option to perform a hotfix installation.
This setting corresponds to the the <installtype> variable in the INSTPARM file. Valid variable values are 1 for a full install, 2 for an upgrade, or 3 for a hotfix install.
Click Next to continue.
Full Install PagePerform a full installation in the following situations
• To install PowerExchange on z/OS for the first time or to a different location
• To update an existing installation to add the CDC software
Click Next to continue.
Select Global Parameters Page (Full Installation)Based on the type of installation, enter and review global parameters.
Based on the default values that you enter in the Default Values area of this page, the z/OS Installation Assistant sets default values for each data set group on the Data Set Group Details page.
Logon ID
The z/OS user ID that enables connection to the z/OS system.
This setting corresponds to the <loginid> variable in the INSTPARM file.
134 Chapter 7: Installing and Upgrading PowerExchange on z/OS
PowerExchange Agent / Logger Prefix
Read-only for an upgrade or a hotfix installation. The base prefix for the PowerExchange Agent and PowerExchange Logger.
Enter an alphanumeric string from 1 to 3 characters in length. Default is PWX.
The z/OS Installation Assistant appends the following characters to this prefix:
• A. For the PowerExchange Agent.
• L. For the PowerExchange Logger.
This setting corresponds to the <zalpref> variable in the INSTPARM file.
HLQ
The default high-level qualifier (HLQ) for PowerExchange data sets.
You can use as many qualifier levels as required. For example, the following are valid HLQs:
• PWX.SYSTEMA.PROD
• SYS3.SYSA.PWX.TEST.A1
Default is PWX.
Maximum length is 26 characters, including periods.
This setting corresponds to the <dflthlq> variable in the INSTPARM file.
Storage Class
SMS only. The default SMS storage class for PowerExchange data sets.
If you specify an SMS storage class, you do not need to specify any volume or unit values.
Note: The SMS automatic class selection (ACS) routines in your installation might not allow specification of SMS classes or might override the values that you specify.
This setting corresponds to the <dfltsmssc> variable in the INSTPARM file.
Volume
The DASD volume serial number (VOLSER) on the z/OS system where you want to install PowerExchange libraries.
Default is VOLSER.
This setting corresponds to the <dfltvol> variable in the INSTPARM file.
Mgmt Class
SMS only. The default SMS management classes for PowerExchange data sets.
Note: The SMS ACS routines in your installation might not allow you to specify SMS classes or might override the values that you specify.
This setting corresponds to the <dfltsmsmc> variable in the INSTPARM file.
Unit
A generic or esoteric unit name on the z/OS system where you want to install PowerExchange.
Default is 3390.
This setting corresponds to the <dfltunit> variable in the INSTPARM file.
z/OS Installation Assistant Reference 135
Data Class
SMS only. The default SMS data classes for PowerExchange data sets.
Note: The SMS ACS routines in your installation might not allow you to specify SMS classes or might override the values that you specify.
This setting corresponds to the <dfltsmsdc> variable in the INSTPARM file.
License Key
The license key for the installation.
This setting corresponds to the <license> variable in the INSTPARM file.
Select Data Set Group Details PageEnter or review information for data set groups.
Data Set Groups
Select a data set group for which to view or change properties. The properties that you select for the group override the default values in the Select Global Parameters window. Select one of the following groups:
• User Modifiable Data Sets (Non-VSAM). Includes RUNLIB, BINLIB, SAMPLIB, and DTLDEMO.
• Read-Only Data Sets, Load Libraries and DBRMLIBs. Includes LOAD, LOADLIB, DBRM, and DBRMLIB.
• VSAM Files. Includes VSAM files other than archive data sets.
• Archive Data Sets. Includes PowerExchange archive log data sets PRILOG.DS01, PRILOG.DS02, PRILOG.DS03, SECLOG.DS01, SECLOG.DS02, and SECLOG.DS03.
• Log Files. Includes the LOG and CDCLOG data sets.
• Condense Data Sets. Includes the PowerExchange Condense data sets.
HLQ
A high-level qualifier (HLQ) to use for the selected data set group.
The following table shows the default HLQs for each group:
Data Set Group Default HLQ Maximum Length
User Modifiable Data Sets (Non-VSAM) PWX 26
Read-Only Data Sets, Load Libraries, and DBRMLIBs PWX 26
VSAM Files PWX.V1 23
Archive Data Sets PWX.V2 17
Log Files PWX 26
The maximum length values include periods.
Depending on the data set group that you selected, this setting corresponds to one of the following variables in the INSTPARM file:
• If you selected User Modifiable Data Sets (Non-VSAM), this setting corresponds to the <libname> variable.
136 Chapter 7: Installing and Upgrading PowerExchange on z/OS
• If you selected Read-Only Data Sets, Load Libraries and DBRMLIBs, this setting corresponds to the <libnameloadlib> variable.
• If you selected VSAM Files, this setting corresponds to the <libnamevsm> variable.
• If you selected Archive Data Sets, this setting corresponds to the <libnamearc> variable.
• If you selected Log Files, this setting corresponds to the <libnamelogfiles> variable.
For Condense data sets, this field is not displayed.
Storage Class
SMS only. The SMS storage class for the data set group.
If you specify an SMS storage class, you do not need to specify the volume or unit values.
Note: The SMS ACS routines at your installation might not allow you to specify SMS classes or might override the values that you specify.
Depending on the data set group that you selected, this setting corresponds to one of the following variables in the INSTPARM file:
• If you selected User Modifiable Data Sets (Non-VSAM), this setting corresponds to the <znonvssc> variable.
• If you selected Read-Only Data Sets, Load Libraries and DBRMLIBs, this setting corresponds to the <zloadstcl> variable.
• If you selected VSAM Files, this setting corresponds to the <zvsamstcl> variable.
• If you selected Archive Data Sets, this setting corresponds to the <zarchstcl> variable.
• If you selected Log Files, this setting corresponds to the <zlogfilesstcl> variable.
For Condense data sets, this field is not displayed.
Volume
The DASD volume serial number (VOLSER) on the z/OS system where you want to install the data sets.
For Condense data sets, this parameter maps to the CONDF_VOL parameter in the PowerExchange Condense configuration file.
Depending on the data set group that you selected, this setting corresponds to one of the following variables in the INSTPARM file:
• If you selected User Modifiable Data Sets (Non-VSAM), this setting corresponds to the <volid> variable.
• If you selected Read-Only Data Sets, Load Libraries and DBRMLIBs, this setting corresponds to the <volload> variable.
• If you selected VSAM Files, this setting corresponds to the <volidvsm> variable.
• If you selected Log Files, this setting corresponds to the <vollogfiles> variable.
• If you selected Condense Data Sets, this setting corresponds to the <condfvol> variable.
For archive data sets, this field is read only.
Mgmt. Class
SMS only. The SMS management class for the data set group.
Note: The SMS ACS routines in your installation might not allow you to specify SMS classes or might override the values that you specify.
z/OS Installation Assistant Reference 137
Depending on the data set group that you selected, this setting corresponds to one of the following variables in the INSTPARM file:
• If you selected User Modifiable Data Sets (Non-VSAM), this setting corresponds to the <znonvsmc> variable.
• If you selected Read-Only Data Sets, Load Libraries and DBRMLIBs, this setting corresponds to the <zloadmgcl> variable.
• If you selected VSAM Files, this setting corresponds to the <zvsammgcl> variable.
• If you selected Archive Data Sets, this setting corresponds to the <zarchmgcl> variable.
• If you selected Log Files, this setting corresponds to the <zlogfilesmgcl> variable.
For Condense data sets, this field is not displayed.
Unit
A generic or esoteric unit name on the z/OS system where you want to install the data sets.
Default is 3390, where applicable.
For archive data sets, this parameter is a PowerExchange Logger EDMUPARM parameter that controls archive logging. Informatica recommends that you write the archive log data sets to DASD. For more information, see the PowerExchange CDC Guide for z/OS.
For Condense data sets, this parameter maps to the CONDF_UNIT parameter in the PowerExchange Condense configuration file.
Depending on the data set group that you selected, this setting corresponds to one of the following variables in the INSTPARM file:
• If you select User Modifiable Data Sets (Non-VSAM), this setting corresponds to the <unit> variable.
• If you select Read-Only Data Sets, Load Libraries and DBRMLIBs, this setting corresponds to the <unitload> variable.
• If you selected Archive Data Sets, this setting corresponds to the <unitarc> variable.
• If you selected Log Files, this setting corresponds to the <unitlogfiles> variable.
• If you selected Condense Data Sets, this setting corresponds to the <condfunit> variable.
For VSAM files, this field is read only.
Data Class
SMS only. The SMS data class for the data set group.
Note: The SMS ACS routines in your installation might not allow you to specify SMS classes or might override the values that you specify.
Maps to the CHKPT_VOLSERS parameter in the PowerExchange Condense configuration file.
Depending on the data set group that you selected, this setting corresponds to one of the following variables in the INSTPARM file:
• If you selected User Modifiable Data Sets (Non-VSAM), this setting corresponds to the <znonvsdc> variable.
• If you selected Read-Only Data Sets, Load Libraries and DBRMLIBs, this setting corresponds to the <zloaddtcl> variable.
• If you selected VSAM Files, this setting corresponds to the <zvsamdtcl> variable.
• If you selected Archive Data Sets, this setting corresponds to the <zarchdtcl> variable.
138 Chapter 7: Installing and Upgrading PowerExchange on z/OS
• If you selected Log Files, this setting corresponds to the <zlogfilesdtcl> variable.
For Condense data sets, this field is not displayed.
Checkpoint Volumes
If you selected the Condense Data Sets group, enter the volume serial numbers (VOLSERs) for the checkpoint data sets.
These settings correspond to the <chkptvol1>, <chkptvol2>, and <chkptvol3> variables in the INSTPARM file.
General Parameters PageEnter or review general parameters.
LE Run-time Library
The data set name of the LE run-time library.
Default is SYS1.SCEERUN.
This field is read only for an upgrade or a hotfix install.
This setting corresponds to the <sceerunlib> variable in the INSTPARM file.
Delete Install Members
Select this check box to run the XIZZZ999 job. This job deletes members that were moved by the XIZZZ998 job from the RUNLIB library to other libraries.
To retain these members in the RUNLIB library, ensure that this check box is cleared. This check box is cleared by default.
This field is read only for an upgrade or a hotfix install.
This setting corresponds to the <delinst> variable in the INSTPARM file.
Auto Submit On
Select this check box to have PowerExchange installation jobs submitted automatically after you submit the initial job.
If you select this check box, also specify TYPRUN=HOLD in the JOB card that you set up in “Step 4. Edit the JOBCARD Member in the RUNLIB Library” on page 102. All of the jobs should end with a return code less than 4.
If you want to manually submit the installation jobs, clear this check box. Informatica recommends that you manually submit the installation jobs so that you can verify that the jobs run in the correct order on the correct system.
By default, this check box is cleared.
Warning: If you are installing PowerExchange for DB2 or PowerExchange CDC, do not select this check box. During PowerExchange installation, you must run a job to bind DB2 plans. Without the appropriate DB2 authority, the BIND job fails. The installation of PowerExchange CDC components requires manual input between the run of various installation jobs.
Note: Selecting the JES3 Install check box causes the Auto Submit On check box to be cleared and become unavailable.
This field is read only for an upgrade or a hotfix install.
z/OS Installation Assistant Reference 139
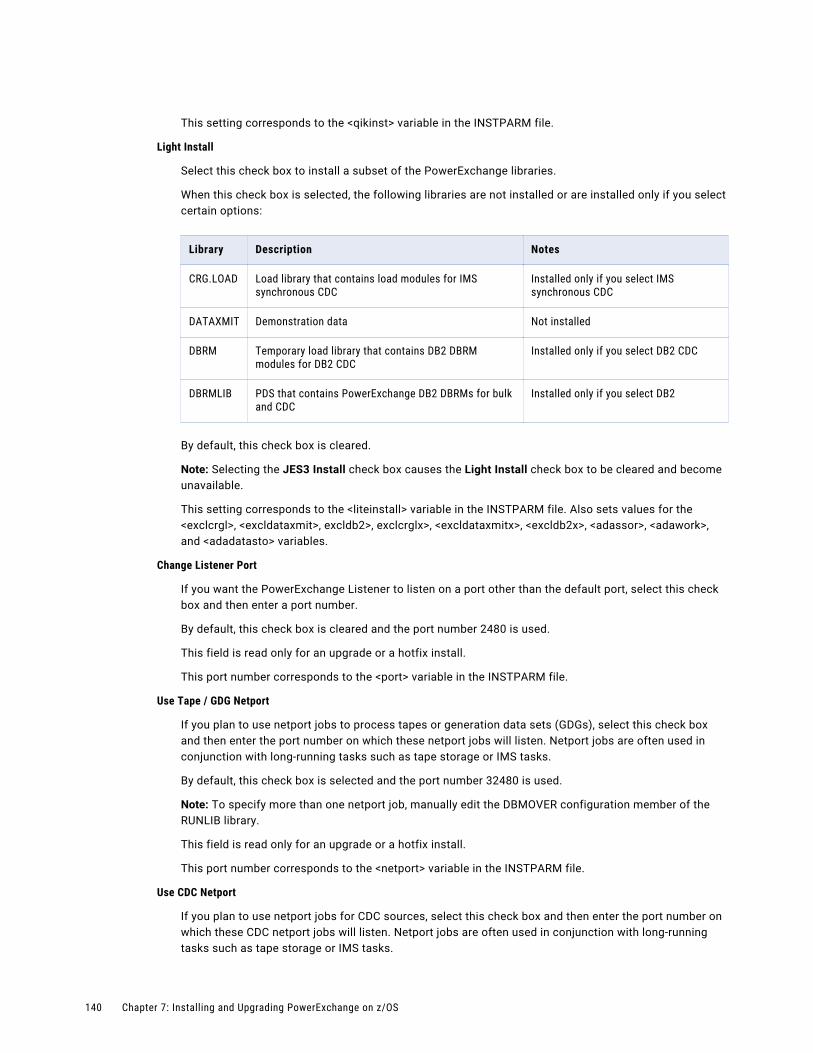
This setting corresponds to the <qikinst> variable in the INSTPARM file.
Light Install
Select this check box to install a subset of the PowerExchange libraries.
When this check box is selected, the following libraries are not installed or are installed only if you select certain options:
Library Description Notes
CRG.LOAD Load library that contains load modules for IMS synchronous CDC
Installed only if you select IMS synchronous CDC
DATAXMIT Demonstration data Not installed
DBRM Temporary load library that contains DB2 DBRM modules for DB2 CDC
Installed only if you select DB2 CDC
DBRMLIB PDS that contains PowerExchange DB2 DBRMs for bulk and CDC
Installed only if you select DB2
By default, this check box is cleared.
Note: Selecting the JES3 Install check box causes the Light Install check box to be cleared and become unavailable.
This setting corresponds to the <liteinstall> variable in the INSTPARM file. Also sets values for the <exclcrgl>, <excldataxmit>, excldb2>, exclcrglx>, <excldataxmitx>, <excldb2x>, <adassor>, <adawork>, and <adadatasto> variables.
Change Listener Port
If you want the PowerExchange Listener to listen on a port other than the default port, select this check box and then enter a port number.
By default, this check box is cleared and the port number 2480 is used.
This field is read only for an upgrade or a hotfix install.
This port number corresponds to the <port> variable in the INSTPARM file.
Use Tape / GDG Netport
If you plan to use netport jobs to process tapes or generation data sets (GDGs), select this check box and then enter the port number on which these netport jobs will listen. Netport jobs are often used in conjunction with long-running tasks such as tape storage or IMS tasks.
By default, this check box is selected and the port number 32480 is used.
Note: To specify more than one netport job, manually edit the DBMOVER configuration member of the RUNLIB library.
This field is read only for an upgrade or a hotfix install.
This port number corresponds to the <netport> variable in the INSTPARM file.
Use CDC Netport
If you plan to use netport jobs for CDC sources, select this check box and then enter the port number on which these CDC netport jobs will listen. Netport jobs are often used in conjunction with long-running tasks such as tape storage or IMS tasks.
140 Chapter 7: Installing and Upgrading PowerExchange on z/OS
By default, this check box is selected and the port number 22480 is used.
This field is read only for an upgrade or a hotfix install.
This port number corresponds to the <cdcport> variable in the INSTPARM file.
ICU
Select this check box to generate International Components for Unicode (ICU) custom converters.
By default, this check box is cleared and the ICU custom converters are not generated.
This field is read only for an upgrade or a hotfix install.
This setting corresponds to the <uss> variable in the INSTPARM file.
USS directory where tar file programs are unpacked
The USS directory to which the ICU installation tar files are copied and unpacked. You must select the ICU check box for this field to be available.
This field is read only for an upgrade or a hotfix install.
This setting corresponds to the <ussunpackdir> variable in the INSTPARM file.
USS directory where ICU CNV files are placed (DTLCFG ICUDATADIR parameter)
The USS directory where the ICU CNV files are placed. You must select the ICU check box for this field to be available.
If you specify this directory, also define the ICUDATADIR statement in the PowerExchange DBMOVER configuration file.
This field is read only for an upgrade or a hotfix install.
This setting corresponds to the <ussicudatadir> variable in the INSTPARM file.
JES3 Install
Select this check box to customize the JCL that installs PowerExchange in a JES3 environment. When this check box is selected, the Auto Submit On and Light Install options are unavailable.
By default, this check box is cleared.
This setting corresponds to the <jes3inst> variable in the INSTPARM file. A value of 0 corresponds to not selected, and a value of 1 corresponds to selected.
Advanced Parms
Enables you to define advanced parameters.
To change an advanced parameter value, complete the following steps:
1. In the Value column, click the cell for the parameter.
Tip: To sort parameters, click a column header. For example, to sort by parameter name, click the Parameter Name header.
2. Enter the parameter value, and click OK.
Note: If you define advanced parameters, you cannot restore these parameters to default values by using the Restore Defaults button.
Restore Defaults
Restores default values.
z/OS Installation Assistant Reference 141
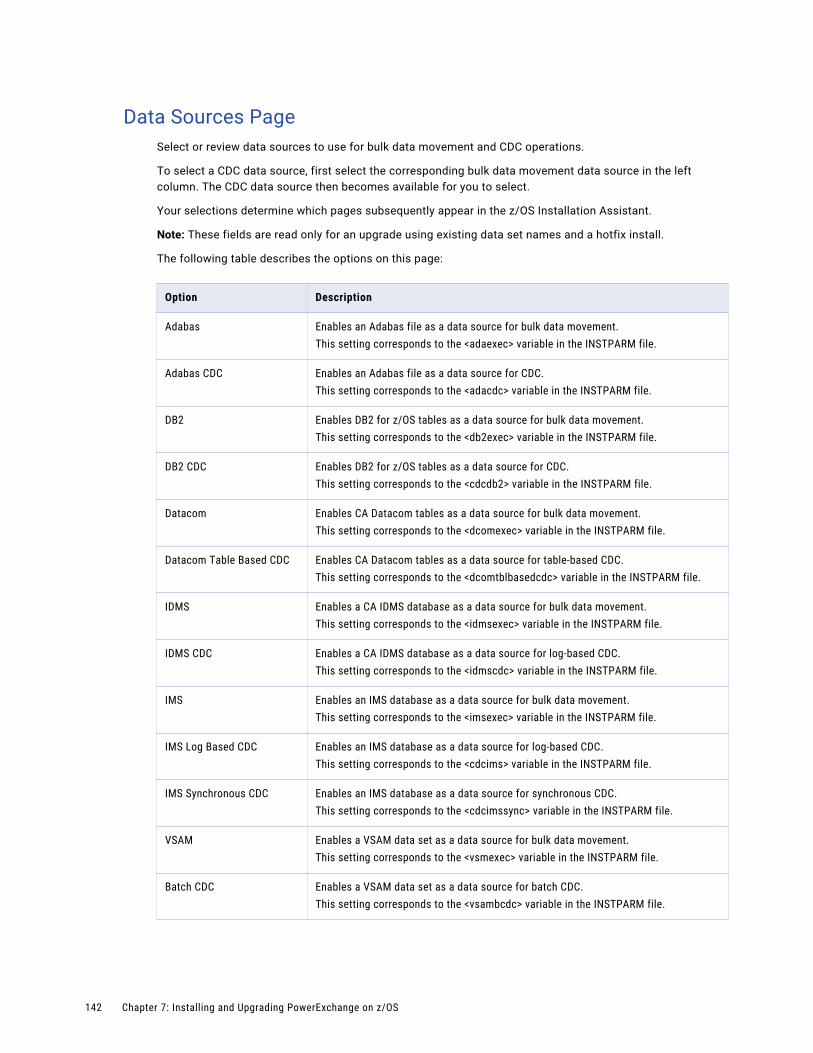
Data Sources PageSelect or review data sources to use for bulk data movement and CDC operations.
To select a CDC data source, first select the corresponding bulk data movement data source in the left column. The CDC data source then becomes available for you to select.
Your selections determine which pages subsequently appear in the z/OS Installation Assistant.
Note: These fields are read only for an upgrade using existing data set names and a hotfix install.
The following table describes the options on this page:
Option Description
Adabas Enables an Adabas file as a data source for bulk data movement.This setting corresponds to the <adaexec> variable in the INSTPARM file.
Adabas CDC Enables an Adabas file as a data source for CDC.This setting corresponds to the <adacdc> variable in the INSTPARM file.
DB2 Enables DB2 for z/OS tables as a data source for bulk data movement.This setting corresponds to the <db2exec> variable in the INSTPARM file.
DB2 CDC Enables DB2 for z/OS tables as a data source for CDC.This setting corresponds to the <cdcdb2> variable in the INSTPARM file.
Datacom Enables CA Datacom tables as a data source for bulk data movement.This setting corresponds to the <dcomexec> variable in the INSTPARM file.
Datacom Table Based CDC Enables CA Datacom tables as a data source for table-based CDC.This setting corresponds to the <dcomtblbasedcdc> variable in the INSTPARM file.
IDMS Enables a CA IDMS database as a data source for bulk data movement.This setting corresponds to the <idmsexec> variable in the INSTPARM file.
IDMS CDC Enables a CA IDMS database as a data source for log-based CDC.This setting corresponds to the <idmscdc> variable in the INSTPARM file.
IMS Enables an IMS database as a data source for bulk data movement.This setting corresponds to the <imsexec> variable in the INSTPARM file.
IMS Log Based CDC Enables an IMS database as a data source for log-based CDC.This setting corresponds to the <cdcims> variable in the INSTPARM file.
IMS Synchronous CDC Enables an IMS database as a data source for synchronous CDC.This setting corresponds to the <cdcimssync> variable in the INSTPARM file.
VSAM Enables a VSAM data set as a data source for bulk data movement.This setting corresponds to the <vsmexec> variable in the INSTPARM file.
Batch CDC Enables a VSAM data set as a data source for batch CDC.This setting corresponds to the <vsambcdc> variable in the INSTPARM file.
142 Chapter 7: Installing and Upgrading PowerExchange on z/OS
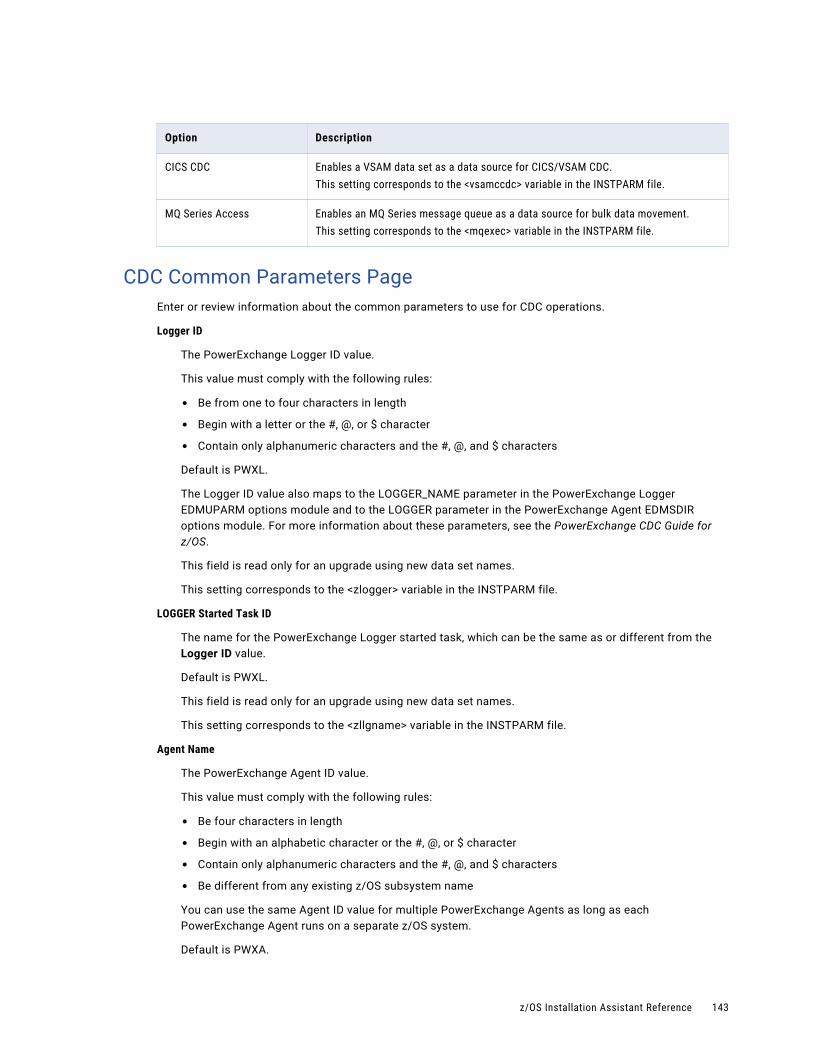
Option Description
CICS CDC Enables a VSAM data set as a data source for CICS/VSAM CDC.This setting corresponds to the <vsamccdc> variable in the INSTPARM file.
MQ Series Access Enables an MQ Series message queue as a data source for bulk data movement.This setting corresponds to the <mqexec> variable in the INSTPARM file.
CDC Common Parameters PageEnter or review information about the common parameters to use for CDC operations.
Logger ID
The PowerExchange Logger ID value.
This value must comply with the following rules:
• Be from one to four characters in length
• Begin with a letter or the #, @, or $ character
• Contain only alphanumeric characters and the #, @, and $ characters
Default is PWXL.
The Logger ID value also maps to the LOGGER_NAME parameter in the PowerExchange Logger EDMUPARM options module and to the LOGGER parameter in the PowerExchange Agent EDMSDIR options module. For more information about these parameters, see the PowerExchange CDC Guide for z/OS.
This field is read only for an upgrade using new data set names.
This setting corresponds to the <zlogger> variable in the INSTPARM file.
LOGGER Started Task ID
The name for the PowerExchange Logger started task, which can be the same as or different from the Logger ID value.
Default is PWXL.
This field is read only for an upgrade using new data set names.
This setting corresponds to the <zllgname> variable in the INSTPARM file.
Agent Name
The PowerExchange Agent ID value.
This value must comply with the following rules:
• Be four characters in length
• Begin with an alphabetic character or the #, @, or $ character
• Contain only alphanumeric characters and the #, @, and $ characters
• Be different from any existing z/OS subsystem name
You can use the same Agent ID value for multiple PowerExchange Agents as long as each PowerExchange Agent runs on a separate z/OS system.
Default is PWXA.
z/OS Installation Assistant Reference 143
The Agent Name value also maps to the AgentID option in the PowerExchange Agent AGENTCTL member and to the AGENTID parameter in the EDMSDIR options module. For more information about these parameters, see the PowerExchange CDC Guide for z/OS .
This field is read only for an upgrade using new data set names.
This setting corresponds to the <zagent> variable in the INSTPARM file.
Agent Started Task ID
The name for the PowerExchange Agent started task proc, which can be the same as or different from the Agent Name value.
Default is PWXA.
This field is read only for an upgrade using new data set names.
This setting corresponds to the <zagentstartid> variable in the INSTPARM file.
Logger Data Set Size (Cylinders)
The number of cylinders to allocate for the PowerExchange Logger primary log, the secondary log, and the primary space for the archive log data sets.
If the active log data set is larger than permitted by the DSPSERV CREATE function, the Log Format utility (EDMLUTL0) issues the PWXEDM172782E error message.
Maximum size is 2912 cylinders for a 3390 device, or 3495 cylinders for a 3380 device.
This field is read only for an upgrade using new data set names.
This setting corresponds to the <zlogdssz> variable in the INSTPARM file.
Change Capture Error
Specifies the action that PowerExchange takes when a DB2, IMS synchronous, batch VSAM, or CICS/VSAM ECCR cannot capture changes for a source.
Select one of the following options:
• Continue. Stops change capture but allows the job or transaction to continue. Changes to the source are not captured.
• Abend. Causes the job or transaction to end abnormally. Transactions cannot update the source.
This option also maps to the CCERR parameter in the EDMSDIR options module. For more information about the EDMSDIR options, see the PowerExchange CDC Guide for z/OS.
This field is read only for an upgrade using new data set names.
This setting corresponds to the <zccerr> variable in the INSTPARM file. Valid variable values are CONT and ABEND.
Use Post Log Merge
Enables the PowerExchange Logger Post-Log Merge environment.
For more information about configuring Post-Log Merge, see the PowerExchange CDC Guide for z/OS.
This field is read only for an upgrade with new data set names.
This setting corresponds to the <plm_logrgrp> variable in the INSTPARM file. Valid variable values are N and Y.
Suffix (1 to 9)
A unique suffix for a PowerExchange Logger member in a Post-Log Merge group.
144 Chapter 7: Installing and Upgrading PowerExchange on z/OS
The suffix is used as in the data set name for USERLIB and in the XCF members created by the PowerExchange Logger.
A valid value is a single numeric character from 1 to 9.
Default is 1.
This field is read only for an upgrade using new data set names.
This setting corresponds to the <plm_suffix> variable in the INSTPARM file.
TIME_CHKPT_FREQ (5-60)
Defines the frequency at which the PowerExchange Logger creates time-based checkpoint records in a Post-Log Merge environment. This value is the number of TIMER_INTERVAL periods.
A valid value is from 5 to 60.
Default is 30.
This field is read only for an upgrade using new data set names.
This setting corresponds to the <plm_time_chkpt_freq> variable in the INSTPARM file.
TIMER_INTERVAL (50-6000)
Defines the frequency at which the PowerExchange Logger completes internal management operations, such as freeing unused virtual storage or detecting inactive tasks that need to be reactivated. This value is specified in hundredths of seconds.
A valid value is from 50 (.5 seconds) to 6000 (1 minute).
Default is 100.
This field is read only for an upgrade using new data set names.
This setting corresponds to the <plm_timer_interval> variable in the INSTPARM file.
Adabas Parameters PageEnter or review information about the Adabas file to use for bulk data movement and CDC operations.
Adabas
Enables an Adabas file as a data source for bulk data movement.
This setting corresponds to the <adaexec> variable in the INSTPARM file.
Adabas CDC
Enables an Adabas file as a data source for CDC.
This setting corresponds to the <adacdc> variable in the INSTPARM file.
Load Library
The name of the Adabas load library.
Default is ADABAS.LOADLIB.
This setting corresponds to the <adaload> variable in the INSTPARM file.
Database ID
The Adabas DBID.
Default is 1000.
z/OS Installation Assistant Reference 145

This setting corresponds to the <adadb> variable in the INSTPARM file.
OUSP
Controls whether security is used for an Adabas data source. If you enable OUSP and PowerExchange security, PowerExchange creates a UNIX User Security Packet (USP) for Adabas users, which enables Adabas to verify user security access.
By default, this option is cleared.
This setting corresponds to the <adasecu> variable in the INSTPARM file.
Associator
Adabas CDC only. The associator data set that corresponds to the database ID.
Default is PWX.DB.ASSOR.
This setting corresponds to the <adassor> variable in the INSTPARM file.
Work
Adabas CDC only. The work data set that corresponds to the given database ID.
Default is PWX.DB.WORK.
This setting corresponds to the <adawork> variable in the INSTPARM file.
Data Storage
Adabas CDC only. The data storage data set that corresponds to the given database ID.
Default is PWX.DB.DATA.
This setting corresponds to the <adadatasto> variable in the INSTPARM file.
Unit
Adabas CDC only. The Adabas unit name for the specified database ID. PowerExchange uses this value in the ADARUN card.
Default is 3390.
This setting corresponds to the <unitada> variable in the INSTPARM file.
Advanced Parms
Enables you to define advanced parameters.
To change an advanced parameter value, complete the following steps:
1. In the Value column, click the cell for the parameter.
Tip: To sort parameters, click a column header. For example, to sort by parameter name, click the Parameter Name header.
2. Enter the parameter value, and click OK.
Note: If you define advanced parameters, you cannot restore these parameters to default values by using the Restore Defaults button.
Restore Defaults
Restores default values.
146 Chapter 7: Installing and Upgrading PowerExchange on z/OS
Datacom Parameters PageEnter or review information about the Datacom tables to use for bulk data movement and CDC operations.
Datacom
Enables CA Datacom tables as a data source for bulk data movement.
This setting corresponds to the <dcomexec> variable in the INSTPARM file.
Table Based CDC
Enables CA Datacom tables as data sources for Database table-based CDC.
This setting corresponds to the <dcomtblbasedcdc> variable in the INSTPARM file.
Load Library
The data set name of the Datacom load library.
Default is DCOM.V10.TARGET.CAILIB.
This setting corresponds to the <dcomload> variable in the INSTPARM file.
Customized Load
The data set name of the Datacom customized load library.
Default is DCOM.V10.CUST1.CUSLIB.
This setting corresponds to the <dcomcust> variable in the INSTPARM file.
Service Pack Library
The data set name of the Datacom service pack library, if one exists.
Default is DCOM.V10.SP01LOAD.
This setting corresponds to the <dcomspl> variable in the INSTPARM file.
IPC Library
The data set name of the Inter-Product Components (IPC) library. This library is a collection of common routines, similar to the CA90s or TNG framework, which enable the product to be insulated from the environment to facilitate speed of development.
Default is CAI.IPC.CAILIB.
This setting corresponds to the <dcomipc> variable in the INSTPARM file.
CA90 / TNG Library
The data set name of the CA90s or the TNG library.
Default is CAI.CAILIB.
This setting corresponds to the <dcomcai> variable in the INSTPARM file.
CXX Directory
The data set name of the Datacom CXX communication library.
Default is DCOM.V10.CXX.
This setting corresponds to the <dcomcxx> variable in the INSTPARM file.
Datacom Table Based Cleanup
Enables Datacom table-based CDC clean up.
z/OS Installation Assistant Reference 147
By default, this option is cleared.
This setting corresponds to the <dcomcleanup> variable in the INSTPARM file.
Datacom Cleanup Interval
If you selected Datacom Table Based Cleanup, the number of seconds that the cleanup subtask must wait before removing changes from the Datacom CDC tables.
Default is 300.
This setting corresponds to the <dcomcleanupinterval> variable in the INSTPARM file.
Datacom CDC Base
The ID of the database that contains the change data.
Default is 2009.
This setting corresponds to the <dcomcdcbase> variable in the INSTPARM file.
Datacom MUF Name
The name of the Datacom MUF from which PowerExchange table-based CDC captures change data.
Default is MUFNAME.
This setting corresponds to the <dcomdbid2> variable in the INSTPARM file.
Advanced Parms
Enables you to define advanced parameters.
To change an advanced parameter value, complete the following steps:
1. In the Value column, click the cell for the parameter.
Tip: To sort parameters, click a column header. For example, to sort by parameter name, click the Parameter Name header.
2. Enter the parameter value, and click OK.
Note: If you define advanced parameters, you cannot restore these parameters to default values by using the Restore Defaults button.
Restore Defaults
Restores default values.
DB2 Parameters PageEnter or review parameters for DB2 for z/OS bulk data movement.
DB2
Select this option to use DB2 for z/OS tables as a data source for bulk data movement.
This setting corresponds to the <db2exec> variable in the INSTPARM file.
DB2 Subsystem ID
The DB2 subsystem ID (SSID) or data-sharing group name for the data source.
Default is DSN1.
This setting corresponds to the <ssid> or <ssid4> variable in the INSTPARM file. The <ssid4> value is padded with spaces.
148 Chapter 7: Installing and Upgrading PowerExchange on z/OS
Load Library
The data set name of the DB2 SDSNLOAD load library. This value is optional if the z/OS LNKLST concatenation includes the DB2 load library.
Default is DSN910.SDSNLOAD.
This setting corresponds to the <db2load> variable in the INSTPARM file.
DB2 Exit
The data set name of the DB2 SDSNEXIT load library.
If the z/OS LNKLST concatenation includes the DB2 exit library, this value is optional.
Default is DSN910.SDSNEXIT .
This setting corresponds to the <db2exit> variable in the INSTPARM file.
Bulk Plan Name
The name of DB2 plan for PowerExchange bulk data movement. This name can be no longer than eight characters.
Default is PWXBKVxn, where x is a letter and n is a number that together correspond to the PowerExchange version. For example, for PowerExchange 10.1, the default name is PWXBKVA1.
This setting corresponds to the <db2plan> variable in the INSTPARM file.
Bulk Plan Owner Name
The owner name that PowerExchange uses to bind the DB2 plan and packages for bulk data movement created during the installation process.
Default is the Logon ID value from the Select Global Parameters page.
This setting corresponds to the <zcreator> variable in the INSTPARM file.
Package Collection Suffix
A suffix that PowerExchange appends to DB2 package collection IDs in the BIND PACKAGE statements in the BIND control members. This suffix can be up to 62 characters in length. If you plan to run more than one PowerExchange version in your environment, you can use the suffix to differentiate the packages for the version that you are installing.
Note: If the InstParm file contains a value for this field from a previous installation and you are performing a full installation or upgrade installation, the default value is taken from the InstParm file. You can edit this value, if necessary. If you are performing a hotfix installation, the default value is also taken from the InstParm file. However, you can edit the value only if the hotfix includes the DBRMXMIT file, which requires a rebind of the DB2 plan and packages.
This setting corresponds to the <db2pkgsuffix> variable in the INSTPARM file.
In the DSNTEP2 group box:
Name
The DSNTEP2 program name.
Default is DSNTEP2.
This setting corresponds to the <db2dsntep2name> variable in the INSTPARM file.
Plan
The DSNTEP2 plan name.
Default is DSNTEP91.
z/OS Installation Assistant Reference 149
This setting corresponds to the <db2instplan> variable in the INSTPARM file.
DB2 RUNLIB
The data set name of the load library that contains the DSNTEP2 program. PowerExchange uses the DSNTEP2 program to run DB2 commands.
Default is DSN910.RUNLIB.LOAD.
This setting corresponds to the <db2runlib> variable in the INSTPARM file.
Advanced Parms
Enables you to define advanced parameters.
To change an advanced parameter value, complete the following steps:
1. In the Value column, click the cell for the parameter.
Tip: To sort parameters, click a column header. For example, to sort by parameter name, click the Parameter Name header.
2. Enter the parameter value, and click OK.
Note: If you define advanced parameters, you cannot restore these parameters to default values by using the Restore Defaults button.
Restore Defaults
Restores default values.
DB2 CDC Parameters PageEnter or review parameters for DB2 for z/OS change data captue (CDC).
DB2 Change Data Capture
Select this option to enable CDC.
This setting corresponds to the <cdcdb2> variable in the INSTPARM file.
Plan
The DB2 ECCR plan name. This value can be up to eight characters in length.
Default is PWXCPVxn, where x is a letter and n is a number that together correspond to the PowerExchange version. For example, for PowerExchange 10.1, the default name is PWXCPVA1.
This setting corresponds to the <zccdb2plan> or < zccdb2plan8> variable in the INSTPARM file. The <zccddb2plan8> variable value is padded with 8 bytes.
Package Collection Name
The collection ID that is used for the DB2 ECCR packages. This value can be up to 70 characters in length.
Default is the plan name.
This setting corresponds to the <zcccollid> variable in the INSTPARM file.
Capture Database Name
The name of the DB2 database to contain the DB2 ECCR capture directory tables.
Default is PWXCCDDB.
This setting corresponds to the <zccdbname> variable in the INSTPARM file.
150 Chapter 7: Installing and Upgrading PowerExchange on z/OS
STOGROUP
The DB2 STOGROUP for the DB2 ECCR capture directory tables, table spaces, and indexes. You can choose an existing STOGROUP name. If you do not specify a STOGROUP, the DB2 defaults apply.
Default is SYSDEFLT.
This setting corresponds to the <zstogroup> variable in the INSTPARM file.
CDC Plan Owner Name
The owner name that PowerExchange uses to bind the DB2 plan and packages for the DB2 ECCR during installation.
Default is the Logon ID value from the Select Global Parameters page.
This setting corresponds to the <zdb2owner> variable in the INSTPARM file.
TCAP Table Owner Name
The owner name that PowerExchange uses to create the PowerExchange capture directory (TCAP) tables and indexes during installation. These objects are required for CDC.
Default is the Logon ID value from the Select Global Parameters page.
This setting corresponds to the <zdb2tcapowner> variable in the INSTPARM file.
TCAPWORK Buffer Pool Name
The name of the DB2 buffer pool to be used for the DB2 ECCR TCAPWORK table space.
This buffer pool must be at least 16 KB in size. Based on the buffer pool size, enter one of the following names for the buffer pool:
• For a 16-KB buffer pool, enter BP16Kn, where the n variable is a number from 0 to 9.
• For a 32-KB buffer pool, enter BP32K or BP32Kn, where the n variable is a number from 1 to 9.
Default is BP16K0.
This setting corresponds to the <zbufpool> variable in the INSTPARM file.
CA Name
The name of the DB2 ECCR, which identifies the DB2 ECCR to the PowerExchange Logger. Define this value in the CA NAME statement in the REPDB2CT member of the RUNLIB library.
Because the DB2 ECCR uses this name to request a global resource lock, this value must be unique within a sysplex.
Default is PWXDB201.
This setting corresponds to the <zdb2caname> variable in the INSTPARM file.
Advanced Parms
Enables you to define advanced parameters.
To change an advanced parameter value, complete the following steps:
1. In the Value column, click the cell for the parameter.
Tip: To sort parameters, click a column header. For example, to sort by parameter name, click the Parameter Name header.
2. Enter the parameter value, and click OK.
Note: If you define advanced parameters, you cannot restore these parameters to default values by using the Restore Defaults button.
z/OS Installation Assistant Reference 151
Restore Defaults
Restores default values.
IDMS Parameters PageEnter or review information about the CA IDMS tables to use for bulk data movement operations.
IDMS
Enables a CA IDMS database as a data source for bulk data movement.
This setting corresponds to the <idmsexec> variable in the INSTPARM file.
Primary Library
The data set name of the primary IDMS library.
Default is IDMS.LOADLIB.
This setting corresponds to the <idmsload> variable in the INSTPARM file.
DBA Library
The data set name of the IDMS DBA library.
Default is IDMS.DBA.LOADLIB.
This setting corresponds to the <idmsdba> variable in the INSTPARM file.
SYSCTL Library
The data set name of the IDMS SYSCTL library.
Default is IDMS.SYSCTL.
This setting corresponds to the <idmsctl> variable in the INSTPARM file.
Third Party Library
The data set name of the IDMS third-party library.
This setting corresponds to the <idms3pty> variable in the INSTPARM file.
DMCL Member
The data set name of the IDMS DMCL member.
Default is GLBLDMCL.
This setting corresponds to the <dtldmcl> variable in the INSTPARM file.
Mode
If you selected the IDMS option but not the IDMS CDC option on the Data Sources page, the following Mode options are available:
• Central. Uses centrally defined databases and the SYSCTL data set.
• Local. Uses the IDMS dictionary and database file entries that you specify in the IDMSDICT and IDMSFILE members of the PowerExchange RUNLIB library. This information overrides data in SYSCTL data set (CV mode).
Default is Local.
This setting corresponds to the <idmslcm> variable in the INSTPARM file. Valid variable values are Central (C) or Local (L).
152 Chapter 7: Installing and Upgrading PowerExchange on z/OS
Restore Defaults
Restores default values.
IDMS CDC Parameters PageEnter or review information about the CA IDMS tables to use for CDC operations.
IDMS CDC
Enables a CA IDMS database as a data source for CDC.
This setting corresponds to the <idmscdc> variable in the INSTPARM file.
IDMS CV Name
The IDMS Central Version (CV) name.
This setting corresponds to the <idmscvname> variable in the INSTPARM file.
Log Location
Specifies the location where IDMS log files are stored.
Default is LOCAL.
This setting corresponds to the <zidmsloglocn> variable in the INSTPARM file.
This location is also specified in the NODE and LOGSID statements in the PowerExchange DBMOVER configuration file on the z/OS system. In the LOGSID statement, the location is specified in the second parameter, listener_node. For more information about these statements, see the PowerExchange Reference Manual and PowerExchange CDC Guide for z/OS.
LOGSID
The name of the IDMS LOGSID, which corresponds to the first parameter, registration_logsid, in the LOGSID statement in the DBMOVER configuration file. For more information about the LOGSID statement, see the PowerExchange Reference Manual.
Default is PWXLGSID.
This setting corresponds to the <zidmslogsid> variable in the INSTPARM file.
Media Type
The media type. The following options are available:
• Disk. The IDMS logs reside on disk.
• Tape. The IDMS logs reside on tape.
Default is Disk.
This setting corresponds to the <idlmediatype> variable in the INSTPARM file. Valid variable values are D (disk) and T (tape).
Advanced Parms
Enables you to define advanced parameters.
To change an advanced parameter value, complete the following steps:
1. In the Value column, click the cell for the parameter.
Tip: To sort parameters, click a column header. For example, to sort by parameter name, click the Parameter Name header.
z/OS Installation Assistant Reference 153
2. Enter the parameter value, and click OK.
Note: If you define advanced parameters, you cannot restore these parameters to default values by using the Restore Defaults button.
Restore Defaults
Restores default values.
Related Topics:• “Step 18. Install Software for IDMS Data Sources (Optional)” on page 106
IMS Parameters PageEnter or review information about the IMS database to use for bulk data movement operations.
IMS
Enables an IMS database as a data source for bulk data movement.
This setting corresponds to the <imsexec> variable in the INSTPARM file.
Access through ODBA
Enables access to IMS data through the Open Database Access (ODBA) method.
This setting corresponds to the <imsodba> variable in the INSTPARM file.
IMS Region
The IMS ID for the IMS region.
Default is IMS.
This setting corresponds to the <imsregn> variable in the INSTPARM file.
PSB Member
The data set name of the program specification block (PSB) member.
Default is PSB1.
This setting corresponds to the <zimspsbmbr> variable in the INSTPARM file.
Procedure Library
The data set name of the IMS procedure library that contains the DLIBATCH PROC.
Default is IMS.PROCLIB.
This setting corresponds to the <zimsproc> variable in the INSTPARM file.
PSB Library
The data set name of the PSB library that is specified in the IMS NETPORT statement of the DBMOVER configuration file. The z/OS Installation Assistant uses this name to customize the IMS JCL members in the RUNLIB library.
Default is IMS.PSBLIB.
This setting corresponds to the <zimspsb> variable in the INSTPARM file.
RESLIB
The data set name of the IMS SDFSRESL library. The z/OS Installation Assistant uses this name to customize the IMS JCL members in the RUNLIB library.
154 Chapter 7: Installing and Upgrading PowerExchange on z/OS
Default is IMS.RESLIB.
This setting corresponds to the <zimsres> variable in the INSTPARM file.
DBD Library
The data set name of the database description (DBD) library. The z/OS Installation Assistant uses this name to customize the IMS JCL members in the RUNLIB library.
Default is IMS.DBDLIB.
This setting corresponds to the <zimsdbd> variable in the INSTPARM file.
IMS Netport
The port number of the port on which the IMS netport job listens.
Default is 12480.
This setting corresponds to the <imsport> variable in the INSTPARM file.
Restore Defaults
Restores default values.
IMS CDC Parameters PageEnter or review information about the IMS database to use for CDC operations.
IMS Log-based CDC
Enables an IMS database as a data source for log-based CDC.
This setting corresponds to the <cdcims> variable in the INSTPARM file.
IMS Synchronous CDC
Enables an IMS database as a data source for synchronous CDC.
This setting corresponds to the <cdcimssync> variable in the INSTPARM file.
IMS Version
The version of the installed IMS system.
Valid values are 10 to 14.
Default is 14.
This setting corresponds to the <imsversion> variable in the INSTPARM file.
Data Set 1
The IMS Database Recovery Control (DBRC) RECON data set for IMS log-based CDC.
Default is PWX.V1.IMSDEMO.RECON1.
This setting corresponds to the <imsreconds1> variable in the INSTPARM file.
Data Set 2
The IMS DBRC RECON data set for IMS log-based CDC.
Default is PWX.V1.IMSDEMO.RECON2.
This setting corresponds to the <imsreconds2> variable in the INSTPARM file.
z/OS Installation Assistant Reference 155
Data Set 3
The IMS DBRC RECON data set for IMS log-based CDC.
Default is PWX.V1.IMSDEMO.RECON3.
This setting corresponds to the <imsreconds3> variable in the INSTPARM file.
IMS Synchronous ECCR DFSESL Data Sets
IMS synchronous CDC only. The data sets that are concatenated to existing DFSESL DD statements in your IMS dependent region or IMS control region.
Enter up to five data set names.
Note: The z/OS Installation Assistant adds these data set names to the ESLLIB option of the EDMSDIR options module. This option specifies the data sets to be concatenated to existing DFSESL DD statements in your IMS dependent region or IMS control region. For more information about these data sets, see the PowerExchange CDC Guide for z/OS.
These settings correspond to the <zesllibparm1>, <zesllibparm2>, <zesllibparm3>, <zesllibparm4>, and <zesllibparm5> variables in the INSTPARM file.
Advanced Parms
Enables you to define advanced parameters.
To change an advanced parameter value, complete the following steps:
1. In the Value column, click the cell for the parameter.
Tip: To sort parameters, click a column header. For example, to sort by parameter name, click the Parameter Name header.
2. Enter the parameter value, and click OK.
Note: If you define advanced parameters, you cannot restore these parameters to default values by using the Restore Defaults button.
Restore Defaults
Restores default values.
MQ Series Parameters PageEnter or review information about the MQ Series message queue to use for bulk data movement operations.
MQ Series Access
Enables an IBM Websphere MQ Series message queue as a data source for bulk data movement operations.
This setting corresponds to the <mqexec> variable in the INSTPARM file.
MQ Load Library 1
The data set name of the SCSQLOAD MQ load library that provides connectivity to Websphere MQ.
Default is CSQ.SCSQLOAD.
This setting corresponds to the <mqload1> variable in the INSTPARM file.
MQ Load Library 2
The data set name of the SCSQANLE MQ load library that provides connectivity to Websphere MQ.
Default is CSQ.SCSQANLE.
156 Chapter 7: Installing and Upgrading PowerExchange on z/OS
This setting corresponds to the <mqload2> variable in the INSTPARM file.
MQ Load Library 3
The data set name of the SCSQAUTH MQ load library that provides connectivity to Websphere MQ.
Default is CSQ.SCSQAUTH.
This setting corresponds to the <mqload3> variable in the INSTPARM file.
Restore Defaults
Restores default values.
VSAM Parameters PageEnter or review options for VSAM bulk data movement and CDC operations.
VSAM
Enables a VSAM data set as a data source for bulk data movement.
This setting corresponds to the <vsmexec> variable in the INSTPARM file.
Batch Change Data Capture
Enables batch VSAM CDC.
This setting corresponds to the <vsambcdc> variable in the INSTPARM file.
CICS Change Data Capture
Enables CICS/VSAM CDC.
This setting corresponds to the <vsamccdc> variable in the INSTPARM file.
Advanced Parms
Enables you to define advanced parameters.
To change an advanced parameter value, complete the following steps:
1. In the Value column, click the cell for the parameter.
Tip: To sort parameters, click a column header. For example, to sort by parameter name, click the Parameter Name header.
2. Enter the parameter value, and click OK.
Note: If you define advanced parameters, you cannot restore these parameters to default values by using the Restore Defaults button.
Create Runlib JCL PageEnter information to create the RUNLIB JCL.
RUNLIB
The fully-qualified name of the RUNLIB library to which the z/OS Installation Assistant transfers the installation JCL, except for an upgrade that uses existing data set names. You must preallocate this library. When the z/OS Installation Assistant creates the installation JCL, it uses this RUNLIB name to customize the JCL.
For a first-time installation, the default value is PWX.RUNLIB.
z/OS Installation Assistant Reference 157
For an upgrade that uses existing data set names, this library must be the RUNLIB library in the currently running PowerExchange environment and must be different from the staging RUNLIB data set name. When the z/OS Installation Assistant creates the JCL that is written to the staging RUNLIB library, the z/OS Installation Assistant uses this name to customize the JCL. The z/OS Installation Assistant does not update this library.
For an upgrade that uses new data set names, the default value is hlq.RUNLIB, where hlq is the value entered on the Data Set Group Details page.
For a hotfix installation, the default value is PWX.SP.RUNLIB. Verify that this data set name does not match the RUNLIB data set name that the current PowerExchange environment uses.
For a full install or an upgrade, this setting corresponds to the <runlib> variable in the INSTPARM file. For a hotfix install, this setting corresponds to the <patchrunlib> variable in the INSTPARM file.
BINLIB
The fully-qualified name of the BINLIB library to which the z/OS Installation Assistant transfers modules and load libraries, except for an upgrade using existing data set names. The z/OS Installation Assistant uses this name to customize the installation JCL. You must preallocate this library.
For a first-time installation, the default value is PWX.BINLIB. When the z/OS Installation Assistant creates the installation JCL, it uses this name to customize the JCL.
For an upgrade that uses existing data set names, this library must be the BINLIB library in the currently running PowerExchange environment and must be different from the staging BINLIB data set name. The z/OS Installation Assistant does not update this library.
For an upgrade that uses new data set names, the default value is hlq.BINLIB, where hlq is the value entered on the Data Set Group Details page.
For a hotfix installation, the default value is PWX.SP.BINLIB. Verify that this data set name does not match the BINLIB data set name that the current PowerExchange environment uses.
For a full install or an upgrade, this setting corresponds to the <binlib> variable in the INSTPARM file. For a hotfix install, this setting corresponds to the <patchbinlib> variable in the INSTPARM file.
The following Pages are incomplete or contain data validation errors...
This message box displays the names of any wizard pages that are incomplete or contain validation errors.
GoTo Page
When you select a page name in the validation errors message window, goes to the page where the validation error is located.
Restore Defaults
Restores default values.
Transfer Files to Mainframe PageEnter information about the z/OS system to which you want to transfer files.
IP Address / Node
The IP address of the z/OS system on which to install PowerExchange.
This setting corresponds to the <ipaddress> variable in the INSTPARM file.
Mixed Case Password
Use a mixed-case password.
158 Chapter 7: Installing and Upgrading PowerExchange on z/OS
If the z/OS system where you are transferring files supports mixed-case passwords, select this check box. Then enter the password in the correct case.
If the z/OS system does not support mixed-case passwords, clear this check box. The password that you enter is automatically converted to uppercase.
This setting corresponds to the <allowmixed> variable in the INSTPARM file.
Logon ID
The user ID that is used to connect to the z/OS system.
This setting corresponds to the <logonid2> variable in the INSTPARM file.
Password
The password that is used to connect to the z/OS system.
This setting is not saved to the INSTPARM file.
Notify Completion of File Transfer
Display a pop-up notification window when the transfer completes.
Clear this option to suppress notification.
This setting is not saved to the INSTPARM file.
FTP Passive Mode Connect
Use FTP in passive mode to transfer files to the z/OS system.
For a full install or an upgrade, this setting corresponds to the <passive_mode> variable in the INSTPARM file. This field is not displayed for a hotfix install.
Runlib
Use FTP to transfer the contents of the XRunlib folder for a full or upgrade or the PXRunlib folder for a hotfix installation to the specified RUNLIB library.
For an upgrade that uses existing data set names, verify that this data set name is different from the RUNLIB data set name that appears on the Create Runlib JCL page. This library is the temporary staging RUNLIB library. You entered the high-level qualifier (HLQ) for this library in the Staging Data Set HLQ box on the Data Set Group Details page.
For an upgrade that uses new data set names, this library is the new RUNLIB library where the z/OS Installation Assistant transfers the RUNLIB data sets. You entered the HLQ value for this library and other user-modifiable data sets on the Data Set Group Details page.
This setting corresponds to the following variables in the INSTPARM file:
• <ftprunlib> variable for a full install or hotfix install
• <upgradeftprunlib_e> variable for an upgrade using existing data set names
• <upgradeftprunlib_n> variable for an upgrade using new data set names
Binary
Uses FTP to transfer the contents of the binary folder for a full installation or an upgrade, or the pbinary folder for a hotfix installation, to the specified BINLIB library.
For an upgrade that uses existing data set names, verify that this data set name is different from the BINLIB data set name that appears on the Create Runlib JCL page. This library is the temporary staging BINLIB library. You entered the HLQ value for this library in the Staging Library HLQ box in the Select Data Set Group Details page.
z/OS Installation Assistant Reference 159
For an upgrade that users new data set names, this library is the new BINLIB library where the z/OS Installation Assistant transfers the BINLIB data sets. You entered the HLQ value for this library and other user-modifiable data sets on the Data Set Group Details page.
This setting corresponds to the following variables in the INSTPARM file:
• <ftpbinlib> variable for a full install or hotfix install
• <upgradeftpbinlib_e> variable for an upgrade using existing data set names
• <upgradeftpbinlib_n> variable for an upgrade using new data set names
Restore Defaults
Restores default values.
View File Transfer Status PageReview status messages for the file transfer to the z/OS system.
The text box at the top shows the directory on Windows from which the files are being transferred and the fully qualified name of the partitioned data set (PDS) on z/OS to which the files are being transferred.
The middle list box shows status messages for the file transfer.
The box at the bottom shows a completion message that indicates whether the file transfer succeeded or failed and the number of tiles that were sent to the z/OS system.
Upgrade to a New Release PageSelect whether to upgrade by using existing or new data set names.
Upgrade by Using Existing Data Set Names
Uses the same names as the existing installation for the message, sample, and load libraries. If you select this option, you cannot add or change data sources.
When you select this option, the z/OS Installation Assistant completes the following tasks:
• Populates the staging RUNLIB and BINLIB libraries.
• Backs up existing execution, sample, and load libraries.
• Copies upgrade libraries to the existing library names.
• Maintains existing data set names for VSAM files, the USERLIB data set, PowerExchange Logger for z/OS logs, PowerExchange Condense data sets, and the PowerExchange Agent cache data set.
If you select this option, you do not have to change any existing JCL.
Upgrade by Using New Data Set Names
Uses new data set names for the message, sample, and load libraries. You can also add or change data sources.
When you select this option, the z/OS Installation Assistant completes the following tasks:
• Creates new load and sample libraries.
• Maintains existing data set names for VSAM files, the USERLIB, PowerExchange Logger for z/OS logs, PowerExchange Condense data sets, and the PowerExchange Agent cache data set.
• Provides new, customized versions of PowerExchange procedures in the new PROCLIB library.
If you select this option, you must edit existing JCL to specify the new library names.
160 Chapter 7: Installing and Upgrading PowerExchange on z/OS
This setting corresponds to the <xbackupuseexisting> variable in the INSTPARM file. Valid variable values are 0 (upgrade by using new data set names) or 1 for (upgrade by using existing data set names).
Import Existing Parameters PageWhen you perform an upgrade, you can import parameters from the customized InstParm file in the current PowerExchange installation directory on Windows to the default InstParm file in the upgrade installation directory. By importing the parameters, you retain the customizations that you last entered. Do not import the existing InstParm parameters if you manually copied the InstParm file from the current installation directory to the new upgrade installation directory.
If the customized InstParm file is not available on Windows, retrieve the latest INPARMnn member from the RUNLIB library on the z/OS system by using FTP or another file transfer method. The latest INPARMnn member has the highest nn number in its name. Also, in INPARMnn members that were created in PowerExchange 10.1 and later, the first line of the contents provides the date and time at which the member was created.
Existing Version
The version of the current PowerExchange installation from which you are importing the InstParm file.
The upgrade jobs append this version to the end of the high-level qualifier for the backup data sets in the following format:
.VversionThis setting corresponds to the <fromversion> variable in the INSTPARM file.
Upgrade Version
The PowerExchange version to which you are upgrading.
Import Existing Parameters
To import parameters from the existing InstParm file that includes your latest customizations to the new upgrade installation directory, complete the following steps:
1. Click Import Existing Parameters.
A dialog box appears.
2. Browse to the location of the customized InstParm file in the top-level installation directory of the current PowerExchange version.
Note: The customized InstParm file can have a name other than InstParm.
3. Click OK.
The z/OS Installation Assistant imports the parameters from the customized InstParm file and stores them in the new InstParm file in the upgrade installation directory.
Review Parameters PageThis page is informational only.
Click Next to continue.
z/OS Installation Assistant Reference 161
Review Global Parameters Page (Upgrade with Existing Data Set Names)
Review or enter global parameters. Only the Logon ID and License Key parameters are editable.
Logon ID
The z/OS user ID that enables connection to the z/OS system.
This setting corresponds to the <loginid> variable in the INSTPARM file.
PowerExchange Agent / Logger Prefix
Read only. The base prefix for the PowerExchange Agent and PowerExchange Logger.
Default is PWX.
The z/OS Installation Assistant appends the following characters to this prefix:
• A. For the PowerExchange Agent.
• L. For the PowerExchange Logger.
HLQ
Read only. The high-level qualifier (HLQ) that you entered for the existing installation.
Storage Class
Read only. For SMS only, the default SMS storage class for PowerExchange data sets.
Note: The SMS automatic class selection (ACS) routines in your installation might not allow specification of SMS classes or might override the values that you specify.
Volume
Read only. The DASD volume serial number (VOLSER) on the z/OS system where you want to install PowerExchange libraries.
Default is VOLSER.
Mgmt. Class
Read only. For SMS only, the default SMS management classes for PowerExchange data sets.
Note: The SMS ACS routines in your installation might not allow you to specify SMS classes or might override the values that you specify.
Unit
Read only. A generic or esoteric unit name on the z/OS system where you want to install PowerExchange.
Default is 3390.
Data Class
Read only. For SMS only, the default SMS data classes for PowerExchange data sets.
Note: The SMS ACS routines in your installation might not allow you to specify SMS classes or might override the values that you specify.
License Key
The license key for the installation. If you have a new license key, enter it. Otherwise, accept the previous license key.
This setting corresponds to the <license> variable in the INSTPARM file.
162 Chapter 7: Installing and Upgrading PowerExchange on z/OS
Review Global Parameters Page (Upgrade with New Data Set Names)
Review or enter global parameters. Only the Logon ID and License Key parameters are editable.
Logon ID
The z/OS user ID that enables connection to the z/OS system.
This setting corresponds to the <loginid> variable in the INSTPARM file.
PowerExchange Agent / Logger Prefix
Read only. The base prefix for the PowerExchange Agent and PowerExchange Logger.
Default is PWX.
The z/OS Installation Assistant appends the following characters to this prefix:
• A. For the PowerExchange Agent.
• L. For the PowerExchange Logger.
HLQ
Read only. The high-level qualifier (HLQ) that you entered for the existing installation.
Storage Class
Read only. For SMS only, the default SMS storage class for PowerExchange data sets.
Note: The SMS automatic class selection (ACS) routines in your installation might not allow specification of SMS classes or might override the values that you specify.
Volume
Read only. The DASD volume serial number (VOLSER) on the z/OS system where you want to install PowerExchange libraries.
Default is VOLSER.
Mgmt. Class
Read only. For SMS only, the default SMS management classes for PowerExchange data sets.
Note: The SMS ACS routines in your installation might not allow you to specify SMS classes or might override the values that you specify.
Unit
Read only. A generic or esoteric unit name on the z/OS system where you want to install PowerExchange.
Default is 3390.
Data Class
Read only. For SMS only, the default SMS data classes for PowerExchange data sets.
Note: The SMS ACS routines in your installation might not allow you to specify SMS classes or might override the values that you specify.
License Key
The license key for the installation. If you have a new license key, enter it. Otherwise, accept the previous license key.
This setting corresponds to the <license> variable in the INSTPARM file.
z/OS Installation Assistant Reference 163
Select Data Set Group Details Page (Upgrade with Existing Data Set Names)
Enter or review information for data set groups.
Data Set Groups
Select a data set group to view or change its properties. Select one of the following groups:
• Staging Data Sets
• Backup Data Sets
• Existing Load Libraries
HLQ
The high-level qualifier (HLQ) for the staging or backup data sets. Use as many qualifier levels as required.
Default value for the staging data sets is .VversionSTG, where the version variable is the version number of the new PowerExchange release.
For example, the HLQ for the staging data sets might be the following value:
PWX.V100STGDefault value for the backup data sets is .Vbackup_version, where the backup_version variable is the version number of the release that you are backing up.
For example, the HLQ for backup data sets might be the following value:
PWX.V961Maximum length is 26 characters.
Depending on the data set group that you selected, this setting corresponds to one of the following variables in the INSTPARM file:
• If you selected Staging Data Sets, this setting corresponds to the <libnameupgrade> variable.
• If you selected Backup Data Sets, this setting corresponds to the <bkuphlq1> variable.
For existing load libraries, this field is read only.
Storage Class
SMS only. The SMS storage class for the data set group.
If you specify an SMS storage class, you do not need to specify any volume or unit values.
Note: The SMS automatic class selection (ACS) routines in your installation might not allow specification of SMS classes or might override the values that you specify.
Depending on the data set group that you selected, this setting corresponds to one of the following variables in the INSTPARM file:
• If you selected Staging Data Sets, this setting corresponds to the <smsscupgrade> variable.
• If you selected Backup Data Sets, this setting corresponds to the <bkupsmssc> variable.
For existing load libraries, this field is read only.
Volume
The DASD volume serial number (VOLSER) on the z/OS system where you want to install the data sets.
164 Chapter 7: Installing and Upgrading PowerExchange on z/OS
Depending on the data set group that you selected, this setting corresponds to one of the following variables in the INSTPARM file:
• If you selected Staging Data Sets, this setting corresponds to the <volupgrade> variable.
• If you selected Backup Data Sets, this setting corresponds to the <bkupvol> and <bkupvolvsm> variables.
For existing load libraries, this field is read only.
Mgmt. Class
SMS only. The SMS management class for the data set group.
Note: The SMS ACS routines in your installation might not allow you to specify SMS classes or might override the values that you specify.
Depending on the data set group that you selected, this setting corresponds to one of the following variables in the INSTPARM file:
• If you selected Staging Data Sets, this setting corresponds to the <smsmcupgrade> variable.
• If you selected Backup Data Sets, this setting corresponds to the <bkupsmsmc> variable.
For existing load libraries, this field is read only.
Unit
A generic or esoteric unit name on the z/OS system where you want to install the data sets.
Default is 3390, where applicable.
Depending on the data set group that you selected, this setting corresponds to one of the following variables in the INSTPARM file:
• If you selected Staging Data Sets, this setting corresponds to the <unitupgrade> variable.
• If you selected Backup Data Sets, this setting corresponds to the <bkupunit> variable.
For existing load libraries, this field is read only.
Data Class
SMS only. The SMS data class for the data set group.
Note: The SMS ACS routines in your installation might not allow you to specify SMS classes or might override the values that you specify.
Depending on the data set group that you selected, this setting corresponds to one of the following variables in the INSTPARM file:
• If you selected Staging Data Sets, this setting corresponds to the <smsdcupgrade> variable.
• If you selected Backup Data Sets, this setting corresponds to the <bkupsmsdc> variable.
For existing load libraries, this field is read only.
z/OS Installation Assistant Reference 165
Select Data Set Group Details Page (Upgrade with New Data Set Names)
Enter or review information for data set groups.
Data Set Groups
Select a data set group to view or change its properties. Select one of the following groups:
• User Modifiable Data Sets (Non-VSAM). Includes RUNLIB, BINLIB, SAMPLIB, and DTLDEMO.
• Read-Only Data Sets, Load Libraries, and DBRMLIBs. Includes LOAD, LOADLIB, DBRM, and DBRMLIB.
• Backup Data Sets.
HLQ
The high-level qualifier (HLQ) for the staging or backup data sets. Use as many qualifier levels as required.
Default for the first two groups is hlq.NEW, where hlq is the value for the high-level qualifier on the Global Parameters page .
Default for the backup data sets is hlq.Vbackup_version, where hlq is the value for the high-level qualifier on the Global Parameters page, and backup_version is the version number of the release that you are backing up.
Maximum length is 26 characters.
Depending on the data set group that you selected, this setting corresponds to one of the following variables in the INSTPARM file:
• If you selected User Modifiable Data Sets (Non-VSAM), this setting corresponds to the <libname> variable.
• If you selected Read-Only Data Sets, Load Libraries and DBRMLIBs, this setting corresponds to the <libnameloadlib> variable.
• If you selected Backup Data Sets, this setting corresponds to the <bkuphlq1> variable.
Storage Class
SMS only. The SMS storage class for the data set group.
If you specify an SMS storage class, you do not need to specify any volume or unit values.
Note: The SMS automatic class selection (ACS) routines in your installation might not allow specification of SMS classes or might override the values that you specify.
Depending on the data set group that you selected, this setting corresponds to one of the following variables in the INSTPARM file:
• If you selected User Modifiable Data Sets (Non-VSAM), this setting corresponds to the <znonvssc> variable.
• If you selected Read-Only Data Sets, Load Libraries and DBRMLIBs, this setting corresponds to the <zloadstcl> variable.
• If you selected Backup Data Sets, this setting corresponds to the <bkupsmssc> variable.
Volume
The DASD volume serial number (VOLSER) on the z/OS system where you want to install the data sets.
166 Chapter 7: Installing and Upgrading PowerExchange on z/OS
Depending on the data set group that you selected, this setting corresponds to one of the following variables in the INSTPARM file:
• If you selected User Modifiable Data Sets (Non-VSAM), this setting corresponds to the <volid> variable.
• If you selected Read-Only Data Sets, Load Libraries and DBRMLIBs, this setting corresponds to the <volload> variable.
• If you selected Backup Data Sets, this setting corresponds to the <bkupvol> variable.
Mgmt. Class
SMS only. The SMS management class for the data set group.
Note: The SMS ACS routines in your installation might not allow you to specify SMS classes or might override the values that you specify.
Depending on the data set group that you selected, this setting corresponds to one of the following variables in the INSTPARM file:
• If you selected User Modifiable Data Sets (Non-VSAM), this setting corresponds to the <znonvsmc> variable.
• If you selected Read-Only Data Sets, Load Libraries and DBRMLIBs, this setting corresponds to the <zloadmgcl> variable.
• If you selected Backup Data Sets, this setting corresponds to the <bkupsmsmc> variable.
Unit
A generic or esoteric unit name on the z/OS system where you want to install the data sets.
Default is 3390, where applicable.
Depending on the data set group that you selected, this setting corresponds to one of the following variables in the INSTPARM file:
• If you select User Modifiable Data Sets (Non-VSAM), this setting corresponds to the <unit> variable.
• If you select Read-Only Data Sets, Load Libraries and DBRMLIBs, this setting corresponds to the <unitload> variable.
• If you select Backup Data Sets, this setting corresponds to the <bkupunit> variable.
Data Class
SMS only. The SMS data class for the data set group.
Note: The SMS ACS routines in your installation might not allow you to specify SMS classes or might override the values that you specify.
Depending on the data set group that you selected, this setting corresponds to one of the following variables in the INSTPARM file:
• If you selected User Modifiable Data Sets (Non-VSAM), this setting corresponds to the <znonvsdc> variable.
• If you selected Read-Only Data Sets, Load Libraries and DBRMLIBs, this setting corresponds to the <zloaddtcl> variable.
• If you select Backup Data Sets, this setting corresponds to the <bkupsmsdc> variable.
z/OS Installation Assistant Reference 167
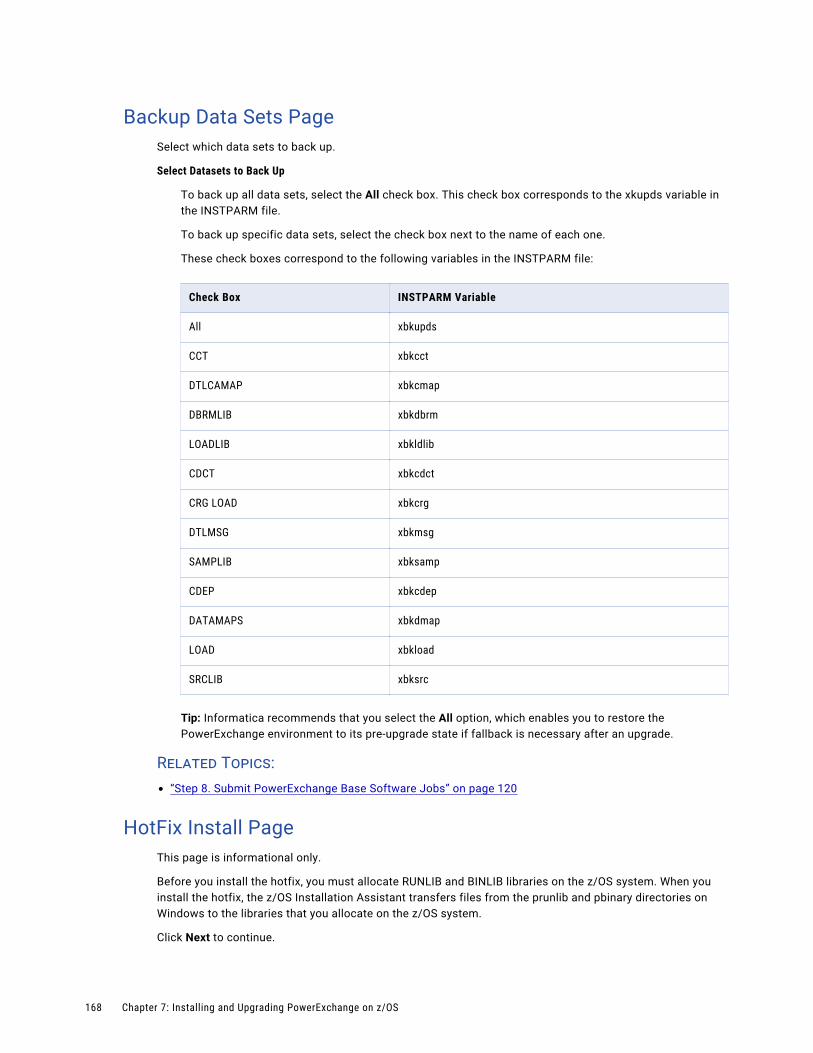
Backup Data Sets PageSelect which data sets to back up.
Select Datasets to Back Up
To back up all data sets, select the All check box. This check box corresponds to the xkupds variable in the INSTPARM file.
To back up specific data sets, select the check box next to the name of each one.
These check boxes correspond to the following variables in the INSTPARM file:
Check Box INSTPARM Variable
All xbkupds
CCT xbkcct
DTLCAMAP xbkcmap
DBRMLIB xbkdbrm
LOADLIB xbkldlib
CDCT xbkcdct
CRG LOAD xbkcrg
DTLMSG xbkmsg
SAMPLIB xbksamp
CDEP xbkcdep
DATAMAPS xbkdmap
LOAD xbkload
SRCLIB xbksrc
Tip: Informatica recommends that you select the All option, which enables you to restore the PowerExchange environment to its pre-upgrade state if fallback is necessary after an upgrade.
Related Topics:• “Step 8. Submit PowerExchange Base Software Jobs” on page 120
HotFix Install PageThis page is informational only.
Before you install the hotfix, you must allocate RUNLIB and BINLIB libraries on the z/OS system. When you install the hotfix, the z/OS Installation Assistant transfers files from the prunlib and pbinary directories on Windows to the libraries that you allocate on the z/OS system.
Click Next to continue.
168 Chapter 7: Installing and Upgrading PowerExchange on z/OS
Global Parameters Page (HotFix)Review or enter global parameters. Only the Logon ID and License Key parameters are editable.
Logon ID
The z/OS user ID that enables connection to the z/OS system.
This setting corresponds to the <loginid> variable in the INSTPARM file.
PowerExchange Agent / Logger Prefix
Read only. The base prefix for the PowerExchange Agent and PowerExchange Logger for z/OS.
Default is PWX.
The z/OS Installation Assistant appends the following characters to this prefix:
• A. For the PowerExchange Agent.
• L. For the PowerExchange Logger.
HLQ
Read only. The high-level qualifier (HLQ) that you entered for the existing installation.
Storage Class
Read only. For SMS only, the default SMS storage class for PowerExchange data sets.
Note: The SMS automatic class selection (ACS) routines in your installation might not allow specification of SMS classes or might override the values that you specify.
Volume
Read only. The DASD volume serial number (VOLSER) on the z/OS system where you want to install PowerExchange libraries.
Default is VOLSER.
Mgmt. Class
Read only. For SMS only, the default SMS management classes for PowerExchange data sets.
Note: The SMS ACS routines in your installation might not allow you to specify SMS classes or might override the values that you specify.
Unit
Read only. A generic or esoteric unit name on the z/OS system where you want to install PowerExchange.
Default is 3390.
Data Class
Read only. For SMS only, the default SMS data classes for PowerExchange data sets.
Note: The SMS ACS routines in your installation might not allow you to specify SMS classes or might override the values that you specify.
License Key
The license key for the installation. If you have a new license key, enter it. Otherwise, accept the previous license key.
This setting corresponds to the <license> variable in the INSTPARM file.
z/OS Installation Assistant Reference 169
Data Set Group Details Page (HotFix)Enter or review information for data set groups.
HOTFIX Data Sets
Select this data set group to view or change properties for hotfix data sets.
HLQ
The high-level qualifier (HLQ) for the hotfix data sets. Use as many qualifier levels as required.
Default is PWXSP.
Maximum length is 26 characters.
This setting corresponds to the <patchlibname> variable in the INSTPARM file.
Storage Class
SMS only. The SMS storage class for the data set group.
If you specify an SMS storage class, you do not need to specify any volume or unit values.
Note: The SMS automatic class selection (ACS) routines in your installation might not allow specification of SMS classes or might override the values that you specify.
This setting corresponds to the <patchsmssc> variable in the INSTPARM file.
Volume
The DASD volume serial number (VOLSER) on the z/OS system where you want to install the data sets.
This setting corresponds to the <patchvol> variable in the INSTPARM file.
Mgmt. Class
SMS only. The SMS management class for the data set group.
Note: The SMS ACS routines in your installation might not allow you to specify SMS classes or might override the values that you specify.
This setting corresponds to the <patchsmsmc> variable in the INSTPARM file.
Unit
A generic or esoteric unit name on the z/OS system where you want to install the data sets.
Default is 3390, where applicable.
This setting corresponds to the <patchunitl> variable in the INSTPARM file.
Data Class
SMS only. The SMS data class for the data set group.
Note: The SMS ACS routines in your installation might not allow you to specify SMS classes or might override the values that you specify.
This setting corresponds to the <patchsmsdc> variable in the INSTPARM file.
170 Chapter 7: Installing and Upgrading PowerExchange on z/OS
A p p e n d i x A
Upgrade ConsiderationsThis appendix includes the following topics:
• Upgrade Considerations Overview, 171
• Coordination of PowerExchange and PowerCenter Upgrades, 172
• Upgrade Considerations for PowerExchange 10.2 HotFix 2, 174
• Upgrade Considerations for PowerExchange 10.2 HotFix 1, 174
• Upgrade Considerations for PowerExchange 10.2, 175
• Upgrade Considerations for PowerExchange 10.1, 176
• Upgrade Considerations for PowerExchange 10.0, 176
• Upgrade Considerations for PowerExchange 9.6.1, 179
• Upgrade Considerations for PowerExchange 9.6.0, 183
Upgrade Considerations OverviewThis chapter discusses specific upgrade considerations for PowerExchange and PowerCenter.
The following table lists the upgrade considerations and the users to whom they apply:
Topic Applies to
“Coordination of PowerExchange and PowerCenter Upgrades” on page 172
PowerExchange users who are upgrading PowerExchange or PowerCenter
“Upgrade Considerations for PowerExchange 10.2 HotFix 2” on page 174
PowerExchange users who are upgrading to 10.2 HotFix 2 from an earlier release
“Upgrade Considerations for PowerExchange 10.2 HotFix 1” on page 174
PowerExchange users who are upgrading to 10.2 HotFix 1 from an earlier release
“Upgrade Considerations for PowerExchange 10.2” on page 175
PowerExchange users who are upgrading to 10.2 from an earlier release
“Upgrade Considerations for PowerExchange 10.1” on page 176
PowerExchange users who are upgrading to 10.1 from an earlier release
“Upgrade Considerations for PowerExchange 10.0” on page 176
PowerExchange users who are upgrading to 10.0 from an earlier release
171
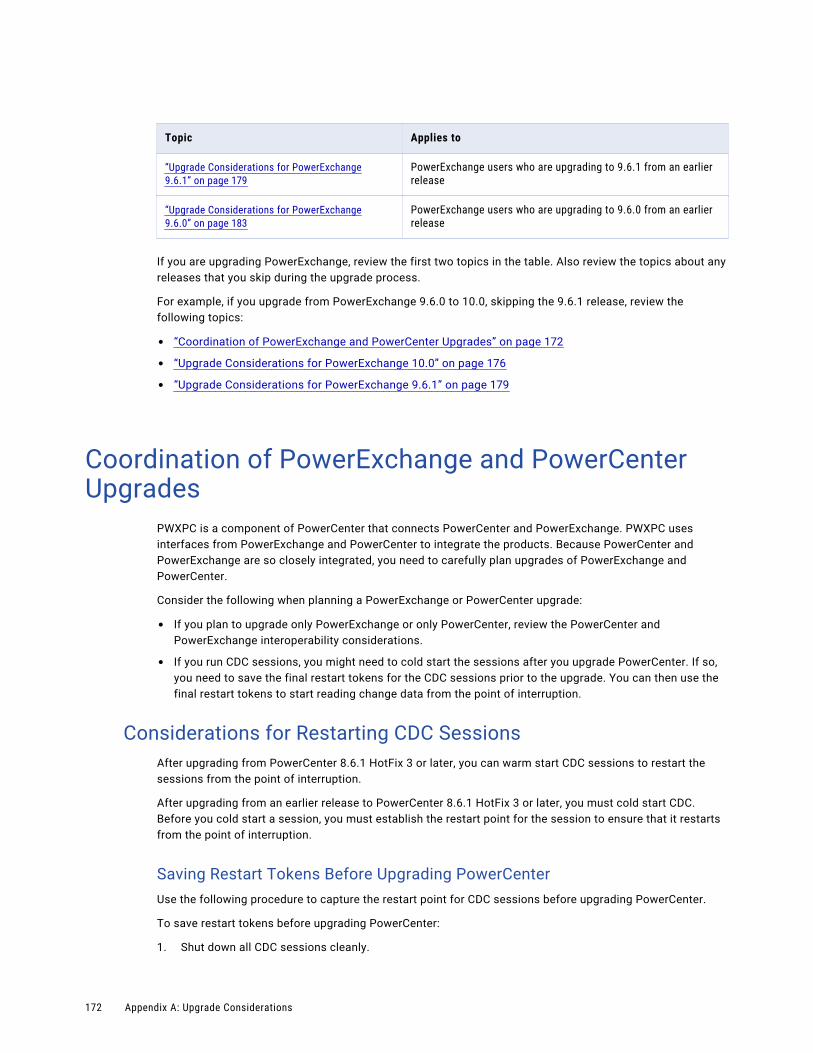
Topic Applies to
“Upgrade Considerations for PowerExchange 9.6.1” on page 179
PowerExchange users who are upgrading to 9.6.1 from an earlier release
“Upgrade Considerations for PowerExchange 9.6.0” on page 183
PowerExchange users who are upgrading to 9.6.0 from an earlier release
If you are upgrading PowerExchange, review the first two topics in the table. Also review the topics about any releases that you skip during the upgrade process.
For example, if you upgrade from PowerExchange 9.6.0 to 10.0, skipping the 9.6.1 release, review the following topics:
• “Coordination of PowerExchange and PowerCenter Upgrades” on page 172
• “Upgrade Considerations for PowerExchange 10.0” on page 176
• “Upgrade Considerations for PowerExchange 9.6.1” on page 179
Coordination of PowerExchange and PowerCenter Upgrades
PWXPC is a component of PowerCenter that connects PowerCenter and PowerExchange. PWXPC uses interfaces from PowerExchange and PowerCenter to integrate the products. Because PowerCenter and PowerExchange are so closely integrated, you need to carefully plan upgrades of PowerExchange and PowerCenter.
Consider the following when planning a PowerExchange or PowerCenter upgrade:
• If you plan to upgrade only PowerExchange or only PowerCenter, review the PowerCenter and PowerExchange interoperability considerations.
• If you run CDC sessions, you might need to cold start the sessions after you upgrade PowerCenter. If so, you need to save the final restart tokens for the CDC sessions prior to the upgrade. You can then use the final restart tokens to start reading change data from the point of interruption.
Considerations for Restarting CDC SessionsAfter upgrading from PowerCenter 8.6.1 HotFix 3 or later, you can warm start CDC sessions to restart the sessions from the point of interruption.
After upgrading from an earlier release to PowerCenter 8.6.1 HotFix 3 or later, you must cold start CDC. Before you cold start a session, you must establish the restart point for the session to ensure that it restarts from the point of interruption.
Saving Restart Tokens Before Upgrading PowerCenterUse the following procedure to capture the restart point for CDC sessions before upgrading PowerCenter.
To save restart tokens before upgrading PowerCenter:
1. Shut down all CDC sessions cleanly.
172 Appendix A: Upgrade Considerations
2. Verify that the final restart token files for all CDC sessions are saved.
Depending on the PowerCenter release that you are migrating from, either PWXPC records the restart tokens or you recover them, as follows:
• If you are migrating from a PowerCenter release earlier than 8.1.1 SP2, PWXPC writes the final restart tokens to the restart token file when the CDC session ends.
• If you are migrating from PowerCenter 8.1.1 SP2 through SP5 without enhanced restart enabled, PWXPC writes the final restart tokens to the restart token file when the CDC session ends.
• If you are migrating from PowerCenter 8.1.1 SP2 through SP5 with enhanced restart enabled, run recovery on all CDC sessions. PWXPC creates a backup restart token file with an appended timestamp that contains the restart tokens.
• If you are migrating from PowerCenter 8.5 or later, run recovery on all CDC sessions. PWXPC updates the restart token file with the restart tokens.
3. As a precaution, back up any relational tables that are targets in the CDC sessions. Also, back up the PowerCenter recovery tables.
4. Upgrade PowerCenter.
Important: If you did not save the final restart token files before the PowerCenter upgrade, you must manually build the restart token file by using the session log. For sessions that run on PowerCenter 8.1.1 SP2 or later with enhanced restart enabled, use the restart tokens from the NRDBCDC_RDR_12075 or PWXPC_12075 message. You can use the restart tokens from the message in conjunction with a special override statement to get the restart tokens for all sources in a CDC session. For sessions that run on PowerCenter releases earlier than 8.1.1 SP2 or without enhanced restart, use the restart tokens in the restart token files. If you need assistance, contact Informatica Global Customer Support.
Establishing Restart Points for CDC Sessions after a PowerCenter UpgradeBefore you start CDC sessions after a PowerCenter upgrade, establish restart points.
Important: Prior to the PowerCenter upgrade, you should have saved the restart tokens. If you did not follow the procedure to save the restart tokens prior to upgrading PowerCenter, contact Informatica Global Customer Support for assistance.
To establish restart points for CDC sessions after a PowerCenter upgrade:
1. Verify that the restart token files for all CDC sessions contain restart tokens.
Depending on the PowerCenter release you are migrating from, PWXPC stored the restart tokens as follows:
• If you are migrating from a PowerCenter release earlier than 8.1.1 SP2, PWXPC stored the final restart tokens in the restart token file for the session when the session ended.
• If you are migrating from PowerCenter 8.1.1 SP2 through SP5 and did not enable enhanced restart, PWXPC stored the final restart tokens in the restart token file for the session when the session ended.
• If you are migrating from PowerCenter 8.1.1 SP2 through SP5 and enabled enhanced restart, PWXPC stored the restart tokens in a backup restart token file with an appended timestamp when the session recovery operation ended. Copy the backup restart token file for each CDC session to the restart token file for that session.
• If you are migrating from PowerCenter 8.5 or later, PWXPC stored the restart tokens in the restart token file when the session recovery operation ended.
2. Cold start the CDC session or workflow.
PWXPC uses the restart token file to restart the CDC session.
Coordination of PowerExchange and PowerCenter Upgrades 173
Upgrade Considerations for PowerExchange 10.2 HotFix 2
If you are upgrading to PowerExchange 10.2 HotFix 2 from an earlier release, review these upgrade considerations before starting the upgrade process.
New SAMPLIB Member for ECCR Programs That Support CICS/VSAM 5.5
PowerExchange 10.2 HotFix 2 adds the #CICSV72 member in SAMPLIB for defining the CICS/VSAM ECCR programs and transaction for the newly supported CICS Transaction Server 5.5 version.
Because the definition of the CICS/VSAM ECCR programs and transaction changed, you must restart the CICS region after upgrading to PowerExchange 10.2 HotFix 2.
Checksums Added to PowerExchange Logger CDCT FileBeginning in PowerExchange 10.2 HotFix 2, PowerExchange performs a checksum test of records in the CDCT file of the PowerExchange Logger for Linux, UNIX, and Windows to detect corrupted records and to avoid potential errors while reading information from the CDCT file.
The addition of checksums to the CDCT file makes the file incompatible with PowerExchange releases earlier than 10.2 HotFix 2. Before you apply 10.2 HotFix 2, back up your existing CDCT file. Then, if you need to fall back from 10.2 HotFix 2 to the earlier release, you can restore the CDCT file from the backup.
Upgrade Considerations for PowerExchange 10.2 HotFix 1
If you are upgrading to PowerExchange 10.2 HotFix 1 from an earlier release, review these upgrade considerations before starting the upgrade process.
Updated Components in the PowerExchange ECCR CRG.LOAD Library for IMS Synchronous CDC
The PowerExchange 10.2 HotFix 1 updates the PowerExchange CRG.LOAD library for IMS synchronous CDC to provide the latest available version of the BMC Software CHANGE RECORDING FACILITY and DATABASE INTEGRITY PLUS components.
If you use the CRG software, after you upgrade PowerExchange, run the CRGUMOD or CRGCLINK job in the hlq.SAMPLIB library again to install DBRC modifications. Otherwise, events such as abends might cause change capture to fail in the DLIODDCx module when the IMS synchronous ECCR tries to capture changes for a source segment. After you run the CRGUMOD or CRGCLINK job, restart the IMS control region.
Important: If you have a supported version of the BMC Software CHANGE RECORDING FACILITY, DATABASE INTEGRITY PLUS, or Fast Path Online Restructure/EP product, use the BMC Software product instead of the CRG software. In this case, you do not need to run the CRGUMOD or CRGCLINK job. Ensure that the BMC Software product version matches or is later than the minimum BMC version that PowerExchange 10.2 HotFix 1 supports for your IMS version.
174 Appendix A: Upgrade Considerations
New SAMPLIB Member for ECCR Programs That Support CICS/VSAM 5.4
PowerExchange 10.2 HotFix 1 adds the SAMPLIB member #CICSV71 for defining the CICS/VSAM ECCR programs and transaction for the newly supported CICS Transaction Server 5.4.
Because the definition of the CICS/VSAM ECCR programs and transaction changed, you must restart the CICS region after upgrading to PowerExchange 10.2 HotFix 1.
Upgrade Considerations for PowerExchange 10.2If you are upgrading to PowerExchange 10.2 from an earlier release, review these upgrade considerations before starting the upgrade process.
Consideration for Upgrading to PowerExchange on i5/OSIf you are upgrading an existing PowerExchange installation on i5/OS to the 10.2 version, after you upgrade the product and before you start the PowerExchange Listener, issue the following commands to rebuild the metadata objects that PowerExchange uses:
ADDLIBLE LIB(DTLLIB) POSITION(*FIRST)CRTDTLENVF DTLLIB(DTLLIB) DATALIB(DATALIB)
Where:
• DTLLIB is the PowerExchange software library.
• DATALIB is the PowerExchange library that contains data files such as the CCT file, PowerExchange configuration parameters file, and the LISTENER and DTLOS_MSQG message queues.
If you need to access a remote DB2 for i5/OS database, you must specify additional parameters in the CRTDTLENVF command, as follows:
CRTDTLENVF DTLLIB(DTLLIB) DATALIB(DATALIB) RMTRDBDIRE(DATABASE_NAME) RMTSYSNAME(HOST_NAME) RMTASPDEV(*) OSLEVEL(OS_LEVEL)
Updated Components in the PowerExchange ECCR CRG.LOAD Library for IMS Synchronous CDC
The PowerExchange 10.2 version includes patch P802235, which updates the PowerExchange CRG.LOAD library for IMS synchronous CDC to provide the latest available version of the BMC Software CHANGE RECORDING FACILITY and DATABASE INTEGRITY PLUS components.
If you use the CRG software, after you upgrade PowerExchange, run the CRGUMOD or CRGCLINK job in the hlq.SAMPLIB library again to install DBRC modifications. Otherwise, events such as abends might cause change capture to fail in the DLIODDCx module when the IMS synchronous ECCR tries to capture changes for a source segment. After you run the CRGUMOD or CRGCLINK job, restart the IMS control region.
Important: If you have a supported version of the BMC Software CHANGE RECORDING FACILITY, DATABASE INTEGRITY PLUS, or Fast Path Online Restructure/EP product, use the BMC Software product instead of the CRG software. In this case, you do not need to run the CRGUMOD or CRGCLINK job. Ensure that the BMC Software product version matches or is later than the minimum BMC version that PowerExchange 10.2 supports for your IMS version.
Upgrade Considerations for PowerExchange 10.2 175
Upgrade Considerations for PowerExchange 10.1If you are upgrading to PowerExchange 10.1 from an earlier release, review these upgrade considerations before starting the upgrade process.
Updated Components in the PowerExchange 10.1 ECCR CRG.LOAD Library for IMS Synchronous CDC
PowerExchange 10.1 includes patch P717217, which updates the PowerExchange CRG.LOAD library for IMS synchronous CDC to provide the latest available version of the BMC Software CHANGE RECORDING FACILITY and DATABASE INTEGRITY PLUS components.
Note: PowerExchange 9.6.1 HotFix 4 also includes patch P717217.
If you use the CRG software, after you upgrade to 10.1 from PowerExchange 10.0 or PowerExchange 9.6.1 HotFix 3 or earlier, run the CRGUMOD or CRGCLINK job in the hlq.SAMPLIB library again to install DBRC modifications. Otherwise, events such as abends might cause change capture to fail in the DLIODDCx module when the IMS synchronous ECCR tries to capture changes for a source segment. After you run the CRGUMOD or CRGCLINK job, restart the IMS control region.
Important: If you have a supported version of the BMC Software CHANGE RECORDING FACILITY, DATABASE INTEGRITY PLUS, or Fast Path Online Restructure/EP product, use the BMC Software product instead of the CRG software. In this case, you do not need to run the CRGUMOD or CRGCLINK job. Ensure that the BMC Software product version matches or is later than the minimum BMC version that PowerExchange 10.1 supports for your IMS version.
Upgrade Considerations for PowerExchange 10.0If you are upgrading to PowerExchange 10.0 or a 10.0 hotfix from an earlier release, review these upgrade considerations before starting the upgrade process.
Considerations for Upgrading PowerExchange on WindowsPowerExchange 10.0 introduced changes in functionality on 32-bit and 64-bit Windows systems. As a result, the following upgrade considerations apply:
• PowerExchange bulk data movement and CDC operations are no longer supported on Windows 32-bit machines. Any existing data sources on these systems are no longer supported.
• If you upgrade from an earlier PowerExchange release on Windows and use PowerExchange ODBC drivers, you must reinstall the PowerExchange ODBC drivers and update PowerExchange ODBC data sources.
For more information about installing the PowerExchange ODBC drivers, see “Step 4. Install the PowerExchange ODBC Drivers (Optional)” on page 79. For more information about updating PowerExchange ODBC data sources, see the PowerExchange Reference Manual.
• To use PowerCenter or Data Services with PowerExchange 10.0, you must upgrade to the 10.0 versions of these products. For more information, see “PowerExchange Interoperability with PowerCenter” on page 32 and “PowerExchange Interoperability with Informatica Services ” on page 33.
176 Appendix A: Upgrade Considerations
Preparing an i5/OS Environment to Accept pwxcmd displaystats Commands
PowerExchange 9.6.1 HotFix 2 added support for issuing the pwxcmd displaystats command to a PowerExchange Listener on i5/OS. If you are upgrading to PowerExchange 10.0 and have set SECURITY=(2,x) in the DMBOVER member of the CFG file, you must prepare the i5/OS environment for issuing pwxcmd displaystats commands if you have not done so already for an earlier PowerExchange release.
To prepare the environment, issue the following command on the i5/OS system where the PowerExchange Listener runs:
CALL PGM(dtllib/CRTDTLENVA) PARM('datalib')In this command, dtllib is the name of the PowerExchange software library that you specified at installation and datalib is the user-specified name for the PowerExchange data library that was entered at installation.
The command provides USE access on the files that are required to execute the pwxcmd displaystats command. If you do not prepare the i5/OS environment, the following error message is issued:
PWX-00252 Userid <user_id> does not have <*USE> access to <datalib/LDISPSTATS>, return code<355>.
Note: If you are installing PowerExchange for the first time instead of upgrading it, the CRTPWXENV command calls CRTDTLENVA to create the PowerExchange environment.
Updated Components in the PowerExchange 10.0 ECCR CRG.LOAD Library for IMS Synchronous CDC
If you upgrade to 10.0 from an earlier release that does not include EDP patch P699028, the PowerExchange CRG.LOAD library for IMS synchronous CDC does not contain the latest available version of the BMC Software CHANGE RECORDING FACILITY and DATABASE INTEGRITY PLUS components.
If you use the CRG software, after you upgrade to 10.0, run the CRGUMOD or CRGCLINK job in the hlq.SAMPLIB library again to install DBRC modifications. Otherwise, events such as abends might cause change capture to fail in the DLIODDCx module when the IMS synchronous ECCR tries to capture changes for a source segment. After you run the CRGUMOD or CRGCLINK job, restart the IMS control region.
Important: If you have a supported version of the BMC Software CHANGE RECORDING FACILITY, DATABASE INTEGRITY PLUS, or Fast Path Online Restructure/EP product, use the BMC Software product instead of the CRG software. In this case, you do not need to run the CRGUMOD or CRGCLINK job. Ensure that the BMC Software product version matches or is later than the minimum BMC version that PowerExchange 10.0 supports for your IMS version.
Requirements for Upgrading the DB2 for z/OS ECCR to PowerExchange 10.0
PowerExchange 10.0 includes EDP patches P712919 and P713954, which affect DB2 for z/OS ECCR. If you perform DB2 for z/OS CDC and are upgrading from an earlier PowerExchange release that did not include the P712919 and P713954 patches, you must perform the following tasks to be able to restart the DB2 ECCR properly.
1. Before you install PowerExchange 10.0, issue the following DB2 for z/OS ECCR QUIESCE command to stop the ECCR:
MODIFY eccr_ task_name,QUIESCEIf you cannot QUIESCE the ECCR, wait until no DDL changes or DB2 utility QUIESCE operations are occurring on the DB2 subsystem and then use the MVS STOP (P) command to stop the ECCR.
Upgrade Considerations for PowerExchange 10.0 177
Note: The ECCR treats DB2 utility QUIESCE operations as DDL changes.
2. Perform the upgrade installation.
3. In the XIDDB225 job in RUNLIB library, edit the JCL to add the PowerExchange 10.0 DBRM data set at the top of the DBRMLIB DD concatenation.
4. Run the XIDDB225 job to bind the DB2 plan and packages for the DB2 ECCR. To run the XIDDB225 job, you must have SYSCTRL authority.
Note: If you do not rebind the DB2 plan and packages with the 10.0 DBRM data set, the ECCR will abend at startup.
5. Restart the DB2 ECCR based on the following criteria:
• If you did not specify an IFI306 OPT statement in the REPL2OPT member of the RUNLIB library, warm start the ECCR.
• If you specified an IFI306 OPT statement in the REPL2OPT member and do not run the ECCR in a DB2 data-sharing environment, warm start the ECCR.
• If you specified an IFI306 OPT statement in the REPL2OPT member, run the ECCR in a DB2 data-sharing environment, and stopped the ECCR with the MVS STOP command instead of the DB2 ECCR QUIESCE command, you must cold start or special start the ECCR.To special start the ECCR from the point in time in the DB2 log where the ECCR stopped processing, include the USEDIR,USESTAT options in the START statement in the REPL2OPT member. If you want to special start the ECCR at some other point in time in the log and if DDL changes might have been logged between the point where the ECCR stopped processing and the point where the special start occurs, do not include the USIDIR,USESTAT options.
Important: If you previously encountered the problem that was fixed by CR 413954 (EDP patch P713954) and do not use the IFI306 OPT statement in the REPL2OPT member, you must delete the capture registration for the table that was identified in message PWXEDM177373W when the ECCR ended. Then warm start the ECCR and re-create the capture registration. If you use the IFI306 OPT statement, use the preceding restart criteria.
Removing an Obsolete Capture Directory Table for the DB2 for z/OS ECCR
Effective in PowerExchange 10.0, the DB2 for z/OS ECCR no longer uses the TCAPTABLEPART capture directory table.
If you upgrade to PowerExchange 10.0 from a previous release, you can delete the TCAPTABLEPART table and its index whenever you are certain that you do not need to fall back to the previous release.
Shutting Down the PowerExchange Agent Before Upgrading to PowerExchange 10.0 on z/OS
To address a PowerExchange Listener failure caused by the premature release of storage for a service address block (SRB) scheduled to the Listener job, you must drain and shut down the PowerExchange Agent before upgrading to PowerExchange 10.0 from an earlier PowerExchange release that did not include EDP patch P628599.
Perform the following steps:
1. Issue the PowerExchange Agent DRAIN command to ensure that all PowerExchange Agent tasks have completed processing before you shut down the Agent address space. Use the following syntax:
cmd_prefix DRAIN
178 Appendix A: Upgrade Considerations
The cmd_prefix variable is the command prefix that is specified in the AGENTCTL member of the RUNLIB library or the AGENTID parameter value in the AGENTCTL member.
2. Issue the PowerExchange Agent SHUTDOWN COMPLETELY command to shut down the Agent address space and delete the data space. Use the following syntax:
cmd_prefix SHUTDOWN COMPLETELY3. Upgrade to PowerExchange 10.0.
4. To restart the PowerExchange Agent, issue the START command:
START agent_task_name
Upgrade Considerations for PowerExchange 9.6.1If you are upgrading to PowerExchange 9.6.1 or later from any previous release, review these upgrade considerations before starting the upgrade process.
Updated Components in the PowerExchange 9.6.1 HotFix 4 ECCR CRG.LOAD Library for IMS Synchronous CDC
PowerExchange 9.6.1 HotFix 4 includes patch P717217, which updates the PowerExchange CRG.LOAD library for IMS synchronous CDC to provide the latest available version of the BMC Software CHANGE RECORDING FACILITY and DATABASE INTEGRITY PLUS components.
If you use the CRG software, after you upgrade to 9.6.1 HotFix 4, run the CRGUMOD or CRGCLINK job in the hlq.SAMPLIB library again to install DBRC modifications. Otherwise, events such as abends might cause change capture to fail in the DLIODDCx module when the IMS synchronous ECCR tries to capture changes for a source segment. After you run the CRGUMOD or CRGCLINK job, restart the IMS control region.
Important: If you have a supported version of the BMC Software CHANGE RECORDING FACILITY, DATABASE INTEGRITY PLUS, or Fast Path Online Restructure/EP product, use the BMC Software product instead of the CRG software. In this case, you do not need to run the CRGUMOD or CRGCLINK job. Ensure that the BMC Software product version matches or is later than the minimum BMC version that PowerExchange 9.6.1 HotFix 4 supports for your IMS version.
Removing an Obsolete Capture Directory Table for the DB2 for z/OS ECCR
Effective in PowerExchange 9.6.1 HotFix 4, the DB2 for z/OS ECCR no longer uses the TCAPTABLEPART capture directory table.
If you upgrade to PowerExchange 9.6.1 HotFix from a previous release, you can delete the TCAPTABLEPART table and its index whenever you are certain that you do not need to fall back to the previous release.
Upgrade Considerations for PowerExchange 9.6.1 179

Requirements for Upgrading the DB2 for z/OS ECCR to 9.6.1 HotFix 3
PowerExchange 9.6.1 HotFix 3 includes EDP patches P712919 and P713954, which affect DB2 for z/OS CDC. If you use DB2 for z/OS CDC and upgrade to PowerExchange 9.6.1 HotFix 3, you must perform several tasks to be able to restart the DB2 ECCR properly.
Perform the following tasks:
1. Before you install the hotfix, issue the following DB2 for z/OS ECCR QUIESCE command to stop the ECCR:
MODIFY eccr_ task_name,QUIESCEIf you cannot QUIESCE the ECCR, wait until no DDL changes or DB2 utility QUIESCE operations are occurring on the DB2 subsystem and then use the MVS STOP (P) command to stop the ECCR.
Note: The ECCR treats DB2 utility QUIESCE operations as DDL changes.
2. Perform the upgrade or hotfix installation.
3. In the XIDDB225 job in RUNLIB library, edit the JCL to add the PowerExchange 9.6.1 HotFix 3 DBRM data set at the top of the DBRMLIB DD concatenation.
4. Run the XIDDB225 job to bind the DB2 plan and packages for the DB2 ECCR. To run the XIDDB225 job, you must have SYSCTRL authority.
Note: If you do not rebind the DB2 plan and packages with the 9.6.1 HotFix 3 DBRM data set, the ECCR will abend at startup.
5. Restart the DB2 ECCR based on the following criteria:
• If you did not specify an IFI306 statement in the REPL2OPT member of the RUNLIB library, warm start the ECCR.
• If you specified an IFI306 statement in the REPL2OPT member and do not run the ECCR in a DB2 data-sharing environment, warm start the ECCR.
• If you specified an IFI306 statement in the REPL2OPT member, run the ECCR in a DB2 data-sharing environment, and stopped the ECCR with the MVS STOP command instead of the DB2 ECCR QUIESCE command, you must cold start or special start the ECCR.To special start the ECCR from the point in time in the DB2 log where the ECCR stopped processing, include the USEDIR,USESTAT options in the START statement in the REPL2OPT member. If you want to special start the ECCR at some other point in time in the log and if DDL changes might have been logged between the point where the ECCR stopped processing and the point where the special start occurs, do not include the USIDIR,USESTAT options.
Important: If you previously encountered the problem that was fixed by CR 413954 (EDP patch P713954) and do not use the IFI306 statement in the REPL2OPT member, you must delete the capture registration for the table that was identified in message PWXEDM177373W when the ECCR ended. Then warm start the ECCR and re-create the capture registration. If you use the IFI306 statement, use the preceding restart criteria.
Updated Components in the PowerExchange 9.6.1 HotFix 2 ECCR CRG.LOAD Library for IMS Synchronous CDC
If you upgrade to 9.6.1 HotFix 2 from an earlier release that does not include patch P699028, the PowerExchange CRG.LOAD library for IMS synchronous CDC does not contain the latest available version of the BMC Software CHANGE RECORDING FACILITY and DATABASE INTEGRITY PLUS components.
If you use the CRG software, after you upgrade to 9.6.1 HotFix 2, run the CRGUMOD or CRGCLINK job in the hlq.SAMPLIB library again to install DBRC modifications. Otherwise, events such as abends might cause
180 Appendix A: Upgrade Considerations
change capture to fail in the DLIODDCx module when the IMS synchronous ECCR tries to capture changes for a source segment. After you run the CRGUMOD or CRGCLINK job, restart the IMS control region.
Important: If you have a supported version of the BMC Software CHANGE RECORDING FACILITY, DATABASE INTEGRITY PLUS, or Fast Path Online Restructure/EP product, use the BMC Software product instead of the CRG software. In this case, you do not need to run the CRGUMOD or CRGCLINK job. Ensure that the BMC Software product version matches or is later than the minimum BMC version that PowerExchange 9.6.1 HotFix 2 supports for your IMS version.
Change to the Format of PowerExchange Logger CDCT Backup Files
Effective in PowerExchange 9.6.1 HotFix 2, backup files for the PowerExchange Logger for Linux, UNIX, and Windows CDCT file have a new format. You cannot use backup files of the new format with PowerExchange versions earlier than PowerExchange 9.6.1 HotFix 2.
Before you upgrade to PowerExchange 9.6.1 HotFix 2 from an earlier release, you must shut down the PowerExchange Logger. Also, save the most recent CDCT backup file in case you need to fall back to the previous release. These backup files have names in the format of CDCT_*_TERM.bkp.
Additional Privileges Required for the PowerExchange Express CDC for Oracle User
If you upgrade to 9.6.1 HotFix 2 from a previous PowerExchange version or hotfix and use PowerExchange Express CDC for Oracle, you must grant some additional privileges to the Express CDC user to retrieve the information that is required for CDC processing.
Issue the following GRANT statements before you restart CDC processing:
GRANT SELECT ON "SYS"."DBA_USERS" TO "ORACAPTL";GRANT SELECT ON "SYS"."DBA_TABLESPACES" TO "ORACAPTL";
In these statements, ORACAPTL is the name of the Express CDC user.
Preparing an i5/OS Environment to Accept pwxcmd displaystats Commands
PowerExchange 9.6.1 HotFix 2 adds support for issuing a pwxcmd displaystats command to a PowerExchange Listener on i5/OS. If you are upgrading to 9.6.1 HotFix 2 from an earlier release and set SECURITY=(2,x) in the DBMOVER member of the CFG file, you need to prepare the i5/OS environment to run pwxcmd displaystats commands.
To prepare the environment, issue the following command on the i5/OS system where the PowerExchange Listener runs:
CALL PGM(dtllib/CRTDTLENVA) PARM('datalib')In this command, dtllib is the name of the PowerExchange software library that you specified at installation and datalib is the user-specified name for the PowerExchange data library that was entered at installation.
The command provides USE access on the files that are required to execute the pwxcmd displaystats command. If you do not prepare the i5/OS environment, the following error message is issued:
PWX-00252 Userid <user_id> does not have <*USE> access to <DTLDEVMFDA/LDISPSTATS>, return code<355>.
Note: If you are installing PowerExchange for the first time instead of upgrading it, the CRTPWXENV command calls CRTDTLENVA to create the PowerExchange environment.
Upgrade Considerations for PowerExchange 9.6.1 181
Shut Down the PowerExchange Agent Before Upgrading to PowerExchange 9.6.1 HotFix 1 on z/OS
To address a PowerExchange Logger for MVS failure, PowerExchange 9.6.1 HotFix 1 changes the size of the global circular queue DSN table in the PowerExchange Agent data space. Before you upgrade to 9.6.1 HotFix 1 from a prior PowerExchange release, you must drain and shut down the PowerExchange Agent.
Perform the following steps:
1. Issue the PowerExchange Agent DRAIN command to ensure that all PowerExchange Agent tasks have completed processing before you shut down the Agent address space. Use the following syntax:
cmd_prefix DRAINThe cmd_prefix variable is the command prefix that is specified in the AGENTCTL member of the RUNLIB library or the AGENTID parameter value in the AGENTCTL member.
2. Issue the PowerExchange Agent SHUTDOWN COMPLETELY command to shut down the Agent address space and delete the data space. Use the following syntax:
cmd_prefix SHUTDOWN COMPLETELY3. Install the hotfix.
4. To restart the PowerExchange Agent, issue the START command:
START agent_task_name
Expanded PowerExchange Agent Buffer Size for DB2 for z/OS ECCR Processing
PowerExchange 9.6.1 expanded the size of a PowerExchange Agent internal buffer to make DB2 for z/OS ECCR processing more efficient.
To use the expanded buffer size, you must perform the following steps when you upgrade to PowerExchange 9.6.1 from an earlier release:
1. After you upgrade PowerExchange, issue the PowerExchange Agent DRAIN command to ensure that all PowerExchange Agent tasks have completed processing before you shut down the Agent address space. Use the following syntax:
cmd_prefix DRAINThe cmd_prefix variable is the command prefix that is specified in the AGENTCTL member of the RUNLIB library or the AGENTID parameter value in the AGENTCTL member.
2. Issue the PowerExchange Agent SHUTDOWN COMPLETELY command to shut down the Agent address space and delete the data space that contains the buffer. Use the following syntax:
cmd_prefix SHUTDOWN COMPLETELY
Updated Components in the PowerExchange 9.6.1 ECCR CRG.LOAD Library for IMS Synchronous CDC
If you upgrade to 9.6.1 from an earlier release that does not include patch P638444, the PowerExchange CRG.LOAD library for IMS synchronous CDC does not contain the latest available version of the BMC Software CHANGE RECORDING FACILITY and DATABASE INTEGRITY PLUS components.
If you use the CRG software, after you upgrade, run the CRGUMOD or CRGCLINK job in the hlq.SAMPLIB library again to install DBRC modifications. Otherwise, events such as abends might cause change capture to fail in the DLIODDCx module when the IMS synchronous ECCR tries to capture changes for a source segment. After you run the CRGUMOD or CRGCLINK job, restart the IMS control region.
182 Appendix A: Upgrade Considerations
Important: If you have a supported version of the BMC Software CHANGE RECORDING FACILITY or DATABASE INTEGRITY PLUS product, use the BMC Software product instead of the CRG software. In this case, you do not need to run the CRGUMOD or CRGCLINK job. Ensure that the BMC Software product version matches or is later than the minimum BMC version that your PowerExchange version supports for the IMS version.
Upgrade Considerations for PowerExchange 9.6.0If you are upgrading to PowerExchange 9.6.0 or later from any previous release, review these upgrade considerations before starting the upgrade process.
DB2 for z/OS CDC Configuration Tasks Related to Upgrading to PowerExchange 9.6.0 from an Earlier Version
If you use DB2 for z/OS CDC and upgrade to PowerExchange 9.6.0 from an earlier version that does not include patch P639029, you must rebind the DBRM package, X029167. If you upgrade from a version that does not include patch P523210, such as version 9.0.1 or version 8.6.1 HotFix 12 or earlier, you must also expand a column in the DB2 for z/OS ECCR TCAPWORK capture directory table to accommodate the longer LRSN values in DB2 9.1 data sharing environments.
Patch P523210 was incorporated in PowerExchange versions 8.6.1 HotFix 14 and 9.1.0 and might have been applied on earlier 8.6.1 or 9.x versions. To determine whether patch P523210 is installed and the steps that you need to perform, execute the following SQL query against the DB2 SYSIBM.SYSCOLUMNS catalog table:
SELECT LENGTH FROM SYSIBM.SYSCOLUMNS WHERE NAME='RBA' and TBCREATOR='TCAP_table_creator' and TBNAME='TCAPWORK'
If this SQL query returns a length of 6, P523210 is not installed. In this case, complete all of the following steps.
If the SQL query returns a length of 8, P523210 is installed. However, you must rebind the DBRM package, XO29167. Complete steps 4 through 7.
1. Use the QUIESCE command to stop the DB2 ECCR.
2. Modify the SQL statements in the EXPNDCP3 member of the SAMPLIB library based on the comments in the member.
This member expands the TCAPWORK capture directory table to increase the size of the RBA column to properly support the longer LRSN values that can occur in DB2 9.1 data sharing environments.
3. Use SPUFI or another tool to execute the modified SQL statements in the EXPNDCP3 member.
4. In the XIDDB225 job in the RUNLIB library, edit the JCL to add the PowerExchange 9.6.0 DBRM data set at the top of the DBRMLIB DD concatenation.
5. Verify that the BIND member that is specified in the SYSTSIN DD concatenation in the XIDB225 job contains the BIND statements for the X029167 package.If the BIND member does not contain BIND statements for X029167, perform one of the following actions:
• If you selected the Upgrade by Using Existing Data Set Names option in the z/OS Installation Assistant, run the SETDB2UE job in the staging RUNLIB library to use the latest DB2BIND or DB2BINDB member that includes the bind statements for the package.
Upgrade Considerations for PowerExchange 9.6.0 183
• Manually add the BIND statements for X029167 to the BIND member based on the sample statements in the P639029S member of the SAMPLIB library. Modify the PACKAGE, OWNER, and QUALIFIER values to match those that are specified for the other packages in the BIND member.
6. Run the XIDDB225 job to perform the binds.
7. Restart the DB2 ECCR.
Change in Default Character Conversion in Single-Byte Static Code Pages
The default for the EXT_CP_SUPPT statement in the DBMOVER configuration file has changed. In PowerExchange releases earlier than 9.6.0, the EXT_CP_SUPPT default is N. In PowerExchange 9.6.0 and later, the default is Y.
This statement controls whether PowerExchange converts certain characters from their EBCDIC to their corresponding ASCII values. The statement affects EBCDIC characters X'41', X'FF', and characters with a value of less than X'40' in single-byte static code pages.
If you need to retain the previous default method of mapping for particular EBCDIC values (for example, if you need to map EBCDIC X'FF' to ASCII X'FF'), Informatica recommends that you create a customized ICU code page.
Connection Sharing for DB2 LookupsPowerExchange 9.6.0 provides connection sharing for DB2 lookups. By default, all DB2 lookups in a workflow use the same connection, and the PowerExchange Listener performs them in a single task.
In PowerExchange releases earlier than 9.6.0, each DB2 lookup uses a separate connection. If you need to preserve this behavior in PowerExchange 9.6.0 or later, specify CONNSHARE=N in the PowerCenter PWX Override connection attribute.
Caution: If the DB2 connection is used as a target in a CDC workflow, do not change the default behavior. Otherwise, internal PowerCenter state tables that require connection sharing might not be updated correctly.
Note: DB2 lookups that share a connection do not use offload processing, partitioning, or threading.
PowerExchange Passphrases and Related Network Layer ChangesIn PowerExchange 9.6.0 and later, you can enter a valid PowerExchange passphrase for access to z/OS and i5/OS instead of a password. You can enter a passphrase in fields, commands, and parameters throughout the PowerExchange interfaces, including the PowerExchange Navigator, PowerExchange utilities, PowerExchange Logger pwxccl.cfg configuration file, pwxcmd and infacmd commands, PowerCenter, Informatica Developer tool, and Informatica Administrator tool. Passphrases provide enhanced security because they are longer and contain a wide range of allowable character types.
In support of longer passphrases, the PowerExchange network layer changed. The network header for data transmissions was split to accommodate much longer security credentials. The connection information was moved from the regular network header to a new PowerExchange Listener header. The connection information is now sent only once instead of in each network message, which reduces network overhead.
Important: Because of these network layer changes, all PowerExchange instances in your environment must be at version 9.6.0 or later, regardless of whether you are using passphrases. Also, if you use passphrases in MVS jobs, you can allocate a long partitioned data set (PDS) for storing passphrases. Ensure that the PDS has a record length that is long enough to store both passphrases and even longer encrypted passphrases. For example, use a record length of 320.
184 Appendix A: Upgrade Considerations
For information about using passphrases in the PowerExchange interfaces, see the PowerExchange Navigator User Guide, PowerExchange Interfaces for PowerCenter, PowerExchange Command Reference, PowerExchange Utilities Guide, Informatica Command Reference, Informatica Developer Tool Guide, and Informatica Administrator Guide.
Updated Components in the IMS Synchronous ECCR CRG.LOAD Library
If you upgrade to 9.6.0 from an earlier release that does not include patch P647646, the PowerExchange CRG.LOAD library for IMS synchronous CDC does not contain the latest available version of the BMC Software CHANGE RECORDING FACILITY and DATABASE INTEGRITY PLUS components.
If you use the CRG software, after you upgrade to 9.6.0, run the CRGUMOD or CRGCLINK job in the hlq.SAMPLIB library again to install DBRC modifications. Otherwise, events such as abends might cause change capture to fail in the DLIODDCx module when the IMS synchronous ECCR tries to capture changes for a source segment. After you run the CRGUMOD or CRGCLINK job, restart the IMS control region.
Important: If you have a supported version of the BMC Software CHANGE RECORDING FACILITY or DATABASE INTEGRITY PLUS product, use the BMC Software product instead of the CRG software. In this case, you do not need to run the CRGUMOD or CRGCLINK job. Ensure that the BMC Software product version matches or is later than the minimum BMC version that PowerExchange 9.6.0 supports for your IMS version. PowerExchange 9.6.0 does not support synchronous CDC with either the CRG software or BMC products for IMS 13.
Bind the DBRM Package for the DB2 for z/OS PlanIf you use DB2 for z/OS CDC and upgrade to PowerExchange 9.6.0 from an earlier version that does not include patch P639029, you must bind the DBRM package, X029167.
The XIDDB225 job, which runs as part of a normal upgrade process, uses the updated DB2BIND or DB2BINDB member that includes the bind statements for X029167. However, if you select the Upgrade by Using Existing Data Set Names option in the z/OS Installation Assistant, a previous DB2BIND member that does not include the bind statements for X029167 might be retained. In this case, run the SETDB2UE job in the staging RUNLIB library to use the latest DB2BIND member that includes the package bind statements.
Avoid PowerExchange Listener Hangs on z/OSOn z/OS, the PowerExchange Listener task might hang during shutdown processing. In this situation, all tasks that communicate with the Log Read API (LRAPI) end with abend code S13E/U0001.
To prevent this problem, before you upgrade to PowerExchange 9.6.0, shut down the PowerExchange change capture components, including the PowerExchange Agent, PowerExchange Logger for MVS, PowerExchange Condense, and the ECCRs. To shut down the PowerExchange Agent, you must use the DRAIN and SHUTDOWN COMPLETELY commands. Otherwise, various abends might occur when you restart the change capture components after the 9.6.0 upgrade.
Upgrade Considerations for PowerExchange 9.6.0 185
A p p e n d i x B
PowerExchange EnvironmentThis appendix includes the following topics:
• PowerExchange Environment Overview, 186
• PowerExchange Environment on i5/OS, 186
• PowerExchange Environment on Linux, UNIX, and Windows, 189
• PowerExchange Environment on z/OS, 192
PowerExchange Environment OverviewA PowerExchange environment includes the PowerExchange software and PowerExchange data files. PowerExchange data includes configuration data, PowerExchange data objects, and source data that PowerExchange processes.
Examples of PowerExchange data include the following:
• Configuration files
• License file
• Data maps
• Extraction maps
• Capture registrations
• PowerExchange Logger log files
• PowerExchange Condense condense files
The following sections provide detailed descriptions of the PowerExchange environment for each operating system. Use this information to:
• Plan a PowerExchange environment before performing a first-time installation
• Copy an existing PowerExchange environment when migrating to a new release
• Plan or implement a backup strategy
PowerExchange Environment on i5/OSThis section describes PowerExchange data libraries and data files on i5/OS and how to specify their location to PowerExchange. Use this information when planning which data files to copy, where to locate
186
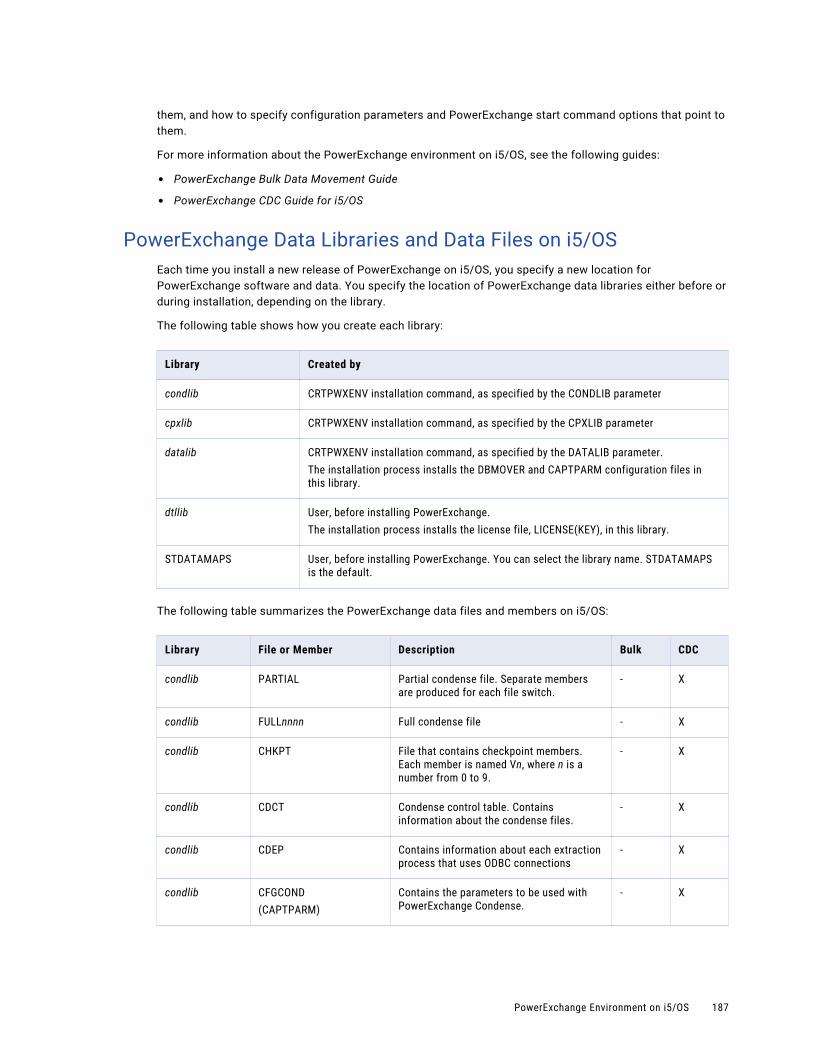
them, and how to specify configuration parameters and PowerExchange start command options that point to them.
For more information about the PowerExchange environment on i5/OS, see the following guides:
• PowerExchange Bulk Data Movement Guide
• PowerExchange CDC Guide for i5/OS
PowerExchange Data Libraries and Data Files on i5/OSEach time you install a new release of PowerExchange on i5/OS, you specify a new location for PowerExchange software and data. You specify the location of PowerExchange data libraries either before or during installation, depending on the library.
The following table shows how you create each library:
Library Created by
condlib CRTPWXENV installation command, as specified by the CONDLIB parameter
cpxlib CRTPWXENV installation command, as specified by the CPXLIB parameter
datalib CRTPWXENV installation command, as specified by the DATALIB parameter.The installation process installs the DBMOVER and CAPTPARM configuration files in this library.
dtllib User, before installing PowerExchange.The installation process installs the license file, LICENSE(KEY), in this library.
STDATAMAPS User, before installing PowerExchange. You can select the library name. STDATAMAPS is the default.
The following table summarizes the PowerExchange data files and members on i5/OS:
Library File or Member Description Bulk CDC
condlib PARTIAL Partial condense file. Separate members are produced for each file switch.
- X
condlib FULLnnnn Full condense file - X
condlib CHKPT File that contains checkpoint members. Each member is named Vn, where n is a number from 0 to 9.
- X
condlib CDCT Condense control table. Contains information about the condense files.
- X
condlib CDEP Contains information about each extraction process that uses ODBC connections
- X
condlib CFGCOND(CAPTPARM)
Contains the parameters to be used with PowerExchange Condense.
- X
PowerExchange Environment on i5/OS 187
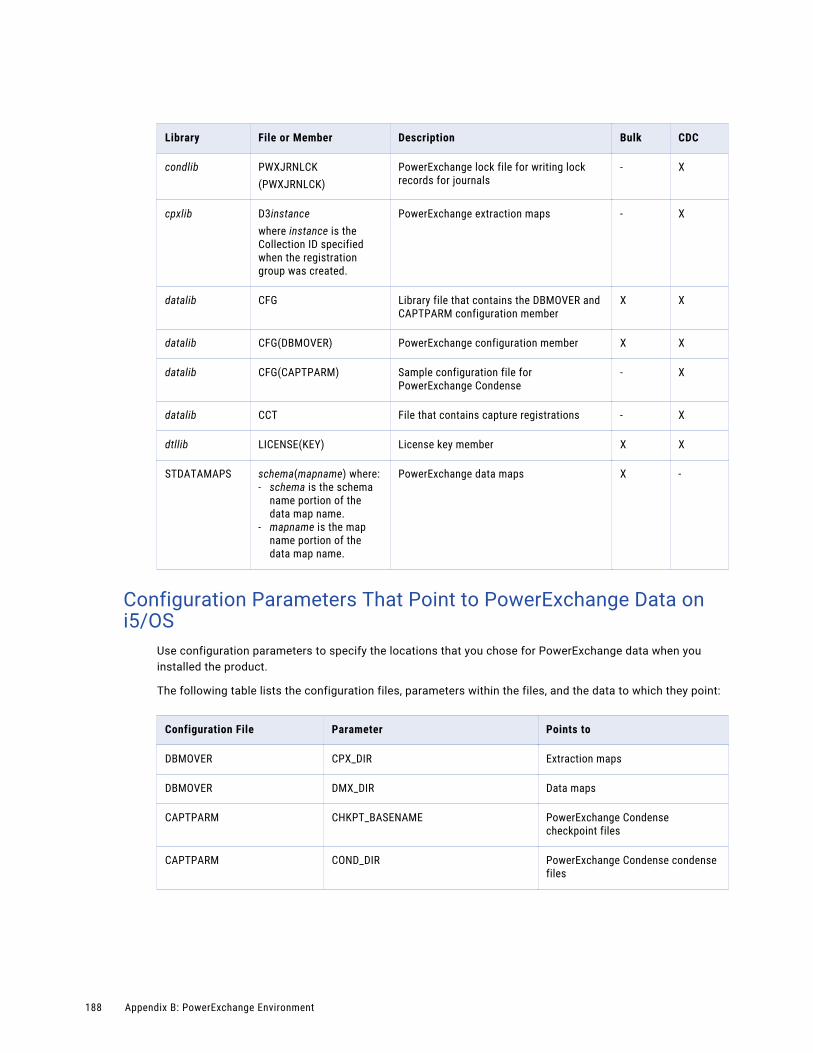
Library File or Member Description Bulk CDC
condlib PWXJRNLCK(PWXJRNLCK)
PowerExchange lock file for writing lock records for journals
- X
cpxlib D3instancewhere instance is the Collection ID specified when the registration group was created.
PowerExchange extraction maps - X
datalib CFG Library file that contains the DBMOVER and CAPTPARM configuration member
X X
datalib CFG(DBMOVER) PowerExchange configuration member X X
datalib CFG(CAPTPARM) Sample configuration file for PowerExchange Condense
- X
datalib CCT File that contains capture registrations - X
dtllib LICENSE(KEY) License key member X X
STDATAMAPS schema(mapname) where:- schema is the schema
name portion of the data map name.
- mapname is the map name portion of the data map name.
PowerExchange data maps X -
Configuration Parameters That Point to PowerExchange Data on i5/OS
Use configuration parameters to specify the locations that you chose for PowerExchange data when you installed the product.
The following table lists the configuration files, parameters within the files, and the data to which they point:
Configuration File Parameter Points to
DBMOVER CPX_DIR Extraction maps
DBMOVER DMX_DIR Data maps
CAPTPARM CHKPT_BASENAME PowerExchange Condense checkpoint files
CAPTPARM COND_DIR PowerExchange Condense condense files
188 Appendix B: PowerExchange Environment
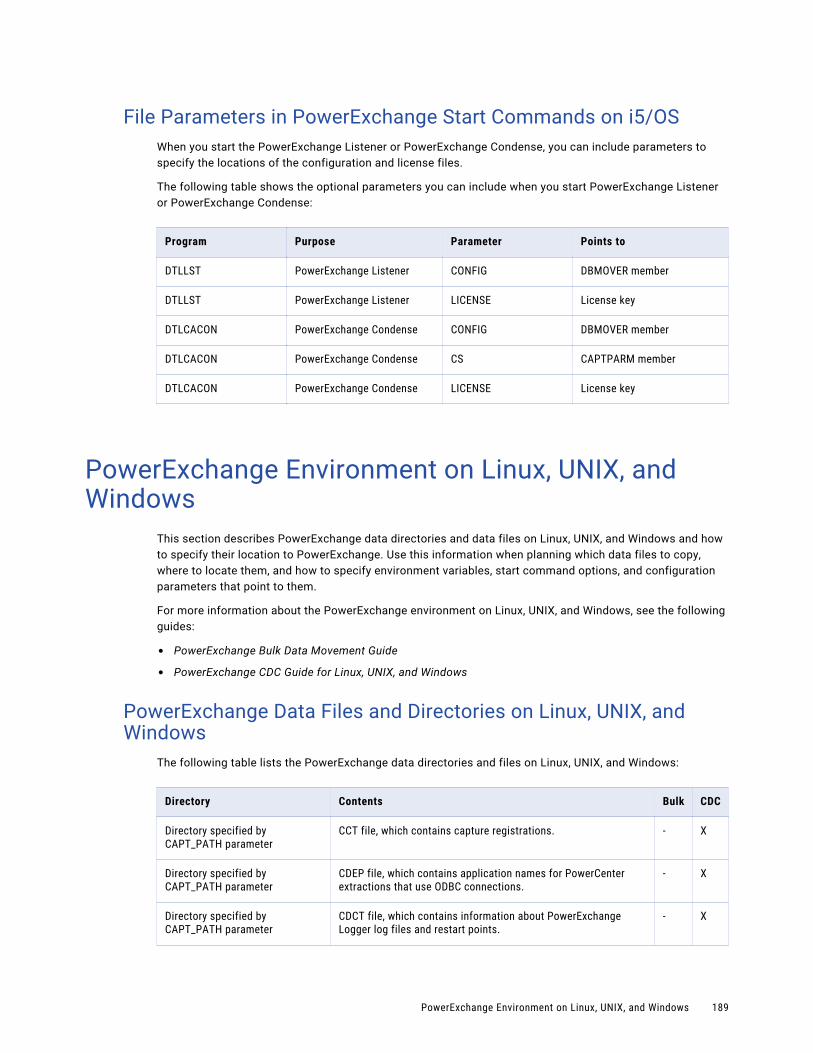
File Parameters in PowerExchange Start Commands on i5/OSWhen you start the PowerExchange Listener or PowerExchange Condense, you can include parameters to specify the locations of the configuration and license files.
The following table shows the optional parameters you can include when you start PowerExchange Listener or PowerExchange Condense:
Program Purpose Parameter Points to
DTLLST PowerExchange Listener CONFIG DBMOVER member
DTLLST PowerExchange Listener LICENSE License key
DTLCACON PowerExchange Condense CONFIG DBMOVER member
DTLCACON PowerExchange Condense CS CAPTPARM member
DTLCACON PowerExchange Condense LICENSE License key
PowerExchange Environment on Linux, UNIX, and Windows
This section describes PowerExchange data directories and data files on Linux, UNIX, and Windows and how to specify their location to PowerExchange. Use this information when planning which data files to copy, where to locate them, and how to specify environment variables, start command options, and configuration parameters that point to them.
For more information about the PowerExchange environment on Linux, UNIX, and Windows, see the following guides:
• PowerExchange Bulk Data Movement Guide
• PowerExchange CDC Guide for Linux, UNIX, and Windows
PowerExchange Data Files and Directories on Linux, UNIX, and Windows
The following table lists the PowerExchange data directories and files on Linux, UNIX, and Windows:
Directory Contents Bulk CDC
Directory specified by CAPT_PATH parameter
CCT file, which contains capture registrations. - X
Directory specified by CAPT_PATH parameter
CDEP file, which contains application names for PowerCenter extractions that use ODBC connections.
- X
Directory specified by CAPT_PATH parameter
CDCT file, which contains information about PowerExchange Logger log files and restart points.
- X
PowerExchange Environment on Linux, UNIX, and Windows 189
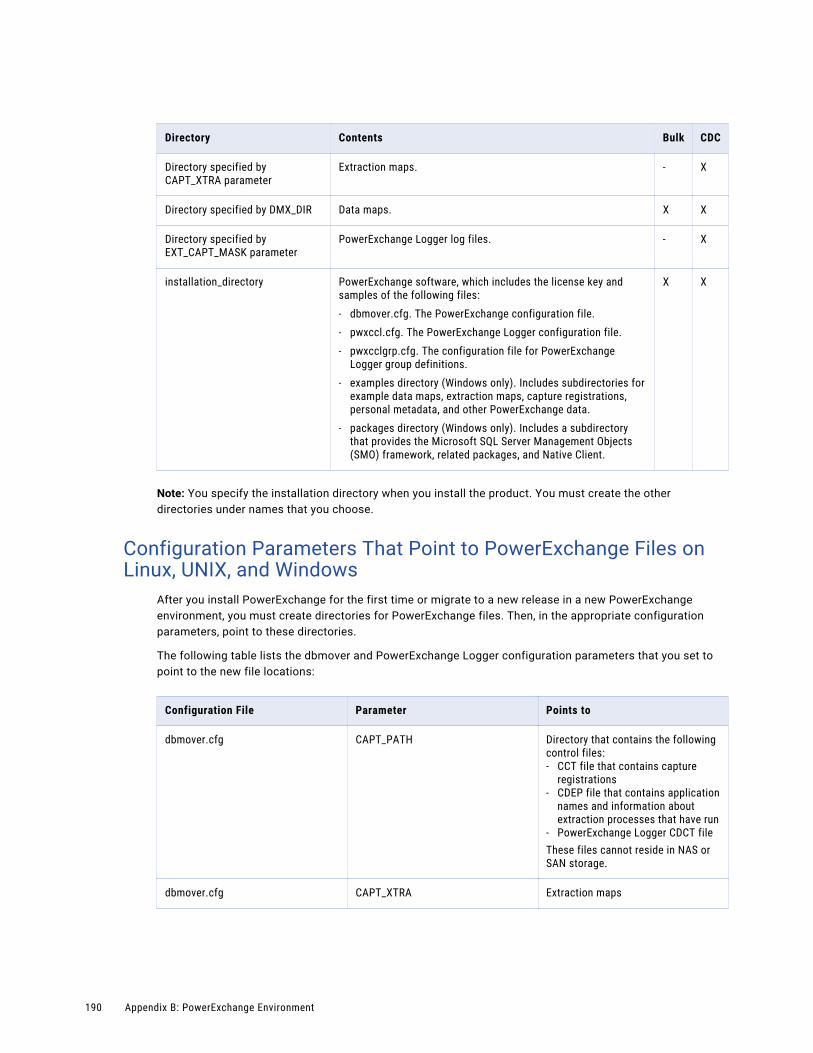
Directory Contents Bulk CDC
Directory specified by CAPT_XTRA parameter
Extraction maps. - X
Directory specified by DMX_DIR Data maps. X X
Directory specified by EXT_CAPT_MASK parameter
PowerExchange Logger log files. - X
installation_directory PowerExchange software, which includes the license key and samples of the following files:- dbmover.cfg. The PowerExchange configuration file.- pwxccl.cfg. The PowerExchange Logger configuration file.- pwxcclgrp.cfg. The configuration file for PowerExchange
Logger group definitions.- examples directory (Windows only). Includes subdirectories for
example data maps, extraction maps, capture registrations, personal metadata, and other PowerExchange data.
- packages directory (Windows only). Includes a subdirectory that provides the Microsoft SQL Server Management Objects (SMO) framework, related packages, and Native Client.
X X
Note: You specify the installation directory when you install the product. You must create the other directories under names that you choose.
Configuration Parameters That Point to PowerExchange Files on Linux, UNIX, and Windows
After you install PowerExchange for the first time or migrate to a new release in a new PowerExchange environment, you must create directories for PowerExchange files. Then, in the appropriate configuration parameters, point to these directories.
The following table lists the dbmover and PowerExchange Logger configuration parameters that you set to point to the new file locations:
Configuration File Parameter Points to
dbmover.cfg CAPT_PATH Directory that contains the following control files:- CCT file that contains capture
registrations- CDEP file that contains application
names and information about extraction processes that have run
- PowerExchange Logger CDCT fileThese files cannot reside in NAS or SAN storage.
dbmover.cfg CAPT_XTRA Extraction maps
190 Appendix B: PowerExchange Environment
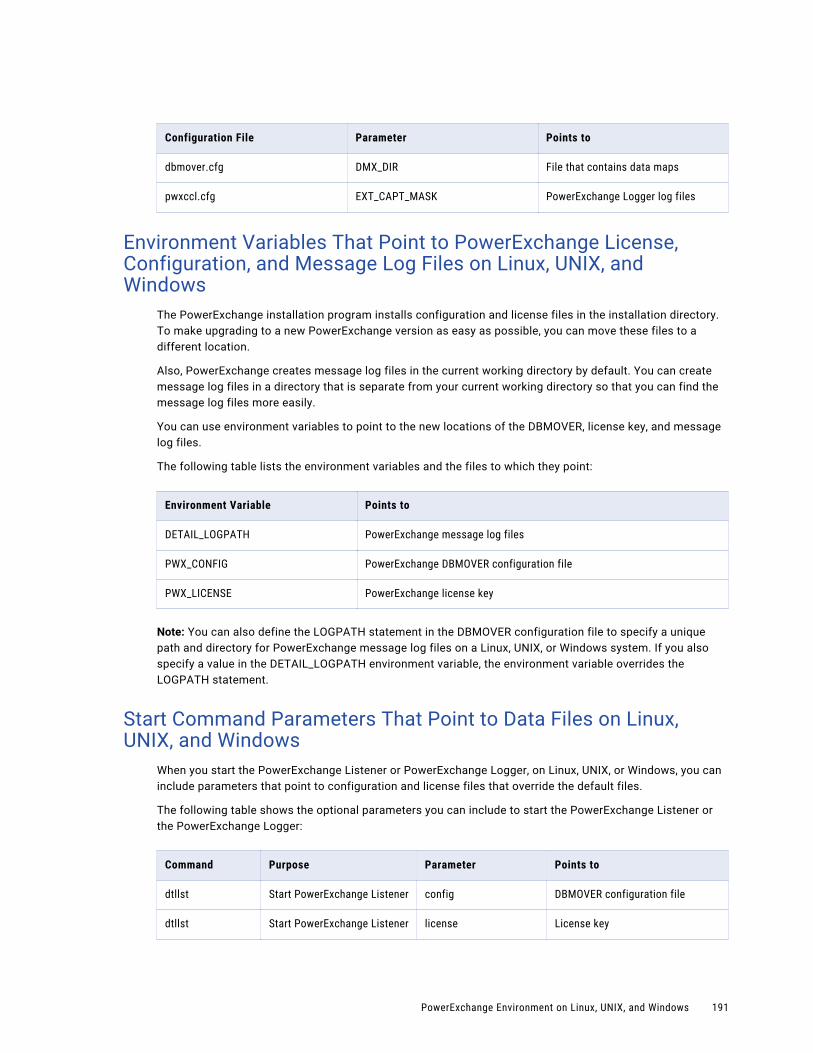
Configuration File Parameter Points to
dbmover.cfg DMX_DIR File that contains data maps
pwxccl.cfg EXT_CAPT_MASK PowerExchange Logger log files
Environment Variables That Point to PowerExchange License, Configuration, and Message Log Files on Linux, UNIX, and Windows
The PowerExchange installation program installs configuration and license files in the installation directory. To make upgrading to a new PowerExchange version as easy as possible, you can move these files to a different location.
Also, PowerExchange creates message log files in the current working directory by default. You can create message log files in a directory that is separate from your current working directory so that you can find the message log files more easily.
You can use environment variables to point to the new locations of the DBMOVER, license key, and message log files.
The following table lists the environment variables and the files to which they point:
Environment Variable Points to
DETAIL_LOGPATH PowerExchange message log files
PWX_CONFIG PowerExchange DBMOVER configuration file
PWX_LICENSE PowerExchange license key
Note: You can also define the LOGPATH statement in the DBMOVER configuration file to specify a unique path and directory for PowerExchange message log files on a Linux, UNIX, or Windows system. If you also specify a value in the DETAIL_LOGPATH environment variable, the environment variable overrides the LOGPATH statement.
Start Command Parameters That Point to Data Files on Linux, UNIX, and Windows
When you start the PowerExchange Listener or PowerExchange Logger, on Linux, UNIX, or Windows, you can include parameters that point to configuration and license files that override the default files.
The following table shows the optional parameters you can include to start the PowerExchange Listener or the PowerExchange Logger:
Command Purpose Parameter Points to
dtllst Start PowerExchange Listener config DBMOVER configuration file
dtllst Start PowerExchange Listener license License key
PowerExchange Environment on Linux, UNIX, and Windows 191
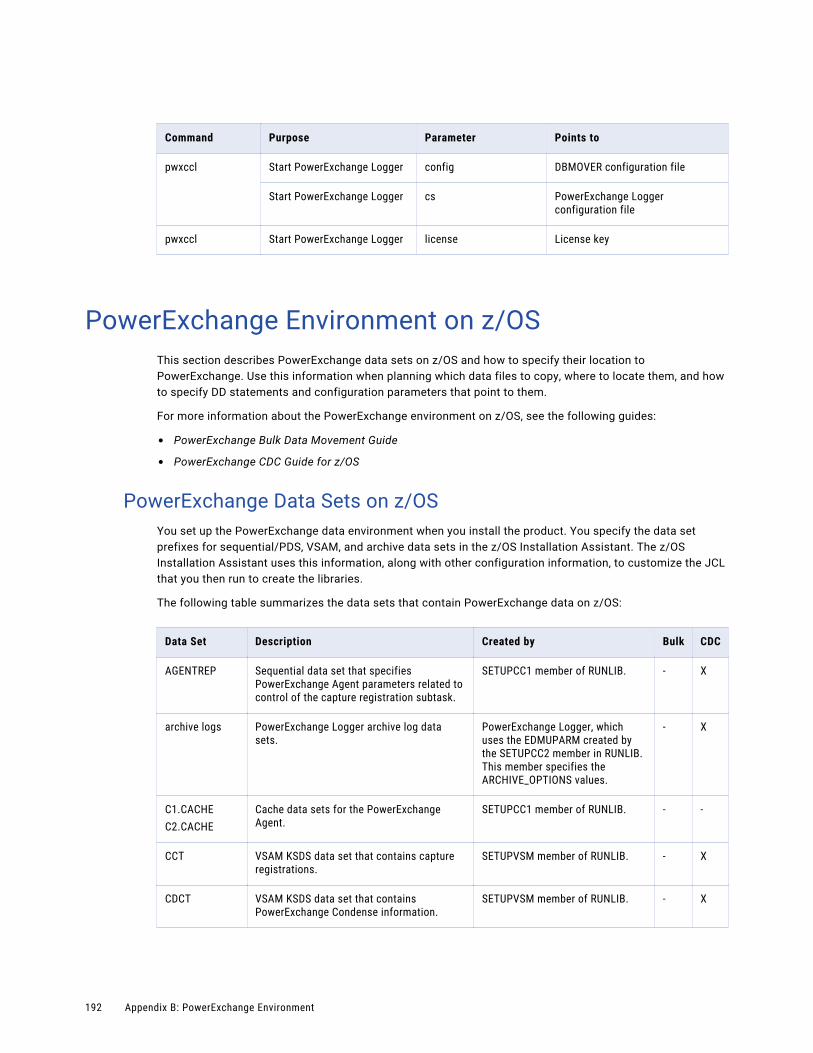
Command Purpose Parameter Points to
pwxccl Start PowerExchange Logger config DBMOVER configuration file
Start PowerExchange Logger cs PowerExchange Logger configuration file
pwxccl Start PowerExchange Logger license License key
PowerExchange Environment on z/OSThis section describes PowerExchange data sets on z/OS and how to specify their location to PowerExchange. Use this information when planning which data files to copy, where to locate them, and how to specify DD statements and configuration parameters that point to them.
For more information about the PowerExchange environment on z/OS, see the following guides:
• PowerExchange Bulk Data Movement Guide
• PowerExchange CDC Guide for z/OS
PowerExchange Data Sets on z/OSYou set up the PowerExchange data environment when you install the product. You specify the data set prefixes for sequential/PDS, VSAM, and archive data sets in the z/OS Installation Assistant. The z/OS Installation Assistant uses this information, along with other configuration information, to customize the JCL that you then run to create the libraries.
The following table summarizes the data sets that contain PowerExchange data on z/OS:
Data Set Description Created by Bulk CDC
AGENTREP Sequential data set that specifies PowerExchange Agent parameters related to control of the capture registration subtask.
SETUPCC1 member of RUNLIB. - X
archive logs PowerExchange Logger archive log data sets.
PowerExchange Logger, which uses the EDMUPARM created by the SETUPCC2 member in RUNLIB. This member specifies the ARCHIVE_OPTIONS values.
- X
C1.CACHEC2.CACHE
Cache data sets for the PowerExchange Agent.
SETUPCC1 member of RUNLIB. - -
CCT VSAM KSDS data set that contains capture registrations.
SETUPVSM member of RUNLIB. - X
CDCT VSAM KSDS data set that contains PowerExchange Condense information.
SETUPVSM member of RUNLIB. - X
192 Appendix B: PowerExchange Environment
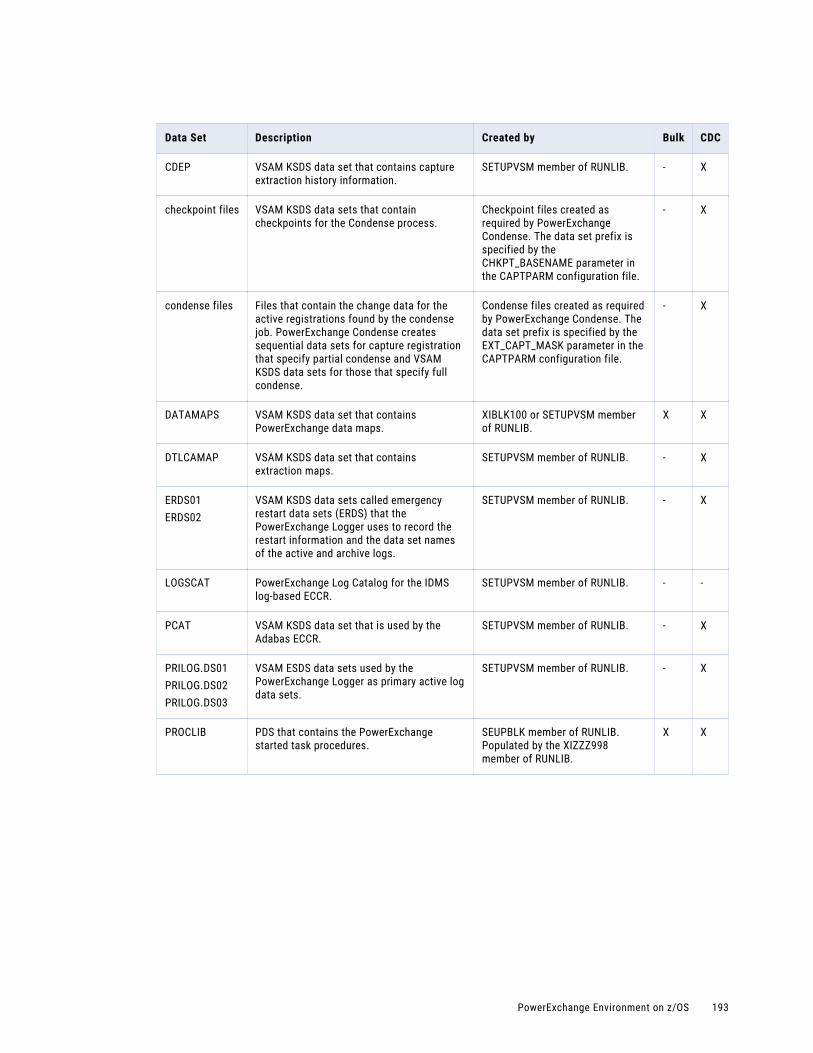
Data Set Description Created by Bulk CDC
CDEP VSAM KSDS data set that contains capture extraction history information.
SETUPVSM member of RUNLIB. - X
checkpoint files VSAM KSDS data sets that contain checkpoints for the Condense process.
Checkpoint files created as required by PowerExchange Condense. The data set prefix is specified by the CHKPT_BASENAME parameter in the CAPTPARM configuration file.
- X
condense files Files that contain the change data for the active registrations found by the condense job. PowerExchange Condense creates sequential data sets for capture registration that specify partial condense and VSAM KSDS data sets for those that specify full condense.
Condense files created as required by PowerExchange Condense. The data set prefix is specified by the EXT_CAPT_MASK parameter in the CAPTPARM configuration file.
- X
DATAMAPS VSAM KSDS data set that contains PowerExchange data maps.
XIBLK100 or SETUPVSM member of RUNLIB.
X X
DTLCAMAP VSAM KSDS data set that contains extraction maps.
SETUPVSM member of RUNLIB. - X
ERDS01ERDS02
VSAM KSDS data sets called emergency restart data sets (ERDS) that the PowerExchange Logger uses to record the restart information and the data set names of the active and archive logs.
SETUPVSM member of RUNLIB. - X
LOGSCAT PowerExchange Log Catalog for the IDMS log-based ECCR.
SETUPVSM member of RUNLIB. - -
PCAT VSAM KSDS data set that is used by the Adabas ECCR.
SETUPVSM member of RUNLIB. - X
PRILOG.DS01PRILOG.DS02PRILOG.DS03
VSAM ESDS data sets used by the PowerExchange Logger as primary active log data sets.
SETUPVSM member of RUNLIB. - X
PROCLIB PDS that contains the PowerExchange started task procedures.
SEUPBLK member of RUNLIB. Populated by the XIZZZ998 member of RUNLIB.
X X
PowerExchange Environment on z/OS 193

Data Set Description Created by Bulk CDC
RUNLIB PDS that contains the jobs to install PowerExchange, jobs to set up and run PowerExchange, and the following configuration and license members:- AGENTCTL. Contains PowerExchange
Agent configuration parameters.- CAPTxxxx. Contains sample
PowerExchange Condense CAPTPARM parameters for the data source.
- DBMOVER. Contains PowerExchange configuration parameters.
- LICENSE. License key member.
Allocated by the user before installing the product. Populated by the z/OS Installation Assistant.
X X
SECLOG.DS01SECLOG.DS02SECLOG.DS03
VSAM ESDS data sets used by the PowerExchange Logger as secondary active log data sets.
SETUPVSM member of RUNLIB. Dual active logging is specified in the EDMUPARM that is created by the SETUPCC2 member of RUNLIB.
- X
SR2TOTAL If IDMS log-based CDC is selected, a sequential data set that contains IDMS CDC information.
SETUPCC1 member of RUNLIB. Populated by the DTLUCSR2 utility.
- X
SR2OUT If IDMS log-based CDC is selected, a sequential data set that contains SR2/SR3 link information for IDMS databases registered for capture.
SETUPCC1 member of RUNLIB. Populated by the DTLUCSR2 utility.
- X
USERLIB Load library that contains control parameters for PowerExchange CDC, including the following members:- EDMSDIR. Contains configuration
parameters for PowerExchange CDC.- EDMUPARM. Contains configuration
parameters for the PowerExchange Logger.
SETUPCC1 member of RUNLIB. Populated by the SETUPCC2 and XICDC600 members of RUNLIB.
- X
DD Statements That Point to PowerExchange Data on z/OSThe JCL for PowerExchange components includes DD statements that point to PowerExchange data.
The following table lists the DD statements, the components for which the JCL includes the statement, and the data set or member to which the DD statement points:
DD Statement PowerExchange Component Points to
DTLCACDC PowerExchange Condense, PowerExchange Listener
CDCT data set
DTLCACDE PowerExchange Condense, PowerExchange Listener
CDEP data set
DTLADKSD Adabas ECCR PCAT data set
194 Appendix B: PowerExchange Environment
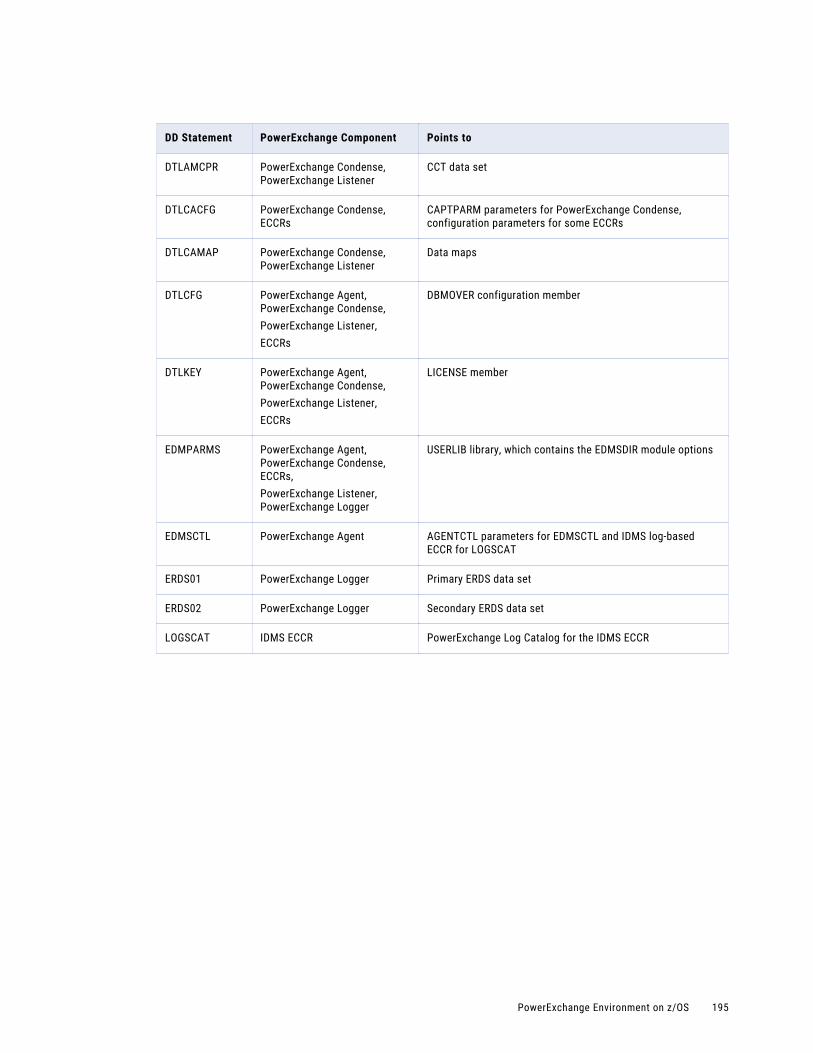
DD Statement PowerExchange Component Points to
DTLAMCPR PowerExchange Condense, PowerExchange Listener
CCT data set
DTLCACFG PowerExchange Condense, ECCRs
CAPTPARM parameters for PowerExchange Condense, configuration parameters for some ECCRs
DTLCAMAP PowerExchange Condense, PowerExchange Listener
Data maps
DTLCFG PowerExchange Agent, PowerExchange Condense,PowerExchange Listener,ECCRs
DBMOVER configuration member
DTLKEY PowerExchange Agent, PowerExchange Condense,PowerExchange Listener,ECCRs
LICENSE member
EDMPARMS PowerExchange Agent, PowerExchange Condense, ECCRs,PowerExchange Listener, PowerExchange Logger
USERLIB library, which contains the EDMSDIR module options
EDMSCTL PowerExchange Agent AGENTCTL parameters for EDMSCTL and IDMS log-based ECCR for LOGSCAT
ERDS01 PowerExchange Logger Primary ERDS data set
ERDS02 PowerExchange Logger Secondary ERDS data set
LOGSCAT IDMS ECCR PowerExchange Log Catalog for the IDMS ECCR
PowerExchange Environment on z/OS 195
I n d e x
A*ALLOBJ authority (i5/OS) 45Adabas
maintenance requirements 25Adabas Parameters page
z/OS Installation Assistant 145adding
PowerExchange LOADLIB library to APF list 103, 121AIX
supported data sources 19supported versions 19
APF list adding PowerExchange LOADLIB library to 103, 121
authorizing users i5/OS 52
BBINLIB library
full installation 93hotfix 129upgrade 111
BKUPDSUE job to back up data sets 121
BKUPDSUN job to back up data sets 120
bulk data movement libraries installing 120
CCCT library 90, 192CDC Common Parameters page
z/OS Installation Assistant 143CDC sessions
establishing restart points 172CDCT library 90, 192CDEP library 90, 192changing object ownership (i5/OS) 51code pages, UNIX 65configuration files
i5/OS 188Linux, UNIX, and Windows 191
configuration parameters i5/OS 188Linux, UNIX, and Windows 190
Create Runlib JCL page z/OS Installation Assistant 157
creating a library save file (i5/OS) 47creating Relational Database Directory Entry 52CRTPWXENV command (i5/OS) 48
DData Set Group Details page
z/OS Installation Assistant 136, 164, 166, 170Data Set Sources page
z/OS Installation Assistant 142data source requirements 18data, PowerExchange 186Datacom Parameters page
z/OS Installation Assistant 147DATAMAPS library 90, 192DB2 CDC Parameters page
z/OS Installation Assistant 150DB2 for z/OS
maintenance requirements 26PowerExchange Agent expanded buffer size for DB2 for z/OS ECCR requests 182
DB2 for z/OS ECCR upgrading to 9.6.1 HotFix 3 180
DB2 Parameters page z/OS Installation Assistant 148
DBRM library 90DBRMLIB library 90DD statements 194disk space requirements
Windows 76DS01 VSAM data set 90, 192DTLCAMAP library 90, 192DTLDATA library 90DTLDEMO library 90DTLEXPL library 90DTLINFO job
z/OS 133dtlinfo utility, UNIX 73dtlinfo.exe
Windows 84DTLLOG library 90DTLMSG library 90
Eediting
JOBCARD member in RUNLIB library 102, 120environment variables
LD_LIBRARY_PATH, UNIX 65LIBPATH, UNIX 65Linux, UNIX, and Windows 191Path (Windows) 79PATH, UNIX 65PWX_HOME, UNIX 65SHLIB_PATH, UNIX 65
environment, PowerExchange 186existing data set names
upgrading z/OS with 115
196
FFTP binary file (i5/OS) 47Full Install page
z/OS Installation Assistant 134full installation
PowerExchange for z/OS 88PowerExchange on z/OS 88, 89z/OS Installation Assistant 94
GGeneral Parameters page
z/OS Installation Assistant 139Global Parameters page
z/OS Installation Assistant 134Global Parameters page (hotfix)
z/OS Installation Assistant 169Global Parameters page (upgrade with existing data set names)
z/OS Installation Assistant 162Global Parameters page (upgrade with new data set names)
z/OS Installation Assistant 163
Hhotfix
installing to PowerExchange on z/OS 127HotFix Install page
z/OS Installation Assistant 168hotfix installation
PowerExchange on z/OS 127z/OS Installation Assistant 130
HP-UX supported versions and data sources 19
Ii5/OS
*ALLOBJ authority 45*SECADM authority 45authorizing users 52changing object ownership 51creating a library save file 47creating Relational Database Directory Entry 52creating the PowerExchange library 47CRTPWXENV command 48IASP 48license key file 48PowerExchange environment 186QSECOFR authority 45restoring the installation library 48setting the IASP group for PowerExchange libraries 46supported data sources 18supported versions 18testing the installation 52
IASP (i5/OS) 48IDMS CDC Parameters page
z/OS Installation Assistant 153IDMS Parameters page
z/OS Installation Assistant 152Import Existing Parameters page
z/OS Installation Assistant 161IMS
maintenance requirements 27
IMS CDC Parameters page z/OS Installation Assistant 155
IMS Parameters page z/OS Installation Assistant 154
IMS synchronous CDC CRG.LOAD library 174, 175, 177latest BMC Software components for 9.6.0 CRG.LOAD library 185latest BMC Software components for 9.6.1 CRG.LOAD library 182
Independent Auxiliary Storage Pool (IASP) 48Informatica services
interoperability with PowerExchange 33installing PowerExchange
i5/OS 44Linux 60UNIX 60Windows 76
JJOBCARD member
in RUNLIB library 102, 120
LLD_LIBRARY_PATH environment variable, UNIX 65LIBPATH environment variable, UNIX 65libraries (z/OS)
BINLIB 93, 111, 129CCT 90, 192CDCT 90, 192CDEP 90, 192DATAMAPS 90, 192DBRM 90DBRMLIB 90DTLCAMAP 90, 192DTLDATA 90DTLDEMO 90DTLEXPL 90DTLLOG 90DTLMSG 90ERDS01 90ERDS02 90LOAD 90LOADCRG 90LOADLIB 90PRILOG 90, 192PROCLIB 90, 192RUNLIB 93, 111, 129SAMPLIB 90SECLOG 90, 192SR2OUT 90SR2TOTAL 90SRCLIB 90USERLIB 90, 192
library save file (i5/OS) 47license file
i5/OS 187Linux, UNIX, and Windows 191z/OS 192
license key 31license key file (i5/OS) 48Linux
PowerExchange environment 189supported data sources 20, 21supported versions 20, 21
LOAD library 90
Index 197
LOADCRG library 90LOADLIB library 90log file
Linux, UNIX, and Windows 191LOGGERNAME library 90
Mmaintenance requirements
Adabas 25DB2 for z/OS 26IMS 27Oracle 23z/OS 25
MQ Series Parameters page z/OS Installation Assistant 156
MySQL CDC configuring MySQL for CDC 66
Nnetwork layer changes
PowerExchange 9.6.0 upgrade considerations 184new data set names
upgrading z/OS with 118
OODBC driver 79operating system requirements 18Oracle
environment variables 65maintenance requirements 23
Ppassphrases
PowerExchange 9.6.0 upgrade considerations 184Path environment variable
verifying on Windows 79PATH environment variable, UNIX 65PowerCenter
interoperability with PowerExchange 32upgrading 172
PowerExchange authorizing users on i5/OS 52environment 186installing ODBC drivers 79installing on i5/OS 44installing on Linux 60installing on UNIX 60installing on Windows 76overview 13uninstalling on Windows 85upgrading 36using multiple versions 34
PowerExchange 10.0 upgrade considerations 176
PowerExchange 10.1 upgrade considerations 176
PowerExchange 10.2 upgrade considerations 175
PowerExchange 10.2 HotFix 1 upgrade considerations 174
PowerExchange 10.2 HotFix 2 upgrade considerations 174
PowerExchange 9.6.0 upgrade considerations 183
PowerExchange 9.6.0 upgrade considerations DB2 for z/OS CDC configuration tasks 183passphrases and network layer changes 184
PowerExchange 9.6.1 upgrade considerations 179
PowerExchange Agent expanded buffer for DB2 for z/OS ECCR requests 182upgrade consideration for 9.6.1 HotFix 1 182
PowerExchange components PowerExchange Agent 13, 15PowerExchange ECCR 14PowerExchange Listener 14PowerExchange Logger for Linux, UNIX, and Windows 15PowerExchange Logger for z/OS 15PowerExchange Navigator 15
PowerExchange for z/OS full installation 88installation overview 87upgrade 108
PowerExchange LOADLIB library adding to APF list 103, 121
PowerExchange Navigator supported Windows versions 23
PowerExchange on z/OS full installation 89hotfix installation 127installing hotfixes 127prerequisite tasks 88
preparing z/OS components on Windows 94, 112, 130
prerequisite tasks for full installation of PowerExchange on z/OS 88
PRILOG library 90, 192PROCLIB library 90, 192PWX_HOME environment variable
UNIX 65
QQSECOFR authority (i5/OS) 45
RRACF profiles, MVS security 87Relational Database Directory Entry
creating 52requirements
data sources 18operating system 18
restarting CDC sessions 172restoring the installation library (i5/OS) 48Review Parameters page
z/OS Installation Assistant 161RUNLIB library
editing JOBCARD member in 102, 120full installation 93hotfix 129upgrade 111
running SETUPCC2 job 106
198 Index
S*SECADM authority (i5/OS) 45SAMPLIB library 90SECLOG library 90, 192security, MVS 87Select Backup Data Sets page
z/OS Installation Assistant 168SETUBL1E job
to install bulk data movement libraries 120SETUBL1N job
to install bulk data movement libraries 120SETUCC1E job
to allocate data sets for CDC 121SETUCC1N job
to allocate data sets for CDC 121SETUPBLK JCL job
submitting 102SETUPCC2 job
active log data set definition 106PowerExchange Logger EDMUPARM creation 106running 106
SHLIB_PATH environment variable, UNIX 65Solaris
supported data sources 20supported versions 20
SR2OUT library 90SR2TOTAL library 90SRCLIB library 90start commands
i5/OS 189Linux, UNIX, and Windows 191
submitting SETUPBLK JCL 102
supported data sources AIX 19HP-UX 19i5/OS 18Linux 20, 21Solaris 20Windows 22z/OS 24
supported versions AIX 19HP-UX 19i5/OS 18Linux 19–21Solaris 20UNIX 19Windows 19, 22z/OS 24
TTAR file
transferring to UNIX 63, 72testing the installation
i5/OS 52UNIX 68Windows 80z/OS 133
Transfer Files to Mainframe page z/OS Installation Assistant 158
transferring the TAR file UNIX 63, 72
UUDB
environment variables 65UNIX
PowerExchange environment 189supported versions 19
UNIX installation code pages 65
upgrade scenarios 37z/OS Installation Assistant 112
Upgrade to a New Release page z/OS Installation Assistant 160
upgrading planning 36PowerExchange for z/OS 108
VView File Transfer Status page
z/OS Installation Assistant 160VSAM data sets 90, 192VSAM Parameters page
z/OS Installation Assistant 157
WWindows
disk space requirements 76environment variables 79PowerExchange environment 189preparing z/OS components on 94, 112, 130supported data sources 22supported versions 19, 22supported versions for PowerExchange Navigator 23
Windows installation overview 75
Zz/OS
maintenance requirements 25PowerExchange environment 192security 87supported data sources 24supported versions 24
z/OS Installation Assistant Adabas Parameters page 145CDC Common Parameters page 143Create Runlib JCL page 157Data Set Group Details page 136, 164, 166, 170Data Set Names page (upgrade with new data set names) 163Data Sources page 142Datacom Parameters page 147DB2 CDC Parameters page 150DB2 Parameters page 148Full Install page 134full installation 94General Parameters page 139Global Parameters page 134Global Parameters page (hotfix) 169Global Parameters page (upgrade with existing data set names) 162HotFix Install page 168hotfix installation 130
Index 199
z/OS Installation Assistant (continued)IDMS CDC Parameters page 153IDMS Parameters page 152Import Existing Parameters page 161IMS CDC Parameters page 155IMS Parameters page 154MQ Series Parameters page 156reference 134
z/OS Installation Assistant (continued)Review Parameters page 161Select Backup Data Sets Page 168Transfer Files to Mainframe page 158upgrade 112Upgrade to a New Release page 160View File Transfer Status page 160VSAM Parameters page 157
200 Index