Embed Size (px)
Citation preview
[Type the document title]
Polycom Document Title 1
8.1.0 | December 2013 | 3725-72102-001H
Getting Started Guide
Polycom® RealPresence®
Resource Manager System, Virtual Edition
© 2013 Polycom, Inc. All rights reserved.
Polycom, Inc. 6001 America Center Drive San Jose CA 95002 USA
No part of this document may be reproduced or transmitted in any form or by any means, electronic or mechanical, for any purpose, without the express written permission of Polycom, Inc. Under the law, reproducing includes translating into another language or format.
As between the parties, Polycom, Inc., retains title to and ownership of all proprietary rights with respect to the software contained within its products. The software is protected by United States copyright laws and international treaty provision. Therefore, you must treat the software like any other copyrighted material (e.g., a book or sound recording).
Every effort has been made to ensure that the information in this manual is accurate. Polycom, Inc., is not responsible for printing or clerical errors. Information in this document is subject to change without notice.
Trademark Information
POLYCOM® and the names and marks associated with Polycom's products are trademarks and/or service marks of Polycom, Inc., and are registered and/or common law marks in the United States and various other countries.
All other trademarks are the property of their respective owners.
Java is a registered trademark of Oracle America, Inc., and/or its affiliates.
Patent Information The accompanying product may be protected by one or more U.S. and foreign patents and/or pending patent applications held by Polycom, Inc.
End User License Agreement Use of this software constitutes acceptance of the terms and conditions of the Polycom <Secondary Product Name> Resource Manager system end-user license agreement (EULA).
The EULA for this product is available on the Polycom Support page for the product.
Polycom, Inc. i
Contents
About This Guide . . . . . . . . . . . . . . . . . . . . . . . . . . . . . . . . . . . . . . . . . . . . . . . . . . . 1
Polycom® RealPresence® Resource Manager System Server Setup . . . . . . . . . . 2Supported Environment . . . . . . . . . . . . . . . . . . . . . . . . . . . . . . . . . . . . . . . . . . . . . . . . . . . . . . . 2
Installation Prerequisites . . . . . . . . . . . . . . . . . . . . . . . . . . . . . . . . . . . . . . . . . . . . . . . . . . . . . . 2
Capacity Planning Guidance . . . . . . . . . . . . . . . . . . . . . . . . . . . . . . . . . . . . . . . . . . . . . . . . . . . 3
Install the RealPresence Resource Manager System . . . . . . . . . . . . . . . . . . . . . . . . . . . . . . . . 3
Manual Configuration of a Static IP Address . . . . . . . . . . . . . . . . . . . . . . . . . . . . . . . . . . . 3
Complete the First Time Setup Worksheet . . . . . . . . . . . . . . . . . . . . . . . . . . . . . . . . . . . . . . . . 4
Set up DNS Host and Service Records . . . . . . . . . . . . . . . . . . . . . . . . . . . . . . . . . . . . . . . . . . . 6
DNS Host Record . . . . . . . . . . . . . . . . . . . . . . . . . . . . . . . . . . . . . . . . . . . . . . . . . . . . . . . . 6
Request Certificates . . . . . . . . . . . . . . . . . . . . . . . . . . . . . . . . . . . . . . . . . . . . . . . . . . . . . . . . . 7
Pre-stage a Computer Account . . . . . . . . . . . . . . . . . . . . . . . . . . . . . . . . . . . . . . . . . . . . . . . . . 7
Prepare Client Systems . . . . . . . . . . . . . . . . . . . . . . . . . . . . . . . . . . . . . . . . . . . . . . . . . . . . . . . 8
Connect to the RealPresence Resource Manager System Server . . . . . . . . . . . . . . . . . . . . . . 8
Polycom® RealPresence® Resource Manager System Software Setup . . . . . . . . 9Complete the First Time Setup Wizard . . . . . . . . . . . . . . . . . . . . . . . . . . . . . . . . . . . . . . . . . . . 9
Complete the System Configuration . . . . . . . . . . . . . . . . . . . . . . . . . . . . . . . . . . . . . . . . . . . . 13
Polycom, Inc. 1
About This Guide
This guide provides the first time setup information you need to configure a Polycom® RealPresence® Resource Manager system, Virtual Edition. Once you’ve completed first time setup, see Chapter 2 of the Polycom RealPresence Resource Manager System Operations Guide for additional configuration and customization tasks you can perform.
Documentation Resources
In addition to this guide, the available documentation that describes the RealPresence Resource Manager system includes:
● Polycom RealPresence Resource Manager System Release Notes
Provides the information users need to know about the specific release of the system you’re implementing.
● Polycom RealPresence Resource Manager System Operations Guide
Provides more detailed and specialized configuration, operation, and administration information users needs to know when using the RealPresence Resource Manager system.
● Polycom RealPresence Resource Manager System Web Scheduling Guide
Gives schedulers detailed information on scheduling and monitoring conferences.
The RealPresence Resource Manager system also has online help available through the user interface.
Assumptions
This guide is written for a technical audience. You will be configuring system networking, and certificates as well as integrating with a time server, and directory server.
This guide assumes that you are starting with a RealPresence Resource Manager system that has never been previously configured.
The Polycom RealPresence UC solution, when deployed according to the guidance in the Polycom RealPresence Resource Manager System Deployment Guide for Maximum Security Environments document (and those referenced by it) meets the U.S. Department of Defense security and interoperability requirements for listing on the US Department of Defense (DoD) Unified Capabilities (UC) Approve Products List (APL) as maintained by the Defense Information Systems Agency (DISA) Unified Capabilities Connection Office (UCCO).
For more information about the UC APL process please visit the UCCO website.
Polycom, Inc. 2
Polycom® RealPresence® Resource Manager System Server Setup
The sections that follow describe the steps required to perform the initial installation and setup of a Polycom® RealPresence® Resource Manager system including:
● Supported Environment on page 2
● Installation Prerequisites on page 2
● Capacity Planning Guidance on page 3
● Install the RealPresence Resource Manager System on page 3
● Complete the First Time Setup Worksheet on page 4
● Set up DNS Host and Service Records on page 6
● Request Certificates on page 7
● Pre-stage a Computer Account on page 7
● Prepare Client Systems on page 8
● Connect to the RealPresence Resource Manager System Server on page 8
Supported EnvironmentThe RealPresence Resource Manager system is supported on VMware vSphere 5.1.
To install and configure the RealPresence Resource Manager system, you’ll need a computer with the following software installed:
● VMware vSphere 5.0 or 5.1 client installed where you can access the ESXi host.
● Microsoft Internet Explorer® v8 or v9
● Adobe® Flash® 9.0.124 or newer
Installation PrerequisitesYou will need the following information in order to install the RealPresence Resource Manager system, Virtual Edition in your VMware environment.
● Login credentials and IP addresses of VMware® ESXi host that will host the RealPresence Resource Manager virtual machine.
Deployment Guide For Maximum Security Environments
Polycom, Inc. 3
● If your network environment includes a DHCP server, Polycom recommends that you reserve a static IP address on your DHCP server before you install the RealPresence Resource Manager system.
● Ensure that your ESXi host machine has the capacity for your planned RealPresence Resource Manager system deployment, see Capacity Planning Guidance on page 3.
● Review the Polycom RealPresence Resource Manager System Release Notes.
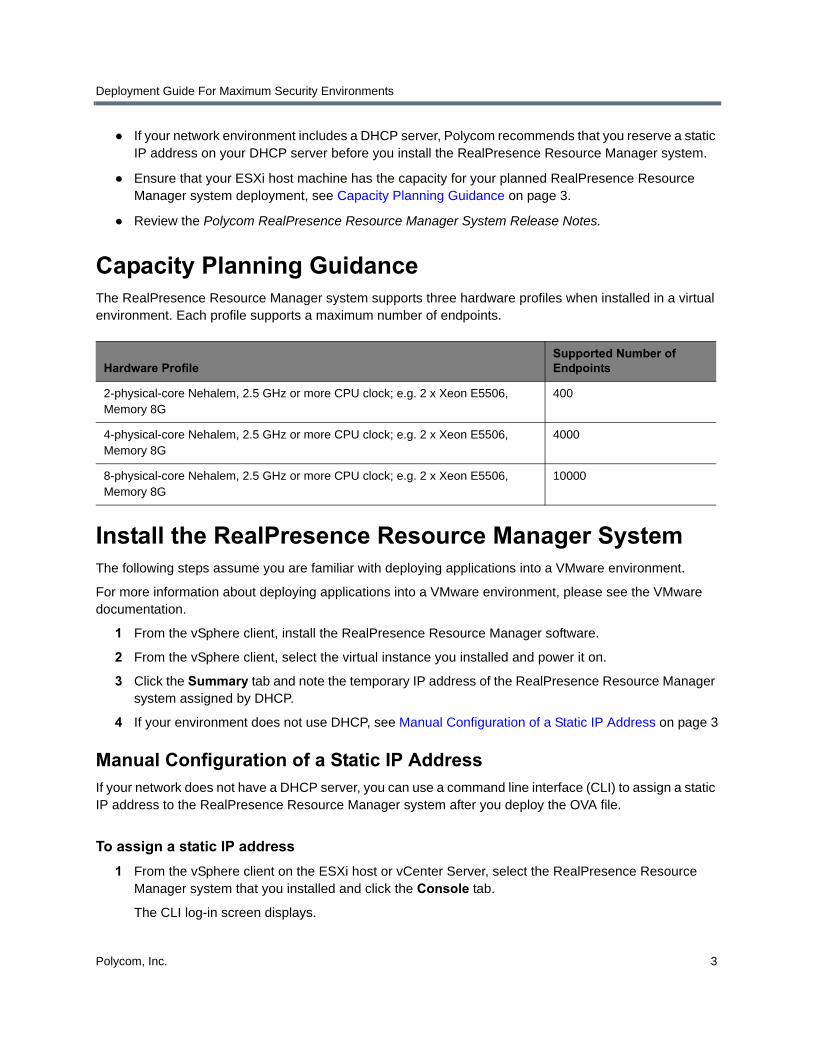
Capacity Planning GuidanceThe RealPresence Resource Manager system supports three hardware profiles when installed in a virtual environment. Each profile supports a maximum number of endpoints.
Install the RealPresence Resource Manager SystemThe following steps assume you are familiar with deploying applications into a VMware environment.
For more information about deploying applications into a VMware environment, please see the VMware documentation.
1 From the vSphere client, install the RealPresence Resource Manager software.
2 From the vSphere client, select the virtual instance you installed and power it on.
3 Click the Summary tab and note the temporary IP address of the RealPresence Resource Manager system assigned by DHCP.
4 If your environment does not use DHCP, see Manual Configuration of a Static IP Address on page 3
Manual Configuration of a Static IP AddressIf your network does not have a DHCP server, you can use a command line interface (CLI) to assign a static IP address to the RealPresence Resource Manager system after you deploy the OVA file.
To assign a static IP address
1 From the vSphere client on the ESXi host or vCenter Server, select the RealPresence Resource Manager system that you installed and click the Console tab.
The CLI log-in screen displays.
Hardware ProfileSupported Number of Endpoints
2-physical-core Nehalem, 2.5 GHz or more CPU clock; e.g. 2 x Xeon E5506, Memory 8G
400
4-physical-core Nehalem, 2.5 GHz or more CPU clock; e.g. 2 x Xeon E5506, Memory 8G
4000
8-physical-core Nehalem, 2.5 GHz or more CPU clock; e.g. 2 x Xeon E5506, Memory 8G
10000

Deployment Guide For Maximum Security Environments
Polycom, Inc. 4
2 Log in with the following credentials:
User ID: polycom
Password: polycom
The command line interface displays.
3 Select Management network setup, then OK.
4 Select eth0, then OK.
5 Select Static address setup.
The RealPresence Resource Manager system does not support the Static route setup or Set DHCP on menu options.
6 Enter the IP address, Subnet mask, and Default gateway.
7 Select Save configuration.
Network services restart.
Complete the First Time Setup WorksheetBefore you begin system setup, fill out the My System Values column of this worksheet.
ItemMy System Values
Factory-Set Default Values Description
System Network Settings (from Admin > Server Settings > Network)
System Name PLCM_RPRM System name of the RealPresence Resource Manager system.
Can be up to 32 characters long; dashes and underscores are valid characters.
DSCP Marker Allows the administrator to configure the Quality of Service level of the RealPresence Resource Manager.
Set the level between 0 - 63.
IPv6 Address IPv6 global address
IPv6 Prefix length Within IPv6 networks, the prefix length is the equivilant of the subnet mask in IPv4 networks. Should be 1-128.
IPv6 Default Gateway The IPv6 address of the gateway server/router. For IPv6 networks only.
IPV6 Link Local Address Read-only field. The RealPresence Resource Manager system generates a value for this field when IPv6 is enabled.

Deployment Guide For Maximum Security Environments
Polycom, Inc. 5
IPv4 Address 192.168.1.254 Static, physical IP address for the system server on an IPv4 network.
192.168.1.254 is the default value that needs to be changed according to your own network.
IPv4 Subnet Mask 255.255.255.0 Network subnet mask of the system server. For IPv4 networks only.
IPv4 Default Gateway 192.168.1.1 IP address of the gateway server/router. For IPv4 networks only.
192.168.1.1 is the default value. You need to change this to match the gateway IP for your network.
DNS Domain This is the DNS domain name suffix for the network in which the domain name server and the system server reside. For example polycom.com, not the fully qualified path of <hostname>.polycom.com.
Preferred DNS Server IP address of the domain name server.
Alternate DNS Server IP address of an alternate domain name server. The alternate IP address can does not have to match the network type of the preferred server. For example, the preferred DNS server can be IPv4, while the alternate DNS server can be IPv6.
Enable 802.1.x
Disabled Enable 802.1.x if your network requires this type of authentication. 802.1.x is commonly required in maximum security environments.
User Name The user name for the 802.1.x account.
Password The password for the 802.1.x account
Confirm Password Confirm the password for the 802.1 x account.
Key Management Protocol Select the appropriate Key Management Protocol for your environment.
ItemMy System Values
Factory-Set Default Values Description
Deployment Guide For Maximum Security Environments
Polycom, Inc. 6
Set up DNS Host and Service RecordsBefore installing a RealPresence Resource Manager system, you should consider configuring your DNS servers to:
● Resolve queries for the RealPresence Resource Manager system by host name.
● Resolve reverse lookup queries for the RealPresence Resource Manager system
● Identify the RealPresence Resource Manager system as a service on the network.
The first function requires a DNS host record and optionally a reverse lookup pointer record. The second function requires a DNS service record.
The DNS should also have entries for your Active Directory server, mail server, and H.323 gatekeepers (if H.323 is deployed).
DNS Host RecordTo allow your DNS servers to resolve queries for the RealPresence Resource Manager system by host name, you must enter a DNS host record in your DNS file. The format of this record depends on the format of your network addressing.
● If you use IPv4 addressing, enter a DNS A record in the required format.
● If you use IPv6 addressing, enter a DNS AAAA record in the required format.
To allow your DNS servers to resolve queries for the Resource Manager system by reverse lookup, you must enter a DNS pointer (PTR) record in your DNS file.
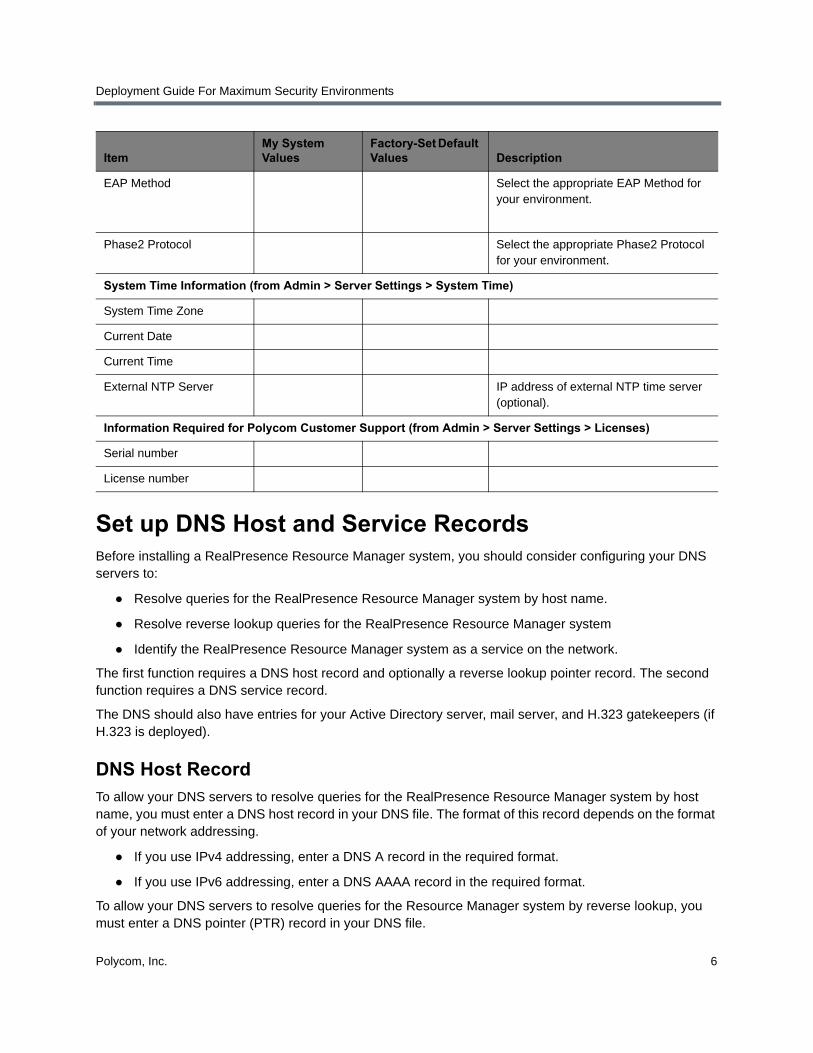
EAP Method Select the appropriate EAP Method for your environment.
Phase2 Protocol Select the appropriate Phase2 Protocol for your environment.
System Time Information (from Admin > Server Settings > System Time)
System Time Zone
Current Date
Current Time
External NTP Server IP address of external NTP time server (optional).
Information Required for Polycom Customer Support (from Admin > Server Settings > Licenses)
Serial number
License number
ItemMy System Values
Factory-Set Default Values Description
Deployment Guide For Maximum Security Environments
Polycom, Inc. 7
Request Certificates If you are using certificates, you should use the same certificates that you used for the initial installation of the system. If that information is not available, use the information below to set them up.
Certificates and certificate chains are a security technology that allows networked computers to determine whether to trust each other.
By default, to support encrypted communications and establish a minimal level of trust, the system includes a default key and self-signed certificate. However, to implement a full certificate chain to a root certificate authority (CA), the system requires a root CA certificate, an identity server certificate signed by the root signing CA and a Sub CA certificate. Therefore, at some time you must request these certificates from your CA.
You must install the root CA and intermediate certificates during first time setup, therefore we recommend you obtain them from your CA before beginning first time setup. However, with regard to the identity server certificate you have two options:
● The RealPresence Resource Manager system First Time Setup Wizard supports the function of creating a certificate signing request (CSR). Therefore, you may choose to create the CSR for the identity server certificate during first time setup and suspend the process while you wait for your CA to provide the certificate.
● You can also request the identity server certificate in advance of first time setup, but to do this you must have extensive knowledge of certificates, certificate templates, and CSR structures.
Pre-stage a Computer AccountTo enable the Use Single Signon option, which allows endpoint users who are included in the Active Directory to securely log into their dynamically- managed endpoints without typing in credentials, an Active Directory administrator must first pre-stage an Active Directory computer account for the RealPresence Resource Manager system.
This procedure can be done at any time before running first time setup.
To pre-stage a computer account
1 On the Active Directory system, use the Microsoft Active Directory Users and Computers MMC snap-in to create a computer account for the RealPresence Resource Manager system. Create the computer account in any desired organizational unit (OU). The computer account object must have Reset Password and Write Account Restrictions permissions.
For more information on the Active Directory Users and Computers MMC snap-in, see Microsoft Technet.
Deployment Guide For Maximum Security Environments
Polycom, Inc. 8
2 From a command window on the Domain Controller, type:
net user <computer account name>$ <Password> /domain
Where <computer account name> is the name of the computer account created in step 1 on page 1-7, <Password> is the desired password, and /domain is literally /domain (i.e., do not substitute with a domain name). For more information on the net user command, see the Microsoft Knowledge Base.
You have now created a computer account that you can use for integrated Windows authentication.
Prepare Client SystemsTo log into the RealPresence Resource Manager system, you need a client system with the following applications.
● Microsoft Internet Explorer® 8.0, 9.0, 10.0
● Adobe® Flash® Player 11.0.x.
If you will be working in a closed network environment, make sure these applications are installed on the client system before beginning First Time Setup.
Connect to the RealPresence Resource Manager System Server You configure the RealPresence Resource Manager system server through a ethernet port.
To connect to the RealPresence Resource Manager system
1 Power on the computer and the system server.
2 Open a browser and enter the static IP address in the address bar.
https://<staticipaddress>:8443/flex
The RealPresence Resource Manager system’s management interface requires Adobe Flash Player. For stability and security reasons, we recommend always using the latest version of Flash Player.
Even so, be aware that your browser’s Flash plugin may hang or crash from time to time. Your browser should alert you when this happens and enable you to reload the plugin. In some cases, you may need to close and restart your browser.
Polycom, Inc. 9
Polycom® RealPresence® Resource Manager System Software Setup
The sections that follow describe the Polycom® RealPresence® Resource Manager system software First Time Setup Wizard.
When you log into a RealPresence Resource Manager system that has not been configured, the First Time Setup Wizard automatically steps you through a series of ordered configuration pages. You cannot use the system until you’ve completed the steps in the first time setup.
Note that changing configuration settings on some pages of the First Time Setup Wizard, such as the System Information page, will cause the system to reboot. When you log into a system after one of these reboots, the next page in the ordered configuration pages appears.
Complete the First Time Setup WizardThe first time setup wizard walks you through setting up the initial configuration of your RealPresence Resource Manager system.
To complete the first-time setup wizard
1 On the computer you connected to the system sever (as described in Connect to the RealPresence Resource Manager System Server on page 8), open a browser window.
2 With First Time Setup Worksheet in hand, enter the static, physical IP address or host name for the RealPresence Resource Manager system in the Address field.
3 When the system login screen appears, if necessary select a different Language.
4 Enter the administrator Username and Password.
The factory default is admin/admin.
You perform the first time setup of the RealPresence Resource Manager system when it is not yet on the corporate network. This means you need to manually verify that the network addresses you are using for services such as an NTP, DNS, or OCSP are correct.
The RealPresence Resource Manager system cannot check these addresses until placed on the network. If these network settings are entered incorrectly, the RealPresence Resource Manager system may not start properly or be unreachable.

Deployment Guide For Maximum Security Environments
Polycom, Inc. 10
5 Click Login.
Because the system has not previously been configured, the Licensing page of the setup wizard appears.
EULA License Agreement
6 Read the end-user license agreement (EULA).
Please note that the EULA includes important definitions and usage limitations that will apply to your installation.
7 To accept the EULA terms and conditions, click Accept.
Administrator Password
8 When the Change Administrator Password page appears, enter the Old Password.
9 For the New Password, enter a new password with a length of at least ten characters.
10 Confirm the New Password and click Next.
The Network page appears.
Network Settings
11 Enter the Network Settings information recorded in Complete the First Time Setup Worksheet on page 4 and click Next.
The System Time page appears.
System Time
12 Configure these settings on the System Time page, as necessary.
Field Description
System Time Zone The time zone in which the system server resides.
Use Current Time Select this checkbox to input the current date and time.
Even if you plan on using an NTP server, you should set the proper time during first-time setup to ensure certificate creation works reliably.
Current Date The system date for the system.
Current Time The system time for the system.
Use External NTP Server Time Synchronization
(Recommended) Select this check box to synchronize the system date and time with an external NTP server.
Do this ONLY after you have first manually set the local system time.
IP address or DNS resolved names separated by spaces
The IP address or fully qualified domain name (ASCII only) of the NTP servers.
Deployment Guide For Maximum Security Environments
Polycom, Inc. 11
13 Click Next.
The Certificates page appears. By default the system is configured to use a default self-signed certificate. Click Yes to confirm.
Certificate Management
14 You can skip the certificates screen and return to it after you complete first time setup.
If you have changed the system name of the RealPresence Resource Manager you can generate a new self-signed certificate at this time.
15 Click Next.
System Reboot
16 When prompted to reboot, click Commit the Settings and Reboot.
The system displays a confirmation message.
17 Click Yes.
The system reboots.
18 Close your browser and wait at least five minutes. Wait for the system to completely reboot.
19 Login using the newly configured local administrator name and password.
20 Click Next.
Enterprise Directory Server Configuration
21 To integrate the system with an enterprise Active Directory server so that users can include enterprise groups, users, and rooms in their conferences:
a On the Enterprise Directory page, select Integrate with Enterprise Directory Server.
b To have the system auto-discover the server by querying DNS, enable Auto-discover in the Enterprise Directory Server DNS Name section; otherwise, enter the DNS Name for the enterprise directory server.
If you set the system to use an external NTP server without first setting the current date and time, the system time may be wrong until the system’s first synchronization.

Deployment Guide For Maximum Security Environments
Polycom, Inc. 12
22 As needed, configure these settings.
23 To integrate the system with an Active Directory domain controller for single sign-on authentication:
a On the Enterprise Directory page, select Allow Delegated Authentication to Enterprise Directory Server.
The system can auto-discover the closest logical domain controller and Active Directory servers, but to do this the network DNS server must have a DNS SRV record for these servers.
b If your network DNS server has a DNS SRV record for the domain controller, in the Domain controller name section enable Auto-discover; otherwise, enter the Fully Qualified Host Name
Setting Description
Domain\Enterprise Directory User ID
Domain and Enterprise Directory User ID for an account that the RealPresence Resource Manager system can use to access the enterprise directory server and retrieve group, user, and room information. This is the account created Pre-stage a Computer Account on page 7.
This User ID must have read permissions so it can search the entire forest on the enterprise directory server.
In non-maximum security environments, this User ID is automatically associated with the RealPresence Resource Manager system administrator role - by default it is the ONLY enterprise directory User ID with this role.
Enterprise Directory User Password
The password for the enterprise directory user account
Security Level The level of security on the connection between the RealPresence Resource Manager system and the enterprise directory server. Possible values include:
• Plain—No security on the connection
• LDAPS—The connection is secured over outbound port 3269 using LDAP-S in a manner similar to https.
If the “Domain Controller: LDAP Server signing requirements” setting on the Active Directory server is set to “Require Signing”, then you must use LDAPS to secure the connection.
• StartTLS—The connection is secured over outbound port 3268 (the same port as Plain), but it then negotiates security once the socket is opened. Some LDAP servers reject any unsecured transactions, so the first command is the StartTLS negotiation command.
Ignore Disabled Enterprise Directory Users
Check this field to have the RealPresence Resource Manager system ignore disabled enterprise users in its queries.
Enterprise Directory Exclusion Filter
If necessary and you understand the filter syntax, specify other types of user accounts to exclude. Don’t edit these expressions unless you understand LDAP filter syntax.
Enterprise Directory Search BaseDN
If necessary and you understand the filter syntax, specify the top level of the enterprise directory tree (referred to as the base DN) to search. Don’t edit these expressions unless you understand the filter syntax.
Deployment Guide For Maximum Security Environments
Polycom, Inc. 13
of the domain controller (for example, dc1.mydomain.com). The pre-staged computer account must be within this domain as well.
c In the Computer Account Credentials section, enter the Domain\Computer Name and Password for the pre-staged computer account created in step Pre-stage a Computer Account on page 7.
24 Click Next.
The Directory Setup page appears.
Directory Configuration
25 On the Directory Setup page:
a To allow non-LDAP directory protocols, select the Allow non-LDAP directory protocols.
b To exclude users with dynamically-managed endpoints from the Global Address Book, clear the Include dynamically-managed devices in the Global Address Book option.
Note that VVX system endpoints and CMA Desktop and RealPresence Mobile clients are always dynamically-managed.
c To exclude guestbook entries from the enterprise directory, clear the Show Guestbook Entries in the Directory option.
d Select the Allow endpoint directories for local users to include enterprise directory user and group information if you want that option.
You can allow local users to access Enterprise Directory entries when the RealPresence Resource Manager is integrated with an enterprise directory.
e If your video network includes LifeSize endpoints, select the Modify Directory Listings for LifeSize® Endpoint Support option.
26 Click Next.
The system displays the message that you have completed first time setup. You have the option of logging out of the system or being redirected to the system Dashboard.
27 Click Next to go to the system Dashboard.
Complete the System ConfigurationOnce you’ve finished first time setup, you will need to perform additional configuration tasks. These tasks are discussed in Chapter 2 of the Polycom RealPresence Resource Manager System Operation Guide. For example:
● Configure your system for redundancy.
● Add licenses to your system.
● Set up your site topology.
● As needed:
Integrate with a DMA system for gatekeeper, SIP registrar, and virtual meeting room services.
Deployment Guide For Maximum Security Environments
Polycom, Inc. 14
Integrate the system with a Microsoft Active Directory.
Configure Areas. (Area functionality is a separately licensed feature.)
● Associate users with roles. You will need at least one user with the device administrator role who will be able to create machine accounts for devices. You will also need at least one user assigned to the role of operator or scheduler/advanced schedule so conferences can be scheduled.
●
●
● Associate users with endpoints.
● Create provisioning profiles and rules for dynamically managed endpoints.
● Add MCUs.
● Enable a management port Whitelist.
If required, you can limit access to the RealPresence Resource Manger's web interface and SNMP interface from only a set of known IP addresses.


![Skaffold - storage.googleapis.com · [getting-started getting-started] Hello world! [getting-started getting-started] Hello world! [getting-started getting-started] Hello world! 5](https://img.pdfslide.net/doc/110x75/5ec939f2a76a033f091c5ac7/skaffold-getting-started-getting-started-hello-world-getting-started-getting-started.jpg)