Embed Size (px)
Citation preview

Copyright(C)2006 Embroidery Central, Inc. Page 1 of 7
Gingery Christmas - GingerbreadOrnamentThere's still time to make a few more quick gifts before the holidays. Use thistechnique to turn applique designs into free-standing ornaments and trimmers forpackages, gifts and decorations for your tree.
Copyright(C)2006 Embroidery Central, Inc. Page 2 of 7
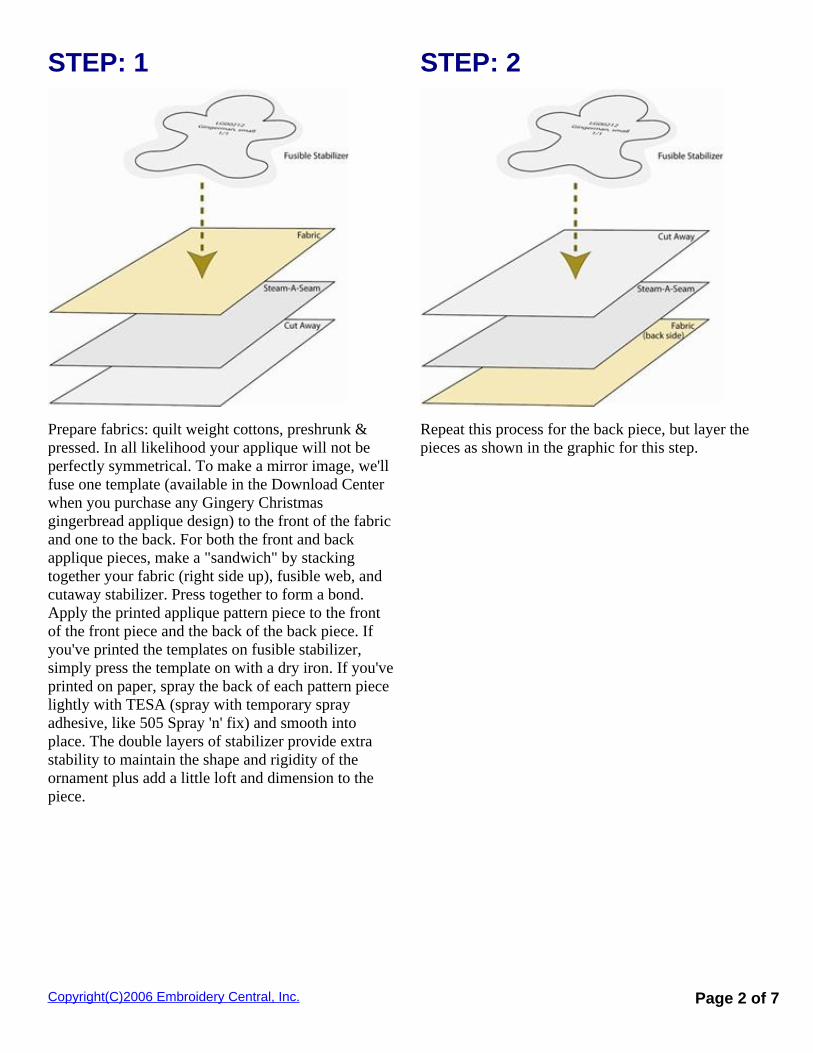
STEP: 1
Prepare fabrics: quilt weight cottons, preshrunk &pressed. In all likelihood your applique will not beperfectly symmetrical. To make a mirror image, we'llfuse one template (available in the Download Centerwhen you purchase any Gingery Christmasgingerbread applique design) to the front of the fabricand one to the back. For both the front and backapplique pieces, make a "sandwich" by stackingtogether your fabric (right side up), fusible web, andcutaway stabilizer. Press together to form a bond.Apply the printed applique pattern piece to the frontof the front piece and the back of the back piece. Ifyou've printed the templates on fusible stabilizer,simply press the template on with a dry iron. If you'veprinted on paper, spray the back of each pattern piecelightly with TESA (spray with temporary sprayadhesive, like 505 Spray 'n' fix) and smooth intoplace. The double layers of stabilizer provide extrastability to maintain the shape and rigidity of theornament plus add a little loft and dimension to thepiece.
STEP: 2
Repeat this process for the back piece, but layer thepieces as shown in the graphic for this step.
Copyright(C)2006 Embroidery Central, Inc. Page 3 of 7
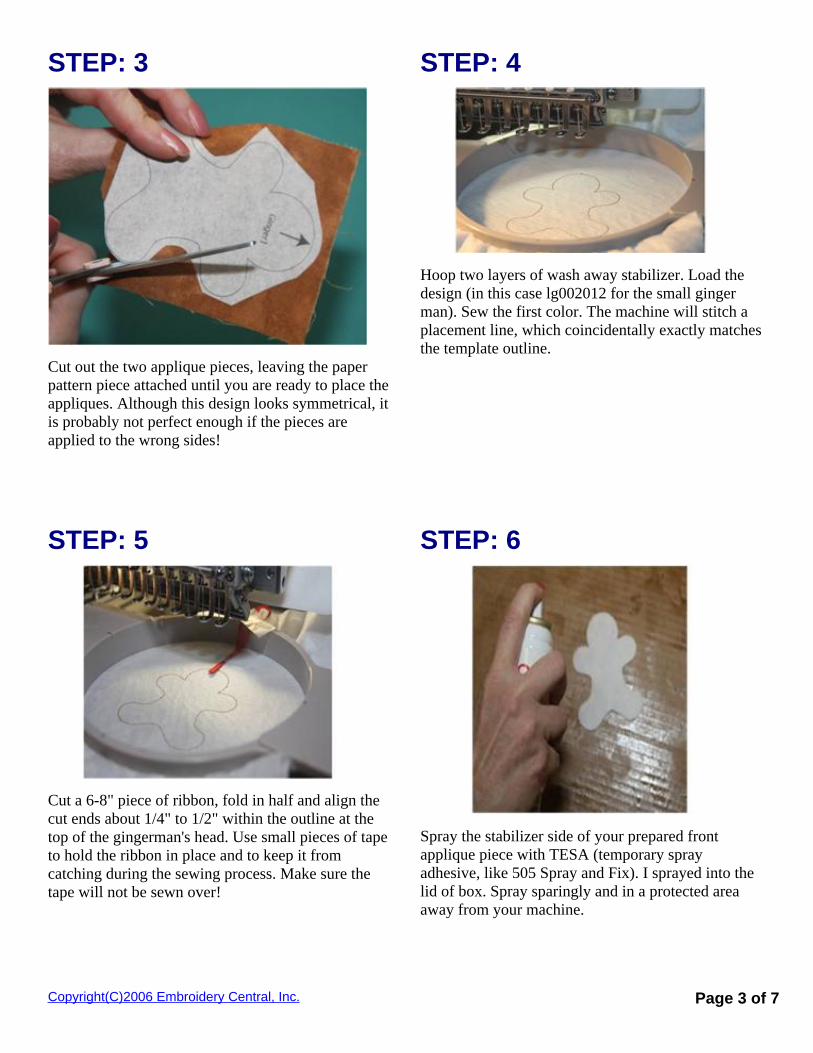
STEP: 3
Cut out the two applique pieces, leaving the paperpattern piece attached until you are ready to place theappliques. Although this design looks symmetrical, itis probably not perfect enough if the pieces areapplied to the wrong sides!
STEP: 4
Hoop two layers of wash away stabilizer. Load thedesign (in this case lg002012 for the small gingerman). Sew the first color. The machine will stitch aplacement line, which coincidentally exactly matchesthe template outline.
STEP: 5
Cut a 6-8" piece of ribbon, fold in half and align thecut ends about 1/4" to 1/2" within the outline at thetop of the gingerman's head. Use small pieces of tapeto hold the ribbon in place and to keep it fromcatching during the sewing process. Make sure thetape will not be sewn over!
STEP: 6
Spray the stabilizer side of your prepared frontapplique piece with TESA (temporary sprayadhesive, like 505 Spray and Fix). I sprayed into thelid of box. Spray sparingly and in a protected areaaway from your machine.
Copyright(C)2006 Embroidery Central, Inc. Page 4 of 7
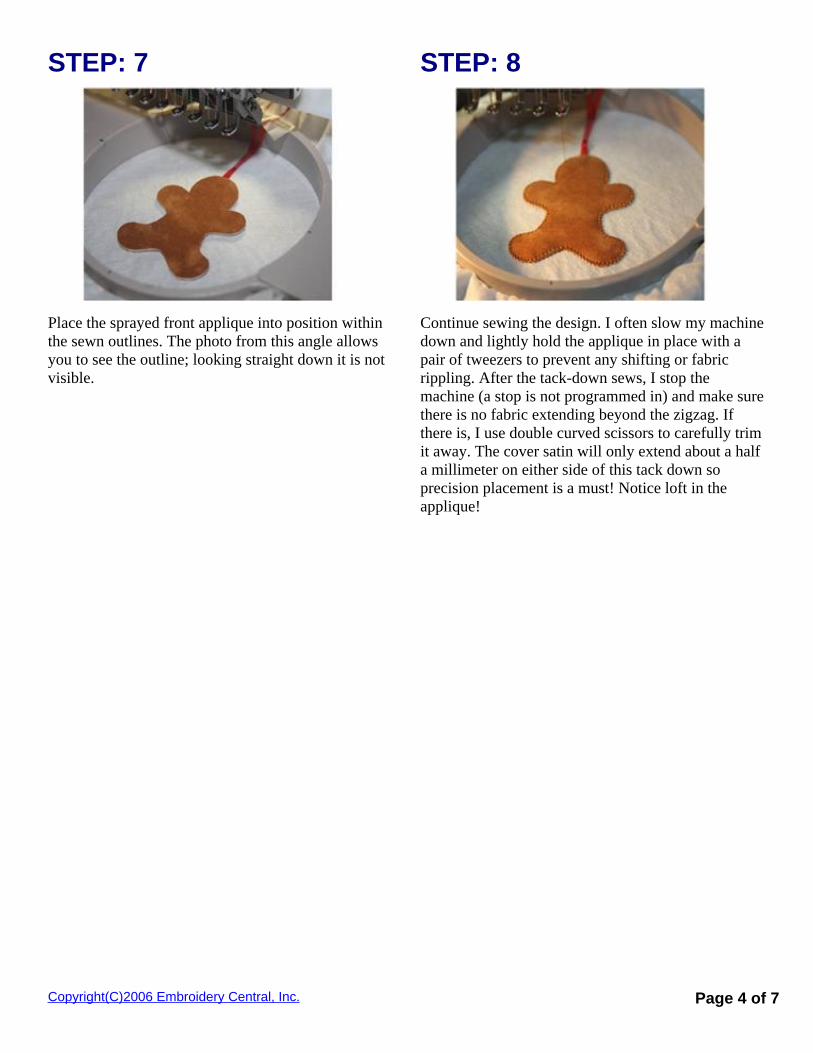
STEP: 7
Place the sprayed front applique into position withinthe sewn outlines. The photo from this angle allowsyou to see the outline; looking straight down it is notvisible.
STEP: 8
Continue sewing the design. I often slow my machinedown and lightly hold the applique in place with apair of tweezers to prevent any shifting or fabricrippling. After the tack-down sews, I stop themachine (a stop is not programmed in) and make surethere is no fabric extending beyond the zigzag. Ifthere is, I use double curved scissors to carefully trimit away. The cover satin will only extend about a halfa millimeter on either side of this tack down soprecision placement is a must! Notice loft in theapplique!
Copyright(C)2006 Embroidery Central, Inc. Page 5 of 7
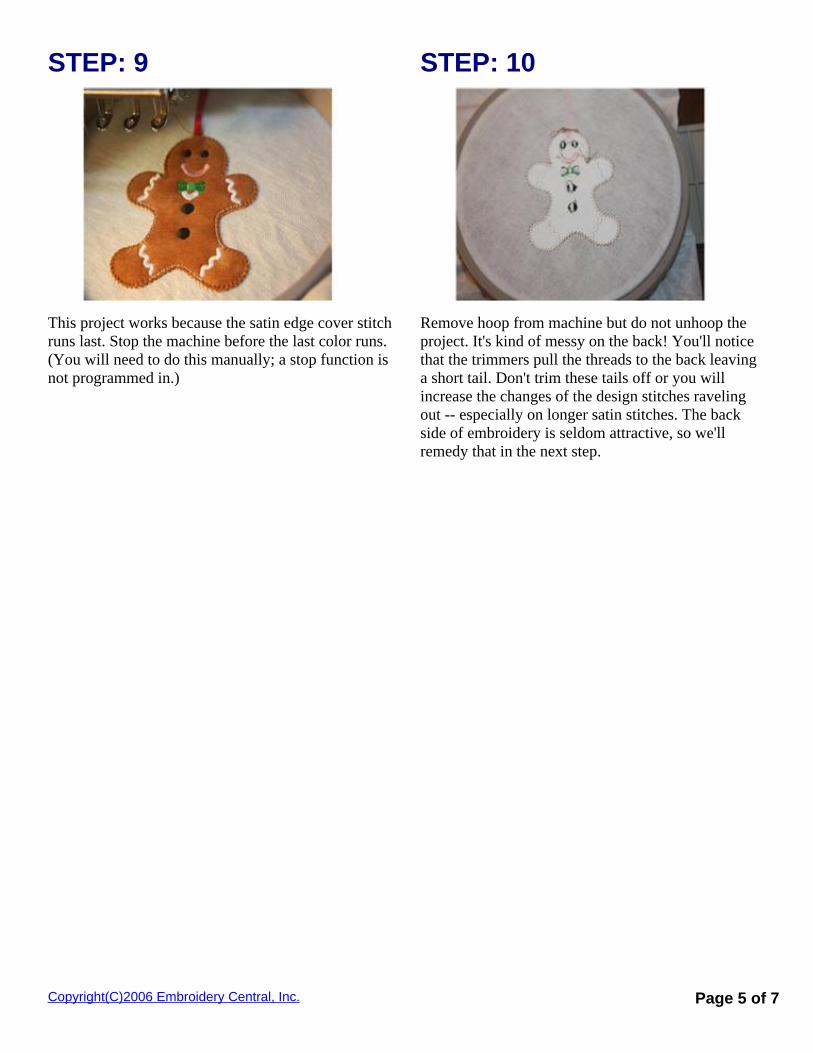
STEP: 9
This project works because the satin edge cover stitchruns last. Stop the machine before the last color runs.(You will need to do this manually; a stop function isnot programmed in.)
STEP: 10
Remove hoop from machine but do not unhoop theproject. It's kind of messy on the back! You'll noticethat the trimmers pull the threads to the back leavinga short tail. Don't trim these tails off or you willincrease the changes of the design stitches ravelingout -- especially on longer satin stitches. The backside of embroidery is seldom attractive, so we'llremedy that in the next step.
Copyright(C)2006 Embroidery Central, Inc. Page 6 of 7
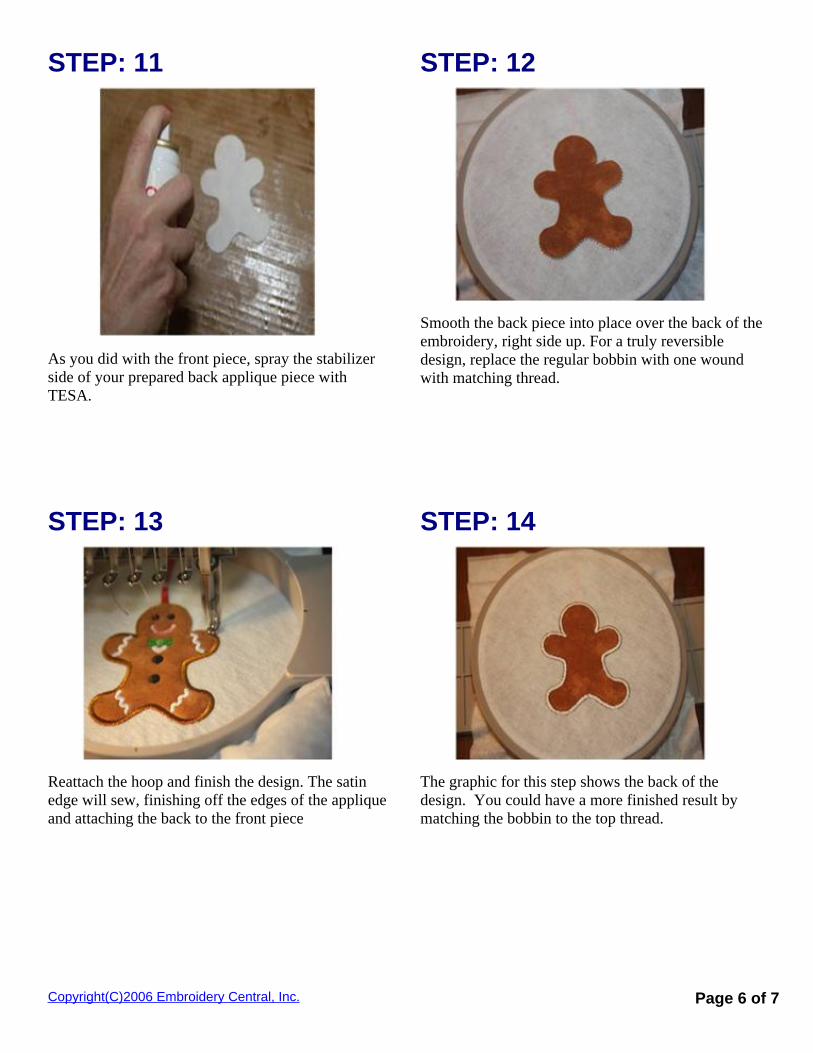
STEP: 11
As you did with the front piece, spray the stabilizerside of your prepared back applique piece withTESA.
STEP: 12
Smooth the back piece into place over the back of theembroidery, right side up. For a truly reversibledesign, replace the regular bobbin with one woundwith matching thread.
STEP: 13
Reattach the hoop and finish the design. The satinedge will sew, finishing off the edges of the appliqueand attaching the back to the front piece
STEP: 14
The graphic for this step shows the back of thedesign. You could have a more finished result bymatching the bobbin to the top thread.
Copyright(C)2006 Embroidery Central, Inc. Page 7 of 7
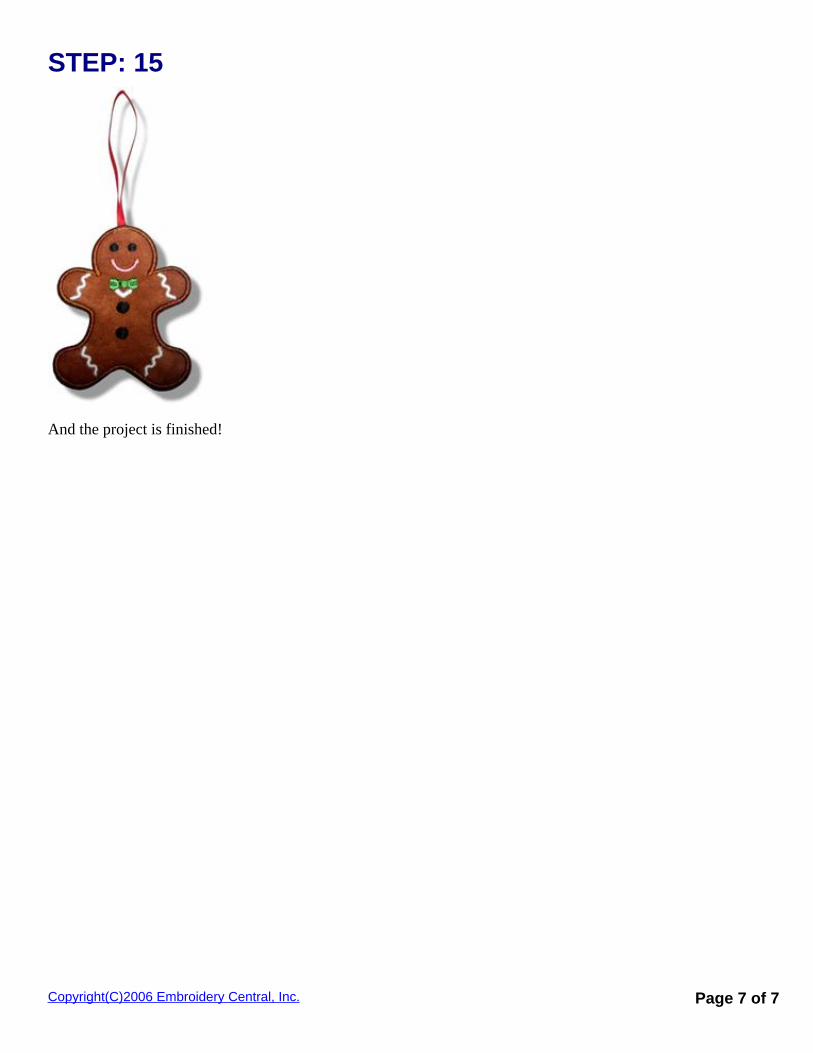
STEP: 15
And the project is finished!