Embed Size (px)
Citation preview
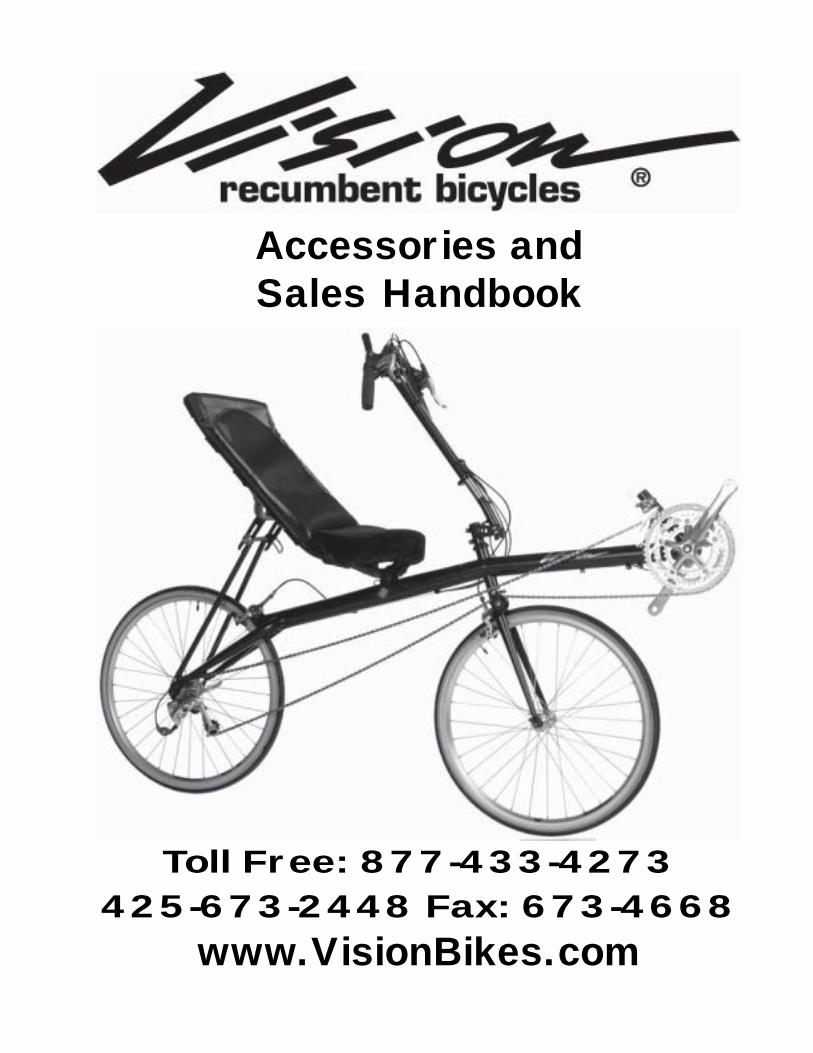
Accessories andSales Handbook
Toll Free: 877-433-4273425-673-2448 Fax: 673-4668
www.VisionBikes.com
Accessories
Accessories - AB40
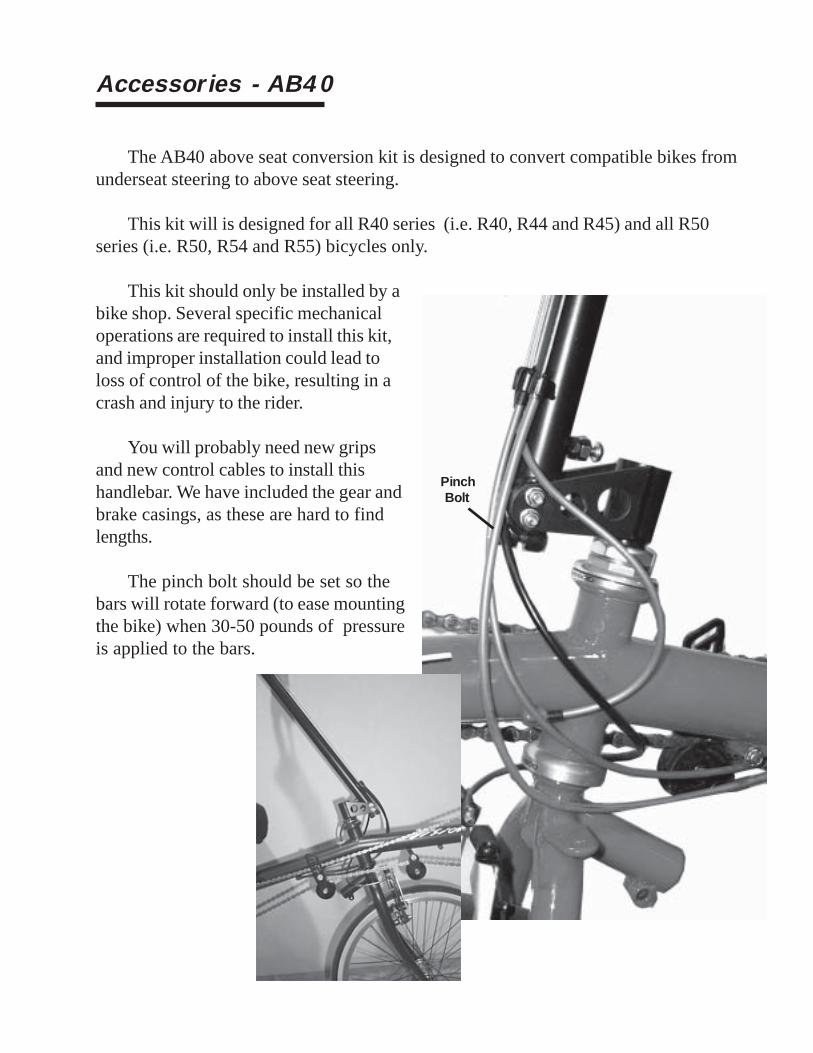
The AB40 above seat conversion kit is designed to convert compatible bikes fromunderseat steering to above seat steering.
This kit will is designed for all R40 series (i.e. R40, R44 and R45) and all R50series (i.e. R50, R54 and R55) bicycles only.
This kit should only be installed by abike shop. Several specific mechanicaloperations are required to install this kit,and improper installation could lead toloss of control of the bike, resulting in acrash and injury to the rider.
You will probably need new gripsand new control cables to install thishandlebar. We have included the gear andbrake casings, as these are hard to findlengths.
The pinch bolt should be set so thebars will rotate forward (to ease mountingthe bike) when 30-50 pounds of pressureis applied to the bars.
PinchBolt
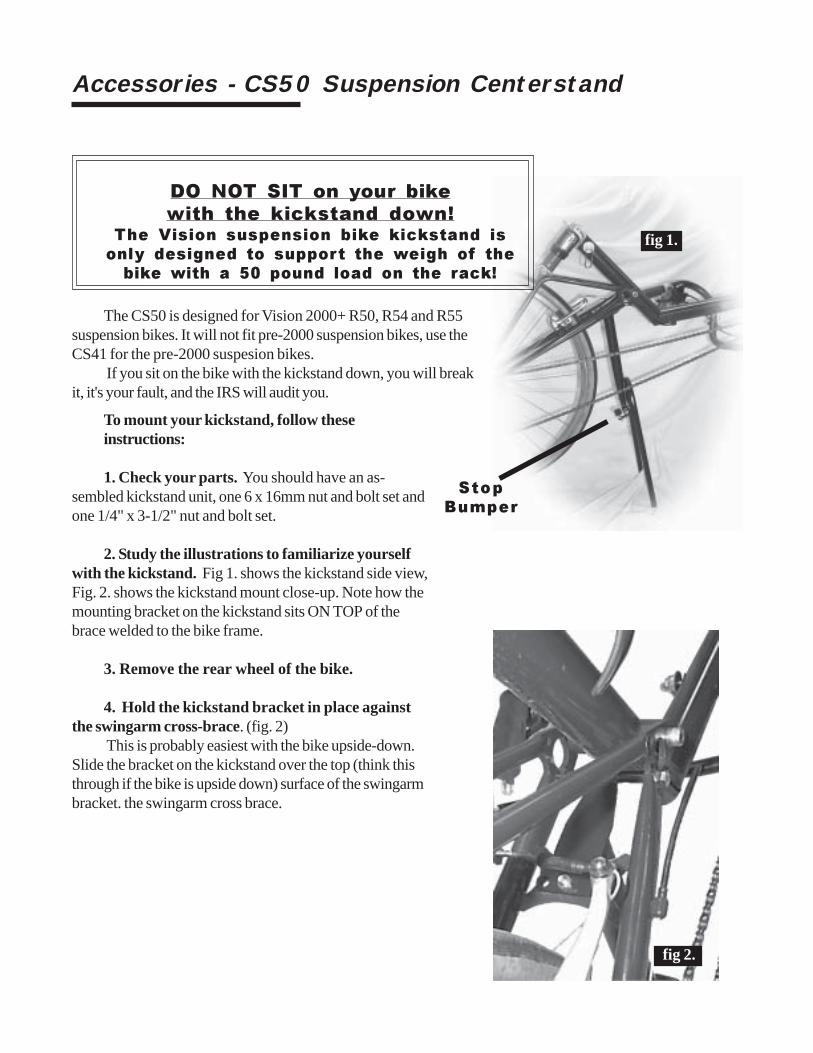
To mount your kickstand, follow theseinstructions:
1. Check your parts. You should have an as-sembled kickstand unit, one 6 x 16mm nut and bolt set andone 1/4" x 3-1/2" nut and bolt set.
2. Study the illustrations to familiarize yourselfwith the kickstand. Fig 1. shows the kickstand side view,Fig. 2. shows the kickstand mount close-up. Note how themounting bracket on the kickstand sits ON TOP of thebrace welded to the bike frame.
3. Remove the rear wheel of the bike.
4. Hold the kickstand bracket in place againstthe swingarm cross-brace. (fig. 2)
This is probably easiest with the bike upside-down.Slide the bracket on the kickstand over the top (think thisthrough if the bike is upside down) surface of the swingarmbracket. the swingarm cross brace.
DO NOT SIT on your bike
with the kickstand down!The Vision suspension bike kickstand is
only designed to support the weigh of the
bike with a 50 pound load on the rack!
fig 1.
The CS50 is designed for Vision 2000+ R50, R54 and R55suspension bikes. It will not fit pre-2000 suspension bikes, use theCS41 for the pre-2000 suspesion bikes.
If you sit on the bike with the kickstand down, you will breakit, it's your fault, and the IRS will audit you.
StopBumper
fig 2.
Accessories - CS50 Suspension Centerstand
fig 3.5. Attach the kickstand. (fig. 3)Align the cross tube with the holes in the
swingarm and slide the 1/4" x 3-1/2" boltthrough the swingarm, the kickstand crosstube, and through the other side of theswingarm. Thread the 1/4" nut on the end ofthe bolt, but do not tighten it yet.
Slide the 6mm bolt through the hole in theend of the kickstand bracket, and through thematching hole in the swingarm cross brace.Thread the 6mm nut on the end of this bolt.
6. Tighten all bolts.Make sure all the hardware is tight (150
inch pounds).
7. Reinstall the rear wheel.
8. Adjust the stop bumper (fig. 4)The rubber stop bumper should be
adjusted with its threaded post so the legs ofthe kickstand are parallel to the ground whenthe kickstand is up.
Stop Bumper
WarrantyThis product is warranted for 1 year from date of purchase. ATP will repair orreplace this unit, free of charge, upon its return, postage paid, to our location.Call us FIRST for return authorization. This warranty does not cover damagedue to alterations or abuse, specifically including, but not limited to, sitting onthe bike with the kickstand down. (and we will know if you did!)
Swingarm
Cross Brace
CrossTube
fig 4.
1/4" x 3-1/2" Bolt
6mm Bolt
Accessories - CS50 Suspension Centerstand (cont.)
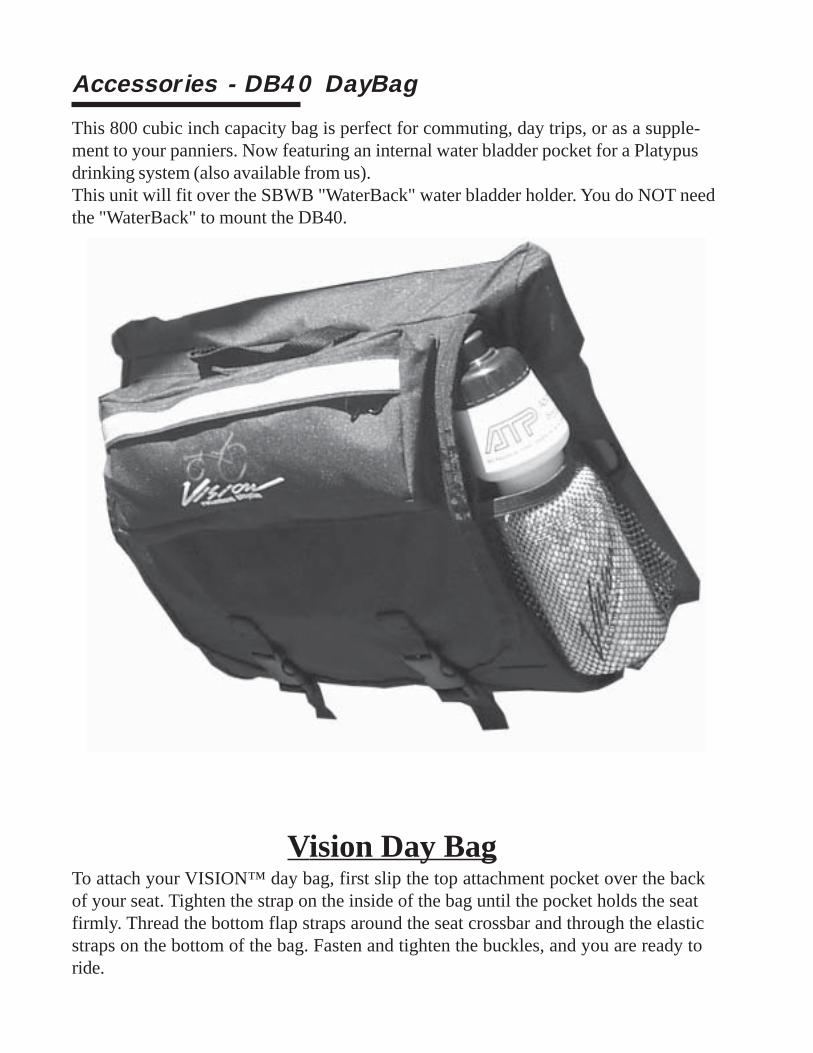
Accessories - DB40 DayBag
Vision Day BagTo attach your VISION™ day bag, first slip the top attachment pocket over the backof your seat. Tighten the strap on the inside of the bag until the pocket holds the seatfirmly. Thread the bottom flap straps around the seat crossbar and through the elasticstraps on the bottom of the bag. Fasten and tighten the buckles, and you are ready toride.
This 800 cubic inch capacity bag is perfect for commuting, day trips, or as a supple-ment to your panniers. Now featuring an internal water bladder pocket for a Platypusdrinking system (also available from us).This unit will fit over the SBWB "WaterBack" water bladder holder. You do NOT needthe "WaterBack" to mount the DB40.
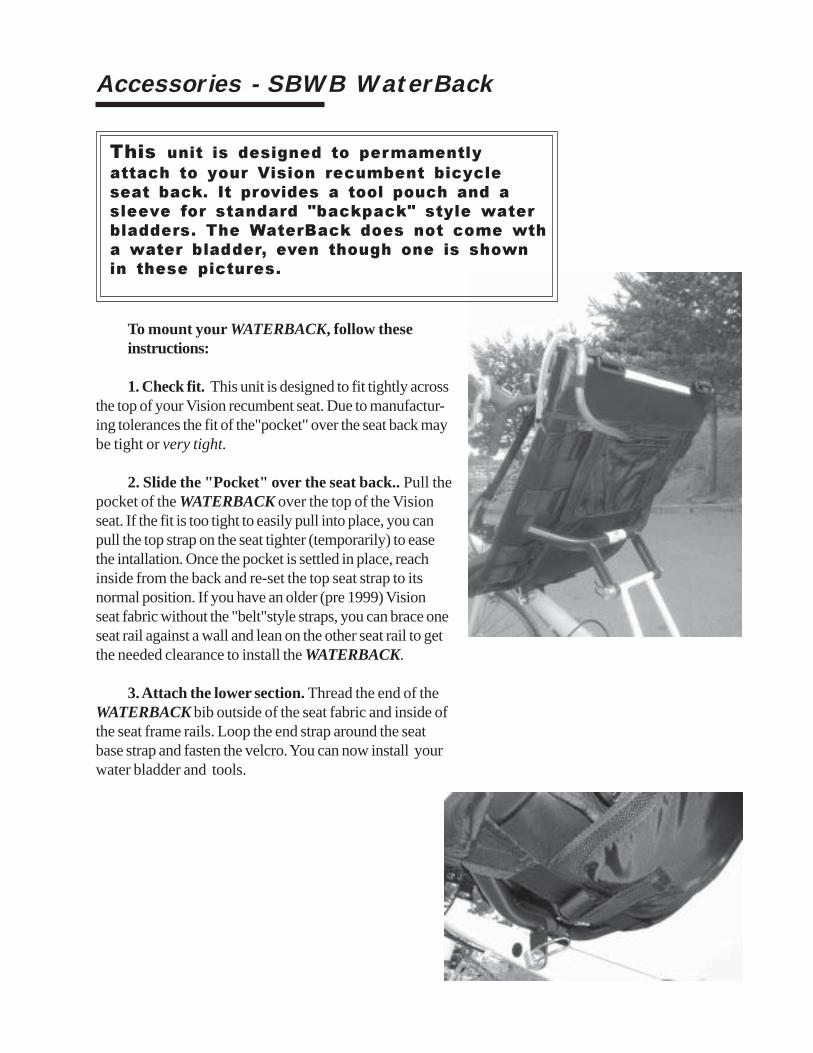
Accessories - SBWB WaterBack
To mount your WATERBACK, follow theseinstructions:
1. Check fit. This unit is designed to fit tightly acrossthe top of your Vision recumbent seat. Due to manufactur-ing tolerances the fit of the"pocket" over the seat back maybe tight or very tight.
2. Slide the "Pocket" over the seat back.. Pull thepocket of the WATERBACK over the top of the Visionseat. If the fit is too tight to easily pull into place, you canpull the top strap on the seat tighter (temporarily) to easethe intallation. Once the pocket is settled in place, reachinside from the back and re-set the top seat strap to itsnormal position. If you have an older (pre 1999) Visionseat fabric without the "belt"style straps, you can brace oneseat rail against a wall and lean on the other seat rail to getthe needed clearance to install the WATERBACK.
3. Attach the lower section. Thread the end of theWATERBACK bib outside of the seat fabric and inside ofthe seat frame rails. Loop the end strap around the seatbase strap and fasten the velcro. You can now install yourwater bladder and tools.
This unit is designed to permamently
attach to your Vision recumbent bicycle
seat back. It provides a tool pouch and a
sleeve for standard "backpack" style water
bladders. The WaterBack does not come wth
a water bladder, even though one is shown
in these pictures.
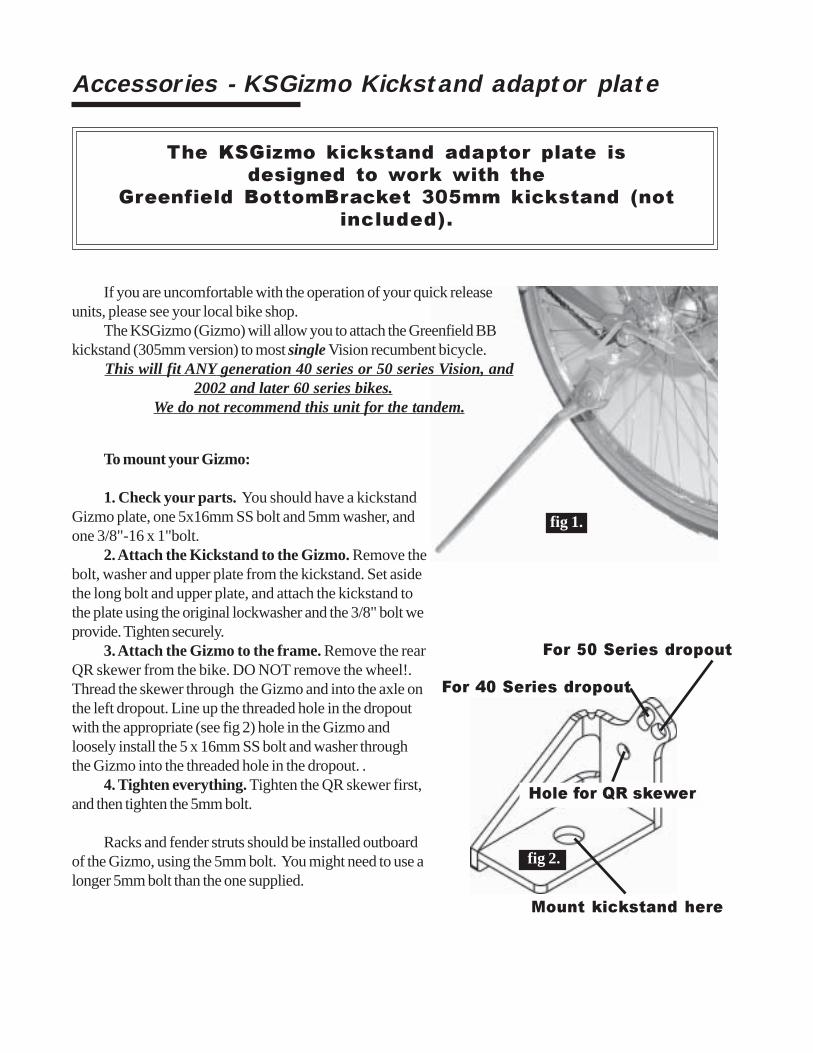
Accessories - KSGizmo Kickstand adaptor plate
To mount your Gizmo:
1. Check your parts. You should have a kickstandGizmo plate, one 5x16mm SS bolt and 5mm washer, andone 3/8"-16 x 1"bolt.
2. Attach the Kickstand to the Gizmo. Remove thebolt, washer and upper plate from the kickstand. Set asidethe long bolt and upper plate, and attach the kickstand tothe plate using the original lockwasher and the 3/8" bolt weprovide. Tighten securely.
3. Attach the Gizmo to the frame. Remove the rearQR skewer from the bike. DO NOT remove the wheel!.Thread the skewer through the Gizmo and into the axle onthe left dropout. Line up the threaded hole in the dropoutwith the appropriate (see fig 2) hole in the Gizmo andloosely install the 5 x 16mm SS bolt and washer throughthe Gizmo into the threaded hole in the dropout. .
4. Tighten everything. Tighten the QR skewer first,and then tighten the 5mm bolt.
Racks and fender struts should be installed outboardof the Gizmo, using the 5mm bolt. You might need to use alonger 5mm bolt than the one supplied.
The KSGizmo kickstand adaptor plate isdesigned to work with the
Greenfield BottomBracket 305mm kickstand (notincluded).
fig 1.
If you are uncomfortable with the operation of your quick releaseunits, please see your local bike shop.
The KSGizmo (Gizmo) will allow you to attach the Greenfield BBkickstand (305mm version) to most single Vision recumbent bicycle.
This will fit ANY generation 40 series or 50 series Vision, and2002 and later 60 series bikes.
We do not recommend this unit for the tandem.
Mount kickstand here
For 40 Series dropout
For 50 Series dropout
fig 2.
Hole for QR skewer
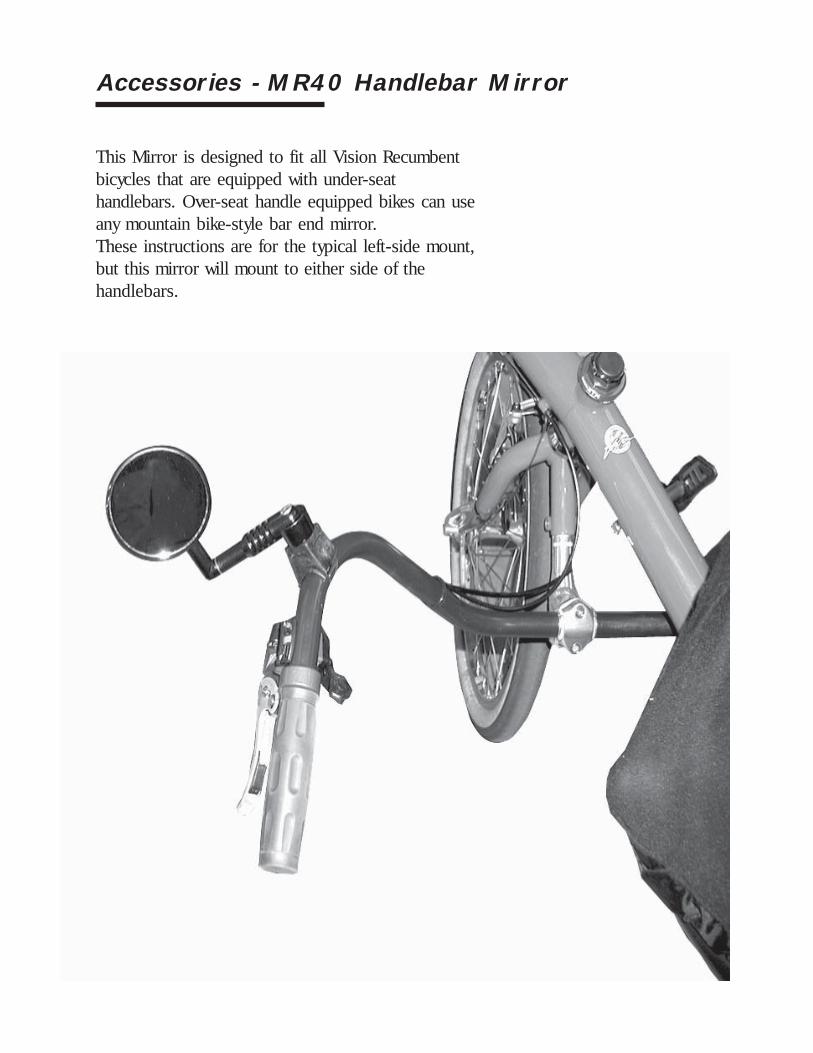
This Mirror is designed to fit all Vision Recumbentbicycles that are equipped with under-seathandlebars. Over-seat handle equipped bikes can useany mountain bike-style bar end mirror.These instructions are for the typical left-side mount,but this mirror will mount to either side of thehandlebars.
Accessories - MR40 Handlebar Mirror
Accessories - MR40 Handlebar Mirror (cont.)
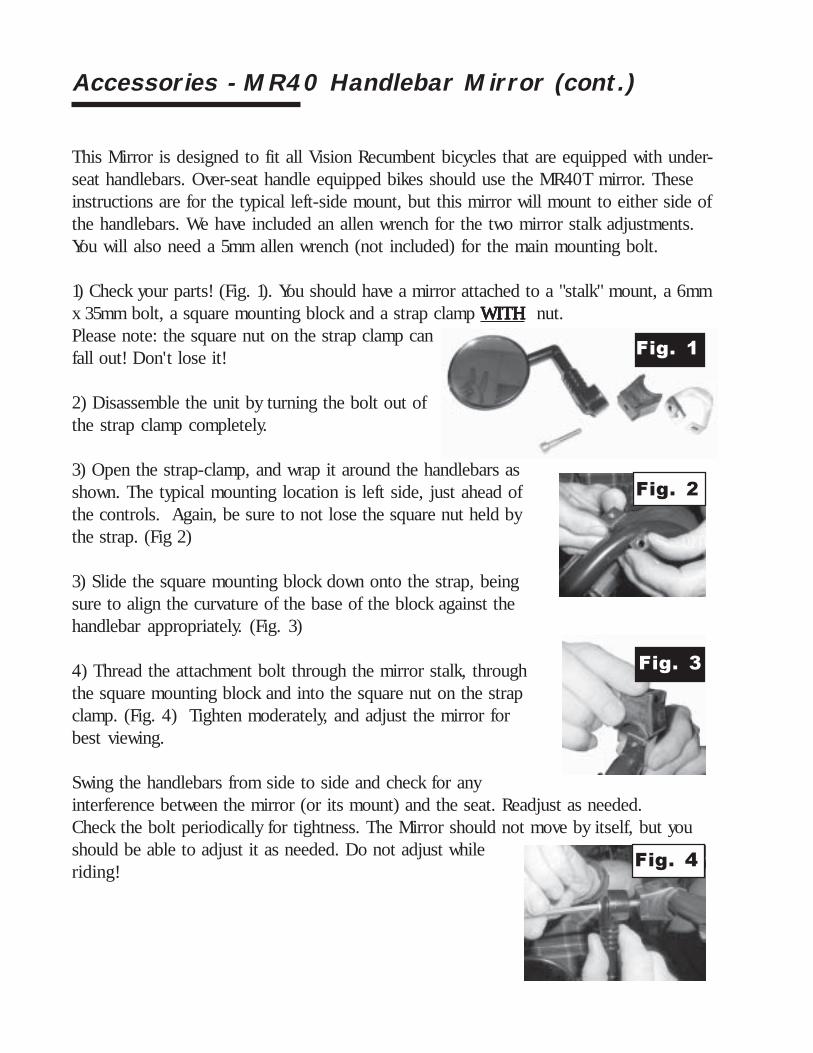
This Mirror is designed to fit all Vision Recumbent bicycles that are equipped with under-seat handlebars. Over-seat handle equipped bikes should use the MR40T mirror. Theseinstructions are for the typical left-side mount, but this mirror will mount to either side ofthe handlebars. We have included an allen wrench for the two mirror stalk adjustments.You will also need a 5mm allen wrench (not included) for the main mounting bolt.
1) Check your parts! (Fig. 1). You should have a mirror attached to a "stalk" mount, a 6mmx 35mm bolt, a square mounting block and a strap clamp WITHWITHWITHWITHWITH nut.Please note: the square nut on the strap clamp canfall out! Don't lose it!
2) Disassemble the unit by turning the bolt out ofthe strap clamp completely.
3) Open the strap-clamp, and wrap it around the handlebars asshown. The typical mounting location is left side, just ahead ofthe controls. Again, be sure to not lose the square nut held bythe strap. (Fig 2)
3) Slide the square mounting block down onto the strap, beingsure to align the curvature of the base of the block against thehandlebar appropriately. (Fig. 3)
4) Thread the attachment bolt through the mirror stalk, throughthe square mounting block and into the square nut on the strapclamp. (Fig. 4) Tighten moderately, and adjust the mirror forbest viewing.
Swing the handlebars from side to side and check for anyinterference between the mirror (or its mount) and the seat. Readjust as needed.Check the bolt periodically for tightness. The Mirror should not move by itself, but youshould be able to adjust it as needed. Do not adjust whileriding!
Fig. 2
Fig. 3
Fig. 4
Fig. 1
Accessories - VFM40 Fairing
Congratulations on your purchase of the Vision VFM40. This fairing offers excellent weather protection andwill dramatically improve the aerodynamics of your Vision.The VFM40 is designed to fit the Vision 40. 50. 60 and 80 series bikes.Note: This unit will not fit a Vision R30 or R32.
To install the VFM40 on your Vision, please follow these directions carefully. Before you start, make sureyour boom has been adjusted correctly for your leg length. If you are new to the bike, it would be a goodidea to ride it for several days to make sure your boom adjustment is correct prior to installing your fairing.
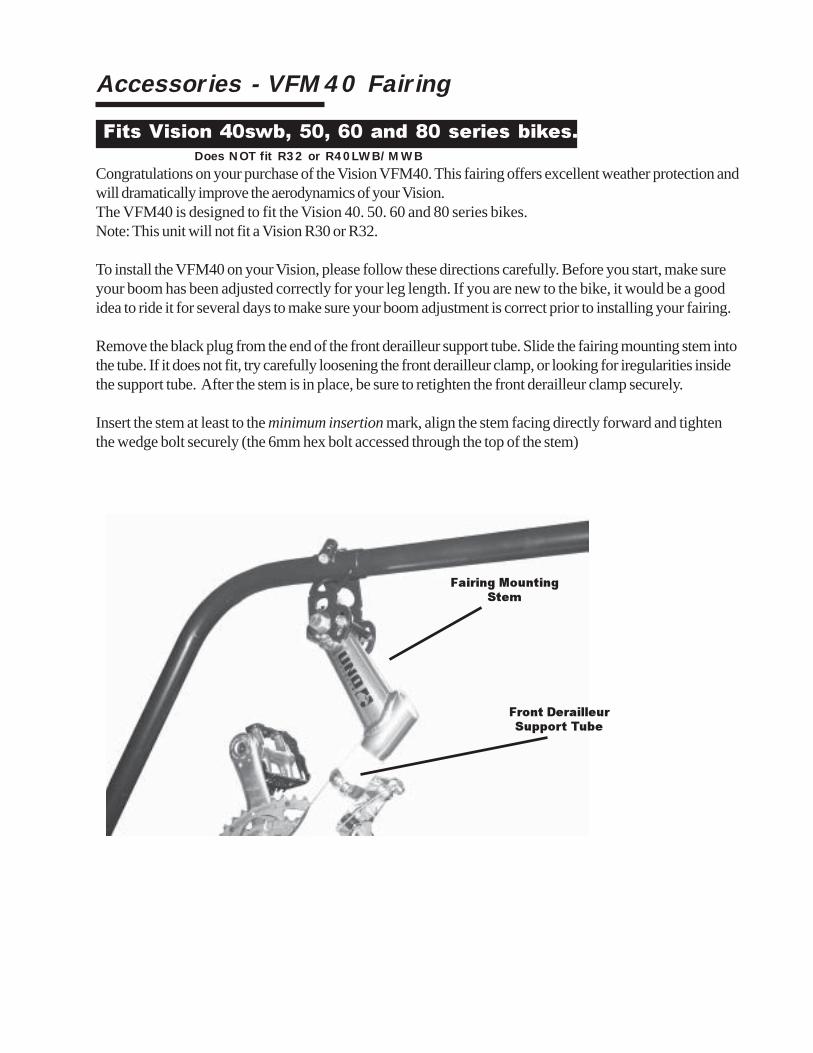
Remove the black plug from the end of the front derailleur support tube. Slide the fairing mounting stem intothe tube. If it does not fit, try carefully loosening the front derailleur clamp, or looking for iregularities insidethe support tube. After the stem is in place, be sure to retighten the front derailleur clamp securely.
Insert the stem at least to the minimum insertion mark, align the stem facing directly forward and tightenthe wedge bolt securely (the 6mm hex bolt accessed through the top of the stem)
Front DerailleurSupport Tube
Fairing MountingStem
Fits Vision 40swb, 50, 60 and 80 series bikes.
Does NOT fit R32 or R40LWB/MWB
Accessories - VFM40 Fairing (cont.)
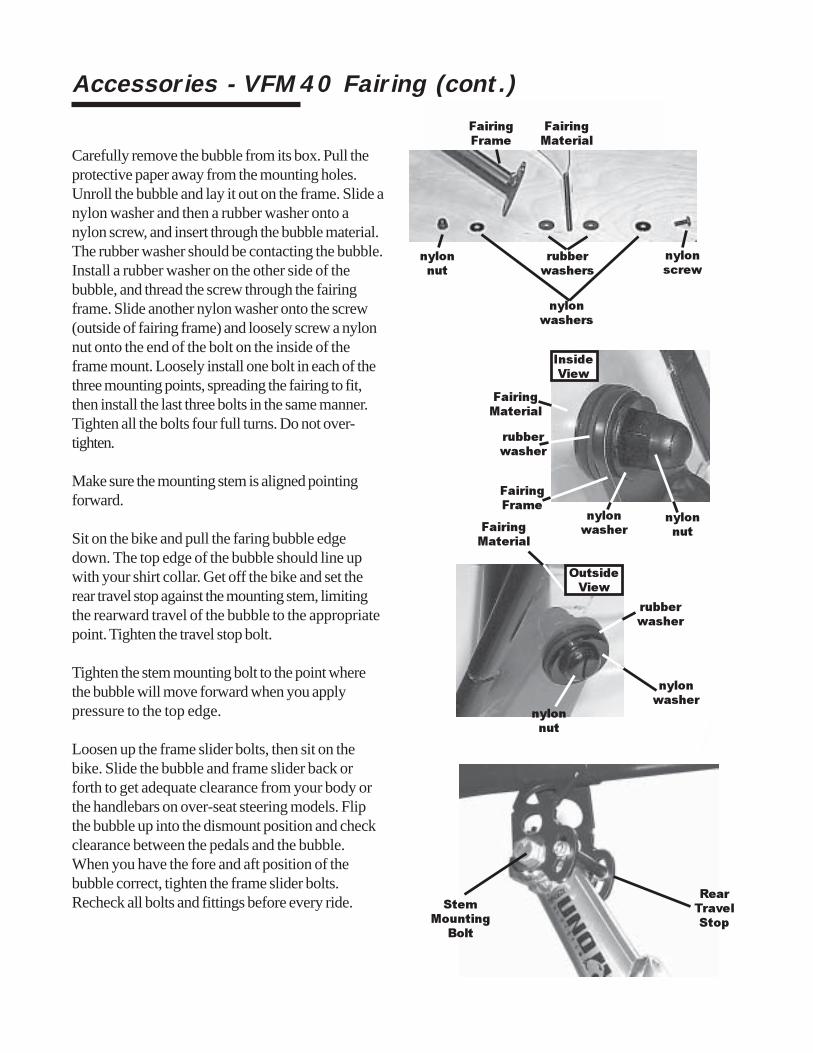
Carefully remove the bubble from its box. Pull theprotective paper away from the mounting holes.Unroll the bubble and lay it out on the frame. Slide anylon washer and then a rubber washer onto anylon screw, and insert through the bubble material.The rubber washer should be contacting the bubble.Install a rubber washer on the other side of thebubble, and thread the screw through the fairingframe. Slide another nylon washer onto the screw(outside of fairing frame) and loosely screw a nylonnut onto the end of the bolt on the inside of theframe mount. Loosely install one bolt in each of thethree mounting points, spreading the fairing to fit,then install the last three bolts in the same manner.Tighten all the bolts four full turns. Do not over-tighten.
Make sure the mounting stem is aligned pointingforward.
Sit on the bike and pull the faring bubble edgedown. The top edge of the bubble should line upwith your shirt collar. Get off the bike and set therear travel stop against the mounting stem, limitingthe rearward travel of the bubble to the appropriatepoint. Tighten the travel stop bolt.
Tighten the stem mounting bolt to the point wherethe bubble will move forward when you applypressure to the top edge.
Loosen up the frame slider bolts, then sit on thebike. Slide the bubble and frame slider back orforth to get adequate clearance from your body orthe handlebars on over-seat steering models. Flipthe bubble up into the dismount position and checkclearance between the pedals and the bubble.When you have the fore and aft position of thebubble correct, tighten the frame slider bolts.Recheck all bolts and fittings before every ride.
RearTravelStop
nylonwashers
StemMounting
Bolt
nylonwasher
rubberwasher
nylonnut
FairingFrame
FairingMaterial
rubberwashers
FairingFrame
nylonscrew
nylonnut
FairingMaterial
FairingMaterial
nylonnut
nylonwasher
rubberwasher
InsideView
OutsideView
Accessories - VFM40 Fairing (cont.)
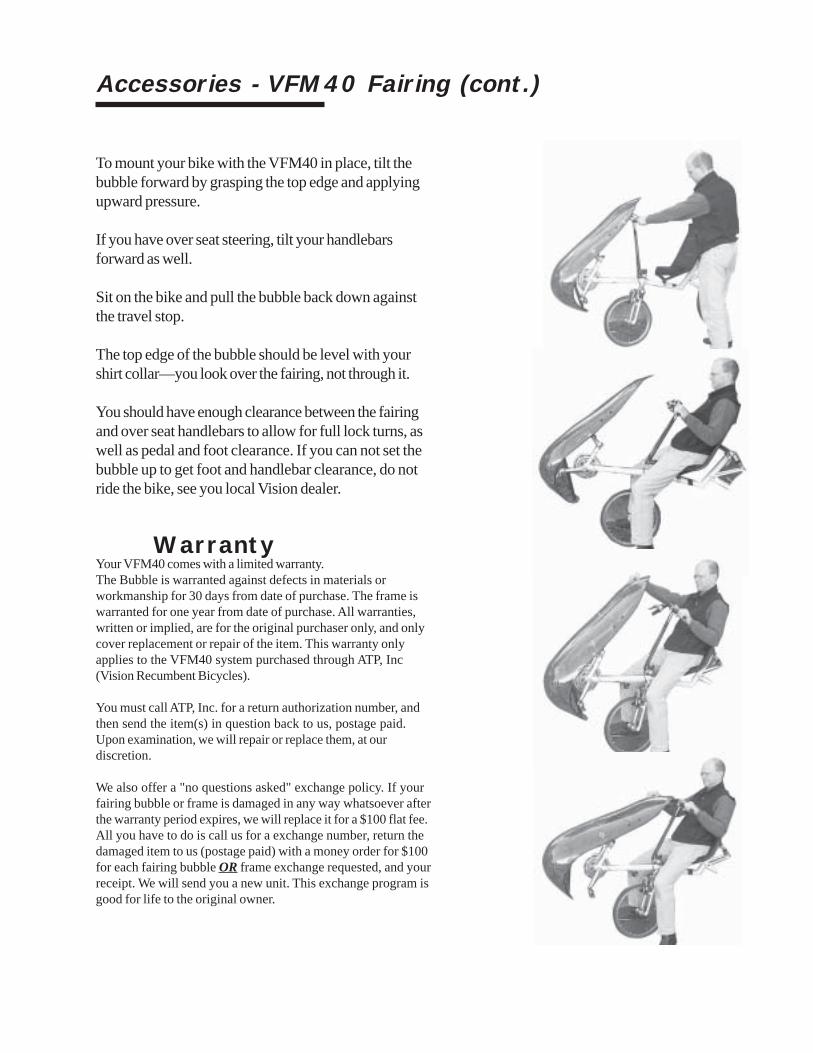
To mount your bike with the VFM40 in place, tilt thebubble forward by grasping the top edge and applyingupward pressure.
If you have over seat steering, tilt your handlebarsforward as well.
Sit on the bike and pull the bubble back down againstthe travel stop.
The top edge of the bubble should be level with yourshirt collar—you look over the fairing, not through it.
You should have enough clearance between the fairingand over seat handlebars to allow for full lock turns, aswell as pedal and foot clearance. If you can not set thebubble up to get foot and handlebar clearance, do notride the bike, see you local Vision dealer.
Your VFM40 comes with a limited warranty.The Bubble is warranted against defects in materials orworkmanship for 30 days from date of purchase. The frame iswarranted for one year from date of purchase. All warranties,written or implied, are for the original purchaser only, and onlycover replacement or repair of the item. This warranty onlyapplies to the VFM40 system purchased through ATP, Inc(Vision Recumbent Bicycles).
You must call ATP, Inc. for a return authorization number, andthen send the item(s) in question back to us, postage paid.Upon examination, we will repair or replace them, at ourdiscretion.
We also offer a "no questions asked" exchange policy. If yourfairing bubble or frame is damaged in any way whatsoever afterthe warranty period expires, we will replace it for a $100 flat fee.All you have to do is call us for a exchange number, return thedamaged item to us (postage paid) with a money order for $100for each fairing bubble OR frame exchange requested, and yourreceipt. We will send you a new unit. This exchange program isgood for life to the original owner.
Warranty
What is this bike all about?What is this bike all about?What is this bike all about?What is this bike all about?What is this bike all about?The Vision is a recumbent, designed to bethe most comfortable bicycle you have everridden.
Is it really comfortable?Is it really comfortable?Is it really comfortable?Is it really comfortable?Is it really comfortable?Just look at the seat, and imagine ridingdown the road in a nice comfortable chair.Add the fact that there is no weight on yourhands and you get to look ahead at thescenery, not at your front wheel—yes, theyare very comfortable.
Are they fast?Are they fast?Are they fast?Are they fast?Are they fast?All bikes are only as fast as the rider, but ona Vision recumbent you have a distinctaerodynamic advantage over the typical rideron an upright bike.Every human-powered land speed record isheld by recumbents, including the DuPontprize for exceeding 65 m.p.h. on a flatcourse.
Can they climb hills?Can they climb hills?Can they climb hills?Can they climb hills?Can they climb hills?Yes—the position is very efficient. Evenwithout the ability to stand up you can applytremendous power to the pedals by bracingagainst the seat back. If you are a racer whocan maintain a standing sprint on hills, youprobably will climb a little slower on arecumbent, but if you tend to downshift andspin your pedals to get up hills, you’ll beevery bit as fast on your Vision as you wereon your upright bike.
FAQ’sFAQ’sFAQ’sFAQ’sFAQ’s
There’s always a lot ofquestions asked.
Here are some of them.
If you are wondering whothe ideal customer for arecumbent is.... It’sanyone who wants acomfortable, safe, funand fast ride.
These are excellent bikesfor any road use:Touring, commuting,general sport riding, longdistance training...anything and everything.
These bikes fit most roof-top and many “receiverhitch” style car carriers.
SPD’s work great onVision bikes.
I’ve never seen these before—why?I’ve never seen these before—why?I’ve never seen these before—why?I’ve never seen these before—why?I’ve never seen these before—why?In 1932, a French racer on a recumbentshattered a 20 year-old world speed record.The officials in charge of internationalbicycle racing immediately banned allrecumbents as an “unfair advantage” anddenied the record. Without the racing circuitto help market the bikes, recumbentdevelopment ended—until recently.
Are recumbents safe?Are recumbents safe?Are recumbents safe?Are recumbents safe?Are recumbents safe?Very safe. You get to ride along feet first, nothead first. If you do drop the bike, you havemuch less distance to fall than on aconventional bike.
What about touring?What about touring?What about touring?What about touring?What about touring?Vision recumbents are the best bikes fortouring—period. The comfortable positionand great “heads-up” view can make yournext tour the best yet. Vision bikes acceptrear racks and pannier sets. You can even towa Bob or Burley trailer with your Vision.
How can I carry this bike?How can I carry this bike?How can I carry this bike?How can I carry this bike?How can I carry this bike?Vision recumbents will fit most standard roofand trunk racks. The tandems and longwheelbase Visions require a tandem roofrack.
Is a Vision difficult to maintainIs a Vision difficult to maintainIs a Vision difficult to maintainIs a Vision difficult to maintainIs a Vision difficult to maintain?All of the components used by Vision arestandard for the bicycle industry. The brakes,gears, tires, cables, and chains can all bemaintained or replaced by any bike shop,anywhere.
FAQ’s
It’s always a good idea tocarry catalogs along fora ride. Otherwise youspend all day talking, notriding.
No, they are not hard toride, yes, they arecomfortable.
R40/R44/R45R50/R54/R55R64/R65/R68all accept standard rearracks for panniers.
R82/R85accept standard rackswith our rack adaptorkit.
Bike Designs
Many different bikes fordifferent people.
Ride the different modelsyourself to get familiarwith them.
There are many different recumbent designsavailable, each different in what they offer therider. Vision is a company unique in itsdiversity, manufacturing a wide variety ofrecumbent styles.
There are two major aspects of recumbentdesign that are used to define the majority ofrecumbents available today: wheelbase andhandlebar position.
Wheelbase refers to the distance between theaxles of the bicycle. In general, there arethree different styles of bikes defined bywheelbase.
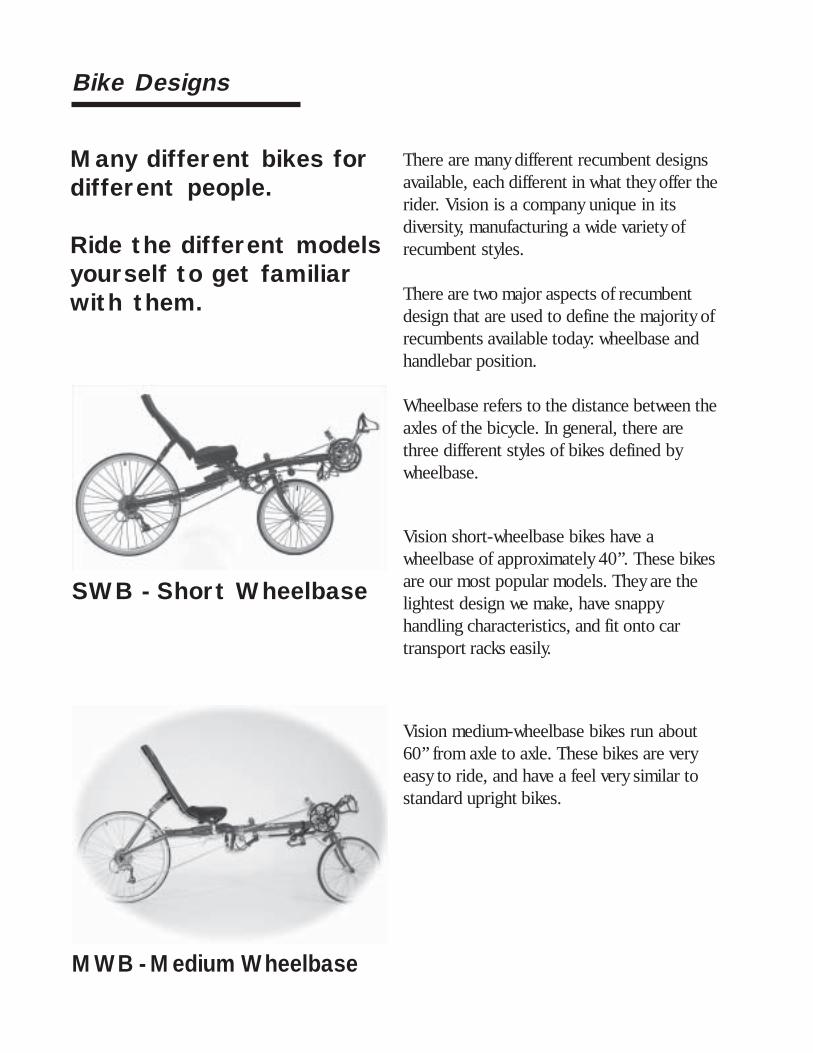
Vision short-wheelbase bikes have awheelbase of approximately 40”. These bikesare our most popular models. They are thelightest design we make, have snappyhandling characteristics, and fit onto cartransport racks easily.
Vision medium-wheelbase bikes run about60” from axle to axle. These bikes are veryeasy to ride, and have a feel very similar tostandard upright bikes.
SWB - Short Wheelbase
MWB - Medium Wheelbase
The other major design aspect of recumbentsis the handlebar position.
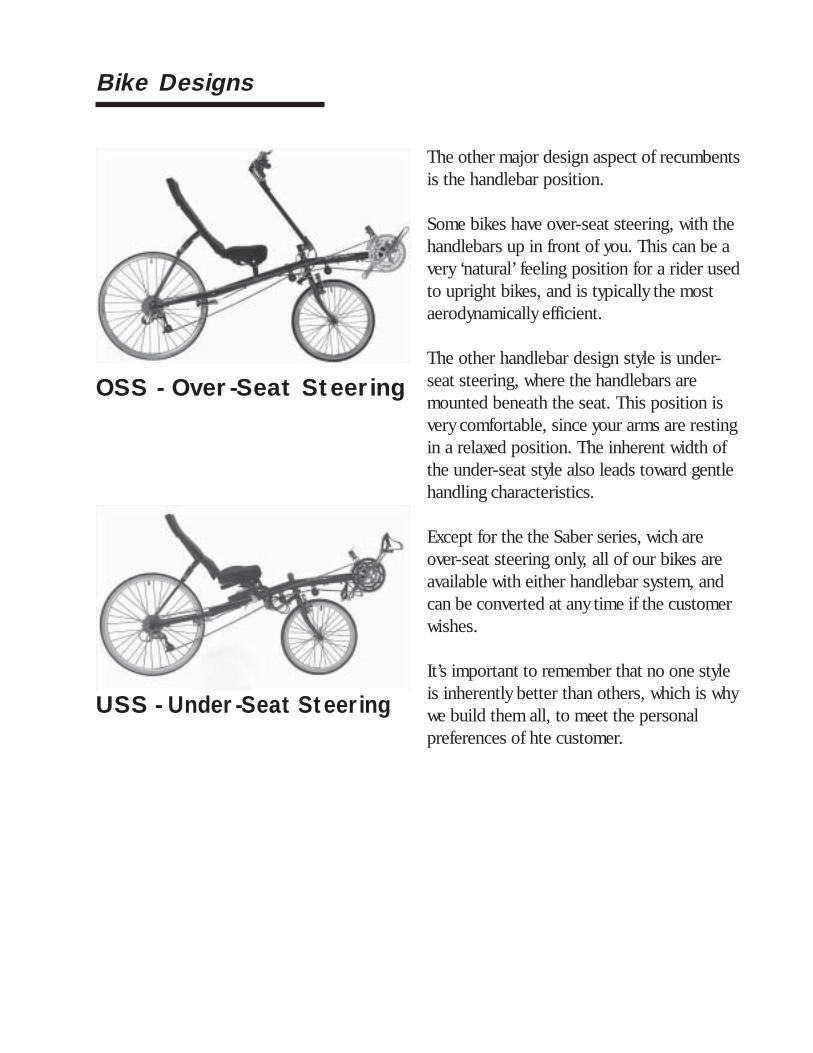
Some bikes have over-seat steering, with thehandlebars up in front of you. This can be avery ‘natural’ feeling position for a rider usedto upright bikes, and is typically the mostaerodynamically efficient.
The other handlebar design style is under-seat steering, where the handlebars aremounted beneath the seat. This position isvery comfortable, since your arms are restingin a relaxed position. The inherent width ofthe under-seat style also leads toward gentlehandling characteristics.
Except for the the Saber series, wich areover-seat steering only, all of our bikes areavailable with either handlebar system, andcan be converted at any time if the customerwishes.
It’s important to remember that no one styleis inherently better than others, which is whywe build them all, to meet the personalpreferences of hte customer.
Bike Designs
OSS - Over-Seat Steering
USS - Under-Seat Steering
Fitting and Demos To get someone to buy a Vision, they have totry a Vision (you too!).
We use two different methods for adjusting abike to fit the rider.
On the stoker seat of the tandem, we use asliding seat assembly. Simply loosen the QRskewers, and slide the seat to an appropriateposition. The proper leg length setting is thesame as it is on an upright bike... legextended but not locked.
For 2002, all of our bikes (except thetandem) feature the Instqant-Adjust boom.To set the bike to fit a rider, loosen the QRskewer on the boom and slide the crankuntil the rider’s outstretched heel is againstthe pedal. Tighten the skewer and you areready to ride.
Unlike upright bikes, Vision recumbents arenot prejudiced against female riders. Sincethe rider does not carry any of their weightwith their hands, the traditional fittingissues about stem and top tube length donot apply. Everyone can be comfortable on aVision.
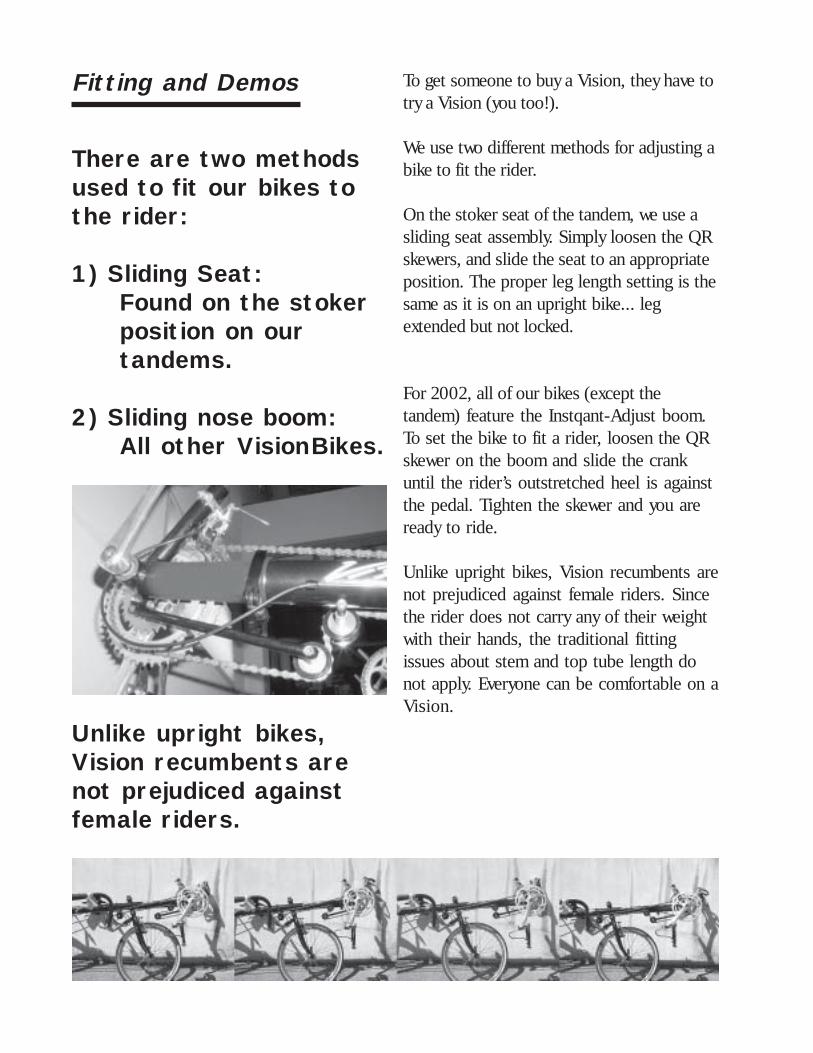
There are two methodsused to fit our bikes tothe rider:
1) Sliding Seat:Found on the stokerposition on ourtandems.
2) Sliding nose boom:All other VisionBikes.
Unlike upright bikes,Vision recumbents arenot prejudiced againstfemale riders.
Fitting and Demos
If the customer has never been on a recumbent before, try the seat back angle at the fullforward position. If they have had recumbent experience, set it in the middle of the adjust-ment range.
Adjust the bike to fit the customer’s leg length.
Choose a large test ride area with as few obstacles as possible. Make sure the customer islined up on a long straight section at the start so they don’t have to turn right away.
Stand behind the seat, straddling the rear wheel, and hold the bike for the customer bygrasping the top of the seat back.
Have the customer sit in the seat and grab the brakes. Some riders will try to sit forward inthe seat - make sure they lean back and relax!
Brief them on the starting technique; one foot on the ground, the other on a pedal at a 12:00midnight position. Just give a good push on the pedal to start.
Assure the rider that the VISION is a real bike, and their normal instincts will take over. Theyshould not be putting any weight on the handlebars - tell them to RELAX, don’t tense up —you may have to repeat that!
Make sure the customer is looking forward normally, and not staring at their feet. Start themforward, holding on to the bike and moving with them. After a few feet you will be able to tellif they “get it” — more than likely they will just ride away and come back all smiles! Tellthem to RELAX.
Occasionally a rider just can’t seem to get the hang of a recumbent their first try. The wife ofone of the engineers, who now has over 15,000 miles on her VISION, couldn’t ride herrecumbent the first day she tried. The second day she got on and rode right off - assure yourcustomer that a bit of time to “think about it” might work.
Make sure you go over the unique features of the VISION with your customer, and try differ-ent adjustments such as seat back angle and handlebar position.
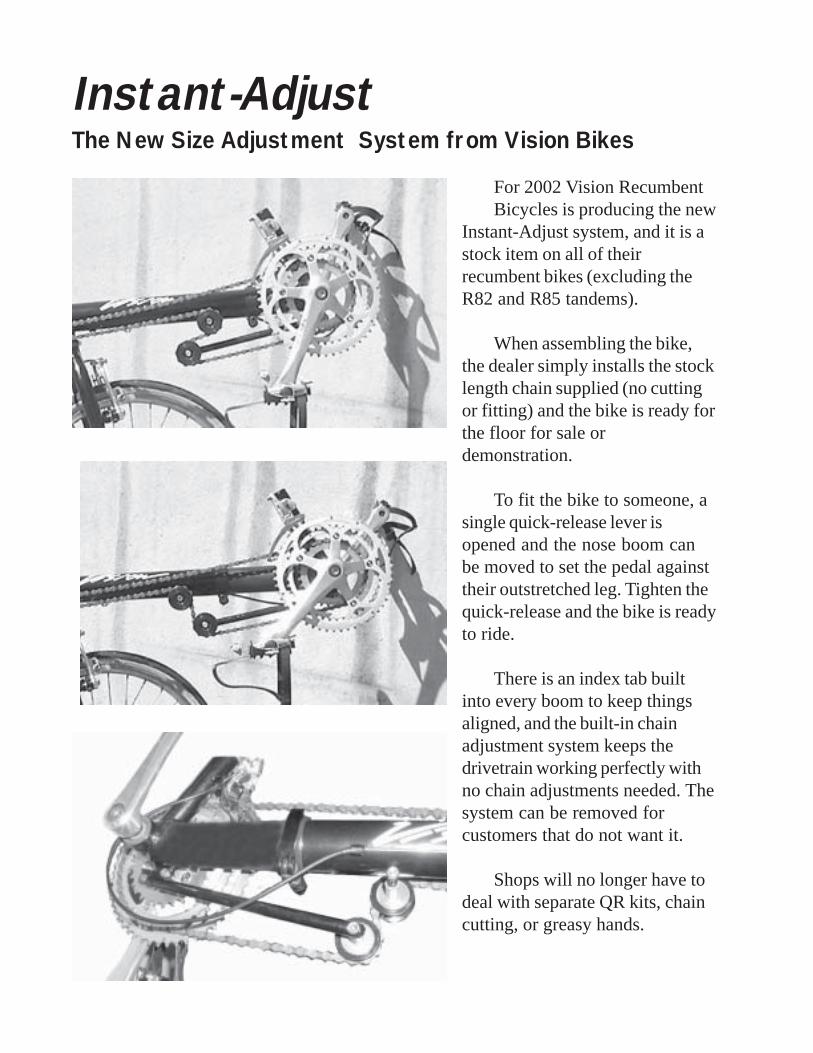
Instant-AdjustThe New Size Adjustment System from Vision Bikes
For 2002 Vision RecumbentBicycles is producing the new
Instant-Adjust system, and it is astock item on all of theirrecumbent bikes (excluding theR82 and R85 tandems).
When assembling the bike,the dealer simply installs the stocklength chain supplied (no cuttingor fitting) and the bike is ready forthe floor for sale ordemonstration.
To fit the bike to someone, asingle quick-release lever isopened and the nose boom canbe moved to set the pedal againsttheir outstretched leg. Tighten thequick-release and the bike is readyto ride.
There is an index tab builtinto every boom to keep thingsaligned, and the built-in chainadjustment system keeps thedrivetrain working perfectly withno chain adjustments needed. Thesystem can be removed forcustomers that do not want it.
Shops will no longer have todeal with separate QR kits, chaincutting, or greasy hands.
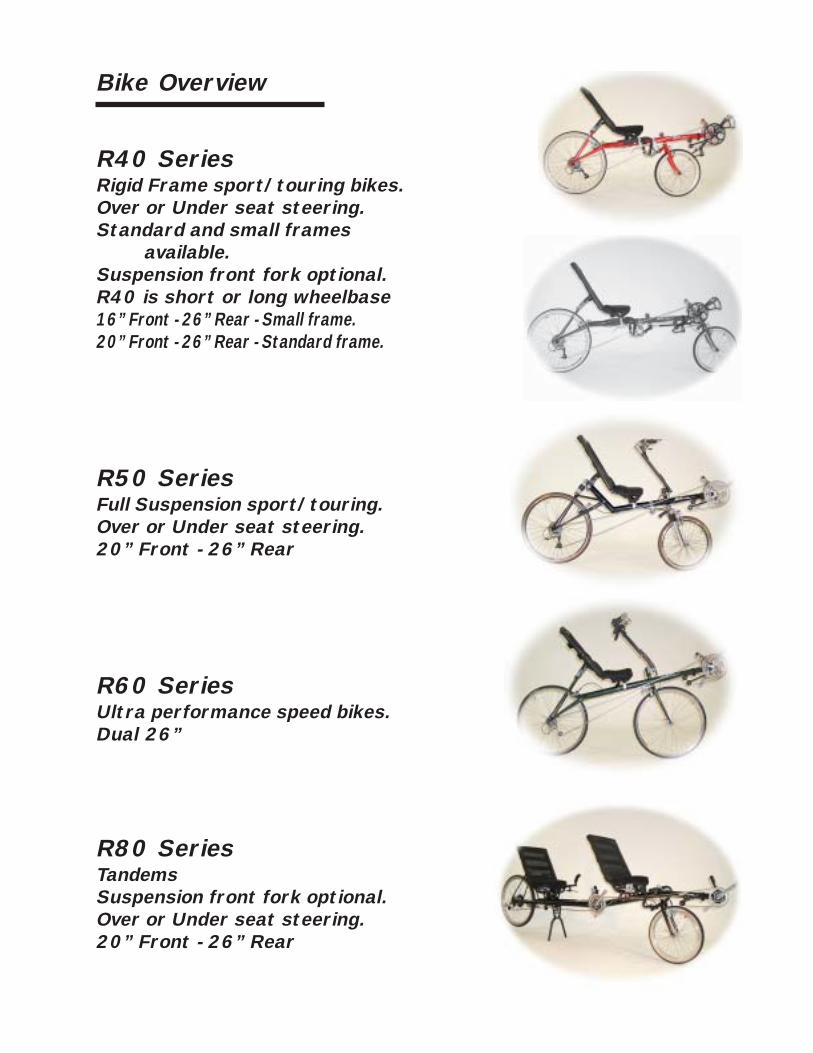
Bike Overview
R40 SeriesRigid Frame sport/touring bikes.Over or Under seat steering.Standard and small frames
available.Suspension front fork optional.R40 is short or long wheelbase16” Front - 26” Rear - Small frame.20” Front - 26” Rear - Standard frame.
R50 SeriesFull Suspension sport/touring.Over or Under seat steering.20” Front - 26” Rear
R60 SeriesUltra performance speed bikes.Dual 26”
R80 SeriesTandemsSuspension front fork optional.Over or Under seat steering.20” Front - 26” Rear
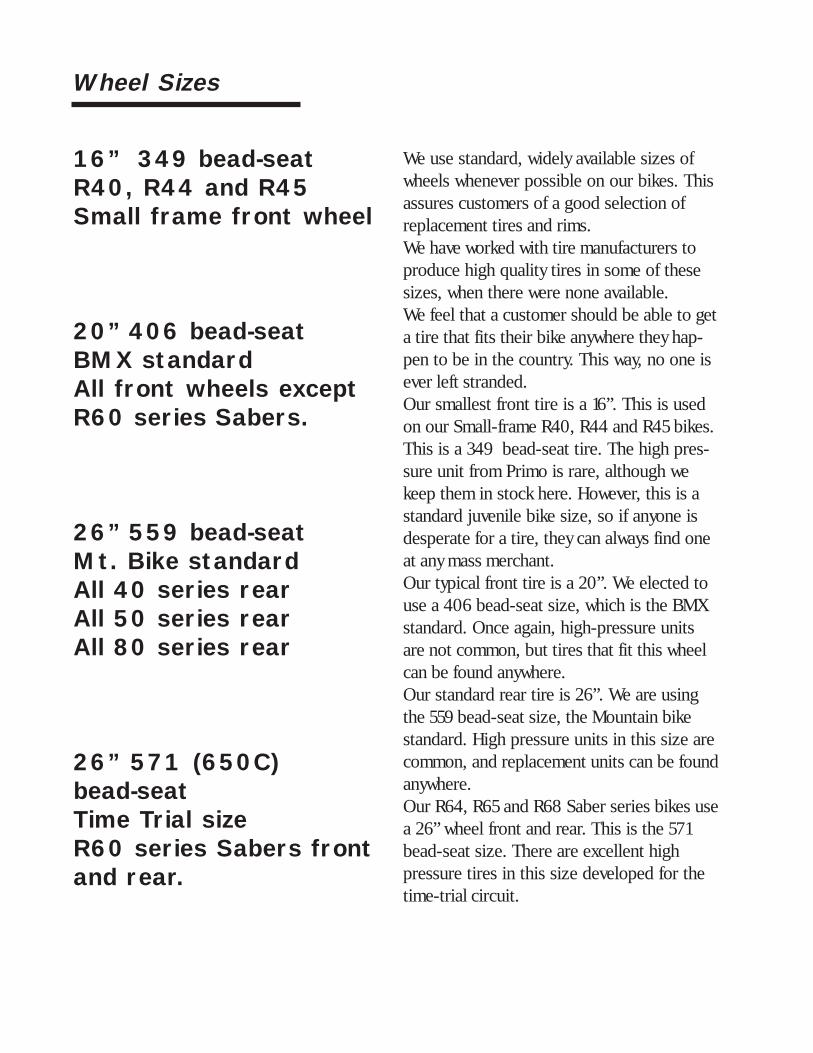
Wheel Sizes
We use standard, widely available sizes ofwheels whenever possible on our bikes. Thisassures customers of a good selection ofreplacement tires and rims.We have worked with tire manufacturers toproduce high quality tires in some of thesesizes, when there were none available.We feel that a customer should be able to geta tire that fits their bike anywhere they hap-pen to be in the country. This way, no one isever left stranded.Our smallest front tire is a 16”. This is usedon our Small-frame R40, R44 and R45 bikes.This is a 349 bead-seat tire. The high pres-sure unit from Primo is rare, although wekeep them in stock here. However, this is astandard juvenile bike size, so if anyone isdesperate for a tire, they can always find oneat any mass merchant.Our typical front tire is a 20”. We elected touse a 406 bead-seat size, which is the BMXstandard. Once again, high-pressure unitsare not common, but tires that fit this wheelcan be found anywhere.Our standard rear tire is 26”. We are usingthe 559 bead-seat size, the Mountain bikestandard. High pressure units in this size arecommon, and replacement units can be foundanywhere.Our R64, R65 and R68 Saber series bikes usea 26” wheel front and rear. This is the 571bead-seat size. There are excellent highpressure tires in this size developed for thetime-trial circuit.
16” 349 bead-seatR40, R44 and R45Small frame front wheel
20” 406 bead-seatBMX standardAll front wheels exceptR60 series Sabers.
26” 559 bead-seatMt. Bike standardAll 40 series rearAll 50 series rearAll 80 series rear
26” 571 (650C)bead-seatTime Trial sizeR60 series Sabers frontand rear.
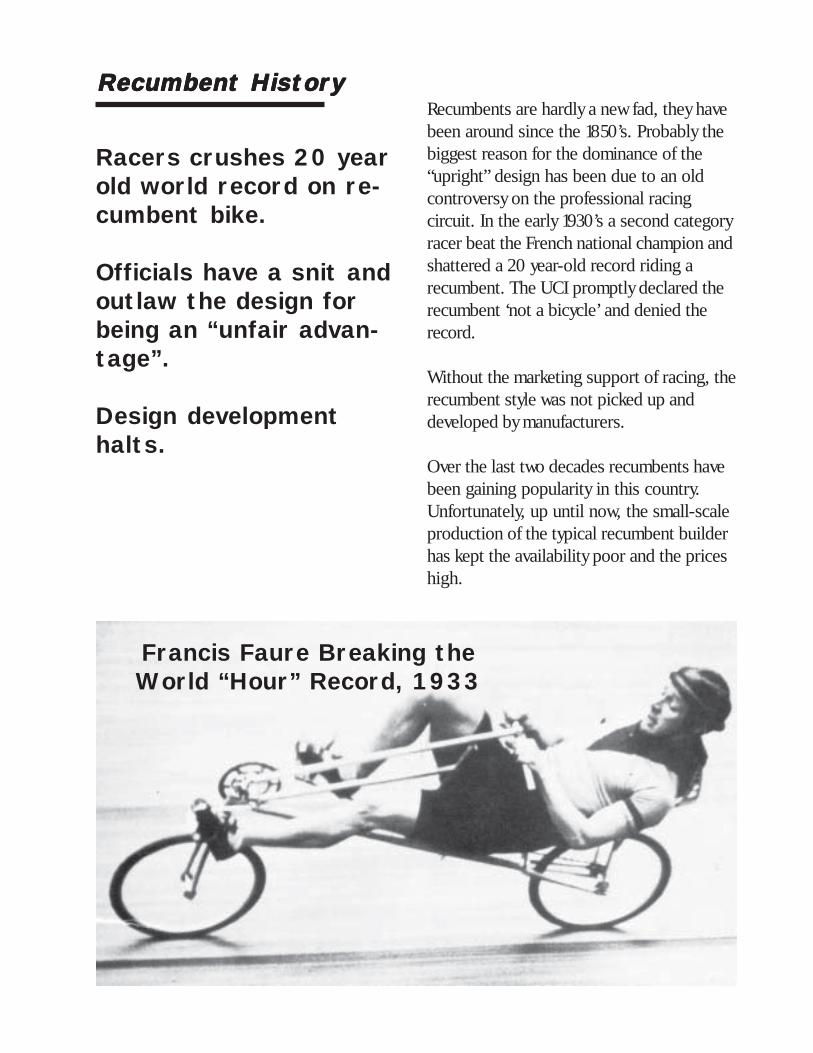
Recumbents are hardly a new fad, they havebeen around since the 1850’s. Probably thebiggest reason for the dominance of the“upright” design has been due to an oldcontroversy on the professional racingcircuit. In the early 1930’s a second categoryracer beat the French national champion andshattered a 20 year-old record riding arecumbent. The UCI promptly declared therecumbent ‘not a bicycle’ and denied therecord.
Without the marketing support of racing, therecumbent style was not picked up anddeveloped by manufacturers.
Over the last two decades recumbents havebeen gaining popularity in this country.Unfortunately, up until now, the small-scaleproduction of the typical recumbent builderhas kept the availability poor and the priceshigh.
Francis Faure Breaking theWorld “Hour” Record, 1933
Recumbent HistorRecumbent HistorRecumbent HistorRecumbent HistorRecumbent Historyyyyy
Racers crushes 20 yearold world record on re-cumbent bike.
Officials have a snit andoutlaw the design forbeing an “unfair advan-tage”.
Design developmenthalts.

Vision introduces the next generation of Comfort Bikes;
The V70 and V72“Thoroughbred” uprights.
Known for its line of Vision Recumbent Bicycles, ATP is now expanding their bicycleline to include upright bicycles.
“Comfort Bikes are the newest growth market in our industry, but most companiesare not doing enough to truly improve the comfort of upright bikes”, according to JoeSmith, President of ATP, Inc. “You can simply bolt on a big saddle or widerhandlebars, but we wanted to do something that would make a real difference in thebike”.
With their experience in recumbent design, ATPis well versed in comfort. The desire to expandtheir product line with more mainstreamproducts, coupled with some real ground updesign work has lead to the development of thenew V70 and V72 bikes.
“Your typical rider wants a bike that they canride without the discomfort of supporting a largeportion of their weight on their hands. They wantto be able to easily reach the ground from thesaddle. They want a bike that is easy to mountand dismount, and they want to see where theyare going” continues Mr. Smith.
“We have studied tradition bicycles extensively,and also have a lot of experience with therecumbent riding position. What we have donewith the 70 series is to rotate the rider’straditional upright position back 22 degrees, andmoved the seat, handlebars and cranksetappropriately. We now have the saddle lowenough to the ground to reach, when the seat tocrank position is set correctly. We’ve reducedthe weight on the rider’s hands, and lifted theirhead up enough to give them a better view.”
The V70 has a suggested retail price of $695,and the upgraded components on the V72 willgenerate a retail price of $859. Available now.
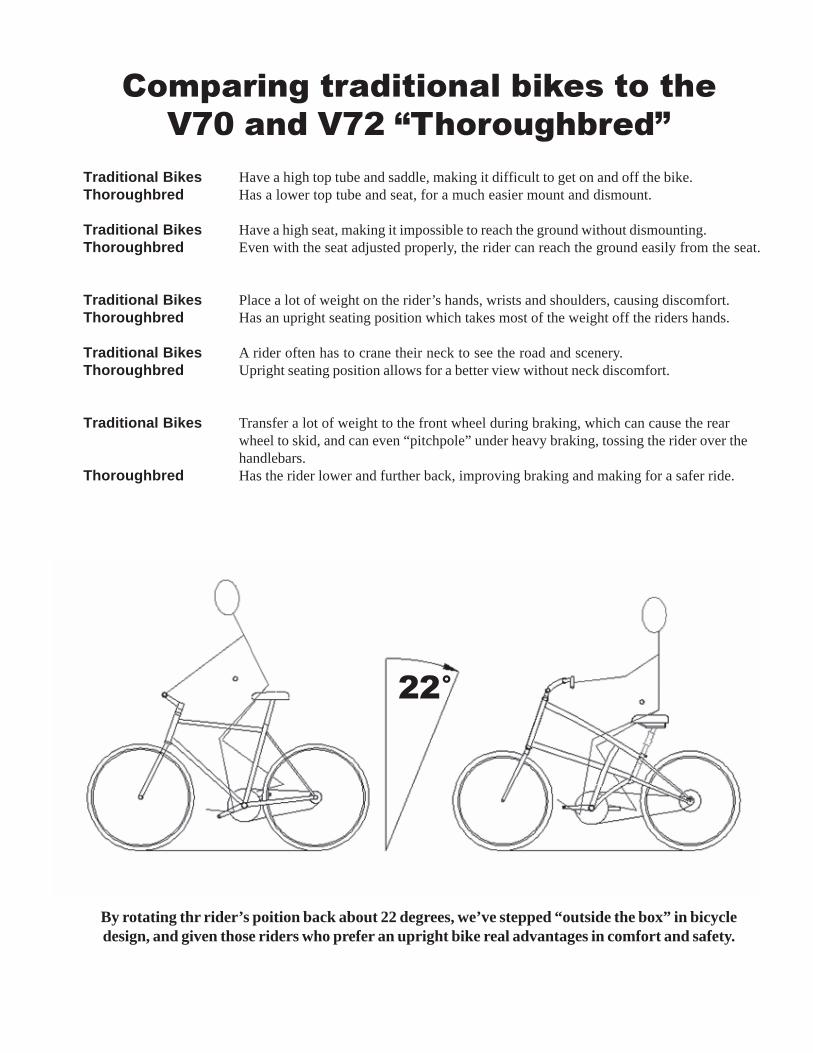
Traditional Bikes Have a high top tube and saddle, making it difficult to get on and off the bike.Thoroughbred Has a lower top tube and seat, for a much easier mount and dismount.
Traditional Bikes Have a high seat, making it impossible to reach the ground without dismounting.Thoroughbred Even with the seat adjusted properly, the rider can reach the ground easily from the seat.
Traditional Bikes Place a lot of weight on the rider’s hands, wrists and shoulders, causing discomfort.Thoroughbred Has an upright seating position which takes most of the weight off the riders hands.
Traditional Bikes A rider often has to crane their neck to see the road and scenery.Thoroughbred Upright seating position allows for a better view without neck discomfort.
Traditional Bikes Transfer a lot of weight to the front wheel during braking, which can cause the rearwheel to skid, and can even “pitchpole” under heavy braking, tossing the rider over thehandlebars.
Thoroughbred Has the rider lower and further back, improving braking and making for a safer ride.
Comparing traditional bikes to the
V70 and V72 “Thoroughbred”
By rotating thr rider’s poition back about 22 degrees, we’ve stepped “outside the box” in bicycledesign, and given those riders who prefer an upright bike real advantages in comfort and safety.
22°
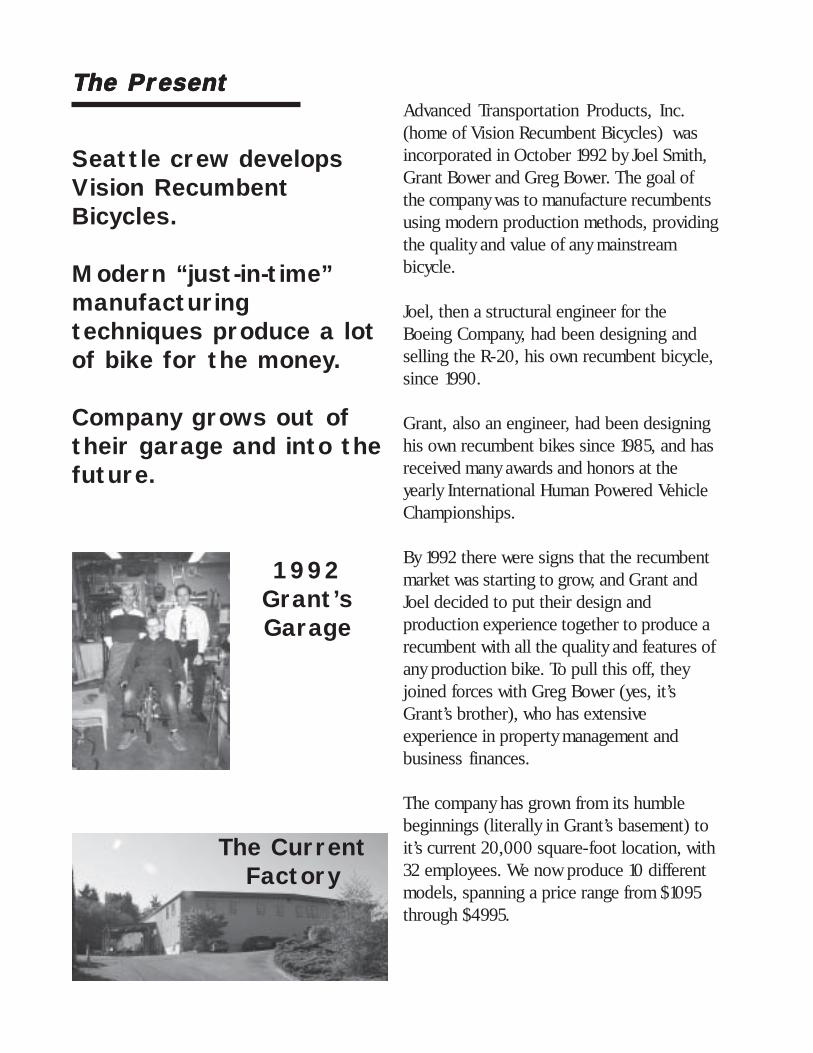
Advanced Transportation Products, Inc.(home of Vision Recumbent Bicycles) wasincorporated in October 1992 by Joel Smith,Grant Bower and Greg Bower. The goal ofthe company was to manufacture recumbentsusing modern production methods, providingthe quality and value of any mainstreambicycle.
Joel, then a structural engineer for theBoeing Company, had been designing andselling the R-20, his own recumbent bicycle,since 1990.
Grant, also an engineer, had been designinghis own recumbent bikes since 1985, and hasreceived many awards and honors at theyearly International Human Powered VehicleChampionships.
By 1992 there were signs that the recumbentmarket was starting to grow, and Grant andJoel decided to put their design andproduction experience together to produce arecumbent with all the quality and features ofany production bike. To pull this off, theyjoined forces with Greg Bower (yes, it’sGrant’s brother), who has extensiveexperience in property management andbusiness finances.
The company has grown from its humblebeginnings (literally in Grant’s basement) toit’s current 20,000 square-foot location, with32 employees. We now produce 10 differentmodels, spanning a price range from $1095through $4995.
The PrThe PrThe PrThe PrThe Presentesentesentesentesent
1992Grant’sGarage
The CurrentFactory
Seattle crew developsVision RecumbentBicycles.
Modern “just-in-time”manufacturingtechniques produce a lotof bike for the money.
Company grows out oftheir garage and into thefuture.

Notes

AAAAATPTPTPTPTP, Inc, Inc, Inc, Inc, IncPPPPP.O. Box 249.O. Box 249.O. Box 249.O. Box 249.O. Box 249
Mountlake TMountlake TMountlake TMountlake TMountlake Terrace, Werrace, Werrace, Werrace, Werrace, WA 94043A 94043A 94043A 94043A 94043
(Shipping only) 6304 215th St SWMountlake TMountlake TMountlake TMountlake TMountlake Terrace, Werrace, Werrace, Werrace, Werrace, WA 94043A 94043A 94043A 94043A 94043
Advanced Transportation Products, IncMailing: P.O. Box 249
Shipping Only: 6304 215th St SWMountlake Terrace, WA 98043425-673-2448 Fax 673-4668