Embed Size (px)
Citation preview
FUT92714: Have a Lot of
Fun with SLES
Jay KruemckeProduct Manager
@mr_sles
(AKA Getting Started with SLES on the Raspberry Pi)

Introducing
SUSE Linux Enterprise 12 for the Raspberry Pi
• 64-bit SLES 12 distribution for the Raspberry Pi 3 Model B
- Will not work on earlier, 32-bit Raspberry Pi models
• Packaged as an image that is ready to copy to an SD Card
• Includes compilers and development tools
• Comes with a free one year self service subscription
• Enabled for Wi-Fi, Bluetooth, HDMI, Ethernet, and GPIO
• Download from https://tinyurl.com/slespi
• Quick start guide on https://www.suse.com/documentation/suse-best-practices/
• Q&A support on https://forums.suse.com/forum.php
2
$35 computer with 64 bit ARM processor
No Commercial Support

Why?
Raspberry Pi is the most successful educational
computer ever sold (10 Million shipped so far)
Raspberry Pi 3 Model B uses a Broadcom
BCM2837 64-bit A53 ARM processor
We wanted to introduce SUSE and SUSE Linux
Enterprise to a wider audience.
It looked like fun!
3

How to get your hands on SLES for the Raspberry Pi
Download the image from SUSE at http://tinyurl.com/slespi
Comes with a free one year self service trial subscription!
4
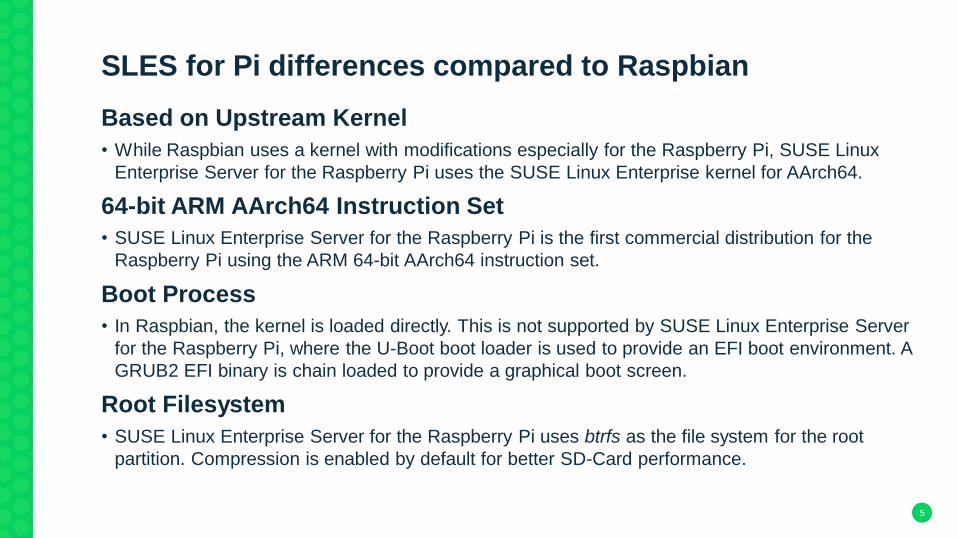
SLES for Pi differences compared to Raspbian
Based on Upstream Kernel
• While Raspbian uses a kernel with modifications especially for the Raspberry Pi, SUSE Linux
Enterprise Server for the Raspberry Pi uses the SUSE Linux Enterprise kernel for AArch64.
64-bit ARM AArch64 Instruction Set
• SUSE Linux Enterprise Server for the Raspberry Pi is the first commercial distribution for the
Raspberry Pi using the ARM 64-bit AArch64 instruction set.
Boot Process
• In Raspbian, the kernel is loaded directly. This is not supported by SUSE Linux Enterprise Server
for the Raspberry Pi, where the U-Boot boot loader is used to provide an EFI boot environment. A
GRUB2 EFI binary is chain loaded to provide a graphical boot screen.
Root Filesystem
• SUSE Linux Enterprise Server for the Raspberry Pi uses btrfs as the file system for the root
partition. Compression is enabled by default for better SD-Card performance.
5

Writing the SLES for the Raspberry Pi image to an SD Card
SLES for the Raspberry Pi is delivered as a compressed image file
(.xv format) that must be uncompressed before writing to the Micro
SD Card.
You should use an Micro SD Card of at least 8GB of capacity
The instructions on the following slides assume you have already
downloaded the compressed SLES for Pi image
Note: All data on the SD Card will be overwritten!
6

Writing the SLES image to the SD Card on Linux
• Before and after you plug in the SD card, run the lsblk command. Then insert the SD Card and
run lsblk again. Between the two runs of lsblk , there should be a difference of one or more lines.
The first column and first row is the name of the node representing the SD card in your system.
• To write the image to the card, use the dd command:
For example:
7

Writing the SLES image to the SD Card on Windows
• You will need to obtain two free software packages to write the SLES for PI image to an SD
Card when using Windows:
- Easy 7-Zip http://www.e7z.org/
- Win32 Disk Imager http://sourceforge.net/projects/win32diskimager/
• Open the downloaded .xv image using Easy-7-Zip.
• Extract the file content into a folder with sufficient free space.
• Run Win32DiskImager and select the extracted (.raw) image file.
Then choose the correct drive letter for the SD Card as Device.
Click on Write to start the procedure.
8
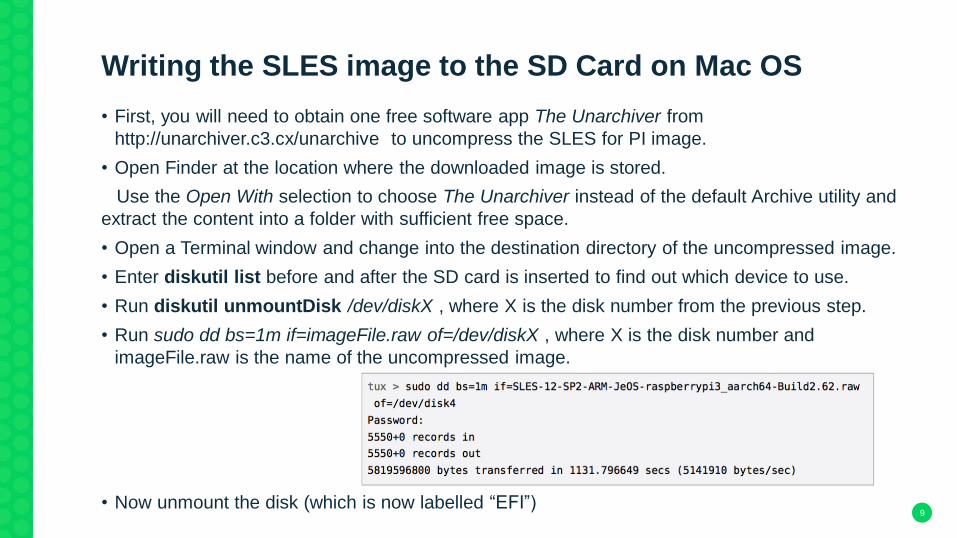
Writing the SLES image to the SD Card on Mac OS
• First, you will need to obtain one free software app The Unarchiver from
http://unarchiver.c3.cx/unarchive to uncompress the SLES for PI image.
• Open Finder at the location where the downloaded image is stored.
Use the Open With selection to choose The Unarchiver instead of the default Archive utility and
extract the content into a folder with sufficient free space.
• Open a Terminal window and change into the destination directory of the uncompressed image.
• Enter diskutil list before and after the SD card is inserted to find out which device to use.
• Run diskutil unmountDisk /dev/diskX , where X is the disk number from the previous step.
• Run sudo dd bs=1m if=imageFile.raw of=/dev/diskX , where X is the disk number and
imageFile.raw is the name of the uncompressed image.
• Now unmount the disk (which is now labelled “EFI”)9

Initial boot of SLES for the Raspberry Pi
• For best results, attach a keyboard, mouse, HDMI and Ethernet to the Raspberry Pi.
• On the first boot, the system will expand to fill the entire SD card, so please be patient.
• After a few minutes, YaST will lead you through the initial system setup. For each screen, use
the drop- down boxes and click Next.
- Set up the network
- Set the language and keyboard
- Read the Welcome
10

Initial boot of SLES for the Raspberry Pi - EULA
• You must read the End User License Agreement (EULA), click the box to accept and then
press “Next”
11

Initial boot of SLES for the Raspberry Pi – Time Zone
• If the time and date shown at the bottom
of the screen are incorrect, setup the
Network Time Protocol client by following
these steps:
- Click Other Settings to open the NTPD
configuration
- Click Other Settings to synchronize date and
time with NTPD
- After the synchronization is complete, click
Accept to return to the Time and Date overview
- Click Next to proceed
12

Initial boot of SLES for the Raspberry Pi – Default User
• Unlike Raspbian, you must create a
default user and set a password
• Note: Automatic Login not supported
- Automatic Login is not supported by xdm , the
default display manager. Install gdm after the
installation to make it work.
13

Initial boot of SLES for the Raspberry Pi – Root Password
• If you skipped the previous step, you will be required to set a root password now
14

Initial boot of SLES for the Raspberry Pi – Activation
• You should use the activation code you were given to register this system
Note: If you do not register, you cannot install additional packages and updates
15

Initial boot of SLES for the Raspberry Pi – Finished
• You have completed the installation. Click Finish to complete the first boot wizard.
16

ICE Window Manager: SLES for the Raspberry Pi
• SLES for the Raspberry uses the ICE window manager to provide good performance
17

Tips and restrictions
• Docker are not included in SLES for Pi
• It is strongly advised that you use version 6 of the gcc for
compiling software. Use gcc-6 instead of gcc
• To enable Bluetooth, run the following commands
• You can then use hciconfig hci0 up to bring the device up and use hcitool scan to scan
the environment for discoverable devices.
• No commercial support is currently offered. Any questions should
be submitted to the SLES for Raspberry Pi forum on
https://forums.suse.com/forum.php18

Have lots of fun!
19