Embed Size (px)
DESCRIPTION
Make it Make it Also in this issue ... • Outdoor spaces • DIY garden chaise and table • Cushions galore • Problem exteriors • Pole dancing in the kitchen • Furniture for indoors or outdoors It’s all about caring for and improving your home September 2010
Citation preview

Home-DzineIt’s all about caring for and improving your home
September 2010
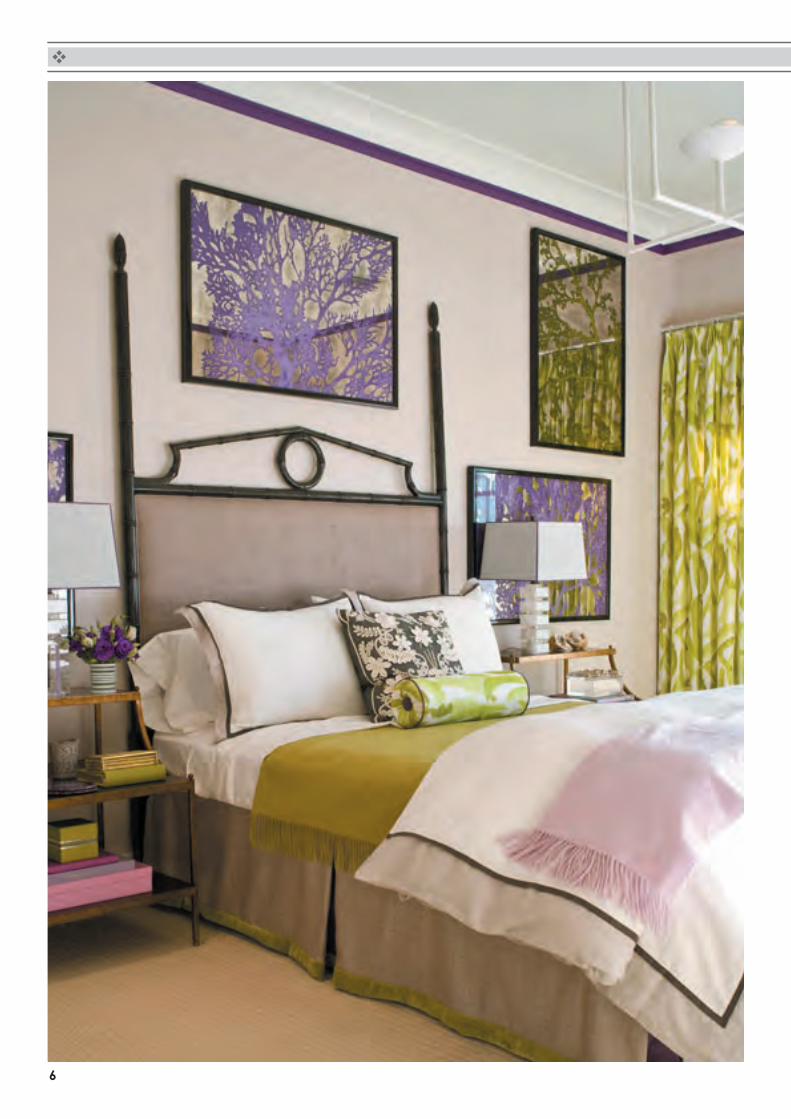
spring is in the air
online
Also in this issue ...• Outdoor spaces • DIY garden chaise and table• Cushions galore • Problem exteriors• Pole dancing in the kitchen • Furniture for indoors or outdoors
Makeit
Makeit

Home-Dzine Online is written and compiled by Janice Anderssen. All projects in this issue, or any other issue, remain the property of Home-Dzine and Janice Anderssen, or the respective copyright holders, and may not be copied or reproduced in any manner whatsoever without written permission.
Image and content credits:meredith publishing - good homes - family handyman - sunset publishing - popular mechanic - house & home - georgia pacific- expert village - channel4 - pottery barn - flikr - nkba - resene - mitre10 - lowes and any others.
Do it!
We’re heading into spring and now is the perfect time to tackle all your outdoor projects so that the garden, deck or pool is perfect for the summer ahead.
This month we have a special feature on outdoors, with some really great - and easy - projects that you can get your teeth into.
If you do start any projects, don’t forget to enter the Home-Dzine Bosch Hamper competition - there are some really, really great prizes up for grabs. Click here for details.
Enjoy!
Janice
a word or two Ladies Night
Wednesday night is Ladies Night at DIY Divas in Randpark Ridge.
Join the DIY Divas for an evening of crafty DIY and start creating your
own unique home decor.
Janice and Nancy show you new and affordable ways to update your
home and provide you with tips, tricks and techniques to show you
just how easy it is.
You will use a variety of hand and power tools at the workshops.
It’s about learning the tips, tricks and techniques so that you will be able to
go home and tackle any project!
Where: Randpark Ridge Time: 06:00 - 20H00 Cost: R250 pp (incl refreshments & snacks)
CLICK HERE TO BOOK NOW
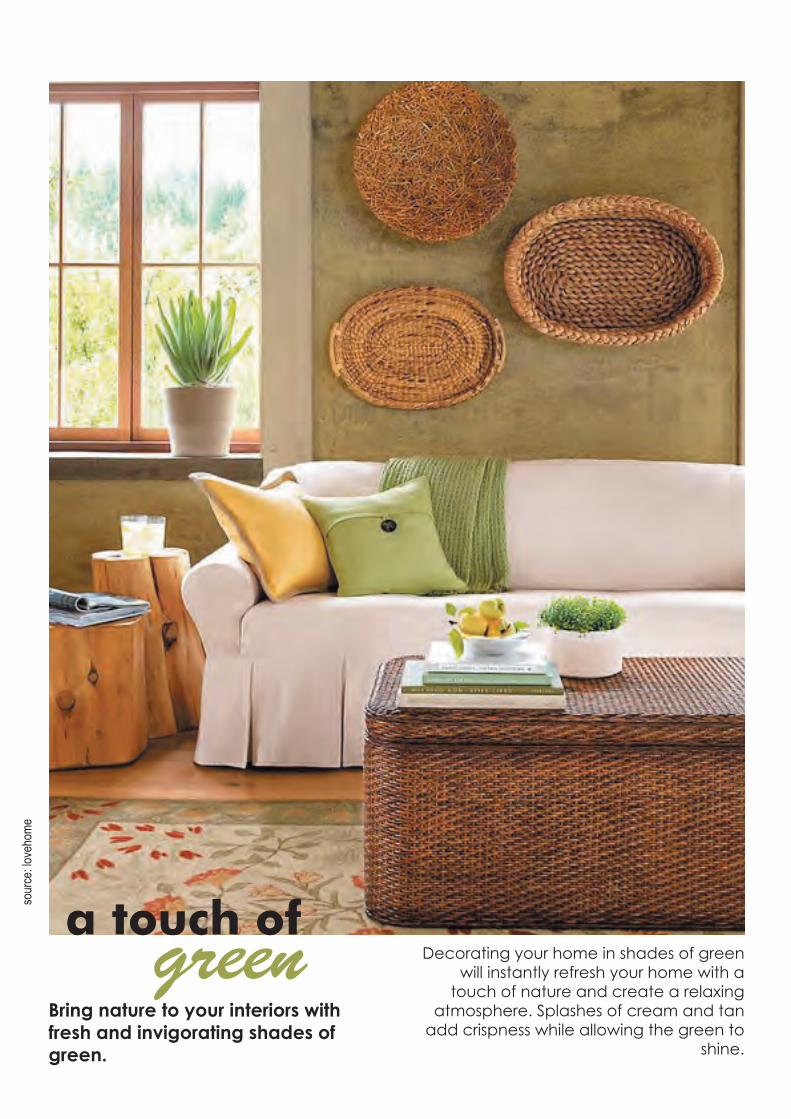
a touch ofgreenBring nature to your interiors with fresh and invigorating shades of green.
Decorating your home in shades of green will instantly refresh your home with a
touch of nature and create a relaxing atmosphere. Splashes of cream and tan
add crispness while allowing the green to shine.
sour
ce: lo
veho
me

2
Green is a soothing and rejuvenating colour, which is why it is often used in health spas. You can harness zesty limes to create an exhilarating and energising scheme or opt for toned down mint for a relaxing and restful atmosphere. Green is the ideal colour for a study, living room, bathroom or hallway, but if you are really a fan, you can make a green colour scheme work in any room of the house.
For a calming, monochromatic colour scheme opt for three shades of the same colour. This is also known as a tonal scheme and uses colours that sit on the same segment of the colour wheel. These become progressively lighter as the
colour is mixed with greater quantities of white. Add interest to a tonal scheme with a variety of textures, like a woollen throw, silk curtains and crushed or velvet cushions.
See further for instructions on how to
make this solid coffee table.
3
4
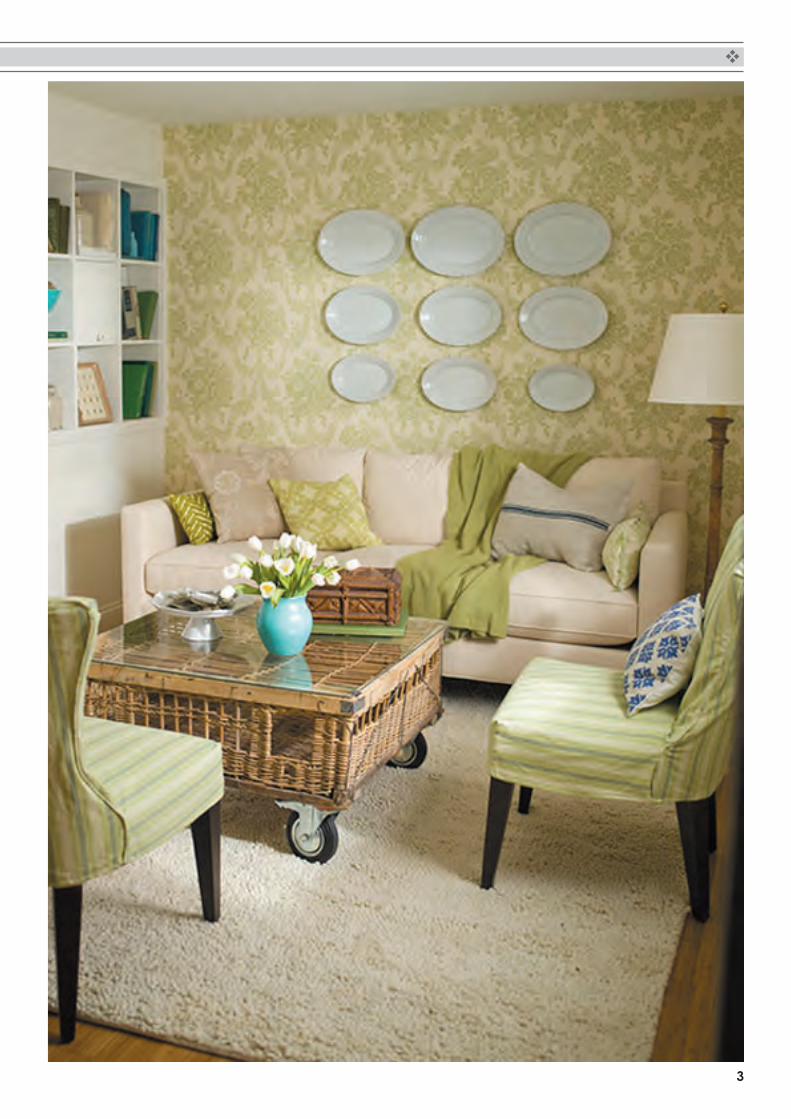
PREVIOUS PAGE: Colour combinations work best in larger scale floral prints orbold geometric patterns. When using a complementary palette, try painting three walls green and papering the fourth feature wall with a print that brings in contrasting colours.
Think naturallyNature always offers inspiration, even for the most flamboyant colour schemes. Thinkof the combination of orange and green in a bird of paradise bloom or the red body and blue and green wings of a macaw.
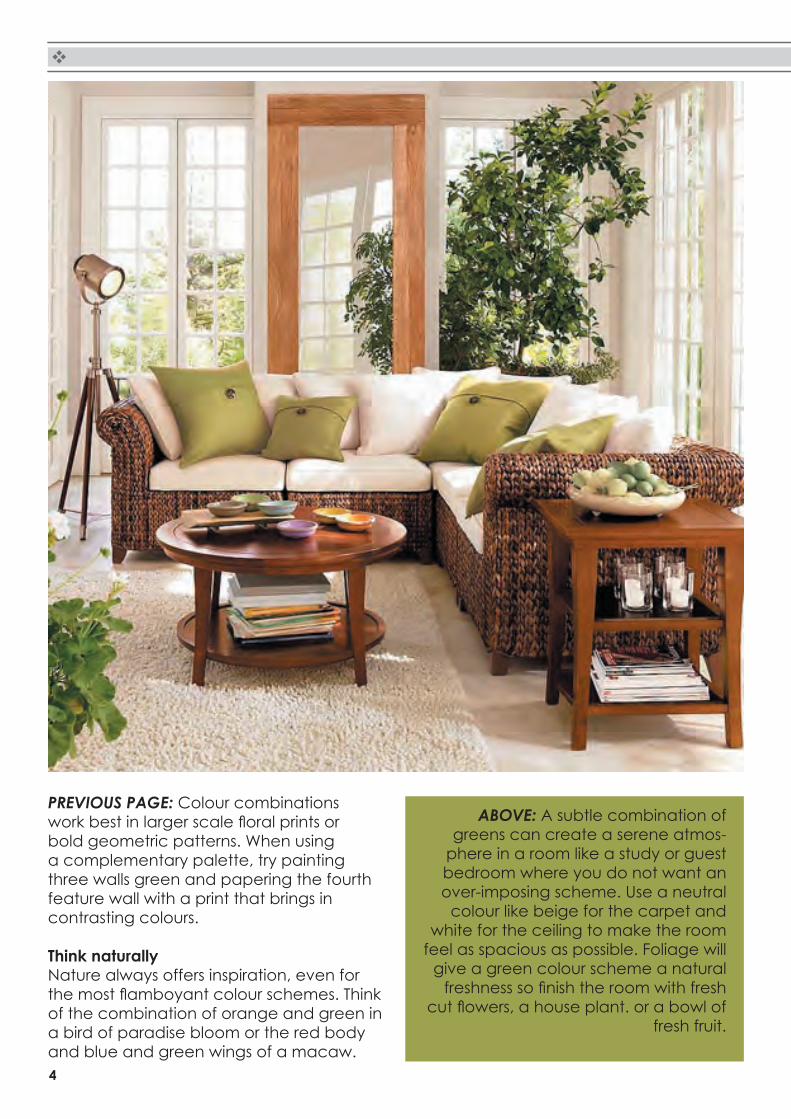
ABOVE: A subtle combination of greens can create a serene atmos-
phere in a room like a study or guest bedroom where you do not want an over-imposing scheme. Use a neutral
colour like beige for the carpet and white for the ceiling to make the room
feel as spacious as possible. Foliage will give a green colour scheme a natural
freshness so finish the room with freshcut flowers, a house plant. or a bowl of
fresh fruit.
5
NEXT PAGE: Create an ephemeral and enigmatic scheme with phosphorescent
chalky limes and smoky lavender.
To create a harmonious colour scheme, combine green with colours adjacent to
it on the colour wheel, for example apple green with bottle green, turquoise and
royal blue. Use scatter cushions, a vase or candle holders to pick up a contrasting
accent, but keep it to no more than ten per cent of the overall scheme.
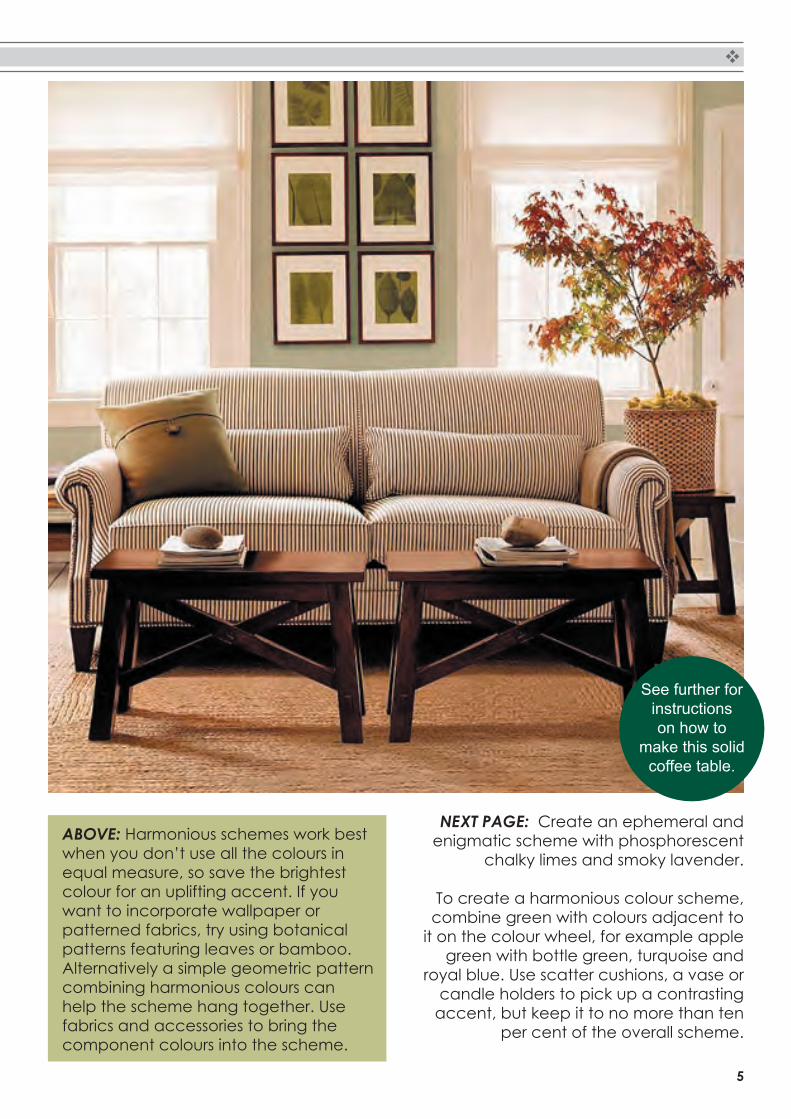
ABOVE: Harmonious schemes work best when you don’t use all the colours in equal measure, so save the brightest colour for an uplifting accent. If you want to incorporate wallpaper or patterned fabrics, try using botanical patterns featuring leaves or bamboo. Alternatively a simple geometric pattern combining harmonious colours can help the scheme hang together. Use fabrics and accessories to bring the component colours into the scheme.
See further for instructions on how to
make this solid coffee table.
6
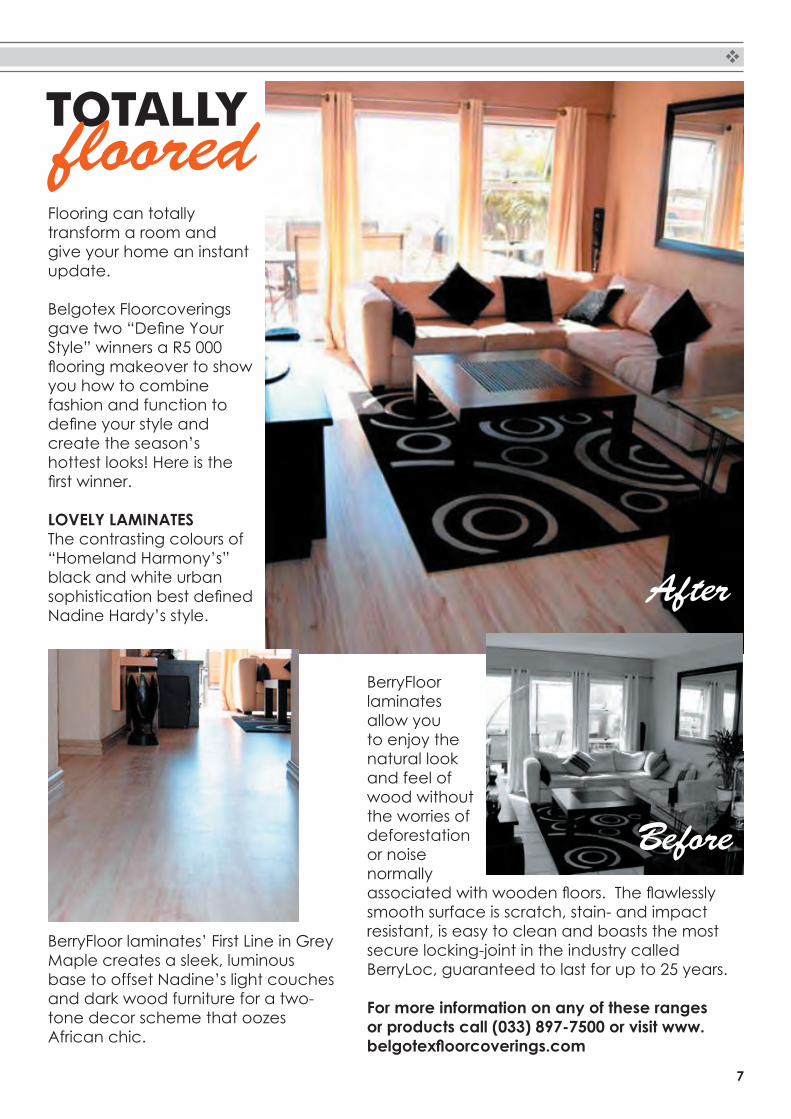
TOTALLYfloored
7
Flooring can totally transform a room and give your home an instant update.
Belgotex Floorcoverings gave two “Define YourStyle” winners a R5 000 flooring makeover to showyou how to combine fashion and function to define your style andcreate the season’s hottest looks! Here is the first winner.
LOVELY LAMINATES The contrasting colours of “Homeland Harmony’s” black and white urban sophistication best definedNadine Hardy’s style.
BerryFloor laminates’ First Line in Grey Maple creates a sleek, luminous base to offset Nadine’s light couches and dark wood furniture for a two-tone decor scheme that oozes African chic.
TOTALLYfloored
BerryFloor laminates allow you to enjoy the natural look and feel of wood without the worries of deforestation or noise normally associated with wooden floors. The flawlesslysmooth surface is scratch, stain- and impact resistant, is easy to clean and boasts the most secure locking-joint in the industry called BerryLoc, guaranteed to last for up to 25 years.
For more information on any of these ranges or products call (033) 897-7500 or visit www.belgotexfloorcoverings.com
Before
After
8
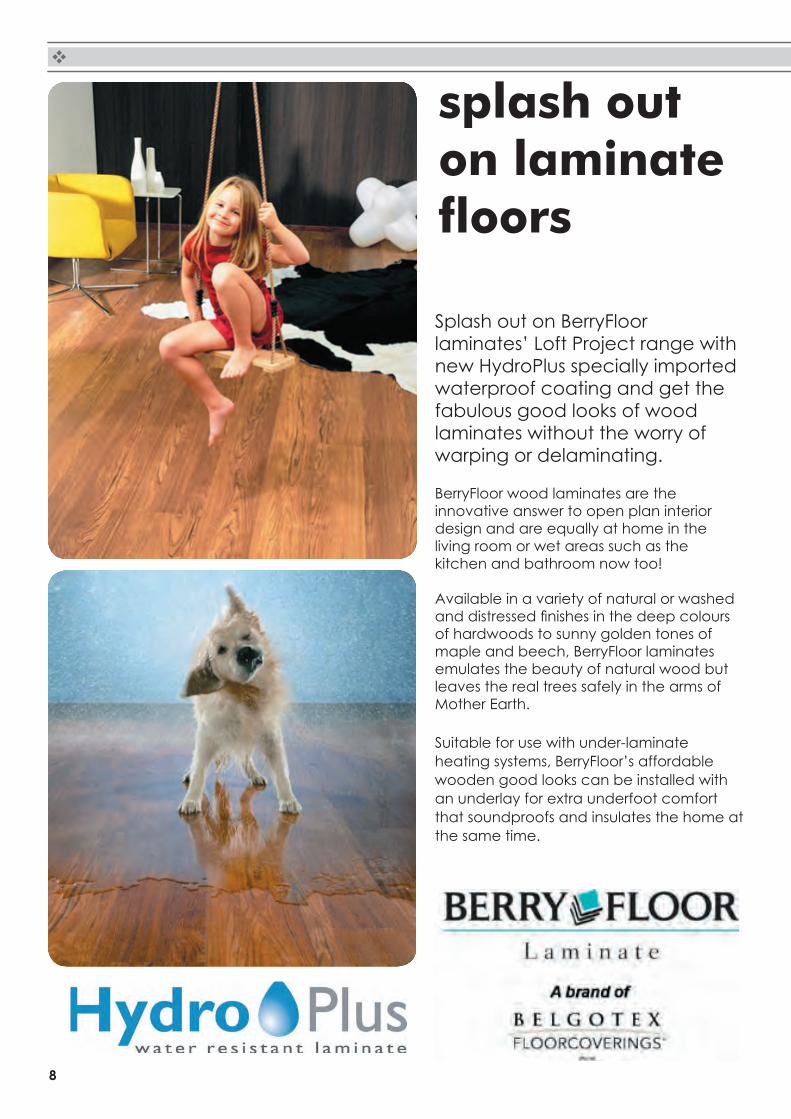
Splash out on BerryFloor laminates’ Loft Project range with new HydroPlus specially imported waterproof coating and get the fabulous good looks of wood laminates without the worry of warping or delaminating.
BerryFloor wood laminates are the innovative answer to open plan interior design and are equally at home in the living room or wet areas such as the kitchen and bathroom now too!
Available in a variety of natural or washed and distressed finishes in the deep coloursof hardwoods to sunny golden tones of maple and beech, BerryFloor laminates emulates the beauty of natural wood but leaves the real trees safely in the arms of Mother Earth.
Suitable for use with under-laminate heating systems, BerryFloor’s affordable wooden good looks can be installed with an underlay for extra underfoot comfort that soundproofs and insulates the home at the same time.
splash out on laminate floors
9
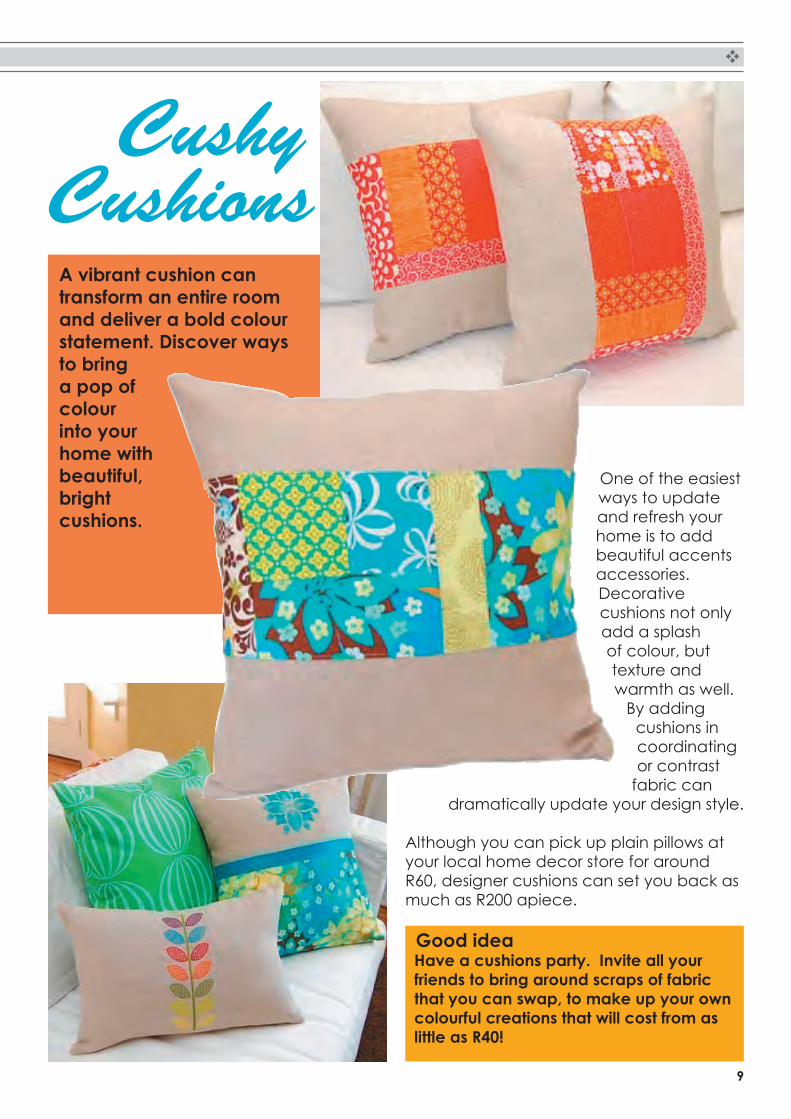
A vibrant cushion can transform an entire room and deliver a bold colour statement. Discover ways to bring a pop of colour into your home with beautiful, bright cushions.
Cushy Cushions
One of the easiest ways to update and refresh your home is to add beautiful accents accessories. Decorative cushions not only add a splash of colour, but texture and warmth as well.
By adding cushions in coordinating or contrast
fabric can dramatically update your design style.
Although you can pick up plain pillows at your local home decor store for around R60, designer cushions can set you back as much as R200 apiece.
Good idea Have a cushions party. Invite all your
friends to bring around scraps of fabric that you can swap, to make up your own colourful creations that will cost from as little as R40!
10
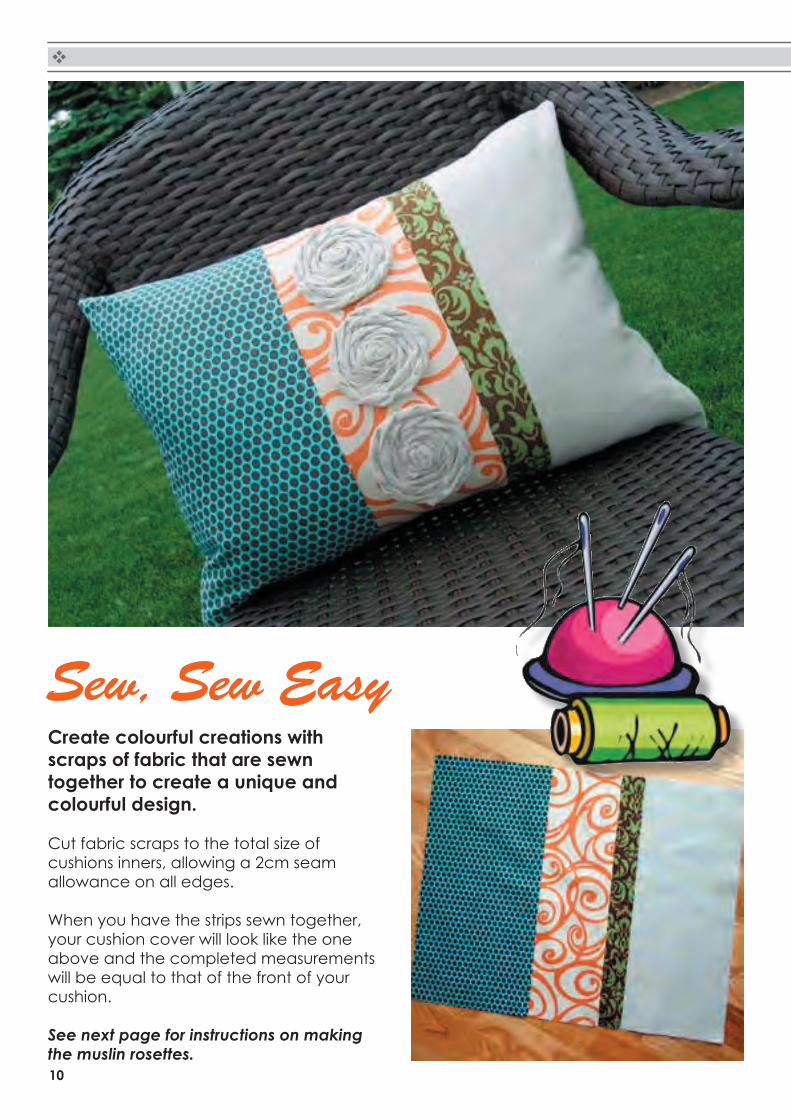
Create colourful creations with scraps of fabric that are sewn together to create a unique and colourful design.
Cut fabric scraps to the total size of cushions inners, allowing a 2cm seam allowance on all edges.
When you have the strips sewn together, your cushion cover will look like the one above and the completed measurements will be equal to that of the front of your cushion.
See next page for instructions on making the muslin rosettes.
Sew, Sew Easy

11
I came across these adorable cushions while browsing on Etsy. The cushion covers are created by using various printed fabrics sewn together to create a colourful whole, adorned with muslin rosettes.
If you’re not handy with a sewing machine, you can always buy plain cushions and adorn them with your own home made blossoms to add a special touch to your home decor.
LEFT: Muslin is very affordable for sewing up your own cushions covers.
Cushy Cushions
sour
ce: ju
st an
other
hang
up

12
You will need:20 to 30cm wide by 1 metre long piece of muslinDremel hot glue gunScissors
Here’s how:1. Fold your strip of fabric in half lengthwise and tie a
knot in the end.
2. Keep the fabric folded in half and roll it around the knot several time to make the centre of your rose. Apply a dot of hot glue to your fabric when the centre is to your liking.
3. Then you can start giving the fabric a twist to make the rose petals. Try to rotate the twists as you go around the rose so they are not always in the same spots and the petals are off centre. I added a dot of glue to the outside edge each time I made a twist.
4. When you reach the end of your fabric, simply bring the end to the underside of the flower and glue.
I made three of these in no time at all. So easy and no sewing involved! I can’t wait to attach them to a pillow!
BELOW: See the instructions on the next page for making this ruffled rosette cushion.
13
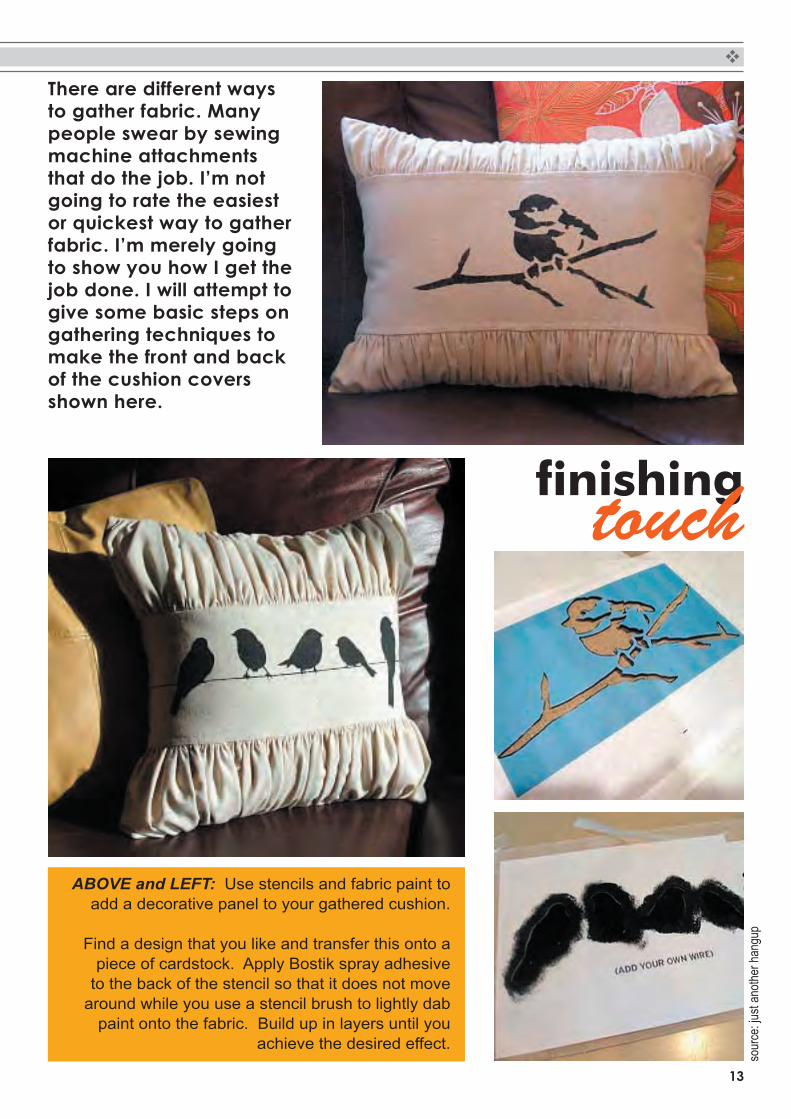
There are different ways to gather fabric. Many people swear by sewing machine attachments that do the job. I’m not going to rate the easiest or quickest way to gather fabric. I’m merely going to show you how I get the job done. I will attempt to give some basic steps on gathering techniques to make the front and back of the cushion covers shown here.
finishingtouch
ABOVE and LEFT: Use stencils and fabric paint to add a decorative panel to your gathered cushion.
Find a design that you like and transfer this onto a piece of cardstock. Apply Bostik spray adhesive
to the back of the stencil so that it does not move around while you use a stencil brush to lightly dab
paint onto the fabric. Build up in layers until you achieve the desired effect.
sour
ce: ju
st an
other
hang
up

14
You will need:
Front - Top and bottom gathered panels[2] pieces of fabric 12cm x 1.5 metres
Middle panel[1] piece of fabric 20cm x *45cm
Back PanelThe amount of fabric depends on how you finish theback. If you are merely making a solid panel back, filling the pillow with stuffing, and then slip stitchingit shut, the panel of fabric should measure *45cm x *45cm.
*Adjust according to size if using a cushion inner.
* Seams 10-12mm unless otherwise noted.
Here’s how:A good rule of thumb is to allow double the finishedlength for the piece of fabric you want gathered.
1. Sew a running stitch along the length of both sides of each panel 10mm from edge. Keep the thread long in order to gather the fabric.
2. Run another running stitch along the length of both sides of each panel 20mm from the edge.
3. On the wrong side of one long panel, take the top two basted threads and pull those threads to gather fabric. Carefully pull threads, then ease gathered fabric toward the middle of the panel while holding the two threads tightly in your hand.Work one side of the fabric toward the centre and then the other side of the fabric toward the centre. Gathers should be uniform and even. Pin gathered panel to middle panel.
4. Sew a regular seam 15mm from edge. The needle should be running in between both basting lines. Remove 20mm basting line and press seam toward middle panel. Top stitch over seam and along edge of gathers on middle panel.
5. Attach front of pillow to back using the same gath-ering techniques you used to attach the gathered panels to the middle panel.

15
Indoors or Outdoors
This sturdy table is perfect for at the poolside or patio.
Not just a table, it’s also a bench.
Available from Pottery Barn in the USA, I haven’t come across anything like this locally so I think it only fair - with thanks to Pottery Barn - that I show you how to make your own table-cum-bench.
You will need:[1] 1.8m length of 44 x 44mm pine[2] 1.8m length of 110 x 22mm pine[2] 1.8m length of 44 x 22mm pine[1] pinePockethole jig or bracketsCut screwsPonal wood glueWood fillerBosch PSR12 drill/driver 22mm spade bitJigsaw and speed cut bladeBosch orbital sander plus 80-, 120 and 180-grit sanding pads.Woodoc 10 sealer and imbuia stain con-centratePaintbrushWoodoc steel wool
Alternative:As opposed to stain and seal, you can also paint your bench for a more cottage/country effect. Use a slightly watered down acrylic PVA and apply as many coats as required to achieve your desired effect. To distress, use a sanding sponge or 80-grit sandpaper to ‘roughen’ the edges and remove the paint.
Make this small bench-
cum-table

16
Note that the legs in this project have a 5o angle at the top and bottom. If you do not have a mitre saw to do this, leave the legs straight.
Here’s how:1. Use a mitre saw set at a 5o angle to cut the top and
bottom of the legs.
2. On the two side panels position the legs 10mm in from each edge and mark with a pencil down each side of the legs.
3. Mark at 10mm in from top and bottom.
4. Use a jigsaw to cut out the 10mm strip to create a tenon.
5. Position the cut tenon against the top of each leg and mark the shape of the tenon on the leg. Use a tape measure to determine and the centre of the tenon shape.
6. Use a 22mm spade bit to drill out the centre of the leg.
DIY Tip:Drill two holes with the spade bit, but only so that the tip of the spade bit peeps through the other side. Turn the wood over and continue to drill from this side. This provides a much neater finish. DO clamp the legsecurely and hold the drill firmly, assometimes there are hard sections in the wood.
7. Use the jigsaw to neaten up the mortise. Go slowly from one end of the hole to the other to shape the hole to be square and neat. Another alternative is to use wood chisels to remove the excess wood.
Dry fit the joins to ensure a snug fit, or adjust wherenecessary.

17
8. Apply wood glue to the back part of the tenon and insert into the mortise (holes that you have drilled out in the legs). Leave to dry.
9. Use the pockethole jig to drill holes into the edges of all the side sections. Screw the side sections to the top of the legs.
DIY Tip:Make sure that the legs are the right way wrong. I screwed the entire frame together before I realised that all the legs were facing in instead of out!
10. Now that the frame is assembled, use wood filler to fill in any gaps. Once dry, sand smooth.
11. Drill pocketholes into the side supports, insert and screw these into position.
12. Drill pocketholes into the underside of the centre support, insert and screw into position.
13. Attach the top to the frame with angle brackets screwed into the underside of the top and into the frame sides.
14. For the ‘V’ frame I first cut oneend of each section at a 45o
angle, then placed both sections against the underside of the top and the centre support and marked the cutting position. Use a jigsaw to cut.
15. Attach the ‘V’ frame by screwing through the underside of the centre frame into each section, and through each section into the underside of the base.

18
Finishing
This was the fun part. I decided that I didn’t want to just stain and seal, but also give the table/bench a more rustic and aged look.
Start off be choosing the colour you want for the finish. I went with anImbuia stain concentrate that was added to Woodoc 10 interior sealer.
Note: If you intend to keep the table/bench outdoors, use Woodoc 30 for inland and Woodoc 50 for coastal areas.
Apply 3 coats in total. After the first coat is dry, rubdown with Woodoc steelwool and then apply the second coat. Once dry you simply brush on the third and final coat.
Use 60-grit sandpaper and steelwool on the edges. The steelwool softens the look. For a satin finish, rubdown the entire table/bench lightly with steelwool.
Customer Support in South Africa
The House of Woodoc provides a free Customer Care and Advice Service:
TOLL-FREE 0800 411 200

19
in stylerelax
Make a basic chaise for relaxing on the patio or deck. A timber frame, foam, a slipcover and a few colourful cushions are all that are required for this look. Here’s how...

20
You will need:[2] pine 22 x 100 x 1500mm - base long sides[2] pine - base short sides[4] pine 44 x 44 x - base legs[1] plywood - base top[1] 16 x 700 x 770mm plywood - side/headboard6 x 50mm cut screws (smooth shank)4 x 30mm cut screws (smooth shank)Ponal wood gluePockethole Jig (or brackets)Drill/Driver plus assorted drill and screw bitsCountersink bit and 12 or 16mm spade bitBosch Orbital Sander plus 180-grit sanding pads
Here’s how:1. Start by drilling pocketholes into both ends of the
inside of base short sides.
2. A pockethole jig is absolutely fantastic and, if you intend to take DIY seriously, is definitely a must-havetool for your workshop. If you don’t have a pocket hole jig you will need to use [2] corner braces per corner to attach the base short sides to the base long sides. (Visit: www.hardwarecentre.co.za for details on Kreg and other pockethole jigs)
3. All joins in this project have a bead of wood glue for extra strength.
4. Use 4 x 30mm cut screws in the pocket holes to attach the base short sides to the base long sides.
DIY Tip:In the materials required I mention ‘smooth shank’ cut screws. Cut screws, when used in pine projects, mean that you do not require pilot holes.
A smooth shank screw has a smooth shaft at the top of the screw and pulls two sections together for a tight join.
Visit: www.eurekadiy.co.zafor more screw tips.
1
2
3
4
21
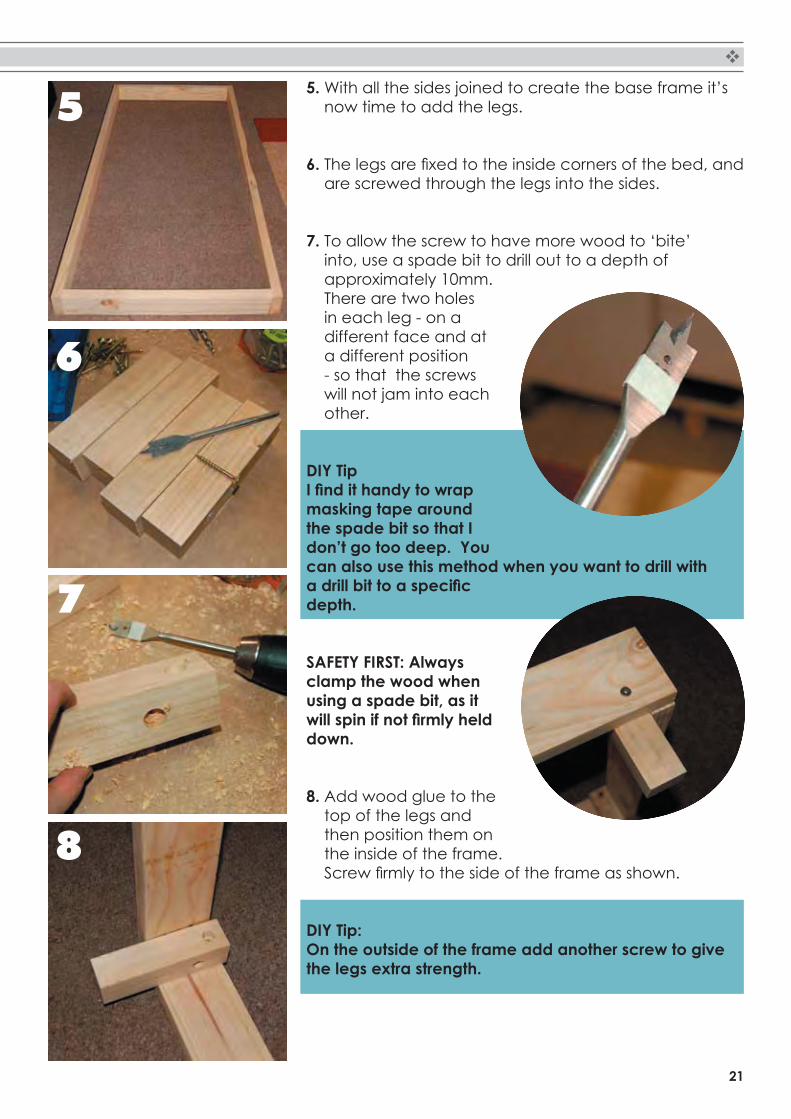
5. With all the sides joined to create the base frame it’s now time to add the legs.
6. The legs are fixed to the inside corners of the bed, andare screwed through the legs into the sides.
7. To allow the screw to have more wood to ‘bite’ into, use a spade bit to drill out to a depth of approximately 10mm. There are two holes in each leg - on a different face and at a different position - so that the screws will not jam into each other.
DIY TipI find it handy to wrapmasking tape around the spade bit so that I don’t go too deep. You can also use this method when you want to drill with a drill bit to a specificdepth.
SAFETY FIRST: Always clamp the wood when using a spade bit, as it will spin if not firmly helddown.
8. Add wood glue to the top of the legs and then position them on the inside of the frame. Screw firmly to the side of the frame as shown.
DIY Tip:On the outside of the frame add another screw to give the legs extra strength.
5
6
7
8

22
9. To attach the plywood top to the base, use a countersink bit around the edge of the board so that any screw heads are below the surface of the board. Attach with 4 x 30mm cut screws (smooth shank).
10. Countersink holes along the bottom of the side panel - 2 rows of 5 holes across - and screw to the base frame with 6 x 50mm cut screws (smooth shank) into the frame legs and 4 x 30mm cut screws (smooth shank) into the frame sides.
11. You will need a piece of foam cut to size to fit ontothe side panel - to the width and height, allowing for the height of the seat cushion (normally 150mm thick).
Apply Pattex PL700 around the edge of the back of the foam and place on the side section. Use masking tape to hold in position until dry.
Slipcover1. Side panel/headboard Panel A covers the entire front and back of the side panel/headboard. Sew B to A as
shown below.
2. Main seat Sew a 20mm hem on D and E. With right sides facing, sew D to C on the sides and E to C
along the bottom. Attach ties to side of D and E as shown below.
3. With right sides facing, join together A and C.
A
B
B
C
D
D
EHem line
Ties
Ties
Fold over top of side panel/headboard

23
exteriorsinspired
Here in South Africa we have the perfect climate for spending time outdoors. With indoor floor space at a premium in manymodern homes, it makes sense to make the most of outdoor spaces. A covered patio or pergola is the ideal solution for extending the living space and making the most of our beautiful weather.
On the following pages we offer some guidelines and inspiration to assist you in creating your dream space.
ABOVE: A small courtyard is transformed into a mediterranean retreat that allows
the homeowners to sit back and relax.

24
Contemporary or modernClean, understated lines in neutral colours, this style complements a modern home design and provides an interesting contrast.
Complete the look: Throw down an outdoor rug in a bold abstract pattern
and hang a piece of abstract outdoor art. Use big, bold, architectural plants in the garden and in bright glazed pots around the patio.
MediterraneanA Mediterranean-style patio evokes sunny days in the Old World, with a warm colour palette and traditional furniture and accessories. Most traditional furniture in wicker, teak or aluminum work as a base for the Mediterranean style. Cushions and pillows cement the look. Base your colour palette on warm apricot, rust, cream, and ivory, and accent with greens.
Complete the look: Terra cotta floor tile will dramatically change the space
into a Mediterranean oasis, and it’s relatively inexpensive to lay over concrete. If it’s in your budget, brightly-coloured decorative tiles inlaid into a wall is another option. Plant up containers with rosemary and lavender.
AsianThe beauty of an Asian-style outdoor space is its clean simplicity, elegance and natural tranquillity. It’s an ideal look for a small patio or garden space.
Complete the look: A key element of Asian design is crushed stone pathways
and a water feature: a simple table top water bowl evokes the same message of calm.
CottageFurniture for an cottage garden is definitely traditional: hardwoods, teak or cane. You’ll need cushions and fabric - floral and chintz - to keep rustic seatingcomfortable, but do keep the patterns simple, such as a plain pastel fabric accented with a floral pillow.
If your weather-worn patio furniture is past its prime, don’t just pick up a new patio set and call it a day. With more furniture styles to choose from than ever, you can create a one-of-a-kind patio style that extends your home outside.
Complete the look: Around the patio, plant an eclectic mix of what grows in your region, with an eye toward full, lush plants with a lot of textural interest and variety.

25
Paint or stain a pergola Choose a colour that harmonises with the space and works well with other colours used. Wood stain is the preferred method, as it will not peel or flake over time.
Cover up Fabrics can do wonders for brightening an outdoor space.
If you need to cover up an unattractive ceiling, fabric - supported by battens or dowels - will instantly create new look.
Make sure that you can easily remove the fabric for occasional washing.
26
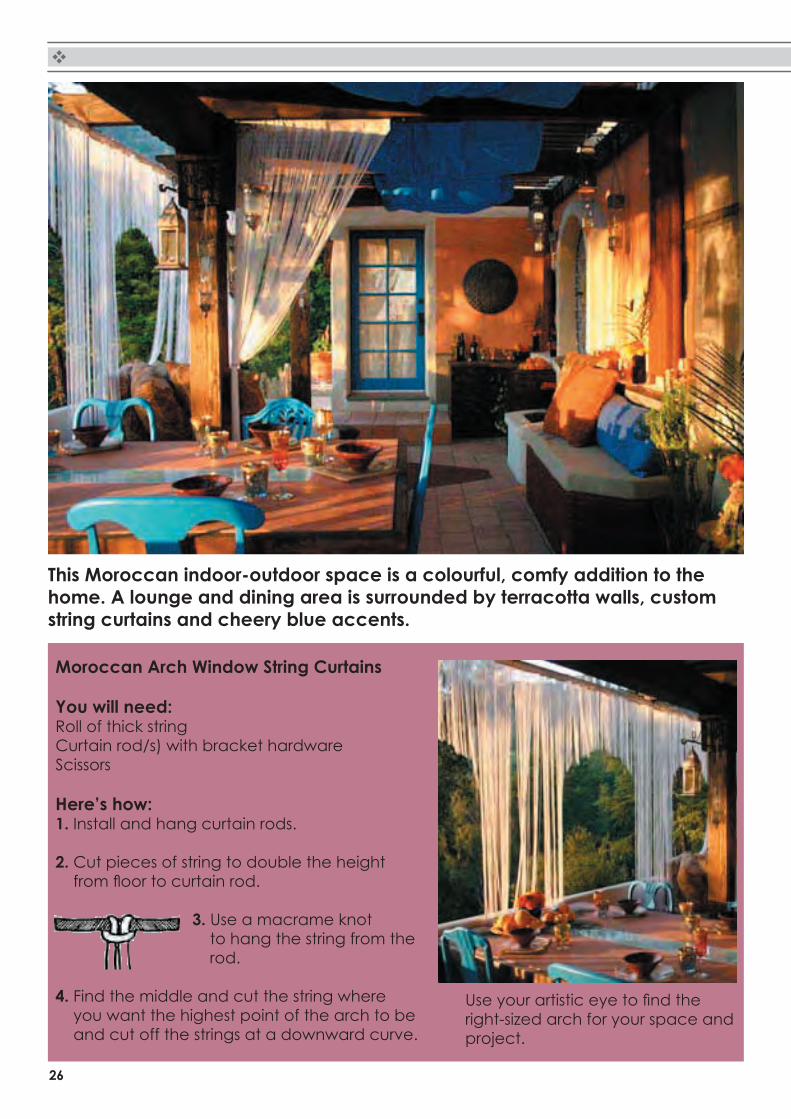
Moroccan Arch Window String Curtains
You will need:Roll of thick stringCurtain rod/s) with bracket hardwareScissors
Here’s how:1. Install and hang curtain rods.
2. Cut pieces of string to double the height from floor to curtain rod.
3. Use a macrame knot to hang the string from the
rod.
4. Find the middle and cut the string where you want the highest point of the arch to be and cut off the strings at a downward curve.
This Moroccan indoor-outdoor space is a colourful, comfy addition to the home. A lounge and dining area is surrounded by terracotta walls, custom string curtains and cheery blue accents.
Use your artistic eye to find theright-sized arch for your space and project.
27
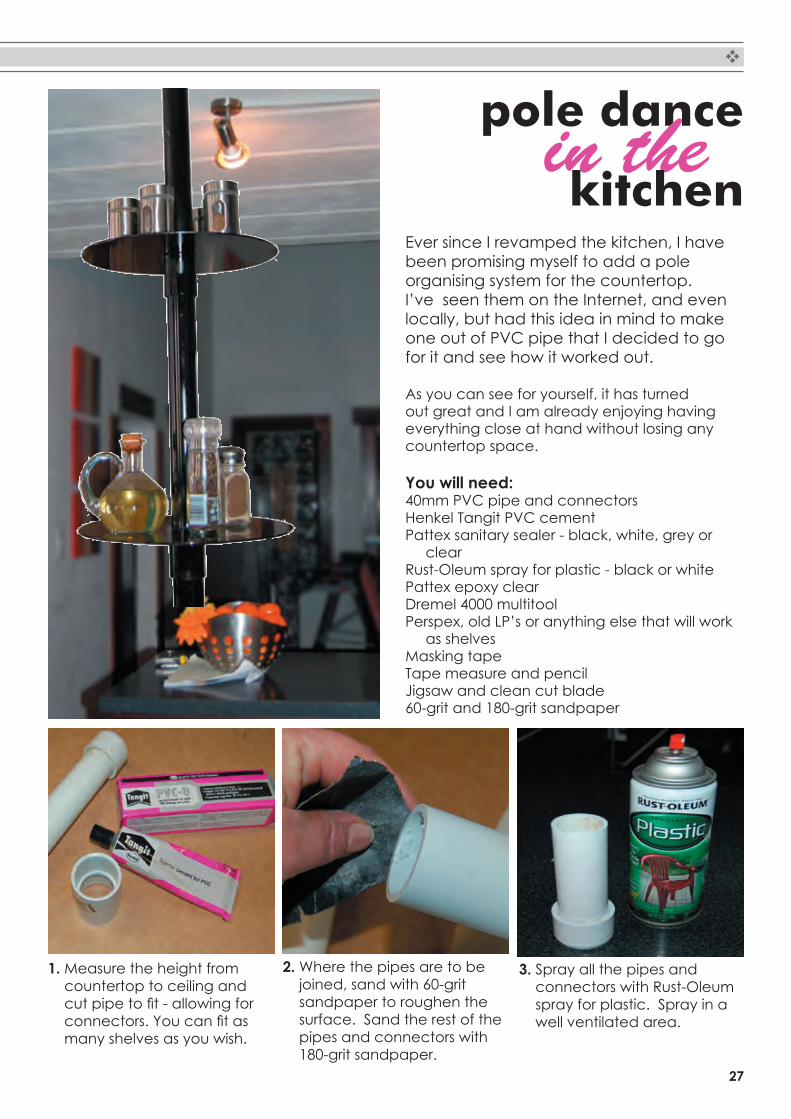
pole dancein thekitchen
Ever since I revamped the kitchen, I have been promising myself to add a pole organising system for the countertop. I’ve seen them on the Internet, and even locally, but had this idea in mind to make one out of PVC pipe that I decided to go for it and see how it worked out.
As you can see for yourself, it has turned out great and I am already enjoying having everything close at hand without losing any countertop space.
You will need:40mm PVC pipe and connectorsHenkel Tangit PVC cementPattex sanitary sealer - black, white, grey or clearRust-Oleum spray for plastic - black or whitePattex epoxy clearDremel 4000 multitoolPerspex, old LP’s or anything else that will work as shelvesMasking tapeTape measure and pencilJigsaw and clean cut blade60-grit and 180-grit sandpaper
1. Measure the height from countertop to ceiling and cut pipe to fit - allowing forconnectors. You can fit asmany shelves as you wish.
2. Where the pipes are to be joined, sand with 60-grit sandpaper to roughen the surface. Sand the rest of the pipes and connectors with 180-grit sandpaper.
3. Spray all the pipes and connectors with Rust-Oleum spray for plastic. Spray in a well ventilated area.

28
4. Apply Tangit PVC cement to the inside of the connectors.
5. Pop a connector onto the first lengthof pipe, add the shelf and then insert the next length of pipe.
DIY TipYou can add as many shelves as you wish, adding a connector to support each shelf.
6. Mix up some Pattex epoxy clear. Place masking tape around the bottom and top of the pole to protect the surfaces. Use a toothpick or long nail to apply the epoxy around the bottom and top for support. Remove the masking tape before the epoxy dries. Let dry.
7. Add more masking tape and use Pattex sanitary sealer to finish off around thebottom and top of the pipe. Remove masking tape before dry.
If you have any old LP’s lying around, these make perfect shelves.
Glue 2 or 3 together and cut out a 40mm hole with a Dremel Multitool
or drill and hole saw.
You can use a wide variety of materials for the shelves. I had some Perspex left over from a previous project and used my Dremel 4000 multitool to cut out the shape and hole to fit onto the pole.

29
Your home should look as good on the outside, as it does on the inside. With the correct preparation you can have a good looking house - for longer.
Thanks to Prominent Paints and Decorating Centre, we transformed a drab, weather-worn exterior into an attention-grabbing home.
a place to callhome

30
A
C
B
THIS PAGE: Before, during & after preparation.
This property needed some intensive TLC to turn it into a good-looking home on the outside.
With all products supplied by Prominent Paints and Decorating Centre, we took one week from start to finish.
In this feature we’re going to show you that blistered or peeling paint, cracks weathered wood and grungy exterior walls can be transformed in a week. Read on the find out whatwe did to this home.
31
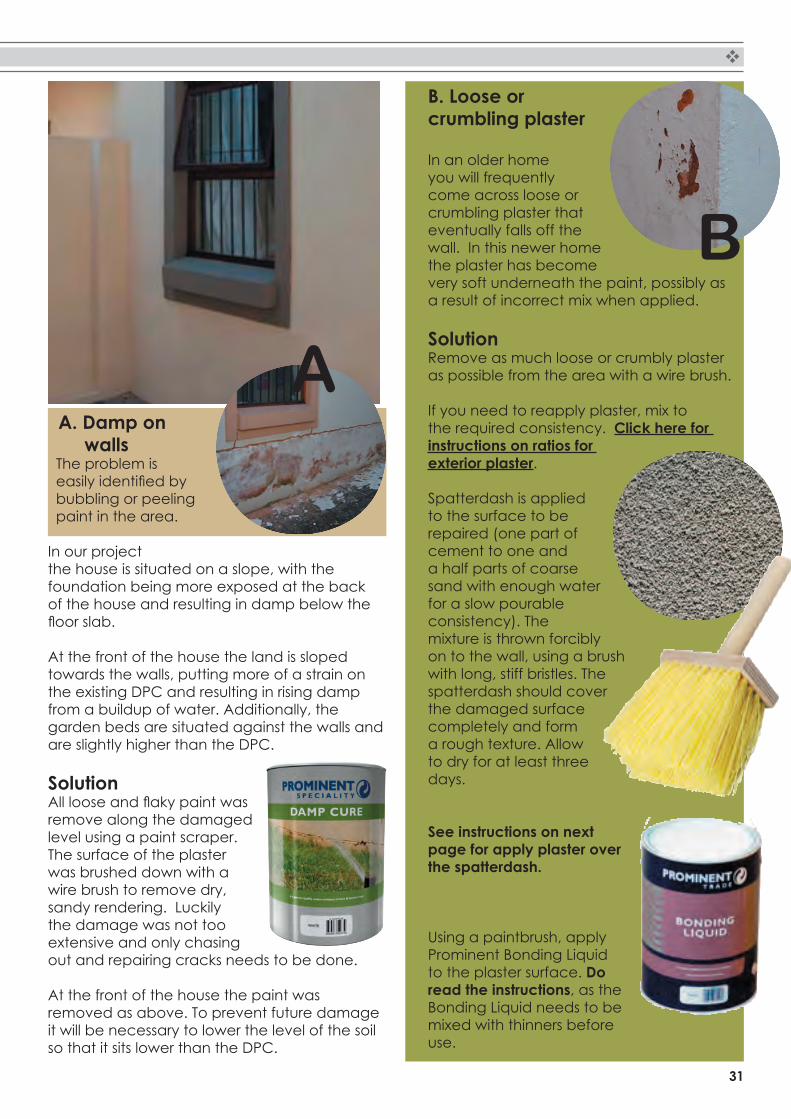
B. Loose or crumbling plaster
In an older home you will frequently come across loose or crumbling plaster that eventually falls off the wall. In this newer home the plaster has become very soft underneath the paint, possibly as a result of incorrect mix when applied.
SolutionRemove as much loose or crumbly plaster as possible from the area with a wire brush.
If you need to reapply plaster, mix to the required consistency. Click here for instructions on ratios for exterior plaster.
Spatterdash is applied to the surface to be repaired (one part of cement to one and a half parts of coarse sand with enough water for a slow pourable consistency). The mixture is thrown forcibly on to the wall, using a brush with long, stiff bristles. The spatterdash should cover the damaged surface completely and form a rough texture. Allow to dry for at least three days.
See instructions on next page for apply plaster over the spatterdash.
Using a paintbrush, apply Prominent Bonding Liquid to the plaster surface. Do read the instructions, as the Bonding Liquid needs to be mixed with thinners before use.
A. Damp on walls The problem is
easily identified bybubbling or peeling paint in the area.
In our project the house is situated on a slope, with the foundation being more exposed at the back of the house and resulting in damp below the floor slab.
At the front of the house the land is sloped towards the walls, putting more of a strain on the existing DPC and resulting in rising damp from a buildup of water. Additionally, the garden beds are situated against the walls and are slightly higher than the DPC.
SolutionAll loose and flaky paint wasremove along the damaged level using a paint scraper. The surface of the plaster was brushed down with a wire brush to remove dry, sandy rendering. Luckily the damage was not too extensive and only chasing out and repairing cracks needs to be done.
At the front of the house the paint was removed as above. To prevent future damage it will be necessary to lower the level of the soil so that it sits lower than the DPC.
A
B
32
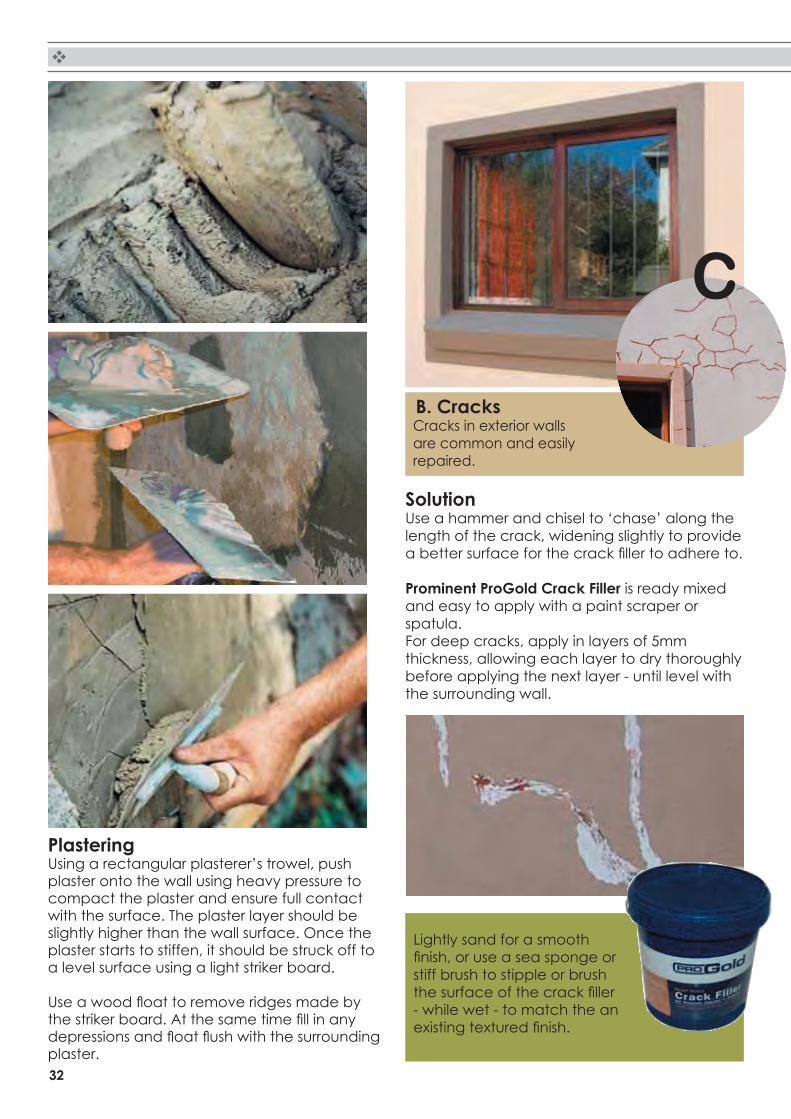
C
B. Cracks Cracks in exterior walls
are common and easily repaired.
SolutionUse a hammer and chisel to ‘chase’ along the length of the crack, widening slightly to provide a better surface for the crack filler to adhere to.
Prominent ProGold Crack Filler is ready mixed and easy to apply with a paint scraper or spatula.For deep cracks, apply in layers of 5mm thickness, allowing each layer to dry thoroughly before applying the next layer - until level with the surrounding wall.
Lightly sand for a smooth finish, or use a sea sponge orstiff brush to stipple or brush the surface of the crack filler - while wet - to match the an existing textured finish.
PlasteringUsing a rectangular plasterer’s trowel, push plaster onto the wall using heavy pressure to compact the plaster and ensure full contact with the surface. The plaster layer should be slightly higher than the wall surface. Once the plaster starts to stiffen, it should be struck off to a level surface using a light striker board.
Use a wood float to remove ridges made bythe striker board. At the same time fill in anydepressions and float flush with the surroundingplaster.


![Gestion calidad 20 sep10[1]](https://img.pdfslide.net/doc/110x75/5599f80f1a28abc72c8b4600/gestion-calidad-20-sep101.jpg)