Embed Size (px)
Citation preview
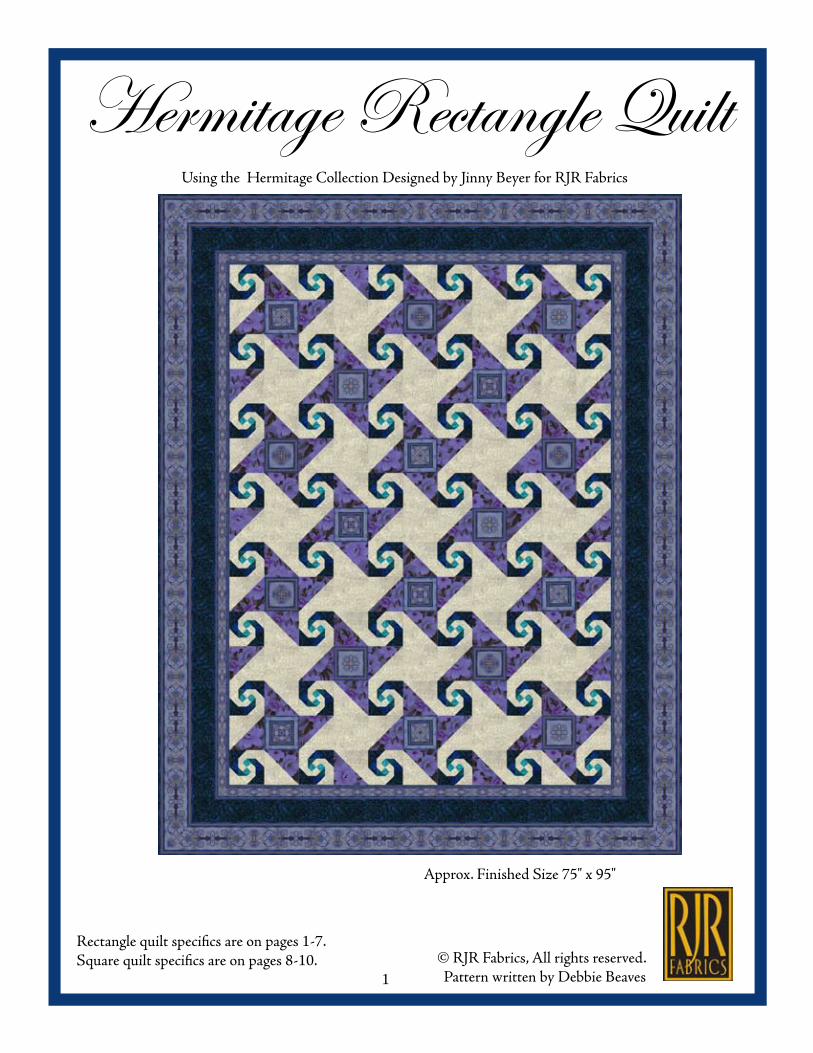
Approx. Finished Size 75" x 95"
Hermitage Rectangle QuiltUsing the Hermitage Collection Designed by Jinny Beyer for RJR Fabrics
© RJR Fabrics, All rights reserved.1 Pattern written by Debbie Beaves
Rectangle quilt specifics are on pages 1-7.Square quilt specifics are on pages 8-10.
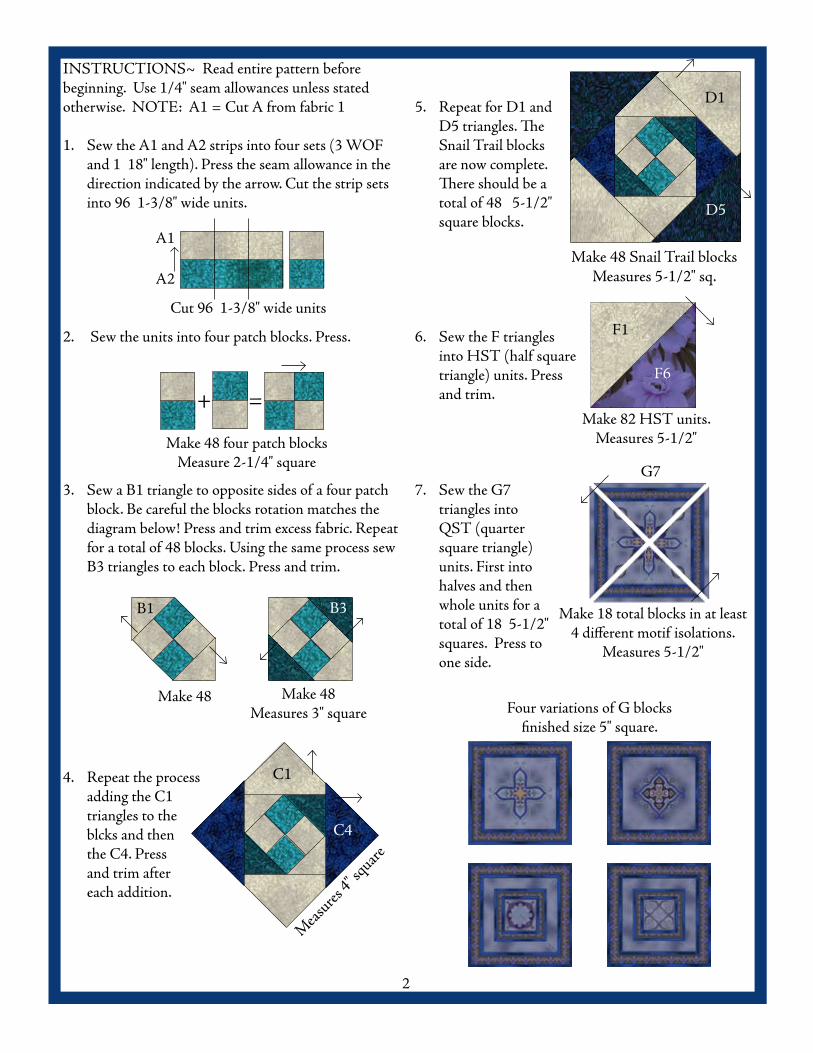
INSTRUCTIONS~ Read entire pattern before beginning. Use 1/4" seam allowances unless stated otherwise. NOTE: A1 = Cut A from fabric 1
Sew the A1 and A2 strips into four sets (3 WOF and 1 18" length). Press the seam allowance in the direction indicated by the arrow. Cut the strip sets into 96 1-3/8" wide units.
Sew the units into four patch blocks. Press.
Sew a B1 triangle to opposite sides of a four patch block. Be careful the blocks rotation matches the diagram below! Press and trim excess fabric. Repeat for a total of 48 blocks. Using the same process sew B3 triangles to each block. Press and trim.
Repeat the process adding the C1 triangles to the blcks and then the C4. Press and trim after each addition.
1.
2.
3.
4.
Repeat for D1 and D5 triangles. The Snail Trail blocks are now complete. There should be a total of 48 5-1/2" square blocks.
Sew the F triangles into HST (half square triangle) units. Press and trim.
Sew the G7 triangles into QST (quarter square triangle) units. First into halves and then whole units for a total of 18 5-1/2" squares. Press to one side.
5.
6.
7.
2
A1
A2
Cut 96 1-3/8" wide units
+ =
Make 48 four patch blocksMeasure 2-1/4" square
Four variations of G blocks finished size 5" square.
D5
D1
Make 48 Snail Trail blocksMeasures 5-1/2" sq.
F1
F6
Make 82 HST units. Measures 5-1/2"
Make 48Measures 3" square
B3
Make 48
B1
Meas
ures 4" s
quareC4
C1
Make 18 total blocks in at least 4 different motif isolations.
Measures 5-1/2"
G7
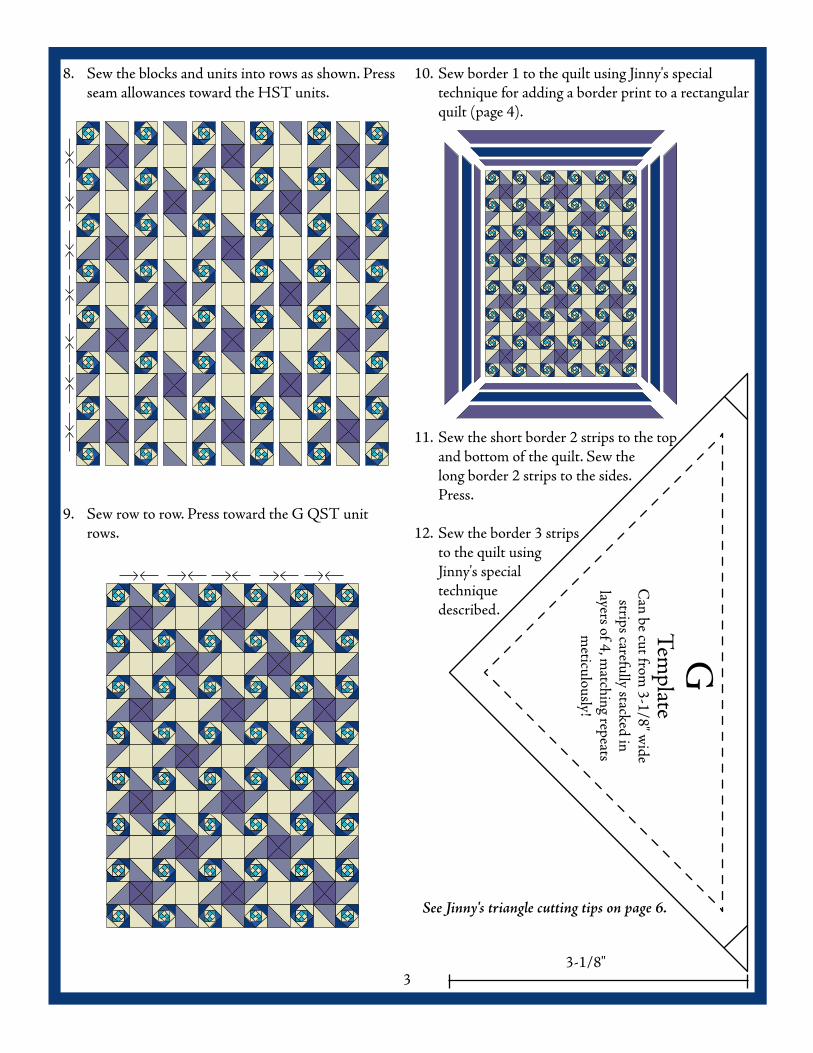
Sew the blocks and units into rows as shown. Press seam allowances toward the HST units.
Sew row to row. Press toward the G QST unit rows.
8.
9.
Sew border 1 to the quilt using Jinny's special technique for adding a border print to a rectangular quilt (page 4).
Sew the short border 2 strips to the top and bottom of the quilt. Sew the long border 2 strips to the sides. Press.
Sew the border 3 strips to the quilt using Jinny's special technique described.
10.
11.
12.
33-1/8"
G
Tem
plateC
an be cut from 3-1/8" w
ide strips carefully stacked in
layers of 4, matching repeats
meticulously!
See Jinny's triangle cutting tips on page 6.
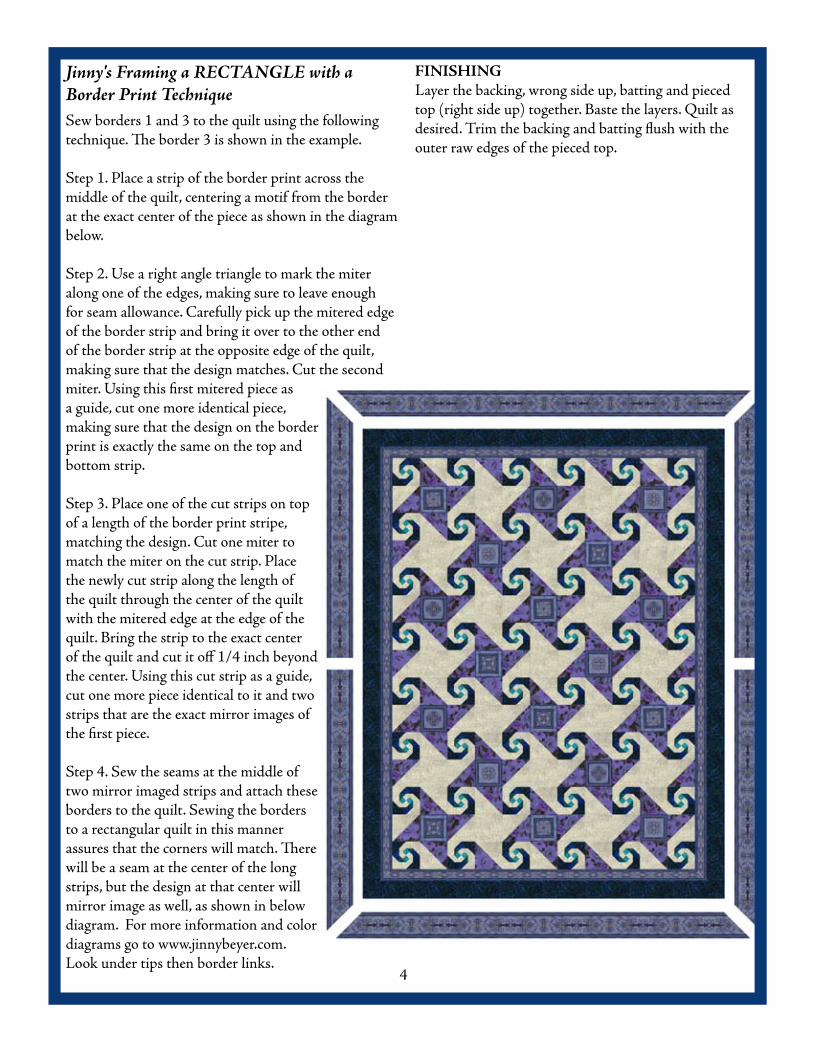
Jinny's Framing a RECTANGLE with a Border Print TechniqueSew borders 1 and 3 to the quilt using the followingtechnique. The border 3 is shown in the example. Step 1. Place a strip of the border print across the middle of the quilt, centering a motif from the border at the exact center of the piece as shown in the diagram below. Step 2. Use a right angle triangle to mark the miter along one of the edges, making sure to leave enough for seam allowance. Carefully pick up the mitered edge of the border strip and bring it over to the other end of the border strip at the opposite edge of the quilt, making sure that the design matches. Cut the second miter. Using this first mitered piece as a guide, cut one more identical piece, making sure that the design on the border print is exactly the same on the top and bottom strip. Step 3. Place one of the cut strips on top of a length of the border print stripe, matching the design. Cut one miter to match the miter on the cut strip. Place the newly cut strip along the length of the quilt through the center of the quilt with the mitered edge at the edge of the quilt. Bring the strip to the exact center of the quilt and cut it off 1/4 inch beyond the center. Using this cut strip as a guide, cut one more piece identical to it and two strips that are the exact mirror images of the first piece.
Step 4. Sew the seams at the middle of two mirror imaged strips and attach these borders to the quilt. Sewing the borders to a rectangular quilt in this manner assures that the corners will match. There will be a seam at the center of the long strips, but the design at that center will mirror image as well, as shown in below diagram. For more information and color diagrams go to www.jinnybeyer.com. Look under tips then border links.
FINISHINGLayer the backing, wrong side up, batting and pieced top (right side up) together. Baste the layers. Quilt as desired. Trim the backing and batting flush with the outer raw edges of the pieced top.
4
5
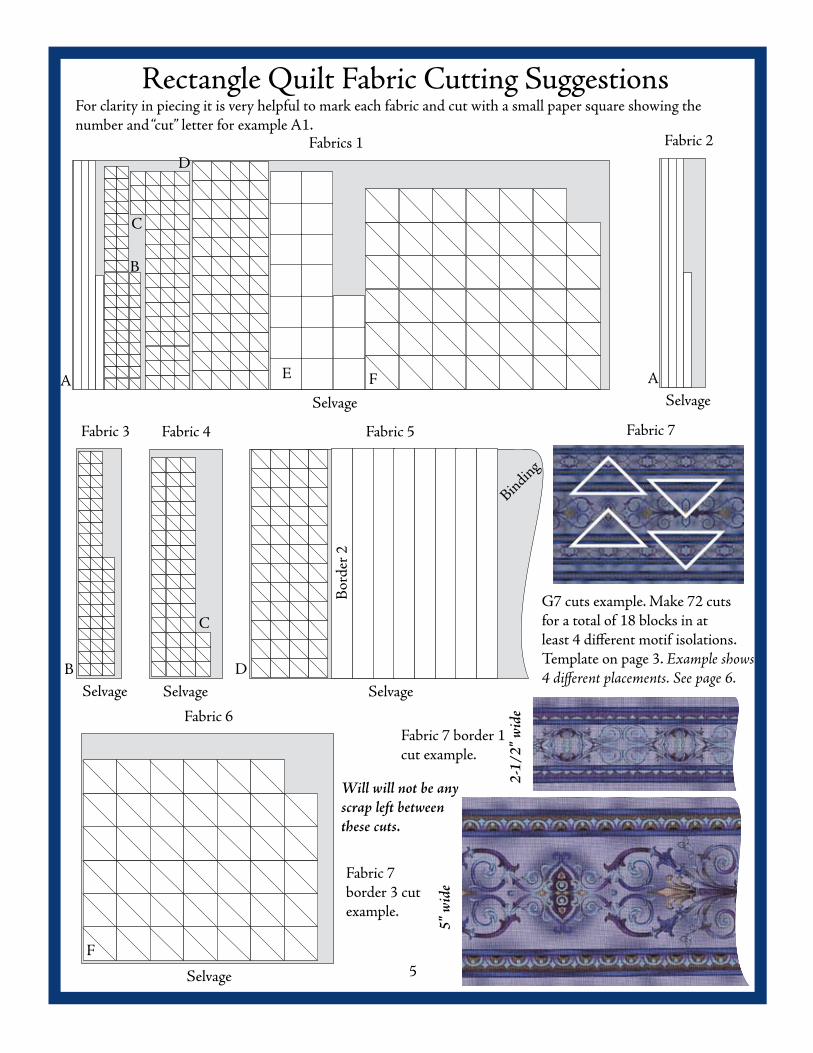
Will will not be any scrap left between these cuts.
Fabric 5
Selvage
For clarity in piecing it is very helpful to mark each fabric and cut with a small paper square showing the number and “cut” letter for example A1.
Rectangle Quilt Fabric Cutting Suggestions
Fabrics 1
SelvageA
B
C
D
E F
Fabric 2
SelvageA
Fabric 3
SelvageB
Fabric 4
Selvage
C
D
Bor
der 2
Fabric 6
Selvage
F
Fabric 7
G7 cuts example. Make 72 cuts for a total of 18 blocks in at least 4 different motif isolations. Template on page 3. Example shows 4 different placements. See page 6.
Fabric 7 border 1 cut example.
Fabric 7 border 3 cut example.
Binding
2-1/
2" w
ide
5" w
ide
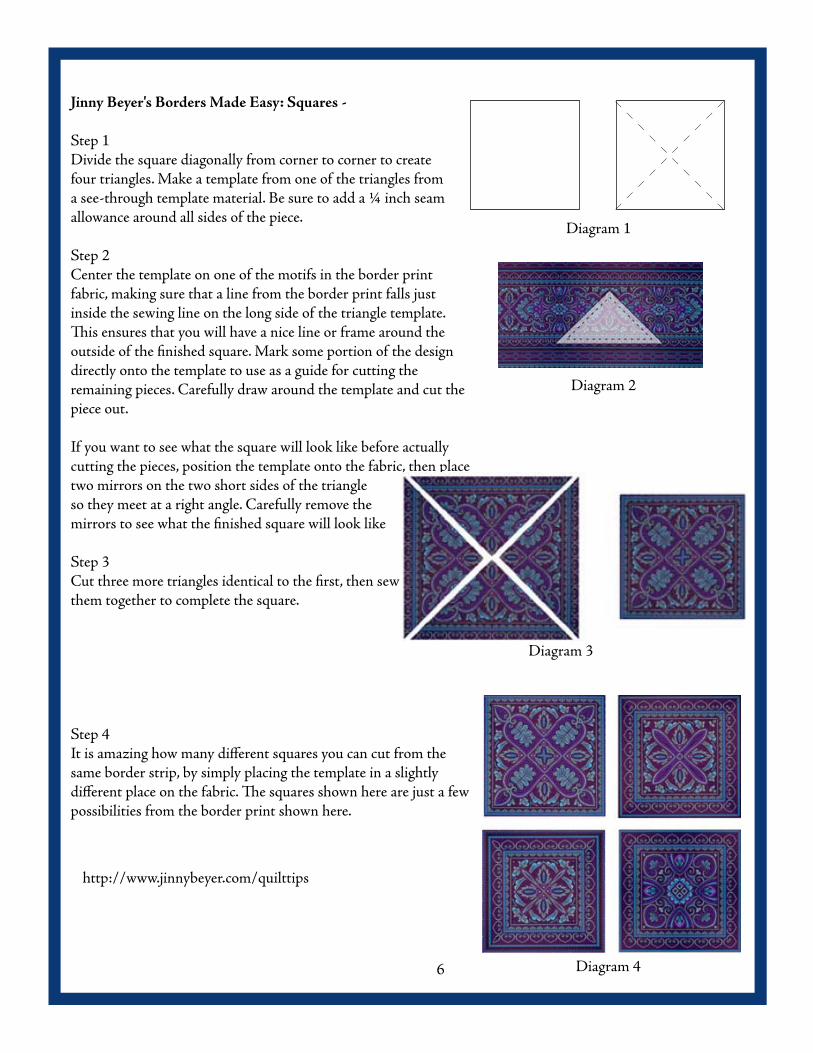
Jinny Beyer's Borders Made Easy: Squares -
Step 1Divide the square diagonally from corner to corner to create four triangles. Make a template from one of the triangles from a see-through template material. Be sure to add a ¼ inch seam allowance around all sides of the piece.
Step 2Center the template on one of the motifs in the border print fabric, making sure that a line from the border print falls just inside the sewing line on the long side of the triangle template. This ensures that you will have a nice line or frame around the outside of the finished square. Mark some portion of the design directly onto the template to use as a guide for cutting the remaining pieces. Carefully draw around the template and cut the piece out.
If you want to see what the square will look like before actually cutting the pieces, position the template onto the fabric, then place two mirrors on the two short sides of the triangle so they meet at a right angle. Carefully remove the mirrors to see what the finished square will look like
Step 3Cut three more triangles identical to the first, then sew them together to complete the square.
Step 4It is amazing how many different squares you can cut from the same border strip, by simply placing the template in a slightly different place on the fabric. The squares shown here are just a few possibilities from the border print shown here.
Diagram 4
Diagram 2
Diagram 3
http://www.jinnybeyer.com/quilttips
Diagram 1
6
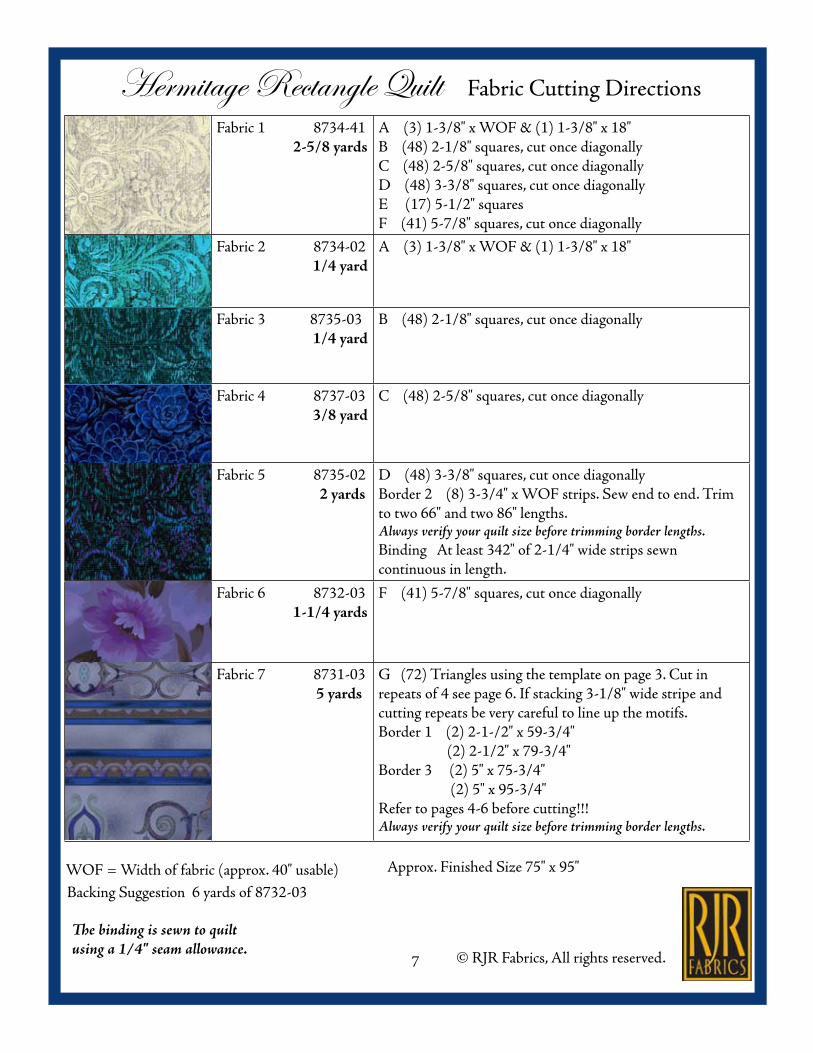
Fabric 1 8734-41 2-5/8 yards
A (3) 1-3/8" x WOF & (1) 1-3/8" x 18"B (48) 2-1/8" squares, cut once diagonallyC (48) 2-5/8" squares, cut once diagonallyD (48) 3-3/8" squares, cut once diagonallyE (17) 5-1/2" squaresF (41) 5-7/8" squares, cut once diagonally
Fabric 2 8734-02 1/4 yard
A (3) 1-3/8" x WOF & (1) 1-3/8" x 18"
Fabric 3 8735-03 1/4 yard
B (48) 2-1/8" squares, cut once diagonally
Fabric 4 8737-03 3/8 yard
C (48) 2-5/8" squares, cut once diagonally
Fabric 5 8735-02 2 yards
D (48) 3-3/8" squares, cut once diagonallyBorder 2 (8) 3-3/4" x WOF strips. Sew end to end. Trim to two 66" and two 86" lengths. Always verify your quilt size before trimming border lengths.Binding At least 342" of 2-1/4" wide strips sewn continuous in length.
Fabric 6 8732-03 1-1/4 yards
F (41) 5-7/8" squares, cut once diagonally
Fabric 7 8731-03 5 yards
G (72) Triangles using the template on page 3. Cut in repeats of 4 see page 6. If stacking 3-1/8" wide stripe and cutting repeats be very careful to line up the motifs.Border 1 (2) 2-1-/2" x 59-3/4" (2) 2-1/2" x 79-3/4" Border 3 (2) 5" x 75-3/4" (2) 5" x 95-3/4"Refer to pages 4-6 before cutting!!!Always verify your quilt size before trimming border lengths.
Hermitage Rectangle Quilt Fabric Cutting Directions
WOF = Width of fabric (approx. 40" usable)
7
Backing Suggestion 6 yards of 8732-03
© RJR Fabrics, All rights reserved.
Approx. Finished Size 75" x 95"
The binding is sewn to quilt using a 1/4" seam allowance.
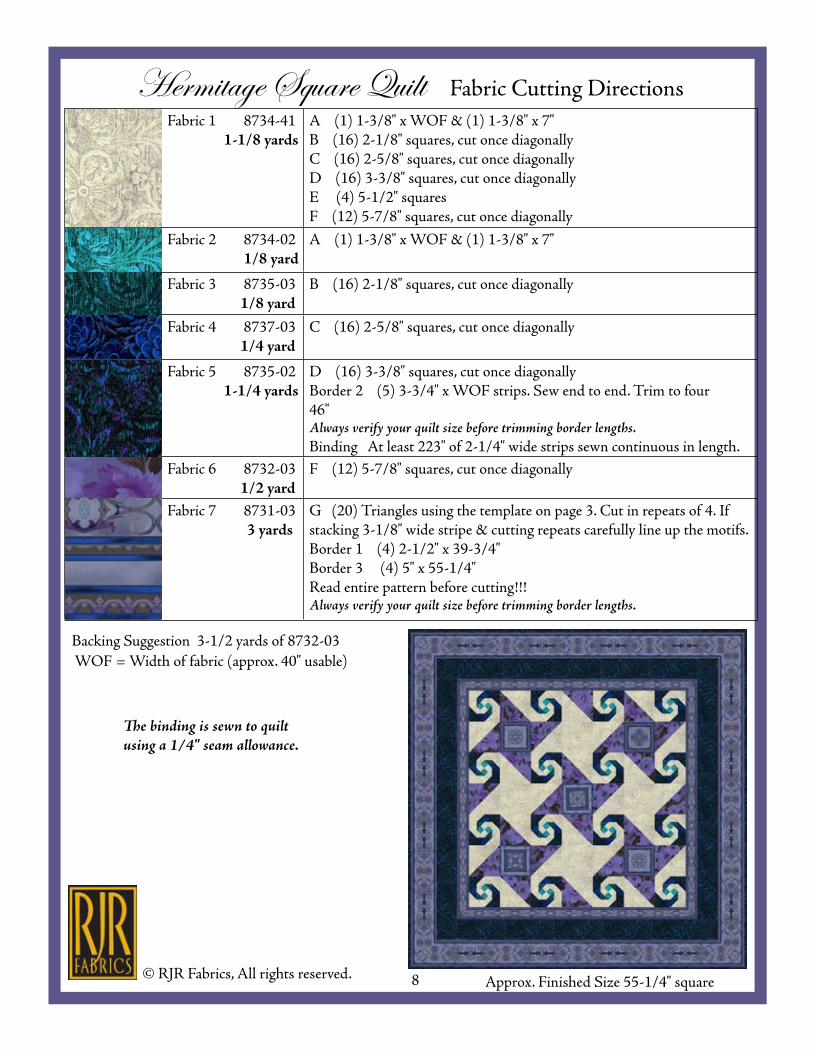
Fabric 1 8734-41 1-1/8 yards
A (1) 1-3/8" x WOF & (1) 1-3/8" x 7"B (16) 2-1/8" squares, cut once diagonallyC (16) 2-5/8" squares, cut once diagonallyD (16) 3-3/8" squares, cut once diagonallyE (4) 5-1/2" squaresF (12) 5-7/8" squares, cut once diagonally
Fabric 2 8734-02 1/8 yard
A (1) 1-3/8" x WOF & (1) 1-3/8" x 7"
Fabric 3 8735-03 1/8 yard
B (16) 2-1/8" squares, cut once diagonally
Fabric 4 8737-03 1/4 yard
C (16) 2-5/8" squares, cut once diagonally
Fabric 5 8735-02 1-1/4 yards
D (16) 3-3/8" squares, cut once diagonallyBorder 2 (5) 3-3/4" x WOF strips. Sew end to end. Trim to four 46" Always verify your quilt size before trimming border lengths.Binding At least 223" of 2-1/4" wide strips sewn continuous in length.
Fabric 6 8732-03 1/2 yard
F (12) 5-7/8" squares, cut once diagonally
Fabric 7 8731-03 3 yards
G (20) Triangles using the template on page 3. Cut in repeats of 4. If stacking 3-1/8" wide stripe & cutting repeats carefully line up the motifs.Border 1 (4) 2-1/2" x 39-3/4"Border 3 (4) 5" x 55-1/4"Read entire pattern before cutting!!! Always verify your quilt size before trimming border lengths.
Hermitage Square Quilt Fabric Cutting Directions
WOF = Width of fabric (approx. 40" usable)
8
Backing Suggestion 3-1/2 yards of 8732-03
© RJR Fabrics, All rights reserved. Approx. Finished Size 55-1/4" square
The binding is sewn to quilt using a 1/4" seam allowance.
9
Fabrics 5
Selvage
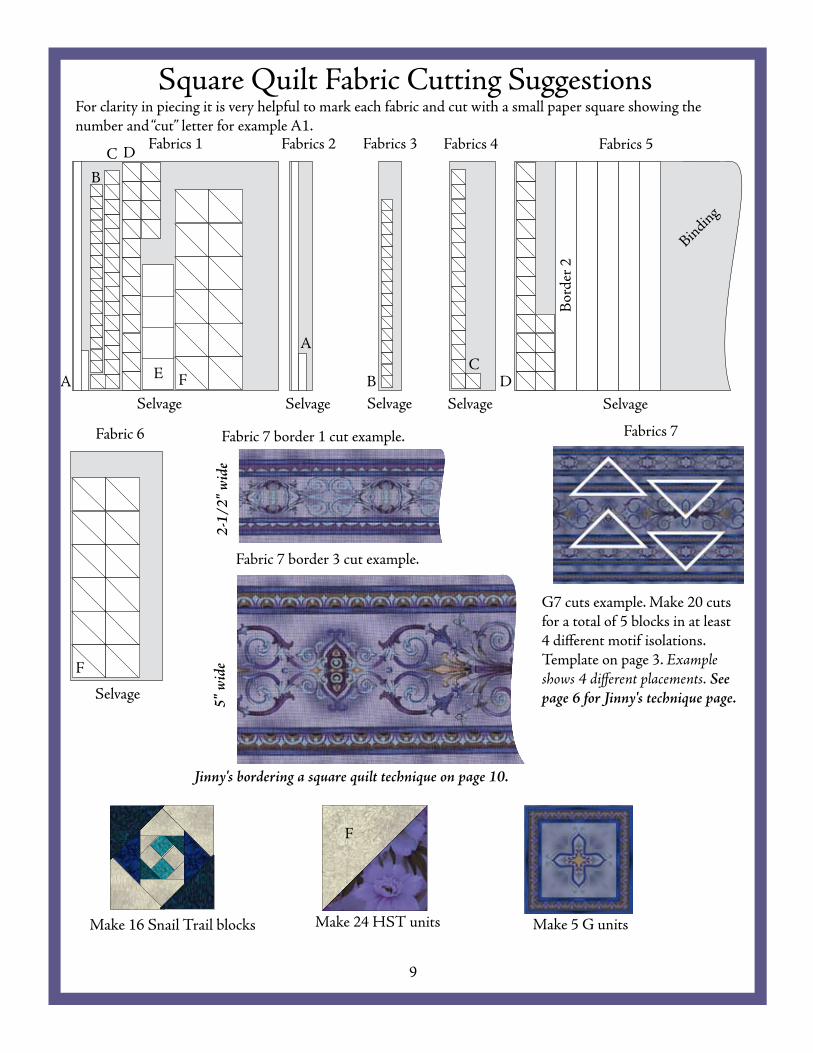
For clarity in piecing it is very helpful to mark each fabric and cut with a small paper square showing the number and “cut” letter for example A1.
Square Quilt Fabric Cutting Suggestions
Fabrics 1
SelvageA
B
C D
E F
Fabrics 2
Selvage
A
Fabrics 3
SelvageB
Fabrics 4
Selvage
CD
Bor
der 2
Fabric 6
Selvage
F
Fabrics 7
G7 cuts example. Make 20 cuts for a total of 5 blocks in at least 4 different motif isolations. Template on page 3. Example shows 4 different placements. See page 6 for Jinny's technique page.
Fabric 7 border 1 cut example.
Fabric 7 border 3 cut example.
Binding2-
1/2"
wid
e5"
wid
e
Make 5 G unitsMake 24 HST unitsMake 16 Snail Trail blocks
Jinny's bordering a square quilt technique on page 10.
F
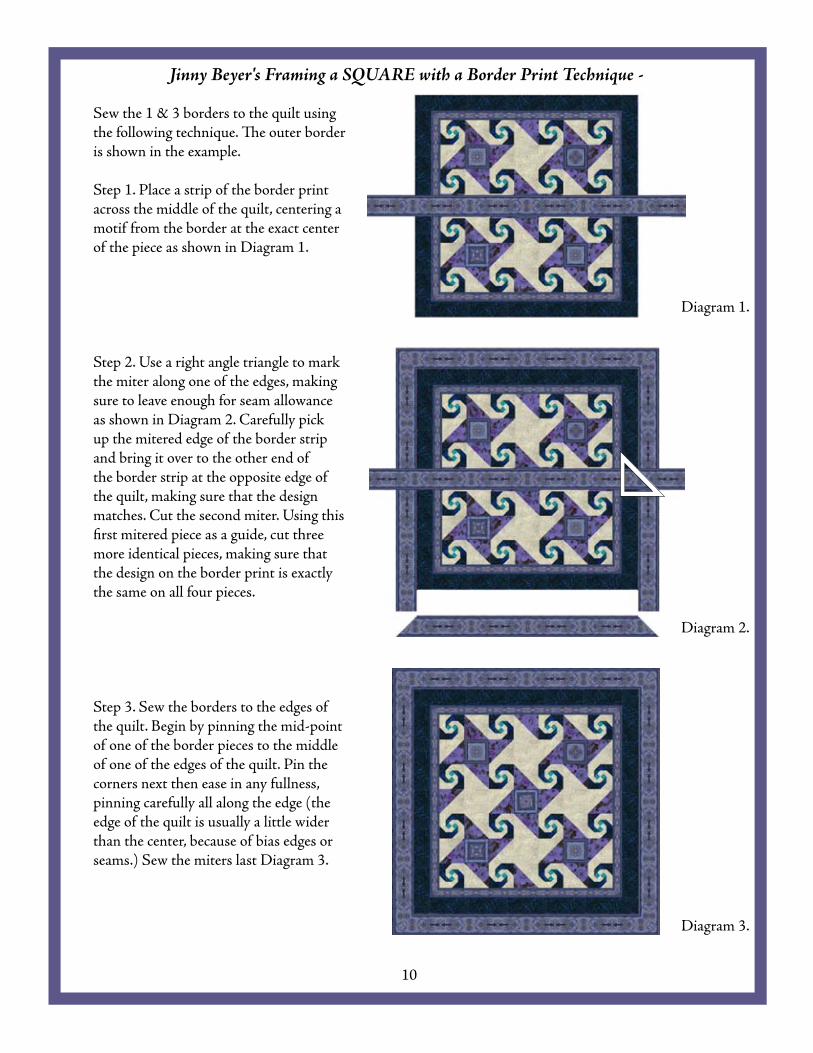
Sew the 1 & 3 borders to the quilt using the following technique. The outer border is shown in the example. Step 1. Place a strip of the border print across the middle of the quilt, centering a motif from the border at the exact center of the piece as shown in Diagram 1.
Step 2. Use a right angle triangle to mark the miter along one of the edges, making sure to leave enough for seam allowance as shown in Diagram 2. Carefully pick up the mitered edge of the border strip and bring it over to the other end of the border strip at the opposite edge of the quilt, making sure that the design matches. Cut the second miter. Using this first mitered piece as a guide, cut three more identical pieces, making sure that the design on the border print is exactly the same on all four pieces.
Step 3. Sew the borders to the edges of the quilt. Begin by pinning the mid-point of one of the border pieces to the middle of one of the edges of the quilt. Pin the corners next then ease in any fullness, pinning carefully all along the edge (the edge of the quilt is usually a little wider than the center, because of bias edges or seams.) Sew the miters last Diagram 3.
10
Jinny Beyer's Framing a SQUARE with a Border Print Technique -
Diagram 1.
Diagram 3.
Diagram 2.