Embed Size (px)
Citation preview
1
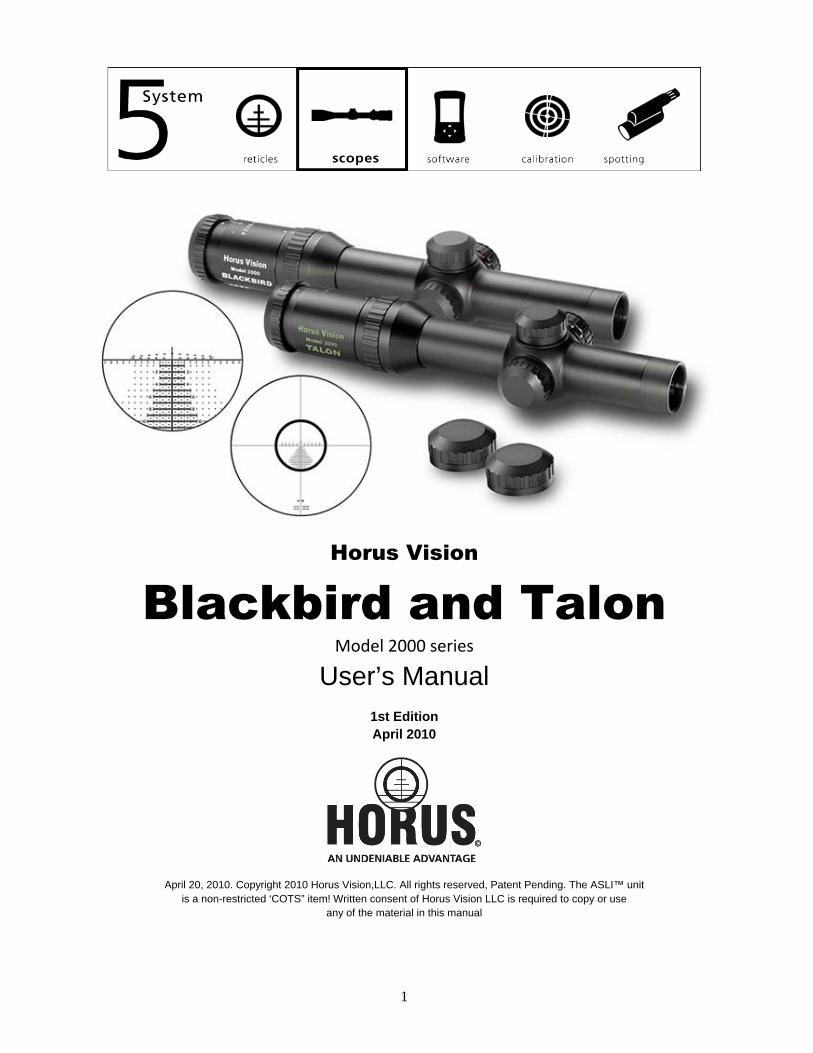
Horus Vision
Blackbird and Talon Model 2000 series
User’s Manual 1st Edition April 2010
April 20, 2010. Copyright 2010 Horus Vision,LLC. All rights reserved, Patent Pending. The ASLI™ unit
is a non-restricted ‘COTS” item! Written consent of Horus Vision LLC is required to copy or use any of the material in this manual
2
▄ Contents
Page
About Horus Vision .............................................................................................................................................. 3
Safety Warning .................................................................................................................................................... 4
Introduction to the Horus Vision Rapid Acquisition Scopes................................................................................. 5
-- Characteristics of the Horus Blackbird & Talon Scopes ....................................................................... 6
The Blackbird....................................................................................................................................................... 7
-- H58 Reticle Specifications.................................................................................................................... 8
-- Using the Blackbird............................................................................................................................... 9
The Talon........................................................................................................................................................... 12
-- H50 Reticle Specifications.................................................................................................................. 13
-- Using the Talon .................................................................................................................................. 15
General Information ........................................................................................................................................... 16
-- Mounting Your Horus Scope .............................................................................................................. 16
-- Zeroing Your Horus Scope ................................................................................................................. 17
Using Illuminated Reticles ................................................................................................................................. 19
Additional Information ........................................................................................................................................ 22
Legal Notice....................................................................................................................................................... 23
Contact Horus Vision ......................................................................................................................................... 24
3
▄ ABOUT HORUS VISION
Horus Vision provides cutting-edge technology to improve rifle accuracy at extended ranges, increasing the likelihood of a first-round hit. Horus products reduce the need for manual scope manipulation and mental calculation and incorporate sophisticated ballistics calculations. Our patented reticle replaces traditional mil-dot reticles. Horus technology and designs deliver simplified, systemized shooting that make expert skill possible and improve accuracy at any distance. Our hardware is combat-proven, meets military standards and can withstand the most rugged conditions. Horus Vision's ballistics calculations were developed and refined by the former Chief of ARDEC's small-arms division. Horus Vision was founded in 2000 and is headquartered in San Bruno, California.
4
▄ SAFETY WARNING
Always use great care with all firearms. A mistake in judgment or lapse of attention can result in serious injury or death.
The information in this manual, while believed to be accurate at the date of publication, is not warranted or represented to be accurate, correct, or useful for any particular purpose. Use the information in this manual with caution and common sense, and verify it with respect to your own firearms before use.
The author and publishing company accept no responsibility for errors in the information presented herein, or for accidents, injuries, damage, or any other problems which might arise as a result of your use of the information contained in this book, and expressly disclaim all liability for injuries, death, and damages, whether direct, incidental, consequential, punitive, or otherwise.
5
▄ INTRODUCTION TO THE HORUS VISION RAPID ACQUISITION RIFLESCOPES
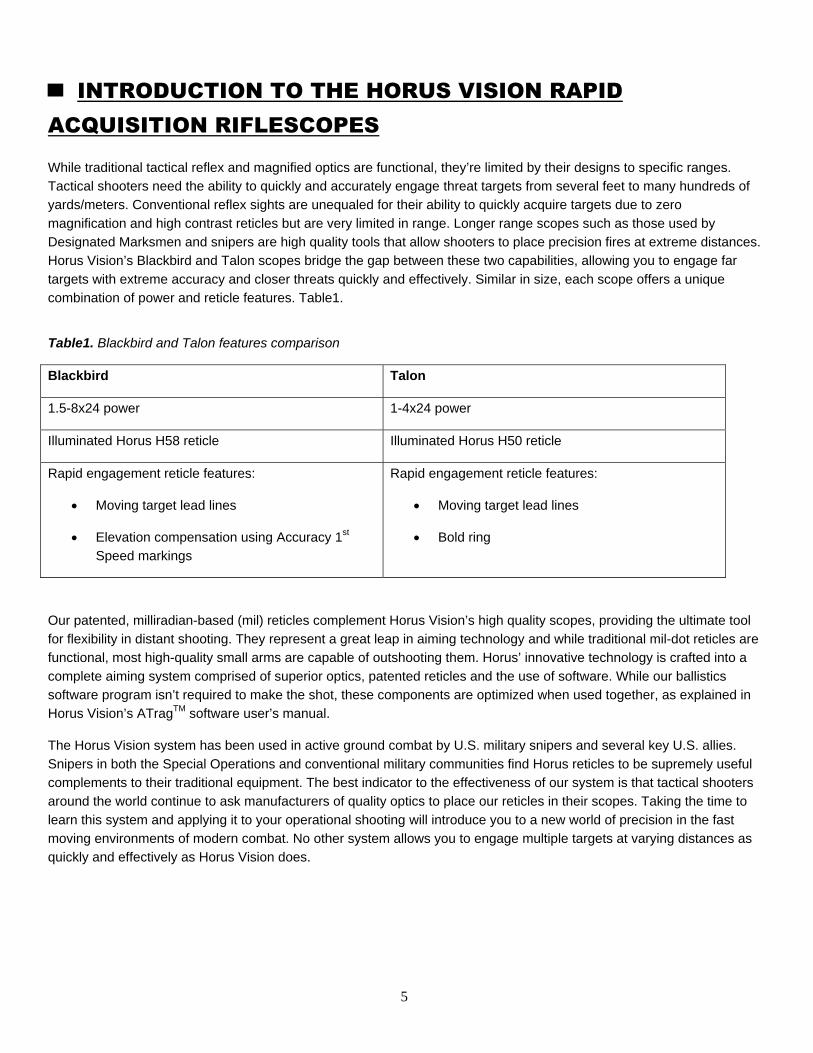
While traditional tactical reflex and magnified optics are functional, they’re limited by their designs to specific ranges. Tactical shooters need the ability to quickly and accurately engage threat targets from several feet to many hundreds of yards/meters. Conventional reflex sights are unequaled for their ability to quickly acquire targets due to zero magnification and high contrast reticles but are very limited in range. Longer range scopes such as those used by Designated Marksmen and snipers are high quality tools that allow shooters to place precision fires at extreme distances. Horus Vision’s Blackbird and Talon scopes bridge the gap between these two capabilities, allowing you to engage far targets with extreme accuracy and closer threats quickly and effectively. Similar in size, each scope offers a unique combination of power and reticle features. Table1.
Table1. Blackbird and Talon features comparison
Blackbird Talon
1.5-8x24 power 1-4x24 power
Illuminated Horus H58 reticle Illuminated Horus H50 reticle
Rapid engagement reticle features:
• Moving target lead lines
• Elevation compensation using Accuracy 1st Speed markings
Rapid engagement reticle features:
• Moving target lead lines
• Bold ring
Our patented, milliradian-based (mil) reticles complement Horus Vision’s high quality scopes, providing the ultimate tool for flexibility in distant shooting. They represent a great leap in aiming technology and while traditional mil-dot reticles are functional, most high-quality small arms are capable of outshooting them. Horus’ innovative technology is crafted into a complete aiming system comprised of superior optics, patented reticles and the use of software. While our ballistics software program isn’t required to make the shot, these components are optimized when used together, as explained in Horus Vision’s ATragTM software user’s manual.
The Horus Vision system has been used in active ground combat by U.S. military snipers and several key U.S. allies. Snipers in both the Special Operations and conventional military communities find Horus reticles to be supremely useful complements to their traditional equipment. The best indicator to the effectiveness of our system is that tactical shooters around the world continue to ask manufacturers of quality optics to place our reticles in their scopes. Taking the time to learn this system and applying it to your operational shooting will introduce you to a new world of precision in the fast moving environments of modern combat. No other system allows you to engage multiple targets at varying distances as quickly and effectively as Horus Vision does.
6
CHARACTERISTICS OF THE HORUS BLACKBIRD & TALON SCOPES: Zero or very low magnification, variable to mid and high powers Rapid acquisition of targets Talon at 1-4 power is the quintessential QCB scope Blackbird at 1.5-8 has more reach and long-range capabilities Durable, one-piece 30mm tubes Fast focus eyepieces Illuminated reticles Accurate range-finding to within 0.2 mil (Blackbird with H58) or 0.5 (Talon H50) No need to “dial in” elevation and windage adjustments for each shot Rapid transition between targets at multiple ranges without altering the shooter’s cheek-to-stock “weld” or body
position Reticles that allow continuous sighting through scopes, eliminating the need to view BDC or target knobs “Fail Safe” system for Second Shot CorrectionTM of observed impacts at highest magnifications Shooter and spotter system for accurate talk-on to targets (when using Horus reticles in both rifle and spotting
scope) Enhanced ability to self-spot for range-finding, windage, moving target leads and follow-up shots at highest
magnifications Reticle placement in the first focal or image plane (1FP), allowing calibrated use of all mil measurements and
holds at any magnification Milliradian-based / metric range finder and measuring scale
7
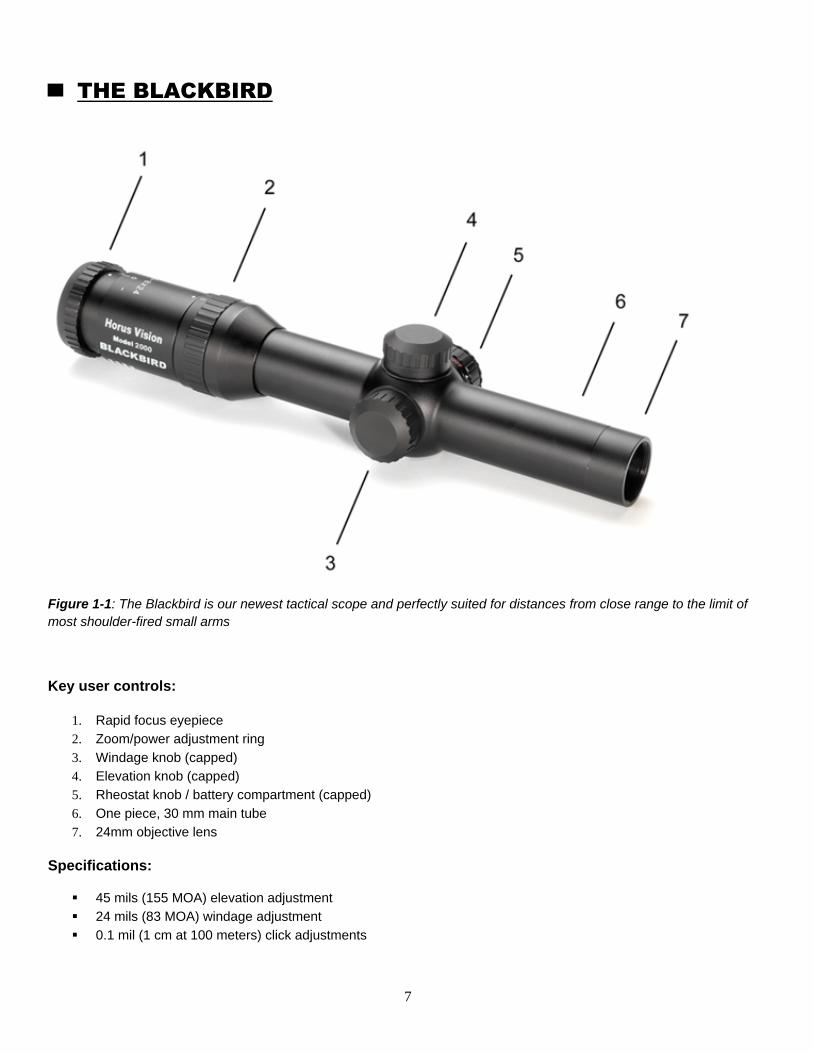
▄ THE BLACKBIRD
Figure 1-1: The Blackbird is our newest tactical scope and perfectly suited for distances from close range to the limit of most shoulder-fired small arms
Key user controls:
1. Rapid focus eyepiece 2. Zoom/power adjustment ring 3. Windage knob (capped) 4. Elevation knob (capped) 5. Rheostat knob / battery compartment (capped) 6. One piece, 30 mm main tube 7. 24mm objective lens
Specifications:
45 mils (155 MOA) elevation adjustment 24 mils (83 MOA) windage adjustment 0.1 mil (1 cm at 100 meters) click adjustments
8
6 brightness settings on rheostat control, with “off” positions between each 10.75” long 18.5 ounces Illumination powered by 1x CR2032 battery Water resistant to 3 meters
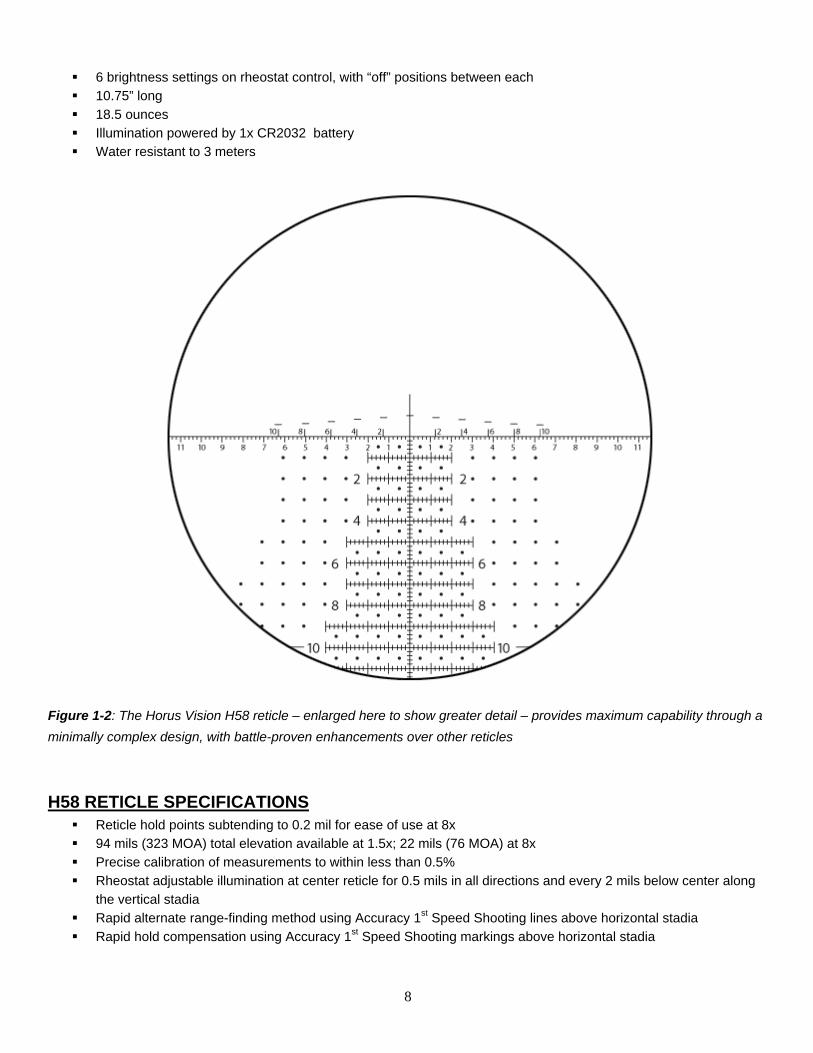
Figure 1-2: The Horus Vision H58 reticle – enlarged here to show greater detail – provides maximum capability through a minimally complex design, with battle-proven enhancements over other reticles
H58 RETICLE SPECIFICATIONS Reticle hold points subtending to 0.2 mil for ease of use at 8x 94 mils (323 MOA) total elevation available at 1.5x; 22 mils (76 MOA) at 8x Precise calibration of measurements to within less than 0.5% Rheostat adjustable illumination at center reticle for 0.5 mils in all directions and every 2 mils below center along
the vertical stadia Rapid alternate range-finding method using Accuracy 1st Speed Shooting lines above horizontal stadia Rapid hold compensation using Accuracy 1st Speed Shooting markings above horizontal stadia
9
Main horizontal stadia provide mil lines for traditional wind hold techniques Open field of view above center reticle for clear observation and spotting Very fine reticle to aid in precise aiming at high power and distant ranges
USING THE BLACKBIRD: The Blackbird represents a fusion of capabilities, blending close-range, rapid acquisition with long-range target engagement capabilities into one functional package. The H58 reticle has been customized to eliminate the “clutter” effect of more complex reticles, while still providing more windage and elevation hold capability than any optic in its class. This clean design includes wind hold dots that extend beyond the grid. In addition to Horus Vision’s standard gridded, mil-based reticle, the Blackbird’s H58 reticle incorporates the Accuracy 1st Speed Shooting Formula to provide rapid moving target holds as well as a system for engaging distant targets quickly without knowing specific ranges. In addition to these extra features, the Blackbird with H58 offers the same functions as typical mil-based reticles or other Horus reticles.
Moving Targets:
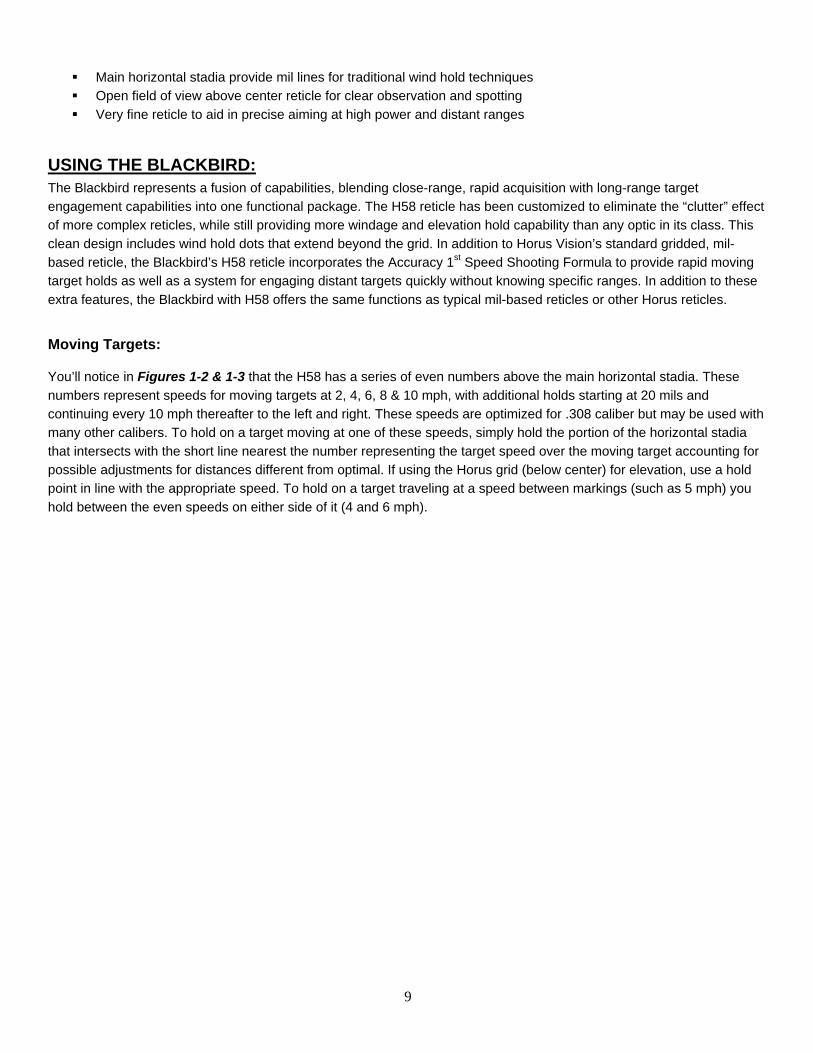
You’ll notice in Figures 1-2 & 1-3 that the H58 has a series of even numbers above the main horizontal stadia. These numbers represent speeds for moving targets at 2, 4, 6, 8 & 10 mph, with additional holds starting at 20 mils and continuing every 10 mph thereafter to the left and right. These speeds are optimized for .308 caliber but may be used with many other calibers. To hold on a target moving at one of these speeds, simply hold the portion of the horizontal stadia that intersects with the short line nearest the number representing the target speed over the moving target accounting for possible adjustments for distances different from optimal. If using the Horus grid (below center) for elevation, use a hold point in line with the appropriate speed. To hold on a target traveling at a speed between markings (such as 5 mph) you hold between the even speeds on either side of it (4 and 6 mph).
10
Figure 1-3: The Accuracy 1st Speed Shooting Formula allows use of the numbers along the horizontal stadia for rapid acquisition of moving targets. This example shows a hold for a target running at approximately 8 mph, from right to left.
Rapid Elevation Holds:
The Accuracy 1st Speed Shooting Formula has been incorporated into the moving target lead lines to provide an additional capability that will help you rapidly determine an elevation hold for your target without using the traditional mil relation formula for range-finding. The steps for determining an expedient hold are as follows:
1. Locate a 12” portion of the target such as the area from the top of a threat target’s shoulder to the top of the head. Any 12” object near the target will work.
2. Using the lines above the moving target [even] numbers, find the line that best brackets the 12” target between the moving target lead line and the horizontal stadia, as shown in Figure 1-4.
3. Note the number corresponding to the lead line in step 2; divide that line value in half. For example, if the head to shoulders area fits between the 4 mph lead line and the horizontal stadia line, divide that in half to get a figure of “2”.
4. Place the 2 mil elevation hold (usually expressed as “2 mils high” or “+2 mils”) on target and fire. This process works well for many cartridges and weapon systems, but not all will impact exactly the same. However this system should place you close enough to make a solid hit, all else being equal. If shooting with different caliber or muzzle velocity, you may need to add to or subtract from the original elevation hold to adapt the formula for your needs.
11
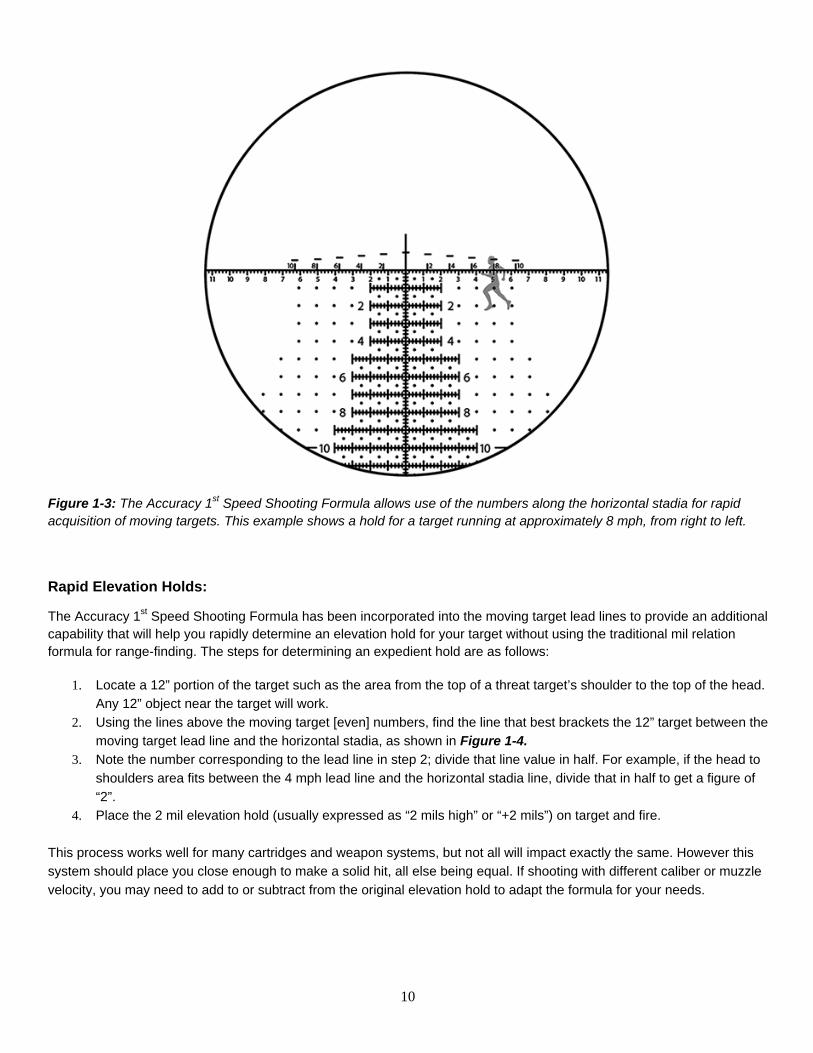
Figure 1-4: The reticle image at left depicts a target’s head and shoulder area (approximately 12” tall) bracketed between the main horizontal stadia and the line above the “4” moving target hold. At right, after dividing the “4” in half, an elevation hold of “2” is used to engage the target’s center mass.
The Blackbird’s H58 reticle allows the traditional methods of determining range and holding over for elevation based on the mil-relation formula, yielding great accuracy. However the Speed Shooting Formula provides a faster method for combat at moderate ranges (out to 600 yards/meters) with common weapon systems. The Speed Shooting Formula has been combat-tested and proven by U.S. military forces and is a great tool for the modern, dynamic battlefield.
Additional Features:
The Blackbird’s rheostat (located on the left side of the main body) has six brightness settings. You’ll notice an “off” position between each numbered setting. This “alternating off” feature allows you to position the rheostat one click from your preferred or likely setting in an off position, eliminating the need to spin through several settings to find the correct one for specific conditions. For example, if you’re in a long-term sniper position observing a target and want to conserve battery life, you may prefer to place the rheostat setting to “off” one position from the brightness setting that best suits the light condition. If a heightened state of preparedness is required, you’d simply rotate the knob one position to the desired brightness setting, without having to look through the scope to ensure it is set correctly.
The Blackbird’s illuminated reticle is not designed for quick acquisition in day or bright light conditions. It’s best used for limited light situations or other times when contrast between a black reticle and a dark target is needed. Although the reticle zoom is normally set to the lowest position for rapid acquisition firing (1.5x for the Blackbird), you may find the reticle difficult to pick up quickly, especially when engaging dark-colored or shaded targets. In these conditions you may find the reticle easier to see if you increase power to the 3x to 4x range. Spend ample time training in multiple light environments, with different colored targets at varying distances and at all powers to increase your effectiveness.
12
▄ THE TALON
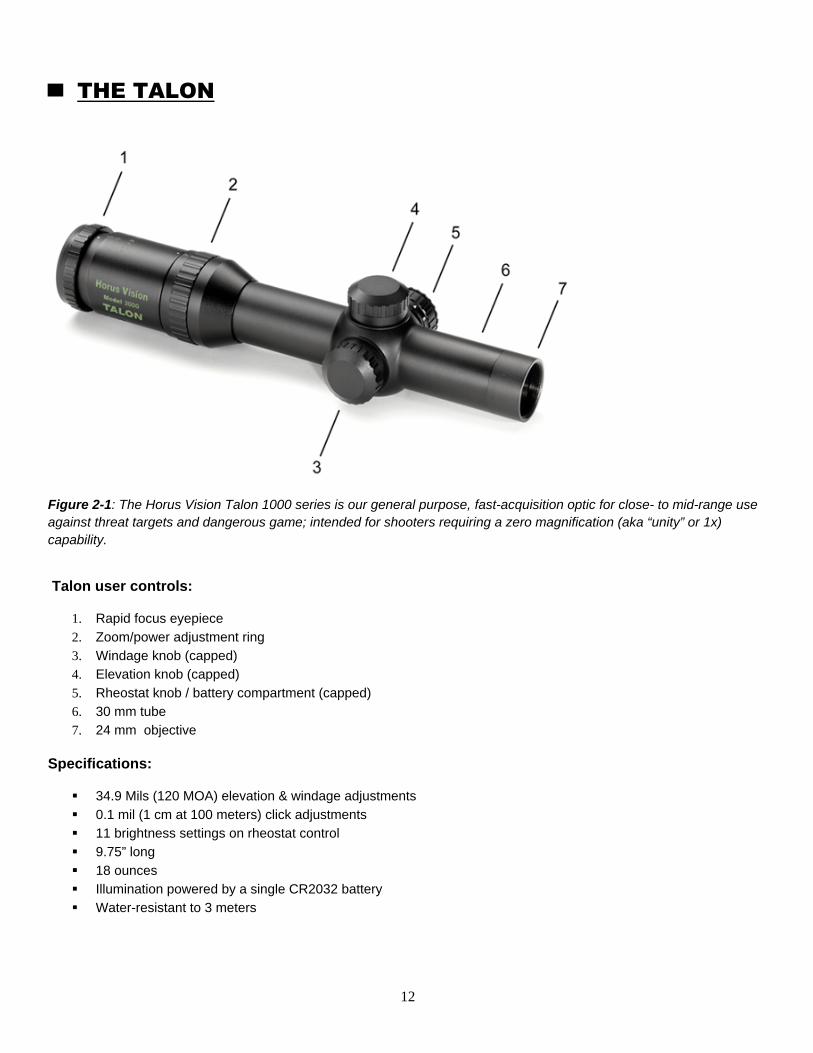
Figure 2-1: The Horus Vision Talon 1000 series is our general purpose, fast-acquisition optic for close- to mid-range use against threat targets and dangerous game; intended for shooters requiring a zero magnification (aka “unity” or 1x) capability.
Talon user controls:
1. Rapid focus eyepiece 2. Zoom/power adjustment ring 3. Windage knob (capped) 4. Elevation knob (capped) 5. Rheostat knob / battery compartment (capped) 6. 30 mm tube 7. 24 mm objective
Specifications:
34.9 Mils (120 MOA) elevation & windage adjustments 0.1 mil (1 cm at 100 meters) click adjustments 11 brightness settings on rheostat control 9.75” long 18 ounces Illumination powered by a single CR2032 battery Water-resistant to 3 meters
13
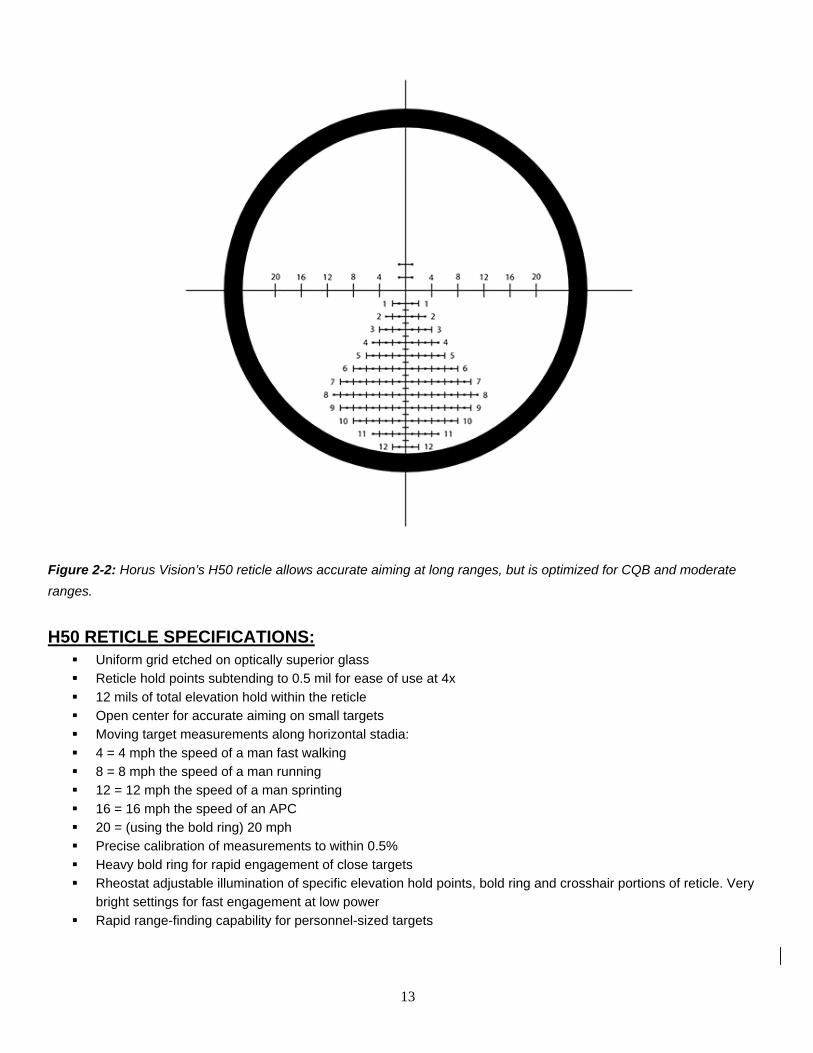
Figure 2-2: Horus Vision’s H50 reticle allows accurate aiming at long ranges, but is optimized for CQB and moderate ranges.
H50 RETICLE SPECIFICATIONS: Uniform grid etched on optically superior glass Reticle hold points subtending to 0.5 mil for ease of use at 4x 12 mils of total elevation hold within the reticle Open center for accurate aiming on small targets Moving target measurements along horizontal stadia: 4 = 4 mph the speed of a man fast walking 8 = 8 mph the speed of a man running 12 = 12 mph the speed of a man sprinting 16 = 16 mph the speed of an APC 20 = (using the bold ring) 20 mph Precise calibration of measurements to within 0.5% Heavy bold ring for rapid engagement of close targets Rheostat adjustable illumination of specific elevation hold points, bold ring and crosshair portions of reticle. Very
bright settings for fast engagement at low power Rapid range-finding capability for personnel-sized targets
14
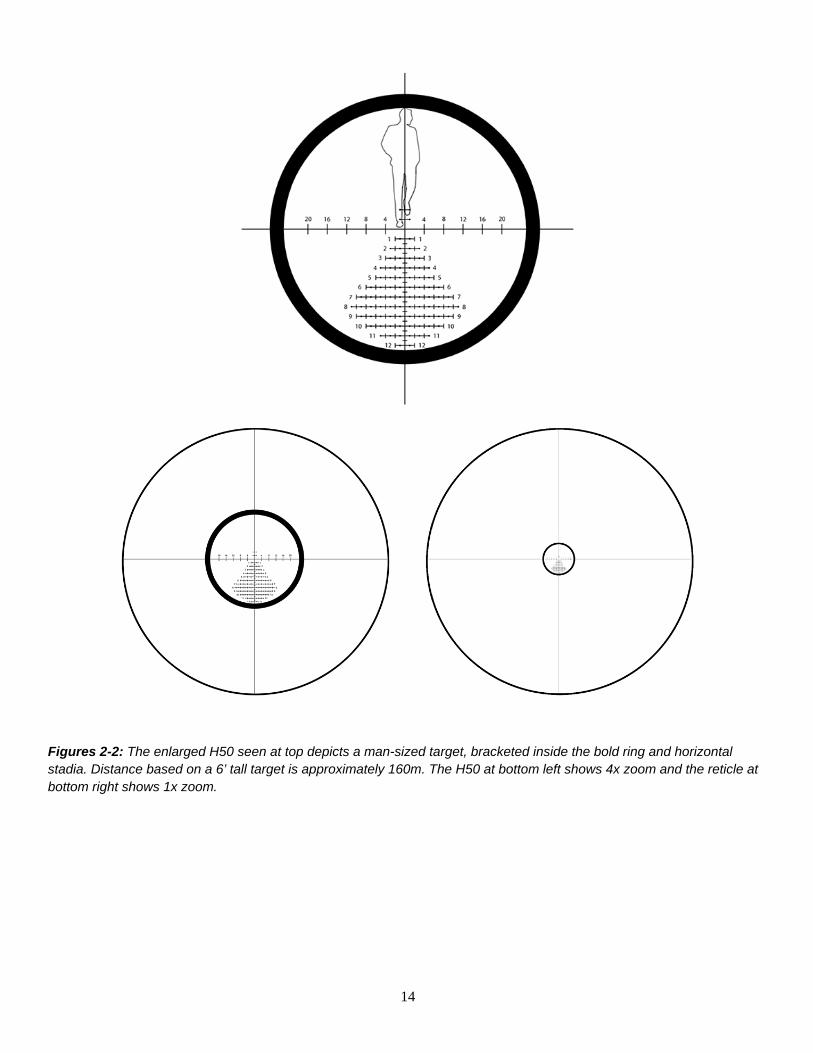
Figures 2-2: The enlarged H50 seen at top depicts a man-sized target, bracketed inside the bold ring and horizontal stadia. Distance based on a 6’ tall target is approximately 160m. The H50 at bottom left shows 4x zoom and the reticle at bottom right shows 1x zoom.
15
USING THE TALON: Horus Vision’s Talon scope has years of battle-proven performance to its credit. The Talon is best suited for those environments requiring no magnification – such as CQB-type shooting – with the potential need to make intermediate range shots. While the Talon’s H50 reticle allows engagement at farther ranges, its 4x magnification does not lend itself to the long-range, precision aiming that is possible with the H58 and other long range Horus reticles. However at 1x (zero magnification) the Talon allows immediate acquisition and engagement with a prominent reticle design and wide field of view. The Talon is a superb optic for urban, jungle and other limited distance environments as well as for use on shorter range weapon systems.
1. CLOSE RANGE: The Horus Talon presents a ‘bold ring’ with a central “crosshair”. It is best to use One power (1x) to achieve the maximum field of view for targets at close ranges. At low power the bold ring is seen as a very large aiming circle while the central reticle virtually disappears. Illumination at low power can be varied from extremely bright for daytime use to minimal for limited visibility. The bold ring, vertical and horizontal stadia all illuminate fully.
2. MID-RANGE: When using the Horus Talon as a mid-range reticle, place the optic on Three (3x) or Four power (4x). The bold ring allows the eye to be quickly centered naturally on the reticle’s center and additional elevation aiming points will be visible below center.

16
▄ GENERAL INFORMATION
MOUNTING YOUR HORUS SCOPE: The Talon and Blackbird both require 30mm rings, which are available in steel and aluminum. While steel rings offer enhanced durability under battlefield conditions they also weigh more. Rings are generally available in four different heights: low, medium, high and extra high. The choice depends upon your rifle’s configuration and your normal body position on the rifle. Rings may come attached to a one-piece base or as separate units. Separate bases or other “riser” type mounting systems may also be used for raising scope height.
Step 1- Mount the bottom half of the rings to the rifle’s mounting rail, making sure that the spacing is correct so the rings won’t interfere with the scope’s turrets.
Step 2- Place the scope on to the bottom rings, positioning it far enough rearward to provide a clear field of view (FOV).
Step 3- Attach the top portion of the ring tightening the screws enough to prevent the scope from falling out of the mounts but loose enough to enable you to adjust the scope forward and aft and to rotate the scope to insure a level reticle.
Step 4- Focus the ocular by adjusting the rear-most ring on the eyepiece. The reticle should be crisp against a distant object or bright surface. The diopter is adjustable to +/- -2, +1 so the scope can be used with or without corrective lenses.
Step 5- To establish proper eye relief, hold your rifle in a stable shooting position and close your eyes. Position the rifle into your shoulder as if firing. Then open your eyes. If the eye relief position is correct, you shouldn’t see any black or hazy outer ring (vignette effect) within the FOV. Your eye should be halfway between being too close or too far from the scope. If your image is not complete or clear, lower the rifle and gently slide the scope forward or aft in the rings and repeat the above exercise. It helps to have someone help move the scope while you maintain position. Continue this procedure until the image is correctly viewed through the eyepiece when you open your eyes. After you’re satisfied that the scope is properly aligned on the rifle, repeat this exercise four or five times in quick succession to ensure that your positioning is correct. If you intend to fire from alternate positions regularly, check eye relief in those positions as well since they’ll change the relationships between shoulder, head and arms. Set up your eye relief for whatever body position you’re most likely to use the majority of the time.
Step 6- Before tightening the top rings, place a spirit level on the uncapped elevation turret to check level against the rifle’s receiver. If the rifle has a “Picatinny” top rail on the receiver, use that surface as the index to level the scope off of. If no rail is available, use the best horizontal surface you can find, such as the bottom metal portion of a bolt action with the floor plate open or magazine removed. While leveling the reticle by eye will work at close ranges, minor level errors will affect use of reticle grid and knob adjustments at farther targets.
Step 7- When satisfied with eye relief and reticle level, tighten the scope ring screws to 15-20 inch-pounds of pressure. Over-tightening can damage the scope tube.

17
ZEROING YOUR HORUS SCOPE: While our scopes can be zeroed at any distance, it is recommended that the zero be exactly 100 meters or yards. Regardless of zero range, it is critical that the measurement be precise.
The following recommended method of zeroing will eliminate problems while saving time and ammunition:
Step 1- Measure the distance from the rifle to the target to ensure a precise ‘zero’ measurement.
Step 2- Use an 18x18 sheet (or larger) of paper with a ½ inch vertical and horizontal line drawn which intersect at the center of the paper. Use a plumb or level to attach the paper to a target backer so that the lines are level.
Step 3- Set your scope power ring to maximum power (Talon 4x or the Blackbird power ring to 8x.)
Step 4- Superimpose the Horus reticle over the vertical and horizontal lines on your target and center the reticle precisely on your intended point of impact (POI).
Step 5- Fire your first shot. Adjust windage and elevation knobs to center the shot at the intersection of the vertical and horizontal lines on your target. If the round’s impact is observable, use the Horus reticle’s mil-based grid to measure your deviation from the intended POI, then dial the exact corrections (in 0.1 mil increments) using the knobs to aid in rapid zero. For example, if your first shot impacts 2 mils low and 1.5 mils right, dial 2 mils (20 clicks) up and 1.5 mils (15 clicks) left. You’ll find zeroing with the Horus reticle to be much faster than conventional reticles.
Step 6- Center the reticle over your intended POI and fire another round. Repeat steps 5 and 6 until repeated shots are successfully centered at the intersection of the target’s vertical and horizontal lines.
Step 7- Fire a five round group at a clean target. Adjust zero as needed and confirm with additional groups until it perfectly matches your intended POI.
Step 8- Tighten the turret covers on the elevation and windage knobs. From this point on, use only the gridlines on the Horus reticle – not the knobs – to make adjustments for wind and elevation.
Remember to always verify your zero and develop data with the ammunition that you will be using for any tactical or hunting purpose.
Slipping Your Scales:
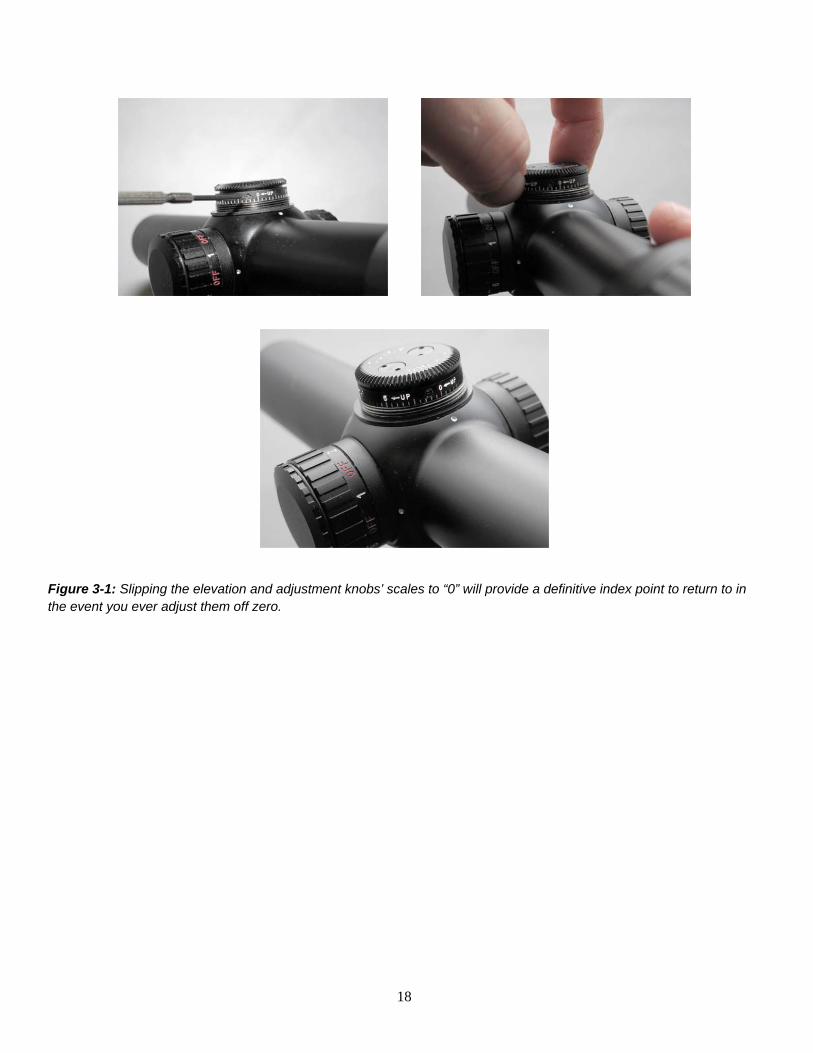
Your Horus scope is designed to allow all deviations from zero for windage and elevation to be made within the reticle, as opposed to the conventional method of dialing target knobs or ballistic drop compensating (BDC) knobs. However, you may elect to index the elevation and windage adjustment knobs on “0” once the rifle is zeroed to allow a return point for zero in the event you adjust the knobs for any reason. To slip the scales in this manner, loosen the two (2) small set screws on the face of the windage and elevation knobs (the viewable sides with numbers on them) using the jeweler’s flat-blade screwdriver included with your scope. Be very careful not to lose these tiny screws. The scale will rotate freely around the knob once the screws are removed. Carefully rotate it until the “0” mark indexes on the small white dot on the scope’s saddle, as depicted below in Figure 3-1. Take care not to inadvertently turn the inner drum while performing this procedure, as it will adjust the scope’s zero point. Once the knobs have been slipped to “0”, reinstall and tighten the set screws, taking care not to strip them by over-tightening. Always verify zero before capping the knobs.
Important: Do not attempt to loosen the screws inset into the top face of the windage and elevation knobs, these are only to be removed by a Horus Vision authorized warranty station.
18
Figure 3-1: Slipping the elevation and adjustment knobs’ scales to “0” will provide a definitive index point to return to in the event you ever adjust them off zero.
19
▄ USING ILLUMINATED RETICLES
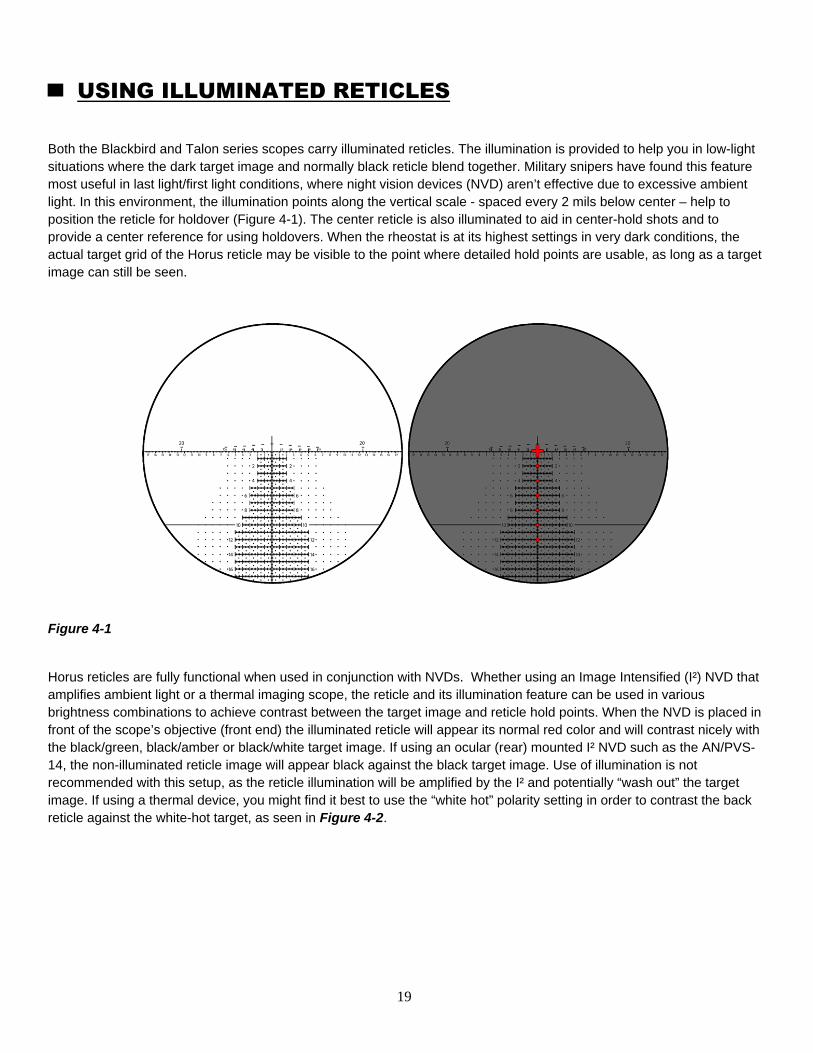
Both the Blackbird and Talon series scopes carry illuminated reticles. The illumination is provided to help you in low-light situations where the dark target image and normally black reticle blend together. Military snipers have found this feature most useful in last light/first light conditions, where night vision devices (NVD) aren’t effective due to excessive ambient light. In this environment, the illumination points along the vertical scale - spaced every 2 mils below center – help to position the reticle for holdover (Figure 4-1). The center reticle is also illuminated to aid in center-hold shots and to provide a center reference for using holdovers. When the rheostat is at its highest settings in very dark conditions, the actual target grid of the Horus reticle may be visible to the point where detailed hold points are usable, as long as a target image can still be seen.
Figure 4-1
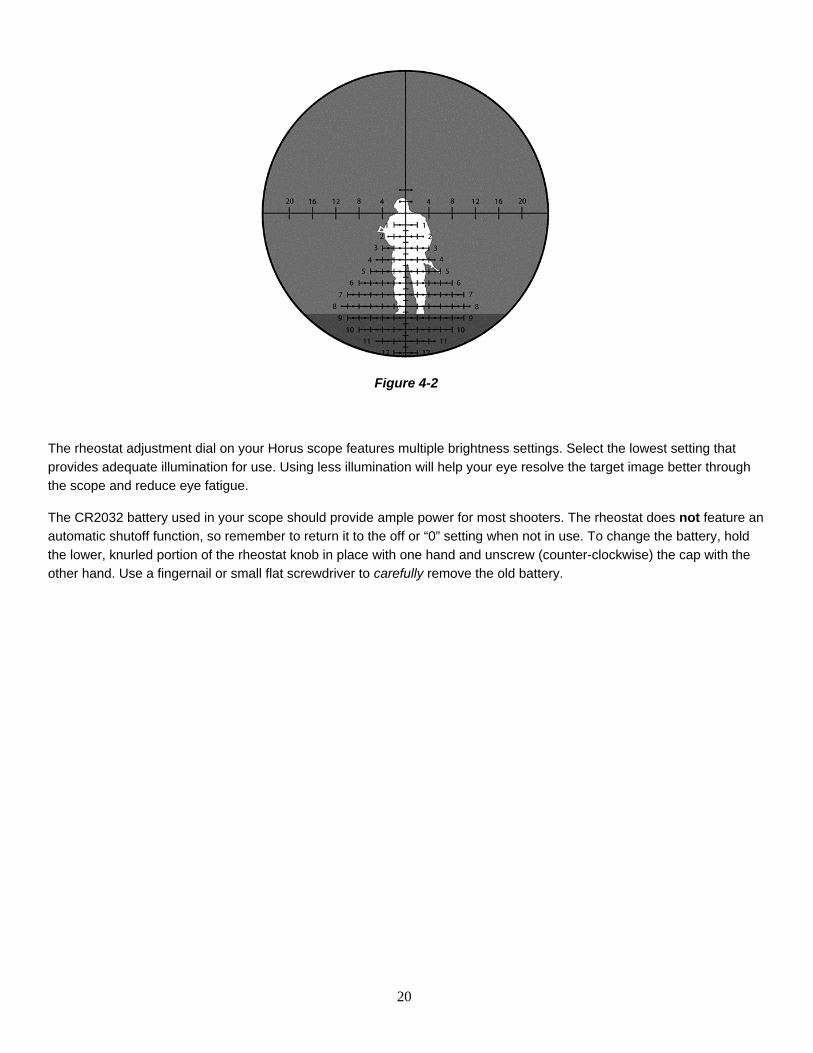
Horus reticles are fully functional when used in conjunction with NVDs. Whether using an Image Intensified (I²) NVD that amplifies ambient light or a thermal imaging scope, the reticle and its illumination feature can be used in various brightness combinations to achieve contrast between the target image and reticle hold points. When the NVD is placed in front of the scope’s objective (front end) the illuminated reticle will appear its normal red color and will contrast nicely with the black/green, black/amber or black/white target image. If using an ocular (rear) mounted I² NVD such as the AN/PVS-14, the non-illuminated reticle image will appear black against the black target image. Use of illumination is not recommended with this setup, as the reticle illumination will be amplified by the I² and potentially “wash out” the target image. If using a thermal device, you might find it best to use the “white hot” polarity setting in order to contrast the back reticle against the white-hot target, as seen in Figure 4-2.
20
Figure 4-2
The rheostat adjustment dial on your Horus scope features multiple brightness settings. Select the lowest setting that provides adequate illumination for use. Using less illumination will help your eye resolve the target image better through the scope and reduce eye fatigue.
The CR2032 battery used in your scope should provide ample power for most shooters. The rheostat does not feature an automatic shutoff function, so remember to return it to the off or “0” setting when not in use. To change the battery, hold the lower, knurled portion of the rheostat knob in place with one hand and unscrew (counter-clockwise) the cap with the other hand. Use a fingernail or small flat screwdriver to carefully remove the old battery.

21
Take care not to damage the contacts under the battery if using a tool to remove it. Replace the battery with a fresh CR2032 with the (+) side up, so that it is flush in the knob (Figure 4-3). Replace the threaded portion of the knob by screwing it on (clockwise). Once the cap is tight, check to ensure you haven’t turned the rheostat on. If you over tighten the cap, the actual illumination knob will turn and activate the reticle light.
Figure 4-3: The CR2032 battery is shown with the rheostat cap removed, placed flush in the battery well with the positive (+) side up. The “0” setting on the dial is the “off” position for reticle illumination and is adjacent to the white index dot in this photo, indicating the reticle’s illumination is turned off. The normal black reticle image is still observable at this and all settings. The lowest illuminated setting is at the “1” position, the highest at either “6” (Blackbird) or “11” (Talon).
22
▄ ADDITIONAL INFORMATION
Horus scopes and reticles make the complex process of precision shooting faster and easier. From the point where you identify a target, to the point where you follow-through to confirm the hit, there are several critical steps where Horus reticles make a difference:
1. Ranging 2. Use of grid for holdover 3. Wind holds and/or moving target lead lines 4. Follow through and Second Shot CorrectionTM
You can explore these steps in greater detail in the Horus Vision Tactical Manual. Please refer to this manual for proper application of these steps.
For even greater accuracy, Horus ATragMX Ballistics Software can be used in combination your Horus scope and reticle. ATragMX lets you take combat-proven aiming solutions into the field so you are instantly ready for any shooting conditions. Any mil-based reticle system is enhanced by the use of a ballistics program like ATragMX, but it is not required. To learn more about the benefits of Horus Ballistics Software, see the ATragMX user’s manual and a related section in the general tactical scope manual.

23
▄ Legal Notice
HORUS VISION®, the EYE OF THE FALCON logo, 1ST HIT, and 1ST HIT TECHNOLOGIES are registered trademarks of Horus Vision, LLC and may not be used in any manner without express permission from Horus Vision, LLC. SECOND SHOT, TACTICAL SOLUTIONS, and TARGETING SOLUTIONS are trademarks of Horus Vision, LLC and may not be used in any manner without express permission from Horus Vision, LLC.
Horus Vision software products and written and visual materials are protected by U.S. and international copyright protection and may not be used in any manner without express permission from Horus Vision, LLC.
A wide variety of scopes, reticles, software, computer systems, and other products associated with shooting and ballistics (“Horus Vision systems”) are exclusively owned by Horus Vision, LLC and are protected by issued patents in the United States, including U.S. Pat. Nos. 5,920,995, 6,032,374, 6,453,595, 6,516,699, and 6,681,512, issued foreign counterparts, as well as numerous additional pending patent applications in the United States and foreign jurisdictions, including, but not limited to Europe, Japan, Israel, Canada, and Australia. Manufacture, sale, importation, or use of the Horus Vision systems requires a license from Horus Vision, LLC. For more specific information on obtaining a license, please contact Horus Vision, LLC.
Nothing contained herein should be construed as granting, by implication, estoppels, or otherwise, any license or right to use any Horus Vision, LLC intellectual property.
© 2010 Horus Vision, LLC
All Rights reserved

24
▄ Contact Horus Vision
Horus Vision, LLC
598 San Mateo Avenue
San Bruno, CA 94066
General Office Phone: 650-588-8862
Sales Office Phone: 650-583-5471
FAX: 650-588-6264
E-mail: [email protected]
Website: www.horusvision.com