Embed Size (px)
Citation preview
IBM Case Manager 5.2Solution Deployment Guide Part 1
Basic Solution Migration and Deployment
Abstract
This guide, presented as a series of articles, focuses on the steps and tools used to migrate and deploy an IBM Case Manager solution from one environment to another. It is intended to augment the information available in the IBM Case Manager and FileNet P8 Information Centers. Throughout this guide, links are provided to Information Center topics. Review of the topics is strongly recommended.
The first article in this series, Part 1: Basic Solution Migration and Deployment , provides an overview of the entire solution migration and deployment process as well as procedures for migrating a solution with only IBM Case Manager assets. Also in the Part 1 appendix is a quick reference checklist for the entire process as presented by all the articles in the complete Solution Deployment Guide.
The second article, Part 2: Advanced Solution Migration and Deployment , builds upon Part 1 to encompass the larger solution application including other FileNet P8 assets.
The final article, Part 3: Selected External Assets Migration and Deployment, uses the solution application migration and deployment model outlined in the first and second articles but illustrates by example how two of the other IBM and external assets are managed.
Revision 2.0
© Copyright IBM Corp. 2013 IBM Case Manager 5.2

Contents
Migration and Deployment Overview............................................................................4IBM Case Manager environments.............................................................................................................4Traditional application migration model................................................................................................5IBM Case Manager solution migration model........................................................................................7Using the best of both migration models.................................................................................................8
Prepare............................................................................................................................11Identify solution application artifacts and assets................................................................................11Assemble migration and deployment instructions..............................................................................13Perform one-time configuration and setup tasks.................................................................................14
Migrate............................................................................................................................15Migrate from source environment...........................................................................................................15Task 2 – Export solution............................................................................................................................17Task 3 – Export security configuration manifest..................................................................................19Task 6 – Import solution............................................................................................................................20Task 7a – Import security configuration manifest...............................................................................23Task 7b – Edit security configuration.....................................................................................................25
Deploy.............................................................................................................................33Suspend and backup the system.............................................................................................................33Task 10a – Deploy Solution......................................................................................................................33
Configure........................................................................................................................36General system configuration..................................................................................................................36Task 10b – Apply security configuration...............................................................................................38
Modify and Verify...........................................................................................................41Optional modification of existing case instances.................................................................................41Verify deployed solution..........................................................................................................................41
Appendices.....................................................................................................................43Solution Migration and Deployment Process Checklist....................................................................43Document Conventions.............................................................................................................................45References and Acknowledgements.......................................................................................................46
© Copyright IBM Corp. 2013 IBM Case Manager 5.2
Overview Migration and Deployment Overview
IBM Case Manager environments
IBM Case Manager is deployed in an application server and uses the IBM FileNet P8 platform to access and store content and solution assets. The Case Manager client utilizes the IBM Content Navigator framework. The lightweight directory access protocol (LDAP) is utilized for user access and authorization.
Multiple instances of IBM Case Manager using distinct application server instances are deployed to create different environments to serve a variety of purposes. The term environment in this guide describes a collection of servers that typically belong to a distinct FileNet P8 domain created for one particular purpose.
For example, you can have an environment for business analysts and solution developers to create a solution, an environment for developers to perform functional testing, and another testing environment for system integrators to test everything. Lastly every company needs a production environment in which the final tested solution is deployed for case workers to work on active and archived cases. Development and testing must not be done in the production environment.
With IBM Case Manager, the development environment has special characteristics and is created with the IBM Case Manager configuration tool using a development profile. In the development environment, the case management design object store in the Content Platform Engine repository is used to store the artifacts created using the IBM Case Manager solution design tools: Case Manager Builder and FileNet Process Designer. These tools are only deployed in the development environment.
Any environment that is not a development environment is also created with the configuration tool but using a production profile. These non-development production environments are intended to support working with running case management solution applications. That work can either be to test a solution application, or to service the solution application placed on the production system for use by the business. These production environments have a case management staging object store in the Content Platform Engine database into which the IBM Case Management artifacts are imported from other environments in preparation for deploying the solution. Issues found in a non-development environment are corrected in a development
© Copyright IBM Corp. 2013 IBM Case Manager 5.2
environment and the solution migrated again into the staging object store for the non-development environment to be redeployed and the changes verified.
Synchronizing the various environments such that every environment behaves identically after having the same changes applied is critical. This verification ensures no surprises occur after deploying to the final production environment. Although this technique works well for functional and integration testing, because development and test environments usually do not have the same hardware as the production environment, performance and load test results typically differ.
The IBM Case Manager administration client is used to migrate solutions from environment to environment. If solutions contain non-case management assets, FileNet Deployment Manager and other tools are utilized to move the additional assets.
The first article in this series, Part 1: Basic Solution Deployment and Migration, provides an overview of the entire solution migration and deployment process as well as procedures for migrating a solution with only IBM Case Manager assets. The second article, Part 2: Advanced Solution Deployment and Migration, builds upon Part 1 to encompass the larger solution application including other FileNet P8 assets as well as selected other IBM and external assets.
This series of articles will not discuss software development life-cycle methodologies although the techniques described in the articles can assist in the implementation of those methodologies. Instead the focus is on the steps and tools used to migrate and deploy an IBM Case Manager solution from one environment to another. Although some elements can apply to moving a solution between development environments, the focus of this guide is on migrating a solution to a non-development environment. A non-development environment can either be an environment used for testing or the production environment.
Information Center references:IBM FileNet P8 5.2 “Content Platform Engine”IBM FileNet P8 5.2 “FileNet P8 domains”IBM Case Manager 5.2 “Planning your development and production environments”IBM Case Manager 5.2 “Planning for IBM Case Manager security”
Traditional application migration model
Typical projects split their infrastructure into at least three environments:
Development (DEV)User acceptance, testing, and quality assurance (UAT)Production (PROD)
A given application moves in stages through those environments. This movement is often expressed using the shorthand
DEV > UAT > PROD
If an issue is found in the UAT environment, a correction to the application can be applied and tested directly in the UAT environment. Once the user acceptance tests have passed, the
© Copyright IBM Corp. 2013 IBM Case Manager 5.2
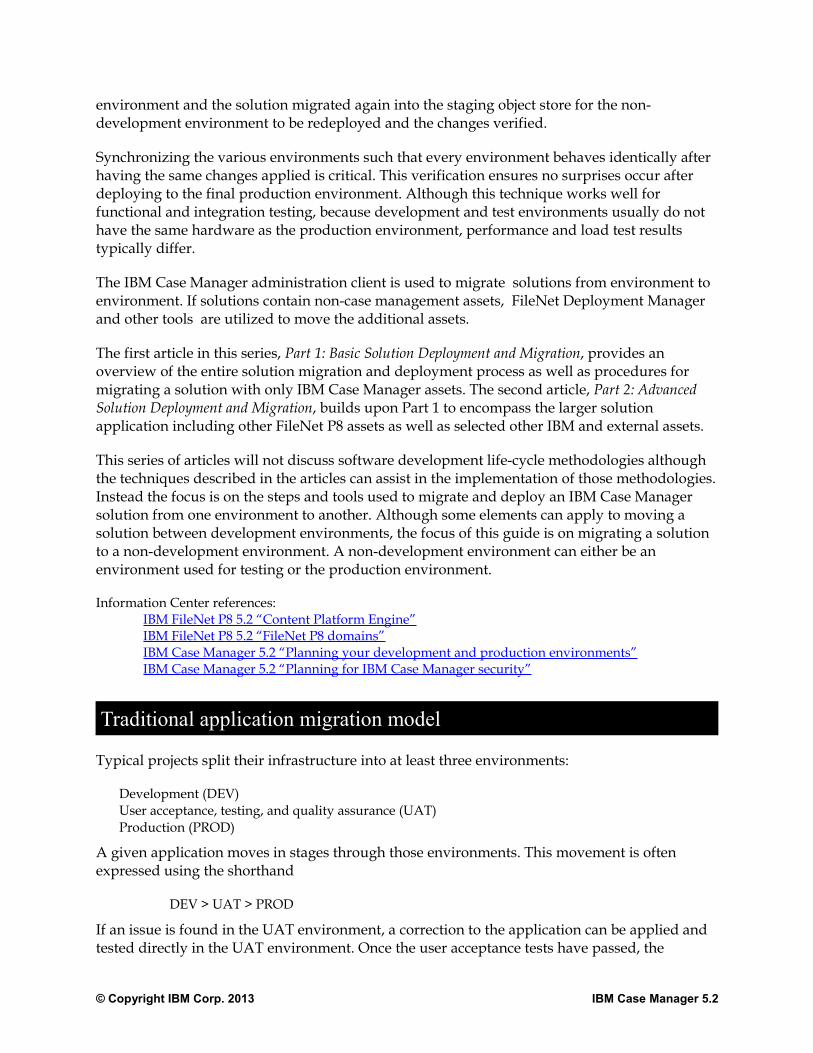
application is often migrated directly from the UAT environment to the PROD environment. The application modifications must then be separately replicated to the development environment to bring the development version of the application in-sync with the version moved to the PROD environment. Having well-defined processes in-place to ensure application modifications are managed as a potentially bi-directional process between the environments is critical.
This next figure shows the stages as a graphical representation.
Figure 1 Traditional P8 application migration model
The UAT environment is also used to capture, potentially automate, and test the configuration steps required to support the application. A critical part of the configuration is the security applied. In many cases, the UAT environment will utilize the same LDAP as the production environment so the testing, application documentation, and any automation developed can be leveraged directly into the production environment.
Although not strict requirements, the following are generally accepted best practices for these environments:
◦ Development must not be done in the same environment as the production site.
◦ For the integrity of the test environment, it too should be separate from development. Segregating these activities in different environments avoids the introduction of unwanted configuration changes or code changes by developers before those changes are ready to be tested. It also allows for verification of changes to be conducted in a clean environment using documented procedures to ensure the results are well understood and repeatable.
© Copyright IBM Corp. 2013 IBM Case Manager 5.2
◦ Similarly segregating production from development and test avoids the introduction of unwanted changes before those changes are ready to be put into production.
◦ Highly advised is the use of the same LDAP foundation across all stages except the development environment. This yields more reliable security testing and allows for scripts and procedures developed during testing to be leveraged when applying the same changes to production.
◦ For most FileNet P8 application development efforts, both traditional and those supported by IBM Case manager, the recommendation is to segregate the environments by the FileNet P8 domain. The isolation achieved by this approach is optimal to allow people to work simultaneously and independently on the same project but in different phases without adversely affecting each other. In particular, giving each environment its own FileNet P8 domain makes it easy to grant domain-wide permissions in each environment to different groups. For example, developers can be given full permission to configuration objects in the development environment but no permission to configuration objects in the production environment.
Larger companies tend to add these additional environments to the basic three environments identified earlier:
Performance testingTrainingStaging
Although these environments are not discussed in this guide, the techniques presented can be used to migrate a solution to these environments or any other.
IBM Case Manager solution migration model
The DEV, UAT, PROD environments, as described in the previous section, as well as the additional environments, also exist with an IBM Case Manager system. The same recommendations for environment separation and other best practices apply. However the migration model for an IBM Case Manager solution application differs in one important way from the traditional application migration model.
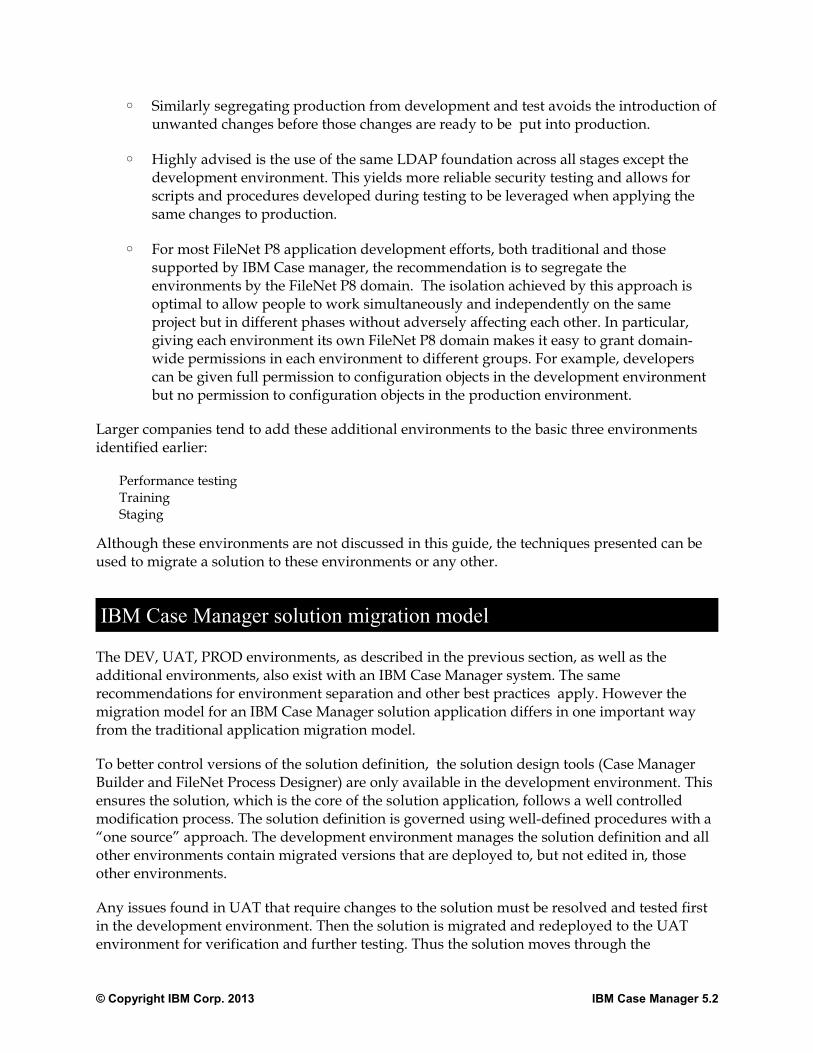
To better control versions of the solution definition, the solution design tools (Case Manager Builder and FileNet Process Designer) are only available in the development environment. This ensures the solution, which is the core of the solution application, follows a well controlled modification process. The solution definition is governed using well-defined procedures with a “one source” approach. The development environment manages the solution definition and all other environments contain migrated versions that are deployed to, but not edited in, those other environments.
Any issues found in UAT that require changes to the solution must be resolved and tested first in the development environment. Then the solution is migrated and redeployed to the UAT environment for verification and further testing. Thus the solution moves through the
© Copyright IBM Corp. 2013 IBM Case Manager 5.2

environments in stages: DEV > UAT, DEV > PROD. This is expressed graphically in the next figure.
Figure 2 Solution migration model
Such change control processes are good for managing risk inherent with change. But it can make adapting to external factors such as organizational shifts or environment specific settings difficult.
Using the best of both migration models
Some external factors can impact the overall solution application, but not effect the core solution definition. As those aspects are modified and tested in the UAT environment, the resulting configuration changes should be migrated directly from UAT to PROD to reduce the risk of unforeseen issues. Examples of aspects not impacting the core and ideally managed without requiring solution redeployment include:
Security model changes and LDAP differencesAudit definition requirements Translation of assets to support localization
The UAT environment can still be used to capture, potentially automate, and test the configuration steps required to support the solution. If the UAT environment for the IBM Case
© Copyright IBM Corp. 2013 IBM Case Manager 5.2
Manager system utilizes the same LDAP as the production environment, then as with the traditional application, the testing, solution application installation and configuration documentation, as well as any automation developed could be leveraged directly when the solution is deployed into the production environment.
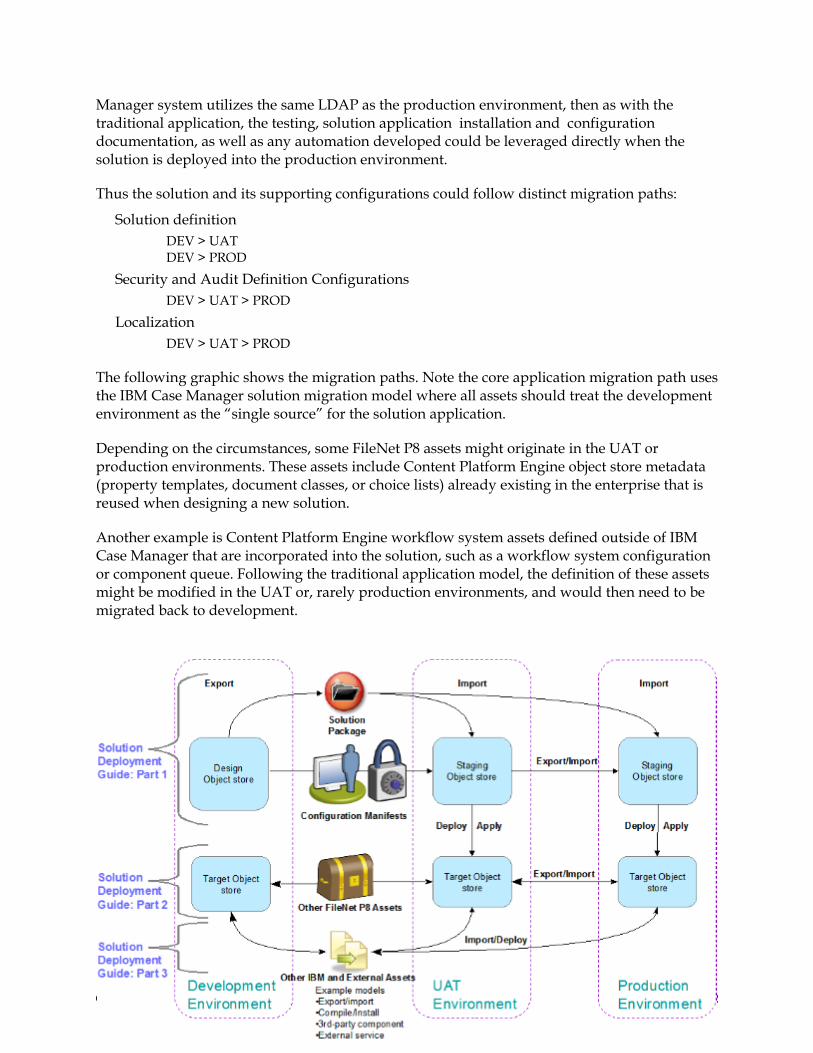
Thus the solution and its supporting configurations could follow distinct migration paths:
Solution definition DEV > UATDEV > PROD
Security and Audit Definition ConfigurationsDEV > UAT > PROD
LocalizationDEV > UAT > PROD
The following graphic shows the migration paths. Note the core application migration path uses the IBM Case Manager solution migration model where all assets should treat the development environment as the “single source” for the solution application.
Depending on the circumstances, some FileNet P8 assets might originate in the UAT or production environments. These assets include Content Platform Engine object store metadata (property templates, document classes, or choice lists) already existing in the enterprise that is reused when designing a new solution.
Another example is Content Platform Engine workflow system assets defined outside of IBM Case Manager that are incorporated into the solution, such as a workflow system configuration or component queue. Following the traditional application model, the definition of these assets might be modified in the UAT or, rarely production environments, and would then need to be migrated back to development.
© Copyright IBM Corp. 2013 IBM Case Manager 5.2

Figure 3 Advanced solution application migration
Incorporation of the traditional migration model for non-core aspects lets experiences and configurations from the testing environments be utilized when the solution is migrated and deployed to the production environment.
The more environments that need to be maintained, the more important it is to produce a repeatable migration and deployment process to achieve the following goals:
Save timeReduce errorsReduce risksEnsure similarity among environmentsReproduce problems reliably for troubleshooting and resolution
The outcome achieved by blending the traditional application migration model with the IBM Case Manager solution migration model can meet those goals by allowing a site to develop and automate a repeatable deployment process in UAT. This repeatable process can then be used when migrating and deploying the solution into other environments, most especially production. Key tasks to complete could be:
▪ Capture, automate repeatable process for moving solution to PROD
▪ Write clear instructions for the entire process capturing important facts like:
• Security credentials used and required
• Manual security changes
• Configuration tweaks needed and how the tweaks are applied
• Order in which assets must be migrated and deployed
▪ Test deployment plan and instructions in UAT
The remainder of this article presents one method using the IBM Case Manager tools showing how to migrate a solution from development and deploy it into a test environment.
© Copyright IBM Corp. 2013 IBM Case Manager 5.2
Phase 1 Prepare
Identify solution application artifacts and assets
During the solution design and development phase, it is important to create and maintain a solution package and supplemental material representing a listing of all assets in the entire solution application. As a part of this, information to assist in the application migration and deployment process must be included. This documentation is needed during the deployment phase and for future tracking and change management purposes.
Note: For a comprehensive discussion of documenting the solution package to migrate, review the IBM Case Manager 5.2 Information Center topic “Identifying solution assets for migration”. The following is a summary of the information in that topic.
When documenting the solution application migration and deployment, items to make note of include:
• A description of the IBM Case Manager solution components. These consist of Solution assets created during solution development using the Case Manager Builder and administration client. Solution assets are represented in the table below.
• Any environment specific references within the solution such as a URL for the WebSite widget or a stored search for the ContentList widget. These references will need to be mapped as a part of the solution migration.
• The solution roles and the LDAP users or groups required to associate with the roles.
The following table contains information on:Type: Short description or name of assetDefined using: Tool used to design the assetResides in: Where the asset used in the solution deployment is kept in the
development environment, for example the Design Object Store (DOS) or the object store for the Case Manager target environment (Target Object Store, TOS).
Migration tool: Used to export/import the asset to move between environments.
© Copyright IBM Corp. 2013 IBM Case Manager 5.2
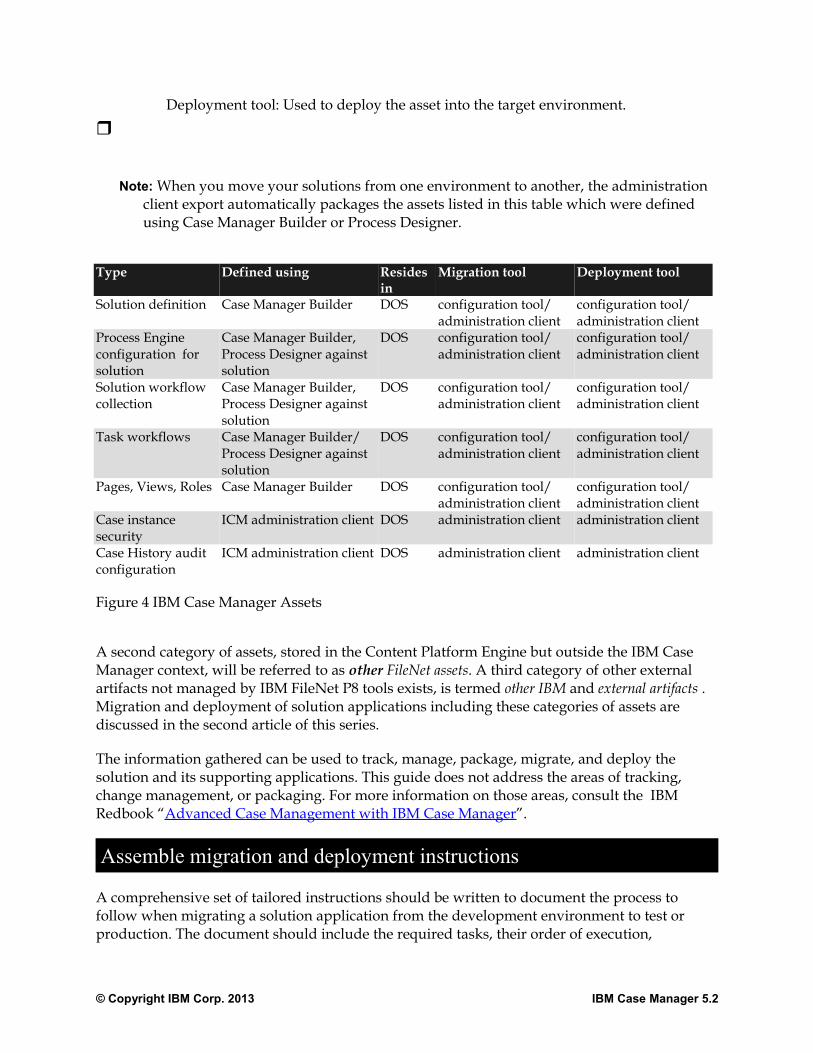
Deployment tool: Used to deploy the asset into the target environment.
Note: When you move your solutions from one environment to another, the administration client export automatically packages the assets listed in this table which were defined using Case Manager Builder or Process Designer.
Type Defined using Resides in
Migration tool Deployment tool
Solution definition Case Manager Builder DOS configuration tool/ administration client
configuration tool/ administration client
Process Engine configuration for solution
Case Manager Builder, Process Designer against solution
DOS configuration tool/ administration client
configuration tool/ administration client
Solution workflow collection
Case Manager Builder, Process Designer against solution
DOS configuration tool/ administration client
configuration tool/ administration client
Task workflows Case Manager Builder/ Process Designer against solution
DOS configuration tool/ administration client
configuration tool/ administration client
Pages, Views, Roles Case Manager Builder DOS configuration tool/ administration client
configuration tool/ administration client
Case instance security
ICM administration client DOS administration client administration client
Case History audit configuration
ICM administration client DOS administration client administration client
Figure 4 IBM Case Manager Assets
A second category of assets, stored in the Content Platform Engine but outside the IBM Case Manager context, will be referred to as other FileNet assets. A third category of other external artifacts not managed by IBM FileNet P8 tools exists, is termed other IBM and external artifacts . Migration and deployment of solution applications including these categories of assets are discussed in the second article of this series.
The information gathered can be used to track, manage, package, migrate, and deploy the solution and its supporting applications. This guide does not address the areas of tracking, change management, or packaging. For more information on those areas, consult the IBM Redbook “Advanced Case Management with IBM Case Manager”.
Assemble migration and deployment instructions
A comprehensive set of tailored instructions should be written to document the process to follow when migrating a solution application from the development environment to test or production. The document should include the required tasks, their order of execution,
© Copyright IBM Corp. 2013 IBM Case Manager 5.2
configuration details and options, and the roles (participants) involved in the processes with information about required system privileges.
Note: For a comprehensive discussion of migration and deployment instructions preparation, review the IBM Case Manager 5.2 Information Center topic “Preparing customized migration and deployment instructions”. The following is a summary of the information in that topic.
Examples of solution migration and deployment process information include:
◦ Name and location of the solution package created by the IBM Case Manager Solution Export operation. Or information about the desired solution so the Solution Export operation can be performed.
◦ Name and location of any other solution packages this solution depends on that need to be deployed before this solution.
◦ Data mapping (data conversion) information.
Data maps are used by the IBM Case Manager administration tool to convert the metadata and content of assets exported from the source environment to reflect information specific to the target environment.
◦ Configuration steps required to complete deployment of the solution or other assets.
All system configuration information should be included in the solution documentation. For example:
♦ Pre-requisite system configuration steps prior to using Case Manager's deploy solution operation such as establishment of a web service.
♦ Post-requisite steps after using Case Manager's deploy solution operation such as setup of printers expected to be available as a part of the case worker's operating environment.
♦ Security configuration details.♦ Audit definition configuration details.
◦ Additional information to support variances in the destination environment.
Assets managed outside of IBM Case Manager like rules or custom services.
Special backup considerations such as assets managed using an organization-wide technology like WebSphere Operational Decision Management.
◦ Post migration case instance modification and verification plan for deployed solution
These instructions would provide information about one-time tasks or special tools needed to alter existing case instances to reflect the redeployed solution. Additionally included would be procedures to verify the solution behaves as expected. Especially
© Copyright IBM Corp. 2013 IBM Case Manager 5.2
important to verify is the integration with external components that may not have been available in the development or test environments.
Note: While this documentation can be created as the deployment process begins, it is more efficient and produces a more complete description if the developers and designers complete the documentation as part of their development process. Especially when a solution is migrated and deployed for the first time, the business analysts or solution developers may need to work directly with the solution administrators to collaborate on creation of items like the security configuration.
Perform one-time configuration and setup tasks
When a traditional application is migrated and deployed into a system for the first time, steps beyond the migrate and deploy are often required to configure it in the new target environment. This is also true for an application built around an IBM Case Manager solution. These additional steps will be referred to collectively as system configuration.
At application/solution redeployment, system configuration information may be overwritten during the redeployment process and may need re-specification. However most configuration steps should not need repeating.
The types of system configuration tasks and their procedures are specific to the solution and its environment. These procedures will not be discussed in this guide. However the second article of this series does include some one-time setup tasks required by the FileNet P8 tools used for migrating other FileNet P8 assets.
Phase 2 Migrate
Migrate from source environment
Using information from the solution documentation, you will prepare a solution package for migration. To ensure a consistent version of the solution is packaged, freeze development activities for the solution to be migrated while the assets are being exported.
© Copyright IBM Corp. 2013 IBM Case Manager 5.2
The 'freeze' is accomplished by coordination between the users in the development environment and the solution administrator performing the export. Project planning and procedures should include how such a freeze will be communicated.
The Case Manager solution edit and export tools cooperate to ensure a set of exported assets is consistent:
• Process Designer and Case Manager Builder both use the same mechanism to support multi-user editing with coordination of draft and major versions of solution assets.
• When using these tools, only committed data will be checked in as a major version.• Solution export uses only committed versions of solution assets. Intermittently saved draft
solution assets are not included.
Minimally the solution package consists of the assets placed into the package automatically by the IBM Case Manager operation Export Solution as initiated from the IBM Case Manager administration client. For a basic solution, additional items might be exported and packaged as:
• Security configuration manifest exported using the IBM Case Manager administration client
• Audit definition manifest exported using the IBM Case Manager administration client
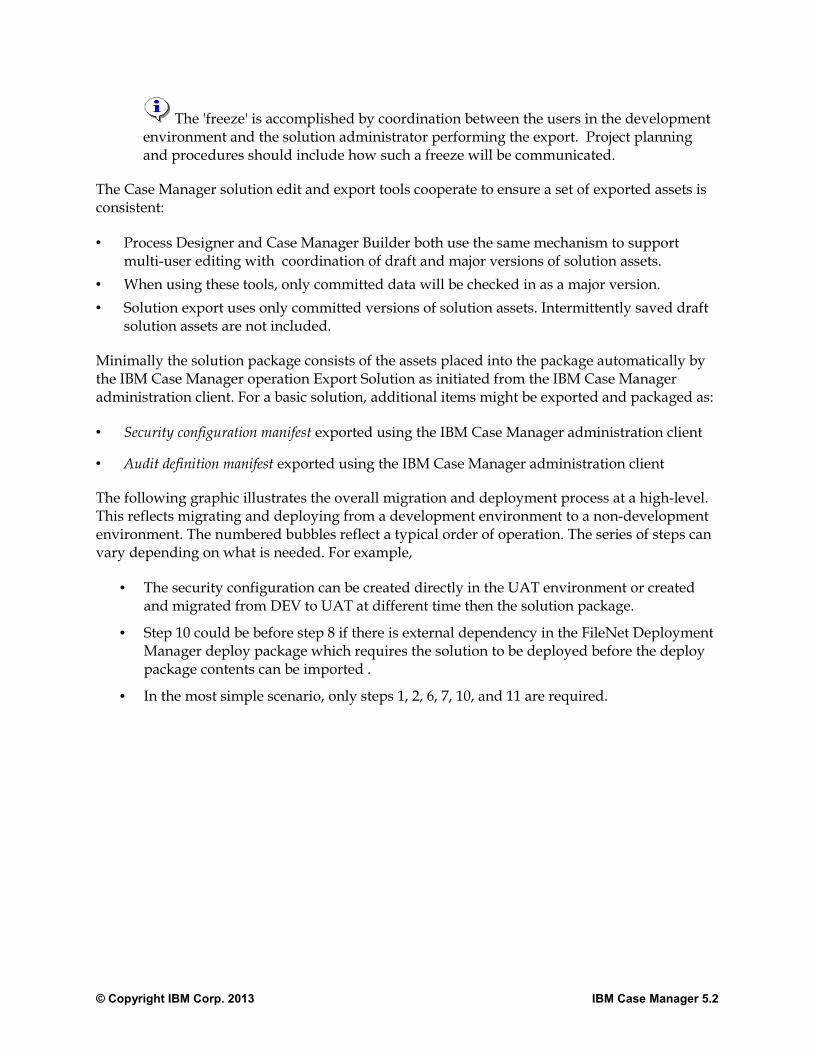
The following graphic illustrates the overall migration and deployment process at a high-level. This reflects migrating and deploying from a development environment to a non-development environment. The numbered bubbles reflect a typical order of operation. The series of steps can vary depending on what is needed. For example,
• The security configuration can be created directly in the UAT environment or created and migrated from DEV to UAT at different time then the solution package.
• Step 10 could be before step 8 if there is external dependency in the FileNet Deployment Manager deploy package which requires the solution to be deployed before the deploy package contents can be imported .
• In the most simple scenario, only steps 1, 2, 6, 7, 10, and 11 are required.
© Copyright IBM Corp. 2013 IBM Case Manager 5.2
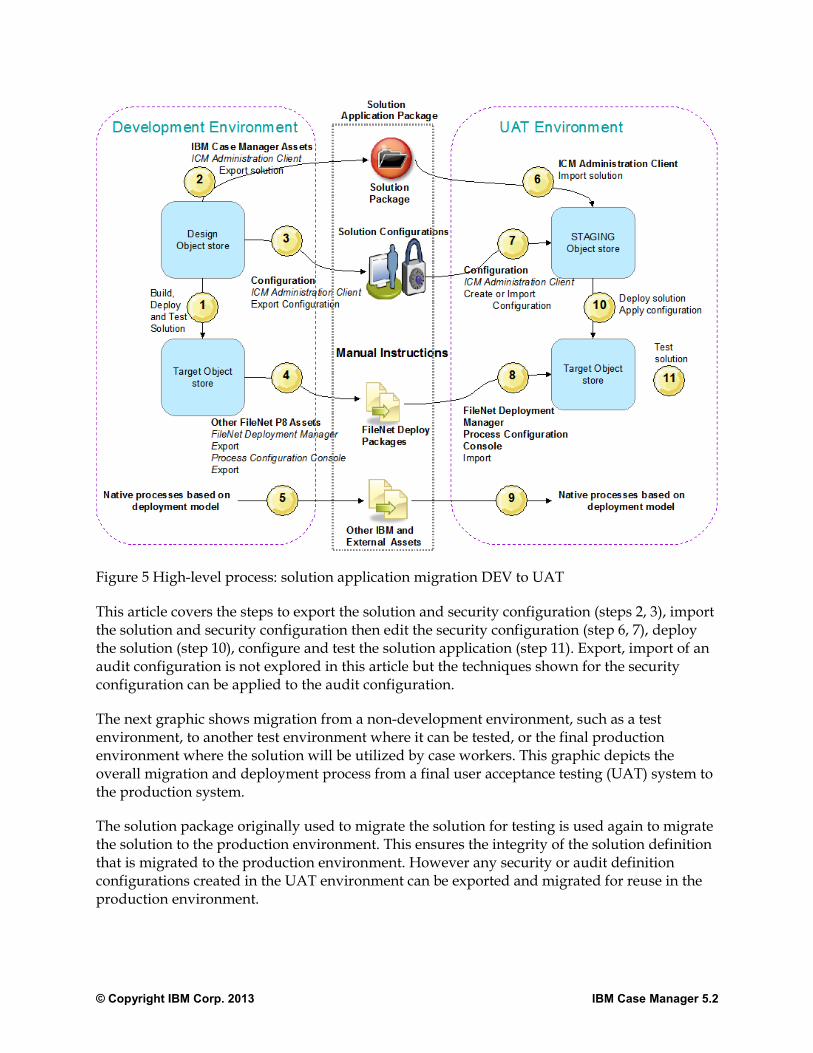
Figure 5 High-level process: solution application migration DEV to UAT
This article covers the steps to export the solution and security configuration (steps 2, 3), import the solution and security configuration then edit the security configuration (step 6, 7), deploy the solution (step 10), configure and test the solution application (step 11). Export, import of an audit configuration is not explored in this article but the techniques shown for the security configuration can be applied to the audit configuration.
The next graphic shows migration from a non-development environment, such as a test environment, to another test environment where it can be tested, or the final production environment where the solution will be utilized by case workers. This graphic depicts the overall migration and deployment process from a final user acceptance testing (UAT) system to the production system.
The solution package originally used to migrate the solution for testing is used again to migrate the solution to the production environment. This ensures the integrity of the solution definition that is migrated to the production environment. However any security or audit definition configurations created in the UAT environment can be exported and migrated for reuse in the production environment.
© Copyright IBM Corp. 2013 IBM Case Manager 5.2
Figure 6 Overview Basic Solution Migration UAT to PROD
The remaining sections of this article describe the specific processes for using the IBM Case Manager tools to perform the basic solution migration and deployment.
The second developerWorks article in this series describes the specific processes for using the FileNet tools for exporting other IBM FileNet P8 assets.
Task 2 – Export solution
If a solution package was provided as input to the migration process, this task is not required.
Export the deployed and tested solution from the development environment.
Step Action
1 Log in to the IBM Case Manager administration client using the URL
http://<ICMserver_host:ICMserver_port>/navigator/?desktop=icmadmin
For example, the default URL when using IBM WebSphere as the application server is:
http://localhost:9080/navigator/?desktop=icmadmin
For example, the default URL when using Oracle WebLogic as the application server is:
http://localhost:7001/navigator/?desktop=icmadmin
© Copyright IBM Corp. 2013 IBM Case Manager 5.2
Step Action
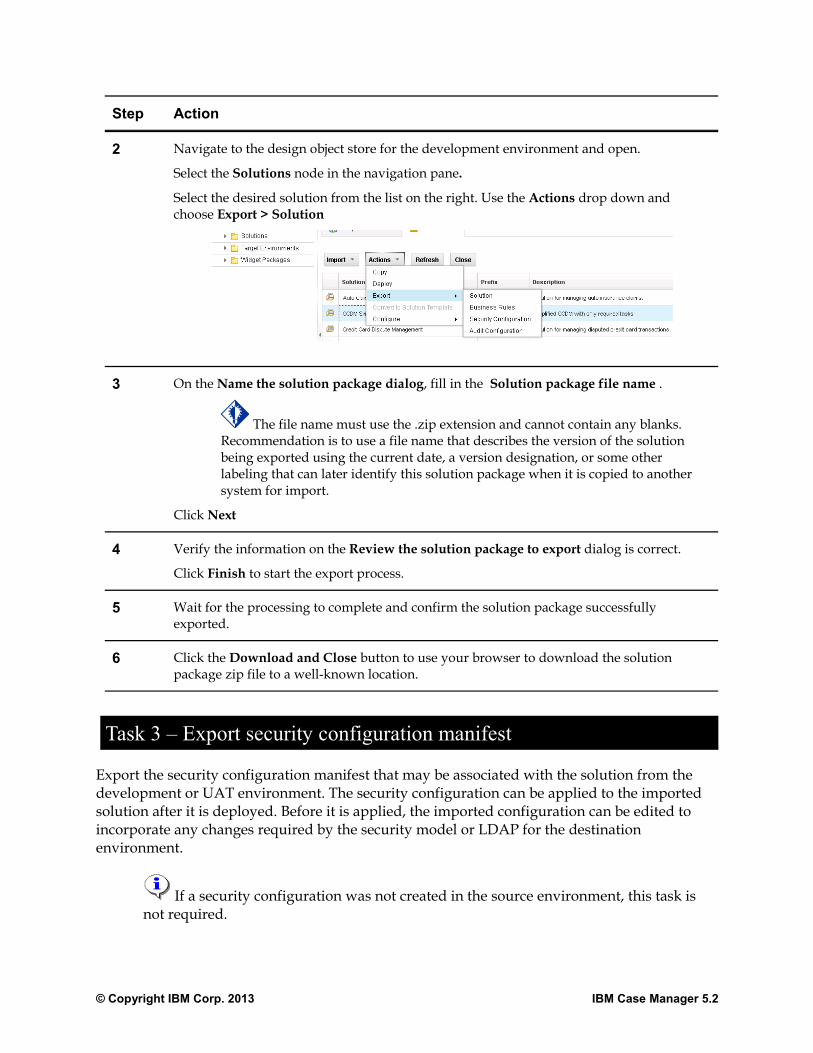
2 Navigate to the design object store for the development environment and open.
Select the Solutions node in the navigation pane.
Select the desired solution from the list on the right. Use the Actions drop down and choose Export > Solution
3 On the Name the solution package dialog, fill in the Solution package file name .
The file name must use the .zip extension and cannot contain any blanks. Recommendation is to use a file name that describes the version of the solution being exported using the current date, a version designation, or some other labeling that can later identify this solution package when it is copied to another system for import.
Click Next
4 Verify the information on the Review the solution package to export dialog is correct.
Click Finish to start the export process.
5 Wait for the processing to complete and confirm the solution package successfully exported.
6 Click the Download and Close button to use your browser to download the solution package zip file to a well-known location.
Task 3 – Export security configuration manifest
Export the security configuration manifest that may be associated with the solution from the development or UAT environment. The security configuration can be applied to the imported solution after it is deployed. Before it is applied, the imported configuration can be edited to incorporate any changes required by the security model or LDAP for the destination environment.
If a security configuration was not created in the source environment, this task is not required.
© Copyright IBM Corp. 2013 IBM Case Manager 5.2
Step Action
1 Log in to the IBM Case Manager administration client. Default URL is:
http://<ICMserver_host:ICMserver_port>/navigator/?desktop=icmadmin
2 Open the desired design (development environment) or staging (non-development) object store.
Select the Solutions node in the navigation pane.
Select the desired solution from the list on the right. Use the Actions drop down and choose Export > Security Configuration
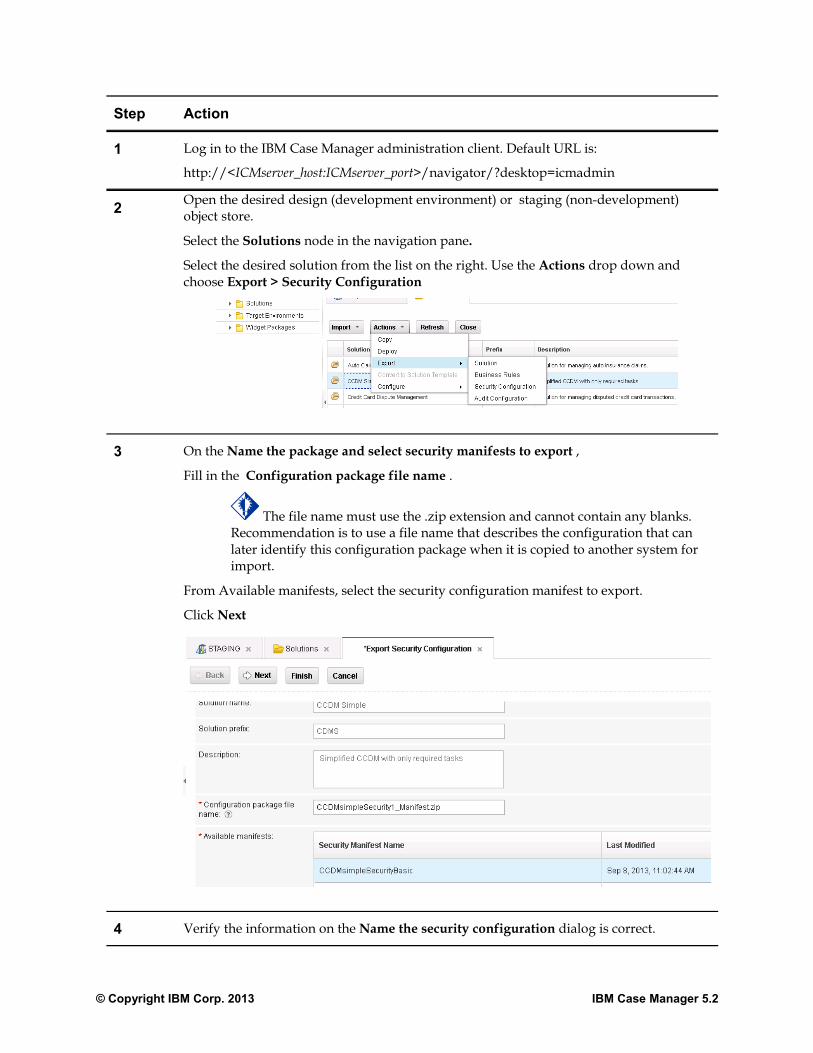
3 On the Name the package and select security manifests to export ,
Fill in the Configuration package file name .
The file name must use the .zip extension and cannot contain any blanks. Recommendation is to use a file name that describes the configuration that can later identify this configuration package when it is copied to another system for import.
From Available manifests, select the security configuration manifest to export.
Click Next
4 Verify the information on the Name the security configuration dialog is correct.
© Copyright IBM Corp. 2013 IBM Case Manager 5.2
Step Action
Click Finish to start the export process.
5 Wait for the processing to complete and confirm the configuration package successfully exported.
6 Click the Download and Close button to use your browser to download the configuration package zip file to a well-known location.
Task 6 – Import solution
Use the IBM Case Manager administration client to import a solution package that was previously exported from another environment. The exported solution package includes all assets that were created for the solution in Case Manager Builder.
When a solution package or a deploy package is reimported, service data mappings submitted through the IBM Case Manager or FileNet Deployment Manager tools may appear to not be applied. This may happen when the package contains a document object asset where the service mapping applies to the content and that asset already exists in the destination object store with the same ID. For actions that can be taken if this occurs, see “Reimport of assets with content containing environment-specific references” in the IBM Case Manager Information Center.
Step Action
1 Log in to the IBM Case Manager administration client. Default URL is:
http://<ICMserver_host:ICMserver_port>/navigator/?desktop=icmadmin
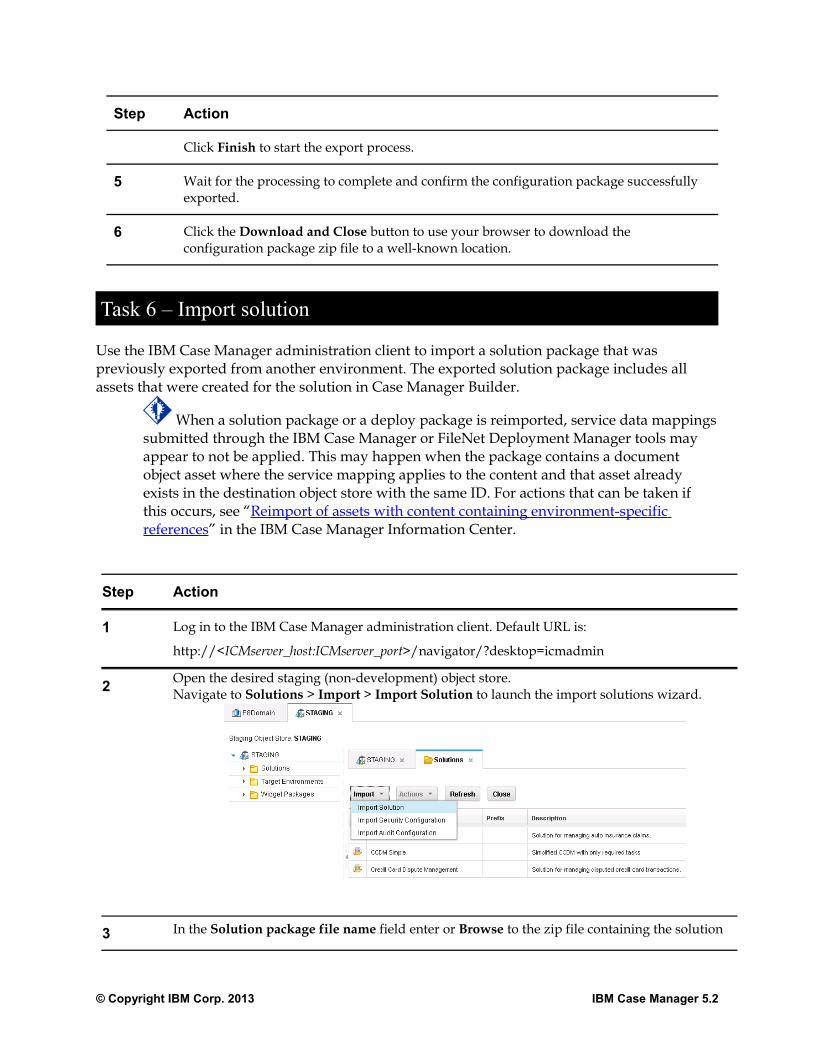
2 Open the desired staging (non-development) object store. Navigate to Solutions > Import > Import Solution to launch the import solutions wizard.
3 In the Solution package file name field enter or Browse to the zip file containing the solution
© Copyright IBM Corp. 2013 IBM Case Manager 5.2
Step Action
package to be imported. Click Next.
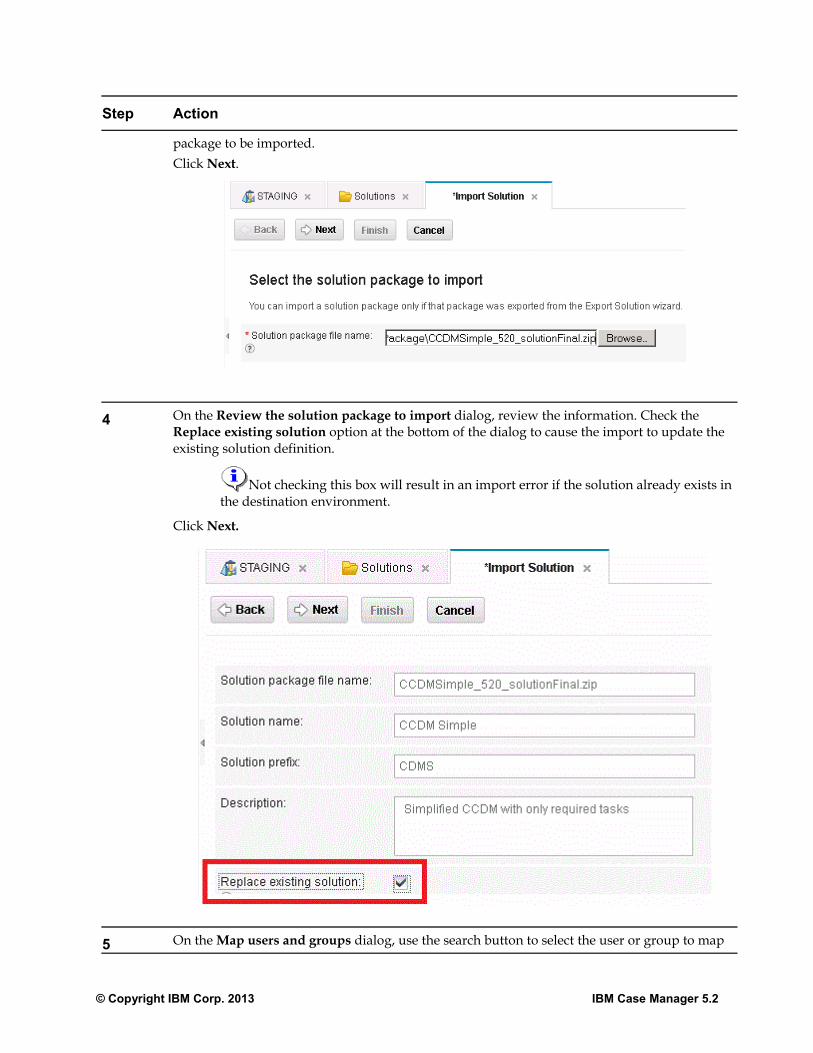
4 On the Review the solution package to import dialog, review the information. Check the Replace existing solution option at the bottom of the dialog to cause the import to update the existing solution definition.
Not checking this box will result in an import error if the solution already exists in the destination environment.
Click Next.
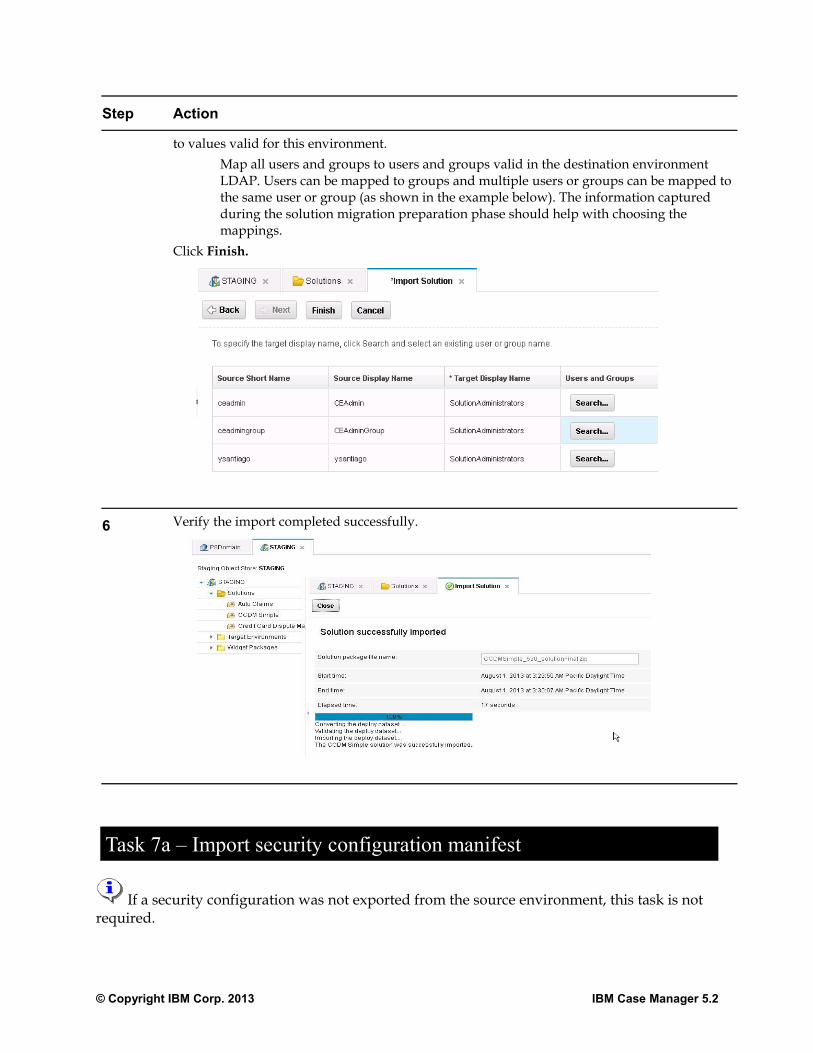
5 On the Map users and groups dialog, use the search button to select the user or group to map
© Copyright IBM Corp. 2013 IBM Case Manager 5.2
Step Action
to values valid for this environment. Map all users and groups to users and groups valid in the destination environment LDAP. Users can be mapped to groups and multiple users or groups can be mapped to the same user or group (as shown in the example below). The information captured during the solution migration preparation phase should help with choosing the mappings.
Click Finish.
6 Verify the import completed successfully.
Task 7a – Import security configuration manifest
If a security configuration was not exported from the source environment, this task is not required.
© Copyright IBM Corp. 2013 IBM Case Manager 5.2
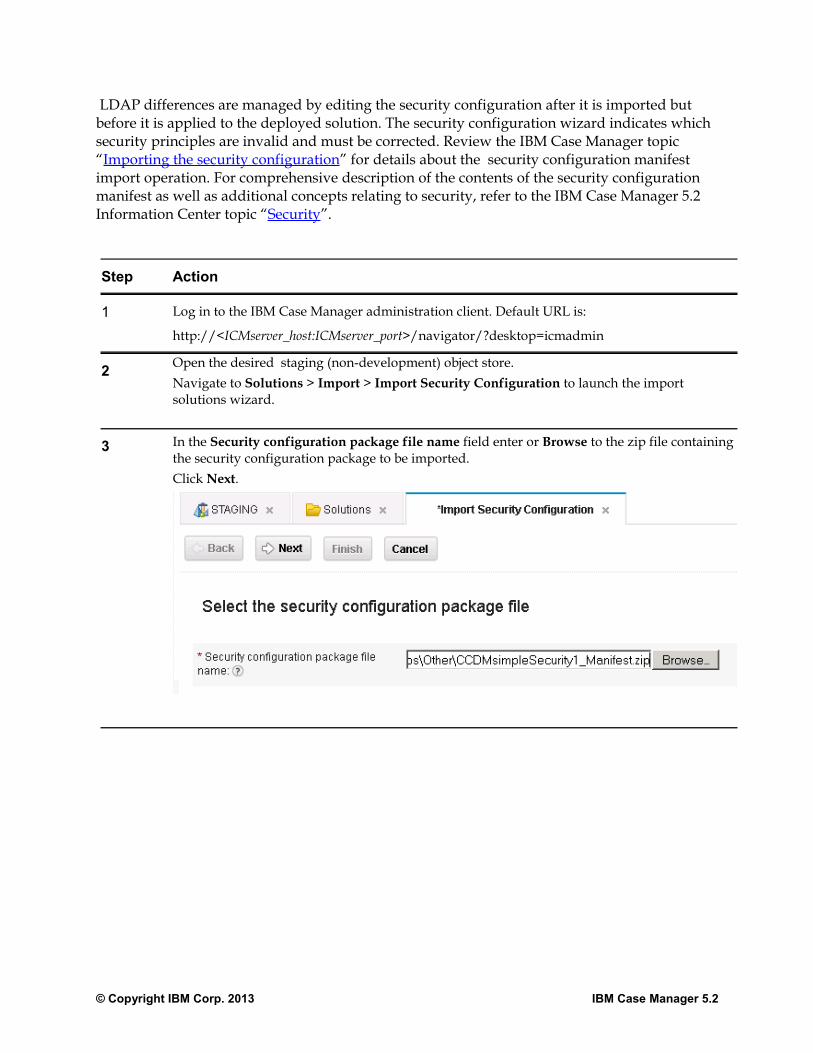
LDAP differences are managed by editing the security configuration after it is imported but before it is applied to the deployed solution. The security configuration wizard indicates which security principles are invalid and must be corrected. Review the IBM Case Manager topic “Importing the security configuration” for details about the security configuration manifest import operation. For comprehensive description of the contents of the security configuration manifest as well as additional concepts relating to security, refer to the IBM Case Manager 5.2 Information Center topic “Security”.
Step Action
1 Log in to the IBM Case Manager administration client. Default URL is:
http://<ICMserver_host:ICMserver_port>/navigator/?desktop=icmadmin
2 Open the desired staging (non-development) object store. Navigate to Solutions > Import > Import Security Configuration to launch the import solutions wizard.
3 In the Security configuration package file name field enter or Browse to the zip file containing the security configuration package to be imported. Click Next.
© Copyright IBM Corp. 2013 IBM Case Manager 5.2
Step Action
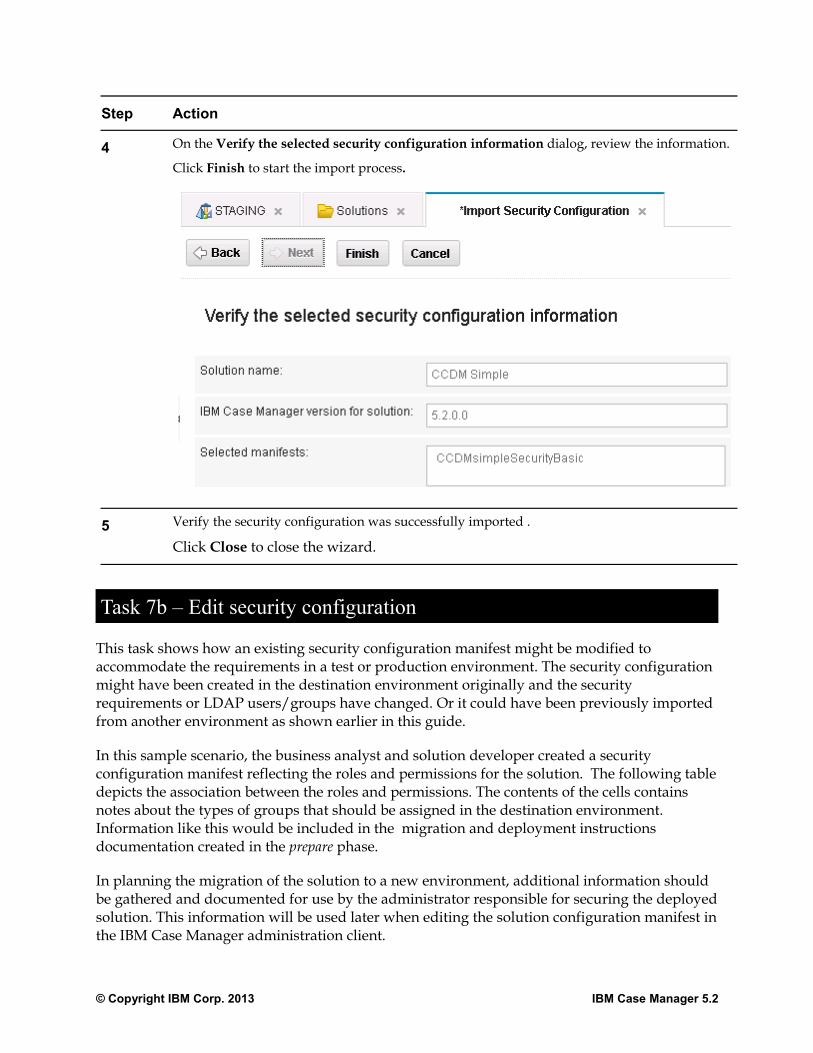
4 On the Verify the selected security configuration information dialog, review the information.
Click Finish to start the import process.
5 Verify the security configuration was successfully imported .
Click Close to close the wizard.
Task 7b – Edit security configuration
This task shows how an existing security configuration manifest might be modified to accommodate the requirements in a test or production environment. The security configuration might have been created in the destination environment originally and the security requirements or LDAP users/groups have changed. Or it could have been previously imported from another environment as shown earlier in this guide.
In this sample scenario, the business analyst and solution developer created a security configuration manifest reflecting the roles and permissions for the solution. The following table depicts the association between the roles and permissions. The contents of the cells contains notes about the types of groups that should be assigned in the destination environment. Information like this would be included in the migration and deployment instructions documentation created in the prepare phase.
In planning the migration of the solution to a new environment, additional information should be gathered and documented for use by the administrator responsible for securing the deployed solution. This information will be used later when editing the solution configuration manifest in the IBM Case Manager administration client.
© Copyright IBM Corp. 2013 IBM Case Manager 5.2
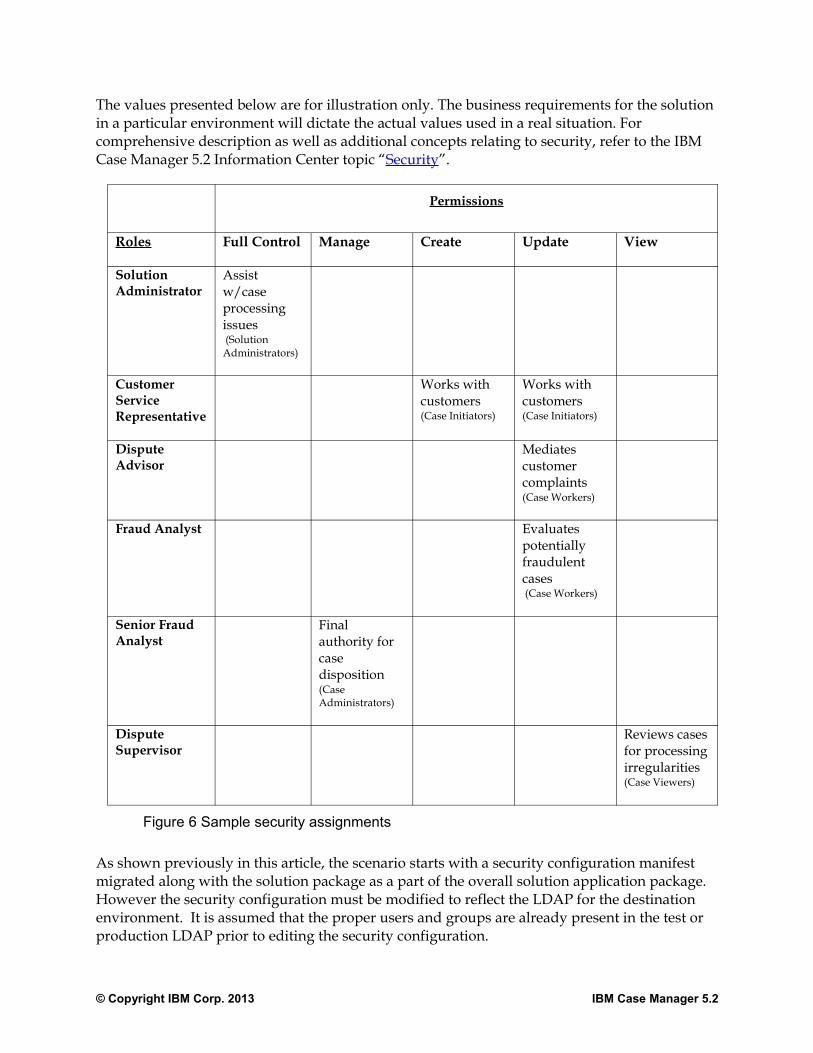
The values presented below are for illustration only. The business requirements for the solution in a particular environment will dictate the actual values used in a real situation. For comprehensive description as well as additional concepts relating to security, refer to the IBM Case Manager 5.2 Information Center topic “Security”.
Permissions
Roles Full Control Manage Create Update View
Solution Administrator
Assist w/case processing issues (Solution Administrators)
Customer Service Representative
Works with customers (Case Initiators)
Works with customers (Case Initiators)
Dispute Advisor
Mediates customer complaints (Case Workers)
Fraud Analyst Evaluates potentially fraudulent cases (Case Workers)
Senior Fraud Analyst
Final authority for case disposition(Case Administrators)
Dispute Supervisor
Reviews cases for processing irregularities(Case Viewers)
Figure 6 Sample security assignments
As shown previously in this article, the scenario starts with a security configuration manifest migrated along with the solution package as a part of the overall solution application package. However the security configuration must be modified to reflect the LDAP for the destination environment. It is assumed that the proper users and groups are already present in the test or production LDAP prior to editing the security configuration.
© Copyright IBM Corp. 2013 IBM Case Manager 5.2
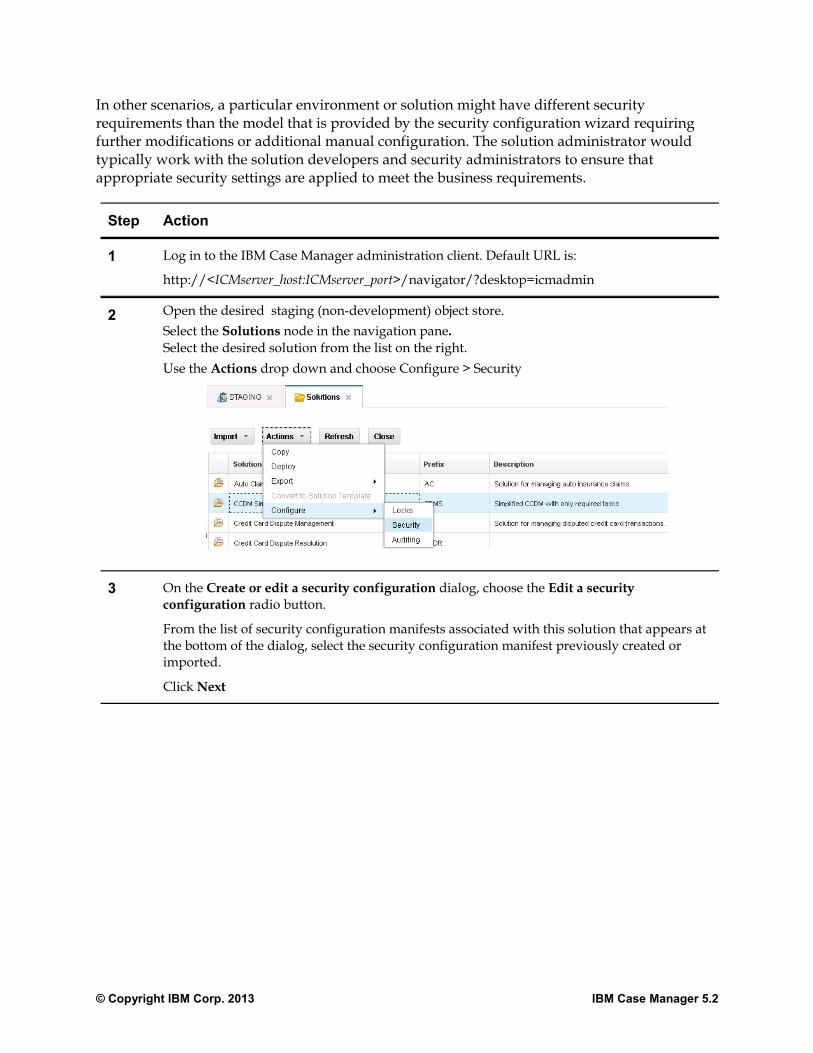
In other scenarios, a particular environment or solution might have different security requirements than the model that is provided by the security configuration wizard requiring further modifications or additional manual configuration. The solution administrator would typically work with the solution developers and security administrators to ensure that appropriate security settings are applied to meet the business requirements.
Step Action
1 Log in to the IBM Case Manager administration client. Default URL is:
http://<ICMserver_host:ICMserver_port>/navigator/?desktop=icmadmin
2 Open the desired staging (non-development) object store. Select the Solutions node in the navigation pane.Select the desired solution from the list on the right. Use the Actions drop down and choose Configure > Security
3 On the Create or edit a security configuration dialog, choose the Edit a security configuration radio button.
From the list of security configuration manifests associated with this solution that appears at the bottom of the dialog, select the security configuration manifest previously created or imported.
Click Next
© Copyright IBM Corp. 2013 IBM Case Manager 5.2
Step Action
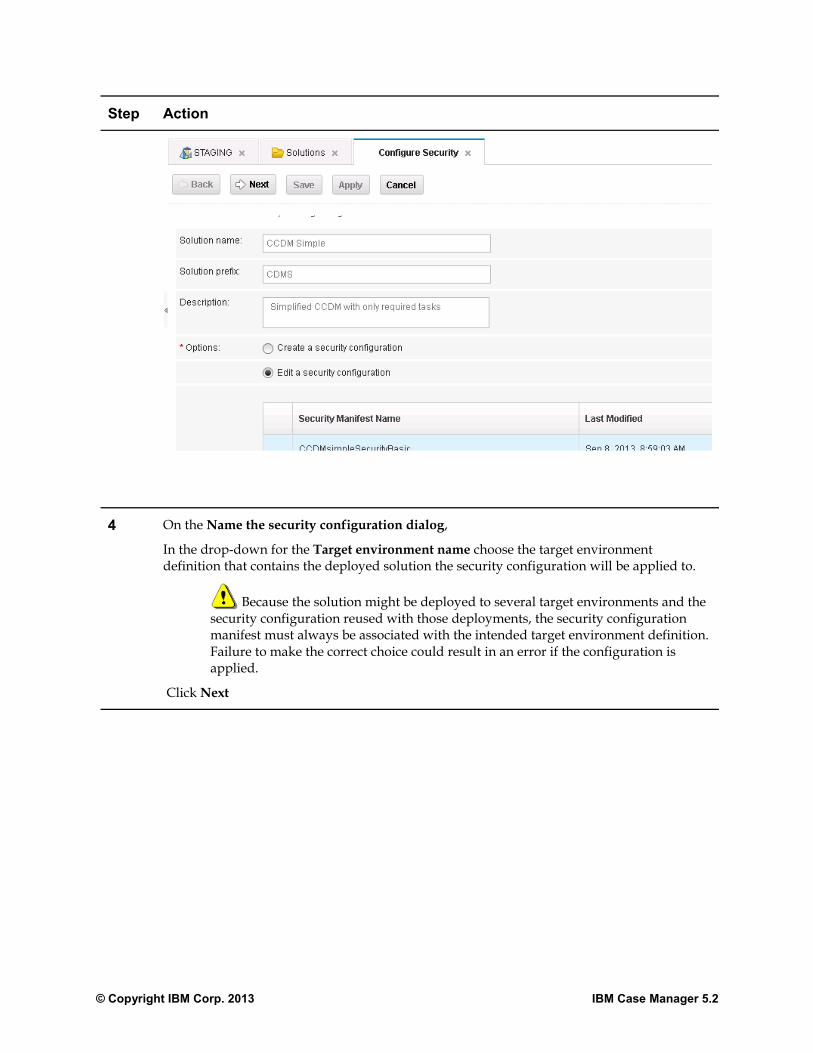
4 On the Name the security configuration dialog,
In the drop-down for the Target environment name choose the target environment definition that contains the deployed solution the security configuration will be applied to.
Because the solution might be deployed to several target environments and the security configuration reused with those deployments, the security configuration manifest must always be associated with the intended target environment definition. Failure to make the correct choice could result in an error if the configuration is applied.
Click Next
© Copyright IBM Corp. 2013 IBM Case Manager 5.2
Step Action
5 On the Modify permissions for roles dialog, review the specifications for case types, roles, and permissions created by the business analyst and solution developer in the source environment. Typically these specifications will not need modification, especially if the solution migration is between a test and production environment.
Click Next to proceed.
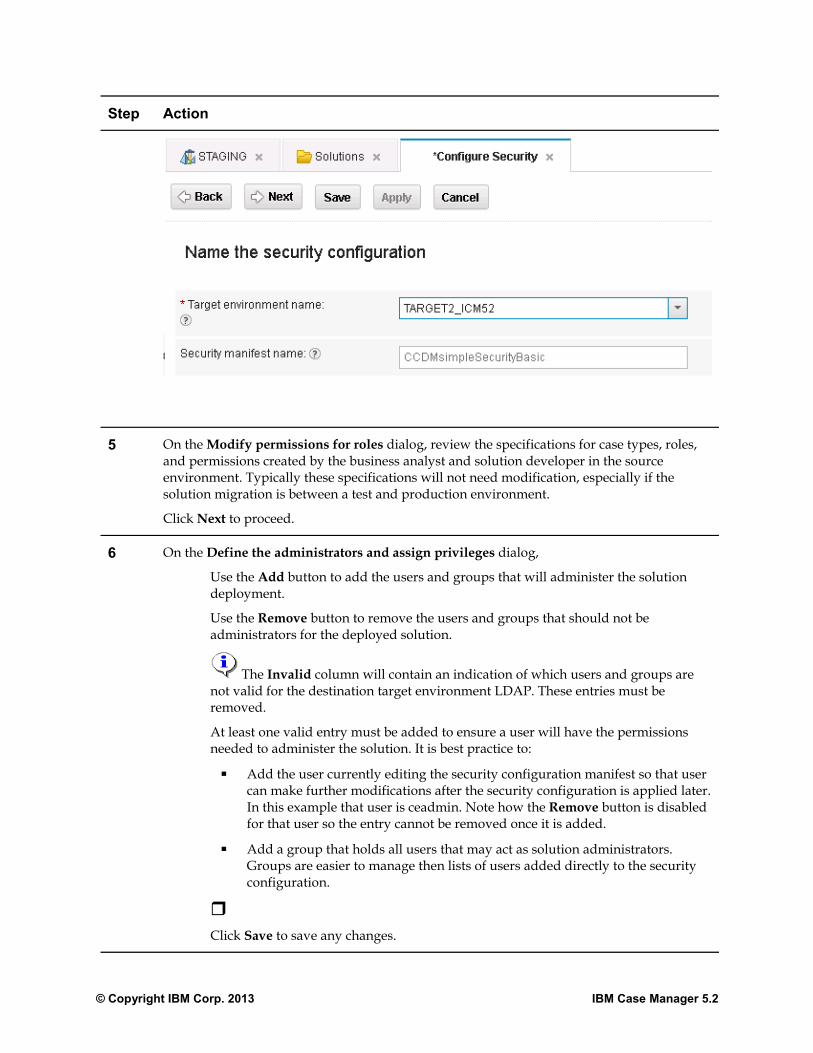
6 On the Define the administrators and assign privileges dialog,
Use the Add button to add the users and groups that will administer the solution deployment.
Use the Remove button to remove the users and groups that should not be administrators for the deployed solution.
The Invalid column will contain an indication of which users and groups are not valid for the destination target environment LDAP. These entries must be removed.
At least one valid entry must be added to ensure a user will have the permissions needed to administer the solution. It is best practice to:
▪ Add the user currently editing the security configuration manifest so that user can make further modifications after the security configuration is applied later. In this example that user is ceadmin. Note how the Remove button is disabled for that user so the entry cannot be removed once it is added.
▪ Add a group that holds all users that may act as solution administrators. Groups are easier to manage then lists of users added directly to the security configuration.
Click Save to save any changes.
© Copyright IBM Corp. 2013 IBM Case Manager 5.2
Step Action
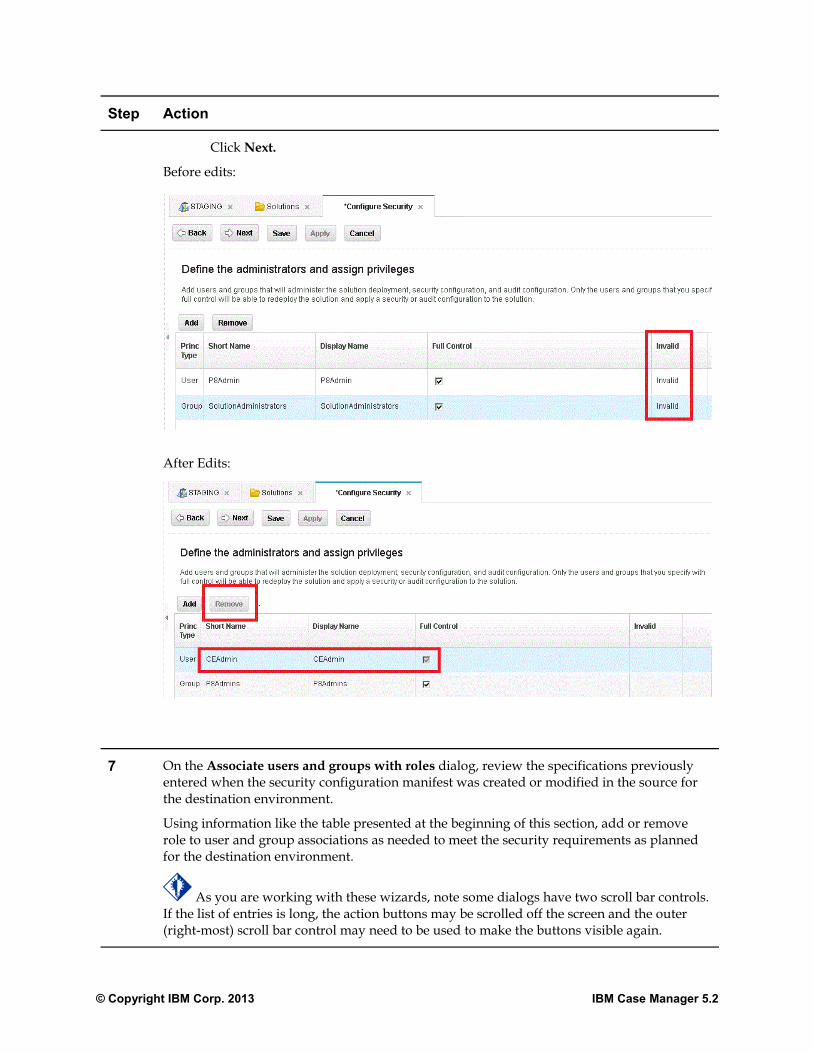
Click Next.
Before edits:
After Edits:
7 On the Associate users and groups with roles dialog, review the specifications previously entered when the security configuration manifest was created or modified in the source for the destination environment.
Using information like the table presented at the beginning of this section, add or remove role to user and group associations as needed to meet the security requirements as planned for the destination environment.
As you are working with these wizards, note some dialogs have two scroll bar controls. If the list of entries is long, the action buttons may be scrolled off the screen and the outer (right-most) scroll bar control may need to be used to make the buttons visible again.
© Copyright IBM Corp. 2013 IBM Case Manager 5.2
Step Action
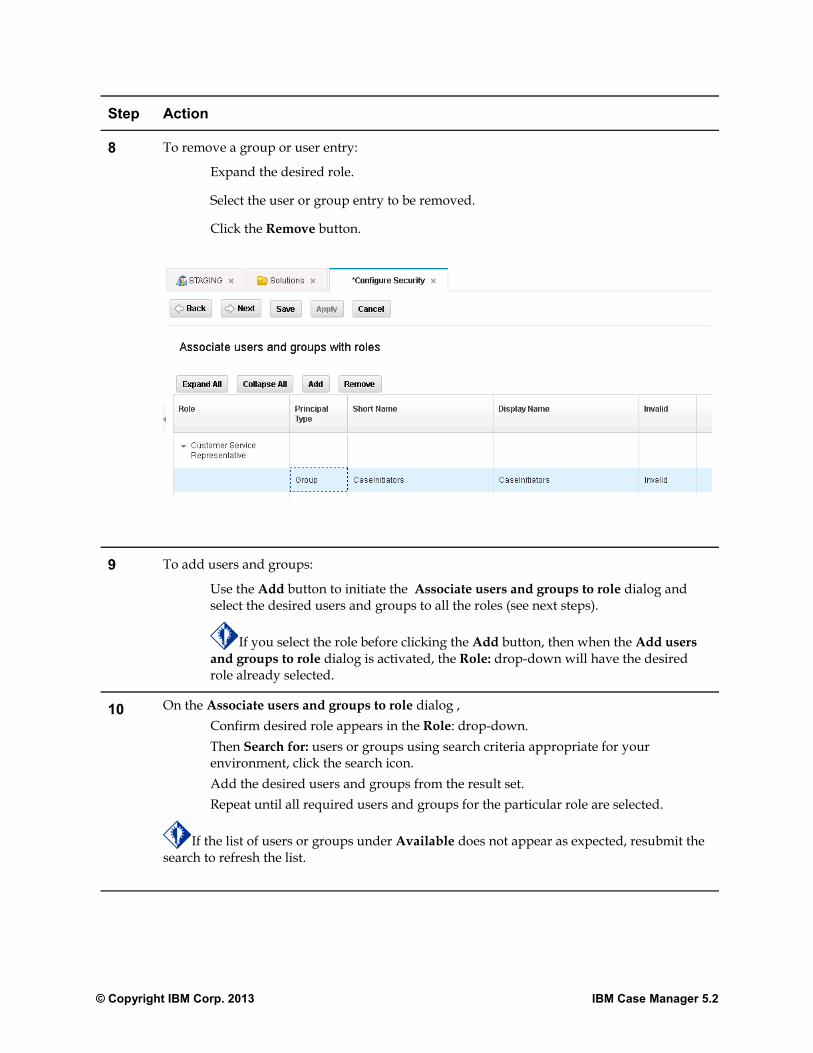
8 To remove a group or user entry:
Expand the desired role.
Select the user or group entry to be removed.
Click the Remove button.
9 To add users and groups:
Use the Add button to initiate the Associate users and groups to role dialog and select the desired users and groups to all the roles (see next steps).
If you select the role before clicking the Add button, then when the Add users and groups to role dialog is activated, the Role: drop-down will have the desired role already selected.
10 On the Associate users and groups to role dialog , Confirm desired role appears in the Role: drop-down. Then Search for: users or groups using search criteria appropriate for your environment, click the search icon. Add the desired users and groups from the result set.Repeat until all required users and groups for the particular role are selected.
If the list of users or groups under Available does not appear as expected, resubmit the search to refresh the list.
© Copyright IBM Corp. 2013 IBM Case Manager 5.2
Step Action
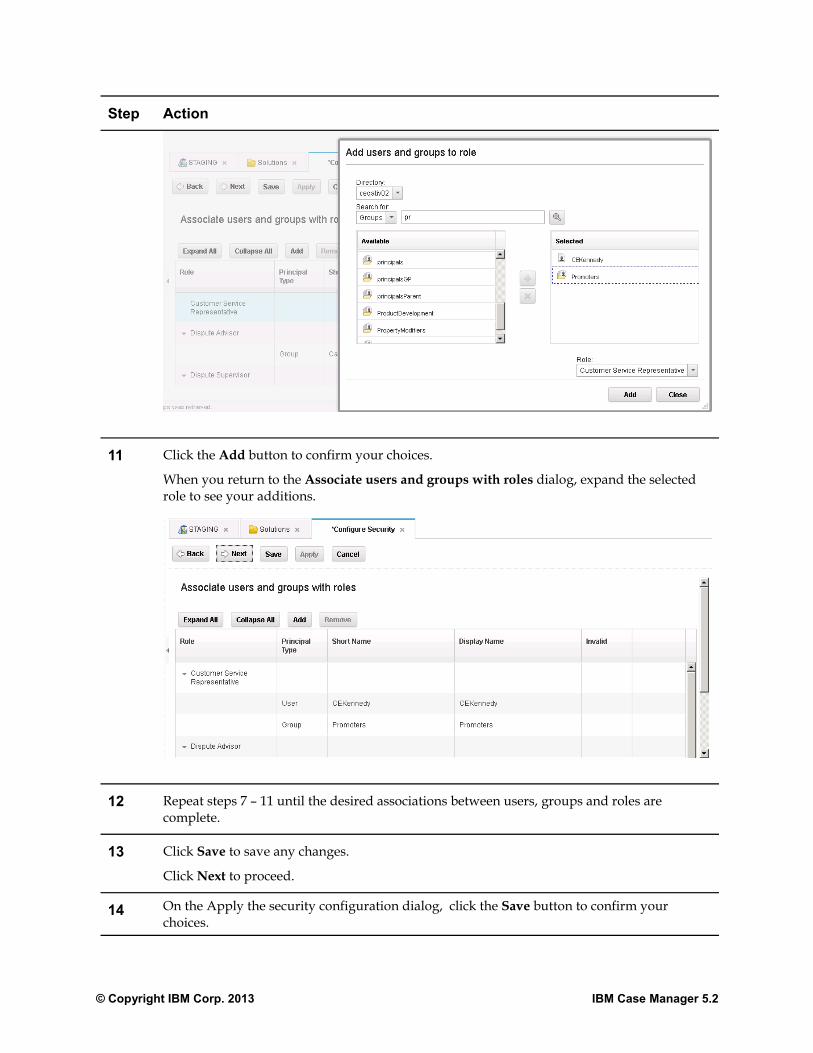
11 Click the Add button to confirm your choices.
When you return to the Associate users and groups with roles dialog, expand the selected role to see your additions.
12 Repeat steps 7 – 11 until the desired associations between users, groups and roles are complete.
13 Click Save to save any changes.
Click Next to proceed.
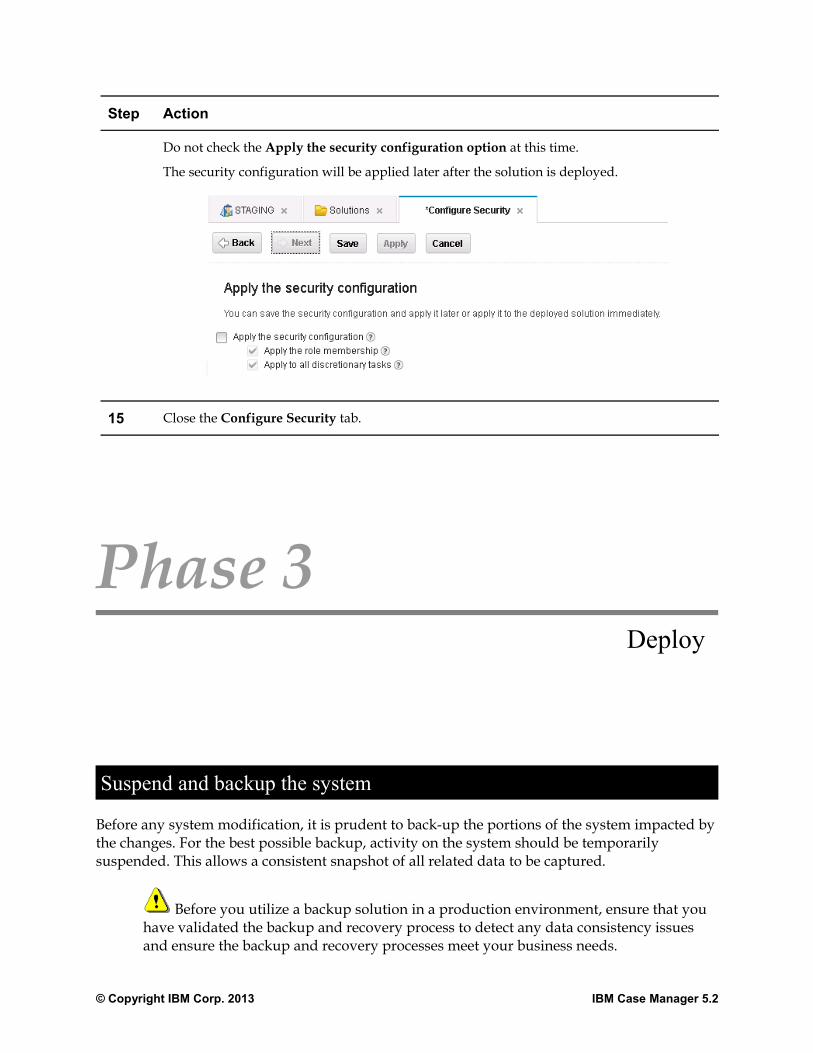
14 On the Apply the security configuration dialog, click the Save button to confirm your choices.
© Copyright IBM Corp. 2013 IBM Case Manager 5.2
Step Action
Do not check the Apply the security configuration option at this time.
The security configuration will be applied later after the solution is deployed.
15 Close the Configure Security tab.
Phase 3 Deploy
Suspend and backup the system
Before any system modification, it is prudent to back-up the portions of the system impacted by the changes. For the best possible backup, activity on the system should be temporarily suspended. This allows a consistent snapshot of all related data to be captured.
Before you utilize a backup solution in a production environment, ensure that you have validated the backup and recovery process to detect any data consistency issues and ensure the backup and recovery processes meet your business needs.
© Copyright IBM Corp. 2013 IBM Case Manager 5.2
You would have a plan to suspend the system using locally defined procedures. Include in your planning how the system and solution administrators will access the system to perform the necessary solution deployment and system configuration tasks.
For details on backups, see “Backing up your system” in the IBM Case Manager Information Center.
Following the backup, access to the system should be minimized to avoid further changes that would make the system inconsistent with the backup.
Task 10a – Deploy Solution
Deploy the imported solution to the desired project area or target environment. If the destination environment is a development environment, the solution is deployed for testing by using the Case Manager Builder. The following procedures assume the destination environment is test or production and the solution will be deployed using the IBM Case Manager administration client.
Step Action
1 Log in to the IBM Case Manager administration client. Default URL is:
http://<ICMserver_host:ICMserver_port>/navigator/?desktop=icmadmin
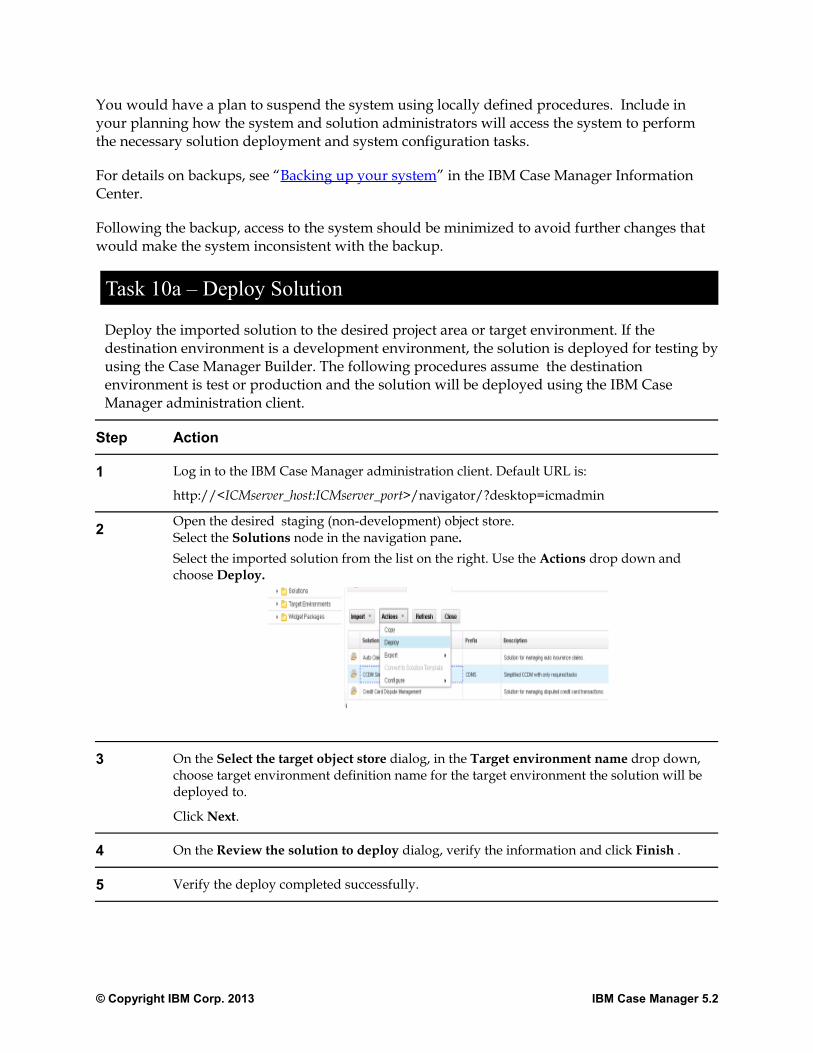
2 Open the desired staging (non-development) object store. Select the Solutions node in the navigation pane.Select the imported solution from the list on the right. Use the Actions drop down and choose Deploy.
3 On the Select the target object store dialog, in the Target environment name drop down, choose target environment definition name for the target environment the solution will be deployed to.
Click Next.
4 On the Review the solution to deploy dialog, verify the information and click Finish .
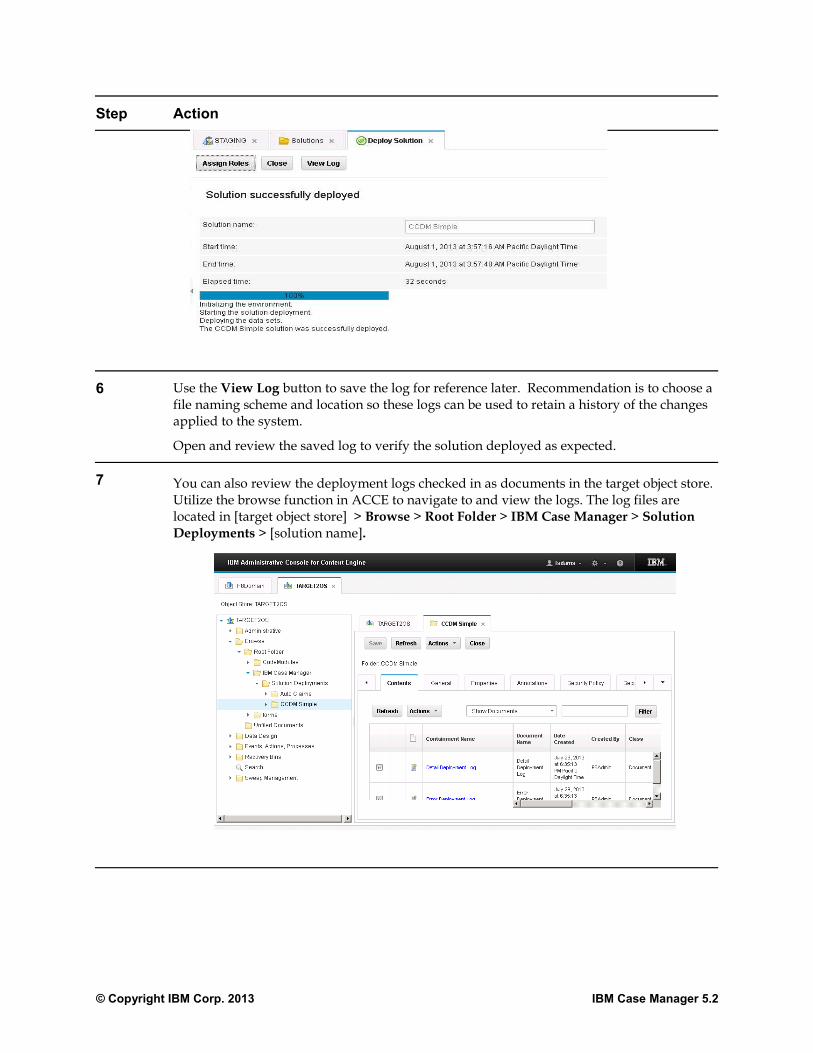
5 Verify the deploy completed successfully.
© Copyright IBM Corp. 2013 IBM Case Manager 5.2
Step Action
6 Use the View Log button to save the log for reference later. Recommendation is to choose a file naming scheme and location so these logs can be used to retain a history of the changes applied to the system.
Open and review the saved log to verify the solution deployed as expected.
7 You can also review the deployment logs checked in as documents in the target object store. Utilize the browse function in ACCE to navigate to and view the logs. The log files are located in [target object store] > Browse > Root Folder > IBM Case Manager > Solution Deployments > [solution name].
© Copyright IBM Corp. 2013 IBM Case Manager 5.2
Step Action
8 Click on a document name link to open the document details dialog and use Actions > View/Download to view the contents.
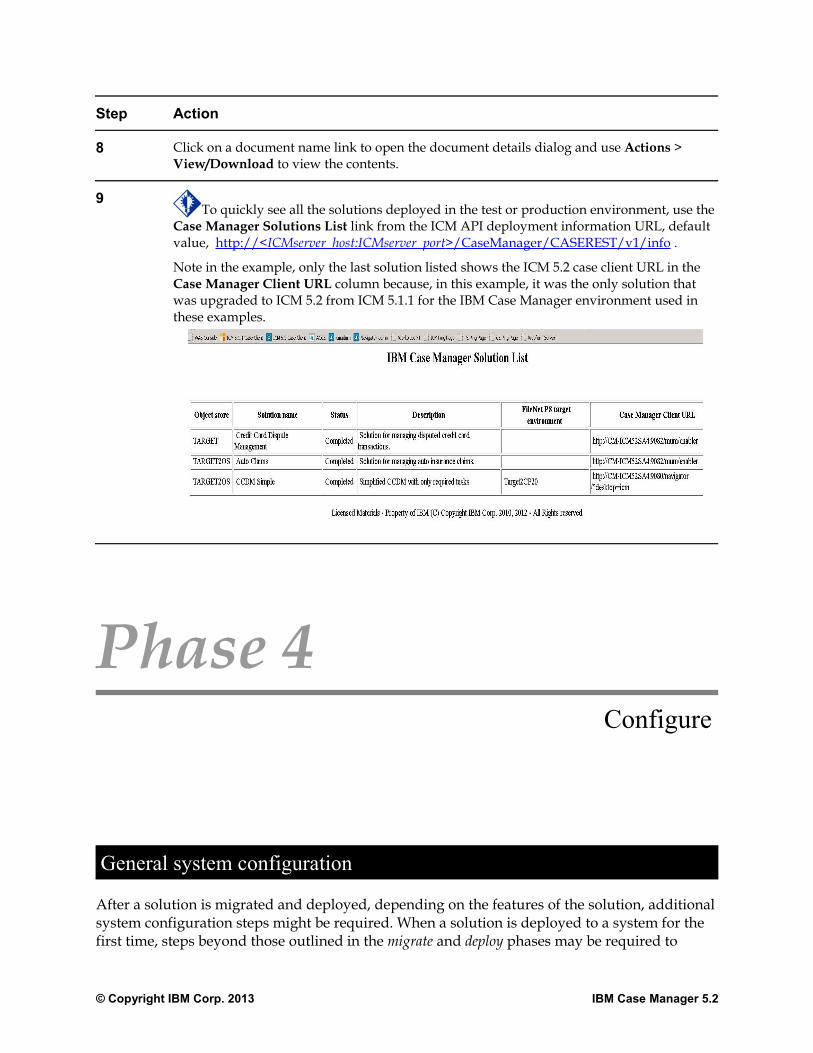
9To quickly see all the solutions deployed in the test or production environment, use the
Case Manager Solutions List link from the ICM API deployment information URL, default value, http://< ICMserver_host:ICMserver_port >/CaseManager/CASEREST/v1/info .
Note in the example, only the last solution listed shows the ICM 5.2 case client URL in the Case Manager Client URL column because, in this example, it was the only solution that was upgraded to ICM 5.2 from ICM 5.1.1 for the IBM Case Manager environment used in these examples.
Phase 4 Configure
General system configuration
After a solution is migrated and deployed, depending on the features of the solution, additional system configuration steps might be required. When a solution is deployed to a system for the first time, steps beyond those outlined in the migrate and deploy phases may be required to
© Copyright IBM Corp. 2013 IBM Case Manager 5.2
configure it into the new environment. When a solution is redeployed, system configuration information may be overwritten during the redeployment process and may need re-specification. However most configuration steps should not need repeating.
Some of this configuration is performed directly on the server for the destination system using system tools. Other configuration tasks are for objects in the FileNet Content Platform Engine created as a part of the solution deployment. Configuration of these objects are accomplished using FileNet P8 or IBM Case Manager administration tools. The migration and deployment instructions documentation created in the prepare phase should provide the information about what additional configuration is needed when a solution is first deployed or subsequently redeployed.
A wide variety of server-level configuration tasks on the destination system might be required to make a solution operational. Examples of server-level configuration items include:
• Setup of printers that might be provided for case workers to utilize
• Creation of file system folders used by custom widgets called by the solution
• Installation of external web services the solution was designed to use
• Installation of additional software components integrated with the solution such as an eMail server, IBM Forms, IBM case analytics tools, IBM Operational Decision Manager, etc.
This guide will not discuss these aspects.
For objects managed in the FileNet Content Platform Engine, a majority of the configuration is migrated when the object is deployed using FileNet Deployment Manager. However some elements that might need additional configuration after deployment include:
• Component queue JAAS credentials (export/import tools typically do not manage passwords)
• Component Manager configuration and start (legacy component queues)
• JMS JNDI specifications for a JMS queue
• Supporting libraries not included in code modules migrated with the solution application but referenced by action handlers or component queues used with the solution
Migration of these objects will be discussed in another article of this series.
Lastly are aspects of the solution managed using the IBM Case Manager administration client. These aspects include:
• Security configuration
Security is configured on the case management objects that are controlled by the Content Platform Engine. The IBM Case Manager administration client provides a wizard to create or edit a security configuration that can then be applied to a
© Copyright IBM Corp. 2013 IBM Case Manager 5.2
solution. The use of this wizard to edit and apply a sample security configuration is shown as a task below. For a more comprehensive description as well as concepts, refer to the IBM Case Manager 5.2 Information Center topic “Security”.
• Audit configuration
To support the IBM case analytic tools, and to create the extended case history data needed by the Timeline Visualizer widget, the deployed solution must have some of its properties audited. The IBM Case Manager administration client provides a wizard to create or edit an audit configuration that can then be applied to a solution. The use of this wizard to edit and apply an audit configuration will not be covered in this guide. For a comprehensive description as well as concepts, refer to the IBM Case Manager 5.2 Information Center topic “Configuring auditing”.
Task 10b – Apply security configuration
This task shows how an existing security configuration manifest already created or edited to accommodate the requirements in the test or production environment would be applied to the deployed solution.
As shown previously in this article, the scenario starts with a security configuration manifest that was migrated along with the solution package as a part of the overall solution application package. Also shown previously was the modification of the security configuration manifest to reflect the LDAP for the destination environment.
Step Action
1 Log in to the IBM Case Manager administration client. Default URL is:
http://<ICMserver_host:ICMserver_port>/navigator/?desktop=icmadmin
© Copyright IBM Corp. 2013 IBM Case Manager 5.2
Step Action
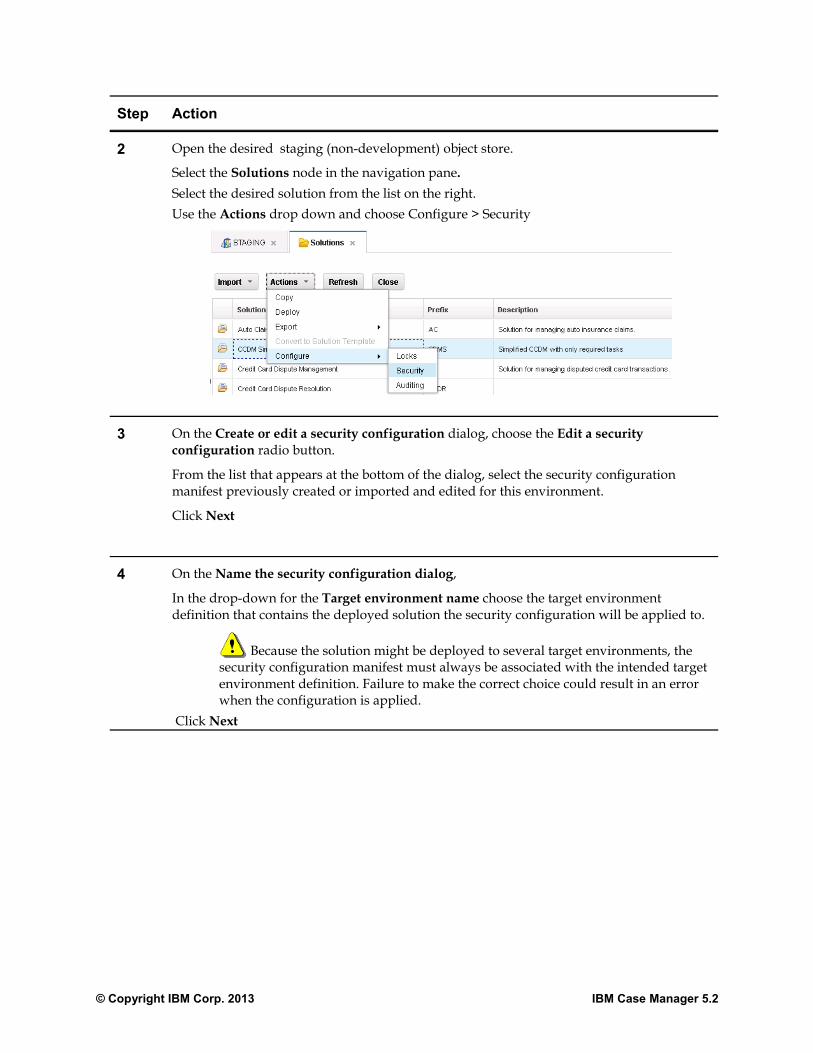
2 Open the desired staging (non-development) object store.
Select the Solutions node in the navigation pane.Select the desired solution from the list on the right. Use the Actions drop down and choose Configure > Security
3 On the Create or edit a security configuration dialog, choose the Edit a security configuration radio button.
From the list that appears at the bottom of the dialog, select the security configuration manifest previously created or imported and edited for this environment.
Click Next
4 On the Name the security configuration dialog,
In the drop-down for the Target environment name choose the target environment definition that contains the deployed solution the security configuration will be applied to.
Because the solution might be deployed to several target environments, the security configuration manifest must always be associated with the intended target environment definition. Failure to make the correct choice could result in an error when the configuration is applied.
Click Next
© Copyright IBM Corp. 2013 IBM Case Manager 5.2
Step Action
5 For each subsequent dialog, review the information presented for correctness, then click Next to proceed.
Repeat until the Apply the security configuration dialog is reached.
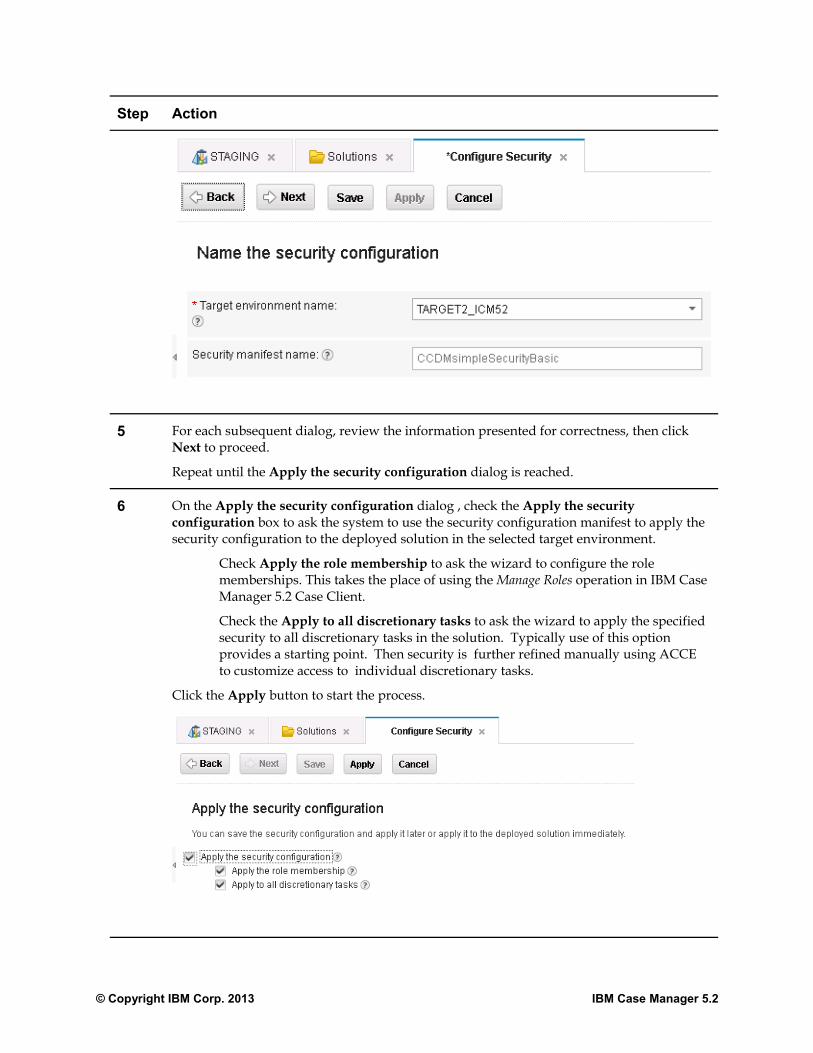
6 On the Apply the security configuration dialog , check the Apply the security configuration box to ask the system to use the security configuration manifest to apply the security configuration to the deployed solution in the selected target environment.
Check Apply the role membership to ask the wizard to configure the role memberships. This takes the place of using the Manage Roles operation in IBM Case Manager 5.2 Case Client.
Check the Apply to all discretionary tasks to ask the wizard to apply the specified security to all discretionary tasks in the solution. Typically use of this option provides a starting point. Then security is further refined manually using ACCE to customize access to individual discretionary tasks.
Click the Apply button to start the process.
© Copyright IBM Corp. 2013 IBM Case Manager 5.2
Step Action
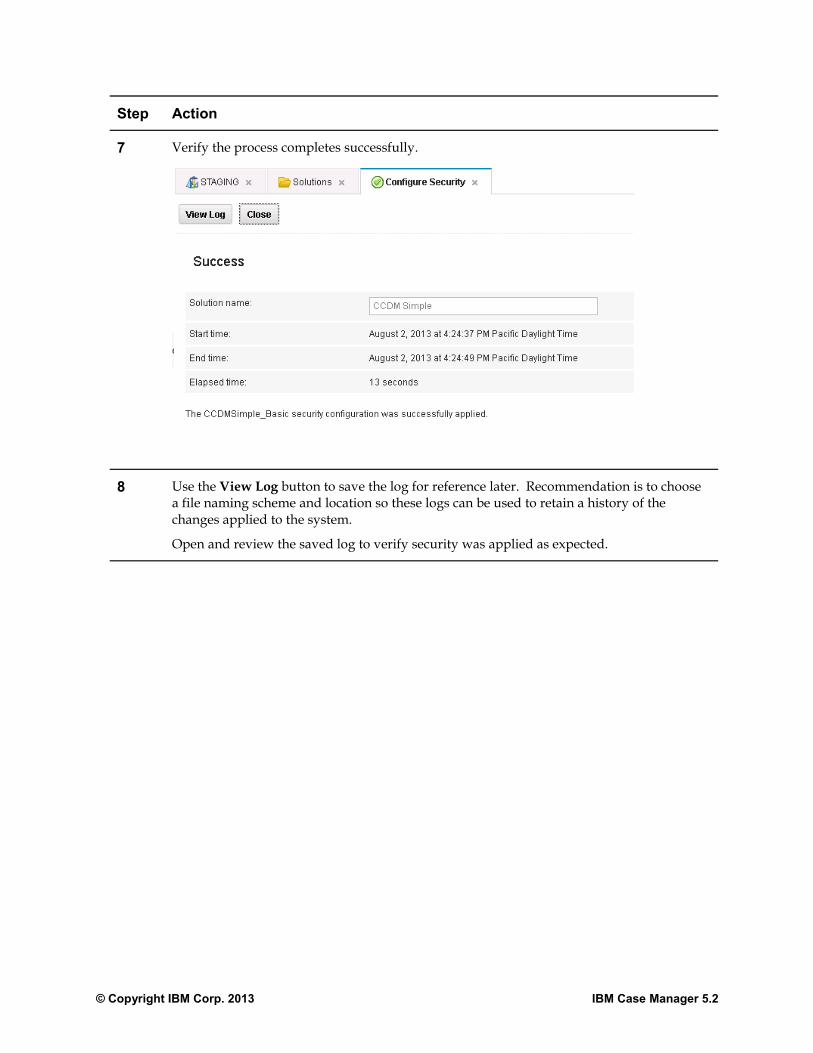
7 Verify the process completes successfully.
8 Use the View Log button to save the log for reference later. Recommendation is to choose a file naming scheme and location so these logs can be used to retain a history of the changes applied to the system.
Open and review the saved log to verify security was applied as expected.
© Copyright IBM Corp. 2013 IBM Case Manager 5.2
Phase 5 Modify and Verify
Optional modification of existing case instances
Changing a solution and redeploying it can affect existing case instances. IBM Case Manager tools assist in making necessary modifications to existing case instances:
• Precondition checker utility
Updates solution tasks in which the following changes were made:
◦ The criteria changes for a task with A property condition is met precondition.◦ The precondition changes from A document is filed in the case or A case property is
updated to A property condition is met.◦ Or, any precondition changes to No precondition.
• Case synchronizer utility
Updates case instances to match changes a redeployed solution might make to the case type, such as:
▪ Adding new tasks
▪ Creating a new folder structure
▪ Updating the state of existing task instances in the case instances
For additional details about redeployment restrictions and synchronizing cases with case type changes, review the IBM Case Manager 5.2 Information Center topic “Synchronizing cases with solution data”.
Verify deployed solution
Before releasing the system for testers or case workers to use, the deployed solution should be tested to verify that all of its components are working correctly. The tests are specific to the
© Copyright IBM Corp. 2013 IBM Case Manager 5.2
solution and will vary depending on the features of the solution and behaviors of its cases. The migration and deployment instructions documentation should include a plan for verifying the deployed solution.
A sample of tests that might be run from Case Manager Client are:
• Access the newly deployed solution from Case Manager Client.
• Use the Add Case feature to create a new case instance. Verify the preconditions for the case are met.
• Use the search case function to find the case instance just created.
• Open the case and visit various pages reviewing the data displayed in the views.
• Open and complete a work item from an in-basket to verify the workflow system is operating properly.
• Repeat the tests using different user accounts that belong to groups assigned to different roles. Confirm the assigned permissions reflect the expected behavior for the roles.
© Copyright IBM Corp. 2013 IBM Case Manager 5.2
IBM Case Manager Solution Deployment
Appendices Appendices
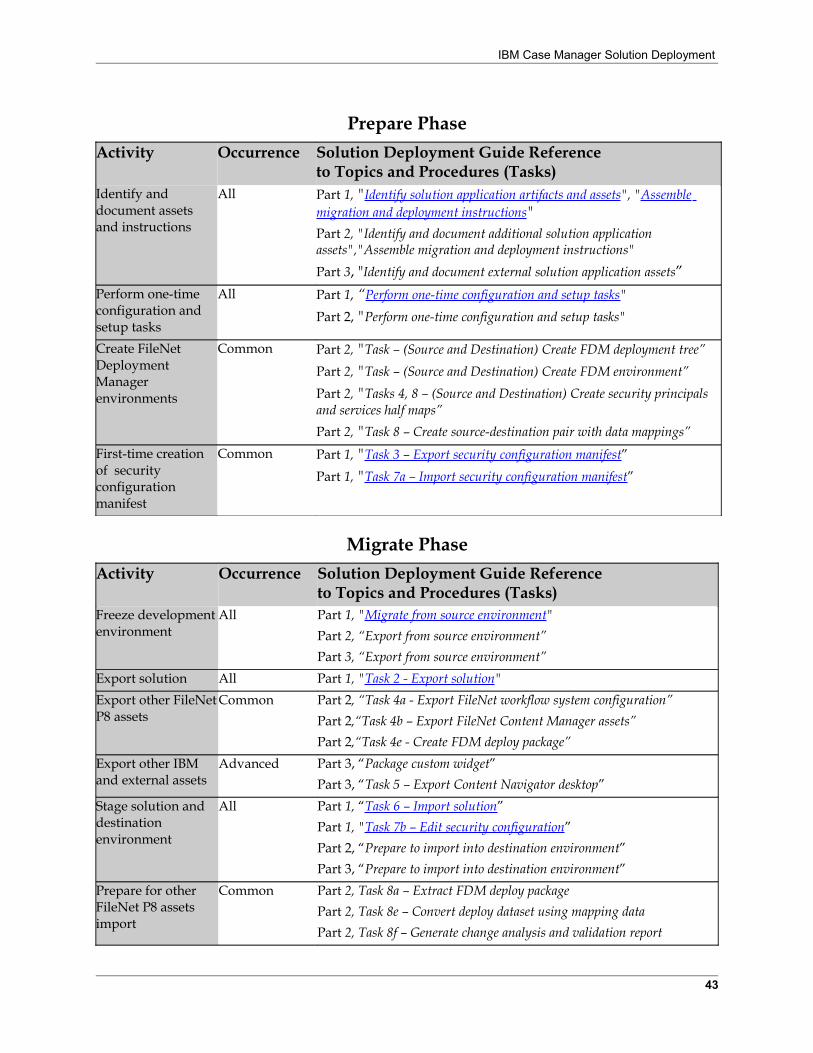
Solution Migration and Deployment Process Checklist
The three parts of the IBM Case Manager 5.2 Solution Deployment Guide show the tasks in the order they would be performed when a solution application is first migrated. It also presents tasks in logical groupings by the tools utilized to make reading the article easier. That exact ordering is not the only viable sequence.
The tables in this appendix give a summary of the entire process by phase. Those tasks where previous setup work can be leveraged and may not need to be repeated are moved into the Prepare phase. This provides a clearer picture of the tasks typically required during the Migrate phase. Thus this appendix presents a summarized checklist of the tasks when a solution is re-migrated and redeployed into the same target environment.
In the tables below, the following designations are used to convey the frequency at which an activity is expected to be required during migration and deployment.
• All A required activity basic to solution migration and deployment.• Common An activity common to solution application deployments.• Advanced An activity found in more complex solution application deployments.
42
IBM Case Manager Solution Deployment
Prepare PhaseActivity Occurrence Solution Deployment Guide Reference
to Topics and Procedures (Tasks)Identify and document assets and instructions
All Part 1, "Identify solution application artifacts and assets", "Assemble migration and deployment instructions"Part 2, "Identify and document additional solution application assets","Assemble migration and deployment instructions"Part 3, "Identify and document external solution application assets”
Perform one-time configuration and setup tasks
All Part 1, “Perform one-time configuration and setup tasks"Part 2, "Perform one-time configuration and setup tasks"
Create FileNet Deployment Manager environments
Common Part 2, "Task – (Source and Destination) Create FDM deployment tree”Part 2, "Task – (Source and Destination) Create FDM environment”Part 2, "Tasks 4, 8 – (Source and Destination) Create security principals and services half maps”Part 2, "Task 8 – Create source-destination pair with data mappings”
First-time creation of security configuration manifest
Common Part 1, "Task 3 – Export security configuration manifest”Part 1, "Task 7a – Import security configuration manifest”
Migrate PhaseActivity Occurrence Solution Deployment Guide Reference
to Topics and Procedures (Tasks)Freeze development environment
All Part 1, "Migrate from source environment"Part 2, “Export from source environment”Part 3, “Export from source environment”
Export solution All Part 1, "Task 2 - Export solution"Export other FileNet P8 assets
Common Part 2, “Task 4a - Export FileNet workflow system configuration”Part 2,“Task 4b – Export FileNet Content Manager assets”Part 2,“Task 4e - Create FDM deploy package”
Export other IBM and external assets
Advanced Part 3, “Package custom widget”Part 3, “Task 5 – Export Content Navigator desktop”
Stage solution and destination environment
All Part 1, “Task 6 – Import solution”Part 1, "Task 7b – Edit security configuration”Part 2, “Prepare to import into destination environment”Part 3, “Prepare to import into destination environment”
Prepare for other FileNet P8 assets import
Common Part 2, Task 8a – Extract FDM deploy packagePart 2, Task 8e – Convert deploy dataset using mapping dataPart 2, Task 8f – Generate change analysis and validation report
43
IBM Case Manager Solution Deployment
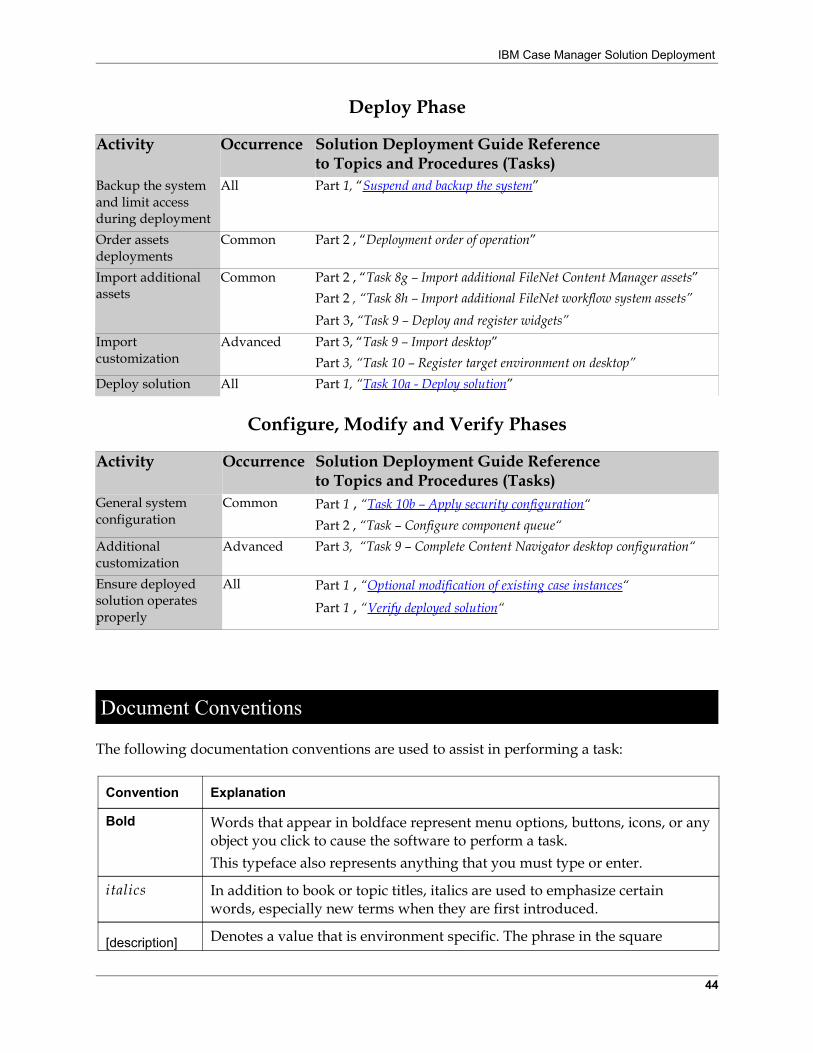
Deploy Phase
Activity Occurrence Solution Deployment Guide Reference to Topics and Procedures (Tasks)
Backup the system and limit access during deployment
All Part 1, “Suspend and backup the system”
Order assets deployments
Common Part 2 , “Deployment order of operation”
Import additional assets
Common Part 2 , “Task 8g – Import additional FileNet Content Manager assets”Part 2 , “Task 8h – Import additional FileNet workflow system assets”Part 3, “Task 9 – Deploy and register widgets”
Import customization
Advanced Part 3, “Task 9 – Import desktop”Part 3, “Task 10 – Register target environment on desktop”
Deploy solution All Part 1, “Task 10a - Deploy solution”
Configure, Modify and Verify Phases
Activity Occurrence Solution Deployment Guide Reference to Topics and Procedures (Tasks)
General system configuration
Common Part 1 , “Task 10b – Apply security configuration“Part 2 , “Task – Configure component queue“
Additional customization
Advanced Part 3, “Task 9 – Complete Content Navigator desktop configuration“
Ensure deployed solution operates properly
All Part 1 , “Optional modification of existing case instances“
Part 1 , “Verify deployed solution“
Document Conventions
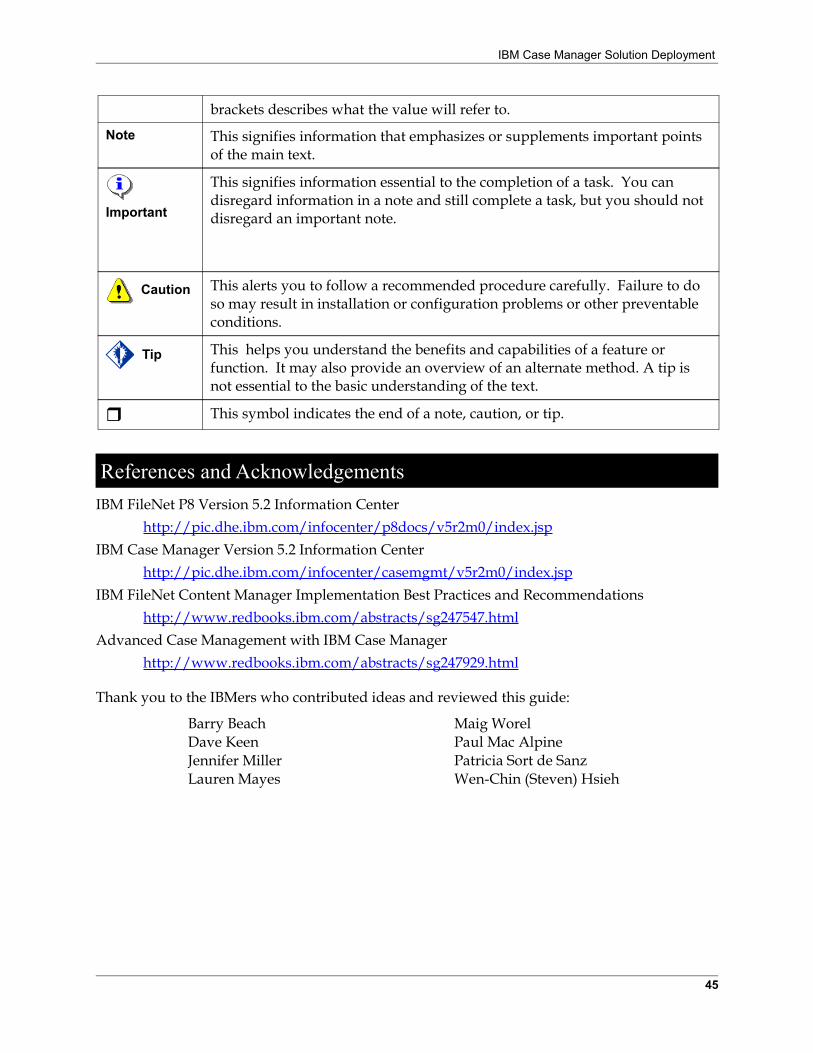
The following documentation conventions are used to assist in performing a task:
Convention Explanation
Bold Words that appear in boldface represent menu options, buttons, icons, or any object you click to cause the software to perform a task. This typeface also represents anything that you must type or enter.
italics In addition to book or topic titles, italics are used to emphasize certain words, especially new terms when they are first introduced.
[description] Denotes a value that is environment specific. The phrase in the square
44
IBM Case Manager Solution Deployment
brackets describes what the value will refer to.
Note This signifies information that emphasizes or supplements important points of the main text.
Important
This signifies information essential to the completion of a task. You can disregard information in a note and still complete a task, but you should not disregard an important note.
Caution This alerts you to follow a recommended procedure carefully. Failure to do
so may result in installation or configuration problems or other preventable conditions.
Tip This helps you understand the benefits and capabilities of a feature or
function. It may also provide an overview of an alternate method. A tip is not essential to the basic understanding of the text.
This symbol indicates the end of a note, caution, or tip.
References and AcknowledgementsIBM FileNet P8 Version 5.2 Information Center
http://pic.dhe.ibm.com/infocenter/p8docs/v5r2m0/index.jspIBM Case Manager Version 5.2 Information Center
http://pic.dhe.ibm.com/infocenter/casemgmt/v5r2m0/index.jspIBM FileNet Content Manager Implementation Best Practices and Recommendations
http://www.redbooks.ibm.com/abstracts/sg247547.htmlAdvanced Case Management with IBM Case Manager
http://www.redbooks.ibm.com/abstracts/sg247929.html
Thank you to the IBMers who contributed ideas and reviewed this guide:
Barry Beach Maig WorelDave Keen Paul Mac AlpineJennifer Miller Patricia Sort de SanzLauren Mayes Wen-Chin (Steven) Hsieh
45