Embed Size (px)
Citation preview

IMS Membership
Express User Guide Financial & Membership Services
Membership Management Services
Version 5.0.2
MEMBERSHIP EXPRESS – USER GUIDE
June 10, 2010 Page 2 of 140
IMS MEMBERSHIP EXPRESS – USER GUIDE
Chapter 1: MEX ........................................................................................................................................................................ 8
Conventions ......................................................................................................................................................................... 8
General Rules ....................................................................................................................................................................... 8
Chapter 2: MEX Tab ............................................................................................................................................................... 10
Chapter 3: Batch Search ........................................................................................................................................................ 11
Retrieve a Batch ................................................................................................................................................................. 11
Search Results .................................................................................................................................................................12
Create a Batch ................................................................................................................................................................... 13
Update Information for a Batch ........................................................................................................................................ 14
Post a Batch ....................................................................................................................................................................... 15
Post all Batches in the Grid ................................................................................................................................................ 15
Un Post a Batch .................................................................................................................................................................. 16
Review Transactions for a Batch ........................................................................................................................................ 16
Review Counts for Transactions in a Batch........................................................................................................................ 17
Unlock a Batch ................................................................................................................................................................... 17
Delete a Batch ................................................................................................................................................................... 18
Review Status for a Submitted Batch ................................................................................................................................ 20
Chapter 4: Transactions......................................................................................................................................................... 22
Transactions Display .......................................................................................................................................................... 22
Maintain Transactions ....................................................................................................................................................... 22
Create a New Transaction ................................................................................................................................................. 23
Review and Update a Transaction ..................................................................................................................................... 24
View a Completed Transaction .......................................................................................................................................... 25
Reset a Transaction ........................................................................................................................................................... 26
Filter on Status for Display of Transaction Listing ............................................................................................................. 27
Resubmit a Transaction ..................................................................................................................................................... 28
View Error Messages for a Rejected Transaction .............................................................................................................. 29
Delete a Transaction .......................................................................................................................................................... 30
Chapter 5: Standard Form Transaction Setup ....................................................................................................................... 31
Key Information ................................................................................................................................................................. 31
Personal Information ......................................................................................................................................................... 32
Address Information .......................................................................................................................................................... 32
Email/Phone Information .................................................................................................................................................. 33
Membership Information .................................................................................................................................................. 34
Obligation Information ...................................................................................................................................................... 35
Obligation Adjustment to a Required or Non-required Fund .........................................................................................36
Add of a Required or Non-required Fund .......................................................................................................................36
Change a Payment Method for a Fund ...........................................................................................................................36
Apply an Individual Reduction to a Fund ........................................................................................................................37
Employment Information .................................................................................................................................................. 37
Work Detail Information .................................................................................................................................................... 38
Demographic Information ................................................................................................................................................. 39
Additional Personal Information ....................................................................................................................................... 40
Student Information .......................................................................................................................................................... 41
Chapter 6: MEX Forms Overview .......................................................................................................................................... 42
How to Decide Which Form to Use ................................................................................................................................... 42
MEMBERSHIP EXPRESS – USER GUIDE
June 10, 2010 Page 3 of 140
Enrollment Form .............................................................................................................................................................42
Renewal Form and Quick Renewal Form ........................................................................................................................43
Generic Form ..................................................................................................................................................................45
Continuous Roster Form .................................................................................................................................................47
Address Change Form .....................................................................................................................................................48
PAC Change Form ...........................................................................................................................................................48
Refund/Opt Out Form.....................................................................................................................................................49
Cancellation Form ...........................................................................................................................................................49
Work Detail Form ...........................................................................................................................................................50
Global Payment Method Change Form ..........................................................................................................................50
Email Address Change Form ...........................................................................................................................................51
Chapter 7: Rejected Transactions.......................................................................................................................................... 52
How to Troubleshoot a Rejected Transaction ................................................................................................................... 52
Chapter 8: Processing Enrollments ....................................................................................................................................... 54
About the Enrollment form ............................................................................................................................................... 54
Pop-up Values Option .....................................................................................................................................................55
Key Information ..............................................................................................................................................................55
Personal Information ......................................................................................................................................................55
Address Information .......................................................................................................................................................55
Membership Information ...............................................................................................................................................55
Obligation Information ...................................................................................................................................................57
Employment Information ...............................................................................................................................................58
Chapter 9: Processing Renewals ........................................................................................................................................... 59
About Renewal Forms ....................................................................................................................................................... 59
Renewal without Critical Changes ..................................................................................................................................59
Key Information ..............................................................................................................................................................60
Personal Information ......................................................................................................................................................60
Address Information .......................................................................................................................................................60
Membership Information ...............................................................................................................................................60
Obligation Information ...................................................................................................................................................61
Employer Information ....................................................................................................................................................62
Work Details Information ...............................................................................................................................................63
Renewal with Critical Changes ........................................................................................................................................63
Chapter 10: Quick Renewal Form .......................................................................................................................................... 66
About Quick Renewal Forms ............................................................................................................................................. 66
Key Information ..............................................................................................................................................................66
Membership Information ...............................................................................................................................................66
Chapter 11: How to Perform a Type Change ......................................................................................................................... 67
About Type Changes .......................................................................................................................................................... 67
Standard Generic Form ...................................................................................................................................................67
Key Information ..............................................................................................................................................................67
Personal Information ......................................................................................................................................................67
Address Information .......................................................................................................................................................67
Membership Information ...............................................................................................................................................67
Standard Continuous Roster Form .................................................................................................................................70
Key Information ..............................................................................................................................................................70
Personal Information ......................................................................................................................................................70
Address Information .......................................................................................................................................................70

MEMBERSHIP EXPRESS – USER GUIDE
June 10, 2010 Page 4 of 140
Membership Information ...............................................................................................................................................70
Chapter 12: Adding Levels of Membership to Existing Sets .................................................................................................. 74
About Adding Levels of Membership ................................................................................................................................ 74
Standard Generic Form ...................................................................................................................................................74
Key Information ..............................................................................................................................................................74
Personal Information ......................................................................................................................................................74
Address Information .......................................................................................................................................................74
Membership Information ...............................................................................................................................................74
Standard Continuous Roster Form .................................................................................................................................76
Key Information ..............................................................................................................................................................76
Personal Information ......................................................................................................................................................76
Address Information .......................................................................................................................................................76
Membership Information ...............................................................................................................................................76
Chapter 13: How to Perform a Chapter Change.................................................................................................................... 79
About Chapter Changes ..................................................................................................................................................... 79
Standard Generic Form ...................................................................................................................................................79
Key Information ..............................................................................................................................................................79
Personal Information ......................................................................................................................................................79
Address Information .......................................................................................................................................................79
Membership Information ...............................................................................................................................................79
Standard Continuous Roster Form .................................................................................................................................81
Key Information ..............................................................................................................................................................81
Personal Information ......................................................................................................................................................81
Address Information .......................................................................................................................................................81
Membership Information ...............................................................................................................................................81
Chapter 14: How to Perform a Local Change ........................................................................................................................ 83
About Local Changes ......................................................................................................................................................... 83
Standard Generic Form ...................................................................................................................................................83
Key Information ..............................................................................................................................................................83
Personal Information ......................................................................................................................................................83
Address Information .......................................................................................................................................................83
Membership Information ...............................................................................................................................................83
Standard Continuous Roster Form .................................................................................................................................85
Key Information ..............................................................................................................................................................85
Personal Information ......................................................................................................................................................85
Address Information .......................................................................................................................................................85
Membership Information ...............................................................................................................................................85
Chapter 15: How to Cancel or Terminate a Membership ..................................................................................................... 87
About Membership Cancels .............................................................................................................................................. 87
Standard Generic Form ...................................................................................................................................................87
Key Information ..............................................................................................................................................................87
Membership Information ...............................................................................................................................................87
Standard Continuous Roster Form .................................................................................................................................88
Key Information ..............................................................................................................................................................88
Membership Information ...............................................................................................................................................88
Quick Cancellation Form .................................................................................................................................................89
Key Information ..............................................................................................................................................................89
Membership Information ...............................................................................................................................................89
MEMBERSHIP EXPRESS – USER GUIDE
June 10, 2010 Page 5 of 140
Chapter 16: How to Reactivate a Cancelled Membership..................................................................................................... 90
About Membership Reactivates ........................................................................................................................................ 90
Standard Generic Form ...................................................................................................................................................90
Key Information ..............................................................................................................................................................90
Membership Information ...............................................................................................................................................90
Chapter 17: How To set a group of members to Continuous ................................................................................................ 92
About Setting a Group of Members to Continuous ........................................................................................................... 92
Use the Generate Feature ..............................................................................................................................................92
Populate a REPL membership transaction ......................................................................................................................92
Membership Information ...............................................................................................................................................92
Initiate the Generate Feature .........................................................................................................................................93
Select Organization(s) .....................................................................................................................................................93
Select Effective and Non-Continuous Memberships ......................................................................................................96
Initiate Search .................................................................................................................................................................96
Review Individuals/Memberships ..................................................................................................................................96
Select Individuals/Memberships ....................................................................................................................................97
Export Listing of Selected Individuals .............................................................................................................................98
Generate Transactions ....................................................................................................................................................99
Review Generated Transactions .....................................................................................................................................99
Chapter 18: How to Perform Obligation Changes ............................................................................................................... 100
About Obligation Changes ............................................................................................................................................... 100
Standard Generic or Continuous Roster Form ............................................................................................................. 100
Key Information ........................................................................................................................................................... 100
Membership Information ............................................................................................................................................ 100
Chapter 19: How to Perform Payment Method Changes.................................................................................................... 102
About Payment Method Changes.................................................................................................................................... 102
Standard Generic or Continuous Roster Form ............................................................................................................. 102
Key Information ........................................................................................................................................................... 102
Membership Information ............................................................................................................................................ 102
Global Pay Method Change Form ................................................................................................................................ 103
Key Information ........................................................................................................................................................... 103
Membership Information ............................................................................................................................................ 103
Chapter 20: How to Perform Address Changes ................................................................................................................... 105
About Address Changes ................................................................................................................................................... 105
Standard Generic or Continuous Roster Form ............................................................................................................. 105
Key Information ........................................................................................................................................................... 105
Address Information .................................................................................................................................................... 105
Address Change Form .................................................................................................................................................. 106
Key Information ........................................................................................................................................................... 106
Address Information .................................................................................................................................................... 106
Chapter 21: Using The PAC Change Form ........................................................................................................................... 107
About PAC Changes ......................................................................................................................................................... 107
PAC Change Form ........................................................................................................................................................ 107
Key Information ........................................................................................................................................................... 107
Membership Information ............................................................................................................................................ 107
PAC Change Information ............................................................................................................................................. 107
Chapter 22: Add or Changes to Work Details ...................................................................................................................... 108
About Work Detail Changes............................................................................................................................................. 108

MEMBERSHIP EXPRESS – USER GUIDE
June 10, 2010 Page 6 of 140
Standard Generic Form and Continuous Roster Form ................................................................................................. 108
Key Information ........................................................................................................................................................... 108
Membership Information ............................................................................................................................................ 108
Work details Information ............................................................................................................................................ 108
Work Detail Change Form............................................................................................................................................ 109
Key Information ........................................................................................................................................................... 109
Membership Information ............................................................................................................................................ 109
Work Details Information ............................................................................................................................................ 109
Chapter 23: Using the Refund/Opt Out Form ..................................................................................................................... 111
About Refund/Opt Out .................................................................................................................................................... 111
Refund/Opt Out Form.................................................................................................................................................. 111
Key Information ........................................................................................................................................................... 111
Membership Information ............................................................................................................................................ 111
Refund/Opt Out Information ....................................................................................................................................... 111
Chapter 24: How to Use the Setup Button .......................................................................................................................... 113
About the Setup Button ................................................................................................................................................... 113
Using the Setup Button ................................................................................................................................................ 113
Setup Button ................................................................................................................................................................ 113
Chapter 25: How to Use the Generate Button .................................................................................................................... 115
About the Generate Button ............................................................................................................................................. 115
Using the Generate Button .......................................................................................................................................... 115
Create a MEX Batch ..................................................................................................................................................... 115
Initiate the Generate Feature ...................................................................................................................................... 115
Saved Queries .............................................................................................................................................................. 116
Select Organization(s)-State/UniServ/Local/Employer/Work Location ...................................................................... 118
Select Membership Types ............................................................................................................................................ 121
Select Funds ................................................................................................................................................................. 122
Select Demographics ................................................................................................................................................... 123
Select Membership Attributes ..................................................................................................................................... 124
Select Roles .................................................................................................................................................................. 126
Select Individual Reduction reason ............................................................................................................................. 127
Initiate Search .............................................................................................................................................................. 128
Review Individuals/Memberships ............................................................................................................................... 128
Select Individuals/Memberships ................................................................................................................................. 128
Export Listing of Selected Individuals .......................................................................................................................... 129
Generate Transactions ................................................................................................................................................. 130
Review Generated Transactions .................................................................................................................................. 131
Chapter 26: How to Use the Values Button ........................................................................................................................ 132
About the Values Button ................................................................................................................................................. 132
Contents of the Values Display .................................................................................................................................... 132
Individual Values .......................................................................................................................................................... 132
Addresses Tab .............................................................................................................................................................. 133
Phones Tab .................................................................................................................................................................. 133
Emails Tab .................................................................................................................................................................... 133
Org Hierarchy Tab ........................................................................................................................................................ 133
Memberships Tab ........................................................................................................................................................ 134
Employers Tab ............................................................................................................................................................. 134
Work Details Tab ......................................................................................................................................................... 134
Obligations Tab ............................................................................................................................................................ 134

MEMBERSHIP EXPRESS – USER GUIDE
June 10, 2010 Page 7 of 140
Roles Tab ..................................................................................................................................................................... 135
Demographics Tab ....................................................................................................................................................... 135
Chapter 27: How to Use the Individual Search Button ........................................................................................................ 136
About the Individual Search Button ................................................................................................................................ 136
Processing an Enrollment without a Social Security Number ..................................................................................... 137
Chapter 28: Processing Rules .............................................................................................................................................. 138
Rules for Obligation Adjustments .................................................................................................................................... 138
Rules for Processing Non-Required Funds with zero Obligation ..................................................................................... 138
Rules for Payment Method changes ................................................................................................................................ 138
MEMBERSHIP EXPRESS – USER GUIDE
June 10, 2010 Page 8 of 140
CHAPTER 1: MEX
The Membership Express Subsystem (MEX) is one subsystem in the Interactive Membership
Services (IMS) web application. MEX represents the rapid entry vehicle for processing
membership. MEX provides data entry features designed to speed the entry of large volumes
of membership updates with minimal screen navigation. Processing is performed in a batch
environment to allow the user to enter data without waiting for the processing of updates.
This means that actual updates are not made to the database until the transactions have been
processed. The user keys volumes of update transactions into a defined batch to be processed
either by the user submitting the batch manually or by the nightly batch processing performed
later that night.
Screens in MEX have very little screen validation. Validation occurs during processing and
transactions are rejected if errors are found or completed if error free.
This user guide provides an overview that explains basic information about MEX. The creation
and update of transactions and batches will be reviewed. After the overview, step-by-step
instructions are given which demonstrate how to create transactions for the update of
individual and membership information.
CONVENTIONS
By the way: Text emphasized like this provides annotations and shortcuts that will help
you use your MEX User Guide more productively
Data Entry Tip: Text emphasized like this provides tips that will facilitate data entry.
Warning: Warnings like this alert you to critical procedures.
Note: Notes like this alert you to important pieces of information.
GENERAL RULES
Only enter the data that has changed for an individual and membership when updating an existing
membership. Key everything on an enrollment unless the individual is found to already exist. If the
individual already exists, only key the information that has changed.
Codes and User IDs are used exclusively in MEX for identifying associated organizations (Local
Affiliates, Chapters, Employers, Work Locations), membership types, position and subject
information, individual demographic information (e.g. gender, ethnicity, party affiliation), address
types, funds, and payment methods.
Help is available on specified fields displayed with field label in blue. Double-click these fields for
help in selection. Selection will populate the field with the associated code or user ID.

MEMBERSHIP EXPRESS – USER GUIDE
June 10, 2010 Page 9 of 140
When trying a new MEX update for the first time, create a small batch of one or two transactions.
Check your results and when you can create this type of update without errors, you are ready to key
larger volumes of transactions.
MEMBERSHIP EXPRESS – USER GUIDE
June 10, 2010 Page 10 of 140
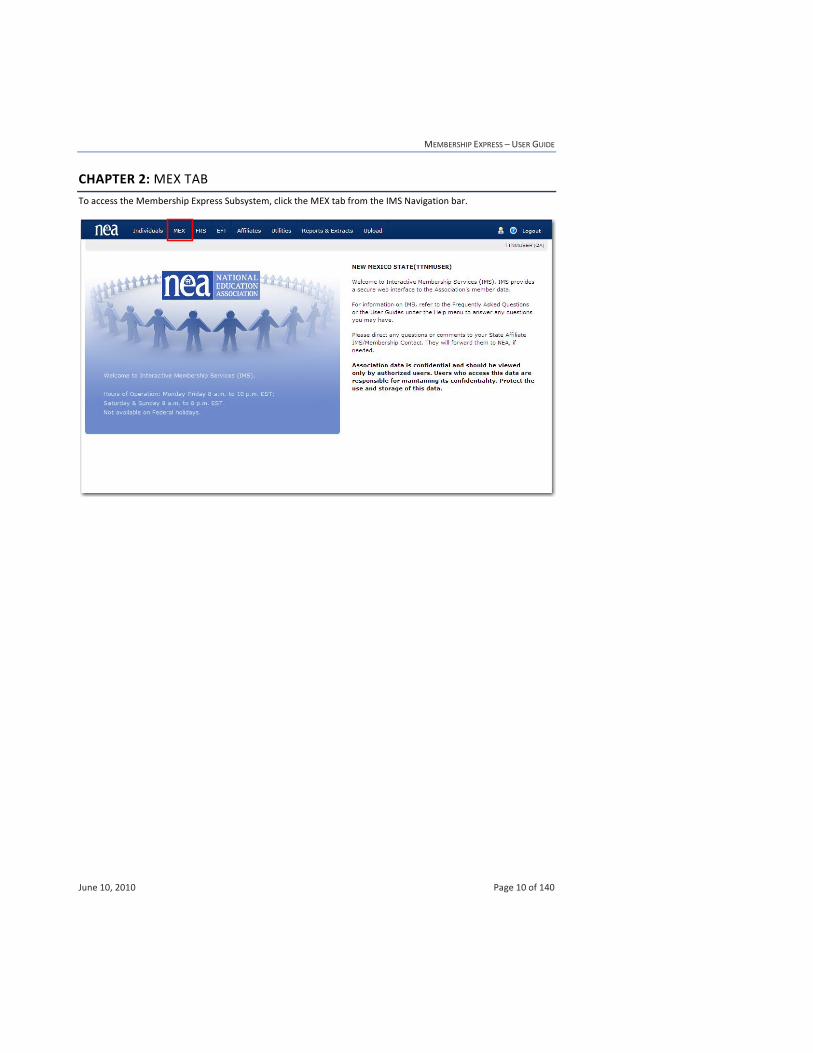
CHAPTER 2: MEX TAB
To access the Membership Express Subsystem, click the MEX tab from the IMS Navigation bar.
MEMBERSHIP EXPRESS – USER GUIDE
June 10, 2010 Page 11 of 140
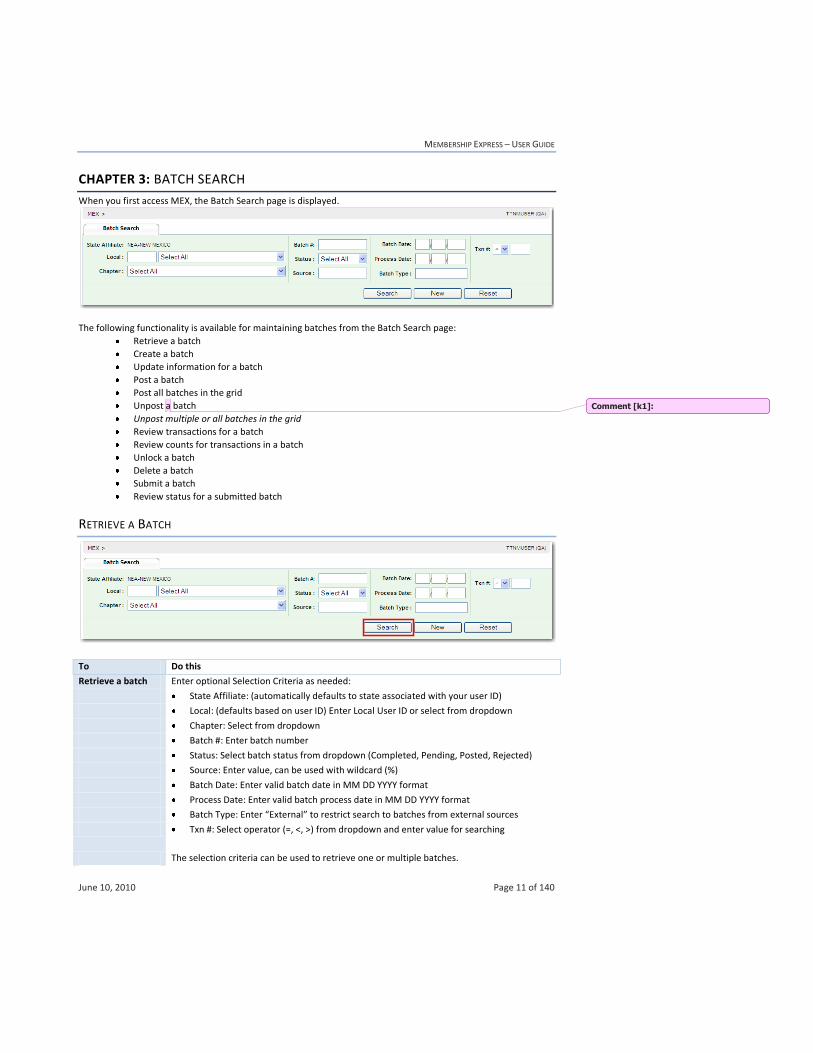
CHAPTER 3: BATCH SEARCH
When you first access MEX, the Batch Search page is displayed.
The following functionality is available for maintaining batches from the Batch Search page:
Retrieve a batch
Create a batch
Update information for a batch
Post a batch
Post all batches in the grid
Unpost a batch
Unpost multiple or all batches in the grid
Review transactions for a batch
Review counts for transactions in a batch
Unlock a batch
Delete a batch
Submit a batch
Review status for a submitted batch
RETRIEVE A BATCH
To Do this
Retrieve a batch Enter optional Selection Criteria as needed:
State Affiliate: (automatically defaults to state associated with your user ID)
Local: (defaults based on user ID) Enter Local User ID or select from dropdown
Chapter: Select from dropdown
Batch #: Enter batch number
Status: Select batch status from dropdown (Completed, Pending, Posted, Rejected)
Source: Enter value, can be used with wildcard (%)
Batch Date: Enter valid batch date in MM DD YYYY format
Process Date: Enter valid batch process date in MM DD YYYY format
Batch Type: Enter “External” to restrict search to batches from external sources
Txn #: Select operator (=, <, >) from dropdown and enter value for searching
The selection criteria can be used to retrieve one or multiple batches.
Comment [k1]:
MEMBERSHIP EXPRESS – USER GUIDE
June 10, 2010 Page 12 of 140
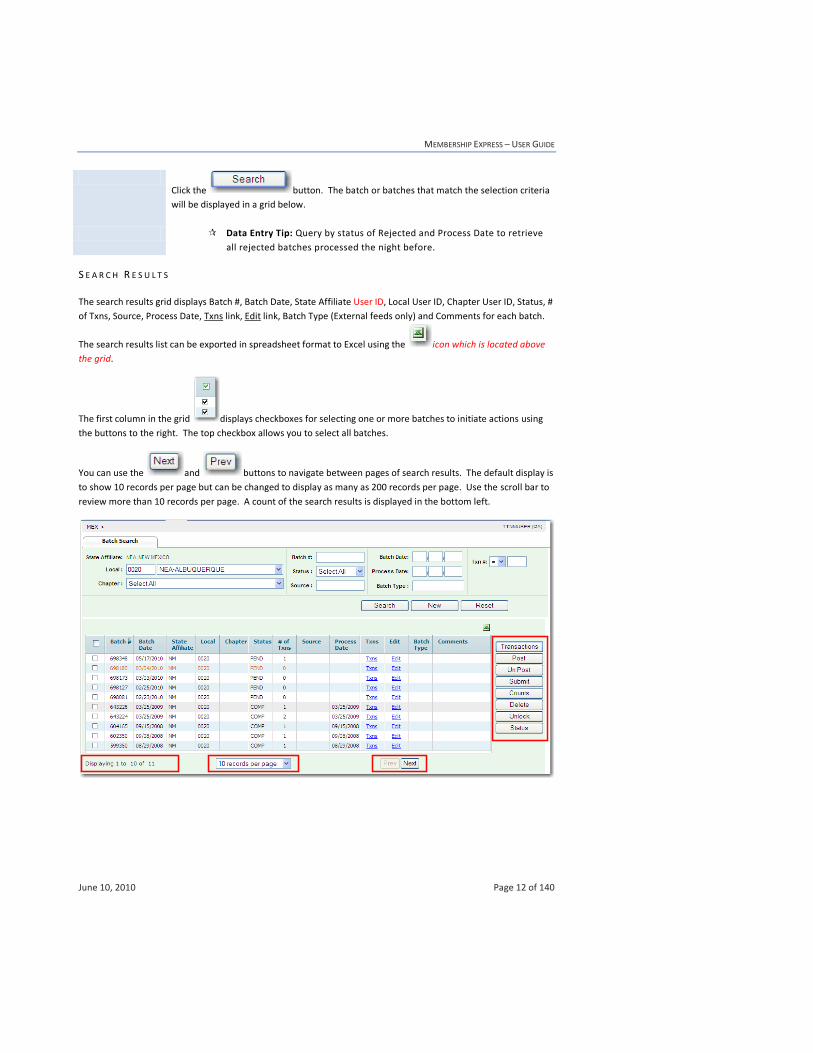
Click the button. The batch or batches that match the selection criteria
will be displayed in a grid below.
Data Entry Tip: Query by status of Rejected and Process Date to retrieve
all rejected batches processed the night before.
S E A R C H R E S U L T S
The search results grid displays Batch #, Batch Date, State Affiliate User ID, Local User ID, Chapter User ID, Status, #
of Txns, Source, Process Date, Txns link, Edit link, Batch Type (External feeds only) and Comments for each batch.
The search results list can be exported in spreadsheet format to Excel using the icon which is located above
the grid.
The first column in the grid displays checkboxes for selecting one or more batches to initiate actions using
the buttons to the right. The top checkbox allows you to select all batches.
You can use the and buttons to navigate between pages of search results. The default display is
to show 10 records per page but can be changed to display as many as 200 records per page. Use the scroll bar to
review more than 10 records per page. A count of the search results is displayed in the bottom left.
MEMBERSHIP EXPRESS – USER GUIDE
June 10, 2010 Page 13 of 140
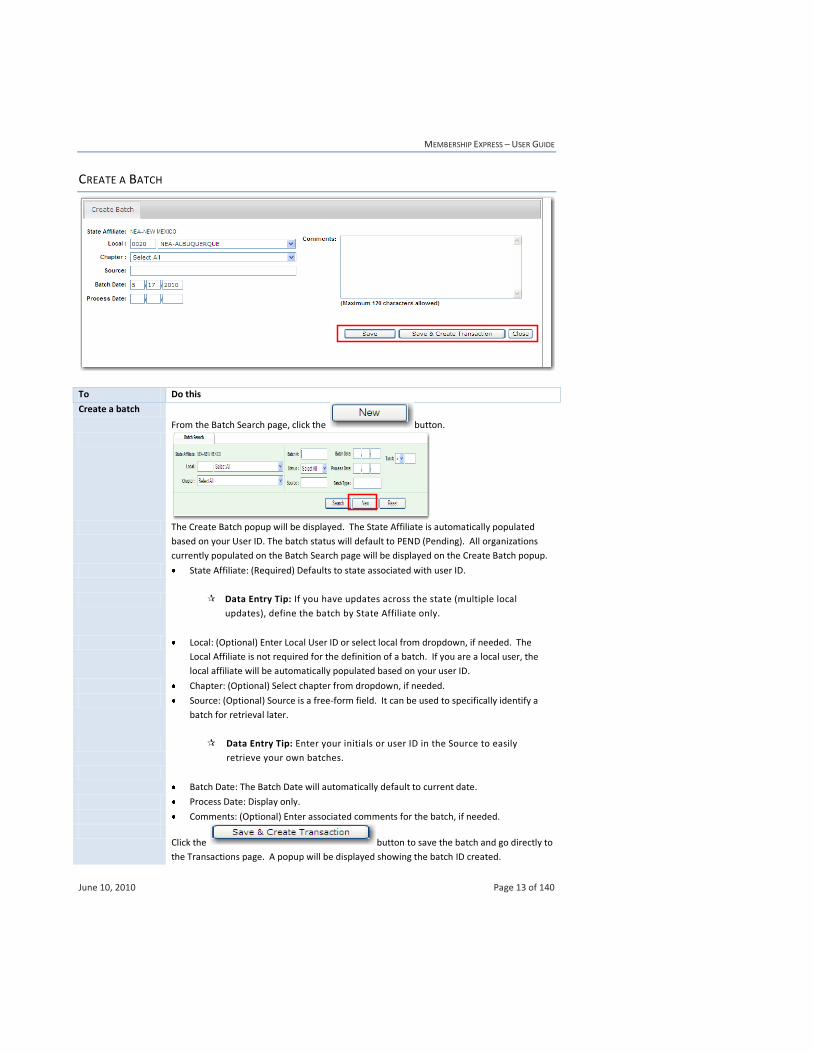
CREATE A BATCH
To Do this
Create a batch
From the Batch Search page, click the button.
The Create Batch popup will be displayed. The State Affiliate is automatically populated
based on your User ID. The batch status will default to PEND (Pending). All organizations
currently populated on the Batch Search page will be displayed on the Create Batch popup.
State Affiliate: (Required) Defaults to state associated with user ID.
Data Entry Tip: If you have updates across the state (multiple local
updates), define the batch by State Affiliate only.
Local: (Optional) Enter Local User ID or select local from dropdown, if needed. The
Local Affiliate is not required for the definition of a batch. If you are a local user, the
local affiliate will be automatically populated based on your user ID.
Chapter: (Optional) Select chapter from dropdown, if needed.
Source: (Optional) Source is a free-form field. It can be used to specifically identify a
batch for retrieval later.
Data Entry Tip: Enter your initials or user ID in the Source to easily
retrieve your own batches.
Batch Date: The Batch Date will automatically default to current date.
Process Date: Display only.
Comments: (Optional) Enter associated comments for the batch, if needed.
Click the button to save the batch and go directly to
the Transactions page. A popup will be displayed showing the batch ID created.

MEMBERSHIP EXPRESS – USER GUIDE
June 10, 2010 Page 14 of 140
Click the button and then to save the batch and return to
the Batch Search page. A popup will be displayed showing the batch ID created.
After clicking the button, the
button will toggle to providing a second chance to
go directly to the Transactions page.
Data Entry Tip: A batch should only contain transactions related to those
affiliates defined for the batch.
UPDATE INFORMATION FOR A BATCH
To Do this
Update
information for a
batch
Click the link on the batch row requiring update. The View/ Edit Batch popup will
be displayed.
Limited updates are allowed on an existing batch. Optionally update Source, Comments and
Batch Date.
Click the button to apply the updates.
Only batches in Pending or Rejected status can be updated.
Data Entry Tip: It is not recommended that Batch Date be modified for
batches in Rejected status.
MEMBERSHIP EXPRESS – USER GUIDE
June 10, 2010 Page 15 of 140
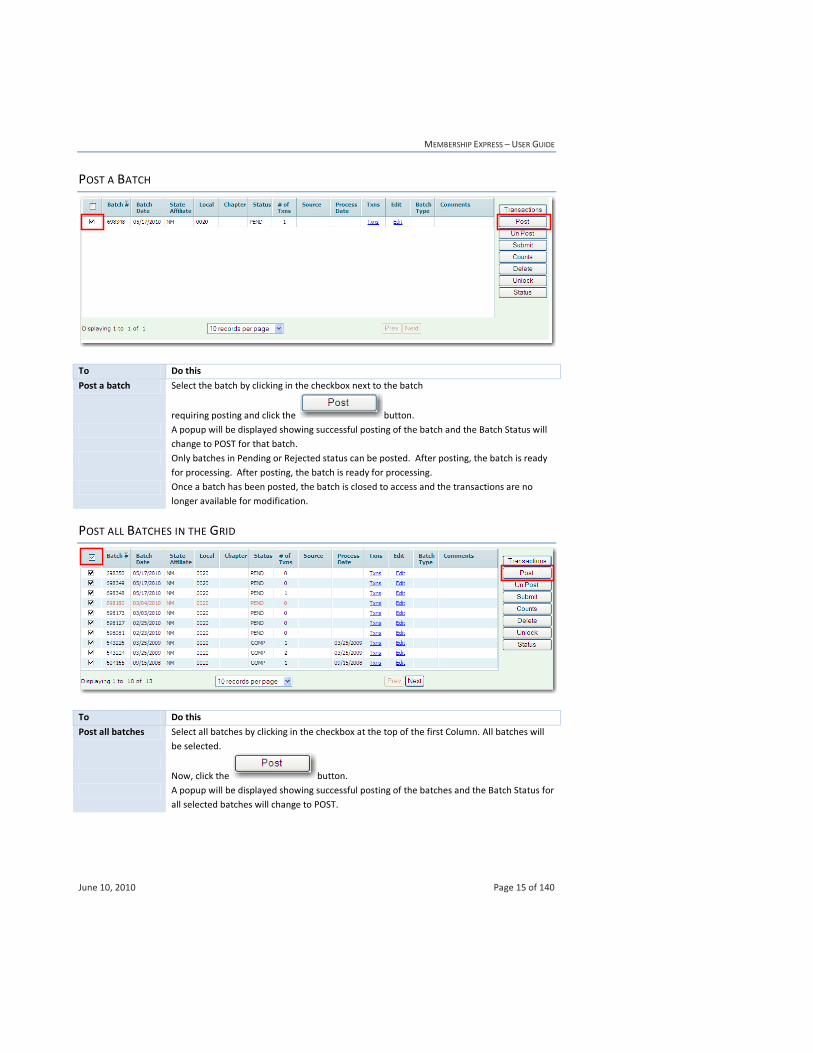
POST A BATCH
To Do this
Post a batch Select the batch by clicking in the checkbox next to the batch
requiring posting and click the button.
A popup will be displayed showing successful posting of the batch and the Batch Status will
change to POST for that batch.
Only batches in Pending or Rejected status can be posted. After posting, the batch is ready
for processing. After posting, the batch is ready for processing.
Once a batch has been posted, the batch is closed to access and the transactions are no
longer available for modification.
POST ALL BATCHES IN THE GRID
To Do this
Post all batches Select all batches by clicking in the checkbox at the top of the first Column. All batches will
be selected.
Now, click the button.
A popup will be displayed showing successful posting of the batches and the Batch Status for
all selected batches will change to POST.
MEMBERSHIP EXPRESS – USER GUIDE
June 10, 2010 Page 16 of 140
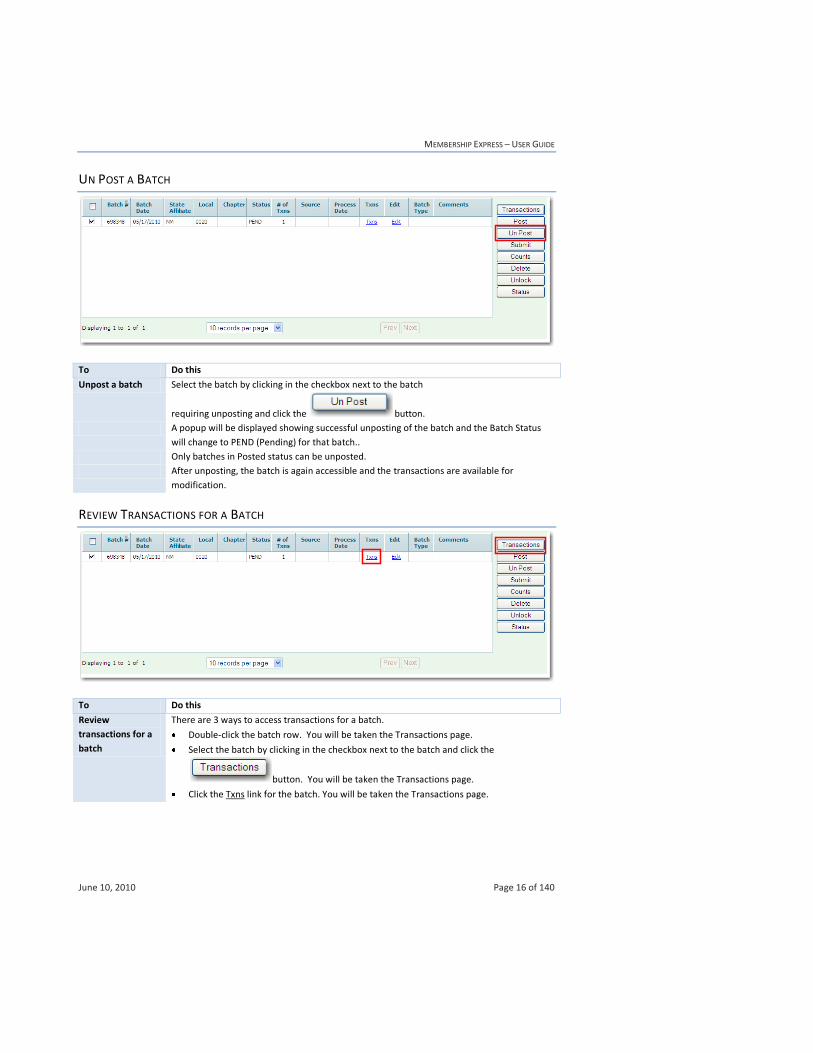
UN POST A BATCH
To Do this
Unpost a batch Select the batch by clicking in the checkbox next to the batch
requiring unposting and click the button.
A popup will be displayed showing successful unposting of the batch and the Batch Status
will change to PEND (Pending) for that batch..
Only batches in Posted status can be unposted.
After unposting, the batch is again accessible and the transactions are available for
modification.
REVIEW TRANSACTIONS FOR A BATCH
To Do this
Review
transactions for a
batch
There are 3 ways to access transactions for a batch.
Double-click the batch row. You will be taken the Transactions page.
Select the batch by clicking in the checkbox next to the batch and click the
button. You will be taken the Transactions page.
Click the Txns link for the batch. You will be taken the Transactions page.
MEMBERSHIP EXPRESS – USER GUIDE
June 10, 2010 Page 17 of 140
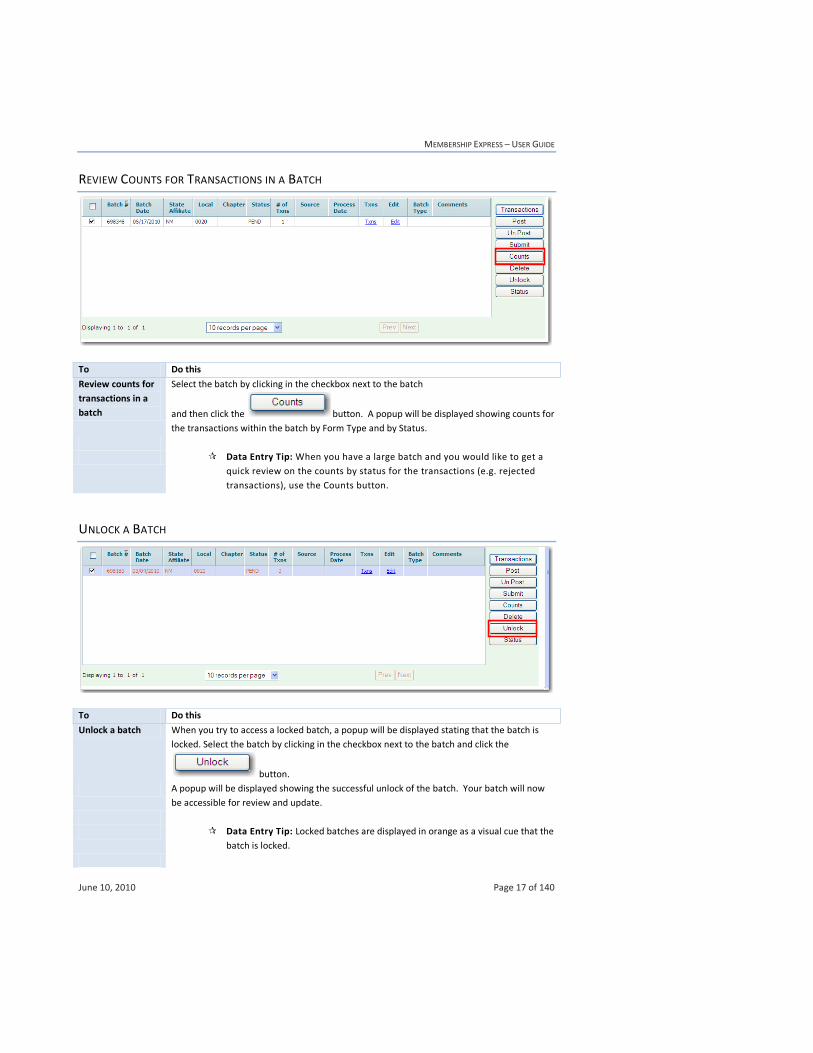
REVIEW COUNTS FOR TRANSACTIONS IN A BATCH
To Do this
Review counts for
transactions in a
batch
Select the batch by clicking in the checkbox next to the batch
and then click the button. A popup will be displayed showing counts for
the transactions within the batch by Form Type and by Status.
Data Entry Tip: When you have a large batch and you would like to get a
quick review on the counts by status for the transactions (e.g. rejected
transactions), use the Counts button.
UNLOCK A BATCH
To Do this
Unlock a batch When you try to access a locked batch, a popup will be displayed stating that the batch is
locked. Select the batch by clicking in the checkbox next to the batch and click the
button.
A popup will be displayed showing the successful unlock of the batch. Your batch will now
be accessible for review and update.
Data Entry Tip: Locked batches are displayed in orange as a visual cue that the
batch is locked.
MEMBERSHIP EXPRESS – USER GUIDE
June 10, 2010 Page 18 of 140
Data Entry Tip: If a batch is locked by you, you should be able to access the
locked batch without unlocking it. Only batches locked by others will have to
be unlocked by you to gain access.
By the way: The Unlock functionality is not available to all users. If your
batch is locked and you do not have security privileges to unlock your
batch, contact your state membership support staff.
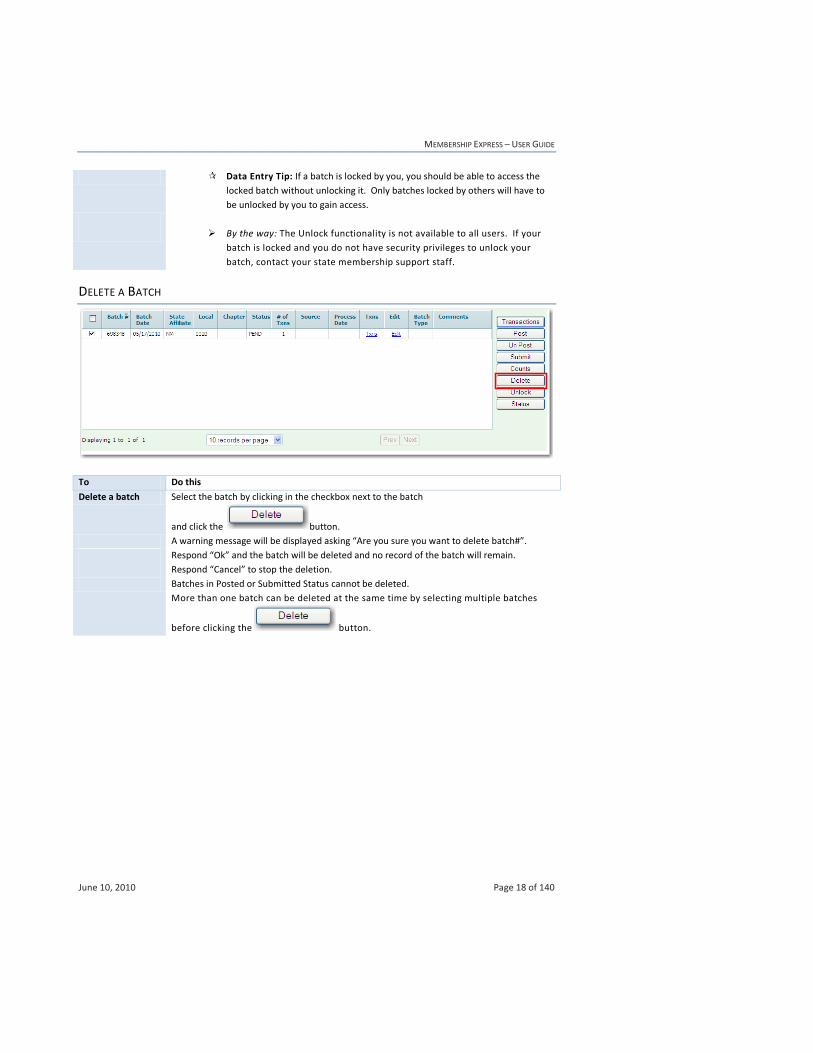
DELETE A BATCH
To Do this
Delete a batch Select the batch by clicking in the checkbox next to the batch
and click the button.
A warning message will be displayed asking “Are you sure you want to delete batch#”.
Respond “Ok” and the batch will be deleted and no record of the batch will remain.
Respond “Cancel” to stop the deletion.
Batches in Posted or Submitted Status cannot be deleted.
More than one batch can be deleted at the same time by selecting multiple batches
before clicking the button.
MEMBERSHIP EXPRESS – USER GUIDE
June 10, 2010 Page 19 of 140
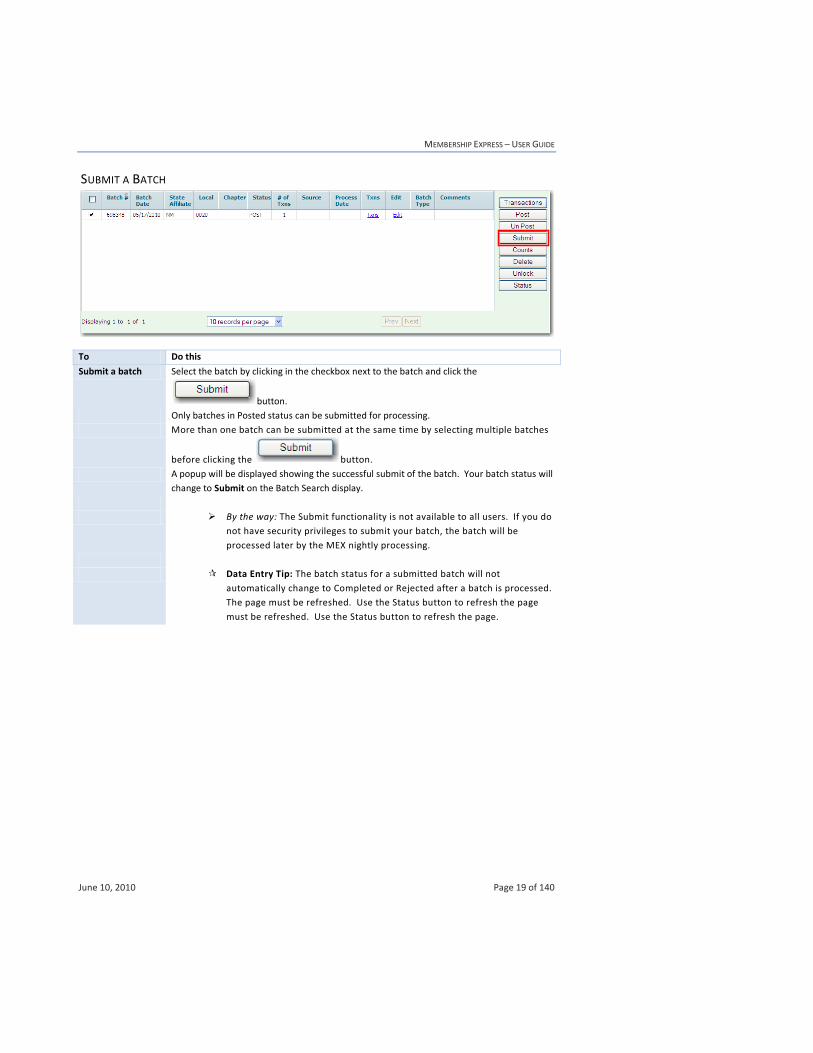
SUBMIT A BATCH
To Do this
Submit a batch Select the batch by clicking in the checkbox next to the batch and click the
button.
Only batches in Posted status can be submitted for processing.
More than one batch can be submitted at the same time by selecting multiple batches
before clicking the button.
A popup will be displayed showing the successful submit of the batch. Your batch status will
change to Submit on the Batch Search display.
By the way: The Submit functionality is not available to all users. If you do
not have security privileges to submit your batch, the batch will be
processed later by the MEX nightly processing.
Data Entry Tip: The batch status for a submitted batch will not
automatically change to Completed or Rejected after a batch is processed.
The page must be refreshed. Use the Status button to refresh the page
must be refreshed. Use the Status button to refresh the page.
MEMBERSHIP EXPRESS – USER GUIDE
June 10, 2010 Page 20 of 140
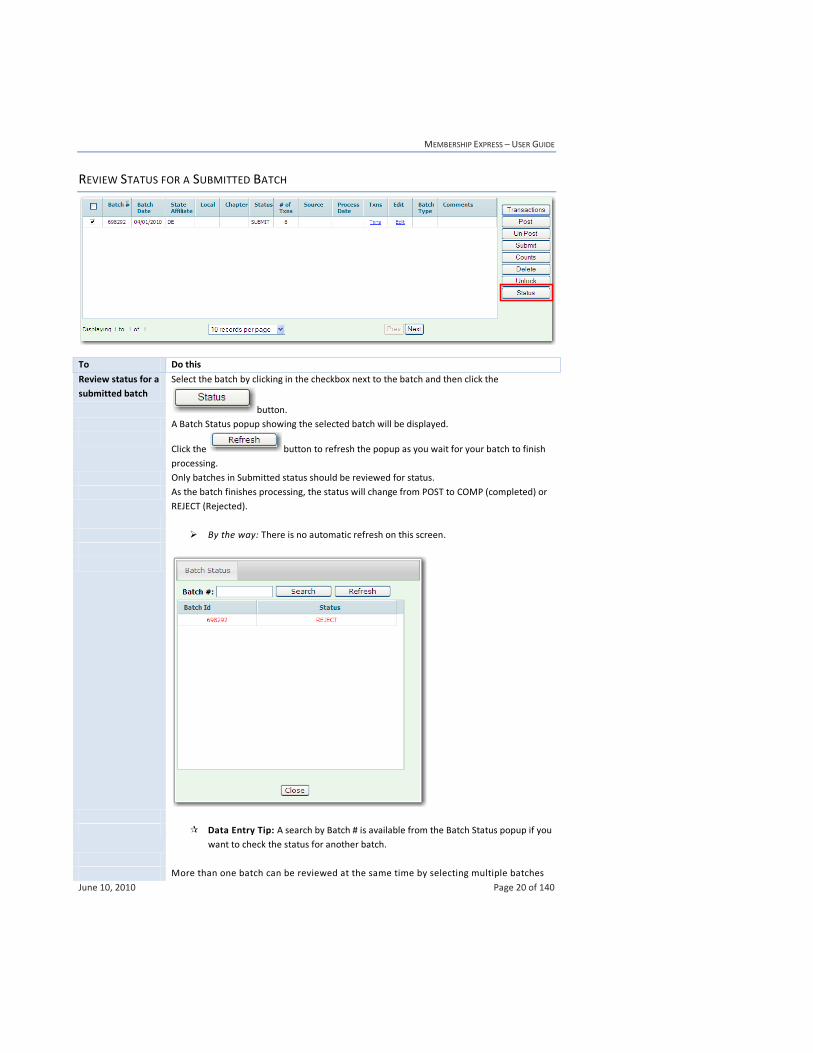
REVIEW STATUS FOR A SUBMITTED BATCH
To Do this
Review status for a
submitted batch
Select the batch by clicking in the checkbox next to the batch and then click the
button.
A Batch Status popup showing the selected batch will be displayed.
Click the button to refresh the popup as you wait for your batch to finish
processing.
Only batches in Submitted status should be reviewed for status.
As the batch finishes processing, the status will change from POST to COMP (completed) or
REJECT (Rejected).
By the way: There is no automatic refresh on this screen.
Data Entry Tip: A search by Batch # is available from the Batch Status popup if you
want to check the status for another batch.
More than one batch can be reviewed at the same time by selecting multiple batches

MEMBERSHIP EXPRESS – USER GUIDE
June 10, 2010 Page 21 of 140
before clicking the button.
If no batches are selected and the Status button is clicked, all batches visible on the
Batch Search page will be displayed.
The status of any batch on the display that is being processed will change after
completion of processing but the button must be clicked to see the
change in status.
After the processing completes and the status of the batch being reviewed has
changed, click the button.
The status for all processed batches will be refreshed on the Batch Search page.
MEMBERSHIP EXPRESS – USER GUIDE
June 10, 2010 Page 22 of 140
CHAPTER 4: TRANSACTIONS
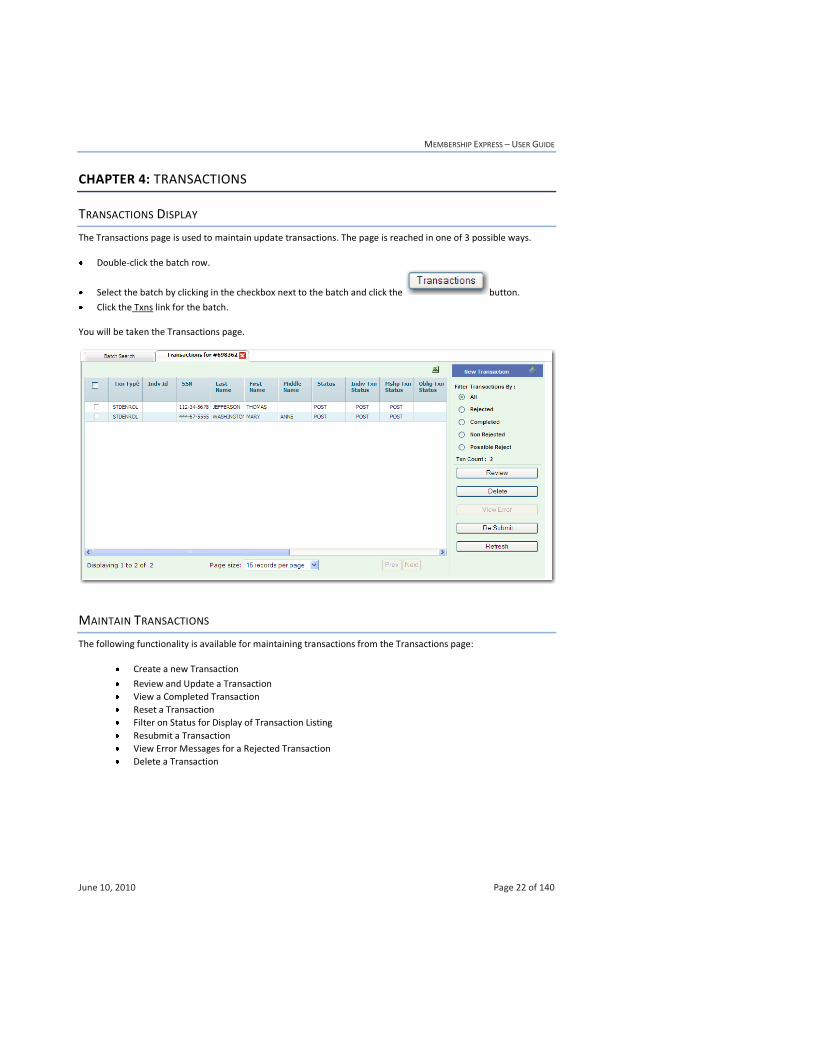
TRANSACTIONS DISPLAY
The Transactions page is used to maintain update transactions. The page is reached in one of 3 possible ways.
Double-click the batch row.
Select the batch by clicking in the checkbox next to the batch and click the button.
Click the Txns link for the batch.
You will be taken the Transactions page.
MAINTAIN TRANSACTIONS
The following functionality is available for maintaining transactions from the Transactions page:
Create a new Transaction
Review and Update a Transaction
View a Completed Transaction
Reset a Transaction
Filter on Status for Display of Transaction Listing
Resubmit a Transaction
View Error Messages for a Rejected Transaction
Delete a Transaction
MEMBERSHIP EXPRESS – USER GUIDE
June 10, 2010 Page 23 of 140
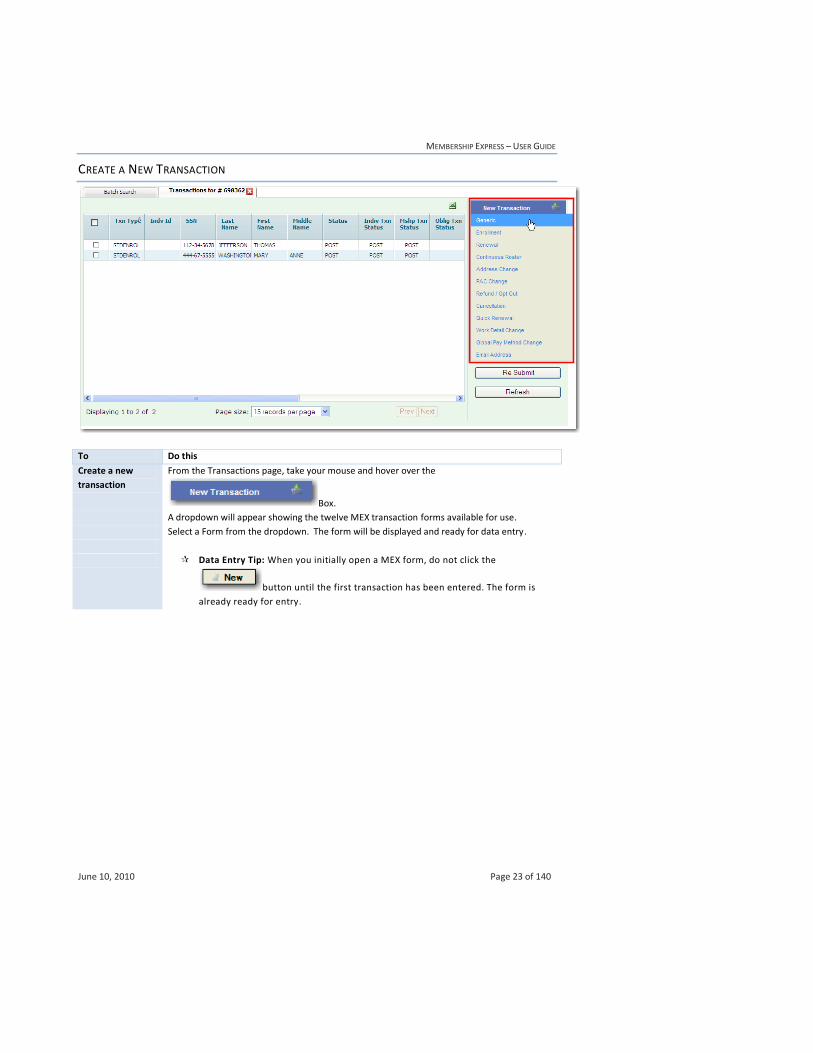
CREATE A NEW TRANSACTION
To Do this
Create a new
transaction
From the Transactions page, take your mouse and hover over the
Box.
A dropdown will appear showing the twelve MEX transaction forms available for use.
Select a Form from the dropdown. The form will be displayed and ready for data entry.
Data Entry Tip: When you initially open a MEX form, do not click the
button until the first transaction has been entered. The form is
already ready for entry.
MEMBERSHIP EXPRESS – USER GUIDE
June 10, 2010 Page 24 of 140
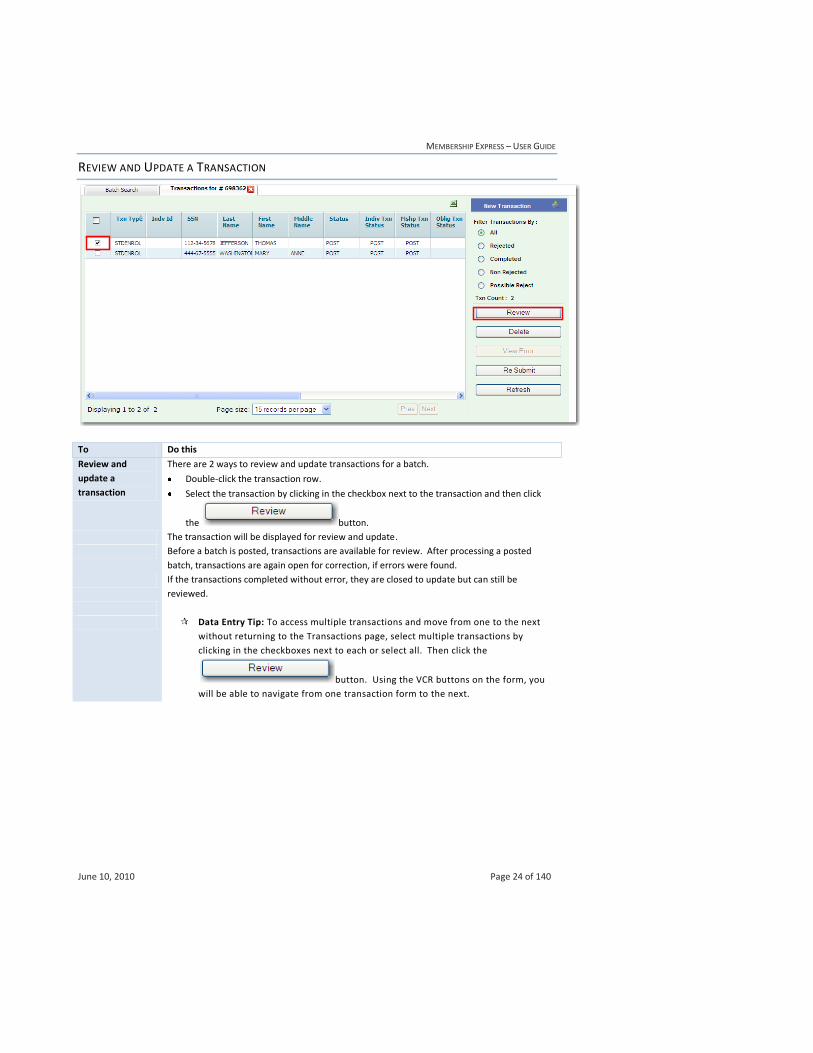
REVIEW AND UPDATE A TRANSACTION
To Do this
Review and
update a
transaction
There are 2 ways to review and update transactions for a batch.
Double-click the transaction row.
Select the transaction by clicking in the checkbox next to the transaction and then click
the button.
The transaction will be displayed for review and update.
Before a batch is posted, transactions are available for review. After processing a posted
batch, transactions are again open for correction, if errors were found.
If the transactions completed without error, they are closed to update but can still be
reviewed.
Data Entry Tip: To access multiple transactions and move from one to the next
without returning to the Transactions page, select multiple transactions by
clicking in the checkboxes next to each or select all. Then click the
button. Using the VCR buttons on the form, you
will be able to navigate from one transaction form to the next.
MEMBERSHIP EXPRESS – USER GUIDE
June 10, 2010 Page 25 of 140
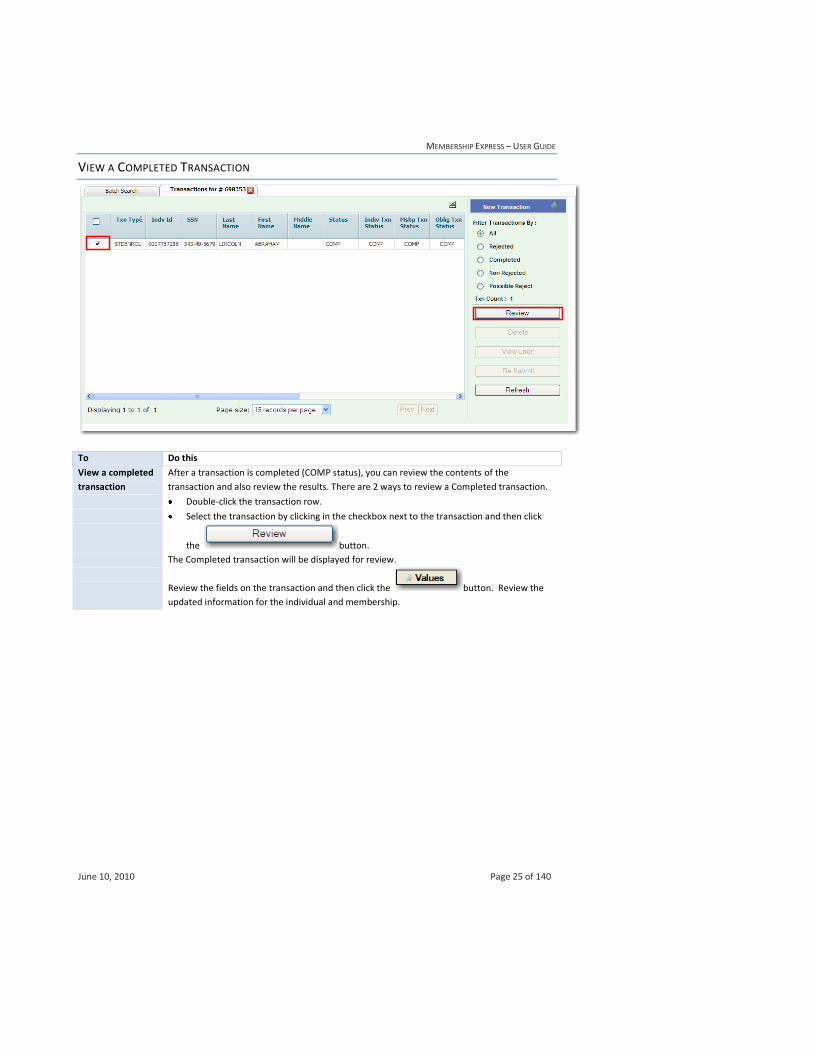
VIEW A COMPLETED TRANSACTION
To Do this
View a completed
transaction
After a transaction is completed (COMP status), you can review the contents of the
transaction and also review the results. There are 2 ways to review a Completed transaction.
Double-click the transaction row.
Select the transaction by clicking in the checkbox next to the transaction and then click
the button.
The Completed transaction will be displayed for review.
Review the fields on the transaction and then click the button. Review the
updated information for the individual and membership.

MEMBERSHIP EXPRESS – USER GUIDE
June 10, 2010 Page 26 of 140
RESET A TRANSACTION
To Do this
Reset a
transaction
If you have keyed a transaction and would like to clear all values on the transaction form to
start over before saving the transaction, simply click the button.
A popup will be displayed asking for confirmation on losing your current changes.
Respond by clicking to continue or to stay on the current page
retaining the keyed data.

MEMBERSHIP EXPRESS – USER GUIDE
June 10, 2010 Page 27 of 140
FILTER ON STATUS FOR DISPLAY OF TRANSACTION LISTING
To Do this
Filter on status for
display of
transaction listing
The Transactions listing on the Transactons page can be filtered by radio buttons.
Click to view all transactions within the batch regardless of status. This is the
screen default.
Click status to view all transactions that are in Reject status. Reject
status means that the transaction did not complete successfully and that the update for
this transaction has not been made to the database.
Click status to view all transactions that are in Completed status.
Completed status means that the transaction has completed successfully and that the
update for this transaction has been made to the database.
Click status to view all transactions that are not in Reject status
(Pending, Possible Reject or Completed Status).
Click status to view all transactions that are in Possible Reject
status. Transactions are marked as Possible Reject status during pre-processing for
external feeds only.
MEMBERSHIP EXPRESS – USER GUIDE
June 10, 2010 Page 28 of 140
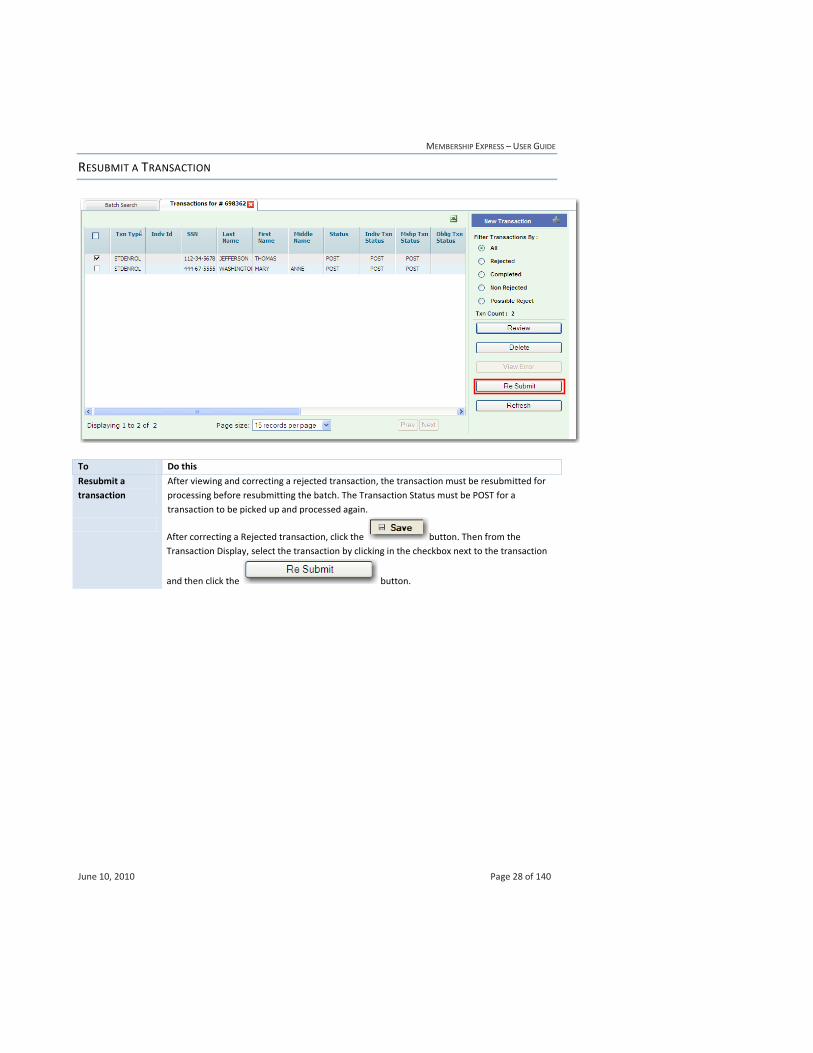
RESUBMIT A TRANSACTION
To Do this
Resubmit a
transaction
After viewing and correcting a rejected transaction, the transaction must be resubmitted for
processing before resubmitting the batch. The Transaction Status must be POST for a
transaction to be picked up and processed again.
After correcting a Rejected transaction, click the button. Then from the
Transaction Display, select the transaction by clicking in the checkbox next to the transaction
and then click the button.
MEMBERSHIP EXPRESS – USER GUIDE
June 10, 2010 Page 29 of 140
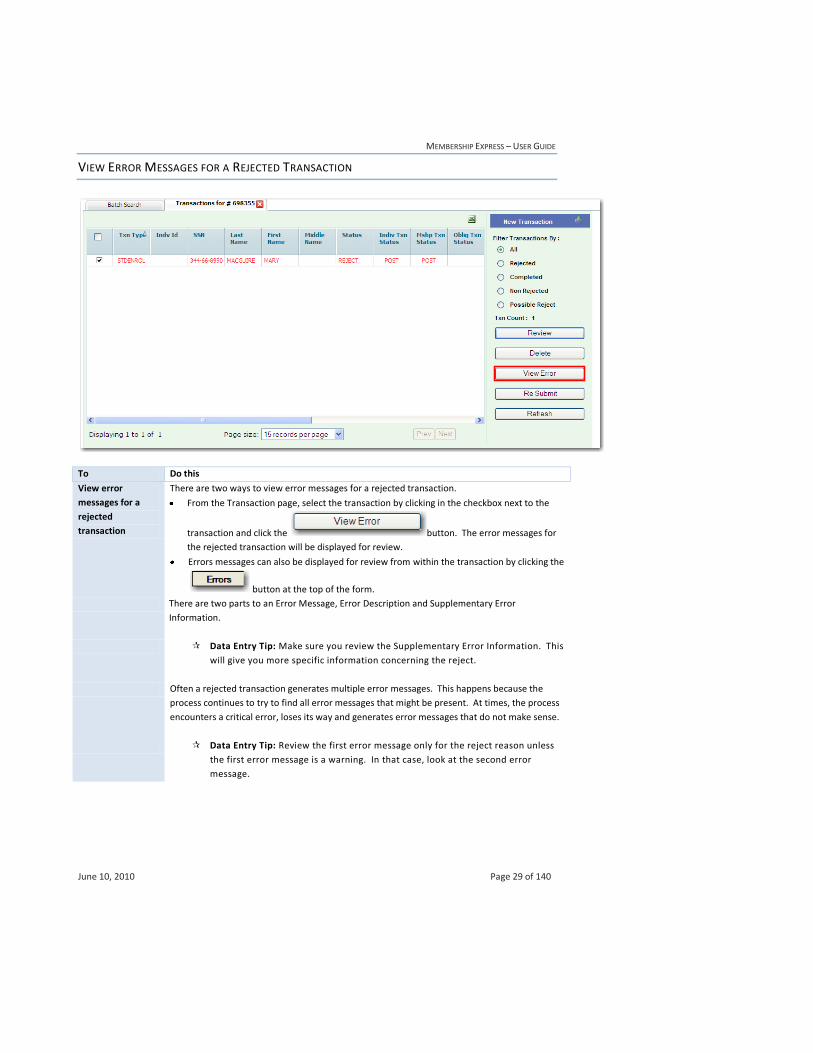
VIEW ERROR MESSAGES FOR A REJECTED TRANSACTION
To Do this
View error
messages for a
rejected
transaction
There are two ways to view error messages for a rejected transaction.
From the Transaction page, select the transaction by clicking in the checkbox next to the
transaction and click the button. The error messages for
the rejected transaction will be displayed for review.
Errors messages can also be displayed for review from within the transaction by clicking the
button at the top of the form.
There are two parts to an Error Message, Error Description and Supplementary Error
Information.
Data Entry Tip: Make sure you review the Supplementary Error Information. This
will give you more specific information concerning the reject.
Often a rejected transaction generates multiple error messages. This happens because the
process continues to try to find all error messages that might be present. At times, the process
encounters a critical error, loses its way and generates error messages that do not make sense.
Data Entry Tip: Review the first error message only for the reject reason unless
the first error message is a warning. In that case, look at the second error
message.
MEMBERSHIP EXPRESS – USER GUIDE
June 10, 2010 Page 30 of 140
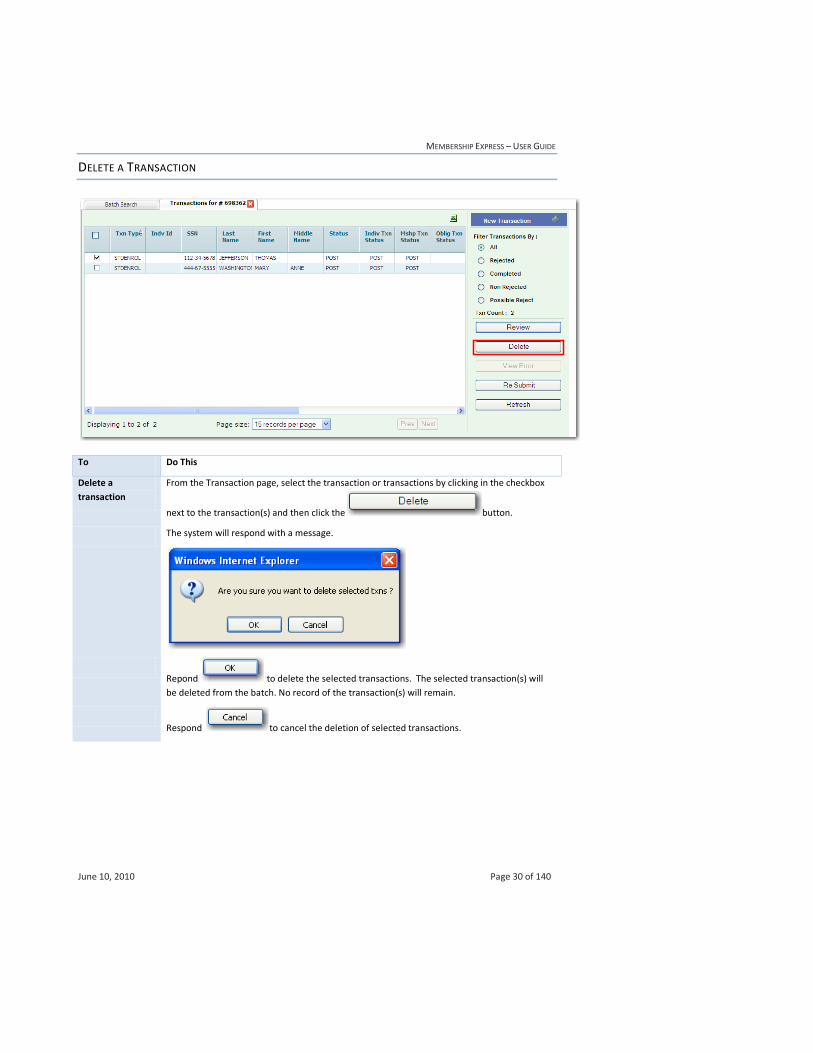
DELETE A TRANSACTION
To Do This
Delete a
transaction
From the Transaction page, select the transaction or transactions by clicking in the checkbox
next to the transaction(s) and then click the button.
The system will respond with a message.
Repond to delete the selected transactions. The selected transaction(s) will
be deleted from the batch. No record of the transaction(s) will remain.
Respond to cancel the deletion of selected transactions.
MEMBERSHIP EXPRESS – USER GUIDE
June 10, 2010 Page 31 of 140
CHAPTER 5: STANDARD FORM TRANSACTION SETUP
Standard Forms include the Generic form, Enrollment form, Renewal form and Continuous Roster form. They are
called standard because they have virtually the same data fields for capturing updates.
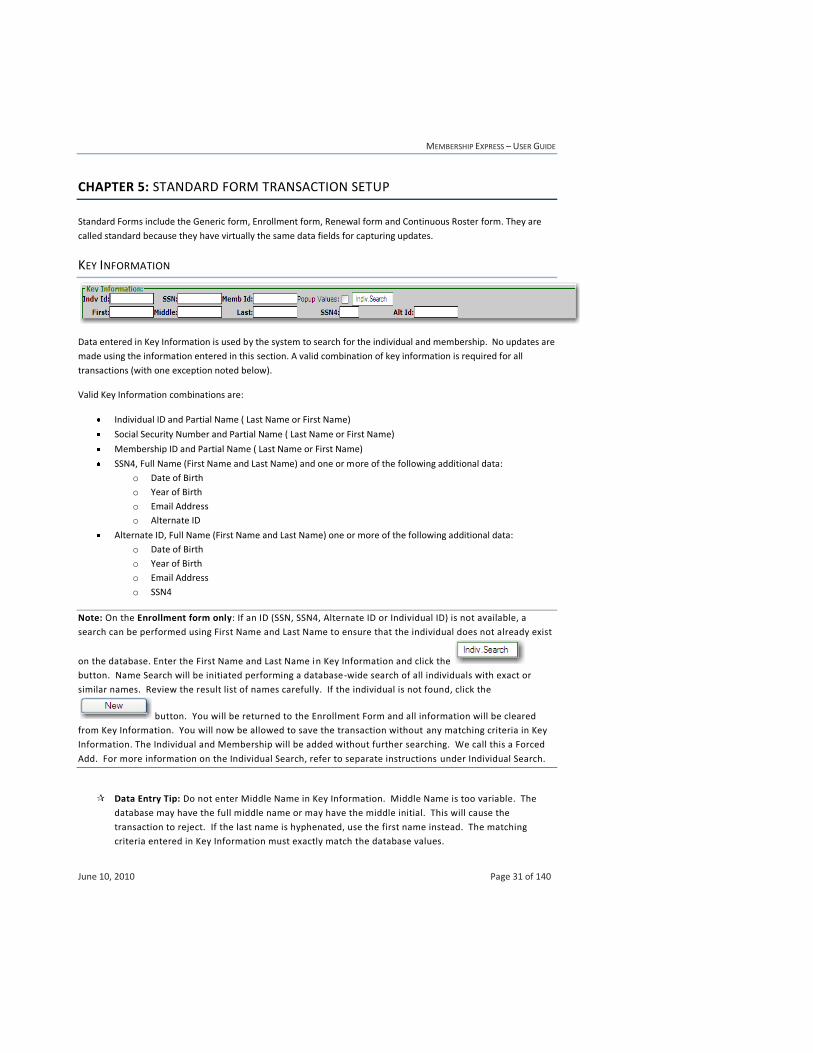
KEY INFORMATION
Data entered in Key Information is used by the system to search for the individual and membership. No updates are
made using the information entered in this section. A valid combination of key information is required for all
transactions (with one exception noted below).
Valid Key Information combinations are:
Individual ID and Partial Name ( Last Name or First Name)
Social Security Number and Partial Name ( Last Name or First Name)
Membership ID and Partial Name ( Last Name or First Name)
SSN4, Full Name (First Name and Last Name) and one or more of the following additional data:
o Date of Birth
o Year of Birth
o Email Address
o Alternate ID
Alternate ID, Full Name (First Name and Last Name) one or more of the following additional data:
o Date of Birth
o Year of Birth
o Email Address
o SSN4
Note: On the Enrollment form only: If an ID (SSN, SSN4, Alternate ID or Individual ID) is not available, a
search can be performed using First Name and Last Name to ensure that the individual does not already exist
on the database. Enter the First Name and Last Name in Key Information and click the
button. Name Search will be initiated performing a database-wide search of all individuals with exact or
similar names. Review the result list of names carefully. If the individual is not found, click the
button. You will be returned to the Enrollment Form and all information will be cleared
from Key Information. You will now be allowed to save the transaction without any matching criteria in Key
Information. The Individual and Membership will be added without further searching. We call this a Forced
Add. For more information on the Individual Search, refer to separate instructions under Individual Search.
Data Entry Tip: Do not enter Middle Name in Key Information. Middle Name is too variable. The
database may have the full middle name or may have the middle initial. This will cause the
transaction to reject. If the last name is hyphenated, use the first name instead. The matching
criteria entered in Key Information must exactly match the database values.
MEMBERSHIP EXPRESS – USER GUIDE
June 10, 2010 Page 32 of 140
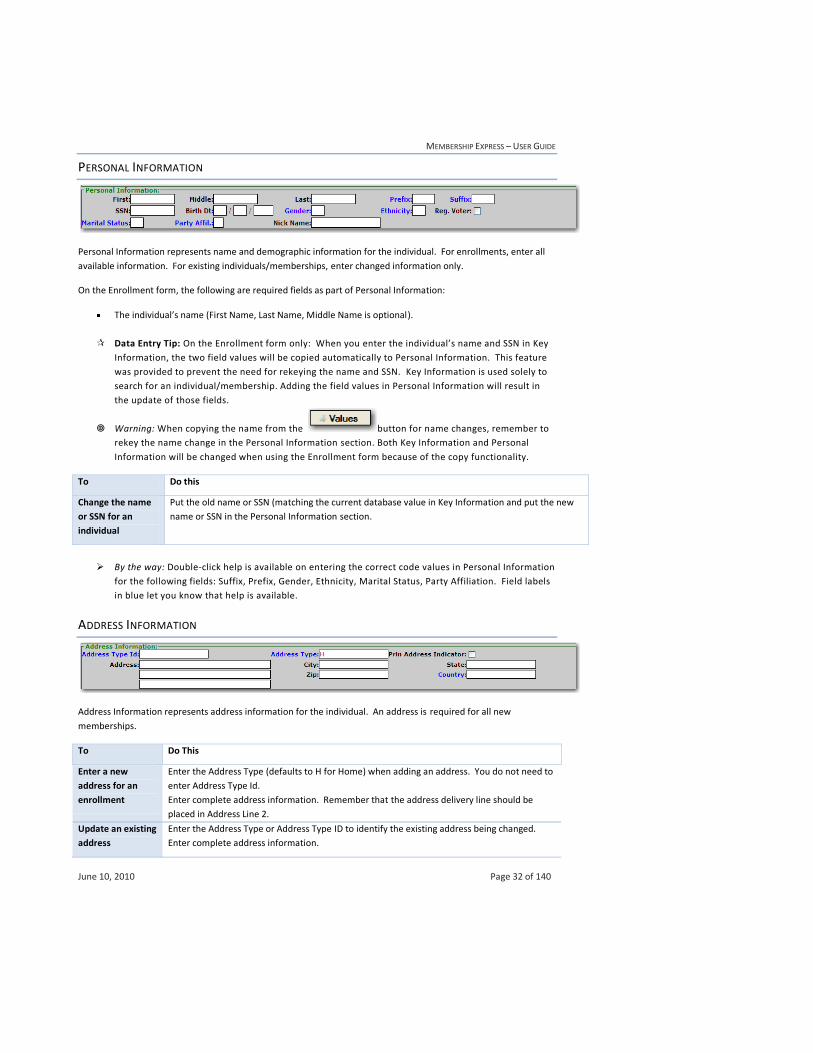
PERSONAL INFORMATION
Personal Information represents name and demographic information for the individual. For enrollments, enter all
available information. For existing individuals/memberships, enter changed information only.
On the Enrollment form, the following are required fields as part of Personal Information:
The individual’s name (First Name, Last Name, Middle Name is optional).
Data Entry Tip: On the Enrollment form only: When you enter the individual’s name and SSN in Key
Information, the two field values will be copied automatically to Personal Information. This feature
was provided to prevent the need for rekeying the name and SSN. Key Information is used solely to
search for an individual/membership. Adding the field values in Personal Information will result in
the update of those fields.
Warning: When copying the name from the button for name changes, remember to
rekey the name change in the Personal Information section. Both Key Information and Personal
Information will be changed when using the Enrollment form because of the copy functionality.
To Do this
Change the name
or SSN for an
individual
Put the old name or SSN (matching the current database value in Key Information and put the new
name or SSN in the Personal Information section.
By the way: Double-click help is available on entering the correct code values in Personal Information
for the following fields: Suffix, Prefix, Gender, Ethnicity, Marital Status, Party Affiliation. Field labels
in blue let you know that help is available.
ADDRESS INFORMATION
Address Information represents address information for the individual. An address is required for all new
memberships.
To Do This
Enter a new
address for an
enrollment
Enter the Address Type (defaults to H for Home) when adding an address. You do not need to
enter Address Type Id.
Enter complete address information. Remember that the address delivery line should be
placed in Address Line 2.
Update an existing
address
Enter the Address Type or Address Type ID to identify the existing address being changed.
Enter complete address information.
MEMBERSHIP EXPRESS – USER GUIDE
June 10, 2010 Page 33 of 140
End an existing
address
Enter the Address Type or Address Type ID to identify the existing address being changed.
Enter an asterisk (*) in the 1st
position of Address Line 2.
Warning: If the address being ended is found to be principal, the transaction will
reject. If the address is not principal, the address will be ended with today’s
date in the End Date. If the address ended is being used by a Role, the tie to the
address from the role will be ended automatically. Be sure to review role
assignments associated with an individual for whom you ended the address.
By the way: Double-click help is available on entering the correct code values in Address Information
for the following fields: Address Type Id, Address Type, Country. Field labels in blue let you know
that help is available.
EMAIL/PHONE INFORMATION
Email/Phone Information represents email and phone information for the individual.
To Do This
Enter/update
principal email
Enter the Principal Email Type. Double-click the field for help in selection. The principal email
is the preferred email address for the individual. This is a required field when entering an
email address.
Enter the Principal Email Address. Must be a valid email address. This is a required field when
entering an email address.
Enter the Principal Email Source. Double-click the field for help in selection. This is an
optional field.
Enter the Principal Email Comments. This is an optional field.
Enter/update
alternate email
Enter the Alternate Email Type. Double-click the field for help in selection. This is a required
field when entering a second email address.
Enter the Alternate Email Address. Must be a valid email address. This is a required field
when entering a second email address.
Enter the Alternate Email Source. Double-click the field for help in selection. This is an
optional field.
Enter the Alternate Email Comments. This is an optional field.
Remove an
existing email
Enter the Principal or Alternate Email Type. Double-click the field for help in selection.
Enter an asterisk (*) in the 1st
position of Email Address.
Enter/update
principal phone
Enter the Principal Phone Type. Double-click the field for help in selection. The principal
phone is the preferred phone for the individual. This is a required field when entering phone
number.
Enter the Principal Phone Number. Be sure to include the area code. This is a required field
when entering a phone number.
Enter/update
alternate phone
Enter the Alternate Phone Type. Double-click the field for help in selection. This is a required
field when entering a second phone number.
Enter the Alternate Phone Number. Be sure to include the area code. This is a required field
when entering a second phone number.
Remove an Enter the Principal or Alternate Phone Type. Double-click the field for help in selection.

MEMBERSHIP EXPRESS – USER GUIDE
June 10, 2010 Page 34 of 140
existing phone Enter an asterisk (*) in the 1st
position of Email Phone Number.
By the way: Double-click help is available on entering the correct code values in Email/Phone
Information for the following fields: Prin Email Type, Prin Email Source, Alt Email Type, Alt Email
Source, Prin Phone Type, Alt Phone Type. Field labels in blue let you know that help is available.
MEMBERSHIP INFORMATION
Member Information represents membership and affiliation information for the individual.
There are two ways to identify a membership. One is by identifying the Membership Id and Membership Year and
the second is by identifying the Local User Id and Membership Year.
The best way is by populating the Membership Id (Memb Id) and the Membership Year. The Memb Id is a unique ID
that identifies the individual and a specific membership for that individual.
The second method of populating the Local User Id and the Membership Year does not always identify a unique
membership and can result in rejected transactions if the process is not able to identify the membership. When
processing critical membership information changes (Type Change, Local Change, Chapter Change, Renewal) and
Cancellations that the Membership ID always be populated.
Data Entry Tip: When creating a membership add, change, renew, reactivate or cancel transaction,
pay attention to the Update Intent for the transaction in red in the upper left hand area of
Membership Information. This tells the process what kind of transaction you are trying to process.
Data Entry Tip: At times you may see two Update Intents displayed in red (for example,
RENEW/ADD). For ADD or enrollment transactions, the original Update Intent could change based
on a review of existing database values.
In other words, an ADD could change to a RENEW if a prior year membership is found in the same state
and local. In this case, the original intent of ADD and the final intent of RENEW would be displayed as seen
in the example above. An ADD transaction could also change to a Change Type (CHGTYP), to a Change
Chapter (CHGCHP), to a Replace (REPL) or to a Reactivate (REACT).
MEMBERSHIP EXPRESS – USER GUIDE
June 10, 2010 Page 35 of 140
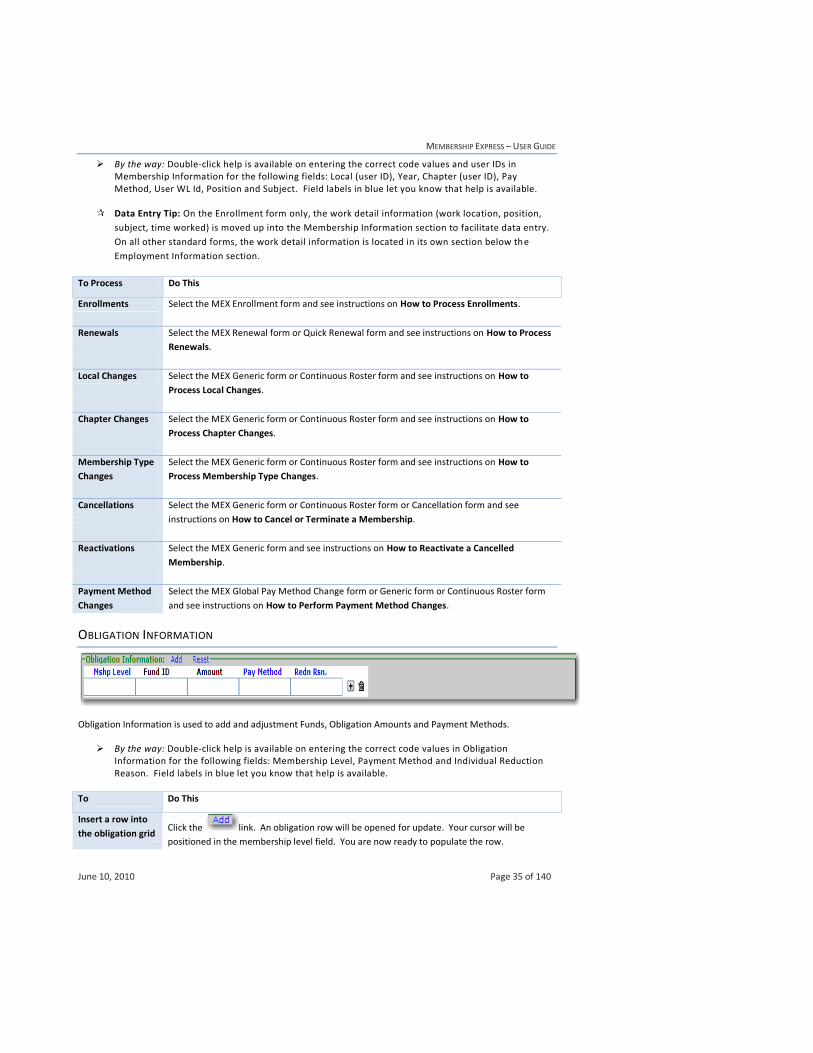
By the way: Double-click help is available on entering the correct code values and user IDs in Membership Information for the following fields: Local (user ID), Year, Chapter (user ID), Pay Method, User WL Id, Position and Subject. Field labels in blue let you know that help is available.
Data Entry Tip: On the Enrollment form only, the work detail information (work location, position,
subject, time worked) is moved up into the Membership Information section to facilitate data entry.
On all other standard forms, the work detail information is located in its own section below the
Employment Information section.
To Process Do This
Enrollments Select the MEX Enrollment form and see instructions on How to Process Enrollments.
Renewals Select the MEX Renewal form or Quick Renewal form and see instructions on How to Process
Renewals.
Local Changes Select the MEX Generic form or Continuous Roster form and see instructions on How to
Process Local Changes.
Chapter Changes Select the MEX Generic form or Continuous Roster form and see instructions on How to
Process Chapter Changes.
Membership Type
Changes
Select the MEX Generic form or Continuous Roster form and see instructions on How to
Process Membership Type Changes.
Cancellations Select the MEX Generic form or Continuous Roster form or Cancellation form and see
instructions on How to Cancel or Terminate a Membership.
Reactivations Select the MEX Generic form and see instructions on How to Reactivate a Cancelled
Membership.
Payment Method
Changes
Select the MEX Global Pay Method Change form or Generic form or Continuous Roster form
and see instructions on How to Perform Payment Method Changes.
OBLIGATION INFORMATION
Obligation Information is used to add and adjustment Funds, Obligation Amounts and Payment Methods.
By the way: Double-click help is available on entering the correct code values in Obligation Information for the following fields: Membership Level, Payment Method and Individual Reduction Reason. Field labels in blue let you know that help is available.
To Do This
Insert a row into
the obligation grid Click the link. An obligation row will be opened for update. Your cursor will be
positioned in the membership level field. You are now ready to populate the row.
MEMBERSHIP EXPRESS – USER GUIDE
June 10, 2010 Page 36 of 140
O B L I G A T I O N A D J U S T M E N T T O A R E Q U I R E D O R N O N - R E Q U I R E D F U N D
In field Do This
Mshp Level Enter the membership level (NEA, SEA, LEA). Double-click the field for help in selection.
Fund ID Enter the Fund ID for the fund being adjusted. (Refer to Funds Setup in the Utilities subsystem
for your associated Fund IDs.
Amount Enter the new amount for the fund.
Data Entry Tip: If adjusting NEA Dues, remember to enter an ‘M’ in the Prorate
field. NEA Dues cannot be overridden without a reason.
Pay Method Enter the Payment Method code. Double-click the field for help in selection.
Data Entry Tip: Enter Payment Method for an existing fund only if the payment
method is changing.
Redn Rsn. Enter the Individual Reduction Code, if applicable. Double-click the field for help in selection.
Be careful when selecting from this help display because all reduction reasons regardless of
state affiliate are displayed. The reduction reason is used to apply individual reductions to
new or existing funds specified in the obligation row.
Data Entry Tip: To apply an individual reduction, the amount must be specified.
A D D O F A R E Q U I R E D O R N O N - R E Q U I R E D F U N D
In field Do This
Mshp Level Enter the membership level (NEA, SEA, LEA). Double-click the field for help in selection.
Fund ID Enter the Fund ID for the new fund. (Refer to Funds Setup in the Utilities subsystem for your
associated Fund IDs.
Amount Enter the amount for the new fund.
Pay Method Enter the Payment Method code. Double-click the field for help in selection.
Redn Rsn. Enter the Individual Reduction Code, if applicable. Double-click the field for help in selection.
Be careful when selecting from this help display because all reduction reasons regardless of
state affiliate are displayed.
Data Entry Tip: To apply an individual reduction, the amount must be specified.
C H A N G E A P A Y M E N T M E T H O D F O R A F U N D
In field Do This
Mshp Level Enter the membership level (NEA, SEA, LEA). Double-click the field for help in selection.
Fund ID Enter the Fund ID for the fund being updated. (Refer to Funds Setup in the Utilities subsystem
for your associated Fund IDs.
Pay Method Enter the Payment Method code. Double-click the field for help in selection.

MEMBERSHIP EXPRESS – USER GUIDE
June 10, 2010 Page 37 of 140
A P P L Y A N I N D I V I D U A L R E D U C T I O N T O A F U N D
In field Do This
Mshp Level Enter the membership level (NEA, SEA, LEA). Double-click the field for help in selection.
Fund ID Enter the Fund ID for the fund being updated. (Refer to Funds Setup in the Utilities subsystem
for your associated Fund IDs.
Amount Enter the amount for the fund.
Redn Rsn. Enter the Individual Reduction Code. Double-click the field for help in selection. Be careful
when selecting from this help display because all reduction reasons regardless of state affiliate
are displayed.
Data Entry Tip: To apply an individual reduction, the amount must be specified.
EMPLOYMENT INFORMATION
Employment Information is used to add and modify Employers and related information.
By the way: Double-click help is available on entering the correct user IDs in Employment Information for the following field: User Employer Id. Field labels in blue let you know that help is available.
To Do This
Add employer and
related
information
Add/Replace: Enter an “A” in the Add/Replace field.
User Emp Id: Enter the Employer User ID. Double-click the field for help in selection. The Local
User ID must be populated in the Local field to received help on Employer User IDs.
If the associated local is a true local affiliate (local type = Local Affiliate) and the membership
class is marked with the “employer required” indicator, an employer is required for the
membership.
An employer assignment is not required for membership associated with non-affiliate locals
(local type = Miscellaneous, Student, Retired, Potential).
All other fields in the employment section are optional.
Data Entry Tip: If adding a membership, the addition of an employer will be
made automatically if a default or primary employer was set up for the local.
Change employer
and related
information
Add/Replace: Enter an “R” in the Add/Replace field.
User Emp Id: Enter the new Employer User ID. Double-click the field for help in selection. The
Local User ID must be populated in the Local field to received help on Employer User IDs.
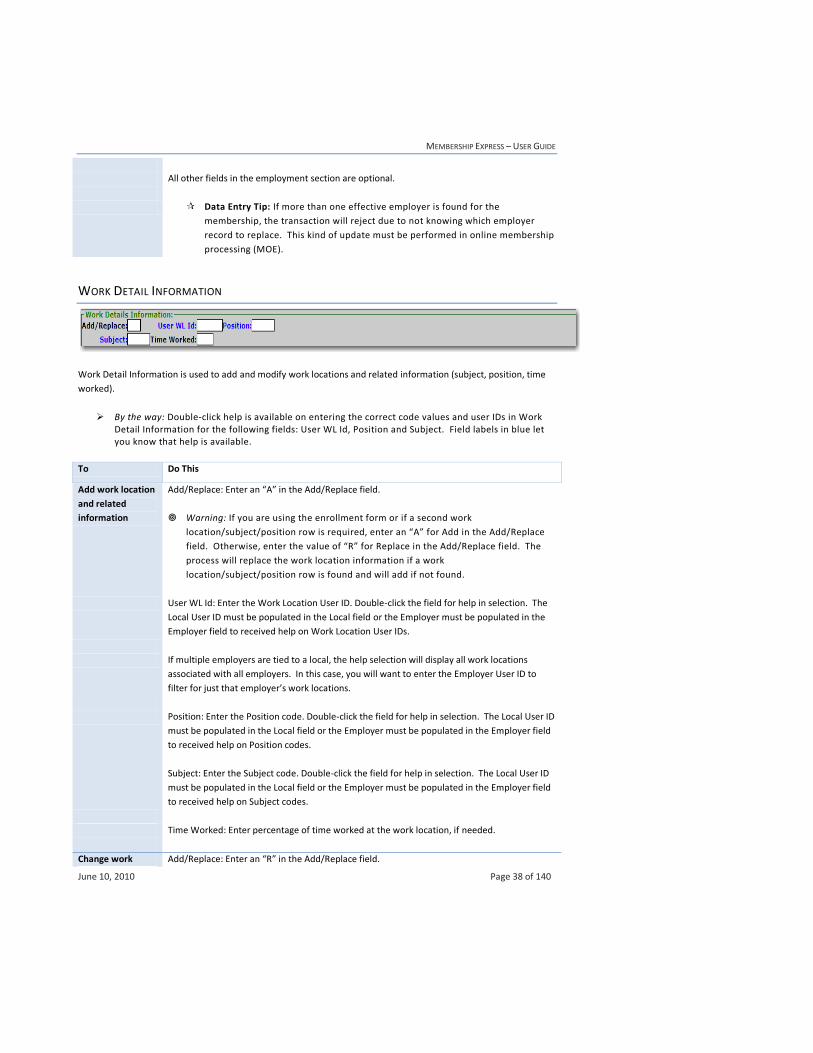
MEMBERSHIP EXPRESS – USER GUIDE
June 10, 2010 Page 38 of 140
All other fields in the employment section are optional.
Data Entry Tip: If more than one effective employer is found for the
membership, the transaction will reject due to not knowing which employer
record to replace. This kind of update must be performed in online membership
processing (MOE).
WORK DETAIL INFORMATION
Work Detail Information is used to add and modify work locations and related information (subject, position, time
worked).
By the way: Double-click help is available on entering the correct code values and user IDs in Work Detail Information for the following fields: User WL Id, Position and Subject. Field labels in blue let you know that help is available.
To Do This
Add work location
and related
information
Add/Replace: Enter an “A” in the Add/Replace field.
Warning: If you are using the enrollment form or if a second work
location/subject/position row is required, enter an “A” for Add in the Add/Replace
field. Otherwise, enter the value of “R” for Replace in the Add/Replace field. The
process will replace the work location information if a work
location/subject/position row is found and will add if not found.
User WL Id: Enter the Work Location User ID. Double-click the field for help in selection. The
Local User ID must be populated in the Local field or the Employer must be populated in the
Employer field to received help on Work Location User IDs.
If multiple employers are tied to a local, the help selection will display all work locations
associated with all employers. In this case, you will want to enter the Employer User ID to
filter for just that employer’s work locations.
Position: Enter the Position code. Double-click the field for help in selection. The Local User ID
must be populated in the Local field or the Employer must be populated in the Employer field
to received help on Position codes.
Subject: Enter the Subject code. Double-click the field for help in selection. The Local User ID
must be populated in the Local field or the Employer must be populated in the Employer field
to received help on Subject codes.
Time Worked: Enter percentage of time worked at the work location, if needed.
Change work Add/Replace: Enter an “R” in the Add/Replace field.

MEMBERSHIP EXPRESS – USER GUIDE
June 10, 2010 Page 39 of 140
location and
related
information
User WL Id: Enter the new Work Location User ID. Double-click the field for help in selection.
The Local User ID must be populated in the Local field or the Employer must be populated in
the Employer field to received help on Work Location User IDs.
If multiple employers are tied to a local, the help selection will display all work locations
associated with all employers. In this case, you will want to enter the Employer User ID to
filter for just that employer’s work locations.
Position: Enter the new Position code. Double-click the field for help in selection. The Local
User ID must be populated in the Local field or the Employer must be populated in the
Employer field to received help on Position codes.
Subject: Enter the new Subject code. Double-click the field for help in selection. The Local
User ID must be populated in the Local field or the Employer must be populated in the
Employer field to received help on Subject codes.
Time Worked: Enter percentage of time worked at the work location, if needed.
Data Entry Tip: If more than one effective employer is found for the membership,
the transaction will reject due to not knowing which work location record to replace.
This kind of update must be performed in online membership processing (MOE).
DEMOGRAPHIC INFORMATION
Demographic Information is used to add or modify demographic information set up for your state affiliate, local
affiliate or globally for all associations (e.g. First Year of Membership). Individual Demographics are tied to the
individual identified in Key Information.
By the way: Double-click help is available on entering the correct code values in Demographic Information for the following fields: Add/Replace, Demo Code and Demo Range Code. Field labels in blue let you know that help is available.
To Do This
Add a new
demographic code
and value
Click the link. A demographic row will be opened for update. Your cursor will be
positioned in the Add/Replace field. You are now ready to populate the row.
Add/Replace: Enter an “A” in the Add/Replace field. Double-click the field for help in
selection.
Demo Code: Enter the Demographic Code. Double-click the field for help in selection. All
demographics set up specifically for your association will be displayed as well as any
demographic code set up for all associations (global setup).
Demo Range Code: If the demographic code being added was defined as a demographic code
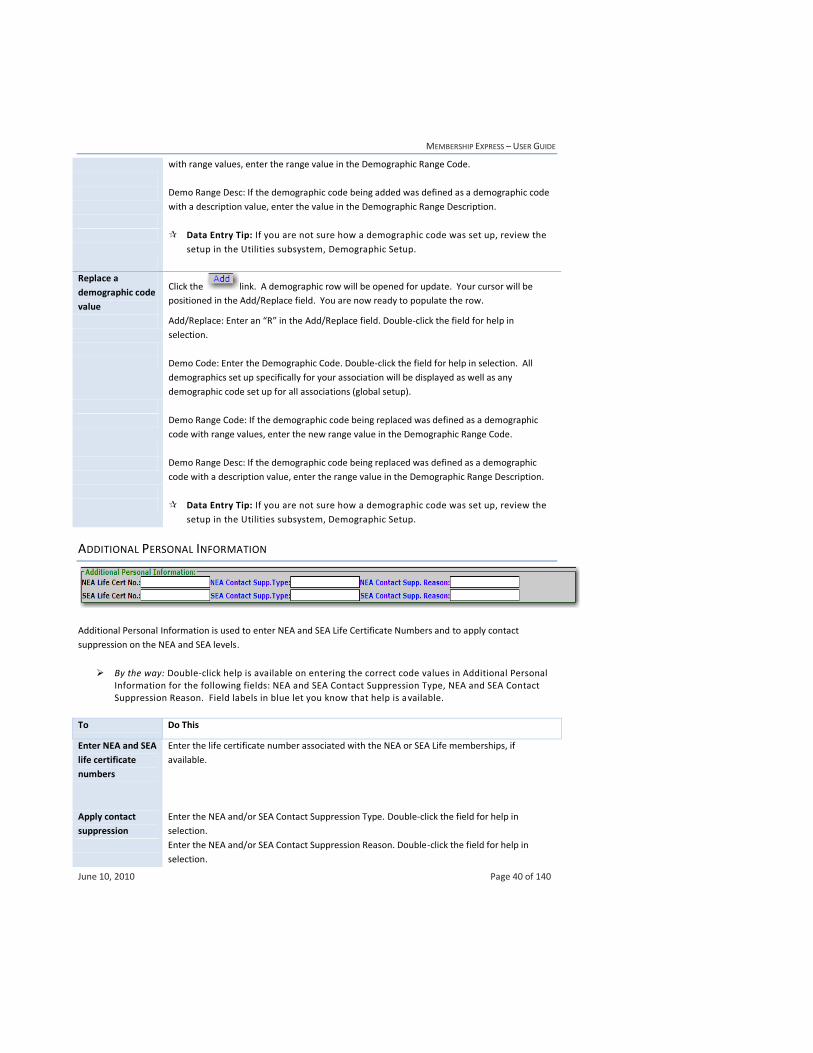
MEMBERSHIP EXPRESS – USER GUIDE
June 10, 2010 Page 40 of 140
with range values, enter the range value in the Demographic Range Code.
Demo Range Desc: If the demographic code being added was defined as a demographic code
with a description value, enter the value in the Demographic Range Description.
Data Entry Tip: If you are not sure how a demographic code was set up, review the
setup in the Utilities subsystem, Demographic Setup.
Replace a
demographic code
value
Click the link. A demographic row will be opened for update. Your cursor will be
positioned in the Add/Replace field. You are now ready to populate the row.
Add/Replace: Enter an “R” in the Add/Replace field. Double-click the field for help in
selection.
Demo Code: Enter the Demographic Code. Double-click the field for help in selection. All
demographics set up specifically for your association will be displayed as well as any
demographic code set up for all associations (global setup).
Demo Range Code: If the demographic code being replaced was defined as a demographic
code with range values, enter the new range value in the Demographic Range Code.
Demo Range Desc: If the demographic code being replaced was defined as a demographic
code with a description value, enter the range value in the Demographic Range Description.
Data Entry Tip: If you are not sure how a demographic code was set up, review the
setup in the Utilities subsystem, Demographic Setup.
ADDITIONAL PERSONAL INFORMATION
Additional Personal Information is used to enter NEA and SEA Life Certificate Numbers and to apply contact
suppression on the NEA and SEA levels.
By the way: Double-click help is available on entering the correct code values in Additional Personal Information for the following fields: NEA and SEA Contact Suppression Type, NEA and SEA Contact Suppression Reason. Field labels in blue let you know that help is available.
To Do This
Enter NEA and SEA
life certificate
numbers
Enter the life certificate number associated with the NEA or SEA Life memberships, if
available.
Apply contact
suppression
Enter the NEA and/or SEA Contact Suppression Type. Double-click the field for help in
selection.
Enter the NEA and/or SEA Contact Suppression Reason. Double-click the field for help in
selection.
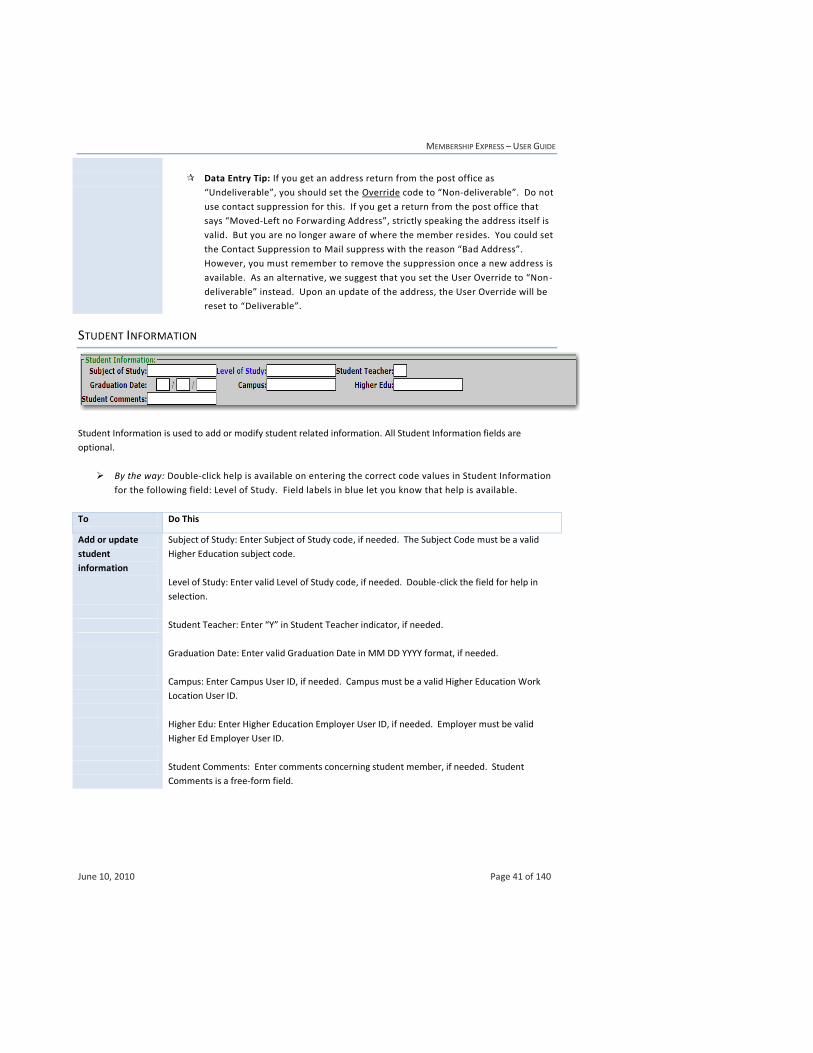
MEMBERSHIP EXPRESS – USER GUIDE
June 10, 2010 Page 41 of 140
Data Entry Tip: If you get an address return from the post office as
“Undeliverable”, you should set the Override code to “Non-deliverable”. Do not
use contact suppression for this. If you get a return from the post office that
says “Moved-Left no Forwarding Address”, strictly speaking the address itself is
valid. But you are no longer aware of where the member resides. You could set
the Contact Suppression to Mail suppress with the reason “Bad Address”.
However, you must remember to remove the suppression once a new address is
available. As an alternative, we suggest that you set the User Override to “Non -
deliverable” instead. Upon an update of the address, the User Override will be
reset to “Deliverable”.
STUDENT INFORMATION
Student Information is used to add or modify student related information. All Student Information fields are
optional.
By the way: Double-click help is available on entering the correct code values in Student Information
for the following field: Level of Study. Field labels in blue let you know that help is available.
To Do This
Add or update
student
information
Subject of Study: Enter Subject of Study code, if needed. The Subject Code must be a valid
Higher Education subject code.
Level of Study: Enter valid Level of Study code, if needed. Double-click the field for help in
selection.
Student Teacher: Enter “Y” in Student Teacher indicator, if needed.
Graduation Date: Enter valid Graduation Date in MM DD YYYY format, if needed.
Campus: Enter Campus User ID, if needed. Campus must be a valid Higher Education Work
Location User ID.
Higher Edu: Enter Higher Education Employer User ID, if needed. Employer must be valid
Higher Ed Employer User ID.
Student Comments: Enter comments concerning student member, if needed. Student
Comments is a free-form field.
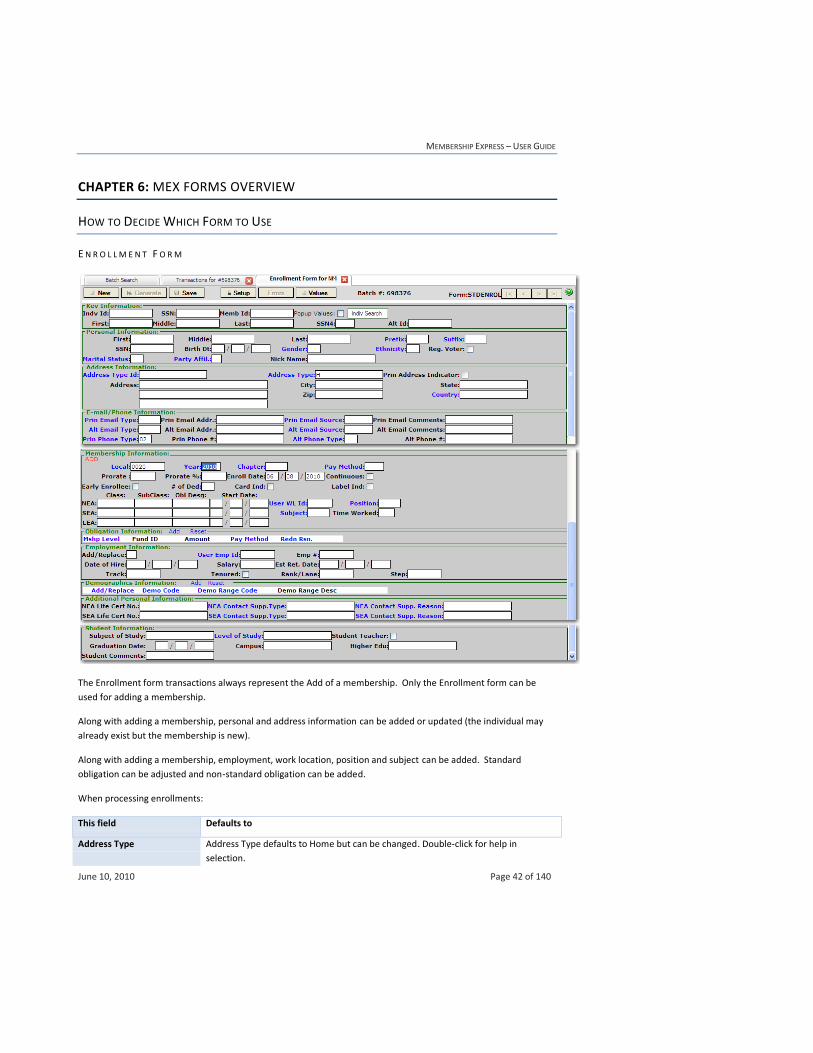
MEMBERSHIP EXPRESS – USER GUIDE
June 10, 2010 Page 42 of 140
CHAPTER 6: MEX FORMS OVERVIEW
HOW TO DECIDE WHICH FORM TO USE
E N R O L L M E N T F O R M
The Enrollment form transactions always represent the Add of a membership. Only the Enrollment form can be
used for adding a membership.
Along with adding a membership, personal and address information can be added or updated (the individual may
already exist but the membership is new).
Along with adding a membership, employment, work location, position and subject can be added. Standard
obligation can be adjusted and non-standard obligation can be added.
When processing enrollments:
This field Defaults to
Address Type Address Type defaults to Home but can be changed. Double-click for help in
selection.
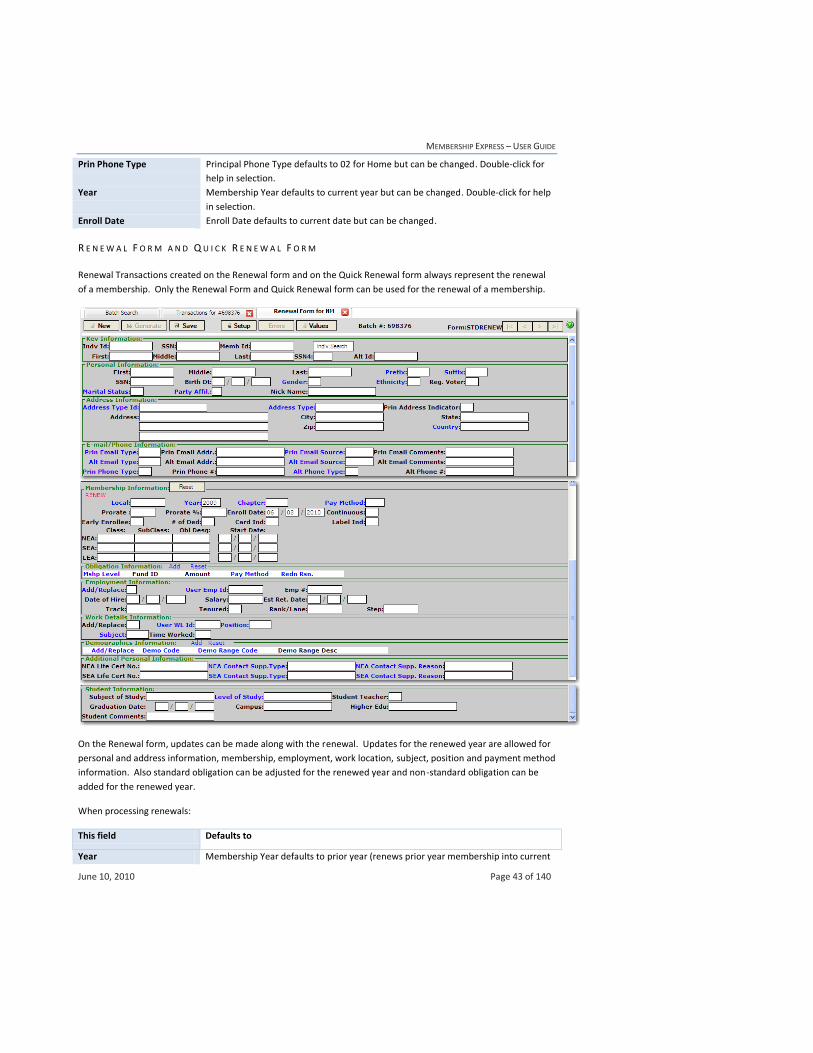
MEMBERSHIP EXPRESS – USER GUIDE
June 10, 2010 Page 43 of 140
Prin Phone Type Principal Phone Type defaults to 02 for Home but can be changed. Double-click for
help in selection.
Year Membership Year defaults to current year but can be changed. Double-click for help
in selection.
Enroll Date Enroll Date defaults to current date but can be changed.
R E N E W A L F O R M A N D Q U I C K R E N E W A L F O R M
Renewal Transactions created on the Renewal form and on the Quick Renewal form always represent the renewal
of a membership. Only the Renewal Form and Quick Renewal form can be used for the renewal of a membership.
On the Renewal form, updates can be made along with the renewal. Updates for the renewed year are allowed for
personal and address information, membership, employment, work location, subject, position and payment method
information. Also standard obligation can be adjusted for the renewed year and non-standard obligation can be
added for the renewed year.
When processing renewals:
This field Defaults to
Year Membership Year defaults to prior year (renews prior year membership into current
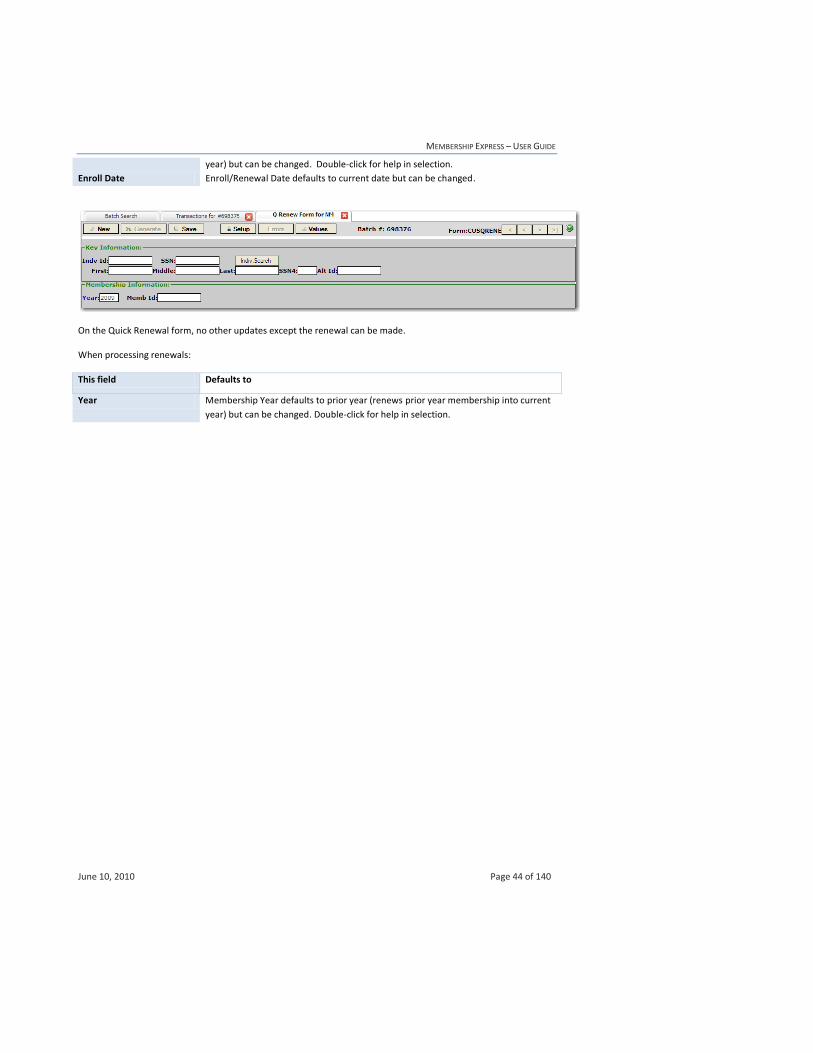
MEMBERSHIP EXPRESS – USER GUIDE
June 10, 2010 Page 44 of 140
year) but can be changed. Double-click for help in selection.
Enroll Date Enroll/Renewal Date defaults to current date but can be changed.
On the Quick Renewal form, no other updates except the renewal can be made.
When processing renewals:
This field Defaults to
Year Membership Year defaults to prior year (renews prior year membership into current
year) but can be changed. Double-click for help in selection.
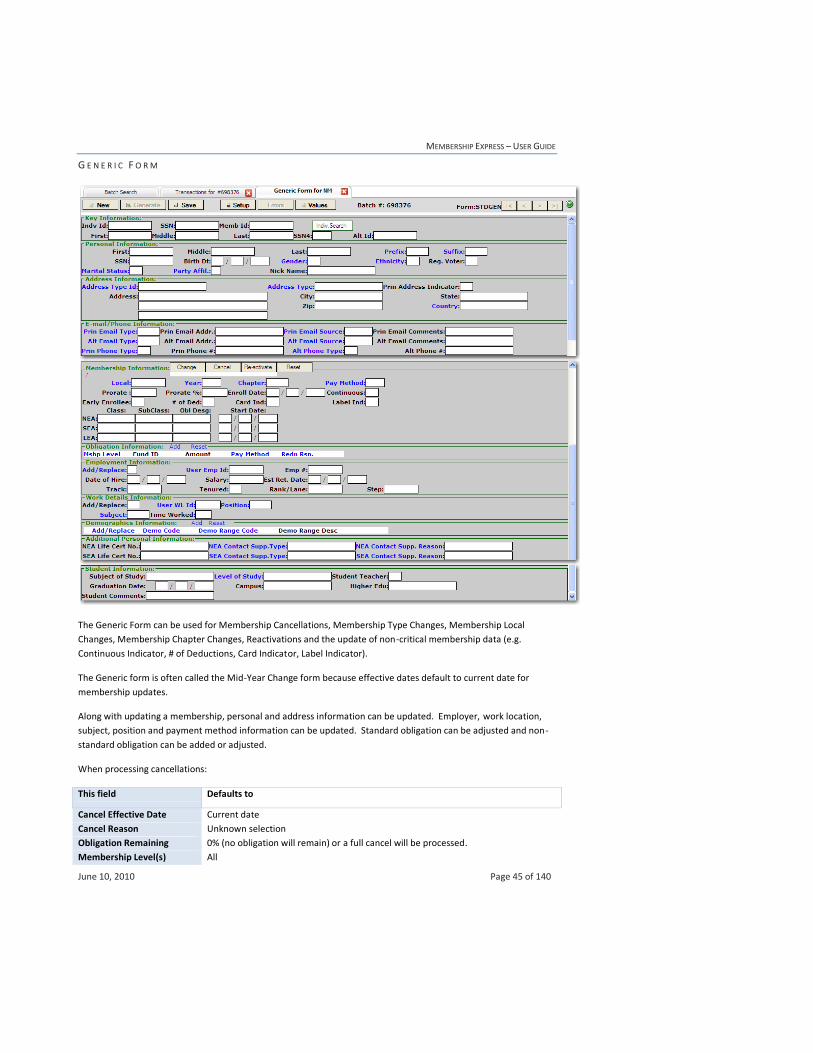
MEMBERSHIP EXPRESS – USER GUIDE
June 10, 2010 Page 45 of 140
G E N E R I C F O R M
The Generic Form can be used for Membership Cancellations, Membership Type Changes, Membership Local
Changes, Membership Chapter Changes, Reactivations and the update of non-critical membership data (e.g.
Continuous Indicator, # of Deductions, Card Indicator, Label Indicator).
The Generic form is often called the Mid-Year Change form because effective dates default to current date for
membership updates.
Along with updating a membership, personal and address information can be updated. Employer, work location,
subject, position and payment method information can be updated. Standard obligation can be adjusted and non-
standard obligation can be added or adjusted.
When processing cancellations:
This field Defaults to
Cancel Effective Date Current date
Cancel Reason Unknown selection
Obligation Remaining 0% (no obligation will remain) or a full cancel will be processed.
Membership Level(s) All
MEMBERSHIP EXPRESS – USER GUIDE
June 10, 2010 Page 46 of 140
When processing critical changes to the membership (Local, Type, Chapter Changes):
Old Membership
This field Defaults to
Cancel Effective Date Current date
Cancel Reason Local Change selection
% Remaining 0% (zero dollars or no obligation will remain).
New Membership
This field Defaults to
Start Date Current date
% Prorate 100% (full obligation will be generated).
When processing reactivations:
This field Defaults to
Membership Level(s) All
Data Entry Tip: All of these fields can be updated.

MEMBERSHIP EXPRESS – USER GUIDE
June 10, 2010 Page 47 of 140
C O N T I N U O U S R O S T E R F O R M
The Continuous Roster form can be used for Membership Cancellations, Membership Type Changes, Membership
Local Changes, Membership Chapter Changes and the update of non-critical membership data (e.g. Continuous
Indicator, # of Deductions, Card Indicator, Label Indicator).
The Continuous Roster form is often called the Beginning of the Year Change form because effective dates default
to 9/1 of the membership year being processed for all membership updates.
Along with updating a membership, personal and address information can be updated. Employer, work location,
subject, position and payment method information can be updated. Standard obligation can be adjusted and non -
standard obligation can be added or adjusted.
When processing cancellations:
This field Defaults to
Cancel Effective Date 9/1 of the membership year being processed. This field cannot be updated.
Cancel Reason Unknown selection. This field can be changed.
Obligation Remaining 0% (no obligation will remain) or a full cancel will be processed. This field cannot be
updated. When using this form, a full cancel will always be processed.
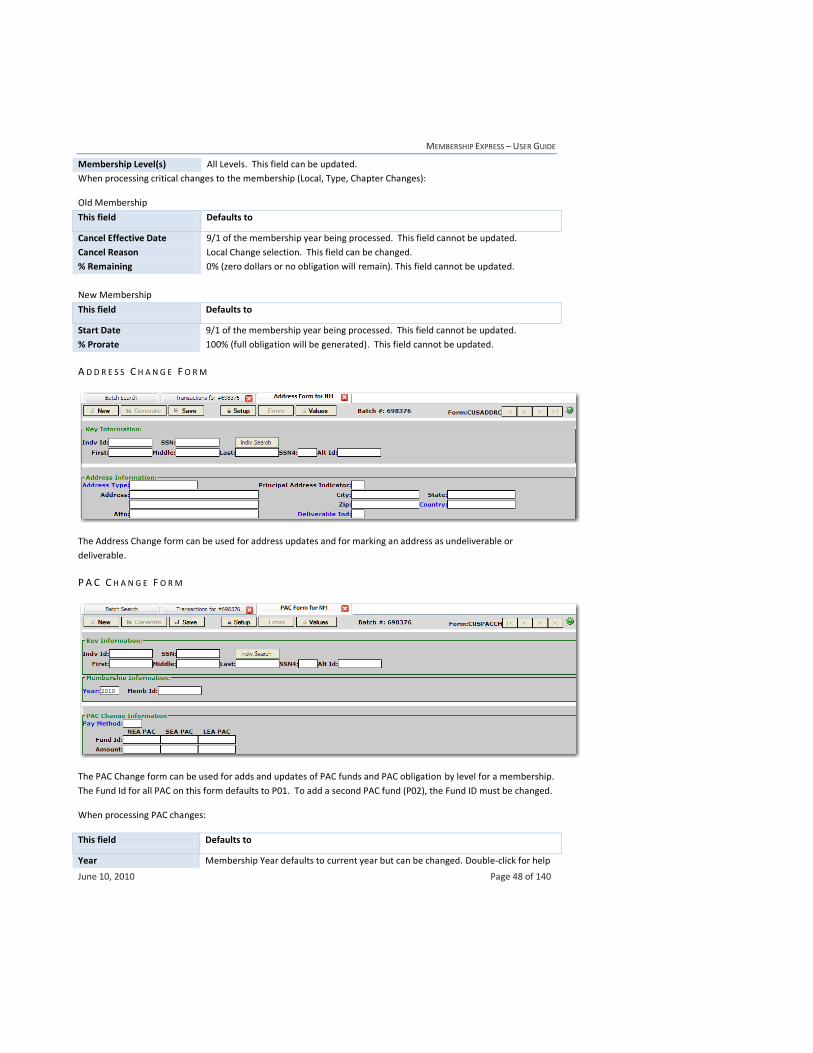
MEMBERSHIP EXPRESS – USER GUIDE
June 10, 2010 Page 48 of 140
Membership Level(s) All Levels. This field can be updated.
When processing critical changes to the membership (Local, Type, Chapter Changes):
Old Membership
This field Defaults to
Cancel Effective Date 9/1 of the membership year being processed. This field cannot be updated.
Cancel Reason Local Change selection. This field can be changed.
% Remaining 0% (zero dollars or no obligation will remain). This field cannot be updated.
New Membership
This field Defaults to
Start Date 9/1 of the membership year being processed. This field cannot be updated.
% Prorate 100% (full obligation will be generated). This field cannot be updated.
A D D R E S S C H A N G E F O R M
The Address Change form can be used for address updates and for marking an address as undeliverable or
deliverable.
P A C C H A N G E F O R M
The PAC Change form can be used for adds and updates of PAC funds and PAC obligation by level for a membership.
The Fund Id for all PAC on this form defaults to P01. To add a second PAC fund (P02), the Fund ID must be changed.
When processing PAC changes:
This field Defaults to
Year Membership Year defaults to current year but can be changed. Double-click for help
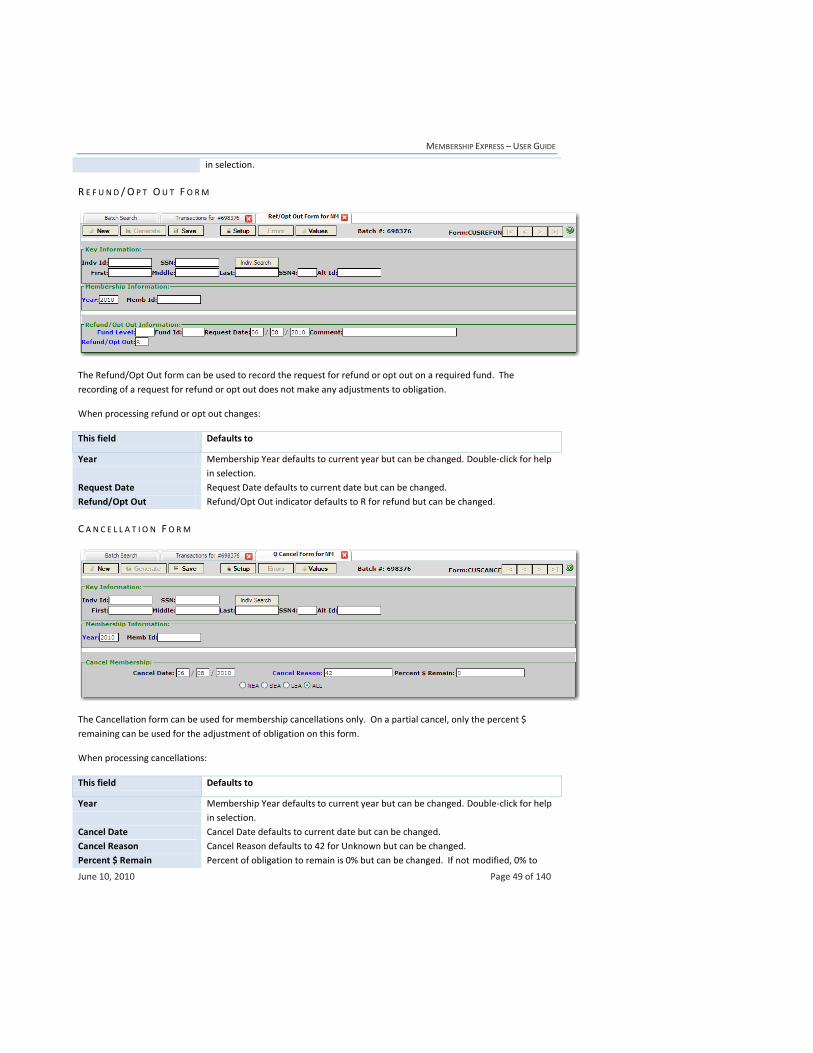
MEMBERSHIP EXPRESS – USER GUIDE
June 10, 2010 Page 49 of 140
in selection.
R E F U N D / O P T O U T F O R M
The Refund/Opt Out form can be used to record the request for refund or opt out on a required fund. The
recording of a request for refund or opt out does not make any adjustments to obligation.
When processing refund or opt out changes:
This field Defaults to
Year Membership Year defaults to current year but can be changed. Double-click for help
in selection.
Request Date Request Date defaults to current date but can be changed.
Refund/Opt Out Refund/Opt Out indicator defaults to R for refund but can be changed.
C A N C E L L A T I O N F O R M
The Cancellation form can be used for membership cancellations only. On a partial cancel, only the percent $
remaining can be used for the adjustment of obligation on this form.
When processing cancellations:
This field Defaults to
Year Membership Year defaults to current year but can be changed. Double-click for help
in selection.
Cancel Date Cancel Date defaults to current date but can be changed.
Cancel Reason Cancel Reason defaults to 42 for Unknown but can be changed.
Percent $ Remain Percent of obligation to remain is 0% but can be changed. If not modified, 0% to
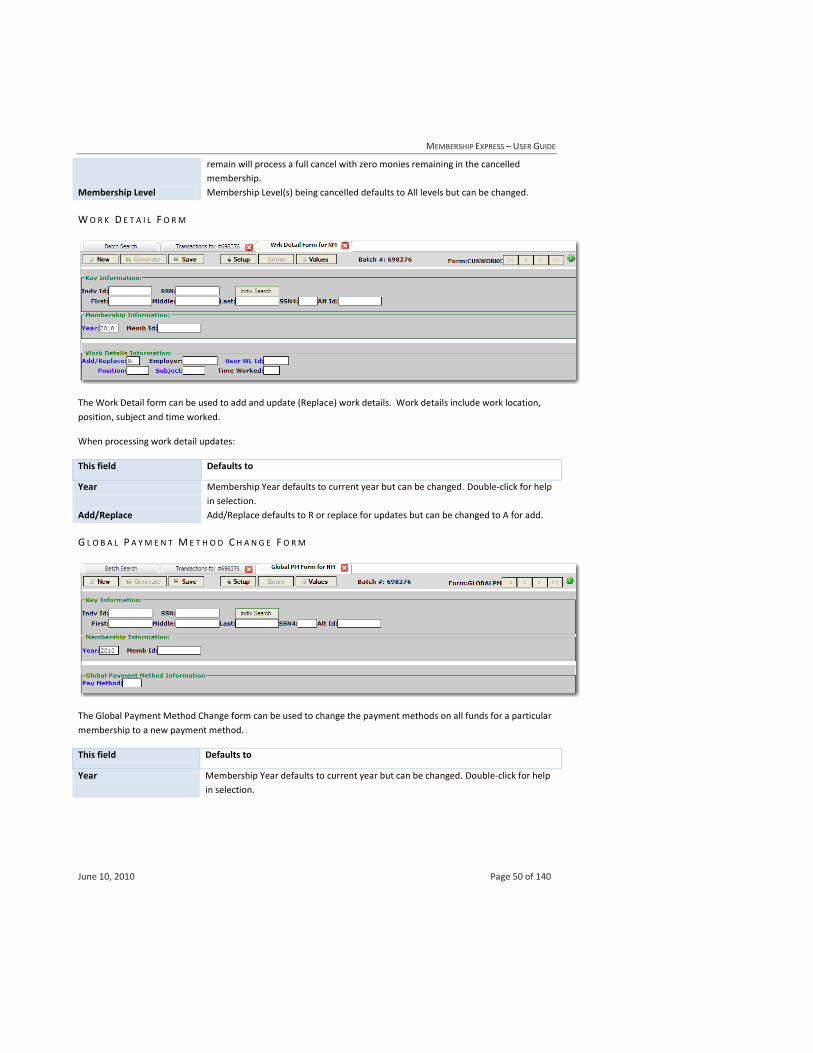
MEMBERSHIP EXPRESS – USER GUIDE
June 10, 2010 Page 50 of 140
remain will process a full cancel with zero monies remaining in the cancelled
membership.
Membership Level Membership Level(s) being cancelled defaults to All levels but can be changed.
W O R K D E T A I L F O R M
The Work Detail form can be used to add and update (Replace) work details. Work details include work location,
position, subject and time worked.
When processing work detail updates:
This field Defaults to
Year Membership Year defaults to current year but can be changed. Double-click for help
in selection.
Add/Replace Add/Replace defaults to R or replace for updates but can be changed to A for add.
G L O B A L P A Y M E N T M E T H O D C H A N G E F O R M
The Global Payment Method Change form can be used to change the payment methods on all funds for a particular
membership to a new payment method.
This field Defaults to
Year Membership Year defaults to current year but can be changed. Double-click for help
in selection.
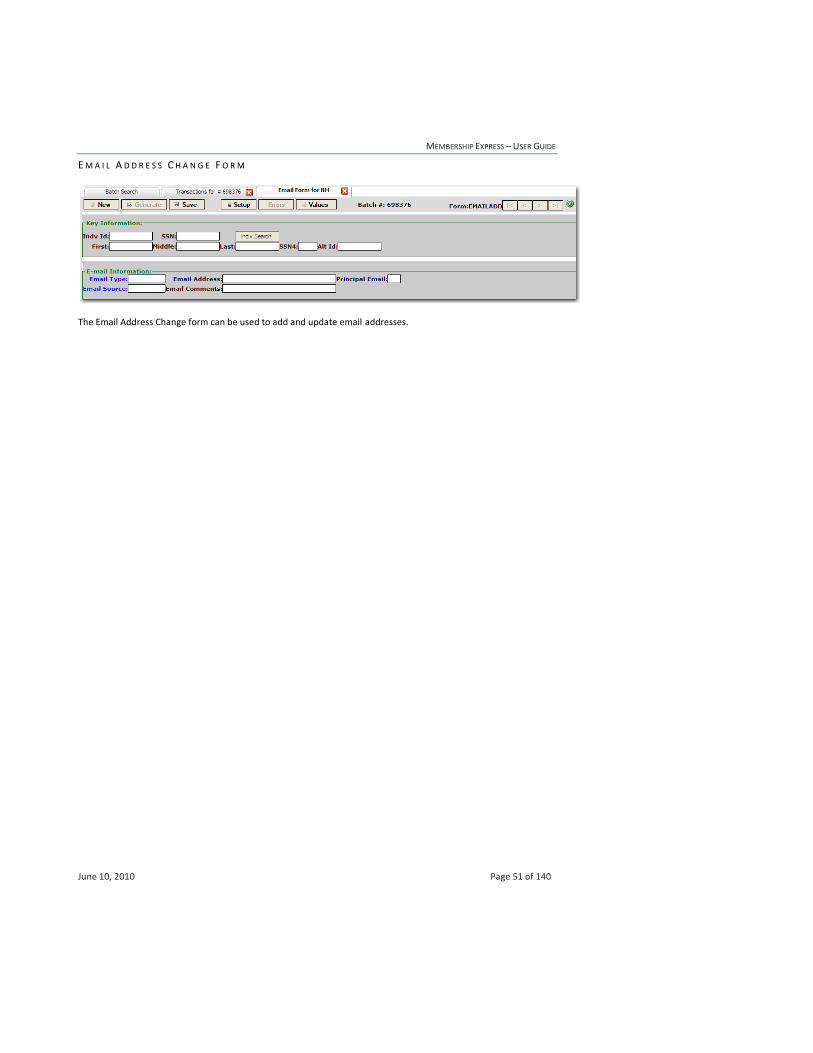
MEMBERSHIP EXPRESS – USER GUIDE
June 10, 2010 Page 51 of 140
E M A I L A D D R E S S C H A N G E F O R M
The Email Address Change form can be used to add and update email addresses.
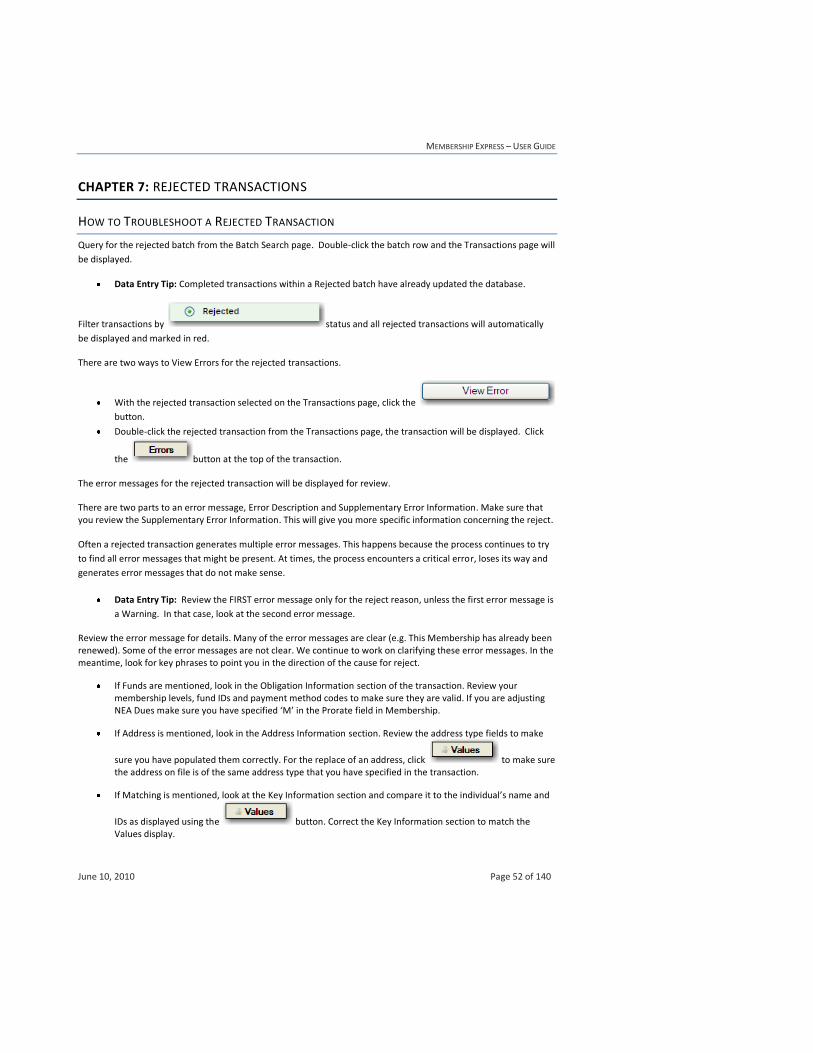
MEMBERSHIP EXPRESS – USER GUIDE
June 10, 2010 Page 52 of 140
CHAPTER 7: REJECTED TRANSACTIONS
HOW TO TROUBLESHOOT A REJECTED TRANSACTION
Query for the rejected batch from the Batch Search page. Double-click the batch row and the Transactions page will
be displayed.
Data Entry Tip: Completed transactions within a Rejected batch have already updated the database.
Filter transactions by status and all rejected transactions will automatically
be displayed and marked in red.
There are two ways to View Errors for the rejected transactions.
With the rejected transaction selected on the Transactions page, click the
button.
Double-click the rejected transaction from the Transactions page, the transaction will be displayed. Click
the button at the top of the transaction.
The error messages for the rejected transaction will be displayed for review.
There are two parts to an error message, Error Description and Supplementary Error Information. Make sure that you review the Supplementary Error Information. This will give you more specific information concerning the reject.
Often a rejected transaction generates multiple error messages. This happens because the process continues to try
to find all error messages that might be present. At times, the process encounters a critical error, loses its way and
generates error messages that do not make sense.
Data Entry Tip: Review the FIRST error message only for the reject reason, unless the first error message is
a Warning. In that case, look at the second error message.
Review the error message for details. Many of the error messages are clear (e.g. This Membership has already been renewed). Some of the error messages are not clear. We continue to work on clarifying these error messages. In the meantime, look for key phrases to point you in the direction of the cause for reject.
If Funds are mentioned, look in the Obligation Information section of the transaction. Review your membership levels, fund IDs and payment method codes to make sure they are valid. If you are adjusting NEA Dues make sure you have specified ‘M’ in the Prorate field in Membership.
If Address is mentioned, look in the Address Information section. Review the address type fields to make
sure you have populated them correctly. For the replace of an address, click to make sure the address on file is of the same address type that you have specified in the transaction.
If Matching is mentioned, look at the Key Information section and compare it to the individual’s name and
IDs as displayed using the button. Correct the Key Information section to match the Values display.
MEMBERSHIP EXPRESS – USER GUIDE
June 10, 2010 Page 53 of 140
If position or subject or work location or employer is mentioned, review employer, work location and subject/position user IDs and codes.
If the error states that the Billable Party does not exist, go to FRS and review the setup for the Billable Party. Make sure that payment methods have been copied forward to the membership year being processed for that billable party.
If the error states that a payment method cannot be replaced, you have probably attempted to change a payment method by specifying it in the membership section. Remember to change a payment method, either the Global Payment Method form must be used for each fund receiving the update must be specified in the Obligation section with the new payment method.
Click the button. Review the existing individual and membership information for an update transaction. Make sure the existing information is as you thought it was when you processed this update transaction.
After correcting the rejected transaction, the transaction should be automatically resubmitted for you. If not,
select all corrected transactions and click the button. The transactions would all be in Post status. You are now ready to post and submit the batch for processing.
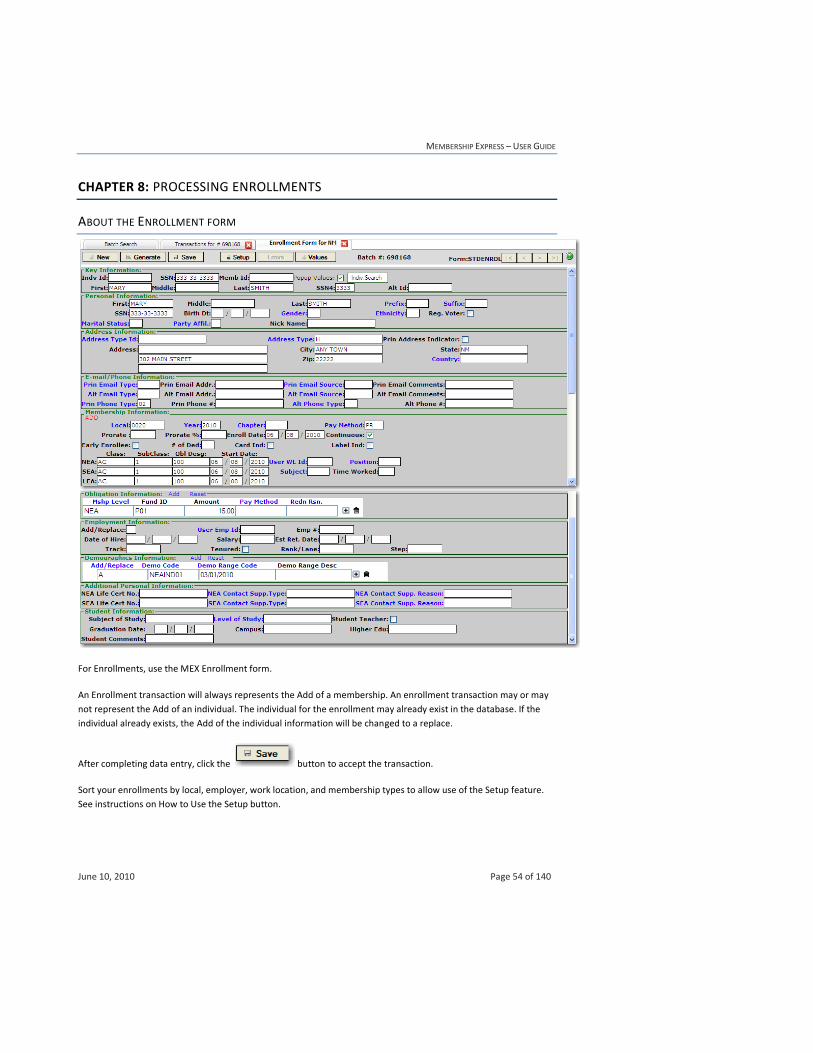
MEMBERSHIP EXPRESS – USER GUIDE
June 10, 2010 Page 54 of 140
CHAPTER 8: PROCESSING ENROLLMENTS
ABOUT THE ENROLLMENT FORM
For Enrollments, use the MEX Enrollment form.
An Enrollment transaction will always represents the Add of a membership. An enrollment transaction may or may
not represent the Add of an individual. The individual for the enrollment may already exist in the database. If the
individual already exists, the Add of the individual information will be changed to a replace.
After completing data entry, click the button to accept the transaction.
Sort your enrollments by local, employer, work location, and membership types to allow use of the Setup feature.
See instructions on How to Use the Setup button.

MEMBERSHIP EXPRESS – USER GUIDE
June 10, 2010 Page 55 of 140
P O P - U P V A L U E S O P T I O N
The Pop-up Values option allows you to automatically pop up the Values Display when an individual is found to already exist on the I&A database.
There are times when enrollments are keyed that should be some other type of transaction based on existing information for the individual. If the Values Display is not reviewed, needless keying may be performed.
To setup the Values Option, click in the field. Now when an ID is entered in the Key Information section of the Enrollment Form and the ID matches an individual on I&A, the Values Display will open automatically for review as you tab from the ID field.
K E Y I N F O R M A T I O N
Fill out the appropriate Key Information for matching the individual/membership. See Instructions for Standard form Transaction Setup, Key Information.
Data Entry Tip: On the Enrollment Form only, the individual’s name and Social Security Number entered in Key Information will be copied automatically to their respective fields in Personal Information. This is done automatically so that re-keying is not necessary.
P E R S O N A L I N F O R M A T I O N
Fill out the appropriate Personal Information for the individual. See Instructions for Form Transaction Setup, Personal Information.
A D D R E S S I N F O R M A T I O N
Fill out the appropriate Address Information for the individual. An address is required when adding a membership. See Instructions for Form Transaction Setup, Address Information.
M E M B E R S H I P I N F O R M A T I O N
In field Do this
Local Enter Local User ID. Double-click the field for help in selection.
After entering the Local User ID, tab to the next field. The following
fields will be automatically populated: Membership Year (defaults to
Current Year), Enroll Date (defaults to current date), Start Dates
(defaults to current date) and Transaction Intent (defaults to )
Chapter Enter Chapter User ID, if applicable. Double-click the field for help in
selection. The Local User ID must be populated in the Local field to
receive help on Chapter User IDs.
Enroll Date Change Enroll Date to another date or leave as current date. Enroll
Date must be a valid date.
Prorate Standard obligation for all required funds will be automatically generated for all enrollments based on the setup for these funds in the Utilities Subsystem.
Proration is used to adjust standard obligations. Proration only applies to the obligation being processed for that membership year. There are two ways to Prorate obligation on the enrollment form, automatic and manual:
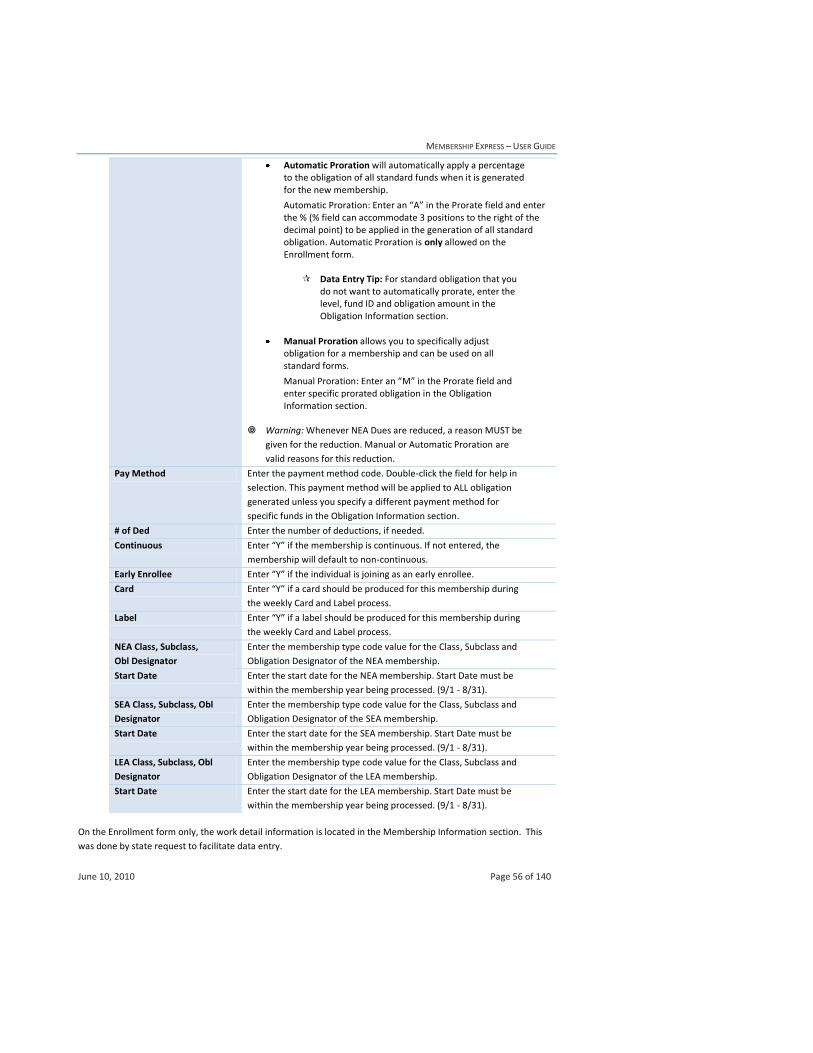
MEMBERSHIP EXPRESS – USER GUIDE
June 10, 2010 Page 56 of 140
Automatic Proration will automatically apply a percentage to the obligation of all standard funds when it is generated for the new membership.
Automatic Proration: Enter an “A” in the Prorate field and enter the % (% field can accommodate 3 positions to the right of the decimal point) to be applied in the generation of all standard obligation. Automatic Proration is only allowed on the Enrollment form.
Data Entry Tip: For standard obligation that you do not want to automatically prorate, enter the level, fund ID and obligation amount in the Obligation Information section.
Manual Proration allows you to specifically adjust obligation for a membership and can be used on all standard forms.
Manual Proration: Enter an “M” in the Prorate field and enter specific prorated obligation in the Obligation Information section.
Warning: Whenever NEA Dues are reduced, a reason MUST be
given for the reduction. Manual or Automatic Proration are
valid reasons for this reduction.
Pay Method Enter the payment method code. Double-click the field for help in
selection. This payment method will be applied to ALL obligation
generated unless you specify a different payment method for
specific funds in the Obligation Information section.
# of Ded Enter the number of deductions, if needed.
Continuous Enter “Y” if the membership is continuous. If not entered, the
membership will default to non-continuous.
Early Enrollee Enter “Y” if the individual is joining as an early enrollee.
Card Enter “Y” if a card should be produced for this membership during
the weekly Card and Label process.
Label Enter “Y” if a label should be produced for this membership during
the weekly Card and Label process.
NEA Class, Subclass,
Obl Designator
Enter the membership type code value for the Class, Subclass and
Obligation Designator of the NEA membership.
Start Date Enter the start date for the NEA membership. Start Date must be
within the membership year being processed. (9/1 - 8/31).
SEA Class, Subclass, Obl
Designator
Enter the membership type code value for the Class, Subclass and
Obligation Designator of the SEA membership.
Start Date Enter the start date for the SEA membership. Start Date must be
within the membership year being processed. (9/1 - 8/31).
LEA Class, Subclass, Obl
Designator
Enter the membership type code value for the Class, Subclass and
Obligation Designator of the LEA membership.
Start Date Enter the start date for the LEA membership. Start Date must be
within the membership year being processed. (9/1 - 8/31).
On the Enrollment form only, the work detail information is located in the Membership Information section. This
was done by state request to facilitate data entry.
MEMBERSHIP EXPRESS – USER GUIDE
June 10, 2010 Page 57 of 140
In field Do this
User WL ID Enter the Work Location User ID. Double-click the field for help in
selection. The Local User ID or Employer User ID must be populated to
receive help on Work Location User IDs.
Position Enter the Position Code, if known. Double-click the field for help in
selection. The Local User ID or the Employer User ID must be populated
to receive help on Position Codes.
Subject Enter the Subject Code, if known. Double-click the field for help in
selection. The Local User ID or the Employer User ID must be populated
to receive help on Subject Codes.
Time Worked Enter the percentage of time worked, if needed.
Data Entry Tip: The following fields are required when processing an Enrollment: Local User ID, Membership Year, Payment Method and at least one level of membership (Class, Sub Class, Obligation Designator, Start Date).
O B L I G A T I O N I N F O R M A T I O N
Data Entry Tip: Remember, you do not need to insert Obligation Rows for memberships that only require standard obligation. All standard required obligation as setup in the Utilities Subsystem will be automatically generated.
Only insert Obligation rows if you need to adjust the standard obligation amount for a required fund or if you need to add a non-required fund or if you need to apply a different payment method to a specific fund.
To Do this
Insert a row into the
obligation grid Click the link. An obligation row will be opened for update
Your cursor will be positioned in the Membership Level field.
You are now ready to populate the obligation row.
Once one obligation row has been created in the obligation grid, use the
icon to easily create a new row. Just tab to the icon and hit the Enter key, a new row will be presented.
Data Entry Tip: Do not insert an empty row in the obligation table window. This will cause a reject. To
eliminate the empty row, click the icon for the row or tab to the icon and hit the Enter key. The row will be deleted.
The obligation information section can be used for the following updates:
OBLIGATION ADJUSTMENT TO A REQUIRED FUND
In field Do this
Mshp Level Enter the Membership Level. Double-click the field for help in selection.
Fund ID Enter the Fund ID for the fund being adjusted. (Refer to Funds Setup in
the Utilities Subsystem for your associated Fund IDs).
Amount Enter the new amount for the required fund.
Pay Method Enter the Payment Method code. Double-click the field for help in
selection. Enter the Payment Method only if different from the
MEMBERSHIP EXPRESS – USER GUIDE
June 10, 2010 Page 58 of 140
Payment Method defined in Membership Information.
Redn Rsn. Enter the Individual Reduction Reason Code, if applicable. To apply an
individual reduction, the amount must be specified.
Data Entry Tip: Remember if you adjust NEA Dues Obligation, you must enter an “M” in the Prorate field of the Membership Information section or you must enter an Individual Reduction Reason Code.
ADD OF A NON-REQUIRED FUND
In field Do this
Mshp Level Enter the Membership Level. Double-click the field for help in selection.
Fund ID Enter the Fund ID for the new fund. (Refer to Funds Setup in the
Utilities Subsystem for your associated Fund IDs).
Amount Enter the amount for the new non-required fund.
Pay Method Enter the Payment Method code. Double-click the field for help in
selection. Enter the Payment Method only if different from the
Payment Method defined in Membership Information.
Redn Rsn. Enter the Individual Reduction Reason Code, if applicable. To apply an
individual reduction, the amount must be specified.
APPLY A DIFFERENT PAYMENT METHOD TO A REQUIRED FUND
In field Do this
Mshp Level Enter the Membership Level. Double-click the field for help in selection.
Fund ID Enter the Fund ID for the fund. (Refer to Funds Setup in the Utilities
Subsystem for your associated Fund IDs).
Pay Method Enter the different Payment Method code. Double-click the field for
help in selection.
E M P L O Y M E N T I N F O R M A T I O N
In field Do this
Add/Replace If an employer is required for the new membership, enter an “A” in the
Add/Replace field.
User Emp ID Enter the Employer User ID. Double-click the field for help in selection.
The Local User ID must be populated in the Local field to receive help
on Employer User IDs.
Data Entry Tip: If a default employer is set up for the local,
the employer will be automatically assigned and need not be
entered here.
Amount Enter the new amount for the required fund.
Pay Method Enter the Payment Method code. Double-click the field for help in
selection. Enter the Payment Method only if different from the
Payment Method defined in Membership Information.
Redn Rsn. Enter the Individual Reduction Reason Code, if applicable. To apply an
individual reduction, the amount must be specified.
Data Entry Tip: All other fields in the employment section are optional.
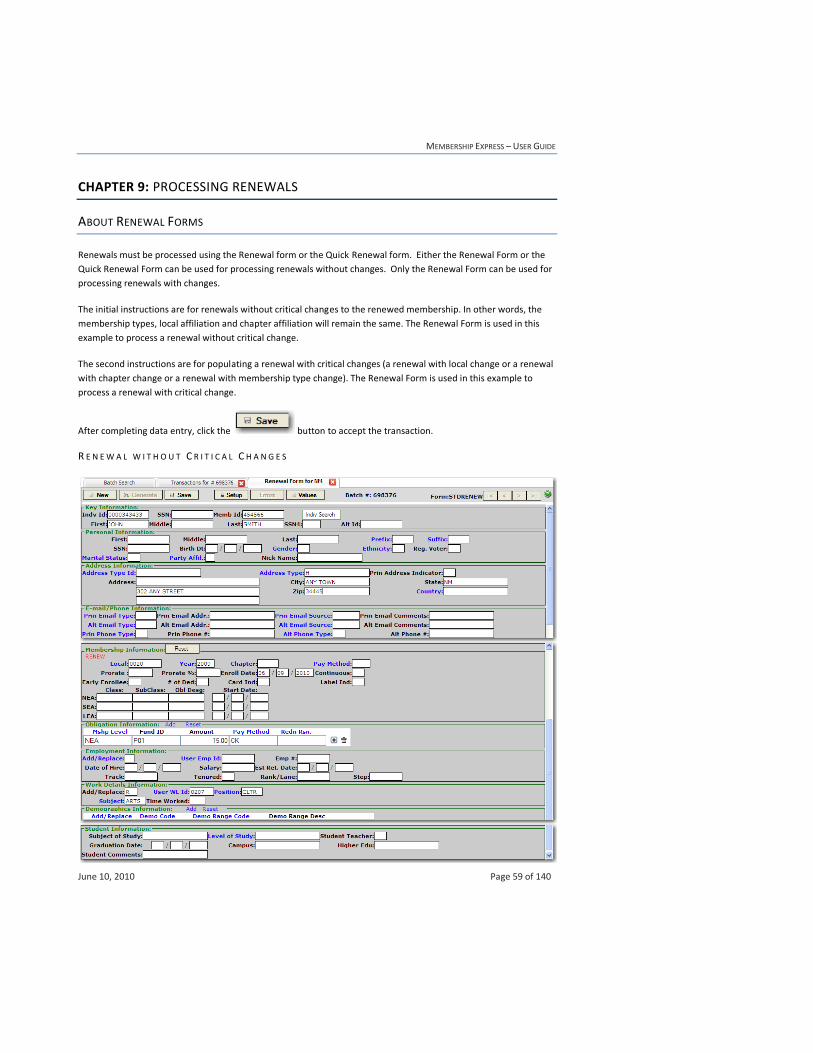
MEMBERSHIP EXPRESS – USER GUIDE
June 10, 2010 Page 59 of 140
CHAPTER 9: PROCESSING RENEWALS
ABOUT RENEWAL FORMS
Renewals must be processed using the Renewal form or the Quick Renewal form. Either the Renewal Form or the
Quick Renewal Form can be used for processing renewals without changes. Only the Renewal Form can be used for
processing renewals with changes.
The initial instructions are for renewals without critical changes to the renewed membership. In other words, the
membership types, local affiliation and chapter affiliation will remain the same. The Renewal Form is used in this
example to process a renewal without critical change.
The second instructions are for populating a renewal with critical changes (a renewal with local change or a renewal
with chapter change or a renewal with membership type change). The Renewal Form is used in this example to
process a renewal with critical change.
After completing data entry, click the button to accept the transaction.
R E N E W A L W I T H O U T C R I T I C A L C H A N G E S

MEMBERSHIP EXPRESS – USER GUIDE
June 10, 2010 Page 60 of 140
K E Y I N F O R M A T I O N
Fill out the appropriate Key Information for matching the individual/membership. Please enter Membership ID when processing a renewal.
Remember, when using renewal forms that the membership ID defined in Key Information and the membership year defined in Membership Information will be for the renewed-from membership. In most cases, the membership ID and membership year will represent the Prior Year membership. See instructions for Standard Form Transaction Setup, Key Information.
P E R S O N A L I N F O R M A T I O N
Fill out the appropriate Personal Information for the individual. Information for the individual need only be entered if a change is required to existing information. See Instructions for Standard Form Transaction Setup, Personal Information.
A D D R E S S I N F O R M A T I O N
Fill out the appropriate Address Information for the individual. Address information for the individual need only be entered if a changed is required. See Instructions for Standard form Transaction Setup, Address Information.
M E M B E R S H I P I N F O R M A T I O N
In field Do this
Local Enter Local User ID. Double-click the field for help in selection.
After entering the Local User ID, tab to the next field. The following
fields will be automatically populated: Membership Year (defaults to
Prior Year), Enroll Date (defaults to current date), Start Dates (defaults
to current date) and Transaction Intent (defaults to )
Enroll Date Change Enroll Date to another date, leave as current date or
remove date. Enroll Date must be a valid date.
Unless the Enroll Date is changed or removed, the date on the
renewed membership will reflect the current date.
If the current date is changed, the renewed membership will reflect
the new Enroll Date entered.
If the Enroll Date is removed and left blank, the existing Enroll Date
on the membership being renewed will be copied forward.
Prorate Standard obligation for all required funds will be automatically generated for all renewals based on the setup for these funds in the Utilities Subsystem.
This is only one way to prorate obligation on the renewal form (Automatic proration is not allowed).
Manual Proration allows you to specifically adjust obligation for a membership and can be used on all standard forms.
Manual Proration: Enter an “M” in the Prorate field and enter specific prorated obligation in the Obligation Information section.
Warning: Whenever NEA Dues are reduced, a reason
MUST be given for the reduction. Manual or Automatic
Proration are valid reasons for this reduction.
MEMBERSHIP EXPRESS – USER GUIDE
June 10, 2010 Page 61 of 140
Pay Method Enter the payment method code, if needed. Double-click the field
for help in selection. This payment method will be applied to ALL
obligation generated unless you specify a different payment
method for specific funds in the Obligation Information section.
Data Entry Tip: You do not need to enter the payment
method code unless payment method is being changed for
the membership being renewed. The payment method
entered here will be applied to all required funds
generated for the renewed membership.
# of Ded Enter the number of deductions, if needed.
Continuous Enter “Y” if the renewed membership should be changed to
continuous.
Card Enter “Y” if a card should be produced for this membership during
the weekly Card and Label process.
Label Enter “Y” if a label should be produced for this membership during
the weekly Card and Label process.
O B L I G A T I O N I N F O R M A T I O N
Data Entry Tip: Remember, you do not need to insert Obligation Rows for memberships that only require standard obligation. All standard required obligation as setup in the Utilities Subsystem will be automatically generated for the renewed membership.
Only insert Obligation rows if you need to adjust the standard obligation amount for a required fund or if you need to add a non-required fund or if you need to apply a different payment method to a specific fund.
To Do this
Insert a row into the
obligation grid Click the link. An obligation row will be opened for update
Your cursor will be positioned in the Membership Level field.
You are now ready to populate the obligation row.
Once one obligation row has been created in the obligation grid, use the
icon to easily create a new row. Just tab to the icon and hit the Enter key, a new row will be presented.
Data Entry Tip: Do not insert an empty row in the obligation table window. This will cause a reject. To
eliminate the empty row, click the icon for the row or tab to the icon and hit the Enter key. The row will be deleted.
The obligation information section can be used for the following updates:
OBLIGATION ADJUSTMENT TO A REQUIRED OR NON-REQUIRED FUND
In field Do this
Mshp Level Enter the Membership Level. Double-click the field for help in selection.
Fund ID Enter the Fund ID for the fund being adjusted. (Refer to Funds Setup in
the Utilities Subsystem for your associated Fund IDs).
Amount Enter the new amount for the required fund.
MEMBERSHIP EXPRESS – USER GUIDE
June 10, 2010 Page 62 of 140
Pay Method Enter the Payment Method code. Double-click the field for help in
selection. Enter the Payment Method only if it is changing.
Redn Rsn. Enter the Individual Reduction Reason Code, if applicable. To apply an
individual reduction, the amount must be specified.
Data Entry Tip: Remember if you adjust NEA Dues Obligation, you must enter an “M” in the Prorate field of the Membership Information section or you must enter an Individual Reduction Reason Code.
ADD OF A NON-REQUIRED FUND
In field Do this
Mshp Level Enter the Membership Level. Double-click the field for help in selection.
Fund ID Enter the Fund ID for the new fund. (Refer to Funds Setup in the
Utilities Subsystem for your associated Fund IDs).
Amount Enter the amount for the new non-required fund.
Pay Method Enter the Payment Method code. Double-click the field for help in
selection.
Redn Rsn. Enter the Individual Reduction Reason Code, if applicable. To apply an
individual reduction, the amount must be specified.
Data Entry Tip: When performing a renewal and there is a new required fund for the new membership, the
payment method for the new fund will be defaulted to the same payment method as is assigned to the
dues fund for the same level of membership.
CHANGE THE PAYMENT METHOD FOR FUNDS
In field Do this
Mshp Level Enter the Membership Level. Double-click the field for help in selection.
Fund ID Enter the Fund ID for the fund being updated. (Refer to Funds Setup in
the Utilities Subsystem for your associated Fund IDs).
Pay Method Enter the new Payment Method code. Double-click the field for help in
selection.
Data Entry Tip: Payment method changes can be performed in two ways when processing a renewal.
Either enter the new payment method in the Membership Information section or enter obligation rows
with the new payment method in the Obligation Information section for each fund requiring a change.
E M P L O Y E R I N F O R M A T I O N
In field Do this
Add/Replace Enter an “R” in the Add/Replace field.
User Emp ID Enter the new Employer User ID. Double-click the field for help in
selection. The Local User ID must be populated in the Local field to
receive help on Employer User IDs.
Data Entry Tip: All other fields in the employment section are optional.
MEMBERSHIP EXPRESS – USER GUIDE
June 10, 2010 Page 63 of 140
W O R K D E T A I L S I N F O R M A T I O N
In field Do this
Add/Replace Enter an “R” in the Add/Replace field.
User WL ID Enter the new Work Location User ID. Double-click the field for help in
selection. The Local User ID or Employer User ID must be populated to
receive help on Work Location User IDs.
Position Enter the new Position Code. Double-click the field for help in selection.
The Local User ID or the Employer User ID must be populated to
receive help on Position Codes.
Subject Enter the new Subject Code. Double-click the field for help in selection.
The Local User ID or the Employer User ID must be populated to
receive help on Subject Codes.
Data Entry Tip: The following fields are required when processing a Renewal: Memb ID, Local User ID, and Membership Year.
R E N E W A L W I T H C R I T I C A L C H A N G E S
Obligation for renewals with critical changes will leave 100% of the obligation found in the renewed from
membership (generally prior year) and 100% obligation generated for the newly renewed membership. If obligation
modifications are found in the Obligation section of the Renewal transaction, those modifications will be applied to
the newly renewed membership.
RENEWAL WITH LOCAL CHANGE
Follow the instructions for “Renewals without Critical Changes” with the following exception.
In field Do this
Local Enter new Local User ID. Double-click the field for help in selection.
Data Entry Tip: The membership ID (Memb ID) must be populated in Key Information.
The renewed membership will have the new local assigned.
Data Entry Tip: Since the Local is changing for the membership, be sure to update (replace) the employer and work details for the renewed membership. If no updates are made, only the position and subject information will be copied to the renewed membership.
RENEWAL WITH CHAPTER CHANGE
Follow the instructions for “Renewals without Critical Changes” with the following exception.
In field Do this
Chapter Enter new Chapter User ID. Double-click the field for help in selection.
The Local User ID must be populated in the Local field to receive help
on Chapter User IDs.
Data Entry Tip: The membership ID (Memb ID) must be populated in Key Information.
The renewed membership will have the new chapter assignment.

MEMBERSHIP EXPRESS – USER GUIDE
June 10, 2010 Page 64 of 140
RENEWAL WITH MEMBERSHIP TYPE CHANGE
Follow the instructions for “Renewals without Critical Changes” with the following exception.
In field Do this
NEA Class, Subclass,
Obl Designator
Enter the new membership type code value for the Class, Subclass
and Obligation Designator of the NEA membership.
SEA Class, Subclass, Obl
Designator
Enter the membership type code value for the Class, Subclass and
Obligation Designator of the SEA membership.
LEA Class, Subclass, Obl
Designator
Enter the membership type code value for the Class, Subclass and
Obligation Designator of the LEA membership.
Data Entry Tip: The membership ID (Memb ID) must be populated in Key Information.
One or two levels of membership may be removed at the same time a renewal is being processed by entering an
asterisk in the Class field, see Membership Level Removal, How to Perform a Type Change.
The renewed membership will have the new membership types assigned.
RENEWAL WITH LOCAL/TYPE CHANGE
Follow the instructions for “Renewals without Critical Changes” with the following exception.
In field Do this
Local Enter new Local User ID. Double-click the field for help in selection.
NEA Class, Subclass,
Obl Designator
Enter the new membership type code value for the Class, Subclass
and Obligation Designator of the NEA membership.
SEA Class, Subclass, Obl
Designator
Enter the membership type code value for the Class, Subclass and
Obligation Designator of the SEA membership.
LEA Class, Subclass, Obl
Designator
Enter the membership type code value for the Class, Subclass and
Obligation Designator of the LEA membership.
Data Entry Tip: The membership ID (Memb ID) must be populated in Key Information.
Data Entry Tip: Since the Local is changing for the membership, be sure to update (replace) the employer and work details for the renewed membership. If no updates are made, only the position and subject information will be copied to the renewed membership.
The renewed membership will have the new membership types and local assigned.
RENEWAL WITH CHAPTER/TYPE CHANGE
Follow the instructions for “Renewals without Critical Changes” with the following exception.
In field Do this
Chapter Enter new Chapter User ID. Double-click the field for help in selection.
The Local User ID must be populated in the Local field to receive help
on Chapter User IDs.
NEA Class, Subclass,
Obl Designator
Enter the new membership type code value for the Class, Subclass
and Obligation Designator of the NEA membership.
SEA Class, Subclass, Obl
Designator
Enter the membership type code value for the Class, Subclass and
Obligation Designator of the SEA membership.
LEA Class, Subclass, Obl
Designator
Enter the membership type code value for the Class, Subclass and
Obligation Designator of the LEA membership.

MEMBERSHIP EXPRESS – USER GUIDE
June 10, 2010 Page 65 of 140
Data Entry Tip: The membership ID (Memb ID) must be populated in Key Information.
The renewed membership will have the new membership types and chapter assigned.
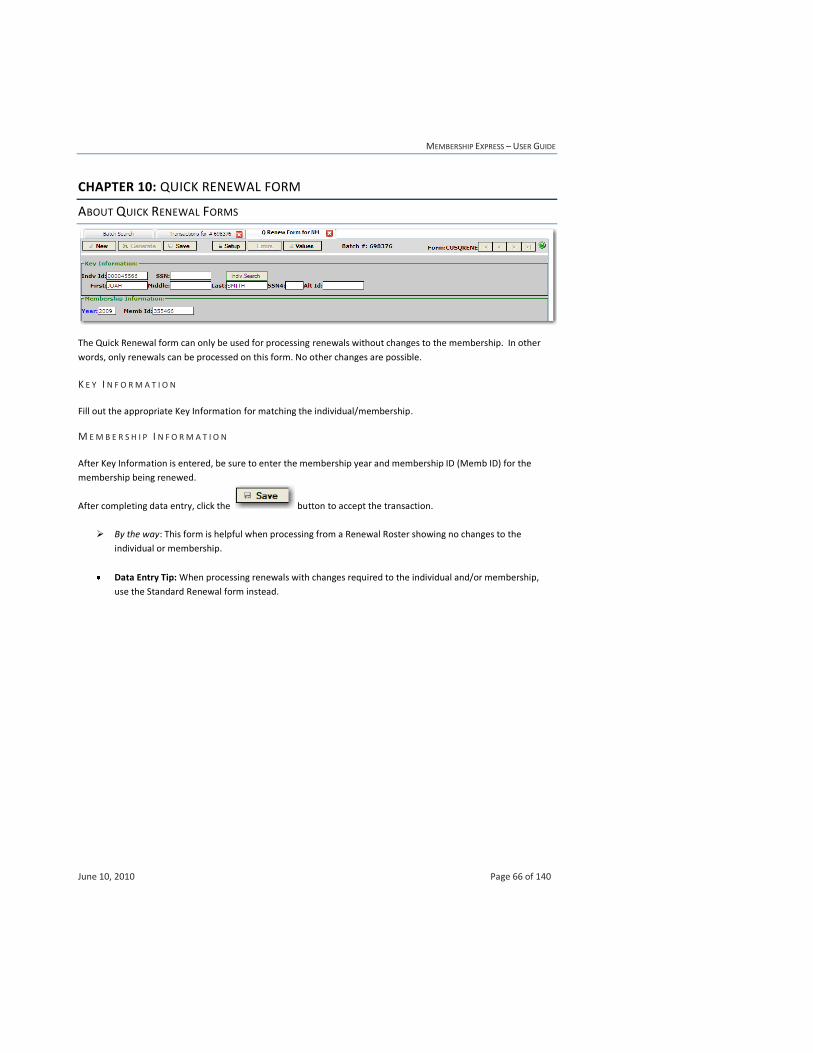
MEMBERSHIP EXPRESS – USER GUIDE
June 10, 2010 Page 66 of 140
CHAPTER 10: QUICK RENEWAL FORM
ABOUT QUICK RENEWAL FORMS
The Quick Renewal form can only be used for processing renewals without changes to the membership. In other
words, only renewals can be processed on this form. No other changes are possible.
K E Y I N F O R M A T I O N
Fill out the appropriate Key Information for matching the individual/membership.
M E M B E R S H I P I N F O R M A T I O N
After Key Information is entered, be sure to enter the membership year and membership ID (Memb ID) for the
membership being renewed.
After completing data entry, click the button to accept the transaction.
By the way: This form is helpful when processing from a Renewal Roster showing no changes to the
individual or membership.
Data Entry Tip: When processing renewals with changes required to the individual and/or membership,
use the Standard Renewal form instead.
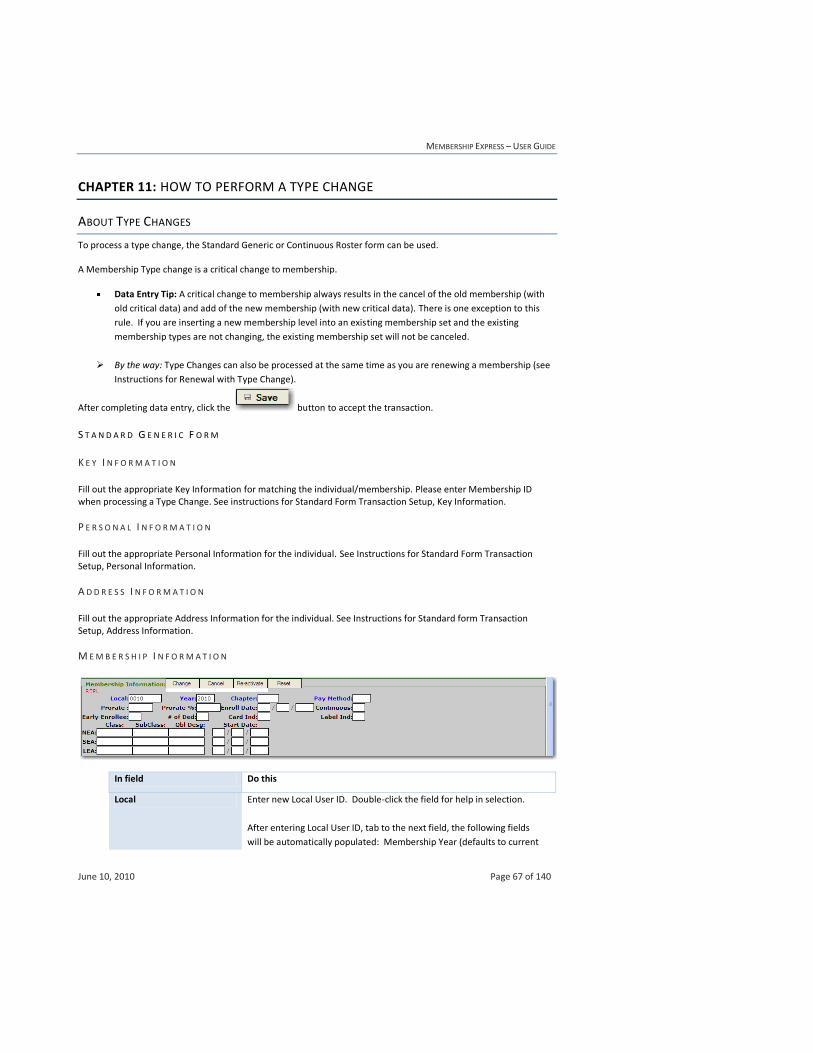
MEMBERSHIP EXPRESS – USER GUIDE
June 10, 2010 Page 67 of 140
CHAPTER 11: HOW TO PERFORM A TYPE CHANGE
ABOUT TYPE CHANGES
To process a type change, the Standard Generic or Continuous Roster form can be used.
A Membership Type change is a critical change to membership.
Data Entry Tip: A critical change to membership always results in the cancel of the old membership (with
old critical data) and add of the new membership (with new critical data). There is one exception to this
rule. If you are inserting a new membership level into an existing membership set and the existing
membership types are not changing, the existing membership set will not be canceled.
By the way: Type Changes can also be processed at the same time as you are renewing a membership (see
Instructions for Renewal with Type Change).
After completing data entry, click the button to accept the transaction.
S T A N D A R D G E N E R I C F O R M
K E Y I N F O R M A T I O N
Fill out the appropriate Key Information for matching the individual/membership. Please enter Membership ID when processing a Type Change. See instructions for Standard Form Transaction Setup, Key Information.
P E R S O N A L I N F O R M A T I O N
Fill out the appropriate Personal Information for the individual. See Instructions for Standard Form Transaction Setup, Personal Information.
A D D R E S S I N F O R M A T I O N
Fill out the appropriate Address Information for the individual. See Instructions for Standard form Transaction Setup, Address Information.
M E M B E R S H I P I N F O R M A T I O N
In field Do this
Local Enter new Local User ID. Double-click the field for help in selection.
After entering Local User ID, tab to the next field, the following fields
will be automatically populated: Membership Year (defaults to current
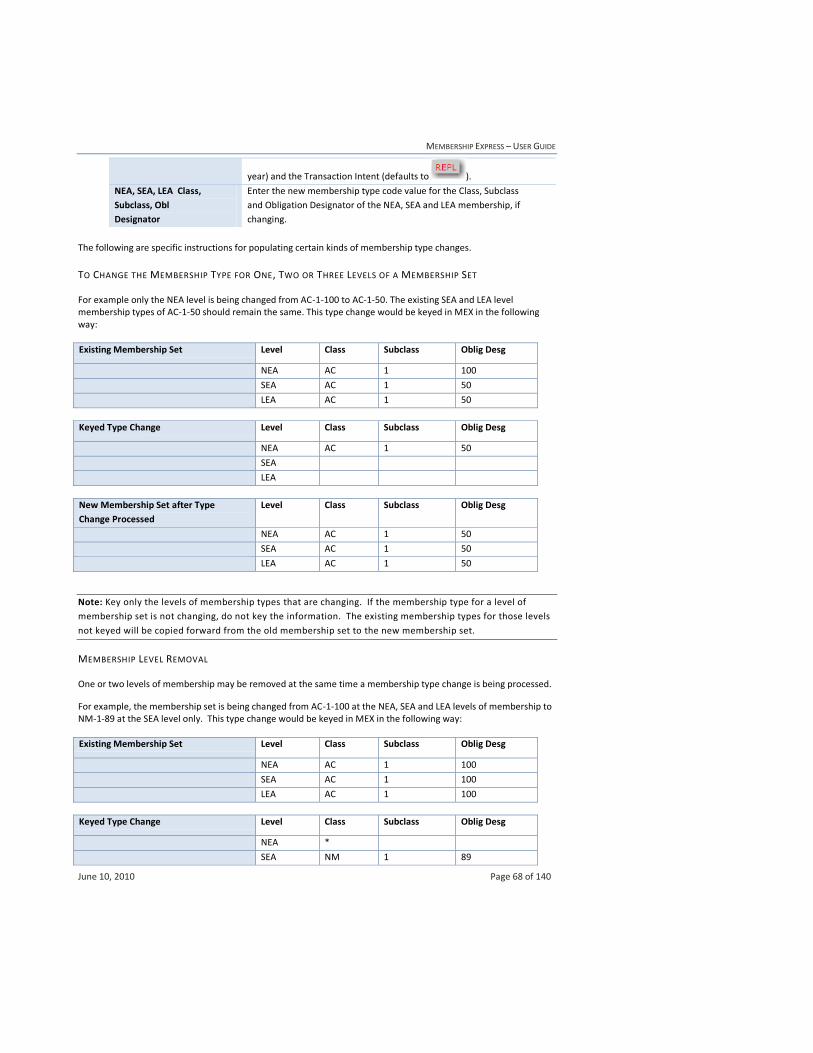
MEMBERSHIP EXPRESS – USER GUIDE
June 10, 2010 Page 68 of 140
year) and the Transaction Intent (defaults to ).
NEA, SEA, LEA Class,
Subclass, Obl
Designator
Enter the new membership type code value for the Class, Subclass
and Obligation Designator of the NEA, SEA and LEA membership, if
changing.
The following are specific instructions for populating certain kinds of membership type changes.
TO CHANGE THE MEMBERSHIP TYPE FOR ONE, TWO OR THREE LEVELS OF A MEMBERSHIP SET
For example only the NEA level is being changed from AC-1-100 to AC-1-50. The existing SEA and LEA level membership types of AC-1-50 should remain the same. This type change would be keyed in MEX in the following way:
Existing Membership Set Level Class Subclass Oblig Desg
NEA AC 1 100
SEA AC 1 50
LEA AC 1 50
Keyed Type Change Level Class Subclass Oblig Desg
NEA AC 1 50
SEA
LEA
New Membership Set after Type
Change Processed
Level Class Subclass Oblig Desg
NEA AC 1 50
SEA AC 1 50
LEA AC 1 50
Note: Key only the levels of membership types that are changing. If the membership type for a level of
membership set is not changing, do not key the information. The existing membership types for those levels
not keyed will be copied forward from the old membership set to the new membership set.
MEMBERSHIP LEVEL REMOVAL
One or two levels of membership may be removed at the same time a membership type change is being processed.
For example, the membership set is being changed from AC-1-100 at the NEA, SEA and LEA levels of membership to NM-1-89 at the SEA level only. This type change would be keyed in MEX in the following way:
Existing Membership Set Level Class Subclass Oblig Desg
NEA AC 1 100
SEA AC 1 100
LEA AC 1 100
Keyed Type Change Level Class Subclass Oblig Desg
NEA *
SEA NM 1 89
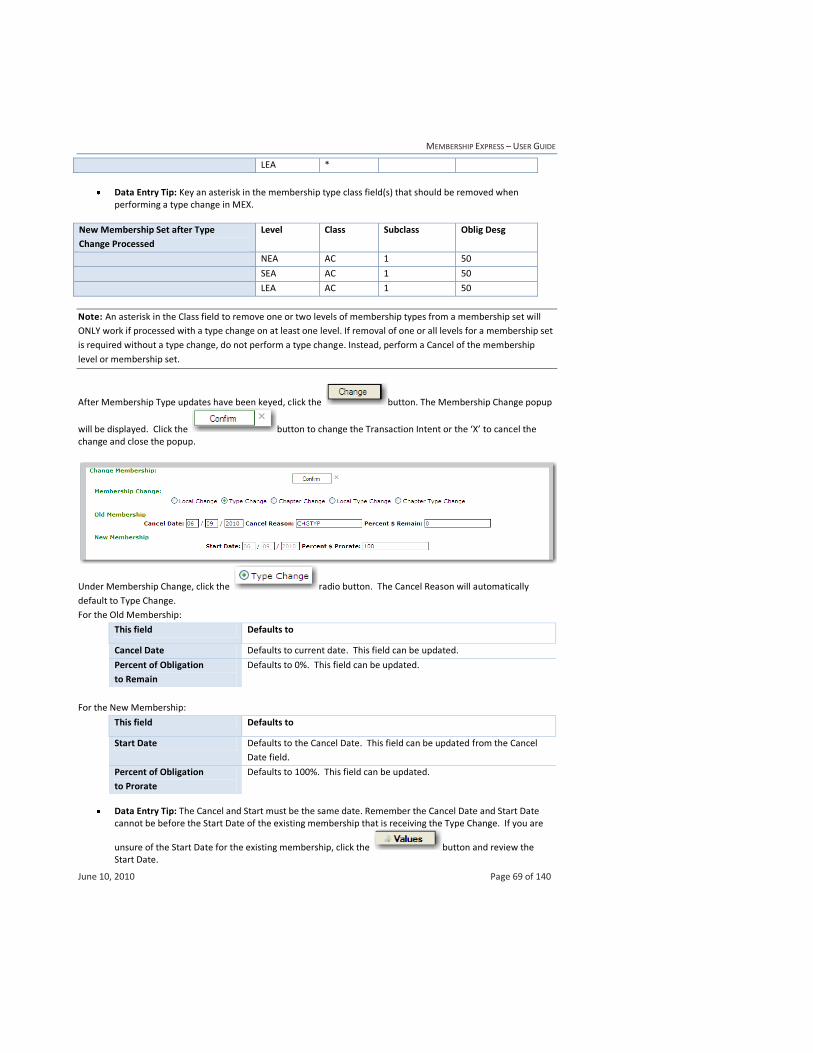
MEMBERSHIP EXPRESS – USER GUIDE
June 10, 2010 Page 69 of 140
LEA *
Data Entry Tip: Key an asterisk in the membership type class field(s) that should be removed when performing a type change in MEX.
New Membership Set after Type
Change Processed
Level Class Subclass Oblig Desg
NEA AC 1 50
SEA AC 1 50
LEA AC 1 50
Note: An asterisk in the Class field to remove one or two levels of membership types from a membership set will
ONLY work if processed with a type change on at least one level. If removal of one or all levels for a membership set
is required without a type change, do not perform a type change. Instead, perform a Cancel of the membership
level or membership set.
After Membership Type updates have been keyed, click the button. The Membership Change popup
will be displayed. Click the button to change the Transaction Intent or the ‘X’ to cancel the change and close the popup.
Under Membership Change, click the radio button. The Cancel Reason will automatically
default to Type Change.
For the Old Membership:
This field Defaults to
Cancel Date Defaults to current date. This field can be updated.
Percent of Obligation
to Remain
Defaults to 0%. This field can be updated.
For the New Membership:
This field Defaults to
Start Date Defaults to the Cancel Date. This field can be updated from the Cancel
Date field.
Percent of Obligation
to Prorate
Defaults to 100%. This field can be updated.
Data Entry Tip: The Cancel and Start must be the same date. Remember the Cancel Date and Start Date cannot be before the Start Date of the existing membership that is receiving the Type Change. If you are
unsure of the Start Date for the existing membership, click the button and review the Start Date.

MEMBERSHIP EXPRESS – USER GUIDE
June 10, 2010 Page 70 of 140
Data Entry Tip: If needed, update (replace) the employer and work detail information (work location, position and subject) for the new membership. If no updates are made, the employer, work location, position and subject will be copied to the new membership.
Warning: Review the Transaction Intent in red in the upper left-hand area of Membership Information. It
should display . If it does not, you will NOT process a type change with this transaction.
Data Entry Tip: A Type Change and Local Change can be performed at the same time. Click the
radio button. In addition, follow instructions on How to Perform a Local Change.
The Transaction Intent should display . If does not, you will NOT process a local and type
change with this transaction.
S T A N D A R D C O N T I N U O U S R O S T E R F O R M
K E Y I N F O R M A T I O N
Fill out the appropriate Key Information for matching the individual/membership. Please enter Membership ID when processing a Type Change. See instructions for Standard Form Transaction Setup, Key Information.
P E R S O N A L I N F O R M A T I O N
Fill out the appropriate Personal Information for the individual. See Instructions for Standard Form Transaction Setup, Personal Information.
A D D R E S S I N F O R M A T I O N
Fill out the appropriate Address Information for the individual. See Instructions for Standard form Transaction Setup, Address Information.
M E M B E R S H I P I N F O R M A T I O N
In field Do this
Local Enter new Local User ID. Double-click the field for help in selection.
After entering Local User ID, tab to the next field, the following fields
will be automatically populated: Membership Year (defaults to current
year) and the Transaction Intent (defaults to ).
NEA, SEA, LEA Class,
Subclass, Obl
Designator
Enter the new membership type code value for the Class, Subclass
and Obligation Designator of the NEA, SEA and LEA membership, if
changing.
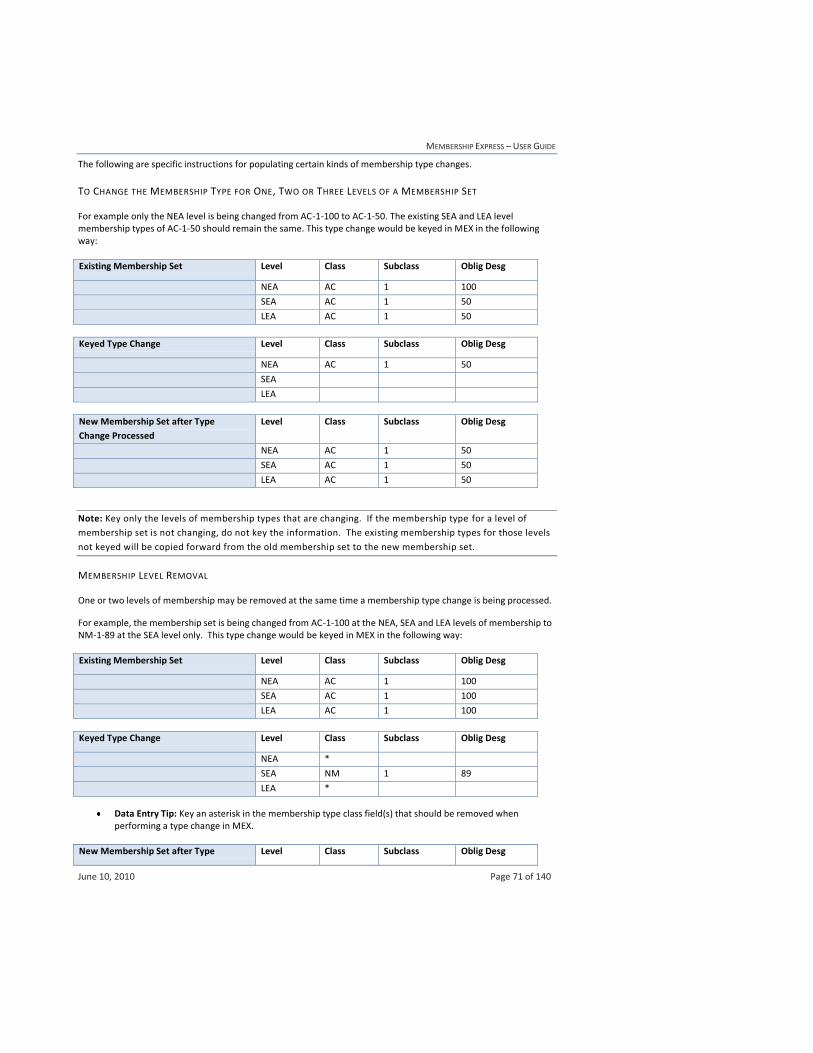
MEMBERSHIP EXPRESS – USER GUIDE
June 10, 2010 Page 71 of 140
The following are specific instructions for populating certain kinds of membership type changes.
TO CHANGE THE MEMBERSHIP TYPE FOR ONE, TWO OR THREE LEVELS OF A MEMBERSHIP SET
For example only the NEA level is being changed from AC-1-100 to AC-1-50. The existing SEA and LEA level membership types of AC-1-50 should remain the same. This type change would be keyed in MEX in the following way:
Existing Membership Set Level Class Subclass Oblig Desg
NEA AC 1 100
SEA AC 1 50
LEA AC 1 50
Keyed Type Change Level Class Subclass Oblig Desg
NEA AC 1 50
SEA
LEA
New Membership Set after Type
Change Processed
Level Class Subclass Oblig Desg
NEA AC 1 50
SEA AC 1 50
LEA AC 1 50
Note: Key only the levels of membership types that are changing. If the membership type for a level of
membership set is not changing, do not key the information. The existing membership types for those levels
not keyed will be copied forward from the old membership set to the new membership set.
MEMBERSHIP LEVEL REMOVAL
One or two levels of membership may be removed at the same time a membership type change is being processed.
For example, the membership set is being changed from AC-1-100 at the NEA, SEA and LEA levels of membership to NM-1-89 at the SEA level only. This type change would be keyed in MEX in the following way:
Existing Membership Set Level Class Subclass Oblig Desg
NEA AC 1 100
SEA AC 1 100
LEA AC 1 100
Keyed Type Change Level Class Subclass Oblig Desg
NEA *
SEA NM 1 89
LEA *
Data Entry Tip: Key an asterisk in the membership type class field(s) that should be removed when performing a type change in MEX.
New Membership Set after Type Level Class Subclass Oblig Desg
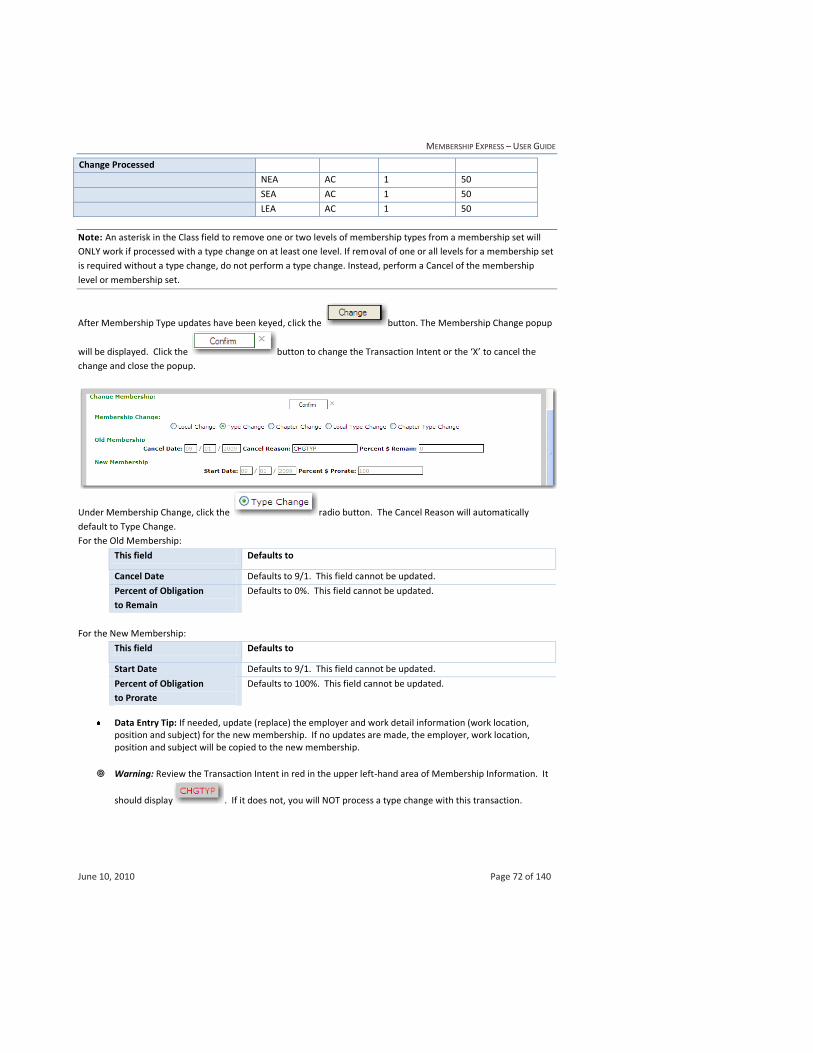
MEMBERSHIP EXPRESS – USER GUIDE
June 10, 2010 Page 72 of 140
Change Processed
NEA AC 1 50
SEA AC 1 50
LEA AC 1 50
Note: An asterisk in the Class field to remove one or two levels of membership types from a membership set will
ONLY work if processed with a type change on at least one level. If removal of one or all levels for a membership set
is required without a type change, do not perform a type change. Instead, perform a Cancel of the membership
level or membership set.
After Membership Type updates have been keyed, click the button. The Membership Change popup
will be displayed. Click the button to change the Transaction Intent or the ‘X’ to cancel the
change and close the popup.
Under Membership Change, click the radio button. The Cancel Reason will automatically
default to Type Change.
For the Old Membership:
This field Defaults to
Cancel Date Defaults to 9/1. This field cannot be updated.
Percent of Obligation
to Remain
Defaults to 0%. This field cannot be updated.
For the New Membership:
This field Defaults to
Start Date Defaults to 9/1. This field cannot be updated.
Percent of Obligation
to Prorate
Defaults to 100%. This field cannot be updated.
Data Entry Tip: If needed, update (replace) the employer and work detail information (work location, position and subject) for the new membership. If no updates are made, the employer, work location, position and subject will be copied to the new membership.
Warning: Review the Transaction Intent in red in the upper left-hand area of Membership Information. It
should display . If it does not, you will NOT process a type change with this transaction.
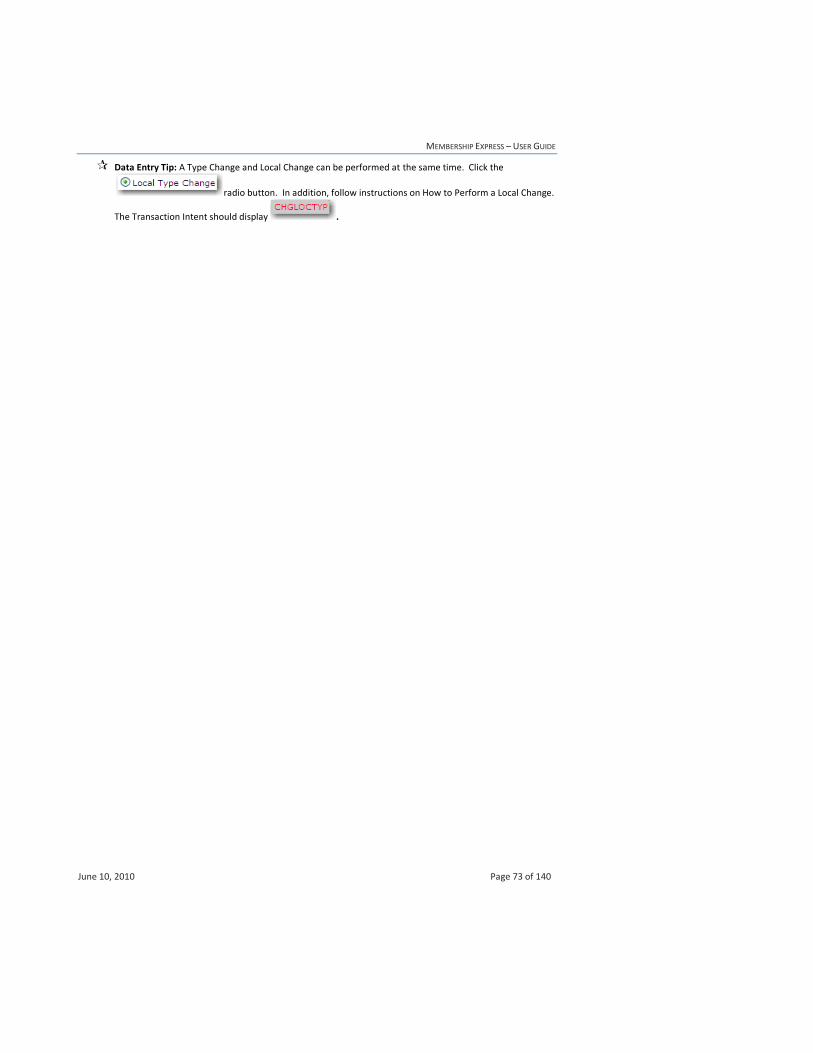
MEMBERSHIP EXPRESS – USER GUIDE
June 10, 2010 Page 73 of 140
Data Entry Tip: A Type Change and Local Change can be performed at the same time. Click the
radio button. In addition, follow instructions on How to Perform a Local Change.
The Transaction Intent should display .
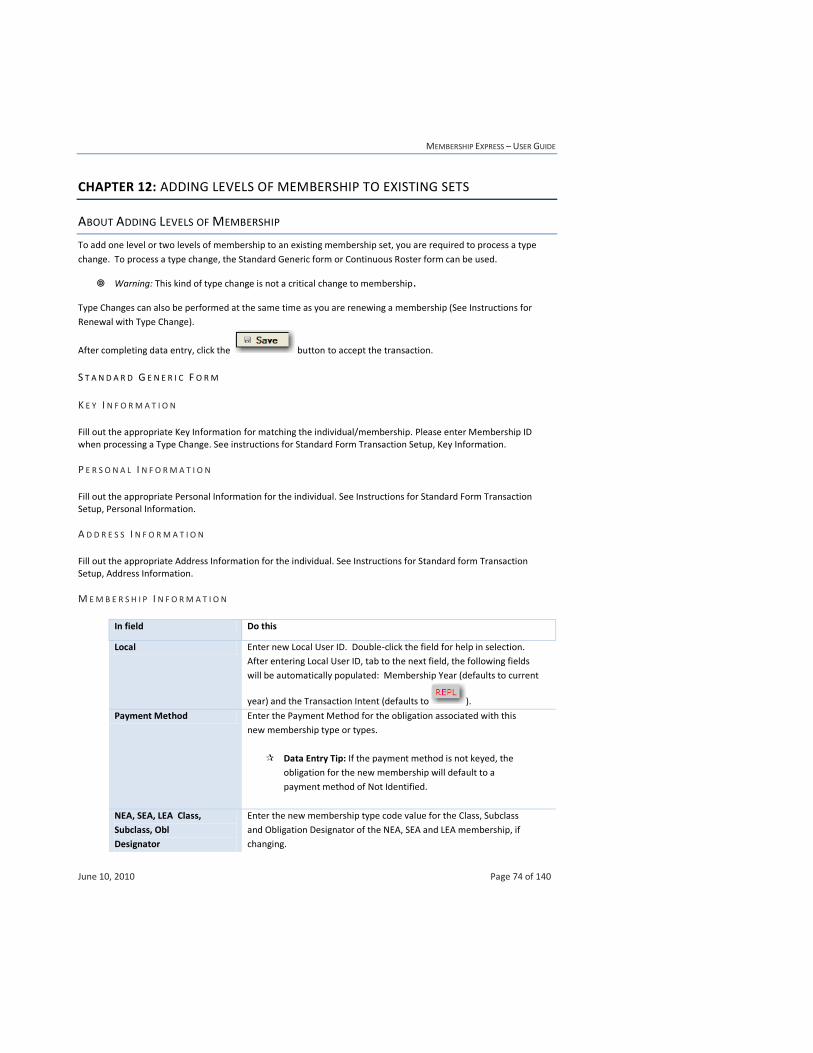
MEMBERSHIP EXPRESS – USER GUIDE
June 10, 2010 Page 74 of 140
CHAPTER 12: ADDING LEVELS OF MEMBERSHIP TO EXISTING SETS
ABOUT ADDING LEVELS OF MEMBERSHIP
To add one level or two levels of membership to an existing membership set, you are required to process a type
change. To process a type change, the Standard Generic form or Continuous Roster form can be used.
Warning: This kind of type change is not a critical change to membership.
Type Changes can also be performed at the same time as you are renewing a membership (See Instructions for
Renewal with Type Change).
After completing data entry, click the button to accept the transaction.
S T A N D A R D G E N E R I C F O R M
K E Y I N F O R M A T I O N
Fill out the appropriate Key Information for matching the individual/membership. Please enter Membership ID when processing a Type Change. See instructions for Standard Form Transaction Setup, Key Information.
P E R S O N A L I N F O R M A T I O N
Fill out the appropriate Personal Information for the individual. See Instructions for Standard Form Transaction Setup, Personal Information.
A D D R E S S I N F O R M A T I O N
Fill out the appropriate Address Information for the individual. See Instructions for Standard form Transaction Setup, Address Information.
M E M B E R S H I P I N F O R M A T I O N
In field Do this
Local Enter new Local User ID. Double-click the field for help in selection.
After entering Local User ID, tab to the next field, the following fields
will be automatically populated: Membership Year (defaults to current
year) and the Transaction Intent (defaults to ).
Payment Method Enter the Payment Method for the obligation associated with this
new membership type or types.
Data Entry Tip: If the payment method is not keyed, the
obligation for the new membership will default to a
payment method of Not Identified.
NEA, SEA, LEA Class,
Subclass, Obl
Designator
Enter the new membership type code value for the Class, Subclass
and Obligation Designator of the NEA, SEA and LEA membership, if
changing.
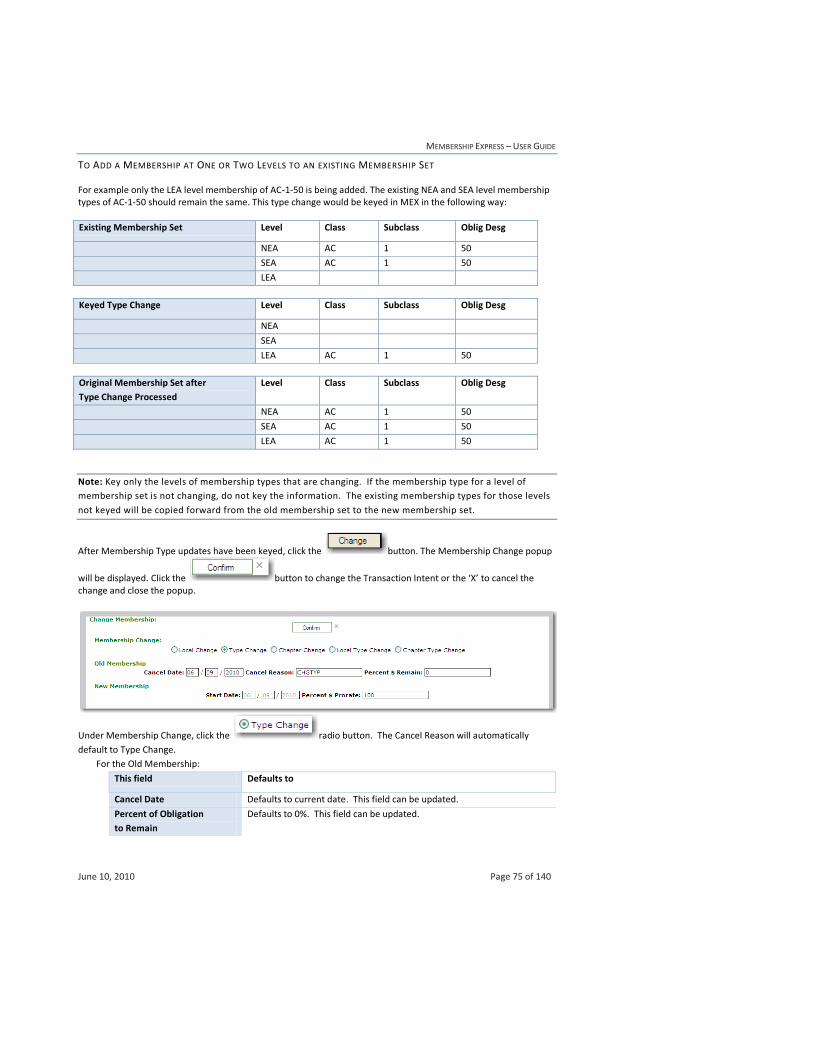
MEMBERSHIP EXPRESS – USER GUIDE
June 10, 2010 Page 75 of 140
TO ADD A MEMBERSHIP AT ONE OR TWO LEVELS TO AN EXISTING MEMBERSHIP SET
For example only the LEA level membership of AC-1-50 is being added. The existing NEA and SEA level membership types of AC-1-50 should remain the same. This type change would be keyed in MEX in the following way:
Existing Membership Set Level Class Subclass Oblig Desg
NEA AC 1 50
SEA AC 1 50
LEA
Keyed Type Change Level Class Subclass Oblig Desg
NEA
SEA
LEA AC 1 50
Original Membership Set after
Type Change Processed
Level Class Subclass Oblig Desg
NEA AC 1 50
SEA AC 1 50
LEA AC 1 50
Note: Key only the levels of membership types that are changing. If the membership type for a level of
membership set is not changing, do not key the information. The existing membership types for those levels
not keyed will be copied forward from the old membership set to the new membership set.
After Membership Type updates have been keyed, click the button. The Membership Change popup
will be displayed. Click the button to change the Transaction Intent or the ‘X’ to cancel the change and close the popup.
Under Membership Change, click the radio button. The Cancel Reason will automatically
default to Type Change.
For the Old Membership:
This field Defaults to
Cancel Date Defaults to current date. This field can be updated.
Percent of Obligation
to Remain
Defaults to 0%. This field can be updated.
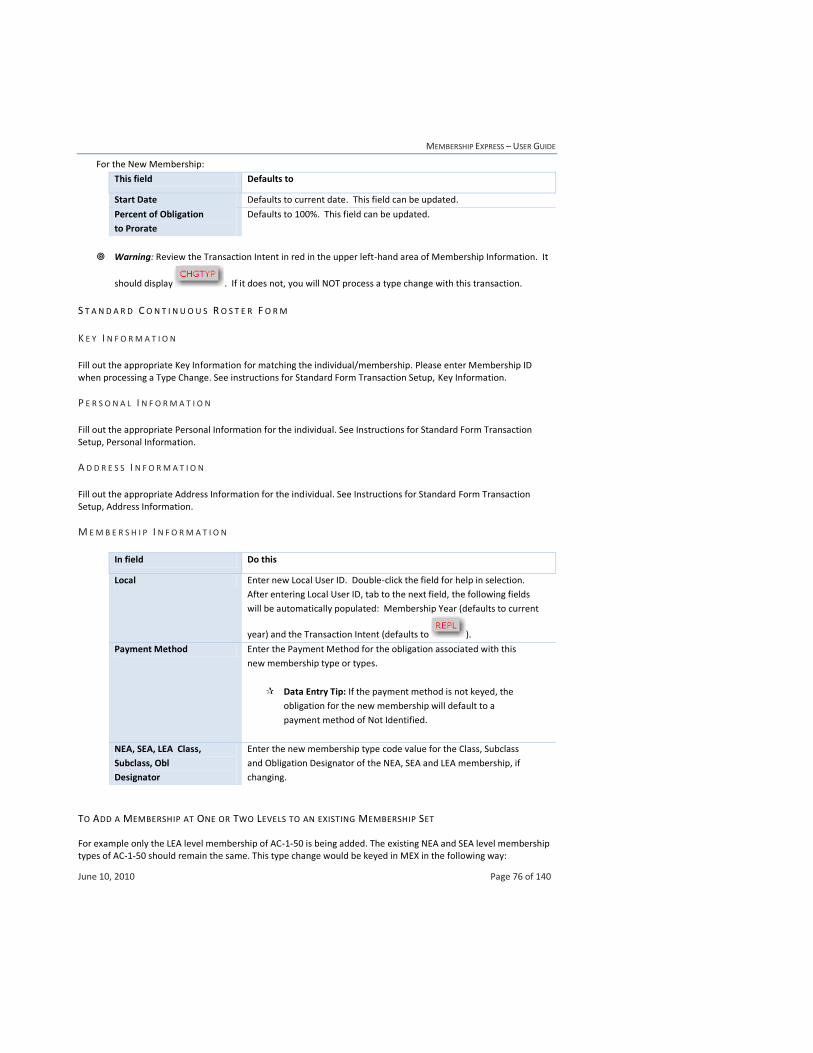
MEMBERSHIP EXPRESS – USER GUIDE
June 10, 2010 Page 76 of 140
For the New Membership:
This field Defaults to
Start Date Defaults to current date. This field can be updated.
Percent of Obligation
to Prorate
Defaults to 100%. This field can be updated.
Warning: Review the Transaction Intent in red in the upper left-hand area of Membership Information. It
should display . If it does not, you will NOT process a type change with this transaction.
S T A N D A R D C O N T I N U O U S R O S T E R F O R M
K E Y I N F O R M A T I O N
Fill out the appropriate Key Information for matching the individual/membership. Please enter Membership ID when processing a Type Change. See instructions for Standard Form Transaction Setup, Key Information.
P E R S O N A L I N F O R M A T I O N
Fill out the appropriate Personal Information for the individual. See Instructions for Standard Form Transaction Setup, Personal Information.
A D D R E S S I N F O R M A T I O N
Fill out the appropriate Address Information for the individual. See Instructions for Standard Form Transaction Setup, Address Information.
M E M B E R S H I P I N F O R M A T I O N
In field Do this
Local Enter new Local User ID. Double-click the field for help in selection.
After entering Local User ID, tab to the next field, the following fields
will be automatically populated: Membership Year (defaults to current
year) and the Transaction Intent (defaults to ).
Payment Method Enter the Payment Method for the obligation associated with this
new membership type or types.
Data Entry Tip: If the payment method is not keyed, the
obligation for the new membership will default to a
payment method of Not Identified.
NEA, SEA, LEA Class,
Subclass, Obl
Designator
Enter the new membership type code value for the Class, Subclass
and Obligation Designator of the NEA, SEA and LEA membership, if
changing.
TO ADD A MEMBERSHIP AT ONE OR TWO LEVELS TO AN EXISTING MEMBERSHIP SET
For example only the LEA level membership of AC-1-50 is being added. The existing NEA and SEA level membership types of AC-1-50 should remain the same. This type change would be keyed in MEX in the following way:
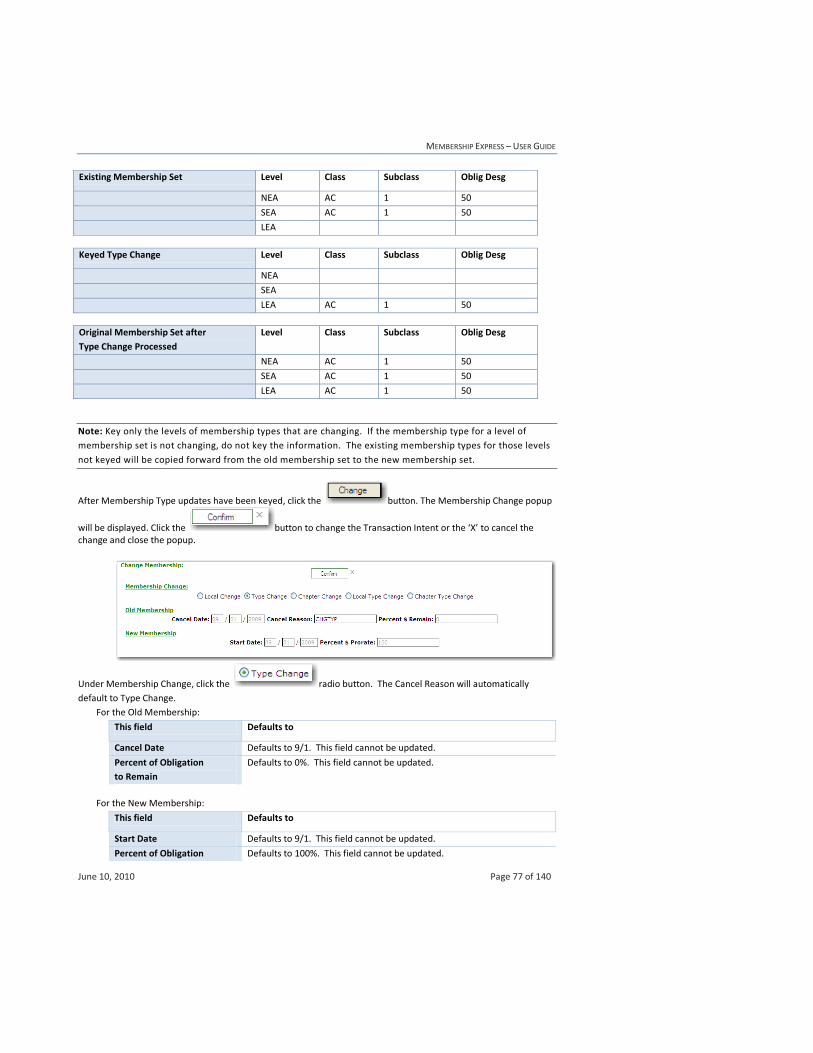
MEMBERSHIP EXPRESS – USER GUIDE
June 10, 2010 Page 77 of 140
Existing Membership Set Level Class Subclass Oblig Desg
NEA AC 1 50
SEA AC 1 50
LEA
Keyed Type Change Level Class Subclass Oblig Desg
NEA
SEA
LEA AC 1 50
Original Membership Set after
Type Change Processed
Level Class Subclass Oblig Desg
NEA AC 1 50
SEA AC 1 50
LEA AC 1 50
Note: Key only the levels of membership types that are changing. If the membership type for a level of
membership set is not changing, do not key the information. The existing membership types for those levels
not keyed will be copied forward from the old membership set to the new membership set.
After Membership Type updates have been keyed, click the button. The Membership Change popup
will be displayed. Click the button to change the Transaction Intent or the ‘X’ to cancel the change and close the popup.
Under Membership Change, click the radio button. The Cancel Reason will automatically
default to Type Change.
For the Old Membership:
This field Defaults to
Cancel Date Defaults to 9/1. This field cannot be updated.
Percent of Obligation
to Remain
Defaults to 0%. This field cannot be updated.
For the New Membership:
This field Defaults to
Start Date Defaults to 9/1. This field cannot be updated.
Percent of Obligation Defaults to 100%. This field cannot be updated.
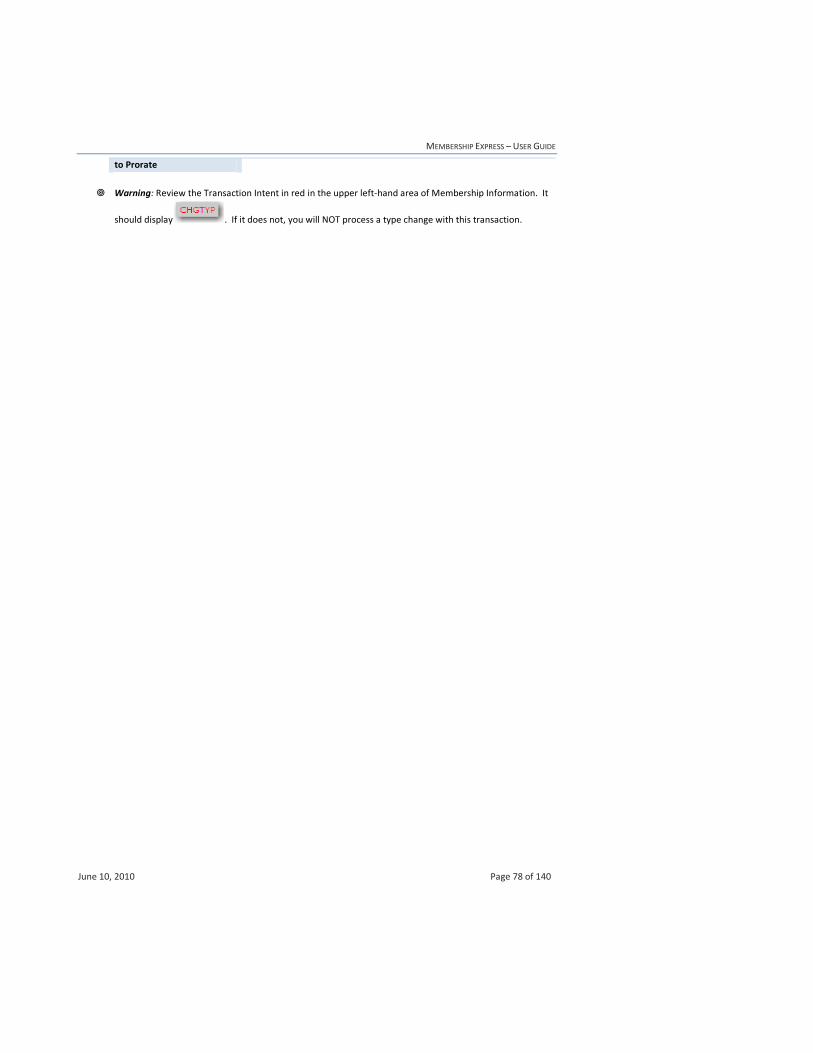
MEMBERSHIP EXPRESS – USER GUIDE
June 10, 2010 Page 78 of 140
to Prorate
Warning: Review the Transaction Intent in red in the upper left-hand area of Membership Information. It
should display . If it does not, you will NOT process a type change with this transaction.
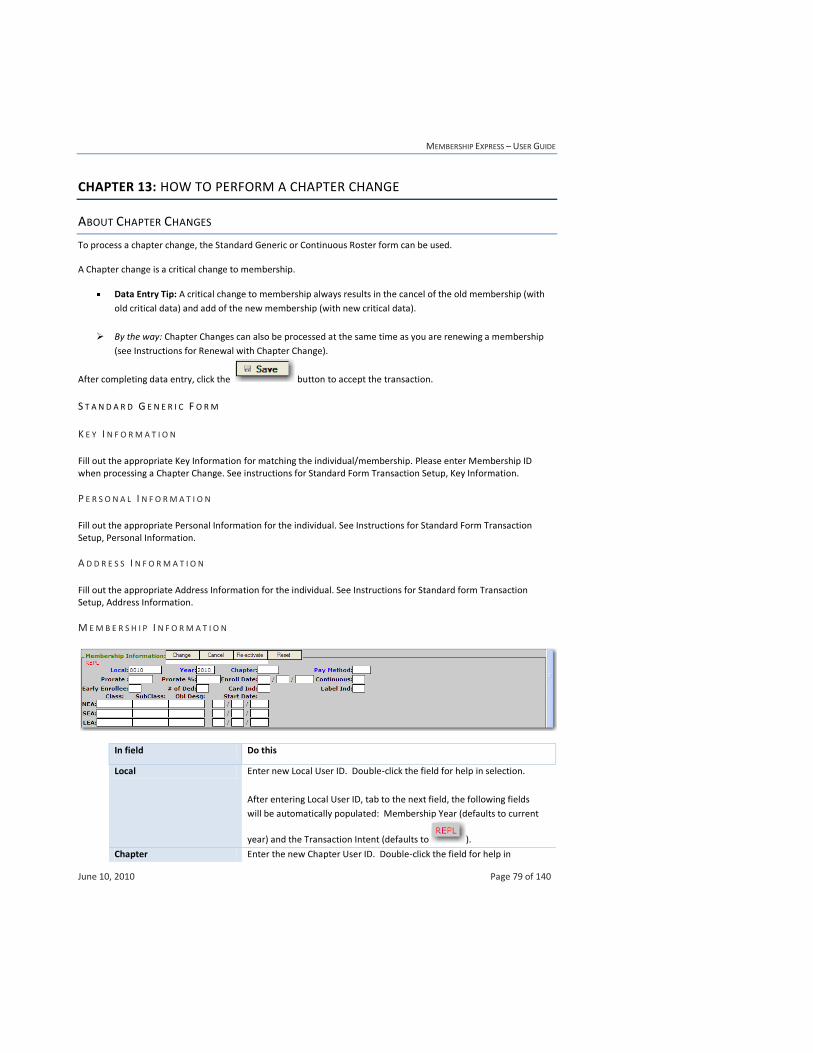
MEMBERSHIP EXPRESS – USER GUIDE
June 10, 2010 Page 79 of 140
CHAPTER 13: HOW TO PERFORM A CHAPTER CHANGE
ABOUT CHAPTER CHANGES
To process a chapter change, the Standard Generic or Continuous Roster form can be used.
A Chapter change is a critical change to membership.
Data Entry Tip: A critical change to membership always results in the cancel of the old membership (with
old critical data) and add of the new membership (with new critical data).
By the way: Chapter Changes can also be processed at the same time as you are renewing a membership
(see Instructions for Renewal with Chapter Change).
After completing data entry, click the button to accept the transaction.
S T A N D A R D G E N E R I C F O R M
K E Y I N F O R M A T I O N
Fill out the appropriate Key Information for matching the individual/membership. Please enter Membership ID when processing a Chapter Change. See instructions for Standard Form Transaction Setup, Key Information.
P E R S O N A L I N F O R M A T I O N
Fill out the appropriate Personal Information for the individual. See Instructions for Standard Form Transaction Setup, Personal Information.
A D D R E S S I N F O R M A T I O N
Fill out the appropriate Address Information for the individual. See Instructions for Standard form Transaction Setup, Address Information.
M E M B E R S H I P I N F O R M A T I O N
In field Do this
Local Enter new Local User ID. Double-click the field for help in selection.
After entering Local User ID, tab to the next field, the following fields
will be automatically populated: Membership Year (defaults to current
year) and the Transaction Intent (defaults to ).
Chapter Enter the new Chapter User ID. Double-click the field for help in
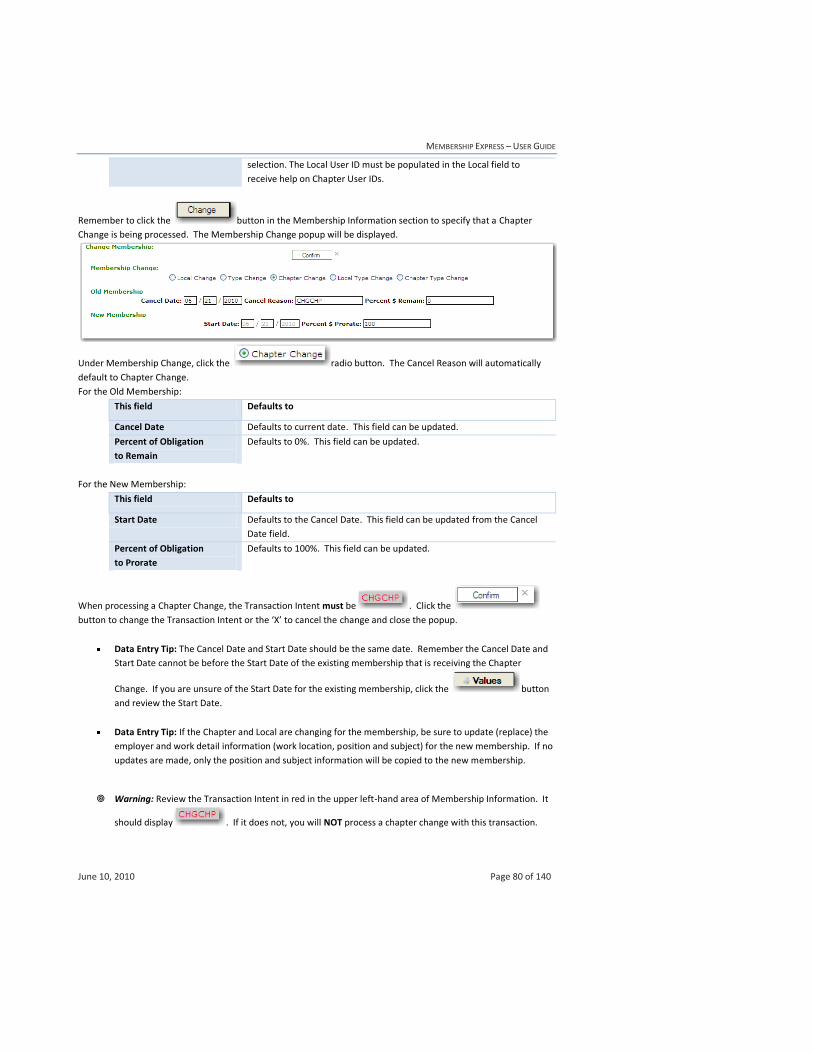
MEMBERSHIP EXPRESS – USER GUIDE
June 10, 2010 Page 80 of 140
selection. The Local User ID must be populated in the Local field to
receive help on Chapter User IDs.
Remember to click the button in the Membership Information section to specify that a Chapter
Change is being processed. The Membership Change popup will be displayed.
Under Membership Change, click the radio button. The Cancel Reason will automatically
default to Chapter Change.
For the Old Membership:
This field Defaults to
Cancel Date Defaults to current date. This field can be updated.
Percent of Obligation
to Remain
Defaults to 0%. This field can be updated.
For the New Membership:
This field Defaults to
Start Date Defaults to the Cancel Date. This field can be updated from the Cancel
Date field.
Percent of Obligation
to Prorate
Defaults to 100%. This field can be updated.
When processing a Chapter Change, the Transaction Intent must be . Click the
button to change the Transaction Intent or the ‘X’ to cancel the change and close the popup.
Data Entry Tip: The Cancel Date and Start Date should be the same date. Remember the Cancel Date and
Start Date cannot be before the Start Date of the existing membership that is receiving the Chapter
Change. If you are unsure of the Start Date for the existing membership, click the button
and review the Start Date.
Data Entry Tip: If the Chapter and Local are changing for the membership, be sure to update (replace) the
employer and work detail information (work location, position and subject) for the new membership. If no
updates are made, only the position and subject information will be copied to the new membership.
Warning: Review the Transaction Intent in red in the upper left-hand area of Membership Information. It
should display . If it does not, you will NOT process a chapter change with this transaction.
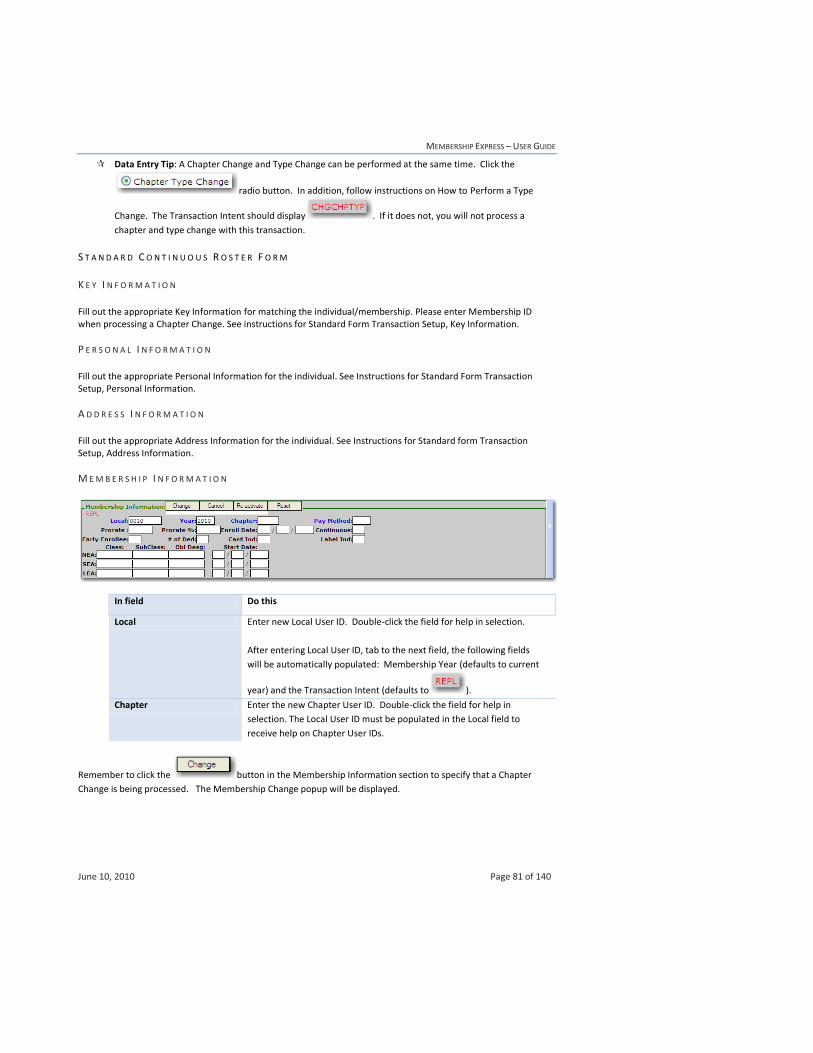
MEMBERSHIP EXPRESS – USER GUIDE
June 10, 2010 Page 81 of 140
Data Entry Tip: A Chapter Change and Type Change can be performed at the same time. Click the
radio button. In addition, follow instructions on How to Perform a Type
Change. The Transaction Intent should display . If it does not, you will not process a
chapter and type change with this transaction.
S T A N D A R D C O N T I N U O U S R O S T E R F O R M
K E Y I N F O R M A T I O N
Fill out the appropriate Key Information for matching the individual/membership. Please enter Membership ID when processing a Chapter Change. See instructions for Standard Form Transaction Setup, Key Information.
P E R S O N A L I N F O R M A T I O N
Fill out the appropriate Personal Information for the individual. See Instructions for Standard Form Transaction Setup, Personal Information.
A D D R E S S I N F O R M A T I O N
Fill out the appropriate Address Information for the individual. See Instructions for Standard form Transaction Setup, Address Information.
M E M B E R S H I P I N F O R M A T I O N
In field Do this
Local Enter new Local User ID. Double-click the field for help in selection.
After entering Local User ID, tab to the next field, the following fields
will be automatically populated: Membership Year (defaults to current
year) and the Transaction Intent (defaults to ).
Chapter Enter the new Chapter User ID. Double-click the field for help in
selection. The Local User ID must be populated in the Local field to
receive help on Chapter User IDs.
Remember to click the button in the Membership Information section to specify that a Chapter
Change is being processed. The Membership Change popup will be displayed.
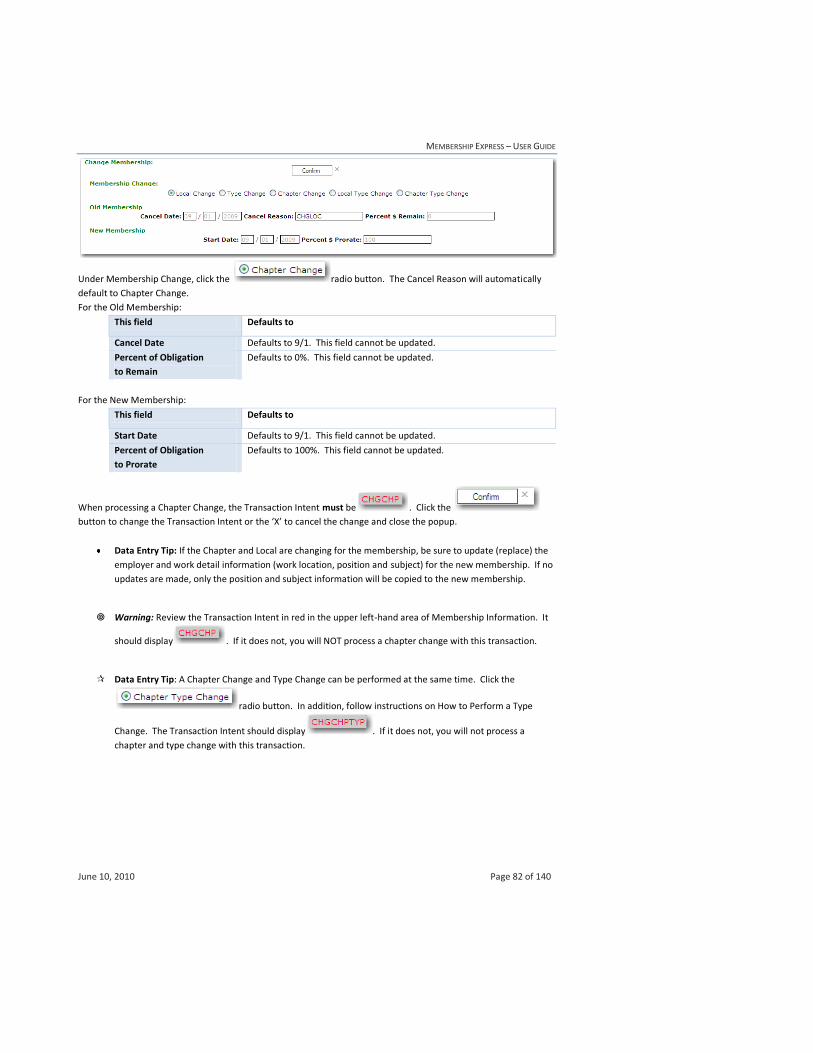
MEMBERSHIP EXPRESS – USER GUIDE
June 10, 2010 Page 82 of 140
Under Membership Change, click the radio button. The Cancel Reason will automatically
default to Chapter Change.
For the Old Membership:
This field Defaults to
Cancel Date Defaults to 9/1. This field cannot be updated.
Percent of Obligation
to Remain
Defaults to 0%. This field cannot be updated.
For the New Membership:
This field Defaults to
Start Date Defaults to 9/1. This field cannot be updated.
Percent of Obligation
to Prorate
Defaults to 100%. This field cannot be updated.
When processing a Chapter Change, the Transaction Intent must be . Click the
button to change the Transaction Intent or the ‘X’ to cancel the change and close the popup.
Data Entry Tip: If the Chapter and Local are changing for the membership, be sure to update (replace) the
employer and work detail information (work location, position and subject) for the new membership. If no
updates are made, only the position and subject information will be copied to the new membership.
Warning: Review the Transaction Intent in red in the upper left-hand area of Membership Information. It
should display . If it does not, you will NOT process a chapter change with this transaction.
Data Entry Tip: A Chapter Change and Type Change can be performed at the same time. Click the
radio button. In addition, follow instructions on How to Perform a Type
Change. The Transaction Intent should display . If it does not, you will not process a
chapter and type change with this transaction.
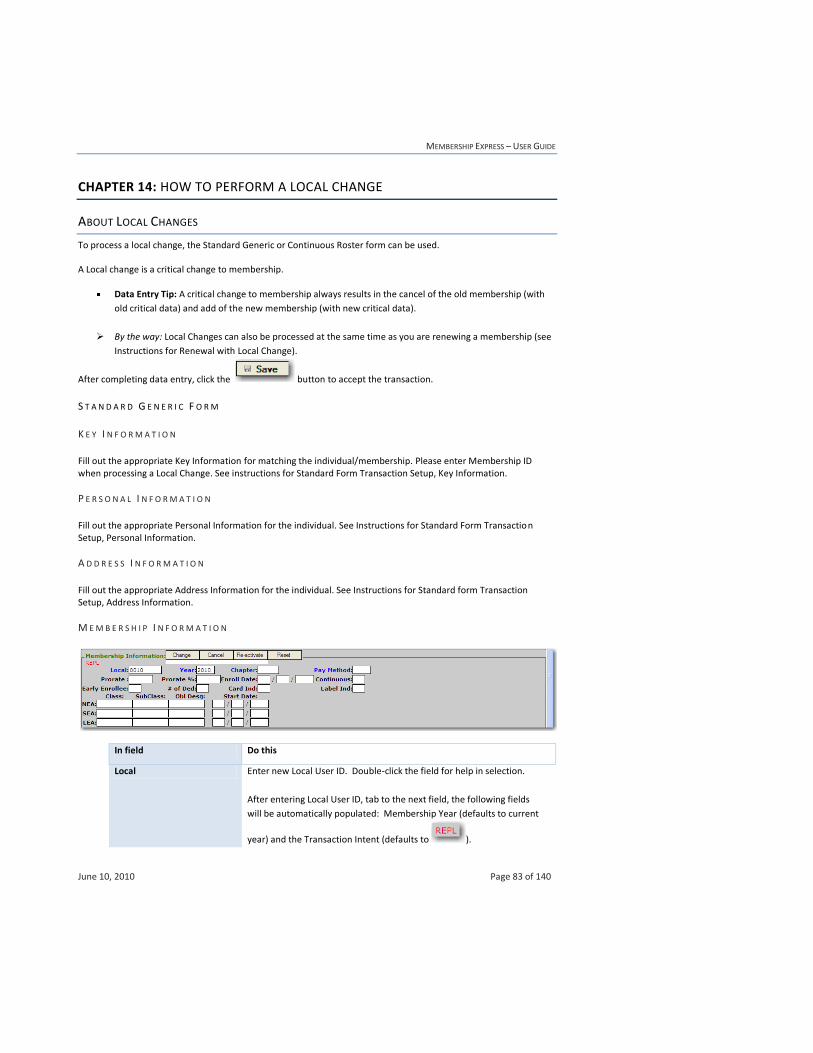
MEMBERSHIP EXPRESS – USER GUIDE
June 10, 2010 Page 83 of 140
CHAPTER 14: HOW TO PERFORM A LOCAL CHANGE
ABOUT LOCAL CHANGES
To process a local change, the Standard Generic or Continuous Roster form can be used.
A Local change is a critical change to membership.
Data Entry Tip: A critical change to membership always results in the cancel of the old membership (with
old critical data) and add of the new membership (with new critical data).
By the way: Local Changes can also be processed at the same time as you are renewing a membership (see
Instructions for Renewal with Local Change).
After completing data entry, click the button to accept the transaction.
S T A N D A R D G E N E R I C F O R M
K E Y I N F O R M A T I O N
Fill out the appropriate Key Information for matching the individual/membership. Please enter Membership ID when processing a Local Change. See instructions for Standard Form Transaction Setup, Key Information.
P E R S O N A L I N F O R M A T I O N
Fill out the appropriate Personal Information for the individual. See Instructions for Standard Form Transaction Setup, Personal Information.
A D D R E S S I N F O R M A T I O N
Fill out the appropriate Address Information for the individual. See Instructions for Standard form Transaction Setup, Address Information.
M E M B E R S H I P I N F O R M A T I O N
In field Do this
Local Enter new Local User ID. Double-click the field for help in selection.
After entering Local User ID, tab to the next field, the following fields
will be automatically populated: Membership Year (defaults to current
year) and the Transaction Intent (defaults to ).
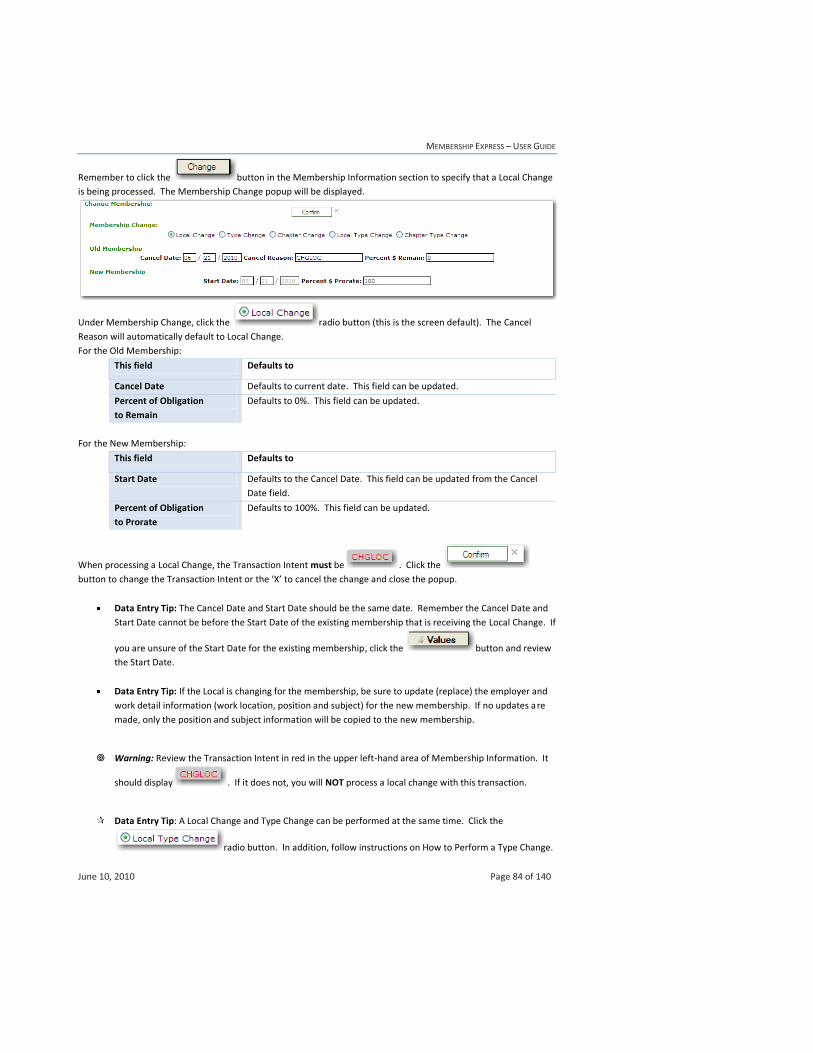
MEMBERSHIP EXPRESS – USER GUIDE
June 10, 2010 Page 84 of 140
Remember to click the button in the Membership Information section to specify that a Local Change
is being processed. The Membership Change popup will be displayed.
Under Membership Change, click the radio button (this is the screen default). The Cancel
Reason will automatically default to Local Change.
For the Old Membership:
This field Defaults to
Cancel Date Defaults to current date. This field can be updated.
Percent of Obligation
to Remain
Defaults to 0%. This field can be updated.
For the New Membership:
This field Defaults to
Start Date Defaults to the Cancel Date. This field can be updated from the Cancel
Date field.
Percent of Obligation
to Prorate
Defaults to 100%. This field can be updated.
When processing a Local Change, the Transaction Intent must be . Click the
button to change the Transaction Intent or the ‘X’ to cancel the change and close the popup.
Data Entry Tip: The Cancel Date and Start Date should be the same date. Remember the Cancel Date and
Start Date cannot be before the Start Date of the existing membership that is receiving the Local Change. If
you are unsure of the Start Date for the existing membership, click the button and review
the Start Date.
Data Entry Tip: If the Local is changing for the membership, be sure to update (replace) the employer and
work detail information (work location, position and subject) for the new membership. If no updates are
made, only the position and subject information will be copied to the new membership.
Warning: Review the Transaction Intent in red in the upper left-hand area of Membership Information. It
should display . If it does not, you will NOT process a local change with this transaction.
Data Entry Tip: A Local Change and Type Change can be performed at the same time. Click the
radio button. In addition, follow instructions on How to Perform a Type Change.
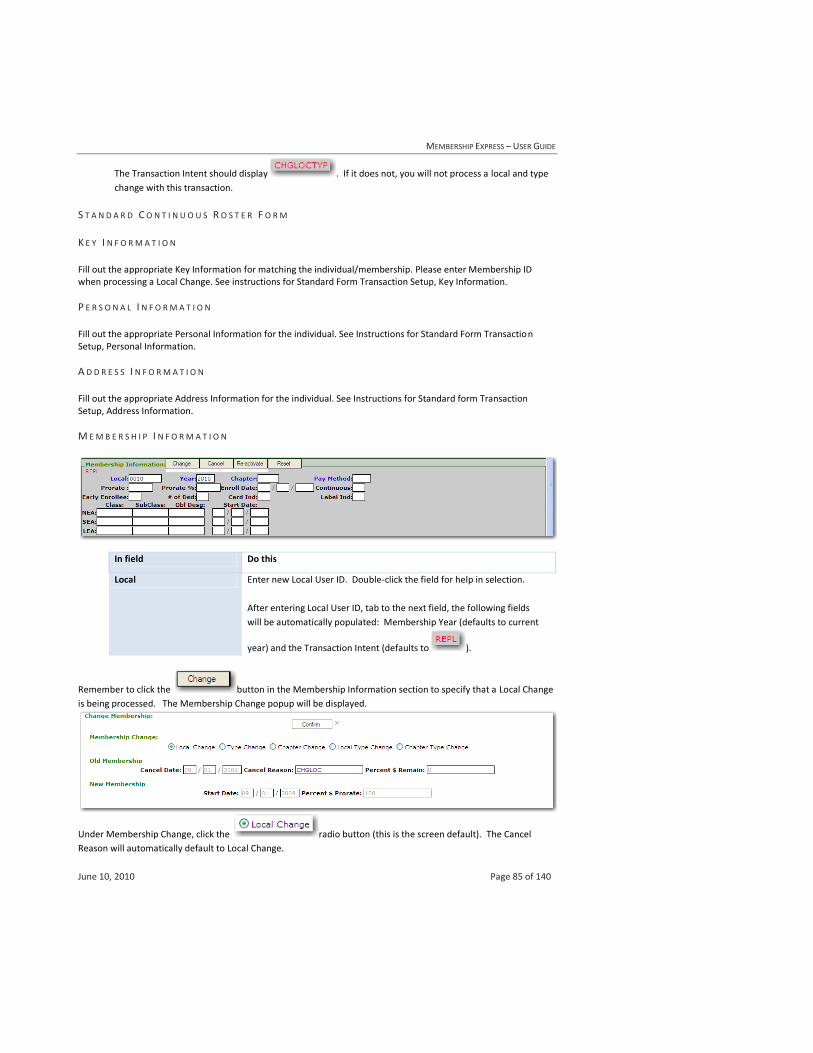
MEMBERSHIP EXPRESS – USER GUIDE
June 10, 2010 Page 85 of 140
The Transaction Intent should display . If it does not, you will not process a local and type
change with this transaction.
S T A N D A R D C O N T I N U O U S R O S T E R F O R M
K E Y I N F O R M A T I O N
Fill out the appropriate Key Information for matching the individual/membership. Please enter Membership ID when processing a Local Change. See instructions for Standard Form Transaction Setup, Key Information.
P E R S O N A L I N F O R M A T I O N
Fill out the appropriate Personal Information for the individual. See Instructions for Standard Form Transaction Setup, Personal Information.
A D D R E S S I N F O R M A T I O N
Fill out the appropriate Address Information for the individual. See Instructions for Standard form Transaction Setup, Address Information.
M E M B E R S H I P I N F O R M A T I O N
In field Do this
Local Enter new Local User ID. Double-click the field for help in selection.
After entering Local User ID, tab to the next field, the following fields
will be automatically populated: Membership Year (defaults to current
year) and the Transaction Intent (defaults to ).
Remember to click the button in the Membership Information section to specify that a Local Change
is being processed. The Membership Change popup will be displayed.
Under Membership Change, click the radio button (this is the screen default). The Cancel
Reason will automatically default to Local Change.

MEMBERSHIP EXPRESS – USER GUIDE
June 10, 2010 Page 86 of 140
For the Old Membership:
This field Defaults to
Cancel Date Defaults to 9/1. This field cannot be updated.
Percent of Obligation
to Remain
Defaults to 0%. This field cannot be updated.
For the New Membership:
This field Defaults to
Start Date Defaults to 9/1. This field cannot be updated.
Percent of Obligation
to Prorate
Defaults to 100%. This field cannot be updated.
When processing a Local Change, the Transaction Intent must be . Click the
button to change the Transaction Intent or the ‘X’ to cancel the change and close the popup.
Data Entry Tip: If the Local is changing for the membership, be sure to update (replace) the employer and
work detail information (work location, position and subject) for the new membership. If no updates are
made, only the position and subject information will be copied to the new membership.
Warning: Review the Transaction Intent in red in the upper left-hand area of Membership Information. It
should display . If it does not, you will NOT process a local change with this transaction.
Data Entry Tip: A Local Change and Type Change can be performed at the same time. Click the
radio button. In addition, follow instructions on How to Perform a Type Change.
The Transaction Intent should display . If it does not, you will not process a local and type
change with this transaction.
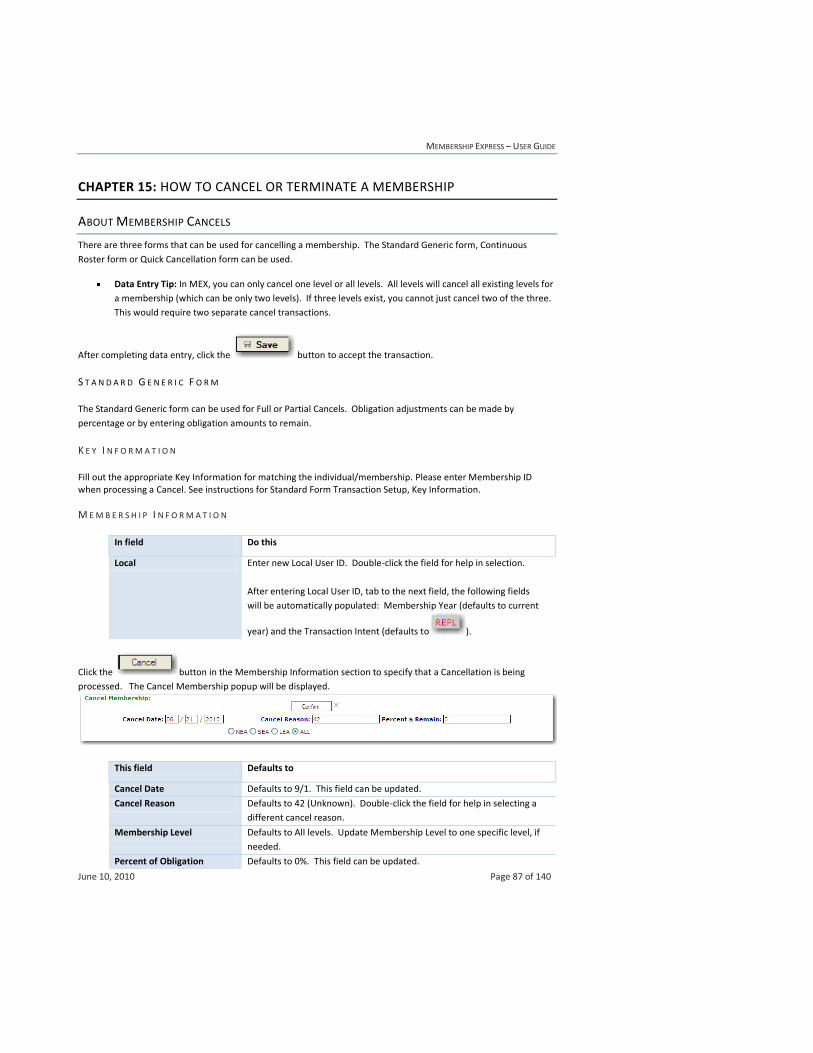
MEMBERSHIP EXPRESS – USER GUIDE
June 10, 2010 Page 87 of 140
CHAPTER 15: HOW TO CANCEL OR TERMINATE A MEMBERSHIP
ABOUT MEMBERSHIP CANCELS
There are three forms that can be used for cancelling a membership. The Standard Generic form, Continuous
Roster form or Quick Cancellation form can be used.
Data Entry Tip: In MEX, you can only cancel one level or all levels. All levels will cancel all existing levels for
a membership (which can be only two levels). If three levels exist, you cannot just cancel two of the three.
This would require two separate cancel transactions.
After completing data entry, click the button to accept the transaction.
S T A N D A R D G E N E R I C F O R M
The Standard Generic form can be used for Full or Partial Cancels. Obligation adjustments can be made by
percentage or by entering obligation amounts to remain.
K E Y I N F O R M A T I O N
Fill out the appropriate Key Information for matching the individual/membership. Please enter Membership ID when processing a Cancel. See instructions for Standard Form Transaction Setup, Key Information.
M E M B E R S H I P I N F O R M A T I O N
In field Do this
Local Enter new Local User ID. Double-click the field for help in selection.
After entering Local User ID, tab to the next field, the following fields
will be automatically populated: Membership Year (defaults to current
year) and the Transaction Intent (defaults to ).
Click the button in the Membership Information section to specify that a Cancellation is being
processed. The Cancel Membership popup will be displayed.
This field Defaults to
Cancel Date Defaults to 9/1. This field can be updated.
Cancel Reason Defaults to 42 (Unknown). Double-click the field for help in selecting a
different cancel reason.
Membership Level Defaults to All levels. Update Membership Level to one specific level, if
needed.
Percent of Obligation Defaults to 0%. This field can be updated.
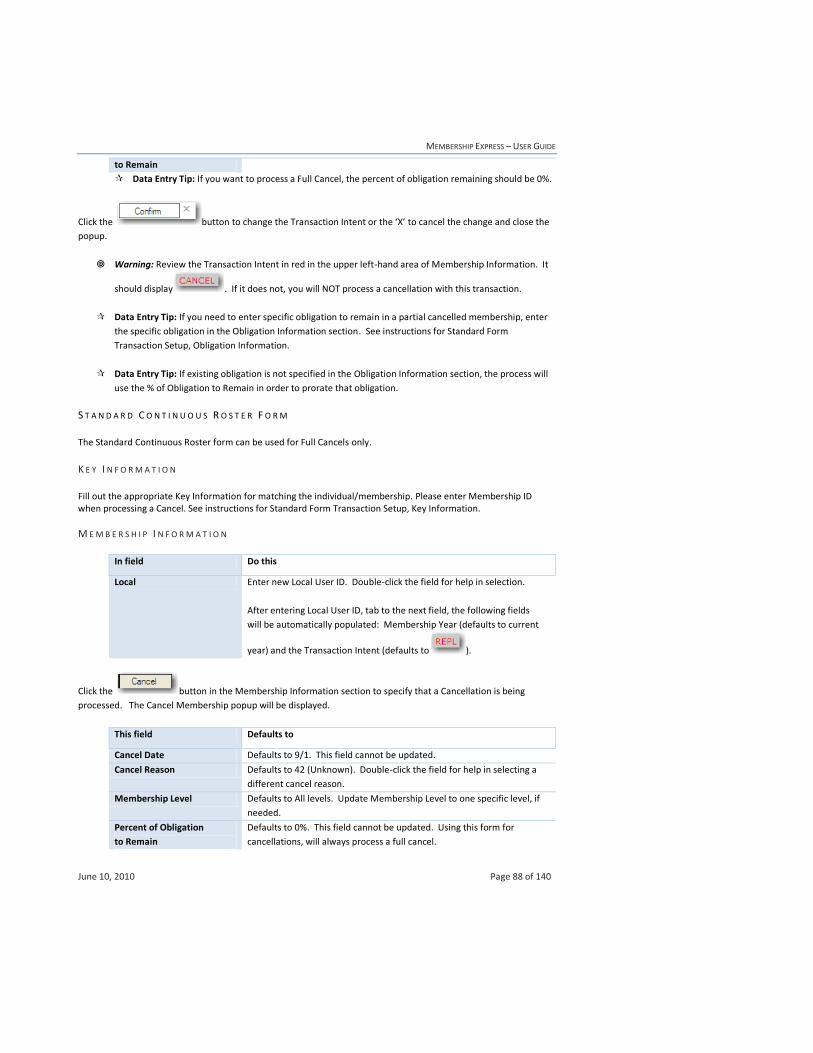
MEMBERSHIP EXPRESS – USER GUIDE
June 10, 2010 Page 88 of 140
to Remain
Data Entry Tip: If you want to process a Full Cancel, the percent of obligation remaining should be 0%.
Click the button to change the Transaction Intent or the ‘X’ to cancel the change and close the
popup.
Warning: Review the Transaction Intent in red in the upper left-hand area of Membership Information. It
should display . If it does not, you will NOT process a cancellation with this transaction.
Data Entry Tip: If you need to enter specific obligation to remain in a partial cancelled membership, enter
the specific obligation in the Obligation Information section. See instructions for Standard Form
Transaction Setup, Obligation Information.
Data Entry Tip: If existing obligation is not specified in the Obligation Information section, the process will
use the % of Obligation to Remain in order to prorate that obligation.
S T A N D A R D C O N T I N U O U S R O S T E R F O R M
The Standard Continuous Roster form can be used for Full Cancels only.
K E Y I N F O R M A T I O N
Fill out the appropriate Key Information for matching the individual/membership. Please enter Membership ID when processing a Cancel. See instructions for Standard Form Transaction Setup, Key Information.
M E M B E R S H I P I N F O R M A T I O N
In field Do this
Local Enter new Local User ID. Double-click the field for help in selection.
After entering Local User ID, tab to the next field, the following fields
will be automatically populated: Membership Year (defaults to current
year) and the Transaction Intent (defaults to ).
Click the button in the Membership Information section to specify that a Cancellation is being
processed. The Cancel Membership popup will be displayed.
This field Defaults to
Cancel Date Defaults to 9/1. This field cannot be updated.
Cancel Reason Defaults to 42 (Unknown). Double-click the field for help in selecting a
different cancel reason.
Membership Level Defaults to All levels. Update Membership Level to one specific level, if
needed.
Percent of Obligation
to Remain
Defaults to 0%. This field cannot be updated. Using this form for
cancellations, will always process a full cancel.
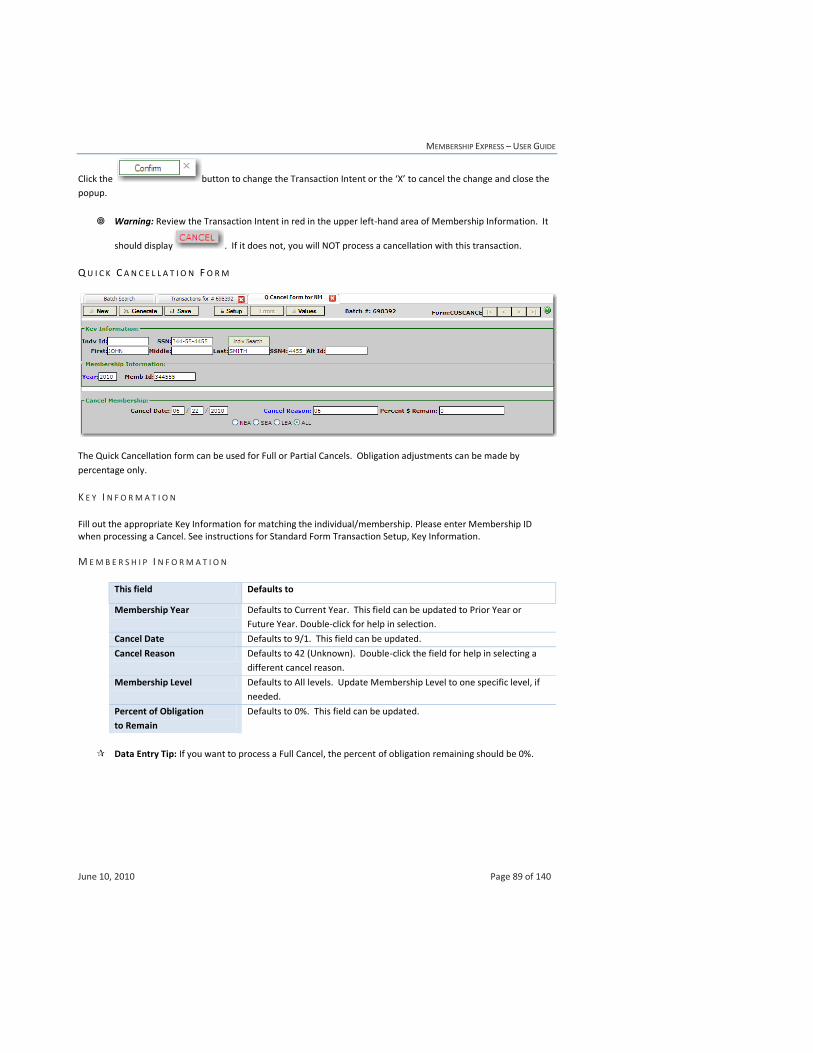
MEMBERSHIP EXPRESS – USER GUIDE
June 10, 2010 Page 89 of 140
Click the button to change the Transaction Intent or the ‘X’ to cancel the change and close the
popup.
Warning: Review the Transaction Intent in red in the upper left-hand area of Membership Information. It
should display . If it does not, you will NOT process a cancellation with this transaction.
Q U I C K C A N C E L L A T I O N F O R M
The Quick Cancellation form can be used for Full or Partial Cancels. Obligation adjustments can be made by
percentage only.
K E Y I N F O R M A T I O N
Fill out the appropriate Key Information for matching the individual/membership. Please enter Membership ID when processing a Cancel. See instructions for Standard Form Transaction Setup, Key Information.
M E M B E R S H I P I N F O R M A T I O N
This field Defaults to
Membership Year Defaults to Current Year. This field can be updated to Prior Year or
Future Year. Double-click for help in selection.
Cancel Date Defaults to 9/1. This field can be updated.
Cancel Reason Defaults to 42 (Unknown). Double-click the field for help in selecting a
different cancel reason.
Membership Level Defaults to All levels. Update Membership Level to one specific level, if
needed.
Percent of Obligation
to Remain
Defaults to 0%. This field can be updated.
Data Entry Tip: If you want to process a Full Cancel, the percent of obligation remaining should be 0%.
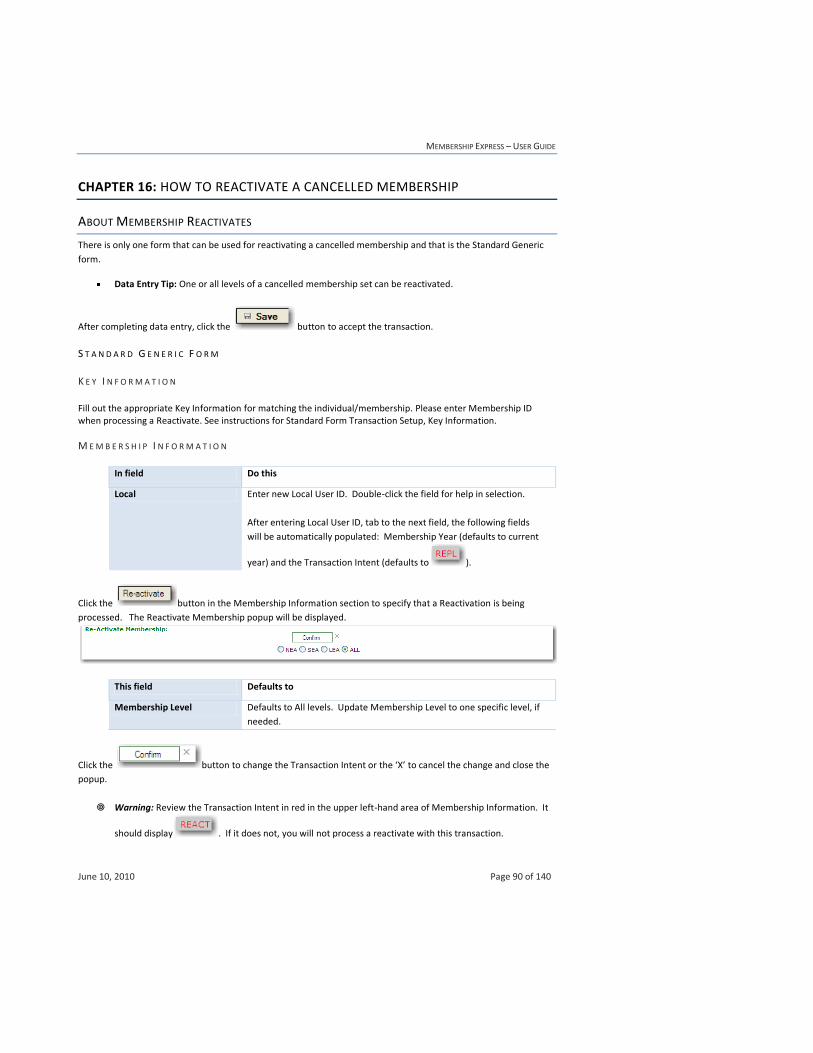
MEMBERSHIP EXPRESS – USER GUIDE
June 10, 2010 Page 90 of 140
CHAPTER 16: HOW TO REACTIVATE A CANCELLED MEMBERSHIP
ABOUT MEMBERSHIP REACTIVATES
There is only one form that can be used for reactivating a cancelled membership and that is the Standard Generic
form.
Data Entry Tip: One or all levels of a cancelled membership set can be reactivated.
After completing data entry, click the button to accept the transaction.
S T A N D A R D G E N E R I C F O R M
K E Y I N F O R M A T I O N
Fill out the appropriate Key Information for matching the individual/membership. Please enter Membership ID when processing a Reactivate. See instructions for Standard Form Transaction Setup, Key Information.
M E M B E R S H I P I N F O R M A T I O N
In field Do this
Local Enter new Local User ID. Double-click the field for help in selection.
After entering Local User ID, tab to the next field, the following fields
will be automatically populated: Membership Year (defaults to current
year) and the Transaction Intent (defaults to ).
Click the button in the Membership Information section to specify that a Reactivation is being
processed. The Reactivate Membership popup will be displayed.
This field Defaults to
Membership Level Defaults to All levels. Update Membership Level to one specific level, if
needed.
Click the button to change the Transaction Intent or the ‘X’ to cancel the change and close the
popup.
Warning: Review the Transaction Intent in red in the upper left-hand area of Membership Information. It
should display . If it does not, you will not process a reactivate with this transaction.

MEMBERSHIP EXPRESS – USER GUIDE
June 10, 2010 Page 91 of 140
At the same time you are processing a reactivate transaction, you can enter update information for the obligation,
payment method, employer, work location, subject, position, number of deductions and continuous indicator fields.
If no updates are included in the reactivate transaction, the membership will be returned to what it was before the
membership was canceled. Obligation amounts will return to the amounts reflected at the time of the cancellation.

MEMBERSHIP EXPRESS – USER GUIDE
June 10, 2010 Page 92 of 140
CHAPTER 17: HOW TO SET A GROUP OF MEMBERS TO CONTINUOUS
ABOUT SETTING A GROUP OF MEMBERS TO CONTINUOUS
To set the Continuous Indicator to Yes for a group of memberships, the Generate feature should be used.
U S E T H E G E N E R A T E F E A T U R E
USE A MEX STANDARD GENERIC FORM
Select the MEX Standard Generic form. You will use this form to populate the “template” transaction to be
replicated for individuals during the Generate process.
P O P U L A T E A R E P L M E M B E R S H I P T R A N S A C T I O N
Data Entry Tip: Do not populate the Key Information section. The system will automatically populate the
identifiers for the individuals during the Generate process.
Because this represents a change to non-critical membership data, you should populate a Replace or
membership transaction. There are two ways to populate a membership transaction.
The first is to process by Local:
In field Do this
Local Enter the Local User ID. Double-click the field for help in selection.
Membership Year Defaults to Current Year. Double-click for help in selection.
Transaction Function
Code Defaults to .
The second way allows you to not process by Local. In other words, you can process by State Affiliate:
In field Do this
Memb ID Enter 4 digit fictitious Membership ID (e.g.4444)
Membership Year Defaults to Current Year. Double-click for help in selection.
Transaction Function
Code Defaults to .
Warning: Do not remove the fictitious Memb ID; it will be overlaid with valid Membership IDs during the
Generate process.
M E M B E R S H I P I N F O R M A T I O N
In field Do this
Continuous Indicator Enter “Y” in the Continuous Indicator field.
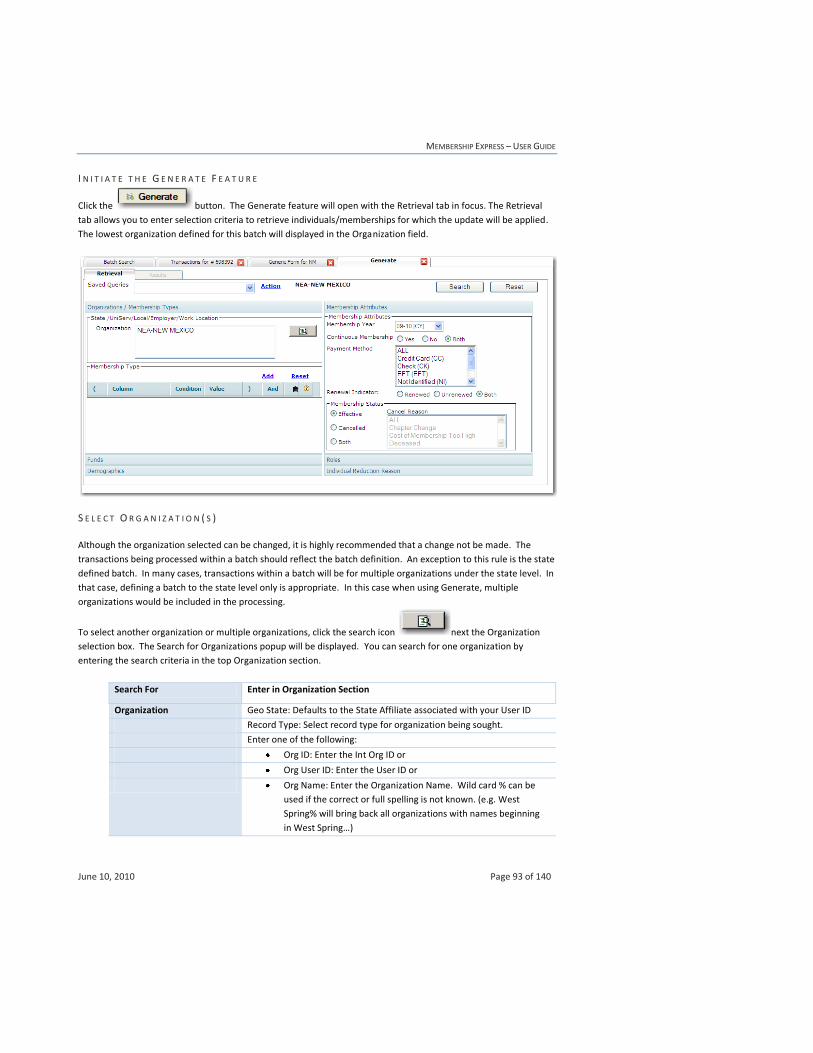
MEMBERSHIP EXPRESS – USER GUIDE
June 10, 2010 Page 93 of 140
I N I T I A T E T H E G E N E R A T E F E A T U R E
Click the button. The Generate feature will open with the Retrieval tab in focus. The Retrieval
tab allows you to enter selection criteria to retrieve individuals/memberships for which the update will be applied.
The lowest organization defined for this batch will displayed in the Organization field.
S E L E C T O R G A N I Z A T I O N ( S )
Although the organization selected can be changed, it is highly recommended that a change not be made. The
transactions being processed within a batch should reflect the batch definition. An exception to this rule is the state
defined batch. In many cases, transactions within a batch will be for multiple organizations under the state level. In
that case, defining a batch to the state level only is appropriate. In this case when using Generate, multiple
organizations would be included in the processing.
To select another organization or multiple organizations, click the search icon next the Organization
selection box. The Search for Organizations popup will be displayed. You can search for one organization by
entering the search criteria in the top Organization section.
Search For Enter in Organization Section
Organization Geo State: Defaults to the State Affiliate associated with your User ID
Record Type: Select record type for organization being sought.
Enter one of the following:
Org ID: Enter the Int Org ID or
Org User ID: Enter the User ID or
Org Name: Enter the Organization Name. Wild card % can be
used if the correct or full spelling is not known. (e.g. West
Spring% will bring back all organizations with names beginning
in West Spring…)
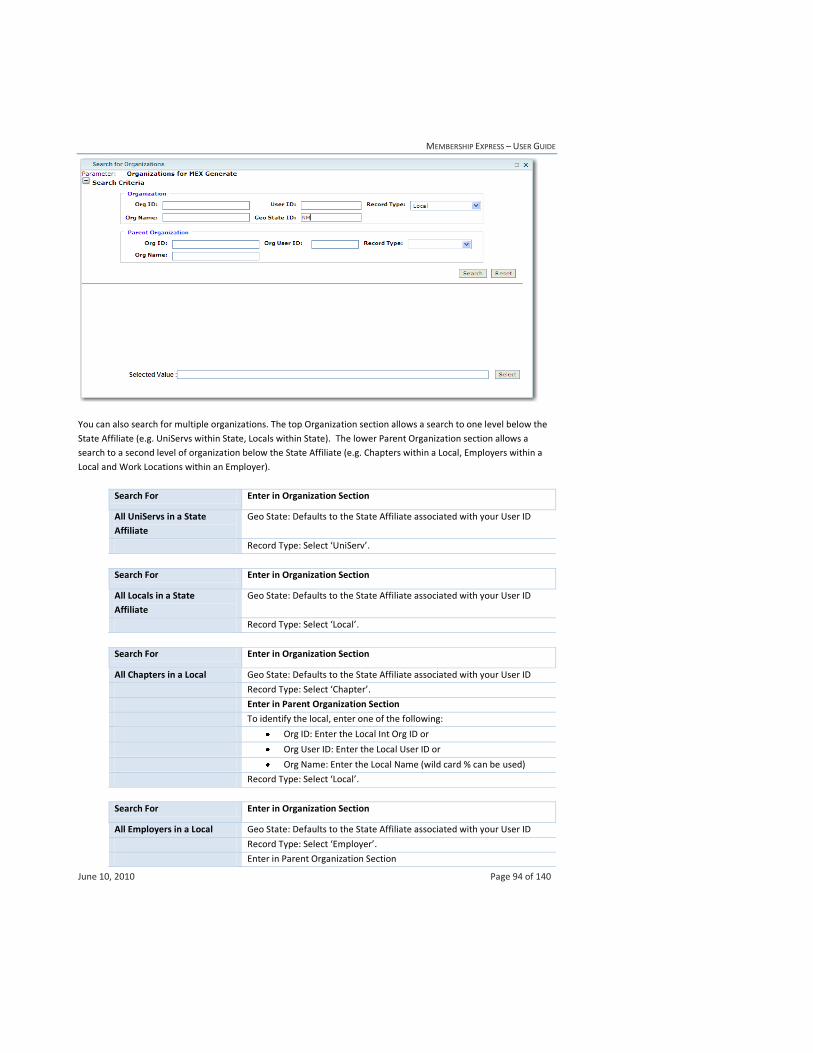
MEMBERSHIP EXPRESS – USER GUIDE
June 10, 2010 Page 94 of 140
You can also search for multiple organizations. The top Organization section allows a search to one level below the
State Affiliate (e.g. UniServs within State, Locals within State). The lower Parent Organization section allows a
search to a second level of organization below the State Affiliate (e.g. Chapters within a Local, Employers within a
Local and Work Locations within an Employer).
Search For Enter in Organization Section
All UniServs in a State
Affiliate
Geo State: Defaults to the State Affiliate associated with your User ID
Record Type: Select ‘UniServ’.
Search For Enter in Organization Section
All Locals in a State
Affiliate
Geo State: Defaults to the State Affiliate associated with your User ID
Record Type: Select ‘Local’.
Search For Enter in Organization Section
All Chapters in a Local Geo State: Defaults to the State Affiliate associated with your User ID
Record Type: Select ‘Chapter’.
Enter in Parent Organization Section
To identify the local, enter one of the following:
Org ID: Enter the Local Int Org ID or
Org User ID: Enter the Local User ID or
Org Name: Enter the Local Name (wild card % can be used)
Record Type: Select ‘Local’.
Search For Enter in Organization Section
All Employers in a Local Geo State: Defaults to the State Affiliate associated with your User ID
Record Type: Select ‘Employer’.
Enter in Parent Organization Section
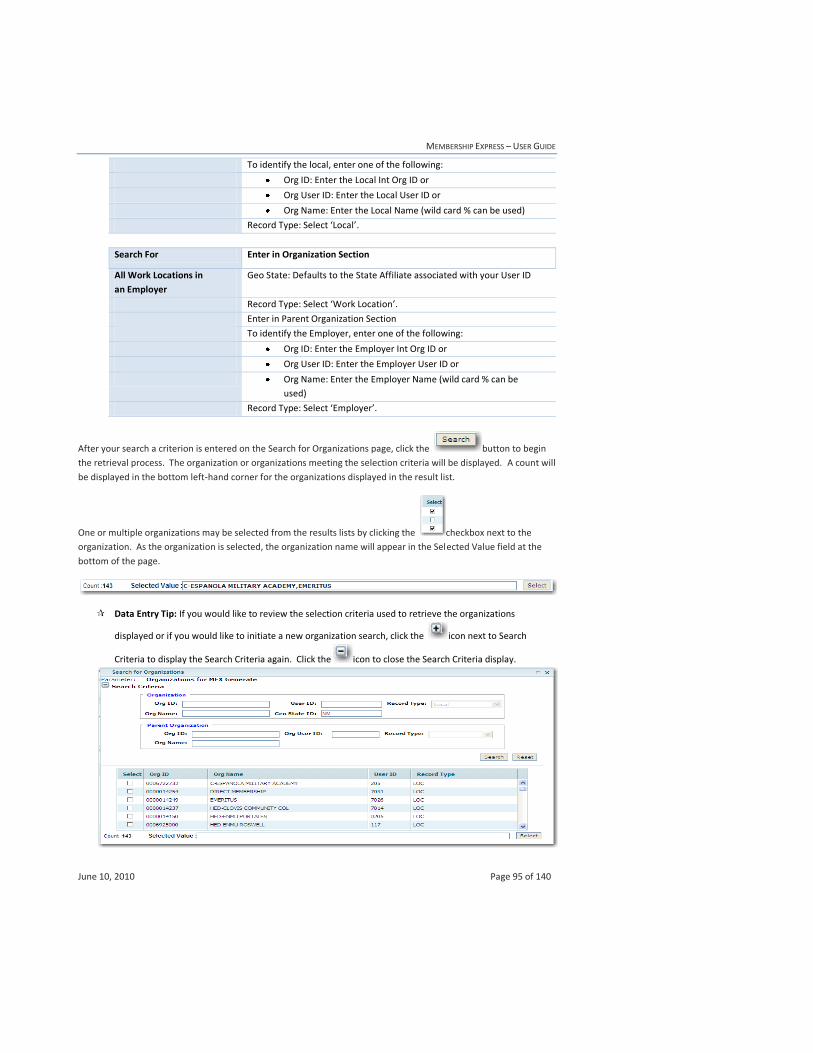
MEMBERSHIP EXPRESS – USER GUIDE
June 10, 2010 Page 95 of 140
To identify the local, enter one of the following:
Org ID: Enter the Local Int Org ID or
Org User ID: Enter the Local User ID or
Org Name: Enter the Local Name (wild card % can be used)
Record Type: Select ‘Local’.
Search For Enter in Organization Section
All Work Locations in
an Employer
Geo State: Defaults to the State Affiliate associated with your User ID
Record Type: Select ‘Work Location’.
Enter in Parent Organization Section
To identify the Employer, enter one of the following:
Org ID: Enter the Employer Int Org ID or
Org User ID: Enter the Employer User ID or
Org Name: Enter the Employer Name (wild card % can be
used)
Record Type: Select ‘Employer’.
After your search a criterion is entered on the Search for Organizations page, click the button to begin
the retrieval process. The organization or organizations meeting the selection criteria will be displayed. A count will
be displayed in the bottom left-hand corner for the organizations displayed in the result list.
One or multiple organizations may be selected from the results lists by clicking the checkbox next to the
organization. As the organization is selected, the organization name will appear in the Selected Value field at the
bottom of the page.
Data Entry Tip: If you would like to review the selection criteria used to retrieve the organizations
displayed or if you would like to initiate a new organization search, click the icon next to Search
Criteria to display the Search Criteria again. Click the icon to close the Search Criteria display.

MEMBERSHIP EXPRESS – USER GUIDE
June 10, 2010 Page 96 of 140
Once the organization selection is completed, click the button. You will be returned to the Generate tab.
The organization selections will be displayed in the Organization box.
S E L E C T E F F E C T I V E A N D N O N - C O N T I N U O U S M E M B E R S H I P S
Search For Enter in Membership Attributes Section
Effective Memberships Membership Status: Retain the default selection of ‘Effective’
Non-Continuous
Memberships
Continuous Membership: Click the radio button for ‘No’.
.
Entering additional selection criteria for retrieving individuals is specific to the organization performing this update.
Some suggestions follow:
Select the Payment Method of Payroll Deduction (PR) that is usually associated with Continuous
Memberships.
Select the specific Membership Types associated with Continuous Memberships. (For help, review
Selection by Membership Types, How to use the Generate Feature)
I N I T I A T E S E A R C H
After the search a criterion is entered, click the button to begin the retrieval process. Click the
button to clear the search criteria to start again.
R E V I E W I N D I V I D U A L S / M E M B E R S H I P S
When the query retrieval is complete, the individuals/memberships meeting the selection criteria will be displayed
on the Results tab. Fifty individuals will be loaded into the result list at a time. You can see the progress by
reviewing the total rows loaded to the total rows retrieved. It is recommended that you wait until all rows are
loaded before making your selections
If you want to begin selecting individuals for the Generate process before all rows are loaded into the result list,
click the button and make your selections. Click the button to resume the load.
The individuals/memberships in the result list can be reviewed by using the scroll bar.
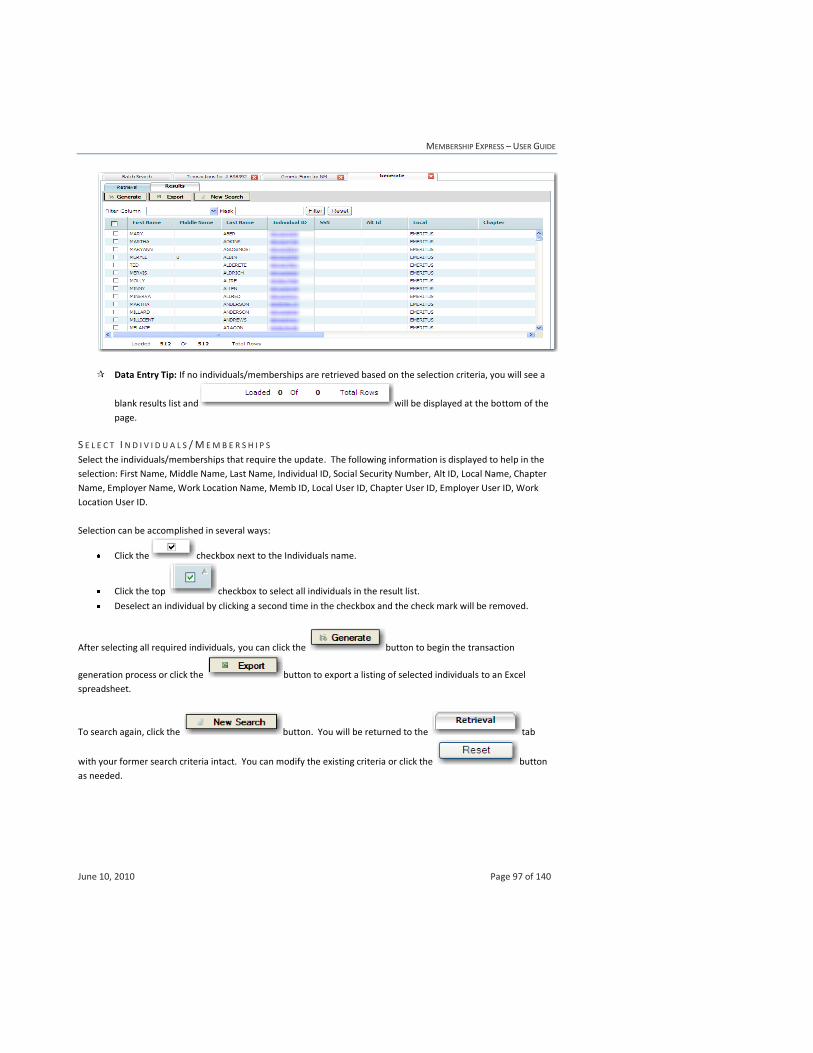
MEMBERSHIP EXPRESS – USER GUIDE
June 10, 2010 Page 97 of 140
Data Entry Tip: If no individuals/memberships are retrieved based on the selection criteria, you will see a
blank results list and will be displayed at the bottom of the
page.
S E L E C T I N D I V I D U A L S / M E M B E R S H I P S
Select the individuals/memberships that require the update. The following information is displayed to help in the
selection: First Name, Middle Name, Last Name, Individual ID, Social Security Number, Alt ID, Local Name, Chapter
Name, Employer Name, Work Location Name, Memb ID, Local User ID, Chapter User ID, Employer User ID, Work
Location User ID.
Selection can be accomplished in several ways:
Click the checkbox next to the Individuals name.
Click the top checkbox to select all individuals in the result list.
Deselect an individual by clicking a second time in the checkbox and the check mark will be removed.
After selecting all required individuals, you can click the button to begin the transaction
generation process or click the button to export a listing of selected individuals to an Excel
spreadsheet.
To search again, click the button. You will be returned to the tab
with your former search criteria intact. You can modify the existing criteria or click the button
as needed.
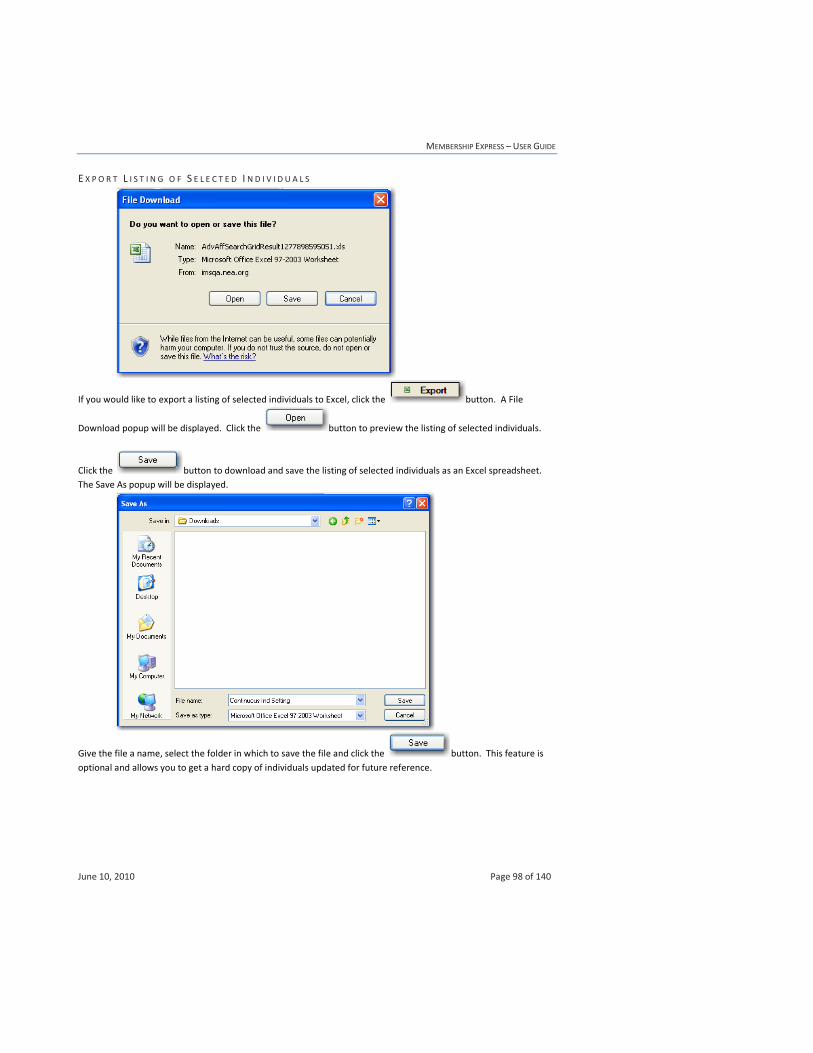
MEMBERSHIP EXPRESS – USER GUIDE
June 10, 2010 Page 98 of 140
E X P O R T L I S T I N G O F S E L E C T E D I N D I V I D U A L S
If you would like to export a listing of selected individuals to Excel, click the button. A File
Download popup will be displayed. Click the button to preview the listing of selected individuals.
Click the button to download and save the listing of selected individuals as an Excel spreadsheet.
The Save As popup will be displayed.
Give the file a name, select the folder in which to save the file and click the button. This feature is
optional and allows you to get a hard copy of individuals updated for future reference.
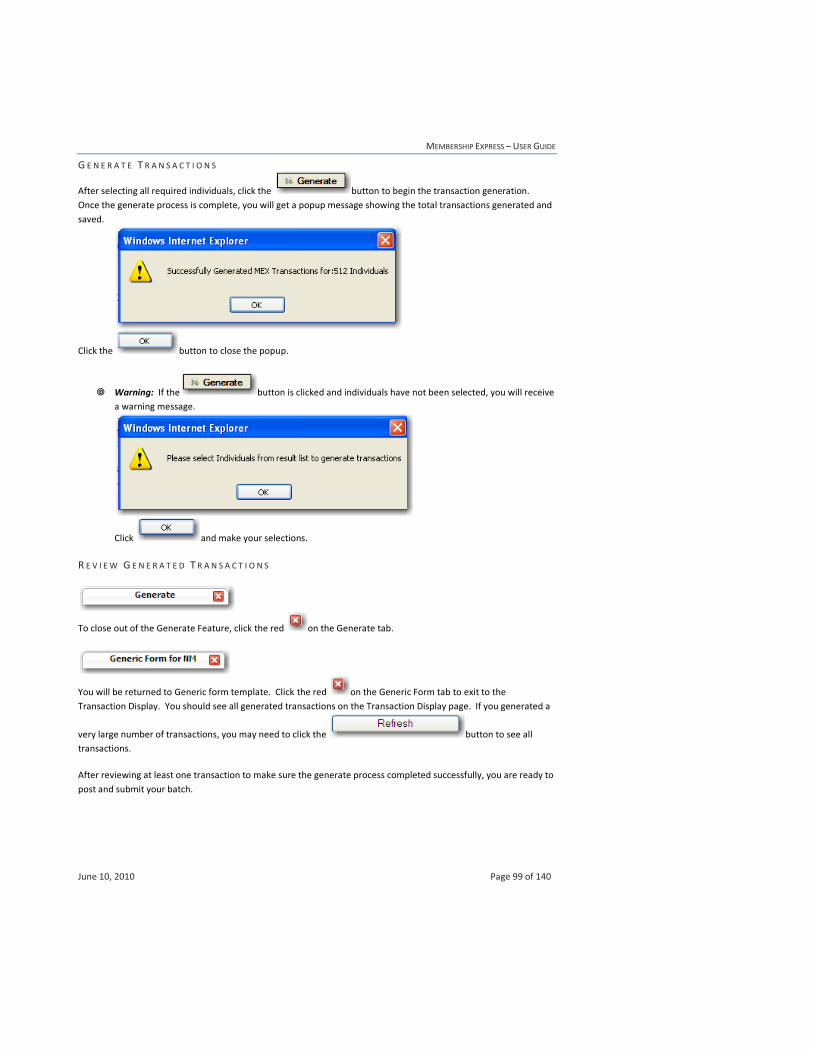
MEMBERSHIP EXPRESS – USER GUIDE
June 10, 2010 Page 99 of 140
G E N E R A T E T R A N S A C T I O N S
After selecting all required individuals, click the button to begin the transaction generation.
Once the generate process is complete, you will get a popup message showing the total transactions generated and
saved.
Click the button to close the popup.
Warning: If the button is clicked and individuals have not been selected, you will receive
a warning message.
Click and make your selections.
R E V I E W G E N E R A T E D T R A N S A C T I O N S
To close out of the Generate Feature, click the red on the Generate tab.
You will be returned to Generic form template. Click the red on the Generic Form tab to exit to the
Transaction Display. You should see all generated transactions on the Transaction Display page. If you generated a
very large number of transactions, you may need to click the button to see all
transactions.
After reviewing at least one transaction to make sure the generate process completed successfully, you are ready to
post and submit your batch.
MEMBERSHIP EXPRESS – USER GUIDE
June 10, 2010 Page 100 of 140
CHAPTER 18: HOW TO PERFORM OBLIGATION CHANGES
ABOUT OBLIGATION CHANGES
The first step in making any obligation changes to an existing membership is to think about whether this change to
obligation is considered an obligation change that should be represented in the your state, local or the NEA
obligation table setup in Utilities. If this is a change that should be reflected in the table setup, make the changes to
the Utilities table(s) first.
Once the Utilities table(s) has been updated, you will need to create MEX transactions to update the obligation
amounts for each individual membership or you could use the Update Member Obligation feature in Utilities.
To perform the obligation update using MEX, create a MEX batch and use the Standard Generic form or the
Continuous Roster form.
Data Entry Tip: If you are adding or updating a fund for multiple memberships within the same local or for
the same membership type, use the Generate feature.
After completing data entry, click the button to accept the transaction.
For processing obligation changes, use the Standard Generic or Continuous Roster form.
S T A N D A R D G E N E R I C O R C O N T I N U O U S R O S T E R F O R M
K E Y I N F O R M A T I O N
Fill out the appropriate Key Information for matching the individual/membership. Please enter Membership ID when processing an obligation change. See instructions for Standard Form Transaction Setup, Key Information.
M E M B E R S H I P I N F O R M A T I O N
To identify the membership that requires the obligation change, you must enter the following:
In field Do this
Local Enter the Local User ID. Double-click the field for help in selection.
Membership Year Defaults to Current Year. Double-click for help in selection.
Membership Intent Transaction Intent defaults to . This means you are attempting
to change or replace non-critical information for this membership. This is
the correct update intent for this change.
Warning: If more than one membership exists for the same local and membership year, the process will
not be able to uniquely identify the membership. The Membership ID will be required.
To Do This
Insert a row into the
obligation grid Click the link. An obligation row will be opened for update. Your
cursor will be positioned in the membership level field. You are now

MEMBERSHIP EXPRESS – USER GUIDE
June 10, 2010 Page 101 of 140
ready to populate the row.
By the way: Once one obligation row has been created in the obligation grid, use the icon to easily create a new row. Just tab to the icon and hit the Enter key, a new row will be presented.
In field Do this
Mshp Level Enter the Membership Level (NEA, SEA, LEA). Double-click the field for
help in selection.
Fund ID Enter the Fund ID for the fund being changed or added (e.g. D01, P01,
U01, F01).
Data Entry Tip: Refer to Funds Setup in the Utilities Subsystem
for your associated Fund IDs.
Amount Enter the obligation amount.
Data Entry Tip: If zero (0.00) is populated in the obligation
amount for a non-required fund, the process will delete the
fund from the membership obligation.
Data Entry Tip: If zero (0.00) is populated in the obligation
amount for a required fund, the process will retain the fund in
the membership obligation and zero out the obligation
amount for the fund.
Pay Method Enter the Payment Method code if the payment method is changing or
a new fund is being added. Double-click the field for help in selection.
Repeat steps above for each obligation row as needed.
Data Entry Tip: If the fund does not exist, it will be added using the information in the obligation row. If the fund does exist, it will be replaced with the information in the obligation row.
Warning: A non-required fund cannot be added in MEX with a zero (0.00) amount. If the obligation row is
populated in MEX for a non-required fund and a zero obligation amount (either with zero populated in the
obligation row or left blank and the suggested amount in Utilities equals zero), the update will be ignored
and the fund will not be added.
You have completed the obligation update.
Data Entry Tip: If this change is being applied to multiple individuals, you may want to use the setup functionality to copy the obligation change transaction for the next individual.
MEMBERSHIP EXPRESS – USER GUIDE
June 10, 2010 Page 102 of 140
CHAPTER 19: HOW TO PERFORM PAYMENT METHOD CHANGES
ABOUT PAYMENT METHOD CHANGES
There are three forms that can be used for changing a Payment Method. The Standard Generic form, Continuous
Roster form or Global Pay Method Change form can be used.
After completing data entry, click the button to accept the transaction.
S T A N D A R D G E N E R I C O R C O N T I N U O U S R O S T E R F O R M
K E Y I N F O R M A T I O N
Fill out the appropriate Key Information for matching the individual/membership. Please enter Membership ID when processing a payment method change. See instructions for Standard Form Transaction Setup, Key Information.
M E M B E R S H I P I N F O R M A T I O N
To identify the membership that requires the obligation change, you must enter the following:
In field Do this
Local Enter the Local User ID. Double-click the field for help in selection.
Membership Year Defaults to Current Year. Double-click for help in selection.
Membership Intent Transaction Intent defaults to . This means you are attempting
to change or replace non-critical information for this membership. This is
the correct update intent for this change.
Warning: You cannot change a payment method for a membership by entering the new payment method
in the Membership area. You must populate obligation rows with the new payment method for each fund
receiving the change.
To Do This
Insert a row into the
obligation grid Click the link. An obligation row will be opened for update. Your
cursor will be positioned in the membership level field. You are now
ready to populate the row.
By the way: Once one obligation row has been created in the obligation grid, use the icon to easily create a new row. Just tab to the icon and hit the Enter key, a new row will be presented.
In field Do this
Mshp Level Enter the Membership Level (NEA, SEA, LEA). Double-click the field for
help in selection.
Fund ID Enter the Fund ID for the fund being updated (e.g. D01, P01, U01, F01).
Data Entry Tip: Refer to Funds Setup in the Utilities Subsystem
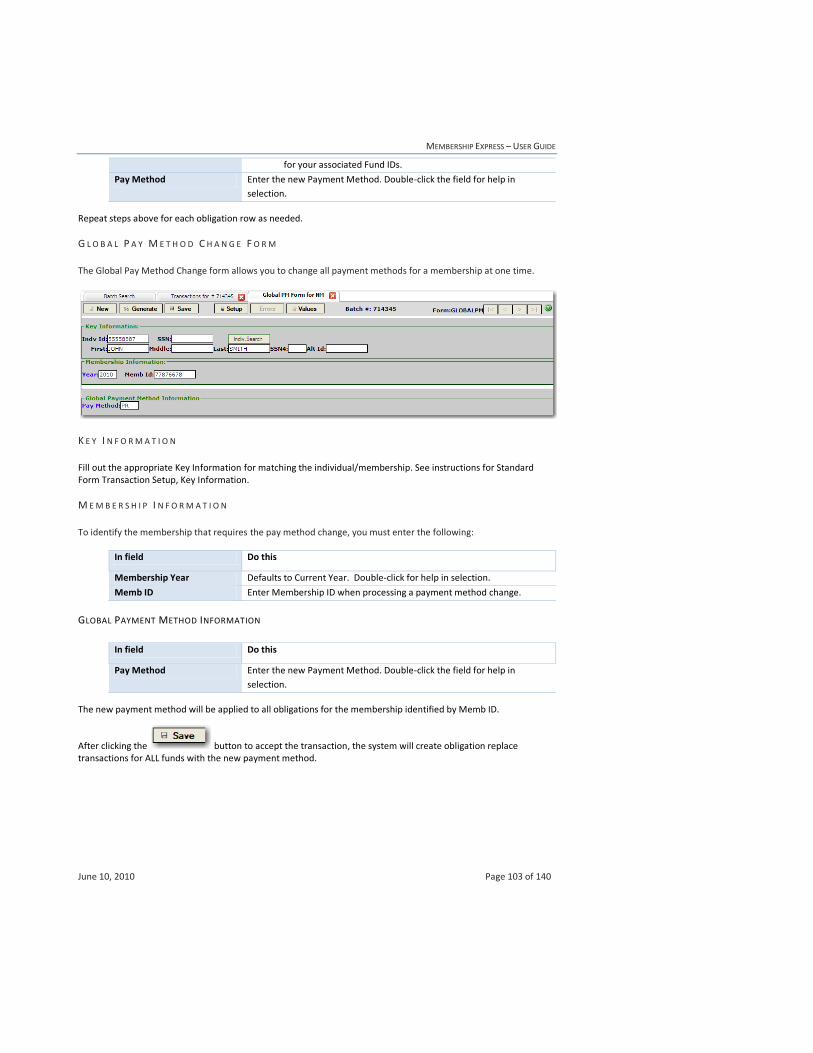
MEMBERSHIP EXPRESS – USER GUIDE
June 10, 2010 Page 103 of 140
for your associated Fund IDs.
Pay Method Enter the new Payment Method. Double-click the field for help in
selection.
Repeat steps above for each obligation row as needed.
G L O B A L P A Y M E T H O D C H A N G E F O R M
The Global Pay Method Change form allows you to change all payment methods for a membership at one time.
K E Y I N F O R M A T I O N
Fill out the appropriate Key Information for matching the individual/membership. See instructions for Standard Form Transaction Setup, Key Information.
M E M B E R S H I P I N F O R M A T I O N
To identify the membership that requires the pay method change, you must enter the following:
In field Do this
Membership Year Defaults to Current Year. Double-click for help in selection.
Memb ID Enter Membership ID when processing a payment method change.
GLOBAL PAYMENT METHOD INFORMATION
In field Do this
Pay Method Enter the new Payment Method. Double-click the field for help in
selection.
The new payment method will be applied to all obligations for the membership identified by Memb ID.
After clicking the button to accept the transaction, the system will create obligation replace transactions for ALL funds with the new payment method.
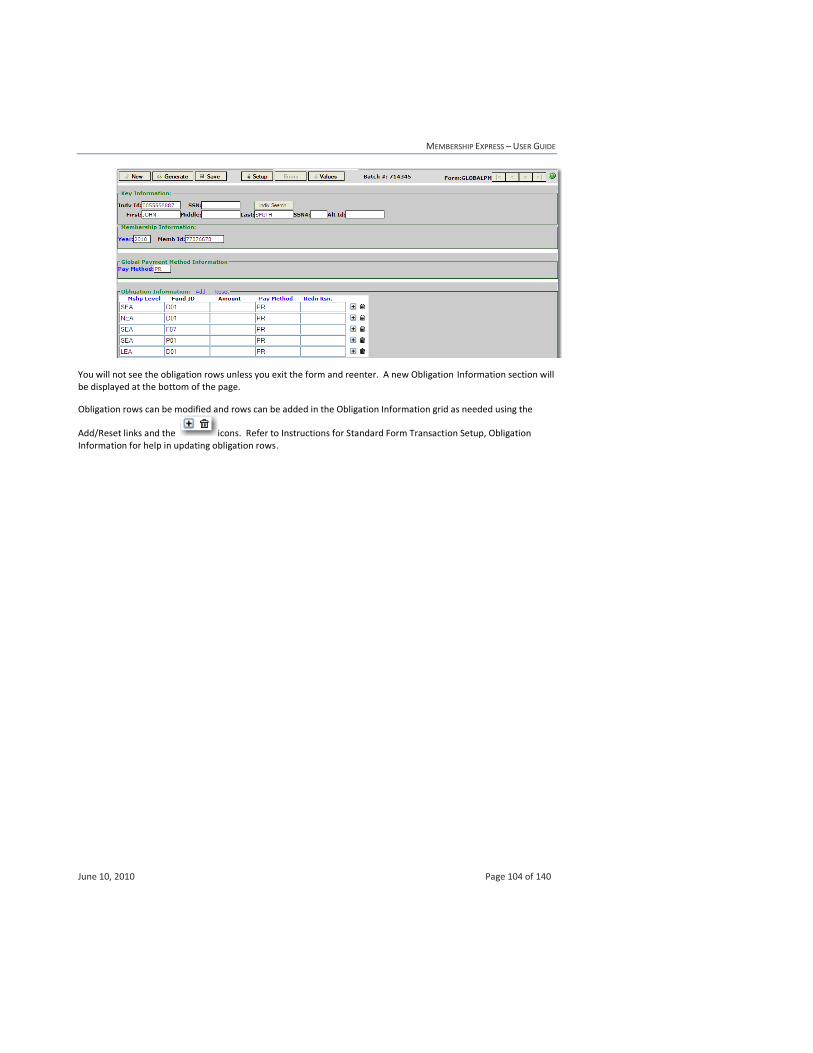
MEMBERSHIP EXPRESS – USER GUIDE
June 10, 2010 Page 104 of 140
You will not see the obligation rows unless you exit the form and reenter. A new Obligation Information section will be displayed at the bottom of the page.
Obligation rows can be modified and rows can be added in the Obligation Information grid as needed using the
Add/Reset links and the icons. Refer to Instructions for Standard Form Transaction Setup, Obligation Information for help in updating obligation rows.
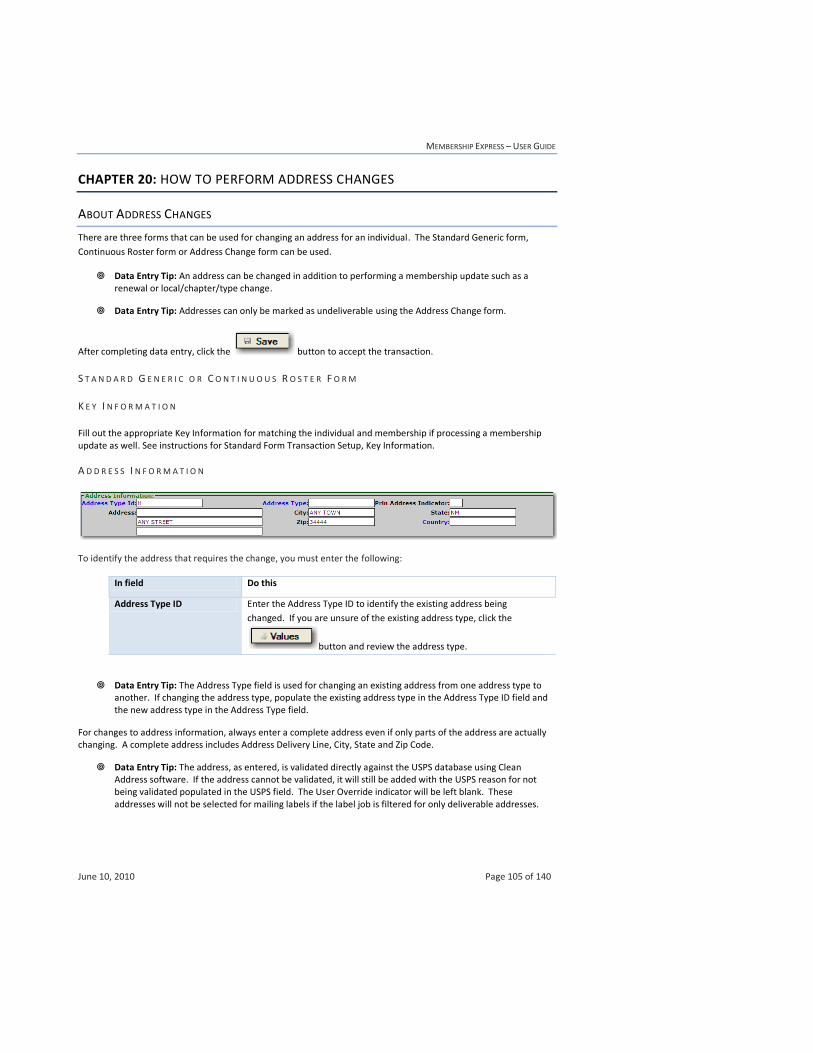
MEMBERSHIP EXPRESS – USER GUIDE
June 10, 2010 Page 105 of 140
CHAPTER 20: HOW TO PERFORM ADDRESS CHANGES
ABOUT ADDRESS CHANGES
There are three forms that can be used for changing an address for an individual. The Standard Generic form,
Continuous Roster form or Address Change form can be used.
Data Entry Tip: An address can be changed in addition to performing a membership update such as a renewal or local/chapter/type change.
Data Entry Tip: Addresses can only be marked as undeliverable using the Address Change form.
After completing data entry, click the button to accept the transaction.
S T A N D A R D G E N E R I C O R C O N T I N U O U S R O S T E R F O R M
K E Y I N F O R M A T I O N
Fill out the appropriate Key Information for matching the individual and membership if processing a membership update as well. See instructions for Standard Form Transaction Setup, Key Information.
A D D R E S S I N F O R M A T I O N
To identify the address that requires the change, you must enter the following:
In field Do this
Address Type ID Enter the Address Type ID to identify the existing address being
changed. If you are unsure of the existing address type, click the
button and review the address type.
Data Entry Tip: The Address Type field is used for changing an existing address from one address type to another. If changing the address type, populate the existing address type in the Address Type ID field and the new address type in the Address Type field.
For changes to address information, always enter a complete address even if only parts of the address are actually changing. A complete address includes Address Delivery Line, City, State and Zip Code.
Data Entry Tip: The address, as entered, is validated directly against the USPS database using Clean Address software. If the address cannot be validated, it will still be added with the USPS reason for not being validated populated in the USPS field. The User Override indicator will be left blank. These addresses will not be selected for mailing labels if the label job is filtered for only deliverable addresses.

MEMBERSHIP EXPRESS – USER GUIDE
June 10, 2010 Page 106 of 140
A D D R E S S C H A N G E F O R M
K E Y I N F O R M A T I O N
Fill out the appropriate Key Information for matching the individual. See instructions for Standard Form Transaction Setup, Key Information.
A D D R E S S I N F O R M A T I O N
To identify the address that requires the change, you must enter the following:
In field Do this
Address Type ID Enter the Address Type ID to identify the existing address being
changed. If you are unsure of the existing address type, click the
button and review the address type.
For changes to address information, always enter a complete address even if only parts of the address are actually changing. A complete address includes Address Delivery Line, City, State and Zip Code.
In field Do this
Undeliverable Ind To mark an existing address as Undeliverable or Deliverable, only enter
the address type and double-click on the Deliverable Indicator. Set
Deliverable (1) or Undeliverable (2).
Data Entry Tip: The address, as entered, is validated directly against the USPS database using Clean Address software. If the address cannot be validated, it will still be added with the USPS reason for not being validated populated in the USPS field. The User Override indicator will be left blank. These addresses will not be selected for mailing labels if the label job is filtered for only deliverable addresses.
Data Entry Tip: Labels produced using the I&A System will display all information needed to update addresses associated with returned or undeliverable mail. The following information is printed on I&A labels: Individual ID, Name and Address Type.
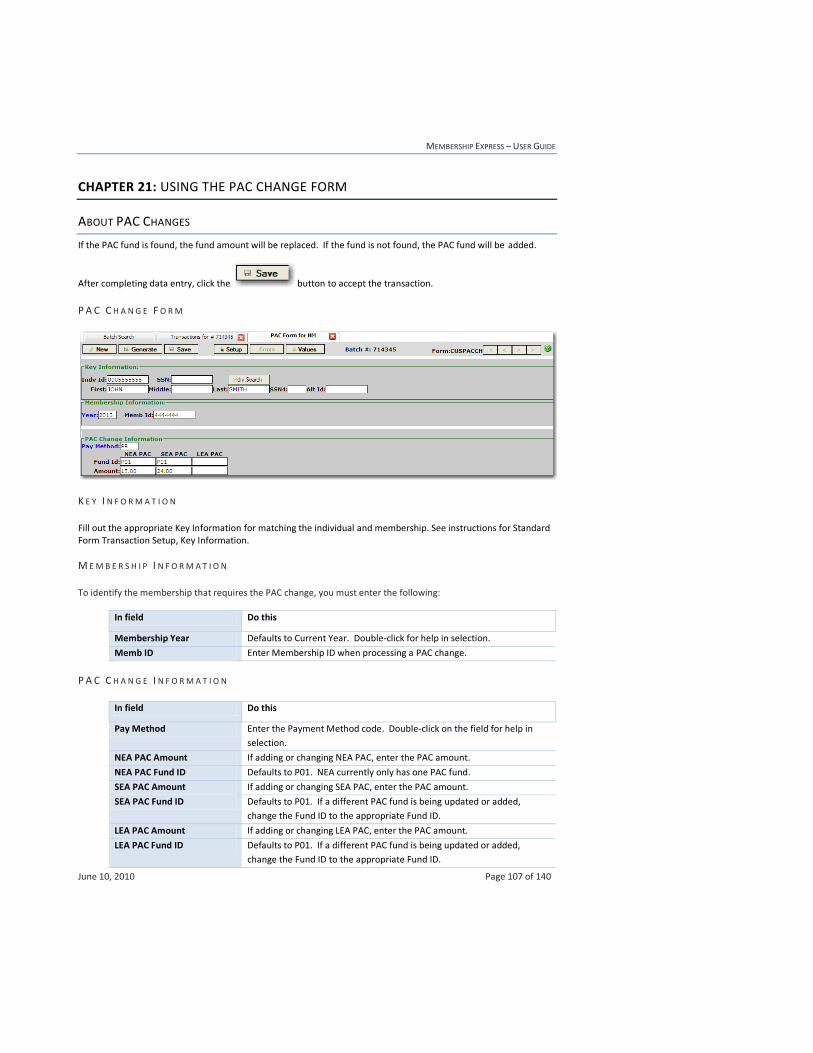
MEMBERSHIP EXPRESS – USER GUIDE
June 10, 2010 Page 107 of 140
CHAPTER 21: USING THE PAC CHANGE FORM
ABOUT PAC CHANGES
If the PAC fund is found, the fund amount will be replaced. If the fund is not found, the PAC fund will be added.
After completing data entry, click the button to accept the transaction.
P A C C H A N G E F O R M
K E Y I N F O R M A T I O N
Fill out the appropriate Key Information for matching the individual and membership. See instructions for Standard Form Transaction Setup, Key Information.
M E M B E R S H I P I N F O R M A T I O N
To identify the membership that requires the PAC change, you must enter the following:
In field Do this
Membership Year Defaults to Current Year. Double-click for help in selection.
Memb ID Enter Membership ID when processing a PAC change.
P A C C H A N G E I N F O R M A T I O N
In field Do this
Pay Method Enter the Payment Method code. Double-click on the field for help in
selection.
NEA PAC Amount If adding or changing NEA PAC, enter the PAC amount.
NEA PAC Fund ID Defaults to P01. NEA currently only has one PAC fund.
SEA PAC Amount If adding or changing SEA PAC, enter the PAC amount.
SEA PAC Fund ID Defaults to P01. If a different PAC fund is being updated or added,
change the Fund ID to the appropriate Fund ID.
LEA PAC Amount If adding or changing LEA PAC, enter the PAC amount.
LEA PAC Fund ID Defaults to P01. If a different PAC fund is being updated or added,
change the Fund ID to the appropriate Fund ID.
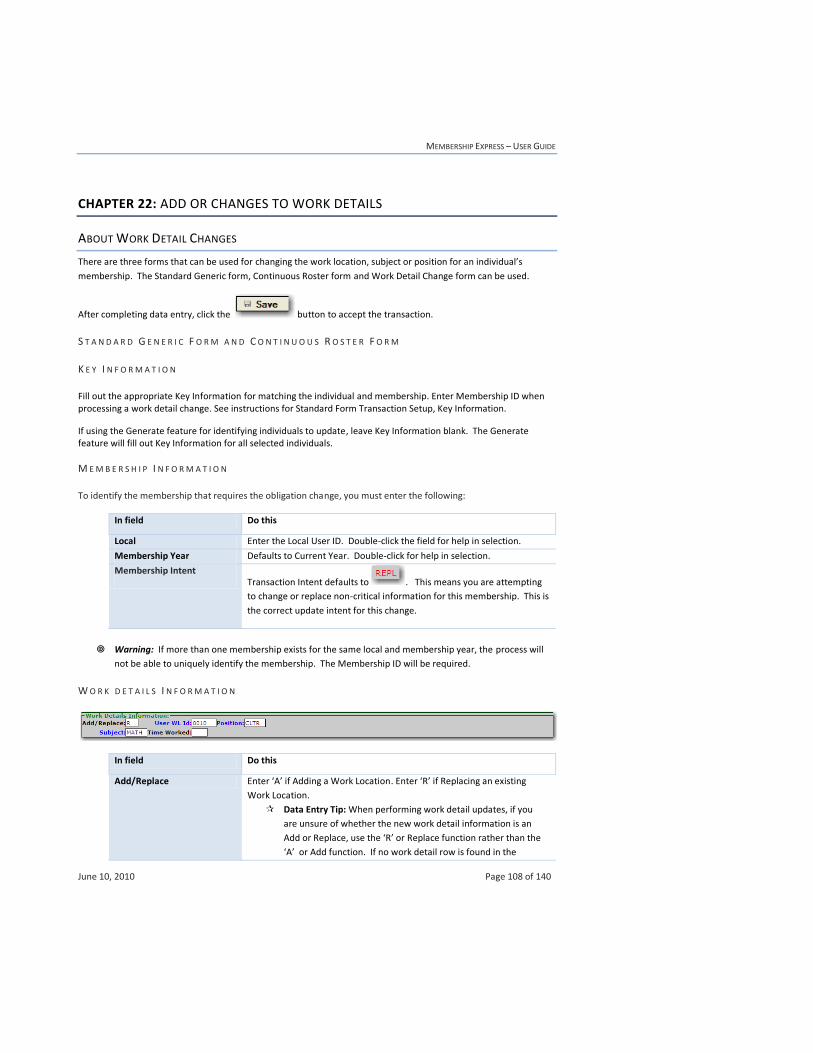
MEMBERSHIP EXPRESS – USER GUIDE
June 10, 2010 Page 108 of 140
CHAPTER 22: ADD OR CHANGES TO WORK DETAILS
ABOUT WORK DETAIL CHANGES
There are three forms that can be used for changing the work location, subject or position for an individual’s
membership. The Standard Generic form, Continuous Roster form and Work Detail Change form can be used.
After completing data entry, click the button to accept the transaction.
S T A N D A R D G E N E R I C F O R M A N D C O N T I N U O U S R O S T E R F O R M
K E Y I N F O R M A T I O N
Fill out the appropriate Key Information for matching the individual and membership. Enter Membership ID when processing a work detail change. See instructions for Standard Form Transaction Setup, Key Information.
If using the Generate feature for identifying individuals to update, leave Key Information blank. The Generate feature will fill out Key Information for all selected individuals.
M E M B E R S H I P I N F O R M A T I O N
To identify the membership that requires the obligation change, you must enter the following:
In field Do this
Local Enter the Local User ID. Double-click the field for help in selection.
Membership Year Defaults to Current Year. Double-click for help in selection.
Membership Intent Transaction Intent defaults to . This means you are attempting
to change or replace non-critical information for this membership. This is
the correct update intent for this change.
Warning: If more than one membership exists for the same local and membership year, the process will
not be able to uniquely identify the membership. The Membership ID will be required.
W O R K D E T A I L S I N F O R M A T I O N
In field Do this
Add/Replace Enter ‘A’ if Adding a Work Location. Enter ‘R’ if Replacing an existing
Work Location.
Data Entry Tip: When performing work detail updates, if you
are unsure of whether the new work detail information is an
Add or Replace, use the ‘R’ or Replace function rather than the
‘A’ or Add function. If no work detail row is found in the

MEMBERSHIP EXPRESS – USER GUIDE
June 10, 2010 Page 109 of 140
database to replace, the process will change the Replace to an
Add transaction.
You cannot delete a work location in MEX. The deletion of a work
location must be accomplished in MOE.
User WL ID Enter the Work Location User ID. Double-click on the field for help in
selection. The Employer User ID must be populated in the Employer
field to receive help on Work Location User IDs.
Position Enter the Position Code. Double-click for help in selection. The
Employer User ID must be populated in the Employer field to receive
help on Position Codes.
Subject Enter the Subject Code. Double-click for help in selection. The
Employer User ID must be populated in the Employer field to receive
help on Subject Codes.
Time Worked Enter the percent of Time Worked at this location, if available.
W O R K D E T A I L C H A N G E F O R M
K E Y I N F O R M A T I O N
Fill out the appropriate Key Information for matching the individual and membership. See instructions for Standard Form Transaction Setup, Key Information.
M E M B E R S H I P I N F O R M A T I O N
To identify the membership that requires the Work Detail change, you must enter the following:
In field Do this
Membership Year Defaults to Current Year. Double-click for help in selection.
Memb ID Enter Membership ID when processing a Work Detail change.
W O R K D E T A I L S I N F O R M A T I O N
In field Do this
Add/Replace Enter ‘A’ if Adding a Work Location. Enter ‘R’ if Replacing an existing
Work Location.
Data Entry Tip: When performing work detail updates, if you
are unsure of whether the new work detail information is an
Add or Replace, use the ‘R’ or Replace function rather than the

MEMBERSHIP EXPRESS – USER GUIDE
June 10, 2010 Page 110 of 140
‘A’ or Add function. If no work detail row is found in the
database to replace, the process will change the Replace to an
Add transaction.
You cannot delete a work location in MEX. The deletion of a work
location must be accomplished in MOE.
User WL ID Enter the Work Location User ID. Double-click on the field for help in
selection. The Employer User ID must be populated in the Employer
field to receive help on Work Location User IDs.
Position Enter the Position Code. Double-click for help in selection. The
Employer User ID must be populated in the Employer field to receive
help on Position Codes.
Subject Enter the Subject Code. Double-click for help in selection. The
Employer User ID must be populated in the Employer field to receive
help on Subject Codes.
Time Worked Enter the percent of Time Worked at this location, if available.

MEMBERSHIP EXPRESS – USER GUIDE
June 10, 2010 Page 111 of 140
CHAPTER 23: USING THE REFUND/OPT OUT FORM
ABOUT REFUND/OPT OUT
The Refund/Opt Out form can be used to record the request for Refund or Opt Out on a required fund.
After completing data entry, click the button to accept the transaction.
R E F U N D / O P T O U T F O R M
K E Y I N F O R M A T I O N
Fill out the appropriate Key Information for matching the individual and membership. Enter Membership ID when processing updates to Refund/Opt Out Information. See instructions for Standard Form Transaction Setup, Key Information.
M E M B E R S H I P I N F O R M A T I O N
To identify the membership that requires the Work Detail change, you must enter the following:
In field Do this
Membership Year Defaults to Current Year. Double-click for help in selection.
Memb ID Enter Membership ID when processing a Work Detail change.
R E F U N D / O P T O U T I N F O R M A T I O N
In field Do this
Fund Level Select the Fund Level (NEA, SEA, LEA) for the fund for which the
request is being recorded. Double-click for help in selection.
Fund ID Enter the Fund ID to identify the fund for which the request is being recorded.
Request Date Defaults to Current Date. This field can be updated.
Comments Enter optional comments in the free-form text field. Record Opt
Out or Refund details here.
Refund/Opt Out Enter ‘R’ for Refund or ‘O’ for Opt Out. Defaults to ‘R’. Double-click
for help in selection.

MEMBERSHIP EXPRESS – USER GUIDE
June 10, 2010 Page 112 of 140
Data Entry Tip: The recording of the request for Refund or Opt Out does not make any adjustments to obligation.
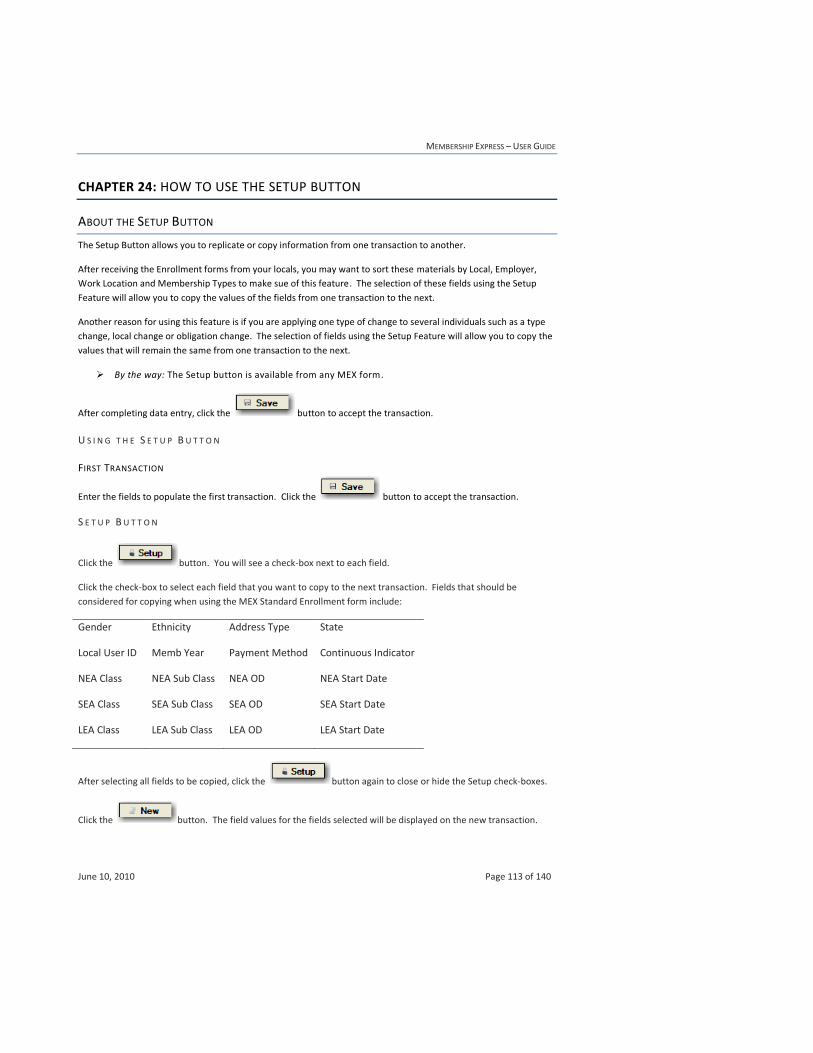
MEMBERSHIP EXPRESS – USER GUIDE
June 10, 2010 Page 113 of 140
CHAPTER 24: HOW TO USE THE SETUP BUTTON
ABOUT THE SETUP BUTTON
The Setup Button allows you to replicate or copy information from one transaction to another.
After receiving the Enrollment forms from your locals, you may want to sort these materials by Local, Employer,
Work Location and Membership Types to make sue of this feature. The selection of these fields using the Setup
Feature will allow you to copy the values of the fields from one transaction to the next.
Another reason for using this feature is if you are applying one type of change to several individuals such as a type
change, local change or obligation change. The selection of fields using the Setup Feature will allow you to copy the
values that will remain the same from one transaction to the next.
By the way: The Setup button is available from any MEX form.
After completing data entry, click the button to accept the transaction.
U S I N G T H E S E T U P B U T T O N
FIRST TRANSACTION
Enter the fields to populate the first transaction. Click the button to accept the transaction.
S E T U P B U T T O N
Click the button. You will see a check-box next to each field.
Click the check-box to select each field that you want to copy to the next transaction. Fields that should be
considered for copying when using the MEX Standard Enrollment form include:
Gender Ethnicity Address Type State
Local User ID Memb Year Payment Method Continuous Indicator
NEA Class NEA Sub Class NEA OD NEA Start Date
SEA Class SEA Sub Class SEA OD SEA Start Date
LEA Class LEA Sub Class LEA OD LEA Start Date
After selecting all fields to be copied, click the button again to close or hide the Setup check-boxes.
Click the button. The field values for the fields selected will be displayed on the new transaction.
MEMBERSHIP EXPRESS – USER GUIDE
June 10, 2010 Page 114 of 140
Data Entry Tip: The Setup Feature is available at any time. Simply click the button to change copy settings.
MEMBERSHIP EXPRESS – USER GUIDE
June 10, 2010 Page 115 of 140
CHAPTER 25: HOW TO USE THE GENERATE BUTTON
ABOUT THE GENERATE BUTTON
The Generate Button allows you to apply one change to a group of individuals. To use the Generate Feature, the
entire change transaction must be populated except for filing in Key Information. This change will be replicated for
all individuals retrieved and selected for the Generation process. After selecting the individuals to receive this
identical change, the system will file in the Key Information for these individuals automatically.
Examples of possible applications are applying a:
Local dues obligation change to everyone in a local
Continuous code update of Yes or No to a group of individuals
Cancellation of memberships for a group of individuals
Renewal of memberships for a group of individuals
Membership local or type change to the memberships for a group of individuals
Warning: This is a very powerful tool. Please be careful in applying changes using the Generate Feature.
If a mistake is made, it does not just affect one individual. It could affect thousands of individuals .
U S I N G T H E G E N E R A T E B U T T O N
C R E A T E A M E X B A T C H
Create a MEX Batch. Next, select a Transaction form and populate the change or ‘template’ transaction.
Data Entry Tip: Do not populate the Key Information section. The system will populate the identifiers for the individuals selected automatically. Remember to populate the change or ‘template’ transaction before
clicking on the button. If you forget this step, blank transactions will be created for the individuals selected.
I N I T I A T E T H E G E N E R A T E F E A T U R E
Click the button. The Generate feature will open with the Retrieval tab in focus. The Retrieval
tab allows you to enter selection criteria to retrieve individuals/memberships for which the update will be applied.
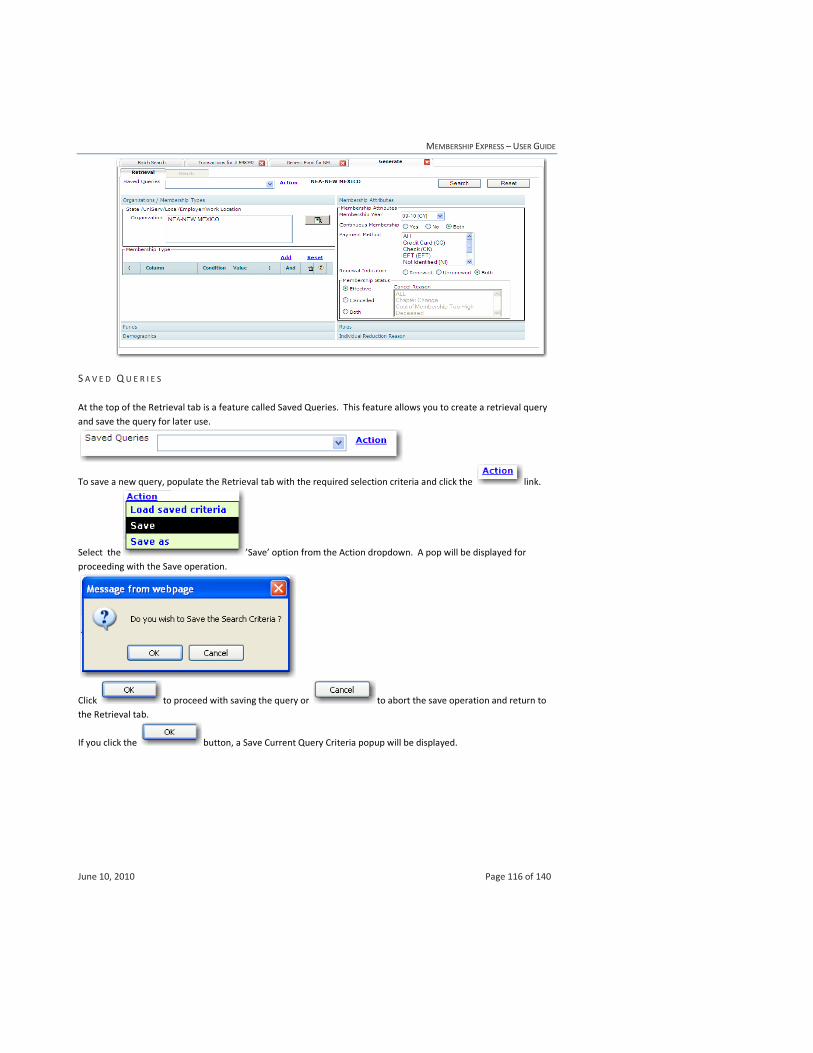
MEMBERSHIP EXPRESS – USER GUIDE
June 10, 2010 Page 116 of 140
S A V E D Q U E R I E S
At the top of the Retrieval tab is a feature called Saved Queries. This feature allows you to create a retrieval query
and save the query for later use.
To save a new query, populate the Retrieval tab with the required selection criteria and click the link.
Select the ’Save’ option from the Action dropdown. A pop will be displayed for
proceeding with the Save operation.
Click to proceed with saving the query or to abort the save operation and return to
the Retrieval tab.
If you click the button, a Save Current Query Criteria popup will be displayed.
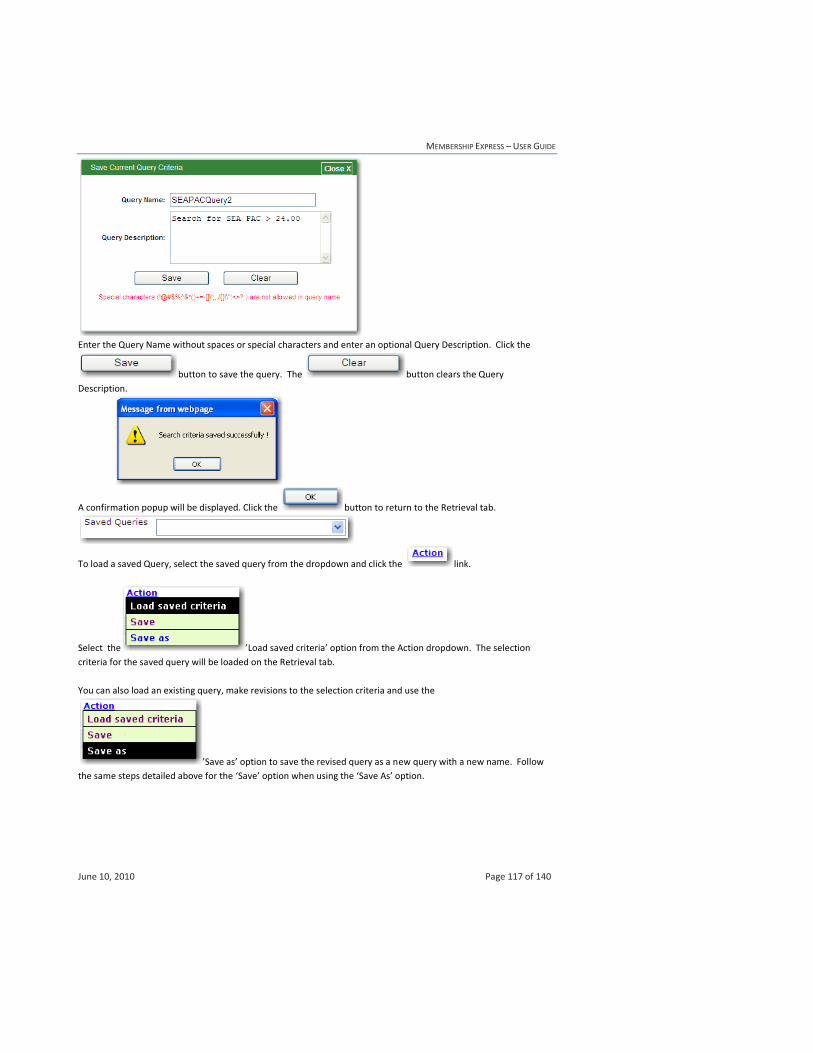
MEMBERSHIP EXPRESS – USER GUIDE
June 10, 2010 Page 117 of 140
Enter the Query Name without spaces or special characters and enter an optional Query Description. Click the
button to save the query. The button clears the Query
Description.
A confirmation popup will be displayed. Click the button to return to the Retrieval tab.
To load a saved Query, select the saved query from the dropdown and click the link.
Select the ’Load saved criteria’ option from the Action dropdown. The selection
criteria for the saved query will be loaded on the Retrieval tab.
You can also load an existing query, make revisions to the selection criteria and use the
’Save as’ option to save the revised query as a new query with a new name. Follow
the same steps detailed above for the ‘Save’ option when using the ‘Save As’ option.
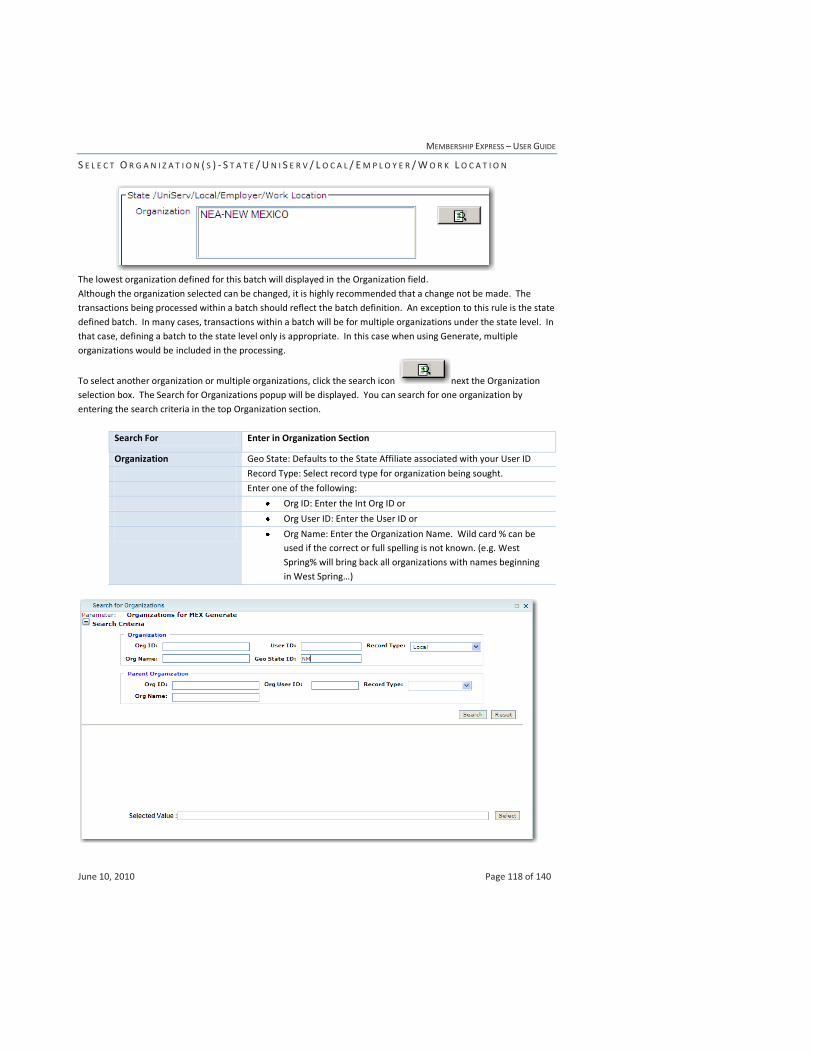
MEMBERSHIP EXPRESS – USER GUIDE
June 10, 2010 Page 118 of 140
S E L E C T O R G A N I Z A T I O N ( S ) - S T A T E / U N I S E R V / L O C A L / E M P L O Y E R / W O R K L O C A T I O N
The lowest organization defined for this batch will displayed in the Organization field.
Although the organization selected can be changed, it is highly recommended that a change not be made. The
transactions being processed within a batch should reflect the batch definition. An exception to this rule is the state
defined batch. In many cases, transactions within a batch will be for multiple organizations under the state level. In
that case, defining a batch to the state level only is appropriate. In this case when using Generate, multiple
organizations would be included in the processing.
To select another organization or multiple organizations, click the search icon next the Organization
selection box. The Search for Organizations popup will be displayed. You can search for one organization by
entering the search criteria in the top Organization section.
Search For Enter in Organization Section
Organization Geo State: Defaults to the State Affiliate associated with your User ID
Record Type: Select record type for organization being sought.
Enter one of the following:
Org ID: Enter the Int Org ID or
Org User ID: Enter the User ID or
Org Name: Enter the Organization Name. Wild card % can be
used if the correct or full spelling is not known. (e.g. West
Spring% will bring back all organizations with names beginning
in West Spring…)
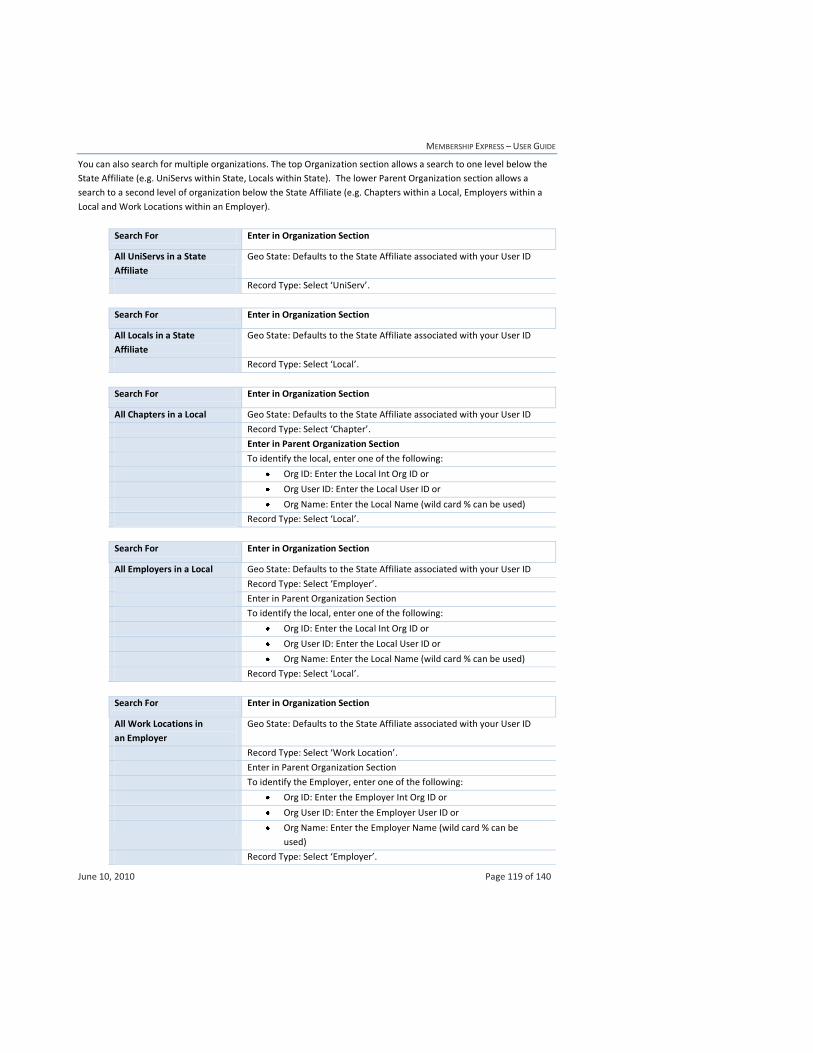
MEMBERSHIP EXPRESS – USER GUIDE
June 10, 2010 Page 119 of 140
You can also search for multiple organizations. The top Organization section allows a search to one level below the
State Affiliate (e.g. UniServs within State, Locals within State). The lower Parent Organization section allows a
search to a second level of organization below the State Affiliate (e.g. Chapters within a Local, Employers within a
Local and Work Locations within an Employer).
Search For Enter in Organization Section
All UniServs in a State
Affiliate
Geo State: Defaults to the State Affiliate associated with your User ID
Record Type: Select ‘UniServ’.
Search For Enter in Organization Section
All Locals in a State
Affiliate
Geo State: Defaults to the State Affiliate associated with your User ID
Record Type: Select ‘Local’.
Search For Enter in Organization Section
All Chapters in a Local Geo State: Defaults to the State Affiliate associated with your User ID
Record Type: Select ‘Chapter’.
Enter in Parent Organization Section
To identify the local, enter one of the following:
Org ID: Enter the Local Int Org ID or
Org User ID: Enter the Local User ID or
Org Name: Enter the Local Name (wild card % can be used)
Record Type: Select ‘Local’.
Search For Enter in Organization Section
All Employers in a Local Geo State: Defaults to the State Affiliate associated with your User ID
Record Type: Select ‘Employer’.
Enter in Parent Organization Section
To identify the local, enter one of the following:
Org ID: Enter the Local Int Org ID or
Org User ID: Enter the Local User ID or
Org Name: Enter the Local Name (wild card % can be used)
Record Type: Select ‘Local’.
Search For Enter in Organization Section
All Work Locations in
an Employer
Geo State: Defaults to the State Affiliate associated with your User ID
Record Type: Select ‘Work Location’.
Enter in Parent Organization Section
To identify the Employer, enter one of the following:
Org ID: Enter the Employer Int Org ID or
Org User ID: Enter the Employer User ID or
Org Name: Enter the Employer Name (wild card % can be
used)
Record Type: Select ‘Employer’.
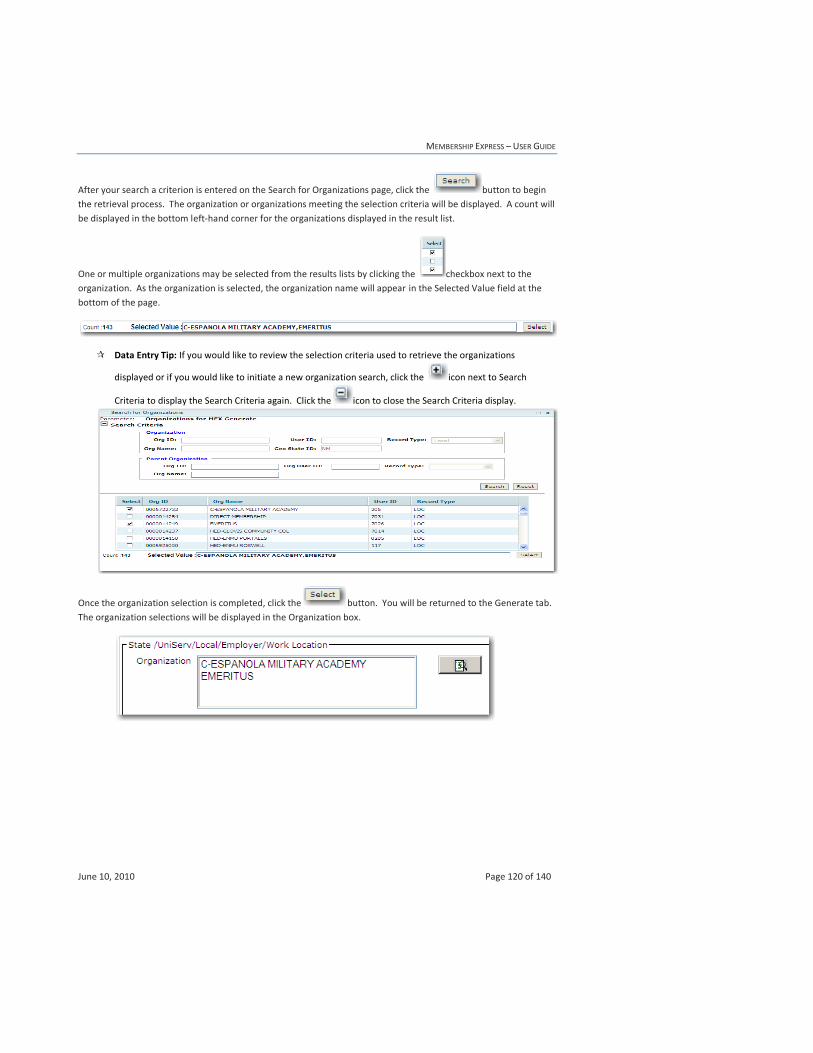
MEMBERSHIP EXPRESS – USER GUIDE
June 10, 2010 Page 120 of 140
After your search a criterion is entered on the Search for Organizations page, click the button to begin
the retrieval process. The organization or organizations meeting the selection criteria will be displayed. A count will
be displayed in the bottom left-hand corner for the organizations displayed in the result list.
One or multiple organizations may be selected from the results lists by clicking the checkbox next to the
organization. As the organization is selected, the organization name will appear in the Selected Value field at the
bottom of the page.
Data Entry Tip: If you would like to review the selection criteria used to retrieve the organizations
displayed or if you would like to initiate a new organization search, click the icon next to Search
Criteria to display the Search Criteria again. Click the icon to close the Search Criteria display.
Once the organization selection is completed, click the button. You will be returned to the Generate tab.
The organization selections will be displayed in the Organization box.
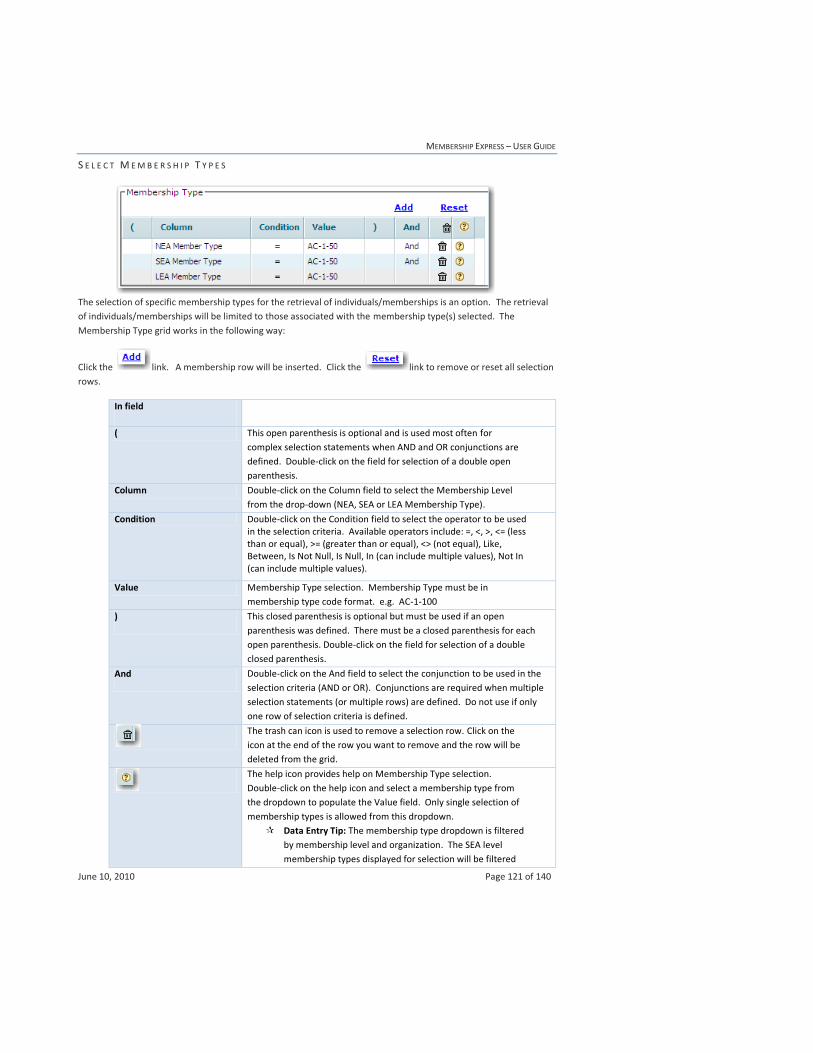
MEMBERSHIP EXPRESS – USER GUIDE
June 10, 2010 Page 121 of 140
S E L E C T M E M B E R S H I P T Y P E S
The selection of specific membership types for the retrieval of individuals/memberships is an option. The retrieval
of individuals/memberships will be limited to those associated with the membership type(s) selected. The
Membership Type grid works in the following way:
Click the link. A membership row will be inserted. Click the link to remove or reset all selection
rows.
In field
( This open parenthesis is optional and is used most often for
complex selection statements when AND and OR conjunctions are
defined. Double-click on the field for selection of a double open
parenthesis.
Column Double-click on the Column field to select the Membership Level
from the drop-down (NEA, SEA or LEA Membership Type).
Condition Double-click on the Condition field to select the operator to be used in the selection criteria. Available operators include: =, <, >, <= (less than or equal), >= (greater than or equal), <> (not equal), Like, Between, Is Not Null, Is Null, In (can include multiple values), Not In (can include multiple values).
Value Membership Type selection. Membership Type must be in
membership type code format. e.g. AC-1-100
) This closed parenthesis is optional but must be used if an open
parenthesis was defined. There must be a closed parenthesis for each
open parenthesis. Double-click on the field for selection of a double
closed parenthesis.
And Double-click on the And field to select the conjunction to be used in the
selection criteria (AND or OR). Conjunctions are required when multiple
selection statements (or multiple rows) are defined. Do not use if only
one row of selection criteria is defined.
The trash can icon is used to remove a selection row. Click on the
icon at the end of the row you want to remove and the row will be
deleted from the grid.
The help icon provides help on Membership Type selection.
Double-click on the help icon and select a membership type from
the dropdown to populate the Value field. Only single selection of
membership types is allowed from this dropdown.
Data Entry Tip: The membership type dropdown is filtered
by membership level and organization. The SEA level
membership types displayed for selection will be filtered
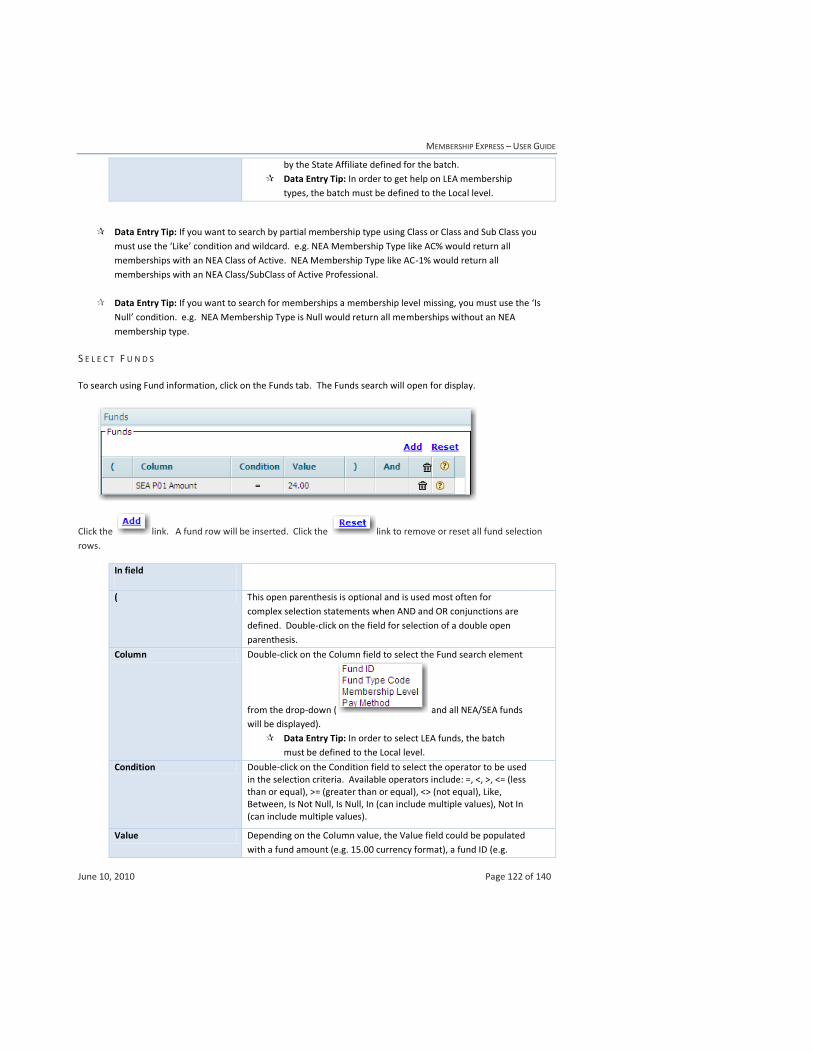
MEMBERSHIP EXPRESS – USER GUIDE
June 10, 2010 Page 122 of 140
by the State Affiliate defined for the batch.
Data Entry Tip: In order to get help on LEA membership
types, the batch must be defined to the Local level.
Data Entry Tip: If you want to search by partial membership type using Class or Class and Sub Class you
must use the ‘Like’ condition and wildcard. e.g. NEA Membership Type like AC% would return all
memberships with an NEA Class of Active. NEA Membership Type like AC-1% would return all
memberships with an NEA Class/SubClass of Active Professional.
Data Entry Tip: If you want to search for memberships a membership level missing, you must use the ‘Is
Null’ condition. e.g. NEA Membership Type is Null would return all memberships without an NEA
membership type.
S E L E C T F U N D S
To search using Fund information, click on the Funds tab. The Funds search will open for display.
Click the link. A fund row will be inserted. Click the link to remove or reset all fund selection
rows.
In field
( This open parenthesis is optional and is used most often for
complex selection statements when AND and OR conjunctions are
defined. Double-click on the field for selection of a double open
parenthesis.
Column Double-click on the Column field to select the Fund search element
from the drop-down ( and all NEA/SEA funds
will be displayed).
Data Entry Tip: In order to select LEA funds, the batch
must be defined to the Local level.
Condition Double-click on the Condition field to select the operator to be used in the selection criteria. Available operators include: =, <, >, <= (less than or equal), >= (greater than or equal), <> (not equal), Like, Between, Is Not Null, Is Null, In (can include multiple values), Not In (can include multiple values).
Value Depending on the Column value, the Value field could be populated
with a fund amount (e.g. 15.00 currency format), a fund ID (e.g.
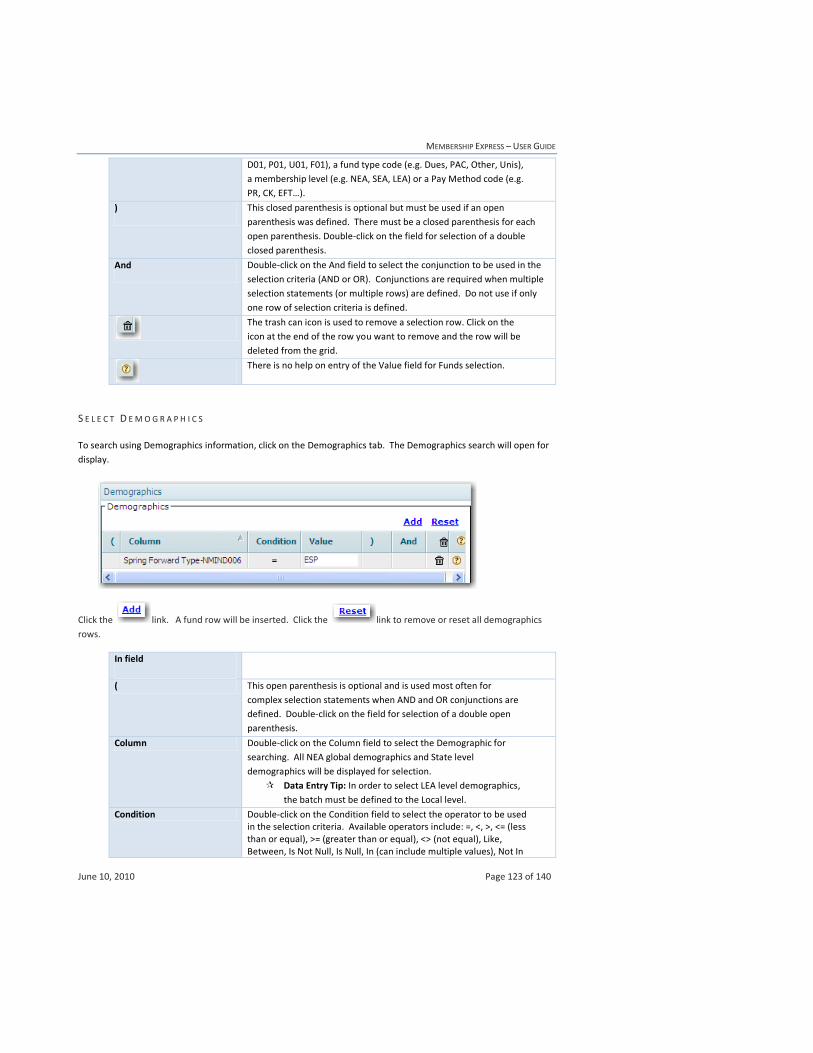
MEMBERSHIP EXPRESS – USER GUIDE
June 10, 2010 Page 123 of 140
D01, P01, U01, F01), a fund type code (e.g. Dues, PAC, Other, Unis),
a membership level (e.g. NEA, SEA, LEA) or a Pay Method code (e.g.
PR, CK, EFT…).
) This closed parenthesis is optional but must be used if an open
parenthesis was defined. There must be a closed parenthesis for each
open parenthesis. Double-click on the field for selection of a double
closed parenthesis.
And Double-click on the And field to select the conjunction to be used in the
selection criteria (AND or OR). Conjunctions are required when multiple
selection statements (or multiple rows) are defined. Do not use if only
one row of selection criteria is defined.
The trash can icon is used to remove a selection row. Click on the
icon at the end of the row you want to remove and the row will be
deleted from the grid.
There is no help on entry of the Value field for Funds selection.
S E L E C T D E M O G R A P H I C S
To search using Demographics information, click on the Demographics tab. The Demographics search will open for
display.
Click the link. A fund row will be inserted. Click the link to remove or reset all demographics
rows.
In field
( This open parenthesis is optional and is used most often for
complex selection statements when AND and OR conjunctions are
defined. Double-click on the field for selection of a double open
parenthesis.
Column Double-click on the Column field to select the Demographic for
searching. All NEA global demographics and State level
demographics will be displayed for selection.
Data Entry Tip: In order to select LEA level demographics,
the batch must be defined to the Local level.
Condition Double-click on the Condition field to select the operator to be used in the selection criteria. Available operators include: =, <, >, <= (less than or equal), >= (greater than or equal), <> (not equal), Like, Between, Is Not Null, Is Null, In (can include multiple values), Not In

MEMBERSHIP EXPRESS – USER GUIDE
June 10, 2010 Page 124 of 140
(can include multiple values).
Value Depending on the Demographic Column value, the Value field could
be populated with a demographic range code or demographic
description.
) This closed parenthesis is optional but must be used if an open
parenthesis was defined. There must be a closed parenthesis for each
open parenthesis. Double-click on the field for selection of a double
closed parenthesis.
And Double-click on the And field to select the conjunction to be used in the
selection criteria (AND or OR). Conjunctions are required when multiple
selection statements (or multiple rows) are defined. Do not use if only
one row of selection criteria is defined.
The trash can icon is used to remove a selection row. Click on the
icon at the end of the row you want to remove and the row will be
deleted from the grid.
Help is available for demographic range codes and demographic
description formats. Double-click on the help icon and select a
demographic range code (if applicable) from the dropdown to
populate the Value field. Or double-click to view the data entry
format for a demographic description. Only single selection of
demographic codes is allowed from this dropdown.
S E L E C T M E M B E R S H I P A T T R I B U T E S
The Membership Attributes search criteria is open for display.
Search By Enter in Membership Attributes Section
Membership Year
The selection defaults to the current membership year. Prior and Future
membership years can also be selected. The retrieval of
individuals/memberships will be limited to those associated with the
affiliate(s) selected.
Data Entry Tip: When performing renewals, always retrieve prior
membership year to renew into the current membership year.
Continuous
Membership The selection of continuous or non-continuous memberships is an option.
The retrieval of individuals/memberships will be limited to those with the
continuous indicator set on or off based on selection. The selection
defaults to Both which means the indicator will not be reviewed for
selection.
Select if you want to select Continuous Memberships only.
Select if you want to select Non-Continuous Memberships only.
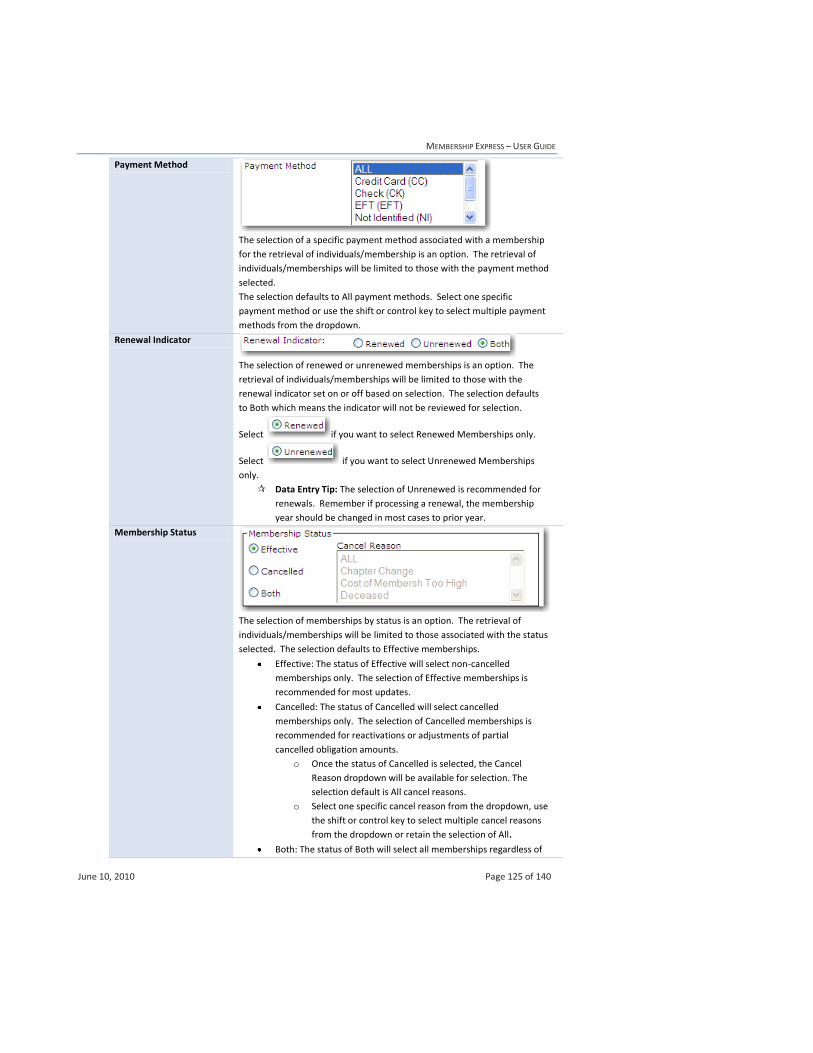
MEMBERSHIP EXPRESS – USER GUIDE
June 10, 2010 Page 125 of 140
Payment Method
The selection of a specific payment method associated with a membership
for the retrieval of individuals/membership is an option. The retrieval of
individuals/memberships will be limited to those with the payment method
selected.
The selection defaults to All payment methods. Select one specific
payment method or use the shift or control key to select multiple payment
methods from the dropdown.
Renewal Indicator
The selection of renewed or unrenewed memberships is an option. The
retrieval of individuals/memberships will be limited to those with the
renewal indicator set on or off based on selection. The selection defaults
to Both which means the indicator will not be reviewed for selection.
Select if you want to select Renewed Memberships only.
Select if you want to select Unrenewed Memberships
only.
Data Entry Tip: The selection of Unrenewed is recommended for
renewals. Remember if processing a renewal, the membership
year should be changed in most cases to prior year.
Membership Status
The selection of memberships by status is an option. The retrieval of
individuals/memberships will be limited to those associated with the status
selected. The selection defaults to Effective memberships.
Effective: The status of Effective will select non-cancelled
memberships only. The selection of Effective memberships is
recommended for most updates.
Cancelled: The status of Cancelled will select cancelled
memberships only. The selection of Cancelled memberships is
recommended for reactivations or adjustments of partial
cancelled obligation amounts.
o Once the status of Cancelled is selected, the Cancel
Reason dropdown will be available for selection. The
selection default is All cancel reasons.
o Select one specific cancel reason from the dropdown, use
the shift or control key to select multiple cancel reasons
from the dropdown or retain the selection of All.
Both: The status of Both will select all memberships regardless of
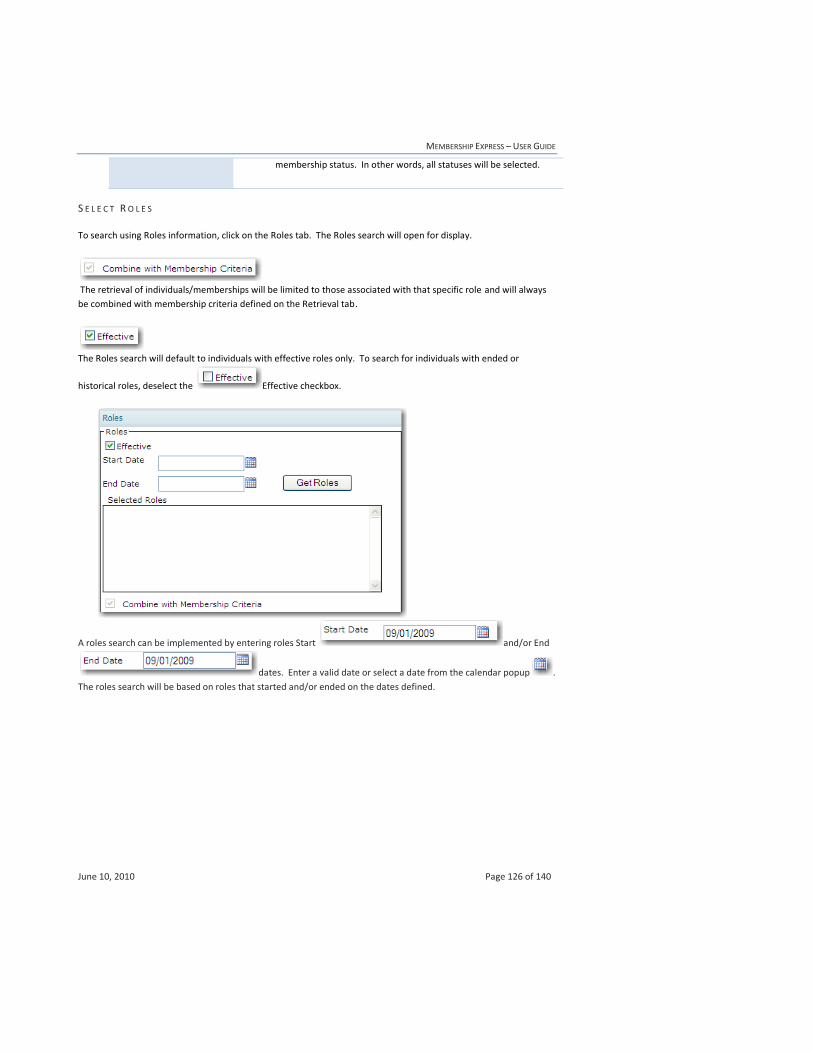
MEMBERSHIP EXPRESS – USER GUIDE
June 10, 2010 Page 126 of 140
membership status. In other words, all statuses will be selected.
S E L E C T R O L E S
To search using Roles information, click on the Roles tab. The Roles search will open for display.
The retrieval of individuals/memberships will be limited to those associated with that specific role and will always
be combined with membership criteria defined on the Retrieval tab.
The Roles search will default to individuals with effective roles only. To search for individuals with ended or
historical roles, deselect the Effective checkbox.
A roles search can be implemented by entering roles Start and/or End
dates. Enter a valid date or select a date from the calendar popup .
The roles search will be based on roles that started and/or ended on the dates defined.

MEMBERSHIP EXPRESS – USER GUIDE
June 10, 2010 Page 127 of 140
To select Roles for retrieving individuals, click the button. A Roles popup with all roles defined
at the user’s level and below will be displayed for selection. You can select one or multiple roles by clicking the
checkbox next to the role. Once the checkbox selections are complete, click the button
to close the popup and populate the Retrieval tab with the roles assignments for retrieval. Or click the
button to close the popup without selection.
S E L E C T I N D I V I D U A L R E D U C T I O N R E A S O N
To search using Individual Reduction information, click the Individual Reduction tab. The Individual Reduction
Reason search will open for display.
Individual Reduction Reasons can be selected from dropdowns by membership level (NEA, SEA, LEA). Only single
selection by level is allowed. The retrieval of individuals/memberships will be limited to those associated with the
specific individual reduction reason(s) selected.
Data Entry Tip: The list of Individual Reduction Reasons presented for selection contains all individual
reduction reasons for all states. Make sure you select the correct membership level and reduction reason
associated with your affiliate.
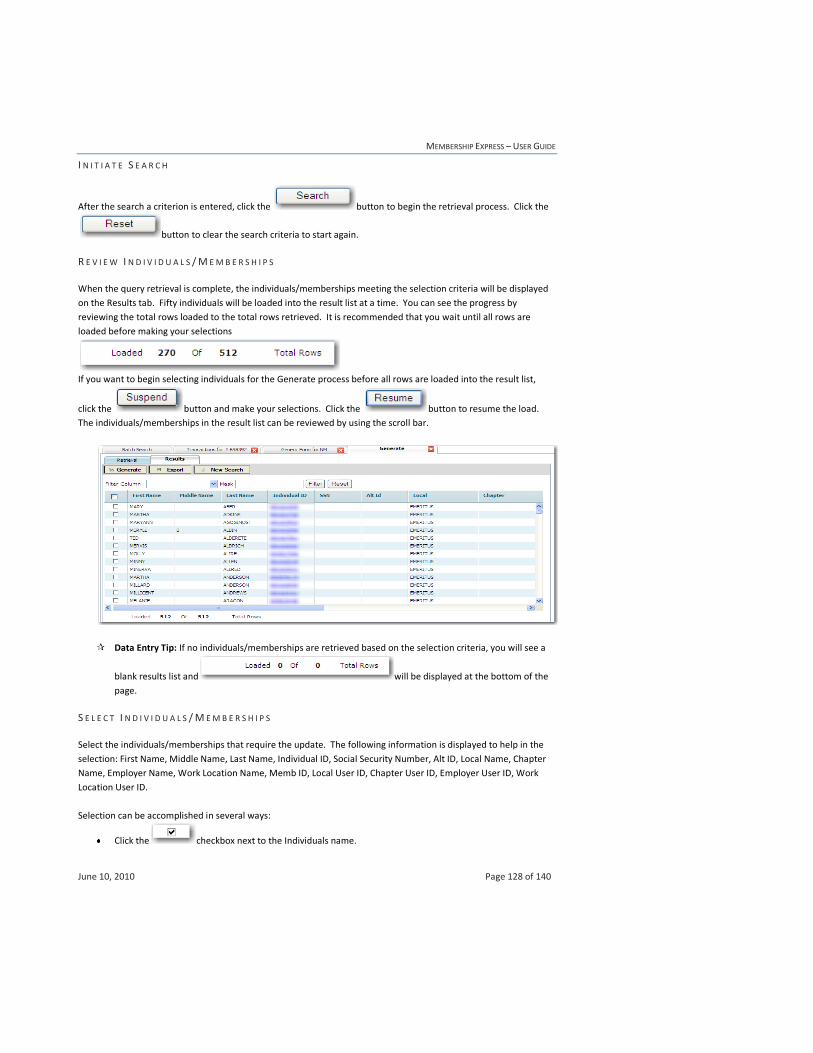
MEMBERSHIP EXPRESS – USER GUIDE
June 10, 2010 Page 128 of 140
I N I T I A T E S E A R C H
After the search a criterion is entered, click the button to begin the retrieval process. Click the
button to clear the search criteria to start again.
R E V I E W I N D I V I D U A L S / M E M B E R S H I P S
When the query retrieval is complete, the individuals/memberships meeting the selection criteria will be displayed
on the Results tab. Fifty individuals will be loaded into the result list at a time. You can see the progress by
reviewing the total rows loaded to the total rows retrieved. It is recommended that you wait until all rows are
loaded before making your selections
If you want to begin selecting individuals for the Generate process before all rows are loaded into the result list,
click the button and make your selections. Click the button to resume the load.
The individuals/memberships in the result list can be reviewed by using the scroll bar.
Data Entry Tip: If no individuals/memberships are retrieved based on the selection criteria, you will see a
blank results list and will be displayed at the bottom of the
page.
S E L E C T I N D I V I D U A L S / M E M B E R S H I P S
Select the individuals/memberships that require the update. The following information is displayed to help in the
selection: First Name, Middle Name, Last Name, Individual ID, Social Security Number, Alt ID, Local Name, Chapter
Name, Employer Name, Work Location Name, Memb ID, Local User ID, Chapter User ID, Employer User ID, Work
Location User ID.
Selection can be accomplished in several ways:
Click the checkbox next to the Individuals name.
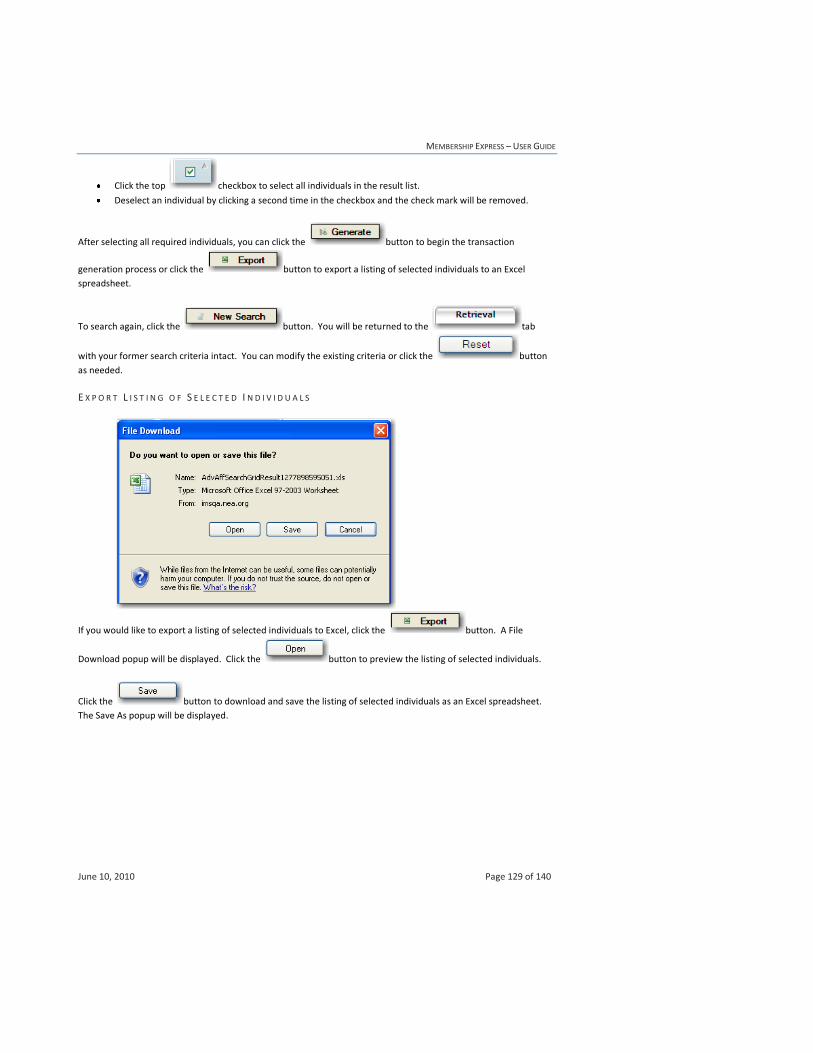
MEMBERSHIP EXPRESS – USER GUIDE
June 10, 2010 Page 129 of 140
Click the top checkbox to select all individuals in the result list.
Deselect an individual by clicking a second time in the checkbox and the check mark will be removed.
After selecting all required individuals, you can click the button to begin the transaction
generation process or click the button to export a listing of selected individuals to an Excel
spreadsheet.
To search again, click the button. You will be returned to the tab
with your former search criteria intact. You can modify the existing criteria or click the button
as needed.
E X P O R T L I S T I N G O F S E L E C T E D I N D I V I D U A L S
If you would like to export a listing of selected individuals to Excel, click the button. A File
Download popup will be displayed. Click the button to preview the listing of selected individuals.
Click the button to download and save the listing of selected individuals as an Excel spreadsheet.
The Save As popup will be displayed.

MEMBERSHIP EXPRESS – USER GUIDE
June 10, 2010 Page 130 of 140
Give the file a name, select the folder in which to save the file and click the button. This feature is
optional and allows you to get a hard copy of individuals updated for future reference.
G E N E R A T E T R A N S A C T I O N S
After selecting all required individuals, click the button to begin the transaction generation.
Once the generate process is complete, you will get a popup message showing the total transactions generated and
saved.
Click the button to close the popup.
Warning: If the button is clicked and individuals have not been selected, you will receive
a warning message.
Click and make your selections.
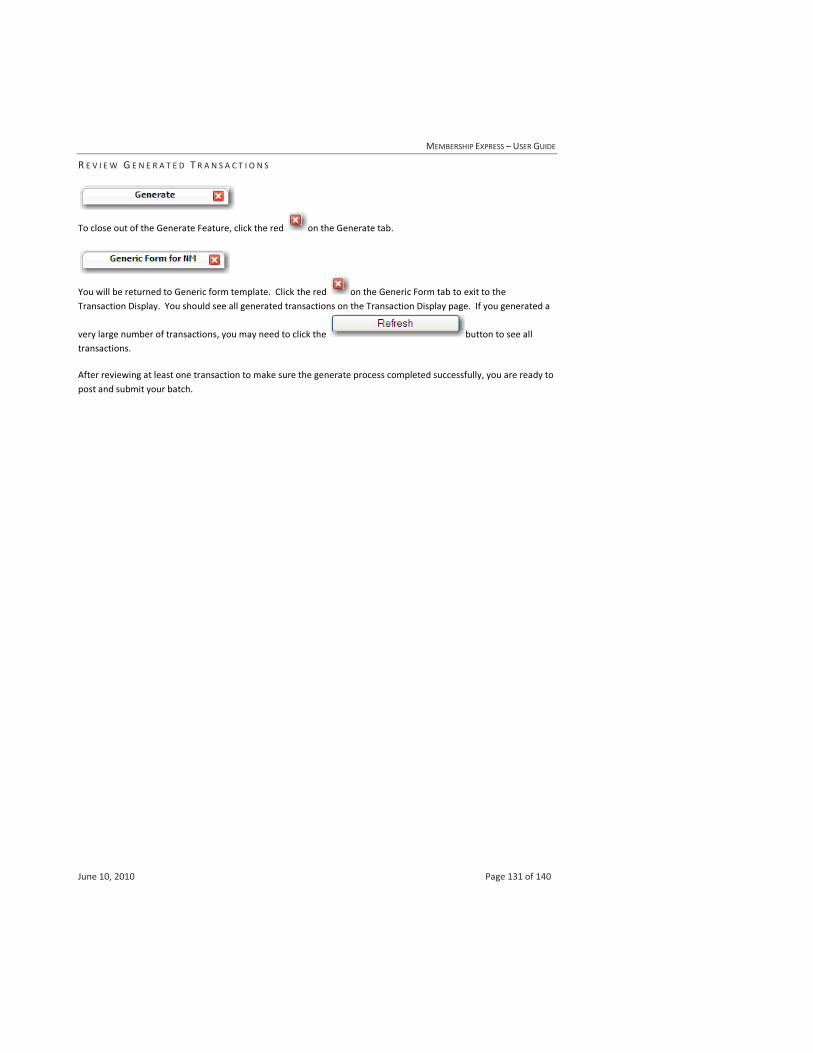
MEMBERSHIP EXPRESS – USER GUIDE
June 10, 2010 Page 131 of 140
R E V I E W G E N E R A T E D T R A N S A C T I O N S
To close out of the Generate Feature, click the red on the Generate tab.
You will be returned to Generic form template. Click the red on the Generic Form tab to exit to the
Transaction Display. You should see all generated transactions on the Transaction Display page. If you generated a
very large number of transactions, you may need to click the button to see all
transactions.
After reviewing at least one transaction to make sure the generate process completed successfully, you are ready to
post and submit your batch.
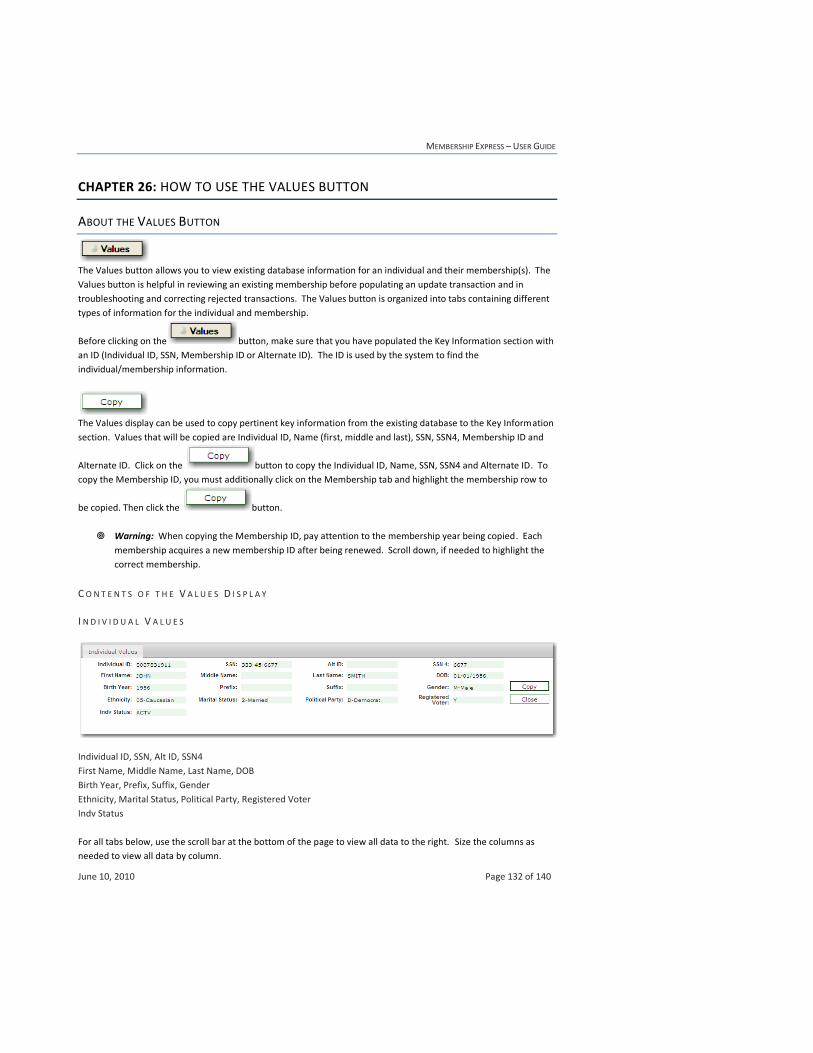
MEMBERSHIP EXPRESS – USER GUIDE
June 10, 2010 Page 132 of 140
CHAPTER 26: HOW TO USE THE VALUES BUTTON
ABOUT THE VALUES BUTTON
The Values button allows you to view existing database information for an individual and their membership(s). The
Values button is helpful in reviewing an existing membership before populating an update transaction and in
troubleshooting and correcting rejected transactions. The Values button is organized into tabs containing different
types of information for the individual and membership.
Before clicking on the button, make sure that you have populated the Key Information section with
an ID (Individual ID, SSN, Membership ID or Alternate ID). The ID is used by the system to find the
individual/membership information.
The Values display can be used to copy pertinent key information from the existing database to the Key Information
section. Values that will be copied are Individual ID, Name (first, middle and last), SSN, SSN4, Membership ID and
Alternate ID. Click on the button to copy the Individual ID, Name, SSN, SSN4 and Alternate ID. To
copy the Membership ID, you must additionally click on the Membership tab and highlight the membership row to
be copied. Then click the button.
Warning: When copying the Membership ID, pay attention to the membership year being copied. Each
membership acquires a new membership ID after being renewed. Scroll down, if needed to highlight the
correct membership.
C O N T E N T S O F T H E V A L U E S D I S P L A Y
I N D I V I D U A L V A L U E S
Individual ID, SSN, Alt ID, SSN4
First Name, Middle Name, Last Name, DOB
Birth Year, Prefix, Suffix, Gender
Ethnicity, Marital Status, Political Party, Registered Voter
Indv Status
For all tabs below, use the scroll bar at the bottom of the page to view all data to the right. Size the columns as
needed to view all data by column.
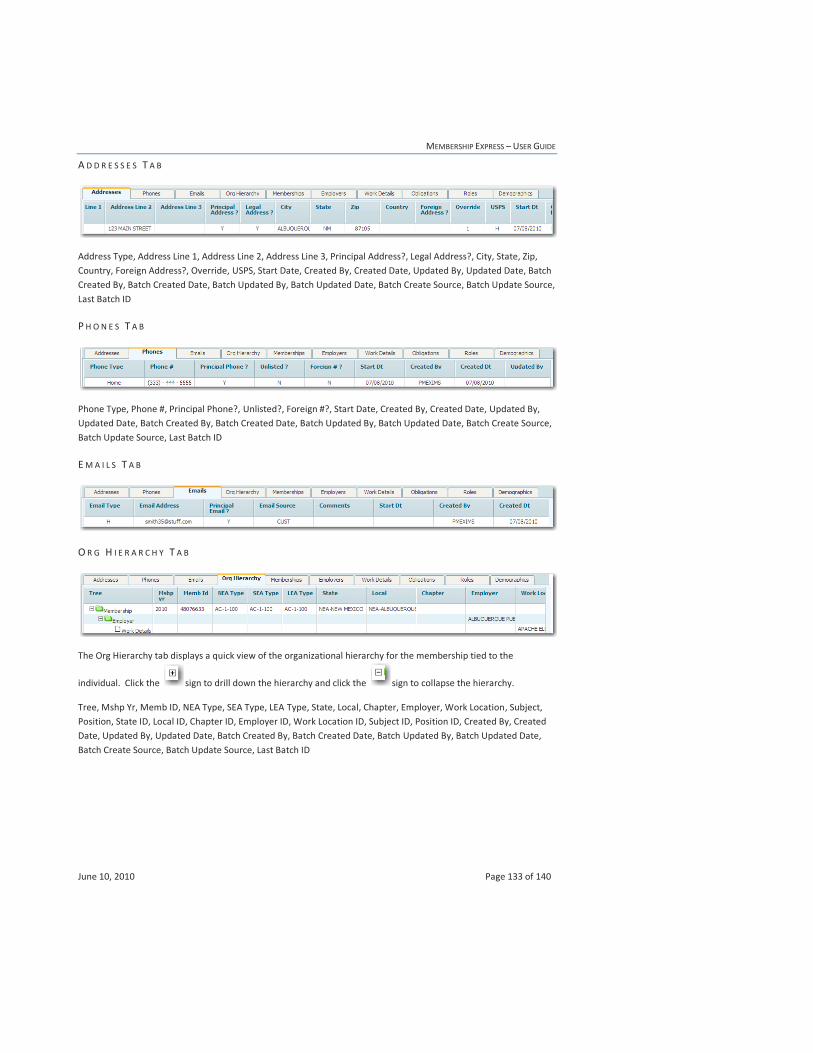
MEMBERSHIP EXPRESS – USER GUIDE
June 10, 2010 Page 133 of 140
A D D R E S S E S T A B
Address Type, Address Line 1, Address Line 2, Address Line 3, Principal Address?, Legal Address?, City, State, Zip,
Country, Foreign Address?, Override, USPS, Start Date, Created By, Created Date, Updated By, Updated Date, Batch
Created By, Batch Created Date, Batch Updated By, Batch Updated Date, Batch Create Source, Batch Update Source,
Last Batch ID
P H O N E S T A B
Phone Type, Phone #, Principal Phone?, Unlisted?, Foreign #?, Start Date, Created By, Created Date, Updated By,
Updated Date, Batch Created By, Batch Created Date, Batch Updated By, Batch Updated Date, Batch Create Source,
Batch Update Source, Last Batch ID
E M A I L S T A B
O R G H I E R A R C H Y T A B
The Org Hierarchy tab displays a quick view of the organizational hierarchy for the membership tied to the
individual. Click the sign to drill down the hierarchy and click the sign to collapse the hierarchy.
Tree, Mshp Yr, Memb ID, NEA Type, SEA Type, LEA Type, State, Local, Chapter, Employer, Work Location, Subject,
Position, State ID, Local ID, Chapter ID, Employer ID, Work Location ID, Subject ID, Position ID, Created By, Created
Date, Updated By, Updated Date, Batch Created By, Batch Created Date, Batch Updated By, Batch Updated Date,
Batch Create Source, Batch Update Source, Last Batch ID
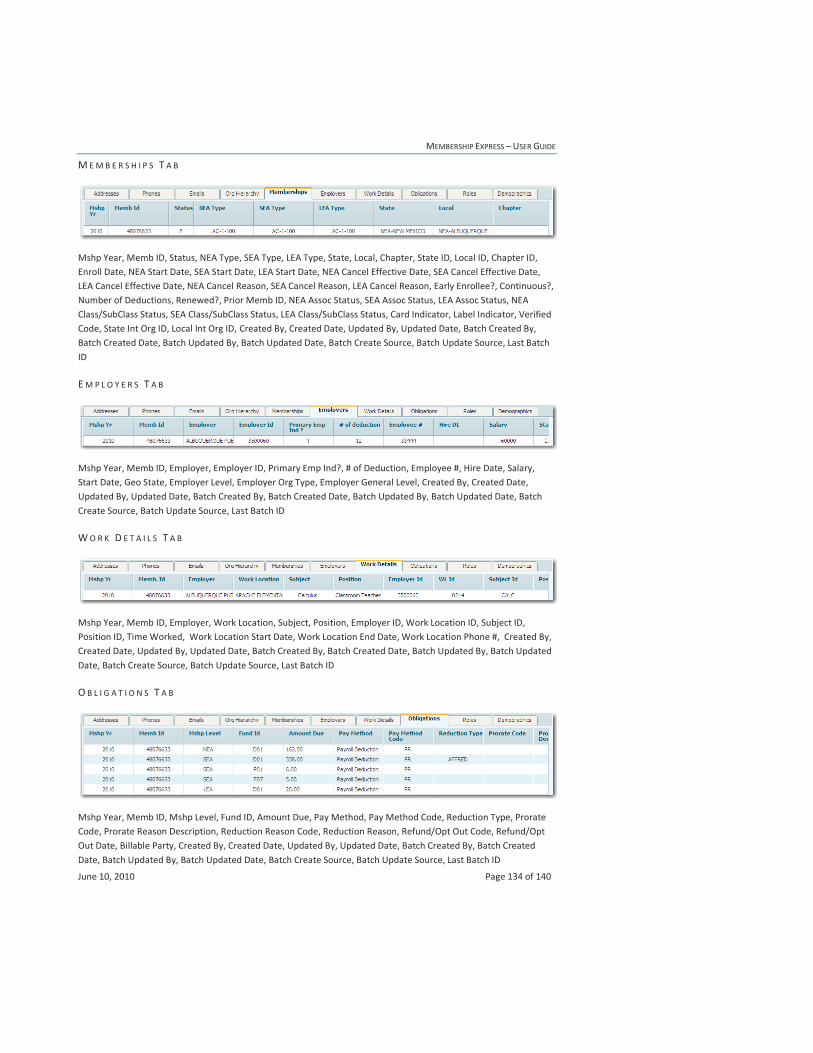
MEMBERSHIP EXPRESS – USER GUIDE
June 10, 2010 Page 134 of 140
M E M B E R S H I P S T A B
Mshp Year, Memb ID, Status, NEA Type, SEA Type, LEA Type, State, Local, Chapter, State ID, Local ID, Chapter ID,
Enroll Date, NEA Start Date, SEA Start Date, LEA Start Date, NEA Cancel Effective Date, SEA Cancel Effective Date,
LEA Cancel Effective Date, NEA Cancel Reason, SEA Cancel Reason, LEA Cancel Reason, Early Enrollee?, Continuous?,
Number of Deductions, Renewed?, Prior Memb ID, NEA Assoc Status, SEA Assoc Status, LEA Assoc Status, NEA
Class/SubClass Status, SEA Class/SubClass Status, LEA Class/SubClass Status, Card Indicator, Label Indicator, Verified
Code, State Int Org ID, Local Int Org ID, Created By, Created Date, Updated By, Updated Date, Batch Created By,
Batch Created Date, Batch Updated By, Batch Updated Date, Batch Create Source, Batch Update Source, Last Batch
ID
E M P L O Y E R S T A B
Mshp Year, Memb ID, Employer, Employer ID, Primary Emp Ind?, # of Deduction, Employee #, Hire Date, Salary,
Start Date, Geo State, Employer Level, Employer Org Type, Employer General Level, Created By, Created Date,
Updated By, Updated Date, Batch Created By, Batch Created Date, Batch Updated By, Batch Updated Date, Batch
Create Source, Batch Update Source, Last Batch ID
W O R K D E T A I L S T A B
Mshp Year, Memb ID, Employer, Work Location, Subject, Position, Employer ID, Work Location ID, Subject ID,
Position ID, Time Worked, Work Location Start Date, Work Location End Date, Work Location Phone #, Created By,
Created Date, Updated By, Updated Date, Batch Created By, Batch Created Date, Batch Updated By, Batch Updated
Date, Batch Create Source, Batch Update Source, Last Batch ID
O B L I G A T I O N S T A B
Mshp Year, Memb ID, Mshp Level, Fund ID, Amount Due, Pay Method, Pay Method Code, Reduction Type, Prorate
Code, Prorate Reason Description, Reduction Reason Code, Reduction Reason, Refund/Opt Out Code, Refund/Opt
Out Date, Billable Party, Created By, Created Date, Updated By, Updated Date, Batch Created By, Batch Created
Date, Batch Updated By, Batch Updated Date, Batch Create Source, Batch Update Source, Last Batch ID
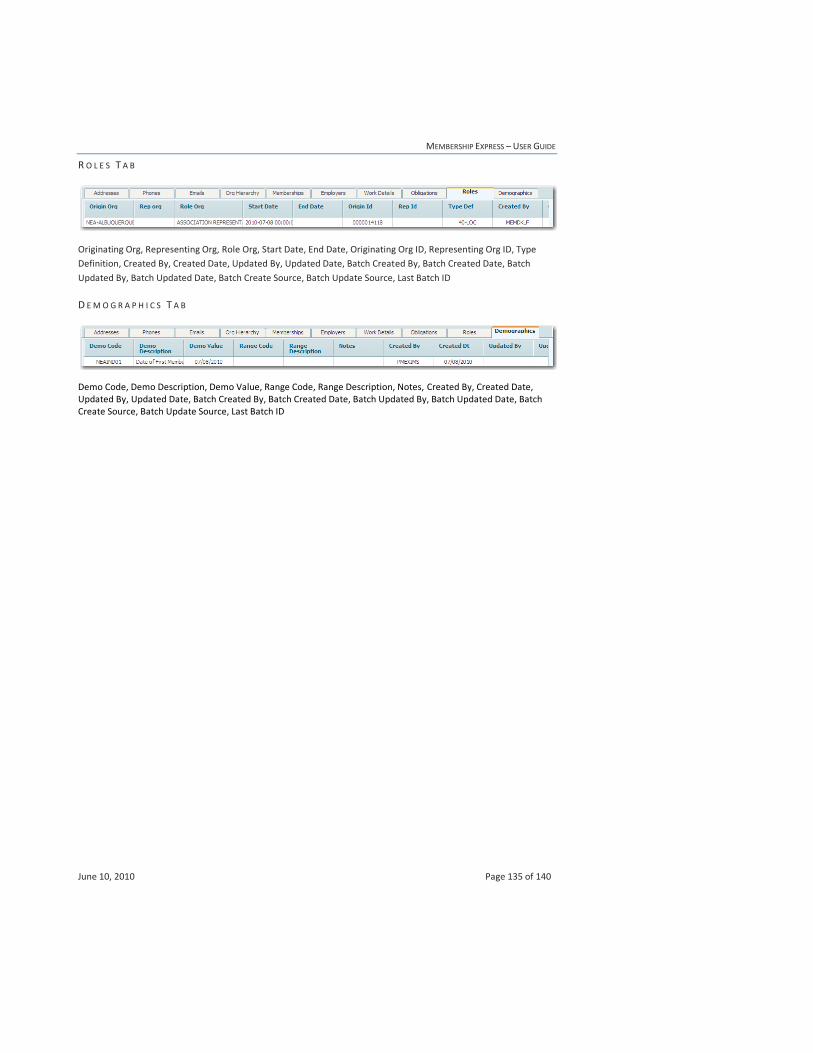
MEMBERSHIP EXPRESS – USER GUIDE
June 10, 2010 Page 135 of 140
R O L E S T A B
Originating Org, Representing Org, Role Org, Start Date, End Date, Originating Org ID, Representing Org ID, Type
Definition, Created By, Created Date, Updated By, Updated Date, Batch Created By, Batch Created Date, Batch
Updated By, Batch Updated Date, Batch Create Source, Batch Update Source, Last Batch ID
D E M O G R A P H I C S T A B
Demo Code, Demo Description, Demo Value, Range Code, Range Description, Notes, Created By, Created Date, Updated By, Updated Date, Batch Created By, Batch Created Date, Batch Updated By, Batch Updated Date, Batch Create Source, Batch Update Source, Last Batch ID
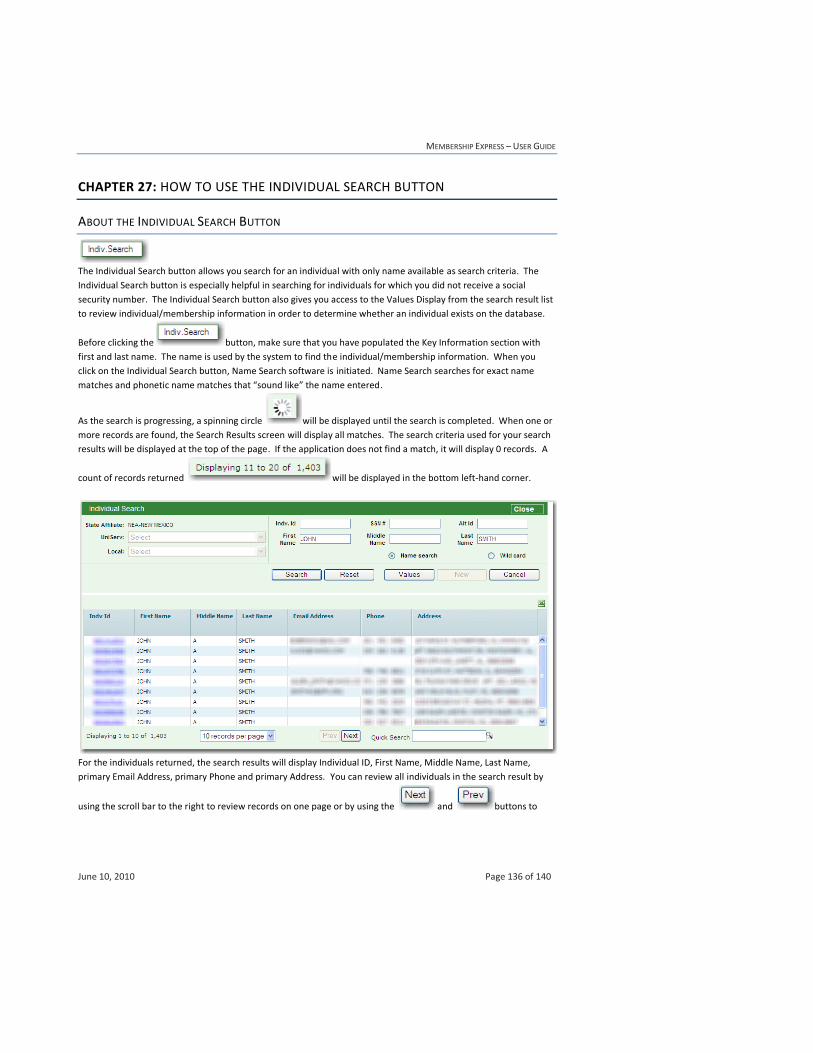
MEMBERSHIP EXPRESS – USER GUIDE
June 10, 2010 Page 136 of 140
CHAPTER 27: HOW TO USE THE INDIVIDUAL SEARCH BUTTON
ABOUT THE INDIVIDUAL SEARCH BUTTON
The Individual Search button allows you search for an individual with only name available as search criteria. The
Individual Search button is especially helpful in searching for individuals for which you did not receive a social
security number. The Individual Search button also gives you access to the Values Display from the search result list
to review individual/membership information in order to determine whether an individual exists on the database.
Before clicking the button, make sure that you have populated the Key Information section with
first and last name. The name is used by the system to find the individual/membership information. When you
click on the Individual Search button, Name Search software is initiated. Name Search searches for exact name
matches and phonetic name matches that “sound like” the name entered.
As the search is progressing, a spinning circle will be displayed until the search is completed. When one or
more records are found, the Search Results screen will display all matches. The search criteria used for your search
results will be displayed at the top of the page. If the application does not find a match, it will display 0 records. A
count of records returned will be displayed in the bottom left-hand corner.
For the individuals returned, the search results will display Individual ID, First Name, Middle Name, Last Name,
primary Email Address, primary Phone and primary Address. You can review all individuals in the search result by
using the scroll bar to the right to review records on one page or by using the and buttons to
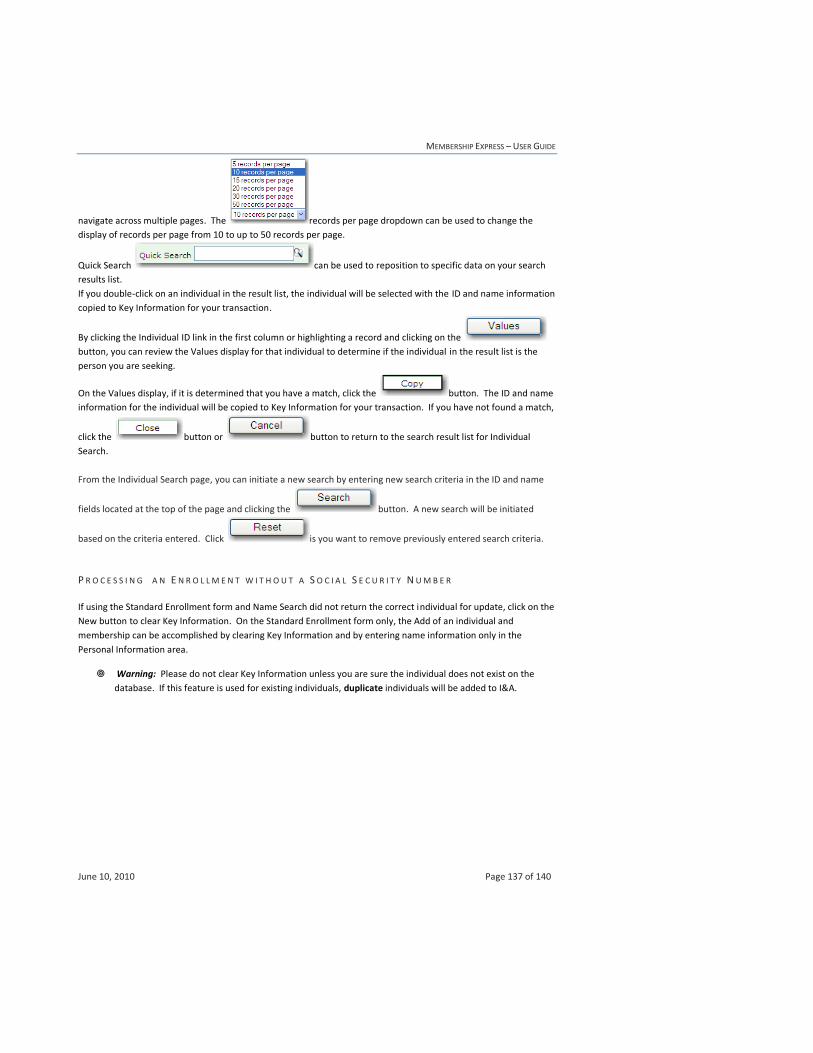
MEMBERSHIP EXPRESS – USER GUIDE
June 10, 2010 Page 137 of 140
navigate across multiple pages. The records per page dropdown can be used to change the
display of records per page from 10 to up to 50 records per page.
Quick Search can be used to reposition to specific data on your search
results list.
If you double-click on an individual in the result list, the individual will be selected with the ID and name information
copied to Key Information for your transaction.
By clicking the Individual ID link in the first column or highlighting a record and clicking on the
button, you can review the Values display for that individual to determine if the individual in the result list is the
person you are seeking.
On the Values display, if it is determined that you have a match, click the button. The ID and name
information for the individual will be copied to Key Information for your transaction. If you have not found a match,
click the button or button to return to the search result list for Individual
Search.
From the Individual Search page, you can initiate a new search by entering new search criteria in the ID and name
fields located at the top of the page and clicking the button. A new search will be initiated
based on the criteria entered. Click is you want to remove previously entered search criteria.
P R O C E S S I N G A N E N R O L L M E N T W I T H O U T A S O C I A L S E C U R I T Y N U M B E R
If using the Standard Enrollment form and Name Search did not return the correct individual for update, click on the
New button to clear Key Information. On the Standard Enrollment form only, the Add of an individual and
membership can be accomplished by clearing Key Information and by entering name information only in the
Personal Information area.
Warning: Please do not clear Key Information unless you are sure the individual does not exist on the
database. If this feature is used for existing individuals, duplicate individuals will be added to I&A.
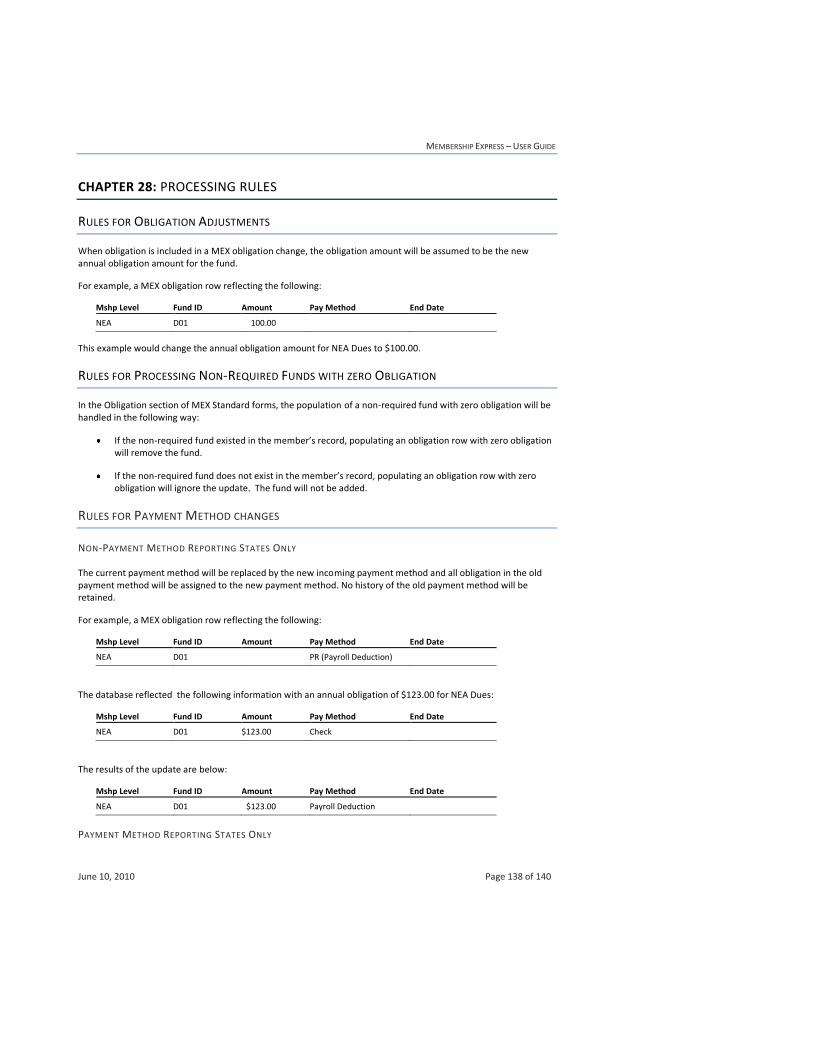
MEMBERSHIP EXPRESS – USER GUIDE
June 10, 2010 Page 138 of 140
CHAPTER 28: PROCESSING RULES
RULES FOR OBLIGATION ADJUSTMENTS
When obligation is included in a MEX obligation change, the obligation amount will be assumed to be the new annual obligation amount for the fund.
For example, a MEX obligation row reflecting the following:
Mshp Level Fund ID Amount Pay Method End Date
NEA D01 100.00
This example would change the annual obligation amount for NEA Dues to $100.00.
RULES FOR PROCESSING NON-REQUIRED FUNDS WITH ZERO OBLIGATION
In the Obligation section of MEX Standard forms, the population of a non-required fund with zero obligation will be handled in the following way:
If the non-required fund existed in the member’s record, populating an obligation row with zero obligation will remove the fund.
If the non-required fund does not exist in the member’s record, populating an obligation row with zero obligation will ignore the update. The fund will not be added.
RULES FOR PAYMENT METHOD CHANGES
NON-PAYMENT METHOD REPORTING STATES ONLY
The current payment method will be replaced by the new incoming payment method and all obligation in the old payment method will be assigned to the new payment method. No history of the old payment method will be retained.
For example, a MEX obligation row reflecting the following:
Mshp Level Fund ID Amount Pay Method End Date
NEA D01 PR (Payroll Deduction)
The database reflected the following information with an annual obligation of $123.00 for NEA Dues:
Mshp Level Fund ID Amount Pay Method End Date
NEA D01 $123.00 Check
The results of the update are below:
Mshp Level Fund ID Amount Pay Method End Date
NEA D01 $123.00 Payroll Deduction
PAYMENT METHOD REPORTING STATES ONLY
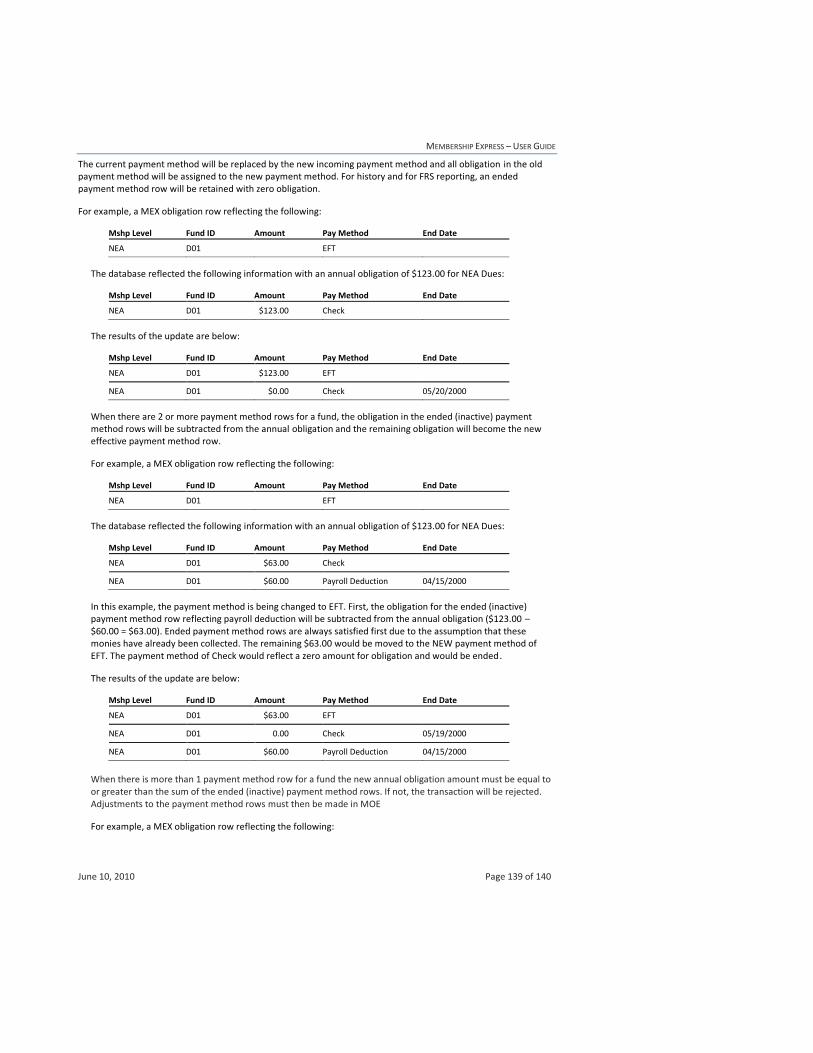
MEMBERSHIP EXPRESS – USER GUIDE
June 10, 2010 Page 139 of 140
The current payment method will be replaced by the new incoming payment method and all obligation in the old payment method will be assigned to the new payment method. For history and for FRS reporting, an ended payment method row will be retained with zero obligation.
For example, a MEX obligation row reflecting the following:
Mshp Level Fund ID Amount Pay Method End Date
NEA D01 EFT
The database reflected the following information with an annual obligation of $123.00 for NEA Dues:
Mshp Level Fund ID Amount Pay Method End Date
NEA D01 $123.00 Check
The results of the update are below:
Mshp Level Fund ID Amount Pay Method End Date
NEA D01 $123.00 EFT
NEA D01 $0.00 Check 05/20/2000
When there are 2 or more payment method rows for a fund, the obligation in the ended (inactive) payment method rows will be subtracted from the annual obligation and the remaining obligation will become the new effective payment method row.
For example, a MEX obligation row reflecting the following:
Mshp Level Fund ID Amount Pay Method End Date
NEA D01 EFT
The database reflected the following information with an annual obligation of $123.00 for NEA Dues:
Mshp Level Fund ID Amount Pay Method End Date
NEA D01 $63.00 Check
NEA D01 $60.00 Payroll Deduction 04/15/2000
In this example, the payment method is being changed to EFT. First, the obligation for the ended (inactive) payment method row reflecting payroll deduction will be subtracted from the annual obligation ($123.00 – $60.00 = $63.00). Ended payment method rows are always satisfied first due to the assumption that these monies have already been collected. The remaining $63.00 would be moved to the NEW payment method of EFT. The payment method of Check would reflect a zero amount for obligation and would be ended.
The results of the update are below:
Mshp Level Fund ID Amount Pay Method End Date
NEA D01 $63.00 EFT
NEA D01 0.00 Check 05/19/2000
NEA D01 $60.00 Payroll Deduction 04/15/2000
When there is more than 1 payment method row for a fund the new annual obligation amount must be equal to or greater than the sum of the ended (inactive) payment method rows. If not, the transaction will be rejected. Adjustments to the payment method rows must then be made in MOE
For example, a MEX obligation row reflecting the following:

MEMBERSHIP EXPRESS – USER GUIDE
June 10, 2010 Page 140 of 140
Mshp Level Fund ID Amount Pay Method End Date
NEA D01 $100.00
The database reflected the following information with an annual obligation of $123.00 for NEA Dues:
Mshp Level Fund ID Amount Pay Method End Date
NEA D01 $48.00 Payroll Deduction
NEA D01 50.00 Check 03/15/2000
NEA D01 $25.00 EFT 02/09/2000
In this example, the annual NEA Dues obligation is being adjusted from $123.00 to $100.00. The ended (inactive) rows only reflect $75.00 of the annual obligation so the rule is covered. The ended rows will remain ‘as is’ because it is assumed that those adjustments reflect monies already collected. The remaining obligation to be collected by payroll deduction will be $25.00 (or $100.00 – ($50.00 + $25.00)).
The results of the update are below:
Mshp Level Fund ID Amount Pay Method End Date
NEA D01 $25.00 Payroll Deduction
NEA D01 50.00 Check 03/15/2000
NEA D01 $25.00 EFT 02/09/2000