Embed Size (px)
Citation preview

HSS 12/3/2002 Plum XL Infusion Pump EDP.doc
Go to: CONTENTS
Abbott Laboratories
PLUM XL
Infusion Pump
Hospital Shared Services PMQA Procedures Number
______________
NOTE: Much of the material found in this report is taken from the manufacturer's
Instruction Manual and Service Manual. In many cases the material is quoted.
HSS 12/3/2002 Plum XL Infusion Pump EDP.doc
Abbot Laboratories
XL Infusion Pump
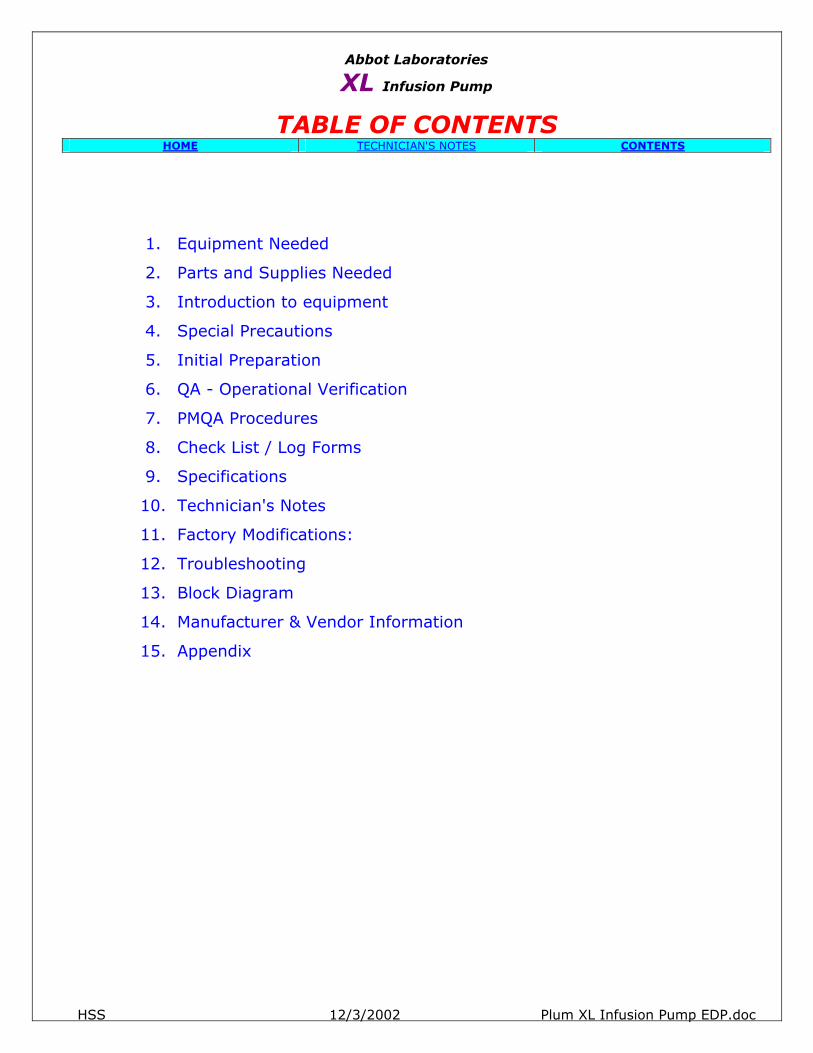
TABLE OF CONTENTS HOME TECHNICIAN'S NOTES CONTENTS
1. Equipment Needed
2. Parts and Supplies Needed
3. Introduction to equipment
4. Special Precautions
5. Initial Preparation
6. QA - Operational Verification
7. PMQA Procedures
8. Check List / Log Forms
9. Specifications
10. Technician's Notes
11. Factory Modifications:
12. Troubleshooting
13. Block Diagram
14. Manufacturer & Vendor Information
15. Appendix

HSS 12/3/2002 Plum XL Infusion Pump EDP.doc
Abbot Laboratories
XL Infusion Pump
TEST EQUIPMENT REQUIRED HOME TECHNICIAN'S NOTES CONTENTS
Generic Test Equipment Equipment Specific Test Equipment Leakage Current Meter / Safety Analyzer 25ml graduated cylinder with 0.2 ml
graduations Digital Volt Meter Pressure Meter, Bio-Tek DPM II
Hand Tools Fluke 77 meter
Abbot Laboratories
XL Infusion Pump
Parts and Supplies Needed HOME TECHNICIAN'S NOTES CONTENTS
SUPPLIES PARTS
Paper or Shop Towels Special cassette with proximal bubble sensor tips removed
General purpose cleaner Special cassette with distal bubble sensor tips removed
Cleaning supplies
Mild soap
Sterile water
3-way stop cock
Reflux valve
IV set list NO. 6426-02
IV set list NO. 3047-01
IV set list NO. 11419
IV set list NO. 11397
21 gauge needle

HSS 12/3/2002 Plum XL Infusion Pump EDP.doc
Abbot Laboratories
XL Infusion Pump
Introduction to equipment HOME TECHNICIAN'S NOTES CONTENTS
Single-Line Infusion
• One device that delivers primary only, secondary only, or automatic piggybacking
• Delivers from large-volume parenterals, part fills, syringes, and vials
• Delivers blood and enteral products
Double-Line Infusion
• Unique tandem carrier offers two-channel, dual-control flexibility and versatility using two Plum XL pumps side by side
• Two separate, independently programmable pumps, for simultaneous micro/macro deliveries in any combination

HSS 12/3/2002 Plum XL Infusion Pump EDP.doc
Abbot Laboratories
XL Infusion Pump
Introduction to equipment HOME TECHNICIAN'S NOTES CONTENTS
• Micro device, 0.1-99.9 mL/hr
• Macro device, 1-999 mL/hr
• Single-line infusion with the Plum XLM
• Double-line infusion with two Plum XLMs and tandem carrier
• Primary Only Delivery with fully automated intermittent Secondary Drug Delivery option
• Delivers from all types of source containers including syringes and vials
• Automatic air trapping and elimination
• Backpriming feature minimizes line breaks
• Automatic free-flow protection — integral to PlumSet
• Smooth, precise on-line titration at the touch of a button
• QuickSet Key, facilitates rapid programming
• Tamper-resistant lockout switch
• XLM weight 7.75 lbs
• Long battery life (8 hrs at 125 mL/hr)
• RS232-compatible DataPort™
• Full line of LifeShield® needleless administration sets
• PlumSet totally compatible with Plum 1.6, Plum XLM, and Plum XL3M
For more information call 1-800-ABBOTT3 (1-800-222-6883)

HSS 12/3/2002 Plum XL Infusion Pump EDP.doc
Abbot Laboratories
XL Infusion Pump
Introduction to equipment HOME TECHNICIAN'S NOTES CONTENTS
HSS 12/3/2002 Plum XL Infusion Pump EDP.doc
Abbot Laboratories
XL Infusion Pump
SPECIAL PRECAUTIONS HOME TECHNICIAN'S NOTES CONTENTS
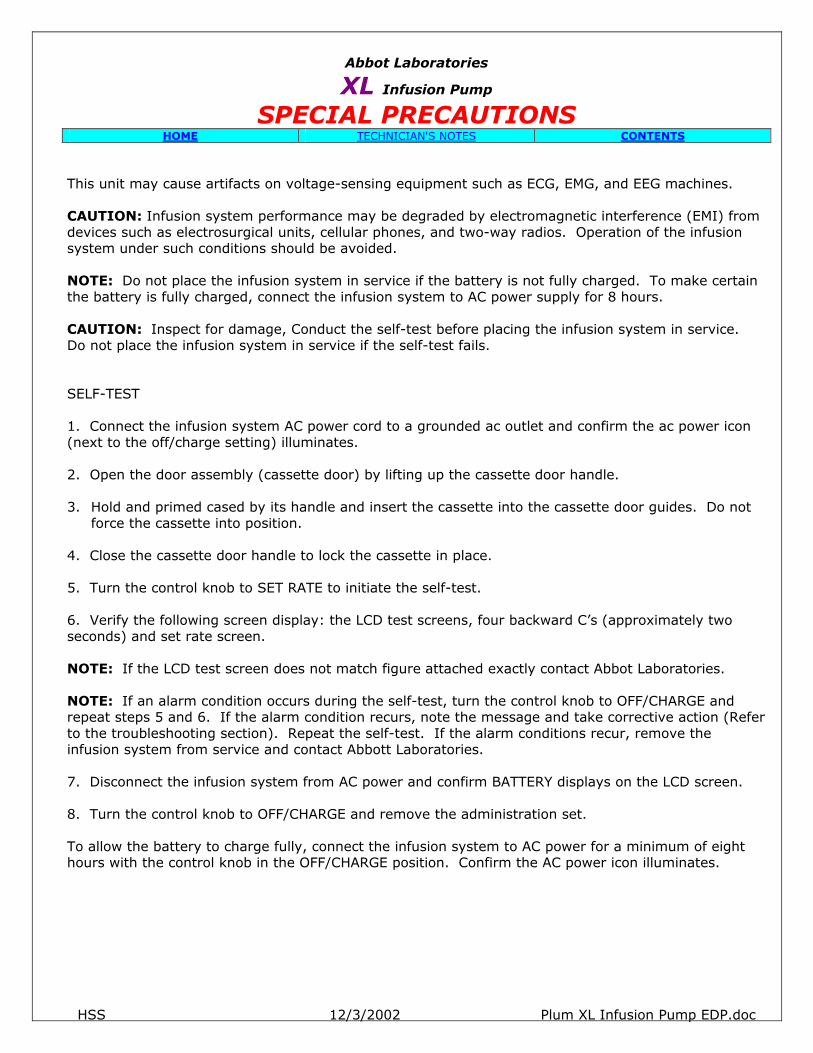
This unit may cause artifacts on voltage-sensing equipment such as ECG, EMG, and EEG machines. CAUTION: Infusion system performance may be degraded by electromagnetic interference (EMI) from devices such as electrosurgical units, cellular phones, and two-way radios. Operation of the infusion system under such conditions should be avoided. NOTE: Do not place the infusion system in service if the battery is not fully charged. To make certain the battery is fully charged, connect the infusion system to AC power supply for 8 hours. CAUTION: Inspect for damage, Conduct the self-test before placing the infusion system in service. Do not place the infusion system in service if the self-test fails. SELF-TEST 1. Connect the infusion system AC power cord to a grounded ac outlet and confirm the ac power icon (next to the off/charge setting) illuminates. 2. Open the door assembly (cassette door) by lifting up the cassette door handle. 3. Hold and primed cased by its handle and insert the cassette into the cassette door guides. Do not
force the cassette into position. 4. Close the cassette door handle to lock the cassette in place. 5. Turn the control knob to SET RATE to initiate the self-test. 6. Verify the following screen display: the LCD test screens, four backward C’s (approximately two seconds) and set rate screen. NOTE: If the LCD test screen does not match figure attached exactly contact Abbot Laboratories. NOTE: If an alarm condition occurs during the self-test, turn the control knob to OFF/CHARGE and repeat steps 5 and 6. If the alarm condition recurs, note the message and take corrective action (Refer to the troubleshooting section). Repeat the self-test. If the alarm conditions recur, remove the infusion system from service and contact Abbott Laboratories. 7. Disconnect the infusion system from AC power and confirm BATTERY displays on the LCD screen. 8. Turn the control knob to OFF/CHARGE and remove the administration set. To allow the battery to charge fully, connect the infusion system to AC power for a minimum of eight hours with the control knob in the OFF/CHARGE position. Confirm the AC power icon illuminates.

HSS 12/3/2002 Plum XL Infusion Pump EDP.doc
Abbot Laboratories
XL Infusion Pump
Initial Preparation HOME TECHNICIAN'S NOTES CONTENTS
To set up the infusion system for the PVT, proceed as follows: 1. Confirm the infusion system and appropriate accesor

HSS 12/3/2002 Plum XL Infusion Pump EDP.doc
Abbot Laboratories
XL Infusion Pump
QA - OPERATIONAL INFORMATION HOME TECHNICIAN'S NOTES CONTENTS
QA (quality assurance - operational verification): Steps 1 through all of 5.
HSS 12/3/2002 Plum XL Infusion Pump EDP.doc
Abbot Laboratories
XL Infusion Pump
PMQA PROCEDURES HOME TECHNICIAN'S NOTES CONTENTS
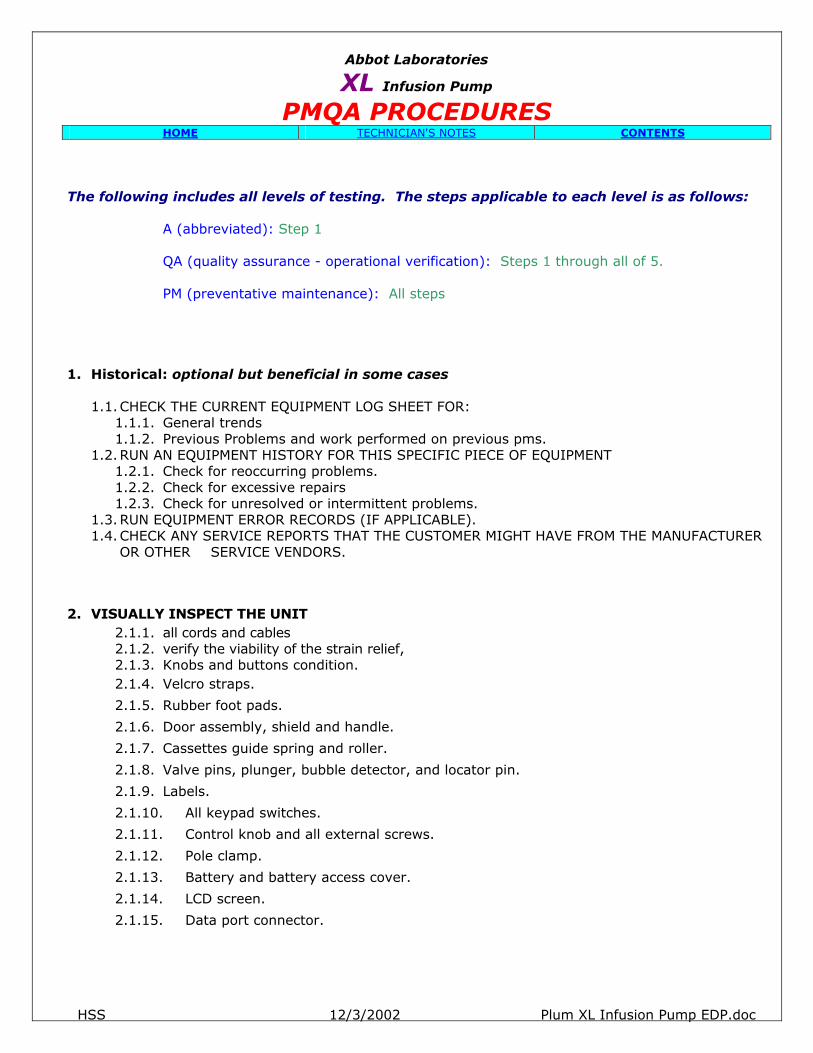
The following includes all levels of testing. The steps applicable to each level is as follows:
A (abbreviated): Step 1 QA (quality assurance - operational verification): Steps 1 through all of 5. PM (preventative maintenance): All steps
1. Historical: optional but beneficial in some cases
1.1. CHECK THE CURRENT EQUIPMENT LOG SHEET FOR: 1.1.1. General trends 1.1.2. Previous Problems and work performed on previous pms.
1.2. RUN AN EQUIPMENT HISTORY FOR THIS SPECIFIC PIECE OF EQUIPMENT 1.2.1. Check for reoccurring problems. 1.2.2. Check for excessive repairs 1.2.3. Check for unresolved or intermittent problems.
1.3. RUN EQUIPMENT ERROR RECORDS (IF APPLICABLE). 1.4. CHECK ANY SERVICE REPORTS THAT THE CUSTOMER MIGHT HAVE FROM THE MANUFACTURER
OR OTHER SERVICE VENDORS.
2. VISUALLY INSPECT THE UNIT 2.1.1. all cords and cables 2.1.2. verify the viability of the strain relief, 2.1.3. Knobs and buttons condition. 2.1.4. Velcro straps.
2.1.5. Rubber foot pads.
2.1.6. Door assembly, shield and handle.
2.1.7. Cassettes guide spring and roller.
2.1.8. Valve pins, plunger, bubble detector, and locator pin.
2.1.9. Labels.
2.1.10. All keypad switches.
2.1.11. Control knob and all external screws.
2.1.12. Pole clamp.
2.1.13. Battery and battery access cover.
2.1.14. LCD screen.
2.1.15. Data port connector.
HSS 12/3/2002 Plum XL Infusion Pump EDP.doc
Abbot Laboratories
XL Infusion Pump
PREVENTATIVE MAINTENANCE (continued) HOME TECHNICIAN'S NOTES CONTENTS
3. CLEANING
3.1. Do not immerse the infusion system in liquids.
3.2. Do not use abrasive cleaners or cleaning solutions.
3.3. Do not use compounds that contain Isopropyl alcohol or dimethyl benzyl.
3.4. Clean the exposed surfaces with a soft lint free cloth dampened with the following cleaning solutions.
3.4.1. Coverage HBV
3.4.2. Formula C
3.4.3. Household bleach
3.4.4. Manu-Klenz
3.4.5. Sporicidin
3.4.6. Super Edisonite
3.4.7. Vesphene Iise
3.5. Do not sterilize
4. SELF-TEST SET UP
4.1. Confirm that the infusion system and appropriate accessories are fully assembled.
4.2. Hang two sterile water containers at a height of 18 to 24 inches above the pumping chamber of the infusion chamber; this is to ensure proper gravity flow and drips.
4.3. Connect the infusion system to AC power. Conduct all tests with the infusion system connected AC power unless otherwise specified.
4.4. Verify the lockout is in the unlocked (down) position (XLM only).
5. SELF-TEST
5.1. Connect the infusion system AC power cord to a grounded AC outlet and confirm the AC power icon (next to the OFF/CHARGE setting) illuminates.
5.2. Open the door assembly (cassette door) by lifting up on the cassette door handle.
5.3. Hold a primed cassette by its handle and insert the cassette into the cassette door guides. Do not force the cassette into position.
5.4. Close the cassette door handle to lock the cassette in place.
5.5. Turn the control knob to the SET RATE to initiate the self-test.
5.6. Verify the following screen display: LCD test screens, four backward C’s (approximately two seconds), and set rate screen.
NOTE: If alarm conditions occurs during the self-test, turn the control knob to OFF/CHARGE and repeat steps 5 and 6. If the alarm condition recurs, note the message and take corrective action. Repeat the self-test. If the alarm condition recurs, remove the infusion system from service and evaluate.

HSS 12/3/2002 Plum XL Infusion Pump EDP.doc
Abbot Laboratories
XL Infusion Pump
PREVENTATIVE MAINTENANCE (continued) HOME TECHNICIAN'S NOTES CONTENTS
5.7. Disconnect the infusion system from the AC power supply and confirm BATTERY displays on the LCD screen.
5.8. Turn the control knob to OFF/CHARGE and remove the administration set.
5.9. To allow the battery to charge fully, connect the infusion system to AC power for a minimum of eight hours with the control knob in the OFF/CHARGE position. Confirm the AC power Icon illuminates.
HSS 12/3/2002 Plum XL Infusion Pump EDP.doc
Abbot Laboratories
XL Infusion Pump
PREVENTATIVE MAINTENANCE (continued) HOME TECHNICIAN'S NOTES CONTENTS
6. KEYPAD AND CONTROL KNOB TEST
6.1. Turn the control knob SET RATE. Press the following keys to verify that each key activates and the screen responds:
6.1.1. {PRI/SEC} TOGGLES SCREEN BETWEEN PRIMARY AND SECONDARY.
6.1.2. {�} RAISES VALUE OF DELIVERY RATE
6.1.3. {�} LOWERS VALUE OF DELIVERY RATE
6.1.4. MICRO legend appears when the rate is lower than 100 ml/hr, and disappears when the rate is above 99.9 ml/hr 9XLM)
6.2. Turn the control knob to SETVTBI. Press the following keys to verify that each key activates and the screen responds:
6.2.1. {�} RAISES VALUE OF DELIVERY RATE
6.2.2. {�} LOWERS VALUE OF DELIVERY RATE
6.3. Turn the control knob to RUN. Press and hold each key combination simultaneously to verify that each key combination activates and the screen responds:
6.3.1. [TITRATE/QUICKSET] AND [�] raises the value of the delivery rate.
6.3.2. [TITRATE/QUICKSET] AND [�] lowers the value of the delivery rate.
6.4. Turn the control knob to SET RATE. Press the [TITRATE/QUICKSET] keys and observe that a quick rate change occurs.
6.5. Turn the control knob to HOLD/RESET. Press and hold [BACK PRIME] to verify pumping occurs from the primary line up through the secondary inlet port.
7. OPEN DOOR ALARM TEST
7.1. Close the clamp on the secondary line (to prevent fluid in containers from mixing).
7.2. Open the cassette door. Verify the DOOR/CASSETTE appears and an alarm sounds.
7.3. Press (SILENCE). Verify the alarm mutes.
7.4. Close the cassette door and unclamp the secondary line.
8. ALARM LOUDNESS TEST
8.1. Turn the control knob to SET RATE and open the cassette door. Verify the DOOR/CASSETTE legend appears and an alarm sounds.
8.2. Toggle the audio switch (located on the infusion system bottom) between the high and low settings. Verify that two alarm levels sound.
8.3. Press [SILENCE]. Verify the alarm mutes.
8.4. Close the cassette door.

HSS 12/3/2002 Plum XL Infusion Pump EDP.doc
Abbot Laboratories
XL Infusion Pump
PREVENTATIVE MAINTENANCE (continued) HOME TECHNICIAN'S NOTES CONTENTS
9. ALARM LOUDNESS AND LOCK FUNCTION TESTS (XLM)
9.1. Turn the control knob to SET RATE and open the cassette door. Verify the DOOR legend appears and an alarm sounds.
9.2. Toggle the audio switch (located on the rear of the panel) between the high and low settings. Verify the two alarm levels sound.
9.3. Press [SILENCE]. Verify the alarm mutes.
9.4. Close the cassette door.
9.5. Turn the control knob to HOLD/RESET, then back to run.
9.6. Press the LOCK button (located on the rear panel). Verify LOCKED appears on the display.
9.7. Turn the control knob to any other position. Verify the infusion system stops pumping and alarm sounds and the display backlight and LOCKED flash.
9.8. Turn the control knob to RUN. Verify the infusion system starts to pump.
9.9. Press [SILENCE]. Verify that the alarm condition remains unchanged.
9.10. Press the LOCK button to clean the alarm condition.
10. BATTERY LEGEND TEST
10.1. Disconnect the infusion system from AC Power.
10.2. Turn the control knob to SET RATE. Verify the line power indicator turns off and the BATTERY legend turns on within five seconds.
10.3. Reconnect the infusion system to AC power after the battery legend check.
10.4. Turn the control knob to the OFF/CHARGE.
WARNING: Infusion system should be operated on battery power for six continuous hours at least once every six months for optimum battery performance and life.
11. FREE FLOW TEST
11.1. Insert a primed cassette into the infusion system.
11.2. Turn the control knob to SET RATE.
11.3. With the cassette door closed, check the distal end of tubing for fluid flow. Verify a minimal flow of fluid (a few drops maximum) occurs.
11.4. Open the cassette door and check the distal end of tubing for fluid flow. Verify a minimal flow of fluid (a few drops maximum) occurs.
NOTE: A SMALL AMOUNT OF FLUID MAY BE EXPELLED FROM THE CASSETTE WHEN OPENING
OR CLOSING THE DOOR.
11.5. Close the cassette door and check the distal end of tubing for fluid flow. Verify a minimal flow of fluid (a few drops maximum) occurs.
11.6. Turn the control knob to OFF/CHARGE.
HSS 12/3/2002 Plum XL Infusion Pump EDP.doc
Abbot Laboratories
XL Infusion Pump
PREVENTATIVE MAINTENANCE (continued) HOME TECHNICIAN'S NOTES CONTENTS
12. DISTAL OCCLUSION TEST
12.1. Connect the distal tubing to the DPM pressure meter through the three-way stopcock. See Appendix.
12.2. Turn the control knob to the SET RATE.
12.3. Set the rate to 40 ml/hr.
12.4. Turn the control knob to SETVTBI.
12.5. Set the volume to 100ml.
12.6. Open the three-way stopcock to air.
12.7. Turn the control knob to RUN and allow the infusion system to stabilize for one minute. Verify all air is cleared from tubing.
12.8. Set the three-way stopcock to measure pressure.
12.9. Verify the occlusion alarm occurs when DPM indicates 10.0 ± 1.8 PSI (69.0 ± 12.4kPa).
12.10. Turn the control knob to HOLD/RESET to clear the occlusion alarm. Open the three-way stopcock to air and disconnect the distal tubing.
13. PROXIMAL OCCLUSION TEST
13.1. Turn the control knob to SET RATE. Set the rate to a value greater than 40 ml/hr.
13.2. Turn the control knob to RUN to start pumping fluid.
13.3. After several pumping cycles, clamp the tubing proximal to the cassette. After drops stop falling through the sight chamber, verify that an occlusion alarm occurs within three pumping cycles.
13.4. Press [SILENCE] and unclamp the proximal tubing.
13.5. Turn the control knob to OFF/CHARGE.
14. DELIVERY ACCURACY TEST
NOTE: Accuracy testing is for informational purposes only and is not to be used as a re-release test.
14.1. Attach an 18-guage cannula or a 21-guage needle to the distal end of the tubing. Verify the fluid container is 18 to 24 inches above the cassette-pumping chamber to ensure enough gravity flow. Verify all lines are unclamped.
14.2. Prime the tubing. Verify no air is in the tubing. Place cannula or needle in a 25ml graduated cylinder.
14.3. Turn the control knob to SET RATE and set the primary rate to 400ml/hr.
14.4. Press [PRI/SEC] TO DISPLAY secondary and set the secondary rate to 400ml/hr.
14.5. Turn the control knob to SET VTBI and press [PRI/SEC] to display PRIMARY.
14.6. Set the primary volume to 10 ml.
14.7. Press [PRI/SEC] to display SECONDARY and set the secondary volume to 10ml.
14.8. Turn the control knob to CLEAR VOL to clear previous value. Verify that four beeps sound.
14.9. Assure the graduated cylinder is dry.
HSS 12/3/2002 Plum XL Infusion Pump EDP.doc
Abbot Laboratories
XL Infusion Pump
PREVENTATIVE MAINTENANCE (continued) HOME TECHNICIAN'S NOTES CONTENTS
14.10. Turn the control knob to RUN to start pumping fluid. Verify volume delivered is 20 ± 1 ml. Verify that after the VTBI is complete, the infusion system changes to KVO mode at a rate of 1ml/hr.
14.11. Turn the control knob to OFF/CHARGE.
14.12. Clamp both lines. Remove the distal tubing. Remove the cassette from the infusion system.
15. EMPTY CONTAINER/AIR-IN-LINE ALARM TEST
15.1. Install the special cassette marked EMPTY in the infusion system. Confirm the special cassette proximal bubble sensor tips are removed, and see attached figure.
15.2. Turn the control knob to SETVTBI.
15.3. Set the volume to 100ml.
15.4. Turn the control knob to RUN to start pumping. Verify that within three pumping cycles the audible alarm sounds and the AIR-IN-LINE and BACKPRIMING legend display.
15.5. Turn the control knob to HOLD/RESET.
15.6. Open the cassette doors and removes the cassette.
15.7. Install the special cassette marked AIR in the fusion system. Confirm the special cassette distal bubble sensor tips are removed.
15.8. Turn the control knob to RUN to start pumping. Verify that within three pumping cycles the alarm sounds and the AIR-IN-LINE legend displays.
15.9. Turn the control knob to HOLD/RESET.
15.10. Open the cassette doors and removes the cassette.
16. ELECTRICAL SAFETY TEST
16.1. Connect the infusion system AC power cord into the safety analyzer.
16.2. Connect the safety analyzer ground lead to the infusion system ground test-point screw located on the rear of the infusion system.
16.3. Check the leakage current with the safety analyzer. Leakage current must not exceed 100 microampere (mA).
16.4. Measure the resistance of the AC connector ground lug with the safety analyzer. Resistance should not exceed 0.1 Ohms.
17. END OF PERFORMANCE VERIFICATION TESTING
17.1. Clear the dose history.
17.2. Reset the infusion system to the original configuration.
17.3. Return the infusion system to service.
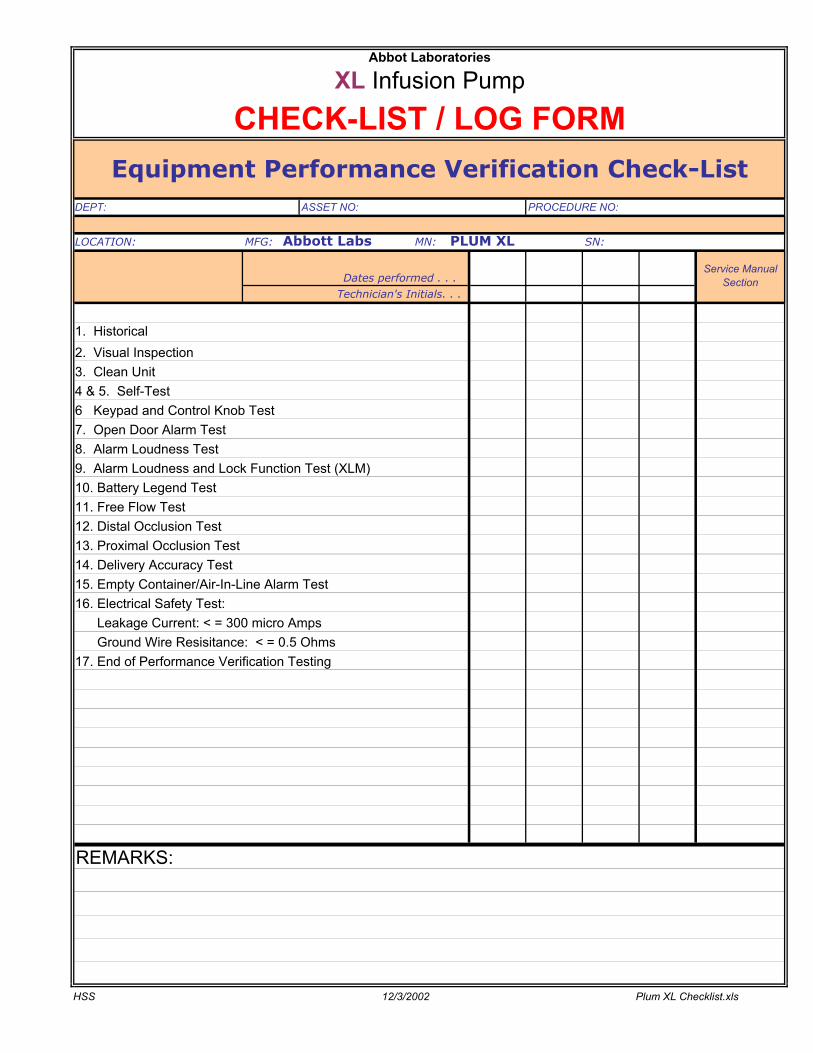
2. Visual Inspection3. Clean Unit4 & 5. Self-Test6 Keypad and Control Knob Test7. Open Door Alarm Test8. Alarm Loudness Test9. Alarm Loudness and Lock Function Test (XLM)10. Battery Legend Test11. Free Flow Test12. Distal Occlusion Test13. Proximal Occlusion Test14. Delivery Accuracy Test15. Empty Container/Air-In-Line Alarm Test16. Electrical Safety Test: Leakage Current: < = 300 micro Amps Ground Wire Resisitance: < = 0.5 Ohms17. End of Performance Verification Testing
XL Infusion Pump
CHECK-LIST / LOG FORM
Abbot Laboratories
REMARKS:
1. Historical
Dates performed . . . Technician's Initials. . .
Service Manual Section
LOCATION: MFG: Abbott Labs MN: PLUM XL SN:
Equipment Performance Verification Check-ListDEPT: ASSET NO: PROCEDURE NO:
HSS 12/3/2002 Plum XL Checklist.xls

HSS 12/3/2002 Plum XL Infusion Pump EDP.doc
Abbot Laboratories
XL Infusion Pump
SPECIFICATIONS HOME TECHNICIAN'S NOTES CONTENTS
SERVICE MODE: The service mode provides diagnostic and repair service information On the Plum XL, the service mode is accessed by simultaneously pressing and holding the [TITRATE] and [SILENCE] keys while turning the control knob from the OFF/CHARGE position. On the Plum XLM, simultaneously press and hold the [TITRATE/QUICKSET] and [SILENCE] keys while turning the control knob from OOF/CHARGE position. These keys must be pressed until the end of the self-test sequence, at which time normal infusion system operation is disabled and the service mode is accessed.
CONTROL KNOB SETTING SERVICE MODE INFORMATION
SET RATE ALARM HISTORY
SET VTBI SOFTWARE REVISION NUMBER
RUN RUN TIME AND BATTERY RUN TIME
HOLD/RESET (XLM WITH DATA PROT) PARAMETER PROGRAMING
ALARM HISTORY When the infusion system is in service mode and the control knob is turned to the SET RATE position, the alarm history can be viewed. In the viewing the alarm history list, large digits indicate an alarm error number (Er01. Er02, Er03) and small digits indicate a four digit alarm code. If there are no entries in the alarm history, the large digits indicate Er, and the small digits indicate-----. The infusion system [�] and [�] keys are sued to scroll through the alarm history. The first entry displayed is the most recent alarm. The large numerals increment to indicate the order of alarms. To clear the alarm history press the [PRI/SEC] KEY AND THE [BACKPRIME] KEY FOR FOUR SECONDS. The small digits flash and the audible tone sounds four times at a once-per-second rate. After four seconds the alarm history list is cleared. RUN TIME AND BATTERY RUN TIME When the infusion system is in the service mode and the control knob is set to the RUN position, the runtime and battery time can be viewed. In the runtime and battery run time display, large digits indicate the total infusion system run time in tens of hours and the small digits indicate the battery run time in tens of hours. For example: if the large digits indicate 245 and the small digits indicate 79, the infusion system has been operated a total of 2450 hours and has also been operated on battery for 790 of those 2450 hours. When replacing the infusion system battery, it may be desirable to clear the battery run time. To clear the battery run time simultaneously press and hold the [PRI/SEC] key and the [BACKPRIME] key for four seconds. The small digits flash and an audible tone sounds four times at a once-per-second rate. After four seconds, the battery run time is cleared. The total infusion system time cannot be cleared
HSS 12/3/2002 Plum XL Infusion Pump EDP.doc
Abbot Laboratories
XL Infusion Pump
SPECIFICATIONS (continued) HOME TECHNICIAN'S NOTES CONTENTS
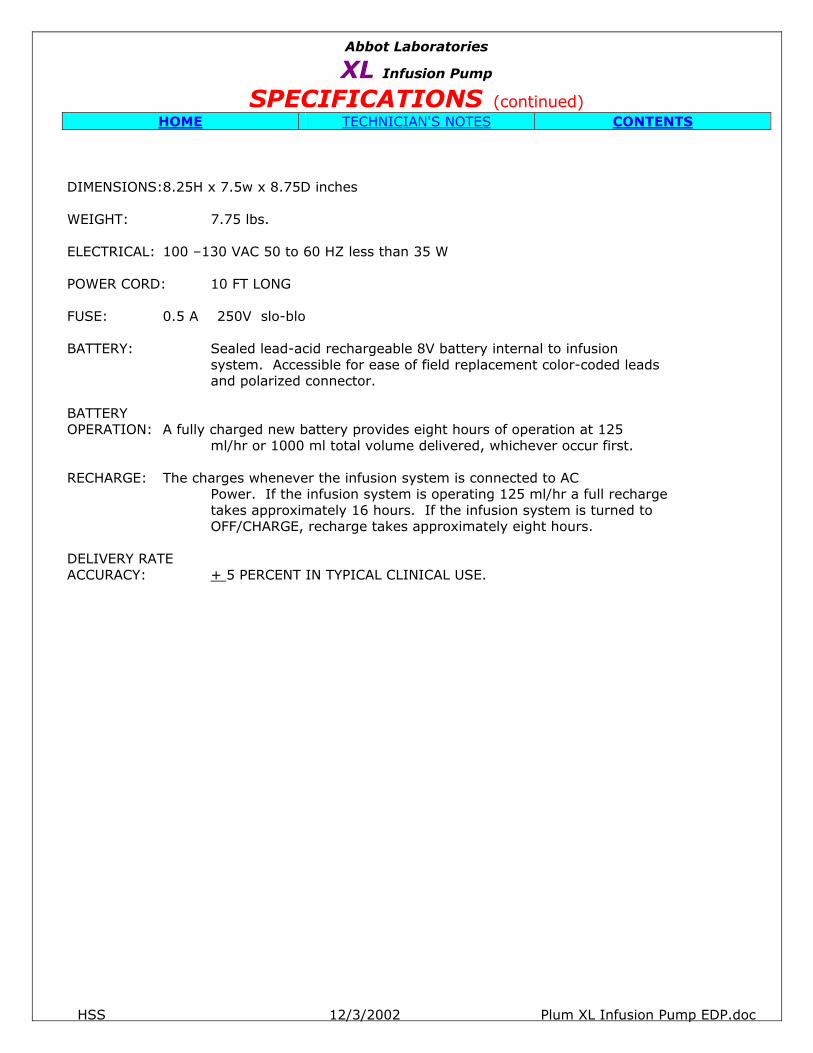
DIMENSIONS: 8.25H x 7.5w x 8.75D inches WEIGHT: 7.75 lbs. ELECTRICAL: 100 –130 VAC 50 to 60 HZ less than 35 W POWER CORD: 10 FT LONG FUSE: 0.5 A 250V slo-blo BATTERY: Sealed lead-acid rechargeable 8V battery internal to infusion
system. Accessible for ease of field replacement color-coded leads and polarized connector.
BATTERY OPERATION: A fully charged new battery provides eight hours of operation at 125
ml/hr or 1000 ml total volume delivered, whichever occur first. RECHARGE: The charges whenever the infusion system is connected to AC
Power. If the infusion system is operating 125 ml/hr a full recharge takes approximately 16 hours. If the infusion system is turned to OFF/CHARGE, recharge takes approximately eight hours.
DELIVERY RATE ACCURACY: + 5 PERCENT IN TYPICAL CLINICAL USE.

HSS 12/3/2002 Plum XL Infusion Pump EDP.doc
Abbot Laboratories
XL Infusion Pump
TECHNICIAN'S NOTES HOME TECHNICIAN'S NOTES CONTENTS
SERVICE MODE: The service mode provides diagnostic and repair service information On the Plum XL, the service mode is accessed by simultaneously pressing and holding the [TITRATE] and [SILENCE] keys while turning the control knob from the OFF/CHARGE position. On the Plum XLM, simultaneously press and hold the [TITRATE/QUICKSET] and [SILENCE] keys while turning the control knob from OOF/CHARGE position. These keys must be pressed until the end of the self-test sequence, at which time normal infusion system operation is disabled and the service mode is accessed.
CONTROL KNOB SETTING SERVICE MODE INFORMATION
SET RATE ALARM HISTORY
SET VTBI SOFTWARE REVISION NUMBER
RUN RUN TIME AND BATTERY RUN TIME
HOLD/RESET (XLM WITH DATA PROT) PARAMETER PROGRAMING
ALARM HISTORY When the infusion system is in service mode and the control knob is turned to the SET RATE position, the alarm history can be viewed. In the viewing the alarm history list, large digits indicate an alarm error number (Er01. Er02, Er03) and small digits indicate a four digit alarm code. If there are no entries in the alarm history, the large digits indicate Er, and the small digits indicate-----. The infusion system [�] and [�] keys are sued to scroll through the alarm history. The first entry displayed is the most recent alarm. The large numerals increment to indicate the order of alarms. To clear the alarm history press the [PRI/SEC] KEY AND THE [BACKPRIME] KEY FOR FOUR SECONDS. The small digits flash and the audible tone sounds four times at a once-per-second rate. After four seconds the alarm history list is cleared. RUN TIME AND BATTERY RUN TIME When the infusion system is in the service mode and the control knob is set to the RUN position, the runtime and battery time can be viewed. In the runtime and battery run time display, large digits indicate the total infusion system run time in tens of hours and the small digits indicate the battery run time in tens of hours. For example: if the large digits indicate 245 and the small digits indicate 79, the infusion system has been operated a total of 2450 hours and has also been operated on battery for 790 of those 2450 hours. When replacing the infusion system battery, it may be desirable to clear the battery run time. To clear the battery run time simultaneously press and hold the [PRI/SEC] key and the [BACKPRIME] key for four seconds. The small digits flash and an audible tone sounds four times at a once-per-second rate. After four seconds, the battery run time is cleared. The total infusion system time cannot be cleared
HSS 12/3/2002 Plum XL Infusion Pump EDP.doc
Abbot Laboratories
XL Infusion Pump
FACTORY MODIFICATIONS HOME TECHNICIAN'S NOTES CONTENTS
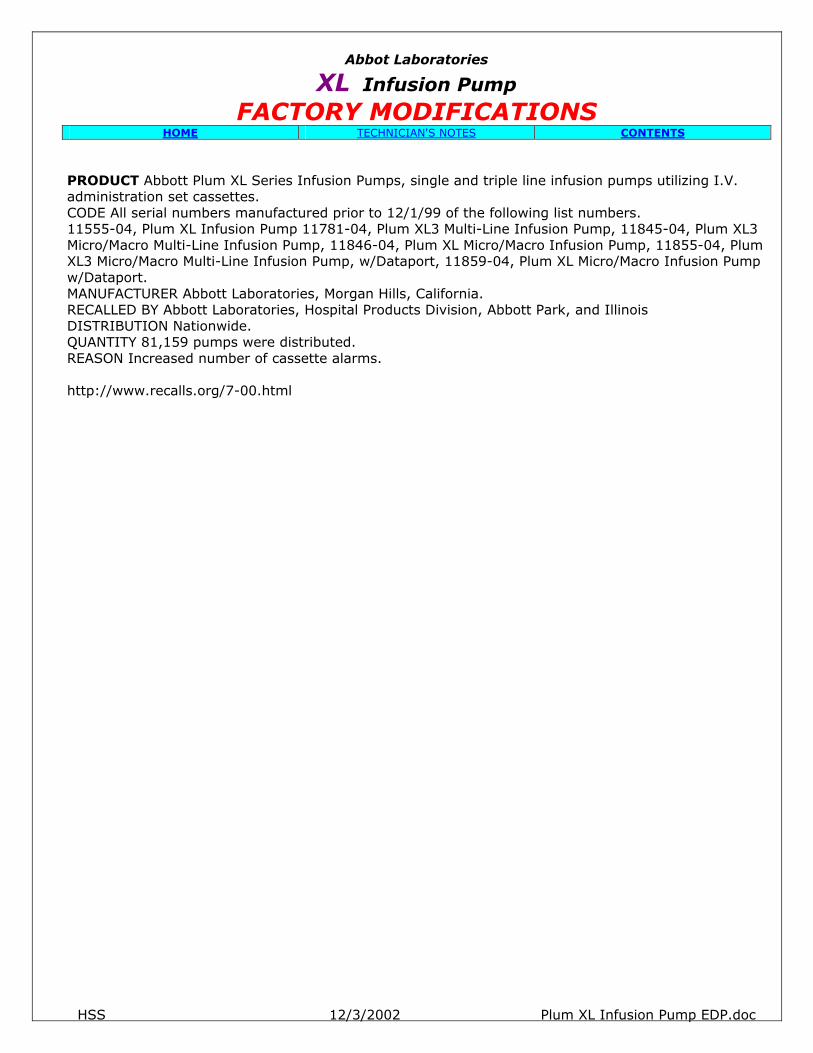
PRODUCT Abbott Plum XL Series Infusion Pumps, single and triple line infusion pumps utilizing I.V. administration set cassettes. CODE All serial numbers manufactured prior to 12/1/99 of the following list numbers. 11555-04, Plum XL Infusion Pump 11781-04, Plum XL3 Multi-Line Infusion Pump, 11845-04, Plum XL3 Micro/Macro Multi-Line Infusion Pump, 11846-04, Plum XL Micro/Macro Infusion Pump, 11855-04, Plum XL3 Micro/Macro Multi-Line Infusion Pump, w/Dataport, 11859-04, Plum XL Micro/Macro Infusion Pump w/Dataport. MANUFACTURER Abbott Laboratories, Morgan Hills, California. RECALLED BY Abbott Laboratories, Hospital Products Division, Abbott Park, and Illinois DISTRIBUTION Nationwide. QUANTITY 81,159 pumps were distributed. REASON Increased number of cassette alarms. http://www.recalls.org/7-00.html
HSS 12/3/2002 Plum XL Infusion Pump EDP.doc
Abbot Laboratories
XL Infusion Pump
TROUBLESHOOTING HOME TECHNICIAN'S NOTES CONTENTS
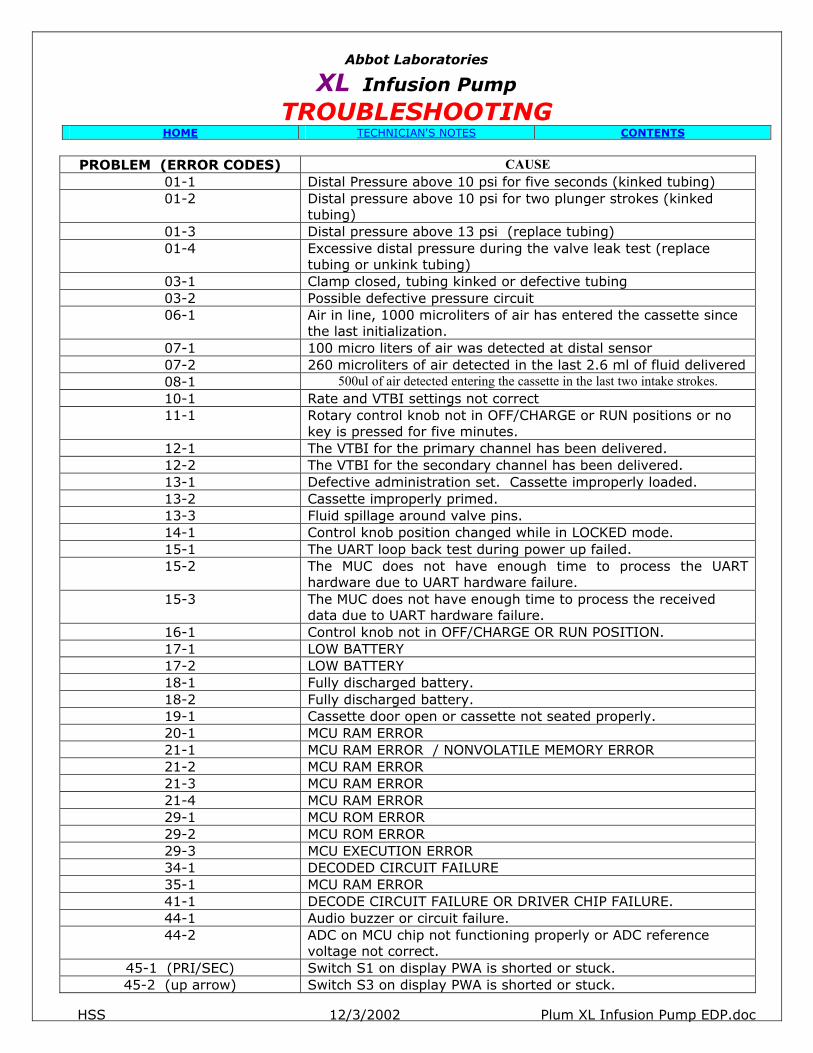
PROBLEM (ERROR CODES) CAUSE
01-1 Distal Pressure above 10 psi for five seconds (kinked tubing) 01-2 Distal pressure above 10 psi for two plunger strokes (kinked
tubing) 01-3 Distal pressure above 13 psi (replace tubing) 01-4 Excessive distal pressure during the valve leak test (replace
tubing or unkink tubing) 03-1 Clamp closed, tubing kinked or defective tubing 03-2 Possible defective pressure circuit 06-1 Air in line, 1000 microliters of air has entered the cassette since
the last initialization. 07-1 100 micro liters of air was detected at distal sensor 07-2 260 microliters of air detected in the last 2.6 ml of fluid delivered 08-1 500ul of air detected entering the cassette in the last two intake strokes. 10-1 Rate and VTBI settings not correct 11-1 Rotary control knob not in OFF/CHARGE or RUN positions or no
key is pressed for five minutes. 12-1 The VTBI for the primary channel has been delivered. 12-2 The VTBI for the secondary channel has been delivered. 13-1 Defective administration set. Cassette improperly loaded. 13-2 Cassette improperly primed. 13-3 Fluid spillage around valve pins. 14-1 Control knob position changed while in LOCKED mode. 15-1 The UART loop back test during power up failed. 15-2 The MUC does not have enough time to process the UART
hardware due to UART hardware failure. 15-3 The MUC does not have enough time to process the received
data due to UART hardware failure. 16-1 Control knob not in OFF/CHARGE OR RUN POSITION. 17-1 LOW BATTERY 17-2 LOW BATTERY 18-1 Fully discharged battery. 18-2 Fully discharged battery. 19-1 Cassette door open or cassette not seated properly. 20-1 MCU RAM ERROR 21-1 MCU RAM ERROR / NONVOLATILE MEMORY ERROR 21-2 MCU RAM ERROR 21-3 MCU RAM ERROR 21-4 MCU RAM ERROR 29-1 MCU ROM ERROR 29-2 MCU ROM ERROR 29-3 MCU EXECUTION ERROR 34-1 DECODED CIRCUIT FAILURE 35-1 MCU RAM ERROR 41-1 DECODE CIRCUIT FAILURE OR DRIVER CHIP FAILURE. 44-1 Audio buzzer or circuit failure. 44-2 ADC on MCU chip not functioning properly or ADC reference
voltage not correct. 45-1 (PRI/SEC) Switch S1 on display PWA is shorted or stuck. 45-2 (up arrow) Switch S3 on display PWA is shorted or stuck.

HSS 12/3/2002 Plum XL Infusion Pump EDP.doc
Abbot Laboratories
XL Infusion Pump
TROUBLESHOOTING (continued) HOME TECHNICIAN'S NOTES CONTENTS
45-3 (down arrow) Switch S2 on display PWA is shorted or stuck. 45-4 (TITRATE) Switch S4 on display PWA is shorted or stuck.
45-5 (BACKPRIME) Switch S5 on display PWA is shorted or stuck. 45-6 (SILENCE) Switch S6 on display PWA is shorted or stuck.
59-1 Position sensor failure. 60-1 Position sensor failure. 60-2 Position sensor failure or enable circuit failed or plunger motor
not moving. 61-1 Position sensor failure or input/output motor not moving. 61-2 Position sensor failure or enable circuit failure or input/output
motor not moving. 62-1 Position sensor failure or Primary/secondary motor not moving. 62-2 Position sensor failure or Primary/secondary motor not moving. 63-1 Plunger motor does not have enough torque or mechanical
assembly failure. 64-1 Input/output motor does not have enough torque or Mechanical
breakage in mechanism. 65-1 Primary/secondary motor does not have enough torque. 71-1 Internal MCU PWA malfunctioning. 73-1 +2.5-vdc reference to ADC missing or bad
+3.75-VDC reference to ADC missing or bad ADC failure.
73-2 +2.5-VDC reference to ADC missing or bad +3.75-VDC reference to ADC missing or bad
74-1 Air sensor or circuitry failure 74-4 Air sensor or circuitry failure. 74-5 Air sensor or circuitry failure. 81-1 Power supply PWA failure.
Failure in conditioning circuit on MCU PWA 81-2 Power supply PWA failure.
Failure in conditioning circuit on MCU PWA 81-3 Power supply PWA failure. 81-4 Power supply PWA failure.
Motor drawing excessive current. 90-1 EEPROM internal failure.
EEPROM decode circuitry failure. 94-1 Control knob circuitry failure. 94-2 Control knob circuitry failure. 94-4 Control knob circuitry failure.
Reed switch failure. 95-1 Pin detects circuitry failure.
Valve pin not present. 95-2 Pin detects circuitry failure.
Valve pin not present. Valve pin not moving.
96-1 UART FAILURE. 99-1 THROUGH 99-6 MCU internal failure.
HSS 12/3/2002 Plum XL Infusion Pump EDP.doc
Abbot Laboratories
XL Infusion Pump
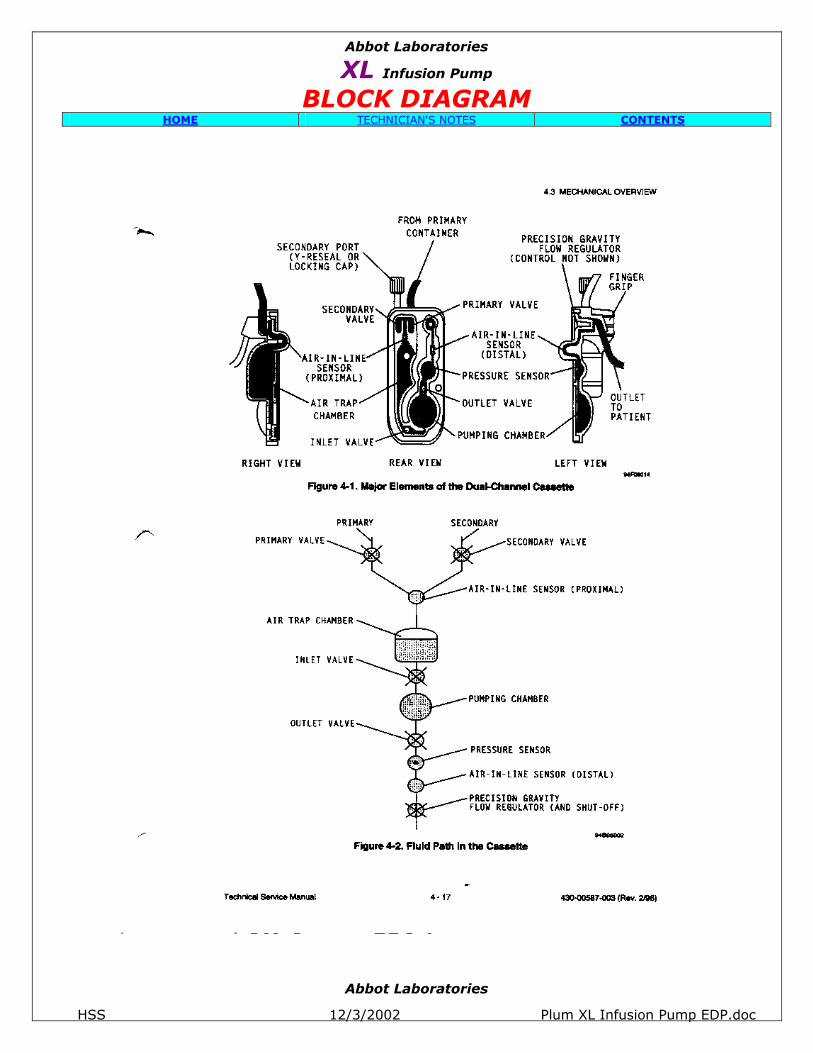
BLOCK DIAGRAM HOME TECHNICIAN'S NOTES CONTENTS
Abbot Laboratories
HSS 12/3/2002 Plum XL Infusion Pump EDP.doc
XL Infusion Pump
Manufacturer & Vender Information HOME TECHNICIAN'S NOTES CONTENTS
ABBOTT LABORATORIES TECHNICAL SUPPORT OPERATIONS 755 JARVIS DRIVE MORGAN HILL, CALIFORNIA 95037 1-800-241-4002 www.abbott.com
HSS 12/3/2002 Plum XL Infusion Pump EDP.doc
Abbot Laboratories
XL Infusion Pump
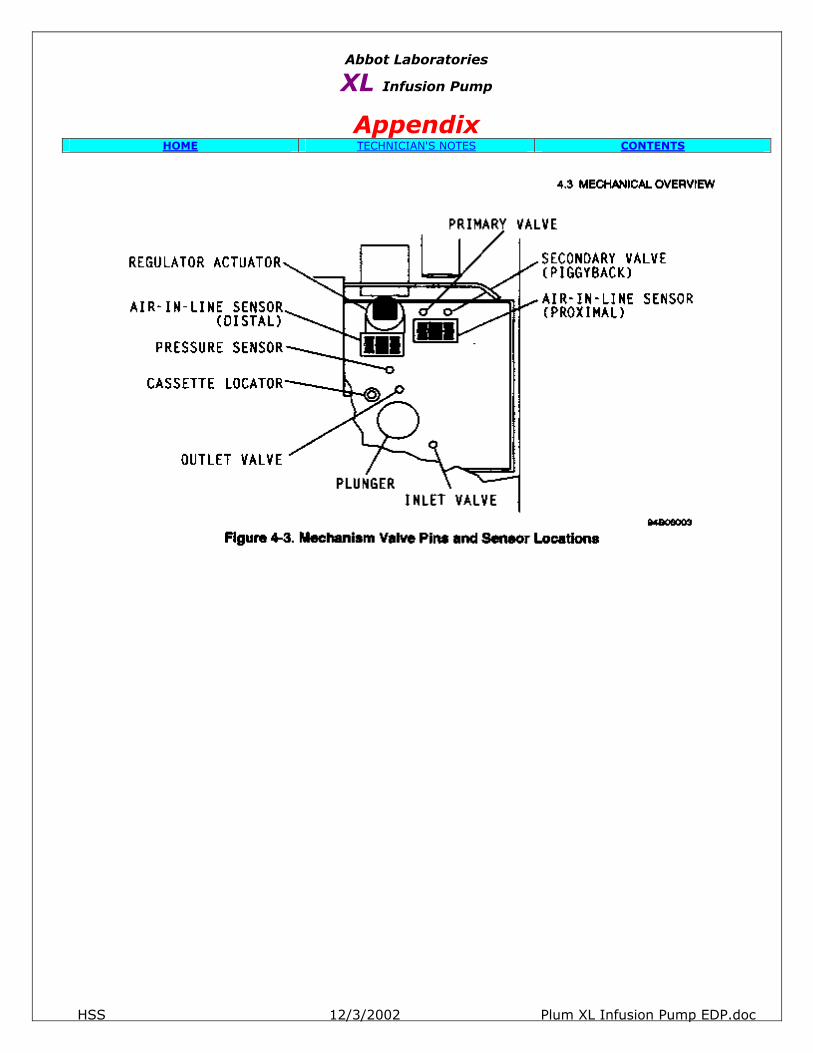
Appendix HOME TECHNICIAN'S NOTES CONTENTS

HSS 12/3/2002 Plum XL Infusion Pump EDP.doc
Abbot Laboratories
XL Infusion Pump
Appendix (continued) HOME TECHNICIAN'S NOTES CONTENTS
Battery Charger Current Test Fixture