Embed Size (px)
Citation preview

Oracle® Java Micro Edition Embedded Client
Installation Guide, Version 1.0
Part No.: 01-07-11May 2011

Copyright © 2011 Oracle and/or its affiliates. All rights reserved.This software and related documentation are provided under a license agreement containing restrictions on use and disclosure and are protected byintellectual property laws. Except as expressly permitted in your license agreement or allowed by law, you may not use, copy, reproduce, translate,broadcast, modify, license, transmit, distribute, exhibit, perform, publish, or display any part, in any form, or by any means. Reverse engineering,disassembly, or decompilation of this software, unless required by law for interoperability, is prohibited.The information contained herein is subject to change without notice and is not warranted to be error-free. If you find any errors, please report them to usin writing.If this is software or related software documentation that is delivered to the U.S. Government or anyone licensing it on behalf of the U.S. Government, thefollowing notice is applicable:U.S. GOVERNMENT RIGHTS Programs, software, databases, and related documentation and technical data delivered to U.S. Government customers are"commercial computer software" or "commercial technical data" pursuant to the applicable Federal Acquisition Regulation and agency-specificsupplemental regulations. As such, the use, duplication, disclosure, modification, and adaptation shall be subject to the restrictions and license terms setforth in the applicable Government contract, and, to the extent applicable by the terms of the Government contract, the additional rights set forth in FAR52.227-19, Commercial Computer Software License (December 2007). Oracle America, Inc., 500 Oracle Parkway, Redwood City, CA 94065.This software or hardware is developed for general use in a variety of information management applications. It is not developed or intended for use in anyinherently dangerous applications, including applications which may create a risk of personal injury. If you use this software or hardware in dangerousapplications, then you shall be responsible to take all appropriate fail-safe, backup, redundancy, and other measures to ensure its safe use. OracleCorporation and its affiliates disclaim any liability for any damages caused by use of this software or hardware in dangerous applications.Oracle and Java are registered trademarks of Oracle and/or its affiliates. Other names may be trademarks of their respective owners.AMD, Opteron, the AMD logo, and the AMD Opteron logo are trademarks or registered trademarks of Advanced Micro Devices. Intel and Intel Xeon aretrademarks or registered trademarks of Intel Corporation. All SPARC trademarks are used under license and are trademarks or registered trademarks ofSPARC International, Inc. UNIX is a registered trademark licensed through X/Open Company, Ltd.This software or hardware and documentation may provide access to or information on content, products, and services from third parties. OracleCorporation and its affiliates are not responsible for and expressly disclaim all warranties of any kind with respect to third-party content, products, andservices. Oracle Corporation and its affiliates will not be responsible for any loss, costs, or damages incurred due to your access to or use of third-partycontent, products, or services.
Copyright © 2011 Oracle et/ou ses affiliés. Tous droits réservés.Ce logiciel et la documentation qui l’accompagne sont protégés par les lois sur la propriété intellectuelle. Ils sont concédés sous licence et soumis à desrestrictions d’utilisation et de divulgation. Sauf disposition de votre contrat de licence ou de la loi, vous ne pouvez pas copier, reproduire, traduire,diffuser, modifier, breveter, transmettre, distribuer, exposer, exécuter, publier ou afficher le logiciel, même partiellement, sous quelque forme et parquelque procédé que ce soit. Par ailleurs, il est interdit de procéder à toute ingénierie inverse du logiciel, de le désassembler ou de le décompiler, excepté àdes fins d’interopérabilité avec des logiciels tiers ou tel que prescrit par la loi.Les informations fournies dans ce document sont susceptibles de modification sans préavis. Par ailleurs, Oracle Corporation ne garantit pas qu’ellessoient exemptes d’erreurs et vous invite, le cas échéant, à lui en faire part par écrit.Si ce logiciel, ou la documentation qui l’accompagne, est concédé sous licence au Gouvernement des Etats-Unis, ou à toute entité qui délivre la licence dece logiciel ou l’utilise pour le compte du Gouvernement des Etats-Unis, la notice suivante s’applique :U.S. GOVERNMENT RIGHTS. Programs, software, databases, and related documentation and technical data delivered to U.S. Government customersare "commercial computer software" or "commercial technical data" pursuant to the applicable Federal Acquisition Regulation and agency-specificsupplemental regulations. As such, the use, duplication, disclosure, modification, and adaptation shall be subject to the restrictions and license terms setforth in the applicable Government contract, and, to the extent applicable by the terms of the Government contract, the additional rights set forth in FAR52.227-19, Commercial Computer Software License (December 2007). Oracle America, Inc., 500 Oracle Parkway, Redwood City, CA 94065.Ce logiciel ou matériel a été développé pour un usage général dans le cadre d’applications de gestion des informations. Ce logiciel ou matériel n’est pasconçu ni n’est destiné à être utilisé dans des applications à risque, notamment dans des applications pouvant causer des dommages corporels. Si vousutilisez ce logiciel ou matériel dans le cadre d’applications dangereuses, il est de votre responsabilité de prendre toutes les mesures de secours, desauvegarde, de redondance et autres mesures nécessaires à son utilisation dans des conditions optimales de sécurité. Oracle Corporation et ses affiliésdéclinent toute responsabilité quant aux dommages causés par l’utilisation de ce logiciel ou matériel pour ce type d’applications.Oracle et Java sont des marques déposées d’Oracle Corporation et/ou de ses affiliés.Tout autre nom mentionné peut correspondre à des marquesappartenant à d’autres propriétaires qu’Oracle.AMD, Opteron, le logo AMD et le logo AMD Opteron sont des marques ou des marques déposées d’Advanced Micro Devices. Intel et Intel Xeon sont desmarques ou des marques déposées d’Intel Corporation. Toutes les marques SPARC sont utilisées sous licence et sont des marques ou des marquesdéposées de SPARC International, Inc. UNIX est une marque déposée concédée sous licence par X/Open Company, Ltd.Ce logiciel ou matériel et la documentation qui l’accompagne peuvent fournir des informations ou des liens donnant accès à des contenus, des produits etdes services émanant de tiers. Oracle Corporation et ses affiliés déclinent toute responsabilité ou garantie expresse quant aux contenus, produits ouservices émanant de tiers. En aucun cas, Oracle Corporation et ses affiliés ne sauraient être tenus pour responsables des pertes subies, des coûtsoccasionnés ou des dommages causés par l’accès à des contenus, produits ou services tiers, ou à leur utilisation.

Contents
1. System Requirements 1
Introduction 1
SDK Requirements 2
SDK Host System Hardware Requirements 2
Linux System Software Requirements 2
Windows System Software Requirements 3
Development Environment 3
Target Device Requirements 4
2. Installation Procedures 5
Installing the SDK 5
▼ Install the Linux/X86 SDK 5
▼ Install the Windows SDK 6
SDK Installation Structure 9
Setting Up the Linux/ARM Environment 9
▼ Install the Linux/ARM Package on the Host 9
▼ Test an Oracle Java ME Embedded Client Application on the Linux/ARMTarget 11
3. Working With NetBeans 13
Oracle Java ME Embedded Client SDK and NetBeans Projects 13
iii

▼ Adding the SDK as a Java Platform 13
▼ Create and Run a New Project 19
Project Options 23
4. Working With Eclipse 25
Oracle Java ME Embedded Client SDK and Eclipse Projects 25
▼ Adding a Java Platform 25
▼ Writing Your First Application 28
5. Command Line Options 31
Changing Default Resolution for Linux SDK 31
Stop a Running VM 32
iv Oracle Java ME Embedded Client Installation Guide • May 2011

CHAPTER 1
System Requirements
The Oracle® Java Micro Edition (Java ME) Embedded Client provides a Java ME –Connected Device Configuration (Java ME-CDC) virtual machine along withFoundation Profile (FP). The Personal Basis Profile (PBP) package provides basicGUI functionality.
The SDK also includes:
■ RMI Optional Package
■ JDBC Optional package for CDC/Foundation Profile
■ J2ME Web services
■ Security Optional Package
The SDK can be installed on X86 PCs running Linux or Windows operating systems,providing a Java ME - CDC application development and emulation environment.For device testing, applications can be exported to a Linux/ARM target running theheadless version of Oracle Java ME Embedded Client.
IntroductionThe Oracle Java ME Embedded Client includes the following software:
■ A software development kit (SDK) for installation on an X86 PC host runningWindows XP or Linux. This environment is used for application development andemulation. See “Install the Linux/X86 SDK” on page 5 or “Install the WindowsSDK” on page 6.
■ An embedded client binary for use on a target platform. See “Setting Up theTarget Runtime Environment” on page 10.
This document describes the installation process for the host and target including abrief description on how to develop a simple application using the NetBeans orEclipse IDE that you can use to test the installation on the target device.
1
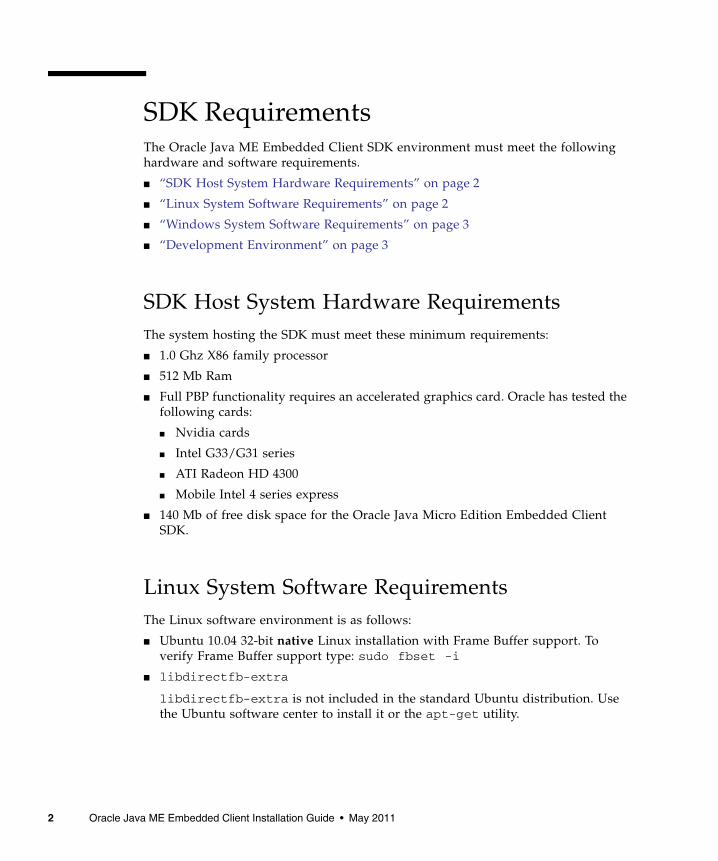
SDK RequirementsThe Oracle Java ME Embedded Client SDK environment must meet the followinghardware and software requirements.
■ “SDK Host System Hardware Requirements” on page 2
■ “Linux System Software Requirements” on page 2
■ “Windows System Software Requirements” on page 3
■ “Development Environment” on page 3
SDK Host System Hardware RequirementsThe system hosting the SDK must meet these minimum requirements:
■ 1.0 Ghz X86 family processor
■ 512 Mb Ram
■ Full PBP functionality requires an accelerated graphics card. Oracle has tested thefollowing cards:
■ Nvidia cards
■ Intel G33/G31 series
■ ATI Radeon HD 4300
■ Mobile Intel 4 series express
■ 140 Mb of free disk space for the Oracle Java Micro Edition Embedded ClientSDK.
Linux System Software RequirementsThe Linux software environment is as follows:
■ Ubuntu 10.04 32-bit native Linux installation with Frame Buffer support. Toverify Frame Buffer support type: sudo fbset -i
■ libdirectfb-extra
libdirectfb-extra is not included in the standard Ubuntu distribution. Usethe Ubuntu software center to install it or the apt-get utility.
2 Oracle Java ME Embedded Client Installation Guide • May 2011

After installing libdirectfb-extra, ensure that DFBARGS=system=x11 is set.This environment variable can be set from the command line (for example, see“Changing Default Resolution for Linux SDK” on page 31), but to make it morepersistent, you can set it in either of two other places:
■ in your .bashrc file. For example, add this line:
export DFBARGS="system=x11"
■ Create or edit a .directfbrc file in your home directory. Add this line:
system=x11
Windows System Software RequirementsThe Oracle Java ME Embedded Client SDK runs on Windows XP. Ensure that thefollowing Microsoft packages are installed.
■ Microsoft Visual C++ 2008 SP1 Redistributable Package (x86)
http://www.microsoft.com/downloads/en/details.aspx?familyid=a5c84275-3b97-4ab7-a40d-3802b2af5fc2&displaylang=en
■ DirectX End-User Runtimes (March 2009)
http://www.microsoft.com/downloads/en/details.aspx?FamilyID=0cf368e5-5ce1-4032-a207-c693d210f616&displaylang=en
■ To install this package, extract the files. In the extraction directory, locate andrun DXSETUP.exe to complete the installation process.
■ To support full 3D acceleration, run the DxDiag utility. On the Display tab,ensure that Direct 3D Acceleration is enabled.
■ Microsoft .NET Framework version 2.0 or higher. The x86 version requires 850MB free space while the x64 version requires 2 GB of disk space. If .NET is notinstalled, the installer will prompt you to add it.
Development EnvironmentThe development environment requires Java. An IDE for profiling and debugging isoptional.
■ JDK 1.6 or higher. Please download the JDK from the Oracle website. OpenJDKhas not been tested, and therefore is not supported.
http://www.oracle.com/technetwork/java/javase/downloads/index.html
■ NetBeans 6.9.1 (including Java ME support) with the latest updates, or EclipseClassic 3.6.1 (Helios).
Chapter 1 System Requirements 3
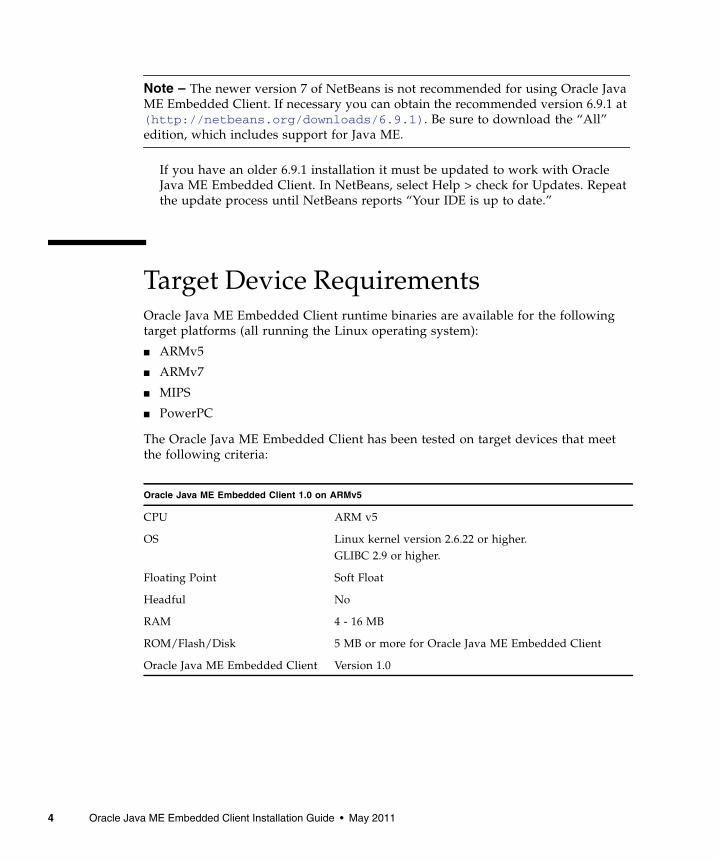
Note – The newer version 7 of NetBeans is not recommended for using Oracle JavaME Embedded Client. If necessary you can obtain the recommended version 6.9.1 at(http://netbeans.org/downloads/6.9.1). Be sure to download the “All”edition, which includes support for Java ME.
If you have an older 6.9.1 installation it must be updated to work with OracleJava ME Embedded Client. In NetBeans, select Help > check for Updates. Repeatthe update process until NetBeans reports “Your IDE is up to date.”
Target Device RequirementsOracle Java ME Embedded Client runtime binaries are available for the followingtarget platforms (all running the Linux operating system):
■ ARMv5
■ ARMv7
■ MIPS
■ PowerPC
The Oracle Java ME Embedded Client has been tested on target devices that meetthe following criteria:
Oracle Java ME Embedded Client 1.0 on ARMv5
CPU ARM v5
OS Linux kernel version 2.6.22 or higher.GLIBC 2.9 or higher.
Floating Point Soft Float
Headful No
RAM 4 - 16 MB
ROM/Flash/Disk 5 MB or more for Oracle Java ME Embedded Client
Oracle Java ME Embedded Client Version 1.0
4 Oracle Java ME Embedded Client Installation Guide • May 2011

Oracle Java ME Embedded Client 1.0 on ARM v7 Little-Endian
CPU ARM v7
OS Linux kernel version 2.6.35 or higher.GLIBC 2.12.1 or higher.
Floating Point Hard, VFP
Headful No
RAM 4 - 16 MB (headless only)
ROM/Flash/Disk 6 MB or more for Oracle Java ME Embedded Client
Oracle Java ME Embedded Client Version 1.0*
* Note: this same binary is likely to run on ARMv6 architecture, although Oracle has not tested this.)
Oracle Java ME Embedded Client 1.0 on MIPS
CPU MIPS32 74K
OS Linux kernel version 2.6.22 or higher.GLIBC 2.8 or higher.
Floating Point Soft Float
Headful No
RAM 4 - 16 MB
ROM/Flash/Disk 5 MB or more for Oracle Java ME Embedded Client
Oracle Java ME Embedded Client Version 1.0
Oracle Java ME Embedded Client 1.0 on PowerPC
CPU PowerPC 464FP
OS Linux kernel version 2.6.32 or higher.GLIBC 2.10.2 or higher.
Floating Point Hard Float
Headful No
RAM 4 - 16 MB
ROM/Flash/Disk 5 MB or more for Oracle Java ME Embedded Client
Oracle Java ME Embedded Client Version 1.0
Chapter 1 System Requirements 5

6 Oracle Java ME Embedded Client Installation Guide • May 2011

CHAPTER 2
Installation Procedures
This chapter discusses installation procedures for the Oracle Java ME EmbeddedClient SDK binary and the environment required to support the emulator.
Installing the SDKThis section describes how to install the SDK on Linux and Windows hosts.
▼ Install the Linux/X86 SDKThis command line procedure installs the SDK in /usr/local.
1. Download the Oracle Java ME Embedded Client bundle to any location on acompliant system.
2. From a Linux terminal use the following command to enable executepermissions on the binary:
3. Use the following steps to run the installer binary:
$ chmod +x ./ojec_1.0_linux_x86_sdk.bin
$ sudo ./ojec_1.0_linux_x86_sdk.bin$ [sudo] password for userid:$ Oracle Java Micro Edition Embedded client version 1.0
Installer is starting, please wait...
5

4. At the prompt, type 1 to start the installation.
If the installation is successful you will see the message “Installationcompleted.”
If another version exists in /usr/local, you will be warned:
Type y to continue or n to exit.
Oracle Java ME Embedded Client is installed in/usr/local/Oracle_JavaME_Embedded_Client/1.0.
▼ Install the Windows SDKThis command line procedure installs the SDK in C:\Program Files\Oracle\Oracle JavaME Embedded Client by default.
1. Download the file ojec_1.0_win32_x86_sdk.zip. Extract the zip file.
This exposes ojec-sdk-setup.msi and setup.exe.
2. Double-click on setup.exe to start the installation.
1 - Install2 - Uninstall3 - QuitEnter choice: 1Installing Oracle Java Micro Edition Embedded Clientversion 1.0...
Please note that installation directory/usr/local/Oracle_JavaME_Embedded_Client/1.0is not empty and files under it will be overwritten!Do you want to continue [y/n]?
6 Oracle Java ME Embedded Client Installation Guide • May 2011

Click Next to continue.
3. Select an installation folder.
Chapter 2 Installation Procedures 7

4. Confirm that you want to start the installation.
5. Click Close at the end of the installation.
8 Oracle Java ME Embedded Client Installation Guide • May 2011

SDK Installation StructureThe default installation locations are:
The installation directory contains the following subdirectories:
Setting Up the Target RuntimeEnvironmentThe procedures in this section describe how to install the runtime package on aLinux development host and make it available to a target device.
The procedures in this section describe working with the runtime binary targeted foran ARMv7 device running Linux. The procedures are very similar for the otheravailable runtime binaries, such as ARMv5, MIPS or Power PC.
▼ Install the Linux/ARM Package on the HostWhen an embedded platform has limited memory it is advisable to install the stackon the host, then mount the stack from the ARM device. If the ARM device hassufficient storage you can copy the Oracle Java ME Embedded Client platformdirectory to the device.
1. Download ojec_1.0_linux_arm_pack.tar.gz and save it on a qualifiedLinux host (see “SDK Requirements” on page 2).
Linux: /usr/local/Oracle_JavaME_Embedded_Client/1.0
Windows: C:\Program Files\Oracle\Oracle JavaME Embedded Client(on 32-bit machines) orC:\Program Files (x86)\Oracle\Oracle JavaME Embedded Client(on 64-bit machines)
docs/ Contains API documentation and product documentation for the JSRsprovided with this SDK.
emulator-platform/ Contains all binary files, libraries and others necessary to run the JavaVirtual Machine.
legal/ Contains license agreements for the Oracle Java Micro EditionEmbedded Client.
Chapter 2 Installation Procedures 9

2. To extract the contents in the current directory, use this command:
tar xfz ojec_1.0_linux_arm_pack.tar.gz
The directory Oracle_JavaME_Embedded_Client/1.0 is created in theextraction directory. It includes these subdirectories:
3. If you are going to copy the stack to the device, mount theOracle_JavaME_Embedded_Client/1.0 directory.If you are going to mount the binaries from the ARM device, export theOracle_JavaME_Embedded_Client/1.0/binaries directory.
For example, add the path to /etc/exports with proper permissions and thenrestart the NFS server.
Optional JAR Files in the Stack
The Oracle Java ME Embedded Client runtime for Linux/ARM comes bundled witha number of optional packages, which are found in:
InstallDir/Oracle_JavaME_Embedded_Client/1.0/binaries/lib
If these APIs are not used and you choose to reduce the size of the static footprint,you can safely delete any of the following files from the system:
binaries All binaries and libraries for Oracle Java ME Embedded Client forLinux/ARM.
legal Copyright and other legal documents.
docs All relevant documentation for Oracle Java ME Embedded Client.
Optional Package File Name(s)
RMI Optional Package Specification Version 1.0 jsr66.jar
JDBC Optional Package for CDC/Foundation Profile 1.0 jsr169.jar
J2ME ME Web Services Specification 1.0 jsr172.jar, xmlparser.jar
Security Optional Package 1.0 jaas.jar, jce.jar,jsse-cdc.jar,ext/sunjec_provider.jar,sunrsasign.jar
10 Oracle Java ME Embedded Client Installation Guide • May 2011

▼ Test an Oracle Java ME Embedded ClientApplication on the Linux/ARM TargetThese instructions assume the target device complies with the “Target DeviceRequirements” on page 4.
1. From the Linux/ARM target platform, mount the directory exported from theLinux host computer in Step 3 of “Install the Linux/X86 SDK” on page 5.
For example:
Alternatively, you can copy the entire stack from the mount point to the device, oronly the parts of the stack you need, as described in Step 3 in “Install theLinux/ARM Package on the Host” on page 10.
2. Use the Oracle Java ME Embedded Client SDK to build and compile anapplication on the Linux host computer.
Note – In version 1.0, the only available client is headless. Your application mustuse a Main file that uses public static void main (String[] args) { }.Your headless application must not use an Xlet and it must not rely on a graphicsstack.
3. Make your application’s JAR (or class) file accessible from the Linux/ARMtarget platform (for example, use mount).
4. Run the application using either the optimized version or the debug version ofthe VM:
InstallDir/Oracle_JavaME_Embedded_Client/1.0/binaries/bin/cvm
For example:
cd /mnt/Oracle_JavaME_Embedded_Client/1.0/bin
./cvm -cp /projects/Hello/dist/Hello.jar hello.Main
Check the output to validate the results.
mount -t nfs -o nolocklinuxhost:/usr/local/Oracle_JavaME_Embedded_Client/1.0/binaries/mnt/Oracle_JavaME_Embedded_Client
Chapter 2 Installation Procedures 11

12 Oracle Java ME Embedded Client Installation Guide • May 2011

CHAPTER 3
Working With NetBeans
As mentioned in “Development Environment” on page 3, the recommendedNetBeans version is 6.9.1. You can find this version at:
http://netbeans.org/downloads/index.html
Choose the “Java” download bundle.
This chapter details the steps to configure NetBeans to use the Oracle Java MEEmbedded Client SDK as a Java platform, and presents a sample project and to runin your configured environment.
Oracle Java ME Embedded Client SDKand NetBeans ProjectsThis section details how to add the SDK as a Java Platform in NetBeans and how tocreate an Oracle Java ME Embedded Client project.
▼ Adding the SDK as a Java PlatformOracle Java ME Embedded Client provides the Java ME platform for embeddeddevices, such as TV Set Top boxes and smart electric meters. These devices run avirtual machine based on Java ME CDC. To emulate this environment, the NetBeansIDE must be configured to use the Oracle Java ME Embedded Client platform.Follow these steps to install this platform into your NetBeans IDE.
This procedure was recorded on a Linux machine. If you are a PC user, use theWindows paths discussed in “SDK Installation Structure” on page 9.
13
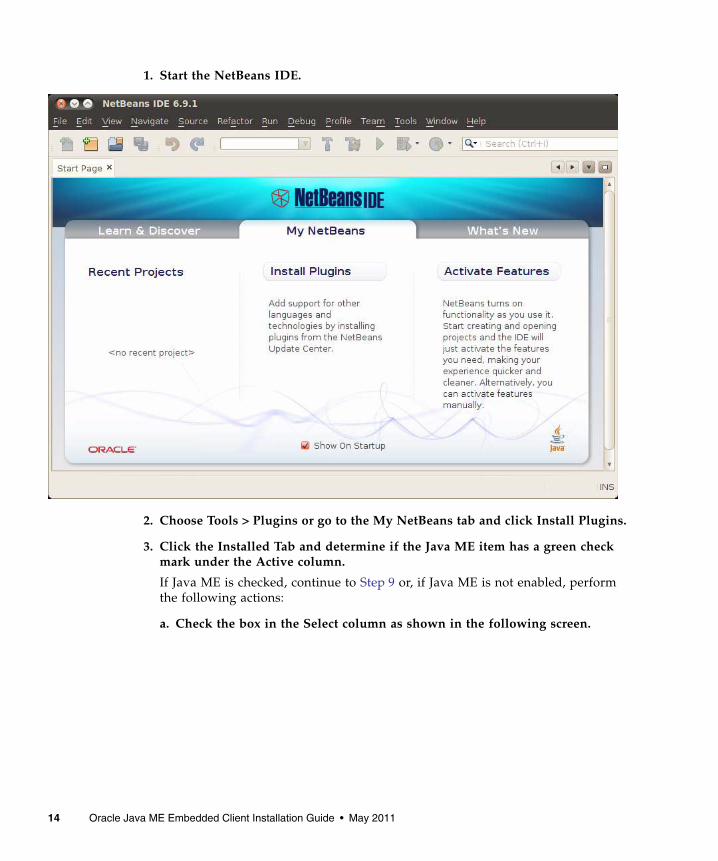
1. Start the NetBeans IDE.
2. Choose Tools > Plugins or go to the My NetBeans tab and click Install Plugins.
3. Click the Installed Tab and determine if the Java ME item has a green checkmark under the Active column.
If Java ME is checked, continue to Step 9 or, if Java ME is not enabled, performthe following actions:
a. Check the box in the Select column as shown in the following screen.
14 Oracle Java ME Embedded Client Installation Guide • May 2011
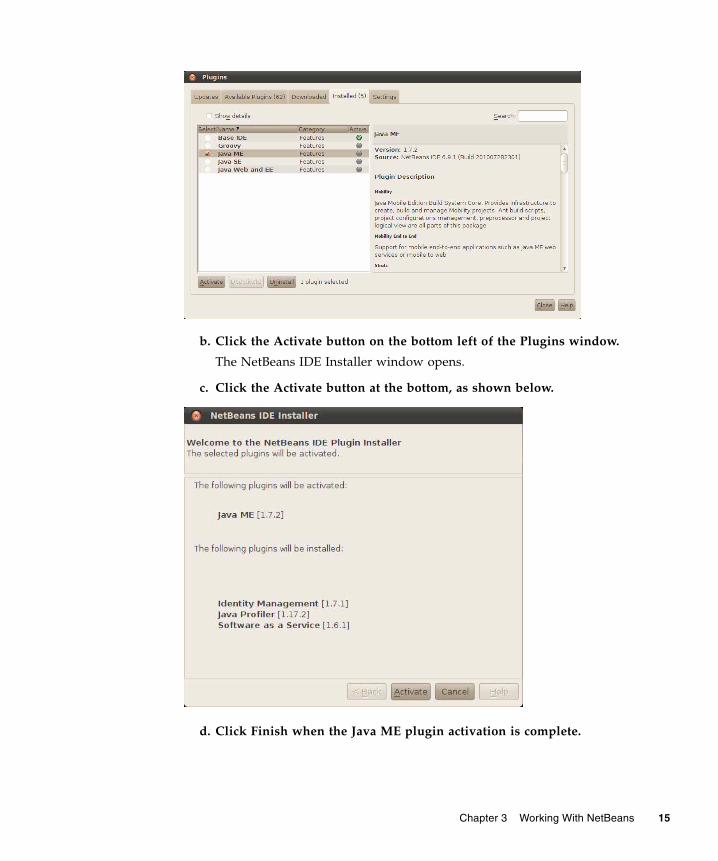
b. Click the Activate button on the bottom left of the Plugins window.
The NetBeans IDE Installer window opens.
c. Click the Activate button at the bottom, as shown below.
d. Click Finish when the Java ME plugin activation is complete.
Chapter 3 Working With NetBeans 15

4. If you have an older 6.9.1 installation it must be updated to work with OracleJava ME Embedded Client. In NetBeans, select Help > check for Updates.Repeat the update process until NetBeans reports “Your IDE is up to date.”
5. After a successful update, NetBeans will prompt you to restart the IDE. Clickthe option Restart IDE now, and click Finish.
6. Select the menu Tools->Plugins and click the Update tab.
Click the Java box as shown, and click the Update button. This step enables theplugin for CDC Java Embedded Client Platform Implementation.
16 Oracle Java ME Embedded Client Installation Guide • May 2011

7. After a successful update, NetBeans will again prompt you to restart the IDE.Click the option Restart IDE now, and click Finish.
8. Click the Close button to dismiss the Plugins window.
9. Select Tools > Java Platforms and the Java Platform Manager window opens.
Chapter 3 Working With NetBeans 17

10. Click the Add Platform button below the Platforms pane and the Add JavaPlatform window opens.
a. On the Select platform type page, select Java ME CDC Platform Emulator.
b. Click Next to display the Choose Platform Folder page.
18 Oracle Java ME Embedded Client Installation Guide • May 2011
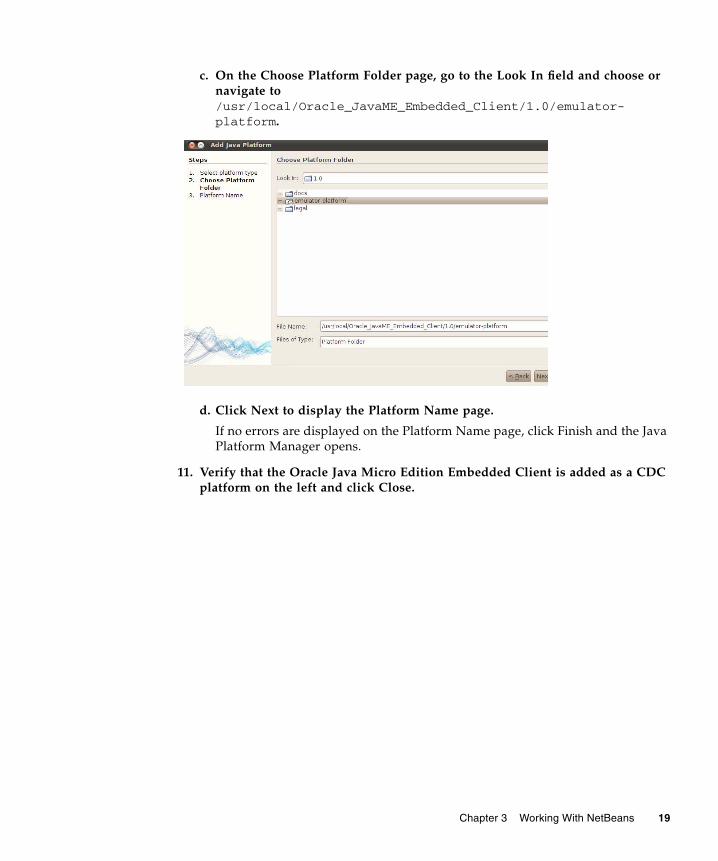
c. On the Choose Platform Folder page, go to the Look In field and choose ornavigate to/usr/local/Oracle_JavaME_Embedded_Client/1.0/emulator-platform.
d. Click Next to display the Platform Name page.
If no errors are displayed on the Platform Name page, click Finish and the JavaPlatform Manager opens.
11. Verify that the Oracle Java Micro Edition Embedded Client is added as a CDCplatform on the left and click Close.
Chapter 3 Working With NetBeans 19
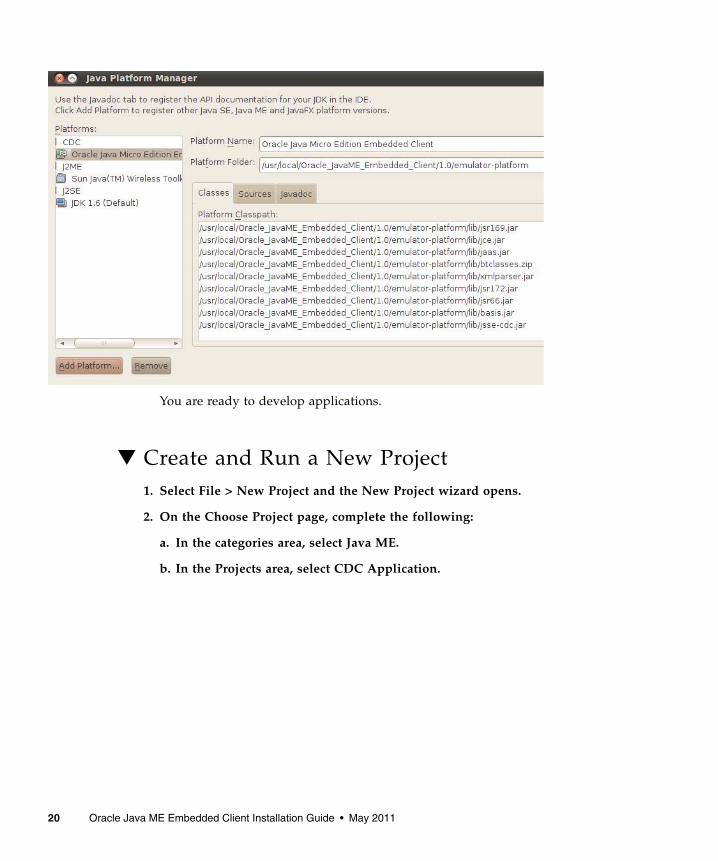
You are ready to develop applications.
▼ Create and Run a New Project1. Select File > New Project and the New Project wizard opens.
2. On the Choose Project page, complete the following:
a. In the categories area, select Java ME.
b. In the Projects area, select CDC Application.
20 Oracle Java ME Embedded Client Installation Guide • May 2011

c. Click Next and the Name and Location page is displayed.
3. On the Name and Location, perform the following actions:
a. Enter HelloWorld for the Project Name.
b. Select an appropriate Project Location.
c. De-select the Create Main Class option.
d. Click Next and the Select Platform page is displayed.
4. On the Select Platform page, perform the following actions:
a. Select Oracle Java Micro Edition Embedded Client Emulator from the JavaPlatform list.
b. Choose JEC-1.0 from the Profile list.
Chapter 3 Working With NetBeans 21

c. Click the Finish button to create the new HelloWorld project (the nameentered in Step 3).
5. Create a Main class in the HelloWorld package by performing the followingactions in the Projects view:
a. Expand the HelloWorld application and the Source Packages tree.
b. Right-click on <default package>.
c. Select New > Java Class to open the New Java Class window.
22 Oracle Java ME Embedded Client Installation Guide • May 2011

d. Name the class Main, enter a lower case package name such as helloworld,and click Finish.
Chapter 3 Working With NetBeans 23

6. Edit the Main class by inserting a main method to print a string.
For example:
7. In the Projects tab, right-click on the project and select the option Build.
8. Identify helloworld.Main as the HelloWorld project main class.
a. In the Projects tab, right-click on the HelloWorld project and selectProperties to open the properties window.
b. In the Category area, select Running.
c. In the Main Class field, click Browse to select the Main.java file.
The Browse Main Classes window opens with helloworld.Main selected.The option Run using main(String[] args) method execution should beselected.
d. Click the Select Main Class button and then click OK to close theHelloWorld properties window.
9. In the Projects tab, right-click on the project and select the option Run.
The message, “Hello, world!” prints in the NetBeans Output window. To open theoutput window, select Window > Output > Output.
public class Main {public static void main(String args[]) {
System.out.println("Hello, world!");}
}
24 Oracle Java ME Embedded Client Installation Guide • May 2011

Project OptionsTo edit project properties, right click on the project and select the option Properties.
■ To change the display resolution, select the Platform category to switch to anotheremulator platform (if available).
■ Open the Build sub-options to set desired values. For example, you can add anyJAR file to the build system by selecting Build sub-option Libraries & Resources.
■ Modify the Running option to pass Arguments or VM options for the Javaruntime.
Chapter 3 Working With NetBeans 25

26 Oracle Java ME Embedded Client Installation Guide • May 2011

CHAPTER 4
Working With Eclipse
This chapter details the steps to configure Eclipse to use the Oracle Java MEEmbedded Client SDK as a Java platform, and presents a sample project and asample application to run in your configured environment.
Note – The SDK supports application development and the emulation. Debuggingand Profiling are not supported.
Oracle Java ME Embedded Client SDKand Eclipse ProjectsThis section describes how to add the Oracle Java ME Embedded Client SDK as aPlatform in Eclipse and how to create a new project in Eclipse.
▼ Adding a Java PlatformLaunch Eclipse and follow these steps:
1. Select Window > Preferences.
The Preferences Window opens.
2. In the Preferences window, go to the left panel, expand the Java item, and selectInstalled JREs.
25
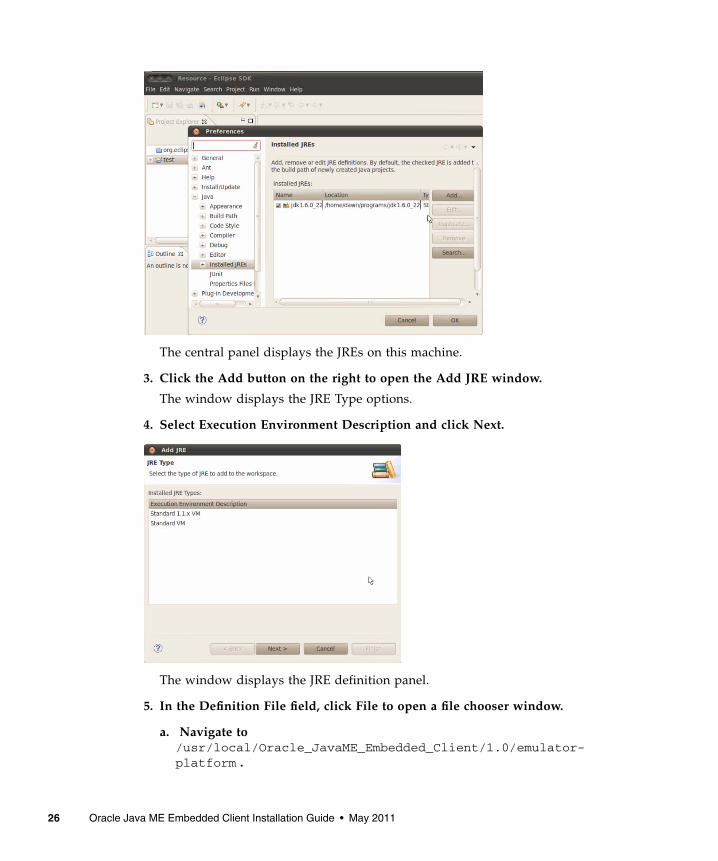
The central panel displays the JREs on this machine.
3. Click the Add button on the right to open the Add JRE window.
The window displays the JRE Type options.
4. Select Execution Environment Description and click Next.
The window displays the JRE definition panel.
5. In the Definition File field, click File to open a file chooser window.
a. Navigate to/usr/local/Oracle_JavaME_Embedded_Client/1.0/emulator-platform .
26 Oracle Java ME Embedded Client Installation Guide • May 2011

b. Select ojec_re_def.ee and click OK to close the file chooser window.
6. Click Finish to load the Oracle Java ME Embedded Client JRE and close theAdd JRE window.
The Installed JREs panel lists Oracle Java Micro Edition Embedded Client 1.0 asan installed JRE.
7. Check the box in front of Oracle Java Micro Edition Embedded Client 1.0 andclick OK.
Now you are ready to develop applications for the Oracle Java ME EmbeddedClient.
Chapter 4 Working With Eclipse 27

▼ Writing Your First ApplicationAfter completing the steps documented in the previous task, Eclipse has the JREplatform required to build and run Oracle Java ME Embedded Client applications.
1. Select File > New > Project and then Java Project.
The Create a Java Project window is displayed.
2. In the Create a Java Project window, perform the following actions:
a. Enter a project name, such as HelloWorld.
b. In the JRE area, select Use a project specific JRE and choose Oracle JavaMicro Edition Embedded Client 1.0.
c. For this example, choose Create separate folders for sources and class files.
d. Click the Finish button.
The new project HelloWorld is created along with separate directories for sourcesand class files, src and bin respectively.
3. Select File > New > Class.
The New Java Class window opens.
28 Oracle Java ME Embedded Client Installation Guide • May 2011

4. In the New Java Class window, perform the following actions:
a. The Source folder field should be populated. If it isn’t, browse for the folder.
b. In the Package field, use lower case characters to enter a name.
c. In the Name field, enter the class file name.
d. In the method stubs area, deselect the Inherited abstract methods option andcheck:
public static void main(String[] args)
5. Click Finish to create the file Hello.java in the src folder.
The new Hello.java file in the src folder is an empty template and must bemodified.
Chapter 4 Working With Eclipse 29

6. In Hello.java, add a print line to the body of the main function:
7. Click the green triangle Run button to compile and run your code.
The Hello World message prints in the console.
package hello;public class Hello { /** * @param args */ public static void main(String[] args) { // TODO Auto-generated method stub System.out.println("Hello World"); }}
30 Oracle Java ME Embedded Client Installation Guide • May 2011

Chapter 4 Working With Eclipse 31

32 Oracle Java ME Embedded Client Installation Guide • May 2011

CHAPTER 5
Command Line Options
This chapter explains how to use certain CVM command line options. The sameoptions can be used with the emulator executable.
Changing Default Resolution for LinuxSDKTo change the resolution add the following line to the DirectFB resource file~/.directfbrc.
Another way to change the resolution is to add the following parameters in thecommand line:
For example, the command to execute an application with a specific screenresolution of 640x480 could be:
mode=720x400
DFBARGS=mode=720x400
/usr/local/Oracle_JavaME_Embedded_Client/1.0/emulator-platform/bin/cvm-Xdevice:HDTV -DFBARGS=mode=640x480 -Xms48m-cp /home/dawn/NetBeansProjects/test/dist/test.jar test.Main
31
Stop a Running VMIf you want to stop the VM emulator (while running in debug mode or not) it is notsufficient to press the red stop key in NetBeans. Pressing the stop key only stops theNetBeans build. There are several ways to stop the VM application:
■ On your application’s window, press the X button.
■ Focus on your application’s window and press CTRL+C.
■ Ubuntu Linux: If the above methods don’t kill the window, you can stop arunning VM from the command line as follows:
■ ARM, PPC, or MIPS Linux: To stop a running VM, use the following command:
for pid in `ps aux || grep Oracle_JavaME_Embedded_Client/1.0/emulator-platform/bin/cvm| grep -v grep | awk '{print $2}'`;do kill -KILL $pid; done
for pid in `ps aux || grep Oracle_JavaME_Embedded_Client/1.0/binaries/bin/cvm| grep -v grep | awk '{print $2}'`;do kill -KILL $pid; done
32 Oracle Java ME Embedded Client Installation Guide • May 2011


![Oracle E-Business Suite Installation and Upgrade Notes Release 12 (12.1.1) for Linux x86 [ID 761564.1]](https://img.pdfslide.net/doc/110x75/557209ca497959fc0b8bf5c4/oracle-e-business-suite-installation-and-upgrade-notes-release-12-1211-for-linux-x86-id-7615641.jpg)