Embed Size (px)
Citation preview
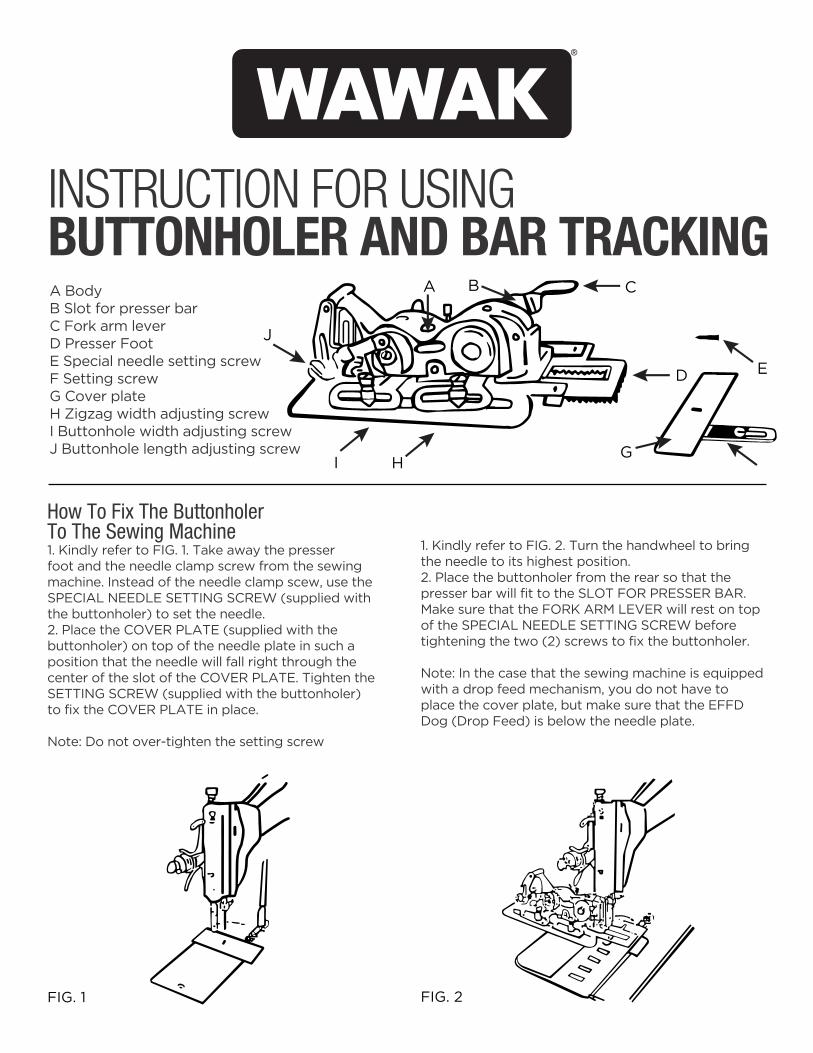
INSTRUCTION FOR USING BUTTONHOLER AND BAR TRACKINGA BodyB Slot for presser barC Fork arm leverD Presser FootE Special needle setting screwF Setting screwG Cover plateH Zigzag width adjusting screwI Buttonhole width adjusting screwJ Buttonhole length adjusting screw
How To Fix The Buttonholer To The Sewing Machine1. Kindly refer to FIG. 1. Take away the presser foot and the needle clamp screw from the sewing machine. Instead of the needle clamp scew, use the SPECIAL NEEDLE SETTING SCREW (supplied with the buttonholer) to set the needle.2. Place the COVER PLATE (supplied with the buttonholer) on top of the needle plate in such a position that the needle will fall right through the center of the slot of the COVER PLATE. Tighten the SETTING SCREW (supplied with the buttonholer) to fix the COVER PLATE in place.
Note: Do not over-tighten the setting screw
1. Kindly refer to FIG. 2. Turn the handwheel to bring the needle to its highest position.2. Place the buttonholer from the rear so that the presser bar will fit to the SLOT FOR PRESSER BAR. Make sure that the FORK ARM LEVER will rest on top of the SPECIAL NEEDLE SETTING SCREW before tightening the two (2) screws to fix the buttonholer.
Note: In the case that the sewing machine is equipped with a drop feed mechanism, you do not have to place the cover plate, but make sure that the EFFD Dog (Drop Feed) is below the needle plate.
FIG. 1 FIG. 2
A
J
B C
G
D
HI
E
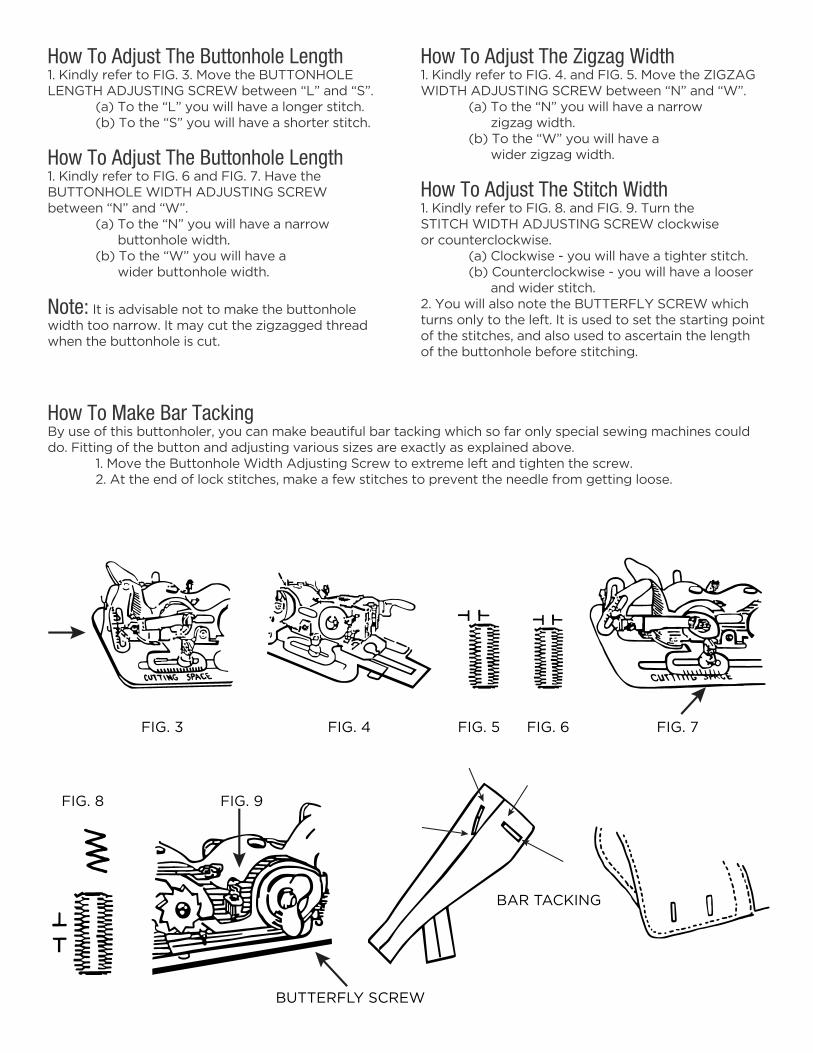
FIG. 3 FIG. 4 FIG. 5 FIG. 7FIG. 6
FIG. 8 FIG. 9
BUTTERFLY SCREW
BAR TACKING
How To Adjust The Buttonhole Length1. Kindly refer to FIG. 3. Move the BUTTONHOLE LENGTH ADJUSTING SCREW between “L” and “S”. (a) To the “L” you will have a longer stitch. (b) To the “S” you will have a shorter stitch.
How To Adjust The Buttonhole Length1. Kindly refer to FIG. 6 and FIG. 7. Have the BUTTONHOLE WIDTH ADJUSTING SCREW between “N” and “W”. (a) To the “N” you will have a narrow buttonhole width. (b) To the “W” you will have a wider buttonhole width.
Note: It is advisable not to make the buttonhole width too narrow. It may cut the zigzagged thread when the buttonhole is cut.
How To Adjust The Zigzag Width1. Kindly refer to FIG. 4. and FIG. 5. Move the ZIGZAG WIDTH ADJUSTING SCREW between “N” and “W”. (a) To the “N” you will have a narrow zigzag width. (b) To the “W” you will have a wider zigzag width.
How To Adjust The Stitch Width1. Kindly refer to FIG. 8. and FIG. 9. Turn the STITCH WIDTH ADJUSTING SCREW clockwise or counterclockwise. (a) Clockwise - you will have a tighter stitch. (b) Counterclockwise - you will have a looser and wider stitch.2. You will also note the BUTTERFLY SCREW which turns only to the left. It is used to set the starting point of the stitches, and also used to ascertain the length of the buttonhole before stitching.
How To Make Bar TackingBy use of this buttonholer, you can make beautiful bar tacking which so far only special sewing machines could do. Fitting of the button and adjusting various sizes are exactly as explained above. 1. Move the Buttonhole Width Adjusting Screw to extreme left and tighten the screw. 2. At the end of lock stitches, make a few stitches to prevent the needle from getting loose.