Embed Size (px)
Citation preview

NISSAN ECU FLASH REPROGRAMMER (Ver. 1.00)
INSTRUCTION MANUAL

! ! NOTE and CAUTION ! !
Thank you for purchasing the TECHTOM Flash Reprogrammer. Please read and follow the instructions carefully to ensure correct operation of programmer. Misuse of the programmer will result in damage to the ECU. This programmer is design to be used with specific auto-mobile models only - DO NOT try to reprogram any ECU other than designated. 1. Flash Memory Flash memory (or CPU) can be reprogrammed up to a certain number of times. If you don’t know how many times your ECU has been reprogrammed before, there may be a possibility of failure. This is limitation of hardware. 2. Data Modification This device is only a reprogrammer and does not have the capability of Map tracing or ROM emulation like the MT-2000. DO NOT modify program area of the data. Improper modification of the DATA for commu-nication and Flash ROM functions will cause malfunction of the ECU which may be irre-versible. KEEP AN EYE ON BATTERY VOLTAGE. Losing power during reprogramming will cause reprogramming failure and you may not be able to recover the ECU. AVOID ELECTRICAL NOISE. Electrical noise may interfere with communication to the ECU and function of ECU or programmer creating a potential for programming failure. A failed ECU cannot start the engine and often cannot be recovered or reprogrammed. Pay special attention when you work with automobiles equipped with an immobilizer. These automobiles cannot be operated with another ECU. The failed ECU may be repaired by special programming operation - please contact the dealer from whom you purchased the programmer for more detail. 3. Check Sum Function The ECU checks integrity of the data. You MUST adjust check sum of the data by the CHECK SUM ADJUSTING software EACH TIME you make changes to the data. Failure to do so will cause check engine light and diagnostic code appearance.

Contents.
1. Kit contents
2. Software operation environment requirements
3. Connection to the vehicle and PC
4. Operation software
5. Data check SUM adjusting software

1. Kit Contents
1 : Instruction Manual 2 : Programmer Device 3 : Programming software (floppy disk) 4 : Security Key (HASP)*1 5 : Data Check Sum Adjusting software (included in the floppy) 6 : Mighty Map Large Lite Version*2 7 : D-sub 9 to 25 adapter cable Option: ECU direct wiring adapter (with AC adapter) *1 If you already have Mighty Map Ver.3, you may use that security key. *2 Optional.

2. Software operation environment requirements
PC/AT compatible machine with legacy interface (serial and printer port). Floppy drive More than 1Mbyte of RAM MS-DOS operating system with XMS and EMS driver support. (Software does NOT work under window’s DOS prompt) (Note: XMS.EMS driver MUST be loaded. Check your config.sys file)

3. Connection to the vehicle and PC
Connect the programmer to the diagnostic port. Make sure connection is firm and secure
Connection to the PC Connect the programmer to the PC’s serial port by using the D-sub 9 to 25 adapter cable
Warning Disconnecting any cable during reprogramming session will cause programming failure. Pay special attention to the diagnostic port connection, avoiding any tension, as there is no locking mechanism

4. Operating Software
All the software for this programming device only works on the MS-DOS 6.20 operating sys-tem. This software will NOT work under the Windows DOS prompt. You will need to install “himem.sys” and “EMM386.exe” memory driver in order for program to work properly. Flash programmer software Each program is made expressly for specific application models. Program name represents its application. Ex. Z33 350Z Z3EWRTPC.EXE (Z33 English Writing program for PC models) The following will explicate the programming process using the Z33 program as an example (during actual programming, please ensure the program name corresponds to your applica-tion.) Installation of the program There is no installer available for the program. If you wish to use the program from your hard drive, simply copy the program from the floppy to the hard drive. Security Key for the program The program requires the security key that is included with the kit (or Mighty Map, if you have one). Connect the security key to the PC’s port before starting the program. Starting the program Ignition Key switch must be set at OFF position. Make sure all the cable connections are correct and secure, then turn the PC on and start MS-DOS. Start the program for the reprogrammer by typing in the program name [Z3EWRTPC] then press the enter key at command prompt. After the program has begun, [turn ignition key ON] message will appear. Turn the ignition key ON. Next messages show up and start connection to the ECU. If program doesn’t proceed to the next step, turn the ignition off immediately and recheck the cable connections and battery condition of the vehicle.

Main Menu The main menu shows up on the screen after the boot process is complete.
FILE DATA Check SUM : The check sum of the data you specified which is going to be sent to the ECU. ECU DATA Check SUM : The check sum of the data that is currently in the ECU. Battery : Current voltage of power supply for the ECU ECU No. : The ID number of the data that is currently in the ECU
Starting Program
Specifying the DATA to program Using UP or DOWN key, select [F1 Write data name…] and press ENTER. File name input screen appears. You can type in the file name, if you know it at this point, otherwise just press ENTER or type drive letter then press ENTER
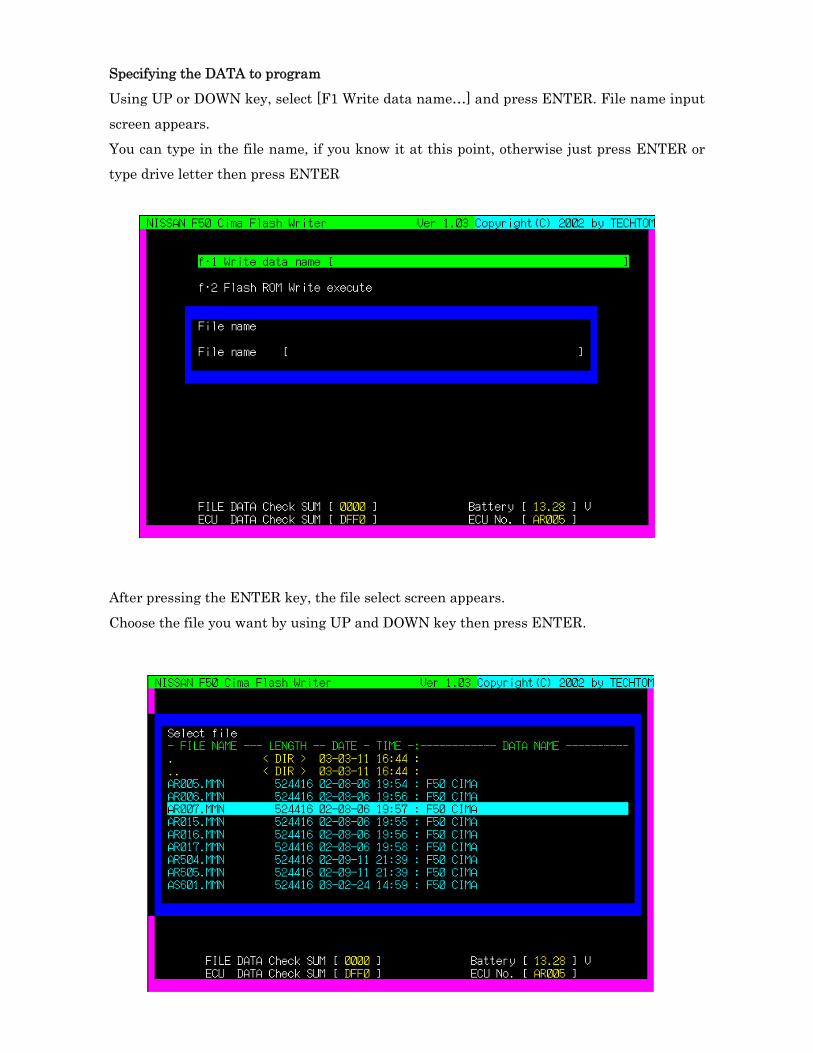
After pressing the ENTER key, the file select screen appears. Choose the file you want by using UP and DOWN key then press ENTER.

Executing programming After specifying the data, select [F2 Flash ROM Write execute….] then press ENTER. Confirmation of [Erase + Write] screen will ask if you are sure to execute programming process. Check all the connection and battery voltage are ok, and then press ENTER. The flash programmer begins process by erasing current data that is in the ECU then re-places it with the new program.
DO NOT INTERRUPT THE PROCESS Power failure and/or cable disconnection will cause the interruption of flash reprogramming process and you can’t recover ECU or starting engine.

Finalizing the Flash programming process When programming has been completed, select [F3 Exit] and press ENTER to terminate the program BEFORE turning power (ignition) off. The ECU generates [ECU fail] diagnostic code during programming session, and the pro-grammer will clear the code when the Exit command is executed. Therefore, if you turn the power (ignition) off before exiting the program, the diagnostic code remains in the ECU causing the check engine light to appear. In case the diagnostic code remains in the ECU, you can do one of the following. 1. Clear the code by using CONSULT II (Nissan diagnostic tool) 2. Clear the code by using third party diagnostic tools (snap-on scanner etc.) 3. Clear the code by using diagnostic clear procedure on the repair manual About learning function of the ECU for TAS If you reprogram the ECU on board, you won’t lose the current TAS parameter as it remains in the ECU. But, if you are programming the ECU on the bench (if the ECU was sent from customer), the TAS parameter is retained only temporarily, clearing within a few days. Should this occur, execution of the TAS learning process is necessary. Refer to your factory repair manual for the TAS learning process. You may also need the ECU to study throttle position (fully open, fully closed).

ECU program monitors its own integrity by checking the SUM of the data. ECU activates check engine light and generates an error code if altered data is written into ECU without following check sum adjusting procedure. To avoid this problem, use the check sum adjusting software included in the kit to adjust the sum of the data after you make any change to it before sending it to the ECU. The stored check sum data addresses differ by program version and need to be specified. The original data distributed by TECHTOM is in Mighty Map file format, which has a fea-ture to hold the address information, as mentioned above. The check sum adjusting software automatically picks up necessary address information and runs the process for your convenience and safety. If you are editing the data with Mighty Map LL and saving the files in Mighty Map format, the address information will be maintained even if you make changes to the data. If you are using other editing software and handling the data in another format (such as Bi-nary format, Intellec Hex format, etc) the address information cannot be stored, therefore, the check sum program will not be able to pick up the address information. In this case, you will need to manually input address information in order to run the check sum adjusting program. Please be careful not to store the check sum information in the wrong location, since mis-handling of the address information can cause the ECU to hung-up and be rendered unre-coverable. Installation of the software Simply copy the program [SUM_NISS.EXE] to desired drive. Executing the program At the command prompt, type [SUM_NISS] then press ENTER.
5. Data Check SUM adjusting software

Specify target file name Choose [1. Input file name] and specify the target data that you are going to adjust check sum.
If you specify the MM format data, the following screen will appear.
Verify the address information then press ENTER. The program automatically sets the ad-dress information. If you are specifying Non-MM format data (such as INTELLEC HEX, Binary format etc) you need to manually specify the address information as follows.

Changing the check data address information To manually specify the check data address, select [4. Check data address setting] from the menu then press ENTER
Type in the address for Check Data address 1 and Check Data address 2. The address information is VERY IMPORTANT. Make sure the address you typed in is correct then press ENTER.

Reflecting check sum correction result Select [2. Computed result reflection] from the main menu, then press ENTER.
After the computing process, the program asks you the file name to save the result file. Target file name will be shown by the default. If you don’t want to overwrite the file, change the name as you like.
Exiting the program To quit the program, select [3. Exit] then press ENTER.

22521 Normandie Avenue; Torrance, CA 90501 USA Tel (310) 787-0847 Fax (310) 787-0948
www.TechnosquareInc.com email: [email protected]