Embed Size (px)
Citation preview
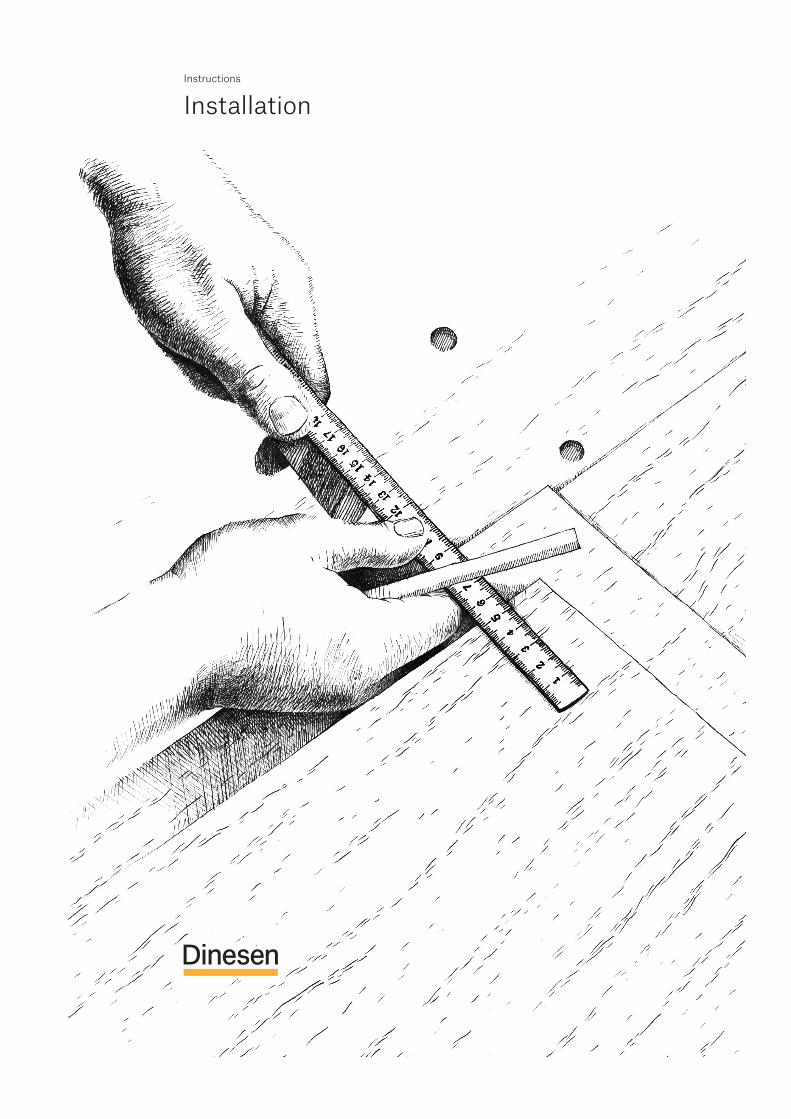
Instructions
Installation

April 2014

A Dinesen floor is a unique piece of nature. It is a living material which must be treated with care. Our instructions explain in detail how you get the best result so the floor can last for centuries.
If you need any additional advice about Dinesen floors, you are very welcome to contact us.
To order and purchase products in the maintenance series, please go to webshop.dinesen.com

1 Important information before installation 7
1.1 Building 7 1.2 Installation 7 1.3 Natural material 8
2 Information tables 9
2.1 Joist spacing 9 2.2 Blocking up the joists 9 2.3 Installation methods 9 2.4 Screw sizes 10 2.5 Screw spacing on solid substructure 10 3 Dinesen floors with fixed tongue in full lengths | Douglas, Oak 11
3.1 Installation on joists/beams 11 – screwed from above or with hidden screws 3.2 Installation on concrete – screwed from above 12 3.3 Installation on plywood/chipboard 13 – screwed from above or with hidden screws 4 Dinesen floors with fixed tongue in random lengths | Douglas, Oak 16
4.1 Installation on joists/beams 16 – screwed from above or with hidden screws 4.2 Installation on concrete – screwed from above 18 4.3 Installation on plywood/chipboard 19 – screwed from above or with hidden screws 5 Dinesen floors with loose tongue in full lengths | Douglas 22 5.1 Installation on joists/beams – screwed from above 22 5.2 Installation on concrete – screwed from above 23 5.3 Installation on plywood/chipboard – screwed from above 24
Contents
6 Dinesen floors with loose tongue in random lengths | Douglas 26 6.1 Installation on joists/beams – screwed from above 26 6.2 Installation on concrete – screwed from above 27 6.3 Installation on plywood/chipboard – screwed from above 28 7 Full-surface gluing of Dinesen floors 30 in full or random lengths | Douglas, Oak 7.1 Full-surface gluing with Stauf products 30 8 Pitfalls 32 9 FAQ 33
10 General guidance 35 10.1 Dinesen instructions 35 10.2 Literature 35
7
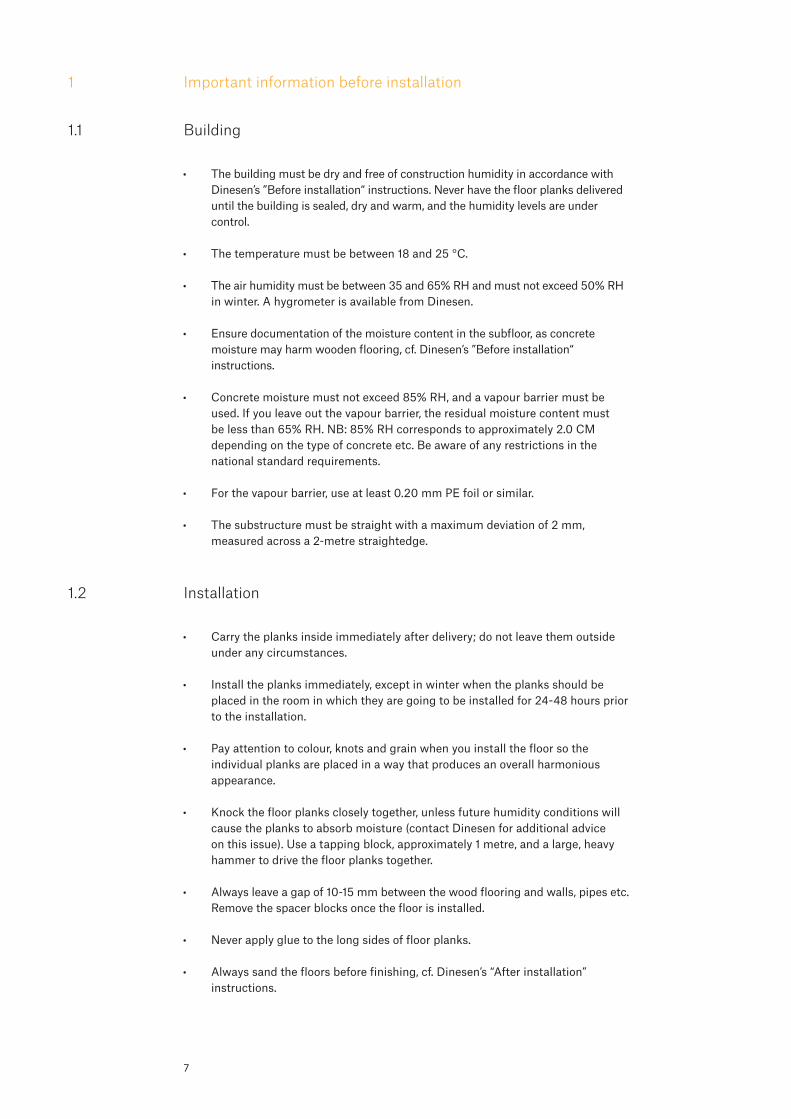
1 Important information before installation
1.1 Building
• ThebuildingmustbedryandfreeofconstructionhumidityinaccordancewithDinesen’s ”Before installation“ instructions. Never have the floor planks delivered until the building is sealed, dry and warm, and the humidity levels are under control.
• Thetemperaturemustbebetween18and25°C.
• Theairhumiditymustbebetween35and65%RHandmustnotexceed50%RHin winter. A hygrometer is available from Dinesen.
• Ensuredocumentationofthemoisturecontentinthesubfloor,asconcretemoisture may harm wooden flooring, cf. Dinesen’s ”Before installation“ instructions.
• Concretemoisturemustnotexceed85%RH,andavapourbarriermustbeused. If you leave out the vapour barrier, the residual moisture content must belessthan65%RH.NB:85%RHcorrespondstoapproximately2.0CMdepending on the type of concrete etc. Be aware of any restrictions in the national standard requirements.
• Forthevapourbarrier,useatleast0.20mmPEfoilorsimilar.
• Thesubstructuremustbestraightwithamaximumdeviationof2mm,measured across a 2-metre straightedge.
1.2 Installation
• Carrytheplanksinsideimmediatelyafterdelivery;donotleavethemoutsideunder any circumstances.
• Installtheplanksimmediately,exceptinwinterwhentheplanksshouldbeplaced in the room in which they are going to be installed for 24-48 hours prior to the installation.
• Payattentiontocolour,knotsandgrainwhenyouinstallthefloorsotheindividual planks are placed in a way that produces an overall harmonious appearance.
• Knockthefloorplankscloselytogether,unlessfuturehumidityconditionswillcause the planks to absorb moisture (contact Dinesen for additional advice on this issue). Use a tapping block, approximately 1 metre, and a large, heavy hammer to drive the floor planks together.
• Alwaysleaveagapof10-15mmbetweenthewoodflooringandwalls,pipesetc.Removethespacerblocksoncethefloorisinstalled.
• Neverapplygluetothelongsidesoffloorplanks.
• Alwayssandthefloorsbeforefinishing,cf.Dinesen’s“Afterinstallation”instructions.
8
• Ifthefloorisnotsandedandfinishedimmediatelyafteritisinstalled,coveritwithgreyflooringcardboard(400g/m²).Keepthesurfacecleanandfreeofnails, screws, wooden blocks etc. that might dent the floor.
• Keepaneyeontemperatureandairhumidity.Iftheplanksarestoredatanairhumidityabove50%RH,theywillabsorbmoistureandthusbecomewider.This will result in larger contraction gaps than normal.
• OnlyuseDinesenproductsorproductsapprovedbyDinesenforsurfacefinishing and maintenance as alternative products can cause unfortunate consequential damages. See Dinesen’s ”After installation” instructions.
• Ifunderfloorheatinghasbeencastintotheconcretelayer,theunderfloorheating must be turned on at an acceptable temperature for at least 30 days before the planks are installed. See Dinesen’s ”Before installation” instructions.
• Dinesendoesnotacceptclaimsconcerningtheappearanceofindividualplanksonce the floor has been installed.
• Dinesendoesnotacceptclaimsconcerningdamageduetoconstructionhumidity.
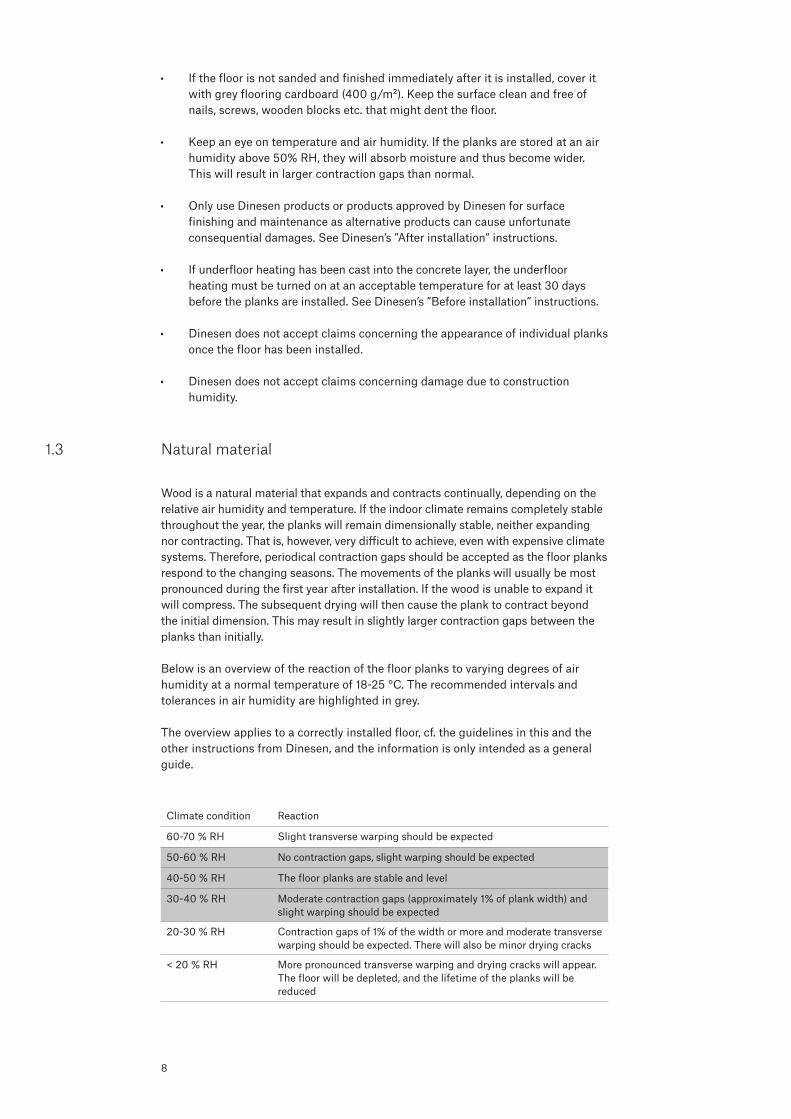
1.3 Natural material
Wood is a natural material that expands and contracts continually, depending on the relative air humidity and temperature. If the indoor climate remains completely stable throughout the year, the planks will remain dimensionally stable, neither expanding nor contracting. That is, however, very difficult to achieve, even with expensive climate systems. Therefore, periodical contraction gaps should be accepted as the floor planks respond to the changing seasons. The movements of the planks will usually be most pronounced during the first year after installation. If the wood is unable to expand it will compress. The subsequent drying will then cause the plank to contract beyond the initial dimension. This may result in slightly larger contraction gaps between the planks than initially.
Below is an overview of the reaction of the floor planks to varying degrees of air humidityatanormaltemperatureof18-25°C.Therecommendedintervalsandtolerances in air humidity are highlighted in grey.
The overview applies to a correctly installed floor, cf. the guidelines in this and the other instructions from Dinesen, and the information is only intended as a general guide.
Climatecondition Reaction
60-70%RH Slight transverse warping should be expected
50-60%RH No contraction gaps, slight warping should be expected
40-50%RH The floor planks are stable and level
30-40%RH Moderatecontractiongaps(approximately1%ofplankwidth)andslight warping should be expected
20-30%RH Contractiongapsof1%ofthewidthormoreandmoderatetransversewarping should be expected. There will also be minor drying cracks
<20%RH Morepronouncedtransversewarpinganddryingcrackswillappear.The floor will be depleted, and the lifetime of the planks will be reduced
9
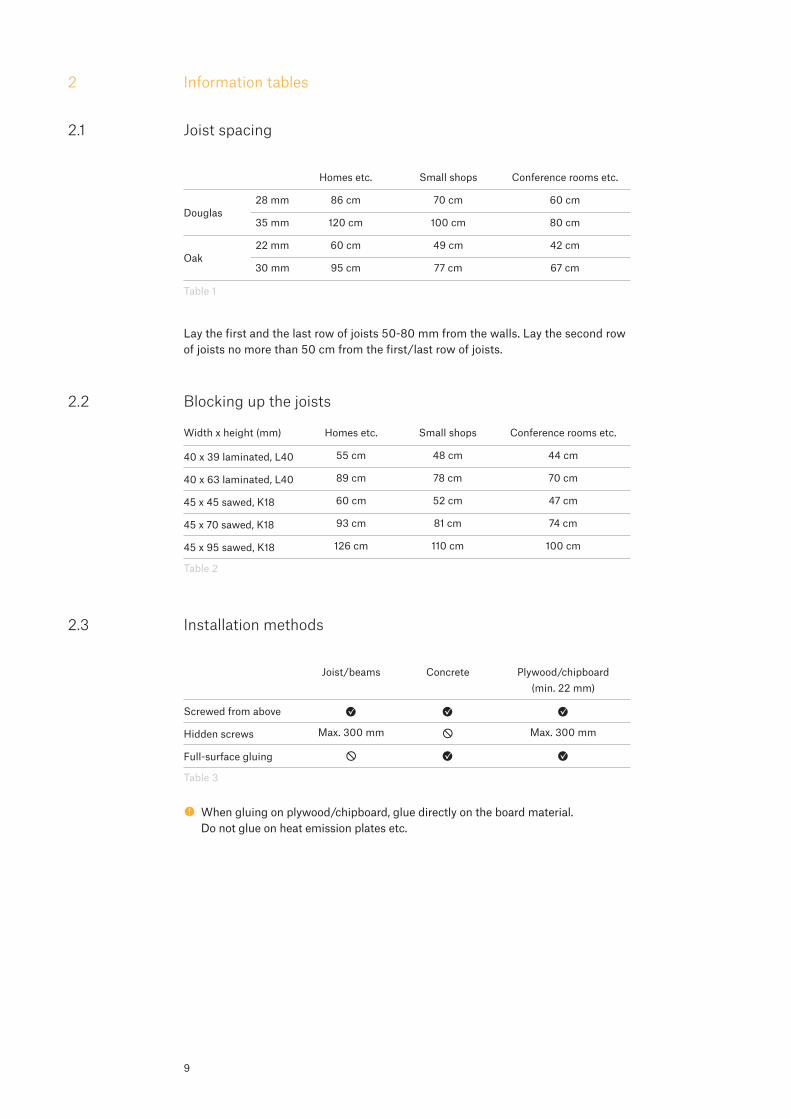
2 Information tables
2.1 Joist spacing
Homesetc. Small shops Conferenceroomsetc.
Douglas28 mm 86 cm 70 cm 60 cm
35 mm 120 cm 100 cm 80 cm
Oak22 mm 60 cm 49 cm 42 cm
30 mm 95 cm 77 cm 67 cm
Table 1
Lay the first and the last row of joists 50-80 mm from the walls. Lay the second row of joists no more than 50 cm from the first/last row of joists.
2.2 Blocking up the joists
Width x height (mm) Homesetc. Small shops Conferenceroomsetc.
40 x 39 laminated, L40 55 cm 48 cm 44 cm
40 x 63 laminated, L40 89 cm 78 cm 70 cm
45x45sawed,K18 60 cm 52 cm 47 cm
45x70sawed,K18 93 cm 81 cm 74 cm
45x95sawed,K18 126 cm 110 cm 100 cm
Table 2
2.3 Installation methods
Joist/beams Concrete Plywood/chipboard (min. 22 mm)
Screwed from above
Hiddenscrews Max.300mm Max.300mm
Full-surface gluing
Table 3
! When gluing on plywood/chipboard, glue directly on the board material. Do not glue on heat emission plates etc.

10
2.4 Screw sizes
Screwed from above
Joist/beams Concrete Plywood/chipboard (min. 22 mm)
Douglas28 mm 5 x 60 mm 5 x 50 mm 5 x 40 mm
35 mm 5 x 60 mm 5 x 60 mm 5 x 45 mm
Oak22 mm 5 x 50 mm 5 x 50 mm 5 x 40 mm
30 mm 5 x 60 mm 5 x 60 mm 5 x 40 mm
Hiddenscrews
Joist/beams Concrete Plywood/chipboard (min. 22 mm)
Douglas28 mm 4,2 x 65 mm 4,2 x 45 mm
35 mm 4,2 x 65 mm 4,2 x 55 mm
Oak22 mm 4,2 x 55 mm 4,2 x 45 mm
30 mm 4,2 x 65 mm 4,2 x 45 mm
Table 4
! With 22 mm Oak planks, only drill the plug hole 7-8 mm deep (instead of the normal 10 mm) to make sure the plank is strong enough for the screw.
2.5 Screw spacing on solid substructure
Concrete Plywood/chipboard (min. 22 mm)
Screwed from above 60-80 cm 60-80 cm
Hiddenscrews 40-50 cm
Table 5
11
3 Dinesen floors with fixed tongue in full lengths | Douglas, Oak
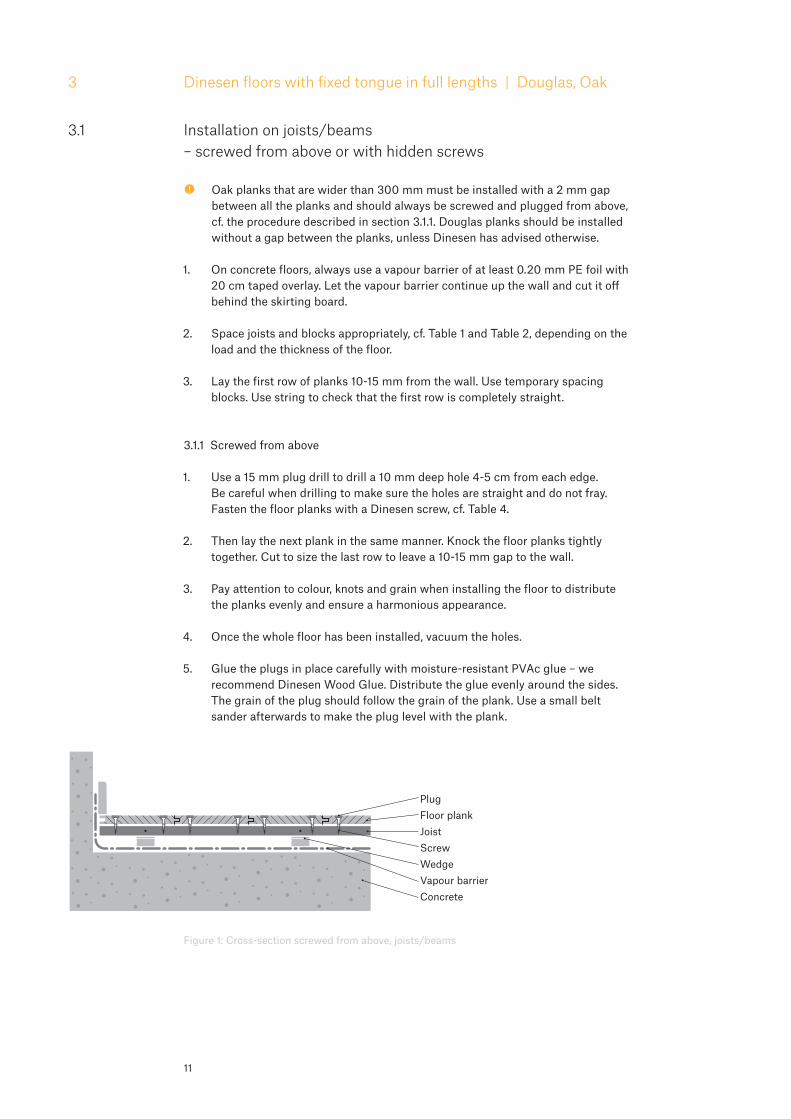
3.1 Installation on joists/beams – screwed from above or with hidden screws
! Oak planks that are wider than 300 mm must be installed with a 2 mm gap between all the planks and should always be screwed and plugged from above, cf. the procedure described in section 3.1.1. Douglas planks should be installed without a gap between the planks, unless Dinesen has advised otherwise.
1. Onconcretefloors,alwaysuseavapourbarrierofatleast0.20mmPEfoilwith20 cm taped overlay. Let the vapour barrier continue up the wall and cut it off behind the skirting board.
2. Space joists and blocks appropriately, cf. Table 1 and Table 2, depending on the load and the thickness of the floor.
3. Lay the first row of planks 10-15 mm from the wall. Use temporary spacing blocks. Use string to check that the first row is completely straight.
3.1.1 Screwed from above
1. Use a 15 mm plug drill to drill a 10 mm deep hole 4-5 cm from each edge. Be careful when drilling to make sure the holes are straight and do not fray. Fasten the floor planks with a Dinesen screw, cf. Table 4.
2. Thenlaythenextplankinthesamemanner.Knockthefloorplankstightlytogether.Cuttosizethelastrowtoleavea10-15mmgaptothewall.
3. Pay attention to colour, knots and grain when installing the floor to distribute the planks evenly and ensure a harmonious appearance.
4. Once the whole floor has been installed, vacuum the holes.
5. Glue the plugs in place carefully with moisture-resistant PVAc glue – we recommend Dinesen Wood Glue. Distribute the glue evenly around the sides. The grain of the plug should follow the grain of the plank. Use a small belt sander afterwards to make the plug level with the plank.
Figure1:Cross-sectionscrewedfromabove,joists/beams
PlugFloor plankJoistScrewWedgeVapour barrierConcrete
12
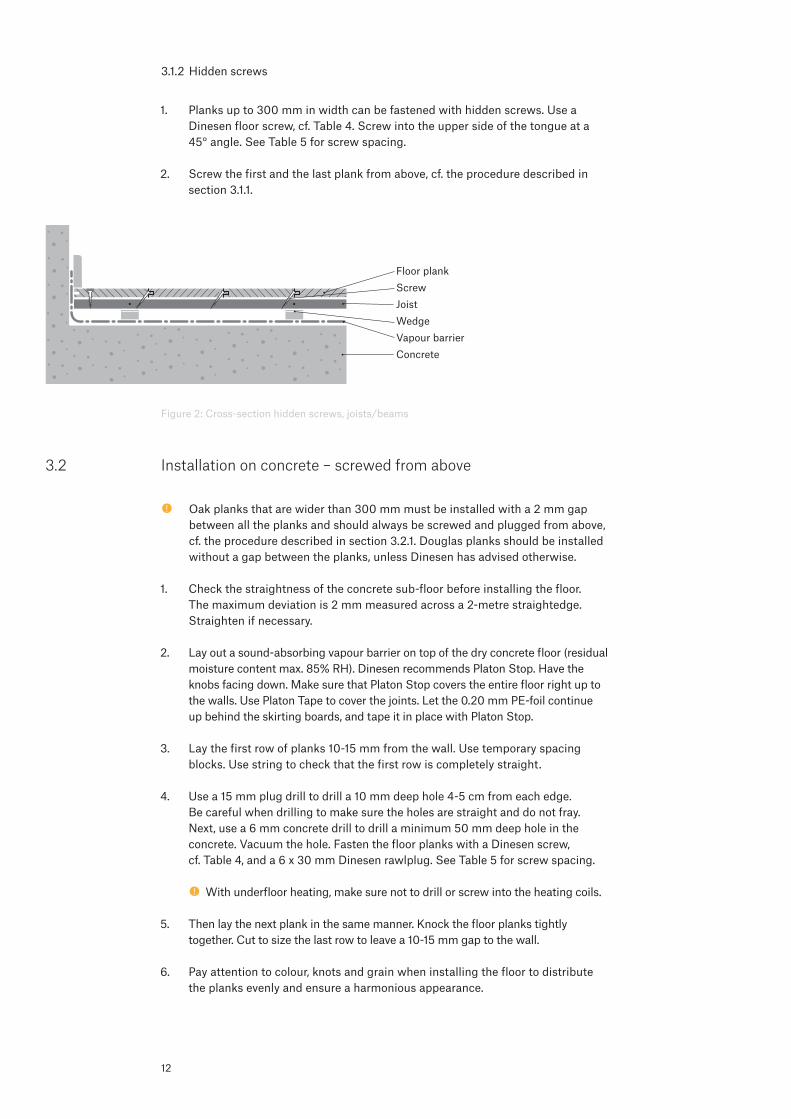
3.1.2Hiddenscrews
1. Planks up to 300 mm in width can be fastened with hidden screws. Use a Dinesen floor screw, cf. Table 4. Screw into the upper side of the tongue at a 45°angle.SeeTable5forscrewspacing.
2. Screw the first and the last plank from above, cf. the procedure described in section 3.1.1.
Figure2:Cross-sectionhiddenscrews,joists/beams
3.2 Installation on concrete – screwed from above
! Oak planks that are wider than 300 mm must be installed with a 2 mm gap between all the planks and should always be screwed and plugged from above, cf. the procedure described in section 3.2.1. Douglas planks should be installed without a gap between the planks, unless Dinesen has advised otherwise.
1. Checkthestraightnessoftheconcretesub-floorbeforeinstallingthefloor.The maximum deviation is 2 mm measured across a 2-metre straightedge. Straighten if necessary.
2. Lay out a sound-absorbing vapour barrier on top of the dry concrete floor (residual moisturecontentmax.85%RH).DinesenrecommendsPlatonStop.Havetheknobsfacingdown.MakesurethatPlatonStopcoverstheentirefloorrightuptothewalls.UsePlatonTapetocoverthejoints.Letthe0.20mmPE-foilcontinueup behind the skirting boards, and tape it in place with Platon Stop.
3. Lay the first row of planks 10-15 mm from the wall. Use temporary spacing blocks. Use string to check that the first row is completely straight.
4. Use a 15 mm plug drill to drill a 10 mm deep hole 4-5 cm from each edge. Be careful when drilling to make sure the holes are straight and do not fray. Next, use a 6 mm concrete drill to drill a minimum 50 mm deep hole in the concrete. Vacuum the hole. Fasten the floor planks with a Dinesen screw, cf. Table 4, and a 6 x 30 mm Dinesen rawlplug. See Table 5 for screw spacing.
! With underfloor heating, make sure not to drill or screw into the heating coils.
5. Thenlaythenextplankinthesamemanner.Knockthefloorplankstightlytogether.Cuttosizethelastrowtoleavea10-15mmgaptothewall.
6. Pay attention to colour, knots and grain when installing the floor to distribute the planks evenly and ensure a harmonious appearance.
Floor plankScrewJoistWedgeVapour barrierConcrete

13
7. Once the whole floor has been installed, vacuum the holes again.
8. Glue the plugs carefully with moisture-resistant PVAc glue – we recommend Dinesen Wood Glue. Distribute the glue evenly around the sides. The grain of the plug should follow the grain of the plank. Use a small belt sander afterwards to make the plug level with the plank.
Figure3:Cross-sectionscrewedfromabove,concrete
! It is important to vacuum the holes in the concrete and to make sure that they are deep enough (50 mm). Otherwise, there is a risk that the screw heads might break off. As you work, check continually that the screws have a sufficient grip in the substructure.
3.3 Installation on plywood/chipboard – screwed from above or with hidden screws
! Oak planks that are wider than 300 mm must be installed with a 2 mm gap between all the planks and should always be screwed and plugged from above, cf. the procedure described in section 3.3.1. Douglas planks should be installed without a gap between the planks, unless Dinesen has advised otherwise.
1. Lay out grey flooring cardboard (400 g/m²) on at least 22 mm plywood or chipboard.
2. Lay the first row of planks 10-15 mm from the wall. Use temporary spacing blocks. Use string to check that the first row is completely straight.
3.3.1 Screwed from above
1. Use a 15 mm plug drill to drill a 10 mm deep hole 4-5 cm from each edge. Be careful when drilling to make sure the holes are straight and do not fray. Fasten the floor planks with a Dinesen screw, cf. Table 4. See Table 5 for screw spacing.
2. Thenlaythenextplankinthesamemanner.Knockthefloorplankstightlytogether.Cuttosizethelastrowtoleavea10-15mmgaptothewall.
3. Pay attention to colour, knots and grain when installing the floor to distribute the planks evenly and ensure a harmonious appearance.
4. Once the whole floor has been installed, vacuum the holes.
PlugFloor plankPlaton StopScrewRawlplugConcrete
PE foil
14
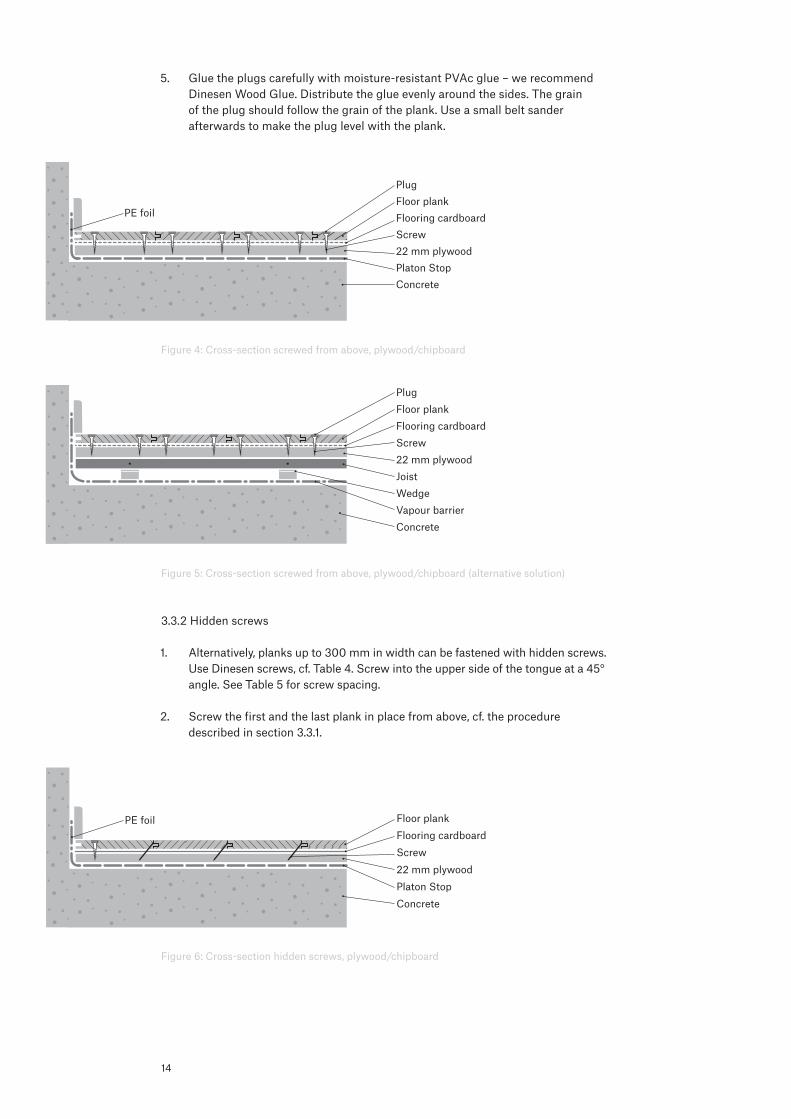
5. Glue the plugs carefully with moisture-resistant PVAc glue – we recommend Dinesen Wood Glue. Distribute the glue evenly around the sides. The grain of the plug should follow the grain of the plank. Use a small belt sander afterwards to make the plug level with the plank.
Figure4:Cross-sectionscrewedfromabove,plywood/chipboard
Figure5:Cross-sectionscrewedfromabove,plywood/chipboard(alternativesolution)
3.3.2Hiddenscrews
1. Alternatively, planks up to 300 mm in width can be fastened with hidden screws. UseDinesenscrews,cf.Table4.Screwintotheuppersideofthetongueata45°angle. See Table 5 for screw spacing.
2. Screw the first and the last plank in place from above, cf. the procedure described in section 3.3.1.
Figure6:Cross-sectionhiddenscrews,plywood/chipboard
PlugFloor plankFlooring cardboardScrew22 mm plywoodPlaton StopConcrete
PE foil
PlugFloor plankFlooring cardboardScrew22 mm plywoodJoistWedgeVapour barrierConcrete
Floor plankFlooring cardboardScrew22 mm plywoodPlaton StopConcrete
PE foil
15
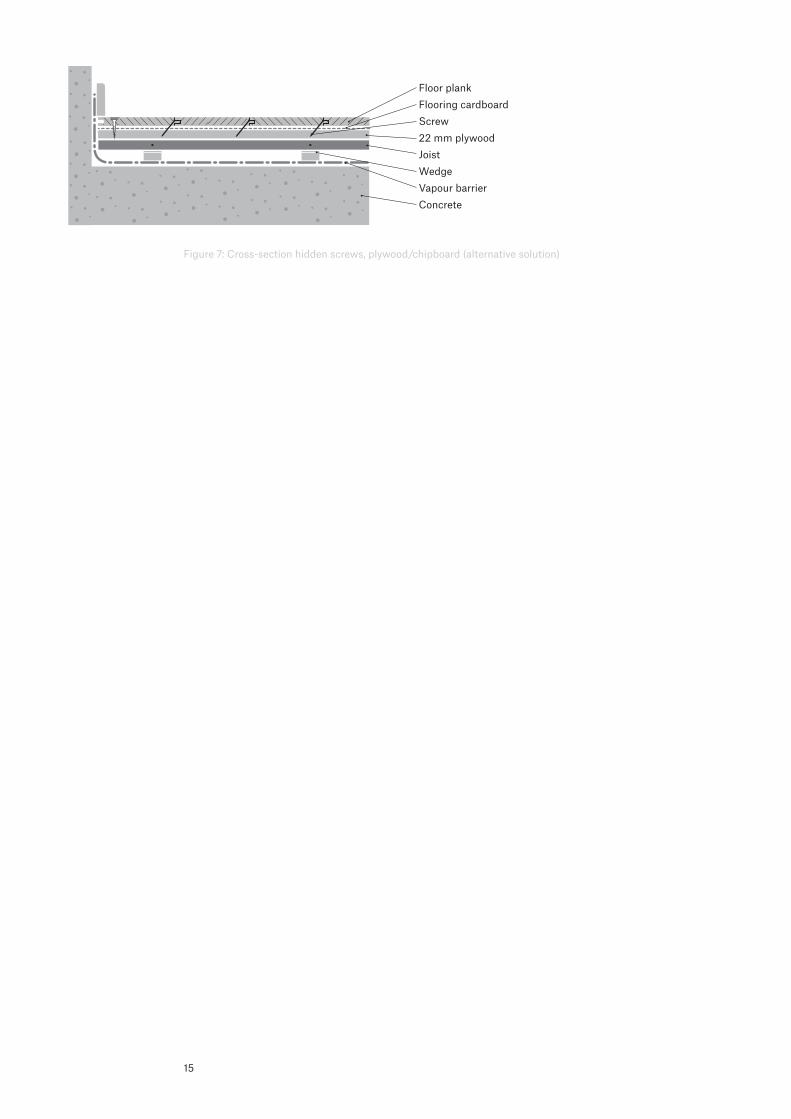
Figure7:Cross-sectionhiddenscrews,plywood/chipboard(alternativesolution)
Floor plankFlooring cardboardScrew22 mm plywoodJoistWedgeVapour barrierConcrete
16
4 Dinesen floors with fixed tongue in random lengths | Douglas, Oak
4.1 Installation on joists/beams – screwed from above or with hidden screws
! Oak planks that are wider than 300 mm must be installed with a 2 mm gap between all the planks and should always be screwed and plugged from above, cf. the procedure described in section 4.1.1. Douglas planks should be installed without a gap between the planks, unless Dinesen has advised otherwise.
1. Onconcretefloors,alwaysuseavapourbarrierofatleast0.20mmPEfoilwith20 cm taped overlay. Let the vapour barrier continue up the wall and cut it off behind the skirting board.
2. Space joists and blocks appropriately, cf. Table 1 and Table 2, depending on the load and the thickness of the floor.
3. Lay the first row of planks 10-15 mm from the wall with the tongue facing into the room. Use temporary spacing blocks. Use string to check that the first row is completely straight.
4.1.1 Screwed from above
1. Use a 15 mm plug drill to drill a 10 mm deep hole 4-5 cm from each edge. Be careful when drilling to make sure the holes are straight and do not fray. Fasten the floor planks with a Dinesen screw, cf. Table 4.
2. Glue the ends of the floor planks together with moisture-resistant PVAc glue – we recommend Dinesen Wood Glue. Apply the glue to the upper side of the tongue and the lower side of the groove. Wipe off excess glue with a damp cloth.
! Never apply glue to the long sides of floor planks!
3. Use the cut-off piece from the first row to begin the next row. It may be necessary to switch planks around to avoid starting off the rows with pieces that are too short.
4. Thenlaythenextplankinthesamemanner.Knockthefloorplankstightlytogether. Use a 1 metre long wooden tapping block to protect the tongue from direct blows. Joints in between joists (unsupported joints) are allowed, but never allow more than one unsupported joint for every three rows of planks in the same section.Avoidendjointsclosetoeachotherinadjacentplanks.Cuttosizethelast row to leave a 10-15 mm gap to the wall.
5. Pay attention to colour, knots and grain when installing the floor to distribute the planks evenly and ensure a harmonious appearance.
6. Once the whole floor has been installed, vacuum the holes.
7. Glue the plugs carefully with moisture-resistant PVAc glue – we recommend Dinesen Wood Glue. Distribute the glue evenly around the sides. The grain of the plug should follow the grain of the plank. Use a small belt sander afterwards to make the plug level with the plank.
17
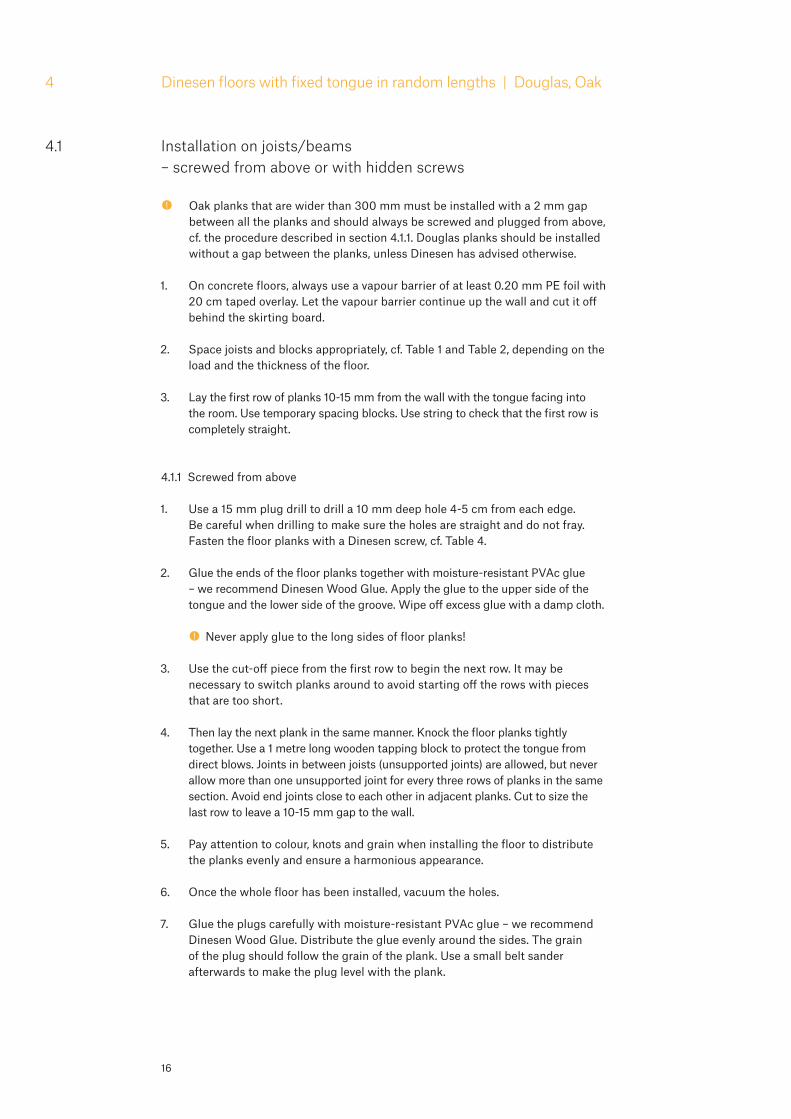
Figure8:Longitudinalsectionscrewedfromabove,joists/beams
Figure9:Cross-sectionscrewedfromabove,joists/beams
4.1.2Hiddenscrews
1. Alternatively, planks up to 300 mm in width can be fastened with hidden screws. UseDinesenscrews,cf.Table4.Screwintotheuppersideofthetongueata45°angle. See Table 5 for screw spacing.
2. Screw the first and the last plank in place from above, cf. the procedure described in section 4.1.1.
3. Glue the ends of the floor planks together with moisture-resistant PVAc glue – we recommend Dinesen Wood Glue. Apply the glue to the upper side of the tongue and the lower side of the groove. Wipe off excess glue with a damp cloth. ! Never apply glue to the long sides of floor planks!
4. Use the cut-off piece from the first row to begin the next row. It may be necessary to switch planks around to avoid starting off the rows with pieces that are too short.
5. Thenlaythenextplankinthesamemanner.Knockthefloorplankstightlytogether. Use a 1 metre long wooden tapping block to protect the tongue from direct blows. Joints in between joists (unsupported joints) are allowed, but never allow more than one unsupported joint for every three rows of planks in the same section.Avoidendjointsclosetoeachotherinadjacentplanks.Cuttosizethelast row to leave a 10-15 mm gap to the wall.
Floor plankJoistWedgeVapour barrierConcrete
PlugLoose tongueFloor plankJoistScrewWedgeVapour barrierConcrete
18
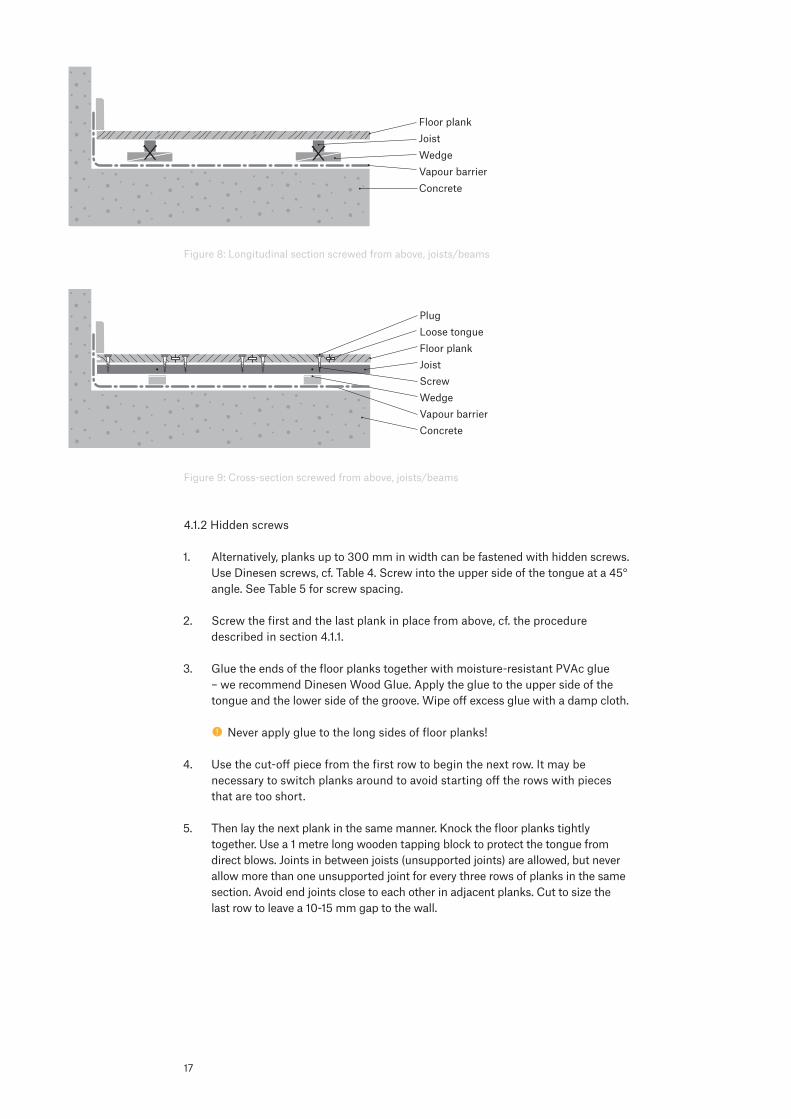
Figure10:Cross-sectionhiddenscrews,joists/beams
4.2 Installation on concrete – screwed from above
! Oak planks that are wider than 300 mm must be installed with a 2 mm gap between all the planks and should always be screwed and plugged from above, cf. the procedure described in section 4.2.1. Douglas planks should be installed without a gap between the planks, unless Dinesen has advised otherwise.
1. Checkthestraightnessoftheconcretesub-floorbeforeinstallingthefloor.The maximum deviation is 2 mm measured across a 2-metre straightedge. Straighten if necessary.
2. Lay out a sound-absorbing vapour barrier on top of the dry concrete floor (residual moisturecontentmax.85%RH).DinesenrecommendsPlatonStop.Havetheknobsfacingdown.MakesurethatPlatonStopcoverstheentirefloorrightuptothewalls.UsePlatonTapetocoverthejoints.Letthe0.20mmPEfoilcontinue up behind the skirting boards, and tape it in place with Platon Stop.
3. Lay the first row of planks 10-15 mm from the wall. Use temporary spacing blocks. Use string to check that the first row is completely straight.
4. Use a 15 mm plug drill to drill a 10 mm deep hole 4-5 cm from each edge. Be careful when drilling to make sure the holes are straight and do not fray. Next, use a 6 mm concrete drill to drill a minimum 50 mm deep hole in the concrete. Vacuum the hole. Fasten the floor planks with a Dinesen screw, cf. Table 4, and a 6 x 30 mm Dinesen rawlplug. See Table 5 for screw spacing. ! With underfloor heating, make sure not to drill or screw into the heating coils.
5. Glue the ends of the floor planks together with moisture-resistant PVAc glue – we recommend Dinesen Wood Glue. Apply the glue to the upper side of the tongue and the lower side of the groove. Wipe off excess glue with a damp cloth. ! Never apply glue to the long sides of floor planks!
6. Use the cut-off piece from the first row to begin the next row. It may be necessary to switch planks around to avoid starting off the rows with pieces that are too short.
7. Thenlaythenextplankinthesamemanner.Knockthefloorplankstightlytogether. Use a 1 metre long wooden tapping block to protect the tongue from directblows.Avoidendjointsclosetoeachotherinadjacentplanks.Cuttosizethe last row to leave a 10-15 mm gap to the wall.
Floor plankScrewJoistWedgeVapour barrierConcrete
19
8. Pay attention to colour, knots and grain when installing the floor to distribute the planks evenly and ensure a harmonious appearance.
9. Once the whole floor has been installed, vacuum the holes.
10. Glue the plugs carefully with moisture-resistant PVAc glue – we recommend Dinesen Wood Glue. Distribute the glue evenly around the sides. The grain of the plug should follow the grain of the plank. Use a small belt sander afterwards to make the plug level with the plank.
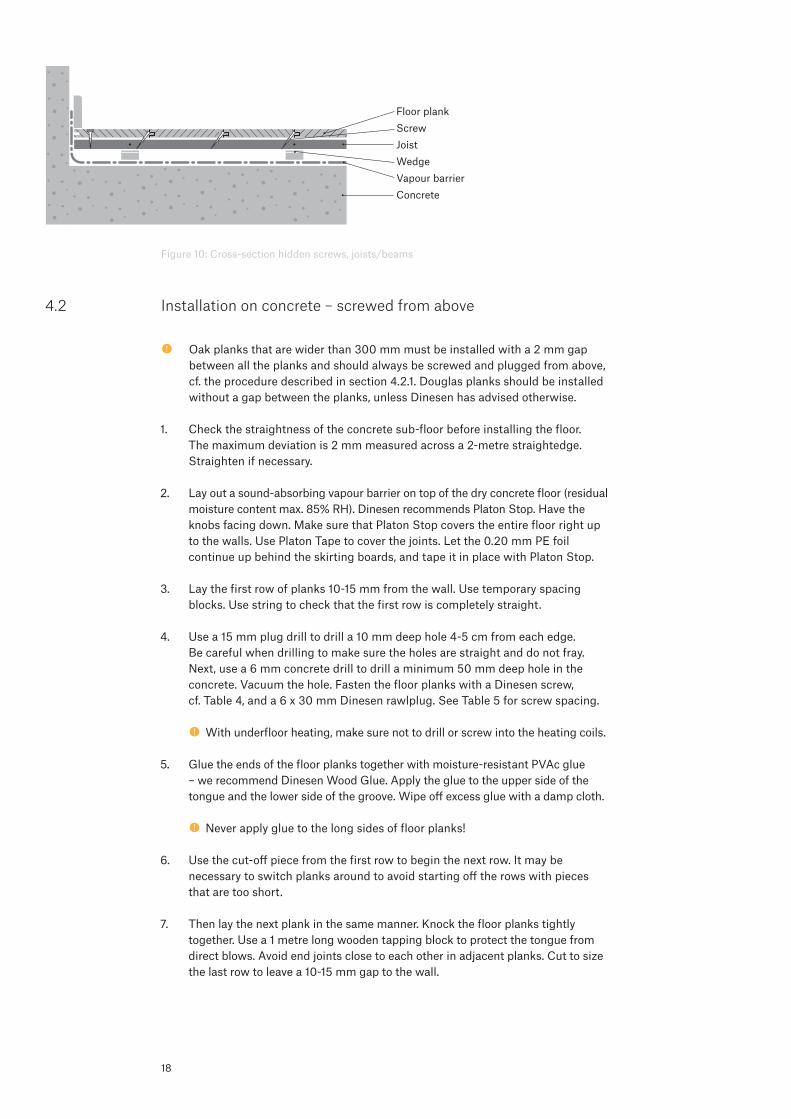
Figure11:Cross-sectionscrewedfromabove,concrete
4.3 Installation on plywood/chipboard – screwed from above or with hidden screws
! Oak planks that are wider than 300 mm must be installed with a 2 mm gap between all the planks and should always be screwed and plugged from above, cf. the procedure described in section 4.3.1. Douglas planks should be installed without a gap between the planks, unless Dinesen has advised otherwise.
1. Lay out grey flooring cardboard (400 g/m²) on at least 22 mm plywood or chipboard.
2. Lay the first row of planks 10-15 mm from the wall. Use temporary spacing blocks. Use string to check that the first row is completely straight.
4.3.1 Screwed from above
1. Use a 15 mm plug drill to drill a 10 mm deep hole 4-5 cm from each edge. Be careful when drilling to make sure the holes are straight and do not fray. Fasten the floor planks with a Dinesen screw, cf. Table 4. See Table 5 for screw spacing.
2. Glue the ends of the floor planks together with moisture-resistant PVAc glue – we recommend Dinesen Wood Glue. Apply the glue to the upper side of the tongue and the lower side of the groove. Wipe off excess glue with a damp cloth. ! Never apply glue to the long sides of floor planks!
3. Use the cut-off piece from the first row to begin the next row. It may be necessary to switch planks around to avoid starting off the rows with pieces that are too short.
PlugFloor plankPlaton StopScrewRawlplugConcrete
PE foil
20
4. Thenlaythenextplankinthesamemanner.Knockthefloorplankstightlytogether. Use a 1 metre long wooden tapping block to protect the tongue from directblows.Avoidendjointsclosetoeachotherinadjacentplanks.Cuttosizethe last row to leave a 10-15 mm gap to the wall.
5. Pay attention to colour, knots and grain when installing the floor to distribute the planks evenly and ensure a harmonious appearance.
6. Once the whole floor has been installed, vacuum the holes.
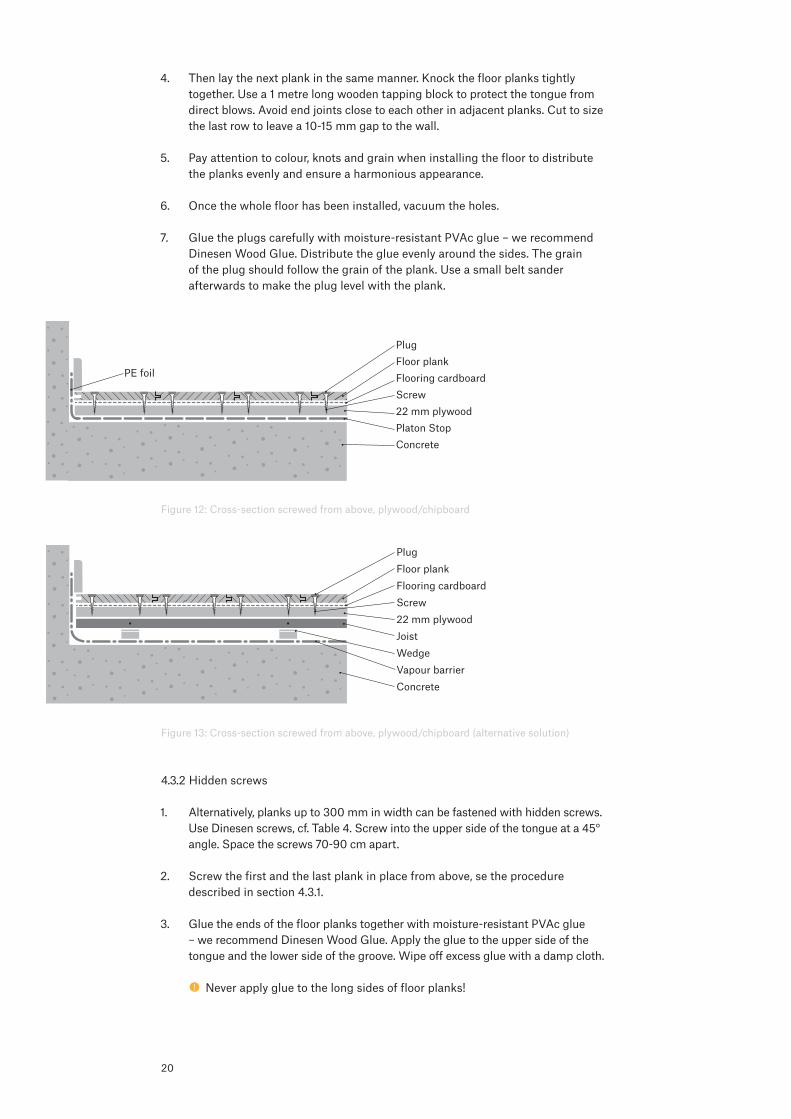
7. Glue the plugs carefully with moisture-resistant PVAc glue – we recommend Dinesen Wood Glue. Distribute the glue evenly around the sides. The grain of the plug should follow the grain of the plank. Use a small belt sander afterwards to make the plug level with the plank.
Figure12:Cross-sectionscrewedfromabove,plywood/chipboard
Figure13:Cross-sectionscrewedfromabove,plywood/chipboard(alternativesolution)
4.3.2Hiddenscrews
1. Alternatively, planks up to 300 mm in width can be fastened with hidden screws. UseDinesenscrews,cf.Table4.Screwintotheuppersideofthetongueata45°angle. Space the screws 70-90 cm apart.
2. Screw the first and the last plank in place from above, se the procedure described in section 4.3.1.
3. Glue the ends of the floor planks together with moisture-resistant PVAc glue – we recommend Dinesen Wood Glue. Apply the glue to the upper side of the tongue and the lower side of the groove. Wipe off excess glue with a damp cloth. ! Never apply glue to the long sides of floor planks!
PlugFloor plankFlooring cardboardScrew22 mm plywoodPlaton StopConcrete
PE foil
PlugFloor plankFlooring cardboardScrew22 mm plywoodJoistWedgeVapour barrierConcrete
21
4. Use the cut-off piece from the first row to begin the next row. It may be necessary to switch planks around to avoid starting off the rows with pieces that are too short.
5. Thenlaythenextplankinthesamemanner.Knockthefloorplankstightlytogether. Use a 1 metre long wooden tapping block to protect the tongue from directblows.Avoidendjointsclosetoeachotherinadjacentplanks.Cuttosizethe last row to leave a 10-15 mm gap to the wall.
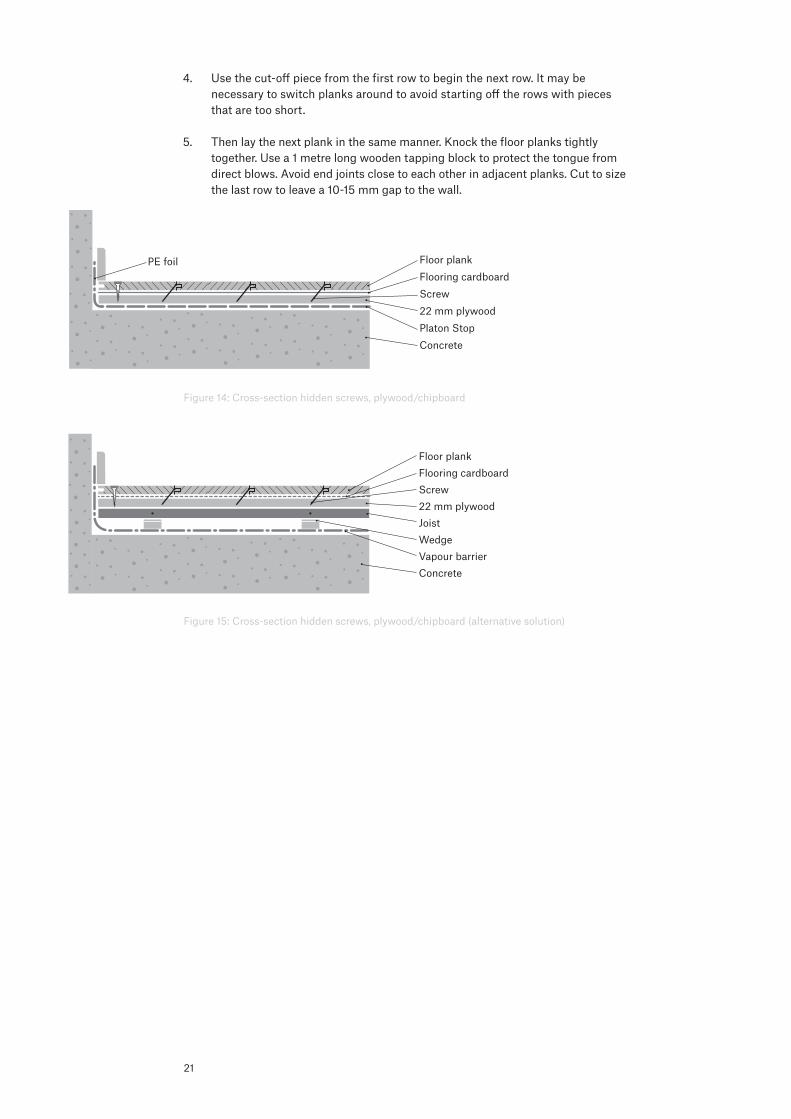
Figure14:Cross-sectionhiddenscrews,plywood/chipboard
Figure15:Cross-sectionhiddenscrews,plywood/chipboard(alternativesolution)
Floor plankFlooring cardboardScrew22 mm plywoodPlaton StopConcrete
PE foil
Floor plankFlooring cardboardScrew22 mm plywoodJoistWedgeVapour barrierConcrete
22
5 Dinesen floors with loose tongue in full lengths | Douglas
5.1 Installation on joists/beams – screwed from above
1. Onconcretefloors,alwaysuseavapourbarrierofatleast0.20mmPEfoilwith20 cm taped overlay. Let the vapour barrier continue up the wall and cut it off behind the skirting board.
2. Space joists and blocks appropriately, cf. Table 1 and Table 2, depending on the load and the thickness of the floor.
3. Lay the first row of planks 10-15 mm from the wall. Use temporary spacing blocks. Use string to check that the first row is completely straight.
4. Use a 15 mm plug drill to drill a 10 mm deep hole 4-5 cm from each edge. Be careful when drilling to make sure the holes are straight and do not fray. Fasten the floor planks with a Dinesen screw, cf. Table 4.
5. Push the loose tongues into the full length of the groove of the first plank. Do not leave a gap in between the individual tongues. Do not glue the tongue. Discard any tongues that are too thin or too tight.
6. Thenlaythenextplankinthesamemanner.Knockthefloorplankstightlytogether.Cuttosizethelastrowtoleavea10-15mmgaptothewall.
7. ForHistoricalplanks,whichfollowtheshapeofthetree,laytheplanksalternately top to bottom to create a uniform floor surface.
8. Pay attention to colour, knots and grain when installing the floor to distribute the planks evenly and ensure a harmonious appearance.
9. Once the whole floor has been installed, vacuum the holes.
10. Glue the plugs carefully with moisture-resistant PVAc glue – we recommend Dinesen Wood Glue. Distribute the glue evenly around the sides. The grain of the plug should follow the grain of the plank. Use a small belt sander afterwards to make the plug level with the plank.
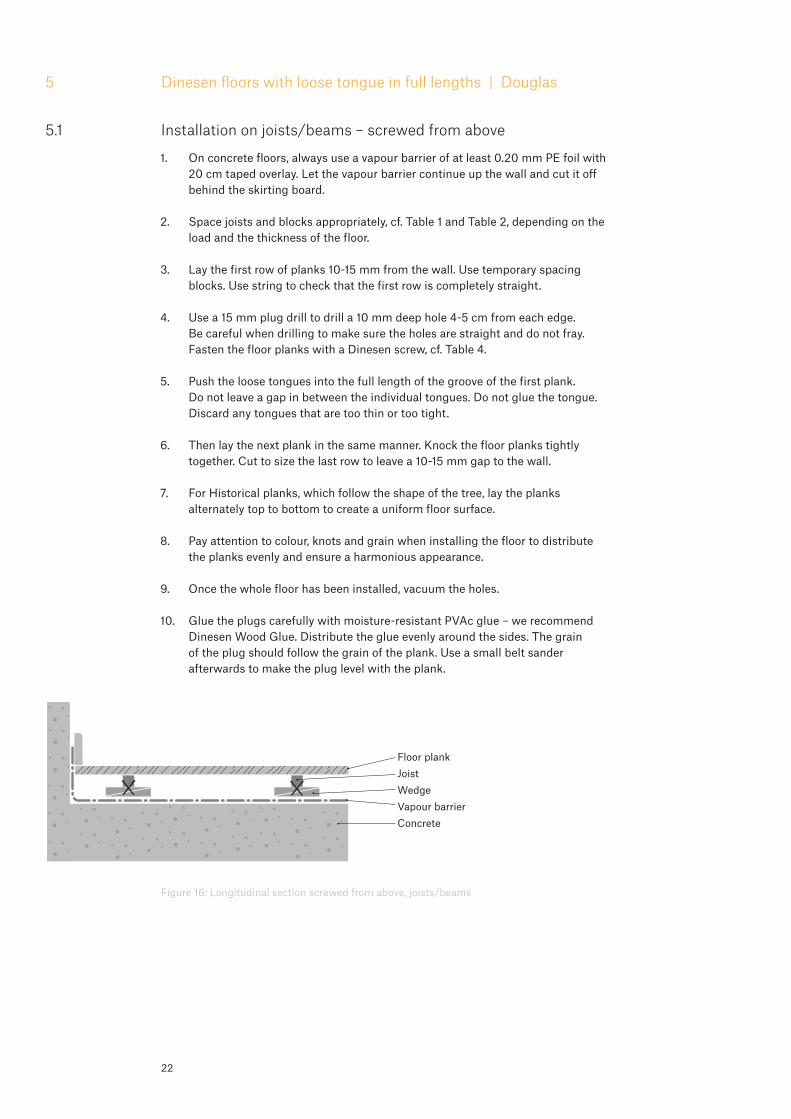
Figure16:Longitudinalsectionscrewedfromabove,joists/beams
Floor plankJoistWedgeVapour barrierConcrete
23
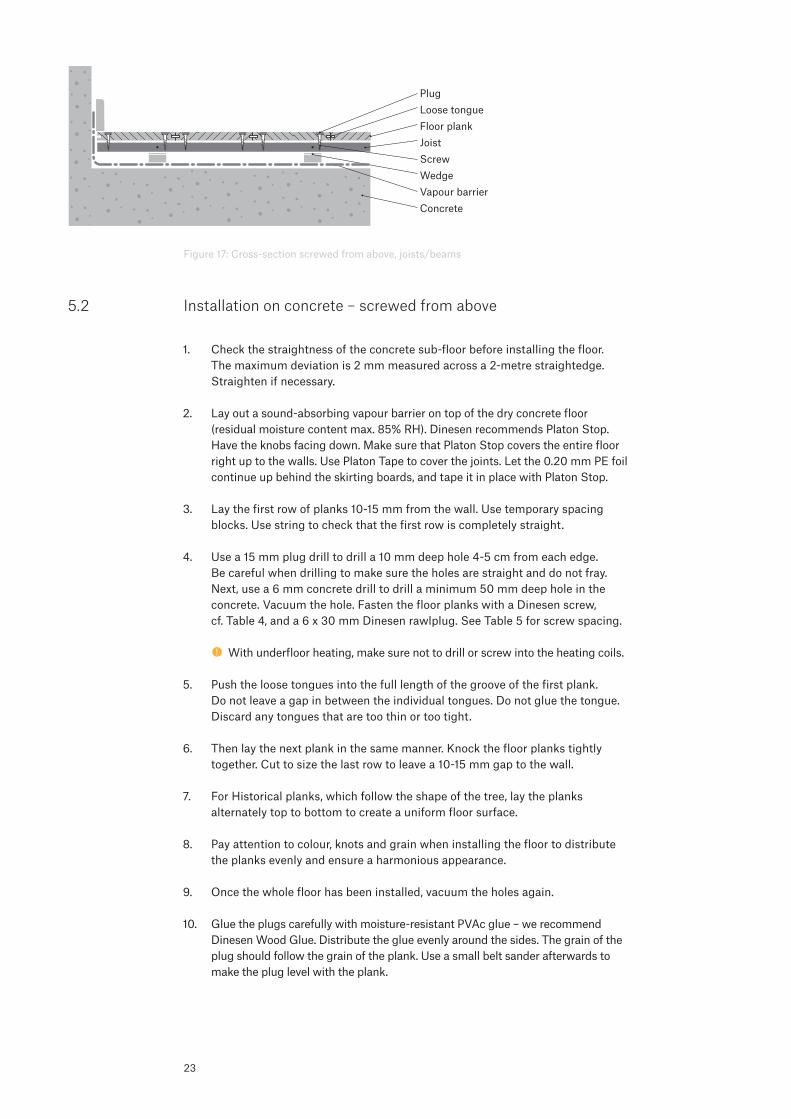
Figure17:Cross-sectionscrewedfromabove,joists/beams
5.2 Installation on concrete – screwed from above
1. Checkthestraightnessoftheconcretesub-floorbeforeinstallingthefloor.The maximum deviation is 2 mm measured across a 2-metre straightedge. Straighten if necessary.
2. Lay out a sound-absorbing vapour barrier on top of the dry concrete floor (residualmoisturecontentmax.85%RH).DinesenrecommendsPlatonStop.Havetheknobsfacingdown.MakesurethatPlatonStopcoverstheentirefloorrightuptothewalls.UsePlatonTapetocoverthejoints.Letthe0.20mmPEfoilcontinue up behind the skirting boards, and tape it in place with Platon Stop.
3. Lay the first row of planks 10-15 mm from the wall. Use temporary spacing blocks. Use string to check that the first row is completely straight.
4. Use a 15 mm plug drill to drill a 10 mm deep hole 4-5 cm from each edge. Be careful when drilling to make sure the holes are straight and do not fray. Next, use a 6 mm concrete drill to drill a minimum 50 mm deep hole in the concrete. Vacuum the hole. Fasten the floor planks with a Dinesen screw, cf. Table 4, and a 6 x 30 mm Dinesen rawlplug. See Table 5 for screw spacing. ! With underfloor heating, make sure not to drill or screw into the heating coils.
5. Push the loose tongues into the full length of the groove of the first plank. Do not leave a gap in between the individual tongues. Do not glue the tongue. Discard any tongues that are too thin or too tight.
6. Thenlaythenextplankinthesamemanner.Knockthefloorplankstightlytogether.Cuttosizethelastrowtoleavea10-15mmgaptothewall.
7. ForHistoricalplanks,whichfollowtheshapeofthetree,laytheplanksalternately top to bottom to create a uniform floor surface.
8. Pay attention to colour, knots and grain when installing the floor to distribute the planks evenly and ensure a harmonious appearance.
9. Once the whole floor has been installed, vacuum the holes again.
10. Glue the plugs carefully with moisture-resistant PVAc glue – we recommend Dinesen Wood Glue. Distribute the glue evenly around the sides. The grain of the plug should follow the grain of the plank. Use a small belt sander afterwards to make the plug level with the plank.
PlugLoose tongueFloor plankJoistScrewWedgeVapour barrierConcrete
24
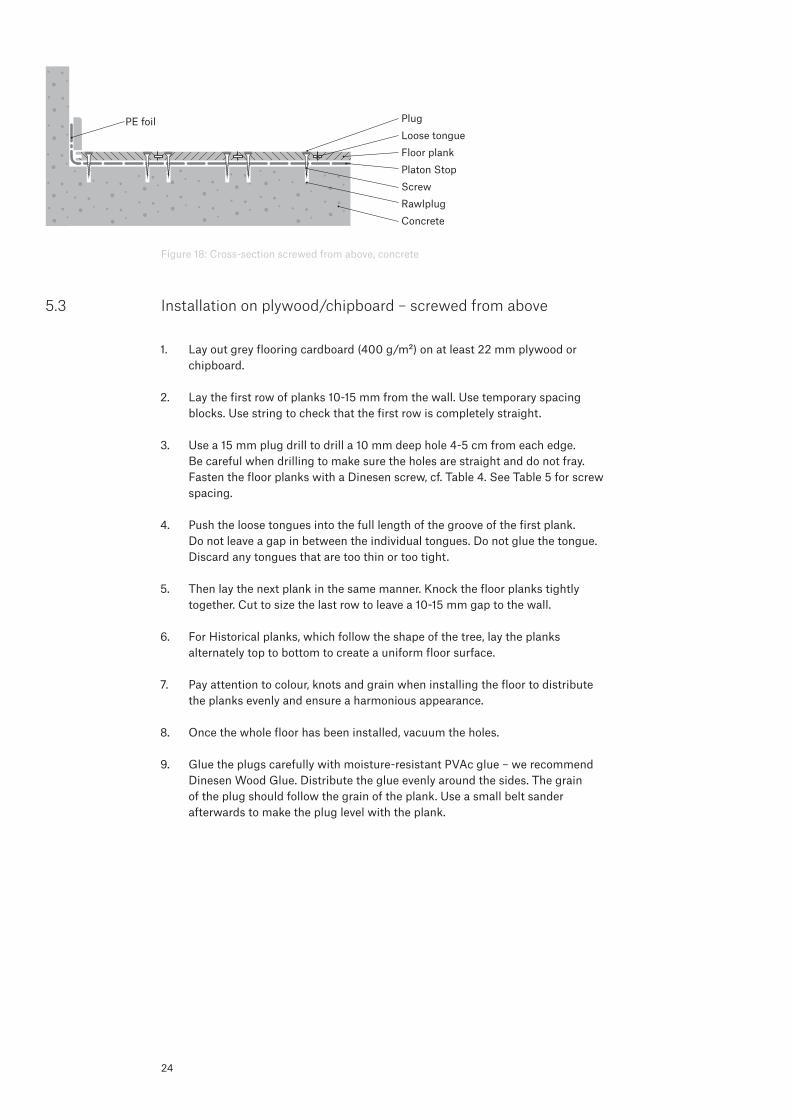
Figure18:Cross-sectionscrewedfromabove,concrete
5.3 Installation on plywood/chipboard – screwed from above
1. Lay out grey flooring cardboard (400 g/m²) on at least 22 mm plywood or chipboard.
2. Lay the first row of planks 10-15 mm from the wall. Use temporary spacing blocks. Use string to check that the first row is completely straight.
3. Use a 15 mm plug drill to drill a 10 mm deep hole 4-5 cm from each edge. Be careful when drilling to make sure the holes are straight and do not fray. Fasten the floor planks with a Dinesen screw, cf. Table 4. See Table 5 for screw spacing.
4. Push the loose tongues into the full length of the groove of the first plank. Do not leave a gap in between the individual tongues. Do not glue the tongue. Discard any tongues that are too thin or too tight.
5. Thenlaythenextplankinthesamemanner.Knockthefloorplankstightlytogether.Cuttosizethelastrowtoleavea10-15mmgaptothewall.
6. ForHistoricalplanks,whichfollowtheshapeofthetree,laytheplanksalternately top to bottom to create a uniform floor surface.
7. Pay attention to colour, knots and grain when installing the floor to distribute the planks evenly and ensure a harmonious appearance.
8. Once the whole floor has been installed, vacuum the holes.
9. Glue the plugs carefully with moisture-resistant PVAc glue – we recommend Dinesen Wood Glue. Distribute the glue evenly around the sides. The grain of the plug should follow the grain of the plank. Use a small belt sander afterwards to make the plug level with the plank.
PlugLoose tongueFloor plankPlaton StopScrewRawlplugConcrete
PE foil
25
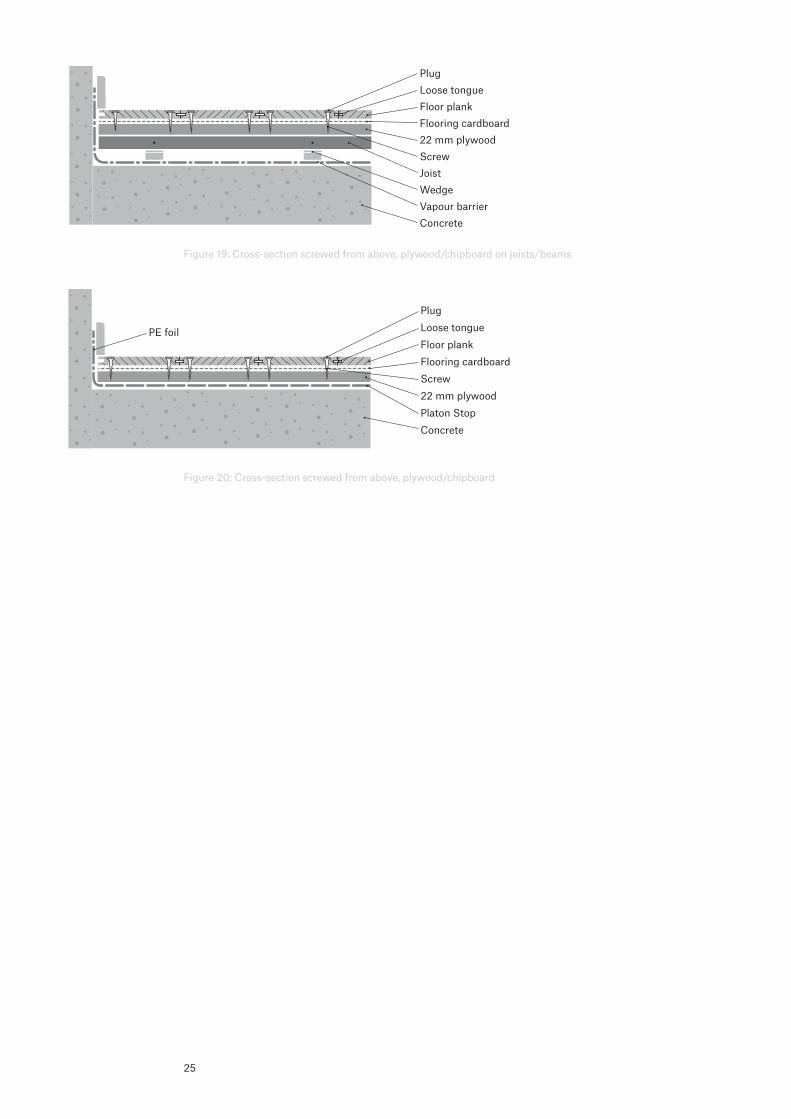
Figure19:Cross-sectionscrewedfromabove,plywood/chipboardonjoists/beams
Figure20:Cross-sectionscrewedfromabove,plywood/chipboard
PlugLoose tongueFloor plankFlooring cardboard22 mm plywoodScrewJoistWedgeVapour barrierConcrete
PlugLoose tongueFloor plankFlooring cardboardScrew22 mm plywoodPlaton StopConcrete
PE foil
26
6 Dinesen floors with loose tongue in random lengths | Douglas
6.1 Installation on joists/beams – screwed from above
1. Onconcretefloors,alwaysuseavapourbarrierofatleast0.20mmPEfoilwith20 cm taped overlay. Let the vapour barrier continue up the wall and cut it off behind the skirting board.
2. Space joists and blocks appropriately, cf. Table 1 and Table 2, depending on the load and the thickness of the floor.
3. Lay the first row of planks 10-15 mm from the wall. Use temporary spacing blocks. Use string to check that the first row is completely straight.
4. Use a 15 mm plug drill to drill a 10 mm deep hole 4-5 cm from each edge. Be careful when drilling to make sure the holes are straight and do not fray. Fasten the floor planks with a Dinesen screw, cf. Table 4.
5. Push the loose tongues into the full length of the groove of the first plank. Do not leave a gap in between the individual tongues. Do not glue the tongue. Discard any tongues that are too thin or too tight.
6. Glue the ends of the floor planks together with moisture-resistant PVAc glue – we recommend Dinesen Wood Glue. Apply the glue to the upper side of the tongue and the lower side of the groove. Wipe off excess glue with a damp cloth. ! Never apply glue to the long sides of floor planks!
7. Use the cut-off piece from the first row to begin the next row. It may be necessary to switch planks around to avoid starting off the rows with pieces that are too short.
8. Thenlaythenextplankinthesamemanner.Knockthefloorplankstightlytogether. Use a 1 metre long wooden tapping block to protect the tongue from direct blows. Joints in between joists (unsupported joints) are allowed, but never allow more than one unsupported joint for every three rows of planks in the same section. Avoid end joints close to each other in adjacent planks. Cuttosizethelastrowtoleavea10-15mmgaptothewall.
9. Pay attention to colour, knots and grain when installing the floor to distribute the planks evenly and ensure a harmonious appearance.
10. Once the whole floor has been installed, vacuum the holes.
11. Glue the plugs carefully with moisture-resistant PVAc glue – we recommend Dinesen Wood Glue. Distribute the glue evenly around the sides. The grain of the plug should follow the grain of the plank. Use a small belt sander afterwards to make the plug level with the plank.
27
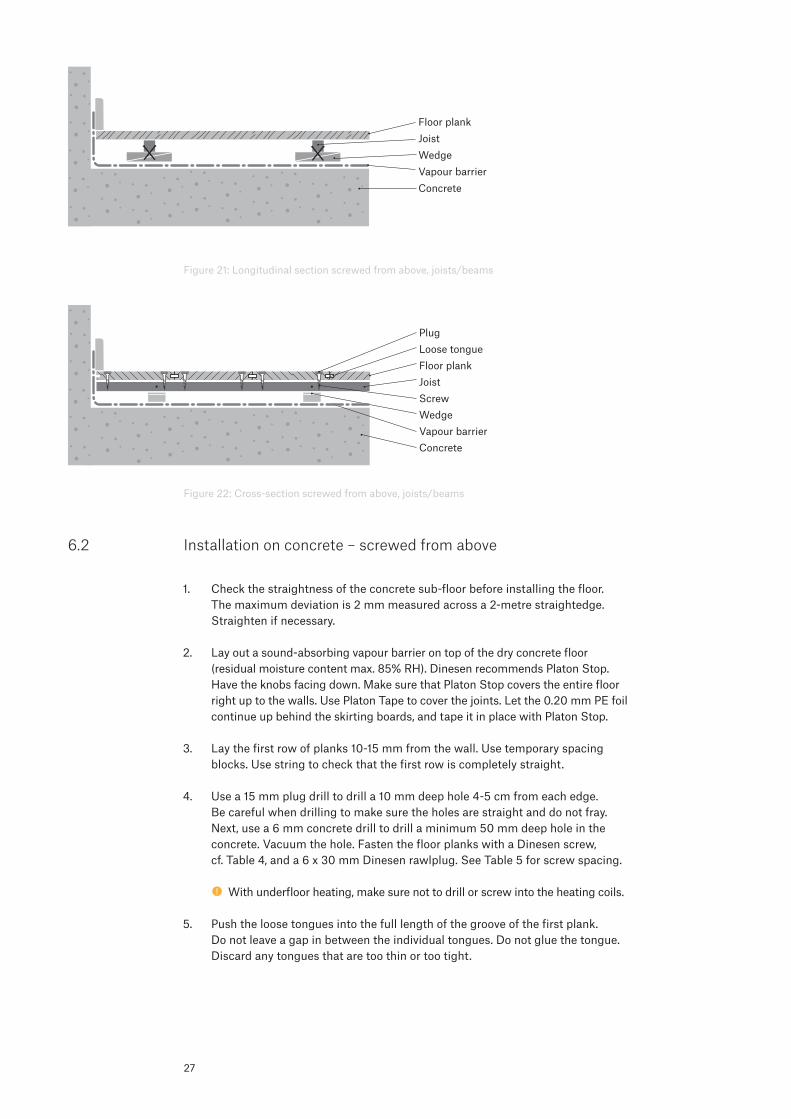
Figure21:Longitudinalsectionscrewedfromabove,joists/beams
Figure22:Cross-sectionscrewedfromabove,joists/beams
6.2 Installation on concrete – screwed from above
1. Checkthestraightnessoftheconcretesub-floorbeforeinstallingthefloor.The maximum deviation is 2 mm measured across a 2-metre straightedge. Straighten if necessary.
2. Lay out a sound-absorbing vapour barrier on top of the dry concrete floor (residualmoisturecontentmax.85%RH).DinesenrecommendsPlatonStop.Havetheknobsfacingdown.MakesurethatPlatonStopcoverstheentirefloorrightuptothewalls.UsePlatonTapetocoverthejoints.Letthe0.20mmPEfoilcontinue up behind the skirting boards, and tape it in place with Platon Stop.
3. Lay the first row of planks 10-15 mm from the wall. Use temporary spacing blocks. Use string to check that the first row is completely straight.
4. Use a 15 mm plug drill to drill a 10 mm deep hole 4-5 cm from each edge. Be careful when drilling to make sure the holes are straight and do not fray. Next, use a 6 mm concrete drill to drill a minimum 50 mm deep hole in the concrete. Vacuum the hole. Fasten the floor planks with a Dinesen screw, cf. Table 4, and a 6 x 30 mm Dinesen rawlplug. See Table 5 for screw spacing. ! With underfloor heating, make sure not to drill or screw into the heating coils.
5. Push the loose tongues into the full length of the groove of the first plank. Do not leave a gap in between the individual tongues. Do not glue the tongue. Discard any tongues that are too thin or too tight.
Floor plankJoistWedgeVapour barrierConcrete
PlugLoose tongueFloor plankJoistScrewWedgeVapour barrierConcrete
28
6. Glue the ends of the floor planks together with moisture-resistant PVAc glue – we recommend Dinesen Wood Glue. Apply the glue to the upper side of the tongue and the lower side of the groove. Wipe off excess glue with a damp cloth. ! Never apply glue to the long sides of floor planks!
7. Use the cut-off piece from the first row to begin the next row. It may be necessary to switch planks around to avoid starting off the rows with pieces that are too short.
8. Thenlaythenextplankinthesamemanner.Knockthefloorplankstightlytogether. Use a 1 metre long wooden tapping block to protect the tongue from directblows.Avoidendjointsclosetoeachotherinadjacentplanks.Cuttosizethe last row to leave a 10-15 mm gap to the wall.
9. Pay attention to colour, knots and grain when installing the floor to distribute the planks evenly and ensure a harmonious appearance.
10. Once the whole floor has been installed, vacuum the holes.
11. Glue the plugs carefully with moisture-resistant PVAc glue – we recommend Dinesen Wood Glue. Distribute the glue evenly around the sides. The grain of the plug should follow the grain of the plank. Use a small belt sander afterwards to make the plug level with the plank.
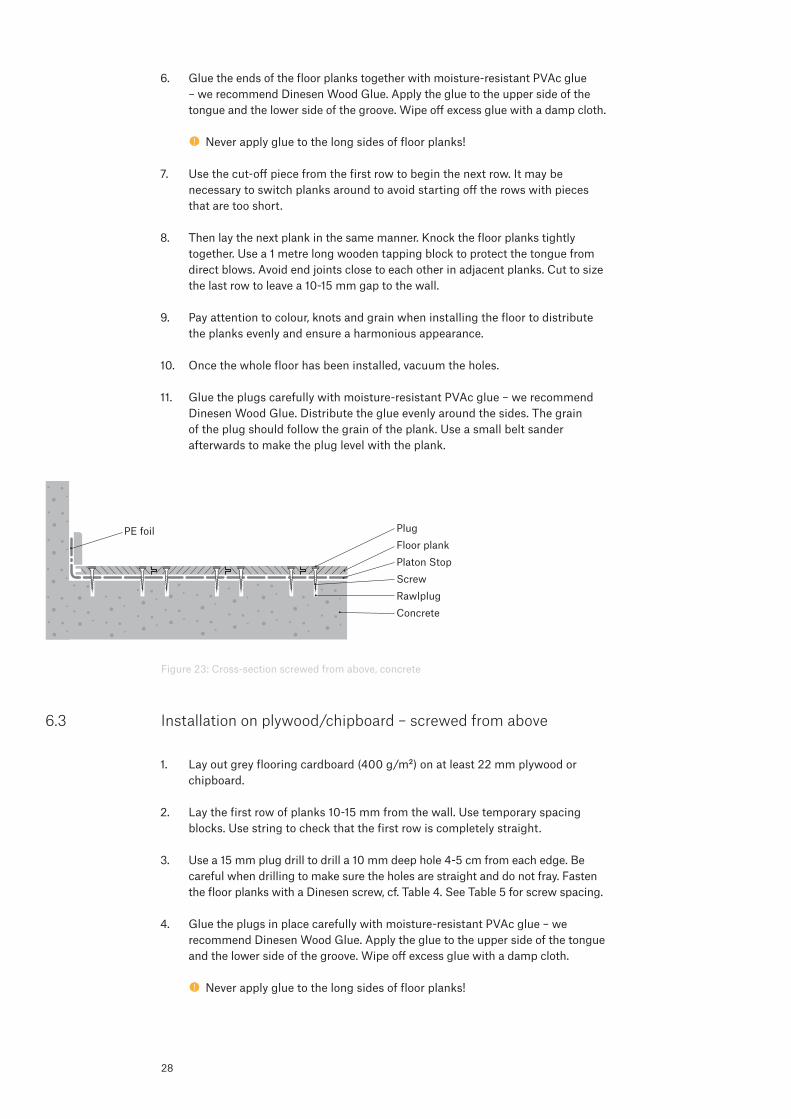
Figure23:Cross-sectionscrewedfromabove,concrete
6.3 Installation on plywood/chipboard – screwed from above
1. Lay out grey flooring cardboard (400 g/m²) on at least 22 mm plywood or chipboard.
2. Lay the first row of planks 10-15 mm from the wall. Use temporary spacing blocks. Use string to check that the first row is completely straight.
3. Use a 15 mm plug drill to drill a 10 mm deep hole 4-5 cm from each edge. Be careful when drilling to make sure the holes are straight and do not fray. Fasten the floor planks with a Dinesen screw, cf. Table 4. See Table 5 for screw spacing.
4. Glue the plugs in place carefully with moisture-resistant PVAc glue – we recommend Dinesen Wood Glue. Apply the glue to the upper side of the tongue and the lower side of the groove. Wipe off excess glue with a damp cloth. ! Never apply glue to the long sides of floor planks!
PlugFloor plankPlaton StopScrewRawlplugConcrete
PE foil
29
5. Use the cut-off piece from the first row to begin the next row. It may be necessary to switch planks around to avoid starting off the rows with pieces that are too short.
6. Push the loose tongues into the full length of the groove of the first plank. Do not leave a gap in between the individual tongues. Do not glue the tongue. Discard any tongues that are too thin or too tight.
7. Thenlaythenextplankinthesamemanner.Knockthefloorplankstightlytogether. Use a 1 metre long wooden tapping block to protect the tongue from directblows.Avoidendjointsclosetoeachotherinadjacentplanks.Cuttosizethe last row to leave a 10-15 mm gap to the wall.
8. Pay attention to colour, knots and grain when installing the floor to distribute the planks evenly and ensure a harmonious appearance.
9. Once the whole floor has been installed, vacuum the holes.
10. Glue the plugs carefully with moisture-resistant PVAc glue – we recommend Dinesen Wood Glue. Distribute the glue evenly around the sides. The grain of the plug should follow the grain of the plank. Use a small belt sander afterwards to make the plug level with the plank.
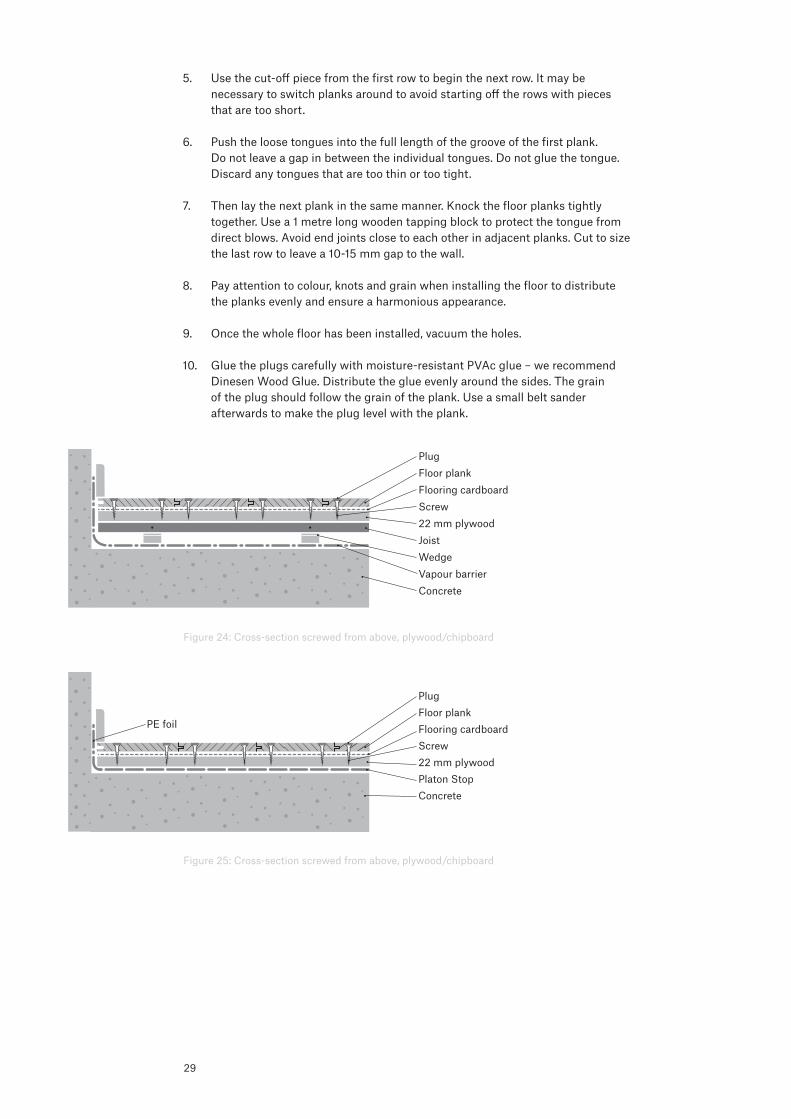
Figure24:Cross-sectionscrewedfromabove,plywood/chipboard
Figure25:Cross-sectionscrewedfromabove,plywood/chipboard
PlugFloor plankFlooring cardboardScrew22 mm plywoodJoistWedgeVapour barrierConcrete
PlugFloor plankFlooring cardboardScrew22 mm plywoodPlaton StopConcrete
PE foil
30
7 Full-surface gluing of Dinesen floors in full or random lengths | Douglas, Oak
7.1 Full-surface gluing with Stauf products
Do not combine full-surface gluing with other installation methods. Only glue the planks themselves to the substructure.
Theairhumiditymustbebetween35and65%RHandmustnotexceed50%RHinwinter.Thetemperaturemustbebetween18and25°C.
Install the planks immediately, except in winter when the planks should be placed in the room in which they are going to be installed for 24-48 hours prior to the installation.
! Never apply glue to the long sides of floor planks!
7.1.1 Stauf products UseSTAUFVPU-155SprimerandSTAUFPUK455glue.FollowStauf’sandDinesen’sinstructionscarefullywithregardto: •Climateconditions •Grade,evennessandmoisturecontentofthesubstructure •Useoftools •Dryingtimesforfiller,primer,masticetc. •Mountingandcuringtimesforprimerandglue •Floorswithunderfloorheating
In addition, always follow Dinesen’s instructions generally.
7.1.2 Substructures For all substructures, Dinesen’s recommendations about humidity apply.
Forcastsubstructures: •Moisturecontentmustnotexceed85%RH.NB:85%RHcorrespondsto approximately2.0CMdependingonthetypeofconcreteetc.Beawareofany restrictions in the national standard requirements •WealwaysrecommendusingSTAUFVPU-155Sprimer
Foranhydritesubstructures: •Moisturecontentmustnotexceed65%RH • DonotuseSTAUFVPU-155Sprimer ContactStaufforfurtheradvice.
Forplywoodandchipboardsubstructures: •Makesurethatthesheet/boardanditssurfaceissuitableforthepurpose •Moisturecontentmustnotexceed8-10%.Inaddition,followDinesen’sgeneral requirements for humidity and climate, cf. Table 2 in Dinesen’s “Before installation” instructions • Checkthatthegluebondscorrectlytothesurface • ContactStaufforfurtheradvice Othersubstructures: • ContactStaufforfurtheradvice
31
7.1.3 Underfloor heating If underfloor heating has been cast into the concrete layer, the underfloor heating must be turned on at an acceptable temperature for at least 30 days before the planks are installed. With underfloor heating, make sure to turn the heat off at least 24 hours before gluing. Do not turn on the heat until 7 days after the floor has been glued. Turn up the heat slowly, following Dinesen’s ”Before installation” instructions.
7.1.4 General installation Apply weights on the planks during the curing period to ensure sufficient pressure across the entire floor. Place 15 kg sand bags, buckets with sand or similar weights on top of the planks. Distribute them evenly with approximately one load per m2 until the glue has cured. The areas along the edges of the floor and the last installed rows are particularly important. The floor should not be used until the glue has cured.
Sanding and finishing should not be performed until at least 48 hours after the full-surface gluing.
To request additional instructions concerning full-surface gluing gluing, please contact Dinesen or download the instructions on dinesen.com
32
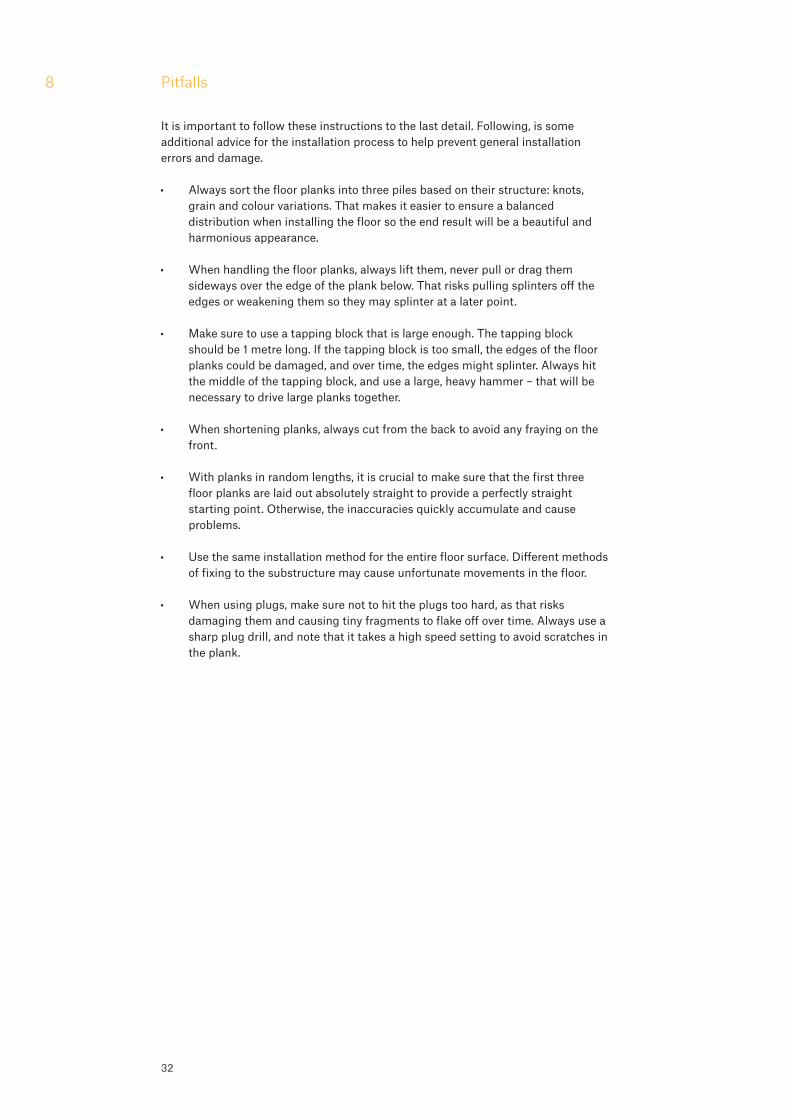
8 Pitfalls
It is important to follow these instructions to the last detail. Following, is some additional advice for the installation process to help prevent general installation errors and damage.
• Alwayssortthefloorplanksintothreepilesbasedontheirstructure:knots,grain and colour variations. That makes it easier to ensure a balanced distribution when installing the floor so the end result will be a beautiful and harmonious appearance.
• Whenhandlingthefloorplanks,alwaysliftthem,neverpullordragthemsideways over the edge of the plank below. That risks pulling splinters off the edges or weakening them so they may splinter at a later point.
• Makesuretouseatappingblockthatislargeenough.Thetappingblockshould be 1 metre long. If the tapping block is too small, the edges of the floor planks could be damaged, and over time, the edges might splinter. Always hit the middle of the tapping block, and use a large, heavy hammer – that will be necessary to drive large planks together.
• Whenshorteningplanks,alwayscutfromthebacktoavoidanyfrayingonthefront.
• Withplanksinrandomlengths,itiscrucialtomakesurethatthefirstthreefloor planks are laid out absolutely straight to provide a perfectly straight starting point. Otherwise, the inaccuracies quickly accumulate and cause problems.
• Usethesameinstallationmethodfortheentirefloorsurface.Differentmethodsof fixing to the substructure may cause unfortunate movements in the floor.
• Whenusingplugs,makesurenottohittheplugstoohard,asthatrisksdamaging them and causing tiny fragments to flake off over time. Always use a sharp plug drill, and note that it takes a high speed setting to avoid scratches in the plank.
33
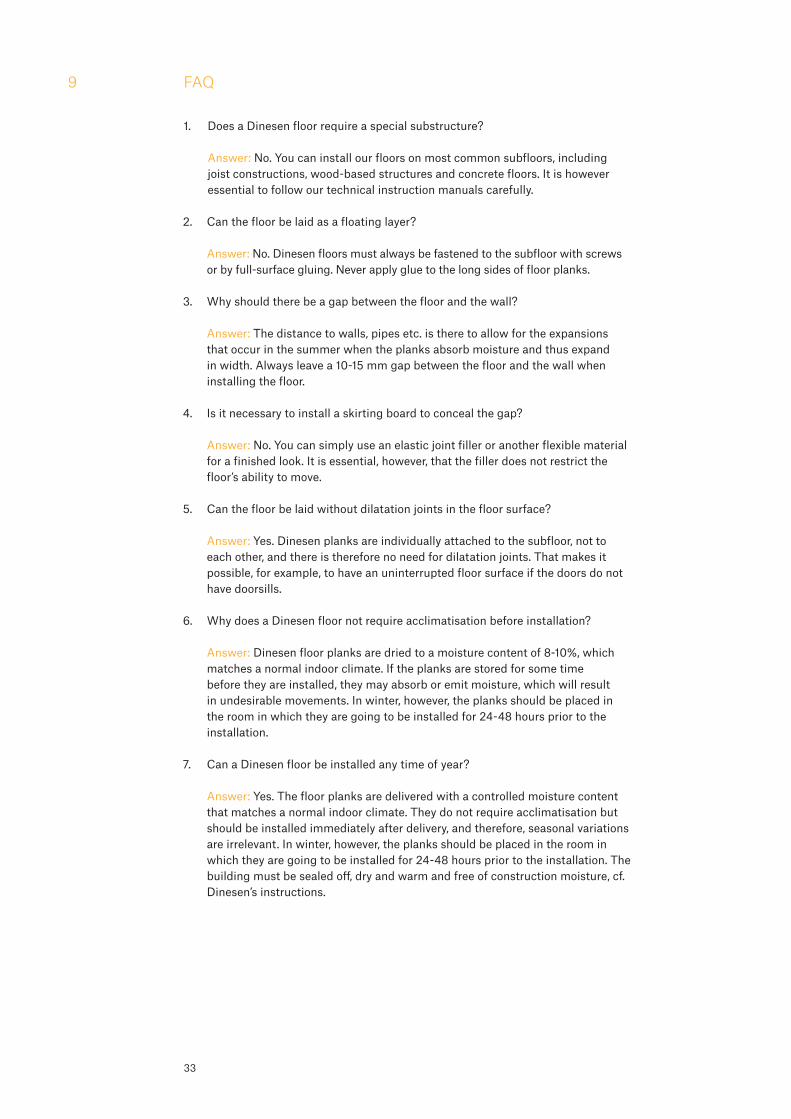
9 FAQ
1. Does a Dinesen floor require a special substructure? Answer: No. You can install our floors on most common subfloors, including joist constructions, wood-based structures and concrete floors. It is however essential to follow our technical instruction manuals carefully.
2. Canthefloorbelaidasafloatinglayer? Answer: No. Dinesen floors must always be fastened to the subfloor with screws or by full-surface gluing. Never apply glue to the long sides of floor planks.
3. Why should there be a gap between the floor and the wall? Answer:The distance to walls, pipes etc. is there to allow for the expansions that occur in the summer when the planks absorb moisture and thus expand in width. Always leave a 10-15 mm gap between the floor and the wall when installing the floor.
4. Is it necessary to install a skirting board to conceal the gap? Answer:No. You can simply use an elastic joint filler or another flexible material for a finished look. It is essential, however, that the filler does not restrict the floor’s ability to move.
5. Canthefloorbelaidwithoutdilatationjointsinthefloorsurface? Answer:Yes. Dinesen planks are individually attached to the subfloor, not to each other, and there is therefore no need for dilatation joints. That makes it possible, for example, to have an uninterrupted floor surface if the doors do not have doorsills.
6. Why does a Dinesen floor not require acclimatisation before installation? Answer:Dinesenfloorplanksaredriedtoamoisturecontentof8-10%,whichmatches a normal indoor climate. If the planks are stored for some time before they are installed, they may absorb or emit moisture, which will result in undesirable movements. In winter, however, the planks should be placed in the room in which they are going to be installed for 24-48 hours prior to the installation.
7. CanaDinesenfloorbeinstalledanytimeofyear? Answer:Yes. The floor planks are delivered with a controlled moisture content that matches a normal indoor climate. They do not require acclimatisation but should be installed immediately after delivery, and therefore, seasonal variations are irrelevant. In winter, however, the planks should be placed in the room in which they are going to be installed for 24-48 hours prior to the installation. The building must be sealed off, dry and warm and free of construction moisture, cf. Dinesen’s instructions.
34
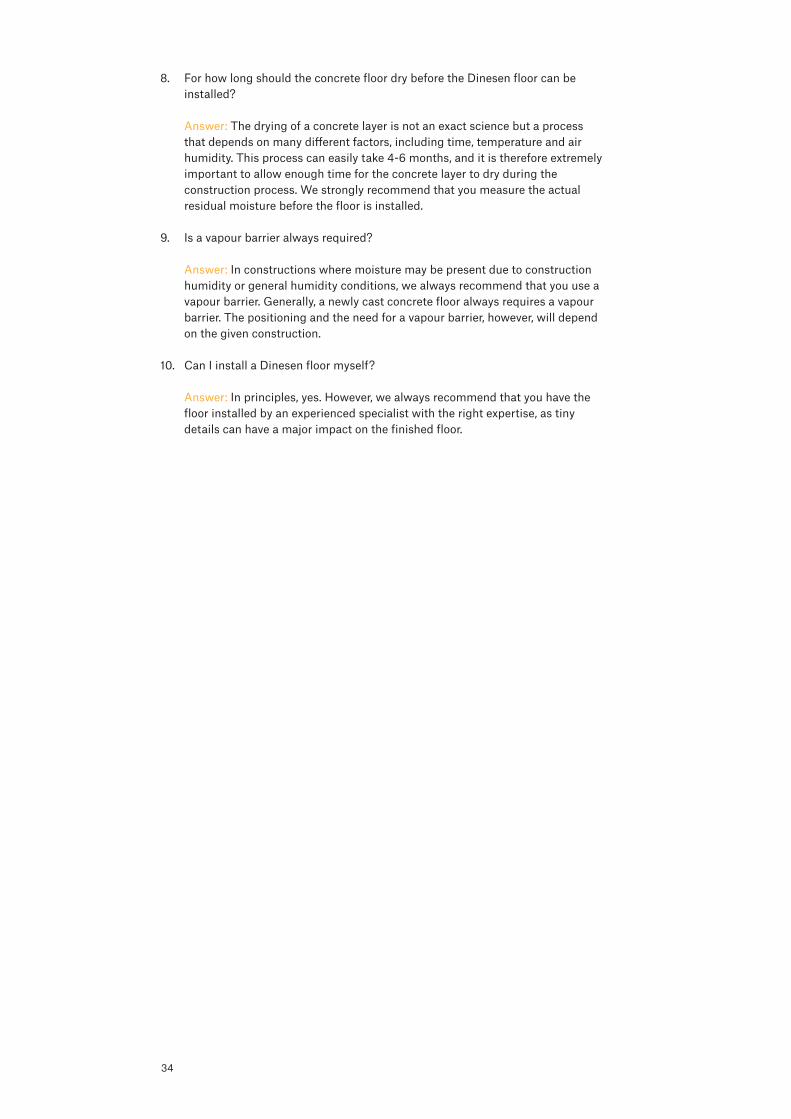
8. For how long should the concrete floor dry before the Dinesen floor can be installed? Answer:The drying of a concrete layer is not an exact science but a process that depends on many different factors, including time, temperature and air humidity. This process can easily take 4-6 months, and it is therefore extremely important to allow enough time for the concrete layer to dry during the construction process. We strongly recommend that you measure the actual residual moisture before the floor is installed.
9. Is a vapour barrier always required? Answer:In constructions where moisture may be present due to construction humidity or general humidity conditions, we always recommend that you use a vapour barrier. Generally, a newly cast concrete floor always requires a vapour barrier. The positioning and the need for a vapour barrier, however, will depend on the given construction.
10. CanIinstallaDinesenfloormyself? Answer:Inprinciples,yes.However,wealwaysrecommendthatyouhavethefloor installed by an experienced specialist with the right expertise, as tiny details can have a major impact on the finished floor.
35
10 General guidance
10.1 Dinesen instructions
Before installation Installation Full-surface gluing After installation
See also our detailed instruction videos concerning sanding, finishing, floor-washing and maintenance on dinesen.com. The instruction videos are only to be seen as a supplement to our instructions.
10.2 Literature
Træinformation:”Træ63“and”Træ64“(traeinfo.dk)
Dinesen’sinstructionsarebasedonDanishbuildingcodesandregulations.Reservationsare therefore made for national codes of practice. Please note that we can only offer advice about our own product, and thus, any additional advice lies outside the service we offer. Other building components and products require a degree of knowledge and insight that makes it necessary to seek advice from a specialist. Dinesen thus does not offer advice about the positioning of insulation and vapour barriers. As we have no control over the actual quality of workmanship, materials used and worksite conditions, these written instructions do not constitute an implied warranty of any kind. The illustrations in this document are strictly intended as a guide. We do not accept any liability for printing errors.