Embed Size (px)
Citation preview

IP10S / IP10 C o r d e d I P p h o n e
User guide

IP10S / IP10 user guide 1 02P182000Aen
Contents
Contents
For your safety ...................................................................................................................................3
Certification information ...................................................................................................................3
Operating conditions........................................................................................................................3
Location...........................................................................................................................................3
Connection ......................................................................................................................................4
Security ...........................................................................................................................................4
Care ................................................................................................................................................4
Qualified service ..............................................................................................................................4
Your phone.........................................................................................................................................5
Introduction......................................................................................................................................5
Keys version A.................................................................................................................................5
Keys version B.................................................................................................................................7
Indicators.........................................................................................................................................8
Getting started .................................................................................................................................10
Package contents ..........................................................................................................................10
Installation .....................................................................................................................................10
Call functions ...................................................................................................................................12
Making a call .................................................................................................................................12
Making a call using the phone book...............................................................................................12
Speed dialing a phone number ......................................................................................................13
Last number redialing ....................................................................................................................13
Dialing using the call lists...............................................................................................................13
Making a call with a headset..........................................................................................................15
Answering a call ............................................................................................................................15
Options during a call ......................................................................................................................16
Telephony services..........................................................................................................................17
Using services during a call ...........................................................................................................17
Using services in standby mode ....................................................................................................18
Phone book ......................................................................................................................................21
Saving names and phone numbers................................................................................................21
Searching for names and phone numbers .....................................................................................22
Scrolling in the phone book............................................................................................................22
Modifying names and phone numbers ...........................................................................................23
Erasing names and phone numbers ..............................................................................................23

IP10S / IP10 user guide 2 02P182000Aen
Memory keys ....................................................................................................................................24
Save memory keys ........................................................................................................................24
Speed dialing using memory keys .................................................................................................25
Call lists............................................................................................................................................26
Unanswered calls ..........................................................................................................................26
Erase call lists................................................................................................................................27
Using the menu ................................................................................................................................28
Accessing a menu function ............................................................................................................28
List of menu functions....................................................................................................................29
Configuring user parameters ..........................................................................................................31
Ringing tones ................................................................................................................................31
Language ......................................................................................................................................32
Display ..........................................................................................................................................32
Headset .........................................................................................................................................33
Voice mail number.........................................................................................................................34
Password.......................................................................................................................................34
Reset.............................................................................................................................................35
Clock .............................................................................................................................................35
Viewing administrator parameters..................................................................................................36
Configuring through a Web browser ..............................................................................................37
Connecting to the IP phone Web server.........................................................................................37
General information .......................................................................................................................38
User settings .................................................................................................................................39
Phone books .................................................................................................................................40
Appendix ..........................................................................................................................................41
Troubleshooting.............................................................................................................................41
Warranty conditions .......................................................................................................................41
Declaration of conformity for the European Community .................................................................42
Compliance and safety information................................................................................................42

IP10S / IP10 user guide 3 02P182000Aen
For your safety
Please read the following safety precautions before setting up your phone.
Certification information
This equipment has been tested and found to comply with the limits for a Class A digital device,pursuant to part 15 of the Federal Communications Commission Rules. These limits are designed toprovide reasonable protection against harmful interference when the equipment is operated in acommercial environment. This equipment generates, uses, and can radiate radio frequency energyand, if not installed and used in accordance with the instruction manual, may cause harmfulinterference to radio communications. Operation of this equipment in a residential area is likely tocause harmful interference in which case the user will be required to correct the interference at hisown expense.
Modifying the equipment without Swissvoice’s written authorization may result in the equipment nolonger complying with FCC requirements for Class A digital devices. In that event, your right to use theequipment may be limited by FCC regulations, and you may be required to correct any interference toradio communications at your own expense.
Operating conditions
This telephone is to be operated on a local area network. The calls are handled by a call managerusing MGCP, H323 or SIP signalling protocol. The telephone must be equipped with the appropriatesoftware version.
Location
Place your telephone in a safe place, on a non-slip surface.Do not expose the telephone to direct sunlight or other sources of heat. Keep it in an ambienttemperature between +5°C and +35°C.Keep the telephone dry.Avoid wet or dusty locations.Avoid locations where your telephone is exposed to aggressive liquids or vapours.Avoid locations in the immediate vicinity of hi-fi and video equipment, domestic appliances, monitors,and electric motors (influence of electromagnetic fields). If your telephone is connected to a PC, themonitor may cause electromagnetic interference.

IP10S / IP10 user guide 4 02P182000Aen
For your safety
Connection
Plug the telephone’s connecting cables into the appropriate sockets only. Never try to change theplugs on the connecting cables.Only a Swissvoice power adaptor must be used with the IP10S and IP10 phones.Swissvoice power adaptor references are:For US: 02P175500AFor Europe: 20314471, 02P175600AFor UK: 02P183100AFor Australia: 02P183200AUse of a third party power adaptor would be improper. Consequently, in case of product defect or flawcaused by this improper use, the guarantee will not apply.
Security
The plug-in power supply is used as a disconnection device.The network and power supply accesses of the phone are classified SELV (Safety Extra Low Voltage).The mains access of the plug-in power supply is classified Dangerous voltage.
Care
Never carry the telephone by its connecting cord.Clean the set with a soft, slightly damp or anti-static cloth. Do not use any detergents or chemicals toclean the set.
Qualified service
Do not attempt to open the phone. Only qualified personnel may repair phone equipment. Changes ormodifications not expressly approved by Swissvoice could void the user’s authority to operate theequipment. If your telephone is faulty or defective, please contact your supplier.
Information regarding the products in this manual is subject to change without notice. This guide isbelieved to be accurate but is presented without warranty of any kind, express or implied. The usableservices and features on the phone depend on the installed software release and on the call manager.Therefore, the conformity of the user guide cannot be guaranteed.

IP10S / IP10 user guide 5 02P182000Aen
Your phone
Introduction
Your IP phone is a full-feature telephone that provides voice communication over an IP (InternetProtocol) network. You can use it as a traditional analog phone, allowing you to make and receivetelephone calls. It also offers features that you have come to expect from a telephone, such as calltransfer, voice mail access, redial key. Furthermore, your IP phone offers you new features because itis part of an IP network. For example, you can customize its settings using the Web based interface.Your IP phone can be either the IP10S or the IP10. The only difference consists in a mini-switch for aPC connection which is offered on the IP10S.Your IP phone is compliant with three signaling protocols: Media Gateway Control Protocol (MGCP),Session Internet Protocol (SIP) and H323 v4. Depending on the software loaded in your phone, thisuser guide may not describe the exact phone behaviour.
Typographical convention: words and messages displayed in the phone are printed in bold and redcolor in this user guide.
Keys version A
Two key-board models are available. Version A offers programmed function keys while version Boffers feature keys (see "Version B", page 7).
Version A

IP10S / IP10 user guide 6 02P182000Aen
Your phone
Display keys
1 OK Confirmation key: enables access to the menu in standby mode, performsa setting option, a service or a call.
2 C Clear key: exits to higher-level menu (short click) or to the standby display(long click).
Deletes the last character in editing mode.
3 Phone book key: offers direct access to name search in the phone books.
4 Service key: offers a list of available services (short click) or performs apre-programmed call number or service (long click).
5-6Scrolling keys: enable browsing through menus and setting options.
5 In standby mode, shows the most recently called numbers.
6 In standby mode, scrolls in the phone books.
Audio keys
7 Loudspeaker key: activates loudspeaker or hands-free function.
8 - + Volume keys: are used to adjust the volume.
Dialing keys
9 to Keypad: is used to key in numbers and letters.
Pressing and holding one key calls the pre-programmed number or function.
10 Feature key is used to program a call number or a service. e.g. Voice Mailnumber. Blinks slowly to indicate that voice messages are present.
11 R Flashing key: enables activation of a service by its code.
12 Mute key: disables the microphone.
13 Redial key: shows the most recently called numbers.
IP10S / IP10 user guide 7 02P182000Aen
Your phone
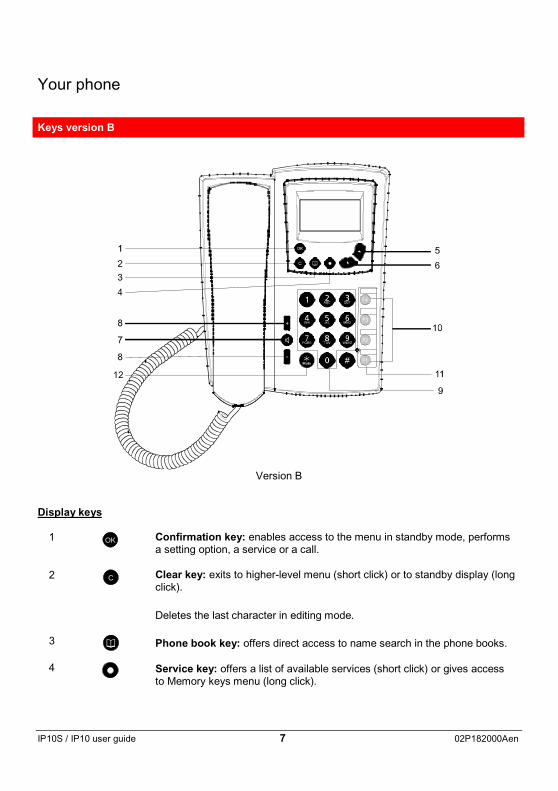
Keys version B
Version B
Display keys
1 OK Confirmation key: enables access to the menu in standby mode, performsa setting option, a service or a call.
2 C Clear key: exits to higher-level menu (short click) or to standby display (longclick).
Deletes the last character in editing mode.
3 Phone book key: offers direct access to name search in the phone books.
4 Service key: offers a list of available services (short click) or gives accessto Memory keys menu (long click).

IP10S / IP10 user guide 8 02P182000Aen
Your phone
5-6 Scrolling keys: enable browsing through menus and setting options.
5 In standby mode, shows the most recently called numbers.
6 Scrolls in the phone books.
Audio keys
7 Loudspeaker key: activates loudspeaker and hands-free functions.
8 - + Volume keys: are used to adjust the volume.
Dialing keys
9to
Keyboard: is used to key in numbers and letters.
Pressing and holding one key calls the pre-programmed number or function.
10 F4F3F2F1Feature keys: are backlighted keys used for speed dialing, lineappearances, feature access.
11 Label for programmable keys.
12 In a call, a long click performs the mute function. The microphone is off.
Indicators
Indicators in standby mode
When the phone is ready for use and no characters have been keyed in by the user, the phone is inthe mode. Example of display:
One or more of the following icons may be shown when a service or function is activated.

IP10S / IP10 user guide 9 02P182000Aen
Your phone
This icon is blinking. You have received one or more voice messages.
Do not disturb service. All your calls are forwarded to your voice mail.
All your calls are forwarded to the number you have chosen.
If there is no reply, your calls are forwarded to your voice mail or to anothernumber.
If busy, your calls are forwarded to your voice mail or to another number.
Ranking indicator when scrolling in sub-menus.
Dynamic alarm indicator.
Waiting for call manager. The phone is not yet connected.
Headset indicator.
Indicators in connected mode
Example of display:
Ready for dialing.
Connection is done.
Handsfree.
Loudspeaker on.
Microphone off (mute).

IP10S / IP10 user guide 10 02P182000Aen
Getting started
Package contents
1 telephone set1 handset1 spiral handset connecting cable1 Ethernet cable (100 base T)1 wall mounting kit1 short operating instruction (A5 paper sheet)1 non-printed sticker for feature keys (version B only)
Separately delivered:1 power supply.
Not included:An additional Ethernet cable to connect any PC to the telephone through its PC-switch.
Installation
Your IP phone is designed to be connected to an Ethernet IP (Internet Protocol) network. Itsconnection to the network has to be done by your system administrator. If that is not the case, followthe above instruction for connecting your phone, and then ask to your system administrator for itsconfiguring.
Connecting the handset: insert the straight end of the spiral connecting cable into the socket onthe base of the telephone (1). By gently pulling, check that the cable connector is in place. Insert theother end of the cable into the handset (2).
You may use a headset instead of the handset.
Powering the telephone*: insert the power cable jack into the socket (3) and plug the other end ina standard power outlet (4). Swissvoice is displayed a few seconds followed byWaiting for callmanager…If your system administrator delivered your phone without a power supply, your phone probablyreceives power through the Ethernet connection.
Connecting to the local area network: insert the Ethernet cable connector into the "LAN" socket atthe bottom of the terminal (5). By gently pulling, check that the cable connector is in place. Insert theother end of the cable into the LAN connection socket (6).
Shared network connection: This capability is offered on the IP10S model. If you have a singleEthernet port in your workspace with your desktop computer already connected to it, disconnect theEthernet cable from the computer and attach it to the "LAN" port on the back of your phone (5). Next,use the Ethernet cable included with your phone to connect the "PC" port (7) on the back of yourphone to your desktop computer (8). The IP10S phone has an integral switch.
* Only a Swissvoice power adaptor must be used. For references, see "Connection" page 4.

IP10S / IP10 user guide 11 02P182000Aen
Getting started
Wall mounting option: you have the possibility to fix your telephone in wall mounting position. Placethe plastic part on the base of the telephone (9). Place two screws distants of 126 mm, to hang thetelephone (10).
The message "Waiting for call manager…" will disappear once the IP address of the phone and theaddress of the call manager will be set. Otherwise, contact your system administrator.

IP10S / IP10 user guide 12 02P182000Aen
Call functions
Making a call
Key in the phone number you want to call.
CPress the Clear key to delete the character to the left of the cursor or press andhold to delete all and abort the dialing preparation.
OK Press the OK key to Call the number,
or
press the loudspeaker key,
or
lift the handset.
Making a call using the phone book
Press the phone book key.
Press the scrolling keys to move the cursor to the phone book you want tosearch in. You may specifically scroll in your Private phone book or in theCommon phone book managed by the administrator. You can also indifferentlysearch in both, by selecting All.
OK Press the OK key to select the phone book.
Enter the first letter of the name.
OK Press the OK key.
Press the scrolling keys to move the cursor to the name you want.Info enables to display the phone number.
Press the Loudspeaker key,
or
Lift the handset.

IP10S / IP10 user guide 13 02P182000Aen
Call functions
Speed dialing a phone number
(see "Memory keys", page 24)
Assuming you have assigned a phone number to one of the memory keys ( to and ), youcan call that phone number:
Press and hold the memory key you want. The phone number is displayed.
OK Press the OK key to confirm the call.
To check the phone number programmed on a memory key, just access the menu and selectmemory keys.
In the version B of the IP10, feature keys F4F3F2F1 can also be used as speed dialing keys. Asimple pressing on the key is sufficient to display the phone number.
Last number redialing
To redial one of the last 30 phone numbers you called:
Press the scrolling key once in standby mode.
Scroll to the number or name you want.
Press the Loudspeaker key,
or
Lift the handset.
The version A of the phone has also a dedicated key for the redial list.
Dialing using the call lists
Your telephone automatically stores the last 30 answered and 30 unanswered calls.(see "Call lists", page 26).

IP10S / IP10 user guide 14 02P182000Aen
Call functions
From the unanswered calls message
In standby mode, new unanswered calls are announced by a message and the blinking envelopeindicator.
Press OK to display details. For each call, the number, the name (if included in the phone book), thenumber of calls, the date and time are available.
or
Press the Loudspeaker key to call back.
OK Press the OK key under Options to save or erase the call information.
From the call lists
OK Press the OK key to enter the Menu.
OK Select Call lists and then one of the call lists by pressing the OK key.
Press the scrolling keys to move the cursor to the name or number you want.
Press the Loudspeaker key,
or
Lift the handset.
The scrolling key gives you directly the last dialed numbers.

IP10S / IP10 user guide 15 02P182000Aen
Call functions
Making a call with a headset
A headset can be used instead of the handset. The headset function has to be activated in the Usersettings menu (see “Headset”, page 33).
Dial the number or select a name or number in a list.
Press the Loudspeaker key.
To end the call, press the loudspeaker key.
Answering a call
Display of caller’s identity
When someone calls you, his number is received and displayed (This is a Call manager service). Thename is also displayed if it is stored with the number in the phonebook.
Adjusting the ring volume
+ - While the phone is ringing you can adjust the ring volume of your telephone bypressing the volume keys.
Receiving a second call
While you are connected, you may receive a second call. Line 2 is displayedand the symbol blinks.
OK Press the OK key to accept this call and to put the first one on hold,
or
Press the hook switch to end the first connected call and automatically beconnected with the incoming call.

IP10S / IP10 user guide 16 02P182000Aen
Call functions
Options during a call
Group listening
Group listening is useful when other individuals in the room need to listen to the conversation.
Press the Loudspeaker key during the call. The symbol is displayed.
The loudspeaker key toggles the loudspeaker On or Off.
Hands-free operation
This feature allows you to make calls through the loudspeaker, without picking up the handset.
Press the Loudspeaker key and leave the handset on-hook.
To end the call, press the Loudspeaker key,
or to continue the call with the handset, just pick it up.
Speech quality decreases with distance from the terminal.
Volume adjustment
The volume in the receiver and the loudspeaker can be changed during a conversation.
+ - Press the volume keys, up or down, to adjust the volume. When group listening
or hands-free mode are active, the volume set level symbol is displayed.
Mute
IP 10 version A:If you wish to talk to someone in the room without the calling party hearing,
Press the Mute key. The symbol is displayed.
To switch the microphone on again, press the Mute key.
IP 10 version B:
Press and hold the star key for two seconds. The symbol is displayed.
To switch the microphone on again, press the star key.

IP10S / IP10 user guide 17 02P182000Aen
Telephony services
A number of services are offered to help you handle your calls with ease. Many of the services areoffered by the Call manager. Consequently, the services listed in this paragraph may not be offered ifnot supported by the Call manager.
Depending on the signalling protocol version loaded in your phone, the list of services may be differentand may also be dynamic. For this reason, the following services are described as examples.
To consult and to use the list of services, press the key. Some services may also be enabledusing the feature keys (see "Memory keys", page 24).
Using services during a call
Enquiry call
You are conversing with one party and wish to make a brief call to another party while holding theexisting connection.
OK Press the OK key to select Line 2.
Enter the number you want to call.
This service can also be activated by pressing the key and selecting Enquiry call or Hold.
Brokering
Two calls are initiated:
OKPress the OK key as often as necessary to switch back and forth between thefirst call and the second one.
To end the call you’re connected with, press the hook switch. You’llautomatically switch to the other call.
Transfer call
To connect the two call partners, press the Service key.
Scroll through the list and select Transfer call.
OK Confirm with the OK key.
The connection is done, replace your handset.

IP10S / IP10 user guide 18 02P182000Aen
Telephony services
Conference
During a call, if you want to set up a conference with a third party:
Press the Service key.
Scroll to select Conference.
OK Press the OK key to confirm.
Key in the number you want to call.
To end the conference, press the Service key.
OK Select Terminate conference and press the OK key to confirm.
Blind Transfer
During a call, you may want to transfer it to a third party.
Press the Service key.
Scroll to select Blind transfer.
OK Press the OK key to confirm.
Key in the phone number to which you want to transfer the call.Hang up the handset.
When Blind transfer is selected but not yet done, you can come back to the connected lineby pressing the Service key and selecting Take back.
Using services in standby mode
Using services
When your telephone is in standby mode, you can use some services. The service availabilitydepends on the Call manager.

IP10S / IP10 user guide 19 02P182000Aen
Telephony services
Voice Mail
To consult your voice mail, press the Service key.
OK Select Voice mail.
Your Voice mail is called automatically.
or
F1Press the F1 key (pre-programmed key in version A) or any assigned voice mailkey (F1 to F4).
OK Press the OK key, or press the loudspeaker, or lift the handset.
The voice mail number is set by the Call manager administrator. Otherwise, you can set yourown voice mail number (see "Voice mail number", page 34). Nevertheless, the first one is thedefault.
Pick up
To pick up a call ringing on an other phone:
Press the Service key.
Scroll to Pick up.
OK Press the OK key to select.
Key in the phone number.You’re connected with the caller.
Do not disturb
To activate this service:
Press the Service key.
Scroll to Do not disturb ON.
OK Press the OK key to select.
OK Press the OK key once again to activate.
The symbol is displayed. The caller will hear a busy tone.

IP10S / IP10 user guide 20 02P182000Aen
Telephony services
To deactivate “Do not disturb”:
Press the Service key.
Scroll to Do not disturb OFF.
OK Press the OK key to select.
OK Press the OK key once again to deactivate.
Call Forward
You can forward incoming calls to another phone number or to your voice mail. The forwarding canconcern all incoming calls, or only those for which you are already on the phone or when you don’tanswer.
Press the Service key.
Scroll to Call forward ON, or CF on no reply ON, or CF on busy ON.
OK Press the OK key to select.
Enter the phone number to which calls will be diverted.
OK Press the OK key to activate.
The symbol for permanent call forward or for call forward on busyor no reply is displayed.
To deactivate “Call forward”:
Press the Service key.
Scroll to the call forward with mention OFF.
OK Press the OK key to select.
OK Press the OK key once again to deactivate.
IP10S / IP10 user guide 21 02P182000Aen
Phone book
You can save names and phone numbers in the phone’s memory (private phone book). You can alsouse the common phonebook saved by the system administrator.
Your private phone book may save up to 100 names and phone numbers. The common phone bookmay contain up to 400 names and numbers.
You can save entries in your phone book locally or from your phone’s Web server interface. (see“Configuration through a Web browser”, page 37). The following section describes how to do it locally.
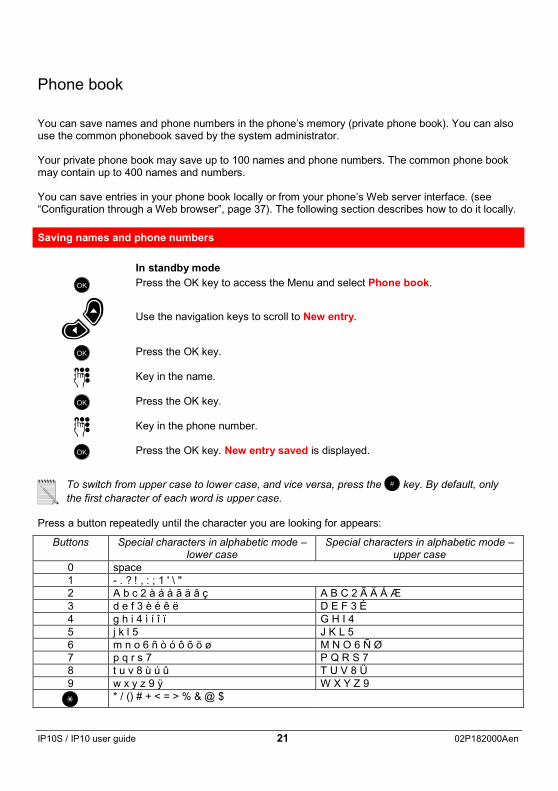
Saving names and phone numbers
In standby mode
OK Press the OK key to access the Menu and select Phone book.
Use the navigation keys to scroll to New entry.
OK Press the OK key.
Key in the name.
OK Press the OK key.
Key in the phone number.
OK Press the OK key. New entry saved is displayed.
To switch from upper case to lower case, and vice versa, press the # key. By default, onlythe first character of each word is upper case.
Press a button repeatedly until the character you are looking for appears:
Buttons Special characters in alphabetic mode –lower case
Special characters in alphabetic mode –upper case
0 space1 - . ? ! , : ; 1 ' \ "2 A b c 2 à á å ã ä â ç A B C 2 Ã Ä Å Æ3 d e f 3 è é ê ë D E F 3 É4 g h i 4 ì í î ï G H I 45 j k l 5 J K L 56 m n o 6 ñ ò ó ô õ ö ø M N O 6 Ñ Ø7 p q r s 7 P Q R S 78 t u v 8 ù ú û T U V 8 Ü9 w x y z 9 ÿ W X Y Z 9
* / () # + < = > % & @ $

IP10S / IP10 user guide 22 02P182000Aen
Phone book
Searching for names and phone numbers
In standby modePress the Phone book key.
OK Select the phone book you want to search in, or select All.
Key in the first letter of the name.
OK Press the OK key.
The first name saved with this letter is displayed.
Scroll to select the name you want to call.Info gives you the phone number associated with the name.
Scrolling in the phone book
The phone book is accessible either in standby mode or during a call.
In standby modePress the Navigation key to access the Scroll submenu in the phone book.
Select the phone book you want to search in, or select All.
OK Press the OK key.
Use the Navigation keys to scroll to a name.Info allows you to display the phone number.
Pick up the handset or press the Loudspeaker key for calling.
During a callPress the Phone book key.
OK Select the phone book you want to search in, or select All.

IP10S / IP10 user guide 23 02P182000Aen
Phone book
Use the Navigation keys to scroll to a name.
OK Press the OK key to access the Options.
OK Select Info to display the phone number or Call to start a second call.
Modifying names and phone numbers
OKIn standby modePress the OK key to access the menu and select Phone book.
Scroll to Edit with the navigation keys.
OK Press the OK key toModify.
C Use the Correction key to modify the name. When pressing and holding theCorrection key, all characters are deleted.
OK Press the OK key to confirm. Proceed the same way with the phone number.
Erasing names and phone numbers
You may erase your entire private phone book or delete entries one by one.
OKIn standby modePress the OK key to access the menu and select Phone book.
Use the Navigation keys to scroll up to Erase.
OK Press the OK key.
Use the Navigation keys to scroll up to the name you want to erase.
OK Press OK and confirm that you want to erase this entry.

IP10S / IP10 user guide 24 02P182000Aen
Memory keys
Each key of the keypad and feature keys can be used for saving a phone number or a function.
… F4F3F2F1
Save memory keys
OKIn standby modePress the OK key to access the Menu and select Memory keys.
Use the Navigation keys to scroll up to the key for the memory in which youwant to save.
OK Press the OK key to select.
Use the Navigation keys to scroll up to the type of memory into which you wantto key: Free number or Function or None to erase the current entry.
OK Press the OK key to select.
For a free number
Select Modify entry and key in the name and number,
or
Select Phone book for saving an entry already saved in the phone book.
For a function
Select one of the functions in the list.

IP10S / IP10 user guide 25 02P182000Aen
Memory keys
Speed dialing using memory keys
Activating a function
To activate a function saved in a memory key,
In standby mode,
Press and hold the number key until the name function is displayed,
or
F2 Press a feature key (F2 is an example).
OK Confirm the activation of the service by pressing the OK key.2 beeps are sounded and the message "Service activated" is displayed.
In idle mode, the service indicator is displayed (see ”Indicators”, page 8).
Deactivating a function
Press the Service key, and select the service with indication OFF.orPress the allocated memory key.
OK Press the OK key to select and once again to confirm the deactivation.

IP10S / IP10 user guide 26 02P182000Aen
Call lists
Your phone registers the last 30 phone numbers of missed, dialed and received calls.
In standby mode,
OK Press the OK key to access the menu and select Call lists.
Use the navigation keys to scroll up to the list you want to consult.
OK Press the OK key to access the list you have selected.
For each registered call, you can view:
The date and time of the call The range number of the callin the list
The number of iterations
The phone number and name The durationof the caller (if saved in the phone book)
OKSelect Options by pressing the OK key to Save the caller’s name and numberin your phone book or to Erase call information from the list.
or
orPick up the handset or press the loudspeaker key for calling back.
Unanswered calls
In standby mode, new unanswered calls are indicated by a written message and the blinking envelopeindicator.
Press the OK key to display further information as described above.
In standby mode, new unanswered calls are indicated by a writtenmessage and the blinking envelope indicator.
Press the OK key to display further information as describedabove.
If the caller saved a message on your voice mail, a secondmessage is displayed New voice message(s).

IP10S / IP10 user guide 27 02P182000Aen
Call lists
When the voice mail number is programmed on a feature key, it blinks slowly to announcenew voice mail messages.
Press the OK key to Listen to new messages or use the backlighted voice mail key if set.
Erase call lists
In the Call lists menu,
Use the Navigation keys to scroll up to Erase call lists.
OK Select it by pressing the OK key.
Use the Navigation keys to scroll up to the list you want to erase.
OK Select it by pressing the OK key.A written message confirms that the list has been erased.
IP10S / IP10 user guide 28 02P182000Aen
Using the menu
The phone offers you an extensive range of functions that allow you to customize the phone to yourneeds and use it with ease. These functions are arranged in menus and sub-menus.
Menu function setting can also be done through the IP phone Web server interface (see "Configuringthrough a Web browser", page 37).
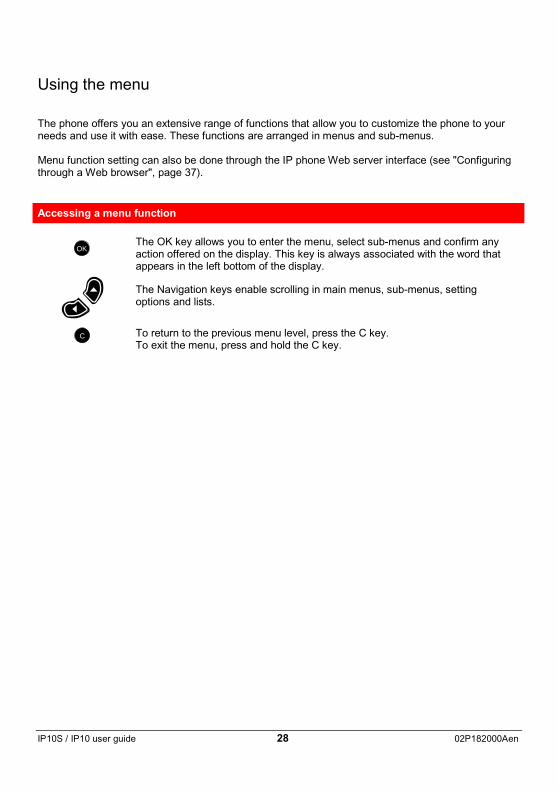
Accessing a menu function
OKThe OK key allows you to enter the menu, select sub-menus and confirm anyaction offered on the display. This key is always associated with the word thatappears in the left bottom of the display.
The Navigation keys enable scrolling in main menus, sub-menus, settingoptions and lists.
C To return to the previous menu level, press the C key.To exit the menu, press and hold the C key.

IP10S / IP10 user guide 29 02P182000Aen
Using the menu
List of menu functions
Menu Phone book Search AllScroll PrivateNew entry CommonEditErase
Call lists Unanswered callsAnswered callsDialed numbersErase call lists
Memory keys List of memory keys Free numberFunctionNone
Ringing tones MelodyVolumeRhythm
User settings *Language EnglishFrançaisDeutschEspañolItaliano
Display Idle screenContrast
Headset OffOn
Other settings Voice mailnumberPasswordReset
Internal ringExternal ring

IP10S / IP10 user guide 30 02P182000Aen
Using the menu
Menu
Admin settings Current settingsChange settings Boot version
DSP versionMAC addressDHCPIP addressSubnet maskDNS addressGW addressVLANVLAN IDVLAN PriorityTOS IDPrecedence IPCall agent addressCall agent portAutomatic DSTSNTP modeSNTP addressSNTP FrequencyTone table
Clock Alarm OnOff
Clock setting Set timeTime formatTime zone
Date setting Set the dateDate format

IP10S / IP10 user guide 31 02P182000Aen
Configuring user parameters
Setting parameters are divided into two categories:
- User settings: You can freely choose the setting options for the functions offered in this category.Ringing tones, display language, display idle screen, headset capability, clock alarm, voice mailnumber, password and reset are the customization possibilities.
- Administrator settings: rights to modify any of these parameters are reserved for your systemadministrator. However, the Administrator’s setting options may be viewed at any time.
While configuring your phone, it is advisable to keep the receiver on the hook. If you lift the handset orif you receive a call while you are configuring, the sequence will be interrupted.
Ringing tones
In the Ringing tones menu you can define the settings - melody, volume, rhythm – for internal andexternal calls. You can choose from 10 melodies and even download polyphonic music in RTTTLformat (5 melodies) using the phone’s Web server (see "Configuring through a Web browser",page 37).
Melody
In the Ringing tonesmain menu,
OK Select Melody by pressing the OK key.
OK Select Internal ring or External ring by pressing the OK key.
Use the Navigation keys to scroll in the melody list. Each melody is played.
OK Select one melody by pressing the OK key.
Volume
In the Ringing tonesmain menu,
OK Select Volume by pressing the OK key.
Use the Navigation keys to increase or decrease the volume.
OK Confirm by pressing the OK key.

IP10S / IP10 user guide 32 02P182000Aen
Configuring user parameters
Rhythm
In the Ringing tonesmain menu,
OK Select Rhythm by pressing the OK key.
OK Select Internal ring or External ring by pressing the OK key.
Increase or decrease the rhythm using the navigation keys.
OK Confirm by pressing the OK key.
Language
A choice of 5 display languages is offered: English, Français, Deutsch, Italiano and Español andone downloadable language (administrator setting). If the display is in a foreign language, look for aword beginning with "*".
In the User settingsmain menu,
OK Select *Language by pressing the OK key.
Use the Navigation keys to scroll to the language you are looking for.
OK Confirm your choice by pressing the OK key.
Display
Text
In the idle state, the text field can be customized by choosing one of the following options:Free idle text, User logo, Operator logo, Digital clock, User name, Internal number, ExternalNumber.Operator logo, user name, internal number and external number must be provided by your systemadministrator to allow their selection.

IP10S / IP10 user guide 33 02P182000Aen
Configuring user parameters
In the User settingsmain menu,
OK Select Display by pressing the OK key.
OK Select Idle screen by pressing the OK key.
Use the Navigation keys to scroll to the option you are looking for.
OK Confirm your choice by pressing the OK key.
To customize the display with your logo, you should first download it through the phone’s Webserver (see "Configuring through a Web browser", page 37).
Contrast
In the User settingsmain menu,
OK Select Display by pressing the OK key.
OK Select Contrast by pressing the OK key.
Adjust the contrast of the display using the Navigation keys.
OK Confirm your choice by pressing the OK key.
Headset
If you want to use a headset instead of the handset, you should change the setting option.
In the User settingsmain menu,
Scroll to Headset.
OK Select Headset by pressing the OK key.
Select On using the Navigation keys.
OKConfirm your choice by pressing the OK key.
The indicator is displayed permanently.
IP10S / IP10 user guide 34 02P182000Aen
Configuring user parameters
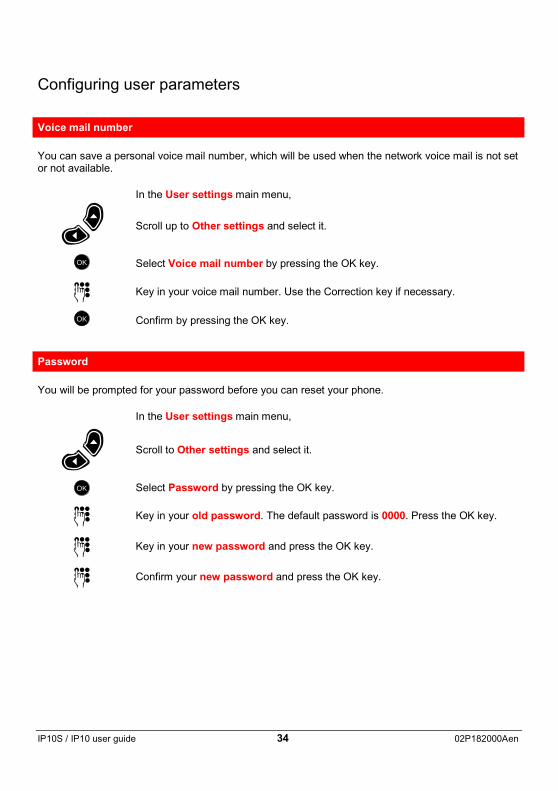
Voice mail number
You can save a personal voice mail number, which will be used when the network voice mail is not setor not available.
In the User settingsmain menu,
Scroll up to Other settings and select it.
OK Select Voice mail number by pressing the OK key.
Key in your voice mail number. Use the Correction key if necessary.
OK Confirm by pressing the OK key.
Password
You will be prompted for your password before you can reset your phone.
In the User settingsmain menu,
Scroll to Other settings and select it.
OK Select Password by pressing the OK key.
Key in your old password. The default password is 0000. Press the OK key.
Key in your new password and press the OK key.
Confirm your new password and press the OK key.

IP10S / IP10 user guide 35 02P182000Aen
Configuring user parameters
Reset
You can reset some of the menu settings to their original values by choosing whether to restorefactory settings or to reset user settings to their original value, without changing some administratorsettings (call agent address, downloaded language or service table).
In the User settingsmain menu,
Scroll to Other settings and select it.
OK Select Reset by pressing the OK key.
Key in your password and press the OK key.
Choose Factory settings or User settings with the navigation keys.
OK Confirm the reset.
Clock
Alarm
The alarm clock can be used as a reminder. When the alarm time expires, the phone sounds an alert
tone, your text is displayed and the indicator is displayed.
Scroll to Clock main menu and press the OK key.
OK Select Alarm by pressing the OK key.
OK Press the OK key and select ON to turn the alarm on, or OFF to turn the alarmoff.
Set the alarm time and confirm with the OK key.
Key in a free text which will be displayed when the alarm rings.
OK Confirm by pressing the OK key.

IP10S / IP10 user guide 36 02P182000Aen
Configuring user parameters
Clock setting
You can change the time settings if the time is not automatically given by the network.
Scroll up to Clock main menu and press the OK key.
OK Scroll and select Clock setting by pressing the OK key.
OK Select Set time by pressing the OK key.
Key in the time and save by pressing the OK key.
You also can choose the time format: 12h or 24h, and the time zone.
Date setting
You can change the date settings if this is not automatically set by the network.
Scroll to Clock main menu and press the OK key.
OK Scroll and select Date setting by pressing the OK key.
OK Select Set the date by pressing the OK key.
Key in the date and save by pressing the OK key.
You also can choose the date format: DD-MM-YY ; MM-DD-YY ; DD-MMM-YY.
Viewing administrator parameters
You have the option to view the technical and network parameters set by the system administrator, butyou can’t change them. See the list of parameters on page 30.
In the Admin. settings main menu,
OK Select Current settings by pressing the OK key.
Scroll with the navigation keys to view each parameter.
OK Press the OK key to go Back to the previous menu.
IP10S / IP10 user guide 37 02P182000Aen
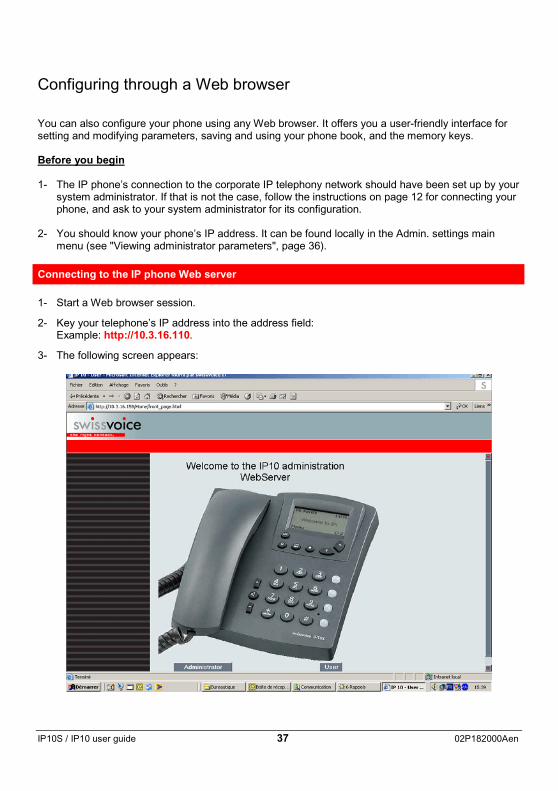
Configuring through a Web browser
You can also configure your phone using any Web browser. It offers you a user-friendly interface forsetting and modifying parameters, saving and using your phone book, and the memory keys.
Before you begin
1- The IP phone’s connection to the corporate IP telephony network should have been set up by yoursystem administrator. If that is not the case, follow the instructions on page 12 for connecting yourphone, and ask to your system administrator for its configuration.
2- You should know your phone’s IP address. It can be found locally in the Admin. settings mainmenu (see "Viewing administrator parameters", page 36).
Connecting to the IP phone Web server
1- Start a Web browser session.
2- Key your telephone’s IP address into the address field:Example: http://10.3.16.110.
3- The following screen appears:

IP10S / IP10 user guide 38 02P182000Aen
Configuring through a Web browser
4- Click on User
5- A window is displayed asking for User name and Password.
6- Enter user in the username field and user in the password field.
7- The following screen appears:
The menu settings appear on the left of the screen. Go through them and change the setting values asyou wish. They will be changed automatically on your phone. For some parameter changes, you willbe asked to reboot your phone locally to activate changes.
General information
Web page language
You can change the language used on the Web server. The following languages are available:English, French, German, Spanish, Italian.

IP10S / IP10 user guide 39 02P182000Aen
Configuring through a Web browser
The fifth language is customizable by your system administrator, who is able to download anotherlanguage.
Phone parameters
This gives an overview of the main technical parameters.
User settings
Memory keys
From this page, you can save a phone number or a function on each dialing key and on each featurekey.If a phone number has been saved, you can also manage a call (Dial – End call) from this page.
Phone idle screen
Free idle text: You can key in the text you want to be displayed in idle state on your phone.
User logo: You also can choose a logo. In that case, go to the User logo page to download it.
Time & date are managed by the system administrator. Otherwise, you can save it locally on yourphone.
User name, internal number, external number and operator logo are set by the systemadministrator. Otherwise, you will not be able to select one of these options to be displayed in idlemode.
User login / user password
You can change the login and the password for access to your IP phone’s Web page.Your login and password must be at least four characters long.
RTTTL ring melodies
You can choose from 10 ringing melodies or download any polyphonic music (up to 5), one forexternal calls and one for internal calls.
Customizing ring tones
Browse to a music file (.txt format) in your PC directories.Select Import for importing the selected music on your phone.Select the music name in the list above and click on either Select int or Select ext.
You can also copy a music sequence into the Tones field and Save it. It will be downloaded to yourphone in the ring tone list.
Conversely, you can save the ring tone list you have in your phone to your PC. Just click the Importbutton.

IP10S / IP10 user guide 40 02P182000Aen
Configuring through a Web browser
Alarm
To activate an alarm, select the On button and key in the time and a text which will be displayed whenthe alarm rings.
Once the alarm is activated, the symbol appears at bottom right of the phone display.
User logo
You can customize your phone display with a logo. Just browse to the file you want in your PCdirectories (format: gif , jpg ), open it and click on the Submit button.
The user logo option must be selected if you want the logo to be displayed as idle text (see"Display", page 35).
Phone books
Import private phone book
You can import an existing private phone book into your phone, provided it is in csv format.
In the other direction, you can easily upload the phone book saved in your IP phone to your PC.
Manage private phone book
This window offers an easy way to enter names and numbers in your private phone book. Use thename and number field to save new entries or change existing ones.
Search and call
Select one name and call this person by pressing the Dial button.You can directly speak in hands free mode and End the call from this window.

IP10S / IP10 user guide 41 02P182000Aen
Appendix
Troubleshooting
If your phone is not functioning as it should, first try to find the fault in the following table. The followingtips should help you correct the fault:
Problem Possible cause RemedyNo dialing tone. No connection to the LAN. Ensure that the LAN connection
cables on the phone and at theLAN socket are correctlyplugged in.
No display. No power. Ensure that the power cable jackis correctly plugged in, or if thephone should normally bepowered by the network, informyour system administrator.
"Waiting for call manager"message, no dialing tone.
One of the following parametersis not set correctly:- Phone IP address- Call agent address and subnetmask
- Gateway address
Check these parameters withyour system administrator.
Your call partner cannot hearyou or you cannot hear him.
The handset cable is notcorrectly plugged in.
Ensure that the handset cable iscorrectly plugged into thehandset and the telephone.
Time is not the one you’veprogrammed.
Time is automatically specifiedby the network.
Ask your system administrator.
"Phone needs to be rebooted"message.
Following changes in theconfiguration of the phone, areboot is needed to take effect.
Press the "OK" key to reboot thephone.
Phone does not always ring. Call forwarding active or Do notdisturb facility set.
Read the relevant section of theuser guide.
Warranty conditions
Your product is covered by a guarantee that is in accordance with the legal provisions of the country inwhich you purchased the product and which runs from the date of purchase. Please retain the receiptas proof of the date of purchase. Within the guarantee period, all faults that are the result of defectivematerials or manufacturing faults will be repaired free of charge. Repairs under guarantee will eitherbe carried out by repairing the defective product or exchanging it, at the supplier’s discretion. Defectsthat do not significantly affect the value or use of the product as well as expendable items or damagethat has been caused by improper use, through fair wear and tear or by interference with the productfrom third parties, are not covered by the guarantee. Possible consequential damages resulting fromthe use, the failure or faults on the product, in particular any liability for pecuniary loss, are excludedfrom this guarantee.

IP10S / IP10 user guide 42 02P182000Aen
Appendix
In the event of a claim under the guarantee, please contact the reseller or the service operator fromwhom you purchased the telephone.
Declaration of conformity for the European Community
The declaration of conformity applies for European Community, Switzerland, Norway, Iceland,Romania, and Liechtenstein.This equipment is in compliance with the essential requirements and other provisions of EuropeanUnion Directive 1999/5/EC.
Compliance and safety information
Your IP phone meets the following regulatory compliance and safety standards:
CE marking, indicating compliance with the European Union Directive 1999/5/EC. It includes thefollowing safety and EMC standards:- User electrical security EN 60950- Federal Communications Commission Part 15 Class A (see "Certification information", page 3).
www.swissvoice.netSwissvoice S.A. 2001We reserve the right to amend delivery options and modify technical specifications.