Embed Size (px)
Citation preview

1
IRBNet Picture Guide
Instructions for On-line Submission of Research
Protocols to the Institutional Review Board (IRB)
www.irbnet.org
For any questions or concerns regarding your submission, visit CSUSM IRB or
contact us at [email protected], 760-750-4029
2
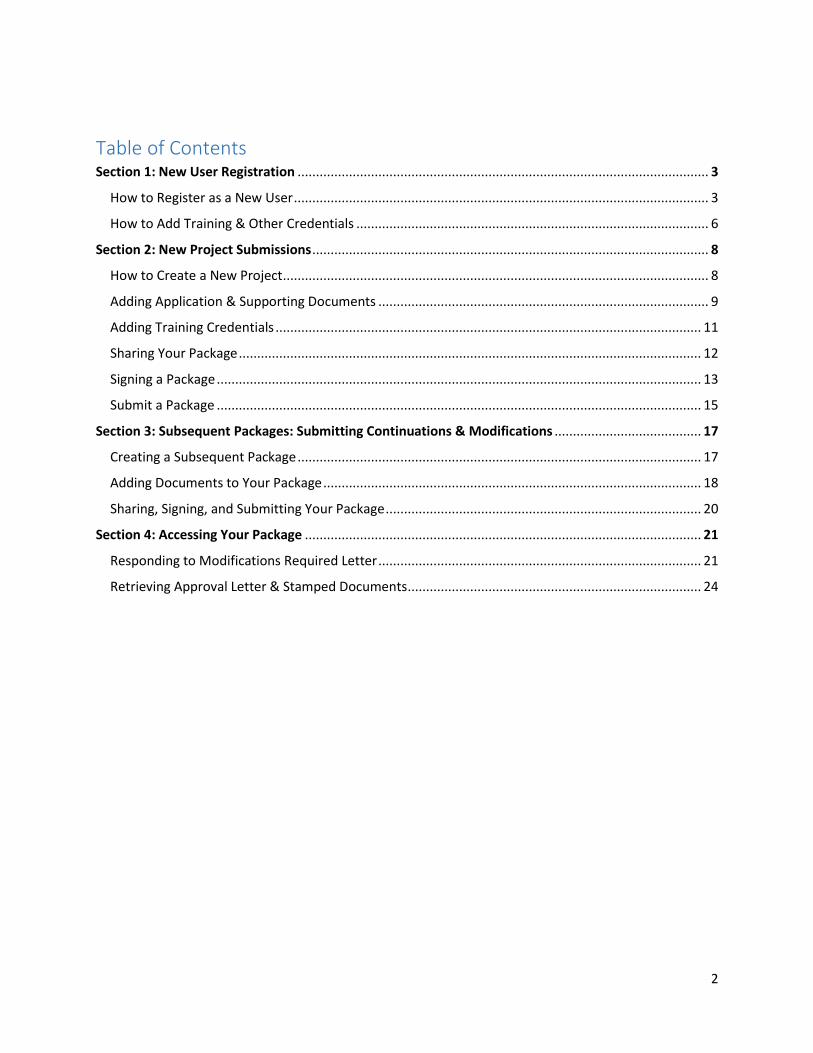
Table of Contents Section 1: New User Registration ................................................................................................................ 3
How to Register as a New User ................................................................................................................. 3
How to Add Training & Other Credentials ................................................................................................ 6
Section 2: New Project Submissions ............................................................................................................ 8
How to Create a New Project .................................................................................................................... 8
Adding Application & Supporting Documents .......................................................................................... 9
Adding Training Credentials .................................................................................................................... 11
Sharing Your Package .............................................................................................................................. 12
Signing a Package .................................................................................................................................... 13
Submit a Package .................................................................................................................................... 15
Section 3: Subsequent Packages: Submitting Continuations & Modifications ........................................ 17
Creating a Subsequent Package .............................................................................................................. 17
Adding Documents to Your Package ....................................................................................................... 18
Sharing, Signing, and Submitting Your Package ...................................................................................... 20
Section 4: Accessing Your Package ............................................................................................................ 21
Responding to Modifications Required Letter ........................................................................................ 21
Retrieving Approval Letter & Stamped Documents ................................................................................ 24
3
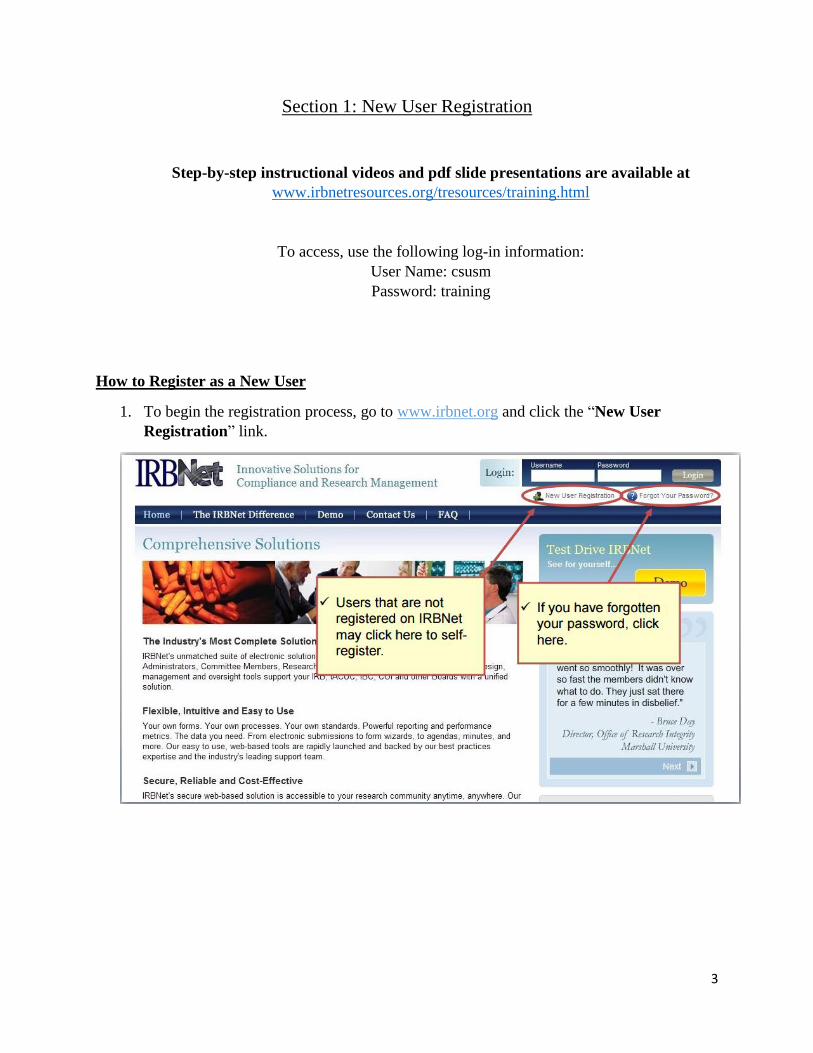
Section 1: New User Registration
Step-by-step instructional videos and pdf slide presentations are available at
www.irbnetresources.org/tresources/training.html
To access, use the following log-in information:
User Name: csusm
Password: training
How to Register as a New User
1. To begin the registration process, go to www.irbnet.org and click the “New User
Registration” link.
4
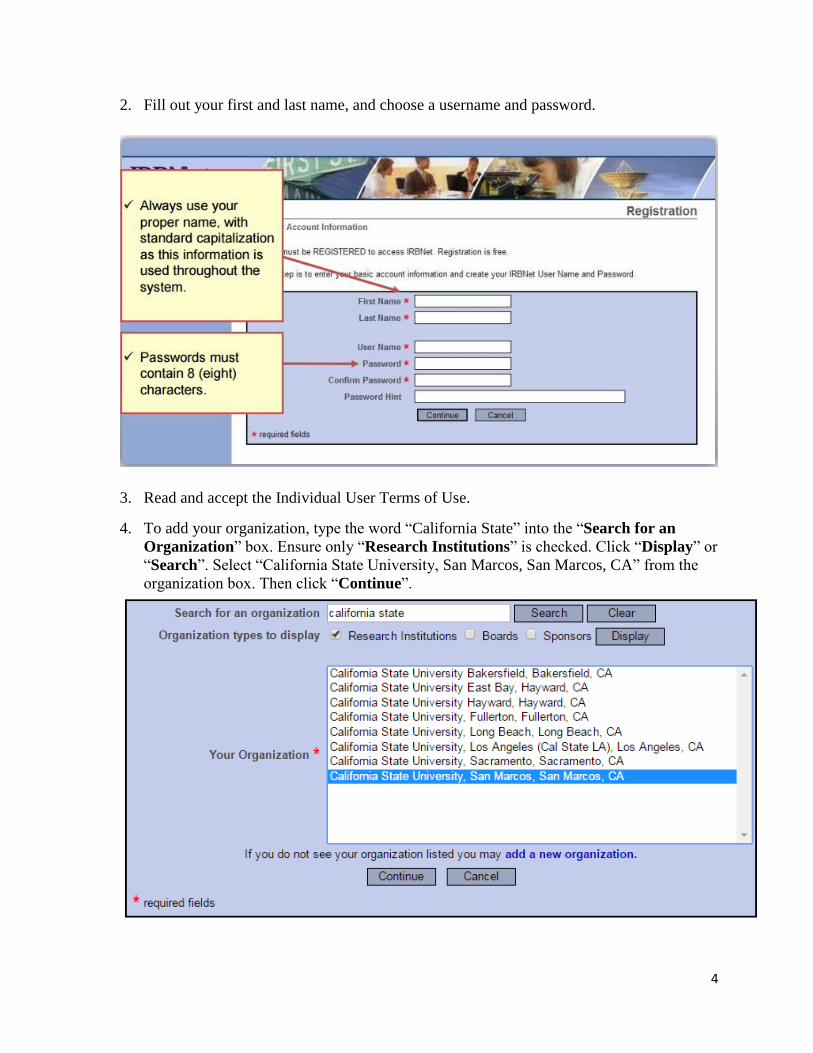
2. Fill out your first and last name, and choose a username and password.
3. Read and accept the Individual User Terms of Use.
4. To add your organization, type the word “California State” into the “Search for an
Organization” box. Ensure only “Research Institutions” is checked. Click “Display” or
“Search”. Select “California State University, San Marcos, San Marcos, CA” from the
organization box. Then click “Continue”.
5
5. Enter your contact information. Enter the email address which you would like to receive
communications from the IRBNet system. (e.g. notification of committee decisions,
communications from your research team or committee administrator). Click
“Continue”.
6. Review your provided information and edit as necessary. When you are satisfied, click
“Register”.
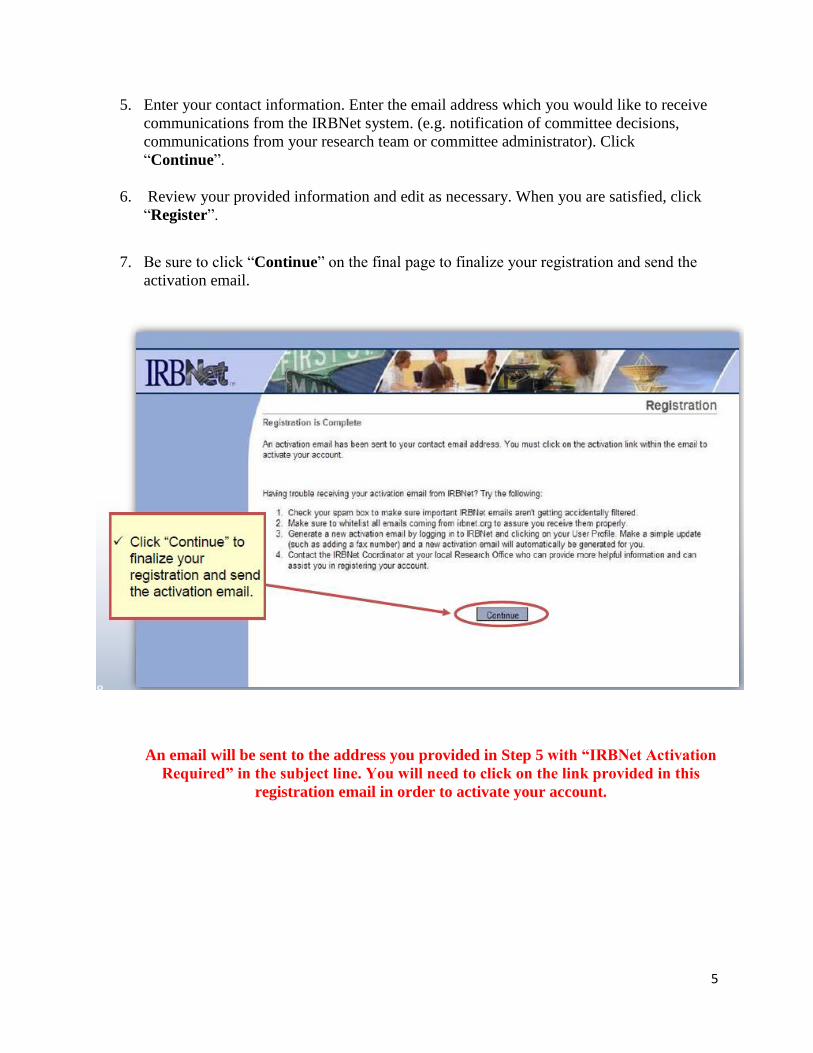
7. Be sure to click “Continue” on the final page to finalize your registration and send the
activation email.
An email will be sent to the address you provided in Step 5 with “IRBNet Activation
Required” in the subject line. You will need to click on the link provided in this
registration email in order to activate your account.

6
How to Add Training and Other Credentials
Proof of completion of training is a required document for submissions to the IRB.
ALL PERSONNEL listed on the proposal MUST provide proof in each project for which
they will be conducting/aiding in research.
1. Log-in to IRBNet using your new username and password. Click on “User Profile”
in the top right corner.
2. Scroll down to the “Training & Credentials” section.
3. Click “Add New Record” and upload your proof of human subjects training. (To
complete the training go to: http://www.csusm.edu/gsr/irb/training.html)
4. Fill in the appropriate information for the credential being added. Fields with a red
asterisk are required.
5. Click “Browse” to search for the training document in your computer. Next, click
“Attach” to add the training document.
7
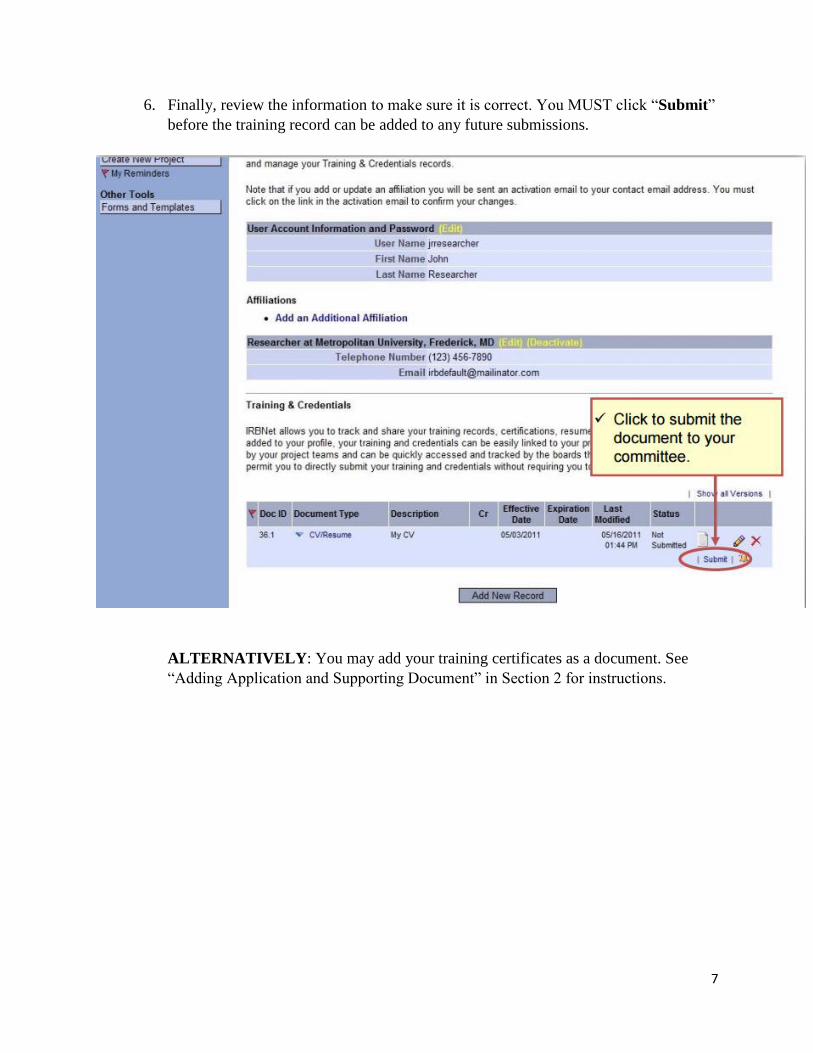
6. Finally, review the information to make sure it is correct. You MUST click “Submit”
before the training record can be added to any future submissions.
ALTERNATIVELY: You may add your training certificates as a document. See
“Adding Application and Supporting Document” in Section 2 for instructions.
8
Section 2: New Project Submissions
Step-by-step instructional videos and pdf slide presentations are available at
www.irbnetresources.org/tresources/training.html
To access, use the following log-in information:
User Name: csusm
Password: training
How to Create a New Project
**Instructional videos can be found on the IRBNet training link above**
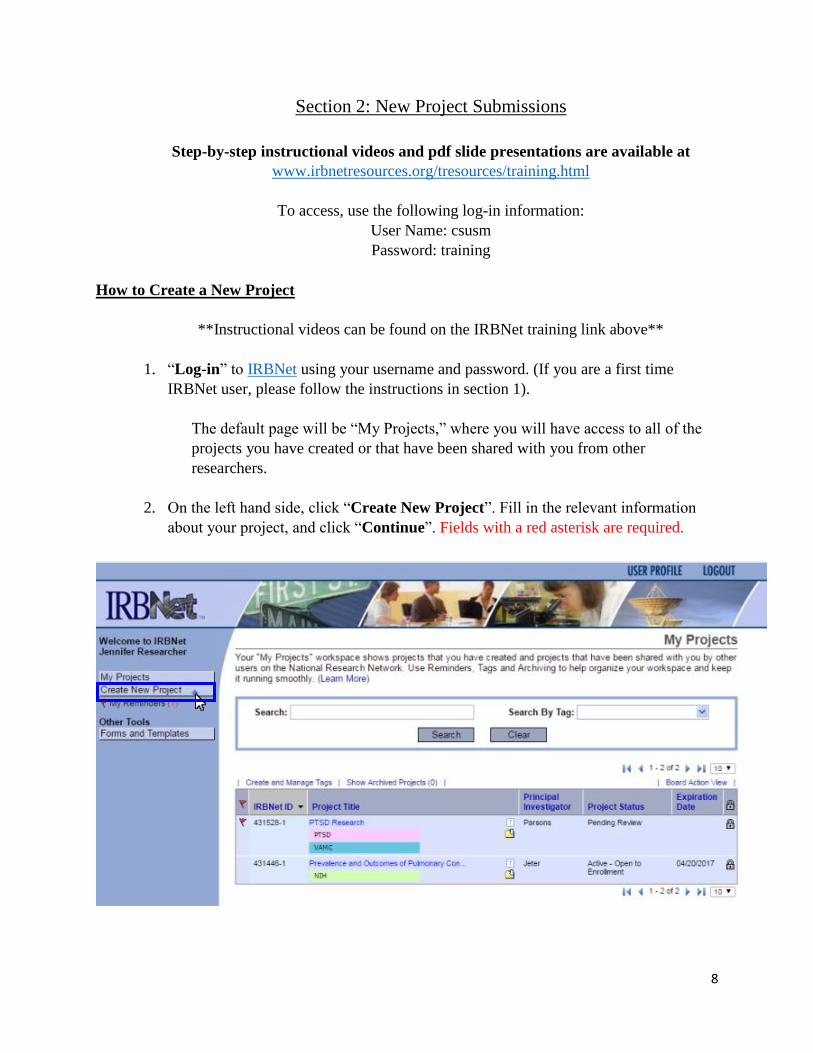
1. “Log-in” to IRBNet using your username and password. (If you are a first time
IRBNet user, please follow the instructions in section 1).
The default page will be “My Projects,” where you will have access to all of the
projects you have created or that have been shared with you from other
researchers.
2. On the left hand side, click “Create New Project”. Fill in the relevant information
about your project, and click “Continue”. Fields with a red asterisk are required.
9
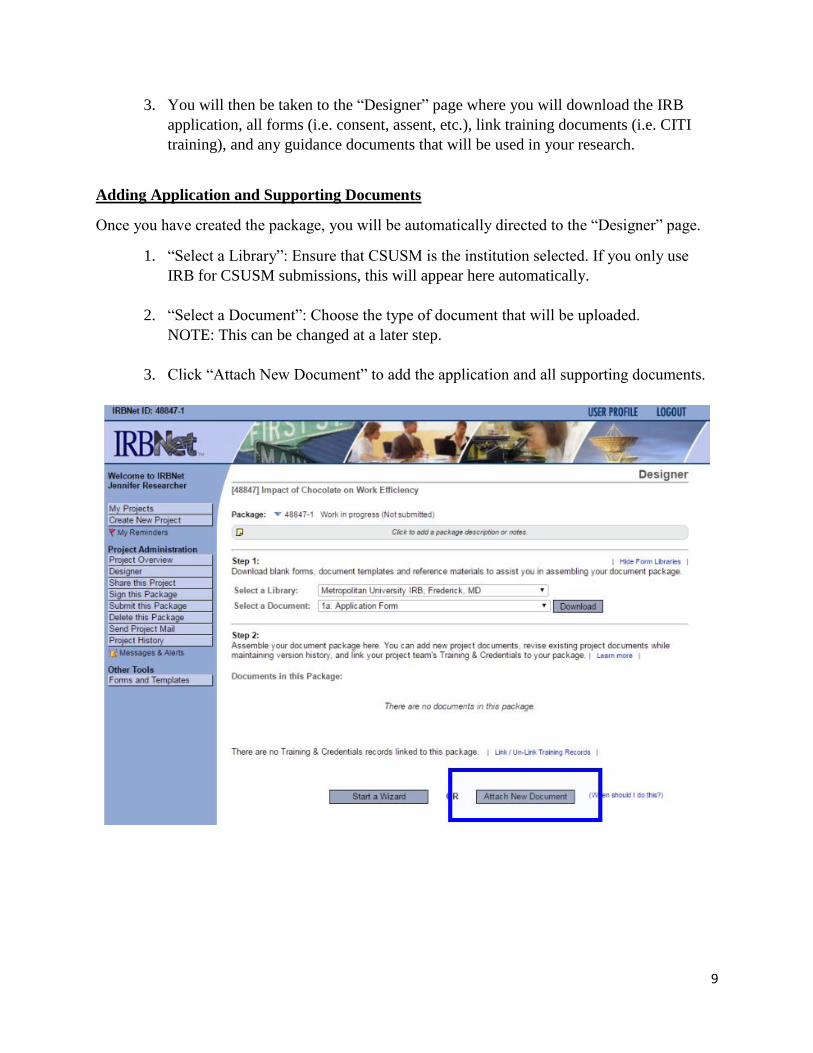
3. You will then be taken to the “Designer” page where you will download the IRB
application, all forms (i.e. consent, assent, etc.), link training documents (i.e. CITI
training), and any guidance documents that will be used in your research.
Adding Application and Supporting Documents
Once you have created the package, you will be automatically directed to the “Designer” page.
1. “Select a Library”: Ensure that CSUSM is the institution selected. If you only use
IRB for CSUSM submissions, this will appear here automatically.
2. “Select a Document”: Choose the type of document that will be uploaded.
NOTE: This can be changed at a later step.
3. Click “Attach New Document” to add the application and all supporting documents.
10
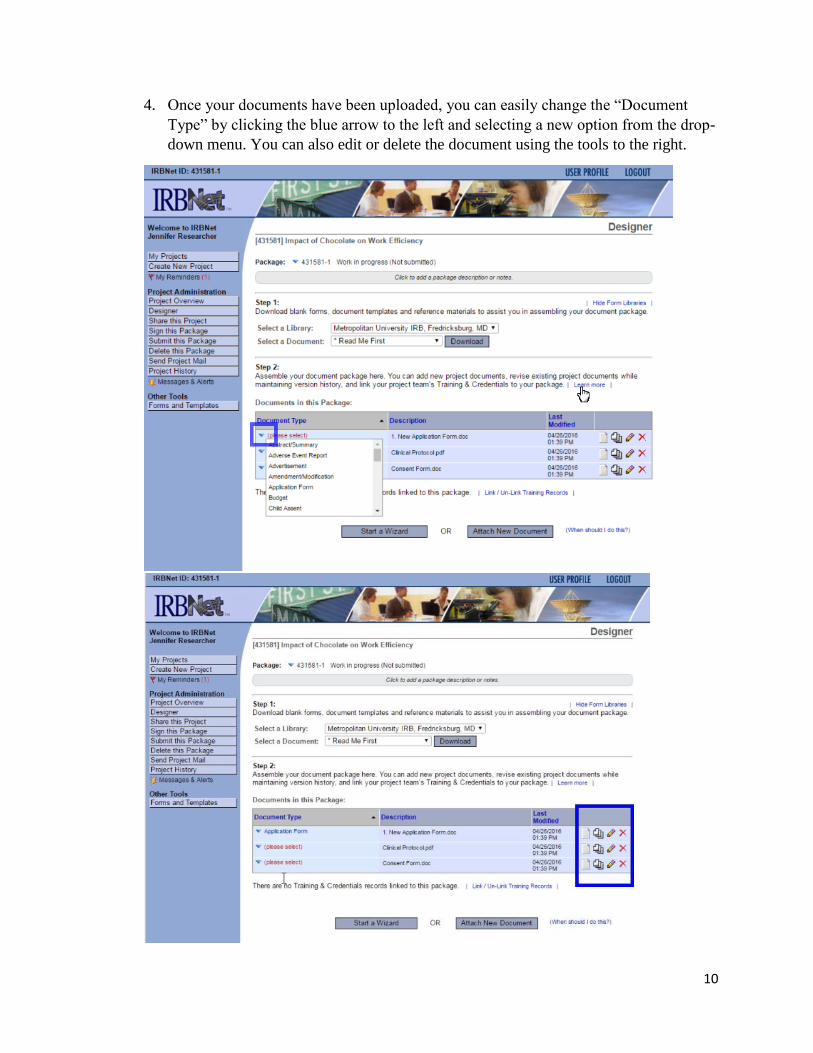
4. Once your documents have been uploaded, you can easily change the “Document
Type” by clicking the blue arrow to the left and selecting a new option from the drop-
down menu. You can also edit or delete the document using the tools to the right.
11
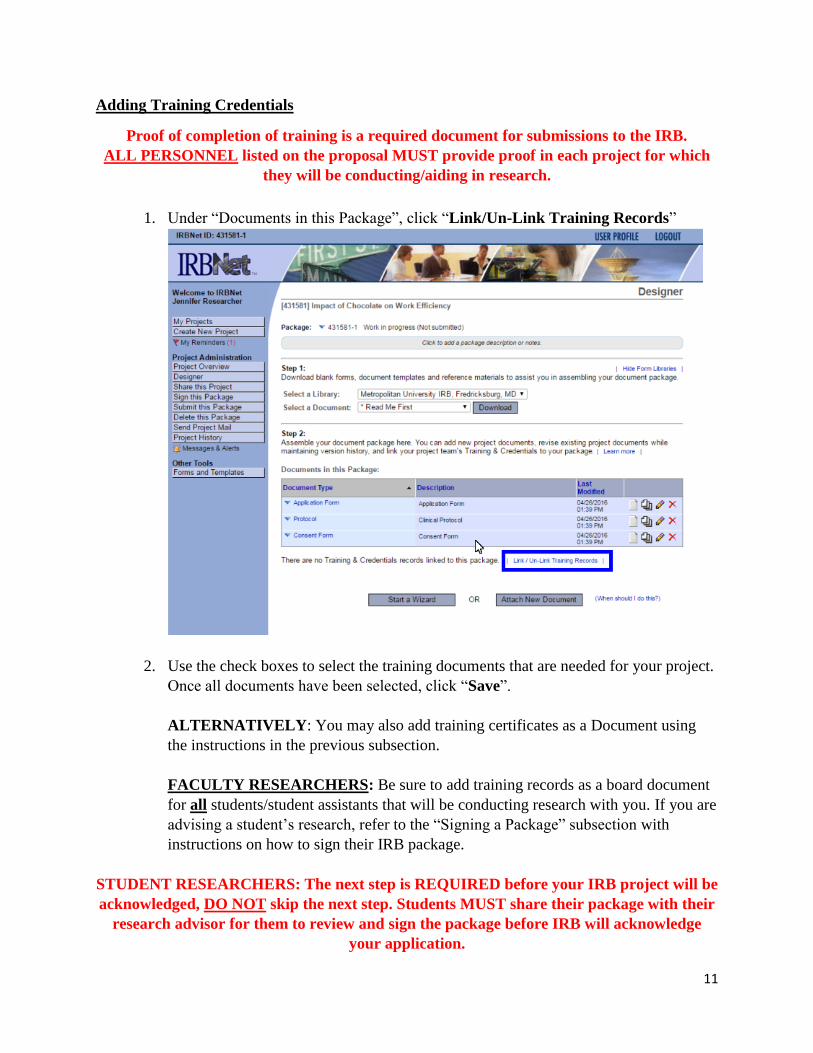
Adding Training Credentials
Proof of completion of training is a required document for submissions to the IRB.
ALL PERSONNEL listed on the proposal MUST provide proof in each project for which
they will be conducting/aiding in research.
1. Under “Documents in this Package”, click “Link/Un-Link Training Records”
2. Use the check boxes to select the training documents that are needed for your project.
Once all documents have been selected, click “Save”.
ALTERNATIVELY: You may also add training certificates as a Document using
the instructions in the previous subsection.
FACULTY RESEARCHERS: Be sure to add training records as a board document
for all students/student assistants that will be conducting research with you. If you are
advising a student’s research, refer to the “Signing a Package” subsection with
instructions on how to sign their IRB package.
STUDENT RESEARCHERS: The next step is REQUIRED before your IRB project will be
acknowledged, DO NOT skip the next step. Students MUST share their package with their
research advisor for them to review and sign the package before IRB will acknowledge
your application.
12
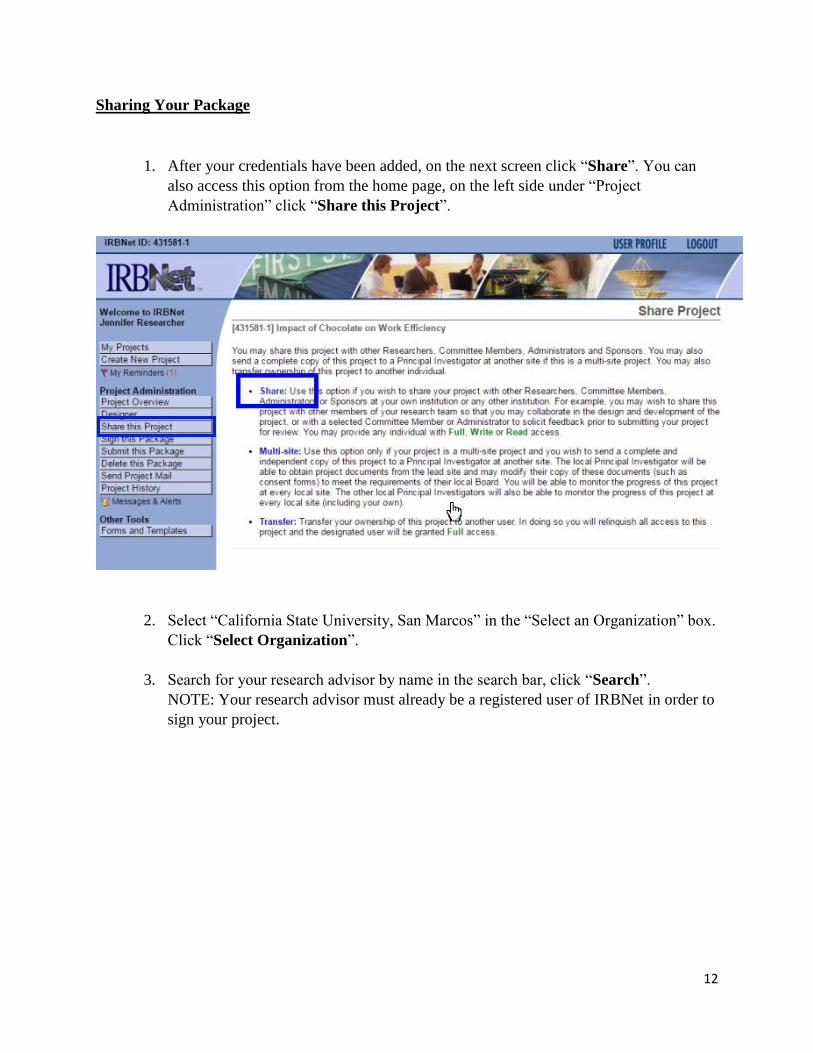
Sharing Your Package
1. After your credentials have been added, on the next screen click “Share”. You can
also access this option from the home page, on the left side under “Project
Administration” click “Share this Project”.
2. Select “California State University, San Marcos” in the “Select an Organization” box.
Click “Select Organization”.
3. Search for your research advisor by name in the search bar, click “Search”.
NOTE: Your research advisor must already be a registered user of IRBNet in order to
sign your project.
13
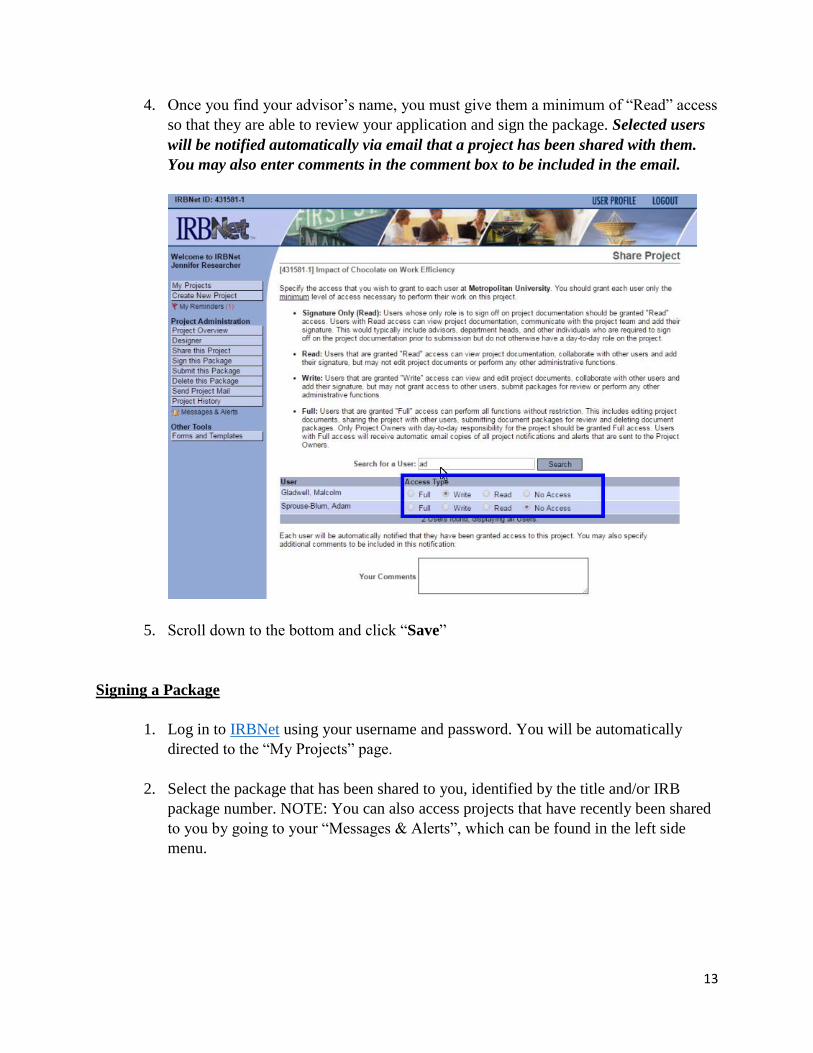
4. Once you find your advisor’s name, you must give them a minimum of “Read” access
so that they are able to review your application and sign the package. Selected users
will be notified automatically via email that a project has been shared with them.
You may also enter comments in the comment box to be included in the email.
5. Scroll down to the bottom and click “Save”
Signing a Package
1. Log in to IRBNet using your username and password. You will be automatically
directed to the “My Projects” page.
2. Select the package that has been shared to you, identified by the title and/or IRB
package number. NOTE: You can also access projects that have recently been shared
to you by going to your “Messages & Alerts”, which can be found in the left side
menu.
14
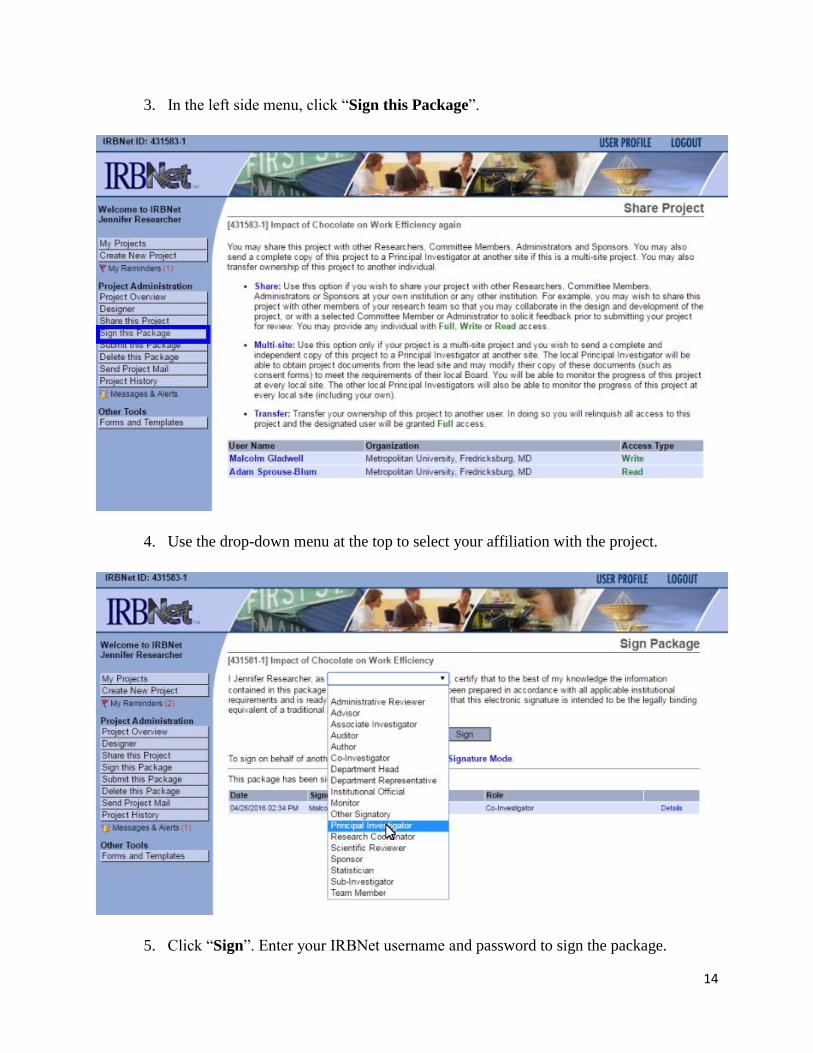
3. In the left side menu, click “Sign this Package”.
4. Use the drop-down menu at the top to select your affiliation with the project.
5. Click “Sign”. Enter your IRBNet username and password to sign the package.
15
Submit Your Package
When you have completed downloading your application, training certificates, and
collected the required signatures, you must then submit your package. STUDENTS: DO NOT
submit your package until you are certain you have uploaded all documents and your faculty
advisor has signed the package in IRBNet.
1. Log in to IRBNet using your username and password. You will be automatically
directed to the “My Projects” page.
2. Select the new project you wish to submit.
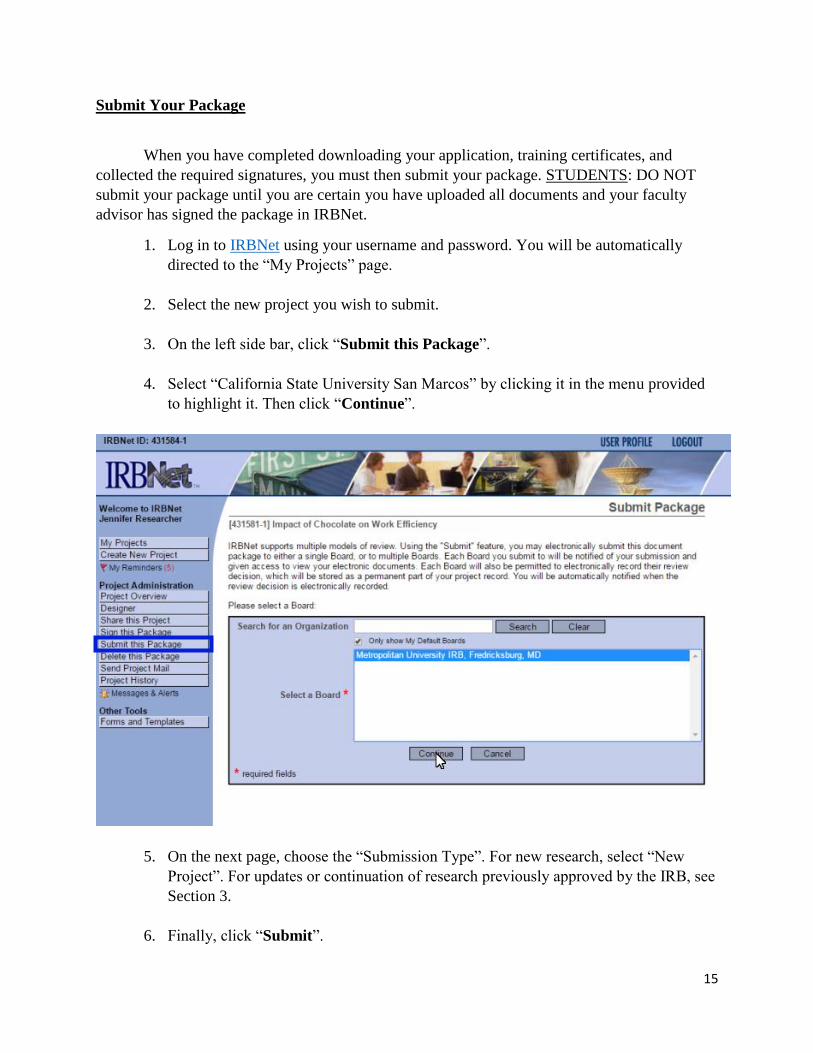
3. On the left side bar, click “Submit this Package”.
4. Select “California State University San Marcos” by clicking it in the menu provided
to highlight it. Then click “Continue”.
5. On the next page, choose the “Submission Type”. For new research, select “New
Project”. For updates or continuation of research previously approved by the IRB, see
Section 3.
6. Finally, click “Submit”.
16
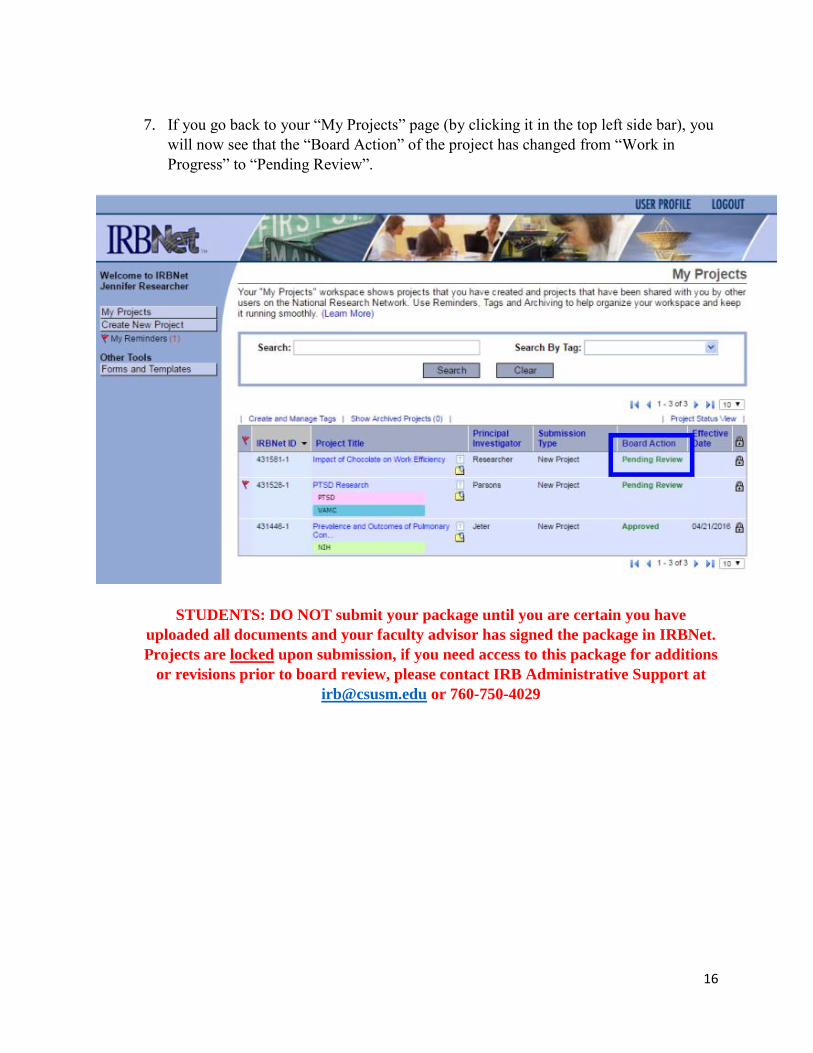
7. If you go back to your “My Projects” page (by clicking it in the top left side bar), you
will now see that the “Board Action” of the project has changed from “Work in
Progress” to “Pending Review”.
STUDENTS: DO NOT submit your package until you are certain you have
uploaded all documents and your faculty advisor has signed the package in IRBNet.
Projects are locked upon submission, if you need access to this package for additions
or revisions prior to board review, please contact IRB Administrative Support at
[email protected] or 760-750-4029
17
Section 3: Subsequent Packages: Submitting Continuations and Modifications
Step-by-step instructional videos and pdf slide presentations are available at
www.irbnetresources.org/tresources/training.html
To access, use the following log-in information:
User Name: csusm
Password: training
Creating a Subsequent Package
1. Log in to IRBNet using your username and password. You will be automatically
directed to the “My Projects” page.
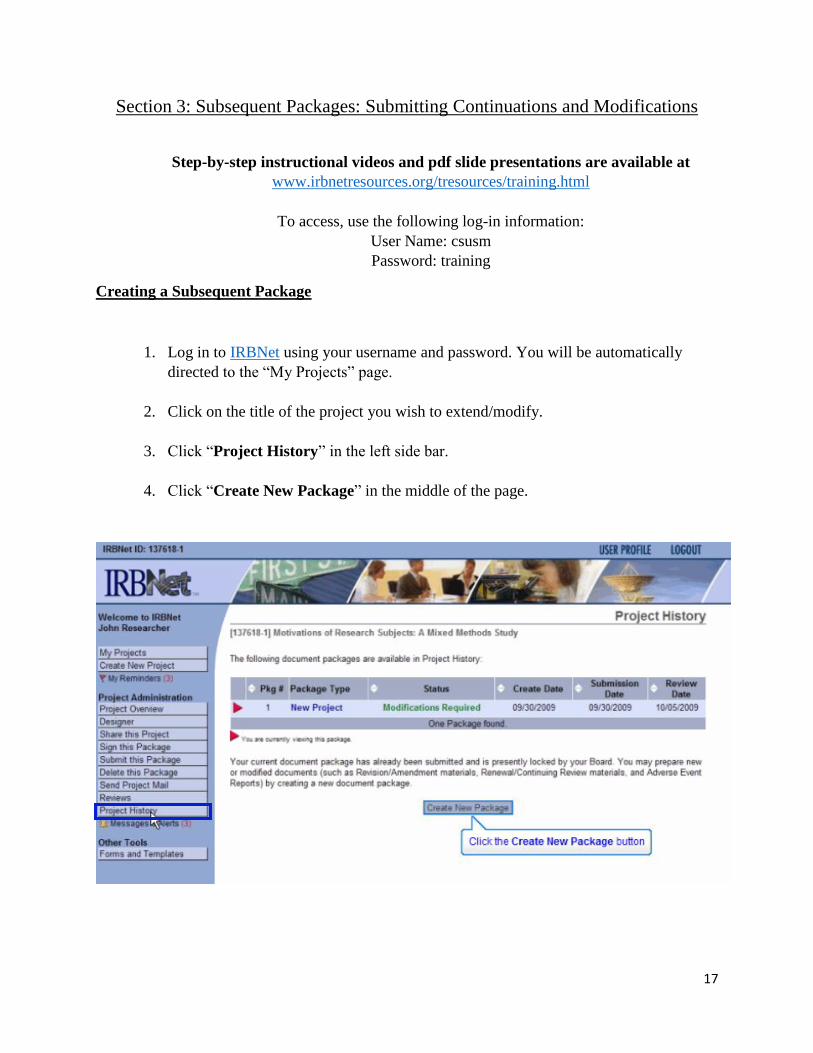
2. Click on the title of the project you wish to extend/modify.
3. Click “Project History” in the left side bar.
4. Click “Create New Package” in the middle of the page.
18
5. This will create a new package with the same IRB number, but a new package
number. For example: Original project is 123456-1, new project will become
123456-2.
Adding Documents to Your Package
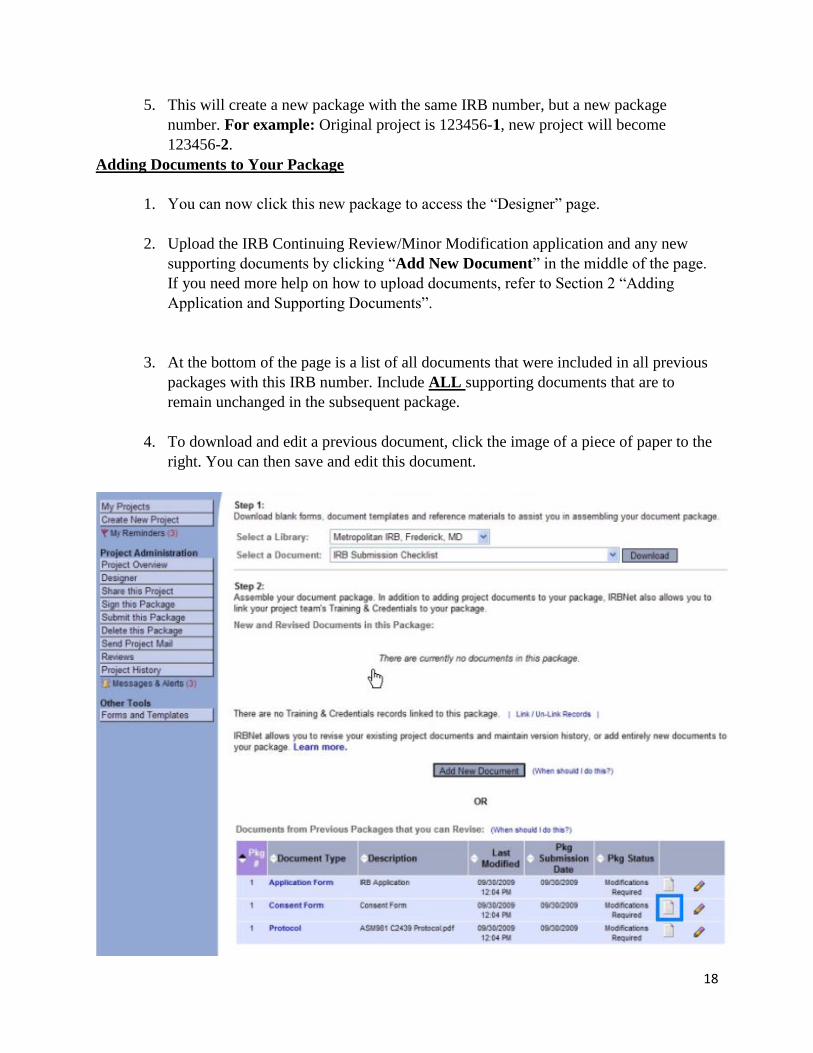
1. You can now click this new package to access the “Designer” page.
2. Upload the IRB Continuing Review/Minor Modification application and any new
supporting documents by clicking “Add New Document” in the middle of the page.
If you need more help on how to upload documents, refer to Section 2 “Adding
Application and Supporting Documents”.
3. At the bottom of the page is a list of all documents that were included in all previous
packages with this IRB number. Include ALL supporting documents that are to
remain unchanged in the subsequent package.
4. To download and edit a previous document, click the image of a piece of paper to the
right. You can then save and edit this document.
19
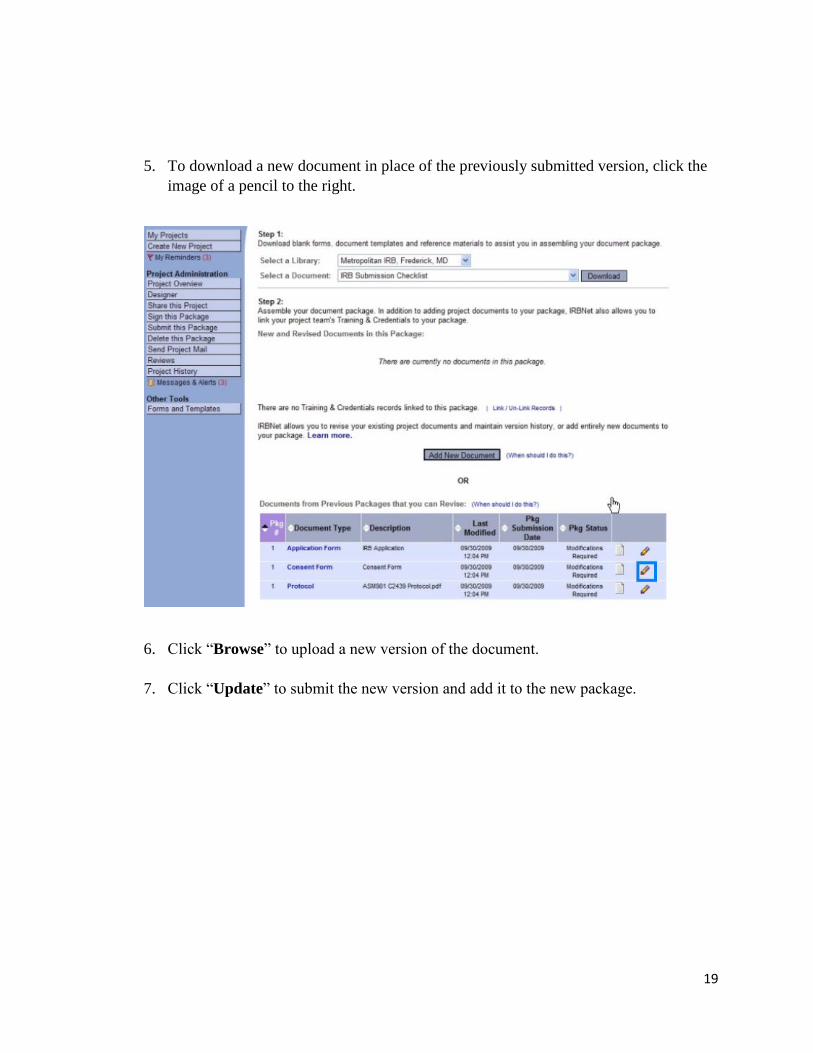
5. To download a new document in place of the previously submitted version, click the
image of a pencil to the right.
6. Click “Browse” to upload a new version of the document.
7. Click “Update” to submit the new version and add it to the new package.
20
Sharing, Signing, and Submitting Your Package
REMEMBER: You must share your package with your faculty advisor for them to sign.
When you have completed downloading your application, training certificates, and collected the
required signatures, you must then submit your package. Follow the steps in Section 2 on how to
share, sign, and submit your package.
STUDENTS: DO NOT submit your package until you are certain you have
uploaded all documents and your faculty advisor has signed the package in IRBNet.
Projects are locked upon submission, if you need access to this package for additions or
revisions prior to board review, please contact IRB Administrative Support at
[email protected] or 760-750-4029
21
Section 4: Accessing Your Package
Step-by-step instructional videos and pdf slide presentations are available at
www.irbnetresources.org/tresources/training.html
To access, use the following log-in information:
User Name: csusm
Password: training
Responding to Modifications Required Letter
If your reviewer is requesting modifications to your submission, a “Modifications
Required Letter” will be added to your package and you will receive an email notification. Your
package will then be unlocked for you to make the required changes.
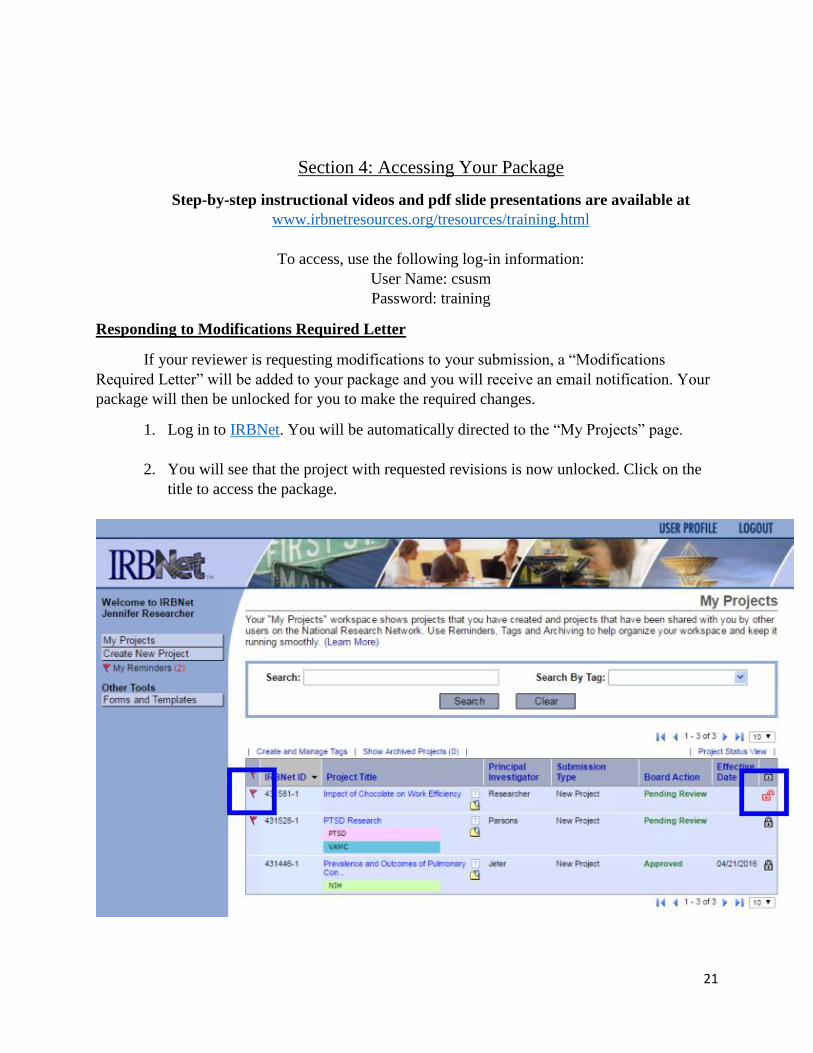
1. Log in to IRBNet. You will be automatically directed to the “My Projects” page.
2. You will see that the project with requested revisions is now unlocked. Click on the
title to access the package.
22
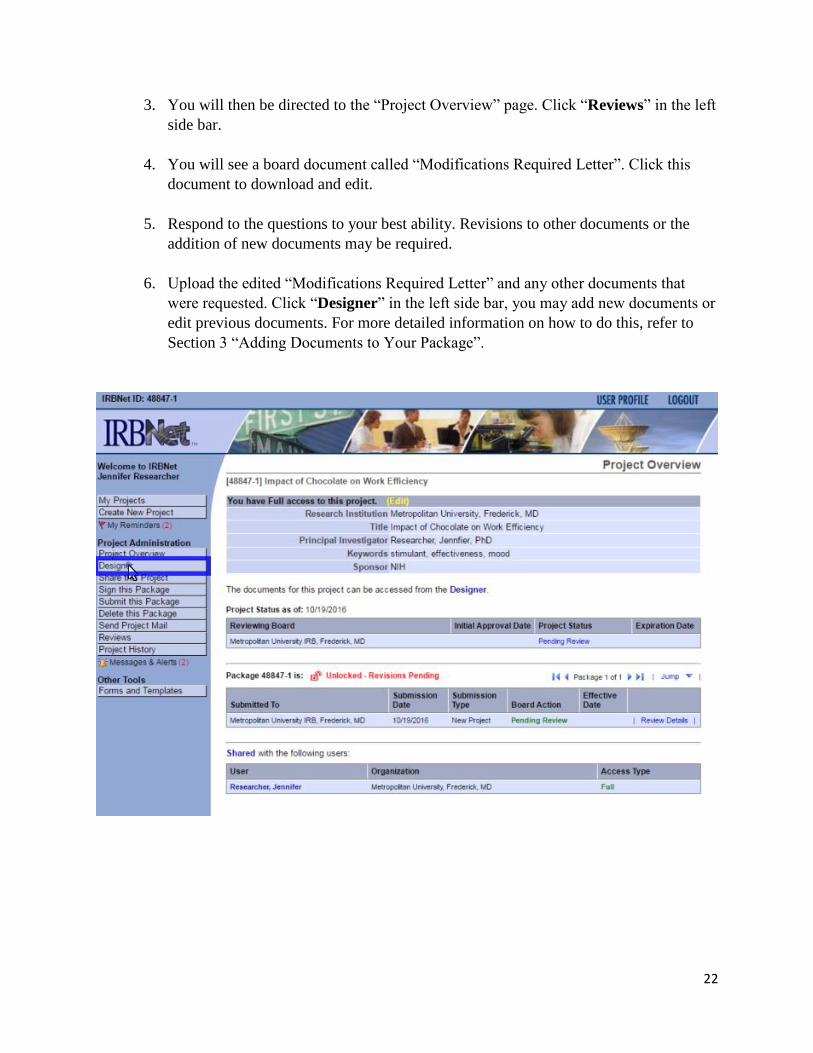
3. You will then be directed to the “Project Overview” page. Click “Reviews” in the left
side bar.
4. You will see a board document called “Modifications Required Letter”. Click this
document to download and edit.
5. Respond to the questions to your best ability. Revisions to other documents or the
addition of new documents may be required.
6. Upload the edited “Modifications Required Letter” and any other documents that
were requested. Click “Designer” in the left side bar, you may add new documents or
edit previous documents. For more detailed information on how to do this, refer to
Section 3 “Adding Documents to Your Package”.
23
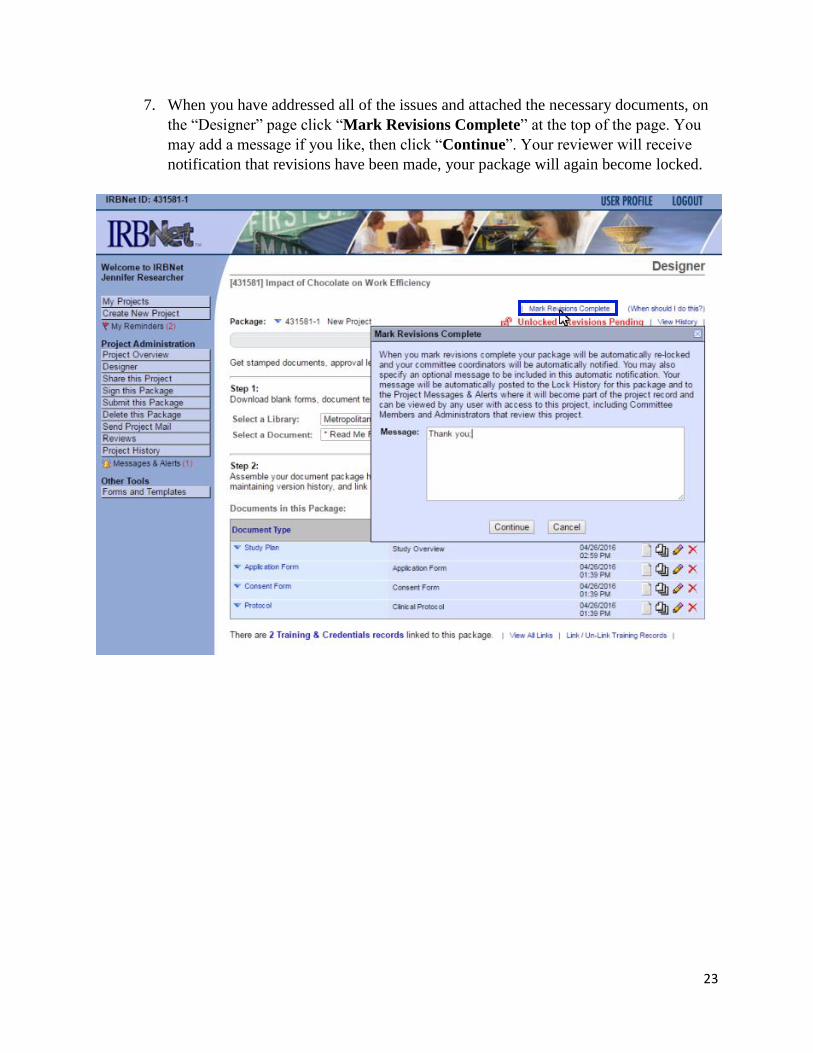
7. When you have addressed all of the issues and attached the necessary documents, on
the “Designer” page click “Mark Revisions Complete” at the top of the page. You
may add a message if you like, then click “Continue”. Your reviewer will receive
notification that revisions have been made, your package will again become locked.
24
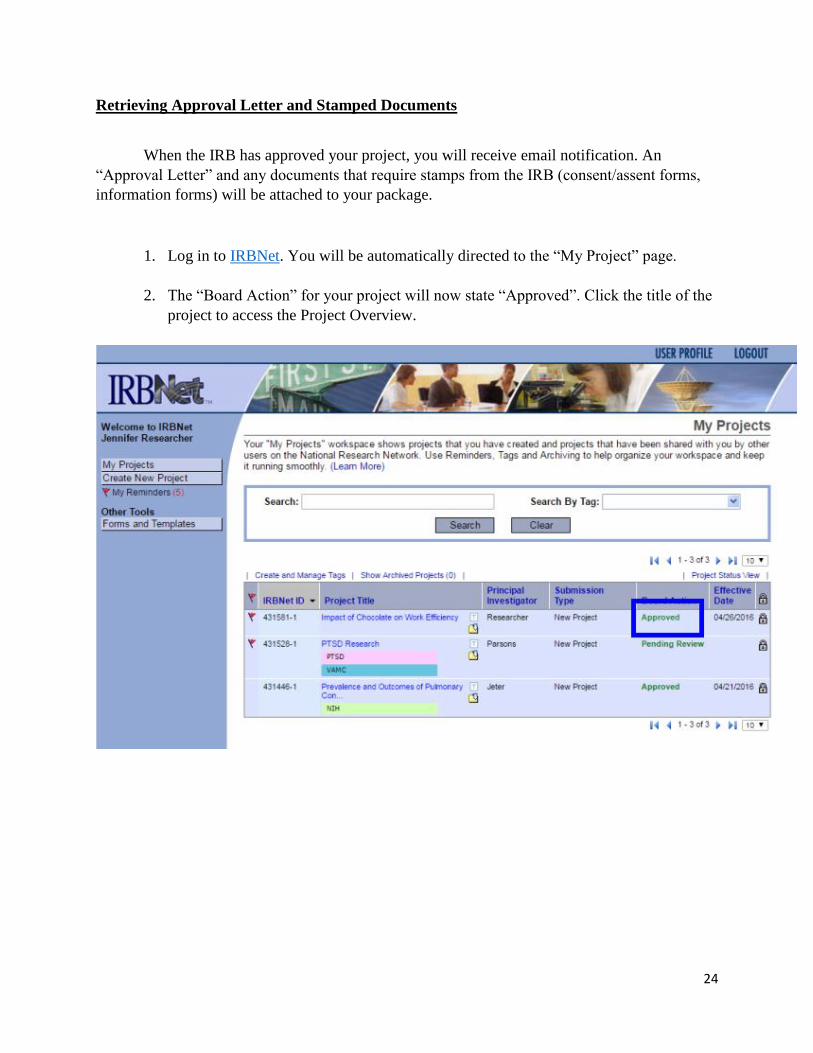
Retrieving Approval Letter and Stamped Documents
When the IRB has approved your project, you will receive email notification. An
“Approval Letter” and any documents that require stamps from the IRB (consent/assent forms,
information forms) will be attached to your package.
1. Log in to IRBNet. You will be automatically directed to the “My Project” page.
2. The “Board Action” for your project will now state “Approved”. Click the title of the
project to access the Project Overview.

25
3. Click “Reviews” in the left side bar.
4. You will see the Approval Letter as well as any stamped documents. You can click on
these to download for your own records.