Embed Size (px)
Citation preview
KICKING ACADEMY By Dead Aim This info should be of major interest to 9 ball players, and will surely aid their kicking game which most players have NO clue as to what they are doing; sorry if you don’t like that statement but that’s the FACT. I have watched numerous club players miss kicks by as much as two diamonds, if you do not know how to kick you will NEVER be an accomplished 9 ball player; if you want to take the easy way out and jump over an obstructing ball then go ahead and do so, this series of posts will not be for you; BUT REMEMBER THIS, I can teach a chimpanzee to jump over a ball. What you need to know about kicking All tables play different, all players stroke different; after learning these systems you will have to apply them to your stroke. After learning these systems you will also begin to play by feel when the system just doesn’t seem right for whatever reason; MEANING, you might make minor adjustments to the hit spot just because it doesn’t FEEL right. I will try to explain these systems as simply as possible, but I WARN you that some of these are complicated just by there nature; there are some 30 to 40 systems for ALL types of kicks, if you learn all these systems I guarantee you will begin to have a 80 to 90 percent success rate with your kicks. DON'T believe it, watch Efren Reyes; he's an accomplished billiard player and uses ALL these systems to make the hits he does. If you want to kick like Efren then LEARN these systems and you WILL. Well, that’s that. I will now go to work on PART 1, “The Diamond System”. Good luck, and I hope that at least one person pays attention and learns from what I post. J. R.
Kicking Academy - Part 1
THE DIAMOND SYSTEM
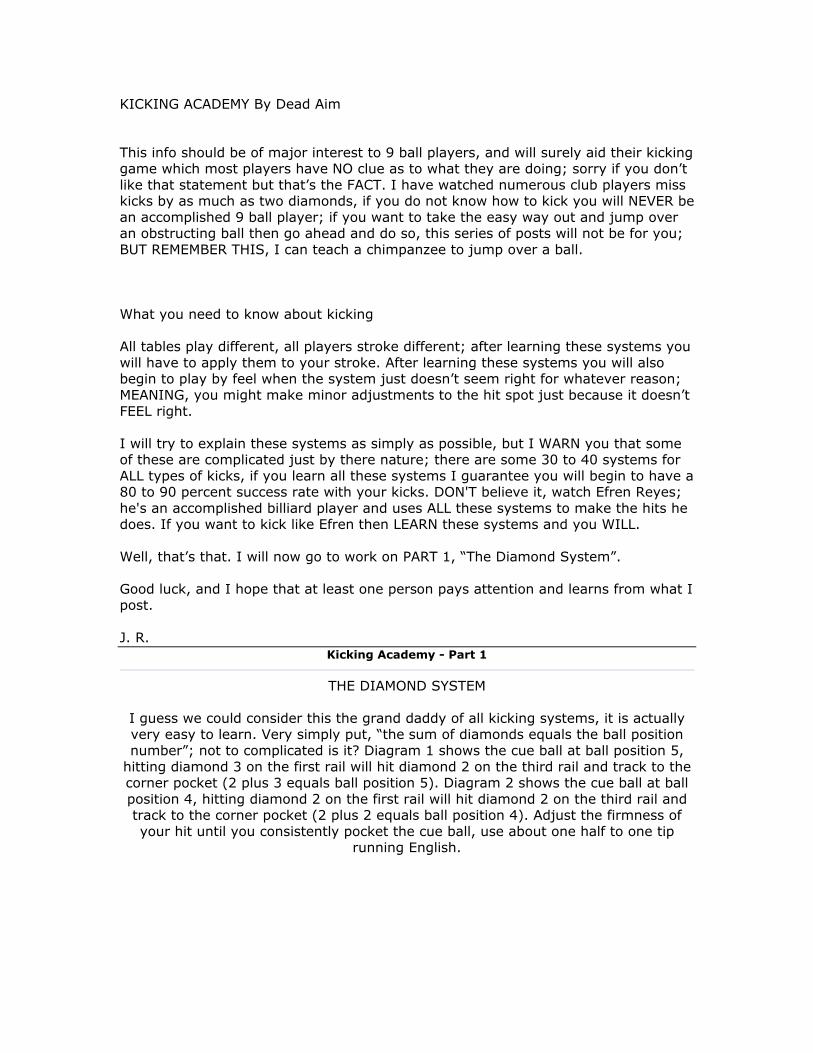
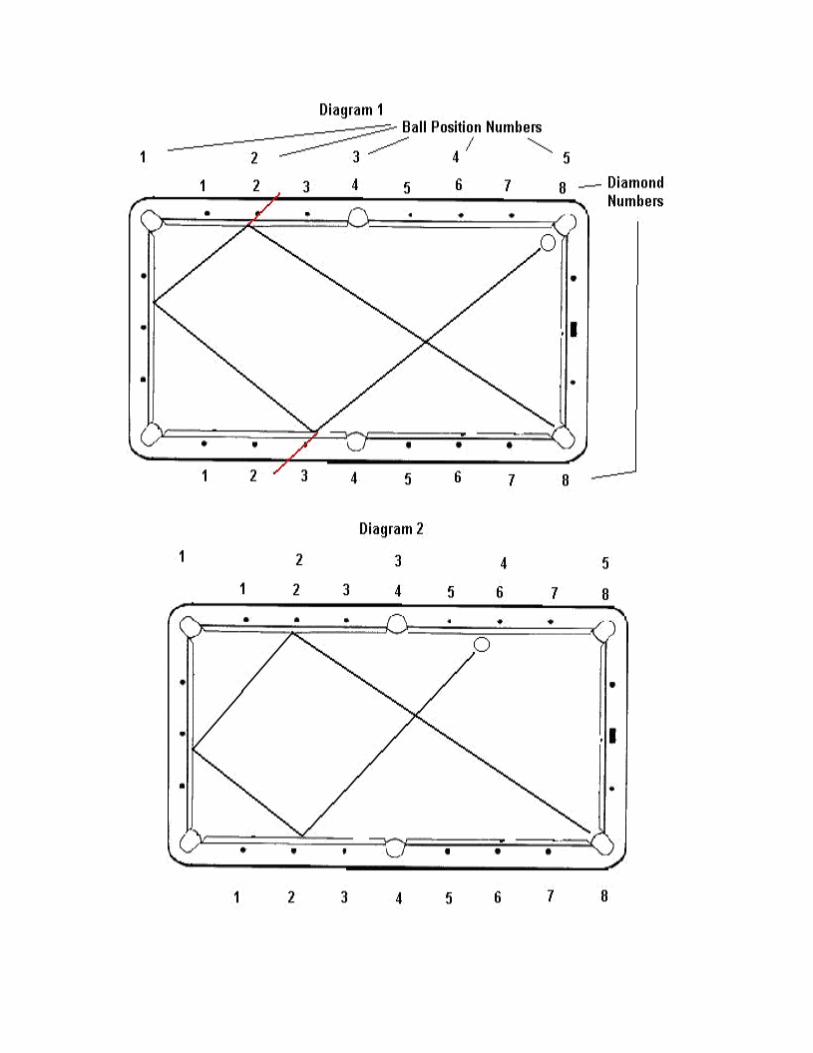
I guess we could consider this the grand daddy of all kicking systems, it is actually very easy to learn. Very simply put, “the sum of diamonds equals the ball position number”; not to complicated is it? Diagram 1 shows the cue ball at ball position 5,
hitting diamond 3 on the first rail will hit diamond 2 on the third rail and track to the corner pocket (2 plus 3 equals ball position 5). Diagram 2 shows the cue ball at ball position 4, hitting diamond 2 on the first rail will hit diamond 2 on the third rail and track to the corner pocket (2 plus 2 equals ball position 4). Adjust the firmness of your hit until you consistently pocket the cue ball, use about one half to one tip
running English.
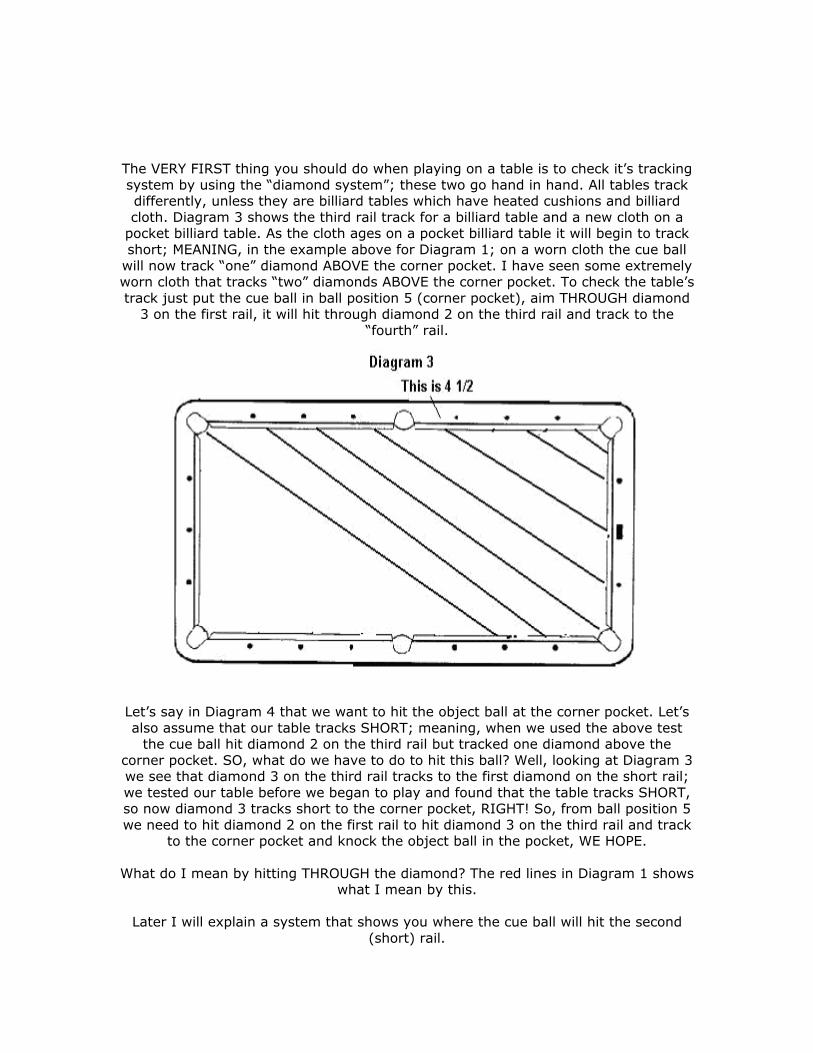
The VERY FIRST thing you should do when playing on a table is to check it’s tracking system by using the “diamond system”; these two go hand in hand. All tables track differently, unless they are billiard tables which have heated cushions and billiard cloth. Diagram 3 shows the third rail track for a billiard table and a new cloth on a
pocket billiard table. As the cloth ages on a pocket billiard table it will begin to track short; MEANING, in the example above for Diagram 1; on a worn cloth the cue ball
will now track “one” diamond ABOVE the corner pocket. I have seen some extremely worn cloth that tracks “two” diamonds ABOVE the corner pocket. To check the table’s track just put the cue ball in ball position 5 (corner pocket), aim THROUGH diamond
3 on the first rail, it will hit through diamond 2 on the third rail and track to the “fourth” rail.
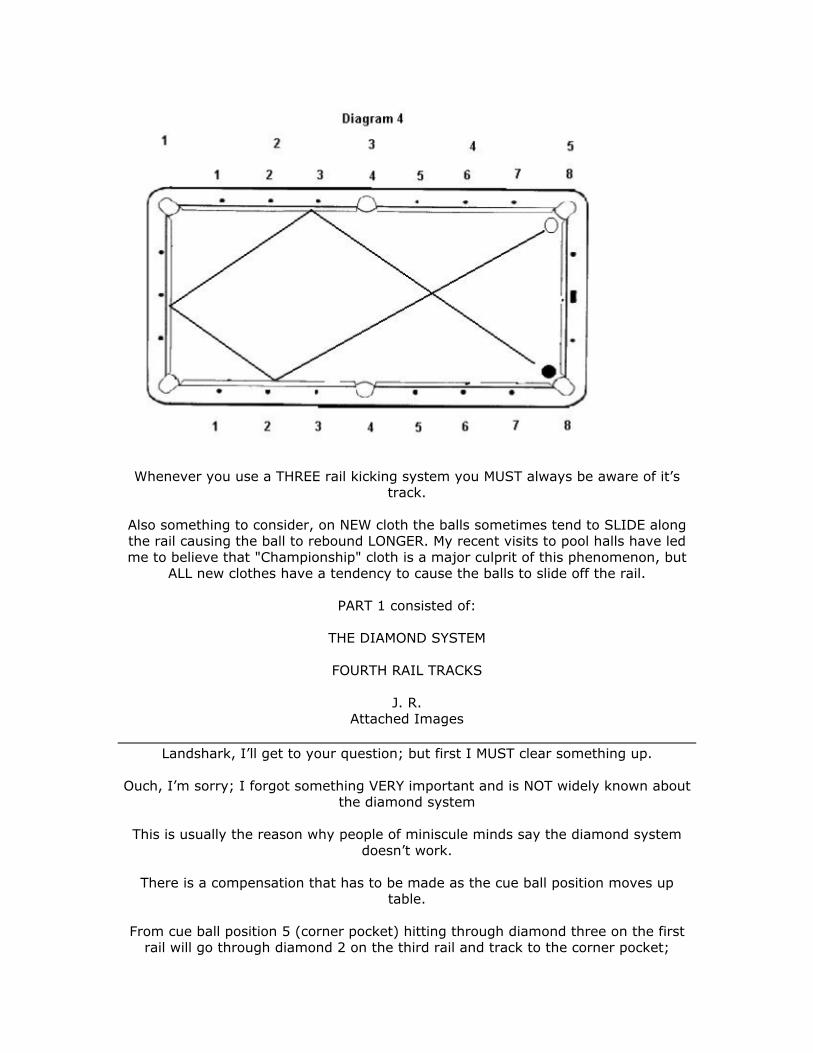
Let’s say in Diagram 4 that we want to hit the object ball at the corner pocket. Let’s also assume that our table tracks SHORT; meaning, when we used the above test
the cue ball hit diamond 2 on the third rail but tracked one diamond above the corner pocket. SO, what do we have to do to hit this ball? Well, looking at Diagram 3 we see that diamond 3 on the third rail tracks to the first diamond on the short rail; we tested our table before we began to play and found that the table tracks SHORT, so now diamond 3 tracks short to the corner pocket, RIGHT! So, from ball position 5 we need to hit diamond 2 on the first rail to hit diamond 3 on the third rail and track
to the corner pocket and knock the object ball in the pocket, WE HOPE.
What do I mean by hitting THROUGH the diamond? The red lines in Diagram 1 shows what I mean by this.
Later I will explain a system that shows you where the cue ball will hit the second
(short) rail.
Whenever you use a THREE rail kicking system you MUST always be aware of it’s track.
Also something to consider, on NEW cloth the balls sometimes tend to SLIDE along the rail causing the ball to rebound LONGER. My recent visits to pool halls have led me to believe that "Championship" cloth is a major culprit of this phenomenon, but
ALL new clothes have a tendency to cause the balls to slide off the rail.
PART 1 consisted of:
THE DIAMOND SYSTEM
FOURTH RAIL TRACKS
J. R. Attached Images
Landshark, I’ll get to your question; but first I MUST clear something up.
Ouch, I’m sorry; I forgot something VERY important and is NOT widely known about
the diamond system
This is usually the reason why people of miniscule minds say the diamond system doesn’t work.
There is a compensation that has to be made as the cue ball position moves up
table.
From cue ball position 5 (corner pocket) hitting through diamond three on the first rail will go through diamond 2 on the third rail and track to the corner pocket;
assuming our table is tracking true. NOW, if we move up to cue ball position 3 ½ (three diamonds up table)’ 3 ½ minus 2 equals a 1 ½ hit on the first rail to get the
cue ball into the corner pocket; BUT, this will NOT work. For each diamond we move UP table we must compensate “one” ball width LESS hit, in my example I moved up
table “three” diamonds which means “three” ball widths of compensation OR ½ diamond. The only confusion here is that it is NOT actually “three” ball widths
because a billiard table is LONGER than our pocket billiard table and has “six” ball widths between diamonds, out tables have approximately 5 ball widths. SO, here we are again playing by “feel”; I equate three diamonds on our table to ½ diamond and adjust from there. If I’m at ball position 3 (side pocket) I will adjust a shade more than ½ diamond and so forth. SO, what does all this mean? NOW, because of the
compensation I must hit the first rail at diamond 1 instead of 1 ½.
Sorry for the extra post but this is TOO important to omit.
Now to Landshark,
“I guess my first area of confusion is that you started off talking about 3 rail kicks. I have mostly been obsessing about 2 rail kicks using the cb only, trying to determine
where the contact point of the second rail would be from the first rail. (Does this make sense??) Are there any diagrams out there or a system that will help me
understand that aspect of the diamond system? For example I am in position 5 and hit Diamond #3 on the first rail and the contact point on the second rail (center ball) will be between the 2nd and 3rd diamonds? Or am I focusing too much on learning
something silly?”
Yes there is, this will come later but I will answer your example with the system I know. Ball position 5 will now translate to diamond number 8 in this system, your
example of diamond number 3 now becomes 30 on the opposite long rail, the short rail hit numbers for the diamonds are 2,3,and 4; 2 being closest to the long rail you want to hit. I hope this isn’t confusing but it is hard to do without a diagram (which
will come when I explain this system) SO, 30 divided by 8 equals 3.75, shooting with a “dead ball” (center ball hit) this is where you will hit; using “running english” you
will end up approximately 3.25. It’s good to know this information so you can navigate any obstructing balls. Here's an easier way to explain this:
Let's say I want to hit an object ball at the middle diamond (number 3) on the short rail and I am at the corner pocket (ball position 5 which now translates to number 8). 3 times 8 equals 24, hit the long rail approx. 2 1/2 diamonds above the corner pocket and you should bury the object ball head on. Here's another neat trick I will
show later; let's say there is an obstructing ball at diamond 2 1/2, move "one" diamond up table to 3 1/2 and use maximum (3 tips) running english. VOILA! Still
hits the object ball dead center.
“Also given your 3 rail kick system, if I am at position 3 then I aim thru the 1st diamond on the first rail thus making contact at the 2nd diamond on the 3rd rail to pocket the ball in the corner pocket? I just want to make sure I really comprehend
this.”
That’s correct, make sure you read the beginning of this post where I explain the adjustments you need to make this work.
“(I am a blonde female, LOL.) What about if I am in-between positions? Say I am in-
between position 4 and 5, how do I figure out which diamond I need to hit on the first rail? What about 3 rail kicks that start out on the short rail?”
Let’s say you’re at 4 ½, 4 ½ minus 2 equals 2 ½ hit on the first rail, assuming our
table is tracking like a billiard table. I’ll get to three rail kicks off the short rail. Like I said, if you learn ALL the systems I show you will be able to hit any ball on the table
unless you are COMPLETELY snookered.
“I am sorry for all of the questions, but I am VERY egger to learn this system. I do have some books that I have started to read, but I haven't gotten very far yet. (They
are books not solely concentrating on kicking.) If I have no clue please feel free to tell me that I should forget pool and take up bowling.”
Grady Mathews’ has a video call “Only Kicks”, I suggest that anyone who wants to
learn some interesting kicking systems purchase this video; I’m not sure if I’m going to get into this video, I really do not want to thread on Grady’s stuff, if in fact it is
“his” stuff. Most of these systems have been handed down from player to player and some have just been invented by players, but Grady’s material is usually advanced
and I know he really does not take much time in explaining the systems he shows on his videos; so it is likely I will take 10 or 12 of the best and explain them so that ALL
players can understand them.
J.R. Kicking Academy - Part 2
Since I am not deleting my posts I will post new info as I complete it.
The attachment is too large so I have to use three posts.
KICKING ACADEMY – PART 2
THE PLUS SYSTEM
DEAD BALL PLUS SYSTEM – BILLIARD
THE SID SYSTEM
PLUS / SID VARIATION - BILLIARD
Before I begin I forgot to mention something of GREAT importance. The “BILLIARD”
systems I show MUST be compensated for when playing 9 ball. When you play “billiards” you are NOT hitting the cue ball hard, the object is to just strike the final
ball; in 9 ball you have to make sure you contact a cushion AFTER the hit. This means that a “ball width” to one quarter diamond must be factored in because you
are hitting the cue ball more firmly than in “billiards”. I will show this in Diagram 3 of “the dead ball plus system”.
Another thing I forgot to mention, I’m doing this “off the cuff with no script” so as I remember things I will insert them; that is why it’s important to SAVE these posts. REMEMBER, most of these systems I show are BILLIARD systems; billiard balls are BIGGER and HEAVIER than pocket billiard balls; AND, when billiards players shoot
they “dig” into a lot of their shots; MEANING, they play many shots at the EXTREME edge of the cue ball so they have to dig into the cue ball so as not to miscue and also
get the desired action on the cue ball. SO, when you see anything that uses EXTREME english be sure to “dig” into the cue ball so you don’t miscue.
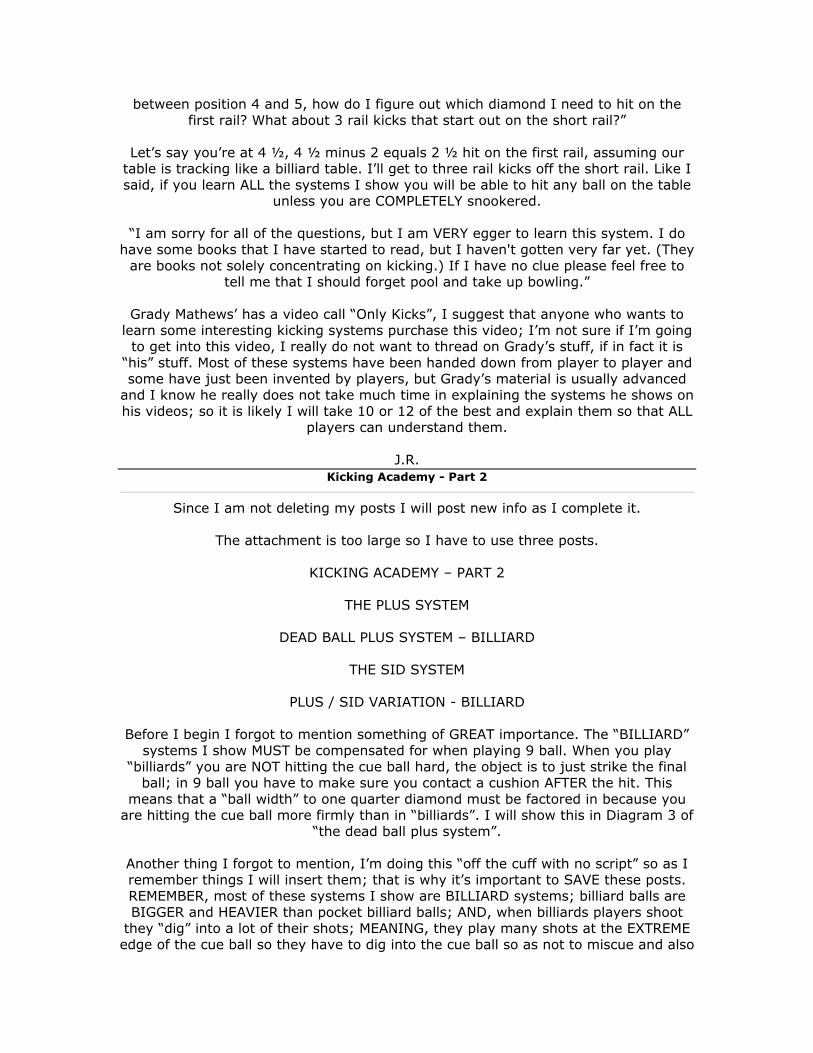
The “Plus System” is the easiest of the three and uses the “RUNNING ENGLISH” as in
“The Diamond System” Simply add the long rail diamond number to the short rail (first rail) number and hit that TOTAL on the third (short) rail. Diagram 1 has the cue ball at diamond 7 on the long rail and the object ball at third rail number 10. To hit this object ball just use a bit of running english and shoot THROUGH the opposite
short rail number 3.
Later, as I said in Part 1, I will show you more systems that let you know where the
cue ball hits rails in between the start and end points so you can determine if “obstructing” balls will hinder the cue ball’s path. Putting these systems together will
aid you in navigating around obstructing balls.
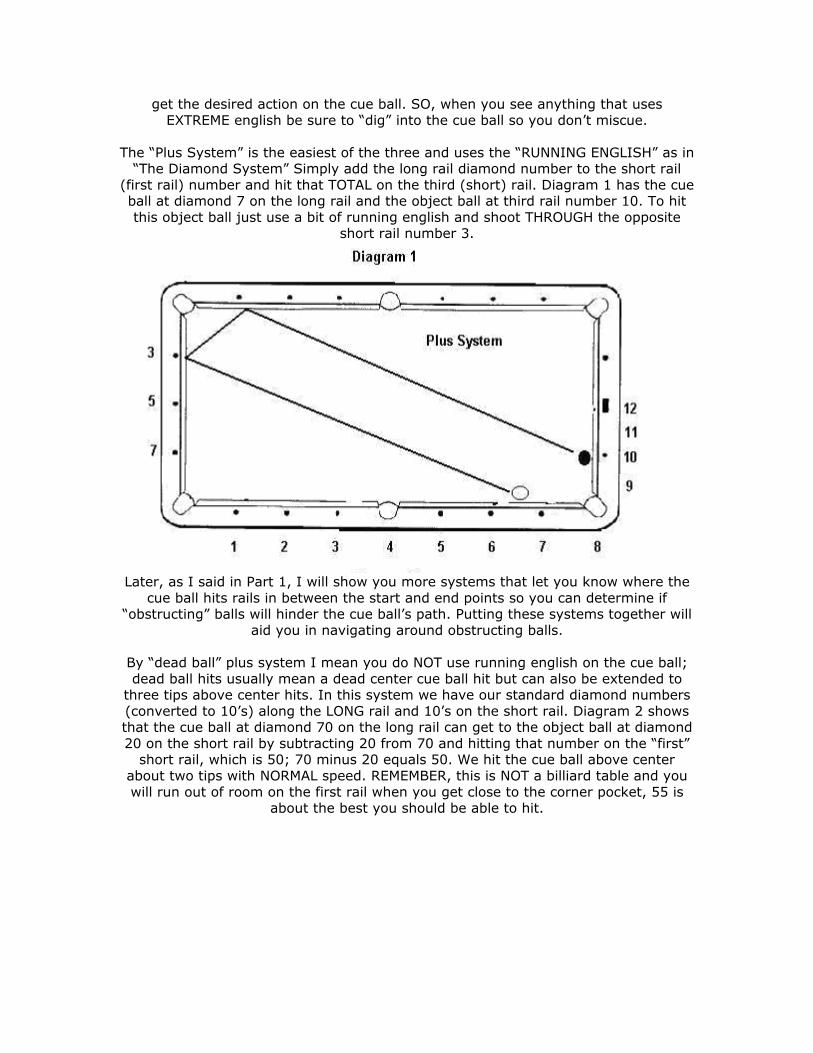
By “dead ball” plus system I mean you do NOT use running english on the cue ball; dead ball hits usually mean a dead center cue ball hit but can also be extended to
three tips above center hits. In this system we have our standard diamond numbers (converted to 10’s) along the LONG rail and 10’s on the short rail. Diagram 2 shows that the cue ball at diamond 70 on the long rail can get to the object ball at diamond 20 on the short rail by subtracting 20 from 70 and hitting that number on the “first”
short rail, which is 50; 70 minus 20 equals 50. We hit the cue ball above center about two tips with NORMAL speed. REMEMBER, this is NOT a billiard table and you will run out of room on the first rail when you get close to the corner pocket, 55 is
about the best you should be able to hit.
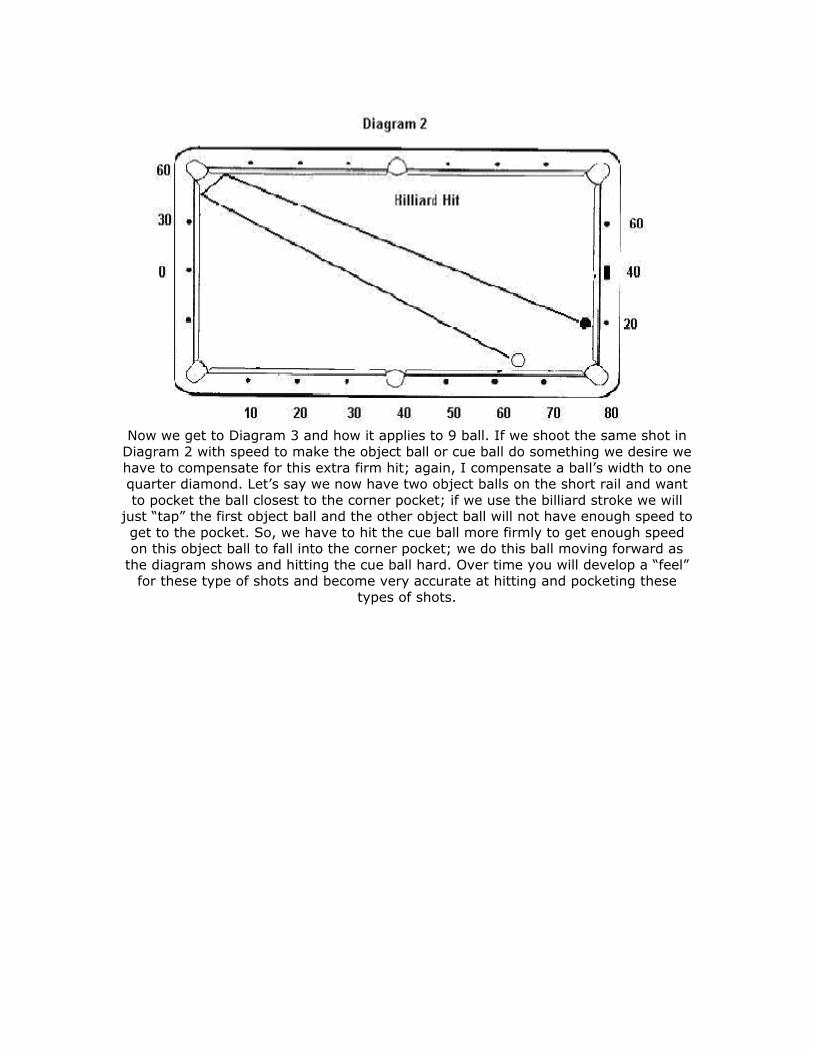
Now we get to Diagram 3 and how it applies to 9 ball. If we shoot the same shot in
Diagram 2 with speed to make the object ball or cue ball do something we desire we have to compensate for this extra firm hit; again, I compensate a ball’s width to one quarter diamond. Let’s say we now have two object balls on the short rail and want to pocket the ball closest to the corner pocket; if we use the billiard stroke we will
just “tap” the first object ball and the other object ball will not have enough speed to get to the pocket. So, we have to hit the cue ball more firmly to get enough speed on this object ball to fall into the corner pocket; we do this ball moving forward as
the diagram shows and hitting the cue ball hard. Over time you will develop a “feel” for these type of shots and become very accurate at hitting and pocketing these
types of shots.
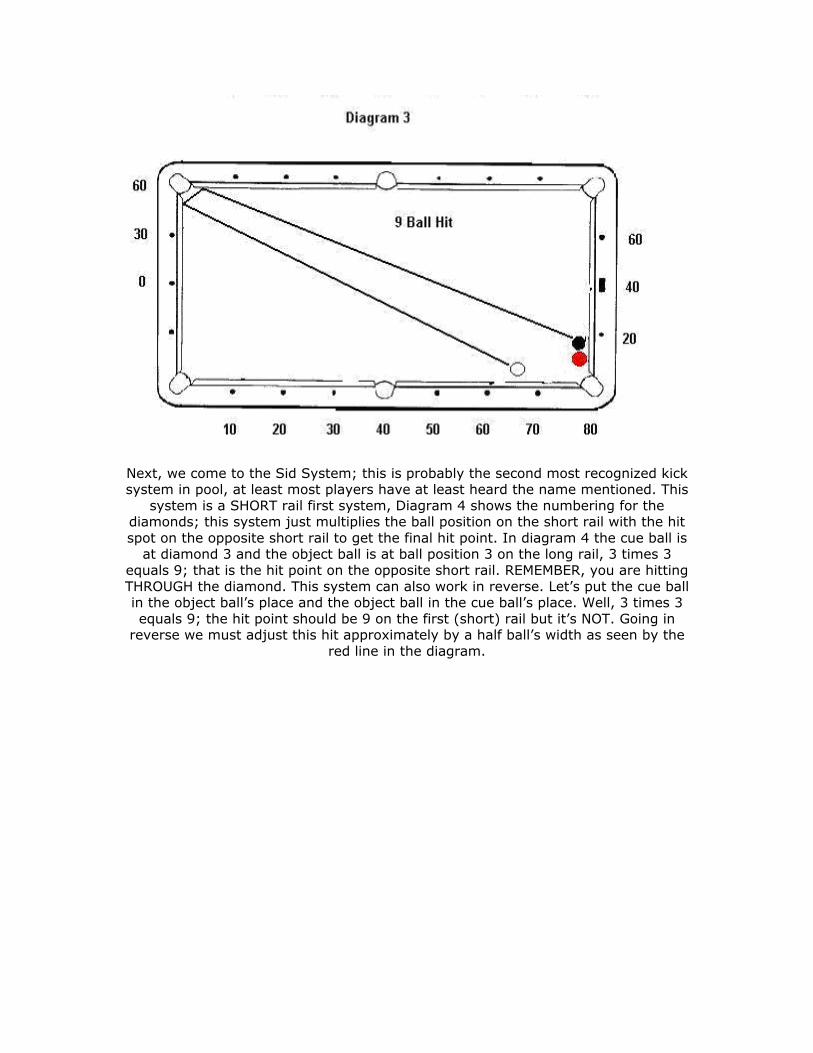
Next, we come to the Sid System; this is probably the second most recognized kick system in pool, at least most players have at least heard the name mentioned. This
system is a SHORT rail first system, Diagram 4 shows the numbering for the diamonds; this system just multiplies the ball position on the short rail with the hit spot on the opposite short rail to get the final hit point. In diagram 4 the cue ball is
at diamond 3 and the object ball is at ball position 3 on the long rail, 3 times 3 equals 9; that is the hit point on the opposite short rail. REMEMBER, you are hitting THROUGH the diamond. This system can also work in reverse. Let’s put the cue ball in the object ball’s place and the object ball in the cue ball’s place. Well, 3 times 3 equals 9; the hit point should be 9 on the first (short) rail but it’s NOT. Going in
reverse we must adjust this hit approximately by a half ball’s width as seen by the red line in the diagram.
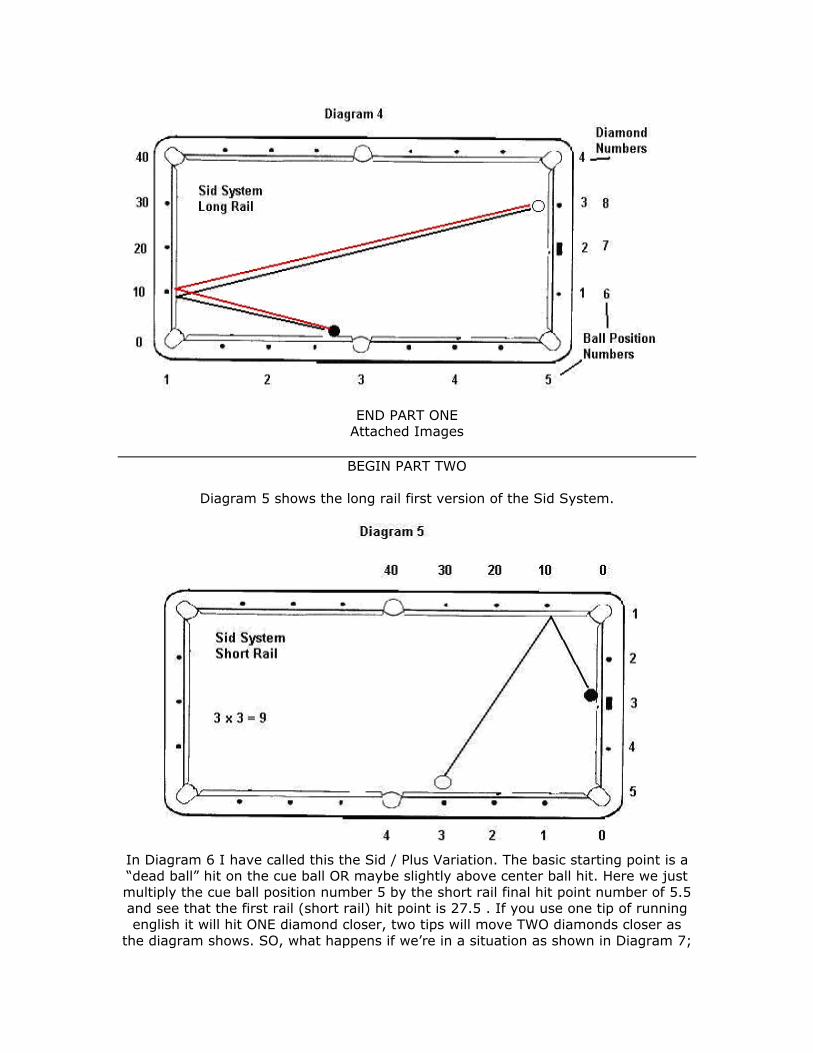
END PART ONE
Attached Images
BEGIN PART TWO
Diagram 5 shows the long rail first version of the Sid System.
In Diagram 6 I have called this the Sid / Plus Variation. The basic starting point is a “dead ball” hit on the cue ball OR maybe slightly above center ball hit. Here we just multiply the cue ball position number 5 by the short rail final hit point number of 5.5 and see that the first rail (short rail) hit point is 27.5 . If you use one tip of running english it will hit ONE diamond closer, two tips will move TWO diamonds closer as
the diagram shows. SO, what happens if we’re in a situation as shown in Diagram 7;
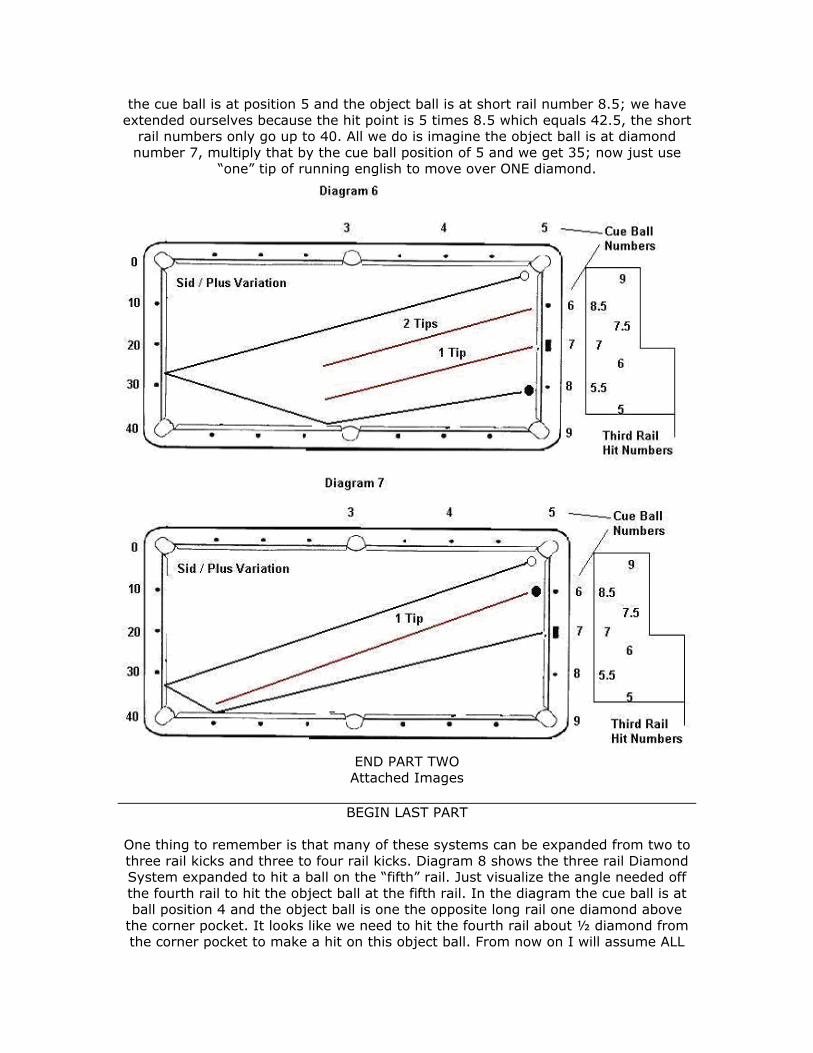
the cue ball is at position 5 and the object ball is at short rail number 8.5; we have extended ourselves because the hit point is 5 times 8.5 which equals 42.5, the short
rail numbers only go up to 40. All we do is imagine the object ball is at diamond number 7, multiply that by the cue ball position of 5 and we get 35; now just use
“one” tip of running english to move over ONE diamond.
END PART TWO Attached Images
BEGIN LAST PART
One thing to remember is that many of these systems can be expanded from two to three rail kicks and three to four rail kicks. Diagram 8 shows the three rail Diamond System expanded to hit a ball on the “fifth” rail. Just visualize the angle needed off the fourth rail to hit the object ball at the fifth rail. In the diagram the cue ball is at ball position 4 and the object ball is one the opposite long rail one diamond above
the corner pocket. It looks like we need to hit the fourth rail about ½ diamond from the corner pocket to make a hit on this object ball. From now on I will assume ALL
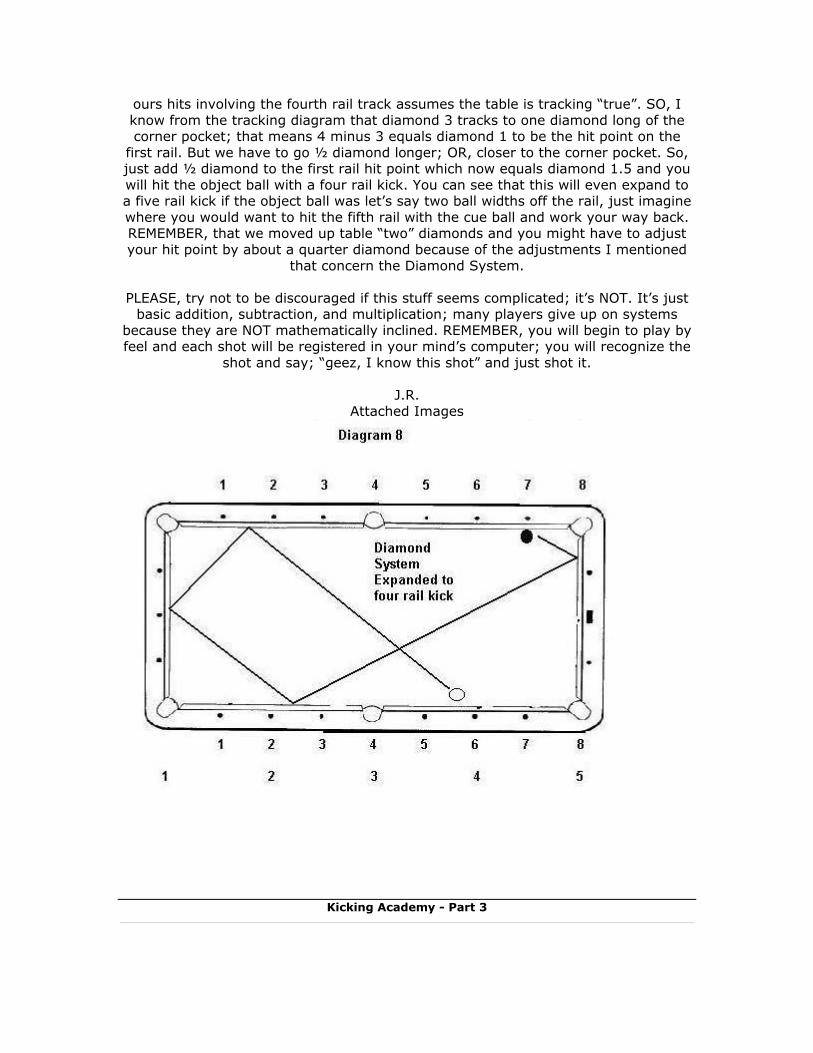
ours hits involving the fourth rail track assumes the table is tracking “true”. SO, I know from the tracking diagram that diamond 3 tracks to one diamond long of the corner pocket; that means 4 minus 3 equals diamond 1 to be the hit point on the
first rail. But we have to go ½ diamond longer; OR, closer to the corner pocket. So, just add ½ diamond to the first rail hit point which now equals diamond 1.5 and you will hit the object ball with a four rail kick. You can see that this will even expand to a five rail kick if the object ball was let’s say two ball widths off the rail, just imagine where you would want to hit the fifth rail with the cue ball and work your way back. REMEMBER, that we moved up table “two” diamonds and you might have to adjust your hit point by about a quarter diamond because of the adjustments I mentioned
that concern the Diamond System.
PLEASE, try not to be discouraged if this stuff seems complicated; it’s NOT. It’s just basic addition, subtraction, and multiplication; many players give up on systems
because they are NOT mathematically inclined. REMEMBER, you will begin to play by feel and each shot will be registered in your mind’s computer; you will recognize the
shot and say; “geez, I know this shot” and just shot it.
J.R. Attached Images
Kicking Academy - Part 3
KICKING ACADEMY – PART 3
First let me start my updating.
I mentioned to a friend what I was doing and he supplied me with Dr. Cue’s three volumes of videos, on volume two Tom has a very interesting version of the Plus System which I think bears looking at; although it has limitations it seems VERY
workable. He also has a good example of the Diamond System which bears looking at. Videos give a much better representation than I can in print.
Today I will deal with two of Grady’s Systems on his “Only Kicks” video. The first
system is remarkably close to Dr. Cue’s Plus Variation, but a little looser and not so involved. Both these systems are based on a shot to the corner pocket but as I will
point out can be expanded into three and four rail kicks.
In the second post of this two part series I will show a GREAT one rail kick system which I call the “Multiplier” System. I found the basics of it in an billiard book and
reworked it a bit to fit 9 ball.
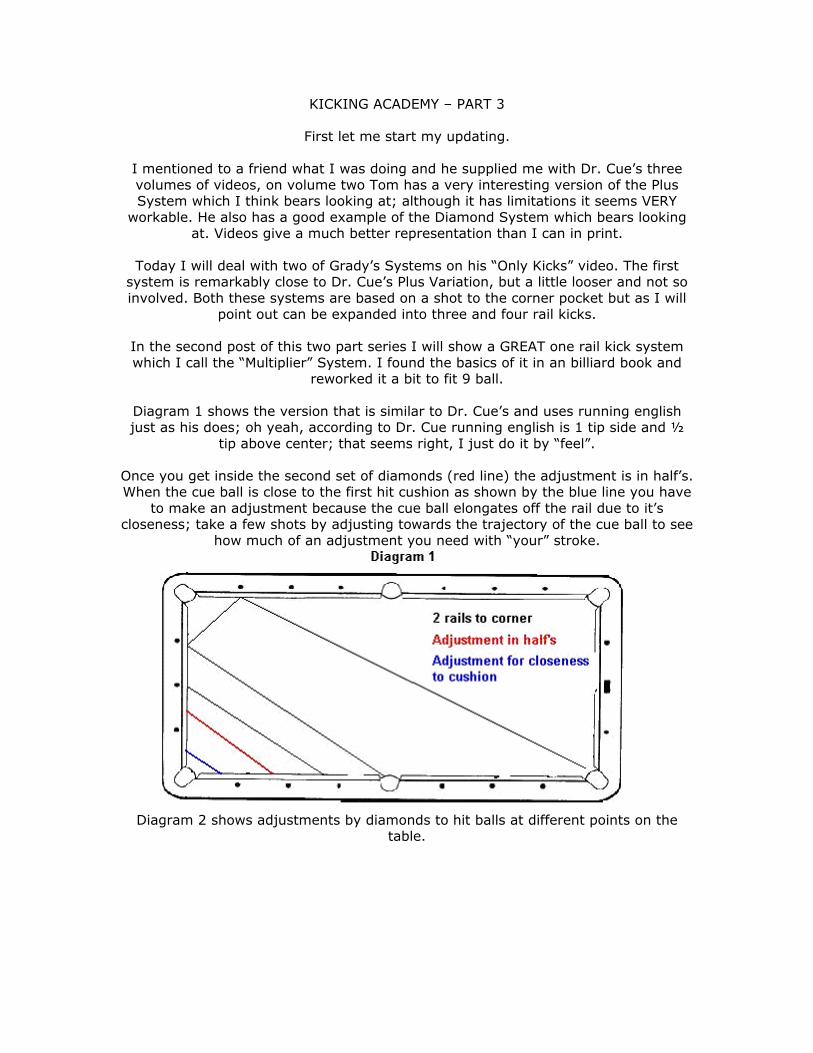
Diagram 1 shows the version that is similar to Dr. Cue’s and uses running english just as his does; oh yeah, according to Dr. Cue running english is 1 tip side and ½
tip above center; that seems right, I just do it by “feel”.
Once you get inside the second set of diamonds (red line) the adjustment is in half’s. When the cue ball is close to the first hit cushion as shown by the blue line you have
to make an adjustment because the cue ball elongates off the rail due to it’s closeness; take a few shots by adjusting towards the trajectory of the cue ball to see
how much of an adjustment you need with “your” stroke.
Diagram 2 shows adjustments by diamonds to hit balls at different points on the
table.
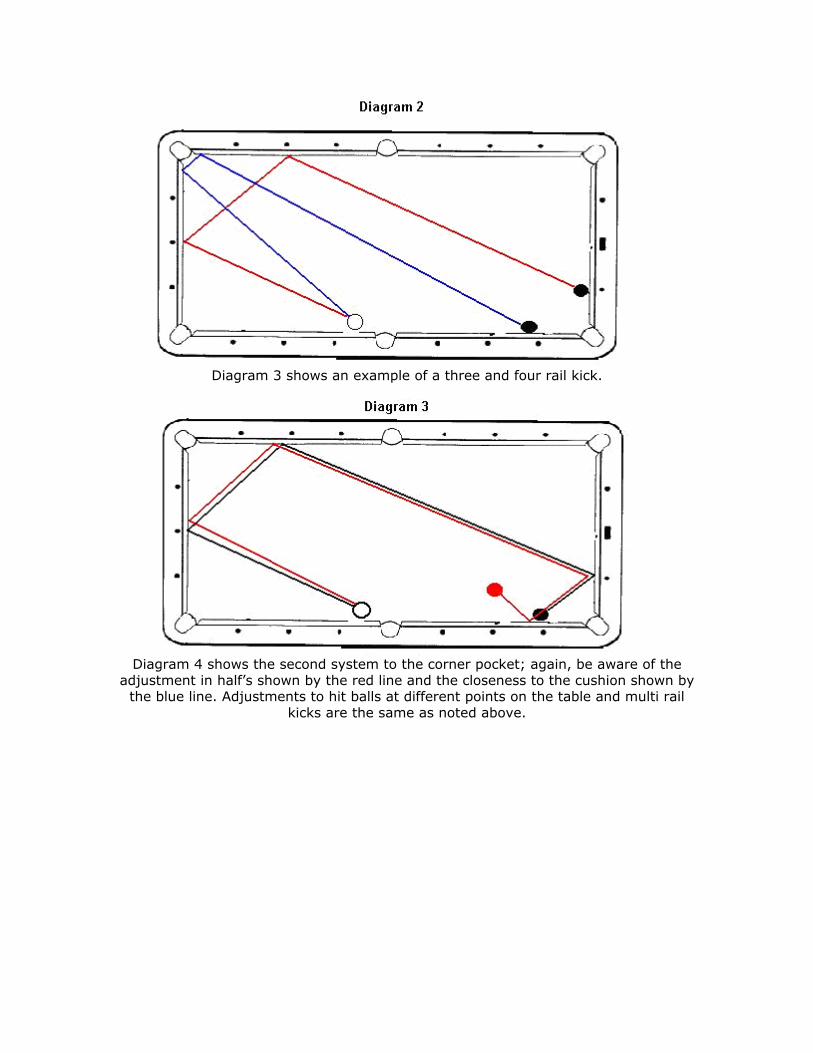
Diagram 3 shows an example of a three and four rail kick.
Diagram 4 shows the second system to the corner pocket; again, be aware of the
adjustment in half’s shown by the red line and the closeness to the cushion shown by the blue line. Adjustments to hit balls at different points on the table and multi rail
kicks are the same as noted above.
END PART
ON E Attached Images
KICKING ACADEMY – PART 3 CONT’D
BEGIN PART TWO
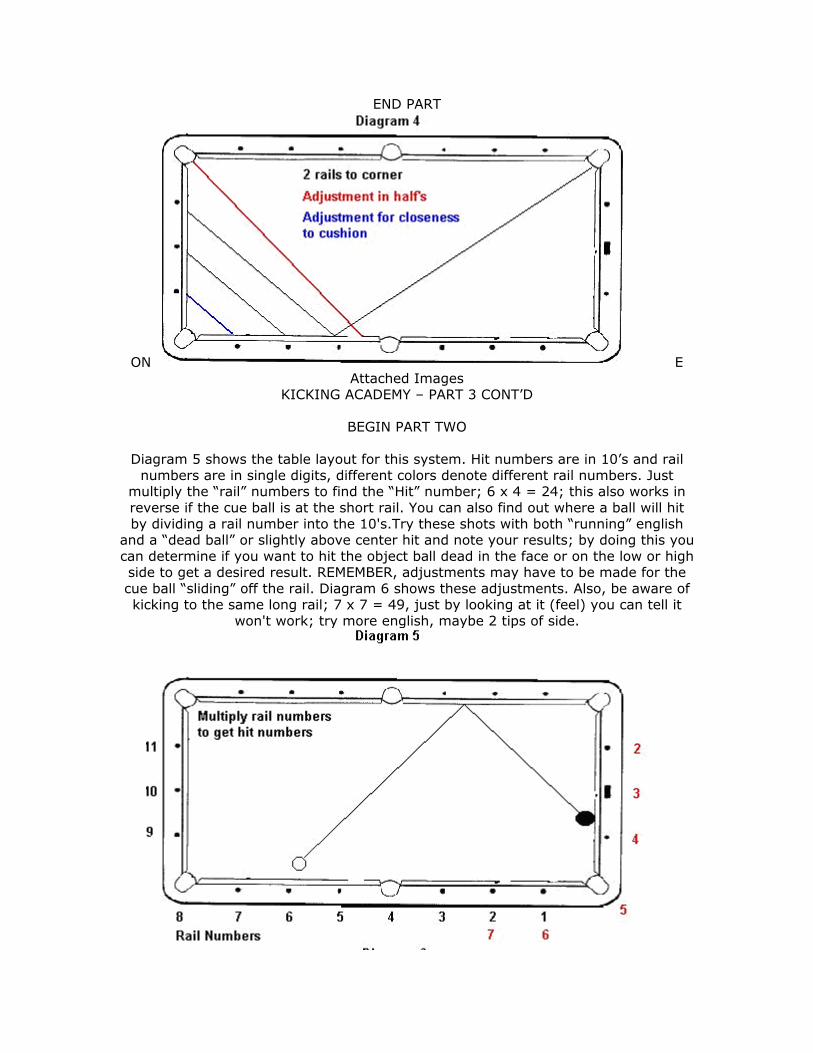
Diagram 5 shows the table layout for this system. Hit numbers are in 10’s and rail numbers are in single digits, different colors denote different rail numbers. Just
multiply the “rail” numbers to find the “Hit” number; 6 x 4 = 24; this also works in reverse if the cue ball is at the short rail. You can also find out where a ball will hit by dividing a rail number into the 10's.Try these shots with both “running” english
and a “dead ball” or slightly above center hit and note your results; by doing this you can determine if you want to hit the object ball dead in the face or on the low or high side to get a desired result. REMEMBER, adjustments may have to be made for the cue ball “sliding” off the rail. Diagram 6 shows these adjustments. Also, be aware of kicking to the same long rail; 7 x 7 = 49, just by looking at it (feel) you can tell it
won't work; try more english, maybe 2 tips of side.
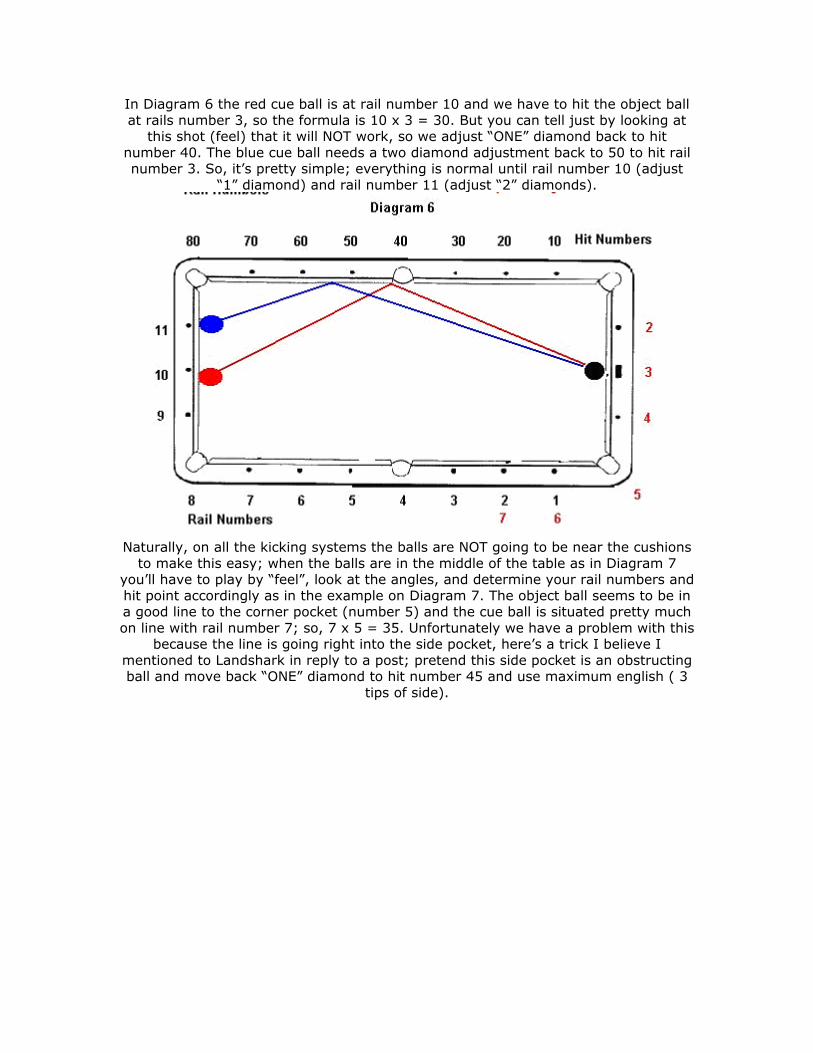
In Diagram 6 the red cue ball is at rail number 10 and we have to hit the object ball at rails number 3, so the formula is 10 x 3 = 30. But you can tell just by looking at
this shot (feel) that it will NOT work, so we adjust “ONE” diamond back to hit number 40. The blue cue ball needs a two diamond adjustment back to 50 to hit rail number 3. So, it’s pretty simple; everything is normal until rail number 10 (adjust
“1” diamond) and rail number 11 (adjust “2” diamonds).
Naturally, on all the kicking systems the balls are NOT going to be near the cushions
to make this easy; when the balls are in the middle of the table as in Diagram 7 you’ll have to play by “feel”, look at the angles, and determine your rail numbers and hit point accordingly as in the example on Diagram 7. The object ball seems to be in a good line to the corner pocket (number 5) and the cue ball is situated pretty much on line with rail number 7; so, 7 x 5 = 35. Unfortunately we have a problem with this
because the line is going right into the side pocket, here’s a trick I believe I mentioned to Landshark in reply to a post; pretend this side pocket is an obstructing ball and move back “ONE” diamond to hit number 45 and use maximum english ( 3
tips of side).
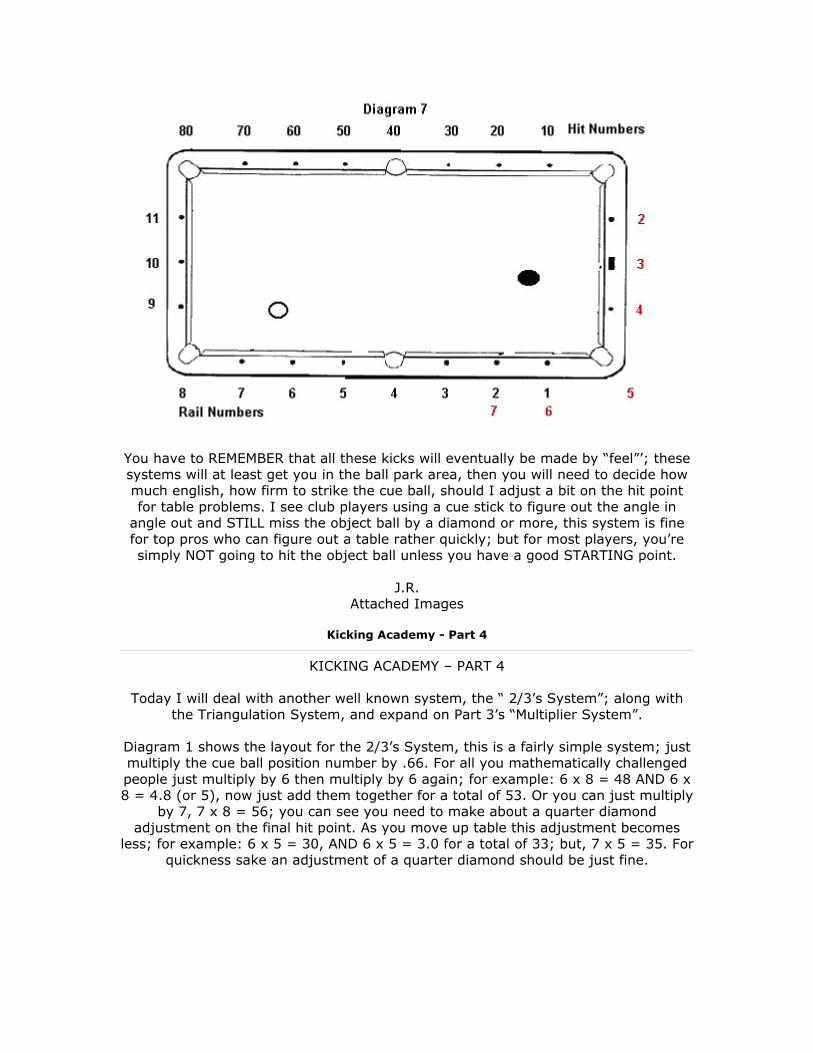
You have to REMEMBER that all these kicks will eventually be made by “feel”’; these systems will at least get you in the ball park area, then you will need to decide how much english, how firm to strike the cue ball, should I adjust a bit on the hit point for table problems. I see club players using a cue stick to figure out the angle in
angle out and STILL miss the object ball by a diamond or more, this system is fine for top pros who can figure out a table rather quickly; but for most players, you’re simply NOT going to hit the object ball unless you have a good STARTING point.
J.R.
Attached Images
Kicking Academy - Part 4
KICKING ACADEMY – PART 4
Today I will deal with another well known system, the “ 2/3’s System”; along with the Triangulation System, and expand on Part 3’s “Multiplier System”.
Diagram 1 shows the layout for the 2/3’s System, this is a fairly simple system; just multiply the cue ball position number by .66. For all you mathematically challenged people just multiply by 6 then multiply by 6 again; for example: 6 x 8 = 48 AND 6 x 8 = 4.8 (or 5), now just add them together for a total of 53. Or you can just multiply
by 7, 7 x 8 = 56; you can see you need to make about a quarter diamond adjustment on the final hit point. As you move up table this adjustment becomes
less; for example: 6 x 5 = 30, AND 6 x 5 = 3.0 for a total of 33; but, 7 x 5 = 35. For quickness sake an adjustment of a quarter diamond should be just fine.
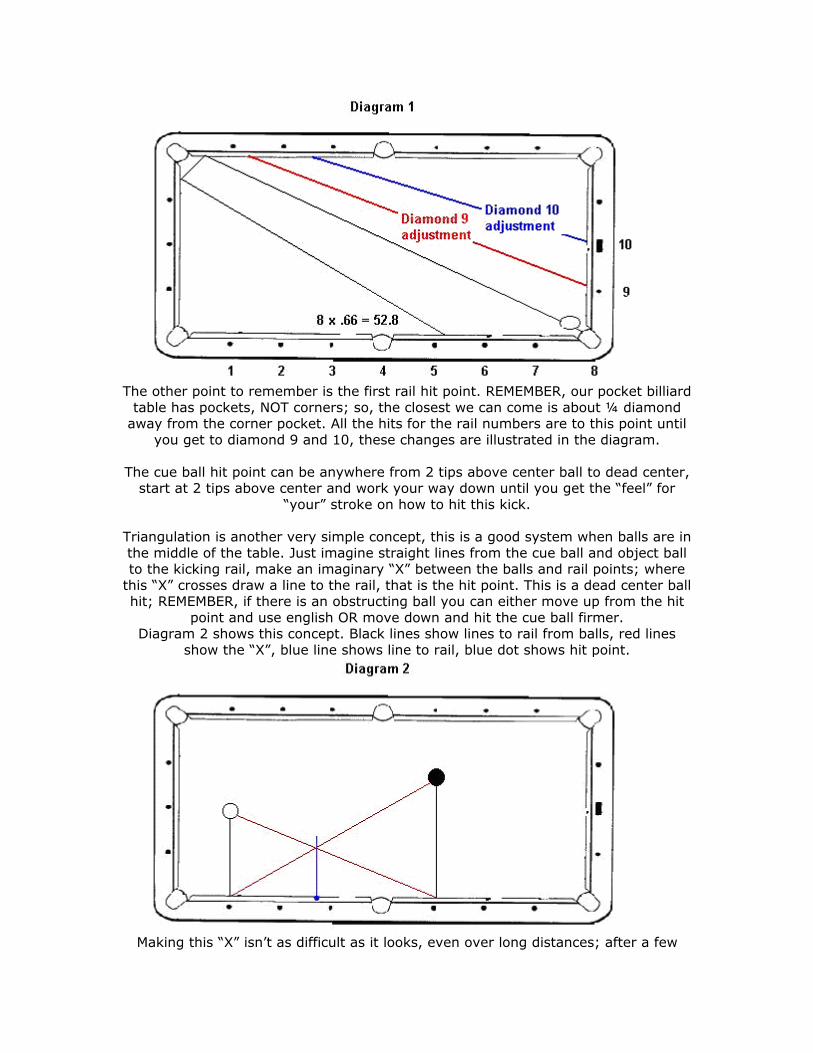
The other point to remember is the first rail hit point. REMEMBER, our pocket billiard
table has pockets, NOT corners; so, the closest we can come is about ¼ diamond away from the corner pocket. All the hits for the rail numbers are to this point until
you get to diamond 9 and 10, these changes are illustrated in the diagram.
The cue ball hit point can be anywhere from 2 tips above center ball to dead center, start at 2 tips above center and work your way down until you get the “feel” for
“your” stroke on how to hit this kick.
Triangulation is another very simple concept, this is a good system when balls are in the middle of the table. Just imagine straight lines from the cue ball and object ball to the kicking rail, make an imaginary “X” between the balls and rail points; where
this “X” crosses draw a line to the rail, that is the hit point. This is a dead center ball hit; REMEMBER, if there is an obstructing ball you can either move up from the hit
point and use english OR move down and hit the cue ball firmer. Diagram 2 shows this concept. Black lines show lines to rail from balls, red lines
show the “X”, blue line shows line to rail, blue dot shows hit point.
Making this “X” isn’t as difficult as it looks, even over long distances; after a few
practice sessions you should be able to do it by eye, but it’s okay to use your cue stick, this is legal. As a matter of fact your opponent will probably wonder what
you’re trying to do, then when you hit the object ball dead center he/she will look at you like you have frogs crawling out of your ears; and will certainly want to know
HOW you did that.
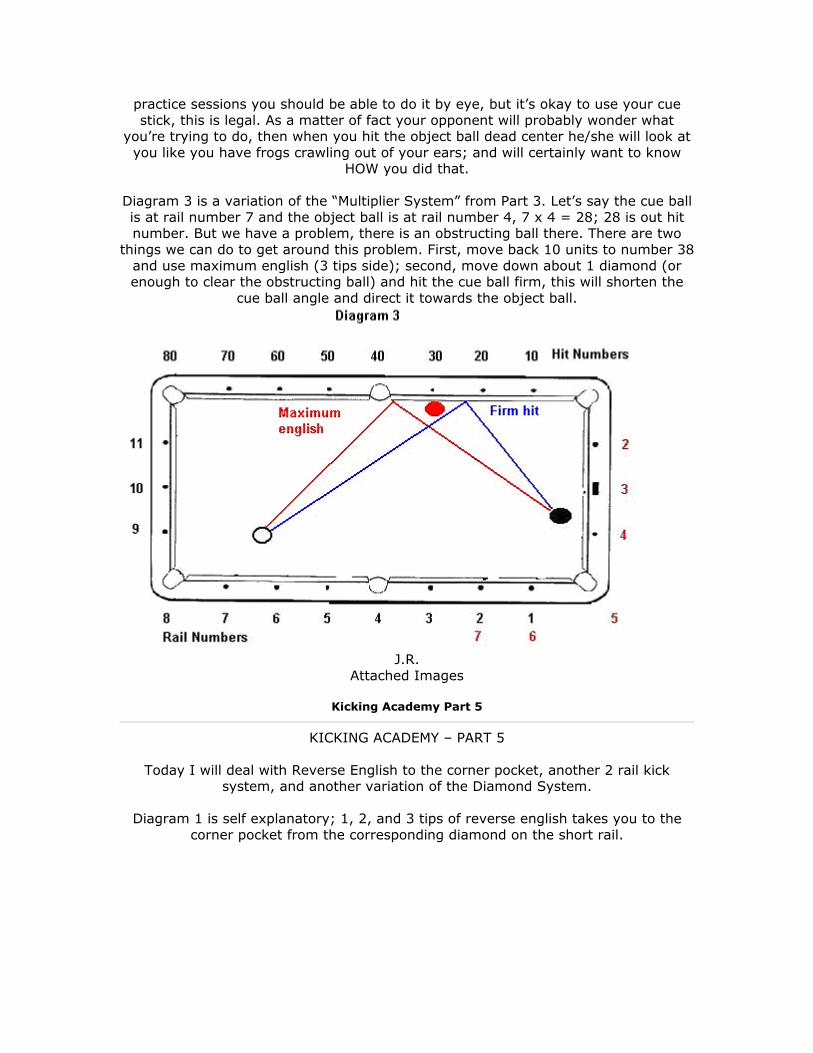
Diagram 3 is a variation of the “Multiplier System” from Part 3. Let’s say the cue ball is at rail number 7 and the object ball is at rail number 4, 7 x 4 = 28; 28 is out hit number. But we have a problem, there is an obstructing ball there. There are two
things we can do to get around this problem. First, move back 10 units to number 38 and use maximum english (3 tips side); second, move down about 1 diamond (or enough to clear the obstructing ball) and hit the cue ball firm, this will shorten the
cue ball angle and direct it towards the object ball.
J.R.
Attached Images
Kicking Academy Part 5
KICKING ACADEMY – PART 5
Today I will deal with Reverse English to the corner pocket, another 2 rail kick system, and another variation of the Diamond System.
Diagram 1 is self explanatory; 1, 2, and 3 tips of reverse english takes you to the
corner pocket from the corresponding diamond on the short rail.
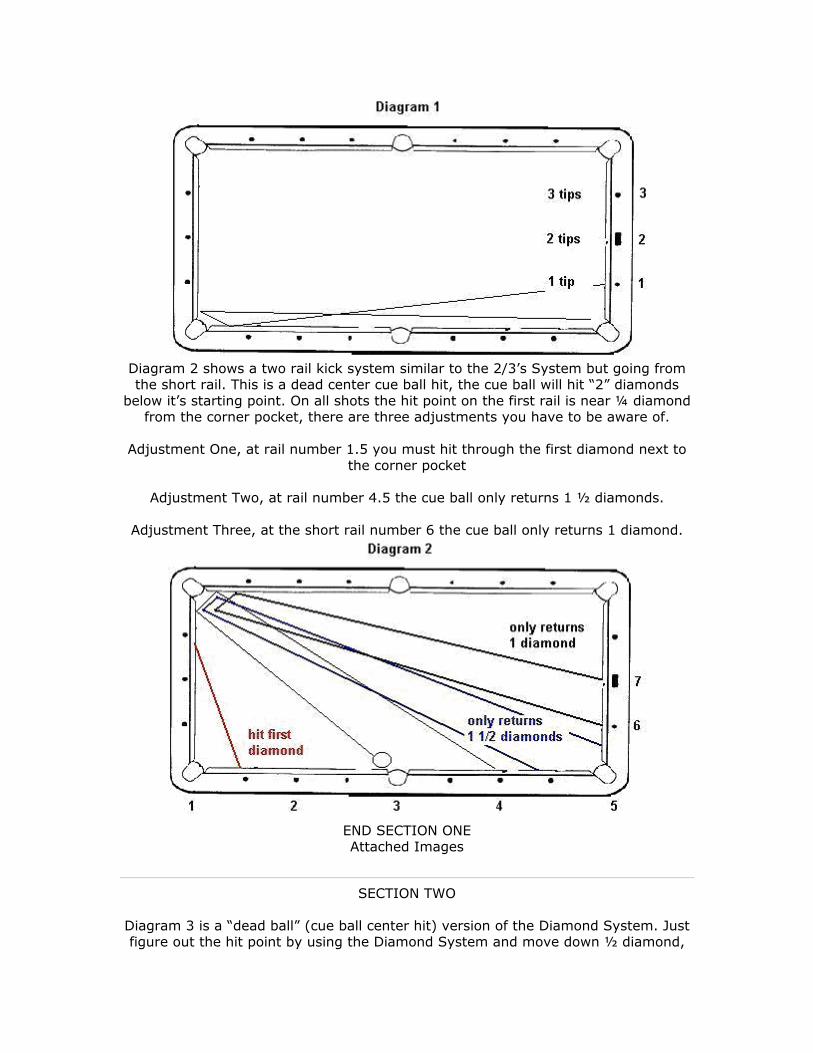
Diagram 2 shows a two rail kick system similar to the 2/3’s System but going from the short rail. This is a dead center cue ball hit, the cue ball will hit “2” diamonds
below it’s starting point. On all shots the hit point on the first rail is near ¼ diamond from the corner pocket, there are three adjustments you have to be aware of.
Adjustment One, at rail number 1.5 you must hit through the first diamond next to
the corner pocket
Adjustment Two, at rail number 4.5 the cue ball only returns 1 ½ diamonds.
Adjustment Three, at the short rail number 6 the cue ball only returns 1 diamond.
END SECTION ONE Attached Images
SECTION TWO
Diagram 3 is a “dead ball” (cue ball center hit) version of the Diamond System. Just figure out the hit point by using the Diamond System and move down ½ diamond,
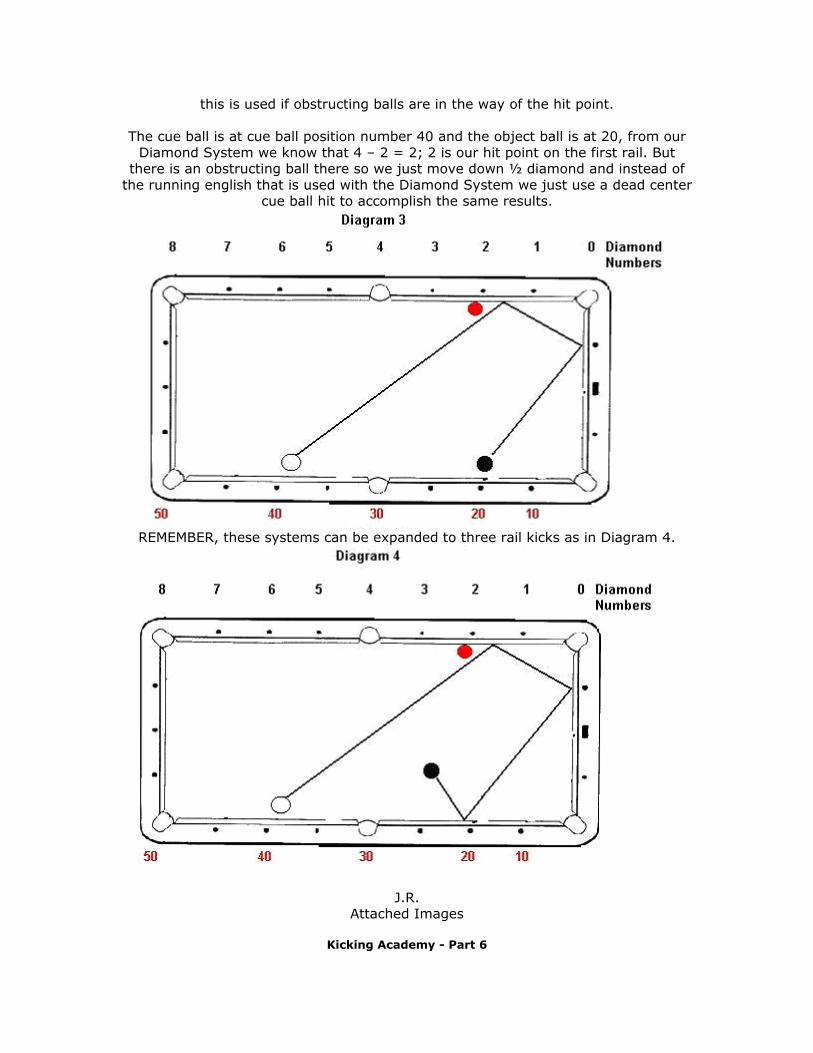
this is used if obstructing balls are in the way of the hit point.
The cue ball is at cue ball position number 40 and the object ball is at 20, from our Diamond System we know that 4 – 2 = 2; 2 is our hit point on the first rail. But
there is an obstructing ball there so we just move down ½ diamond and instead of the running english that is used with the Diamond System we just use a dead center
cue ball hit to accomplish the same results.
REMEMBER, these systems can be expanded to three rail kicks as in Diagram 4.
J.R.
Attached Images
Kicking Academy - Part 6
KICKING ACADEMY – PART 6
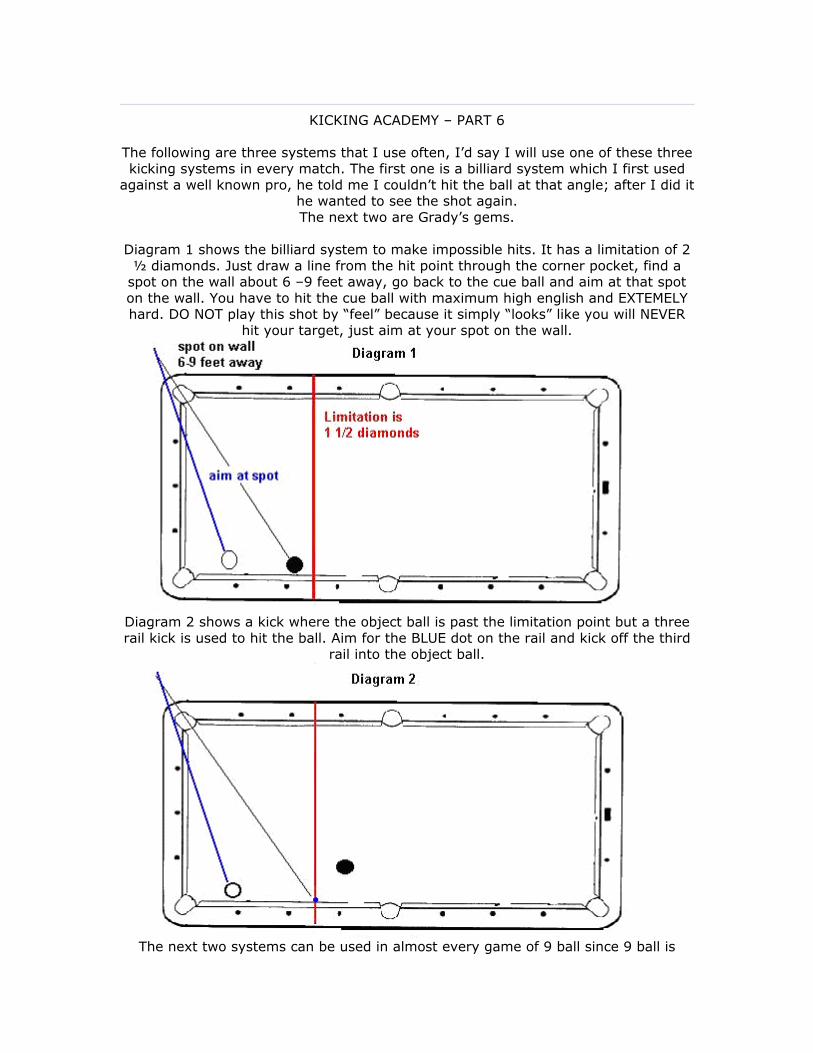
The following are three systems that I use often, I’d say I will use one of these three kicking systems in every match. The first one is a billiard system which I first used
against a well known pro, he told me I couldn’t hit the ball at that angle; after I did it he wanted to see the shot again. The next two are Grady’s gems.
Diagram 1 shows the billiard system to make impossible hits. It has a limitation of 2 ½ diamonds. Just draw a line from the hit point through the corner pocket, find a
spot on the wall about 6 –9 feet away, go back to the cue ball and aim at that spot on the wall. You have to hit the cue ball with maximum high english and EXTEMELY hard. DO NOT play this shot by “feel” because it simply “looks” like you will NEVER
hit your target, just aim at your spot on the wall.
Diagram 2 shows a kick where the object ball is past the limitation point but a three rail kick is used to hit the ball. Aim for the BLUE dot on the rail and kick off the third
rail into the object ball.
The next two systems can be used in almost every game of 9 ball since 9 ball is
about 80 percent luck if you’re not playing at the pro level, you will consistently find yourself snookered after a weaker player misses; this is because they usually have no clue as to what they are doing and when they miss they miss BIG TIME, and the final resting place of the balls is in the hands of the Pool Gods. These next to kicks
are going to come up all the time in 9 ball.
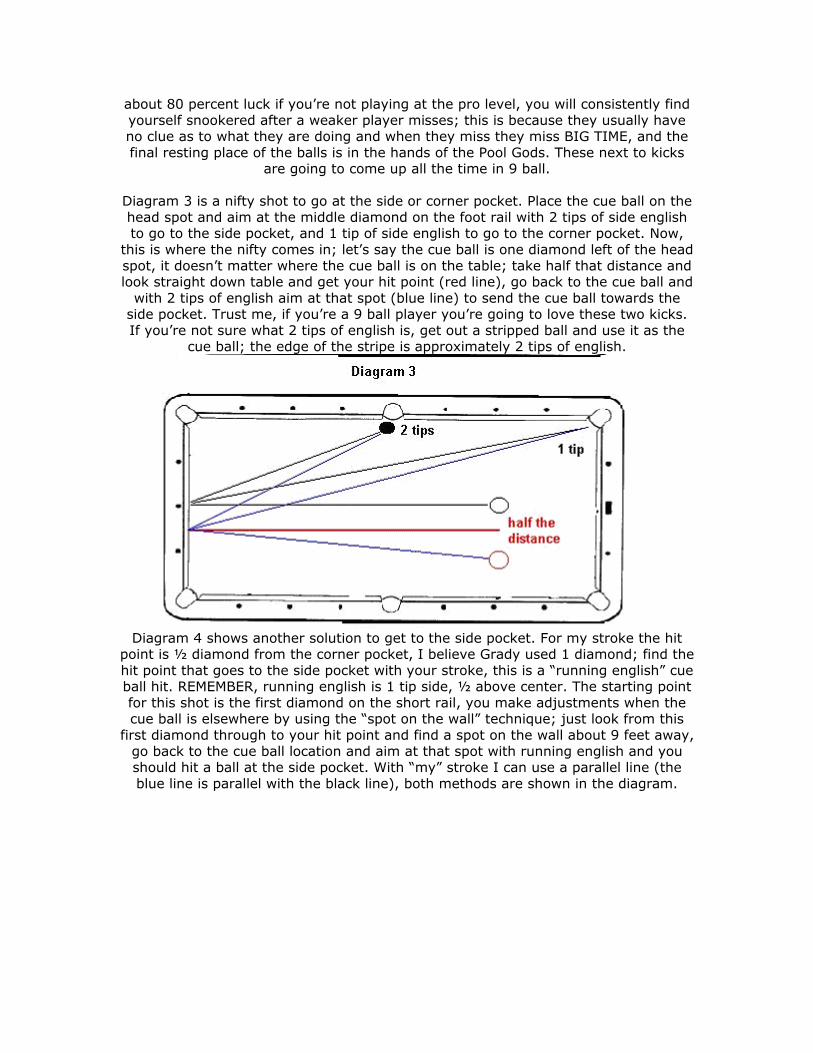
Diagram 3 is a nifty shot to go at the side or corner pocket. Place the cue ball on the head spot and aim at the middle diamond on the foot rail with 2 tips of side english to go to the side pocket, and 1 tip of side english to go to the corner pocket. Now,
this is where the nifty comes in; let’s say the cue ball is one diamond left of the head spot, it doesn’t matter where the cue ball is on the table; take half that distance and look straight down table and get your hit point (red line), go back to the cue ball and
with 2 tips of english aim at that spot (blue line) to send the cue ball towards the side pocket. Trust me, if you’re a 9 ball player you’re going to love these two kicks. If you’re not sure what 2 tips of english is, get out a stripped ball and use it as the
cue ball; the edge of the stripe is approximately 2 tips of english.
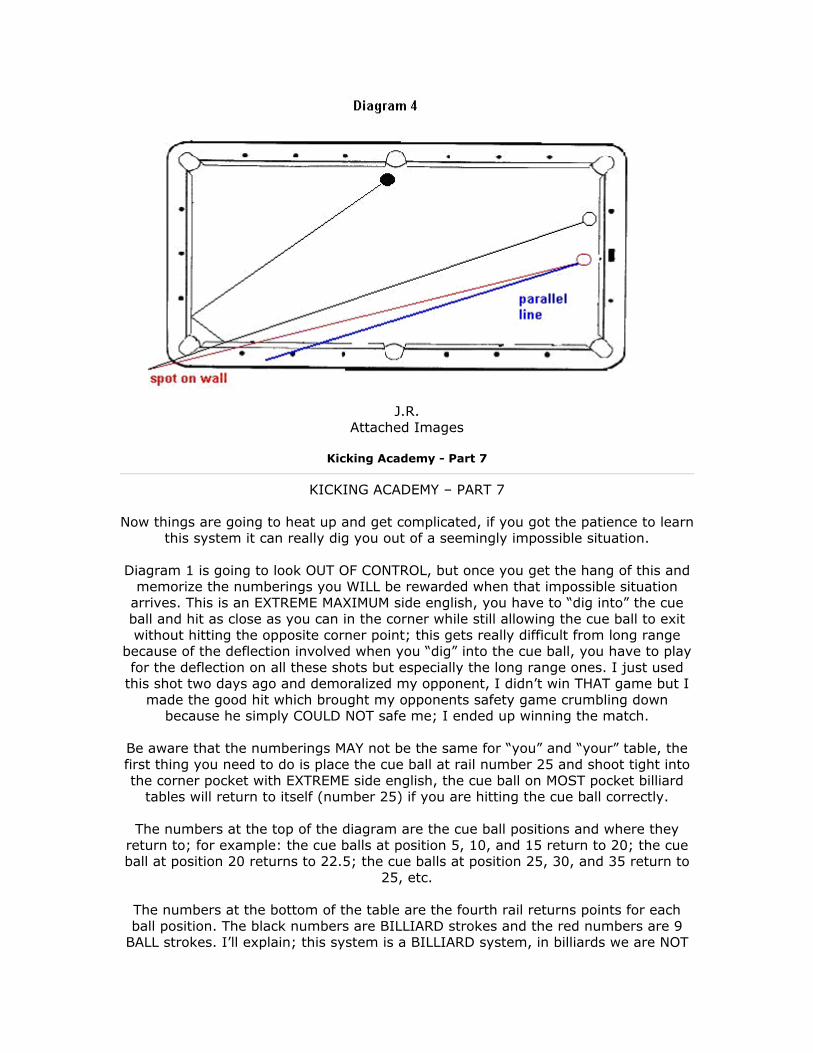
Diagram 4 shows another solution to get to the side pocket. For my stroke the hit
point is ½ diamond from the corner pocket, I believe Grady used 1 diamond; find the hit point that goes to the side pocket with your stroke, this is a “running english” cue ball hit. REMEMBER, running english is 1 tip side, ½ above center. The starting point for this shot is the first diamond on the short rail, you make adjustments when the cue ball is elsewhere by using the “spot on the wall” technique; just look from this
first diamond through to your hit point and find a spot on the wall about 9 feet away, go back to the cue ball location and aim at that spot with running english and you should hit a ball at the side pocket. With “my” stroke I can use a parallel line (the blue line is parallel with the black line), both methods are shown in the diagram.
J.R.
Attached Images
Kicking Academy - Part 7
KICKING ACADEMY – PART 7
Now things are going to heat up and get complicated, if you got the patience to learn this system it can really dig you out of a seemingly impossible situation.
Diagram 1 is going to look OUT OF CONTROL, but once you get the hang of this and
memorize the numberings you WILL be rewarded when that impossible situation arrives. This is an EXTREME MAXIMUM side english, you have to “dig into” the cue ball and hit as close as you can in the corner while still allowing the cue ball to exit without hitting the opposite corner point; this gets really difficult from long range
because of the deflection involved when you “dig” into the cue ball, you have to play for the deflection on all these shots but especially the long range ones. I just used
this shot two days ago and demoralized my opponent, I didn’t win THAT game but I made the good hit which brought my opponents safety game crumbling down
because he simply COULD NOT safe me; I ended up winning the match.
Be aware that the numberings MAY not be the same for “you” and “your” table, the first thing you need to do is place the cue ball at rail number 25 and shoot tight into the corner pocket with EXTREME side english, the cue ball on MOST pocket billiard
tables will return to itself (number 25) if you are hitting the cue ball correctly.
The numbers at the top of the diagram are the cue ball positions and where they return to; for example: the cue balls at position 5, 10, and 15 return to 20; the cue ball at position 20 returns to 22.5; the cue balls at position 25, 30, and 35 return to
25, etc.
The numbers at the bottom of the table are the fourth rail returns points for each ball position. The black numbers are BILLIARD strokes and the red numbers are 9
BALL strokes. I’ll explain; this system is a BILLIARD system, in billiards we are NOT
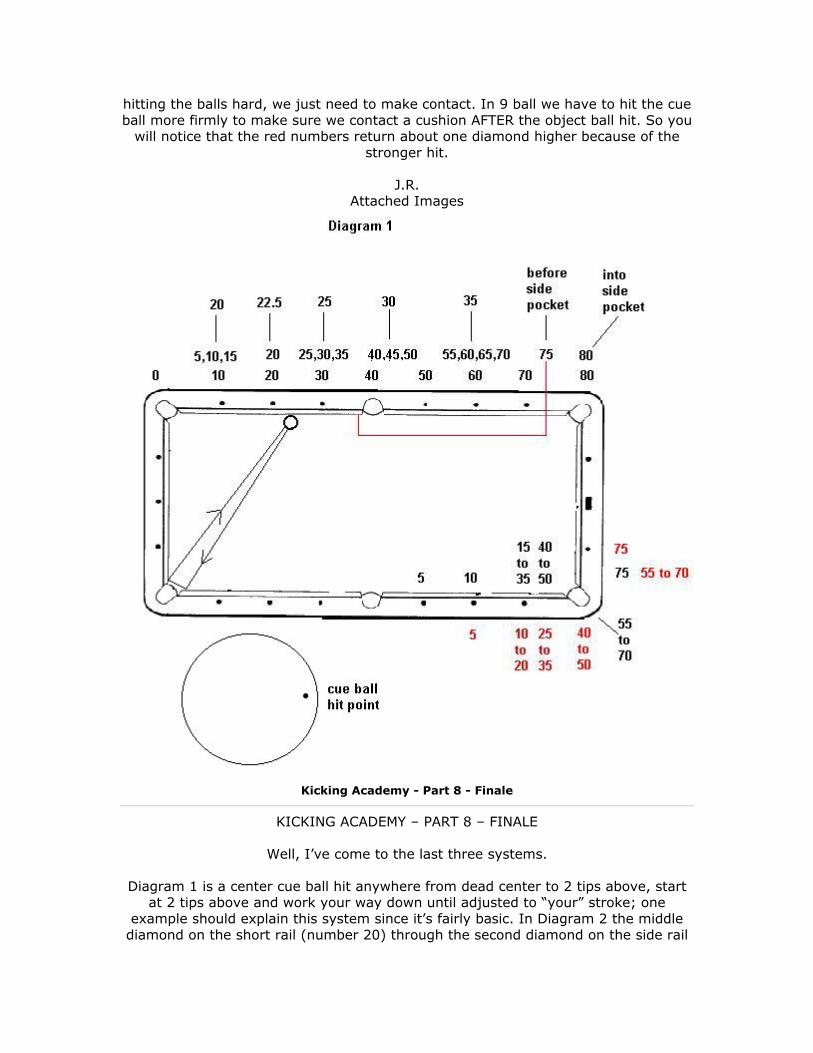
hitting the balls hard, we just need to make contact. In 9 ball we have to hit the cue ball more firmly to make sure we contact a cushion AFTER the object ball hit. So you
will notice that the red numbers return about one diamond higher because of the stronger hit.
J.R.
Attached Images
Kicking Academy - Part 8 - Finale
KICKING ACADEMY – PART 8 – FINALE
Well, I’ve come to the last three systems.
Diagram 1 is a center cue ball hit anywhere from dead center to 2 tips above, start
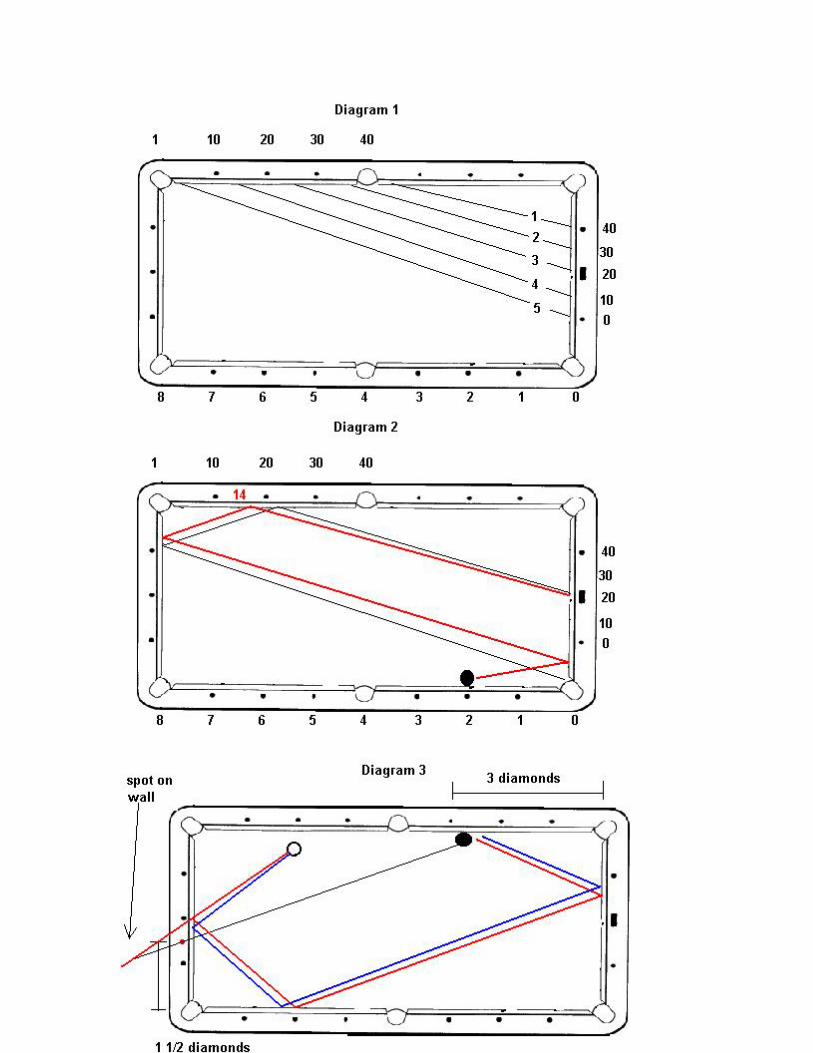
at 2 tips above and work your way down until adjusted to “your” stroke; one example should explain this system since it’s fairly basic. In Diagram 2 the middle
diamond on the short rail (number 20) through the second diamond on the side rail
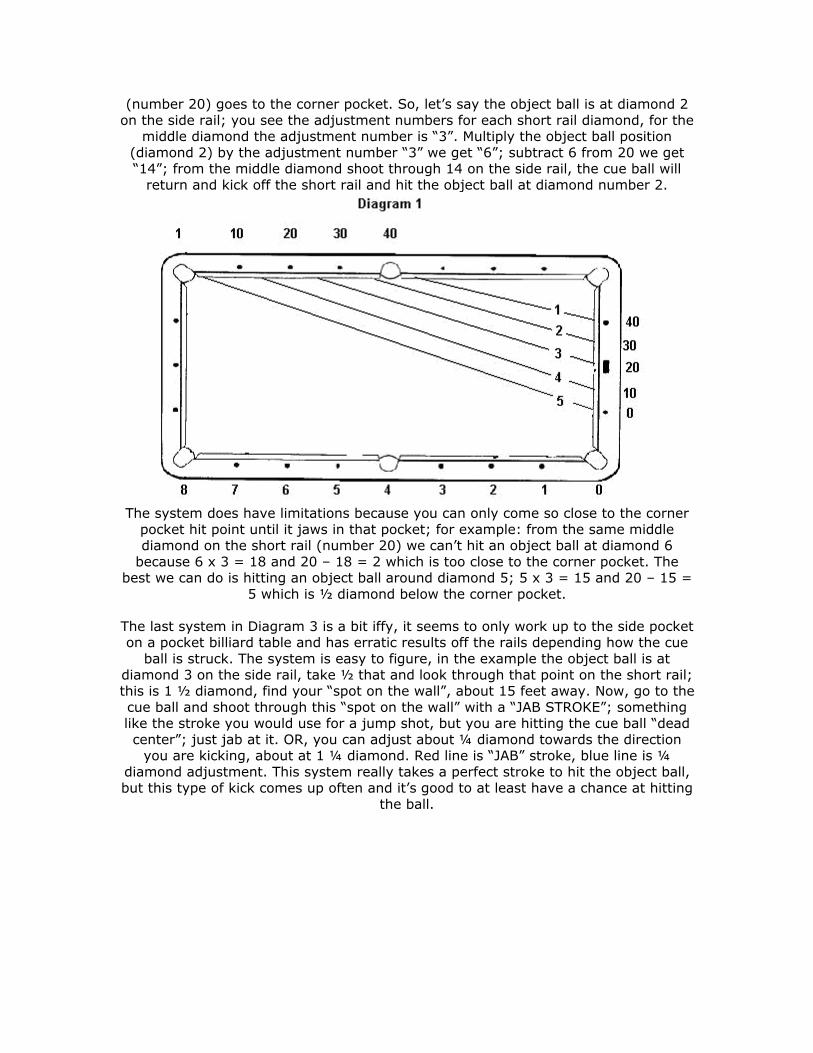
(number 20) goes to the corner pocket. So, let’s say the object ball is at diamond 2 on the side rail; you see the adjustment numbers for each short rail diamond, for the
middle diamond the adjustment number is “3”. Multiply the object ball position (diamond 2) by the adjustment number “3” we get “6”; subtract 6 from 20 we get “14”; from the middle diamond shoot through 14 on the side rail, the cue ball will
return and kick off the short rail and hit the object ball at diamond number 2.
The system does have limitations because you can only come so close to the corner
pocket hit point until it jaws in that pocket; for example: from the same middle diamond on the short rail (number 20) we can’t hit an object ball at diamond 6
because 6 x 3 = 18 and 20 – 18 = 2 which is too close to the corner pocket. The best we can do is hitting an object ball around diamond 5; 5 x 3 = 15 and 20 – 15 =
5 which is ½ diamond below the corner pocket.
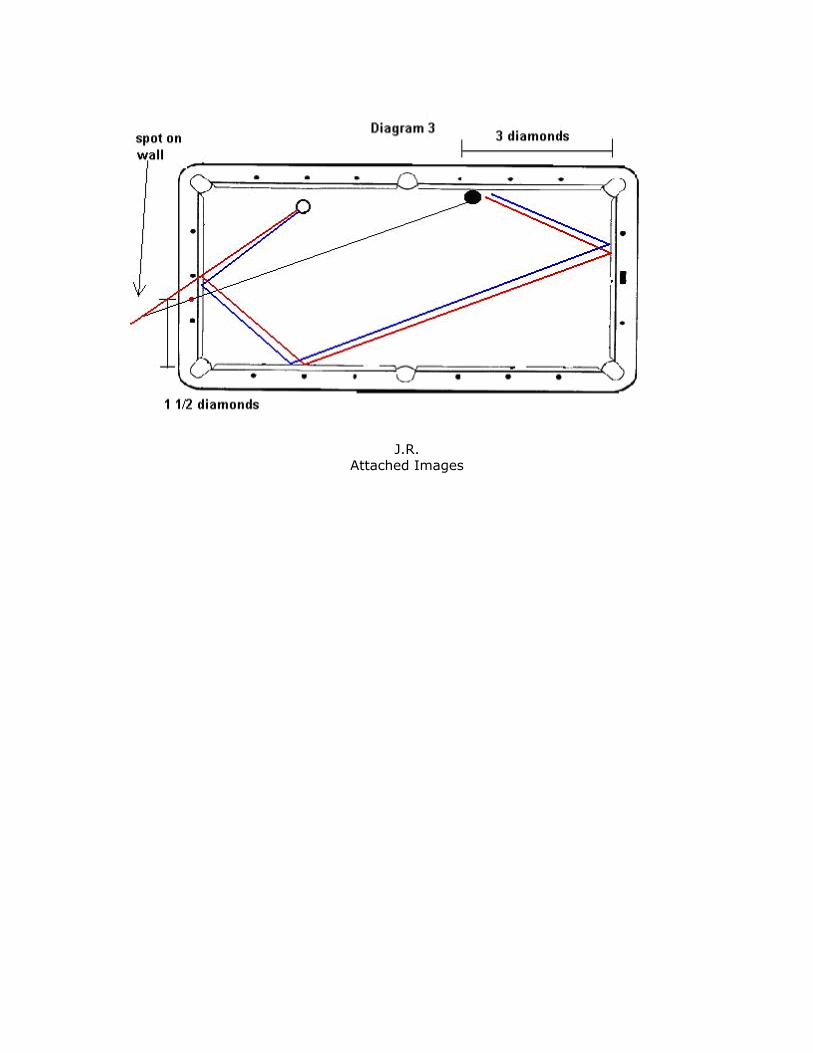
The last system in Diagram 3 is a bit iffy, it seems to only work up to the side pocket on a pocket billiard table and has erratic results off the rails depending how the cue
ball is struck. The system is easy to figure, in the example the object ball is at diamond 3 on the side rail, take ½ that and look through that point on the short rail; this is 1 ½ diamond, find your “spot on the wall”, about 15 feet away. Now, go to the cue ball and shoot through this “spot on the wall” with a “JAB STROKE”; something like the stroke you would use for a jump shot, but you are hitting the cue ball “dead center”; just jab at it. OR, you can adjust about ¼ diamond towards the direction
you are kicking, about at 1 ¼ diamond. Red line is “JAB” stroke, blue line is ¼ diamond adjustment. This system really takes a perfect stroke to hit the object ball, but this type of kick comes up often and it’s good to at least have a chance at hitting
the ball.
J.R.
Attached Images
Kicking Academy - The End
Well, that’s that; it should take about 6 months to a year to learn and apply these systems to your game, by then you should be playing many of these kicks within a
minimal amount of time or by “feel”. I hope that the people who are REALLY interested in learning how to play this game apply these systems to your game and enjoy frustrating your opponent by consistently hitting his/her safes; by the number
of hits (80-120) for each of my posts I see that there are not many who are interested in kicking or learning how to kick. Actually, there are many more than I expected; most people here just want to “CHAT” with someone; OR, are fine with
taking the easy way out and JUMPING over the obstructing ball; I wonder what these people do when they’re within a couple inches of the obstructing
ball??????????????????????
I can tell you, THEY’RE LOSERS. Because they DON'T know how to kick.
I enjoyed my stay here and I hope I left you with something you can apply to your 9 ball game. Hope to see you on tour.
J.R.