Embed Size (px)
Citation preview
Name:___________________________Section:________
4-1
Lab 3A: Protein Fractionation- Actin and Myosin from Chicken Muscle
A response is required for each item marked: (#__). Your grade for the lab 3 report (labs 3A, 3B, and 3C) will be the fraction of correct responses on a 50 point scale[(# correct/# total) x 50]. In order to carry out a precise analysis of a protein’s structure and function, it is often necessary to isolate it from the cell and study it in purified from. In this lab, you will carry out the initial steps of a purification of myosin and actin from chicken muscle through differential salt extraction. Chicken breast will be the source of skeletal muscle in the exercise. Purification of any protein involves a series of steps designed to remove other proteins with physical properties differing from those of the protein of interest. Section 18.7 of your text describes some of the methods used to fractionate proteins on the basis of differences in charge, hydrophobicity, or size. Selective precipitation by salts is often the first step in a purification. This will form the basis of the initial fractionation of actin and myosin from chicken skeletal muscle in today’s lab exercise. The solubility of a protein in salts is determined by its charge and hydrophobicity. Previous biochemical studies have been used to determine the salt solubility properties of actin and myosin. Myosin is highly soluble in high salt solutions, whereas actin is more soluble in low salt. This difference in salt solubility can, therefore, provide a convenient first step in fractionating the two proteins from skeletal muscle cells.
What differences in amino acid composition would you predict for myosin and actin on the basis of their different salt solubilities? In other words, which amino acids would favor the highly polar environment of a high salt aqueous environment and which would favor a non-polar environment? (#1)
You will begin today’s exercise by grinding the chicken breast in a high salt buffer. This will extract the high salt-soluble proteins into the soluble (supernatant) fraction during centrifugation. Those that are more soluble in low salt will remain in the insoluble (pellet) fraction. It is then possible to achieve further purification of the high salt-soluble proteins by then lowering the concentration of salt in the solution. This will cause myosin and other high salt-soluble proteins to now become insoluble and precipitate out of the low salt solution. You will save aliquots of the fractions from your purification (the supernatant and pellet fractions from the high salt extraction and the pellet fraction from the subsequent low salt precipitation
Name:___________________________Section:________
4-2
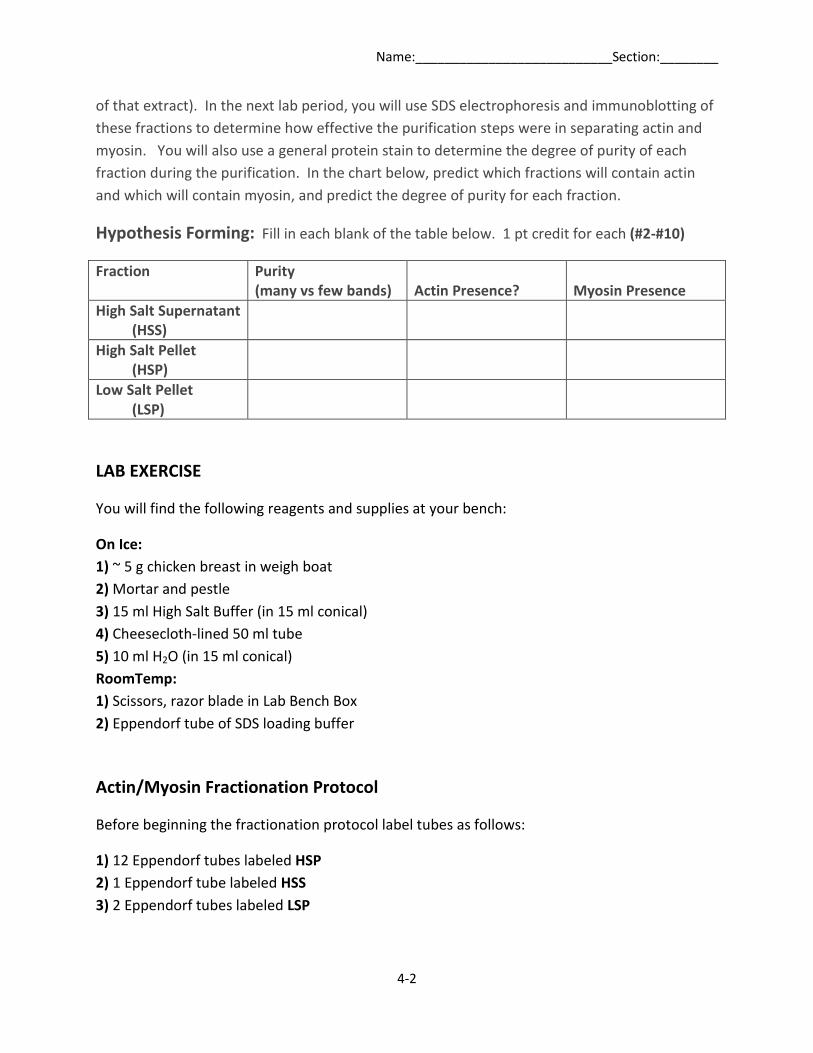
of that extract). In the next lab period, you will use SDS electrophoresis and immunoblotting of these fractions to determine how effective the purification steps were in separating actin and myosin. You will also use a general protein stain to determine the degree of purity of each fraction during the purification. In the chart below, predict which fractions will contain actin and which will contain myosin, and predict the degree of purity for each fraction.
Hypothesis Forming: Fill in each blank of the table below. 1 pt credit for each (#2-#10)
Fraction Purity (many vs few bands)
Actin Presence?
Myosin Presence
High Salt Supernatant (HSS)
High Salt Pellet (HSP)
Low Salt Pellet (LSP)
LAB EXERCISE
You will find the following reagents and supplies at your bench:
On Ice: 1) ~ 5 g chicken breast in weigh boat 2) Mortar and pestle 3) 15 ml High Salt Buffer (in 15 ml conical) 4) Cheesecloth-lined 50 ml tube 5) 10 ml H2O (in 15 ml conical) RoomTemp: 1) Scissors, razor blade in Lab Bench Box 2) Eppendorf tube of SDS loading buffer
Actin/Myosin Fractionation Protocol
Before beginning the fractionation protocol label tubes as follows:
1) 12 Eppendorf tubes labeled HSP 2) 1 Eppendorf tube labeled HSS 3) 2 Eppendorf tubes labeled LSP
Name:___________________________Section:________
4-3
HIGH SALT EXTRACTION OF MYOSIN
1. Use a razor blade to finely mince the chicken breast in the weigh boat in your ice pan. 2. Scrape the minced chicken breast into your mortar & pestle. 3. Pour a small volume (< 5 ml) of HIGH SALT BUFFER into the mortar & pestle and grind the chicken
breast. After the chicken breast is fully homogenized, add the remainder of the High Salt buffer. 4. Pour the homogenate through the cheesecloth-lined funnel in the tube labeled Homogenate in your
ice pan. Wring out any residual liquid from the cheesecloth into the tube. Make sure there are no large clumps of the chicken breast in the filtered homogenate.
5. Use a Pasteur pipette to transfer as much homogenate as you can to the 12 Eppendorf tubes (labeled HSP). If you are unable to fill all 12 tubes, fill an even number of as many as you can. Centrifuge the tubes at 10,000 rpm for 3 min in the microfuge on your bench. Always make sure that tubes are balanced in the microfuge rotor (opposite a tube of ~ equal weight).
6. After the centrifugation, use a blue tip and your P-1000 to transfer 200 µl of the soluble supernatant (HIGH SALT SUPERNATANT) from one tube to the eppendorf tube labeled HSS . Be careful not to draw any of the pellet into your tip. The blue tips have a smaller opening than a Pasteur pipette, making it less likely for this to happen. Then add 100 µl SDS loading buffer to the HSS fraction and save it for electrophoresis in the next lab.
7. Remove the remaining supernatant from the same tube and 100 µl SDS loading buffer and 200 µl H2O to the pellet and use your blue tip to gently resuspend the insoluble pellet fraction (HIGH SALT PELLET). Make sure the tube is still labeled HSP. Also save this tube for electrophoresis in the next lab.
LOW SALT PRECIPITATION OF MYOSIN FROM HIGH SALT EXTRACT
8. Transfer another 200 µl of the supernatant from one of the tubes after the centrifugation to the two
eppendorf tubes labeled LSP (Low Salt Pellet). You will precipitate myosin and other high salt-soluble proteins from this fraction by reducing its salt concentration. Do so by adding 6 volumes (600 µl, twice) of ice cold H2O to each, inverting to mix, and incubating on ice for 10 min, while continuing to invert periodically. You may be able to see strands of insoluble myosin filaments form in the diluted extract.
9. After the 10 min incubation on ice, centrifuge the 2 tubes at 10,000 rpm for 3 min. Always place your tubes in the centrifuge in a way that they will be balanced.
10. Remove and discard the supernatant fraction from each tube after centrifugation. Then add 100 µl SDS loading buffer and 200 µl H2O to the pellet fraction from ONE tube and use a blue tip to gently resuspend the pellet fraction. It is best to use your pipette tip to squirt the SDS loading buffer mix onto the pellet rather than trying to suck the pellet into the SDS loading buffer mix. If you are unable to dissolve your pellet, add another 100 µl of SDS loading buffer and try again. After the pellet is resuspended, make sure the tube is still labeled LSP and save the fraction for electrophoresis in the next lab.
Name:___________________________Section:________
4-4
11. Be sure that the following fractions from your lab group are clearly marked. Then place each fraction in the appropriately marked eppendorf rack on the group lab bench designated by your TA:
1) High Salt Supernatant from step 7- label HSS 2) High Salt Pellet from step 8- label HSP 3) Low Salt Pellet from step 11-label LSP
The fractions from your group will be combined with the same fractions from other lab groups to make a single combined fraction for each. In next week’s lab, you will carry out the electrophoresis of the combined HSS, HSP, and LSP fractions. The class as a whole will run one gel of the three combined fractions loaded into adjacent wells, next one loaded with a protein molecular weight standard. This gel will be stained with the general protein stain (Coomassie), allowing you to visualize the entire protein composition of each sample. Each bench will also run a pair of gels with one of the combined fractions loaded into every well of the two gels The TA will assign a combined fraction to each bench. These gels will be used for immunoblotting of the fractions. The proteins must first be transferred to nitrocellulose and strips of the resulting protein blot will be immunoblotted with antibodies for actin and myosin. Each lab group will be given two strips for each fraction; one strip from each fraction will be used for actin-immunoblotting and the other will be used for myosin-immunoblotting. The results of these experiments will allow you to you’re your hypothesis on page 2 and determine which of the three fractions contain actin and which contain myosin. Combining the fractions in this way will produce an averaging of the fractionation results from individual lab groups to minimize error and, more importantly, will increase the likelihood of success with the immunoblotting technique for all lab groups.
Bioinformatics Analyses of Actin and Myosin
You will now use bioinformatics tools to analyze the amino acid sequences of actin and myosin to examine the physical basis of their different solubilities in salt. The instructions for this exercise are in a file on the desktop of the computer at your bench. Insert your answers into that file and save it under a new name. Then either e-mail the file to yourself or use a flash drive to transport it to your computer for printing. Both students of each lab group should include a printed copy of the completed exercise with Lab Report 3 (parts A-C). The exercise is a group effort, and, therefore, it is expected that partners will have similar answers. However, each partner should use his/her own words in phrasing his/her answers.
(#11-#19) in 3A Bioinformatics Exercise
Name:___________________________Section:________
4-5
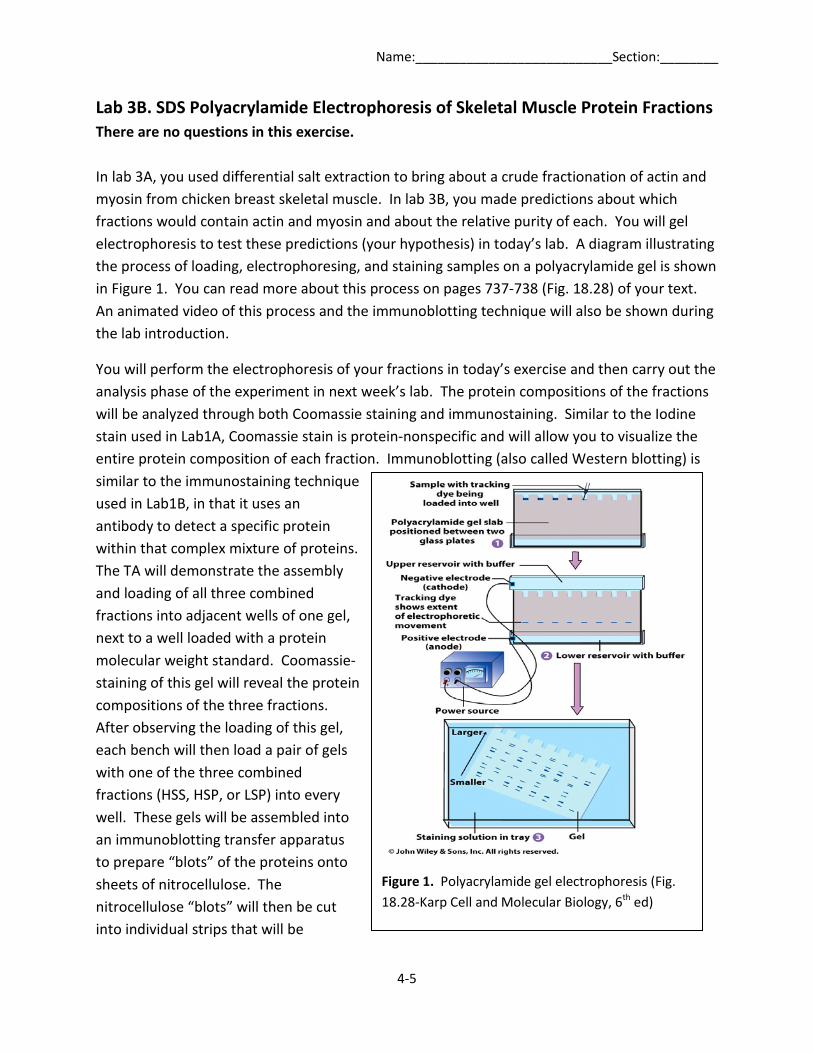
Figure 1. Polyacrylamide gel electrophoresis (Fig. 18.28-Karp Cell and Molecular Biology, 6th ed)
Lab 3B. SDS Polyacrylamide Electrophoresis of Skeletal Muscle Protein Fractions There are no questions in this exercise. In lab 3A, you used differential salt extraction to bring about a crude fractionation of actin and myosin from chicken breast skeletal muscle. In lab 3B, you made predictions about which fractions would contain actin and myosin and about the relative purity of each. You will gel electrophoresis to test these predictions (your hypothesis) in today’s lab. A diagram illustrating the process of loading, electrophoresing, and staining samples on a polyacrylamide gel is shown in Figure 1. You can read more about this process on pages 737-738 (Fig. 18.28) of your text. An animated video of this process and the immunoblotting technique will also be shown during the lab introduction.
You will perform the electrophoresis of your fractions in today’s exercise and then carry out the analysis phase of the experiment in next week’s lab. The protein compositions of the fractions will be analyzed through both Coomassie staining and immunostaining. Similar to the Iodine stain used in Lab1A, Coomassie stain is protein-nonspecific and will allow you to visualize the entire protein composition of each fraction. Immunoblotting (also called Western blotting) is similar to the immunostaining technique used in Lab1B, in that it uses an antibody to detect a specific protein within that complex mixture of proteins. The TA will demonstrate the assembly and loading of all three combined fractions into adjacent wells of one gel, next to a well loaded with a protein molecular weight standard. Coomassie-staining of this gel will reveal the protein compositions of the three fractions. After observing the loading of this gel, each bench will then load a pair of gels with one of the three combined fractions (HSS, HSP, or LSP) into every well. These gels will be assembled into an immunoblotting transfer apparatus to prepare “blots” of the proteins onto sheets of nitrocellulose. The nitrocellulose “blots” will then be cut into individual strips that will be
Name:___________________________Section:________
4-6
incubated with antibodies that are specific for the proteins of interest (actin and myosin). The antibody incubations will be done in next week’s lab. Using strips from a common blot for combined fractions will eliminate the variability of results between lab groups and maximize the likelihood of all lab groups having a successful immunoblotting result.
There will be multiple long steps in the protocol (electrophoresis and protein transfer steps). During these steps, you can return to the bioinformatics exercise from Lab 4, if you did not complete it in that lab period. There will also be a class discussion of that exercise. A second bioinformatics exercise is on the desktop of your laptop. If time permits, you can do this exercise during these long steps.
LAB EXERCISE The following reagents and supplies should be sitting on your bench: 1) Combined HSS, HSP, or LSP fraction to be used by your bench 2) Package of SDS polyacrylamide gels (1 per bench) 4) Plastic container of Western transfer buffer 5) Green lever tool 6) 3 sheets filter paper 7) 1 sheet nitrocellulose membrane (WEAR GLOVES) 8) Electrophoresis unit (1 per bench) 9) Power supply (1 per bench) 10) Scissors in Lab Bench Box SDS ELECTROPHORESIS OF PROTEIN FRACTIONS 1. First prepare your samples for the electrophoresis. The samples contain SDS loading buffer.
Boiling the samples in SDS will cause the proteins to denature. The anionic SDS (See structure on pg. 129 of your text) will coat the surface of the denatured proteins, giving them a uniformly negative charge that will migrate toward the positive pole when subjected to an electrical current. A heat block is set up for boiling your samples on a group bench in the middle of the lab. The TA will help you with this process. Be sure to puncture the top of the eppendorf tube of your fraction with a needle before placing it in a well of the heat block for 2-5 min. The sample can then sit on your benchtop while you assemble the gels into your electrophoresis unit.
Name:___________________________Section:________
4-7
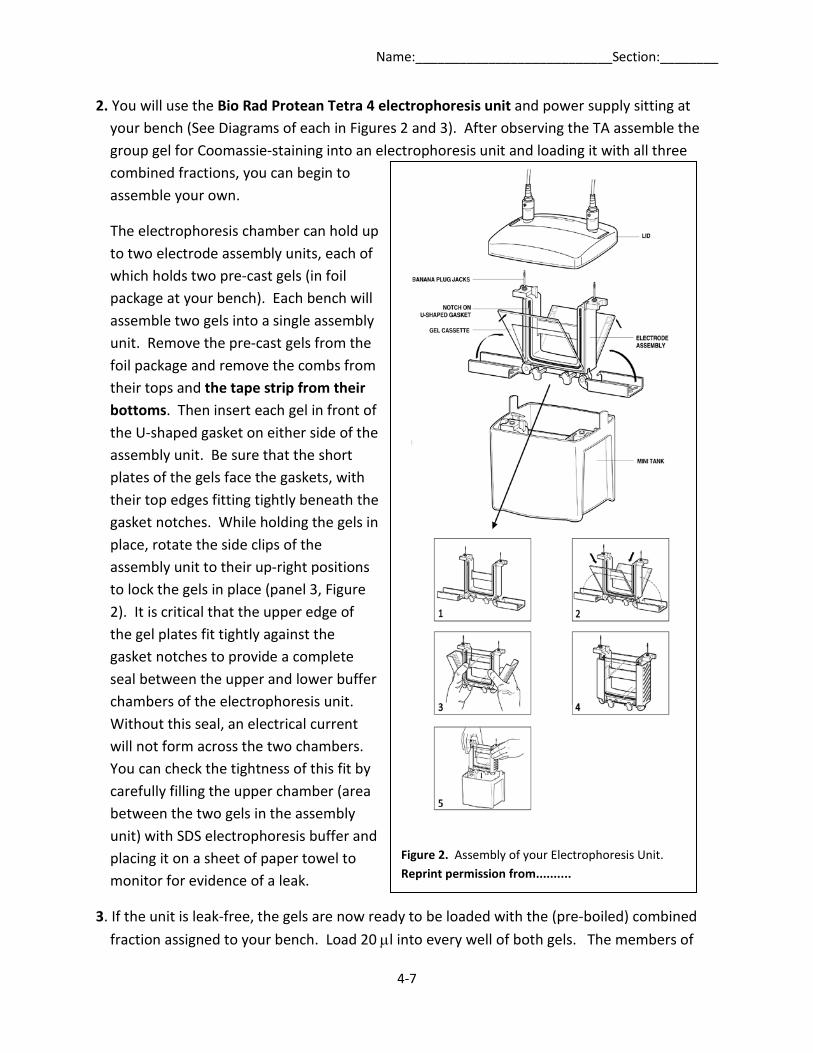
Figure 2. Assembly of your Electrophoresis Unit. Reprint permission from..........
2. You will use the Bio Rad Protean Tetra 4 electrophoresis unit and power supply sitting at your bench (See Diagrams of each in Figures 2 and 3). After observing the TA assemble the group gel for Coomassie-staining into an electrophoresis unit and loading it with all three combined fractions, you can begin to assemble your own.
The electrophoresis chamber can hold up to two electrode assembly units, each of which holds two pre-cast gels (in foil package at your bench). Each bench will assemble two gels into a single assembly unit. Remove the pre-cast gels from the foil package and remove the combs from their tops and the tape strip from their bottoms. Then insert each gel in front of the U-shaped gasket on either side of the assembly unit. Be sure that the short plates of the gels face the gaskets, with their top edges fitting tightly beneath the gasket notches. While holding the gels in place, rotate the side clips of the assembly unit to their up-right positions to lock the gels in place (panel 3, Figure 2). It is critical that the upper edge of the gel plates fit tightly against the gasket notches to provide a complete seal between the upper and lower buffer chambers of the electrophoresis unit. Without this seal, an electrical current will not form across the two chambers. You can check the tightness of this fit by carefully filling the upper chamber (area between the two gels in the assembly unit) with SDS electrophoresis buffer and placing it on a sheet of paper towel to monitor for evidence of a leak.
3. If the unit is leak-free, the gels are now ready to be loaded with the (pre-boiled) combined fraction assigned to your bench. Load 20 µl into every well of both gels. The members of
Name:___________________________Section:________
4-8
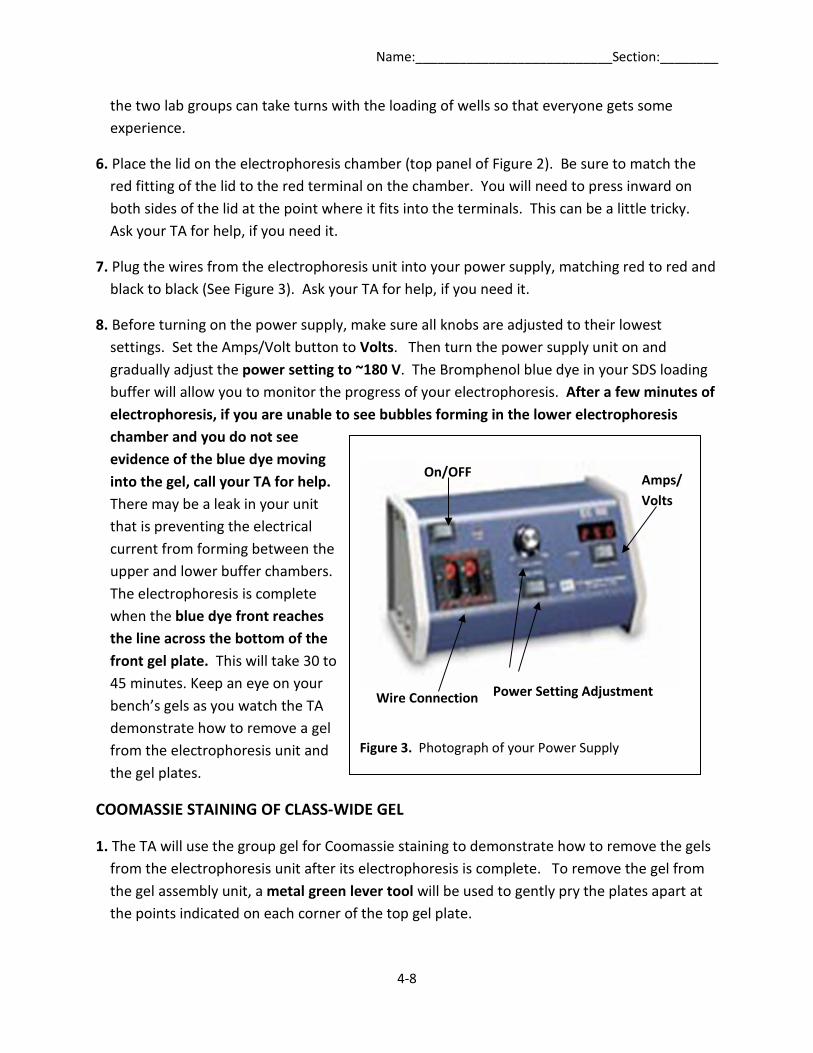
Figure 3. Photograph of your Power Supply
On/OFF Amps/ Volts
Power Setting Adjustment Wire Connection
the two lab groups can take turns with the loading of wells so that everyone gets some experience.
6. Place the lid on the electrophoresis chamber (top panel of Figure 2). Be sure to match the red fitting of the lid to the red terminal on the chamber. You will need to press inward on both sides of the lid at the point where it fits into the terminals. This can be a little tricky. Ask your TA for help, if you need it.
7. Plug the wires from the electrophoresis unit into your power supply, matching red to red and black to black (See Figure 3). Ask your TA for help, if you need it.
8. Before turning on the power supply, make sure all knobs are adjusted to their lowest settings. Set the Amps/Volt button to Volts. Then turn the power supply unit on and gradually adjust the power setting to ~180 V. The Bromphenol blue dye in your SDS loading buffer will allow you to monitor the progress of your electrophoresis. After a few minutes of electrophoresis, if you are unable to see bubbles forming in the lower electrophoresis chamber and you do not see evidence of the blue dye moving into the gel, call your TA for help. There may be a leak in your unit that is preventing the electrical current from forming between the upper and lower buffer chambers. The electrophoresis is complete when the blue dye front reaches the line across the bottom of the front gel plate. This will take 30 to 45 minutes. Keep an eye on your bench’s gels as you watch the TA demonstrate how to remove a gel from the electrophoresis unit and the gel plates.
COOMASSIE STAINING OF CLASS-WIDE GEL
1. The TA will use the group gel for Coomassie staining to demonstrate how to remove the gels from the electrophoresis unit after its electrophoresis is complete. To remove the gel from the gel assembly unit, a metal green lever tool will be used to gently pry the plates apart at the points indicated on each corner of the top gel plate.
Name:___________________________Section:________
4-9
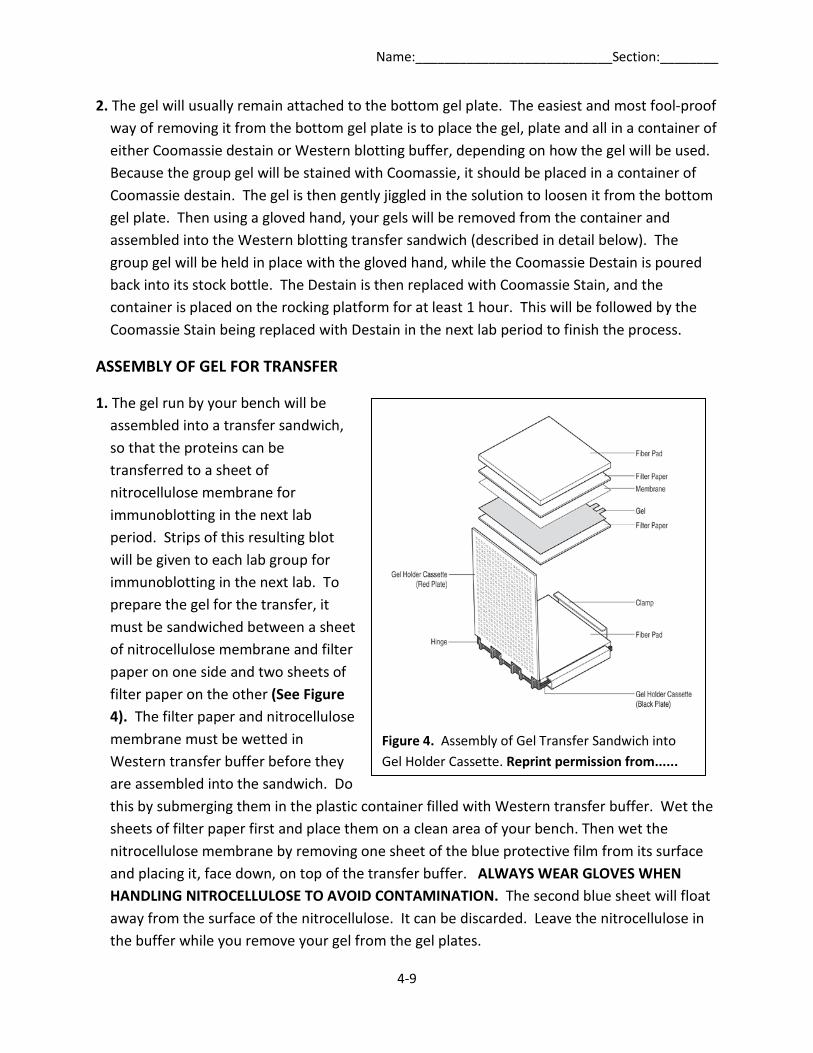
Figure 4. Assembly of Gel Transfer Sandwich into Gel Holder Cassette. Reprint permission from......
2. The gel will usually remain attached to the bottom gel plate. The easiest and most fool-proof way of removing it from the bottom gel plate is to place the gel, plate and all in a container of either Coomassie destain or Western blotting buffer, depending on how the gel will be used. Because the group gel will be stained with Coomassie, it should be placed in a container of Coomassie destain. The gel is then gently jiggled in the solution to loosen it from the bottom gel plate. Then using a gloved hand, your gels will be removed from the container and assembled into the Western blotting transfer sandwich (described in detail below). The group gel will be held in place with the gloved hand, while the Coomassie Destain is poured back into its stock bottle. The Destain is then replaced with Coomassie Stain, and the container is placed on the rocking platform for at least 1 hour. This will be followed by the Coomassie Stain being replaced with Destain in the next lab period to finish the process.
ASSEMBLY OF GEL FOR TRANSFER
1. The gel run by your bench will be assembled into a transfer sandwich, so that the proteins can be transferred to a sheet of nitrocellulose membrane for immunoblotting in the next lab period. Strips of this resulting blot will be given to each lab group for immunoblotting in the next lab. To prepare the gel for the transfer, it must be sandwiched between a sheet of nitrocellulose membrane and filter paper on one side and two sheets of filter paper on the other (See Figure 4). The filter paper and nitrocellulose membrane must be wetted in Western transfer buffer before they are assembled into the sandwich. Do this by submerging them in the plastic container filled with Western transfer buffer. Wet the sheets of filter paper first and place them on a clean area of your bench. Then wet the nitrocellulose membrane by removing one sheet of the blue protective film from its surface and placing it, face down, on top of the transfer buffer. ALWAYS WEAR GLOVES WHEN HANDLING NITROCELLULOSE TO AVOID CONTAMINATION. The second blue sheet will float away from the surface of the nitrocellulose. It can be discarded. Leave the nitrocellulose in the buffer while you remove your gel from the gel plates.
Name:___________________________Section:________
4-10
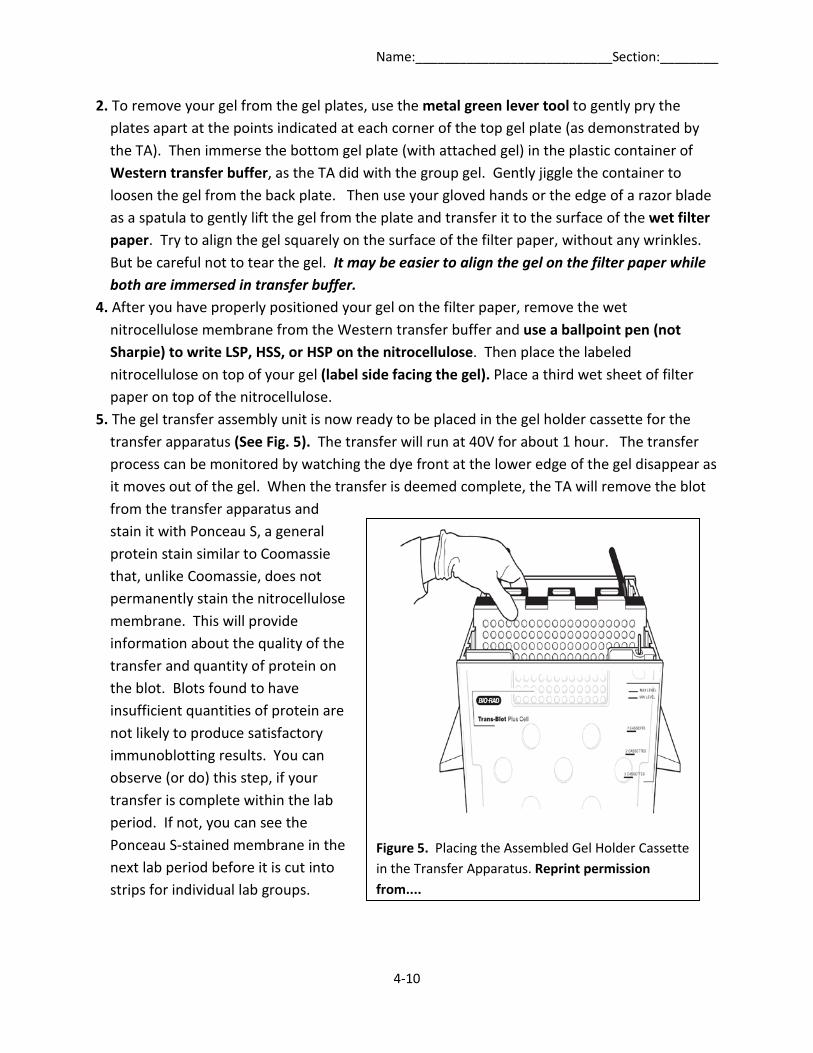
Figure 5. Placing the Assembled Gel Holder Cassette in the Transfer Apparatus. Reprint permission from....
2. To remove your gel from the gel plates, use the metal green lever tool to gently pry the plates apart at the points indicated at each corner of the top gel plate (as demonstrated by the TA). Then immerse the bottom gel plate (with attached gel) in the plastic container of Western transfer buffer, as the TA did with the group gel. Gently jiggle the container to loosen the gel from the back plate. Then use your gloved hands or the edge of a razor blade as a spatula to gently lift the gel from the plate and transfer it to the surface of the wet filter paper. Try to align the gel squarely on the surface of the filter paper, without any wrinkles. But be careful not to tear the gel. It may be easier to align the gel on the filter paper while both are immersed in transfer buffer.
4. After you have properly positioned your gel on the filter paper, remove the wet nitrocellulose membrane from the Western transfer buffer and use a ballpoint pen (not Sharpie) to write LSP, HSS, or HSP on the nitrocellulose. Then place the labeled nitrocellulose on top of your gel (label side facing the gel). Place a third wet sheet of filter paper on top of the nitrocellulose.
5. The gel transfer assembly unit is now ready to be placed in the gel holder cassette for the transfer apparatus (See Fig. 5). The transfer will run at 40V for about 1 hour. The transfer process can be monitored by watching the dye front at the lower edge of the gel disappear as it moves out of the gel. When the transfer is deemed complete, the TA will remove the blot from the transfer apparatus and stain it with Ponceau S, a general protein stain similar to Coomassie that, unlike Coomassie, does not permanently stain the nitrocellulose membrane. This will provide information about the quality of the transfer and quantity of protein on the blot. Blots found to have insufficient quantities of protein are not likely to produce satisfactory immunoblotting results. You can observe (or do) this step, if your transfer is complete within the lab period. If not, you can see the Ponceau S-stained membrane in the next lab period before it is cut into strips for individual lab groups.
Name:___________________________Section:________
4-11
Lab 3C. Electrophoretic Analysis of Protein and DNA Samples
Protein Samples
In lab 3A, you used differential salt extractions to fractionate actin and myosin from chicken skeletal muscle and prepared nitrocellulose blots of those fractions. In lab 3B, you carried out electrophoresis and immunoblot transfers of these fractions. In lab 3C, you will test your predictions about the actin and myosin compositions and relative purity of those fractions. We will use a general protein stain to visualize the entire protein composition of each fraction on the group electrophoresis gel. This will allow us to broadly assess the relative purity of the three fractions, but it cannot give specific information about the presence or absence of any particular protein (for example, actin and myosin). You will use immunoblotting (Western blotting) with anti-actin and anti-myosin antibodies to detect these specific proteins in each fraction. Strips of the blots produced from the gels of combined fractions by each lab bench will be used in immunoblotting.
DNA Samples
You will also use electrophoresis to analyze and compare different DNA samples in today’s lab. You will compare a sample of genomic DNA isolated from whole Drosophila melanogaster animals to that of a copy of a specific Drosophila gene cloned into a bacterial mini-chromosome (plasmid). Three versions of the Drosophila gene, one wild type and two mutants, will be examined. As in protein electrophoresis, the rate of migration of a DNA molecule is proportional to its size. The density of the gel matrix of an agarose gel also affects this migration rate and the size range of DNA molecules that can be resolved from one another. The resolution range for the typical 1% agarose gel used in today’s exercise is ~0.5 kb -10.0 kb. The total size of the Drosophila melanogaster genome is ~123,000 kb, with each major chromosome spanning ~50,000 kb. Remember that each chromosome is a single linear dsDNA molecule. It is clear that a molecule of 50,000 kb would not be resolved in such an electrophoresis; it would never even leave the loading well. It is, therefore, necessary to first cut genomic DNA into smaller fragments of resolvable size. To this end, restriction endonuclease enzymes are used to cut the DNA at specific DNA sequences. The sequence specificity of these enzymes generates a characteristic set of DNA fragments that reflects the underlying sequence of the DNA. An alteration in the characteristic set of DNA fragments of a gene can, therefore, provide visible evidence of a mutation in the gene. In today’s exercise, you will use this strategy to compare the three different versions (alleles) of the cloned Drosophila gene.
Name:___________________________Section:________
4-12
Lab Exercise:
You will find the following reagents and supplies:
on Ice (ice pan on your bench): Protein Samples: 2) 15 ml Milk Block (labeled BLOCK) 3) 5 ml anti-actin 1o antibody (produced in rabbit) (labeled Actin 1o) 4) 5 ml tube anti-myosin 1o antibody (produced in mouse) (labeled Myosin 1o) 5) 10 ml tube anti- mouse IgG 2o antibody-AP(labeled Mouse 2o) DNA Samples: 1) DNA molecular weight standards (labeled Mkr) 2) set of wt, Mutant 1, and Mutant 2 HOAP clones digested with EcoRI (labeled wt-Eco, Mut 1-
Eco, and Mut 2-Eco) 3) set of wt, Mutant 1, and Mutant 2 HOAP clones digested with BamHI (labeled wt-Bam, Mut
1-Bam, and Mut 2-Bam) at RT: Protein Samples: 1) 2 Western blotting dishes 2) bottle Wash Buffer 3) BCIP/NBT tablet (1 per bench) 4) forceps in Lab Bench Box DNA Samples: 1) agarose mini-gel (1 per bench) 2) Horizontal gel box (1 per bench) 3) Power supply (1 per bench) 4) calculator in Lab Bench Box ANALYSIS OF PROTEIN SAMPLES
Destaining of Coomassie-Stained Class-wide Gel 1. Watch as a volunteer from the class helps remove the Coomassie stain from the class-wide
gel from last week. A gloved hand is used to hold the gel in place, while pouring the Coomassie stain into the lab Coomassie stain stock bottle.
2. The gel and container will then be rinsed with H2O. Use your gloved hand to hold the gel in place, while pouring it into the sink.
Name:___________________________Section:________
4-13
3. The container is then filled with Destain (~2/3 full). Place sheets of Kimwipe along the two longer edges of the gel. Replace the container lid and place on rocking platform. The gel will continue to destain during the immunoblotting protocol.
Western Blotting (Immunoblotting) Protocol The Western blotting (immunoblotting) protocol is similar to the immunostaining protocol used in Lab1B, in that it includes a 1o antibody incubation step, followed by a 2o antibody incubation step. Remember that the 2o antibodies used in immunostaining are usually labeled with a fluorescent tag. In the immunoblotting protocol, the 2o antibody usually has an enzyme that converts an uncolored substrate to a colored product linked to it. The enzymatic reaction leaves a colored band in the region where the 1o antibody is bound to the protein of its specificity on the nitrocellulose membrane. Many different Western blotting detection systems have been developed; these use a variety of conjugated enzymes and colorimetric substrates. We will use a 2o antibody that has the Alkaline Phosphatase (AP) enzyme covalently linked to it, with its colorimetric substrate BCIP/NBT. The AP enzyme will produce a dark blue band over the specific protein recognized by each 1o antibody. Both primary antibodies were produced in mouse, so the AP-linked anti-mouse 2o antibody will be used with each 1o antibody.
1. You will be given two strips of the nitrocellulose blot for each fraction (one for actin immunoblotting and one for myosin immunoblotting). Note that the bottom of each blot has already been marked with lines to indicate the identity of the protein fraction on the blot (1 line-HSS; 2 lines-HSP; 3 lines-LSP) and primary antibody to be used (black-actin; red-myosin). Use your forceps to place the three strips marked with black lines in one dish and those marked with red lines in the second. Use a piece of tape to label the dish for the actin blots (black lines)-actin and that for the myosin blots (red lines)-myosin. Also include your bench #/name on the dish labels. Pour enough PBS into each container to wet the strips.
2. BLOCK: Get a tube of Milk Block from the Lab Reagent Bench. Incubating your blots with a blocking solution before incubating them with antibodies will reduce non-specific binding of the antibodies to the blots. Divide the Milk Block between the two dishes and place the dishes on the rocking platform for 10 min (Be sure they are labeled with your bench #/name). The milk proteins in the Blocking solution will absorb the Ponceau S stain from the membrane, turning it red. Don’t be alarmed.
3. WASH: After the blocking step, pour the Milk Block into the liquid discard container at your bench. Then immediately pour PBS from the bottle at your bench into each dish to rinse the membranes. (Be careful throughout the blotting procedure not to let the membrane dry out. This will result in high background levels on your final blot.) Rinse the blot strips several
Name:___________________________Section:________
4-14
times, until the rinse is clear. While the membrane is still submerged in PBS, get 1 tube of anti-Actin 1o and 1 tube of anti-Myosin 1o from the ice bucket on the Lab Reagent bench.
4. lo INCUBATION: Pour the anti-actin 1o antibody into the dish labeled ACTIN and the anti-myosin 1o antibody into the dish labeled MYOSIN. Place on rocking platform for 1 hr.
DURING THE 1o INCUBATION: Go to the ANALYSIS OF DNA SAMPLES section on page 7. Return to Step 5 after the 1o INCUBATION is complete in 1 hr.
5. WASH: After the 1o incubation step, pour each 1o antibody solution into your liquid discard container. Pour PBS into the dishes to rinse the strip blots. (Be careful not to let the membrane dry out.) Rinse until clear. While the membrane is still submerged in PBS, get the tube of anti-mouse 2o from the ice pan on the Lab Reagent bench.
6. 2o INCUBATION: Pour the PBS out of each dish and then split the anti-mouse 2o into the dish labeled MYOSIN and the dish labeled ACTIN. Place both on rocking platform for 1 hr.
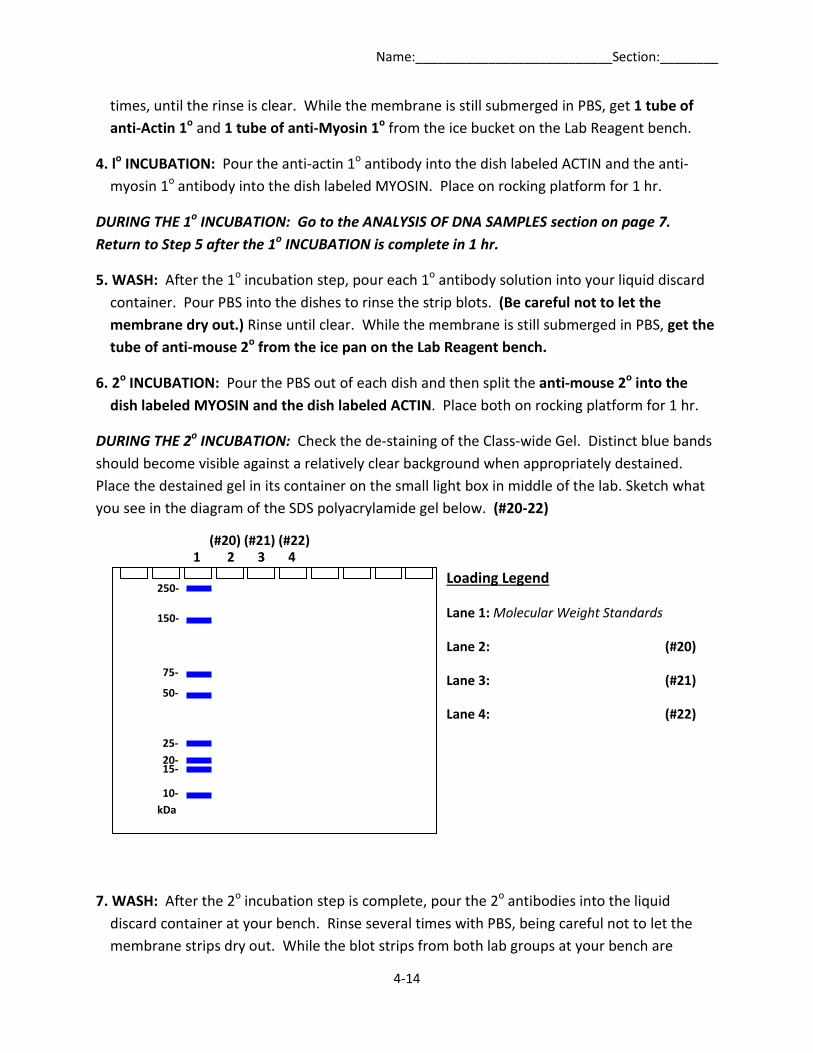
DURING THE 2o INCUBATION: Check the de-staining of the Class-wide Gel. Distinct blue bands should become visible against a relatively clear background when appropriately destained. Place the destained gel in its container on the small light box in middle of the lab. Sketch what you see in the diagram of the SDS polyacrylamide gel below. (#20-22)
7. WASH: After the 2o incubation step is complete, pour the 2o antibodies into the liquid discard container at your bench. Rinse several times with PBS, being careful not to let the membrane strips dry out. While the blot strips from both lab groups at your bench are
Loading Legend
Lane 1: Molecular Weight Standards
Lane 2: (#20)
Lane 3: (#21)
Lane 4: (#22)
250-
150-
75-
50- 25- 20- 15-
10- kDa
1 2 3 4 (#20) (#21) (#22)
Name:___________________________Section:________
4-15
submerged in PBS, dissolve the tablet of BCIP/NBT in 15 ml H2O. This will make enough BCIP/NBT substrate for both dishes from both lab groups at your bench. So coordinate the timing of the Detection step with the other lab group at your bench.
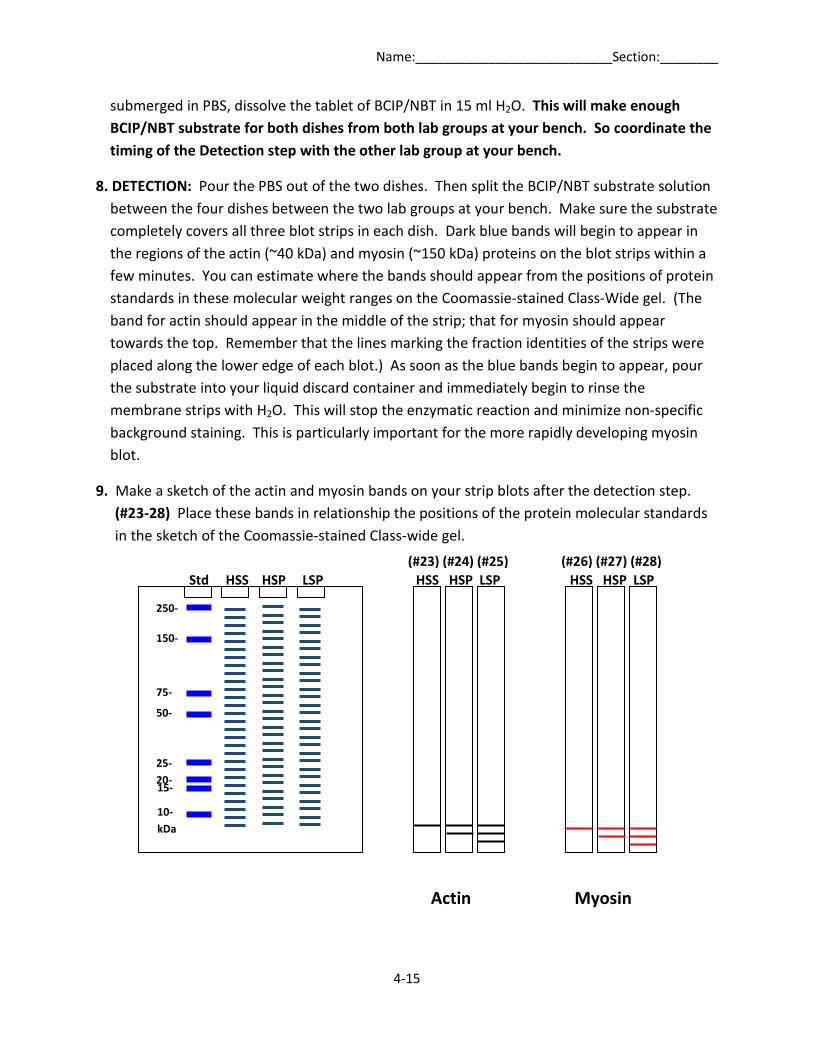
8. DETECTION: Pour the PBS out of the two dishes. Then split the BCIP/NBT substrate solution between the four dishes between the two lab groups at your bench. Make sure the substrate completely covers all three blot strips in each dish. Dark blue bands will begin to appear in the regions of the actin (~40 kDa) and myosin (~150 kDa) proteins on the blot strips within a few minutes. You can estimate where the bands should appear from the positions of protein standards in these molecular weight ranges on the Coomassie-stained Class-Wide gel. (The band for actin should appear in the middle of the strip; that for myosin should appear towards the top. Remember that the lines marking the fraction identities of the strips were placed along the lower edge of each blot.) As soon as the blue bands begin to appear, pour the substrate into your liquid discard container and immediately begin to rinse the membrane strips with H2O. This will stop the enzymatic reaction and minimize non-specific background staining. This is particularly important for the more rapidly developing myosin blot.
9. Make a sketch of the actin and myosin bands on your strip blots after the detection step. (#23-28) Place these bands in relationship the positions of the protein molecular standards in the sketch of the Coomassie-stained Class-wide gel.
Actin Myosin
Std HSS HSP LSP HSS HSP LSP HSS HSP LSP
250-
150-
75-
50- 25- 20- 15-
10- kDa
(#23) (#24) (#25) (#26) (#27) (#28)
Name:___________________________Section:________
4-16
Questions on Analysis of Protein Samples
1. Using the protein molecular weight standards on the Coomassie-stained class-wide gel as a guide, did the sizes of the bands that appeared on the two sets of immunoblots agree with the expected sizes for actin and myosin? (#29)
2. Judging from the immunoblots of the HSP and LSP fractions with anti-myosin antibody, how effective was the high salt extraction in removing myosin from the skeletal muscle cells with high salt? (#30)
3. Judging from the Coomassie staining profiles of the HSP and LSP fractions on the class-wide gel, how effective was the high salt extraction in removing myosin from the skeletal muscle cells with high salt? (#31)
4. Based on what you have learned in lecture about the actinomyosin contractile cycle in muscle contraction, what effect would adding ATP to the High Salt Buffer have on the extraction of myosin from the skeletal muscle? Would it be better or worse and explain why? (#32)
Name:___________________________Section:________
4-17
5. You probably found that our protocol was fairly effective at extracting myosin from the skeletal muscle, but less effective at extracting actin. Based on what you have learned about the salt solubility of actin, relative to myosin, and the effects of ATP on actin discussed in question #6, devise a buffer composition (salt and ATP concentrations) that might be most effective in extracting actin from skeletal muscle. (#33)
ANALYSIS OF DNA SAMPLES
The restriction digests of the cloned Drosophila gene can provide direct visible evidence of a mutation, as these samples come from a clone of the gene. In order to similarly detect a mutation in the copy of the endogenous gene within the Drosophila genome, a mechanism for specifically detecting restriction fragments from that gene among the complex set of fragments generated in a restriction digest of the entire Drosophila genome. Remember that the Drosophila melanogaster genome consists of ~123,000 kb. For a 1.1 kb Drosophila gene (like the one you will analyze today), what fraction of the genome does this gene constitute? (#34)
In today’s exercise the DNA has been cut with either the EcoRI or the BamHI restriction endonuclease. Each of these enzymes recognizes and produces a cut at a specific 6 bp sequence. How frequently would you expect a specific 6 bp sequence to be found in any genome, considering that there are 4 possibilities for each of the 6 nucleotides in the restriction enzyme cutting site? (#35)
Based on this frequency and the size of the Drosophila melanogaster genome given above, how many cutting sites for this enzyme would you expect to find in the entire Drosophila genome? (#36)
This calculation tells us that it would be impossible to identify a fragment from any particular gene among 30,000 possibilities. In analyzing proteins in protein electrophoresis, an antibody can be used to detect a specific protein among a complex mixture of proteins. We will need a similar specificity reagent to detect a specific DNA fragment among the 30,000 fragments from the entire Drosophila genome. Nucleic acids are not particularly antigenic (fail to stimulate the
Name:___________________________Section:________
4-18
immune system to produce an antibody), but the specificity of complementary base pairing can provide a mechanism for detecting a specific DNA or RNA molecule. Chapter 18 of your text (Fig. 18.36) describes the Southern blotting technique, which uses a labeled DNA fragment that is complementary to a gene of interest to specifically detect that gene among the complex mixture of DNA fragments generated by a restriction digestion of the entire genome. Southern blotting is similar to Western blotting in that the molecules to be probed must first be transferred to a sheet of nitrocellulose membrane before probing. In Western blotting, proteins on the nitrocellulose membrane are probed with an antibody that recognizes a specific protein. In Southern blotting DNA fragments are probed with a labeled DNA fragment that is complementary to the gene of interest. (In Northern blotting, the labeled DNA is used to detect complementary mRNAs of interest.) Beca use the transfer and hybridization process for nuceic acids requires more time than is available in this lab period, the results of restriction digests of cloned genes will simulate the results of a Southern blot in comparison to a similar digest of genomic DNA.
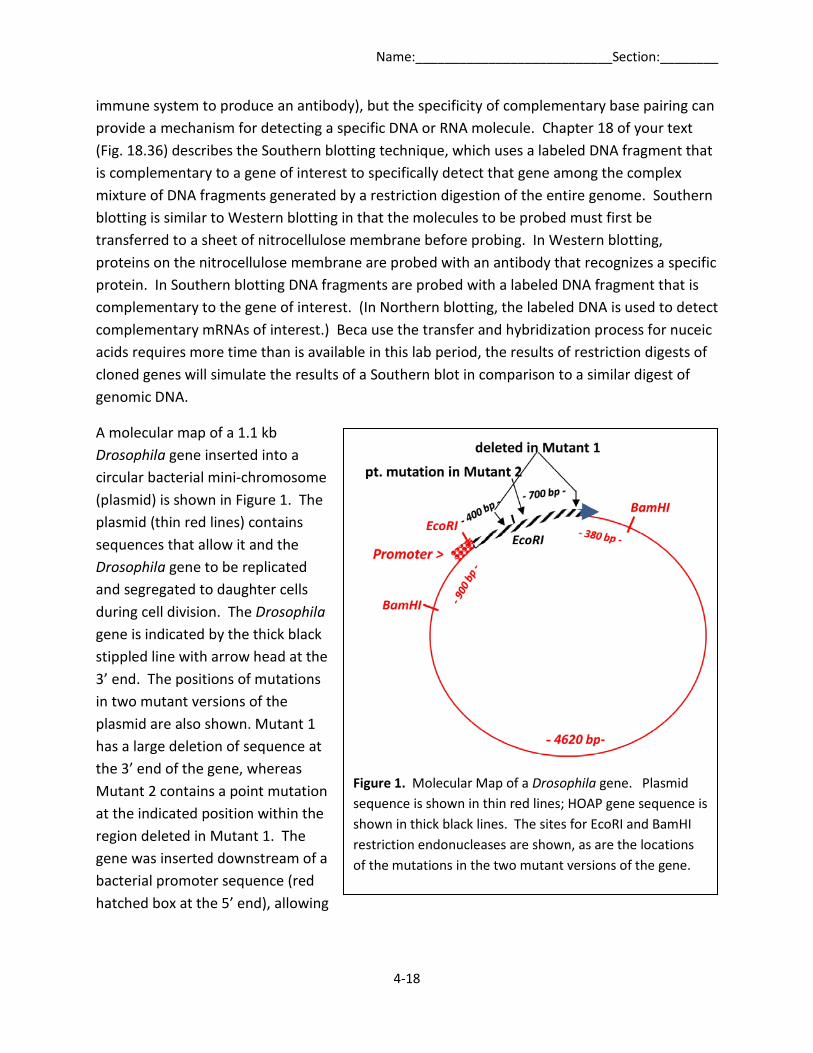
A molecular map of a 1.1 kb Drosophila gene inserted into a circular bacterial mini-chromosome (plasmid) is shown in Figure 1. The plasmid (thin red lines) contains sequences that allow it and the Drosophila gene to be replicated and segregated to daughter cells during cell division. The Drosophila gene is indicated by the thick black stippled line with arrow head at the 3’ end. The positions of mutations in two mutant versions of the plasmid are also shown. Mutant 1 has a large deletion of sequence at the 3’ end of the gene, whereas Mutant 2 contains a point mutation at the indicated position within the region deleted in Mutant 1. The gene was inserted downstream of a bacterial promoter sequence (red hatched box at the 5’ end), allowing
Figure 1. Molecular Map of a Drosophila gene. Plasmid sequence is shown in thin red lines; HOAP gene sequence is shown in thick black lines. The sites for EcoRI and BamHI restriction endonucleases are shown, as are the locations of the mutations in the two mutant versions of the gene.
Name:___________________________Section:________
4-19
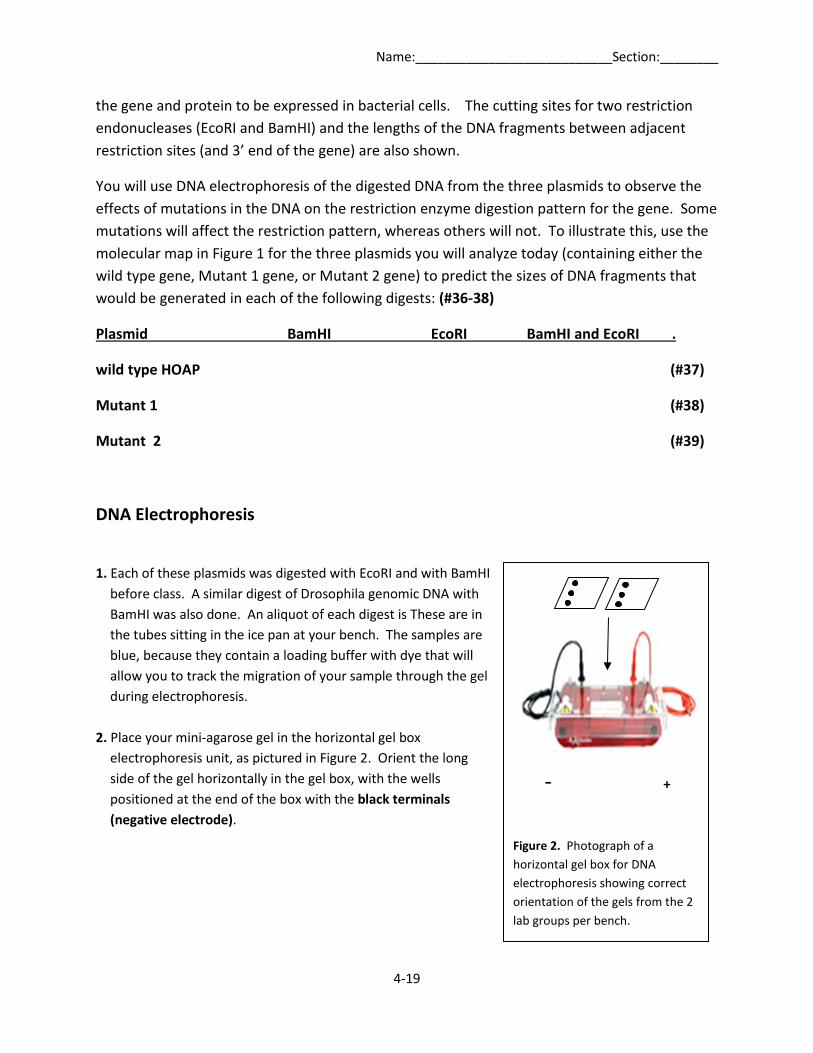
Figure 2. Photograph of a horizontal gel box for DNA electrophoresis showing correct orientation of the gels from the 2 lab groups per bench.
- +
the gene and protein to be expressed in bacterial cells. The cutting sites for two restriction endonucleases (EcoRI and BamHI) and the lengths of the DNA fragments between adjacent restriction sites (and 3’ end of the gene) are also shown.
You will use DNA electrophoresis of the digested DNA from the three plasmids to observe the effects of mutations in the DNA on the restriction enzyme digestion pattern for the gene. Some mutations will affect the restriction pattern, whereas others will not. To illustrate this, use the molecular map in Figure 1 for the three plasmids you will analyze today (containing either the wild type gene, Mutant 1 gene, or Mutant 2 gene) to predict the sizes of DNA fragments that would be generated in each of the following digests: (#36-38)
Plasmid BamHI EcoRI BamHI and EcoRI .
wild type HOAP (#37)
Mutant 1 (#38)
Mutant 2 (#39)
DNA Electrophoresis
1. Each of these plasmids was digested with EcoRI and with BamHI
before class. A similar digest of Drosophila genomic DNA with BamHI was also done. An aliquot of each digest is These are in the tubes sitting in the ice pan at your bench. The samples are blue, because they contain a loading buffer with dye that will allow you to track the migration of your sample through the gel during electrophoresis.
2. Place your mini-agarose gel in the horizontal gel box
electrophoresis unit, as pictured in Figure 2. Orient the long side of the gel horizontally in the gel box, with the wells positioned at the end of the box with the black terminals (negative electrode).
Name:___________________________Section:________
4-20
1 2 3 4 5 6 7 8
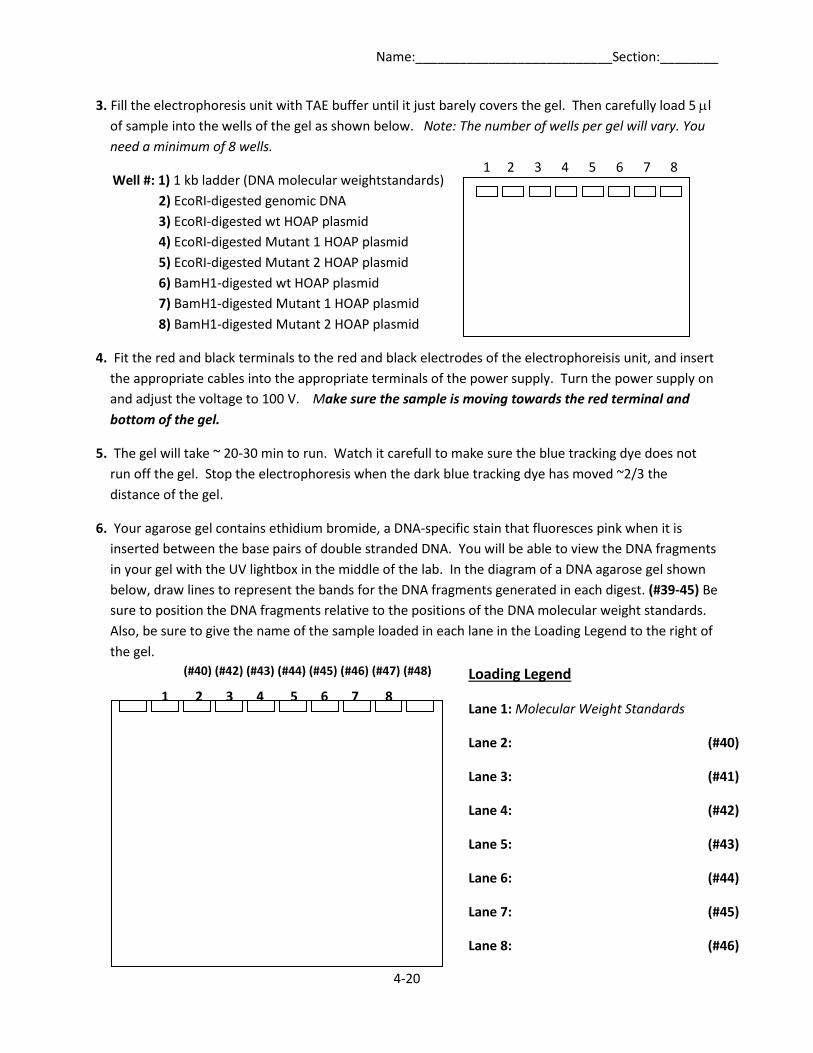
3. Fill the electrophoresis unit with TAE buffer until it just barely covers the gel. Then carefully load 5 µl of sample into the wells of the gel as shown below. Note: The number of wells per gel will vary. You need a minimum of 8 wells.
Well #: 1) 1 kb ladder (DNA molecular weightstandards) 2) EcoRI-digested genomic DNA 3) EcoRI-digested wt HOAP plasmid 4) EcoRI-digested Mutant 1 HOAP plasmid 5) EcoRI-digested Mutant 2 HOAP plasmid 6) BamH1-digested wt HOAP plasmid 7) BamH1-digested Mutant 1 HOAP plasmid 8) BamH1-digested Mutant 2 HOAP plasmid
4. Fit the red and black terminals to the red and black electrodes of the electrophoreisis unit, and insert the appropriate cables into the appropriate terminals of the power supply. Turn the power supply on and adjust the voltage to 100 V. Make sure the sample is moving towards the red terminal and bottom of the gel.
5. The gel will take ~ 20-30 min to run. Watch it carefull to make sure the blue tracking dye does not run off the gel. Stop the electrophoresis when the dark blue tracking dye has moved ~2/3 the distance of the gel.
6. Your agarose gel contains ethidium bromide, a DNA-specific stain that fluoresces pink when it is inserted between the base pairs of double stranded DNA. You will be able to view the DNA fragments in your gel with the UV lightbox in the middle of the lab. In the diagram of a DNA agarose gel shown below, draw lines to represent the bands for the DNA fragments generated in each digest. (#39-45) Be sure to position the DNA fragments relative to the positions of the DNA molecular weight standards. Also, be sure to give the name of the sample loaded in each lane in the Loading Legend to the right of the gel.
1 2 3 4 5 6 7 8
7- 6- 5-
4- 3-
2-
1-
0.5- kb
Loading Legend
Lane 1: Molecular Weight Standards
Lane 2: (#40)
Lane 3: (#41)
Lane 4: (#42)
Lane 5: (#43)
Lane 6: (#44)
Lane 7: (#45)
Lane 8: (#46)
(#40) (#42) (#43) (#44) (#45) (#46) (#47) (#48)
Name:___________________________Section:________
4-21
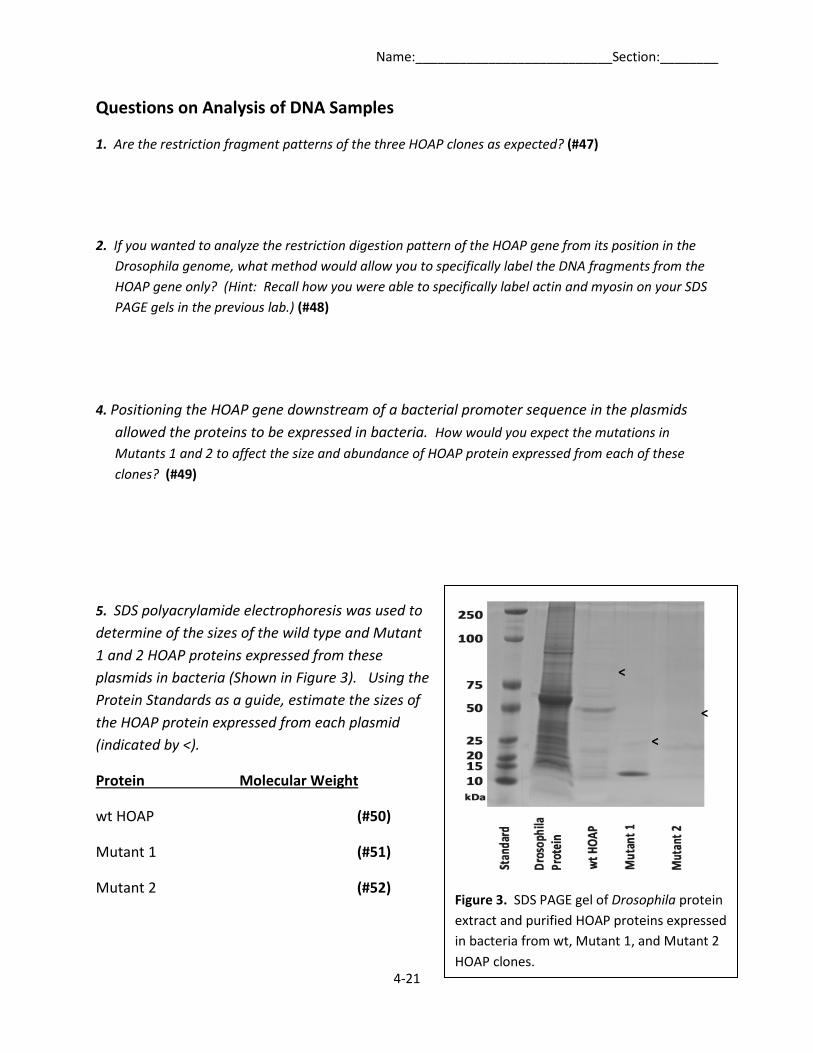
Figure 3. SDS PAGE gel of Drosophila protein extract and purified HOAP proteins expressed in bacteria from wt, Mutant 1, and Mutant 2 HOAP clones.
Questions on Analysis of DNA Samples
1. Are the restriction fragment patterns of the three HOAP clones as expected? (#47)
2. If you wanted to analyze the restriction digestion pattern of the HOAP gene from its position in the Drosophila genome, what method would allow you to specifically label the DNA fragments from the HOAP gene only? (Hint: Recall how you were able to specifically label actin and myosin on your SDS PAGE gels in the previous lab.) (#48)
4. Positioning the HOAP gene downstream of a bacterial promoter sequence in the plasmids allowed the proteins to be expressed in bacteria. How would you expect the mutations in Mutants 1 and 2 to affect the size and abundance of HOAP protein expressed from each of these clones? (#49)
5. SDS polyacrylamide electrophoresis was used to determine of the sizes of the wild type and Mutant 1 and 2 HOAP proteins expressed from these plasmids in bacteria (Shown in Figure 3). Using the Protein Standards as a guide, estimate the sizes of the HOAP protein expressed from each plasmid (indicated by <).
Protein Molecular Weight
wt HOAP (#50)
Mutant 1 (#51)
Mutant 2 (#52)
< <
<
Name:___________________________Section:________
4-22
6. Are the molecular weights of the two mutant HOAP proteins what you expected? How do you explain any discrepancy? (#53)
7. How does the protein profile of the Drosophila Protein Extract compare to the purified bacterially expressed protein? (#54)
8. If you wanted to analyze the size and abundance of the HOAP protein in an extract from a Drosophila animal that you think may be mutant for the HOAP gene, what method could you use to target your analysis specifically to the HOAP protein in that extract? (#55)