Embed Size (px)
Citation preview
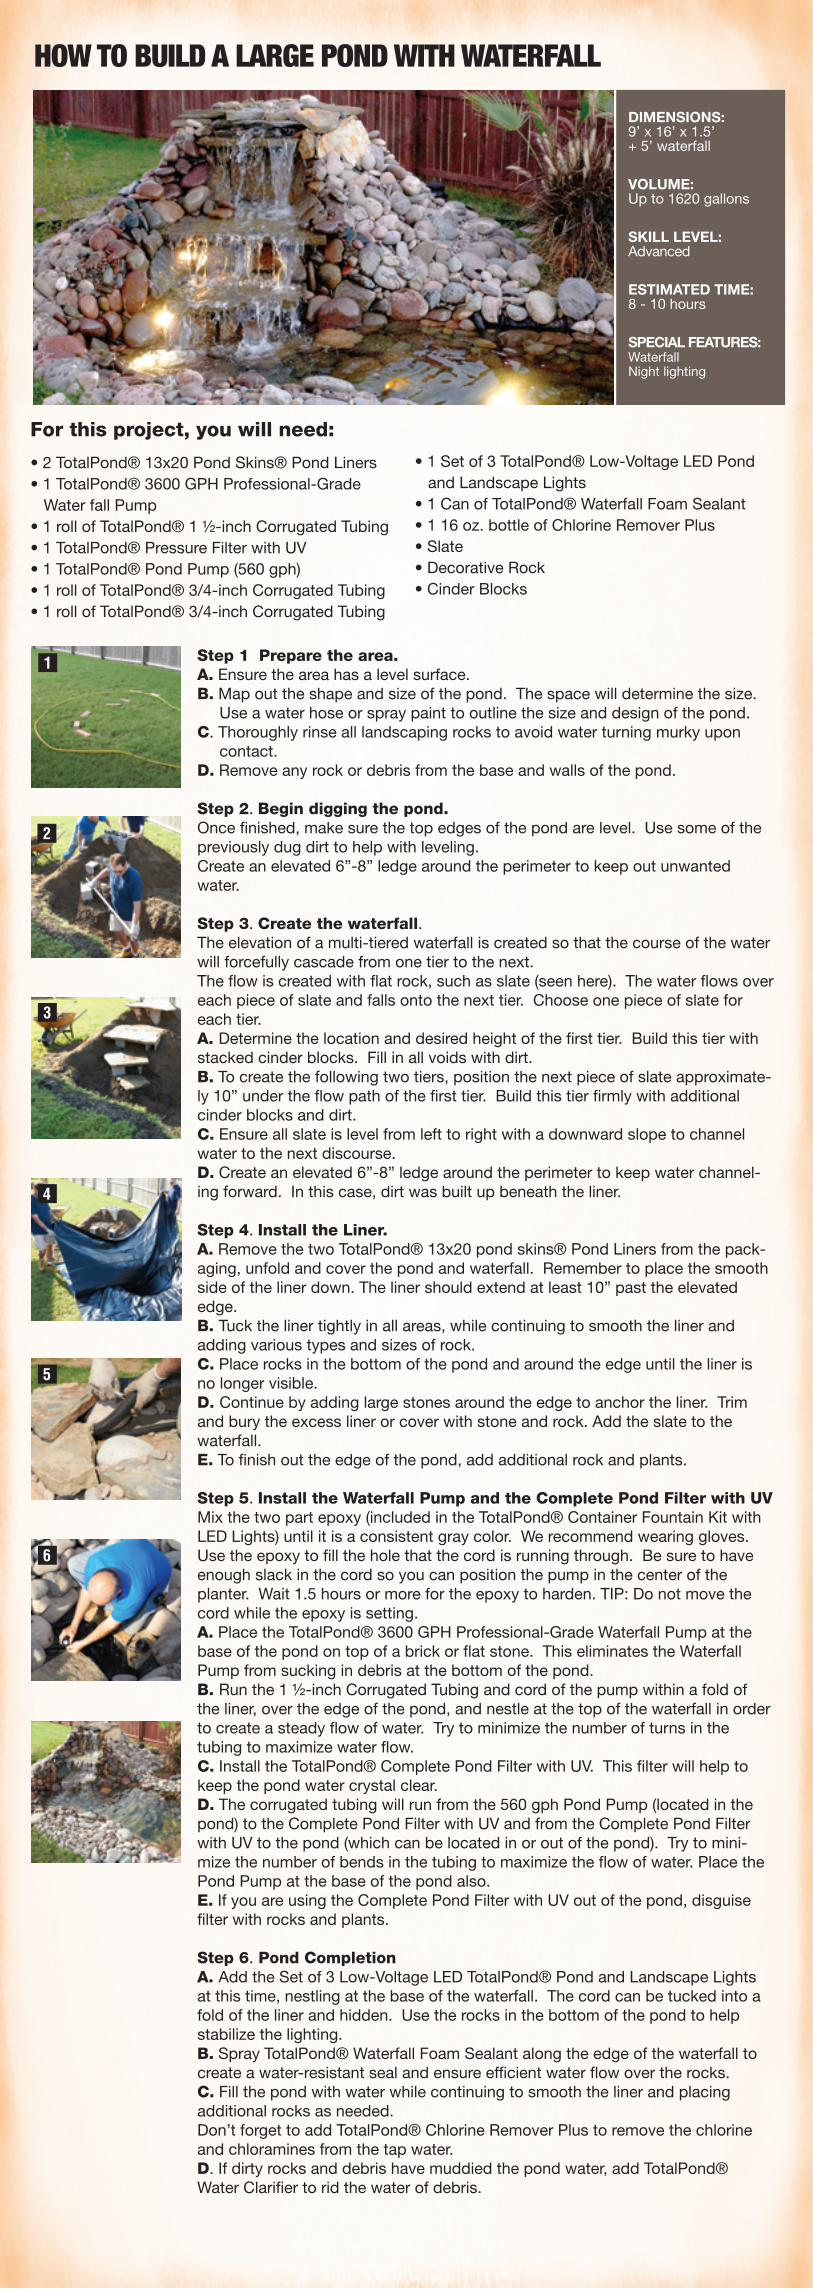
For this project, you will need:
• 2 TotalPond® 13x20 Pond Skins® Pond Liners• 1 TotalPond® 3600 GPH Professional-Grade Water fall Pump• 1 roll of TotalPond® 1 ½-inch Corrugated Tubing• 1 TotalPond® Pressure Filter with UV• 1 TotalPond® Pond Pump (560 gph)• 1 roll of TotalPond® 3/4-inch Corrugated Tubing• 1 roll of TotalPond® 3/4-inch Corrugated Tubing
• 1 Set of 3 TotalPond® Low-Voltage LED Pond and Landscape Lights• 1 Can of TotalPond® Waterfall Foam Sealant• 1 16 oz. bottle of Chlorine Remover Plus• Slate• Decorative Rock• Cinder Blocks
Step 1 Prepare the area.
A. Ensure the area has a level surface. B. Map out the shape and size of the pond. The space will determine the size. Use a water hose or spray paint to outline the size and design of the pond.C. Thoroughly rinse all landscaping rocks to avoid water turning murky upon contact.D. Remove any rock or debris from the base and walls of the pond.
Step 2. Begin digging the pond. Once finished, make sure the top edges of the pond are level. Use some of the previously dug dirt to help with leveling. Create an elevated 6”-8” ledge around the perimeter to keep out unwanted water.
Step 3. Create the waterfall.The elevation of a multi-tiered waterfall is created so that the course of the water will forcefully cascade from one tier to the next.The flow is created with flat rock, such as slate (seen here). The water flows over each piece of slate and falls onto the next tier. Choose one piece of slate for each tier.A. Determine the location and desired height of the first tier. Build this tier with stacked cinder blocks. Fill in all voids with dirt.B. To create the following two tiers, position the next piece of slate approximate-ly 10” under the flow path of the first tier. Build this tier firmly with additional cinder blocks and dirt.C. Ensure all slate is level from left to right with a downward slope to channel water to the next discourse.D. Create an elevated 6”-8” ledge around the perimeter to keep water channel-ing forward. In this case, dirt was built up beneath the liner.
Step 4. Install the Liner.A. Remove the two TotalPond® 13x20 pond skins® Pond Liners from the pack-aging, unfold and cover the pond and waterfall. Remember to place the smooth side of the liner down. The liner should extend at least 10” past the elevated edge. B. Tuck the liner tightly in all areas, while continuing to smooth the liner and adding various types and sizes of rock.C. Place rocks in the bottom of the pond and around the edge until the liner is no longer visible.D. Continue by adding large stones around the edge to anchor the liner. Trim and bury the excess liner or cover with stone and rock. Add the slate to the waterfall. E. To finish out the edge of the pond, add additional rock and plants. Step 5. Install the Waterfall Pump and the Complete Pond Filter with UVMix the two part epoxy (included in the TotalPond® Container Fountain Kit with LED Lights) until it is a consistent gray color. We recommend wearing gloves. Use the epoxy to fill the hole that the cord is running through. Be sure to have enough slack in the cord so you can position the pump in the center of the planter. Wait 1.5 hours or more for the epoxy to harden. TIP: Do not move the cord while the epoxy is setting.A. Place the TotalPond® 3600 GPH Professional-Grade Waterfall Pump at the base of the pond on top of a brick or flat stone. This eliminates the Waterfall Pump from sucking in debris at the bottom of the pond.B. Run the 1 ½-inch Corrugated Tubing and cord of the pump within a fold of the liner, over the edge of the pond, and nestle at the top of the waterfall in order to create a steady flow of water. Try to minimize the number of turns in the tubing to maximize water flow.C. Install the TotalPond® Complete Pond Filter with UV. This filter will help to keep the pond water crystal clear.D. The corrugated tubing will run from the 560 gph Pond Pump (located in the pond) to the Complete Pond Filter with UV and from the Complete Pond Filter with UV to the pond (which can be located in or out of the pond). Try to mini-mize the number of bends in the tubing to maximize the flow of water. Place the Pond Pump at the base of the pond also.E. If you are using the Complete Pond Filter with UV out of the pond, disguise filter with rocks and plants.
Step 6. Pond CompletionA. Add the Set of 3 Low-Voltage LED TotalPond® Pond and Landscape Lights at this time, nestling at the base of the waterfall. The cord can be tucked into a fold of the liner and hidden. Use the rocks in the bottom of the pond to help stabilize the lighting.B. Spray TotalPond® Waterfall Foam Sealant along the edge of the waterfall to create a water-resistant seal and ensure efficient water flow over the rocks. C. Fill the pond with water while continuing to smooth the liner and placing additional rocks as needed. Don’t forget to add TotalPond® Chlorine Remover Plus to remove the chlorine and chloramines from the tap water.D. If dirty rocks and debris have muddied the pond water, add TotalPond® Water Clarifier to rid the water of debris.
HOW TO BUILD A LARGE POND WITH WATERFALL
DIMENSIONS:9’ x 16’ x 1.5’+ 5’ waterfall
VOLUME:Up to 1620 gallons
SKILL LEVEL:Advanced
ESTIMATED TIME:8 - 10 hours
SPECIAL FEATURES:WaterfallNight lighting
1
2
3
4
5
6