Embed Size (px)
Citation preview
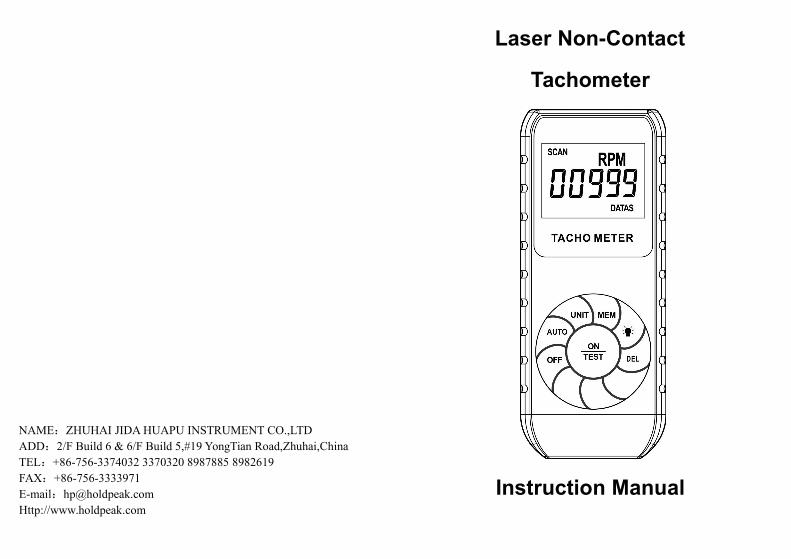
Laser Non-Contact
Tachometer
Instruction Manual
NAME:ZHUHAI JIDA HUAPU INSTRUMENT CO.,LTDADD:2/F Build 6 & 6/F Build 5,#19 YongTian Road,Zhuhai,ChinaTEL:+86-756-3374032 3370320 8987885 8982619FAX:+86-756-3333971E-mail:[email protected]://www.holdpeak.com


7
before attaching reflective tape. Shaft surface must be clean
and smooth before applying reflective tape.
(4-2) Very low RPM measurement: as it is easy to get high
resolution. If measuring the very low RPM values, suggest
user to attach more “REFLECTIVE MARKS” averagely.
Then divide the reading shown by the number of
“REFLECTIVE MARKS” to get the real RPM.
(4-3) If the instument is not to be used for any extended period,
remove batteries.
5.Accessories:
Reflecting tape marks length 600mm
Operation manual 1pc
TABLE OF CONTENTS
1.FEATURES……………………………………………1
2.SPECIFICATIONS……………………………1/2/3
3.PANEL DESCRIPTION…………………………3/4
4.MEASURING PROCEDURE…………………5/6/7
5.ACCESSORIES……………………………………7

1
1.FEATURES
※ It is used the microcomputer (CPU) technique and junction
laser technique for one instrument combine PHOTO TACH.
(RPM)
※ Wide measuring range and High resolution.
※ Auto emerald green backlight makes sure that tachometer can
work normally in any light circumstance.
※ The last displayed may be automatically stored in memory and
10s of measured value According to user needs .So this makes
customers collected and recorded data .(The tachometer starts
to store the data measured after which is renovation for three
times).
※ Low battery voltage indication.
※ The instrument is delicate and rugged .It uses the
durable .long-lasting components and a strong, light weight
ABS plastic housing .The housing has been carefully shaped to
fit comfortably in either hand.
2.SPECIFICATION
※ Display:5digital,13mm(0.5’’ Emerald green backlight LCD )
※ Accuracy : ±(0.05 % +1digital)Sampling Time:1sec (over6
the applied target. Verify that the MONTOR INDICATOR lights
when the target aligns with the beam.
d. It will display RPM value when display value stabilized.
(3) TOTAL MEASUREMENT
a .Apply a reflective mark to the object being measured . push the
function switch to display “0 ” on LCD.
b. Press measuring button, then you see light beam in line with the
target, start measuring. The value will add 1 as the object rotate a
circle or passed one reflective mark, herein, the total value will
stored in the meter until loosen the button.
(4) Reminds
(4-1) Reflective mark: cut and peel adhesive tape provided into
approx. 12mm(0.5’’)squares and apply one square to each
rotation shaft. The non-reflective area must always be
greater than the reflective area. If the shaft is normally
reflective, it must be covered with black tape or black paint

5
4.Measuring procedure
(1) ATTENTION BEFORE MEASURING
(1-1) When it is necessary to replace the battery(2 cell battery
voltage less than approx. 2.4V, “ ” will appear on
the display).
(1-2) Remove the screws of the battery cabinet by a screwdriver.
Slide the battery cover away from the Instrument and
remove the battery.
(1-3) Install the batteries into the case Permanent damage to the
circuit may result from incorrect installation.
(1-4) Don't illuminate other people's eyes with the laser and Laser
radition do not stare into beam.
(2) RPM MEASUREMENT
a .Apply a reflective mark to the object being measured . press
the TEST
button to tun on.
b .press the UNIT button to display “RPM ” on LCD.
c .Depress the TEST button and align the visible light beam with
2
60’RPM )
※ Measuring Range: 2.5 to 99999 RPM
※ Resolution: 0.1RPM (2.5to 9999.9 RPM)
1 RPM (over 10000 RPM)
※ Total Test Range: 1 to 99999
※ Range Select: Auto-Range
※ Time Base: Quartz crystal
※ Detecting Distance: 50mm---500mm
※ Illuminant: Wavelenght 630-670 nm Class 2 (Ⅱ) Laser
※ Dimension : 122×52×28mm
※ Power :2×1.5V AAA Size Battery.
※ Power consumption: MAX 35mA
Data Memory Explain
(1) The tachometer has ten groups of storage units, from DATA 0
to DATA 9, such as shown on the display DATA 5, said the current
is the DATA 5 storage unit , the measurement DATA of the
current will be stored in a DATA 5 storage unit, the tachometer can
be stored in the DATA of the maximum and the minimum , and the
last time the measured average.
(2) Data stored button operation

3
(2-1) Display last value before turning off the TEST button .
Continuous press MEM button, according to sequence
display MAX DATA or MIN DATA ,and AVG DATA of the
current storage unit., after display AVG DATA, And then
press the MEM, display the next data storage unit
(2-2) Press DEL button, clear all storage unit.
Reminds: AVG DATA will be AVG DATA of last measuring
data , But MAX DATA or MIN DATA is a data of all measuring
DATA. If you measure MAX DATA or MIN DATA of last measuring,
please Press DEL button to clear all DATA.
If you want to store measurement DATA in the storage unit of
DATA 5, please push the MEM button long, display will cycle DATA
0 to DATA 9, when display DATA 5, stop push MEM button, this
time measurement, the DATA is stored in the storage unit of DATA
5.
3. Panel description:
A: The laser emission and receiving port
4
B: Display window
C: Memory call button
D: Backlight button
E: Clear all Memory data botton
F: Select RPM or Total button
G: Continuous Measure button
H: Power OFF button
I : Power ON and Measure button
J: Top Cover