Embed Size (px)
Citation preview
31
• • • • • • • • • •
LESSON 2
2
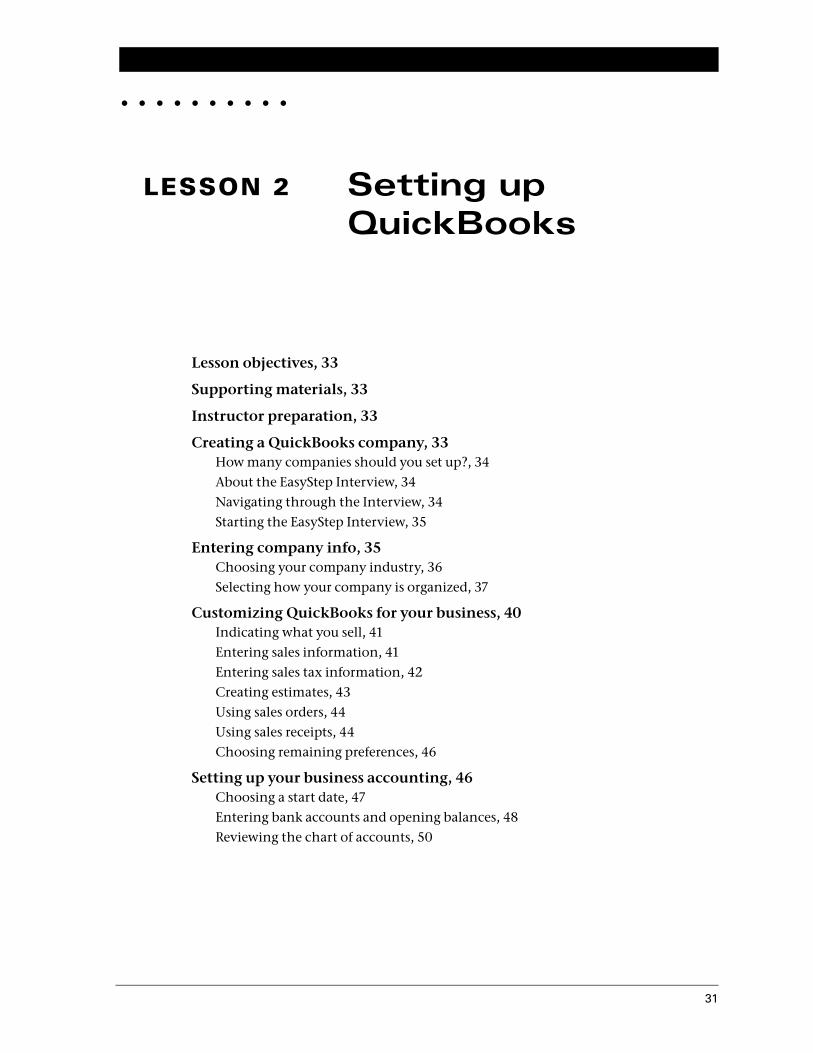
Lesson objectives, 33
Supporting materials, 33
Instructor preparation, 33
Creating a QuickBooks company, 33How many companies should you set up?, 34About the EasyStep Interview, 34Navigating through the Interview, 34Starting the EasyStep Interview, 35
Entering company info, 35Choosing your company industry, 36Selecting how your company is organized, 37
Customizing QuickBooks for your business, 40Indicating what you sell, 41Entering sales information, 41Entering sales tax information, 42Creating estimates, 43Using sales orders, 44Using sales receipts, 44Choosing remaining preferences, 46
Setting up your business accounting, 46Choosing a start date, 47Entering bank accounts and opening balances, 48Reviewing the chart of accounts, 50
Setting up QuickBooks

32
S e t t i n g u p Q u i c k B o o k s
Completing company file setup, 52Adding customers, 52
Adding a job, 54Adding vendors, 56
About customer and vendor types, 58Setting up additional accounts, 58
Adding a new account, 58Adding items, 60Entering historical transactions, 62Learning more about the company setup process, 62
Getting help while using QuickBooks, 62Using onscreen Help, 63
Finding a topic in the onscreen Help, 63
Closing the company file, 64
33
L E S S O N 2
Lesson objectives To discuss some of the decisions you need to make before using QuickBooks, such as
your QuickBooks start date and the number of QuickBooks companies you should create
To create a new QuickBooks company using the EasyStep Interview
To set QuickBooks preferences in the Interview
To record the opening balance for a checking account
To create customers, jobs, vendors, accounts, and items for a QuickBooks company
To practice using the QuickBooks Help tools
Supporting materials PowerPoint file: Lesson 2
Instructor preparation Review this lesson, including the examples, to make sure you’re familiar with the
material.
Ensure that all students have a copy of qblesson.qbb on their computer’s hard disk.
Creating a QuickBooks companyA QuickBooks company contains all the financial records for a single business. Before you can use QuickBooks, you need to tell QuickBooks about your business so that it can set up your company file. Setting up your company file properly is the most important thing you can do to help yourself manage your business efficiently and with confidence.
Explain to students that if they’ve been using Quicken or an older version of QuickBooks to keep their company’s financial records, they don’t need to create a new company; QuickBooks can convert their data for them. However, in this lesson, you’ll be showing them how to create a new QuickBooks company.
Qu
ickS
tart
Tip If you’ve been using Quicken or an earlier version of QuickBooks to keep your company’s
financial records, you don’t need to create a new company; QuickBooks can convert the data for you. See the QuickBooks Startup and Quick Reference Guide for detailed instructions, or search the onscreen Help index for “Quicken.”
34
S e t t i n g u p Q u i c k B o o k s
How many companies should you set up?
If you operate a business enterprise, the IRS expects you to clearly show all sources of income and to document any business expenses you claim as deductions. For tax purposes, therefore, it’s usually best to set up a separate QuickBooks company for each business enterprise you report on your tax forms.
About the EasyStep Interview
The EasyStep Interview walks you through the process of setting up your business on QuickBooks. The setup process is easy; the EasyStep Interview should take you only about 30 minutes to complete. When you set up your company file, QuickBooks will ask you for a number of details about your company.
Navigating through the Interview Click Next to display the next window in the Interview.
Click Prev to display the previous window in the Interview.
Click Leave to leave the Interview and return to QuickBooks. The next time you open the company file, QuickBooks remembers the information you have already entered and returns you to the EasyStep Interview where you left off.
Qu
ickS
tart
Tip Most small business owners do better with QuickBooks setup if they break the job into
manageable chunks. Here’s a suggested schedule for completion:
1 Choose the QuickBooks start date.
2 Gather the necessary business information and documents.
3 Set up the company file using the EasyStep Interview.
4 Fine-tune the chart of accounts.
5 Enter any historical transactions.
6 Complete customer and vendor information.
7 Complete the Item list.
8 Enter any optional adjustments.
Qu
ickS
tart
Tip Set aside a block of uninterrupted time to work on setting up your QuickBooks file. Don’t
try to complete the setup while you’re in the middle of a busy workday. If you schedule your time before or after work hours, or on the weekend, setup should take a few hours.
Your goal while setting up is to provide as much information as necessary to get going, but not to provide all the details at once. For example, you could enter data for only your biggest customers and vendors. Later, you can enter customer and vendor data as you begin working in QuickBooks. (Or, if you have an especially large customer base, you may wish to hire a data entry clerk to complete this task for you.)
35
L E S S O N 2
Starting the EasyStep Interview
To begin adding a new company:1 Start QuickBooks.
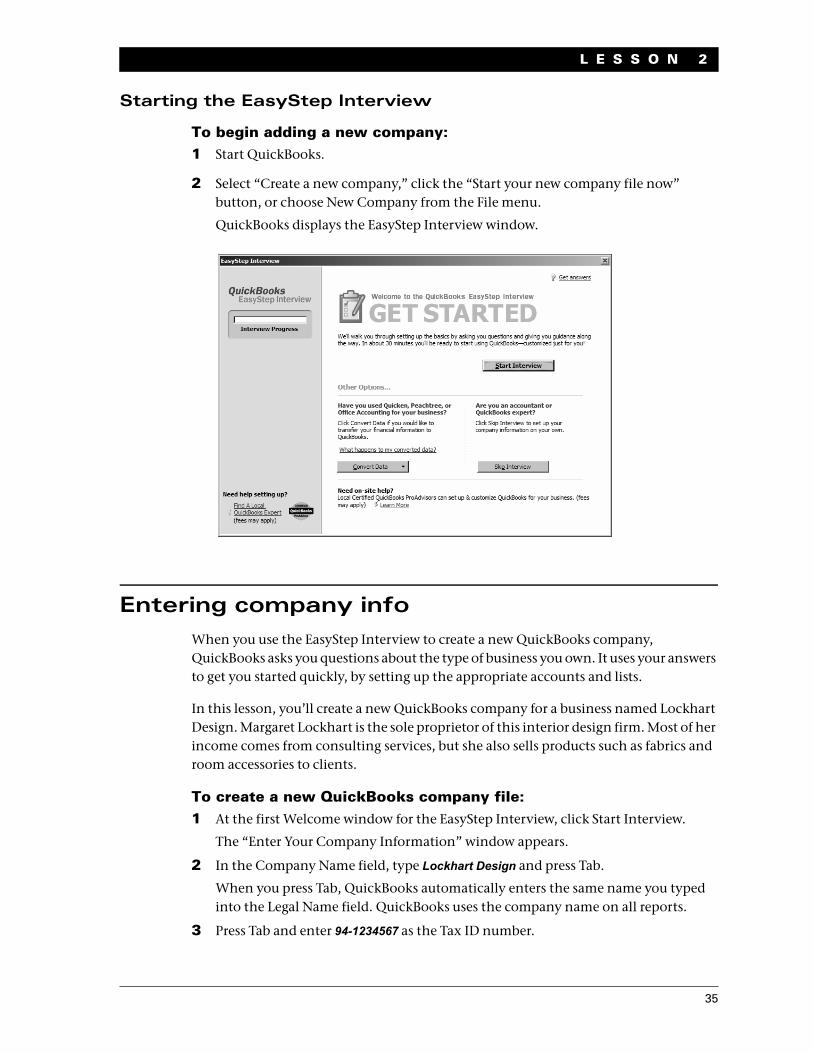
2 Select “Create a new company,” click the “Start your new company file now” button, or choose New Company from the File menu.
QuickBooks displays the EasyStep Interview window.
Entering company infoWhen you use the EasyStep Interview to create a new QuickBooks company, QuickBooks asks you questions about the type of business you own. It uses your answers to get you started quickly, by setting up the appropriate accounts and lists.
In this lesson, you’ll create a new QuickBooks company for a business named Lockhart Design. Margaret Lockhart is the sole proprietor of this interior design firm. Most of her income comes from consulting services, but she also sells products such as fabrics and room accessories to clients.
To create a new QuickBooks company file:1 At the first Welcome window for the EasyStep Interview, click Start Interview.
The “Enter Your Company Information” window appears.
2 In the Company Name field, type Lockhart Design and press Tab.
When you press Tab, QuickBooks automatically enters the same name you typed into the Legal Name field. QuickBooks uses the company name on all reports.
3 Press Tab and enter 94-1234567 as the Tax ID number.

36
S e t t i n g u p Q u i c k B o o k s
4 Type the following information in the street address, city, state, and zip fields.
1239 Bayshore RoadMiddlefield, CA 94432
QuickBooks prints this company address on checks, invoices, and other forms.
5 Now enter the following information in the Phone number and Fax number fields:
Phone: 650-555-1234
Fax: 650-555-5678
6 Next enter the email and Web addresses for Lockhart Design.
Email: [email protected]
Web Site: www.lockhart_design.com
Your screen should resemble the following.
7 Click Next.
Choosing your company industry
When you create a new QuickBooks company, you can select a company type that most closely matches your type of business, and QuickBooks sets up accounts and lists that are appropriate for your type of company.
Your industry selection is used by the interview to ask questions and recommend features that work best for your business.
QuickBooks will recommend features that can best meet your business needs, such as:
Enabling sales tax for retail businesses
Using estimates in QuickBooks for some service-based businesses
Managing inventory in QuickBooks for wholesalers and manufacturers
Creating income and expense categories
37
L E S S O N 2
Even if you own a type of company that isn’t specifically listed, you should select the one that’s closest. Margaret Lockhart does consulting, as well as retail sales, so we’ll select a Retail company type.
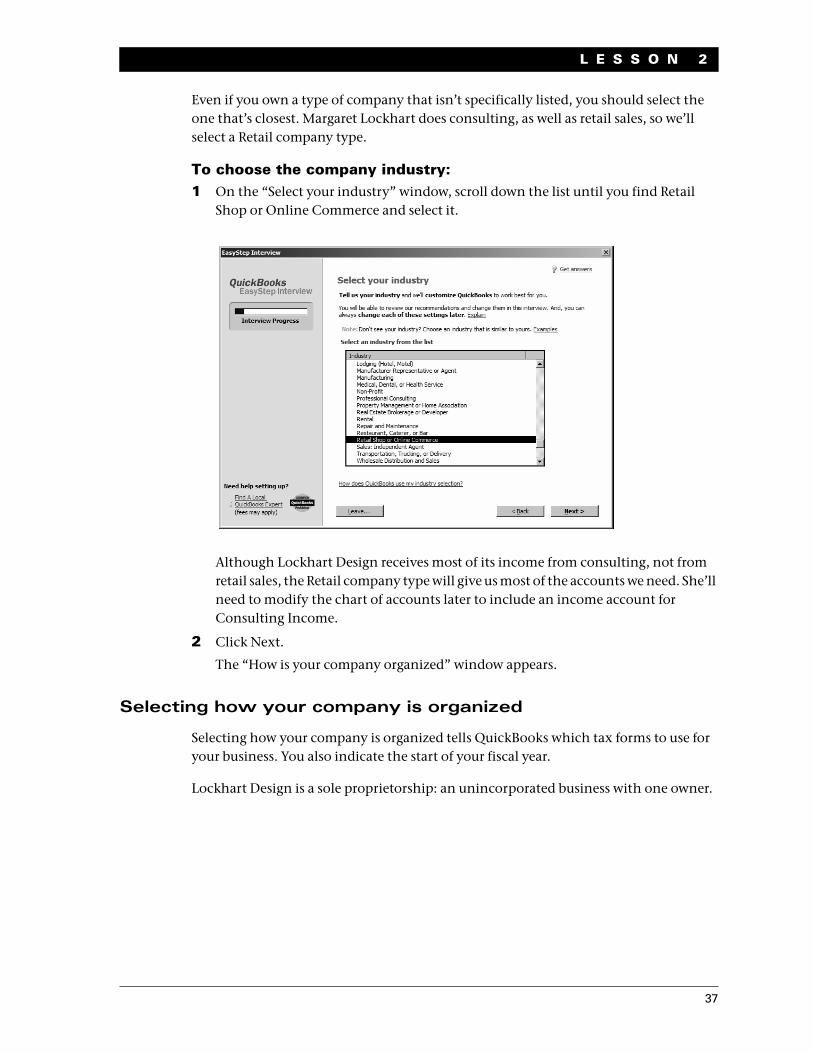
To choose the company industry:1 On the “Select your industry” window, scroll down the list until you find Retail
Shop or Online Commerce and select it.
Although Lockhart Design receives most of its income from consulting, not from retail sales, the Retail company type will give us most of the accounts we need. She’ll need to modify the chart of accounts later to include an income account for Consulting Income.
2 Click Next.
The “How is your company organized” window appears.
Selecting how your company is organized
Selecting how your company is organized tells QuickBooks which tax forms to use for your business. You also indicate the start of your fiscal year.
Lockhart Design is a sole proprietorship: an unincorporated business with one owner.
38
S e t t i n g u p Q u i c k B o o k s
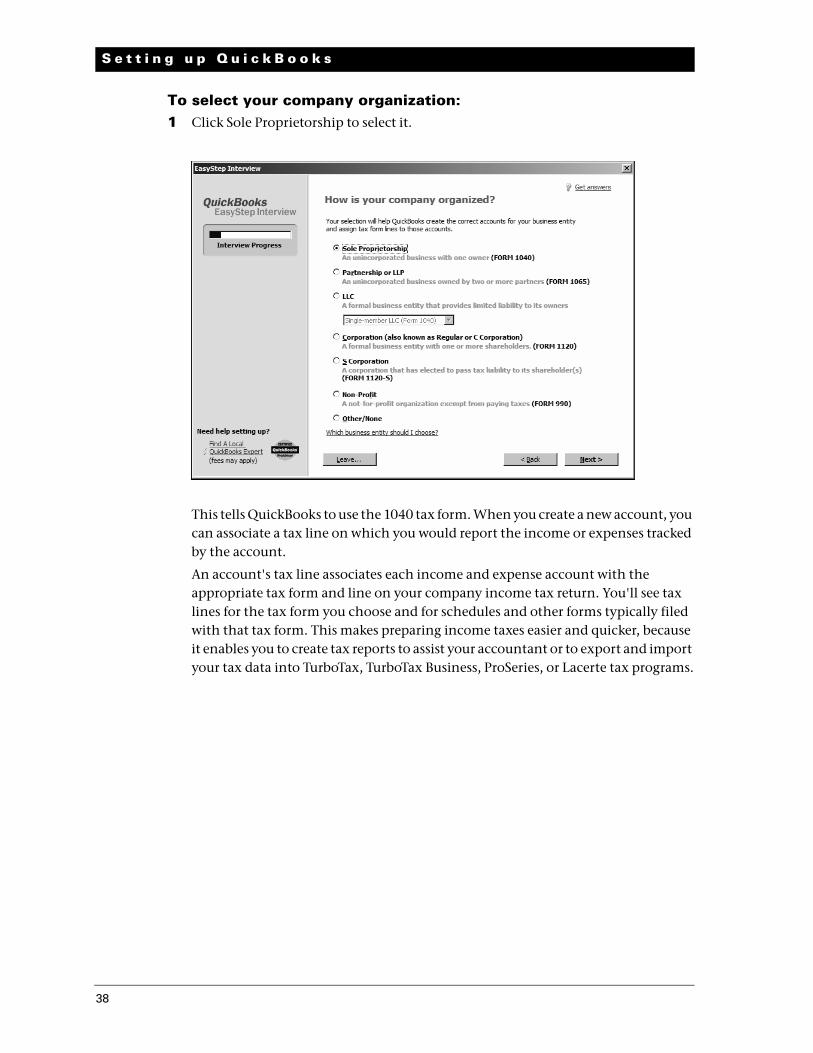
To select your company organization:1 Click Sole Proprietorship to select it.
This tells QuickBooks to use the 1040 tax form. When you create a new account, you can associate a tax line on which you would report the income or expenses tracked by the account.
An account's tax line associates each income and expense account with the appropriate tax form and line on your company income tax return. You'll see tax lines for the tax form you choose and for schedules and other forms typically filed with that tax form. This makes preparing income taxes easier and quicker, because it enables you to create tax reports to assist your accountant or to export and import your tax data into TurboTax, TurboTax Business, ProSeries, or Lacerte tax programs.
39
L E S S O N 2
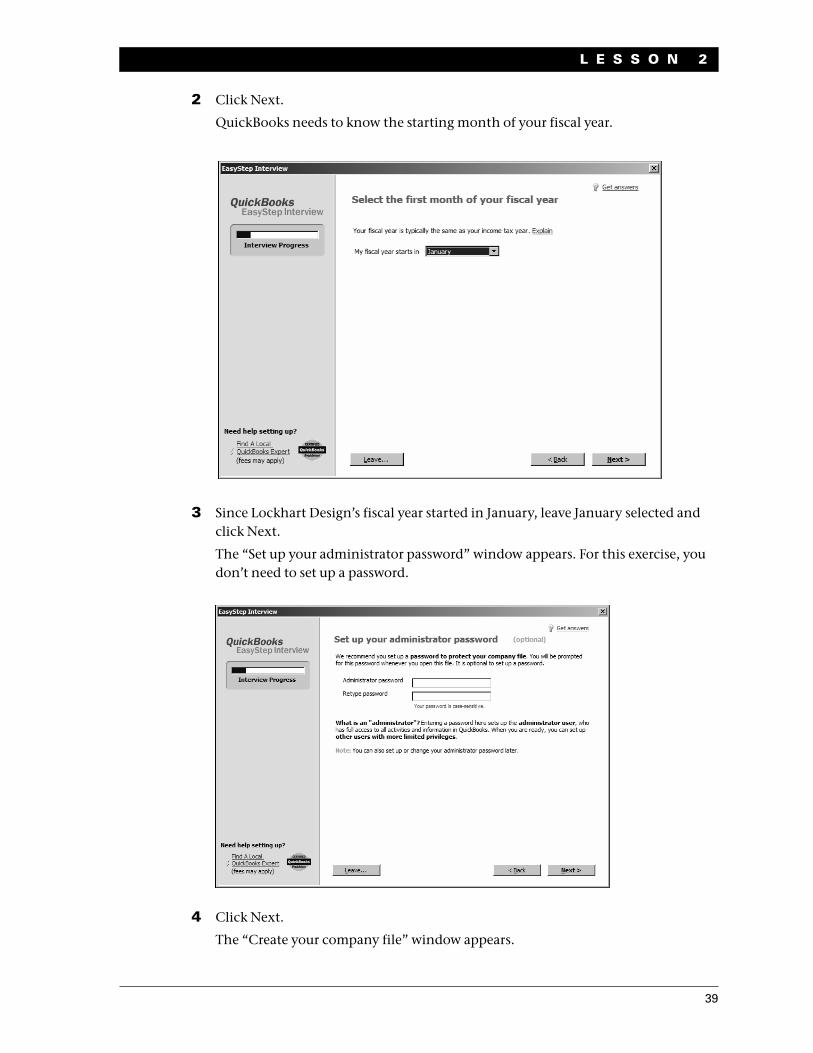
2 Click Next.
QuickBooks needs to know the starting month of your fiscal year.
3 Since Lockhart Design’s fiscal year started in January, leave January selected and click Next.
The “Set up your administrator password” window appears. For this exercise, you don’t need to set up a password.
4 Click Next.
The “Create your company file” window appears.

40
S e t t i n g u p Q u i c k B o o k s
5 Click Next to save the company file.
6 In the “Filename for New Company” window, make sure that QuickBooks is set to save the file in the QBtrain folder you set up in the introduction to this guide.
7 Click Save to accept the default filename of “Lockhart Design.”
QuickBooks creates the company file.
Customizing QuickBooks for your businessThe customization section of the EasyStep Interview is where you indicate:
What you sell
How and when your customers pay you
How you pay your bills
Based on your answers, QuickBooks sets preferences for the company file. The preferences enable certain features of the QuickBooks program.
41
L E S S O N 2
Indicating what you sell
You need to indicate what your business sells. In general, businesses either sell products or services, or both. Margaret Lockhart provides consulting services as well as selling products, such as fabrics.
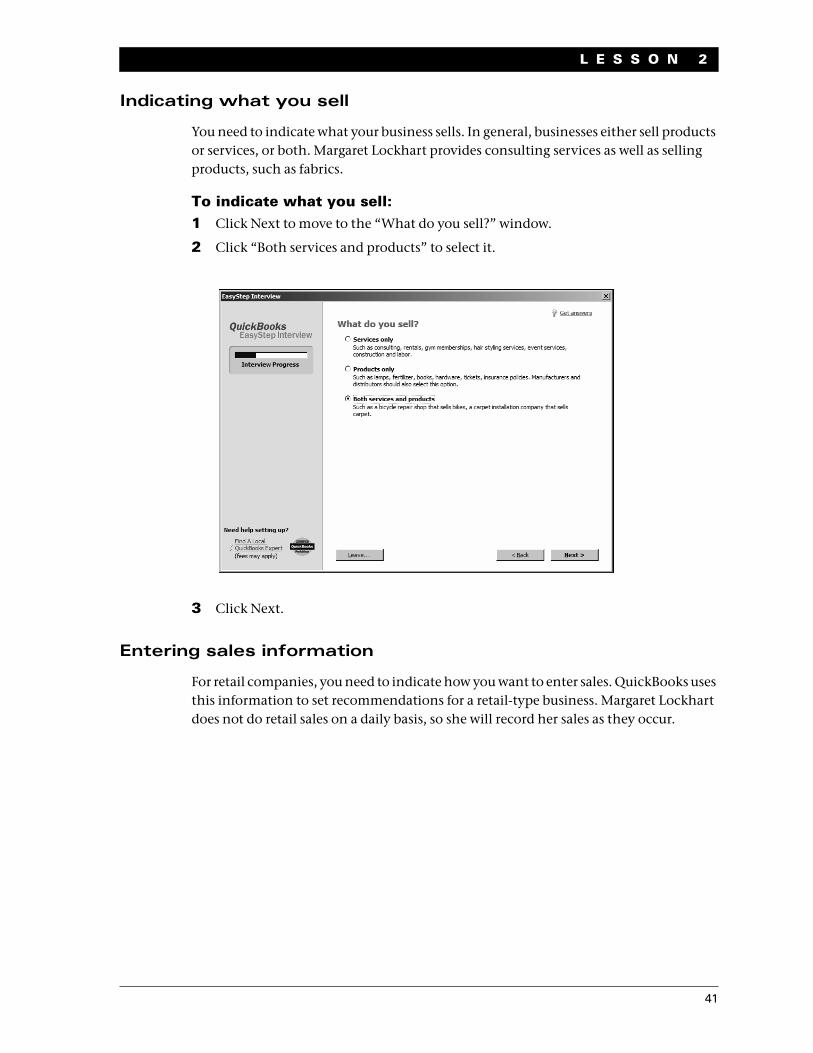
To indicate what you sell:1 Click Next to move to the “What do you sell?” window.
2 Click “Both services and products” to select it.
3 Click Next.
Entering sales information
For retail companies, you need to indicate how you want to enter sales. QuickBooks uses this information to set recommendations for a retail-type business. Margaret Lockhart does not do retail sales on a daily basis, so she will record her sales as they occur.
42
S e t t i n g u p Q u i c k B o o k s
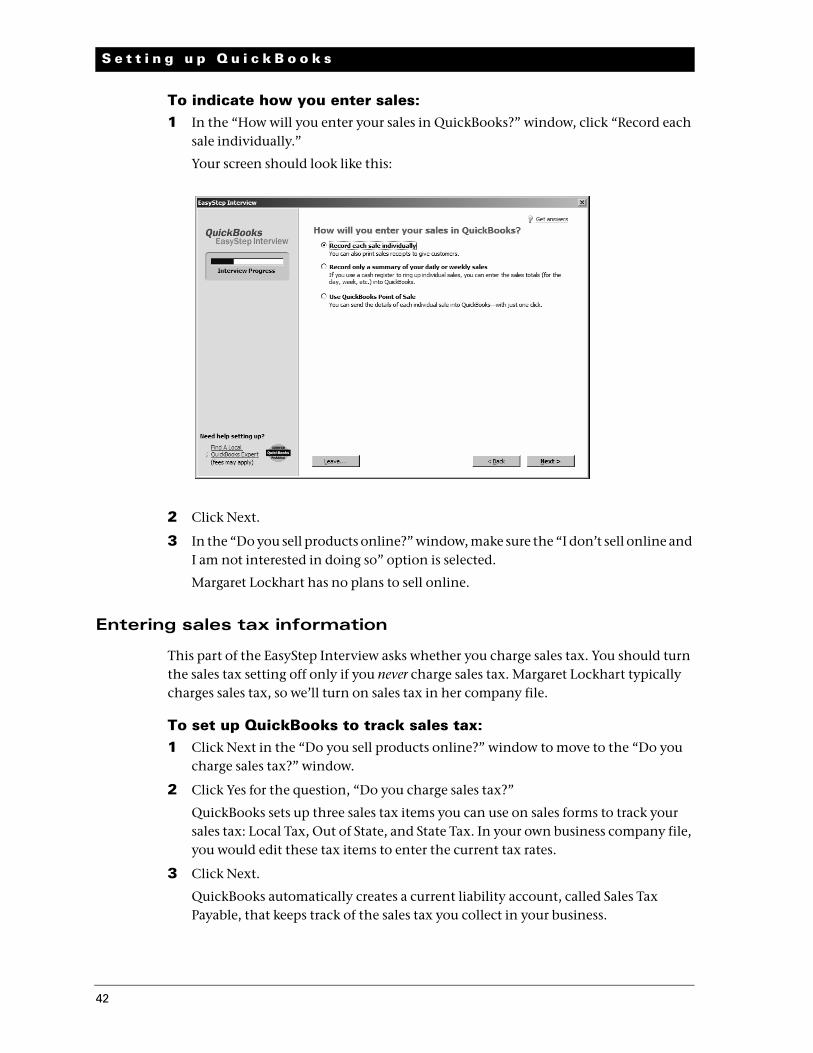
To indicate how you enter sales:1 In the “How will you enter your sales in QuickBooks?” window, click “Record each
sale individually.”
Your screen should look like this:
2 Click Next.
3 In the “Do you sell products online?” window, make sure the “I don’t sell online and I am not interested in doing so” option is selected.
Margaret Lockhart has no plans to sell online.
Entering sales tax information
This part of the EasyStep Interview asks whether you charge sales tax. You should turn the sales tax setting off only if you never charge sales tax. Margaret Lockhart typically charges sales tax, so we’ll turn on sales tax in her company file.
To set up QuickBooks to track sales tax:1 Click Next in the “Do you sell products online?” window to move to the “Do you
charge sales tax?” window.
2 Click Yes for the question, “Do you charge sales tax?”
QuickBooks sets up three sales tax items you can use on sales forms to track your sales tax: Local Tax, Out of State, and State Tax. In your own business company file, you would edit these tax items to enter the current tax rates.
3 Click Next.
QuickBooks automatically creates a current liability account, called Sales Tax Payable, that keeps track of the sales tax you collect in your business.

43
L E S S O N 2
Creating estimates
If you provide any type of estimate or bid—even a verbal quote—there are many reasons to use estimates in QuickBooks.
You can use the QuickBooks estimate form to prepare professional-looking itemized estimates, bids, quotes, or proposals for your customers. You can customize a QuickBooks estimate to look and say exactly what you want it to.
When it's time to bill your customer, you can easily create an invoice from the estimate with just one click. QuickBooks then creates an invoice using information from your estimate. You can also associate price levels with your customers and use those price levels on estimates.
When you need to know how accurate your estimates are, you can create reports that compare your estimated costs and revenue against your actual costs and revenue.
Creating estimates in QuickBooks will allow you to easily compare your actual costs against what you estimated. This will let you see how accurate your estimates are.
You can track which estimates are still active and easily update each estimate as you continue to negotiate with your customers.
For this exercise, Margaret Lockhart creates proposals for her customers for their interior design projects, so she needs to enable estimates for her company.
To create estimates for your business:1 On the “Do you want to create estimates in QuickBooks?” window, click Yes.
2 Click Next.
44
S e t t i n g u p Q u i c k B o o k s
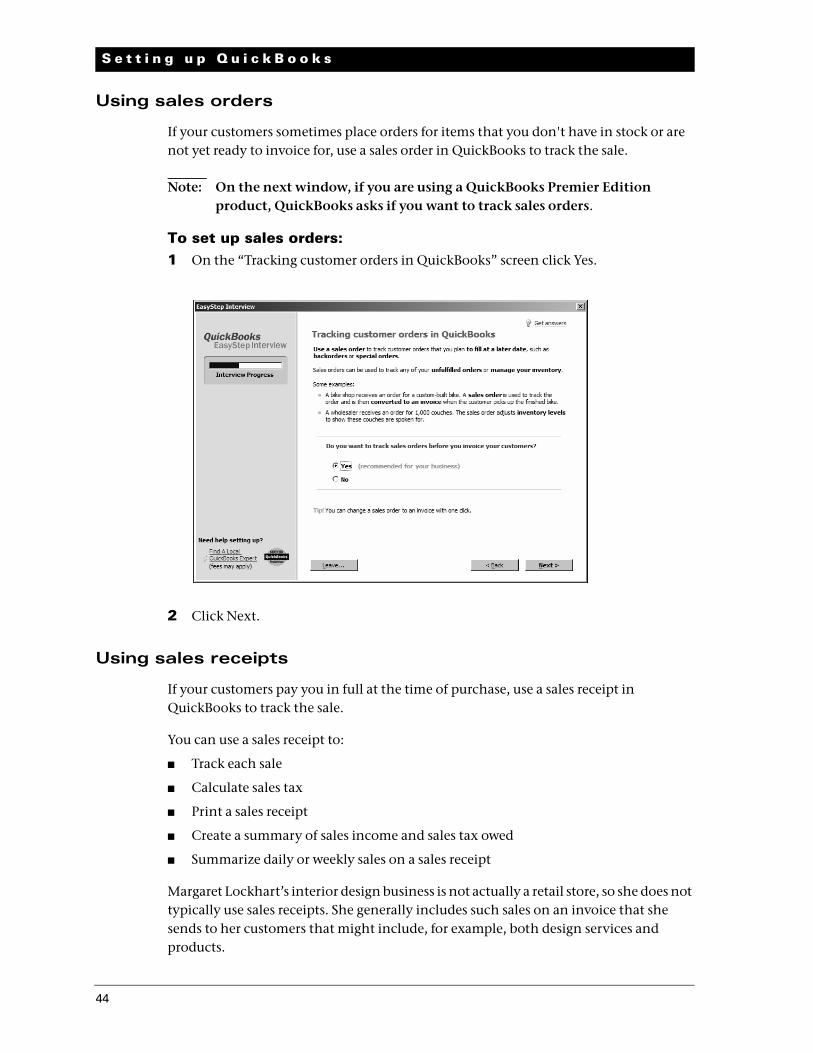
Using sales orders
If your customers sometimes place orders for items that you don't have in stock or are not yet ready to invoice for, use a sales order in QuickBooks to track the sale.
Note: On the next window, if you are using a QuickBooks Premier Edition product, QuickBooks asks if you want to track sales orders.
To set up sales orders:1 On the “Tracking customer orders in QuickBooks” screen click Yes.
2 Click Next.
Using sales receipts
If your customers pay you in full at the time of purchase, use a sales receipt in QuickBooks to track the sale.
You can use a sales receipt to:
Track each sale
Calculate sales tax
Print a sales receipt
Create a summary of sales income and sales tax owed
Summarize daily or weekly sales on a sales receipt
Margaret Lockhart’s interior design business is not actually a retail store, so she does not typically use sales receipts. She generally includes such sales on an invoice that she sends to her customers that might include, for example, both design services and products.
45
L E S S O N 2
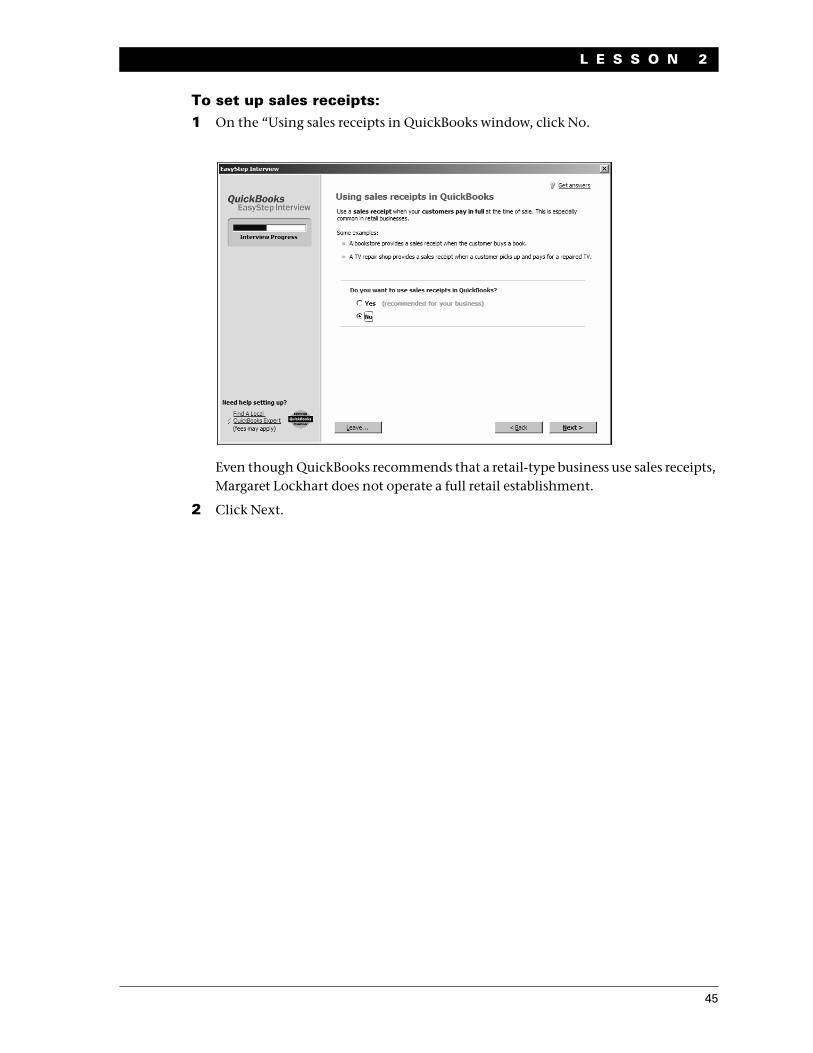
To set up sales receipts:1 On the “Using sales receipts in QuickBooks window, click No.
Even though QuickBooks recommends that a retail-type business use sales receipts, Margaret Lockhart does not operate a full retail establishment.
2 Click Next.
46
S e t t i n g u p Q u i c k B o o k s
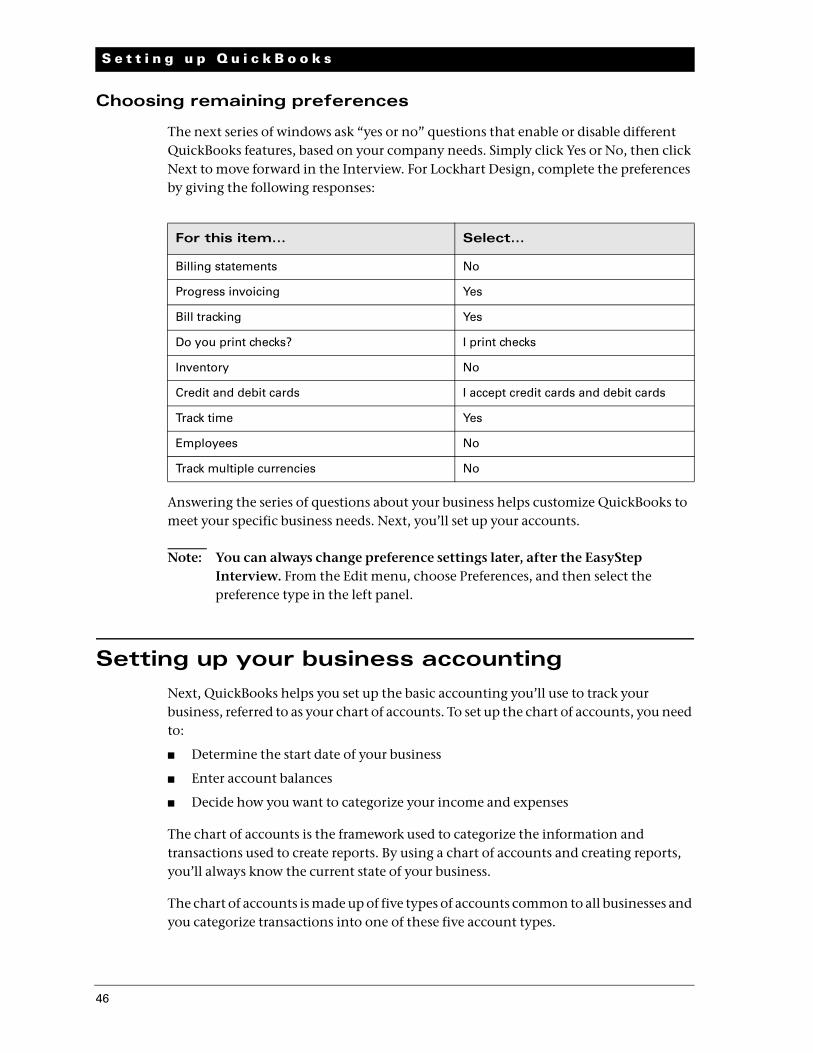
Choosing remaining preferences
The next series of windows ask “yes or no” questions that enable or disable different QuickBooks features, based on your company needs. Simply click Yes or No, then click Next to move forward in the Interview. For Lockhart Design, complete the preferences by giving the following responses:
Answering the series of questions about your business helps customize QuickBooks to meet your specific business needs. Next, you’ll set up your accounts.
Note: You can always change preference settings later, after the EasyStep Interview. From the Edit menu, choose Preferences, and then select the preference type in the left panel.
Setting up your business accountingNext, QuickBooks helps you set up the basic accounting you’ll use to track your business, referred to as your chart of accounts. To set up the chart of accounts, you need to:
Determine the start date of your business
Enter account balances
Decide how you want to categorize your income and expenses
The chart of accounts is the framework used to categorize the information and transactions used to create reports. By using a chart of accounts and creating reports, you’ll always know the current state of your business.
The chart of accounts is made up of five types of accounts common to all businesses and you categorize transactions into one of these five account types.
For this item... Select...
Billing statements No
Progress invoicing Yes
Bill tracking Yes
Do you print checks? I print checks
Inventory No
Credit and debit cards I accept credit cards and debit cards
Track time Yes
Employees No
Track multiple currencies No
47
L E S S O N 2
Choosing a start date
Before you start entering your company’s financial data, you need to choose a QuickBooks start date. This is the starting point you want to use for all your QuickBooks accounts. The start date is the date for which you give QuickBooks a financial snapshot of your company assets and liabilities.
Once you decide on a start date, you enter all your company’s transactions since that date. That’s why you should choose a start date that’s not too far back in the past for you to handle. Many business owners like to use the last day of a financial period as their start date, such as the end of last fiscal year, last quarter, or last month. You need to enter all historical transactions from the day after your start date up through today. For example, if you decide on a start date of March 31, you’d enter your historical transactions from April 1 up through today.
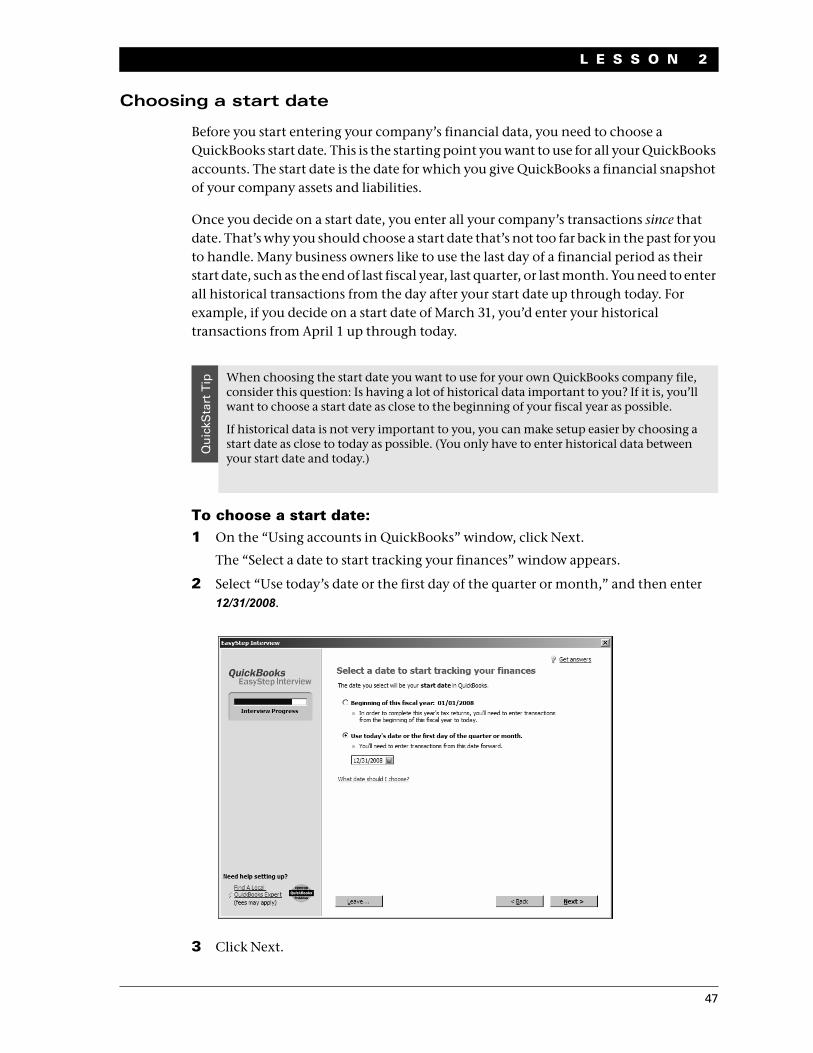
To choose a start date:1 On the “Using accounts in QuickBooks” window, click Next.
The “Select a date to start tracking your finances” window appears.
2 Select “Use today’s date or the first day of the quarter or month,” and then enter 12/31/2008.
3 Click Next.
Qu
ickS
tart
Tip When choosing the start date you want to use for your own QuickBooks company file,
consider this question: Is having a lot of historical data important to you? If it is, you’ll want to choose a start date as close to the beginning of your fiscal year as possible.
If historical data is not very important to you, you can make setup easier by choosing a start date as close to today as possible. (You only have to enter historical data between your start date and today.)
48
S e t t i n g u p Q u i c k B o o k s
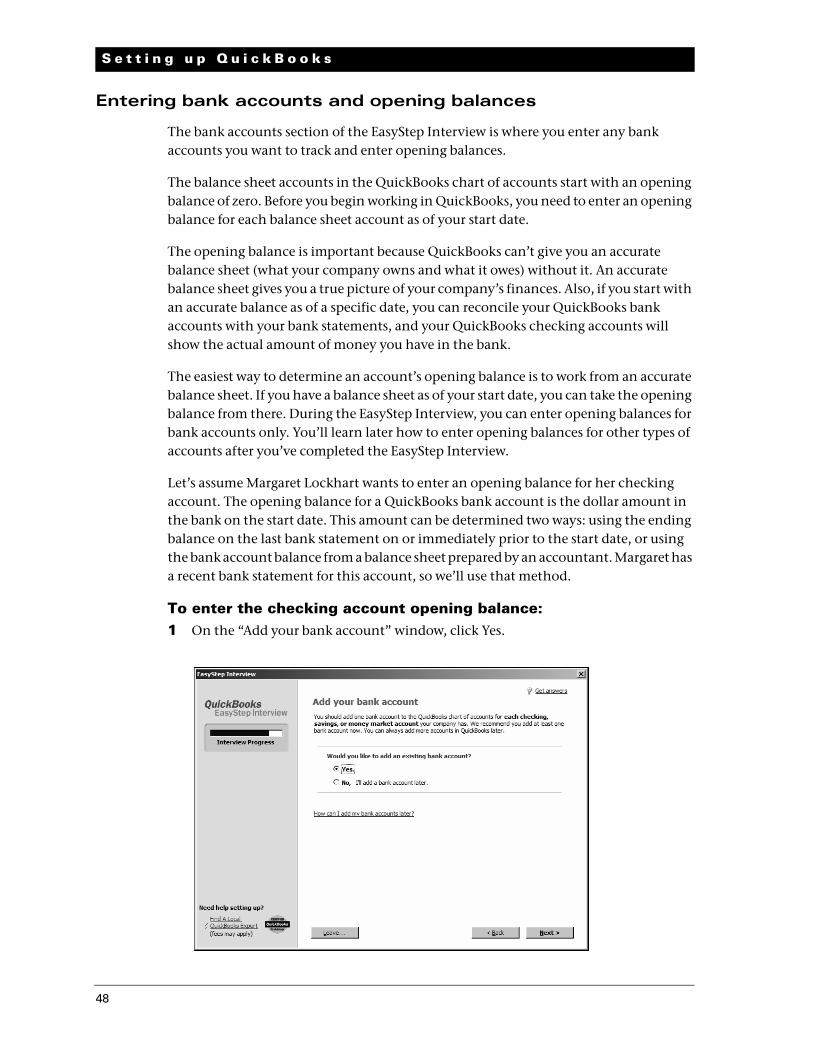
Entering bank accounts and opening balances
The bank accounts section of the EasyStep Interview is where you enter any bank accounts you want to track and enter opening balances.
The balance sheet accounts in the QuickBooks chart of accounts start with an opening balance of zero. Before you begin working in QuickBooks, you need to enter an opening balance for each balance sheet account as of your start date.
The opening balance is important because QuickBooks can’t give you an accurate balance sheet (what your company owns and what it owes) without it. An accurate balance sheet gives you a true picture of your company’s finances. Also, if you start with an accurate balance as of a specific date, you can reconcile your QuickBooks bank accounts with your bank statements, and your QuickBooks checking accounts will show the actual amount of money you have in the bank.
The easiest way to determine an account’s opening balance is to work from an accurate balance sheet. If you have a balance sheet as of your start date, you can take the opening balance from there. During the EasyStep Interview, you can enter opening balances for bank accounts only. You’ll learn later how to enter opening balances for other types of accounts after you’ve completed the EasyStep Interview.
Let’s assume Margaret Lockhart wants to enter an opening balance for her checking account. The opening balance for a QuickBooks bank account is the dollar amount in the bank on the start date. This amount can be determined two ways: using the ending balance on the last bank statement on or immediately prior to the start date, or using the bank account balance from a balance sheet prepared by an accountant. Margaret has a recent bank statement for this account, so we’ll use that method.
To enter the checking account opening balance:1 On the “Add your bank account” window, click Yes.
49
L E S S O N 2
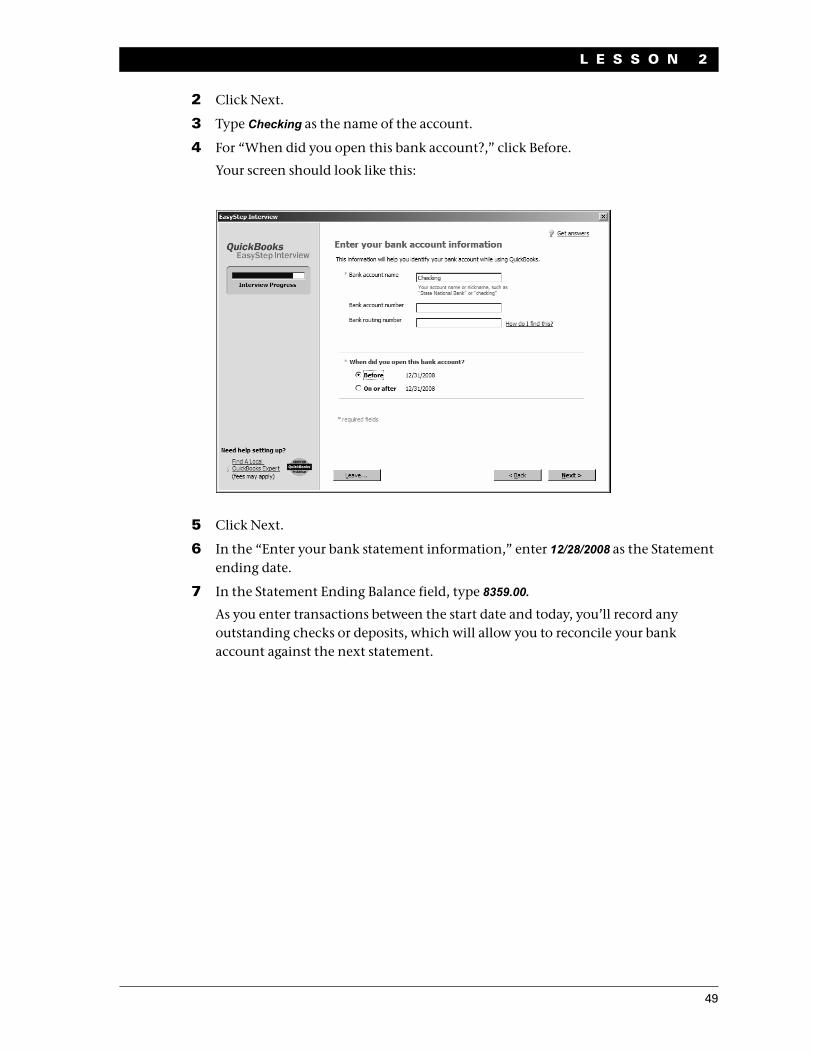
2 Click Next.
3 Type Checking as the name of the account.
4 For “When did you open this bank account?,” click Before.
Your screen should look like this:
5 Click Next.
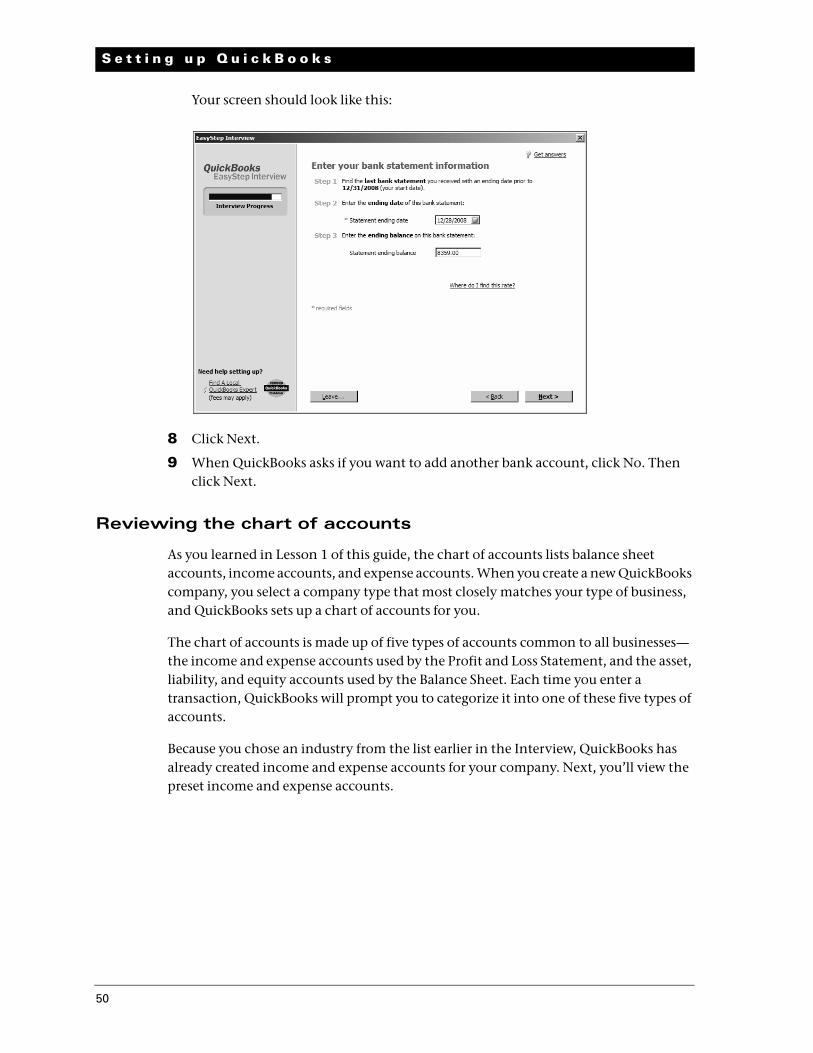
6 In the “Enter your bank statement information,” enter 12/28/2008 as the Statement ending date.
7 In the Statement Ending Balance field, type 8359.00.
As you enter transactions between the start date and today, you’ll record any outstanding checks or deposits, which will allow you to reconcile your bank account against the next statement.
50
S e t t i n g u p Q u i c k B o o k s
Your screen should look like this:
8 Click Next.
9 When QuickBooks asks if you want to add another bank account, click No. Then click Next.
Reviewing the chart of accounts
As you learned in Lesson 1 of this guide, the chart of accounts lists balance sheet accounts, income accounts, and expense accounts. When you create a new QuickBooks company, you select a company type that most closely matches your type of business, and QuickBooks sets up a chart of accounts for you.
The chart of accounts is made up of five types of accounts common to all businesses—the income and expense accounts used by the Profit and Loss Statement, and the asset, liability, and equity accounts used by the Balance Sheet. Each time you enter a transaction, QuickBooks will prompt you to categorize it into one of these five types of accounts.
Because you chose an industry from the list earlier in the Interview, QuickBooks has already created income and expense accounts for your company. Next, you’ll view the preset income and expense accounts.
51
L E S S O N 2
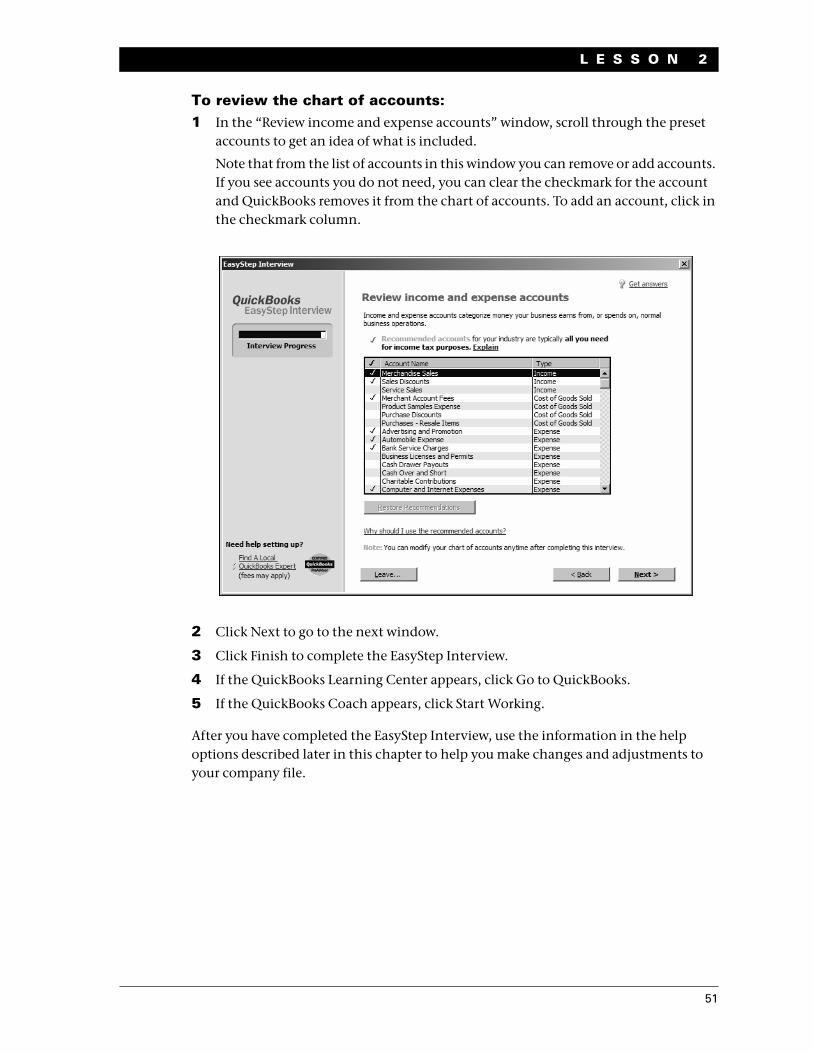
To review the chart of accounts:1 In the “Review income and expense accounts” window, scroll through the preset
accounts to get an idea of what is included.
Note that from the list of accounts in this window you can remove or add accounts. If you see accounts you do not need, you can clear the checkmark for the account and QuickBooks removes it from the chart of accounts. To add an account, click in the checkmark column.
2 Click Next to go to the next window.
3 Click Finish to complete the EasyStep Interview.
4 If the QuickBooks Learning Center appears, click Go to QuickBooks.
5 If the QuickBooks Coach appears, click Start Working.
After you have completed the EasyStep Interview, use the information in the help options described later in this chapter to help you make changes and adjustments to your company file.
52
S e t t i n g u p Q u i c k B o o k s
Completing company file setupAfter you have created your company file using the EasyStep Interview, you can begin using QuickBooks to run your business. However, there are some additional tasks you might need do to make sure the company file is properly set up and that the data is complete.
QuickBooks is based on four key concepts: Customers, Vendors, Accounts, and Items. If you take two minutes now to understand these basic concepts, you'll be able to get started quickly and correctly with your company information.
Customer: A customer is anyone who pays you. This can mean patients, donors, members, legal or consulting clients, or your typical retail customer.
Vendor: A vendor is anyone you pay, except for employees. This can mean subcontractors, utility companies, your landlord, tax agencies, or suppliers.
Account: There are two types of accounts—real world accounts, such as checking accounts, and income and expense accounts that you use to group transactions for reporting purposes. For example you may want to create expense accounts to track office supply purchases separately from advertising costs. All accounts are listed on your chart of accounts. If you choose a tax form, you can associate accounts with tax lines, which would make preparing for tax time easier.
Item: An item is anything you want to put on an invoice. This includes parts, services, labor, discounts, and taxes.
This section covers how to set up customers, vendors, and items, and how to add an income account.
Adding customers
In order to bill customers with QuickBooks, you need to add your customers.
By entering details about the people and companies you do business with, you can personalize their bills, send invoices easily, and quickly view the status of their accounts. You can add new customers at any time.
Note: You can also add customers and vendors as you perform everyday tasks. For example, if you enter the name of a new customer when filling out an invoice, QuickBooks will prompt you to enter information about this customer. You can choose from two quick setup options: Quick Add and Set Up. Quick Add adds the name to the list and you add details later. Set Up lets you enter the details right away.
53
L E S S O N 2
To add a customer:1 Click Customer Center in the icon bar.
2 Click the New Customer & Job menu button, and then choose New Customer.
3 In the Customer Name field, enter the name of the customer as you'd like it to appear on your Customers & Jobs list. For this exercise, type Smith, Lee, and then press Tab.
You want the list to show last names first.
4 Press Tab in the Opening Balance field to leave this field blank.
The Opening Balance field tells you how much each customer owes you on your start date so that when you enter the rest of your transactions from your start date to today, all balances since your start date will be accurate.
For now, leave this field blank. Lockhart Design is planning to set up one or more jobs for this customer. QuickBooks will calculate and track the overall balance for this customer from the balances you enter for the individual jobs.
5 In Address Info tab, click in the First Name field and type Lee.
6 Press tab and type M. as the middle initial and in the Last Name field, type Smith.
7 Press Tab to go to the Address field, and then press Enter after Lee M. Smith.
8 Type 43 Hampshire Blvd and press Enter.
9 Type East Bayshore, CA 94327.
10 Click the Copy button to copy the address to the Ship To field. Click OK in the Add to Ship To Address Information window.
You can have and use more than one Ship To address per customer or job, but Lee Smith uses only one address.
54
S e t t i n g u p Q u i c k B o o k s
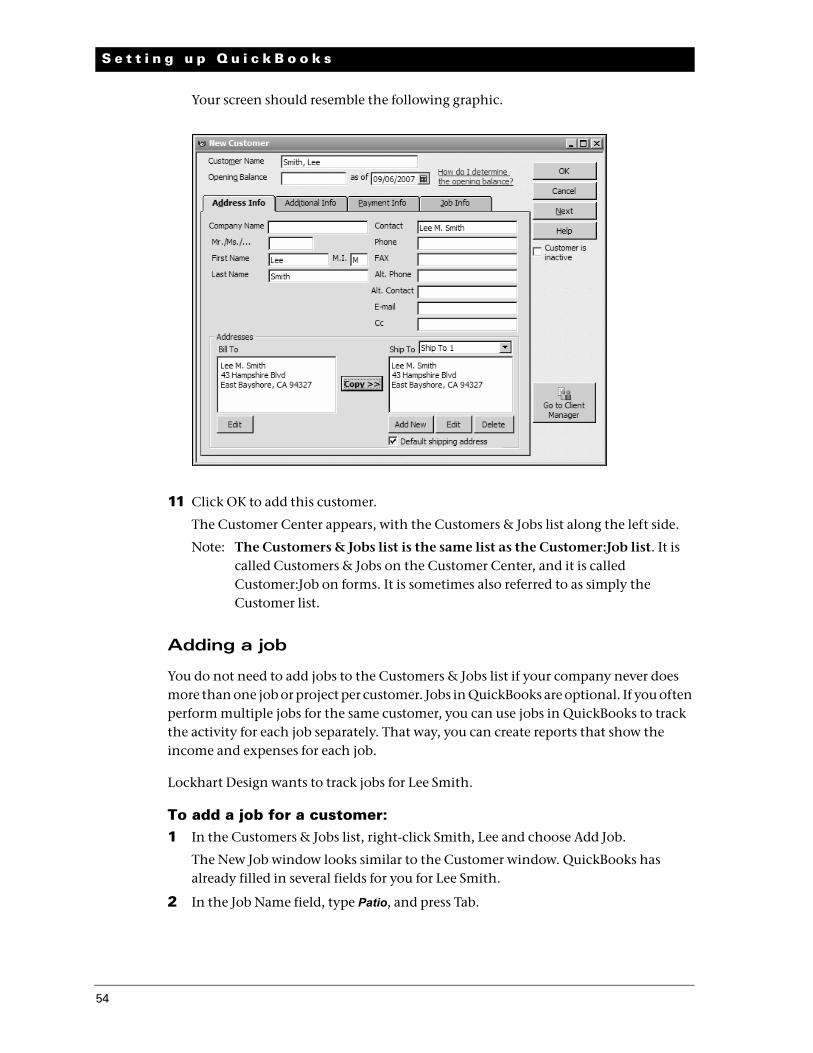
Your screen should resemble the following graphic.
11 Click OK to add this customer.
The Customer Center appears, with the Customers & Jobs list along the left side.
Note: The Customers & Jobs list is the same list as the Customer:Job list. It is called Customers & Jobs on the Customer Center, and it is called Customer:Job on forms. It is sometimes also referred to as simply the Customer list.
Adding a job
You do not need to add jobs to the Customers & Jobs list if your company never does more than one job or project per customer. Jobs in QuickBooks are optional. If you often perform multiple jobs for the same customer, you can use jobs in QuickBooks to track the activity for each job separately. That way, you can create reports that show the income and expenses for each job.
Lockhart Design wants to track jobs for Lee Smith.
To add a job for a customer:1 In the Customers & Jobs list, right-click Smith, Lee and choose Add Job.
The New Job window looks similar to the Customer window. QuickBooks has already filled in several fields for you for Lee Smith.
2 In the Job Name field, type Patio, and press Tab.
55
L E S S O N 2
3 In the Opening Balance field, type 862 and press Tab.
You want to keep track of the balances for each job. QuickBooks calculates and tracks the overall balance for this customer from the balances you enter for the individual jobs.You want to keep track of the balances for each job.
Note: The information QuickBooks fills in comes from your customer's record. If you make any changes here, the changes affect only this job. For example, if your customer's billing address is different for this job, you can enter the job address without affecting the customer's main address.
4 Enter 12/31/2008 in the As Of field to indicate that this was the balance outstanding for this job as of the QuickBooks start date.
5 Click the Job Info tab and choose “In Progress” from the Job Status drop-down list.
Job status information is for your records—it gives you a way to keep track of each job. When you create a customer list report, QuickBooks includes the status of each job on the report. You can also see the status of a job by clicking a job in the Customers & Jobs list and looking in the Job Information area.
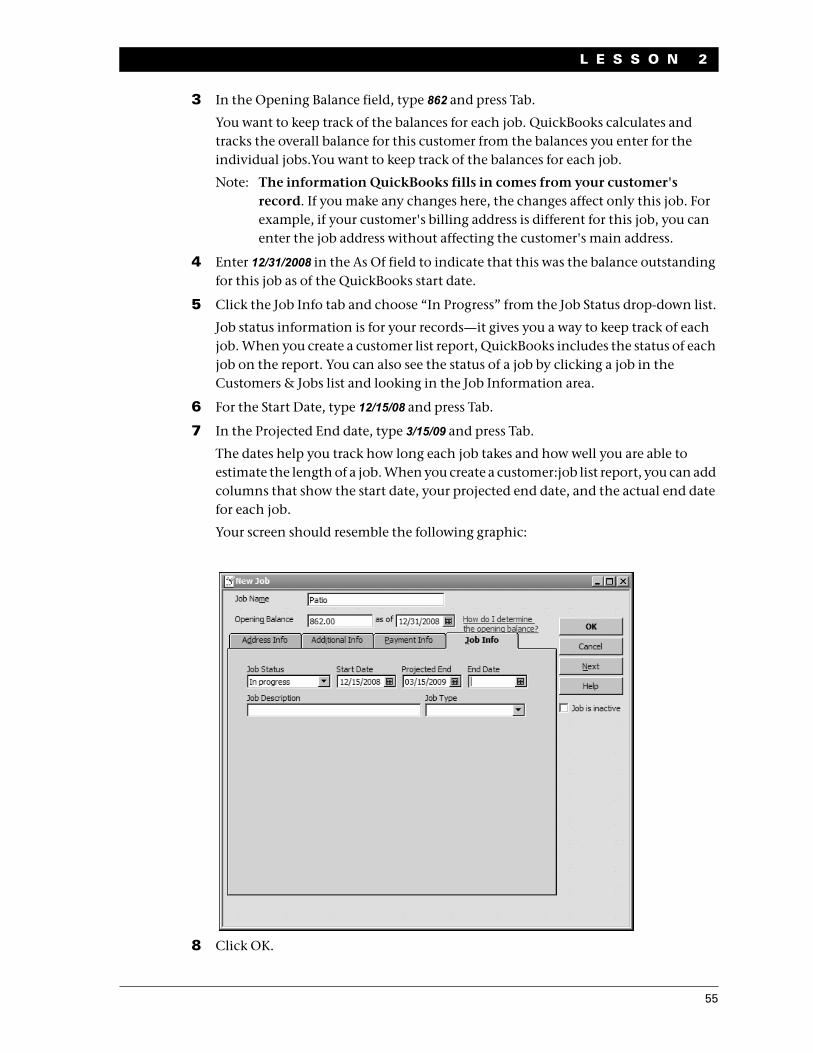
6 For the Start Date, type 12/15/08 and press Tab.
7 In the Projected End date, type 3/15/09 and press Tab.
The dates help you track how long each job takes and how well you are able to estimate the length of a job. When you create a customer:job list report, you can add columns that show the start date, your projected end date, and the actual end date for each job.
Your screen should resemble the following graphic:
8 Click OK.
56
S e t t i n g u p Q u i c k B o o k s
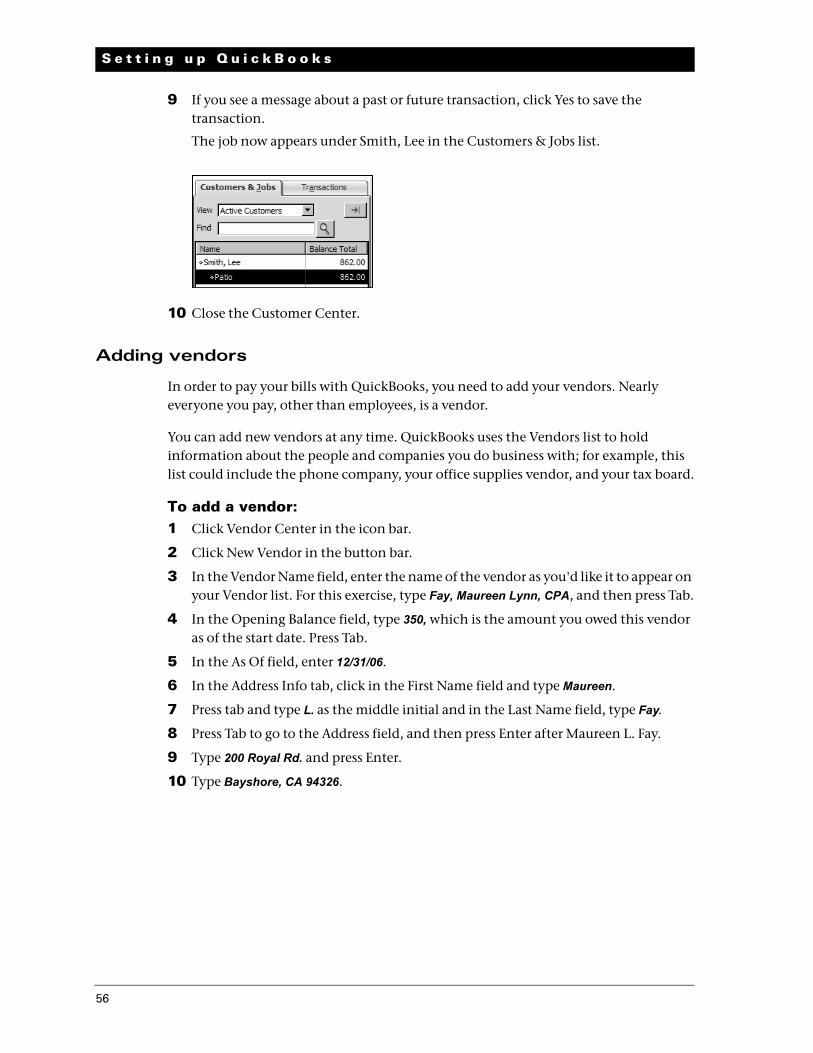
9 If you see a message about a past or future transaction, click Yes to save the transaction.
The job now appears under Smith, Lee in the Customers & Jobs list.
10 Close the Customer Center.
Adding vendors
In order to pay your bills with QuickBooks, you need to add your vendors. Nearly everyone you pay, other than employees, is a vendor.
You can add new vendors at any time. QuickBooks uses the Vendors list to hold information about the people and companies you do business with; for example, this list could include the phone company, your office supplies vendor, and your tax board.
To add a vendor:1 Click Vendor Center in the icon bar.
2 Click New Vendor in the button bar.
3 In the Vendor Name field, enter the name of the vendor as you'd like it to appear on your Vendor list. For this exercise, type Fay, Maureen Lynn, CPA, and then press Tab.
4 In the Opening Balance field, type 350, which is the amount you owed this vendor as of the start date. Press Tab.
5 In the As Of field, enter 12/31/06.
6 In the Address Info tab, click in the First Name field and type Maureen.
7 Press tab and type L. as the middle initial and in the Last Name field, type Fay.
8 Press Tab to go to the Address field, and then press Enter after Maureen L. Fay.
9 Type 200 Royal Rd. and press Enter.
10 Type Bayshore, CA 94326.
57
L E S S O N 2
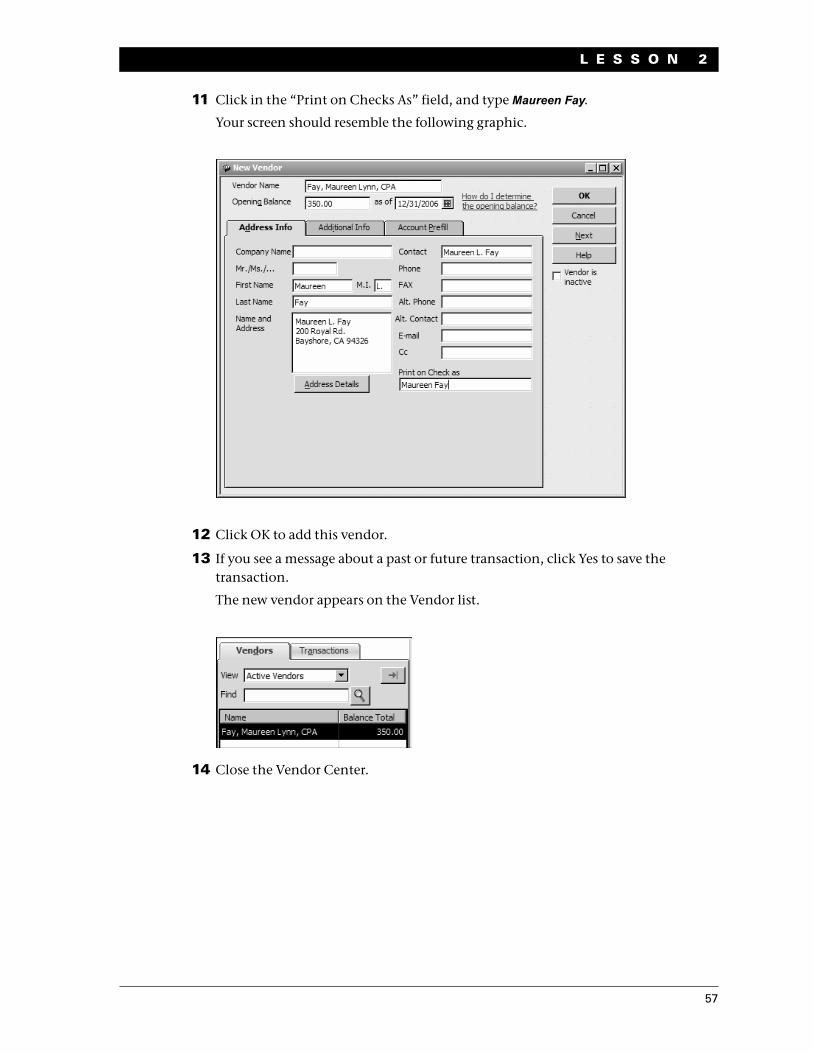
11 Click in the “Print on Checks As” field, and type Maureen Fay.
Your screen should resemble the following graphic.
12 Click OK to add this vendor.
13 If you see a message about a past or future transaction, click Yes to save the transaction.
The new vendor appears on the Vendor list.
14 Close the Vendor Center.
58
S e t t i n g u p Q u i c k B o o k s
About customer and vendor types
Customer and vendor types let you categorize your customers and vendors in ways that are meaningful to your business. For example, you could set up your customer types so that they indicate which industry a customer represents, a customer's geographic location, or how a customer first heard about your business. You could set up your vendor types so that they indicate a vendor's industry or geographic location. For example, you might create the type Painters with the subtypes Exterior and Interior.
Commercial photographers might use customer types to record a customer's primary interest: graduation, portraiture, weddings, and so on.
Building contractors might use vendor types to classify their subcontractors by geographical location so they can use the ones closest to each job.
You can create reports and do special mailings that are based on your customer and vendor types. For example, if you use customer types to categorize your customers by location, you could print mailing labels for all the customers in a particular region.
Setting up additional accounts
During the EasyStep Interview, you added one checking account for Lockhart Design. There are two basic types of accounts: balance sheet accounts, such as savings or checking, and accounts used to group transactions for reporting purposes, such as income and expense accounts. Income and expense accounts track the sources of your income and the purpose of each expense. When you record transactions, you usually assign the amount of the transaction to one or more income or expense accounts.
In the EasyStep Interview, you selected “Retail Shop or Online Commerce” as the industry for Lockhart Design. QuickBooks created a chart of accounts based on the retail industry. However, Margaret Lockhart also receives income from design consulting. She needs to modify the chart of accounts to add an income account for consulting.
Adding a new account
You may need to add one or more of the following accounts:
Income accounts to track new sources of income
Expense accounts to track new types of expenses
Bank accounts when you open new checking, savings, or money market accounts at your bank
Credit card accounts when you acquire new credit cards
Other kinds of balance sheet accounts to track specific assets, liabilities, or equity
For example, you may need to add a fixed asset account to track the depreciation of a new equipment purchase, a long term liability account to track a business loan, or an equity account to track the investment from a new business partner.
59
L E S S O N 2
A complete list of your business’ accounts and their balances appear in the chart of accounts. You use a chart of accounts to track how much money your company has, how much money it owes, how much money is coming in, and how much is going out.
For Lockhart Design, you’ll add an income account for her consulting income.
To add an income account:1 From the Lists menu, choose Chart of Accounts.
2 Click the Account menu button and choose New.
3 In the Add New Account window, choose Income, and then click Continue.
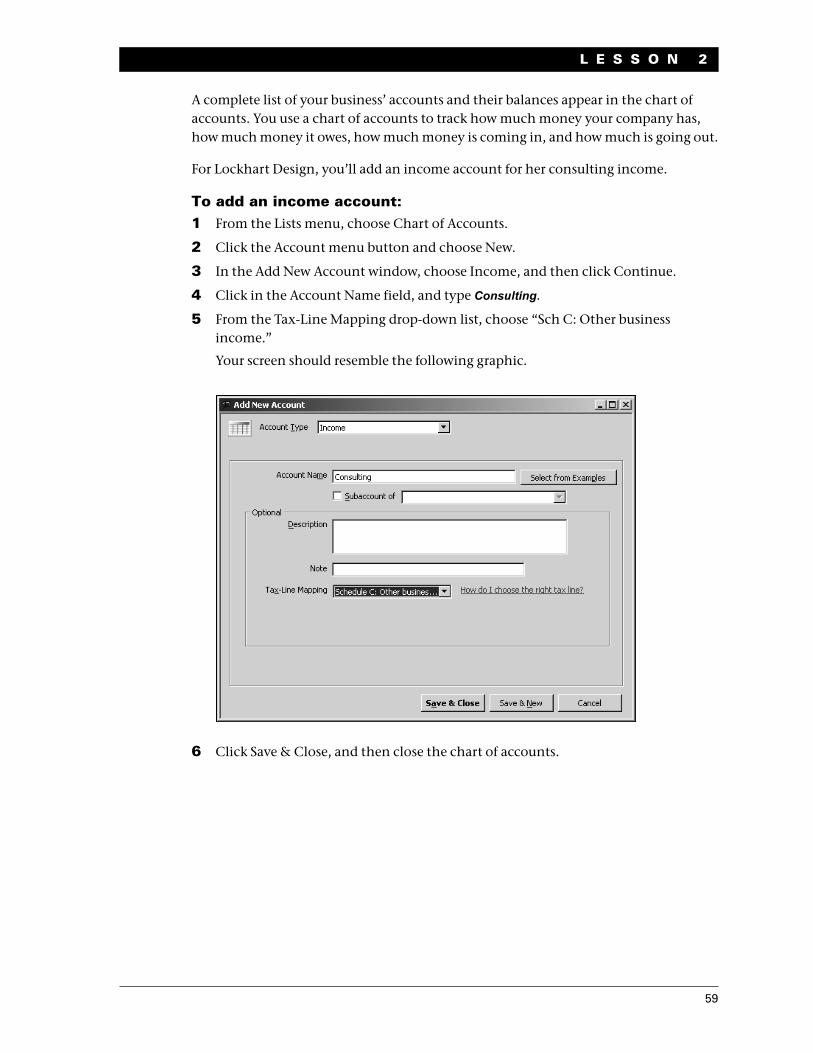
4 Click in the Account Name field, and type Consulting.
5 From the Tax-Line Mapping drop-down list, choose “Sch C: Other business income.”
Your screen should resemble the following graphic.
6 Click Save & Close, and then close the chart of accounts.
60
S e t t i n g u p Q u i c k B o o k s
Adding items
In QuickBooks, an item is anything that your company buys, sells, or resells in the course of business, such as products, shipping and handling charges, discounts, and sales tax (if applicable). You can think of an item as something that shows up as a line on an invoice or other sales or purchase form.
Items help you fill out the line item area of a sales or purchase form quickly. When you choose an item from your Item list, QuickBooks fills in a description of the line item and calculates its amount for you.
While they provide a quick means of data entry, a much more important role for items is to handle the behind-the-scenes accounting. When you create an item, you link it to an account; when the item is used on a form, it posts an entry to that account and another entry to the appropriate accounts receivable, accounts payable, checking, fixed asset, or other account.
When creating items, consider how much detail you want on your invoices or statements and set up items with that level of detail in mind. For example, if you are a seamstress who creates and sells home accessories, you can set up a single item and charge a flat rate for a certain size of couch pillow, or you can break that pillow down further into labor and materials.
QuickBooks provides several different types of items. Some—such as the service item or the inventory part item—help you record the services and products your business sells. Others—such as the subtotal item or discount item—are used to perform calculations on the amounts in a sale.
For Lockhart Design, you’ll set up a service item for billing the time used for initial consultation for a design project. You’ll assign it to the new Consulting income account.
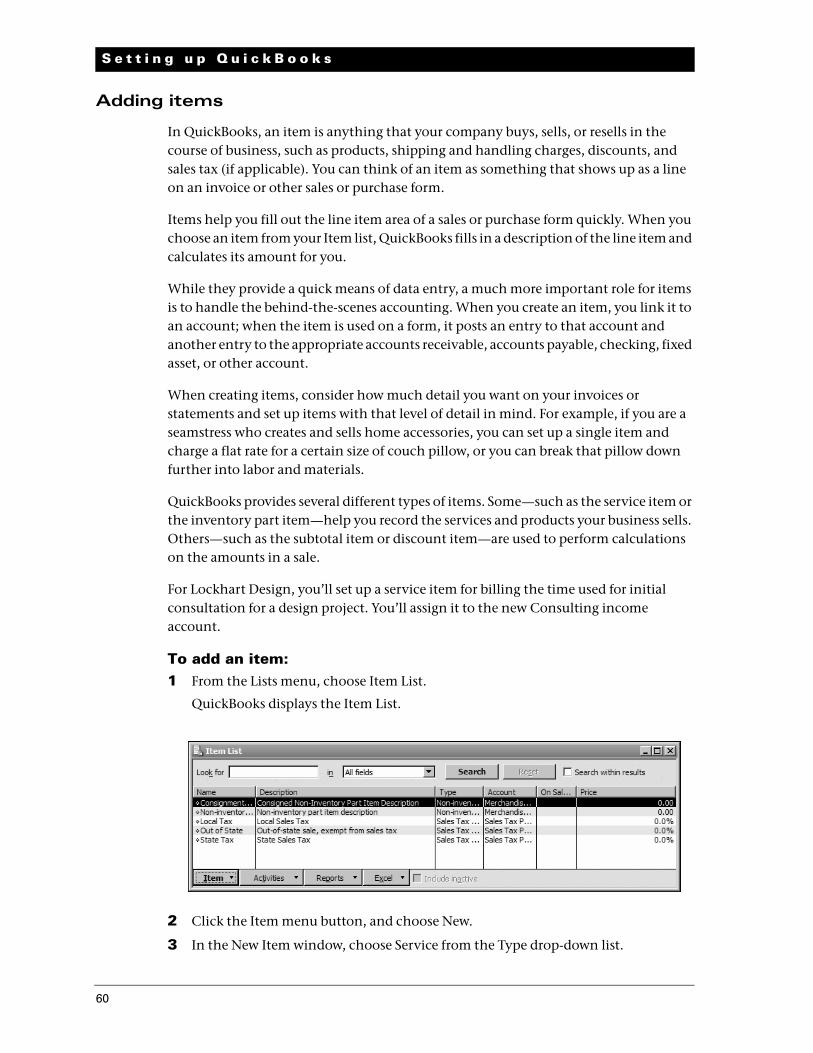
To add an item:1 From the Lists menu, choose Item List.
QuickBooks displays the Item List.
2 Click the Item menu button, and choose New.
3 In the New Item window, choose Service from the Type drop-down list.
61
L E S S O N 2
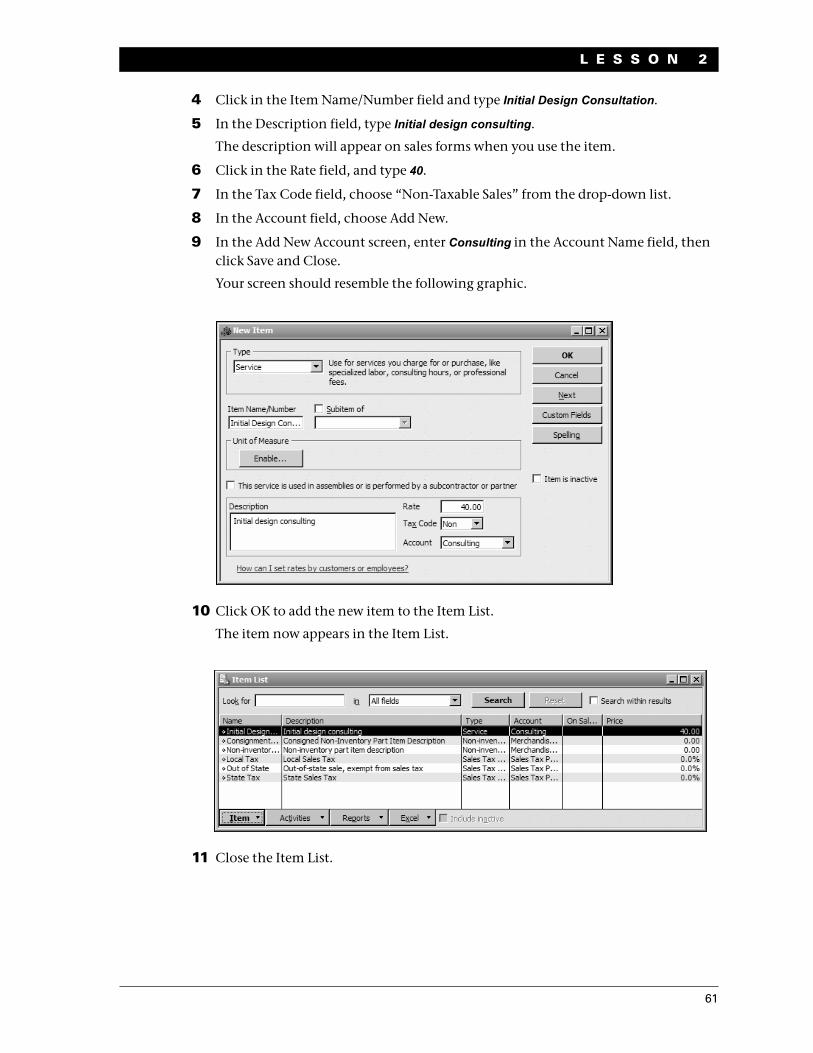
4 Click in the Item Name/Number field and type Initial Design Consultation.
5 In the Description field, type Initial design consulting.
The description will appear on sales forms when you use the item.
6 Click in the Rate field, and type 40.
7 In the Tax Code field, choose “Non-Taxable Sales” from the drop-down list.
8 In the Account field, choose Add New.
9 In the Add New Account screen, enter Consulting in the Account Name field, then click Save and Close.
Your screen should resemble the following graphic.
10 Click OK to add the new item to the Item List.
The item now appears in the Item List.
11 Close the Item List.
62
S e t t i n g u p Q u i c k B o o k s
Entering historical transactions
If your QuickBooks start date is before today’s date, you also need to enter past transactions so that you have complete financial records from the start date forward. It is important to enter historical transactions in this order:
1 All sales (sales receipts, invoices, or statement charges)
2 Customer payments received for outstanding invoices after the start date
3 Bills received since the start date
4 Bills paid since the start date
5 Deposits made to any of the accounts since the start date
6 Any other checks written (other than bills) since the start date
Learning more about the company setup process
When you are setting up your own company in QuickBooks, you may want to view the tutorials available in the Learning Center to help you finish setting up your own company file. The information provided in the videos gives you an overview of the program and more detailed information about using specific parts of the product.
To open the Learning Center: From the Help menu, choose Learning Center Tutorials.
For more information, choose Support from the Help menu.
Getting help while using QuickBooksQuickBooks provides extensive help in various formats. When you have questions, QuickBooks provides:
Onscreen Help to provide conceptual information and step-by-step instructions.
Tutorials on key tasks. These are available by choosing Learning Center Tutorials from the Help menu.
Live Community. Instant access to frequently asked questions and experts who can answer your own questions.
63
L E S S O N 2
Using onscreen Help
The onscreen Help provides several different types of information:
Conceptual explanations of how to apply QuickBooks to your particular business situation.
Step-by-step instructions.
A search engine that provides you with a list of topics related to the word or phrase you enter.
Information relevant to the task you are currently performing.
To view onscreen help:
When you launch QuickBooks help, it displays information about the task you are currently performing along with a list of topics relevant to what you are doing. There are several ways to access QuickBooks help:
Press the F1 key on your keyboard.
Click the Help icon in the icon bar at the top of the screen.
From the Help menu, choose QuickBooks Help.
Finding a topic in the onscreen Help
Suppose you want to find out how to change the information about a customer. You can type what you’re looking for in the Help Search field, and QuickBooks displays a list of topics.
To find a topic in onscreen Help:1 From the Help menu, choose QuickBooks Help.
The Relevant Topics tab displays a list of topics related to the QuickBooks screen you are using.
2 Click the Search tab.
3 Type customers and click the arrow button.
QuickBooks Help displays a list of topics related to customers.
64
S e t t i n g u p Q u i c k B o o k s
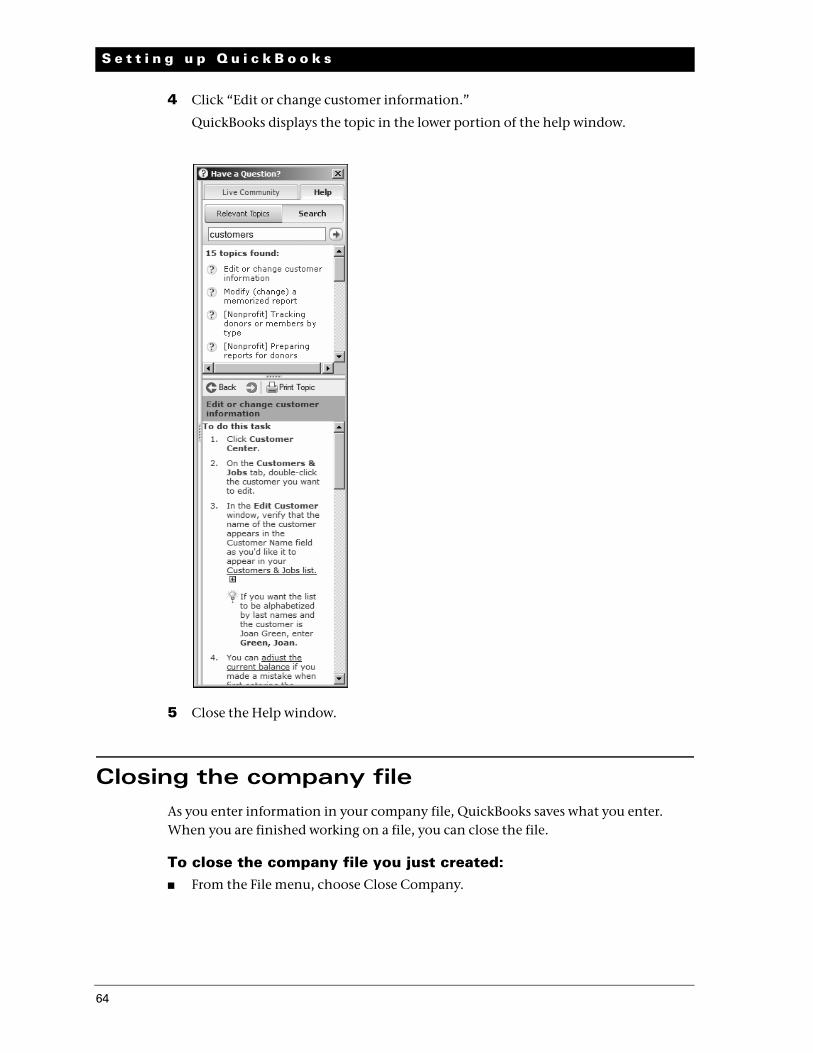
4 Click “Edit or change customer information.”
QuickBooks displays the topic in the lower portion of the help window.
5 Close the Help window.
Closing the company fileAs you enter information in your company file, QuickBooks saves what you enter. When you are finished working on a file, you can close the file.
To close the company file you just created: From the File menu, choose Close Company.