Embed Size (px)
Citation preview

Free plans courtesy of:
See more plans at bateau.com
____________________________________________________________________________________
www.eboat.net Page eboat.net1
Cheap canoe, description.
Plywood-epoxy canoe (stitch and glue) made from two sheets of 6mm (1/4") plywood: cheap!
LOA: 13' 5" Beam: 30"(4,05 m x 75 cm)
Overview:
This canoe is made of plywood panels, cut flat on the floor from dimensions given on the plans. The shapeof the panels is very simple and easy to transfer to the plywood.Butt blocks are used to make long panels from standard sheets of plywood.The side panels are folded around the bottom panel and a batten, held in place with duct tape.Fiberglass seams are built inside.The assembly is then flipped over and fiberglass tape is used to cover all the outside edges.Finish by installing a simple seat reinforcement in the middle, two small breasthooks and a rubrail madefrom a plain wooden strip.Epoxy coat and paint the complete assembly.
In the following building notes we will describe how to:
Ø transfer the dimensions to the plywoodØ cut the plywood and make long panelsØ assemble the hull with epoxy and fiberglassØ finish with the installation of some reinforcements

Free plans courtesy of:
See more plans at bateau.com
____________________________________________________________________________________
www.eboat.net Page eboat.net2
Cheap canoe, drawing the parts on the plywood.
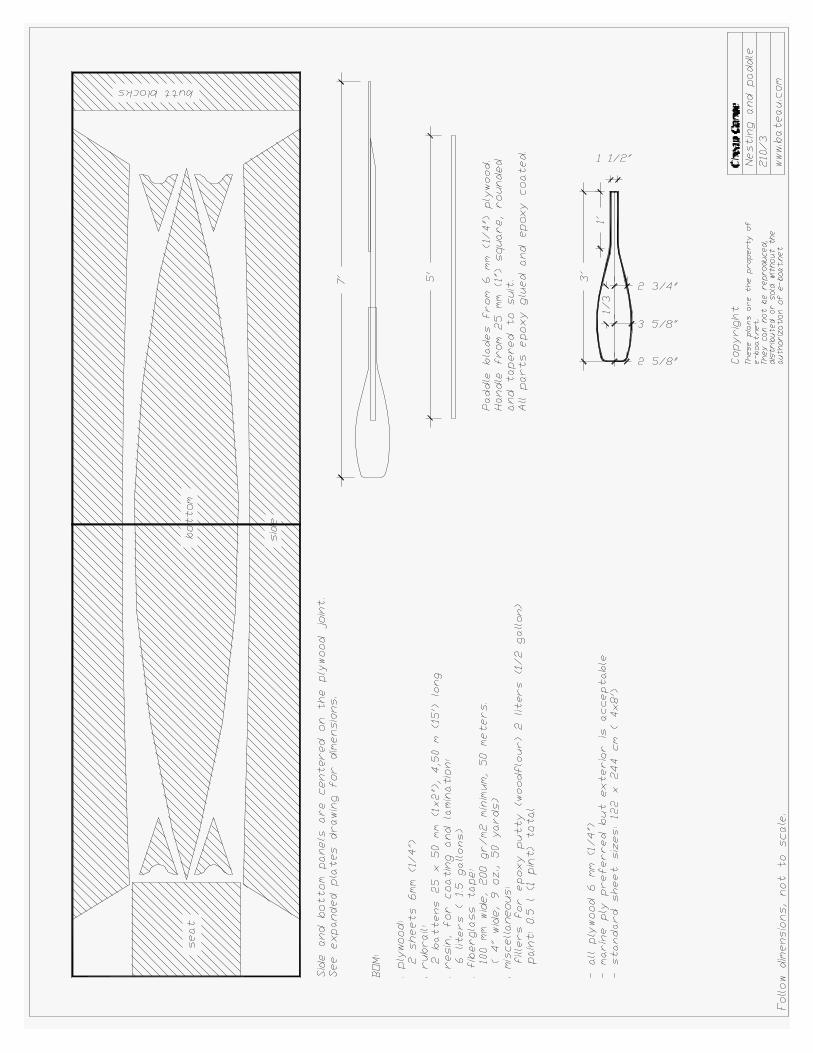
We start by cutting the main parts from two sheets of 6 mm (1/4") plywood.Look at the nesting drawing below for the suggested layout of these parts on the plywood.
(Go to the last pages of this file for high resolution copies of the plans)The drawing shows two standard sheets of plywood, side by side, joined along their shorter edge.
The two narrow panels drawn on the plywood are the side panels of the canoe, the oblong one in thecenter is the bottom panel.
Before we start marking the plywood, two remarks:
1. The boat is symmetrical along two axis: port and starboard are identical as on most boats but in thisone, the bow and the stern are also the same. This makes the scribing of the shapes easy: you need onlyto measure one side, the other side can be copied from the first one.
2. The hull panels are longer than a standard sheet of plywood. We will cut two pieces and assemble thosepieces with a butt block.
See a picture of a butt block at our web site bateau.com in the tutorials section. It is just a piece of plywood glued over the jointbetween the two parts: simple, fast and strong. The designer located the butt blocks right in the middle of the boat where they arenot only less conspicuous but also serve as reinforcements. Please do not use scarfs or any other complicated woodworking assemblytechnique: we need the extra thickness of the butt block right where we show it.
Which plywood?
Any exterior plywood with no voids will work. Some varieties of Lauan plywood are perfect but checkthem: it should be exterior and the outside plies should not be too thin.Marine plywood is fine, the best one for this boat being Okume: light, easy to bend, easy to finish butexpensive.Read more about plywood selection at bateau.com

Free plans courtesy of:
See more plans at bateau.com
____________________________________________________________________________________
www.eboat.net Page eboat.net3
Scribing the side panel.
Let's draw the outline of the plywood pieces, first one of the side panels.
The designer made our work easier by calculating the hull in such a way that one side of that panel isstraight. That side, the sheer side, will nicely curve in 3 dimensions when bent.On the flat plywood sheets, that side panel is lined up with the long edge of the plywood.
For explanations of boat building terms like "sheer", see our web site bateau.com, tutorials section.
The middle of the side panel is at the junction between the two sheets of plywood: we will measure fromthere.Let's first mark the two corners of the longer side. The dimensions drawing shows that each corner is at2135 mm * from the middle (follow the arrow). Let's mark one corner on each side.
That was easy.
• Why metric? Metric is not only the official, legal units system in the US but it is much easier. Please do nottranslate metric units to inches: most tape measures have a metric side, use that one.
If you don’t want to work in metric, see the dimensions in feet and inches onthe plans included in the last pages of this file.

Free plans courtesy of:
See more plans at bateau.com
____________________________________________________________________________________
www.eboat.net Page eboat.net4
Now, let's scribe the line on which the lower tips, the other two corners, will be. The drawing shows thatthese corners are on a line at 12 " from the edge (see the arrow below). Let's draw that line: measure 12"along the short side of each plywood sheet and join those points with a straight line.
On that line, the corners are at 1945 mm from the middle: measure and mark them.Now that you have the upper and lower corners of side panel, you can draw a line between them, they willbecome the bow and stern.

Free plans courtesy of:
See more plans at bateau.com
____________________________________________________________________________________
www.eboat.net Page eboat.net5
All that is left to draw is the lower side of the panel. That side is curved. It is an easy curve: a plain arc ofa circle that we can draw with only three points. We already have the two end points, we need one in themiddle.Look at the drawing: it shows that the middle point is 37 mm above the straight line that we drew at 12"from the long edge. Mark that point. That point is in the middle and this means that it is on the edge ofthe plywood sheets.
There is no need for more points: small variations are very acceptable in our building method. Gapsbetween the panel's egdes are better than a tight fit. Read more about that in the tutorials at bateau.com.

Free plans courtesy of:
See more plans at bateau.com
____________________________________________________________________________________
www.eboat.net Page eboat.net6
Now, to scribe the curve, we need a batten. We like to use PVC pipes for that. Lay a PVC pipe or a woodbatten on the plywood and position it so that it passes next to the three points. You can put a nail at eachpoint or use weights to keep the batten in place. See a picture of the method below:
Note that this is a picture from another boat . . .That was the last line for that panel: we now have a complete outline of one side panel, as below.
We will cut it later and from it, we will cut the second side, using the first one as a pattern.

Free plans courtesy of:
See more plans at bateau.com
____________________________________________________________________________________
www.eboat.net Page eboat.net7
Scribing the bottom panel.
The bottom panel is a little more complicated but if one proceeds step by step, there will be no problem.
Look at the nesting drawing: we show the bottom panel right in the middle of the two plywood sheets.
Also look at the drawing with the dimensions: everything will be measured from a centerline drawnlengthwise in the middle of those panels and from the edge between the plywood sheets. Those two linesfrom which we measure are called a coordinate system. All measurements must be taken from thosestraight lines.
The long line is also named baseline on some boat plans: it is the "base" of all our measurements.On boat plans, center lines are frequently marked CL and baselines are marked BL.

Free plans courtesy of:
See more plans at bateau.com
____________________________________________________________________________________
www.eboat.net Page eboat.net8
Let’s start by drawing that centerline on the plywood sheets.Mark the middle of the short side of each plywood sheet then scribe a thick line all the way across: this isyour center line or base line.
The dimensions drawing (see the last pages) shows that we will mark points on parallel lines evenlyspaced 12".The first thing to do is to draw those paralell lines.Starting from the middle, measure 12" along the long edges of the plywood sheets, on each side. Youneed 5 of them.Join these marks with a line: you now have your parallel lines on which we are going to takemeasurements.

Free plans courtesy of:
See more plans at bateau.com
____________________________________________________________________________________
www.eboat.net Page eboat.net9
We will now mark points on the parallel lines, starting from the middle, the widest part.The first measurement is 279 mm up from the centerline. This one is right in the middle of the bottompanel, on the edge of the plywood. Measure and mark it.
The second point is on the first line (at 12" from the edge) and the distance above the centerline is 273mm. Mark it.The next one is on the second line, distance 252 mm. Mark it.Proceed the same way for all other points.The last one is at 105 mm.We need one more point to finish: the tip of the panel. The drawing shows that it is at 1919 mm from themiddle, on the centerline: mark it.

Free plans courtesy of:
See more plans at bateau.com
____________________________________________________________________________________
www.eboat.net Page eboat.net10
Before scribing the curve, we will mark the other side of the same curve, the right side. The curve will besmoother that way.
The procedure is exactly the same than for the left side that we just did but mirror image:- scribe parallel lines every 12" (to the right this time)- mark all the points on the right side this time, including the tip.
All the points for one side of the bottom panel are now on the plywood and all that is left to do is to scribea nice smooth curve passing through all those points.Use the same method as for the side panel: punch one nail in each point, push a batten or PVC pipe alongit and draw your curve.
If the curve is not smooth (fair), it is almost certainly because there is a measurement mistake somewhere: check it.Our curves must never be faired or corrected by hand: they are mathematically correct. We do all the lofting on the computer foryou.

Free plans courtesy of:
See more plans at bateau.com
____________________________________________________________________________________
www.eboat.net Page eboat.net11
The other side of the bottom panel is scribed exactly the same way but with the points under thecenterline.
This is how your plywood sheets will look at this point:
You can now cut the panels. See next page.

Free plans courtesy of:
See more plans at bateau.com
____________________________________________________________________________________
www.eboat.net Page eboat.net12
Cutting the plywood.
We prefer to cut thin plywood with a circular saw: it is fast and produces very smooth curves. You can usea jig-saw too but the cuts will not be as fair.
Cut right on the line and again, don't worry too much about precision: in stitch and glue, gaps up to 10mm are acceptable. What counts is fairness and symmetry.
First, cut the side panel that we drew at the beginning.Take your two halves, flip them over and use them as a pattern to scribe and cut the other side panel.
Next, cut your bottom panel.
Now that these parts are cut, we need to assemble them with butt blocks.Cut a 8" wide slice from the edge of the plywood panel on the left (see the nesting drawing). We will usethat piece of plywood for butt blocks.
From that piece of plywood, make a first butt block for the side panel. The width is the width of the sliceà 8". The length is the width of the side panel in the middle minus approximately 2".The butt block starts at the sheer side but does not go all the way to the chine: it would interfere with thebottom panel and get in the way of the fiberglass tape that we will apply inside later. see the assemblypictures: we show the narrower butt blocks.
The butt block for the side panel is 8" long by 8" wide: a plain square.Cut a second one: we need two.
Cut the butt block for the bottom: it should be 14" long. As for the side panel, we leave around 2" freealong the edges for the fiberglass tape.

Free plans courtesy of:
See more plans at bateau.com
____________________________________________________________________________________
www.eboat.net Page eboat.net13
Plates assembly
You can now assemble the two halves of all your panels with butt blocks.It is important to get everything straight and the easiest way to do that is to re-assemble all the parts, asin a puzzle, in the two plywood sheets. The plywood sheets will keep everything in place and the buttblocks will be on the right side of the hull, inside.

Free plans courtesy of:
See more plans at bateau.com
____________________________________________________________________________________
www.eboat.net Page eboat.net14
Hull Assembly.
The building method may be named stitch and glue but for this boat, we will not use any stitches. Thebending radius of the plywood panels is so small that duct tape will suffice to keep the panels in positionduring the application of the epoxy and fiberglass.
Ideally, the assembly should be done on some kind of support: sawhorses, blocks.
Start by arranging the panels flat as shown on the drawing: the two sides touching the bottom paneledges right in the middle.
There should be piece of duct tape under the panels, full width. The tape will act as a hinge.
For the next step, you are going to need a batten to keep the side panels up: any wooden stick will do.Cut it to the width of the boat in the middle, the length is on the plans.

Free plans courtesy of:
See more plans at bateau.com
____________________________________________________________________________________
www.eboat.net Page eboat.net15
Fold the sides up, fasten and keep them in position with the batten: one screw or nail each side.
Pinch the bows together and keep them in position with duct tape.
(duct tape not shown on the pictures)
Note that the bottom panel is still flat.
Free plans courtesy of:
See more plans at bateau.com
____________________________________________________________________________________
www.eboat.net Page eboat.net16
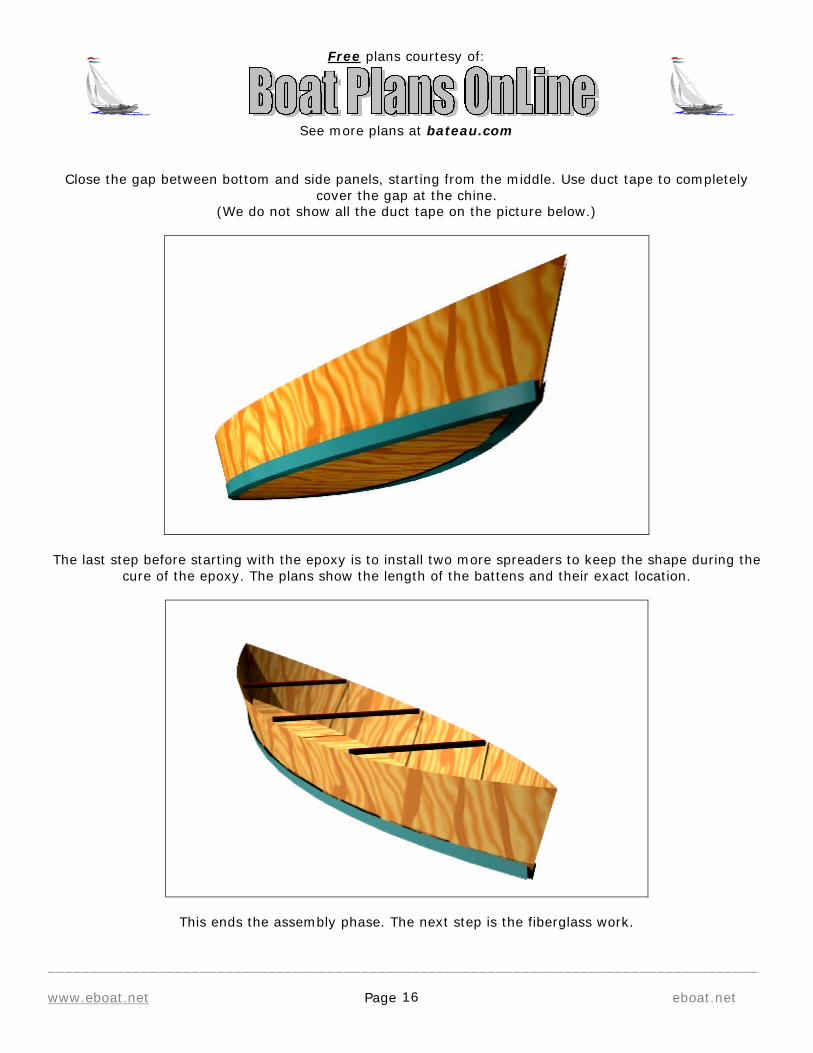
Close the gap between bottom and side panels, starting from the middle. Use duct tape to completelycover the gap at the chine.
(We do not show all the duct tape on the picture below.)
The last step before starting with the epoxy is to install two more spreaders to keep the shape during thecure of the epoxy. The plans show the length of the battens and their exact location.
This ends the assembly phase. The next step is the fiberglass work.
Free plans courtesy of:
See more plans at bateau.com
____________________________________________________________________________________
www.eboat.net Page eboat.net17
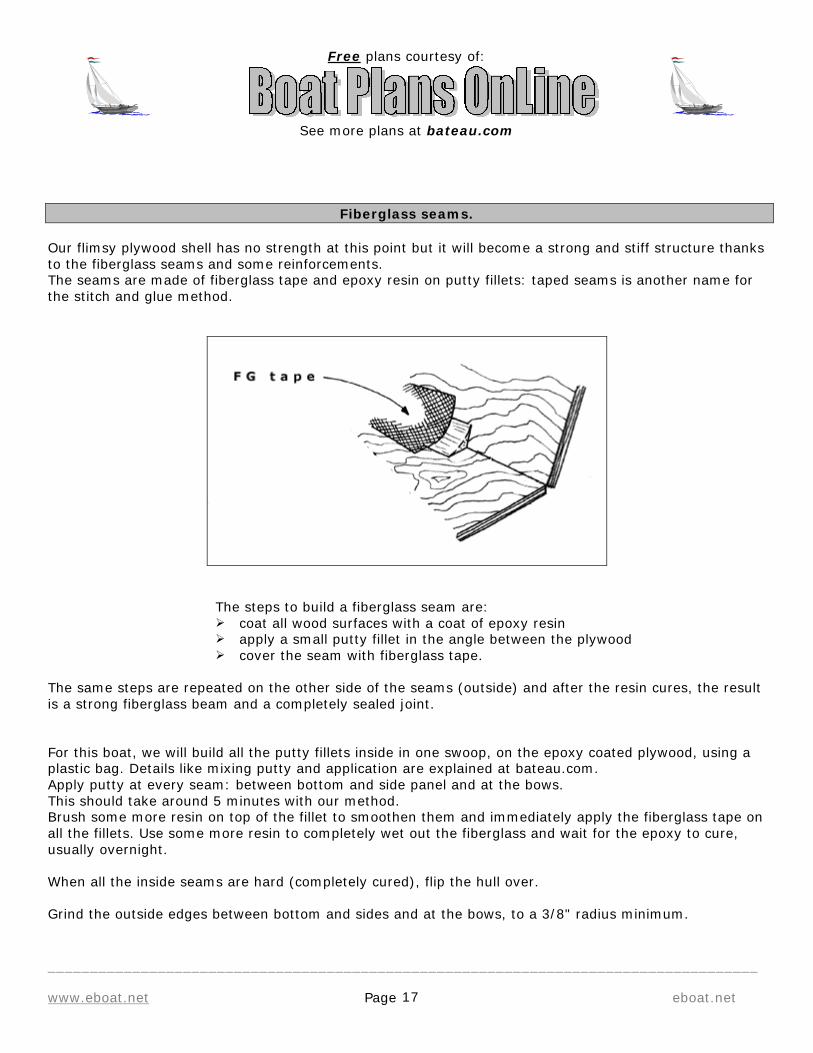
Fiberglass seams.
Our flimsy plywood shell has no strength at this point but it will become a strong and stiff structure thanksto the fiberglass seams and some reinforcements.The seams are made of fiberglass tape and epoxy resin on putty fillets: taped seams is another name forthe stitch and glue method.
The steps to build a fiberglass seam are:Ø coat all wood surfaces with a coat of epoxy resinØ apply a small putty fillet in the angle between the plywoodØ cover the seam with fiberglass tape.
The same steps are repeated on the other side of the seams (outside) and after the resin cures, the resultis a strong fiberglass beam and a completely sealed joint.
For this boat, we will build all the putty fillets inside in one swoop, on the epoxy coated plywood, using aplastic bag. Details like mixing putty and application are explained at bateau.com.Apply putty at every seam: between bottom and side panel and at the bows.This should take around 5 minutes with our method.Brush some more resin on top of the fillet to smoothen them and immediately apply the fiberglass tape onall the fillets. Use some more resin to completely wet out the fiberglass and wait for the epoxy to cure,usually overnight.
When all the inside seams are hard (completely cured), flip the hull over.
Grind the outside edges between bottom and sides and at the bows, to a 3/8" radius minimum.

Free plans courtesy of:
See more plans at bateau.com
____________________________________________________________________________________
www.eboat.net Page eboat.net18
Prime the plywood with a coat of resin.If there are any gaps on the outside edge, fill them with epoxy putty.Cover all the outside seams with fiberglass tape and wet out as for the inside.Wait for the epoxy to cure, usually overnight.
The complete procedure outlined above is described in detail with pictures at our web site bateau.com.See our stitch and glue primer and other files.
After the cure, you have a complete hull and the next step is to finish it.
There are several detailed tutorials about the stitch and glue boat building method at ourweb sites.
Start at bateau.com for example where you will find a complete tutorial with tens ofpictures, "how to" files about the use of resin, selection of materials etc.
There is also a kit available for this boat: it contains all of the epoxy and fiberglassneeded to build the boat, not the plywood. The kit comes with a 55 page book describing
step by step how to use epoxy and fiberglass. The kit includes the dispensing pumps,gloves and mixing cups, needed to work cleanly
Get the kit fromwww.boatbuildercentral.com
The same web site also sells an epoxy-fiberglass trial kit for those who have neverworked with resins.
These two kits are in the building materials section,à Resins à Epoxy à Epoxy Kits

Free plans courtesy of:
See more plans at bateau.com
____________________________________________________________________________________
www.eboat.net Page eboat.net19
Finishing the boat.
There are a few tasks left to do before we can call this a complete boat:Ø install a rubrailØ install breasthooksØ install the seat supportØ sand and paint
The rubrail and breatshooks will add enormous stiffness to the hull. Without them, the sides will be veryflimsy but do not worry, those parts will remedy that.
The seat support will also add stiffness and reinforce the bottom in the middle of the boat. Note that themiddle of the boat is already reinforced by the butt blocks acting as a frame. This is typical of our designs:we use strategically located butt blocks to reinforce the hull, a win-win situation combining ease ofbuilding with strength and simplicity.

Free plans courtesy of:
See more plans at bateau.com
____________________________________________________________________________________
www.eboat.net Page eboat.net20
Ø Let's start with the rubrail.Since the sheer line is straight when developed, we can use any straight wood batten with a section closeto what we show on the plans: 1 x 2", the length is exactly the length of the sheer side panel: we alreadymeasured that when cutting the plywood.That batten is epoxy glued to the edge of the plywood.The installation procedure is important: one must proceed on the two sides at the same time. If not thebatten will pull the hull to one side and we will have an asymmetrical boat.Start in the middle and progress from there towards the ends. Save clamps by using slices of 3" diameterPVC pipe cut with a slot as clamps (picture at baetau.com).
After the epoxy cures, round the tips and edges with your grinder or sander.
Ø The breasthooksThey can now be inserted at the bows. The plans show suggested dimensions. Do not make them shorterbut you can customize all the curves that we show.
The breasthooks can be made from leftover plywood: two or three layers laminated but if you have somehardwood between 1/2" and 3/4" thick, use it for those parts.In all cases, build some fiberglass seams between hull sides and breasthooks underneath. You willprobably handle the boat through the breasthooks and they should be strong.
Ø The seat reinforcementThis is optional but highly recommended. It is piece of plywood cut from the dimensions on the plans andepoxy glued to the top of the bottom panel butt block and to the sides. Fiberglass seams at the sides areoptional but highly recommended.The seat panel is wider than the hull at that point but it will bend easily when pushed down. Keep it inposition with drywall screws or weights during the cure of the epoxy and do not forget to coat all sides andedges with epoxy before installation.The seat panel adds stiffness to the hull.
Ø It is possible to customize your boat: runners on the bottom will help to protect the bottom againstabrasion if you frequently beach the boat. They also help with tracking.
Some builders will install an inwale or thwarts: it's all up to you at this point.

Free plans courtesy of:
See more plans at bateau.com
____________________________________________________________________________________
www.eboat.net Page eboat.net21
Painting
Before painting, we will fair and sand the hull and do not forget:all plywood must be epoxy coated, inside and out. All plywood means ALL, no exception.
There are two stages in the sanding and fairing process.In the first stage, you sand to fair: remove the ridges at the edge of the fiberglass tape, round the bowsetc. To fill gaps, use an epoxy slurry.Once you are satisfied with fairness, you can start sanding for smoothness.This is best done with a sanding primer of the same brand than the paint you will use.By the way, a good way to reduce sanding to a minimum is to smoothen the epoxy resin before it cures:put a piece of wax paper on the wet epoxy and roll it out with a rolling pin, a steel pipe or whatever ishandy.
Almost any paint will work on an epoxy boat: from inexpensive exterior latex to sophisticated linearpolyurethane's. Choose in function of your preferences and budget.
There are many enlightening discussions of paint systems on the boat builders message board atBoatPlansOnLine.com but the bottom line is to pick a paint system and follow their instructions.Good marine paints can be bought online at discount prices from BoatBuilderCentral.com.
More
Ø A free version of this plan in US units (inches) can be downloaded from bateau.com.Ø Updated versions of the free plans are posted regularly at bateau.com. This version may be obsolete
by the time you are reading this.Ø An epoxy and fiberglass kit is also available from BoatBuilderCentral.com:
http://www.boatbuildercentral.com/composites/listing.htm/Epoxy+KitsØ We are working on more plans for canoes and kayaks in all sizes (January 2001).
See bateau.com for more information.

Free plans courtesy of:
See more plans at bateau.com
____________________________________________________________________________________
www.eboat.net Page eboat.net22
Legal stuff
In most countries, small boats like this are not subject to regulations or taxes. In most US states, thereare no license or tag requirements for canoes: launch it and have fun.
ø This file is copyrighted ÜÜ
This file can not be modified in any way.You can distribute the metric version over the Internet without permission but NOT the US version. TheUS version is the one with the plans in inches and feet.
This plan is distributed in the hopes it will be useful, but without any warranty or guarantee of fitness for aparticular purpose. By using this plan you agree to absolve the author of any and all liability for problemsoccurring as a result of using this plan and building notes.
The end?
For many, a first boatbuilding experience is only the beginning. Dream about your next project by lookingat the designs for amateurs available on the Internet. Start with the best and oldest boat plans web site:BATEAU.COM. There are other free plans available at that web site: the D4 for example is an 8' dinghyfor oars, sails or outboard. We stopped counting downloads years ago but we must be close to 1,000,000free copies! Thousands of D4's are sailing all over the world
There is no free technical support for our free plans but:
Ø see the best tutorials and how to files about amateur boat building at www.bateau.comØ read messages from other builders on our message board, link from bateau.comØ ask questions to other builders on our message boardØ buy a book about stitch and glue from one of our web sites: bateau.com or boatbuildercentral.com