Embed Size (px)
Citation preview
VITA/TCE Training
Logging In and Configuring
TaxSlayer Pro Online
© 2016 TaxSlayer, LLC
Logging In and Configuring TaxSlayer Pro Online 2
Login and Passwords .................................................................................. 4
Login ....................................................................................................... 4
Retrieving Your User Name ..................................................................... 6
Resetting Your Password ........................................................................ 8
Resetting with Security Question ......................................................... 9
Resetting with Security Code ............................................................. 10
Setting up Site Information ........................................................................ 12
Setting up Your Site .............................................................................. 12
Setting up EROs ................................................................................... 16
Setting up Security Templates .................................................................. 20
Predefined Security Templates ............................................................. 20
Creating Security Templates ................................................................. 21
Editing Security Templates .................................................................... 24
Assigning Security Templates ............................................................... 25
Adding Preparers ...................................................................................... 27
Creating Users ...................................................................................... 27
SIDN .................................................................................................. 29
Return Access ................................................................................... 29
Login Setup ....................................................................................... 29
Working with Custom Questions ............................................................... 33
Adding Custom Questions ..................................................................... 33
Configuring Printing .................................................................................. 36
Predefined Print Sets ............................................................................ 36
View the Master Print ......................................................................... 36
Create a Custom Print Set..................................................................... 37
Managing Returns .................................................................................... 40
Working with Return Tags ..................................................................... 40
Logging In and Configuring TaxSlayer Pro Online 3
Setting up Return Tags ...................................................................... 40
Filtering Returns Using Return Tags .................................................. 42
Deactivating/Deleting Returns ............................................................... 44
Adding Taxpayer Notes ......................................................................... 46
Sending Messages ................................................................................ 49
Working with Reports ................................................................................ 52
Running Reports ................................................................................... 52
Searching and Sorting ....................................................................... 53
Printing .............................................................................................. 53
Exporting ........................................................................................... 54
Managing Multiple Sites ............................................................................ 54
Using Multiple Office Features .............................................................. 54
Transferring Settings to Offices .......................................................... 55
Searching by Office (Relational EFIN required) ................................. 56
Accessing Offices (Relational EFIN Required) ...................................... 56
Contingency Procedures ........................................................................... 59
TaxSlayer Pro ....................................................................................... 59
Index ......................................................................................................... 62
Logging In and Configuring TaxSlayer Pro Online 4
After completing this topic, you will be able to:
Navigate to TaxSlayer Pro Online.
List the password requirements.
Change your password the first time you log in.
Reset your password.
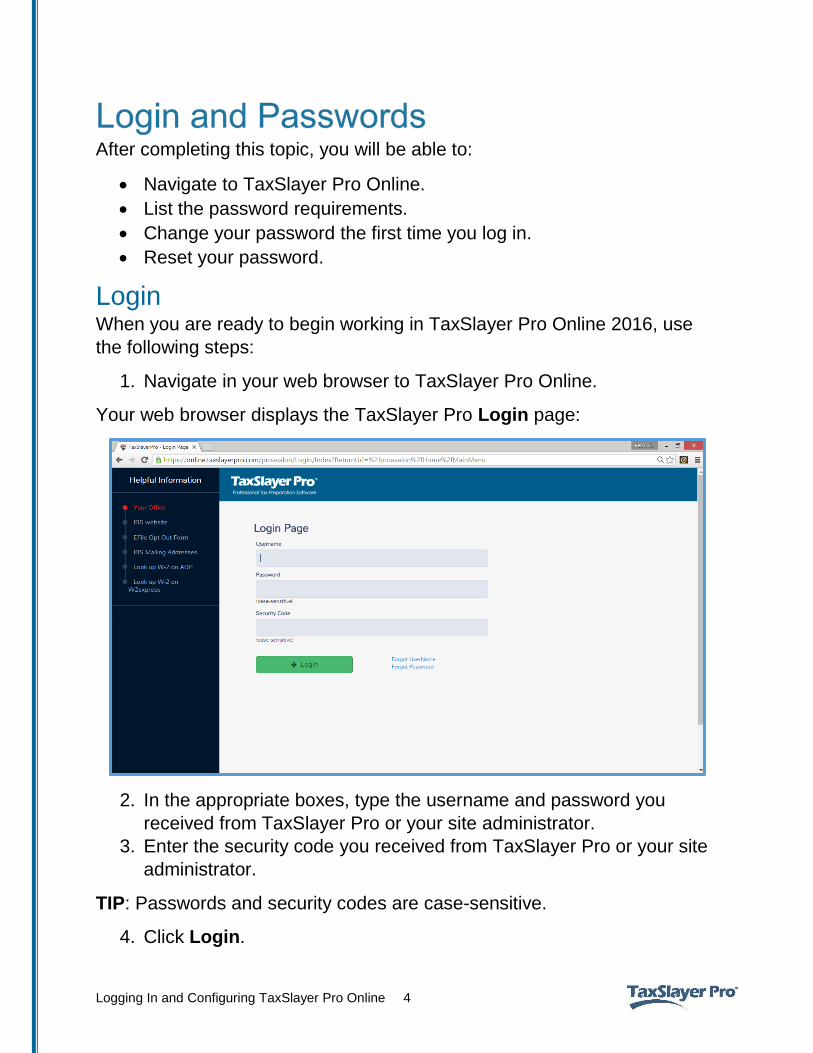
Login When you are ready to begin working in TaxSlayer Pro Online 2016, use
the following steps:
1. Navigate in your web browser to TaxSlayer Pro Online.
Your web browser displays the TaxSlayer Pro Login page:
2. In the appropriate boxes, type the username and password you
received from TaxSlayer Pro or your site administrator.
3. Enter the security code you received from TaxSlayer Pro or your site
administrator.
TIP: Passwords and security codes are case-sensitive.
4. Click Login.
Logging In and Configuring TaxSlayer Pro Online 5
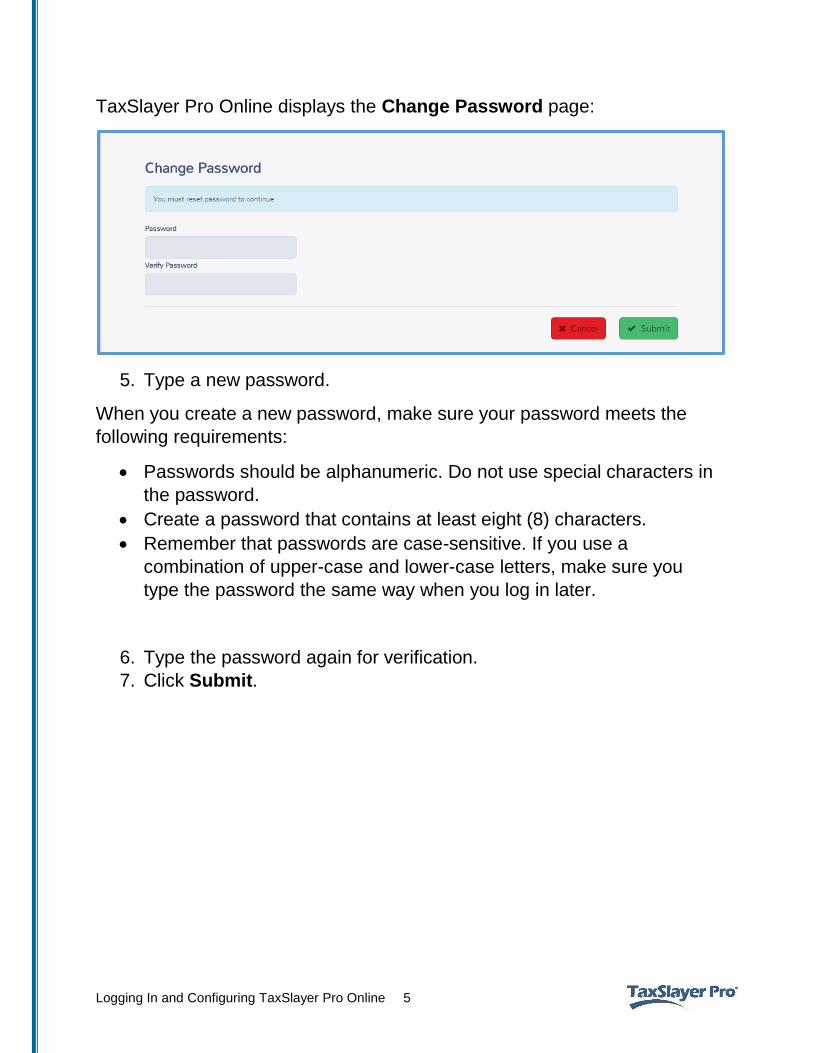
TaxSlayer Pro Online displays the Change Password page:
5. Type a new password.
When you create a new password, make sure your password meets the
following requirements:
Passwords should be alphanumeric. Do not use special characters in
the password.
Create a password that contains at least eight (8) characters.
Remember that passwords are case-sensitive. If you use a
combination of upper-case and lower-case letters, make sure you
type the password the same way when you log in later.
6. Type the password again for verification.
7. Click Submit.
Logging In and Configuring TaxSlayer Pro Online 6
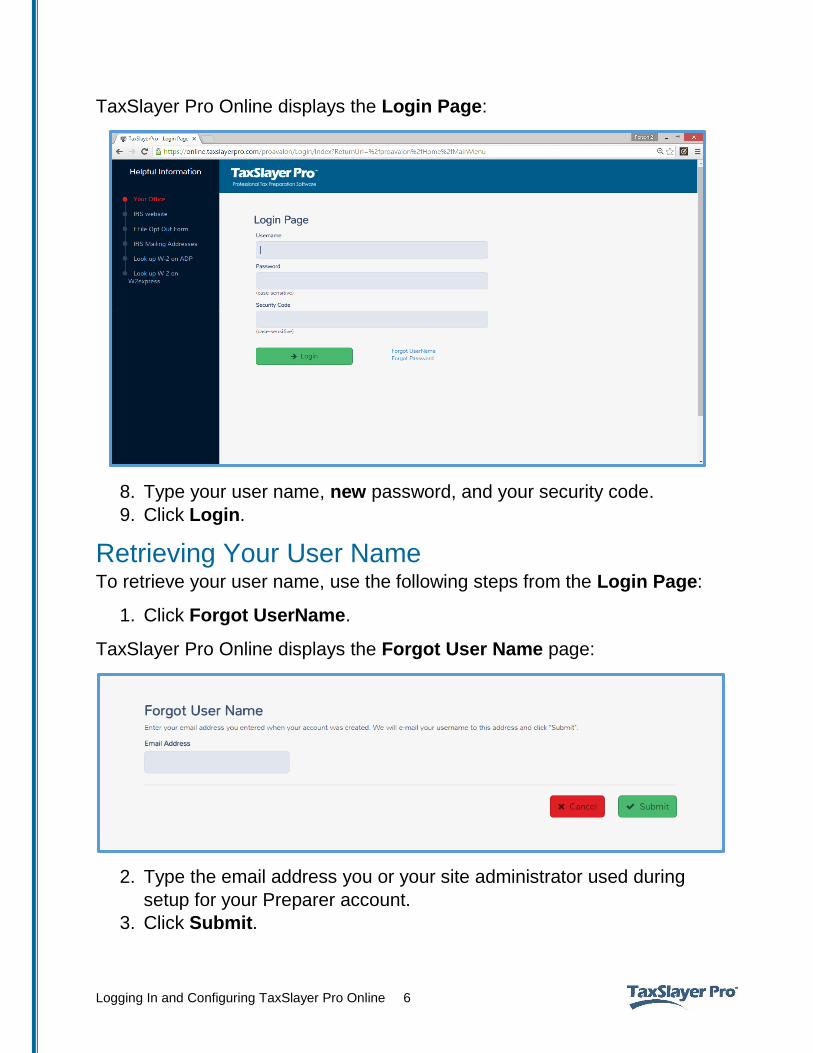
TaxSlayer Pro Online displays the Login Page:
8. Type your user name, new password, and your security code.
9. Click Login.
Retrieving Your User Name To retrieve your user name, use the following steps from the Login Page:
1. Click Forgot UserName.
TaxSlayer Pro Online displays the Forgot User Name page:
2. Type the email address you or your site administrator used during
setup for your Preparer account.
3. Click Submit.
Logging In and Configuring TaxSlayer Pro Online 7
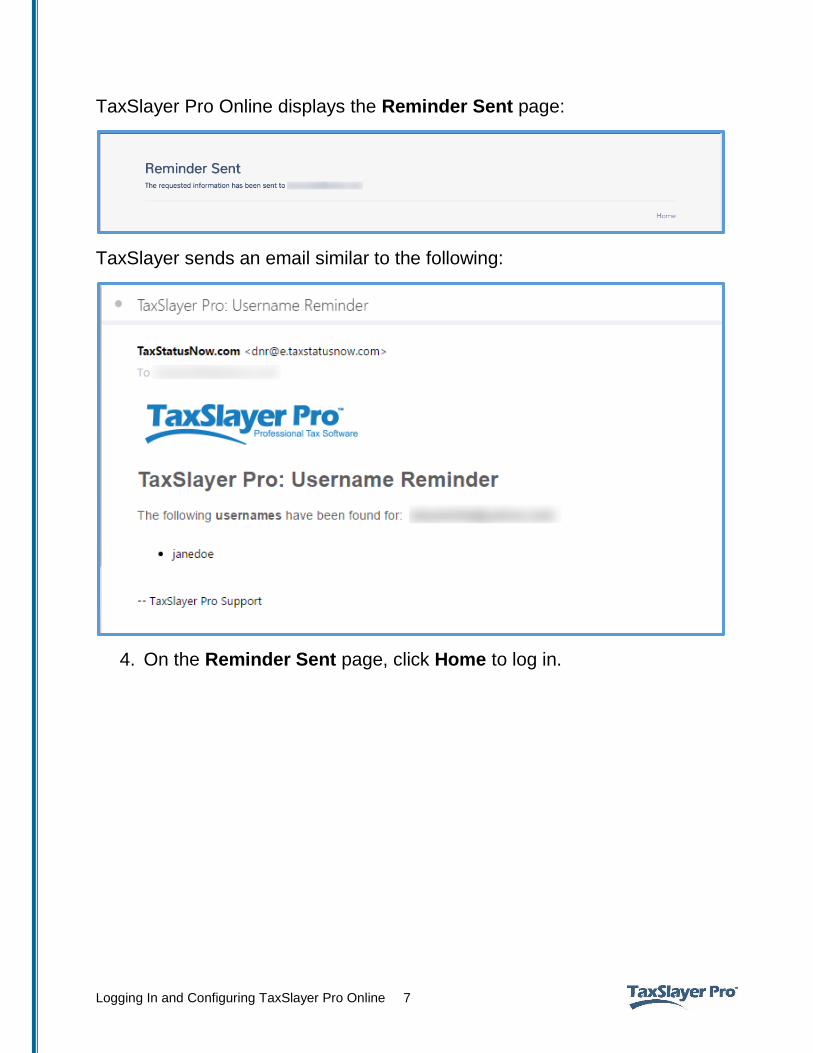
TaxSlayer Pro Online displays the Reminder Sent page:
TaxSlayer sends an email similar to the following:
4. On the Reminder Sent page, click Home to log in.
Logging In and Configuring TaxSlayer Pro Online 8
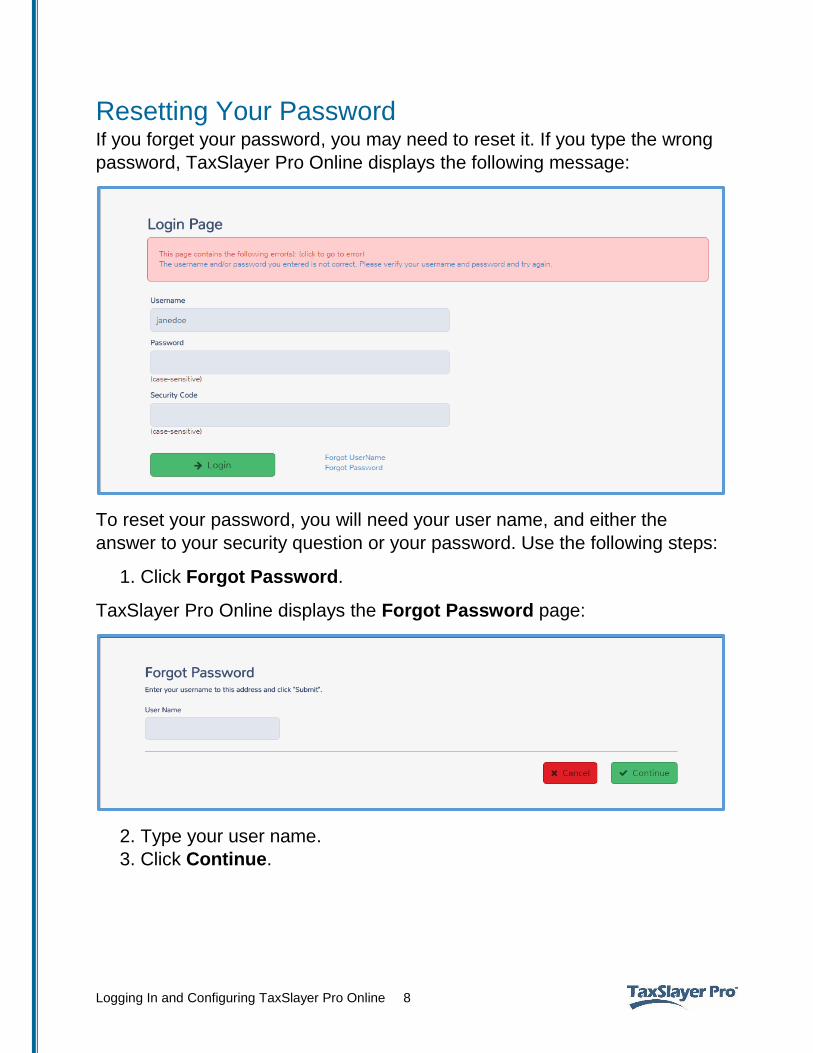
Resetting Your Password If you forget your password, you may need to reset it. If you type the wrong
password, TaxSlayer Pro Online displays the following message:
To reset your password, you will need your user name, and either the
answer to your security question or your password. Use the following steps:
1. Click Forgot Password.
TaxSlayer Pro Online displays the Forgot Password page:
2. Type your user name.
3. Click Continue.
Logging In and Configuring TaxSlayer Pro Online 9
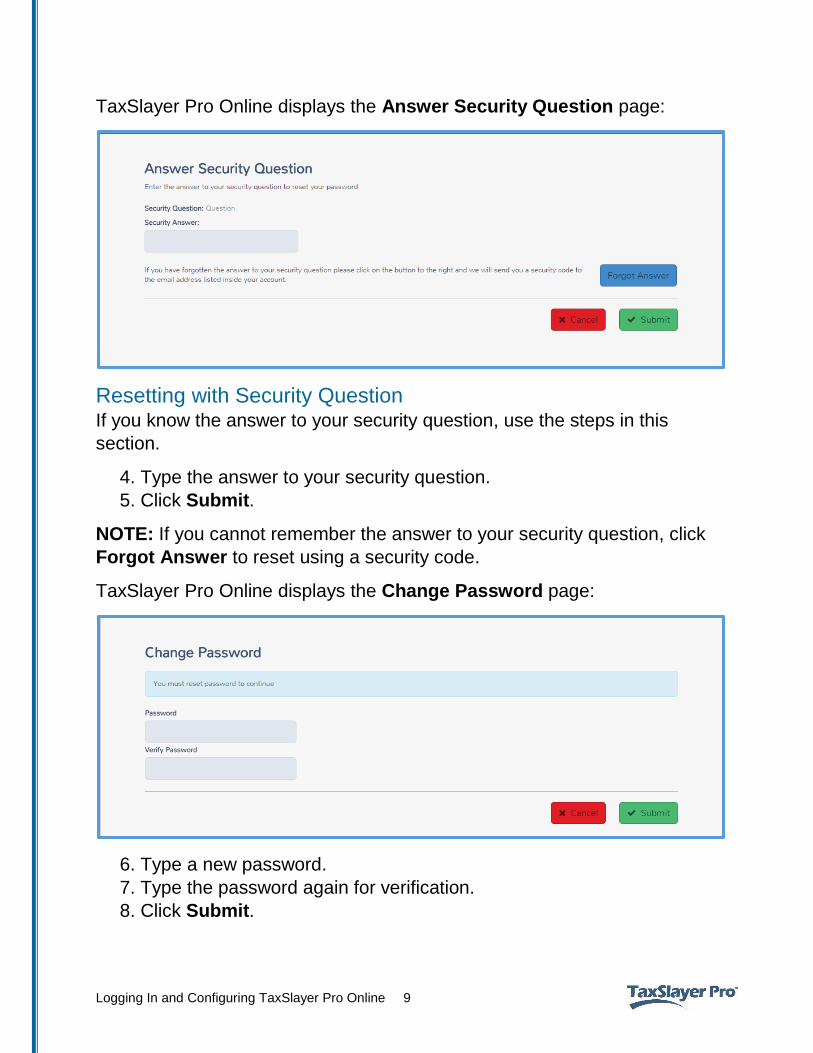
TaxSlayer Pro Online displays the Answer Security Question page:
Resetting with Security Question If you know the answer to your security question, use the steps in this
section.
4. Type the answer to your security question.
5. Click Submit.
NOTE: If you cannot remember the answer to your security question, click
Forgot Answer to reset using a security code.
TaxSlayer Pro Online displays the Change Password page:
6. Type a new password.
7. Type the password again for verification.
8. Click Submit.
Logging In and Configuring TaxSlayer Pro Online 10
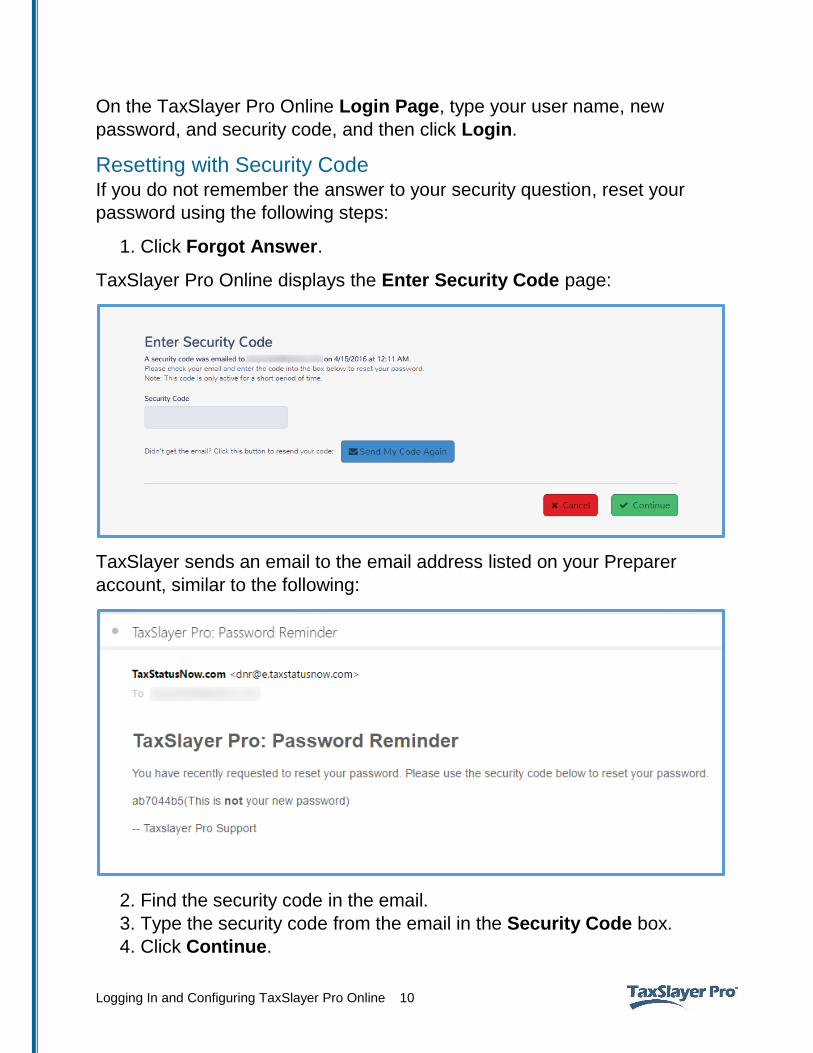
On the TaxSlayer Pro Online Login Page, type your user name, new
password, and security code, and then click Login.
Resetting with Security Code If you do not remember the answer to your security question, reset your
password using the following steps:
1. Click Forgot Answer.
TaxSlayer Pro Online displays the Enter Security Code page:
TaxSlayer sends an email to the email address listed on your Preparer
account, similar to the following:
2. Find the security code in the email.
3. Type the security code from the email in the Security Code box.
4. Click Continue.
Logging In and Configuring TaxSlayer Pro Online 11
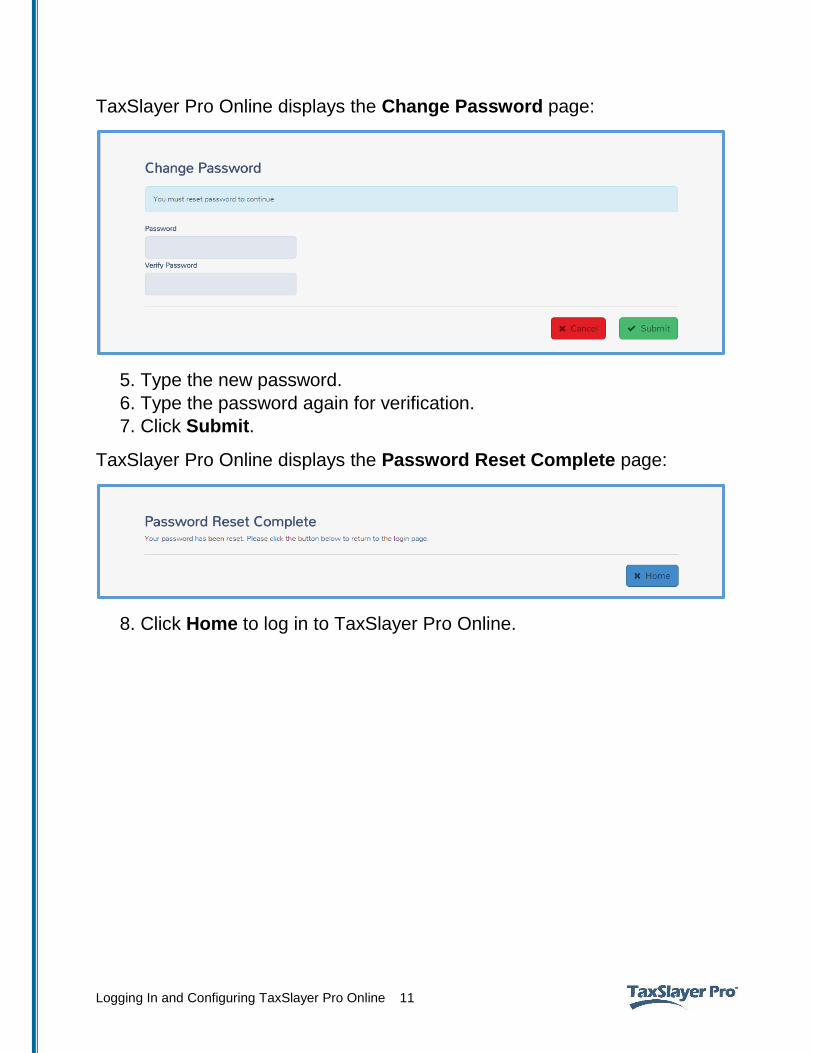
TaxSlayer Pro Online displays the Change Password page:
5. Type the new password.
6. Type the password again for verification.
7. Click Submit.
TaxSlayer Pro Online displays the Password Reset Complete page:
8. Click Home to log in to TaxSlayer Pro Online.
Logging In and Configuring TaxSlayer Pro Online 12
After completing this topic, you will be able to:
Set up your site.
Set up your EROs.
Determine the data that carries to the return.
Before you begin using TaxSlayer Pro Online, you need to configure
settings. You can set up your site, edit, or delete information for the ERO
and preparers. Several items in configuration carry to tax returns so that
you only have to enter this information once. This includes items such as
the firm/site information.
Setting up Your Site First, set up your site information. To do so, use the following steps:
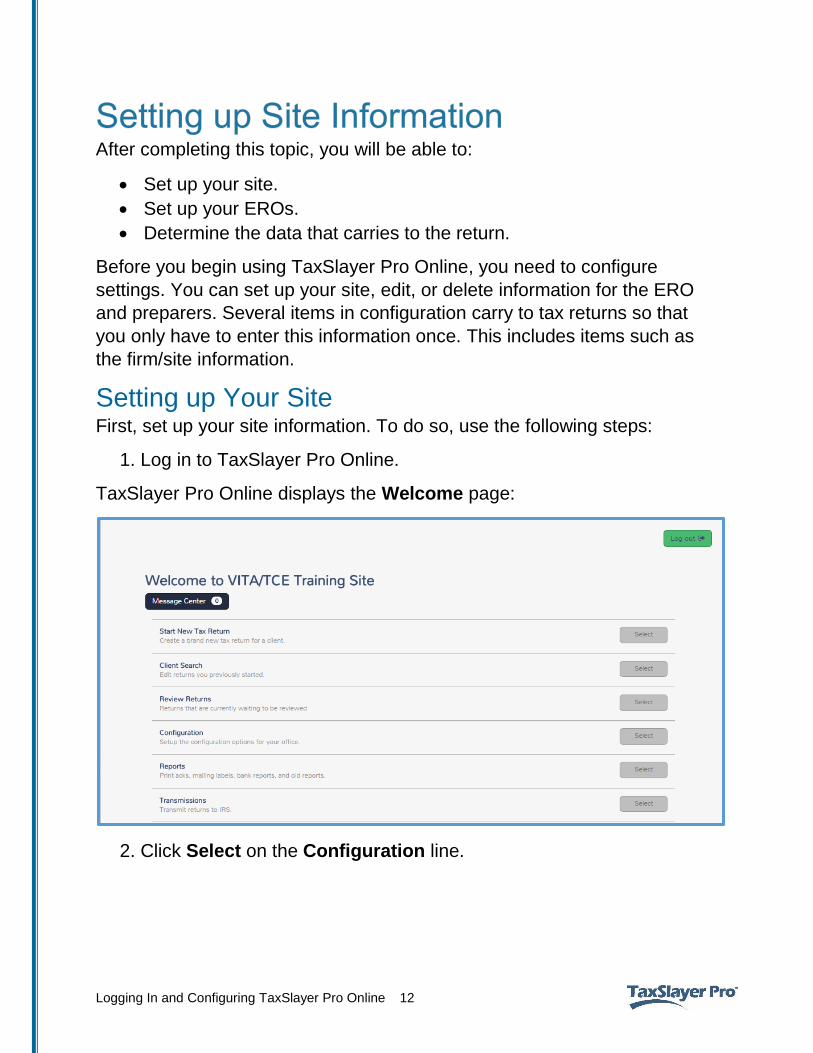
1. Log in to TaxSlayer Pro Online.
TaxSlayer Pro Online displays the Welcome page:
2. Click Select on the Configuration line.
Logging In and Configuring TaxSlayer Pro Online 13
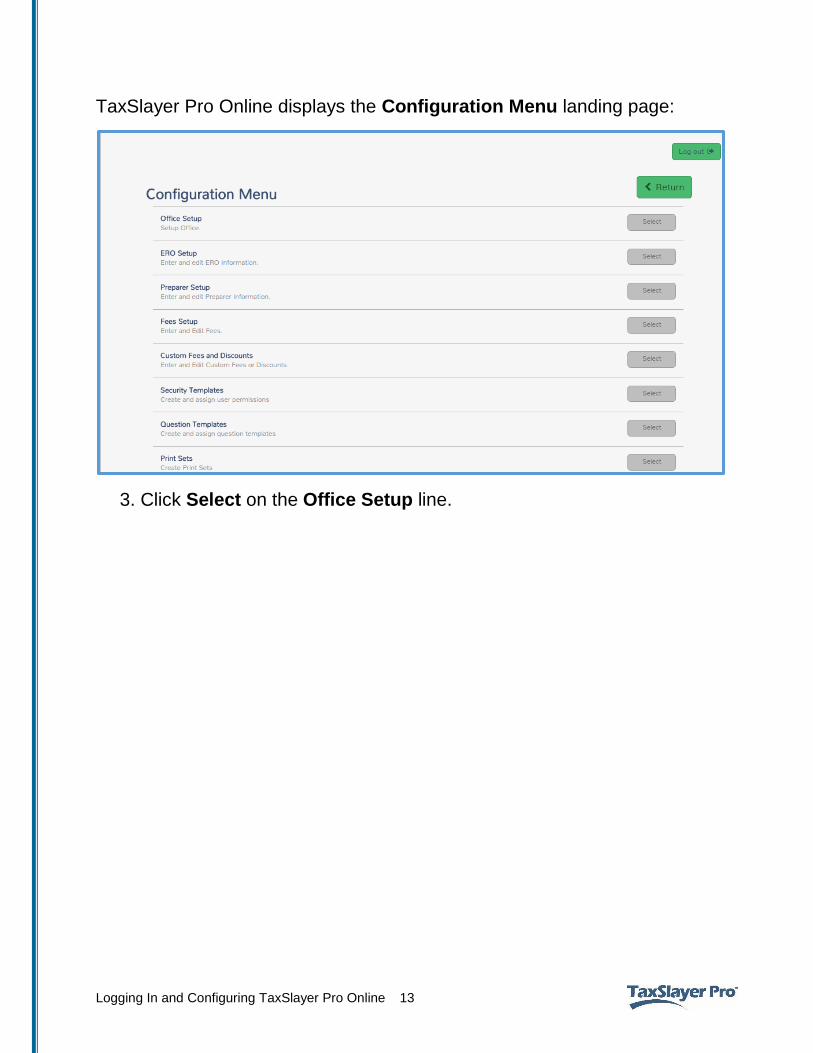
TaxSlayer Pro Online displays the Configuration Menu landing page:
3. Click Select on the Office Setup line.
Logging In and Configuring TaxSlayer Pro Online 14
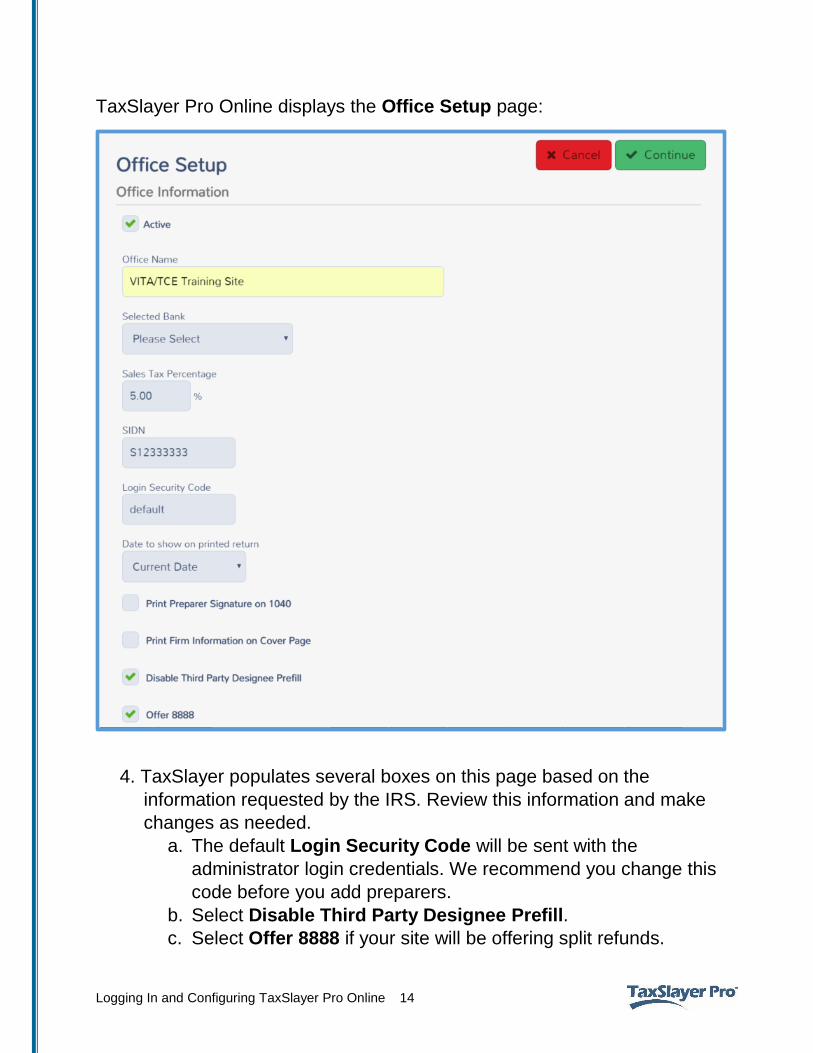
TaxSlayer Pro Online displays the Office Setup page:
4. TaxSlayer populates several boxes on this page based on the
information requested by the IRS. Review this information and make
changes as needed.
a. The default Login Security Code will be sent with the
administrator login credentials. We recommend you change this
code before you add preparers.
b. Select Disable Third Party Designee Prefill.
c. Select Offer 8888 if your site will be offering split refunds.
Logging In and Configuring TaxSlayer Pro Online 15
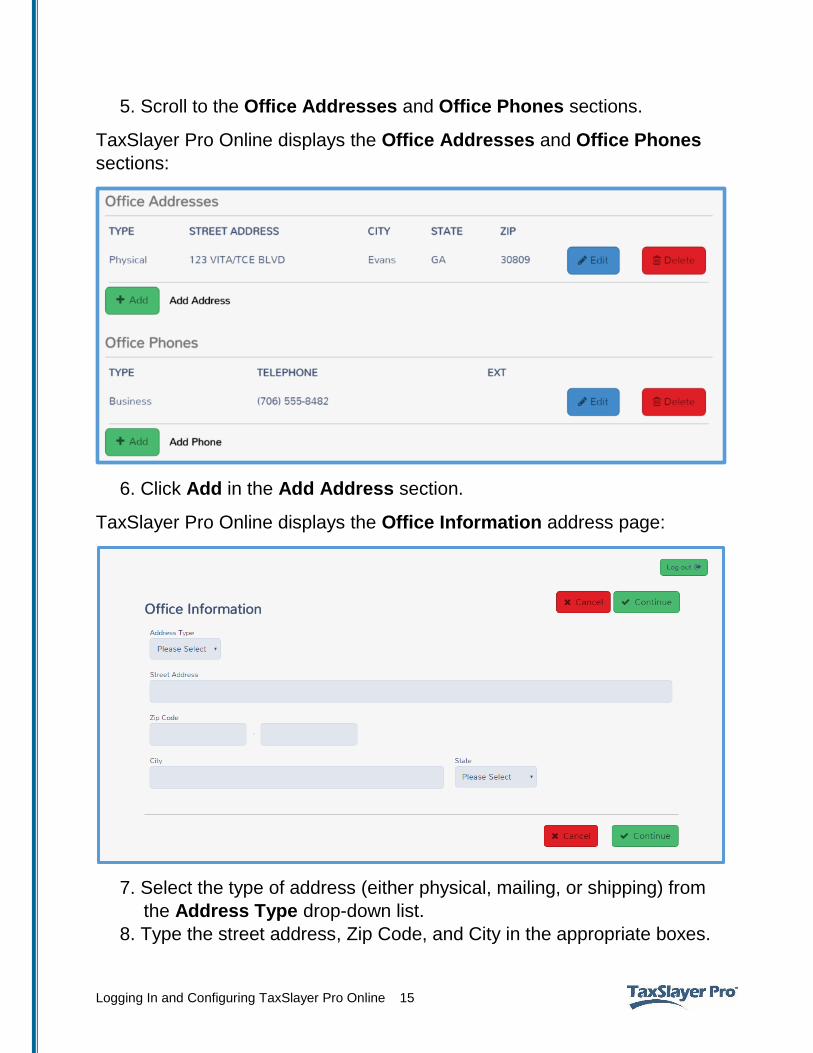
5. Scroll to the Office Addresses and Office Phones sections.
TaxSlayer Pro Online displays the Office Addresses and Office Phones
sections:
6. Click Add in the Add Address section.
TaxSlayer Pro Online displays the Office Information address page:
7. Select the type of address (either physical, mailing, or shipping) from
the Address Type drop-down list.
8. Type the street address, Zip Code, and City in the appropriate boxes.
Logging In and Configuring TaxSlayer Pro Online 16
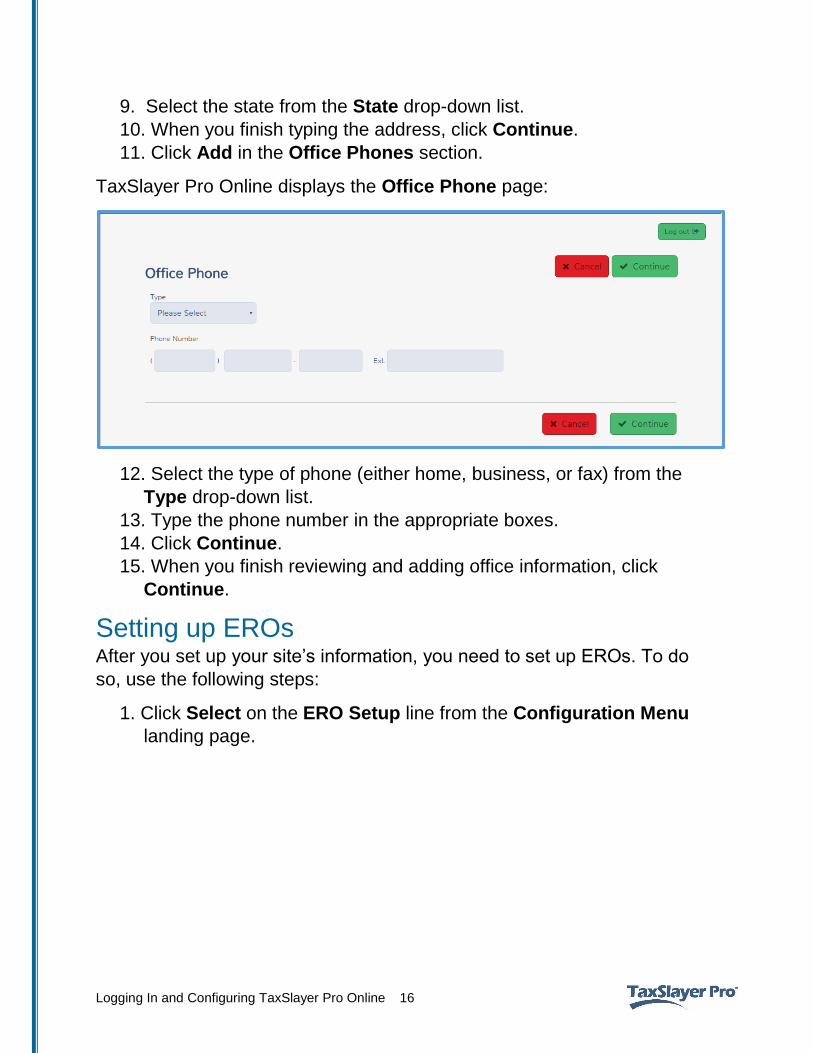
9. Select the state from the State drop-down list.
10. When you finish typing the address, click Continue.
11. Click Add in the Office Phones section.
TaxSlayer Pro Online displays the Office Phone page:
12. Select the type of phone (either home, business, or fax) from the
Type drop-down list.
13. Type the phone number in the appropriate boxes.
14. Click Continue.
15. When you finish reviewing and adding office information, click
Continue.
Setting up EROs After you set up your site’s information, you need to set up EROs. To do
so, use the following steps:
1. Click Select on the ERO Setup line from the Configuration Menu
landing page.
Logging In and Configuring TaxSlayer Pro Online 17
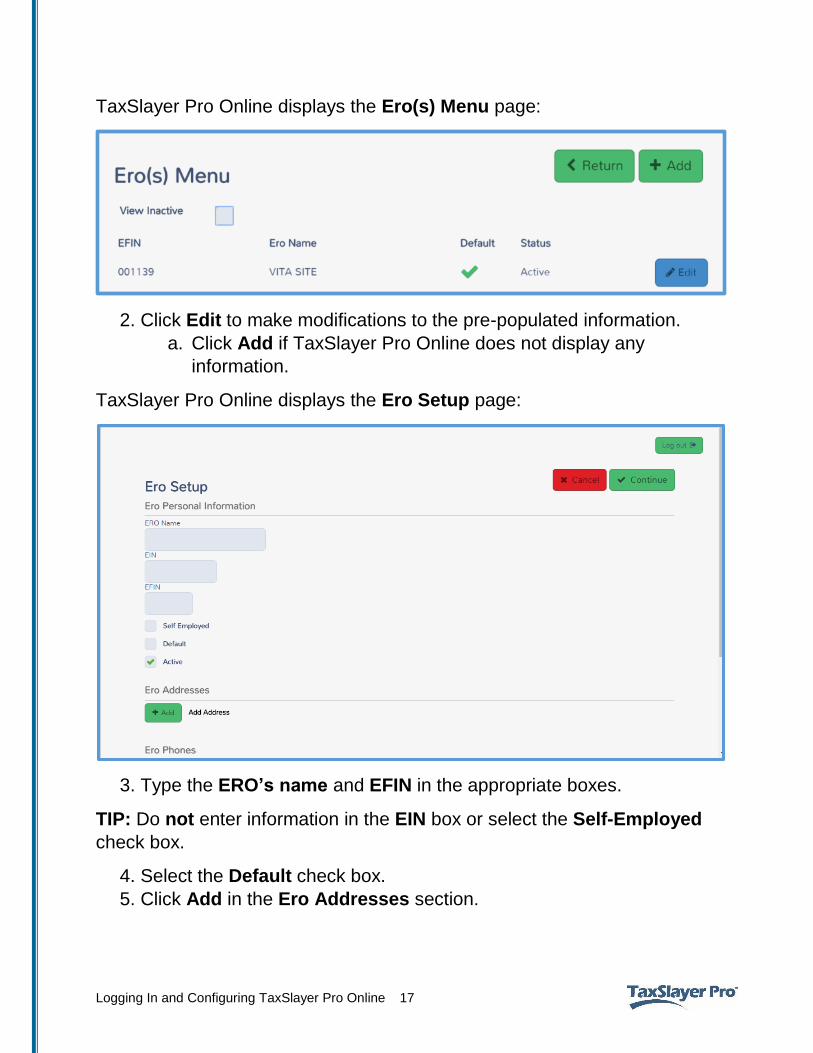
TaxSlayer Pro Online displays the Ero(s) Menu page:
2. Click Edit to make modifications to the pre-populated information.
a. Click Add if TaxSlayer Pro Online does not display any
information.
TaxSlayer Pro Online displays the Ero Setup page:
3. Type the ERO’s name and EFIN in the appropriate boxes.
TIP: Do not enter information in the EIN box or select the Self-Employed
check box.
4. Select the Default check box.
5. Click Add in the Ero Addresses section.
Logging In and Configuring TaxSlayer Pro Online 18
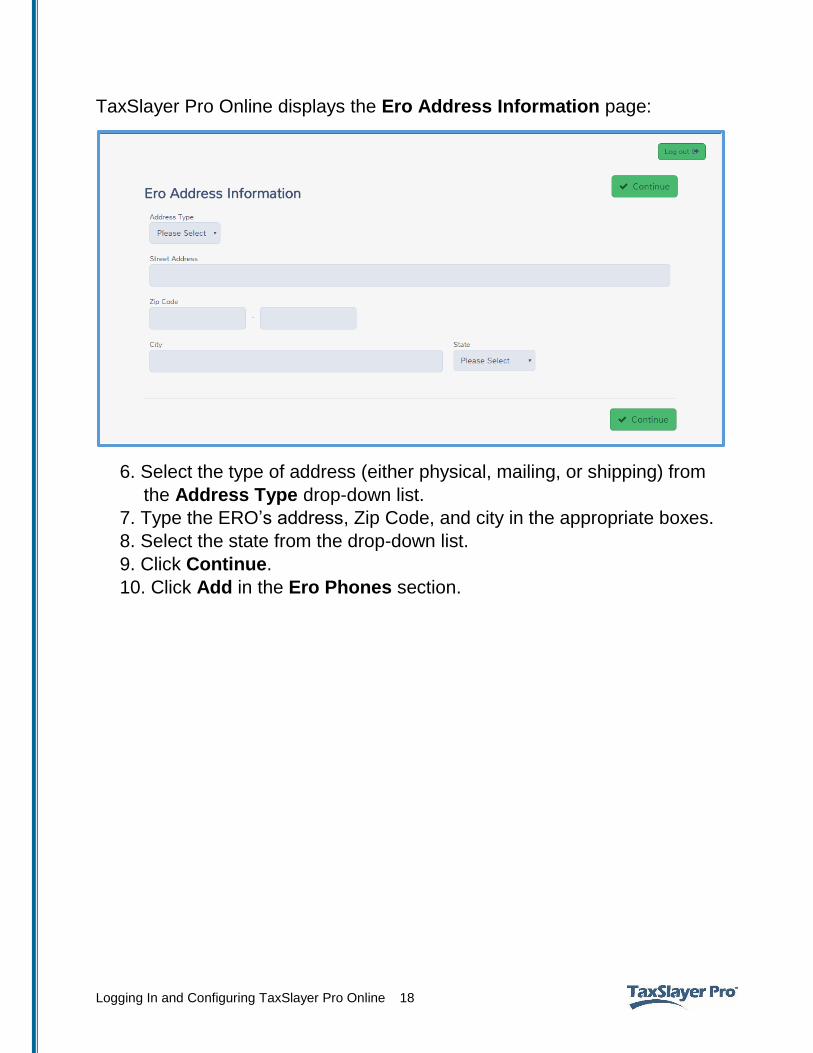
TaxSlayer Pro Online displays the Ero Address Information page:
6. Select the type of address (either physical, mailing, or shipping) from
the Address Type drop-down list.
7. Type the ERO’s address, Zip Code, and city in the appropriate boxes.
8. Select the state from the drop-down list.
9. Click Continue.
10. Click Add in the Ero Phones section.
Logging In and Configuring TaxSlayer Pro Online 19
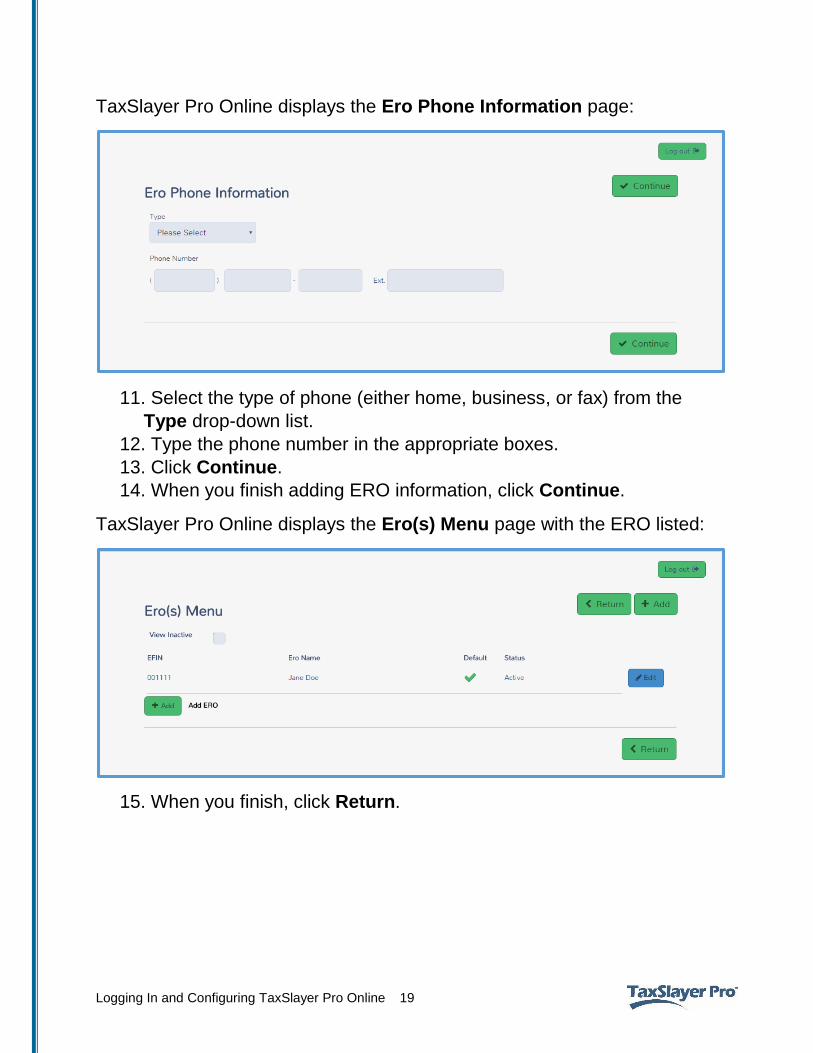
TaxSlayer Pro Online displays the Ero Phone Information page:
11. Select the type of phone (either home, business, or fax) from the
Type drop-down list.
12. Type the phone number in the appropriate boxes.
13. Click Continue.
14. When you finish adding ERO information, click Continue.
TaxSlayer Pro Online displays the Ero(s) Menu page with the ERO listed:
15. When you finish, click Return.
Logging In and Configuring TaxSlayer Pro Online 20
After completing this topic, you will be able to:
List the pre-defined security templates.
Determine which security template to use based on the allowed
actions.
Create a new security template.
Edit an existing security template.
Assign security templates.
In TaxSlayer Pro Online, use security templates to set the permissions for
each preparer. You can use predefined security templates, create your own
templates, or edit existing templates as needed.
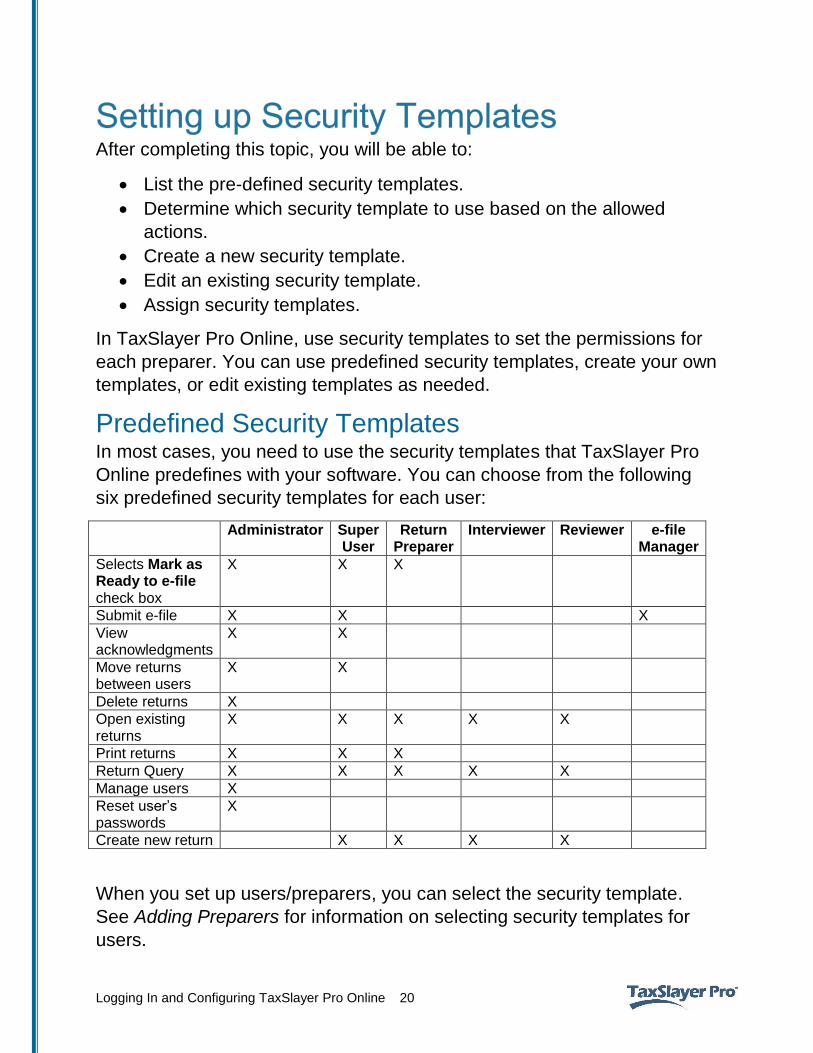
Predefined Security Templates In most cases, you need to use the security templates that TaxSlayer Pro
Online predefines with your software. You can choose from the following
six predefined security templates for each user:
Administrator Super User
Return Preparer
Interviewer Reviewer e-file Manager
Selects Mark as Ready to e-file check box
X X X
Submit e-file X X X
View acknowledgments
X X
Move returns between users
X X
Delete returns X
Open existing returns
X X X X X
Print returns X X X
Return Query X X X X X
Manage users X
Reset user’s passwords
X
Create new return X X X X
When you set up users/preparers, you can select the security template.
See Adding Preparers for information on selecting security templates for
users.
Logging In and Configuring TaxSlayer Pro Online 21
NOTE: You cannot edit the predefined security templates and will not see
them listed in your site Configuration. You will be able to select a template
from them when setting up users. See Adding Preparers for information on
selecting security templates for users.
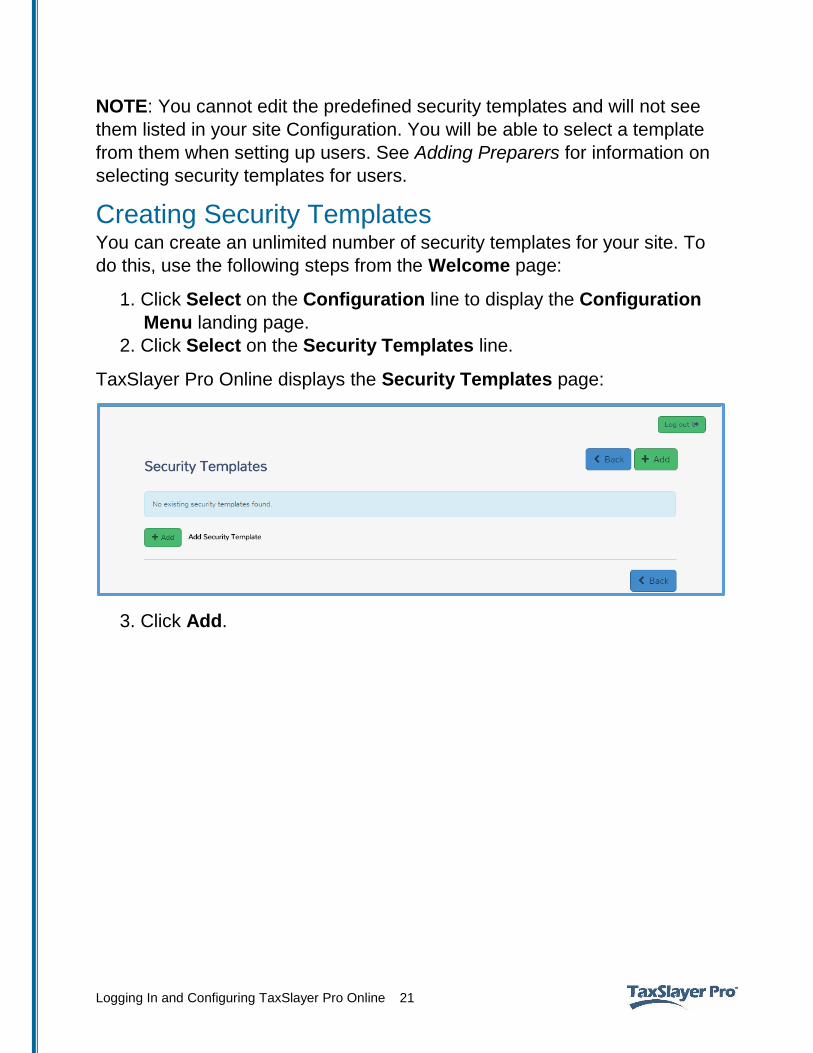
Creating Security Templates You can create an unlimited number of security templates for your site. To
do this, use the following steps from the Welcome page:
1. Click Select on the Configuration line to display the Configuration
Menu landing page.
2. Click Select on the Security Templates line.
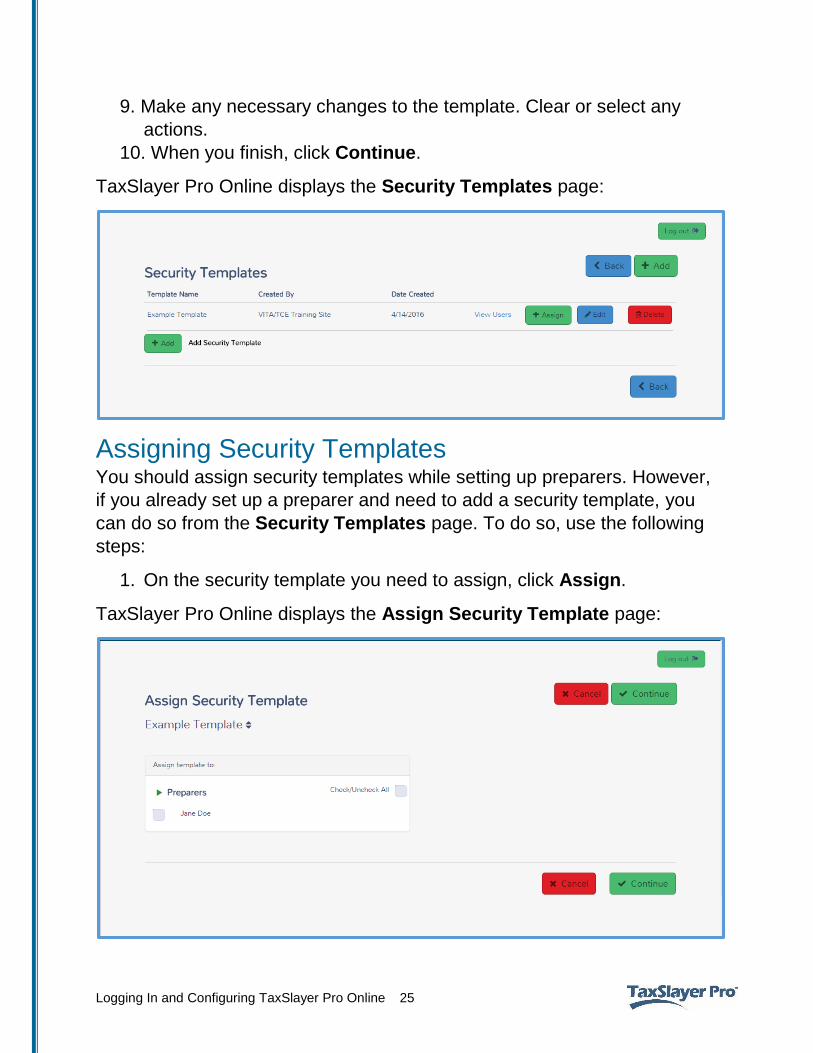
TaxSlayer Pro Online displays the Security Templates page:
3. Click Add.
Logging In and Configuring TaxSlayer Pro Online 22
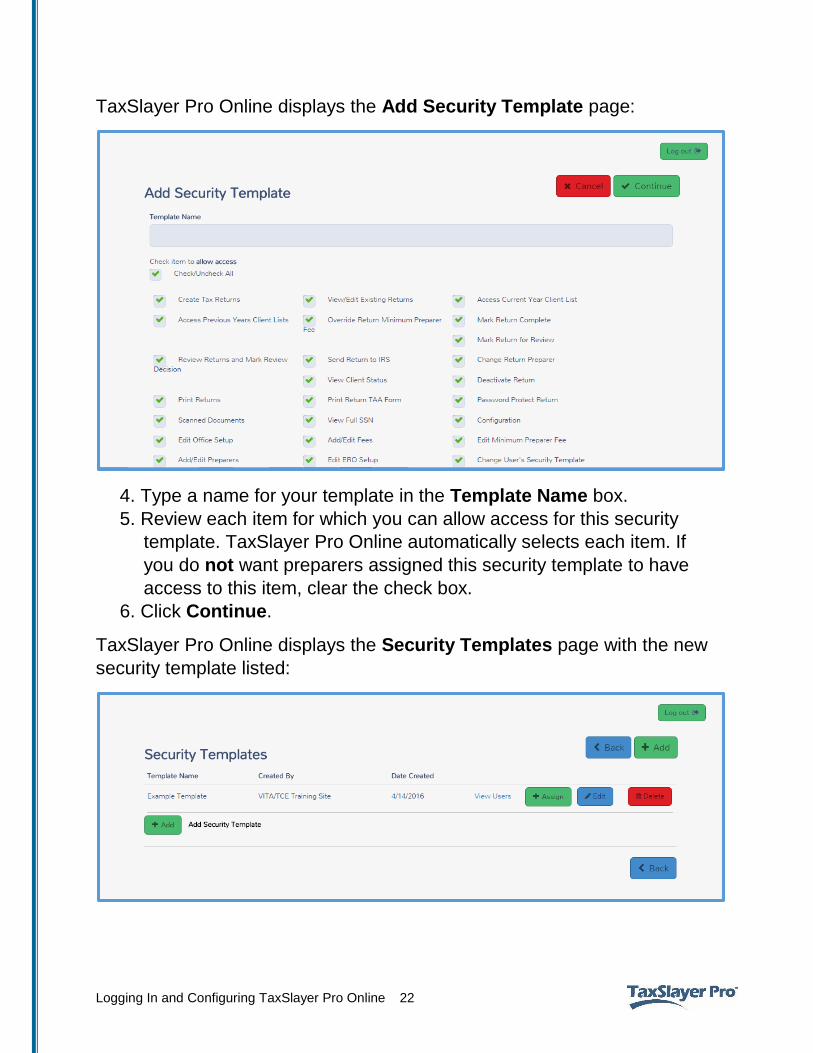
TaxSlayer Pro Online displays the Add Security Template page:
4. Type a name for your template in the Template Name box.
5. Review each item for which you can allow access for this security
template. TaxSlayer Pro Online automatically selects each item. If
you do not want preparers assigned this security template to have
access to this item, clear the check box.
6. Click Continue.
TaxSlayer Pro Online displays the Security Templates page with the new
security template listed:
Logging In and Configuring TaxSlayer Pro Online 23
7. If you need to add more security templates, click Add and follow the
same steps for each security template.
8. When you finish adding security templates, click Back to return to the
Welcome page.
Logging In and Configuring TaxSlayer Pro Online 24
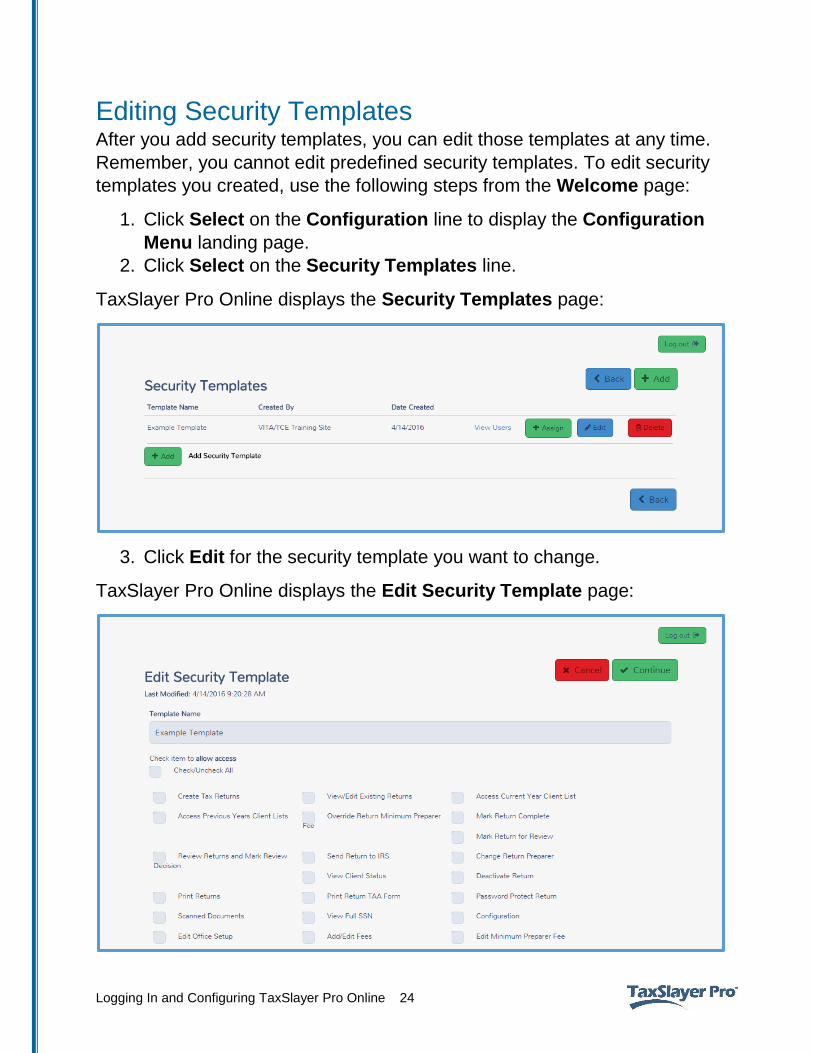
Editing Security Templates After you add security templates, you can edit those templates at any time.
Remember, you cannot edit predefined security templates. To edit security
templates you created, use the following steps from the Welcome page:
1. Click Select on the Configuration line to display the Configuration
Menu landing page.
2. Click Select on the Security Templates line.
TaxSlayer Pro Online displays the Security Templates page:
3. Click Edit for the security template you want to change.
TaxSlayer Pro Online displays the Edit Security Template page:
Logging In and Configuring TaxSlayer Pro Online 25
9. Make any necessary changes to the template. Clear or select any
actions.
10. When you finish, click Continue.
TaxSlayer Pro Online displays the Security Templates page:
Assigning Security Templates You should assign security templates while setting up preparers. However,
if you already set up a preparer and need to add a security template, you
can do so from the Security Templates page. To do so, use the following
steps:
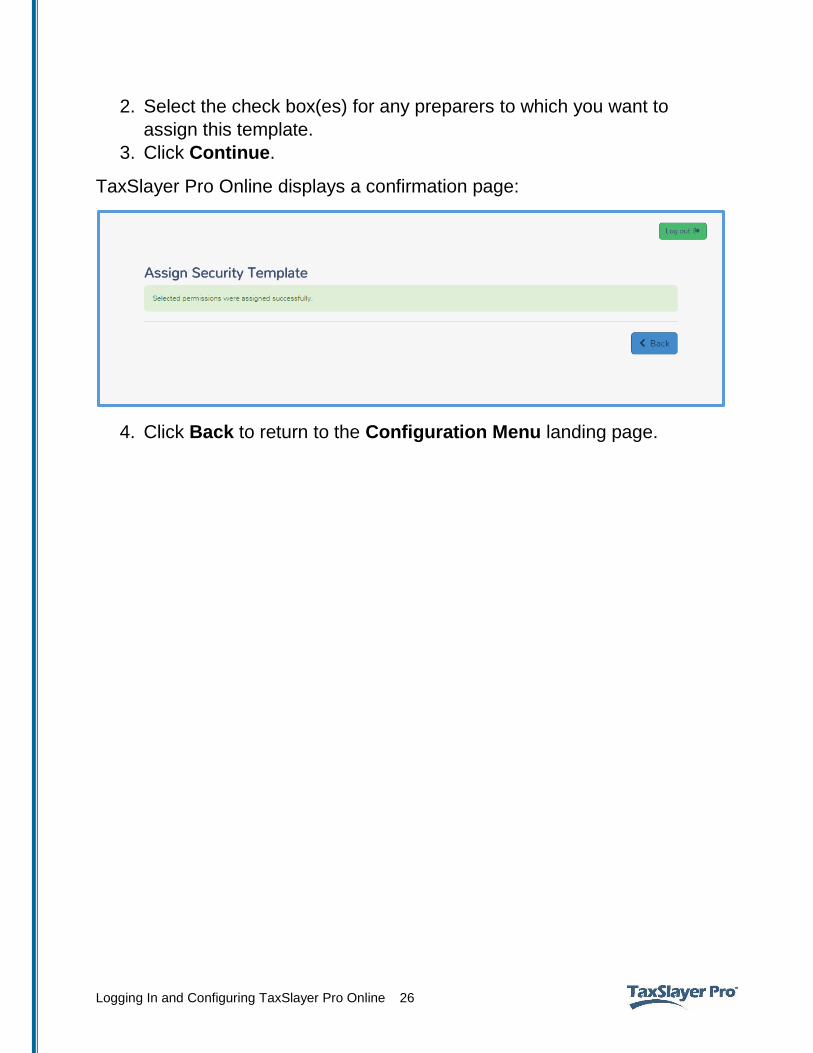
1. On the security template you need to assign, click Assign.
TaxSlayer Pro Online displays the Assign Security Template page:
Logging In and Configuring TaxSlayer Pro Online 26
2. Select the check box(es) for any preparers to which you want to
assign this template.
3. Click Continue.
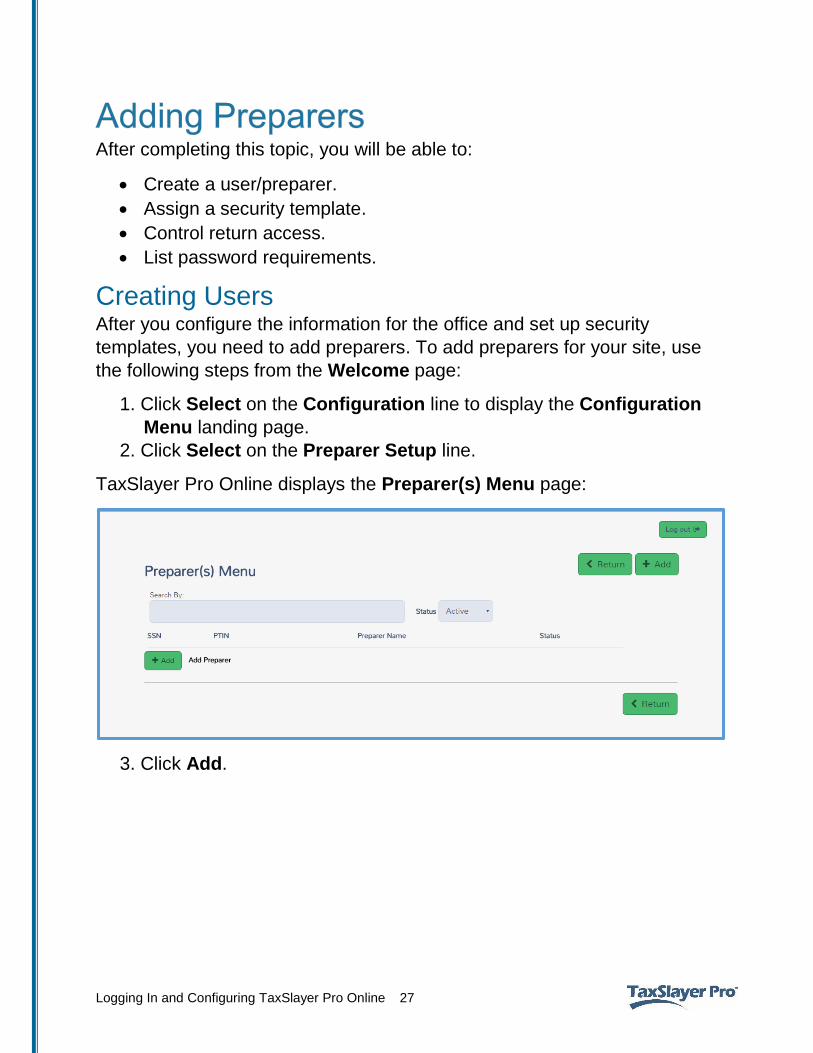
TaxSlayer Pro Online displays a confirmation page:
4. Click Back to return to the Configuration Menu landing page.
Logging In and Configuring TaxSlayer Pro Online 27
After completing this topic, you will be able to:
Create a user/preparer.
Assign a security template.
Control return access.
List password requirements.
Creating Users After you configure the information for the office and set up security
templates, you need to add preparers. To add preparers for your site, use
the following steps from the Welcome page:
1. Click Select on the Configuration line to display the Configuration
Menu landing page.
2. Click Select on the Preparer Setup line.
TaxSlayer Pro Online displays the Preparer(s) Menu page:
3. Click Add.
Logging In and Configuring TaxSlayer Pro Online 28
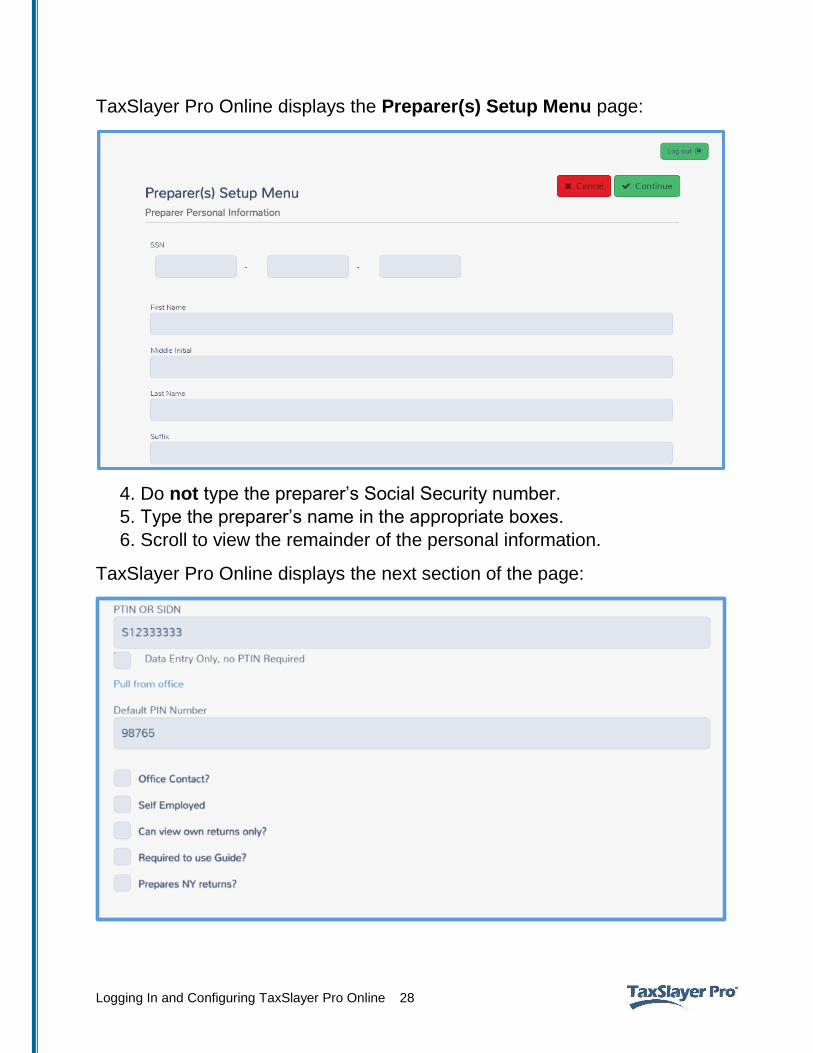
TaxSlayer Pro Online displays the Preparer(s) Setup Menu page:
4. Do not type the preparer’s Social Security number.
5. Type the preparer’s name in the appropriate boxes.
6. Scroll to view the remainder of the personal information.
TaxSlayer Pro Online displays the next section of the page:
Logging In and Configuring TaxSlayer Pro Online 29
SIDN 7. From the PTIN OR SIDN box, click Pull from office to have
TaxSlayer Pro Online carry the site’s SIDN to the preparer.
8. TaxSlayer Pro Online defaults the PIN to 98765 and carries this PIN
to all returns created by this preparer.
9. Do not select the Office Contact or Self-Employed check boxes.
Return Access 10. Select the check box to allow the preparer to view only his or her
own returns.
11. Check Required to use Guide? if you want to restrict the preparer
to using the Guide Me feature for data entry.
12. Select Prepares NY returns? and select code 09 for NYTPRIN
exempt as a volunteer tax preparer if you are preparing returns for
New York.
Login Setup 13. Scroll to the Edit Login Account section.
Logging In and Configuring TaxSlayer Pro Online 30
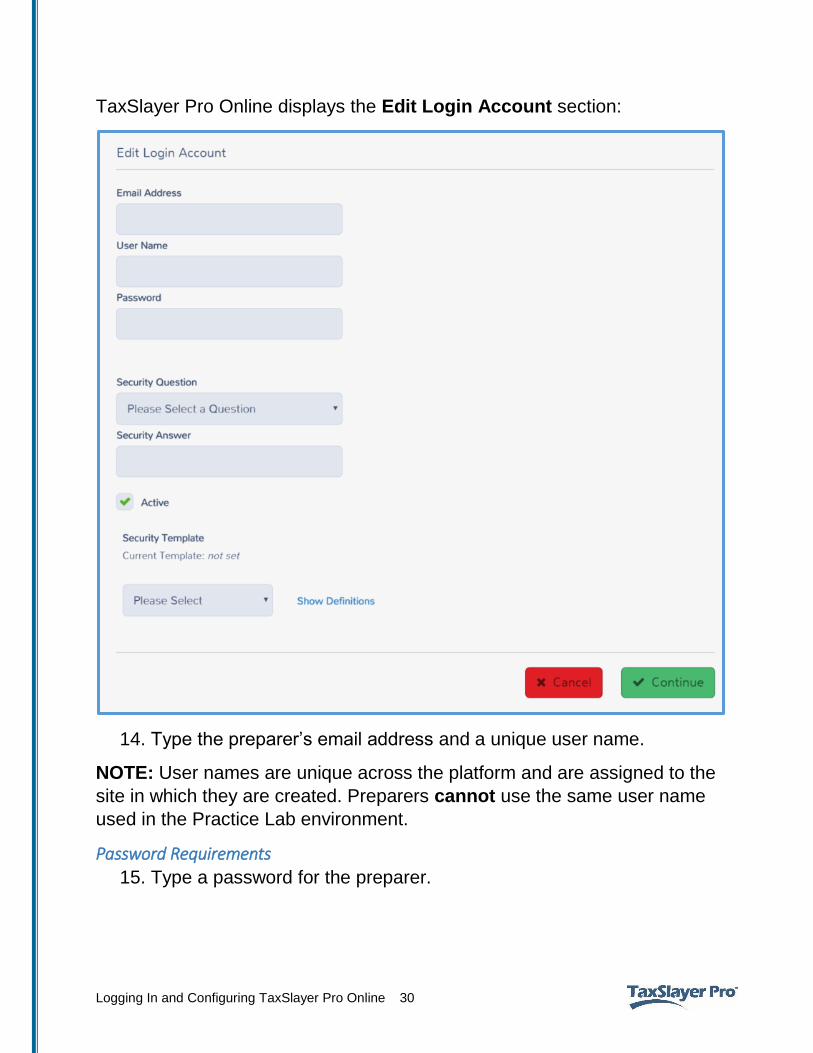
TaxSlayer Pro Online displays the Edit Login Account section:
14. Type the preparer’s email address and a unique user name.
NOTE: User names are unique across the platform and are assigned to the
site in which they are created. Preparers cannot use the same user name
used in the Practice Lab environment.
Password Requirements
15. Type a password for the preparer.
Logging In and Configuring TaxSlayer Pro Online 31
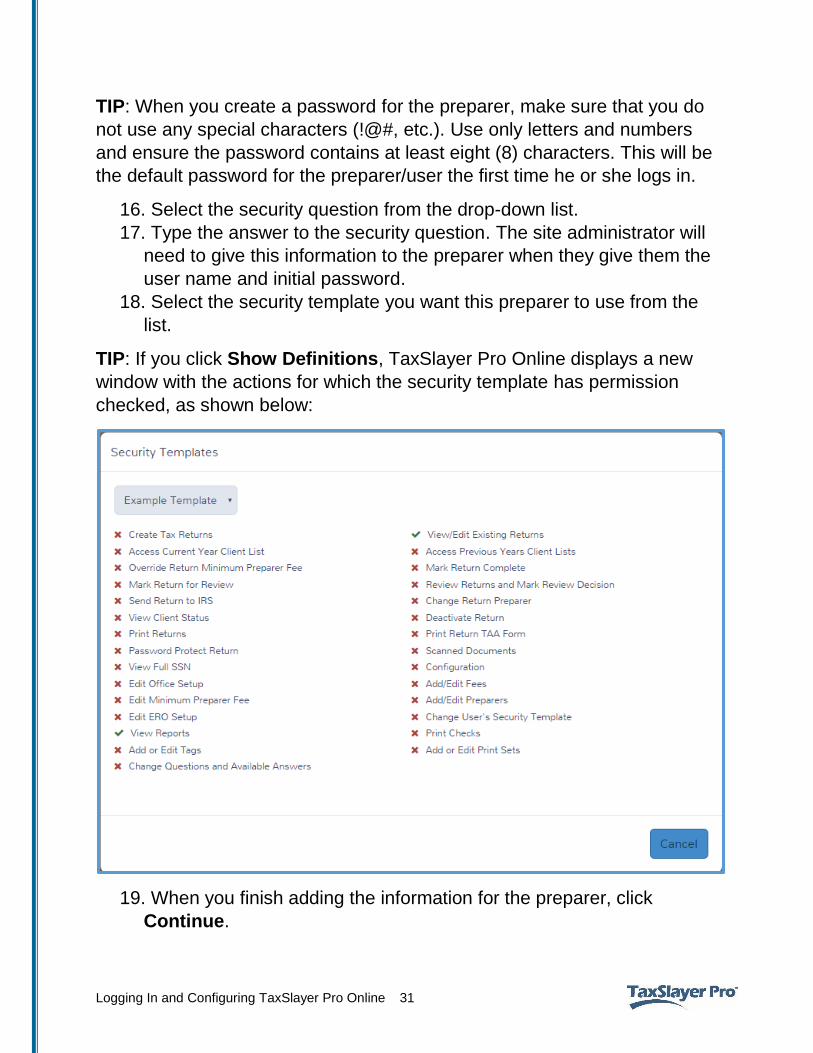
TIP: When you create a password for the preparer, make sure that you do
not use any special characters (!@#, etc.). Use only letters and numbers
and ensure the password contains at least eight (8) characters. This will be
the default password for the preparer/user the first time he or she logs in.
16. Select the security question from the drop-down list.
17. Type the answer to the security question. The site administrator will
need to give this information to the preparer when they give them the
user name and initial password.
18. Select the security template you want this preparer to use from the
list.
TIP: If you click Show Definitions, TaxSlayer Pro Online displays a new
window with the actions for which the security template has permission
checked, as shown below:
19. When you finish adding the information for the preparer, click
Continue.
Logging In and Configuring TaxSlayer Pro Online 32
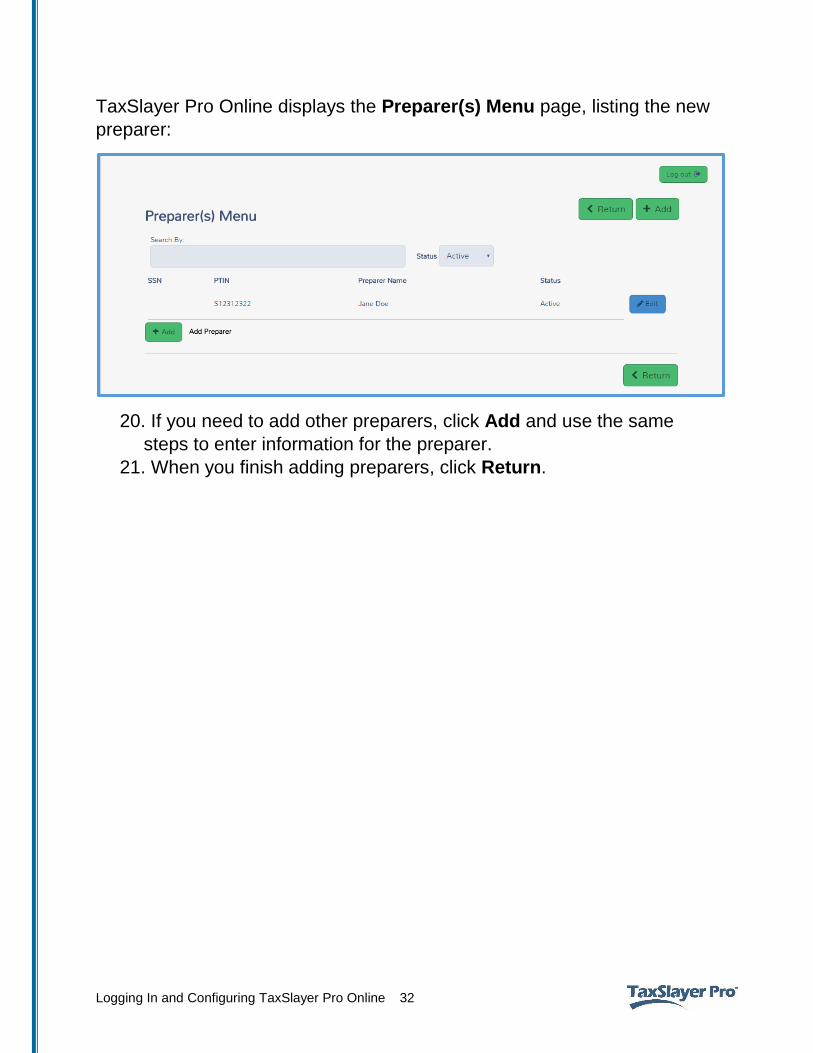
TaxSlayer Pro Online displays the Preparer(s) Menu page, listing the new
preparer:
20. If you need to add other preparers, click Add and use the same
steps to enter information for the preparer.
21. When you finish adding preparers, click Return.
Logging In and Configuring TaxSlayer Pro Online 33
After completing this topic, you will be able to:
Configure custom questions and answers.
TaxSlayer Pro Online allows you to set up custom questions that preparers
can use to capture data during the return preparation process. You can use
the predefined questions or add more questions.
While you can add more questions and answers during tax season, we
recommend that you finalize your questions before tax season begins to
ensure accuracy of reports.
Adding Custom Questions To access custom questions from the Welcome page, use the following
steps:
1. Click Select on the Configuration line to display the Configuration
Menu landing page.
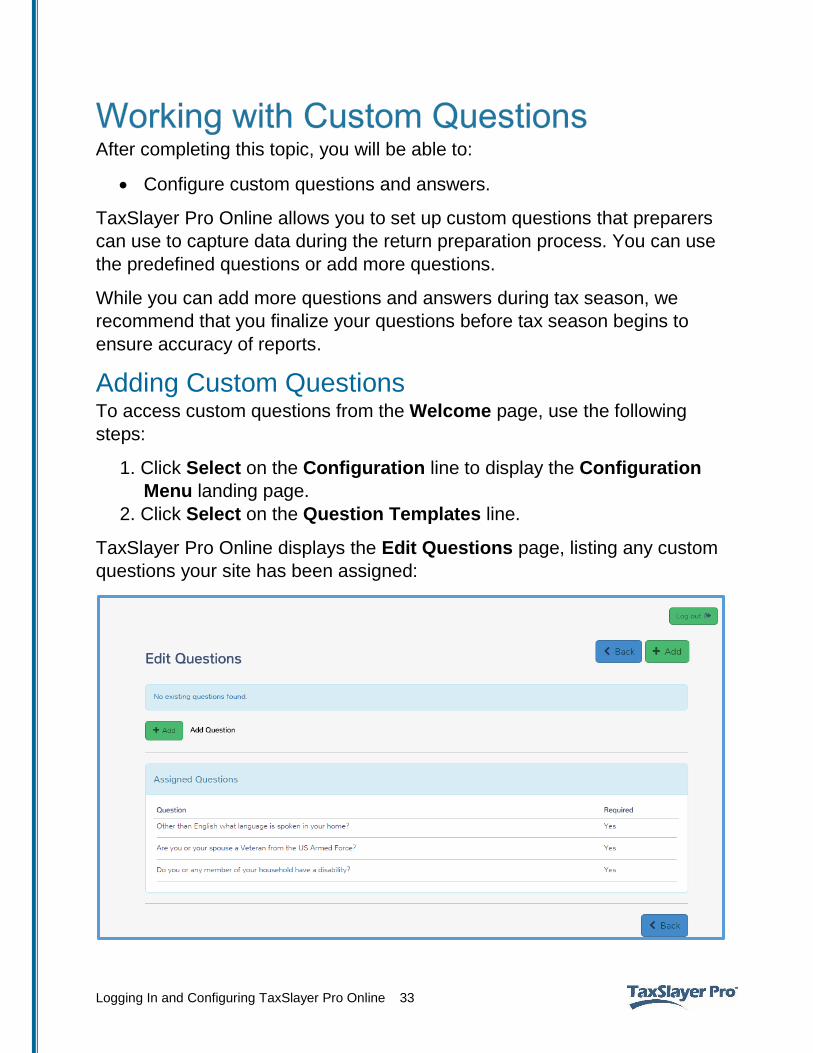
2. Click Select on the Question Templates line.
TaxSlayer Pro Online displays the Edit Questions page, listing any custom
questions your site has been assigned:
Logging In and Configuring TaxSlayer Pro Online 34
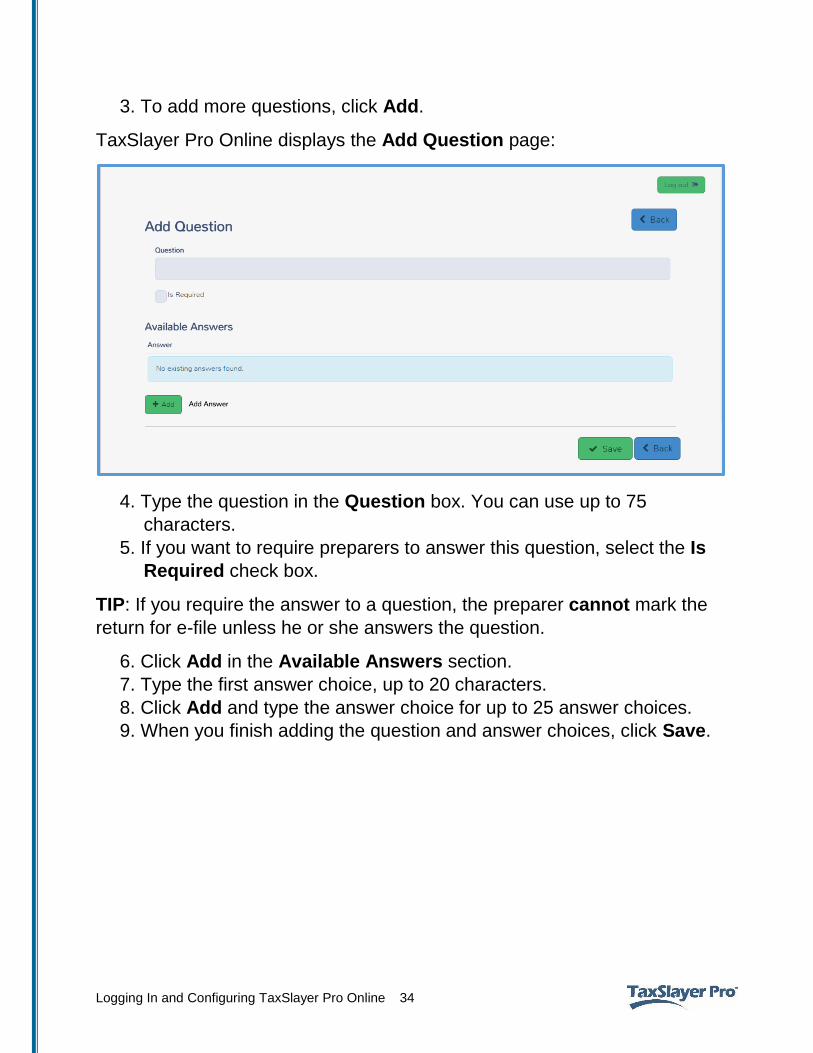
3. To add more questions, click Add.
TaxSlayer Pro Online displays the Add Question page:
4. Type the question in the Question box. You can use up to 75
characters.
5. If you want to require preparers to answer this question, select the Is
Required check box.
TIP: If you require the answer to a question, the preparer cannot mark the
return for e-file unless he or she answers the question.
6. Click Add in the Available Answers section.
7. Type the first answer choice, up to 20 characters.
8. Click Add and type the answer choice for up to 25 answer choices.
9. When you finish adding the question and answer choices, click Save.
Logging In and Configuring TaxSlayer Pro Online 35
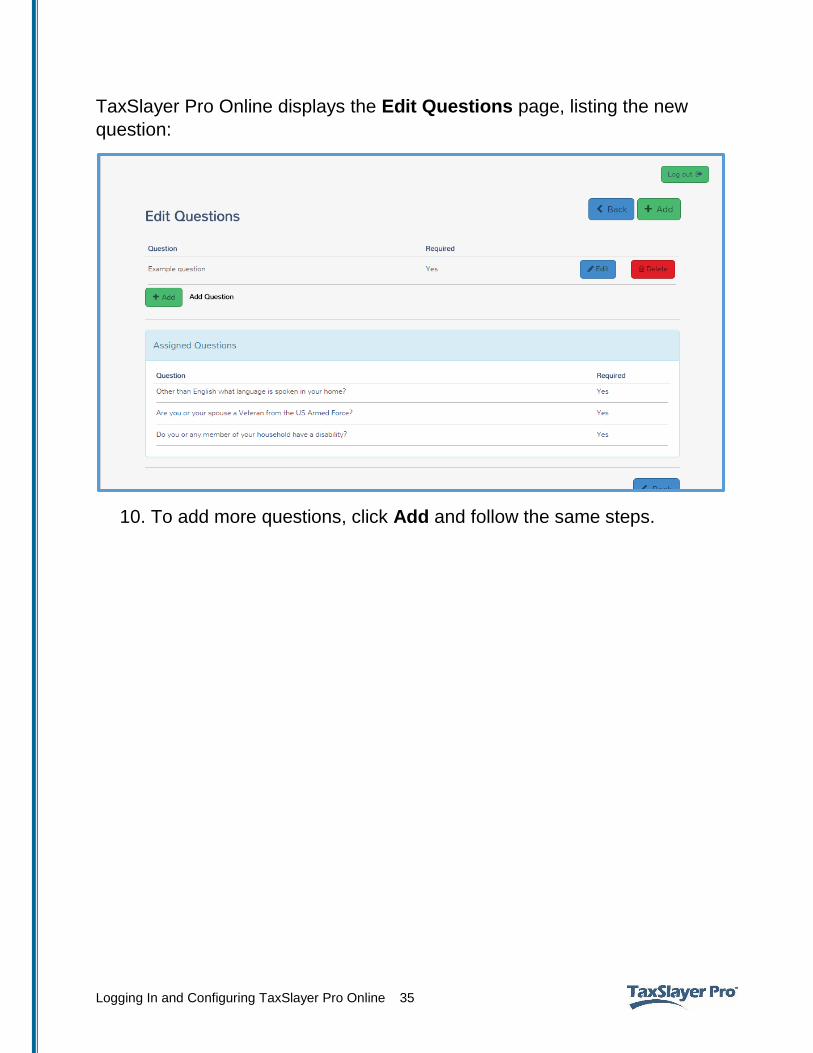
TaxSlayer Pro Online displays the Edit Questions page, listing the new
question:
10. To add more questions, click Add and follow the same steps.
Logging In and Configuring TaxSlayer Pro Online 36
After completing this topic, you will be able to:
List the predefined print sets.
Determine which print sets to use for the taxpayer.
Create custom print sets.
Predefined Print Sets TaxSlayer Pro Online contains several print sets that will be presented to
the preparer during the print return process. Review these before printing
tax returns so you know what forms and how many copies of each form
print with each print set. In most cases, you should use the set. TaxSlayer
Pro designed this print set to follow the IRS guidelines.
The following print sets will be available for printing the return, but cannot
be modified:
a) One Copy – Federal and State
b) Two Copies – Federal and State
c) Three Copies – Federal and State
d) One Copy – Federal Only
e) One Copy – 1040 Only
f) One Copy – State Only
g) One Copy – Form 8879 Only
h) Print Invoice
View the Master Print To view the contents of the Master Print set, use the following steps from
the Welcome page:
1. Click Select on the Configuration line to display the Configuration
Menu landing page.
2. Click Select on the Print Sets line.
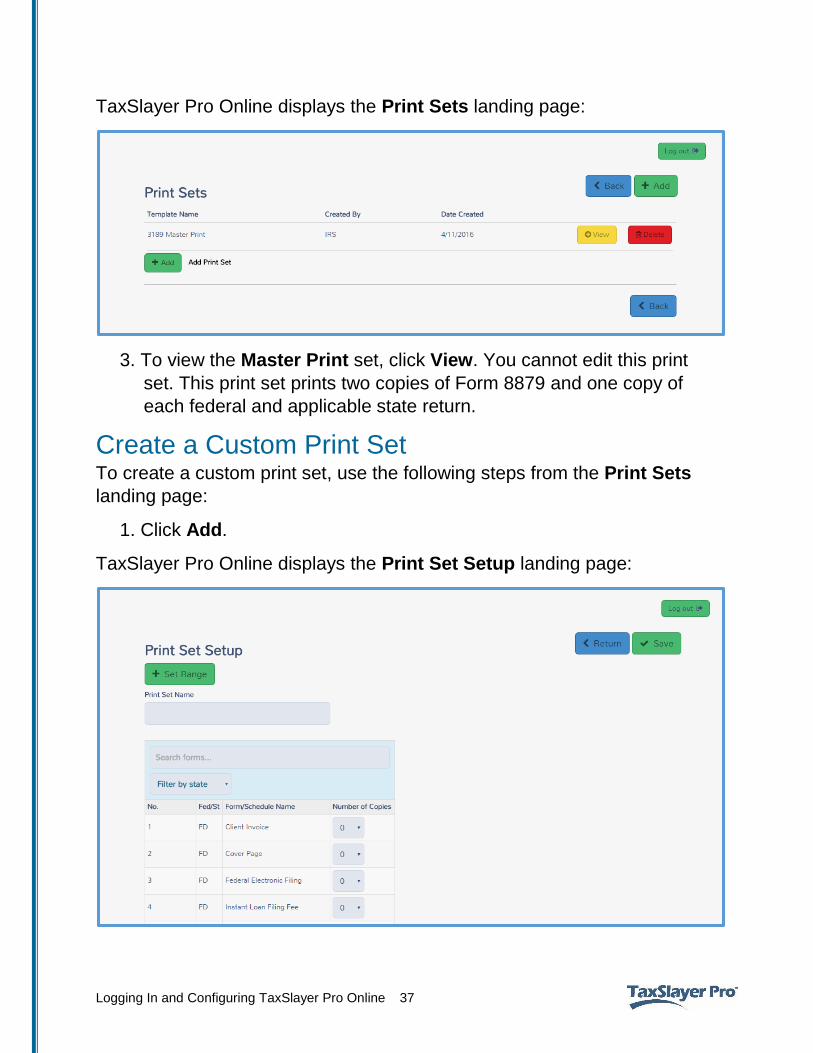
Logging In and Configuring TaxSlayer Pro Online 37
TaxSlayer Pro Online displays the Print Sets landing page:
3. To view the Master Print set, click View. You cannot edit this print
set. This print set prints two copies of Form 8879 and one copy of
each federal and applicable state return.
Create a Custom Print Set To create a custom print set, use the following steps from the Print Sets
landing page:
1. Click Add.
TaxSlayer Pro Online displays the Print Set Setup landing page:
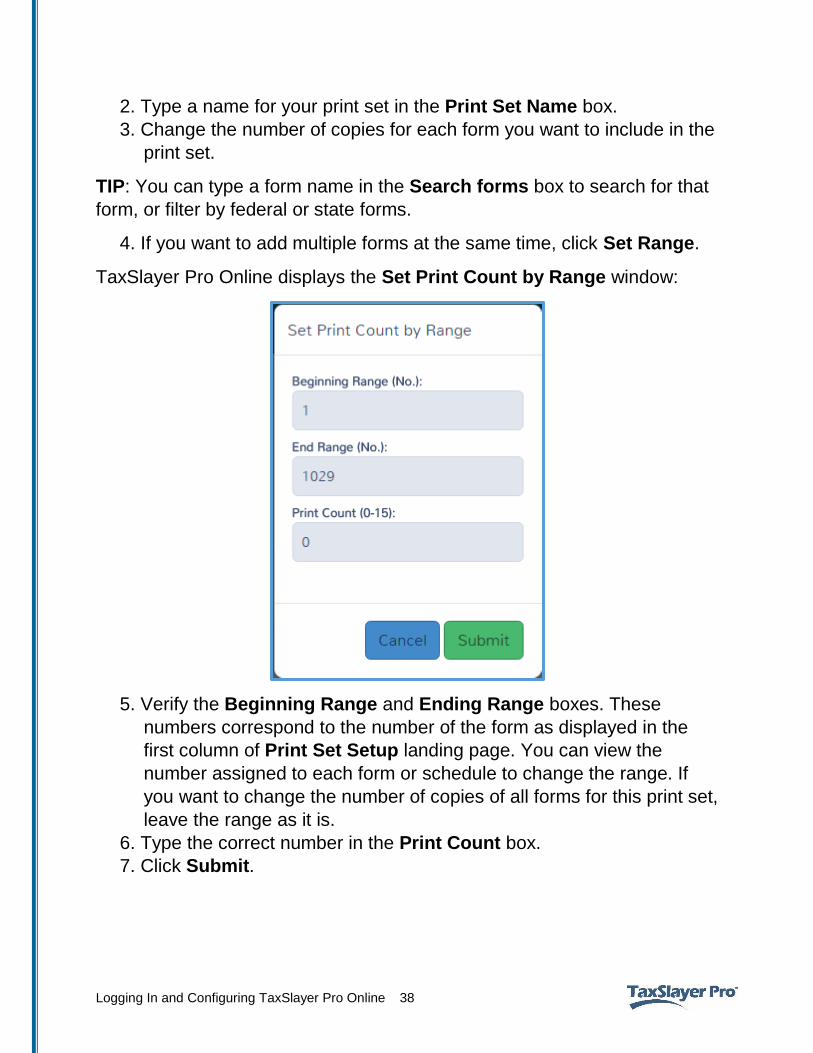
Logging In and Configuring TaxSlayer Pro Online 38
2. Type a name for your print set in the Print Set Name box.
3. Change the number of copies for each form you want to include in the
print set.
TIP: You can type a form name in the Search forms box to search for that
form, or filter by federal or state forms.
4. If you want to add multiple forms at the same time, click Set Range.
TaxSlayer Pro Online displays the Set Print Count by Range window:
5. Verify the Beginning Range and Ending Range boxes. These
numbers correspond to the number of the form as displayed in the
first column of Print Set Setup landing page. You can view the
number assigned to each form or schedule to change the range. If
you want to change the number of copies of all forms for this print set,
leave the range as it is.
6. Type the correct number in the Print Count box.
7. Click Submit.
Logging In and Configuring TaxSlayer Pro Online 39
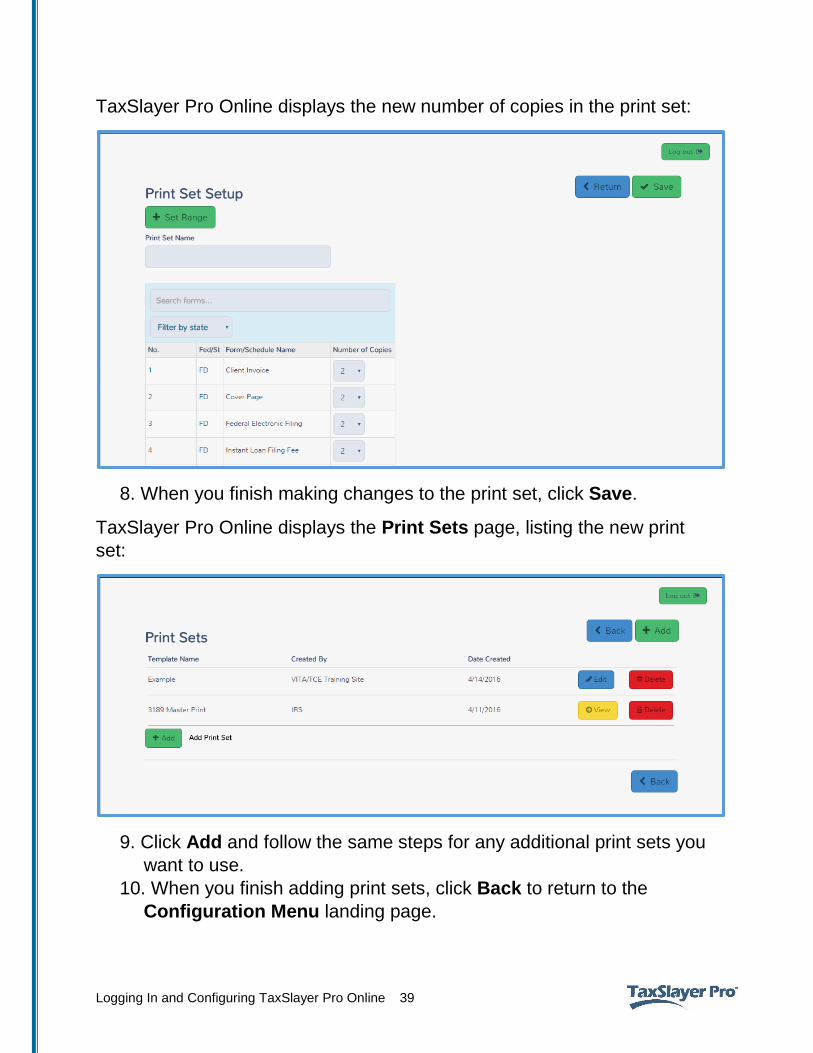
TaxSlayer Pro Online displays the new number of copies in the print set:
8. When you finish making changes to the print set, click Save.
TaxSlayer Pro Online displays the Print Sets page, listing the new print
set:
9. Click Add and follow the same steps for any additional print sets you
want to use.
10. When you finish adding print sets, click Back to return to the
Configuration Menu landing page.
Logging In and Configuring TaxSlayer Pro Online 40
After completing this topic, you will be able to:
Set up return tags.
Filter returns by return tags.
Delete returns.
Restore returns.
Add taxpayer notes.
Send messages.
Working with Return Tags TaxSlayer Pro Online allows you to set up return tags to manage the status
of your returns. You can create a customized list of return tags to manage
the status of the return at your site.
Setting up Return Tags TaxSlayer Pro Online does not have default return tags. You can create
these while configuring the site. To add return tags, use these steps from
the Welcome page:
1. Click Select on the Configuration line to display the Configuration
Menu landing page.
2. Click Select on the Tags line.
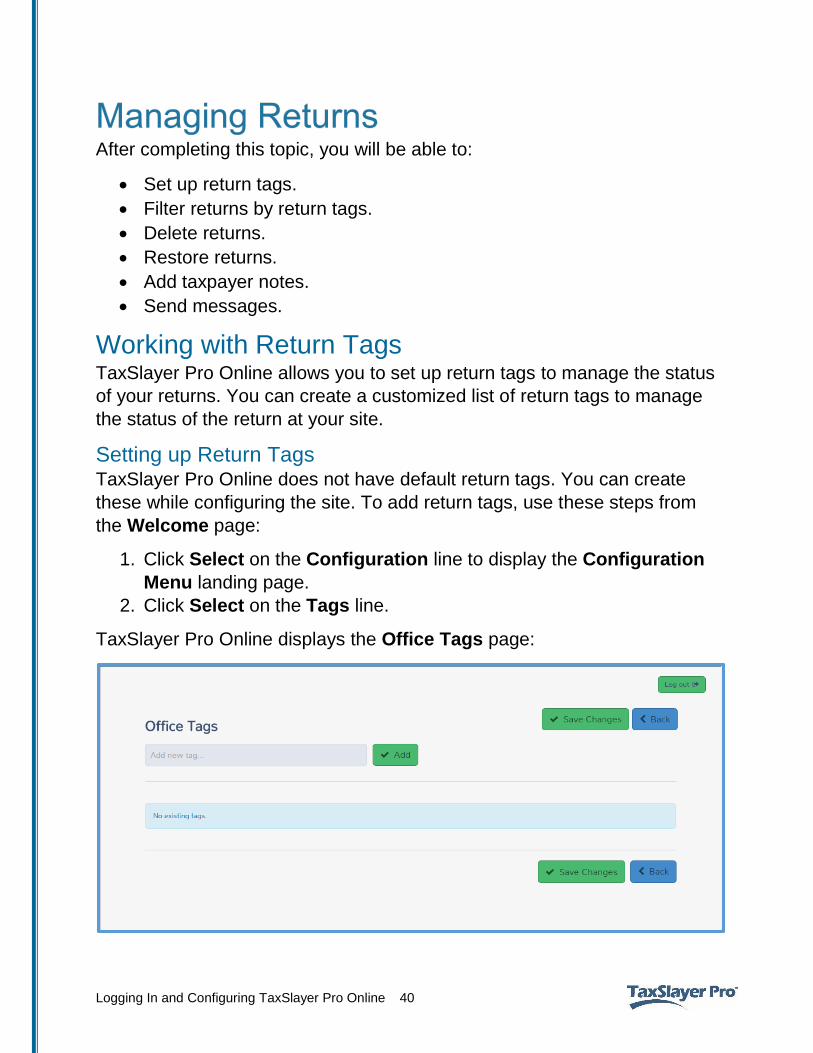
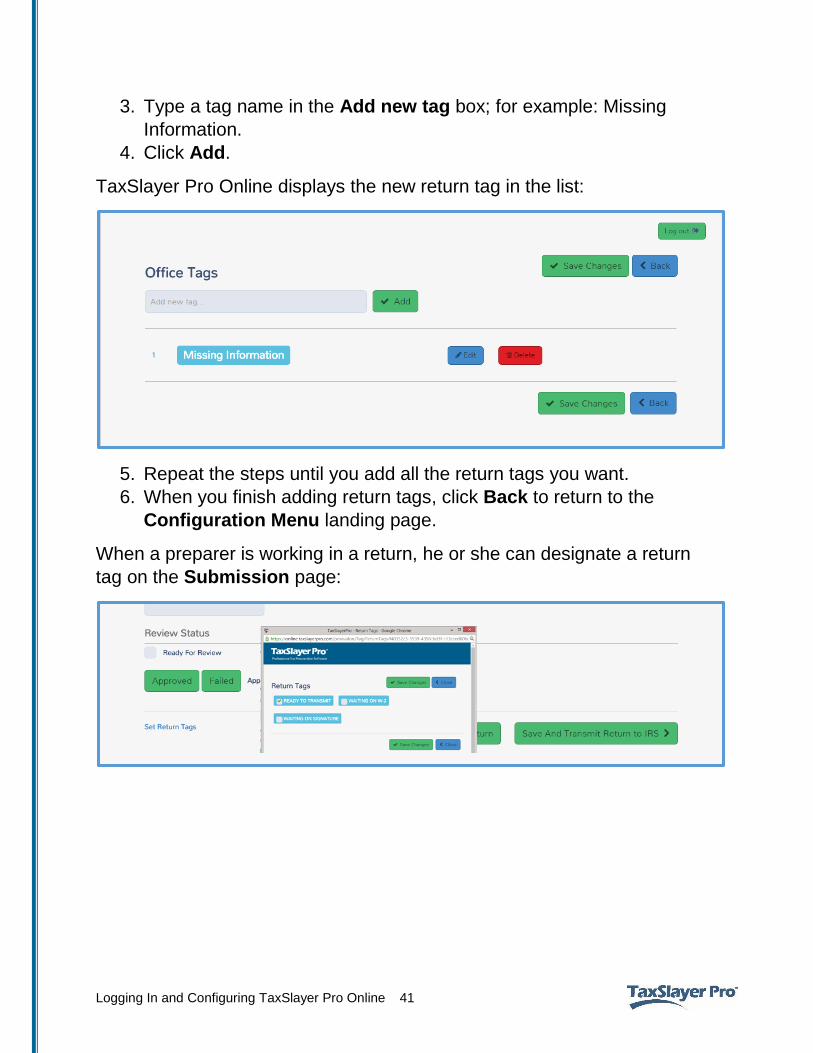
TaxSlayer Pro Online displays the Office Tags page:
Logging In and Configuring TaxSlayer Pro Online 41
3. Type a tag name in the Add new tag box; for example: Missing
Information.
4. Click Add.
TaxSlayer Pro Online displays the new return tag in the list:
5. Repeat the steps until you add all the return tags you want.
6. When you finish adding return tags, click Back to return to the
Configuration Menu landing page.
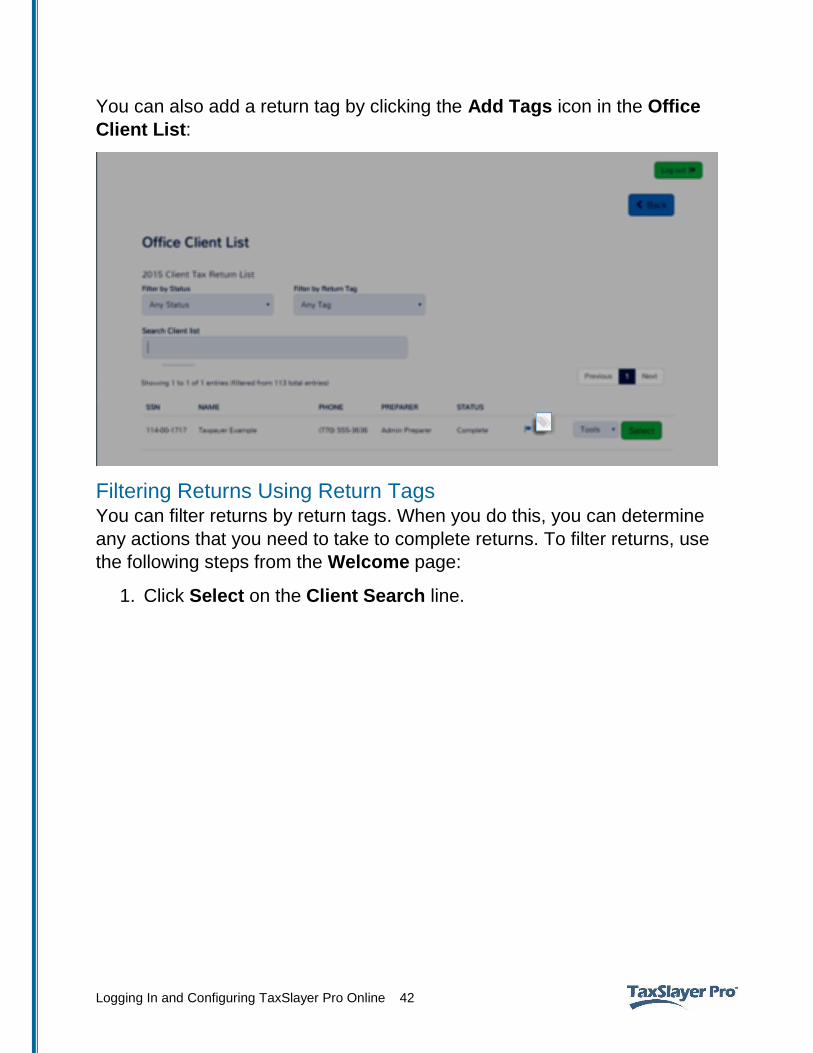
When a preparer is working in a return, he or she can designate a return
tag on the Submission page:
Logging In and Configuring TaxSlayer Pro Online 42
You can also add a return tag by clicking the Add Tags icon in the Office
Client List:
Filtering Returns Using Return Tags You can filter returns by return tags. When you do this, you can determine
any actions that you need to take to complete returns. To filter returns, use
the following steps from the Welcome page:
1. Click Select on the Client Search line.
Logging In and Configuring TaxSlayer Pro Online 43
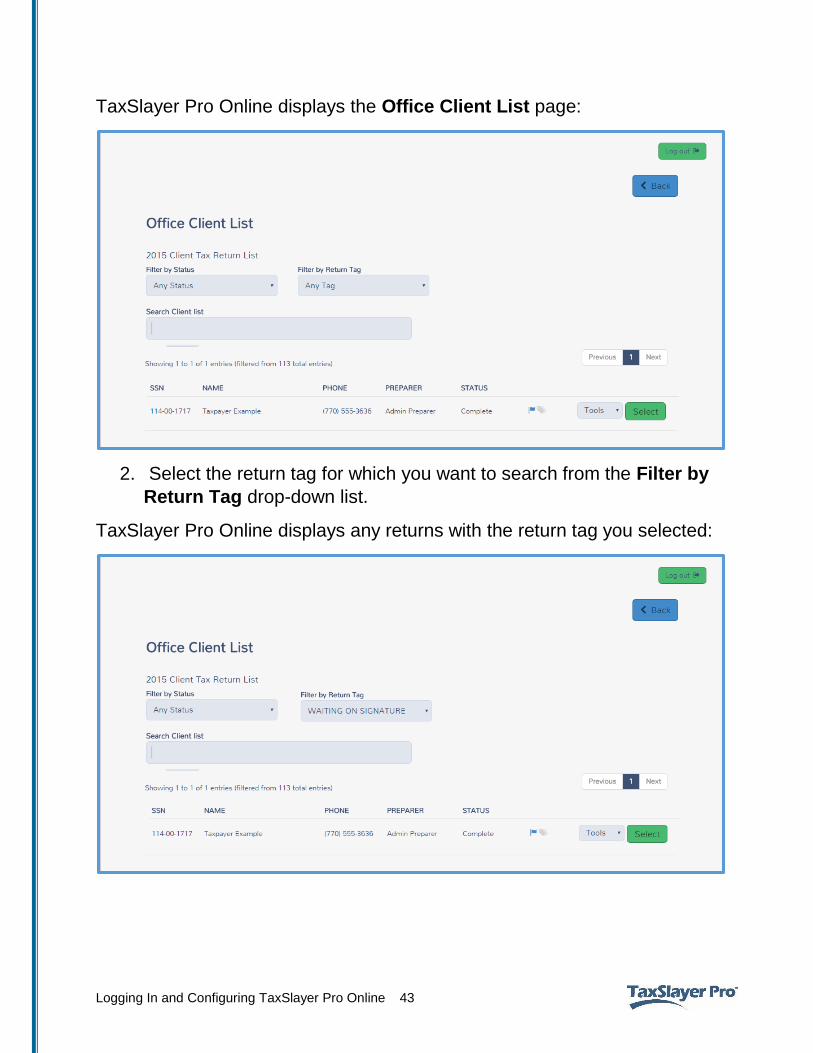
TaxSlayer Pro Online displays the Office Client List page:
2. Select the return tag for which you want to search from the Filter by
Return Tag drop-down list.
TaxSlayer Pro Online displays any returns with the return tag you selected:
Logging In and Configuring TaxSlayer Pro Online 44
Deactivating/Deleting Returns In rare events, you may need to delete a return. You can do this in the
Office Client List.
TIP: Use this feature with caution. Do not delete a return that you may need
later.
When you deactivate a return, TaxSlayer Pro Online makes it unavailable
for edits. To deactivate a return, use the following steps from the Welcome
page:
1. Click Select on the Client Search line.
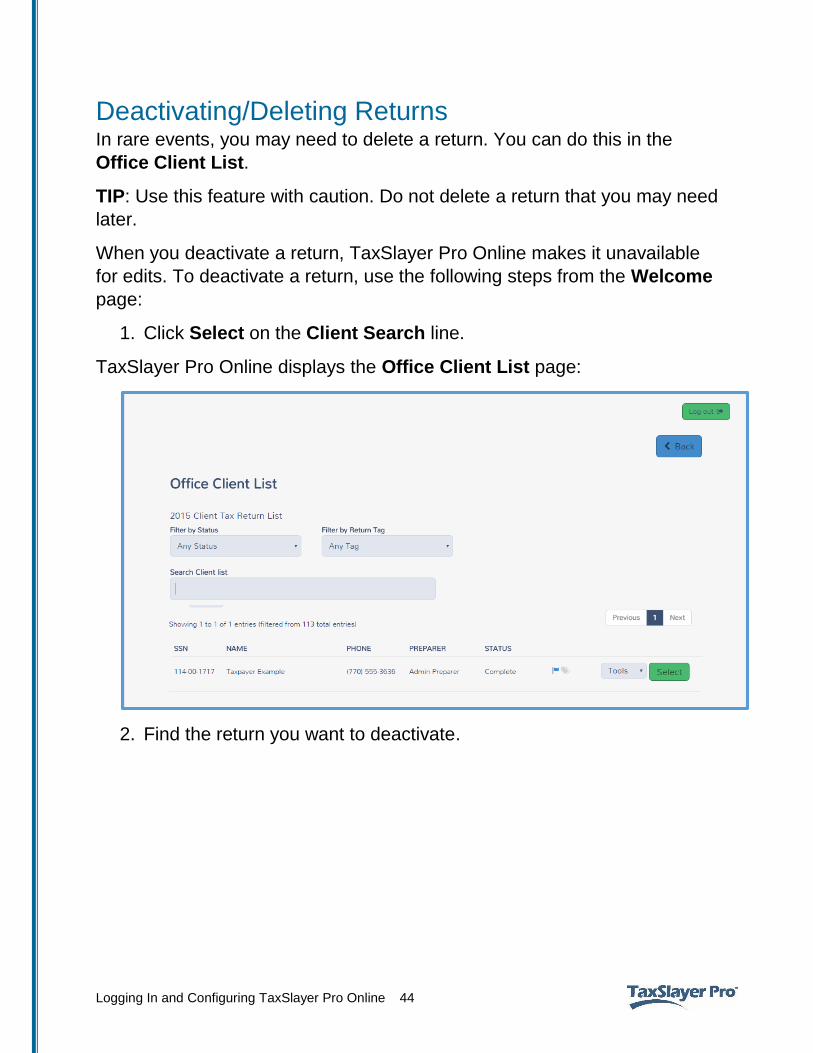
TaxSlayer Pro Online displays the Office Client List page:
2. Find the return you want to deactivate.
Logging In and Configuring TaxSlayer Pro Online 45
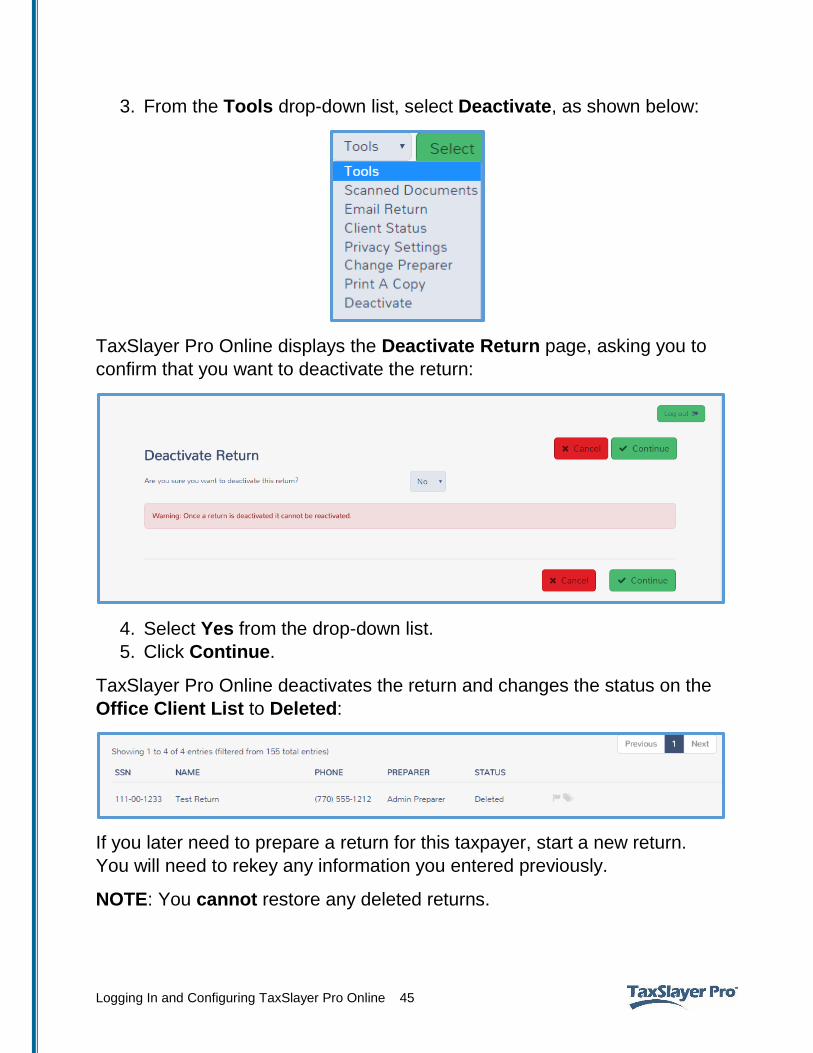
3. From the Tools drop-down list, select Deactivate, as shown below:
TaxSlayer Pro Online displays the Deactivate Return page, asking you to
confirm that you want to deactivate the return:
4. Select Yes from the drop-down list.
5. Click Continue.
TaxSlayer Pro Online deactivates the return and changes the status on the
Office Client List to Deleted:
If you later need to prepare a return for this taxpayer, start a new return.
You will need to rekey any information you entered previously.
NOTE: You cannot restore any deleted returns.
Logging In and Configuring TaxSlayer Pro Online 46
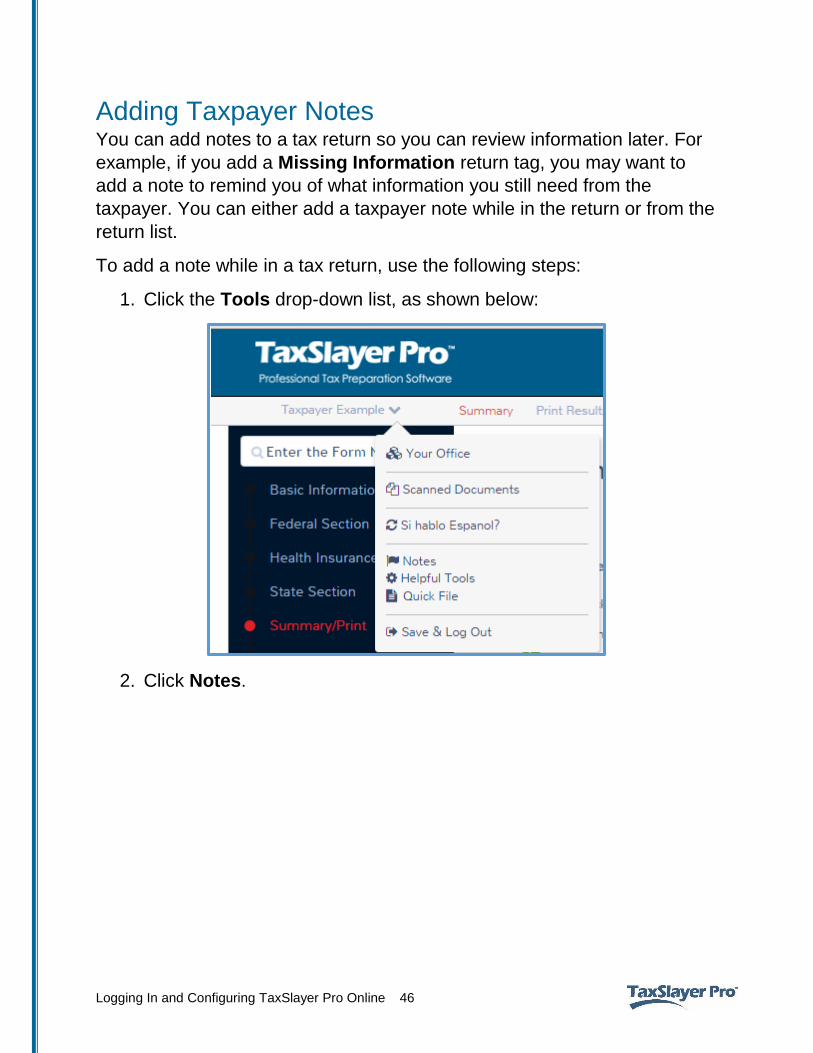
Adding Taxpayer Notes You can add notes to a tax return so you can review information later. For
example, if you add a Missing Information return tag, you may want to
add a note to remind you of what information you still need from the
taxpayer. You can either add a taxpayer note while in the return or from the
return list.
To add a note while in a tax return, use the following steps:
1. Click the Tools drop-down list, as shown below:
2. Click Notes.
Logging In and Configuring TaxSlayer Pro Online 47
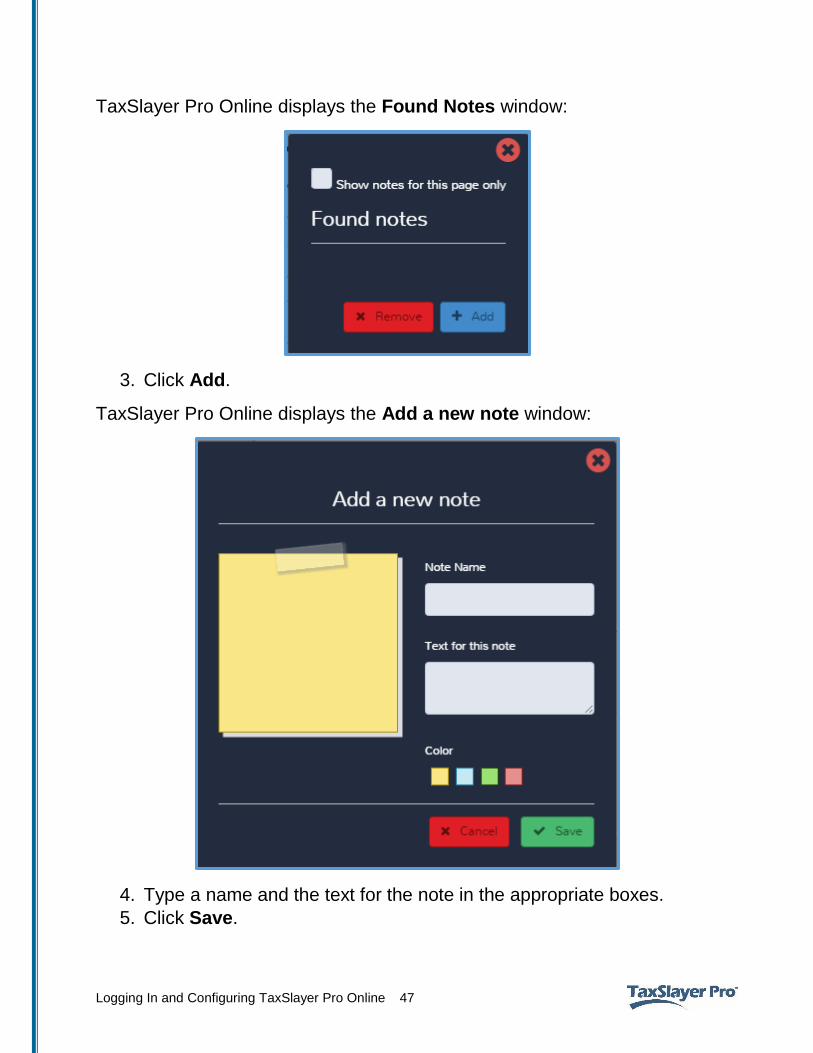
TaxSlayer Pro Online displays the Found Notes window:
3. Click Add.
TaxSlayer Pro Online displays the Add a new note window:
4. Type a name and the text for the note in the appropriate boxes.
5. Click Save.
Logging In and Configuring TaxSlayer Pro Online 48
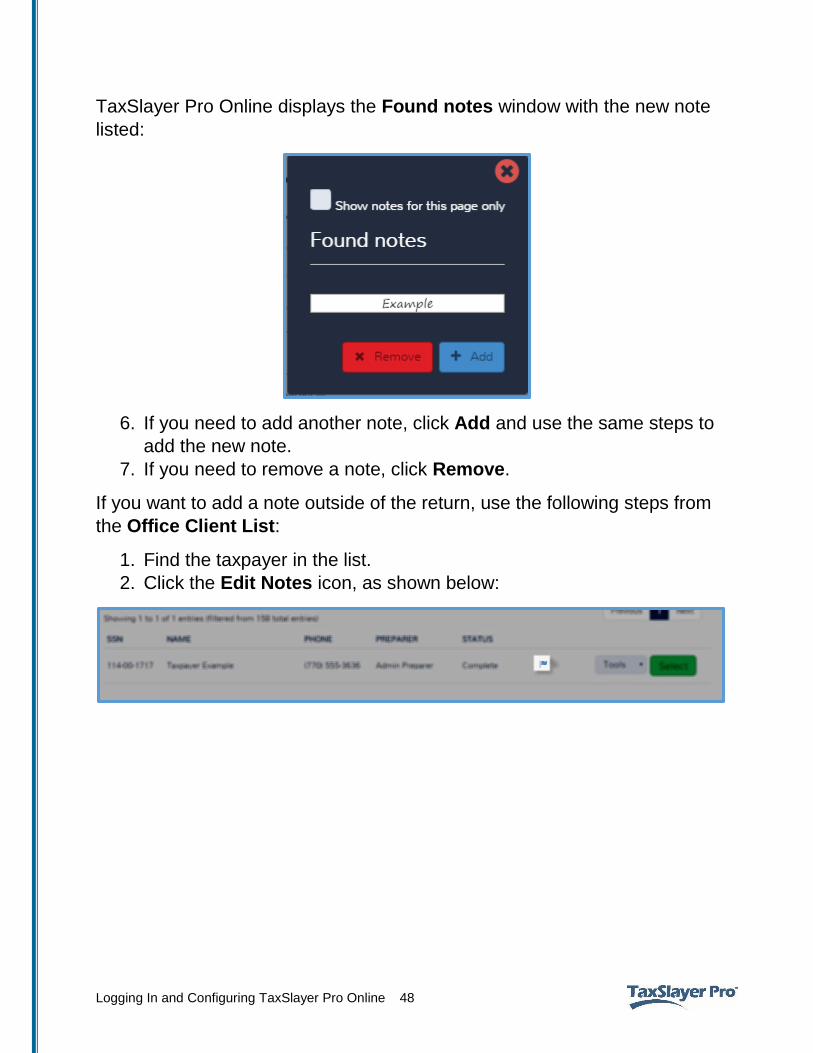
TaxSlayer Pro Online displays the Found notes window with the new note
listed:
6. If you need to add another note, click Add and use the same steps to
add the new note.
7. If you need to remove a note, click Remove.
If you want to add a note outside of the return, use the following steps from
the Office Client List:
1. Find the taxpayer in the list.
2. Click the Edit Notes icon, as shown below:
Logging In and Configuring TaxSlayer Pro Online 49
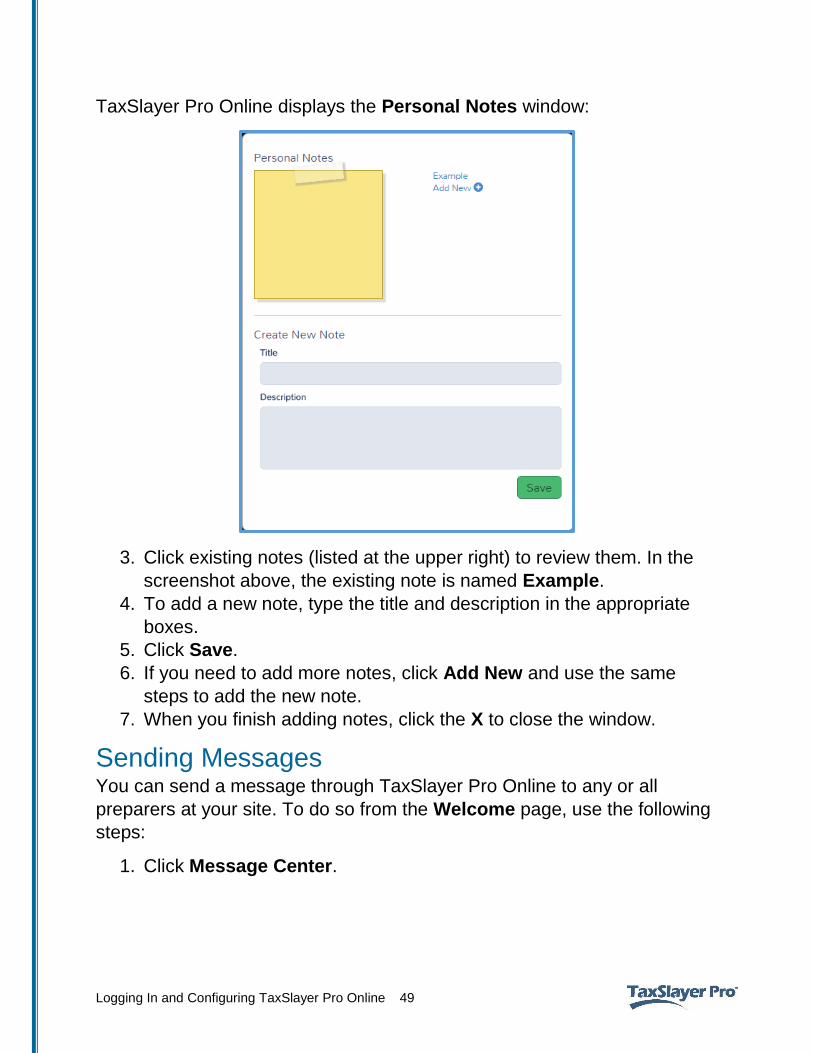
TaxSlayer Pro Online displays the Personal Notes window:
3. Click existing notes (listed at the upper right) to review them. In the
screenshot above, the existing note is named Example.
4. To add a new note, type the title and description in the appropriate
boxes.
5. Click Save.
6. If you need to add more notes, click Add New and use the same
steps to add the new note.
7. When you finish adding notes, click the X to close the window.
Sending Messages You can send a message through TaxSlayer Pro Online to any or all
preparers at your site. To do so from the Welcome page, use the following
steps:
1. Click Message Center.
Logging In and Configuring TaxSlayer Pro Online 50
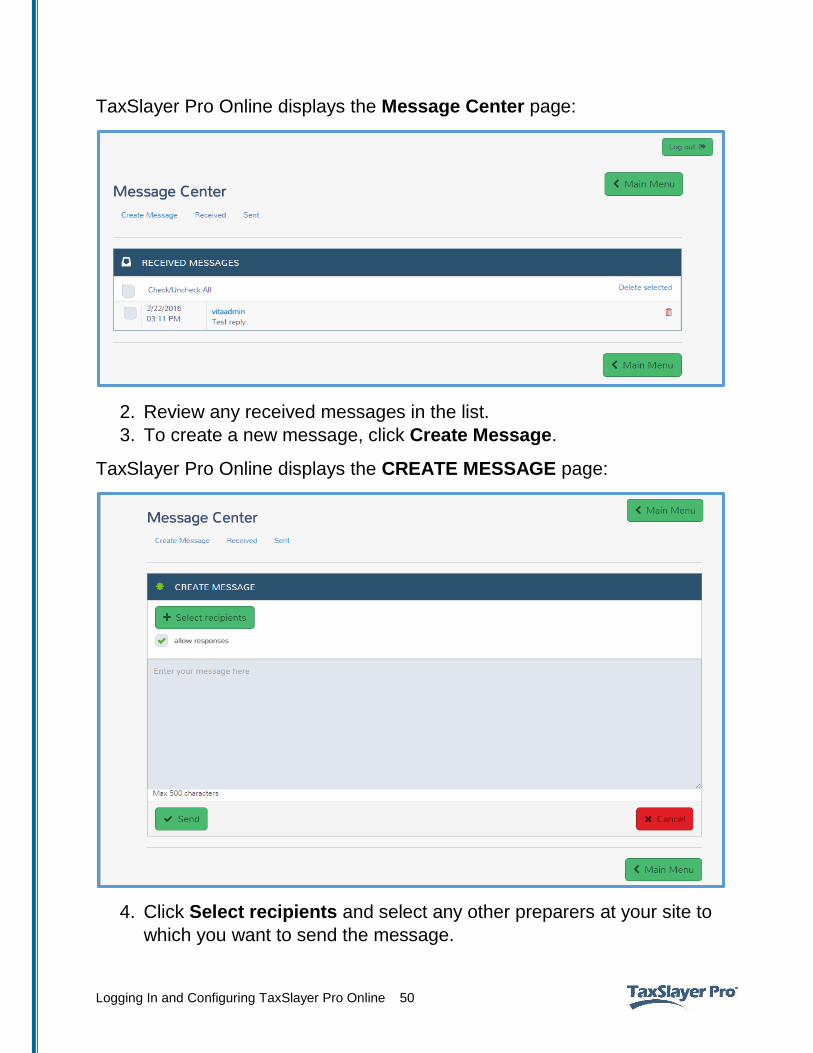
TaxSlayer Pro Online displays the Message Center page:
2. Review any received messages in the list.
3. To create a new message, click Create Message.
TaxSlayer Pro Online displays the CREATE MESSAGE page:
4. Click Select recipients and select any other preparers at your site to
which you want to send the message.
Logging In and Configuring TaxSlayer Pro Online 51
5. Type the message you want to send in the message box. You can
type up to 500 characters.
6. When you finish typing your message, click Send.
Logging In and Configuring TaxSlayer Pro Online 52
After completing this topic, you will be able to:
Run reports.
Filter reports.
Export reports.
TaxSlayer Pro Online provides several reports that you can run to help
manage returns.
Running Reports To run a report, use the following steps from the Welcome page:
1. Click Select on the Reports line.
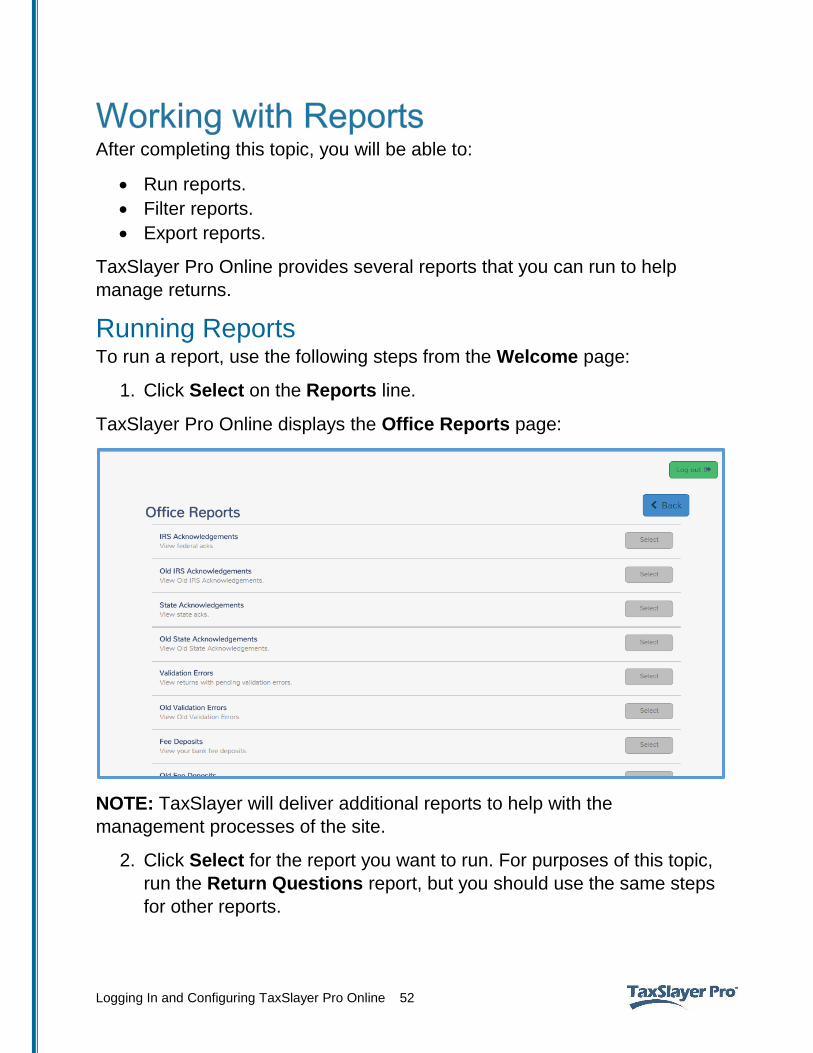
TaxSlayer Pro Online displays the Office Reports page:
NOTE: TaxSlayer will deliver additional reports to help with the
management processes of the site.
2. Click Select for the report you want to run. For purposes of this topic,
run the Return Questions report, but you should use the same steps
for other reports.
Logging In and Configuring TaxSlayer Pro Online 53
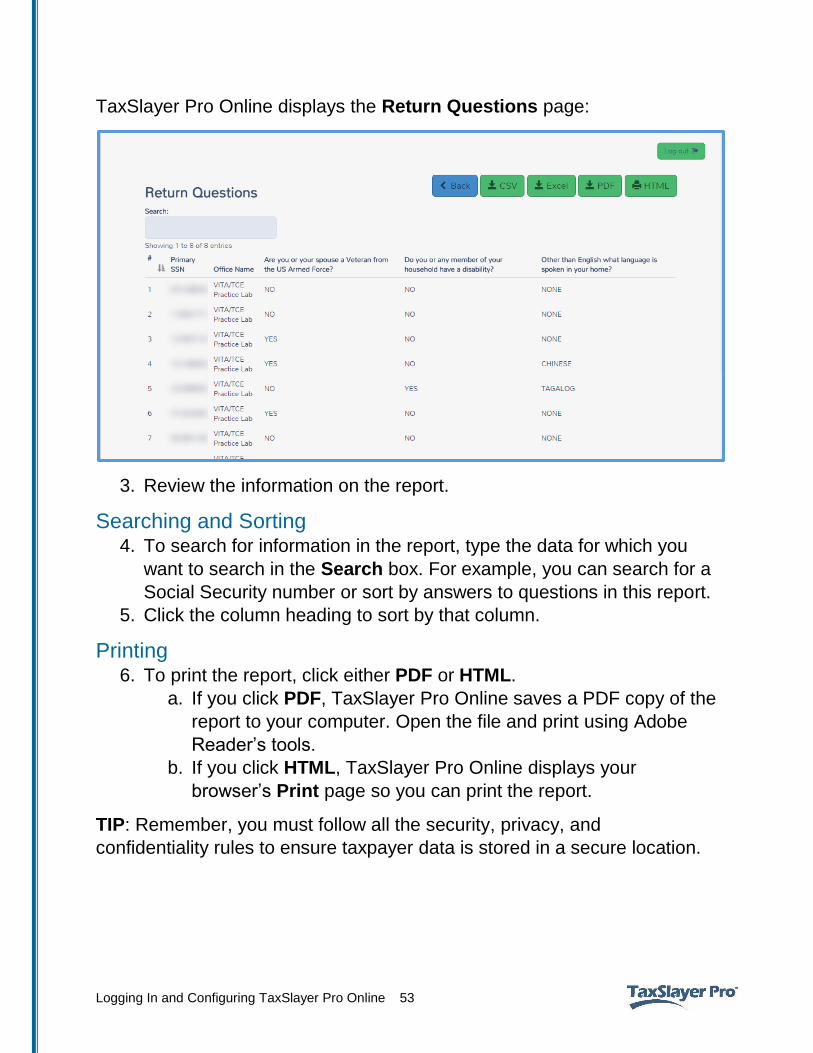
TaxSlayer Pro Online displays the Return Questions page:
3. Review the information on the report.
Searching and Sorting 4. To search for information in the report, type the data for which you
want to search in the Search box. For example, you can search for a
Social Security number or sort by answers to questions in this report.
5. Click the column heading to sort by that column.
Printing 6. To print the report, click either PDF or HTML.
a. If you click PDF, TaxSlayer Pro Online saves a PDF copy of the
report to your computer. Open the file and print using Adobe
Reader’s tools.
b. If you click HTML, TaxSlayer Pro Online displays your
browser’s Print page so you can print the report.
TIP: Remember, you must follow all the security, privacy, and
confidentiality rules to ensure taxpayer data is stored in a secure location.
Logging In and Configuring TaxSlayer Pro Online 54
Exporting 7. To export the report, click either CSV or Excel, depending on the
format you want to use for the report.
TaxSlayer Pro Online saves the .csv or .xlsx file to your computer. Open
the file and use Microsoft’s tools to work with the report.
After completing this topic, you will be able to:
Log in as the multi-site administrator.
List management options.
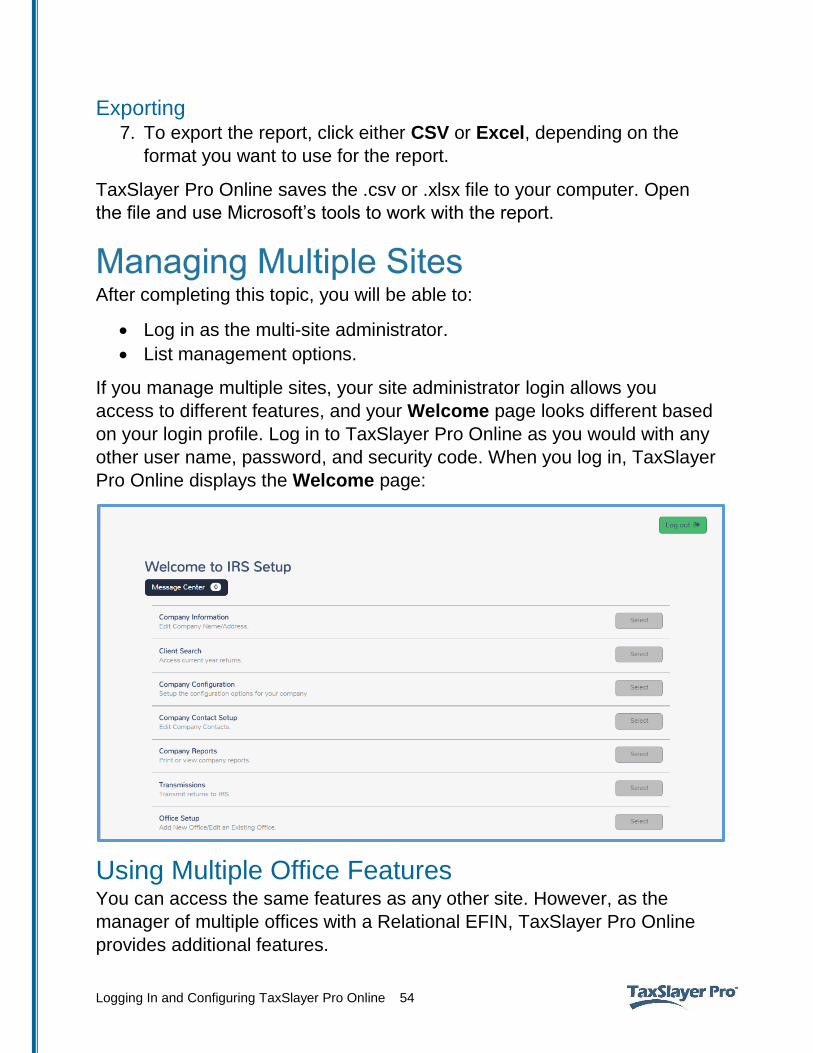
If you manage multiple sites, your site administrator login allows you
access to different features, and your Welcome page looks different based
on your login profile. Log in to TaxSlayer Pro Online as you would with any
other user name, password, and security code. When you log in, TaxSlayer
Pro Online displays the Welcome page:
Using Multiple Office Features You can access the same features as any other site. However, as the
manager of multiple offices with a Relational EFIN, TaxSlayer Pro Online
provides additional features.
Logging In and Configuring TaxSlayer Pro Online 55
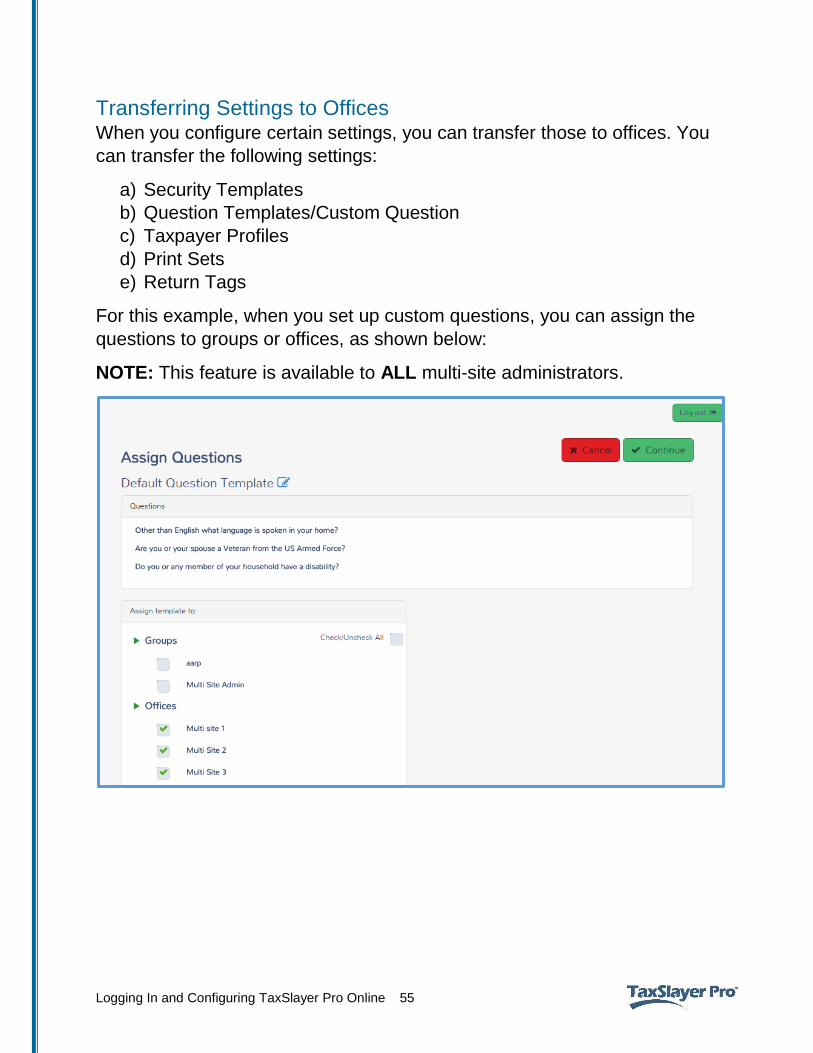
Transferring Settings to Offices When you configure certain settings, you can transfer those to offices. You
can transfer the following settings:
a) Security Templates
b) Question Templates/Custom Question
c) Taxpayer Profiles
d) Print Sets
e) Return Tags
For this example, when you set up custom questions, you can assign the
questions to groups or offices, as shown below:
NOTE: This feature is available to ALL multi-site administrators.
Logging In and Configuring TaxSlayer Pro Online 56
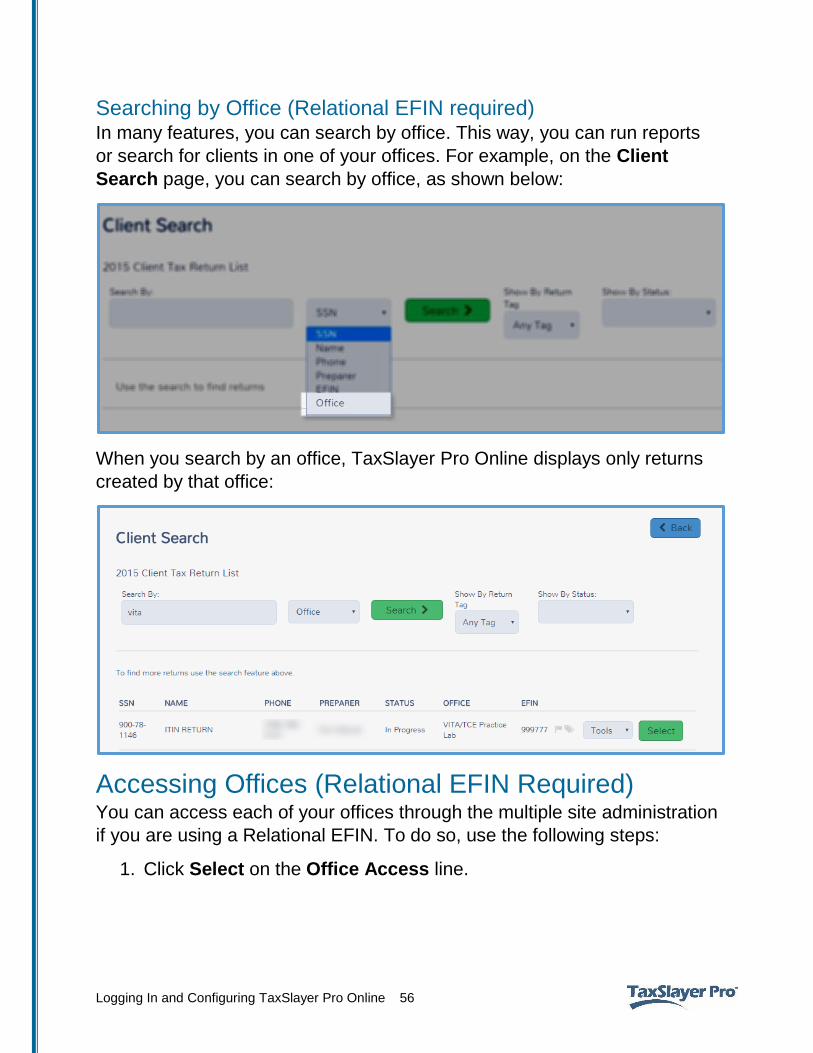
Searching by Office (Relational EFIN required) In many features, you can search by office. This way, you can run reports
or search for clients in one of your offices. For example, on the Client
Search page, you can search by office, as shown below:
When you search by an office, TaxSlayer Pro Online displays only returns
created by that office:
Accessing Offices (Relational EFIN Required) You can access each of your offices through the multiple site administration
if you are using a Relational EFIN. To do so, use the following steps:
1. Click Select on the Office Access line.
Logging In and Configuring TaxSlayer Pro Online 57
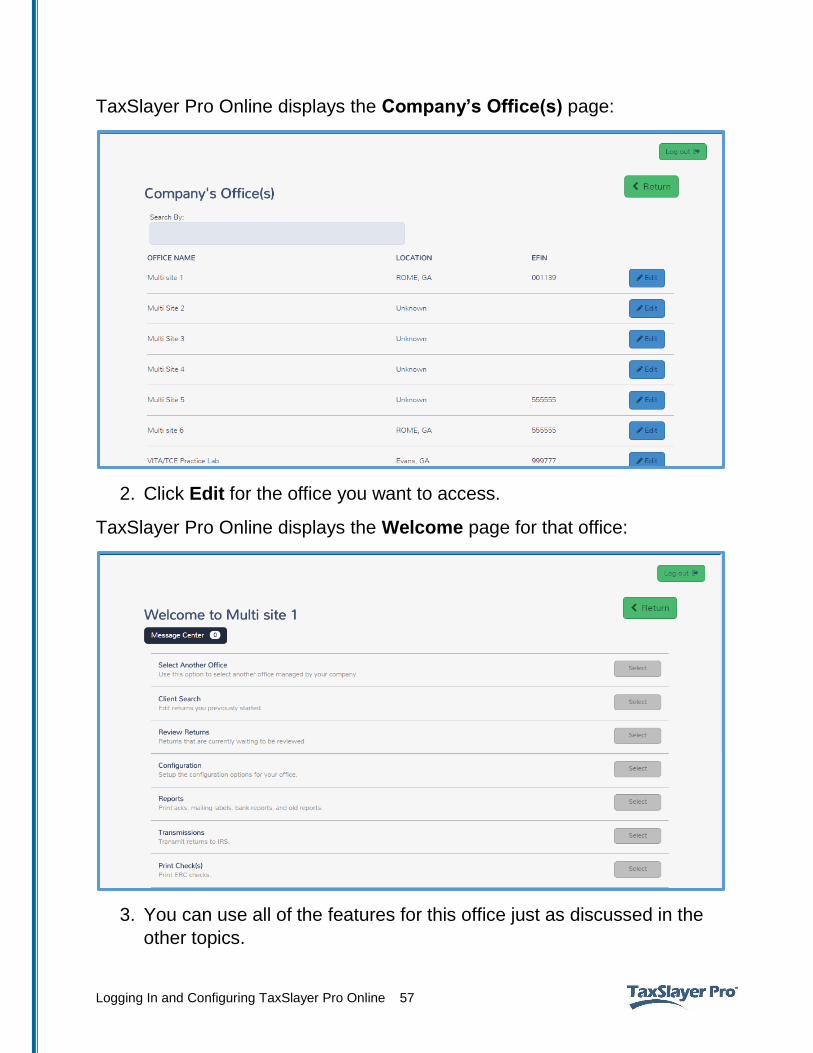
TaxSlayer Pro Online displays the Company’s Office(s) page:
2. Click Edit for the office you want to access.
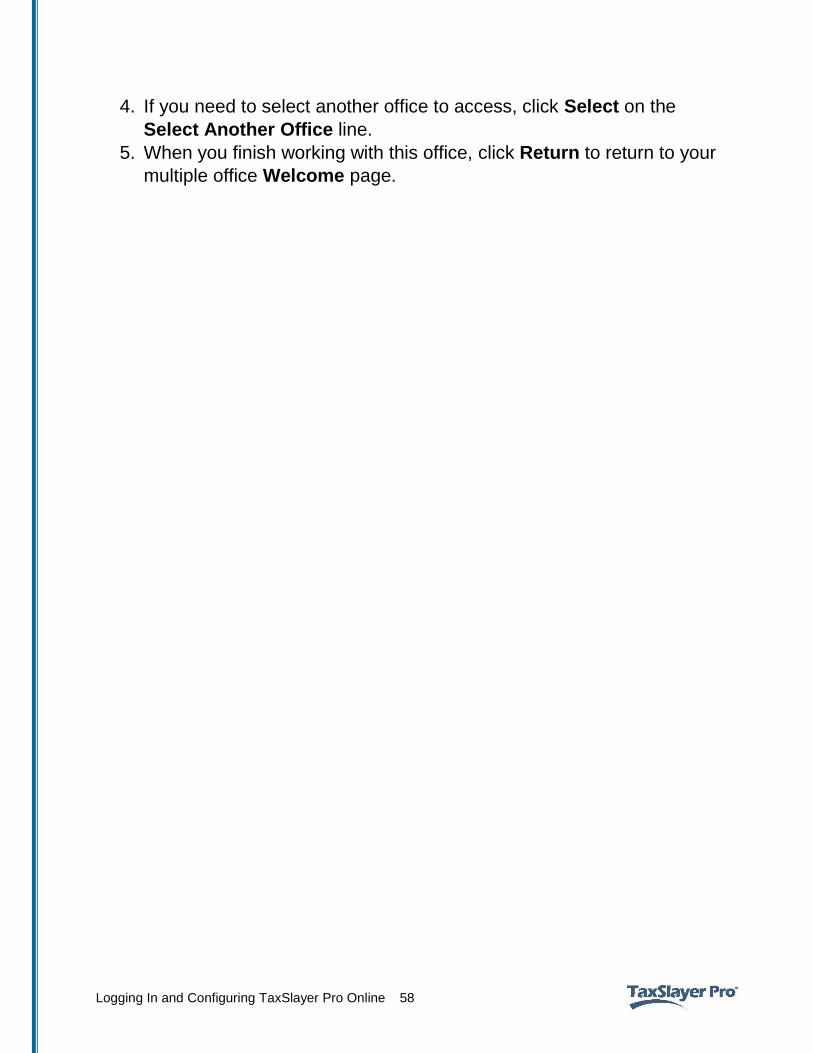
TaxSlayer Pro Online displays the Welcome page for that office:
3. You can use all of the features for this office just as discussed in the
other topics.
Logging In and Configuring TaxSlayer Pro Online 58
4. If you need to select another office to access, click Select on the
Select Another Office line.
5. When you finish working with this office, click Return to return to your
multiple office Welcome page.
Logging In and Configuring TaxSlayer Pro Online 59
After completing this topic, you will be able to:
Describe the TaxSlayer Pro Online contingency plan.
Download TaxSlayer Pro’s desktop application.
TaxSlayer Pro TaxSlayer makes a contingency procedure available in the rare event that
the web site becomes unavailable. If that happens, you can use TaxSlayer
Pro’s desktop application to prepare and e-file returns.
Download the desktop application in advance so that your site does not
have any downtime. Do not install TaxSlayer Pro on a network as a
contingency plan. Instead, install on a standalone computer with an internet
connection.
To download the desktop application, use the following steps:
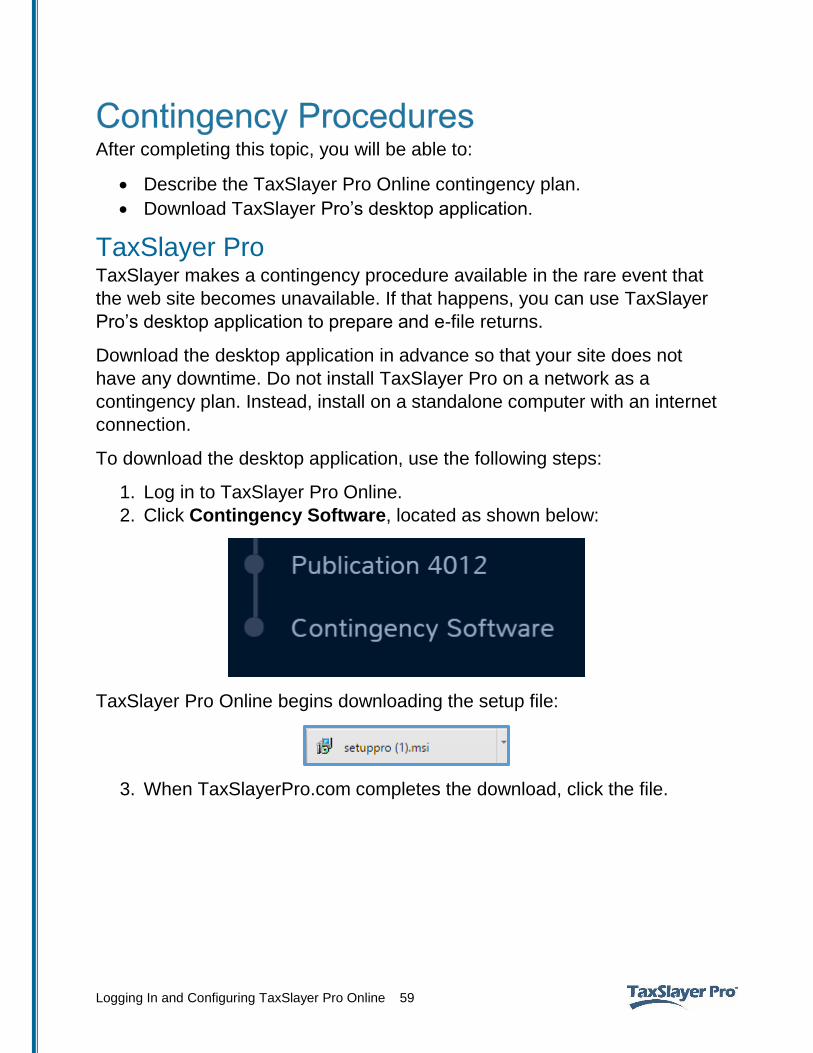
1. Log in to TaxSlayer Pro Online.
2. Click Contingency Software, located as shown below:
TaxSlayer Pro Online begins downloading the setup file:
3. When TaxSlayerPro.com completes the download, click the file.
Logging In and Configuring TaxSlayer Pro Online 60
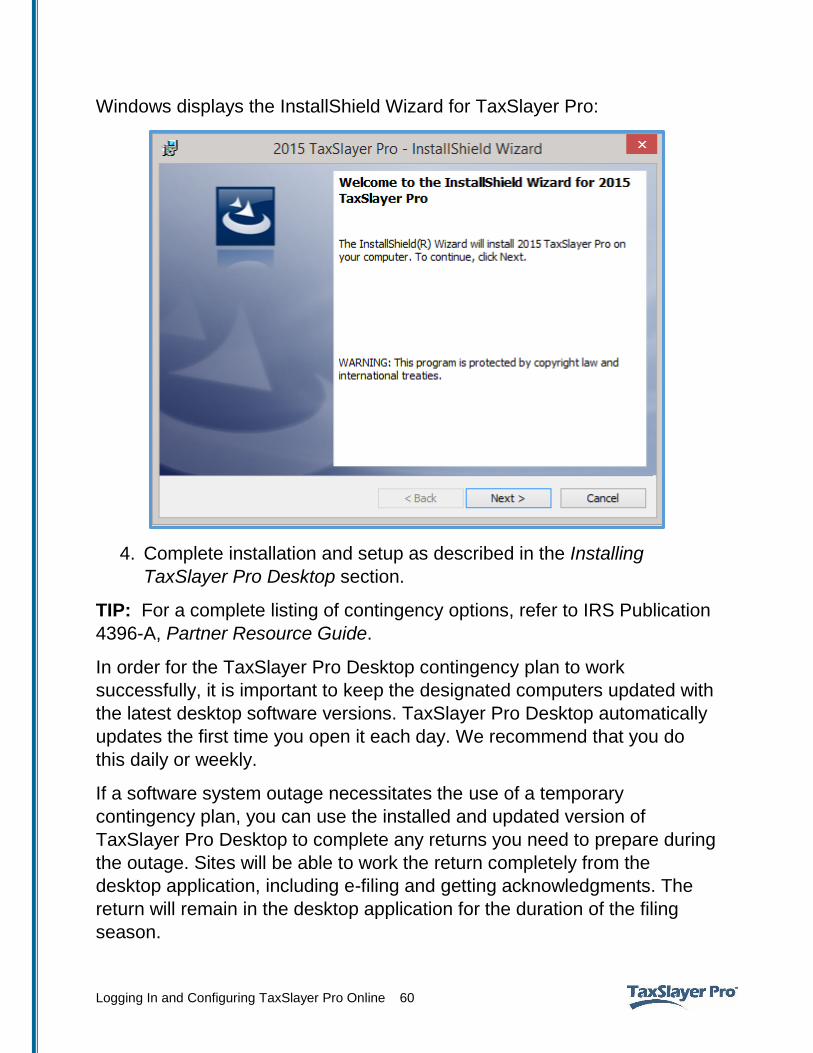
Windows displays the InstallShield Wizard for TaxSlayer Pro:
4. Complete installation and setup as described in the Installing
TaxSlayer Pro Desktop section.
TIP: For a complete listing of contingency options, refer to IRS Publication
4396-A, Partner Resource Guide.
In order for the TaxSlayer Pro Desktop contingency plan to work
successfully, it is important to keep the designated computers updated with
the latest desktop software versions. TaxSlayer Pro Desktop automatically
updates the first time you open it each day. We recommend that you do
this daily or weekly.
If a software system outage necessitates the use of a temporary
contingency plan, you can use the installed and updated version of
TaxSlayer Pro Desktop to complete any returns you need to prepare during
the outage. Sites will be able to work the return completely from the
desktop application, including e-filing and getting acknowledgments. The
return will remain in the desktop application for the duration of the filing
season.
Logging In and Configuring TaxSlayer Pro Online 61
TIP: Returns prepared using the desktop software during a contingency
plan will be transmitted from the desktop software. You will also use the
desktop software to retrieve any acknowledgement associated with the
returns transmitted from the desktop software.
When TaxSlayer Pro Online is available again, use it to prepare new
returns and complete any returns you started previously in TaxSlayer Pro
Online.
Logging In and Configuring TaxSlayer Pro Online 62
Address, 6, 10, 15, 16, 18, 30 Administrator, 20 Business, 16, 19 Checks, 29 Configuration, 12, 13, 16, 21, 24, 26, 27, 33, 36, 39, 40, 41 Configure, 12, 27, 55 Contingency plan, 33, 59, 60, 61 CSV, 54 Custom print set, 36, 37 Custom questions, 33, 55 Deactivate, 44, 45 Delete, 12, 20, 40, 44 e-file, 20, 34, 59 e-file Manager, 20 EFIN, 17, 54, 56 EIN, 17 ERO, 12, 16, 17, 18, 19 Excel, 54 Firm, 12 Form 8879, 36, 37 Guide Me, 29 HTML, 53 Install, 59 Interviewer, 20 Message Center, 49, 50 Multi-site administrator, 54, 55 Network, 59 Notes, 40, 46, 47, 48, 49 NYTPRIN, 29 Office Access, 56 Office Client List, 42, 43, 44, 45, 48 Office Reports, 52 Office Tags, 40 Password, 4, 5, 6, 8, 9, 10, 11, 27, 30, 31, 54 PDF, 53 Permissions, 20 Personal Notes, 49 Phone number, 16, 19
Logging In and Configuring TaxSlayer Pro Online 63
PIN, 29 Predefined, 20, 21, 24, 33, 36 Preparers, 12, 14, 20, 21, 22, 25, 26, 27, 30, 32, 33, 34, 49, 50 Prepares NY returns?, 29 Print, 20, 36, 37, 38, 39, 53, 55 Print set, 36, 37, 38, 39, 55 PTIN, 29 Question template, 33, 55 Range, 38 Relational EFIN, 54, 56 Reports, 33, 52, 56 Required, 29, 34, 56 Required to use Guide?, 29 Reset, 4, 8, 9, 10, 11, 20 Restore, 40, 45 Return Preparer, 20 Return Query, 20 Return tags, 40, 41, 42, 55 Review, 14, 22, 36, 46, 49, 50, 53 Reviewer, 20 Security code, 4, 6, 9, 10, 14, 54 Security Question, 8, 9, 10, 31 Security Template, 20, 21, 22, 23, 24, 25, 27, 31, 55 SIDN, 29 Site administrator, 4, 6, 54, 55 Social Security number, 28, 53 Split refund, 14 State, 16, 18, 36, 37, 38 Submission, 41 Super User, 20 Taxpayer notes, 40, 46 Taxpayer Profile, 55 Third party designee, 14 Transfer, 55 User name, 4, 6, 8, 10, 30, 54 ZIP code, 15, 18