Embed Size (px)
Citation preview

Home Vegetable Gardeningouisiana L


1
Home Vegetable Gardening
5 INTRODUCTION . . . . . . . . . . . . . . Kathryn Fontenot, Charles Johnson, Dan Gill and Robert Turley
6 CLIMATIC CONDITIONS . . . . . . . . . . . . . . . . . . . . . . . . . . . . . . . . . . . . .Daniel J. Gill and Robert Turley
7 GARDEN SITES . . . . . . . . . . . . . . . . . . . . . . . . . . . . . . . . . . . . . . . .Kathryn Fontenot and Charles Johnson
8 RAISED BED and CONTAINER VEGETABLE GARDENING . . . . . . . . . . . . . Kathryn Fontenot, Charles Johnson and Thomas J. Koske
9 SOILS . . . . . . . . . . . . . . . . . . . . . . . . . . . . . . .James E. Boudreaux, Kathryn Fontenot and Charles Johnson
11 FERTILITY . . . . . . . . . . . . . . . . . . . . . . . . .Kathryn Fontenot, Charles Johnson and James E. Boudreaux
12 PLASTIC MULCH . . . . . . . . . . . . . . . . . .Kathryn Fontenot, Charles Johnson and James E. Boudreaux
13 IRRIGATION . . . . . . . . . . . . . . . . . . . . . . .Kathryn Fontenot, Charles Johnson and James E. Boudreaux
14 DRIP IRRIGATION . . . . . . . . . . . . . . . . .James E. Boudreaux, Kathryn Fontenot and Charles Johnson
15 FERTIGATION . . . . . . . . . . . . . . . . . . . . . .Kathryn Fontenot, Charles Johnson and James E. Boudreaux
15 TRANSPLANTS . . . . . . . . . . . . . . . . . . . .Kathryn Fontenot, Charles Johnson and James E. Boudreaux 16 Time to start seeds for vegetable transplants for home gardeners 17 Companies that specialize in home garden seeds and plants
18 ROW COVERS . . . . . . . . . . . . . . . . . . . . . . . . . . . . . . . . . . . . . . . . . . . . . . . . . . . . . . . . . . . . James E. Boudreaux
Vegetable Guide 20 ARTICHOKES . . . . . Kathryn Fontenot, Charles Johnson, James E. Boudreaux and G. Stephen Crnko
21 ASPARAGUS . . James E. Boudreaux and G. Stephen Crnko, Kathryn Fontenot and Charles Johnson
22 BEANS, BUTTER BEANS . . . . . . . . . . . .James E. Boudreaux, Kathryn Fontenot and Charles Johnson
23 BEANS, SNAP BEANS . . . . . . . . . . . . . . .James E. Boudreaux, Kathryn Fontenot and Charles Johnson
24 BEETS . . . . . . . . . . . . . . . . . . . . . . . . . . . . . . .James E. Boudreaux, Kathryn Fontenot and Charles Johnson
25 BROCCOLI . . . . . . . . . . . . . . . . . . . . . . . . . .James E. Boudreaux, Kathryn Fontenot and Charles Johnson
26 BRUSSELS SPROUTS . . . . . . . . . . . . . . . .James E. Boudreaux, Kathryn Fontenot and Charles Johnson
27 CABBAGE . . . . . . . . . . . . . . . . . . . . . . . . . . . James E. Boudreaux Kathryn Fontenot and Charles Johnson
ouisianaL

2
28 CABBAGE, CHINESE CABBAGE . . . . . . . . . . . . . . . . . . . . . . . . . . . . . . . . . . . . . . . . . . . . . Thomas J. Koske
29 CANTALOUPES . . . . . . . . . . . . . . . . . . . .James E. Boudreaux, Kathryn Fontenot and Charles Johnson
30 CARROTS . . . . . . . . . . . . . . . . . . . . . . . . . . . . . . . . . . . . . . . . . . . . . . . . . . . . . . . . . . . . . . . . . James E. Boudreaux
31 CAULIFLOWER . . . . . . . . . . . . . . . . . . . . . . . . . . . . . . . . . . . . . . . . . . . . . . . . . . . . . . . . . . . James E. Boudreaux
32 CHARD, SWISS CHARD . . . . . . . . . . . . . . . Thomas J. Koske, Kathryn Fontenot and Charles Johnson
33 CUCUMBERS . . . . . . . . . . . . . . . . . . . . . . . . . . . . . . . . . . . . . . . . . . . . . . . . . . . . . . . . . . . . James E. Boudreaux
35 EGGPLANTS . . . . . . . . . . . . . . . . . . . . . . . . . . . . . . . . . . . . . . . . . . . . . . . . . . . . . . . . . . . . . . James E. Boudreaux
36 GARLIC . . . . . . . . . . . . . . . . . . . . . . . . . . . . . . . . . . . . . . . . . . . . . . . . . . . . . . . . . . . . . . . . . . . James E. Boudreaux
37 GREENS, MUSTARD, TURNIPS AND COLLARDS . . . James E. Boudreaux, Kathryn Fontenotand Charles Johnson
38 KOHLRABI . . . . . . . . . . . . . . . . . . . . . . . . . . . . . . . . . . . . . . . . . . . . Thomas J. Koske and Kathryn Fontenot
39 LETTUCE . . . . . . . . . . . . . . . . . . . . . . . . . . . . . . . . . . . . . . . . . . . James E. Boudreaux and Kathryn Fontenot
40 OKRA . . . . . . . . . . . . . . . . . . . . . . . . . . . . . . . . . . . . . . . . . . . . . . James E. Boudreaux and Kathryn Fontenot
41 ONIONS . . . . . . . . . . . . . . . . . . . . . . . . . . . . . . . . . . . . . . . . . . . . . . .James E. Boudreaux and Thomas J. Koske
43 SHALLOTS, LEEKS AND GREEN ONIONS . . . . . . . . . . . . . . . . . . . . . . . . . . . . . . . . . . Thomas J. Koske
44 PEAS, ENGLISH PEAS AND SNOW PEAS . . . . . . . . . . . . . . . . . . . . . . . . . . . . . . . . . . . Thomas J. Koske
45 PEAS, SOUTHERN PEAS . . . . . . . . . . . . . . . . . . . . . . . . . . . . . . . . . . . . . . . . . . . . . . . . . James E. Boudreaux
46 PEPPERS, BELL PEPPERS . . . . . . . . . . . . . . . . . . . . . . . . . . . . . . . . . . . . . . . . . . . . . . . . . . James E. Boudreaux
48 PEPPERS, HOT PEPPERS AND OTHER TYPE OF PEPPERS . . . . . . . . . .James E. Boudreaux and Kathryn Fontenot
50 POTATOES, IRISH POTATOES . . . . . . . . . . . . . . . . . . . . . . . . . . . . . . . . . . . . . . . . . . . James E. Boudreaux
51 PUMPKINS . . . . . . . . . . . . . . . . . . . . . . . . . . . . . . . . . . . . . . . . . . . . . . . . . . . . . . . . . . . . . . . James E. Boudreaux
52 SQUASH, SUMMER SQUASH . . . . . . . . . . . . . . . . . . . . . . . . . . . . . . . . . . . . . . . . . . . . James E. Boudreaux
53 SQUASH, WINTER HARDSHELL SQUASH . . . . . . . . . . . . . . . . . . . . . . . . . . . . . . . . . Thomas J. Koske
54 SPINACH . . . . . . . . . . . . . . . . . . . . . . . . . . . . . . . . . . . . . . . . . . . . . . . . . . . . . . . . . . . . . . . . . James E. Boudreaux
55 STRAWBERRIES . . . . . . . . . . . . . . . . . . . . . James E. Boudreaux, Dale K. Pollet, Donald M. Ferrin, and Sandra H. Benjamin
58 SWEET CORN . . . . . . . . . . . . . . . . . . . . . . . . . . . . . . . . . . . . . . . James E .Boudreaux and Thomas J. Koske
60 SWEET POTATOES . . . . . . . . . . . . . . . . . . . . . . . . . . . . . . . . . . . . . . . . . Thomas J. Koske and Don LaBonte
61 TOMATOES . . . . . . . . . . . . . . . . . . . . . . . . . . . . . . . . . . . . . . . . . . .James E. Boudreaux and Thomas J. Koske
63 TOMATOES, HEIRLOOM VARIETIES . . . . . . . . . . . . . . . . James E. Boudreaux, Kathryn Fontenot and Charles Johnson
64 WATERMELONS . . . . . . . . . . . . . . . . . . . . . . . . . . . . . . . . . . . . . . . . . . . . . . . . . . . . . . . . . James E. Boudreaux
3
Weeds, Insects, Pests and Disease 67 WEED CONTROL IN HOME GARDENS . . . . . . . . . . . . . . . . . . . . . . . . . . . . . . . . . James E. Boudreaux 68 Louisiana Suggested Weed Control Guide for Home Gardeners
68 WILDLIFE CONTROL . . . . . . . . . . . . . . . . . . . . . . . . . . . . . . . . . James E. Boudreaux and Donald P Reed
69 BENEFICIAL INSECTS/Organisms . . . . . . . . . . . . . . . . . . . . . . . . . .Dale K. Pollet and Alan L. Morgan
69 INSECT MANAGEMENT IN THE HOME VEGETABLE GARDEN . . . . . . . .Dale K. Pollet and Alan L. Morgan
70 INSECTICIDES/CHEMICAL CONTROL . . . . . . . . . . . . . . . . . . .Dale K. Pollet and Alan L. Morgan
72 GARDEN PESTS . . . . . . . . . . . . . . . . . . . . . . . . . . . . . . . . . . . . . . . . . . . . .Dale K. Pollet and Alan L. Morgan
72 SOME COMMON PESTS OF VEGETABLE GARDENS . . . . . . . . . . . . . . . . . . . . . . . . Alan L.Morgan
74 PESTICIDES—USE AND APPLICATION . . . . . . . . . . . . . . . . . . .Dale K. Pollet and Alan L. Morgan 75 Control recommendation for insects of home vegetable gardens 88 Common chemical names
89 Home Vegetable DISEASE Management gUIDE . . . . . . . . . . . . . . . . . . . . . . . . . . . . . . . Donald M. Ferrin 91 Fungicides available for disease management in home vegetable gardens
94 VEGETABLE NEMATODE MANGEMENT . . . . . . . . . . . . . . . . . . . . . . . . . . . . . . . Charles Overstreet
Herbs 100 GROWING HERBS IN LOUISIANA . . . . . . . . . . . . . . . . . . . . . . . . . . . . . . . . . . . . . . . . . . . . Daniel J. Gill 100 Herb Planting Chart—Cool Season Annuals 101 Herb Planting Chart—Warm Season Annuals 102 Perennial Herb Planting Chart
Tools and Equipment 104 EQUIPMENT FOR HOME VEGETABLE GARDENING . . . . . . . . . . . . . . . . . . . . Richard L. Parish

4
Home Vegetable Gardening ouisiana L

5
INTRODUCTIONKathryn Fontenot, Charles Johnson, Dan Gill and Robert Turley
Gardening is a popular activity in Louisiana. With estimates of more than 475,000 home gardens in
the state, it’s clear gardening is so popular because it fits the lifestyles of many different kinds of people
– from young to old and very active to less active. Gardening provides exercise, interaction with nature
and fresh healthful food options right in your own backyard or neighborhood garden.
Many people have started growing a portion of their food because of health and environmental con-
cerns. The green movement has made its way through our society. Terms such as “organic” and “sus-
tainable” commonly are used in workplaces, homes and schools. As demand for organic and sustain-
able foods has risen, so have the prices.
Many people opt for growing their own produce because they can monitor the use of conventional
pesticides and chemicals used on their food. Still others continue to garden because that’s what they
and generations before them have always done.
Luckily for Louisianans, we live in a fairly moderate climate, which allows us to plant or harvest fruit
and vegetables year-round. Louisiana gardeners occasionally experience a drought or a hard freeze, but
this only challenges us to find innovative methods for growing and maintaining our crops. If you are
new to gardening or have years of experience, the information in this book, along with a little sweat
equity, will help you grow an excellent backyard vegetable garden!

6
CLIMATIC CONDITIONSDan Gill and Robert Turley
Climate. Louisiana has a fairly mild climate. The state is divided into two hardiness zones – 8 and 9 – based on average minimum temperatures. Much of the state is located in hardiness zone 8 where the average minimum lows are 10 to 20 degrees Fahren-heit. Hardiness zone 9 (20-30 F) covers the coastal parishes from Cameron and southern Calcasieu in the west to those following along the Gulf to New Orleans and south of Lake Pontchartrain.
Most (about 90 percent) of the state is classified as being in heat zone 9 with northern and southern fringes in heat-zone 8. Louisiana enjoys a yearlong growing season for vegetable gardening, especially in the southern part of the state.
Average Frost Dates. Predicting yearly frost dates is like predicting the weather in general; however, it does not diminish its importance to vegetable garden-ing. Average frost dates are useful, but remember, damaging freezes can and will occur before or after the average frost date for spring or fall planting.
Average last frost dates are necessary to determine when to plant seed for early transplants, when to set out tender transplants for spring planting and when is the earliest possible date to plant seeds in the gar-den row. Late cold spells sometimes occur after dates listed here. For those who like to be on the safe side, begin your vegetable planting four weeks after the last average frost date for your area.
Last Frosts
Northern Louisiana mid- to late March
Central Areas South of Alexandria early to mid-March
Coastal Louisiana mid- to late February
Historically, first frosts usually occur later than earlier in the time periods listed. First Frosts
Northern Louisiana early to mid-November
Central Areas South of Alexandria mid- to late November
Coastal Louisiana early to mid-December
Annual Rainfall. Rainfall occurs throughout the year, with October usually being the driest month. Rainfall averages from 40 inches in the northwestern areas of the state to as high as 70 inches in the New Orleans region, making rainfall an integral part of life. Rainfall is brought by storms in the winter and thunderstorms and tropical storms in the summer and fall. The rainfall pattern is not uniformly distrib-uted; some areas may receive 4 to 10 inches of rain or more in a rainfall event, while others go without any appreciable amount.
Successful vegetable garden soils require good drainage. This may be accomplished by building up high rows or raised beds to handle the periods of excessive rainfall. In the absence of sufficient rainfall, supplementary water is needed during these extended periods of dryness that can occur from mid-spring through late fall.
Planting Season. Something can be planted every day of the year in the state. When one vegetable is finished producing, remove it, rework the soil and plant another vegetable crop. The spring planting season begins in March and continues through mid-May. This season has mild-to-warm day tempera-tures from 70 to 80 F, with night temperatures in the 50s to 60s with no chance of killing frost. This is the time to plant seed and transplants into the spring vegetable garden.
The summer planting season begins in late May and continues through August with day temperatures in the mid-80s through mid- to high 90s. Night tem-
Map and data source: Southern Regional Climate Center and Louisiana Office of State Climatology

7
peratures range in the mid- to upper 70s and 80s. Summer vegetable gardening can be challenging with the heat and humidity, the need for watering or too much water from rainfall. Weed and pest manage-ment can be daunting to the beginner as vegetation grows vigorously this time of year and damaging insect pest populations are higher. Many gardeners abandon the outdoors for the cooler indoors during this time of year. Regardless of the high temperatures, summer is a time of abundant growth and production from those plants that thrive in it, which includes vegetables like cucumbers, squash, cantaloupes, watermelons, okra, eggplant and southern peas. Good culture and pest management practices are an important part of vegetable gardening during this time of year.
The fall planting season begins in August and September and continues into late November.
Summer heat gives way to cooler weather as the state comes under the influences of cool fronts pushing through the state. Summer vegetables can still be growing with harvest continuing until killing frost. The planting of cabbage, broccoli, cauliflower, Brus-sels sprouts, collards, onions, mustard, turnips and other cool-growing vegetables begins.
The winter planting season begins in late Novem-ber and continues through late February. This is the time of year when frost and low temperatures occur. Low temperatures can descend into the teens from late December through February; however, extreme weather usually does not last very long. Louisiana weather is mild, for the most part, with night tem-peratures above freezing and day temperatures in the 50s, 60s and 70s. These temperatures allow the continued planting of cool-season vegetables in the garden.
GARDEN SITESKathryn Fontenot and Charles Johnson
Several site factors influence the quality and quanti-ty of vegetables you can grow. The three most impor-tant factors when considering where to plant your vegetable garden are sunlight, proximity to a water source and drainage.
Successful vegetable gardens require sunlight. Crops that bear a fruit, such as tomatoes, peppers, squash, eggplants and others, require a minimum of six hours of direct sunlight and yield even better when receiving eight hours of direct sunlight. Leafy vegetables, including broccoli, cauliflower, greens, lettuce and others, will yield well when receiving five to seven hours of direct sunlight a day. For the best growth, choose the sunniest spot in your yard for your vegetables.
Although too much shade is a detriment because plants will look spindly and yield poorly, you can use shade to your advantage. If you have trees that block the afternoon sun, you can plant earlier fall crops of broccoli, cauliflower, cabbage and greens successfully. Large deciduous trees will not affect early plantings of tomatoes and cucumbers until they produce foliage.
Annual rainfall in Louisiana usually is about 60 inches or so, but we do experience periods of drought. Critical times to water vegetables are the first two weeks after seeding and transplanting and during bloom initiation. Lack of water during these critical periods will reduce yields. Consider plac-ing your garden near an outdoor faucet so you easily
can install an irrigation system or carry a hose to the garden. Filling bucket after bucket of water to irrigate your garden will becoming a daunting task, and soon you’ll find yourself praying for rain! Make gardening easy by selecting a site near the faucet.
Drainage is the key to success. Vegetables inun-dated by water for two or more days will become sus-ceptible to root rot. If the soil in your yard is heavy in clay, amend with lots of organic materials on an annual basis and build rows at least 6 inches high when planting in the ground. Gardeners who have yards with poor drainage might consider building raised beds. Gardeners with sandy soils have less to worry about, since water quickly moves through the soil profile. In sandy soil conditions, carefully con-sider whether or not you even need to build rows.
8
RAISED BED and CONTAINER VEGETABLE GARDENINGKathryn Fontenot, Charles Johnson and Thomas J. Koske
There are many great reasons to grow vegetables in a raised bed in your home landscape. Raised beds are perfect for smaller yards, owners without large garden equipment, those who don’t want to constantly fight encroaching grass.
Before building a raised bed you must remove or kill weeds, grass and other plant materials prior to filling with soil and planting. Removing weeds before you build will make maintaining the garden so much easier in the future. You can remove weeds and grass in several manners.
• Use a non-selective herbicide such as Glyphosate to kill broadleaf and grass weeds. Allow the plants to completely die, which generally takes 2 weeks. Remove all plant material from the area where you plan on placing your bed. This includes removing roots.
• Use black plastic, cardboard or some other mate-rial to smother weeds and grass from sunlight. This process will take at least a month for a complete kill. Again, remove all plant shoots and roots before build-ing the raised bed.
• Use a weed-eater to remove all grass and weeds in the area. Completely remove all green portions of the grass and then dig at least 3 inches into the ground with the weed-eater to remove roots. Rake out and construct your raised bed.
Once the plant material below the raised bed is removed, start to consider how you will build the bed and to what size. Raised beds come in many sizes and shapes. Design possibilities for raised beds are limited only by your imagination. However, consider the following rules when designing your raised beds.
Raised beds must be:• At least 8 inches in depth. This allows for an
adequate root-ball growth for optimum yields. • No wider than what you can comfortably reach
to the middle. Constantly stepping in raised beds compounds soil, making it necessary to till, thus defeating the purpose of building the raised bed.
• Treated wood manufactured after 2003 is com-pletely safe for vegetable gardens. Untreated wood will not hold up in Louisiana’s wet climate. Fresh wood treated with creosote such as railroad ties or telephone poles may burn roots of vegetable plants. Bricks, pavers, stones, cinderblocks and other build-ing materials are suitable construction materials for raised vegetable gardens.
• If using non-conventional containers such as old
horse troughs, make sure that proper drainage is add-ed. No matter how tall the container might be, drill-ing drain holes is necessary especially if a few days of constant rain are in the forecast.
Containers can also successfully be used for vegeta-ble gardens. Just think about the mature size of your plant. Vegetables like tomatoes, peppers, eggplant, asparagus, artichoke, and squash can take up a lot of space. We recommend only using containers that are 5 gallons in size or larger. The larger the container the less frequently you’ll need to water. Smaller contain-ers require frequent irrigation as they dry out quickly. As frequency of irrigation increases, so does leaching of essential nutrients leading to poor quality fruit production.
Garden soil is not uniform throughout the state. The optimum soil mix for raised beds is a 1:1:1 ratio of sand, compost and garden loam. But you may be introducing incredible amounts of weed seeds and disease causing organisms if the soil has not been treated to eliminate weeds and disease organisms. Most garden centers sell a garden blend of soilless soil or media that works well for vegetables. Try to choose a soil that isn’t primarily composed of large bark pieces. Too much bark ties up nutrients and drains too fast. Ask the seller for a copy of the soil analysis. Make sure the soil has a pH of 5.5 to 7.0. This is the perfect range for most vegetable crops. Soil should be dark in color and comprised of decomposed materials.
As for fertilization, your container plants will perform best when you use a soluble fertilizer. You should follow the directions on the label for the cor-rect fertilization rate. As an example of soluble fertil-izer, try 20-20-20 fertilizer applied once a week at the rate of about 1 ounce of fertilizer in 4 gallons of water. If you decide to use a solid fertilizer such as 8-8-8, you may try 1 level teaspoon of fertilizer per square foot of soil about every three weeks. The type of fertilizer used depends on the vegetable planted. Tomatoes and eggplants should have a fertilizer that is higher in potassium than in nitrogen. Vegetables harvested mainly for their leaves should get a 1-1-1 even ratio fertilizer or one that is a little higher in nitrogen.
A big advantage of container gardening is that the plants can be moved. Plants least tolerant to shade are fruit-bearing crops such as tomatoes, cucumbers, squash, peppers, etc. The intermediate light crops are

9
Vegetable gardens can be grown on almost any soil type with the right drainage and fertility. Well-drained sandy soils with a high level of organic mat-ter are ideal, but home gardeners must work with the soil they have for their gardens. Heavy clay soils that are poorly drained, stay wet for a long time in the spring and are sticky and difficult to cultivate.
Good surface drainage is absolutely necessary for a successful vegetable garden. Water standing in the garden for long periods of time is fatal to the growth of vegetables. Low and wet areas can be improved by adding an 8- to 9-inch layer of top soil (2-3 yards of topsoil per 100 square feet) to raise the garden site, putting in drains to carry the water away from the garden and planting on high rows.
Gardeners who have a clay soil that is poorly drained should consider purchasing a load of good
sandy topsoil to add to the site. The addition of the topsoil will improve the garden area for years to come and will more than justify the expense and effort. The good topsoil should be laid over the clay soil in an 8- to 9-inch layer. Two to three yards of good topsoil are required to raise a 100-square-foot garden site 8-9 inches high, thus providing better drainage.
Organic matter is another option for improving heavy clay soil by improving soil tilth and increas-ing its nutrient- and water-holding capacity. These improvements also will enhance the growth of vegetables.
The quickest way to increase the organic matter level in a soil is to add compost or manures. Munici-pal compost facilities are good sources for compost for the home gardener, and horse stables are good sources of manure. Avoid sources of organic matter that are contaminated with hard-to-control weed seeds, wood shavings and other items that can cause problems in the garden. The addition of 1-2 yards of compost or manure on a 100-square-foot site will improve the physical and chemical condition of the soil. It will take three to six months for the manure and compost to decompose before the full benefits of the organic matter are seen.
In small gardens, any area not being used should be covered with a loose mulch such as leaves, straw, etc., which keeps the area clean of weeds and the soil loose and friable. The mulch can be incorporated into the soil when you’re ready to plant.
Commercial mixes for flower beds should not be used for vegetable gardens. These mixes contain
SOILS James E. Boudreaux, Kathryn Fontenot and Charles Johnson
root crops such as beets and radishes. The crops most tolerant to shade are the leafy crops such as greens, parsley and lettuce. If you plan on moving contain-ers from one spot in your yard to another throughout the season, consider investing in a dolly as containers filled with soil and plants can become heavy. Plant breeders have developed a number of dwarf or pixie hybrids for container gardening. Small or dwarf variet-ies will have less of a root mass and less shoot mass which is desirable container plantings. Check seed catalogs for these types of plants.
Many people get caught up in planting as much as they can into a small space. Consider mature plant
size when planting seedlings and direct seeding into the garden container. Crowded plants will become more susceptible to insect damage and disease pres-sure. Allowing plenty of space between plants creates airflow and reduces competition for sun, water and nutrients. Information spacing is listed for each veg-etable crop on pages 5-65.
Even though container and raised bed gardening is touted as “low input” and “for the busy person” remember to pull or spray weeds around the edge of the bed / containers so they don’t encroach. Scout for insect and disease and choose plants appropriate for the season. Enjoy your small, personal sized garden!

10
pine bark that must decompose for the nutrients to become available to the vegetable plants. In most cas-es these mixes take two to three years to decompose and do not work well for vegetable gardens.
CompostAre you interested in starting a small compost pile?
It really isn’t too hard. Many gardeners shy away from composting in fear of attracting wildlife to their yards. Open system compost piles may attract ani-mals. but closed system compost barrels and crates keep most animals out. It’s also a good idea to avoid adding any fats, dairy or meat to your compost pile. Microorganisms will decompose these items, but since they have strong odors they tend to attract ani-mals to the pile.
Like vegetables, compost piles work best when placed in the ideal location. A partially shady spot close to the garden is the best place to build your compost pile. In general, a 33-to-1 ratio of brown to green items makes the ideal compost pile. Brown items include things such as leaves, saw dust, wood ash, paper products, hay, straw etc. Green items include grass clippings, herbaceous materials and fruit and vegetable peelings and foliage that are not typically consumed.
Mix all items you want to compost in your bin or container. Add a small amount of soil from the gar-den, water and fertilizer (1 cup of 13-13-13) to jump-start the decomposition of the pile.
To test for the right amount of moisture, try these tips: When squeezing a small amount of compost in your hands, you should have a few drops of water in the palm of your hand after you drop it into the pile. If your hand is dry, you need to add water. If the compost oozes through your fingers, add additional hay, straw or leaves to absorb some of the water.
Flip the compost pile regularly, at least once a week. Having a good ratio of green to brown materi-als, available water and air will keep the microorgan-isms happy and thus help you make compost faster.
Compost is ready to use when the majority of the pile appears dark and is crumbly like soil. Pieces of leaves and sticks will still be in the mixture. If the pile is steaming, it is not ready to be incorporated into the garden. Compost piles can reach temperatures of 90-120 degree F when “cooking” but will cool when
they are fully decomposed. The pile also should have reduced in height by about half.
Mix compost into the top layer of your in-ground garden or raised beds and till into the existing soil. Layering topsoil, organic matter or compost will just create hardpans, so always till compost into the garden.
Soil PreparationSoil should be tilled or turned in the late winter
and early spring as soon as the ground is dry enough to move a small tiller through the garden area with-out soil clumping and clinging to any small equip-ment you might choose to use.
Leftover vegetation in the garden should be cut and tilled into the soil to decompose. Garden sites should be well broken up to make a good seedbed.
The soil should never be worked wet because large, hard clods of dirt can develop. These clods are diffi-cult to break up once dry and prevent the preparation of a good seedbed.
All vegetable crops in Louisiana should be grown on raised rows at least 6 to 10 inches high. High rows provide good drainage, especially during times of heavy rains. The width of the row depends on the available space in a garden. Generally, rows 3- to 4-foot wide are the minimum size used for in-ground gardens.
Vegetables grown in primarily sandy soil should not be grown on rows, since these soils tend to dry quickly. Seeds and seedlings can be planted into the soil on a flat plane. As crops grow, you may choose to hip soil up around the base of the plant to encourage tiller roots and bring moisture to the plant.
11
Fertility is the only factor that is completely controlled by the gardener. One of the most com-mon gardening mistakes is applying an insufficient amount of fertilizer to plants. Supplying an adequate amount of nutrients is both easy and beneficial, and vigorously growing crops have less insect and dis-ease problems.
Soil test the garden site at least every three years. Soil pH is one of the most important factors; most vegetable crops need to be in the 6.0-7.0 range. Irish potatoes and sweet potatoes are grown in soil with a pH of 5.0-6.0. Soil-borne disease pressure of these crops is reduced in more acidic soils.
Preplant and side-dress fertilizers are used in the garden. Preplant fertilizer is a complete fertilizer, like 8-24-24 or 13-13-13, applied 7-21 days before plant-ing. It is best to apply the fertilizer in a 4- to 6-inch wide band in the bottom of the row 4-6 inches below the final seed bed. Band application is the most effi-cient method of applying the fertilizer to the plants.
The fertilizer grade 13-13-13 is often recommended for home gardens. Established gardens generally are high in phosphorus and potassium. These soils only require a medium level of nutrients for good early growth and development. The fertilizer (13-13-13) can be used to supply a medium level of N, P and K. Additional nitrogen is supplied by side-dressing.
The fertilizer 8-24-24, although it may be dif-ficult to find, also is recommended for use in home gardens. This ratio of nutrients supplies a high level of phosphorus and potassium with a medium level of nitrogen. Again, additional nitrogen is needed to make the crop and it is applied as a side-dressing. Ask your local feed and seed stores, garden centers and hardware stores to carry this grade.
Phosphorus and potassium in the soils are available in limited quantities to plants during cool weather; therefore, when planting a spring garden, these ele-ments must be added.
After applying pre-plant fertilizer, irrigate the garden or wait for a rain prior to planting. Planting in dry soil with a heavy rate of fertilizer increases the chances of burning the plants. Generally, there is sufficient moisture (soil makes a loose ball when squeezed in the hand) in the spring to avoid burning the new plants with fertilizer.
Side-dress fertilizer is the addition of nitrogen fertilizer applied on the top of soil 4 to 6 inches to the side of the plants when flowering and fruit set occurs (three to four weeks after planting). Ammo-nium nitrate, ammonium sulfate or calcium nitrate are some of the more common nitrogen fertilizers used to side-dress vegetable crops. The additional nitrogen enhances the growth of the plant and fruit and ensures high yields. Just remember if you already have a low pH soil, the addition of ammonium sulfate can further reduce your soils pH.
Side-dressing is a means of getting more efficient use of nitrogen fertilizer. Transplants and seedlings have a low requirement of nitrogen. As the plants develop and produce fruit, nitrogen requirements increase. A number of crops are side-dressed heavily with two or three applications of nitrogen fertilizer while others are side-dressed once. It is best to have moisture soon after side-dressing to get maximum benefit from the fertilizer.
Side-dressing on plastic mulch can be accom-plished by punching a 1- to 2-inch deep hole through the plastic on the edge of the row (shoulder of the row) between the plants with a broom stick. It is recommended that the hole be at least 6 to 8 inches away from the plant. Placing nitrogen close to the plant will result in a burn. The nitrogen fertilizer can be placed in the hole. Generally, ½ teaspoon of calci-um nitrate or potassium nitrate every 12 to 18 inches is enough to supply the required amount of nitrogen for side-dressing.
The above recommendations are helpful for those gardeners growing in clay-based soils. If you have more sandy soils, you’ll want to apply the same amounts of fertilizer (recommended on individual vegetable pages) but in smaller quantities over a lon-ger period of time. For instance, apply half the recom-mended rate of pre-plant fertilizer prior to planting the crop and the other half within the first two weeks of planting. Side dress in smaller quantities through-out the growing season starting after bloom initiation. Since water moves quickly through sandy soil pro-files, fertilizer tends to leach from this soil type read-ily. Splitting fertilizer applications more frequently followed by rain or irrigation will enable plants to use the fertilizer before it leaches.
FERTILITYKathryn Fontenot, Charles Johnson and James E. Boudreaux
?stays in?

12
PLASTIC MULCH Kathryn Fontenot, Charles Johnson and James E. Boudreaux
Plastic mulch and drip irrigation are widely used in vegetable production. Plastic mulch provides higher soil temperatures that promote earliness, weed con-trol, soil moisture management, disease control and reduction in fruit rots. It also protects the plants from saturated soil conditions by shedding water away from the plant during heavy rains. The correct use of drip irrigation and fertigation in combination with the plastic mulch provides ideal soil moisture and nutrient levels for good plant growth and high yields.
White-on-black plastic mulch is recommended for the summer and fall crops to avoid development of high soil temperatures. White-on-black is necessary to prevent weed seeds from germinating under the plastic. (White plastic mulch can be made by paint-ing black plastic mulch with a 1:2 or 1:3 mixture of white latex paint and water.)
Putting out plastic in the garden can be quite a task. The plastic should be as wide as the row, (48-inch wide plastic on 48-inch rows). You must first work up the garden and build high rows. Generally,
a 4-foot-wide row 6 to 8 inches tall with an 18-inch to 20-inch flat top is used for plastic mulch. A small shallow trench is made on each side of the row to bury the edge of the plastic. Anchor the plastic by covering the edge in the trench with soil.
Plastic and drip irrigation can be justified by using it for more than one crop. A second crop can be grown in the summer or fall on the plastic mulch left from a spring crop. The spring crop is cleaned from the plastic and then the plastic is painted with a 1:2 to 1:3 mixtures of white latex paint and water.
The second crop is planted between the holes from the spring crop. The second planting requires little soil preparation. The crop is grown with the leftover fertilizer, mulch and drip irrigation.
Use leaves as mulch between the rows of plastic after the spring garden is planted. The layer of leaves helps to control weeds, gives the garden a clean, neat appearance, provides a clean path for gardeners to work (especially after heavy rains) and adds organic matter to the soil. By the following spring, the leaves will have decomposed and will build the organic matter level in the soil over time.
The addition of leaves is not recommended in the fall. Leaves do not readily decompose during the win-ter and will keep the garden wet in the early spring and hinder the preparation of the soil.
13
For a successful garden, watering is a must. Rainfall seldom occurs in a steady enough pattern to maintain adequate moisture throughout the growing season. Do not delay watering by waiting for a rain. Doing so will expose the garden to moisture stress that hurts yields and quality of the fruit.
The highest demand for water is when plants are flowering and setting fruit. During flowering and fruit set, 1 inch of water is required every seven to 10 days. Moisture stress at this time will reduce fruit set, fruit size and yields. Water can be supplied to the garden by sprinkler, flooding the row middles or drip irrigation systems.
Sprinkler Irrigation Sprinkler irrigation using an oscillating sprinkler
imitates natural rainfall and is probably the most popular type of irrigation for home gardens. A num-ber of different types of sprinklers, from wide angle misters to rotating sprinkler heads, can be used to water a garden. Sprinkler irrigation equipment is widely available and easy to set up to provide uni-form coverage of the garden. Run the sprinkler early in the morning just before daylight. The plant’s foli-age will dry up as the sun comes up and tempera-ture increases, reducing the chance of diseases.
The amount of water applied can be determined by placing cans at several different locations in the garden. Check the time it requires to apply 1 inch of water in the cans. A disadvantage of sprinkler irriga-tion is that insecticides and fungicides used for insect and disease control are washed off. The humidity around the plant also increases, which promotes the development of diseases. Working in the garden after sprinkler irrigation is difficult.
Hand-WateringMany gardeners who grow vegetables in contain-
ers and raised beds choose to hand water their crops. Doing this is great because you’ll be forced to visit the garden more often than those gardeners using a timer.
As you water, take time to look under foliage for insects and scan foliage for signs of diseases. Do not let plants in raised beds and containers wilt, but also do not water too frequently. Deep, infrequent
watering is best to help the plants develop deep root systems.
Allowing water to run out of the bottoms of con-tainers also helps flush salts that can build up in these small garden spaces. Use a watering can or a water wand with a long handle to help you easily water the base of the plants. Avoid wetting the foliage to reduce disease incidence.
Furrow Irrigation Furrow irrigation involves flooding the row
middles. Water is applied at the upper end of the garden and allowed to flow down the row. Often the end of the row is dammed to collect the water. Moisture is soaked up by the soil into the plants’ root zones from the row middles. The water should never be allowed to stay in the row for more than half a day or to flow over the top of the row. Either of these situations can harm the garden by saturat-ing the soil and excluding air from the roots of the plants.
The disadvantage of furrow irrigation is that the middles of the rows become so wet that working in the garden becomes very difficult. Plus soil borne dis-eases will spread more rapidly as spores and sclerotia may flow down the rows from one side of the garden to the other with the water.
IRRIGATION Kathryn Fontenot, Charles Johnson and James E. Boudreaux

14
Drip irrigation schedule for home vegetable garden crops.Spring1 Summer2 Fall3
Crop Stage Weeks Minutes/day4 Minutes/day4 Minutes/day4
Small Plants 2 20 30 30
Growing Plants 3-4 30 40 30
Flowering and Fruit Development 3-4 90 90 60
Harvest 2-3 60 60 45
Late Harvest 2-3 60 60 301Spring–Plantings made in March and April. 2Summer–Plantings made in May and June. 3Fall–Plantings made in July and August. 4All time intervals for irrigation are based on the use of a drip tube with a flow rate of one-half gallon per minute per 100 feet.
The correct use of drip irrigation and fertigation provides ideal soil moisture and nutrient levels for optimum plant growth and high yields. It also pre-vents the wetting of the foliage, which decreases the occurrence of foliar diseases and does not interfere with working in the garden.
The water in a drip irrigation system runs from the source through a supply line into a flat plastic tape called drip tape. Embedded in the drip tape at regu-lar intervals are devices called emitters, which are designed to allow a small amount of water (one-half to 1 gallon of water per 100 feet per minute) to flow out of the drip line to the soil. Only 10 to 15 pounds per square inch (psi) are required to run a drip irriga-tion system. Working with a local irrigation supply company can help you determine the pressure in your water faucet.
The drip tape should be buried 1-2 inches deep in the row and covered with plastic mulch. If the irriga-tion tube is not buried, the irrigation water will devel-op a small channel and run off the top of the row into the row middles. This action will result in a dry area on top of the row with all the irrigation water in the middle of the row. With a single drill of large plants, such as tomatoes and eggplant, the drip tape is offset 4-6 inches to the side of the row. With smaller plants such as cole crops, the tape is buried in the center of the row. A row of plants can be grown on each side of the drip tape making two rows of plants per row (double row).
Drip tape can easily burst if the pressure is too high. Before fully opening the faucet, start with half turns and check the drip line. You want it to feel soft like jelly. A hard line that cannot be pinched may burst and cause a flooded area in the garden.
If you have short rows or are trying to water a very small garden with drip irrigation, consider purchas-ing drip tube instead of tape. Drip tubing is made out of a slightly more durable material with set emitters at regular intervals, but may increase initial irrigation costs
The irrigation time interval depends on the rate of water evaporation, temperature, stage of plant devel-opment and the flow rate of the drip tube. Intervals start short and increase as a plant develops and the temperature increases. The demand for water is great-est during the fruit setting and fruit sizing stages. It is important for the soil to be at the ideal soil moisture levels during this time to obtain high yields of high quality vegetables.
A battery-operated irrigation timer on a drip irriga-tion system is recommended. It is relatively inexpen-sive and turns the water on and off at the correct time intervals.
Check your garden every two or three days to determine if the time intervals for irrigation need to be increased or decreased. The soil in the root zone (6-8 inches deep) should be moist and form a loose ball when squeezed in the hand. The soil should nev-er be saturated. Water should not run out from under the plastic into the middle of the row.
DRIP IRRIGATION James E. Boudreaux, Kathryn Fontenot and Charles Johnson
15
A schedule for fertigation for home vegetable gardens.
Crop Stage Weeks Amount of fertilizer /100 ft. of row/ week
calcium nitrate 20-20-20
Small Plants 2 none none
Growing Plants 3-4 2 tbs 1 tbs
Flowering & Fruit Development 3-4 2 tbs 1 tbs
Early Harvest 2 2 tbs 1 tbs
Late Harvest 2 none none
Drip irrigation allows gardeners to add nitrogen fertilizer through the drip line by using an injec-tion device. This is known as fertigation and will increase yields by setting more fruit and producing larger fruit with fewer defects. It is the most effec-tive way to apply nitrogen fertilizer to vegetable crops.
When using fertigation, some of the nitrogen is applied with the preplant fertilizer. The rest of the side-dressing nitrogen is injected in equal incre-ments starting with bloom and fruit set (three to four weeks after planting) and continuing for eight to nine weeks to harvest. Gardeners are encouraged
to include a back flow preventer when injecting nitrogen fertilizer to prevent the contamination of the water source with nitrogen fertilizer.
Only put completely soluble fertilizers through the drip line such as fish emulsions, 20-20-20, Miracle Grow similar products and greenhouse grade cal-cium nitrate.
If you are fertigating in raised beds or in areas that cannot be measured in linear feet like a row, deter-mine the total square feet of your area that the drip line is irrigating. For example, a 10-foot row is really 40 square feet, assuming a row that is 4 feet wide row and 10 feet long.
FERTIGATIONKathryn Fontenot, Charles Johnson and James E. Boudreaux
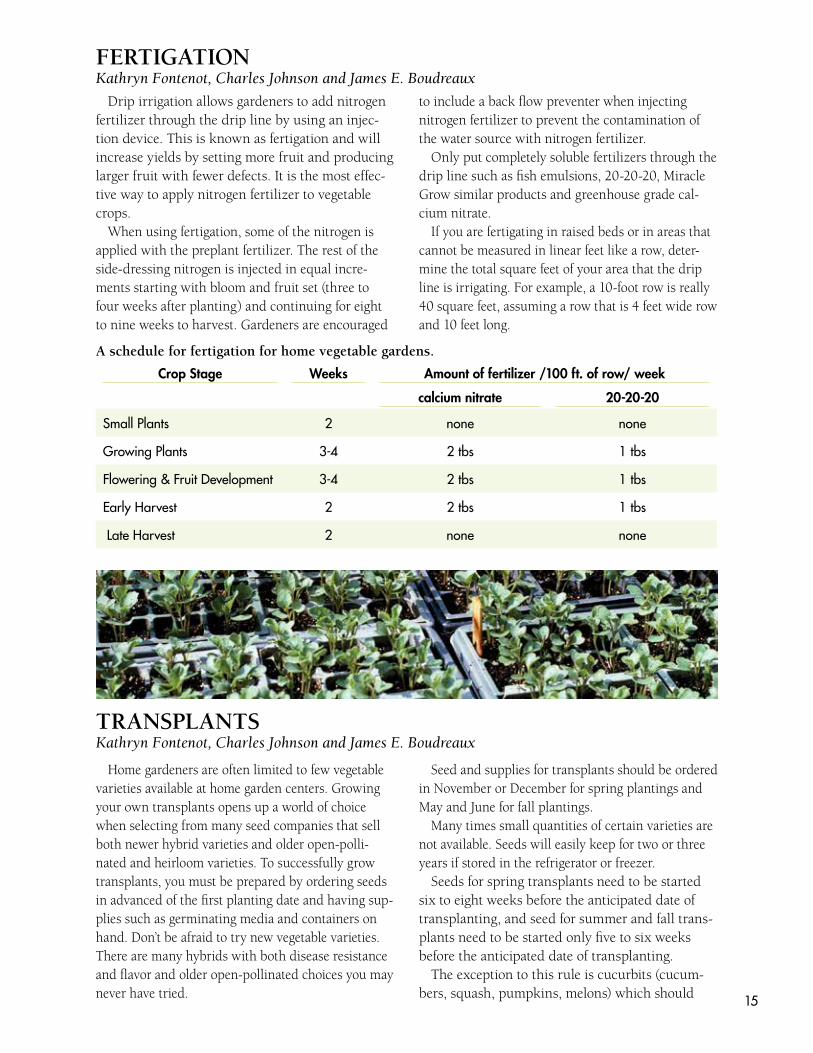
Home gardeners are often limited to few vegetable varieties available at home garden centers. Growing your own transplants opens up a world of choice when selecting from many seed companies that sell both newer hybrid varieties and older open-polli-nated and heirloom varieties. To successfully grow transplants, you must be prepared by ordering seeds in advanced of the first planting date and having sup-plies such as germinating media and containers on hand. Don’t be afraid to try new vegetable varieties. There are many hybrids with both disease resistance and flavor and older open-pollinated choices you may never have tried.
Seed and supplies for transplants should be ordered in November or December for spring plantings and May and June for fall plantings.
Many times small quantities of certain varieties are not available. Seeds will easily keep for two or three years if stored in the refrigerator or freezer.
Seeds for spring transplants need to be started six to eight weeks before the anticipated date of transplanting, and seed for summer and fall trans-plants need to be started only five to six weeks before the anticipated date of transplanting.
The exception to this rule is cucurbits (cucum-bers, squash, pumpkins, melons) which should
TRANSPLANTSKathryn Fontenot, Charles Johnson and James E. Boudreaux

16
Time to start seeds for vegetable transplants for home gardeners.
Vegetable Crop Time to Start Seeds
Weeks Required to Produce Transplants South Louisiana North Louisiana
Tomatoes PeppersEggplant
Spring January February 8 weeks
Summer May – June May – June 6 weeks
Fall June – July June 6 weeks
CabbageBroccoli
Cauliflower Brussels Sprouts
Fall Mid-July – August Mid-July – August 6 weeks
Spring Late December – January January – February 6 weeks
Winter (Cabbage only) October ------ 6 weeks
SquashCucumbers Cantaloupes Watermelons
Spring Mid-February – March March 3-4 weeks
Summer May – June May – June 3-4 weeks
Fall July Mid – June 3-4 weeks
Artichokes Spring June ____________ 12-14 weeks
Lettuce Spring December – January January – February 5-6 weeks
Fall August – September August – September 4-5 weeks
Onion Fall Mid-September – Mid-October September – Mid-October 10-12 weeks
only be started 3-4 weeks prior to planting in the ground. The difference in time needed to ger-minate and grow differs between fall and spring because of higher temperatures and longer days that occur at the time of growing the summer and fall transplants.
The time-honored way of producing tomato, pepper and eggplant transplants was to plant the seeds (1/4 inch deep) closely together (4-6 seeds/inch) in rows spaced 2-3 inches apart in flats. After the seedlings developed true leaves, they were pulled from the flats and transplanted into a container such as a peat cup or plastic cell pack. Cole crop and cucurbit seeds are planted directly into the final container.
Vegetable transplants should be grown in a com-mercially prepared soilless mix for transplants and plastic cell packs, often call germinating mix. Not all types of potting soil are suited for transplant produc-tion. Many of these potting soil mixes are designed for transplanting house plants. They contain fertilizer that results in high levels of salts, which may dam-age young seedlings. All soilless mixtures should be well leached with water to wash out the salts before planting.
Different sized cell packs can be used for vegetable transplants. The recommended cell pack size is 1.5 x 1.5 inches for vegetable transplants. Local garden centers usually sell empty six packs that can be used to start vegetable transplants. But you can also use old containers such as egg cartons, milk cartons and shallow plastic containers as long as you add drainage and clean them well. If old containers once had plant materials or food in them, clean with a 10 percent bleach solution to prevent newly emerging vegetable crops from damping off disease.
Fungal disease also may occur in the plant bed. Gray mold (Botrytis), Pythium and Phytophthora are common problems. Captan (2 tablespoons per gallon) can be used to control these diseases.
Daytime temperatures of 70-80 degrees Fahrenheit and nighttime temperatures of 60-70 degrees F are ideal growing temperatures. Controlling the daytime temperature is difficult in Louisiana. If you are lucky enough to have a small greenhouse, it is not uncom-mon for inside temperatures to reach 90-95 degrees F on a bright sunny day in February. Ventilation and air circulation will help, but they will not lower the temperature to the preferred level. This is the biggest

17
BurpeeW. Atlee Burpee & Co.300 Park Ave. Warminster, PA 18974800-888-1447www.burpee.com
D.V. Burrell Seed Growers Co.P.O. Box 150Rocky Ford, CO 81067866-254-7333 Fax: 719-254-3319E-mail: [email protected]
Dixondale Farms(Onion Transplants)P.O. Box 129Carrizo Springs, TX 78834877-367-1015www.dixondalefarms.com
Clifton Seed Co. 2586 N.C. 403 SouthP.O. Box 206Faison, NC 28341800-231-9359www.cliftonseed.com
Harris Seeds355 Paul RdP.O. Box 24966Rochester, NY 14624-09661-800-544-7938www.harrisseeds.com
Johnny’s Selected Seeds955 Benton Ave.Winslow, ME 04901-2601877-564-6697www.johnnyseeds.comOtis S. Twilley Seed Co. Inc.121 Gary RoadHodges, SC 29653800-622-7333www.twilleyseed.com
Rupp Seeds Inc.17919 County Road BWauseon, OH 43567800-700-1199www.ruppseeds.com
Seed Savers Exchange3094 North Winn RoadDecorah, IA 52101 563-382-5990www.seedsavers.org
Southern Exposure Seed Exchange P.O. Box 460Mineral, VA 23117540-894-9480Fax: 540-894-9481www.southernexposure.comE-mail: [email protected]
Stokes Seeds Inc.Box 548Buffalo, NY 14240-0548800-396-9238www.stokeseeds.com
Tomato Growers Supply Co.P.O. Box 60015Fort Myers, FL 33906 888-478-7333www.tomatogrowers.com
Willhite Seed Inc.P.O. Box 23Poolville, TX 76487-0023800-828-1840www.willhiteseed.com
Companies that specialize in home garden seeds and plants.
problem we have in controlling the height of trans-plants. Roll up the sides of the greenhouse during the day to prevent high daytime temperatures.
You may also want to build a cold frame to store your transplants in while they are growing. Keeping seedlings inside the house is only acceptable if you have a very bright windowsill. When seedlings start to stretch or become leggy, this is a sign that they need more light and should be moved outdoors.
Transplants require additional fertilizer after they develop their true leaves. Nutrients usually are applied as water-soluble fertilizer through the water-ing system. Consistent application of a moderate rate of fertilizer is most efficient. Under such a system, a stock solution is made with the water-soluble fertil-izer, such as 20-20-20. The solution is then metered into the watering system with a device called an injector.
The most commonly used injector is an inexpen-sive siphon mixer that connects to a faucet and water hose. Using a siphon mixer with a 16-to-1 injector
ratio, 1-2 ounces of 20-20-20 fertilizer per gallon of stock solution will provide an adequate fertilizer solu-tion. You also can use other liquid fertilizers as long as you carefully follow directions on the label. Using even a little extra fertilizer at this stage of growth can be detrimental to your transplants.
Seven to 14 days usually is adequate for transplant hardening. The keys to ideal transplant production are uniform temperatures, moderate fertility, avoid-ance of overwatering and proper hardening. Once a plant is overly stressed, growth and production that are lost can never be recovered.
Bare-rooted Transplants Cabbage, broccoli, cauliflower, onion and lettuce
transplants for fall plantings can be produced in the field as bare-rooted transplants. The seeds are sown thickly (8-10 seeds/foot) on a well-prepared row. The plants are then pulled and transplanted to the field without any soil on the roots (bare-rooted).

18
ROW COVERSJames E. Boudreaux
Row covers, also known as weather protection cloth, made of light poly fabric can be used to protect plants from frost. The covers are placed directly on top of the small plants like strawberries to protect the fruit and blooms from frost. Covers need to be sup-ported above tomato plants with a frame. The leaves will be damaged by frost wherever they touch the cover. Covers need to be well-anchored to prevent the wind from blowing them off the plants. In most cases, people use loose bricks or sandbags to hold the covers down.
The heavier the cover, the more protection these covers provide. Covers of 0.5 to 1 ounce per square yard are the most popular. They trap heat during the day to push plant development and earlier harvest. Covers should be removed during the day to allow pollination and pest control, but can remain on the plants as long as a week or two without causing dam-age. Be sure to scout for insect and disease regularly when using covers. If you plant early in the spring,
covers should be placed over tomatoes, eggplant and peppers anytime temperatures dip below 40 degrees Fahrenheit. Fall crops of cauliflower, broccoli, greens and lettuce benefit from covers when temperatures dip below 35 degrees F..

19
VegetablesArtichokes 20Asparagus 21Beans, Butter Beans 22 Snap Beans 23Beets 24Broccoli 25 Brussels Sprouts 26Cabbage 27 Chinese Cabbage 28Cantaloupes 29Carrots 30Cauliflower 31 Chard, Swiss Chard 32Cucumbers 33Eggplant 35Garlic 36GreensMustard, Turnips and Collards 37Kohlrabi 38Lettuce 39Okra 40Onions 41Shallots, Leeks and Green Onions 43Peas, English Peas and Snow Peas 44Peas, Southern Peas 45Peppers, Bell Peppers 46Peppers, Hot Peppers and Other Types 48Potatoes, Irish Potatoes 50 Pumpkins 51Squash, Summer Squash 52Squash, Winter Hardshell Squash 53Spinach 54Strawberries 55Sweet Corn 58Sweet Potatoes 60Tomatoes 61 Heirloom Tomato Varieties 63Watermelons 64
20
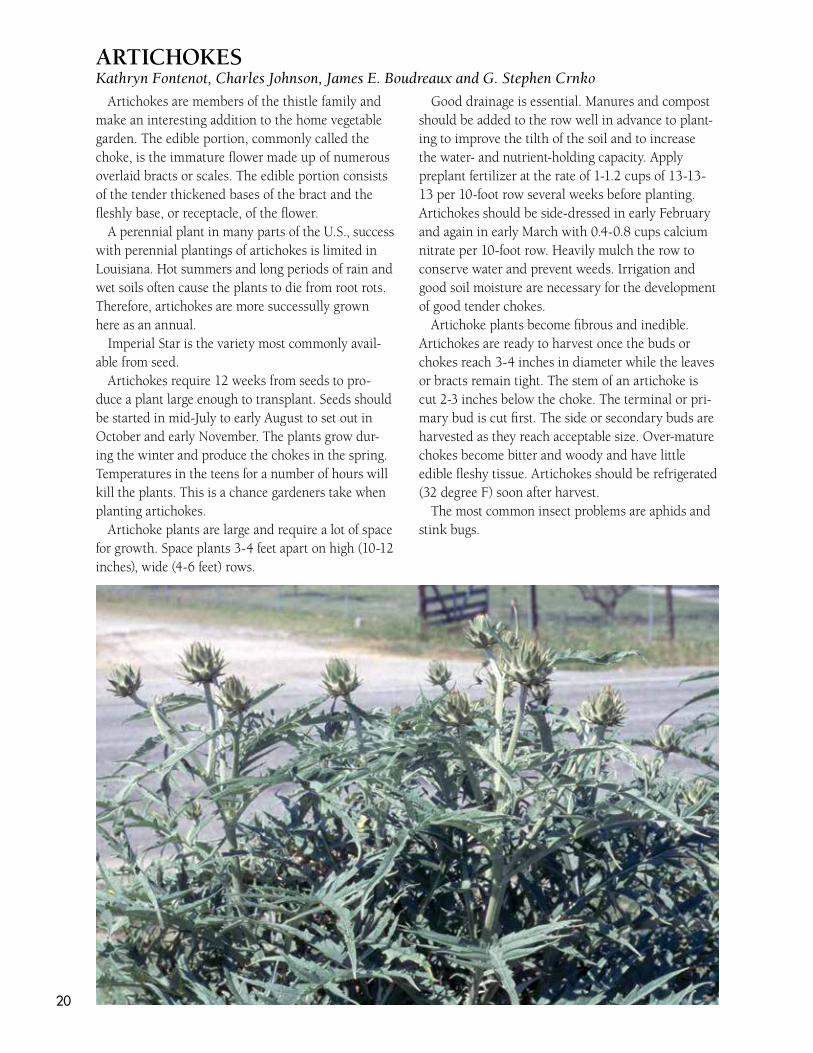
Artichokes are members of the thistle family and make an interesting addition to the home vegetable garden. The edible portion, commonly called the choke, is the immature flower made up of numerous overlaid bracts or scales. The edible portion consists of the tender thickened bases of the bract and the fleshly base, or receptacle, of the flower.
A perennial plant in many parts of the U.S., success with perennial plantings of artichokes is limited in Louisiana. Hot summers and long periods of rain and wet soils often cause the plants to die from root rots. Therefore, artichokes are more successully grown here as an annual.
Imperial Star is the variety most commonly avail-able from seed.
Artichokes require 12 weeks from seeds to pro-duce a plant large enough to transplant. Seeds should be started in mid-July to early August to set out in October and early November. The plants grow dur-ing the winter and produce the chokes in the spring. Temperatures in the teens for a number of hours will kill the plants. This is a chance gardeners take when planting artichokes.
Artichoke plants are large and require a lot of space for growth. Space plants 3-4 feet apart on high (10-12 inches), wide (4-6 feet) rows.
Good drainage is essential. Manures and compost should be added to the row well in advance to plant-ing to improve the tilth of the soil and to increase the water- and nutrient-holding capacity. Apply preplant fertilizer at the rate of 1-1.2 cups of 13-13-13 per 10-foot row several weeks before planting. Artichokes should be side-dressed in early February and again in early March with 0.4-0.8 cups calcium nitrate per 10-foot row. Heavily mulch the row to conserve water and prevent weeds. Irrigation and good soil moisture are necessary for the development of good tender chokes.
Artichoke plants become fibrous and inedible. Artichokes are ready to harvest once the buds or chokes reach 3-4 inches in diameter while the leaves or bracts remain tight. The stem of an artichoke is cut 2-3 inches below the choke. The terminal or pri-mary bud is cut first. The side or secondary buds are harvested as they reach acceptable size. Over-mature chokes become bitter and woody and have little edible fleshy tissue. Artichokes should be refrigerated (32 degree F) soon after harvest.
The most common insect problems are aphids and stink bugs.
ARTICHOKES Kathryn Fontenot, Charles Johnson, James E. Boudreaux and G. Stephen Crnko

21
Asparagus can be successfully grown in Louisi-ana gardens. The edible portion is the young tender shoots called spears. Asparagus makes a large fern during the summer. The tops of the plants are cut back to ground level in late winter and removed. The spears emerge in the early spring from the stored food in the roots of the plants. Asparagus generally has a 6-8 week harvest period in the spring (mid-March to early May). After the end of the harvest period (mid-May), the spears are allowed to develop the fern-type leaf to produce food for next year’s crop.
Asparagus is dioecious, having separate male and female plants. The plant is a large perennial and will remain in the garden for a number of years. Locate asparagus on the edge of the garden where it is out of the way or create a separate raised bed dedicated to this crop. A high (10-12 inches tall), wide (4-6 feet) row is necessary to provide enough space and drainage for the asparagus plants. The row should be prepared in the fall for planting in the spring. The addition of compost and manure to improve the tilth of the soil and to increase the water- and nutrient-holding capacity of the soil is beneficial to plant growth and spear quality. The row should be fertil-ized with 1.2-1.7 cups of 13-13-13 per 10-foot row several weeks before planting.
Asparagus is established by crowns, which should be ordered in the fall from nurseries for planting in the spring. The male hybrid varieties Jersey Knight and Jersey Giant (Jersey Supreme and Purple Passion – trial plantings) are recommended for Louisiana gar-dens. These varieties are all male plants and will not produce berries that grow into volunteer seedlings. They also produce quality spears.
Crowns should be planted 12-16 inches apart, 6-8 inches deep, on a well-prepared row. Mulch the row heavily to control weeds. Irrigation is essential to be successful with asparagus. Spears emerge within 2-4 weeks of planting. These spears should be allowed to develop into ferns. The ferns should be side-dressed two months after planting. The ferns are cut down in January or February and hauled out of the garden to prevent the spread of disease.
The asparagus bed should be fertilized in February with 1.2-1.4 cups of 13-13-13 per 10-foot row. As the spears begin to emerge the following spring, harvest all spears that come up for about one month and stop
harvesting. Side-dress after the cutting season with 0.4 to 0.8 cups calcium nitrate per 10-foot row.
A light harvest for three to four weeks (six-eight spears per crown) is possible the first spring after planting. In the following years, the spears can be cut for six-eight weeks. Spears should be snapped or cut at ground level when they are 6-10 inches tall. Always harvest spears when the heads are tight before the tips start to fern out. Taller spears become too tough and fibrous to eat and should be left to develop into ferns. Daily harvest is necessary during warm weath-er to harvest quality spears. Uniform soil moisture from irrigation (1 inch every seven-10 days) is benefi-cial in obtaining high yields of quality spears.
Asparagus spears lose quality rapidly after harvest. Protect the spears from the sun and refrigerate as soon as possible.
Weed control is the biggest problem with aspara-gus. Gardeners are encouraged to mulch the aspara-gus thickly for weed control.
ASPARAGUSJames E. Boudreaux, G. Stephen Crnko, Kathryn Fontenot and Charles Johnson

22
Both bush and pole butter bean varieties are avail-able. Bush varieties have the advantage of not requir-ing staking, while pole butter beans are easier to pick and bear over a longer time.
Butter bean seeds will not germinate well in cool soil and should not be planted until the danger of frost has passed. The plants are tender and can be killed by a frost. Butter beans are planted from mid- to late March until early August. The highest yield plantings are made in April and early May. Yields are low during the summer because high temperatures and drought stress interfere with pollination and pod set. Butter beans planted in late July and August (fall crop) often are higher yielding than the spring crop due to the weather pattern of going from hot to cool days.
Bush butter bean varieties are planted rather thinly on a row, one bean every 3-6 inches (2-4 plants per foot), while 4 or 5 pole butter bean seeds are planted in hills 6-12 inches apart. A pole on a slight angle to the center of the row is stuck near each hill. The 2-, 3- or 4-pole support is gathered and tied together at the top to form a tepee in the garden. The bean vines climb up the poles, making picking easier. All poles need to be stuck in the ground 10-12 inches deep to anchor the tepees to prevent heavy vines from falling over.
For preplant fertilizer, use 0.3-0.4 pounds (0.6-1.8 cups) of 13-13-13 or 8-24-24 per 10-foot row. Butter beans are subject to fertilizer burn. Place preplant fer-tilizer in a band well below the seed (4-6 inches). Do not side-dress butter beans as they are very suscep-tible to over fertilization with nitrogen.
Butter beans are picked two to four times, four to five days apart, while pole beans are harvested seven to ten times on a five to seven day schedule. Butter beans are ready to harvest when the pod reaches 3-4 inches long and a bulge on the pod from the seed can
be seen. Butter beans can be shelled with mechanical shell-
ers. Allowing butter beans to sit out overnight in cir-culating air will dry down the beans and increase the shell-out percentage with mechanical shellers. The shelled beans are highly perishable and need to be cooled as soon as possible. Hand shelling is common in smaller gardens.
The most common problems on butter beans are worms and stink bugs. Treating worms and stink bugs as soon as you see them is the key to control.
Recommended butter beans varieties
BUSH VARIETIES POLE VARIETIES Henderson Bush Florida Speckle (speckle seed)Thorgreen King of the GardenJackson Wonder
BEANS, BUTTER BEANS James E. Boudreaux, Kathryn Fontenot and Charles Johnson
23
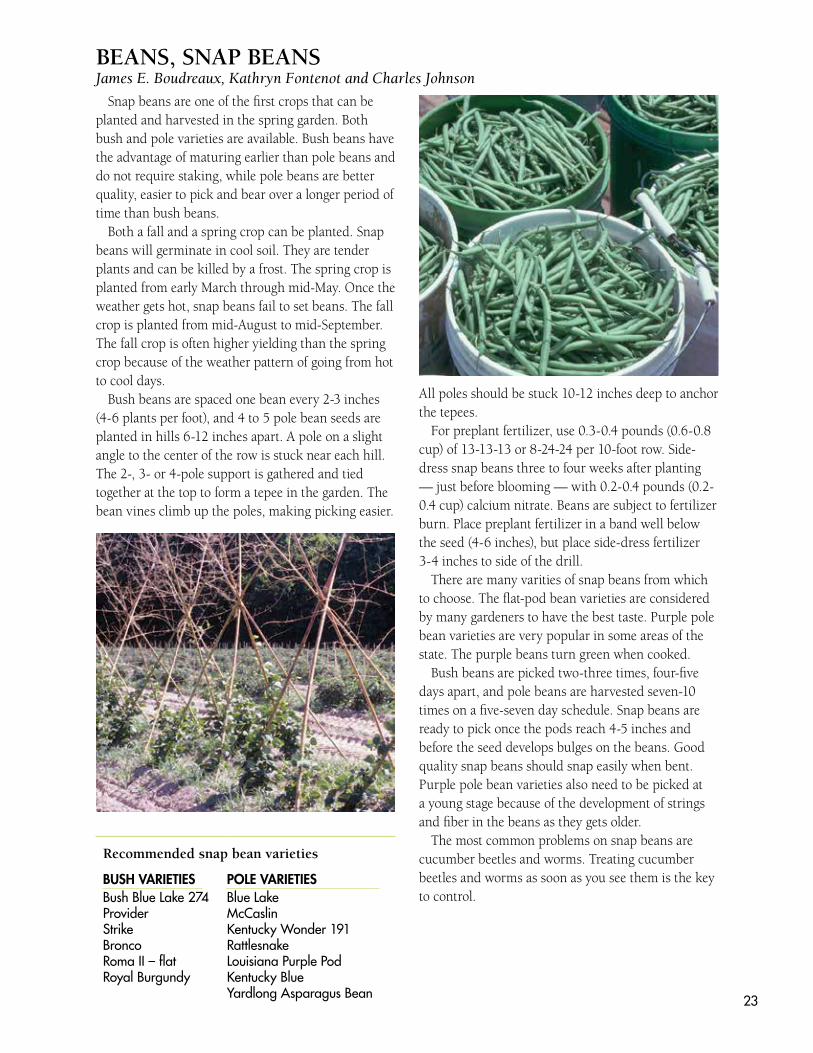
Snap beans are one of the first crops that can be planted and harvested in the spring garden. Both bush and pole varieties are available. Bush beans have the advantage of maturing earlier than pole beans and do not require staking, while pole beans are better quality, easier to pick and bear over a longer period of time than bush beans.
Both a fall and a spring crop can be planted. Snap beans will germinate in cool soil. They are tender plants and can be killed by a frost. The spring crop is planted from early March through mid-May. Once the weather gets hot, snap beans fail to set beans. The fall crop is planted from mid-August to mid-September. The fall crop is often higher yielding than the spring crop because of the weather pattern of going from hot to cool days.
Bush beans are spaced one bean every 2-3 inches (4-6 plants per foot), and 4 to 5 pole bean seeds are planted in hills 6-12 inches apart. A pole on a slight angle to the center of the row is stuck near each hill. The 2-, 3- or 4-pole support is gathered and tied together at the top to form a tepee in the garden. The bean vines climb up the poles, making picking easier.
All poles should be stuck 10-12 inches deep to anchor the tepees.
For preplant fertilizer, use 0.3-0.4 pounds (0.6-0.8 cup) of 13-13-13 or 8-24-24 per 10-foot row. Side-dress snap beans three to four weeks after planting — just before blooming — with 0.2-0.4 pounds (0.2-0.4 cup) calcium nitrate. Beans are subject to fertilizer burn. Place preplant fertilizer in a band well below the seed (4-6 inches), but place side-dress fertilizer 3-4 inches to side of the drill.
There are many varities of snap beans from which to choose. The flat-pod bean varieties are considered by many gardeners to have the best taste. Purple pole bean varieties are very popular in some areas of the state. The purple beans turn green when cooked.
Bush beans are picked two-three times, four-five days apart, and pole beans are harvested seven-10 times on a five-seven day schedule. Snap beans are ready to pick once the pods reach 4-5 inches and before the seed develops bulges on the beans. Good quality snap beans should snap easily when bent. Purple pole bean varieties also need to be picked at a young stage because of the development of strings and fiber in the beans as they gets older.
The most common problems on snap beans are cucumber beetles and worms. Treating cucumber beetles and worms as soon as you see them is the key to control.
Recommended snap bean varieties
BUSH VARIETIES POLE VARIETIES Bush Blue Lake 274 Blue LakeProvider McCaslinStrike Kentucky Wonder 191Bronco RattlesnakeRoma II – flat Louisiana Purple Pod Royal Burgundy Kentucky Blue
Yardlong Asparagus Bean
BEANS, SNAP BEANSJames E. Boudreaux, Kathryn Fontenot and Charles Johnson

24
Beets are a popular vegetable in the home garden. They are cold hardy and can withstand freezing temperatures. This makes them valuable as a fresh vegetable that gardeners can enjoy during the winter months. Beets can remain in the field for a long time. One planting easily can provide beets for six-eight weeks.
Both a fall and spring crop can be planted. Beets are planted from mid-August through early March. Plantings made in mid-August to early October are ready to harvest in late November through February and March, and plantings made in January and Feb-ruary can be harvested in April and May.
Once the weather gets hot and the days become longer, beets tend to develop seed stalks and bolt. Once beets bolt, the quality of the product deteriorates.
Gardeners are encouraged to obtain fresh beet seeds. Fresh seeds germinate well, which results
in good stands. Beet seeds should be stored in the freezer. Do not plant beets too thickly. Dense stands result in small roots and delay growth. Beets should be thinned to one plant every 2-3 inches. The use of a hand push planter helps obtain the desired spac-ing. Avoid planting beets too thickly by spreading a mixture of 1 part beet seeds with 3 or 4 parts soil or sand. Many gardeners transplant beets to the desired spacing. Two drills of beets (spaced 12 inches apart) can be planted on a single row.
Both hybrid and open-pollinated varieties are recommended.
Recommended beet varietiesOPEN POLLINATED VARIETIES Ruby QueenDetroit Dark Red
HYBRID VARIETY Red Acre
For preplant fertilizer, 0.4-0.5 pounds (0.8-1 cup)of 13-13-13 or 8-24-24 per 10-foot row is recommend-ed. Side-dress beets twice, once three to four weeks after planting and again to three to four weeks after the first, using 0.2-0.4 pounds (0.4-0.8 cup) calcium nitrate per 10-foot row.
Beets also are high users of boron. Boron deficiency can occur in soils with either a low or high pH or on soils recently limed. Boron-deficient beets have a large water-soaked brown area near the center of the root. The boron requirement can be satisfied by spraying a mixture of 1-2 tablespoon of Borax per gallon of water on the foliage at the time of side-dressing.
Beets are subject to drought stress. Uniform mois-ture is necessary to produce round, smooth beets. Long, pointed roots are signs of moisture stress. Beets can be harvested once the roots reach 1½-2 inches in diameter.
The most common problems on beets are worms and aphids. Treating worms and aphids as soon as you see them is the key to control.
BEETS James E. Boudreaux, Kathryn Fontenot and Charles Johnson

25
Broccoli can be grown in the fall and spring. It is a hardy plant that can withstand temperatures into the upper 20s. Broccoli cannot handle rainy weather near harvest. Wet, rainy and cool weather encourages the development of bacterial soft rot of the heads.
Broccoli can be transplanted into the garden from August through October for harvest in November and December. Transplants set out in January and Febru-ary are ready in late March through early May — the spring crop.
It takes five-six weeks to produce broccoli trans-plants from seed. Broccoli can be planted from con-tainer plants as well as bare-rooted transplants. (See the section on transplants for more information on transplants.)
Broccoli head size is controlled by plant spacing. Close spacings of 9-12 inches produce heads 3-4 inches in diameter, and spacings of 16-18 inches pro-duce larger heads 8-10 inches in diameter. Two drills (spaced 12 inches apart) of transplants can be planted on one row.
All of the recommended varieties are hybrid. The hybrids are uniform in growth and maturity and have more vigor than the open-pollinated varieties. Plant-ing varieties with different maturities will spread out the harvest from one planting.
Recommended broccoli varietiesFALL CROPPackman – earlyPremium Crop – medium-late
SPRING CROP Packman – early
For preplant fertilizer, use 0.5-0.6 pounds (1-1.2
cups) of 8-24-24 or 13-13-13 per 10-foot row. Side-dress three times with 0.2 pounds calcium nitrate per 10-foot row. Apply the first side-dressing three to four weeks after planting or when the largest leaves are 2-4 inches wide. Apply the second 10-14 days after the first side-dressing and apply the third 10-14 days after the second.
In large gardens, broccoli is an excellent crop to be planted on plastic mulch and drip tube left over from a spring crop. Side-dressing also can be done by injecting the fertilizer through the drip line by using
an injection device starting three to four weeks after planting and continued for eight-nine weeks. (See the section on drip irrigation and fertigation.)
Broccoli is a heavy user of boron. Boron deficiency can occur on soils with either a low or high pH or on soils recently limed. Boron-deficient broccoli has a hollow stem and dark discoloration on the florets. Boron can be applied as a foliar spray by using 1-2 tablespoons of Borax in a gallon of water at the time of side-dressing.
Broccoli heads can be cut once they reach 3-4 inches in diameter. The main stem should not be any longer than 4-6 inches to leave some of the side bud to make smaller heads for later harvest. Side branches, or shoots, will make smaller heads and are harvested for a number of weeks after the main shoot is harvested. Broccoli is highly perishable and should be refrigerated soon after cutting.
The biggest insect problems with broccoli are aphids and worms. Look for worms and aphids once the leaves are 2-4 inches across. Early detection and treatment are the keys to controlling worms and aphids in broccoli.
BROCCOLIJames E. Boudreaux, Kathryn Fontenot and Charles Johnson
26
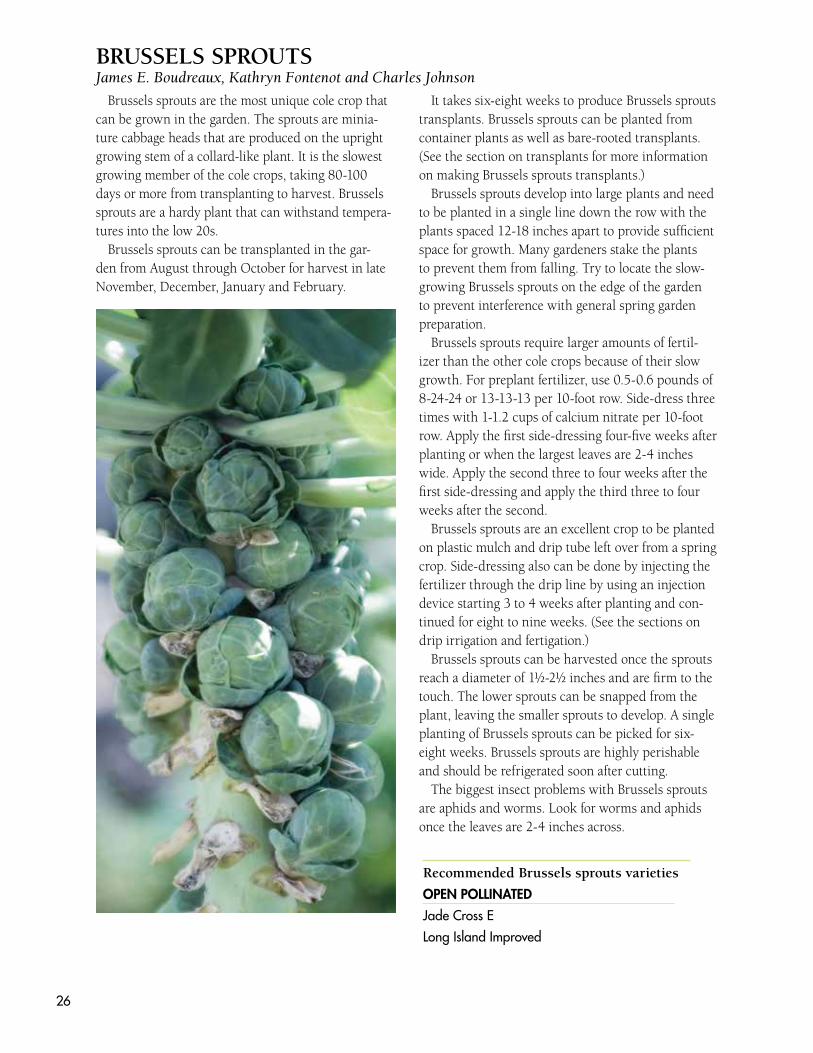
Brussels sprouts are the most unique cole crop that can be grown in the garden. The sprouts are minia-ture cabbage heads that are produced on the upright growing stem of a collard-like plant. It is the slowest growing member of the cole crops, taking 80-100 days or more from transplanting to harvest. Brussels sprouts are a hardy plant that can withstand tempera-tures into the low 20s.
Brussels sprouts can be transplanted in the gar-den from August through October for harvest in late November, December, January and February.
It takes six-eight weeks to produce Brussels sprouts transplants. Brussels sprouts can be planted from container plants as well as bare-rooted transplants. (See the section on transplants for more information on making Brussels sprouts transplants.)
Brussels sprouts develop into large plants and need to be planted in a single line down the row with the plants spaced 12-18 inches apart to provide sufficient space for growth. Many gardeners stake the plants to prevent them from falling. Try to locate the slow-growing Brussels sprouts on the edge of the garden to prevent interference with general spring garden preparation.
Brussels sprouts require larger amounts of fertil-izer than the other cole crops because of their slow growth. For preplant fertilizer, use 0.5-0.6 pounds of 8-24-24 or 13-13-13 per 10-foot row. Side-dress three times with 1-1.2 cups of calcium nitrate per 10-foot row. Apply the first side-dressing four-five weeks after planting or when the largest leaves are 2-4 inches wide. Apply the second three to four weeks after the first side-dressing and apply the third three to four weeks after the second.
Brussels sprouts are an excellent crop to be planted on plastic mulch and drip tube left over from a spring crop. Side-dressing also can be done by injecting the fertilizer through the drip line by using an injection device starting 3 to 4 weeks after planting and con-tinued for eight to nine weeks. (See the sections on drip irrigation and fertigation.)
Brussels sprouts can be harvested once the sprouts reach a diameter of 1½-2½ inches and are firm to the touch. The lower sprouts can be snapped from the plant, leaving the smaller sprouts to develop. A single planting of Brussels sprouts can be picked for six-eight weeks. Brussels sprouts are highly perishable and should be refrigerated soon after cutting.
The biggest insect problems with Brussels sprouts are aphids and worms. Look for worms and aphids once the leaves are 2-4 inches across.
Recommended Brussels sprouts varieties
OPEN POLLINATED
Jade Cross E
Long Island Improved
BRUSSELS SPROUTSJames E. Boudreaux, Kathryn Fontenot and Charles Johnson

27
CABBAGEJames E. Boudreaux, Kathryn Fontenot and Charles Johnson
Cabbage can be grown for six months in Louisiana gardens through the fall, winter and spring. It is a hardy plant, making it a valuable fresh vegetable that gardeners can enjoy during the winter months.
Cabbage can be transplanted from August through early March. The crop transplanted in August, Septem-ber and October is ready to harvest in November and December. Cabbage transplanted in early September will be ready for New Year’s. Transplants set out in November and early December will be ready to harvest in late February, March and April – the winter crop. Those set out in January and February will be ready in late March to early May – the spring crop.
It takes five-six weeks to produce cabbage trans-plants. Cabbage can be planted from container plants as well as bare-rooted transplants. (See section on transplants.)
Cabbage head size is controlled by plant spacing. A 10- to 12-inch spacing produces 3- to 4-pound heads and a 16- to 18-inch spacing yields 5- to 7-pound heads. Two drills (spaced 12 inches apart) of trans-plants can be planted on one row.
All of the recommended varieties are hybrid. They have uniform growth and maturity and more vigor than the open-pollinated varieties. Many varieties have an attractive blue-green that stands out in the garden. They also have a sweet taste and do not have the strong cabbage smell while cooking. Varieties recommended for winter production are cold hardy and resistant to bolting (premature seed stalk develop-ment). Varieties recommended in the spring are adapt-ed to warm weather and resistant/tolerant to black rot (bacterial disease) and tip burn (calcium deficiency).
Planting varieties with different maturities will spread out the harvest from one planting.
For preplant fertilizer, use 0.5-0.6 pounds (1-1.2 cups) of 8-24-24 or 13-13-13 per 10-foot row. Side-dress three times with 0.75 cup (6 ounce) of calcium nitrate per 10-foot row. Apply the first side-dressing three to four weeks after planting or when the largest leaves are 2-4 inches wide. Apply the second 10-14 days after the first side-dressing and apply the third 10-14 days after the second. Red cabbage varieties require higher nitrogen rates to make good size heads. A fourth side-dressing 10-14 days after the third is rec-ommended on red cabbage.
Cabbage also can be grown on plastic mulch and drip irrigation left over from a crop in the spring. Side-dressing can be done by injecting the fertilizer through the drip line by using an injection device. One cup (½ pound) of calcium nitrate per 100-foot row per week is injected starting three to four weeks after planting and continued for eight-nine weeks. (See the section on drip irrigation and fertigation.)
Cabbage can be harvested when the heads are firm. A mature head will not yield when pressed with the thumb. The edge of the top leaf on a mature head will curl back slightly. Mature cabbage heads will hold in the field for several weeks.
The most common problems on cabbage are worms and aphids. Treating worms and aphids as soon as you see them is the key to controlling these pests.
WINTER CROP Bravo – medium-lateRio Verde – medium-late
SPRING CROPBravo – medium-late
Recommended cabbage varieties
FALL CROPBravo – medium-late Rio Verde – medium-lateCheers – mediumEmblem – mediumVantage Point – medium-lateRoyal Vantage – medium-late

28
Hybrids of Chinese cabbage are being grown in Louisiana. Since head lettuce does not always grow well in Louisiana, and these new hybrids grow extremely well, you may want to substitute Chinese cabbage for lettuce. This vegetable is rarely used like cabbage, but it is often used in stir fry.
Most varieties have a long or oval head with a crisp, firm interior. The leaves are slightly wrinkled and are a lighter, brighter green than those of regu-lar cabbage. The broad white midrib is very crisp and has a mild flavor. Color, texture and flavor of the leaves resemble head lettuce leaves more than cabbage leaves.
Plant Chinese cabbage seed from August through the first week in October. September generally is the best month to plant in Louisiana. You may start seed indoors during January in South Louisiana or February in North Louisiana. A spring crop, espe-cially if planted late, is a risk since bolting (flower-ing) is likely to occur and split the head. Tip burn is common in Napa cabbage grown at 85 degreeF or higher.
Before planting, mix in about 6 ounces (0.75 cup) 8-24-24 per 10-foot row. Chinese cabbage may be seeded directly into the row, or transplants may be produced and set out. Be careful not to damage the roots of plants when transplanting. Transplants can
be ready to set in the beds three to four weeks from the time the seeds are sown.
Since the seeds are small, a firm seed bed is important. Plant seeds shallow, about 1/4 inch deep, on raised, well-drained beds. The seeds may be drilled and later thinned to a 10- or 12-inch spacing between plants for pak choi types and 16 inches for Napa and chihli types. Keep soil moist, especially in late summer, to speed germination.
Before heading, the plants will form a rosette of leaves and look like mustard. Side-dress with about 4 ounces (½ cup) of calcium nitrate per 10-foot row. Do this about one month after seeding or two weeks after setting transplants. One or two more side-dressings will be needed about two weeks apart.
Most varieties will be ready to harvest 50-80 days from seeding. Harvest when heads are solid. Heads may weigh from 3 to 5 pounds, or as much as 10-12 pounds, depending on the variety and generosity of row spacing.
Two general types of head shape are common. The chihli types are tall and slender. Napa types have shorter but thicker heads. A stalkier form of Chinese cabbage is the pak choi type. These are prized for their prominent petioles.
Common insect problems of Chinese cabbage are aphids and worms. Treat these problems early.
Recommend Chinese cabbage varieties
NAPA TYPE CHIHLI TYPE PAK CHOI TYPE China Pride (Fall) Jade Pagoda Joi Choi Apollo Monument Mei Qing ChoiBlues Greenwich White Celery MustardOptiko
CHINESE CABBAGEThomas J. Koske
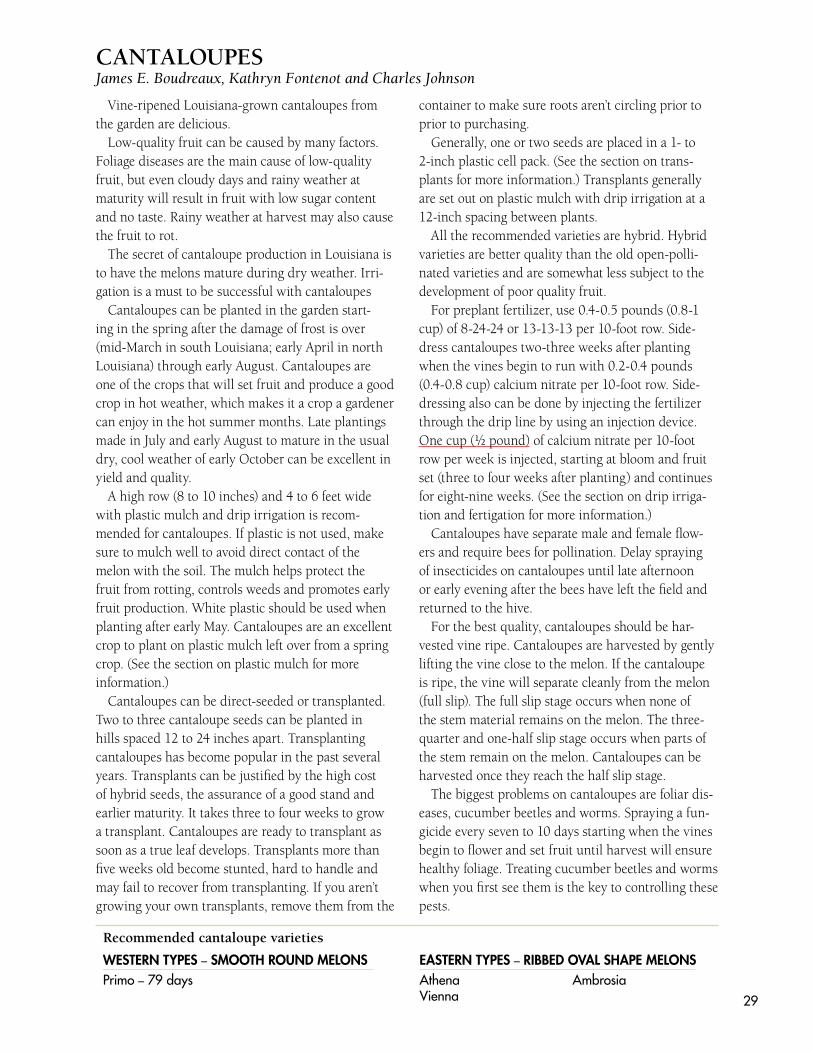
29
CANTALOUPES James E. Boudreaux, Kathryn Fontenot and Charles Johnson
Vine-ripened Louisiana-grown cantaloupes from the garden are delicious.
Low-quality fruit can be caused by many factors. Foliage diseases are the main cause of low-quality fruit, but even cloudy days and rainy weather at maturity will result in fruit with low sugar content and no taste. Rainy weather at harvest may also cause the fruit to rot.
The secret of cantaloupe production in Louisiana is to have the melons mature during dry weather. Irri-gation is a must to be successful with cantaloupes
Cantaloupes can be planted in the garden start-ing in the spring after the damage of frost is over (mid-March in south Louisiana; early April in north Louisiana) through early August. Cantaloupes are one of the crops that will set fruit and produce a good crop in hot weather, which makes it a crop a gardener can enjoy in the hot summer months. Late plantings made in July and early August to mature in the usual dry, cool weather of early October can be excellent in yield and quality.
A high row (8 to 10 inches) and 4 to 6 feet wide with plastic mulch and drip irrigation is recom-mended for cantaloupes. If plastic is not used, make sure to mulch well to avoid direct contact of the melon with the soil. The mulch helps protect the fruit from rotting, controls weeds and promotes early fruit production. White plastic should be used when planting after early May. Cantaloupes are an excellent crop to plant on plastic mulch left over from a spring crop. (See the section on plastic mulch for more information.)
Cantaloupes can be direct-seeded or transplanted. Two to three cantaloupe seeds can be planted in hills spaced 12 to 24 inches apart. Transplanting cantaloupes has become popular in the past several years. Transplants can be justified by the high cost of hybrid seeds, the assurance of a good stand and earlier maturity. It takes three to four weeks to grow a transplant. Cantaloupes are ready to transplant as soon as a true leaf develops. Transplants more than five weeks old become stunted, hard to handle and may fail to recover from transplanting. If you aren’t growing your own transplants, remove them from the
container to make sure roots aren’t circling prior to prior to purchasing.
Generally, one or two seeds are placed in a 1- to 2-inch plastic cell pack. (See the section on trans-plants for more information.) Transplants generally are set out on plastic mulch with drip irrigation at a 12-inch spacing between plants.
All the recommended varieties are hybrid. Hybrid varieties are better quality than the old open-polli-nated varieties and are somewhat less subject to the development of poor quality fruit.
For preplant fertilizer, use 0.4-0.5 pounds (0.8-1 cup) of 8-24-24 or 13-13-13 per 10-foot row. Side-dress cantaloupes two-three weeks after planting when the vines begin to run with 0.2-0.4 pounds (0.4-0.8 cup) calcium nitrate per 10-foot row. Side-dressing also can be done by injecting the fertilizer through the drip line by using an injection device. One cup (½ pound) of calcium nitrate per 10-foot row per week is injected, starting at bloom and fruit set (three to four weeks after planting) and continues for eight-nine weeks. (See the section on drip irriga-tion and fertigation for more information.)
Cantaloupes have separate male and female flow-ers and require bees for pollination. Delay spraying of insecticides on cantaloupes until late afternoon or early evening after the bees have left the field and returned to the hive.
For the best quality, cantaloupes should be har-vested vine ripe. Cantaloupes are harvested by gently lifting the vine close to the melon. If the cantaloupe is ripe, the vine will separate cleanly from the melon (full slip). The full slip stage occurs when none of the stem material remains on the melon. The three-quarter and one-half slip stage occurs when parts of the stem remain on the melon. Cantaloupes can be harvested once they reach the half slip stage.
The biggest problems on cantaloupes are foliar dis-eases, cucumber beetles and worms. Spraying a fun-gicide every seven to 10 days starting when the vines begin to flower and set fruit until harvest will ensure healthy foliage. Treating cucumber beetles and worms when you first see them is the key to controlling these pests.
Recommended cantaloupe varieties
WESTERN TYPES – SMOOTH ROUND MELONS EASTERN TYPES – RIBBED OVAL SHAPE MELONS Primo – 79 days Athena Ambrosia
Vienna
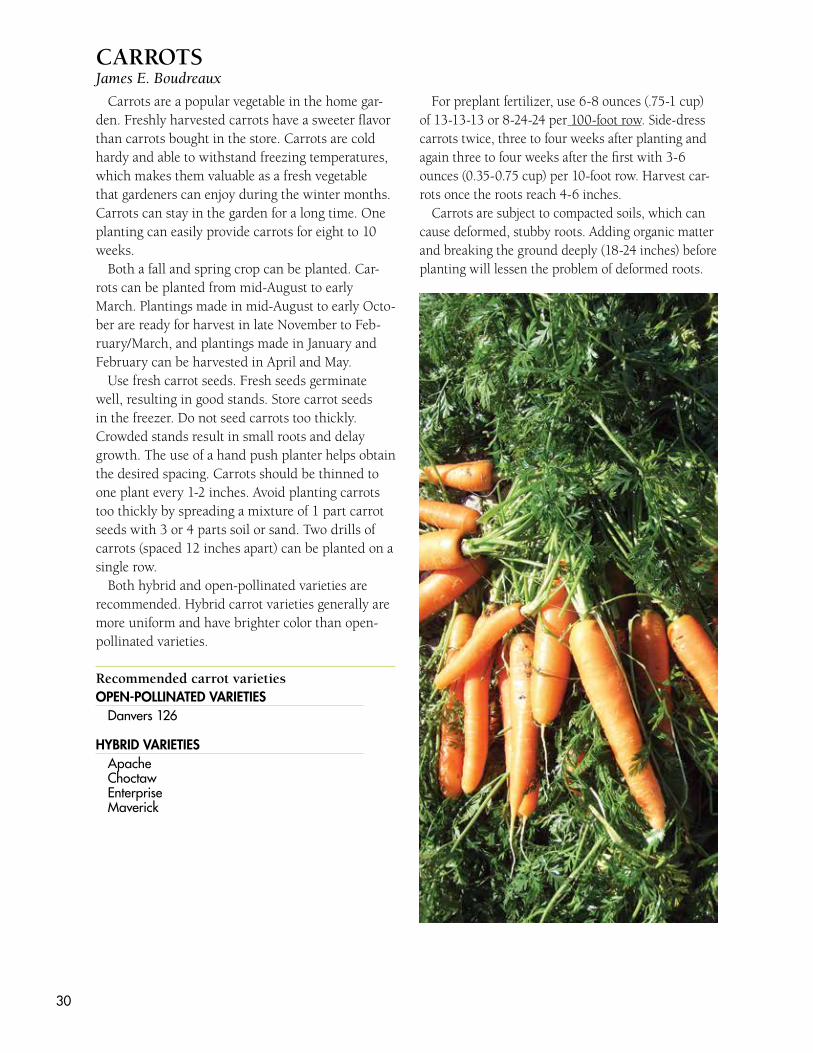
30
Carrots are a popular vegetable in the home gar-den. Freshly harvested carrots have a sweeter flavor than carrots bought in the store. Carrots are cold hardy and able to withstand freezing temperatures, which makes them valuable as a fresh vegetable that gardeners can enjoy during the winter months. Carrots can stay in the garden for a long time. One planting can easily provide carrots for eight to 10 weeks.
Both a fall and spring crop can be planted. Car-rots can be planted from mid-August to early March. Plantings made in mid-August to early Octo-ber are ready for harvest in late November to Feb-ruary/March, and plantings made in January and February can be harvested in April and May.
Use fresh carrot seeds. Fresh seeds germinate well, resulting in good stands. Store carrot seeds in the freezer. Do not seed carrots too thickly. Crowded stands result in small roots and delay growth. The use of a hand push planter helps obtain the desired spacing. Carrots should be thinned to one plant every 1-2 inches. Avoid planting carrots too thickly by spreading a mixture of 1 part carrot seeds with 3 or 4 parts soil or sand. Two drills of carrots (spaced 12 inches apart) can be planted on a single row.
Both hybrid and open-pollinated varieties are recommended. Hybrid carrot varieties generally are more uniform and have brighter color than open-pollinated varieties.
Recommended carrot varieties OPEN-POLLINATED VARIETIES
Danvers 126
HYBRID VARIETIES ApacheChoctawEnterpriseMaverick
For preplant fertilizer, use 6-8 ounces (.75-1 cup) of 13-13-13 or 8-24-24 per 100-foot row. Side-dress carrots twice, three to four weeks after planting and again three to four weeks after the first with 3-6 ounces (0.35-0.75 cup) per 10-foot row. Harvest car-rots once the roots reach 4-6 inches.
Carrots are subject to compacted soils, which can cause deformed, stubby roots. Adding organic matter and breaking the ground deeply (18-24 inches) before planting will lessen the problem of deformed roots.
CARROTSJames E. Boudreaux

31
Cauliflower is a unique member of the cole crop group. It does not tolerate low temperatures, drought stress or rainy weather as well as cabbage. It is one vegetable that even experienced gardeners have failed at; however, it is a hardy plant that can withstand temperatures into the mid-20s.
Cauliflower can be grown in the fall and spring. It can be transplanted into the garden from August through October for harvest in November and December. Transplant cauliflower in August for har-vest at Thanksgiving and in September for harvest at Christmas. Transplants set out in January and Febru-ary are ready in late March to early May – the spring crop.
It takes five to six weeks to produce cauliflower transplants. Cauliflower can be planted from contain-er plants as well as bare-rooted transplants. (See the section on transplants for more information.)
Cauliflower head size is controlled by plant spac-ing. Spacings of 10-12 inches produce heads of 3-4 pounds, and spacings of 16-18 inches produce larger heads of 5-7 pounds. It is best to plant only one row or drill of cauliflower per row as the plants are very large.
All of the recommended varieties are hybrid. They mature earlier and have more vigor than the open-pollinated varieties. The development of hybrid vari-eties has made the production of cauliflower easier. Plant varieties with different maturities to extend the harvest.
Recommended cauliflower varieties Snow Crown – early Majestic – medium earlyCandid Charm – mediumIncline – lateWentworth – medium lateCumberland – medium late
For preplant fertilizer, use 0.5-0.6 pounds of 8-24-24 or 13-13-13 per 10-foot row. Side-dress three times with 0.4 pounds calcium nitrate per 10-foot row.
Cauliflower is an excellent crop to grow on plastic mulch and drip irrigation left over from a spring crop. Side-dressing also can be done by injecting the fertil-izer through the drip line by using an injection device. ????? One cup (½ pound) of calcium nitrate per 10-foot row per week is injected starting three to four weeks
after planting and continuing for eight to nine weeks. (See the sections on plastic mulch, drip irrigation and fertigation.)
Cauliflower is a heavy user of molybdenum. Molyb-denum deficiency in cauliflower usually result in dis-torted, narrow leaves with small, open, loose curds.
Molybdenum deficiency occurs on acid soils. Molyb-denum can be applied as a foliar spray by using 1/4 to ½ teaspoon per gallon of sodium molybdate at the time of side-dressing. Ask the local feed and seed store about ordering sodium molybdenum. It is a common micronu-trient treatment used in poinsettia production.
Use the correct fertilizer and moisture to keep cauli-flower growing vigorously to avoid stressing the plants. Stress will result in small, deformed heads (buttons) or a purple discoloration on the curds. Blanching, or wrap-ping, the leaves over the curds when they are 1-2 inches in diameter is helpful for producing snow-white curd. Blanching is done by gathering all the leaves at the base of the plant and tying them together at the top of leaves. This shades the curds from the sun and prevents them from turning yellow. The blanching process also can be accomplished by laying several large leaves from the base of the plant over the small curds. Check regularly to make sure the leaves have not blown off.
Cauliflower can be harvested when the heads reach 4-6 inches in diameter and weigh 2-4 pounds. Larger heads 10-12 inches in diameter weighing 5-6 pounds are common in the garden. (Cauliflower generally is ready to cut within seven to 10 days of blanching.) The head is cut at the base of the plant and the side leaves are trimmed all around the top of the head. The trimmed leaves should be left on the cauliflower to provide a good appearance and protection during handling.
The biggest insect problems with cauliflower are worms and aphids. Check for them once the leaves are 2-4 inches across. Early detection and treatment are the keys to controlling this pest.
CAULIFLOWER James E. Boudreaux
blanched unblanched
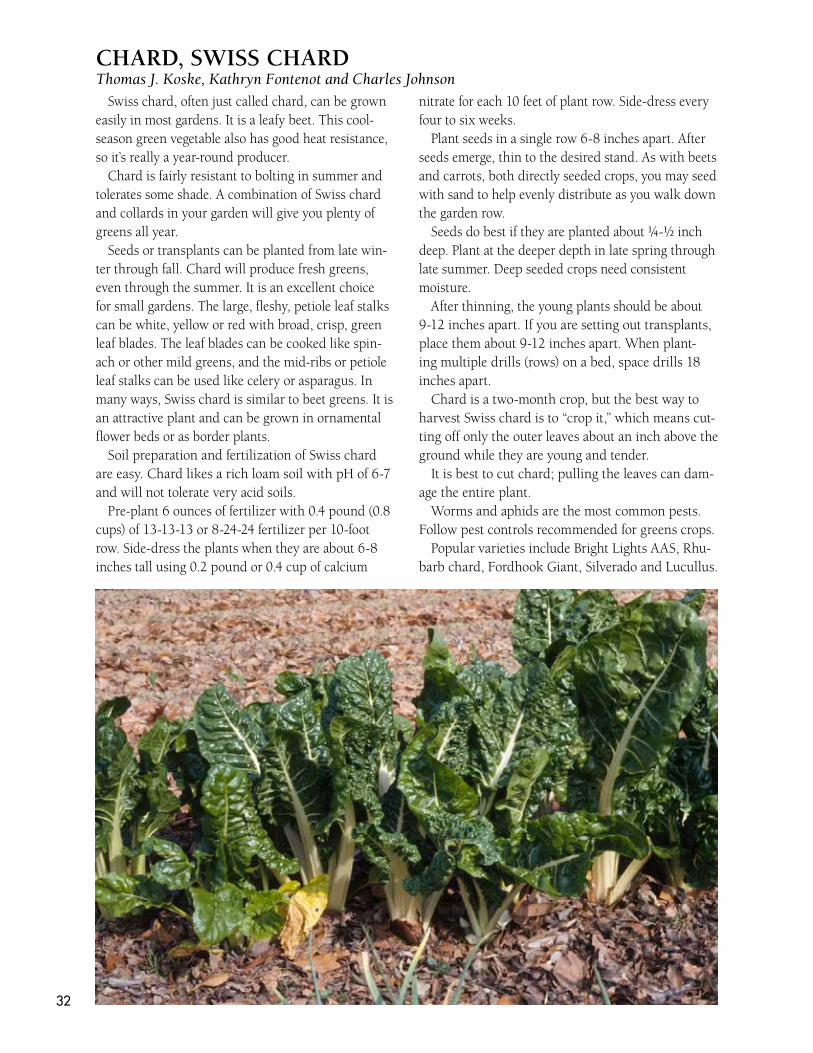
32
CHARD, SWISS CHARDThomas J. Koske, Kathryn Fontenot and Charles Johnson
Swiss chard, often just called chard, can be grown easily in most gardens. It is a leafy beet. This cool-season green vegetable also has good heat resistance, so it’s really a year-round producer.
Chard is fairly resistant to bolting in summer and tolerates some shade. A combination of Swiss chard and collards in your garden will give you plenty of greens all year.
Seeds or transplants can be planted from late win-ter through fall. Chard will produce fresh greens, even through the summer. It is an excellent choice for small gardens. The large, fleshy, petiole leaf stalks can be white, yellow or red with broad, crisp, green leaf blades. The leaf blades can be cooked like spin-ach or other mild greens, and the mid-ribs or petiole leaf stalks can be used like celery or asparagus. In many ways, Swiss chard is similar to beet greens. It is an attractive plant and can be grown in ornamental flower beds or as border plants.
Soil preparation and fertilization of Swiss chard are easy. Chard likes a rich loam soil with pH of 6-7 and will not tolerate very acid soils.
Pre-plant 6 ounces of fertilizer with 0.4 pound (0.8 cups) of 13-13-13 or 8-24-24 fertilizer per 10-foot row. Side-dress the plants when they are about 6-8 inches tall using 0.2 pound or 0.4 cup of calcium
nitrate for each 10 feet of plant row. Side-dress every four to six weeks.
Plant seeds in a single row 6-8 inches apart. After seeds emerge, thin to the desired stand. As with beets and carrots, both directly seeded crops, you may seed with sand to help evenly distribute as you walk down the garden row.
Seeds do best if they are planted about 1/4-½ inch deep. Plant at the deeper depth in late spring through late summer. Deep seeded crops need consistent moisture.
After thinning, the young plants should be about 9-12 inches apart. If you are setting out transplants, place them about 9-12 inches apart. When plant-ing multiple drills (rows) on a bed, space drills 18 inches apart.
Chard is a two-month crop, but the best way to harvest Swiss chard is to “crop it,” which means cut-ting off only the outer leaves about an inch above the ground while they are young and tender.
It is best to cut chard; pulling the leaves can dam-age the entire plant.
Worms and aphids are the most common pests. Follow pest controls recommended for greens crops.
Popular varieties include Bright Lights AAS, Rhu-barb chard, Fordhook Giant, Silverado and Lucullus.

33
Recommended cucumber varieties
Slicer Cucumbers Burpless Cucumbers Pickling Cucumbers
Dasher II Sweet Slice CalypsoThunder Sweet Success
General LeeSpeedway
No spring garden can be complete without cucum-bers. They help to cool off summer salads. Cucum-bers are a tender plant and are planted from mid-March through September. They are easy to grow and set fruit during the hot summer months. Usually 40-45 days from planting.
Cucumbers planted from early March to late May are ready for harvest in late May to July. A fall crop is planted from August to mid-September for harvest from mid-September through November.
Build rows 8 to 10 inches high and 4 to 6 feet wide if you have heavy clay soils. In larger gardens, plas-tic mulch and drip irrigation are recommended for cucumbers. The mulch helps protect the fruit from rotting, controls weeds and promotes early fruit pro-duction. White plastic should be used when planting after early May. (See the section on plastic mulch for more information.) In smaller gardens, apply leaves, newspaper and other sources of mulch.
Cucumbers can be direct-seeded or transplanted. Two to three seeds can be planted in each hill with the hills spaced 8 to 12 inches apart. Transplanting cucumbers has become popular in the past several years. Transplants can be justified by the high cost of hybrid seeds, the assurance of a good stand and earlier maturity. Transplant cucumbers as soon as a true leaf develops, usually within three to four weeks. Transplants more than five weeks old become stunted, hard to handle and may fail to recover from transplanting.
Generally, one or two seeds are placed in a 1-2 inch plastic cell pack. (See the section on transplants for more information.) Transplants generally are set out on plastic mulch with drip irrigation at 12-inch spac-ing between plants.
All the recommended varieties are hybrid. Hybrid varieties are darker in color, higher yielding and have better quality and resistance to more diseases than the old open-pollinated varieties.
For preplant fertilizer, use 0.8 pounds (1 cup) of 8-24-24 or 13-13-13 per 10-foot row. Side-dress cucumbers two to three weeks after planting when the vines begin to run with 0.7 pound (0.8 cup) cal-cium nitrate per 10-foot row.
Cucumbers have male and female flowers and require bees for pollination. Delay spraying of insec-ticides on cucumbers until late afternoon or early evening after the bees have left the field and returned to the hive.
Cucumbers require harvesting at least every other day. The best quality cucumbers are 6-8 inches long, 2-2½ inches in diameter and picked before seeds develop into a hard structure. The fruit is harvested by hand by gently snapping the stems with the thumb. Remove all oversized fruit from the vine to promote continued fruit development. A planting of cucumbers can be picked for three to four weeks in the garden.
The most common problems for cucumber plants are foliar diseases, cucumber beetles and worms. Spraying a fungicide every seven to 10 days starting when the vines flower and set fruit and continu-ing until harvest will ensure healthy foliage. Treat cucumber beetles and worms when you first see them to control these pests.
Trellising cucumbers will increase fruit quality, yield and length of harvest and will reduce disease
CUCUMBERSJames E. Boudreaux
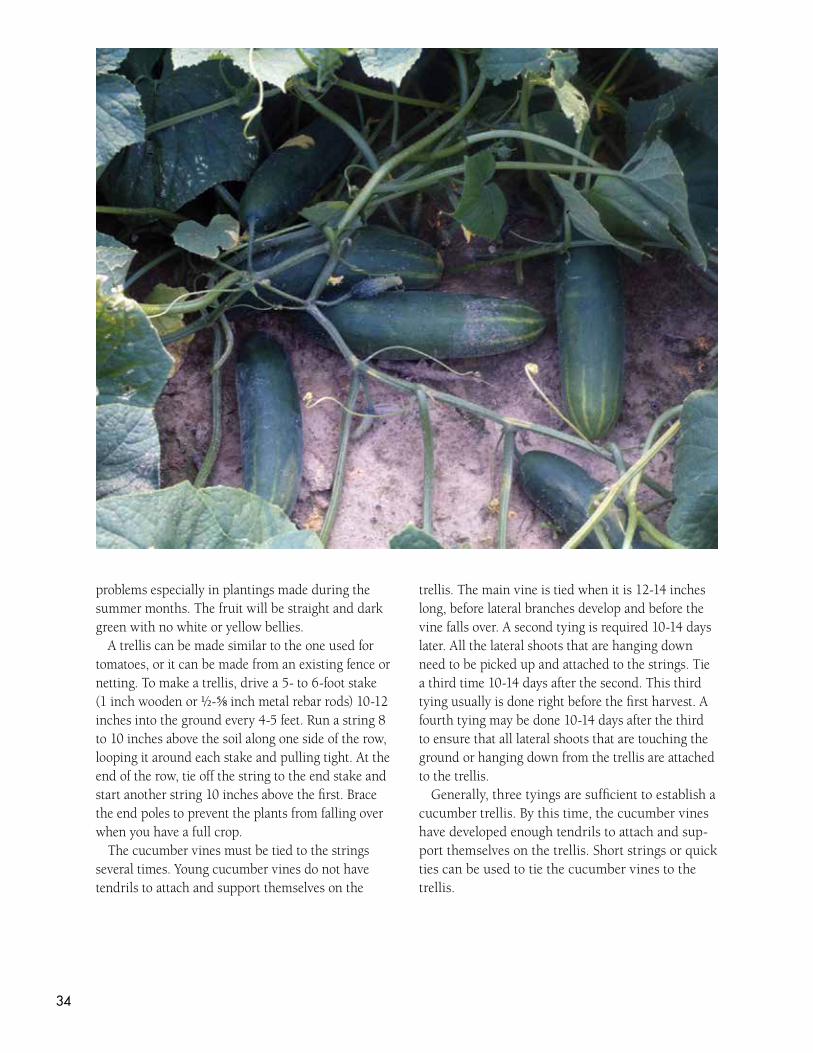
34
problems especially in plantings made during the summer months. The fruit will be straight and dark green with no white or yellow bellies.
A trellis can be made similar to the one used for tomatoes, or it can be made from an existing fence or netting. To make a trellis, drive a 5- to 6-foot stake (1 inch wooden or ½-⅝ inch metal rebar rods) 10-12 inches into the ground every 4-5 feet. Run a string 8 to 10 inches above the soil along one side of the row, looping it around each stake and pulling tight. At the end of the row, tie off the string to the end stake and start another string 10 inches above the first. Brace the end poles to prevent the plants from falling over when you have a full crop.
The cucumber vines must be tied to the strings several times. Young cucumber vines do not have tendrils to attach and support themselves on the
trellis. The main vine is tied when it is 12-14 inches long, before lateral branches develop and before the vine falls over. A second tying is required 10-14 days later. All the lateral shoots that are hanging down need to be picked up and attached to the strings. Tie a third time 10-14 days after the second. This third tying usually is done right before the first harvest. A fourth tying may be done 10-14 days after the third to ensure that all lateral shoots that are touching the ground or hanging down from the trellis are attached to the trellis.
Generally, three tyings are sufficient to establish a cucumber trellis. By this time, the cucumber vines have developed enough tendrils to attach and sup-port themselves on the trellis. Short strings or quick ties can be used to tie the cucumber vines to the trellis.

35
Recommended eggplant varieties
Hybrid Eggplant Varieties Open Pollinated Varieties
Santana – black elongated oval fruit Black Beauty – black roundClassic – black teardrop shaped fruit Epic – black elongated oval ASIAN TYPESDusky – black elongated oval Ichiban
Eggplants are fun to grow. They produce plenty of fruit with little effort. It is has very few problems and bears fruit over a long time in the hot summer months. A single planting can be harvested for six to eight weeks.
Eggplant is a tender plant and should be planted when the danger of frost has passed. Eggplant can be transplanted from mid-March to early July. It requires eight to 10 weeks to produce an eggplant transplant.
Transplants should be spaced 18-36 inches apart. If growing in heavy clay soils, build rows 8-10 inches high and 4-6 feet wide. (See the section on trans-plants for more information on producing eggplant transplants.)
A variety of different colors and types of eggplant is available. Gardeners are encouraged to try the hybrid varieties of eggplant. The hybrids are earlier, have higher yields and bear large-size fruit for a longer time than the open-pollinated varieties.
In many areas, green eggplants are popular. Fans of green eggplant find that it does not get as bitter as the black/purple varieties in the summer. Many garden-ers have their own strains of green eggplant and save the seed from year to year.
For preplant fertilizer, use 1.2 pounds (1.2-1.4 cups) of 8-24-24 or 13-13-13 per 10-foot row for egg-plant. Side-dress eggplant at first fruit set with 0.4 pounds (0.8 cup) of Calcium nitrate per 10-foot row. Eggplants should be side-dressed every two to four weeks after harvest begins to maintain fruit size and vigorous plants.
Side-dressing also can be done by injecting the fertilizer through the drip line by using an injection device starting at bloom and fruit set (three to four weeks after planting) and continuing for eight to nine weeks. (See the sections on drip irrigation and fertiga-tion for more information.)
Eggplants should be staked for support and grown on plastic mulch using fertigation and drip irrigation.
Staking keeps the plants upright and productive for a long time. The mulch controls weeds and increases the soil temperature, promoting early fruit produc-tion. The drip irrigation and fertigation maintains the fruit size and quality of the eggplant through a number of weeks for harvest. (Check the sections on trellising tomatoes, plastic mulch, drip irrigation and fertigation for more information.)
Eggplant is harvested at an immature stage. Depending on the variety, the size and length will change, but you want the skin to have a glossy shine. Harvesting twice a week encourages plants to keep producing fruit and helps to keep the fruit from becoming too large. The large fruit without a glossy shine are starting to mature, are seedy and develop a bitter taste. The fruit should be cut from the plant with part of the stem left on the fruit.
Mites, fleas, beetles, white flies and Colorado potato beetles are the most common problems on eggplant. Look under the leaves that have a whitish discolor-ation for mites. They are worse on the green variet-ies than the purple. Mites generally attack eggplant about half way through the harvest season. Spray the underside of the leaves as soon as you see a mite.
EGGPLANTSJames E. Boudreaux

36
Garlic is a long-term crop (nine to 10 months) and should be planted on rows at the edge of the garden where it will not interfere with spring garden prepa-ration. Plant in September and October for May and June harvest.
Garlic must be exposed to low temperatures (32-50 degrees F) for two months before the long day peri-ods will induce bulbing.
Garlic is planted from cloves (toes) that are sepa-rated from the bulbs and planted 2-3 inches deep. All the cloves should be planted vertically base down to produce bulbs with straight necks. Till the ground until the soil is loose and push the gloves down 2-3 inches deep in the loose soil. Two drills (12 inches apart) of garlic can be planted on one row to take advantage of higher yields from more plants on one row.
The availability of different garlic varieties is lim-ited. The most popular variety is Elephant garlic or
Tahiti. It has large, light green leaves, makes large, dark cloves with mild flavor and stores well. Creole garlic has broad, dark green leaves, makes medium, white cloves with a strong flavor and has moderate storage ability. Italian garlic has narrow, light green leaves, makes small pink cloves with a strong flavor and stores well. Seed (cloves for planting) for Creole and Italian garlic varieties are difficult to find.
Garlic stays in the garden nine to 10 months and grows through three seasons – fall, winter and spring. Garlic requires 1.2-1.4 pounds of 13-13-13 or 8-24-24 of preplant fertilizer to make a good crop. Side-dress garlic three times with 0.2-0.4 pound (0.4-0.8 cup)
of calcium nitrate per 10 feet of row: (1) when the plants come up (mark the row) about three to four weeks after planting, (2) when growth starts in Feb-ruary and (3) three to four weeks after the second side-dressing.
Garlic is an excellent crop to grow using plastic mulch and drip irrigation. The mulch provides weed control and keeps the bulbs clean. Side-dressing also can be done by injecting the fertilizer through the drip line by using an injection device. One-tenth cup of calcium nitrate per 10-foot row per week is injected starting in February and continuing through March and April. (See the sections on plastic mulch, drip irrigation and fertigation.)
Garlic is ready to harvest when the tops turn yel-low. This generally occurs in May to early June. To speed up the drying and harvesting process, a spad-ing fork can be stuck in the ground 4-6 inches to the side of the plant. Lift the plant slightly with the fork, leaving the plant in the ground. This breaks the attachment of the roots in the soil and encourages the plant to dry down. The bulbs can then be pulled five to seven days later.
The bulbs need to be dry for 5-7 days in an open shed. Do not leave the bulbs in the sun without some type of protection from burning. After drying, the outer, loose portion of the bulbs is removed and the roots trimmed about ½ inch to the base of the bulb. The tops of the plants can be left on the bulbs to make braids. For loose garlic, the stem is generally trimmed an inch above the bulb.
The most common insect problems are thrips.
GARLIC James E. Boudreaux
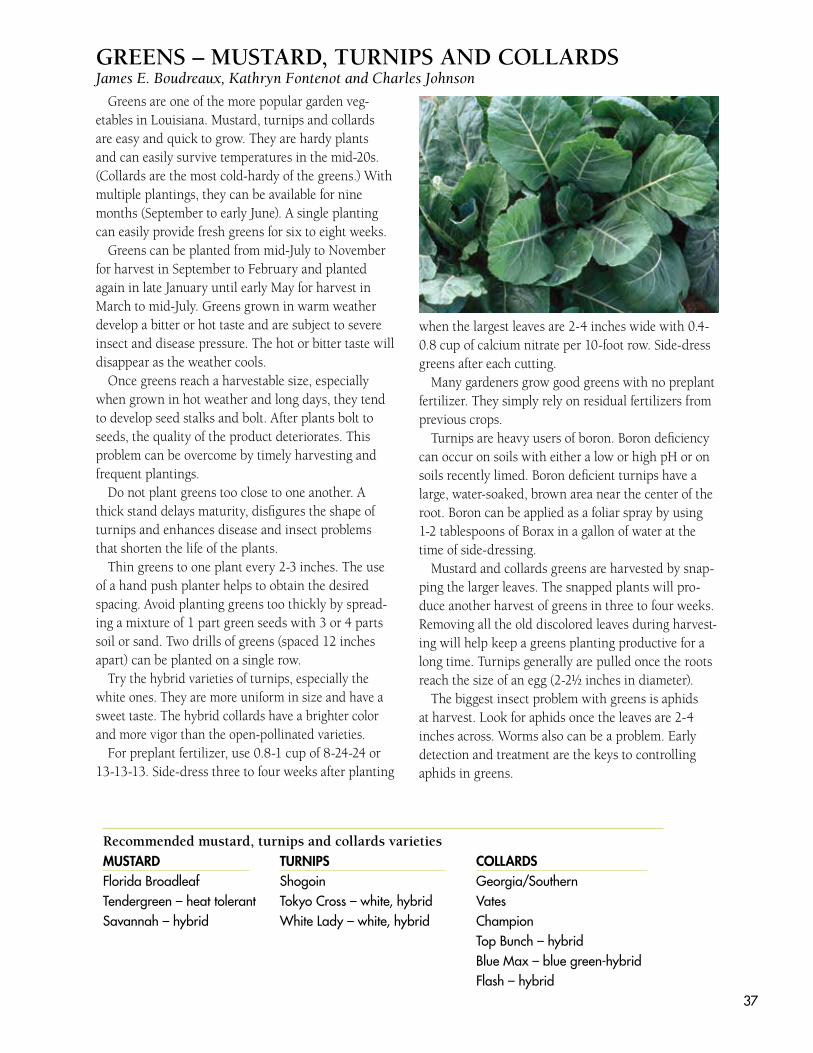
37
Greens are one of the more popular garden veg-etables in Louisiana. Mustard, turnips and collards are easy and quick to grow. They are hardy plants and can easily survive temperatures in the mid-20s. (Collards are the most cold-hardy of the greens.) With multiple plantings, they can be available for nine months (September to early June). A single planting can easily provide fresh greens for six to eight weeks.
Greens can be planted from mid-July to November for harvest in September to February and planted again in late January until early May for harvest in March to mid-July. Greens grown in warm weather develop a bitter or hot taste and are subject to severe insect and disease pressure. The hot or bitter taste will disappear as the weather cools.
Once greens reach a harvestable size, especially when grown in hot weather and long days, they tend to develop seed stalks and bolt. After plants bolt to seeds, the quality of the product deteriorates. This problem can be overcome by timely harvesting and frequent plantings.
Do not plant greens too close to one another. A thick stand delays maturity, disfigures the shape of turnips and enhances disease and insect problems that shorten the life of the plants.
Thin greens to one plant every 2-3 inches. The use of a hand push planter helps to obtain the desired spacing. Avoid planting greens too thickly by spread-ing a mixture of 1 part green seeds with 3 or 4 parts soil or sand. Two drills of greens (spaced 12 inches apart) can be planted on a single row.
Try the hybrid varieties of turnips, especially the white ones. They are more uniform in size and have a sweet taste. The hybrid collards have a brighter color and more vigor than the open-pollinated varieties.
For preplant fertilizer, use 0.8-1 cup of 8-24-24 or 13-13-13. Side-dress three to four weeks after planting
when the largest leaves are 2-4 inches wide with 0.4-0.8 cup of calcium nitrate per 10-foot row. Side-dress greens after each cutting.
Many gardeners grow good greens with no preplant fertilizer. They simply rely on residual fertilizers from previous crops.
Turnips are heavy users of boron. Boron deficiency can occur on soils with either a low or high pH or on soils recently limed. Boron deficient turnips have a large, water-soaked, brown area near the center of the root. Boron can be applied as a foliar spray by using 1-2 tablespoons of Borax in a gallon of water at the time of side-dressing.
Mustard and collards greens are harvested by snap-ping the larger leaves. The snapped plants will pro-duce another harvest of greens in three to four weeks. Removing all the old discolored leaves during harvest-ing will help keep a greens planting productive for a long time. Turnips generally are pulled once the roots reach the size of an egg (2-2½ inches in diameter).
The biggest insect problem with greens is aphids at harvest. Look for aphids once the leaves are 2-4 inches across. Worms also can be a problem. Early detection and treatment are the keys to controlling aphids in greens.
GREENS – MUSTARD, TURNIPS AND COLLARDS James E. Boudreaux, Kathryn Fontenot and Charles Johnson
Recommended mustard, turnips and collards varieties
MUSTARD TURNIPS COLLARDS Florida Broadleaf Shogoin Georgia/SouthernTendergreen – heat tolerant Tokyo Cross – white, hybrid Vates Savannah – hybrid White Lady – white, hybrid Champion
Top Bunch – hybridBlue Max – blue green-hybrid Flash – hybrid

38
Kohlrabi is an old European member of the cab-bage family that grows well during Louisiana’s cool seasons. It has been described as an above-ground turnip. It has a sweet, crisp, mild, turnip-like flavor. The name comes from the German words for cabbage and turnip.
The part you eat is a swollen stem. You can eat the stems raw or prepare them in a turnip-like dish. The young, tender leaves also may be harvested and eaten as a turnip green.
Kohlrabi can be planted in Louisiana throughout the cool season. It will be ready for harvest two to three months from the seeding date.
The plant will grow well in average-to-rich soils. Before planting, apply 1-2 cups of an 8-24-24 fertilizer or equivalent per 10-foot row. Plant the seeds about 1/4 inch deep, and thin emerging plants about 6 inches in the row. A constant, rapid growth produces the best quality kohlrabi. To get this type of growth, pro-vide an even supply of moisture, and side-dress the plants once a month with 0.4-0.8 cup calcium nitrate per 10-foot row.
Uneven or slow development can result in growth cracks and tough, fibrous stem. If the stems do become tough, trim the outer layers of skin because a tender inside may still be salvaged. Kohlrabi is har-
vested when the stems are about 3-4 inches in diam-eter. Older and larger stems can be more fibrous.
The most commonly planted cultivars are the Early White Vienna and Early Purple Vienna. The hybrid Grand Duke is an All-America selection and has pro-duced a high quality stem. The hybrid Winner is even better. Other new hybrid cultivars are Rapid Star and Express Forever.
Common pest problems are aphids and worms. Treat these problems early.
KOHLRABIThomas J. Koske and Kathryn Fontenot

39
Both head and leaf lettuce can be grown in the home garden. Fresh lettuce from the garden is a dif-ferent vegetable than lettuce bought in the store. Ice-berg or crisp-head and leaf-type varieties can stand in the field for several weeks, but romaine lettuces bolt easily and should be harvested as soon as they form a head.
Both a fall and spring crop can be planted. Let-tuce transplants can be planted from mid-September through October for harvest in late November, December and early January. Transplants planted in late January, February and early March produce let-tuce for late March, April and early May. The spring crop is better than the fall crop because of the warm-er weather and longer days.
Lettuce transplants should be spaced 12 inches apart. Planting double drills (spaced 12 inches apart) of lettuce on a row will increase yields. Planting let-tuce on plastic mulch prevents dirt from splashing into the heads. Lettuce is an excellent crop to follow another crop on plastic mulch.
Both hybrid and open-pollinated varieties are recommended.
For preplant fertilizer, use 1-1.2 cups of 8-24-24 or 13-13-13 for a 10-foot row. Side-dress twice, once three to four weeks after planting (when leaves are 3-4 inches across) and again in 10-14 days after the first side-dressing, with 0.8 cup calcium nitrate per 10-foot row.
Gardeners can harvest any time the plants reach 10-12 inches in diameter and eat as leaf lettuce. Head lettuce is harvested once the heads develop and become firm. A mature head will yield slightly when pressed with the thumb. Head lettuce, and especially romaine varieties, do not hold in the field under Loui-siana conditions and need to be harvested as soon as the heads develop.
Leaf lettuce is ready to harvest once the plant reach-es an acceptable size of 10-12 inches in diameter.
The most common problems on lettuce are worms and aphids. Treating for worms or aphids as soon as you see them is the key to control.
Recommended lettuce varieties
Iceberg Lettuce (Crisp head) Leaf Lettuce Romaine Bibb Endive/ Escarole Maverick Prizehead Green Towers Buttercrunch
Salad Bowl Parris Island Cos Red Salad BowlSierraNevada
LETTUCEJames E. Boudreaux and Kathryn Fontenot

40
Okra is one of the main vegetables grown in a home garden in the South. It is very tolerant to heat and one of the few vegetables that will set a good crop in Louisiana’s hot summer weather. This makes it valuable as a fresh vegetable that can be enjoyed during July, August and September. Okra bears over a long time. One planting can easily provide okra for five to six months.
Okra should not be planted until the weather is warm. Okra can be planted from April to early August. The ideal spacing for okra is one plant every 10-12 inches.
Different areas of the state prefer different okra varieties. Both hybrid and open-pollinated varieties are available.
For preplant fertilizer, use 0.6-0.8 cup of 13-13-13 or 8-24-24 per 10-foot row for okra. Side-dress twice, once at first fruit set and again three to four weeks after the first with 0.4-0.8 cup calcium nitrate per 10-foot row.
Harvest okra every one to two days to maintain pod size. The best quality okra are 2- to 4-inch-long pods with a short stem. The young, tender pods can be snapped from the plant. The cap of an okra pod that is too hard to eat will not break cleanly from the stem. The hard okra should be removed from the plant. Okra also is harvested by cutting. The leaves often are cut along with the pods. Cutting the leaves
makes harvesting okra easier. Okra will produce until frost if harvested regularly.
The most common problems on okra are stink bugs, aphids, whiteflies and worms. Treating insects as soon as you see them is the key to control. Fire ants also can be a big problem. Controlling aphids in okra will help to eliminate fire ant problems. Control-ling fire ants around the garden also will help mini-mize this problem.
Large okra plants can be cut back to 4-6 inches high. The new sprouts will produce a late crop. Cut-ting back and rationing control size.
Recommended okra varieties
OPEN POLLINATED
Clemson Spineless – ribbed fruit Emerald – smooth round fruit Cowhorn – ribbed
HYBRID
Annie Oakley – ribbedCajun Delight – ribbed
OKRA James E. Boudreaux and Kathryn Fontenot

41
ONIONS James E. Boudreaux and Thomas J. Koske
Onions are used in all the different types of cuisine around the world. Onions make a good addition to the garden. Onions are winter-hardy plants that can withstand low temperatures. They are planted in the garden during the winter, grow for four to five months and are harvested in the spring. They can be used in the fresh green stage just as they start devel-oping bulbs (green tops and bulbs) as well as dry mature bulbs.
Onions require considerable time to grow and mature. They should be planted in a row on the edge of the garden to avoid interfering with ground prepa-ration in the spring garden.
Louisiana grows short-day onion varieties. Most onion-growing gardeners are interested in the short-day sweet/mild tasting onions similar to the Texas Supersweet and Vidalia. Short-day onions are planted during the short days at the start of winter. They grow through the winter and develop into bulbs as the days grow longer in the spring.
The short-day sweet onion varieties do not store well under Louisiana conditions. They need to be used within a few months after harvesting. Many times gardeners cut and freeze the sweet onions for later use.
The only onion variety that will store well under Louisiana conditions is Red Creole. This is the tradi-tional onion grown in Louisiana. At one time it was widely grown in Pointe Coupee Parish for marketing in the Caribbean Islands. Red Creole is a dark red onion with a hot, pungent taste. It is higher in dry matter, which allows it to store under the humid con-ditions in Louisiana.
A few varieties of intermediate-day onion varieties have performed well in the state.
Recommended short- or intermediate-day onion varieties
Candy (hybrid) – Intermediate-day OnionGrano 502Red CreoleSavannah SweetTexas Grano 1015Yellow Granex
It requires 10 to 12 weeks to produce onion trans-plants. Plant seeds for onion transplants from mid-September to mid-October. Seeds generally are sown thickly, 1/4 to ¾ inch deep, on a wide band on top of a well-prepared row. The plants are then pulled and
transplanted to the field. Onion plants with a stem diameter larger than a pencil (1/4 inch) and extremely small plants (fewer that three true leaves) should not be transplanted to the garden. The pencil-size plants are subject to bolting, (premature seed stalk develop-ment), while the smaller plants have a difficult time surviving.
It is easier for gardeners to obtain onion plants and to transplant the plants into the garden. Check the list of vegetable seed companies for businesses deal-ing in onion transplants.
Onions plants are transplanted in December and January. Onions plants are set 2 to 4 inches apart. Two drills of onions plants (spaced 12 inches apart) can be planted on a single row. On wide rows that are 60 to 72 inches wide, four drills can be planted.
The depth on transplanting will affect the shape of the onion bulbs. The base of the onion plant where the roots originate should only be planted ½-¾ inch deep. Onions planted rather shallow will be flat and round in shape, while onions planted too deep will be long and oval/round in shape.

42
If you have a large garden, consider growing onions using plastic mulch and drip irrigation. The mulch provides weed control and keeps the bulbs clean. Onions can be grown on plastic mulch left over from another crop.
For preplant fertilizer, use 1.2-1.4 cups of 13-13-13 or 8-24-24 per 10-foot row. Onions are side-dressed three or four times with 0.4-0.8 cup of calcium nitrate per 10-foot row when the plant growth starts in mid-February, again in two to three weeks after the first side-dressing and again in two to three weeks.
Onions on plastic mulch can be side-dressed by punching a 1- to 2-inch-deep hole with a broom stick through the plastic on the edge of the row every 6 inches. The hole should be 6 to 8 inches away from the plant. Generally ½ teaspoon of calcium nitrate is
put in each hole. Side-dressing also can be done by injecting the
fertilizer through the drip line by using an injec-tion device starting in February and continuing through March and April. (See the section on plas-tic mulch, drip irrigation and fertigation for more information.)
Never allow the onions to suffer for moisture once they start developing bulbs. The correct use of drip irrigation provides ideal soil moisture level for plant growth. (See the section on drip irrigation for more information.)
Onions are ready to harvest when 50 percent to 60 percent of the tops have fallen over, which generally occurs in May. Use a garden fork to gently lift the soil and bulbs a little without digging the bulbs up out of the soil. This process breaks the contact of the roots with the soil and encourages the drying process. Pull the bulbs by hand. Trim the roots close to the base of the bulb, and trim the neck 1-1½ inches above the bulb.
The bulbs can be further dried by hanging them in a burlap sack in a shed with good air circulation. The worst thing that can happen to onions is to get wet once they have been harvested. After drying for several days in burlap sacks, the outer, loose skins on the bulbs easily fall off when the onions are removed from the sack. This makes the bulbs a much neater product. Onions should be stored in a dark, dry place with good air circulation.
Bolting occurs when the onion produces a flower stalk that develops into a seed head. The flower stalk grows right through the middle of the onion bulb, ruining the bulb. The process is influenced mainly by temperature, plant size and variety. Bolting is induced by cool weather. Once an onion plant develops seven to 10 leaves, exposure to night temperatures below 50 F for two to three weeks causes bolting. Onion transplants about 1/4 inch in diameter (pencil size) do not bolt because they are not large enough to perceive the bolting stimulus. To prevent bolting, transplant onions in mid-December to mid-January, do not use transplants larger than the size of a pencil and avoid high rates of fertilizer in December and January, which will cause excessive growth.
Weed control can be difficult with onions. The plants are in the field for five to six months and go through both the winter and warm-season weeds. Onions do not compete well with weeds; weeds can reduce the size of the bulbs and yields. Shallow culti-vation with a hand wheel cultivator and frequent hoe-ing are necessary to keep onions weed free.
Thrips are the main insect problem on onions. Look for thrips by shaking the leaves of the onion plant over a white piece of paper. Thrips are very small yellow to black insects. Purple blotch and downy mildew also can be serious disease problems on the foliage of onions. Keeping the plants actively growing with adequate fertility and moisture will help reduce the problems of foliar diseases. Early detection and treatment are the keys to controling thrips and foliar diseases.

43
Shallots, leeks and green onions are members of the Allium genus that are primarily grown for their veg-etative stalks. Production is similar to that of bulbing onions without concern for developing a large stor-age bulb. They are all quite hardy and grow from late summer until late spring. Onions grown for green onions (scallions) or bunching onion use are not as fussy about soils. These onions normally are direct-seeded thickly in the row and are grown to suitable size and then harvested for table use.
Leeks are alliums that are similar to green onions but milder in flavor. Leeks are grown from seed or small bulbs planted in the fall. Although the above-ground portion resembles a thick-necked garlic plant, the thick white neck is used in soups and stews.
Shallots are similar to multiplying onions but have a hint of garlic flavor. Although most of the world thinks of shallots as dry bulbs, in Louisiana the green shoots are more often used as a green onion or scallion substitute. Bulbing shallots grown for bulbs here face tremendous disease pressure but would be grown the same as bulbing onions.
A moist, well-prepared seed bed is important to obtain a good stand. Soaking seeds for several hours in warm water will promote good germination. Choose a well-drained garden loam or sandy soil that will not easily crust over. Spade the soil, and build beds high enough for good drainage. If you have heavy clay soils, pre-plant with 0.8 cups 13-13-13 or
8-24-24 fertilizer per 10-foot row. Cover seeds with no more than 1/4 inch of good soil or sand. When plants are well sprouted, thin to 4 inches between plants in high density plantings. Controlling weeds is more difficult when plants are crowded into multiple drills.
Transplants or sets also should be planted in well-developed beds from August through February. As the plants grow in spring, side-dress monthly with 0.4 cup calcium nitrate for every 10-foot row.
After the shallot and multiplying onion sets grow and divide into several stalks, the clumps may be pulled and divided. Each stalk then may be harvested or set back in a row to grow and divide again.
During early summer these onions usually stop growing and may die back to bulbs, which are dug and stored dry until fall planting.
The most common insect and disease problems are thrips and purple blotch disease.
Recommended onion varietiesGREEN ONIONSEvergreen BunchingIshikuraSouthport
SHALLOTtake out--heading?
SHALLOTS, LEEKS AND GREEN ONIONSThomas J. Koske
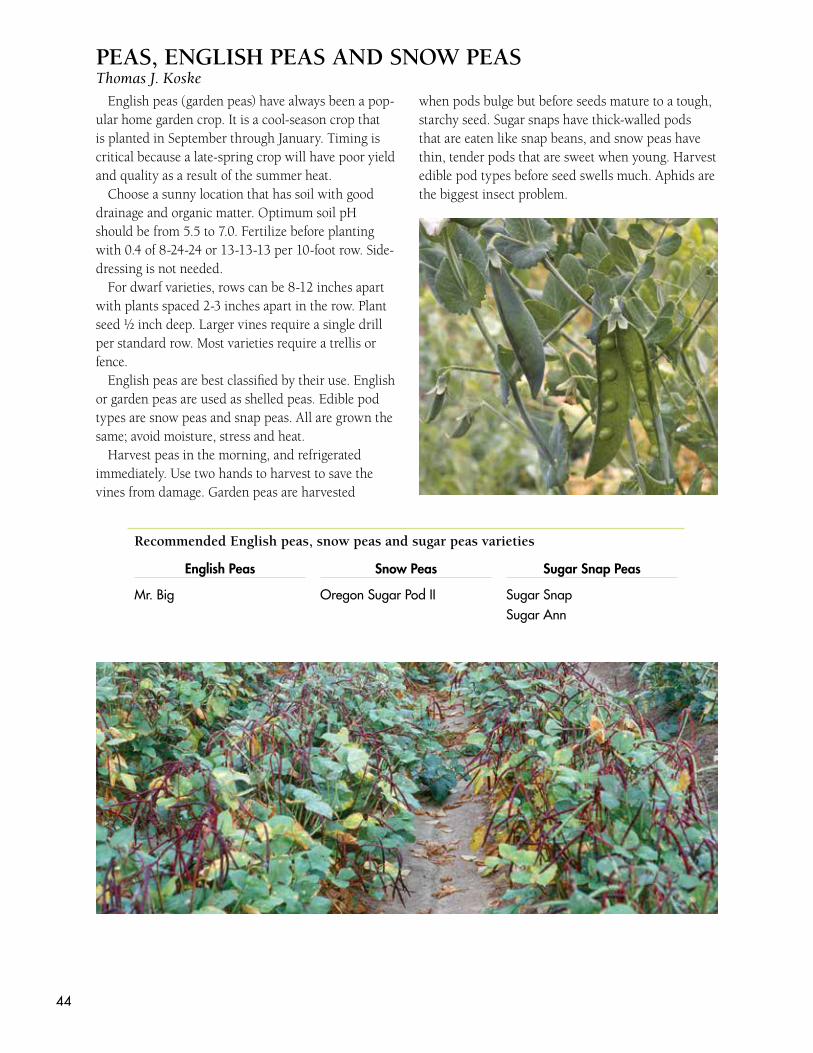
44
English peas (garden peas) have always been a pop-ular home garden crop. It is a cool-season crop that is planted in September through January. Timing is critical because a late-spring crop will have poor yield and quality as a result of the summer heat.
Choose a sunny location that has soil with good drainage and organic matter. Optimum soil pH should be from 5.5 to 7.0. Fertilize before planting with 0.4 of 8-24-24 or 13-13-13 per 10-foot row. Side-dressing is not needed.
For dwarf varieties, rows can be 8-12 inches apart with plants spaced 2-3 inches apart in the row. Plant seed ½ inch deep. Larger vines require a single drill per standard row. Most varieties require a trellis or fence.
English peas are best classified by their use. English or garden peas are used as shelled peas. Edible pod types are snow peas and snap peas. All are grown the same; avoid moisture, stress and heat.
Harvest peas in the morning, and refrigerated immediately. Use two hands to harvest to save the vines from damage. Garden peas are harvested
when pods bulge but before seeds mature to a tough, starchy seed. Sugar snaps have thick-walled pods that are eaten like snap beans, and snow peas have thin, tender pods that are sweet when young. Harvest edible pod types before seed swells much. Aphids are the biggest insect problem.
Recommended English peas, snow peas and sugar peas varieties
English Peas Snow Peas Sugar Snap Peas
Mr. Big Oregon Sugar Pod II Sugar SnapSugar Ann
PEAS, ENGLISH PEAS AND SNOW PEASThomas J. Koske

45
Southern peas are one of the crops that will set and produce a crop in hot weather. It is one of the few fresh vegetables that can be enjoyed in the hot days of July, August and September. It can also have the added benefit of being used as a cover crop after spring vegetables to add organic matter and improve the soil.
Peas are tender crops and do not germinate well in cool soils and should not be planted until the weather becomes warm. Peas can be planted in the garden from April to early August. As a general rule, there is more vine growth in the peas planted in July and August than in the earlier plantings. Gardeners are encouraged to purchase western grown pea seed that is virus free. Peas are planted every 4-6 inches (2-3 plants per foot).
Peas do not require much fertilizer. They often are grown on residual fertilizer from other crops. For pre-plant fertilizer, use 0.6-0.8 cup of 8-24-24 or 13-13-13 on ground that has not been fertilized. Do not side-dress peas. High fertility soils will produce large viny plants with few peas.
Peas are harvested once they reach the green mature stage. Varieties with hulls that turn purple when mature simplify the harvest procedure since it is easy to determine when they are ready to harvest. Peas are picked over two to three weeks at four- to five-day intervals.
Freshly harvested peas in the hull can easily over-heat and spoil after harvest. Place peas in a well-ventilated, shaded place before shelling. Hard-to-shell varieties will shell easier if they can be left out over-night to dry down a little in a well-ventilated area. Fresh shelled peas are highly perishable and should be cooled soon after shelling.
In areas where deer are prevalent, peas must be protected. A simple two- or three-wire electric fence will protect the garden. The deer will hit and break the fence several times before learning to stay away.
The main insect pest of southern peas is stink bugs. Start looking for stink bugs when the pea plants flow-er and set fruit. Treat when you first see stink bugs to control this damage.
Recommended southern pea varieties
PURPLE HULL PEASPea varieties with purple coloring on the pods. These varieties also may be classified as other types such as Crowder or black-eye peas.
Pinkeye Purple Hull Top Pick Pinkeye – nonviningMississippi Pink Eye Purple Hull Quick Pic – nonvining
CROWDER PEASPea varieties with closely spaced seeds. The seeds are tightly pressed against each other and generally have higher starch content than other types. These varieties also may be classified as other types such as purple hulls. Mississippi Purple Dixie LeeMississippi Silver Top Pick Brown Crowder – nonvining
BLACK-EYED PEASPea varieties with seeds that have a dark eye. These varieties also may be classified as other types such as purple hulls.Magnolia Blackeye Royal BlackeyeQueen Anne
CREAM PEASPea varieties with light green or white seeds that do not turn dark when cooked. Pods of these types are light green to white at harvest maturity. The cooking water or pot liquor comes out bright and clear.Elite – nonvining Top Pick Cream – nonvining
PEAS, SOUTHERN PEASJames E. Boudreaux

46
Recommended bell pepper varieties
Open Pollinated Varieties Bacterial Spot Resistant
Hybrid Varieties TSWV Resistant Hybrid Varieties
Jupiter Camelot X3R Heritage
Capistrano Aristotle X3R Excursion II
Plato
Hybrid Varieties Hybrid Varieties
Phytophthora ResistantCrusader Paladin
King Arthur
Bell peppers are popular additions to a garden. Bell peppers require full sun for good yields. Shade from trees, buildings or even from other tall veg-etables like tomatoes will cause the small bell pep-pers to shed off the plant, reducing the yield. Try planting bell peppers on the end row of a garden to avoid shading from other vegetables. Other types of peppers are not as susceptible to shedding fruit from shade.
Bell peppers are tender plants and should be plant-ed when the danger of frost has passed. Both a spring and fall crop can be planted. The spring crop is plant-ed in mid-March through early May for production in late May, June and July, and the fall crop is planted in late June to early August for production in October and early November.
It requires eight to 10 weeks to produce bell pepper transplants. (See the section on transplants for more information.)
Bell peppers are planted 12-18 inches apart on a row 6-8 inches high and 4-6 feet wide. In large gar-dens consider using plastic mulch with drip irrigation and fertigation. Two rows, spaced 12 inches apart can be planted on a single row.
Encourage your local plant sources to handle some of the hybrid bell pepper varieties. The hybrid pep-per varieties bear high yields of large and extra large peppers and are resistant to several diseases (bacte-rial spot, TSWV and Phytophthora) that affect bell peppers.
For preplant fertilizer, use 1.2-1.4 cups of 8-24-24 or 13-13-13 per 10-foot row for bell peppers. Side-dress bell peppers at first fruit set with 0.4-0.8 cups calcium nitrate per 10-foot row.
In large gardens, side-dressing can be done by injecting the fertilizer through the drip line by using an injection device. One-tenth cup of calcium nitrate
per 10-foot row per week is injected starting at bloom and fruit set (three to four weeks after planting) and continue for eight to nine weeks. (See the sections on drip irrigation and fertigation for more information.)
Bell peppers should be staked for support and grown with plastic mulch, fertigation and drip irriga-tion. Staking keeps the plants upright and produc-tive for a longer time. The mulch controls weeds
PEPPERS, BELL PEPPERS James E. Boudreaux

47
and increases the soil temperature, promoting early fruit production. The drip irrigation and fertigation increase the yields and size of bell peppers.
To stake bell peppers, drive a 2- to 3-foot stake (1-inch wooden or metal rebar rods) 10 to 12 inches into the ground between every four to six plants. The first string is run 6-8 inches above the soil and should be strung when the plants are 12-15 inches high and before the plants fall over. Strings are passed along one side of the row, looping the string around each stake, and pulled tight. Once you reach the end of the row, turn around and run a string at the same level on the opposite side of the row again, looping the string around the stake and pulling it tight. The two strings bind the plants between the stakes. In this method, the plants are never tied to the strings or stakes. The second string is run at the top and on the outside of the stake. Only one string is used on the top level. Tying peppers in this manner helps to prevent fully loaded plants from being blown over in rainstorms and greatly reduces sun burning on the fruit.
Staking and tying bell peppers
Moisture stress, especially during the bloom and fruit-set stage, will decrease the yields and size of the peppers. The correct use of drip irrigation provides ideal soil moisture levels for plant growth. (See the section on drip irrigation for more information.)
Bell peppers are harvested when they are firm and dark green. The stem of a mature bell pepper will easily snap from the plant when the fruit is slightly lifted. A gentle touch should be used in harvesting bell peppers since the stems are brittle and easily broken. Bell peppers are harvested every seven to 10 days for four to five weeks.
Blossom end rot (BER) can be a major problem on bell peppers in the home garden. This is caused by a calcium deficiency and lack of water or too much water. Correcting the soil pH and calcium levels in the soil with lime, the use of calcium nitrate and drip irrigation will reduce BER in bell peppers.
Aphids, worms and stink bugs are the main insect problems. Begin looking for aphids soon after plant-ing. Worms and stink bugs are present when the plants start to set fruit and can be a problem until harvest. Ripe rot, bacterial spot, southern blight and Phytophthora can be problems on bell peppers. Early detection and treatment are the keys to control of these pests.

48
A few hot pepper plants are always a good addi-tion to the garden. They can be used fresh, pickled (preserved in vinegar) or to make sauces and salsa. Tabasco, cayenne and habanero take 100-120 days to bear fruit. Plant this type of pepper on rows at the edge of the garden to prevent interference with the soil preparation. Home gardeners may have difficulty with bell peppers, but many of the other type of pep-pers can be grown quite successfully. They set fruit in hot weather, which extends availability of fresh peppers.
Peppers are tender plants and should not be plant-ed until the danger of frost has passed. They can be planted from mid-March until early June. It requires eight to 10 weeks to produce pepper transplants. (See the section on transplants for more information.)
Peppers are planted 12-18 inches apart on a row 6-8 inches high and 4-6 feet wide. In large gardens, consider growing on plastic mulch with drip irriga-tion and fertigation. The mulch controls weeds and increases the soil temperature — promoting early fruit production. The use of drip irrigation and ferti-gation will increase the yields of peppers.
In areas with high incidence of tomato spotted wilt virus (TSWV), peppers can be grown on aluminum reflective mulch. The light that reflects from the alu-minum tends to discourage the virus-carrying aphids and thrips from feeding on the plants. This reduces the occurrence of TSWV. Peppers will be stunted by
the reflective aluminum mulch after planting. This setback can be overcome by using aluminum reflec-tive mulch with a black strip for the pepper plants and aluminum on the sides. (See the sections on plastic mulch, drip irrigation and fertigation for more information.)
For preplant fertilizer, use 1.2-1.4 cups of 8-24-24 or 13-13-13 per 10-foot row for peppers. Peppers should be side-dressed at first fruit set with 0.4-0.8 cup of calcium nitrate per 10-foot row.
Side-dressing also can be done by injecting the fertilizer through the drip line by using an injection device. Use 0.1 cup of calcium nitrate per 10-foot row
Recommemded pepper varieties and estimated days from transplanting to harvest
Tabasco Peppers120-140 days
Jalapeno Peppers65-75 days
McIlhenny Tabasco Jalapeno M
Milta (hybrid)
Cayenne100-120 days
Banana65-80 days
Cayenne Large Red Thick Inferno Hybrid-hot
Charleston Hot
Chili Types65-75 days
Serrano Chili
Ancho 101
PEPPERS, HOT PEPPERS AND OTHER TYPES OF PEPPERSJames E. Boudreaux and Kathryn Fontenot
Other Peppers
Hungarian Yellow Wax65-75 days
Hungarian Sweet Wax65-75 days
Habanero90-100 days

49
per week is injected starting at bloom and fruit set (three to four weeks after planting) and continued for eight to nine weeks. (See the sections on drip irriga-tion and fertigation for more information.)
Peppers should be staked for support. Staking keeps the plants upright and productive for a longer time. (See the section on bell peppers for more infor-mation on staking peppers.)
Moisture stress, especially during the bloom and fruit set stage, will decrease the yields and size of the peppers. The correct use of drip irrigation provides an ideal soil moisture level for plant growth. See the section on drip irrigation for more information.
Hot peppers are harvested when they are firm and have developed the desired color. The stem of a mature pepper will easily snap from the plant when the fruit is slightly lifted. Peppers are harvested every seven to 10 days. Many peppers will produce fruit for 12-16 weeks.
Blossom end rot (BER) can be a big problem on peppers in the home garden. This is caused by a cal-cium deficiency and lack of water or too much water. Correcting the soil pH and calcium levels in the soil with lime, the use of calcium nitrate and drip irriga-tion will reduce BER in peppers.
The main insects found in peppers are aphids, worms and stink bugs. Look for aphids soon after planting. Worms and stink bugs are present when the plants start to set fruit and can be a problem until harvest. Early detection and treatment are the keys to control of these pests.
Virus diseases can be prevalent in peppers. To help offset virus damage to peppers, plant two plants together in the same spot. Many times one plant will be infected by virus while the other one is fine. Pull out infected plants as soon as virus symptoms appear and control insects and weeds. Ripe rot, bacterial spot, southern blight and Phytophthora also can be problems on hot peppers. Early detection and treat-ment are the keys to control of these pests.
The use of different peppers and the color of fruit at maturity.
Pepper Use Color Maturity Stage
Tabasco Hot Sauce Red Pickled (pepper vinegar) Green
Cayenne Hot Sauce Red
Banana Fresh Yellow/RedPickled Yellow/Red
Hungarian Yellow Wax Fresh Yellow
Jalapeno Fresh GreenPickled Green
Hot Sauce/Salsa Green and Red Chili Fresh Green
Dried Brown/Red
50
Irish potatoes should be planted in every garden. Freshly dug potatoes have a unique taste that soon disappears after harvest and storage.
Potatoes are a great crop to introduce children to gardening. Children get excited when they find a potato in the ground.
Early planting (January and February) is neces-sary to obtain high yields with Irish potatoes. Certi-fied seed potatoes are used to plant the spring crop. The seed potatoes should be cut into 1½- to 2-ounce seed pieces. This is easily accomplished by cutting a medium-size (3 inches in diameter) seed potato into four or five pieces, and a small seed potato (2 inches and smaller in diameter) into two or three pieces. Seed potatoes can be cut several days or even a week before planting. The cut seed pieces should be stored in a dark, cool place until planting.
Many times the seed potatoes are cut into small seed pieces with an eye. (A medium-size seed potato is cut into six to eight pieces with a single eye on each piece.) You will have smaller seed pieces but more per sack. The smaller seed pieces will rot easily during wet, cold weather. The plants from the little pieces do not make as many potatoes as the larger seed pieces.
A fall planting can be made with the small potatoes (1-2 inches in diameter) left over from the spring crop in August to mid-September. Small potatoes for fall seed should be stored in a dark, cool place (36–50 degrees F). A 60- to 90-day period of storage is nec-essary to break the dormancy period and ensure sprouting.
Prepare garden space early in January and Febru-ary. When dry weather develops, the potatoes can be quickly planted.
The seed pieces should be spaced every 9-12 inches on a 4- to 6-foot wide row. Care should be taken to open the row 3-4 inches above the bottom of the row. This is necessary to prevent the seed pieces from sit-ting in saturated soils during times of heavy rain.
Gardeners try to plant the seed pieces with the eyes up, but it is not absolutely necessary. Seed pieces with the eyes turned down will sprout and also develop into plants. The seed potatoes should be covered with 3-4 inches of soil after planting. Covering the
seed pieces deeper than this will delay their emer-gence. Soil can always be added to the top of the row (hipped up) as the plant grows.
The selection of potato varieties is limited in Loui-siana to Red LaSoda (a red-skin potato) and Ken-nebec (a white-skin potato) are most easily found. Other varieties will grow well but must be mail- or Internet-ordered.
For preplant fertilizer, use 1.4-1.6 cups of 8-24-24 or 13-13-13 for 10-foot row. Side-dress potatoes four to five weeks after planting when the plant emerges and mark the row with 0.4-0.8 cup calcium nitrate per 10-foot row.
Irish potatoes should never be allowed to suffer from moisture stress once the plants start blooming; 1 inch of moisture every seven to 10 days is necessary at this time. This is the time the plant sets the pota-toes (tubers) and sizes the tubers. Stress at this time will result in reduced yields.
At the final cultivation, soil should be thrown up next to the plants, covering the tops of the rows. It is necessary to cover the potatoes near the surface of the soil to prevent the potatoes from turning green.
New potatoes can be dug as soon as the tubers reach 1½-2 inches in diameter. Gardeners can start checking for new potatoes 60-70 days after planting. The skin on new potatoes easily rubs off or feathers.
Irish potatoes are ready for the final harvest when the plants turn yellow and start to die and the potato skins have set. The skin of a mature potato will not rub off, or feather. Mature potatoes will store better than new potatoes. Red LaSoda and Kennebec gener-ally require 100-110 days after planting to mature.
Potatoes can be stored in a dry, dark place with air circulation for four to five months in good condition. After five to six months, the potatoes start to sprout and become spongy.
The biggest problem with potatoes is scab, foliar diseases (Early Blight) and Colorado potato beetles. Clean seed and a soil pH of 5.0-6.0 will help reduce scab. Spraying fungicide every 10-14 days starting when the potato plant flowers and is setting tubers will ensure healthy foliage until harvest. Colorado potato beetles should be treated when first seen.
POTATOES, IRISH POTATOESJames E. Boudreaux

51
PUMPKINSJames E. Boudreaux
Pumpkins are planted in the garden to make pies or have jack-o’-lanterns for Halloween. But they are difficult to grow. They require a considerable amount of space and are subject to foliar disease, several virus diseases, fruit rots and worm problems.
Pumpkins are tender plants and should be planted after the danger of frost has passed. Plant pumpkin from March to July. For Halloween use, plant from mid-June to mid-July.
A row 8-10 inches high and 4-6 feet wide is recom-mended for pumpkins grown in clap soils. Pumpkins are an excellent crop to plant on plastic mulch left over from a spring crop in larger gardens. The mulch helps protect the fruit from rotting and controls weeds. White plastic should be used when planting after early May. (See the section on plastic mulch for more information.)
Pumpkins can be direct-seeded or transplanted. Plant two to three seeds in hills spaced 4-5 feet apart. It takes three to four weeks to make a trans-plant. Pumpkins are ready to transplant as soon as a true leaf develops. Transplants more than 5 weeks old become stunted, hard to handle and may fail to recover from transplanting. Generally, 1 or 2 seeds are placed in a 1- to 2-inch plastic cell pack. See the section on transplants for more information.
For preplant fertilizer, use 0.7-1 cup of 8-24-24 or 13-13-13 per 10-foot row. Side-dress pumpkins two to three weeks after planting when the vines begin to run with 0.4-0.8 cup calcium nitrate per 10-foot row.
Pumpkins are an excellent crop to plant on plastic mulch and drip irrigation left over from another crop. Side-dressing also can be done by injecting the fertil-izer through the drip line with an injection device.
One-tenth cup of calcium nitrate per 10-foot row per week is injected starting at bloom and fruit set (three to four weeks after planting) and continues for eight to nine weeks. (See the sections on drip irriga-tion and fertigation for more information.)
Pumpkins have separate male and female flowers and require bees for pollination. Delay spraying of insecticides until late afternoon or early evening after the bees have left the field and return to the hive.
Pumpkins are ready to harvest after color has fully developed and the rind is hard enough to penetrate with the thumbnail. Yellowing of the vines is another sign that pumpkins are ready to harvest. Pumpkins should be cut from the vine leaving a 3- to 5-inch stem for a handle attached to the fruit. Store pump-kins in a dry, well-ventilated, dark area.
Pumpkins have a lot of problems — viruses, foliar diseases, fruit rots, squash vine borers, cucumber beetles and worms. Pumpkins should be sprayed with an insecticide when the vines begin to bunch, flower and set fruit to control the squash vine borer. Spraying a fungicide every seven to 10 days, start-ing when the vines flowers and set fruit and con-tinue until harvest, will ensure healthy foliage. Treat cucumber beetles and worms when you first see them.
The Creole or Cow Pumpkins (strains of light orange pumpkins) are more dependable under Louisi-ana conditions than the bright orange jack-o’-lantern varieties. Many gardeners have their own strain of these pumpkins and save the seeds from year to year.
Recommended pumpkin varieties
GIANT PUMPKINS25-80 POUNDS (TYPE OF SQUASH)
LARGE PUMPKINS10-30 POUNDS
MINIATURELESS THAN A POUND
Big Max Cinderella-type of squash Jack-be-LittleAtlantic GiantBig Moon
OTHERS
Cushaw – local strains Creole or Cow Pumpkins – local strains of light orange pumpkins

52
Squash is a quick and easy vegetable that can set fruit during the hot summer months. It also is one of the first vegetables to be harvested from the spring garden.
Squash are tender plants and should be planted when the danger of frost has passed. Squash can be planted from mid-March to September. Plant squash from mid-March to late May for late May to July har-vest; plant August to mid-September for harvest from mid September through November. Squash can pro-duce fruit in 35-40 days after seeding during the hot summer months.
In clay soils, build rows 8-10 inches high and 4-6 feet wide. For large gardens, consider using plastic mulch and drip irrigation. The mulch helps protect the fruit from rotting, controls weeds and promotes early fruit production. White plastic should be used when planting after early May. Squash is an excellent crop to plant on plastic mulch left over from a spring crop. (See the section on plastic mulch for more information.)
Squash can be direct-seeded or transplanted. Plant two to three seeds in hills spaced 12-36 inches apart. Transplanting squash has become popular in the past several years. Transplants can be justified by the high cost of hybrid seeds, the assurance of a good stand and earlier maturity. It takes three to four weeks to make a transplant. Squash is ready to transplant as soon as a true leaf develops. Transplants more than five weeks old become stunted, hard to handle and may fail to recover from transplanting. Generally, one or two seeds are placed in a 1- to 2-inch plastic cell pack. (See the section on transplants for more information.)
All the recommended varieties are hybrids. Hybrid varieties are higher yielding, have brighter color and resist more of the virus diseases than the old open-pollinated varieties.
For preplant fertilizer, use 0.8-1 cup of 8-24-24 or 13-13-13 per 10-foot row. Side-dress squash two to three weeks after planting when the vines begin to run with 0.4-0.8 cup calcium nitrate per 10-foot row.
Squash are excellent to plant on plastic mulch and drip irrigation. Side-dressing can be done by inject-ing the fertilizer through the drip line by using an injection device. One-tenth cup calcium nitrate per 10-foot row per week is injected starting at bloom and fruit set (three to four weeks after planting) and continued for eight to nine weeks. (See the section on drip irrigation and fertigation for more information.)
Squash have male and female flowers and require bees for pollination. Delay spraying of insecticides until late afternoon or early evening after the bees have left the field and returned to the hive.
Squash require harvesting at least every other day for three to four weeks. The best time to pick yellow and zucchini squash is at an immature, tender stage when they are 1½ to 2 inches in diameter and 4-6 inches long with a bright shiny color. Squash fruit larger than 2¾-3 inches in diameter and 6-8 inches long without the bright shiny color is of poor quality. A short piece of the stem (½-1 inch) should be left on
Recommended squash varieties
YELLOW CROOKNECK SQUASH YELLOW STRIGHTNECK SQUASH ZUCCHINI SQUASH
Destiny III – virus resistant 1 Liberator III – virus resistant 1 SenatorDixie Multipik ClassicPrelude II Declaration II – virus resistant1
SCALLOP WHITE SQUASH Spineless BeautyPeter Pans
Sunburst1 Transgenic variety resistant to some viruses
SQUASH, SUMMER SQUASHKathryn Fontenot, Charles Johnson and James E. Boudreaux

53
The term “winter squash” may be confusing, because these squash are grown in the spring and summer. Winter squash usually have a vining habit — although some are bush types. Their fruit is allowed to remain on the vine until fully matured as indicated by a hard rind (skin) as with pumpkins. They need about three to four months to mature and can be planted as soon as the soil warms or threat of frost is over. The best winter squash are those that mature in cool weather to maintain higher sweet-ness. The mature fruit stores well like a pumpkin but has a finer-textured flesh. Winter squash usually are served baked but can be boiled, steamed or mashed.
This class of squash has numerous types — with a variety of shapes, sizes and colors. Some types of winter squash include butternut, banana, buttercup, acorn, turk’s turban, delicata, spaghetti, calabasa, hubbard, marrow and several others.
All types of squash are monoecious, meaning one complete plant. However, they have separate male and female flowers on the same plant and require insect pollination. Without pollen transfer and both flower types present, no fruit will develop after flowering.
Squash need a sunny location and well-drained soil. Squash prefer soils of higher organic matter. Before planting the rows, apply 0.8-1 cup of a com-plete fertilizer like 8-24-24 or 13-13-13 per 10-foot row. This is best done a couple of weeks before planting.
Overfertilization, especially with nitrogen, can cause problems by forcing excessive vegetative growth. This will lead to delayed yields and a greater hazard of fruit rot and foliage disease. Side-dress a 3 to 4 weeks after planting using 0.8 cup calcium nitrate per 10-foot row. Repeat side-dressing a month later.
Space winter squash 3 feet apart within the row and at least 5 feet between rows, or allow about 6 feet of row to train the vines down if not running them across into the next row. Train or guide them early in their growth to stay in the space allotted. Plant bush types about 4 feet apart in the row.
Mulch well to conserve moisture and reduce dis-ease. Water well when needed to help with fruit set and development.
Winter squash, like pumpkins, are harvested when fully mature. The skin color will have darkened and developed to the color for that variety. The skin will also have become tough and hard to puncture with the thumbnail, and the ground spot will turn to col-or. These types of squash keep well in storage and are frequently kept for several months under conditions of low temperatures and moderate humidity. Harvest winter squash by cutting the mature fruit off the vine. Leave about 2 inches of stem on the fruit. This helps to prolong storage life.
The most common squash pests are cucumber beetles, vine borers, aphids, squash bugs and spider mites.
Recommended winter squash varieties
CREAM OF CROP ACORNEarly ButternutButternut SupremeGolden Hubbard-OPSweet Mama ButtercupSunshine
TABLE ACE ACORNTable QueenTivoli SpaghettiWaltham Butternut
the fruit. Many gardeners cut squash from the vine with garden clippers. It is best to remove all over-sized fruit from the vine to ensure continued fruit development.
The biggest problems on squash are virus diseases, foliar diseases, squash vine borer, cucumber beetles
and worms. Virus-resistant varieties should be used in late summer and fall when viruses are a problem. Squash should be sprayed with an insecticide when the vines begin to bunch, flower and set fruit to con-trol the squash vine borer. Treat cucumber beetles and worms when first seen.
SQUASH, WINTER HARDSHELL SQUASHThomas J. Koske

54
Spinach is a popular vegetable in the home garden. It can be used as a cooked vegetable as well as a fresh salad vegetable. Spinach is cold hardy and can with-stand freezing temperatures. This makes it valuable as a fresh vegetable gardeners can enjoy during win-ter. Spinach can stay in the field for a long time. One planting easily can provide spinach for 10-12 weeks.
Spinach is planted after the weather cools in the fall. Plantings made during times of warm tempera-ture germinate poorly. Spinach can be planted in late September through December.
Plantings made in late September to October are ready to harvest in late November through Feb-ruary/March, and plantings made in November and January are harvestable in March, April and early May. Once the weather gets hot and the days become longer, spinach tends to bolt and develop seed stalks. Once spinach bolts to seed, the quality of the product deteriorates.
Gardeners are encouraged to obtain fresh spinach seeds. Fresh seeds germinate well, which results in good stands. Spinach seed should be stored in the freezer. It should be sown rather thickly, one seed every 1-2 inches. Thick stands encourage upright-standing plants. The use of a hand push planter helps to obtain the desired spacing. Two drills of
spinach (spaced 12 inches apart) can be planted on a single row.
Both hybrid and open-pollinated varieties are rec-ommended. Spinach varieties are divided into savoy types (crinkle leaf) and smooth leaf types. Savoy types are preferred for salads while the smooth leaf types are used for cooking.
For preplant fertilizer, use 0.8-1 cup 13-13-13 or 8-24-24 per 10-foot row. Side-dress twice, once three to four weeks after planting and again three to four weeks after the first, with 0.4-0.8 cup calcium nitrate per 10-foot row. Side-dress after each cutting. Spin-ach is ready to harvest once the leaves become 2-4 inches tall.
The most common problems on spinach are worms and aphids. Treating worms and aphids as soon as you see them is the key to control.
SPINACHJames E. Boudreaux
Recommended spinach varieties. OPEN-POLLINATED VARIETIES
Bloomsdale Long Standing
HYBRID VARIETIES Melody – SavoyTyee – SavoySmooth leaf

55
STRAWBERRIESJames E. Boudreaux, Dale K. Pollet, Donald M. Ferrin and Sandra H. Benjamin
Strawberries can be grown in all parts of the state and have been an important crop for many years. Tangipahoa and Livingston parishes have been the traditional commercial production areas.
Strawberries in the home garden are difficult to produce. Gardeners must control diseases, insects, weeds and birds. The plants must be planted cor-rectly in a well-prepared site. Harvest of plug plants begins in late November, and harvest of bare-root plants begins in late February and lasts six to eight weeks.
VarietiesStrawberry varieties include:
■ Strawberry Festival – developed by the University of Florida. Earliest maturing variety, medium-long fruiting period, light red, medium to large berries, good quality, not susceptible to anthracnose fruit rot.
■ Camarosa – developed by the University of Califor-nia. Early, firm, high yields, long fruiting period, large and extra large berries, only fair quality, sus-ceptible to anthracnose fruit rot.
■ Camino Real – developed by the University of California. Later than Camarosa, produces large to extra large berries, firm, good-shaped fruit with good quality.
■ Chandler – developed by the University of Califor-nia. High yields, medium maturity, deep red berry, somewhat soft, good quality, very susceptible to the development of misshapen fruit, when blooming during times of low temperatures, susceptible to anthracnose fruit rot.
Source of PlantsThe production of strawberry plants in Louisiana
has become extremely difficult because of the inci-dence of crown rot. Few plants are produced in the state. Growers obtain plants from commercial nurser-ies in California, Michigan, Nova Scotia and Quebec. Plants from each source have unique characteristics.
■ California plants – plants without leaves with medium to late season maturity. These plants need to be planted in early October.
■ Nova Scotia plants – large, leafy plants with a medium to early season maturity. Fruit tends to concentrate at midseason.
■ Quebec plants – large, leafy plants with an early season maturity.
■ Michigan plants – medium-size plants with a large root system and early season maturity.
Individuals interested in strawberry plants should check with an LSU AgCenter county agent for a list of individuals and local nurseries handling plants.
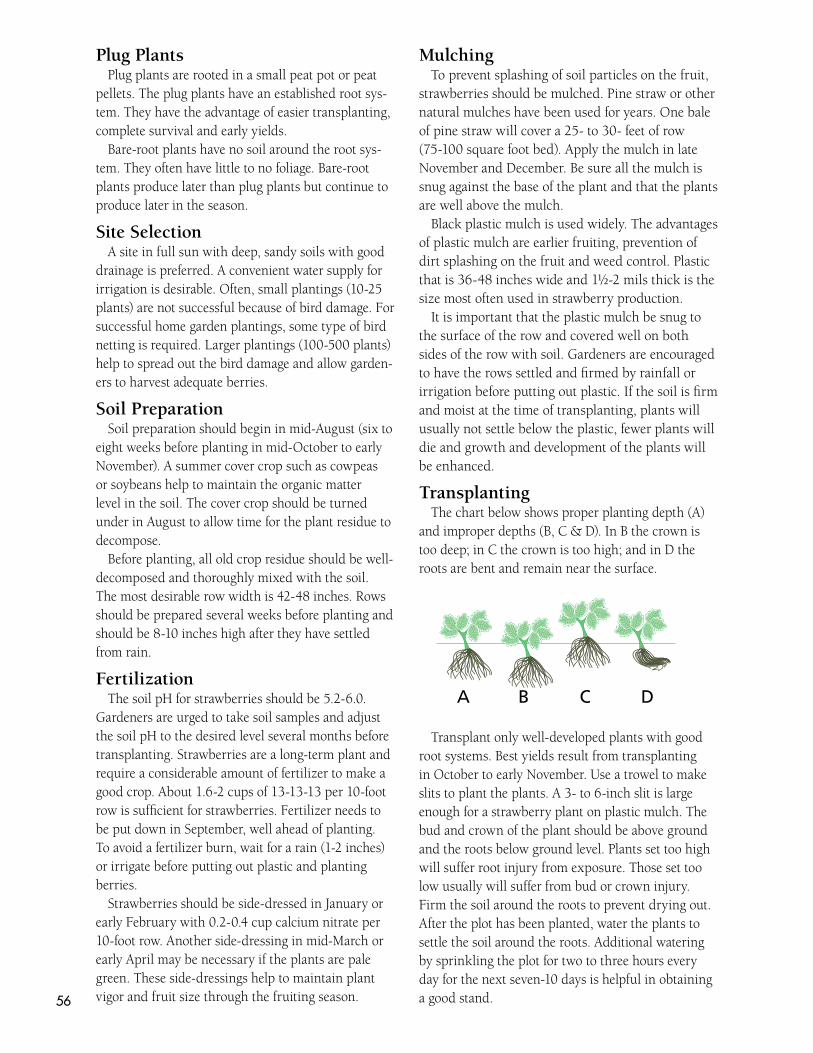
56
Plug Plants Plug plants are rooted in a small peat pot or peat
pellets. The plug plants have an established root sys-tem. They have the advantage of easier transplanting, complete survival and early yields.
Bare-root plants have no soil around the root sys-tem. They often have little to no foliage. Bare-root plants produce later than plug plants but continue to produce later in the season.
Site SelectionA site in full sun with deep, sandy soils with good
drainage is preferred. A convenient water supply for irrigation is desirable. Often, small plantings (10-25 plants) are not successful because of bird damage. For successful home garden plantings, some type of bird netting is required. Larger plantings (100-500 plants) help to spread out the bird damage and allow garden-ers to harvest adequate berries.
Soil Preparation Soil preparation should begin in mid-August (six to
eight weeks before planting in mid-October to early November). A summer cover crop such as cowpeas or soybeans help to maintain the organic matter level in the soil. The cover crop should be turned under in August to allow time for the plant residue to decompose.
Before planting, all old crop residue should be well-decomposed and thoroughly mixed with the soil. The most desirable row width is 42-48 inches. Rows should be prepared several weeks before planting and should be 8-10 inches high after they have settled from rain.
FertilizationThe soil pH for strawberries should be 5.2-6.0.
Gardeners are urged to take soil samples and adjust the soil pH to the desired level several months before transplanting. Strawberries are a long-term plant and require a considerable amount of fertilizer to make a good crop. About 1.6-2 cups of 13-13-13 per 10-foot row is sufficient for strawberries. Fertilizer needs to be put down in September, well ahead of planting. To avoid a fertilizer burn, wait for a rain (1-2 inches) or irrigate before putting out plastic and planting berries.
Strawberries should be side-dressed in January or early February with 0.2-0.4 cup calcium nitrate per 10-foot row. Another side-dressing in mid-March or early April may be necessary if the plants are pale green. These side-dressings help to maintain plant vigor and fruit size through the fruiting season.
MulchingTo prevent splashing of soil particles on the fruit,
strawberries should be mulched. Pine straw or other natural mulches have been used for years. One bale of pine straw will cover a 25- to 30- feet of row (75-100 square foot bed). Apply the mulch in late November and December. Be sure all the mulch is snug against the base of the plant and that the plants are well above the mulch.
Black plastic mulch is used widely. The advantages of plastic mulch are earlier fruiting, prevention of dirt splashing on the fruit and weed control. Plastic that is 36-48 inches wide and 1½-2 mils thick is the size most often used in strawberry production.
It is important that the plastic mulch be snug to the surface of the row and covered well on both sides of the row with soil. Gardeners are encouraged to have the rows settled and firmed by rainfall or irrigation before putting out plastic. If the soil is firm and moist at the time of transplanting, plants will usually not settle below the plastic, fewer plants will die and growth and development of the plants will be enhanced.
TransplantingThe chart below shows proper planting depth (A)
and improper depths (B, C & D). In B the crown is too deep; in C the crown is too high; and in D the roots are bent and remain near the surface.
A B C D
Transplant only well-developed plants with good root systems. Best yields result from transplanting in October to early November. Use a trowel to make slits to plant the plants. A 3- to 6-inch slit is large enough for a strawberry plant on plastic mulch. The bud and crown of the plant should be above ground and the roots below ground level. Plants set too high will suffer root injury from exposure. Those set too low usually will suffer from bud or crown injury. Firm the soil around the roots to prevent drying out. After the plot has been planted, water the plants to settle the soil around the roots. Additional watering by sprinkling the plot for two to three hours every day for the next seven-10 days is helpful in obtaining a good stand.

57
On single-planted rows, space plants 10-12 inches apart in the center of the row. On double-row-planted berries, space the plants 14-16 inches apart alternate-ly along the row with a 10-12 inch spacing between parallel rows. Double-set rows usually yield more ber-ries than single-set rows, and single-row plants pro-duce more berries per plant than double-row plants.
IrrigationThe strawberry is a shallow-rooted plant. Anyone
growing this crop should have irrigation for watering during establishing and fruiting. Sprinkler irrigation can be used as well as drip irrigation.
Row CoversRow covers made of light poly fabric can be placed
directly on top of the plants to protect the fruit and blooms from frost. The heavier the cover, the more protection these covers provide. Covers ½ to 1 ounce per square yard are the most popular. They trap heat during the day, pushing plant development and earli-er harvest. Covers should be put on when you decide to start saving blooms – generally anytime night tem-peratures drop below 40 degrees Fahrenheit. Remove them during the day to allow pollination and pest control, although covers can remain on for up to a week, if needed.
It is best to cover berries well before a hard freeze, taking advantage of the building up and trapping heat during the day to protect the berries from low tem-peratures at night.
Disease ControlSeveral leaf spots and fruit rots attack Louisiana
strawberries. Most leaf spots are caused by fungi. Leaf spot, leaf blight and leaf blotch are caused by fungi. These fungi occur early in the growing season and can defoliate the plants or severely restrict their production.
The most common fruit rots of strawberries in the home garden are gray mold and anthracnose. They are also caused by fungi.
Diseases in the home garden can best be controlled with a combination of sanitation and fungicidal sprays. The berries should be grown on raised beds with plastic mulch to reduce moisture and contact with the soil. Preventive sprays with Captan should be used routinely once the plants bloom and start setting fruit. Thorough coverage of the plants is nec-essary to control diseases in strawberries. Remove all diseased or damaged material from the garden.
Insect ControlThe two-spotted spider mite and the European
red mite are two of the common mite pests normally found on the plants during the middle to end of March through the rest of the fruiting season. The two-spotted spider mite does the most damage if not treated early. Look for very small greenish-yellow or deep red bugs under the leaves of the plants. A mag-nifying glass (10X power) is helpful in finding these mites. Watch for webbing and stippling patterns on the leaves.
Insecticidal soaps can be used as soon as you see mites. Thorough coverage of the underneath of the leaves is the key to controlling mites. Insecticidal soaps are fairly safe for the home gardener. Repeat as needed, but rinse the plants with water after the third application of soap. Kelthane is a commercial miticide and can be used on strawberries.
Slugs also are pests and can be managed with baits or traps. Place a jar lid in the soil near the plants, fill with beer or 1 teaspoon of baking yeast and 3 ounces of water. The slugs will climb in and drown. They also can be trapped with a hollowed grapefruit or cantaloupe half placed open side down. Remove as they fill with slugs. Diatomaceous earth can be spread around the plants. The sharp grains will cut the soft bodies of the slugs. Slug baits can be found in local garden shops. Dipel (Bacillus thuringiensis) can be used for caterpillars feeding on the plants.
Harvesting Harvest berries early in the morning when the
weather is cool. Fruit for home use is picked fully ripe and totally red. It should be pinched from the plant rather than pulled. Pinching allows the caps (calyx) to stay on the fruit and also provides a ½-inch stem attached to the fruit to allow handling the fruit without touching. A harvest every third day usu-ally is required for maximum yields of high-quality fruit. Rotten, deformed or damaged berries should be removed from the plant at each harvest. Remove the discarded berries from the field to prevent the spread of diseases.
Handle fruit gently at all times. Trying to hold too many fruit at one time will result in bruising. Har-vested strawberries should be placed, not dropped, in the container. Berries should be refrigerated at 32 F to 34 F as soon after harvest as possible.

58
Eating an ear of boiled sweet corn right out of the garden is one of the greatest rewards for vegetable gardeners. Sweet corn is the favorite vegetable for most children.
Gardeners need rather large areas in full sun to be successful with sweet corn. A yield of eight to ten ears may be expected per 10-foot row. Three rows of sweet corn need to be planted side by side to ensure pol-lination and well-filled ears. Sweet corn has male (tas-sels) and female flowers (silks) on the same plant. The wind moves the pollen from the tassels to the silks. The absence of kernels on the cob is a sign of a lack of pollination. Sweet corn grown in the shade tends to fall over before the ears mature.
Sweet corn is a warm-season crop. It can be planted from early March through April. March plantings reach maturity in June, and April plantings are har-vested in July. Gardeners are encouraged to plant sweet corn in March to take advantage of reduced worm problems and the timely rains in May when the ears are filling. A continuous supply of sweet corn can be obtained by making plantings every two or three weeks. Varieties with different maturity dates (early, midseason and late) can be planted on the same date to provide a harvest of sweet corn for an extended period.
High yields of sweet corn are directly linked with good stands. Two or three seeds should be planted 8 to 10 inches apart. After emergence, thin the plants to one plant per hill. The use of a hand-pushed planter makes the planting operation easier and helps obtain the desired spacing. Sweet corn can be planted on rows as narrow as 30 inches. On wide rows (60 -72 inches), two drills spaced 12 to 18 inches apart can be planted on a single row.
In the past several years, much improvement has been made in the development of sweet corn variet-ies. Three types of sweet corn are now available to the gardener. The normal sugary (SU) sweet corn variet-ies are the traditional type of sweet corn. These vari-
eties possess a gene that allows the kernels to accu-mulate sugars instead of starch in the development of ears. They have a creamy texture that provides the good sweet corn taste. The sugars in these varieties are rapidly converted into starch if not cooked the day of harvest.
Sugar-enhanced (SE) varieties have high sugars with a creamy texture. The sugar-enhanced varieties will hold their quality longer that normal sweet corn.
Supersweet (SH) varieties have a gene which gives the ears high sugar content. The supersweet varieties do not have a creamy texture. The seeds of the SH varieties are shriveled and should be handled careful-ly. The supersweet varieties must be protected from pollination with other types of corn to maintain the high sugar content in the ears. Protection is accom-
Recommended sweet corn varieties
YELLOW WHITE BICOLORSeneca Horizon SU 8101 Summer Sweet SH Lancelot SEGold Queen SU Silver Queen SU Precious Gem SEHoney Select SE, SH
SWEET CORNJames E. Boudreaux and Thomas J. Koske
SE–Sugar-enhanced SH–Supersweet SU–normal sugary

59
plished by planting supersweet varieties 25-200 feet from other types of sweet corn. Planting the super-sweet varieties 14 to 21 days after other plantings also will ensure that pollination with other types does not occur. The conversion of starch to sugars is delayed in supersweet varieties, thus extending their shelf life.
Breeders have developed improved supersweet vari-eties that have higher sugar content than the original supersweets with a good texture. Xtra-sweet, Ultra-sweet and Triplesweet are names of the latest devel-opments in sweet corn varieties. These new types of sweet corn combine the genetics of SH, SE and SU genotypes. These varieties are high in sugars, hold well in storage and have a tender texture.
Gardeners are encouraged to try the new types of sweet corn. These varieties have very good eating quality and longer shelf life than the traditional sweet corn varieties.
Corn is a heavy user of nutrients. Apply 1.2-1.4 cups of 8-24-24 or 13-13-13 per 10-foot row before planting. Make two side-dress fertilizer applications of 0.4-0.8 cup calcium nitrate per 10-foot row. The first side-dressing is made when the corn is about 12 inches tall and another when 24 inches tall.
The most critical time for moisture for sweet corn is during the silking process. This is the time when the kernels are pollinating and developing on the ear. Sweet corn needs moisture (1 inch of rain) every five to seven days from the time the silks develop until they
turn brown. Any moisture stress at this time will pre-vent the development of kernels on the tip of the ear.
The best time to harvest sweet corn is in the cool of the morning. Corn is ready to pick once the silks have begun to dry and turn brown. The ears should feel firm and full. Shuck an ear and puncture a few kernels on the ears with your thumb nail. The juice from a mature ear of corn will be milky white, while on an immature ear, the juice will be clear. An over-mature ear will have a doughlike juice, and the ker-nels will be shriveled.
The sugars in sweet corn start turning to starch as soon as the ears are picked. Sweet corn should be iced as soon as it is picked to preserve its high quality.
The biggest insect problems on corn are worms that feed on kernels on the tip of the ear. Many times a spray application when the corn plant starts to develop a tassel will reduce worm damage. Worm-free corn requires an insecticide treatment every two or three days from the time the silks emerge until they turn brown. It is important that the silks of the ears be covered by the spray.
An ear of sweet corn is a favorite treat for raccoons and deer. Many times an electric fence or tall wire fence is necessary to protect sweet corn from wildlife.
The practice of removing the sucker shoots that develop at the base of the corn plant is not neces-sary — it once was felt that removing the suckers enhanced the development of ears.

60
Sweet potatoes (or southern yams) are a popular vegetable in large southern gardens. They require plenty of room for the vines to run, a relatively light-textured soil and only a modest amount of fertilizer.
Beauregard is the predominant variety now grown in Louisiana, and it is the most commonly available seed or plants. Seed or plants of the older varieties such as Porto Rico and Jewel often are difficult to find but still produce well.
In midspring, build a fairly high bed in which to transplant slips. Soils of low to medium fertility will require 4-5 pounds of a complete fertilizer such as 8-24-24 or similar per 100-foot row. Soils high in organic matter or highly fertile probably will require no fertilizer. Overfertilization, especially with nitro-gen, causes the plants to produce an abundance of vines and few potato roots. A side-dressing of fertil-izer generally is not advised.
Transplant slips into the garden beginning in late April in South Louisiana and from the first of May through June in North Louisiana. An ideal transplant is 12-14 inches long with five or six leaves, a strong stem and no roots attached. Using cut plants, rather than pulled plants with a root system, helps to ensure against the transfer of several diseases from the plant bed to the garden. It also helps prevent the transfer of the sweet potato weevil.
Although the cuttings don’t have roots, they will develop roots quickly if planted in warm soil and watered. Place each transplant about 4 inches deep. Be careful to leave the terminal buds above ground. Space the plants 12-14 inches apart in the row, and space rows at least 3-4 feet apart. Build a fairly high bed on which to transplant.
Keep the soil moist in the early part of the season to encourage establishment of a good fibrous root sys-tem. Storage roots should begin to “set” or immedi-ately after transplanting. After the roots begin to set, keep the soil moist by irrigating during dry periods. Watering helps to increase the size of the roots that have set. Be careful not to keep the soil too wet, since this can lead to rotting of the roots.
Sweet potatoes can be harvested any time after the hills have produced usable potatoes, usually 90-120 days after transplanting varieties. If the potatoes are allowed to remain in the soil, they will continue to grow and can get oversized. Most of the sizing takes place in the last two to three weeks, so check often. Don’t allow dug potatoes to be exposed to the sun for more than an hour. A good practice is to cover the potatoes with vines. Harvest before frost to avoid rot.
Sweet potatoes are not very sweet or moist when first dug. It will take two months before they will have the best taste and texture when baked. Freshly harvested potatoes can be candied or used in pies.
Cure roots by storing in a warm (85 F), humid place for a week. After curing, store potatoes about 58 F. Storage in refrigeration will cause the potatoes to develop a hard center. Stored at a warmer tempera-ture, they begin to sprout, shrivel and become stringy and pithy.
Sweet potatoes are susceptible to several diseases that primarily affect the roots. The sweet potato wee-vil can be a problem, too. Most of these problems can be overcome by good sanitation and cultural practic-es. These include the use of disease- and weevil-free slips for transplants, rotation of the crop from year to year and the use of vine cuttings without roots (slips) to transplant. Weevil control in many areas of South Louisiana may still be very difficult.
The most common problems encountered in grow-ing sweet potatoes are soil insects such as white grubs, sweet potato weevils and wire worms; over-fertilization; poor soil drainage and low rows; and too much shade. Gardeners who are aware of these potential problems and who plan around them should be able to produce a bushel of sweet potatoes on 25-30 feet of row.
SWEET POTATOESThomas J. Koske and Don LaBonte

61
Tomatoes are the most popular vegetable in the home garden. The taste of a vine-ripe tomato is one of the main reasons individuals grow a garden. Tomatoes require little space when staked and tied and can produce up to 5 pounds of fruit per plant. Tomatoes require full sun for high yields but will do well in the shade as long as they get some sun dur-ing the day.
Gardeners can provide a continuous supply of fresh tomatoes by making several plantings through the year. A spring, summer and fall crop can be planted. The spring crop generally is the most successful. The summer and fall plantings are made with heat-set varieties, which set fruit dur-ing hot weather. The summer and fall plantings can encounter high temperatures, rainy weather, droughts and high insect and disease pressure. It is not uncommon to lose the crop on summer and fall tomatoes two years out of five years.
Tomatoes are tender plants and should be planted when the danger of frost has passed. The spring crop is planted in March and April for production in late May, June and July. The summer crop is planted in May and June for production in late July, August and September. The fall plantings are made in July and early August for production in October, November and early December.
It requires eight to 10 weeks to produce a tomato transplant for the spring, but only four to six weeks for fall and summer plantings due to the warmer temperatures. (See the section on transplants for more information.)
For preplant fertilizer, use 1.2-1.4 cups of 8-24-24 or 13-13-13 per 10-foot row for tomato. Side-dress tomatoes at the first cluster with 0.4-0.8 cup calci-um nitrate (CaNO3) per 10-foot row and again when the third cluster of fruit is set.
Tomatoes on plastic mulch can be side-dressed by punching a 1-2 inch deep hole with a broom stick through the plastic on the edge of the row between the plants. The hole should be 6 to 8 inches away from the plant. Generally ½ teaspoon of calcium nitrate is put in each hole.
Side-dressing also can be done by injecting the fertilizer through the drip lines by using an injec-tion device. One-tenth cup of calcium nitrate per 10-foot row per week is injected from bloom and fruit set three to four weeks after planting and con-tinue for eight to nine weeks. (See the sections on irrigation and fertigation for more information.)
Tomatoes are planted 16 to 18 inches apart on a row 6 to 8 inches high and 4 to 6 feet wide. Plastic mulch with drip irrigation and fertigation should be used on tomatoes in large gardens.
Recommended tomato varieties
Spring Crop Indeterminate
Spring Crop Determinant
Summer and Fall Tomato Determinate & Heat-Set
Better Boy Amelia (TSWV* resistant) Florida 91Big Beef Bella Rosa (TSWV* resistant) Phoenix
Champion Carolina Gold Sun LeaperCupid Celebrity Solar SetCreole Crista- TSWV resistant SunmasterJet Star Mountain Fresh
Sun Gold Mountain SpringSweet Million
Terrific
TOMATOES James E. Boudreaux and Thomas J. Koske
*TSWV—tomato spotted wilt virus
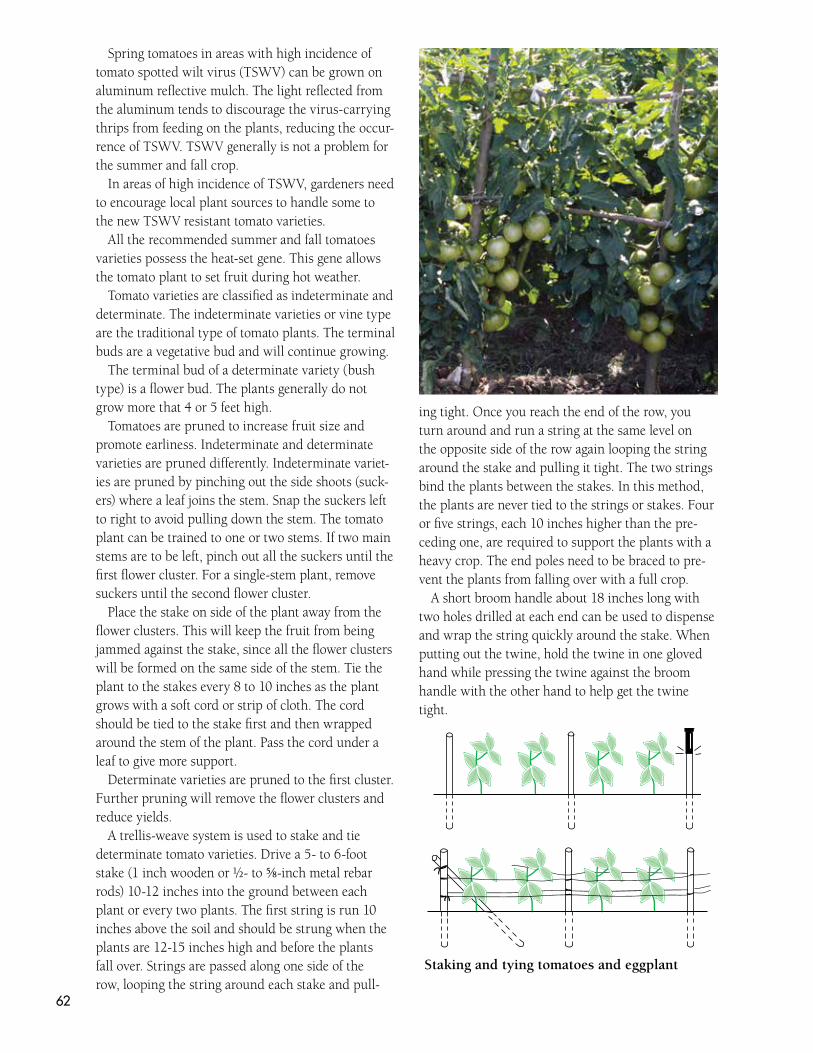
62
Spring tomatoes in areas with high incidence of tomato spotted wilt virus (TSWV) can be grown on aluminum reflective mulch. The light reflected from the aluminum tends to discourage the virus-carrying thrips from feeding on the plants, reducing the occur-rence of TSWV. TSWV generally is not a problem for the summer and fall crop.
In areas of high incidence of TSWV, gardeners need to encourage local plant sources to handle some to the new TSWV resistant tomato varieties.
All the recommended summer and fall tomatoes varieties possess the heat-set gene. This gene allows the tomato plant to set fruit during hot weather.
Tomato varieties are classified as indeterminate and determinate. The indeterminate varieties or vine type are the traditional type of tomato plants. The terminal buds are a vegetative bud and will continue growing.
The terminal bud of a determinate variety (bush type) is a flower bud. The plants generally do not grow more that 4 or 5 feet high.
Tomatoes are pruned to increase fruit size and promote earliness. Indeterminate and determinate varieties are pruned differently. Indeterminate variet-ies are pruned by pinching out the side shoots (suck-ers) where a leaf joins the stem. Snap the suckers left to right to avoid pulling down the stem. The tomato plant can be trained to one or two stems. If two main stems are to be left, pinch out all the suckers until the first flower cluster. For a single-stem plant, remove suckers until the second flower cluster.
Place the stake on side of the plant away from the flower clusters. This will keep the fruit from being jammed against the stake, since all the flower clusters will be formed on the same side of the stem. Tie the plant to the stakes every 8 to 10 inches as the plant grows with a soft cord or strip of cloth. The cord should be tied to the stake first and then wrapped around the stem of the plant. Pass the cord under a leaf to give more support.
Determinate varieties are pruned to the first cluster. Further pruning will remove the flower clusters and reduce yields.
A trellis-weave system is used to stake and tie determinate tomato varieties. Drive a 5- to 6-foot stake (1 inch wooden or ½- to ⅝-inch metal rebar rods) 10-12 inches into the ground between each plant or every two plants. The first string is run 10 inches above the soil and should be strung when the plants are 12-15 inches high and before the plants fall over. Strings are passed along one side of the row, looping the string around each stake and pull-
ing tight. Once you reach the end of the row, you turn around and run a string at the same level on the opposite side of the row again looping the string around the stake and pulling it tight. The two strings bind the plants between the stakes. In this method, the plants are never tied to the strings or stakes. Four or five strings, each 10 inches higher than the pre-ceding one, are required to support the plants with a heavy crop. The end poles need to be braced to pre-vent the plants from falling over with a full crop.
A short broom handle about 18 inches long with two holes drilled at each end can be used to dispense and wrap the string quickly around the stake. When putting out the twine, hold the twine in one gloved hand while pressing the twine against the broom handle with the other hand to help get the twine tight.
Staking and tying tomatoes and eggplant

63
The main attraction of heirloom varieties is the unique taste of the fruit. Production of heirloom tomatoes is somewhat different than that of the standard tomato varieties. Fruit set and yields are considerably less in many heirloom varieties than standard hybrid varieties. Most of these varieties are very tall, indeterminate plants and require tying and tall stakes. Many of the heirloom varieties do not have resistance to fusarium wilt.
It is interesting to notice such things as fruit core length, blossom scars, stem scars, catfacing, fruit
cracks and fruit firmness on heirloom varieties — traits that are no longer a concern in modern varieties because of improvements made in the development of tomato varieties.
After-harvest handling of heirloom tomatoes pres-ents the biggest problem to the grower. Many heir-loom varieties are very soft and subject to cracking at this stage.
Heirloom varieties that can be considered for home garden production are Cherokee Purple, Striped German, German Pink and Red Brandywine.
TOMATOES, HEIRLOOM VARIETIES James E. Boudreaux, Kathryn Fontenot and Charles Johnson
Caging is another method of supporting tomatoes. The tomato cages will support the plant and keep the fruit off the ground without tying. Tomato cages gen-erally are made of heavy wire bent in a circle 16 to 18 inches wide and 4 to 6 foot high. The cage is put over the plant and stuck into the ground. (The plant grows inside the cage with the leaves supporting themselves on the wires.) The cage should be tied to a stake driv-en right next to the cage. The stake anchors the cage during times of high winds. The cage can be wrapped with a light poly-fabric row cover material to protect the plant from frost in both early spring and late fall.
Moisture stress, especially during the blooming and fruit-setting stage, will decrease the yields and size of tomatoes. The correct use of drip irrigation provides an ideal soil moisture level for plant growth. (See the section on drip irrigation for more information.)
Tomatoes are harvested when they start showing red color (breaker stage) until the fruit is completely red (vine ripe). Tomatoes can be harvested every three to four days for four to five weeks. Tomatoes picked in breaker stage will develop full color when held at room temperature for a few days. Tomatoes are subject to chilling injury in the refrigerator. Toma-
toes should only be put in the refrigerator one or two hours before serving.
Blossom end rot (BER) can be a major problem on tomatoes in the home garden. It is caused by lack of calcium, too much nitrogen, moisture stress and wet soil conditions. Correcting the soil pH and calcium levels with lime and the use of calcium nitrate, plastic mulch and drip irrigation will just about eliminate BER in tomatoes.
Fruit cracking occurs when a large amount of water is absorbed by the fruit during the ripening process. Fruit cracks ruin the appearance of tomatoes and provide a site for the development of diseases and insects after harvest. (The use of crack resistant vari-eties, plastic mulch and drip irrigation will maintain even moisture and reduce the amount of cracking in tomatoes.)
The biggest problems on tomatoes are foliar diseas-es, worms and stinkbugs. Spraying a fungicide and an insecticide every seven to 10 days starting at fruit set of the first cluster and continuing until harvest will ensure healthy foliage and reduce the insect prob-lems. Common fruit disorders are catfacing, blotchy ripening and sun scald.

64
WATERMELONS James E. Boudreaux
Watermelons are a good addition to a garden if sufficient space is available. Each watermelon plant requires a 10- by 10-foot space. Watermelons are a tender crop and should not be planted until danger of frost has passed. Watermelons will set and pro-duce fruit during the hot summer months.
Watermelons can be planted from mid-March to late June. Watermelons for the 4th of July must be planted in mid-March to early April, while Labor Day melons need to be planted in late May to early June.
Watermelons do best on deep, sandy, well-drained soils. Both the yield and quality of the melons will be reduced on heavy soils with poor internal drainage.
A 6- to 8-inch high row by 6- to 8-feet wide is required for watermelons. Many times gardeners plant watermelons on a row and skip one or two rows to provide sufficient space. The use of plastic mulch and drip irrigation is recommended. The mulch helps to protect the fruit from rotting, controls weeds and promotes early fruit production.
The correct use of drip irrigation and fertigation ensures good yields of large, high-quality melons. White plastic should be used when planting after early May. Watermelons are an excellent crop to plant on plastic mulch left over from a spring crop. On plantings made during hot weather, black plas-
tic should be painted white to lower the tempera-ture. (See the section on plastic mulch for more information.)
Watermelons can be direct-seeded or transplanted. Two to three watermelon seeds can be planted in hills spaced 4-6 feet apart. Transplanting watermel-ons has become popular in recent years. Transplants can be justified by the high cost of hybrid seeds, the assurance of a good stand and earlier maturity. It takes three to four weeks to make a transplant. Watermelons are ready to transplant as soon as a true leaf develops. Transplants more than five weeks old become stunted, hard to handle and may fail to recover from transplanting. Generally, one or two seeds are placed in a 1- to 2-inch plastic cell pack. (See the section on transplants for more informa-tion.) Watermelon transplants generally are set out on plastic mulch with drip irrigation at 2- to 4-foot spacings.
Gardeners are encouraged to try some of the hybrid melons. Hybrid melons are earlier in maturity, more uniform in size (15-25 pounds) and better quality than many of the open-pollinated varieties.
Seedless watermelons are hybrid triploids plants that do not produce true seeds. They produce thin, whitish edible seed-like structures. They do not produce viable pollen and require a “seeded variety”

65
Recommended watermelon varieties
Long Striped Type (15-30 POUND MELONS)
LONG DARK GREEN STRIPED TYPE (15-20 POUND MELONS)
OBLONG GREEN STRIPED TYPES(20-25 POUND MELONS)
Jubilee, Jubilee IIRoyal Jubilee (hybrid) JubilationSummer Flavor 710 (hybrid)
Sangria (hybrid)Desert Storm (hybrid)Patriot (hybrid)Summer Flavor 720 (hybrid)Legacy
Royal Sweet (hybrid)Royal Star (hybrid)Regency (hybrid)Stars N Stripes (hybrid) Starbrite (hybrid)Big Stripe (hybrid) Jamboree (hybrid)Fiesta (hybrid)
Round, Light Green Stripe (15-20 POUND MELONS )
ICE BOX TYPES (5-12 POUND MELONS)
YELLOW/ORANGE FLESH (15-20 POUND MELONS)
Dixie LeeLouisiana Sweet
Sugar BabyMickylee
TendersweetDesert KingOrange Glo
SEEDLESS MELONS (10-15 POUND MELONS) Crimson Trio – round shape, red flesh, medium-green rind with dark stripes Laurel – round shape, red flesh, medium-green rind with dark stripesMillionaire – oval shape, light-green rind with dark stripes
Nova – round shape, red flesh, green rind with dark stripes
to be planted close by and bees to provide pol-len. Seedless watermelon seeds are expensive and these varieties are grown from transplants. Extra care must be provided for successful germination, stand establishment and growth of seedless melons. The seedcoat on seedless melons is thick and often adheres to the seedling, causing distortion or death. The seed should be placed with the point root end up at a 45- to 90-degree angle to reduce this prob-lem. The seed coat needs to be removed by hand on the young seedlings. It is best to grow seedless watermelons on plastic mulch with drip irrigation.
For preplant fertilizer, use 0.4-0.8 cup of 8-24-24 or 13-13-13 per 10-foot row. Side-dress watermel-ons three to four weeks after planting when the vines begin to run with 0.1 cup calcium nitrate per 10-foot row.
Side-dressing also can be done by injecting the fertilizer through the drip line by using an injection device. One-tenth cup calcium nitrate per 10-foot row per week is injected starting at bloom and fruit set (three to four weeks after planting) and continue for
eight to nine weeks. (See the sections on drip irriga-tion and fertigation for more information.)
Watermelons have male and female flowers and require bees for pollination. Delay spraying of insecticides on watermelons until late afternoon or early evening after the bees have left the field and returned to the hive.
Determining whether a watermelon is ripe is not easy. Experienced gardeners look for a combination of signs to determine ripeness.
■ Hollow sound when the melon is thumped or patted.
■ Ground spot on belly of the melon begins to turn yellow.
Watermelons should be cut from the vine with a 2- to 3-inch stem. Place the melon in a shaded area after cutting to avoid sunburn. The biggest problems on watermelons are foliar diseases, cucumber beetles and worms. Spraying a fungicide every 10 to 14 days starting when the vines begin to flower and set fruit until harvest will ensure healthy foliage. Treating cucumber beetles and worms when you first see them is the key to controlling these pests.

66

67
Weed control is important to the success of the garden. If weeds are not controlled early, they can reduce both yield and quality of your garden veg-etables. They not only compete for fertilizer, water and sunlight, but they can make pest control, har-vesting and other work in the garden difficult and uncomfortable.
Begin controlling weeds in the home garden by getting rid of johnsongrass, bermudagrass, nutsedge (coco grass), morning glory and tie vines. These weeds are difficult to control and will take over a gar-den quickly. Spraying Roundup herbicide as soon as the final harvest is made in the spring/summer gar-den will kill the existing weeds in the garden. After the weeds die, the garden can be cleaned up and prepared into rows. Allow the weeds to come up and grow to 3-4 inches tall; then make another applica-tion of Roundup. Once the weeds die, the garden can be planted.
Hoeing or cultivating the garden is the most popular means of controlling weeds. All hoeing and cultivation should be done when the weeds are 2-3 inches high. Eliminate weeds when they are small, before they compete with the vegetable plants. Make a special effort to see that no weed plants go to seeds. The garden needs to be hoed every 10-14 days or after a rain from the time of planting until just before harvest. Done at this stage the task is quick and easy to accomplish and very effective in reducing the competing weeds around the small plants. A hoe, mechanical tiller or a hand push plow can all be used to cultivate the garden. Be careful to avoid cutting the
roots of the vegetable plants during cultivation. This is especially important as the plants become bigger and are near harvest.
Plastic mulch is quite effective in controlling weeds in the garden. The weeds between the rows will need to be controlled by cultivation, or leaves can be used to mulch the middles to control weeds. (Look in the section on plastic mulch for more details.)
A thick layer (4-6 inches deep) of leaves, pine straw and hay may be used to control weeds in the garden. Natural mulches not only control weeds but also pre-vent moisture loss and keep the fruit and plant free of splashing soil to help control diseases.
Be aware that mulches, especially the one that contain large amount of woods chips and bark may tie up the fertilizer in the garden causing reduction in growth and yields. When using mulches, always remember to increase the amount of preplant and side-dress fertilizers by 20 percent to 30 percent to overcome the possibility of tying up the fertilizer in the garden. This is important the year that you use the mulch as well as the year after you use the mulch. Avoid mulches that contain weed seeds and plant parts (bermudagrass stems and nutsedge tubers) that will sprout. These mulches can introduce weeds into a clean garden.
The availability of herbicides in small containers is limited to trifluralin (Treflan and other tradenames) and sethoxydin (Poast and other tradenames). Very few home gardeners use any herbicides.
Treflan is a preemergence herbicide that is applied to the soil surface before planting snap beans, but-ter beans, southern peas, English peas, okra, carrots, mustard, turnips and collards or transplanting of tomatoes, eggplants, peppers, cabbage, broccoli, cau-liflower and Brussels sprouts. Treflan prevents annual grasses and some broadleaf weeds from sprouting. Treflan must be tilled or incorporated into the soil 1 inch deep. Another means of incorporating Tre-flan is to sprinkle irrigate (1-2 inches) immediately after application. (See table for more details.) Treflan cannot be used on sweet corn, cucumbers, canta-loupes, squash and watermelons.
Poast is a post-emergence herbicide that is applied over the top of vegetable crops to control young annual and perennial grass plants. Poast should be applied 20-30 days before harvest, depending upon the different vegetables. Poast cannot be used on sweet corn, which is a grass.
WEED CONTROL IN HOME GARDENSJames E. Boudreaux
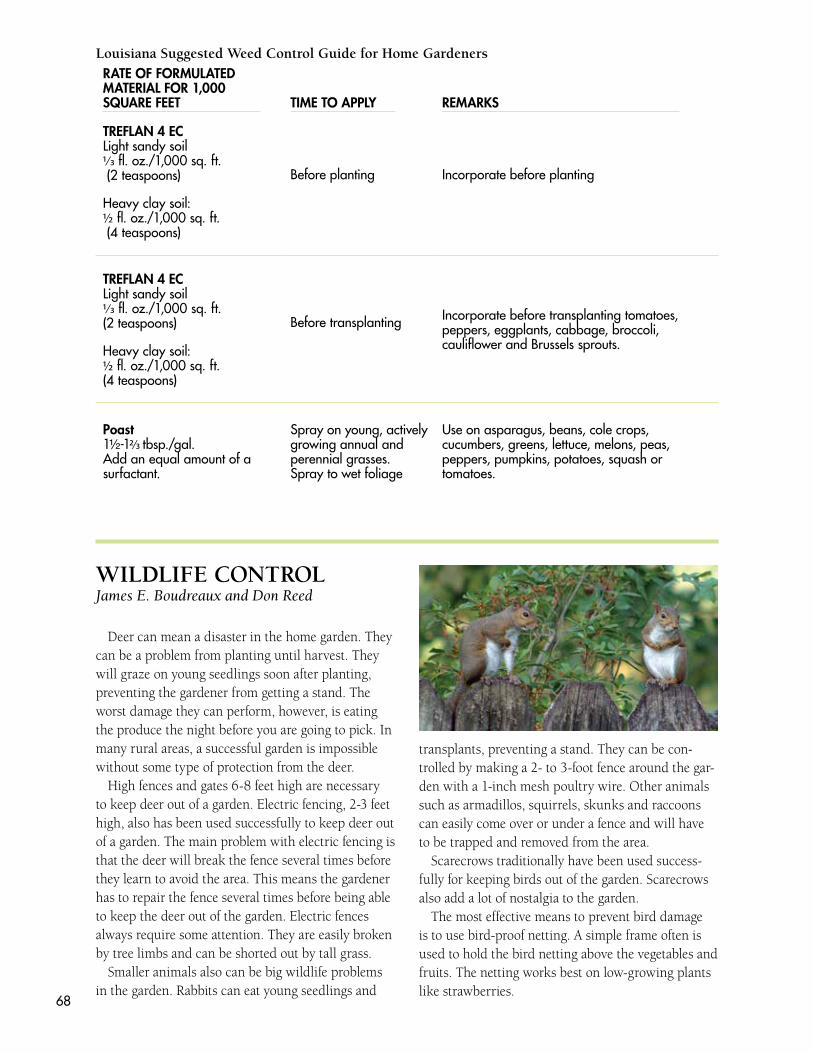
68
Louisiana Suggested Weed Control Guide for Home Gardeners
RATE OF FORMULATED MATERIAL FOR 1,000 SQUARE FEET TIME TO APPLY REMARKS
TREFLAN 4 ECLight sandy soil 1∕3 fl. oz./1,000 sq. ft. (2 teaspoons)
Heavy clay soil:½ fl. oz./1,000 sq. ft. (4 teaspoons)
Before planting Incorporate before planting
TREFLAN 4 ECLight sandy soil 1∕3 fl. oz./1,000 sq. ft. (2 teaspoons)
Heavy clay soil:½ fl. oz./1,000 sq. ft. (4 teaspoons)
Before transplanting Incorporate before transplanting tomatoes, peppers, eggplants, cabbage, broccoli, cauliflower and Brussels sprouts.
Poast1½-12⁄3 tbsp./gal.Add an equal amount of a surfactant.
Spray on young, actively growing annual and perennial grasses.Spray to wet foliage
Use on asparagus, beans, cole crops, cucumbers, greens, lettuce, melons, peas, peppers, pumpkins, potatoes, squash or tomatoes.
WILDLIFE CONTROLJames E. Boudreaux and Don Reed
Deer can mean a disaster in the home garden. They can be a problem from planting until harvest. They will graze on young seedlings soon after planting, preventing the gardener from getting a stand. The worst damage they can perform, however, is eating the produce the night before you are going to pick. In many rural areas, a successful garden is impossible without some type of protection from the deer.
High fences and gates 6-8 feet high are necessary to keep deer out of a garden. Electric fencing, 2-3 feet high, also has been used successfully to keep deer out of a garden. The main problem with electric fencing is that the deer will break the fence several times before they learn to avoid the area. This means the gardener has to repair the fence several times before being able to keep the deer out of the garden. Electric fences always require some attention. They are easily broken by tree limbs and can be shorted out by tall grass.
Smaller animals also can be big wildlife problems in the garden. Rabbits can eat young seedlings and
transplants, preventing a stand. They can be con-trolled by making a 2- to 3-foot fence around the gar-den with a 1-inch mesh poultry wire. Other animals such as armadillos, squirrels, skunks and raccoons can easily come over or under a fence and will have to be trapped and removed from the area.
Scarecrows traditionally have been used success-fully for keeping birds out of the garden. Scarecrows also add a lot of nostalgia to the garden.
The most effective means to prevent bird damage is to use bird-proof netting. A simple frame often is used to hold the bird netting above the vegetables and fruits. The netting works best on low-growing plants like strawberries.

69
BENEFICIAL INSECTS/ORGANISMS Dale K. Pollet and Alan L. Morgan
Beneficial insects are grouped in four categories: predators, parasites, biologicals and pollinators. Predators have the flashy names such as velvet ants, assassin bugs, yellow jackets, bald-face hornets, lady beetles, lace wings, dragon flies, fire ants, syrphid flies, robber flies and caterpillar hunters. Parasites have more technical names like braconid wasp, ich-neumonid wasp, tachinid flies, Eulophids and chal-cids, to name a few. Biologicals’ names vary, such as Bt (Bacillus thuringiensis), milky spore disease, spinosad, Dipel, Thuricide, xentari, Extinguish, Esteem, logic or Knack, but all are either bacterial-viruses or growth regulators used to manage pest insect populations. Pollinators are extremely ben-eficial because they help produce the food we eat either directly or indirectly. These include hon-eybees, bumble bees, carpenter bees, some flies, beetles and butterflies.
No matter which category they fall into, for “beneficials” to function properly they require that a host be available. The predators, parasites and biologicals need to have some quantity of hosts present to establish their population or infection. It is unwise at any time to purchase any of these to assist in your yard or garden without having some-thing for them to feed on.
Predators work by feeding directly on the host or hosts and consuming several of them to complete development or to reproduce and continue manag-ing the existing populations. In most cases, both the immature or developing stage and the adult feed on the hosts. Parasites, on the other hand, infest the
host and develop on or in a single host. Usually a single egg is laid in the host and either a single larva develops or the egg may divide several times and numerous adults may emerge from a single host. Bacteria and viruses infect a host, and the organ-isms feed on the host and multiply within it. Infected material can be collected and stored and the organ-ism allowed to multiply. Then it can be mixed in solution and reapplied to the host when another infestation of the pest occurs. The growth regulator stops the immature pest from developing or steril-izes the adults so they cannot reproduce. In either case, the pest is managed safely and efficiently. The pollinators help us produce the foods we eat, and the other beneficials protect the crops.
Beneficials are not always on the side where we want them to be, however. Wasps, yellow jackets, fire ants, some assassin bugs and all bees can sting. In many situations, when they find a good food source, they tend to nest in or around these areas. Due to their aggressive behavior and vicious stings, they are not welcome when their nesting sites interfere with our lifestyles. Even some parasites can be a problem when they attack other parasites or when they infest another organism grown for fun and profit. The little parasite that feed on the tomato horn worm also parasitizes the catalpa worm, which makes it a pest. The fire ant or any wasp or bee that stings someone, no matter how good, is a problem in that situation. It makes no difference how many insects it eats or how many flowers it pollinates, it is its effect, at that moment, that most people remember.
Insects are a fact of life in most home vegetable gardens, especially in the South. The home gardener can employ several integrated pest management (IPM) practices to reduce insect problems. Integrated pest management is the name given to the practice of using a combination of treatment methods to control insects in a garden. Methods other than chemical control are used in combination with chemical con-trol. Nonchemical control strategies include cultural,
mechanical and biological control methods as well as the practice of good sanitation.
Other methods and practices that a vegetable gar-dener should be aware of that would be valuable in managing insects in the garden include the following:
■ Always plant varieties that are recommended for the area, and plant them at the proper time for the best growth. Plants can be more susceptible to some soil insects if planted too early when the soil
INSECT MANAGEMENT IN THE HOME VEGETABLE GARDENDale K. Pollet and Alan L. Morgan

70
Several types of insecticides are available for home vegetable gardeners. Chemical controls are divided into several classes: botanical insecticides, horticul-tural oils, biological or microbial control insecticides, insecticidal soaps, synthetic insecticides and pesticide formulations
Botanical InsecticidesBotanical insecticides contain naturally occurring
toxicants derived from plants. Botanical insecticides include pyrethrums, rotenone, sabradilla, nicotine and neem.
Pyrethrum is derived from the flowers of certain chrysanthemums. Upon contact, pyrethrum provides a quick knockdown of targeted pests. It causes rapid paralyses and apparent death of the insect, but many insects recover and continue on unless the pyrethrum is used in combination with a synergist or other poi-son. Pyrethrum provides control for up to one day
and is most effective against soft-bodied insects such as aphids.
Rotenone is extracted from the roots of Derris plants. This general garden insecticide is highly toxic to fish and insects and moderately toxic to mammals. Rotenone acts slowly and is broken down in sunlight and air in about a week.
Sabradilla is made from the seeds of a lilylike plant and acts as both a contact and stomach poison for insect pests. It is not very toxic to mammals but can cause eye and respiratory tract irritations.
Nicotine, in its pure form, is an extract from tobac-co and is highly toxic to warmblooded animals. Dusts can irritate the skin and are not normally used in gar-dens. It degrades quickly and can therefore be used on many food plants close to harvest.
Neem is a complex of oil extracts derived from leaves or seeds of neem trees. The active ingredient, azadirachtin, combats a variety of insect pests.
INSECTICIDES/CHEMICAL CONTROLDale K. Pollet and Alan L. Morgan
is too cool. Vegetable transplants should be checked and inspected for insects before they are purchased to ensure they are not infested with an insect pest.
■ Consider rotating the location of the garden every year. Crop rotation is a simple yet effective control for insects that have a single generation every year. This involves planting a crop in an area of the gar-den where it has not been planted for at least a year. When a crop is grown in the same area every year insects can become established in the soil. This can result in a more rapid infestation of pests each year. The practice of rotation of crops, even a short dis-tance from the last site, can help to delay or avoid damage from insects.
■ Practice good sanitation in the garden. Sanitation involves removing volunteer plants and infested crop debris from last year’s garden and properly disposing of it. Because many pests survive in veg-etable plant residues, it is a good idea to dispose of this and not save it for mulching.
■ Keep the garden as weed-free as possible. Many garden pests also attack and survive in weeds. Some weeds actually attract certain pests. It also
is a good idea to maintain a weed-free garden and a weed-free zone around the garden. Aphids and leafhoppers are common carriers of plant diseases. Perennial weeds such as Johnson grass harbor insects and diseases and should be removed from in and around the garden.
■ Use proper plant spacing, water, fertilizers and cultural practices to ensure vigorous plant growth. Vigorously growing healthy plants often can tol-erate more insect damage than poorly growing plants.
■ Inspect vegetable plants on a regular basis for insects or insect damage. Early detection results in more effective control and can reduce damage. In small gardens, caterpillars, loopers, hornworms and large beetles often can be hand-picked from plants and destroyed before they cause serious problems.
■ Treat most vegetables with insecticides when pest insects are observed or present. Certain vegetables like cucumbers, cantaloupes and squash can be treated on a preventative basis to avoid serious damage from insects such as vine borers.

71
Horticultural OilsHorticultural oils are petroleum- or plant-based oils
with insecticidal and miticidal properties. Suffocation is the mode of action of horticultural oils. Although most horticultural oils are highly refined and can be used as dormant and in-season foliar treatments, care should be exercised when using them on extremely hot days. They work only on contact and have no residual activity.
Biological or Microbial Control Insecticides
Biological or microbial control insecticides available to the home gardener contain spores of the bacterium Bacillus thuringiensis (Bt) and may be used where caterpillars are the primary pest. This is an excellent means of nonchemical caterpillar control. The bacte-ria produce a poison (delta-endotoxin) that is used to kill insects. The toxin, not the bacteria, is in the pes-ticide. The toxin is harmless to warmblooded animals and beneficial insects, but it kills caterpillars. Bt is sold under various trade names such as Dipel, Bactur and Thuricide.
Insecticidal SoapsInsecticidal soaps are made from naturally occur-
ring fatty acids. Soaps are strictly contact materials to be used against soft-bodied insects and soft-bodied stages of insects that have hard thick cuticles as adults. Some soaps wash off the outer waxy layer of the insects cuticle, causing the insect to dry up and die. Other soaps have insecticidal properties that affect the nervous system of plant-eating insects, yet do not affect beneficial insects or honeybees.
Synthetic InsecticidesSynthetic insecticides are man-made insecticides
that do not occur naturally and include organochlo-rines, organophosphates, carbamates and pyrethroid insecticides. In contrast to most “organic” pesticides, these compounds have been synthesized from raw products using industrial technology. It should also be noted that all currently registered and labeled pes-ticides have been determined to be safe for use based on current regulations from the U.S. Environmental Protection Agency and the state of Louisiana when used according to the label.
Pesticide FormulationsThe active ingredients in a pesticide are the chemi-
cals that control the target pest. Most pesticide prod-
ucts you buy also have other ingredients, called inert (inactive) ingredients. They are used to dilute the pesticide or to make it safer, more effective, easier to measure, easier to mix and apply and more conve-nient to handle. Some formulations are ready for use. Others must be further diluted with water by the user when they are applied.
Liquid formulations include emulsifiable concen-trates (EC or E), solutions (S), concentrate solutions (C) and flowables.
Emulsifiable concentrates (EC) usually contain liq-uid active ingredient, one or more petroleum-based solvents and an agent that allows the formulation to be mixed with water to form an emulsion.
Solutions (S) have active ingredients that dissolve readily in a liquid solvent, such as water or a petro-leum-based solvent. When mixed with water, they form a solution that will not settle out or separate. Solutions may be used in any type of sprayer indoors or outdoors.
Concentrate solutions (C) must be further diluted with a liquid solvent before they are applied.
Flowables are formulated to where active ingredi-ents are mixed with a liquid, along with inert ingredi-ents to form a suspension. Flowables are mixed with water for application and are similar to EC or wettable powder formulations in ease of handling.
Dry formulations include dusts, wettable powders and soluble powders. Most dust formulations are ready to use and contain a low percentage of active ingredients plus a fine, dry inert carrier made from talc, chalk, clay or volcanic ash. Dusts are always used dry, and they easily drift into nontarget sites.
Wettable powders (WP) are dry, finely ground formulations that look like dusts. They usually must be mixed with water for application as a spray. A few products, however, may be applied either as a dust or as a wettable powder. The choice is left to the applicator.
Wettable powders are one of the most widely used pesticide formulations. They can be used for most pest problems and in most types of spray equipment but must be agitated or shaken frequently. Soluble powders (SP or WSP) look like wettable powders. When mixed with water, however, soluble powders dissolve readily and form a true solution. After they are mixed thoroughly, no additional agitation is necessary.
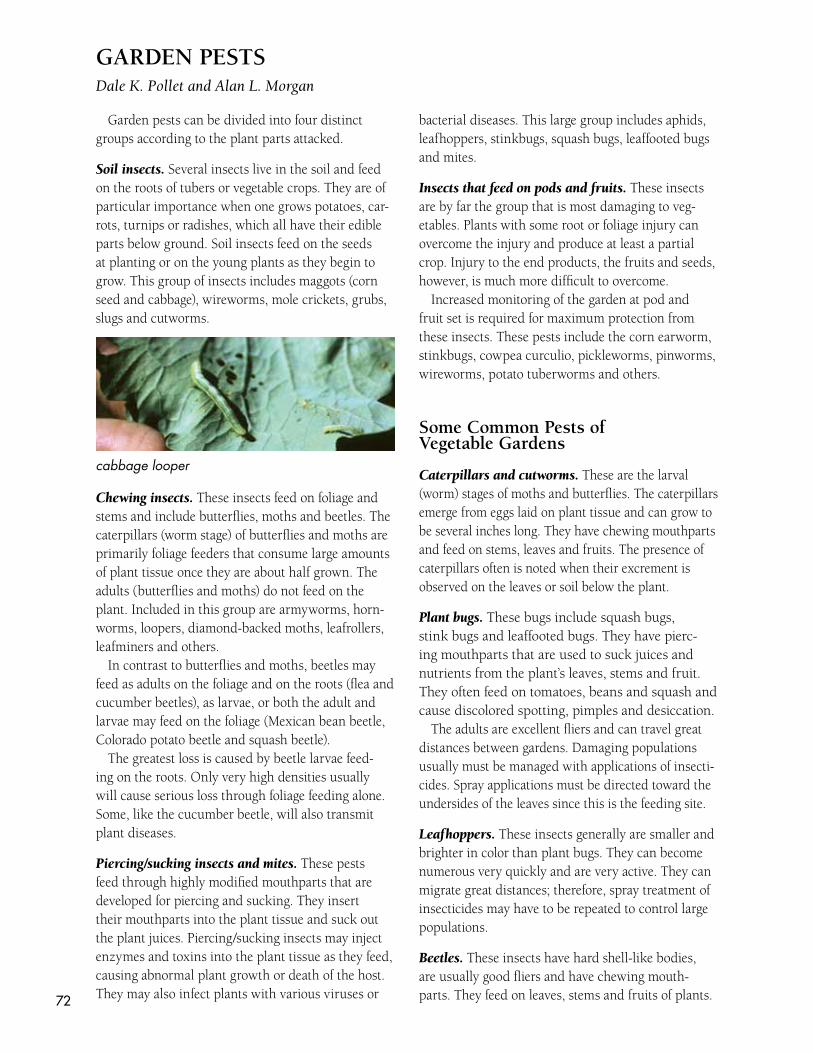
72
GARDEN PESTS Dale K. Pollet and Alan L. Morgan
Garden pests can be divided into four distinct groups according to the plant parts attacked.
Soil insects. Several insects live in the soil and feed on the roots of tubers or vegetable crops. They are of particular importance when one grows potatoes, car-rots, turnips or radishes, which all have their edible parts below ground. Soil insects feed on the seeds at planting or on the young plants as they begin to grow. This group of insects includes maggots (corn seed and cabbage), wireworms, mole crickets, grubs, slugs and cutworms.
Chewing insects. These insects feed on foliage and stems and include butterflies, moths and beetles. The caterpillars (worm stage) of butterflies and moths are primarily foliage feeders that consume large amounts of plant tissue once they are about half grown. The adults (butterflies and moths) do not feed on the plant. Included in this group are armyworms, horn-worms, loopers, diamond-backed moths, leafrollers, leafminers and others.
In contrast to butterflies and moths, beetles may feed as adults on the foliage and on the roots (flea and cucumber beetles), as larvae, or both the adult and larvae may feed on the foliage (Mexican bean beetle, Colorado potato beetle and squash beetle).
The greatest loss is caused by beetle larvae feed-ing on the roots. Only very high densities usually will cause serious loss through foliage feeding alone. Some, like the cucumber beetle, will also transmit plant diseases.
Piercing/sucking insects and mites. These pests feed through highly modified mouthparts that are developed for piercing and sucking. They insert their mouthparts into the plant tissue and suck out the plant juices. Piercing/sucking insects may inject enzymes and toxins into the plant tissue as they feed, causing abnormal plant growth or death of the host. They may also infect plants with various viruses or
bacterial diseases. This large group includes aphids, leafhoppers, stinkbugs, squash bugs, leaffooted bugs and mites.
Insects that feed on pods and fruits. These insects are by far the group that is most damaging to veg-etables. Plants with some root or foliage injury can overcome the injury and produce at least a partial crop. Injury to the end products, the fruits and seeds, however, is much more difficult to overcome.
Increased monitoring of the garden at pod and fruit set is required for maximum protection from these insects. These pests include the corn earworm, stinkbugs, cowpea curculio, pickleworms, pinworms, wireworms, potato tuberworms and others.
Some Common Pests of Vegetable Gardens
Caterpillars and cutworms. These are the larval (worm) stages of moths and butterflies. The caterpillars emerge from eggs laid on plant tissue and can grow to be several inches long. They have chewing mouthparts and feed on stems, leaves and fruits. The presence of caterpillars often is noted when their excrement is observed on the leaves or soil below the plant.
Plant bugs. These bugs include squash bugs, stink bugs and leaffooted bugs. They have pierc-ing mouthparts that are used to suck juices and nutrients from the plant’s leaves, stems and fruit. They often feed on tomatoes, beans and squash and cause discolored spotting, pimples and desiccation.
The adults are excellent fliers and can travel great distances between gardens. Damaging populations usually must be managed with applications of insecti-cides. Spray applications must be directed toward the undersides of the leaves since this is the feeding site.
Leafhoppers. These insects generally are smaller and brighter in color than plant bugs. They can become numerous very quickly and are very active. They can migrate great distances; therefore, spray treatment of insecticides may have to be repeated to control large populations.
Beetles. These insects have hard shell-like bodies, are usually good fliers and have chewing mouth-parts. They feed on leaves, stems and fruits of plants.
cabbage looper
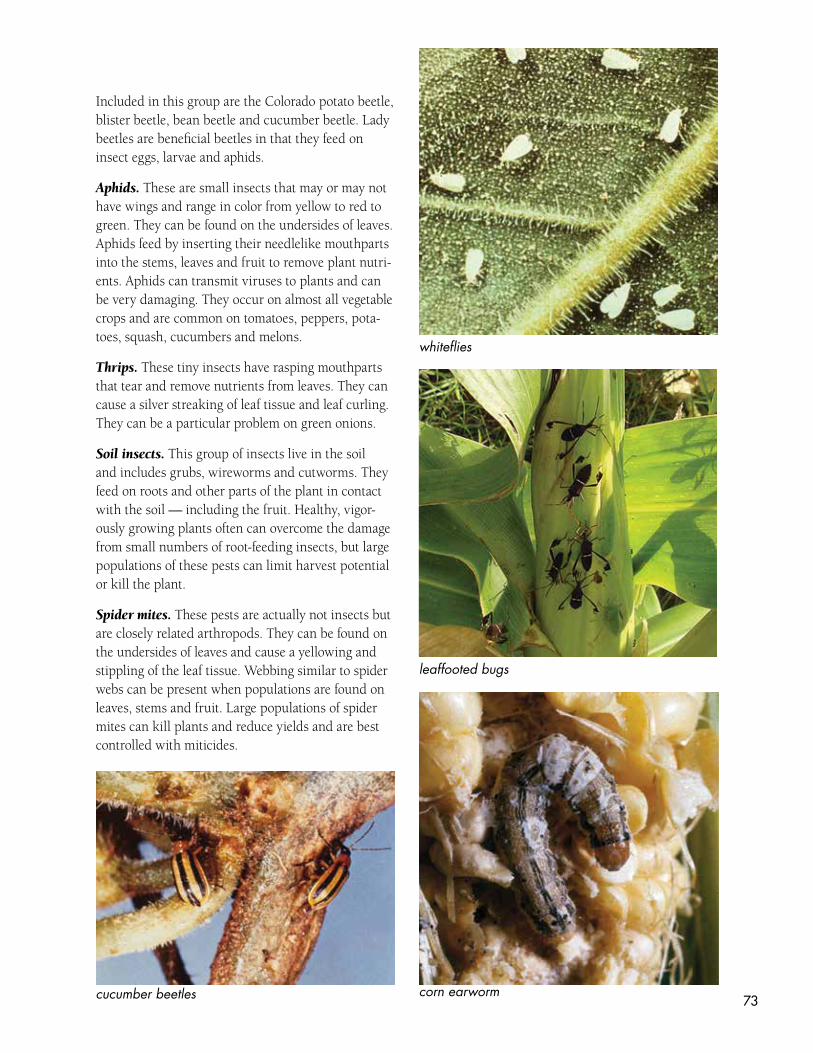
73
Included in this group are the Colorado potato beetle, blister beetle, bean beetle and cucumber beetle. Lady beetles are beneficial beetles in that they feed on insect eggs, larvae and aphids.
Aphids. These are small insects that may or may not have wings and range in color from yellow to red to green. They can be found on the undersides of leaves. Aphids feed by inserting their needlelike mouthparts into the stems, leaves and fruit to remove plant nutri-ents. Aphids can transmit viruses to plants and can be very damaging. They occur on almost all vegetable crops and are common on tomatoes, peppers, pota-toes, squash, cucumbers and melons.
Thrips. These tiny insects have rasping mouthparts that tear and remove nutrients from leaves. They can cause a silver streaking of leaf tissue and leaf curling. They can be a particular problem on green onions.
Soil insects. This group of insects live in the soil and includes grubs, wireworms and cutworms. They feed on roots and other parts of the plant in contact with the soil — including the fruit. Healthy, vigor-ously growing plants often can overcome the damage from small numbers of root-feeding insects, but large populations of these pests can limit harvest potential or kill the plant.
Spider mites. These pests are actually not insects but are closely related arthropods. They can be found on the undersides of leaves and cause a yellowing and stippling of the leaf tissue. Webbing similar to spider webs can be present when populations are found on leaves, stems and fruit. Large populations of spider mites can kill plants and reduce yields and are best controlled with miticides.
cucumber beetles corn earworm
whiteflies
leaffooted bugs

74
PESTICIDES – THEIR USE AND MEANS OF APPLICATIONDale K. Pollet and Alan L. Morgan
Pesticides and Their LabelsPesticides, as the name implies, are materials used
to control, manage or kill pests whether those pests are insects, diseases or weeds. They can be common everyday materials like soap, alcohol, boiling water, salt or fingernail polish remover. Yet, they can be highly technical materials such as deltamethrin, chlo-rpyrifos, dimethoate, carbaryl, Bacillus thuringiensis, Beauveria bassiana or dichlorvos. Or they can be sold across the counter such as malathion, sevin, cygon, spinosad or thiodan.
No matter how they are sold or what name they carry, it is important for us to understand they are made to kill, and they cannot distinguish between a pest and an individual. Therefore, it is important that each time we use an insecticide we use it according to the label and make sure we apply it to the pest or infested plant properly.
To control or manage insects, it is important to obtain as complete coverage with the treatment as possible. The more contact between the pest and the insecticide, the greater the potential for optimum management of the pest. This procedure reduces the need for additional applications and reduces the potential for injury to nontarget organisms and the environment.
The first and most critical factor in selecting an insecticide is to make sure you know what the pest is and how it functions. By knowing the identification of the pest, you will know what it likes to feed on, when it can occur and the optimal time in its devel-opment to treat it.
When buying the insecticide, check the label to make sure that it not only lists the pest it controls but that it’s also safe for the crops you are spraying. What is on the label? What does it tell you about the insec-ticide you are buying? Labels include the following information:
• The insecticide’s name, formulation and company name.
• The active ingredients and the inert materials or fillers and what percentage they make up. For example, an insecticide with 22.8 percent active ingredient contains 2 pounds of active ingredient per gallon.
• The U. S. patent number(s), the EPA registration number and an alert such as “caution,” “warning” or “toxic.”
• Precautionary information about protective cloth-ing to use when spraying, safety recommendations and environmental hazards.
• Directions for use.
• General information on storage and disposal, use, resistance management, mixing, tank mixing with other materials, premixing, additives to enhance the pesticides performance and application.
Depending on what you are using, the label will give instructions on types of application and precau-tions. It will then provide a listing of the crops that have been cleared for treatment using this product, the pests it will control, the rates that will perform best for that pest on that host and the time required between the last application and harvest.
All of this label information is important so we obtain the desired results without injury or dam-age to crop, the environment, beneficials or the applicator/consumer.
Water pHNow that we have identified the pest and pur-
chased the insecticide to treat it, we have one final obstacle to address before we treat. We must know the water pH or the alkaline concentration of the water. Knowing this is critical because if it is too high, we can lose the effectiveness of the insecticide before we have a chance to spray it.
The average Louisiana water pH is 8.3, which is basic (low in acid), but the optimal pH range for insecticides is between 5.5 and 6.5. The pH is affect-ed by what is dissolved in the water and can vary with temperature, sunlight and movement.
To check water pH, three different methods are available: a swimming pool test kit, litmus paper or a digital pH pen. Each of these can tell you whether the water is acid or basic, but only the digital pH pen can give you an exact reading.
The closer you are to the proper range, the better the control you will have, the less you will have to treat and the better you will make it for the environ-ment and yourself.
If the reading on the pen is 8.5, the question is how to lower the pH. There are several answers: vinegar, acid or a buffer. The first two are effective but once mixed must be used fairly quickly because a change in the water temperature can allow the vinegar or acid to break down and the pH to rise —

75
thereby reducing the effectiveness of the pesticide. A buffer will lock the pH in place. Commonly used
buffers are sodium bicarbonate (baking soda) and calcium carbonate (found in antacids).
Once the water is in the tank, check the pH. If high, add a small amount of the buffer, mix thor-oughly and recheck. Repeat the process until the water pH is within the optimal range then mix in the pesticide. Without adjusting the pH of the water, the pesticide goes through a process called alkaline hydrolysis, where the basic water and the acid pes-ticide neutralize each other, thereby reducing the potential impact of thepesticide.
Adjusting the pH allows the pesticide to provide the initial knock down of the pest and allows the residual effect to work properly, which means better management of the pest with reduced treatments. This all saves time and money and greatly reduces the potential for the development of tolerance or resistance of the pest to the pesticide.
How is treating accomplished? Many types of sprayers and spreaders are available. To make them
function properly, they must be calibrated to apply the correct amount of material over a given area. Using too much material in a small space can cause phytotoxic effects on the crops. Where sprays are applied, it is essential to obtain as complete cover-age as possible. Coverage provides optimal control of pest populations by direct contact with the pest or through residual effects on the crop surface. Spray-ers can be of the pump variety, the hose-end type or CO2 or hand backpack. In any case, make sure there is proper agitation in the tanks to prevent materials from settling out of solution. This could be a factor in both control and phytotoxicity.
Granular applicators can be handheld whirly bird types, drop spreaders or broadcast spreaders. Each of these can apply granules or baits effectively to provide effective management of the pest. The kind of sprayer or spreader used depends on what best fits your situation and what you are comfortable using. Small pieces of equipment are best suited for small areas and are easy to store and to keep clean and working.
Control recommendation for insects of home vegetable gardens
Crop and Pest
Insecticide and
Formulation
Amount per 1 gallons water
PHI (minimum interval between
application and
harvest)
REI Hours (Restricted
Entry Intervals)
Application Procedure
BEANS Beetles Carbaryl 1.5-3.0 tablespoons 3 Repeat as needed up to
4 times; 7 days between applications.
Bifenthrin 0.3%
1.5 fluid ounces 3 Wait at least 7 days between applications.
Aphids Bifenthrin 0.3%
1.5 fluid ounces 3 Wait at least 7 days between applications.
Imidacloprid 0.5 ounce per quart per 10 square feet.
veg. row
21 No more than 1 application/yr.
Malathion 2.0 teaspoons 1 Wait at least 7 days between applications.
Whitefly Bifenthrin 0.3%
1.5 fluid ounces 3 Wait at least 7 days between applications.
Imidacloprid 0.5 ounce per quart per 10 square feet.
veg. row
21 No more than 1 application/yr.
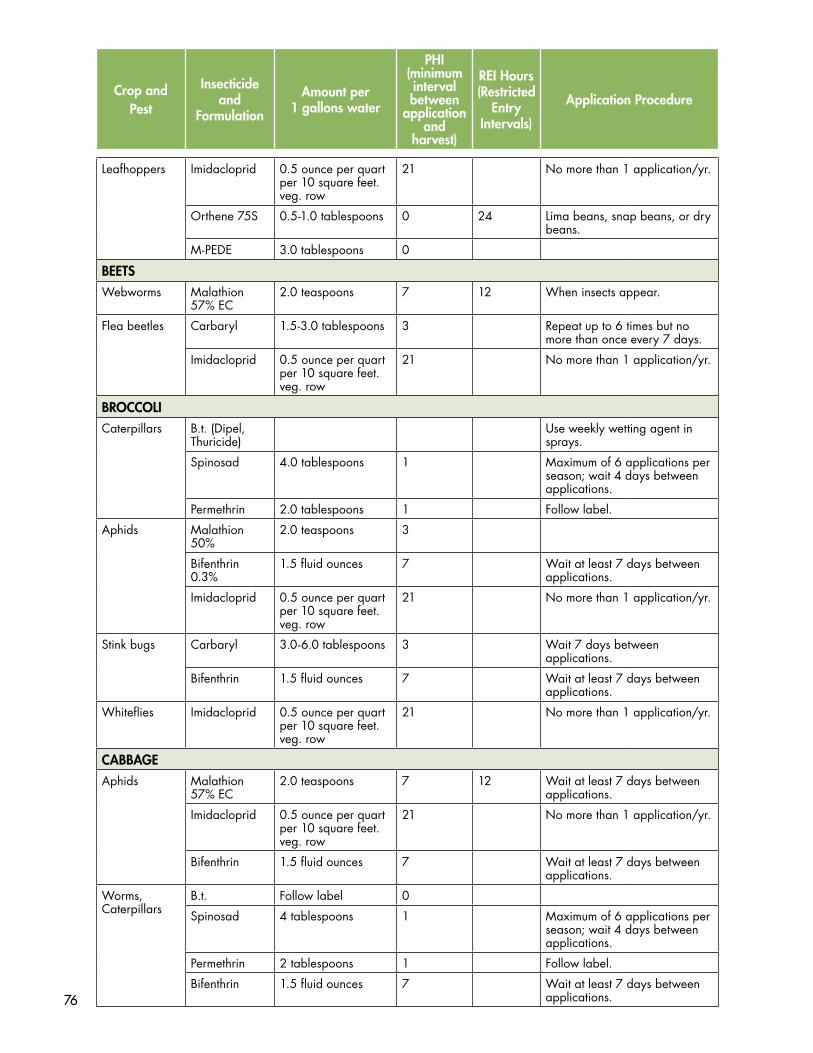
76
Crop and Pest
Insecticide and
Formulation
Amount per 1 gallons water
PHI (minimum interval between
application and
harvest)
REI Hours (Restricted
Entry Intervals)
Application Procedure
Leafhoppers Imidacloprid 0.5 ounce per quart per 10 square feet. veg. row
21 No more than 1 application/yr.
Orthene 75S 0.5-1.0 tablespoons 0 24 Lima beans, snap beans, or dry beans.
M-PEDE 3.0 tablespoons 0
BEETS Webworms Malathion
57% EC 2.0 teaspoons 7 12 When insects appear.
Flea beetles Carbaryl 1.5-3.0 tablespoons 3 Repeat up to 6 times but no more than once every 7 days.
Imidacloprid 0.5 ounce per quart per 10 square feet. veg. row
21 No more than 1 application/yr.
BROCCOLI Caterpillars B.t. (Dipel,
Thuricide) Use weekly wetting agent in sprays.
Spinosad 4.0 tablespoons 1 Maximum of 6 applications per season; wait 4 days between applications.
Permethrin 2.0 tablespoons 1 Follow label.
Aphids Malathion 50%
2.0 teaspoons 3
Bifenthrin 0.3%
1.5 fluid ounces 7 Wait at least 7 days between applications.
Imidacloprid 0.5 ounce per quart per 10 square feet. veg. row
21 No more than 1 application/yr.
Stink bugs Carbaryl 3.0-6.0 tablespoons 3 Wait 7 days between applications.
Bifenthrin 1.5 fluid ounces 7 Wait at least 7 days between applications.
Whiteflies Imidacloprid 0.5 ounce per quart per 10 square feet. veg. row
21 No more than 1 application/yr.
CABBAGE Aphids Malathion
57% EC 2.0 teaspoons 7 12 Wait at least 7 days between
applications.
Imidacloprid 0.5 ounce per quart per 10 square feet. veg. row
21 No more than 1 application/yr.
Bifenthrin 1.5 fluid ounces 7 Wait at least 7 days between applications.
Worms, Caterpillars
B.t. Follow label 0
Spinosad 4 tablespoons 1 Maximum of 6 applications per season; wait 4 days between applications.
Permethrin 2 tablespoons 1 Follow label.
Bifenthrin 1.5 fluid ounces 7 Wait at least 7 days between applications.

77
Crop and Pest
Insecticide and
Formulation
Amount per 1 gallons water
PHI (minimum interval between
application and
harvest)
REI Hours (Restricted
Entry Intervals)
Application Procedure
Flea beetles Carbaryl 1.5-3 tablespoons 3 On foliage, repeat as needed up to 4 times, but no more than once every 7 days.
COLLARDS Aphids Malathion
50% 2 teaspoons 7 Apply as necessary, wait 7
days between applications.
Imidacloprid 0.5 ounce per quart per 10 square feet. veg. row
21 No more than 1 application/yr.
Flea beetles Carbaryl 1.5- 3 tablespoons 14 On foliage as needed; Repeat as necessary up to 4 times, but no more than once every 7 days.
CANTALOUPE Aphids Malathion
57% EC 2.0 teaspoons 3 12
Bifenthrin 0.3%
1.5 fluid ounces 7 Wait at least 7 days between applications.
Imidacloprid 0.5 ounce per quart per 10 square feet. veg. row
21 No more than 1 application/yr.
Beetles Imidacloprid 0.5 ounce per quart per 10 square feet. veg. row
21 No more than 1 application/yr.
Carbaryl 3.0 tablespoons
Bifenthrin 0.3%
1.5 fluid ounces 3 Wait at least 7 days between applications.
Permethrin Follow label 0 Follow label.
Leafminer Spinosad 4.0 tablespoons 3 Maximum of 6 applications per season; wait 5 days between applications.
Caterpillars Carbaryl 1.5-3.0 tablespoons 3 Do not use Carbaryl for aphid control.
Bifenthrin 0.3%
1.5 fluid ounces 3 Wait at least 7 days between applications.
Permethrins As recommended on label
0 Follow label.
Spinosad 4 tablespoons 3 Maximum of 6 applications per season; wait 5 days before reapplying.
CARROTS Aphids, Leafhoppers, Vegetable weevils
Malathion 57% EC
2.0 teaspoons 7 12 When insects appear.

78
Crop and Pest
Insecticide and
Formulation
Amount per 1 gallons water
PHI (minimum interval between
application and
harvest)
REI Hours (Restricted
Entry Intervals)
Application Procedure
CUCUMBERS Aphids Bifenthrin 1.5 fluid ounces 3 Wait at least 7 days between
applications.
Safer Insecticidal Soap
5.0 tablespoons 0 For suppression, repeat applications may be needed. Repeat at weekly intervals up to 3 times. Do not make more than 3 sequential applications over a 2-week period. Do not apply When temps exceed 90ºF.
Imidacloprid 0.5 ounce per quart per 10 square feet. veg. row
21 No more than 1 application/yr.
Cucumber beetles, Squash bugs
Carbaryl 3.0 tablespoons 3 Apply late in day to minimize killing pollinating insects.
Bifenthrin 1.5 fluid ounces 3 Wait at least 7 days between applications.
Permethrin As recommended on label
0 Follow label.
Malathion 50%
4.0 teaspoons 1 Apply when needed. Wait at Least 7 days between applications.
Imidacloprid 0.5 ounce per quart per 10 square feet. veg. row
21 No more than 1 application/yr.
EGGPLANT Aphids Malathion
50% EC 2.0 teaspoons 3 Apply when aphids present and
repeat when needed; wait 7 days between applications.
Bifenthrin 1.5 fluid ounces 7 Wait at least 7 days between applications.
Imidacloprid 0.5 ounce per quart per 10 square feet. veg. row
21 No more than 1 application/yr.
Flea beetles Bifenthrin 1.5 fluid ounces 3 Wait at least 7 days between applications.
Malathion 50%
1.0 tablespoons 3 Wait at least 7 days between applications.
Carbaryl 1.5-3.0 tablespoons 3 On foliage as needed; no more than once every 7 days.
Imidacloprid 0.5 ounce per quart per 10 square feet. veg. row
21 No more than 1 application/yr.
Spider mites Malathion 1.0 tablespoons 3 Repeat treatments often as necessary
Ultrafine oil Follow label
Caterpillars Carbaryl 80% S
2.0 tablespoons 12
B.t. (Dipel, Thuricide)

79
Crop and Pest
Insecticide and
Formulation
Amount per 1 gallons water
PHI (minimum interval between
application and
harvest)
REI Hours (Restricted
Entry Intervals)
Application Procedure
Whiteflies Bifenthrin 1.5 fluid ounces 7 Wait at least 7 days between applications.
Imidacloprid 0.5 ounce per quart per 10 square feet. veg. row
21 No more than 1 application/yr.
ENGLISH PEAS Aphids, Leafhoppers
Imidacloprid 0.5 ounce per quart per 10 square feet. veg. row
21 No more than 1 application/yr.
Malathion 57% EC
2.0 teaspoons 3 12 When insects appear.
IRISH POTATOES Aphids Malathion
57% EC 2.0 teaspoons 3 12 When insects appear.
Colorado potato beetle
Permethrin 2.5L
3.0 tablespoons 7 Follow label.
Spinosad 4.0 tablespoons 7 Maximum of 6 applications per season; wait 7 days before reapplying.
Leafhopper, Flea beetles
Carbaryl 80% S
2.0 tablespoons 0 12
Malathion 57% EC
2.0 teaspoons 3 12
LETTUCE Aphids Malathion
50% EC 1.0 tablespoons 14-leaf
7-head 12 When insects appear. Wait
at least 7 days between applications.
Bifenthrin 0.3%
1.5 fluid ounces 7 Wait at least 7 days between applications.
Imidacloprid 0.5 ounce per quart per 10 square feet. veg. row
21 No more than 1 application/yr.
Caterpillars B.t. (Dipel, Thuricide)
As recommended on label
0 Repeat weekly until harvest.
Bifenthrin 0.3%
1.5 fluid ounces 7-head Wait 7 days between
Permethrin 2.5%
4.0 tablespoons follow label
1 Apply every 5-10 days as needed but no more than 10 times (liquid form) per season.
Spinosad 0.5%
4.0 tablespoons 1 Apply no more than 6 applications per season; wait 4 days between applications.
MUSTARD Aphids Malathion
57% EC 2.0 teaspoons 7 12
Vegetable weevils
Malathion 57% EC
2.0 teaspoons 3 12
Flea beetles Carbaryl 1.5-3.0 tablespoons 14 Repeat up to 4 times; no more than once every 7 days.
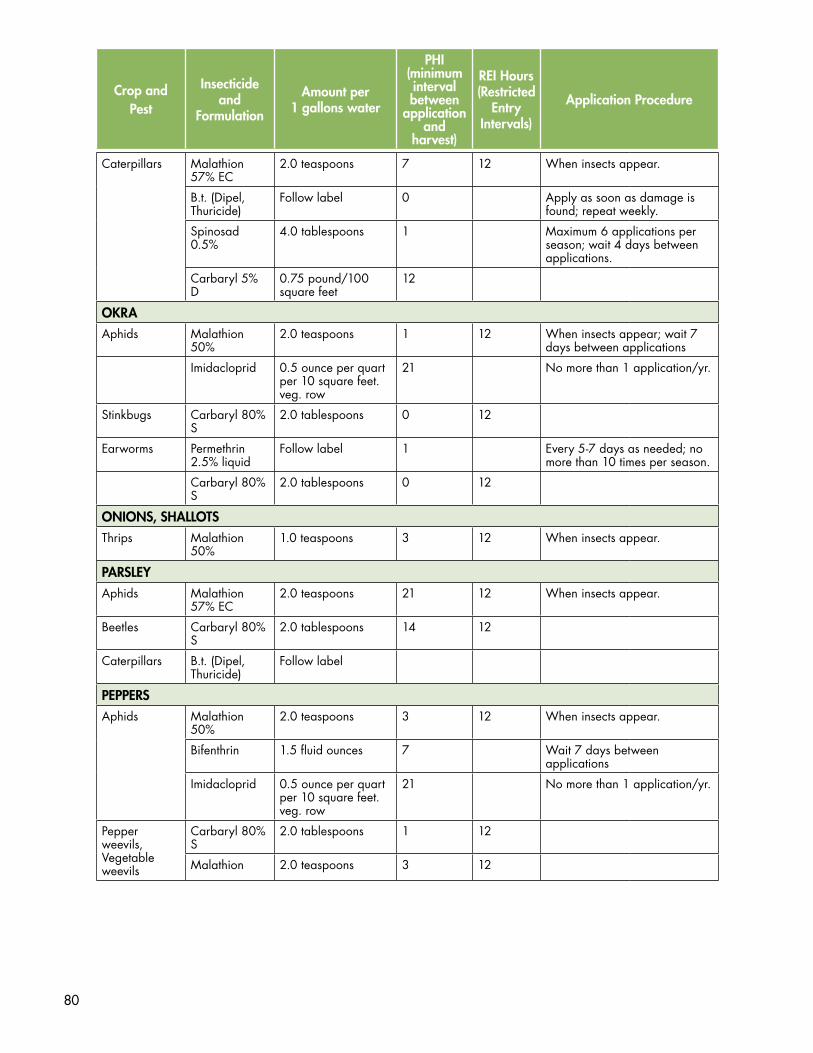
80
Crop and Pest
Insecticide and
Formulation
Amount per 1 gallons water
PHI (minimum interval between
application and
harvest)
REI Hours (Restricted
Entry Intervals)
Application Procedure
Caterpillars Malathion 57% EC
2.0 teaspoons 7 12 When insects appear.
B.t. (Dipel, Thuricide)
Follow label 0 Apply as soon as damage is found; repeat weekly.
Spinosad 0.5%
4.0 tablespoons 1 Maximum 6 applications per season; wait 4 days between applications.
Carbaryl 5% D
0.75 pound/100 square feet
12
OKRA Aphids Malathion
50% 2.0 teaspoons 1 12 When insects appear; wait 7
days between applications
Imidacloprid 0.5 ounce per quart per 10 square feet. veg. row
21 No more than 1 application/yr.
Stinkbugs Carbaryl 80% S
2.0 tablespoons 0 12
Earworms Permethrin 2.5% liquid
Follow label 1 Every 5-7 days as needed; no more than 10 times per season.
Carbaryl 80% S
2.0 tablespoons 0 12
ONIONS, SHALLOTS Thrips Malathion
50% 1.0 teaspoons 3 12 When insects appear.
PARSLEY Aphids Malathion
57% EC 2.0 teaspoons 21 12 When insects appear.
Beetles Carbaryl 80% S
2.0 tablespoons 14 12
Caterpillars B.t. (Dipel, Thuricide)
Follow label
PEPPERS Aphids Malathion
50% 2.0 teaspoons 3 12 When insects appear.
Bifenthrin 1.5 fluid ounces 7 Wait 7 days between applications
Imidacloprid 0.5 ounce per quart per 10 square feet. veg. row
21 No more than 1 application/yr.
Pepper weevils, Vegetable weevils
Carbaryl 80% S
2.0 tablespoons 1 12
Malathion 2.0 teaspoons 3 12
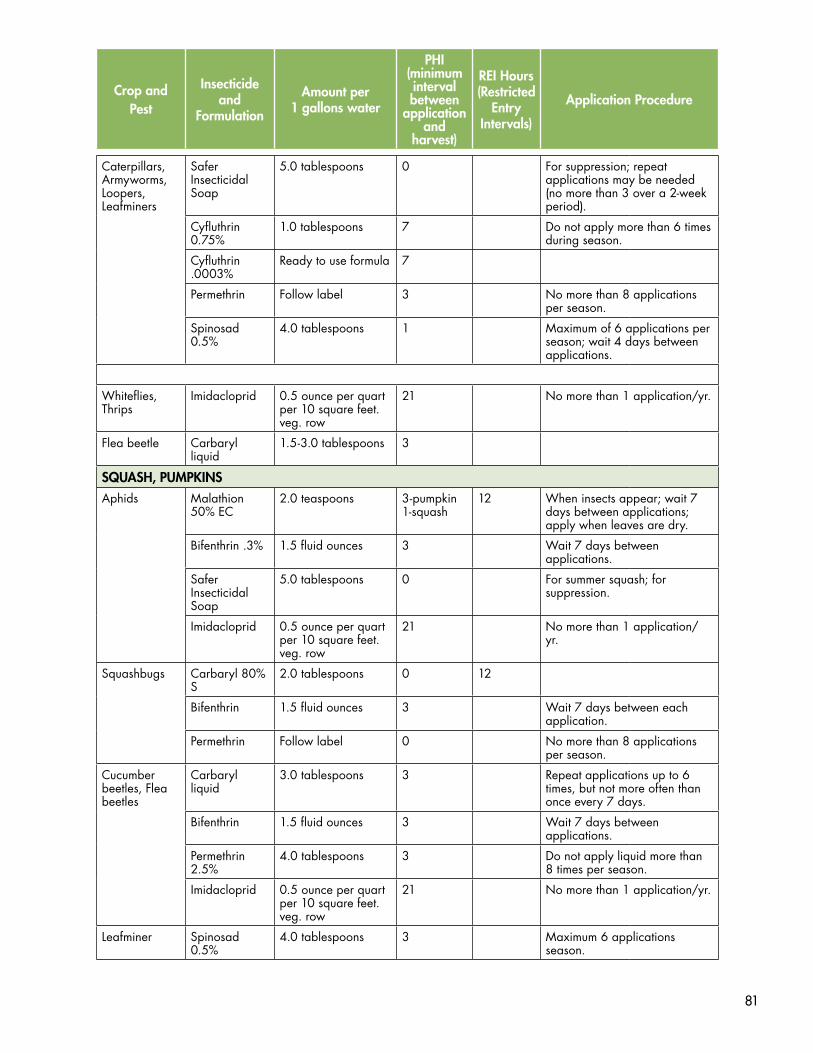
81
Crop and Pest
Insecticide and
Formulation
Amount per 1 gallons water
PHI (minimum interval between
application and
harvest)
REI Hours (Restricted
Entry Intervals)
Application Procedure
Caterpillars, Armyworms, Loopers, Leafminers
Safer Insecticidal Soap
5.0 tablespoons 0 For suppression; repeat applications may be needed (no more than 3 over a 2-week period).
Cyfluthrin 0.75%
1.0 tablespoons 7 Do not apply more than 6 times during season.
Cyfluthrin .0003%
Ready to use formula 7
Permethrin Follow label 3 No more than 8 applications per season.
Spinosad 0.5%
4.0 tablespoons 1 Maximum of 6 applications per season; wait 4 days between applications.
Whiteflies, Thrips
Imidacloprid 0.5 ounce per quart per 10 square feet. veg. row
21 No more than 1 application/yr.
Flea beetle Carbaryl liquid
1.5-3.0 tablespoons 3
SQUASH, PUMPKINS Aphids Malathion
50% EC 2.0 teaspoons 3-pumpkin
1-squash 12 When insects appear; wait 7
days between applications; apply when leaves are dry.
Bifenthrin .3% 1.5 fluid ounces 3 Wait 7 days between applications.
Safer Insecticidal Soap
5.0 tablespoons 0 For summer squash; for suppression.
Imidacloprid 0.5 ounce per quart per 10 square feet. veg. row
21 No more than 1 application/ yr.
Squashbugs Carbaryl 80% S
2.0 tablespoons 0 12
Bifenthrin 1.5 fluid ounces 3 Wait 7 days between each application.
Permethrin Follow label 0 No more than 8 applications per season.
Cucumber beetles, Flea beetles
Carbaryl liquid
3.0 tablespoons 3 Repeat applications up to 6 times, but not more often than once every 7 days.
Bifenthrin 1.5 fluid ounces 3 Wait 7 days between applications.
Permethrin 2.5%
4.0 tablespoons 3 Do not apply liquid more than 8 times per season.
Imidacloprid 0.5 ounce per quart per 10 square feet. veg. row
21 No more than 1 application/yr.
Leafminer Spinosad 0.5%
4.0 tablespoons 3 Maximum 6 applications season.

82
Crop and Pest
Insecticide and
Formulation
Amount per 1 gallons water
PHI (minimum interval between
application and
harvest)
REI Hours (Restricted
Entry Intervals)
Application Procedure
Vine borers, Pickleworms
Carbaryl 22.5% liquid
1.5-3 tablespoons 3 Repeat as necessary up to 6 times, but no more than once every 7 days.
Bifenthrin 1.5 fluid ounces 3 Wait 7 days between applications.
Permethrin Follow label 0 No more than 8 times per season.
Whiteflies Imidacloprid 0.5 ounce per quart per 10 square feet. veg. row
21 No more than 1 application/yr.
SOUTHERN PEAS Aphids Imidacloprid 0.5 ounce per quart
per 10 square feet. veg. row
21 No more than 1 application/yr.
Malathion 50% EC
1.0 tablespoons 3 12 When insects appear.
Earworms, Curculio
Carbaryl 80% S
2.0 tablespoons 0 12
European corn borer
Carbaryl liquid 22.5%
3.0-4.5 tablespoons 3- fresh 21-dried
Spinosad 4.0 tablespoons 3 Maximum 6 applications per season; wait 5 days between applications.
Cyfluthrin 0.75%
1.0 tablespoons 7 Do not apply more than 6 applications per season.
SPINACH Aphids Imidacloprid 0.5 ounce per quart
per 10 square feet. veg. row
21 No more than 1 application/yr.
Malathion 57% EC
2.0 teaspoons 7 When insects appear.
Caterpillars B.t. (Dipel, Thuricide)
3.0 tablespoons 0
Bifenthrin See label. 7
Cyfluthrin See label. 0
SQUASH
Aphids Imidacloprid 0.5 ounce per quart per 10 square feet. veg. row
21 No more than 1 application/yr.
Malathion 57% EC +
2.0 teaspoons 1 12
M-PEDE 3.0 tablespoons 0
Pickleworms, Beetles
Carbaryl 80% S
2.0 tablespoons 0 12 Weekly-when beetles, pickleworms, or vine borers are present.
Methoxychlor 1 12
Imidacloprid 0.5 ounce per quart per 10 square feet. veg. row
21 No more than 1 application/ yr.

83
Crop and Pest
Insecticide and
Formulation
Amount per 1 gallons water
PHI (minimum interval between
application and
harvest)
REI Hours (Restricted
Entry Intervals)
Application Procedure
Vine borers 50% WP 1.75 tablespoons
25% EC 7.0 teaspoons 1
Bifenthrin See label. 3
Cyfluthrin See label. 0
SWEET CORN Corn earworm, Fall armyworm, European corn borer
Carbaryl 80% S
2.0 tablespoons 0 12 Treat silks every other day for earworm.
Bifenthrin 0.3%
1.5 fluid ounces 1 Wait 7 days between applications
Cyfluthrin 0.75%
1.0 tablespoons 0 Do not apply more than 5 times per season.
Permethrin 2.5% liquid
3.0 tablespoons 1 Apply as needed every 5 days, but no more than 6 times per season.
Spinosad 0.5%
4.0 tablespoons 1 Maximum of 6 applications per season; wait 3 days between applications.
TOMATOES Aphids Malathion
50% EC 2.0 teaspoons 1 12 When insects appear.
Bifenthrin 1.5 fluid ounces 1 Wait at least 7 days between applications.
Safer Insecticidal Soap
5.0 tablespoons 0 For suppression, repeat applications may be required.
Imidacloprid 0.5 ounce per quart per 10 square feet. veg. row
21 No more than 1 application/ yr.
Fruitworm, Hornworm
Carbaryl 80% S
2.0 tablespoons 0 12 Weekly-from bloom through harvest.
Cyfluthrin 0.75 %
1.0 tablespoons 0 Do not apply more than 5 times per season.
Bifenthrin 1.5 fluid ounces 1 Wait 7 days between applications.
Permethrin 2.5% liquid
3.0 tablespoons 0 No more than 8 times per season.
Spinosad 0.5%
4.0 tablespoons 1 No more than 6 applications per season; wait 4 days between applications.
B.t. (Dipel, Thuricide)
Follow label 0 When insects are present
Stinkbugs, Leaf-footed
Carbaryl 80% S
2.0 tablespoons 0 12
Cyfluthrin 0.75%
1.0 tablespoons 0 Do not apply more than 5 times per season.
Bifenthrin 1.5 fluid ounces 1 Wait 7 days between applications.
Permethrin 0.25%
Follow label 0 Maximum 6 applications/season,

84
Crop and Pest
Insecticide and
Formulation
Amount per 1 gallons water
PHI (minimum interval between
application and
harvest)
REI Hours (Restricted
Entry Intervals)
Application Procedure
Whiteflies Bifenthrin 0.3%
1.5 fluid ounces 1 Wait 7 days between applications.
Safer Insecticidal Soap
5.0 tablespoons 0 No more than 3 applications in2 weeks. Do not apply when temperature exceeds 90 °F.
Pyrethrin Follow label 0 Spray underside of leaves; repeated weekly applications needed for control.
Imidacloprid 0.5 ounce per quart per 10 square feet. veg. row
21 No more than 1 application/yr.
Leafminer Spinosad 0.5%
4.0 tablespoons 1 No more than 6 applications per season; wait 4 days between applications.
Spider mites Bifenthrin 0.3%
1.5 fluid ounces 1 Wait 7 days between applications.
Cutworms Carbaryl 22.5% liquid
6.0 tablespoons 3 Mix in enough water to get sufficient coverage of plants and soil around plants. Repeat weekly no more than 5 times per season.
Cyfluthrin 0.75%
1.0 tablespoons 3 Do not apply more than 5 times per season.
Permethrin 2.5%
3.0 tablespoons 0 Do not apply more than 8 times per season.
Beetles Carbaryl liquid 22.5%
1.5-3.0 tablespoons 3 Repeat applications up to 7 times, but no more than once every 7 days.
Bifenthrin 0.3%
1.5 fluid ounces 1 Wait 7 days between applications.
Permethrin Follow label 0 No more than 6 times per year.
Tomato pinworms
Spinosad 0.5%
4.0 tablespoons 1 Maximum 6 applications per season; wait 4 days between applications.
Bifenthrin 0.3%
1.5 fluid ounces 1 Wait 7 days between applications.
TURNIPS Aphids Imidacloprid 0.5 ounce per quart
per 10 square feet. veg. row
21 No more than 1 application/yr.
Malathion 50% EC
2.0 teaspoons 7 12 When insects appear.
Caterpillars B.t. (Dipel, Thuricide)
Follow label 0 When insects appear.
Flea beetles, Worms
Imidacloprid 0.5 ounce per quart per 10 square feet. veg. row
21 No more than 1 application/yr.
Carbaryl 80% S
2.0 tablespoons 3 for roots 14 for tops
2

85
Crop and Pest
Insecticide and
Formulation
Amount per 1 gallons water
PHI (minimum interval between
application and
harvest)
REI Hours (Restricted
Entry Intervals)
Application Procedure
WATERMELONAphids Malathion
57% EC 2.0 teaspoons 1 12 When insects appear.
Bifenthrin 0.3%
1.5 fluid ounces 3 Wait 7 days between applications.
Imidacloprid 0.5 ounce per quart per 10 square feet. veg. row
No more than 1 application/yr
Beetles Imidacloprid 0.5 ounce per quart per 10 square feet. veg. row
21 No more than 1 application/yr.
Permethrin liquid2.5%
Follow label 0 Do not apply more than 8 times per year.
Carbaryl 80% S
2.0 tablespoons 0 12 Don’t use Carbaryl for aphids.
Thrips Spinosad 0.5%
4.0 tablespoons 3 No more than 6 applications per year; wait 5 days between applications.
Imidacloprid 0.5 ounce per quart per 10 square feet. veg. row
21 No more than 1 application/yr.
Common Chemical Name Trade Name(s) Manufacturer/Brand
Bacillus thuringiensis (Bt) Dipel dust Fertilome
Dipel dust Hi-Yield
BT Worm Killer Green Light
Thuricide Bonide
Thuricider/HPC Southern Ag
Bifenthrin Ortho Bug-B-Gone Max Lawn & Garden Insect Killer Ortho
Carbaryl Bayer Complete Insect Killer for Gardens Bayer Advanced
Sevin Spectracide
Bug B Gone Ortho
Sevin Garden Tech
Sevin-10 Garden Tech
Liquid Carbaryl Garden Spray Ferti-Lome
5% Carbaryl Garden & Pet Dust Hi-Yield
Cyfluthrin Bayer Advanced Garden PowerForce Multi-Insect Killer Concentrate Bayer
Bayer Advanced Lawn and Garden Multi-Insect Killer Bayer
Common chemical names

86
Dimethoate Cygon Bonide
Cygon 2E Hi-Yield
Imidacloprid Bayer AdvanceFruit, Citrus and Vegetable insect ConrolBay Advanced Fruit, Citrus and VegetableInsect Conrol
Bayer
Malathion 50% Malathion Green Light
Malathion Plus Insect Spray Concentrate Ortho
Malathion Ace
50% Malathion Martin’s
Malathion Insect Spray Hi-Yield
Malathion 50% E.C. Southern Ag
Oil Sun-spray Ultra Fine Oil Security Products
Parafine Horticultural Oil Southern Ag
Permethrin Bayer Complete Insect Dust for Gardens Bayer Advanced
Permethrin Insect Control Spectracide
Bug-B-Gone Ortho
Permethrin 10% Martin’s
Indoor/Outdoor MultiPurpose Insect Spray Ferti-Lome
Vegetable Fruit and Flower Spray Bonide
Multi Purpose Garden Insect Killer KGRO
Vegetable Plus Martin’s
Pyrethrin Tomato and Vegetable Safer
Tomato Vegetable Insect Spray Spectracide
Spinosad Lawn and Garden Spray with Spinosad Green Light
Borer Bagworm, Tent caterpillar and Leafminer Spray Fertilome
Monterey Garden Insect Spray Monterey
Spinosad Landscape and Garden Insecticide Natural Guard
Neem Green Light Neem Concentrate Green Light
Triple Action Neem Oil Southern Ag
Insecticidal Soaps M-Pede Dow Agro Sciences
Insecticidal Soap Safer
Insecticidal Soap Garden Safe
Tomato Vegetable Insect Killer Safer
Disclaimer statement. The pesticides recommended in this publication were registered for the prescribed uses at time of publication. Pesticide registrations are continuously reviewed. Should registration of a recommended pesticide be canceled, it would no longer be recommended by the LSU AgCenter.
The use of brand or trade names in this publication is for clarity and information. It does not imply approval of the product to the exclusion of others that may be of similar, suitable composition, nor does it guarantee or warrant the standard of the product. The above list is not a complete list.
Common Chemical Name Trade Name(s) Manufacturer/Brand
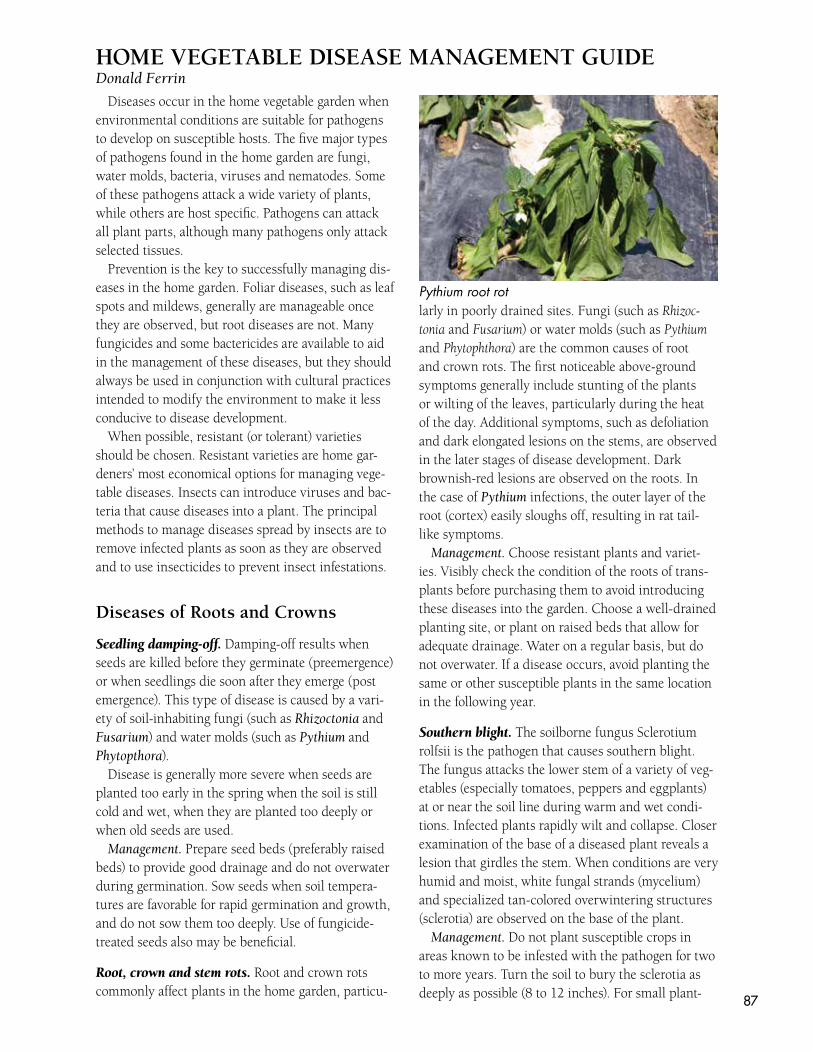
87
Diseases occur in the home vegetable garden when environmental conditions are suitable for pathogens to develop on susceptible hosts. The five major types of pathogens found in the home garden are fungi, water molds, bacteria, viruses and nematodes. Some of these pathogens attack a wide variety of plants, while others are host specific. Pathogens can attack all plant parts, although many pathogens only attack selected tissues.
Prevention is the key to successfully managing dis-eases in the home garden. Foliar diseases, such as leaf spots and mildews, generally are manageable once they are observed, but root diseases are not. Many fungicides and some bactericides are available to aid in the management of these diseases, but they should always be used in conjunction with cultural practices intended to modify the environment to make it less conducive to disease development.
When possible, resistant (or tolerant) varieties should be chosen. Resistant varieties are home gar-deners’ most economical options for managing vege-table diseases. Insects can introduce viruses and bac-teria that cause diseases into a plant. The principal methods to manage diseases spread by insects are to remove infected plants as soon as they are observed and to use insecticides to prevent insect infestations.
Diseases of Roots and Crowns
Seedling damping-off. Damping-off results when seeds are killed before they germinate (preemergence) or when seedlings die soon after they emerge (post emergence). This type of disease is caused by a vari-ety of soil-inhabiting fungi (such as Rhizoctonia and Fusarium) and water molds (such as Pythium and Phytopthora).
Disease is generally more severe when seeds are planted too early in the spring when the soil is still cold and wet, when they are planted too deeply or when old seeds are used.
Management. Prepare seed beds (preferably raised beds) to provide good drainage and do not overwater during germination. Sow seeds when soil tempera-tures are favorable for rapid germination and growth, and do not sow them too deeply. Use of fungicide-treated seeds also may be beneficial.
Root, crown and stem rots. Root and crown rots commonly affect plants in the home garden, particu-
larly in poorly drained sites. Fungi (such as Rhizoc-tonia and Fusarium) or water molds (such as Pythium and Phytophthora) are the common causes of root and crown rots. The first noticeable above-ground symptoms generally include stunting of the plants or wilting of the leaves, particularly during the heat of the day. Additional symptoms, such as defoliation and dark elongated lesions on the stems, are observed in the later stages of disease development. Dark brownish-red lesions are observed on the roots. In the case of Pythium infections, the outer layer of the root (cortex) easily sloughs off, resulting in rat tail-like symptoms.
Management. Choose resistant plants and variet-ies. Visibly check the condition of the roots of trans-plants before purchasing them to avoid introducing these diseases into the garden. Choose a well-drained planting site, or plant on raised beds that allow for adequate drainage. Water on a regular basis, but do not overwater. If a disease occurs, avoid planting the same or other susceptible plants in the same location in the following year.
Southern blight. The soilborne fungus Sclerotium rolfsii is the pathogen that causes southern blight. The fungus attacks the lower stem of a variety of veg-etables (especially tomatoes, peppers and eggplants) at or near the soil line during warm and wet condi-tions. Infected plants rapidly wilt and collapse. Closer examination of the base of a diseased plant reveals a lesion that girdles the stem. When conditions are very humid and moist, white fungal strands (mycelium) and specialized tan-colored overwintering structures (sclerotia) are observed on the base of the plant.
Management. Do not plant susceptible crops in areas known to be infested with the pathogen for two to more years. Turn the soil to bury the sclerotia as deeply as possible (8 to 12 inches). For small plant-
HOME VEGETABLE DISEASE MANAGEMENT GUIDEDonald Ferrin
Pythium root rot
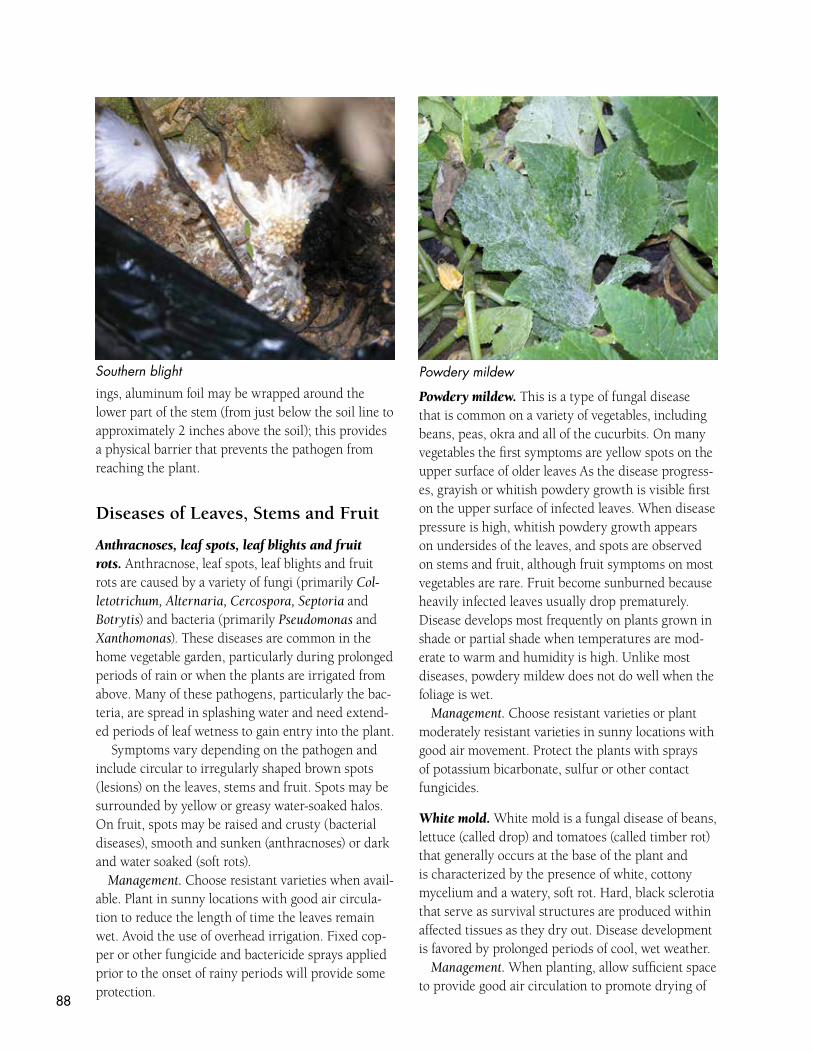
88
ings, aluminum foil may be wrapped around the lower part of the stem (from just below the soil line to approximately 2 inches above the soil); this provides a physical barrier that prevents the pathogen from reaching the plant.
Diseases of Leaves, Stems and Fruit
Anthracnoses, leaf spots, leaf blights and fruit rots. Anthracnose, leaf spots, leaf blights and fruit rots are caused by a variety of fungi (primarily Col-letotrichum, Alternaria, Cercospora, Septoria and Botrytis) and bacteria (primarily Pseudomonas and Xanthomonas). These diseases are common in the home vegetable garden, particularly during prolonged periods of rain or when the plants are irrigated from above. Many of these pathogens, particularly the bac-teria, are spread in splashing water and need extend-ed periods of leaf wetness to gain entry into the plant.
Symptoms vary depending on the pathogen and include circular to irregularly shaped brown spots (lesions) on the leaves, stems and fruit. Spots may be surrounded by yellow or greasy water-soaked halos. On fruit, spots may be raised and crusty (bacterial diseases), smooth and sunken (anthracnoses) or dark and water soaked (soft rots).
Management. Choose resistant varieties when avail-able. Plant in sunny locations with good air circula-tion to reduce the length of time the leaves remain wet. Avoid the use of overhead irrigation. Fixed cop-per or other fungicide and bactericide sprays applied prior to the onset of rainy periods will provide some protection.
Powdery mildew. This is a type of fungal disease that is common on a variety of vegetables, including beans, peas, okra and all of the cucurbits. On many vegetables the first symptoms are yellow spots on the upper surface of older leaves As the disease progress-es, grayish or whitish powdery growth is visible first on the upper surface of infected leaves. When disease pressure is high, whitish powdery growth appears on undersides of the leaves, and spots are observed on stems and fruit, although fruit symptoms on most vegetables are rare. Fruit become sunburned because heavily infected leaves usually drop prematurely.Disease develops most frequently on plants grown in shade or partial shade when temperatures are mod-erate to warm and humidity is high. Unlike most diseases, powdery mildew does not do well when the foliage is wet.
Management. Choose resistant varieties or plant moderately resistant varieties in sunny locations with good air movement. Protect the plants with sprays of potassium bicarbonate, sulfur or other contact fungicides.
White mold. White mold is a fungal disease of beans, lettuce (called drop) and tomatoes (called timber rot) that generally occurs at the base of the plant and is characterized by the presence of white, cottony mycelium and a watery, soft rot. Hard, black sclerotia that serve as survival structures are produced within affected tissues as they dry out. Disease development is favored by prolonged periods of cool, wet weather.
Management. When planting, allow sufficient space to provide good air circulation to promote drying of
Powdery mildewSouthern blight

89
the soil surface and the interior of the lower canopy. Remove and destroy infected plants as soon as they are evident. The sclerotia can be destroyed by turning the soil to bury them at least 10 or more inches deep.
Downy Mildew. This is a type of disease caused by various “water molds” that commonly occurs on the cole crops, cucurbits, onions, lettuce, spinach and other leafy greens. In 2009, downy mildew was observed on sweet basil in Louisiana. Symptoms of downy mildew vary with the host and environ-mental conditions. The first symptom usually is the appearance of pale green to light yellow spots on the upper leaf surfaces. As the disease progresses, the spots turn yellow and angular to irregular in shape. During moist weather, downy pale gray to purple growth and spores (called sporangia) form on the undersides of the spots. Leaves eventually wither and turn brown. Spores are disseminated primarily by wind and rain, and the disease devel-ops during periods of cool, wet weather (except downy mildew on cucurbits, which can develop and grow at temperatures as high as 90 degrees Fahren-heit). Moisture on the leaves is required for disease development.
Management. Choose resistant varieties or plant moderately resistant varieties in sunny locations with good air movement. Irrigate in the early morn-ing to reduce the amount of time leaves are wet. Fungicide applications may provide some protection, but good coverage is essential to reach the pathogen on the undersides of the leaves. Fungicides effective against powdery mildew will not be effective against downy mildew.
Late blight. Late blight of potatoes (Irish) and toma-toes is caused by a water mold known as Phytophtho-ra infestans. The disease causes greasy black lesions on stems and leaf petioles and blackening of the fruit. Dark, dead areas on the foliage also develop as the disease progresses. Late blight is favored by cool, wet weather during the spring.
Management. Remove and destroy diseased plants and plant debris. Do not compost infected plant material. If wooden stakes are used to support tomato plants, those stakes also should be removed and destroyed. Inspect tomato seedlings for disease symptoms before buying them. Preventive fungicide applications may provide some protection against late
blight, especially when weather conditions are favor-able for disease development and spread.
Diseases of the Whole Plant
Fusarium and Verticillium wilts. The soilborne fungi Fusarium and Verticillium cause Fusarium wilt and Verticillium wilt, respectively. The fungi invade the roots of susceptible plants and colonize the water-conducting tissues (xylem) of the plants, blocking the movement of water. Symptoms include yellowing and wilting of foliage, often on only one side of a plant. When cross-section cuts are made on wilted branches of infected plants, the exposed vascular tissues are brown.
Management. Choose resistant cultivars. Avoid planting susceptible plants in infested soils for at least three years. Remove and destroy infected plants as soon as symptoms are observed.
Southern bacterial wilt. Southern bacterial wilt of tomatoes, peppers, eggplants and potatoes is caused by the soilborne bacterium Ralstonia solanacearum. Bacteria enter the roots through wounds. Wet soils and high temperatures favor disease development. Disease severity often is higher in soils infested with root-knot nematodes. Infected plants initially go limp but recover overnight. As the disease progresses, plants rapidly wilt and die. Dark brown sunken lesions may be observed on the bases of infected tomato plants. When stems of wilted branches are cut in a 1-2 inch cross-section and suspended in clean water in a glass container, milky threads of bacteria stream from the cut stem.
Management. No resistant varieties currently are available. Avoid planting susceptible plants in infest-ed soils for at least three years. Remove and destroy infected plants as soon as symptoms are observed.
Bacterial wilt of cucurbits. Bacterial wilt of cucurbits is caused by the bacterium Erwinia tracheiphila. The bacterium survives in the gut of striped and spotted cucumber beetles and is spread from plant to plant during insect feeding. Initially, one or two leaves on the plant will turn dark green and collapse. As the disease spreads, entire runners and plants wilt, and the leaves, vines and fruit eventually shrivel and die. A cross section of the stem will show discolored yel-low xylem tissue (water conducting vessels of the

90
plant). Bacterial wilt can be confirmed in the field by taking a 3-4 inch section of stem near the crown and cutting it into two pieces. Slowly separate the two pieces and look for thin threadlike strands of bacte-rial slime.
Management. Plant resistant types of cucurbits. Cucumbers and cantaloupes are highly susceptible to bacterial wilt, while most gourds and watermelons are resistant. Squash and pumpkins are moderately susceptible. Prevention of bacterial wilt of cucurbits is dependent on managing the striped and spotted cucumber beetles. Screens, cones or row covers can be placed over the transplants for up to five days after flowering to protect the plants from beetle feeding. Insecticides also can be applied during peak beetle activity.
Viruses. Viruses can infect many types of vegetables. Typical virus symptoms include mosaic, mottle and ring spot or line patterns on the foliage or fruit, leaf distortion and distorted fruit. Some common viruses found in home gardens are cucumber mosaic virus, impatiens necrotic spot virus, tobacco mosaic virus, tomato spotted wilt virus and tomato yellow leaf curl. Viruses are spread primarily by various insects of which aphids, whiteflies and thrips are the most common. Many viruses also can be transmitted by seeds or mechanically in sap or on pruning shears or hands. Keep in mind that some symptoms caused by viruses look similar to the symptoms caused by nutrient deficiencies or herbicide injuries. Once infected with a virus, a plant cannot be cured.
Management. Choose resistant plants or variet-ies. Purchase virus-free transplants so virus-infected plants are not introduced into the garden. Prevent the spread of viruses by controlling insects and regularly cleaning tools used to work with the plants. Reflective mulches can aid in disrupting insect transmission of some viruses. Remove and destroy infected plants as soon as symptoms are observed.
Noninfectious Disorders of PlantsMany environmental factors can cause plant dis-
orders that mimic disease symptoms. These include drought, excess water, soil compaction, air pollutants, nutrient deficiencies or toxicities, heat or cold dam-age, herbicide damage and improper soil pH. They generally can be recognized because they affect many plants at the same time and do not spread from plant
to plant. Some of the more common disorders of gar-den vegetables are described below.
Blossom end rot. Blossom end rot results from a cal-cium deficiency in young, rapidly expanding fruit. Tomatoes, eggplants and peppers are highly sensitive to blossom end rot. Drought stress or extreme fluc-tuation in soil moisture or excessive nitrogen fertiliza-tion may worsen blossom end rot. Blossom end rot is more common in coarse, sandy soils and soils with a low pH. Sunken, dry leathery areas develop on the blossom end of ripe and green fruits. Soil analysis is required to know the calcium content and soil pH. If calcium is low, lime application may be required. Add organic matter to improve texture and water-retaining capacity of sandy soils. Prepare well-drained beds or raised beds to promote good water drainage. Avoid water stress and irrigate plants regularly to maintain a uniform moisture level in the soil. Use a nitrate source of nitrogen.
Frost or freeze injury. Symptoms of cold damage depend on the vegetable and the season. Warm-season vegetables such as tomatoes, snap beans, cucurbits, okra, basil and other tender herbs and peppers are more sensitive to cold weather than cool-season crops (broccoli, cabbage, onions, many leafy greens and peas). Seedlings, young plants, flowers and mature fruit are very sensitive to cold damage. Blistering, water-soaked lesions, plant collapse and soft rots are common cold damage symptoms. Cover plants with plastic or cloth sheets when cold evenings are predicted. Watering plants at the soil line before a freeze can help to protect plants. Wet soil absorbs more heat than dry soil and will radiate the heat dur-ing the night.
Herbicide injury. When used exactly as prescribed, herbicides rarely cause problems on nontarget plants. Injury can occur, however, if they are used or applied incorrectly or when they are blown by the wind to nontarget areas (herbicide drift). Herbicide damage can be difficult to diagnose, because symptoms often resemble those of infectious diseases and symptoms vary depending on the plant injured. Common leaf symptoms associated with herbicide damage are leaf distortion, twisting, curling, spotting, vein bleach-ing and mottling. Adventitious leaf growth also may occur. Brittle shoot tissue is common in cucurbits, tomatoes and peppers. Some of the most common

91
herbicides that cause plant injury are Roundup (glyphosate), paraquat and 2, 4-D, MCPE or Weedone (phenoxy acid).
Oedema (edema). Oedema occurs when plants take up more water through the roots than they can use or release through their leaves. Oedema occurs when the soil is warm and saturated, while the air is cool and humid. Blisters form on the upper or lower sides of leaves. Leafy greens, brassicas and cole crops are very sensitive to oedema.
Ozone damage. Ozone is the most important air pollutant for plants in the United States. Ozone is the active form of oxygen and it causes a variety of symptoms in plants, including interveinal (between leaf veins) necrosis, superficial tissue collapse, silver or white flecking and colored (tan, red brown, purple) markings on the upper surfaces of leaves. Snap beans, edamame, citrus and potatoes are very sensitive to ozone pollution. Ozone is produced when sunlight reacts with nitrogen oxides and hydrocarbons. The burning of garbage and the combustion of coal or
petroleum fuels form hydrocarbons. Ozone is moved to ground level by turbulence generated during elec-trical storms. Ozone levels usually are highest from 11 a.m. until 5 p.m. and during the summer when daylight hours are extended.
Sunscald. Sunscald or sunburn of tomatoes, peppers and eggplants is caused by direct exposure of the fruit to sunlight. Sunscald occurs when plants have lost leaves due to diseases, excessive pruning or high winds. Fruit exhibits a large light-colored paperlike area on the sides of the fruit exposed to direct sun-light. Over time, the area may become sunken and wrinkly. Secondary fungi may colonize the scalded area, giving it a black, gray or green appearance. The fruit eventually begins to rot and drops off the plant. Sunscald can be minimized by spacing plants so that adequate shade is available to reduce fruit exposure to direct sun, managing diseases that may result in defoliation and minimizing breaking of foliage or shoots during pruning and picking.
Fungicides available for disease management in home vegetable gardens
Product Name Comments
BIOPESTICIDESType of fungicide: Most are contactCrops: Most vegetablesDiseases managed: Bacterial spot, powdery mildew, Botrytis gray mold and early blight
ActinovateBayer Natria Disease ControlSerenade Garden1
Can be used for organic gardening.
CAPTANType of fungicide: ContactCrops: Most vegetablesDiseases managed: Pre- and post-emergence damping-off
High Yield Captan Fungicide 50% WP Seed treatment only.
CHLOROTHALONILType of fungicide: ContactCrops: Most vegetablesDiseases managed: Anthracnose, Botrytis, downy mildew, early blight, fruit rots, fungal leaf spots and blights, gummy stem blight, late blight, powdery mildew and rust
Bonide Fung-onil Multi-purpose Fungicide Ferti-lome Broad Spectrum Landscape and Garden Fungicide1GardenTech Daconil Fungicide1Hi-Yield Vegetable, Flower, Fruit and Ornamental FungicideOrtho Disease B Gon Garden Fungicide ConcentrateOrtho Max Garden Disease Control ConcentrateSA-50 Liquid Ornamental and Vegetable Flowable Fungicide

92
COPPERType of fungicide: ContactCrops: Most vegetablesDiseases managed: Anthracnose, bacterial leaf spots and blights, downy mildew, early blight, fungal leaf spots and blights, gummy stem blight, late blight, powdery mildew, scab, white rust and white mold
Bonide Copper Spray or DustBonide Liquid Copper Fungicide1Concern Copper Soap FungicideGordon’s Bordeaux MixtureHi-Yield Bordeaux Mix FungicideHi-Yield Copper FungicideLiqui-Cop Copper Fungicidal Garden SprayLilly Miller Cueva Copper Soap FungicideNatural Guard Copper Soap Liquid Fungicide1SA-50 Southern Ag Liquid Copper Fungicide
Can be used for organic gardening.
Do not mix with liquid fertilizers.
Do not use in spray solutions with a pH of less than 6.5.
May cause staining of masonry, concrete, etc.
COPPER + INSECTICIDESType of fungicide: ContactCrops: Most vegetablesDiseases managed: Anthracnose, bacterial leaf spots and blights, downy mildew, early blight, fungal leaf spots and blights, gummy stem blight, late blight, powdery mildew, scab, white rust and white mold
Bonide Garden DustBonide Dragoon Dust with Copper
Do not mix with liquid fertilizers.Do not use in spray solutions with a pH of less than 6.5.May cause staining of masonry, concrete, etc.
MANCOZEBType of fungicide: ContactCrops: Asparagus, corn, cucurbits, onions, potatoes and tomatoesDiseases managed: Anthracnose, bacterial leaf spots and blights, downy mildew, early blight, fungal leaf spots and blights, gummy stem blight, late blight, powdery mildew, scab, white rust and white mold
Bonide Mancozeb Flowable With ZincSA-50 Dithane M-45
MYCLOBUTANILType of fungicide: ContactCrops: Asparagus, cucurbits, snap beans and tomatoesDiseases managed: Powdery mildew and rust
Immunox Multi-Purpose Fungicide Spray Concentrate
NEEM OILType of fungicide: ContactCrops: All vegetables, herbs and spicesDiseases managed: Anthracnose, downy mildew, fungal leaf spots and blights, gray mold, powdery mildew, rust and scab
Bonide Rose Rx 3 in 11Bonide Tomato and Vegetable 3 in 1Concern Garden Defense Multi-purpose Spray1Ferti-lome Rose, Flower and Vegetable SprayGardens Alive! Shield-All IIGarden Safe Fungicide 3-in-11Green Light Neem ConcentrateGreen Light Powdery Mildew Killer RTUNatural Guard Neem PySouthern Ag TripleAction Neem Oil
Can be used for organic gardening.
NEEM OIL PLUS INSECTICIDESType of fungicide: ContactCrops: All vegetables, herbs and spicesDiseases managed: Anthracnose, downy mildew, fungal leaf spots and blights, powdery mildew and rust
Ferti-lome Triple Action Plus1Green Light Neem II Ready-To-UseMonterey Neem Oil 70%
Product Name Comments

93
PHOSPHOROUS ACIDType of fungicide: SystemicCrops: Most vegetablesDiseases managed: Root, crown and fruit rots caused by Phytophthora and Pythium, downy mildew, gummy stem blight and late blight
Monterey Agri-Fos Systemic Fungicide
POTASSIUM BICARBONATEType of fungicide: ContactCrops: Most vegetablesDiseases managed: Powdery mildew
Garden-ville Potassium Bicarbonate
PROPICONAZOLEType of fungicide: SystemicCrops: Sweet cornDiseases managed: Leaf spots/blights and rust
Bonide Fung-onil Lawn and Garden Disease Control Ready to SprayBonide Infuse Systemic Disease Control Lawn and Landscape Ready to SprayFerti-lome Ready to Spray Liquid Systemic FungicideMaxide Dual Action Disease Killer Ready to Spray
Do not spray within 14 days of harvest.
SULFURType of fungicide: ContactCrops: Beans (may injure some varieties), cole crops, onions and peasDiseases managed: Botrytis, downy mildew, powdery mildew and rust
Bonide Sulfur Plant FungicideFerti-lome Dusting SulfurGreen Light Wettable Dusting SulfurHi-Yield Wettable Dusting SulfurLilly Miller Sulfur DustSafer Brand Garden Fungicide II Southern Ag Wettable or Dusting Sulfur
Do not re-enter treated area for 24 hours after application.
Do not use during periods of high temperatures (85 degrees Fahrenheit or higher) or within two to four weeks of using an oil spray.
Do not use on cucurbits (cucumbers, squash, melons etc.).
SULFUR + POTASSIUM SALTSType of fungicide: ContactCrops: Beans, cucumbers, peas, potatoes and squashDiseases managed: Powdery mildew
Safer Brand 3-in-1 Garden Spray1 Do not use in full sun, when temperature exceeds 90 F or within four weeks of an oil spray.
1Available in concentrate and ready-to-use formulations.
Product Name Comments

94
VEGETABLE NEMATODE MANAGEMENTCharles Overstreet
Quite a number of nematodes can be found in the typical garden. Most of the time only two species really appear to cause damage to a number of different vegetables. These two nematode species are referred to as the Southern root-knot nematode and reniform nematode. Both are found throughout the state.
The southern root-knot nematode is a subtropical or tropical nematode found in the warmer regions of the world. Root-knot nematodes like warm condi-tions, so they are not active in the soil until soil tem-peratures warm up to 65 F. Likewise, in the fall these nematodes are no longer very active once tempera-tures drop back down to that level. This leaves a five to six month period that these pests are active in Lou-isiana. Since each female lays hundreds of eggs and a generation may be only 25-30 days, large populations can develop quickly in the soil. Root-knot nematode seems to favor soils that are sandy; however, they can be introduced on contaminated equipment or infected transplants and survive fairly well on all but very heavy soils.
The reniform nematode also is considered to be a subtropical or tropical nematode found in many countries. This pest doesn’t like cold weather either and is not active when soil temperatures are below 60 degrees. It has a very fast life cycle that may be only 18-20 days and the pests often build up to extremely high levels in the soil. Reniform seems to do slightly better in soils that are more loamy but can do very well in sandy to fairly heavy clay soils. This nematode is very tough and is much more difficult to reduce populations by some of the normal practices that are used on root-knot such as tilling to dry out the soil or fallowing.
Symptoms Both of these nematodes live in the soil and dam-
age plant roots. Most of the damage that is visible above ground is the result of damage that was previ-ously caused to the root system. Root-knot nematode produces a very distinctive symptom on the roots (galling) that makes it easy to recognize. Galls can range in size from being just barely visible on crops such as corn to extremely large as found on butter-beans, okra or tomatoes. The size of the gall also may be an indication of the number of nematodes pres-ent. Large galls have a lot more nematodes present in them than small galls, which may have only one or two. The amount of galling that is present also may
give you an indication of just how serious a problem exists. Plants with only a few galls may function almost normally, and little damage may be visible. Large numbers of galls on the roots of plants can be a good indication that a major problem is present.
Ideally, the best thing to do is observe the plant roots after they are finished producing and look for the presence of galls. A few galls may mean that a problem is building and corrective action should be taken. Severe galling means future plantings in this location are likely to be seriously damaged and cor-rective action is necessary.
Galling disrupts the flow of water and nutrients in a plant and damage really shows during dry periods. Increasing the available water and nutrients has been one of the management strategies for many years. Above-ground plants may be stunted, wilt early, yield poorly or die prematurely.
When you discover plants that fit any of these foli-ar symptoms, be sure to check the root system and look for visible galling.
Reniform nematode is much more subtle than the root-knot nematode and can easily be misidentified. It doesn’t produce any distinctive symptoms on the roots. The large numbers that attack the roots weak-en them and slow down growth and fruiting poten-tial of many vegetables. Fortunately, fewer vegetables are attacked by reniform than the Southern root-knot. This makes it a lot easier to develop rotational plans for management. Above-ground symptoms are usually stunting and reduced yield.
Damage by nematodes usually only occurs when high numbers of the nematodes are present at the time of planting. Nematode populations have ups and downs each year depending on past crops, growing conditions, winter survival, predators and parasites. In years where large numbers of these pests survive, damage can be severe on many crops. Once established in a garden, these pests are likely to appear on spring, summer or fall vegetables.
Just about every type of vegetable that we plant in our gardens can be attacked by root-knot nematode. Those planted and growing during the hot summer months such as tomatoes, okra, butterbeans, squash, cucumbers and melons generally are some of the most severely damaged. Since the damage is done to the roots of these plants, most people only see that the plants are stunted, wilt easily during dry weath-er, yield poorly and die prematurely.
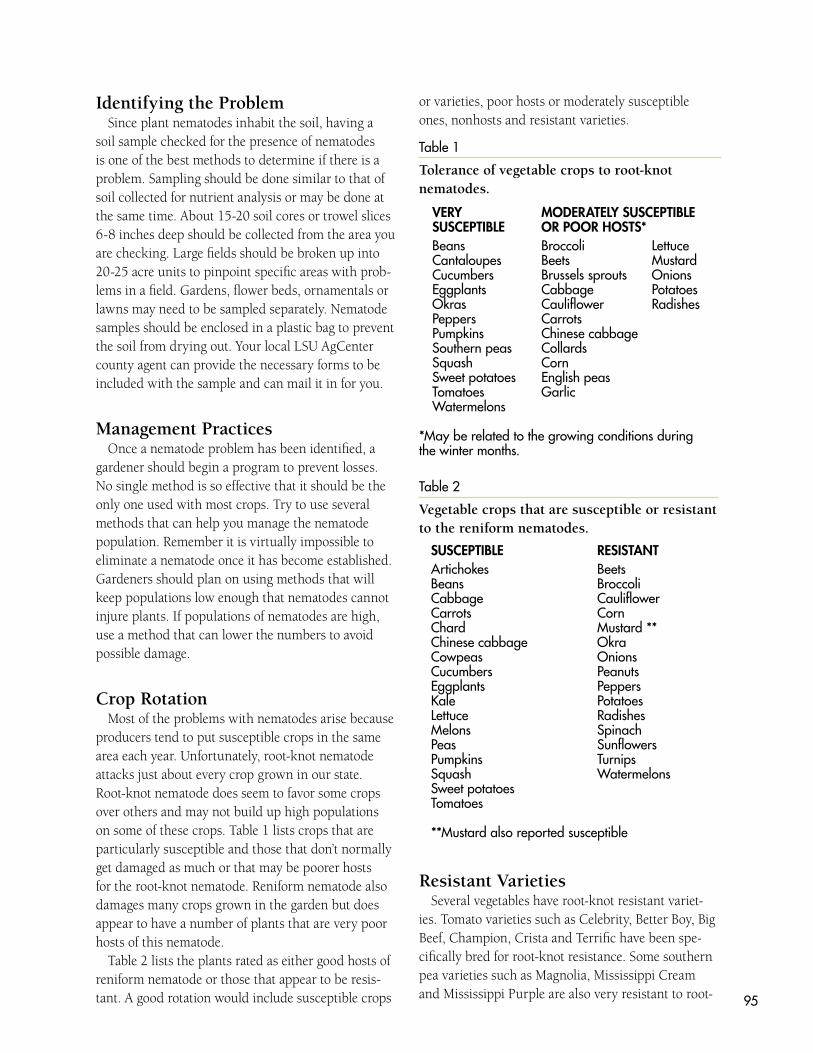
95
Identifying the ProblemSince plant nematodes inhabit the soil, having a
soil sample checked for the presence of nematodes is one of the best methods to determine if there is a problem. Sampling should be done similar to that of soil collected for nutrient analysis or may be done at the same time. About 15-20 soil cores or trowel slices 6-8 inches deep should be collected from the area you are checking. Large fields should be broken up into 20-25 acre units to pinpoint specific areas with prob-lems in a field. Gardens, flower beds, ornamentals or lawns may need to be sampled separately. Nematode samples should be enclosed in a plastic bag to prevent the soil from drying out. Your local LSU AgCenter county agent can provide the necessary forms to be included with the sample and can mail it in for you.
Management PracticesOnce a nematode problem has been identified, a
gardener should begin a program to prevent losses. No single method is so effective that it should be the only one used with most crops. Try to use several methods that can help you manage the nematode population. Remember it is virtually impossible to eliminate a nematode once it has become established. Gardeners should plan on using methods that will keep populations low enough that nematodes cannot injure plants. If populations of nematodes are high, use a method that can lower the numbers to avoid possible damage.
Crop RotationMost of the problems with nematodes arise because
producers tend to put susceptible crops in the same area each year. Unfortunately, root-knot nematode attacks just about every crop grown in our state. Root-knot nematode does seem to favor some crops over others and may not build up high populations on some of these crops. Table 1 lists crops that are particularly susceptible and those that don’t normally get damaged as much or that may be poorer hosts for the root-knot nematode. Reniform nematode also damages many crops grown in the garden but does appear to have a number of plants that are very poor hosts of this nematode.
Table 2 lists the plants rated as either good hosts of reniform nematode or those that appear to be resis-tant. A good rotation would include susceptible crops
or varieties, poor hosts or moderately susceptible ones, nonhosts and resistant varieties.
Resistant VarietiesSeveral vegetables have root-knot resistant variet-
ies. Tomato varieties such as Celebrity, Better Boy, Big Beef, Champion, Crista and Terrific have been spe-cifically bred for root-knot resistance. Some southern pea varieties such as Magnolia, Mississippi Cream and Mississippi Purple are also very resistant to root-
Table 1
Tolerance of vegetable crops to root-knot nematodes.
VERY MODERATELY SUSCEPTIBLE SUSCEPTIBLE OR POOR HOSTS* Beans Broccoli LettuceCantaloupes Beets MustardCucumbers Brussels sprouts OnionsEggplants Cabbage PotatoesOkras Cauliflower RadishesPeppers CarrotsPumpkins Chinese cabbageSouthern peas CollardsSquash CornSweet potatoes English peasTomatoes GarlicWatermelons
*May be related to the growing conditions during the winter months.
Table 2
Vegetable crops that are susceptible or resistant to the reniform nematodes.
SUSCEPTIBLE RESISTANTArtichokes BeetsBeans BroccoliCabbage CauliflowerCarrots CornChard Mustard **Chinese cabbage OkraCowpeas Onions Cucumbers PeanutsEggplants PeppersKale PotatoesLettuce RadishesMelons SpinachPeas SunflowersPumpkins TurnipsSquash WatermelonsSweet potatoesTomatoes
**Mustard also reported susceptible

96
knot nematode. Plant any of these resistant variet-ies in areas where root-knot nematodes have begun building up or prior to planting a very susceptible crop in the future. These varieties have worked fairly well for us and help keep the levels fairly low.
Southern peas are fairly cheap and can be readily used as a summer cover crop to lower populations of the root-knot nematode. Unfortunately, the effects of planting a resistant crop are short, and nematodes will multiply rapidly once a susceptible crop is plant-ed. If the population levels are low enough at the time of planting, however, a susceptible crop usually will not be seriously damaged.
Solarization Soil solarization is a method of using the natural
energy of the sun to sufficiently heat the soil to tem-peratures high enough to kill many soil pests. A clear plastic tarp is used to cover the soil, trapping the heat beneath. Pests that may be killed by solariza-tion include nematodes, plant disease organisms and weeds. Most nematodes are killed when the soil tem-perature goes above 118 degrees F. Several weeks may be required, however, to sufficiently heat the soil to a depth of 6-8 inches where most nematodes are found. The hottest months are the best time for solarization and include June, July and August. Because many spring vegetables are finished by May or June, the soil can be treated before it is time to plant fall crops. Follow these procedures to ensure success with soil solarization:
■ The soil should be well tilled and free of clods or sticks that could tear the plastic. Try to keep the soil surface relatively flat to ensure a tight fit by the plastic covering.
■ Adequate moisture should be present in the soil. Moist soils will conduct heat better than dry soils. Irrigate, if necessary, before treating. If conditions are extremely dry, it may be advisable to run some type of irrigation or soaker hose under the plastic to water during the course of the treatment.
■ Use a clear plastic or polyethylene cover that is between 1 mil and 4 mils thick. White or black plastic does not transmit enough solar radiation to provide sufficient heat. Thicker plastics may hold up better in the garden. Patch any holes immedi-ately with tape to prevent heat loss.
■ Stretch the plastic tight on the area you are treating, and seal the edges with soil.
■ Leave the plastic tarp on the area four to eight weeks. Longer is better, particularly if there have been prolonged periods of cloudy weather.
■ After that period, carefully remove soil from the cover edges and remove the cover. Avoid contami-nating the treated soil with soil from other parts of the garden.
■ Plant crops that are susceptible to nematodes. Fall crops could include cucumbers, squash, okra, tomatoes, potatoes, melons, carrots, cabbage and beets.
The high temperatures that develop beneath the plastic tarp will kill many of the common pests found in the soil. Since the temperature of the soil will decrease with depth, several weeks of exposure to the sun are required to reduce pests that are deep within the soil. Solarization can never eliminate nematodes, weeds or soil diseases but it certainly can reduce their incidence. This treatment should allow a successful planting of a susceptible crop for at least one growing period. Currently, no nematicides are available for use in the home garden. Solarization can be a useful management tool to protect vegetables in the garden.
Trap Crops and Antagonistic PlantsOnly a few plants have been found to produce
substances known to be detrimental to nematodes. Asparagus, pangola grass, neem, castor beans and marigolds produce substances that are toxic to at least one or more kinds of nematodes. Marigolds are known to be particularly effective against root-knot nematodes. Most of the effect of marigolds, however, is not from these natural nematicides but the plants acting as a trap crop. The nematode enters roots of the plant but is unable to develop further in its life cycle or may be actively killed by the plant when it attempts to feed.
Most marigold varieties probably could be used against our common root-knot nematode. Variet-ies of the French marigold appear to be the most effective in suppressing nematode populations. The variety Tangerine appears to be an exceptionally effective selection since it doesn’t appear to support any reproduction by the root-knot nematode. Unfor-

97
tunately, one type of small-flowered marigold (Sig-net – Tagetes signata or tennifolia) lacks this natural resistance and shouldn’t be used when root-knot is present.
Although planting marigolds as companion plants for susceptible crops sounds like a good idea, it just doesn’t work. The nematodes that enter the mari-golds are killed, but the ones that enter the suscep-tible crops are not killed. Eventually, they will build up on the suitable host and cause problems. The best way to use marigolds is as a cover crop in the rows or area where you want to reduce the nema-tode problem. After about three to four months of being in continuous marigolds, you can successfully plant a susceptible crop. Don’t expect the influence of the marigolds to be good for more than one crop or maybe one season. Nematodes are quite prolific, and populations will quickly return.
Clean TransplantsAlthough many of our home landscapes or gar-
dens are naturally infested by nematodes, it’s easy for them to be introduced on infected transplants. Also, infected plants may reduce the effectiveness of other management measures. Most commercial nurseries use clean potting soil, lessening the likeli-hood that plants will have nematodes present. The greatest danger comes from transplant beds that are in the same area year after year or if unsterilized soil from the garden is used in a homemade potting mix. If a permanent transplant bed is used, use several cultural methods to reduce nematodes in this area during the off-season. Small amounts of soil can be made free of nematodes either through drying for 30 minutes to one hour in the oven at low heat or freez-ing several days in the freezer (0 degrees F). Freezing will not eliminate other soil pathogens however.
Escape PlantingMost nematodes, like root-knot, require certain
soil temperatures before they are active in the soil. Root-knot nematodes are not active until soil tem-peratures reach 65 degrees in the spring. Crops grown when soil temperatures are below this level generally are not seriously damaged by root-knot. Many of our late fall and early spring crops are grown when temperatures are too low for root-knot nematodes to be a problem. If these same crops are
planted when temperatures are high enough for the nematodes to be active, the crop may be severely damaged. A good example of an escape planting is the Irish potato. It normally is planted in January or early February and escapes serious injury from root-knot nematodes. The times not to plant potatoes in the fall are from mid-August to mid-September. Root-knot nematodea are very active at that time and can severely damage potatoes.
FallowingAllowing the land to lay idle without a crop has
been a practice for thousands of years. Clean fallow, which involves keeping the soil free of weeds or grass, has been used to starve nematodes of a food source and reduce the populations. Many of the common weeds found growing in a garden such as chick-weed, henbit, morning glory, crab grass, pigweed or teaweed are also hosts for the southern root-knot nematode. The only major drawback to clean fal-lowing is that it is detrimental to soil (both through erosion and in structure) and should be used only infrequently. A cover crop is preferred over that of fallowing, assuming the cover crop will not build up the nematode.
FertilizationMost of the influence of fertilization is indirect. The
damage caused by a light infestation of nematodes may be reduced by the increase of higher rates of fertilizer. Since you are improving only the growth of the plant, nematode levels may be much higher on these plants at the end of the growing season. If any nutrient is already low in the soil, damaged roots by nematodes certainly will make it much more dif-ficult to obtain. Test the soil to determine the levels of various nutrients, and make sure adequate levels are present. Don’t use excessive amounts, however, because of a salt buildup or pH problems from high levels of fertilizer.
Organic MulchesAdding organic amendments to the soil is an
effective method of reducing damage by nematodes. These amendments may have an effect on the nem-atode population or plants in several ways. These organic amendments may stimulate microorgan-isms in the soil that attack nematodes and reduce
98
the populations of the pests. Many different types of organisms use nematodes as a food source. One group in particular, called nematode trapping fungi, has been of great interest because of its unique abili-ty to form trapping structures to catch and kill nem-atodes. Several of these nematode trapping fungi are very common in Louisiana.
Organic amendments may improve soil structure, water holding capacity and plant nutrition, which makes for better growing conditions for plants. Plants growing in a good soil environment may be able to tolerate nematode injury before symptoms begin to develop.
As some organic materials decompose in the soil, they may produce chemicals such as ammonia, which can kill nematodes. Organic amendments that are fairly high in nitrogen, such as animal manures; shells of crawfish, crab or shrimp; green manures; and hays from leguminous crops may pro-vide better nematode control than some of the other amendments that are low in nitrogen.
RotavationSome nematodes found in coarse soils (containing a
high percentage of sand) may be injured by abrasion if the soil is intensely tilled. Although tilling coarse soil may reduce some of the nematodes, it may not be sufficient to prevent damage.
SanitationSanitation includes such things as weed control,
crop residue destruction and disinfection of equip-ment. Since many weeds are hosts of nematodes such as root-knot, it is important that management prac-tices include a good weed control program. Plants should be tilled up or removed as soon as they are through producing to prevent any further nematode development. Plants that have badly galled roots should be removed from the garden for disposal. Don’t add them to a compost pile unless you are sure the temperature will get high enough during composting to destroy nematodes. Nematodes can be killed by heat when temperatures reach 111-118 degrees for a short time. Nematodes in the infected roots also can be killed by exposure to the sun. Equipment can spread nematodes from one area to another. If nematodes are a problem in one area, it may be a good idea to wash off equipment before moving to another location.
Site SelectionIf sufficient land is available, gardeners with nema-
tode problems should try to rotate their plant site every few years. Try to select areas which have been in pasture or grasses. Many gardens or ornamentals can be planted in only one area. Even if you cannot move the site, plan to use a careful rotation of the crops that you plant.

99
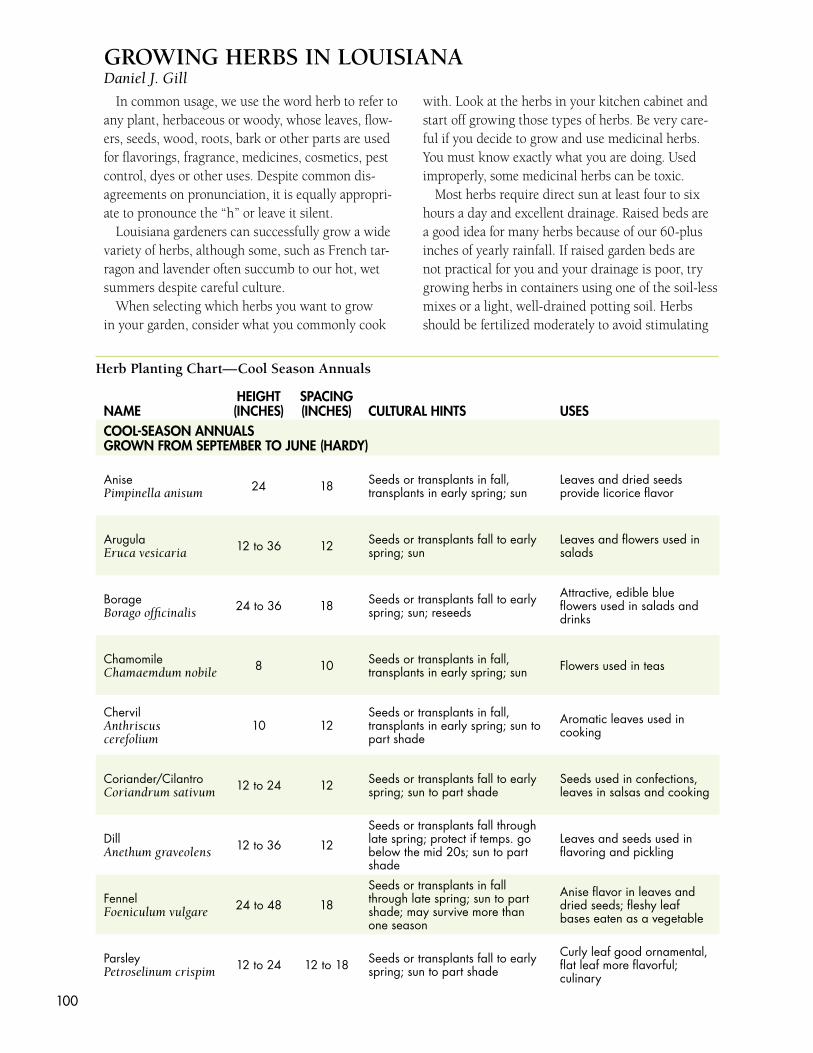
100
GROWING HERBS IN LOUISIANADaniel J. Gill
In common usage, we use the word herb to refer to any plant, herbaceous or woody, whose leaves, flow-ers, seeds, wood, roots, bark or other parts are used for flavorings, fragrance, medicines, cosmetics, pest control, dyes or other uses. Despite common dis-agreements on pronunciation, it is equally appropri-ate to pronounce the “h” or leave it silent.
Louisiana gardeners can successfully grow a wide variety of herbs, although some, such as French tar-ragon and lavender often succumb to our hot, wet summers despite careful culture.
When selecting which herbs you want to grow in your garden, consider what you commonly cook
with. Look at the herbs in your kitchen cabinet and start off growing those types of herbs. Be very care-ful if you decide to grow and use medicinal herbs. You must know exactly what you are doing. Used improperly, some medicinal herbs can be toxic.
Most herbs require direct sun at least four to six hours a day and excellent drainage. Raised beds are a good idea for many herbs because of our 60-plus inches of yearly rainfall. If raised garden beds are not practical for you and your drainage is poor, try growing herbs in containers using one of the soil-less mixes or a light, well-drained potting soil. Herbs should be fertilized moderately to avoid stimulating
Herb Planting Chart—Cool Season Annuals
NAMEHEIGHT(INCHES)
SPACING(INCHES) CULTURAL HINTS USES
COOL-SEASON ANNUALSGROWN FROM SEPTEMBER TO JUNE (HARDY)
AnisePimpinella anisum 24 18 Seeds or transplants in fall,
transplants in early spring; sunLeaves and dried seeds provide licorice flavor
ArugulaEruca vesicaria 12 to 36 12 Seeds or transplants fall to early
spring; sunLeaves and flowers used in salads
BorageBorago officinalis 24 to 36 18 Seeds or transplants fall to early
spring; sun; reseeds
Attractive, edible blue flowers used in salads and drinks
ChamomileChamaemdum nobile 8 10 Seeds or transplants in fall,
transplants in early spring; sun Flowers used in teas
ChervilAnthriscus cerefolium
10 12Seeds or transplants in fall, transplants in early spring; sun to part shade
Aromatic leaves used in cooking
Coriander/CilantroCoriandrum sativum 12 to 24 12 Seeds or transplants fall to early
spring; sun to part shadeSeeds used in confections, leaves in salsas and cooking
DillAnethum graveolens 12 to 36 12
Seeds or transplants fall through late spring; protect if temps. go below the mid 20s; sun to part shade
Leaves and seeds used in flavoring and pickling
FennelFoeniculum vulgare 24 to 48 18
Seeds or transplants in fall through late spring; sun to part shade; may survive more than one season
Anise flavor in leaves and dried seeds; fleshy leaf bases eaten as a vegetable
ParsleyPetroselinum crispim 12 to 24 12 to 18 Seeds or transplants fall to early
spring; sun to part shade
Curly leaf good ornamental, flat leaf more flavorful; culinary
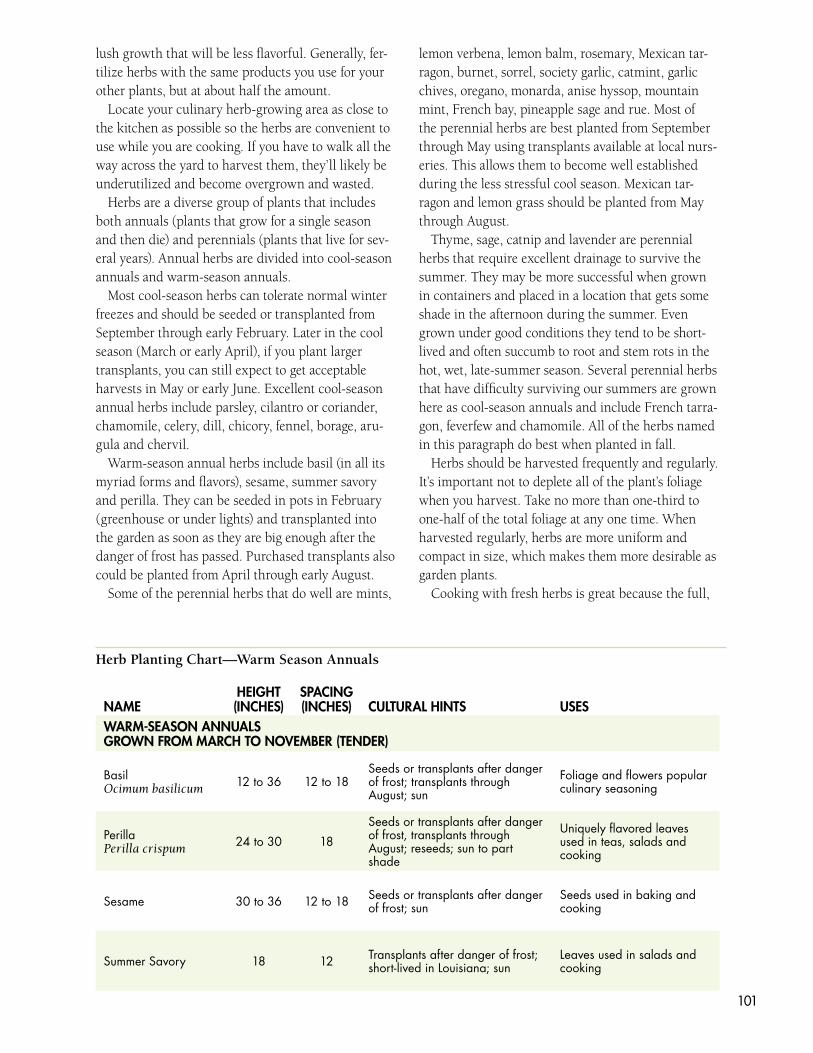
101
lush growth that will be less flavorful. Generally, fer-tilize herbs with the same products you use for your other plants, but at about half the amount.
Locate your culinary herb-growing area as close to the kitchen as possible so the herbs are convenient to use while you are cooking. If you have to walk all the way across the yard to harvest them, they’ll likely be underutilized and become overgrown and wasted.
Herbs are a diverse group of plants that includes both annuals (plants that grow for a single season and then die) and perennials (plants that live for sev-eral years). Annual herbs are divided into cool-season annuals and warm-season annuals.
Most cool-season herbs can tolerate normal winter freezes and should be seeded or transplanted from September through early February. Later in the cool season (March or early April), if you plant larger transplants, you can still expect to get acceptable harvests in May or early June. Excellent cool-season annual herbs include parsley, cilantro or coriander, chamomile, celery, dill, chicory, fennel, borage, aru-gula and chervil.
Warm-season annual herbs include basil (in all its myriad forms and flavors), sesame, summer savory and perilla. They can be seeded in pots in February (greenhouse or under lights) and transplanted into the garden as soon as they are big enough after the danger of frost has passed. Purchased transplants also could be planted from April through early August.
Some of the perennial herbs that do well are mints,
lemon verbena, lemon balm, rosemary, Mexican tar-ragon, burnet, sorrel, society garlic, catmint, garlic chives, oregano, monarda, anise hyssop, mountain mint, French bay, pineapple sage and rue. Most of the perennial herbs are best planted from September through May using transplants available at local nurs-eries. This allows them to become well established during the less stressful cool season. Mexican tar-ragon and lemon grass should be planted from May through August.
Thyme, sage, catnip and lavender are perennial herbs that require excellent drainage to survive the summer. They may be more successful when grown in containers and placed in a location that gets some shade in the afternoon during the summer. Even grown under good conditions they tend to be short-lived and often succumb to root and stem rots in the hot, wet, late-summer season. Several perennial herbs that have difficulty surviving our summers are grown here as cool-season annuals and include French tarra-gon, feverfew and chamomile. All of the herbs named in this paragraph do best when planted in fall.
Herbs should be harvested frequently and regularly. It’s important not to deplete all of the plant’s foliage when you harvest. Take no more than one-third to one-half of the total foliage at any one time. When harvested regularly, herbs are more uniform and compact in size, which makes them more desirable as garden plants.
Cooking with fresh herbs is great because the full,
NAMEHEIGHT(INCHES)
SPACING(INCHES) CULTURAL HINTS USES
WARM-SEASON ANNUALSGROWN FROM MARCH TO NOVEMBER (TENDER)
BasilOcimum basilicum 12 to 36 12 to 18
Seeds or transplants after danger of frost; transplants through August; sun
Foliage and flowers popular culinary seasoning
PerillaPerilla crispum 24 to 30 18
Seeds or transplants after danger of frost, transplants through August; reseeds; sun to part shade
Uniquely flavored leaves used in teas, salads and cooking
Sesame 30 to 36 12 to 18 Seeds or transplants after danger of frost; sun
Seeds used in baking and cooking
Summer Savory 18 12 Transplants after danger of frost; short-lived in Louisiana; sun
Leaves used in salads and cooking
Herb Planting Chart—Warm Season Annuals
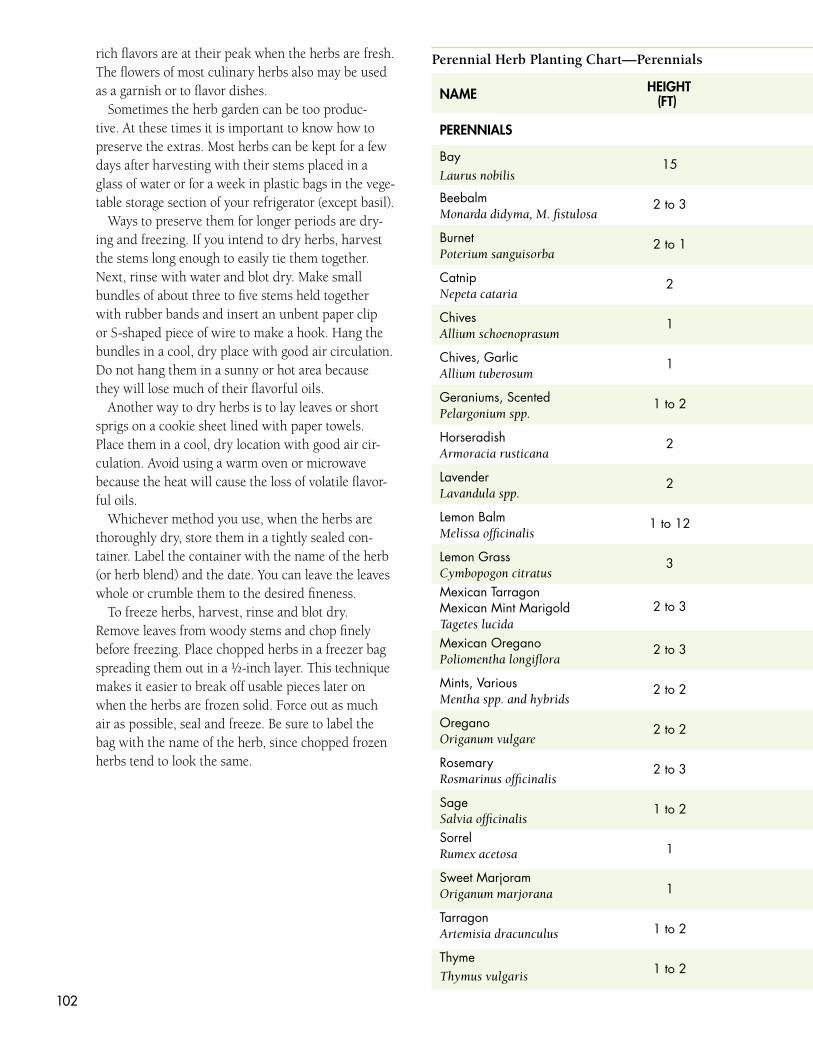
102
rich flavors are at their peak when the herbs are fresh. The flowers of most culinary herbs also may be used as a garnish or to flavor dishes.
Sometimes the herb garden can be too produc-tive. At these times it is important to know how to preserve the extras. Most herbs can be kept for a few days after harvesting with their stems placed in a glass of water or for a week in plastic bags in the vege-table storage section of your refrigerator (except basil).
Ways to preserve them for longer periods are dry-ing and freezing. If you intend to dry herbs, harvest the stems long enough to easily tie them together. Next, rinse with water and blot dry. Make small bundles of about three to five stems held together with rubber bands and insert an unbent paper clip or S-shaped piece of wire to make a hook. Hang the bundles in a cool, dry place with good air circulation. Do not hang them in a sunny or hot area because they will lose much of their flavorful oils.
Another way to dry herbs is to lay leaves or short sprigs on a cookie sheet lined with paper towels. Place them in a cool, dry location with good air cir-culation. Avoid using a warm oven or microwave because the heat will cause the loss of volatile flavor-ful oils.
Whichever method you use, when the herbs are thoroughly dry, store them in a tightly sealed con-tainer. Label the container with the name of the herb (or herb blend) and the date. You can leave the leaves whole or crumble them to the desired fineness.
To freeze herbs, harvest, rinse and blot dry. Remove leaves from woody stems and chop finely before freezing. Place chopped herbs in a freezer bag spreading them out in a ½-inch layer. This technique makes it easier to break off usable pieces later on when the herbs are frozen solid. Force out as much air as possible, seal and freeze. Be sure to label the bag with the name of the herb, since chopped frozen herbs tend to look the same.
Perennial Herb Planting Chart—Perennials
NAME HEIGHT (FT)
SPACING(FT) CULTURAL HINTS USES
PERENNIALS Trees, shrubs and herbaceous perennials; planted year-round with fall and spring preferred
BayLaurus nobilis
15 5 Tree or large shrub; protect below 20 degrees; sun Leaves used in cooking; good container plant in north Louisiana
BeebalmMonarda didyma, M. fistulosa
2 to 3 1 Seeds in spring; transplants any time; divisions fall or spring; spreads rapidly; sun to part sun
Showy flowers, aromatic seed heads; leaves used in tea
BurnetPoterium sanguisorba
2 to 1 1 to 12 Well-drained soil; full to part sun; seeds or divisions in spring
Cucumber flavored leaves used fresh in salads; attractive evergreen foliage
CatnipNepeta cataria
2 1 to 2 Well-drained soil; seeds, transplants or divisions; sun to part shade; often short-lived in Louisiana
Leaves used in teas and seasoning; cats love it
ChivesAllium schoenoprasum
1 2 Seeds, transplants or divisions; divide in fall when overcrowded; sun
Leaves used for mild onion flavor; attractive, lavender, edible flowers
Chives, GarlicAllium tuberosum
1 2 to 1 Seeds, transplants or divisions; divide spring or fall; sun to part shade
Leaves used for mild garlic flavor; attractive, white, edible flowers
Geraniums, ScentedPelargonium spp.
1 to 2 1 to 2Well-drained soil; full to part sun; transplants or rooted cutting; protect below mid-20s; may be short-lived
Aromatic leaves used in jellies, cakes and potpourri; grow in containers in north Louisiana
HorseradishArmoracia rusticana
2 1 Rich soil; divide every one to two years in fall; sun Roots used for strong, pungent flavor
LavenderLavandula spp.
2 1 to 2 Needs perfect drainage, often more successful in pots, difficult due to hot, humid summers; sun
Flowers dried for sachets and potpourri; some culinary uses
Lemon BalmMelissa officinalis
1 to 12 12 Easy; seeds, transplants or divisions; full sun to part shade
Lemon scented leaves; culinary uses as well as teas and potpourri
Lemon GrassCymbopogon citratus
3 2 to 3Transplants or divisions in spring; protect below low 20s; sun to part sun; good container plant in north Louisiana
Lemon-flavored leaf bases used in cooking
Mexican TarragonMexican Mint MarigoldTagetes lucida
2 to 3 1 Transplants after danger of frost; dormant in winter; sun to part sun
Foliage has pungent tarragon flavor; attractive, gold, edible flowers in fall
Mexican OreganoPoliomentha longiflora
2 to 3 2 to 3 Transplant anytime; shrubby; sun to part sun Foliage provides pungent oregano substitute
Mints, VariousMentha spp. and hybrids
2 to 2 1Plant transplants or divisions in fall or spring; also grown from seeds and cuttings; moist soil; sun to shade
Aromatic foliage used for flavoring, teas; spearmint and peppermint most popular
OreganoOriganum vulgare
2 to 2 1 to 12 Seeds, transplants or divisions in spring; sun to part sun Foliage has many culinary uses; good ground cover
RosemaryRosmarinus officinalis
2 to 3 2Well-drained, alkaline soil; protect below 20 F; transplants or rooted cuttings in spring; sun to part sun
Foliage has many culinary uses; woody shrub
SageSalvia officinalis
1 to 2 1 to 2 Well-drained, alkaline soil; difficult due to hot, humid summers; short-lived; sun Seasoning for meats and dressings
SorrelRumex acetosa 1 1 Transplants or divisions in fall or spring; sun Acidic, sour foliage used in salads
Sweet MarjoramOriganum marjorana 1 12 Well-drained soil; protect below 20 F; transplants or
divisions in spring Foliage has many culinary uses
TarragonArtemisia dracunculus 1 to 2 1 to 2 Plant transplants in fall; will not tolerate summer
heat, grow as a cool-season annual; part sunFoliage has mild anise flavor; has many culinary uses
ThymeThymus vulgaris 1 to 2 1 Well-drained alkaline soil; plant transplants in fall;
sun to part sun Foliage has many culinary uses

103
Perennial Herb Planting Chart—Perennials
NAME HEIGHT (FT)
SPACING(FT) CULTURAL HINTS USES
PERENNIALS Trees, shrubs and herbaceous perennials; planted year-round with fall and spring preferred
BayLaurus nobilis
15 5 Tree or large shrub; protect below 20 degrees; sun Leaves used in cooking; good container plant in north Louisiana
BeebalmMonarda didyma, M. fistulosa
2 to 3 1 Seeds in spring; transplants any time; divisions fall or spring; spreads rapidly; sun to part sun
Showy flowers, aromatic seed heads; leaves used in tea
BurnetPoterium sanguisorba
2 to 1 1 to 12 Well-drained soil; full to part sun; seeds or divisions in spring
Cucumber flavored leaves used fresh in salads; attractive evergreen foliage
CatnipNepeta cataria
2 1 to 2 Well-drained soil; seeds, transplants or divisions; sun to part shade; often short-lived in Louisiana
Leaves used in teas and seasoning; cats love it
ChivesAllium schoenoprasum
1 2 Seeds, transplants or divisions; divide in fall when overcrowded; sun
Leaves used for mild onion flavor; attractive, lavender, edible flowers
Chives, GarlicAllium tuberosum
1 2 to 1 Seeds, transplants or divisions; divide spring or fall; sun to part shade
Leaves used for mild garlic flavor; attractive, white, edible flowers
Geraniums, ScentedPelargonium spp.
1 to 2 1 to 2Well-drained soil; full to part sun; transplants or rooted cutting; protect below mid-20s; may be short-lived
Aromatic leaves used in jellies, cakes and potpourri; grow in containers in north Louisiana
HorseradishArmoracia rusticana
2 1 Rich soil; divide every one to two years in fall; sun Roots used for strong, pungent flavor
LavenderLavandula spp.
2 1 to 2 Needs perfect drainage, often more successful in pots, difficult due to hot, humid summers; sun
Flowers dried for sachets and potpourri; some culinary uses
Lemon BalmMelissa officinalis
1 to 12 12 Easy; seeds, transplants or divisions; full sun to part shade
Lemon scented leaves; culinary uses as well as teas and potpourri
Lemon GrassCymbopogon citratus
3 2 to 3Transplants or divisions in spring; protect below low 20s; sun to part sun; good container plant in north Louisiana
Lemon-flavored leaf bases used in cooking
Mexican TarragonMexican Mint MarigoldTagetes lucida
2 to 3 1 Transplants after danger of frost; dormant in winter; sun to part sun
Foliage has pungent tarragon flavor; attractive, gold, edible flowers in fall
Mexican OreganoPoliomentha longiflora
2 to 3 2 to 3 Transplant anytime; shrubby; sun to part sun Foliage provides pungent oregano substitute
Mints, VariousMentha spp. and hybrids
2 to 2 1Plant transplants or divisions in fall or spring; also grown from seeds and cuttings; moist soil; sun to shade
Aromatic foliage used for flavoring, teas; spearmint and peppermint most popular
OreganoOriganum vulgare
2 to 2 1 to 12 Seeds, transplants or divisions in spring; sun to part sun Foliage has many culinary uses; good ground cover
RosemaryRosmarinus officinalis
2 to 3 2Well-drained, alkaline soil; protect below 20 F; transplants or rooted cuttings in spring; sun to part sun
Foliage has many culinary uses; woody shrub
SageSalvia officinalis
1 to 2 1 to 2 Well-drained, alkaline soil; difficult due to hot, humid summers; short-lived; sun Seasoning for meats and dressings
SorrelRumex acetosa 1 1 Transplants or divisions in fall or spring; sun Acidic, sour foliage used in salads
Sweet MarjoramOriganum marjorana 1 12 Well-drained soil; protect below 20 F; transplants or
divisions in spring Foliage has many culinary uses
TarragonArtemisia dracunculus 1 to 2 1 to 2 Plant transplants in fall; will not tolerate summer
heat, grow as a cool-season annual; part sunFoliage has mild anise flavor; has many culinary uses
ThymeThymus vulgaris 1 to 2 1 Well-drained alkaline soil; plant transplants in fall;
sun to part sun Foliage has many culinary uses
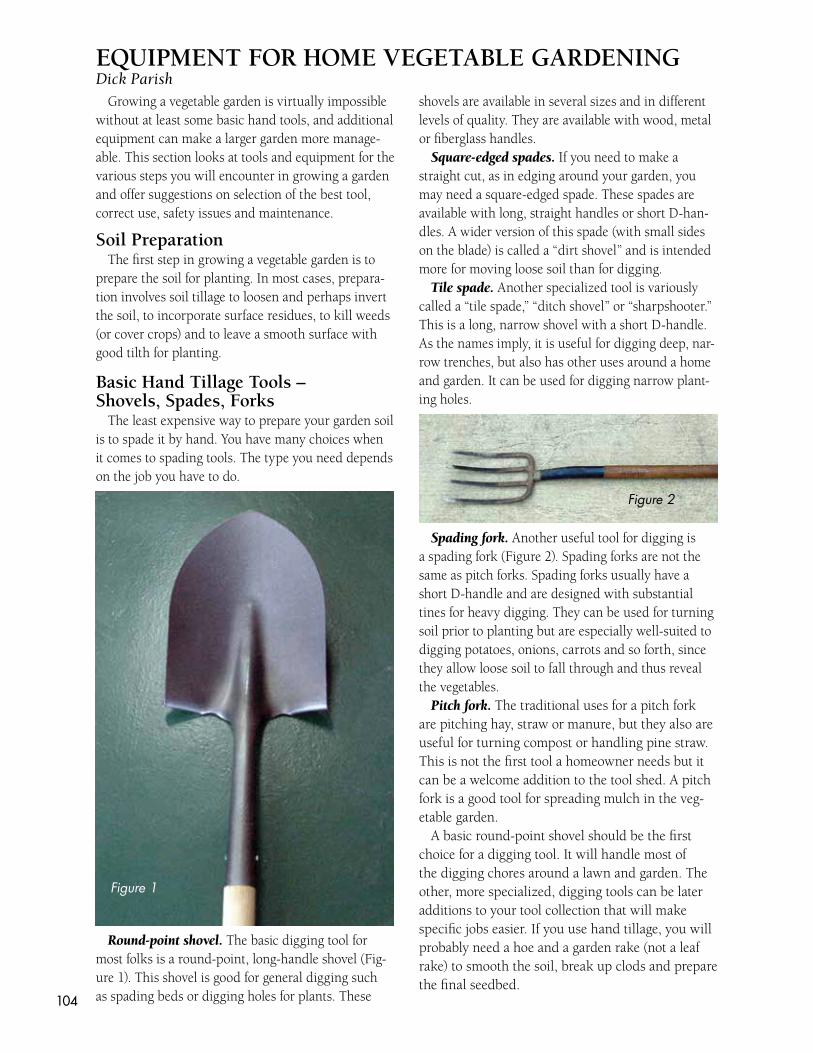
104
Growing a vegetable garden is virtually impossible without at least some basic hand tools, and additional equipment can make a larger garden more manage-able. This section looks at tools and equipment for the various steps you will encounter in growing a garden and offer suggestions on selection of the best tool, correct use, safety issues and maintenance.
Soil PreparationThe first step in growing a vegetable garden is to
prepare the soil for planting. In most cases, prepara-tion involves soil tillage to loosen and perhaps invert the soil, to incorporate surface residues, to kill weeds (or cover crops) and to leave a smooth surface with good tilth for planting.
Basic Hand Tillage Tools – Shovels, Spades, Forks
The least expensive way to prepare your garden soil is to spade it by hand. You have many choices when it comes to spading tools. The type you need depends on the job you have to do.
Round-point shovel. The basic digging tool for most folks is a round-point, long-handle shovel (Fig-ure 1). This shovel is good for general digging such as spading beds or digging holes for plants. These
shovels are available in several sizes and in different levels of quality. They are available with wood, metal or fiberglass handles.
Square-edged spades. If you need to make a straight cut, as in edging around your garden, you may need a square-edged spade. These spades are available with long, straight handles or short D-han-dles. A wider version of this spade (with small sides on the blade) is called a “dirt shovel” and is intended more for moving loose soil than for digging.
Tile spade. Another specialized tool is variously called a “tile spade,” “ditch shovel” or “sharpshooter.” This is a long, narrow shovel with a short D-handle. As the names imply, it is useful for digging deep, nar-row trenches, but also has other uses around a home and garden. It can be used for digging narrow plant-ing holes.
Spading fork. Another useful tool for digging is a spading fork (Figure 2). Spading forks are not the same as pitch forks. Spading forks usually have a short D-handle and are designed with substantial tines for heavy digging. They can be used for turning soil prior to planting but are especially well-suited to digging potatoes, onions, carrots and so forth, since they allow loose soil to fall through and thus reveal the vegetables.
Pitch fork. The traditional uses for a pitch fork are pitching hay, straw or manure, but they also are useful for turning compost or handling pine straw. This is not the first tool a homeowner needs but it can be a welcome addition to the tool shed. A pitch fork is a good tool for spreading mulch in the veg-etable garden.
A basic round-point shovel should be the first choice for a digging tool. It will handle most of the digging chores around a lawn and garden. The other, more specialized, digging tools can be later additions to your tool collection that will make specific jobs easier. If you use hand tillage, you will probably need a hoe and a garden rake (not a leaf rake) to smooth the soil, break up clods and prepare the final seedbed.
EQUIPMENT FOR HOME VEGETABLE GARDENINGDick Parish
Figure 1
Figure 2
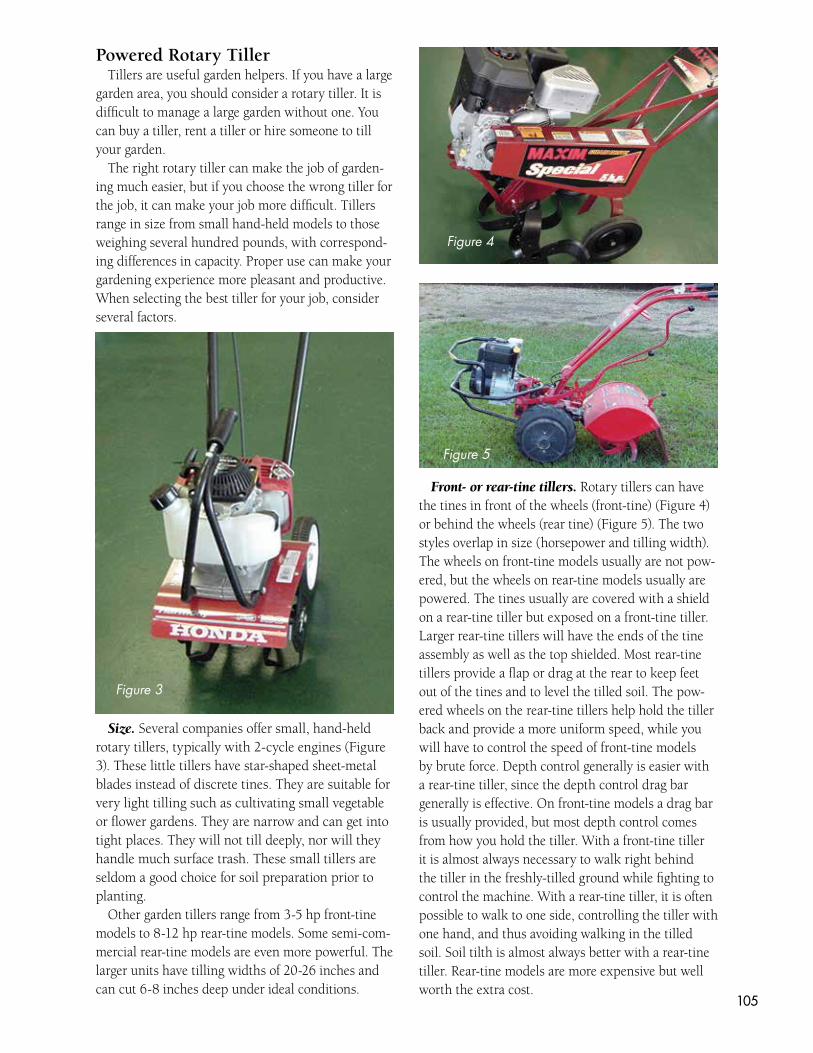
105
Powered Rotary Tiller Tillers are useful garden helpers. If you have a large
garden area, you should consider a rotary tiller. It is difficult to manage a large garden without one. You can buy a tiller, rent a tiller or hire someone to till your garden.
The right rotary tiller can make the job of garden-ing much easier, but if you choose the wrong tiller for the job, it can make your job more difficult. Tillers range in size from small hand-held models to those weighing several hundred pounds, with correspond-ing differences in capacity. Proper use can make your gardening experience more pleasant and productive. When selecting the best tiller for your job, consider several factors.
Size. Several companies offer small, hand-held rotary tillers, typically with 2-cycle engines (Figure 3). These little tillers have star-shaped sheet-metal blades instead of discrete tines. They are suitable for very light tilling such as cultivating small vegetable or flower gardens. They are narrow and can get into tight places. They will not till deeply, nor will they handle much surface trash. These small tillers are seldom a good choice for soil preparation prior to planting.
Other garden tillers range from 3-5 hp front-tine models to 8-12 hp rear-tine models. Some semi-com-mercial rear-tine models are even more powerful. The larger units have tilling widths of 20-26 inches and can cut 6-8 inches deep under ideal conditions.
Front- or rear-tine tillers. Rotary tillers can have the tines in front of the wheels (front-tine) (Figure 4) or behind the wheels (rear tine) (Figure 5). The two styles overlap in size (horsepower and tilling width). The wheels on front-tine models usually are not pow-ered, but the wheels on rear-tine models usually are powered. The tines usually are covered with a shield on a rear-tine tiller but exposed on a front-tine tiller. Larger rear-tine tillers will have the ends of the tine assembly as well as the top shielded. Most rear-tine tillers provide a flap or drag at the rear to keep feet out of the tines and to level the tilled soil. The pow-ered wheels on the rear-tine tillers help hold the tiller back and provide a more uniform speed, while you will have to control the speed of front-tine models by brute force. Depth control generally is easier with a rear-tine tiller, since the depth control drag bar generally is effective. On front-tine models a drag bar is usually provided, but most depth control comes from how you hold the tiller. With a front-tine tiller it is almost always necessary to walk right behind the tiller in the freshly-tilled ground while fighting to control the machine. With a rear-tine tiller, it is often possible to walk to one side, controlling the tiller with one hand, and thus avoiding walking in the tilled soil. Soil tilth is almost always better with a rear-tine tiller. Rear-tine models are more expensive but well worth the extra cost.
Figure 3
Figure 4
Figure 5
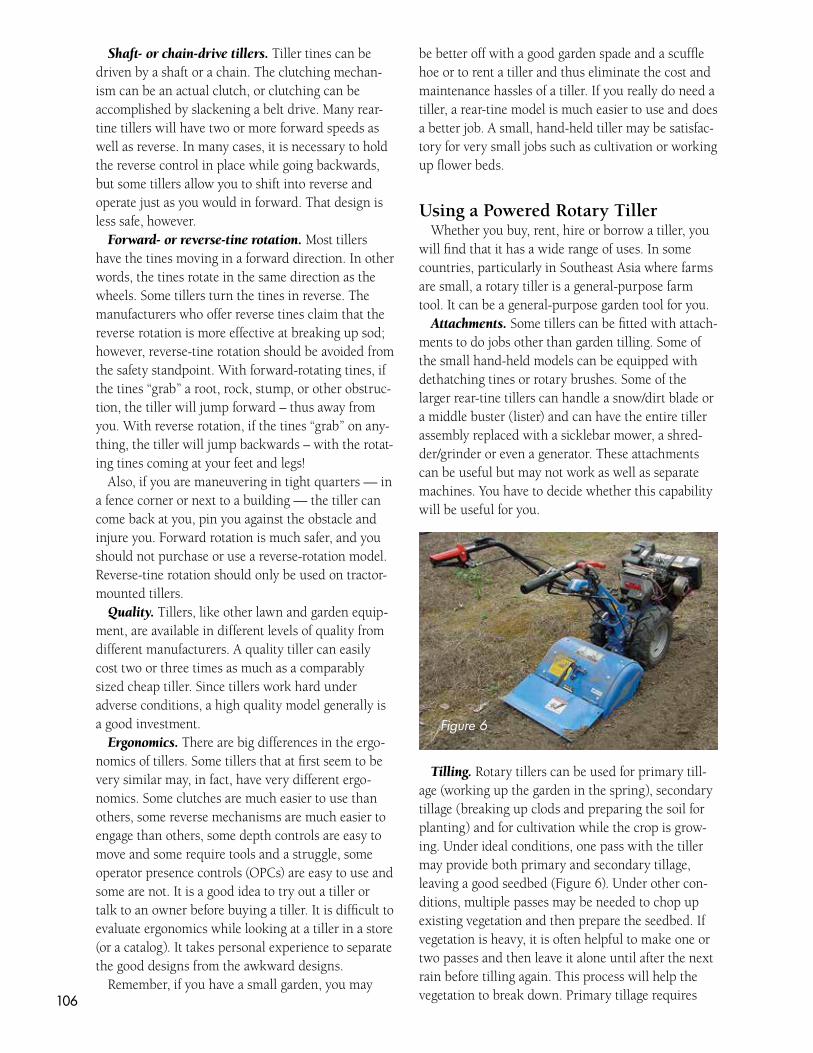
106
Shaft- or chain-drive tillers. Tiller tines can be driven by a shaft or a chain. The clutching mechan-ism can be an actual clutch, or clutching can be accomplished by slackening a belt drive. Many rear-tine tillers will have two or more forward speeds as well as reverse. In many cases, it is necessary to hold the reverse control in place while going backwards, but some tillers allow you to shift into reverse and operate just as you would in forward. That design is less safe, however.
Forward- or reverse-tine rotation. Most tillers have the tines moving in a forward direction. In other words, the tines rotate in the same direction as the wheels. Some tillers turn the tines in reverse. The manufacturers who offer reverse tines claim that the reverse rotation is more effective at breaking up sod; however, reverse-tine rotation should be avoided from the safety standpoint. With forward-rotating tines, if the tines “grab” a root, rock, stump, or other obstruc-tion, the tiller will jump forward – thus away from you. With reverse rotation, if the tines “grab” on any-thing, the tiller will jump backwards – with the rotat-ing tines coming at your feet and legs!
Also, if you are maneuvering in tight quarters — in a fence corner or next to a building — the tiller can come back at you, pin you against the obstacle and injure you. Forward rotation is much safer, and you should not purchase or use a reverse-rotation model. Reverse-tine rotation should only be used on tractor-mounted tillers.
Quality. Tillers, like other lawn and garden equip-ment, are available in different levels of quality from different manufacturers. A quality tiller can easily cost two or three times as much as a comparably sized cheap tiller. Since tillers work hard under adverse conditions, a high quality model generally is a good investment.
Ergonomics. There are big differences in the ergo-nomics of tillers. Some tillers that at first seem to be very similar may, in fact, have very different ergo-nomics. Some clutches are much easier to use than others, some reverse mechanisms are much easier to engage than others, some depth controls are easy to move and some require tools and a struggle, some operator presence controls (OPCs) are easy to use and some are not. It is a good idea to try out a tiller or talk to an owner before buying a tiller. It is difficult to evaluate ergonomics while looking at a tiller in a store (or a catalog). It takes personal experience to separate the good designs from the awkward designs.
Remember, if you have a small garden, you may
be better off with a good garden spade and a scuffle hoe or to rent a tiller and thus eliminate the cost and maintenance hassles of a tiller. If you really do need a tiller, a rear-tine model is much easier to use and does a better job. A small, hand-held tiller may be satisfac-tory for very small jobs such as cultivation or working up flower beds.
Using a Powered Rotary Tiller Whether you buy, rent, hire or borrow a tiller, you
will find that it has a wide range of uses. In some countries, particularly in Southeast Asia where farms are small, a rotary tiller is a general-purpose farm tool. It can be a general-purpose garden tool for you.
Attachments. Some tillers can be fitted with attach-ments to do jobs other than garden tilling. Some of the small hand-held models can be equipped with dethatching tines or rotary brushes. Some of the larger rear-tine tillers can handle a snow/dirt blade or a middle buster (lister) and can have the entire tiller assembly replaced with a sicklebar mower, a shred-der/grinder or even a generator. These attachments can be useful but may not work as well as separate machines. You have to decide whether this capability will be useful for you.
Tilling. Rotary tillers can be used for primary till-age (working up the garden in the spring), secondary tillage (breaking up clods and preparing the soil for planting) and for cultivation while the crop is grow-ing. Under ideal conditions, one pass with the tiller may provide both primary and secondary tillage, leaving a good seedbed (Figure 6). Under other con-ditions, multiple passes may be needed to chop up existing vegetation and then prepare the seedbed. If vegetation is heavy, it is often helpful to make one or two passes and then leave it alone until after the next rain before tilling again. This process will help the vegetation to break down. Primary tillage requires
Figure 6
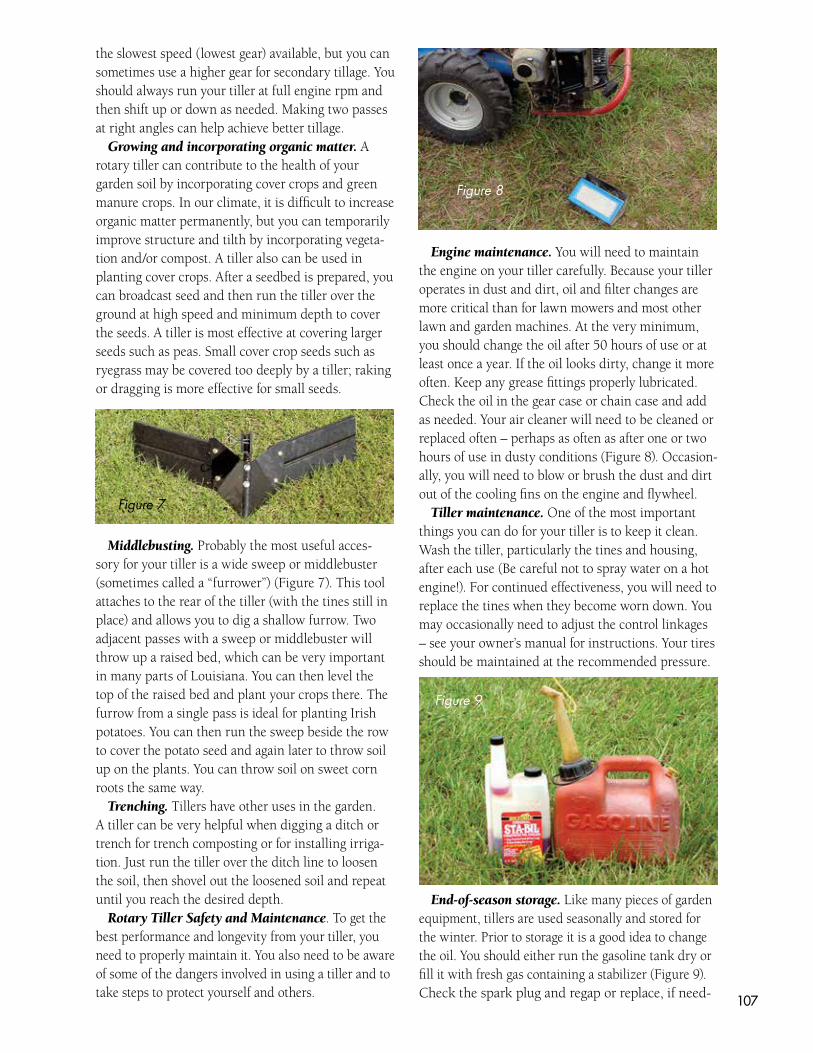
107
the slowest speed (lowest gear) available, but you can sometimes use a higher gear for secondary tillage. You should always run your tiller at full engine rpm and then shift up or down as needed. Making two passes at right angles can help achieve better tillage.
Growing and incorporating organic matter. A rotary tiller can contribute to the health of your garden soil by incorporating cover crops and green manure crops. In our climate, it is difficult to increase organic matter permanently, but you can temporarily improve structure and tilth by incorporating vegeta-tion and/or compost. A tiller also can be used in planting cover crops. After a seedbed is prepared, you can broadcast seed and then run the tiller over the ground at high speed and minimum depth to cover the seeds. A tiller is most effective at covering larger seeds such as peas. Small cover crop seeds such as ryegrass may be covered too deeply by a tiller; raking or dragging is more effective for small seeds.
Middlebusting. Probably the most useful acces-sory for your tiller is a wide sweep or middlebuster (sometimes called a “furrower”) (Figure 7). This tool attaches to the rear of the tiller (with the tines still in place) and allows you to dig a shallow furrow. Two adjacent passes with a sweep or middlebuster will throw up a raised bed, which can be very important in many parts of Louisiana. You can then level the top of the raised bed and plant your crops there. The furrow from a single pass is ideal for planting Irish potatoes. You can then run the sweep beside the row to cover the potato seed and again later to throw soil up on the plants. You can throw soil on sweet corn roots the same way.
Trenching. Tillers have other uses in the garden. A tiller can be very helpful when digging a ditch or trench for trench composting or for installing irriga-tion. Just run the tiller over the ditch line to loosen the soil, then shovel out the loosened soil and repeat until you reach the desired depth.
Rotary Tiller Safety and Maintenance. To get the best performance and longevity from your tiller, you need to properly maintain it. You also need to be aware of some of the dangers involved in using a tiller and to take steps to protect yourself and others.
Engine maintenance. You will need to maintain the engine on your tiller carefully. Because your tiller operates in dust and dirt, oil and filter changes are more critical than for lawn mowers and most other lawn and garden machines. At the very minimum, you should change the oil after 50 hours of use or at least once a year. If the oil looks dirty, change it more often. Keep any grease fittings properly lubricated. Check the oil in the gear case or chain case and add as needed. Your air cleaner will need to be cleaned or replaced often – perhaps as often as after one or two hours of use in dusty conditions (Figure 8). Occasion-ally, you will need to blow or brush the dust and dirt out of the cooling fins on the engine and flywheel.
Tiller maintenance. One of the most important things you can do for your tiller is to keep it clean. Wash the tiller, particularly the tines and housing, after each use (Be careful not to spray water on a hot engine!). For continued effectiveness, you will need to replace the tines when they become worn down. You may occasionally need to adjust the control linkages – see your owner’s manual for instructions. Your tires should be maintained at the recommended pressure.
End-of-season storage. Like many pieces of garden equipment, tillers are used seasonally and stored for the winter. Prior to storage it is a good idea to change the oil. You should either run the gasoline tank dry or fill it with fresh gas containing a stabilizer (Figure 9). Check the spark plug and regap or replace, if need-
Figure 7
Figure 8
Figure 9

108
ed. If you are going to store the tiller for several months, it is a good idea to squirt a teaspoonful or so of clean engine oil into the spark plug hole and then pull the starter rope to rotate the crankshaft a time or two before replacing the spark plug. Be sure to use a torque wrench to tighten the spark plugs. Many small engines are made of aluminum and it is very easy to strip the threads when tight-ening the spark plug. Clean or replace the air filter. Check the oil in the gear case or chain case and refill (or replace if dirty). Be sure the tiller is clean before storage; then store it out of the weather. Be sure it is not stored in direct sunlight, since the UV light will degrade the tires.
Safety. Tiller tines are aggressive! They can chew up a hand or foot just as easily as a patch of Ber-muda grass. Stay away from rotating tines! Keep bystanders, particularly children, away from tillers. Watch out for roots, stumps, rocks, buried pipes, etc. that might cause the tiller to “grab” and jump. Even if it jumps away from you, it can cause a sprained back. A 200-pound tiller leaping forward can really jerk an operator. Avoid areas where elec-tric or gas lines might be buried. Most tillers now have operator presence controls (OPCs) which con-sist of a lever or handle that must be held in place while operating or the engine will die (or the tines stop rotating). Don’t try to defeat the OPC on a til-ler – it is there for your protection.
Remember, your tiller works very hard under some very dirty conditions. You will need to be very conscientious about maintenance to overcome the effects of the tilling environment. Remember, too, that tillers are potentially dangerous and must be treated with respect.
PlantingYou don’t necessarily need any tools or equip-
ment for planting seeds – you can meter out the seeds by hand and even cover them by hand – but simple tools can help. The most basic tool for planting is a simple garden hoe. You can use the corner of the hoe to make a furrow for the seeds (or a hole for transplants), then use the blade of the hoe to pull soil over the furrow, and then use the back of the hoe to lightly firm the soil over the seed row. Depending on the soil type and moisture content, it may be possible to firm the soil over the row by walking down the row. Be careful of over-compaction with this method.
There are also special hoe-like tools with a single point that are specifically designed to make seed furrows. Trowels and bulb planters can be used to make holes for transplants or bulbs such as onion and garlic sets.
Garden SeedersIf you grow a larger vegetable garden, you probably
get tired of bending over placing seeds in a furrow. Perhaps you also are tired of making the planting furrow and then covering it over and tamping it after planting. If so, you might be interested in one of the garden seeders available on the market.
Several types of garden seeders are available. The simplest types require that you make a furrow and then manually cover the furrow – they just meter the seeds into the furrow. The more advanced seeders make the furrow, meter the seeds into the furrow, drag soil into the furrow and then firm the soil over the furrow (Figure 10).
Some seeders add a fertilizer hopper to meter granular fertilizer into the soil while planting. Many have an arm with a tooth on it that can be dropped down to mark the correct location for the next row. Additional optional seed plates for other crops may be available.
Basic seeders. These tools don’t work well in hard, cloddy, trashy or rocky soil. The “tractor” power on these seeders is you, and you won’t be able to push the seeder through anything except well-prepared garden soil. Any plant residue on or in the soil will cause plugging. The deeper you set the opener, the cleaner the soil has to be. If you like to plant through a vegetative mulch, don’t try one of these seeders.
Figure 10
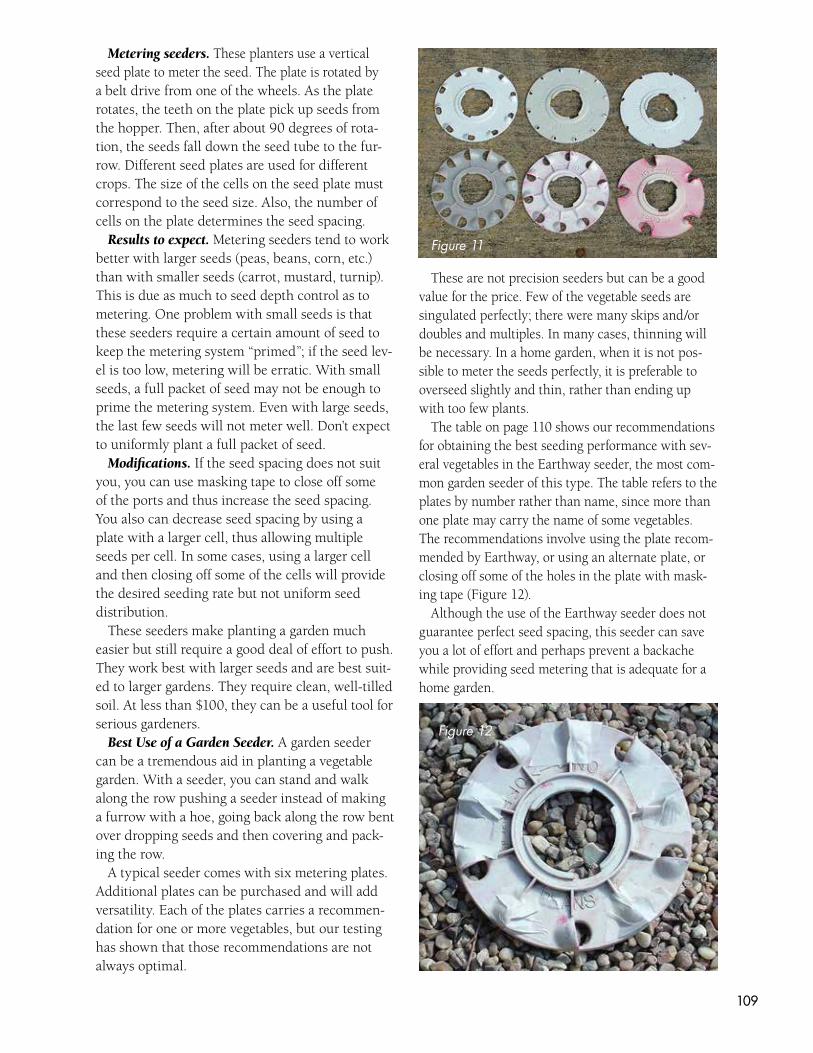
109
Metering seeders. These planters use a vertical seed plate to meter the seed. The plate is rotated by a belt drive from one of the wheels. As the plate rotates, the teeth on the plate pick up seeds from the hopper. Then, after about 90 degrees of rota-tion, the seeds fall down the seed tube to the fur-row. Different seed plates are used for different crops. The size of the cells on the seed plate must correspond to the seed size. Also, the number of cells on the plate determines the seed spacing.
Results to expect. Metering seeders tend to work better with larger seeds (peas, beans, corn, etc.) than with smaller seeds (carrot, mustard, turnip). This is due as much to seed depth control as to metering. One problem with small seeds is that these seeders require a certain amount of seed to keep the metering system “primed”; if the seed lev-el is too low, metering will be erratic. With small seeds, a full packet of seed may not be enough to prime the metering system. Even with large seeds, the last few seeds will not meter well. Don’t expect to uniformly plant a full packet of seed.
Modifications. If the seed spacing does not suit you, you can use masking tape to close off some of the ports and thus increase the seed spacing. You also can decrease seed spacing by using a plate with a larger cell, thus allowing multiple seeds per cell. In some cases, using a larger cell and then closing off some of the cells will provide the desired seeding rate but not uniform seed distribution.
These seeders make planting a garden much easier but still require a good deal of effort to push. They work best with larger seeds and are best suit-ed to larger gardens. They require clean, well-tilled soil. At less than $100, they can be a useful tool for serious gardeners.
Best Use of a Garden Seeder. A garden seeder can be a tremendous aid in planting a vegetable garden. With a seeder, you can stand and walk along the row pushing a seeder instead of making a furrow with a hoe, going back along the row bent over dropping seeds and then covering and pack-ing the row.
A typical seeder comes with six metering plates. Additional plates can be purchased and will add versatility. Each of the plates carries a recommen-dation for one or more vegetables, but our testing has shown that those recommendations are not always optimal.
These are not precision seeders but can be a good value for the price. Few of the vegetable seeds are singulated perfectly; there were many skips and/or doubles and multiples. In many cases, thinning will be necessary. In a home garden, when it is not pos-sible to meter the seeds perfectly, it is preferable to overseed slightly and thin, rather than ending up with too few plants.
The table on page 110 shows our recommendations for obtaining the best seeding performance with sev-eral vegetables in the Earthway seeder, the most com-mon garden seeder of this type. The table refers to the plates by number rather than name, since more than one plate may carry the name of some vegetables. The recommendations involve using the plate recom-mended by Earthway, or using an alternate plate, or closing off some of the holes in the plate with mask-ing tape (Figure 12).
Although the use of the Earthway seeder does not guarantee perfect seed spacing, this seeder can save you a lot of effort and perhaps prevent a backache while providing seed metering that is adequate for a home garden.
Figure 11
Figure 12

110
Vegetable Plate # ModificationsActual Average Seed Spacing
(in inches)Comments
Beets 22 Use every other hole 1.2 Mostly multiples; will need thinning
Broccoli 24 Block 3 of every 4 holes 3.5 Correct seeding
Cabbage 9 Use every hole 4.0 Correct seeding
Cantaloupe 26 Use every hole 5.9 Will probably need thinning
Carrots 24 Block every other hole 0.9 Will need thinning
Cucumbers 26 Use every hole 4.1 A little heavy; few skips; many multiples; may need thinning
English peas 14 Use every hole 2.9 Correct seeding
Lima beans 27 Use every hole 4.1Somewhat erratic, but OK; different varieties will perform differently due to seed size
Mustard 24 Block 2 of every 3 holes 1.0 Correct seeding
Okra 29 Use every hole 7.2 Somewhat erratic spacing
Onions – green 10 Use every hole 1.4 OK for green onions; too heavy for bulbing onions
Onions – bulbing 24 Use every hole 1.9OK for bulbing onions, but holes tend to plug with seeds; may need to clean out plate on long rows
Radishes 5 Use every hole 1.7 Correct seeding
Snap beans 14 Use every hole 4.7 Correct seeding
Spinach 5 Use every hole 3.2 Correct seeding
Southern peas 22 Use every hole 4.1 Correct seeding
Squash 26 Use every hole 11.3Correct seeding with small-seeded squash (yellow summer); other varieties (e.g. zucchini or winter) may be different
Sweet corn -large-seeded 14 Block every other hole 3.0 – 5.5 May need thinning
Sweet corn -small-seeded 18 Block 2 of every 3
holes 3.9 May need thinning
Turnips 24 Block 2 of every 3 holes 2.2 OK for root turnips; may be too light for
turnip greens
Garden seeder plate, modifications and seed spacing.

111
Mechanical Weed Control
Garden CultivatorsIf you have a small garden, or you have a larger gar-
den and are energetic, many manual cultivation tools are available for your use. A powered rotary tiller is not always necessary.
Long-handled hoes. These are the traditional cul-tivating tool for small gardens. Hoes come in many shapes and old-timers will argue vigorously about the relative advantages of their favorite. More important than shape is keeping the blade sharp. You should file a hoe blade as needed to keep a sharp edge.
Scuffle hoes. These are designed to cut in two directions – on both the push and pull strokes. Thus, they can work twice as fast as a conventional hoe. Furthermore, they don’t have to be lifted out of the ground. Many have blades that are shaped in a loop (Figure 13). The loop may be rigidly attached to the toolhead, or the loop may be free to wobble through a short arc. Again, personal preference will dictate your choice. These hoes allow faster and easier cultivation than a standard garden hoe.
Scuffle hoes with spiked wheels (crumbler). These go a step further. They have a row of spiked wheels mounted behind the scuffle hoe blade (Figure 14). As
the blade undercuts the soil crust and the weeds, the spiked wheels break up the crust and knock soil off the roots of the weeds. This allows you to move faster, since multiple passes are less necessary.
Pronged cultivators. These are similar to the pronged attachments for high-wheel cultivators but have a long handle for manual operation (Figure 15). They are good at soil loosening and can root out larger weeds. They can operate in only one direction.
More Exotic Cultivators. Other cultivation tools are available from many sources. They include angled pairs of rotating tines, one-sided scuffle hoes and others.
High-wheeled cultivators. These traditional gar-den implements are an excellent choice for opening, covering and cultivating fairly long rows. These cultivators have one large wheel (about 2 feet in diameter) and a pair of handles. The traditional models have a wooden frame, but newer styles use a steel frame. You usually have a choice of three tools that can be mounted on the cultivator. A small, straight shovel is used to make planting furrows. A small twisted moldboard plow can be used to cover planting furrows or to throw soil on a row of crops (hilling sweet corn or potatoes, for instance). The primary tool is a 5-pronged cultivator that can be used to loosen soil and remove small weeds. These machines are relatively easy to push and steer. They allow you to cultivate between narrow rows and also get close to crop rows. The cost typically is under $100.
Figure 13 Figure 15
Figure 14
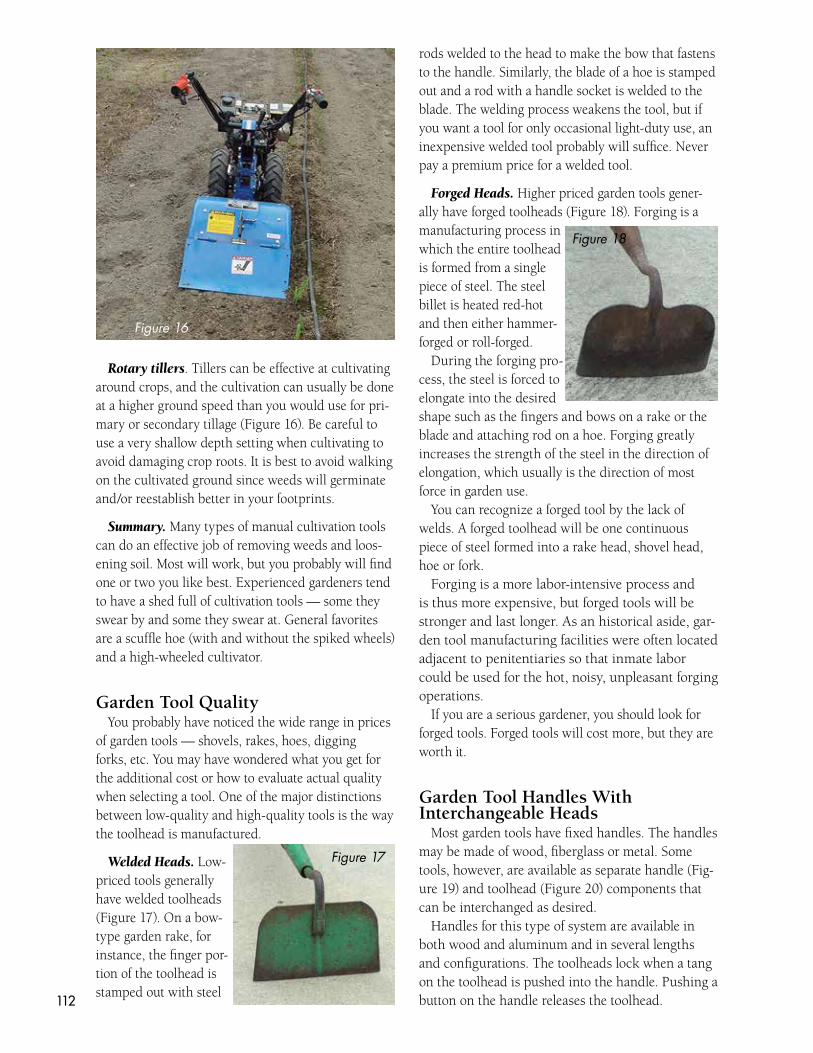
112
Rotary tillers. Tillers can be effective at cultivating around crops, and the cultivation can usually be done at a higher ground speed than you would use for pri-mary or secondary tillage (Figure 16). Be careful to use a very shallow depth setting when cultivating to avoid damaging crop roots. It is best to avoid walking on the cultivated ground since weeds will germinate and/or reestablish better in your footprints.
Summary. Many types of manual cultivation tools can do an effective job of removing weeds and loos-ening soil. Most will work, but you probably will find one or two you like best. Experienced gardeners tend to have a shed full of cultivation tools — some they swear by and some they swear at. General favorites are a scuffle hoe (with and without the spiked wheels) and a high-wheeled cultivator.
Garden Tool QualityYou probably have noticed the wide range in prices
of garden tools — shovels, rakes, hoes, digging forks, etc. You may have wondered what you get for the additional cost or how to evaluate actual quality when selecting a tool. One of the major distinctions between low-quality and high-quality tools is the way the toolhead is manufactured.
Welded Heads. Low-priced tools generally have welded toolheads (Figure 17). On a bow-type garden rake, for instance, the finger por-tion of the toolhead is stamped out with steel
rods welded to the head to make the bow that fastens to the handle. Similarly, the blade of a hoe is stamped out and a rod with a handle socket is welded to the blade. The welding process weakens the tool, but if you want a tool for only occasional light-duty use, an inexpensive welded tool probably will suffice. Never pay a premium price for a welded tool.
Forged Heads. Higher priced garden tools gener-ally have forged toolheads (Figure 18). Forging is a manufacturing process in which the entire toolhead is formed from a single piece of steel. The steel billet is heated red-hot and then either hammer-forged or roll-forged.
During the forging pro-cess, the steel is forced to elongate into the desired shape such as the fingers and bows on a rake or the blade and attaching rod on a hoe. Forging greatly increases the strength of the steel in the direction of elongation, which usually is the direction of most force in garden use.
You can recognize a forged tool by the lack of welds. A forged toolhead will be one continuous piece of steel formed into a rake head, shovel head, hoe or fork.
Forging is a more labor-intensive process and is thus more expensive, but forged tools will be stronger and last longer. As an historical aside, gar-den tool manufacturing facilities were often located adjacent to penitentiaries so that inmate labor could be used for the hot, noisy, unpleasant forging operations.
If you are a serious gardener, you should look for forged tools. Forged tools will cost more, but they are worth it.
Garden Tool Handles With Interchangeable Heads
Most garden tools have fixed handles. The handles may be made of wood, fiberglass or metal. Some tools, however, are available as separate handle (Fig-ure 19) and toolhead (Figure 20) components that can be interchanged as desired.
Handles for this type of system are available in both wood and aluminum and in several lengths and configurations. The toolheads lock when a tang on the toolhead is pushed into the handle. Pushing a button on the handle releases the toolhead.
Figure 16
Figure 17
Figure 18
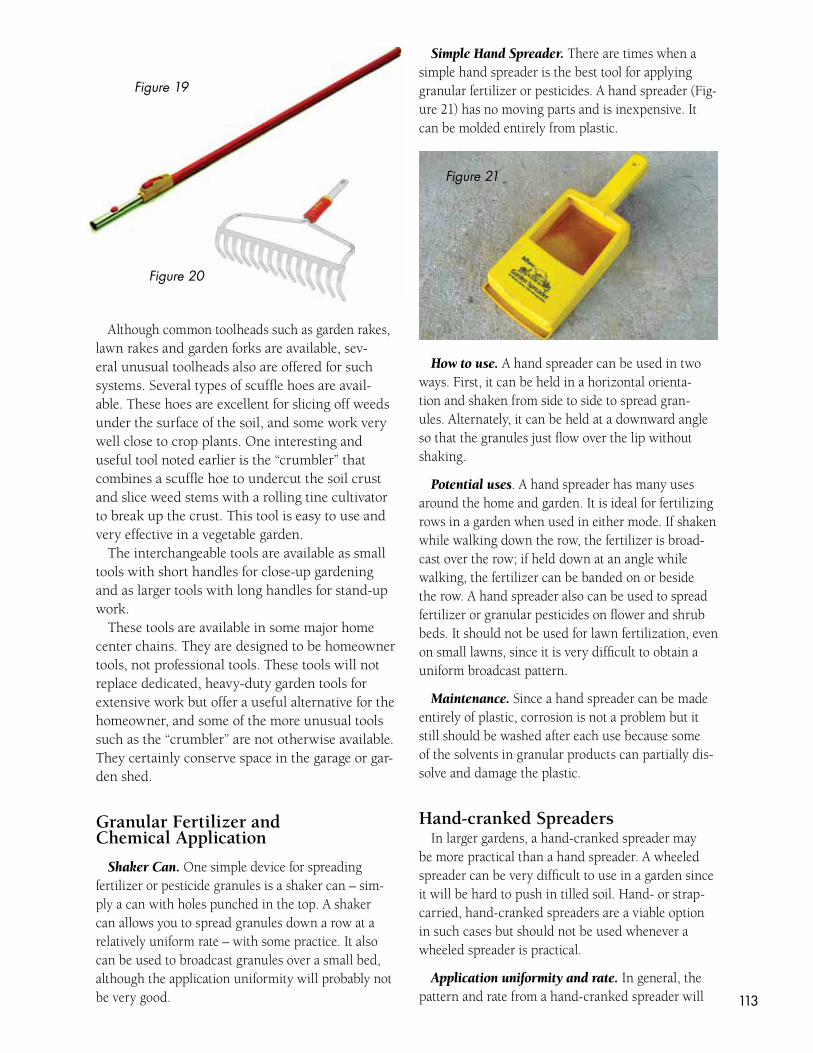
113
Although common toolheads such as garden rakes, lawn rakes and garden forks are available, sev-eral unusual toolheads also are offered for such systems. Several types of scuffle hoes are avail-able. These hoes are excellent for slicing off weeds under the surface of the soil, and some work very well close to crop plants. One interesting and useful tool noted earlier is the “crumbler” that combines a scuffle hoe to undercut the soil crust and slice weed stems with a rolling tine cultivator to break up the crust. This tool is easy to use and very effective in a vegetable garden.
The interchangeable tools are available as small tools with short handles for close-up gardening and as larger tools with long handles for stand-up work.
These tools are available in some major home center chains. They are designed to be homeowner tools, not professional tools. These tools will not replace dedicated, heavy-duty garden tools for extensive work but offer a useful alternative for the homeowner, and some of the more unusual tools such as the “crumbler” are not otherwise available. They certainly conserve space in the garage or gar-den shed.
Granular Fertilizer and Chemical Application
Shaker Can. One simple device for spreading fertilizer or pesticide granules is a shaker can – sim-ply a can with holes punched in the top. A shaker can allows you to spread granules down a row at a relatively uniform rate – with some practice. It also can be used to broadcast granules over a small bed, although the application uniformity will probably not be very good.
Simple Hand Spreader. There are times when a simple hand spreader is the best tool for applying granular fertilizer or pesticides. A hand spreader (Fig-ure 21) has no moving parts and is inexpensive. It can be molded entirely from plastic.
How to use. A hand spreader can be used in two ways. First, it can be held in a horizontal orienta-tion and shaken from side to side to spread gran-ules. Alternately, it can be held at a downward angle so that the granules just flow over the lip without shaking.
Potential uses. A hand spreader has many uses around the home and garden. It is ideal for fertilizing rows in a garden when used in either mode. If shaken while walking down the row, the fertilizer is broad-cast over the row; if held down at an angle while walking, the fertilizer can be banded on or beside the row. A hand spreader also can be used to spread fertilizer or granular pesticides on flower and shrub beds. It should not be used for lawn fertilization, even on small lawns, since it is very difficult to obtain a uniform broadcast pattern.
Maintenance. Since a hand spreader can be made entirely of plastic, corrosion is not a problem but it still should be washed after each use because some of the solvents in granular products can partially dis-solve and damage the plastic.
Hand-cranked Spreaders In larger gardens, a hand-cranked spreader may
be more practical than a hand spreader. A wheeled spreader can be very difficult to use in a garden since it will be hard to push in tilled soil. Hand- or strap-carried, hand-cranked spreaders are a viable option in such cases but should not be used whenever a wheeled spreader is practical.
Application uniformity and rate. In general, the pattern and rate from a hand-cranked spreader will
Figure 21
Figure 19
Figure 20
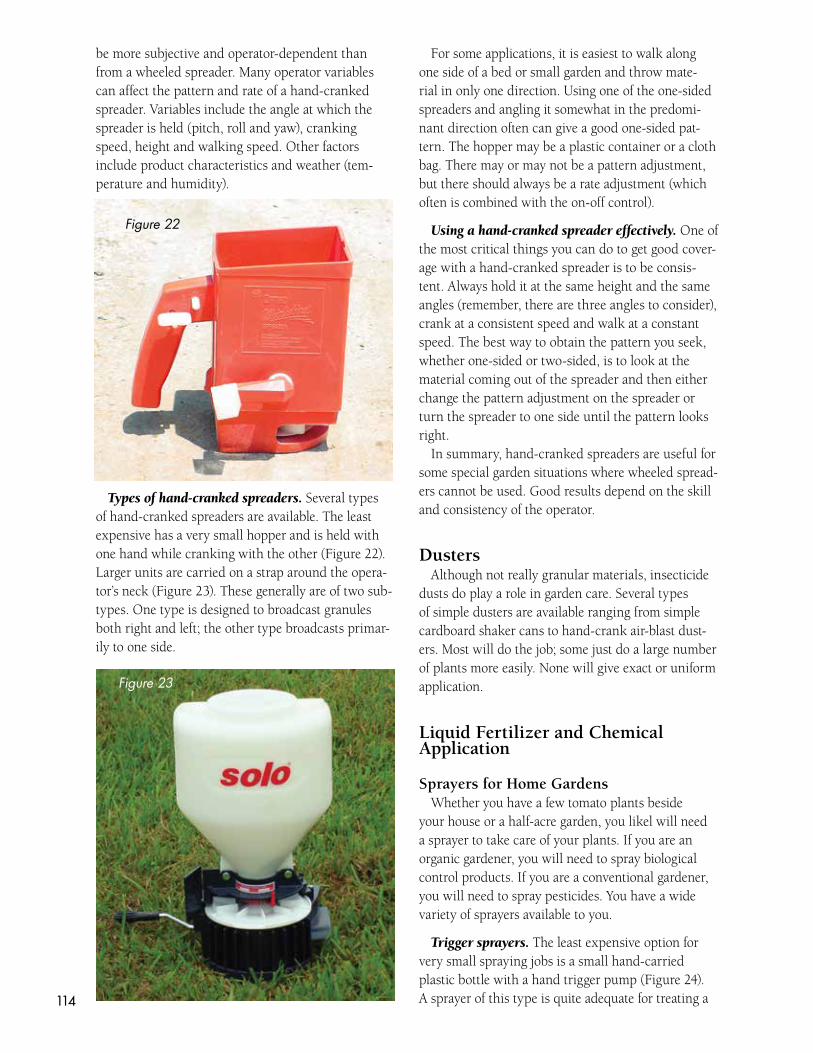
114
be more subjective and operator-dependent than from a wheeled spreader. Many operator variables can affect the pattern and rate of a hand-cranked spreader. Variables include the angle at which the spreader is held (pitch, roll and yaw), cranking speed, height and walking speed. Other factors include product characteristics and weather (tem-perature and humidity).
Types of hand-cranked spreaders. Several types of hand-cranked spreaders are available. The least expensive has a very small hopper and is held with one hand while cranking with the other (Figure 22). Larger units are carried on a strap around the opera-tor’s neck (Figure 23). These generally are of two sub-types. One type is designed to broadcast granules both right and left; the other type broadcasts primar-ily to one side.
For some applications, it is easiest to walk along one side of a bed or small garden and throw mate-rial in only one direction. Using one of the one-sided spreaders and angling it somewhat in the predomi-nant direction often can give a good one-sided pat-tern. The hopper may be a plastic container or a cloth bag. There may or may not be a pattern adjustment, but there should always be a rate adjustment (which often is combined with the on-off control).
Using a hand-cranked spreader effectively. One of the most critical things you can do to get good cover-age with a hand-cranked spreader is to be consis-tent. Always hold it at the same height and the same angles (remember, there are three angles to consider), crank at a consistent speed and walk at a constant speed. The best way to obtain the pattern you seek, whether one-sided or two-sided, is to look at the material coming out of the spreader and then either change the pattern adjustment on the spreader or turn the spreader to one side until the pattern looks right.
In summary, hand-cranked spreaders are useful for some special garden situations where wheeled spread-ers cannot be used. Good results depend on the skill and consistency of the operator.
Dusters Although not really granular materials, insecticide
dusts do play a role in garden care. Several types of simple dusters are available ranging from simple cardboard shaker cans to hand-crank air-blast dust-ers. Most will do the job; some just do a large number of plants more easily. None will give exact or uniform application.
Liquid Fertilizer and Chemical Application
Sprayers for Home GardensWhether you have a few tomato plants beside
your house or a half-acre garden, you likel will need a sprayer to take care of your plants. If you are an organic gardener, you will need to spray biological control products. If you are a conventional gardener, you will need to spray pesticides. You have a wide variety of sprayers available to you.
Trigger sprayers. The least expensive option for very small spraying jobs is a small hand-carried plastic bottle with a hand trigger pump (Figure 24). A sprayer of this type is quite adequate for treating a
Figure 22
Figure 23

115
few small patio plants or spot spraying herbicide. On some models, the spray pattern is adjustable. With this type of sprayer, you place a diluted solution or suspension into the bottle. If using suspended material, you will need to shake the bottle often to keep the material suspended.
Hose-end sprayers. Another inexpensive option for home lawn and garden use is a hose-end sprayer. These devices consist of a bottle with a venturi suction device and screw onto a garden hose. They suck the pesticide from the bottle and mix it with the water coming from the hose while spraying, thus diluting the mate-rial as it is sprayed. With this type of sprayer, the directions may tell you to place concentrated pesti-cide into the bottle or to partially dilute the mate-rial in the bottle, depending on the dilution ratio of the sprayer and the concentration needed. The spray pattern and the dilution ratio may or may not be adjustable. It is important to follow both the sprayer manufacturer’s directions for use and the pesticide label instructions for dilution. Even so, the actual dilution applied may differ substantially from what is claimed by the manufacturer. If using suspended material, you will need to shake the bottle often to keep the material suspended.
Hand-carried pump-up sprayers. The next step up is a 1-3 gallon hand-carried pump-up sprayer (Figure 25). Most current models are plastic, although steel and stainless steel models may be available. With this type of sprayer, you dilute the pesticide to the correct strength in the tank. You then install the lid and pump the sprayer to pressur-ize the tank. You will need to repressurize the tank several times as you work, since the air volume in the tank changes and causes a pressure drop as the tank empties. If using suspended material, you will need to shake the tank often to keep the material suspended. The spray pattern usually is adjustable by twisting the nozzle. You can spray a lot of plants with even a 1-gallon tank.
Lever-pump backpack sprayers. The biggest, best and most expensive hand-powered spray-ers are lever-pump backpack sprayers (Figure 26). You wear these sprayers like a backpack. The tank typically holds from 1 to 5 gallons of diluted spray mix. You hold the wand on the end of a hose in one hand, and with the other hand you pump a lever up and down to pressurize a small internal chamber. On some models, pumping the lever also actuates an agitator to keep the pesticide in suspension. Some sprayers use standard agricultural nozzles and thus allow you to interchange nozzles and obtain many different spray patterns and spray rates.
The type of sprayer you need will be determined by the amount of spraying you need to do. Any of the above sprayers except the hose-end sprayer should do an adequate job if used properly. Some hose-end sprayers will not deliver the correct con-
Figure 25
Figure 26
Figure 24

116
centration and are not recommended. With any sprayer, it is very important that you
avoid contamination. A few drops of herbicide left in a sprayer can cause a real problem when you spray insecticide or fungicide on the roses or tomatoes. You need to rinse your sprayer thoroughly at least three times after each use, including pumping clean rinse water through the hose and nozzle. It is not enough to just rinse the tank or bottle. If you do much spray-ing, it is a good idea to have separate sprayers — one for herbicides and another for insecticides and fungi-cides. Even with separate sprayers, you should rinse a sprayer after each use unless you use only one chemi-cal in it.
With one exception, you should not leave any pes-ticides stored in your sprayer. Glyphosate (Roundup7 and other similar products) is one of the very few pesticides that is water-soluble and can be stored in diluted form without degradation.
Wheelbarrows and Garden CartsHomeowners and gardeners often use wheelbar-
rows and garden carts to move materials around their property. Wheelbarrows and carts are handy for haul-ing bags of fertilizer or mulch, plants, tools, trash or bulk materials like soil, sand, gravel or compost. Both types of conveyance are useful, but each offers certain advantages and limitations.
Wheelbarrows Traditional wheelbarrows have a hopper, one tire
and two handles. The hopper is located between the tire and the handles; thus, the operator must lift much of the weight of the cargo. The single wheel makes it possible to roll a wheelbarrow along a board over a muddy spot or up a narrow ramp. On the other hand, the single wheel makes a wheelbarrow somewhat unsteady. The operator must be careful to keep the load balanced to avoid tipping over.
Wheelbarrows generally are available in 4- or 6-cubic-foot sizes. The smaller size often has a small, hard rubber (semipneumatic) tire, and the larger size usually has a wider pneumatic tire that rolls more easily. Some wheelbarrows now have two tires, which provides much better stability but still leaves much of the weight on the operator and negates the ability to traverse a narrow board or ramp.
Small Garden Carts Many styles of small garden carts are available. The
hoppers may be metal or plastic. They typically have
two small tires. Load capacity is fairly low. They are often capable of tipping over forward so that leaves can be raked directly into the hopper. These carts are useful for light loads in small gardens. Some types will fold up for storage.
Large Garden Carts Large carts with 20- or 26-inch bicycle tires have
become popular in the past 20-30 years. They typi-cally have a tubular steel frame with a plywood body that is open at the rear (Figure 27). They are often sold unassembled, and, in some cases, you can buy a kit without the plywood. The models with 20-inch tires hold about 6-7 cubic feet, and the models with 26-inch tires hold about 11-12 cubic feet. Thus, these carts hold twice the volume of a wheelbarrow and, because of the big tires, roll much easier than a wheelbarrow. They are best at hauling light, bulky materials like leaves, pine straw and compost. When hauling soil, sand or gravel, they should not be fully loaded, or the weight will be excessive. With these carts, the hopper is mounted over the axle instead of behind the wheel like a wheelbarrow, so more of the weight is car-ried by the tires and less by the operator. Stability is excellent. When the carts are tipped forward, the front panel is flush on the ground — making it easy to rake materials directly into the hopper. On most models, the front panel can be removed or swung out for easy unloading.
CostYou can get a small garden cart or a small wheel-
barrow for under $50. A large wheelbarrow may cost from $40 to $100. Large garden carts will range from $60 to $250, depending on size and quality.
In summary, a good wheelbarrow is a sound investment for home construction projects involving
Figure 27

117
mixing concrete or moving sand, gravel, etc. A large garden cart is the best choice for serious gardeners. It is easier to use and will carry more of the types of things gardeners typically carry.
Tool Maintenance
Easy Ways to Care for Your Garden Tools .We all know garden tools will last longer if we take good care of them, but it can be a real bother to do so. There is a simple trick that will make it much easier for you to keep your shovels, hoes, trowels and other tools clean and protected.
Water. There is no simple way to avoid washing the mud and caked clay off your tools. It often only takes a minute or so with a garden hose to get the mess off your tools, although in some cases you may have to do a bit of rubbing to remove stubborn mud. It is almost always easier to remove soil immediately rather than letting it dry and harden on the tools.
Oil and sand. No, the subject is not the Middle East, but oil and sand can make your cleanup a lot easier! Simply fill a bucket two-thirds full of clean sand and add a little oil (Figure 28). Used engine oil drained from your car is fine – it doesn’t have to be new, clean oil. A few quarts is enough. The point is to have a little oil in the sand, not a little sand in the oil. If you can see liquid oil on top of the sand, you have way too much oil. Now, simply plunge the washed (and dry) tool into the bucket a few times. Any remaining dirt will be sanded off, and the tool will be oiled.
If you haven’t overdone the quantity of oil, the tool will have a film of oil, but not enough to drip and make a mess. The tool is now ready to hang up and store. It will be clean and rust-free when you next need it.
Remember, the key here is to not overdo the oil! Like the old hair tonic commercial, “A little dab will do ya.”
Cutting Tools This oil and sand treatment is not recommended
for knives, pruning shears, etc., because the sand will dull the cutting edge.
Sharpening. Some garden tools, such as hoes, require regular sharpening to work effectively. Hoes can be sharpened with a file. It helps to clamp the hoe in a vise. Stroke the file away from the cutting edge to avoid injury.
StorageTools should always be stored inside, out of the
weather. Both rain and sunshine are detrimental to tools, whether hand tools or larger power equipment. You should store the tools away from contact with soil (such as the dirt floor in a shed). It is a good idea to hang up hand tools.
Figure 28

118
IndexA
Artichokes 20Asparagus 21
B
BeansButter Beans 22Snap Beans 23
Beets 24Broccoli 25Brussels Sprouts 26
C
Cabbage 2–3, 19, 27, 28Chinese Cabbage 28
Climatic 6Cantaloupes 29Carrots 30Chard 32Container gardening 99Cucumbers 33
D
DiseaseDisease Management Guide 89–92
Table: Disease Management Guide 92
E
Eggplant 35Equipment 104–117
F
FertilityFertilizer 1, 9, 10, 12, 15, 16, 17, 20, 22, 23,
24, 25, 26, 27, 29, 30, 31, 32, 33, 35, 36, 37, 38, 39, 40, 42, 43, 44, 45, 46, 48, 49, 50, 51, 52, 53, 54, 56, 59, 60, 61, 62, 65, 67, 97, 99, 108, 113, 116
Side-dress Fertilizers 9, 67Recommended amount of fertilizer 10
G
Garden Site 7Garlic 36Greens, Collards 37
Mustard 37Turnips 37
H
Hardiness Zone – LousianaPlanting Season 7
Herbs 3, 100–102, 101–102
I
Insects Beneficial Insects 69Control Recommendations 76Insects 3, 69Insecticides 70-73, 76–88
Irrigation 13Furrow Irrigation 13Sprinkler Irrigation 13
K
Kohlrabi 38
L
Lettuce 39
M
Mulch 12Plastic Mulch 1, 12
N
Nematode 94–98, 95–98
O
Okra 40Onions
Green Onions 43Leeks 43Shallots 43
P
PeasEnglish Peas 44Snow Peas 44Southern Peas 44–45
PeppersBell Peppers 2–3, 19, 46Hot Peppers 2–3, 19, 48
PestsInsects 3, 69Insecticides 70-73, 76–88Pesticides 74–88
PotatoesIrish Potatoes 50
Pumpkins 51
R
Rainfall 6Row Covers 57

119
Photographic Credits
James Boudreaux: cover (cucumber, greens, lettuce, beans, greens, gardeners middle row L and center, pumpkin), 4 (carrots, lettuce, beans, greens, garden), 7, 8, 12–14, 15 (fertigation), 18, 19 (beans, beets, cabbage, garlic, okra, peppers, pumpkin, squash, strawberries, watermelon), 20–25, 27, 29–31, 33–37, 39–44, 46–49, 51, 52, 55, 58, 59, 64, 67, 98.
Donald M. Ferrin 89–91.
Thomas J. Koske cover (sweet potatoes, peas, transplant tray), 4 (transplants, sweet potatoes), 5, 9, 15 (transplants), 17, 19 (chard, kohlrabi), 23 (pole bean bottom L) 28, 32, 38, 44 (top R), 60, 62, 99.
Kathy Kramer 26, 54, 66.
Dale K. Pollet 72–73.
Richard L. Parish 104–109, 111–117.
John Wozniak cover (sweet corn, tomatoes, gardeners bottom L), 4 (tomatoes, sweet corn), 19 (cucumbers, sweet corn, tomatoes), 61, 68.
S
Soil Preparation 56, 104Spinach 2, 19, 54Squash
Summer Squash 2–3, 19, 52–53Winter Hardshell Squash 53
Strawberries 55–57Sweet Corn 2–3, 19, 58Sweet Potatoes 2, 19, 60
T
Tomatoes 2–3, 19, 61, 63Heirloom Varieties 2, 63
TransplantsBare-rooted Transplants 18Companies – garden seeds and plants 17Time to start seeds for vegetable transplant 16
W
Watermelons 2–3, 19, 64–65Weed control 67, 111Wildlife 68

120
Square Measures 1 square foot = 144 square inches
1 square yard = 9 square feet
1 square rod = 272.25 square feet = 30.25 square yards
1 acre = 43,560 square feet = 4,840 square yards = 160 square rods
1 square mile = 640 acres
Cubic Measures 1 cubic foot = 1728 cubic inches = 7.48 gallons
1 cubic yard = 27 cubic feet
1 cubic foot of water = 62.5 pounds
Liquid Measures 1 tablespoon = 3 teaspoons
1 fluid ounce = 2 tablespoons
1 cup = 8 fluid ounces
1 pint = 2 cups = 16 fluid ounces
1 quart = 2 pints = 32 fluid ounces
1 gallon = 4 quarts = 8 pints = 128 fluid ounces
Weight Measures 1 pounds = 16 ounces
1 hundredweight = 100 pounds
1 ton = 2,000 pounds
Conversion Charts & Measurement Tables
Square Measures 1 ounce per square foot = 2,722.5 pounds per acre
1 ounce per square yard = 302.5 pounds per acre
1 ounce per 100 square feet = 27.2 pounds per acre
1 pound per 100 square feet per acre = 435.6 pounds
1 pound per 1000 square feet per acre = 43.6 pounds
1 gallon per acre = 1∕3 ounce per 1,000 square feet
5 gallon per acre = 1 pint per 1,000 square feet
100 gallon per acre = 2.5 gallons per 1,000 square feet = 1 quart per 100 square feet
100 pounds per acre = 2.5 pounds per 1,000 square feet
Small Garden Conversions
Dry MaterialRate per Acre Rate per 1,000 sq. ft. Rate per 100 sq. ft.
1 lb. 2½ teaspoons ¼ teaspoon
3 lbs. 2¼ tablespoons ¾ teaspoon
4 lbs. 3 tablespoons 1 teaspoon
5 lbs. 4 tablespoons 1¼ teaspoons
10 lbs. ½ cup 2 teaspoons
100 lbs. 2¼ lbs. ¼ lb.
200 lbs. 4½ lbs. ½ lb.
300 lbs. 6¾ lbs. ¾ lb.
400 lbs. 9 lbs. 1 lb.
500 lbs 11¼ lbs. 1¼ lbs.


Home Vegetable Gardening
Visit our Web site:www.lsuagcenter.com
Authors:
Kathryn Fontenot, Charles Johnson and James BoudreauxPatricia A. Beckley, Sandra H. Benjamin, G. Sephen Crnko, Donald M. Ferrin, Daniel J. Gill, Thomas
J. Koske, Alan L. Morgan, Charles Overstreet, Dale K. Pollet, Richard L. Parish, Donald P. Reed and Robert Turley
William B. Richardson, LSU Vice President for Agriculture
Louisiana State University Agriculture CenterLouisiana Agricultural Experiment StationLouisiana Cooperative Extension Service
LSU College of Agriculture
Pub. 3000 (5M) 07/14 Rev.
The LSU AgCenter and LSU provide equal opportunities in programs and employment
ouisiana L