Embed Size (px)
Citation preview

The original work on elastic thread magic,first published in 1989.
All the pro tips you need, along with 6 full routines tostart performing right now!
BLACKMAMBA
elastic thread routines

You are authorized to keep one copy of this manuscript on your computer and to print a single copy for physical reference.
All other rights reserved. The end user (you) agree to abide by international, territorial, state and local copyright laws in regards the manuscript herein. You agree not to allow any part of this publication to be reproduced, stored in a retrieval system, or transmitted, in any form or by any means, electronic, mechanical, photocopying, recording, the internet, or otherwise, without the prior permission of the author in writing. You agree not to make this manuscript available via any P2P networks.
End User Agreement

BLACKMAMBA
elastic thread routines

Copyright © 1989 and 2009 by Ben Harris
Digital Edition Copyright © 2009 by Ben Harris
This edition licensed by Mambo Labs (Sweden)
The Author asserts the moral right to be identified as the creator of this work.
All rights reserved.No part of this publication may be reproduced,
stored in a retrieval system, or transmitted,in any form or by any means, electronic, mechanical, photocopying, recording, the internet, or otherwise,
without the prior permission of the author in writing.
www.wowbound.com
INTRODUCTION TO THE DIGITAL VERSION
You see so much information published about “Elastic Thread Magic” today—you’d think it all “brand new”. Alas, such is not the case. If you look hard, you’ll see much of today’s gold is really the silver of yesteryear.
This booklet was originally published in 1989. That’s over twenty years ago. Some of the information within is still being presented by others as if it were original to them. “History is best ignored at your own peril” someone very wise once said. So, here’s a brief capsule of the REAL story of Elastic Thread, firmly established and supported by the printed record.
Michael Weber was the first magician to publish (and to establish in the written record) an elastic thread routine. His matchbox effect, utilizing the then unheard of magic-fibre, appeared in an issue of Genii Magazine. Michael credits his mother with having introduced him to the special thread.
Independently of this, (circa 1985) Finn Jon from Norway truly established the use of the thread within the magic fraternity. Finn is to be credited with the creation of a special application of elastic thread technology, ie: the Elastic Loop*
Elastic thread, like any thread, is a fussy medium to work with. Finn Jon's creation of the Elastic Loop is profound in its practicality and applicability– it eliminated the pesky ends!
I personally obtained a set of Elastic Loops when working a convention in Bordeaux, France. The year was 1986, and I was impressed! It seemed incomprehensible that a thread so fine could stretch so far. My mind filled with ideas and I continued to work on, and perform elastic thread magic throughout 1986–1989. This led to the development of the original Premier Elastic Thread (the world’s first ever supply of BULK Elastic Thread, ‘87), and this booklet Premier Elastic Thread and Routines, (’89).
This manuscript you hold contains original routines as well as important information that appeared in the original 1989 manuscript. Even the illustrations are the originals. With Black Mamba Elastic Thread being so cost-effective it’s never been a better time to explore! Enjoy and impress...
*Yigal Mesika claims a Registered TradeMark for the word “Loops” and it is used here with his permission.
ElasticTHREADroutines

flashing
controlling the ends
camouflage
securing elastic thread
making a band of elastic thread
the slider (a precursor to Zoom)
the enchanted butterfly
floating smoke ring
flying pip
floating card
coins on the move

hread has always been a fussy medium to deal with. Elastic thread, even more so. This is why the Loop concept is so wonderful. There are NO ends left to worry about. No matter what brand Tof elastic thread you use, (and we would recommend “ULTRA Elastic Thread”, from your
dealer), there are certain considerations that must be kept in mind.
If you can be aware of these limitations, you can then “factor them in” ensuring a trouble-free performance.
FLASHING:
Every brand of Elastic Thread is glossy to an extent. When performing with elastic thread you may get flashes (light reflecting off the thread and refracting through the thread). These can signal to your audience that a thread is in play.
To reduce this problem, color the thread with a permanent marking pen. To do this, simply take the length you intend to use, lay it on a white card, and carefully run the wedge-shaped nib of the pen down the thread's length. Black marker is the best, but depending on your working situation, and what you are wearing, other colors can be useful. Also, the golden rule of thread work applies: always work with an interesting background but do not have any light source behind you.
CONTROLLING THE ENDS:
Elastic thread can appear to be a fussy medium to work with. The loose ends can be difficult to control. This is why Finn Jon's contribution, “The Elastic Loop” is so grand. By tying the thread in a band, you are controlling the ends. The thread is now manageable. Other applications with the ends of the thread glued in place will also be found practical.
CAMOUFLAGE:
The idea of camouflaging a thread to make it more invisible appeared in issue 127 of The Jinx. There, Bruce Elliot suggests marking a white thread with pen and ink. The thread is marked alternately at half inch intervals to give a "broken" effect. This "zebra-striping" concept is ideal for use with elastic
ElasticTHREADroutines
7

thread. Use both a black and a red marker (other color combinations can be used), and color the thread alternately along its length.
This charming idea renders the thread almost totally invisible. It breaks up any "line" that may flash into appearance. The eye, thanks to the zebra-striping, has no continuous track to follow; no visual way of confirming a glimmer.
SECURING ELASTIC THREAD:
When securing the thread to playing cards or other non-porous surfaces, it is best to utilize one of the popular types of SuperGlue. Simply secure the thread with a small "touch" of the glue. Apply the glue with a toothpick or other pointed implement. Cut away any excess thread.
MAKING A BAND OF ELASTIC:
To secure the thread in a band, firstly cut a length that is longer than required. Fold this length around a drinking glass and then tie two knots. Finally, apply a dab of SuperGlue to the knot and quickly squeeze between thumb and finger. Ensure that it is a quick squeeze or you will end up with the thread glued to your finger or thumb.
Finally, cut away the excess thread and remove the band from around the glass. By using the glass as a solid working base and not tightening the loop firmly around the glass, you can create bands of virtually any size.
Let’s now explore some routines that get away from the expected.
ElasticTHREADroutines
8

THE SLIDER:
A popular card plot is The Travelers. In such routines, cards (normally, the four aces) gather one at a time. The illusion created is that they travel between point "A" and point "B" invisibly. As a gag, or a visual convincer, you can use elastic thread to clearly and visually demonstrate the mobility of the cards. You can show a card visually skittling across the table, from hand to hand.
To prepare the Slider Card, secure a length of elastic thread to one upper corner, fold the thread around one long edge and secure to underside of the card at the adjacent corner. Illustration 1. The thread is not pulled tight. It is "just" firm so that it does not hang loosely. The thread is secured with SuperGlue. The card, thus prepared, can be used without hassle or detection in your other routines.
When ready to demonstrate the card's skittish personality, secure the midpoint of the thread against the table with your left little finger. Now use the right hand to slide the card a good 30cm to the right. Pin the card to the table with your right little finger. Illustration 2.
By releasing the card, it will skittle across the table and arrive under the left hand. Ensure that you draw firm attention to the hands prior to releasing the card, and also be sure not to move the hands. The only perceived movement should be that of the card. (This was a precursor to Ben’s now famous ZOOM, which is available from your dealer).
THE ENCHANTED BUTTERFLY:
This is a startling application of the "shiftable anchor"– elastic thread gives you the freedom to shift your anchor or anchors as the levitation is in process. This subtly diffuses the thought of a thread being hooked to them. The elasticity of the thread allows the floating object to remain stationary and apparently independent of the moving anchor(s).
Tie a band of elastic thread so that it will sit snugly (but not tightly), lengthwise around a playing card. This card can be left within the deck until ready to perform. When ready to exhibit The
illustration 1
illustration 2
ElasticTHREADroutines
9
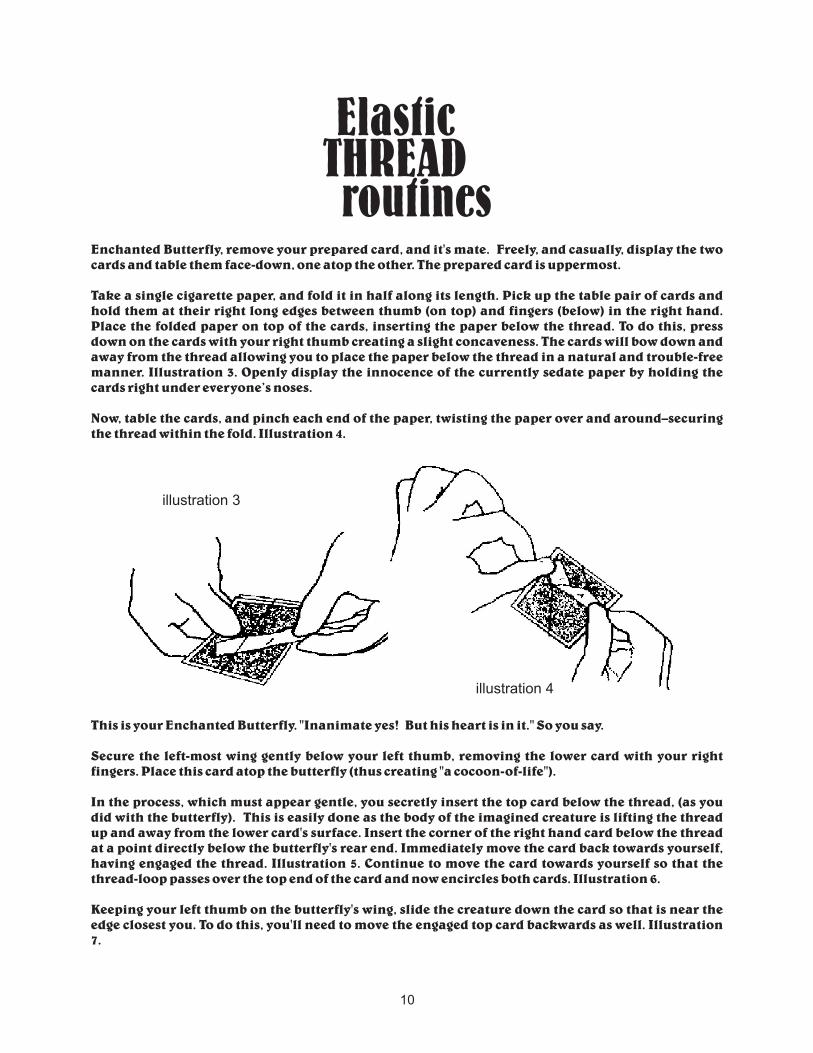
Enchanted Butterfly, remove your prepared card, and it's mate. Freely, and casually, display the two cards and table them face-down, one atop the other. The prepared card is uppermost.
Take a single cigarette paper, and fold it in half along its length. Pick up the table pair of cards and hold them at their right long edges between thumb (on top) and fingers (below) in the right hand. Place the folded paper on top of the cards, inserting the paper below the thread. To do this, press down on the cards with your right thumb creating a slight concaveness. The cards will bow down and away from the thread allowing you to place the paper below the thread in a natural and trouble-free manner. Illustration 3. Openly display the innocence of the currently sedate paper by holding the cards right under everyone’s noses.
Now, table the cards, and pinch each end of the paper, twisting the paper over and around–securing the thread within the fold. Illustration 4.
This is your Enchanted Butterfly. "Inanimate yes! But his heart is in it." So you say.
Secure the left-most wing gently below your left thumb, removing the lower card with your right fingers. Place this card atop the butterfly (thus creating "a cocoon-of-life").
In the process, which must appear gentle, you secretly insert the top card below the thread, (as you did with the butterfly). This is easily done as the body of the imagined creature is lifting the thread up and away from the lower card's surface. Insert the corner of the right hand card below the thread at a point directly below the butterfly's rear end. Immediately move the card back towards yourself, having engaged the thread. Illustration 5. Continue to move the card towards yourself so that the thread-loop passes over the top end of the card and now encircles both cards. Illustration 6.
Keeping your left thumb on the butterfly's wing, slide the creature down the card so that is near the edge closest you. To do this, you'll need to move the engaged top card backwards as well. Illustration 7.
illustration 3
illustration 4
ElasticTHREADroutines
10

illustration 5
illustration 6
illustration 7
illustration 8

Place the top card flatly against the lower card (sandwiching the butterfly between them). The thread stretches to allow this. Continue to pinch the butterfly through the cards so that he remains clamped in place at the short end, closest to you. Hold the cards at their left long edges, pinching the butterfly between. Illustration 8.
Insert your free right fingers, grab the butterfly and gently pull him half way into view. Illustration 9. A firm pressure will hold the butterfly secure. Gently release the pressure allowing the elastic to pull the butterfly back into its cocoon. The audience see the creature come to life. Illustration 10.
Once the butterfly has disappeared from view increase the pressure between your left thumb and fingers. This will stop the creature from moving any further.
You will now make the butterfly leap out from between the cards, and perch gracefully atop the uppermost edges. Draw careful attention to the cards (the left hand grip has not changed) and use your right fingers to slowly pull down the outer right corner of the lower card. The butterfly will leap from between the cards and perch atop the outer short edge. Illustration 11.
Immediately release the corner pulled down by the right fingers. The entire time-frame is brief. No longer than the aside, "Oh, there he is".
Regrip between fingers on top, outer, short ends of the cards, and thumbs below. Bow the cards. This displays the butterfly sitting atop his now exposed cocoon. Illustration 12.
Slowly separate the hands–taking one bowed card in each hand. The butterfly will float between the open sides of the cocoon, and you may continue to move the hands apart until they are separated by about 20cm. Do this slowly. The butterfly stays put, yet the cards move away. A subtle cancellation of hook-ups. This is the "shiftable anchor" concept.
By reversing the actions you my re-enclose the butterfly within its cocoon. Illustration 13.
Further reverse the actions previously explained in order to separate the cards and disengage the butterfly. The thread is easily "stolen" allowing immediate examination if you wish.
NOTES:
It does look good if you perform this right up in front of your face, imperceptibly blowing on the butterfly, giving it further animation. Instead of merely reversing the actions to get back to the starting point, use your imagination and work out how to free the loop from the cards during the butterfly's flight, thus allowing an additional between-the-hands interlude.
ElasticTHREADroutines
12

illustration 9
illustration 10
illustration 11 illustration 12
illustration 13

THE FLOATING SMOKE RING:
This delightful levitation sequence introduces a shocking application of the shiftable anchor principle. The entire sequence is squeaky clean in appearance, using nothing but a cigarette paper and a glass tumbler. To start, make an elastic band to fit comfortably around a small glass tumbler. The tumbler must have ridges or bumps on its underside so as to keep the loop on track. (Alternatively, an ashtray with suitable bumps on its underside, and cut-outs in its upper rim may be employed.)
The thread runs across the mouth of the tumbler and gently sits in place. Drop a pack of cigarette papers into the tumbler and you're set to perform. Illustration 14.
Table the tumbler in front of you, ensuring that the thread running across its mouth cuts a line between Two O'clock and Eight O'clock (your view). Remove the cigarette papers, and talk about the "mysterious properties of smoke rings." In order to demonstrate, and not offend the airways, you offer to manufacture a "L.O.R." (Low Offence Ring). Do this by removing a single paper. Hold it with the gummed side on top and along the outer edge. Roll the paper into a loose tube starting at the inner right corner and rolling diagonally. Illustration 15. By rolling in this fashion, you obtain a tube with a gummed corner protruding at the right hand end. This will allow you to secure the tube into a ring-shape.
Notice the packet of papers on the table and pick them up, returning them to the tumbler. As you remove your hand from the tumbler, it is a simple matter to engage the loop of thread over your right thumb. Simply engage as you remove your hand. Lift the right hand directly upwards, stretching out the band. Bring your left hand, which holds the paper tube, directly over to meet the right fingers. Insert the tube below the thread directly in front of your right thumb. Illustration 16.
Now, lick the exposed gummed corner and roll the tube into a ring. Press the sticky corner down, securing the ring. After doing this, insert your left thumb through the band and disengage your right thumb. At this point, transfer the smoke ring to between the left thumb and fingers releasing the right hand. Illustration 17.
At this moment, we start to use the shiftable anchor. The right hand moves down to the glass, turns it slightly clockwise in order to create a parallel line of thread, and then moves the glass about eight inches to the right. The left hand remains motionless. Illustration 18.
Hold the left hand off the table (it is to the left of the glass) at a height equivalent to that of the tumbler's mouth. Now open the left fingers allowing the ring to sit in the left hand. The ring should sit motionless due to the hands position at or above the height of the glass. Illustration 19.
Slowly lower the left hand, tilting the palm toward the glass, and the ring will appear to float straight up off the hand. Illustration 20.
The right hand may now come in, engage the loop on the right of the ring, allowing you to create a nice floating smoke ring interlude. Illustration 21.
ElasticTHREADroutines
14

illustration 14
illustration 15
illustration 16illustration 17
illustration 18

illustration 19
illustration 20
illustration 21
illustration 22
illustration 23

To finish, you cause the ring to float through space and to settle on the upturned base of the glass. In doing this, you will have a fine finish (with a visual ending not unlike Finn Jon's Stage Floating Ball Routine) that is strengthened by a startling use of the "shiftable anchor" concept. To do this, revert to the position depicted in illustration 20. The now free right hand moves across to the glass, removes the papers, and then returns to the glass in order to regrip it in an upturned hand. The right hand now slowly turns the tumbler mouth down in an anticlockwise direction. This must be done with care so that the tumbler twists over, yet remains within, the band-framework. (The thread band remains static and is not disturbed - the tumbler turns within it). Illustration 22.
With the tumbler now mouth down, the left hand is raised so that the "Smoke Ring" may glide slowly down the length of thread to gently settle upon the tumbler's base. Illustration 23.
If you feel that the smoke ring and tumbler need be examined, it is a simple matter to break the loop as you walk into the audience.
THE FLYING PIP:
Elastic thread will prove useful in many areas other than levitation and animation. "Pip Cards" could be revolutionized with this thread. And, they bring this sort of gaffed card firmly into the close-up arena. An example, is a card that visually changes. For instance: a Two Of Diamonds, into a Three Of Diamonds. To make such a card, gently erase the middle pip of a 3D. Do this with a good quality eraser. Now cut a spare Diamond pip from another card. With a fine needle, poke a hole through the 3D at the two inner-most points of the remaining pips. Thread a length of Ultra Elastic Thread through one of the holes (from the back), across the face of the card, and then out through the second hole. Stretch the thread tightly, and secure at both ends of the card with SuperGlue. Place a small square of sticky tape (sticky-side up) below the thread at the point where the center pip should be. Now press the extra pip in place over this square of tape. The card is now complete.
illustration 24
ElasticTHREADroutines
17

The pip may be pulled across the face of the card and folded under one long edge. Illustration 24. If you display the card like this, it looks like a 2D. When you drop the card to the table, the extra pip will fly back around and the card will visually turn into the 3D. This is just a basic possibility. Much more can be done - think about it.
THE FLOATING CARD:
This delightful item is self contained and a breeze to "get into" at any point in your performance.
In effect, a card is chosen, signed (if desired), and then lost in the deck. The cards are shuffled and then fanned in the left hand. The right hand is waved over the fanned cards and one card (the selection), is seen to rise from the fan. The card rises completely from the fan and is seen to float in mid air. For a finale, the card leaps into the gesturing right hand. To prepare, make an elastic band of such a size that it fits snugly (but not tightly) widthwise around a playing card. With a sharp knife, cut a small (0.5mm) slit into both long sides of a single card. Place these invisible slits about one inch from one short end of the card. Place the band around the card engaging the thread within the slits. Illustration 25.
Place the prepared card on top of your deck. To perform, force the prepared card on a spectator. After the card is noted, shuffle the selection back into the deck, secretly controlling it back to the top.
Execute a face-out pressure fan in the left hand, and then contact the back of the selected card with your right thumb tip. Swivel this card to an upright position. Illustration 26. Insert your right thumb beneath the thread band and hold your right hand over the fan. Illustration 27.
illustration 25
illustration 26
illustration 27
ElasticTHREADroutines
18

It is now an easy matter to cause the card to rise from the fan: push it upwards with the left thumb, and at the same time raise the right hand pulling the card upwards. Pull the card up and clear of the fan so it is seen to float in mid air.
To cause the card to jump into the right hand, simply give the hand a slight up and down jerk. The card will leap up, where it is caught by the right fingers and thumb. COINS ON THE MOVE:
In Jay Sankey's first book (Sankey Panky, 1986), there appeared a routine entitled The Visible Coin Assembly. The idea was a visible coin assembly–four coins gathering without any cover–visibly skittling across the table. It was noted that a thread of sufficient strength was not available to perform such an effect. However, let's look at it from another angle.
If one made the coins lighter, then the existing invisible threads, including elastic thread, could be used. So, instead of coins, why not use plastic poker chips or counters? By drilling a tiny hole (with a micro-bit) through the middle of each chip, the routine can be performed as described in Jay's book. Spread the four coins out by contacting them with the tips of your extended second fingers and thumbs. Illustration 28. Now, by releasing your grip, one coin at a time, the coins will visually skittle toward the center of the formation.
The most amazing effects are possible with elastic thread. Enjoy the exploration.
illustration 28
ElasticTHREADroutines
19

MAMBO LABS
SWEDEN