Embed Size (px)
Citation preview

Manual Premium Builder “We all become builders”Version 1.2

Builder manual 2
Printing PrinterPrint technology FDM / FFF Fused Deposition Method Weight: Small: 18 KG
Medium: 22 KGLarge: 24 KG
Buildvolume (LxWxH): Small: 205x215x200 mm (8.07x8.46x7.87 inch)Medium: 205x215x400 mm (8.07x8.46x15.74 inch)Large: 205x215x600 mm (8.07x8.46x23.62 inch)
Dimensions printer (LxWxH): Small: 380x370x495 mm (14.96x14.57x19.49 inch)Medium: 380x370x710 mm (14.96x14.57x27.95 inch)Large: 380x370x890 mm (14.96x14.57x35.04 inch)
Resolution: Low quality: 0.3 - 0.2mmNormal quality: 0.2 - 0.1 mmHigh quality: 0.1 - 0.05 mm
Color frame: Red /White
Printspeed: Dual: 10 - 80 mm/s Print platform: Heated bed glass plateTravelspeed: Dual: 10 - 120 mm/s Certificate: CE certificatePosition accuracy X: 10 micron Y: 12.5 micron Z: 2.5 micronNozzle diameter: 0.4 mm TemperatureFilament 1.75 mm PLA/ Flex / Wood-Bronzfill Operating - temp. printer: 15 - 32° COperating temp. nozzle Dual: 180 - 250° C Storage - temp. printer: 0 - 35° CElectronics SoftwareAC input: 2x 100 – 240V 3A 50/60Hz
(6A 50/60Hz)Software Repetier, Cura, Simplify3D
Power: 2x 120 W (240W) Operating systems Windows, MAC
Connections: USB, Wifi, Display Standalone File types STL / OBJ / AMF / DAE
Builder PremiumSpecifications
CAUTION!The Builder warranty is only valid when Builder approved material is used.

Builder manual 3
Specifications 2Unboxing 4Accessoiries 5Overview Builder 6
Start printingInstalling 8Control 9Interface 10-11Installingfilament 12Wirelessconnection 13Bedleveling 14-15Interface 16
Software Printsoftware 18Cura 19-23Colormixing 24
Maintenance & support BuilderDual-Feed 26-27Maintenance 28Troubleshoot 29-30Safetyinstructions 31Contactinformation 32
Builder PremiumContent
Builder manual 4
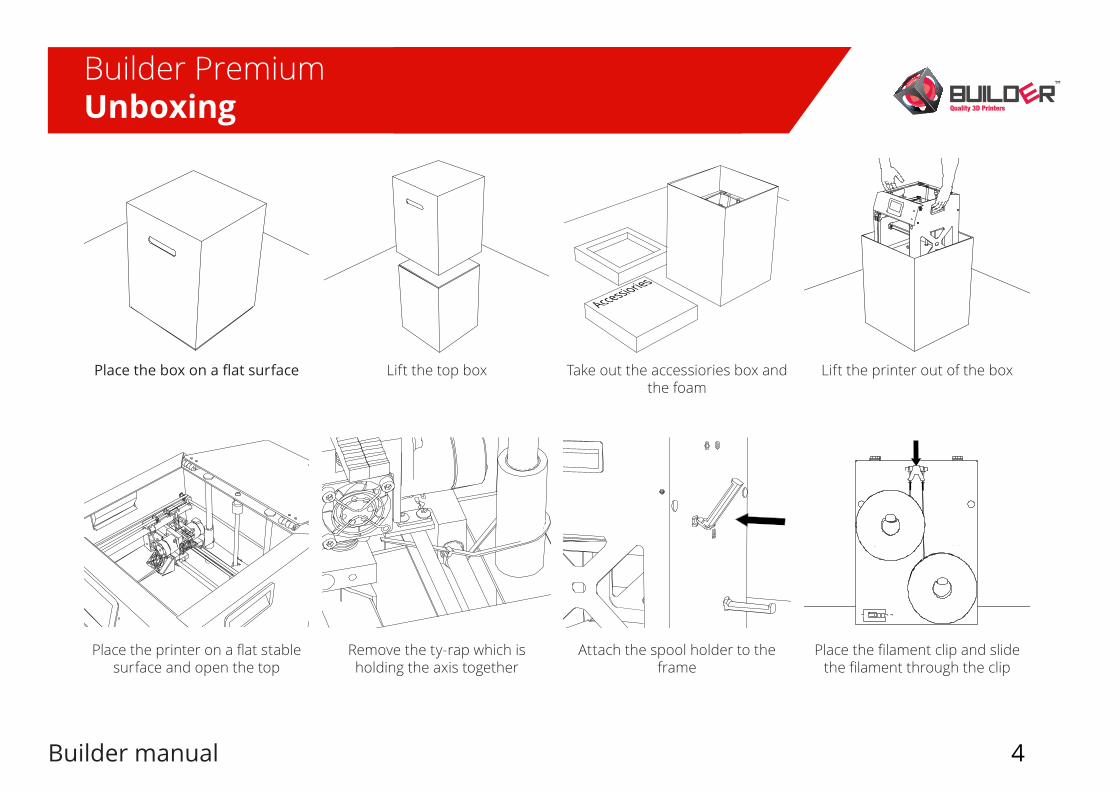
Builder PremiumUnboxing
Placetheboxonaflatsurface Lift the top box Take out the accessiories box and the foam
Lift the printer out of the box
Place the printer on a flat stable surface and open the top
Remove the ty-rap which is holding the axis together
Attach the spool holder to the frame
Place the filament clip and slide the filament through the clip
Accessiories

Builder manual 5
AccessoiresThefollowingpartsareincludedwithyourBuilder3Dprinter.Pleasecheckiftheitemsbelowareinsidethebox.
Builder PremiumAccessoires
Pressure plug
2 x
Filament holder
2 x
Build Plate
1 x
Filament guide tube
2 x
Paint tray and roller
1 x
Power supply
2 x
Wifi USB adapter
1 x
Steel wire cleaning nozzle
1 x
Filament
2 x
Wood glue
1 x
Teflon tube (Spare parts)
2 x
Nozzle 0.4 mm
1 x
Tool nozzle
1 x
Tool heaterblock
1 x
Filament clip
1 x

Builder manual 6
Parts:1. Powersocket2. Spool holder3. FilamentGuide
4. LCD Screen5. USBSocket6. Nozzle7. Heatedbed
1
2
34
5
6
7
Builder PremiumOverview

Start printing

Builder manual 8
PlacetheBuilderonastablesurface. MakesurethepowerswitchisintheOffposition.PlugthepowersupplyintothepowerinputoftheBuilder.Nowplugthepowercord
intoagroundedoutlet.
Builder PremiumInstalling

Builder manual 9
ControlSwitchontheBuilderPremiumandwaituntillthemainscreenappears.ControltheBuilderbypressingthebuttonsontheLCDtouchscreen.
200º000º
NOZZLE
000º000º
HEATEDBED
0.00BEDHEIGHT
STATUS - IDLE l NO WIFI
version
Builder PremiumControl
Main ScreenThemainscreenprovidesinformationabouttheprinterandobject.Pressthewifibuttonandaconnectionwithanetworkcanbemade.InthemainscreenanIPadresswillbeshown.Typethisadressinyoursmartphonewhichisconnectedwiththesamenetwork.Nowtheprintcanbewatchedfromyourphone.
USB stickPlugintheUSBstickonthesideoftheprinter.SelectprinttoselectthegcodesfromtheUSBstick.
Wifi adapterPlugintheWifiadaptertomakeaconnectionwithyournetwork

Builder manual 10
Main screenTheMainscreenshowsthemostimportantinformation.Fromthisinformationscreenafewsettingscanbechangedwhileprinting.Themostcommonlyusedfunctionsareexplainedinthischapter.
200º000º
NOZZLE
000º000º
HEATEDBED
0.00BEDHEIGHT
STATUS - IDLE l NO WIFI
version
Settings screenThesettingsscreenshowsthemainfunctionsforpreparingtheprinter.Inthismenutheprinterheadcanbemoved,youcanpreheattheprinterorthefilamentcanbeloadedorunloaded.Whenaprintisstartedlockingtheprinterscreenispossibletosecuretheprint.Choosethelockmenuandenterapassword.Thispasswordcanbechangedanytime.Resetthepasswordbyswitchingoffandontheprinter.
Move screenMovetheprintheadinthemovescreen.Enteravalueandmovetheprintheadbychoos-ingthedirection.
Builder PremiumInterface

Builder manual 11
Preheat screenEntertherequiredtemperatureandselectpreheatnozzleorbedtoheatup.
Lock screenThelockscreengivestheopportunitytolockthescreenwhileprintingsonobodyisabletostoportunetheprintexceptyou.
Replace screenWheninsertingfilamentchoosetheextruderandpressloaduntillthefilamentisplaced.
Builder PremiumInterface

Builder manual 12
Installing filamentsInsertfilamentmaterialbyfollowingthestepsbelow
1. Selectreplaceinthesettingsmenu.2. Pressloadandtheprinterwillstarttoheatupthenozzle.3. Whenthetemperatureisreachedthetextnexttothebuttonsstartstoblink.4. Pushdowntheleverandinsertthefilamentuntilyoufeelsomeresistance.
Nowinsertthesecondfilamentbydoingthesame.5. Presstheloadbuttonuntilsomefilamentcomesoutofthenozzle.Dothis
withbothextruders.
Start Printing1. Selectprintinthemainmenu.2. Selectthestoragefromwhereyouwanttoprint.3. Selectthefilewhichyouwanttoprint.
WARNING!Make sure when printing with the Dual-Feed Builder both extruder holes are filled with a filament
Builder PremiumInstalling filament
Press and hold thebuttontoload or unload filament
REPLACE LOCK SETTINGS← ←
↓LOAD↓
UNLOAD
↓
UNLOAD
↓
EXTRUDER 1 EXTRUDER 2
LOAD

Builder manual 13
Builder PremiumWireless connection
Status:
Nozzle Temperature:
Bed Temperature:
Operational
022 / 000
022 / 000
Files:
Twistedvase.gcode
Bedleveling.gcode
BraceletColormix.gcode
Colormixbuilderbeker.gcode
Select file to upload (.... MB free):
Browse Uploadfile
Live webstream:
Wireless connection
WiththePremiumline3DprinterfromBuilderit’spossibletocontroltheprinterusingawirelessconnection.Toconnectadevicewiththeprinterselectawifinetworkbypressingthewifiicon.Allthewifispotsintheneigbourhoodwillshowupnow.Selectawifinetworkandenterthepassword.Gobacktothemainscreen.EntertheIPadressintheadressbarofadeviceandanewpagewillopen.Onthispageprintjobscanbeloaded,startedorstopped.Inaddition,theprintjobscanbewatchedwiththelivewebstreamcamera.
ToloadanGcodeontheprinter,browsethefileandselect.Usethe“uploadfile”buttontouploadthefileontheprinter.WhenusingChromeastatusbarisshowedattheleftbottomofthescreen.Whentheuploadiscompletethelistwillberefreshedandtheuploadedfilecanbeprintedwithaclickonthe“print”icon.Canceltheprintbyclickingthe“removedoc”icon.
Both devices need to be connected to the same networkNOTE!

Builder manual 14
PrepareInstalltheglassplatebyopeningthetwobedclamps.Nowgentlyslidetheglassplateinsidetheclampsatthebackofthebuildplate.Holdtheglassplateinplacewiththetwoclampsatthefrontofthebuildplate.
Foragoodadhesiontotheglassplateit’snecessarytoapplyanadhesionlayer.BuilderprovideswoodworkersgluewiththeBuilderPremiumline.Dilutethewoodgluehalfwithwaterandapplythiswiththepaintroller.Usingagluestickisalsoanoption.
Builder PremiumBed leveling
HOTSURFACE
Bed levelingThePremiumBuildersareequippedwithaheatedbed.Theheatedbedensuresagoodadhesionbetweenobjectandglassplate.Besidestheheatedbedsignificantlyreduceswarpingoftheobject.
Levelingtheprintbedisextremelyimportantforagoodqualityprint.Aftertransportationyoumightwanttolevelyourglassplatetoensureyourobjectwillstickwelltotheglassplate.Usethefollowingthesestepstocheckthis.
CAUTION!There is a potential risk of burns, as the heated bed can reach a temperature of 60 degrees Celsius.

Builder manual 15
Set height1. Cleanthenozzleforarightadjustment.2. Movetheextruderheadtohishomepositionsotheprinterrecognizeshiszero
position.3. Whentheprintheadisinhishomeposition,measurethespacebetweenthe
nozzleandthebedwithapieceofpaper.Adjustthescrewsuntillyoufeelslightfrictionwhenmovingthepieceofpaper.
4. Nowmoveyourprintheadabovethesecondadjustingpoint(screw)andrepeatthestepswiththepieceofpaper.
Fine tune heightFinetunethenozzleheightwhenprintingthe“bedleveling”gcode.Thefirstlayerhastosticktotheplatformasshownintheimagebelow.Duringprintingitispossibletooptimizetheheight.
Nozzletohigh Nozzleperfect Nozzletolow
Builder PremiumBed leveling

Builder manual 16
FilamentBuilder3Dprintersoffersyoumanydifferenttypesoffilament.Everyfilamentthatisforsaleistestedonourprinters.Thefollowingtypesareavailableinourwebshop
• Woodfill,woodenlook
• Bronzefill,abronzeappearanceafterpolishing
• PVA, material which dissolves when it makescontactwithwater
• PLA
Printing other materialsAfterprintingwithothermaterialsit’swisetoextrudesomePLAtopreventjamming.Pushdownthefilamentuntilitcomesout.
Builder PremiumFilament

Software

Builder manual 18
RepetierRepetierHostpreparesyourobjectintoafile(gcode)thatcanbereadbytheBuilder3Dprinter.
• DownloadRepetierHostfromourwebsite.
• RepetierHostisadjustedtothesettingsoftheBuilder3Dprinter.
• FormoreinformationaboutRepetierHost,checkchapter“RepetierHost”.
Cura (Windows, MAC, Linux)Curaisanopensourceprogramwhichpreparesyourobjectintoafile(gcode)thatcanbereadbytheBuilder3Dprinter.
• Gotoourwebsiteandclick“support”-->“installation”(Step2).
• DownloadtheCurasoftware
• AfterinstallingCura,selectCustommachineandenterthesizesofyourBuilder.
• DownloadtheINI-filesforyourBuilder3Dprinter.
• LoadtheINI-filesinCurabyusingtheoption“openprofile”.
• Enterthenumberofextrudersinthe“Machinesettings”menu.
• Reopenthismenuandsettheextrudersoffset(X-Y)valuestozero.
• FormoreinformationaboutCura,checkthemanual.
Builder PremiumPrinter software

Builder manual 19
CuraConfiguration wizard
Configuration WizardWhenyouopenupCuraforthefirsttime,youwillbeaskedtoselectthe3Dprinterthatyouhave.Tosetupyourmachinefollowtheinstructionsbelow.
Guide to 3D printing with CuraCuraisanopensourceprogramwhichpreparesyourobject(STLfile)intoaGcodefilethatcanbereadbytheBuilder3Dprinters.ThismanualdescribeshowtosetupCuraforyourBuilder3Dprinter.
Select the option “Other”and choose if you want to submit anonymous usage information
Select the option “Custom...” Enter the correct width, depth and height for your Builder 3D printer and select “heated bed”.
Builder manual 20
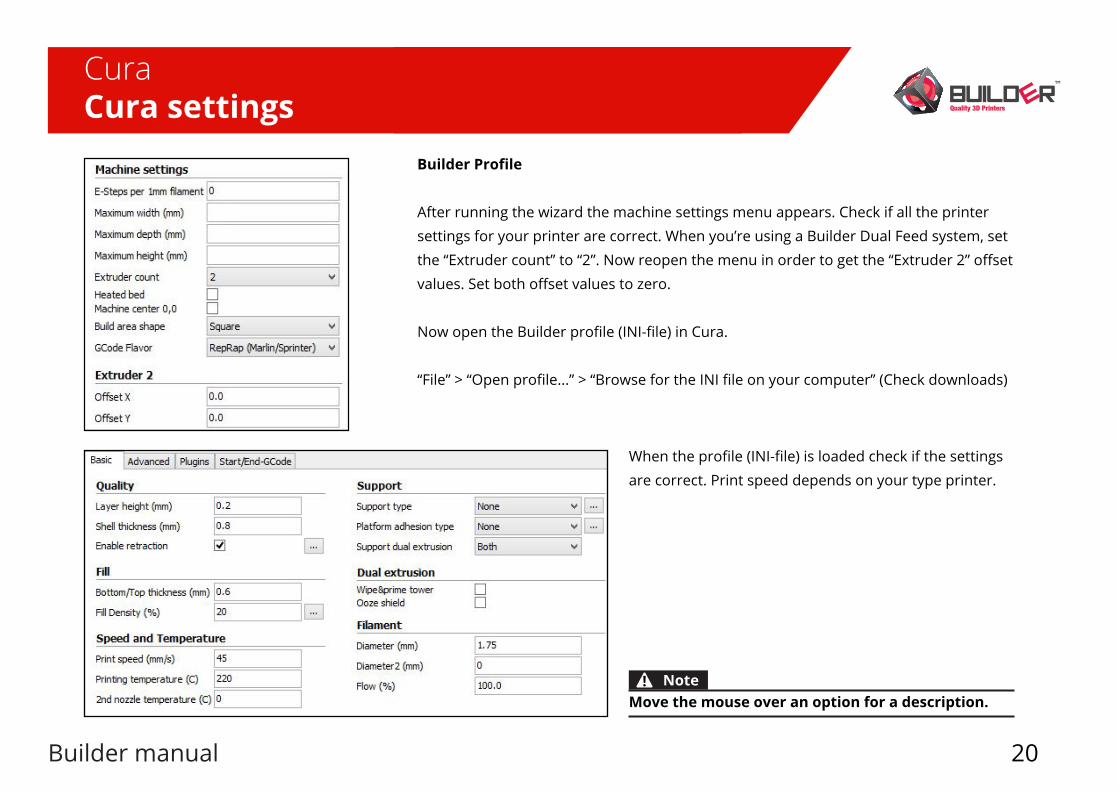
CuraCura settings
Builder Profile
Afterrunningthewizardthemachinesettingsmenuappears.Checkifalltheprintersettingsforyourprinterarecorrect.Whenyou’reusingaBuilderDualFeedsystem,setthe“Extrudercount”to“2”.Nowreopenthemenuinordertogetthe“Extruder2”offsetvalues.Setbothoffsetvaluestozero.
NowopentheBuilderprofile(INI-file)inCura.
“File”>“Openprofile...”>“BrowsefortheINIfileonyourcomputer”(Checkdownloads)
Whentheprofile(INI-file)isloadedcheckifthesettingsarecorrect.Printspeeddependsonyourtypeprinter.
Move the mouse over an option for a description.Note!

Builder manual 21
InterfaceTheimagebelowshowsthemainscreenofCurawiththemostimportantfunctions.Hereyoucanloadandadjust3Dmodelsandselectthepreferedprintprofile.Curawillconvertthe3Dmodeltoa3Dprintfile(Gcode).
Tools Cura
1. Load:Loada3Dmodel(STL-file)2. Save Toolpath: Save 3D model as a
GCODEfileoncomputerorSDcard.3. View mode: Thisoptionallows
youtoviewa3Dmodelindiffer-entmodes.Thiscanbeusefulltoseehowanobjectlookslikeafterslicing.
4. Rotate:Rotatethe3Dmodelinawayhowit’seasytoprint.
5. Scale:Scalethe3Dmodel.6. Mirror:Mirrorthe3Dmodel.
1 2 3
4 5 6
CuraInterface
By right clicking on your model you can center, delete and multiply your object.
Note!

Builder manual 22
Fast PLA printLayerheight:0.3mmShellthickness:0.8mmFilldensity:20%Printspeed:60mm/s
Normal PLA PrintLayerheight:0.2mmShellthickness:0.8mmFilldensity:20%Printspeed:45mm/s
Print profilesInthischapteryoucanfindbasicsettingsforsomemainmaterials.
Beginner:Whenyoufirststartwith3DprintingwerecommendtostartprintingwithPLAmaterial.BelowyoucanfindsomebasicsettingsforprintingwithPLAmaterial.
High Quality PLA PrintLayerheight:0.1mmShellthickness:0.8mmFilldensity:20%Printspeed:30mm/s
Intermediate:Afteryouunderstandthebasicsof3DprintingyoucanstartwithprintingPLAincombinationwithPVAasasupportmaterial.BelowyoucanfindthebasicsettingsforprintingwithPVAmaterial.
Normal PVA printLayerheight:0.2mmShellthickness:0.8mmFilldensity:20%Printspeed:35mm/sSupporttype:EverywherePlatformadhesion:BrimSupportDualextrusion:SecondextruderWipe&Primetower:On
Openthismenubyclickingthe“...”behind“supporttype”
CuraBasic settings

Builder manual 23
Adjust tension leverWhenprintingathighspeedtheprinterhastoextrudemorematerial.Toavoidunderextru-sionincreasethepressureonthefilamentbytighteningthescrewinthelever.
Expert:Whenyouunderstandallabout3Dprintingyoucanstartprintflexiblefilament.Be-lowyoucanfindthebasicsettingsforanormalflexibleprint.
Normal Flexible printLayerheight:0.2mmShellthickness:0.8mmFilldensity:20%Printspeed:20mm/s
CuraBasic settings

Builder manual 24
ColormixingBesidesprintingtwocolorsorsupportmaterialwiththeDual-Feedextrudersystem,it’spossibletomixtwocolors.Whenusingthecolormixingtool,acolorgradientcanbemade.Alsomanuallyacolorgradientcanbemadeduringprinting.
Colormixing Tool:
• Activatethecolormixapplicationwiththereceivedactivationcode(startswithBP)
• UploadtheGcodefileyouwanttocolorize.Clickbrowsetoupload.
• Choosethegradientbyslidingthebars.Thecolorsareanexampleofhowtheproductshouldlooklike.
• Colorinthemiddleisamixofthetopcolorandbottomcolor.Intheexampleblueandyellowmakesgreen.
• SavethecoloredGcodewhenyouaresatisfiedwiththesettings.
Color mixing manuallyForamanualcolormixingobject,navigatetroughthedisplaymenu.Duringprinting,theratiopercentageofeach(front/rear)extrudercanbeset.Selectanextruderandsettheamountofratioyouwant.
Builder PremiumColormixing

Maintenance & support

Builder manual 26
Maintain printhead
MaintainingyourBuilder3Dprinterisimportanttoachievethebestresult.Afteralotofprinting,thefilamentmaterialfeedingwheelcancontainsmallplasticparts.Forcleaningthisfollowthenextsteps.
• PressdownbothleversoftheDual-Feedsystem
• Usethepressureplugtoremovetheshaftthatisholdingbothleversinplace.
• Takebothleversoutoftheextruderhead
• Checkthefeedingwheelforstuckprintingmaterial.Removethisbyusinga simple brush or compressed air.
• Whencleaningthefeedingwheelishard,youcanchoosetoremovethefeedingwheelfromtheextrudermotor.Removeonlywhenneeded!
• Whenassemblingthefeedingwheelbesurethatthegrooveisabovethehotendentrance
• Aftercleaning,assemblebothleversinplacebypushingtheshaftthrough
Forchangingthenozzleandtubesgotoouryoutubepage
Builder PremiumDual-Feed extruder

Builder manual 27
Pressure plugs
Incasethefilamentmaterialgetsjammed,youcanchoosetousethepressureplugs.Onlyusethepressureplugswhenthereisnootheroption.
• HeatuptheprintheadofyourBuilderDual-Feedextrudertill230degreesCelsius.
• PressdownbothleversoftheDual-Feedsystem.
• Usethepressureplugtoremovetheshaftthatisholdingbothleversinplace.
• Takebothleversoutoftheextruderhead.
• Placethepressureplugsinbothchannelsasshownatthepicture.
• Add somepressure to the both of the pressure plugs until the jammedmaterialcomesoutofthenozzle.
• Aftercleaning,assemblebothleversbypushingtheshaftthrough.
Printing other materials
AfterprintingwithothermaterialsBuilderadvisestoextrudesomePLAtopreventjamming.Pushdownthefilamentuntilitcomesout.
Builder PremiumDual-Feed extruder
When using the pressure plug do not slide it along the feeding wheels. This can damage the printer feeding wheel.
Caution!

Builder manual 28
12
3
Maintenance Toachievethebestresultsandlifetime,maintainceofyourBuilder3Dprinterisveryimportant.
LubricateLubricationoftherotatingandslidingpartsisimportantforaniceprintsurface.Lubricatetheaxis(X-Y)2and3withoilwhentheprintedobjectsshowssomesignsofvibrations.LubricatetheZaxiswhenthosefeeldry.
Feeder wheels Afteralotofprinting,thefeedingwheelcancontainsmallplasticparts.Forcleaning,useasimplebrushorcompressedair.
NozzleDuringprinting,printmaterialcansticktothenozzle.Thisstuckmaterialcanpollutetheobjectwhileprinting.Cleanthenozzlebeforeprinting.
Useoiltolubricatepoint2and3
Usegreasetolubri-catepoint1
Builder PremiumMaintenance
WARNING!When the nozzle is hot, clean the nozzle using a thick towel. Do not use any sharp objects to clean the nozzle, this can damage the nozzle.

Builder manual 29
The first layer does not stick to the print bedThisproblemiswellknowninthe3Dprintingworld.Thecolorsubstancesaddedtothefilamentmayinfluencethemeltingpointofthefilament.Tooptimizetheadhesionoffirstlayermakesurethat:• Thespacebetweenthenozzleandprintbediscorrect.Thisshouldbe0.2–0.3mm.• Cleantheprintbed,replacetheadhesionlayerbuusingWoodglueorPritt• Increasethe”firstlayerthickness”forabetteradhesion.• Placea“skirt”aroundtheobject.Theskirtisalinedrawnaroundtheobjectatthefirst
layer.Thishelpswithprintingagoodfirstlayer.• Extrudematerialbeforeprinting.• Usetheoption“brim”tocreatesomeextragriparoundtheobject.
Under extrusion • Makesuretheextruderwheelsareclean.Afteralotofprintingthesewheelscanbefullof
dustand/orfilament.Cleanthemwithabrushorcompressedair.• Thereisnotenoughpressureonthefilament.Increasethepressurebytighteningthe
lever screws• Theextrusionspeedistoohigh.Decreasetheprintspeed.• Thenozzlegotjammed.CleanthenozzlewiththetoolsprovidedbyBuilder3DPrinters.• Increasethetemperature(250C)forashorttime(max5min).TheBuilderwillmelttheold
materialandextrudethisthroughthenozzle.• ThefilamentspecsaredifferentfromthefilamentdeliveredbyBuilder3DPrinters.Every
filamenthasitsownspecs.Contactthefilamentsupplierformoreinfo.
Builder PremiumTroubleshooting

Builder manual 30
• Thethermalprotectionisactivatedastheextuderheadgottohot.Cooldowntheextruder
No connection with the Builder:TheBuilder3DPrintersarestand-aloneprinters.IftheBuilderisconnectedtothepcorlaptopbutthesoftwareisunabletoidentifytheprinterthismightbetheproblem:• Isthedriverinstalledcorrectly?Useadministratorrights.• ChecktowhichCOMporttheBuilderisconnected.Use“devicemanagement”. Difficulty with inserting the filament• Bendthefilamentstraightandcutthefilamentatanangle(seeexample).Thismakesit
easiertoinsertthefilamentintheextruderhead.• Brokenfilamentintheextruderhead.Preheatto210andremovethebrokenfilament.If
thefilamentistooshort,usethepressureplug.• Leverscrewsaretootight.Turnthemabitlooser.
The 3D printed object doesn’t look good. • Notenoughcooling.Increasethe“minimumlayerheight”time• Checkthetensiononthetimingbelts.Increasethetensionifneeded.Checkourofficial
YouTubechannel:https://www.youtube.com/user/builder3dprinters• ThefilamentspecsaredifferentfromthefilamentdeliveredbyBuilder3DPrinters.Every
filamenthasitsownspecs.Contactthefilamentsupplierformoreinfo.
Builder PremiumTroubleshooting
Builder manual 31
• DoNOTusewaterorfluidliquids,thebottomcontainselectriccomponents.• MinimumageforuseoftheBuilderisage14.• UsetheBuilderinabrightareaandpreferablyin20degreesCelsius.• DoNOTentertheprintingareawithyourhandswhentheprinterisinuse.• MakesuretheBuilderisplacedinaventilatedroom.• Whencleaningthenozzle,useapieceofcloth,butbeware(!!)thenozzleisstillhotafterprinting.• Aftera30hourprint,cleantheroundconductionwithapieceofclothandprovidetheprinterwithnewgrease/oilifnecessary.• TurntheBuilderoffwiththemainswitchonthebackoftheBuilderwhentheprinterneedsmaintenance.• TheBuilderhasbeenextensivelytested,[email protected].• DoNOTopenthebottomsideorthecoverplatebehindthedisplay,butleavethistoourcertifiedworkers.• IfyoudecidetoleavetheBuilderunattendedtoprint,makesuretoremoveflammableobjectsneartheprinter.
Builder PremiumSafety instructions
WARNING!If you do not follow these next instructions, it will lead to fire, electric shocks or other injuries or damage to the Builder or other properties. Read all safety information below before you start using the Builder.

Contact information:Builder3DPrintersHQSmelterij4,2211SHNoordwijkerhoutTheNetherlands
Telephone +31(0)252-744128Email: [email protected] Helpdesk: [email protected]: www.builder3dprinters.com